

Page 1

Version: V2.0
Cordless IP Phone
User Manual
Page 2

1 INTRODUCTION ..................................................................................................5
1.1 Hardware overview .................................................................................................5
1.2 Software overview ...................................................................................................5
2 PHONE MENU SETTINGS .................................................................................7
2.1 Key features ............................................................................................................7
3 THE OPERATION METHOD OF TELEPHONE .............................................
3.1 How to make a phone call? ..................................................................................
7
8
3.1.1 Basic call ..............................................................................................................9
3.1.2 Hold key................................................................................................................9
3.1.3 Volume control .................................................................................................
9
3.1.4 Mute......................................................................................................................9
3.1.5 Memory key ........................................................................................................ 10
3.1.6 Tripartite meeting features .................................................................................10
3.1.7 Transfer ............................................................................................................... 10
3.1.8 call park ...............................................................................
3.1.9 Redial ..................................................................................
..............................
.............................
10
10
3.1.10 Register the Handset ......................................................................................... 10
3.1.11 Toggle between Base Unit and Handset ............................................................ 11
4 WEB SET.............................................................................................................. 11
4.1 Home Page ............................................................................................................. 11
4.2 Network Setting ..................................................................................................... 12
4.2.1 WAN Setting ....................................................................................................... 12
4.2.1.1 Basic Setting .................................................................................................... 13
4.2.1.2DHCP ................................................................................................................ 13
4.2.1.3Static IP Setting ................................................................................................. 14
4.2.1.4 PPPoE Setting .................................................................................................. 14
4.2.1.5 802.1x settings ................................................................................................. 14
4.2.1.6 LLDP settings .................................................................................................. 14
4.2.2LAN Settings ....................................................................................................... 15
4.2.2.1 LAN Settings ................................................................................................... 15
4.2.2.2 NAT .................................................................................................................. 16
4.3 VoIP SETTING ...................................................................................................... 16
4.3.1 Primary Register ................................................................................................. 16
4.3.2 Audio Setting ...................................................................................................... 18
4.3.3 Call Feature ......................................................................................................... 20
4.3.4 Dial Rule ............................................................................................................. 22
4.3.5 Multicast Paging ................................................................................................. 24
4.3.6 Advanced Settings ............................................................................................... 25
4.4 QoS setting ............................................................................................................. 25
Page 3

4.5 Provisioning ........................................................................................................... 26
4.6 System Settings ...................................................................................................... 28
4.6.1 Syslog Server ...................................................................................................... 28
4.6.2 Time Settings ...................................................................................................... 29
4.6.3 User Management ............................................................................................... 30
4.6.4 System Actions.................................................................................................... 31
4.6.5 DECT .................................................................................................................. 31
5 SHORTCUT KEYS .............................................................
.............................. 32
Page 4

The phone started, get Provisioning Server address by DHCP Server, then the phone LED lights flashing, and issued a
"beep beep" prompt tone, "Config ID". Through the digital keyboard input after the ID, and then enter the "#", then
the opportunity to Provisioning Server automatically load the configuration file, automatically restart after the
success; if this fails, then the opportunity to enter the default standby state, after 15s can log on; if you do not want to
download directly into the standby state # by default. If you do not complete the download, or download the
configuration file in the AutoUpdate Settings config ID no configuration parameters, will still be asked to enter
"Config ID" after the restart.
After the phone has entered the default state, you can have the phone to broadcast the IP address by pressing “**47#”.
Function
1. Support DHCP automatic distribution of IP addresses and other parameters
2. Support PPPOE agreement (ADSL, cable modem access use)
3. The program can be upgraded via HTTP, HTTPS, FTP or TFTP
4. Dynamic voice detection; comfort noise generation; voice buffer technology
5. Hold function
6. Speed dial
7. DND (Do Not Disturb), blacklist, call restriction, hotline function
8. Voicemail
9. Using a standard web browser (such as IE) for setting
10. SSH remote management function
11. Classified management for common user password and remote user password
12. Support * * code function
13. Call Waiting Feature
14. Auto answer
15. Call park
16. Call transfer
17. Tripartite conference
18. 802.1x Authentication
19. LLDP Feature
Standard and Protocols
◆
IEEE802.3/802.3u10 Base T/100Base
◆
PPPoE: Point to point protocol over Ethernet
◆
DHCP Client and Server: Dynamic Host Configuration Protocol
◆
Support G.711a/u, G.729, G.723.1, G.722, iLBC speech encoding algorithm
◆
SIP RFC3261, RFC2543
◆
TCP/IP: Internet transmission control protocol
◆
RTP: Real-time Transfer Protocol
◆
RTCP: Real-time Control Protocol
Page 5

◆
VAD/CNG: can save bandwidth
◆
TFTP: Trivial File Transfer Protocol
1. INTRODUCTION
This is the 9602IP network telephone user manual. Before the use of 9602IP phone, you need to make
some phone configuration for normal use. This book illustrates how to use keyboard and Web phone
service configuration page.
1.1 H
The default WAN port is a DHCP client, the user connects it to the ADSL or WAN port switch, LAN
port connects to the computer; you can use the administrator username "admin" and password "admin"
to set the login password.
Only WAN port supports POE.
1.2 S
ARDWARE OVERVIEW
OFTWARE OVERVIEW
Network Protocol Tone
SIP v2(RFC3261)
IP/TCP/UDP/RTP/RTCP
IP/ICMP/ARP/RARP/SNTP
TFTP Client/DHCP Client/PPPOE
Client
Telnet/HTTP Server
DNS Clients
Codec
G.711a
G.711u:
G.723.1:
G.729
G.722
iLBC
Voice Quality Security
VA D : Voice activity detection
AGC: Automatic Gain Control
AEC:Automatic Echo Cancellation
SRTP: Secure Real-time Transport
Protocol
Ring Tone
Ring Back Tone
Dial Tone
Busy Tone
Phone Function
Volume Adjustment
Speed dial key
IP Assignment
IP (Static IP)
DHCP
PPPoE
HTTP 1.1 basic/digest authentication
for Web setup
MD5 for SIP authentication
(RFC2069/RFC2617)
QoS
QoS field
Page 6

Call Function NAT Traversal
Call Hold
Call Waiting
Call forward
Caller ID
DTMF Firmware Upgrade
IN Band
RFC2833
SIP Info
STUN
Configuration
Web Browser
Keypad
TFTP
HTTP
FTP
HTTPS
Page 7

2 PHONE MENU SETTINGS
Using the web configuration page: familiar with the PC user can use the method
to configure the phone. Sequentially press the "**47#" button, then the phone will
voice broadcast address IP. Directly in the browser address bar entering the
address of the IP phone can log in web page, enter the login name: admin,
password: admin
2.1 KEY FEATURES
The user can use the table below to confirm the key and hardware function.
Key function on base unit:
Key State Function / Display
Volume +
Volume -
Message
LOCATE
Speaker
Mute
Redial
Hold
M1~M10
Line1
Line2
1
2
3
4
5
6
7
8
9
0
*
#
Key function on handset:
Key State Function / Display
Conversation Increase the volume
Conversation Decrease the volume
Dialing
Listen to the voice message
Dialing Page the handset
Conversation Toggle between handset and speakerphone
Conversation Mute
Dialing The last number redial and call
Conversation Hold or release hold or Park key
Dialing
Speed dial and call or secondary function
Stand-by Line1 state (only for two-line model)
Stand-by Line2 state (only for two-line model)
Dialing
Dialing
Dialing
Dialing
Dialing
Dialing
Dialing
Dialing
Dialing
Dialing
Dialing
Dialing
“1”
“2”
“3”
“4”
“5”
“6”
“7”
“8”
“9”
“0”
“*”
Can be used as the first number dialing out or
equivalent dial end tag
Page 8

Volume+
Conversation Increase the receiver volume
Stand-by Increase the ringer volume
Volume-
Conversation Decrease the receiver volume
Stand-by Decrease the ringer volume
Line1
Line2
Mute
Redial Dialing
Hold/Conf
Two lines on hold
FNC/Flash
Speaker
1 Dialing “1”, press and hold for 3s to pick up the voice message
2 Dialing “2”, press and hold for 3s to dial out the number in M6
3 Dialing “3”, press and hold for 3s to dial out the number in M7
4 Dialing “4”, press and hold for 3s to dial out the number in M8
5 Dialing “5”, press and hold for 3s to dial out the number in M9
6 Dialing “6”, press and hold for 3s to dial out the number in M10
7 Dialing “7”
8 Dialing “8”
9 Dialing “9”
0 Dialing “0”
* Dialing “*”
# Dialing
Stand-by Line1 state (only for two-line model)
Stand-by Line2 state (only for two-line model)
Conversation Mute
The last number redial and call
Conversation Hold or release hold or Park key
Achieve Conference function
Conversation
Conversation
Achieve Transfer function
Only M series supports it
Can be used as the first number dialing out or
(only for two-line model)
equivalent dial end tag
Page 9

3 THE OPERATION METHOD OF TELEPHONE
HOW TO MAKE A PHONE CALL
3.1
You could make a phone call after the phone configuration items are set up. Please check if the
cable is properly connected before use.
3.1.1 Basic call
1. Making the call by handset
?
After the handset is placed off-hook, dial and use “#”
2. Making the call by speakerphone
After the phone is placed off-hook, dial and use “#”
key
key
as the
end dialing symbol.
end dialing symbol.
as the
3.1.2 Hold Key
1. You can keep and release the call of current line. The only one line is presently in a call, the
other line must be placed on hold.
1) Place the call of one line on hold
Make sure that the call you want to keep is enabled, then press "Hold" key.
2) Release Hold
Make sure that the call is initiated, then press "Hold" key.
2. Call Park Function
Initiate the call park function, Hold key can be used as a Park key.
3.1.3 Volume Control
Press “VOL▲” to increase the volume, while press “VOL▼” to decrease the volume.
Page 10

3.1.4 Mute
During the call, if you do not want to let them hear your own voice, you can press "Mute" key, so
that the other party cannot hear your voice, and you can hear the sound of other end.
3.1.5 Memory Key
In addition to serving as a storage function, but also can be used as hold, DND, transfer and
conference function. See the web call feature function set.
3.1.6
If the phone is Line1 hold, line2 in the call, press the conference key, which can achieve three
party conference.
During the three party conference, the base unit and handset cannot be switched each other.
Tripartite Conference Function
3.1.7 Transfer
The telephone is in conversation with A, A wants to call B, you can press the Transfer key, and
then call B, press the Transfer button again after B hooking off, the transfer function can be
achieved.
3.1.8 Call Park
After the call park feature is enabled, and Hold Key Active and Idle Hold Key related parameters
are configured, we can perform the function of park. This function is only applicable to the base
unit.
3.1.9 Redial
After the base unit is stand by or the handset is off-hooked, press Redial key, the last dialed
number will be dialed out to achieve the redial function.
3.1.10 Register the Handset
Place the handset into the cradle of base unit. The “Message” LED on base unit will
blink. Initiate the handset registration. The “Message” LED on handset will also begin
to blink. At that time, if the base unit and handset have found out each other, the
Page 11

“Message” LED on base unit will stop blinking and the “Message” LED on handset
will also stop blinking and emit the prompt sound of successful registration.
Note: each base unit can register up to 5 handsets.
3.1.11 Toggle between Base Unit and Handset
When the base unit is in conversation, press “Line1”/“Line2” key on handset, the call will switch
over to the handset. If the handset is in conversation, press “SPEAKER” key, the call will switch
over to the base unit.
4 WEB SETTING
The IP phone and the computer are connected to the same network (LAN), open the browser, enter
the IP address of the phone, the page will request to input a username and password. Enter your
username and password to login as administrator.
4.1 H
Enter the user name and password, the page is shown below:
OME PAGE
Page 12

4.2 N
You can get the network information of phone in the page.
ETWORK SETTING
4.2.1 WAN Setting
WAN port setting page.
WAN port supports the static IP, dynamic allocation IP and PPPoE.
Page 13

4.2.1.1 Basic Setting
Basic Setting
Network Mode
Link mode
Primary DNS
Secondary DNS
4.2.1.2 DHCP
Select the network mode of WAN port; the default is DHCP
Configure the WAN port network connection mode
Set the main DNS address
Set the secondary DNS address
If your local network has a DHCP server, 3302IP phone can get WAN network
information from the DHCP server.
Page 14

4.2.1.3Static IP Setting
Static IP setting (WAN port network mode is set to Static IP)
Static IP Address
Subnet Mask
Default Gateway
Set static IP address
Set subnet mask with static IP
Set the default gateway with static IP
4.2.1.4 PPPoE Setting
PPPoE Setting (Required if Network Mode is set to PPPoE)
User Account
Password
Set the PPPoE user account
Set the PPPoE account password
4.2.1.5 802.1x settings
802.1x settings
802.1x_Enable Enable or disable 802.1x authentication
802.1x_UserName
802.1x_Password
Type Multicast/Broadcast
802.1x username
802.1x authentication password
4.2.1.6 LLDP settings
LLDP settings
LLDP Enable Enable or disable LLDP function
Packet Interval Packet interval
Page 15

Note: if the user wants to access the phone through the WAN port, then he / she must use the new
IP address to access the phone after changing IP address of WAN port.
4.2.2 LAN Settings
LAN port setting interface
4.2.2.1 LAN Settings
LAN Settings
Link Mode Configure the LAN port network connection mode
WAN/LAN Mirror Enable Whether WAN/LAN mirror mode is enabled
LAN Port Mode The mode of LAN port is Nat/Bridge/Disable
Page 16

4.2.2.2 NAT
NAT
IP Address IP address of LAN port
Subnet Mask Subnet Mask
DHCP Server DHCP server is enabled or not
IP Pool Start IP address assignment start address
IP Pool End IP address assignment end address
MAX Leases Maximum release time
DNS Relay DNS relay is enabled or not
4.3 VOIP SETTING
You can get SIP account information and registration status of the phone through the page.
4.3.1 Primary Register
Configure the SIP registration information of phone in the below page.
Page 17

Register Server
Use Service Enable or disable SIP registration
Display Name Set the displayed name of phone's SIP account
User Name Set the username (SIP account)
Authorization User Name Confirm the SIP account
Password Set the password of SIP account
Register Server Port Set the port No. of register server, the default is 5060
Register Server Address Set the IP address or domain name of register server
Domain Realm Set the authentication domain of server
Outbound Proxy Set the proxy server
Register Expire Set the register time in second, the default is 300s
Sip Backup Type Device backup type: Failover/Redundant
Sip Backup Server Set the address of SIP backup server
Page 18

Protocol Control
Disable: the phone prohibits MWI function. Even if it receives a
NOTIFY from server that there is a new voice mail, the phone will
not have a prompt.
Enable(Subscribe): the phone enables MWI function and will send
MWI Subscribe
Local SIP Port Set the No. of local SIP port. The default is 5060.
Local RTP Port Set the No. of local RTP port. The default is 20000.
Keep Alive Packet Will you keep alive packet or not?
Keep Alive Period Keep alive interval. The default is 60S.
DTMF
DTMF SIP INFO Mode DTMF out of band detection mode: signal=*/# or signal=10/11
SUBSCRIBE. If it receives a NOTIFY from server that there is a new
voice mail, the MWI LED on phone will blink to give a prompt.
Enable(No Subscribe): the phone enables MWI function but will not
send SUBSCRIBE. If it receives a NOTIFY from server that there is
a new voice mail, the MWI LED on phone will also blink to give a
prompt.
Select DTMF mode in 3 options: “RFC2833”, “In band” and “SIP
Info”. The default is RFC2833.
DNS Type DNS type: A request, DNS SRV, NAPTR+SRV
Jitter Buffer Max The jitter buffer maximum. The default is 150.
Will the anonymous call be rejected? The default is disable (namely
Anonymous Call Pejection
Session Switch Will the session switch be turned on?
Session Time(Min=90S) Set the session time. The default is 1800S.
Prack
Support Update Method Supports the update method.
Rport The relocation port has penetrated NAT
Sip Transport SIP transfer protocol: UDP/TCP/TLS
Sip URI SIP call address uses SIP/SIPS
SRTP The safe real-time transfer protocol mode: Optional / Mandatory
no reject).
Temporary recovery confirmation. Ensure the reliable transfer of
response of 1XX in SIP.
4.3.2 Audio Setting
You can adjust the volume of microphone and handset in the page, set the codec.
Page 19

Audio Setting
Sound and Volume Control
Configure the handset output volume. The control range is 1~7.
Handset
The default is 5.
Configure the speakerphone output volume. The control range is
Speaker
1~7. The default is 5.
Ring Tone Configure the ringer volume. The range is 1~7. The default is 4.
The signal standard. There are 12 categories in total.
Signal Standard
#0: Belgium; 1: China; 2: Germany; 3: Israel; 4: Japan;
#5: Holland; 6: Norway; 7: South Korea; 8: Sweden;
#9: Switzerland;10: Taiwan; 11: USA
Ringer Will the ringer be enabled?
There are 11 ring tones in total for selection. The default
Ringer Type
is Ringer1.
Codec Setting
Set the codec priority, there are 6 modes as follows:
Codec Priority1~6
l
G.711a
l
G.711u
l
G.729
l
G.723.1
Page 20

l iLBC
l
G.722
Packet Data Size The packet data size is 20mS by default.
IBLC 15.2k iLBC 15.2kbit/s is enabled or not. The default is disable.
G.723.1 5.3k G.723.1 5.3kbit/s is enabled or not. The default is disable.
Voice VAD/CNG
Voice VAD Enable or disable Mute detection function
CNG Enable or disable the comfortable noise.
Codec ID Settings
DTMF
Payload(RFC2833)
DTMF payload. The default is 101.
4.3.3 Call Feature
You can set call feature, create the blocked list and restricted list in this page.
Page 21

Call Feature
Programmable Keys&MWI Touchlite
1. Set the number in speed dial key.
Mem1~Mem10
MWI Touchlite Set the number in shortcut key for voice message pickup.
Park Mode Enable or disable Park function.
Hold key Active
Hold key Idle
Call Features
Hotline Hotline
Warm Line Time
2. Set the second function. Each memory can be arbitrarily
set as Hold, DND, Transfer, Conference, Multicast Paging
Set the Call Park number. In Park mode, when one line of
phone is in call, press HOLD key to call the number.
Set the Call Park number. In Park mode, when the phone is
idle, press HOLD key to call the number.
Set the waiting time of user taking the phone off-hook to
call the hotline number. The range is 0-9s and the default
is 0s. If the warm line time is 0s, the hotline number will
be sent out immediately after the phone is off-hook.
Page 22

Auto answer
Auto Answer Time Out
Forward Type
The set range is 1-9s, for example 3s, the hotline number
will be sent out immediately after 3s with the phone
off-hook and without pressing any key. As long as any key
is pressed within the set time, the time counting will stop.
Enable or disable auto answer function. If enabled, you
could set 5 auto answer phone numbers for incoming call.
Enable the auto answer function after timeout. The set
range is 0~30s, the default is 5s.
Call forward type (mono-choice, the default is “Disable”
type)
Disable: disable the call forward function.
Always Forward: all the incoming calls are forwarded to
the appointed phone.
Busy Forward: when the phone is busy, the incoming call
will be forwarded to the appointed phone.
No Answer Forward: if the phone has not answered, the
incoming call will be forwarded to the appointed phone.
Forward Phone Number Call the forwarded phone number.
Enable Call time out Enable the no answer timeout function.
No Answer timeout Set the no answer time. The default is 20s.
Call waiting Enable or disable the call waiting.
Do Not Disturb Set DND.
Ban Outgoing Restrict any outgoing call.
Accept Any Call Enable accepting any incoming call.
In the Black List page, you can add blacklist number, you can also delete.
Add New
Position Position 1~10
Number The number to be blocked.
4.3.4 Dial Rule
Configure dialing rules in the page.
Page 23

Dialing Rules Configuration
Entry Name Description
Dialing Rules
Configuration
User Define Rules Users can add 10 custom dialing rules.
1. Set the end of dialing rules, there are 2 kinds to choose from:
End with “#”.
Timeout: Timeout setting. Set the waiting time for dialing
end, the unit is second, the default is 5s.
The default is "#" as the end of the dial.
2. 60mins。Redialing timeliness: The default is 60mins, redial will be
invalid. Maximum of 60mins can be set.
Page 24

4.3.5 Multicast Paging
You can use the multicast function that will simply, conveniently and efficiently send the timely
notice to each member of the multicast group. The multicast key is set on the telephone to send the
multicast RTP stream to the pre-configured multicast address. Through the configuration
monitoring multicast address on the phone, listen and play the RTP stream sent by the multicast
address, the RTP stream multicast process does not involve SIP signaling. The phone can be set up
to monitor 10 multicast addresses.
Multicast Paging Configuration
The common call priority in case of the multicast access.
Define the call priority, 1 is the top level, 10 is the bottom
Paging Barge
Paging Priority Active
level.
Paging priority switch: you can enable or disable the
paging priority switch. The function determines how to
handle the newly incoming multicast RTP stream when the
phone is presently performing the multicast session. If the
paging priority switch is enabled, the phone will
automatically ignore the multicast RTP stream with the
lower priority and receive the multicast RTP stream with
the higher priority and place the current multicast session
on hold. If the paging priority switch is disabled, the phone
will automatically ignore all the newly incoming multicast
RTP streams.
Page 25

Multicast Paging Codec
Multicast Listening
listening Address
Label Multicast label
The multicast voice coding format: 0:G.711a; 1:G.711u;
2:G.723; 3:G.729; 4:iLBC; 5:G.722
You can set to listen up to 10 different multicast addresses
on the phone which can be used to receive the multicast
RTP stream sent by them. If the priority of incoming
multicast RTP stream is lower than the priority of current
call, the phone will automatically ignore the multicast RTP
stream. If the priority of incoming multicast RTP stream is
higher than the priority of current call, the phone will
automatically receive the multicast RTP stream and place
the call on hold. You can select to disable the paging
priority switch, the phone will automatically ignore all the
incoming multicast RTP streams.
4.3.6 Advanced Settings
Advanced Setting
Entry Name Description
Enable Enable or disable NAT firewall function. The default is enable.
STUN Server Address Set the address of STUN server.
STUN Server Port Set the port # of STUN server.
4.4 QOS
You can get QoS information in the page.
SETTING
Page 26

QoS Setting
Entry Name Description
Voice VLAN
Voice VID(TAG)
User Priority User priority. The default is 0.
Data VLAN
Data Priority Data label. The range is 2~4094. The default is 137.
User Priority User priority. The default is 0.
Voice QoS (Diff-Serv) Voice interval service priority: the default is 40.
SIP QoS (Diff-Serv) SIP interval service priority: the default is 40.
4.5 P
You can set the configuration information of phone in the page.
ROVISIONING
Enable or disable Voice VLAN function. The default is
disable.
The Voice Video Tag. The range is 2~4094. The default
is 136.
Enable or disable Data VLAN function. The default is
disable. When it is enabled, LAN port will operate in the
bridge mode.
Page 27

Choose File
No file chosen
Choose File
No file chosen
Provisioning
Provision Options
DHCP Options Support DHCP Options parameter or not.
Auto Redirection Support Auto Redirection or not
MAC File Support that the Config. filename is MAC address or not
Config ID Support that the Config. filename is config ID or not
Fireware Update Support the firmware upgrade
Notify Reboot
Enable or disable
into 2 cases, one needs the authentication, the another does
Notify Reboot
. After enabled, it is divided
not need.
Provisioning Server Settings
Server Type Configure the server type: disable /TFTP/FTP/HTTP/HTTPS
Server URL Configure the server address: IP address or domain name
User Name User name
Password Password
AutoUpdate Settings
Config ID Config ID
Page 28

0-24, 0 - Disable, 1-24 hour selects any hours among 1-24 and
ConfigID Update Time
Firmware Update Time
WebUI Management
Configuration Version Number Configure the version number of file
generates a random number as the minute of upgrade among 0~60
and delays a few seconds to begin to detect if Config ID file is
updated.
0-24, 0 - Only check at reboot, 1-24 hour selects any hours among
1-24 and generates a random number as the minute of upgrade
among 0~60 and delays a few seconds to check if there is any
firmware update.
Export Configuration
Import Configuration
Firmware Version Number The version number of firmware
Import Firmware
Export the Config. file to local
Import the Config. file from local, press "Import Now" to do
import
Import the firmware version from local, press "Import Now" to
do import
4.6 SYSTEM SETTINGS
4.6.1 Syslog Server
Set the information of Syslog server.
Syslog Server
Entry Name Description
Syslog Server Enable or disable the syslog function. The default is disable.
Server Address Set the IP address or domain name of syslog server. The default is
empty. It could be loaded from option43.
Page 29
Server Port Set the port # of syslog server. The default is 49494.
default The default of logintelval is 0.
Events only Log information print interval is 1min.
Events plus periodic
status
inteval Log interval time setting.
Logint is the setting range of lower interval.
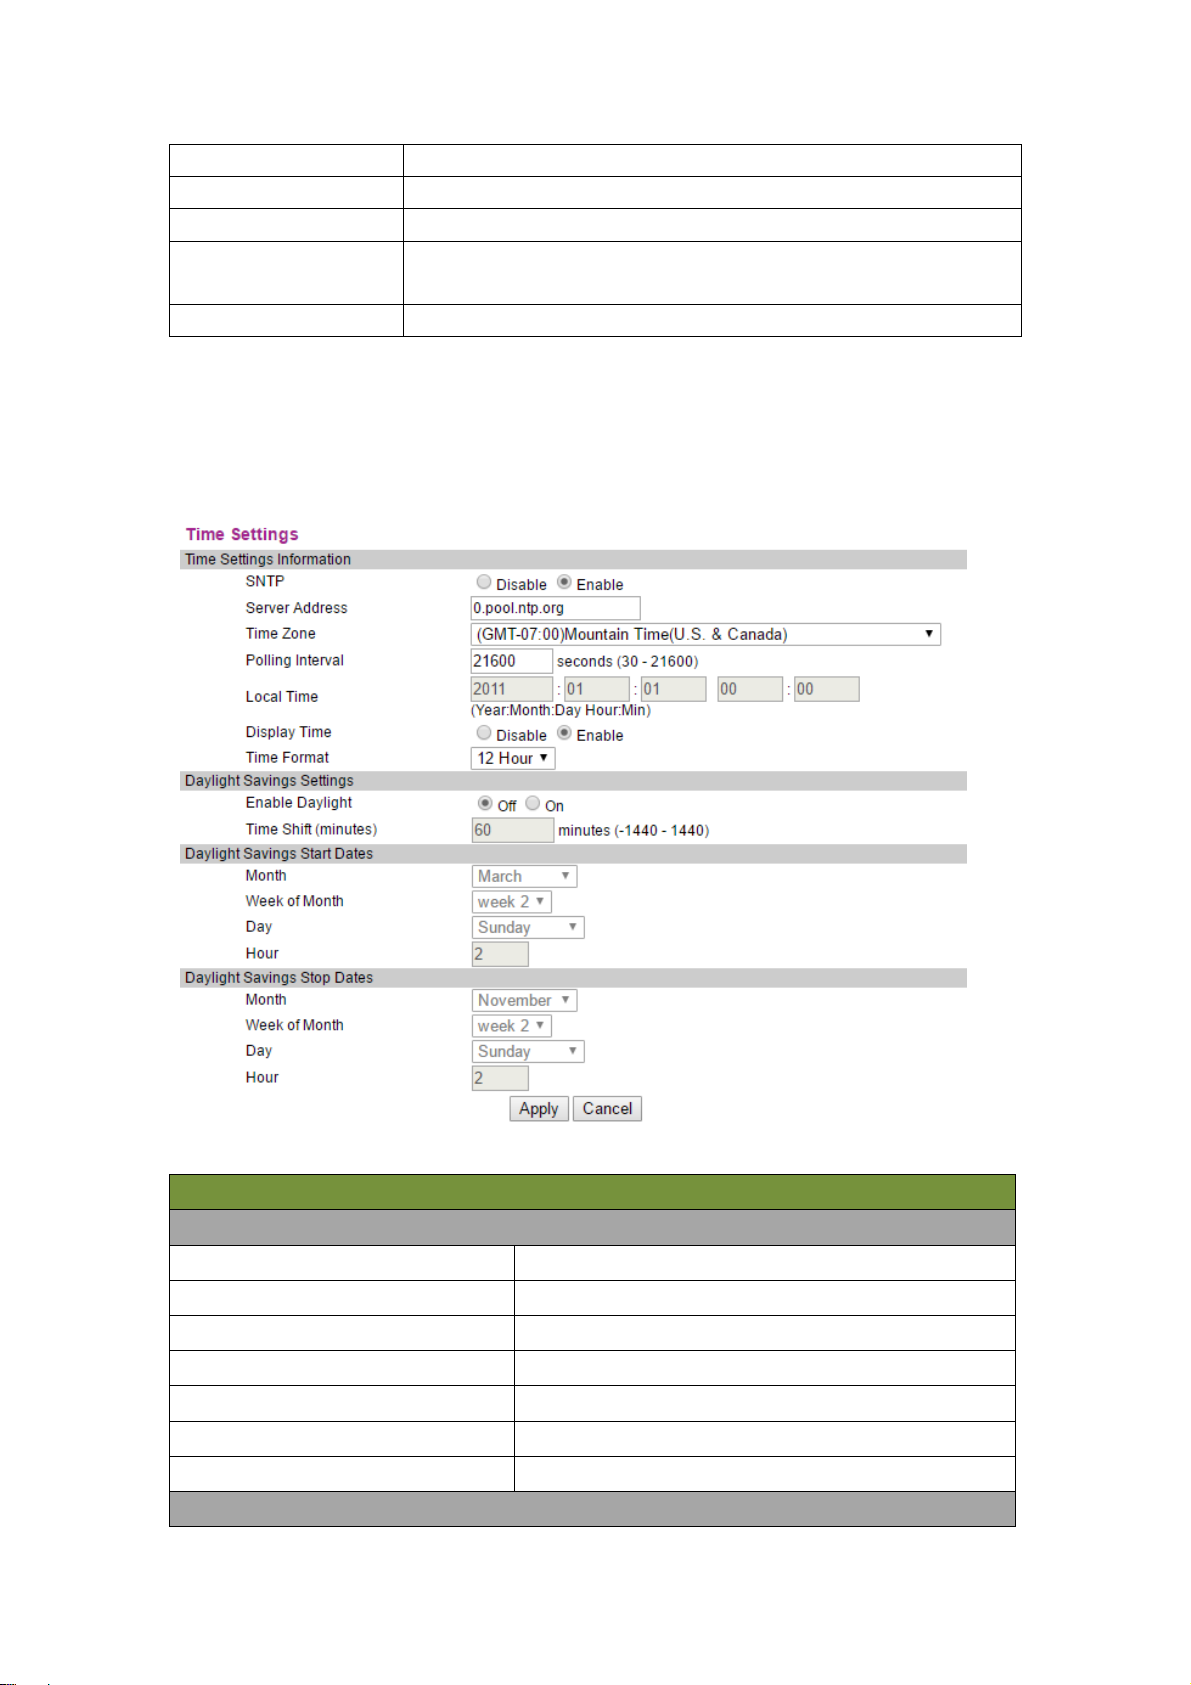
4.6.2 Time Settings
Time Settings
Time Settings Information
SNTP SNTP server enable or disable.
Server Address SNTP server address: the default is 0.pool.ntp.org
Time Zone Time zone selection
Polling Interval Polling interval
Local Time Local time
Display Time Display the time or not
Time Format Time format: 12 hour/24 hour
Daylight Savings Settings
Page 30

Enable Daylight Daylight savings enable or disable.
Time Shift(minutes) Time difference (minute)
Daylight Savings Start Dates
Month Daylight Savings Start Month
Week of Month Week of Month
Day Day of Week
Hour Hour of Day
Daylight Savings Stop Dates
Month Daylight Savings Stop Month
Week of Month Week of Month
Day Day of Week
Hour Hour of Day
4.6.3 User Management
Set the user information.
User Management
Keypad Password
Keypad Password Set the keypad access password. The default is 123.
Verify Password Input the set new password again for verification.
User Management
Administrator User ID
Set the administrator ID as the username for webpage
login. The default is admin.
Page 31

Administrator Password
Set the password for webpage login in the identity of
administrator. The default is admin.
Verify Password
Remote Administration
CetisAdmin User
CetisAdmin Password
Verify Password
4.6.4 System Actions
System operation.
Input the administrator password again for
verification.
Set the username of remote administrator. The default
is admin.
Set the login password of remote administrator. The
default is admin.
Input the administrator password again for
verification.
System Action
Reset Factory Default Click【Reset】button to recover factory setting of phone.
Reboot Device Click【Reboot】button to reboot the phone.
4.6.5 DECT
DECT configuration.
DECT
Base Settings
Page 32

Select the power level of registered handset. The power level is
related to the receiving range. The level 0 is minimum, level 7 has
Power Level
Frequency Select the DECT frequency band: select the different countries.
the maximum receiving range.
5 SHORTCUT KEYS
1. * * 47 #, Broadcast the current ip address of the phone.
2. * * 39 #, Broadcast the current software version of the phone.
3. * * 85 #, Broadcast the current phonevlan ID.
4. * * 83 #, Broadcast current tftp server address.
5. * * 72 #, Restart the phone.
6. * * 36 #, Broadcast the current account of the phone.
7. * * 33 * password #, Clear all the current configuration of the phone, and automatically restart.
8. * * 77 * password * config ID #, The phone downloads the configuration file from the tftp
server and restarts automatically after the download is successful.
9. * * 87 * password * VLAN ID #, Modify the vlan ID of the phone; modify the vlan id success,
the prompt success, and broadcast the modified vlan. ID, and then restart the phone.
10. * * 89 * < keypad password > * < TFTP server IP address > * < configid> #, The phone
downloads the configuration file from the tftp server and restarts automatically after the download
is successful.
11. The following ways: the phone is connected to the POE static settings after the start
* * 73 * 123 # Set the phone wan port to a fixed ip address mode.
* * 74 * 123 * 192.168.18.111 # Set a fixed ip address, I heard ip broadcast voice after the
success of the amendment.
* * 76 * 123 * 255.255.255.0 # Set subnet, I heard the broadcast ip address of the voice after
the success of the amendment.
* * 49 * 123 *192.168.18.1 # Set the gateway, I heard the ip address of the broadcast voice
after the success of the amendment.
**72# after the phone restarts, input IP address in the PC’s LAN browser, enter the WEB
setup IP account settings.
Page 33

FCC Warning:
This device complies with part 15 of the FCC Rules. Operation is subject to the following two conditions:
(1) This device may not cause harmful interference, and (2) this device must accept any interference
received, including interference that may cause undesired operation. Any Changes or modifications not
expressly approved by the party responsible for compliance could void the user's authority to operate the
equipment.
Note: This equipment has been tested and found to comply with the limits for a Class B digital device,
pursuant to part 15 of the FCC Rules. These limits are designed to provide reasonable protection against
harmful interference in a residential installation. This equipment generates, uses and can radiate radio
frequency energy and, if not installed and used in accordance with the instructions, may cause harmful
interference to radio communications. However, there is no guarantee that interference will not occur in a
particular installation. If this equipment does cause harmful interference to radio or television reception,
which can be determined by turning the equipment off and on, the user is encouraged to try to correct the
interference by one or more of the following measures:
—Reorient or relocate the receiving antenna.
—Increase the separation between the equipment and receiver.
—Connect the equipment into an outlet on a circuit different from that to which the receiver is connected.
—Consult the dealer or an experienced radio/TV technician for help.
FCC Exposure to Radio Frequency (RF) Signals
For Handset
This is a radio t r ansmitter and rece iver. It i s designed and manu factured not to exceed th e emission limi tsfor
exposu r e to radio frequency ( RF) energy set b y t he Feder al Communications Commission (FCC) of the
U.S.Government. These li mits are part of comp r ehensi ve guidelines and establish permitted levels of RF
energy for th e general population. The g uidelines are base d on th e safety standar ds pr eviousl y se t by both
U.S . and internati onal standards bodies. These standards include a subst antial saf ety margin d esigned to
assure the safety of all persons,regardless of ag e and health. This device and its ante nna must no t be colocated or operating in conjunction with any other antenna or tr ansm itter. Thi s produ ct has been shown to be
capable of com pliance for localized specific absorpti on rate (SAR) for uncontrolled environment/general
pop ulation exposure lim i ts speci fi ed in ANSI/IEEE Std. C95.1-1992 and
the m easurement procedur es specified in FCC/OET Bulletin 65 Supplement C (2001) and IEEE 1528 .
Fro Base
This equipment complies with FC C r adiation exposure lim i ts set forth for an uncontrolled en vironment . This
equ i pment should be i nstal l ed and operated with m in imum distance 20cm between the radiator& your body.
This transmitter must not be co-located or op er ating in conjunct i on with any other anten na or transmit ter.
h
ad been tested in accordance wit h
ISEDC Warning:
This device complies with ISEDC licence-exempt RSS standard(s). Operation is sub ject to the following two
conditions:
(1) this device may not cause interference, and
(2) this device must accept any interference, includi ng interference that may cause undesired operation of
the device.
Le présent appareil est conforme aux CNR d 'ISEDC applicables aux appareils radio exempts de
licence.L ' exploitation est autorisée aux deux conditions suivantes :
Page 34

(1) l' appareil nedoi t pas produire de brouillag e, et
(2) l' utili sateur de l'appareil d oit accepter tout b r ouillage radioéle ct r i que subi , m ême si le brouillag e est
suscept ib le d'en compromettr e l e fonctionnement.
The device has been t ested and compliance wit h SAR li mits, users can obtain C anadian i nformation on RF
exposu r e and compliance
Le présent appareil est conforme Après examen de ce matériel aux conformité aux limit es DAS et/ou aux
limites d ’intensité de champ R F, les utilisat eurs p euvent sur l’exposition aux radiofréquences et la
conformité and compliance d’acquérir
ISEDC Specific Absorption Rate (SAR) information
For Handset
SAR tests are co nducted usi ng standard operatin g posit ions accepted by the ISEDC with device transmitting
at it s high est certified power level in all tested frequen cy bands, although the SAR is d etermined at the
highest cer tified power level, the actual SAR l evel of the device while operating can be well below the
maximum valu e. Befor e a new m odel device is a available for sale to the publ ic, it must be t ested and
certified to the ISEDC that it does not exceed the exposure limi t established by th e ISEDC, tests for each
device are performed in positions and locations as required by the ISEDC. For body worn operat ion, this
model device has been tested and meets th e ISEDC RF exposure gu id elines when used with an accessory
designated for this product or when used with an accessory that contai ns no m etal.
For Base
This equipment complies with ISEDC radiation exp osure limits set forth for an un control led environment. This
equ i pment should be i nstal l ed and operated with m in imum distance 20cm between the radiator& your body.
This transmitter must not be co-located or op er ating in conjunct i on with any other anten na or transmit ter.
ISEDC Radiation Exposure Statement:
For Handset
SAR l’utili sation des règ les sm a l’emplace ment Le maté r iel de tr ansmission et fo nctionnant da ns tous les
essais à la certification, mêm e si l a puissance suprême a décidé l e niveau, utili sation spécifique peut être
trè s en deçà de la valeur de référ ence m aximale.Types de mat ériel sont vendus au public un ancien, d’essai
et de certification de l’exposition, limite maximum sma, chaque document et l’emplacement du m atériel
d’essai et conformémen t au document.L e m odèle en physique, matériel d ’ essai et conform e aux directives
d’exposition des radiofréquences sma quand une annexe désigné pou r ce produ i t lors de leur ut ilisati on ou
des pièces de rechange ne contiennent pas de métal .
For Base
Cet équipement est conforme aux limites d'exposition aux radiations ISEDC définies pour un environnement non
contrôlé. Cet équipement doit être installé et utilisé avec une distance minimale de 20 cm entre le radiateur et votre
corps.
Cet émetteur ne doit pas être situé ou fonctionner conjointement avec une autre antenne ou un autre émetteur.
REN:N/A
 Loading...