

Page 1

Instruction Manual (English) – Page 1
Manuel d'instruction (français) – Page 14
Manual de instrucciones (español) – página 27
Gebrauchsanleitung (Deutsch) – Seite 40
Page 2
IMPORTANT SAFETY INSTRUCTIONS
CAUTION: THE LIGHTNING FLASH WITH AN ARROWHEAD SYMBOL WITHIN AN EQUILATERAL TRIANGLE
IS INTENDED TO ALERT THE USER TO THE PRESENCE OF UN-INSULATED DANGEROUS VOLTAGE WITHIN
THE UNITS ENCLOSURE THAT MAY BE OF SUFFICIENT MAGNITUDE TO CONSTITUTE A RISK OF ELECTRIC
SHOCK TO PERSONS.
WARNING: THE EXCLAMATION POINT WITHIN AN EQUILATERAL TRIANGLE IS INTENDED TO ALERT THE
USER TO THE PRESENCE OF IMPORTANT OPERATING AND MAINTENANCE (SERVICING) INSTRUCTIONS
IN THE LITERATURE ACCOMPANYING THE PRODUCT.
NOTE: THE HAND WITHIN AN EQUILATERAL TRIANGLE IS INTENDED TO ALERT THE USER TO SPECIFIC
GUIDANCE AND INFORMATION REGARDING THE OPERATION OF THE UNIT, AND SHOULD BE READ FULLY
BEFORE USING THE UNIT FOR THE FIRST TIME.
CAUTION: TO REDUCE THE RISKS OF FIRE OR ELECTRIC SHOCK DO NOT REMOVE ANY
COVERS, OR OPEN THE UNIT. THERE ARE NO USER-SERVICABLE PARTS INSIDE. ALL
SERVICING SHOULD BE REFERRED TO QUALIFIED SERVICE ENGINEERS.
WARNING: READ AND FOLLOW ALL THE SAFETY AND OPERATING INSTRUCTIONS BEFORE
CONNECTING OR USING THIS UNIT. RETAIN THIS USER MANUAL FOR FUTURE REFERENCE.
ALL WARNINGS ON THE UNIT AND ITS PACKAGING SHOULD BE READ AND FOLLOWED.
WARNING: This product contains a chemical known to the State of California to cause cancer and birth
defects or other reproductive harm.
CAUTION: To reduce the risks of fire or electric shock do not expose this product to rain or moisture. Do
not use this product near water; for example, near a bath tub, washbowl, kitchen sink, laundry tub, in a wet
basement or near a swimming pool. Unplug the unit from the wall outlet before cleaning. Never use thinner,
cleaning fluids, solvents or chemically impregnated cloths. For cleaning always use a soft dry cloth. Unplug
this product during lightning storms or when unused for long periods of time.
CAUTION: The unit should be installed so that its location or position does not interfere with its proper
ventilation. For example, it should not be situated on a bed, sofa, rug or similar surface that may block the
ventilation openings; or placed in a built-in installation, such as a bookcase or cabinet, that may impede the
flow of air through its ventilation openings. The unit should be situated away from heat sources such as
radiators, heat registers, stoves or other devices (including amplifiers) that produce heat. No naked flame
sources, such as lighted candles, should be placed on, or near the unit.
WARNING: Do not place this unit on an unstable surface, cart, stand or tripod, bracket or table. The unit
may fall, causing serious injury to a child or adult and serious damage to the unit. Use only with a cart,
stand, tripod, bracket or table recommended by the manufacturer or sold with the unit. Any mounting of the
device on a wall or ceiling should follow the manufacturer’s instructions and should use a mounting
accessory recommended by the manufacturer. An appliance and cart combination should be moved with
care. Quick stops, excessive force and uneven surfaces may cause the appliance and cart combination to
overturn. Use only with the cart, stand, tripod, bracket, or table specified by the manufacturer, or sold with
the apparatus. When a cart is used, use caution when moving the cart/apparatus combination to avoid
injury from tip-over.
NOTE: Should the unit become damaged beyond repair, or reaches the end of its life, please consult the
regulations regarding disposal of electronic products in your region.
NOTE: Cerwin-Vega!, LLC cannot be held responsible for damage, and, or including data loss caused by
improper use of the unit and or the applications provided for use with the unit.
1
Page 3

CAUTION TO PREVENT ELECTRIC SHOCK, MATCH WIDE BLADE OF PLUG TO WIDE SLOT FULLY
INSERT.
The unit and power supply should only be connected to a power supply outlet only of the voltage and
frequency marked on its casing.
1. Protect the power cable from being walked on or pinched particularly at plugs, convenience
receptacles, and the point where they exit from the apparatus.
2. Do not defeat the safety purpose of the polarized or grounding-type plug. A polarized plug has two
blades with one wider than the other. A grounding type plug has two blades and a third grounding
prong. The wide blade or the third prong is provided for your safety. If the provided plug does not fit
into your outlet, consult a qualified electrician for replacement of the obsolete outlet.
3. If the mains plug supplying this product incorporates a fuse then it should only be replaced with a
fuse of identical or lower rupture value.
4. Never use a damaged or frayed power cable; this can introduce serious risk of exposing lethal
voltages.
5. The power supply cable of the unit should be unplugged from the wall outlet when it is to be unused
for a long period of time.
6. Only use attachments/accessories specified by the manufacturer.
DO NOT ATTEMPT SERVICING OF THIS UNIT YOURSELF. REFER SERVICING TO QUALIFIED
SERVICE PERSONNEL.
Upon completion of any servicing or repairs, request the assurance that only Factory Authorized
Replacement Parts with the same characteristics as the original parts have been used, and that the routine
safety checks have been performed to guarantee that the equipment is in safe operating condition.
REPLACEMENT WITH UNAUTHORIZED PARTS MAY RESULT IN FIRE, ELECTRIC SHOCK OR
OTHER HAZARDS.
Refer all servicing to qualified service personnel. Servicing is required when the apparatus has been
damaged in any way, such as power-supply cord or plug is damaged, liquid has been spilled or objects have
fallen into the apparatus, the apparatus has been exposed to rain or moisture, does not operate normally,
or has been dropped.
Apparatus shall not be exposed to dripping or splashing liquids and no objects filled with liquids, shall not be
placed on the apparatus.
Where the MAINS plug or an appliance coupler is used as the disconnect device, the disconnect device shall
remain readily operable.
NOTE: Unplug the unit from the wall outlet before cleaning. Never use benzene, thinner or other solvents
for cleaning. Use only a soft damp cloth.
NOTE: Care should be taken so that objects do not fall, and liquids are not spilled into the enclosure
through any openings.
If an indoor antenna is used (either built into the set or installed separately), never allow any part of the
antenna to touch the metal parts of other electrical appliances such as a lamp, TV set etc.
CAUTION – POWER LINES
Any outdoor antenna must be located away from all power lines.
2
Page 4
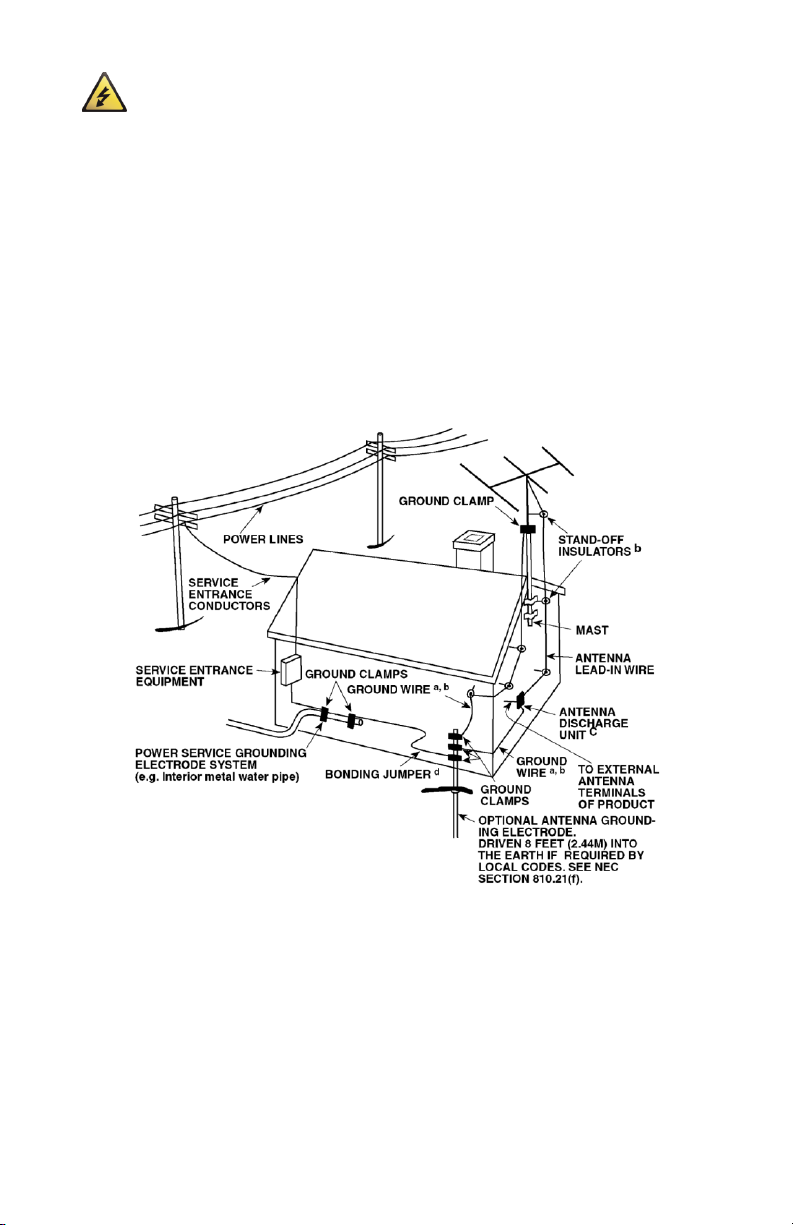
OUTDOOR ANTENNA GROUNDING
If an outside antenna is connected to your tuner or tuner-preamplifier, be sure the antenna system is
grounded so as to provide some protection against voltage surges and built-up static charges. Article 810 of
the National Electrical Code, ANSI/NFPA No. 70-1984, provides information with respect to proper grounding
of the mast and supporting structure, grounding of the lead-in wire to an antenna discharge unit, size of
grounding conductors, location of antenna discharge unit, connection to grounding electrodes and
EXAMPLE OF ANTENNA GROUNDING AS PER NATIONAL ELECTRICAL CODE INSTRUCTIONS CONTAINED IN ARTICLE 810
- RADIO AND TELEVISION EQUIPMENT.
requirements for the grounding electrode.
a. Use No. 10 AWG (5.3mm2) copper, No. 8 AWG (8.4mm2) aluminium, No. 17 AWG (1.0mm2) copper-clad
steel or bronze wire, or larger, as a ground wire.
b. Secure antenna lead-in and ground wires to house with stand-off insulators spaced from 4-6 feet (1.22 -
1.83 m) apart.
c. Mount antenna discharge unit as close as possible to where lead-in enters house.
d. Use jumper wire not smaller than No.6 AWG (13.3mm2) copper, or the equivalent, when a separate
antenna-grounding electrode is used. see NEC Section 810-21 (j).
NOTE TO CATV SYSTEM INSTALLER: This reminder is provided to call the CATV system installers attention to Article
820-40 of the National Electrical Code that provides guidelines for proper grounding and, in particular, specifies that the
ground cable ground shall be connected to the grounding system of the building, as close to the point of cable entry as
practical.
DO NOT ATTEMPT TO REPAIR THIS DEVICE YOU OWN. REFER SERVICING TO QUALIFED SERVICE PERSONNEL.
Upon completion of any servicing or repairs, request the service shops assurance that only Factory Authorized
Replacement Parts with the same characteristics as the original parts have been used, and that the routine safety checks
have been performed to guarantee that the equipment is in safe operating condition.
REPLACEMENT WITH UNAUTHORIZED PARTS MAY RESULT IN FIRE, ELECTRIC SHOCK OR OTHER HAZARDS.
3
Page 5

Introduction
With over 50 years of speaker system know-how for concerts, movies, public
address and clubs – when you want to recreate these experiences at home on
the desktop – those that know turn to Cerwin-Vega!
When creating a speaker for desktop and computer applications the goal is to
optimize the sound output while keeping the enclosure small. Clarity is critical,
especially for those producing multimedia or analyzing tracks. Signal purity
must be maintained by using low noise amplifiers that don’t disappoint when
the volume is set to high. And, if it has the Cerwin-Vega! name, the bass has to
be in-your-face.
Powered desktop speakers must also fully integrate with your entire sound
system and outboard accessories. With the capability to handle multiple inputs,
you can switch instantly between your computer as a source or other more
portable platforms such as MP3 players, phones and other media players via
the ⅛” stereo Auxiliary input. A convenient headphone jack allows you to “keep
it down” while maintaining full control through the front panel volume
adjustments.
Package Contents
• XD3 Powered Desktop Speakers
• ⅛” stereo mini-to-RCA 3’ cable
• ⅛” stereo mini-to-mini cable
• AC power cable
• Speaker cable
• User Manual
• Warranty Card
Features
3” Woofer / ¾” tweeter
15 watts per channel amp with built in crossover
4
Page 6
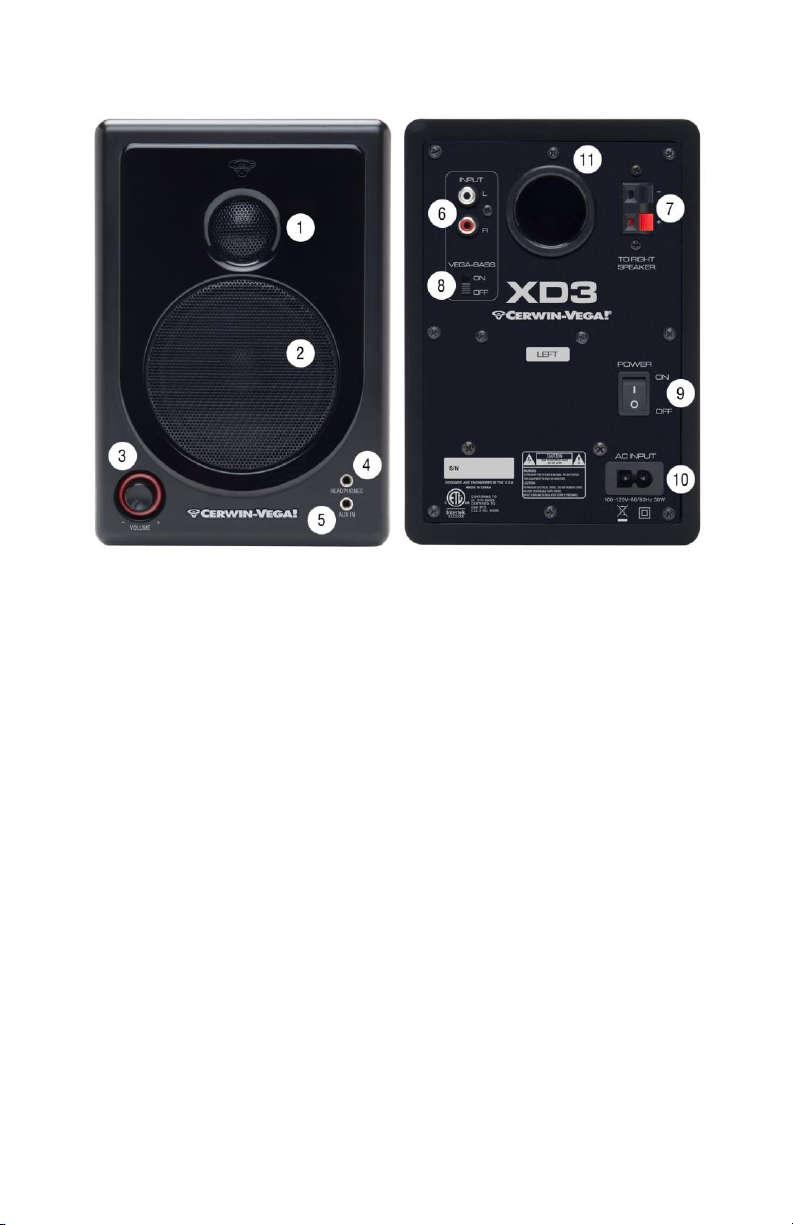
Product Features
① ¾”Tweeter
Both left and right speakers features a precise 3/4" silk dome tweeter with
protective magnetic shielding. The tweeter delivers high frequency sound and
is further naturalized with internal damping technology to minimize unwanted
resonance.
② 3” Woofer with Vega -Bass
Below the tweeter is a durable 3” polypropylene treated paper cone woofer
with high-temperature voice coil to provide consistent sound over hours and
hours of continually usage. The woofer delivers balanced mid- and lowfrequency sound and also features protective magnetic shielding.
5
Page 7

③ Illuminate d Volume Knob
The volume control knob controls both left and right speaker volume at the
same time. Turning the volume control knob in a clock-wise direction will
increase the speaker volume. Turning the volume control know in a counterclock-wise direction will decrease the speaker volume. When the speaker is
powered on, a red ring will be lit around the knob.
④ ⅛” Headphone Jack
A stereo ‘Head phone’ jack is conveniently located on the front of the speaker.
Use a ⅛” stereo jack from the headphone and insert it into the ‘Head phone’
jack. When a headphone is placed into the jack, the sound from the main
speaker will be muted.
⑤ ⅛” Auxil ia ry Input Jack
A stereo ‘Aux In’ input is provided in a convenient location for an easy
connection to a portable device such as an MP3 or mobile phone. Use a maleto-male ⅛” stereo-mini to connect the portable device to the XD3 speaker
system.
⑥ External A udio Input (RCA/Pho no)
A stereo RCA-type input is located on the rear of the left speaker. This is an
unbalanced input that is common with a majority of consumer level home
audio electronics. The RCA-type input can be connected to a computer or
portable device using a ⅛” stereo mini-to-RCA audio cable speaker system. The
volume control knob controls both the Main Stereo Input and ‘Aux In’.
6
Page 8

⑦ Speaker O ut Connecti on & Speaker I nput Conn ection
For complete stereo sound, the right speaker must be connected to the left
speaker. Using the supplied 2-conductor speaker cable, connect the ‘output to
right speaker’ to the ‘input front left speaker’. Be sure to note the color
polarity to maintain the best audio performance. The left speaker’s red jack
should be connected to the right speaker’s red jack. The left speaker’s black
jack should be connected to the right speaker’s black jack.
⑧ Vega-Bass Selector
The Vega-Bass selector delivers a quick way to tailor the XD3 speaker system to
your personal preference. With the Vega-Bass selector set to ‘On’, the XD3
speaker will increase the bass response (increase low frequency gain). With
the Vega-Bass selector set to ‘Off’, the XD3 speaker will be set to a more
natural even response.
⑨ Power Switc h
The main power switch is located on the rear of the left speaker. To use the
XD3 speaker system, be sure the power switch is set to the ‘ON’ position. When
the XD3 speaker system is not in use, set the power switch to the ‘OFF’
position.
⑩ AC Power I nlet
The ‘AC IN’ must be connected to a power outlet to use the XD3 speaker
system. Use only the power cord provided with the XD3 system. Be sure the
power cord is firmly secured into the AC power inlet.
⑪ Reinforced Rear-F iring Bass Port
On both left and right speakers is a custom low-frequency tuned base port. The
port allows low frequency signals to be released thus enhancing the overall
bass response. Avoid placing the speaker against a flat surface such as a wall, to
prevent restriction of the bass port.
7
Page 9
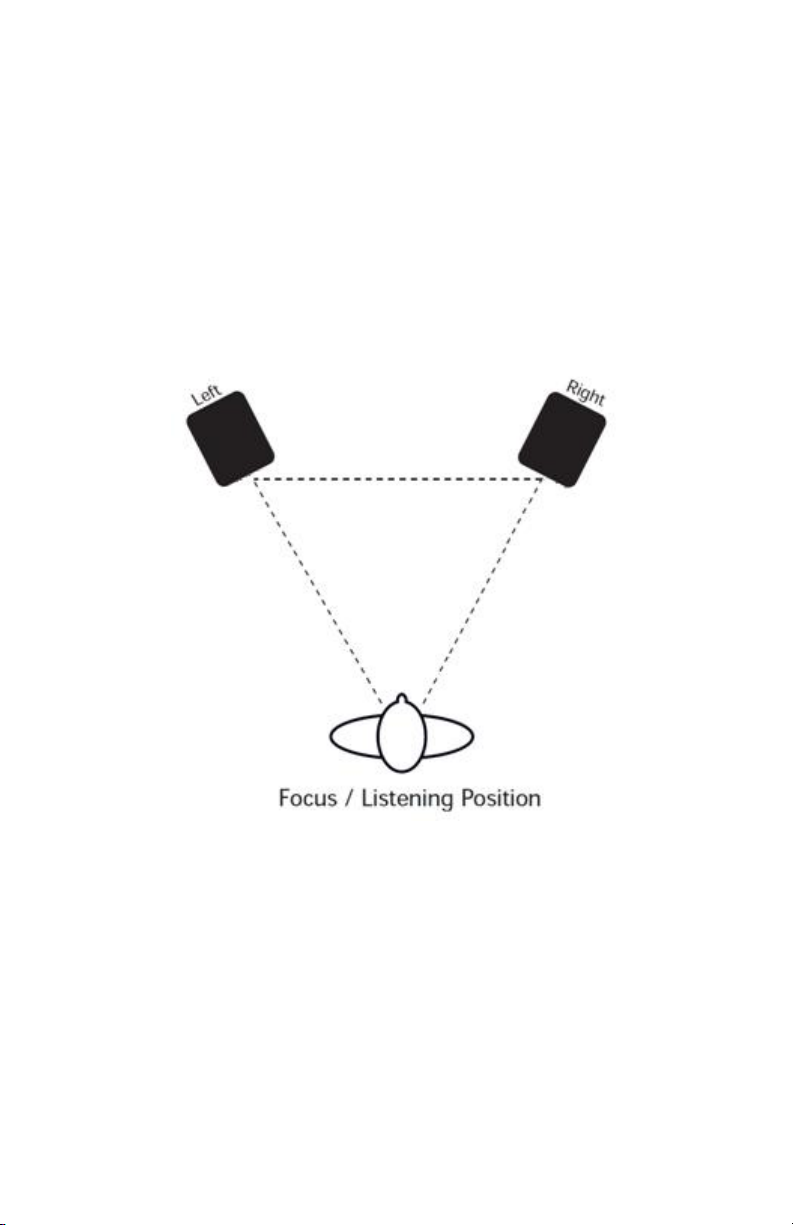
QUICK START
Placement
For the best listening experience, place the XD3 speaker system in the optimal
position. The left and right speakers should be placed at a vertical height
leveled with the main user’s head. The left and right speakers should be placed
so that it is in an equilateral triangle with the main user. An equilateral triangle
is where the distance between the left and rights speakers and the main user
are equal. The distance should be greater than 3 feet (1 meter). The rotation of
the left and right speaker should be at a 60 degree angle towards the main
user.
8
Page 10
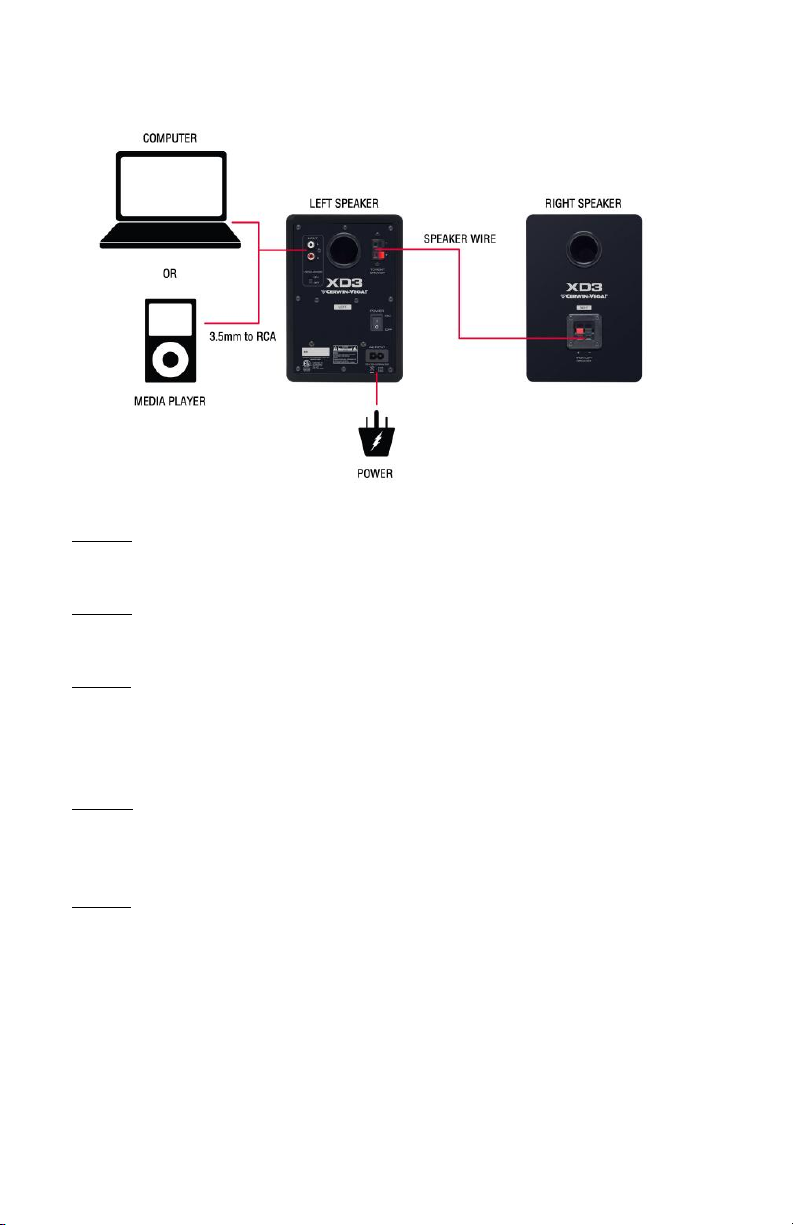
Connection s
STEP A: Situate the left and right speakers in the desired locations. Connect the
2-conductor speaker wire in between the left and right speakers.
STEP B: Connect the output from the computer or portable media player to the
input of the left speaker.
STEP C: Set the volume knob, located on the front of the left speaker, to the
most counter-clockwise position. Be sure the power switch on the left speaker
is set to ‘OFF’. Connect the power cord from an acceptable power socket to the
‘AC IN’ located on the rear of the left speaker.
STEP D: Turn the power switch on the left speaker to ‘ON’. Next, apply audio to
the XD3 speaker system by playing music from the computer or portable media
player.
STEP E: Slowly turn the volume knob clockwise until the desired volume has
been reached.
9
Page 11
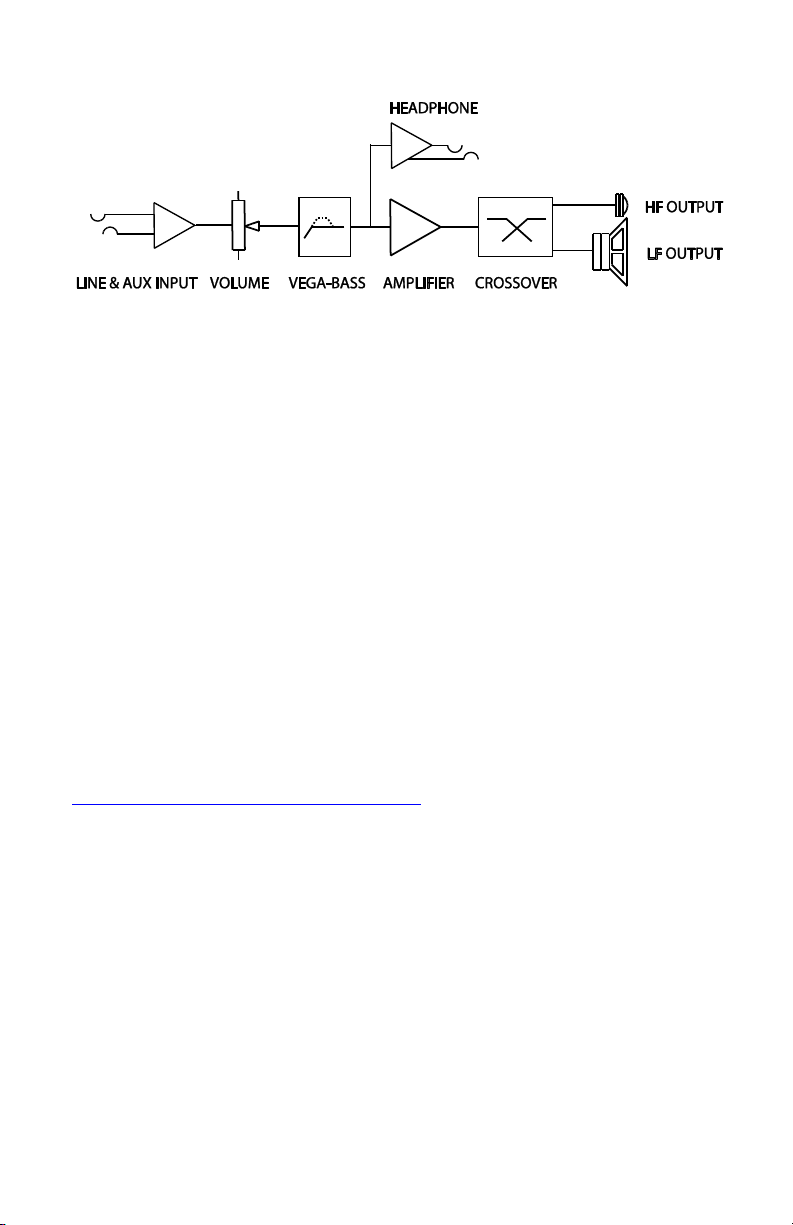
Block Diagram
Speaker Type
Two-way Powered Desktop Speaker
LF Driver
3” diameter, polypropylene treated paper cone.
HF Driver
¾” diameter, silk dome tweeter.
Power
15 watts per channel amplifier
Certification
cETLus, CE
Power Requirements
100-120V/~50/60Hz
220-240V/~50/60Hz (for export models only)
Requires 2-conductor line cord (included)
Cabinet
Vinyl-laminated MDF
Cabinet Dimensions
(H x W x D)
8” x 5.5” x 6.5” / 203mm x 140mm x 165mm
Weight
6.5 lbs /2.9 kgs (pair)
11.0 lbs / 5.0 kgs (packed pair)
Specifications
Product Registration and Warranty
To register your product and warranty, visit:
http://www.cerwinvega.com/register.html
If you do not have access to the Internet or a computer, please contact via
telephone at 954-949-9600 Option #2 and request a product
registration/warranty form to be mailed to you for completion or mail us at:
Cerwin-Vega
772 S. Military Trail
Deerfield Beach, FL 33442
ATTN: Product Registration/Warranty
10
Page 12

Please note that product and warranty registration gives Cerwin-Vega!
permission to send you information about new and existing products and
promotions. If you do not wish to be contacted regarding new products and
promotions, please opt out during the product/warranty registration process.
You will continue to receive important product updates concerning your
purchased Cerwin-Vega! products.
Troubleshooting Tips
No Power
The XD3 features a power indicator around the volume control knob on the left
speaker. This ‘ring’ will be lit when the XD3 is powered ‘on’.
Be sure the XD3 is being used with the correct power source. Do NOT use the
XD3 intended for 100-120V on a power source that is 220-240V. Do NOT use
the XD3 intended for 220-240V on a power source that is 100-120V. The XD3 is
marked appropriately on the back of the left speaker.
Make sure the power cord is securely seated and plugged all the way into the
‘AC IN’ socket of the XD3 speaker. Be sure the power cord is plugged all the
way into the AC outlet.
Check that the AC outlet is live (such as using a lamp or qualified tester from
the same outlet). In some cases, the AC outlet may be controlled by a light
switch or the power strip has a switch in the incorrect ‘off’ position.
Verify that the power switch on the rear of the XD3 speaker is in the ‘on’
position. The ‘on’ position is where the ‘|’ symbol is pressed down.
No Sound
Verify that the XD3 is powered ‘on’. See the above section.
Make sure the audio cable is plugged into both the source output (computer or
portable media player) and the XD3 audio input (either the two RCA jacks
located on the rear or the ⅛” ‘AUX IN’ jack located on the front).
11
Page 13

Check that the source (computer or portable media player) volume level is set
to a level that can properly send a signal to the monitors. Also verify that the
volume knob on the XD3 speaker is turned to the full clockwise position.
If the right speaker does not produce audio, than check both sides of the 2conductor wire that is connected to the left and right speaker. The ends of the
2-conductor wire must be bare wire (no insulation material) and inserted into
the push terminals.
Ba d Sound
Verify that all audio related connections are securely attached. For example,
make sure the audio input connectors are clean and fully inserted into the jack.
Distorted or noisy sound can result from the source (computer or portable
media player). Try to listen to the source using a set of headphones and
adjusting the volume to different levels. If the audio is bad through the
headphones, than the source is the problem.
The position of the speakers can contribute to bad sound. Make sure the
proximity of the speakers is not restricted by other objects such as books or
being placed too close to the wall. Experiment by moving the XD3 speakers to
different positions.
Check that the wiring is not restricted and not in close proximity to electrical
interference sources such as power cords, mobile phones or dimming lights.
12
Page 14

CERWIN-VEGA! USA:
772 S. MILITARY TRAIL • DEERFIELD BEACH, FL 33442
P 954.949.9600 • F 954.949.9590 • www.cerwin-vega.com
CERWIN-VEGA! EUROPE:
382 AVE. DE LA COURONNE • B-1505 BRUSSELS
P +32.2.645.05.00 • F +32.2.645.05.05
CERWIN-VEGA! IS A REGISTERED TRADEMARK OF CERWIN-VEGA, LLC.
XD3 USER GUIDE REV B © 2011 CERWIN-VEGA, LLC.
This document is copyright protected. No part of this manual may be copied or
reproduced in any form without prior written consent from CERWIN-VEGA.
CERWIN-VEGA shall not be liable for operational, technical, or editorial
errors/omissions made in this document.
13
Page 15

MESURES DE SECURITE IMPORTANTES
Avertissement : Pour réduire les risques d'incendie ou de chocs électriques, l'appareil ne doit pas être
exposé à la pluie ou à l'humidité.
Le symbole de l'éclair à l'intérieur d'un triangle équilatéral, est destiné à alerter l'utilisateur de la présence
de pièces sous tension non isolées dans le boîtier de l'appareil, d'une magnitude pouvant constituer un
risque d'électrocution.
Le symbole du point d'exclamation, dans un triangle équilatéral, est destiné à alerter l'utilisateur que
d'importants conseils de fonctionnement et de maintenance (réparation) sont fournis dans la documentation
accompagnant le produit.
ATTENTION : AFIN DE REDUIRE LES RISQUE DE CHOC ELECTRIQUE, N'ENLEVEZ PAS LE COUVERCLE (OU
LE PANNEAU ARRIERE). AUCUNE PIÈCE RÉPARABLE PAR L’UTILISATEUR À L’INTÉRIEUR. EN CAS DE
PROBLÈME, S'ADRESSER À UN PERSONNEL TECHNIQUE QUALIFIÉ.
Respectez les avertissements et les instructions de fonctionnement du produit. Avant de brancher et
d'utiliser l'appareil lisez les instructions d'utilisation et respectez les consignes de sécurité. Conservez cette
notice et le guide d'utilisation pour toute référence ultérieure.
Évitez de placer l’appareil sur chariots, supports, trépieds, étagères ou tables instables. L’appareil pourrait
tomber et causer de graves blessures à des enfants et adultes et endommager le produit même. Utilisez
seulement chariot, support, trépied ou table recommandée par le fabricant ou vendue avec le produit.
L’accrochage du produit à un mur ou au plafond doit respecter les instructions fournies par le fabricant et
les accessoires montés doivent être ceux conseillés par le fabricant. Déplacez le chariot et l’appareil avec
beaucoup de précaution. Les arrêts brutaux, les poussées trop fortes et les surfaces irrégulières peuvent
renverser l'ensemble.
NOTE : Si l'unité sont endommagée au-delà de réparation, ou atteint la fin de sa vie, veuillez consulter le
règlement au sujet de l'élimination des produits électroniques dans votre région.
NOTE : Cerwin-Vega!, LLC ne peut être tenu responsable de dommages et, ou y compris la perte de
données causée par une mauvaise utilisation de l'unité et ou les applications fournies pour une utilisation
avec l'unité.
MISE EN GARDE POUR PRÉVENIR LES CHOCS ÉLECTRIQUES, LAME LARGE MATCH DU
BOUCHON À FENTE LARGE INSÉRER PLEINEMENT.
La fourniture de l'unité et la puissance devrait seulement être reliée à une prise de fourniture seulement de
la tension et la fréquence indiquée sur son boîtier.
1. Protéger le câble d'alimentation d'être marchait sur ou pincés particulièrement à bouchons, récipients de
commodité et le point où ils sortir de l'appareil.
2. Ne pas vaincre l'objectif de sécurité du bouchon polarisé ou type de mise à la terre. Un bouchon polarisé
a deux lames avec un plus large que l'autre. Un bouchon de type échouement a deux lames et un troisième
volet mise à la terre. La lame large ou le troisième volet est fourni pour votre sécurité. Si le plug fourni ne
correspond pas à votre point de vente, consulter un électricien qualifié pour le remplacement de l'exutoire
obsolète.
3. Si les conduites de brancher fournissant ce produit intègre un fusible, alors seulement, il devrait être
remplacé avec un fusible de valeur identique ou inférieure rupture.
4. Jamais utiliser un câble d'alimentation endommagés ou effilochés. Cela peut introduire un risque sérieux
d'exposer les tensions létales.
14
Page 16
5. Le câble d'alimentation de l'unité devrait être débranché de la prise murale lorsque c'est d'être inutilisée
pendant une longue période de temps.
6. Utilisez uniquement des pièces jointes/accessoires spécifiés par le fabricant.
N'utilisez pas ce produit près d'une source d’eau, telle qu’une baignoire, un lavabo, un évier ou un bac à
laver, dans un sous-sol humide ou près d'une piscine.
L'unité devrait être placée de sorte qu'elle ne gêne pas sa propre ventilation. Par exemple, elle ne devrait
pas être placée sur un lit, un sofa, une couverture ou une surface semblable qui peut bloquer les fentes de
ventilation ; ou placée dans un endroit encastré, comme une bibliothèque ou une armoire qui peuvent
empêcher la circulation d'air par les fentes d'aération.
L'unité devrait être placée loin de toute source de chaleur telle que radiateurs, bouches de chauffage,
cuisinières et autres appareils (y compris des amplificateurs) qui produisent de la chaleur.
L'unité ne doit être branchée qu'à une alimentation électrique de tension et fréquence marquées à l'arrière
de l'appareil.
Le cordon d'alimentation doit être disposé de manière à ce qu'il ne soit ni piétiné ni pincé en particulier au
niveau des fiches, des prises de courant et du point de sortie de l'appareil.
Débranchez toujours l'appareil de la prise secteur avant de le nettoyer. N’utilisez jamais d'essence, diluant
ou autre solvants pour le nettoyage. N'utilisez qu'un chiffon doux humidifié.
Débranchez l'appareil de la prise secteur s'il ne va pas être utilisé pendant une longue période. Veiller à ne
pas laisser tomber des objets ni laisser de liquides s'introduire à travers les ouvertures de l’appareil.
Consulter tous les entretien au personnel de service qualifié. Entretien est requis lorsque l'appareil a été
endommagé en aucune façon, comme le cordon d'alimentation ou plug est endommagé, de liquide a été
débordé ou d'objets sont tombés dans l'appareil, de l'appareil a été exposé à la pluie ou de l'humidité, ne
fonctionne pas normalement, ou a été abandonnée.
Appareil ne doit pas être exposés à égouttement ou éclaboussures de liquides et aucun objet remplis de
liquides, ne doit pas être placé sur l'appareil.
Lorsque les conduites de brancher ou à un coupleur appliance est utilisé comme dispositif de déconnexion,
le dispositif de déconnexion doit rester facilement utilisable.
ATTENTION POUR EVITER LES CHOCS ÉLECTRIQUES, INTRODUISEZ LA LAME LA PLUS LARGE DE LA
FICHE DANS LA BORNE CORRESPONDANTE DE LA PRISE ET POUSSEZ JUSQU'AU FOND.
Si une antenne intérieure est utilisée (soit intégrée au poste ou installée séparément), ne laissez jamais une
partie de l'antenne toucher les parties métalliques des autres appareils électriques, tels que lampes,
téléviseurs, etc.
ATTENTION - LIGNES ELECTRIQUES
Toute antenne extérieure doit être située loin de toutes les lignes électriques.
MISE À LA TERRE D'UNE ANTENNE EXTÉRIEURE
Si une antenne extérieure est reliée à votre tuner ou tuner pré-amplificateur, veillez à que le système
d’antenne est mis à la terre, afin d'assurer une protection contre toute surtension et accumulation de
charges statiques. La section 810 du National Electric Code, ANSI/NFPA 70-1984, contient des
renseignements sur la mise à la terre appropriée du pylône et de la structure de soutien, la mise à la terre
de l'entrée de courant de l'unité de décharge de l'antenne, la taille des conducteurs de mise à la terre,
l'emplacement de l'unité de décharge de l'antenne, le branchement aux prises de terre et les normes
relatives aux prises de terre.
a. Utilisez un fil en cuivre n° 10 AWG (5,3mm2), en aluminium n° 8 AWG (8,4 mm2) ou en acier recouvert
de cuivre ou de bronze n° 17 AWG (1 mm2) comme fil de terre.
15
Page 17

b. Raccordez le fil conducteur de l'antenne et les fils de terre à la maison au moyen d'isolateurs muraux
espacés de 122 à 183 cm (4 à 6 pieds).
c.Installez l’unité de décharge de l’antenne aussi près que possible du point d’entrée du fil antenne dans la
d. Utilisez un câble de liaison d'au moins la taille d'un fil de cuivre n° 6 AWG (13,3mm2) ou équivalent
EXEMPLE DE MISE À LA TERRE D’UNE ANTENNE CONFORMÉMENT AUX DIRECTIVES DU CODE NATIONAL DE
L’ÉLECTRICITÉ SE TROUVANT À L’ARTICLE 810 - ÉQUIPMENT DE RADIO ET DE TÉLÉVISION;
maison.
lorsqu'un conducteur de terre d'antenne séparé est utilisé ; voir (NEC) ou Code canadien de l'électricité
(CCE) Section 810-21 (j).
Note à l’installateur de câblodistribution (CATV): Cette note a pour objet d'attirer l'attention de l’installateur de
câblodistribution (CATV) sur l'article 820-40 du Code canadien de l'électricité (CCE) qui fournit des directives pour la mise
à la terre convenable et signale, en particulier, que le câble de terre doit être relié au dispositif de mise à la terre du
bâtiment, aussi près que possible du point d’entrée du câble.
NE TENTEZ PAS DE REPARER CET APPAREIL VOUS-MEME. CONFIEZ TOUTE RÉPARATION À UN TECHNICIEN QUALIFIÉ
Après tout dépannage ou réparation, assurez-vous que le technicien utilise les pièces de rechange agréées par le
fabricant ou qu'elles présentent les mêmes caractéristiques que les pièces d’origine, et demandez au technicien de
procéder à un contrôle de sécurité pour s’assurer que le produit est en bon état de fonctionnement.
TOUTES LES SUBSTITUTIONS NON AUTORISEES PEUVENT RESULTER EN INCENDIE, CHOCS ELECTRIQUES OU AUTRES
RISQUES.
16
Page 18

Introduction
Avec plus de 50 ans de savoir-faire dans les systèmes d'enceintes pour
concerts, films, sonorisation et boîtes de nuit - quand vous voulez recréer ces
ambiances au salon à la maison - ceux qui savent se tournent toujours vers
Cerwin-Vega !
Lors de la création d'une enceinte pour salon ou applications informatiques,
l'objectif est d'optimiser la reproduction sonore tout en réduisant le
l'encombrement du boîtier. La netteté est essentielle, surtout pour ceux qui
reproduisent du multimédia ou l'analyse de pistes. La pureté du signal doit être
maintenue en utilisant des amplificateurs à faible bruit qui ne doivent pas
décevoir quand le volume est réglé trop fort. Mais si vous avez un CerwinVega!, les graves "vous sauteront au visage".
Les enceintes de salon amplifiées doivent également s'intégrer pleinement
avec votre système de sonorisation et autres accessoires. Avec la capacité de
gérer des entrées multiples, vous pouvez basculer instantanément entre les
sources, ordinateur ou autres plates-formes plus mobiles telles que lecteurs
MP3, téléphones et autres lecteurs multimédias via l'entrée ⅛" stéréo
auxiliaire. Une prise casque pratique vous permet de "le maintenir bas", tout
en gardant un contrôle total au moyen des touche de réglage de volume du
panneau avant.
Contenu de l'emballage
• Enceintes de salon amplifiées XD3
• Câble stéréo mini ⅛" vers RCA de 1 mètre
• Câble stéréo mini vers mini ⅛"
• Câble d'alimentation secteur
• Câble d'enceinte
• Guide d’utilisation
• Carte de garantie
Caractéristiques
Woofer 3"/tweeter ¾"
15 watts par canal amplifié avec crossover intégré
17
Page 19

Caractéristiques du produit
① Tweeter ¾ "
Les deux enceintes gauche et droite sont dotées d'un tweeter 3/4" à dôme en
soie précis avec un blindage magnétique de protection. Le tweeter reproduit
un son à haute fréquence et il s'adapte encore mieux avec la technologie
d'amortissement interne afin de réduire toute résonance indésirable.
② Woofer 3” a vec Vega -Bass
Sous le tweeter se trouve une membrane de woofer 3" solide en polypropylène
traité avec de la pâte de carton et une bobine haute température pour délivrer
un son régulier pendant des heures et des heures d'utilisation continue. Le
woofer délivre un son équilibré à moyennes et basses fréquences et doté
également de blindage magnétique de protection.
③ Bouton de volume ill uminé
Le bouton de réglage du volume contrôle le volume des enceintes gauche et
droite en même temps. Tournez le bouton volume dans le sens horaire pour
18
Page 20

augmenter le volume des enceintes. Tournez le bouton volume dans le sens
antihoraire pour baisser le volume des enceintes. Lorsque l'enceinte est
allumée, un anneau rouge de lumière contourne le bouton.
④ Prise cas que ⅛”
Une prise casque stéréo est idéalement située sur la face avant de l'enceinte.
Utilisez une prise stéréo ⅛" pour connecter un casque d'écoute. Quand un
casque est connecté dans la prise, le son de l'enceinte est coupé.
⑤ Prise d'ent rée auxil ia ire ⅛"
Une entrée auxiliaire stéréo "Aux In" bien située assure une connexion facile à
un dispositif portable tel qu'un téléphone mobile ou un lecteur MP3. Utilisez un
câble mini-stéréo ⅛" mâle-mâle pour connecter le dispositif portable au
système d'enceintes XD3.
⑥ Entrée au dio externe (RCA/Pho no)
Une entrée stéréo de type RCA se trouve à l'arrière de l'enceinte gauche. Il
s'agit d'une entrée asymétrique qui est commune à la majorité des appareils
électroniques grand public au niveau audio. L'entrée de type RCA peut être
connectée à un ordinateur ou un dispositif portable en utilisant un câble audio
stéréo mini-RCA ⅛" de système d'enceintes. Le bouton de réglage du volume
contrôle à la fois l'entrée stéréo principale et "Aux In".
⑦ Connexio n de sortie e t d'entrée d'enceinte
Pour un son stéréo complet, l'enceinte droite doit être connectée à l'enceinte
gauche. À l'aide du câble d'enceinte à 2 conducteurs fourni, connectez la
"sortie de l'enceinte droite" à "l'entrée de l'enceinte gauche". Veillez à bien
respecter les polarités en fonction des couleurs afin de maintenir les meilleures
performances audio. La prise rouge de l'enceinte gauche doit être connectée à
la prise rouge de l'enceinte droite. La prise noire de l'enceinte gauche doit être
connectée à la prise noire de l'enceinte droite.
19
Page 21

⑧ Sélecteur V ega-Bass
Le sélecteur Vega-Bass offre un moyen rapide pour adapter le système
d'enceintes XD3 à vos préférences personnelles. Avec le sélecteur Vega-Bass
réglé sur "On", l'enceinte XD3 augmente la réponse des graves (augmentation
de gain des basses fréquences). Avec le sélecteur Vega-Bass réglé sur "Off",
l'enceinte XD3 assure une réponse plus naturelle et régulière.
⑨ Interrupte ur d'alime ntation
L'interrupteur d'alimentation principal est situé à l'arrière de l'enceinte gauche.
Pour utiliser le système d'enceintes XD3, veillez à ce que l'interrupteur
d'alimentation soit réglé sur la position "ON". Lorsque le système d'enceintes
XD3 n'est pas utilisé, positionnez l'interrupteur d'alimentation sur "OFF".
⑩ Entrée d 'al imentation secteur
Pour utiliser le système d'enceintes XD3, l'entrée "AC IN" doit être connectée à
une prise de courant. Utilisez uniquement le cordon d'alimentation fourni avec
le système XD3. Assurez-vous que le cordon d'alimentation est bien inséré dans
la prise d'alimentation.
⑪ Évent arr ière renfor cé des gra ves
Sur les deux enceintes gauche et droite il y a un port accordé à basse
fréquence. Le port permet aux signaux à basse fréquence d'être libérés
améliorant ainsi la réponse globale des graves. Évitez de placer l'enceinte
contre une surface plane telle qu'un mur, pour éviter toute restriction du port
des graves.
20
Page 22

Démarrage rapide
Emplacement
Pour obtenir la meilleure position d'écoute, placez le système d'enceintes XD3
dans un emplacement optimal. Les enceintes gauche et droite doivent être
placées à hauteur de la tête de l'utilisateur principal. Les enceintes gauche et
droite doivent former un triangle équilatéral avec l'utilisateur principal. Un
triangle équilatéral signifie que les distances entre les enceintes gauche et
droite et l'utilisateur principal sont égales. La distance doit être supérieure à 1
mètre (3 pieds). La rotation des enceintes gauche et droite doit être d'un angle
de 60 degrés vers l'utilisateur principal.
21
Page 23

Connexions
Étape A : Placez les enceintes gauche et droite aux endroits choisis. Connectez
les enceintes gauche et droite avec le câble d'enceinte à 2 conducteurs.
Étape B : Connectez la sortie de l'ordinateur ou lecteur multimédia portable à
l'entrée de l'enceinte gauche.
Étape C : Réglez le bouton volume, situé sur la face avant de l'enceinte gauche,
à fond dans le sens antihoraire. Assurez-vous que l'interrupteur d'alimentation
de l'enceinte gauche est positionné sur "OFF". Connectez le cordon
d'alimentation à partir d'une prise de courant sous tension à l'entrée "AC IN"
située à l'arrière de l'enceinte gauche.
Étape D : Positionnez l'interrupteur d'alimentation sur de l'enceinte gauche sur
"ON". Envoyez ensuite de l'audio au système d'enceintes XD3 à partir d'un
ordinateur ou d'un lecteur multimédia portable.
Étape E : Tournez lentement le bouton volume jusqu'à atteindre le volume
désiré.
22
Page 24

Schéma de principe
Type d'enceintes
Enceintes de salon deux voies amplifiées
Excitateur électrostatique BF
(basse fréquence)
Membrane de diamètre 3" en polypropylène
traité avec de la pâte de carton.
Excitateur électrostatique HF
(haute fréquence)
Tweeter ¾" à dôme en soie.
Alimentation
15 watts par amplificateur de canaux
Certification
cETLus
Alimentation requise
100-120V/~50/60Hz
220-240V/~ 50/60 Hz (pour les modèles à
l'exportation uniquement)
Nécessite un câble à 2 conducteurs (inclus)
Boîtier
Panneaux MDF plaqués vinyle
Dimensions du boîtier
(H x L x P)
203mm x 140mm x 165mm/8” x 5.5” x 6.5”
Poids
2,9 kg/6,5 livres
Spécifications
Enregistrement du produit et la garantie
Pour enregistrer votre produit et la garantie, visitez le site:
http://www.cerwinvega.com/register.html
Si vous n'avez pas accès à Internet ou à un ordinateur, s'il vous plaît contacter
par téléphone au 954-949-9600 Option n ° 2 et demander un enregistrement
du produit / de garantie sous forme d'être envoyé à vous pour l'achèvement ou
courriel à:
Cerwin-Vega
772 S. Military Trail
Deerfield Beach, FL 33442
ATTN: Product Registration/Warranty
23
Page 25

S'il vous plaît noter que l'enregistrement du produit et la garantie donne
Cerwin-Vega! la permission de vous envoyer des informations sur les produits
existants et nouveaux et les promotions. Si vous ne souhaitez pas être contacté
au sujet de nouveaux produits et promotions, s'il vous plaît retirer pendant le
processus d'enregistrement du produit / garantie. Vous continuerez à recevoir
des mises à jour importantes concernant votre achat Cerwin-Vega! produits.
Astuces de dépannage
Pas de coura nt
Le XD3 dispose d'un voyant d'alimentation autour du bouton volume de
l'enceinte gauche. Cet "anneau" sera allumé lorsque le XD3 est allumé.
Assurez-vous que le XD3 est utilisé avec la source d'alimentation appropriée.
N'utilisez pas un XD3 fonctionnant à 100-120V avec une source d'alimentation
de 220-240V. N'utilisez pas un XD3 fonctionnant à 220-240V avec une source
d'alimentation de 100-120V. Le XD3 est marqué de manière appropriée à
l'arrière de l'enceinte gauche.
Assurez-vous que le cordon d'alimentation est bien en place et inséré à fond
dans la prise "AC IN" de l'enceinte XD3. Assurez-vous que le cordon
d'alimentation est inséré à fond dans la prise secteur.
Vérifiez que la prise secteur est sous tension (en utilisant par exemple une
lampe ou un testeur approprié sur la même prise). Dans certains cas, la prise de
courant est peut être contrôlée par une barre d'alimentation dont
l'interrupteur est sur la position "off".
Vérifiez que l'interrupteur d'alimentation situé à l'arrière de l'enceinte XD3 est
sur la position "ON". La position "ON" c'est lorsque le symbole "|" est enfoncé.
Pas de son
Vérifiez que le XD3 est alimenté sur "on". Voir la section ci-dessus.
Assurez-vous que le câble audio est connecté à la sortie de la source
(ordinateur ou lecteur multimédia portable) et à l'entrée audio de XD3 (ou aux
24
Page 26

deux prises RCA situées à l'arrière ou à la prise "AUX IN" ⅛" située sur la face
avant).
Vérifiez que le niveau de volume de la source (ordinateur ou lecteur
multimédia portable) est réglé à un niveau qui peut envoyer un signal vers les
moniteurs. Vérifiez également que le bouton volume de l'enceinte XD3 est
tourné à fond à droite.
Si l'enceinte droite ne reproduit pas de l'audio, vérifiez les deux extrémités du
câble à 2 conducteurs qui relie l'enceinte gauche et droite. Les extrémités du
câble à 2 conducteurs doivent être dénudées (pas de matériau d'isolation) et
insérées dans les bornes à poussoir.
Mauvaise qua lité du s on
Vérifiez que toutes les connexions audio sont fermement attachées. Par
exemple, assurez-vous que les connecteurs d'entrée audio sont propres et bien
insérés dans la prise.
Un son déformé ou bruyant peut être dû à la source (ordinateur ou lecteur
multimédia portable). Essayez d'écouter la source en utilisant un casque
d'écoute et réglez le volume à des niveaux différents. Si le son est toujours
mauvais dans le casque, c'est que la source est la cause du problème.
Les emplacements des enceintes peuvent contribuer à donner un son de
mauvaise qualité. Assurez-vous que les enceintes ne sont pas obstruées par
différents objets, tels que livres, ou placées trop près du mur. Essayez en
déplaçant les enceintes XD3 dans des emplacements différents.
Vérifiez que le câblage n'est pas coincé et n'est pas à proximité de sources
d'interférences électriques telles que cordons d'alimentation, téléphones
portables ou gradateurs de lumière.
25
Page 27

CERWIN-VEGA! États-Unis :
772 S. MILITARY TRAIL • DEERFIELD BEACH, FL 33442
P 954.949.9600 • F 954.949.9590 • www.cerwin-vega.com
CERWIN-VEGA! EUROPE:
382 AVE. DE LA COURONNE • B-1505 BRUXELLES
P +32.2.645.05.00 • F +32.2.645.05.05
CERWIN-VEGA! EST UNE MARQUE DÉPOSÉE DE CERWIN-VEGA, LLC.
GUIDE DE L'UTILISATEUR XD3 REV B © 2011 CERWIN-VEGA, LLC.
Ce document est protégé par les lois sur les droits d'auteur. Aucune partie de
ce manuel ne peut être copiée ou reproduite sous quelque forme que ce soit
sans le consentement écrit préalable de CERWIN-VEGA. CERWIN-VEGA ne peut
être tenu responsable des erreurs ou omissions opérationnelles, techniques ou
éditoriales faites dans ce document.
26
Page 28

INSTRUCCIONES IMPORTANTES DE
SEGURIDAD
El radio con punta de flecha dentro de un triángulo equilátero alerta al usuario de la presencia de voltaje
peligroso no aislado dentro de la carcasa del producto que puede ser de magnitud suficiente para constituir
un riesgo de choque eléctrico para las personas.
El punto de exclamación dentro de un triángulo equilátero alerta al usuario de la presencia de instrucciones
importantes de funcionamiento y mantenimiento (servicio) en la literatura que acompaña al producto.
El símbolo de la exclamación, en un triángulo equilátero, pretende alertar al usuario operan importantes y
consejos de mantenimiento (reparación) figuran en la documentación que acompaña al producto.
PRECAUCIÓN: PARA REDUCIR EL RIESGO DE CHOQUE ELÉCTRICO, NO RETIRE LA CUBIERTA (O LA
PARTE TRASERA). NO HAY PARTES QUE REQUIEREN SERVICIO EN EL INTERIOR. SOLICITE EL SERVICIO A
TRAVÉS DEL PERSONAL AUTORIZADO.
Lea y siga todas las instrucciones de funcionamiento y seguridad antes de conectar o utilizar esta unidad.
Conserve esta nota y los manuales de servicio para referencia posterior. Deben respetarse todas las
advertencias en la unidad e instrucciones de funcionamiento.
Advertencia: Para reducir el riesgo de incendio o choque eléctrico, no exponga esta unidad al agua o la
humedad. No utilice esta unidad cerca del agua, por ejemplo, cerca de una bañera, lavabo, fregadero de
cocina, tina de lavado, en un sótano húmedo o cerca de una piscina.
La unidad debe instalarse de modo que su ubicación o posición no interfiera con su adecuada ventilación.
Por ejemplo, no debe colocarse sobre una cama un sofá, alfombra o superficie similar que pudiera bloquear
los orificios de ventilación; o colocarse dentro de una instalación integral, tales como, armarios para libros o
armarios que pudieran impedir el flujo de aire a través de los orificios de ventilación. La unidad deberá
colocarse lejos de fuentes de calor tales como radiadores, registros de calor, estufas u otros dispositivos
generadores de calor (incluidos los amplificadores).
No coloque esta unidad sobre carros, soportes o trípodes, apoyos o mesas inestables. La unidad podría caer
y provocar serias heridas a niños o adultos, además de graves daños a la unidad. Use solamente carros,
soportes o trípodes, respaldos o mesas recomendados por el fabricante o vendidos con la unidad. Cualquier
montaje del dispositivo sobre una pared o techo deberá realizarse según las instrucciones del fabricante y
utilizar un accesorio para el montaje recomendado por el mismo. La combinación carro-dispositivo deberá
desplazarse cuidadosamente. Las paradas rápidas, la fuerza excesiva y las superficies desniveladas podrían
ocasionar el vuelco de la combinación carro-dispositivo.
Nota: Si la unidad se daña más allá de la reparación, o alcanza el final de su vida, por favor consulte las
normas relativas a la eliminación de productos electrónicos en la región.
Nota: Cerwin-Vega!, LLC no se hace responsable de los daños y, o incluso la pérdida de datos causada por
uso indebido de la unidad y o las aplicaciones que se proporciona para su uso con la unidad.
PRECAUCIÓN PARA EVITAR DESCARGAS ELÉCTRICAS, BLADE AMPLIA COINCIDENCIA DEL CONECTOR DE
RANURA DE AMPLIA DE INSERTAR PLENAMENTE.
La unidad debe conectarse a un enchufe de alimentación únicamente con el voltaje y frecuencia indicados
en su panel trasero.
27
Page 29

1. Proteger el cable de alimentación de ser caminó sobre o pinza especialmente en tapones, recipientes de
2. No en contra del objetivo de seguridad de la clavija polarizada o tipo de conexión a tierra. Un enchufe
3. Si la red eléctrica enchufe suministra este producto incorpora un fusible y sólo debe ser reemplazado con
4. Nunca utilice un cable de alimentación dañados o fracturado; Esto puede introducir grave riesgo de
5. El cable de fuente de alimentación de la unidad debe ser desconectado de la toma de pared cuando se
6. Sólo utilizar archivos adjuntos/accesorios especificados por el fabricante.
conveniencia y el punto donde salen del aparato.
polarizado tiene dos módulos con uno más amplio que el otro. Un tipo de enchufe tiene dos hojas y una
tercera clavija de toma de tierra. La amplia hoja o la clavija de tercera se proporciona para su seguridad. Si
el enchufe proporcionado no encajan en su salida, consultar a un electricista cualificado para la sustitución
de la toma de obsoleta.
un fusible de valor de ruptura idénticos o inferior.
exposición voltajes letales.
queden inutilizados durante un largo período de tiempo.
NO INTENTO DE PRESTACIÓN DE SERVICIOS DE ESTA UNIDAD USTED MISMO. SOLICITE
Al finalizar de cualquier mantenimiento o reparaciones, solicitar la garantía que piezas de recambio
AYUDA AL PERSONAL DE SERVICIO CUALIFICADO.
autorizados de fábrica sólo con las mismas características que se han utilizado las piezas originales, y que la
seguridad de rutina comprueba que se han realizado para garantizar que el equipo está en condiciones de
funcionamiento seguro.
REEMPLAZO CON PARTES NO AUTORIZADOS PUEDE PROVOCAR INCENDIOS, DESCARGAS
ELÉCTRICAS Y OTROS PELIGROS.
Solicite ayuda todos a personal cualificado. Prestación de servicios se requiere cuando el aparato ha sido
dañado de alguna forma, como el cable de alimentación o el enchufe está dañado, líquido o objetos han
caído en el aparato, el aparato se ha expuesto a la lluvia o humedad, no funciona normalmente, o se ha
eliminado.
Aparato no deberán estar expuestos a goteo o salpicaduras de líquidos y no objetos llenos de líquidos, no se
colocará en el aparato.
Cuando conecte la red eléctrica o un acoplador de dispositivo se utiliza como dispositivo de desconexión, el
dispositivo de desconexión seguirán siendo fácilmente operable.
El cable de alimentación deberá orientarse de modo que pueda evitarse pisarlo o estrangularlo,
especialmente cerca del enchufe, los receptáculos de servicio o en la salida de la unidad.
Desconecte la unidad del enchufe de pared antes de limpiarla. No utilice bencina, diluyentes u otros
disolventes para la limpieza. Utilice solamente un paño ligeramente humedecido.
El cable de alimentación de la unidad debe desconectarse del enchufe de pared cuando la misma no se
utilice por períodos prolongados. Debe tenerse cuidado de que los objetos no caigan y que los líquidos no se
derramen dentro de la carcasa a través de cualquier orificio.
PRECAUCIÓN PARA PREVENIR CHOQUE ELÉCTRICO, INSERTE COMPLETAMENTE LA HOJA ANCHA DE LA
CLAVIJA EN LA RANURA ANCHA.
Si se utiliza una antena interna (ya sea incorporada dentro del equipo o instalada por separado), no permita
que ninguna parte del antena entre en contacto con las partes metálicas de otros dispositivos eléctricos,
tales como lámparas, televisores, etc.
PRECAUCIÓN CABLES ELÉCTRICOS
Cualquiera de antena externa debe colocarse lejos de los cables eléctricos.
ANTENA EXTERNA CON TIERRA
Si una antena externa se conecta en su sintonizador o preamplificador-sintonizador, compruebe que su
sistema de antena esté conectado a tierra, de modo que pueda ofrecer protección contra sobretensiones y
contra la formación de cargas estáticas. El artículo 810 del National Electrical Code (Código Eléctrico
Nacional), ANSI/NFPA N.° 70-1984, presenta información referente a la tierra apropiada del poste y la
estructura de soporte, la tierra de la línea de entrada a una unidad de descarga del antena, el tamaño de
los conductores de tierra, la ubicación de la unidad de descarga del antena, la conexión con electrodos de
tierra y los requisitos para estos últimos.
28
Page 30

a. Utilice hilo de cobre n.° 10 AWG (5.3mm2), hilo de aluminio n.° 8 AWG (8.4mm²), hilo de bronce o acero
EJEMPLO DE UNA PUESTA A TIERRA SEGÚN LAS INSTRUCCIONES DEL CÓDIGO ELÉCTRICO NACIONAL CONTENIDAS EN
EL ARTÍCULO 810: EQUIPO DE RADIO Y TELEVISIÓN.
recubierto con cobre n.° 17 AWG (1.0mm²), o superiores, como hilos de puesta a tierra.
b. Asegure los hilos de entrada y conexión a tierra en la casa con aisladores distanciadores separados entre
4y 6 pies (1.22 y 1.83 m).
c. Instale la unidad de descarga del antena lo más cercano posible a donde se encuentra el pasamuro
doméstico.
d. Utilice un cable del puente de cobre no menor al n.° 6 AWG (13.3mm²), o el equivalente, cuando se
utilice por separado un electrodo de puesta a tierra para la antena, ver sección NEC 810-21 (j).
NOTA PARA EL INSTALADOR DEL SISTEMA CATV: Este recordatorio tiene por objeto avisar a los instaladores de sistemas
CATV sobre el artículo 820-40 del Código Eléctrico Nacional que les proporciona las guías para la adecuada conexión a
tierra y, en particular, especifica que el cable de tierra deberá conectarse lo más cercano posible al sistema de tierra del
edificio.
NO INTENTE DAR SERVICIO A LA UNIDAD POR CUENTA PROPIA. SOLICITE SERVICIO A TRAVÉS DEL PERSONAL
AUTORIZADO.
Tras la ejecución de cualquier servicio o reparación, solicite a las tiendas de servicio que aseguren que únicamente se han
utilizado partes de repuesto autorizadas por la fábrica con las mismas características que las originales y que se hayan
realizado verificaciones de seguridad de para garantizar que el equipo está en condiciones de funcionamiento seguras.
EL REEMPLAZO CON PARTES NO AUTORIZADAS PODRÍA PROVOCAR INCENDIO, CHOQUE ELÉCTRICO Y OTROS
PELIGROS.
29
Page 31

Introducción
¡Con más de 50 años de conocimiento en sistemas de altavoces para
conciertos, películas, domicilios públicos y clubes –cuando lo que se desea es
recrear estas experiencias en el escritorio de su hogar–, los conocedores ponen
la mirada en Cerwin-Vega!
Cuando se diseña un altavoz para aplicaciones de ordenador y escritorio, el
objetivo es optimizar la salida del sonido conservando un tamaño de caja
pequeño. La claridad es crítica, especialmente, para aquellos que producen
multimedios o pistas de análisis. La pureza de la señal debe conservarse
mediante la utilización de amplificadores de bajo ruido que no decepcionen
cuando el volumen es muy alto. ¡Y esto lo tiene Cerwin-Vega! El nombre, que
todo bajo debe portar con orgullo.
Los altavoces de escritorio también deben integrarse completamente con todos
sus sistemas de sonido y sus accesorios externos. Con capacidad para manejar
salidas múltiples, usted puede cambiar al instante entre su ordenador como
una fuente u otras plataformas portátiles adicionales, tales como,
reproductores MP3, teléfonos y otros reproductores de medios mediante la
entrada a auxiliar estéreo de ⅛”. Un práctico enchufe para auricular le permite
“mantener un bajo volumen”, mientras mantiene el control total a través de los
ajustes del volumen en el panel frontal.
Contenido de la caja
• Altavoces de escritorio con XD3
• Cable de 3’ de RCA a estéreo mini de ⅛”
• Cable mini a mini de ⅛”
• Cable de suministro de CA
• Cable de altavoz
• Manual del usuario
• Tarjeta de garantía
Características
Membrana de bajos de 3” / membrana de agudos de ¾”
Amp. de 15 vatios por canal con transición integrada
30
Page 32

Características del producto
① Membrana de agudos de ¾”
Los altavoces izquierdo y derecho presentan una precisa membrana de agudos
de 3/4" de seda con escudo magnético protector. La membrana de agudos
permite un sonido de alta frecuencia y además, está naturalizada con
tecnología amortiguadora interna para reducir la resonancia indeseada.
② Membrana de bajos d e 3” con Vega -Bass
Debajo de la membrana de altos se tiene una membrana de bajos de 3” de
cono de papel tratada con polipropileno con bobina de voz de alta temperatura
para favorecer un sonido consistente por horas y horas de uso continuo. La
membrana de bajos proporciona un sonido equilibrado de frecuencia media a
baja y también presenta un escudo magnético protector.
③ Perilla il uminada de volumen
La perilla de control de volumen controla el volumen de los altavoces derecho e
izquierdo en forma simultánea. Girando la perilla de control de volumen en el
sentido de las agujas del reloj, el volumen del altavoz aumentará. Girando la
perilla de control de volumen en el sentido opuesto de las agujas del reloj, el
31
Page 33

volumen del altavoz disminuirá. Cuando el altavoz está encendido, un anillo
rojo se iluminará alrededor de la perilla.
④ Enchufe de auricular de ⅛”
Un enchufe de ‘Head phone’ (auricular) está perfectamente colocado al frente
del altavoz. Utilice una clavija estéreo de ⅛” desde el auricular e insértela en el
enchufe para ‘Head phone’ (auricular). Cuando se coloca un auricular en el
enchufe, el sonido del altavoz principal enmudecerá.
⑤ Enchufe de entrada a uxiliar ⅛
Se incluye una entrada estéreo ‘Aux In’ ubicada convenientemente para una
fácil conexión con un dispositivo portátil, tal como un MP3 o un teléfono móvil.
Utilice un mini estéreo de ⅛” macho a macho para conectar el dispositivo
portátil al sistema de altavoces XD3.
⑥ Entrada d e audio ext erna (RCA/ Phono)
Una entrada estéreo tipo RCA está ubicada en la parte trasera del altavoz
izquierdo. Esta es una entrada no compensada compatible con la mayoría de
dispositivos electrónicos de audio caseros a nivel consumidor. La entrada tipo
RCA puede conectarse a un ordenador o un dispositivo portátil utilizando un
sistema de altavoces de cable de audio estéreo mini a RCA de ⅛”. La perilla de
control de volumen controla tanto la entrada del estéreo principal como la ‘Aux
In’ (entrada auxiliar).
⑦ Conexión d e salida de a ltavoz y c onexión de entrada de a lt avoz
Para un sonido estéreo completo, el altavoz derecho debe conectarse con el
altavoz izquierdo. Utilizando el cable de altavoz bidireccional incluido, conecte
la ‘output to right speaker’ (salida al altavoz der.) con la ‘input front left
speaker’ (salida del altavoz izq. en el frente). Compruebe identificación de la
polaridad del color para mantener el mejor funcionamiento del audio. El
enchufe rojo del altavoz izquierdo debe conectarse con el enchufe rojo del
altavoz derecho. El enchufe negro del altavoz izquierdo debe conectarse con el
enchufe negro del altavoz derecho.
⑧ Selector V ega-Bass
El selector Vega-Bass proporciona una vía rápida para adecuar el sistema de
altavoces XD3 a su propia conveniencia. Con el selector Vega-Bass puesto en
‘On’ (encendido), el altavoz XD3 aumentará la respuesta del bajo (aumento en
32
Page 34

la ganancia de frecuencia baja). Con el selector e Vega-Bass puesto en ‘Off’
(apagado), el altavoz XD3 se adaptará a una respuesta natural más uniforme.
⑨ Botón de en cendido
El botón de encendido está ubicado en la parte trasera del altavoz izquierdo.
Para utilizar el sistema de altavoces XD3, compruebe que el botón de
encendido está en la posición ‘ON’ (encendido). Cuando el sistema de altavoces
XD3 no se utiliza, ponga el botón de encendido en la posición ‘OFF’ (apagado).
⑩ Entrada d e CA
La ‘AC IN’ (entrada de CA) debe estar conectada a la salida de corriente para
utilizar el sistema de altavoces XD3. Utilice solamente el cable de corriente
incluido en el sistema XD3. Compruebe que el cable de corriente esté
firmemente asegurado dentro de la entrada de CA.
⑪ Puerto pa ra bajo d e disparo r eforzado en la parte tr asera
En ambos altavoces (izquierdo y derecho) se encuentra un puerto base para
sintonización personalizada de baja frecuencia. El puerto permite que las
señales de baja frecuencia se liberen y, por tanto, aumenta la respuesta
general del bajo. Evite colocar el altavoz frente a una superficie plana, por
ejemplo, una pared, para evitar la restricción del puerto del bajo.
33
Page 35

GUÍA RÁPIDA
Colocación
Para la mejor sensación auditiva, coloque el sistema de altavoces XD3 en una
posición óptima. Los altavoces izquierdo y derecho deberán colocarse
nivelados a una altura vertical con respecto a la cabeza del usuario principal.
Los altavoces izquierdo y derecho deberán colocarse de modo que formen un
triángulo equilátero con el usuario principal. Un triángulo equilátero se define
como el lugar donde la distancia entre los auriculares izquierdo y derecho, y el
usuario principal, es la misma. La distancia no deberá ser mayor a 3 pies (1
metro). La rotación de los altavoces izquierdo y derecho deberá ser en un
ángulo de 60° con respecto del usuario principal.
34
Page 36

Conexiones
PASO A: Coloque los altavoces izquierdo y derecho en las posiciones deseadas.
Conecte el cable del altavoz bidireccional entre los altavoces izquierdo y
derecho.
PASO B: Conecte la salida desde el ordenador o el reproductor de medios
portátiles en la entrada del altavoz izquierdo.
PASO C: Ajuste la perilla de volumen, ubicada en el frente del altavoz izquierdo,
en la posición más alta en sentido contrario a las agujas del reloj. Compruebe
que el botón de encendido sobre el altavoz izquierdo está puesto en ‘OFF’
(apagado). Conecte el cable de alimentación desde una toma de corriente
adecuada en la entrada de CA ‘AC IN’ ubicada en la parte trasera del altavoz
izquierdo.
PASO D: Coloque el botón de encendido del altavoz izquierdo en la posición
‘ON’ (encendido). A continuación, utilice el audio en sistema de altavoces XD3
para reproducir música desde su ordenador o un reproductor de medios
portátiles.
PASO E: Gire a lentamente la perilla de volumen en el sentido de las agujas del
reloj hasta que se alcance el volumen deseado.
35
Page 37

Diagrama de bloque
Tipo de altavoz
Altavoz de escritorio bidireccional
Controlador de BF
3” de diámetro, cono de papel tratado con
polipropileno.
Controlador de AF
¾” de diámetro, membrana de altos de seda.
Certificación
cETLus
Requisitos de corriente
100-120V/~50/60Hz
220-240V/~50/60Hz (sólo modelos de
exportación)
Requiere cable de alimentación bidireccional
(incluido)
Armario
MDF con láminas de vinilo
Dimensiones del armario
(A x A x D)
8” x 5.5” x 6.5” / 203mm x 140mm x 165mm
Peso
6,5 lbs. /2,9 kg
Especificaciones
Registro del producto y garantía
Para registrar su producto y garantía, visite:
http://www.cerwinvega.com/register.html
Si usted no tiene acceso a Internet o un ordenador, por favor póngase en
contacto por teléfono al 954-949-9600 opción # 2 y solicitar un registro del
producto / garantía de forma que se enviará para que lo complete o correo
electrónico a:
Cerwin-Vega
772 S. Military Trail
Deerfield Beach, FL 33442
ATTN: Product Registration/Warranty
36
Page 38

Tenga en cuenta que el registro del producto y la garantía da Cerwin-Vega!
permiso para enviarle información sobre productos nuevos y existentes y las
promociones. Si usted no desea ser contactado en relación con nuevos
productos y promociones, por favor, optar por no durante el proceso de
registro del producto / warranty. Usted seguirá recibiendo actualizaciones de
productos con respecto a su compra Cerwin-Vega! los productos.
Consejos para la identificación y resolución de fallos
Sin corrie nt e
El XD3 presenta un indicador de energía alrededor de la perilla de control de
volumen sobre el altavoz izquierdo. Este ‘ring’ (anillo) se encenderá cuando el
XD3 esté en ‘on’ (encendido).
Compruebe que el XD3 se utiliza con la fuente de energía correcta. NO UTILICE
el XD3 para 100-120V en una fuente diseñada para 220-240V. No UTILICE el
XD3 para 220-240V en una fuente diseñada para 100-120V. El XD3 está
perfectamente identificado en la parte trasera del altavoz izquierdo.
Compruebe que el cable de alimentación asienta firmemente y está conectado
por completo en el enchufe ‘AC IN’ (entrada CA) del altavoz XD3. Compruebe
que el cable de alimentación está completamente enchufado en la toma de CA.
Compruebe que la toma de CA está activa (utilizando una lámpara o un
comprobador cualificado desde el mismo enchufe). En algunos casos, el
enchufe de CA puede estar controlado por un interruptor de luces o la regleta
de corriente tiene un interruptor en la posición incorrecta ‘off’ (apagado).
Compruebe que el botón de encendido en la parte trasera del altavoz XD3 está
en la posición ‘on’ (encendido). La posición ‘on’ (encendido) se ubica donde el
símbolo ‘|’ se encuentra pulsado.
No hay soni do
Compruebe que el XD3 esté en ‘on’ (encendido). Ver la sección anterior.
Compruebe que el cable de audio está conectado tanto en la fuente de salida
(ordenador o reproductor de medios portátiles), como en la salida de audio
XD3 (tanto los dos enchufes RCA localizados en la parte trasera o el enchufe
‘AUX IN’ de ⅛” localizado en el frente).
Compruebe que el volumen de la fuente (ordenador o reproductor portátil de
medios) esté colocado a un nivel apropiado, de modo que puede enviar
37
Page 39

adecuadamente una señal a los monitores. Compruebe también que la perilla
de volumen en el altavoz XD3 está completamente desplazada en el sentido de
las agujas del reloj.
Si el altavoz derecho no genera audio, revise que ambos extremos del cable
bidireccional estén conectados con los altavoces izquierdo y derecho. Los
extremos del cable bidireccional deben estar descubiertos (sin material
aislante) e introducidos dentro de las terminales de encaje.
Sonido inad ecuado
Compruebe que todas las conexiones de audio relacionadas están firmemente
aseguradas. Por ejemplo, compruebe que los conectores de entrada de audio
estén limpios y completamente dentro del enchufe.
El sonido distorsionado o ruidoso puede provenir de la fuente (ordenador o
reproductor portátil de medios). Intente escuchar la fuente utilizando un juego
de auriculares y ajuste el volumen a diferentes niveles. Si el audio es malo a
través de los auriculares, entonces el problema está en la fuente.
La posición de los altavoces puede contribuir a un mal sonido. Compruebe que
la proximidad de los altavoces no está limitada por ningún otro objeto, por
ejemplo, libros, o por colocarlos muy cerca de la pared. Evalúe el movimiento
de los altavoces XD3 en diferentes posiciones.
Compruebe que el cableado no esté restringido ni cerca de fuentes de
interferencia eléctrica externas, tales como, cables de corriente, teléfonos
móviles o luces de alumbrado.
38
Page 40

CERWIN-VEGA! EE. UU.:
772 S. MILITARY TRAIL • DEERFIELD BEACH, FL 33442
P 954.949.9600 • F 954.949.9590 • www.cerwin-vega.com
CERWIN-VEGA! EUROPA:
382 AVE. DE LA COURONNE • B-1505 BRUSSELS
P +32.2.645.05.00 • F +32.2.645.05.05
CERWIN-VEGA! ES UNA MARCA REGISTRADA DE CERWIN-VEGA, LLC.
MANUAL DE USUARIO XD3 REV B © 2011 CERWIN-VEGA, LLC.
Este documento está protegido por los derechos de autor. Ninguna parte de
este manual podrá ser copiado reproducida en forma alguna sin previo
consentimiento por escrito de CERWIN-VEGA. CERWIN-VEGA no asume
ninguna responsabilidad por errores u omisiones de funcionamiento, técnicas o
editoriales cometidos en este documento.
39
Page 41

WICHTIGE SICHERHEITSHINWEISE
VORSICHT: DAS BLITZZEICHEN MIT DEM PFEILSYMBOL IM GLEICHSCHENKLIGEN DREIECK WARNT BENUTZER VOR
NICHT ISOLIERTEN GEFÄHRLICHEN STROMSPANNUNGEN INNERHALB DES GERÄTES, DIE EVENTUELL STROMSCHLÄGE
BEI PERSONEN VERURSACHEN KÖNNTEN.
WARNUNG: DAS AUSRUFEZEICHEN IM GLEICHSCHENKLIGEN DREIECK WEIST BENUTZER AUF WICHTIGE BETRIEBSUND WARTUNGSANWEISUNGEN (REPARATUREN) BEIM PRODUKT HIN.
HINWEIS: DAS HANDSYMBOL IM GLEICHSCHENKLIGEN DREIECK WEIST BENUTZER AUF BESONDERE
INFORMATIONEN UND ANLEITUNGEN BEZÜGLICH DES GERÄTEBETRIEBES HIN UND SOLLTE VOR DER ERSTEN
INBETRIEBNAHME DES GERÄTES VOLLSTÄNDIG DURCHGELESEN WERDEN.
VORSICHT
GEFAHR VON STROMSCHLAG BITTE NICHT ÖFFNEN
VORSICHT: UM DAS RISIKO DURCH FEUER ODER STROMSCHLAG ZU VERMEIDEN BITTE KEINE
GEHÄUSETEILE ENTFERNEN ODER DAS GERÄT ÖFFNEN. ES BEFINDEN SICH KEINE FÜR DEN BENUTZER
VERWERTBAREN TEILE IM INNEREN DES GERÄTES. ALLE WARTUNGSARBEITEN SOLLTEN
AUSSCHLIESSLICH VON DAFÜR QUALIFIZIERTEN KUNDENDIENSTMITARBEITERN VORGENOMMEN
WERDEN.
WARNUNG: BITTE LESEN UND BEFOLGEN SIE ALLE SICHERHEITS- UND BETRIEBSHINWEISE GENAU
BEVOR DIESES GERÄT AN DAS STROMNETZ ANGESCHLOSSEN WIRD UND BEWAHREN SIE DIESE
GEBRAUCHSANLEITUNG FÜR ZUKÜNFTIGE REFERENZ AUF. ALLE WARNHINWEISE AUF DEM GERÄT UND
AUF DER VERPACKUNG SOLLTEN GELESEN UND BEFOLGT WERDEN.
WARNUNG: Dieses Gerät enthält eine Chemikalie, die laut dem Staat Kalifornien krebserregend ist und Defekte bei
Geburten oder Neugeborenen verursachen kann.
VORSICHT: Zur Vermeidung von Bränden oder Stromschlag das Produkt nicht Regen oder Feuchtigkeit aussetzen. Das
Produkt nicht nahe Wasser, z.B. nahe einer Badewanne, Waschbecken, Spülen, Wäschezubern, in feuchten Kellern oder
nahe eines Swimmingpools verwenden. Vor dem Reinigen das Gerät aus der Steckdose ausstecken. Keine Verdünner,
Reinigungsflüssigkeiten oder chemisch behandelte Reinigungstücher verwenden. Zum Reinigen ein weiches, trockenes
Tuch verwenden. Dieses Gerät während Gewittern oder längeren Perioden der Nichtbenutzung ausstecken.
VORSICHT: Das Gerät sollte so aufgestellt werden, dass der Ort und die Position eine gute Belüftung des Gerätes
zulässt. Zum Beispiel nicht auf ein Bett, Sofa, Teppich oder andere Oberflächen stellen, die die Lüftungsöffnungen
blockieren könnten; auch nicht in Einbauelementen, z.B. einem Bücherschrank oder einer Kommode, die den Luftstrom
durch die Öffnungen behindern könnten. Das Gerät entfernt von Wärmequellen, z.B. Heizkörpern, Heizlüftern, Öfen oder
anderen Geräten (auch Verstärker) die Hitze abgeben, aufstellen. Keine offenen Flammen, z.B. brennende Kerzen auf das
Gerät oder in der Nähe des Gerätes aufstellen.
WARNUNG: Dieses Gerät nicht auf instabilen Oberflächen, Wagen, Ständern oder Dreifüßen, Halterungen oder Tischen
aufstellen. Das Gerät kann durch Herunterfallen Personen verletzen und beschädigt werden. Ausschliesslich nur mit vom
Herstellern beim Kauf mitgelieferten Wagen, Ständern, Dreifüßen, Halterungen oder Tischen verwenden. Eine Montage an
der Wand sollte nur gemäß der Anleitung des Herstellers und mit geeignetem Zubehör für die Montage
durchgeführt werden. Gerät und Wagen sollten vorsichtig bewegt werden. Schnelles Anhalten, übermäßige
Gewaltanwendung und ungleichmäßige Oberflächen können Wagen und Gerät umkippen lassen. Ausschliesslich
mit Wagen, Ständern, Dreifüßen, Halterungen oder Tischen verwenden, die vom Hersteller empfohlen oder mit
dem Gerät zusammen gekauft wurden. Bei der Verwendung eines Wagens, den Wagen und das Gerät darauf
vorsichtig bewegen, um Kippen oder Verletzungen an Personen zu vermeiden.
HINWEIS: Sollte das Gerät unwiderruflich beschädigt sein oder ausgemustert werden, bitte die örtlichen Vorschriften zur
Entsorgung von Altelektronik und Elektronikschrott beachten.
HINWEIS: CERWIN - Vega! LLC haftet nicht für Schäden oder Datenverlust, die durch unsachgemäße Verwendung des
Gerätes oder des Zubehörs verursacht werden.
40
Page 42

VORSICHT: ZUR VERMEIDUNG EINES STROMSCHLAGES DEN PASSENDEN STECKER GANZ IN DIE
STECKDOSE EINSTECKEN.
Das Gerät und Netzteil sollten nur an eine Steckdose mit der auf dem Gerätegehäuse angegebenen Stromspannung und
Amplitude eingesteckt werden.
1. Das Stromkabel vor Knicken und Darauftreten - besonders an Steckern, Steckleisten und am Gerät selbst -
schützen.
2. Die Erdung und Polung des Schuko-Steckers nicht umgehen. Ein Steckerpol ist breiter als der andere. Ein
geerdeter Stecker hat zwei Pole und eine zusätzliche Erdung. Der breitere Pol oder die 3. Erdung dienen der
Sicherheit. Wenn der mitgelieferte Stecker nicht in die Steckdose passt, sollte ein Elektriker die veraltete
Steckdose auswechseln lassen.
3. Wenn der Hauptstecker dieses Gerätes eine Sicherung hat, sollte diese nur mit derselben oder einer mit
niedrigerem Widerstand ersetzt werden.
4. Kein beschädigtes oder ausgefranstes Stromkabel verwenden, da dieses lebensgefährliche Stromschläge
verursachen kann.
5. Das Stromkabel des Gerätes sollte ausgesteckt werden, wenn es längere Zeit nicht benutzt wird.
6. Nur vom Hersteller empfohlenes Zubehör/Halterungen verwenden.
DIESES GERÄT BITTE NICHT SELBST REPARIEREN. REPARATUREN NUR VON QUALIFIZIERTEM
KUNDENDIENSTPERSONAL DURCHFÜHREN LASSEN.
Nach dem Abschluss von Wartungs- oder Reparaturarbeiten bitte bestätigen lassen, dass nur Originalteile als Ersatzteile
verwendet worden sind und die Abschlusskontrolltests zum sicheren Betrieb des Gerätes durchgeführt wurden.
ERSATZTEILE DIE KEINE ORIGINALTEILE SIND KÖNNEN BRÄNDE, STROMSCHLÄGE ODER ANDERE
GEFAHREN VERURSACHEN.
Alle Reparaturarbeiten nur von qualifiziertem Kundendienstpersonal durchführen lassen. Eine Reparatur ist erforderlich,
wenn das Gerät, Stecker oder Kabel beschädigt wurde, Flüssigkeiten darauf ausgeleert oder Objekte in das Gerät gefallen
sind, das Gerät Regen oder Feuchtigkeit ausgesetzt war, nicht ordnungsgemäß funktioniert oder fallengelassen wurde.
Das Gerät sollte keinem Spritz- oder Tropfwasser ausgesetzt und es sollten keine mit Flüssigkeiten gefüllte Behälter
darauf abgestellt werden.
Wenn der HAUPT-Stecker oder eine Steckleiste mit Schalter oder Überspannungsschutz zum Ausschalten verwendet wird,
sollte diese Vorrichtung voll funktionsfähig sein.
HINWEIS: Gerät vor dem Reinigen aus der Steckdose ausstecken. Kein Benzol, Verdünner oder andere Lösungsmittel
zum Reinigen verwenden. Nur ein weiches feuchtes Tuch verwenden.
HINWEIS: Es sollten keine Objekte in die Lüftungsschlitze fallen und keine Flüssigkeiten in das Gehäuse eindringen.
Bei Verwendung einer Zimmerantenne (eine eingebaute oder externe) sollten keine Teile der Antenne Metallteile anderer
elektrischer Geräte, z.B. Lampen, TV-Geräte usw., berühren.
VORSICHT - STROMLEITUNGEN
Außenantennen sollten von allen Stromleitungen entfernt montiert werden.
ERDUNG DER AUSSENANTENNE
Wenn eine Außenantenne an einen Tuner oder Tuner-Vorverstärker angeschlossen wird, sollte die Antenne geerdet sein,
um Schäden durch Überspannungen und elektrische Entladungen zu vermeiden. Artikel 810 des NEC, die ANSI/NFPA Nr.
70-1984, liefert relevante Informationen in Hinsicht auf korrekte Erdung des Antennenmastes und Trägern, die Erdung
der Zuleitung zur Antennenentnahmeeinrichtung, die Stärke der Erdungswiderstände, der Sitz der
Antennenentnahmeeinrichtung, Anschlüsse für die Erdungselektroden und Bedingungen für die Erdungselektroden.
a. Verwenden Sie Nr. 10 AWG [5.3mm2) Kupfer, Nr. 8 AWG (8.4 mm2) Aluminium, Nr. 17 AWG (1.0mm2)
kupferummanteltes Stahl- oder Bronzekabel, oder dickere Kabel, als Erdungskabel.
b. Antenneneingangsbuchse sichern und das Erdungskabel zum Haus legen und Abstandsisolatoren in Abstand
von 4-6 Fuß (1.22 -1.83 m) montieren.
c. Die Antennenentnahmeeinheit so nah wie möglich zum Antenneneingangsbuchse am Haus montieren.
d. Das Jumperkabel sollte nicht dünner als Nr. 6 AWG (13,3 mm²) Kupfer oder gleich dick sein, wenn eine
separate Antennenerdungselektrode verwendet wird - siehe NEC Abschnitt 810-21 (j).
41
Page 43

BEISPIEL FÜR EINE ANTENNENERDUNG GEMÄSS NEC ANLEITUNG IN ARTIKEL 810 - FÜR RADIO UND FERNSEHGERÄTE:
HINWEIS FÜR CATV SYSTEM EINBAU: Diese Information weist die CATV Systeminstallateure darauf hin, dass der
Artikel 820 - 40 des NEC die Richtlinien für eine korrekte Erdung und insbesondere wie das Erdungskabel im Erdreich an
das Erdungssystem des Gebäudes möglichst nahe am Kabeleingang angeschlossen wird, vorgibt.
GERÄT NICHT SELBST REPARIEREN. REPARATUREN DAFÜR QUALIFIZIERTEM KUNDENDIENSTPERSONAL ÜBERLASSEN.
Bei Abschluss von Wartungs- oder Reparaturarbeiten die Kundendienste darauf hinweisen, nur Originalteile als Ersatzteile
zu verwenden und die Routine-Sicherheitschecks für einen sicheren Betrieb des Gerätes vorzunehmen.
DIE VERWENDUNG VON ERSATZTEILEN, DIE KEINE ORIGINALTEILE SIND, KANN BRÄNDE, STROMSCHLÄGE ODER
ANDERE GEFAHREN VERURSACHEN.
42
Page 44

Einleitung
Mit dem Lautsprecheranlagen-Knowhow von über 50 Jahren für Konzerte,
Filme, PA und Diskotheken - und wenn Sie dieses Gefühl zu Hause auf ihrem
Schreibtisch erleben wollen - dann liegen Sie bei Cerwin-Vega genau richtig!
Bei dem Bau eines Lautsprechers für Desktop- und Computeranwendungen
liegt das Ziel bei verbesserter Klangausgabe in einem vergleichsweise kleinem
Gehäuse. Die Klangreinheit ist entscheidend und spielt bei Multimedia und
Trackanalysen eine herausragende Rolle. Deswegen sollte die Signalreinheit mit
dem Einsatz von rauscharmen Verstärkern aufrechterhalten werden, die auch
bei hohen Lautstärken nicht enttäuschen. Und wie bei allen Cerwin-Vega
Produkten muss der Bass knackig ausfallen.
Diese Desktop-Lautsprecher sollen natürlich auch voll kompatibel zu ihrer
Stereoanlage und externem Zubehör sein. Mit einer Funktionskapazität, die mit
mehreren Quellen umgehen kann, dient der Computer als eine Quelle und es
kann zwischen anderen tragbaren Plattformen, wie z.B. MP3-Player, Kopfhörer
oder weitere Medien über den Stereo AUX-Buchse hin und her geschaltet
werden. Mit einer bequem zugänglichen Kopfhörerbuchse können Sie die
Lautstärke leiser drehen und gleichzeitig doch volle Kontrolle über die
autstärkeeinstellungen auf dem vorderen Bedienfeld behalten.
Packungsinha lt
• XD3 Desktop-Lautsprecher
• 3,5mm Klinke auf Cinch Kabel
• 3,5mm auf 3,5mm Klinke Kabel
• Netzkabel
• Lautsprecherkabel
• Benutzerhandbuch
• Garantiekarte
Kenndaten
• 76mm (3”) Basslautsprecher / 19mm (¾”) Hochton
• 15 Watt Verstärkung für jeden Kanal mit eingebauter Frequenzweiche
43
Page 45

Produktfunktionen
① 19mm (¾”)Tweeter
In den Lautsprechern ist ein präzise klingender 19mm (3/4") Hochton aus Seide
mit Abschirmungsmagneten eingebaut. Der Hochton besitzt einen
Hochfrequenztonbereich und ist mit einem Schalldämpfer ausgestattet, der
unerwünschte Resonanzen verringert und so einen natürlichen Klang
ermöglicht.
② 76mm (3”) Vega-Bass
Unter dem Hochton befindet sich ein stabiler 76mm (3") Papierkonus-Woofer
der mit Polypropylen verstärkt wurde und über eine HochtemperaturSchwingspule verfügt, die stundenlang einen gleichbleibenden Klang im
Dauerbetrieb zulässt. Der Basslautsprecher liefert die mittlere und niedere
Frequenzbreite und verfügt über eine
magnetische Abschirmung.
③ Leuchtender Lautstärkeregler
Mit dem Lautstärkeregler kann die Lautstärke rechts und links gleichzeitig
eingestellt werden. Ein Drehen des Reglers im Uhrzeigersinn erhöht die
Lautstärke. Ein Drehen des Reglers gegen den Uhrzeigersinn verringert die
Lautstärke. Wenn die Lautsprecher eingeschaltet sind, leuchtet ein roter Ring
um den Regler herum auf.
44
Page 46

④ 3,5mm (1/8”) Kopfhörerbuchse
Eine Stereo "Kopfhörerbuchse" ist bequem auf der Vorderseite des
Lautsprechers erreichbar. Steckern Sieeinen 3,5mm (1/8") Stereoklinkenstecker
des Kopfhörers in die Kopfhörerbuchse. Wenn ein Kopfhörer in die Buchse
eingesteckt wird, ist der Ton der Lautsprechern automatisch stummgeschaltet.
⑤ 3,5mm (1/8”) Aux-Eingangsbuchse
Über eine bequem zu erreichende Stereo Aux-Eingangsbuchse, kann leicht ein
tragbares Gerät (z.B. MP3 Player oder Handy) angeschlossen werden. Mit
einem 3,5mm (1/8") Stereo Miniklinkenstecker kann das
tragbare Gerät an das XD3 Lautsprechersystem angeschlossen werden.
⑥ Externer Audio Eingang (RCA / Phono)
Auf der Rückseite des linken Lautsprechers befindet sich ein Stereo RCA (Cinch)
Eingang. Der Eingang ist nicht abgeglichen und ist kompatibel zu den meisten
Heimaudiogeräten im Konsumgüterbereich. Über den RCA (Cinch) Eingang
kann ein PC oder tragbares Gerät mit einer 3,5mm (1/8") Stereominiklinke-zuRCA Audiokabel an die Lautsprecher angeschlossen werden. Mit dem Regler
kann die Lautstärke über den
Stereoeingang und der Aux-In eingestellt werden.
⑦Lautsprecher Ausgang Anschluss & Lautsprecher Eingang Anschluss
Damit ein vollständiger Stereoklang erreicht wird, den rechten Lautsprecher an
den linken anschließen. Mit dem mitgelieferten 2-Wege Lautsprecherkabel die
"Ausgangsbuchse zum rechten Lautsprecher" mit der "Eingangsbuchse am
linken Lautsprecher" verbinden. Die farbigen Pole weisen dabei die beste
Audioleistungsfähigkeit zu. Die rote Anschlussklemme des linken Lautsprechers
sollte mit der roten
Anschlussklemme des rechten Lautsprechers verbunden werden.
Dementsprechend auch die schwarze Anschlussklemme des linken
Lautsprechers mit der schwarzen Anschlussklemme des rechten Lautsprechers.
⑧ Vega-Bass Wahlschalter
Mit dem Vega-Bass Wahlschalter kann das XD3 Lautsprechersystem schnell auf
ihre persönlichen Einstellungen abgestimmt werden. Wenn der Vega-Bass
Wahlschalter auf "ON" steht wird die Basswiedergabe des XD3 Lautsprechers
erhöht (Anhebung der unteren Frequenzen). Für ein natürlicheres (lineares)
Klangbild des XD3 Lautsprechers den Vega-Bass Wahlschalter auf "OFF" stellen.
45
Page 47

⑨ Netzschalter
Der Netzschalter befindet sich auf der Rückseite des linken Lautsprechers.
Damit das XD3 Lautsprechersystem verwendet werden kann, den Netzschalter
auf "ON" stellen. Wenn das XD3 Lautsprechersystem ausgeschaltet werden soll,
den Netzschalter auf "OFF" stellen.
⑩ AC Netzkabelbuchse
Die "AC INPUT" Buchse sollte zur Verwendung des XD3 Lautsprechersystems
mit einem Stromkabel an eine Steckdose angeschlossen sein. Nur das
mitgelieferte Stromkabel mit dem XD3 System zusammen verwenden. Der
Stecker des Stromkabels soll fest in der AC-Netzkabelbuchse stecken.
⑪ Verstärker Bassreflexloch
Am linken und rechten Lautsprecher befindet sich ein Bassreflexloch. Der Port
ermöglicht es den unteren Frequenzschallwellen, die Gesamtbassresonanz zu
verstärken. Die Lautsprecher deswegen nicht direkt an der Wan aufstellen, um
den Bassreflex nicht einzuschränken.
46
Page 48

SCHNELLSTARTANLEITUNG
Aufstellen
Richten Sie das XD3 Lautsprechersystem möglichst optimal aus, um die beste
Hörerfahrung zu machen. Der rechte und linke Lautsprecher sollten in
Kopfhöhe des Zuhörers in senkrechter Position aufgestellt werden. Der linke
und rechte Lautsprecher sollten dreieckförmig zum Zuhörer hin aufgestellt
werden. Die Abstände in diesem gleichschenkligen Dreieck zwischen rechten
und linken Lautsprecher und dem Zuhörer sind gleich. Der Abstand sollte
mindestens 3 Fuß (1 Meter) betragen. Der linke und rechte Lautsprechers
sollten in einem 60° Winkel zum Zuhörer hin aufgestellt sein.
47
Page 49

Anschlüsse
SCHRITT A: Den linken und rechten Lautsprecher am gewünschten Ort
aufstellen. Das 2-Wege Lautsprecherkabel zwischen dem rechten und linken
Lautsprecher verlegen und anschließen.
SCHRITT B: Ausgangsbuchse am Computer oder am tragbaren Medienplayer an
die Eingangsbuchse des linken Lautsprechers anschließen.
SCHRITT C: Den Lautstärkeregler auf der Vorderseite des linken Lautsprechers
einstellen und entgegen dem Uhrzeigersinn bis zum Anschlag drehen. Der
Netzschalter am linken Lautsprecher muss auf "OFF" stehen. Das Stromkabel an
eine passende Steckdose und an die "AC INPUT" Buchse auf der Rückseite des
linken Lautsprechers
anschließen.
SCHRITT D: Den Netzschalter am linken Lautsprecher auf "ON" stellen. Nun
Audio zum XD3 Lautsprechersystem durch Wiedergabe vom Computer oder
tragbarem Medienplayer einspielen.
SCHRITT E: Den Lautstärkeregler langsam im Uhrzeigersinn drehen, bis die
gewünschte Lautstärke erreicht wird.
48
Page 50

Schaltplan
Technische Daten
Typ Lautsprecher 2-Wege Tischlautsprecher mit Netzbetrieb
LF Membran 76mm (3”) Durchmesser, Papierkonus mit
Polypropylen behandelt.
HF Membran 19mm (¾”) Durchmesser, Dome-Tweeter aus
Seide.
Leistung 15 Watt pro Kanal
Zulassung cETLus, CE
Netzspannung 230V/ 50Hz
Gehäuse Vinyl-beschichtetes MDF
Abmessungen Gehäuse 8” x 5.5” x 6.5” / 203mm x 140mm x 165mm
(H x B x T)
Gewicht 6.5 lbs /2.9 kg (Paar)
11.0 lbs / 5.0 kg (Paar verpackt)
Produkt-Registrierung und Garantie
Http://www.cerwinvega.com/register.html: Um Ihr Produkt-und
Garantieinformationen finden Sie registrieren
Wenn Sie keinen Zugang zum Internet oder einem Computer, wenden Sie sich
bitte telefonisch unter 954-949-9600 Option # 2 und fordern Sie eine
Gewährleistung / Garantie Formular aus, um Sie für die Fertigstellung oder mail
uns an per Post:
Cerwin-Vega
772 S. Military Trail
Deerfield Beach, FL 33442
ATTN: Product Registration/Warranty
49
Page 51

Bitte beachten Sie, dass Produkt-und Garantie-Registrierung Cerwin-Vega gibt!
Erlaubnis zur Zusendung von Informationen über neue und bestehende
Produkte und Promotions. Wenn Sie nicht möchten, dass in Bezug auf neue
Produkte und Aktionen kontaktiert werden, bitte Opt-out bei der
Produktentwicklung / warranty Registrierungsprozess. Sie werden weiterhin
wichtige Produkt-Updates zu Ihrer gekauften Cerwin-Vega zu erhalten!
Produkte.
Tipps für die Fehlerbehebung
Kein Strom
Der XD3 verfügt über eine Einschaltanzeige um den Lautstärkeregler am linken
Lautsprecher. Dieser "Ring" leuchtet, wenn der XD3 eingeschaltet wurde. Der
XD3 sollte mit der korrekten Stromspannung betrieben werden. Einen XD3 der
für 100" 120V ausgerichtet ist, NICHT an einer Stromquelle mit 220" 240V
betreiben. Einen XD3 der auf 220" 240
V ausgerichtet ist, NICHT an einer Stromquelle mit 100" 120 V betreiben. Der
XD3 ist dementsprechend auf der Rückseite des linken Lautsprechers
gekennzeichnet.
Das Stromkabel sollte sicher verbunden und ganz in die "AC IN" Buchse des XD3
Lautsprechers eingesteckt sein. Das Stromkabel sollte ganz in die Steckdose
eingesteckt sein. Prüfen, ob auf der Steckdose Spannung vorhanden ist (dazu
eine Lampe oder ein Testgerät an derselben Steckdose einstecken). Manchmal
sind Steckdosen mit Schaltern
versehen oder der Schalter steht bei Steckleisten auf "OFF".
Der Netzschalter auf der Rückseite des XD3 Lautsprechers steht auf "ON". Die
‘ON’ Position - das ‘|’ Symbol ist dabei heruntergedrückt.
Kein Ton
Der XD3 sollte eingeschaltet sein. Siehe dazu oberen Abschnitt.
Das Audiokabel sollte am Ausgang der Audioquelle (Computer oder tragbarer
Medienplayer) und dem XD3 Audioeingang (zwei RCA (Cinch) Buchsen auf der
Rückseite oder die 1/8" AUX-IN Buchse auf der Vorderseite) eingesteckt sein.
Die Lautstärke der Audioquelle (Computer oder tragbarer Medienplayer) sollte
so eingestellt sein, dass ein Signal zu
den Boxen gelangt.
50
Page 52

Der Lautstärkeregler auf der XD3 Lautsprecherbox sollte ebenfalls voll im
Uhrzeigersinn bis zum Anschlag aufgedreht sein.
Wenn der rechte Lautsprecher keine Tonwiedergabe hat, beide Enden des 2Wege Lautsprecherkabels überprüfen, das am linken und rechten Lautsprecher
angeschlossen ist. Die Enden des 2-Wege Kabels sollten blank liegen (ohne
Isolation) und fest in die Anschlussklemmen eingesteckt sein.
Schlechter K lang
Alle Audiokomponenten sollten fest angebracht und eingesteckt sein.
Insbesondere die Audioeingangskontakte sollten sauber und voll in die Buchsen
eingesteckt sein.
Ein verzerrter oder blecherner Klang kann auch von der Quelle selber stammen
(Computer oder tragbarer Medienplayer). Mit Kopfhörern die Quelle abhören
und dabei die Lautstärke auf verschiedene Stufen stellen. Wenn der Klang über
Kopfhörer schlecht ist, liegt es an der Audioquelle selber.
Auch die Aufstellung der Lautsprecherboxen kann die Klangqualität
beeinträchtigen. Die Lautsprecher sollten nicht von anderen Objekten wie
Büchern zugestellt oder zu nah an der Wand aufgestellt sein. Probieren Sie es
aus, die XD3 Lautsprecherboxen auf verschiedenen Positionen aufzustellen.
Die Kabel dürfen nicht eingeklemmt sein oder zu nahe an elektrischen
Störquellen wie z.B. Stromleitungen, Handys oder Beleuchtungsdimmern
liegen.
51
Page 53

CERWIN-VEGA ! USA:
772 S. MILITARY TRAIL • DEERFIELD BEACH, FL 33442
T +1.954.949.9600 • F +1.954.949.9590 • www.cerwin-vega.com
CERWIN-VEGA! EUROPA:
382 AVE. DE LA COURONNE • B-1505 BRÜSSEL
T +32.2.645.05.00 • F +32.2.645.05.05
CERWIN-VEGA! IST EINE EINGETRAGENE HANDELSMARKE DER CERWIN-VEGA,
LLC.
XD3 BENUTZERHANDBUCH REV. B © 2011 CERWIN-VEGA, LLC.
Dieses Dokument ist urheberrechtlich geschützt. Kein Teil dieses Handbuches
darf ohne vorheriges schriftliches Einverständnis von CERWIN-VEGA kopiert
oder in anderer Form vervielfältigt werden. CERWIN-VEGA haftet nicht für
betriebsbedingte, technische oder redaktionelle Fehler/Auslassungen in diesem
Dokument.
52
 Loading...