

Page 1

AirID - User Manual
Trademarks
ŝƌ/
The information contained in this document is subject to change without prior notice.
Table of Content
x 1. Device Layout
o 1.1. Overview
o 1.2. Package Contents
o 1.3. Hardware Features
x 2. Technical Specification
x 3. Menu Layout
o 3.1. AirID
o 3.2. Connection
o 3.3. Pairing Code
o 3.4. Settings
o 3.5. AirID Info
o 3.6. Card Info
o 3.7. Prefered Device
x 4. Using AirID
o 4.1. Windows
4.1.1. Installation
4.1.2. Deleting the Connection
4.1.3. AirID Central App
o 4.2. iOS
Page 2

1. Device Layout
1.1. Overview
AirID is a wireless smart card reader that you can carry with you at all times. The AirID reader
communicates via a secure Bluetooth Low Energy (BLE) connection with your device and makes
the inserted smart card available for cryptographical operations such as data encryption or
authentication.
AirID is powered by a rechargeable Li-Po battery. The battery is charged by plugging the AirID
into either a computer or external USB wall adapter using the USB cable provided. The LCD
display shows all setting information and status of the reader. The user-friendly jog-dial control
element helps you to navigate through the settings of the device.
Bluetooth Connected Mode Usage
With the AirID is it possible to protect Apps with smart card based-security via Bluetooth Low
Energy (BLE).
Note: Because of the sandbox architecture of iOS and Android, the AirID driver needs to be
integrated into an app to use AirID with this specific app.
Examples of apps with AirID integration:
x cgPhone
x SecurePIM
x your company specific apps*
*contact your company administrator!
If you would like to integrate AirID into your app, contact our support
at [email protected].
USB Connected Mode Usage
AirID can be used as a standard CCID USB reader on all most all PCs with an common
operanting system (Windows, OS X and Linux).
Page 3
1.2. Package Contents
Check the product box for the following items:
x AirID smart card reader
x Bumper (landscape and portrait variant)
x USB cable
x transparent plastic strap for use AirID as ID badges
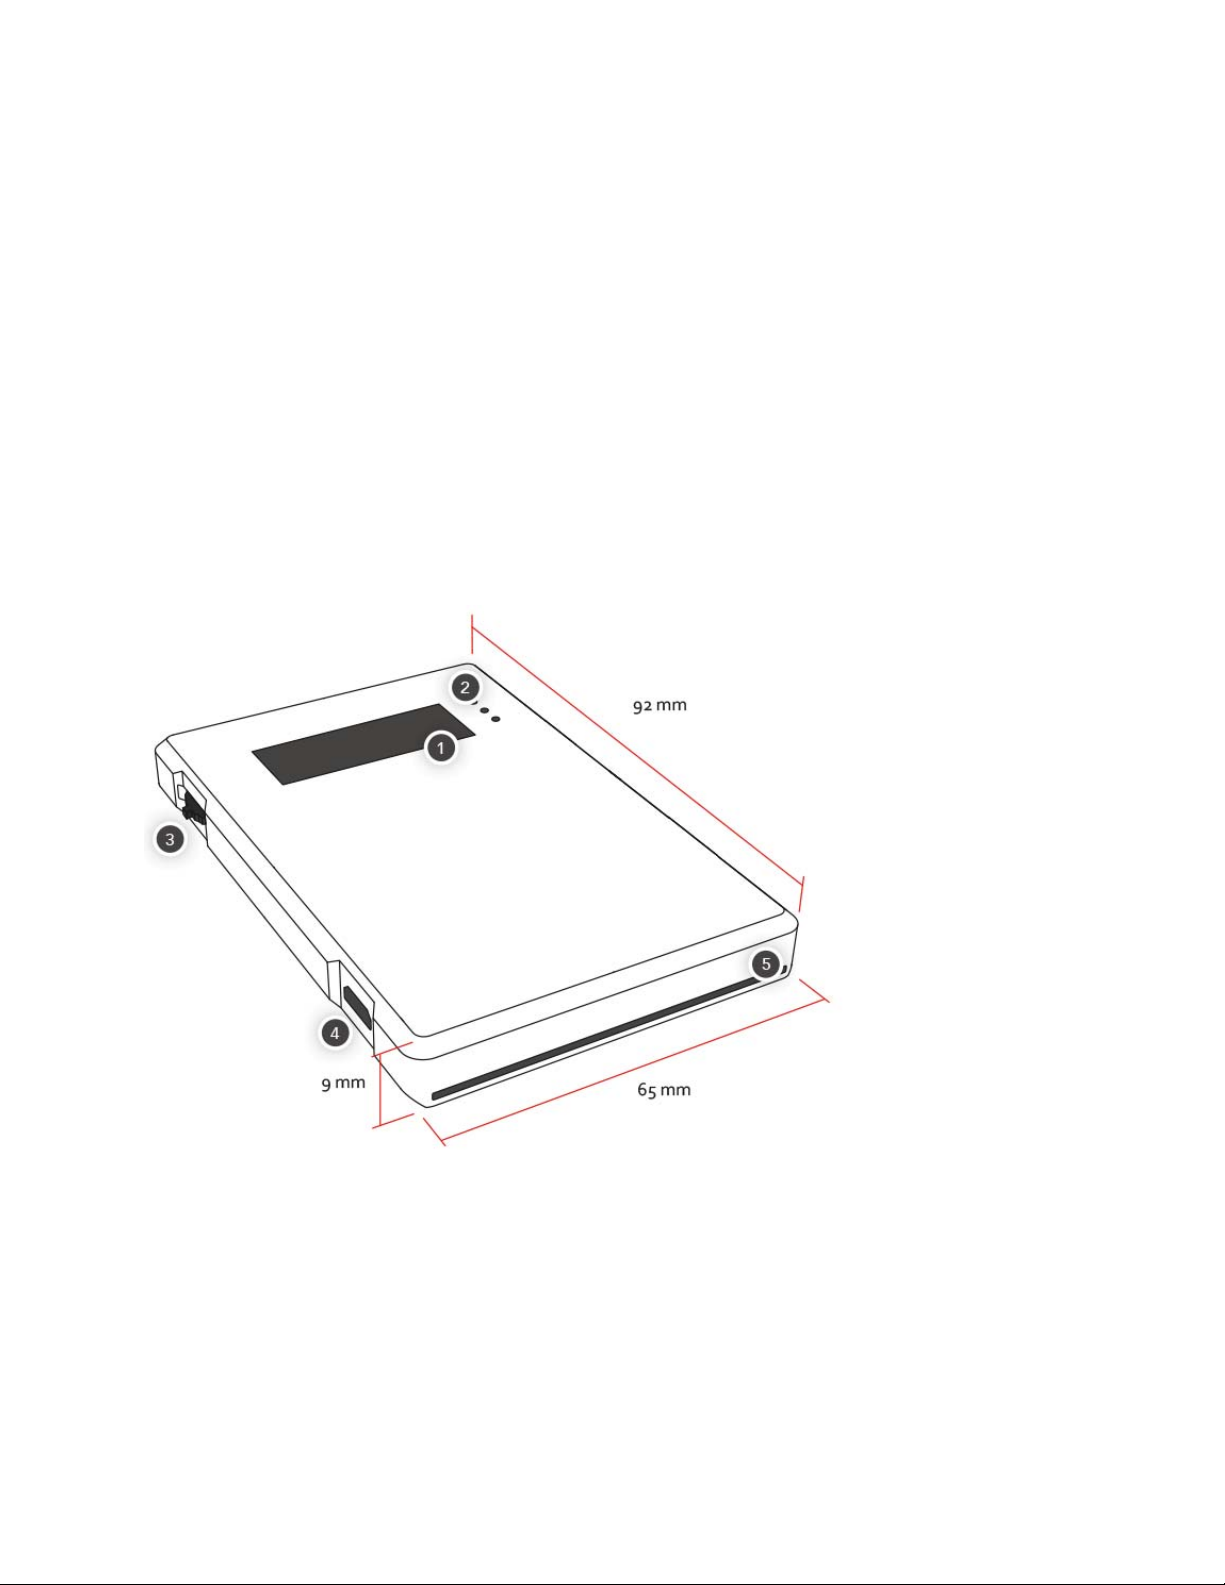
1.3. Hardware Features
Device Features
Front View
1 Low Power LCD Display
2 LED indicator
3 Jog dial control element
4 USB interface
5 Smart card internal slot
Page 4
Back View
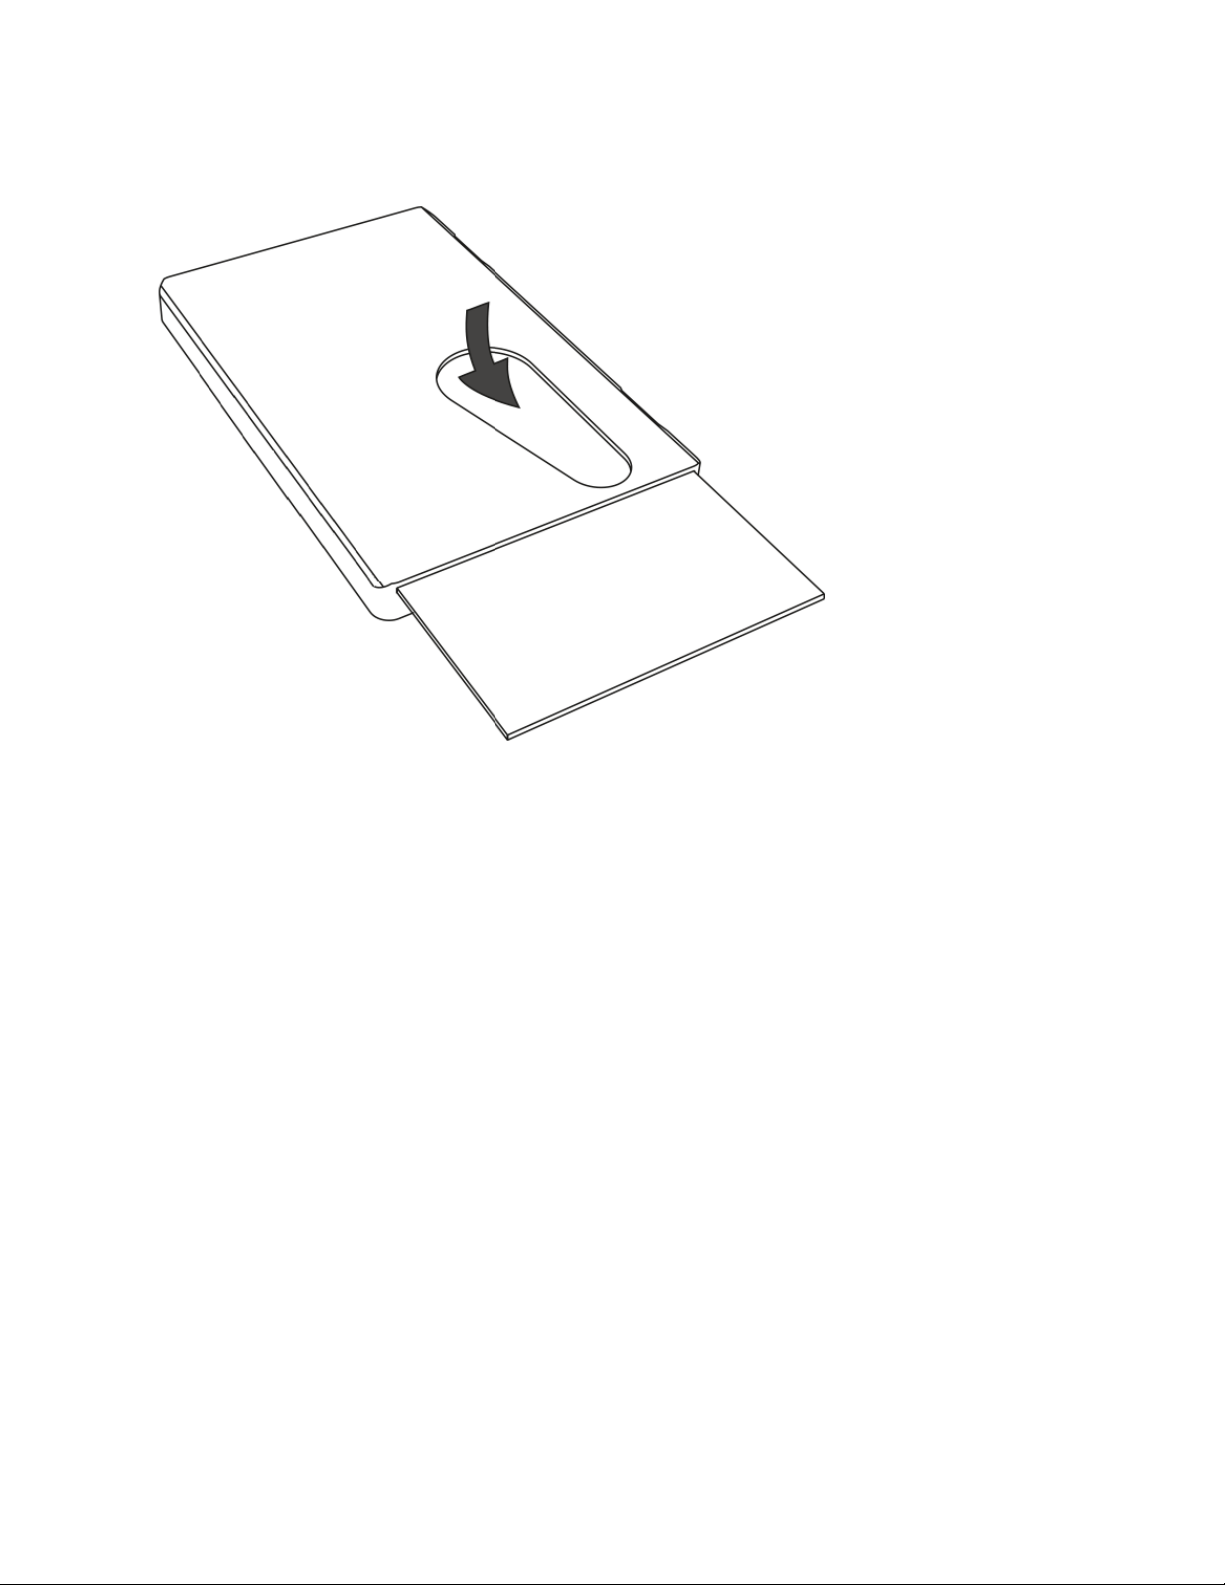
Insert and remove a smart card
Insert the card chip first. The double header of the AirID reader can read the chip regardless of
which side the chip is on.
To remove the card, simply slide it with the finger through the cut-out.
Page 5
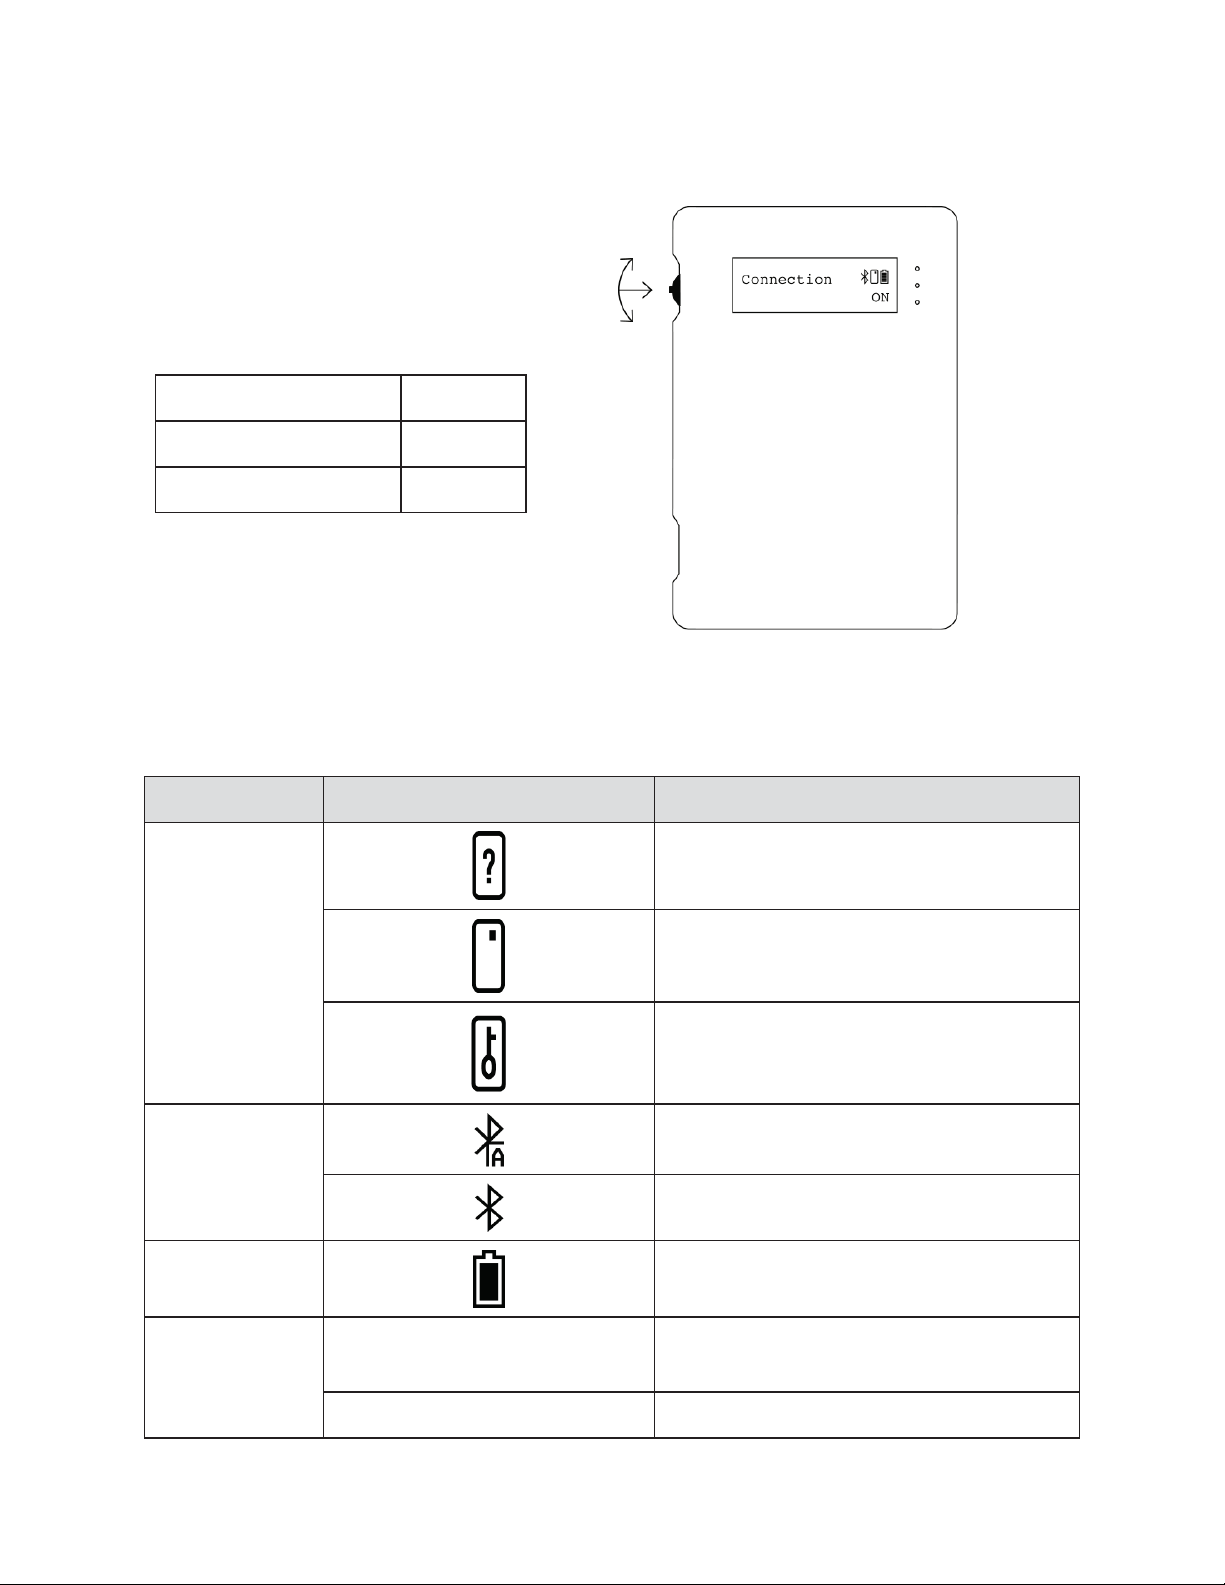
Control Element
AirID is designed for easy menu
navigation using a 3
jog dial control element.
Action
Function
up and down scrolling
navigation
press
select
Status
Status Indicator
Meaning
Smart card
status
card inserted, card unreadable
card insert
card access blocked (coverage)
Connection
status
Bluetooth and advertising activated
Bluetooth activated and connected
Battery status
remaining battery capacity
LED
on while battery charging, off when
battery charging is done
blue
on while smart card activities
-way version of
Status Indicator
Following status indicators exists on AirID
ed and card supported
red
Page 6
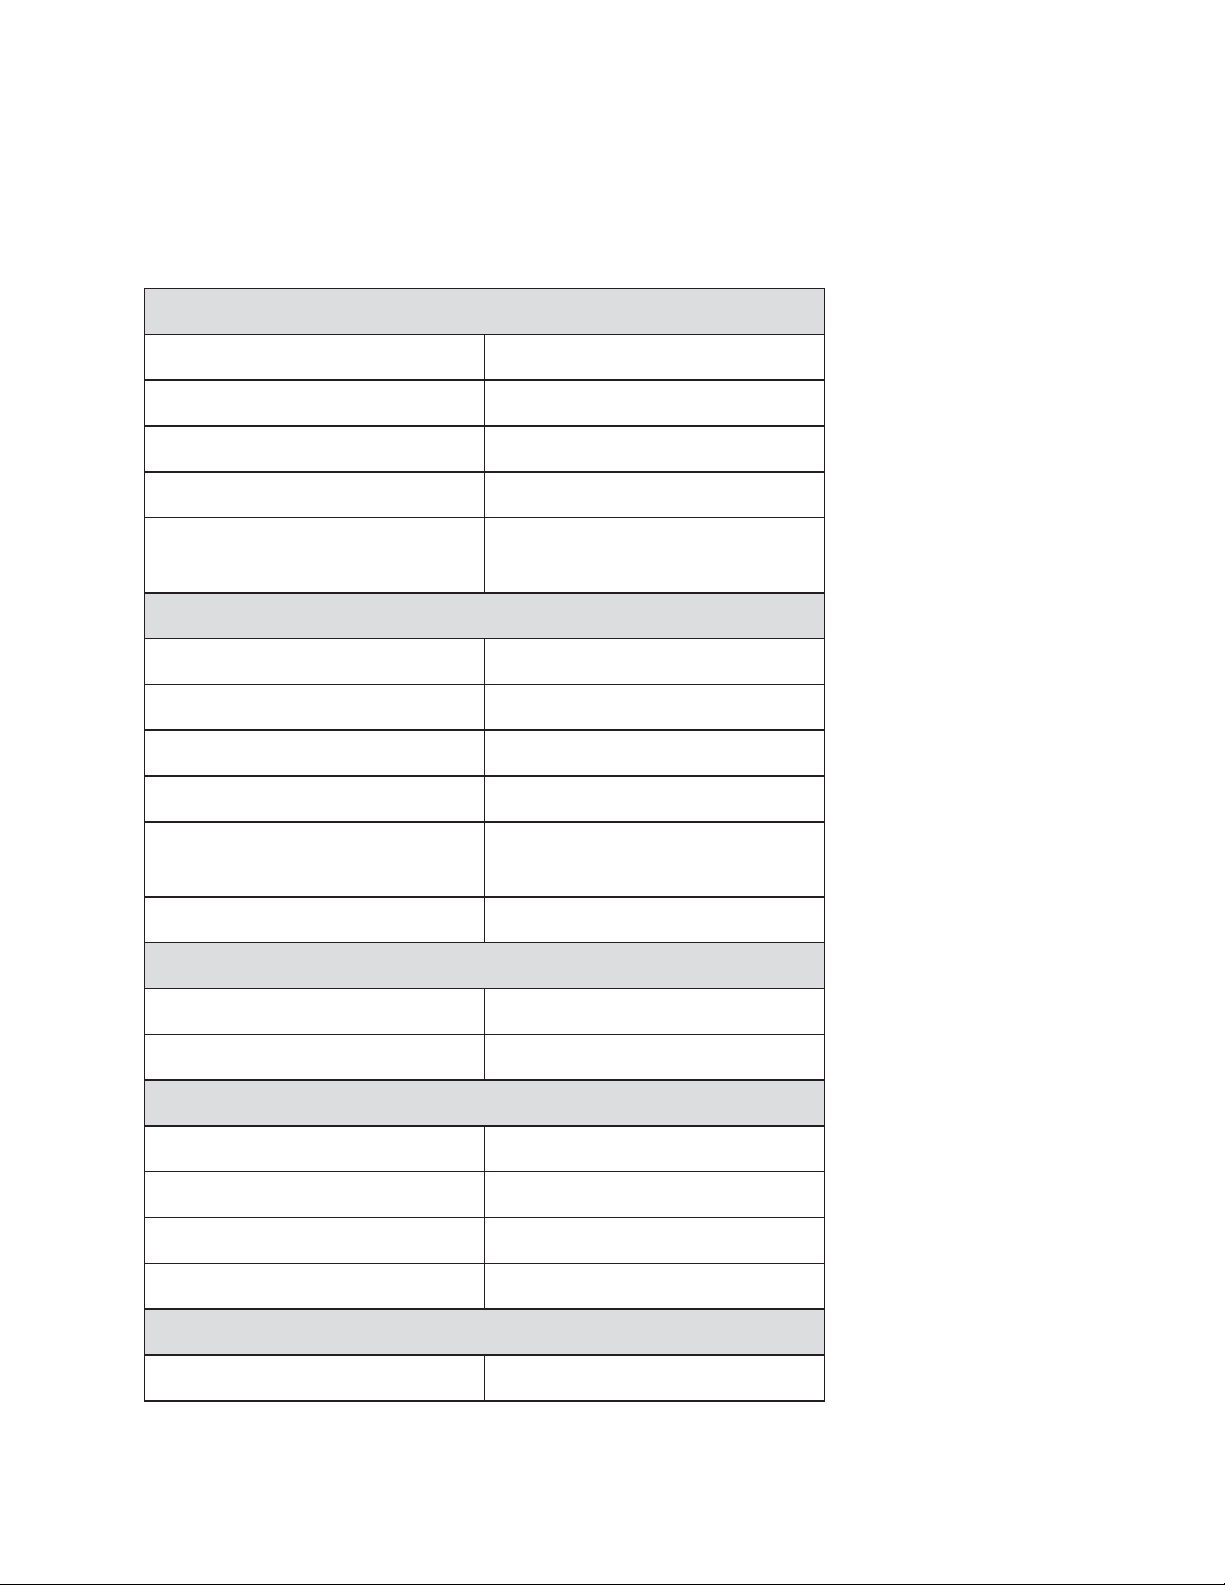
2. Technical Specification
Enclosure
Shape
rectangular plus Bumper
Dimension
90 x 60 x 9 mm (plus Bumper)
Bumper
utilizable
Weight
ca. 50 g
Orientation of hanger with
bumper
4
Human interface
Display type
LCD, 132x32
Display size
ca. 9 x 30 mm
Control element
Jog Dial (up/down/select)
USB port
USB-2.0-Micro-B
LED visible
2 (red: on while charging, blue:
on while smart card powered on)
Acoustic feedback
Buzzer
Bluetooth
Bluetooth Version
BLE chip
BGM13P, SiLabs
Battery
Battery type
NEXcell NEX422339PA
Battery size and weight
4.5 x 24.0 x 41.5 mm, 8g
Capacity
340mAh
Battery charging
via USB
Smart card interface
smart card size
ID1, contact interface (ISO7816)
This chapter provides the specification for the AirID model.
4.2
Page 7
3. Menu Layout
In the AirID device menu you can make various settings. You can access the different setting
menus by navigating with the jog dial.
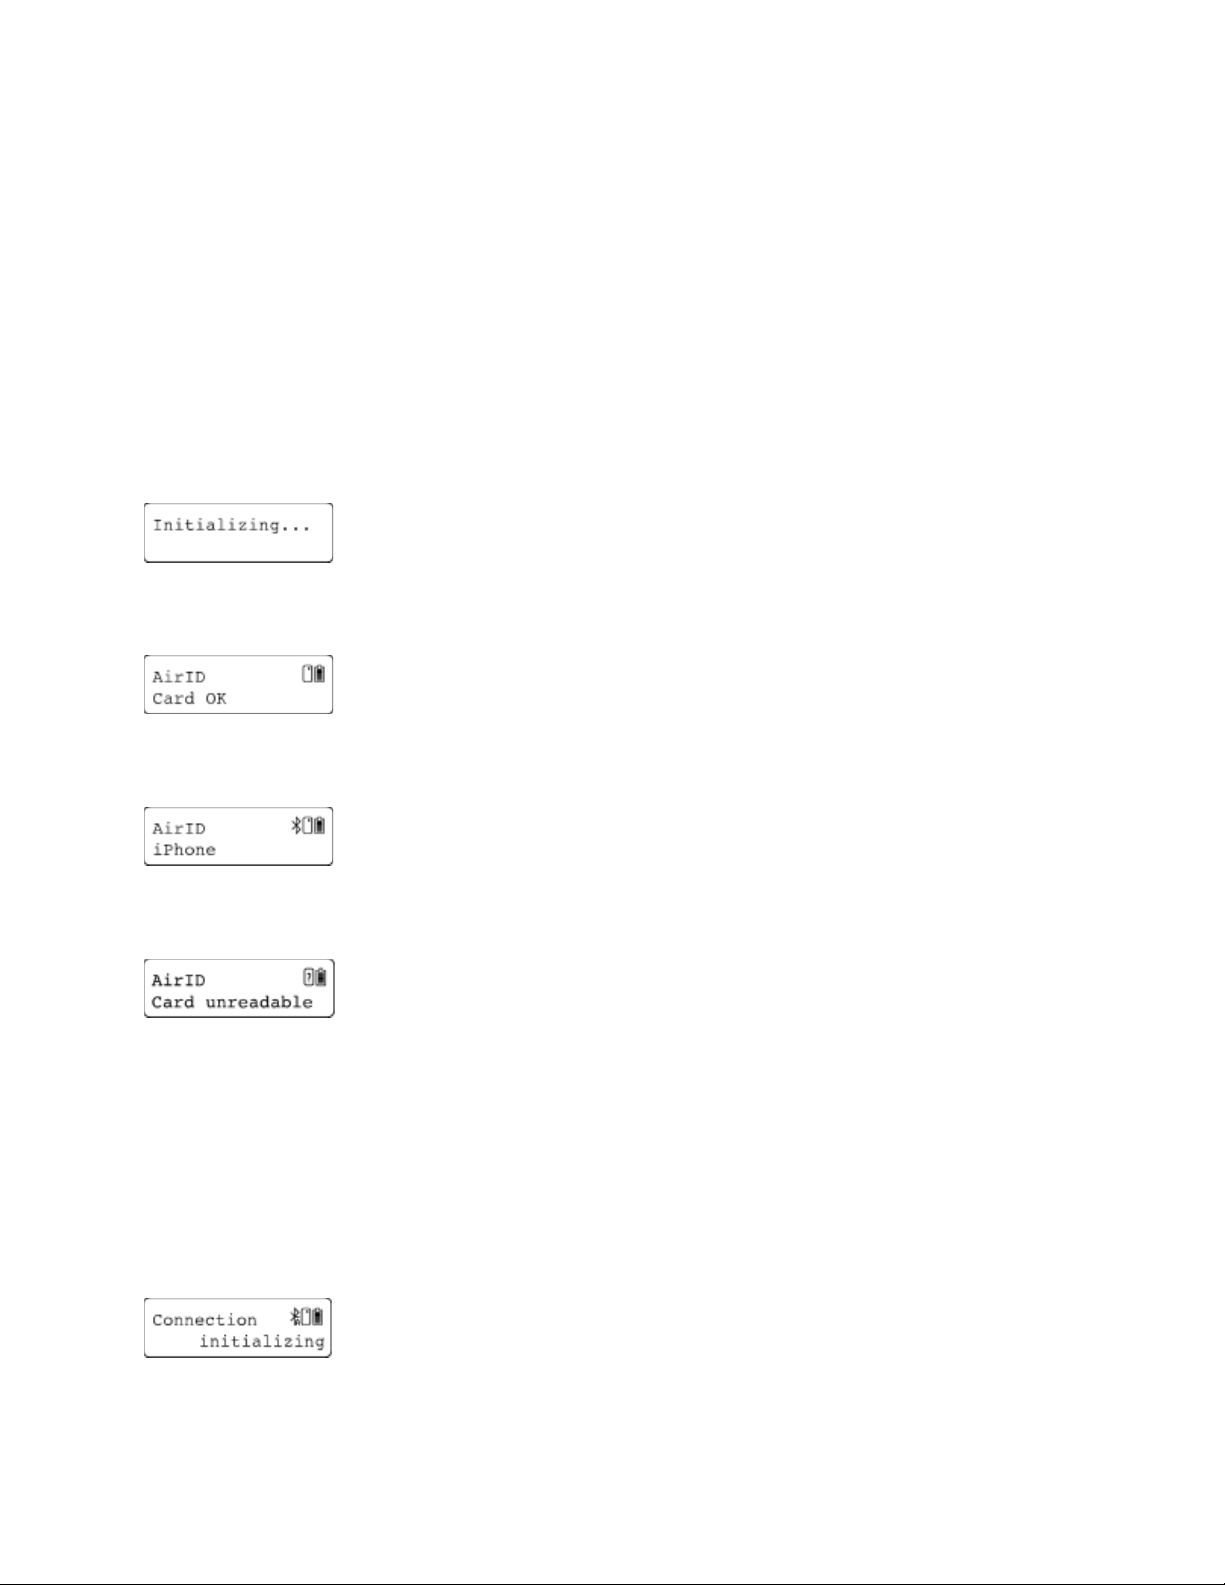
3.1. AirID
The AirID menu is diplayed in the main window and shows the smart card status.
Initialize
AirID initialized the smart card. This message appears only very shortly.
Card OK
The smart card is inserted and it is recognized.
When AirID is paired with a device, the device name is displayed here.
Card unreadable
The inserted smart card is not readable. Please ensure that the card is
properly inserted and the smart card is supported
3.2. Connection
The Connection menu is the second setting when you scroll down. This is used to activate the
Bluetooth connection or to terminate the connection.
Initialize
AirID initializes Bluetooth and activates the advertising mode. This message
appears only very shortly.
Page 8
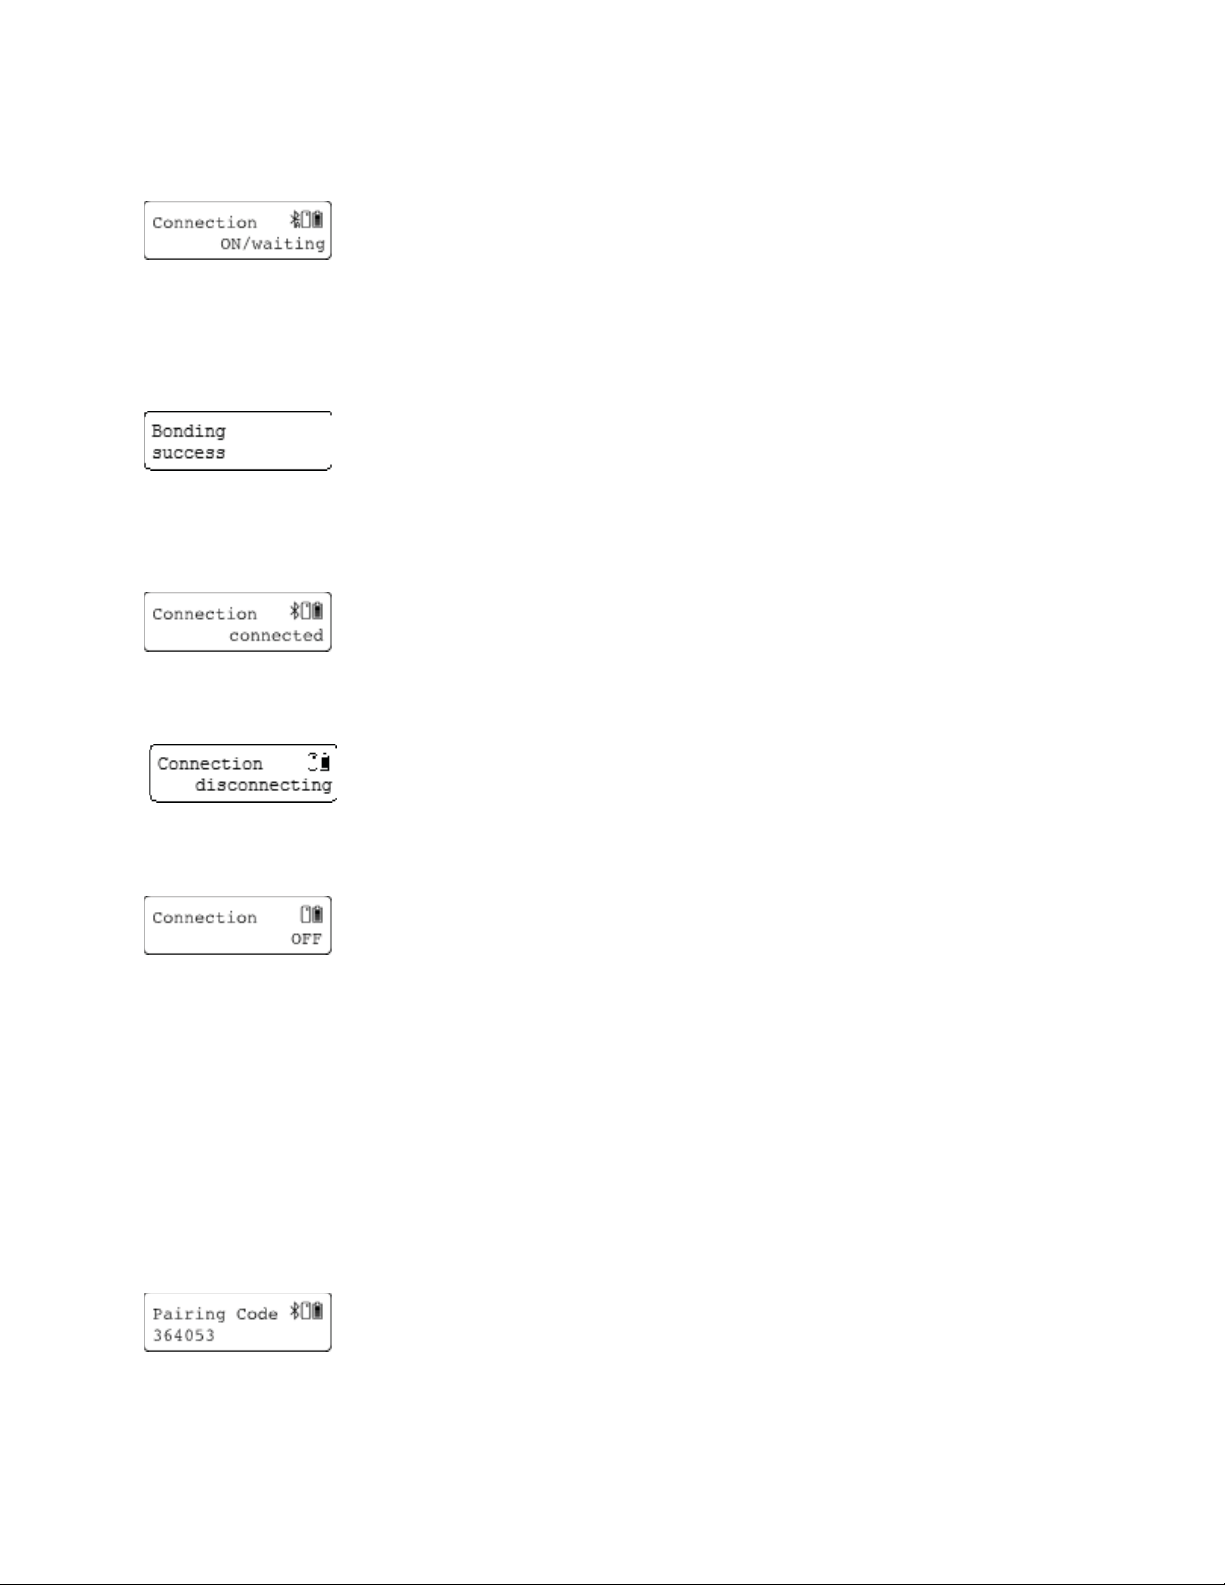
ON/ waiting
AirID has activated Bluetooth and the advertising mode and is waiting for
the connection to be established. When the jog dial is pressed, Bluetooth and the advertising
mode are disabled.
Bonding
AirID has successfully connected to a device. This message appears only very
shortly.
Connected
AirID is connected to a device.
Disconnecting
When the jog dial is pressed, the connection is terminated.
OFF
Bluetooth and the advertising mode are disabled. Pressing the jog dial
activates Bluetooth and the advertising mode.
In the advertising mode, the AirID sends a Bluetooth signal making it detectable by devices.
Requests must be checked and confirmed.
3.3. Pairing Code
This menu is only shown the first time a connection is established with a
device and is used to display the connection key.
Page 9
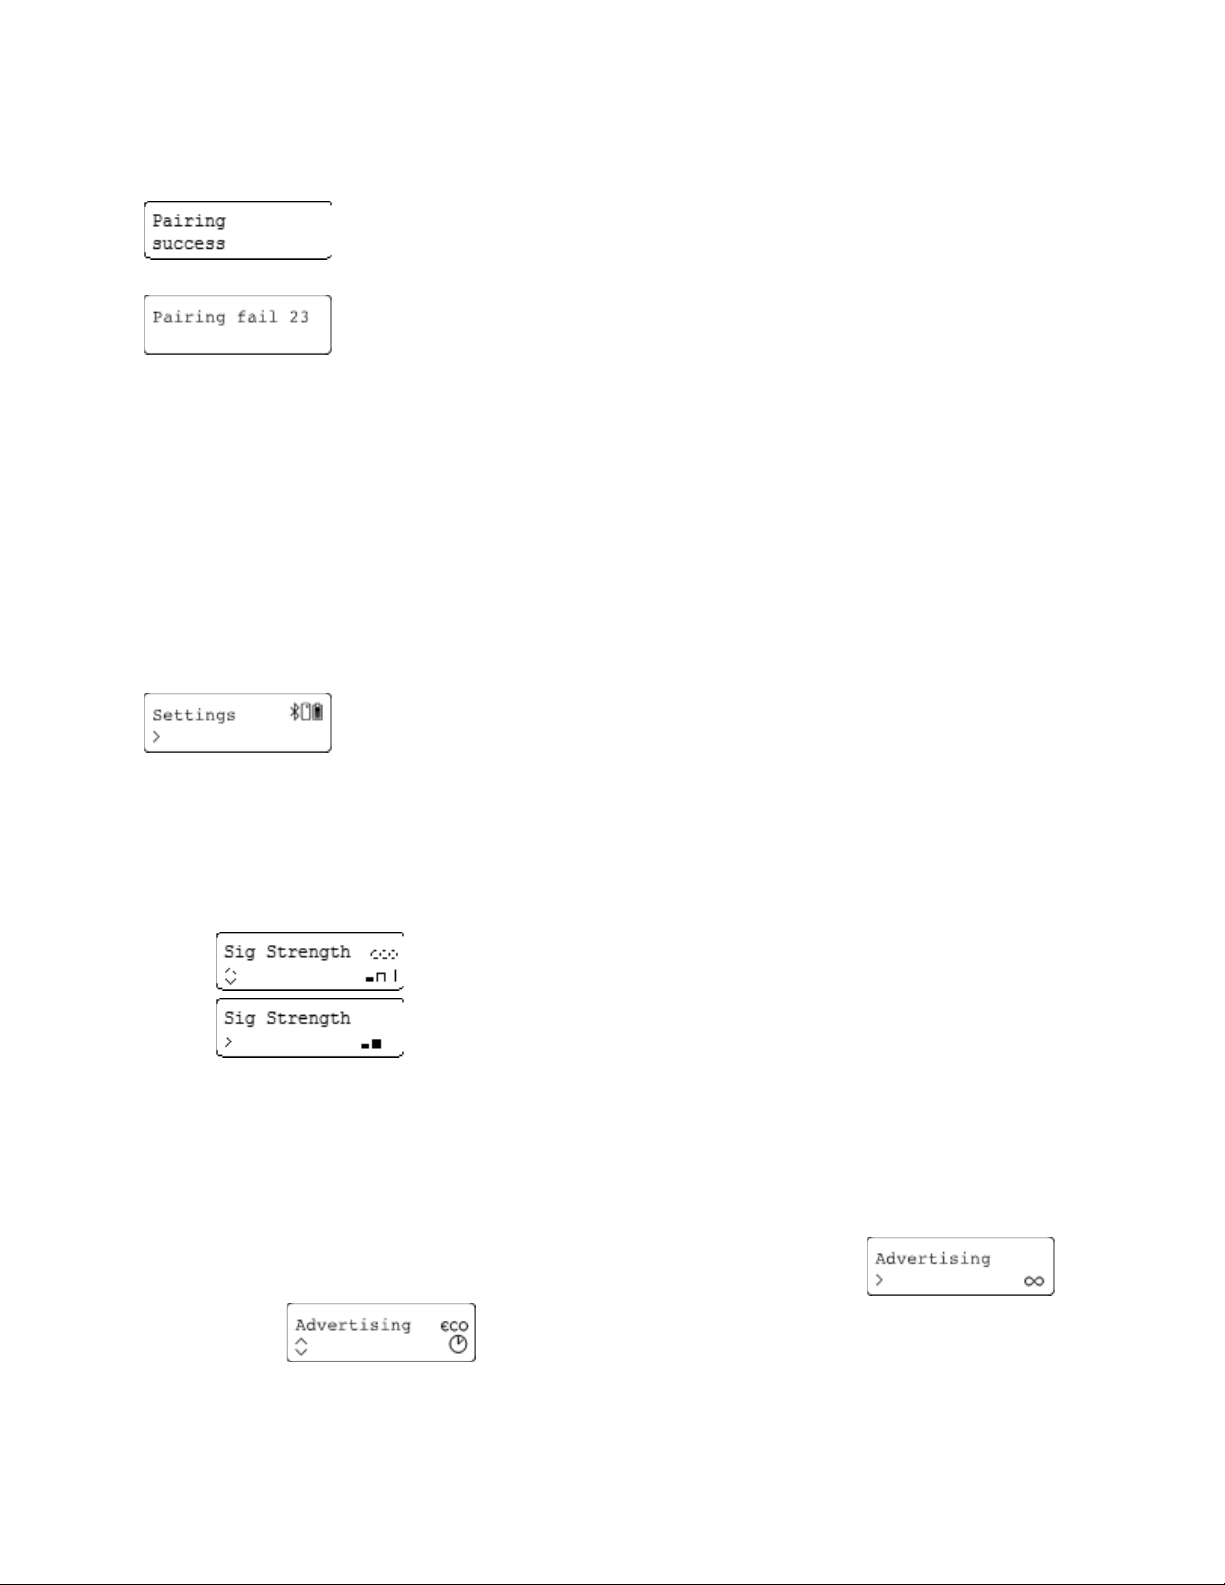
Pairing success
Connection successful
Connection failed. The following errors may occur:
x Pairing fail 1: Pairing canceled
x Pairing fail 4: Pairing code wrong
x Pairing fail 23: Time out
Pairing defines the successfull Bluetooth connection between a device and the AirID. Since the
pairing information is retained, the same devices may only be paired once. The device will ask
you to compare the pairing code displayed on the AirID and confirm.
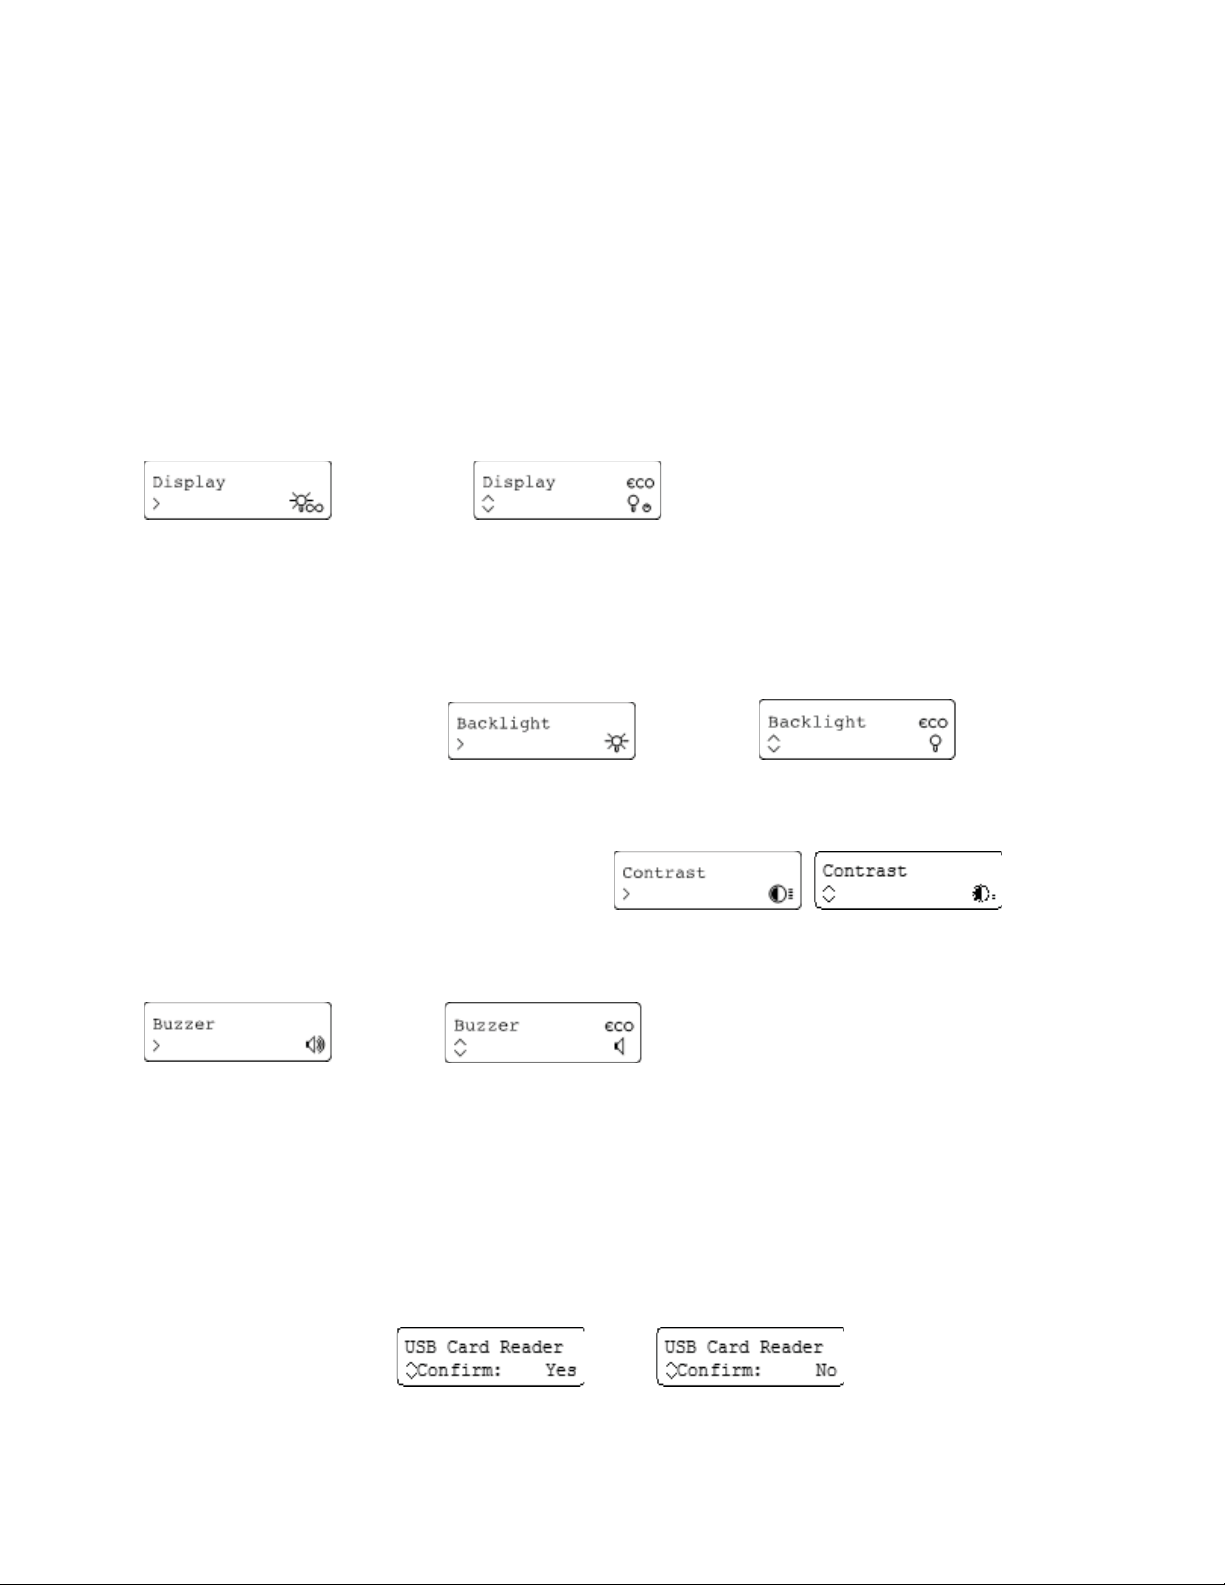
3.4. Settings
Under the menu Settings, you can configure settings for your AirID . Use the
jog dial to select and confirm the settings.
Sig Strenght
Following settings are possible:
x low (~3-5m, EcoModus, 1 bar)
x middle (~5-7 m, 2 bars)
x high (~7,5-10 m, 3 bars)
Advertising
Use the jog dial to set the advertising mode (Connection via Bluetooth) to
permanent or EcoMode
Page 10
If during the active advertising mode (EcoMode) no connection to a device is established, the
advertising mode switches off automatically to save battery power. Therefore, a manual
reconnection is necessary afterwards.
To save energy, a work schedule can be created via AirID Central App. If the working hours are
exceeded, the advertising mode remains deactivated.
Display
permanent or eco mode so that the display switches off
after a certain period of time.
Backlight
Select whether the backlight is activated or deactivated.
Contrast
Increase display contrast (adjustable in 4 levels) , .
Buzzer
Activate or deactivate the acoustic feedback of the
AirID.
Force 256bit
Select if you want to encrypt the connection between AirID and the work device with AES-256.
USB Card Reader
If the AirID is connected via USB to the work device, you can select whether the AirID should be
used as a USB card reader or not . If the AirID is not used
as USB reader, the AirID is supplied with power via USB and thus charged.
Page 11
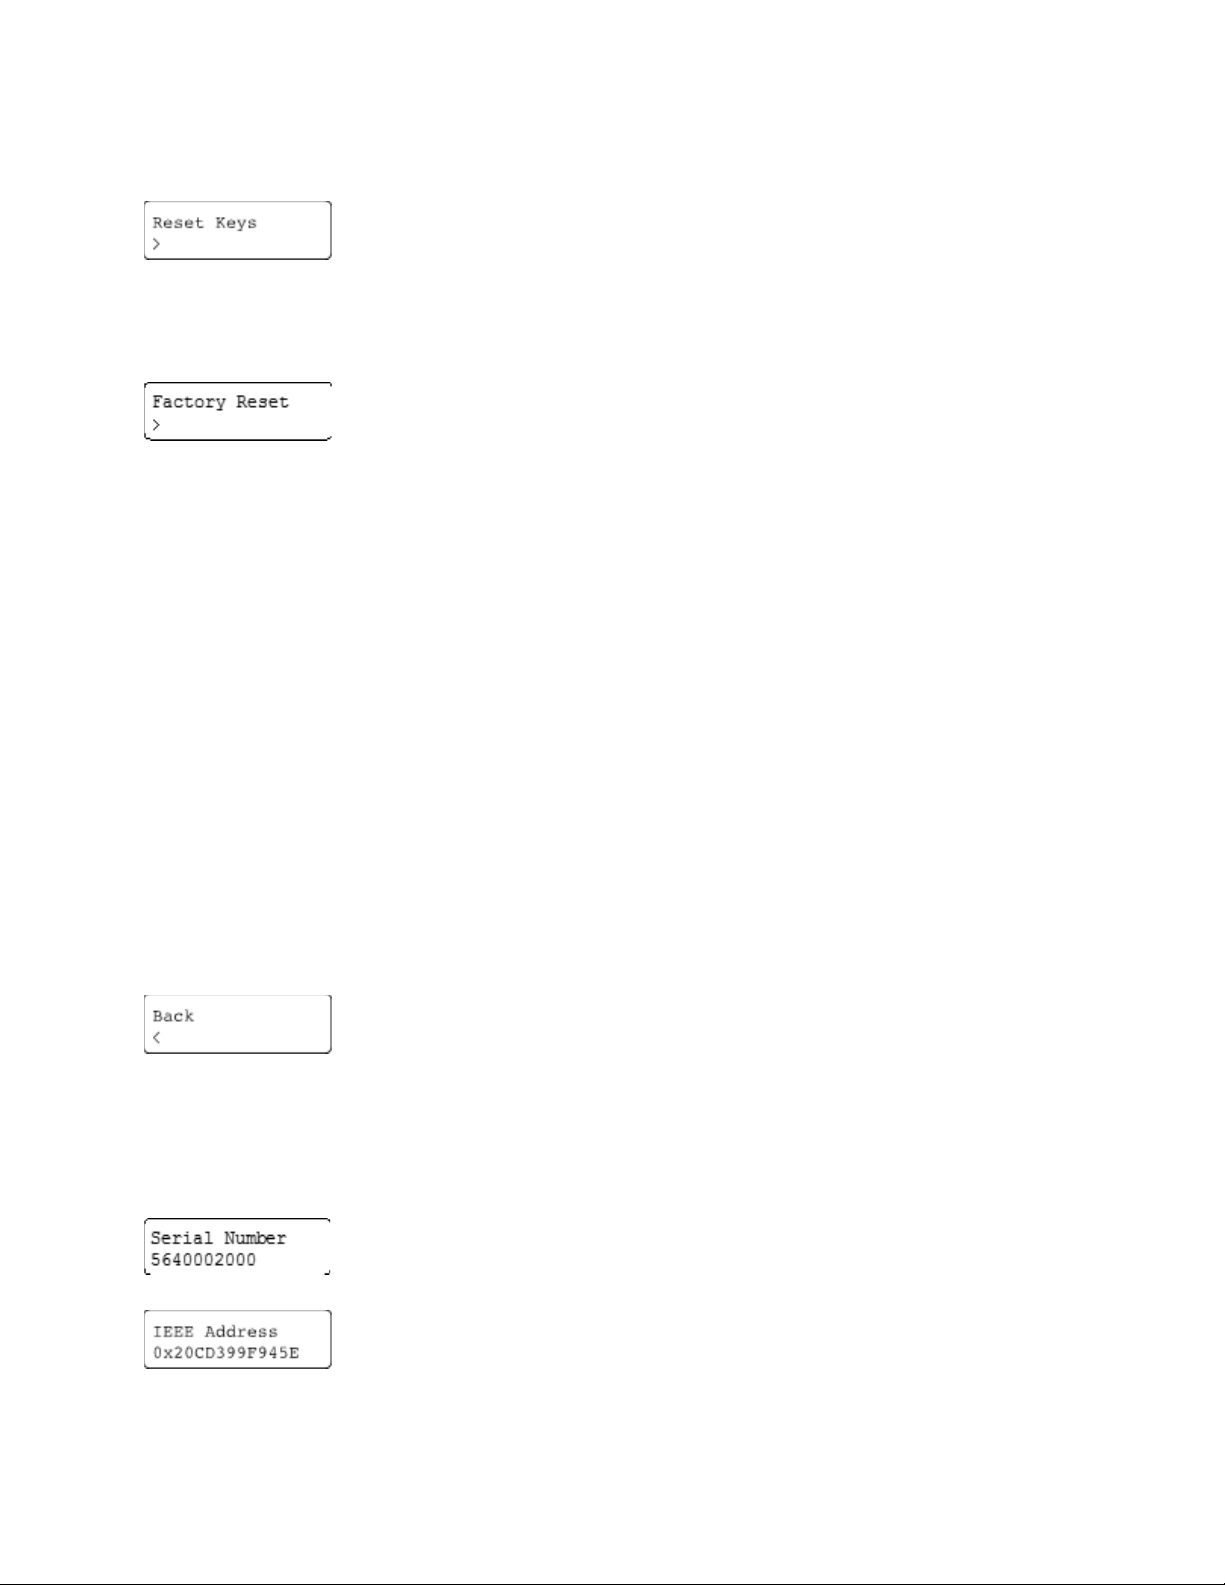
Reset Keys
This setting deletes all pairing keys. This is recommended if you pass on
AirID to others. After a reset, a new key exchange is necessary to re-established a connection.
Factory Reset
This setting reset the AirID to factory settings. All pairing keys are also
deleted.
Update Firmware
The AirID firmware can be updated with this setting.
Coverage
The AirID reader can log you out automatically, if a (preset) distance between your computer
and your AirID has been exceeded. The "Distance Log-Out" is managed in AirID settings using "
Coverage".
This setting is optional and can only be configured if there is an active Bluetooth connection to
the a device.
You need to configure the distance manually.
Back
Select Back to return to the main menu.
3.5. AirID Info
Under AirID Info you will find further information about the AIrID.
Serial number of the AirID
Bluetooth address of the AirID
Page 12
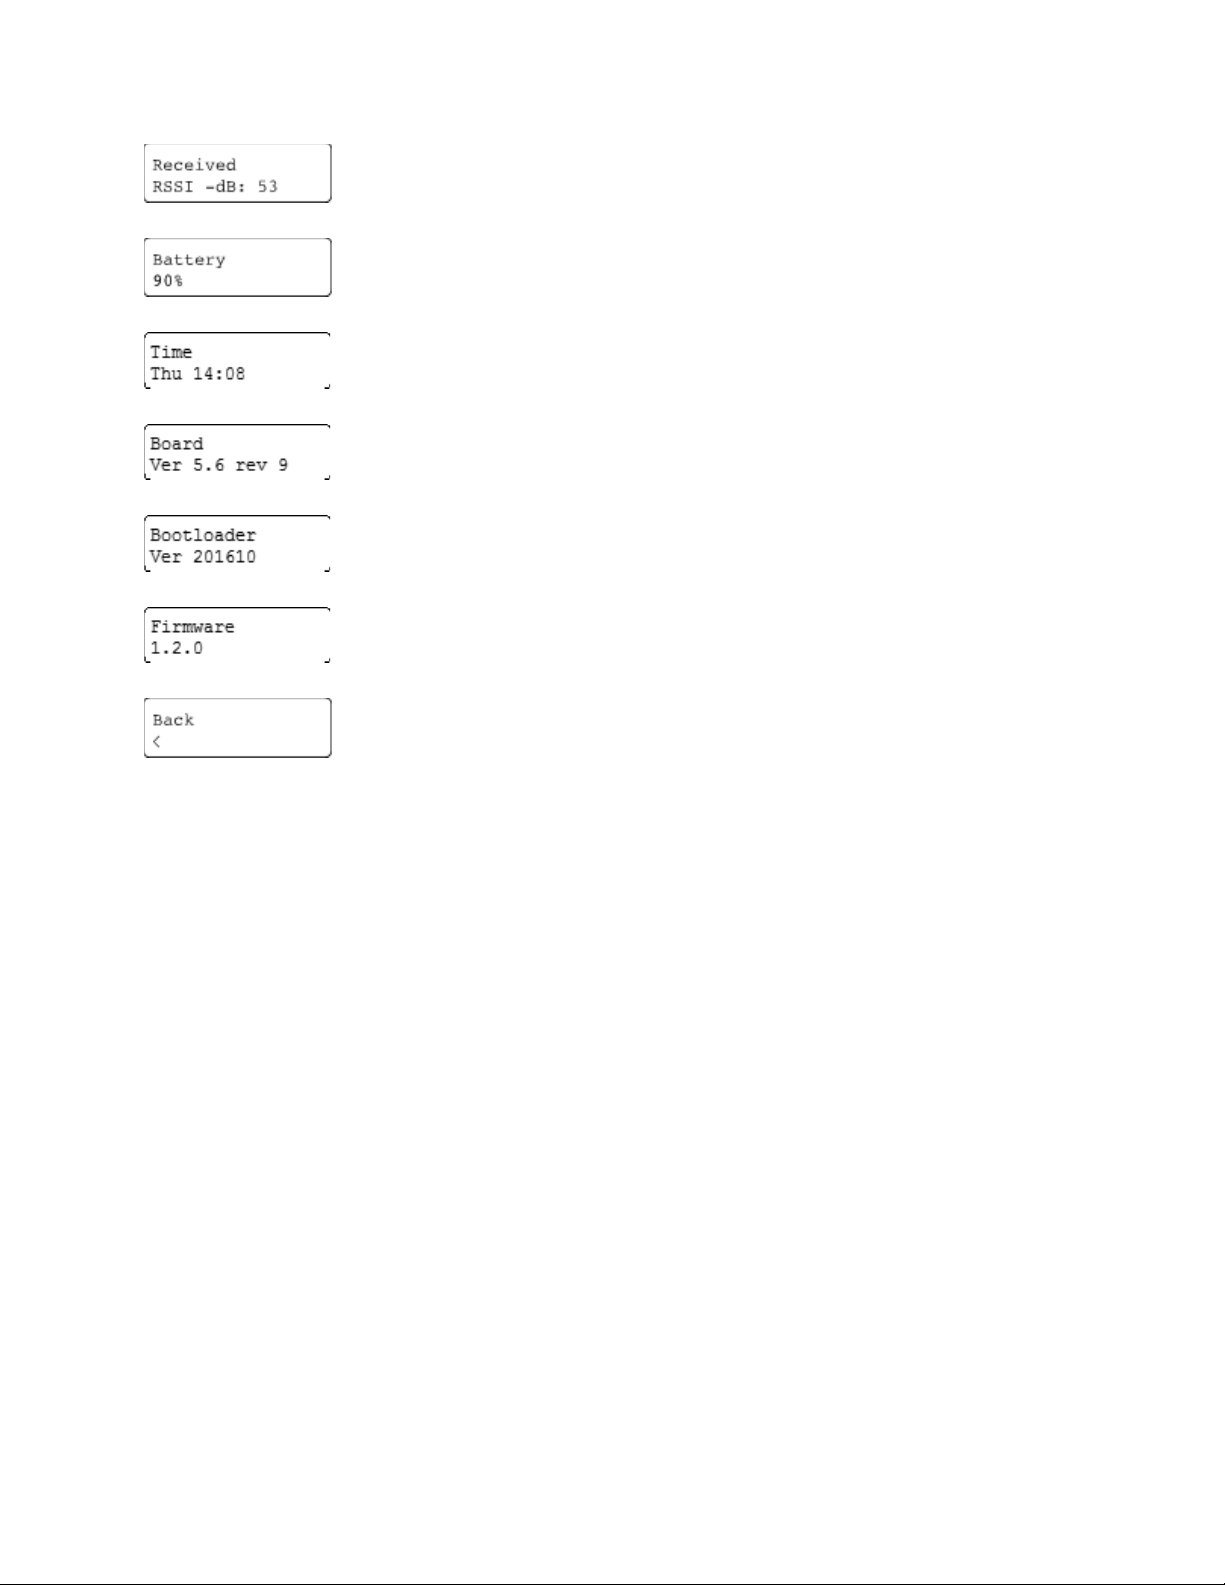
The received signal strength
Battery percentage indicator
Current time and day
Version of the AirID board
Version of the AIrID bootloader
Version of the AirID firmware version
Select Back to return to the main menu
3.6. Card Info
Displays information about the inserted smart card. These information is only displayed if the
smart card is correctly inserted and recognized/ supported.
3.7. Prefered Device
Under "Prefer Device" the pairing information of the AirID with the before connected devices
are stored. From these information you can select to which device the AirID should preferably
be connected in the future. All other devices will be ignored.
Select the option New to connect AirID to a new device if the already connected devices are
nearby. All other devices connected to AirID will be ignored.
The pairing information with up to 10 different devices can be stored at the same time.
Page 13
4. Using AirID
AirID supports various operating systems like Windows, MacOS, Linux, iOS and Android. The
basic requirement is the Bluetooth Low Energy functionality of the device.
The AirID software consists of two components:
1. AirID Central App - a management software for your AirID forming the basis for usage of
the device. The tool provides you with information and setting options for your AirID
when your reader is connected to your device.
2. AirID drivers, which ensures the communication between the AirID and the operating
system, must be installed additionally depending on the platform or is already
integrated in the Apps and solutions of third party vendors.
AirID can be used with different terminals and platforms is possible, but not in parallel
operation.
4.1. Windows
The use of AirID under windows is only possible as of Windows 8.1 due to the Bluetooth Low
Energy functionality required. For use under Windows 7, an ONEKEY BRIDGE is additionally
required.
4.1.1. Installation
1. Download the latest installer (zipped .msi file) for Windows at AirID - Software, Driver &
SDK.
2. Unzip and double click on the .msi installer file.
3. Follow the instructions in the installation wizard.
4. The AirID Windows driver and the AirID Central App are now installed.
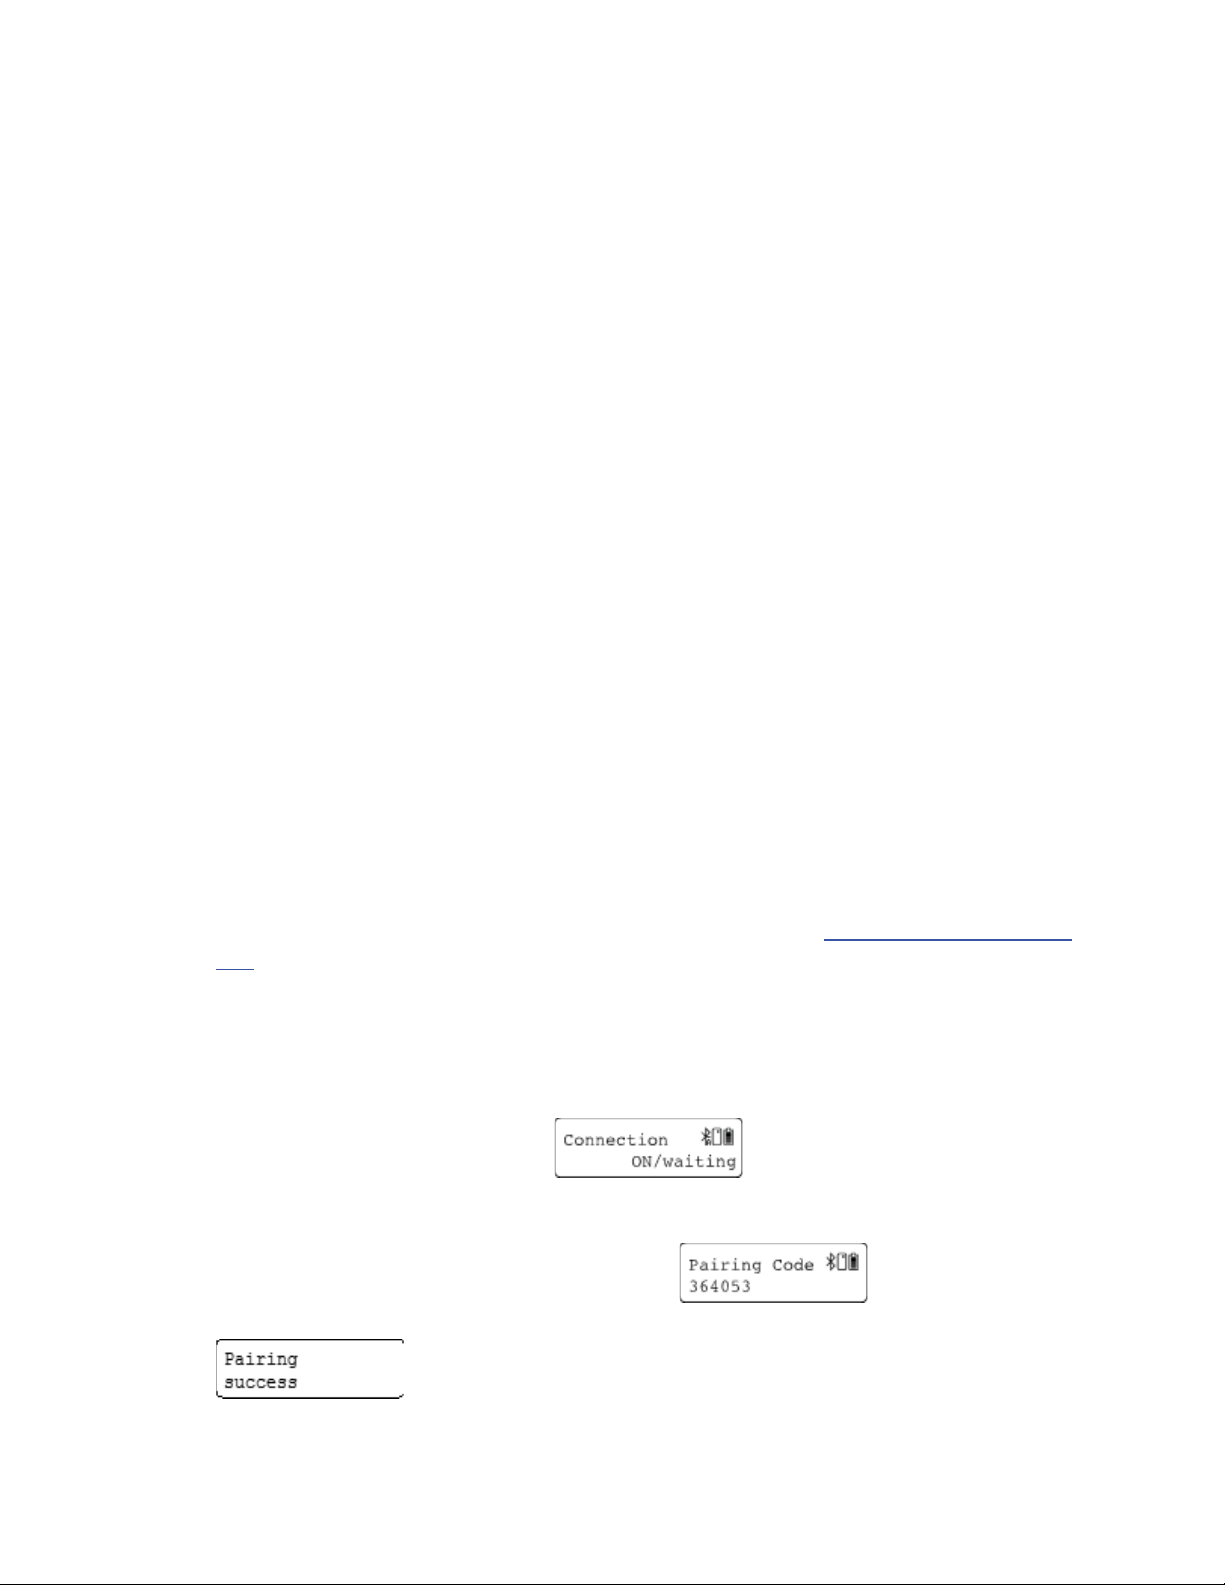
5. Insert your smart card to power on the AirID reader and activate Bluetooth at the AirID
reader by navigating to the connection menu and pressing the jog dial control
element. The AirID should display:
6. Open Windows "Settings→ Devices→ Bluetooth". Your AirID should be listed with its
serial number. Press "Pair"
7. Enter 6 digit pairing key shown on AirID display
8. After successful pairing "Pairing successful" will be displayed on AirID
Page 14

9. After successful connection establishment, the AirID should display the name of your
device
The AirID can now be used.
4.1.2. Deleting the Connection
The pairing information are stored on both the Windows system and AirID. To terminate the
connection completely, the information on both sides must be deleted.
On Windows
1. Open the Bluetooth settings on Windows (Settings- Devices - Bluetooth)
2. Select the corresponding AirID using the displayed serial number and click on "Remove
Device"
3. Click "Yes" to confirm the removal of the device.
On AirID
Delete All Pairing Information
To delete all stored pairing information from AirID a "Reset Keys" can be performed in the
Settings menu.
Delete Specific Pairing Information
To delete specific pairing information from AirID a "Reset Keys" of the Windows workstation
can be performed in the Settings menu.
The pairing information can also be deleted via AirID Central App. To do this, go to the paired
devices view, select the corresponding device from the list and click Delete.
4.1.3. AirID Central App
AirID Central provides information and setting options for your AirID once your AirID is
connected to your Windows device. If there is no connection, "No device" is displayed in the
AirID Central.
AirID Central as an AirID management software, provides an overview of:
x Serial Number - Displays the Serial Number of the connected AirID
x Card Status - Displays the status of the inserted smart card. This can be readable,
unreadable or no card inserted
x Coverage Feature - Displays if the coverage feature is activated or not
Page 15

x Encryption - Displays if the AES encryption is set to 128 or 256-bit
x Refresh - Checks if there is an older firmware and offers a firmware update if necessary.
x AirID Change - Displays the list of the connected AirID readers from which you can
select one.
x Battery Status - Displays the battery charge in percent. The green flash symbol indicates
an active charging process.
In the AirID Central, the following settings can also be made on the AirID:
x Signal Strenght - Select the signal strength of the AirID:
o low (~3-5m)
o middle (~5-7 m)
o high (~7,5-10 m)
x Backlight - Select if a display backlight is required
x Buzzer - Select if an acustic feedback is required
x Display - Select if the display should always be on or only for a certain time.
x Advertising - Select if the Bluetooth signal for the connection to a device should always
be on or only for a certain time.An individual work schedule to save energy can also be
created with AirID Central. The advertising mode remains deactivated after the defined
working hours.
If during the active advertising mode (EcoMode) no connection to a device is established, the
advertising mode switches off automatically to save battery power. Therefore, a manual
reconnection is necessary afterwards.
The following information is displayed when clicking on the AirID device displayed in the AirID
Central App:
x Serial Number
x MAC Address
x Hardware - Board Version of the AirID
x Bootloader Version
x Firmware Version
x Card OS of the inserted smart card
x Build version of the firmware
x Connected devices - shows a list of devices for which AirID stores connection
information. The connection information can be deleted by deleting the device from the
list.
A right click on the AirID Central icon in the Windows notification area opens a menu with the
following application functions:
Page 16

x Reestablish - opens the AirID Central App window in the foreground.
x Settings -
x System Log - displays a log of the system log entries that you can use to track activities
and processes.
x Bridge - Displays the ONEKEY Bridge and the settings you can do.
x Change PIN - PIN change function for the inserted smart card
x About - Shows the AirID Central version and the developer informationen
x Close - Closes the AirID Central App
4.2. iOS
Under iOS system-wide support of smart cards and card readers is not possible. Therefore, the
AirID driver needs to be integrated into an app to use AirID with this specific app. These apps
usually interact with the available AirID Central App via extension or keychain.
The AirID Central App is available in the App Store.
The connection to the the iOS device is only active when the app in foreground is open. As soon
as the app goes into the background, the Bluetooth connection to the AirID is released again.
Page 17

FCC Warning
This device complies with part 15 of the FCC Rules. Operation is subject to the following two conditions:
(1) This device may not cause harmful interference, and (2) this device must accept any interference
received, including interference that may cause undesired operation.
Any Changes or modifications not expressly approved by the party responsible for compliance could void
the user's authority to operate the equipment.
Note: This equipment has been tested and found to comply with the limits for a Class B digital device,
pursuant to part 15 of the FCC Rules. These limits are designed to provide reasonable protection against
harmful interference in a residential installation. This equipment generates uses and can radiate radio
frequency energy and, if not installed and used in accordance with the instructions, may cause harmful
interference to radio communications. However, there is no guarantee that interference will not occur in a
particular installation. If this equipment does cause harmful interference to radio or television reception,
which can be determined by turning the equipment off and on, the user is encouraged to try to correct the
interference by one or more of the following measures:
` -Reorient or relocate the receiving antenna.
` -Increase the separation between the equipment and receiver.
` -Connect the equipment into an outlet on a circuit different from that to which the receiver is
connected.
` -Consult the dealer or an experienced radio/TV technician for help.
The device has been evaluated to meet general RF exposure requirement. The device can be used in
portable exposure condition without restriction.
 Loading...