

Page 1
Certes PentaClass A, AB, Runa
Users manual
hear. understand.
Page 2

• iPod, iPad are trademarks of Apple Inc. Registered in the U.S. and other countries.
• Wi-Fi®, Wi-Fi Alliance® are registered trademarks of the Wi-Fi Alliance.
• The Bluetooth® trademark is owned by the Bluetooth® SIG.
NOTES
• The contents of this user’s manual shall not be reprinted in part or whole without permission.
• The contents of this user’s manual are subject to change without notice.
Important Safeguards
READ INSTRUCTIONS
All the safety and operating instructions should be read before the appliance is operated.
RETAIN INSTRUCTIONS
The safety and operating instructions should be retained for future reference.
HEED WARNINGS
All warnings on the product and in the operating instructions should be adhered to.
FOLLOW INSTRUCTIONS
All operating and maintenance instructions should be followed.
CLEANING
Unplug this product from the wall outlet before cleaning. Do not use liquid cleaners or aerosol cleaners. Use a damp
cloth for cleaning.
ATTACHMENTS
Do not use attachments that are not recommended by the product manufacturer as they may cause hazards.
WATER AND MOISTURE
Do not use this product near water - for example, near a bath tub, wash bowl, kitchen sink, or laundry tub, in a wet
basement, or near a swimming pool and the like. Immersion in water will destroy the PentaClass speaker, microphone
or remote.
GROUNDING OR POLARIZATION
For US only: This product may be equipped with either a polarized 2-wire AC line plug (a plug having one blade wider
than the other) or a 3-wire grounding type plug, a plug having a third (grounding) pin. The 2-wire polarized plug does
not fit in the outlet, try reversing the plug. If the plug still fails to fit, contact your electrician to replace your obsolete
outlet. Do not defeat the safety purpose of the polarized plug. The 3-wire grounding type plug will fit into a grounding
type power outlet. This is a safety feature. If you are unable to insert the plug into the outlet, contact your electrician to
replace your obsolete outlet. Do not defeat the safety purpose of the grounding type plug.
For UK only: In UK, a BS approved power cord with molded plug has a Black (five Amps) fuse installed for use with this
equipment. If a power cord is not supplied with this equipment please contact your supplier.
POWER-CORD PROTECTION
Power-supply cords should be routed so that they are not likely to be walked on or pinched by items placed upon or
against them, paying particular attention to cords at plugs, convenience receptacles and the point where they exit from
the product.
LIGHTNING
For added protection for this product during a lightning storm, or when it is left unattended and unused for a long
time, unplug it from the wall outlet and disconnect the cable system. This will prevent damage to the product due to
lightning and power-line surges.
OVERLOADING
Do not overload wall outlets, extension cords, or integral convenience receptacles as this can result in a risk of fire or
electric shock.
OBJECT AND LIQUID ENTRY
Never push objects of any kind into this product through openings as they may touch dangerous voltage points or
short-out parts that could result in a fire or electric shock. Never spill liquid of any kind on the product.
SERVICING
Do not attempt to service this product yourself as opening or removing covers may expose dangerous voltage or other
hazards. Refer to qualified service personnel.
DAMAGE
Unplug this product from the wall outlet and refer servicing to qualified service personnel under the following
conditions:
• When the power-supply cord or plug is damaged.
• If liquid has been spilled, or objects have fallen into the product.
• If the product has been exposed to rain or water.
• If the product does not operate normally by following the operating instructions adjust only those controls that are
covered by the operating instructions as an improper adjustment of other controls may result in damage and will often
require extensive work by a qualified technician to restore the product to its normal operation.
• If the product has been dropped or damaged in any way.
• When the product exhibits a distinct change in performance - this indicates a need for service.
REPLACEMENT PARTS
When replacement parts are required, be sure that the service technician uses only spare parts approved by Certes. If
you are uncertain, contact Certes. Unauthorized substitutions may result in fire, electric shock or other hazards and will
void the warranty.
SAFETY CHECK
Upon completion of any service or repairs to this product, ask the service technician to perform safety checks to
determine that the product is in proper operating condition.
Certes PentaClass Operating Manual02
Page 3

POWER-CORD PROTECTION
Power-supply cords should be routed so that they are not likely to be walked on or pinched by items placed upon or
against them, paying particular attention to cords at plugs, convenience receptacles and the point where they exit from
the product.
LIGHTNING
For added protection for this product during a lightning storm, or when it is left unattended and unused for a long
time, unplug it from the wall outlet and disconnect the cable system. This will prevent damage to the product due to
lightning and power-line surges.
OVERLOADING
Do not overload wall outlets, extension cords, or integral convenience receptacles as this can result in a risk of fire or
electric shock.
OBJECT AND LIQUID ENTRY
Never push objects of any kind into this product through openings as they may touch dangerous voltage points or
short-out parts that could result in a fire or electric shock. Never spill liquid of any kind on the product.
SERVICING
Do not attempt to service this product yourself as opening or removing covers may expose dangerous voltage or other
hazards. Refer to qualified service personnel.
DAMAGE
Unplug this product from the wall outlet and refer servicing to qualified service personnel under the following
conditions:
• When the power-supply cord or plug is damaged.
• If liquid has been spilled, or objects have fallen into the product.
• If the product has been exposed to rain or water.
• If the product does not operate normally by following the operating instructions adjust only those controls that are
covered by the operating instructions as an improper adjustment of other controls may result in damage and will often
require extensive work by a qualified technician to restore the product to its normal operation.
• If the product has been dropped or damaged in any way.
• When the product exhibits a distinct change in performance - this indicates a need for service.
REPLACEMENT PARTS
When replacement parts are required, be sure that the service technician uses only spare parts approved by Certes. If
you are uncertain, contact Certes. Unauthorized substitutions may result in fire, electric shock or other hazards and will
void the warranty.
SAFETY CHECK
Upon completion of any service or repairs to this product, ask the service technician to perform safety checks to
determine that the product is in proper operating condition.
Certes PentaClass Operating Manual 03
Page 4

Before Operating
• Be sure to use the power cord and the AC adapter included with your PentaClass.
• Be sure to use the power cord applicable to your local power specifications.
• When storing the product, do not leave it under direct sunlight or near heaters. It may become discolored, deformed,
or damaged.
• Do not place this product in any humidity, dusty, salt bearing wind, or vibrating locations. Use it only under the
following environmental conditions: temperature: 0°C - 40°C (32°F - 104°F), humidity: 30% - 85% (No condensation).
• Use a soft, dry cloth for cleaning. Do not use any volatile solvent such as thinner or benzene.
FOLLOW THE GUIDELINES BELOW TO PREVENT THE UNIT FROM DROPPING
• Use the product on a stable base, desk, or table. Do not place the product on an unstable base or slanted surface.
• Please install the product as recommended in this user manual.
• Place or wire the unit to prevent the AC adapter cord from pulling.
• Carry the product by holding the lower part of the main unit in both hands. Never hold the product by the tubes or
the top part.
• In time, the PentaClass performance and quality may deteriorate due to the lifetime of its parts. To purchase
replacement parts, consult the dealer from whom you purchased this product or our branch/office near your location.
REMOTE CONTROL BATTERY PRECAUTIONS
• If this product is not going to be used for a long time, take the batteries out of the remote control.
• Do not use rechargeable batteries (e.g., Ni-Cd (NiCad batteries)).
• Do not try to recharge or short-circuit the batteries.
• When disposing of used batteries, follow the instructions of your local municipality.
• Insert batteries from one side and pay particular attention to the polarity (+/- directions).
• Be sure to use CR2025 type batteries.
• If any liquid from a battery leaks on your skin or clothes, flush the area with clean water immediately. If it gets into your
eyes, flush immediately with clean water and then contact a doctor.
MICROPHONE BATTERY PRECAUTIONS
• Do not charge the microphone when it is placed near a heat source or in direct sunlight or another places where the
temperature exceeds +40°C (104°F).
• Do not store or leave the Microphone near a heat source or in direct sunlight or other places where the temperature
exceeds +40°C (104°F).
• Do not store or leave the Microphone in a cold place under -20°C (-4°F).
• Do not try to recharge the Microphone using an inappropriate charger, please use the USB charger included with this
product.
• Do not place the Microphone in liquids, rain and other moist places.
• In the event of any physical damage to the microphone please do not try to charge it. Contact your dealer or repair
service.
• If any liquid from a microphone battery leaks onto your skin or clothes, flush the area with clean water immediately. If
it gets into your eyes, flush immediately with clean water and then contact a doctor.
PRECAUTIONS REGARDING THE MICROPHONE LANYARD
To prevent unexpected accidents, please note the following:
• This lanyard is for the microphone only and should not be used for any other purposes.
• Do not wrap the lanyard around parts of your body such as your neck, arm, or finger.
• Do not leave it within reach of small children.
• For safety reasons, the break-away section of the lanyard has been designed to separate if too much force is applied.
Therefore, please avoid any overly strenuous movements and do not apply excessive force.
• The lanyard length adjustment feature is designed to be simple. Excessive force or strenuous movements may change
the length.
• Do not use excessive force when adjusting the lanyard. This could damage the lanyard.
• Be careful using the lanyard in environment where rotating or other mechanical equipment is operating.
PRECAUTIONS REGARDING PACKING PARTS
To prevent unexpected accidents, please note the following points:
• Keep all small parts such as plastic bags and installation hardware away out of reach of small children.
• Do not put the plastic bags on the head, keep them out of reach of small children.
• Do not eat or put in mouth, mounting brackets, cardboard parts, plastic bags, screws or any another parts supplied
with the product and keep away them from reach of small children.
OTHER SAFETY PRECAUTION
• Servicing and maintenance must be carried out by authorized service staff only.
• Use only spare parts approved by Certes. If you are uncertain, contact Certes.
• Make sure the device is securely mounted and installed in accordance with instructions before starting it.
• Regularly check the screws and other attachment devices.
• In the event of abnormal noise turn off the PentaClass and consult your supplier.
• Electrical installation must be carried out by an authorized electrician only.
• Take special care to not drop the equipment while mounting it to the ceiling.
• Never force anything into the openings or source inputs of the speaker equipment.
• Do not use this equipment if it shows obvious signs of damage from shipping or dropping.
• Make sure equipment is properly mounted according to the Mounting Instructions found in this guide. This is the only
approved method of installation; any other may cause a loss of your warranty.
Certes PentaClass Operating Manual04
Page 5

PRECAUTIONS REGARDING THE MICROPHONE LANYARD
To prevent unexpected accidents, please note the following:
• This lanyard is for the microphone only and should not be used for any other purposes.
• Do not wrap the lanyard around parts of your body such as your neck, arm, or finger.
• Do not leave it within reach of small children.
• For safety reasons, the break-away section of the lanyard has been designed to separate if too much force is applied.
Therefore, please avoid any overly strenuous movements and do not apply excessive force.
• The lanyard length adjustment feature is designed to be simple. Excessive force or strenuous movements may change
the length.
• Do not use excessive force when adjusting the lanyard. This could damage the lanyard.
• Be careful using the lanyard in environment where rotating or other mechanical equipment is operating.
PRECAUTIONS REGARDING PACKING PARTS
To prevent unexpected accidents, please note the following points:
• Keep all small parts such as plastic bags and installation hardware away out of reach of small children.
• Do not put the plastic bags on the head, keep them out of reach of small children.
• Do not eat or put in mouth, mounting brackets, cardboard parts, plastic bags, screws or any another parts supplied
with the product and keep away them from reach of small children.
OTHER SAFETY PRECAUTION
• Servicing and maintenance must be carried out by authorized service staff only.
• Use only spare parts approved by Certes. If you are uncertain, contact Certes.
• Make sure the device is securely mounted and installed in accordance with instructions before starting it.
• Regularly check the screws and other attachment devices.
• In the event of abnormal noise turn off the PentaClass and consult your supplier.
• Electrical installation must be carried out by an authorized electrician only.
• Take special care to not drop the equipment while mounting it to the ceiling.
• Never force anything into the openings or source inputs of the speaker equipment.
• Do not use this equipment if it shows obvious signs of damage from shipping or dropping.
• Make sure equipment is properly mounted according to the Mounting Instructions found in this guide. This is the only
approved method of installation; any other may cause a loss of your warranty.
NOTATION CONVENTIONS
Warning! Indicates a potentially hazardous situation which, if instructions are not followed, could result in
death or serious injury.
Certes PentaClass Operating Manual 05
Page 6

Contents
IMPORTANT SAFEGUARDS
Before Operating
INTRODUCTION
What’s in the Box?
Introducing Certes PentaClass
Features for all Certes PentaClass models
NAMES OF CERTES PENTACLASS PARTS
Operation of the Main Unit
Rear Panel and Cable Connection
Names of Remote Control Parts
Preparation of Remote Control
Replacement Battery Installation
Remote Control Operating Range
The Runa Microphone
Your Runa Microphone Components and Button Commands
Preparing your Runa Microphone
Charging Your Runa Microphone Battery
The Runa Microphone IR Remote Control Operating Range
CERTES PENTACLASS MODELS
PentaClass A
PentaClass AB
PentaClass Runa
PentaClass Microphone
OPERATIONAL DESCRIPTION
Turning on the PentaClass
Connectivity
Connecting to Device Using AUX Input
Connecting to Device Using Bluetooth
Connecting Microphone to the PentaClass
Power Saving Mode
02
04
08
08
09
09
10
10
11
11
12
12
12
13
13
13
13
14
15
15
16
17
18
20
20
20
20
20
21
22
CHANNEL MIXER AND STATUS INDICATION
System Status Indication
Channel Mixer
Mixer Status Indication
VOLUME ADJUSTMENT
Feedback Cancellation
AUDIO PRESETS
SYSTEM RESET
Bluetooth Reset
System Setting Reset
INSTALLATION
Determining Speaker Location
Installation Materials / Tools Required
Safety Rules for Installation
Mounting on the Ceiling
Mounting Procedure for Suspended Ceiling
Mounting Procedure for Wall
DAISY CHAINING
TROUBLESHOOTING
PENTACLASS TECHNICAL SPECIFICATION
Input Source Specifications
PentaClass Speaker Specification
PentaClass Microphone Specification
REGULATORY
NOTES
Certes PentaClass Operating Manual06
Page 7

CHANNEL MIXER AND STATUS INDICATION
System Status Indication
Channel Mixer
Mixer Status Indication
VOLUME ADJUSTMENT
Feedback Cancellation
AUDIO PRESETS
SYSTEM RESET
Bluetooth Reset
System Setting Reset
INSTALLATION
Determining Speaker Location
Installation Materials / Tools Required
Safety Rules for Installation
Mounting on the Ceiling
Mounting Procedure for Suspended Ceiling
Mounting Procedure for Wall
DAISY CHAINING
TROUBLESHOOTING
PENTACLASS TECHNICAL SPECIFICATION
Input Source Specifications
PentaClass Speaker Specification
PentaClass Microphone Specification
REGULATORY
NOTES
22
22
22
22
23
23
24
24
24
24
25
25
26
26
26
27
28
29
30
30
30
30
31
32
34
Certes PentaClass Operating Manual 07
Page 8
Introduction
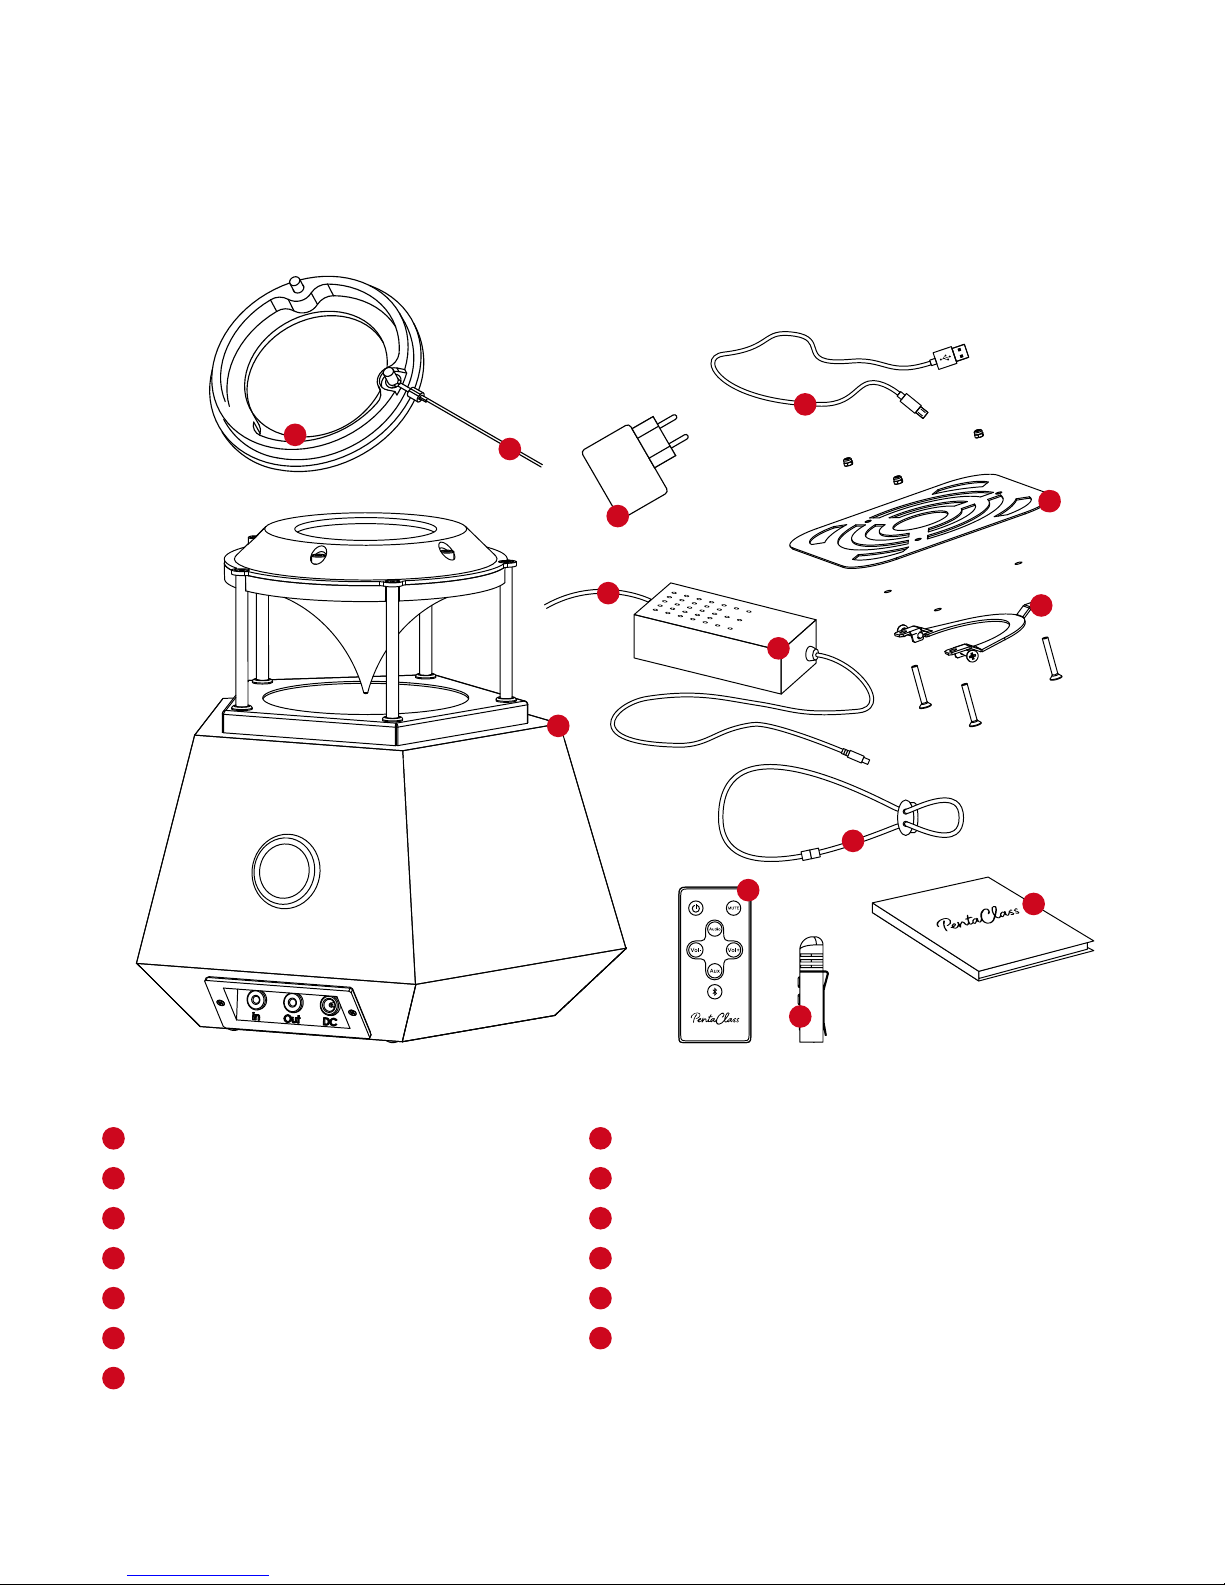
What’s in the Box?
Make sure your box contains everything listed. If any pieces are missing, contact your dealer.
Introducing Certes PentaClass
Thank you for purchasing the best classroom and conference room audio system available. The Certes PentaClass
enables you to transmit pristine voice clarity from the microphone while giving you the opportunity to project full
room multimedia HD audio sound using one device.
Features for all PentaClass models
ALL-IN-ONE DEVICE
Certes PentaClass combines your speaker, amplifier and mixer all in one.
360˚ OMNIDIRECTIONAL SOUNDFIELD
Enjoy truly rich sounds whenever your audience members are seated in the room.
ONE ROOM - ONE SPEAKER
Thanks to its special design, just one Certes PentaClass speaker is able to spread sound evenly in a room and is suitable
for room sizes of up to 120 m
to 3 PentaClass speakers.
SIMPLE INSTALLATION
In a matter of minutes you can install PentaClass using the supplied mount on a ceiling or wall.
SYSTEM STATUS INDICATION
Depending on the PentaClass status, it will illuminate a specific color light.
POWER-SAVING MODE
Automatic power-saving mode switches on if there is no incoming signal for more than 20 minutes.
AUDIO PRESETS
These allows you to choose the audio mode, switching between voice, multimedia and music presets.
BIG AUDITORIUMS WELCOME
Thanks to our smart audio in/out system, you can daisy chain up to 3 Certes PentaClasses and cover auditoriums up to
360m
2
(3875 sq. ft.).
HI-FI ACOUSTIC DESIGN
The PentaClass design ensures pure vocal clarity, full high and mid-ranges and a rich bass for music.
ROBUST DESIGN
The natural birch plywood box, aluminum speaker protector and durable plastic parts are used to ensure a long-term
lifespan for your PentaClass. Thanks to its simple and elegant design it will fit into any interior.
BUILT-IN MIXER
The built-in mixer allows you to mix an analog input with Bluetooth or microphone channels without unplugging the
cables or disconnecting the wireless connection.
REMOTE CONTROL
All PentaClass versions come with a remote control for the easy operation of devices.
DYNAMIC RANGE COMPRESSION
Whether you are listening at a low or high volume, the DRC ensures the quality of non-distorted sound.
DAISY CHAIN READY
Thanks to the mixed Aux output, you can connect up to 3 Certes PentaClass's to cover much larger spaces including
auditoriums.
1
2
3
4
5
6
7
Certes PentaClass speaker
Power supply 19 V 2A
Power cord
Remote control with battery
Fixation bracket with screws
Safety wire
Plate for false ceiling
8
9
10
11
12
13
Flange
Runa Microphone*
Lanyard*
USB charger 5V1A*
Micro USB cable 1 m*
User’s manual
* included with Certes PentaClass Runa version
4
5
1
6
7
10
8
2
3
9
12
11
13
Certes PentaClass Operating Manual08
Page 9

Introducing Certes PentaClass
Thank you for purchasing the best classroom and conference room audio system available. The Certes PentaClass
enables you to transmit pristine voice clarity from the microphone while giving you the opportunity to project full
room multimedia HD audio sound using one device.
Features for all PentaClass models
ALL-IN-ONE DEVICE
Certes PentaClass combines your speaker, amplifier and mixer all in one.
360˚ OMNIDIRECTIONAL SOUNDFIELD
Enjoy truly rich sounds whenever your audience members are seated in the room.
ONE ROOM - ONE SPEAKER
Thanks to its special design, just one Certes PentaClass speaker is able to spread sound evenly in a room and is suitable
for room sizes of up to 120 m
2
(1300 ft2). If you have an auditorium larger than 120 m2 (1300 ft2), you can daisy chain up
to 3 PentaClass speakers.
SIMPLE INSTALLATION
In a matter of minutes you can install PentaClass using the supplied mount on a ceiling or wall.
SYSTEM STATUS INDICATION
Depending on the PentaClass status, it will illuminate a specific color light.
POWER-SAVING MODE
Automatic power-saving mode switches on if there is no incoming signal for more than 20 minutes.
AUDIO PRESETS
These allows you to choose the audio mode, switching between voice, multimedia and music presets.
BIG AUDITORIUMS WELCOME
Thanks to our smart audio in/out system, you can daisy chain up to 3 Certes PentaClasses and cover auditoriums up to
360m
2
(3875 sq. ft.).
HI-FI ACOUSTIC DESIGN
The PentaClass design ensures pure vocal clarity, full high and mid-ranges and a rich bass for music.
ROBUST DESIGN
The natural birch plywood box, aluminum speaker protector and durable plastic parts are used to ensure a long-term
lifespan for your PentaClass. Thanks to its simple and elegant design it will fit into any interior.
BUILT-IN MIXER
The built-in mixer allows you to mix an analog input with Bluetooth or microphone channels without unplugging the
cables or disconnecting the wireless connection.
REMOTE CONTROL
All PentaClass versions come with a remote control for the easy operation of devices.
DYNAMIC RANGE COMPRESSION
Whether you are listening at a low or high volume, the DRC ensures the quality of non-distorted sound.
DAISY CHAIN READY
Thanks to the mixed Aux output, you can connect up to 3 Certes PentaClass's to cover much larger spaces including
auditoriums.
Certes PentaClass Operating Manual 09
Page 10
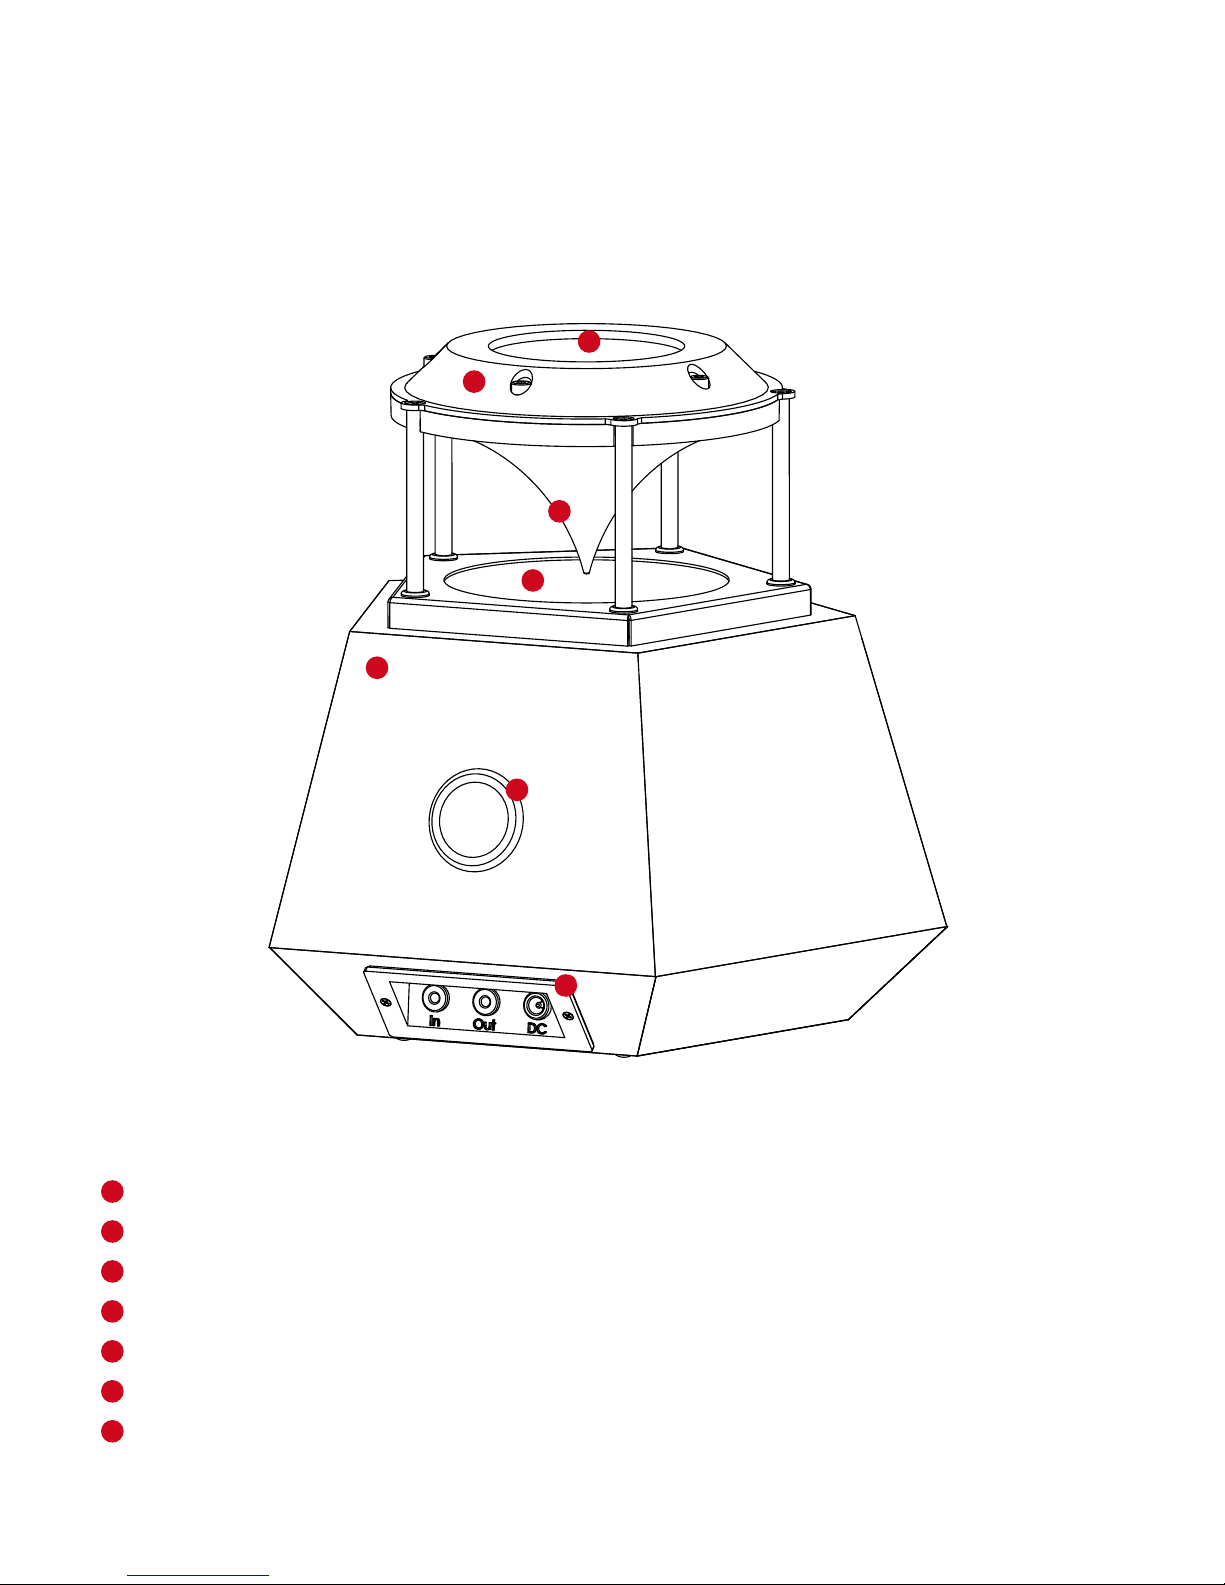
Names of Certes PentaClass parts
Operation of the main unit
Make sure your box contains everything listed. If any pieces are missing contact your dealer.
Rear Panel and Cable Connection
Aux in - Audio in (3.5mm mini Jack). An audio cable is not supplied with this product.
Aux out - Audio out (3.5mm mini Jack). An audio cable is not supplied with this product.
DC - Input for the AC adapter.
Connecting the AC adapter. Before inserting the AC adapter in an outlet, connect the DC plug of the supplied AC
adapter to the terminal on the rear panel.
Connecting the unit to another PentaClass (daisy chain), Induction loop devices or another audio preamplified devices
with an audio line input terminal on the connector panel.
To connect the unit to a device with an audio line output such as:
• Mobile phone • Microphone
• Tablet • DVD / VHS
• Projector • Computer
Names of Remote Control Components
Infrared Transmitter
Power ON/OFF Button
Mute Button
Volume down Button
Volume up Button
AUX channel ON/OFF Button
Bluetooth channel activation Button
Audio Preset
System status indication window and IR sensor location
Main Board housing
Sound reflector cone
Speaker grill with protective frame
Birch plywood soundbox
Phase inverter
Connector panel
1
2
2
3
3
1
2
3
4
4
5
5
6
6
7
7
1
2
3
4
5
6
7
8
1
Certes PentaClass Operating Manual10
Page 11
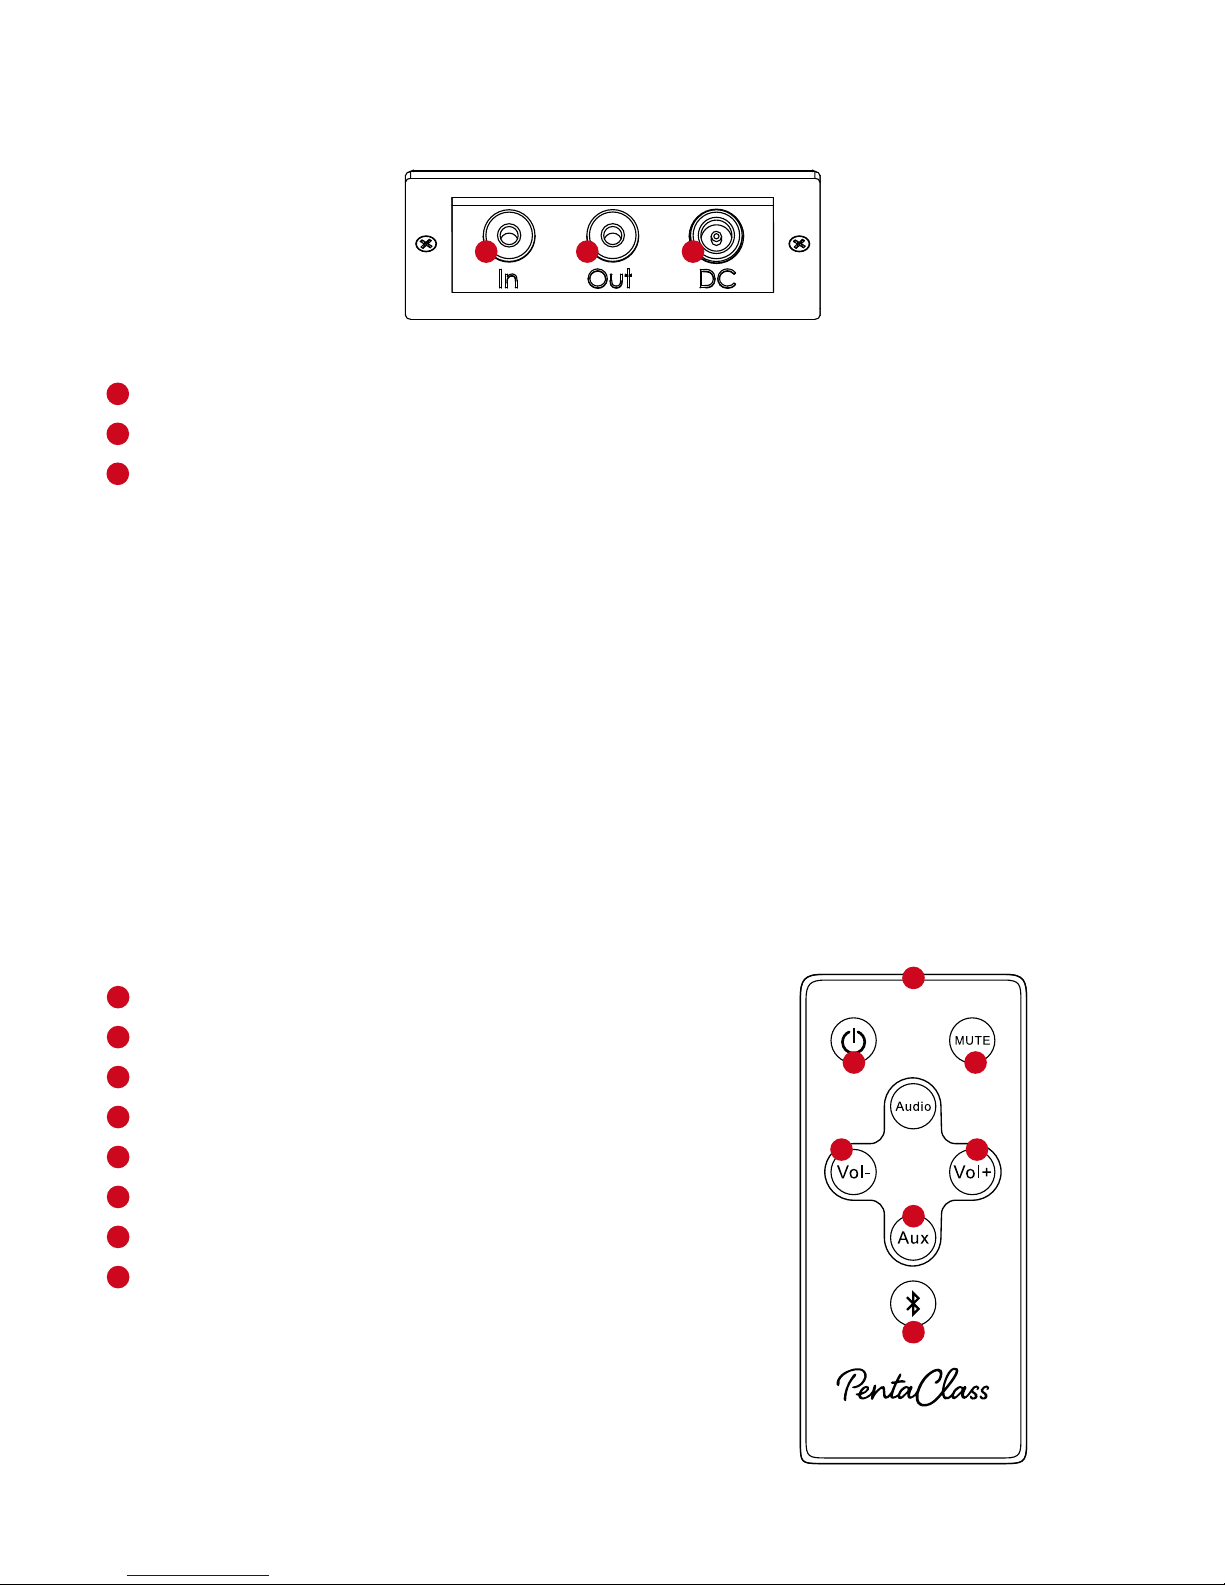
Rear Panel and Cable Connection
Aux in - Audio in (3.5mm mini Jack). An audio cable is not supplied with this product.
Aux out - Audio out (3.5mm mini Jack). An audio cable is not supplied with this product.
DC - Input for the AC adapter.
Connecting the AC adapter. Before inserting the AC adapter in an outlet, connect the DC plug of the supplied AC
adapter to the terminal on the rear panel.
Connecting the unit to another PentaClass (daisy chain), Induction loop devices or another audio preamplified devices
with an audio line input terminal on the connector panel.
To connect the unit to a device with an audio line output such as:
• Mobile phone • Microphone
• Tablet • DVD / VHS
• Projector • Computer
Names of Remote Control Components
Infrared Transmitter
Power ON/OFF Button
Mute Button
Volume down Button
Volume up Button
AUX channel ON/OFF Button
Bluetooth channel activation Button
Audio Preset
1
1
2
2
3
3
1
2
3
4
5
6
7
8
1
2 3
4
5
6
7
Certes PentaClass Operating Manual 11
Page 12
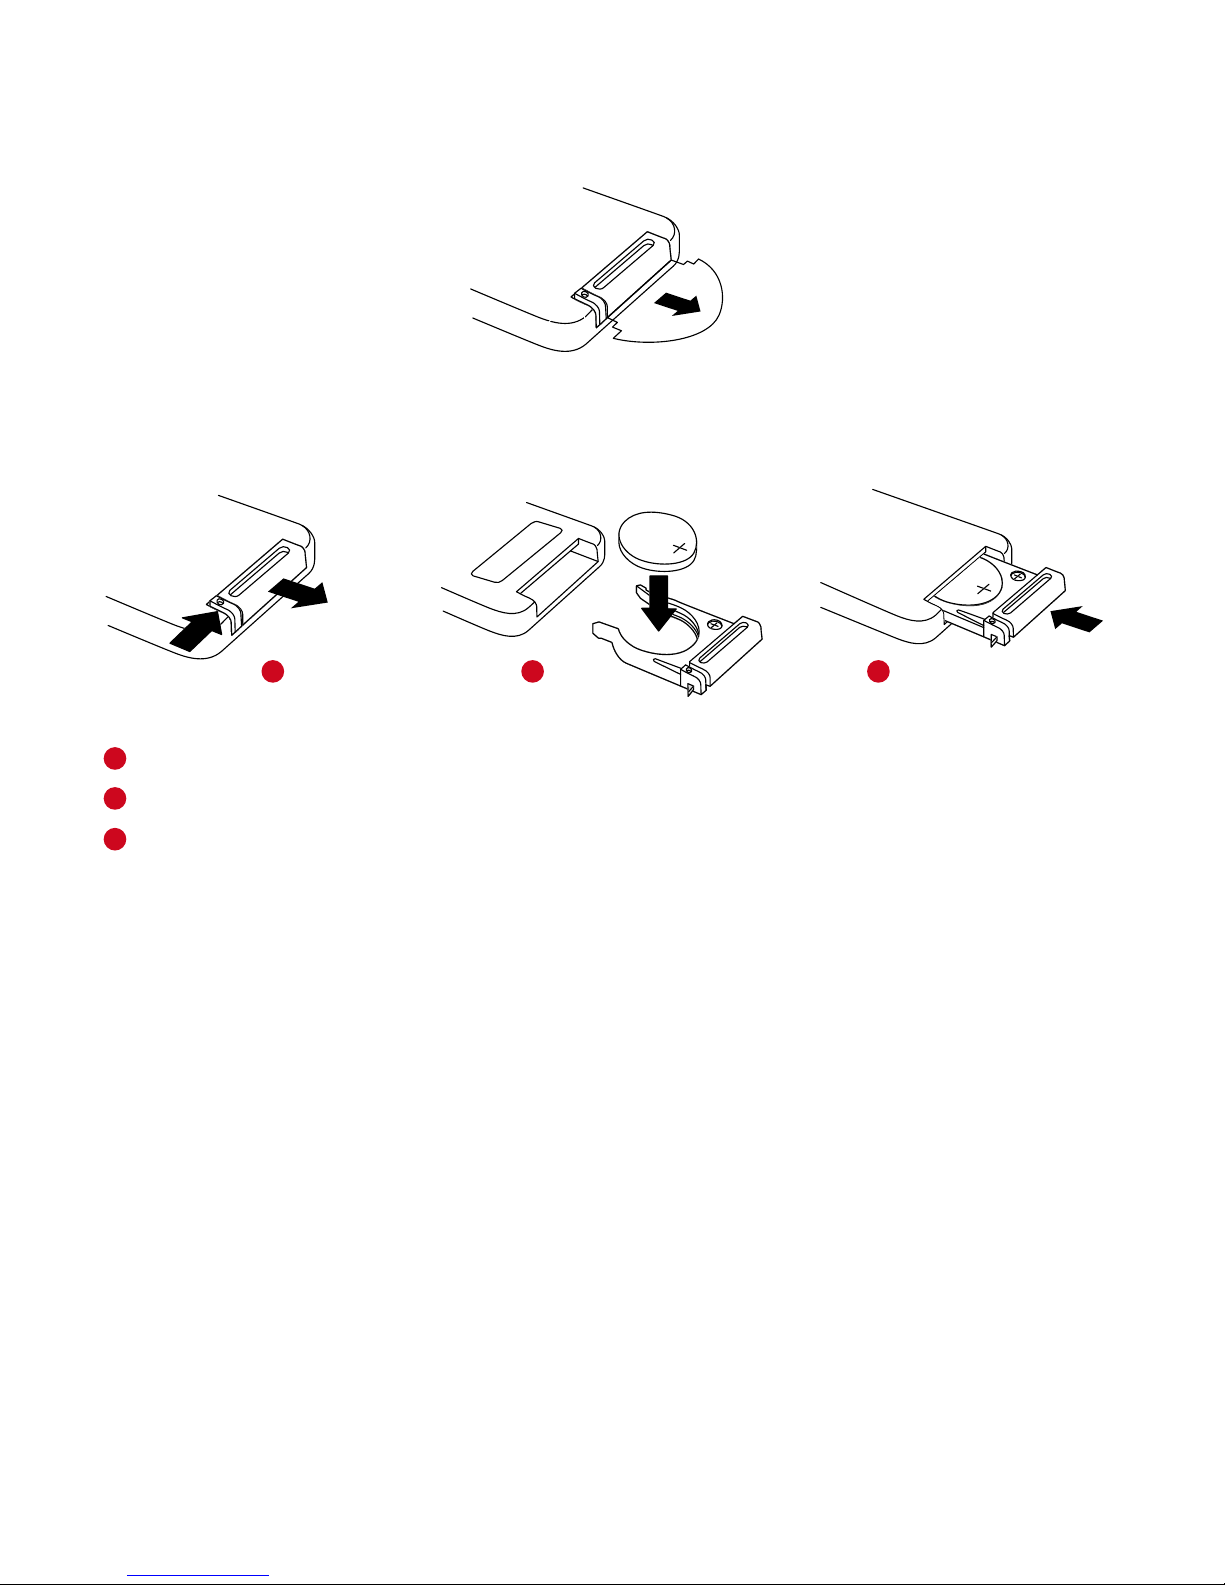
Preparation of remote control
Remove plastic insulating sheet located at the bottom of remote control.
Replacement Battery Installation
Remove the battery compartment cover by sliding the cover. Pull out the cover.
Insert the battery with the polarity “+” facing up.
Replace the cover.
CAUTION
• Use only a 3V lithium battery (CR2025).
• Ensure that you have the batteries’ polarity (+/−) aligned correctly.
• If the remote control gets wet, wipe it dry immediately.
• Avoid excessive heat and humidity.
• Do not short, heat, or disassemble batteries.
• Do not throw batteries into a fire.
• If you will not be using the remote control for a long time, remove the batteries.
• Dispose of used batteries according to your local regulations.
• Children may ingest small batteries; always keep batteries safe and out of reach of children and pets. WARNING: If a
battery is swallowed, consult a doctor immediately as this could result in asphyxiation or be an obstacle to digestion,
etc.
Remote control operating range
The remote control uses infrared transmission to control the PentaClass. It is necessary to point the remote directly at
the PentaClass. The remote will function well within a radius of about 7 meters (23 feet) and within a 140 degree angle
from the PentaClass IR sensor location level. If the PentaClass does not respond to the remote control, move it a little
closer.
The Runa Microphone
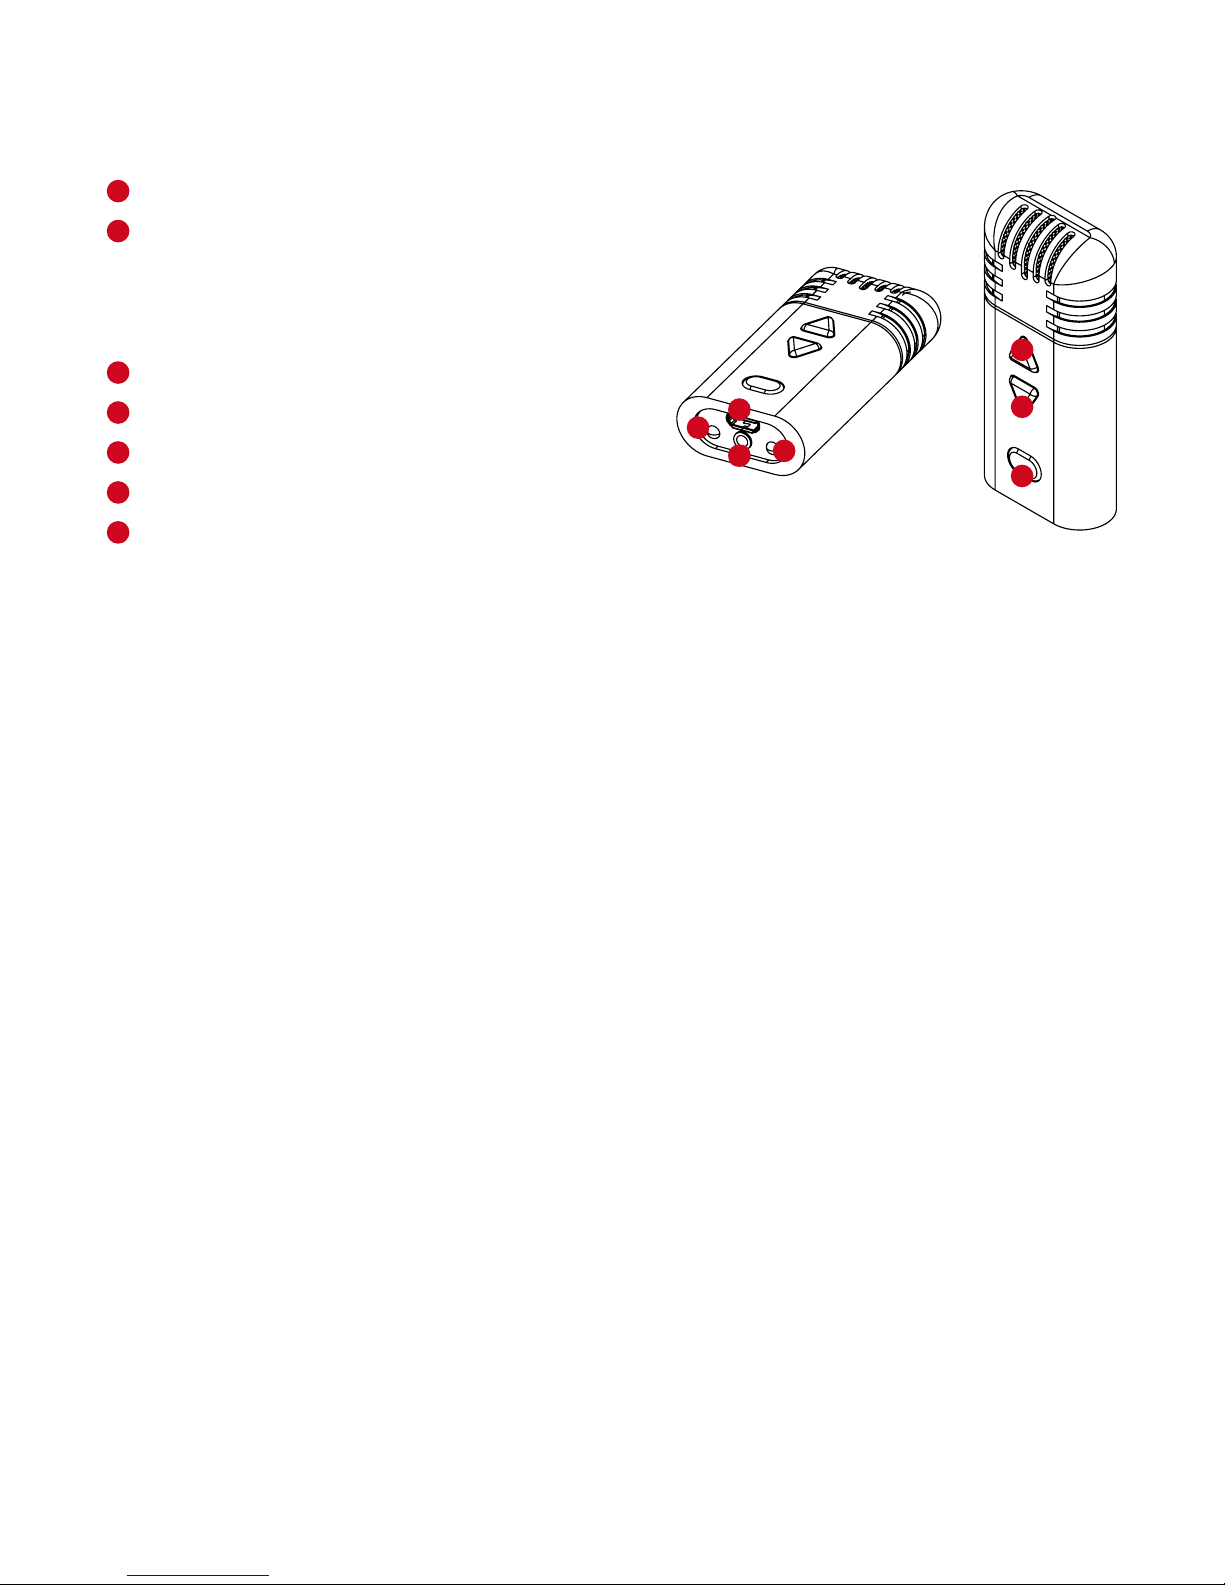
Your Runa Microphone components and button commands
Infrared Transmitter
Power ON/OFF
Hold Power ON/OFF button for a 3 seconds -
Pairs microphone with already paired PentaClasss speaker
Hold Power ON/OFF button for a 10 seconds -
Pairs microphone with a new, (non paired), PentaClasss speaker
Arrow Button 1
Arrow Button 2
LED Indication light
Micro USB charging slot
2.5mm output for the optional external over-the-ear microphone
Hold Volume up button together with Power ON/OFF button for 3 seconds - Bluetooth channel activates.
Hold Volume down button together with Power ON/OFF button for 3 seconds - AUX channel ON/OFF activates.
Preparing Your Runa Microphone
Take the microphone from the packaging and charge it before using it for the first time - the charging procedure is
described in the next paragraph.
Charging your Runa Microphone Battery
CHARGING PROCEDURE FOR MICROPHONE UNIT
Before using it for the first time, the microphone should be charged accordingly:
• Connect one end of the USB cable to the Micro USB charging slot and connect the other end of the USB cable to the
USB charger or your computer.
• If the USB charger is used, connect it to a 100-240V power supply outlet.
A fully charged microphone will last up to 7 hours of use. If microphones are used daily, they should be charged
frequently.
It will take up to 3-4 hours for the microphone to obtain a full charge.
MICROPHONE STATUS INDICATION WHILE IT’S CHARGING
• Steady orange - microphone is charging
• Steady green - microphone is fully charged
MICROPHONE STATUS INDICATION WHILE IT’S PAIRED TO THE PENTACLASS
• Blinking green - microphone is paired to the PentaClass
• Blinking red - microphone is paired to the PentaClass, but the battery is running out and it will last up to 30 minutes
• No status indication - microphone is disconnected from the PentaClass, (is not paired), or the Battery has fully
discharged
1
2
1
2
3
1 2 3
3
4
5
6
7
Certes PentaClass Operating Manual12
Page 13
The Runa Microphone
Your Runa Microphone components and button commands
Infrared Transmitter
Power ON/OFF
Hold Power ON/OFF button for a 3 seconds Pairs microphone with already paired PentaClasss speaker
Hold Power ON/OFF button for a 10 seconds Pairs microphone with a new, (non paired), PentaClasss speaker
Arrow Button 1
Arrow Button 2
LED Indication light
Micro USB charging slot
2.5mm output for the optional external over-the-ear microphone
Hold Volume up button together with Power ON/OFF button for 3 seconds - Bluetooth channel activates.
Hold Volume down button together with Power ON/OFF button for 3 seconds - AUX channel ON/OFF activates.
Preparing Your Runa Microphone
Take the microphone from the packaging and charge it before using it for the first time - the charging procedure is
described in the next paragraph.
Charging your Runa Microphone Battery
CHARGING PROCEDURE FOR MICROPHONE UNIT
Before using it for the first time, the microphone should be charged accordingly:
• Connect one end of the USB cable to the Micro USB charging slot and connect the other end of the USB cable to the
USB charger or your computer.
• If the USB charger is used, connect it to a 100-240V power supply outlet.
A fully charged microphone will last up to 7 hours of use. If microphones are used daily, they should be charged
frequently.
It will take up to 3-4 hours for the microphone to obtain a full charge.
MICROPHONE STATUS INDICATION WHILE IT’S CHARGING
• Steady orange - microphone is charging
• Steady green - microphone is fully charged
MICROPHONE STATUS INDICATION WHILE IT’S PAIRED TO THE PENTACLASS
• Blinking green - microphone is paired to the PentaClass
• Blinking red - microphone is paired to the PentaClass, but the battery is running out and it will last up to 30 minutes
• No status indication - microphone is disconnected from the PentaClass, (is not paired), or the Battery has fully
discharged
1
2
3
4
5
6
7
1
2
3
4
5
6
7
Certes PentaClass Operating Manual 13
Page 14

MICROPHONE BATTERY STATUS INDICATION CHECK
It is possible to check the battery level by pushing any button on the microphone:
• If the status indication is green - battery is charged.
• If the status indication is red - battery power is low.
• If there is no status indication - battery is fully discharged.
HOW TO STORE THE RUNA MICROPHONE
The microphone unit has Lithium-polymer battery. Do not store it in extreme temperatures, including, but not limited
to, leaving it in the hot sun. Elevated temperature and allowing the battery to sit at the 100% maximum charge for
extended periods of time will shorten your battery's life.
The Runa Microphone IR Remote Control
Operating Range
Your PentaClass microphone is multifunctional device, it can also be operated as remote control using infrared
transmission to control the PentaClass. It is necessary to point the remote directly at the PentaClass.
The remote will function well within a radius of about 7 meters (23 feet) and within a 140 degree angle from the
PentaClass IR sensor location level. If the PentaClass does not respond to the remote control, move a little closer.
Certes PentaClass Models
PentaClass A
PentaClass A is a specially designed multimedia system for classrooms with an omnidirectional 360º sound field. This
PentaClass A utilizes audio cables for delivering the audio signals to the speaker. It is suitable for classrooms or meeting
rooms where there is no need for voice amplification or wireless Bluetooth connectivity.
PentaClass A also is perfect for a daisy chain as slave speaker.
Because the PentaClass is a modular system you can make the following upgrades:
• Certes PentaClass A upgrade to Certes PentaClass AB (Bluetooth version) by ordering the additional Bluetooth Kit (part
no. 100111 Bluetooth module).
• Certes PentaClass A upgrade to Certes PentaClass AM, (Microphone version with Bluetooth). Simply purchase the
upgrade pack (part no. 106100 Microphone)
• Certes PentaClass A upgrade to Certes PentaClass Runa, (Microphone version with Bluetooth). Simply purchase the
Microphone upgrade pack (part no. 106100 Microphone) and Bluetooth Kit (part no. 100111 Bluetooth module).
NOTE
* Upgrades should only be installed by trained dealer personal or authorized repair service.
Certes PentaClass Operating Manual14
Page 15
Certes PentaClass Models
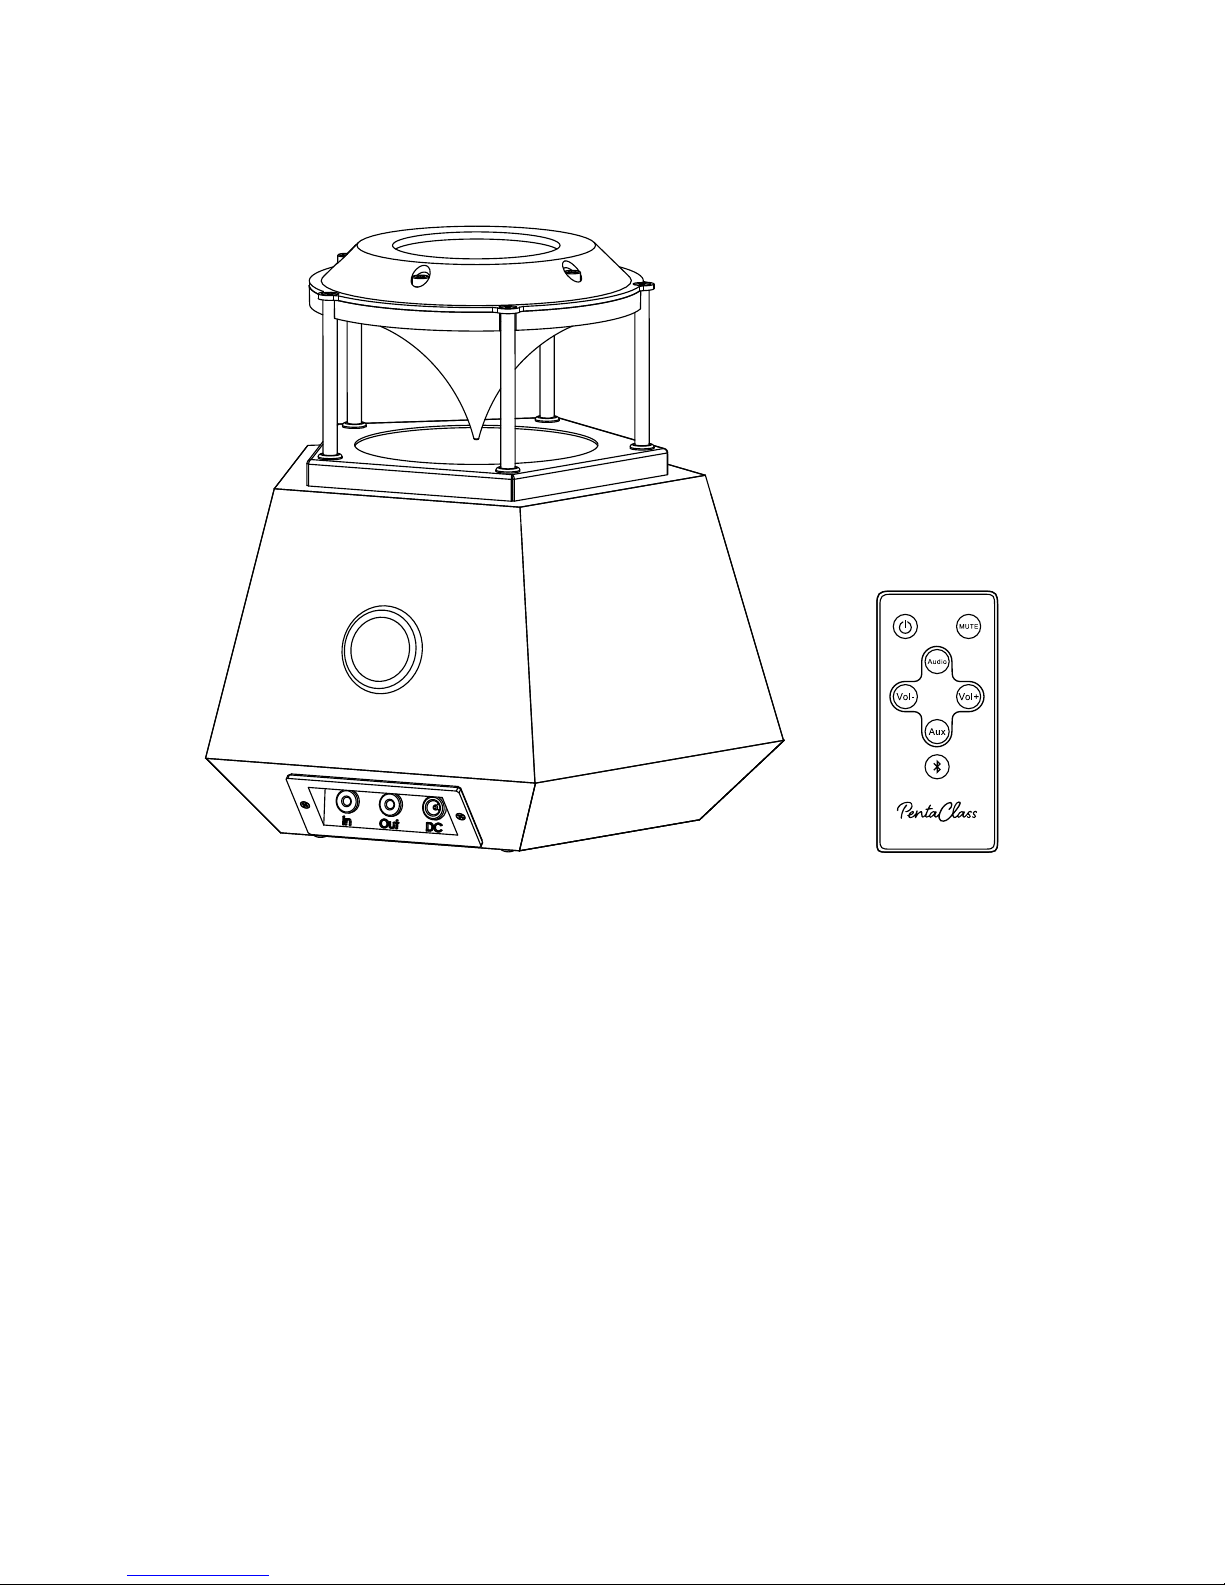
PentaClass A
PentaClass A is a specially designed multimedia system for classrooms with an omnidirectional 360º sound field. This
PentaClass A utilizes audio cables for delivering the audio signals to the speaker. It is suitable for classrooms or meeting
rooms where there is no need for voice amplification or wireless Bluetooth connectivity.
PentaClass A also is perfect for a daisy chain as slave speaker.
Because the PentaClass is a modular system you can make the following upgrades:
• Certes PentaClass A upgrade to Certes PentaClass AB (Bluetooth version) by ordering the additional Bluetooth Kit (part
no. 100111 Bluetooth module).
• Certes PentaClass A upgrade to Certes PentaClass AM, (Microphone version with Bluetooth). Simply purchase the
upgrade pack (part no. 106100 Microphone)
• Certes PentaClass A upgrade to Certes PentaClass Runa, (Microphone version with Bluetooth). Simply purchase the
Microphone upgrade pack (part no. 106100 Microphone) and Bluetooth Kit (part no. 100111 Bluetooth module).
NOTE
* Upgrades should only be installed by trained dealer personal or authorized repair service.
Certes PentaClass Operating Manual 15
Page 16
PentaClass AB
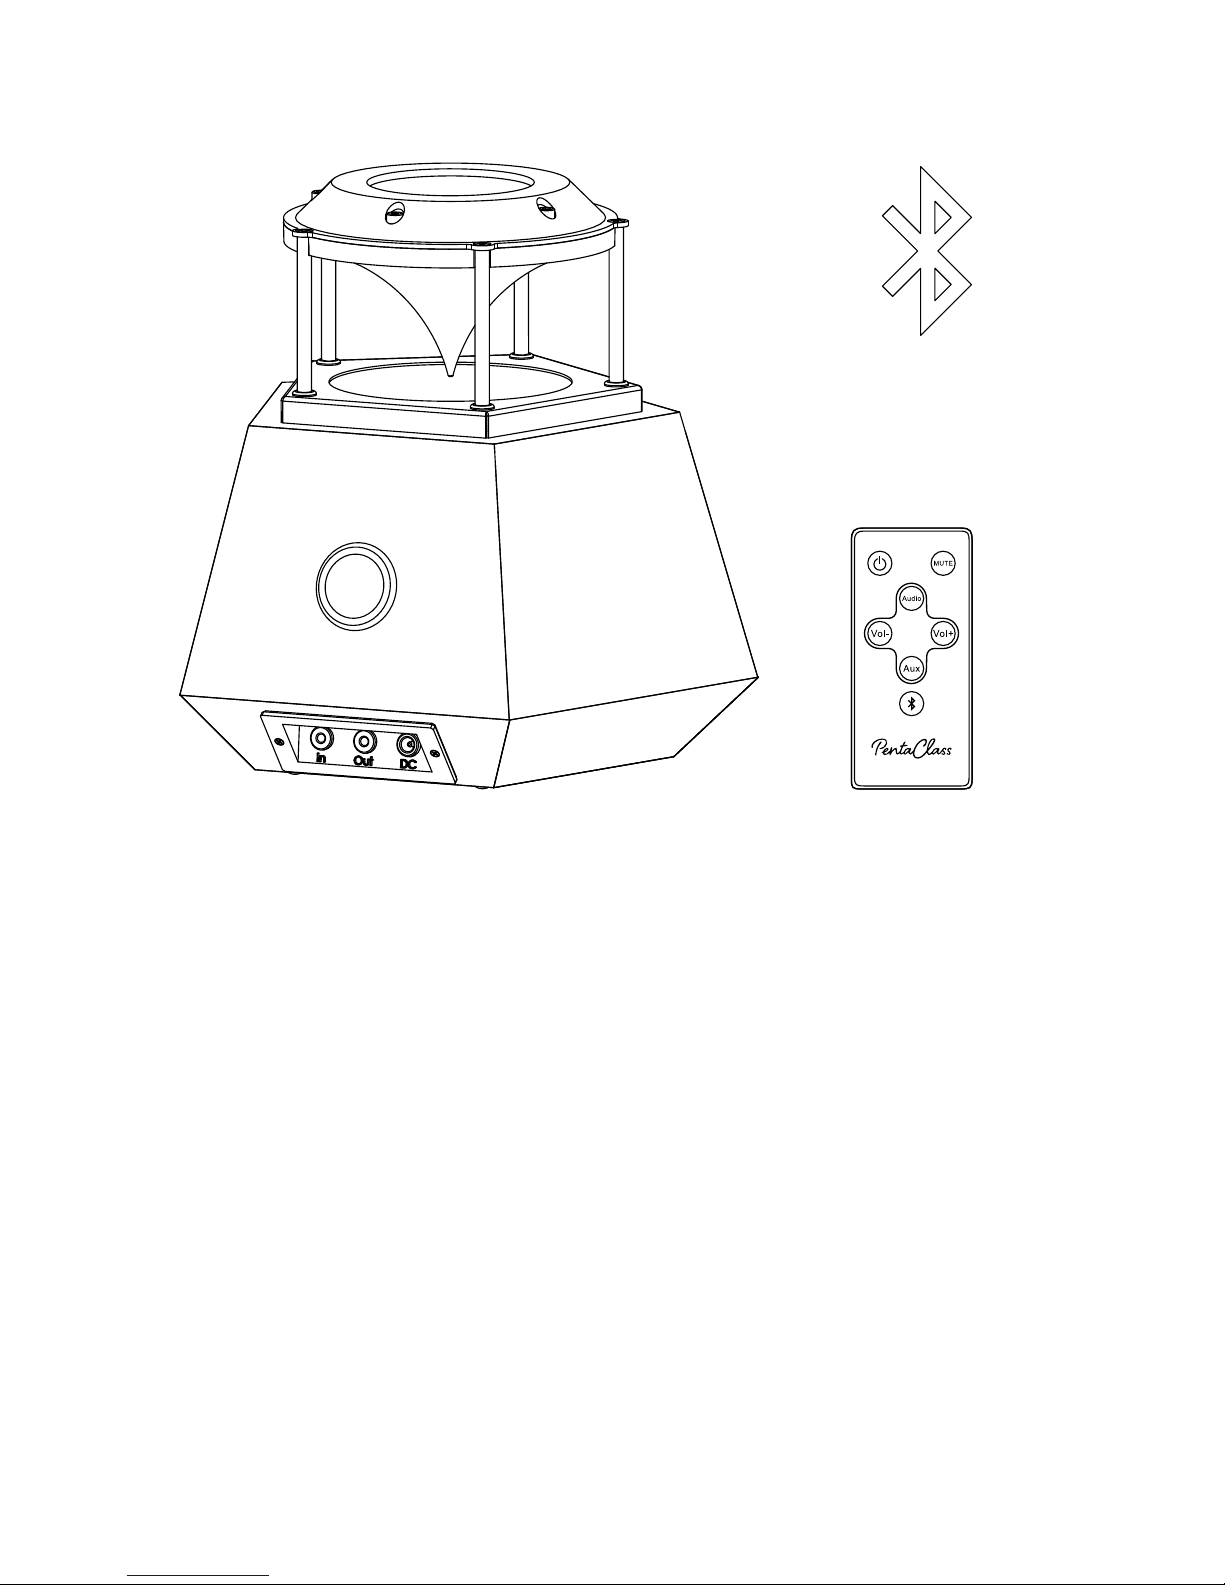
PentaClass AB is a multimedia classroom system with an omnidirectional 360º sound field. It has been designed for
both wired and wireless audio connectivity with a Bluetooth audio-ready device. PentaClass AB is the perfect solution
for contemporary users using Bluetooth-enabled devices. PentaClass AB is recommended for rooms where voice
amplification is unnecessary.
Because the PentaClass is a modular system you can make the following upgrades:
• Certes PentaClass AB upgrade to Certes PentaClassRuna, (Microphone version with Bluetooth). Simply purchase the
Microphone upgrade pack (part no. 106100 Microphone).
NOTE
Upgrades should only be installed by trained dealer personal or authorized repair service.
PentaClass Runa
The PentaClass Runa is a fully equipped, 360° omnidirectional; classroom, conference or meeting room audio system
with built-in Bluetooth and teacher's / presenters HD wireless microphone we call The Runa.
The wireless 2.4 GHz Runa microphone, (which is designed for comfortable all day use), the Bluetooth connectivity and
all the many other features allow you to experience all the benefits offered by PentaClass.
Certes PentaClass AB upgrade to Certes PentaClass Runa, (Microphone version with Bluetooth). Simply purchase the
Microphone upgrade pack (part no. 106100 Microphone).
Certes PentaClass Operating Manual16
Page 17
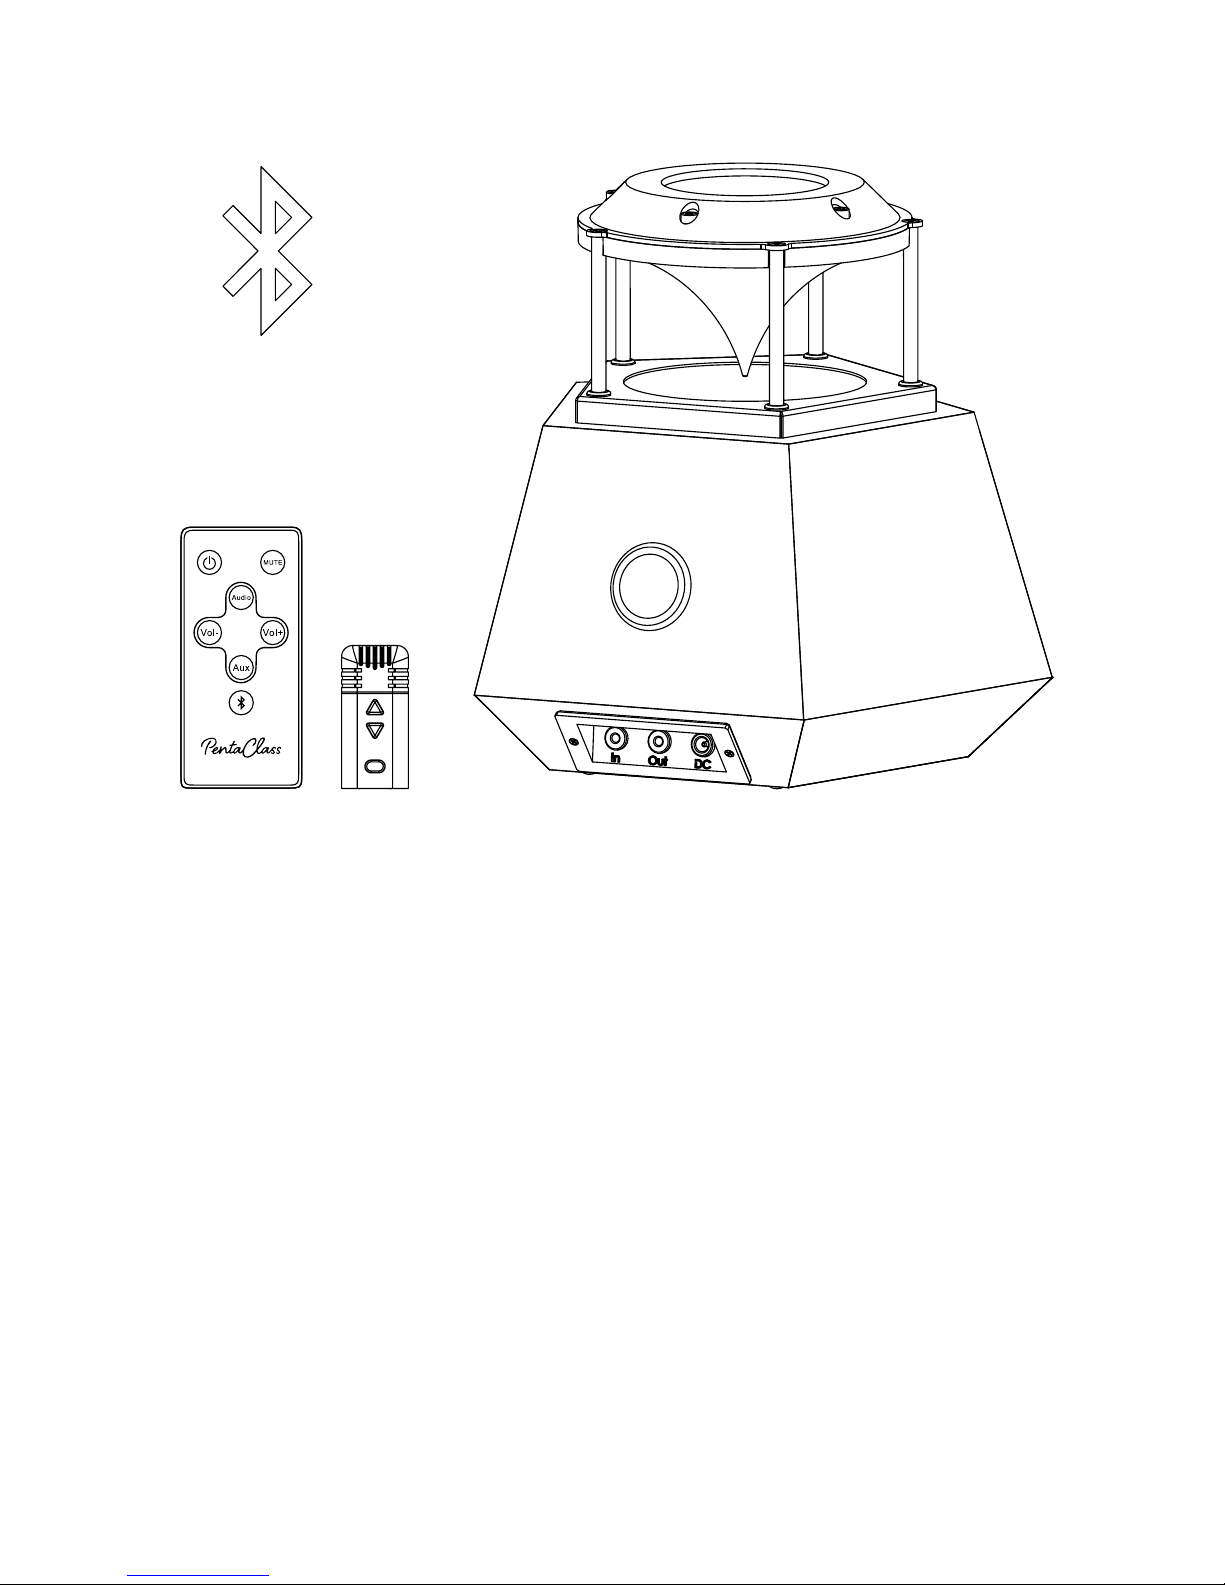
PentaClass Runa
The PentaClass Runa is a fully equipped, 360° omnidirectional; classroom, conference or meeting room audio system
with built-in Bluetooth and teacher's / presenters HD wireless microphone we call The Runa.
The wireless 2.4 GHz Runa microphone, (which is designed for comfortable all day use), the Bluetooth connectivity and
all the many other features allow you to experience all the benefits offered by PentaClass.
Certes PentaClass AB upgrade to Certes PentaClass Runa, (Microphone version with Bluetooth). Simply purchase the
Microphone upgrade pack (part no. 106100 Microphone).
Certes PentaClass Operating Manual 17
Page 18
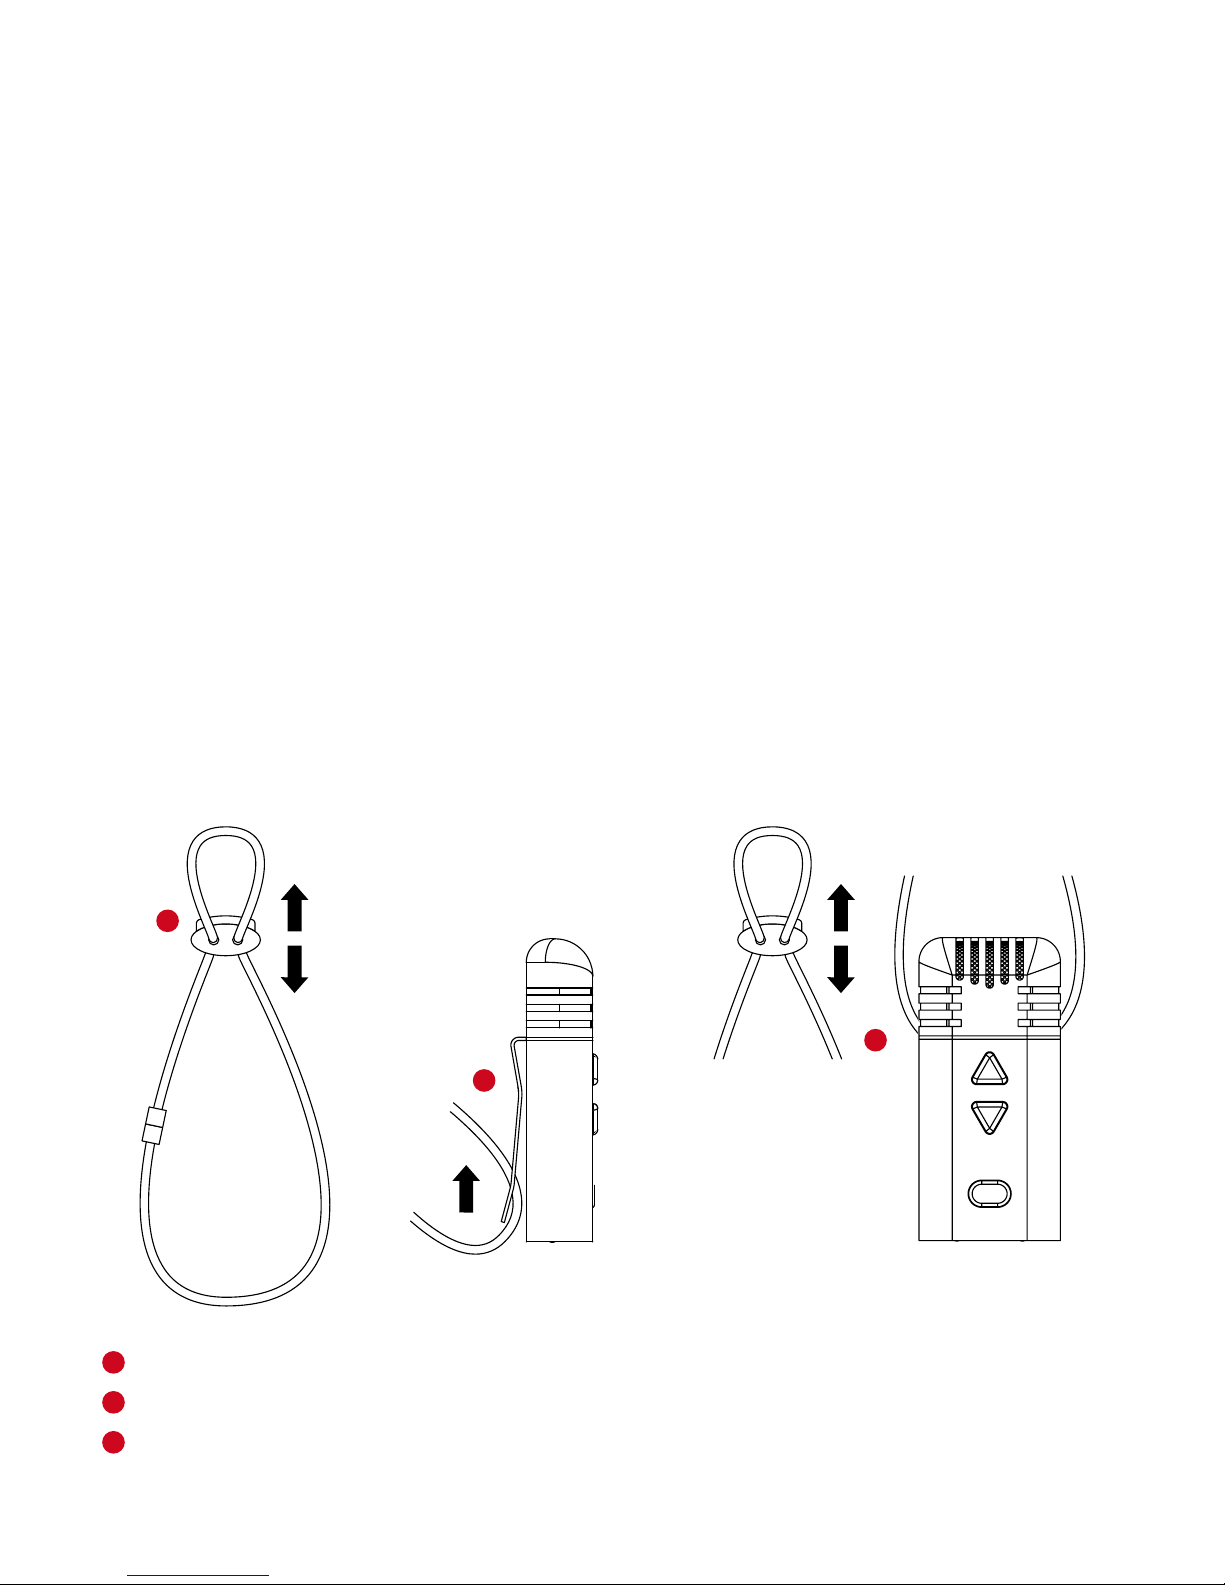
Runa microphone
Certes PentaClass Runa comes with a thumb-sized microphone/remote control. The smallest speaker’s microphone on
the market. 60x25x13mm (2.36”x0.79”x0.39”). The microphone weighs just 27 grams (0.95 ounces). Certes PentaClass
Runa comes with a thumb-sized microphone/remote control. The smallest speaker’s microphone on the market.
60x25x13mm (2.36”x0.79”x0.39”). The microphone weighs just 27 grams (0.95 ounces).
MICROPHONE FEATURES
2-in-1
The microphone has dual functionality - a microphone and a remote control.
FREQUENCY HOPPING
This ensures that only the cleanest frequency bands are automatically selected for the connection between the
microphone and PentaClass.
UN-COMPRESSED VOICE
The PentaClass microphone uses a state-of-the-art transmitter and receiver that operate in the 2.4 GHz worldwide
license-free band. Thanks to this digital transmission, you get pristine, high-definition voice reproduction.
TWO WEARING OPTIONS
Thanks to its small form factor, the microphone can be worn with a lanyard or clip. Just choose the option that suits you
best.
MICROPHONE LANYARD
The Certes Runa microphone lanyard is designed for frequent and comfortable use. Its length is adjustable and has a
safety break-away clip.
Please see the pictures describing how to attach
the lanyard to the microphone:
Adjust the length by using plastic cord lock.
Hang your Runa microphone on the lanyard using the clip.
Adjust the length so the microphone would be about 10cm away from mouth.
The safety break-away clip also can be used as a clip for easily taking the lanyard off your neck.
For better microphone performance adjust the microphone lanyard length as short as possible so the microphone is
closer to your mouth.
THE RUNA MICROPHONE FUNCTIONS
Your Runa microphone has been designed to be a HD wireless microphone, transceiver and remote control all in one
small, beautiful unit.
REMOTE CONTROL FUNCTIONALITY
When your Runa microphone is not paired with the PentaClass speaker, it can function as a remote control for the
PentaClass speaker. To send commands to the PentaClass speaker do the following:
Point the bottom of your Runa microphone towards your PentaClass Speaker.
Push the appropriate buttons on the Runa to send the commands to the PentaClass speaker as described in
paragraph 13.
NOTE: Because you are pointing the bottom of the Runa towards the PentaClass speaker in remote control mode, arrow
Button 1 serves as Volume down and arrow Button 2 serves as Volume up
MICROPHONE MODE FUNCTIONALITY
When your Runa is functioning as a microphone it will not function as a remote control for the PentaClass speaker. The
two arrow buttons on the Runa can raise and lower the volume of the Runa Microphone itself. You will not need to
point it towards the PentaClass speaker.
NOTE
In Microphone mode arrow Button 1 serves as Volume Up and arrow Button 2 serves as Volume Down. The center
power ON/OFF button disconnects pairing.
NOTE
When your Runa is connected to the PentaClass speaker, the Audio EQ is set to voice preset automatically by default.
1
1
2
2
3
3
1
2
Certes PentaClass Operating Manual18
Page 19

The safety break-away clip also can be used as a clip for easily taking the lanyard off your neck.
For better microphone performance adjust the microphone lanyard length as short as possible so the microphone is
closer to your mouth.
THE RUNA MICROPHONE FUNCTIONS
Your Runa microphone has been designed to be a HD wireless microphone, transceiver and remote control all in one
small, beautiful unit.
REMOTE CONTROL FUNCTIONALITY
When your Runa microphone is not paired with the PentaClass speaker, it can function as a remote control for the
PentaClass speaker. To send commands to the PentaClass speaker do the following:
Point the bottom of your Runa microphone towards your PentaClass Speaker.
Push the appropriate buttons on the Runa to send the commands to the PentaClass speaker as described in
paragraph 13.
NOTE: Because you are pointing the bottom of the Runa towards the PentaClass speaker in remote control mode, arrow
Button 1 serves as Volume down and arrow Button 2 serves as Volume up
MICROPHONE MODE FUNCTIONALITY
When your Runa is functioning as a microphone it will not function as a remote control for the PentaClass speaker. The
two arrow buttons on the Runa can raise and lower the volume of the Runa Microphone itself. You will not need to
point it towards the PentaClass speaker.
NOTE
In Microphone mode arrow Button 1 serves as Volume Up and arrow Button 2 serves as Volume Down. The center
power ON/OFF button disconnects pairing.
NOTE
When your Runa is connected to the PentaClass speaker, the Audio EQ is set to voice preset automatically by default.
1
2
Certes PentaClass Operating Manual 19
Page 20

Operational Description
Turning on the PentaClass
Plug the power adapter into the power input on the PentaClass.
Plug the power cord into to a 100-240V AC wall outlet.
To start the speaker push the On/Off button on the remote control.
Connectivity
All versions of the PentaClass have different connectivity options, so depending on the PentaClass system you have
purchased, please choose the correct one for your PentaClass.
Connecting to Device Using Aux Input
This type of connectivity is available for all PentaClass versions:
Connect your audio device, (phone, PC or another), using the 3.5mm mini-jack male/male cable, to the AUX input
located on the speaker's connector plate.
Start the speaker.
Play the audio from your device. Please note - it is recommended that you set the sound level to about 60% on your
device to avoid sound distortion. Control the volume by using volume up/down buttons of the PentaClass's remote
control.
Connecting to the PentaClass Using Bluetooth
Only PentaClass AB and PentaClass Runa versions have Bluetooth connectivity. The PentaClass A version has no
Bluetooth connectivity unless you have upgraded your PentaClass A version with the Bluetooth Kit (part no. 100111
Bluetooth module).
COMMON BLUETOOTH SIGNAL SOURCES
• Mobile phone • Computer
• Tablet • Other device incorporating Bluetooth technology.
To activate Bluetooth by the unit's remote control please do the following:
Turn on the speaker.
Press the Bluetooth button to activate the Bluetooth channel.
The PentaClass speaker Status indicator should start blinking in blue. This command will activate the Bluetooth
channel and it will become scanable for Bluetooth devices for 1.5 minutes.
In the list of Bluetooth devices on the Settings page of your device please find the Bluetooth device named
PentaClass-000000.... (the last 6 symbols will differ as they display the mac address of your PentaClass).
Connect your device to the PentaClass Bluetooth channel.
NOTE
• The Bluetooth channel is closed by default for security reasons.
• The Bluetooth channel cannot be opened while the PentaClass is linked to the microphone.
• There is no password for the Bluetooth connection.
• Once your Bluetooth device has established a connection to the PentaClass, it will be stored in the PentaClass'
memory. The PentaClass will remember your device.
• For security reasons the Bluetooth connection must be activated from your Bluetooth device every time you restart
the PentaClass.
• In the event that someone has made an unauthorized connection to the PentaClass, you can erase paired Bluetooth
devices from the PentaClass' memory by following these steps: While PentaClass is turned ON, open Bluetooth channel,
then push the mute button on the remote, - The PentaClass should display a white light.
• When the PentaClass is connected to an audio source via Bluetooth, the Bluetooth connection disconnects when the
microphone sends its pairing command.
Connecting the Runa Microphone to the PentaClass Speaker
MICROPHONE PAIRING
Microphone pairing is designed to be as simple as possible - just press the button on the mic and the system is ready to
use. You can use any Runa microphone with any PentaClass system in your school or facility. Just follow these steps:
If you pair your Runa microphone with the same PentaClass speaker you were paired with previously, (Pairing
Method 1):
As long as your PentaClass speaker is plugged into a wall outlet, regardless of your PentaClass' status, whether it is
turned On or Off, you can pair it with your Runa microphone.
Point the bottom of your Runa microphone towards the PentaClass speaker and HOLD the On/Off button on the
microphone for THREE seconds - The microphone's LED Indication light will illuminate green for 3 seconds and will
then change to an orange light which confirms that the command has been sent to the PentaClass.
Release microphone's On/Off button.
The status indication light on the top of the PentaClass will light Violet and then Orange or Yellow, (depending on
the Aux input status - see Mixer description), followed by 3 short beeps. This indicates that the microphone is paired
successfully.
If you pair a Runa microphone with a new PentaClass speaker, (Pairing Method 2):
As long as your PentaClass speaker is plugged into a wall outlet, regardless of your PentaClass' status, whether it is
turned On or Off, you can pair it with your Runa microphone.
Point the bottom of your Runa microphone towards the PentaClass and HOLD the On/Off button on the
microphone for TEN seconds - The microphone LED will display a green light for 3 seconds and will then change to
orange for 7 seconds, then a short Red light will confirm that the command has been sent to the PentaClass.
Release the microphone's On/Off button.
The status indication light on the PentaClass will display Violet and then Orange or Yellow (depending on Aux input
status - see Mixer description), followed by 3 short sound beeps. This means that the microphone is paired
successfully.
NOTE
• Your PentaClass microphone can only keep the last PentaClass speaker pairing data in its memory, so if you use
multiple PentaClass speakers with one microphone, please use Pairing Method 2 so that you are not pairing with the
last paired PentaClass speaker.
• When the PentaClass is connected to the audio source via Bluetooth, the Bluetooth connection will stop when the
microphone sends a pairing command.
• You can use multiple PentaClass microphones per building since there is no interference between two rooms /
auditoriums next to each other and every microphone pairs point-to-point to the correct PentaClass speaker.
• The Runa microphone's range is 15m, (45'), and has a frequency hopping feature, but in Wi-Fi busy environments the
range can be decreased. Please check carefully to be certain that the local Wi-Fi network doesn’t interfere with a paired
PentaClass system before installation.
• If the link is lost between the microphone and PentaClass speaker the radio module will try to re-establish the
connection within 15 seconds.
1
2
3
1
2
3
1
2
3
A
B
C
D
A
B
C
D
4
5
Certes PentaClass Operating Manual20
Page 21

• There is no password for the Bluetooth connection.
• Once your Bluetooth device has established a connection to the PentaClass, it will be stored in the PentaClass'
memory. The PentaClass will remember your device.
• For security reasons the Bluetooth connection must be activated from your Bluetooth device every time you restart
the PentaClass.
• In the event that someone has made an unauthorized connection to the PentaClass, you can erase paired Bluetooth
devices from the PentaClass' memory by following these steps: While PentaClass is turned ON, open Bluetooth channel,
then push the mute button on the remote, - The PentaClass should display a white light.
• When the PentaClass is connected to an audio source via Bluetooth, the Bluetooth connection disconnects when the
microphone sends its pairing command.
Connecting the Runa Microphone to the PentaClass Speaker
MICROPHONE PAIRING
Microphone pairing is designed to be as simple as possible - just press the button on the mic and the system is ready to
use. You can use any Runa microphone with any PentaClass system in your school or facility. Just follow these steps:
If you pair your Runa microphone with the same PentaClass speaker you were paired with previously, (Pairing
Method 1):
As long as your PentaClass speaker is plugged into a wall outlet, regardless of your PentaClass' status, whether it is
turned On or Off, you can pair it with your Runa microphone.
Point the bottom of your Runa microphone towards the PentaClass speaker and HOLD the On/Off button on the
microphone for THREE seconds - The microphone's LED Indication light will illuminate green for 3 seconds and will
then change to an orange light which confirms that the command has been sent to the PentaClass.
Release microphone's On/Off button.
The status indication light on the top of the PentaClass will light Violet and then Orange or Yellow, (depending on
the Aux input status - see Mixer description), followed by 3 short beeps. This indicates that the microphone is paired
successfully.
If you pair a Runa microphone with a new PentaClass speaker, (Pairing Method 2):
As long as your PentaClass speaker is plugged into a wall outlet, regardless of your PentaClass' status, whether it is
turned On or Off, you can pair it with your Runa microphone.
Point the bottom of your Runa microphone towards the PentaClass and HOLD the On/Off button on the
microphone for TEN seconds - The microphone LED will display a green light for 3 seconds and will then change to
orange for 7 seconds, then a short Red light will confirm that the command has been sent to the PentaClass.
Release the microphone's On/Off button.
The status indication light on the PentaClass will display Violet and then Orange or Yellow (depending on Aux input
status - see Mixer description), followed by 3 short sound beeps. This means that the microphone is paired
successfully.
NOTE
• Your PentaClass microphone can only keep the last PentaClass speaker pairing data in its memory, so if you use
multiple PentaClass speakers with one microphone, please use Pairing Method 2 so that you are not pairing with the
last paired PentaClass speaker.
• When the PentaClass is connected to the audio source via Bluetooth, the Bluetooth connection will stop when the
microphone sends a pairing command.
• You can use multiple PentaClass microphones per building since there is no interference between two rooms /
auditoriums next to each other and every microphone pairs point-to-point to the correct PentaClass speaker.
• The Runa microphone's range is 15m, (45'), and has a frequency hopping feature, but in Wi-Fi busy environments the
range can be decreased. Please check carefully to be certain that the local Wi-Fi network doesn’t interfere with a paired
PentaClass system before installation.
• If the link is lost between the microphone and PentaClass speaker the radio module will try to re-establish the
connection within 15 seconds.
A
B
C
D
A
B
C
D
Certes PentaClass Operating Manual 21
Page 22

DISCONNECTING MICROPHONE
To disconnect the microphone from the PentaClass just push the On/Off button on the microphone -> the microphone
will disconnect from the PentaClass but the PentaClass will remain ON.
Power Saving Mode
To save on power, the Certes PentaClass audio system has an automatic sleep function that engages after 20 minutes of
inactivity. The Runa microphone will go into automatic sleep mode when it is not linked to the PentaClass speaker for a
1 minute.
Channel Mixer and Status Indication
System status indication
System status indication is a feature that allows you to determine your PentaClass' status. The indicator light is located
on the top of the PentaClass speaker. Following are the various colors and the status they represent.
LIST OF SYSTEM STATUS INDICATION LIGHTS:
• None - PentaClass is turned OFF.
• Any color - PentaClass is tuned ON.
• White - indicates that the PentaClass settings are being reset or that it has just been plugged in to a power outlet but
is not yet turned ON.
• Green - default status indication that denotes the PentaClass is turned ON and the AUX channel is opened.
• Red - Indicates that the AUX channel is turned off. It is recommended that you close the AUX channel when the
PentaClass is connected to a long audio cable that produces a buzzing sound when the cable is not connected to an
audio source.
• Blue - The PentaClass is connected to a Bluetooth device and the AUX channel is turned Off.
• Orange - The microphone is connected to the PentaClass and the Aux channel is turned Off.
• Bright Blue - The PentaClass is connected to a Bluetooth device and the AUX channel is turned On.
• Yellow - The microphone is connected to the PentaClass and the Aux channel is turned On.
• Violet - Indicates that the PentaClass is receiving an IR, (Infrared), signal from the remote control unit.
• Blinking any colour - Mute function is activated.
There is also an Audio preset visual signal described on (› page 24).
Channel Mixer
MIXER STATUS INDICATION
The PentaClass can mix 2 channels simultaneously:
• Aux in + Bluetooth (AB and Runa models only)
• Aux in + Microphone (Runa model only)
The Aux in channel can be turned off by pressing the AUX button on the remote control (› page 12).
To display the status of any channel activity, every channel has its own color indication displayed on the top of the
PentaClass speaker:
NOTE
Bluetooth and microphone channels cannot be operated simultaneously to avoid conflicting signals.
Volume Adjustment
There are two methods of adjusting volume:
Primary PentaClass amplifier volume adjustment - this can be controlled by using the remote control or
microphone volume up and down buttons
Audio source and microphone volume adjustment - This can be controlled by the audio source device or the
microphone.
NOTE
• When the PentaClass amplifier exceeds 80% of it’s volume the bass is automatically decreased to prevent audio
distortion.
• It’s recommended you set your audio source volume to about 60% and then control the PentaClass's volume by using
the remote control.
• When the PentaClass is turned On for the first time, or after reconnecting to a power outlet, the volume resets to the
default level. Be careful to decrease your audio source volume level to prevent speaker damage before turning on
the PentaClass speaker.
• The PentaClass has DRC - Dynamic Range Compression which helps prevent the speaker from being damaged if the
music volume becomes too high.
CAUTION
Protect your hearing: Do not listen to the PentaClass at full volume for a long period of time.
Feedback Cancellation
For better performance it is recommended that you locate the PentaClass speaker as far away as possible from the
person using the microphone. If you get distracting feedback from the PentaClass speaker just reduce the microphone
volume. In some environments where loud sound near the person speaking is unavoidable it is recommended that you
use the optional unidirectional external over-the-ear microphone. This comfortable over-the-ear microphone can be
connected to your Runa microphone by plugging it into the 2.5mm audio input located at the bottom of your Runa
microphone. When the external microphone is being used the Runa serves as a tiny wireless microphone transceiver
and can be put conveniently into your pocket if you wish.
1
2
Certes PentaClass Operating Manual22
Page 23

To display the status of any channel activity, every channel has its own color indication displayed on the top of the
PentaClass speaker:
NOTE
Bluetooth and microphone channels cannot be operated simultaneously to avoid conflicting signals.
Volume Adjustment
There are two methods of adjusting volume:
Primary PentaClass amplifier volume adjustment - this can be controlled by using the remote control or
microphone volume up and down buttons
Audio source and microphone volume adjustment - This can be controlled by the audio source device or the
microphone.
NOTE
• When the PentaClass amplifier exceeds 80% of it’s volume the bass is automatically decreased to prevent audio
distortion.
• It’s recommended you set your audio source volume to about 60% and then control the PentaClass's volume by using
the remote control.
• When the PentaClass is turned On for the first time, or after reconnecting to a power outlet, the volume resets to the
default level. Be careful to decrease your audio source volume level to prevent speaker damage before turning on
the PentaClass speaker.
• The PentaClass has DRC - Dynamic Range Compression which helps prevent the speaker from being damaged if the
music volume becomes too high.
CAUTION
Protect your hearing: Do not listen to the PentaClass at full volume for a long period of time.
Feedback Cancellation
For better performance it is recommended that you locate the PentaClass speaker as far away as possible from the
person using the microphone. If you get distracting feedback from the PentaClass speaker just reduce the microphone
volume. In some environments where loud sound near the person speaking is unavoidable it is recommended that you
use the optional unidirectional external over-the-ear microphone. This comfortable over-the-ear microphone can be
connected to your Runa microphone by plugging it into the 2.5mm audio input located at the bottom of your Runa
microphone. When the external microphone is being used the Runa serves as a tiny wireless microphone transceiver
and can be put conveniently into your pocket if you wish.
Aux
BT
Mic
Aux
Green
Bright blue
Yellow
BT
Bright Blue
Blue
Not present
Mic
Yellow
Not present
Orange
1
2
Certes PentaClass Operating Manual 23
Page 24

Audio Presets
This function allows you to select pre-equalized audio settings. The PentaClass has 4 audio presets for various usage
scenarios and better sound performance:
• Multimedia - is the default preset tuned for multimedia as such as videos or movies
• Voice - tuned for voice frequency
• Music - tuned for music listening
• Bass - tuned to emphasize low frequencies
To indicate the active preset the PentaClass status indicator will flash a particular number of times to denote the chosen
preset when you are switching between presets:
• Multimedia x 1 • Music x 3
• Voice x 2 • Bass mode x 4
System Reset
Bluetooth Reset
You can erase a paired Bluetooth enabled device from the PentaClass by following these steps:
While PentaClass is turned ON, open the Bluetooth channel (› page 20) - The System indicator will blink blue.
Then push the mute button (› page 11), - Your PentaClass will display a white light that confirms the Bluetooth reset
has been successful.
After resetting the Bluetooth settings, all paired devices will be erased from the Bluetooth module memory. After a
Bluetooth reset on the PentaClass you will be need to delete the previously paired PentaClass device in your mobile
phone, iPad, tablet or other Bluetooth enabled device.
To pair your Bluetooth enabled device again just repeat the simple Bluetooth pairing steps (› page 20).
System Setting Reset
You can reset your PentaClass system settings to the factory default by following these steps:
Be sure the PentaClass is turned OFF, (Status indicator is not illuminated), but the PentaClass is connected to a
power outlet.
While the PentaClass is turned OFF push the Bluetooth channel activation button on the remote control (› page 11),
- The PentaClass will display a white light.
Your PentaClass has now been reset to its factory settings.
Installation
Determine Speaker Location
The PentaClass speaker has three options for installation:
The PentaClass speaker should be placed on a surface at least 0.7 meter, (2.5'), from the floor. Choose a location as far as
possible away from the speaker who will be using the microphone, (PentaClass Model Runa model). Choose a location
with the clearest direct line of sight, without obstacles such as furniture, walls, people, etc. between the PentaClass
speaker and the microphone for best performance. We recommend placing or mounting your PentaClass speaker in
the middle of the room where people are seated. If you like you can choose a location near the projector in order to
share the same power source.
NOTE
Place the PentaClass speaker away from direct heat,
high humidity or physical obstructions. Do not place the
speaker near a projector exhaust port or fan. The hot air from the
projector can cause overheating and failure of your PentaClass speaker.
A
B
A
B
Certes PentaClass Operating Manual24
Page 25
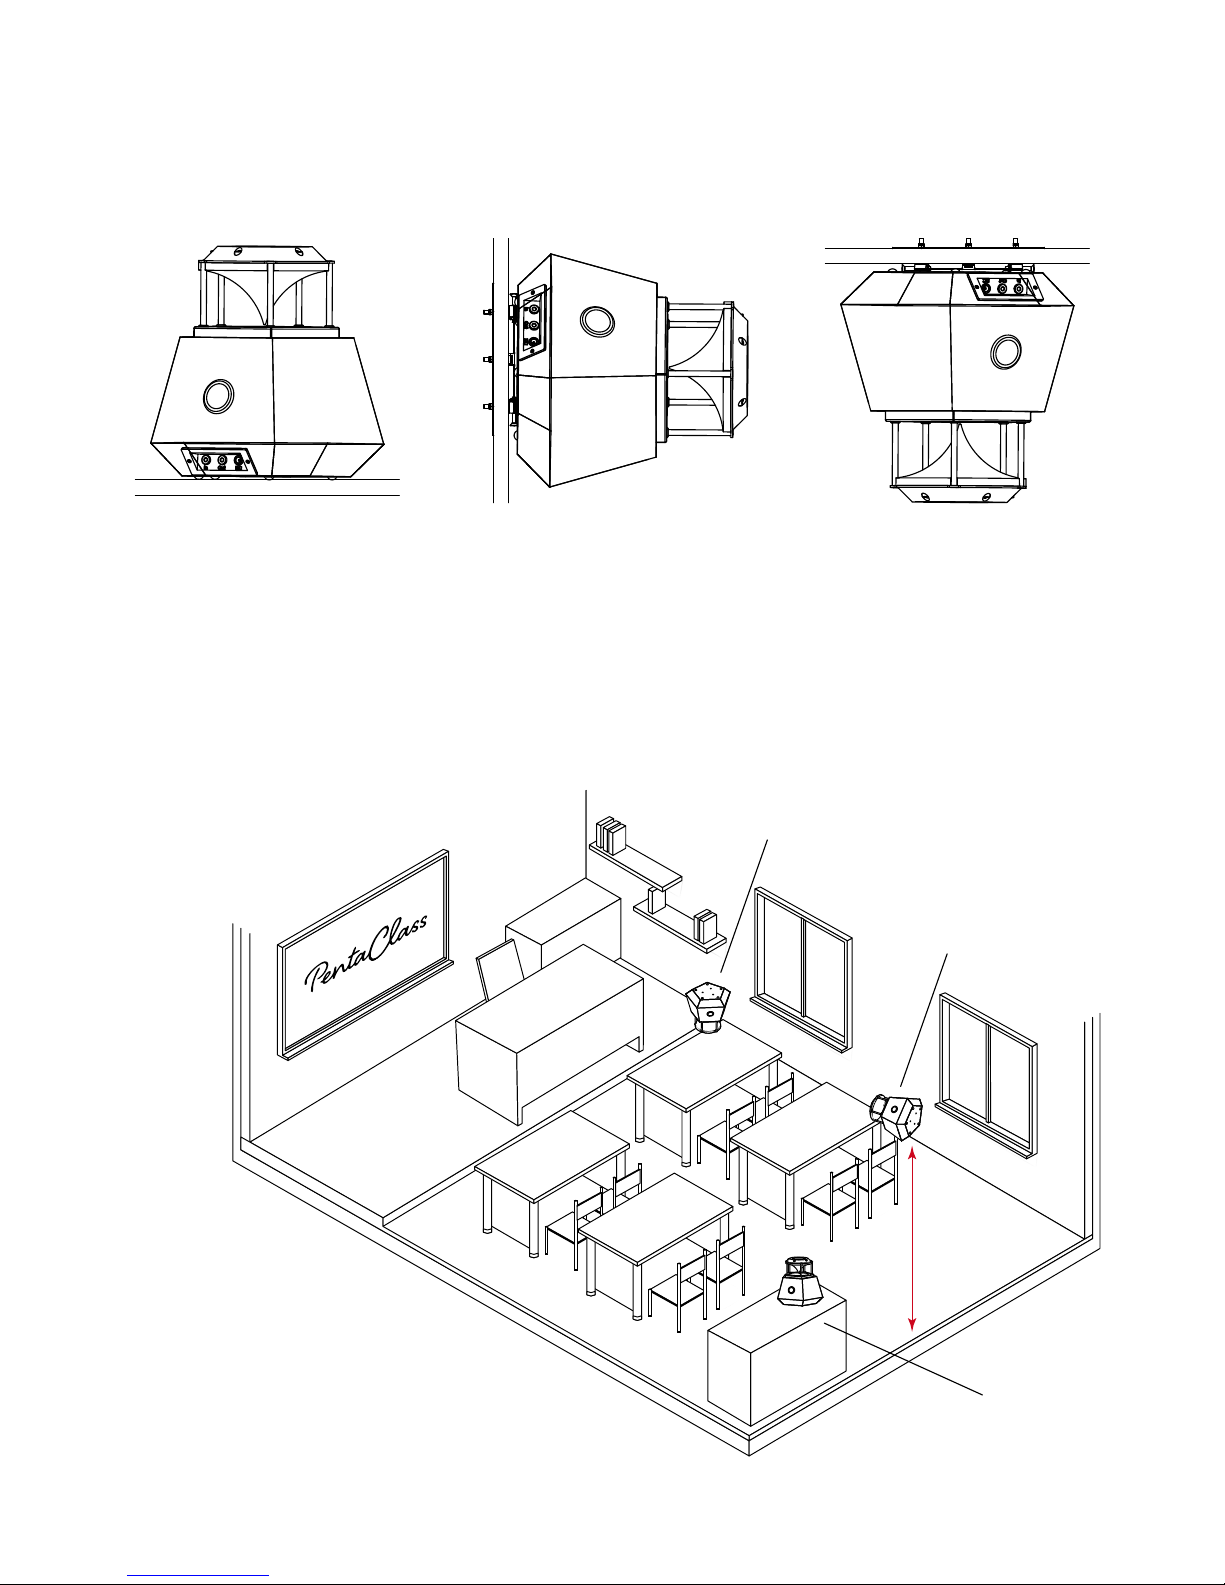
Installation
Determine Speaker Location
The PentaClass speaker has three options for installation:
The PentaClass speaker should be placed on a surface at least 0.7 meter, (2.5'), from the floor. Choose a location as far as
possible away from the speaker who will be using the microphone, (PentaClass Model Runa model). Choose a location
with the clearest direct line of sight, without obstacles such as furniture, walls, people, etc. between the PentaClass
speaker and the microphone for best performance. We recommend placing or mounting your PentaClass speaker in
the middle of the room where people are seated. If you like you can choose a location near the projector in order to
share the same power source.
NOTE
Place the PentaClass speaker away from direct heat,
high humidity or physical obstructions. Do not place the
speaker near a projector exhaust port or fan. The hot air from the
projector can cause overheating and failure of your PentaClass speaker.
Place it on the table. Mount it on a wall. Mount it on the ceiling.
Min 0.7m
Good placement
on a table
Good placement
on the wall
Best placement
on the ceiling
Certes PentaClass Operating Manual 25
Page 26
Instalation materials / tools needed
• Drill with 4 and 6mm bit
• Screw driver
• Flange and Ceiling Bracket
• Safety wire
• Anchors: Needed for mounting on drywall (3x)
• Screws: M4x14, Countersunk head screw DIN 965 (3x)
• Screws: wood screws or screws appropriate for anchors (3x)
• For False ceiling: Plate for false ceiling, M4x30, Countersunk head screw DIN 965 (3x) and M4 ISO7040 Nylon (5x)
Safety Rules for Installation
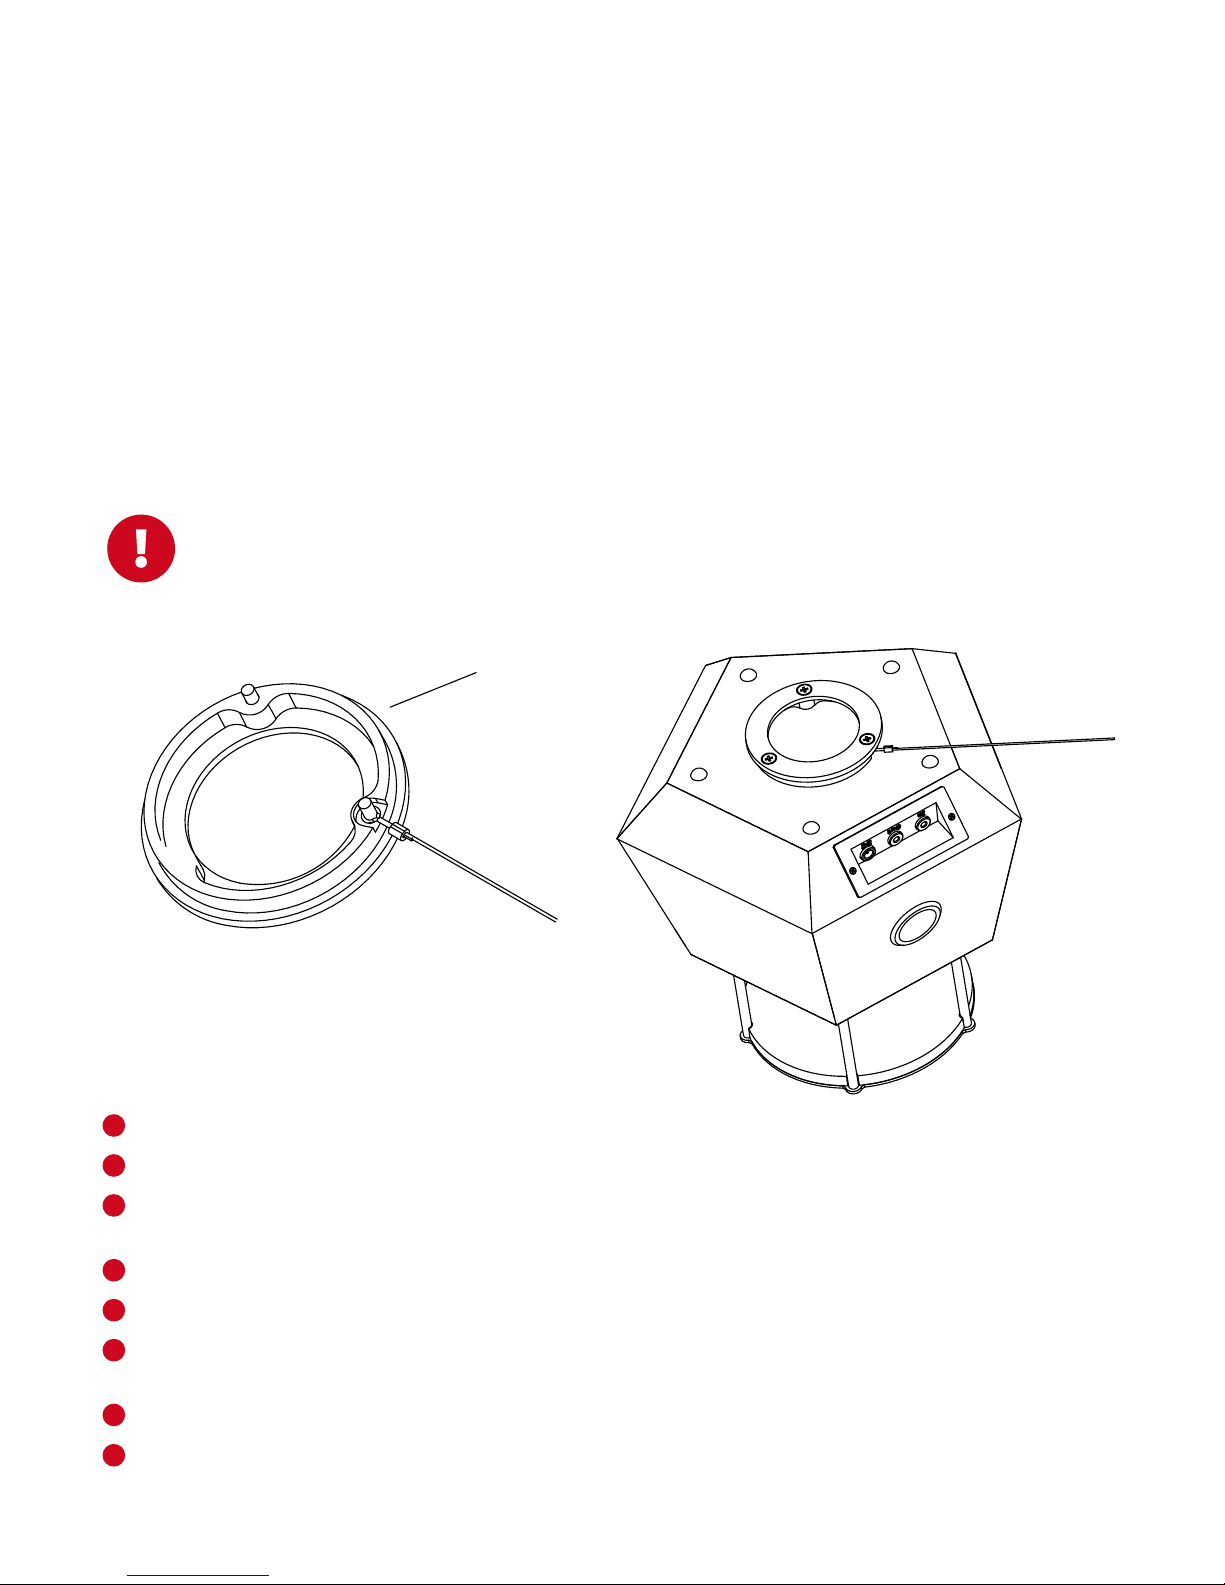
Use the suspension wire to be sure the speaker is installed safely.
Always attach the safety wire to the speaker as shown in the picture below. Affix the safety wire to a
secured location like a pipe or embedded hook.
Mounting on the ceiling
Use the ceiling bracket as a template to mark the holes on the surface.
If installing on concrete, drill three holes with a 6mm or 0.24" diameter drill and plug in dowels (anchors).
Fasten the ceiling bracket using the appropriate screws for the ceiling surface material, (i.e.; wood, metal or plaster
screws).
Use screws M4x14, Countersunk head screw DIN 965 (3x) to fasten flange to the speaker.
Insert the groove of the flange into the bracket.
When the PentaClass is inserted into the bracket, turn the PentaClass so that the power and audio cables can be
inserted easily.
Tighten the two fixation screws from sides.
Use the safety wire to be sure the PentaClass speaker will not fall.
Mounting Procedure for a Suspended Ceiling
Use the Ceiling Plate as a template to mark hole locations on the suspended ceiling tile.
PLEASE NOTE
Position the ceiling plate along the corner of the ceiling tile.
Drill three holes in ceiling tile with 4mm or 0.157" diameter drill.
Fasten ceiling bracket to the ceiling plate by using screws M4x30.
Use screws M4x14, Countersunk head screw DIN 965 (3x) to fasten flange to the speaker.
Put the suspended ceiling tile back in place.
Insert the groove of the flange into the bracket.
When the PentaClass is inserted into the bracket, turn the PentaClass to the best position for inserting the power
and audio cables.
Tighten two fixation screws from the sides.
Use the safety wire to insure that the
PentaClass speaker is secure.
1
2
3
4
5
6
7
8
1
2
3
4
5
6
7
8
9
Flange
Certes PentaClass Operating Manual26
Page 27
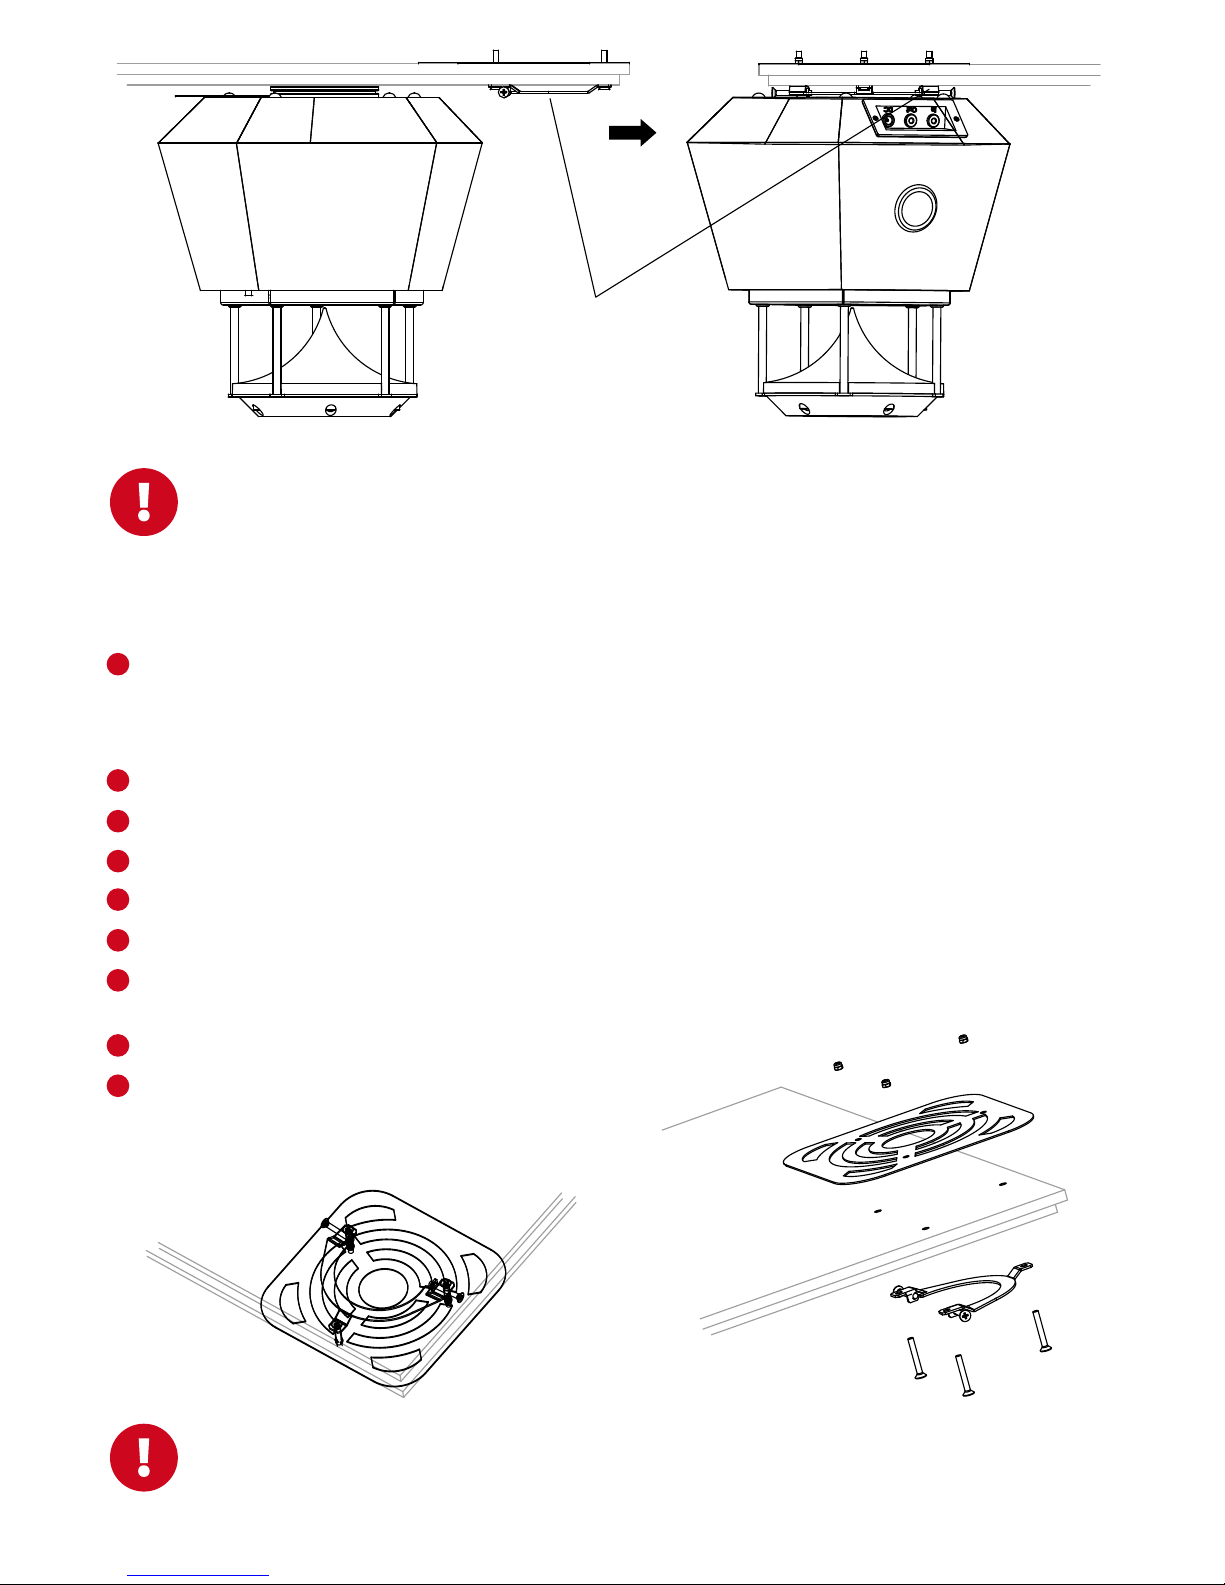
Always attach the safety wire to the speaker as shown in the picture on page 26. Carefully attach the
other end of the safety wire to secure surface with the proper fixation screw.
Mounting Procedure for a Suspended Ceiling
Use the Ceiling Plate as a template to mark hole locations on the suspended ceiling tile.
PLEASE NOTE
Position the ceiling plate along the corner of the ceiling tile.
Drill three holes in ceiling tile with 4mm or 0.157" diameter drill.
Fasten ceiling bracket to the ceiling plate by using screws M4x30.
Use screws M4x14, Countersunk head screw DIN 965 (3x) to fasten flange to the speaker.
Put the suspended ceiling tile back in place.
Insert the groove of the flange into the bracket.
When the PentaClass is inserted into the bracket, turn the PentaClass to the best position for inserting the power
and audio cables.
Tighten two fixation screws from the sides.
Use the safety wire to insure that the
PentaClass speaker is secure.
Always attach the safety wire to the speaker as shown in the picture in page 26. Carefully affix the other
end of the safety wire to a secure surface with the proper fixation screw.
1
2
3
4
5
6
7
8
9
Fixation screws (x2)
Click!
Ceiling plate
Ceiling bracket
Fixation screws (x2)
Certes PentaClass Operating Manual 27
Page 28
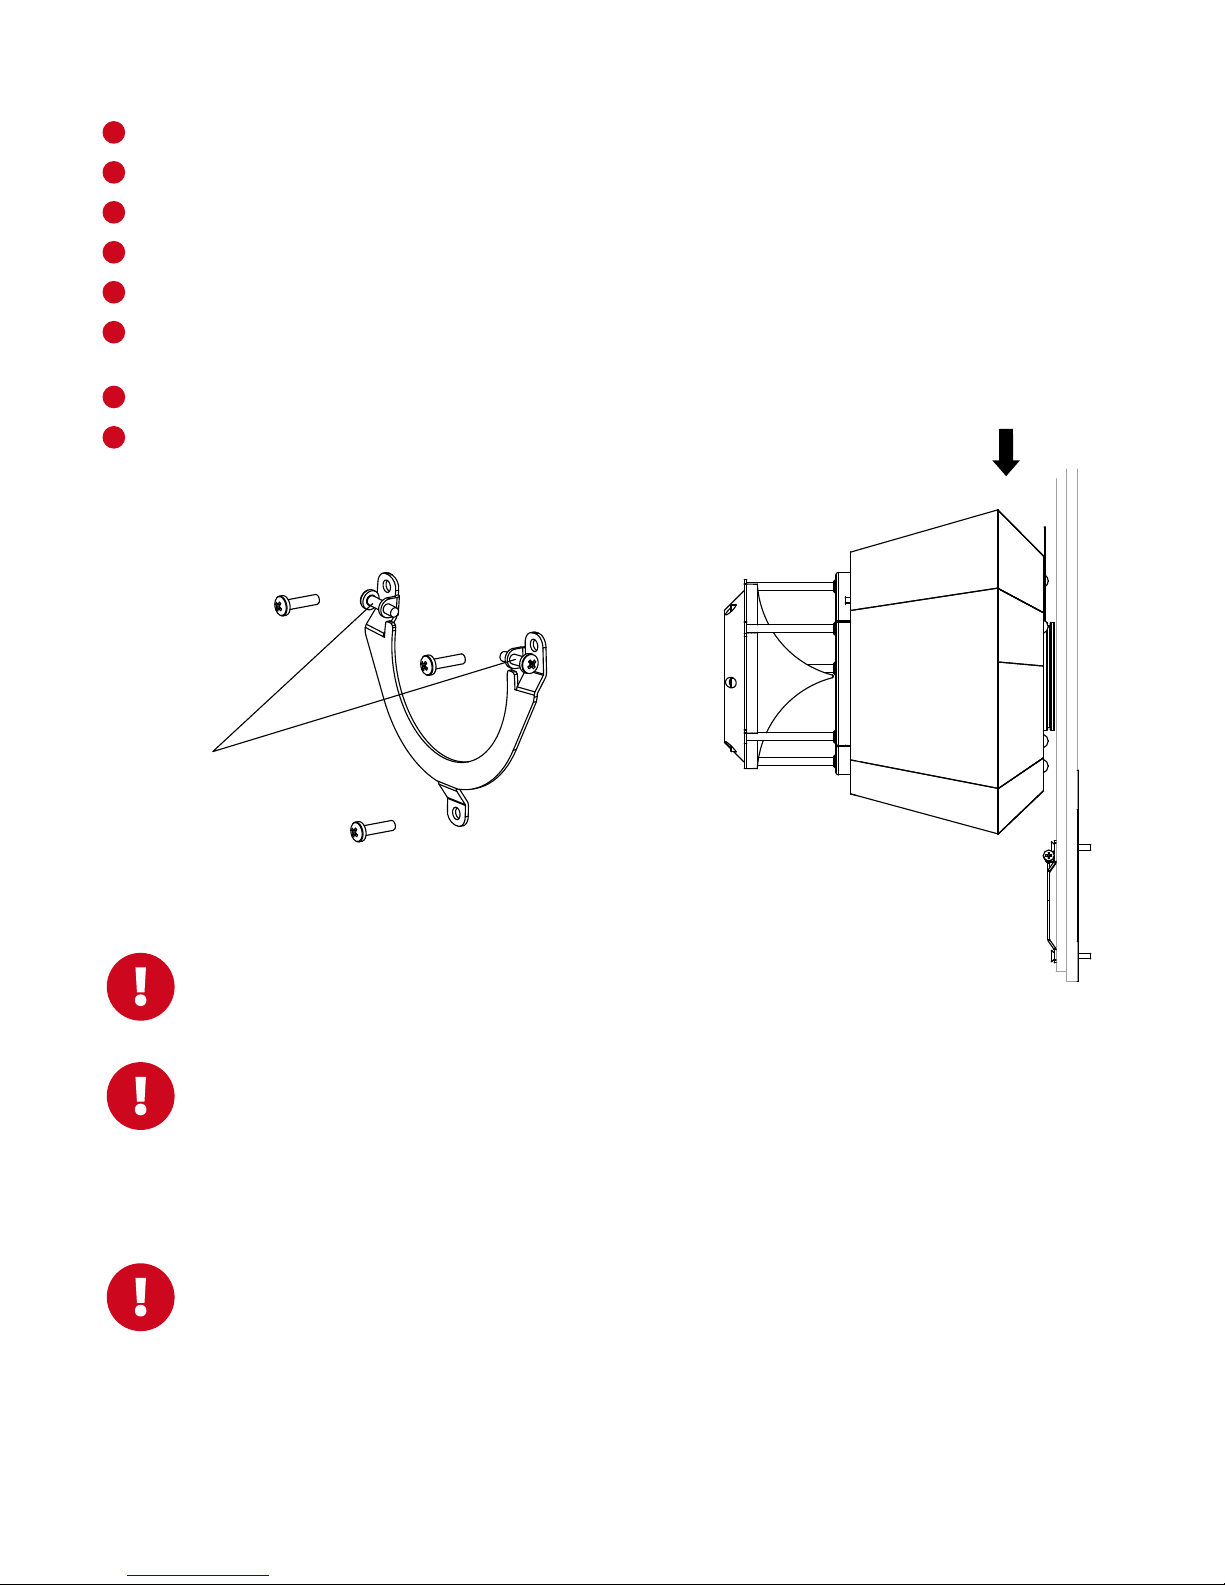
1
2
3
4
5
6
7
8
Click!
Mounting procedure for wall
Use the ceiling bracket as a template to mark the holes in the surface.
If installing on concrete, drill three holes with 6mm or 0.24" diameter drill bit and plug in dowels (anchors).
Fasten the bracket using the appropriate screws for the wall surface material, (i.e.; wood, metal or plaster screws).
Use screws M4x14, Countersunk head screw DIN 965 (3x) to fasten flange to the speaker.
Insert the groove of the flange into the bracket, (as shown in the picture in page 28).
When the PentaClass is inserted into the bracket, turn the PentaClass to the best position for inserting the power
and audio cables.
Tighten the two fixation screws from the side.
Use the safety wire to insure that the PentaClass speaker is secure.
Always attach the safety wire to the speaker as shown in the picture in page 26. Carefully affix
the other end of the safety wire to a secure surface with the proper fixation screw.
Low Voltage Connection
The speaker has AUX IN and AUX OUT 3.5 mm female connectors and a DC connector. First insert the power
cable into the power input on the PentaClass. Then insert the audio cables if required. Your PentaClass can
be connected to a variety of different A/V devices. Please use only high quality stereo/mono cables, (3.5 mm
mini jacks), when connecting your audio source equipment. Input voltage for the PentaClass speaker is:
18-19VDC, 2.2 A. Use only an original PentaClass power supply unit.
High Voltage Connection
If applicable do not connect the PentaClass speaker to the power supply until the ceiling installation is
completed! Use only a genuine PentaClass power supply unit. The supply unit input voltage is: 100-240VAC,
1A.
Daisy Chaining
Optionally you can connect several PentaClass speakers in daisy chain by using the AUX channel. Choose one
PentaClass speaker to be the master unit. Plug your source audio cable into the audio input of this unit. It is
recommended that you do not connect more than 3 speakers in daisy chain.
CONNECTING PROCEDURE FOR DAISY CHAINING
• Use audio cables to connect the speakers to each other. Use the in and out ports on the speakers as shown in the
pictures.
• Each speaker requires a separate DC power adapter.
• Reset of all the speakers to the default settings, (see the resetting procedure).
• Turn on the speakers using the remote control unit.
CONTROL OF DAISY CHAINED UNITS
One remote control can be used to control the daisy chained units. Please note that if you point the remote control
towards the one PentaClass it can send IR commands to another PentaClass as well.
The volume for all daisy chained PentaClass speakers can be adjusted simultaneously by adjusting the audio source
device's volume.
Fixation screws (x2)
Certes PentaClass Operating Manual28
Page 29
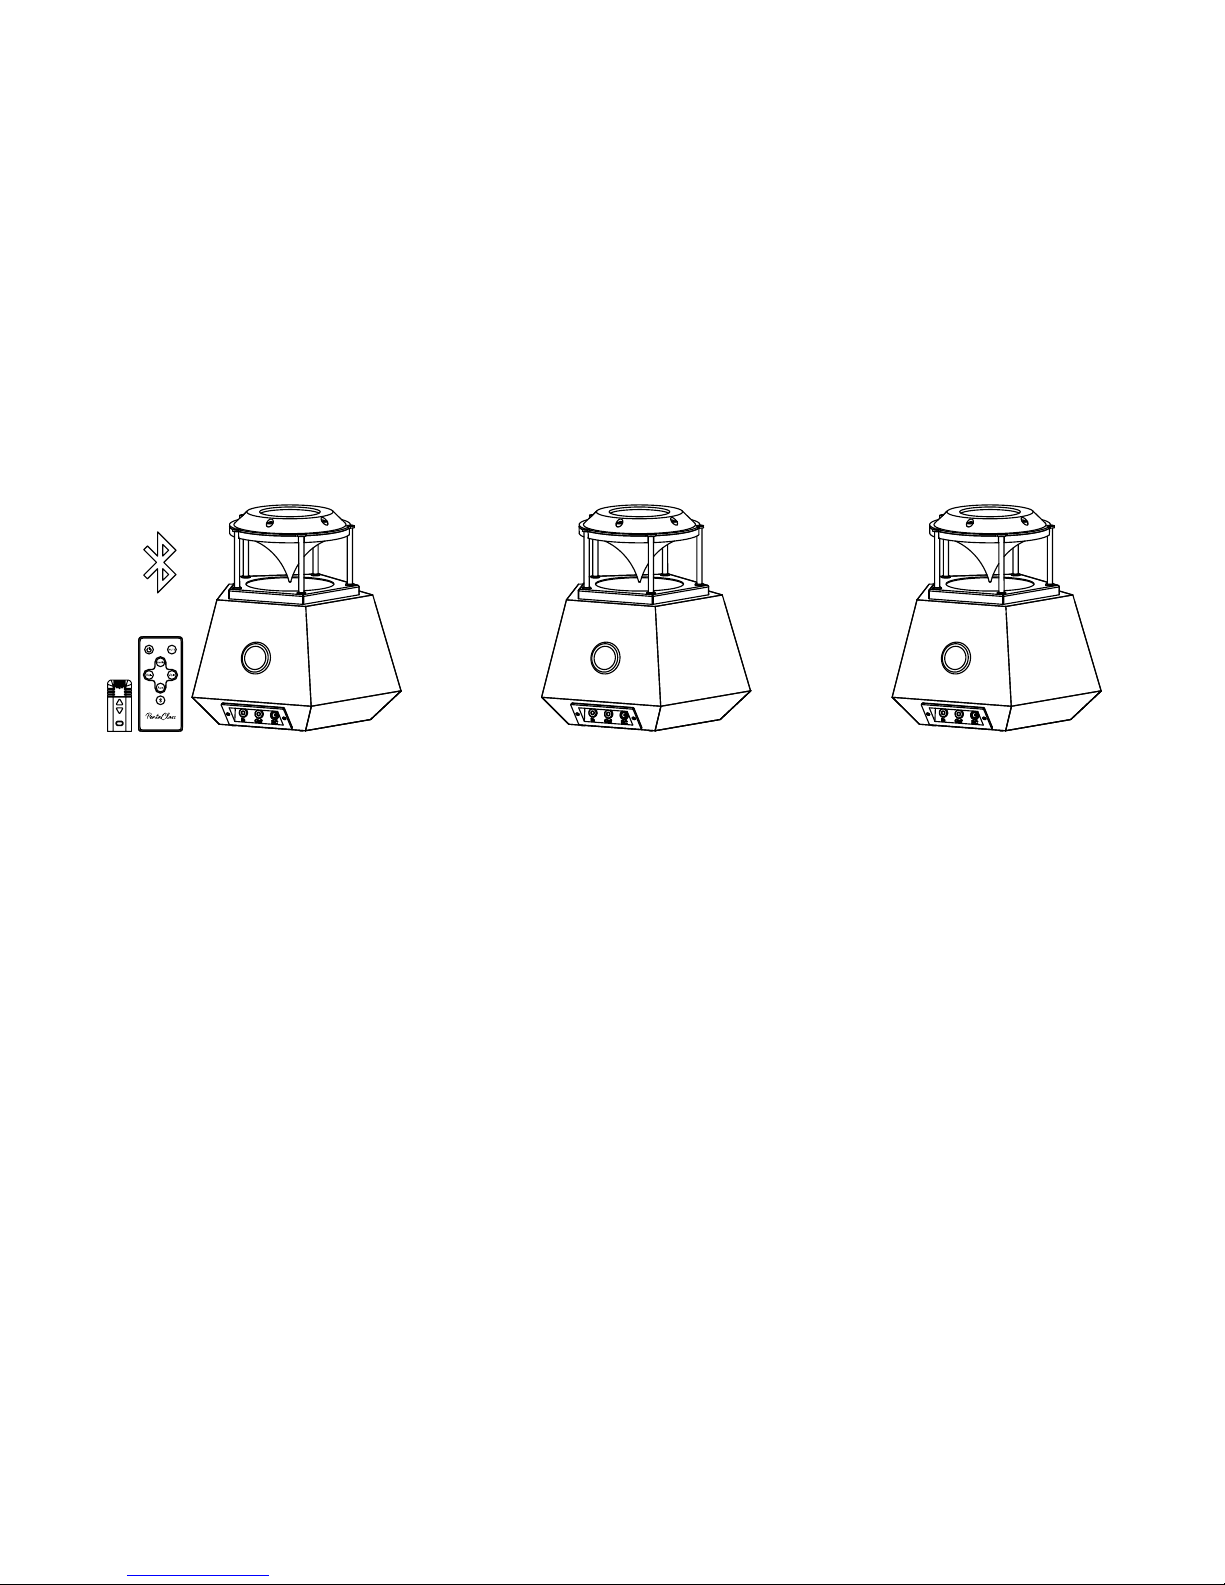
Daisy Chaining
Optionally you can connect several PentaClass speakers in daisy chain by using the AUX channel. Choose one
PentaClass speaker to be the master unit. Plug your source audio cable into the audio input of this unit. It is
recommended that you do not connect more than 3 speakers in daisy chain.
CONNECTING PROCEDURE FOR DAISY CHAINING
• Use audio cables to connect the speakers to each other. Use the in and out ports on the speakers as shown in the
pictures.
• Each speaker requires a separate DC power adapter.
• Reset of all the speakers to the default settings, (see the resetting procedure).
• Turn on the speakers using the remote control unit.
CONTROL OF DAISY CHAINED UNITS
One remote control can be used to control the daisy chained units. Please note that if you point the remote control
towards the one PentaClass it can send IR commands to another PentaClass as well.
The volume for all daisy chained PentaClass speakers can be adjusted simultaneously by adjusting the audio source
device's volume.
Master Slave Slave
Certes PentaClass Operating Manual 29
Page 30

Pentaclass Technical specification
SPEAKER SPECIFICATION
Frequency Response
Output
Loudness
Inputs
Output
Power Requirements
Power saving mode
Status indication
Amplifier
Mixer
Control
Built in equalizer presets
Acoustics
Dimensions (W x H x D)
Weight
Mounting
Included accessories
40 Hz - 20 kHz
45 W @ 8 Ω
88 dB
1 x AUX, 3.5 mm stereo
1 x AUX, 3.5 mm stereo, mixed
110V/240V AC 50-60Hz 1A
Auto turn OFF after 20 min. inactivity
Indication of exact status of PentaClass
Class D, 44 100 kHz sample rate, 24 bit resolution, digital audio processor (DAP),
dynamic range compression (DRC), soft mute
Two channel mixer: 1) Mixes AUX input channel with Bluetooth (AB and Runa models),
and AUX input channel with microphone (Runa model)
Infrared remote control with 7 buttons (Speaker power on/off, Mute, Audio presets,
Speaker volume up, Speaker volume down, AUX on/off, Bluetooth on/off
(enabled for AB and Runa models)
Speech, Multimedia, Music, Mega bass
Omni-directional, plywood sound box, fine tuned port. Designed for rooms
up to 120 m
2
(1291 sq ft).
24 x 24 x 23 cm (9.45 x 9.45 x 9.06 in)
3 kg (6.61 lbs)
Universal wall/ceiling mount for drop and concrete ceilings supplied
Power supply, power cord, remote control, wall / ceiling mount, user manual
RUNA MICROPHONE SPECIFICATION (only in Runa model)
Frequency band
Audio Transmission
Frequency range
Range
Audio Level control
Signal to noise ratio (typical)
Power
Battery life with full charge (active mode)
Recharging time
Microphone IR range
Status indication
Dimensions (W x H x D)
Weight
Charger
Connectivity
Power Requirements
Control in remote control mode
Control in microhone control mode
Wearing options
Included accessories
AUDIO INPUT / OUTPUT ELECTRICAL CHARACTERISTICS
Aux In Input Impedance
Maximal Aux In Input Level
Aux Out Output Impedance
Typical LINE OUT Output level (0 dB @ 10 kW load)
BLUETOOTH SPECIFICATION (AB and Runa models)
Bluetooth version
Data rates
Frequency range
Range
Receive Sensitivity
Wireless Specification
Profiles
Audio codec support
2.4 GHZ MICROPHONE RECEIVER (only in Runa model)
Frequency band
Audio Transmission
Frequency range
Range
Troubleshooting
Most common Problems and Solutions
No sound is coming out of the PentaClass
• Please make sure the system is turned on and that the status indicator light on the top of the PentaClass is illuminated.
• Be sure that the power supply of the speaker is connected correctly.
Cannot connect the microphone
• Please check the battery status of the mic. Most mic problems are related to low battery levels in the microphone.
Low volume
• Check the volume level of the PentaClass speaker. Increase the volume from your audio source device.
Feedback
• Decrease the volume level.
• Increase the distance between the speaker and microphone.
Signal Connection Problems
• Check the AUX connections cables, plugs and ports. Be sure all connections are tight and that the cables are not
damaged anywhere.
Remote control doesn’t work
• Check the batteries of the remote control - replace the battery if necessary.
• Check the battery status of the microphone - charge if necessary.
Certes PentaClass Operating Manual30
Page 31

RUNA MICROPHONE SPECIFICATION (only in Runa model)
Frequency band
Audio Transmission
Frequency range
Range
Audio Level control
Signal to noise ratio (typical)
Power
Battery life with full charge (active mode)
Recharging time
Microphone IR range
Status indication
Dimensions (W x H x D)
Weight
Charger
Connectivity
Power Requirements
Control in remote control mode
Control in microhone control mode
Wearing options
Included accessories
ISM 2.4GHz
Un-Compressed audio transmission 44,1 kHz 16bit
2400 - 2483.5 MHz, 18 channel adaptive frequency hopping
Up to 25 meters
Manual and AGC (Auto Gain Control)
74 dB
Built in rechargeable Li-Po battery
7 hours
up to 4 hours
7 meters (23 feet)
RG LED
1.18 x 2.6 x 0.55 inch (3.0 x 6.5 x 1.4 cm)
0.98 oz (28g )
USB 5V 1A
Micro USB - charging and firmware upgrade, 2.5mm audio input external microphone connection
110V/240V AC 50-60Hz 1A
Infrared remote control built in with 3 multifunctional buttons (Speaker power
on/off, Mute, Audio presets, Speaker volume up, Speaker volume down,
AUX on/off, Bluetooth on/off )
3 multifunctional buttons (Microhone on/off, Mute, Microhone volume up,
Microhone volume down)
Lanyard or clip
1x USB Charger, 1x Lanyard, 1x USB-micro USB Cable
AUDIO INPUT / OUTPUT ELECTRICAL CHARACTERISTICS
Aux In Input Impedance
Maximal Aux In Input Level
Aux Out Output Impedance
Typical LINE OUT Output level (0 dB @ 10 kW load)
BLUETOOTH SPECIFICATION (AB and Runa models)
Bluetooth version
Data rates
Frequency range
Range
Receive Sensitivity
Wireless Specification
Profiles
Audio codec support
2.4 GHZ MICROPHONE RECEIVER (only in Runa model)
Frequency band
Audio Transmission
Frequency range
Range
29 kΩ
2.83 Vpp
320 Ω
2.61 Vpp
Version 2.1 + EDR, Class 2
Up to 3 Mbps (over the air)
2402 - 2480 MHz
Up to 25 meters
Better than -86 dBm
802.11 b/g
A2DP
SBC, AAC and apt-X for high quality audio applications
ISM 2.4GHz
Un-Compressed audio transmission 44,1 kHz 16bit
2400 - 2483.5 MHz, 18 channel adaptive frequency hopping
Up to 25 meters
Features and specifications are subject to change without prior notice.
Certes PentaClass Operating Manual 31
Page 32

Regulatory
FCC compliance statement
Changes or modifications not expressly approved by the party responsible for compliance could void the user’s
authority to operate the equipment.
This equipment has been tested and found to comply with the limits for a Class A digital device, pursuant to part 15 of
the FCC Rules. These limits are designed to pro-vide reasonable protection against harmful interference when the
equipment is operated in a commercial environment.
This equipment generates, uses, and can radiate radio frequency energy and, if not installed and used in accordance
with the instruction manual, may cause harmful interference to radio communications. Operation of this equipment in
a residential area is likely to cause harmful interference in which case the user will be required to correct the
interference at his own expense.
FCC RF Exposure Information for PentaClass
This equipment complies with the FCC RF radiation exposure limits set forth for an uncontrolled environment. This
equipment should be installed and operated with a minimum distance of 20 centimeters between the radiator and
your body.
This transmitter must not be co-located or operating in conjunction with any other antenna or transmitter.
FCC RF Exposure Information (SAR)
for Runa microphone
Microphone Runa has been tested and meets applicable limits for radio frequency (RF) exposure. Specific Absorption
Rate (SAR) is a measure of the rate at which energy is absorbed by the human body when exposed to a radio frequency.
The SAR limit is 1.6 watts per kilogram in countries that set the limit averaged over 1 gram of tissue and 2.0 watts per
kilogram in countries that set the limit averaged over 10 grams of tissue.
During Testing, Runa was placed into Test Mode at maximum duty cycle transmissions using software commands. The
product was tested in the mode which produced the highest conducted power. Product was tested with the back side
of it while wearing a clip placed in positions that simulate RF exposure in usage near the body with the separation
0.0cm.
For this device, the highest reported SAR value for near the body is 0.134 Watts per kilogram. The FCC has granted an
Equipment Authorization for this model device with all reported SAR levels evaluated as in compliance with the FCC RF
exposure guidelines. SAR information on this model device is on file with the FCC and can be found under the Display
Grant section of fcc.gov/oet/ea/fccid after searching on FCC ID: 2AFZR-CTPR2
Canadian regulatory statement
This Class A digital apparatus complies with Canadian ICES-003.
This device complies with Industry Canada licence-exempt RSS standard(s). Operation is subject to the following two
conditions: (1) this device may not cause interference, and (2) this device must accept any interference, including
interference that may cause undesired operation of the device.
Cet appareil numérique de la classe A est conforme à la norme NMB-003 du Canada.
Le présent appareil est conforme aux CNR d'Industrie Canada applicables aux appareils radio exempts de licence.
L'exploitation est autorisée aux deux conditions suivantes : (1) l'appareil ne doit pas produire de brouillage, et (2)
l'utilisateur de l'appareil doit accepter tout brouillage radioélectrique subi, même si le brouillage est susceptible d'en
compromettre le fonctionnement.
CE Confirmation of compliance
Certes Technologies declares that PentaClass models A, AB, and Runa has been manufactured in accordance with
following directive:
• 2004/108/EG EMC Directive Electromagnetic Compatibility (EMC-directive)
• 2006/95/EC Low Voltage Directive (LVD).
It has been manufactured in accordance with the following harmonized standards, or parts therefore:
• EN 60950; EN 60065; EN 55032.
SAFETY
The device is labelled with CE label, which means that the device and its associated documentation meet the
requirements of Low Voltage Directive (LVD).
CONVERSION OF THE DEVICE
If the device is converted or supplemented with parts that the manufacturer does not approve, this declaration of
conformity will not apply to the parts which alter the function of the device.
If the device is upgraded or converted, it is very important to ensure that this instruction manual is also updated
immediately to include any new illustrations, photographs and text.
DEVICE IDENTITY
If the device is upgraded or converted, it is very important to ensure that this instruction manual is also updated
immediately to include any new illustrations, photographs and text.
Certes PentaClass Operating Manual32
Page 33

Canadian regulatory statement
This Class A digital apparatus complies with Canadian ICES-003.
This device complies with Industry Canada licence-exempt RSS standard(s). Operation is subject to the following two
conditions: (1) this device may not cause interference, and (2) this device must accept any interference, including
interference that may cause undesired operation of the device.
Cet appareil numérique de la classe A est conforme à la norme NMB-003 du Canada.
Le présent appareil est conforme aux CNR d'Industrie Canada applicables aux appareils radio exempts de licence.
L'exploitation est autorisée aux deux conditions suivantes : (1) l'appareil ne doit pas produire de brouillage, et (2)
l'utilisateur de l'appareil doit accepter tout brouillage radioélectrique subi, même si le brouillage est susceptible d'en
compromettre le fonctionnement.
CE Confirmation of compliance
Certes Technologies declares that PentaClass models A, AB, and Runa has been manufactured in accordance with
following directive:
• 2004/108/EG EMC Directive Electromagnetic Compatibility (EMC-directive)
• 2006/95/EC Low Voltage Directive (LVD).
It has been manufactured in accordance with the following harmonized standards, or parts therefore:
• EN 60950; EN 60065; EN 55032.
SAFETY
The device is labelled with CE label, which means that the device and its associated documentation meet the
requirements of Low Voltage Directive (LVD).
CONVERSION OF THE DEVICE
If the device is converted or supplemented with parts that the manufacturer does not approve, this declaration of
conformity will not apply to the parts which alter the function of the device.
If the device is upgraded or converted, it is very important to ensure that this instruction manual is also updated
immediately to include any new illustrations, photographs and text.
DEVICE IDENTITY
If the device is upgraded or converted, it is very important to ensure that this instruction manual is also updated
immediately to include any new illustrations, photographs and text.
Certes PentaClass Operating Manual 33
Page 34

Notes
Certes PentaClass Operating Manual34
Page 35

Certes PentaClass Operating Manual 35
Page 36

Phone: (+371) 6761 5096
E-mail: [email protected]
Certes Technologies
Mukusalas street 41b, Riga, LV-1004, Latvia
www.certestechnologies.com
hear. understand.
 Loading...