

CertainTeed CTG-CT037-EF User Manual
CertainTeed
Drywall Finishing Compound
Finishing Guide
The finishing process requires patience! You
should apply three coats of Easi-Fil
pound through the process and allow 24-hours of
drying time between applications. The first coat is
used to embed the tape, while the two finishing
coats feather out the compound, resulting in a uniform, smooth finished surface.
®
joint com-
A few pointers for easy and safe application:
o Always wear a dust mask when sanding
o Use only a 150 - 180 grit sandpaper, designed
especially for joint compound
o Keep your knife clean by drawing it over the
edge of the mudpan or hawk.
o Throw out any dried bits of joint
compound… they will leave scratches
o Don’t worry about a smooth finish on the first
coat… the finishing coats will take care of that.
o Stir joint compound well before use. Add clear
water for desired consistency.
o Joint compound should never be frozen.
In cold weather compound should be at room
temperature 24 hours before using.
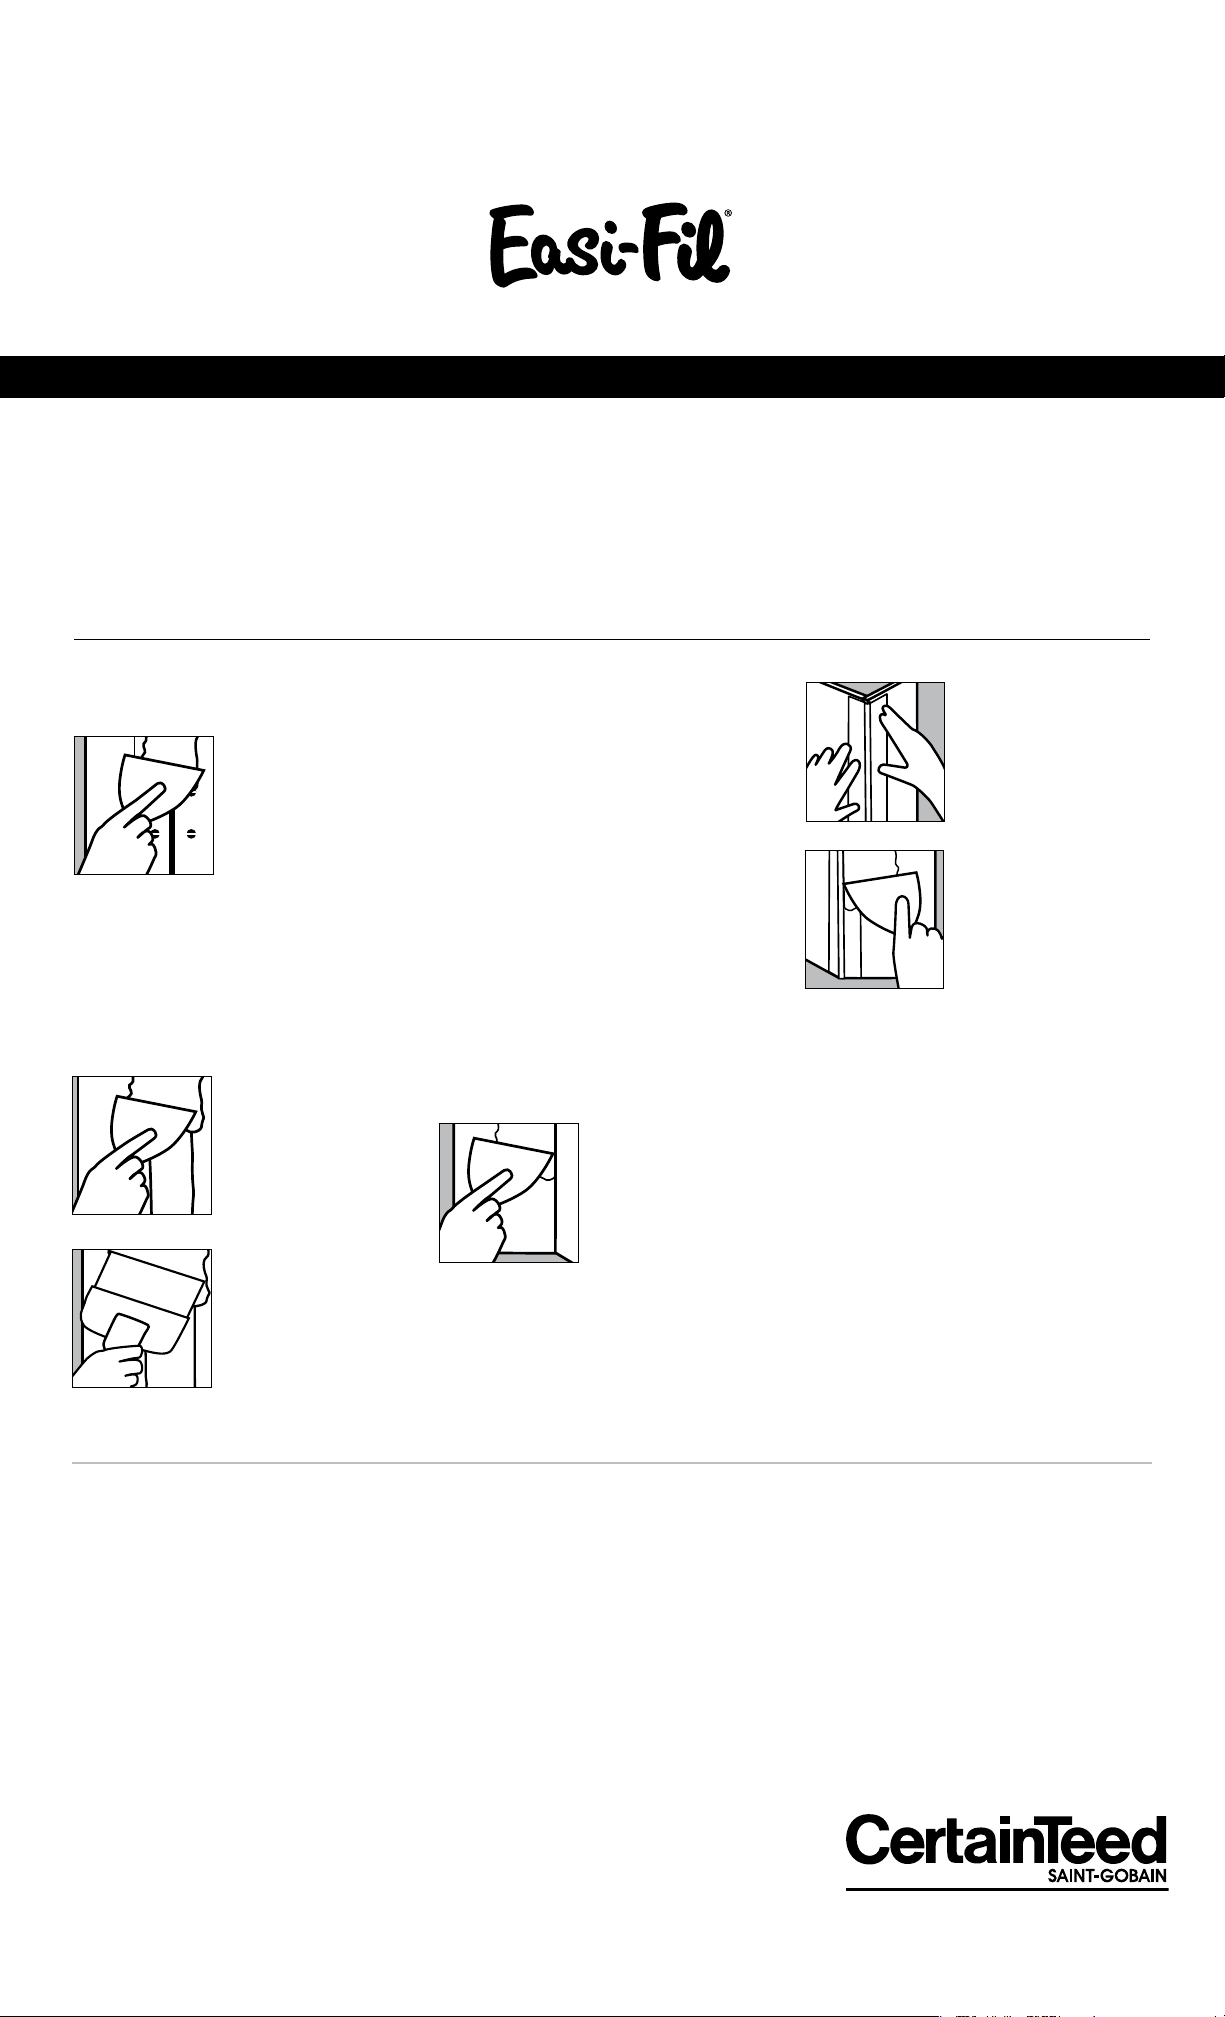
Joint treatment and taping
TAPING AND FINISHING OUTSIDE CORNERS
Begin with the butt joints – the areas where the
unfinished ends of CertainTeed drywall meet.
First, apply a coat of Easi-
®
Fil
joint compound over
the joint with your four-inch
knife. Then, press the tape
firmly into the compound
by pressing your knife over
the tape. Squeeze out excess
that there is enough Easi-Fil joint compound under
tape to make a good bond.
Allow each coat to dry thoroughly before applying
the next coat (24-hours between coats). If the tape
does lift along the edges after drying; simply cut out
the affected area in the shape of a canoe before
applying the next coat. If the tape lifts in the centre,
you must tear out affected area and re-tape.
compound, making sure
Apply a second coat using
a 7" taping knife and this
coat should extend approximately 4" - 6" beyond each
side of the joint. After the
coat dries approximately
24 hours, sand the area
Apply a third coat using a
12" taping knife and this
coat should be a thin coat
and should extend approximately 7-12" beyond each
side of the joint. The further
you feather the compound
out, the harder it will be to
see imperfections.
When you are finished, you may want to test the
finishing by holding your 12-inch finishing knife
blade across the joint. If the blade rocks, you’ll
know there is still a hump, which will need further
feathering.
SANDING
Do not sand after applying tape, remove small
lumps behind with your knife before applying 2nd
coat. When sanding use 150-180 grit paper and
always sand along the outside edge well, so that
the transition between the compound and the
CertainTeed drywall are smooth with no imperfections. Then sand the rest of the joint lightly in order
to make smooth. Be careful not to sand too much
off. If too much is sanded off, you will need to
apply additional coats of compound.
INSIDE CORNERS
Inside corners will need to be taped as well. First,
apply a thin layer of joint compound on both sides
of the corners using a 2-1/2" taping knife, extend-
ing the compound slightly
beyond where the tape
would extend.
Next, fold the tape and
lightly press it into the
corner with your knife.
Once it is in place, using
your 2-1/2" knife or a corner tool to firmly embed
the tape into the compound. Allow to dry for
24-hours, then apply a second coat using a 7"
taping knife to one side of the corner. You can only
do one side of the corner today, as the compound
must dry completely so the other side can be
finished tomorrow. Do the same for the third coat,
using a 12" taping knife.
knife, allowing knife to rest on nose of the bead. Let
dry for 24-hours and apply a third coat. After another
24-hours, sand the corner to a smooth finish.
FINISHING FASTENERS
You will want to coat each of the nail or screw
heads used to fasten your CertainTeed drywall with
Easi-Fil joint compound.
After the first coat has dried completely, you will
need to sand and apply two more coats to the
fasteners, sanding between each coat.
Repairs
Measure bead and cut to
right length; a snug fit from
floor to ceiling (about 1/4"
shorter than the wall
height). With a 7" knife
apply a generous amount
of Easi-Fil joint compound
on either side of corner.
Using even pressure, press
paper / metal bead onto
corner into position, ensuring it is aligned; embed it
into compound by running
the knife at 45° angle. Let
dry for 24-hours. Apply a
second coat with the 7"
SMALL BREAKS
To repair small cracks and holes, first remove any
loose material. Then, using a clean putty knife, fill the
opening with joint compound. Let it dry and apply
additional coats, if needed. To repair larger cracks,
embed a piece of joint tape to cover the opening,
then apply a second coat of joint compound and
finish the surface.
LARGER BREAKS
Where the tape will not bridge the opening, use a
keyhole or other saw to cut out an area around the
hole. Cut the drywall back to the center of the stud
on either side of the damaged area. For a large
crack, remove the section and any fasteners with a
hammer or screw gun. Measure and cut a new
gypsum board panel to fit the damaged area.
Fasten it to the studs. Apply joint compound and
embed the tape to all four sides of the replacement
piece. Or, for larger holes, use self-sticking fiberglass tape along the edges and apply joint compound. Let it dry, then apply a second coat,
feathering to produce a smooth surface. If necessary, apply a third coat.
POPPED NAILS
Press the drywall firmly against the framing member. Drive and dimple a new nail about 1- 1/2” from
800-233-8990 • certainteed.com
http://blog.certainteed.com
ROOFING • SIDING • TRIM • DECKING • RAILING • FENCE • FOUNDATIONS
GYPSUM • CEILINGS • INSULATION • PIPE
© 01-2008 CertainTeed Gypsum Canada, Inc. Rev. 05-2013 Printed in Canada on recycled paper. CTG-4089
the popped nail. Then drive the first nail below the
surface of the board. Cover the dimples with joint
compound.
TORN FACE PAPER
Peel away any loose paper. Apply a very thin layer
of joint compound, using a finishing knife large
enough to cover the damaged area. Feather it to
get a smooth finish. Let it dry for 24 hours and
apply a second coat, if needed.
Drywall Installation Guide
CERTAINTEED DRYWALL
A durable, lightweight, cost-effective building
material for interior walls and ceilings.
Consisting of a premium quality, non-combustible gypsum core, CertainTeed drywall
is encased in a smooth face (front) and back
covering of 100% recycled paper. The tapered
edges are precision manufactured and
paper bound for easy joint finishing, making
CertainTeed drywall the ideal choice for finishing interior walls and ceilings. Once primed, it can
be painted, wallpapered or textured for a look
that works for you.
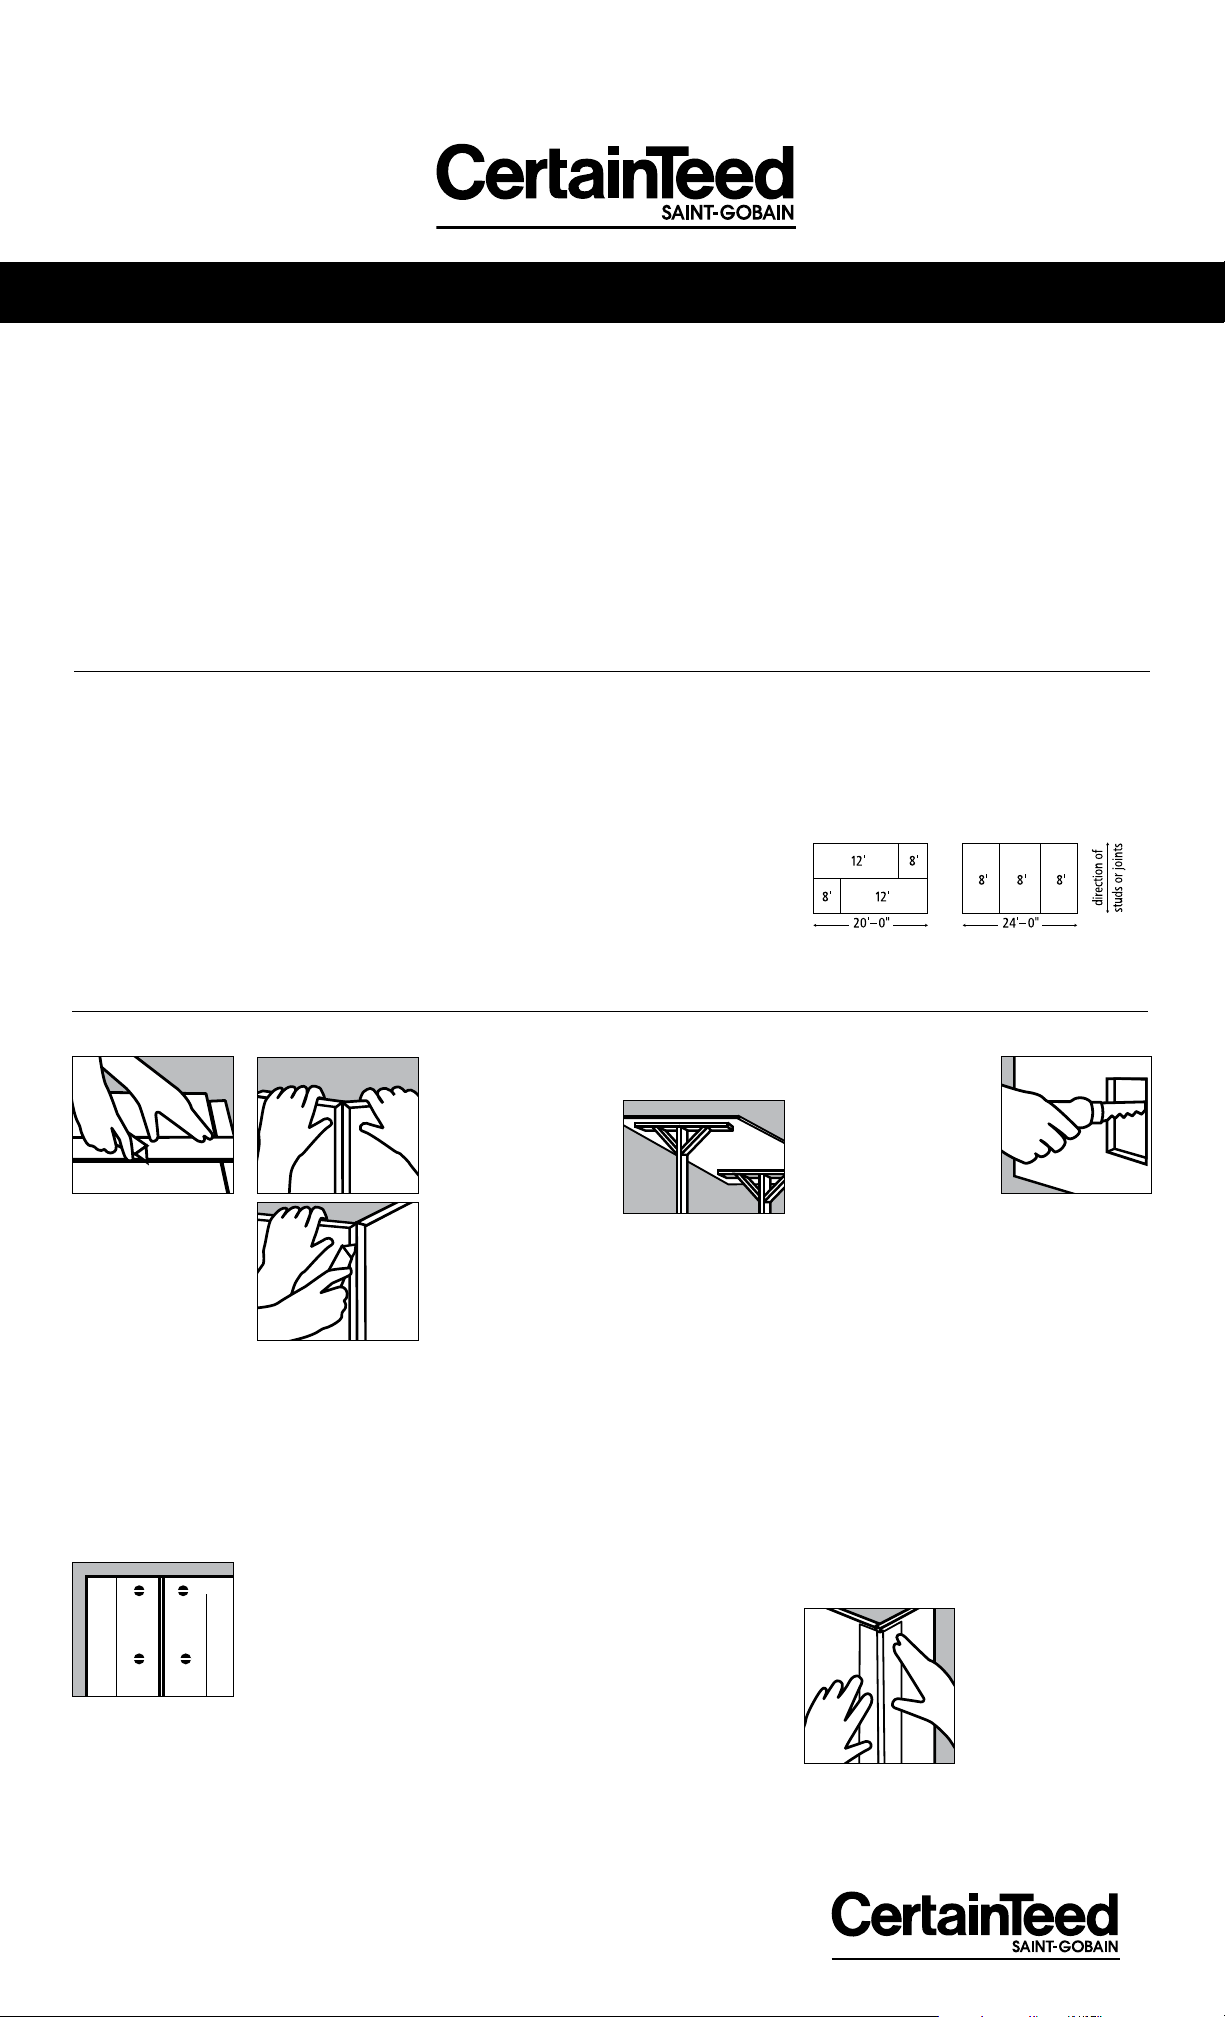
Planning the Job
It’s best to plan your drywall installation with
the least amount of joints (the seam where
boards meet). Fewer joints will mean less
finishing work.
We recommend installing CertainTeed drywall
perpendicular to studs or joists. drywall comes
in 4-foot wide and various lengths and thicknesses. However, most common are 8", 10",
12". You may find it easiest to work with 8-foot
boards.
If you are intending to finish your ceilings with a
water based texture, you should use CertainTeed
TOOLS YOU WILL NEED
To properly install CertainTeed drywall,
you’ll need the following tools:
o Tape measure
o 4-foot T-square or straight edge
o Utility knife with extra blades
o Step ladder
o Marking pencil
o Wallboard Saw
o Tin snips
o “Mud” Hawk or Pan
o 2-1/2", 4", 7" and 12" finishing knife
o Drywall rasp
1/2" Interior Ceiling Board on maximum 24" on
centre joists, in order to avoid sagging.
To determine how many boards you will need,
simply calculate the total surface area of your
walls and/or ceiling by multiplying the length by
the width. You might wish to draw a sketch of
the room/area you are working on to make
things easier. When calculating, do not subtract
windows or door areas. Divide your total
square footage by the square footage of your
boards (32-feet for an 8-foot board) and round
up to find the number of boards you need.
o Dust mask
o Safety glasses or goggles
o 150-180 grit sandpaper
o Sanding pad and pole sander
o Sponge
o Drywall hammer or regular carpenter’s
hammer (if installing with drywall nails)
o Electric screw gun or standard drill with
dimpler attachment (if installing with drywall
screws)
Based on the square footage of your project
area, you’ll need the following materials per
100-square-feet:
o 100 1-1/4" drywall screws (or 1/2 lb of nails)
o 30-feet of CertainTeed joint tape
o 4.5 L of CertainTeed joint compound
Installation Instructions
CUTTING THE BOARD
CertainTeed drywall is
very easy to work with
and cutting is quite
simple. To make a cut,
score the paper on the
face side with a utility
knife along the edge of
your T-square. Apply
firm, but even, pressure
to snap the board along the score. Then fold
the board along the score and cut the paper
along the crease with the utility knife. Lastly,
smooth the rough edges with a sanding block
or drywall rasp.
Remember, always wear safety glasses when
cutting or sanding boards.
ATTACHING CERTAINTEED DRYWALL
You can attach your
drywall to studs or
joists using nails,
screws. We recommend using drywall
screws for optimum
installation and professional finish. You
might wish to consult
with your dealer when considering the different
application methods.
Always install ceiling first, then install walls,
allowing a space of at least 1/2" off of the floor.
Keep fasteners 6-inches away from the interior
ceiling and ensure that nails or screws are not
less than 3/8" from the ends and edges of the
drywall.
CEILING
Installing ceiling boards can be tricky and
requires two people. In addition, you will find
it much easier if you use T-braces or a drywall
lift to hold the drywall in place until they are
fastened.
You can build T-braces
yourself! You’ll need a
two by four that is an
inch longer than the
distance from the floor
to the ceiling framing
members, as well as, 2-two foot lengths of one
by fours.
One piece of the 1 x 4 should be used for the
top of the “T”, while the second piece should
be used as a brace and attached diagonally
from the top piece to the stem. You’ll need to
make sure the T stays square.
Have your helper use one T-brace, while you
manage the other to lift the drywall into place.
Your drywall screws should be installed 12" to
the joists. If using nails, they should be placed
6" apart. Install nails or screws slightly indented
into the surface, without breaking the paper
face or damaging the gypsum core. If you
do break the paper, remove the fastener and
replace with one 2" away.
WALLS
When installing drywall, install the upper board
first, ensuring that you push the board firmly
against the ceiling and that tapered edges are in
contact. Then fasten with drywall screws spaced
16" apart (or preferably double nails 6" apart)
working from the center out to the edges.
To put the lower panel into place, you may wish
to use a wedge or drywall lifter. Put the angled
edge under the board and use it as a lever to
jack it up against the top panel.
CUTOUTS
You will need to cut openings in your drywall to
accommodate electrical outlets, light fixtures,
windows and doors.
For light fixtures and electrical boxes, measure
the distance from the edge of the adjacent
board to the near and far sides of the installed
fixture box. Then measure from the top edge
of the panel to the top
and bottom of the box.
Trace the outline of the
box in the position you
just measured on the
board. Cut the opening
with a drywall saw.
For larger openings, install the panels directly
across the openings. Then use a drywall saw to
cut the panels, using the framing as your guide.
As you install the boards, make sure that you
do not place joints at the edges of doors or
windows. If you do, as the door or window
is opened and closed over time, the joint will
crack.
INSIDE CORNER
To join boards at an inside corner, simply butt
the second board against the first and fasten its
end to a framing member.
OUTSIDE CORNER
On outside corners, be sure to cover the end of
the first installed board with that of the second.
Fasten both ends of the boards to the common
stud.
To prepare the corner
for finishing, install a
corner bead. Measure
the length needed, then
cut the bead with tin
snips, cutting through
each flange towards
the nose, then bending
the bead to break. After
selecting the corner bead of your choice, follow
the manufacturer’s instructions for installation.
 Loading...