

Page 1
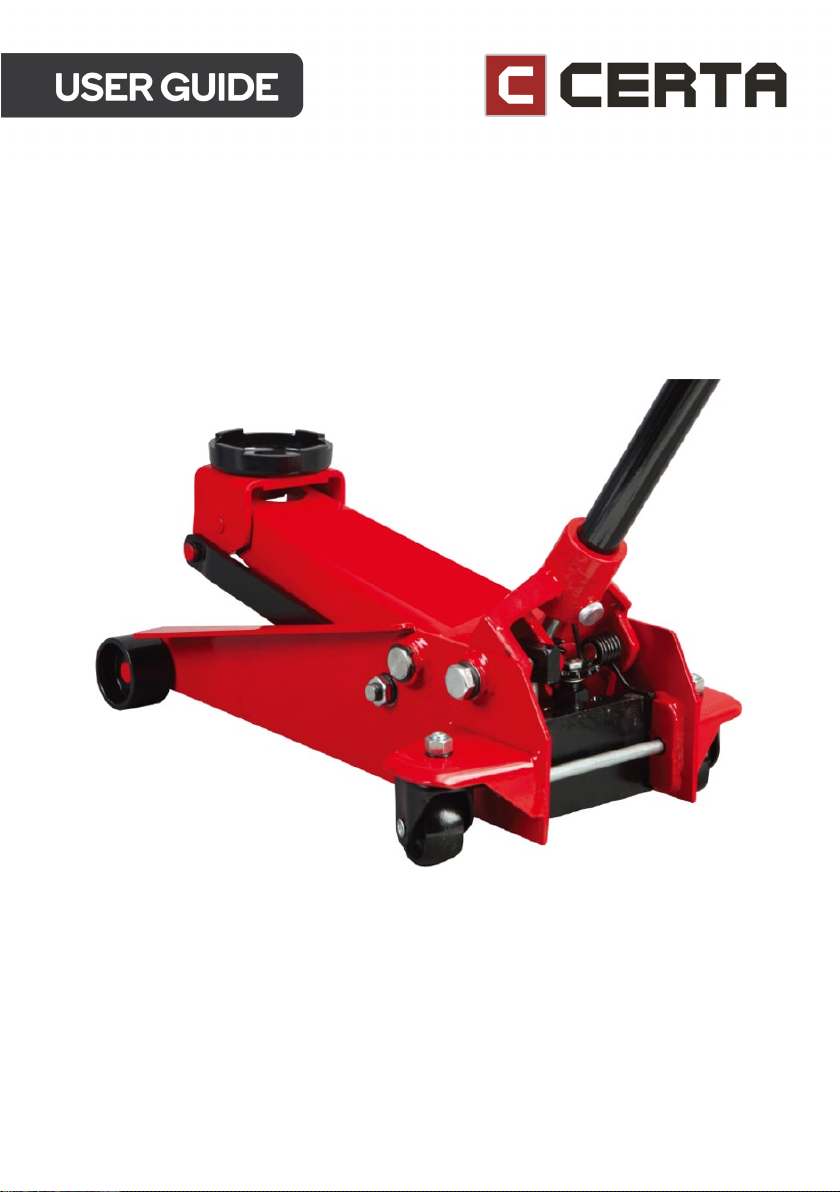
2000KG TROLLEY JACK
CTTJCK2000A
Page 2

Page 3
SAFETY & WARNINGS
Ensure to read all instructions and warnings in this user guide prior to first use. Retain this
user guide for future reference.
Failure to follow the guidelines set out in this user guide may lead to incorrect use, causing
serious injury or death.
• Ensure no one is inside the vehicle when the vehicle is lifted by
the trolley jack.
• The trolley jack is intended for raising and lowering vehicles
only. Do not use the trolley jack for any other purpose.
• Ensure to read the vehicle’s manufacturer user guide prior to
lifting the vehicle with the trolley jack.
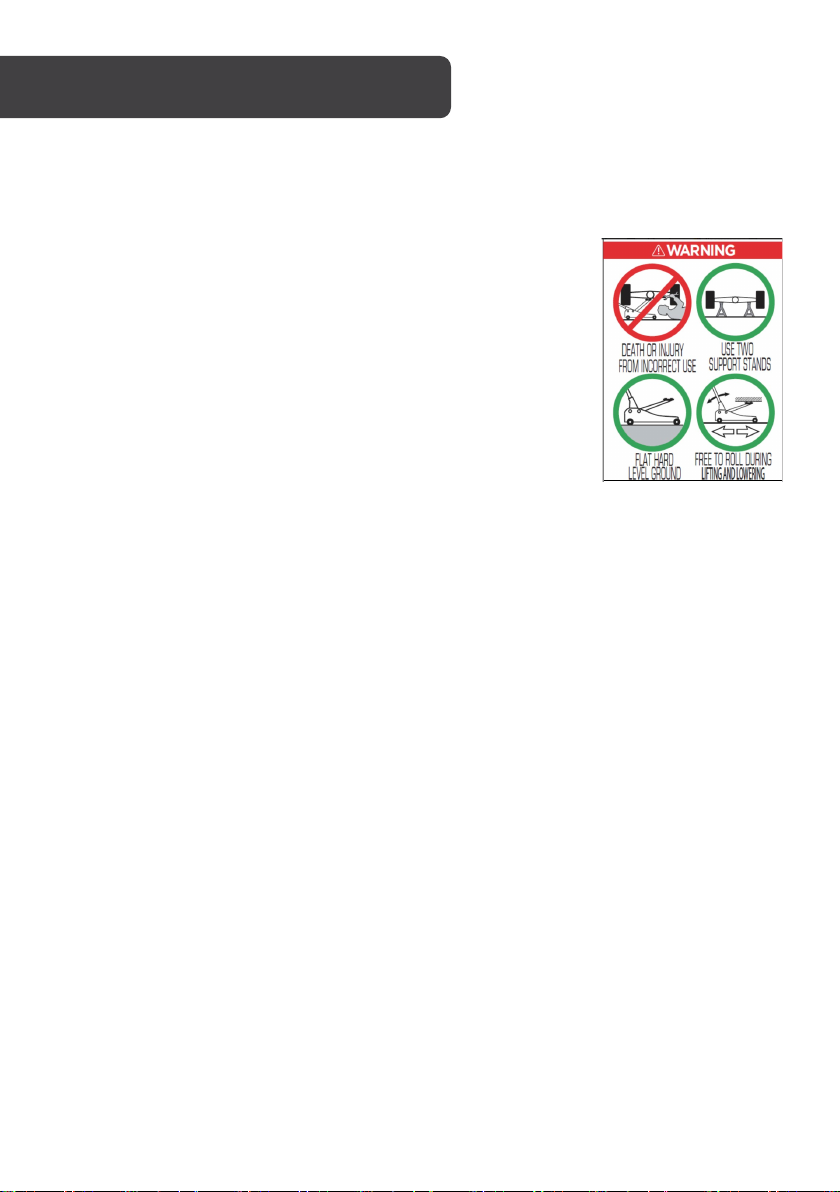
• This trolley jack has a weight capacity of 2000kg. Do not
overload the trolley jack beyond capacity.
• Ensure the load is centrally located on the head cap of the
trolley jack before raising.
• Do not bodily go under the vehicle if it is only supported with the trolley jack.
• Ensure the raised vehicle is supported with two appropriately rated support stands
(not supplied).
• Ensure the trolley jack is used on flat hard ground in an open area that will allow the
wheels to move freely when the trolley jack is being used.
• This trolley jack may roll during lifting and lowering.
• Conduct pre-operational checks on the trolley jack before every use.
• Ensure to chock the vehicle’s wheels that will not be lifted.
• Do not get dirt or any other substance inside the hydraulic system.
• Ensure the vehicle is supported by suitably rated vehicle support stands, and that
hydraulic trolleys jacks are removed prior to commencing work on the vehicle.
• Do not move the vehicle while it is on the trolley jack.
• Perform regular checks on the trolley jack for damage or wear and tear. If the trolley
jack is damaged, stop use immediately and contact help.Kogan.com for assistance.
• Do not attempt to disassemble or repair the trolley jack yourself.
• Do not make modifications or add accessories to this trolley jack.
• This trolley jack uses ISO VG 32/SAE 10 jack oil. Do not use any other types of oils
inside this trolley jack.
Kogan Australia Pty Ltd
139 Gladstone Street, South Melbourne, VIC, 3205
Australia
Page 4
(underneath)
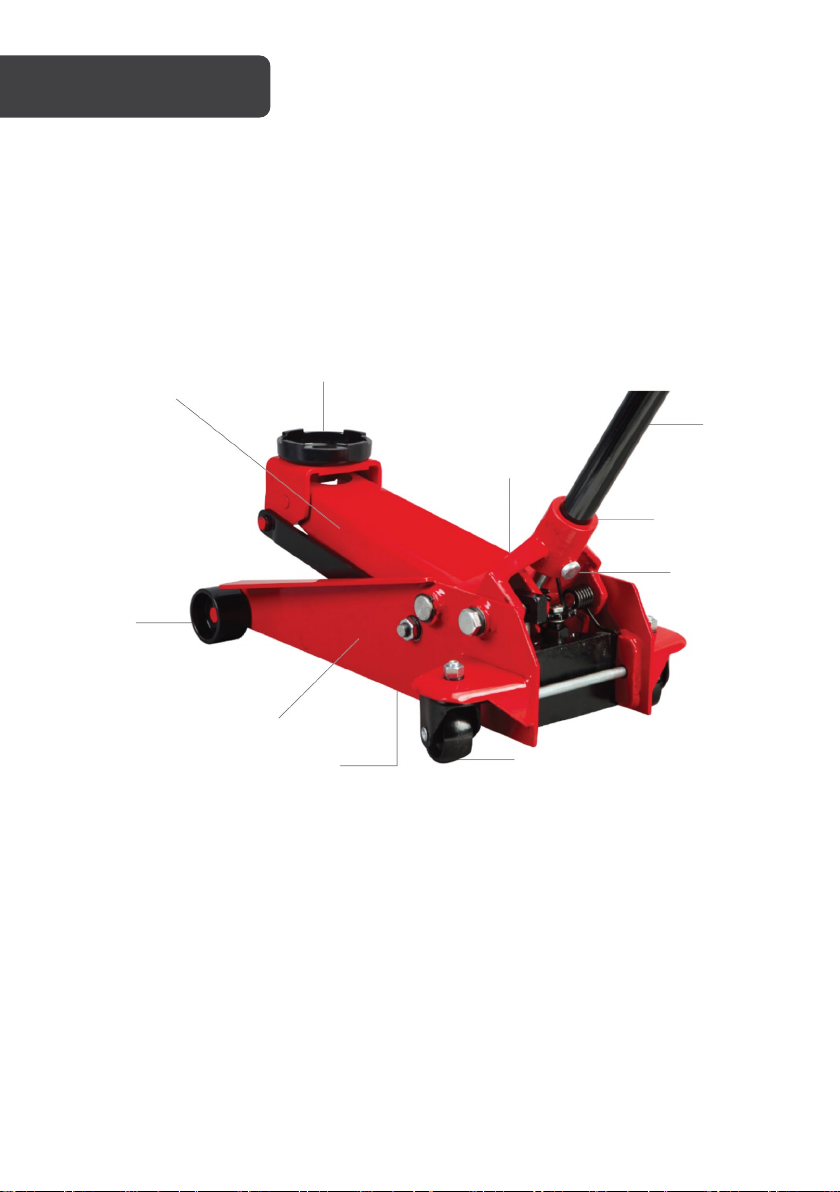
Handle
Handle socket
Screw
Rear castors
Head cap
Lifting arm
Wheels
Oil plug
Frame
OVERVIEW
Hydraulic arm
Page 5
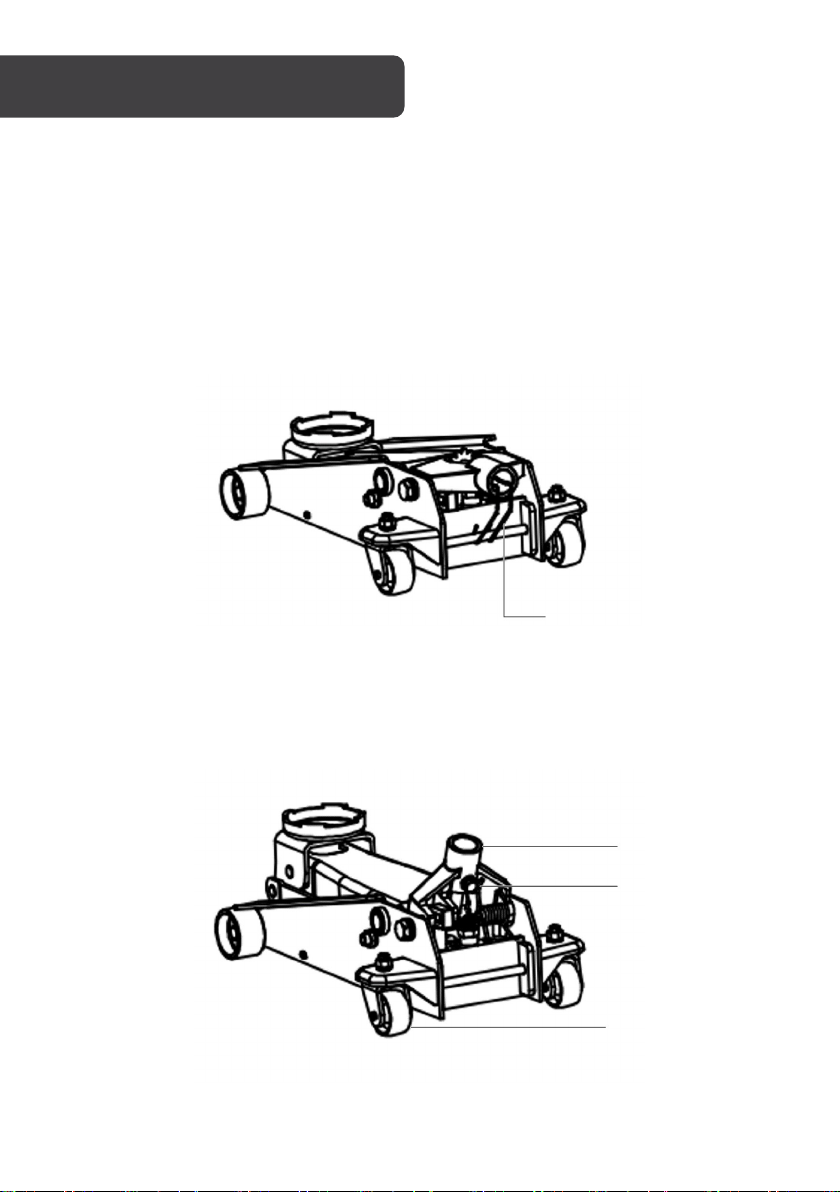
Clip
Screw
Handle socket
Rear wheels
BEFORE FIRST USE
Unpacking
Remove the trolley jack and handle pieces from the packaging. Ensure all components are
located before disposing of any packaging. If any components are missing or damaged, do
not use the product. Contact help.Kogan.com for assistance.
Assembly
1. Remove the clip attached onto the handle socket. This clip is used for shipping
purposes and can be disposed.
2. Take the two pieces of the handle and connect them to create a long handle.
3. Loosen the screw on the handle socket. Insert the handle into the handle socket and
secure the handle in place by tightening the screw.
Page 6
Other checks prior to first use
Purging the air
Air can sometimes make its way into the hydraulic cylinder which will prevent the trolley jack
from pumping properly. This may happen during transit and shipping, or from long periods
of storage. If this has occurred, the air will need to be removed.
To purge the air, follow the steps below.
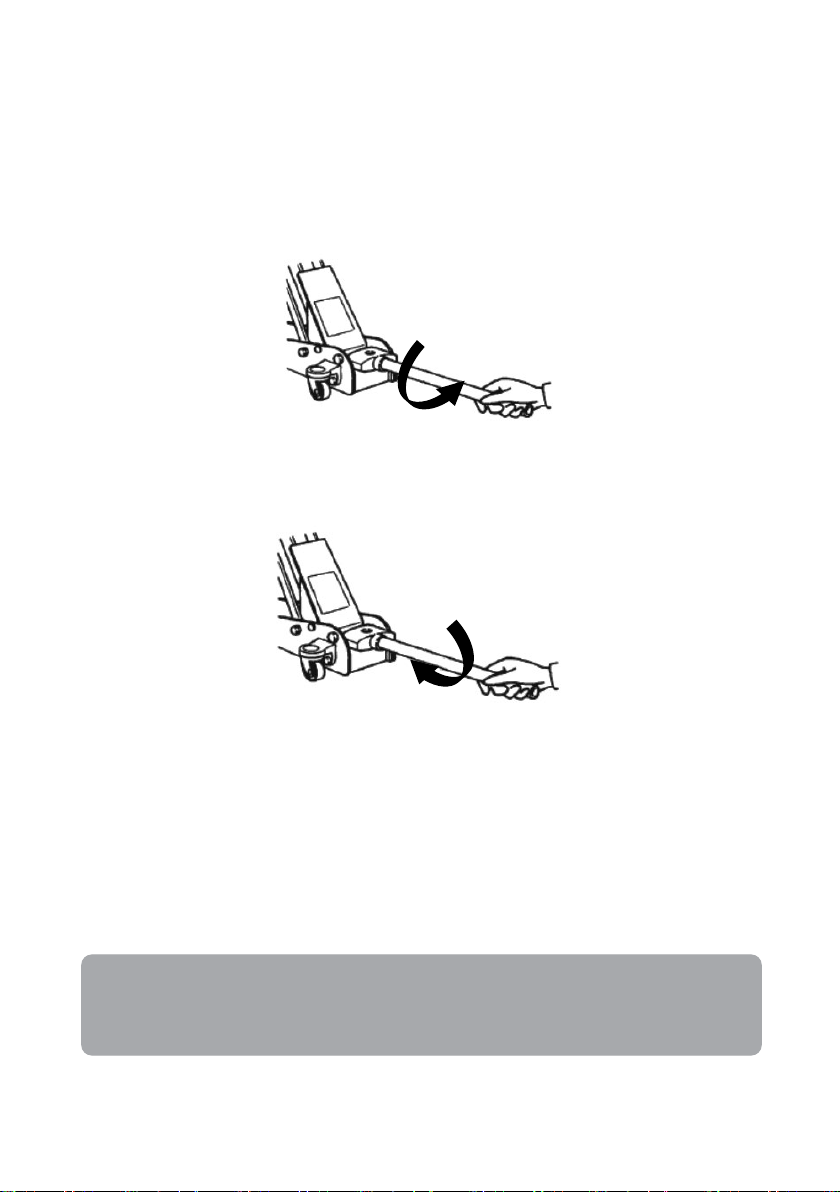
1. Turn the handle anti-clockwise with one full turn to open the release valve.
2. Using the handle, pump fully eight times.
3. Turn the handle clockwise to close the release valve.
4. Pump the handle until the hydraulic cylinder reaches its maximum height and
continue pumping several times to remove the trapped air inside the cylinder.
5. Slowly pinch the oil plug to release the trapped air.
6. Turn the handle anti-clockwise with one full turn to open the release valve and lower
the hydraulic cylinder to its lowest position. It may be necessary to apply force to the
head cap to lower the cylinder.
7. Turn the handle clockwise to close the release valve and check the trolley jack can
pump properly.
Note:
It may be necessary to perform this procedure more than once to ensure the air
has expelled completely.
Page 7
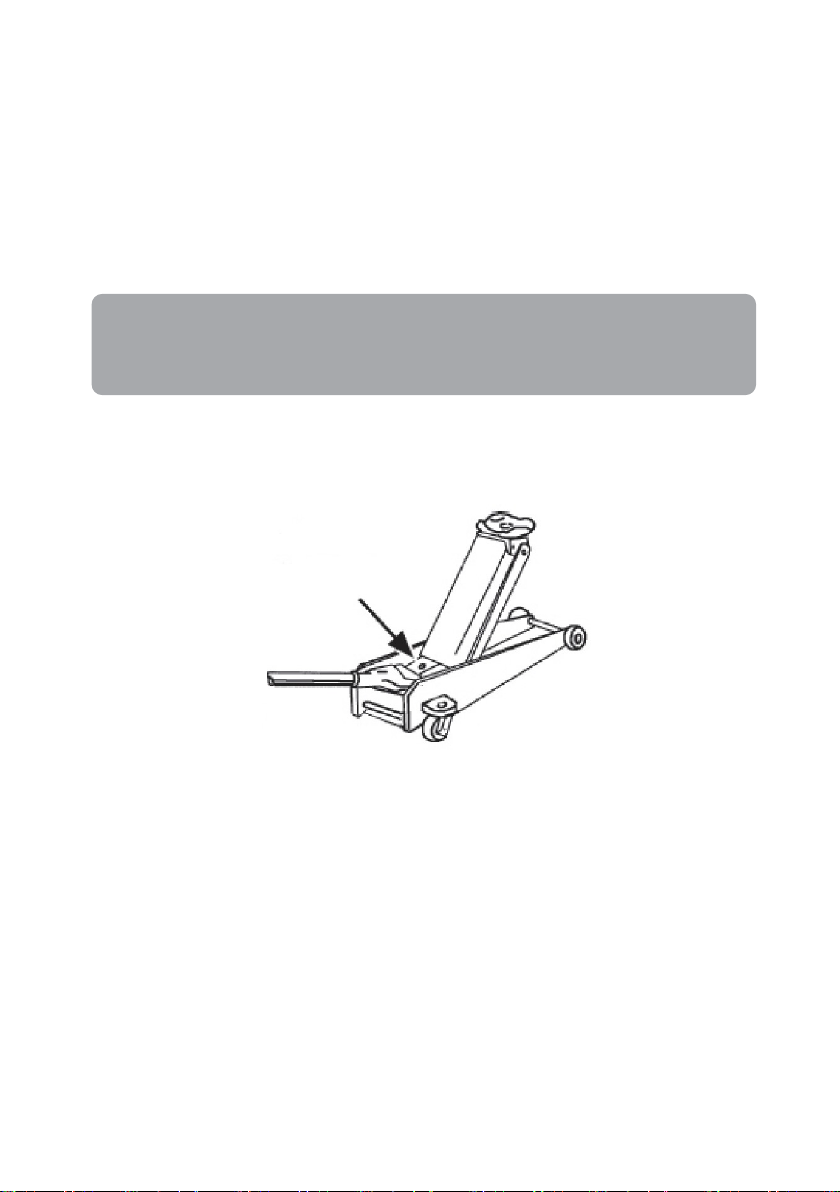
Checking the oil level
Oil plug
The trolley jack comes with oil inside but needs checking if the trolley jack is not operating
properly.
1. Ensure the trolley jack is on a flat surface. Turn the handle anti-clockwise with one full
turn to open the release valve and lower the hydraulic cylinder to its lowest position. It
may be necessary to apply force to the head cap to lower.
2. Remove the oil plug. Stand the trolley jack in a vertical position with handle socket
down. The oil level should match with the bottom of the fill hole. If not, top up with
more oil. Do not overfill.
Note:
Only use ISO VG 32/SAE 10 jack oils with this trolley jack. Do not use any other
fluids with this trolley jack.
3. Cover with the oil plug and check the trolley jack can pump properly. Purge air from
the trolley jack if necessary.
Chocking
Chock the wheels on the vehicle that will not be raised. This will prevent the vehicle from
moving when raised.
Page 8

OPERATION
WARNING: Ensure the safety warnings are read and understood
before using this trolley jack.
Raising the vehicle
1. Turn the handle clockwise as far as it will go to close the release valve.
2. Block the vehicle's wheels to ensure the vehicle is stable during lifting.
3. Refer to the vehicle manufacturer’s user guide to locate the approved lifting points
and appropriately place the trolley jack under the vehicle. Position the trolley jack so
that the head cap is centred on the lifting point.
4. Pump the trolley jack to raise the head cap until it makes contact with the vehicle.
Check that the head cap is centred and is contacted on the vehicle’s lifting point
firmly.
5. Continue to pump the jack with the handle to lift the vehicle to the desired height.
6. After pumping, support the vehicle with appropriately rated vehicle support stands
(not supplied) before commencing work on the vehicle.
Lowering the vehicle
1. Pump the trolley jack high enough to allow room to remove the support stands.
Remove the support stands.
2. Ensure there is nothing below the vehicle before and while the trolley jack will be
lowered. Slowly turn the handle anti-clockwise to carefully open the release valve.
The hydraulic cylinder will then begin to fall.
Page 9

CLEANING & CARE
Monthly maintenance is recommended. Lubrication is critical to trolley jacks as their
purpose is to support heavy loads. Any restriction due to dirt, rust, and other irritants may
cause either slow movement or rapid jerks when using the trolley jack, damaging the
internal components. Failure to maintain the trolley jack may lead to damage or personal
injury.
• Lubricate the hydraulic cylinder, linkages, head cap, and pump mechanism with light
oil.
Note:
If corrosion is present on the hydraulic cylinder, clean the cylinder, then wipe it
with an oily cloth.
• Visually inspect for cracked welds, bent, loose or missing parts, and hydraulic oil leaks. If
the trolley jack is damaged, stop use immediately and contact help.Kogan.com for
assistance.
Note:
Always inspect the trolley jack immediately if it has been subjected to an
abnormal load or shock.
• Use a soft cloth to clean after each use. Do not use harsh abrasives on the trolley jack.
• Check and maintain the oil level.
Storage
Store the trolley jack in a dry location in the fully lowered position with only the wheels
touching the ground.
Page 10

SPECIFICATIONS
Weight capacity 2000kg
Maximum height (mm) 465
Minimum height (mm) 130
Handle length 1013mm, 2 pieces
Head cap diameter (mm) 108
Compliance standard met AS 2615
Page 11
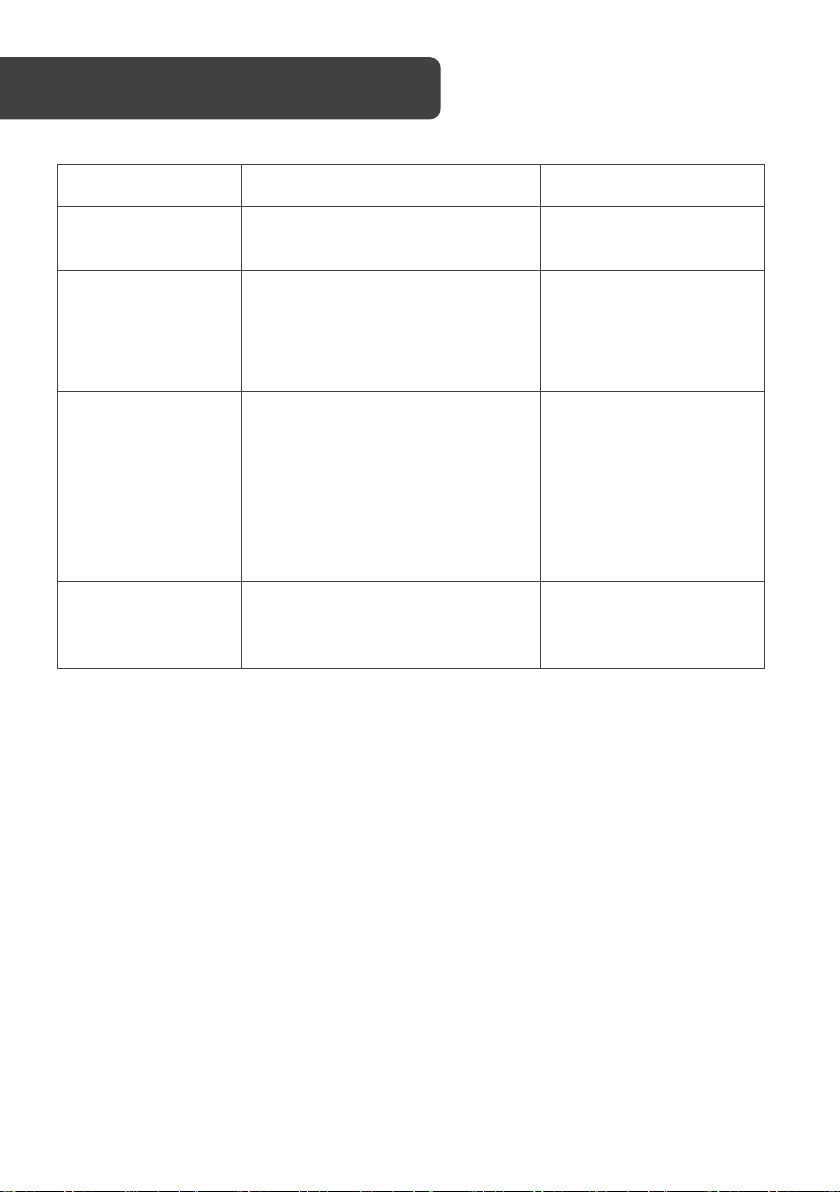
Problem Possible cause Solution
Trolley jack will not
lift to the full height.
Trolley jack is unable
to hold the weight of
the vehicle.
The lifting arm will
not lower.
Trolley jack feels
spongy when lifting.
Low oil level
• Release valve is not closing.
• Hydraulic jack oil is contaminated.
• Pump valves are not sealing.
• Hydraulic cylinder is stuck.
• Hydraulic cylinder is stuck.
• Components are worn out.
• Internal damage
• Return spring is unhooked or
broken.
• The joining mechanism to the
hydraulic arm is bent or broken.
Air is trapped inside the trolley jack.
Check the oil level and
refill if needed.
Stop use immediately and
contact help.Kogan.com
for assistance.
Stop use immediately and
contact help.Kogan.com
for assistance.
Follow the steps in the
‘Purging the air’ section of
this user guide.
Page 12
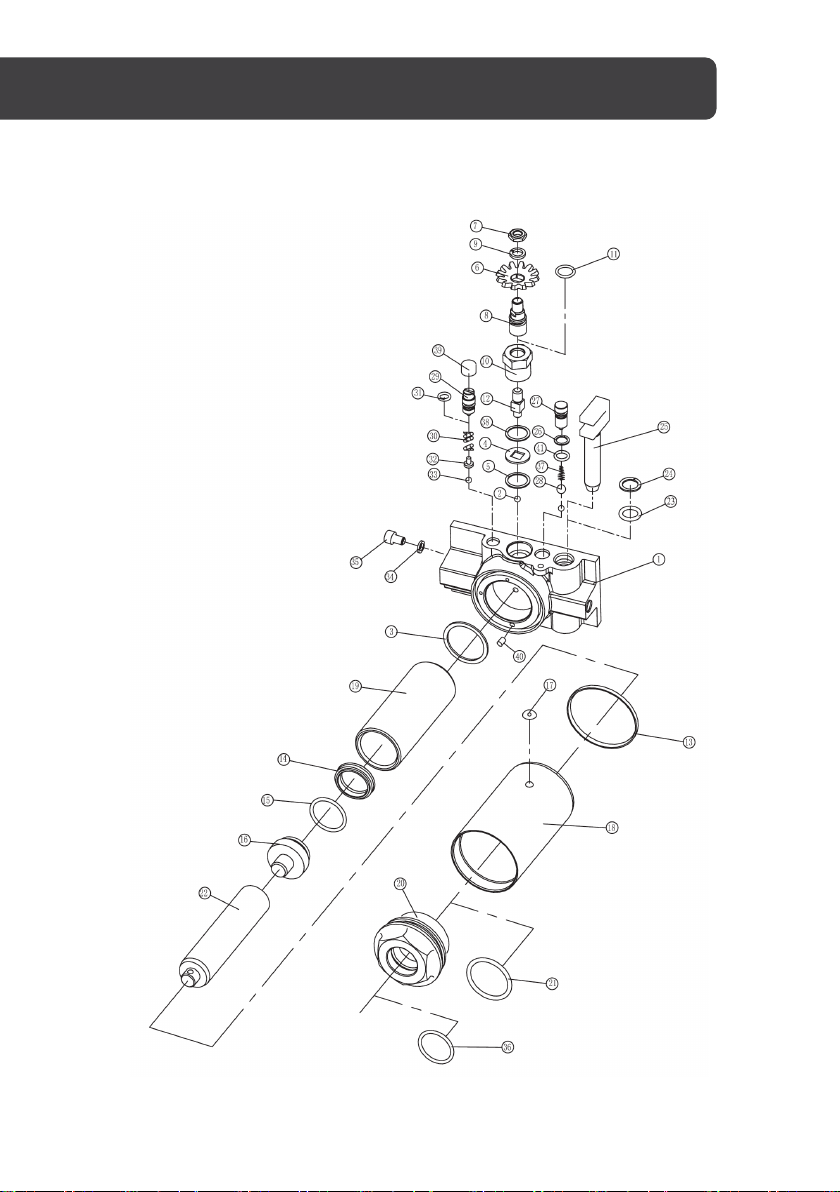
INTERNAL COMPONENTS OVERVIEW
Hydraulic arm
Page 13
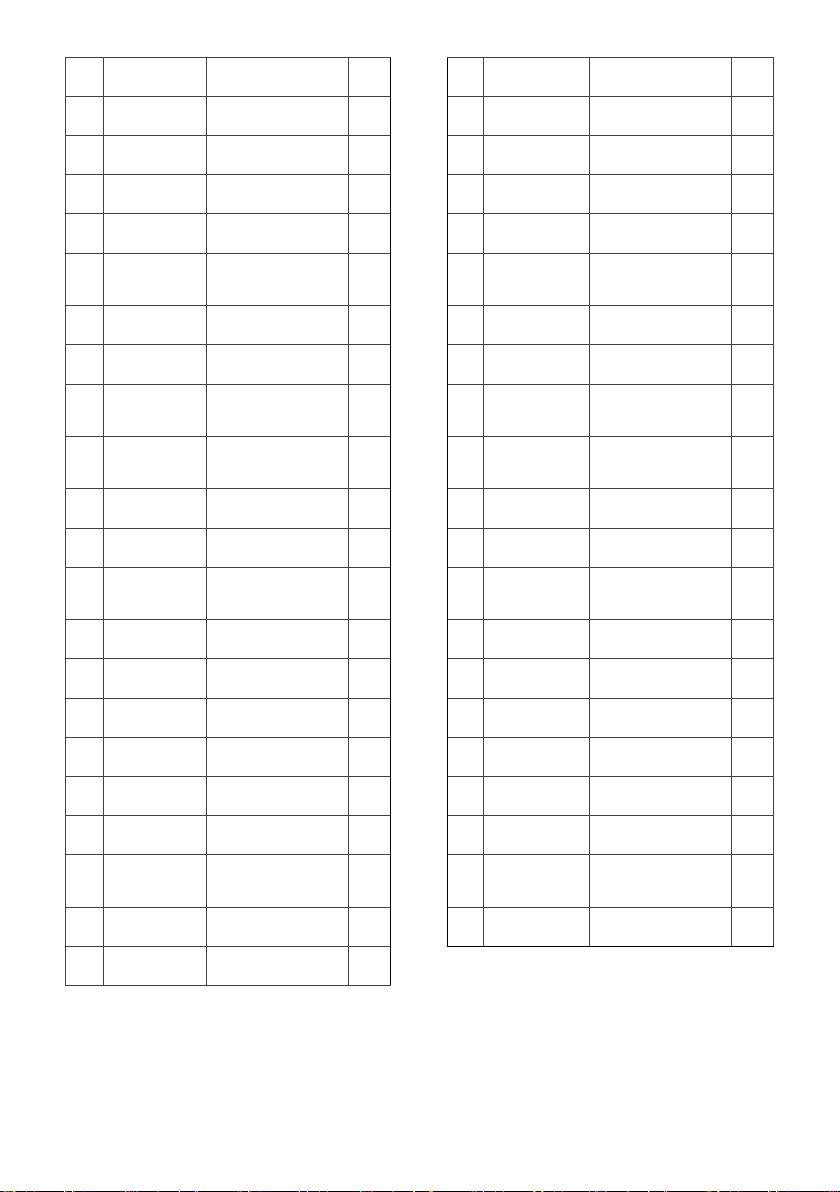
No.
Part No.
Description
Qty No.
Part No.
Description
Qty
1 TTITJ2KB1 Base plate 1
3
24
Aluminium
7
28
10
31
Release valve
14
35
16
37
Oil filter (not
20
41
22 TTITJ2KB22 Piston rod 1
2 TTITJ2KB2 Steel ball 2
TTITJ2KB3 Rectangular ring 1
4 TTITJ2KB4 Washer 1
5 TTITJ2KB5
6 TTITJ2KB6 Gear 1
TTITJ2KB7 Locknut 1
8 TTITJ2KB8
9 TTITJ2KB9 Washer 1
TTITJ2KB10 Release valve nut 1
11 TTITJ2KB11 O-ring 1
12 TTITJ2KB12
13 TTITJ2KB13 Seal ring 1
TTITJ2KB14 O-ring 1
15 TTITJ2KB15 Bowl washer 1
washer
Release valve
connector
core
23 TTITJ2KB23 Y-ring 1
TTITJ2KB24 Retaining ring 1
25 TTITJ2KB25 Plunger 1
1
1
1
26 TTITJ2KB26 Rectangular ring 1
27 TTITJ2KB27 Oil plug 1
TTITJ2KB28 Steel ball 1
29 TTITJ2KB29 Release valve nut 1
30 TTITJ2KB30
TTITJ2KB31 O-ring 1
32 TTITJ2KB32 Spring base 1
33 TTITJ2KB33 Steel ball 1
34 TTITJ2KB34 Rectangular ring 1
TTITJ2KB35 Nut 1
36 TTITJ2KB36 O-ring 1
Safety valve
spring
1
TTITJ2KB16 Piston 1
17 TTITJ2KB17 Oil plug 1
18 TTITJ2KB18 Reservoir 1
19 TTITJ2KB19 Cylinder 1
TTITJ2KB20 Top cap 1
21 TTITJ2KB21 O-ring 1
TTITJ2KB37 Taper spring 1
38 TTITJ2KB38 Steel washer 1
39 TTITJ2KB39 Safety valve 1
40 TTITJ2KB40
TTITJ2KB41 O-Ring 1
shown)
1
Page 14
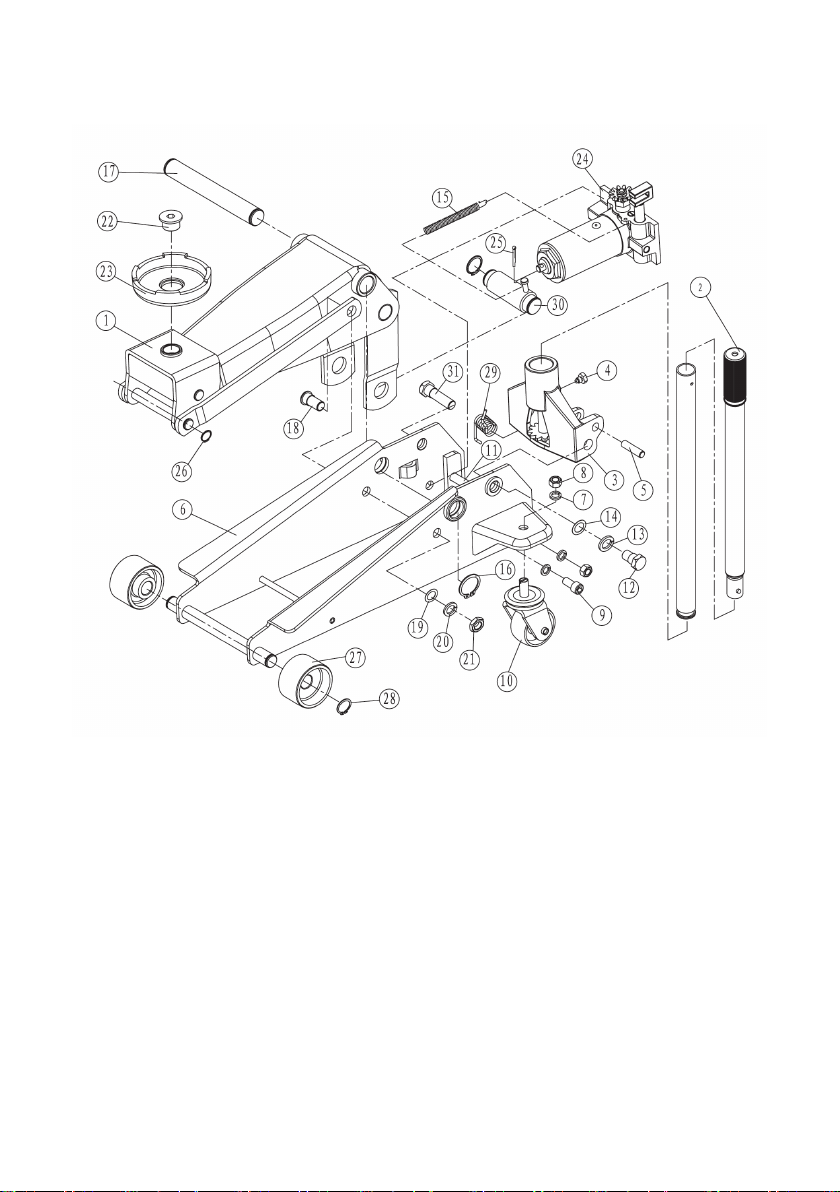
Trolley
Page 15
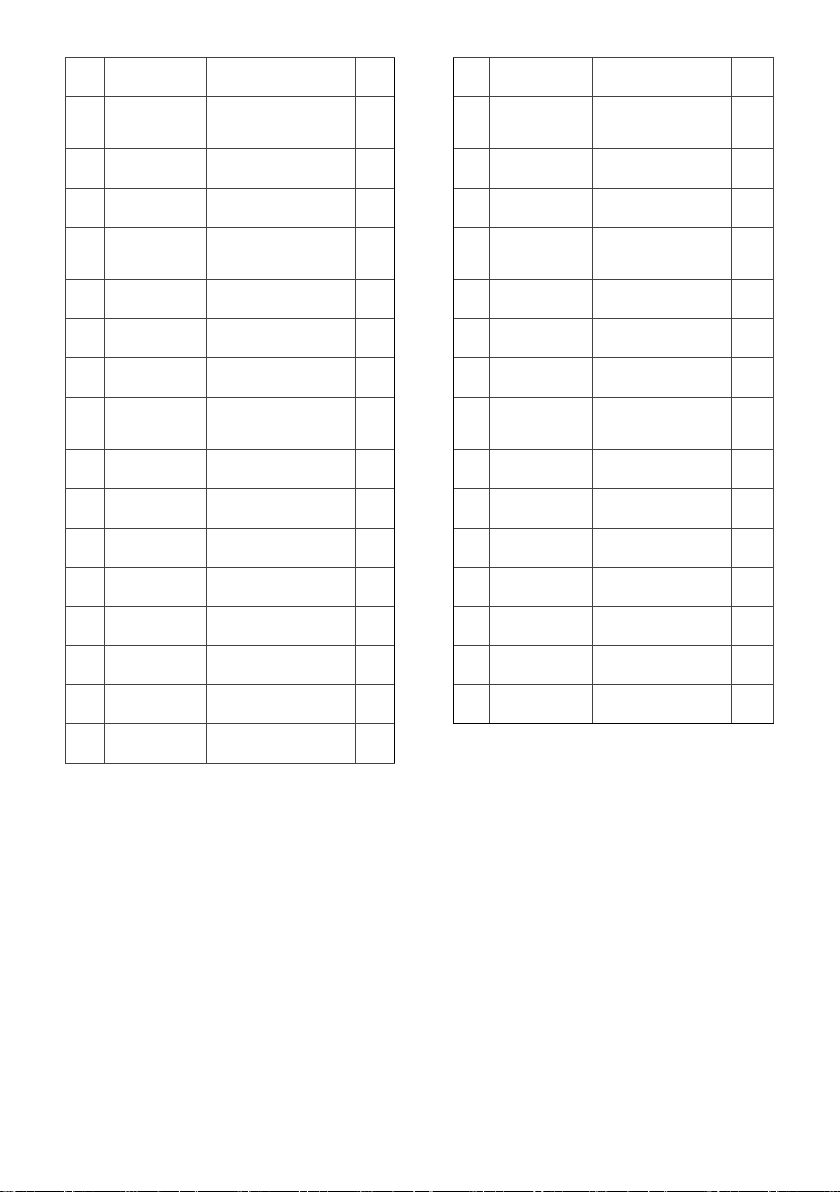
No.
Part No.
Description
Qty No.
Part No.
Description
Qty
1 TTITJ2KA1
2
18
Handle socket
Linking bolt
6
22
Hydraulic cylinder
10
26
12
28
15
31
Lifting arm
assembly
1
17 TTITJ2KA17 Shaft arm 1
TTITJ2KA2 Handle assembly 2
3 TTITJ2KA3 Handle socket 1
4 TTITJ2KA4
5 TTITJ2KA5 Handle socket pin 1
TTITJ2KA6 Frame assembly 1
7 TTITJ2KA7 Lock washer 6
8 TTITJ2KA8 Lock nut 4
9 TTITJ2KA9 Cap screw 2
TTITJ2KA10 Caster assembly 2
11 TTITJ2KA11 Supporting shaft 1
TTITJ2KA12 Left bolt 1
13 TTITJ2KA13 Lock washer 2
14 TTITJ2KA14 Split lock washer 2
TTITJ2KA15 Return spring 1
16 TTITJ2KA16 Retaining ring 4
screw
TTITJ2KA18 Linking bolt 2
19 TTITJ2KA19 Lock washer 2
1
20 TTITJ2KA20
21 TTITJ2KA21 Locknut 2
TTITJ2KA22 Head cap screw 1
23 TTITJ2KA23 Head cap 1
24 TTITJ2KA24
25 TTITJ2KA25 Cotter pin 1
TTITJ2KA26 Retaining ring 2
27 TTITJ2KA27 Front wheel 2
TTITJ2KA28 Retaining ring 2
29 TTITJ2KA29 Torsion spring 1
30 TTITJ2KA30 Block 1
TTITJ2KA31 Linking bolt 1
washer
assembly
2
1
Page 16

Need more information?
We hope that this user guide has given you
the assistance needed for a simple set-up.
For the most up-to-date guide for your product,
as well as any additional assistance you may require,
head online to help.kogan.com
 Loading...