

Page 1
English PM-1644AA 5/00
Do not use this product until
you read and understand
these instructions.
Instruction
Manual
Deluxe Bassinet
DEDICATED TO QUALITY
Page 2

IMPORTANT INFORMATION
Need Help?
✔ Read and understand instruction manual before
assembling and using Fold’N Go Deluxe Bassinet.
✔ Do not use in any vehicle.
✔ Never leave child unattended.
✔ Use with only one (1) child at a time.
✔ Do not use bassinet as a car bed.
✔ Do not use bassinet if infant can push up on hands and
knees or sit unassisted.
✔ Do not carry bassinet with child in it.
✔ Do not move or fold Playard with child in it.
✔ Do not add padding or other objects inside Playard
which may permit child to climb out or cause a
suffocation hazard.
✔ Do not use accessories other than those provided
by Century.
Bassinet:
Maximum Weight: 8.2 kg (18 lbs.)
Maximum Height: 63.5 cm (25 inches)
Activity: Discontinue use if child can push up on hands
and knees or sit unassisted.
Playard:
Maximum Weight: 14 kg (30 lbs.)
Maximum Height: 89 cm (35 inches)
Activity: Discontinue use if child can climb out of
Playard.
Page:
1 Important Information
2 Warnings
3 Assembly and Use
Playard
Bassinet
Canopy
7 Folding and Storing
Canopy
Bassinet
Playard
9 Maintenance
Cleaning
9 Replacement Parts
1
Safety First Checklist
Weight, Height and Activity Limits
Table of Contents
Save instruction manual
for future reference.
If you should have any problems with this product, call
toll-free 1-800-837-4044 from anywhere in the U.S. or
Canada or fax at 1-610-286-4555.
Or write us at: Century Products
P.O. Box 100
Elverson, PA 19520-9974
Attention: Customer Service Department
Please have the following information available. See label
on bottom tubing of Playard.
Model Number:
Manufacture Date:
Date of Purchase:
Page 3

Failure to follow all warnings and instructions could result in serious injury or
death.
• Never leave child unattended. Always keep child in view.
• This product is intended for use by one child at a time.
• Bassinet and/or Playard, including side rails, MUST be fully erected prior to use.
• Keep product away from stoves, heaters, campfires, fireplaces and other hazards which can
burn or cause injury to child.
• DO NOT use accessories other than those provided by Century.
• Strings can cause strangulation. DO NOT place items with a string around a child’s neck (such
as hood strings, pacifier cords, etc.). DO NOT suspend strings over product or attach strings
to toys.
• DO NOT place product near a window where cords from blinds or drapes can strangle child.
• DO NOT use product in a motor vehicle. Serious injury or death could result from a sudden
stop or accident.
WARNINGS
2
Page 4
1 Pull travel bag up and over top
of Playard.
5 Push down on center of Playard
floor until it is flat and locks into
position.
NOTE: Locking action is
automatic.
2 Stand Playard on legs and
wheels and unfasten Floorboard
Attachment Straps.
3 Separate Playard legs to
approximately 60 cm (2 feet)
apart.
4 Pull up on Top Rails until all
“click” and lock.
IMPORTANT: Floor loop
MUST remain raised at least
45.7 cm (18 inches) in order
for rails to lock.
NOTE: Test by pushing
down on each top rail
to be sure they are locked.
ASSEMBLY and USE
3
Playard
2 Feet
WARNING
All top rails MUST be straight and locked in
position or child may become entrapped and
suffocate.
Top Rail
WARNING
Avoid serious injury or death:
• Use Playard for a child who is unable to
climb out of Playard and weighs less than
14 kg (30 lbs.) and is less than 89 cm
(35 inches) tall.
• DO NOT use Playard without floorboard
being properly secured to Playard floor.
• DO NOT add padding or objects inside
Playard that will permit child to climb out.
• DO NOT move or fold Playard with child in
it.
• SUFFOCATION HAZARD: To help prevent
suffocation from entrapment, use only
floorboard provided by Century. NEVER
use additional mattress or padding.
Floorboard
Attachment Straps
Page 5

HINT: It may be necessary to
lift end of Playard to push center
down.
6 Place floorboard in Playard with
padded side facing up.
NOTE: DO NOT install floorboard if using
bassinet. Go to bassinet assembly section.
1
Lay bassinet on flat surface
and spread open.
2 Rotate and extend four (4)
Hooks until they “click” in
place.
3 If floorboard is installed in
Playard, remove floorboard.
4 Fold Floorboard into “W”
shape and place in center
of bassinet.
7 Secure ends of floorboard to
Playard by passing Attachment
Straps through holes in
bottom of Playard floor and
securing to underside of
Playard.
Playard assembly is now complete and
ready to use.
4
ASSEMBLY and USE continued
WARNING
To prevent child from
suffocating, attachment
straps MUST be secured
to underside of Playard.
Hook
Bassinet
Attachment
Strap
WARNING
Avoid serious injury or death:
• Use bassinet with infant who weighs less
than 8.2 kg (18 lbs.) and is less than
63.5 cm (25 inches) tall.
• DO NOT use without floorboard being
properly place in bassinet.
• Discontinue use of bassinet if infant can
push up on hands and knees or sit
unassisted.
• DO NOT carry bassinet with infant in it.
• DO NOT use as a car bed.
• SUFFOCATION HAZARD: To help prevent
suffocation from entrapment, use only
floorboard provided by Century. NEVER
use additional mattress or padding.
Floorboard
Page 6

T
o use bassinet with Playard:
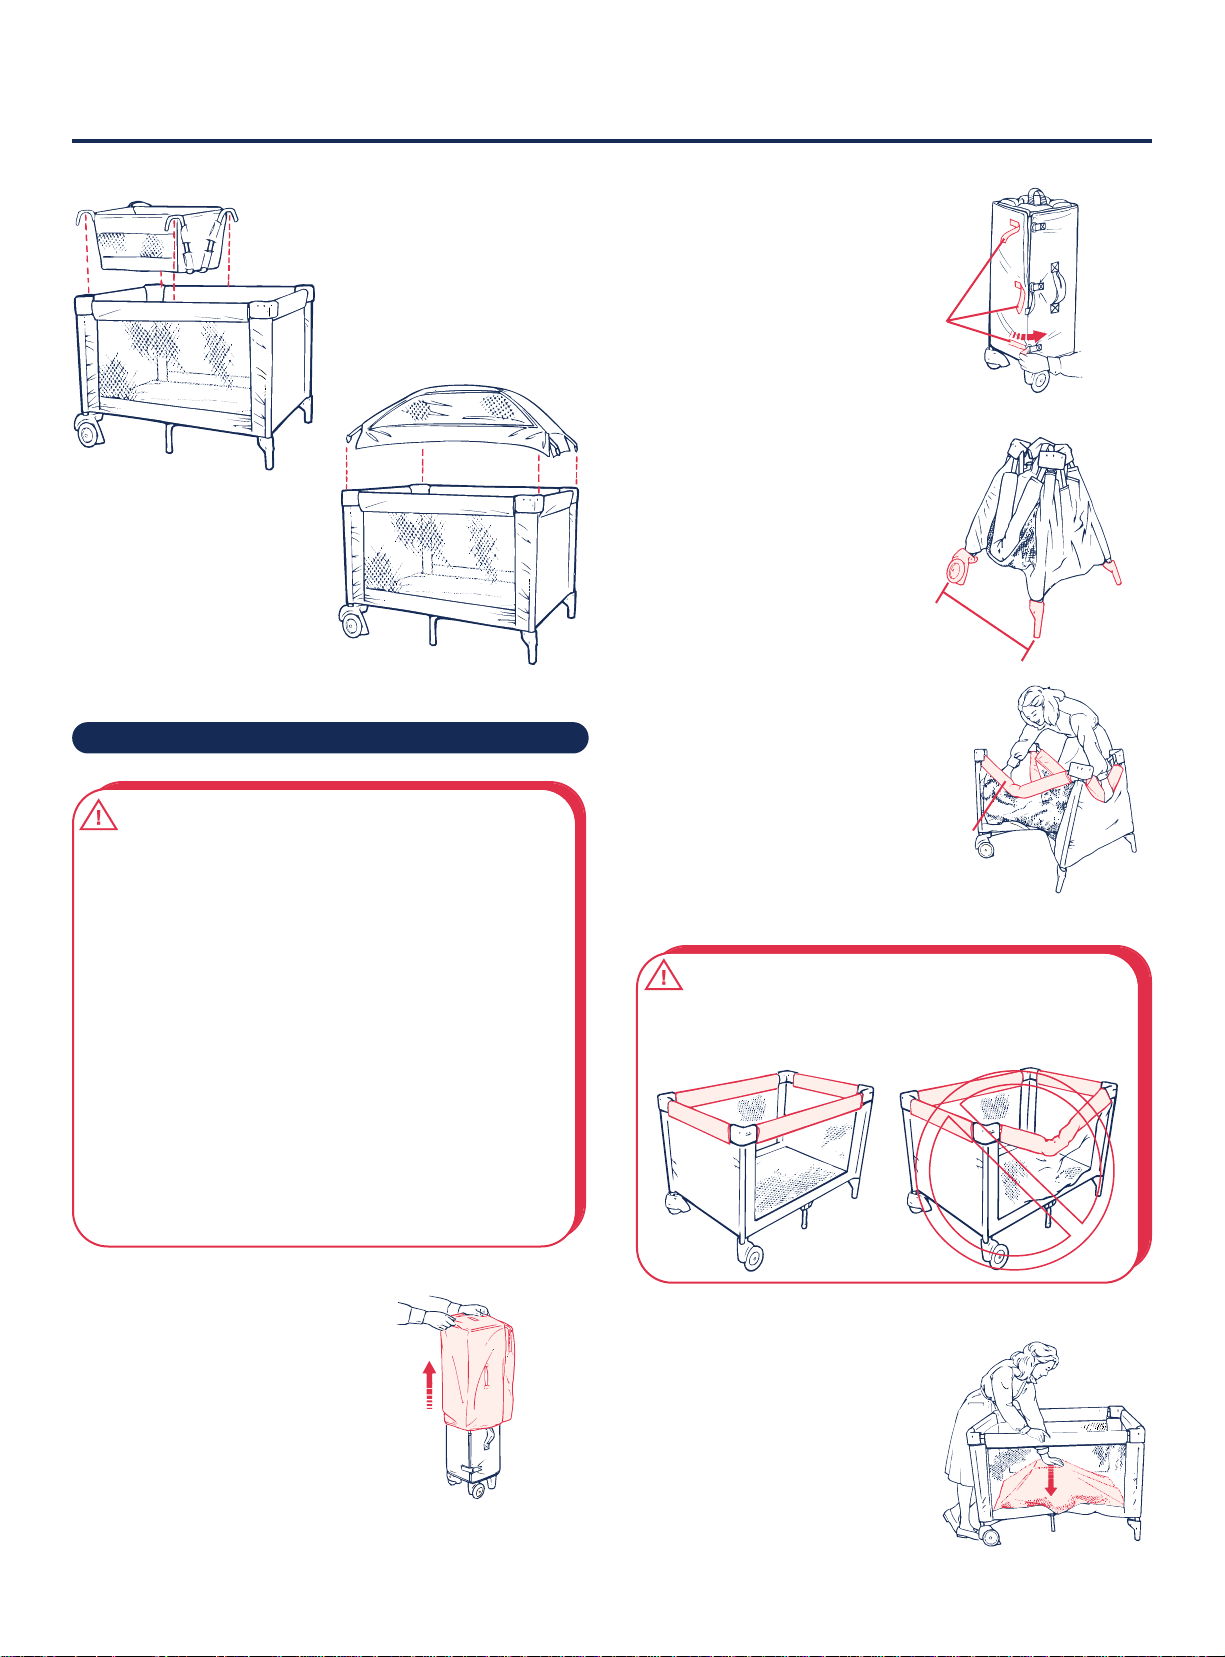
1 Place bassinet in Playard so that
hooks go over long rails.
2 Secure bassinet to Playard:
• Pass Attachment Strap
through opening in corner
of side panel of Playard.
• Fasten strap to outside of
Playard.
Repeat for other strap.
Bassinet is now ready for use with Playard.
5 Insert one side of floorboard
under Pocket on side of
bassinet.
6 Pull Pocket down over
floorboard to hold
floorboard in place.
Repeat steps 5 and 6 for
other side of floorboard.
7 Push down on center of
floorboard to flatten.
Bassinet assembly is now complete.
• Bassinet can be used with or without Playard.
ASSEMBLY and USE continued
5
1 Set bassinet on flat and stable surface that will keep
floorboard level so child will not roll into corner or side of
bassinet resulting in breathing difficulties.
2 Keep at least 30.5 cm (12 inches) away from surface edges
and stay within reach of child. Child’s wiggling and rocking
may cause bassinet to move and possibly fall off surfaces.
WARNING
Prevent falls and suffocation:
• Use only on a surface that is flat, level and
stable.
• Keep bassinet away from surface edges.
Attachment
Strap
Pocket
Pockets
To use bassinet without Playard:
Page 7

4 Pull end of Sleeve over rod and
release rod.
Repeat for other rod.
5 Set canopy over Playard and
insert canopy tabs into
curved slots of Playard corners.
6 Secure canopy bottom around
Playard corners using
Attachment Strips.
ASSEMBLY and USE continued
6
1 Lay canopy on flat surface.
2 Unfold rods and insert fiber
glass ends into aluminum ends.
NOTE: There are three
(3) sections of each rod
that must be extended.
3 Slide rod completely into
canopy fabric.
Repeat for other rod.
Canopy
WARNING
Avoid serious injury or death:
Temperature inside Playard with canopy can
be higher than outside:
• DO NOT cover mesh. Keep well ventilated.
• Keep out of direct sun.
• Remove child from Playard before child
becomes overheated.
Attachment
Strips
Canopy can only be used with Playard.
DO NOT use canopy when using bassinet.
Sleeve
Page 8

1 Unfasten both attachment straps.
2 Remove bassinet from Playard.
FOLDING and STORING
7
3
Remove floorboard from
bassinet.
4 Press release buttons on each
hook and push hook into
larger tube.
5 Rotate hooks to center of
bassinet.
6 Fold bassinet.
7 Place bassinet in pocket of
travel bag.
IMPORTANT: If continuing to use Playard, be sure to
properly secure floorboard in Playard.
Bassinet
1
Unfasten attachment strips, pull canopy tabs out of
corners and lift canopy up and away from Playard.
2 Remove rods from canopy.
3 Pull rods apart and fold.
NOTE: Rods are NOT a play
toy! Keep out of reach of
children. Store in pocket of
travel bag.
4 Fold canopy.
5 Place canopy and rods
in pocket of travel bag.
Canopy
Page 9

1 To remove floorboard:
• Unfasten attachment straps.
• Remove floorboard and set
aside.
2 Lift Floor Handle, rotate
counterclockwise to unlock
floor and pull up,
approximately 45.7 cm
(18 inches).
3 To fold top rails:
• Pull up on top rail slightly.
• Squeeze Release Button
on bottom of top rail and
push rail down. (Release
buttons are identified by
printed arrows.)
Repeat for other sides.
NOTE:
• If rails are difficult to
unlock, raise center of
floor higher and
squeeze Release
Button again.
• If only one side of rail
folds, squeeze Release
Button again to fully
fold.
FOLDING and STORING continued
8
Playard
4 Gather Playard frame together
while pulling up on Floor Loop.
5 Wrap floorboard around Playard
frame with padding facing in.
NOTE: Floorboard Handle MUST
be aligned with wheels as shown.
6 Secure Attachment Straps
by threading through loops
on end of floorboard and
folding back onto itself.
NOTE: Make sure floorboard
is positioned above wheels.
7 Position travel bag over Playard
so Handle comes through
Opening in side of bag.
Pull travel bag over Playard.
Pull Floor Loop through opening
on top of travel bag.
NOTE: To prevent rubbing,
make sure travel bag is
positioned above wheels.
Release
Button
Floor
Handle
Handle
Attachment
Straps
Floor Loop
Handle
Opening
Floor Loop
Page 10

A. Travel Bag US $ 10.00 x _____ = $ ______
(CAN $ 15.50)
B. Padded Floorboard US $ 25.00 x _____ = $ ______
(CAN $ 38.75)
C. Instruction Manual FREE x _____ = FREE
REPLACEMENT PARTS
Parts List (Model 10-745-XXX-01) Price Quantity Total
NOTE: Prices subject to change.
Total Parts $ ______
Playard, Bassinet, Canopy, Floorboard and
Travel Bag
• Surface wash with mild detergent and water, air dry.
• Quickly clean up any spills with warm soapy water.
9
MAINTENANCE
Cleaning
Page 11

Cardholder’s Name:
Card Number:
Card Exp. Date:
Check enclosed for $
SHIP TO:
Name:
Address:
City:
State: Zip:
Telephone No.:( )
Please make checks payable to CENTURY PRODUCTS or charge
to VISA, MASTERCARD or DISCOVER.
Orders outside USA Must use credit card.
Total Parts $
Sales Tax $
Shipping & Handling $
Outside Continental USA $
Total $
MAIL BOTH PAGES OF ORDER TO:
CENTURY PRODUCTS
P.O. BOX 100
ELVERSON, PA 19520-9974
ATTENTION: CUSTOMER SERVICE DEPARTMENT
FAX BOTH PAGES OF ORDER TO:
(610) 286-4555
REPLACEMENT PARTS ORDER FORM
We must have this information to process your order: see label
on bottom tubing of Playard.
Model No.:
Manufacture Date:
NOTE: If requested color is not available, a similar color
will be substituted.
PM-1644AA 5/00
Shipping & Handling
US $ 0.01 to $ 9.99 = US $ 3.00
(CAN $ 0.01 to $ 15.49 = CAN $ 4.75)
US $ 10.00 and over = US $ 5.00
(CAN $ 15.50 and over = CAN $ 7.75)
Outside Continental USA
Add: US $ 10.00
(CAN $ 15.50)
Sales Tax
• California, Illinois, Indiana,
Maryland and New York Residents
Add Sales & Applicable Local Taxes
• Ohio Residents Add 5.75% Sales Tax
• Pennsylvania Residents Add 6% Sales
Tax except for Philadelphia and
Allegheny Counties add 7% Sales Tax
• South Carolina Residents Add 5% Sales
Tax
Page 12

Remember
We are here to help you!
For immediate help, call our Customer
Service Department at 1-800-837-4044
from anywhere in the U.S. or Canada
or fax at 1-610-286-4555.
Visit us at our Web site:
www.centuryproducts.com
 Loading...