

Century 1010, 1014, 1060, 1050, 1150 Owner's Manual
...
1. SAVE THESE INSTRUCTIONS - This manual
contains important safety and operating instructions
for models 1010, 1014, 1050, 1060, 1150, 1160,
1200, 87102, 87104, 87105, 87106, 87120, 87122,
87128, 87150, 87151, 87302, & YA510B.
2. Do not expose charger to rain or snow.
3. Use of an attachment not recommended or sold by
Century Mfg. Co. may result in a risk of fire, electric
shock, or injury to persons.
4. To reduce risk of damage to electric plug and cord,
pull by plug rather than cord when disconnecting
charger.
5. An extension cord should not be used unless
absolutely necessary. Use of improper extension cord
could result in a risk of fire and electric shock. If
extension cord must be used, make sure:
a. That pins on plug of extension cord are the same
number, size, and shape as those of plug on
charger,
b. That extension cord is properly wired and in good
electrical condition; and
c. That the wire size is large enough for the length of
cord as specified below.
Length of cord in feet: 25 50 100 150
AWG size of cord: 18 18 16 14
6. Do not operate charger with damaged cord or plug.
Replace the cord or plug immediately.
7. Do not operate charger if it has received a sharp blow,
been dropped, or otherwise damaged in any way; take
it to a qualified serviceman. Call 1-800-328-2921 and
ask for the location of a service center near you.
8. Do not disassemble charger; take it to a qualified
serviceman when service or repair is required.
Incorrect reassembly may result in a risk of electric
shock or fire.
9. To reduce risk of electric shock, unplug charger from
outlet before attempting any maintenance or cleaning.
Turning off controls will not reduce this risk.
10. WARNING - RISK OF EXPLOSIVE GASES.
a. WORKING IN VICINITY OF A LEAD-ACID
BATTERY IS DANGEROUS. BATTERIES
GENERATE EXPLOSIVE GASES DURING
NORMAL BATTERY OPERATION. FOR THIS
REASON, IT IS OF UTMOST IMPORTANCE THAT
EACH TIME BEFORE USING YOUR CHARGER,
YOU READ THIS MANUAL AND FOLLOW THE
INSTRUCTIONS EXACTLY.
b. To reduce risk of battery explosion, follow these
instructions and those published by battery
manufacturer and manufacturer of any equipment
you intend to use in vicinity of battery. Review
cautionary marking on these products and in
engine compartment.
BATTERY CHARGER
OWNER’S MANUAL
IMPORTANT SAFETY INSTRUCTIONS - READ THESE FIRST
PERSONAL PRECAUTIONS
1. Someone should be within range of your voice or
close enough to come to your aid when you work near
a lead-acid battery.
2. Have plenty of fresh water and soap nearby in case
battery acid contacts skin, clothing, or eyes.
3. Wear complete eye protection and clothing protection.
Avoid touching eyes while working near battery.
4. If battery acid contacts skin or clothing, wash
immediately with soap and water. If acid enters eye,
immediately flood eye with running cold water for at
least 10 minutes and get medical attention
immediately.
5. NEVER smoke or allow a spark or flame in vicinity of
battery or engine.
6. Be extra cautious to reduce risk of dropping a metal
tool onto battery. It might spark or short-circuit battery
or other electrical part that may cause explosion.
7. Remove personal metal items such as rings,
bracelets, necklaces, and watches when working with
a lead-acid battery. A lead-acid battery can produce a
short-circuit current high enough to weld a ring or the
like to metal, causing a severe burn.
8. Use charger for charging LEAD-ACID battery only. It
is not intended to supply power to a low voltage
electrical system other than in a starter-motor
application. Do not use battery charger for charging
dry-cell batteries that are commonly used with home
appliances. These batteries may burst and cause
injury to persons and damage to property.
9. NEVER charge a frozen battery.
A
B
Congratulations on purchasing the finest new charger
on the market today. We wish to acknowledge UL for
their contribution of the following important safety
precautions. Please read and retain these instructions
for the continued safe use of your new charger.
1
Form# 842-240-000
E
n
g
l
i
s
h
F
r
a
n
ç
a
i
s
E
s
p
a
ñ
o
l

1. If necessary to remove battery from vehicle to charge,
always remove grounded terminal from battery first.
Make sure all accessories in the vehicle are off, so as
not to cause an arc.
2. Be sure area around battery is well ventilated while
battery is being charged. Gas can be forcefully blown
away by using a piece of cardboard or other
nonmetallic material as a fan.
3. Clean battery terminals. Be careful to keep corrosion
from coming in contact with eyes.
4. Add distilled water in each cell until battery acid
reaches level specified by battery manufacturer. This
helps purge excessive gas from cells. Do not overfill.
For a battery without cell caps, carefully follow
manufacturer’s recharging instructions.
5. Study all battery manufacturer’s specific precautions
such as removing or not removing cell caps while
charging and recommended rates of charge.
6. Determine voltage of battery by referring to car
owner’s manual and make sure that output voltage
selector switch is set at correct voltage.
1 Locate charger as far away from battery as dc cables
permit.
2. Never place charger directly above battery being
charged; gases from battery will corrode and damage
charger.
3. Never allow battery acid to drip on charger when
reading gravity or filling battery.
4. Do not operate charger in a closed area or restrict
ventilation in any way.
5. Do not set a battery on top of charger.
6. Locate charger at least 18” above the floor.
1. CAUTION: Connect and disconnect dc output
clips only after setting any switches with an “off”
position to off and removing AC cord from electric
outlet. Never allow clips to touch each other.
2. When hooking up charger, attach one clip to battery
and the other to a point away from battery (see
sections “G” & “H”). Do not hook up charger until
reading sections A-J.
To reduce explosion risk, never connect both clips
directly to the battery. When making each connection,
twist or rock clip back and forth several times to make a
good connection and to reduce the risk of a clip slipping
off and creating a spark. Do not twist or rock clip on
the battery after the second clip connection is made.
PREPARING TO CHARGE BATTERY
LOCATING THE CHARGER
BATTERY CHARGER CONNECTION PRECAUTIONS
F
D
C
Charger should be grounded to reduce risk of electric
shock. Charger is equipped with an electric cord having
an equipment-grounding conductor and grounding plug.
The plug must be plugged into an outlet that is properly
installed and grounded in accordance with all local codes
and ordinances.
DANGER - Never alter AC cord or plug provided - if it
will not fit outlet, have proper outlet installed by a
qualified electrician. Improper connection can result
in a risk of an electric shock.
GROUNDING AND AC POWER CORD CONNECTION INSTRUCTIONS
E
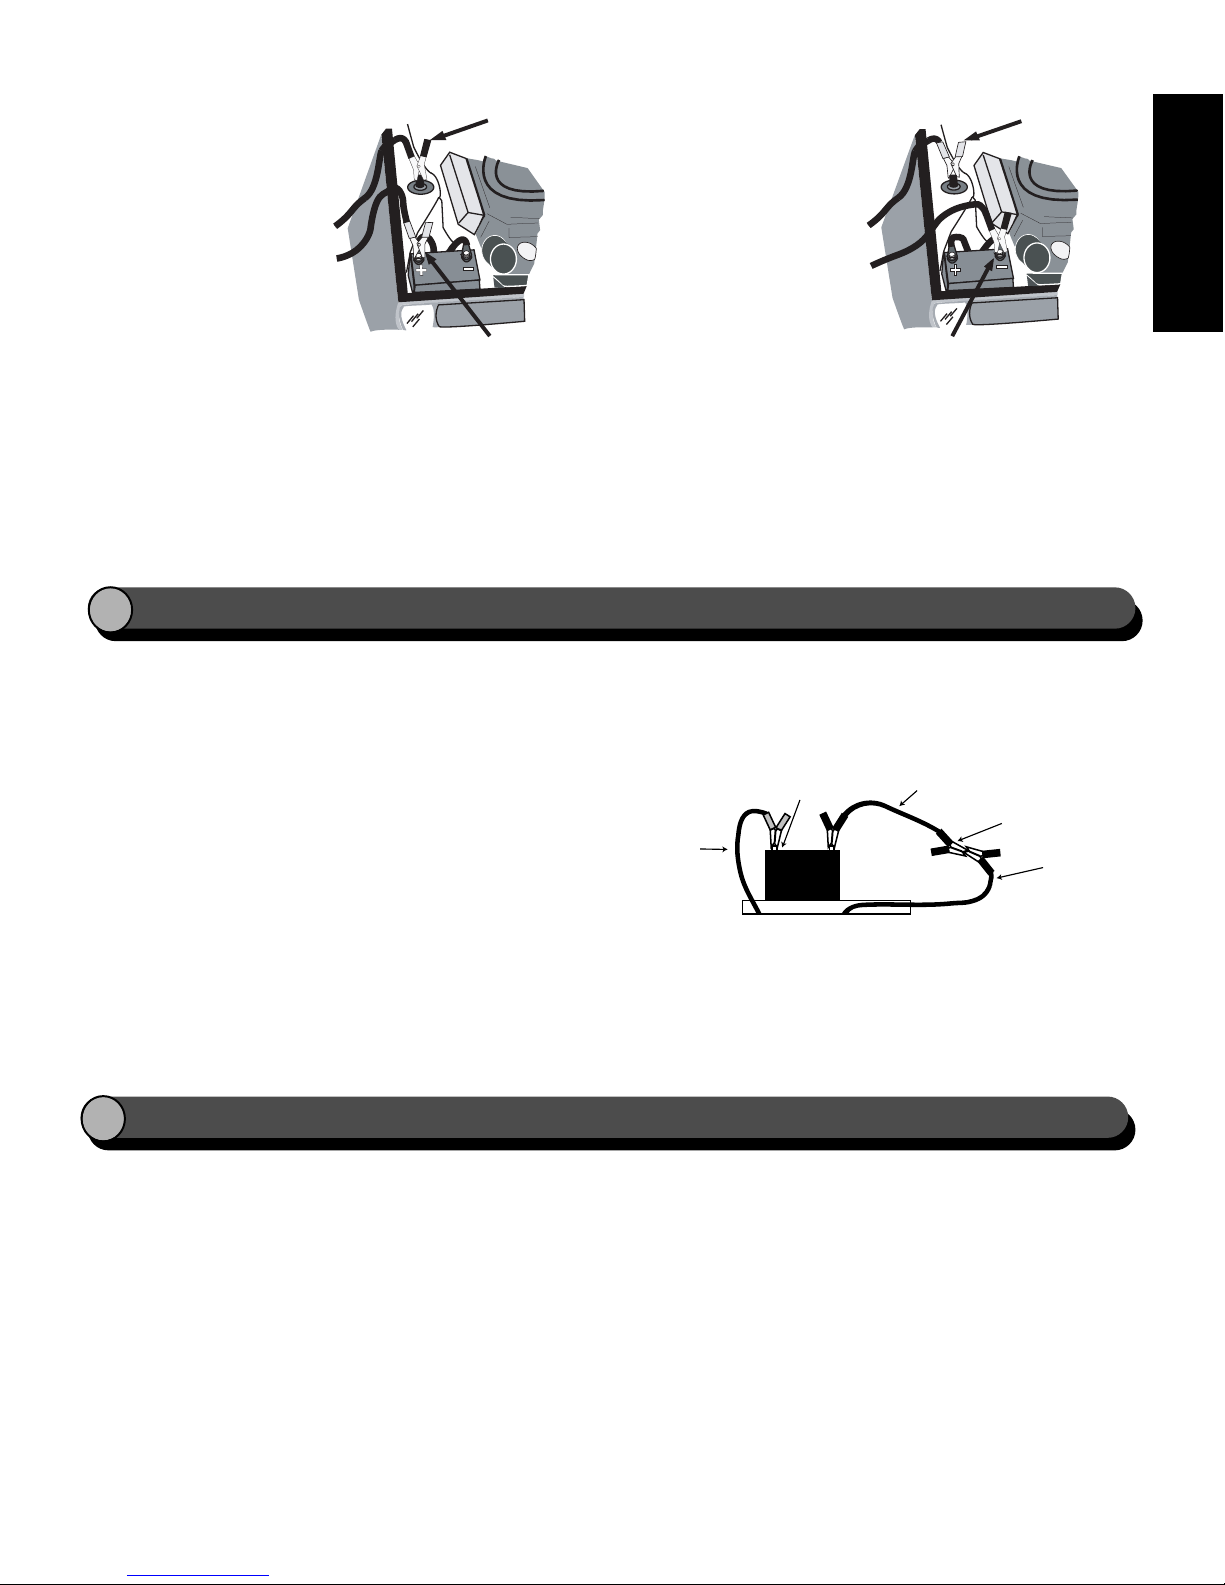
CHARGING A BATTERY IS INSTALLED IN VEHICLE
G
CAUTION: A MARINE (BOAT) BATTERY MUST BE
REMOVED AND CHARGED ON SHORE. TO CHARGE
IT ON BOARD REQUIRES EQUIPMENT SPECIALLY
DESIGNED FOR MARINE USE.
CAUTION: A SPARK NEAR BATTERY MAY CAUSE
BATTERY EXPLOSION. TO REDUCE RISK OF A
SPARK NEAR BATTERY:
1. Position ac and dc cords to reduce risk of damage by
hood, door, or moving engine part.
2. Stay clear of fan blades, belts, pulleys, and other parts
that can cause injury to persons.
3. Check polarity of battery posts. POSITIVE
(POS, P, +) battery
post usually has
larger diameter
than NEGATIVE (NEG, N, -) post.
2
E
n
g
l
i
s
h
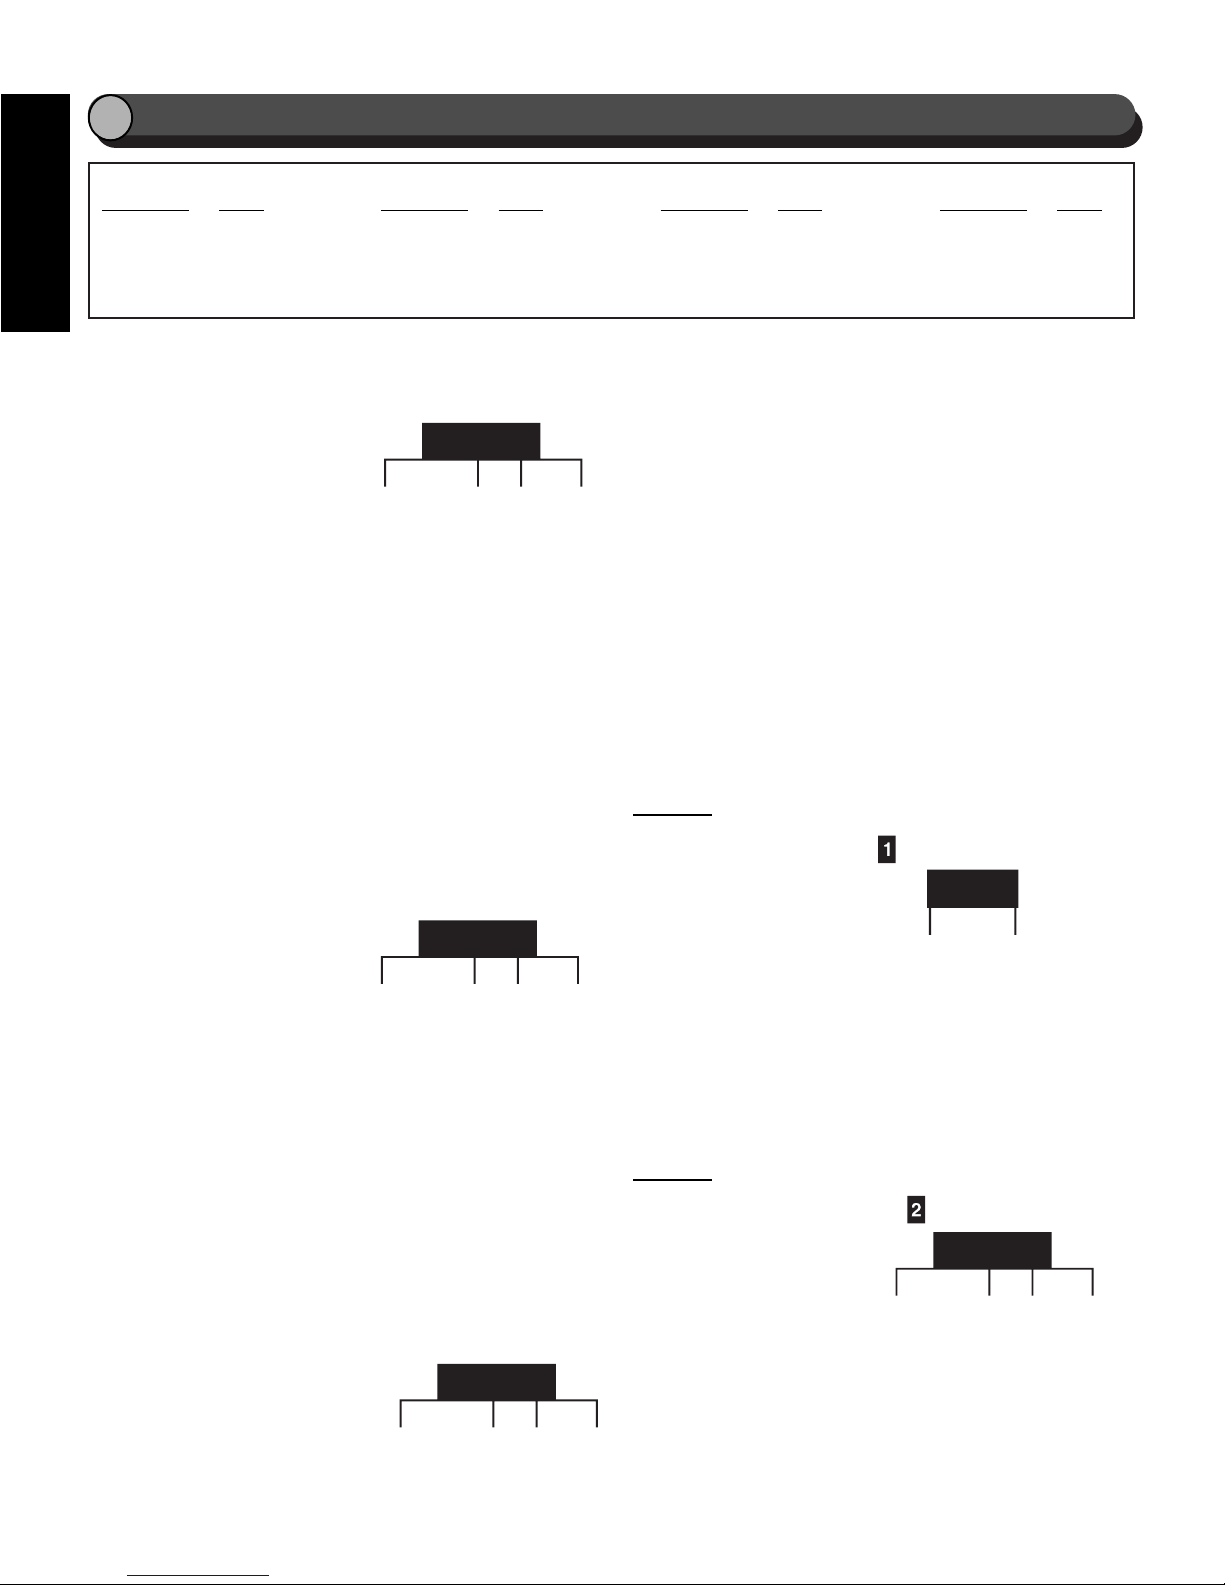
CAUTION: A SPARK NEAR THE BATTERY MAY
CAUSE BATTERY EXPLOSION. TO REDUCE RISK OF
A SPARK NEAR BATTERY:
1. Check polarity of battery posts. POSITIVE (POS, P,+)
battery post usually has a larger diameter than
NEGATIVE (NEG, N,-) post.
2. Attach a cable (not provided) to the NEGATIVE (NEG,
N, -) battery post. This cable must be a minimum of
24” long, and of a wire gauge that is no lighter than
the wire gauge of the charger’s output cables (battery
cables and booster cables work well).
3. Connect POSITIVE (RED) charger clip to POSITIVE
(POS, P, +) post of battery.
4. Position yourself and the free end of the cable
(installed in step #2) as FAR away from the battery as
possible. FACING AWAY FROM THE BATTERY,
connect the NEGATIVE (Black) charger clip to the
free end of the cable.
5. When disconnecting charger, always do so in reverse
sequence of connecting procedure and break first
connection while as far away from battery as practical.
4. Determine which post
of battery is grounded
(connected) to the
chassis. If the negative
post is grounded to the
chassis (as in most
vehicles), see figure 1
and instruction “5a”. If
the positive post is
grounded to the
chassis, see figure 2
and instruction “5b”.
5a. For NEGATIVE-
GROUNDED vehicle,
connect POSITIVE (Red) clip from the battery charger
to the POSITIVE (POS, P,+) ungrounded post of the
battery.
5b. For POSITIVE-GROUNDED vehicle, connect the
NEGATIVE (Black) clip from the battery charger to the
NEGATIVE (NEG, N, -) ungrounded post of the battery.
6. Connect the remaining
battery charger clip to the
vehicle chassis or engine
block, as far away from
the battery as possible.
Do not connect the
clip to carburetor,
fuel lines, or sheetmetal body parts.
Connect to a heavygauge metal part of
the frame or engine
block.
7. When disconnecting
charger, turn all switches with an “off” position to “off”,
disconnect ac cord, remove clip from vehicle chassis,
and then remove clip from battery terminal.
8. Refer to the Operating Instructions for information on
setting selector switches. Be sure to refer to the
instructions for your model of charger.
Negative to
Chassis Ground
Positive
Positive to
Chassis Ground
Negative
Figure 2
Figure 1
NOTE: Not applicable to Model 1010,1014, 87102, and
87122.
1. Connect the battery charger to the vehicle according
to sections “G” or “H” (as appropriate) found earlier in
this manual.
2. Follow the Operating Instructions for the model of
charger you are using in setting the output switches.
NOTE: Performance will be enhanced if you charge
the battery for 5-15 minutes before attempting to
start.
3. Crank engine for 3 to 4 seconds.
4. If engine fails to start, charge battery for another 515 minutes and attempt to start the engine again.
NOTE: This charger is equipped with an automatic-reset
circuit breaker to protect the battery charger from
overload conditions. This circuit breaker will trip if you
crank the engine too long at one time. If this happens,
wait six to seven minutes. The breaker will reset
automatically and engine starting or battery charging can
resume.
CAUTION: BATTERY MUST BE INSTALLED IN
VEHICLE TO USE THE ENGINE STARTING FEATURE.
CHARGING A BATTERY OUTSIDE OF THE VEHICLE
H
3
Figure 3
ENGINE STARTING
I
E
n
g
l
i
s
h
Positive
Cable
from
Charger
_
+
Booster
Cable
Negative
Cable from
Charger
OPERATING INSTRUCTIONS
J
TABLE OF CONTENTS
Model No. Page Model No. Page Model No. Page Model No. Page
1010 4 1150 5 87105 4 87122 5
1014 4 1160 6 87106 4 87150 6
1050 4 1200 6 87120 5 87151 6
1060 4 87102 4 87128 5 87302 6
87104 4 YA510B 4
MODEL 1014 &
87104
Select “6V, 10 Amp” for manual
charging of 6-volt batteries used
in automobiles, trucks and farm
equipment. Note: The 6V, 10
Amp position is manual only
and does not taper.
Select “12V, 2 Amp” for
charging lawn tractor, motorcycle, snowmobile or other
small batteries.
Select “12V, 10 Amp for charging large lead acid batteries
used in automobiles, boats, trucks, vans, farm equipment,
etc.
Note: Discontinue charging within 24 hours of battery
reaching full charge.
MODEL 87102 & 1010
Select “10 A, 12 V” if you are charging large lead acid
batteries such as those used in automobiles, boats,
trucks, vans, farm equipment,
etc.
Select “2 A, 12 V” for charging
lawn tractor, motorcycle,
snowmobile, or other small
batteries.
Select “10 A, 6 V” for charging
6 volt batteries used in automobiles, trucks, and farm
equipment. This setting does not taper.
After you have read the owner’s manual and
completed the steps required in sections “A” through
“J”, the charger can be plugged in and used!
MODEL 87105 &1050
Select “55 A Start” if you are attempting to start a car with
a weak battery. Note: for best results, first charge battery
for 5 - 15 minutes. Crank engine for 3-4 seconds; if engine
fails to start, charge the battery for another 5-15 minutes
and attempt to start the engine
again.
Select “10 A, 12 V” if you are
charging large lead acid
batteries such as those used in
automobiles, boats, trucks,
vans, farm equipment, etc.
Select “2 A, 12 V” for charging lawn tractor, motorcycle,
snowmobile, or other small batteries.
Select “10 A, 6 V” for charging 6 volt batteries used in
automobiles, trucks, and farm equipment. This setting
does not taper. After you have read the owner’s
manual and completed the steps required in sections
“A” through “J”, the charger can be plugged in and
used!
MODEL 87106, 1060
&YA510B
Charging a Battery-Starting an Engine
This charger is equipped with Auto On-off Technology
which senses when a battery has reached full charge and
then shuts the charger off automatically (12-V settings
only). Note: Charger will continue to “hum” as it monitors
battery charge level.
Step 1: SELECT FUNCTION (Switch 1)
Note: Preactivation of a
low or dead battery may be
required.
Select START. Charge for
5-15 minutes then select
the desired charge rate to
continue charging. Repeat
if the battery does not start taking a charge.
Select “Charge” if you will be charging a battery.
Select “Start” if you are attempting to start a car with a
weak battery. After you have read the owner’s manual
and completed the steps required in sections “A”
through “J”, the charger can be plugged in and used.
Step 2: SELECT SETTING (Switch 2)
Select “55 A Start” if you
are attempting to start a
car with a weak battery.
Note: for best results, first
charge battery, using
directions in Step 1, for 515 minutes.
4
E
n
g
l
i
s
h
SELECT SETTING
OFF 10A
10A
12V2A12V
AUTOMATIC MANUAL
6V
SELECT SETTING
OFF 10A
12V2A12V
10A
6V
55 AMP
START
SELECT SETTING
10A
12V2A12V
SELECT FUNCTION
CHARGE START
10A
6V
55 AMP
START
SELECT SETTING
10A
12V2A12V
10A
6V
Engage starter for 3-4 seconds; if engine fails to start,
charge the battery for another 5-15 minutes and attempt
to start the engine again.
Select “10A, 12 V Auto” if you are charging large lead acid
batteries such as those used in automobiles, boats,
trucks, vans, farm equipment, etc.
Select “2 A, 12 V” for charging lawn tractor, motorcycle,
snowmobile, or other small batteries. Do not use this
setting for large automotive, truck or marine batteries.
Select “10 A, 6 V” for charging 6 volt batteries used in
automobiles, trucks, and farm equipment. This setting
does not taper. NOTE: The 10 A, 6 V position does not
shut-off automatically.
MODEL 87120
Select “70 A Start” if you
are attempting to start a
car with a weak battery.
Note: for best results,
first charge battery,
using directions above,
for 5 - 15 minutes.
Crank engine for 3-4
seconds. If engine fails
to start, charge battery for another 5-15 minutes and
attempt to start the engine again.
Select “12 A” if you are charging large lead acid batteries
such as those used in automobiles, boats, trucks, vans,
farm equipment, etc.
Select “2 A” for charging lawn tractor, motorcycle,
snowmobiles, or other small batteries.
After you have read the owner’s manual and
completed the steps required in sections “A” through
“J”, the charger can be plugged in and used!
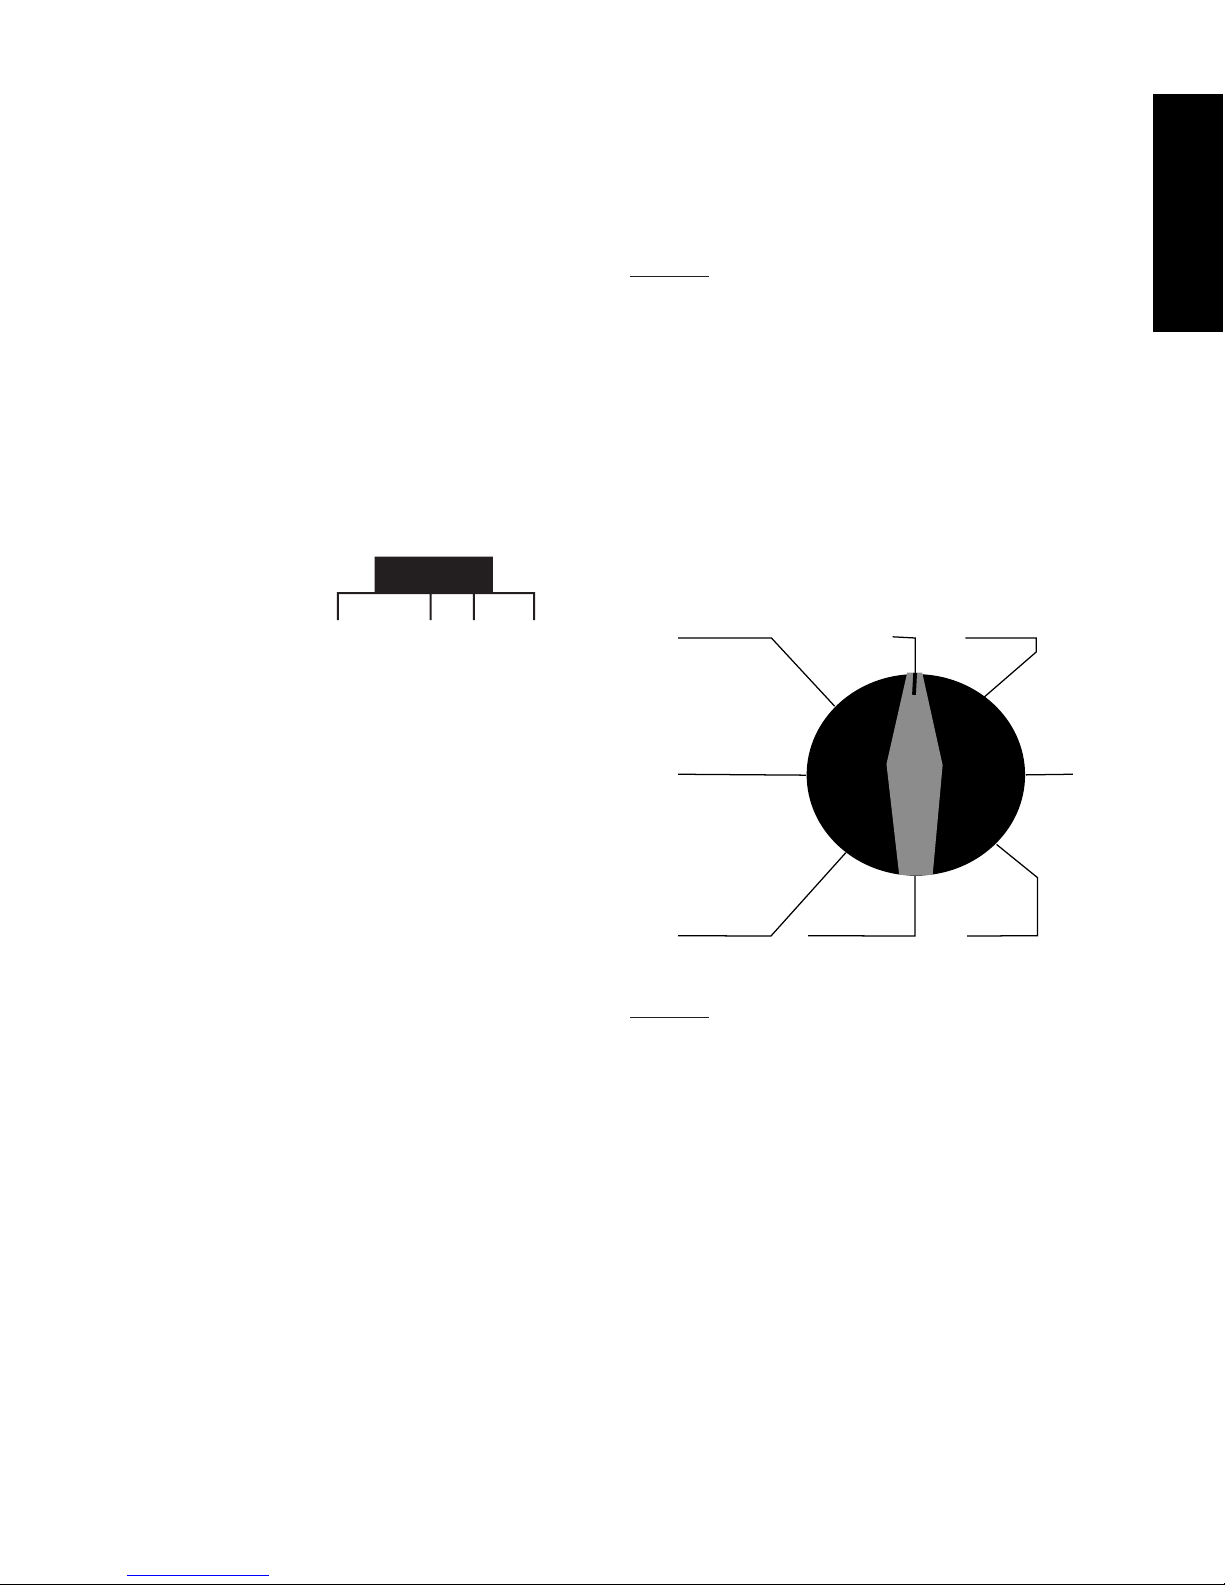
MODEL 87128
Charging A Battery-Starting an Engine
This charger is equipped with Auto On-Off Technology
which senses when a battery has reached full charge and
then shuts the charger off automatically (12-V selections
only). Note: Charger will continue to
hum
as it monitors
battery charge level.
Select 12 A, 12 V AUTOMATIC DEEP CYCLE position if
you are charging a lead acid deep cycle battery.
NOTE: The MANUAL charging positions do not shut off
automatically. Only the AUTOMATIC charging positions
will shut off automatically.
Select either 12 A, 12 V position if you are charging large
lead acid batteries such as those used in automobiles,
boats, trucks, vans, farm equipment, etc.
Select either 2 A, 12 V position for charging lawn tractor,
motorcycle, snowmobile, or other small batteries. Do not
use this setting for large automotive, truck or marine
batteries.
Select 12 A, 6 V MANUAL position for charging 6 V
batteries used in automobiles, trucks, and farm
equipment. This setting does not taper. NOTE: The
MANUAL charging positions do not shut-off automatically.
Step 1: CHARGING A BATTERY
Rotate the selector switch from OFF to the desired voltage
and amperage level to charge a battery. There is only one
position available (12A 6V MANUAL) for charging 6 volt
batteries. Automatic positions are available for charging
12 volt batteries only.
Note: Preactivation of a low or dead battery may be
required.
To preactivate a battery, rotate the selector switch to the
70A 12V position (70A 12V ENGINE START/ACTIVATE).
Charge the battery in that position for 5-15 minutes then
select the desired charge rate to continue charging.
Repeat if the battery does not start to charge.
Step 2: Starting a vehicle
Note: for best results, first charge battery, using directions
in Step 1, for 5-15 minutes.
Rotate the selector switch to the 70A 12V position (70A
12V ENGINE START/ACTIVATE) for assistance in starting
an engine with a weak battery.
Crank engine for 3 seconds. If engine fails to start, charge
battery for another 5 to 15 minutes and attempt to start
the engine again.
After you have read the owner’s manual and
completed the steps required in sections “A” through
“J”, the charger can be plugged in and used.
MODEL 87122
Charging A Battery
This charger is equipped with Auto On-off Technology
which senses when a battery has reached full charge and
5
E
n
g
l
i
s
h
70 AMP
START
SELECT SETTING
12A 2A OFF
12A 12V
AUTOMATIC
DEEP CYCLE
12A 12V
AUTOMATIC
2A 12V
AUTOMATIC
ENGINE START/
ACTIVATE
OFF 12A 6V
MANUAL
12A
12V
MAN.
2A 12V70A 12V
MANUAL

then shuts the charger off automatically (12-V settings
only).
Note: Charger will continue to “hum” as it monitors
battery charge level.
Step 1: SELECT FUNCTION (Switch 1).
Select “Auto” if you will be charging
a battery.
Select “Manual/Activate”if you are
attempting to charge a battery that
has less than 3 volts in it (leave in
this position for 5-15 minutes before
switching it to the “Auto” position.
Step 2: SELECT SETTING (Switch 2)
Select “Activate” when trying
to charge a battery with less
than 3 volts (only leave here
for 5-15 minutes before
beginning the charging
process as follows).
Select “12 A, 12 V Auto” if you
are charging large lead acid
batteries such as those used
in automobiles, boats, trucks, vans, farm equipment, etc.
Select “12 A, 6 V Manual” for charging 6 V batteries used
in automobiles, trucks, and farm equipment. This setting
does not taper. NOTE: The 12 A, 6 V position does not
shut-off automatically.
Select “Off” when all battery charging operations are
completed.
After you have read the owner’s manual and
completed the steps required in sections “A”
through “J”, the charger can be plugged in and used.
MODEL 87150 & 1150
Select “100 A Start” if you are attempting to start a car
with a weak battery. Note: for best results, first charge
battery for 5 - 15 minutes. Crank engine for 3-4 seconds.
If engine fails to start, charge battery for another 5-15
minutes and attempt to start
the engine again.
Select “15 A, 12 V” if you are
charging large lead acid
batteries such as those used
in automobiles, boats, trucks,
vans, farm equipment, etc.
Select “2 A, 12 V” for
charging lawn tractor, motorcycle, snowmobile or other
small batteries.
Select “15 A, 6 V” for charging 6 volt batteries used in
automobiles, trucks, and farm equipment. This setting
does not taper.
After you have read the owner’s manual and
completed the steps required in sections “A”
through “J”, the charger can be plugged in and used!
MODEL 87151 &1160
Charging a Battery-Starting an Engine
This charger is equipped with Auto On-off Technology
which senses when a battery has reached full charge
and then shuts the charger off automatically (12-V
settings only). Note: Charger will continue to “hum” as it
monitors battery charge level.
Step 1: SELECT BATTERY (Switch 1)
Select “Normal” for standard
automobile, truck, and lawn
tractor batteries, including
motorcycles and marine
starting batteries. Deep cycle
and lead calcium batteries
over 2 years old should also
be charged at this setting.
Select “Deep Cycle” for marine deep cycle batteries and
lead calcium batteries that are less than two years old.
Step 2: SELECT FUNCTION (Switch 2)
Select “Charge” if you will be
charging a battery.
Select “Start” if you are
attempting to start a car with a
weak battery.
Step 3: SELECT SETTING (Switch 3)
Select “100 A Start” if
you are attempting to
start a car with a
weak battery. Note:
for best results, first
charge battery, using
directions in Step 1,
for 5-15 minutes.
Engage starter for 3
seconds; if engine fails to start, allow charger to rest for
6-7 minutes before trying again.
Select “15 A, 6 V” for charging 6 V batteries used in
automobiles, trucks, and farm equipment. This setting
does not taper. NOTE: The 15 A, 6 V position does
not shut-off automatically.
After you have read the owner’s manual and
completed the steps required in sections “A”
through “J”, the charger can be plugged in and used.
Note: Preactivation of a low or dead battery may be
required.
Select START. Charge for 5-15 minutes then select the
desired charge rate to continue charging. Repeat if the
battery does not start taking a charge.
6
E
n
g
l
i
s
h
SELECT FUNCTION
CHARGE START or
ACTIVATE 2A
SELECT SETTING
AUTO
SELECT SETTING
100 AMP
START
15A
12V AUTO
ACTIVATE
12A
MANUAL
2A 15A
12A
OFF
6V
6V
MANUAL
100 AMP
START
SELECT BATTERY
NORMAL /
AUTOMOTIVE
SELECT FUNCTION
CHARGE START
SELECT SETTING
15A 2A
12V AUTO
DEEP
CYCLE
6V MANUAL
15A

When in the one of the automatic shut-off modes, the
charger‘s output will shut off when the proper voltage is
reached. You should monitor the charging process at least
daily to ensure that the battery’s electrolyte level is proper
and that the battery does not over charge. When the
charger’s output does shut off, the green “Charge
Complete” light comes on. The transformer of the charger
is still on so it is normal to hear a humming or buzzing
noise as the charger continues to monitor the battery
charge level. If the green “Charge Complete” light does
not come on at least once in a day’s charging, set the
“Select Setting” switch to “Start” (“Activate” on 87122). If
the green “Charge Complete” light does not come on
within 30 minutes, discontinue charging and read section
“M”, TROUBLESHOOTING. Continuing to charge may
damage the battery.
MODELS 1060, 1160, 87106, 87122, 87128,87151 & YA510B ONLY
7
READING THE METER & TIME TO CHARGE
L
The ammeter built into this charger indicates the
amperage that the battery is drawing from the charger.
The meter will read the maximum output rating of the
charge setting selected only if the battery being charged is
fully discharged.
The “Battery” area in red at the top of the meter gives an
approximation of the battery’s state of charge. The needle
will move from right to left as the battery approaches full
charge (12 volt only).
When set to an Automatic Shut-off position (the “Select
Function” switch is in the “Charge” position and the “Select
Setting” switch is in one of the 12 volt positions), the
battery charger will automatically shut off when the battery
has been fully charged.
The 6 volt setting is a constant current setting and the
needle will not move from right to left (not applicable to the
87122).
ABOUT THE AUTOMATIC CIRCUITRY
K
Approximate
Charge Hours
Rate Uses to Charge
2 AMP Motorcycle Batteries 2-8
Snowmobile Batteries
Lawn Tractor Batteries
10 AMP Automotive Batteries 3-5
Tractor Batteries
Truck Batteries
12 AMP Automotive Batteries 2.5-4
Tractor Batteries
Truck Batteries
15 AMP Automotive Batteries 2-4
Tractor Batteries
Truck Batteries
30 AMP Large Automotive Batteries 1-4
Large Truck Batteries
Large Tractor Batteries
MODEL 87302 & 1200
Step 1: Set RATE SELECTOR (Top
Switch)
Select “Low” for 2 Amp, 12 Volt
Charging and 6 Amp, 6 Volt Charging.
Select “High & Start” for 30 Amp
Charging (6 and 12 Volt) and Engine
Starting.
Note: If you are attempting to start a car with a weak
battery, for best results, charge the battery for 5-15
minutes. Crank the engine for 3-4 seconds. If engine fails
to start, charge battery for another 5-15 minutes and
attempt to start the engine again.
Step 2: Set VOLT SELECTOR (Bottom
Switch)
Select “6 Volt” for
charging and starting 6
volt batteries used in
automobiles, trucks and
farm equipment.
Select “12 Volt” for
charging and starting 12
volt batteries used in automobiles, lawn tractor,
motorcycle, trucks and farm equipment.
After you have read the owner’s manual and
completed the steps required in sections “A” through
“J”, the charger can be plugged in and used.
E
n
g
l
i
s
h
RATE SELECT
LOW HIGH &
START
6 VOLT OFF 12 VOLT
VOLT SELECT

TROUBLESHOOTING
M
1. NO AMMETER READING and NO INDICATOR
LIGHTS (Charging has not yet started)
• Make sure charger is plugged into a LIVE ac outlet.
• After unplugging unit, check connections at battery.
Make sure the clamps are making good contact
with the battery terminal and other point of
connection.
• Check to see that battery is capable of being
charged. It may be damaged, sulfated, or have an
open circuit.
• Make sure you have selected the proper charge
voltage for the battery being charged.
2. LOW AMMETER READING and NO INDICATOR
LIGHTS (Charging has been in process)
• Battery is nearing full charge, green light will
eventually turn on.
• The 2 amp setting has been selected for charging a
larger 12 volt battery (not applicable to the 87122).
In this mode, full charge may never be reached to
allow the CHARGE COMPLETE light to turn on.
Switch to 10 amp, 12 amp, or 15 amp - 12 volt
setting (as applicable).
• If green “Charge Complete” indicator does not
come on at least once in a day of charging, set the
SELECT SETTING switch to “Start” (“Activate” on
87122) and charge for 30 minutes. If the “Charge
Complete”indicator fails to come on during this
time, discontinue charging. Have the battery
professionally tested. If the battery is defective,
replace battery. If battery is OK, call Battery
Charger Service at (800) 328-2921.
3. NO AMMETER READING, REVERSE HOOK-UP
INDICATOR IS ON
• The charger’s output cables are reversed at the
battery and other point of connection. Unplug
charger, correct the hook-up, then plug charger in
and resume charging.
4. NO AMMETER READING, but CHARGE
COMPLETE INDICATOR IS LIT
• Battery is fully charged. Charger may be
disconnected at any time.
5. CHARGE COMPLETE INDICATOR IS ON, BUT
BATTERY EYE DOES NOT INDICATE FULL
CHARGE
• When the CHARGE COMPLETE indicator comes
on, the battery IS fully charged. However, due to
electrolyte stratification, the hydrometer “eye” in the
battery may not immediately indicate full charge.
To get the “eye” to register full charge, set the
SELECT FUNCTION switch to “Start” and charge
for one more hour.
MODELS 1060, 1160, 87106, 87122 , 87128, 87151 & YA510B
MODELS 1010, 1014, 1050, 1150, 1200, 87102,
87104, 87105, 87120, 87150 & 87302
1. NO AMMETER READING
• Make sure charger is plugged into a LIVE ac outlet.
• After unplugging unit, check connections at battery.
Make sure the clamps are making good contact
with the battery terminal and other point of
connection.
• Check to see that battery is capable of being
charged. It may be damaged, sulfated, or have an
open circuit.
• Make sure you have selected the proper charge
voltage for the battery being charged.
2. LOW AMMETER READING
• The 2-amp setting has been selected for charging a
larger 12-volt battery. Unless you desire an
extremely long recharge time, switch to the high 12volt setting (10 amp, 12 amp, or 15 amp, as
applicable.
8
ALL MODELS
(EXCEPT MODELS 1010, 1014, 87102, 87104, & 87122)
VEHICLE WILL NOT START WHEN USING THE ENGINE
START SETTING
• After unplugging unit, check connections. Make
sure the clamps are making good contact with the
battery terminal and other point of connection.
• If ammeter reads zero, the internal circuit breaker
may have tripped. Wait six to seven minutes. The
circuit breaker will reset automatically and the
ammeter needle will again register amperage.
Charge battery for another 5-15 minutes and
attempt to start the engine again.
• If after several attempts, the engine still won’t start,
there may be a problem with the engine that will
need to be corrected before it can be started.
E
n
g
l
i
s
h

CHARGER CARE & MAINTENANCE
CAUTION - Make sure charger is unplugged from AC
outlet before performing any maintenance.
A minimum amount of care can keep your battery charger
working and looking good for years.
1. Clean the clamps after each use. Wipe off any battery
fluid that may have come in contact with the clamps to
prevent corrosion. Battery fluid may be neutralized
with a solution of water and baking soda.
2. Coil the input and output cables neatly around the
cable wrap/handle, on the top of the charger after
each use. This will help prevent damage to the cables
and the charger.
3. If needed, the case may be wiped clean with a soft
cloth.
Any other service to this battery charger must be done by
a qualified repair facility. There are no user-serviceable
parts inside.
For information concerning use, applications, or service,
call Battery Charger Service at (800) 328-2921.
N
9
LIMITED WARRANTY
O
Century Manufacturing Co. warrants that for 2 years from
the date of original retail purchase, it will repair at no
charge for parts and labor, this product proven defective in
material or workmanship. If, after reasonable efforts by
Century, the product is deemed not repairable, Century
will, at its option, refund the original purchase price or
supply a replacement unit.
THE TERMS OF THE CENTURY LIMITED WARRANTY
CONSTITUTE THE BUYER’S SOLE AND EXCLUSIVE
REMEDY. THE IMPLIED WARRANTIES OR
MERCHANTABILITY AND FITNESS FOR A
PARTICULAR PURPOSE ARE LIMITED IN DURATION
TO THIS EXPRESS WARRANTY. AFTER 2 YEARS
FROM DATE OF PURCHASE, ALL RISK OF LOSS
FROM WHATEVER REASON SHALL BE PUT UPON
THE PURCHASER.
CENTURY SHALL NOT BE LIABLE FOR INCIDENTAL
AND CONSEQUENTIAL DAMAGES UNDER ANY
CIRCUMSTANCES: CENTURY’S LIABILITY, IF ANY,
SHALL NEVER EXCEED THE PURCHASE PRICE OF
THIS MACHINE REGARDLESS OF WHETHER
LIABILITY IS PREDICTED UPON BREACH OF
WARRANTY (EXPRESS OR IMPLIED), NEGLIGENCE,
STRICT TORT OR ANY OTHER THEORY.
This warranty extends to each person who acquires lawful
ownership within two years of the original retail purchase,
but is void if the product has been abused, altered,
misused or improperly packaged and damaged when
returned for repair.
This warranty applies to the product only and does not
apply to any accessory items included with the product
which are subject to wear from usage; the replacement or
repair of these items shall be at the expense of the owner.
Some states do not permit the limitation of warranties or
limitation of consequential or incidental damages, so the
above disclaimer and limitation may not apply to you. This
warranty gives you specific legal rights, and you may also
have other rights which vary from state to state.
T
O OBTAIN SERVICES UNDER THIS
WARRANTY
DO NOT RETURN PRODUCT TO THE STORE. For
answers to questions concerning use, out-of-warranty
service, or warranty/service information on other Century
products, contact:
Century Mfg. Co.
Minneapolis, MN 55431
(800) 328-2921 Toll Free
(952) 884-3211
©CMC 1996
E
n
g
l
i
s
h

 Loading...