

Page 1
1
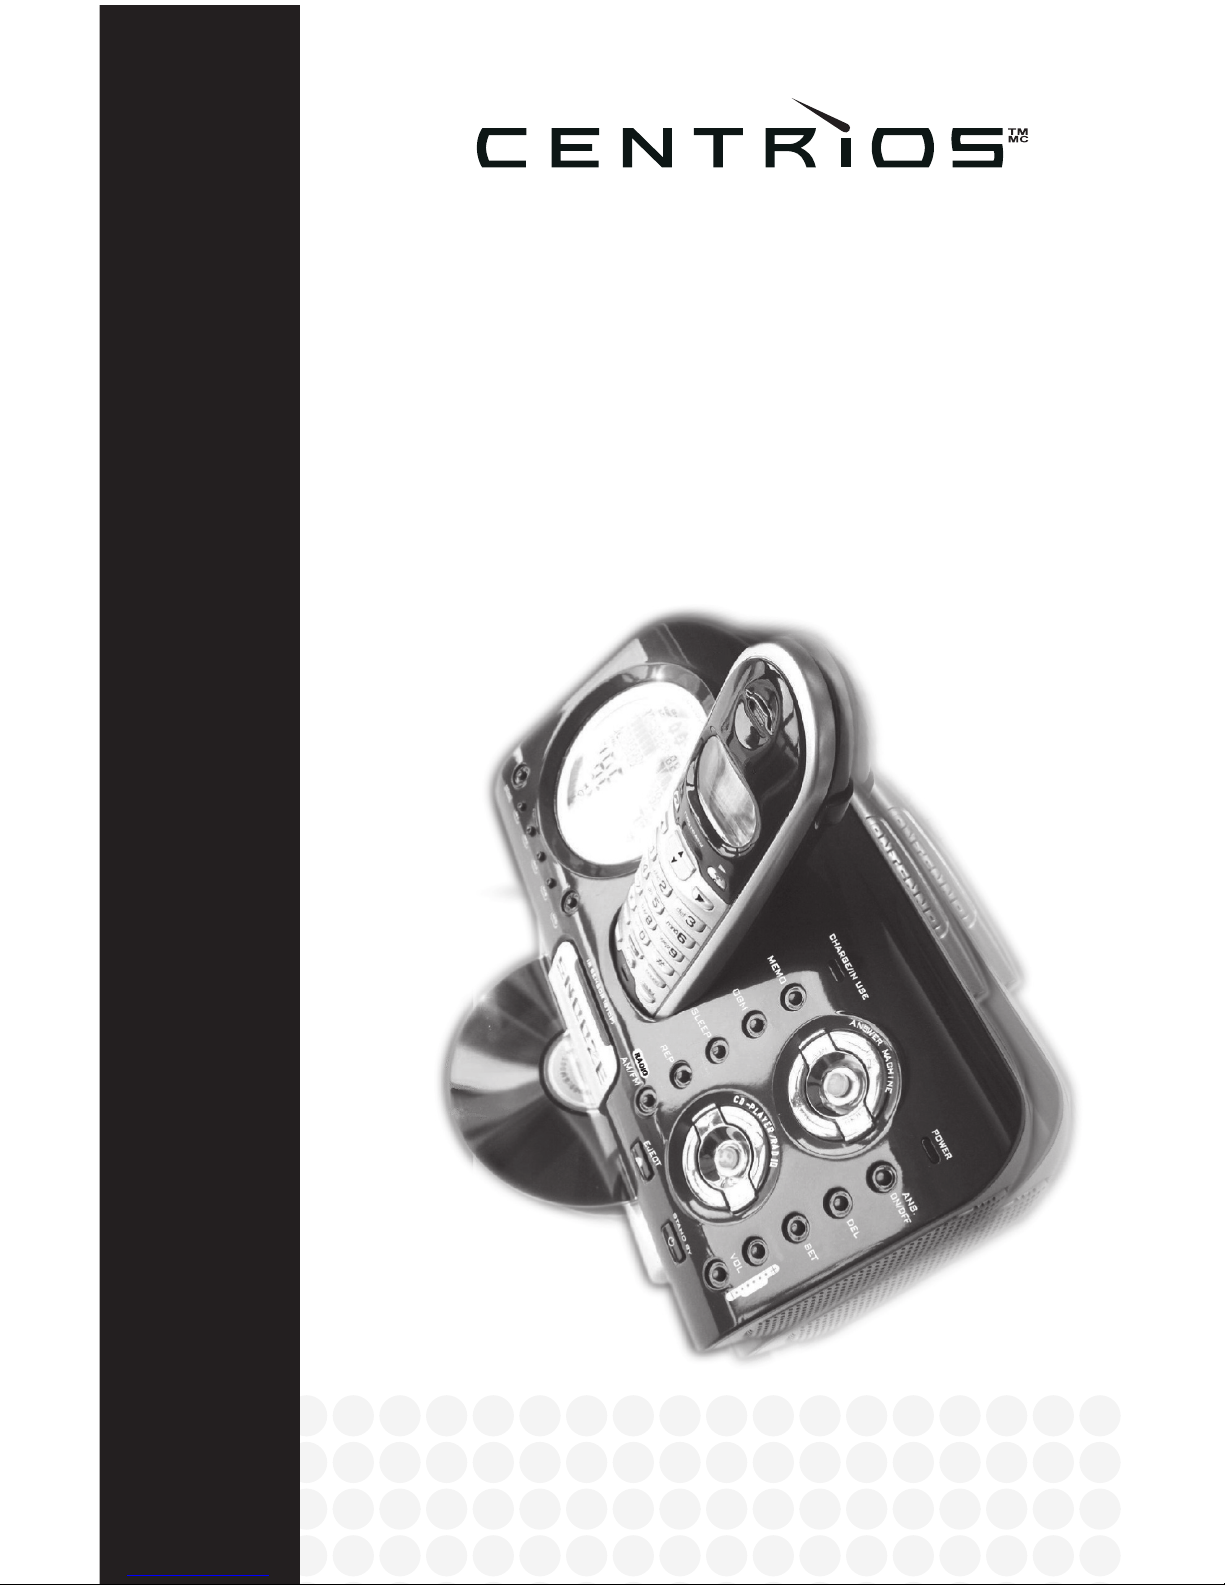
2.4GHz Audio Phone with
Digital Answering Machine
4313376
Instruction Manual
Page 2
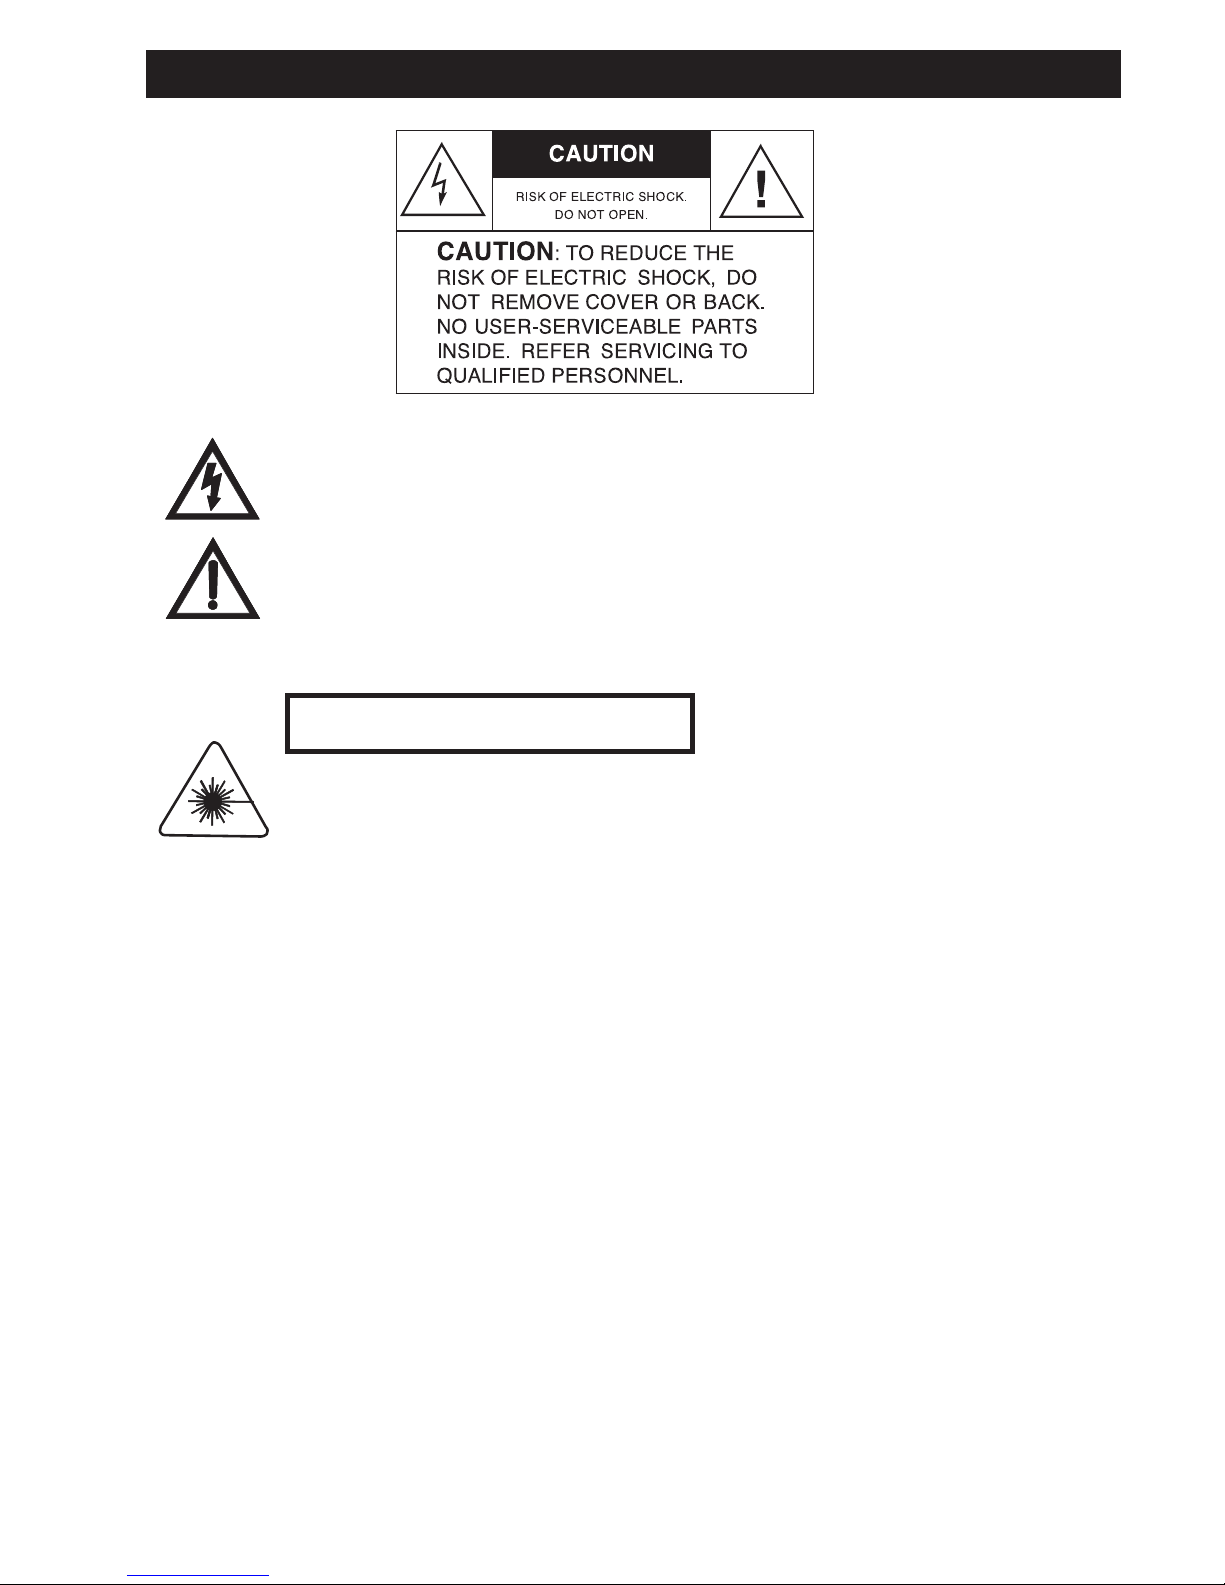
Caution
CLASS 1 LASER PRODUCT
This symbol is intended to alert you to the presence of uninsulated
dangerous voltage within the product’s enclosure that might be of
sufficient magnitude to constitute a risk of electric shock. Do not
open the product’s case.
This symbol is intended to inform you that important operating
and maintenance instructions are included in the literature
accompanying this product.
2
CAUTION: Invisible laser radiation when open and interlocks
defective. Avoid exposure to the beam.
Page 3

1
Table of Contents
Table of contents ..................................1
Parts Checklist .....................................
2
Important Safety Instructions ...............
3-5
Guidance For Quick Operations ....... 6-10
Prior To Use ......................................
6
Basic Operations .................................6
Cordless phone ................................
6
CD Player ........................................
7
FM/AM Radio .................................
7
Answering machine ...........................
7
Alarm clock ......................................
8
Other Important Features ....................
8-9
Auto Mute ........................................
8
Auto Pause .....................................
8-9
Page button /Search handset ..............
9
STANDBY Button ...............................
9
SNOOZE/MUTE Button .....................
9
Guidance For Advanced Settings .... 11-22
Setting Up Handset .................... 11-13
Registering handset ..........................
11
Naming handset .............................
11
Keypad chart .................................
11
Choosing language .........................
12
Choosing dial tone (Tone/Pulse) ........
12
Setting date & time ..........................
12
Setting area code ...........................
12
Choosing ringer tone & Adjusting
ringer volume .................................
13
Setting answer ON/OFF ..................
13
Setting user ID for remote accessibility .
13
Using the headset feature ..................
13
Setting up base unit ...................
14-16
Setting auto answer ring times ...........
14
Setting date & time ..........................
14
Setting loudness ..............................
14
Setting bass ...................................
15
Setting treble ..................................
15
Setting alarm ..................................
15
Quickly setting alarm mode
& duration .................................
15-16
Handset/Phonebook .......................16
Saving numbers to phonebook ...........
16
Saving incoming numbers to
phonebook ....................................
16
Dialing from phone book ..................
16
Editing phone book .........................
17
Deleting from phone book .................
17
Handset/Caller ID & Call waiting .....17
Checking caller ID ...........................
17
Deleting caller ID ............................
17
Deleting all caller ID ........................
17
Call waiting ...................................
17
Handset/Answering machine
remote control ...........................
17-18
CD Player & radio ...........................
18
Sleep timer for CD player
or Radio ........................................
18
Repeat CD player ...........................
18
Alarm & Snooze ........................
18-19
Canceling alarm .............................
18
Stopping alarm ...............................
18
Pause alarm ...................................
19
Answering Machine ...................
19-20
Setting answer ON/OFF ..................
19
Incoming calls auto answer ...............
19
Stopping auto answer ......................
19
Playing/Recording OGM .................
19
MEMO recording ...........................
20
Line remote control ..........................
20
Multihandset Functions. .............. 21-22
Conference call ..............................
21
Handset to handset Intercom .............
21
Transferring a call from one
handset to another ...........................
22
FCC Regulations ................................23
Industry Canada Notice ......................
24
Warranty ..........................................
25
Page 4
Congratulations on your selection of a quality Centrios™ product.
This unique fashion designed Music System combined with 2.4GHz
Digital Cordless Phone will provide you with best quality communication
service and auto-type CD Player and Alarmed Radio for powerful and
realistic sound experience.
With proper care, and by following the Operation Instructions, you can
enjoy all the advantages from this unit.
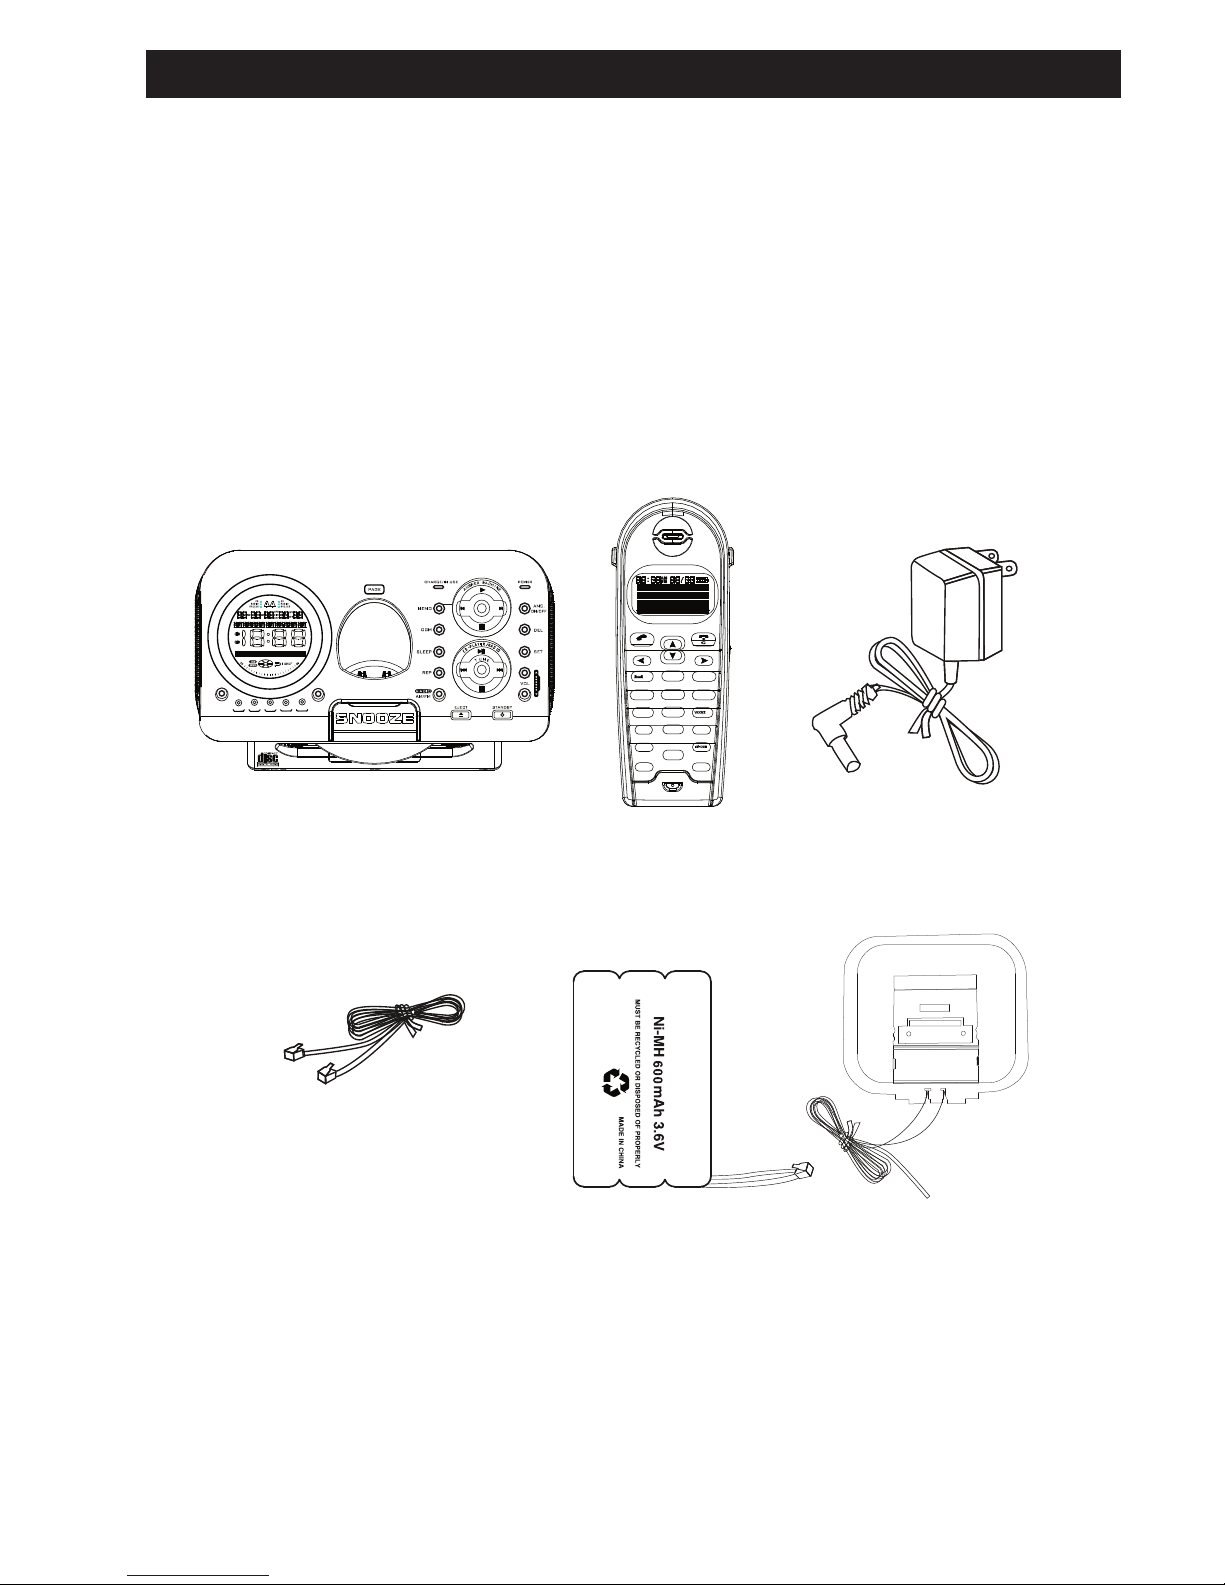
This package includes BASE UNIT, HANDSET, AC POWER ADAPTOR,
PHONE LINE CORD, HANDSET BATTERY PACK, RADIO ANTENNA, and
OPERATION INSTRUCTIONS. Please contact the store/dealer immediately
if anything is damaged or missing.
Parts Checklist
MUT E
M5
M4
M3
M2
M1
ALM-1
ALM-2
1. Base 2. Handset 3. AC Power
adapter
4. 7 foot line cord
for desk use
5. Ni-Mh battery
pack
6. Radio antenna
2
Page 5

Important Safety Instructions
1. Read Instructions - All the safety and operating instructions should be read before
the product is operated.
2. Retain Instructions - The safety and operating instructions should be retained for
future reference.
3. Heed Warnings - All warnings on the product and in the operating instructions
should be adhered to.
4. Follow instructions - All operating and use instructions should be followed.
5. Cleaning - Unplug this product from the wall outlet before cleaning. Do not use
liquid cleaners or aerosol cleaners. Use a damp cloth for cleaning.
6. Attachments - Do not use attachments not recommended by the product
manufacturer as they may cause hazards.
7. Water and Moisture - Do not use this product near water - for example, near a
bath tub, wash bowl, kitchen sink, or laundry tub; in a wet basement, or near a
swimming pool, and the like.
8. Accessories - Do not place this product on an unstable cart, stand tripod, bracket,
or table. The product may fall, causing serious injury to a child or adult, and
serious damage to the product. Use only with a cart, stand, tripod, bracket, or
table recommended by the manufacturer, or sold with the product. Any mounting
of the product should follow the manufacturer instructions, and should use a
mounting accessory recommended by the manufacturer.
9. A product and cart combination should be moved with care. Quick stops,
excessive force, and uneven surfaces may cause the appliance and cart
combination to overturn.
10. Ventilation - Slots and openings in the cabinet are provided for ventilation and to
ensure reliable operation of the product and to protect it from overheating, and
these openings must not be blocked or covered. The openings should never be
blocked by placing the product on a bed, sofa, rug, or other similar surface. This
product should not be placed in a built-in installation such as a bookcase or rack
unless proper ventilation is provided or the manufacturer’s instructions have been
adhered to.
11. Power Sources - This product should be operated only from the type of power
source indicated on the marking label. If you are not sure of the type of power
supply to your home, consult your product dealer or local power company. For
products intended to operate from battery power, or other sources, refer to the
operating instructions.
12. Grounding or Polarization - This product may be equipped with a polarized
alternating-current line plug (a plug having one blade wider than the other). This
plug will fit into the power outlet only one way. This is a safety feature. If you are
unable to insert the plug fully into the outlet, try reversing the plug. If the plug
should still fail to fit, contact your electrician to replace your obsolete outlet. Do not
defeat the safety purpose of the polarized plug.
Alternate Warnings - This product is equipped with a three-wire grounding- type
plug, a plug having a third (grounding) pin. This plug will only fit into a groundingtype power outlet. This is a safety feature. If you are unable to insert the plug into
the outlet, contact your electrician to replace your obsolete outlet. Do not defeat
the safety purpose of the grounding-type plug.
13. Power-Cord Protection - Power supply cords should be routed so that they are not
likely to be walked on or pinched by items placed upon or against them, paying
particular attention to cords at plugs, convenience receptacles, and point where
they exit from the product.
3
Page 6

14. Protective Attachment Plug - The product is equipped with an attachment plug
having overload protection. This is a safety feature. See Instruction Manual
for replacement or resetting of protective device. If replacement of the plug is
required, be sure the service technician has used a replacement plug specified by
the manufacturer that has the same overload protection as the original plug.
15. Outdoor Antenna Grounding - If an outside antenna is connected to the receiver,
be sure the antenna system is grounded so as to provide some protection against
voltage surges and built-up static charges. Article 810 of the National Electrical
Code, ANSI/NFPA 70, provides information with regard to proper grounding
of the mast and supporting structure, grounding of the mast and supporting
structure, grounding of the lead-in wire to an antenna-discharge unit, size of
grounding conductors, location of antenna-discharge unit, connection to grounding
electrodes, and requirements for the grounding electrode.
16. Lightning - For added protection for this product during a lightning storm, or when
it is left unattended and unused for long periods of time, unplug it from the wall
outlet and disconnect the antenna or cable system. This will prevent damage to the
product due to lightning and power-line surges.
17.Power Lines - An outside antenna system should not be located in the vicinity of
overhead power lines or other electric light or power circuits, or where it can
fall into such power lines or circuits. When installing an outside antenna system,
extreme care should be taken to keep from touching such power lines or circuits as
contact with them might be fatal.
18. Overloading - Do not overload wall outlets, extension cords, or integral
convenience receptacles as this can result in a risk of fire or electric shock.
19. Object and Liquid Entry - Never push objects of any kind into this product through
openings as they may touch dangerous voltage points or short-out parts that could
result in a fire or electric shock. Never spill liquid of any kind on the product.
20. Servicing - Do not attempt to service this product yourself as opening or removing
covers may expose you to dangerous voltage or other hazards. Refer all servicing
to qualified service personnel.
21. Damage Requiring Service - Unplug this product from the wall outlet and refer
servicing to qualified service personnel under the following conditions:
a) When the power-supply cord or plug is damaged,
b) If liquid has been spilled, or objects have fallen into the product,
c) If the product has been exposed to rain or water,
d) If the product does not operate normally by following the operating
instructions. Adjust only those controls that are covered by the operating
instructions as an improper adjustment of other controls may result in
damage and will of ten require extensive work by a qualified technician to
restore the product to its normal operation.
e) If the product has been dropped or damaged in any way, and
f) When the product exhibits a distinct change in performance - this indicates
a need for service.
22. Replacement Parts - When replacement parts are required, be sure the service
technician has used replacement parts specified by the manufacturer or have the
same characteristics as the original part. Unauthorized substitutions may result in
fire, electric shock, or other hazards.
23. Safety Check - Upon completion of any service or repairs to this product, ask the
service technician to perform safety checks to determine that the product is in
proper operating condition.
Important Safety Instructions
4
Page 7

24. Wall or Ceiling Mounting - The product should be mounted to a wall or ceiling
only as recommended by the manufacturer.
25. Heat - The product should be situated away from heat sources such as radiators,
heat registers, stoves, or other products (including amplifiers) that produce heat.
IF YOUR PRODUCT UTILIZES BATTERIES, THE FOLLOWING ADDITIONAL
PRECAUTIONS SHOULD BE OBSERVED:
1. Use only the type and size of batteries specified in the users manual.
2. Do not dispose of batteries in a fire. The cells may explode. Check with local
codes for possible special disposal instructions.
3. Do not open or mutilate the batteries. Released electrolyte is corrosive and may
cause damage to the eyes or skin. It may be toxic if swallowed.
4. Exercise care in handling batteries in order not to short the battery with conducting
materials such as rings, bracelets and keys. The battery or conductor may overheat
and cause burns.
5. Do not attempt to recharge the batteries with or identified for use with this product.
The batteries may leak corrosive electrolyte or explode.
6. Do not attempt to rejuvenate the batteries provided with or identified for use with
this product by heating them. Sudden release of the battery electrolyte may occur
causing burns or irritation to eyes or skin.
7. When replacing batteries, all batteries should be replaced at the same time.
Mixing fresh and discharged batteries could increase internal cell pressure and
rupture the discharged batteries.
8. When inserting the batteries into this product, the proper polarity or direction must
be observed. Reverse insertion of batteries can cause charging, which may result
in leakage or explosion. If a battery is installed incorrectly it may explode.
9. Remove the batteries from this product if the product will not be used for a long
period of time (several months or more) since during this time the batteries could
leak, damaging the product.
10. Discard “dead” batteries as soon as possible since they are more likely to leak in a
product.
11. Do not store this product, or the batteries provided with or for identified use with
this product, in high temperature areas.
12. If your product uses a rechargeable battery, charge the battery(ies) only in
accordance with the instructions and limitation specified in the User Manual.
- SAVE THESE INSTRUCTIONS -
SPECIFICATIONS
POWER SOURCES ............ AC 120V, 60Hz
SPEAKER ......................... 32mm (L) x 32mm (W), 3W x 2, 4 Ω
POWER SUPPLY ................ DC 12V, 1000mA
CD PLAYER ...................... CD, CD-R
RADIO ............................ FM 88 - 108MHz; AM 530 - 1700KHz
Important Safety Instructions
5
Page 8
6
Guidance For Quick Operations
PRIOR TO USE
1) Connect the PHONE LINE CORD to the “TEL LINE” jack on the bottom of
BASE UNIT, then plug the other end into a telephone outlet.
2) Connect the AC Power Adaptor to the 12V DC jack on the bottom of BASE
UNIT, then plug the other end into the wall power outlet.
3) Plug the RADIO ANTENNA to the terminal on the bottom of the BASE UNIT.
Note: Be sure to insert the RADIO ANTENNA to ensure better reception of
AM radio signal.
4) Install the battery pack into the battery compartment of HANDSET and be sure
to charge the battery pack for 12 hours before the initial use, otherwise the
lasting time will be reduced and the battery life will be shortened.
Note: Properly-charged battery pack can last 5 days in STANDBY Mode, and
about 4 hours of continuous use.
BASIC OPERATIONS
CORDLESS PHONE
MAKING A PHONE CALL:
- Pick up HANDSET and press , dial the phone number when the dial
tone is heard.
- OR: Pick up HANDSET and dial the phone number, then press .
- OR: Press
SP K
on HANDSET and dial the phone number when the dial
tone is heard.
TERMINATING A PHONE CALL:
- Place HANDSET back to the charger.
- OR: Press
on HANDSET to hang up.
ANSWERING A CALL:
- Pick up HANDSET and press
- OR: Press [SPK] and connect the call on SPEAKERPHONE mode.
REDIALING:
- Press
, or [SPK] and then press [REDIAL] to dial the last call
dialed.
ADJUSTING THE PHONE VOLUME:
- Press
or on HANDSET during a call to adjust the phone
volume.
SWITCHING BETWEEN HANDSET & SPEAKERPHONE:
- Press [SPK] during the call in use to switch between HANDSET and
SPEAKERPHONE.
MUTE:
- Press [MUTE] on HANDSET to activate mute and press again to cancel.
Note: When [MUTE] is activated, the caller on the other end cannot
hear you.
Page 9

CD PLAYER
PLAYING CD:
- Insert the CD into the CD slot and the CD will automatically play, with
corresponding icon appearing on the screen.
- OR: Press § on CD/RADIO operation panel with a CD already loaded.
- Press F to replay the current song, or press F at the first second to skip
back to the previous song, and Press J to skip to the next song.
- Press [VOL +] / [VOL –] to adjust the volume.
- Press on § CD/RADIO OPERATION PANEL during playback to pause.
- Press [MUTE] on BASE UNIT to switch between pause and playback.
- Press D or press [STANDBY] to stop playback.
- Press to release the CD from CD Slot.
FAST FORWARDING & REVERSING:
- Press and hold J or F for fast forward or fast reverse.
FM/AM RADIO
LISTENING TO THE RADIO :
- Press [RADIO, AM/FM] to turn on the RADIO
- Press [RADIO, AM/FM] to switch between AM and FM
- Press [VOL +] / [VOL –] to adjust the volume.
- Press
D
on CD/RADIO OPERATION PANEL to turn off RADIO.
SEARCHING FOR STATIONS:
- Press
F or J for the tuner to search for a station.
- Press and hold F or J for fast automatic station searching.
PRESETTING STATIONS:
- Press [M1] ~ [M5] to turn in the corresponding preset radio station. The
corresponding icon appears on the screen.
- Press and hold [M1] ~ [M5] during radio play until the corresponding
icon is displayed on the screen to save the preset station. A total of
10 stations can be preset, 5 stations each for AM and PM. The preset
stations are not lost when the power is off.
ANSWERING MACHINE
LISTENING TO THE VOICE MESSAGE:
- Press g on the ANSWERING MACHINE to play messages. It plays new
messages when there are new ones .
- Press or on the ANSWERING MACHINE during the message
playing to play previous or next message
- Press D on ANSWERING MACHINE to stop or press [STANDBY].
DELETING THE VOICE MESSAGE:
- Press [DEL] to delete the current message during the message playback.
- Press and hold [DEL] to delete all the old messages during the
message playback.
Guidance For Quick Operations
7
Page 10

ALARM CLOCK
There are two alarms as [ALM1] and [ALM2].
- Press [SET] and the text ‘SET TIME?’ will be displayed on the screen,
scroll [VOL +] / [VOL –] to ‘SET ALARM1?’.
- Press [SET] again to display ‘SET AL1 HOUR’, scroll [VOL +] / [VOL –]
to select.
- Press [SET] to confirm, and set the ‘MINUTE’ in the same way. The ‘SET
AL1 MODE’ appears on the screen,scroll [VOL +] / [VOL –] to select the
alarm mode in the following order:
Note: Once in OFF mode, no CD, or RADIO, or BUZZER icon is
displayed on the screen.
- Press [SET] to confirm the mode, then ‘SET AL1 VOLUME’ appears on
the screen. Scroll [VOL +] / [VOL –] to adjust the volume.
Note: The volume of the alarm increases gradually when it rings. The
setting is for the maximum volume (no less than 5).
- Press [SET] to confirm the Volume, then ‘SET AL1-DURATION’ appears
on the screen. Scroll [VOL +] / [VOL –] to select the duration.
Note: Minimum duration is 10 minutes,maximum duration is 120
minutes for CD/RADIO and 30 minutes for BUZZER.
- Press [SET] to confirm and quit.
Note: Directly press [ALM1] to view the time and duration of ALM1,
once ‘ALARM1 XXMIN’ and corresponding icon appear on the screen.
Here “XXMIN”means the duration of the ALARM. Follow the same
instructions for ALARM 2.
OTHER IMPORTANT FEATURES
AUTO MUTE:
RADIO or CD PLAYER will automatically become mute during one of the
following circumstances, plus the icon <MUTE> flashes on the screen:
- When the phone is ringing
- OR: When the phone is in use.
- OR: When HANDSET is under REMOTE CONTROL mode.
AUTO MUTE WILL BE AUTOMATICALLY CANCELLED
- When the phone call is finished or the ring stops;
- OR: Press
[SNOOZE/MUTE] on BASE UNIT.
AUTO PAUSE
RADIO or CD PLAYER will automatically pause under one of the following
circumstances:
- When Auto ANSWER of ANSWERING MACHINE responds to
INCOMING CALLS.
- OR: Press to listen to the voice message or OGM;
- OR: Press to record OGM or MEMO.
Guidance For Quick Operations
8
OFF → CD → RADIO → BUZZER
Page 11
Auto Pause automatically ceases and RADIO or CD PLAYER resumes under one
of the following circumstances
- When auto answer has finished;
- OR: When voice message or OGM has stopped;
- OR: When the recording is finished;
- OR: Press [RADIO, AM/FM] or § with the CD in the CD slot.
[PAGE] BUTTON/SEARCH HANDSET :
- Press [PAGE] on BASE UNIT. CHARGER/IN USE indication light
illuminates if HANDSET is within the range of communication. The
HANDSET buzzs continuously for 2 minutes.
- Press [PAGE] on BASE UNIT again or press on HANDSET to stop
PAGE.
NOTE: HANDSET will buzz alarm if it is too far from the BASE UNIT
and the connection may be rebuilt under such circumstances. BASE
UNIT will automatically disconnect the phone when it detects HANDSET
to be out of range continuously for more than 20 seconds.
[STANDBY] BUTTON:
- Press [STANDBY] to stop all the functions except the phone calls and
REMOTE CONTROL function.
[SNOOZE/MUTE] BUTTON:
- Press [SNOOZE/MUTE] to temporarily stop the alarm, and the alarm
will resume in 7 minutes.
- Press [SNOOZE/MUTE] anytime during Radio or CD PLAYER to set to
MUTE, the corresponding icon flashing on the screen.
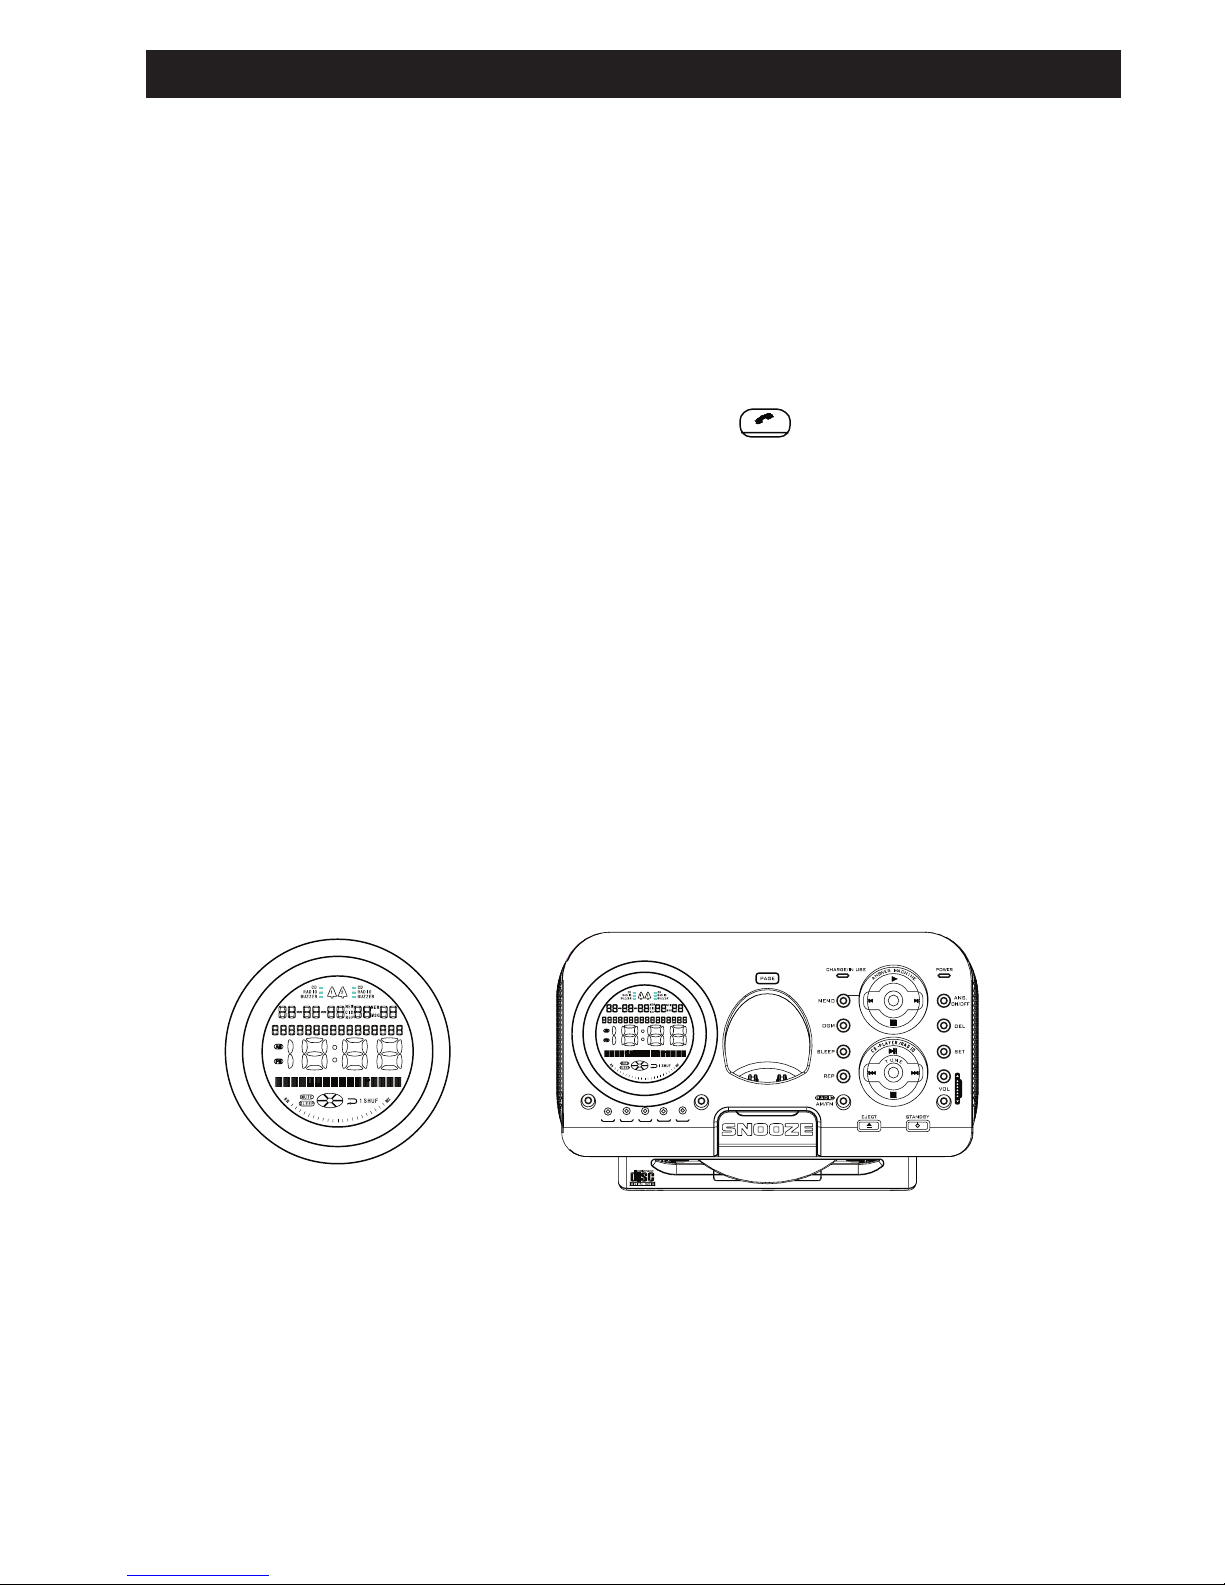
MUT E
M5
M4
M3
M2
M1
ALM-1
ALM-2
Base Unit Display
(Display in Standby Mode)
Guidance For Quick Operations
9
Base Unit Panel
Page 12
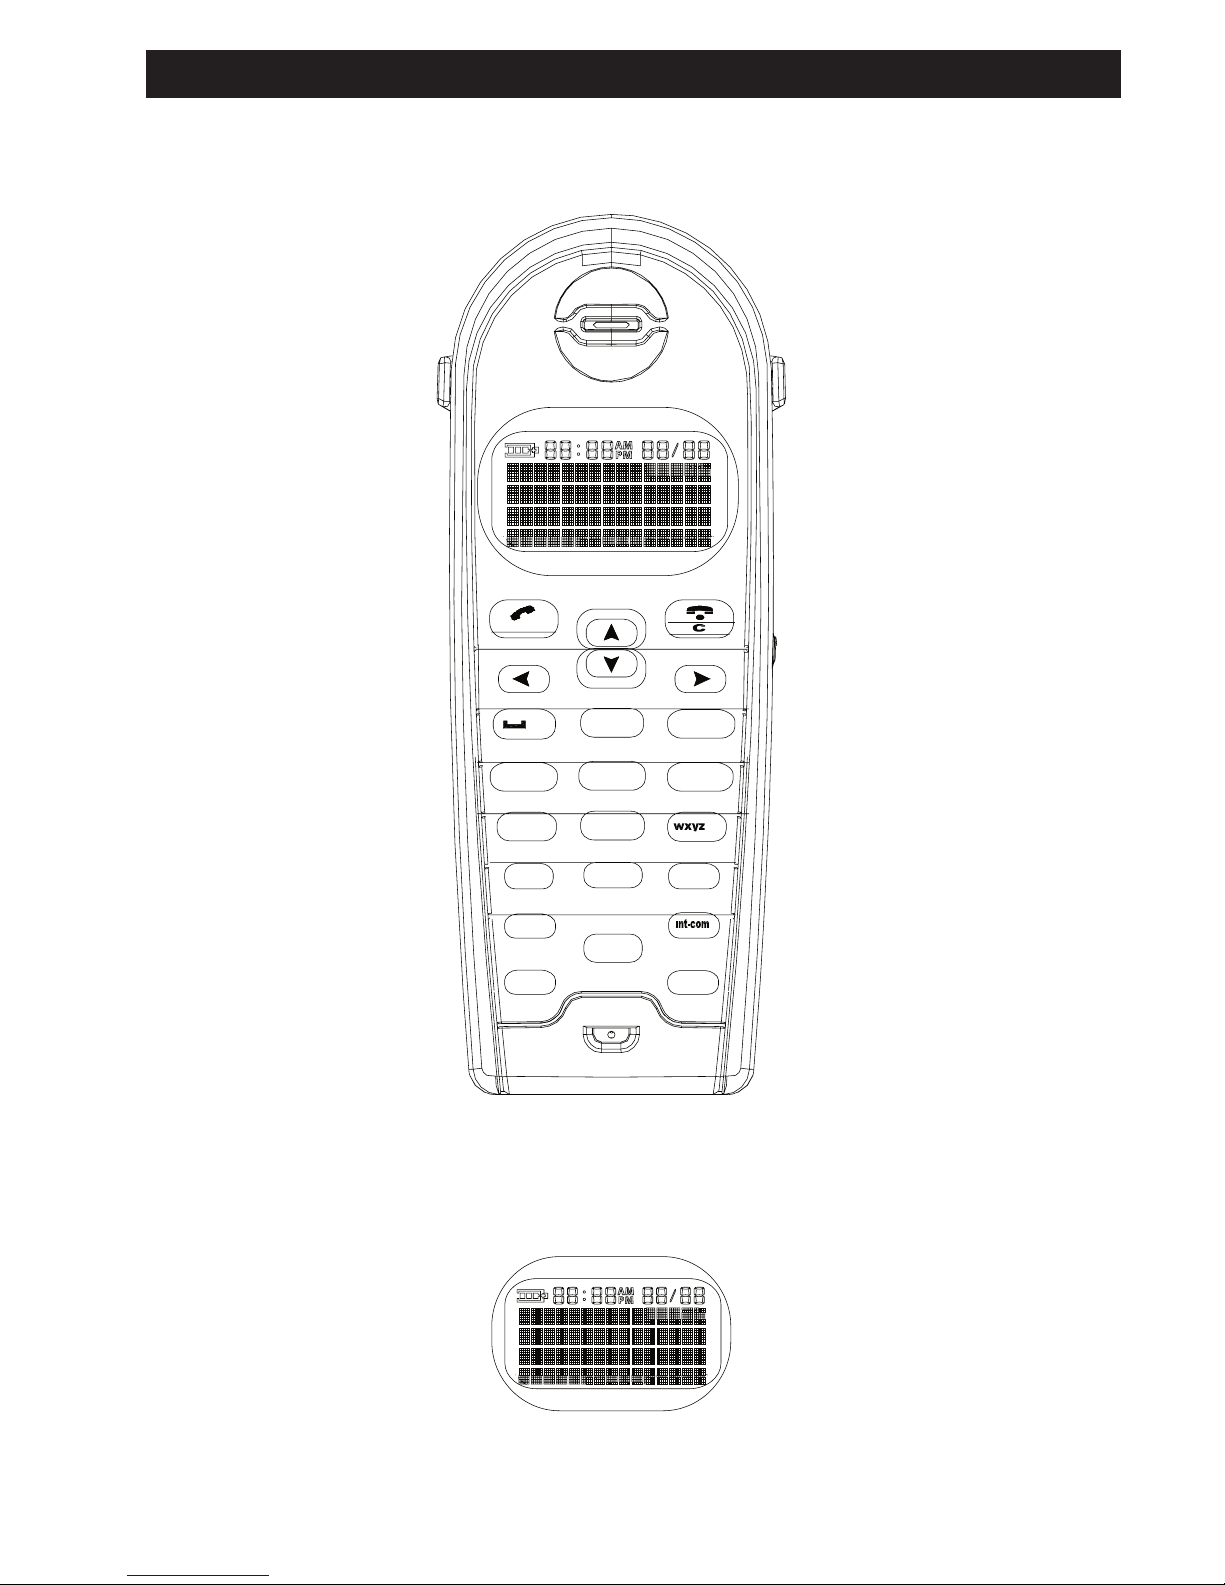
HANDSET PANEL
Guidance For Quick Operations
10
HANDSET DISPLAY (DISPLAY IN STANDBY MODE)
de f
3
ab c
2
gh i
4
mn o
6
tu v
8 9
pq rs
7
*
op er
0
#
mu te
R/ P
SP K
OK
5
jk l
1
Page 13
SETTING UP HANDSET
REGISTERING HANDSET:
- Press
O K
to enter MENU.
- Scroll to ‘REGISTER’, then press
O K
to confirm.
- Press and hold [PAGE] on BASE UNIT until CHARGE/IN USE indicator
blinks or a long buzzing is heard with HANDSET name, such as
Handset (2), appearing on the screen.
- Press
to return to STANDBY mode.
Note: HANDSET in the package is pre-registered, three more
HANDSETS can be purchased and registered to BASE UNIT in the same
way described above.
Please deregister HANDSET as follows if the previous registration fails:
- Press and hold [PAGE] on BASE UNIT until CHARGER/IN USE
indicator blinks.
- Press and hold [PAGE] again until CHARGER/IN USE indicator blinks
faster.
- Press [PAGE] and ALL HANDSETS have been deregistered. Register
HANDSETS once again in the same way as described.
Note: Deregistration is NOT recommended unless it is absolutely
necessary.
NAMING HANDSET:
- Press
O K
to access MENU.
- Scroll to ‘NAME HANDSET’ and press
O K
.
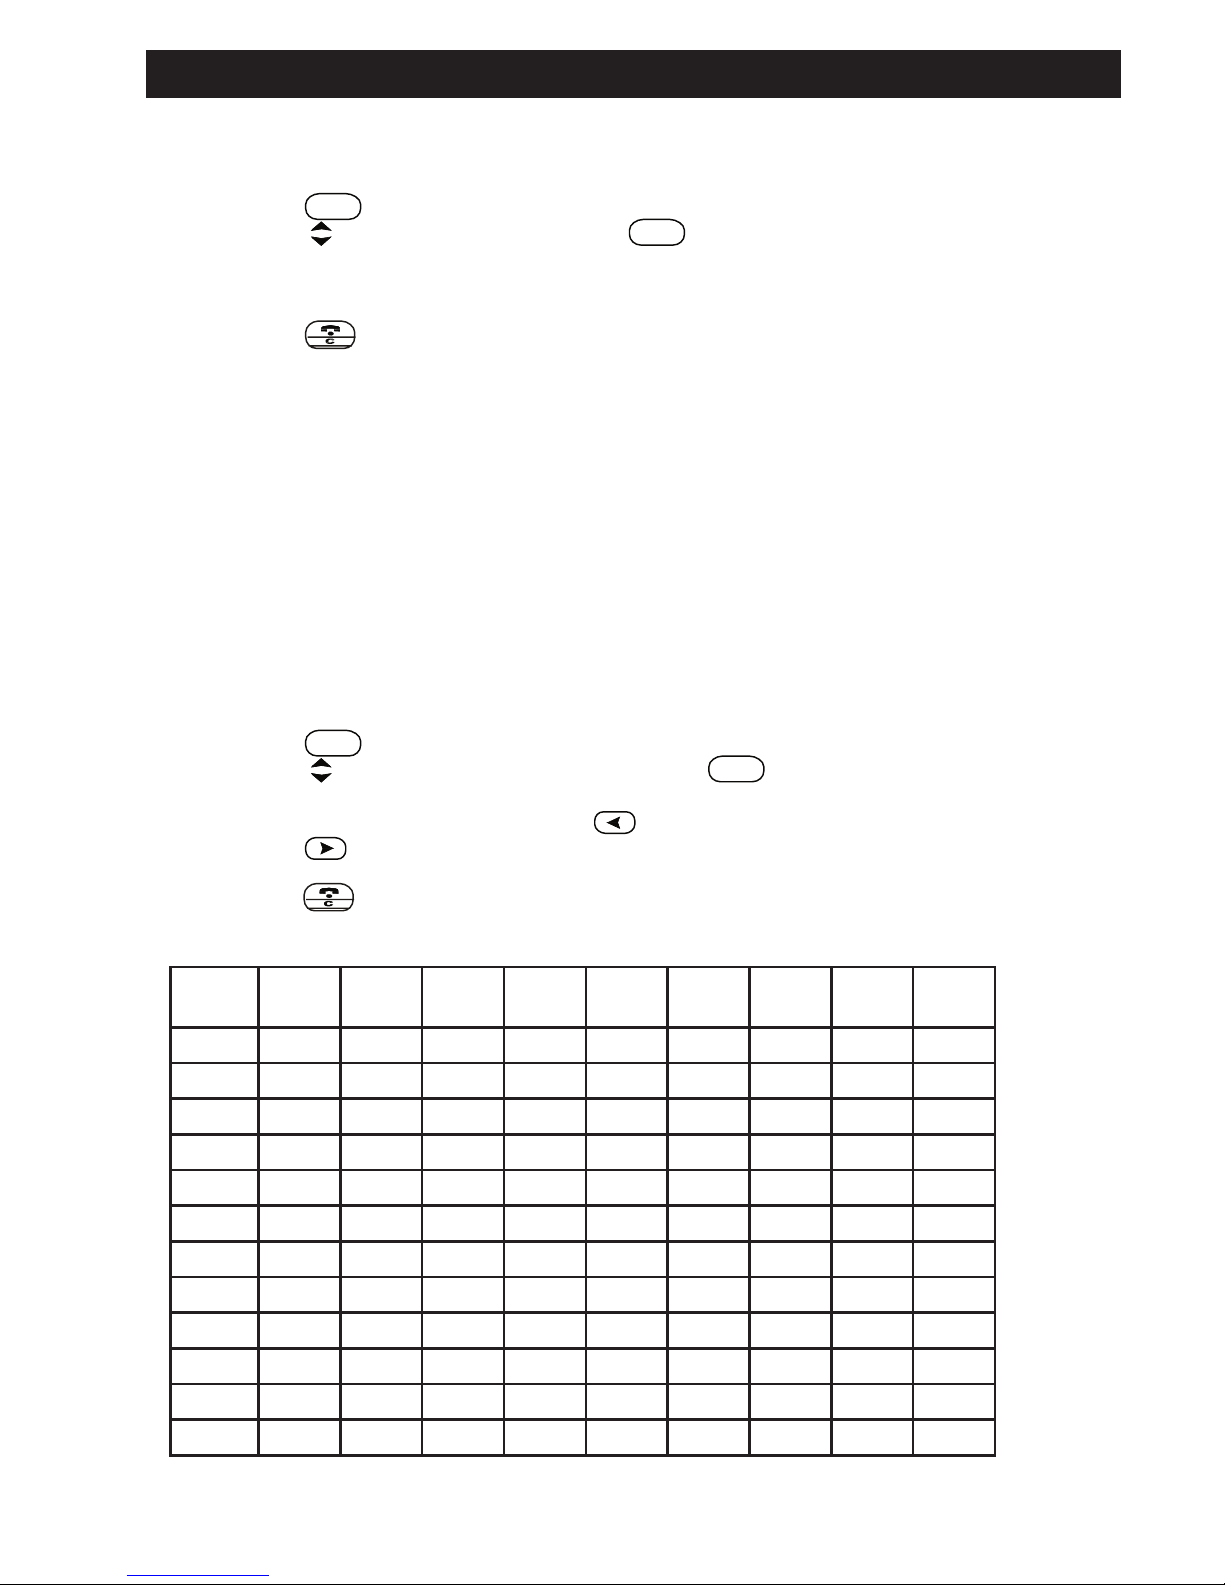
- Enter the name using the keypad up to a maximum of 11 letters (see
keypad chart) or numbers. Use
to delete the letter before the cursor.
- Press
to save.
Note: The name created in the registration will be part of the new name.
- Press
to return to Standby mode or access other options from Menu.
KEYPAD CHART
Key 1st
Press
2nd
Press
3rd
Press
4th
Press
5th
Press
6th
Press
7th
Press
8th
Press
9th
Press
1 Space 1 & ‘ ( ) . Space 1
2 A B C a b c 2 A B
3 D E F d e f 3 D E
4 G H I g h i 4 G H
5 J K L j k l 5 J K
6 M N O m n o 6 M N
7 P Q R S p q r s 7
8 T U V t u v 8 T U
9 W X Y Z w x y z 9
0 0 0 0 0 0 0 0 0 0
* * * * * * * * * *
# # # # # # # # # #
Example: Press “3” Key on KEYBOARD three times to enter the letter “F”.
Guidance for Advanced Settings
11
Page 14
CHOOSING LANGUAGE:
- Press
O K
to access MENU.
- Scroll to ‘LANGUAGE’ and press
O K
.
- Scroll to the desired language (English, French, Spanish) and press
to save.
- Press to return to STANDBY mode or to enter other options from Menu.
CHOOSING DIAL TONE (TONE/PULSE):
- Press
O K
to access MENU.
- Scroll to ‘TONE/PUSE’ and press
O K
.
- Scroll to the desired mode and press to
save.
- Press
to return to STANDBY mode or to enter other options from Menu.
SETTING DATE & TIME
SETTING TIME:
- Press
O K
to access MENU.
- Scroll to ‘DATE/TIME’ and press
O K
.
- Scroll to time format (12 hours or 24 hours) and press
O K
.
- Scroll to AM or PM if 12 hour format is chosen.
- Use KEYPAD to enter TIME and press
to save.
- Press
to return to STANDBY mode or to enter other options from Menu.
SETTING DATE:
- Press
O K
to access MENU.
- Scroll to ‘DATE/TIME’ an press
O K
.
- Scroll to the date format (either MM/DD or DD/MM) and press
O K
.
- Use the KEYPAD to enter the DATE and press
to save.
- Press
to return to STANDBY mode or to enter other options from Menu.
SETTING AREA CODE:
Attention: The function explained in this section must work with Caller ID
Service, which requires subscription from the local telephone company.
- Press
O K
to access MENU.
- Scroll to ‘LOC AREA CODES’ and press
O K
.
- Use the KEYPAD to enter the area code and press to
save.
- Press
to return to STANDBY mode or to enter other options from Menu.
Note: Setting of AREA CODE is helpful when dialing from INCOMING
CALL List, the three Area Code formats are as follows:
7-digit: Phone Number without Area Code
10- digit: Area Code + Phone Number
11-digit: 1 + Area Code + Phone Number
Guidance for Advanced Settings
12
Page 15
CHOOSING RINGER TONE & ADJUSTING RINGER VOLUME:
- Press
O K
to access MENU.
- Scroll to ‘RINGER’ and press
O K
.
- Press
O K
when ‘RINGER VOLUME’ appears.
- Scroll to select the desired volume OFF, LOW, MEDIUM, HIGH and
the ringer will sound with each selection.
- Press
to save.
- Scroll down to ‘RINGER TONE’ and press
O K
.
- Scroll to select from 6 ringer tones and the ringer will sound with
each selection.
- Press
to save.
- Press
to return to STANDBY status or to enter other options from Menu.
SETTING ANSWER ON/OFF:
- Press
O K
to access MENU.
- Scroll to ‘ANS MACH SETUP’ and press
O K
.
- Use to select”ANSWER ON/OFF”and press
O K
.
- Use to select and press to
save.
- Press
to return to STANDBY mode or to enter other options from Menu.
SETTING LINE REMOTE CONTROL SECURITY ID:
- Press
O K
to access MENU.
- Scroll to ‘ANS MACH SETUP’ and press
O K
.
- Use to select ‘SECURITY ID’ and press
O K
.
- Use the keypad to entera password with less than THREE letters and
press
to save.
- Press
to return to STANDBY mode or to enter other options from Menu.
USING THE HEADSET FEATURE
Your HANDSET, when connected to a headset (not included), will provide you
with hands-free communication.
Pull out the HEADSET JACK COVER, and then insert the small plug on the end
of the headset into the HEADSET JACK to the left side of the HANDSET.
Follow the procedures discussed in “Receiving Calls” and “Placing Calls” to
receive and place a call.
NOTE: When you plug the headset plug into the HEADSET JACK it
automatically mutes the MICROPHONE and SPEAKER of the HANDSET.
Unplug the headset to return the HANDSET to normal use.
A selection of headsets is available at your local The Source by Circuit City
store. The HEADSET JACK is compatible with 2.5 mm headset plugs only.
Guidance for Advanced Settings
13
Page 16
SETTING UP BASE UNIT:
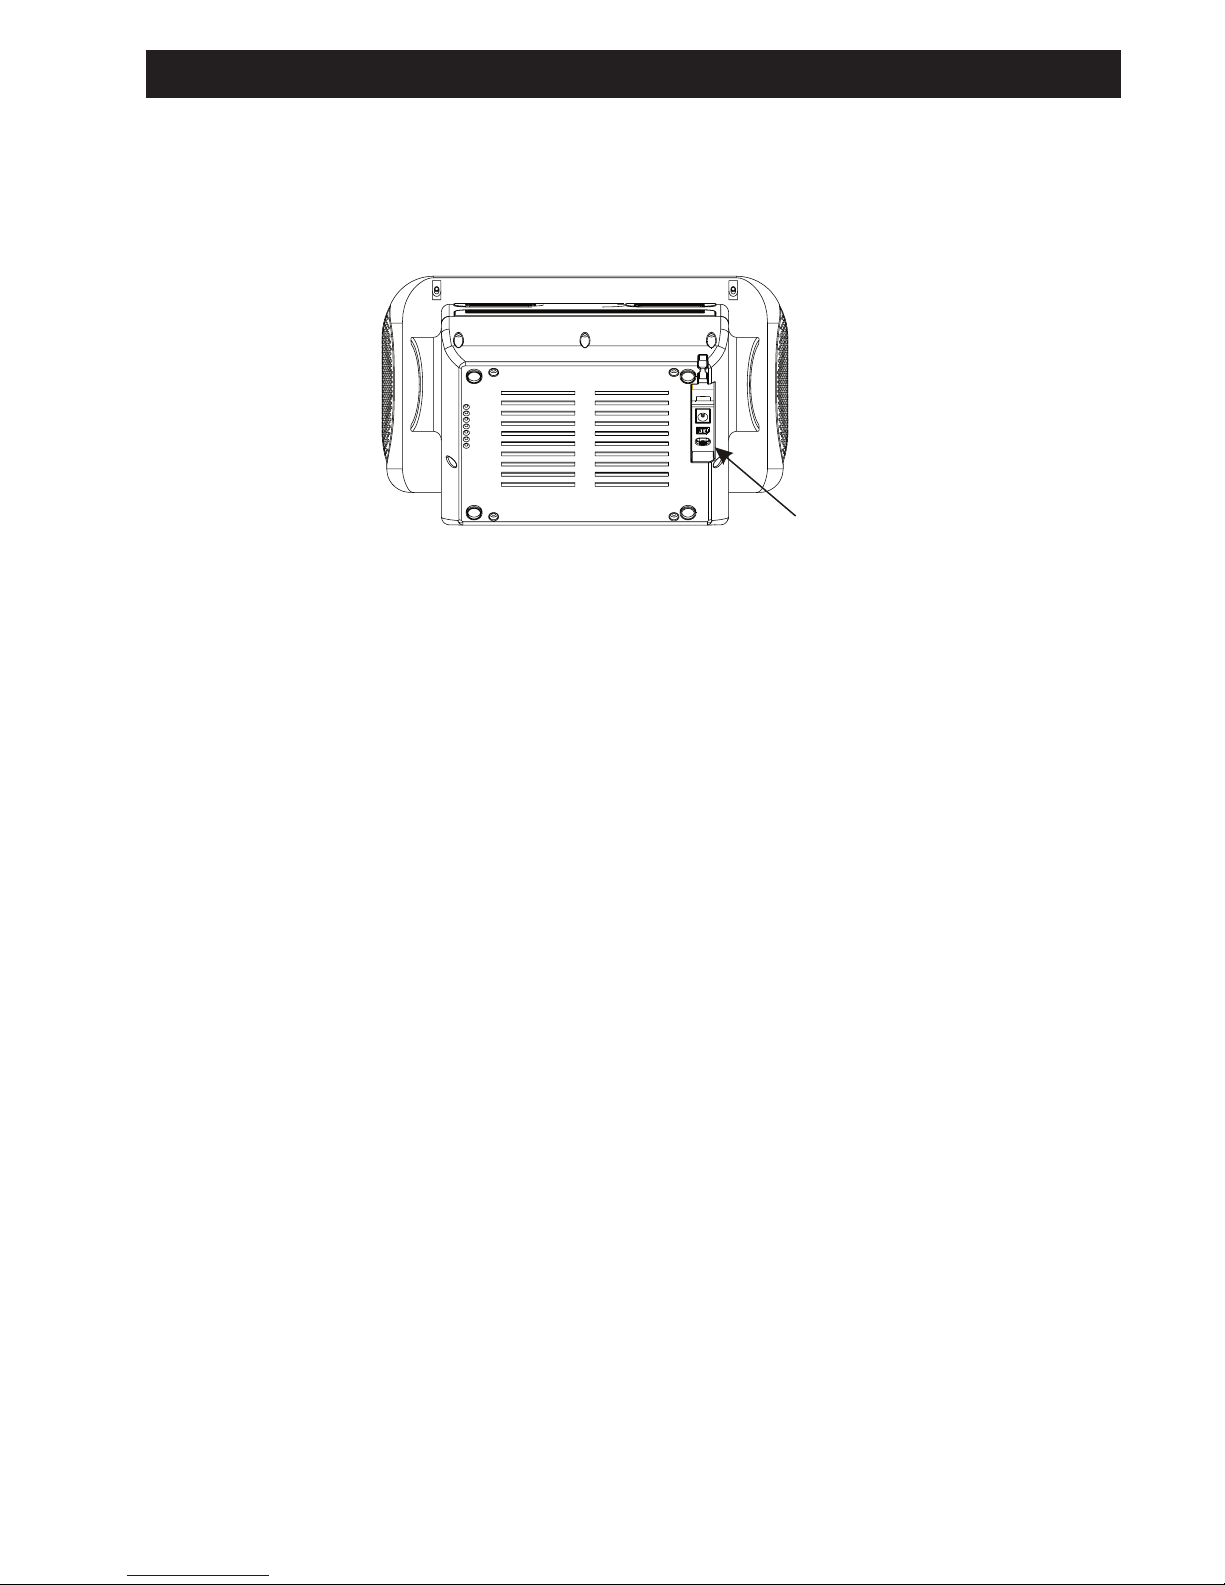
SETTING AUTO ANSWER RING TIMES:
The ring times can be set using the toggle switch on the bottom of BASE UNIT
with three selections: 3 rings, 5 rings and TS Toll Saver 3/5 :
Setting rings enables ANSWERING MACHINE to automatically answer
INCOMING CALLS with the corresponding rings:
3 rings: ANSWER MACHINE will automatically answer the incoming
calls after it rings 3 times.
5 rings: ANSWER MACHINE will automatically answer the incoming
calls after it rings 5 times.
TS (Toll Saver 3/5):
1) When there are new messages existing, the user
automatically answers the incoming calls after it rings 3 times.
2) When there are not new messages, the user automatically
answers the incoming calls after it rings 5 times.
• When you need to listen to the messages with line remote control mode,
you can hang up after the 4th ring because it means there are no new
messages.
• When the user sets it to ANSWER OFF, it does not answer the incoming
calls as above described but will answer after ringing 10 times.
SETING DATE & TIME:
- Press [SET] and the text ‘SET TIME?’ appears on the screen.
- Press [SET] again to display ‘SET TIME-YEAR’ and the ‘YEAR’ flashes.
- Scroll [VOL+] / [VOL -] to select.
- Press [SET] for the third time to confirm YEAR. Set ‘MONTH’, ‘DATE’,
‘HOUR’ and ‘MINUTE’ in the same way. The time displayed on the
screen is automatically updated with the confirmation of ‘MINUTE’, and
will automatically update the WEEK.
Note: The WEEK can only be accurate based on the correct YEAR.
Every INCOMING CALL message from ANSWER MACHINE recording
has week/time information.
SETTING LOUDNESS:
- Press [SET]and the text ‘SET TIME?’ appears on the screen.
- Scroll [VOL+] / [VOL -] to ‘SET LOUDNESS ?’.
- Press [SET] to confirm and scroll [VOL+] / [VOL -] to select ON or OFF.
- Press [SET] to confirm and quit.
Note: This setting is only for CD and RADIO.
Guidance for Advanced Settings
14
Page 17

SETTING BASS:
- Press [SET] and the text ‘SET TIME?’ will be displayed on the screen.
- Scroll [VOL+] / [VOL -] to ‘SET BASS?’.
- Press [SET] to confirm and scroll [VOL+] / [VOL -] to adjust.
- Press [SET] to confirm and quit.
Note: This setting is only for CD and RADIO.
SETTING TREBLE:
- Press [SET]] and the text ‘SET TIME?’ appears on the screen.
- Scroll [VOL+] / [VOL -] to ‘SET TREBLE?’.
- Press [SET] to confirm and scroll [ VOL ] / [VOL ] to adjust.
- Press [SET] to confirm and quit.
Note: This setting is only for CD and RADIO
SETTING ALARM:
- Press [SET] and the text ‘SET TIME?’ appears on the screen.
- Scroll [VOL+] / [VOL -] to “SET ALARM1?’.
- Press [SET] again to display ‘SET AL1 HOUR’, scroll [VOL+] / [VOL -]
to select.
- Press [SET] to confirm and set the ‘MINUTE’ in the same way, then ‘SET
AL1 MODE’ appears on the screen. Scroll [VOL+] / [VOL -] to select the
alarm mode in the following order:
Note: OFF mode is effective once there is no CD, or RADIO, or
BUZZER icon displayed on the screen
- Press [SET] to confirm the mode, then ‘SET AL1 VOLUME’ appears on
the screen.
- Scroll [VOL+] / [VOL -] to adjust the volume.
Note: The volume of the alarm increases gradually when it rings. The
setting is for the maximum volume (no less than 5).
- Press [SET] to confirm the Volume, then ‘SET AL1-DURATION’ appears
on the screen.
- Scroll [VOL+] / [VOL -] to select the duration.
Note: Minimum duration is 10 MIN, maximum duration is 120 MIN for
CD/RADIO and 30 MIN for BUZZER.
- Press [SET] to confirm and quit.
Note: Directly press [ALM1] to view the time and duration of ALM1,
once ‘ALARM1 XXMIN’ and corresponding icon appears on the screen
, here “XXMIN”means the duration of the ALARM. Follow the same
instructions for ALARM 2.
QUICK SETTING ALARM MODE & DURATION:
- Directly Press [ALM1] or [ ALM 2 ] for quick setting alarm mode and
duration. e.g. [ALM1]:
Guidance for Advanced Settings
15
OFF → CD → RADIO → BUZZER
View alarm
→
CD 30
minutes
→
RADIO 30
minutes
→
BUZZER 10
minutes
→
OFF
CD 60
minutes
→
RADIO 60
minutes
→
BUZZER 20
minutes
→
OFF
CD 120
minutes
→
RADIO 120
minutes
→
BUZZER 30
minutes
→
OFF
Page 18
- Directly press [ALM1] to view the time and duration of ALM1
- Press [ALM1] to scroll to adjust the mode and duration.
- Press and hold [ALM1] to skip to the setting of ALM1 directly. The same
applies to ALM2.
HANDSET/PHONE BOOK
SAVING NUMBERS TO PHONE BOOK:
PHONE BOOK can save up to 64 numbers, frequently used for easy and
quick acces.
SAVING A NEW NUMBER TO PHONE BOOK:
- Press to access PHONE BOOK when inSTANDBY mode.
- Scroll to ‘NEW ENTRY’ and press
O K
.
- Enter the name (maximum 11 characters). Press
to delete the
incorrectly entered characters before the cursor.
Note: Please refer to NAMING HANDSET (p.11) for info on entering
characters.
- Press
to confirm.
- Enter the phone number (maximum 24 characters). Press
to delete
the incorrectly entered numbers before the cursor.
- Press
to save.
- Scroll to ‘PHONE BOOK’.
SAVE THE RECENTLY DIALED NUMBER TO PHONE BOOK:
- Press [ redial ] to show the recently dialed numbers on the screen.
- Press .
- Enter the name (maximum 11 characters). Press
for deleting the
incorrectly entered characters before the cursor.
Note: Please refer to NAMING HANDSET (p.11) for info on entering
characters.
- Scroll to ‘PHONE BOOK’, where the phone number is displayed and
edit if necessary.
- Press
to
save.
SAVING INCOMING CALL NUMBERS TO PHONE BOOK:
- Press to show INCOMING CALL LIST.
- Scroll to the number to be saved.
- Press FORMAT (
#
) to select the desired redial format (7 digit, 10
digit or 11 digit).
- Press
to
display and edit the caller’s name shown on the screen.
Note: Please refer to NAMING HANDSET (p.11) for info on entering
characters.
- Scroll to ‘PHONEBOOK’, where the phone number is displayed and
edit if necessary.
- Press to save.
DIALING FROM PHONE BOOK:
- Press to access PHONE BOOK in STANDBY mode.
- Scroll to the number to be dialed.
- Press
or [SPK] to dial.
Guidance for Advanced Operations
16
Page 19
EDITING PHONE BOOK:
- Press to access PHONE BOOK in STANDBY mode
- Scroll to the number to be edited and press
O K
to confirm.
- Press
to select ‘EDIT’ then press
O K
.
- Edit the name and press
for deleting the incorrectly entered numbers
before the cursor.
Note: Please refer to NAMING HANDSET (p.11) for info on entering
characters.
- Press to ‘PHONEBOOK’.
- Change the number.
- Press
to save.
DELETING FROM PHONE BOOK:
- Press to access PHONE BOOK in STANDBY mode .
- Scroll until the number to be deleted appears.
- Press when ‘DELETED?’ is displayed on the screen.
- Press
to confirm.
HANDSET/CALLER ID & CALL WAITING:
CALLER’S NAME AND PHONE NUMBER:
HANDSET automatically displays an incoming caller’s name and phone
number, together with date and time of the call. It records and stores up
to 40 calls and has CALL WAITING service.
Attention: CALLER ID & CALL WATING services must be subscribed
from the local telephone company.
CHECKING CALLER ID:
- Press to access ‘INCOMING CALL LIST’ under STANDBY mode.
- Scroll to scan up and down.
DELETING CALLER ID:
- Press to access ‘INCOMING CALL LIST’ in STANDBY mode.
- Scroll to the number to be deleted.
- Press
and ‘DELETE?’ appears on the screen.
- Press
to confirm
DELETING ALL CALLER IDS:
- Press and hold
until ‘DELETE ALL?’ appears on the screen.
- Press
to confirm.
CALL WAITING:
- Press to listen to Caller 2. When talking with Caller 2 press
again to return to the Caller 1.
Note: Available whether you are speaking into the handset or into
SPEAKERPHONE.
HANDSET/ANSWERING MACHINE REMOTE CONTROL
HANDSET can be used as a Remote Control to set up ANSWERING
MACHINE mode, to listen to messages and to make a recording etc.
- Press ‘MUTE’in STANDBY mode to access REMOTE CONTROL mode.
The screen shows ‘ANSWERER REMOTE’.Operate according to the
voice instructions.
- Press ‘MUTE’ again to exit from REMOTE CONTROL mode.
Guidance for Advanced Operations
17
Page 20

Note: The voice instructions include:
For help menu, press 7;
To turn answer Off/On, press 4
To playback, press 1 twice;
To stop, press 2 again;
During playback;
To skip to next, press 3;
To skip to the previous, press 1;
To delete, press zero
CD PLAYER & RADIO
SLEEP TIMER FOR CD PALAYER OR RADIO:
Press [SLEEP] during CD or RADIO playback to set up timer, and the CD
PLAYER or RADIO will automatically turn off at the previously-set time. Options
include 30 / 60 / 90 /120 minutes and OFF can be chosen from, and the
corresponding icon appears on the screen.
- Press [SLEEP] to review the remaining time.
- Press [SLEEP] to adjust the timer when the remaining time is still
displayed on the screen.
Note: The corresponding icon [SLEEP] will appear on the screen after
selection. You can not set the sleep time during the CD player as Alarm.
REPEATING CD PLAY:
- Press [REP] to switch REPEAT modes when a CD is playing. The
corresponding icons appear on the screen. There are three REPEAT
modes:
repeat all songs
repeat the current song
Shuffle mode randomly rearranges the track order. If you want to
play the tracks in a random order, select Shuffle mode. If you didn’t
select the Shuffle mode ,you will play the tracks in a particular order.
ALARM & SNOOZE
CANCELLING ALARM:
- Press [SET] to cancel the alarm. Refer to the ‘SETTING ALARM’ pg 15
for details.
- OR: Press [ ALM1] /[ALM2] to quickly cancel the alarm. Refer to QUICK
SETTING ALARM MODE & DURATION on page 15 for details.
Note:
• NO ALARM icon, such as <CD>, <RADIO> or <BUZZER> will
appear on the screen once the function is cancelled.
• If ALARM is cancelled , it is not available until ALARM is reset.
STOPPING ALARM:
- Press [ALM1] or [ ALM 2 ] to stop ALARM.
- Press [STANDBY] to stop ALARM.
• Alarm will resume at the same time on the next day.
1
SHU F
30 → 60 → 90 → 120 → OFF
Guidance for Advanced Operations
18
Page 21

PAUSING ALARM (SNOOZE):
- Press [SNOOZE/MUTE] to pause ALARM, which rings again after 7
minutes until ALARM DURATION has expired
Note: ALARM automatically pauses during INCOMING CALL or AUTO
ANSWERING.
ANSWERING MACHINE
SETTING ANSWERING MACHINE ON/OFF:
- Press [ANS ON/OFF] to switch between Answer On or Answer Off, and
‘Answer On’ or ‘Answer Off’ will be displayed on the screen with the
corresponding voice prompt .
Note: Answer On/Off can be selected via HANDSET remote control or
LINE remote control, too.
INCOMING CALL AUTO ANSWER (RECORD ICM):
- ANSWER MACHINE will automatically answer the incoming call after
the preset rings (3 rings or 5 rings or TS) and play the voice instruction
‘Please leave your message after the tone’.
Note: ANSWER MACHINE will respond after 10 rings, but make no
recording in ‘ANSWER OFF’ mode.
- The buzzer will beep to indicate that recording is to start following the
voice instruction.
Note: The maximum recording time is 1 minute for each message.
- [CHARGE/IN USE] indication light flashes every one second to remind
you that there are new messages.
- The number of total messages and that of new messages will display
separately on the screen.
Note:
• The phone can save up to 59 messages in the memory.
• Recording automatically stops if the memory is full with ‘MEMORY IS
FULL’ displayed on the screen.
• ANSWERING MACHINE will stop recording and hang up when
there is a 7-second silence in the recording process to avoid any
unimportant messages and to save the memory capacity.
STOPPING AUTO ANSWER:
- The AUTO ANSWER stops under one of the following circumstances:
• Press or [SPK] on the HANDSET during answering.
• OR: Other HANDSET answers the call.
• OR: Press D on ANSWER MACHINE or press [STANDBY].
Note: During AUTO ANSWER, the Alarm Clock, CD Player or the
Radio can be operated, but the Auto Answer function continues.
PLAYING/RECORDING OGM:
- Press [OGM] to play OGM.
- Press and hold [OGM] to erase the original OGM and to activate OGM
recording.
Note: The maximum OGM Recording time is 30 seconds and OGM
automatically replays the recorded voice right after the recording.
- Press D on the Answering Machine or press [STANDBY] to stop.
Guidance for Advanced Operations
19
Page 22

MEMO
MEMO RECORDING
- Press [MEMO] on Answering Machine to start recording.
LISTENING TO THE MEMO:
- Press g on Answering Machine to play MEMO.
- Press or on Answering Machine during playback to listen to
previous or next MEMO
- Press D on Answering Machine or press [STANDBY].
DELETING THE MEMO:
- Press [DEL] to delete the current MEMO during the MEMO playback.
- Press and hold [DEL] to delete all the old MEMOs together with all the
old messages during the MEMO playback.
Note: The maximum recording time is 2 minutes for each MEMO.
Recording automatically stops if the memory is full ‘MEMORY IS FULL’
appears on the screen.There are a total of 59 messages that can be
saved into the memory including the ICM (Incoming Messages) and
MEMO.
LINE REMOTE CONTROL:
ANSWERING MACHINE can be controlled by an incoming call from an
outline line to set up answering mode, listen to voice messages and make
recording etc.
- Make a call from outlines.
- Enter the passwords when the phone automatically answers the call
with recording. Refer to ‘Setting LINE REMOTE CONTROL SECURITY
ID’ (pg13) of ‘Setting Handset’ section for password set up. Follow the
voice instructions.
Note: ANSWER MACHINE automatically disconnects when it fails to
receive REMOTE password within 8 Seconds.
Note: Hang up the phone at 4 rings when listening to the recorded
incoming message if AUTO ANSWER RING is set up to TS Mode.
- Hang up to exit.
VOICE INSTRUCTIONS:
For help menu, press 7;
To turn answer Off/On, press 4;
To playback, press 2;
To stop, press
2 again;
During playback;
To skip to next, press 3;
To skip to the previous, press
1;
To delete, press 0.
Guidance for Advanced Operations
20
Page 23
21
Guidance for Advanced Operations
MULTIHANDSET FUNCTIONS
You may register a total of 4 HANDSETS to your BASE unit. The expanded
handsets (chargers) do not need to be connected to a phone line. You can
place them wherever you like. When you have several handsets you can use
the following functions:
CONFERENCE CALL
When one handset is in communication, all the other handsets will display
‘LINE IN USE’. When another handset joins in the talk, all the other handsets
will display ‘ON CONFERENCE’
INVITING
1. Press [INTERCOM] to display ‘CALL ON HOLD’ on the screen.
2. Press to select the handset you would like to invite and then press
O K
.
• In case there are only two handsets, then you do not have to select.
The pressing of [INTERCOM] will directly page the other handset.
• Before the invited handset answers, press [INTERCOM] again for
canceling.
3. When the screen is displaying ‘ON INTERCOM’, the invited handset
already has joined in, press
O K
again.
4. ‘ON CONFERENCE’ displayed on the screen shows that the
conference call is beginning.
JOIN IN
- Press or [SPK].
QUIT
- Any handset can quit the conference call by pressing .
• At most, two handsets can be ON CONFERENCE CALL with the
incoming caller.
• One handset hanging up will quit the CONFERENCE CALL; once the
second handset hangs up the call is finished.
HANDSET TO HANDSET INTERCOM
PAGING
1. Press
[INTERCOM];
2. Press to select the handset you want to call or select all, and then
press
O K
.
• If there are only two handsets, then you do not have to select.
Pressing [INTERCOM] will directly page the other handset.
• Before the invited handset answers, press [INTERCOM] again for
canceling.
3. When the invited handset answers and ‘ON INTERCOM’ displays on
LCD, the talking can begin.
ANSWERING
- Press
or [SPK].
HANGING UP
- Press
.
Page 24
TRANSFERRING A CALL FROM ONE HANDSET TO ANOTHER
When you want to transfer the call you are receiving to the other handset,
follow the steps below:
TRANSFERRING
1. Press [INTERCOM] ‘CALL ON HOLD’ appears on LCD, which will hold
the call.
2. Use to select the handset you want to transfer to and press
O K
.
• If there are only two handsets, then you do not have to select.
Pressing [INTERCOM] will directly page the other handset.
• Before the invited handset answers, press [INTERCOM] again for
canceling.
3. Press
to hang up. The call is still on hold before the transfer handset
answers.
ANSWERING
- Press or [SPK]
• If the paged handset does not answer or hangs up by pressing ,
the call will return to the handset that transfers the call.
Hanging up
- Press
Guidance for Advanced Operations
22
Page 25

23
The FCC Wants You to Know
This equipment has been tested and found to comply with the limits for a
Class B digital device, pursuant to Part 15 of the FCC Rules. These limits are
designed to provide reasonable protection against harmful interference in
a residential installation. This equipment generates, uses and can radiate
radio frequency energy and, if not installed and used in accordance with the
instructions, may cause harmful interference to radio communications.
However, there is no guarantee that interference will not occur in a particular
installation. If this equipment does cause harmful interference to radio or
television reception, which can be determined by turning the equipment off
and on, the user is encouraged to try to correct the interference by one or
more of the following measures:
• Reorient or relocate the receiving antenna.
• Increase the separation between the equipment and receiver.
• Connect the equipment into an outlet on a circuit different from that to which
the receiver is connected.
• Contact your local electronic store for help.
FCC Information
This device complies with Part 15 of the FCC Rules. Operation is subject to the
following two conditions:
(1) this device may not cause harmful interference, and
(2) this device must accept any interference received, including interference that
may cause undesired operation.
Warning: Changes or modifications to this unit not expressly approved by
the party responsible for compliance could void the user’s authority to operate
the equipment.
FCC Regulations
Page 26

24
This telephone is registered for use in Canada.
Notice: The Industry Canada label identifies certified equipment. This
certification means that the equipment meets certain telecommunications
network, protective, operational and safety requirements. Industry Canada
does not guarantee the equipment will operate to the user’s satisfaction.
Before installing this equipment, users should ensure that it is permissible to
be connected to the facilities of the local telecommunications company. The
equipment must also be installed using an acceptable method of connections.
The customer should be aware that compliance with the above conditions may
not prevent degradation of service in situations.
Repairs to certified equipment should be made by an authorized Canada
maintenance facility designated by the supplier. Any repairs or alterations
made by the user to this equipment, or equipment malfunctions, may give
the telecommunications company cause to request the user to disconnect the
equipment.
Users should ensure for their own protection that the electrical ground
connections of the power utility, telephone lines and internal metallic water
pipe system, if present, are connected together. This precaution may be
particularly important in rural areas.
Caution: Users should not attempt to make such connections themselves, but
should contact an appropriate electric inspection authority, or electrician, as
appropriate.
Notice: The REN assigned to this device denotes the number of devices you
may connect to the telephone loop which is used by the device to prevent
overloading. The termination on a loop may consist of any combination of
devices subjected only to the requirement that the sum of the REN does exceed
five (5.0). The REN assigned to this device is located on the base of the unit.
This device complies with RSS-210 of Industry Canada. Operation is subject to
the following two conditions:
(1) this device may not cause interference, and
(2) this device must accept any interference, including interference that may cause
undesired operation of the device.
Industry Canada Notice
Page 27

25
Warranty
Who is Providing This Warranty?
• Orbyx Electronics, LLC (“Orbyx”), as the distributor of this Centrios™ product (your “Product”).
What Does This Warranty Cover?
• This warranty covers defects in materials or workmanship in your Product under normal use and conditions.
What is the Period of Coverage?
• This warranty covers your Product for 12 months from the original purchase date.
Who Is Covered?
• This warranty covers the original consumer purchaser. Coverage terminates if you sell or otherwise transfer your Product.
What Will We Do To Correct Problems?
• We will repair your Product or replace your Product with a new or reconditioned equivalent product, at our option.
How Do You Get Service?
• Call Orbyx TOLL FREE at 1-866-363-3059 for instructions for obtaining warranty service from Orbyx’s authorized
service providers.
• Or, return your Product directly to the retail store from which you purchased the Product.
• When you obtain service for your Product, you must provide a purchase receipt (or other proof of the original purchase
date) and a description of the defect(s).
What Does This Warranty Not Cover?
• This warranty DOES NOT COVER:
• damage due to misuse, abuse, alteration, unauthorized repair, or accident (such as improper electrical current);
• damage due to “acts of God” (such as lightning) or other contingencies beyond our control;
• cosmetic damage;
• externally generated static, signal reception or antenna problems not caused by your Product; or batteries.
• This warranty also DOES NOT COVER, and in no case will we be liable for, any incidental damages (such as
transportation costs to and from an authorized service provider, or loss of time) or consequential damages (such as costs
of repairing or replacing other property which is damaged, including tapes, discs, speakers not included with your
Product or other accessories, or external electrical systems) resulting from the use of your Product. Some states do not
allow the exclusion or limitation of incidental or consequential damages, so the above limitation or exclusion may not
apply to you.
• Defacing the serial number, or using your Product for commercial or institutional purposes, voids this warranty.
Are There Other Warranties?
• There are no express warranties other than those expressed herein. Neither the sales personnel nor any other person is
authorized to make any other warranties or to extend the duration of any warranties.
• ANY IMPLIED WARRANTIES, INCLUDING ANY IMPLIED WARRANTY OF MERCHANTABILITY (AN UNWRITTEN
WARRANTY THAT A PRODUCT IS FIT FOR ORDINARY USE), ARE LIMITED TO 90 DAYS. Some states do not allow
limitations on how long an implied warranty lasts, so the above limitation may not apply to you.
How Does State Law Apply?
• This warranty gives you specific legal rights, and you may also have other rights which vary from state to state.
ORBYX ELECTRONICS WARRANTY
ORBYX Electronics warrants that this product will be free from defects in materials and workmanship for a period of one (1) year
from the date of purchase. Within this period, simply take the product and your proof of purchase to any ORBYX Electronics store
or dealer and the product will be repaired without charge for parts and labour. ORBYX Electronics reserves the right to charge for
transportation. Any product which has been subject to misuse or accidental damage is excluded from this warranty.
This warranty is only applicable to a product purchased through ORBYX Electronics’ company owned stores and dealers and to
a product that is presented for repair in a country where ORBYX Electronics offers the product for sale. While this warranty does
not confer any legal rights other than those set out above, you may have additional statutory rights which will vary under the laws
of the various countries, states, province and other governmental entities in which ORBYX Electronics operates. This warranty is
subject to all statutory rights you may have in the country of purchase.
Distributed exclusively in the U.S. by Orbyx Electronics, LLC
501 South Cheryl Lane, Walnut, CA 91789
Imported in Canada for/Importé au Canada pour
Orbyx Electronics, Concord, Canada, L4K 4M3
Manufactured in China
For product support please contact www.orbyxelectronics.com or 1-866-363-3059.
LIMITED WARRANTY
LIMITED WARRANTY
Limited Warranty/Garantie Limitée
U.S.A & Canada
© 2005 ORBYX Electronics. All Rights Reserved.
 Loading...