

Page 1
HSILGNE
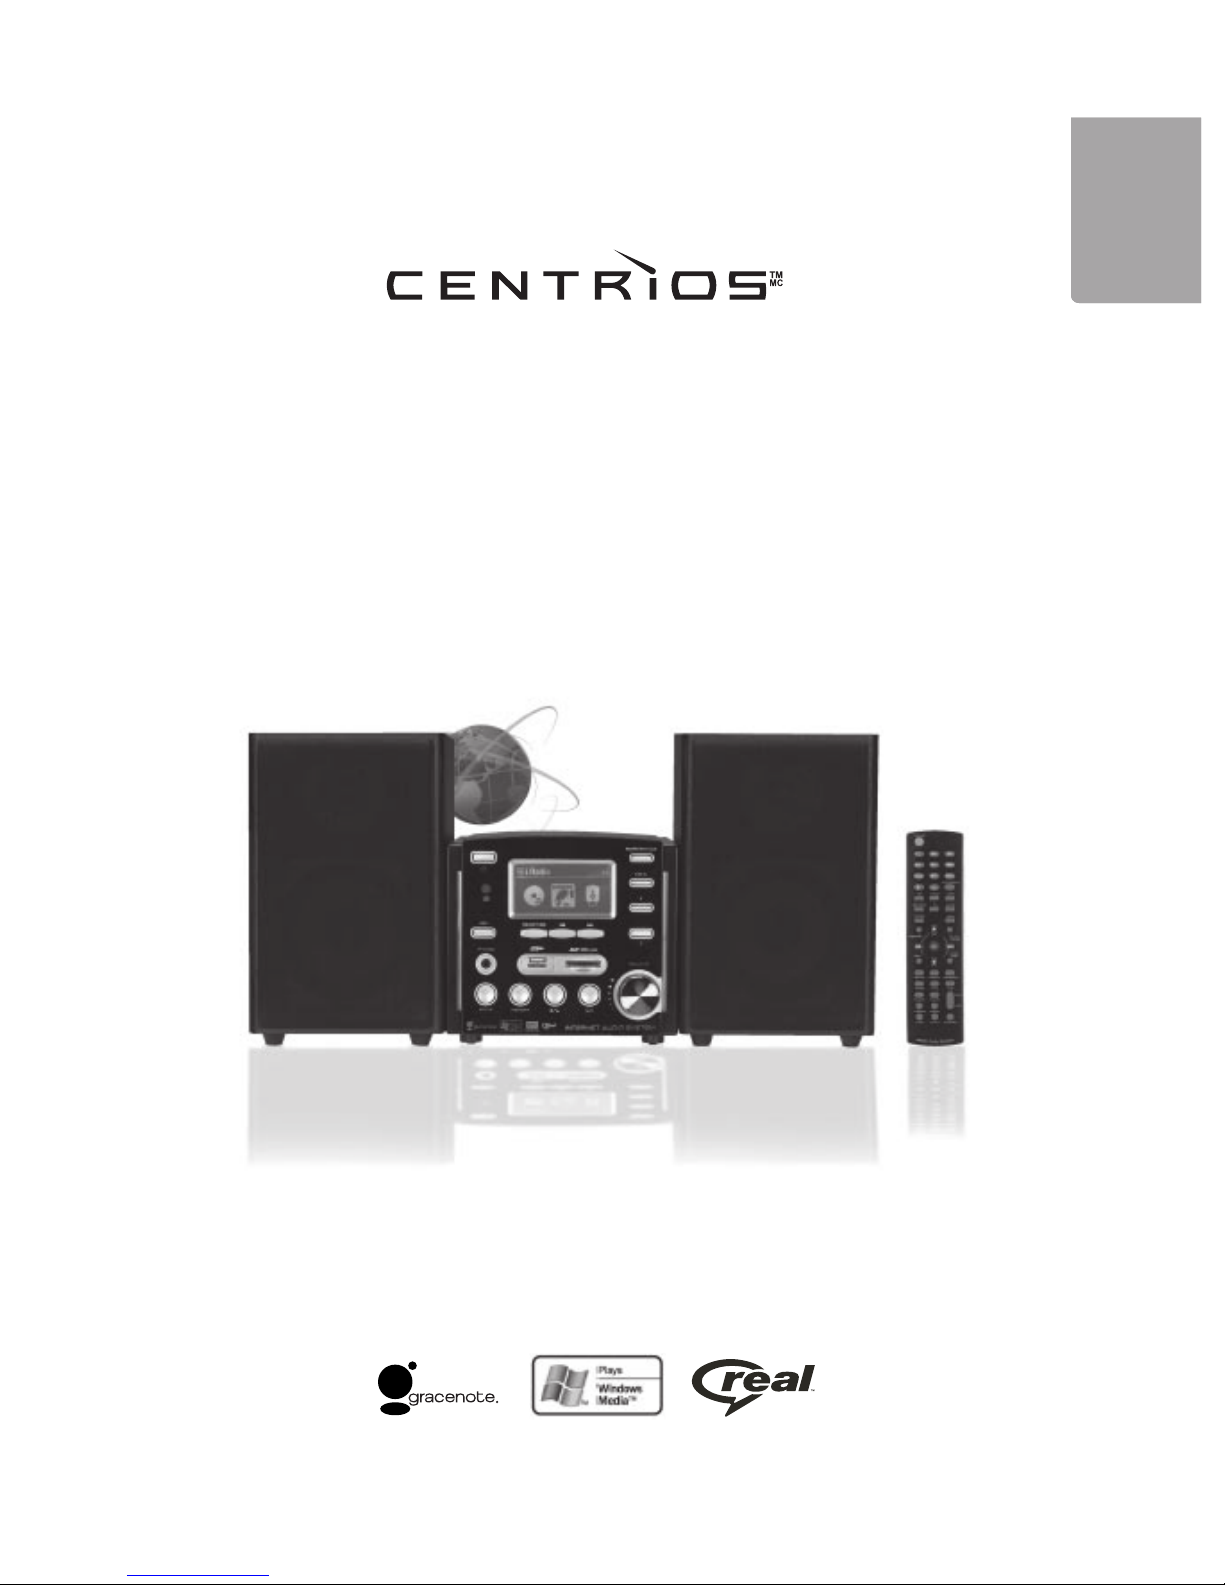
Internet Radio Micro Hi-Fi System
1315117
Page 2

2
Table of Contents
Copyright Statements . . . . . . . . . . . . . . . . . . . . . . . . . . . . . . . . . . . . . . . . . . . . . . . . . . . . . . . . . . . . . . . . . 3
Safety . . . . . . . . . . . . . . . . . . . . . . . . . . . . . . . . . . . . . . . . . . . . . . . . . . . . . . . . . . . . . . . . . . . . . . . . . . . . . 5
Starting Up . . . . . . . . . . . . . . . . . . . . . . . . . . . . . . . . . . . . . . . . . . . . . . . . . . . . . . . . . . . . . . . . . . . . . . . . . 6
CD Functions . . . . . . . . . . . . . . . . . . . . . . . . . . . . . . . . . . . . . . . . . . . . . . . . . . . . . . . . . . . . . . . . . . . . . . . 14
Using Internet Radio . . . . . . . . . . . . . . . . . . . . . . . . . . . . . . . . . . . . . . . . . . . . . . . . . . . . . . . . . . . . . . . . . 17
Playing Music from USB memory . . . . . . . . . . . . . . . . . . . . . . . . . . . . . . . . . . . . . . . . . . . . . . . . . . . . . . . 19
Playing Music from a Memory Card . . . . . . . . . . . . . . . . . . . . . . . . . . . . . . . . . . . . . . . . . . . . . . . . . . . . . 20
Using FM Radio . . . . . . . . . . . . . . . . . . . . . . . . . . . . . . . . . . . . . . . . . . . . . . . . . . . . . . . . . . . . . . . . . . . . . 21
Playing Music from a Media Server . . . . . . . . . . . . . . . . . . . . . . . . . . . . . . . . . . . . . . . . . . . . . . . . . . . . . . 23
File Manager . . . . . . . . . . . . . . . . . . . . . . . . . . . . . . . . . . . . . . . . . . . . . . . . . . . . . . . . . . . . . . . . . . . . . . . 24
AUX . . . . . . . . . . . . . . . . . . . . . . . . . . . . . . . . . . . . . . . . . . . . . . . . . . . . . . . . . . . . . . . . . . . . . . . . . . . . . . 24
Settings . . . . . . . . . . . . . . . . . . . . . . . . . . . . . . . . . . . . . . . . . . . . . . . . . . . . . . . . . . . . . . . . . . . . . . . . . . . 25
Troubleshooting . . . . . . . . . . . . . . . . . . . . . . . . . . . . . . . . . . . . . . . . . . . . . . . . . . . . . . . . . . . . . . . . . . . . . 30
Specifications . . . . . . . . . . . . . . . . . . . . . . . . . . . . . . . . . . . . . . . . . . . . . . . . . . . . . . . . . . . . . . . . . . . . . . 31
Warning Statements and Warranty . . . . . . . . . . . . . . . . . . . . . . . . . . . . . . . . . . . . . . . . . . . . . . . . . . . . . . 32
Page 3
Copyright Statements
● Music recognition technology and related data are provided by Gracenote®. Gracenote is the industry
standard in music recognition technology and related content delivery. For more information visit
http:/
/www.gracenote.com/.
● CD and music-related data from Gracenote, Inc., copyright © 2006 Gracenote. Gracenote Software,
copyright © 2006 Gracenote. This product and service may practice one or more of the following U.S.
Patents: #5,987,525; #6,061,680; #6,154,773, #6,161,132, #6,230,192, #6,230,207, #6,240,459,
#6
,330,593, and other patents issued or pending. Some services supplied under license from Open
Globe,
Inc. for U.S. Patent: #6,304,523. Gracenote and CDDB are registered trademarks of Gracenote.
The Gracenote logo and logotype, and the "Powered by Gracenote" logo are trademarks of Gracenote.
● MPEG Layer-3 audio coding technology licensed from Fraunhofer IIS and Thomson.
● Supply of this product does not convey a license nor imply any right to distribute content created with this
pro
duct in revenue-generating broadcast systems (terrestrial, satellite, cable and/or other distribution
cha
nnels), streaming applications (via Internet, intranets and/or other networks), other content
dis
tribution systems (pay-audio or audio-on-demand applications and the like) or on physical media
(com
pact discs, digital versatile discs, semiconductor chips, hard drives, memory cards and the like). An
independent
license for such use is required. For detail please visit http://mp3licensing.com.
● Microsoft® and Windows Media® are either registered trademarks or trademarks of Microsoft Corporation
in
the United States and/or other countries.
● RealNetworks, RealAudio and the Real logo is a trademark or a registered trademark of RealNetworks,
Inc. Real Format Client Code is included under license from RealNetworks, Inc. Copyright 1995-2007,
RealNe
tworks, Inc. All rights reserved.
Notice
Recording/Ripping any audio content made with this system is only for your personal use. It should
no
t be sold, distributed, and played for a public audience without copyright holder’ permission.
3
Page 4

4
H
SI
LG
N
E
Gracenote® EndUser License Agreement
Version 20061005
This application or device contains software from Gracenote, Inc. of Emeryville, California
(“Gracenot
e”). The software from Gracenote (the “Gracenote Software”) enables this
application to perform disc and/or file identification and obtain music-related information,
including name, artist, track, and title information (“Gracenote Data”) from online servers
or embedded databases (collectively, “Gracenote Servers”) and to perform other
functions. You may use Gracenote Data only by means of the intended End-User
funct
ions of this application or device.
You
agree that you will use Gracenote Data, the Gracenote Software, and Gracenote
Servers for your own personal non-commercial use only. You agree not to assign, copy,
transfer or transmit the Gracenote Software or any Gracenote Data to any third party.
YOU
AGREE NOT TO USE OR EXPLOIT GRACENOTE DATA, THE GRACENOTE
SOFT
WARE, OR GRACENOTE SERVERS, EXCEPT AS EXPRESSLY PERMITTED
HEREIN.
You
agree that your non-exclusive license to use the Gracenote Data, the Gracenote
Software, and Gracenote Servers will terminate if you violate these restrictions. If your
lice
nse terminates, you agree to cease any and all use of the Gracenote Data, the
Gracenote Software, and Gracenote Servers. Gracenote reserves all rights in Gracenote
Data, the Gracenote Software, and the Gracenote Servers, including all ownership rights.
Und
er no circumstances will Gracenote become liable for any payment to you for any
information that you provide. You agree that Gracenote, Inc. may enforce its rights under
this Agreement against you directly in its own name.
Th
e Gracenote service uses a unique identifier to track queries for statistical purposes.
The purpose of a randomly assigned numeric identifier is to allow the Gracenote service to
count
queries without knowing anything about who you are. For more information, see the
web page for the Gracenote Privacy Policy for the Gracenote service.
The
Gracenote Software and each item of Gracenote Data are licensed to you “AS IS.”
Gr
acenote makes no representations or warranties, express or implied, regarding the
accuracy of any Gracenote Data from in the Gracenote Servers. Gracenote reserves
the right to delete data from the Gracenote Servers or to change data categories for any
cause
that Gracenote deems sufficient. No warranty is made that the Gracenote
Software or Gracenote Servers are error-free or that functioning of Gracenote Software or
Gracenote
Servers will be uninterrupted. Gracenote is not obligated to provide you with
ne
w enhanced or additional data types or categories that Gracenote may provide in the
future and is free to discontinue its services at any time.
GRACENOTE DISCLAIMS ALL WARRANTIES EXPRESS OR IMPLIED, INCLUDING,
BUT NOT LIMITED TO, IMPLIED WARRANTIES OF MERCHANTABILITY, FITNESS
FOR
A PARTICULAR PURPOSE, TITLE, AND NON-INFRINGEMENT. GRACENOTE
DOES NOT WARRANT THE RESULTS THAT WILL BE OBTAINED BY YOUR USE OF
THE
GRACENOTE SOFTWARE OR ANY GRACENOTE SERVER. IN NO CASE WILL
GRACEN
OTE BE LIABLE FOR ANY CONSEQUENTIAL OR INCIDENTAL DAMAGES
OR
FOR ANY LOST PROFITS OR LOST REVENUES.
© Gracenote 2006
Page 5
5
HS
I
LG
N
E
C A U T I O N
!
RISK OF ELECTRIC
SHOCK DO NOT OPEN
CLASS 1
LASER PRODUCT
Micro System with Internet Radio
Please read the entire instruction manual before using and save it for future use. Any technical data in this
manual is subject to change without notice. If you have any questions concerning technical problems please
contact Orbyx Electronics technical support at www.orbyxelectronics.com.
1. Safety
The product should only be repaired by qualified service personnel.
The product should not be dismantled or altered.
Do not place the product where it could possibly fall into water or any other type of liquid. Do not place any
objects containing liquid on the product, e.g. flower vase or soft drink.
Turn off the standby function during night time or when you will be away for periods of time.
Do not cover the product. Adequate ventilation with a distance of at least 15 cm between ventilation holes and
surrounding area is necessary to prevent the device from becoming warm.
Do not place the stereo in a damp, dusty environment or where there are strong vibrations.
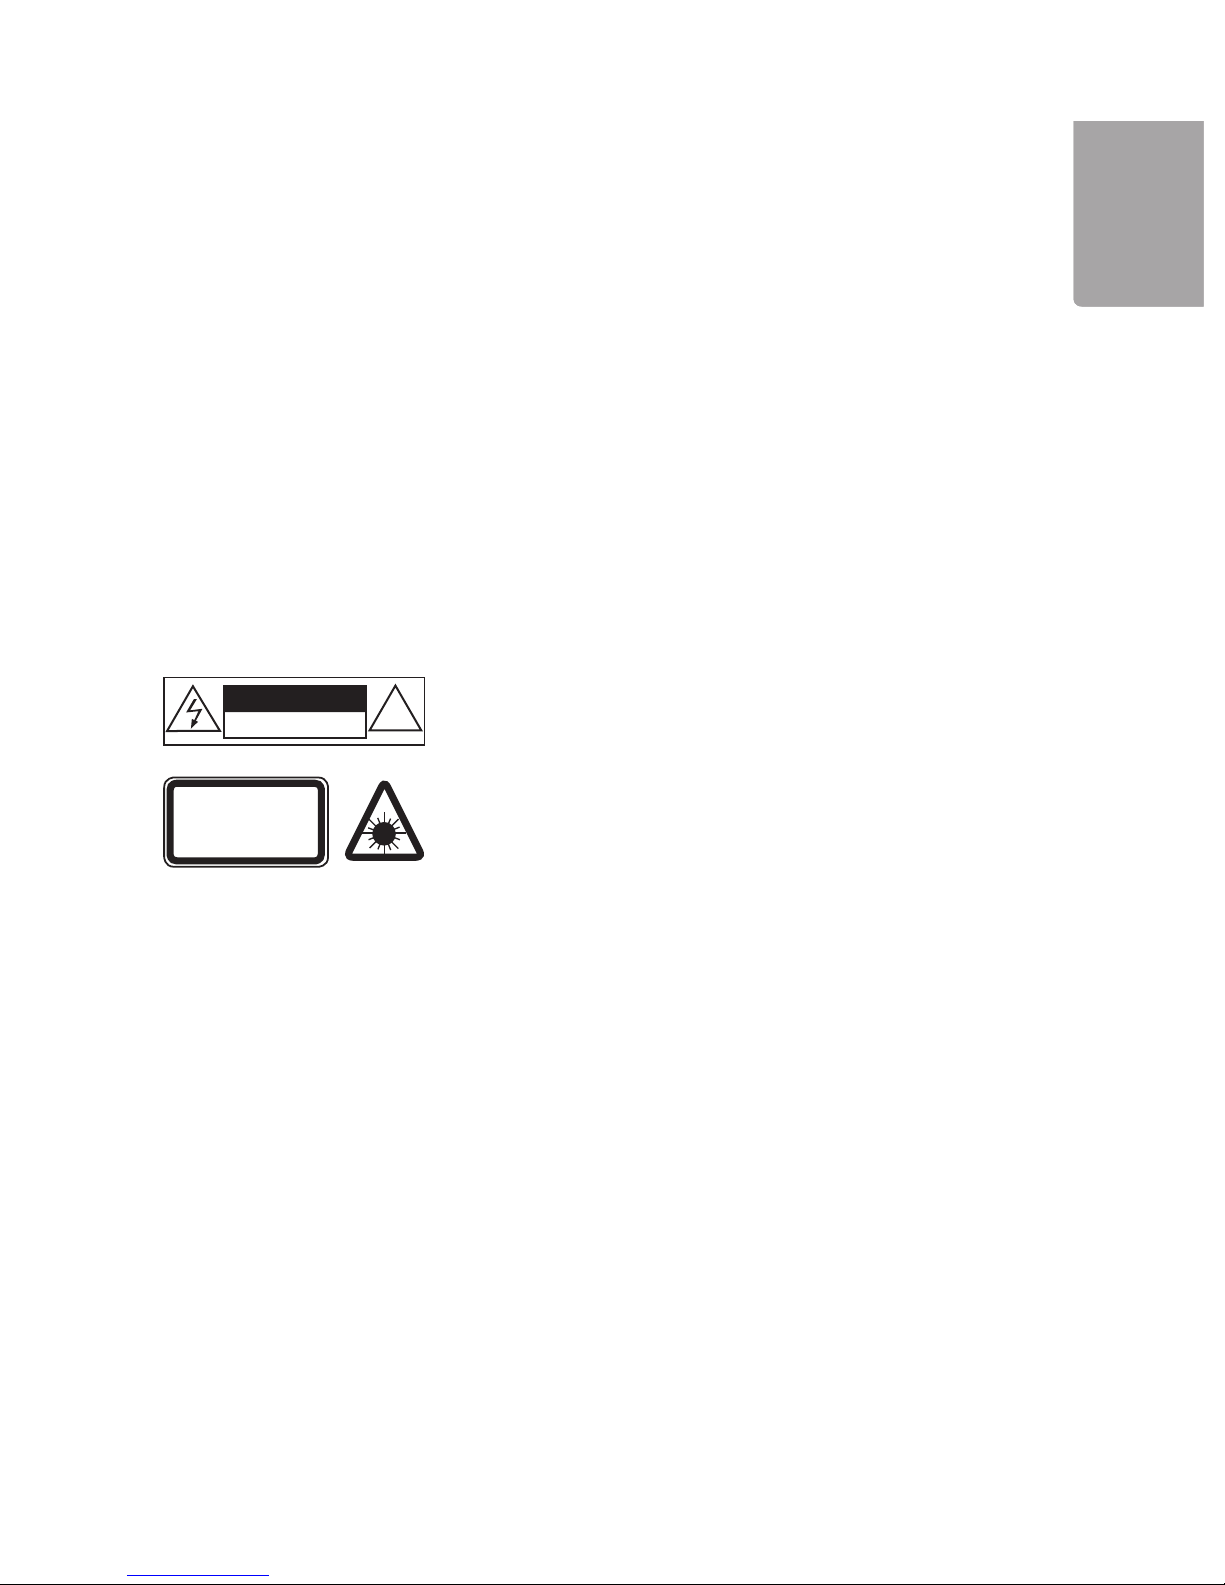
Note the following safety symbols
Warning!
Do not open the casing. Dangerous current exists in unprotected
components within the product’s casing. Contact with these can lead
to fire or electric shock.
CLASS 1 LASER DEVICE
Warning! Do not open the casing. Invisible laser radiation can cause
eye damage. Do not look directly into the laser beam or look directly
at it through an optical instrument.
Page 6
6
ENGLISH
.
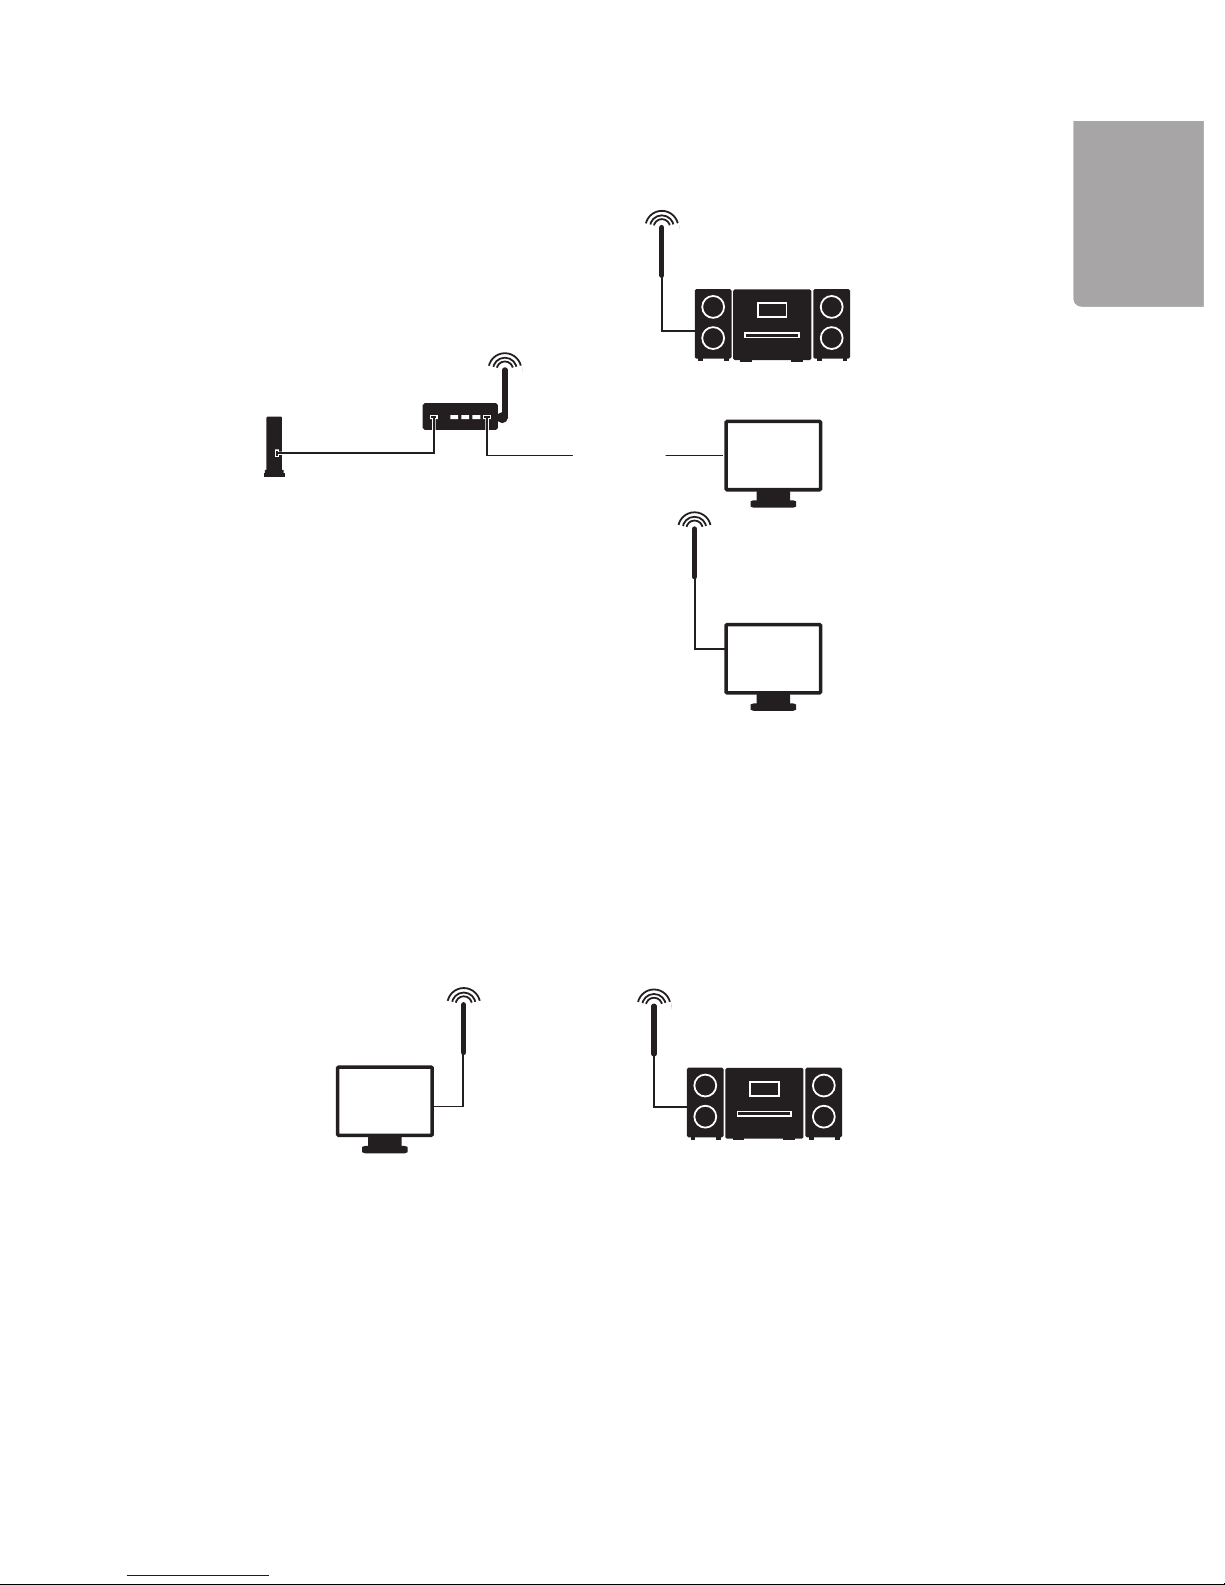
ADSL or Cable modem
Broadband Router
Ethernet
Ethernet
Micro System
Micro System
PC (Media Server)
PC (Media Server)
Crossover
2. Starting Up
2.1 Setting up the equipment
2.1.1 Speakers
Connect the speakers to the outlet on the back of the device. Connect the right speaker to the outlet marked
R and the left speaker to the outlet marked L.
2.1.2 Power cord
1. Connect the power cord to a wall socket. Check that the voltage (V) which is shown in the marking label
on the back of the unit is the same as your local electrical outlet (120 V AC, 60 Hz). Get advice from the
retailer or at a place of service if it is not the same.
2. To turn the power off completely, unplug the unit from the wall socket. It is reccomended to unplug the
unit during strong thunder storms to protect the device.
2.1.3 Aerial
Connect the included wire aerial to the aerial connection on the back of the device.
2.2 Installing onto network (LAN)
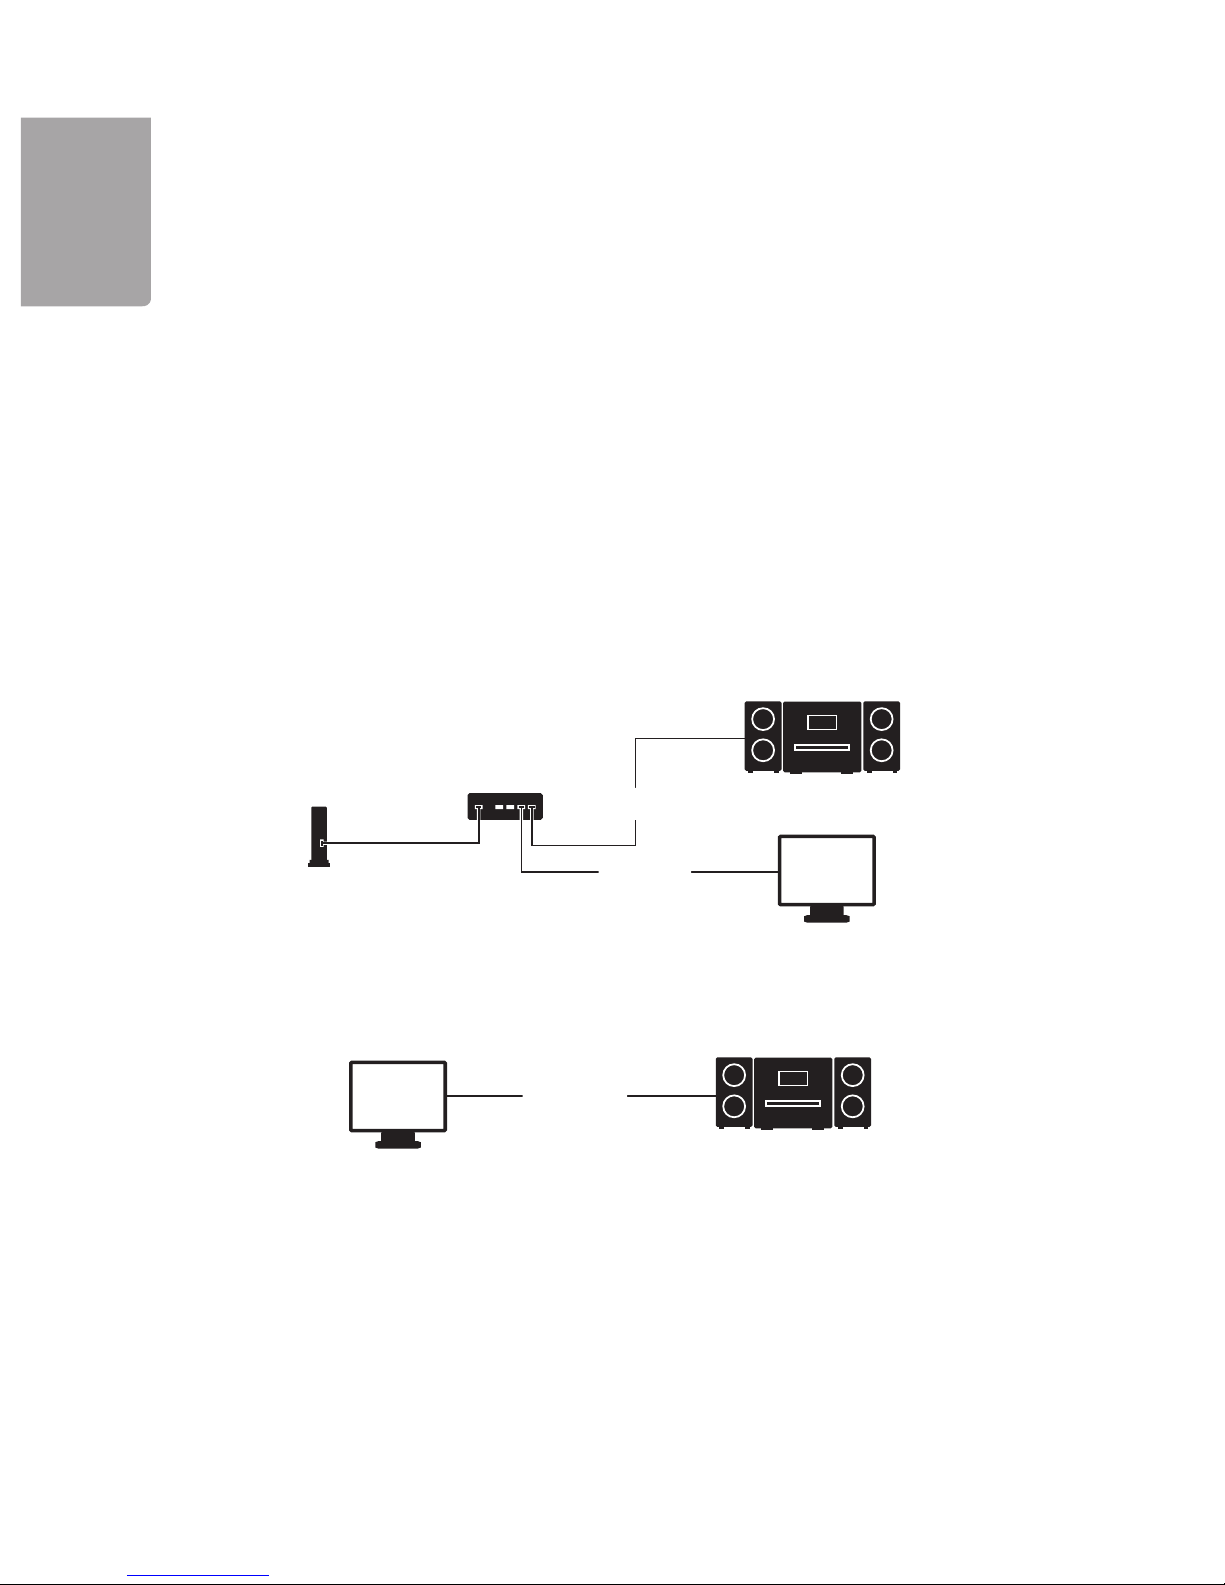
Connect the device to an Internet connected router according to the picture. Use a standard network cable.
To connect the unit to a PC, see the picture above. When connected to a PC the unit can only play music that
is stored on the computer. A crossover network cable is required (not included).
Note! When the device is connected to a PC you can only listen to music which is stored on the computer.
The computer must have special software installed. See section Media Server.
Page 7
7
H
S
ILGN
E
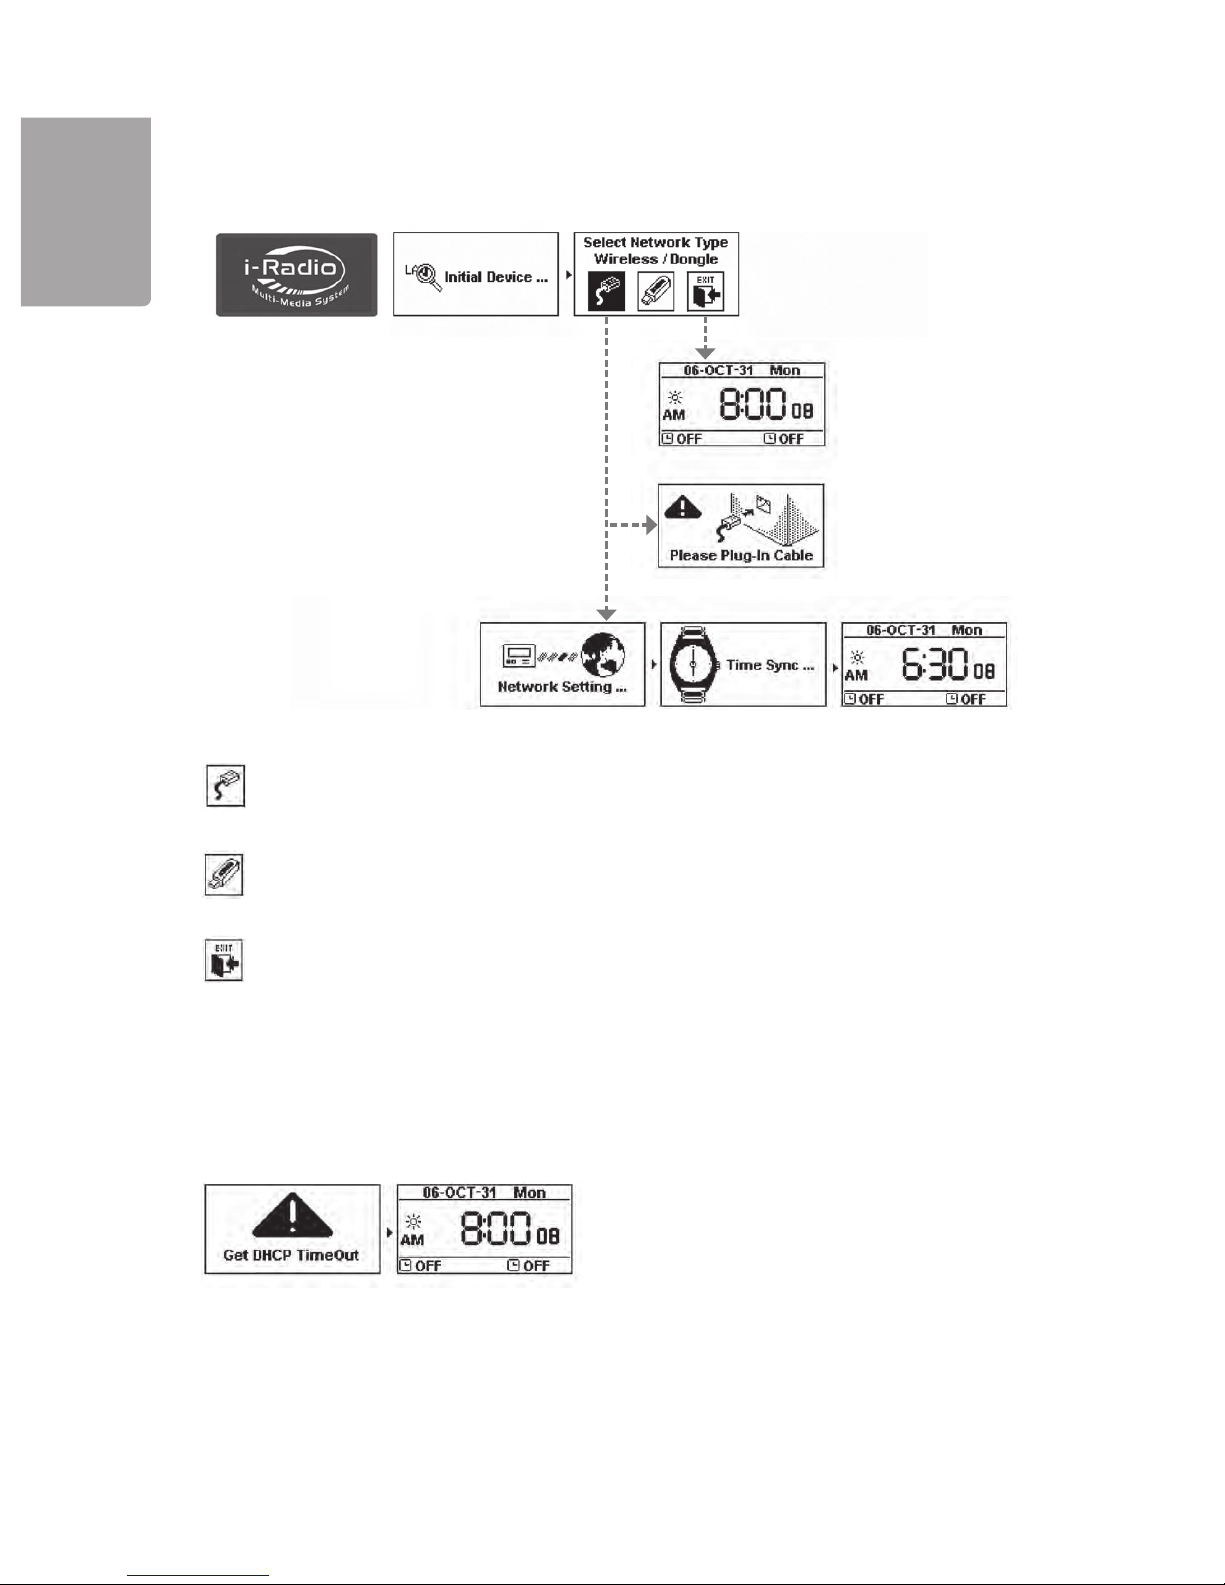
2.3 Installation of a wireless network (WLAN)
Micro System
WiFi Dongle
WiFi Dongle
WiFi Dongle WiFi Dongle
PC (Media Server)
Micro System
PC (Media Server)
PC (Media Server)
ADSL or Cable Modem
Ethernet
802.11 b/g Wireless
Broadband Router
To begin, first ensure that the wireless network (e.g. a wireless router) is ready for connection
and has a connection to the Internet.
Connect the included wireless network adaptor (WiFi Dongle) to the socket marked “WiFi” on the
back of the unit.
You can also connect the unit wirelessly to a computer using a wireless network card.
When the unit is connected in this way, you will only be able to listen to music that is stored on
the computer. The computer must have special software installed. See section marked Media
Server.
Page 8
8
H
SI
LG
N
E
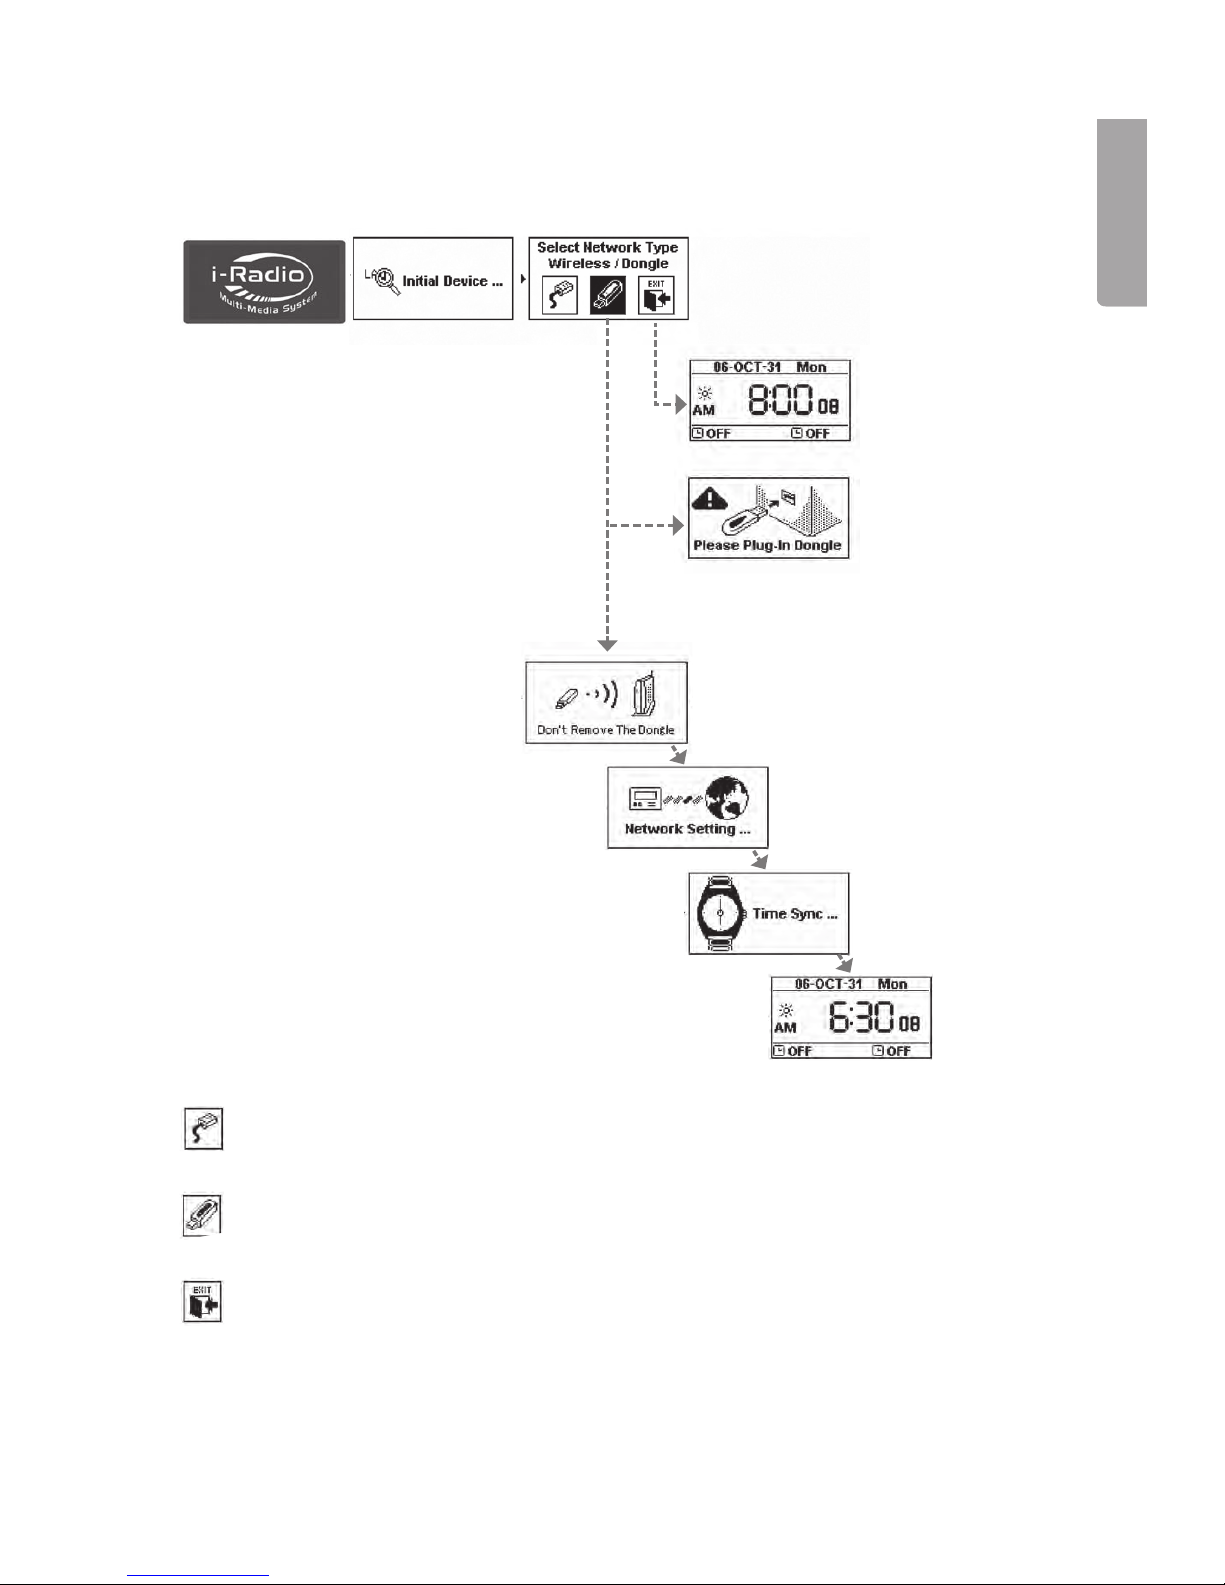
Network Settings – LAN
If no IP number is obtained via Dynamic Host Configuration Protocol
DHCP (DHCP Timeout), the below screen will be displayed. If connection is
successful, the clock display will be shown.
Select LAN to connect to the Internet via a network.
or
Select WLAN to connect to the Internet via a wireless network.
or
Select EXIT to exit from the guide.
Page 9
9
HS
I
LG
N
E
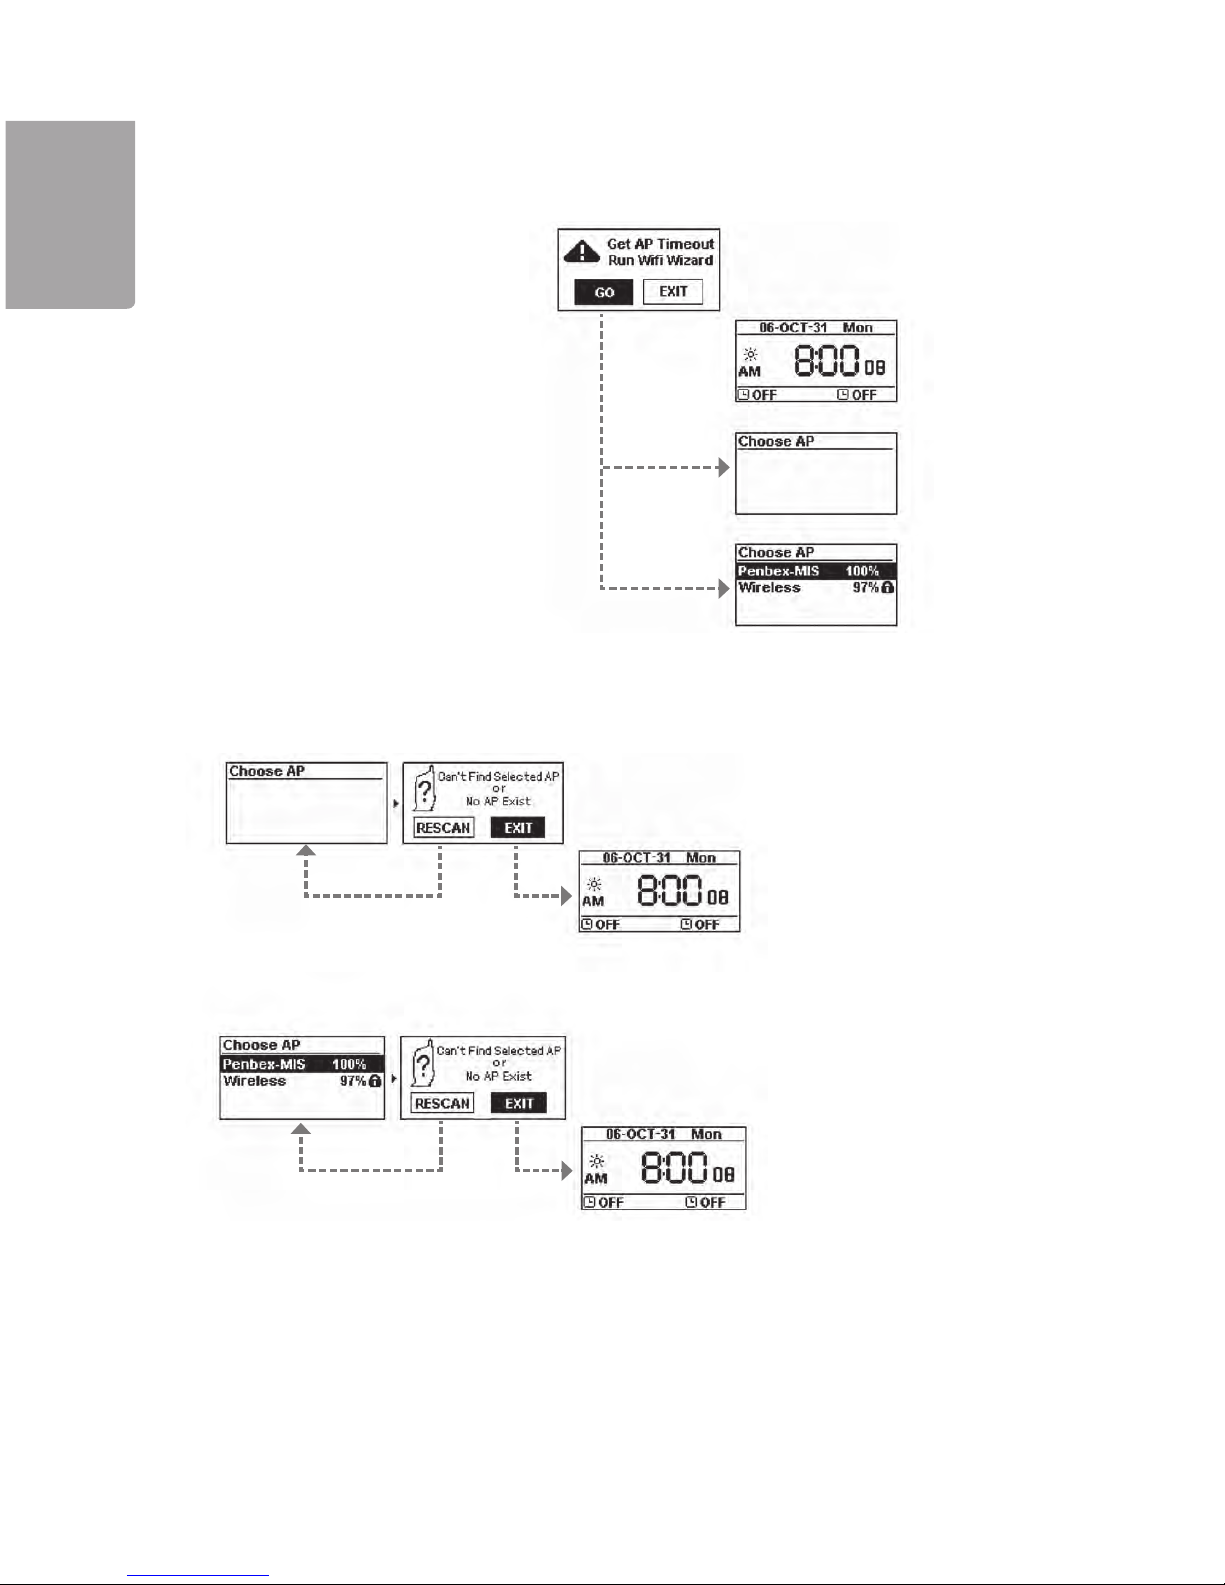
Network Settings – WLAN (With WiFi Dongle)
Select LAN to connect to the Internet via a network.
or
Select WLAN to connect to the Internet via a wireless network.
or
Select EXIT to exit from the guide.
Page 10
10
H
SI
LG
N
E
If no wireless network can be found:
Select GO to start the guide.
(1) Cannot find a wireless network
Select RESCAN to search again or select EXIT to exit the guide
(1) Cannot find the desired wireless network
Select
RESCAN to search again or select EXIT to exit the guide
Page 11
11
HS
I
LG
N
E
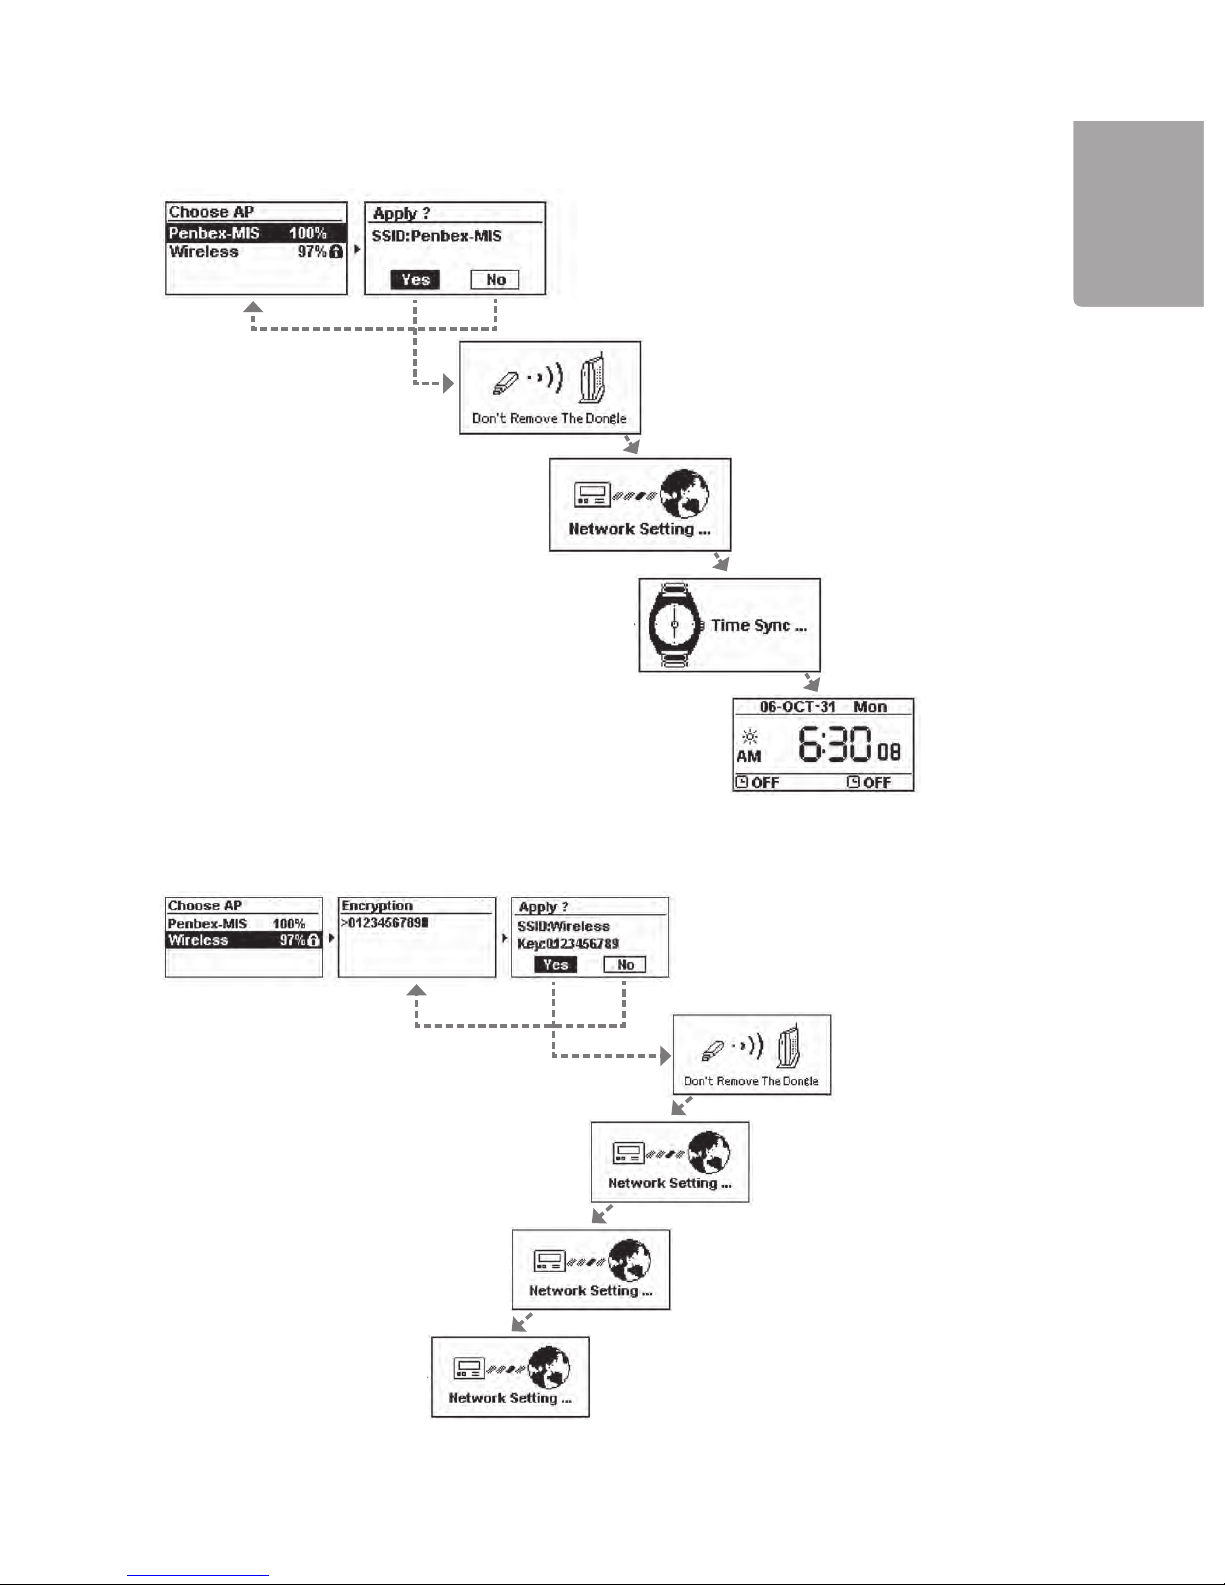
Select an open, unprotected wireless network
Select a protected wireless network which requires a password
Select YES to establish a connection or
NO to select another network.
Enter the network password and then select
YES to connect or NO to select another network.
Page 12
12
H
SI
LG
N
E
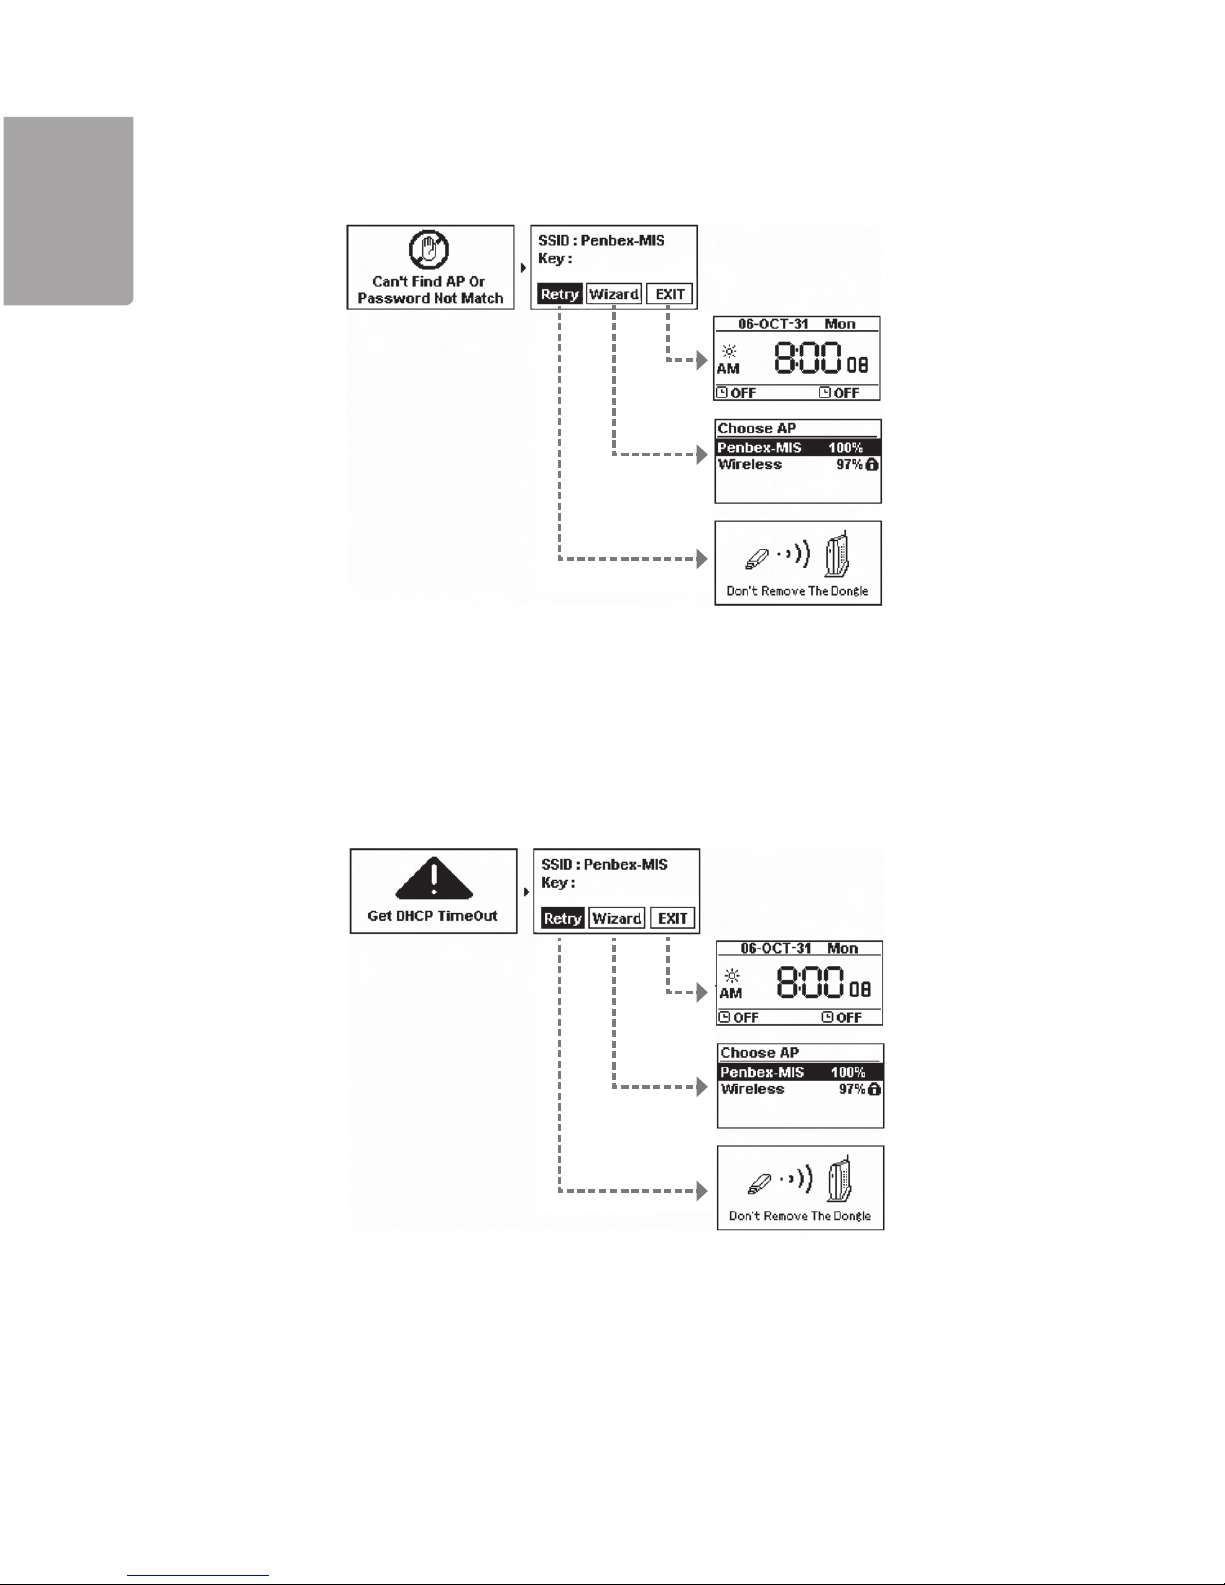
Failed to connect to the wireless network
No IP number is obtained via DHCP (DHCP Timeout)
1. Select RETRY to reconnect
2. or select WIZARD to search for available wireless networks
3. or select EXIT to exit.
1. Select
RETRY to reconnect
2. or select WIZARD to search for available wireless networks
3. or select EXIT to exit.
Page 13
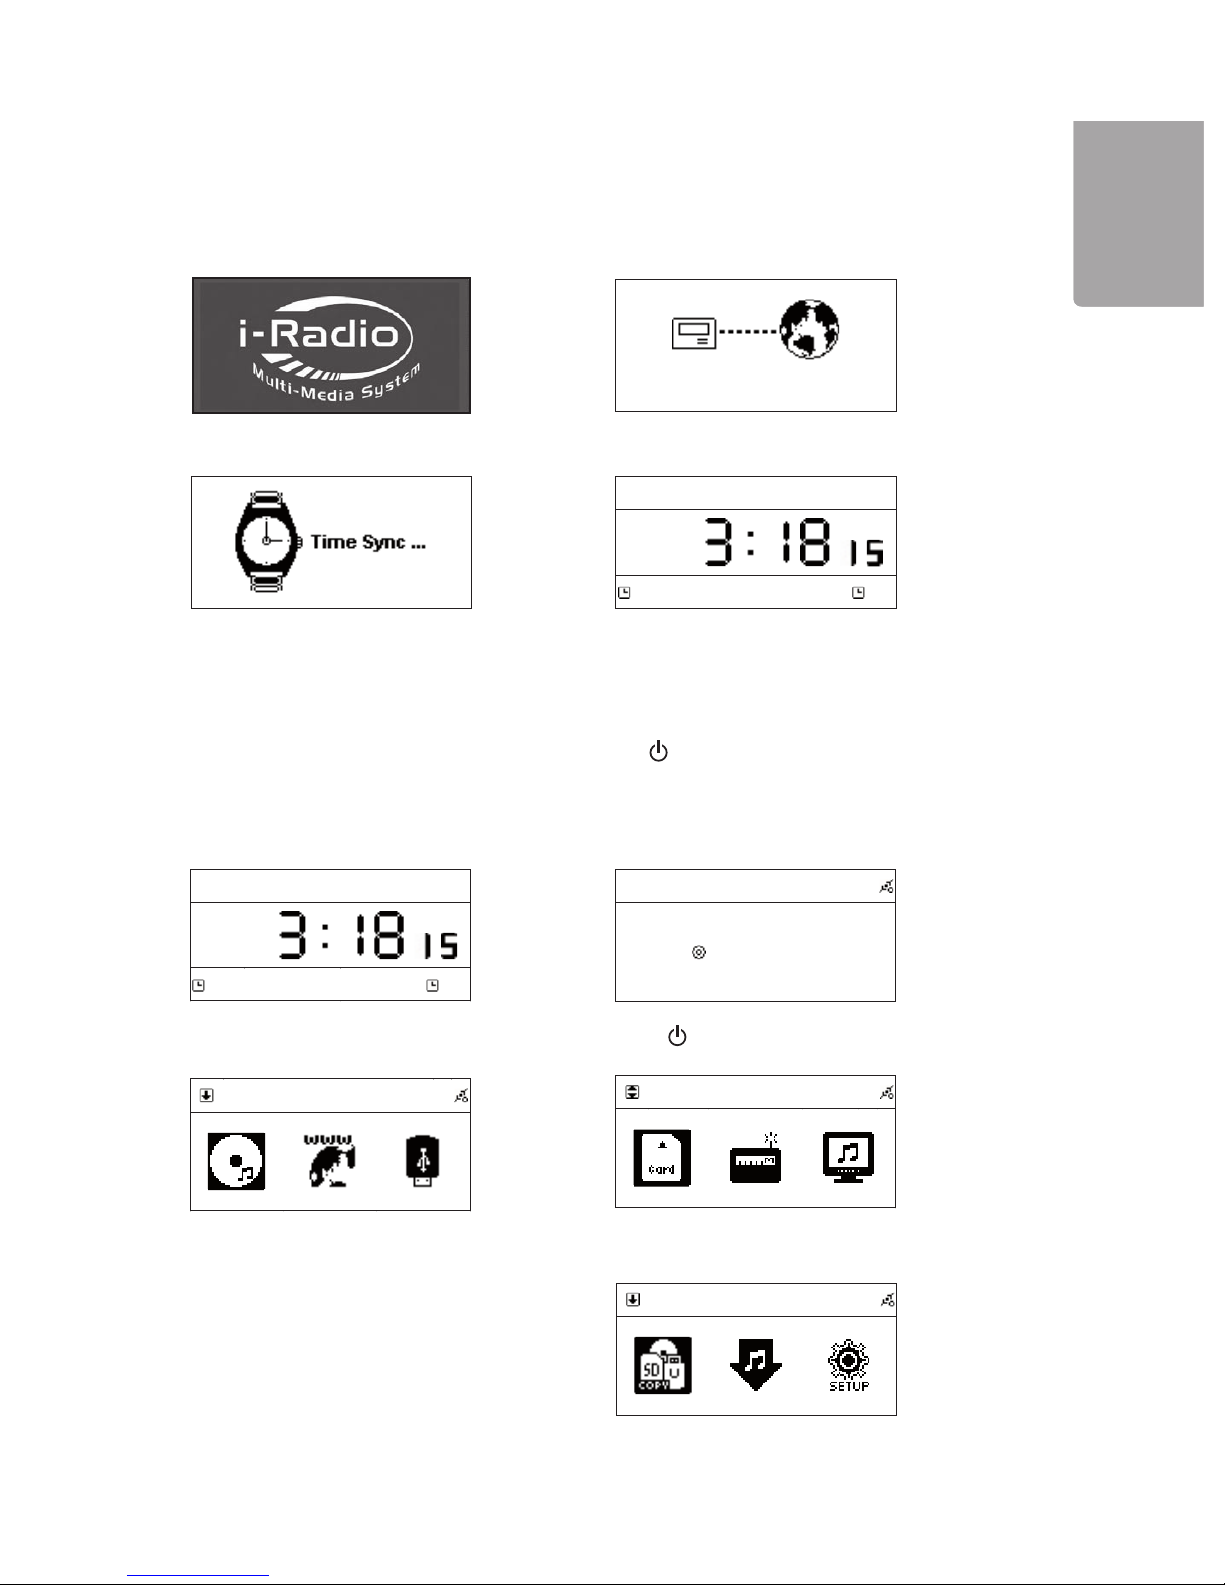
When the unit is in standby mode it is turned ON by pressing (Power) on the unit or STANDBY on the
remote control. You can adjust the brightness of the backlight of the display by pressing DIMMER button on
the remote control.
The display shows the following when the unit is turned on:
13
HS
I
LG
N
E
→
2007
20
072007
20
07----May
MayMay
May----03 Thu.
03 Thu.03 Thu.
03 Thu.
PM
MPMP
PM
Off
OffOff
Off off
ffo ffo
off
→
1
FileMgr
Network Connecting
Network ConnectingNetwork Connecting
Network Connecting
…
2007
20
072007
20
07----May
MayMay
May----03 Thu..
03 Thu..03 Thu..
03 Thu..
PM
MPMP
PM
Off
OffOff
Off off
ffo ffo
off
CD
DCDC
CD
Loading
Loa
dingLoading
Loa
ding
…
CD
DCDC
CD
→
SD/MMC
SD/MMCSD/MMC
SD/MMC
1. The equipment starts up.
2. Searches for a network.
3. The clock synchronizes with a time server.
4. The unit returns to standby position.
2.5 Turn the unit ON and OFF
2.4 Starting the unit for the first time
1. The unit is in standby mode. 2. Press to turn the unit on.
4. Press to display more menu options.
3. The main menu shows.
►►I
5. Press to display the rest of the menu.
►►I
When you turn on the unit for the first time the stereo will try to automatically search for an IP
address.
If the network is successfully connected to the Internet, the unit will also synchronize the time with
the time server.
The following is displayed when the unit is started up for the first time.
Page 14
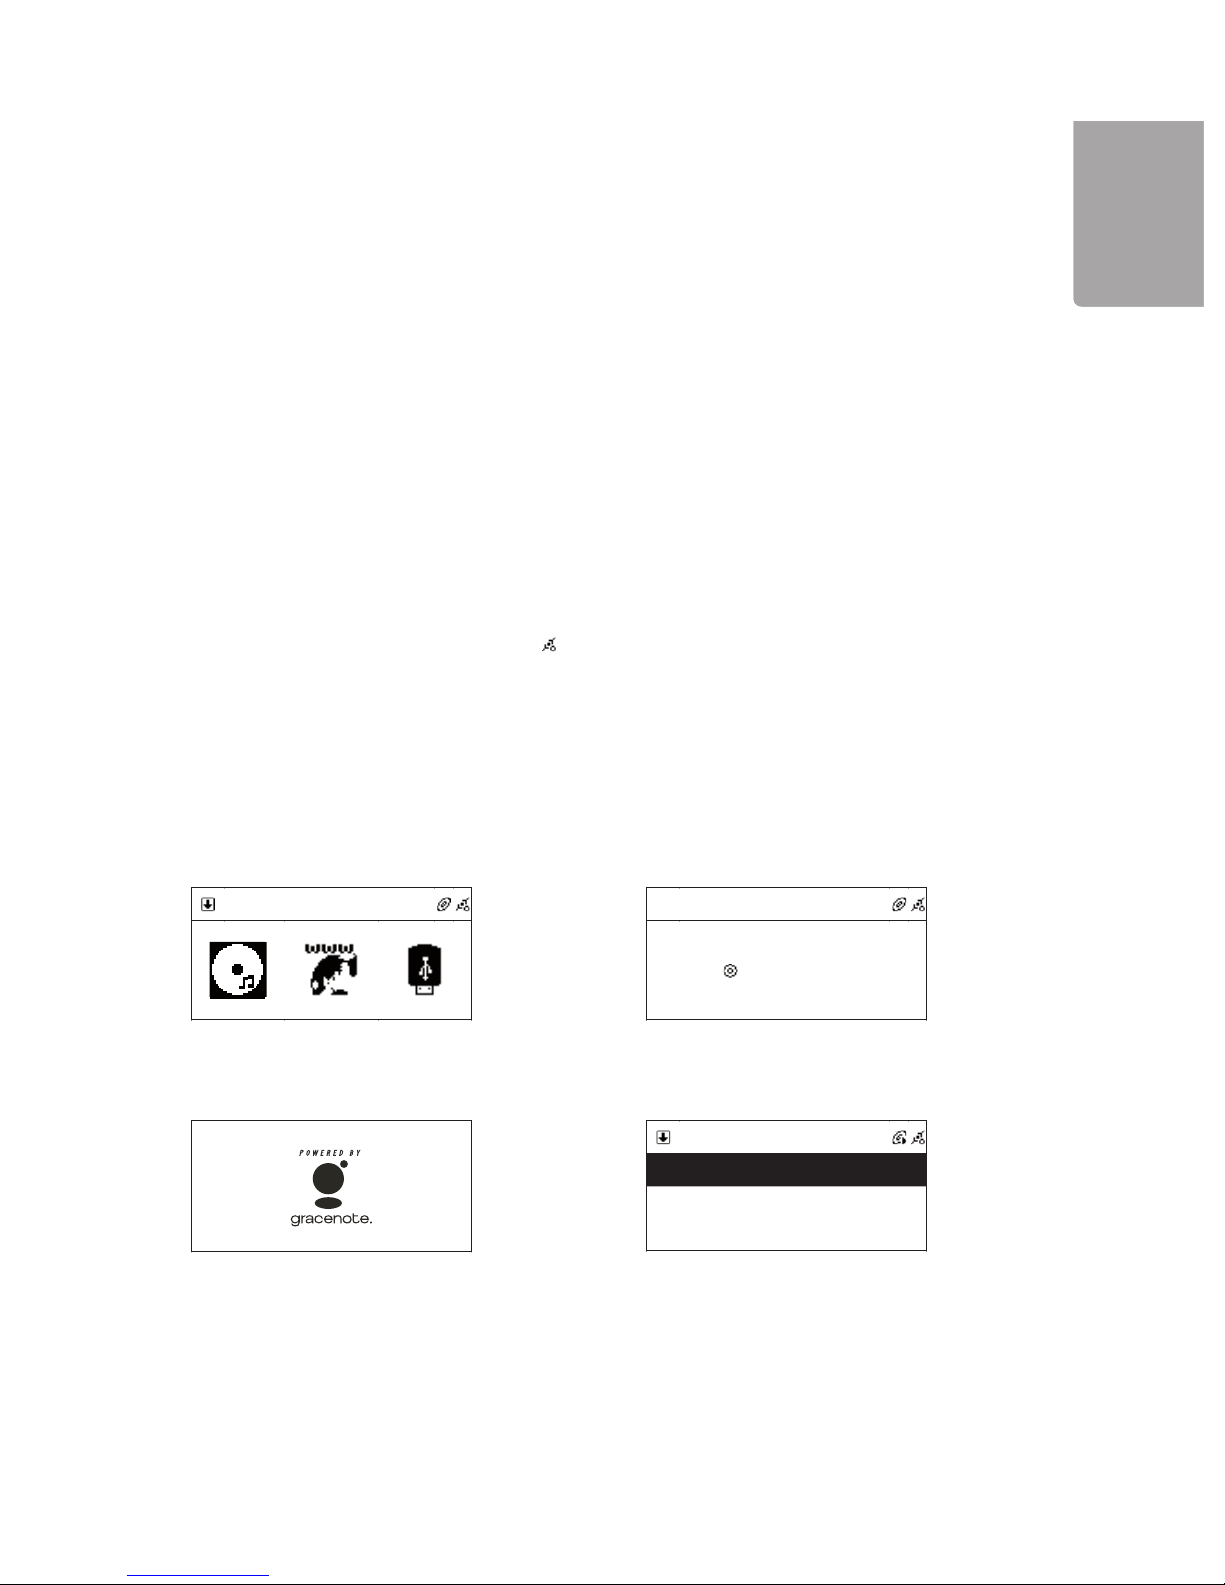
3.1 Playing a CD
The unit can play Audio Discs, CD-R, CD-RW and discs that contain MP3/WMA (Windows Media format) files.
1. Open the CD door by pressing and releasing the corner marked OPEN/CLOSE on the CD door.
2. Place a CD, CD-R, CD-RW or a CD containing MP3 files in the slot and close the door.
3.The display will show “Loading” and the icon “ ” will be displayed.
3.2 Obtaining track information
To obtain track information from the Gracenote Music Recognition Service, the unit needs to be connected to the
Internet and the CD that is being played must exist in the data base.
1. Insert a CD according to the above instructions.
14
H
S
I
LG
N
E
CD
→→→
CD
Loading
…
→
CD
? All
?
Track 01
?
Track 02
2.6 Using the menus
■
I◄◄ ►►I
↑ ↓
3. Using the CD player
The instructions in the operating manual describe the buttons on the main unit and in some cases refer to the
buttons on the remote control.
You can at any time return to the previous menu selection by pressing the stop button .
1.Press MENU once to enter the main menu.
2.Use and to select the desired function: CD, Internet radio, USB, SD/MMC, FM radio, UPNP, File
Processing, External input or Setup.
3.Navigate upwards or downwards through the menus using the buttons and .
4.When you have come to the selected menu choice press,
SELECT/OK to confirm.
2. When the start menu is displayed choose menu
selection CD and then press SELECT/OK.
4. The unit automatically connects to the
Gracenote Media Database and tries to
pick-up track information.
5. At first, the track information may not be
updated, and will display as above.
3. The CD reads the disc.
Page 15
15
H
S
ILGN
E
CD
? All
?
Can’t Stop Loving You
?
Do You Remember
CD
DCDC
CD
?
?
Can’t Stop Loving You
?
Do You Remember
? All
CD
? All
?
Can’t Stop Loving You
?
Do You Remember
CD
?
A
ll
♫♫
Phil Collins
?
Do You Remember
CD
? A
llll
?
Unknow Track 01
?
Unknow Track 02
CD
?
All
Phil Collins
?
Do You Remember
Play the entire CD
3.4 Playing a disc containing MP3 or WMA files
3.3 Playing a CD
Play the entire CD
►II
Playing marked tracks
►II
Playing marked tracks
►II
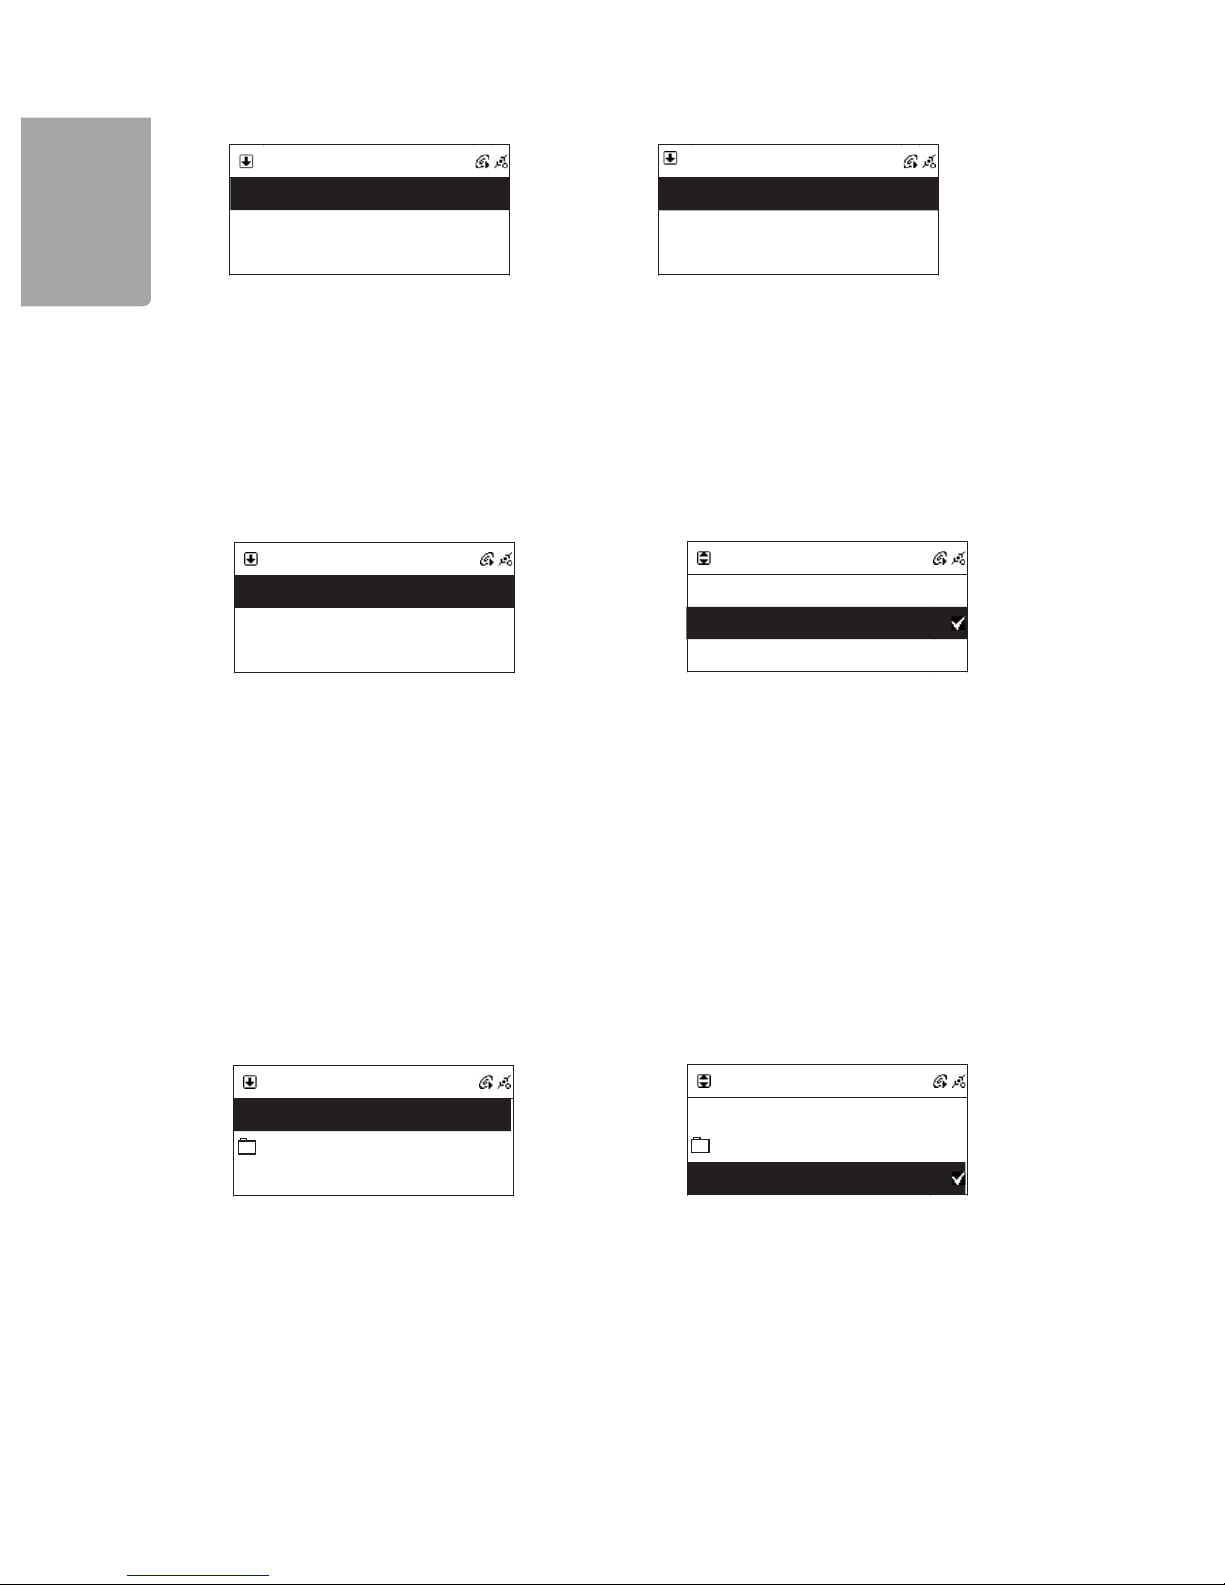
6.Once the track information has been collected,
the display will show the name of the track.
7. If there is no information, the track will instead
show Unknown Track 01, and so on.
1.To play all the tracks, use the arrow buttons
to select All.
2.Then press or SELECT/OK to start the
playback.
1.To play all the tracks, use the arrow buttons
to select All.
2.Then press or SELECT/OK to start the
playback.
1.Use the arrow to select the track you want to
play. Then press MEMORY to mark the
selected track.
2.Repeat the above to mark the desired
tracks. The symbol √ marks the chosen
track.
3.Then press or SELECT/OK to start the
playback of marked tracks.
►II
1.Use the arrow to select the track you want to
play. Then press MEMORY to mark the
selected track.
2.Repeat the above to mark the desired
tracks. The symbol √ marks the chosen
track.
3.Then press or SELECT/OK to start the
playback of marked tracks.
Page 16
16
H
S
I
LG
N
E
?
001/012
Can’t Stop Loving You
Phil Collins
*** Love So
ngs: A Compilation
02:30 04:30
►II
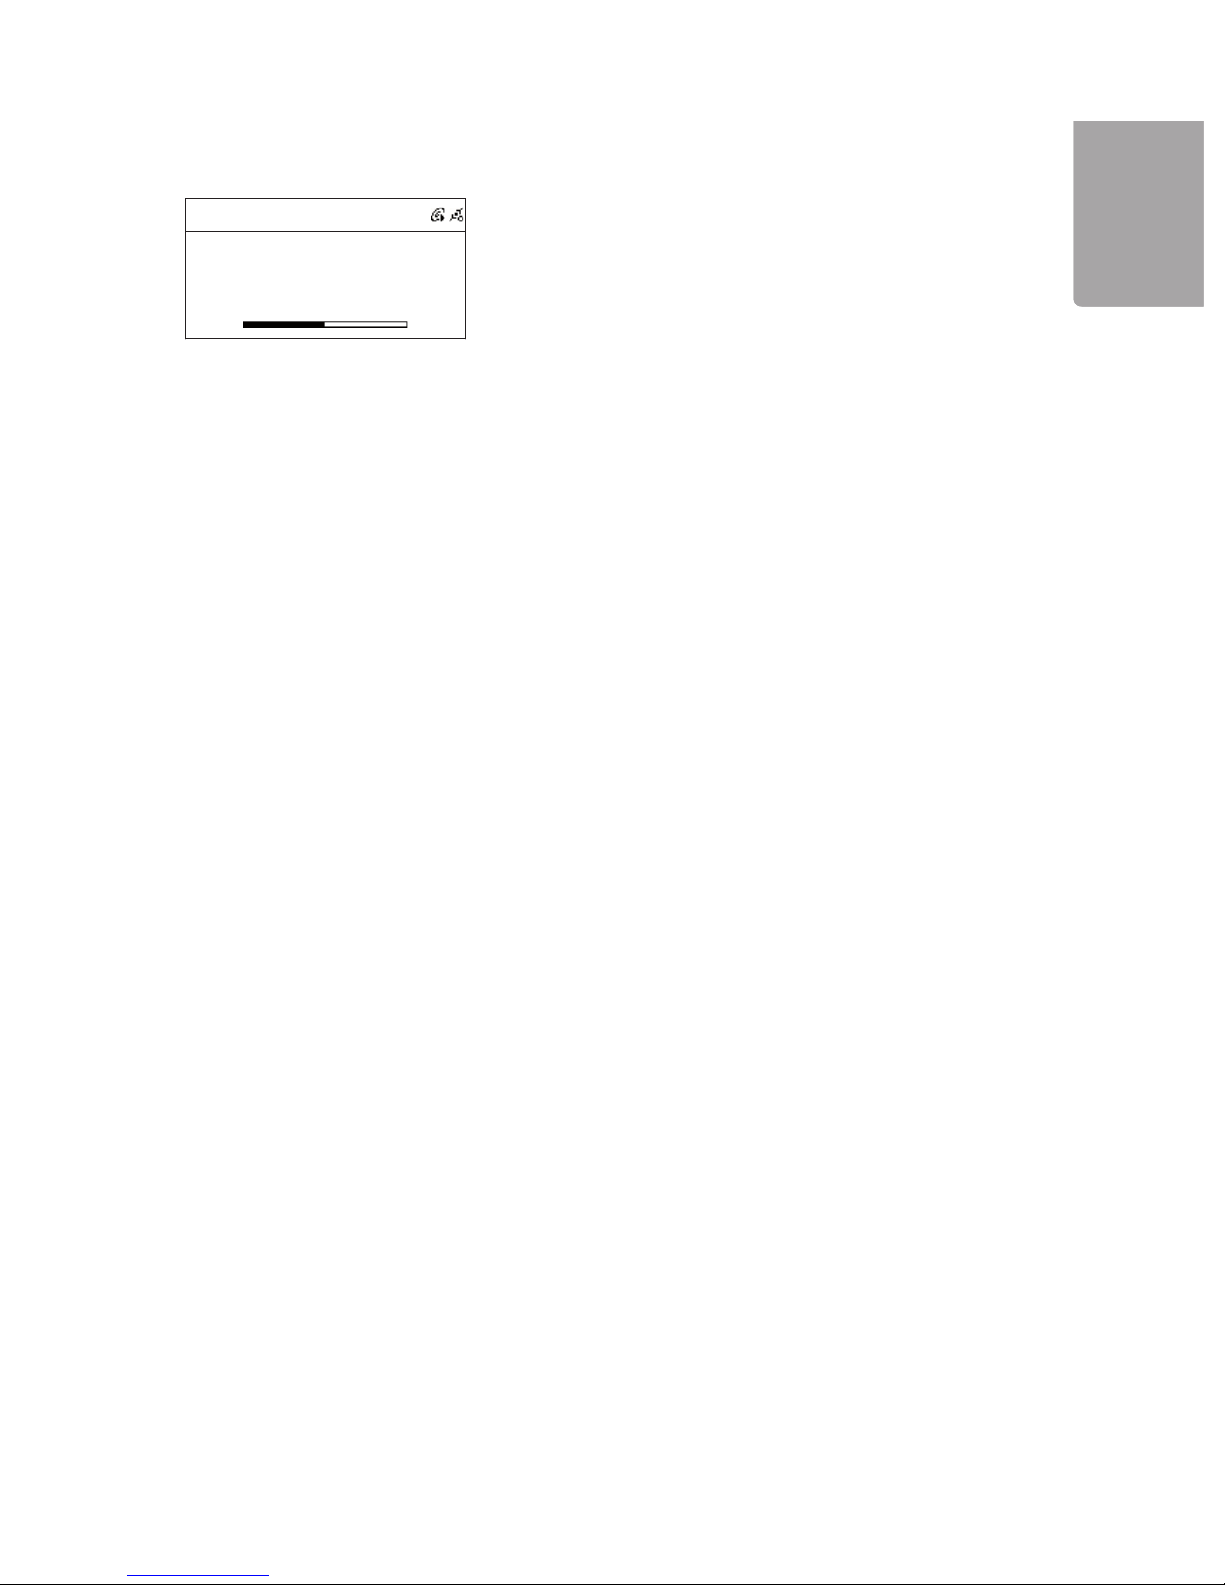
1.Use the arrows to select the desired folder and then press SELECT/OK
2.Use the arrow to select the tract you wish to play. Then press MEMORY to mark the selected track.
3.Repeat the above to mark several tracks. The symbol √ marks the chosen track.
4.Then press or SELECT/OK to start the playback of marked tracks.
3.5 Record from a CD to a USB memory or SD/MMC memory card
The track from a CD can be converted and saved as a MP3 file on a memory card or USB memory.
The unit automatically shares the tracks from the CD.
Note! Recording does not function from copy protected CDs.
1.Insert a CD according to the above. When the start menu is displayed, choose menu selection CD and
then press SELECT/OK
2.Select All to record all tracks from the CD or mark the desired track with the MEMORY button.
3.Insert a USB memory or a SD/MMC memory card in the connection on the front of the unit.
4.Press REC to start the recording. If both the memory card and USB memory are connected you will be
asked to choose which location you want the files to be saved.
3.6 Playing options
The following playing options will work during the playback of CD or MP3 files on a CD or USB
memory/memory card. The buttons for the playing options below are found on the remote
control.
3.1.1 Amp Base amplification
Press X-BASS button on the remote control to activate strengthened bass amplification.
3.1.2 Equalizer (Preset sound schedule)
Press repeatedly P-EQ to select between one of the following sound schedule: Normal → Classic → Jazz
→ Pop → Rock and Bass + Normal → Bass + Classic → Bass + Jazz → Bass + Pop → Bass + Rock
The display will show the chosen sound schedule.
3.1.3 REPEAT (repeated playing)
Press REPEAT to activate repeated playing. Choose between REPEAT ONE (repeat a track) or
REPEAT ALL (repeat all tracks).
3.1.4 RANDOM (random playing)
Press RANDOM to activate random playing.
3.1.5 A-B Loop (repeated playing between two times)
During playback, press the A-B button once to mark the location in the track you would like to begin a
section, and press it again to mark the end. The indication AB will show in the upper part of the display.
The playback will automatically begin between the two marked positions.
Play tracks from a specific folder
Page 17
17
H
S
ILGN
E
Internet Radio
Internet Radio
Favorite >>>>
World Station >>>>
SHOUTCast >>>>
Internet Radio
Africa >>>>
Americas >>>>
Asia >>>>
South Korea >>>>
SriLanka >>>>
Taiwan >>>>
Internet Radio
Internet Radio
BCC News Radio
BCC Classical
Bcc Pop
Internet Radio
Internet Radio
BCC News Radio
<BCC News>
24 Kbps
4. Using the Internet Radio
4.1 Introduction
4.2 World Station
Internet radio can receive radio stations that are transmitted over the Internet. Most large radio stations in
the world offer their program to listeners through the Internet.
To be able to listen to the Internet radio, the unit needs to be connected to the Internet through a router to
a broadband connection (e.g. ADSL or cable modem).
The following format for Internet radio can be received:
World Station
The unit automatically sorts through the radio stations by country. This makes it easier to find the desired
radio station for a particular country.
Shoutcast http://www.shoutcast.com
The unit automatically sorts through the radio stations by category.
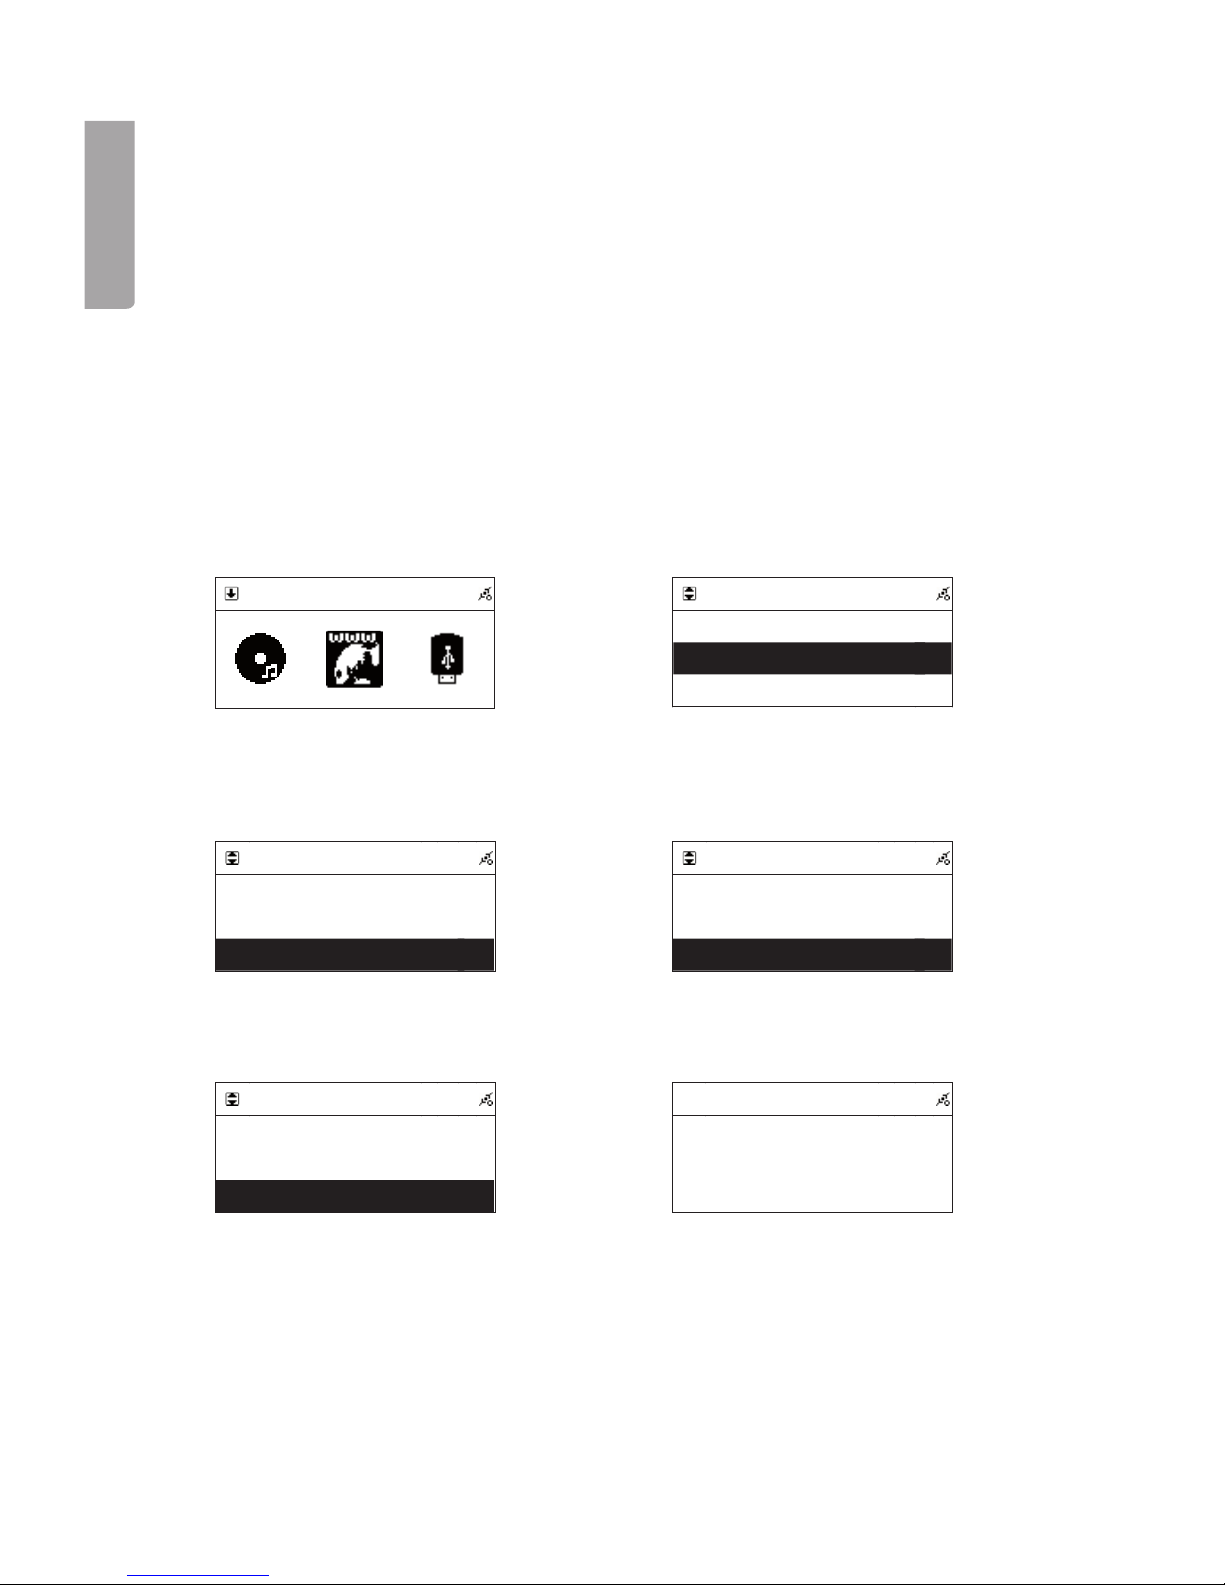
1. In the main menu use the ↑ and ↓ buttons
to select Internet radio. Then press
SELECT/OK to confirm.
3. Choose the desired world location and
press SELECT/OK to confirm.
3. Choose the desired radio station and
press
SELECT/OK to confirm.
4. Choose the desired country and
press
SELECT/OK to confirm.
6. When the unit has connected to the radio
station and buffered the music to 100%, the
playing begins.
2. To select a station by country, choose
World Station then press SELECT/OK
to confirm.
Page 18
18
H
S
I
LG
N
E
World Station
BCC News Radio
BCC Classical
BCC Pop
Fav
orite
BCC News Radio
World Station
BCC News Radio
BCC Classical
BCC Pop
Favorite
BCC News Radio
Delete Favorite
Delete this station?
Favorite
4.3 SHOUTcast
4.4 Add or remove stations in the favourites list
In the favourite list (Favourites) 20 radio stations can be stored in memory.
To select a station by category:
1. In the main menu use the
↑ and ↓ buttons to select Internet Radio, then press SELECT/OK to confirm.
2. Choose SHOUTcast and press
SELECT/OK to confirm.
3. Choose the desired category and press
SELECT/OK to confirm.
4. Choose the desired radio station and press
SELECT/OK to confirm and connect to the radio station.
5. When the unit has connected to the radio station and buffered the music to 100%, the playing begins.
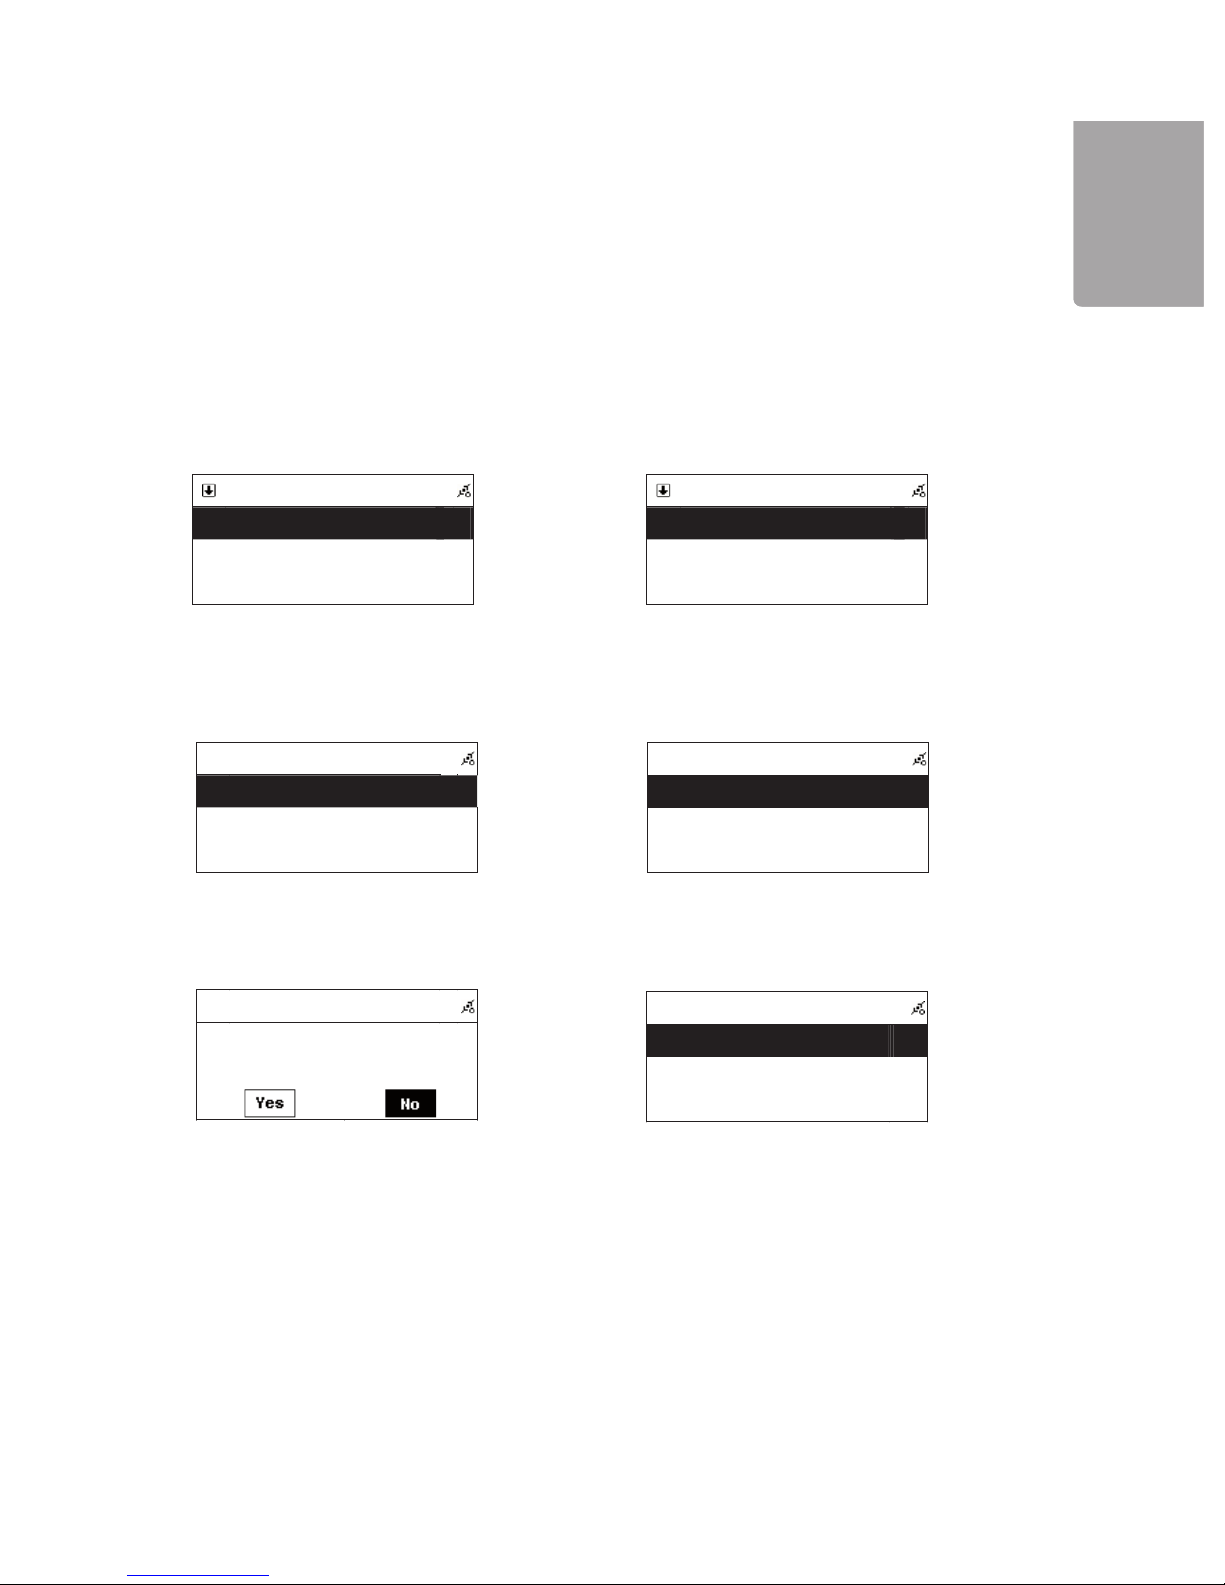
1. Mark the radio station that you want to store
in the favourite list.
3. To delete a favourite, mark the radio station
in the favourite list.
5. Confirm the deletion of the station by marking
YES and then press the SELECT/OK button
to confirm.
4. Press and hold
SELECT/OK for 2 seconds.
6. Press ■ to go back to the menu.
2. Press
MEMORY once. The marked station
blinks twice and the station has now been
added to the list.
Page 19
19
H
S
ILGN
E
i.Radio
Whispering
<Phil Collins> <Can’t Stop Lo
64 Kbps
i.Radio
Whispering
<Phil Collins> <Ca
64 Kbps
Save as
USB
SD/MMC
USB
?
All
Phil Collins
?
Do You Remember
USB
?
All
Phil Collins
Phil Collins
?
Do You Remember
?
001/012
Can t Stop Loving You
Phil Collins
*** Love So
ngs: A Compilation
02
:
:
30 04 30
4.5 Record from an Internet radio to a USB memory or SD/MMC memory card
Play all tracks
Playing marked tracks
Note! Recording from the Internet only works with radio stations that transmit through SHOUTcast.
The instructions assume that you have first started the playing of a SHOUTcast Internet station.
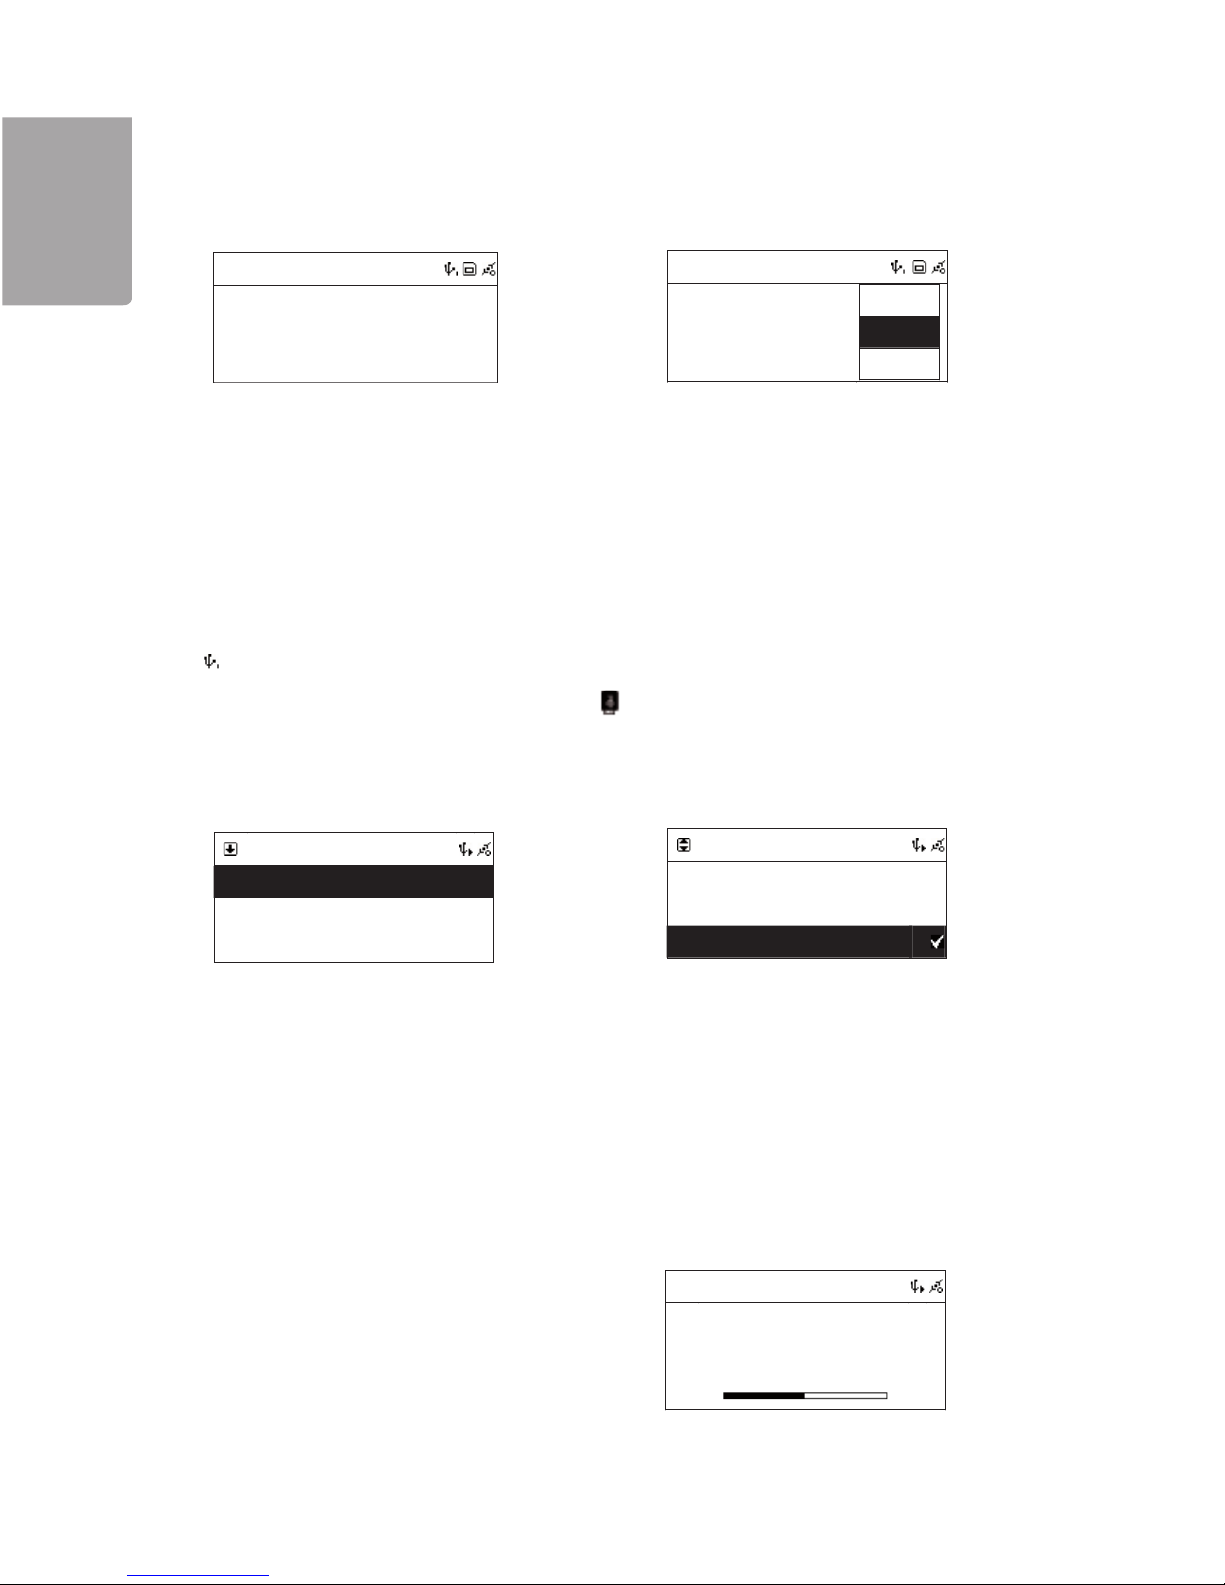
1.Insert a USB memory or SD/MMC
memory card in the connection on the front
of the unit.
3.To play all the tracks use the arrow
buttons to select All.
4.Then press ►II or SELECT/OK to start
playback.
5.Use the arrow to select the track you
wish to play. Then press MEMORY to mark
the selected track.
6.Repeat the above to select the desired
tracks. The symbol √ marks the chosen
track.
7.Then press ►II or SELECT/OK to start
the playback of selected tracks.
Play tracks from a specific folder
8.Use the arrows to select the desired
folder and then press SELECT/OK
9.Use the arrows to select the track you
wish to play. Then press MEMORY to mark
the selected track.
10.Repeat the above to mark several
tracks. The symbol √ marks the chosen
track. Then press ►II or SELECT/OK to
start the playback of marked tracks.
2.Press REC to start the recording. If both
the memory card and USB memory are
connected you will be asked to choose the
location you want to save the recording.
3.Press ■ to end the recording.
5. Playing music from USB memory
5.1 To play music from USB memory
1. Insert a USB memory device containing MP3 or WMA files into the USB port on the front of the unit.
will show on the display when the USB memory is connected.
2. Press MENU to enter the main menu. Select USB and confirm with SELECT/OK.
Page 20
20
H
S
ILGN
E
SD/MMC
?
All
Phil Collins
?
Do You Remember
SD/MMC
SD/MMCSD/MMC
SD/MMC
?
All
Phil Collins
?
Do You Remember
?
001/012
Can’t Stop Loving You
Phil Collins
02:30 04:30
▲
Card
Play tracks from a specific folder
8. Use the arrows to select the desired folder
and then press SELECT/OK.
9. Use the arrows to select the track you wish to
play. Then press MEMORY to mark the
selected track.
10. Repeat the above to mark several tracks.
The symbol √ marks the chosen track. Then
press ►II or SELECT/OK to start the
playback of marked tracks.
3. To play all the tracks use the arrow buttons to
select All.
4. Then press ►II or SELECT/OK to start the
playback.
5. Use the arrow to select the track you wish to play.
Then press MEMORY to mark the selected track.
6. Repeat the above to mark several tracks. The
symbol √ marks the chosen track.
7. Then press ►II or SELECT/OK to start the
playback of marked tracks.
6. Play music from a Memory card
6.1 Play music from a SD/MMC memory card
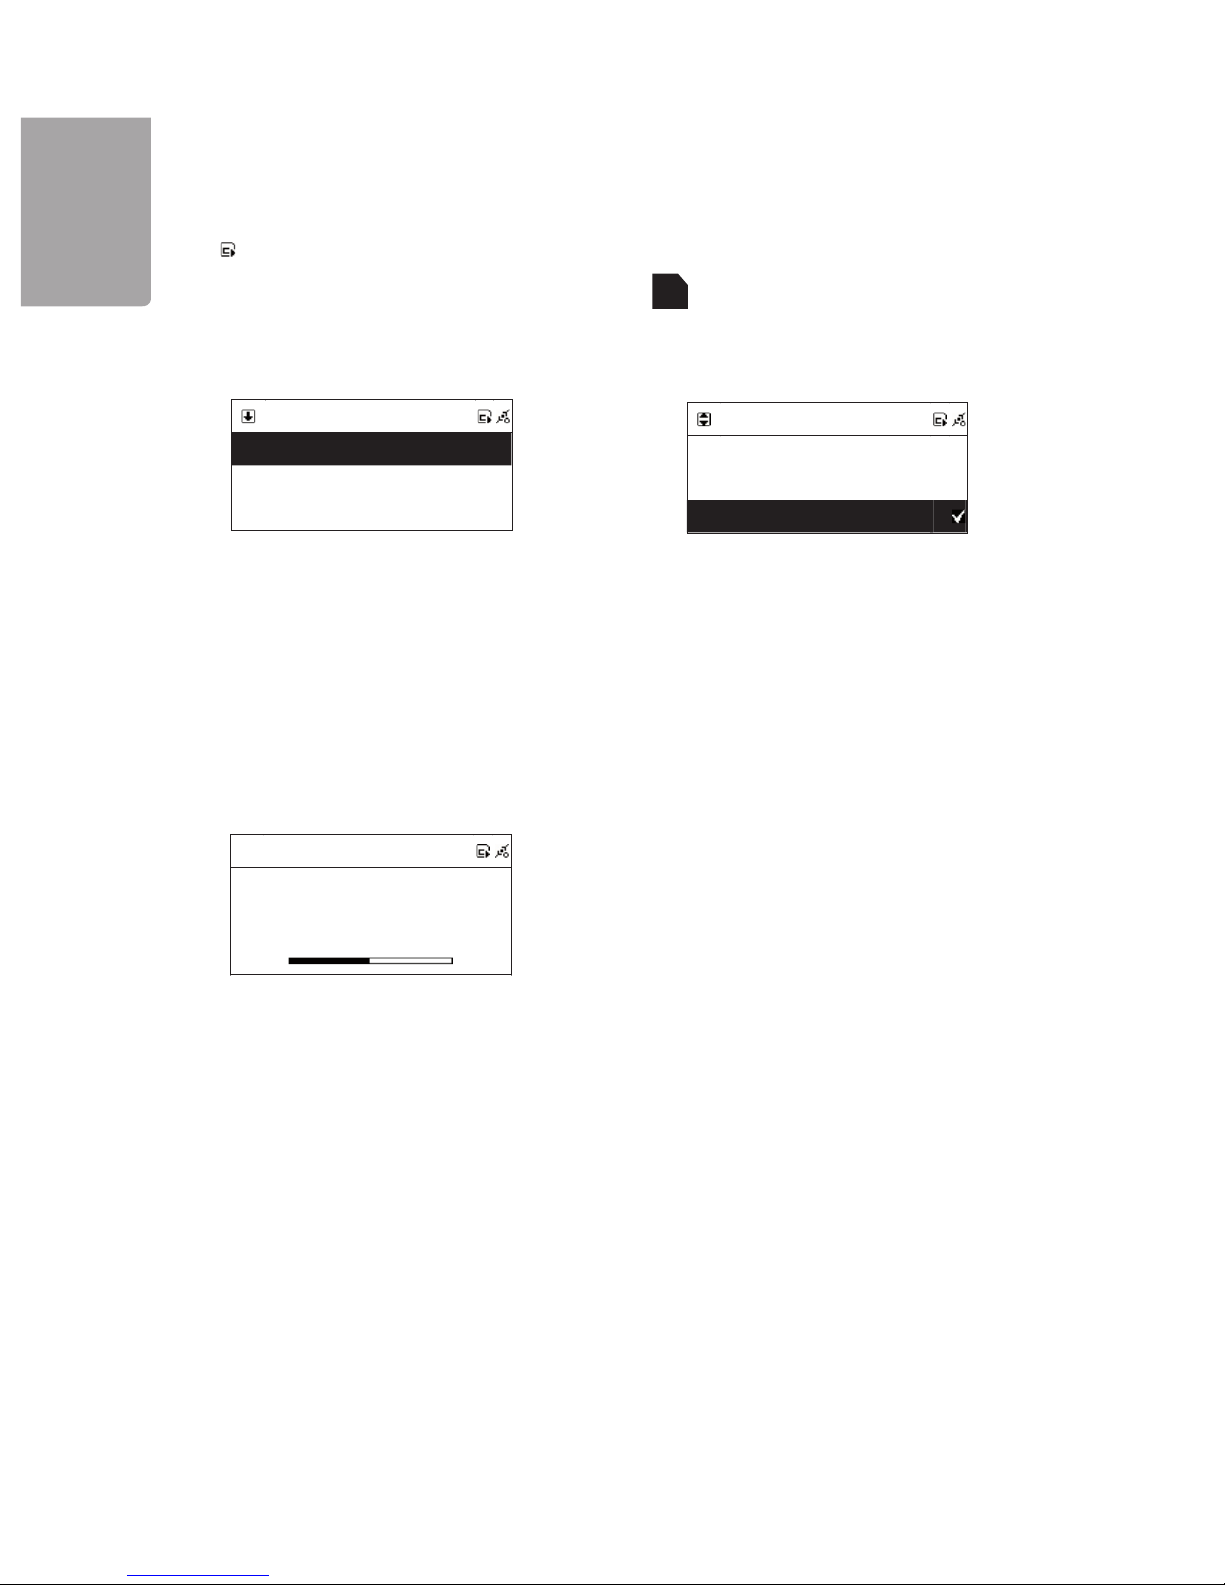
1. Insert a SD/MMC memory card containing MP3 or WMA files into the memory card slot on the front of the unit.
will show on the display when the memory card is connected.
2. Press MENU to enter the main menu. Select SD/MMC Card and confirm with SELECT/OK.
Play all tracks Play marked tracks
Page 21
21
H
S
I
LG
N
E
FM
F
FM
90.10 MHz
90.10 MHz
FM
90.10 MHz
Pre---Scan
FM
87.50 MHz
Pre---Scanning
…
1
FM
8
99.30 MHz
Pre---Scanning
…
1
FM
92.10 MHz
Pre---Scanning
…
→
→
→
7.2 Quick search radio channel
To search for a radio channel press and hold I◄◄ or ►►I until the words AUTO SEARCH
is
shown on the display.
When a radio channel has been found, the search stops and AUTO SEARCH disappears from
the display. To continue searching hold I◄◄ or ►►I to quickly search again.
7.3 Automatic search and storing radio channels
1. Press and hold
SELECT/OK until the message
Pre-Scan is shown on the display.
3. Any radio stations found are automatically
stored in the channel list.
2. The search begins when the SELECT/OK
button is released. The message Pre-
Scanning will show in the display.
4. The search continues until the entire frequency
band has been searched through.
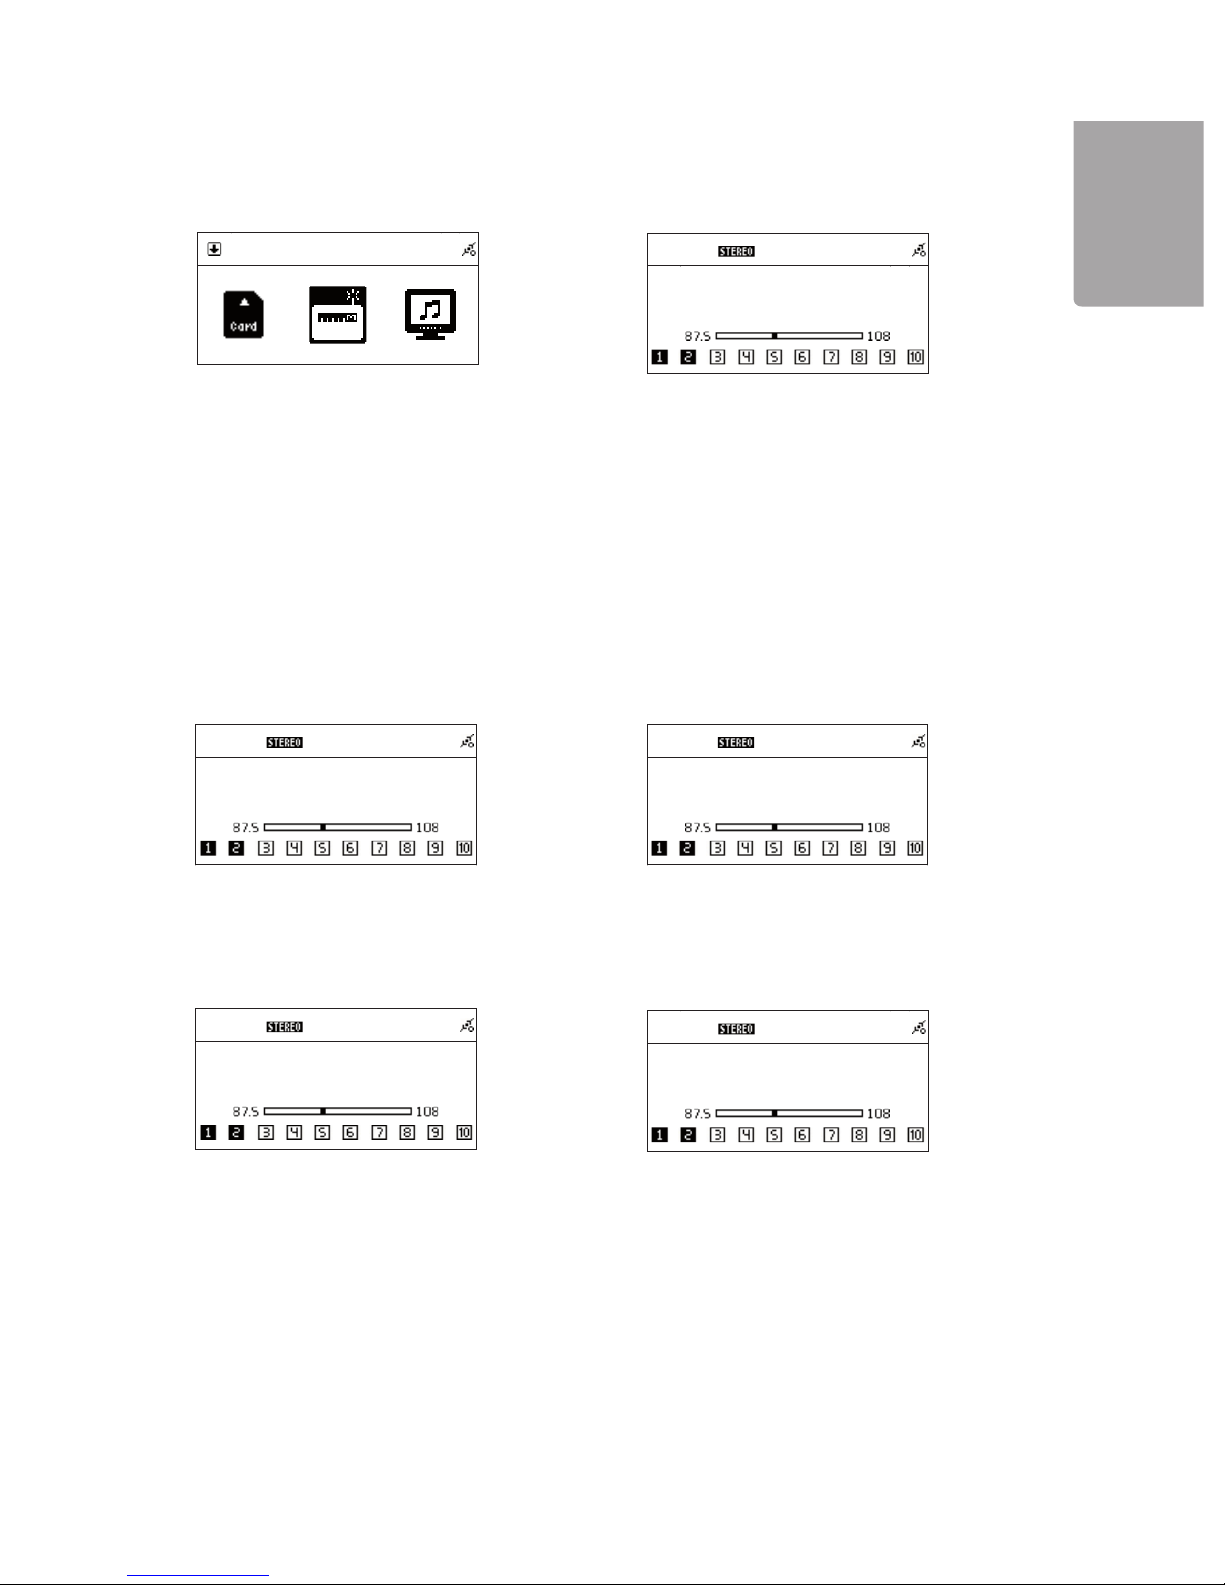
1. Press
MENU to enter the main menu. Select
FM and confirm with SELECT/OK.
2. Press I◄◄ or ►►I to adjust the frequency
upwards or downwards.
7. Using FM radio
7.1 Listen to FM radio
Page 22
22
H
S
ILGN
E
1
FM
108.00 MHz
Pre---Scanning Completed
1
FM
90.10 MHz
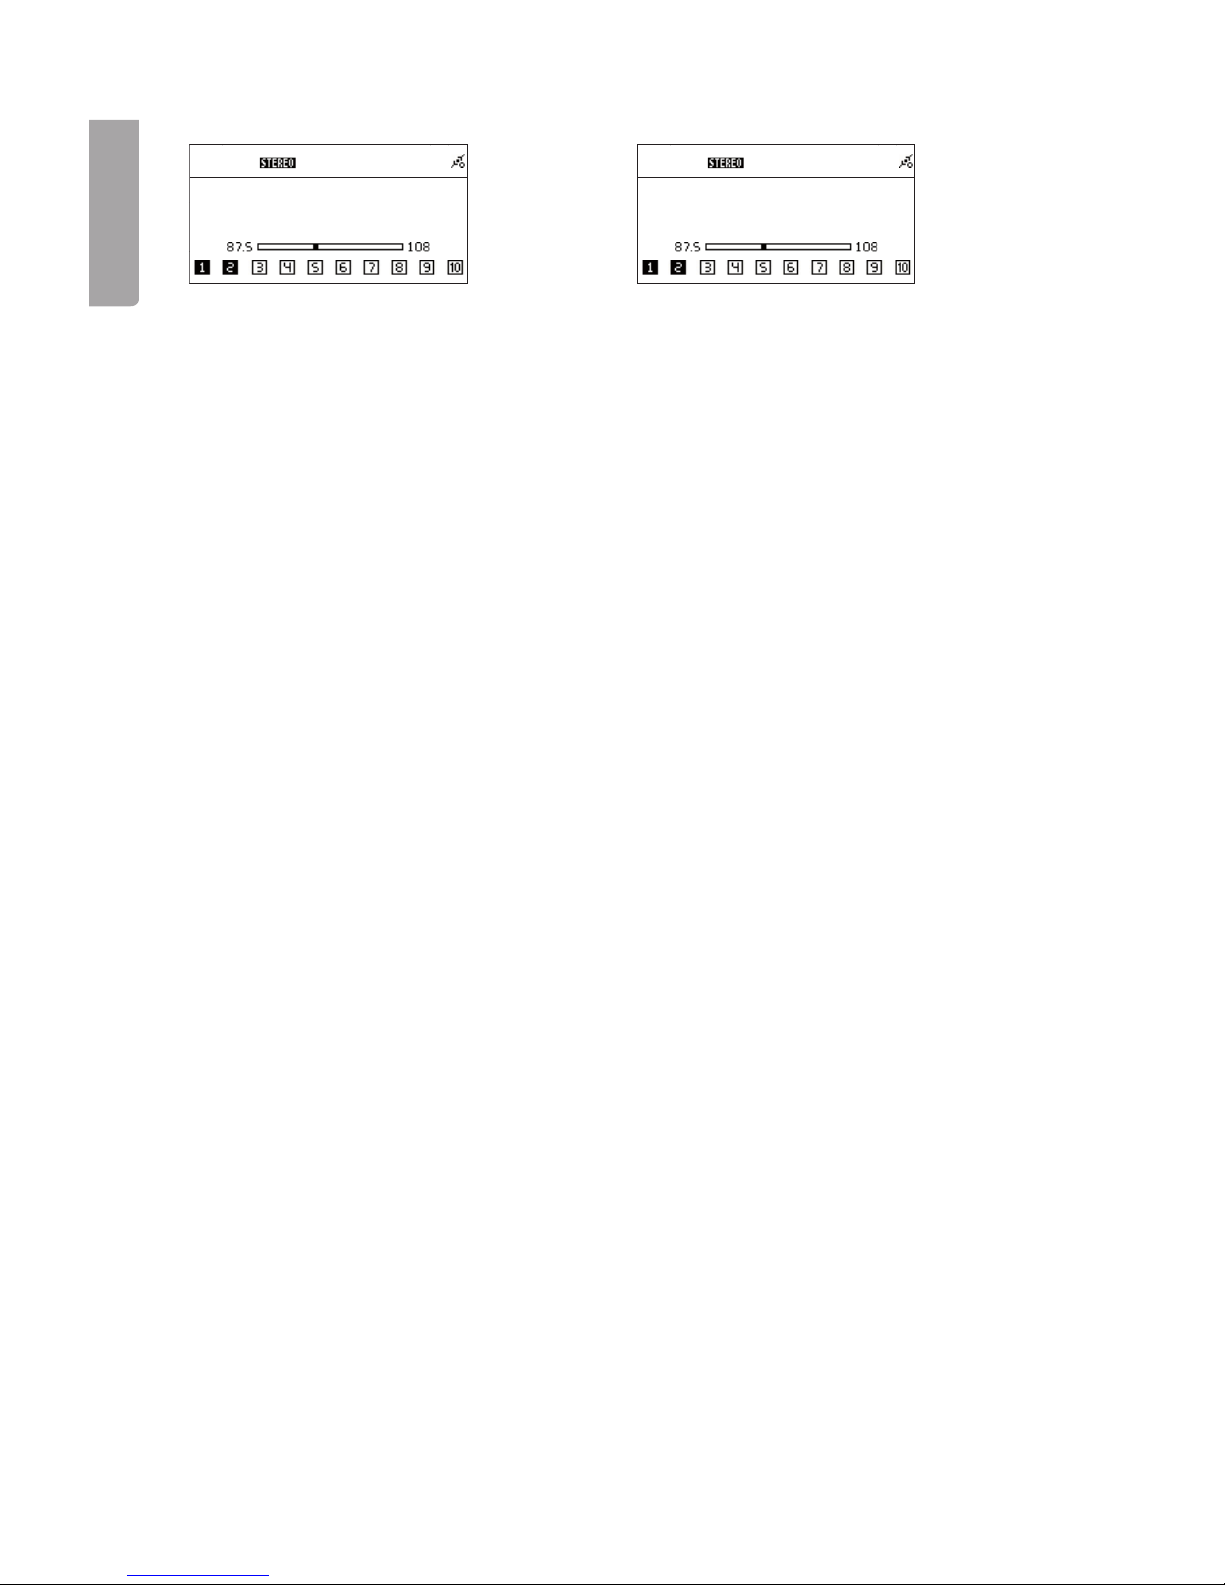
7.4 Store a radio channel in the channel list
1. Select the desired radio channel.
2. Press MEMORY once. CH1 (memory location 1) will blink on the display.
3. Press I◄◄ or ►►I to select the memory location you want to store the channel in.
4. Press SELECT/OK to store the radio channel in the list.
7.5 Listen to a stored radio channel
1. Select radio position.
2. Press ↑ or ↓ to select the stored radio channel. The selected channel will show on the display.
7.6 Record from a FM radio to a USB memory or SD/MMC memory card
1. Select the desired radio channel.
2. Insert a USB memory or SD/MMC memory card in the connection on the front of the unit and then press
REC once to start the recording.
3. If both the memory card and USB memory are connected you will be asked to choose the location where you
want save the recording.
4. Press ■ to end the recording.
5. When the search is completed the message
Pre-Scanning Completed will show on the display.
6. Press ►II to listen to the stored radio channels.
Select any saved radio channels using the ↑ and ↓
buttons.
Page 23
23
H
S
I
LG
N
E
Broadband Router
Micro System
PC (Media Server)
ADSL or Cable Modem
Ethernet
Ethernet
PC (Media Server)
PC (Media Server)
Micro System
Ethernet
80? .11 b/g Wireless
Broadband Router
ADSL or Cable Modem
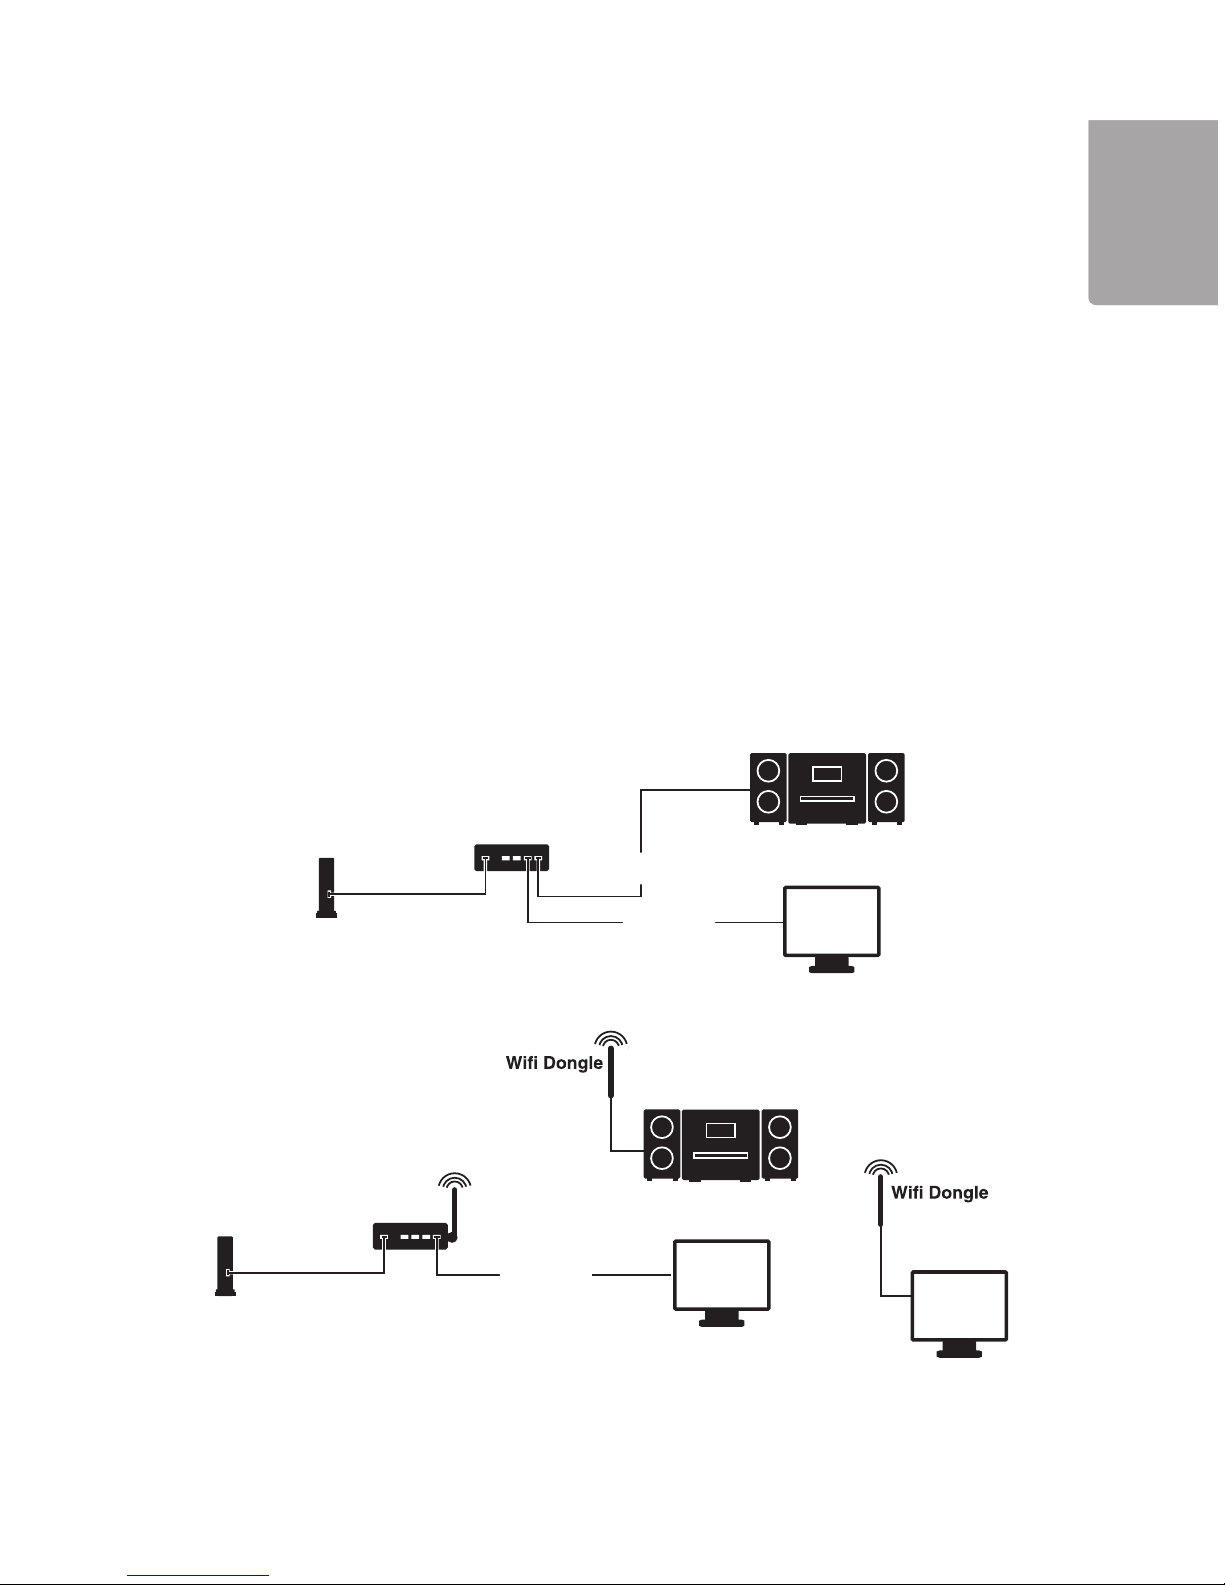
8. Listen to music through a media server
8.1 Compatible software (Media Server)
With a Media Server software installed in your computer, you can listen to music that is stored in your
computer on your micro system. The music is transferred through the network to the micro system.
Examples of software which must be installed in the computer:
- Windows Media Player 11 or later (demands Windows XP with SP2)
- Media Tomb (for Linux) http://mediatomb.cc/
8.2 Prepare the computer and network for UPnP (Universal Plug and Play)
UPnP is a communication protocol collection. One unit can be connected to your network and will
automatically obtain an IP address, notify its qualities and identify other connected units.
Prepare the computer:
1. Install the desired software on the computer, e.g. Windows Media Player 11 (or later).
2. Make sure that you have de-activated the firewall on the computer (even Windows built-in firewall) or that
you have configured it to allow network traffic for the media server you have installed. Otherwise there is a
risk that the micro system will not be able to find the media server on the network.
3. If the micro system connects to the Internet through a proxy server it must be activated.
4. Follow the software manufacturer’s instructions on how to configure the programme to transfer the
played music through the network. For example, Media sharing in Windows Media Player 11.
5. Connect the micro system to a network according to one of the below options.
Note: For further detailed information on network settings and media servers, please visit www.orbyxelectronics.com.
Page 24
24
H
S
ILGN
E
AUX AUX
A U X
8.3 Playing music over the network
1. In the main menu select the option UPNP and press SELECT/OK to connect to the media server.
2. When the server is found, choose Browse to select media server (if there are several servers on the
network).
3. Use I ◄◄ or ►►I to browse the list select a song or title, artist, album or category.
Press SELECT/OK to confirm.
4. Browse in the list to select a desired song. Press ►II to start the playback.
9. File manager
With the file manager you can copy files between USB memory and the SD/MMC memory card.
In the main menu, select the option Filemgr to start the file manager.
Highlight the CD, USB or SD/MMC and confirm your selection by pressing SELECT/OK button on the
unit or OK button on the remote control. Please note that only data CD can be accessed by the FILE
MANAGER. When an audio CD is inserted, the message in the picture to the right is displayed on the
LCD display.
- Select the storage medium that you want to access (e.g. USB).
- You can open a folder (e.g. “Recording”) or highlight a file directly using the MEMORY
button
- All the highlighted tracks are marked with a tick on the LCD display.
- Press the
REC button
- The following menu appears on the display
“Copy
Move
Delete”
- Press the
SELECT/OK button on the unit or OK button on the remote control to confirm your selection
(e.g. Copy)
- Then choose the storage medium (USB or SD/MMC) on that the files shall be saved.
- After you have selected the storage medium (e.g. SD/MMC) you can select a folder in that you want to
save the file by pressing SELECT/OK button on the main unit or OK button on the remote control.
- The subfolder (e.g. ALL) opens. Press the
REC button. The following menu appears on the display
“Paste
Abort”
- Select “Paste” and press
SELECT/OK or OK. The device starts to copy the file.
- The process is displayed in percent on the LCD display.
- When the copy is completed the message
“Successful! OK” appears.
- If not sufficient space is available on the storage device, the system displays the error message
:Error! Memory Full!”. In this case, please press the SELECT/OK or OK to return the previous menu.
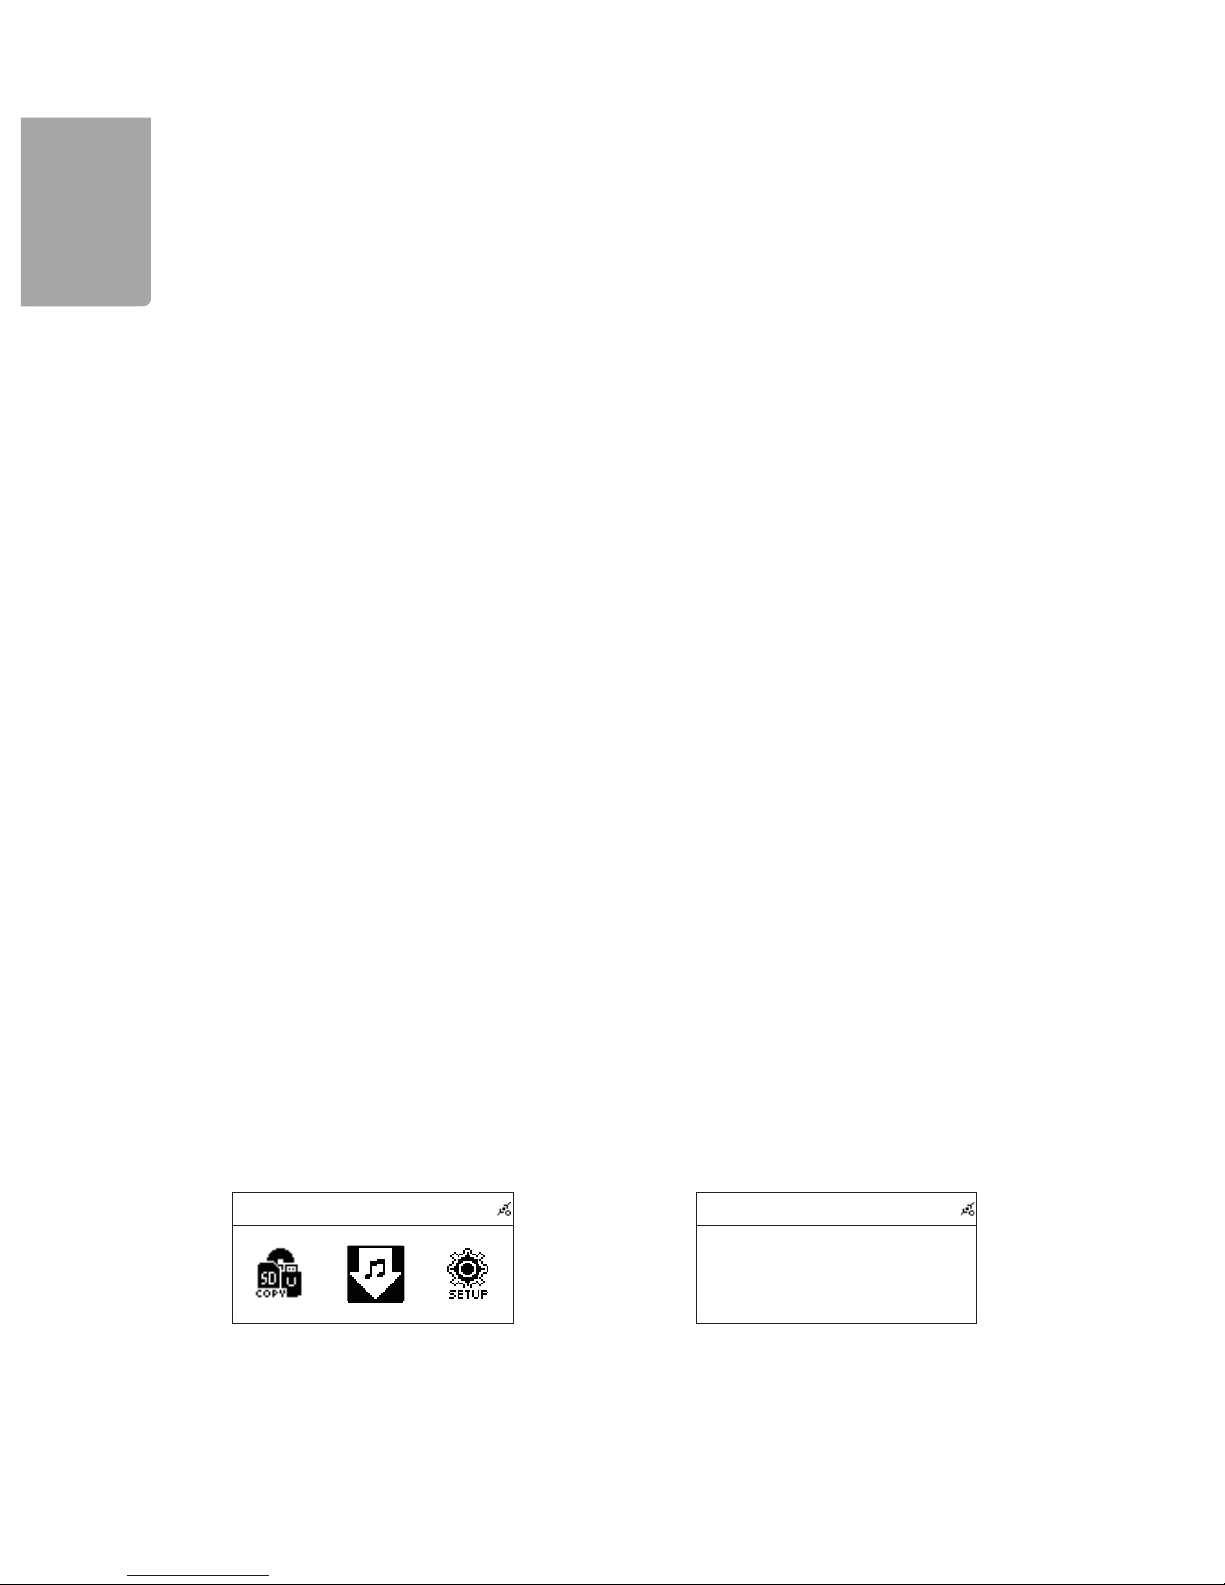
10. AUX
The stereo can be used as an external amplifier for external sound sources, e.g. portable MP3 players.
1. Connect the external sound source using a 3.5
mm stereo cable (not included) to the port marked
AUX located on the back of the micro system.
2. In the main menu, select the option
AUX and then
start the playing of the external sound source.
3. Adjust the sound volume on both stereo devices
and on the external sound source.
Page 25
25
H
S
I
LG
N
E
Setting
Date & Time >
Alarm >
Sleep >
Date &
TimeTime
TimeSync Yes
Date >
Time >
Date
? ????
2006 09 07
?
????
Setting
Date & Time >
Alarm >
Sleep >
Date & Time
TimeSync Yes
Date >
Time >
→
11. Settings
Any stereo adjustments are done in the menu Settings and its submenus. The instructions in this chapter
describe the submenus.
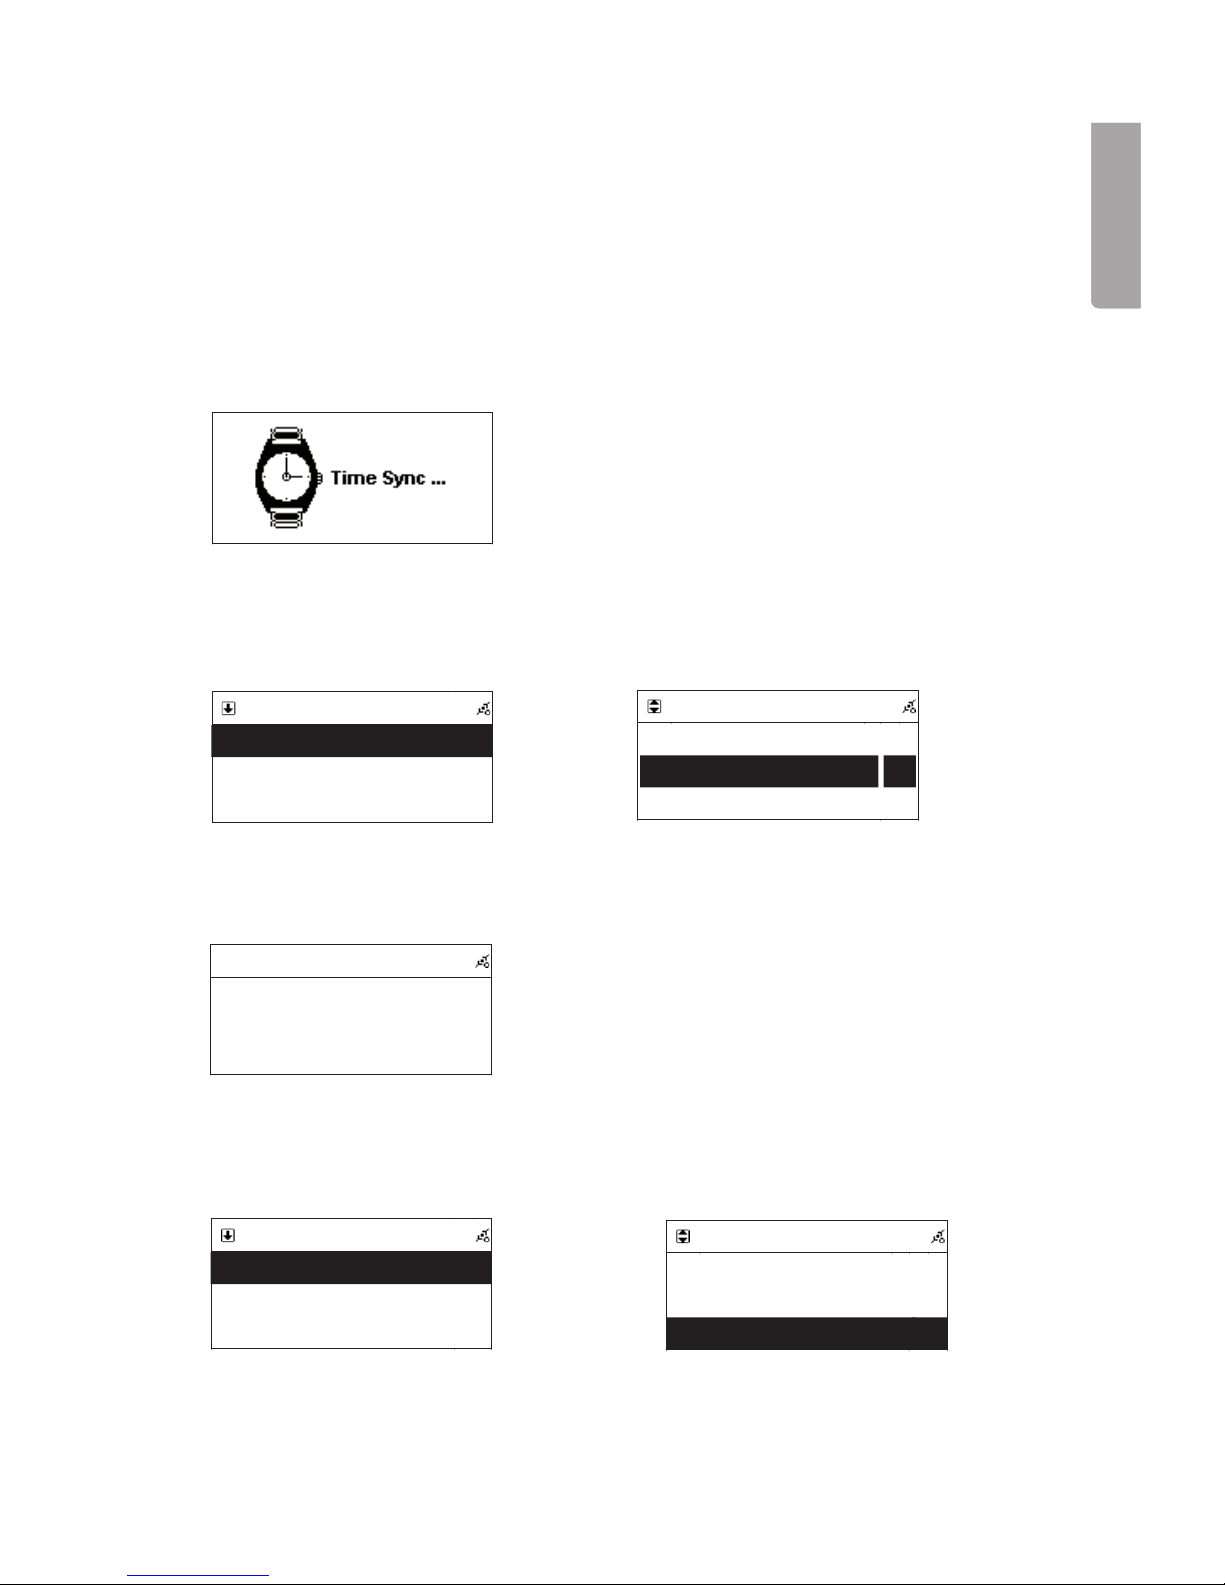
11.1 Setting time and date
The built-in clock automatically updates the time and date if the device is connected to the Internet.
Synchronization of time and date occurs every day at 12.00 and 24.00 hours and every time the unit is
turned on. Time Sync will show on the display when the time and date is updated.
11.1.1 Setting the date manually
If you do not have an Internet connection, the date can be set manually.
1. Under setting, select Date & Time
with SELECT/OK.
11.1.2 Setting the time manually
If you do not have an Internet connection, the time can be adjusted manually.
1. Under setting, Select Date & Time and confirm
with SELECT/OK.
and confirm
2. Select Date and confirm with SELECT/OK.
3. Use buttons ↑ and ↓ to set the year, month and
date. Press SELECT/OK to confirm and to
move to the next setting.
4. When you have adjusted the year, month and
day press SELECT/OK again to save your
settings.
2. Select Time and confirm with SELECT/OK.
Page 26
H
Date & Time
TimeSync Yes
Date >
Time >
Time
?
????
13
:41:
23
?
????
S
ILGN
E
3. Use the ↑ or ↓ to set the hours. Then press
SELECT/OK to confirm and to set the minutes.
4. When you have adjusted the hour and minutes,
press SELECT/OK again to save your adjustments.
11.2 Sleep function (automatic shut off)
The micro system can be programmed to turn off automatically according to a set time.
1. Select Sleep and confirm with SELECT/OK.
2. Select Sleep and press SELECT/OK to turn the function on or off.
3. Select Sleep Minutes and use the SELECT/OK button to choose the time for automatic shut off.
4. When the function is activated “Zz” lights up in the upper part of the display.
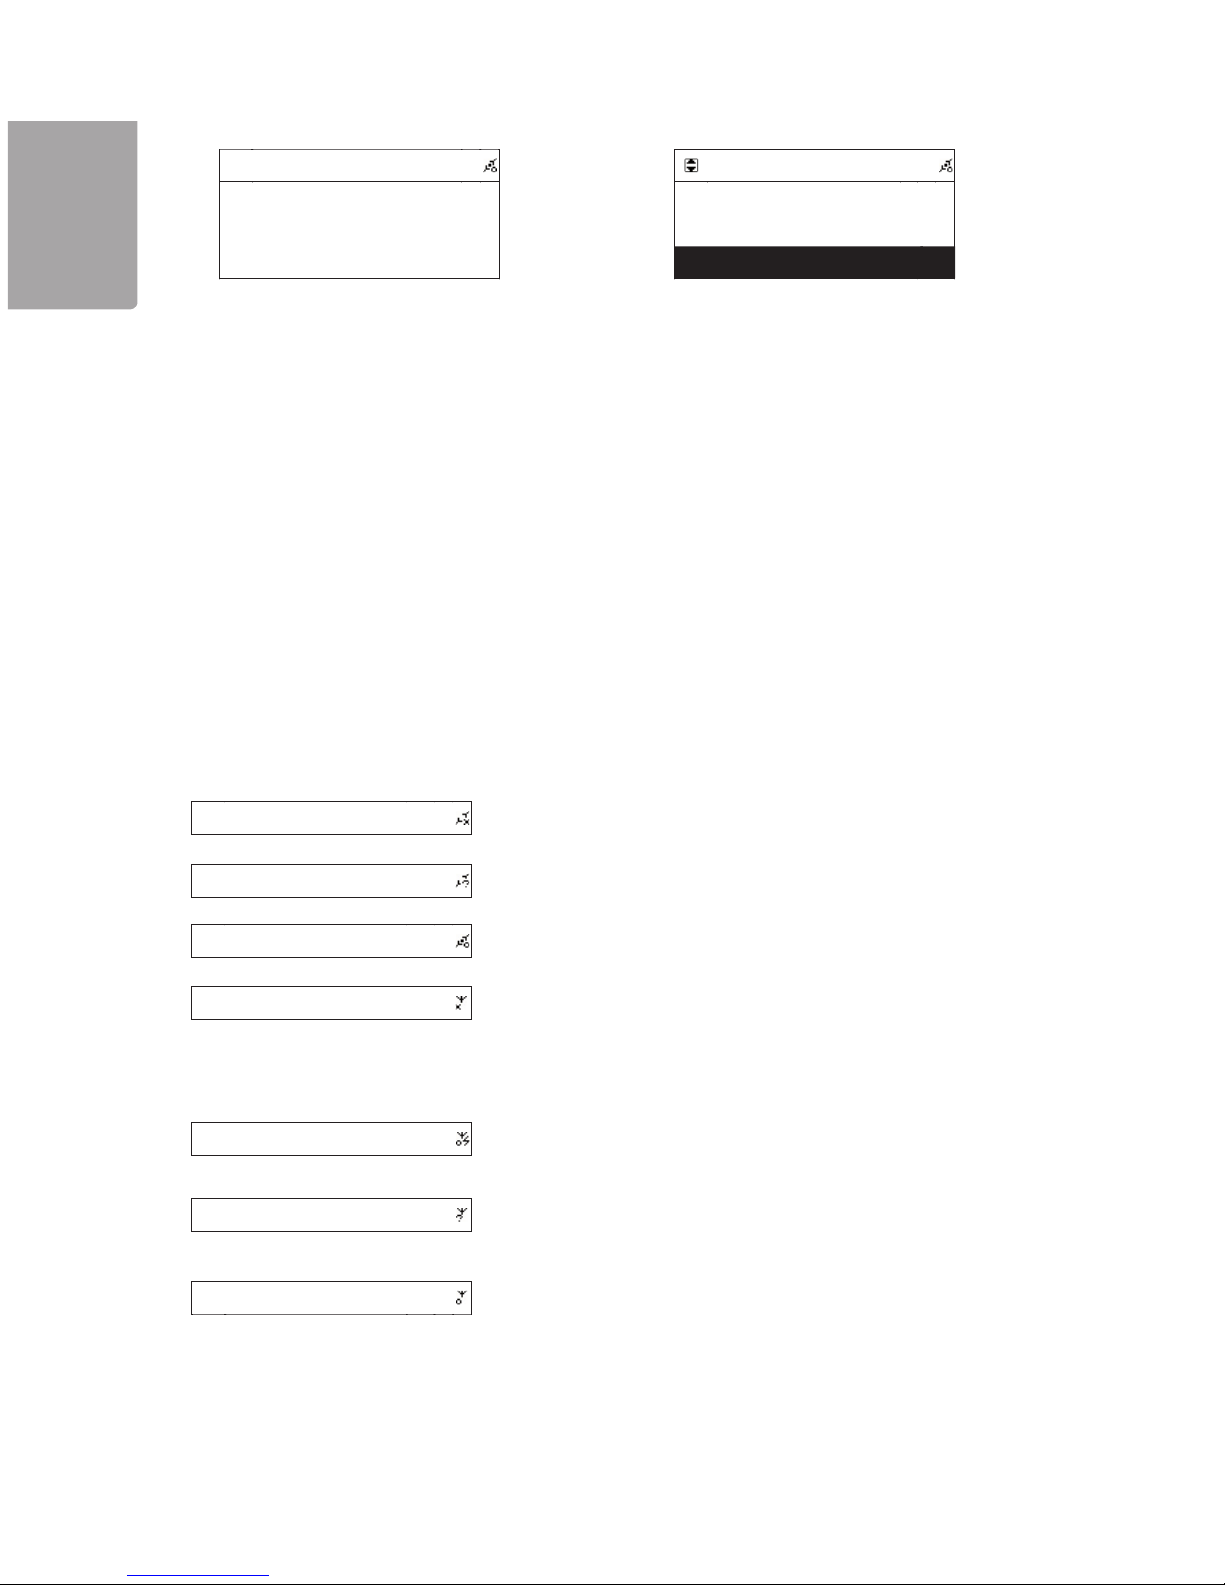
11.3 Network adjustments
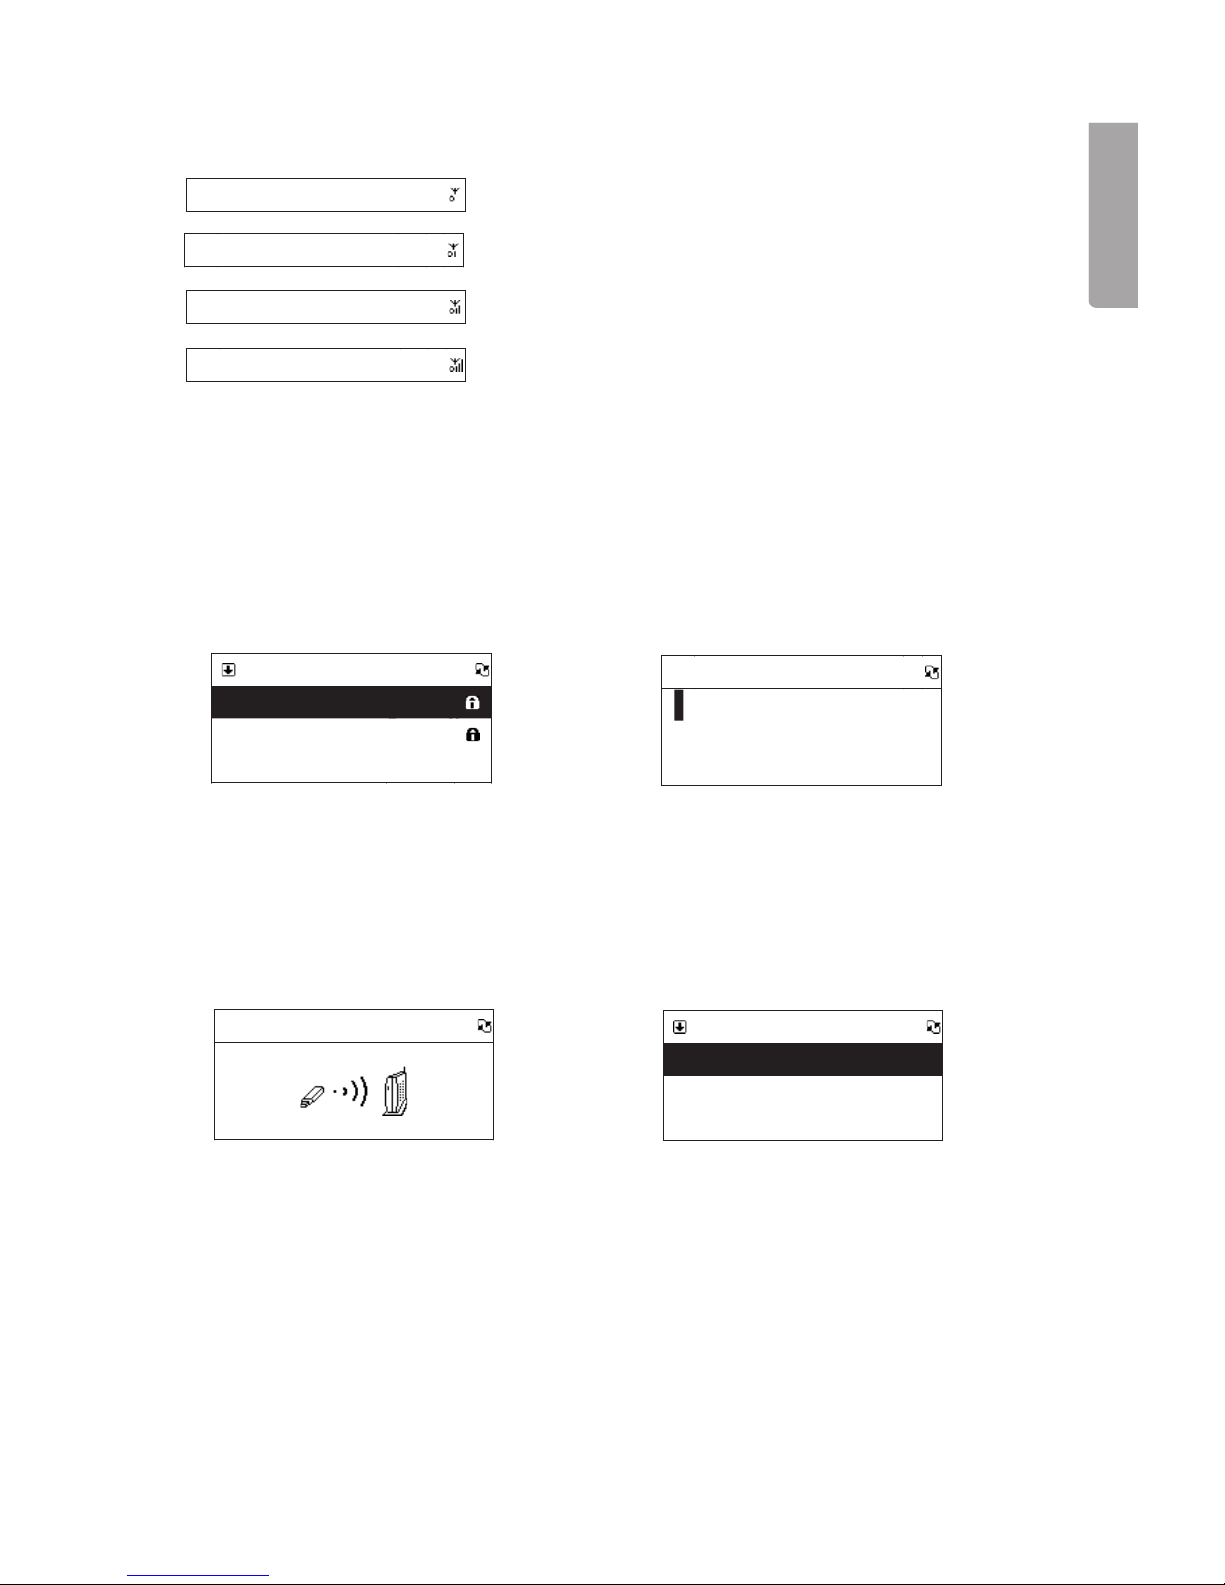
11.3.1 List of possible symbols for connection to the network
Connection through network cable
Title
A network cable is not connected.
Title
An IP address could not be obtained.
Title
Correct connection to the network through network cable.
Title
The wireless network adaptor is not correctly connected.
Connection through the wireless network
The wireless network adaptor is correctly connected and has
Title
obtained an IP address. The network adaptor is in Green Mode.
The wireless network adaptor is correctly connected but has
Title
failed to obtain an IP address.
The wireless network adaptor is correctly connected and has
Title
obtained an IP address.
26
Page 27
27
H
S
I
LG
N
E
Title
Title
Title
Title
Wizard
ap01 61%
D---LINK
LINK
85%
default 21%
Wizard
>
Network
Conn
ect(ap01)
WLAN
IP Setting >
Wireless >
Wizard
→
→
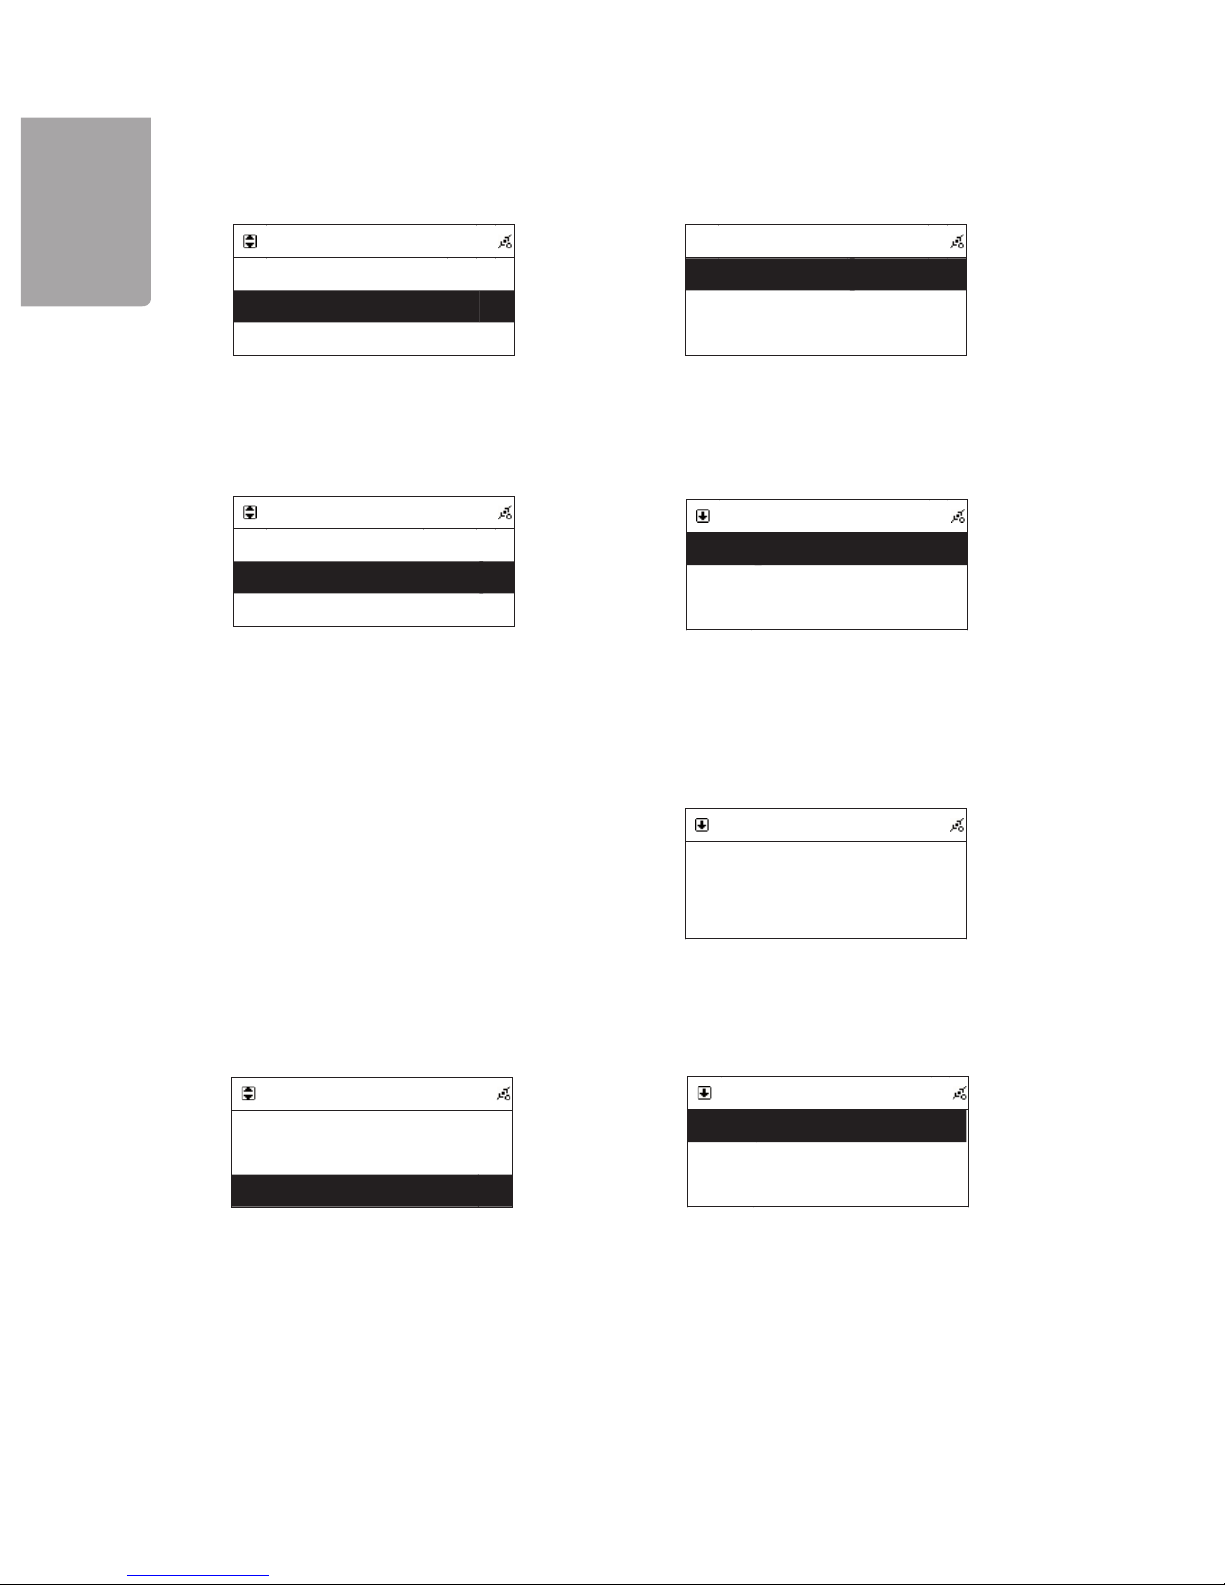
Measure of signal strength for wireless network
Weak (Under 20%)
Low (20%-59%)
Good (60% - 79%)
Very good (over 80%)
11.3.2 Connect to a wireless network
Connect with help of the connection guide (Wizard).
1. Place the wireless network adaptor in the USB socket marked WiFi on the back of the unit.
2. Select Network and confirm with SELECT/OK.
3. Select Connect and press SELECT/OK to choose between LAN (network cable) and WLAN
(wireless network). Select WLAN.
4. Select Wizard to start the connection guide. The search for an accessible network begins.
5. Select the desired network to connect, then
press
SELECT/OK.
6. If a network uses a network key (password),
enter it here. Press SELECT/OK to start the feed.
8. Press STOP/ESC
to save the network key and
return to the menu. The network key will be
verified by the network.
9. When the network menu displays again, the
connection is complete. Press STOP/ESC again
to finish and exit the menu.
7. Enter a letter using the remote control’s digits, then press ►►I to enter the next letter.
Confirm with
SELECT/OK once you have entered the entire network key.
Page 28
28
H
S
ILGN
E
Ne
N twork
Connect LAN
IP Setting >
Use Proxy No
IP Setting
IP Source Dymanic
IP Setting
IP Source Static
TCP/IP >
DNS >
TCP/IP
IP
I
192.169.001.100
Mask 255.255.255.000
GW 192.169.001.254
TCP/IP
The IP Setting Value is
illegal ! Setting is
Changed to Default !
IP Setting
IP Source Static
TCP/IP >
DNS >
DNS
DNS1 168.095.001.001
DNS2 000.000.000.000
→
→
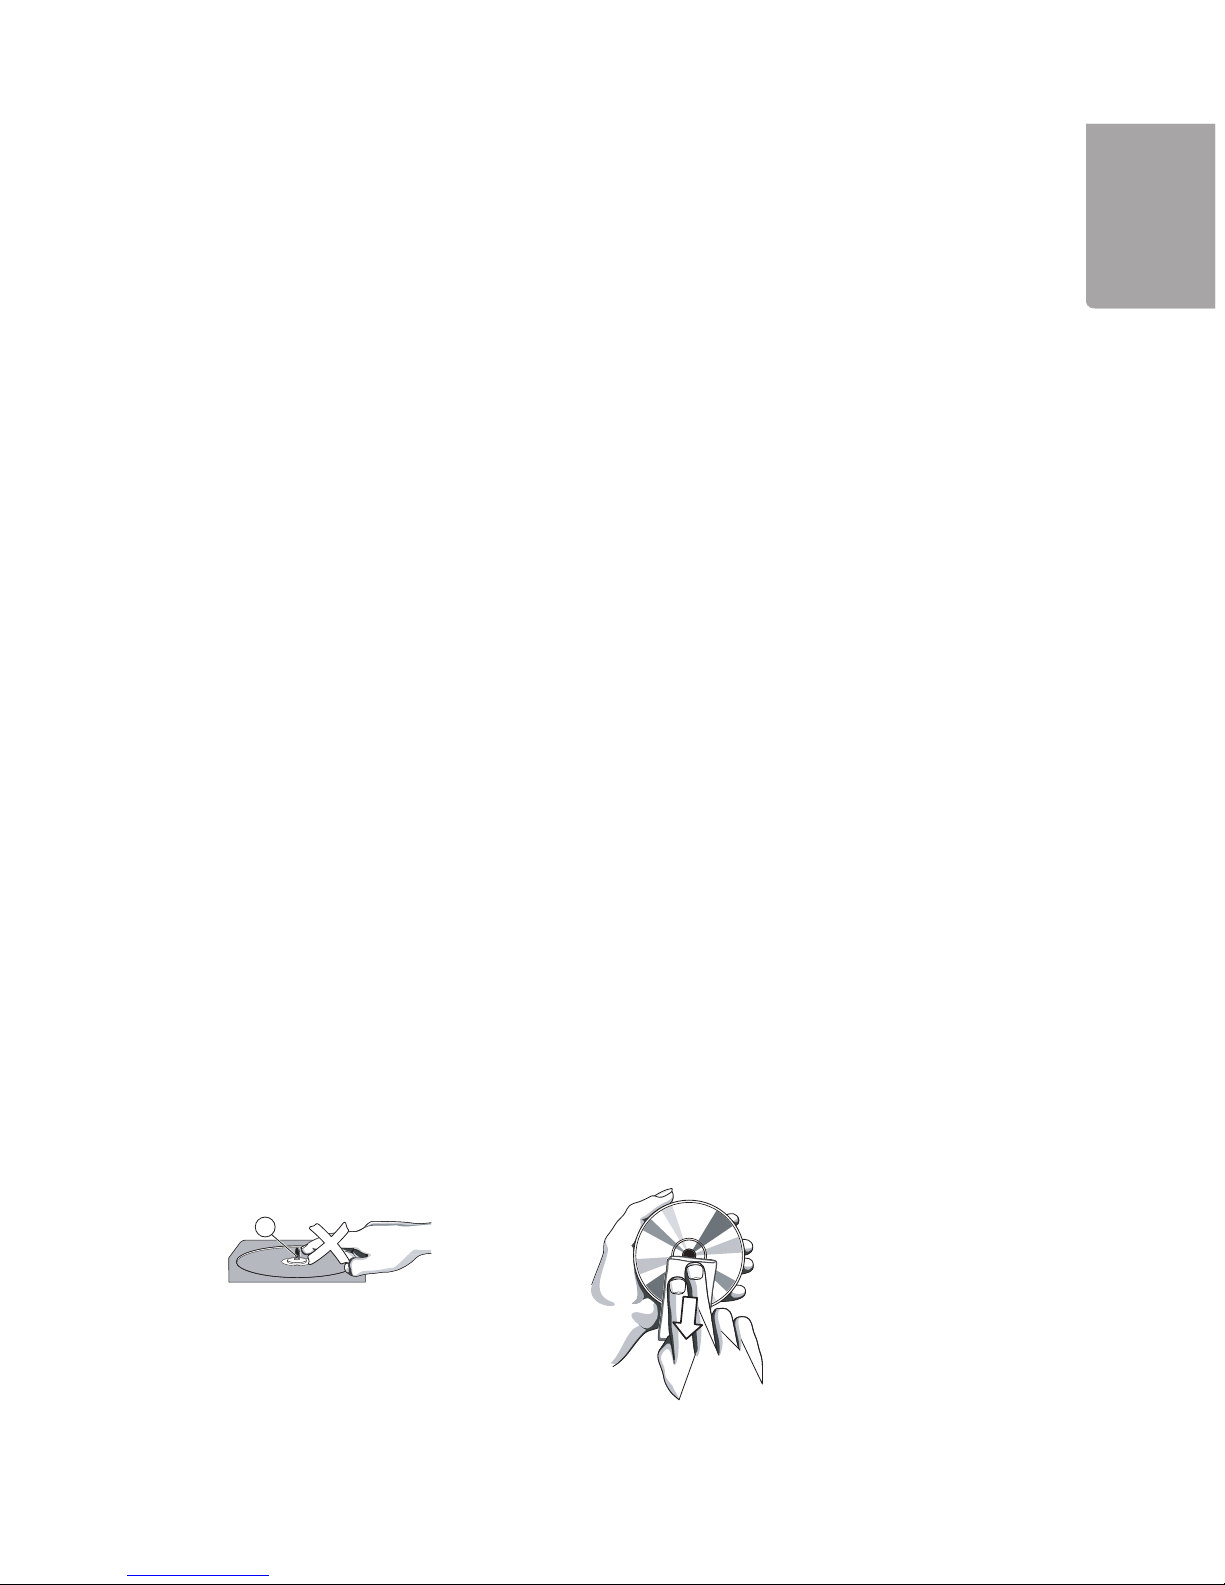
11.3.4 Enter DNS server
1. Select Network and confirm with SELECT/OK.
2. Select IP Setting and press SELECT/OK. 3. Select IP source and press SELECT/OK to select
Dynamic (Obtain an IP address automatically) or
Static (Use a fixed IP address).
4. Select TCP/IP in the menu to enter an IP address.
5. Enter a number using the remote control’s digits.
Press ►►I to enter the next number in the IP
address.
6. Confirm with SELECT/OK once you have entered
the IP address. Continue by entering a net mask
and gateway.
7. If a wrong IP address, net mask or gateway is
entered the following error notification will display:
2. Select DNS and press
SELECT/OK. 3. Enter DNS server 1 and 2 in the same manner as
you entered the IP address.
11.3.3 Enter a static (fixed) IP address
1. Select Network and press SELECT/OK to confirm.
Page 29
29
H
S
I
LG
N
E
X
11.3.5 Use with Proxy-server
If the micro system is used on the network where the connection occurs through a proxy server this is
indicated in the submenu “Use Proxy.”
- Enter the domain and port for the proxy server using the remote control’s digits.
11.4 Language
The menu settings are multi-lingual. Choose your desired language for the MENU from English, German,
Spanish, Portuguese, French, Italian, Swedish, Finnish, Dutch, Danish, Traditional Chinese or Norwegian.
11.5 Information
Select Information to view the software versions and network installations.
11.6 Firmware Upgrade
Press OK and select YES to check for firmware upgrades (with LAN or WI-FI connected). Select
ONLINE and the unit will automatically check if there is any updated firmware. Select the update firmware
and press OK to download and install.
11.7 Return to manufacturer’s settings
Select “Reset all Settings” to return the micro system to the original default settings at time of delivery.
Care and Maintenance
General Care
- Use a soft, dry cloth to clean the unit. Do not use detergent that may contain alcohol, ammonia, petrol
or abrasives as it can damage the casing.
Maintenance of CD player and CD discs
- The CD player’s lens must not be touched!
- Sudden changes in the surrounding temperature can cause condensation and the lens can be covered
by vapour. In this case, it is not possible to play a CD.
- Do not try to dry off the lens. Instead let the unit stand in a warm room until the moisture has
evaporated.
- Always close the CD door to keep the CD tray free from dust. Use a soft, dry cloth to remove dust
if
needed.
- If the CD needs to be cleaned, it can be cleaned with a soft, lint free cloth wiping from the middle out
towards the edge in a straight line. Do not use detergent as it can damage the CD.
- Never attach stickers to the CD.
Page 30

30
H
S
ILGN
E
Troubleshooting
The Micro System
No sound/ No voltage.
- The volume is not adjusted. Turn up the volume.
- No voltage in the wall socket. Check the wall socket and the stereo’s power cord.
- Ensure the speakers are properly connected.
The display does not work properly or at all. Nothing is shown in the display when any of the controls are used.
- Static electricity needs to be uncharged. Turn off the unit and unplug. Wait a couple of seconds, then re-insert the plug.
CD player
No disc indication.
- No CD is inserted. Insert a CD, CD-R or CD-RW.
- The CD disc is scratched or dirty. Change or clean the disc. See instructions for care.
- The laser lens is misty. Wait until the lens has adjusted to the room's temperature.
- The CD-R disc is empty or the copying has not finished. Use a copied CD-R.
Playing of the CD does not work.
- The CD disc is scratched or dirty. Change or clean the disc. See section for care.
- The laser lens is misty. Wait until the lens has adjusted to the room's temperature.
The CD player hops over tracks.
- The CD disc is scratched or dirty. Change or clean the disc.
The display does not show the title of the CD songs.
- Check the network adjustments and ensure that the micro system is connected to the Internet.
- Try removing and re-inserting in the disc again.
- The CD information is not included in the Gracenote media database.
Recording
It is not possible to record to USB memory.
- Make sure that the USB memory is correctly inserted.
- Check that there is enough memory space on the USB memory.
- Check that the USB memory is not write protected.
It is not possible to record to memory card.
- Make sure that the memory card is correctly inserted.
- Check that there is enough memory space on the memory card.
- Check that the memory card is not write protected.
Page 31

31
H
S
I
LG
N
E
Internet radio
The Internet radio does not function/ The list does not show any stations at all.
- Check the network adjustments and also that the stereo is connected to the Internet.
- Use a computer to check that a desired station can be reached and that is still exists. It can take a
while before the list is updated if the radio station stops sending.
The Internet radio locks when connected.
- Check the network adjustments and also that the stereo is connected to the Internet.
The list shows several stations but they can’t be listened to.
- Check the network adjustments and also that the stereo is connected to the Internet.
- Check that any possible firewalls are deactivated.
- Make sure that any proxy installations are correct.
The message "No More Data" appears.
- Check the network adjustments and also that the stereo is connected to the Internet.
- The Internet connection's band width is limited or heavily loaded.
Disposal
Follow local ordinances when disposing of this product. If you are unsure about how to dispose of this
product contact your municipality.
Specifications
Mains supply 120V AC, 50Hz
Battery type, remote control 2 x AAA (not included)
Frequency area radio FM 88 – 108 MHz
Outputs Low level (RCA), Subwoofer (RCA)
Inputs AUX (3.5 mm)
Network outlet 1x 10/100 Mbps (RJ45)
WLAN 802.11 b/g (via network adaptor)
Security, WLAN WEP 64/128, WPA-PSK-encryption
Proxy Support for proxy
Size
Main unit 170x215x150 mm (6.69" x 8.46" x 5.91")
Speakers 142x177x220 mm (5.59" x 6.97" x 8.66")
Page 32

32
The FCC Wants You To Know
This equipment has been tested and found to comply with the limits for a Class B digital device, pursuant to Part 15 of the FCC Rules.
These limits are designed to provide reasonable protection against harmful interference in a residential installation.
This equipment generates, uses, and can radiate radio frequency energy and, if not installed or used in accordance with the instructions,
may cause harmful interference to radio communications. However, there is no guarantee that interference will not occur in a particular
installation.
If this equipment does cause harmful interference to radio or television reception, which can be determined by turning the equipment off
and on, the user is encouraged to try to correct the interference by one or more of the following measures: 1) reorient or relocate the
receiving antenna; 2) increase the separation between the equipment and the receiver; 3) connect the equipment to an outlet on a circuit
different from that to which the receiver is connected;
4) consult the dealer or an experienced radio/TV technician for additional suggestions.
Any changes or modifications not expressly approved by the party responsible for compliance could void the user’s authority to operate
the equipment. Where shielded interface cables have been provided with the product or specified additional components or accessories
elsewhere defined to be used with the installation of the product, they must be used in order to ensure compliance with FCC regulation.
Canadian DOC statement
DOC Class B Compliance - This Class B digital apparatus complies with Canadian ICES-003.
This device complies with RSS-210 of Industry Canada. Operation is subject to the following two
conditions:
(1) this device may not cause interference, and
(2) this device must accept any interference, including interference that may cause undesired
operation of the device.
This digital apparatus does not exceed the Class B limits for radio noise emissions from digital
apparatus set out in the Radio Interference Regulations of Industry Canada.
Industry Canada Notice
Page 33
33
LIMITED WARRANTY
Who is Providing This Warranty?
• Orbyx Electronics, LLC (“Orbyx), as the distributor of this
Centrios™
product (your “Product”).
What Does This Warranty Cover?
• This warranty covers defects in materials or workmanship in your
Product under normal use and conditions.
What is the Period of Coverage?
• This warranty covers your Product for 12 months from the original
purchase date.
Who Is Covered?
• This warranty covers the original consumer purchaser. Coverage
terminates if you sell or otherwise transfer your Product.
What Will We Do To Correct Problems?
• We will repair your Product or replace your Product with a new or
reconditioned equivalent product, at our option.
How Do You Get Service?
• Call Orbyx TOLL FREE at 1-866-363-3059 for instructions for
obtaining warranty service from Orbyx’s authorized service
providers.
• Or, return your Product directly to the retail store from which you
purchased the Product.
• When you obtain service for your Product, you must provide a
purchase receipt (or other proof of the original purchase date) and
a description of the defect(s).
What Does This Warranty Not Cover?
• This warranty DOES NOT COVER:
• damage due to misuse, abuse, alteration, unauthorized repair, or
accident (such as improper electrical current);
• damage due to “acts of God” (such as lightning) or other
contingencies beyond our control;
• cosmetic damage;
• externally generated static, signal reception or antenna problems
not caused by your Product; or batteries.
• This warranty also DOES NOT COVER, and in no case will we be
liable for, any incidental damages (such as transportation costs to
and from an authorized service provider, or loss of time) or
consequential damages (such as costs of repairing or replacing
other property which is damaged, including tapes, discs, speakers
not included with your Product or other accessories, or external
electrical systems) resulting from the use of your Product. Some
states do not allow the exclusion or limitation of incidental or
consequential damages, so the above limitation or exclusion may
not apply to you.
• Defacing the serial number, or using your Product for commercial
or institutional purposes, voids this warranty.
Are There Other Warranties?
• There are no express warranties other than those expressed
herein. Neither the sales personnel nor any other person is
authorized to make any other warranties or to extend the duration
of any warranties.
• ANY IMPLIED WARRANTIES, INCLUDING ANY IMPLIED
WARRANTY OF MERCHANTABILITY (AN UNWRITTEN
WARRANTY THAT A PRODUCT IS FIT FOR ORDINARY USE),
ARE LIMITED TO 90 DAYS. Some states do not allow limitations
on how long an implied warranty lasts, so the above limitation may
not apply to you.
How Does State Law Apply?
• This warranty gives you specific legal rights, and you may also
have other rights which vary from state to state.
ORBYX ELECTRONICS WARRANTY
ORBYX Electronics warrants that this product will be free from
defects in materials and workmanship for a period of one (1) year
from the date of purchase. Within this period, simply take the
product and your proof of purchase to any ORBYX Electronics store
or dealer and the product will be repaired without charge for parts
and labour. ORBYX Electronics reserves the right to charge for
transportation. Any product which has been subject to misuse or
accidental damage is excluded from this warranty.
This warranty is only applicable to a product purchased through
ORBYX Electronics' company owned stores and dealers and to a
product that is presented for repair in a country where ORBYX
Electronics offers the product for sale. While this warranty does not
confer any legal rights other than those set out above, you may have
additional statutory rights which will vary under the laws of the
various countries, states, province and other governmental entities
in which ORBYX Electronics operates. This warranty is subject to all
statutory rights you may have in the country of purchase.
LIMITED WARRANTY
Limited Warranty/Garantie Limitée
U.S.A & Canada
© 2007 ORBYX Electronics. All Rights Reserve d.
Distributed by
Circuit City Stores, Inc.
9950 Mayland Drive
Richmond, VA 23233
Imported in Canada for/Importé au Canada pour
Orbyx Electronics,
Concord, Canada, L4K 4M3
Manufactured in China
 Loading...