

MixerFace R4 / R4R
Mobile Recording Interface
User Manual
MixerFace™ and CEntrance™ are trademarks or registered
trademarks of CEntrance LLC, All rights reserved. Other trademarks
are property of their respective holders. Rev 9.2. 2019-10-27

MixerFace R4 / R4R User Manual
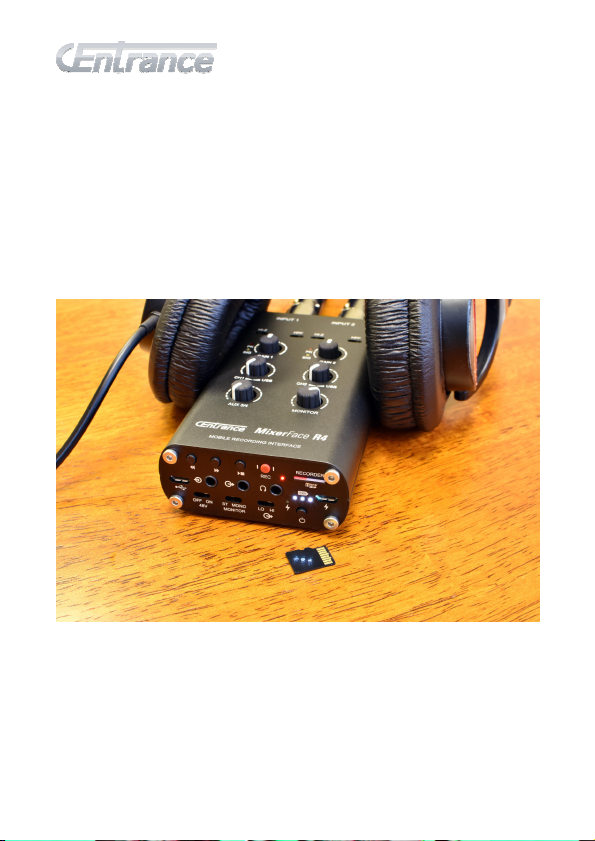
Recording Studio, in Your Hand
These days, your smartphone or tablet is not
only your Digital Audio Workstation, but also
your means of sharing content with the world
online. MixerFace R4 takes advantage of this
environment by connecting your audio
sources with the digital ecosystem, making it
the ultimate mobile recording interface.
Modern location audio professionals demand
rechargeable batteries and field reliability.
Production crews, musicians, online
personalities, and field recording enthusiasts
alike share a need for a durable, portable
recording tool that delivers pristine audio
quality, available on-the-go, session after
session. MixerFace R4 is a modern,
sophisticated piece of recording equipment,
which allows you to create pro-level content
in any location.
1

MixerFace R4 / R4R User Manual
Table of Contents
FEATURES AT A GLANCE.........................3
TOP PANEL CONTROLS ............................7
FRONT PANEL FEATURES......................16
BACK PANEL FEATURES........................18
RECORDER FUNCTIONS .........................26
TROUBLESHOOTING STEPS ..................39
2

MixerFace R4 / R4R User Manual
Features at a Glance
One of the most impressive features of
MixerFace R4 lies in its digital technology,
which connects the built-in pristine analog
preamplifiers to your phone and tablet’s
audio capturing app(s) for recording and
playback. While your phone or tablet
replaces the laptop, MixerFace R4 places the
entire production studio in the palm of your
hand.
Top Panel Adjustments
MixerFace lives up to its name—it’s part
audio mixer, part recording interface. The top
panel looks like a familiar music mixer,
offering an easy way to adjust signal and
monitoring levels. The controls are laid out
logically, making sure all audio adjustments
are right at your fingertips.
3

MixerFace R4 / R4R User Manual
Connectivity Options
Despite R4’s small footprint, its front and
back panels pack multiple connectors for
inputs and outputs. R4’s strength is in its
extensive connectivity options. There are a
total of four analog inputs and six analog
outputs, which allow routing your audio to
headphones, monitors, and line-level
devices. Digital input/output over micro USB
allows easy connections to computers,
tablets and smartphones.
Preamps and A/D Converters
Don’t let the small size fool you! MixerFace
R4 includes two boutique microphone
preamplifiers with custom Jasmine™
technology, which delivers clean, velvetysmooth sound with the lowest noise and
distortion. It uses professional A/D and D/A
converters, which operate at sampling rates
4

MixerFace R4 / R4R User Manual
of up to 192kHz, and resolutions up to 24-bit,
meeting the most demanding needs of
today’s content producers.
Phantom Power
MixerFace R4 offers +48V phantom power on
channels 1 & 2, enabling you to use
professional condenser microphones. Unlike
other devices, it offers true +48V, which
means you can use it with any condenser
microphone in your mic locker. This feature
was previously found only in studio-level
products, but now MixerFace R4 makes it
available in a mobile package.
Signal Level LEDs
To ensure high-quality, distortion-free
recording, each channel features bright “SIG”
and “PK” LED indicators for monitoring
incoming signal strength. White LEDs
5

MixerFace R4 / R4R User Manual
indicate signal present (“SIG”) and Red LEDs
indicate overload or peak (“PK”).
• White LEDs turn on when the input
signal level is 40dB below clipping.
• Red LEDs turn on when the signal is
6dB below clipping.
• Once triggered, all LEDs remain on for
a little while to make sure you notice
them.
6
MixerFace R4 / R4R User Manual
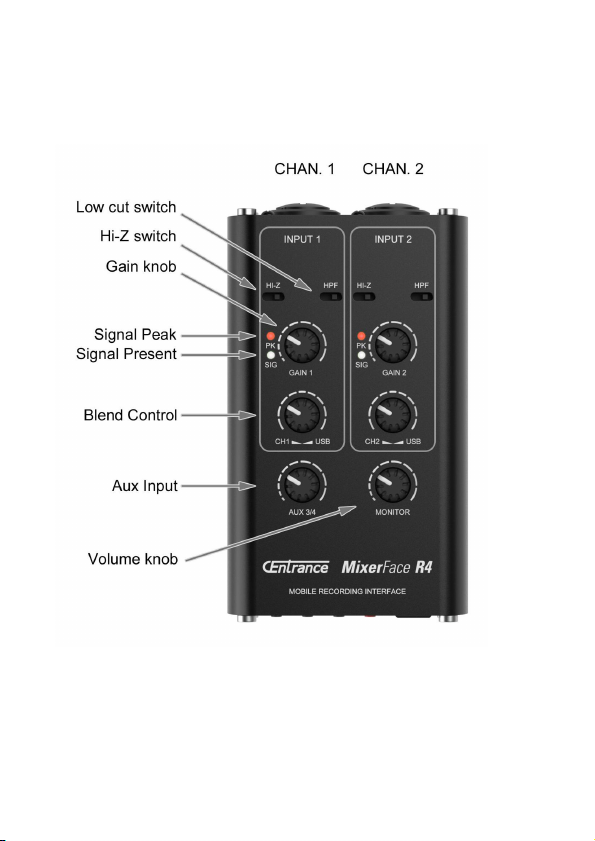
Top Panel Controls
Top panel controls, as described below
7
MixerFace R4 / R4R User Manual
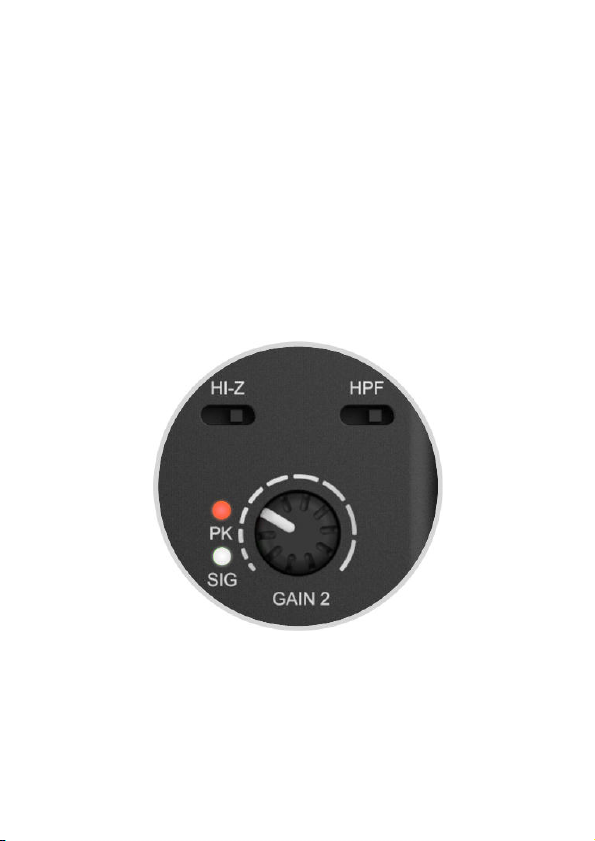
Channel Switches
All switches are active when the lever is
moved to the right. The levers are recessed
to prevent accidental adjustment. Use a thin,
sharp object, such as a paperclip, toothpick
or a pen tip to slide the lever to the right to
activate the feature.
Channel switches and the GAIN knob
8

MixerFace R4 / R4R User Manual
LINE / Hi-Z switch
These switches select between line input and
electric guitar (“Hi-Z”) input on the ¼” portion
of the Neutrik combo jack, per channel.
MixerFace R4 includes two professional,
electric guitar preamplifiers with high
impedance (“Hi-Z”) inputs. This means you
can connect MixerFace R4 directly to electric
guitar and bass to record anywhere.
Recording two different instruments or
signals is possible. For example, connect a
Microphone to Channel 1 and Guitar to
Channel 2, or record Guitar on one channel
and mono keyboard on the other. Each
channel works independently of the other,
offering diverse possibilities for recording.
Hi-Z switch operation is described below:
9

MixerFace R4 / R4R User Manual
• Slide the lever to the left to engage the
“Line” position. Hi-Z input is
disconnected and input gain is
reduced to accommodate line-level
sources on the ¼” jacks.
• Slide the lever to the right to engage
the “Hi-Z” feature per channel. Ideal
for connecting electric guitar and bass.
Low Cut Switch (HPF)
To simplify recording in noisy environments
and reduce wind or mic handling noise in
outdoor recordings, low cut switches are
available on each input channel. By design,
the low frequency rumble is cut early – right
at the input jack, long before the mic preamp
has a chance to overload and ruin your take.
The switches are labeled HPF, short for
10

MixerFace R4 / R4R User Manual
“High Pass Filter”, which is a more
appropriate name, if you want to get technical
about it. The 6dB/octave cut is below 130Hz.
GAIN Control
MixerFace preamplifiers have a wide gain
adjustment range of over 55dB. This covers a
variety of applications – from on-the-mic
narration, to recording nature sounds from a
distance, using X-Y stereo microphones.
The two gain controls let you adjust the levels
of the individual input channels for minimum
noise and distortion. A common guideline
when adjusting input levels is to let the red
“peak” LED blink occasionally, but not stay
illuminated all the time. The white “signal
present” LED is useful to check signal level
during quieter packages.
11

MixerFace R4 / R4R User Manual
Signal Peak & Present LEDs
The White LED labeled “SIG” illuminates to
indicate “signal present”. This happens when
the audio level at the input of the A/D
converter reaches -40dB. The white LED
stays illuminated until the signal drops below
the -40dB threshold.
The Red LED labeled “PK” illuminates to
indicate “signal peak”. This happens when
the audio level at the input of the A/D
converter reaches -6dB. The red LED stays
illuminated until the signal drops below the –
6dB threshold.
As these bright, sunlight-visible lights blink
with the audio, they attract attention, offering
a simple way to see signal levels at a glance,
and make gain adjustments as necessary.
12

MixerFace R4 / R4R User Manual
Blend Controls (CH — USB)
Blend controls adjust the mix between the
zero latency input signal and USB playback.
This allows you to strike a balance between
the inputs on Ch 1 or 2 (CCW) and the stereo
signal coming back from your computer or
smartphone (CW), as seen below:
Blend, Aux3/4 and MONITOR controls
13

MixerFace R4 / R4R User Manual
You will find this knob useful when playing
your instrument over a backing track fed from
the computer. Another use of this feature is in
Voiceover, where you need to narrate over a
music bed streaming from the computer. In
both cases you can adjust the blend to taste.
This knob also comes in handy when you are
using your computer or smartphone as an
effects processor and need to dial in just the
right amount of direct signal vs. effects return
(AKA dry/wet control).
When monitoring the inputs, rotate the dials
counter-clockwise to silence the signal from
USB. When playing back from the computer,
smart phone or tablet, rotate the dials
clockwise to silence the input channels.
Note: The blend you create in your monitors
is for monitoring only. It will not be recorded.
Channels 1…4 are recorded as a stereo mix.
14

MixerFace R4 / R4R User Manual
AUX 3/4 Control
The Aux 3/4 knob adjusts the level of the
stereo signal fed into the Auxiliary input (line
input) located on the back panel. You can
connect an MP3 player or another source to
this input in order to play along with a click
track, a prerecorded track or to overdub.
Note: The stereo mix of CH 1&2 and Aux ¾
in your monitors will be exactly the way it will
be captured in your recording software.
MONITOR Control
The MONITOR volume knob controls the
level of the entire mix as monitored through
the headphones or balanced outputs.
Note: If the MONITOR knob is turned all the
way up and your monitor level is still too low,
adjust the blend controls counter-clockwise.
15

MixerFace R4 / R4R User Manual
Front Panel Features
The Front panel contains combo input and
balanced output connectors.
Inputs 1 and 2
MixerFace R4 features Neutrik combo XLR
jacks for connecting mic, line-level sources,
electric guitar, bass, etc.
16

MixerFace R4 / R4R User Manual
Balanced Outputs (TRS)
While you may do most of your monitoring
with headphones, sometimes it’s good to
listen to the mix on larger studio monitors.
We have provided two 1/8” (3.5mm)
balanced outputs on the front panel. Use
these outputs to connect MixerFace R4 to
external powered monitors. The 3.5mm
outputs use industry-standard TRS pinout,
with “Hot” connected to the left (tip), “Cold”
connected to the right (ring) and “Common”
connected to the ground (sleeve) pin. A
special cable may be required. Consult the
CEntrance website for recommendations.
The top panel MONITOR knob adjusts the
level at both balanced outputs. This allows
you to control the level of your monitor mix
right from the MixerFace. No need to get up
and walk to adjust the monitors.
17

MixerFace R4 / R4R User Manual
Back Panel Features
Back panel controls are explained below.
Power Button
The power button turns the power on/off.
18

MixerFace R4 / R4R User Manual
• To turn on, press and hold for three
seconds until the battery level LEDs
light up.
• To turn off, press and hold for three
seconds until the battery level LEDs
rapidly blink to indicate: “bye-bye”.
Charger Connection
MixerFace R4 will charge from any standard
5V charger by connecting a USB cable to the
right hand side micro USB jack, located next
to the battery LED indicators. For best
results, use a charger that offers at least 2A
of output current.
Note: There is no danger in leaving the
charger plugged in indefinitely – the battery
will stop charging when full and will only top
off as needed, automatically.
19

MixerFace R4 / R4R User Manual
Battery Level and Charging LEDs
Three white LEDs to the left of the power jack
indicate charge level when the unit is turned
on, as follows:
• 3 LEDs: over 75% battery is left
• 2 LEDs: about 50% battery is left
• 1 LED: less than 25% of battery is left
The charging LED turns on when the unit is
charging from an external source. This LED
will turn off when charging is complete. This
LED works independently of the power switch
and only tracks the battery charging status.
Battery Operation
MixerFace R4 will operate for about 8 hours
on a full charge. Phantom power and certain
20

MixerFace R4 / R4R User Manual
condenser microphones may reduce this time
slightly. The unit should charge to 90% in 4
hours and to 100% in 5 hours. The battery is
not user replaceable, but is expected to
provide years of uninterrupted service.
USB Audio connection
MixerFace R4 may be used with iOS,
Android, Windows, Mac and Linux devices as
a USB recording device. Connect a standard
micro USB cable from your smartphone,
tablet or computer to the left hand side micro
USB socket on the back panel of MixerFace
R4. The MixerFace R4 is now ready to be a
used as a USB recording interface.
Note: For iOS devices, a Lightning to USB
adaptor is required. For Android devices, an
OTG cable is required. For Windows devices,
download an ASIO driver from the CEntrance
website.
21

MixerFace R4 / R4R User Manual
Line Input (Aux In)
Line input stereo 1/8” (3.5mm) jack feeds the
Aux 3/4 level knob described above. It is
useful for connecting external sources, such
as CD player, MP3 player, mixer, etc. Inputs
3 and 4 are mixed with Channels 1 and 2,
enabling a number of applications: playing
along, overdubbing, multi-tracking and stage
mixing (R4 is great for coffee shop gigs).
Line Output (Aux Out)
The 1/8” stereo Line output can connect to
another device such as a DSLR camera. This
way MixerFace R4 serves as a high-quality
mic preamp for your camera, which
dramatically improves your video’s audio
quality. You could also connect this output to
a mixer or an external recorder, for additional
monitoring options or for recording a safety
copy.
22

MixerFace R4 / R4R User Manual
Headphone Output
MixerFace R4 can accommodate a wide
range of headphones for monitoring. It
features a 1/8” (3.5mm) headphone jack and
a clean, powerful headphone amplifier using
technology from the CEntrance audiophile
product line. Headphone models with lower
impedance (25…50 Ohms) will generally
offer higher sound level.
Phantom Power Switch
For Condenser microphones MixerFace R4
supplies +48V phantom power selectable via
a back panel switch. Move the switch to the
right to turn 48V on. It will be applied to both
input channels at once. Be careful, a pop
may be heard in headphones. Note: ¼”
inputs are not affected by 48V, but turn 48V
off when using XLR cables with line-level
sources.
23

MixerFace R4 / R4R User Manual
MONO Switch
MixerFace R4 allows you to monitor recorded
audio in Mono and Stereo.
In Mono Mode, each input channel is
monitored in both ears. This is useful for
recording from mono sources, such as
interviews, spoken word, guitar and bass,
etc. In this mode, all input sources from
Channel 1 and Channel 2 appear in the
middle of the head when listening to
headphones.
In Stereo Mode, the input channels appear
on their respective sides in headphones – L
on the left and R on the right. This is useful
when monitoring stereo material, such as
feeds from a mixing console, stereo
keyboard, or recording from an X/Y stereo
microphone pair.
24

MixerFace R4 / R4R User Manual
Output Level Switch
This switch adjusts the level at the 1/8”
(3.5mm) line output (aux output) jack. This
control does not change the level at the
balanced output jack.
• Use the Low position with DSLRs,
which only have a mic-level input.
• Use the High position with line level
devices such as amplifiers, audio
recorders, mixers, etc.
25

MixerFace R4 / R4R User Manual
SD Card Recorder Function
The MixerFace R4R version features a micro
SD card stereo audio recorder, which makes
the unit much more versatile than the basic
R4 model, for several reasons:
• Now you can record audio right to the
MixerFace. No need for a connected
phone. Your setup is simpler this way.
• If you use the phone for streaming to
social media sites, such as Facebook
or Instagram, you can record a local
copy of the audio to MixerFace.
• If you record important, once-in-alifetime events and must make sure
you have a safety copy, record to the
connected phone and also to the SD
card in the MixerFace, for redundancy.
26

MixerFace R4 / R4R User Manual
Overview
The built-in micro SD card recorder will
record the same audio that is recorded to the
connected computer or phone.
While they get the same analog audio, it's
important to note that MixerFace R4R uses
two separate A/D converters for the two
recording paths, making them completely
independent of each other.
27

MixerFace R4 / R4R User Manual
You can start/stop the recording on the SD
card recorder and on the computer/phone at
any time. They will not influence each
another. The two recorders are totally
independent, for safety and redundancy.
The built-in SD card recorder will always
record at 24-bit / 48kHz resolution, while on
the connected computer and phone you can
select any resolution up to 192kHz.
Signal path review
Both the computer/phone and the SD card
recorder will record the same stereo mix,
which consists of Channels 1 and 2 (XLR
inputs) and Channels 3 and 4 (AUX 3/4 IN).
Channels 1 and 3 are mixed together and
recorded on the left channel of the stereo
track. Channels 2 and 4 are mixed together
28

MixerFace R4 / R4R User Manual
and recorded on the right channel of the
stereo track.
The AUX input can be especially useful for
these use cases:
• While adding background music to a
podcast,
• While overdubbing or adding the main
vocal to the backing track,
• While practicing with or performing live
to a prerecorded track.
You can control the levels of your inputs via
the top panel control knobs, which are
designed to be easily accessible and provide
tactile feedback via the rubberized knobs.
Recorder has 4 pushbuttons, and 1 LED on
the back panel, which we will describe below.
29

MixerFace R4 / R4R User Manual
Recording Transport Controls
MixerFace R4R recorder has 4 pushbuttons:
Previous, Next, Play/Stop and Record.
•
Press PLAY/STOP button to start or
pause the playback of recorded
material. Status LED lights up solid
green during playback.
•
Press RECORD (the red button) to
start recording audio. Status LED
lights up solid red while recording.
Press PLAY/STOP to stop or pause
recording.
•
Press PREVIOUS to play the previous
track, or to replay a track— depending
on how many recorded tracks there
are.
•
Press NEXT to play the next recorded
track, if any.
30

MixerFace R4 / R4R User Manual
Micro SD Card Guide + Tips
•
For best results we recommend using
class 10 micro SD cards from known
brands such as Sandisk and Lexar.
Cards sized up to 256GB have been
tested with success.
•
A 24-bit/48kHz stereo WAV recording
Uses about 1GB of space per hour. A
32GB card will last about 32 hours,
etc.
•
Cards larger than 32GB should be
formatted with R4R before use.
Warning: Formatting will erase all data
on the card (see formatting section).
•
To insert the card, push the card into
the micro SD slot until it clicks into
place. To eject, simply push the card
again and it should pop out.
31

MixerFace R4 / R4R User Manual
Formatting Micro SD Card
Follow these steps to format the SD card
inside the MixerFace R4R:
1. Ensure the unit is OFF. Insert micro
SD card into R4R.
2. Press and hold the RECORD button,
then turn the unit ON.
3. Once the status LED lights up RED,
release the RECORD button.
Once you release the RECORD button, the
LED will blink RED, awaiting confirmation:
•
To proceed with formatting, press the
PLAY/STOP button.
•
To cancel formatting, turn OFF R4R.
32

MixerFace R4 / R4R User Manual
The LED will then indicate the formatting
progress as follows:
• If LED turns ORANGE: Formatting is
in progress.
• If LED turns GREEN: Formatting is
complete. Turn unit OFF, then ON.
Now you are ready to record!
• If LED changes to RED: Formatting
failed. Please use alternate SD card.
SD card Adapter
Use an adapter to convert
the micro SD card to
regular SD card for use
with those computers,
which don't have the
micro SD card slot.
33

MixerFace R4 / R4R User Manual
Disk Drive Mode
In Disk Drive mode, MixerFace R4R
becomes an external USB drive for your
computer, allowing you to transfer files
without taking the SD card out. Note: SD card
audio recording is not possible when in Disk
Drive mode.
Follow these steps to switch the unit into the
Disk Drive mode.
1. Ensure the unit is OFF. Insert micro
SD card into R4R.
2. Press and hold the PLAY button and
turn the unit ON.
3. Once the status LED turns GREEN,
release the PLAY button. the unit has
entered the Disk Drive Mode.
34

MixerFace R4 / R4R User Manual
Note, you will be using the right USB jack
(labeled charging) to connect the MixerFace
to your computer for transferring files.
Once the Recorder has entered the Disk
Drive Mode:
•
Connect a USB data cable to the right
(charging) USB jack. Connect the
other end to your Windows or Mac OS
computer.
•
Your computer will now recognize
R4R’s micro SD card as a disk drive.
•
To exit disk drive mode, first eject the
USB storage device on the computer,
then turn R4R OFF and back ON
again to start using normally. The Disk
Drive Mode will disappear and the
recording function will return.
35

MixerFace R4 / R4R User Manual
Updating Internal Clock
Rarely you may notice that the time stamp on
the files that MixerFace prints onto the SD
card needs to be adjusted. If so, you can
update the internal clock in MixerFace by
using the following procedure:
1. Save a blank file named “R4TIME.txt”
onto the SD card.
2. Insert this SD card into the R4R and
then turn the unit ON.
3. R4R will now have the correct
time/date on recordings.
36

MixerFace R4 / R4R User Manual
Recorder FAQ
Q: Can you record to a USB device and the
built in SD card recorder in the R4R model?
A: Yes! MixerFace R4R offers the ability to
record to both paths for redundancy.
Q: Can you change the sample rate or type
of recordings made with R4R built-in SD card
recorder?
A. MixerFace R4R records 24bit/48kHz
Stereo WAV Files. They are sufficiently high
quality and the format cannot be changed.
Q: How can I speed up the file transfer
between R4R and my computer?
A: For fastest transfer speeds, you can read
the card in the computer. Turn off R4R, eject
SD card, insert SD card into your computer.
37

MixerFace R4 / R4R User Manual
Description of LED indications
Orange blink = absent SD card if Play/Record
button pressed.
Green blink = press Play but no wav files are
on SD card.
No LED = press Record when SD card is full
Note:
A fragmented SD card, i.e., a card that had
many small files deleted, will not ‘fill up’ to full
on one recording take. Therefore, it is best to
backup files and then format the SD card if a
very long recording take is planned to come
close to filling the SD card.
38

MixerFace R4 / R4R User Manual
Troubleshooting steps
Here are some quick troubleshooting steps in
case your product is misbehaving:
Symptom Cause Resolution
All LEDs are off,
no sound is
heard
R4 takes too
long to charge
No sound in
headphones
Cannot hear
channel monitor
or playback
Battery is dead Connect a
charger to the
right USB jack
Insufficient
charger
Input level or
volume control
at minimum
Blend control in
the wrong
position
Use 2A or
greater charger
Check AUX 3/4
or MONITOR
knobs
Turn Blend
knob CW
(USB) or CW
(Channel input)
39

MixerFace R4 / R4R User Manual
Symptom Cause Resolution
Input is clipping Wrong input
jack used
Guitar is too
quiet
Camera
receiving low
audio from R4
Unit does not
connect over
USB
R4 doesn’t work
with Windows
Hi-Z mode not
enabled
Line Output too
Quiet
USB cable
plugged into the
wrong jack
CEntrance
Universal Driver
not installed
Switch to linelevel inputs;
Adjust gain
Check the Hi-Z
switch
Set line output
switch to HIGH
Plug USB cable
to the left USB
jack
Download and
install the driver
40

MixerFace R4 / R4R User Manual
Warranty Service
MixerFace R4 comes with a one-year
worldwide warranty. In the unlikely event that
the product requires service, please contact
CEntrance by one of the ways listed below.
We will be glad to help. If you are planning to
send the unit in for repair, please first request
an RMA number by calling or emailing us.
CEntrance, LLC
www.centrance.com
info@centrance.com
tel: 833-CENTRANCE (833-236-8726)
We spent a long time painstakingly developing this
product. We want to thank you for your support and
wish that MixerFace R4 brings you many years of
quality service!
- The CEntrance Team
41
 Loading...