

Page 1
AIR HAND NAILER
41164
ASSEMBLY & OPERATING INSTRUCTIONS
®
99
REV 07/01
Page 2
THANK YOU for choosing a HARBOR FREIGHT T OOLS product. For future ref erence , please complete the
owner’s record belo w:
Model____________ Serial No._______________ Purchase Date _________________
SA VE THE RECEIPT, WARRANTY AND THESE INSTRUCTIONS. It is important that you read the entire
manual to become familiar with the unit BEFORE you begin assemb ly.
Technical Specifications
T ool Name: Air Hand Nailer
Item Number: 41164
Material: Gravity Aluminum
Air Nipple Material: Chrome Plated Steel
T ool Length: 5-1/4"
T ool Width: 3-1/6"
Nail Length: 4"
Operating Pressure: 70 to 125 PSI *
Air Consumption: 8 CFM non-continuous
Driver Hardness: HRC 46 to 56
Air Inlet: 1/4" NPT Female
* The air pressure setting must not exceed job site regulations/restrictions. The air pressure setting
must not exceed 90 PSI when being used with work pieces that have a thickness of less than 1-3/4”.
Warning: The warnings, cautions and instructions discussed in this instruction manual
cannot cover all possible conditions and situations that may occur. It must
be understood by the operator that COMMON SENSE AND CA UTION ARE
FACTORS WHICH CANNOT BE BUILT INTO THIS PR ODUCT, BUT
MUST BE SUPPLIED BY THE OPERATOR.
The Operator
PLEASE REMEMBER:
Do not operate the product if under the influence of alcohol or drugs. Read w arning labels on prescriptions to
determine if your judgment/reflexes might be impaired.
Do not wear loose clothing or jewelry as they can be caught in moving parts.
Protective gloves and non-skid f ootw ear is recommended.
Wear restrictive hair cov ering to contain long hair .
Use eye and ear protection. Always wear ANSI appro ved impact safety goggles.
Maintain proper footing and balance at all times.
Keep hands aw ay from firing part of the Nailer or serious injury may occur.
#41164 REV 07/01 REV 11/06 Page 2
Page 3

Do not point Nailer at yourself, other people or pets.
Do not randomly shoot the Nailer into open space, as this may result in injury.
Work Area
TO AVOID RISK OF PERSONAL INJURY, EQUIPMENT DAMAGE, FIRE AND SHOCK, MAKE SURE YOUR
WORK AREA IS:
Free of damp , w et or rain y conditions
Free of flammable gasses or liquids
Free of children (ne v er let them handle tools or machinery)
Well-lit
Clean and uncluttered
Well-ventilated
Before Operating
Before operating your Air Hand Nailer , chec k for damaged parts.
Never force the tool or attachment to do the work of a larger industrial tool. It is designed to do
the job better and more safely at the rate f or which it w as intended.
Do not try to use inappropriate attachments in an attempt to exceed the tool’s capacity. Approved accessories
are availab le from Harbor F reight Tools.
Check for damaged parts. Before using any tool, any part that appears damaged should be carefully checked
to determine that it will operate properly and perform its intended function.
Never driv e f asteners on top of other f asteners as the fastener may deflect, resulting in injury.
Assembly
Y our Air Hand Nailer comes completely assemb led.
Air connection
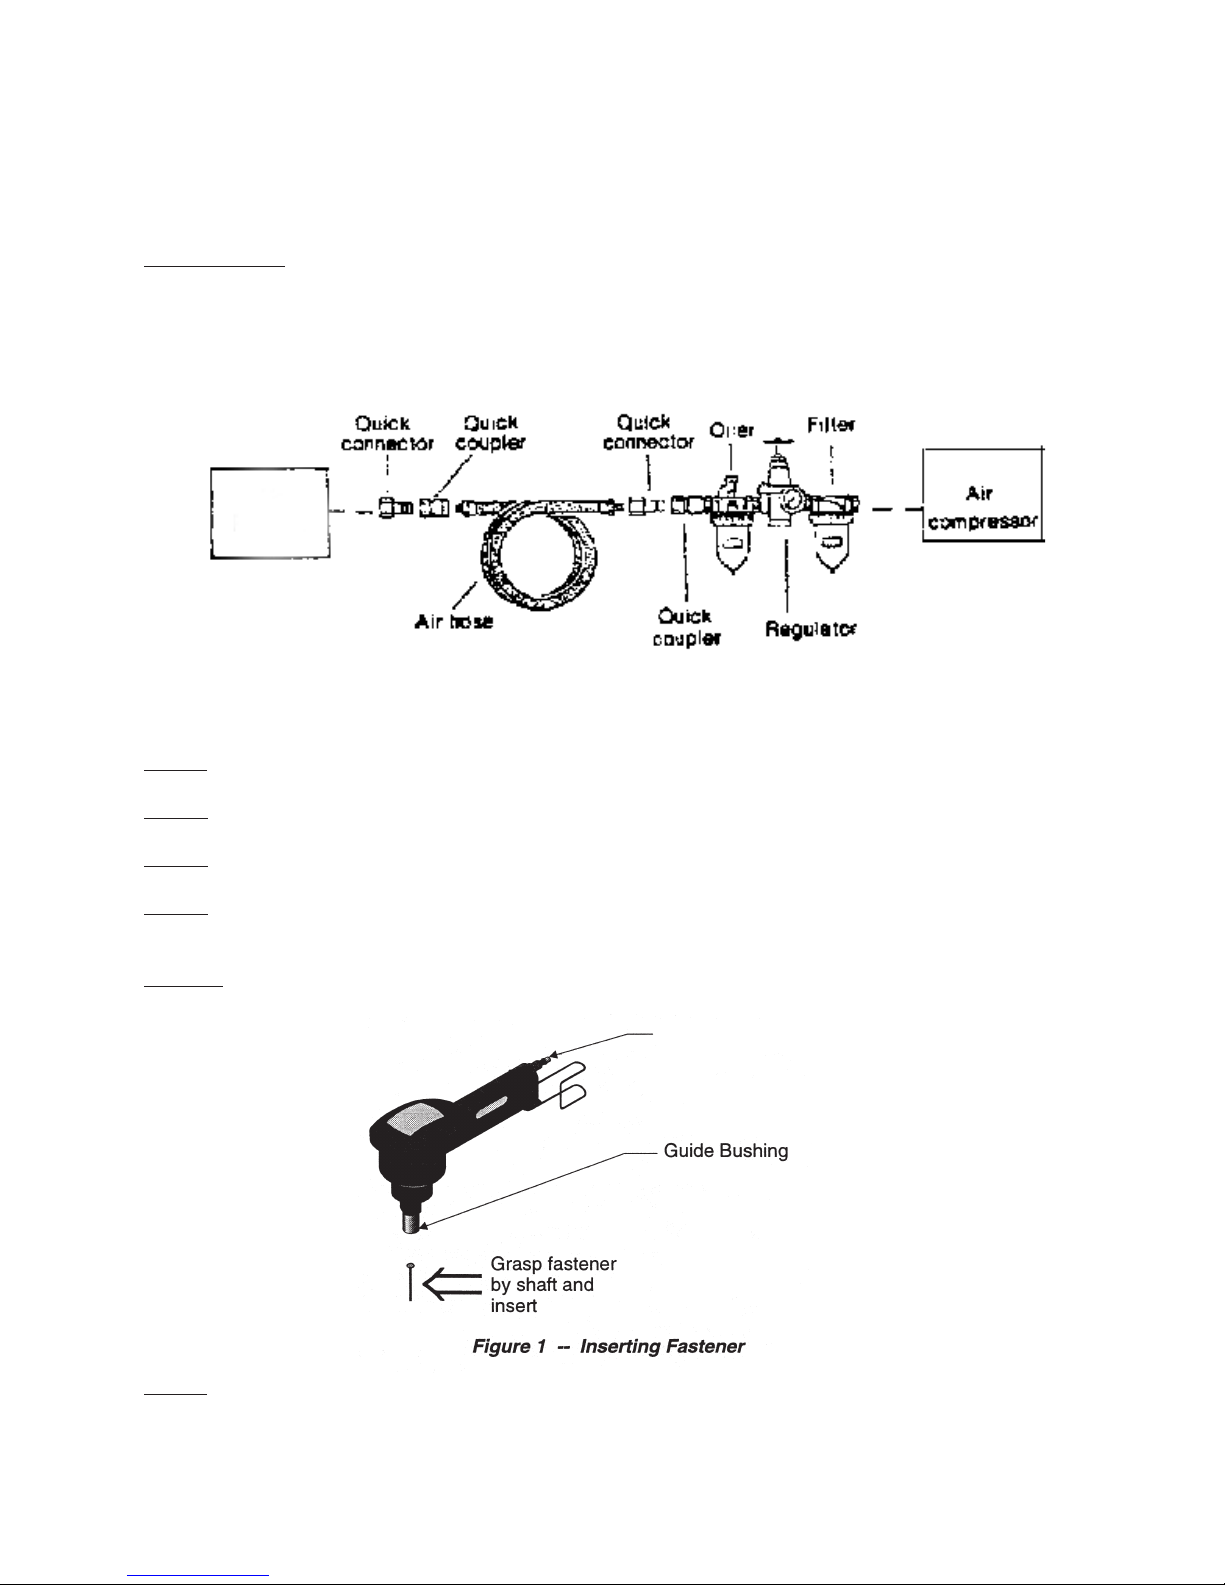
Step 1) You will need a Union fitting (sold separately) before you can connect your Air
Hand Nailer to an air compressor. Attach the Union fitting to the Air Inlet and
tighten the fitting.
Step 2) Attach an Air Coupler (sold separately) to the Union fitting if desired. This is a useful
accessory as it allows quick-coupling action when using a variety of tools with the same
air compressor.
Set up
Frequent, but not excessive, lubrication is required for best performance. Oil added through the airline
connection will lubricate internal parts. An automatic airline oiler is recommended but oil may be added
manually before every operation or after about one (1) hour of continuous use. Only a few drops of oil at a time
are necessary . Too much oil will collect inside of the tool and be blown out during the exhaust cycle. Use only
Pneumatic tool oil. Do not use detergent oil or additiv es as these lubricants will cause accelerated wear to
#41164 REV 07/01 Page 3
Page 4
the seals in the tool.
Dirt and water in the air supply are major causes of pneumatic tool wear. Use a filter/oiler f or better
performance and longer life of the tool. The filter must hav e adequate flo w capacity f or the specific application.
Set up (Cont’ d)
Consult the manufacturer’ s instructions for proper maintenance of your filter .
The connector on the tool must not hold pressure when the air supply is disconnected. If the wrong fitting is
used, the tool can remain charged with air after being disconnected and still be able to drive a fastener.
Air Nailer
Operation
Please refer to the P arts List on pages 5 and the Assembly Diagram on page 6 prior to operation. It is
important that your read the entire manual to become familiar with the unit BEFORE you use it.
Step 1) Set the air compressor regulator to between 70 PSI and 125 PSI.
Step 2) Turn on the compressor.
Step 3) Connect the air line to the Air Plug (part #21).
Step 4) Grasp the fastener by the shaft and insert it into the Guide Bushing (part #20) as shown below
in Figure 1.
Warning: Never allow the point of any fastener to face your body, any other person or
animal, or any equipment that could be injured or damaged!
Air Plug
Step 5) Holding the Nailer firmly, bring the point of the F astener in to contact with the work
piece and firmly press down until the Guide Bushing (#20) is fully retracted into the Guide
Bushing Retainer (part #18). The Nailer will then begin nailing.
#41164 REV 07/01 REV 11/06 Page 4
Page 5

Step 6) Lift the Nailer off of the work piece immediately after the fastener has been driven in.
Step 7) Upon completion of your job, disconnect the Nailer from the air supply. Turn off
the compressor.
Caution: Disconnect the Air Hand Nailer from the compressor hose before performing maintenance or
replacing parts.
Spring and Connector Replacement
If the Spring (part #17) begins to slip, you must replace the Guide Bushing (#18), Guide Bushing Retainer (#18),
and Seal Ring (part #19).
Step 1) Remove the Guide Bushing Retainer from the Tool. Slide the Retainer off of the Guide
Bushing.
Step 2) Remove the Spring from the Nailer. Replace the Spring, Guide Bushing and
Guide Bushing Retainer. Securely tighten back into place.
Seal Ring Replacement
If air leaks from the unit, you will need to replace the Seal Ring (part #14). Take the f o llowing steps if y ou are
replacing the Seal Ring.
Step 1) Remove the f our Hex Bolts (part #1) from the Exhaust Cover (part #2). Remove the Exhaust
Cover from the body (part #16).
Step #2) Remove the Seal Ring. It may involve some scraping for remo v al.
Step #3) Using the appropriate replacement Seal Ring (available through Harbor F reight Tools), replace
the worn Seal Ring with the new Seal Ring.
Step #4) Replace the Exhaust Cover and Hex Bolts . Tighten do wn securely.
IF THERE IS ANY QUESTION ABOUT A CONDITION BEING SAFE OR UNSAFE, DO NOT OPERATE THE TOOL.
Unpacking
UNPACK AND CHECK CONTENTS
When unpacking your Air Hand Nailer , chec k to make sure the f ollo wing parts are included. If any parts are
missing or broken, please call HARBOR FREIGHT T OOLS at 1-800-444-3353.
Part # Description Quantity Part # Description Quantity
1 Hex Bolt 1 13 Pipe 1
2 Exhaust Cover 1 14 Seal Ring 1
3 O-Ring 2 15 O-Ring 1
4 O-Ring 1 16 Body 1
5 O-Ring 2 17 Spring 1
6 Main Piston Unit 1 18 Guide Bushing 1
7 Slide Cover 1 19 Seal Ring 1
8 O-Ring 1 20 Guide Bushing Retainer 1
9 O-Ring 1 21 Air Plug 1
10 Cylinder 1 22 Hook 1
11 Cylinder Sleeve 1 23 W asher 1
12 Bumper 1 2 4 Hex Bolt 1
#41164 REV 07/01 Page 5
Page 6
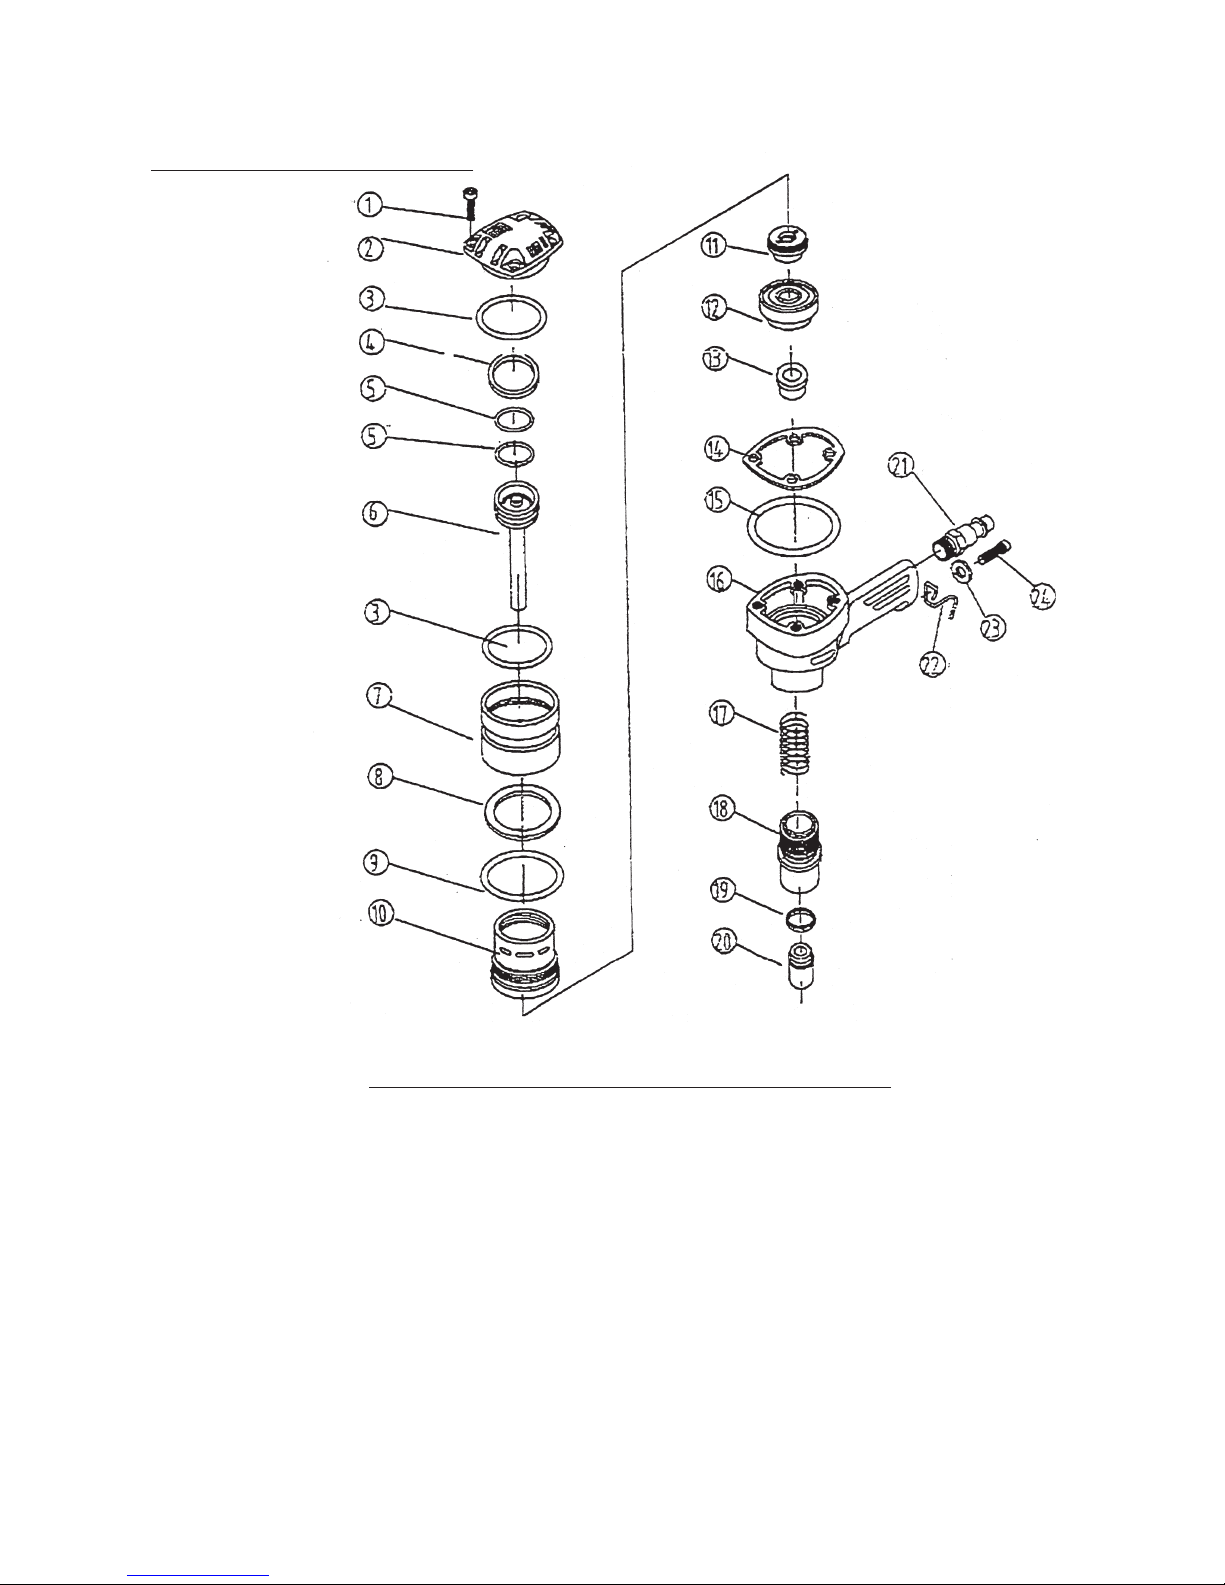
Assembly Diagram-Air Hand Nailer
PLEASE READ THE FOLLOWING CAREFULLY
THE MANUFACTURER AND/OR DISTRIBUTOR HAS PROVIDED THE PARTS
DIAGRAM IN THIS MANUAL AS A REFERENCE TOOL ONLY. NEITHER THE
MANUFACTURER NOR DISTRIBUTOR MAKES ANY REPRESENTATION OR
WARRANTY OF ANY KIND TO THE BUYER THAT HE OR SHE IS QUALIFIED TO MAKE
ANY REPAIRS TO THE PRODUCT OR THAT HE OR SHE IS QUALIFIED TO REPLACE
ANY PARTS OF THE PRODUCT. IN FACT, THE MANUFACTURER AND/OR
DISTRIBUTOR EXPRESSLY STATES THAT ALL REPAIRS AND PARTS
REPLACEMENTS SHOULD BE UNDERTAKEN BY CERTIFIED AND LICENSED
TECHNICIANS AND NOT BY THE BUYER. THE BUYER ASSUMES ALL RISK AND
LIABILITY ARISING OUT OF HIS OR HER REPAIRS TO THE ORIGINAL PRODUCT OR
REPLACEMENT PARTS THERETO, OR ARISING OUT OF HIS OR HER INSTALLATION
OF REPLACEMENT PARTS THERETO.
#41164 REV 07/01 Page 6
 Loading...