

Page 1

INFRARED LASER
THERMOMETER
ASSEMBLY & OPERATING INSTRUCTIONS
Visit our Web site at http://www.harborfreight.com
Copyright © 2003 by Harbor Freight Tools®. All rights reserved. No portion of this manual
or any artwork contained herein may be reproduced in any shape or form without the
express written consent of Harbor Freight Tools.
For technical questions please call 1-800-444-3353
3491 Mission Oaks Blvd., Camarillo, CA 93011
Page 2

SPECIFICATIONS
ITEM
Material
Finish
Storage Case
Non-Contact
Thermometer w/
DESCRIPTION
Plastic Housing w/LCD Display
Black Housing w/Yellow Trim
Green Polyester with Black Trim/ Zipper,
Padded
Switch from Fahrenheit to Celsius, LCD
Display, last reading is held for 7 seconds
Laser
Distance and
Spot Size
4 Digital Readout
D/S:6:1, 1”@6”, 2”@12”, 4”@24”
Reading: 0F to 650F Degrees and
-18C to 315C Degrees
Battery (not included)
9V Alkaline or NICAD Battery (required)
SAVE THIS MANUAL
You will need the manual for the safety warnings and precautions, assembly
instructions, operating and maintenance procedures, parts list and diagram. Keep
your invoice with this manual. Write the invoice number on the inside of the front
cover. Keep the manual and invoice in a safe and dry place for future reference.
SAFETY WARNINGS AND PRECAUTIONS
1. KEEP PRODUCT USAGE AREA CLEAN. Cluttered areas invite injuries.
2. KEEP CHILDREN AWAY FROM PRODUCT. This is not a toy. It is a delicate/
precision instrument. Do not allow children to handle this product.
3. TO AVOID RISK OF PERSONAL INJURY, EQUIPMENT DAMAGE, FIRE AND
SHOCK, make sure your work area is free of damp, wet or rainy conditions.
4. USE EYE PROTECTION. NEVER point the laser directly at the eye. Do not point
laser on or indirectly off of a reflective surfaces such as Stainless Steel or
Aluminum, etc.
6. CHECK FOR DAMAGED PARTS. Before using this product, carefully check that it
will operate properly and perform its intended function. Check for damaged parts and
any other conditions that may affect its operation. Replace or repair damaged or
worn parts immediately.
7. DO NOT USE PRODUCT IN FOLLOWING FIELDS- EMF (electromagnetic fields),
arc welder, induction heater, etc.
8. ABRUPT TEMPERATURE CHANGE CAN CAUSE HEAT SHOCK. If this occurs,
allow 30 minutes for thermal stabilization before using again to prevent the possibility
of inaccurate temperature readings.
SKU 90380 PAGE 2
Page 3

9. DON’T LEAVE UNIT ON or near objects of high temperature.
10. DO NOT OVERREACH. Keep proper footing and balance at all times when
using this product.
11. REPLACEMENT PARTS AND ACCESSORIES. When servicing, use only identical
replacement parts. Only use accessories intended for use with this product. Approved
accessories are available from Harbor Freight Tools.
12. MAINTAINING PRODUCT. This is a delicate/precision instrument. Keep clean and dry.
Any repairs should be done by qualified technicians only.
13. USE THE RIGHT PRODUCT FOR THE RIGHT JOB. There are certain applications
for which this product was designed. It will do the job better and more safely at the rate
for which it was intended. Do not modify this tool and do not use this tool for any purpose
other than which it was intended.
UNPACKING
When unpacking, check to make sure all parts shown on the Parts List (page #5) are included.
If any parts are missing or broken, please call Harbor Freight Tools at the number shown on the
cover of this manual as soon as possible.
The Infrared Laser Thermometer
With this non-contact Thermometer, you can point, shoot and read the Laser by pointing directly at
the target and get an accurate reading. Switch from Fahrenheit to Celsius for instant temperature
readings. Temperature measurement has never been easier. Accuracy is +/- 2%. Response time is
500MS. It’s flashlight shape design has a Storage Case making it compact and portable.
Electronic field: This instrument can measure the radiation point of an electric panel, fuse, dynamotor and gearbox and electronic parts.
Do not use product in following fields- EMF (electromagnetic fields), arc welder, induction
heater, etc.
Heating and Air-Condition field: Checks and monitors supply, leakage of pipe and air
stratification.
Automotive field: Check cylinder, heat system & cool system, scan radiator, etc.
Food field: When foods are stored, measures surface temperatures in accordance with HACCP
(Hazard Analysis & Critical Control Point) standards.
Assembly of Infrared Thermometer
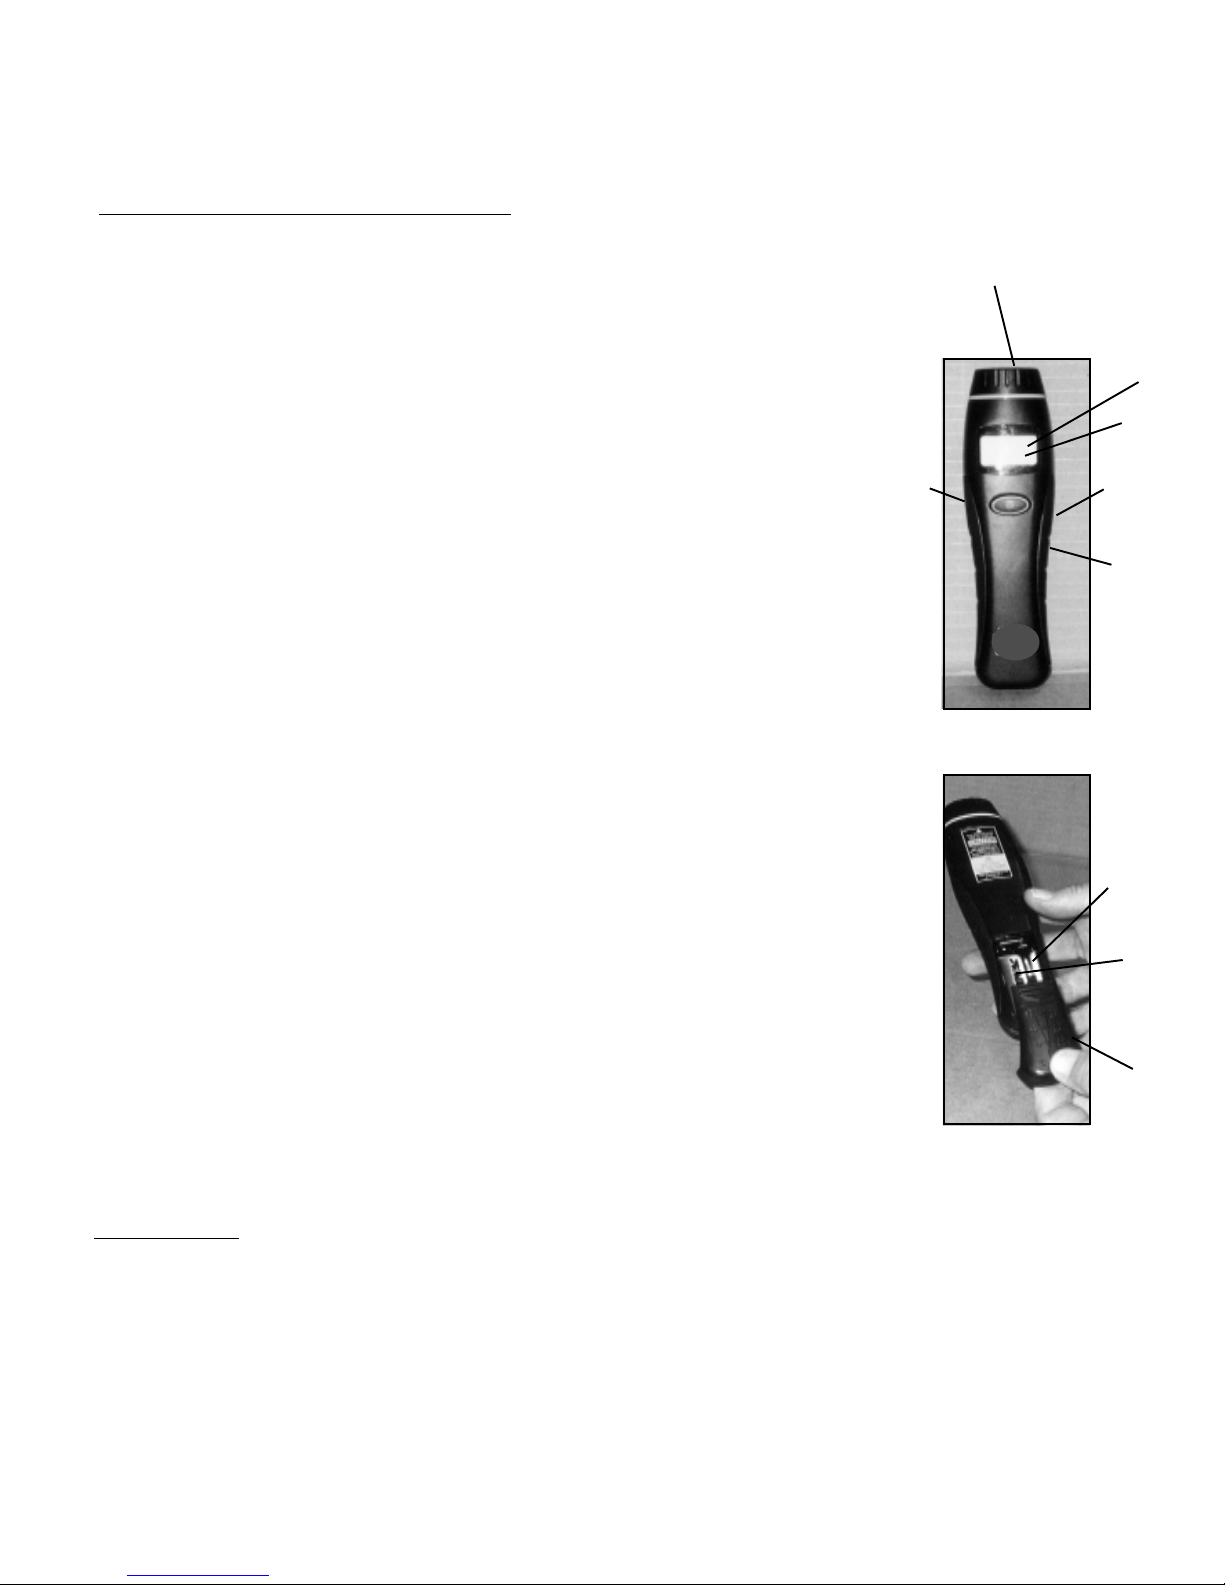
1. Slide off the Battery Cover exposing the Battery Cavity (#7). See Figure 2.
2. Insert the DC 9V Battery (not included) into the Battery compartment. DISPOSE OF OLD
BATTERIES PROPERLY. Never put in fire. Contact local Hazard Waste Disposal
authorities for proper guidelines. Replace Battery Cover over the Battery Cavity (#7) after
inserting a new Battery.
SKU 90380 PAGE 3
Page 4
Operating the Infrared Thermometer
#3
Laser
Source
1. Press the Measure and Laser Button (#5) for the Laser Source (#3). Point the
Laser directly at the target and the temperature reading (Temperature
Detector #1) will appear under the LCD Protective Cover (#4). See Figure 1.
2. You may set the temperature to Fahrenheit or Celsius by moving the
Switch (#6) on the side of the Infrared Thermometer up or
down as marked. See Figure 1.
#2
Power
Switch
3. To obtain accurate temperature readings, you must be sure the distance
from the target is correct. Determine the distance to be measured. The
farther the distance from the target, the larger the spot size.
4. The smaller the object, the closer you should be to it. If you want to get an
accurate reading, you must be sure that the laser reflection is twice as large
as the object.
5. To find a “hot spot”, aim the thermometer outside the area of interest.
Then scan across the object with an up and down motion until you locate
the “hot spot”.
6. When you release the Measure and Laser Button (#5), the last
reading will be held for 7 seconds. The HOLD icon appears on the
screen. See Figure 1.
Figure 1
#1
Temperature
Detector
#4
LDC
Cover
#5
Press
Measure &
Laser
Button
#6
0
C / 0F
Switch
#7
Battery
Cavity
(Battery
not
included)
7. Use masking tape or flat black paint to cover surfaces such as shiny or
polished metal that has low emissive measurements. Take into consideration
the tape and allow more time for the tape to get the same temperature as the
material underneath the tape.
8. If your Battery is low, the LDC screen (#4) will indicate “low battery”.
At this time you will need to replace the Battery (#9). Dispose of the old
Battery. (Contact local Hazard Waste Disposal authorities for proper
guidelines for disposal). See Figure 2.
Figure 2
Maintenance
1. Clean the LDC Protective Cover (#4) with a can of compressed air (not included). Gently brush
remaining dust with a camel hair brush. Carefully wipe the surface with a moist cotton swab
moistened with water or water based glass cleaner.
.
2. For better and safer performance, keep all parts of this product clean and dry at all times
SKU 90380 PAGE 4
#9
Battery
Battery
Cover
Page 5
PARTS LIST
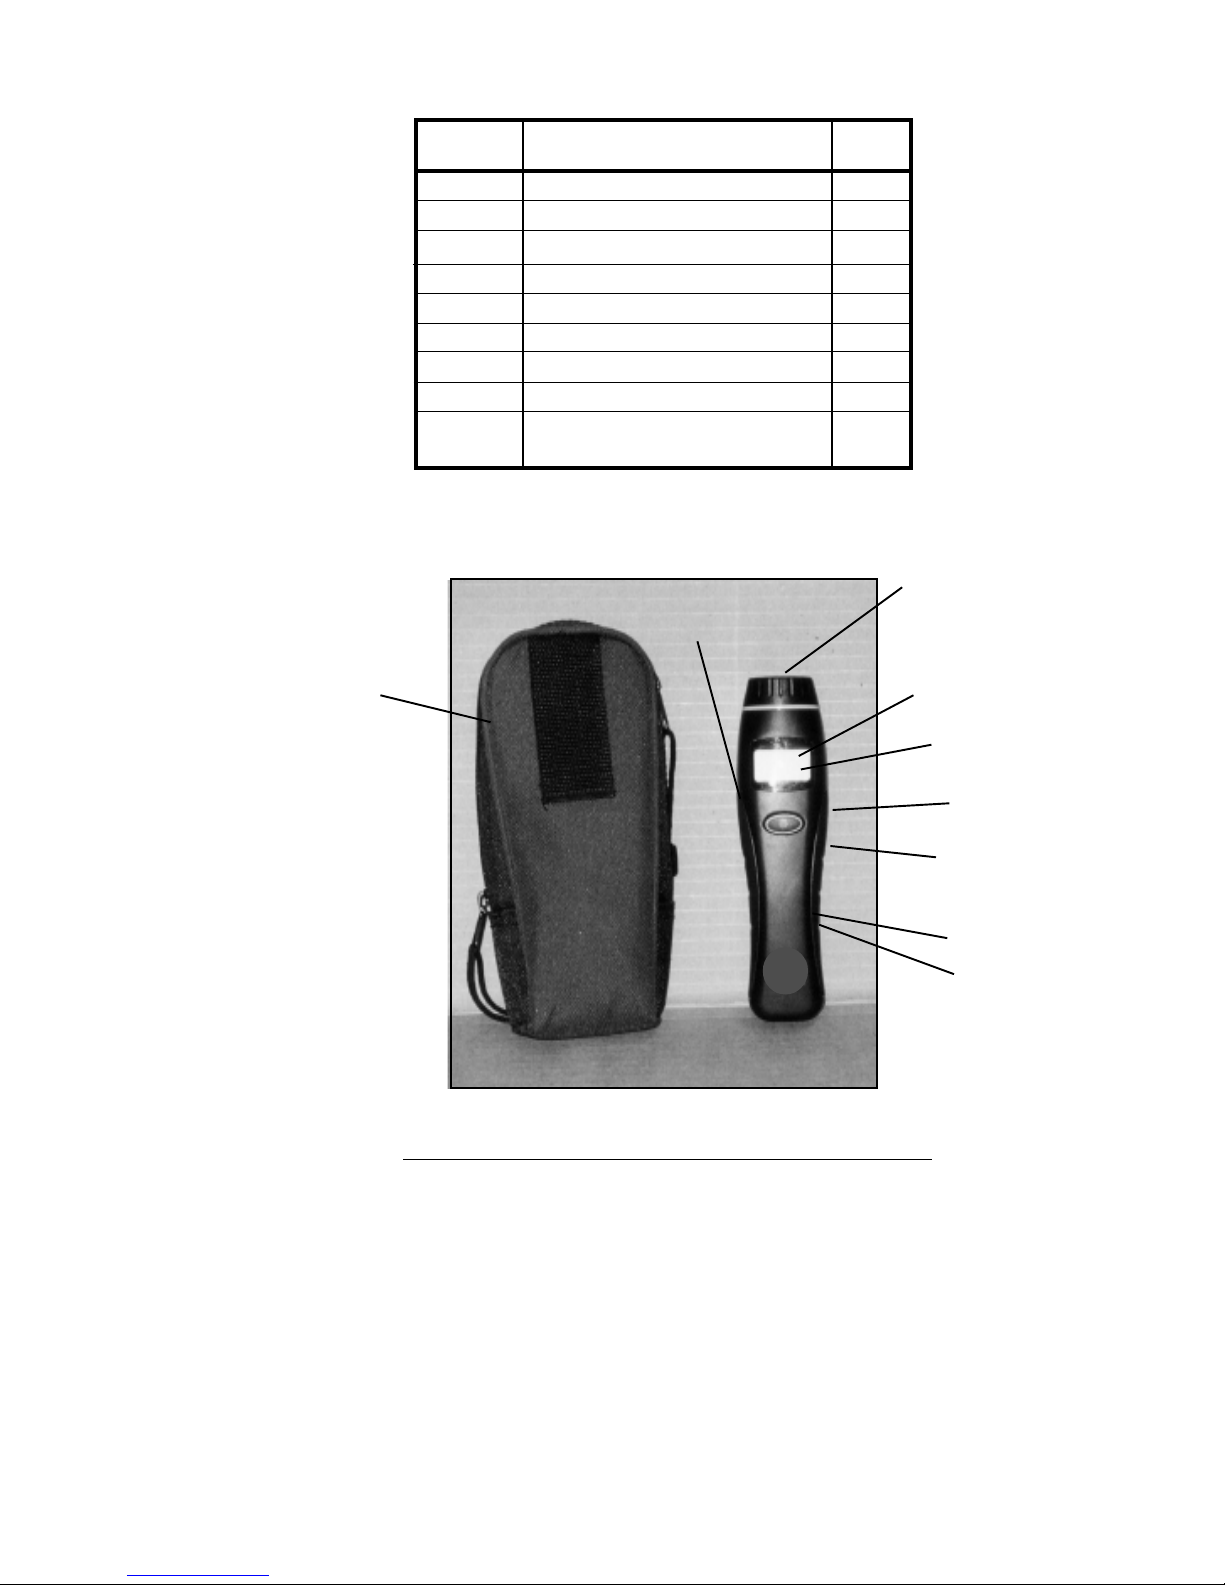
PART # DESCRIPTION QTY
#8
1
2
3
4
5
6
7
8
9
Temperature Detector
Power Switch
Laser Source
LCD Protective Cover
Measure and Laser Button
Celsius or Fahrenheit Switch
Battery Cavity
Carrying Case/Storage Case
Battery-90V Alkaline or Nicad
Battery (not included)
PARTS ASSEMBLY
#2
1
1
1
1
1
1
1
1
1
#3
#1
#4
#6
#5
#7
#9
PLEASE READ THE FOLLOWING CAREFULLY
THE MANUFACTURER AND/OR DISTRIBUTOR HAS PROVIDED THE PARTS DIAGRAM IN THIS
MANUAL AS A REFERENCE TOOL ONLY. NEITHER THE MANUFACTURER NOR DISTRIBUTOR
MAKES ANY REPRESENTATION OR WARRANTY OF ANY KIND TO THE BUYER THAT HE OR SHE IS
QUALIFIED TO MAKE ANY REPAIRS TO THE PRODUCT OR THAT HE OR SHE IS QUALIFIED TO
REPLACE ANY PARTS OF THE PRODUCT. IN FACT, THE MANUFACTURER AND/OR DISTRIBUTOR
EXPRESSLY STATES THAT ALL REPAIRS AND PARTS REPLACEMENTS SHOULD BE UNDERTAKEN
BY CERTIFIED AND LICENSED TECHNICIANS AND NOT BY THE BUYER. THE BUYER ASSUMES
ALL RISK AND LIABILITY ARISING OUT OF HIS OR HER REPAIRS TO THE ORIGINAL PRODUCT OR
REPLACEMENT PARTS THERETO, OR ARISING OUT OF HIS OR HER INSTALLATION OF REPLACEMENT PARTS THERETO.
SKU 90380 PAGE 5
 Loading...