

Page 1
CT-10 Response Manual
™
CT-10 Response Manual
LIMITED WARRANTY
Subject to the conditions and exceptions stated in this
warranty Cen-Tec Systems warrants the products sold by
Cen-Tec Systems to be free from defects in materials and
workmanship under normal residential use and service for
one (1) year from the date of deliver y on presentation of the
original contract or invoice. A copy of the original bill of sale
must accompany all warranty requests. If one is not produced
as required the manufactures date code will be used.
CONTACT INFORMATION
1807 Morrissey Drive
Bloomington, Illinois 61704
PHONE: (309) 664-0328
TOLL FREE: (800) 833-2822
FAX: (309 663-8766
EMAIL: [email protected]
WEBSITE: www.centecsystems.com
www.centeccommercial.com
©Cen-Tec Systems Inc 2008 F51088
Page 2
Safety instructions
!
WARNING
Electric shock could
occur if used out doors
or on wet surfaces.
Please read all instructions before using this Electric Powerhead.
Save these instructions. INTENDED FOR HOUSEHOLD USE ONLY.
1) Unplug and disconnect power before servicing.
2) Always turn o this appliance before connecting
or disconnecting either hose or motorized
nozzle.
3) Do not pick up anything that is burning or
smoking, such as cigarettes, matches or hot
ashes.
4) Use only as described in this manual. Use only
manufacturers recommended attachments.
5) Do not unplug by pulling on cord. to unplug,
grasp the plug, not the cord.
6) Do not handle system or appliances with wet
hands.
7) Turn o all controls before unplugging.
8) Do not use with damaged cord or plug. If
appliance is not working as it should, has been
dropped, damaged, left outdoors, or dropped
into water, return it to distributor.
9) Do not allow to be used as a toy. Close attention
is necessary when used by or near small
children.
10) The hose contains electrical wires. Do not use if
damaged, cut or punctured. Avoid picking up
sharp objects.
11) Do not put any object into openings.
12) Do not use with any opening blocked; keep free
of dust, lint, hair, and anything that may reduce
air ow.
13) Keep hair, loose clothing, ngers, and all parts of
the body away from openngs and moving parts.
14) Do not leave vacuum or brush when plugged in.
Unplug from outlet when not in use and before
servicing.
15) Do not pick up ammable or combustible
liquids such as gasoline or use it in areas where
they may be present.
16) Use extra care when cleaning on stairs.
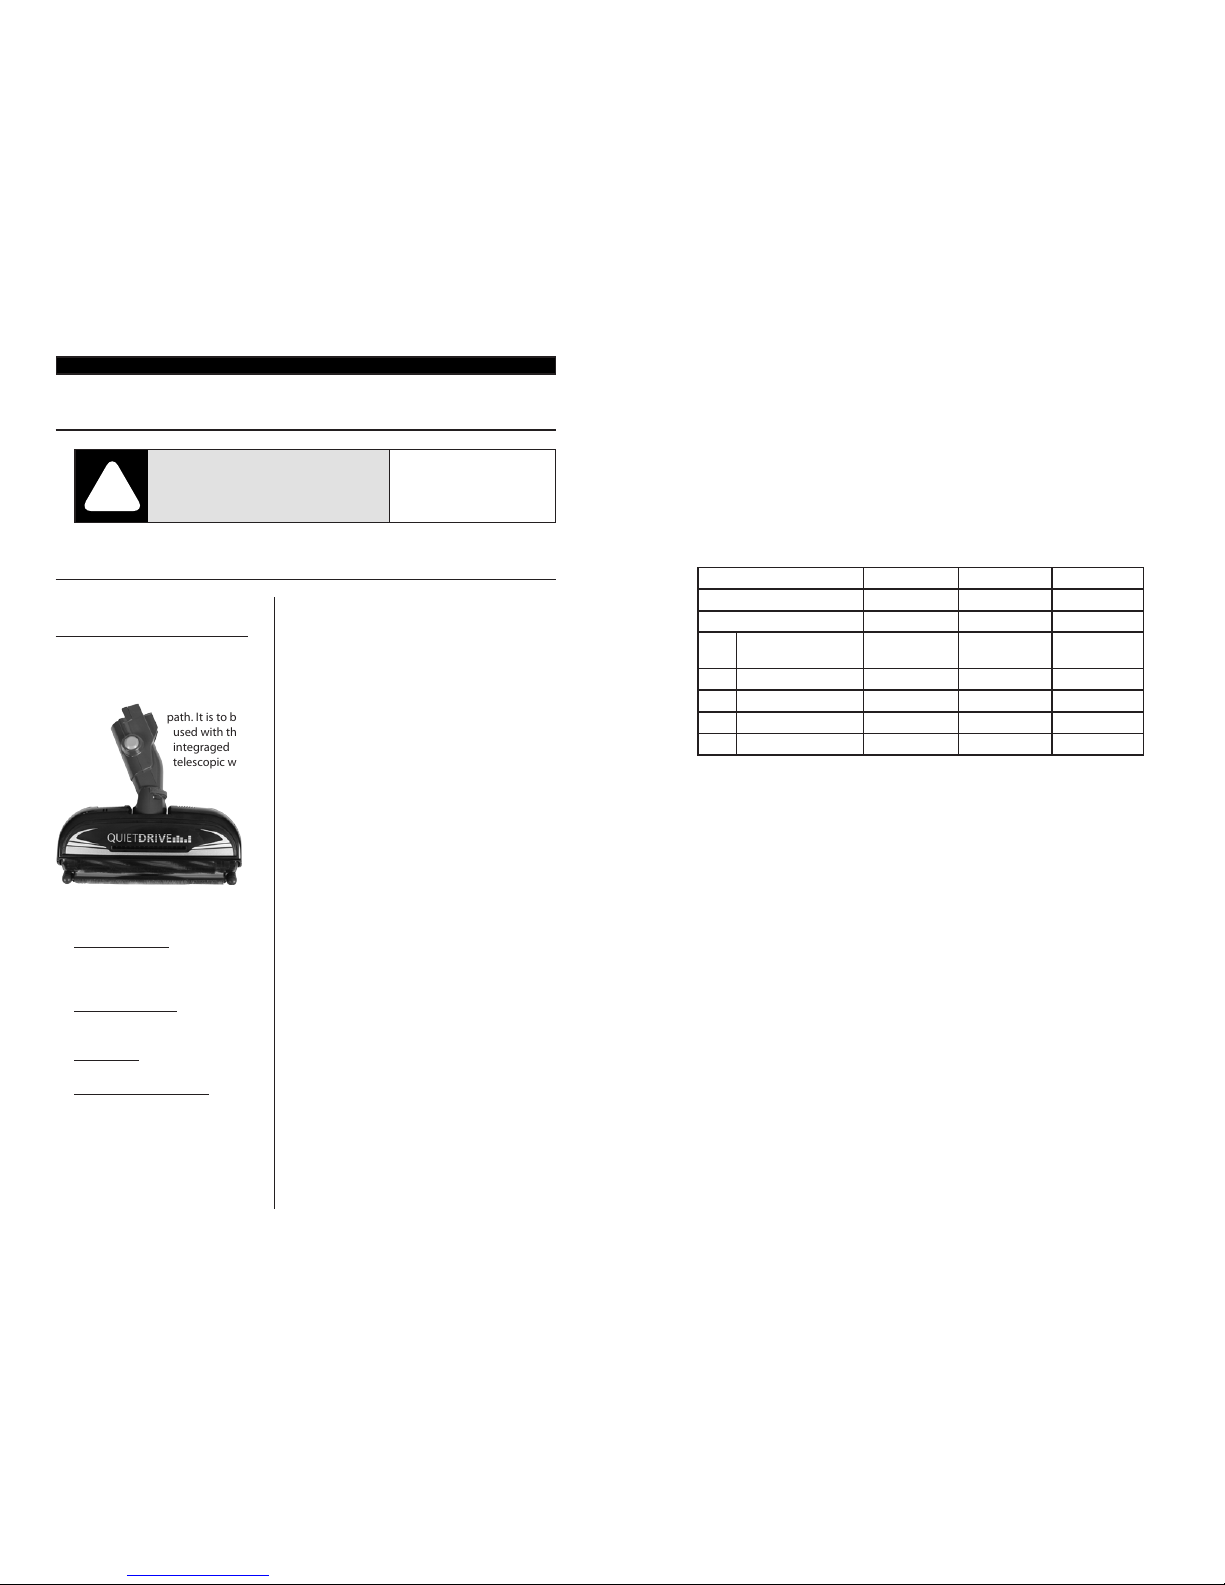
CT-10 Response
Premium Electric Power Brush
This power brush is used to vacuum
carpets and hard surfaces. It has a 10”
edge to edge brushed head to create
a wider cleaning
path. It is to be
used with the
integraged
telescopic wand.
Features include:
Quietdrive™ V-Belt• - Multi-grooved
reinforced belt for continuous contact
and ecient transfer of power to the
brush.
Quick Wand Release• - For an easy
switch from carpet to hard oor, edge
cleaning or above oor cleaning.
Soft Bumper• - Wraps around brush
to protect baseboards and furniture.
Active Brush Edge Cleaner• - Guide
either side of the brush along base
boards or next to furniture to help
remove dirt trapped at carpet edges.
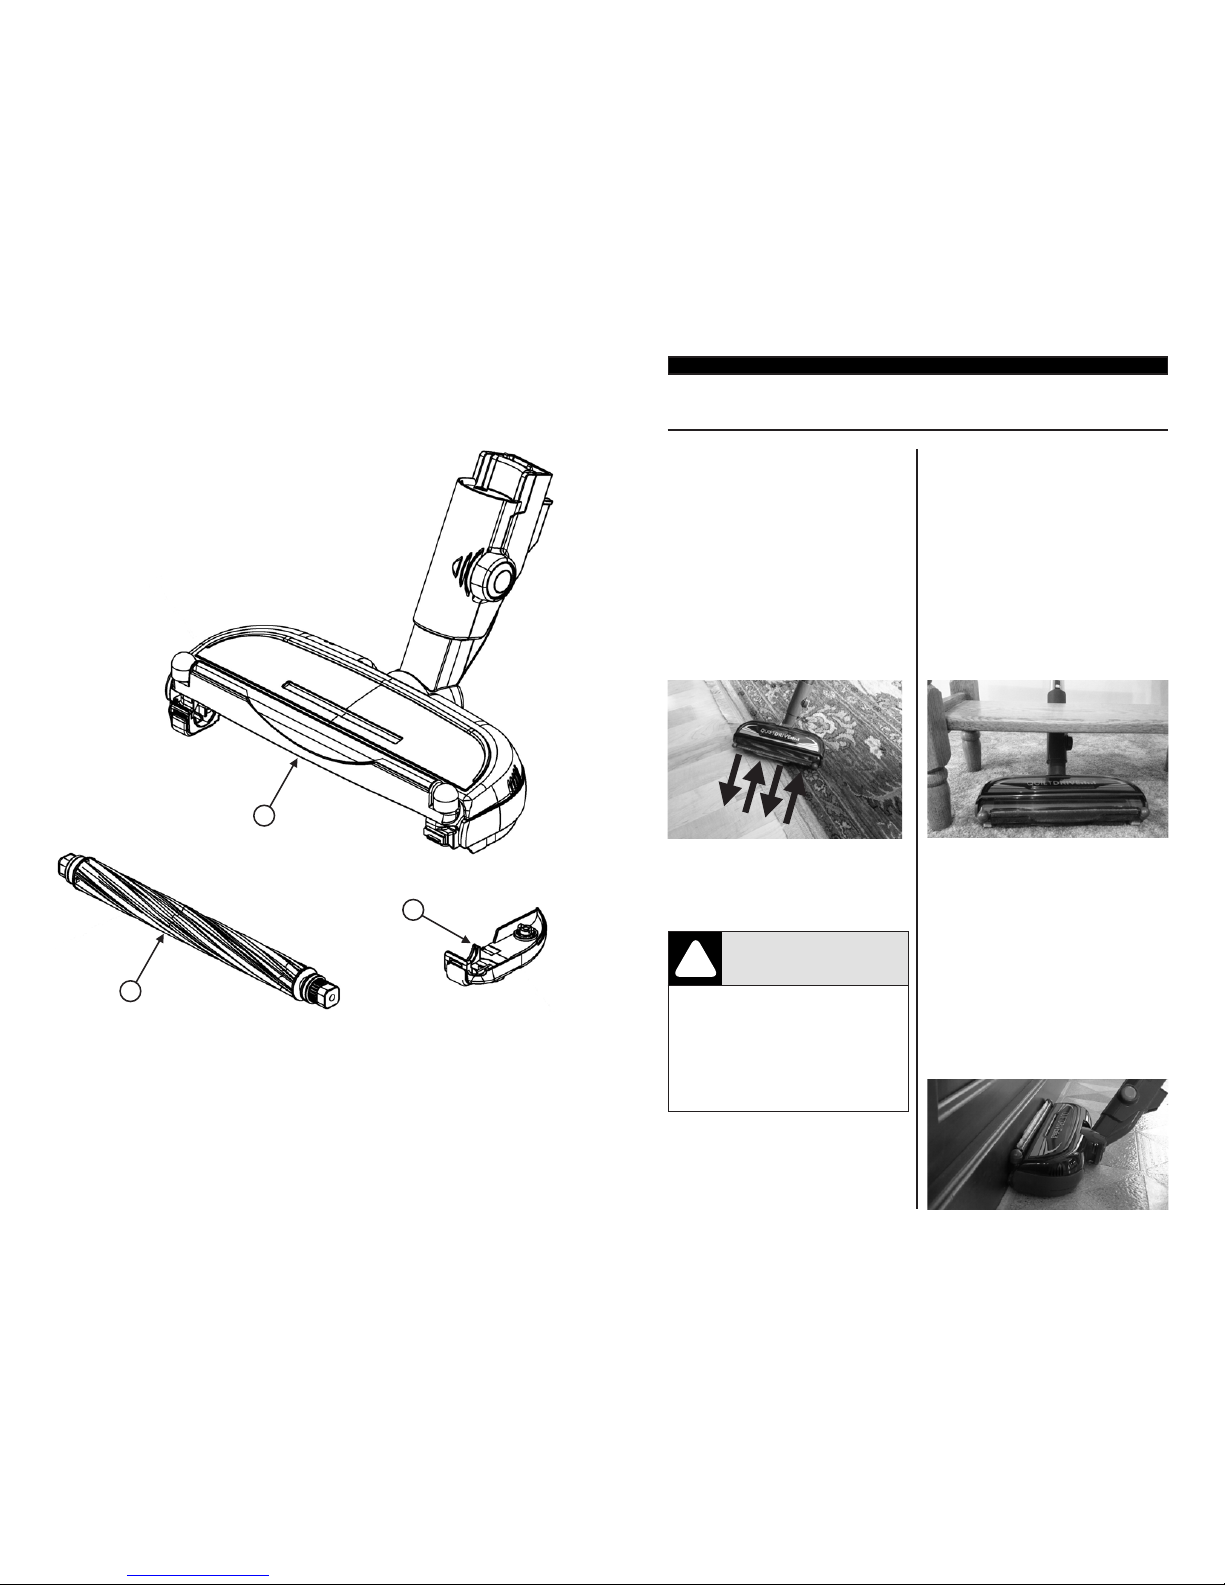
Cen-Tec CT-10 00
Electric Brush Parts Explosion List
ASSEMBLY NUMBER C50XEBE00000 C50XECG00000 C50ECV00000
REVISION D D D
VENDOR 535 535 535
ITEM
N0.
PART NAME PART NUMBER PART NUMBER PART NUMBER
1 POWER NOZZLE UNIT C85PEBE00000 C85PECG00000 C85PECV00000
2 AGITATOR ASSEMBLY C92SEBE00000 C92SEBE00000 C92SEBE00000
3 BELT COVER C43SEBE00000 C43SEBE00000 C43SEBE00000
- - - PACKAGING OPTION OPTION2 OPTION 1 OPTION 2
NOTES:
REFER TO B.O.M. FOR COMPLETE LIST OF PART NUMBERS, COLORS & QUALITIES.1.
AGITATOR, WHEELS, SHUTTER AND SHUTTER ROLLERS TO ROTATE FREELY.2.
SWIVEL MUST ROTATE FREELY. THROUGH ALL THREE DETENT POSITIONS. WITH3.
AUDIBLE CLICK AT THE 0 ° AND 180 ° POSITION.
WITH NOZZLE CONNECTED TO C99PDXE EXTENSION WAND UNIT. BUTTON MUST4.
RELEASE THE LOCK SMOOTHLY AND WITH UNDUE NOISE.
SUPPLIER QUALITY SYSTEM MUST CONFORM TO QI-742-2**.5.
A. THIS COMPONENT OR ASSEMBLY (INCLUDING RAW MATERIALS) MUST6.
COMPLY WITH THE PANASONIC GROUP CHEMICAL SUBSTANCES ANAGEMENT
RANK GUIDELINES (LATEST VERSION) : OF PANASONIC APPLIANCES COMPANY
RECEIVING CONTROL GUIDLINES FOR PROHIBITED SUBSTANCES IN PRODUCT.
B. RED AND/OR YELLOW TAPE AND PAINT THAT MAY REMAIN OR ADHERE IN THE
FINAL PRODUCT SHOULD NOT BE USED.
Page 3
Cen-Tec CT-10 00
Electric Brush Parts Explosion
Vacuuming tips
Suggested Sweeping Pattern
For best cleaning action, the
powerhead should be pushed
straight away from you and pulled
straight back. At the end of each
pull stroke, the direction of the
powerhead should be changed to
point into the next section to be
cleaned. This pattern should be
continued across the carpet or oor
with slow, gliding motions.
NOTE: Fast random strokes do not
provide complete cleaning.
!
WARNING
Personal Injury and Product Damage Hazard
DO NOT run over power cord with the •
powerhead. Personal injury or product
damage could result.
DO NOT pull plug from wall by the •
power cord. If there is damage to the cord
or plug, personal injury or property damage
could result.
Powerhead Steering
The nozzle swivel rotates left and
right for improved maneuvering in
tight spaces and around corners.
Under Furniture
To maximize the reach of the
powerhead under furniture, turn the
handle to either side and lower the
wand close to the oor.
Edge Cleaning
To clean the corners of the oor and
wall press the powerhead against
the wall until the shutter system is
fully opened. On hard surfaces such
as tile, linoleum, wood and stone it
is possible to move the powerhead
along the wall edge for easier
cleaning. Carpet and area rugs may
be more dicult.
2
3
1
Page 4
Belt & Agitator Changing/Replacement Agitator Cleaning
To Clean Agitator
NOTE: In order to keep cleaning
eciency high and to prevent
damage to your powerhead, the
agitator must be cleaned every time
the belt is changed. The agitator
must also be cleaned according to
the following schedule.
Vacuum Cleaner Use
HEAVY -
(used daily)
MODERATE -
(used 2-3 times/week)
LIGHT -
(used 1 time/week)
Clean Agitator
every week
every month
every 2 months
IMPORTANT
Disconnect powerhead from
electrical outlet. Check and remove
hair, string and lint build-up
frequently in the powerhead agitator
and end cap areas.
Remove any dirt or debris in the belt
path area or in the brush roller area.
Carefully remove string or debris
located on the agitator or end caps.
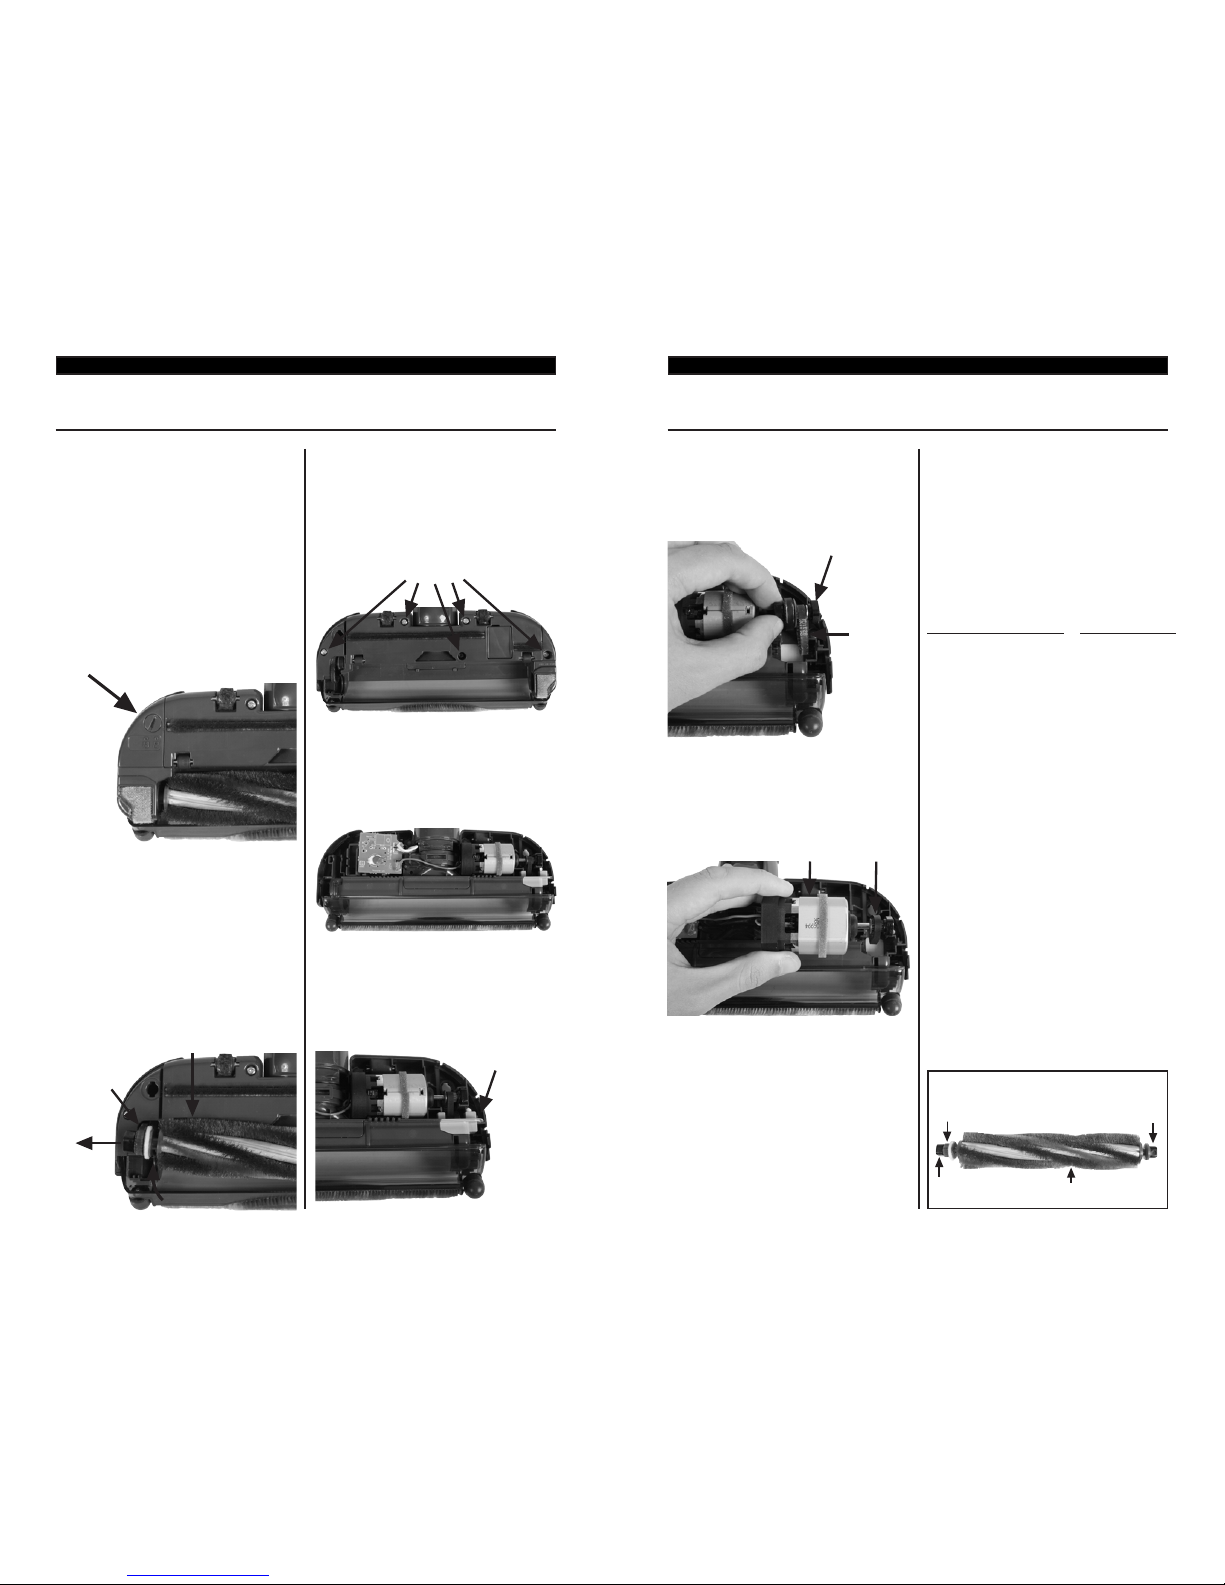
1) Turn the nozzle upside down
and locate the belt plate shown
below.
2) Turn the locking mechanism
counter-clockwise to the
unlock position and remove
the belt plate from the nozzle.
3) Lift the agitator on the belt
connected end.
4) Pull the belt o of the
agitator and remove the
agitator from the nozzle.
5) Remove the ve screws
from the bottom of the nozzle
located below.
7) Remove the light gray cover
plate shown below.
8) Carefully lift up the axel
holding the belts and remove
the axel and agitator belt.
9) Lift up the motor to replace
the second belt.
Agitator
Belt
Screws
Cover Plate
Axel
Belt
Motor
Belt
End Cap
Belt Path
Brush Unit
End Cap
Agitator Assembly
Belt Plate
6) Turn the nozzle over and
remove the top casing.
10) To put the nozzle back
together follow the steps in
reverse order (9 to 1).
To Replace BeltsTo Replace Agitator
 Loading...