

Centec M2827-2 Dirt Devil Operation And Safety Notes
Vacuum Cleaner
M2827-2
VACUUM CLEANER
Operation and Safety Notes
PÖLYNIMURI
Käyttö- ja turvaohjeet
DAMMSUGARE
Bruksanvisning och säkerhetsanvisningar
STØVSUGER
Brugs- og sikkerhedsanvisninger
BODENSTAUBSAUGER
Bedienungs- und Sicherheitshinweise

2
DE
CH
AT
GB
IE
SE
FI
DK
Operation and Safety Notes ........................................................................................................................ 4 - 9
Käyttö- ja turvaohjeet .................................................................................................................................. 10 - 15
Bruksanvisning och säkerhetsanvisningar .............................................................................................. 16 - 21
Brugs- og sikkerhedsanvisninger ............................................................................................................. 22 - 27
Bedienungs- und Sicherheitshinweise ...................................................................................................... 28 - 33
3
31
2
13
26
28
5
12
11
10
3
7
8
9
6
1
30
27
23
25
24
22
20
19
18
17
16
14
15
4
29
34
33
32
21
1
4
1 Overview of your Centec
1 Overview of your Centec
Thank you!
Thank you for purchasing the Centec and your confidence in us.
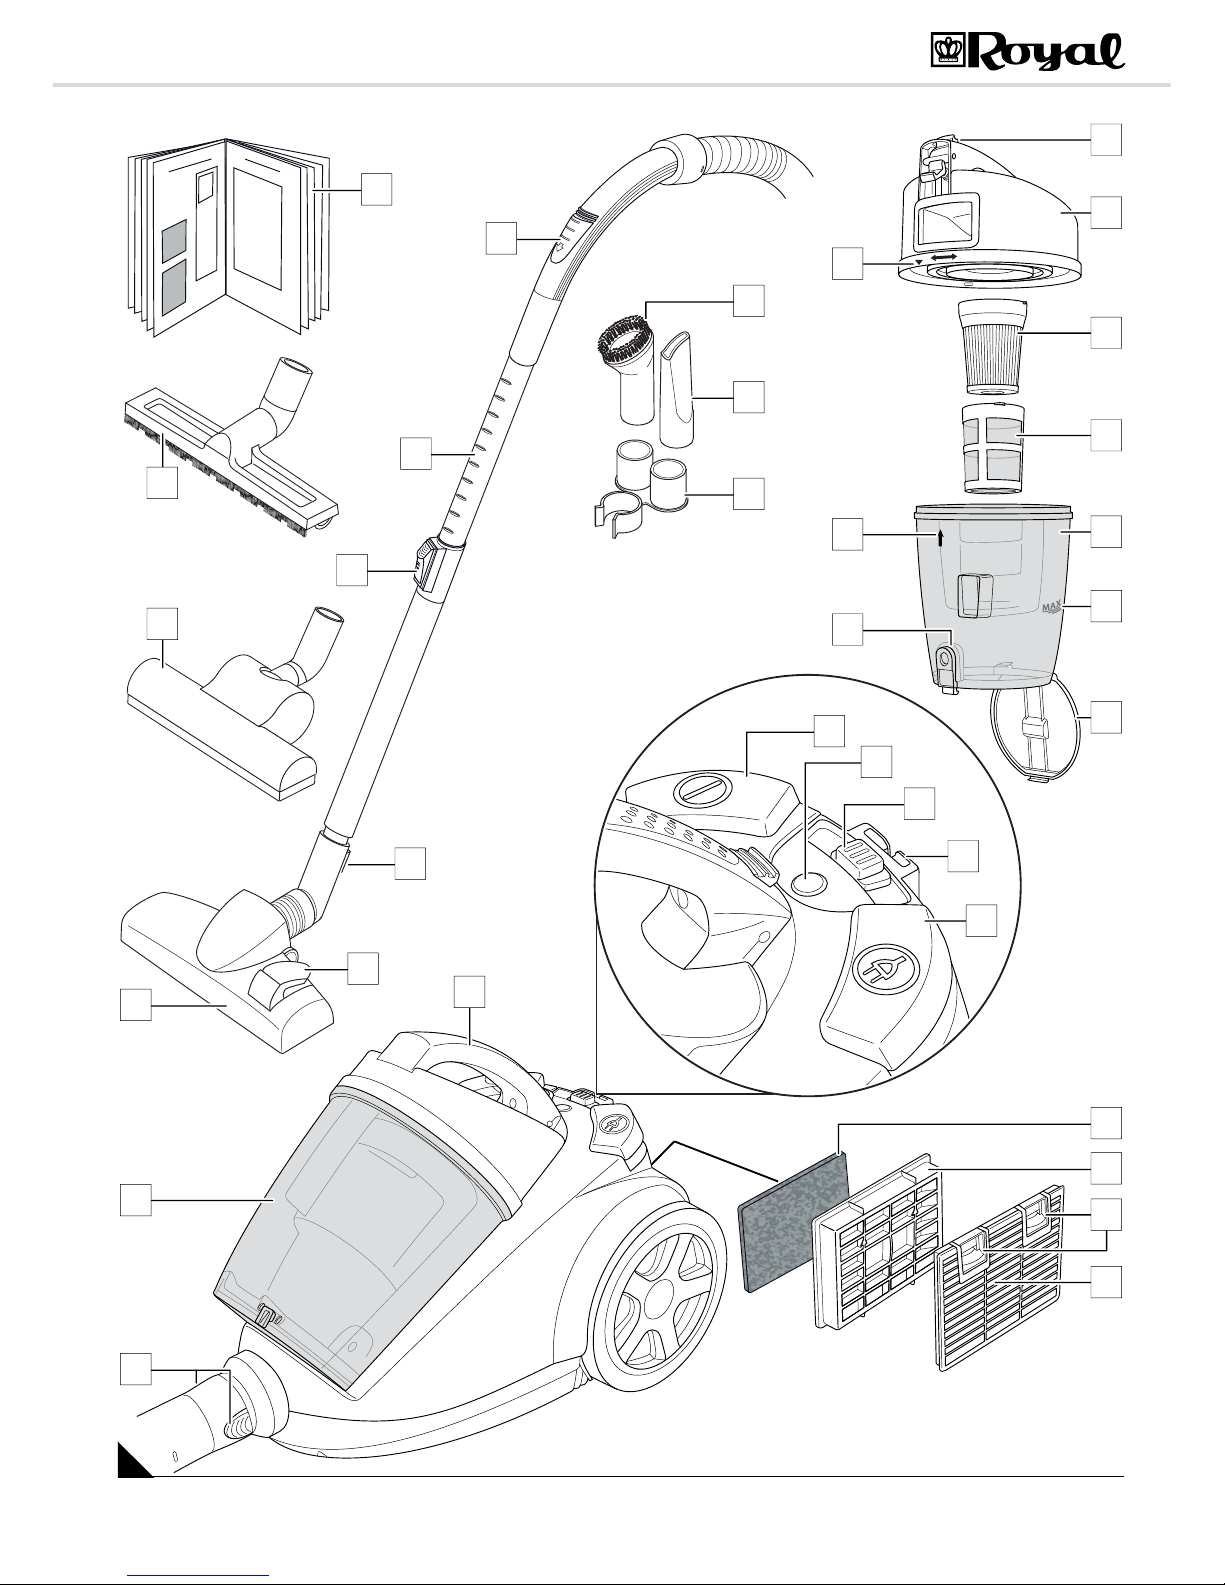
Overview of the scope of delivery (Fig. 1)
1 Suction hose release buttons
2 Dust container
3 Floor nozzle
4 Carrying-handle
5 "Carpet/hard floor" selector
6 Parking hook
7 Telescopic tube stop catch
8 Telescopic tube
9 Bypass vent
10 Furniture brush
11 Crevice nozzle
12 Accessory bracket
13 Emptying button
14 Fitting mark on the dust container
15 Fitting mark on the dust container cover
16 Release button for the dust container
17 Dust container cover
18 Central lamellae filter
19 Filter screen
20 Dust container
21 MAX marking on the dust container
22 Dust compartment bottom plate
23 On/Off switch
24 Cleaning indicator
25 Suction power control
26 Parking bracket
27 Cable retraction button
28 Exhaust filter element
29 Filter holder
30 Exhaust filter cover release buttons
31 Exhaust filter cover
32 Operating Manual
33 Parquet brush
34 Turbo brush
List of contents
1 Overview of your Centec ........................................................... 4
Conditions of warranty .................................................................. 4
In case of a warranty claim ........................................................... 4
2 Safety notices ............................................................................. 5
2.1 Re: Operating Manual .................................................................. 5
2.2 Re: Certain groups of persons ...................................................... 5
2.3 Re: Power supply ......................................................................... 5
2.4 Re: Appropriate Use ..................................................................... 5
2.5 If the appliance is defective .......................................................... 5
2.6 Re: Disposal ................................................................................. 5
3 Before use ................................................................................... 6
3.1 Unpacking ..................................................................................... 6
3.2 Selecting the proper nozzle .......................................................... 6
3.3 Assembly ...................................................................................... 6
4 Operation ..................................................................................... 7
4.1 Operational safety ........................................................................ 7
4.2 Vacuum cleaning .......................................................................... 7
4.3 Switching off ................................................................................. 7
4.4 Transport and storage .................................................................. 7
5 Maintenance ................................................................................ 8
5.1 Emptying and cleaning the dust container .................................... 8
5.2 Cleaning central lamellae filter and motor protection filter ............ 8
5.3 Cleaning the exhaust filter ............................................................ 9
5.4 Spare parts and accessories ........................................................ 9
5.5 Before you send in the appliance ................................................. 9
Technical data
Technical and design specifications may be changed in the course of continuous
product improvement. © Royal Appliance International GmbH
Conditions of warranty
We grant the legally prescribed warranty of 24 months from the date
of purchase for the appliance distributed by us.
Within this period we will either repair or replace the appliance or accessory
(damages to accessories do not automatically cause a replacement of the
complete appliance) all defects due to manufacturing or materials at no
cost.
Damages due to inappropriate use (operation on wrong voltage or type of
current, connecting to unsuitable power supplies, breakage, etc.) are
exempt from warranty, as are normal wear and minor defects that only
negligibly influence the appliance's serviceability.
Intrusions by unauthorised parties and the use of spare parts not supplied
by Royal
Appliance invalidate the warranty. Consumable parts are not
included in the warranty and are therefore at the customer's expense!
The warranty is only valid if the date of purchase has been acknowledged
by the dealer's stamp and signature on the warranty card or if a copy of the
invoice or sales slip is included with the sent-in appliance. Warranty work
does not extend the warranty period nor does it constitute a claim for a new
warranty!
In case of a warranty claim
Send us the appliance with its dust container empty and a short description
of the defect in printed letters.
Head your accompanying letter with the notice "warranty claim". Send it to
the following address, including the warranty card or a copy of the invoice
or purchase slip:
ZPage 37, „International Service“
Type of appliance : bagless cylinder vacuum cleaner
Model : Centec
Model number : M2827-2
Voltage : 220 – 240V ~, 50/60 Hz
Power : 1800 W nom. – 2300 W max.
Max. available dust bag capacity : approx. 1.5 litres
Power cord length : approx. 5 m
Weight : approx. 5.3 kg

5
2 Safety notices
GB
IE
2 Safety notices
2.1 Re: Operating Manual
Read this operating manual completely before working with the
appliance. Keep the operating manual for reference. Include the operating
manual if you pass the appliance on to someone else.
Violations of the operating instructions can lead to severe injuries as
well as damages to the appliance.
We take no responsibility for damages due to violations of these operating
instructions.
By all means always observe the notices marked as follows to avoid
accidents and damages to the appliance.
2.2 Re: Certain groups of persons
This appliance is not intended to be used by persons (including children)
with impaired physical, sensorial or mental abilities and/or insufficient
experience or knowledge, unless they are supervised by a person
responsible for their safety or have been instructed in the proper use of the
appliance by this person. Keep the appliance out of reach of people of these
groups.
Children should be supervised in order to make sure that they don’t play
with the appliance. Children must not be allowed to stand or sit on the
appliance.
Packing material must not be used to play with. There is danger of
suffocation.
2.3 Re: Power supply
The appliance runs on electricity -- that means there is a general risk of
electric shock. So please especially observe the following:
Never immerse the appliance in water or other liquids. Keep it away
from rain and moisture.
Always pull directly at the plug if you want to disconnect the appliance
from the mains. Never pull on the cable as this could damage it.
Never carry the appliance by its power cord. It could be damaged.
Take care that the power cord is not bent, pinched, rolled over or gets
in contact with heat sources. Also take care that it does not become a
stumbling-hazard.
Never touch the plug with wet hands.
Before connecting to the power supply, make sure that the voltage
stated on the type plate matches the voltage of your plug socket. Only use
sockets with a ground/safety contact.
If possible, avoid using extension cords. If you must use an extension
cord, use only safety-certified, water-protected single extension cords (nomulti-socket distributors) designed for the power consumption of the
appliance.
Always check the power cord for possible damages before using the
appliance.
2.4 Re: Appropriate Use
The cylinder vacuum cleaner is intended for home use only. It is not
suitable for commercial use.
Use the cylinder vacuum cleaner only for cleaning dry, normally soiled
floors. With the furniture brush attached, you may also use the appliance
for vacuuming furniture surfaces. With the bypass vent (Fig. 1/9) completely open and the necessary caution, you may even use the appliance to vacuum-clean drapes.
Any other use is considered inappropriate and is prohibited. It is
especially forbidden:
To use the appliance near explosive or easily flammable substances.
There is danger of fire or explosion.
To use the appliance outdoors. There is danger of rain and dirt
destroying the appliance.
To stick objects into the appliance's openings. It could overheat.
To modify or repair the appliance on your own.
It is also forbidden:
To vacuum-clean:
- hair, fingers and other body parts. They could be sucked in and
injured.
- pieces of clothing (e.g. shoelaces, scarves, etc.). They could be
sucked in and cause injuries.
- water and other fluids, especially damp carpet cleaning agents.
Moisture inside the appliance can cause a short-circuit.
- toner dust (for laser printers, copying machines, etc.). There is
danger of fire or explosion.
- hot ash, burning cigarettes or matches. This could cause a fire.
- pointed objects, such as glass shards, nails, etc. They can damage
the appliance.
- rubble, plaster, cement, fine drilling-dust, makeup, etc. These might
damage the appliance.
2.5 If the appliance is defective
If the power cord of this appliance is damaged it must be replaced by the
manufacturers, their authorised service representative or a similarly
qualified person to avoid danger.
Never use a defective appliance or operate an appliance with a defective
power cord. Bring or send a defective appliance to a specialist dealer or to
Royal Appliance Customer Services for repair. Address ZPage 37,
„International Service“.
2.6 Re: Disposal
Dispose of the appliance in compliance with the environmental
protection laws of your country. Electrical waste may not be disposed of together with domestic waste. Use local old-appliance
collection points instead.
The filters used are made from environment-friendly materials. You may
dispose of them in your household waste.
WARNING:
Warning concerning health hazards describing possible risks of injury.
ATTENTION:
Warning concerning possible dangers to the appliance or other objects.
NOTE:
Highlights tips and information for you.

6
3 Before use
3 Before use
3.1 Unpacking
1. Unpack the appliance and all its accessories.
2. Check that the contents are intact.
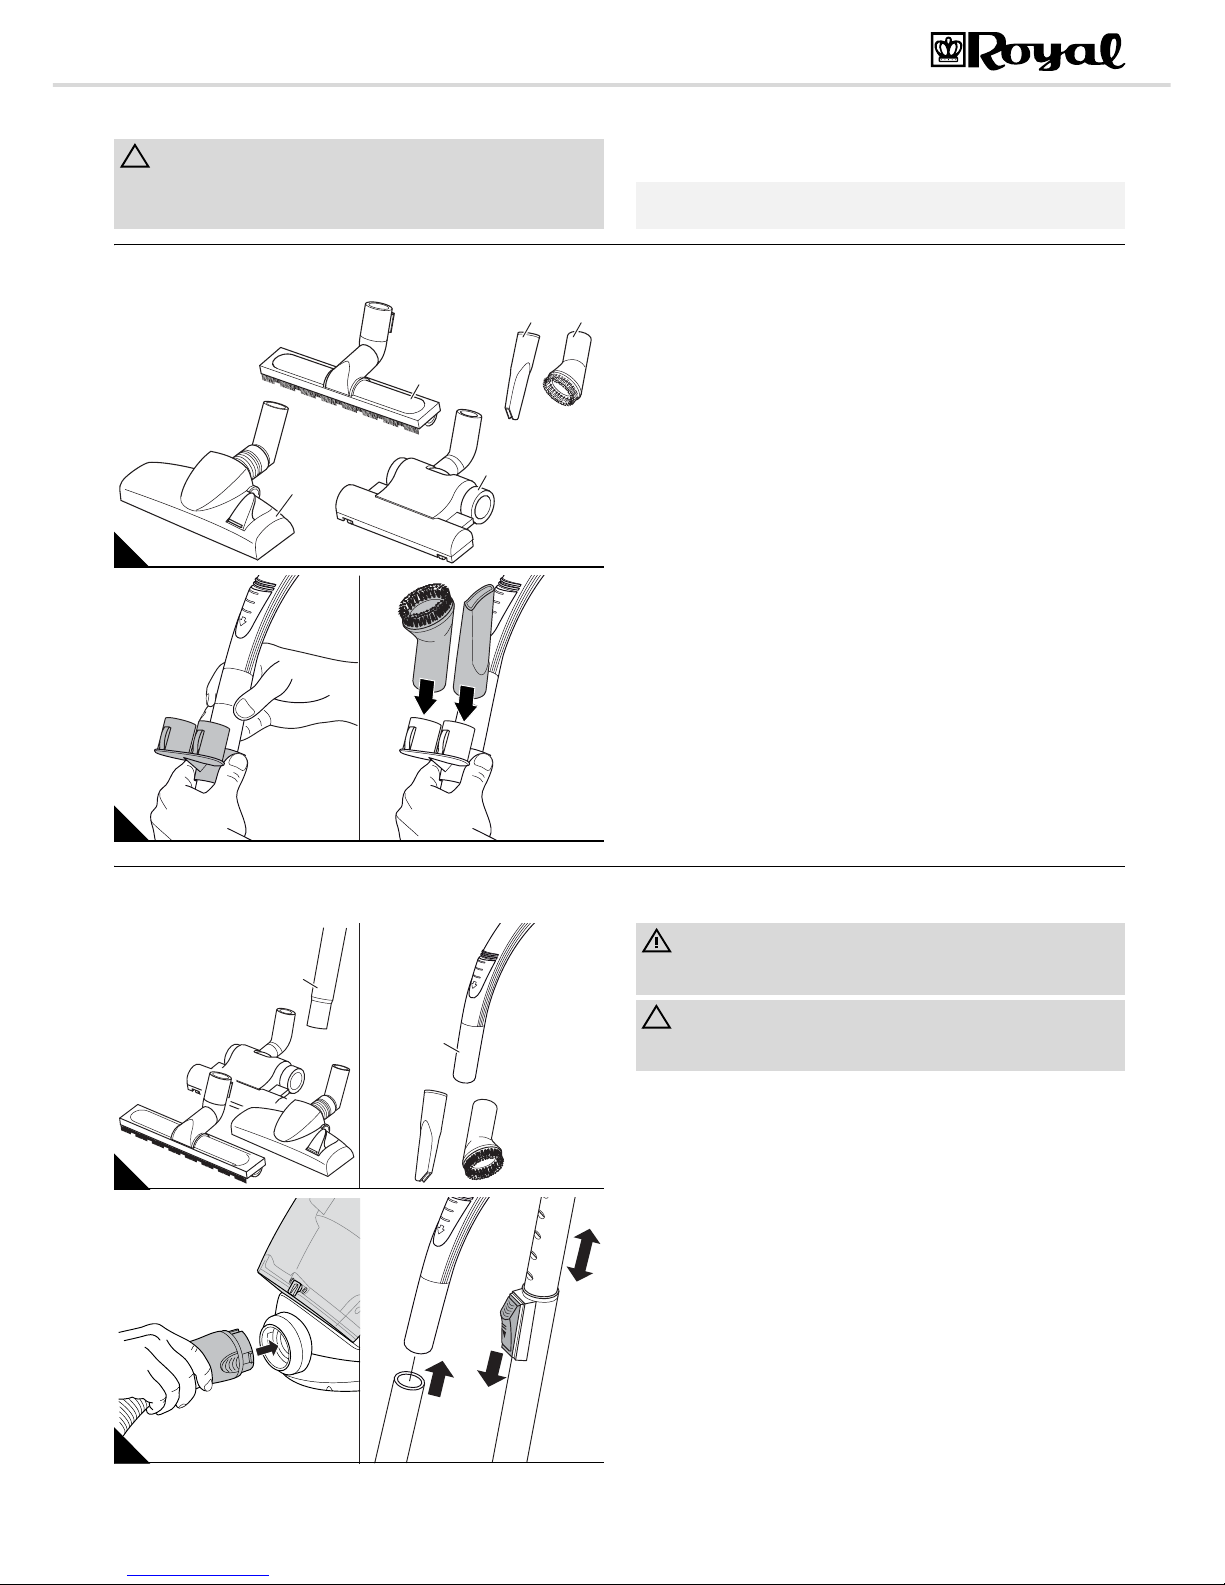
3.2 Selecting the proper nozzle
1. Select the nozzle according to the surface to be cleaned:
Floor nozzle (Fig. 2/1):
It can be used everywhere and, thanks to its switch, can be used equally
well on carpets and hard floors.
Parquet brush (Fig. 2/2):
Its long bristles make it especially suitable for cleaning delicate surfaces
(e.g. parquet and laminate floors).
Turbo brush (Fig. 2/3:
This has a rotating brush head and is most suitable for deep cleaning
carpets thoroughly. The brushing action also raises the carpet pile.
Crevice nozzle (Fig. 2/4):
Use these accessories to vacuum dust from narrow, hard-to-reach places.
Furniture brush (Fig. 2/5:
Use this to vacuum dust off objects that have sensitive surfaces.
2. Push the accessory bracket onto the telescopic tube as shown, or onto
the handle (Fig. 3/A).
3. Push nozzles not in use onto the stubs of the accessory bracket (Fig. 3/
B).
4. Keep the other nozzles safe and inaccessible to children.
3.3 Assembly
1. Attach the selected nozzle to the bottom end of the telescopic tube
(Fig. 4/A1) or of the handle (Fig. 4/B1).
2. Insert the end of the suction hose into the intake opening (Fig. 5/A) of
the vacuum cleaner until you hear and feel it locking into place.
If using the telescopic tube:
3. Insert the handle into the upper end of the telescopic tube (Fig. 5/B).
4. Adjust the length of the telescopic tube (Fig. 5/C). Press down the
release latch on the tube to do this. Then extend the telescopic tube to
the desired length. Let go of the release catch while pulling until it locks
in place. You will hear a distinct click.
ATTENTION:
Always transport or ship the appliance in its original packaging to avoid
damage. Keep the packaging for such an event. However, dispose of no
longer needed packaging material properly.
NOTE:
Immediately contact your dealer if you have found damage resulting
from transport.
2
3
4 5
1
2
BA
3
B
A
1
1
4
B
C
A
5
WARNING:
Danger of injury! Only attach the nozzles if the appliance is not
connected to the power supply. The cylinder vacuum cleaner could be
switched on by accident.
ATTENTION:
Before vacuuming, make sure that the fitted nozzle suits the surface to
be cleaned. Also observe the flooring manufacturer's recommendations.
7
4 Operation
GB
IE
4 Operation
4.1 Operational safety
4.2 Vacuum cleaning
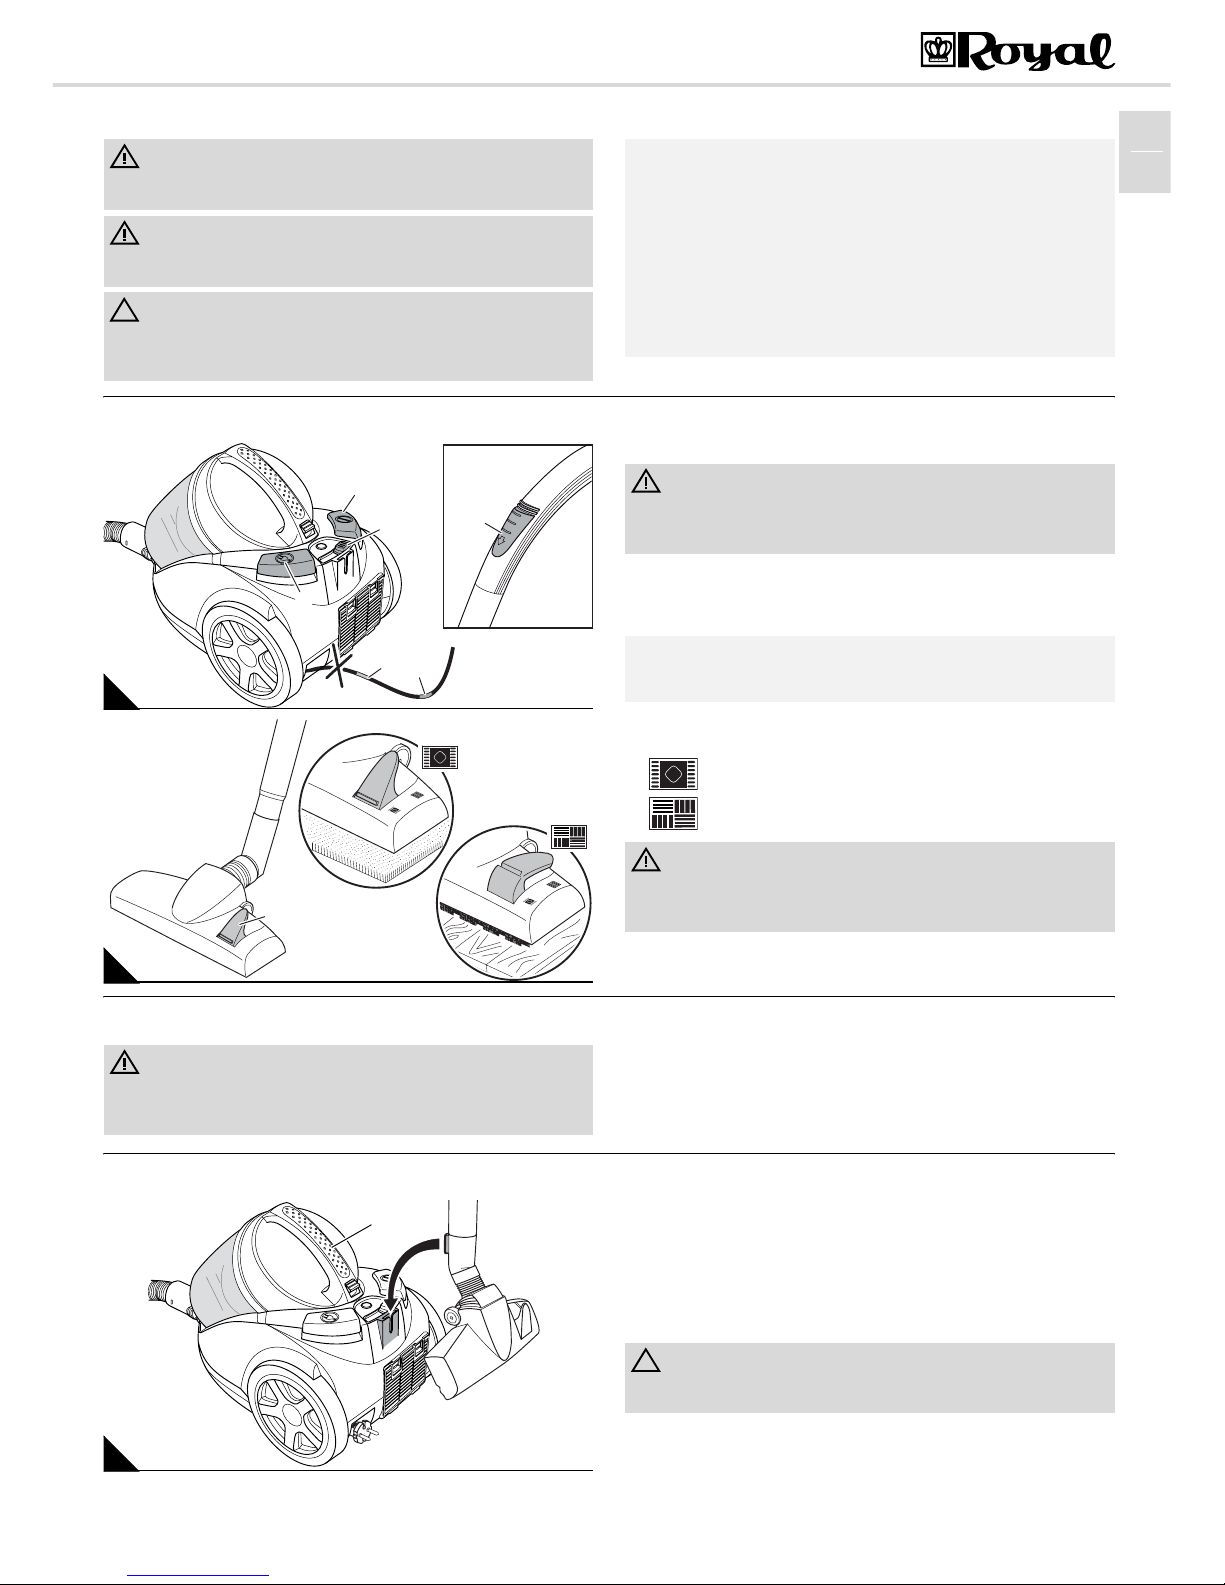
1. Pull out the cord by the plug up to the yellow mark (Fig. 6/1).
2. Insert the mains plug into a socket with ground/safety contact.
3. Switch on the cylinder vacuum cleaner with the on/off switch (Fig. 6/4).
4. Adjust the suction power with the suction power control (Fig. 6/5).
5. If using the floor nozzle, set the "carpet/hard floor" selector according
to the type of floor to be cleaned (Fig. 7/1):
for deep- and short-pile carpets, runners (Fig. 7/A)
for hard floors such as laminate, tiles, PVC etc. (Fig. 7/B).
4.3 Switching off
1. Switch off the cylinder vacuum cleaner with the on/off switch (Fig. 6/4)
and pull the plug from the mains socket.
2. Keep the plug in your hand.
3. To retract the power cord, push the cord retracting button (Fig. 6/3).
4.4 Transport and storage
Only carry the vacuum cleaner by its carrying-handle (Fig. 8/1).
For storage you can park the telescopic tube on the vacuum cleaner by
inserting the parking-hook of the floor nozzle into the parking-bracket
(Fig. 8).
If you want to store the appliance for a longer period of time, empty the
dust container. Zchapter 5.1, „Emptying and cleaning the dust container“.
Store the appliance in a cool, dry place, out of reach of children.
WARNING:
Danger of injury! Check appliance and power cord before each use. A
damaged appliance must never be used.
WARNING:
Danger of injury! Especially when vacuum-cleaning stairs make sure
that you always stand on a higher level than the appliance.
ATTENTION:
Only use the cylinder vacuum cleaner with all filters intact, in dry
condition and correctly fitted. Make sure that no objects obstruct the
telescopic tube, the suction hose or other openings.
NOTE:
Your cylinder vacuum cleaner is equipped with a safety switch to prevent
overheating. It will switch off automatically if overheated (e.g. due to
clogged suction channels).
If this happens:
Switch off the vacuum cleaner.
Pull the plug from the power socket.
Remove the cause of the overheating.
Wait for about 45 minutes.
After it has cooled off, you may switch on the vacuum cleaner again.
6
1
2
3
4
5
6
A
B
1
7
WARNING:
Danger of electric shock! If the red marking (Fig. 6/2) shows, press the
cord retracting button (Fig. 6/3) to pull in the cord up to the yellow mark
(Fig. 6/1) again. Otherwise, the power cord may be damaged.
NOTE:
With the bypass vent (Fig. 6/6) you can quickly reduce the suction power
if less power is needed, e.g. to release curtains accidentally sucked in.
WARNING:
Danger of injury! When leaving your working-area, switch off the
appliance and mind the notices at Zchapter 4.3, „Switching off“. This will
help avoid accidents.
WARNING:
Danger of injury! During uncontrolled retraction the power cord can whip
around, become an obstacle or overthrow objects. Therefore keep the
plug in your hand and guide it when retracting the power cord.
1
8
ATTENTION:
Never store the appliance next to heat sources (e.g. stoves or radiators).
Avoid exposing it to direct sunlight. Heat can damage the appliance.
8
5 Maintenance
5 Maintenance
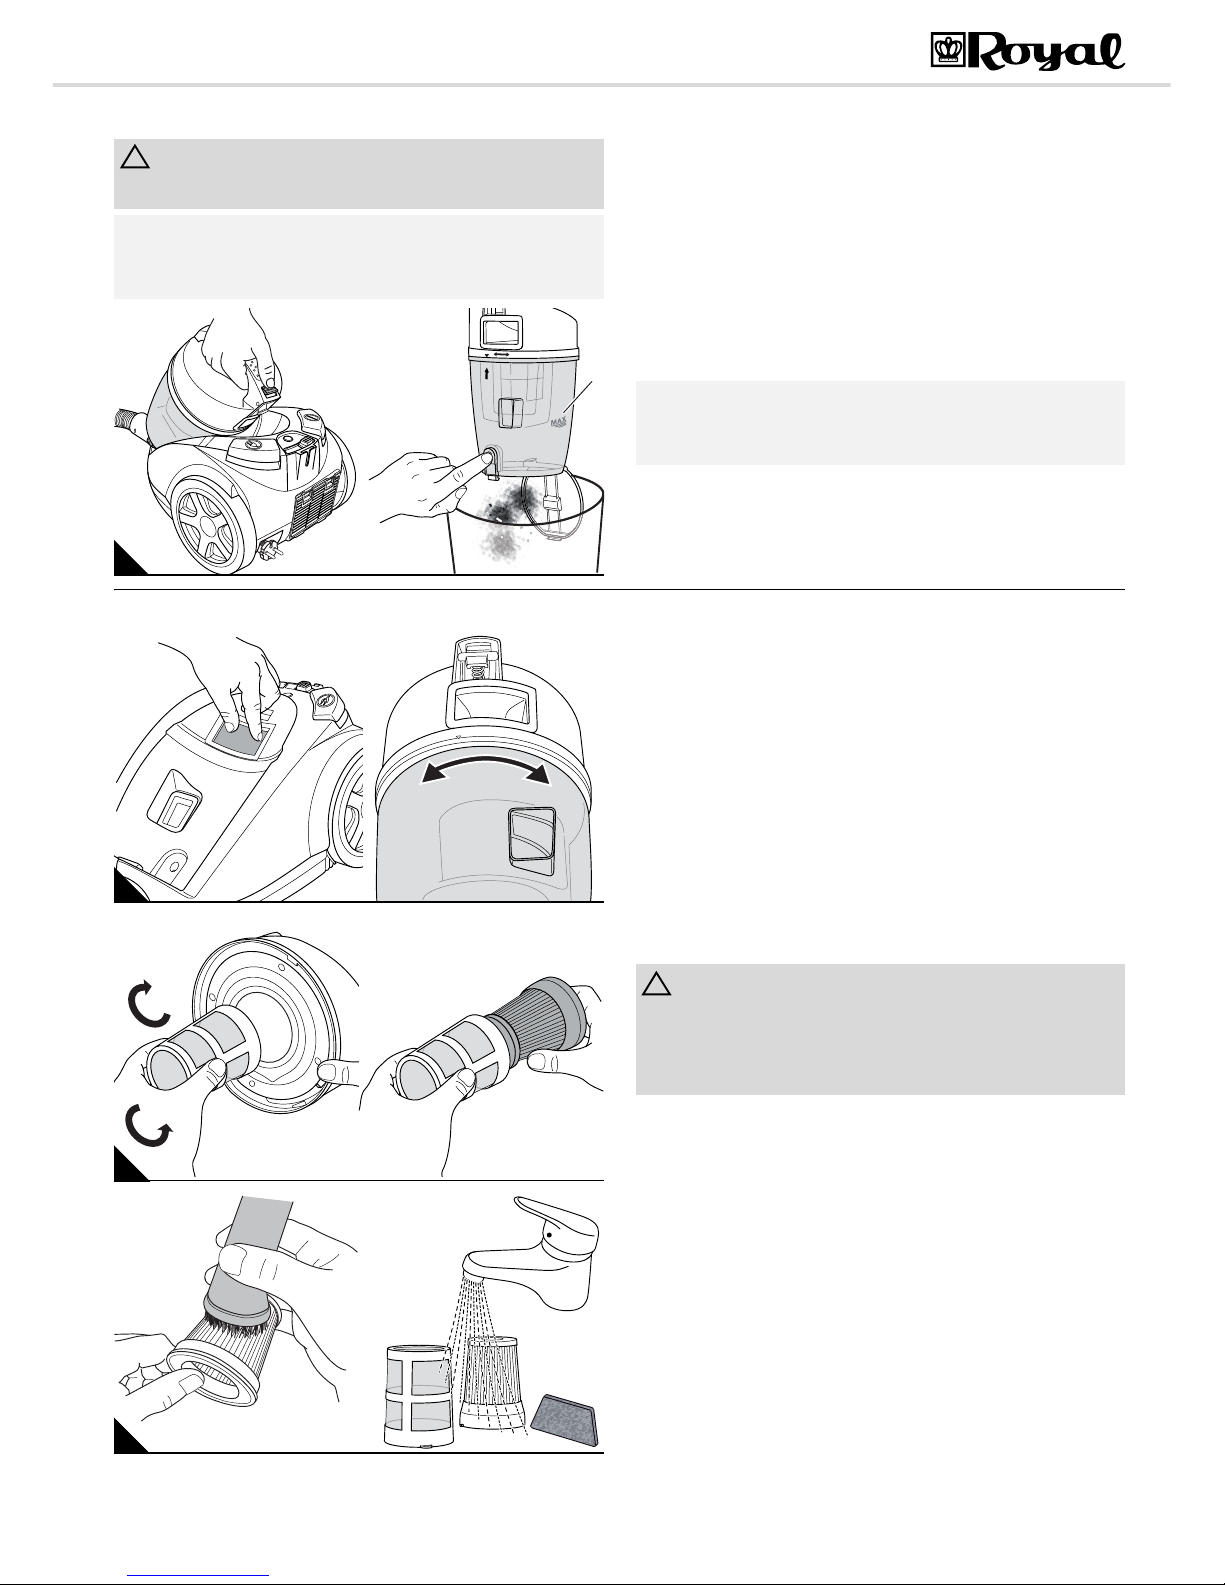
5.1 Emptying and cleaning the dust container
It is best to empty the dust container after each vacuuming session.
But empty the dust container at latest when:
- when the "MAX" marking (Fig. 9/B1) has been reached,
- before prolonged storage or re-shipment.
1. Switch off the appliance, Zchapter 4.3, „Switching off“.
2. Push the release button for the dust container (Fig. 9/A).
3. Remove the dust container by pulling it upwards out of its receptacle.
4. Empty the dust container by holding it low over a dustbin and only then
press the release button (Fig. 9/B).
5. Also clean the central lamellae filter on this occasion. Zchapter 5.2,
„Cleaning central lamellae filter and motor protection filter“.
6. Remove any residual dust from the dust container using a dry cloth or
a soft brush, e.g. the supplied furniture brush.
7. Close the dust compartment bottom plate.
5.2 Cleaning central lamellae filter and motor protection filter
1. Switch off the appliance, Zchapter 4.3, „Switching off“.
2. Remove and empty the dust container, Zchapter 5.1, „Emptying and
cleaning the dust container“.
3. remove the motor protection filter from its holder (Fig. 10/A).
4. Release the dust compartment cover by turning it in the "UNLOCK“
direction (Fig. 10/B) and take it off the dust container.
5. Take the filter screen together with the central lamellae filter off the
cover by twisting in the "UNLOCK" direction (Fig. 11/A).
6. Hold both filter elements low over a dustbin, and only then separate
them from one another (Fig. 11/B).
7. Remove larger agglomerations of dirt from both filter elements by hand.
8. Brush the central lamellae filter clean with the supplied furniture brush
(Fig. 12/A).
9. If the filter elements are still dirty after this procedure, thoroughly rinse
them by hand in running water (Fig. 12/B) until all dirt is gone.
10. If a filter element is damaged or too dirty, replace it with a new one
(ordering information Zchapter 5.4, „Spare parts and accessories“).
11. Put the new / cleaned and completely dry motor protection filter back
into its receptacle (Fig. 10/A).
12. Put the central lamellae filter back into the filter screen (Fig. 11/B).
13. Refit the new or cleaned filter screen to the dust compartment cover by
twisting it in the "LOCK" direction until it is securely fastened (Fig. 11/
A). You will feel and hear it snap into place.
14. Fit the cover in such a way that the fitting mark on the cover (T) exactly
corresponds to the arrow on the dust compartment.
15. Fix the cover by twisting it in the "LOCK" direction (Fig. 10/B).
16. Put the dust container back into its receptacle. You will feel and hear it
snap into place.
ATTENTION:
Switch off the appliance before emptying the dust container. This will
prevent dust from damaging the appliance.
NOTE:
You can dispose of the contents of the dust container with your regular
domestic waste as long as it does not contain any substances not
permitted in domestic waste.
AB
1
9
NOTE:
The dust container cannot be cleaned with the central lamellae filter
fitted. The central lamellae filter must be cleaned at latest when the
cleaning indicator (Fig. 1/24) lights up.
A B
LOCKUNLOCK
10
B
LOCK
A
UNLOCK
11
B
A
12
ATTENTION:
The filter elements are washable, but may not be cleaned in
dishwashers or washing-machines. Also, do not use detergents or
brushes with hard bristles to clean the filters. Let the filters dry for
approx. 24 hours at room temperature after cleaning. Only put them
back into the appliance when they are completely dry.

9
5 Maintenance
GB
IE
5.3 Cleaning the exhaust filter
1. Switch off the appliance, Zchapter 4.3, „Switching off“.
2. Push the release catches of the exhaust filter cover down (Fig. 13/A)
and fold down the exhaust filter cover.
3. Remove the exhaust filter (Fig. 13/B).
4. Hold the exhaust filter deeply into a dustbin.
5. Only now separate the exhaust filter element from the filter holder
(Fig. 14/A).
6. Thoroughly tap the dirt from both elements.
7. Remove residual dust with a soft brush, e.g. the supplied furniture
brush.
8. If the exhaust filter element is damaged, deformed or too soiled,
replace it (ordering information Zchapter 5.4, „Spare parts and
accessories“).
9. Put the cleaned or new exhaust filter element back into the filter holder.
10. Now put the filter holder with the freshly fitted filter back into its
receptacle (Fig. 13/B).
11. Fit the exhaust filter cover on the bottom side first (Fig. 14/B) and then
fold it in upwards.
5.4 Spare parts and accessories
Ordering address: ZPage 37, „International Service“
Further information: Z www.dirtdevil.de
The following accessories and spare parts can be reordered:
5.5 Before you send in the appliance
Before contacting your authorised Royal dealer, Royal service partner or
appliance market or sending in the appliance, first follow the procedure in
the following table to check if you can solve the problem yourself.
A B
13
A B
14
ATTENTION:
The exhaust filter element is not washable.
ATTENTION:
Only use original spare parts from the scope of delivery or those that you
have acquired by reordering.
Item number Description
2827001 Filter set 4 pcs, consisting of 1 central lamellae filter,
1 filter screen, 1 motor protection filter, 1 exhaust filter
M203 1 parquet brush
M209 1 turbo brush
WARNING:
Danger of injury! Never use a defective appliance! Always switch off the
appliance and disconnect it from the mains before starting troubleshooting Zchapter 4.3, „Switching off“.
Problem Possible cause / solution
The appliance will not
start.
The socket does not carry current.Test the vacuum cleaner at another socket which you are sure carries current.
Power cord is damaged. Have the power cord replaced by
Royal Appliance Customer Service, address, ZPage 37,
„International Service“.
The vacuum
cleaner
stops suddenly.
The overheating protection has tripped (possibly due to
blocked suction channels, filters, or similar).
Switch the appliance off and pull the plug out of the socket.
Remove the cause of overheating (e.g. by disassembling
telescopic tube and suction hose and removing the obstacle and/or cleaning filters). Wait for about 45 minutes. After
the appliance has cooled off, you may switch it on again.
Cleaning indicator
(Fig. 1/24)
lights up.
The central lamellae filter is dirty. Clean the central lamellae filter, Zchapter 5.2, „Cleaning central lamellae filter
and motor protection filter“.
The dust container is full.
Empty / clean the dust container, Zchapter 5.1, „Emptying
and cleaning the dust container“.
The cleaning results
are unsatisfactory in
spite of the
appliance
working correctly.
The bypass vent (Fig. 1/9) is open.
Close the bypass vent .
The attached nozzle is unsuitable. Change the nozzle,
Zchapter 3.2, „Selecting the proper nozzle“.
The suction power you set is unsuitable.
Adjust the suction power control to suit the flooring,
Zchapter 4.2, „Vacuum cleaning“, step 4.
The position of the "carpet/hard floor" selector (Fig. 1/5) is
unsuitable. Set the "carpet/hard floor" selector to the correct position for the type of floor, Zchapter 4.2, „Vacuum
cleaning“, step 5.
The dust container is full.
Empty / clean the dust container Zchapter 5.1, „Emptying
and cleaning the dust container“.
The filter is dirty.
Clean the respective filter Zchapter 5.2, „Cleaning central
lamellae filter and motor protection filter“ or Zchapter 5.3,
„Cleaning the exhaust filter“.
Nozzle, telescopic tube or suction hose are blocked.
Remove the obstacle. If necessary, use a long wooden
stick (e.g. a broomstick) to do this.
NOTE:
If you cannot solve the problem following these instructions, contact the
Royal Appliance customer service (ZPage 37, „International Service“).
Problem Possible cause / solution
10
1 Centec-imurin esittely
1 Centec-imurin esittely
Kiitos!
Kiitos Centec-imurin ostamisesta ja luottamuksenosoituksesta.
Toimituksen sisältö (kuva 1)
1 Letkun salpa
2 Pölysäiliö
3 Lattiasuulake
4 Kantokahva
5 Valitsin "matto / kova lattia"
6 Kiinnike
7 Teleskooppiputken lukitus
8 Teleskooppiputki
9 Sivuilmasäädin
10 Kalusteharja
11 Rakosuulake
12 Varustekiinnike
13 Tyhjennyspainike
14 Asetusmerkki pölysäiliössä
15 Asetusmerkki pölysäiliön kannessa
16 Pölysäiliön vapautuspainike
17 Pölysäiliön kansi
18 Lamellikeskussuodatin
19 Suodatinsihti
20 Pölysäiliö
21 MAX-merkintä pölysäiliössä
22 Pölysäiliön pohjalevy
23 Virtakytkin
24 Pölysäiliön merkkivalo
25 Imutehon säädin
26 Kannake
27 Virtajohdon kelauspainike
28 Poistoilman suodatinosa
29 Suodatinosan pidike
30 Poistoilmasuodattimen kannen vapautuspainike
31 Poistoilmasuodattimen suojus
32 Käyttöohjeet
33 Parkettiharja
34 Turboharja
Sisällysluettelo
1 Centec-imurin esittely .............................................................. 10
Takuuehdot ................................................................................. 10
Takuuaikana ............................................................................... 10
2 Turvallisuusohjeet .................................................................... 11
2.1 Käyttöohje ................................................................................... 11
2.2 Käyttörajoitukset ......................................................................... 11
2.3 Virransyöttö ................................................................................ 11
2.4 Määräysten mukainen käyttö ...................................................... 11
2.5 Viallinen laite .............................................................................. 11
2.6 Hävittäminen ............................................................................... 11
3 Ennen käyttöä ........................................................................... 12
3.1 Purkaminen pakkauksesta ......................................................... 12
3.2 Suuttimen valinta ........................................................................ 12
3.3 Kokoaminen ................................................................................ 12
4 Laitteen käyttäminen ................................................................ 13
4.1 Käyttöturvallisuus ....................................................................... 13
4.2 Imuroiminen ................................................................................ 13
4.3 Virran katkaiseminen .................................................................. 13
4.4 Kuljettaminen ja säilyttäminen .................................................... 13
5 Huolto ........................................................................................ 14
5.1 Tyhjennä ja puhdista pölysäiliö ................................................... 14
5.2 Puhdista lamellikeskussuodatin ja moottorinsuojasuodatin ........ 14
5.3 Poistoilmasuodattimen puhdistaminen ....................................... 15
5.4 Varaosat ja lisävarusteet ............................................................ 15
5.5 Ennen kuin lähetät laitteen ......................................................... 15
Tekniset tiedot
Tuotetta parannetaan jatkuvasti, joten oikeus teknisiin ja muihin muutoksiin pidätetään. © Royal Appliance International GmbH
Takuuehdot
Myönnämme markkinoimallemme laitteelle lakisääteisen 24 kuukauden takuun ostopäivästä.
Takuuaikana korjaamme materiaali- tai valmistusvioista johtuvat viat veloituksetta, valintamme mukaan joko korjaamalla tai vaihtamalla laitteen tai
varusteen (varusteosien vauriot eivät johda automaattisesti koko laitteen
vaihtamiseen).
Takuu ei korvaa vaurioita, joiden syynä on virheellinen käyttö (väärä virta/
jännite, liittäminen sopimattomiin virtalähteisiin, rikkoutuminen), eikä normaalia kulumista tai puutteita, jotka vaikuttavat laitteen arvoon tai käyttökelpoisuuteen vain vähäisessä määrin.
Luvattomat muutokset tai korjaukset tai muiden kuin alkuperäisten Royal
Appliance -varaosien käyttö mitätöivät takuun. Kuluvat osat eivät kuulu takuun piiriin, joten niistä laskutetaan!
Takuu on voimassa vain, kun myyjä on leimannut ja allekirjoittanut takuukortin tai laitteen mukana lähetetään kopio laskusta. Takuukorjaukset eivät
pidennä takuuaikaa, eikä niille myönnet uutta takuuta!
Takuuaikana
Tyhjennä pölysäiliö ja lähetä laite sekä tekstaamalla kirjoitettu lyhyt selostus viasta.
Merkitse saatteeseen sanat ”Takuuvika”. Lähetä imuri sekä takuukortti tai
laskun kopio osoitteeseen:
ZSivu 37, „International Service“
Laitteen tyyppi : pölypussiton pölynimuri
Malli : Centec
Mallin numero : M2827-2
Jännite : 220 – 240V ~, 50/60 Hz
Teho : 1800 W nim. – 2300 W max.
Pölysäiliön maksimitäyttötilavuus : n. 1,5 litraa
Virtajohdon pituus : n. 5 m
Paino : n. 5,3 kg

11
2 Turvallisuusohjeet
FI
2 Turvallisuusohjeet
2.1 Käyttöohje
Lue käyttöohjeet kokonaan ennen kuin käytät laitetta. Säilytä ohjeet
huolellisesti. Jos luovutat laitteen edelleen, anna käyttöohjeet mukana.
Näiden ohjeiden noudattamatta jättämisestä voi olla seurauksena vakava loukkaantuminen tai laitteen vaurioituminen.
Emme vastaa vahingoista, joiden syynä on käyttöohjeiden noudattamatta
jättäminen.
Onnettomuudet ja laitteen vauriot voidaan välttää kun noudatetaan oh-
jeita, joissa on seuraavat merkinnät:
2.2 Käyttörajoitukset
Laitetta ei ole tarkoitettu fyysisesti tai psyykkisesti tai aisteiltaan vam-
maisten henkilöiden käytettäväksi, eikä myöskään henkilöiden, joilla ei ole
riittävää kokemusta ja/tai osaamista (lapset mukaan lukien). Nämä henkilöt
voivat käyttää laitetta turvallisuudestaan vastaavan henkilön valvonnassa tai
opastamana. Säilytä laite turvallisessa paikassa.
Lasten leikkiminen laitteella on estettävä. Lapset eivät saa koota tai
käynnistää imuria.
Pakkausmateriaaleja ei saa käyttää lasten leikeissä. Tukehtumisvaara.
2.3 Virransyöttö
Laite toimii sähkövirralla, joka voi periaatteessa aiheuttaa sähköiskun. Ota
erityisesti huomioon:
Älä tartu pistokkeeseen märillä käsillä.
Kun haluat irrottaa pistokkeen pistorasiasta, vedä suoraan pistokkees-
ta. Älä vedä johdosta, koska se voi vahingoittua.
Älä kuljeta imuria koskaan virtajohdosta. Se voi vaurioitua.
Huolehdi siitä, että virtajohto ei taitu, puristu, jää pyörien alle eikä joudu
kosketuksiin lämmönlähteiden kanssa. Huolehdi myös siitä, ettei siihen voi
kompastua.
Älä upota laitetta veteen tai muihin nesteisiin, ja suojaa se sateelta ja
kosteudelta.
Varmista myös ennen imurin kytkemistä virtalähteeseen, että tyyppikil-
vessä ilmoitettu sähköjännite vastaa pistorasian jännitettä. Käytä vain suojamaadoitettuja pistorasioita.
Älä käytä jatkojohtoa mikäli mahdollista. Mikäli se kuitenkin on välttä-
mätöntä, käytä ainoastaan hyväksyttyä, roiskevesisuojattua yksinkertaista
jatkojohtoa (ei monipistokerasiaa), joka soveltuu laitteen ottamalle teholle.
Ennen kuin käytät virtajohtoa, tarkista ettei se ole vaurioitunut.
2.4 Määräysten mukainen käyttö
Pölynimuria saa käyttää vain kotitalouksissa. Se ei sovellu ammattimaiseen käyttöön.
Käytä pölynimuria vain kuivien, normaalisti likaisten lattioiden puhdistamiseen. Kun olet kiinnittänyt kalusteharjan, voit käyttää laitetta myös kalusteiden imuroimiseen. Kun sivuilmasäädin (kuva 1/9) on kokonaan auki voi
imurilla varovaisesti imuroida myös verhot.
Kaikki muu käyttö on määräysten vastaista ja kielletty. Erityisesti kiellet-
tyä on:
Käyttö lähellä räjähtäviä tai helposti syttyviä aineita. Tulipalon ja räjäh-
dyksen vaara.
Käyttö ulkona. Sade ja lika voivat rikkoa laitteen.
Esineiden työntäminen laitteen aukkoihin. Laite voi kuumentua liikaa.
Laitteen avaaminen, muuttaminen tai korjaaminen itse.
Erityisesti kiellettyä on lisäksi:
seuraavien imurointi:
- Hiusten sormien ja muiden ruumiinosien imurointi. Ne voivat imeytyä
sisään ja vahingoittua.
- Vaatekappaleiden (esim. kengännauhojen, huivien jne.) imurointi. Ne
voivat imeytyä sisään ja aiheuttaa loukkaantumisen.
- Veden ja muiden nesteiden, erityisesti kosteiden matonpuhdistusaineiden imurointi. Laitteeseen päässyt kosteus voi aiheuttaa oikosulun.
- Värijauheen (lasertulostin, kopiokone jne.) imeminen. Tulipalon ja räjähdyksen vaara.
- Hehkuvan tuhkan, palavien savukkeiden tai tulitikkujen imurointi. Tulipalon vaara.
- Terävien esineiden, kuten lasinsirpaleiden, naulojen jne. imurointi.
Ne voivat vaurioittaa laitetta.
- Rakennusjätteiden, kipsin, sementin, hienon porausjauhon, ehosteiden, puuterin jne. imurointi. Laite voi vaurioitua.
2.5 Viallinen laite
Jos laitteen virtajohto vaurioituu, valmistajan, valtuutetun huollon tai muun
ammattitaitoisen henkilön on vaihdettava se vaaran välttämiseksi.
Älä käytä viallista imuria tai imuria, jonka virtajohto on viallinen. Toimita laite
korjattavaksi huoltoliikkeeseen tai Royal
Appliance -keskushuoltoon. Osoi-
te ZSivu 37, „International Service“.
2.6 Hävittäminen
Hävitä laite voimassa olevien määräysten mukaisesti. Sähkölaiteromua ei saa hävittää kotitalousjätteen mukana. Vie laite sen sijaan paikalliseen vanhojen laitteiden keräilypisteeseen.
Suodattimet on valmistettu ympäristölle vaarattomista materiaaleista. Ne
voi hävittää kotitalousjätteen mukana.
VAROITUS:
Varoittaa terveysvaaroista ja mahdollisista loukkaantumisriskeistä.
HUOMIO:
Varoittaa laitteen tai muiden esineiden mahdollisesta vaarantumisesta.
OHJE:
Tärkeitä vihjeitä ja tietoja.
12
3 Ennen käyttöä
3 Ennen käyttöä
3.1 Purkaminen pakkauksesta
1. Pura laite ja kaikki varusteet pakkauksesta.
2. Tarkasta, että sisältö on vahingoittumaton.
3.2 Suuttimen valinta
1. Valitse suutin imuroitavan pinnan mukaan:
Lattiasuulake (kuva 2/1):
Lattiasuulake on yleiseen käyttöön ja soveltuu valitsimen avulla yhtä hyvin
matoille ja kovalle lattialle.
Parkettiharja (kuva 2/2):
Pitkäharjaksista harjaa käytetään erityisen arkojen pintojen (esim. parketti,
laminaatti) imurointiin.
Turboharja (kuva 2/3):
Siinä on pyörivä harjapää, joten se soveltuu sen ansiosta mattojen syväpuhdistukseen. Harjaus myös nostaa maton nukat ylös.
Rakosuulake (kuva 2/4):
Käytä rakosuulaketta hankalien kohteiden imuroimiseen.
Kalusteharja (kuva 2/5):
Käytä arkojen pintojen imuroimiseen (esim. kaapit, pöydät).
2. Kiinnitä välinekiinnike kuvan osoittamalla tavalla teleskooppiputkeen
tai painikkeeseen (kuva 3/A).
3. Kiinnitä lisävarustesuulakkeet, joita ei tarvita, paikoilleen lisävarustepi-
dikkeeseen (kuva 3/B).
4. Säilytä muut suulakkeet poissa lasten ulottuvilta.
3.3 Kokoaminen
1. Kiinnitä valittu suulake teleskooppiputken (kuva 4/A1) tai kahvan
(kuva 4/B1) alapäähän.
2. Työnnä imuletkun pää kuvan mukaisesti aukkoon (kuva 5/A), niin pit-
källe, että se lukkiutuu kuuluvasti ja tuntuvasti.
Teleskooppiputken käyttö:
3. Kiinnitä kahva teleskooppiputken yläpäähän (kuva 5/B).
4. Säädä teleskooppiputken pituus (kuva 5/C). Työnnä teleskooppiputken
lukitusta alaspäin. Vedä teleskooppiputkin halutun pituiseksi. Lukitse
säätö vapauttamalla lukitus, kun vedät putkea. Kuulet selvän naksahduksen.
HUOMIO:
Kuljeta/lähetä imuri alkuperäisessä pakkauksessa, jotta se ei vaurioituisi. Säilytä alkuperäinen pakkaus. Hävitä tarpeeton pakkausmateriaali
määräysten mukaisesti.
OHJE:
Jos havaitset kuljetusvaurioita, ota viipymättä yhteys laitteen myyjään.
2
3
4 5
1
2
BA
3
B
A
1
1
4
B
C
A
5
VAROITUS:
Tapaturman vaara! Irrota pistoke pistorasiasta ennen suulakkeiden kiinnittämistä. Pölynimuri voi käynnistyä vahingossa.
HUOMIO:
Varmista ennen imurointia, että asetettu suulake on soveltuva imuroitavalle pinnalle. Noudata lattianpinnoitteen valmistajan suosituksia.
 Loading...