

Page 1
Safety Instruction s
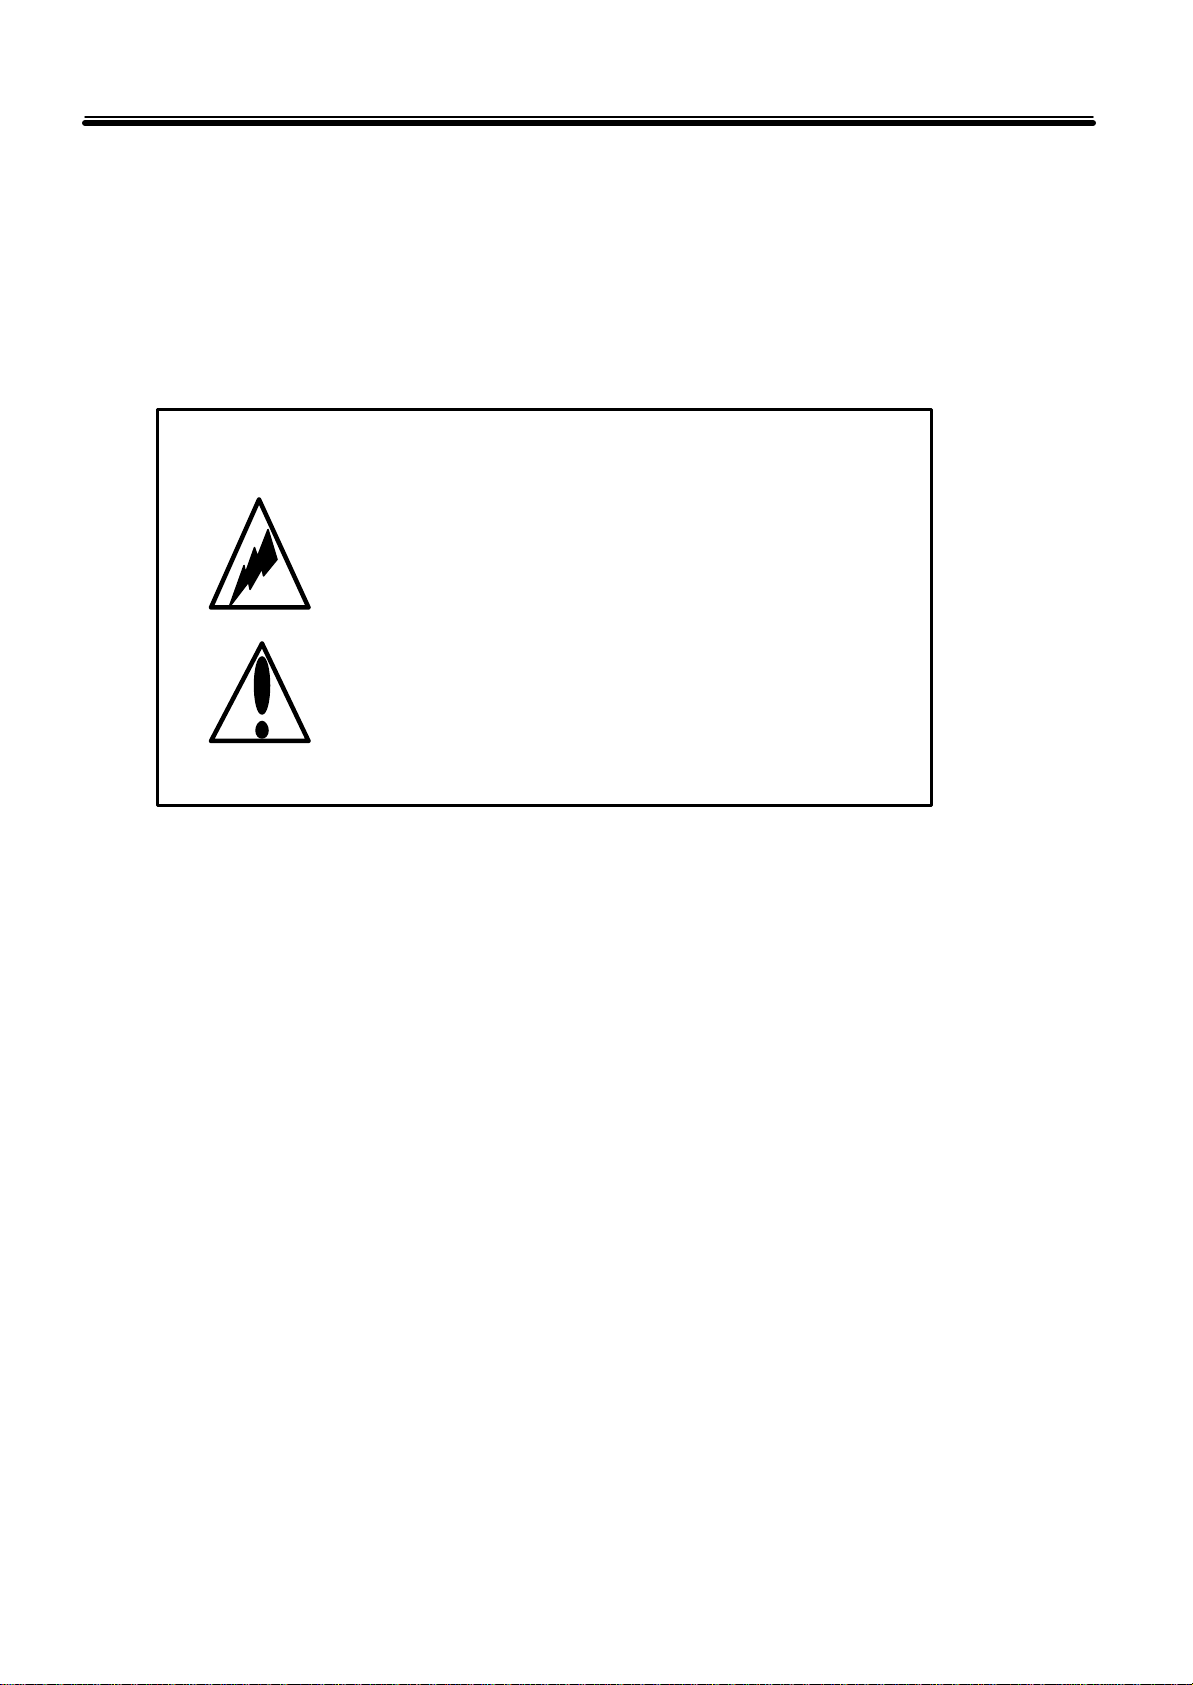
This symbol indicates that personal
injury may occur or the product may
be damaged when you fail to follow
This symbol indicates that property
loss may occur or the product may
malfunction when you fail to follow
● These instructions describe the precautions and about how to deal with the product to prevent personal injury or
property loss. Please read the following safety precautions carefully.
● Keep this instruction in the place which you can find easily whenever you need.
Warning and Caution
Warning
the given instruction.
Caution
the given instruction.
1
Page 2
Contents
■ Safety Instruction
■ Precautions
■ Product Features
■ Names of Parts
■ Before Using
- Inserting Battery
- Powering On/Off
- Button Functions
■ MP3 Mode
- Playback
- Scanning File(FF/REW)
- Deleting MP3 File
- MP3 Playback Functions
- Scan and Playback
- Resume
- A-B Repeat
- Setting Menu
- EQ(Equalizer)
- USER EQ mode
- Repeating
- Erasing
■ Voice Mode
- Switching to Voice Mode
- Recording
- Playback
- Scanning File(FF/REW)
- Deleting File
- Recording Function
- Index Added Recording
- Playback Functions
- Scan and Playback
- A-B Repeat
- Setting Menu
- Repeating
- Erasing
■ Radio Mode
- Switching to Radio Mode
- Scanning Frequency
- Preset Memory
2
Page 3

- Using Frequency Preset Memory
- Deleting Preset Frequency
- Recording Broadcast
- Setting Menu
- Area
■ PC Interface
- Installing Driver
- Download
- Upload
- Deleting File
■ Trouble Shooting
■ Specifications
■ Warranty
3
Page 4

Precautions
Make sure not to place cash cards
or pass cards, susceptible to
influences, near to the
Do not clean using chemicals such
ce the battery in a location that
your children or infants cannot
Do not drop down any materials on
the product or impact against the
Do not impact against the LCD of
■ Precautions for use of the product
Do not install the product in a place exposed to these conditions:
High temperature (above 40℃)
Poorly ventilated or closed
(car inside, especially summer)
magnetic
speaker of the product.
Much moisture
(humidity, above 75%)
Dusty place
as alcohol, benzene, or sinner, etc.
Pla
access to.
the product.
* Does not have any responsibility for property loss due to your use of the product even if you use the product
correctly. Also does not have any responsibility for demanding any compensation from others.
product.
* Does not have any responsibility for memory data corruptions and resulted property loss due to product
malfunction or fault, repair, and/or other reasons.
4
Page 5
Precautions
Make sure to use the specified
Do not impose heat on it. Do not
Otherwise, it may cause damages or
Do not place the metals such as
may cause a fire due
Make sure that the polarities are
When your skin
r
Place the battery in a location that your
Make sure to remove the battery
when you do not use the product for
Do not mix a new battery with the
■ Precautions for use of the battery
standard battery.
(‘AAA’ Alkaline battery)
coins and keys with the battery.
Otherwise, it
to frictional heat.
children or infants cannot access to.
disassemble or short-circuit.
malfunctions to the product.
correct when inserting a battery.
a long time.
old one.
5
Warning
주의사항
● When your skin or clothes is stained with electrolyte:
Wash them with clean water immediately.
has been hurt, make sure to consult your doctor.
● When electrolyte enters your eye;
Do not rub your eye. Wash it with clean wate
immediately and make sure to consult your doctor.
Page 6

Precautions
Do not use earphone during driving
Otherwise it may cause a traffic
If the product smokes or any
modification occurs due to heating,
Do not use the product in an
airplane or a place where electronic
Otherwise it may damage your
Do not disassemble the product
■ Safety Precautions
remove the battery immediately.
devices should not be used.
or walking.
accident.
arbitrarily.
Do not listen to with a loud volume.
hearing. Control the volume again.
6
Page 7

Product Features
■ Compact Size
Handy to carry due to compact size and light-weight.
■ Adapting flash memory
Recorded sound is preserved even if the power is cut off.
■ Automated Power Break
Automated power break reduces battery consumption.
■ EL lighting
You can see the message on the LCD screen even if the place is dark.
■ EQ(Equalizer) Function
You can listen to a MP3 file in the Flat, Pop, Rock or User EQ mode.
■ MP3 and WMA playback
Both MP3 files and WAM files are supported.
■ VBR playback
Various MP3 files are supported from 8Kbps to VBR.
■ Semi Mass Storage
Only installing driver uploading and downloading is available without software.
■ Receiving and Recording FM Radio
You can receive and record an FM radio.
7
Page 8
Names of Parts
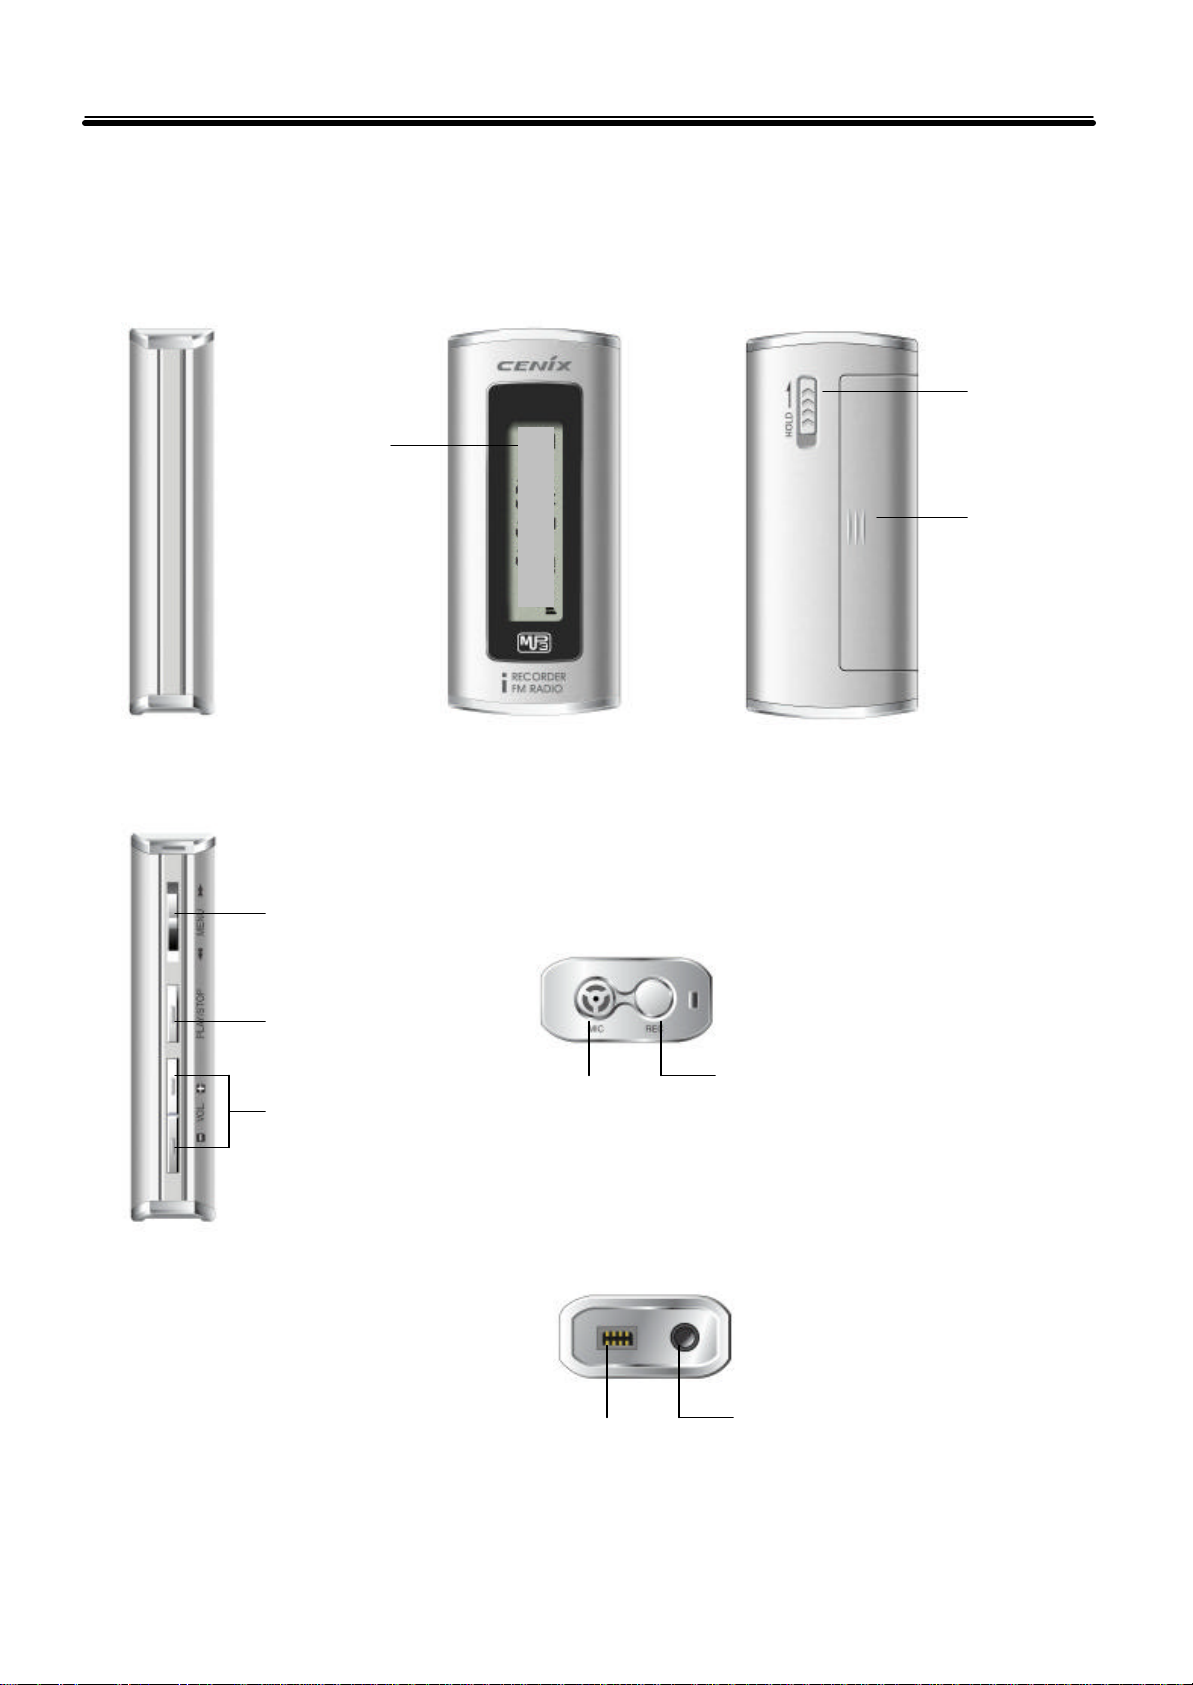
Left Front
LCD
Right
Back
HOLD
Battery
Cover
FF/MENU/REW
POWER/PLAY/STOP
VOLUME
Top
RECORD/STOP
Built-in
Microphone
Bottom
Earphone Jack
USB Socket
8
Page 9
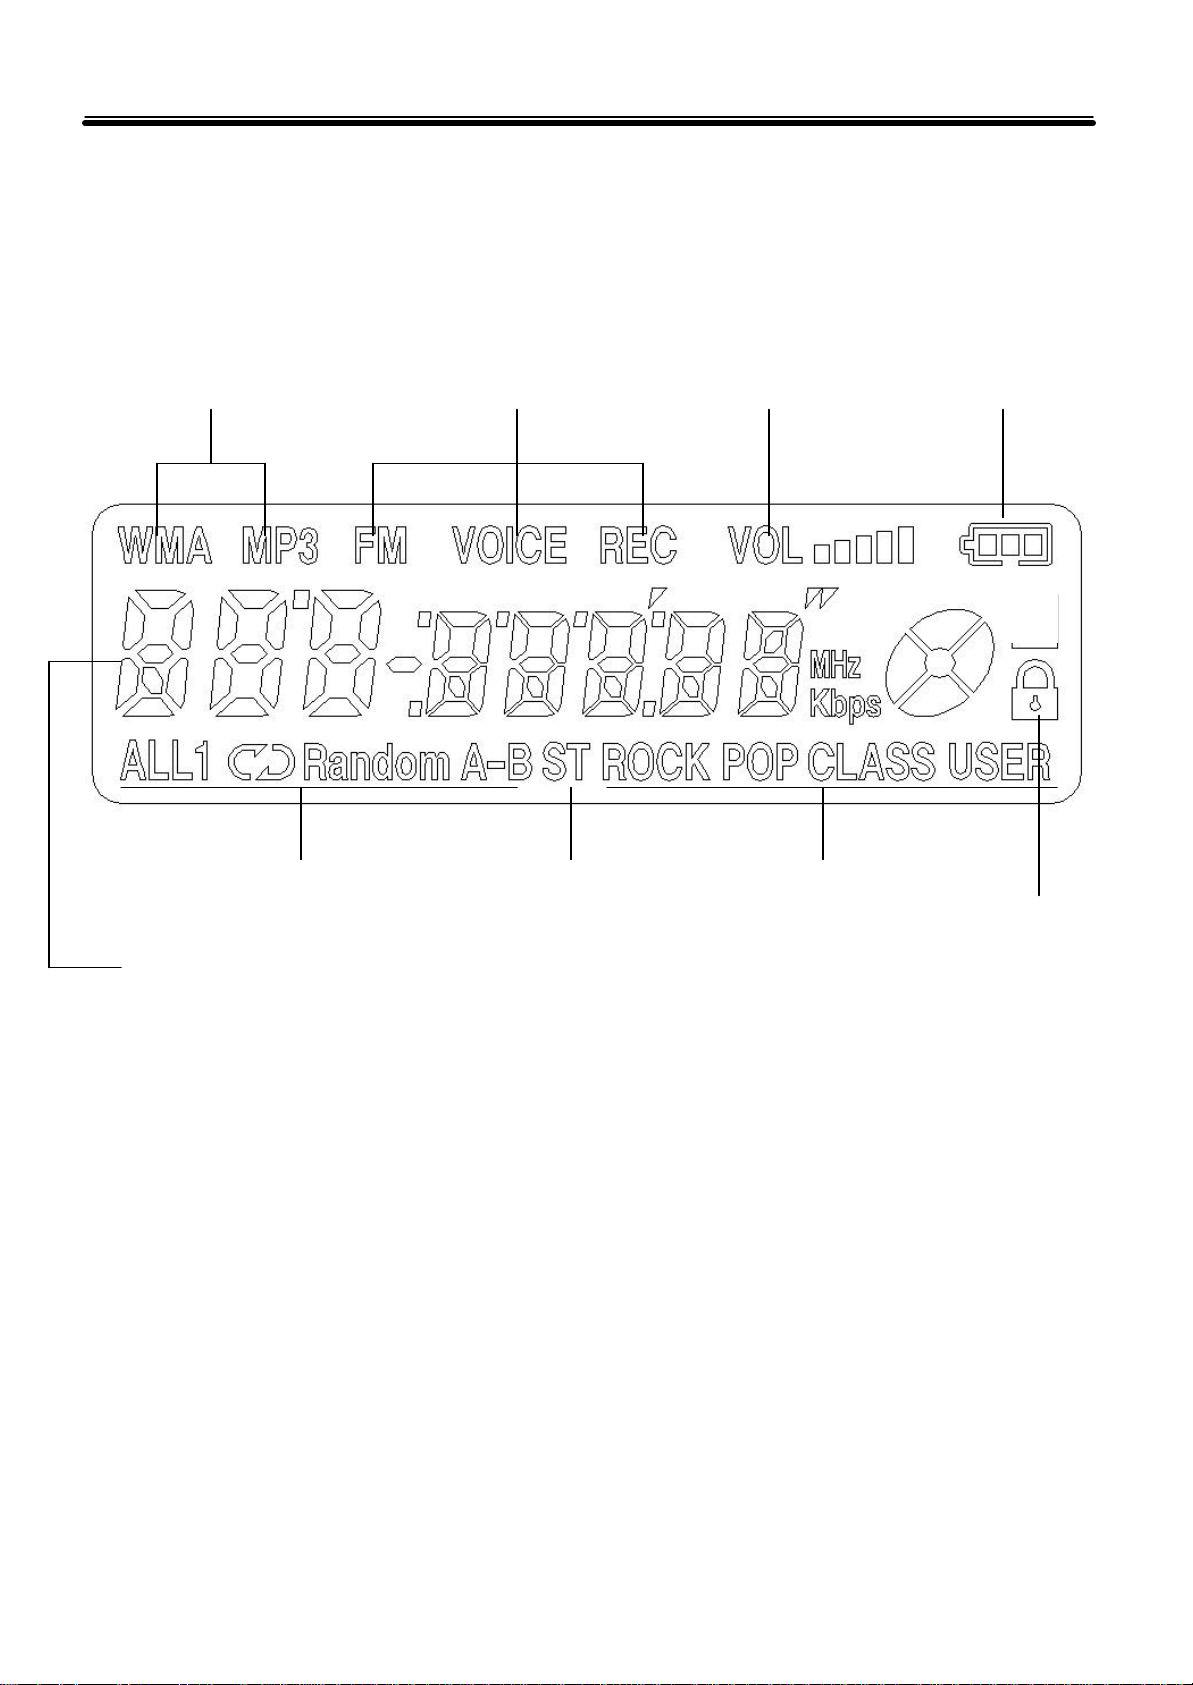
Description of LCD
Playback
Mode Icon
Repeat Mode Stereo Mode
File No./Playback Time
Recording Time/Frequency
Operating
Volume Icon Battery Indicator
Mode Icon
EQ mode
HOLD ON
9
Page 10

Before Using
"LO Batt" is displayed when the voltage is low due to
■ Inserting Battery
1. Push the battery cover slightly and slide it in the arrow direction.
2. Insert one AAA alkaline battery. Make sure that the polarities (+, -) are correct.
3. Close the battery cover.
■ Battery Usage Icon
Full Little consumed Much consumed Time to replace
☞ Note ☜
Caution
● Make sure to replace the batteries in stop mode.
● Make sure that the polarities (+, -) are correct.
consumption.
10
Page 11

Before Using
r efficient use of the battery if you do not
to prevent unwanted
urned off automatically if there is no operation for 1
is displayed and the power is not turned
■ Battery Lifetime ("AAA" Alkaline)
Battery MP3 Playback Voice Recording FM Mode Playback with
Earphone(VOL. 10)
AAA
Alkaline
☞ Note ☜
● Battery lifetime is subject to battery type and the volume you use.
● The power is turned off automatically fo
use the product for more than 1 minute.
● When you do not use the product, set the HOLD switch to ON
consumption of the battery due to misuse of the buttons.
■ Powering On/Off
1. Set the HOLD button to OFF (HOLD OFF).
00 hours 00 hours 00 hours 00 hours
2. Press the POWER/PLAY/STOP button shortly once to turn the power on.
3. Press the POWER/PLAY/STOP button longer once to turn the power off.
☞ Note ☜
● The power is t
minute.
● In HOLD ON mode, HOLD
on.
■ Button Functions
◎ MENU : Selecting MENU and switching functions(MP3/Voice/Radio)
◎ REC/STOP : Recording and stop, preset memory
◎ PLAY/STOP/POWER : Playback and stop, power On/Off and using frequency preset memory
◎ REW/FF : Rewind and fast forward
◎ HOLD : Button hold on/off to prevent unwanted operations
◎ VOLUME: Volume control
◎ ERASE : Deleting files
11
Page 12
MP3 Mode
ed on the LCD
Do not listen to recorded files with a loud volume.
Start from a low volume, and then set the volume to an
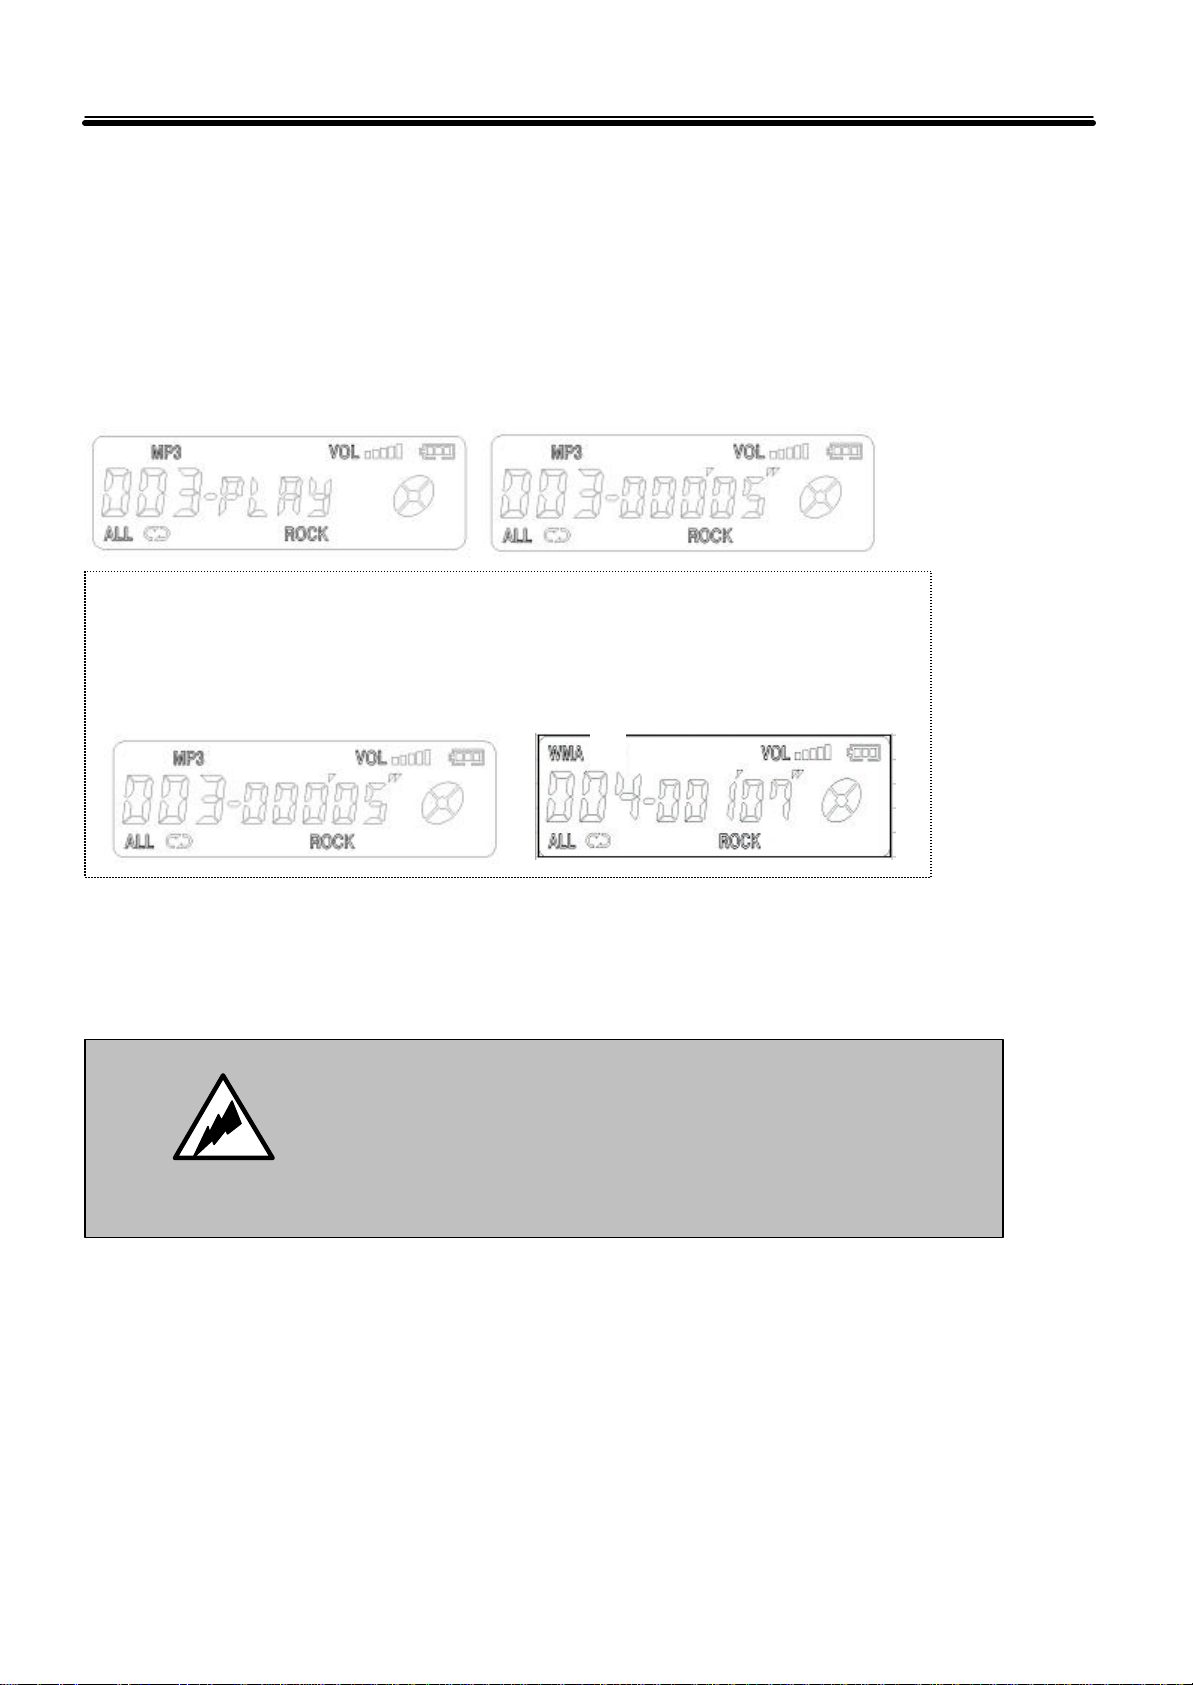
■ Playback
You can listen to MP3 file saved in the product.
1. Select a file you wish to playback using FF/REW button.
2. Press the PLAY/STOP ?button shortly once to start playback.
2. Press the PLAY/STOP ?button shortly once again to stop playback.
☞ Note ☜
● MP3 files with 8Kbps to VBR are available.
● MP3 is displayed on the LCD when MP3 files playback. WMA is display
when WMA files playback.
■ Volume Control
Controls the volume using the VOL. button. The range is between 0 and 20.
Warning
●
Otherwise it may damage your hearing.
●
appropriate level.
12
Page 13

MP3 Mode
■ Scanning File (FF/REW)
Using the FF/REW ?button, you can move to the file you want.
● Moving to the previous or next file: Press the FF/REW ?button shortly during playback.
● Scanning file: Press the FF/REW ?button longer during playback.
For the first 10 seconds: The playback time is increased or decreased by second.
After 10 seconds: The playback time is increased or decreased by 10 seconds.
● Selecting the previous or next file : Press FF/REW ?button shortly in the stop state.
■ Deleting MP3 File
You can delete the MP3 files saved in the product. The file numbers are decreased by one after deleting file.
● Deleting one file(FILE ERASE)
Deletes one file in the recoded sounds.
1. Select the file to delete in stop mode, press the MENU button longer once and shortly twice to enter ERASE
MODE.
2. Select FILE ERASE using the FF/REW button.
3. Press the MENU button longer once to delete the file.
● Deleting all files(ALL ERASE)
Deletes all the recorded files saved in a folder.
1. Press the MENU button longer once in stop mode and shortly twice to enter ERASE MODE.
Before deleting #3 file After deleting #3 file
2. Select ALL ERASE using the FF/REW button.
3. Press the MENU button longer once to delete all files.
13
Before ALL ERASE After ALL ERASE
Page 14
MP3 Mode
button, file deletion is
the
button after stopping
☞ Note ☜
◆ If you press the MENU button or other button except the ERASE
cancelled.
■ MP3 Playback Functions
● Scan and Playback
Caution
● The deleted recording file cannot be recovered.
Please make sure to decide carefully and check
file(s) you select to delete.
The first 5 seconds of each files are played back one by one.
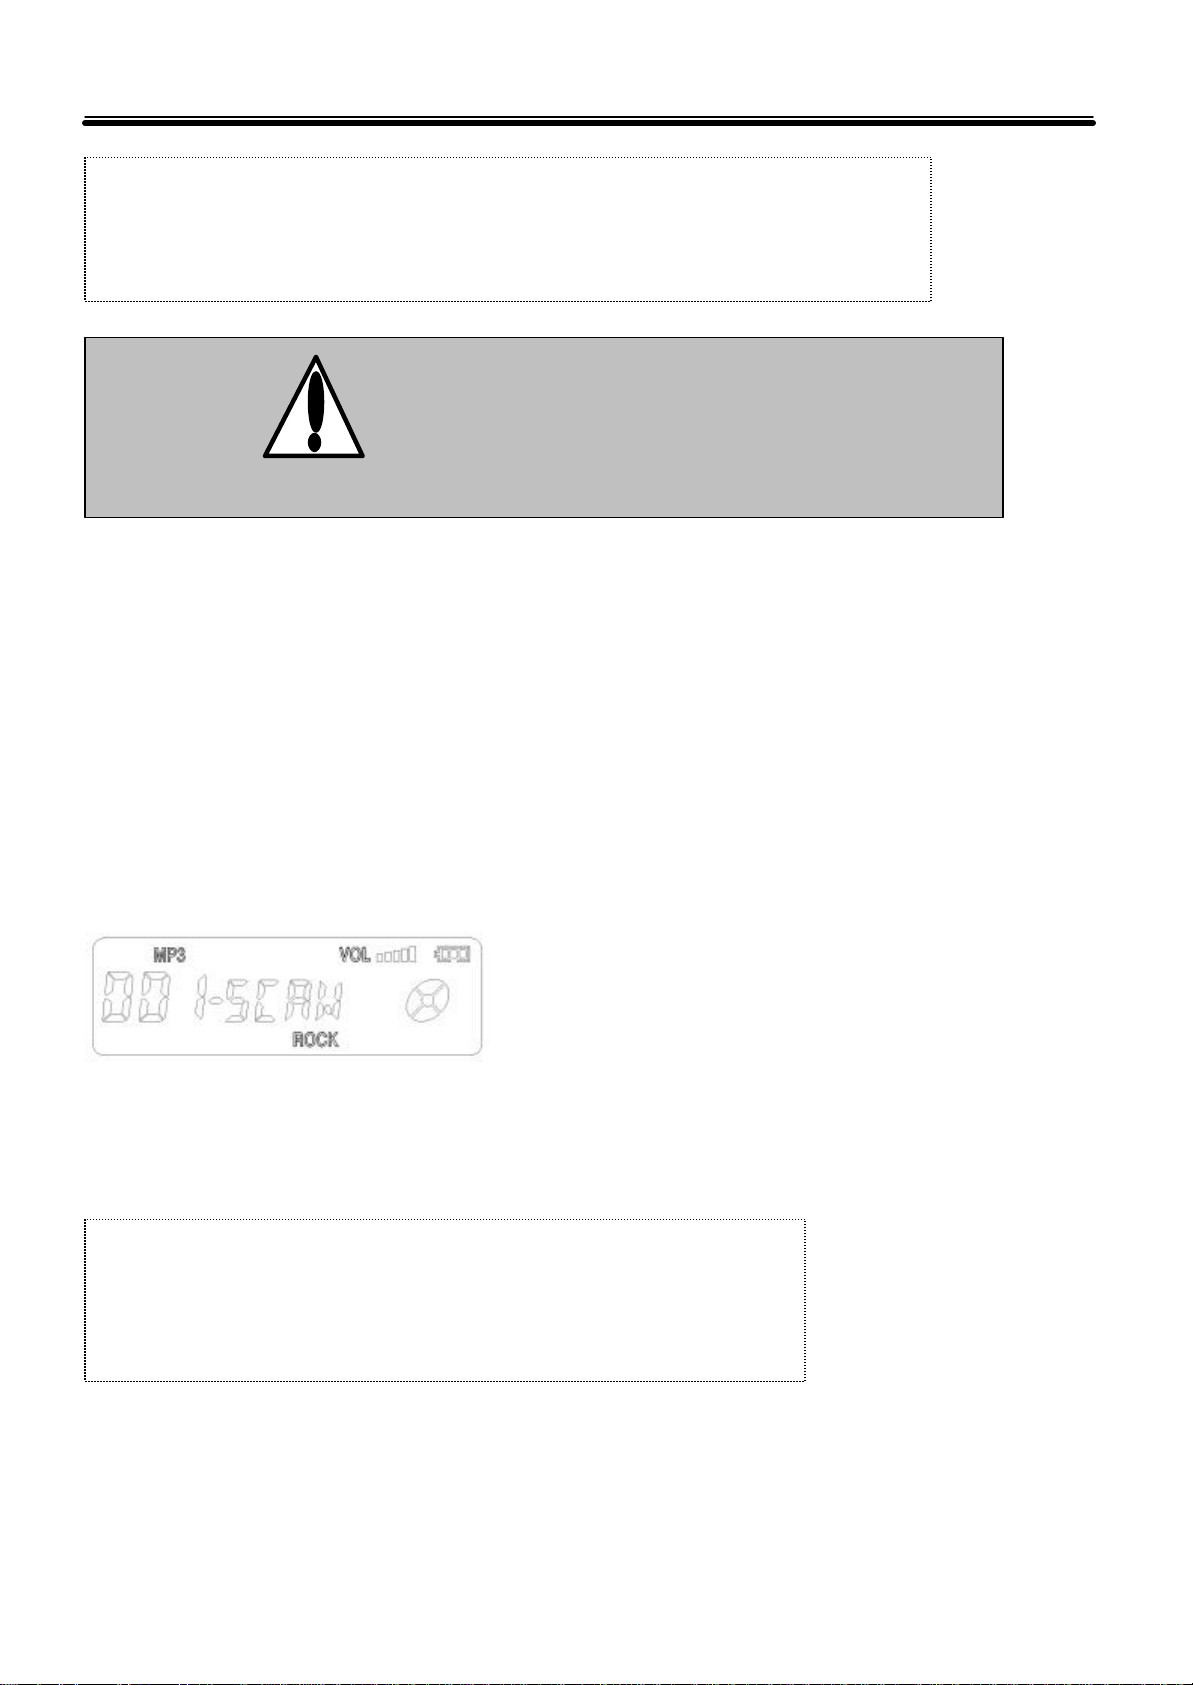
1. Press the PLAY/STOP button longer once during playback.
2. The SCAN message is displayed on the LCD and the first 5 seconds of the recorded files are played back in the
order.
3. Press the PLAY/STOP button shortly once to stop scan and playback.
● Resume
Playbacks from the position you stopped when you stopped playback.
☞ Note ☜
● If you press other button than the PLAY/STOP
playback, the file is played back from the first position.
14
Page 15
MP3 Mode
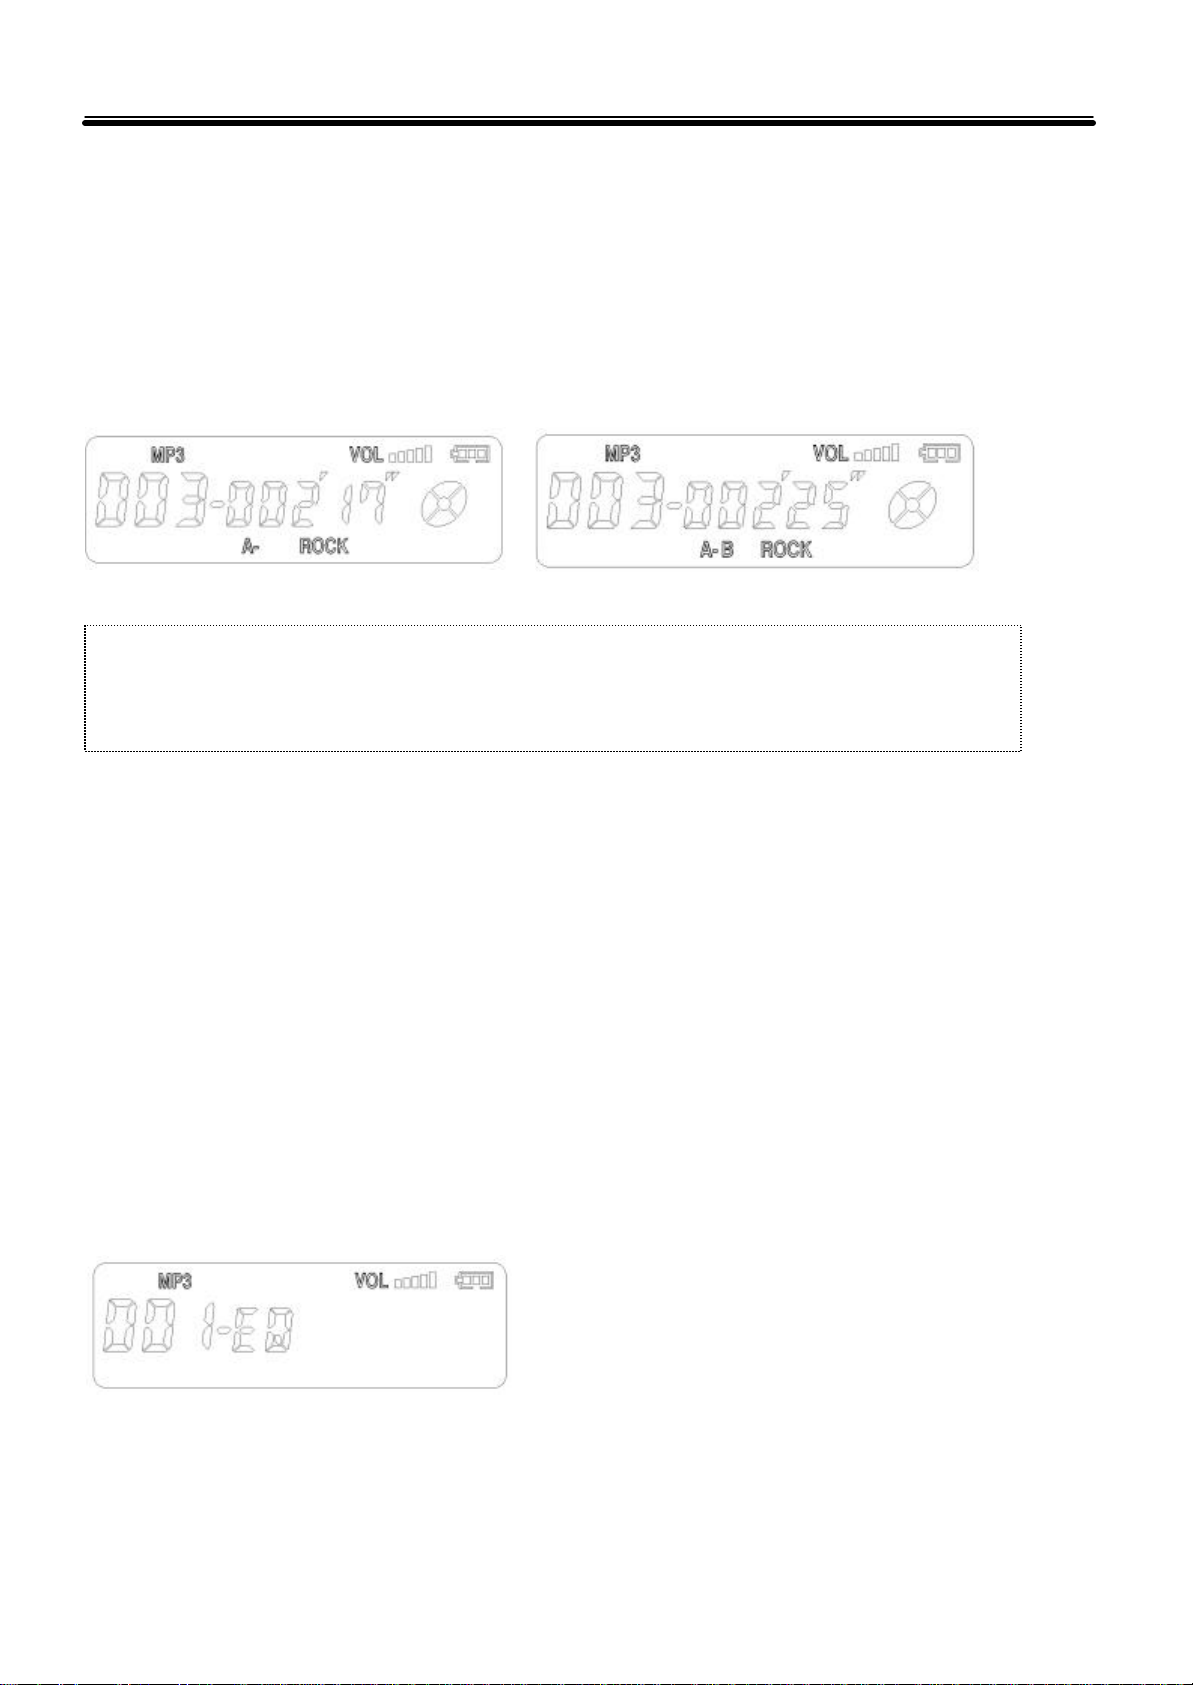
● A-B Repeat
Repeats the selected part.
1. Press the MENU button shortly once to select A point during playback.
2. Press the MENU button shortly once again to select B point, the selected A-B part is repeated.
3. Press the MENU button shortly once to release A -B repeat.
☞ Note ☜
● If u don’t select B point after selecting A point, repeat mode is released and moves to the next file.
Select A point Select B point
■ Setting Menu
Entering to menu mode: Press the MENU button longer once during playback or in stop mode.
Move to the next menu: Setting each menu, press the MENU button shortly once.
Exit from menu mode: Setting each menu, press the MENU button longer once.
● Setting EQ(Equalizer)
You can select an appropriate mode according to music file type you wish to playback.
1. Press the MENU button shortly once during playback or in stop mode.
2. Select ROCK, POP, CLASS or USER mode using FF/REW button.
3. Press the MENU button again to complete setting EQ.
15
Page 16
MP3 Mode
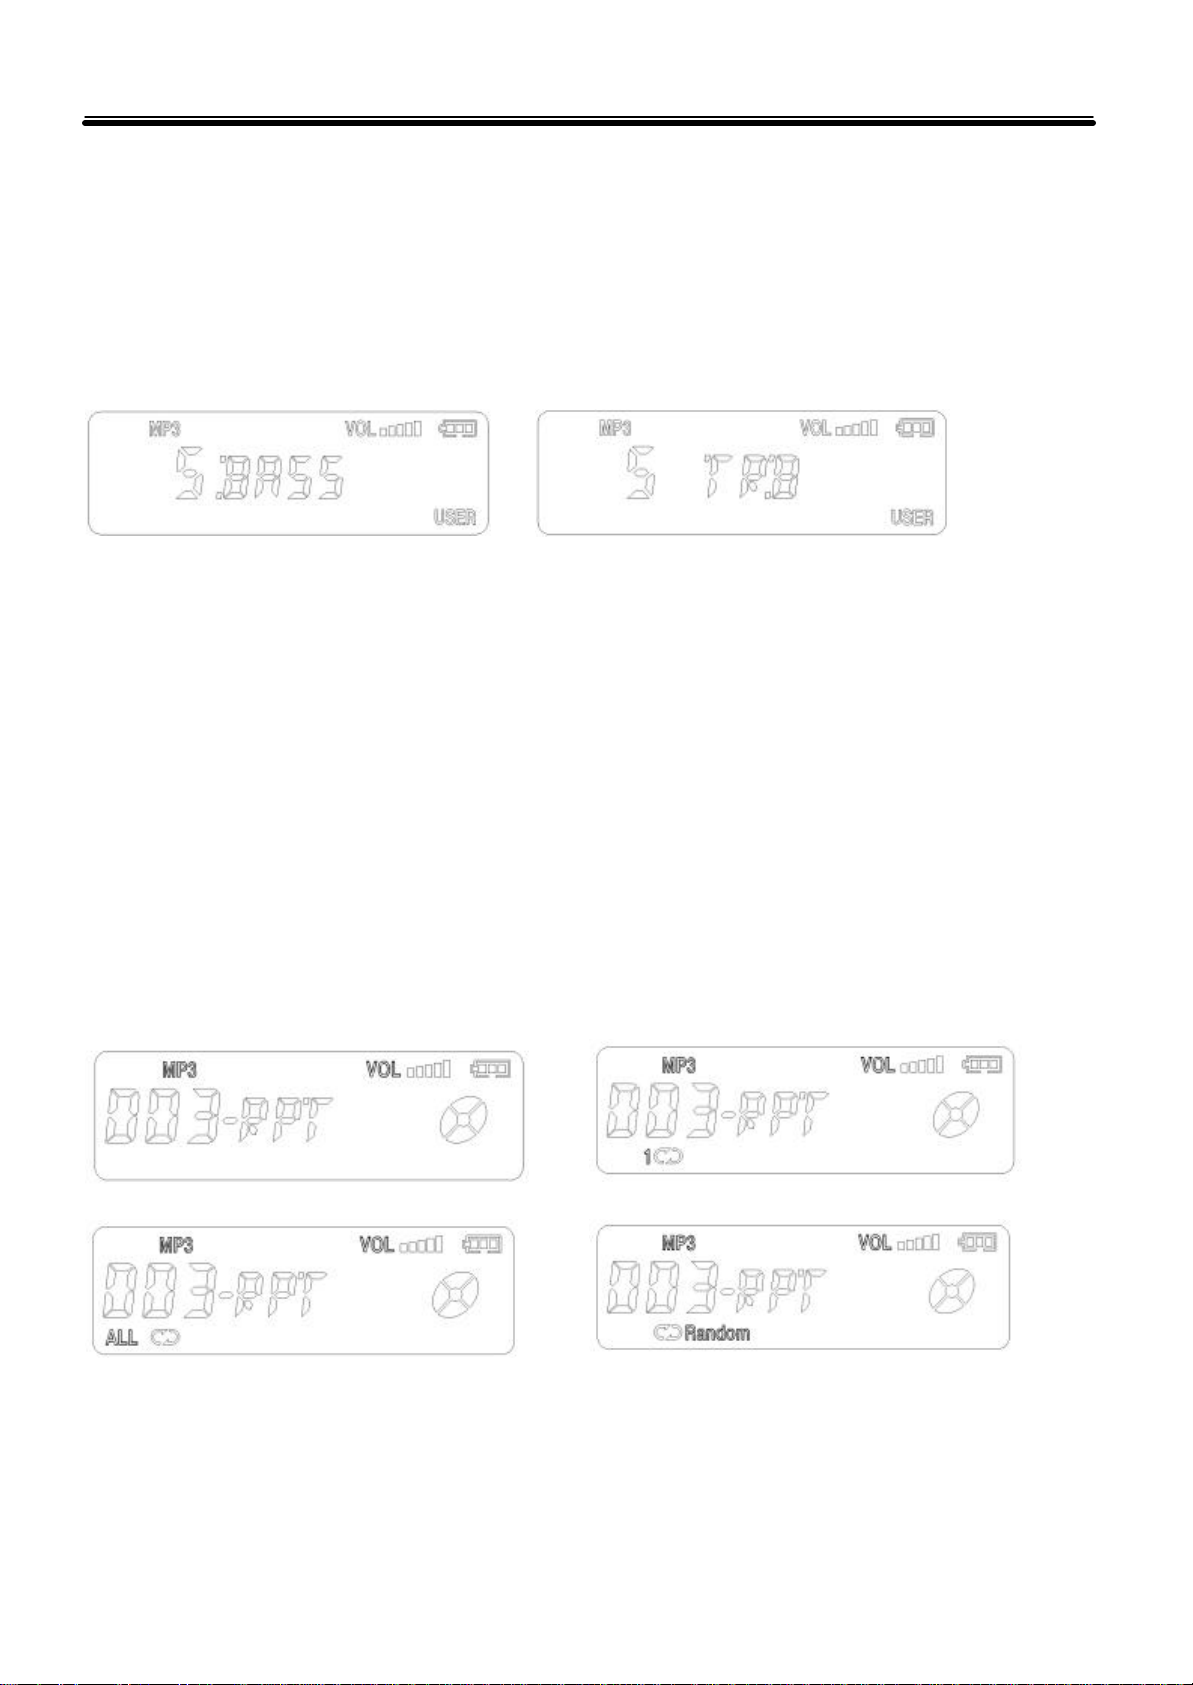
● Setting USER EQ mode
You can set LOW sound(BASS) and HIGH sound(TREBLE) for 5 steps.
1. Select USER in the setting EQ mode, select MENU button shortly once.
2. Set the BASS using the FF/REW button, press the MENU button shortly once.
3. Set the TREBLE using the FF/REW button, press the MENU button to complete setting USER EQ mode.
● Repeating
You can set repeating style.
BASS TREBLE
1. Press the MENU button longer once during playback or in stop mode and press the MENU button shortly once.
2. Select NORMAL, REPEAT_1, REPEAT_ALL or RAMDOM using FF/REW button.
3. Press the MENU button to complete setting.
NORMAL : Playback from the first file to the last file and stop.
REPEAT_1 : Repeat only one file.
REPEAT_ALL : Repeat all files continuously in order.
RANDOM : Repeat all files randomly.
Enter to repeating mode(NORMAL)
REPEAT_1
16
REPEAT_ALL RANDOM
Page 17

MP3 Mode
● Deleting
You can delete MP3 files saved in the product. Deleting one file and all files are available. The way of
deleting files is the same as Deleting MP3 File, page 13.
17
Page 18
Voice Mode
■ Switching to Voice Mode
Press the MENU button shortly once, select Voice Mode using the FF/REW button.
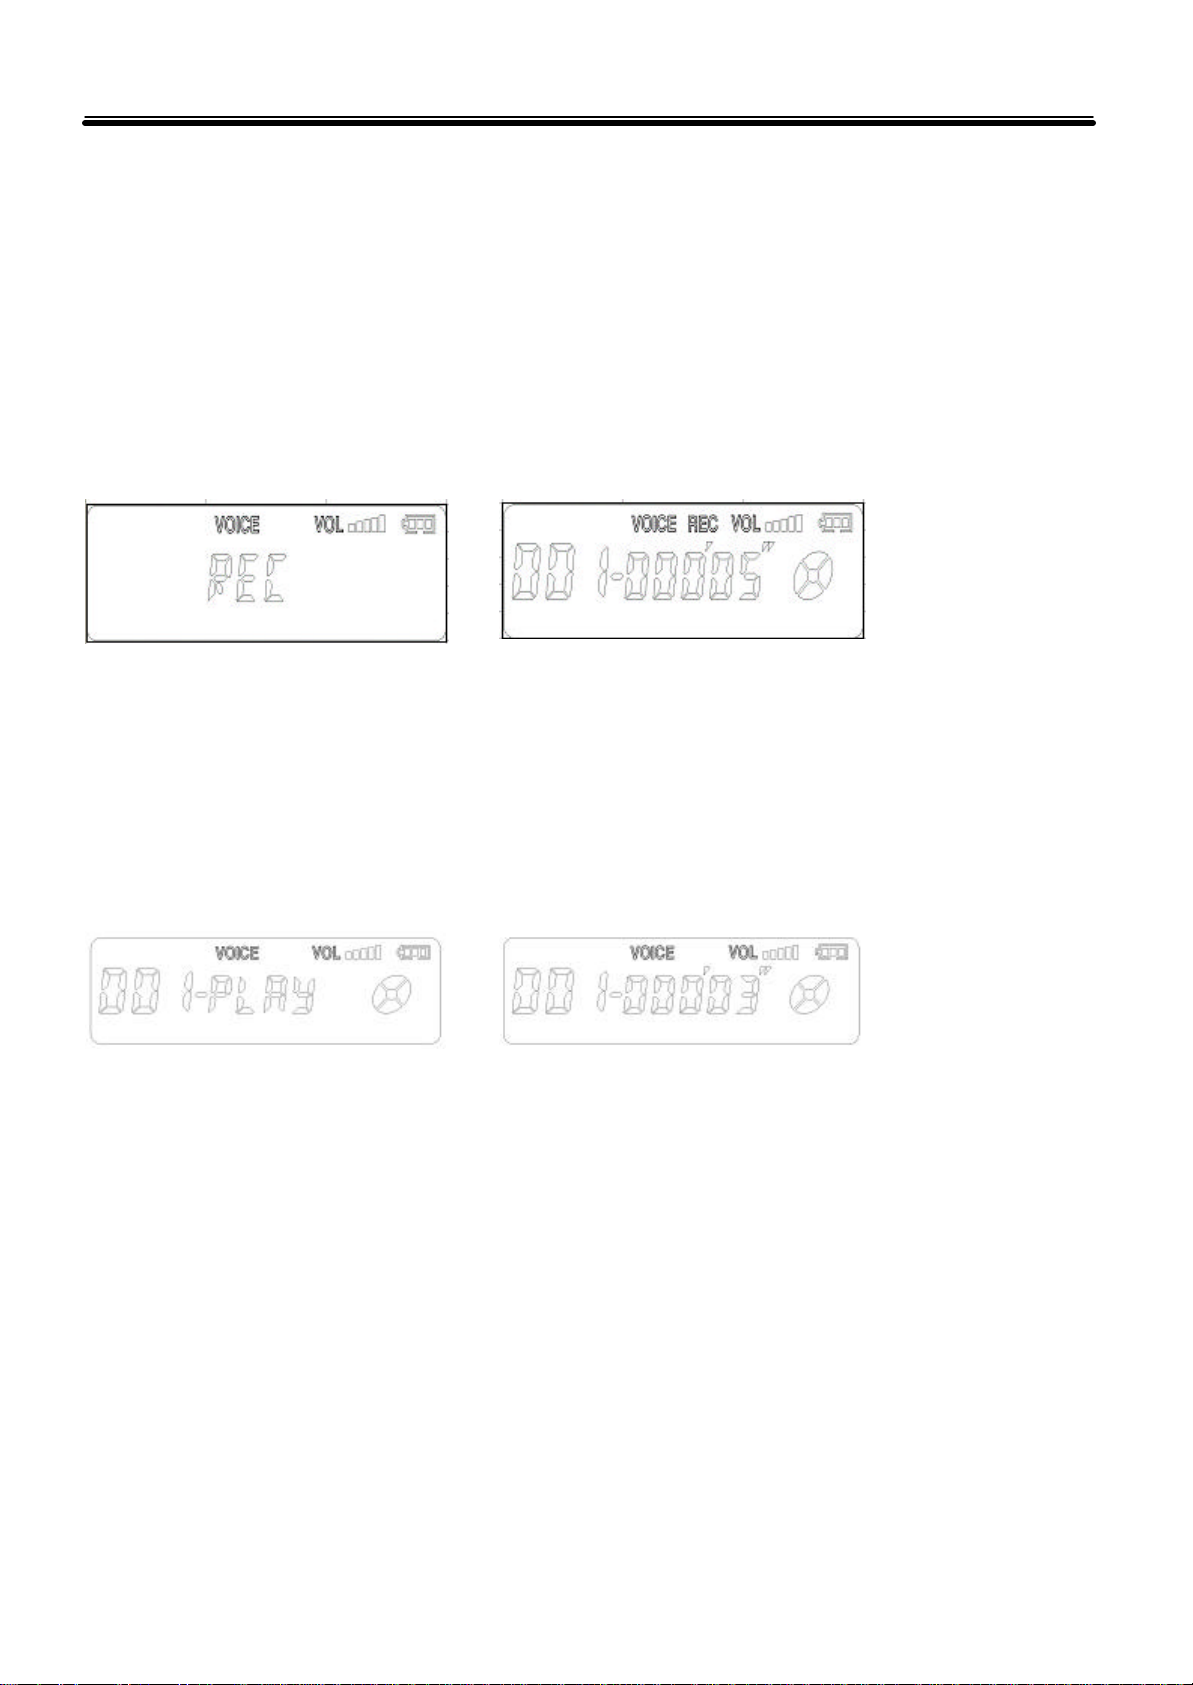
■ Recording
You can record voice or sound.
1. Press the REC/STOP button shortly once to start recording in stop mode.
2. Press the REC/STOP button shortly once again to stop recordin g.
■ Playback
You can listen to the recorded file saved in the product using earphones.
1. Select a file you wish to playback using FF/REW button.
2. Press the PLAY/STOP button shortly once to start playback.
3. Press the PLAY/STOP button shortly once to stop playback.
■ Scanning File (FF/REW)
Using the FF/REW ?button, you can move to the file you want.
● Moving to the previous or next file: Press the FF/REW ?button shortly during playback.
● Scanning file: Press the FF/REW ?button longer during playback.
For the first 10 seconds: The playback time is increased or decreased by second.
After 10 seconds: The playback time is increased or decreased by 10 seconds.
● Selecting the previous or next file : Press FF/REW ?button shortly in the stop state.
18
Page 19
Voice Mode
button, file deletion is
Please make sure to decide carefully and check the
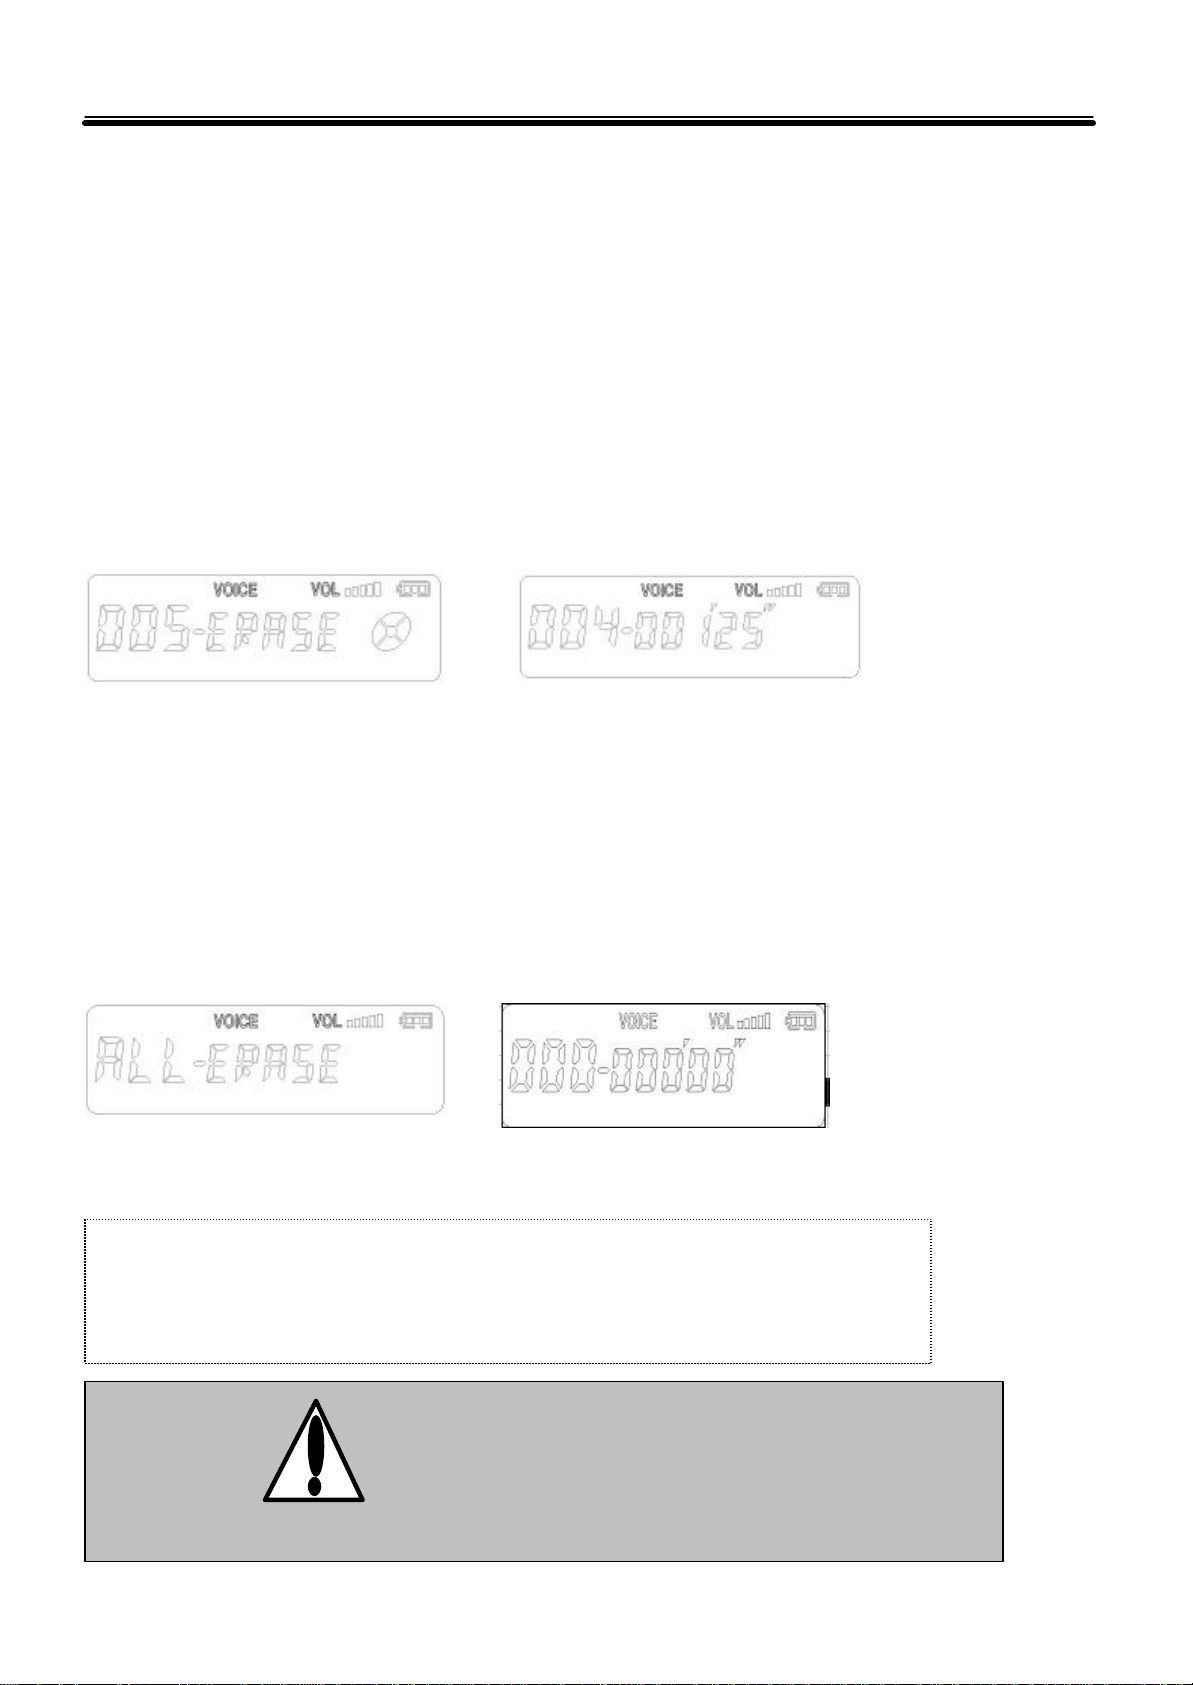
■ Deleting Voice File
You can delete the voice files saved in the product.
● Deleting one file(FILE ERASE)
Deletes one recorded file in the product. The file numbers are decreased by one after deleting file.
1. Select the file to delete in stop mode, press the MENU button longer once and shortly twice to enter ERASE
MODE.
2. Select FILE ERASE using the FF/REW button.
3. Press the MENU button longer once to delete the file.
Before deleting #5 file After deleting #5 file
● Deleting all files(ALL ERASE)
Deletes all the recorded files saved in voce folder.
1. Press the MENU button longer once in stop mode and shortly twice to enter ERASE MODE.
2. Select ALL ERASE using the FF/REW button.
3. Press the MENU button longer once to delete all files.
☞ Note ☜
◆ If you press the MENU button or other button except the ERASE
cancelled.
Before ALL ERASE
After ALL ERASE
19
Caution
● The deleted recording file cannot be recovered.
file(s) you select to delete.
Page 20
Voice Mode
topping
■ Voice Recording Function
● Index Added Recording
Adds the indexing number (file number) of the file being recorded.
Press the FF?button during recording, the file number of the file being recorded is increased and saved automatically.
◆ When you press the FF button and record for 30 minutes after recording for 30 minutes starting from the
number 1 file, the sound is recorded in the number 1 file for 30 minutes and in the number 2 file for 30 minutes.
■ Voice Playback Functions
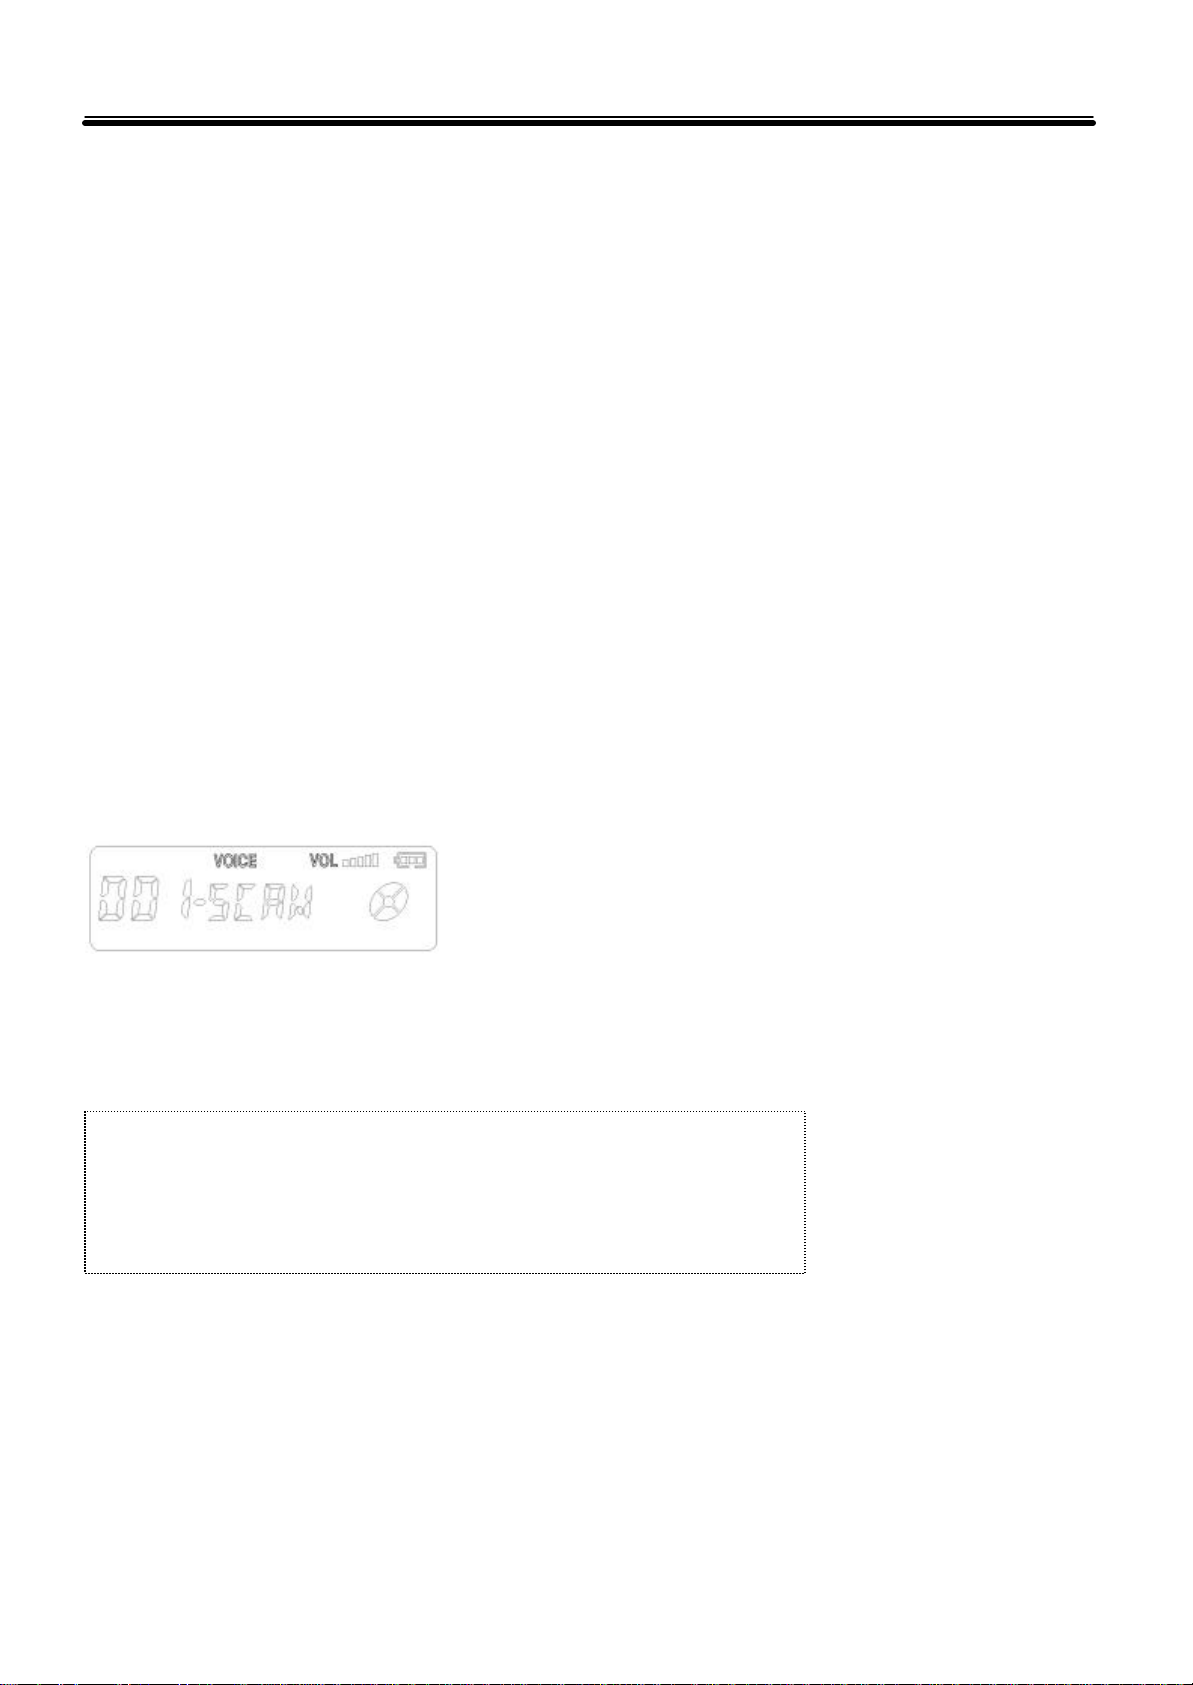
● Scan and Playback
The first 5 seconds of each files are played back one by one.
1. Press the PLAY/STOP button longer once during playback.
2. The SCAN message is displayed on the LCD and the first 5 seconds of the recorded files are played back in the
order.
3. Press the PLAY/STOP button shortly once to stop scan and playback.
● Resume
Playbacks from the position you stopped when you stopped playback.
☞ Note ☜
● If you press other button than the PLAY/STOP button after s
playback, the file is played back from the first position.
20
Page 21
Voice Mode
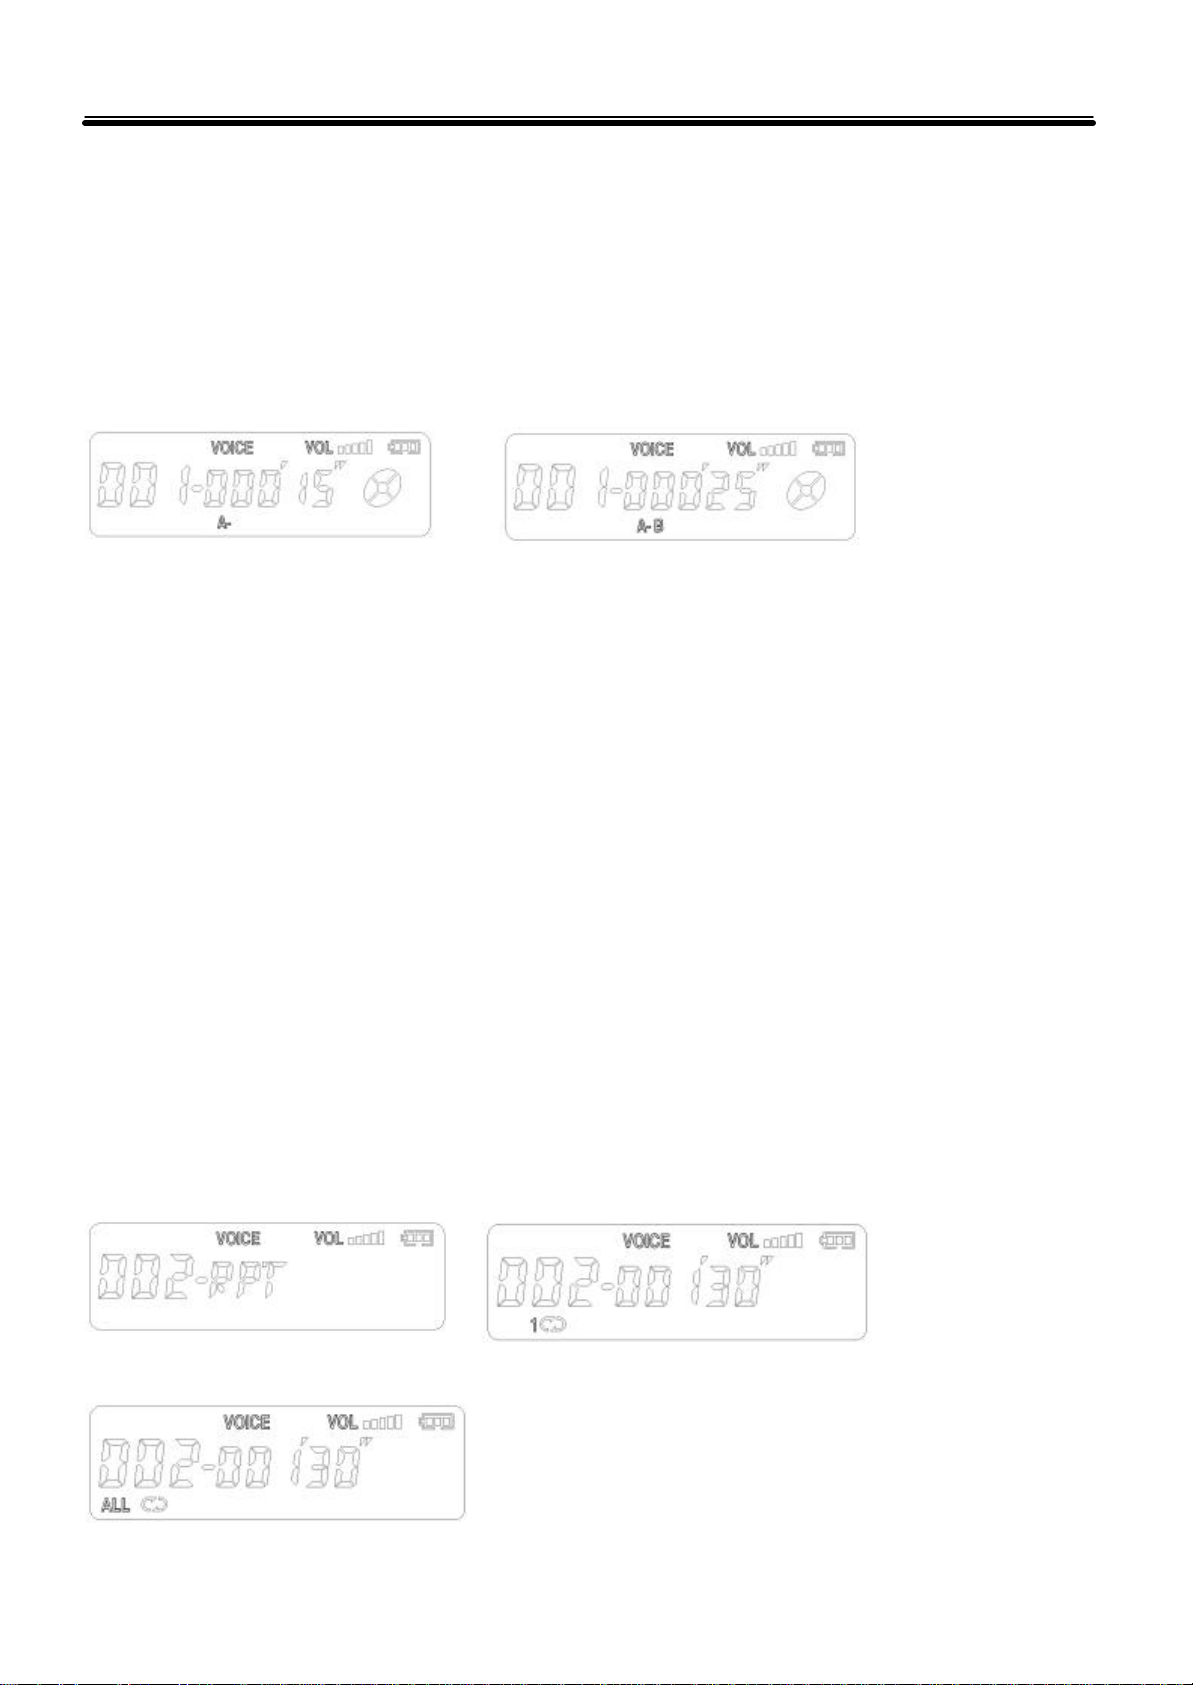
● A-B Repeat
Repeats the selected part.
1. Press the MENU button shortly once to select A point during playback.
2. Press the MENU button shortly once again to select B point, the selected A-B part is repeated.
3. Press the MENU button shortly once to release A -B repeat.
■ Setting Menu
Entering to menu mode : Press the MENU button longer once during playback or in the stop mode.
Select A point Select B point
Move to the next menu : Setting each menu, press the MENU button shortly once.
Exit from menu mode : Setting each menu, press the MENU button longer once.
● Repeating
You can set repeating style.
1. Press the MENU button longer once during playback or in stop mode and press the MENU button shortly once.
2. Select NORMAL, REPEAT_1 or REPEAT_ALL using FF/REW button.
3. Press the MENU button to complete setting.
NORMAL : Playback from the first file to the last file and stop.
REPEAT_1 : Repeat only one file.
REPEAT_ALL : Repeat all files continuously in order.
Enter to repeating mode(NORMAL)
21
REPEAT_ALL
REPEAT_1
Page 22

Voice Mode
● Deleting
You can delete MP3 files saved in the product. Deleting one file and all files are available. The way of deleting files
is the same as Deleting Voice File, page 19.
22
Page 23
Radio Mode
■ Switching to Radio Mode
Press the MENU button shortly once, select Radio Mode using the FF/REW button.
■ Scanning Frequency
Scans the frequency of the broadcast you wish to listen to.
● Auto Frequency Scanning
Press the FF/REW button longer while listening to a radio broadcast.
● Manual Frequency Scanning
Press the FF/REW button shortly once while listening to a radio broadcast.
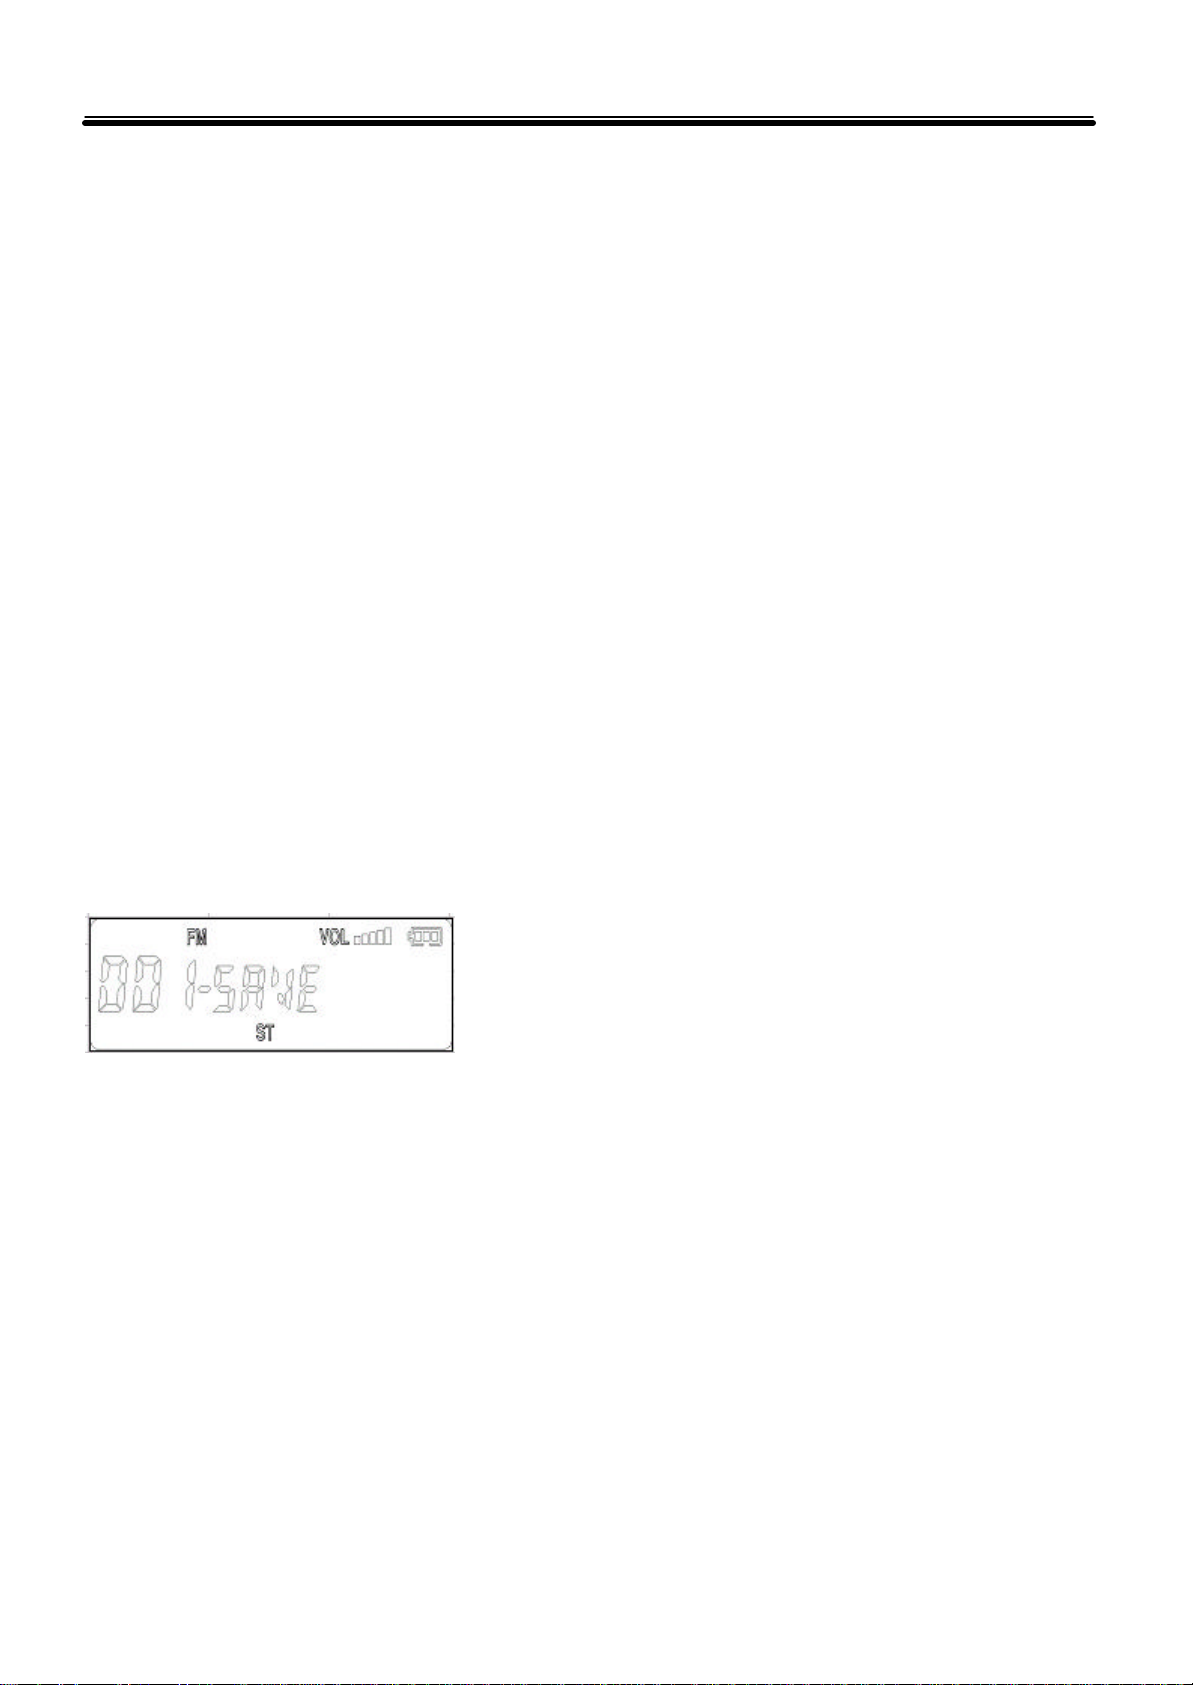
■ Preset Memory
Memorizes the frequency of the current broadcast to your desired frequency memory number. You can save up to
20 frequencies.
1. Press the REC/STOP button shortly once while listening to a radio broadcast.
2. Select your desired frequency memory number using the FF/REW button.
3. Press the REC/STOP button shortly once again to save the current broadcast frequency to the selected number.
23
Page 24
Radio Mode
If the preset numbers which have no saved frequency are not
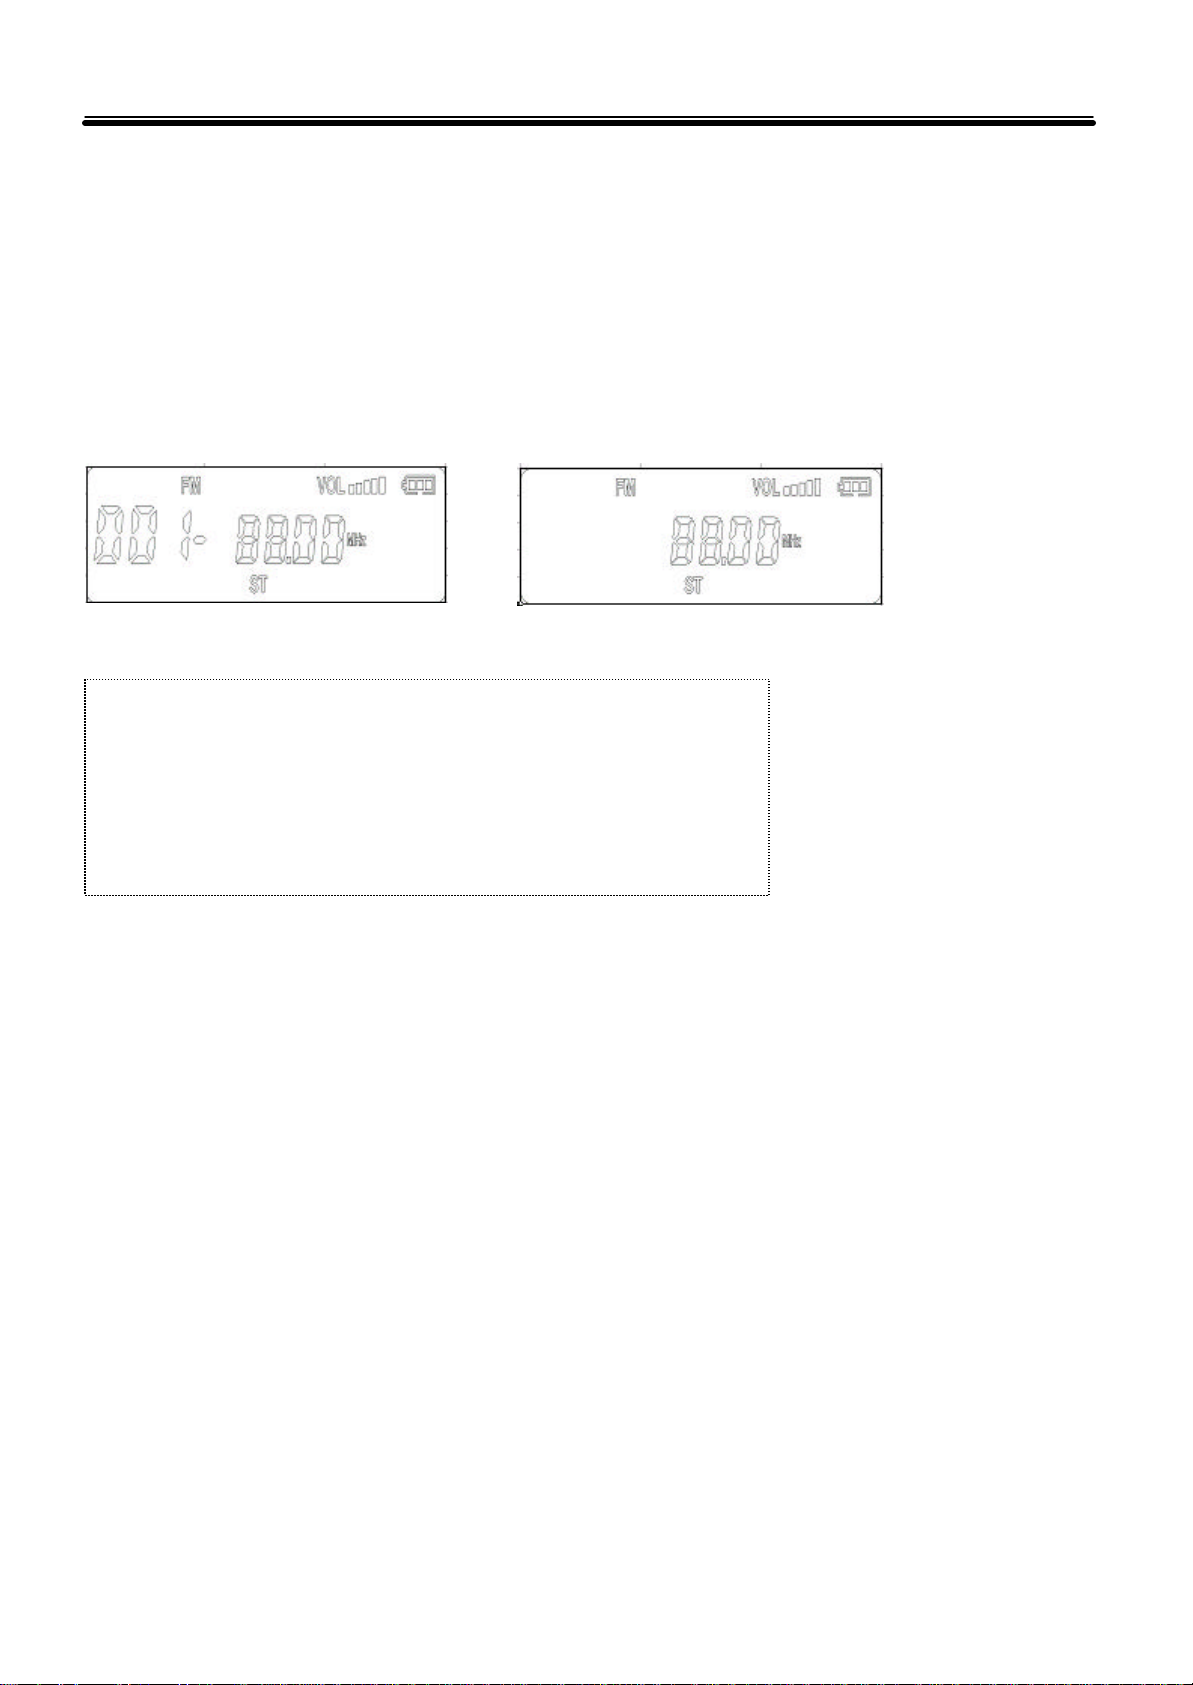
■ Listening to Preset Frequency
You can listen to the frequency broadcast saved with the preset number.
1. Press the PLAY/STOP?button shortly once while listening a radio broadcast.
2. The Preset number and broadcast frequency displays on the LCD screen.
3. Select your desired number using the FF/REW button to listen to a preset broadcast.
4. Press the PLAY/STOP button shortly once to release the preset frequency mode.
Listening to preset frequency
☞ Note ☜
● When there is no saved numb er, this function does not work.
●
displayed on the LCD screen when selecting a number with the FF/REW
button.
Releasing the preset frequency
■ Deleting Preset Frequency
You can delete a preset frequency.
1. Select the number you wish to delete using the FF/REW ?button.
2. Press the ERASE button longer once, the ERASE is displayed on the LCD screen.
3. Press the ERASE button shortly once to delete the frequency of the selected number.
24
Page 25
Radio Mode
t
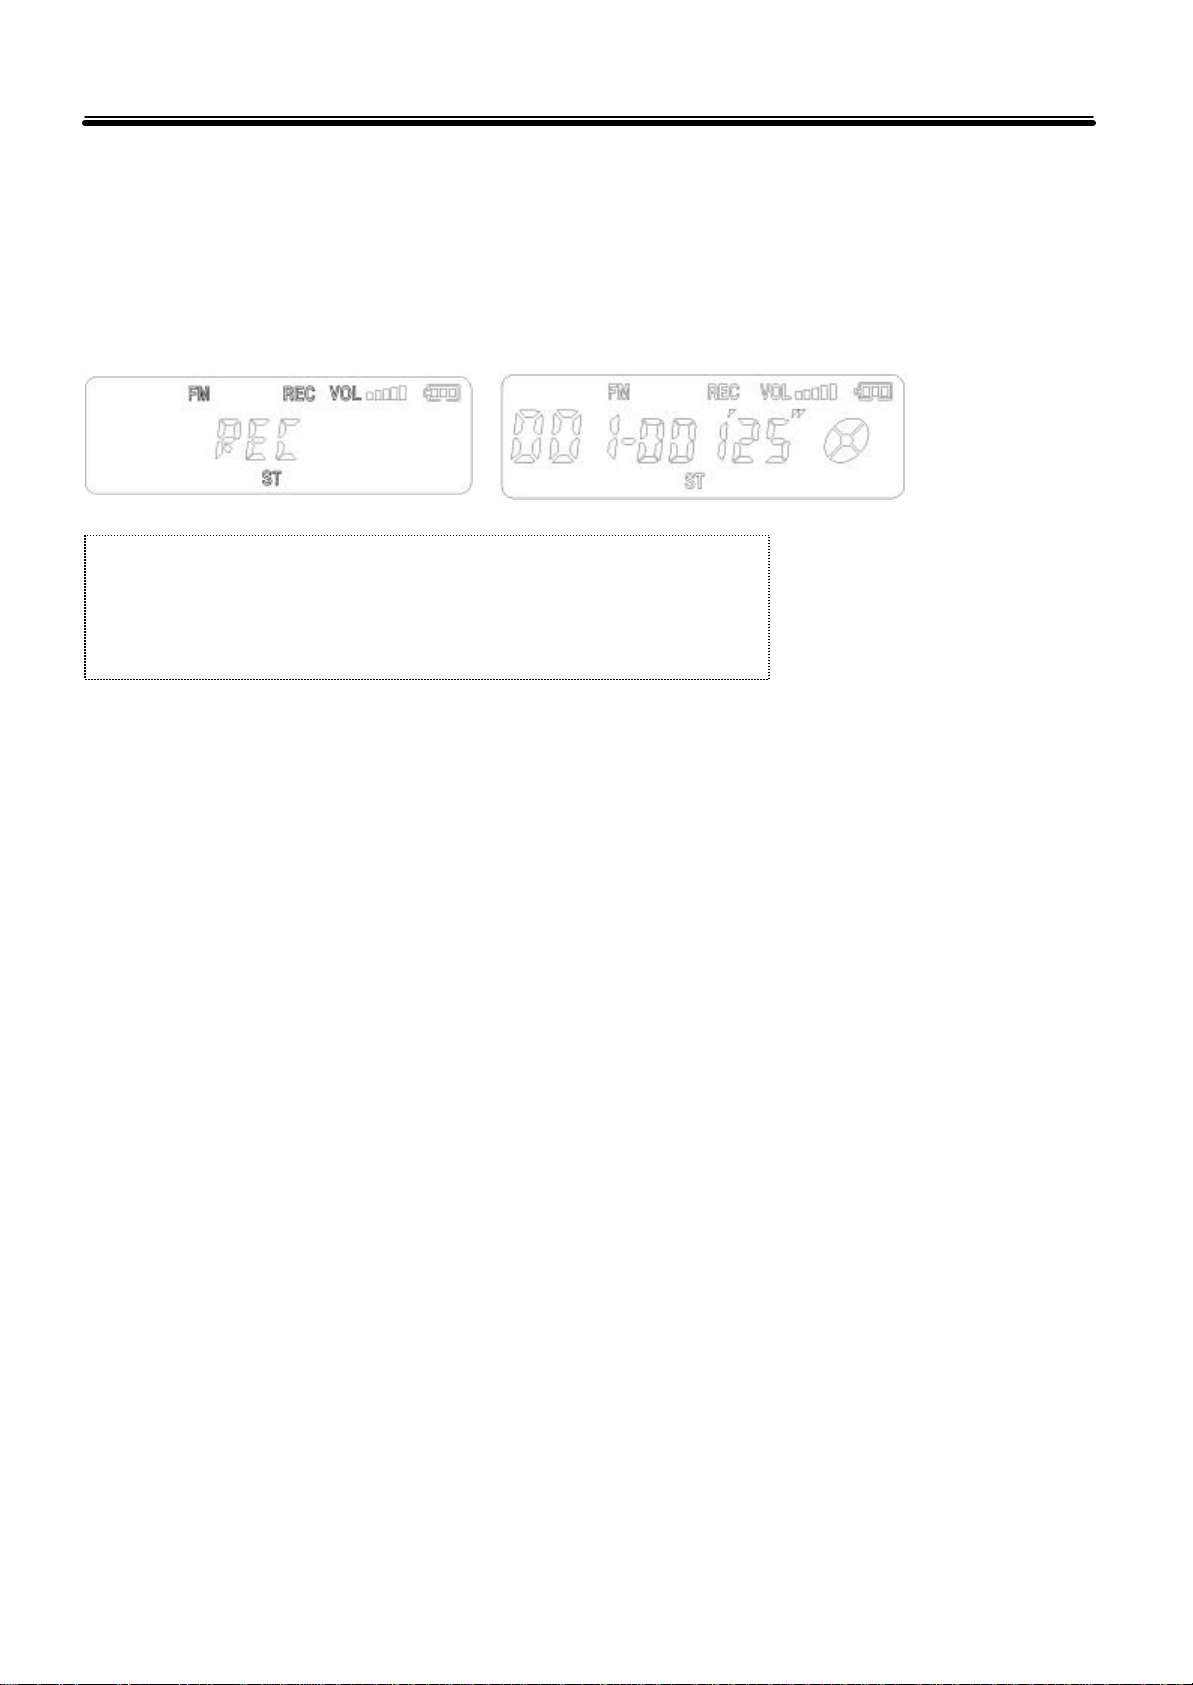
■ Recording Broadcast
Records the broadcast you are listening to.
1. Press the REC/STOP button longer to start recording while listening to a broadcast.
2. Press the REC/STOP button longer once to stop recording.
☞ Note ☜
● Recorded file is saved in the VOICE folder as *.WAV. You can check i
on the screen after connecting to the PC.
■ Playback the Recorded Broadcast
1. Switch to the Voice Mode. (See page 18)
2. Select a file you wish to playback using FF/REW button.
3. Press the PLAY/STOP button shortly once to start playback.
4. Press the PLAY/STOP button shortly once to stop playback.
25
Page 26
Radio Mode
■ Setting Menu
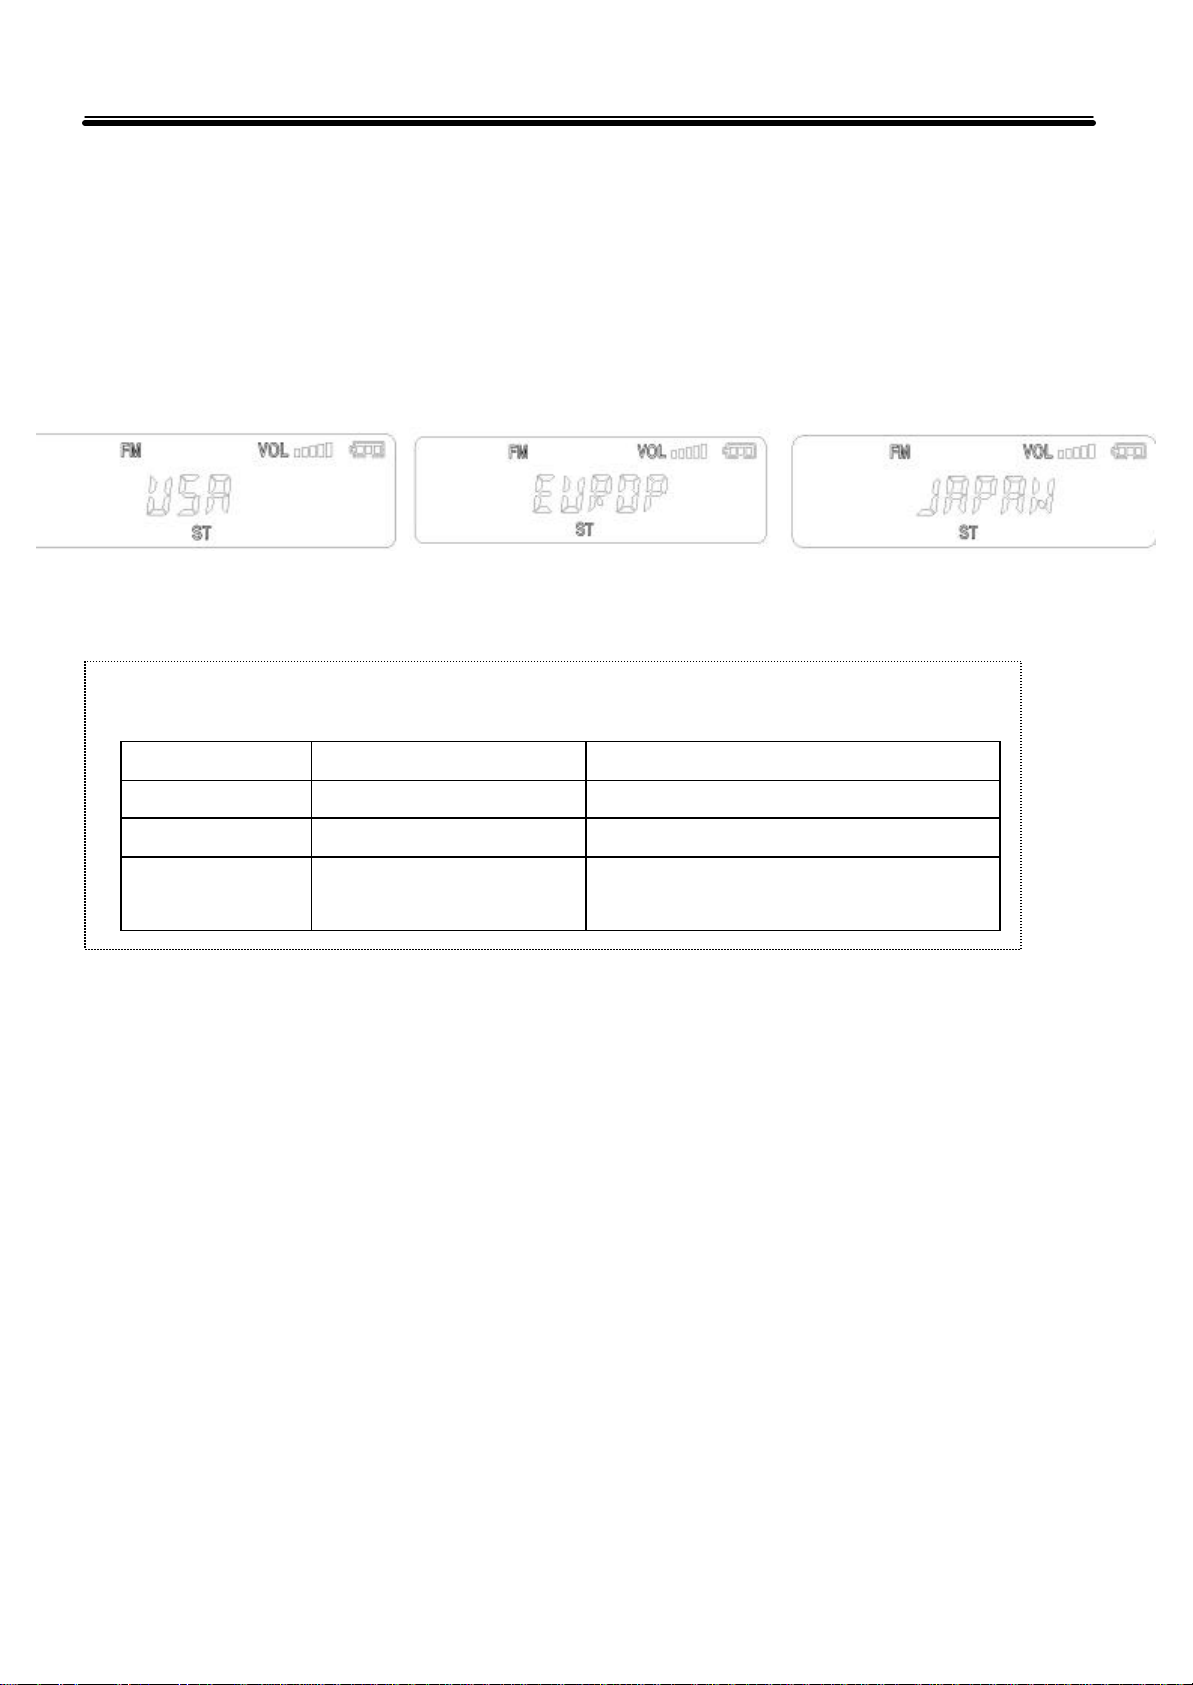
● Area
You can change the frequency band according to your area.
1. Press the MENU button longer once.
2. Select your area using the FF/REW button and press the MENU button shortly once to complete setting.
☞ Note ☜
● Available frequency band according to area
USA EUROPE/KOREA JAPAN
Area Frequency Band Mobile Frequency Unit
USA 88 MHz ~ 108 MHz 100 KHz
Europe/Korea 88 MHz ~ 108 MHz 50 KHz
Japan 76 MHz ~ 108 MHz 76.0 MHz ~ 90.0 MHz : 100 KHz
90.0 MHz ~ 108.1 MHz : 50 KHz
26
Page 27
PC Interface
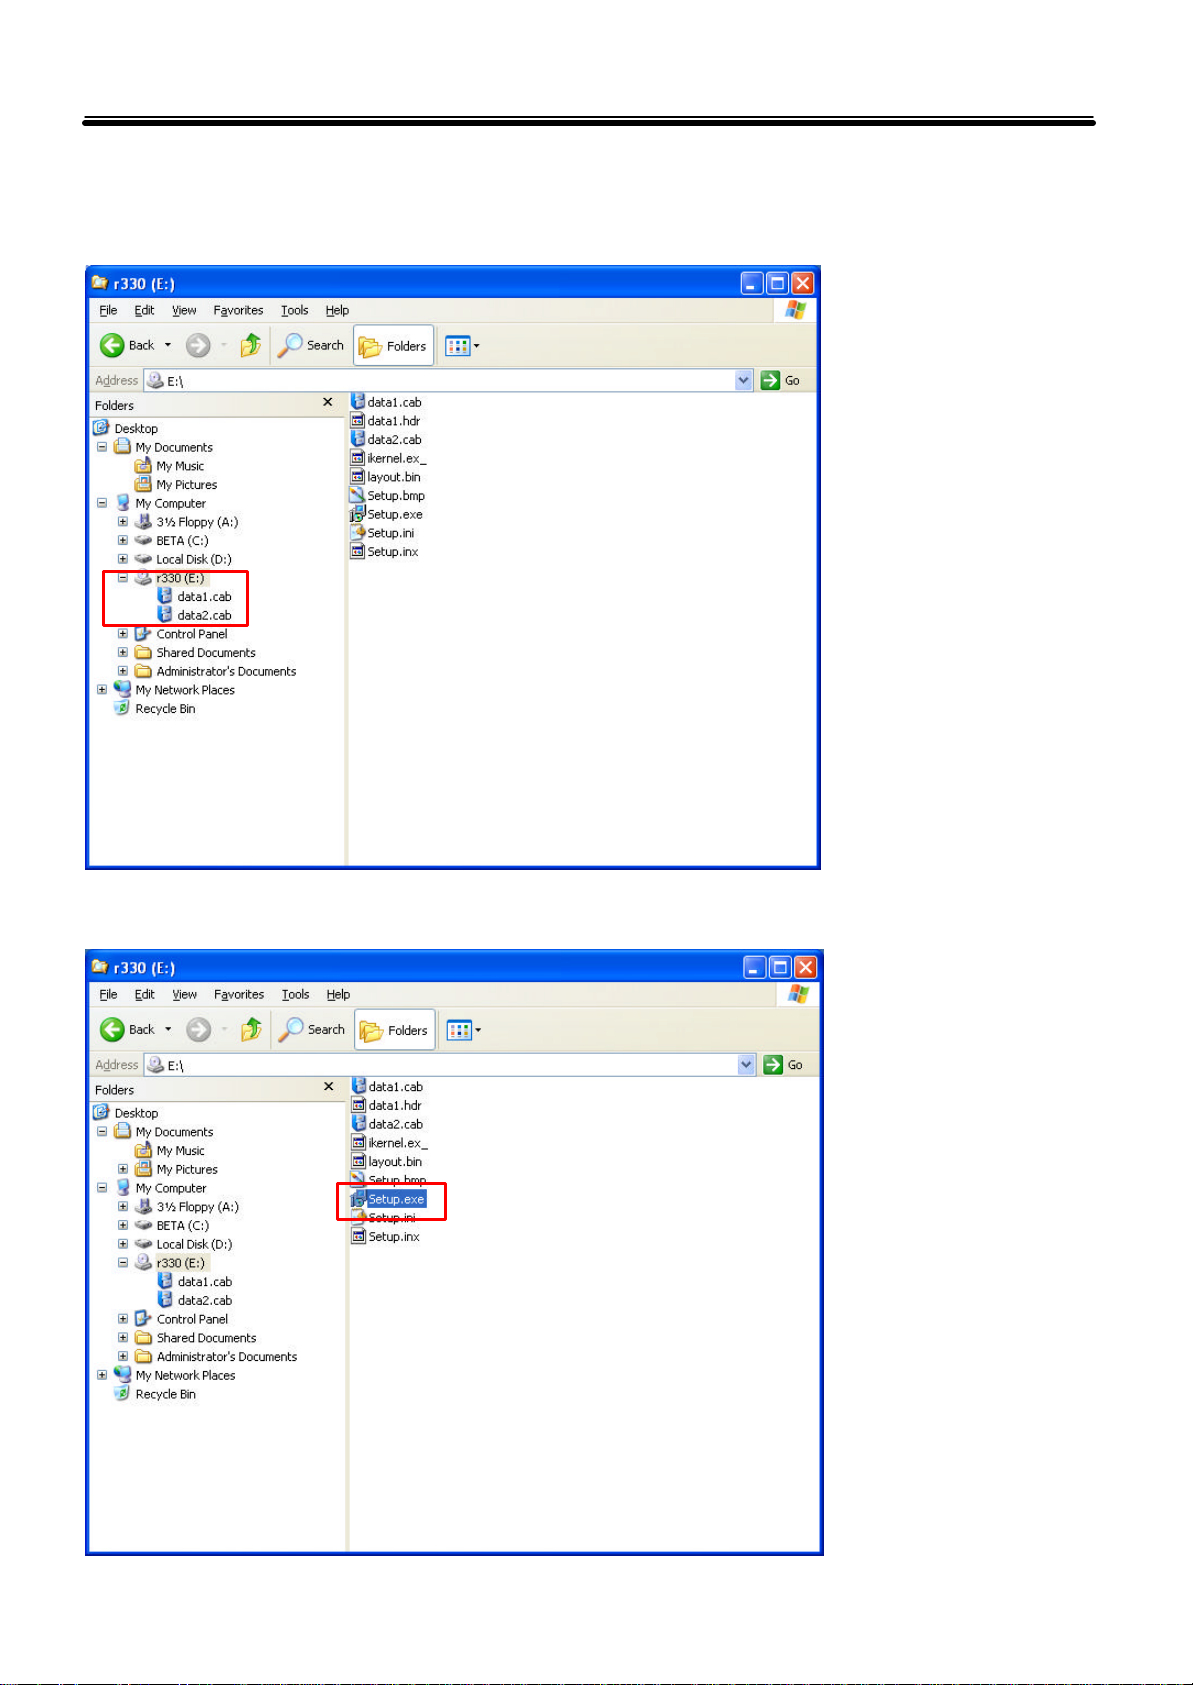
■ Installing Driver
1. Insert the Driver CD on your CD Rom driver. Open the CD driver on the windows explorer.
2. Double -click the [Setup.exe] item in the right window.
27
Page 28
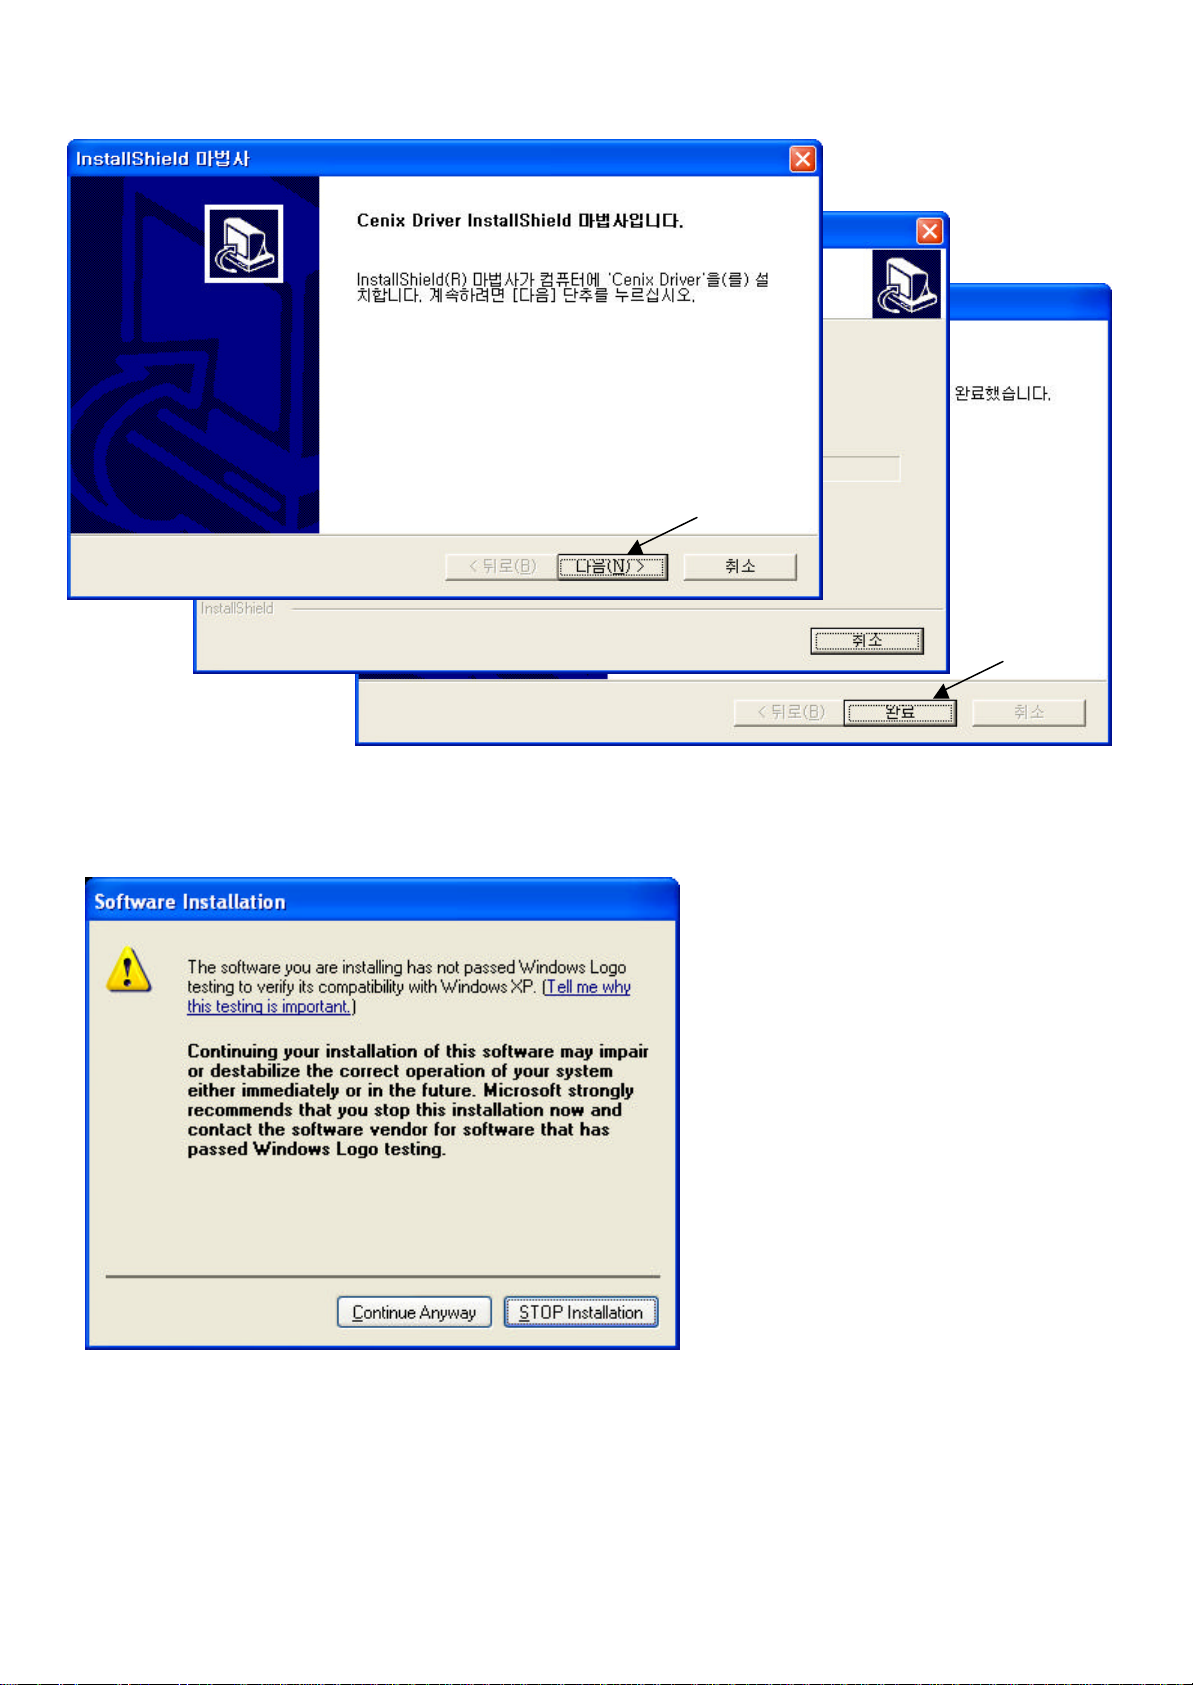
3. Press the NEXT button sequentially as directed on the screen to finish the installation.
※ Note
Please press the [Continue Anyway] button and keep installing when the below message is shown after installing
the driver on the Windows XP.
Click
Click
※ Caution
Do not connect the product to the PC before installing the driver.
28
Page 29
PC Interface
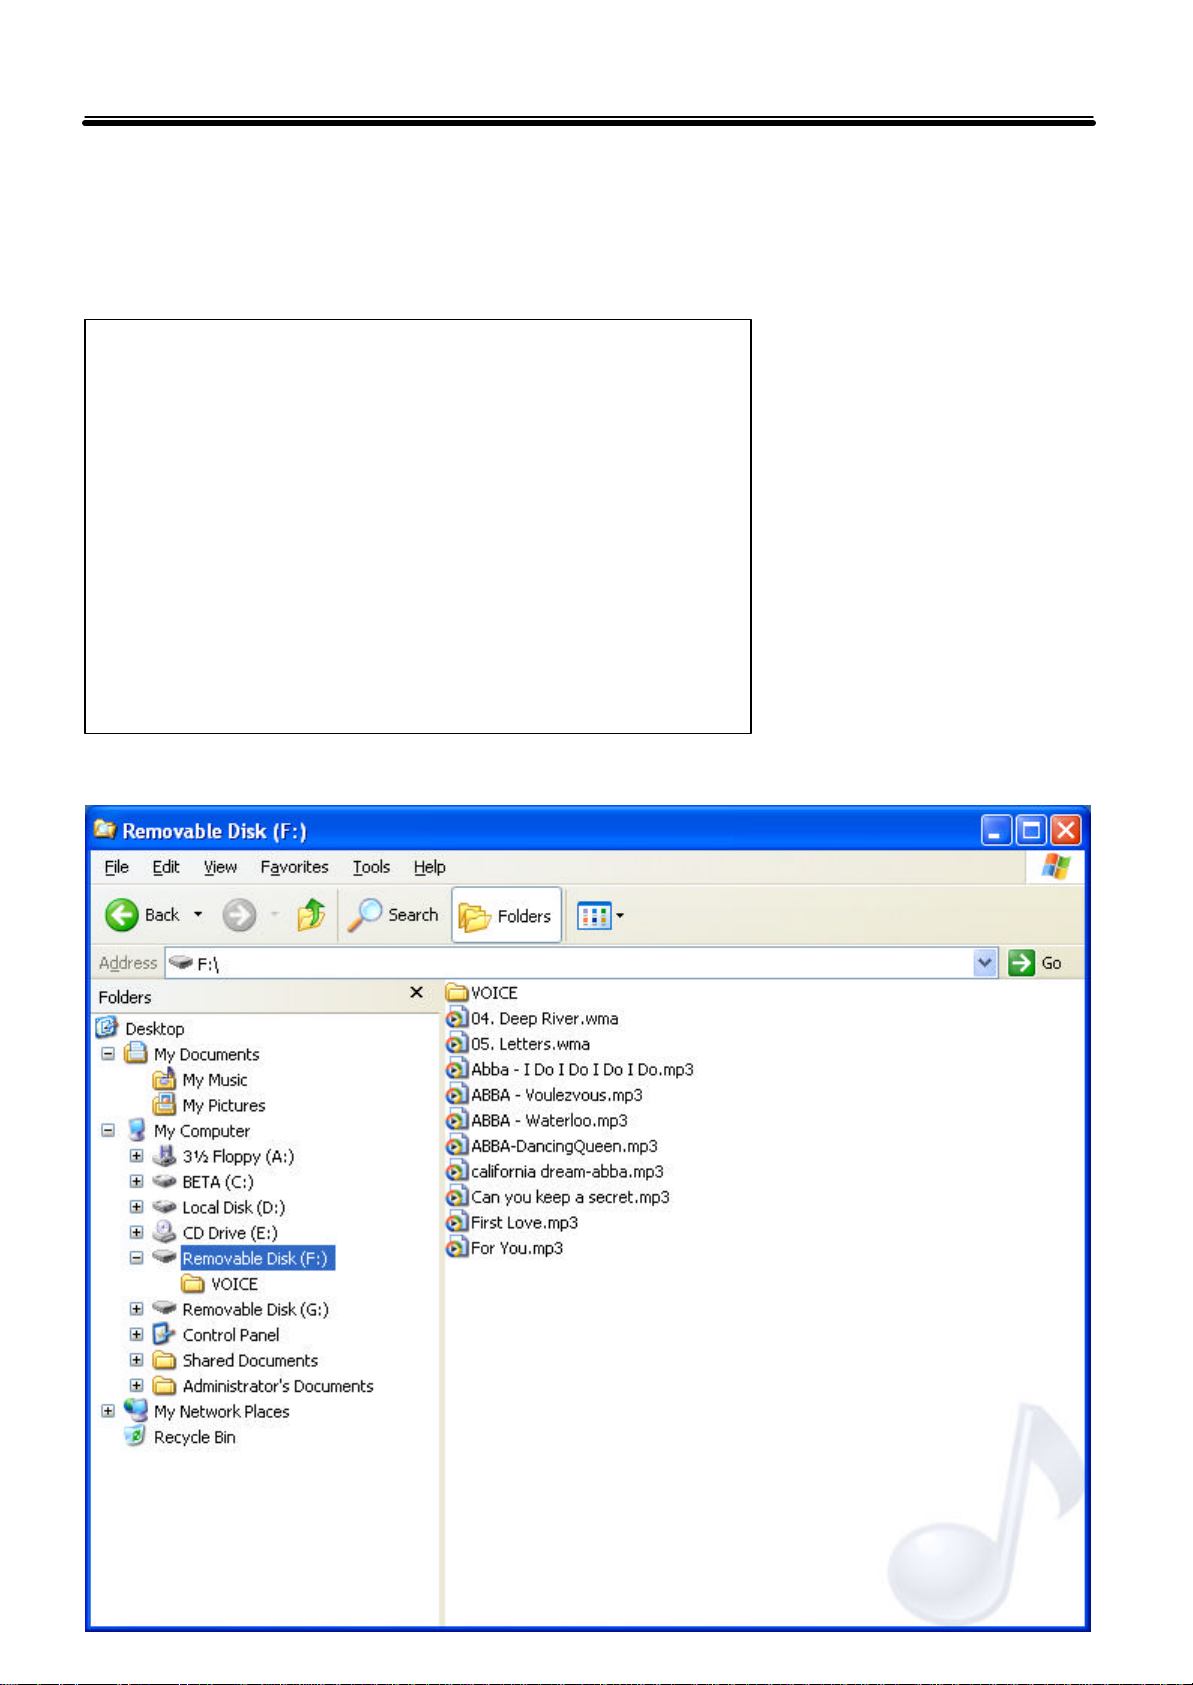
■ Downloading
1. Turn the power on and connect the product to the PC after installing the driver using USB cable.
2. [Removable Disk] is created in the win dows explorer. The saved files are displayed on the right window.
29
Page 30
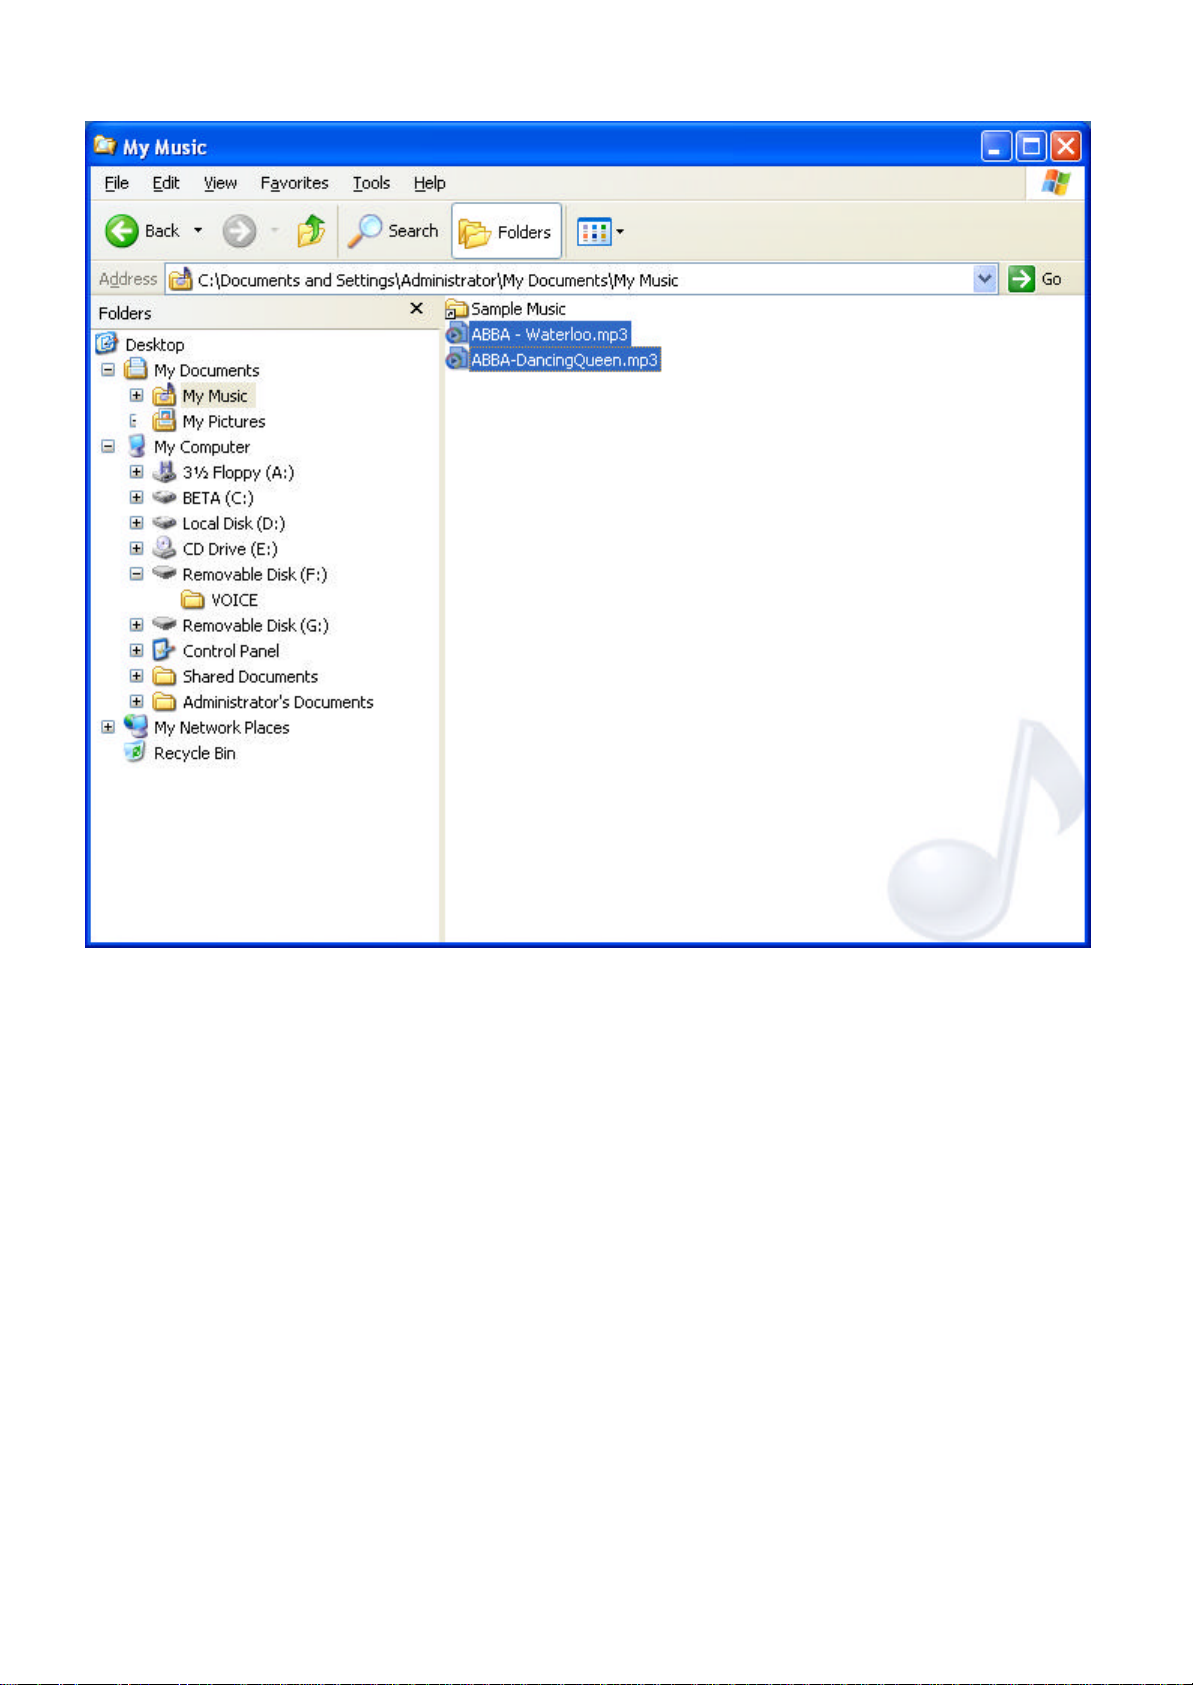
3. Select the MP3 file(s) you wish to download to the product.
30
Page 31
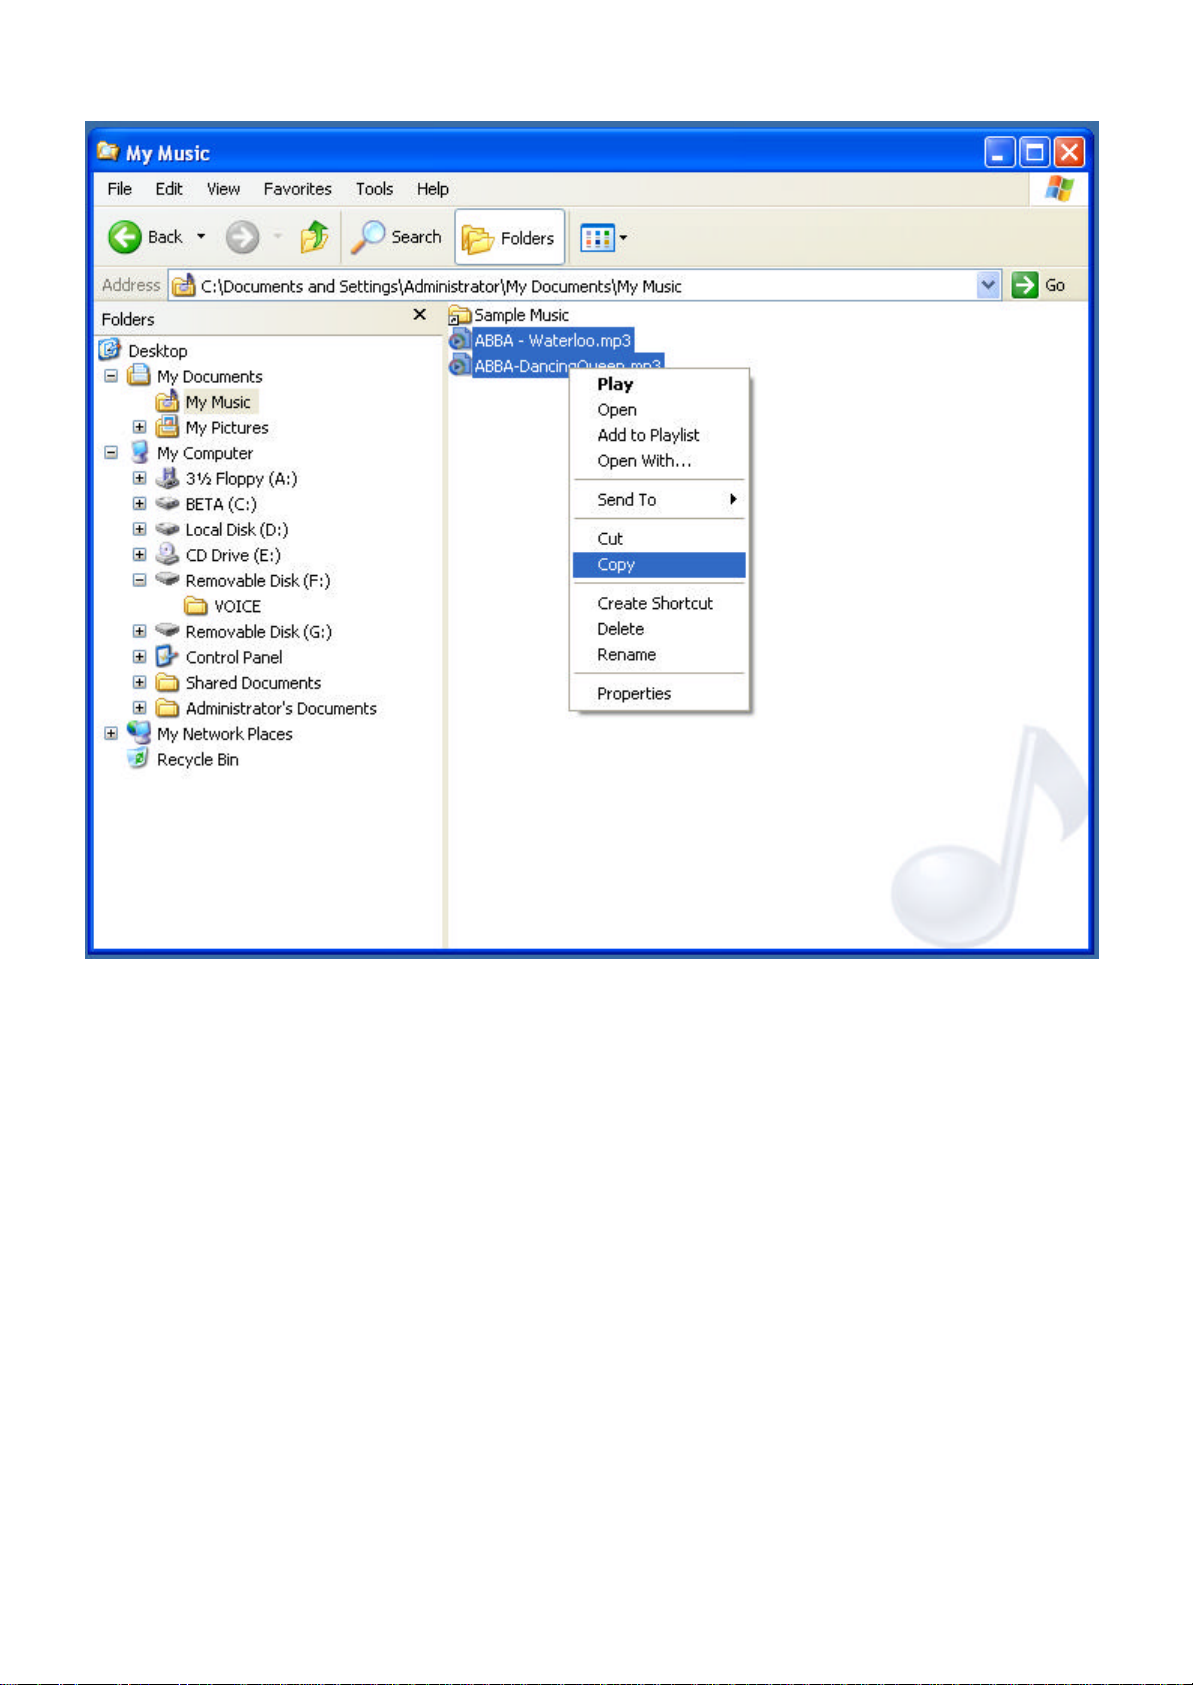
4. Click the right button of your mouse. Select [Copy] item.
31
Page 32
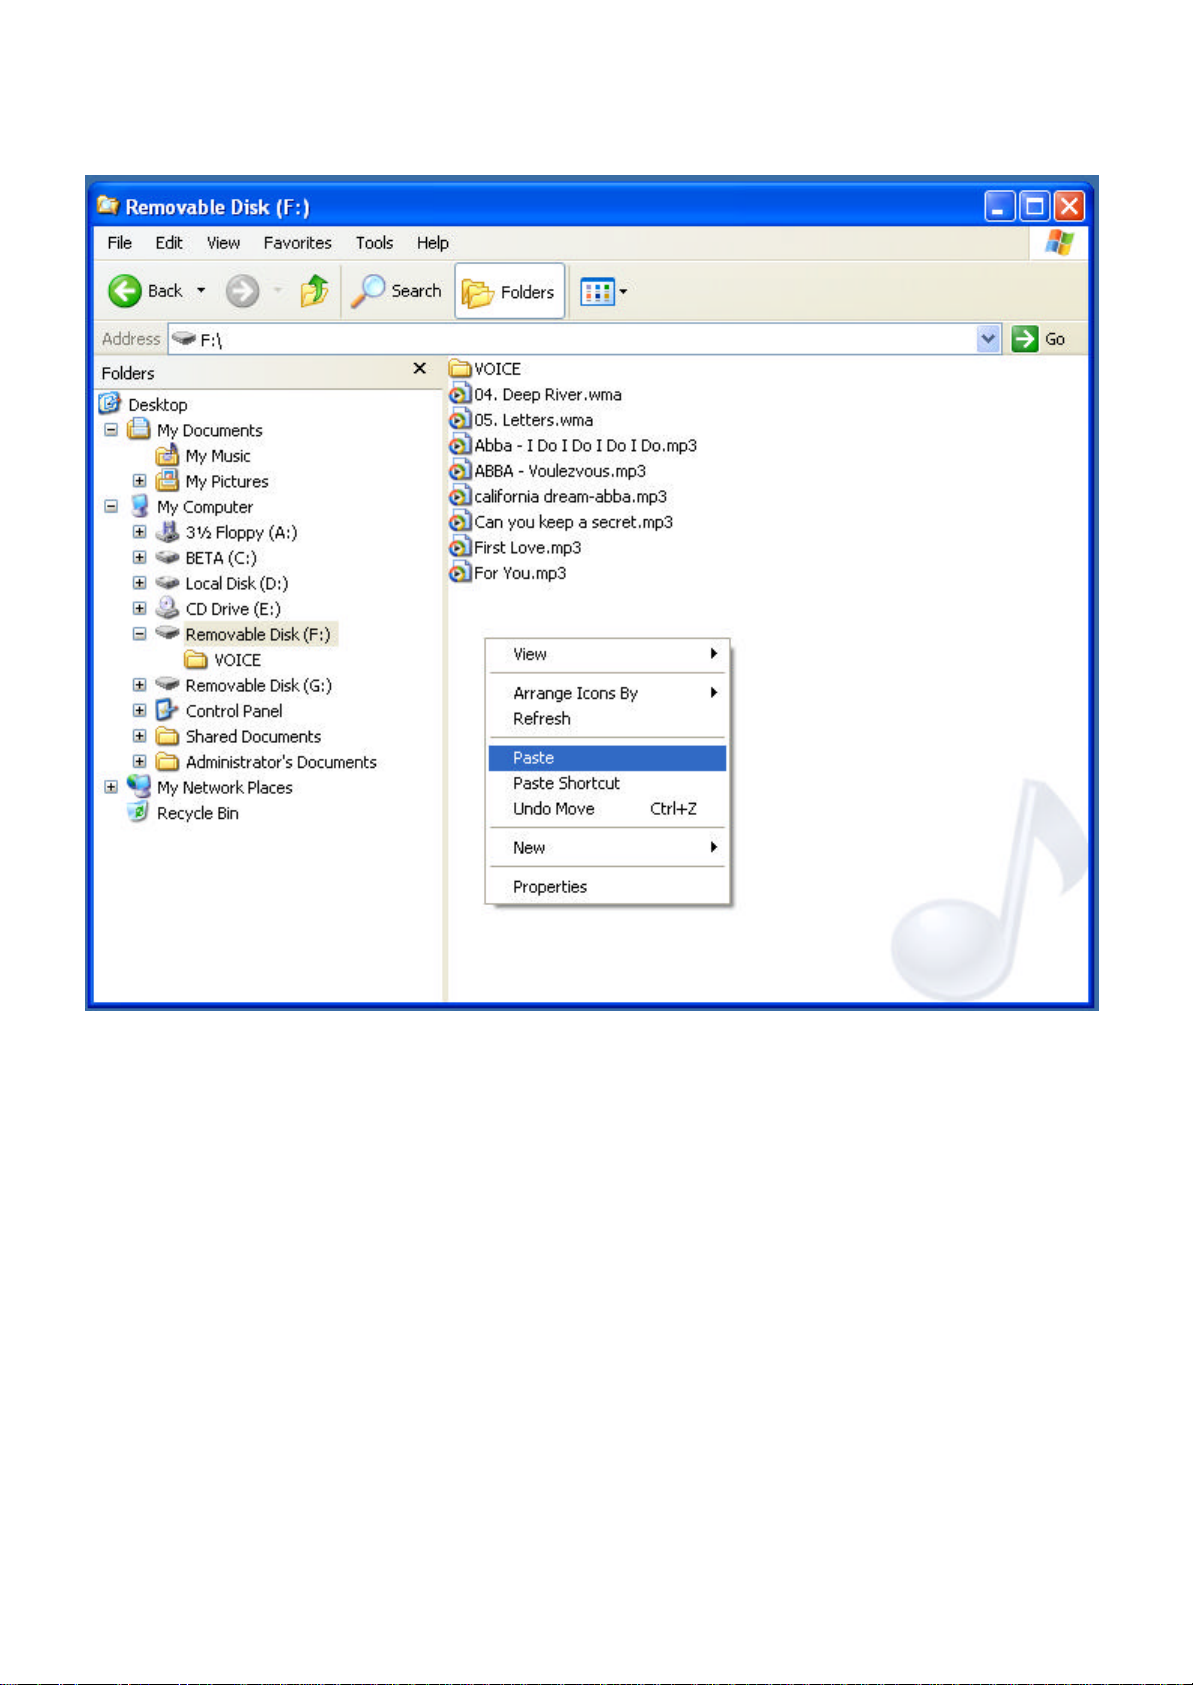
5. Select the [Removable Disk] on the left window and click the [Paste]. Or drag and drop to the
[Removable Disk].
32
Page 33
PC Interface
■ Uploading
※ You cannot upload MP3 files to the PC.
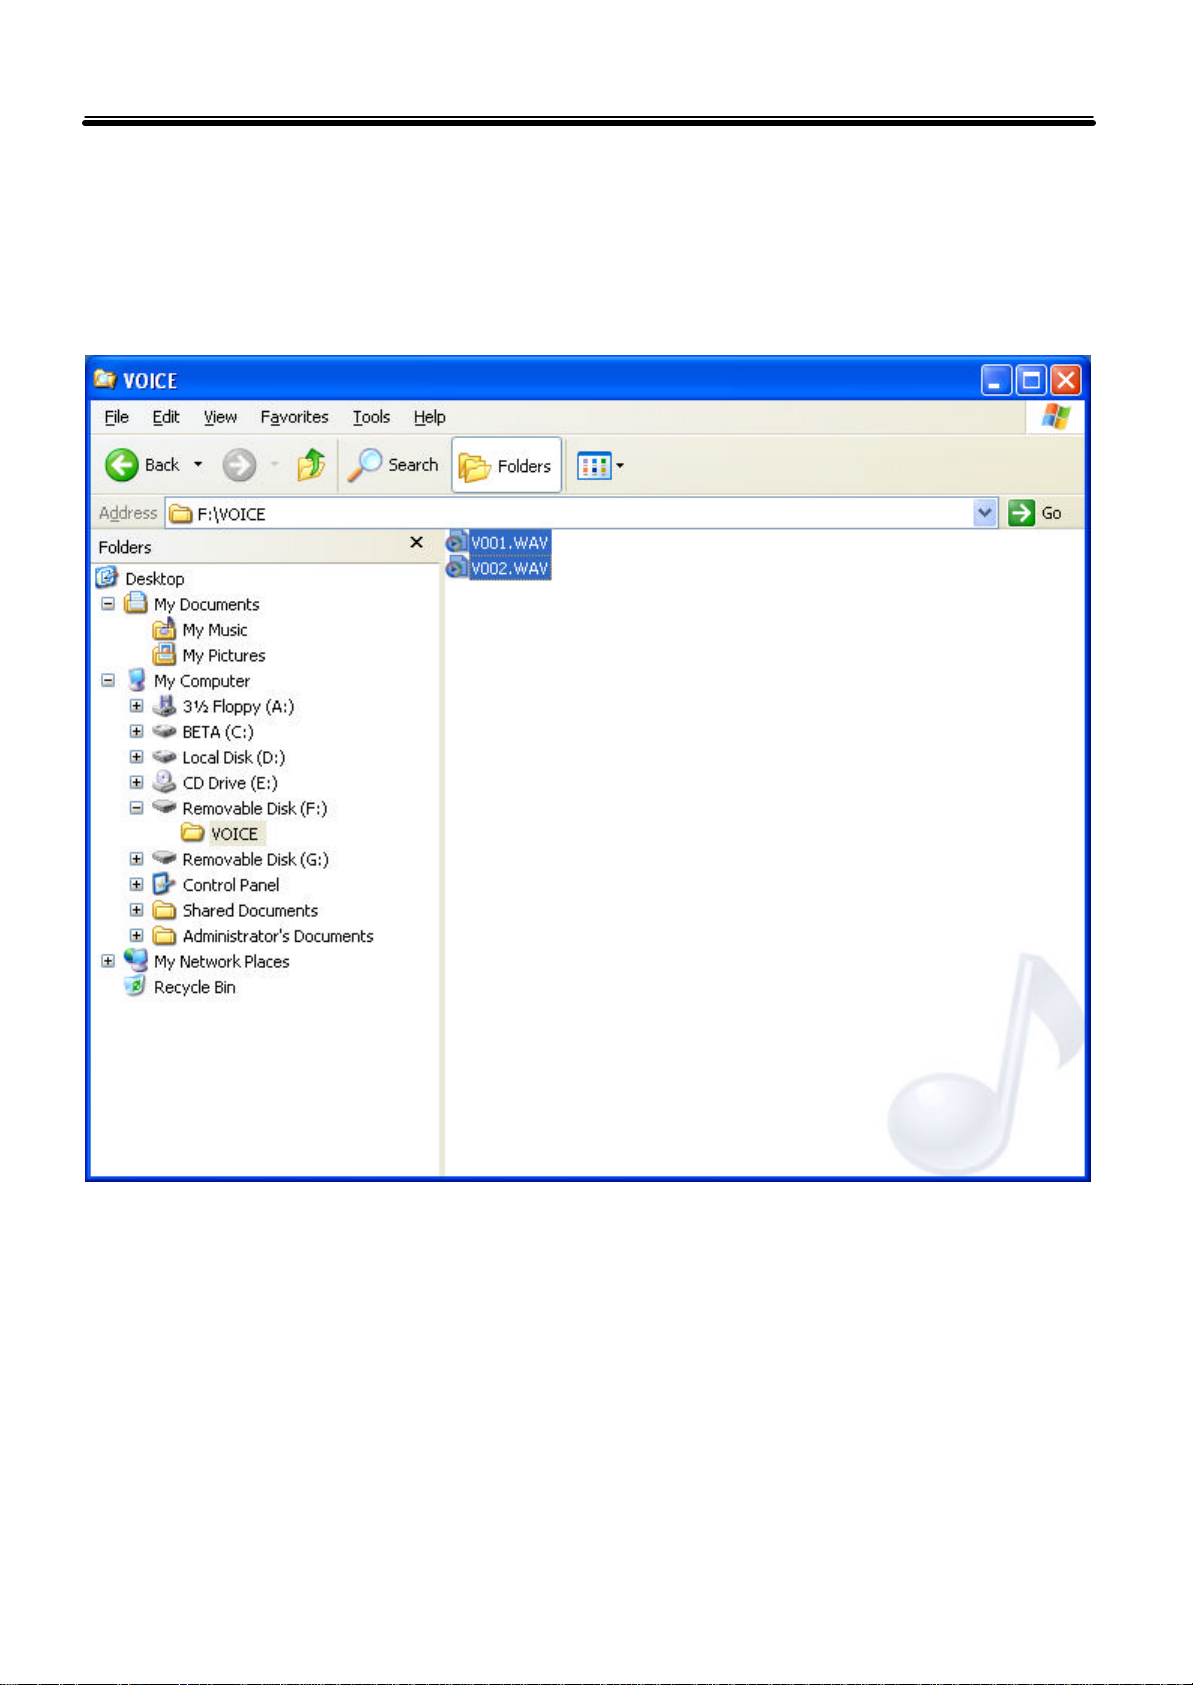
1. Select file(s) you wish to upload in the right window of the windows explorer.
33
Page 34
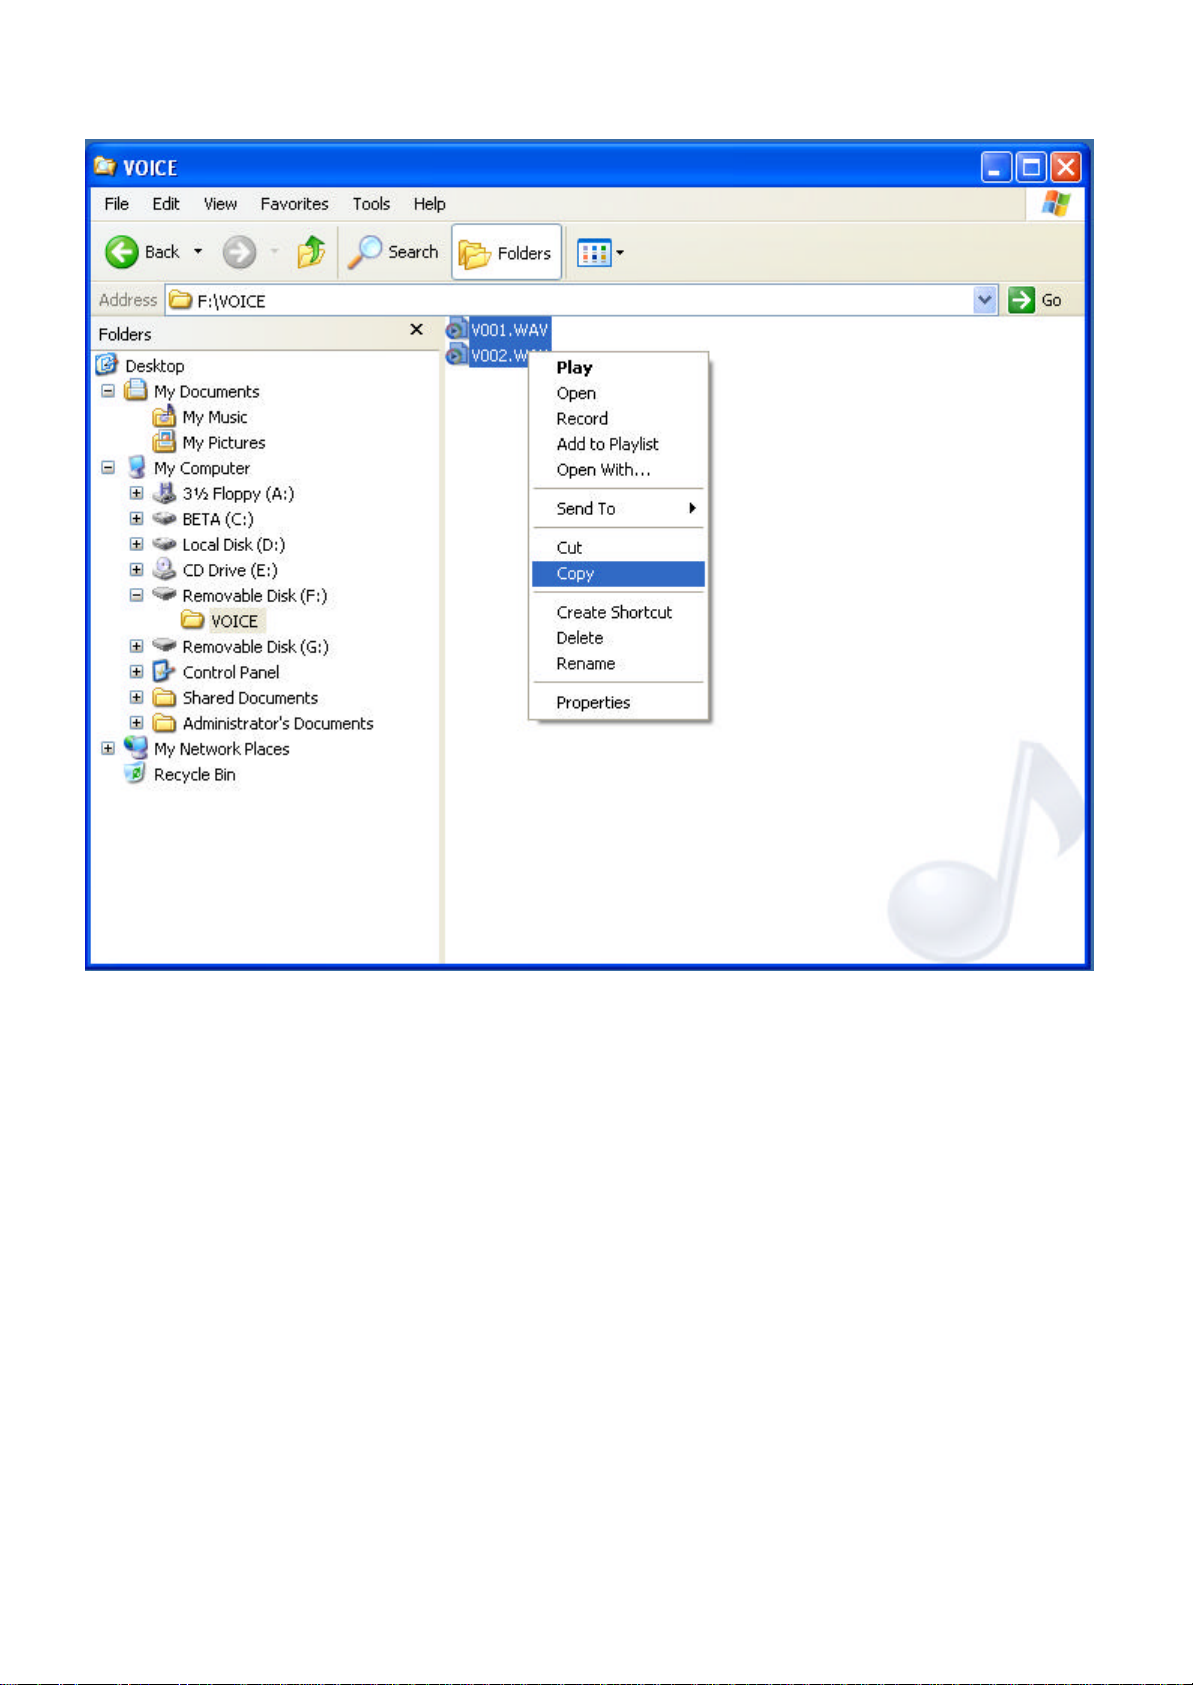
2. Click the right button of your mouse and select the [Copy].
34
Page 35
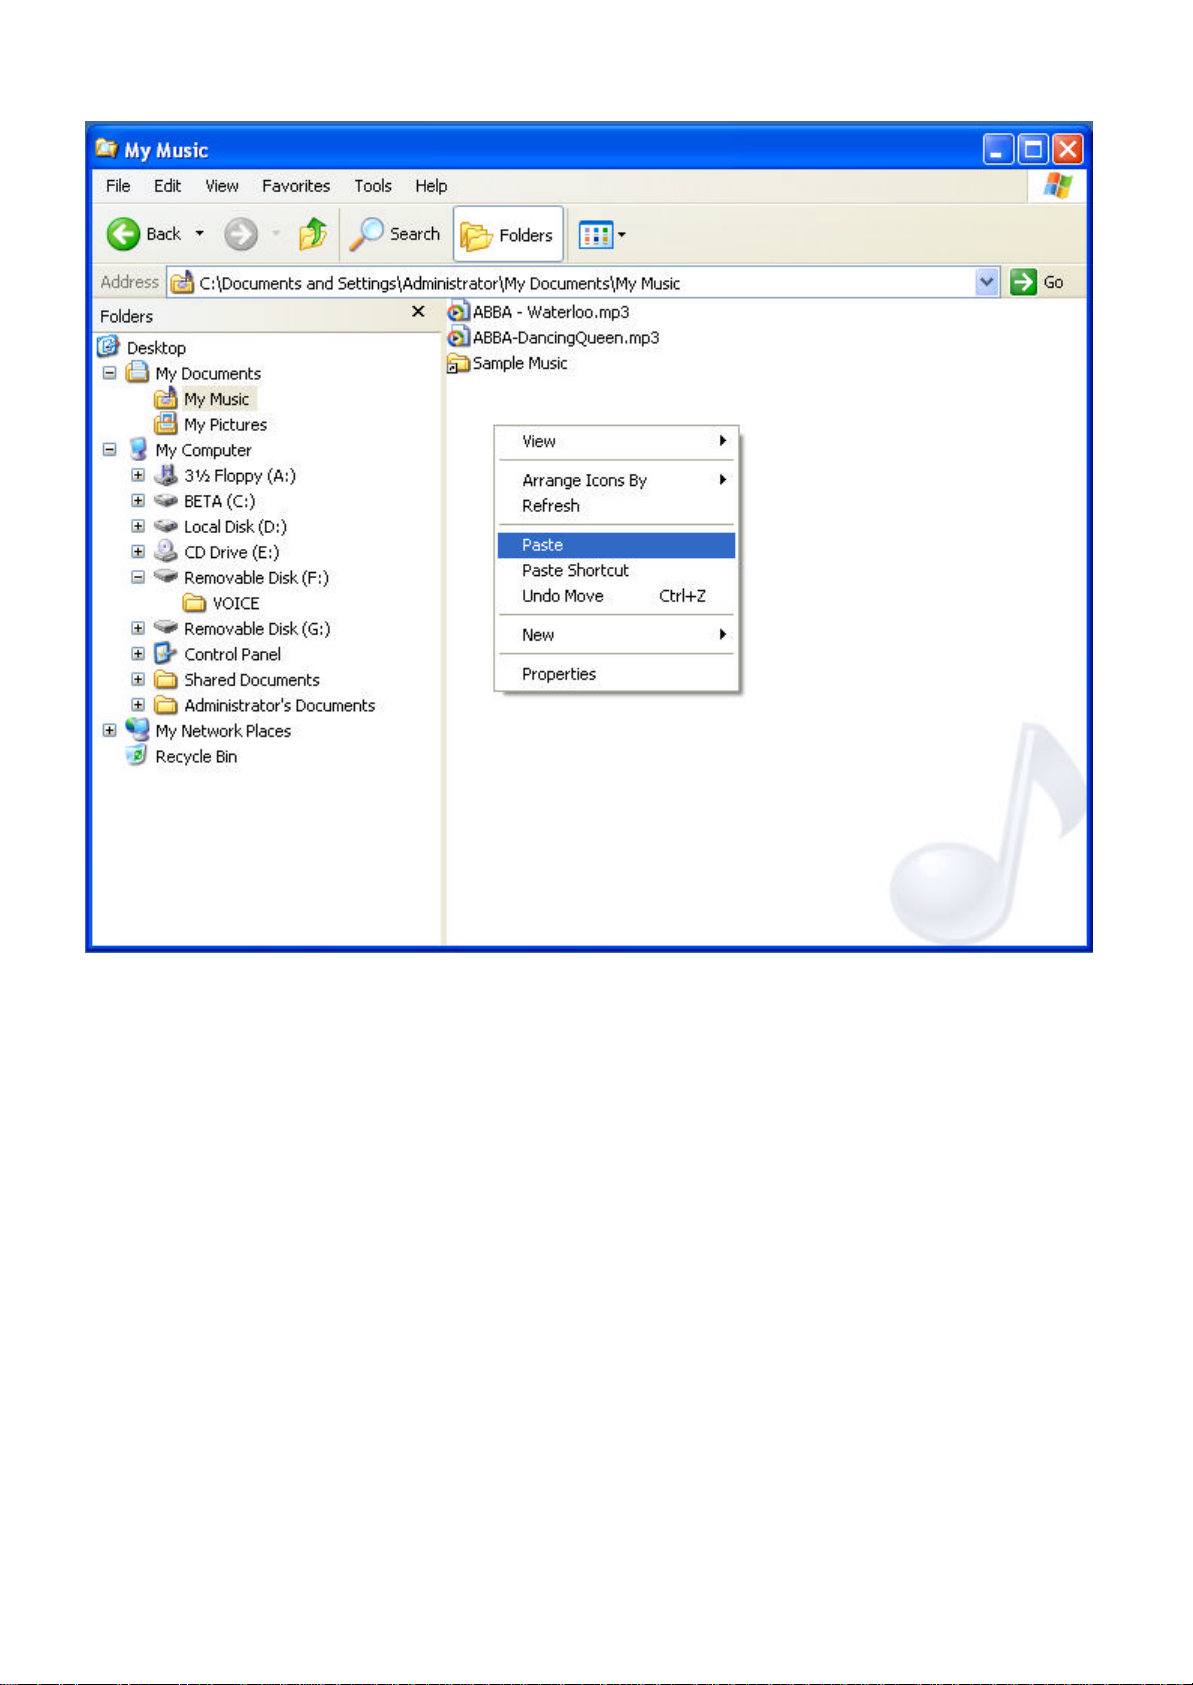
3. Select any folder to save file(s) and click the [Paste]. Or drag and drop file(s) where you want to save.
35
Page 36
PC Interface
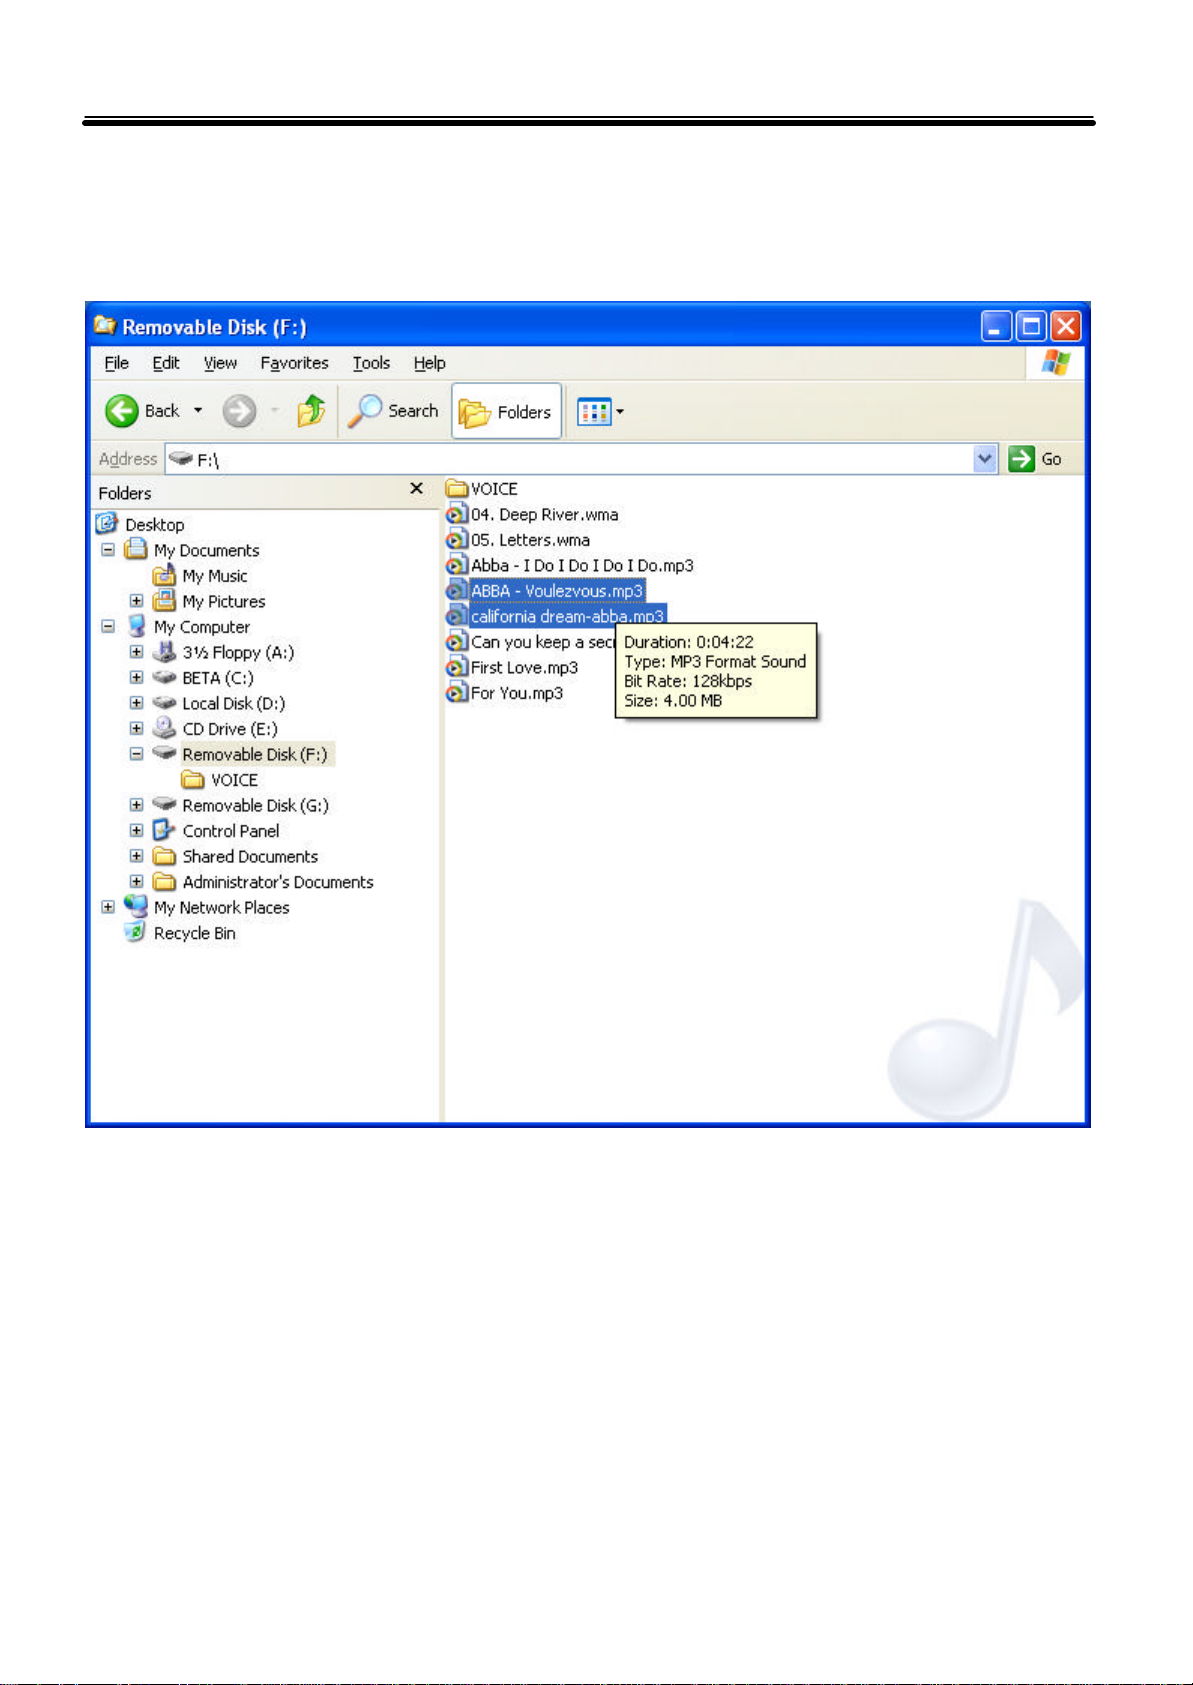
■ Deleting File
1. Select file(s) you wish to delete on the right window of the windows explorer.
36
Page 37
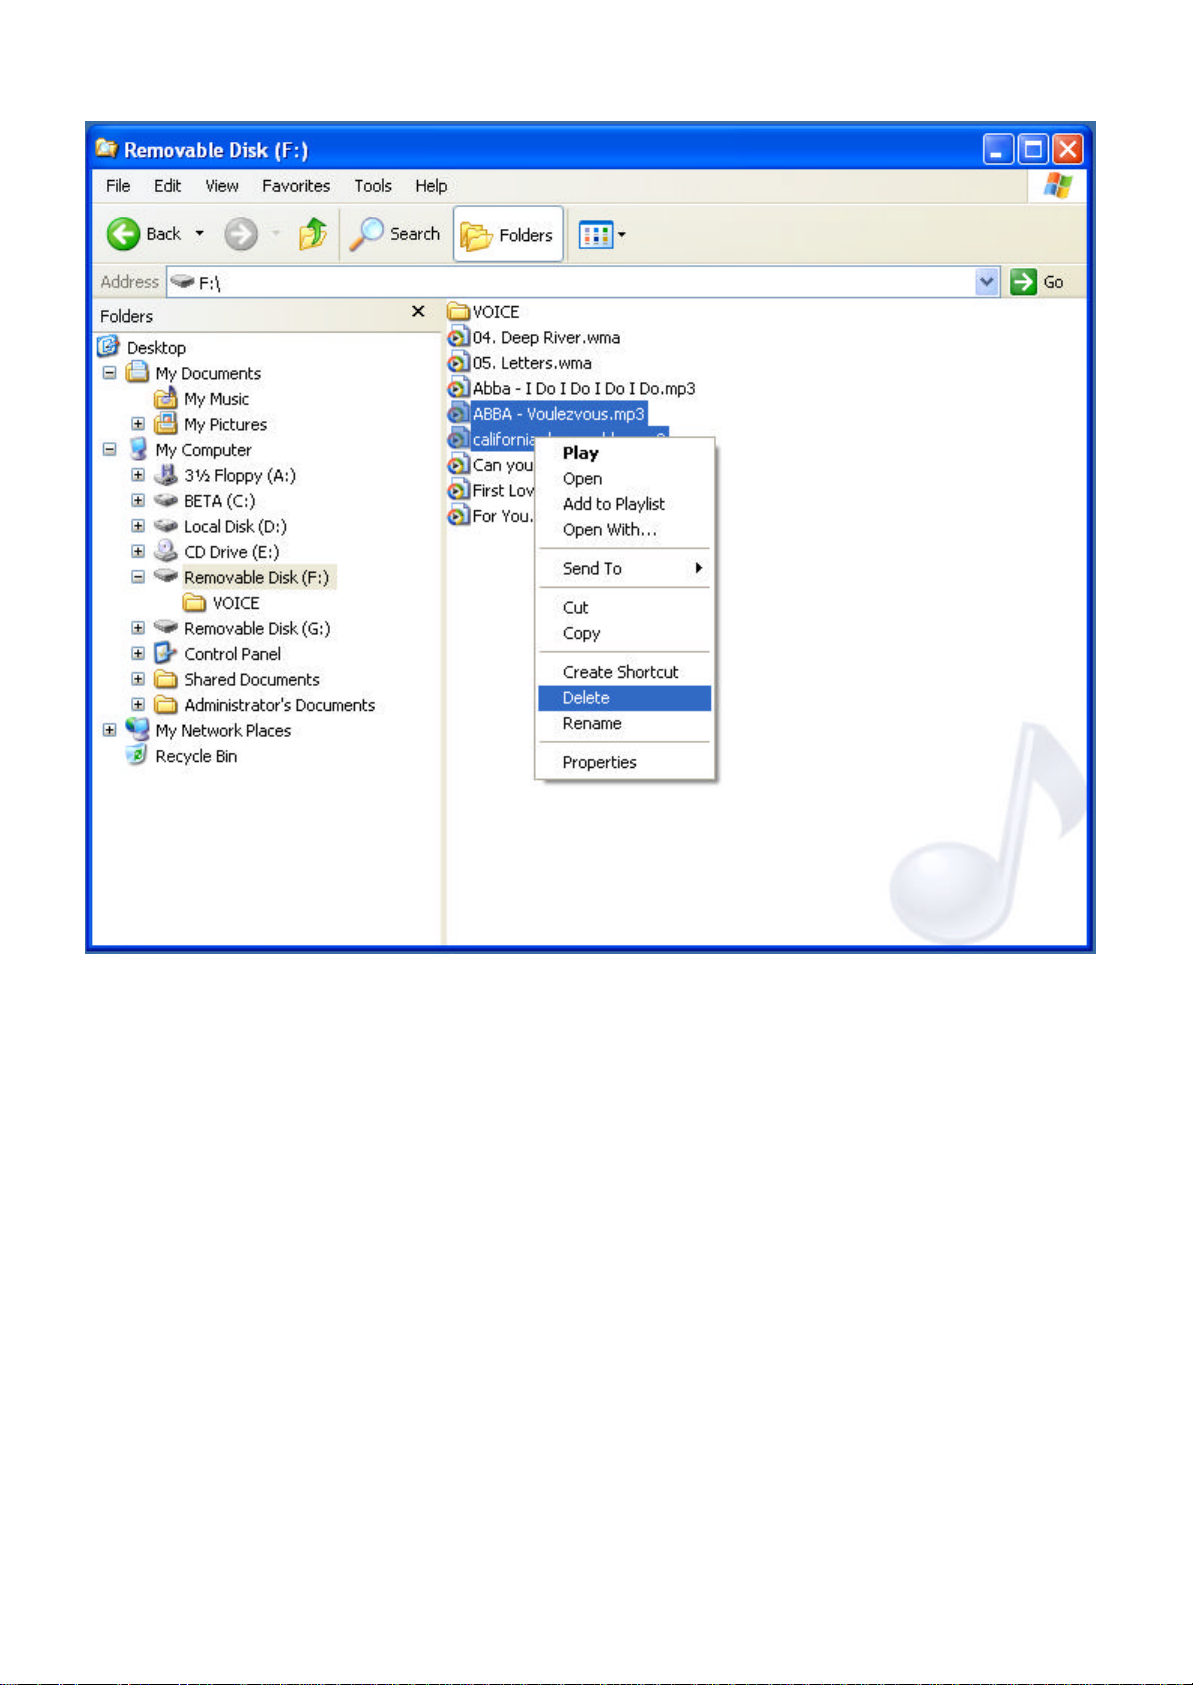
2. Click the right button of the mouse and click [Delete].
37
Page 38
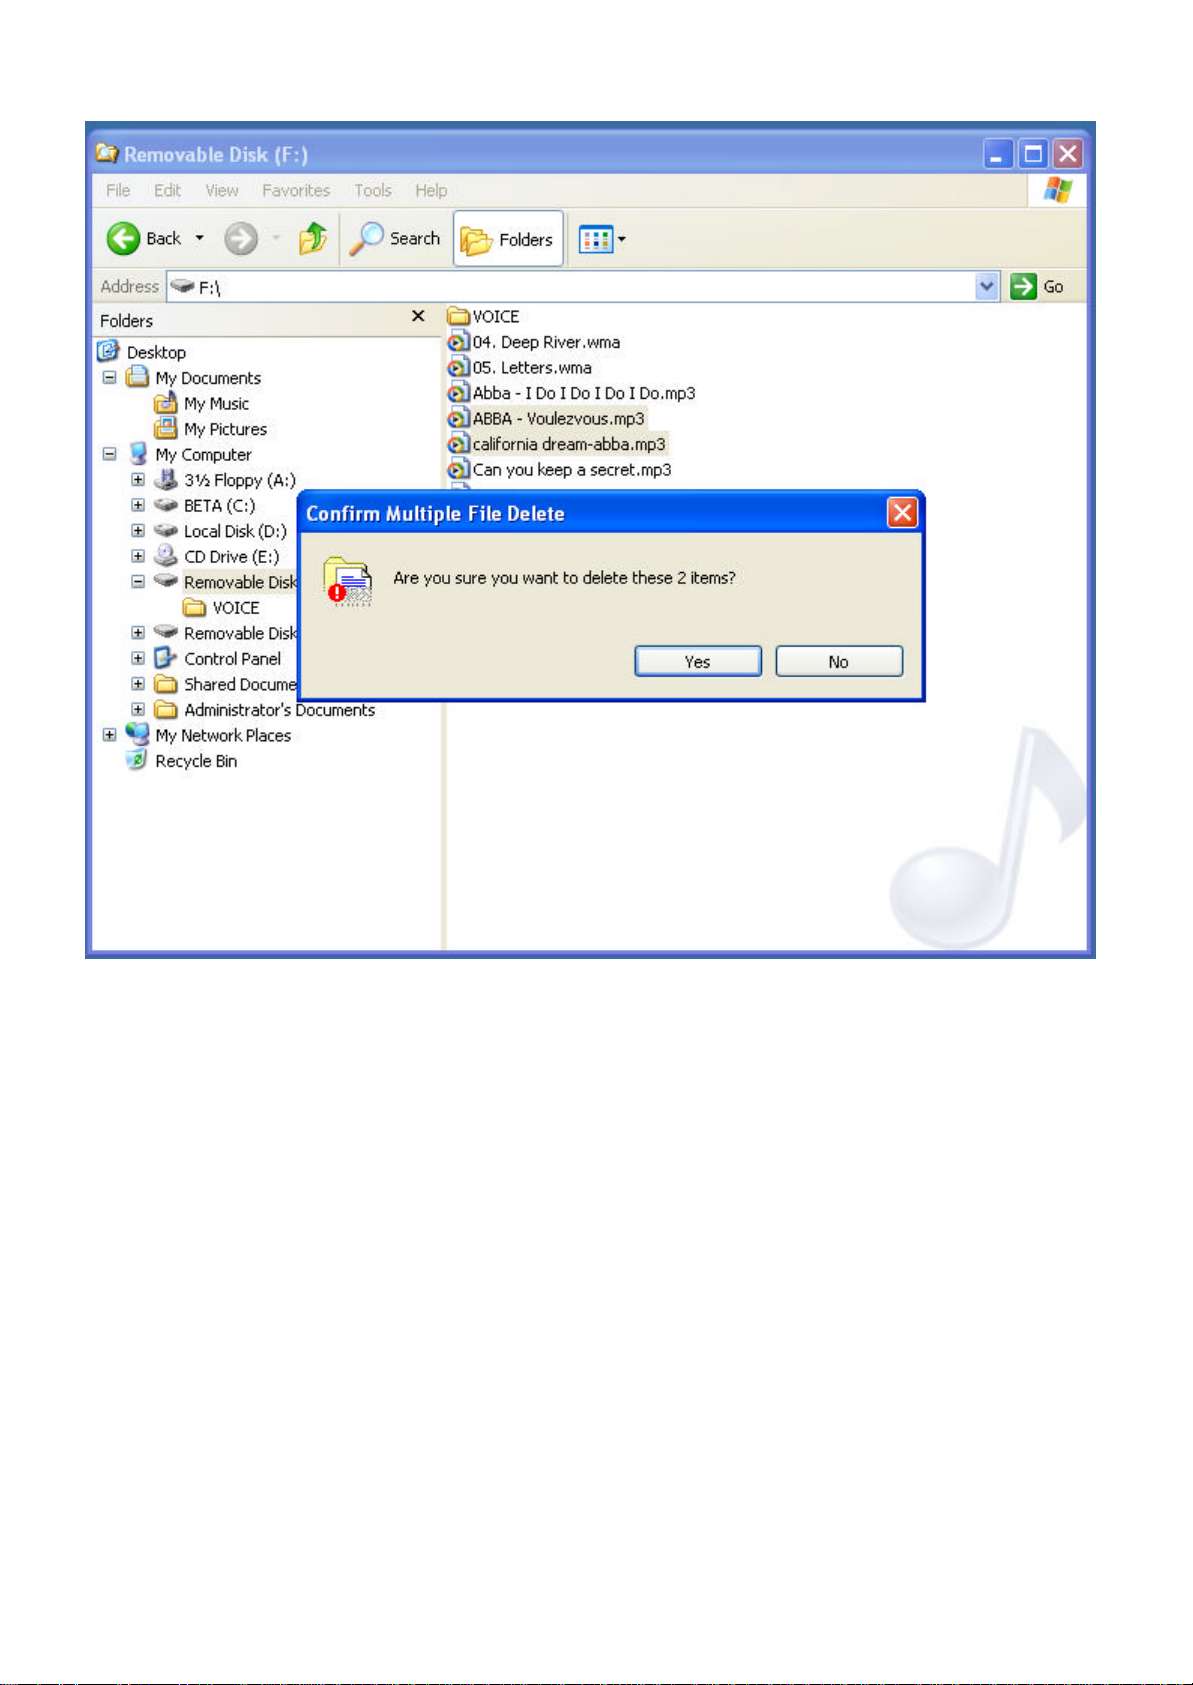
3. Click [Yes] to delete the file(s).
38
Page 39
Troubleshooting
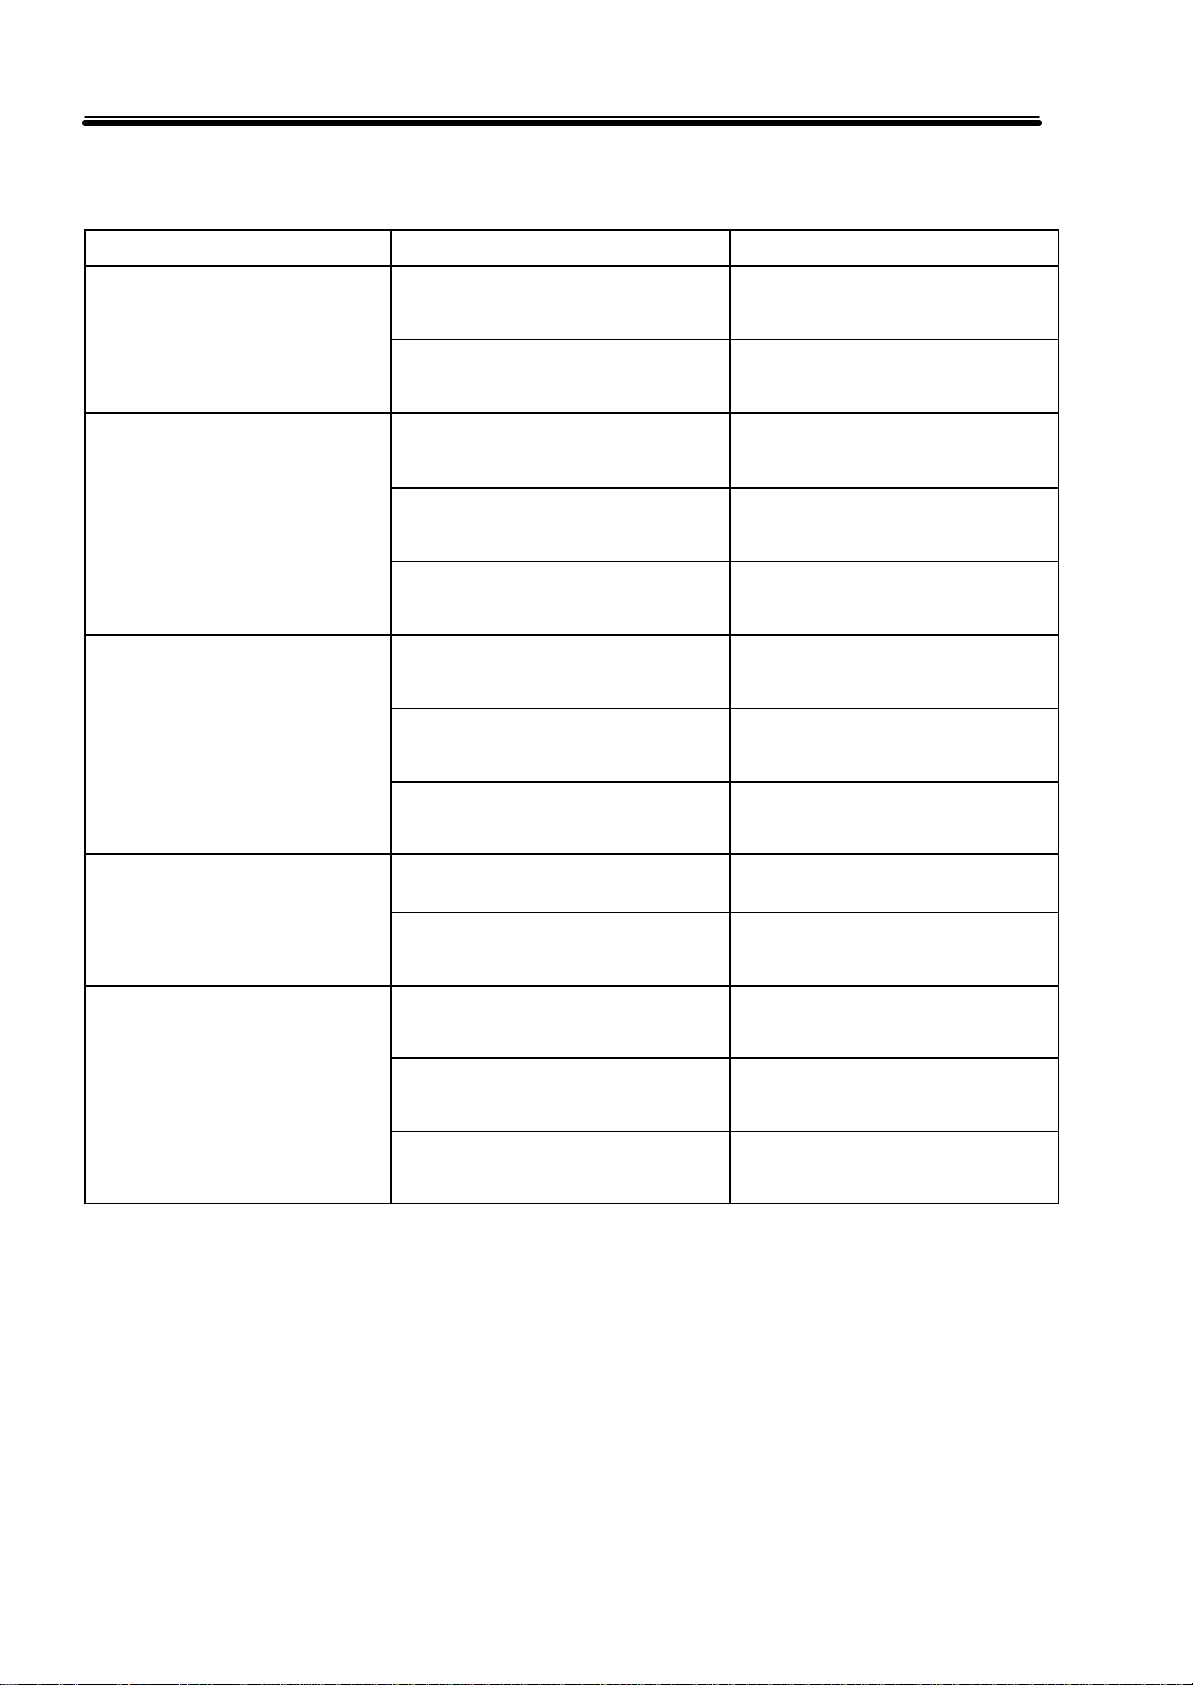
When you encounter any problem, check the following items.
Symptom Cause Action
Nothing is displayed on the
LCD screen.
Cannot record.
Cannot playback.
Cannot hear sound through
the earphone.
Check whether the battery runs out. Replace the battery with a new
one.
Check whether the polarities are
correct.
Check whether the HOLD button is
set to ON.
Check whether the memory is full.
Check whether the battery runs out. Replace the battery with a new
Check whether the HOLD button is
set to ON.
Check whether the product has the
saved files.
Check whether the battery runs out. Replace the battery with a new
Check the volume is set to 0. Control the volume.
Make sure that the polarities are
correct.
Set the HOLD button to OFF.
Delete unnecessary files.
one.
Set the HOLD button to OFF.
Check the file number.
one.
Cannot download or upload
files.
Check whether the earphone is
connected firmly and correctly.
Check whether the power is ON. Turn the power ON and connect to
Check whether the driver is
installed.
Check the connection between
product and PC.
Connect the earphone firmly and
correctly.
the PC.
Install the driver.
Connect the USB cable firmly and
correctly.
39
Page 40
Specifications
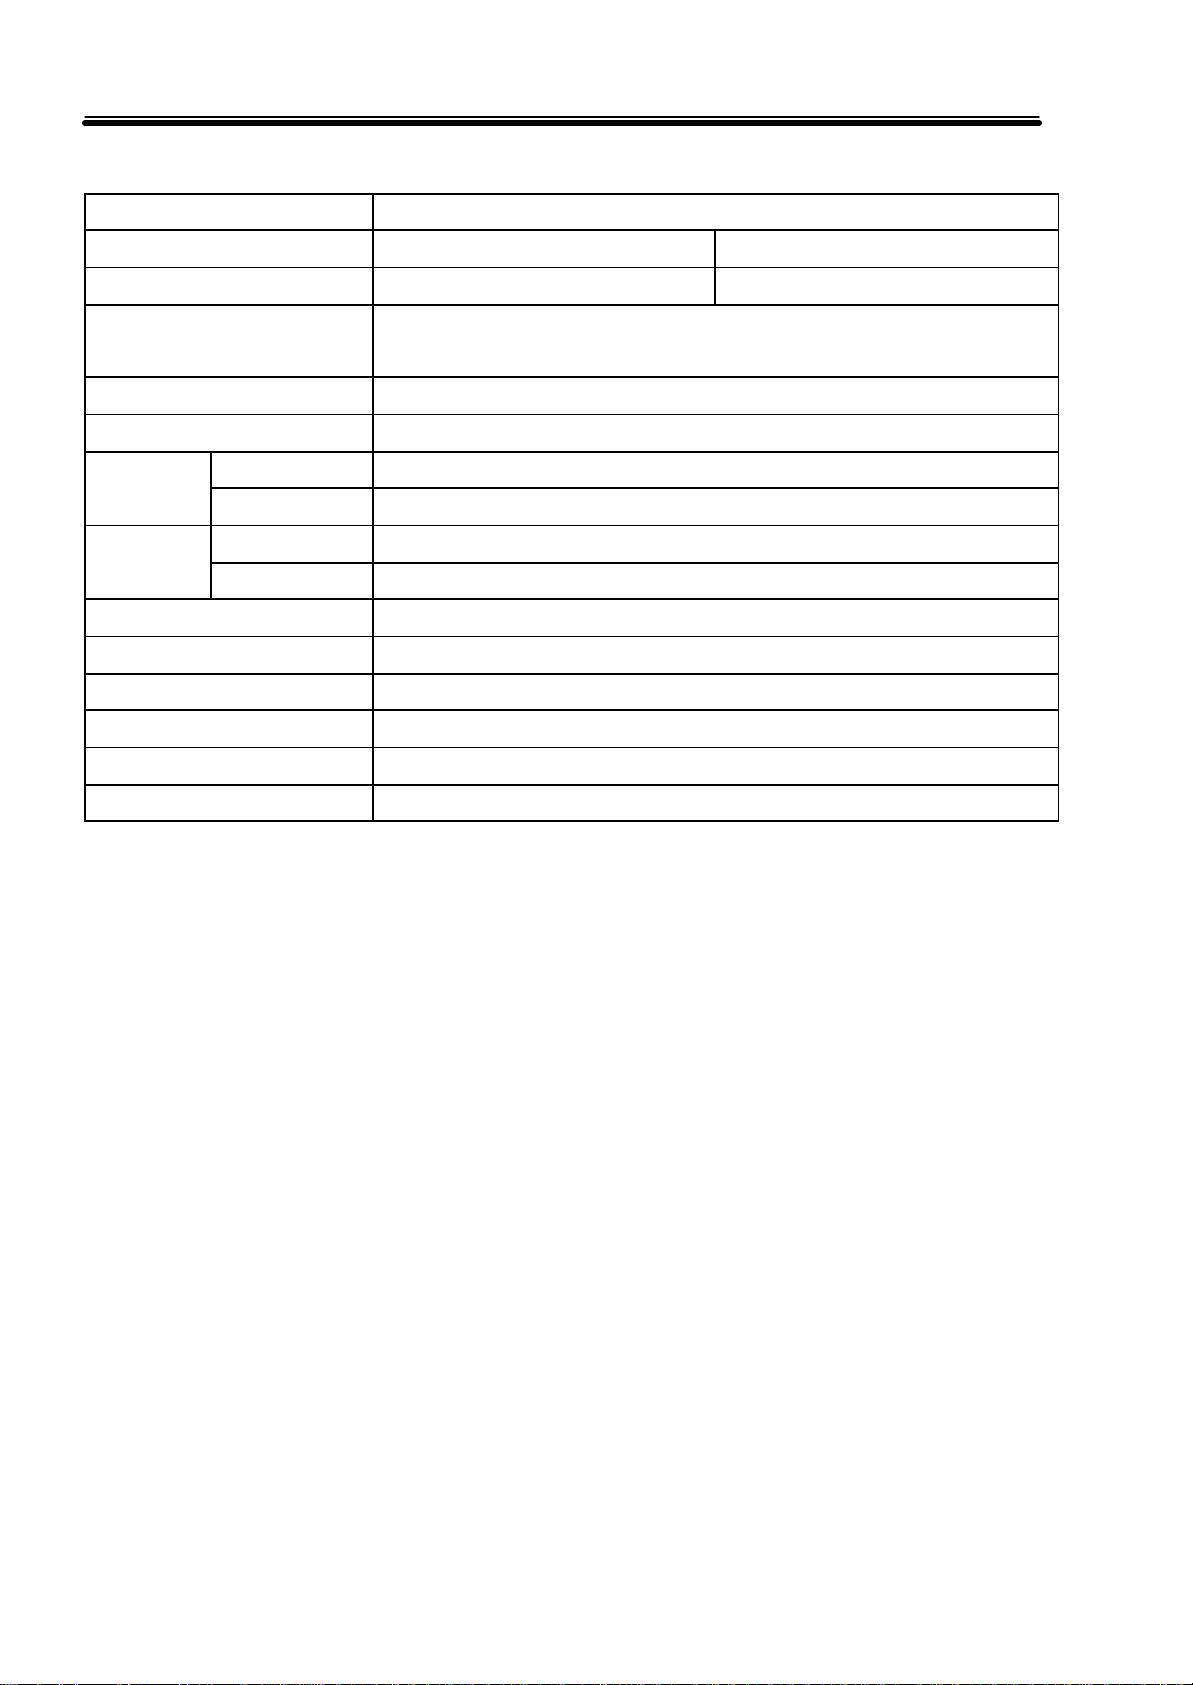
Item Specification
Model MMP-R330 MMP-R630
Memory 64 MB 128 MB
Battery Life Time MP3 playback: approx. 00 hours Voice playback: approx. 00 hours
Voice recording: approx. 00 hours
Frequency 500 Hz ~ 3500 Hz
Bit Rate 8Kbps ~ VBR
MP3 MPEG 1, 2, WMA, AAC Codec
VOICE ADPCM IMA
Earphone 3mW, 160 Ohm External
Input
Dimension 31*70 *15.9 mm(W * H * D)
Weight About 248g(without battery)
Storage Media Ebeded Flash Memory
Power Source 1.5V AAA Alkaline * 1
Operating Temperature 0 ℃ ~ 40 ℃
Accessories User Manual, Earphone, AAA Alkaline Battery 1, USB Cable, Diver CD
※ The specifications and appearance of the product may change without notice in order to improve the
quality.
USB cable PC Interface USB 1.1
40
Page 41

Warranty
41
Page 42

THIS DEVICE COMPLIES WITH PART 15 OF THE FCC RULES. OPERATION IS SUBJECT TO THE
FOLLOWING TWO CONDITIONS: (1) THIS DEVICES MAY NOT CAUSE HARMFUL INTERFERENCE,
AND (2) THIS DEVICE MUST ACCEPT ANY INTERFERENCE, RECEIVED, INCLUDING INTERFERENCE
THAT MAY CAUSE UNDERSIRED OPERATION.
Note : This equipment has been tested and found to comply with the limits for a Class B
digital device, pursuant to part 15 of the FCC Rules. These limits are designed to provide
reasonable protection against harmful in terference in a residential installation. This
equipment generates, uses and can radiate radio frequency energy and, if not
installed and used in accordance with the instructions, may cause harmful interference
to radio communications. However, there is no guarantee that interference will not
occur in a particular installation. If this equipment does cause harmful interference to
radio or television reception, which can be determined by turning the equipment off
and on, the user is encouraged to try to correct the interference by one or more of the
following measures :
- Reorient or relocate the receiving antenna.
- Increase the separation between the equipment and receiver.
- Connect the equipment into an outlet on a circuit different from that to which the
receiver is connected.
- Consult the dealer or an experienced radio/TV technician for help.
NOTE: THE MANUFACTURER IS NOT RESPONSIBLE FOR ANY RADIO OR TV INTERFERENCE CAUSED BY
UNAUTHORIZED MODIFICATIONS TO THIS EQUIPMENT. SUCH MODIFICATIONS COULD VOID THE USER'S
AUTHORITY TO OPERATE THE EQUIPMENT.
42
 Loading...