

Page 1
Troubleshooting Guide
Before troubleshooting any CEN products, the service technician should:
WARNING
• read, understand, and agree to follow all information contained in this troubleshooting guide.
• understand the operational characteristics of the electrical charging system components to be tested.
• be profi cient at the use of tools and test equipment used in troubleshooting CEN products.
for N1617 Alternator
Hazard Definitions
These terms are used to bring attention to presence of hazards
of various risk levels or to important information concerning
product life.
Indicates presence of hazard(s) that
WARNING
can cause severe personal injury,
death, or substantial property
damage if ignored.
Indicates presence of hazards that
CAUTION
will or can cause minor personal
injury or property damage.
Indicates special instructions on
NOTICE
installation, operation or mainte nance that are important but not
related to personal injury hazards.
Table of Contents
Section A: Component Description ..................... 2 – 3
Section B: On-vehicle Troubleshooting ............... 4 – 5
Testing Guidelines
Professional service technicians rely on the following
guidelines when testing electrical components.
Voltage testing:
• Set meter to proper scale and type (AC or DC).
• Be sure to zero the meter scale or identify the meter
burden by touching meter leads together. Meter burden must be subtracted from final reading obtained.
• Be sure the meter leads touch source area only.
Prevent short circuit damage to test leads or source
by not allowing meter leads to touch other pins or
exposed wires in test area.
Voltage drop testing:
• Measure voltage between B+ on alternator or source
and B- (ground) on alternator or source. Record
obtained reading. Move to batteries or other source
and measure again between B+ and B- terminals on
battery or other source. Difference between the two
readings represents voltage lost within the circuit
due to but not limited to inadequate cable gage or
faulty connections.
• Voltage drop measurements must be taken with
all electrical loads or source operating.
Resistance (ohm) testing:
• Set meter to proper scale.
• Be sure to zero the meter scale or identify the meter
burden by touching meter leads together. Meter burden must be subtracted from final reading obtained.
• Be sure the meter leads touch source area only.
Prevent altering the reading by not allowing fingers
or body parts to touch meter leads or source during
reading.
• Be sure reading is taken when source is at 70ºF.
Readings taken at higher temperatures will increase
the reading. Conversely, readings taken at lower
temperatures will decrease the reading.
• Be sure to test directly at the source. Testing through
extended harnesses or cable extensions may increase
the reading.
When testing field coil or stators,
CAUTION
most shorts to ground will measure
0-100 ohms. Test readings may also
show higher, other than OL, typi cally in the megaohm range, when
windings are dust-covered, wet,
or oily from environment. Be
sure to distinguish between
defective readings and surface
debris readings when determin ing the test results.
Dynamic/Live testing:
Definition: Connecting power and ground to a
component to test operation/function out of circuit.
1. Be sure to connect jumper leads directly and securely
to source contacts of the component being tested.
2. Be sure to make any connection to power and ground
at the power supply or battery source terminals. Do
not make connection at component source terminals
as that may create an arc and damage component
source terminals.
TG82A
Page 1
Page 2
Section A: Component Description
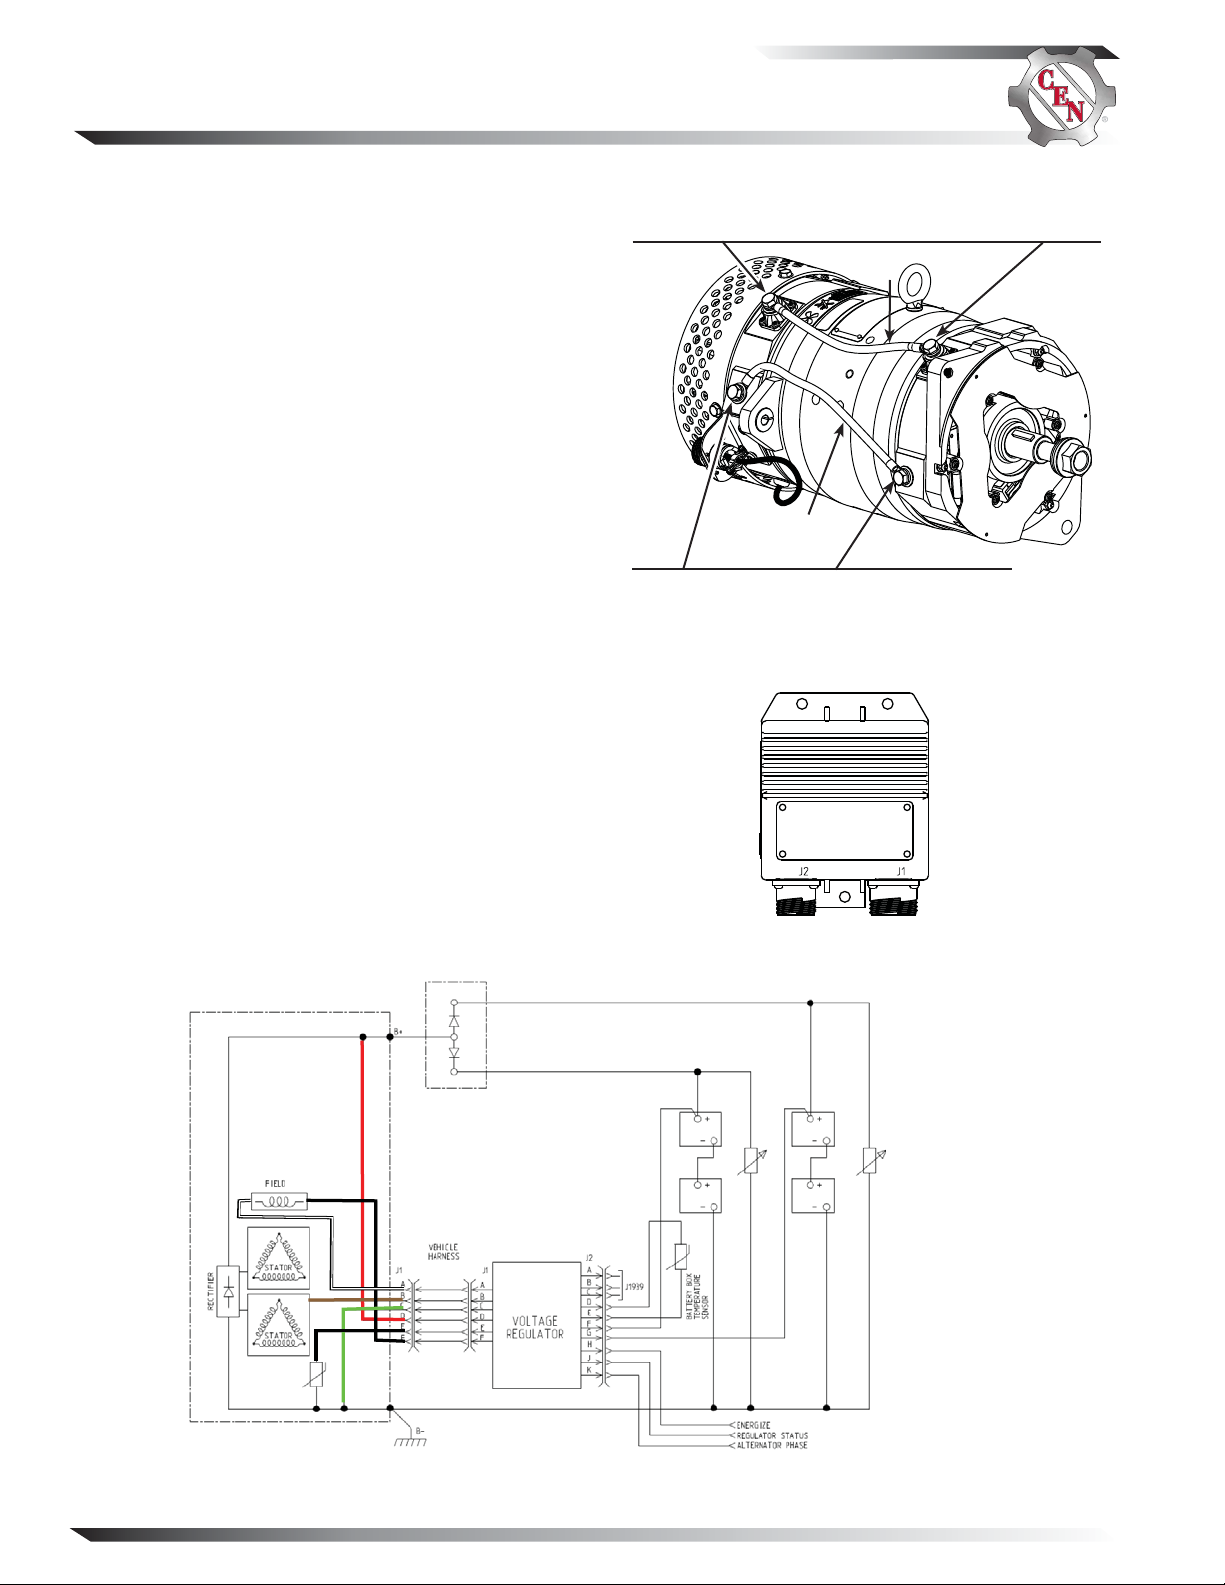
CEN N1617
Alternator Description and Operation
N1617 570 A 28 V alternator is internally rectified.
All windings and current-transmitting components are
non-moving, so there are no brushes or slip rings to
wear out. Energize switch activates regulator. Field coil
is then energized. Alternator output current is self-limiting and will not exceed rated capacity of alternator.
N3264 remote-mounted regulator used with these units:
• regulates alternator voltage so that neither Battery A
signal nor Battery B signal exceeds 30.0 volts.
• is negative temperature compensated according
to switch-selected vehicle battery type. Switch is
factory-set to position 1. Customer selects position
per application
—Position 1 for Gel, AGM
—Position 2 for 6TLFP, 6TLMF
B+ connections on alternator
Both positive cables must be connected together at alternator or
isolator input when alternator is installed in vehicle and during
operation. Interconnect cable is part of vehicle cabling.
Interconnect
cable
Interconnect
cable
B– connections on alternator
Both ground cables must be connected to vehicle’s common
ground. An interconnect cable is required as shown if a single
cable to vehicle common ground is used.
Figure 1 — N1617 Alternator
Figure 2 — N3264 Regulator Connections
BATTERY ISOLATOR
(SEE PAGE 3 FOR DE TAILS)
Figure 3 — Schematic Diagram of N1617 Alternator with N3264 Regulator
Page 2
TG82A
Page 3

N2013 Battery Isolator Description
and Operation
N2013 battery isolator used with this charging system:
• allows alternator to charge two battery banks at the
same time.
• allows one battery bank to discharge without draining the other.
• is rated for 14 V or 28 V DC nominal. 600 A max.
current.
• operates optimally between -40ºC to 65ºC (-40ºF to
149ºF) ambient temperature.
• includes voltage ripple filter connected to negative
ground.
Section A: Component Description (CONT’ D)
AUX connection
ALT connection
STRT connection
Ground bolt
Figure 4 – N2013 Battery Isolator
TG82A
ALT
STRT
Main Battery Bank
Figure 5 - Generic Wiring Schematic for Reference Only—See Vehicle Manufacturer Specifi cations
AUX
Aux. Battery Bank
Page 3
Page 4

Section B: On-vehicle Troubleshooting
Perform on-vehicle troubleshooting
NOTICE
before attempting on-bench tests
or static tests.
Chart 1: No Power to Main Battery Bank (STRT) or Aux. Battery Bank (AUX) with Engine Running
Before Troubleshooting, Check Batteries for Proper Charge Voltage. See Page 1.
Disconnect battery master switches.
Set DMM to diode test. Connect DMM red lead to STRT terminal on isolator. Connect black lead to
ALT terminal on isolator. DMM should read blocking in this direction. Then reverse leads. DMM
should read flow in this direction. Repeat for AUX and ALT terminals. Tests should read flow in one
direction and blocking in the other direction. Did readings pass the tests?
Yes No
Go to Chart 2 on page 5 to
troubleshoot alternator.
Tools and Equipment for Testing
• Digital Multimeter (DMM)
• Ammeter (digital, inductive)
Battery isolator
is defective.
ALT connection
STRT connection
Ground bolt
Figure 6 – N2013 Battery Isolator
AUX connection
Page 4
TG82A
Page 5

Section B: On-vehicle Troubleshooting (CONT’D)
Chart 2: No Alternator Output – Test Charging Circuit
• TEST MEASUREMENTS ARE TAKEN ON HARNESS CONNECTOR AT ALTERNATOR. TEST MEASUREMENT AT
AN EXTENDED HARNESS PLUG MAY AFFECT RESULTS.
• REMOTE-MOUNTED REGULATORS: CHECK CONDITION OF FUSES IN EXTENDED WIRING HARNESS AND
PIN-TO-PIN CONTINUITY BEFORE TROUBLESHOOTING.
• BEFORE STARTING DIAGNOSTIC SEQUENCE, VERIFY THE FOLLOWING AND REPAIR/REPLACE IF NOT
TO SPEC:
—BATTERIES FOR STATE-OF-CHARGE (24.5-25.5 V), CONDITION, AND SECURE CONNECTIONS
—MASTER BATTERY SWITCH FOR FUNCTION
MASTER BATTERY SWITCH ON, KEY ON, ENGINE ON: Test for battery voltage at B+ terminal on alternator ADE
to ground. Disconnect vehicle wiring harness at regulator J2 connector and test for battery voltage at socket H on
vehicle harness plug (see Figure 8) to ground. Does battery voltage exist at both locations?
Yes
No
RECONNECT VEHICLE WIRING HARNESS TO
REGULATOR J2 CONNECTOR.
ENGINE OFF: Disconnect 6-socket alternator-to-regulator
harness plug at alternator J1 connector.
MASTER BATTERY SWITCH ON, KEY OFF, ENGINE OFF: Readings of all five tests must pass.
1. Battery voltage test: Connect DMM red lead to socket D on alternator J1 6-socket connector (see Figure 7).
Connect DMM black lead to socket C on same connector. Battery voltage should exist.
2. Field coil resistance test: Set DMM to ohms test. Field resistance between sockets F and A on alternator J1
6-socket connector should measure nominal 1.0-1.5 ± 0.2 ohms. Field coil is defective if reading is less than 0.5
ohms or greater than 3 ohms.
3. Significant magnetism test:
a. Securely connect one jumper wire between socket F on alternator J1 6-socket connector and B+ terminal on
alternator ADE.
b. Insert one end of second jumper wire in socket A on alternator J1 6-socket connector. Momentarily (1 sec.)
touch other end of second jumper wire to alternator B– terminal. Spark will occur at B– terminal. Touch steel
tool to shaft to detect significant magnetism.
c. Remove both jumper wires.
4. Alternator temperature sensor circuit test: Set DMM to ohms test. Sensor resistance between socket E on alternator J1 6-socket connector and B– terminal on alternator should measure 80-130K ohms at 70ºF (20ºC). Note: If
ambient temperature is higher, resistance will measure less than listed and vice versa.
5. Phase supply test: Set DMM to diode test. Connect DMM black lead to socket B on alternator J1 6-socket connector.
Connect red lead to alternator B+ terminal on ADE. DMM should read blocking in this direction. Then reverse
leads. DMM should read flow in this direction. Repeat for socket B and B– terminal. Tests should read f low in
one direction and blocking in the other direction.
Repair vehicle wiring as necessary. Run engine
and re-test charging circuit. Is charging system
performing properly?
No
System is operative.
Yes
Yes
Regulator is defective.
ALTERNATOR J1
SOCKET CONNECTIONS
A F–
B AC
C B–
D B+
E Alt Temp Sense
F F+
Figure 7 — Alternator J1 6-socket Connector
(ADE)
If you have quest ions about your alternator or any of these test procedures, or if you need to locate a Factor y Authorized Ser vice Dealer, please contact us at:
TEL: 800.643.4633 USA and Canada • TEL: 847.866.6030 outside USA and Canada • FAX: 847.492.1242
TG82A
B
A
F
C
E
D
C. E. Niehoff & Co.• 2021 Lee Street • Eva nston, IL 60202 USA
E-mail us at service@CENiehoff.com
VEHICLE-TO-REGULATOR J2 HARNESS PLUG SOCKET CONNECTIONS
A J1939 +
B J1939−
C J1939 Shield
D Signal −
E Battery Box Temp Sense
F Battery Pack 1 Volt Sense
G Battery Pack 2 Volt Sense
Figure 8 — Vehicle-to-regulator J2 18-socket Harness Plug
Disconnected at Regulator
Alternator is defective.
No
H Energize
J Regulator Status
K Alternator Phase (AC)
L, R, S, T, U Not Used
M, N, P Reserved
Page 5
 Loading...