

Page 1

Page 2
EC Declaration of Conformity
Cengar. Ltd.
70, Lister Lane, Halifax
England HX1 5DN
We the undersigned, declare under our sole responsibility that the
following apparatus: -
Machine description: Cengar Air Saw
Machine Type: PL 905
Is in conformity with the following relevant EC legislation:
Machinery Directive 2006/42/EC
Atex Directive 94/ 9/EC
Based on the following Harmonised Standards:
EN13463-1:2009
And therefore complies with the essenti al requir ements o f those
directives.
Additional Information:
ATEX Coding II 2G T5
Certificate No. TRAC09ATEX21236X
Technical File No. CEEX-0803
Authorised Signature:
Date: 15/12/09
Title of Signatory: General Manager - Cengar Ltd.
Page 3
SPECIFICATIONS
Speed
Stroke
Air Consumption
Air Pressure
Weight
Length
Height
Width
Vibration Level averaged
Sound Pressure Level
Sound Power Level
Atex Certification
2000 strokes per minute
22 mm (
7
/8”)
0.116m
3
/minute (4 cfm)
5-6 Bar (100 PSI)
2.4 Kgs. (5
1
/4 Lbs.)
300 mm. (11
7
/8”)
135 mm. (5
3
/8”)
40.6 mm. (1
5
/8”)
1.9 m/s
2
68.7 db.
69.8 db.
CE II 2G T5 X
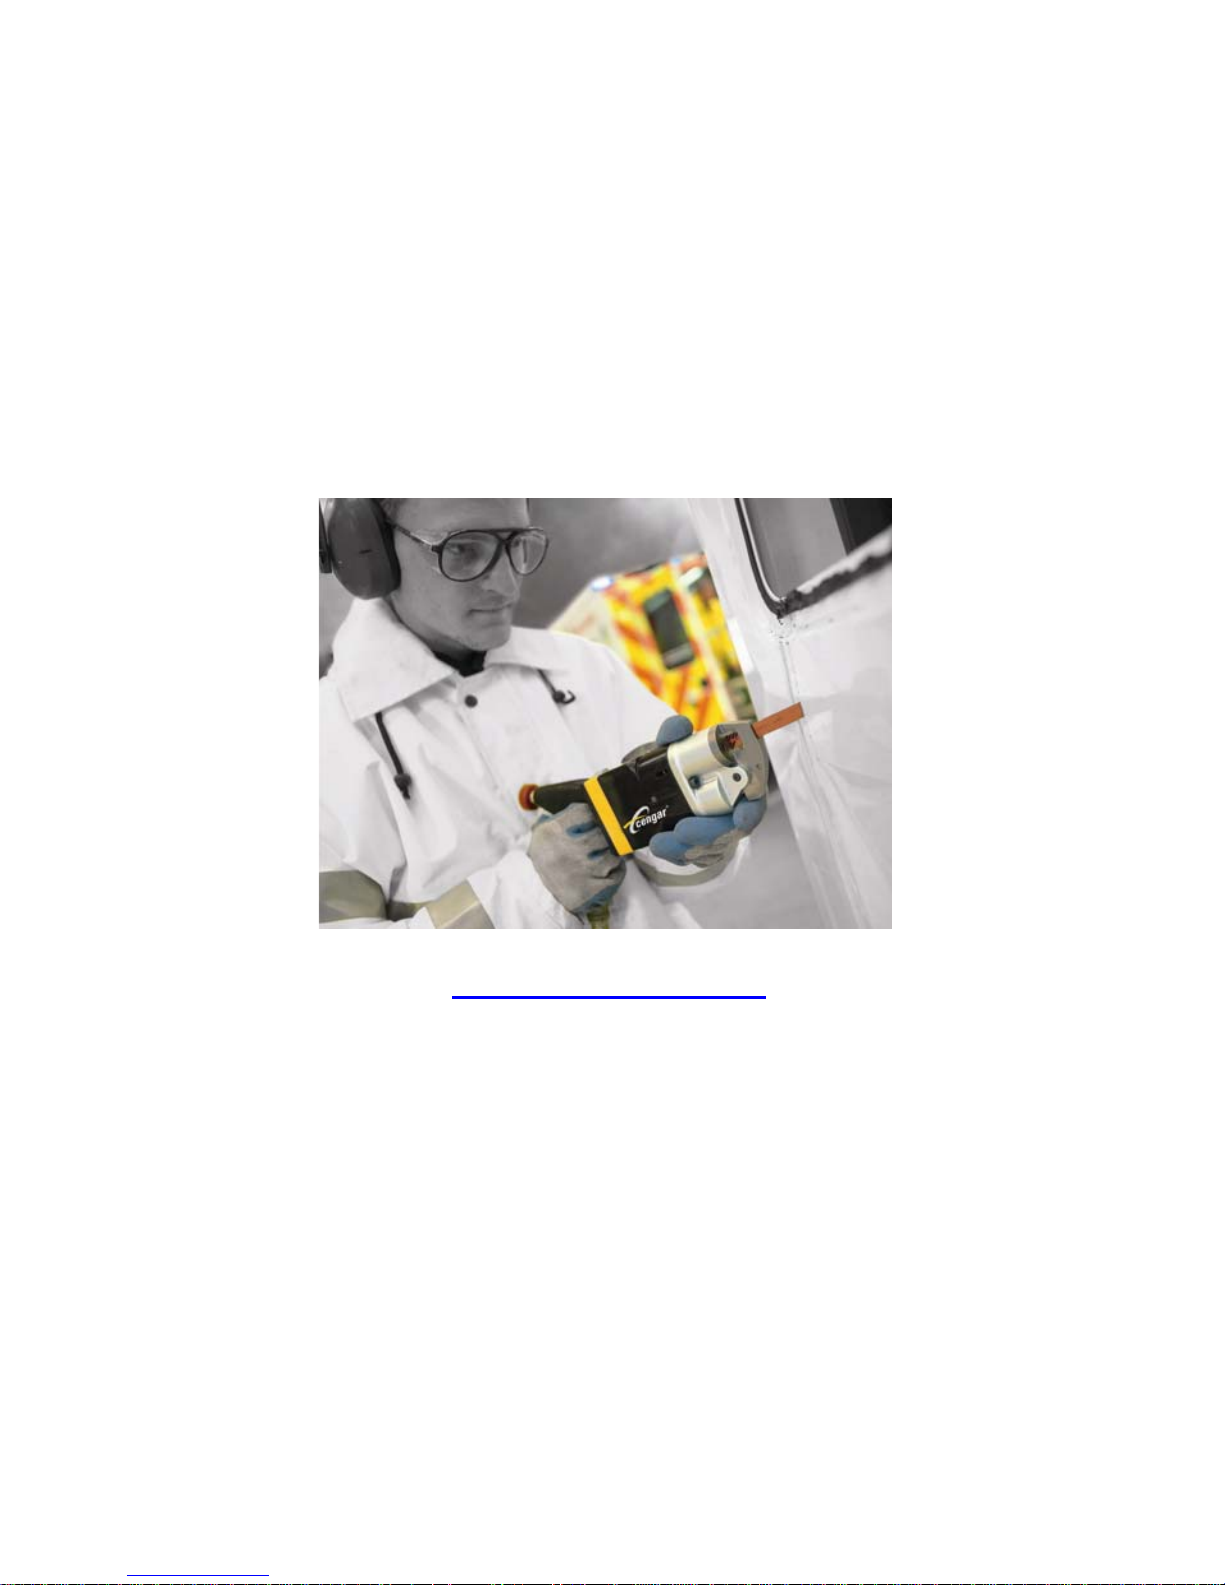
Cengar Air Saw Model PL 905
We recommend normal safe working practices
should be followed as per the Health and Safety at
Work Act, or the appropriate National and State
Laws. We recommend that eye protection be worn
when using Cengar Saws
Page 4

CENGAR SAWS
are hand held reciprocating saws designed to cut metals and plastics in
production environments and can be used in Atex zoned areas where
appropriate. They should only be used by trained operators who are
responsible for the safety of themselves and others in the vicinity. Saw
blades are capable of causing serious injury
Think safe Act safe Be safe
LUBRICATION
Use Cengar Green Oil with longer lasting coating properties for best
results. Cengar Green Oil is specially prepared to: -
1 Emulsify the water generally foun d in compressed air li nes.
2 Give perfect mist lubrication.
3 Remain fluid at the low working temperature of compressed air tools.
4 Contains corrosion and oxidation inhibitors.
Incorrect oils if used will soon “b reak down” for ming a sludge wh ich will
slow and eventually stop the action of the saw . See maintenance deta ils.
INSTALLATION OF BLADES.
Before attempting to insert or change a blade, ensure that the air supply is
isolated by operating the isolation valve provided. Loosen the retaining
grub screws with the key provided, insert blade through nosepiece so that
the teeth are cutting on the pull stroke.
Locate the back screw in the hole in the end of the blade, for a positive
drive, the front screw can then be tightened to grip the blade firmly.
BLADES
Cengar “Shatterproof” Bi-Metal blades are specially prepared for use with
Cengar saws, to withstand the high operating speeds, and give maximum
cutting life.
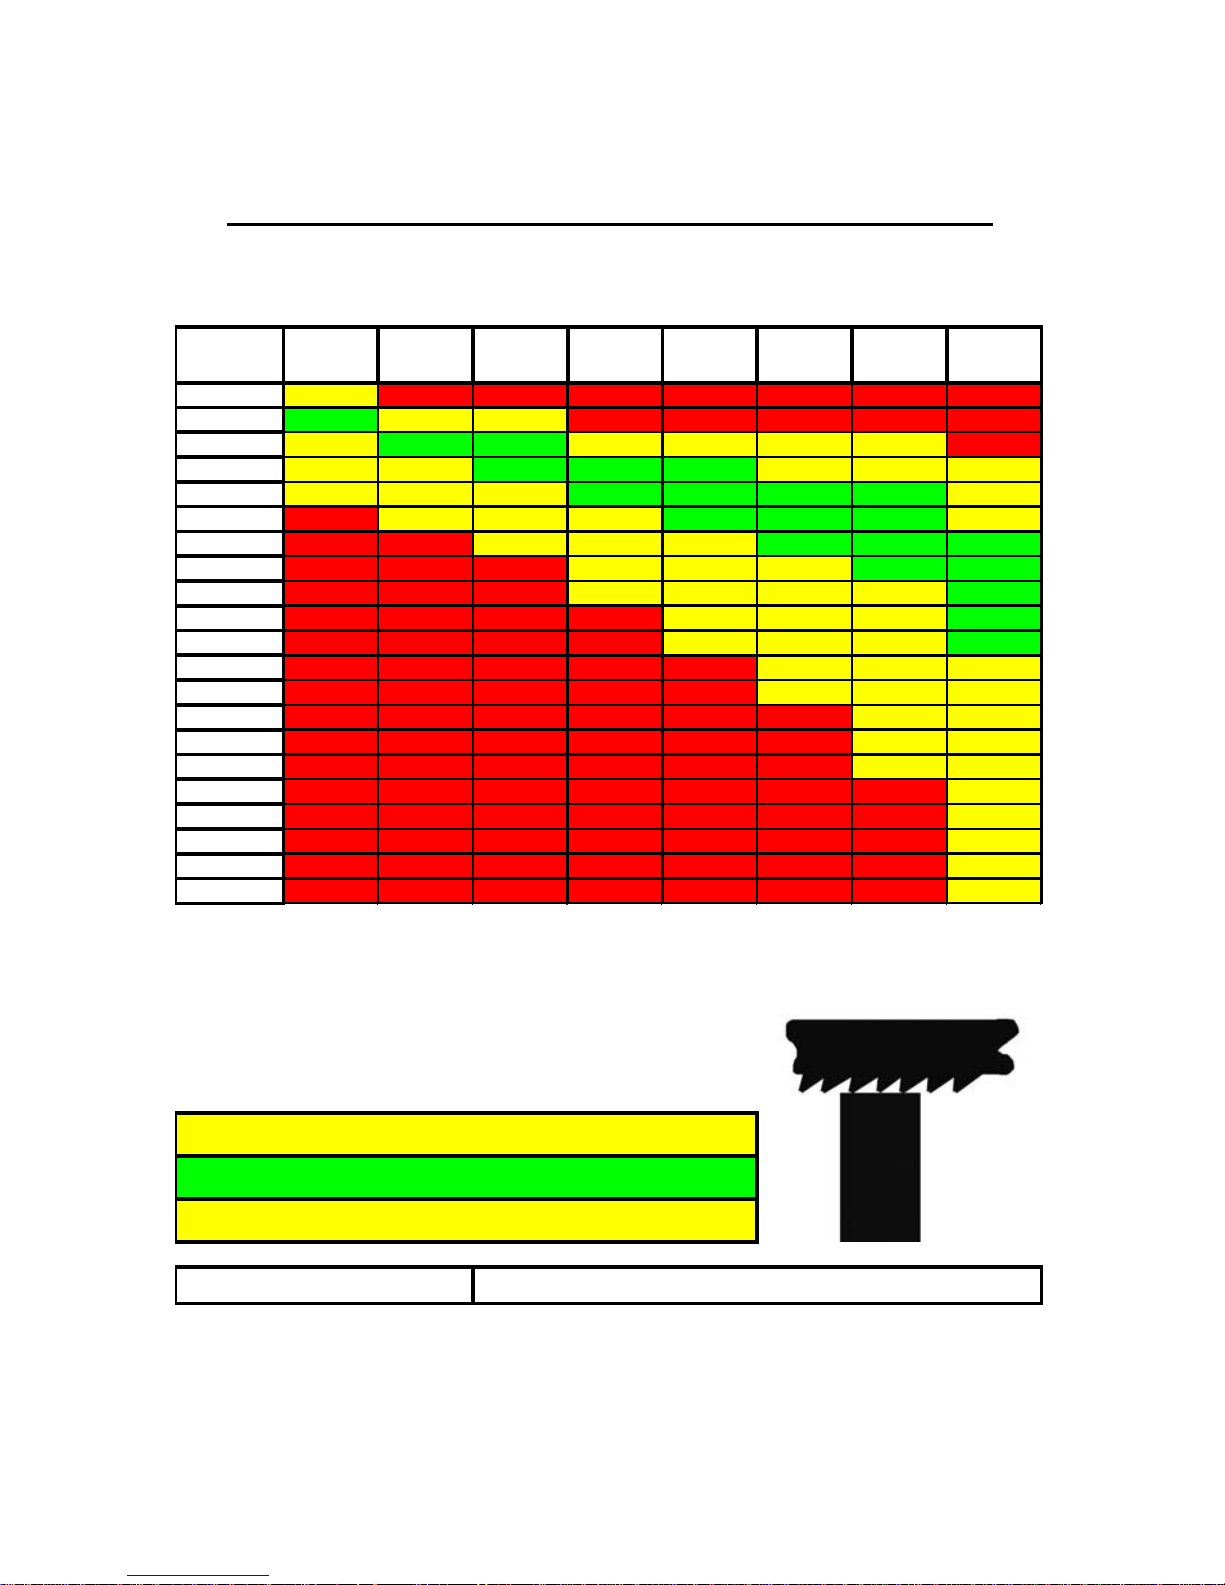
Choose the teeth per inch to suit the characteristics of the material being
cut.
Choose pitch to ensure that at least 3 or 4 teeth are cutting at the same time.
(See chart on page 14 for guidance)
Page 5

OPERATING THE SAW
We recommend that eye protection be worn, and normal safe
working practices observed as per the Health and Safety at work
act, and the appropriate National and State Laws
.
Set the isolator to “on” position, rest the blade on the material to be
cut with the nosepiece firmly abutted to the work piece, with
forward hand pressure, to prevent judder. Allow the Cengar Saw to
cut under its own weight, with just a slight downward hand pressure
to keep the teeth engaged in the cut. It is not necessary to put
excessive downward pressure on the saw, this only accelerates
blade wear, and prevents the saw from operating efficiently. Normal
airline pressure of 5 to 6 Bar is required, any higher pressure onl y
accelerates internal wear of the machine.
USE IN HAZARDOUS AREAS
We strongly advise that the contact area of the blade on the work
piece be quenched with coolant or water during cutting to dissipate
any heat which may be created by the cutting process.
Anti-static conductive air hose must be used, with adequate
earth bond continuity (resistance below 1 ohm), to ground any
electrostatic charges.
MAINTENANCE AND GENERAL HINTS
Always ensure sufficient oil in the tool, especially when the saw is
in constant use.
The valve unit part no. 9507 is a vital component manufactured to
close tolerances, and will not tolerate abusive treatment. Lubrication
is essential. Any neglect will seriously affect performance of the
saw, causing the saw to stall intermittently, or stop completely.
Very little maintenance is required if the correct oil is used, but
incorrect oil will soon breakdown into sludge, slowing down the
action of the saw, necessitating its removal by use of Cengar M.S.
Cleaner. It is imperative that the saw is re-oiled immediately after
cleaning, with Cengar Green Oil.
Page 6
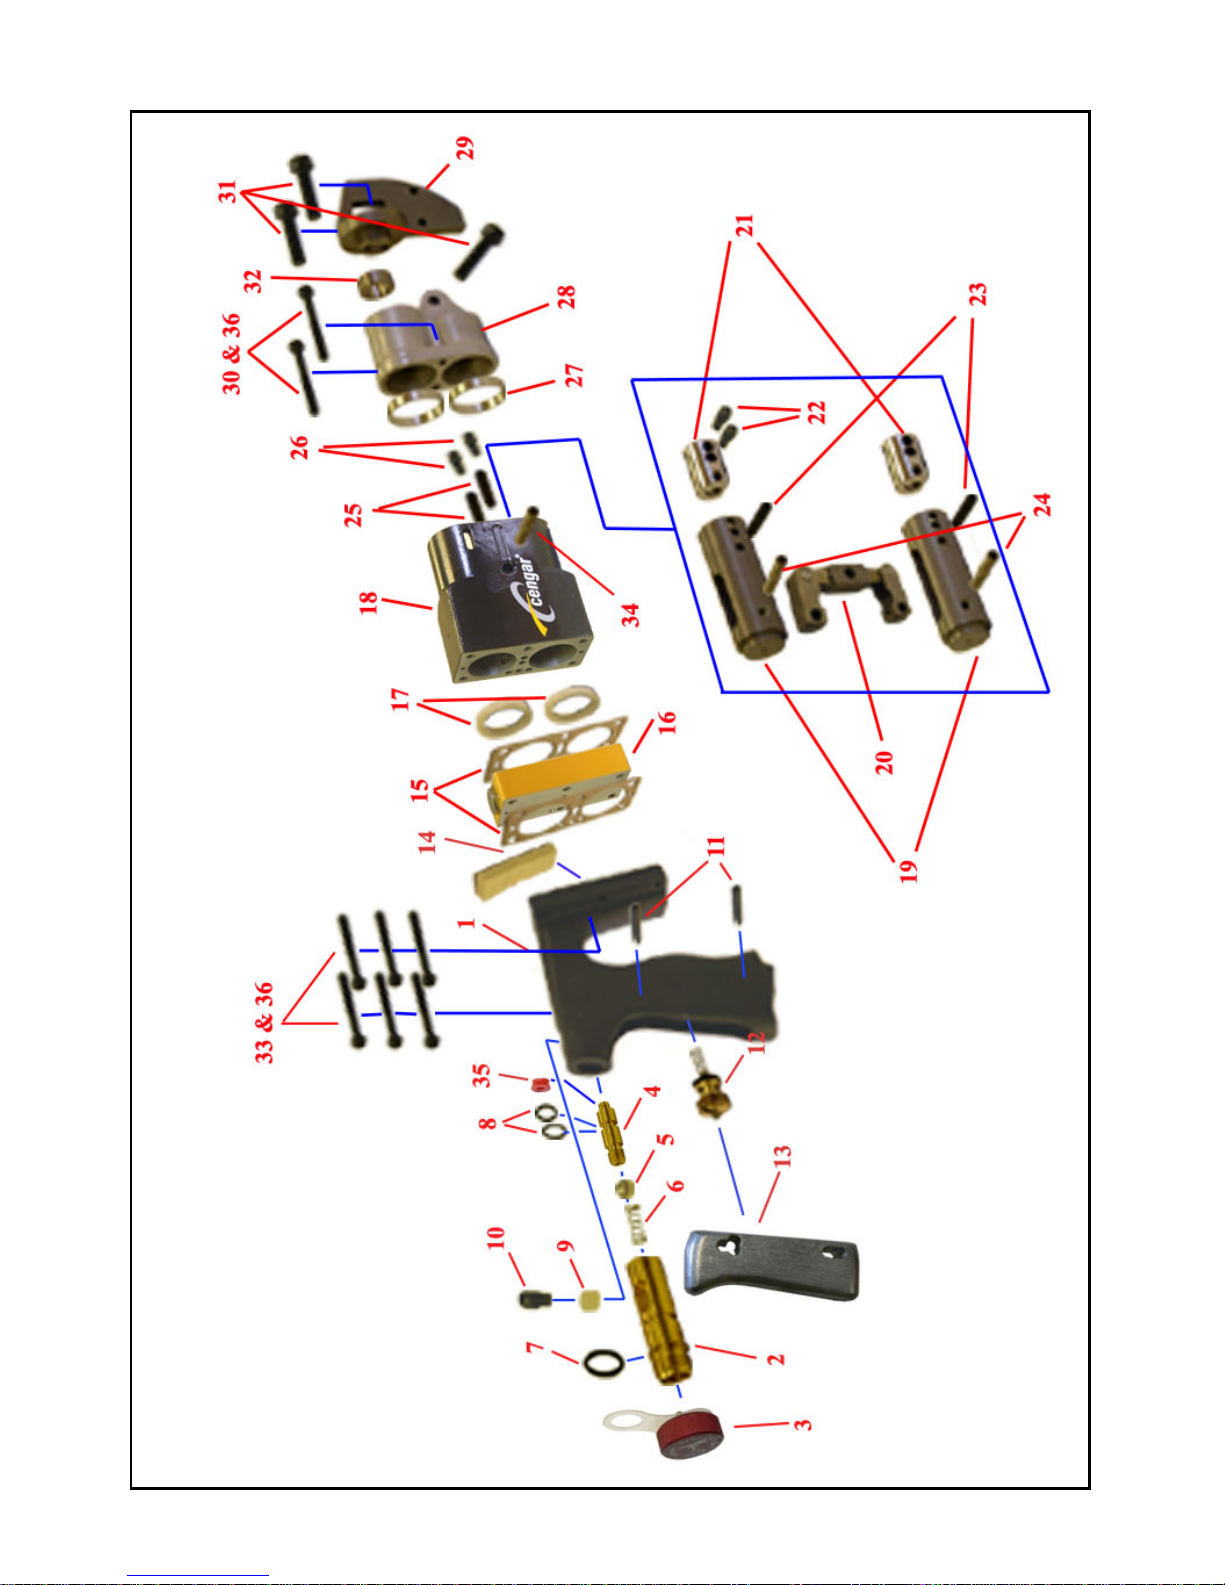
PL905 Exploded View
Page 7

Item Part No. Description
Number
Per Tool
Item Part No.
Description Number
Per tool
1 9550 Handle 1 19 9509P Piston 2
2 9554 Isolator body 1 20 1150 Link 1
3 9553 Oil Cap & Retainer 1 21 9512 Blade Grip 2
4 9555 Isolator Nozzle 1 22 5068 Blade screw 2
5 9559 Oil Control Ball 1 23 9513 Pin-Blade Grip 2
6 9334A Spring 1 24 9519 Pin-Link 2
7 9561 ‘O’ Ring Large 2 25 9514 Locking Pin 2
8 9560 ‘O’ Ring Small 2 26 5056 Retaining Sc rew 2
9 9557 Détente Spring 1 27 9515 Connecting Ring 2
10 9556A Lock Screw 1 28 9516 Front End 1
2 to 10 9552 Isolator Assembly 29 5045 Nose Piece 1/2” 1
11 51834 Roll Pin-Trigger 2 30 5520 Screw 2
12 50034 Valve in Handle 1 31 54160 Screw 3
13 9502 Trigger 1 32 9517 Guide Bush 1
14 9506 Filter/Gauze 1 33 5540 Screw—Handle 6
15 9538 Gasket 2 34 9511 Pivot Pin 1
16 9507 Valve Unit 1 35 QR5108 Quad Ring 1
17 9510 Piston Ring 2 36 W55 Serrated Washer 8
18 9508 Body 1
Page 8
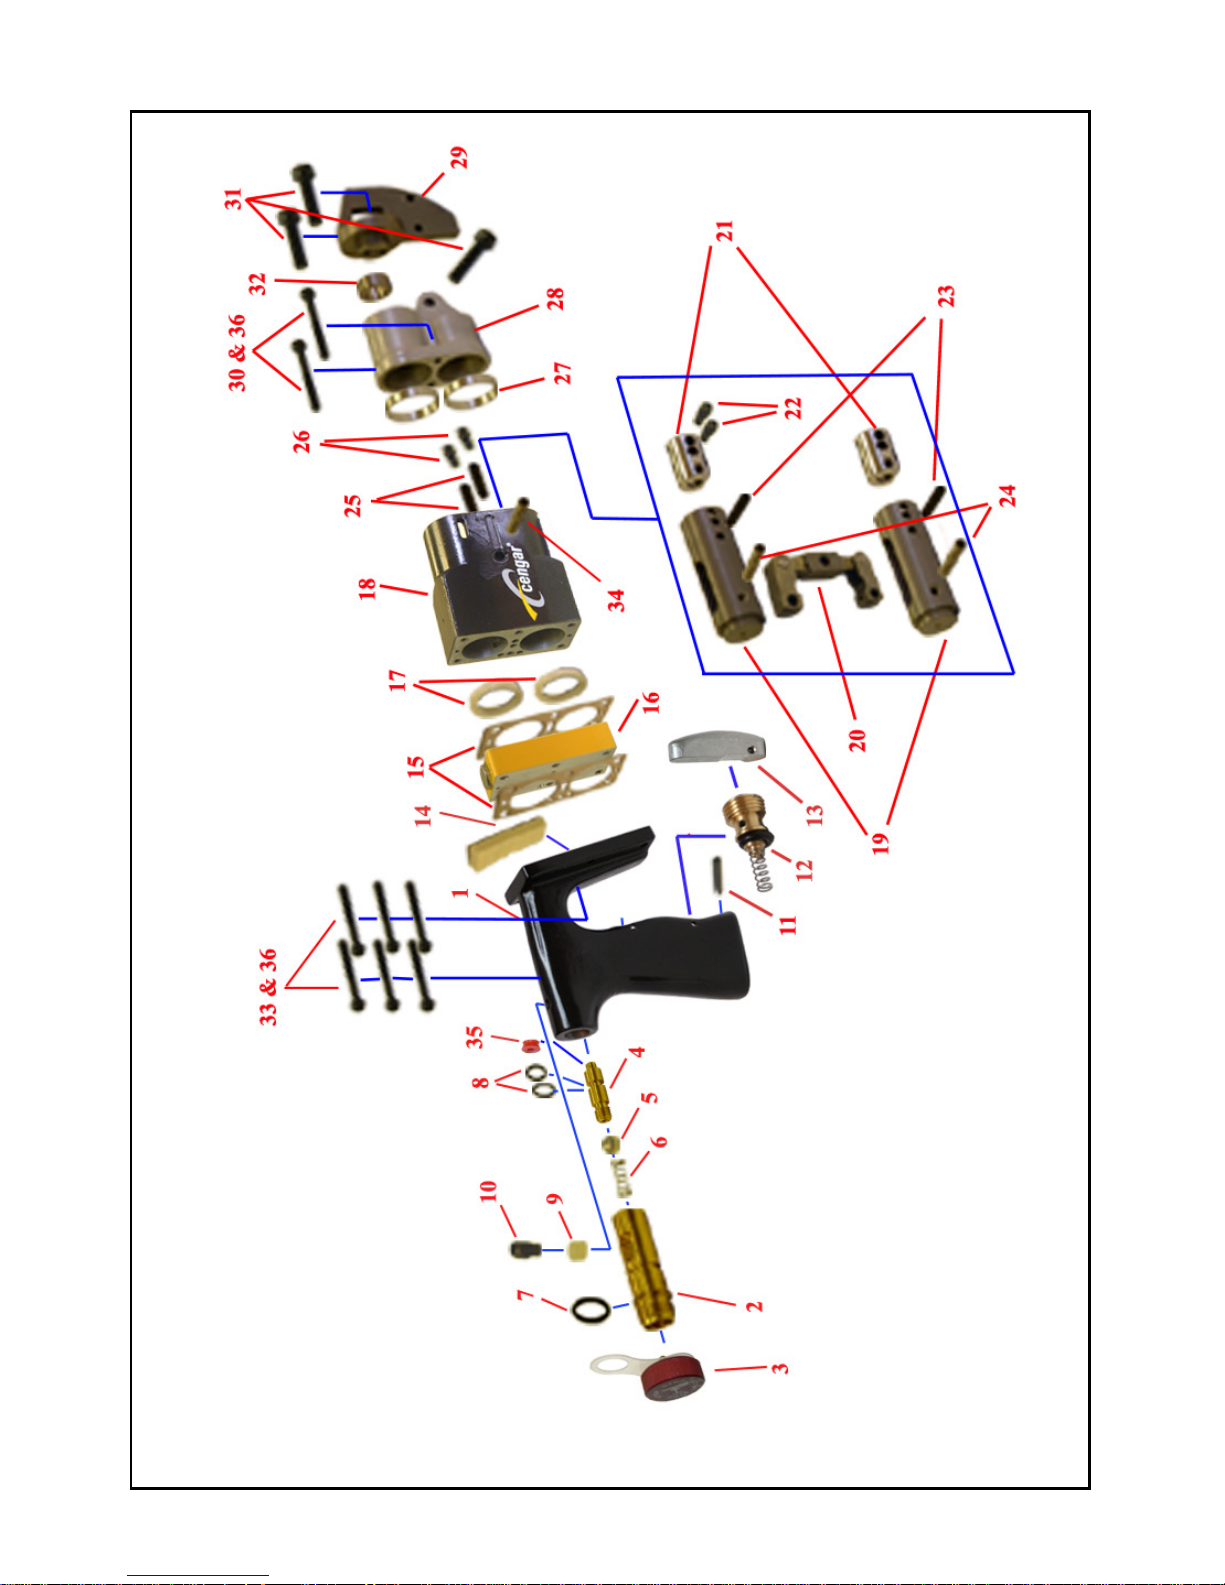
PL905FT Exploded View
Page 9
Item Part No. Description
Number
Per Tool
Item Part No.
Description Number
Per tool
1 9550FT Handle 1 19 9509P Piston 2
2 9554 Isolator body 1 20 1150 Link 1
3 9553 Oil Cap & Retainer 1 21 9512 Blade Grip 2
4 9555 Isolator Nozzle 1 22 5068 Blade screw 2
5 9559 Oil Control Ball 1 23 9513 Pin-Blade Grip 2
6 9334A Spring 1 24 9519 Pin-Link 2
7 9561 ‘O’ Ring Large 2 25 9514 Locking Pin 2
8 9560 ‘O’ Ring Small 2 26 5056 Retaining Screw 2
9 9557 Détente Spring 1 27 9515 Connecting Ring 2
10 9556A Lock Screw 1 28 9516 Front End 1
2 to 10 9552 Isolator Assembly 29 5045 Nose Piece 1/2” 1
11 51834 Roll Pin-Trigger 1 30 5520 Screw 2
12 50034 Valve in Handle 1 31 54160 Screw 3
13 9502FT Trigger 1 32 9517 Guide Bush 1
14 9506 Filter/Gauze 1 33 5540 Screw—Handle 6
15 9538 Gasket 2 34 9511 Pivot Pin 1
16 9507 Valve Unit 1 35 QR5108 Quad Ring 1
17 9510 Piston Ring 2 36 W55 Serrated Washer 8
18 9508 Body 1
Page 10

IF THE SAW DOES NOT OPERATE
1 Check that the isolator is switched on.
2 Check air supply is correct.
3 Valve in handle (part no. 50034) could be worn and/or the seal
is broken, blocking an air passage. Check and replace if
necessary.
4 Valve unit (Part No. 9507) may be stuck. IT IS IM PERAT IVE
TO REMOVE THE SAW FROM THE AIRLINE BEFORE
COMMENCING THIS CHECK. Remove the two hexagonal
nuts, push out valve piston with a pencil, keeping note which
end is top. Clean with oil only, NEVER USE ABRASIVE.
Clean valve bore with oil, re-fit piston from top, keeping the
seal at the top end. Tighten nuts, and reconnect saw to air
supply.
REPLACEMENT OF PISTON SEALS AND
BLADE GRIP BLOCK ON PL 905 SAW
The centre shaft is always fitted from the blade grip access side of
the saw body, and should be removed in the opposite direction after
first slackening the two screws (part no 5056) using 2.5mm
hexagon wrench.
The piston link assembly should only be removed from the body,
when fitting new pistons or link. Inspection of the seals can be
carried out as explained in No. 2 or No. 5 of the following
procedures.
1 Fit the link to pistons with the shorter piston slot facing outward.
Install 2 blade grip screws (Part No. 5068) into the blade grip
block (Part No. 9512) and fit to top piston, with securing pin
Part no. 9513) Fit second blade grip block to bottom pis ton also,
for balance purposes.
2 Fit Piston – link assembly to body without seals, and with one
piston leading the other. With both pistons in the bod y, push one
to the rear, to reveal the piston seal slot.
Page 11

Place the piston seal in hot (not boiling) water until pliable, and
fit to piston with the outer lip facing outward, and ensure that
the seal is fully home in the groove. Push piston back into bore
using hand pressure only. Repeat the procedure with the second
piston.
3 Do not push the piston in to the bore too far, the seal must not
travel as far as the cut-away inside the body. Move the pistons
in the bores until the hole in the centre part of the link (part No.
1150) lines up with the centre shaft hole in the body, and fit
centre shaft (part No. 9511)
4 Fit roll pins (part no. 9514) and screws (part no. 5056) in to the
two threaded holes in the front , to secure the centre shaft.
5 Should the blade grip block, or its screws require replacement at
any time, this can be achieved without removing the pistons
fully, which would damage the seals. With the handle/valve
block removed, pushing the piston as far forward as it will go,
will reveal the retaining pin. Tap this out, and replace blade grip
block. Use a new retaining pin each time.
REPLACEMENT OF ISOLATOR ASSEMBLY
All the parts of the isolator are available separately, however for
ease of service, we offer an Isolator assembly (Part No 9552)
Complete with retaining screw and Détente spring, This has the
seat bonded in place already, and can be fitted in seconds.
Always remove the saw from the airline before commencing
any maintenance work.
Only fit genuine Cengar parts and accessories, or safety may be
compromised
Page 12

NEVER
1 NEVER fit breakable “All-Hard” blades in Cengar
saws, these can shatter causing injury to yourself and
others.
2 NEVER operate saw without wearing safety glasses
3 NEVER operate saw whilst you, or others are near
the saw blade, which can cause serious injury or
trapping
4 NEVER use excessive force, this may increase
vibration above safe levels
5 NEVER hold the Cengar saw in a vice by the body,
this will distort the bores, rendering the tool
inoperative.
6 NEVER screw nameplates to the body, as the screws
may penetrate an airway or bore.
7 NEVER operate the Cengar saw without lubrication.
8 NEVER be tempted to clean internal parts with
anything other than a clean lint free cloth, and M.S.
Cleaner, or Cengar Green oil.
9 NEVER modify Cengar saws or use non Cengar
parts, this will invalidate ATEX approval, and
warranty.
Page 13

ALWAYS
1 ALWAYS use Cengar green oil for best results.
Keeping the saw clean and well oiled will give
excellent reliability, and a long life.
2 ALWAYS use Cengar Bi-Metal Shatterproof blades,
for safety, and best cutting performance
3 ALWAYS isolate the air supply when changing
blades.
4 ALWAYS wear eye protection when using sawing
machines.
5 ALWAYS keep the nosepiece abutted to the work to
prevent excessive vibration
6 ALWAYS isolate the machine when not in use
7 ALWAYS keep others away from the saw blade to
prevent injury or trapping
8 ALWAYS have machines vibration tested annually to
ensure exposure is kept to the minimum
Page 14
Thickness
(mm)
32 TPI 24 TPI 18 TPI 14 TPI
10-14 TPI
Varipitch
10 TPI 8 TPI 6 TPI
2
32111110
5
65432221
10
139765432
15
19 14 11 8 7 6 5 4
20
25 19 14 11 9 8 6 5
25
31 24 18 14 12 10 8 6
30
38 28 21 17 14 12 9 7
35
44 33 25 19 17 14 11 8
40
50 38 28 22 19 16 13 9
45
57 43 32 25 21 18 14 11
50
63 47 35 28 24 20 16 12
55
69 52 39 30 26 22 17 13
60
76 57 43 33 28 24 19 14
65
82 61 46 36 31 26 20 15
70
88 66 50 39 33 28 22 17
75
94 71 53 41 35 30 24 18
80
101 76 57 44 38 31 25 19
85
107 80 60 47 40 33 27 20
90
113 85 64 50 43 35 28 21
95
120 90 67 52 45 37 30 22
100
126 94 71 55 47 39 31 24
General Rule: -
For Hollow Section: Thickness in mm = Wall Thickness X 2
Cengar Blade selection for cutting solid material
No Less than 3 teeth in contact
Ideally between 6 and 12 teeth in contact
No More than 24 teeth in contact
The numbers in the coloured boxes indicates the actual number of teeth in contact
Available blade pitches
Page 15
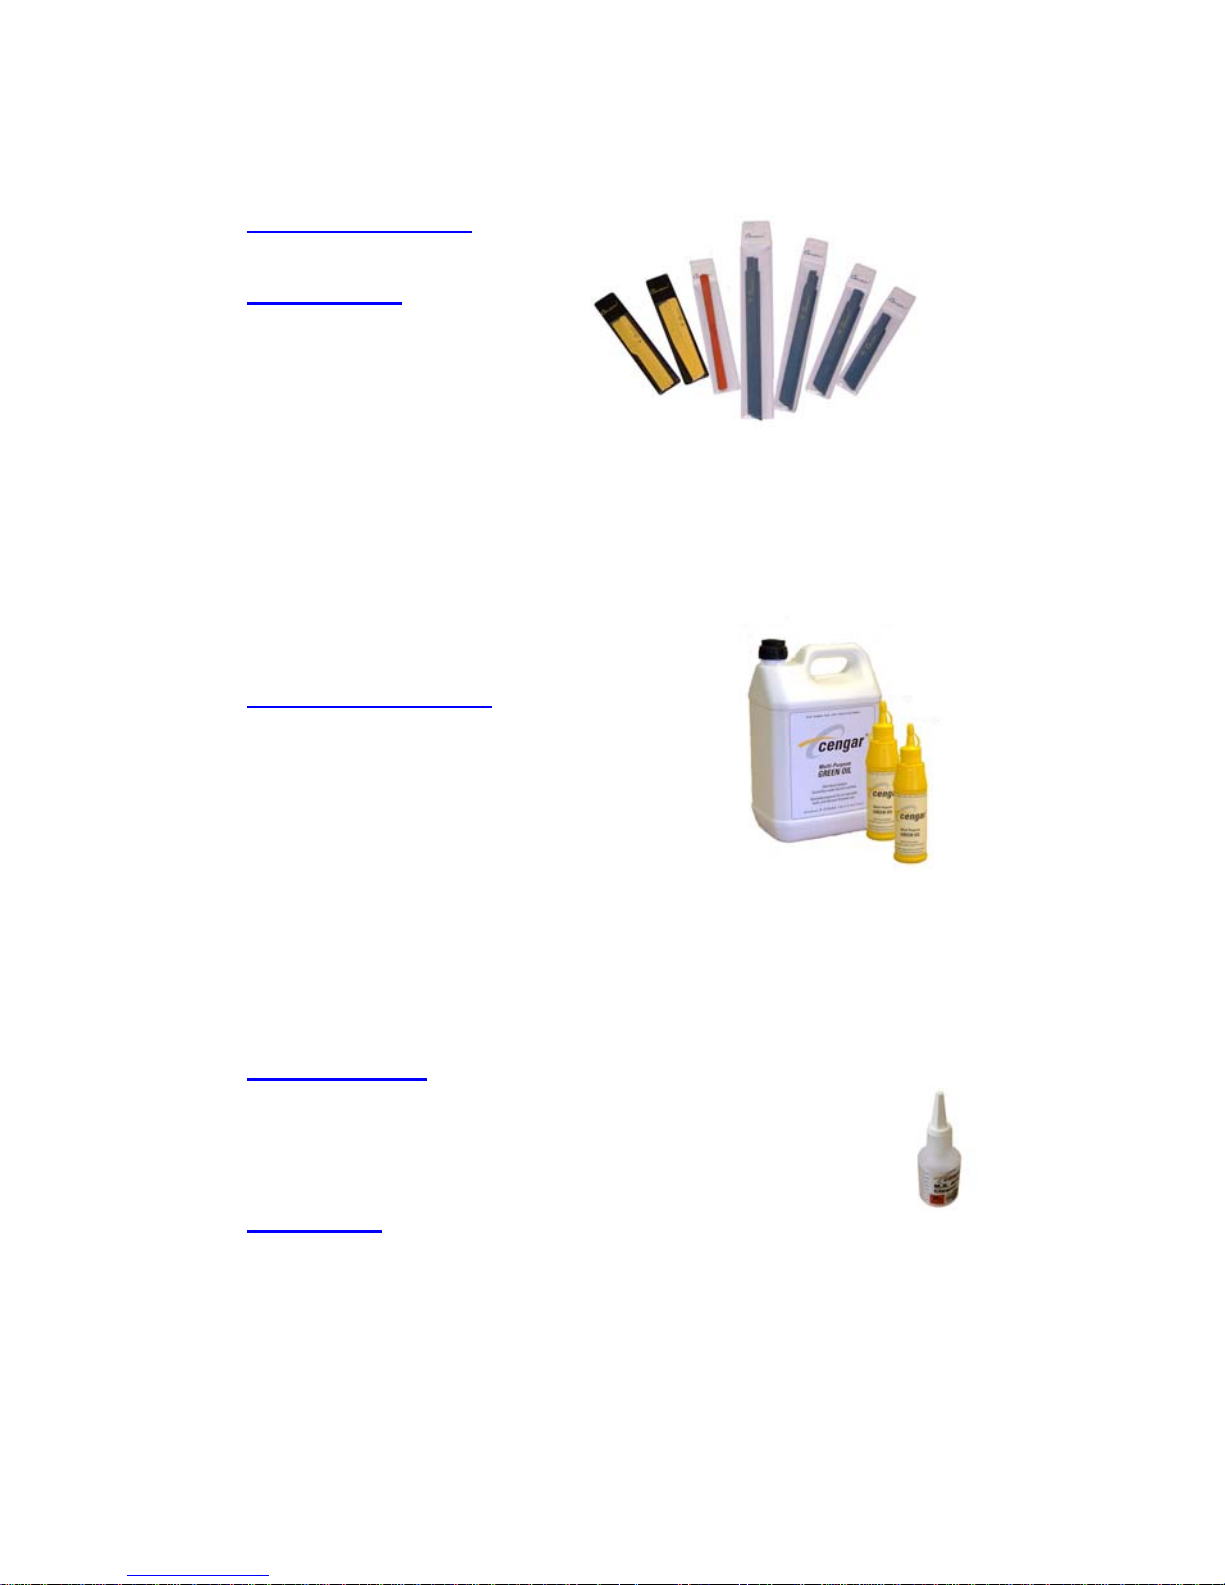
ACCESSORIES
Saw Blades
MC 220/24
220 mm long by 12 mm deep blade for general cutting 24 TPI
Other sizes and types available on request
A range of 19 mm deep blades could be fitted in certain circumstances. Replace the
nosepiece 5045 with 5075 to use 19 mm blades
Cengar Green Oil
GO 9107P Cengar Green Oil 250 ml plastic bottles for all air tools
GO 9109 As above in 5 litre container
GO 9110 As above in 25 litre container
M.S. Cleaner
MS 9105
1 litre General purpose cleaning fluid for air tools.
MS 9125 50 ml. In a dropper bottle. - Enough for 10 tools
Always use plenty of Cengar green oil afterwards.
Nosepiece
5045
Replacemen t nosepiece/blad e guide for 12 m m deep bl ades
5075 Alternative nosepiece/blade guide for 19 mm deep blades
Page 16

Cengar Ltd.
70 Lister Lane
Halifax, England . HX1 5DN
Tel: 01422 354626 Fax: 01422 349024
www.cengar.com
SERVICE
We offer a full factory repair and refurbishment service for
Cengar Saws, - normally within 5 working days. Quotations at
no charge can be given before work is carried out.
DISTRIBUTOR ADDRESS
Manual Document No. MAN905ENG/01 Issue 06 (Jan ‘10)
 Loading...