

Page 1
Quick Start
Guide
Corporation
600269
Rev. 1
Page 2

System Installation
Note:
Retain all packing materials.
1.
Following the instructions provided in the SMART Turbo shipping carton, carefully remove the instrument and place
it on the vibration-free workbench or laboratory table in a location that
a. provides a draft free, dust free, dry environment. The temperature of the room must be between 50 °F and 85 °F
(10 °C - 29 °C). Temperature should not vary more than 10 °F (5 °C) per day. Relative humidity range should be
0-85%.
b. is free from vibration of large equipment and/or excessive walk-through traffic.
c. is capable of supporting the combined weight of the SMART Turbo and the SMART Trac II magnet {165 lbs. (75
kg)} and, if applicable,
does not have a steel (iron) top
d. . Materials such as wood, plastic, aluminum, or non-magnetic stainless steel
are suitable surfaces. Ensure that no steel bar, supporting the work surface, runs directly beneath the magnet.
e. provides adequate bench space — 44 in. (112 cm) in length and 30 in. (76 cm) in depth minimum - SMART
f. allows the instrument to be connected to a dedicated, grounded outlet as specified in the instrument
specifications and capable of accepting the plug of the power conditioner illustrated in this manual.
the SMART Trac II processor module {combined weight of 202 lbs. (95 kg)}.
Turbo and SMART Trac II Magnet
58 in. (148 cm) in length and 30 in. (76 cm) in depth minimum - SMART
—
Turbo, SMART Trac II Magnet and SMART Trac II Processor
2.
Carefully remove the SMART Trac II processor module from its shipping carton and, based on available space, place
it on the workbench, on a shelf above the workbench or on the floor under the workbench. The processor
Note:
module must be within 9 ft. (3 m) of the magnet.
3. Cut the bands securing the cardboard on the magnet.
4. Lift the cardboard from the magnet.
2
Page 3
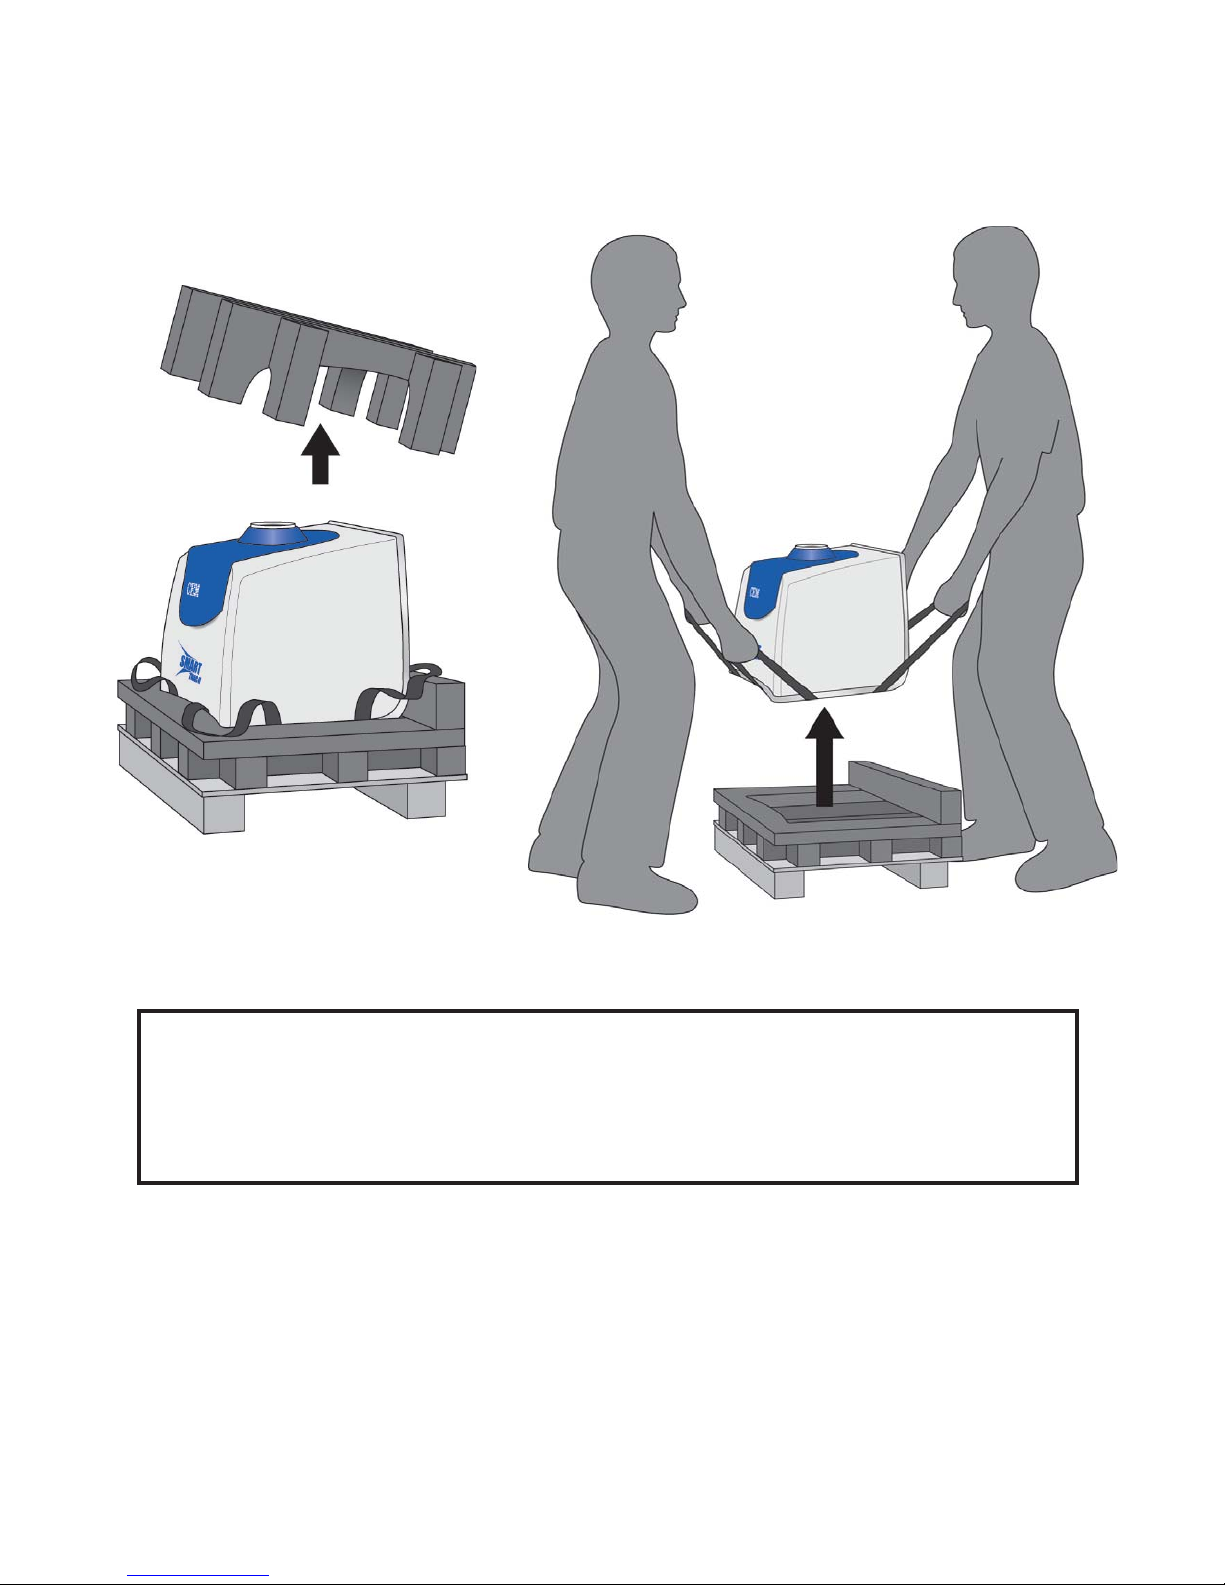
5. Remove the foam from the top of the magnet.
6. With two people positioned on the sides of the magnet, one on each side, use the straps and carefully lift the magnet
from the skid and place it on the workbench beside the SMART Turbo. The magnet weighs approximately 110
pounds (50 kg).
7. Inspect each component of the system for visual damage.
If damage is noted, do not attempt instrument operation.
Ne pas mettre en marche si l’instrument est endommagé.
8. If any instrument component has been damaged in shipping, contact the freight carrier to report the damage and to
file a damage report. Contact CEM Service or the nearest subsidiary or distributor to request service information.
9. Verify that all accessories illustrated and listed on page 6 are included.
WARNING
AVERTISSEMENT
3
Page 4
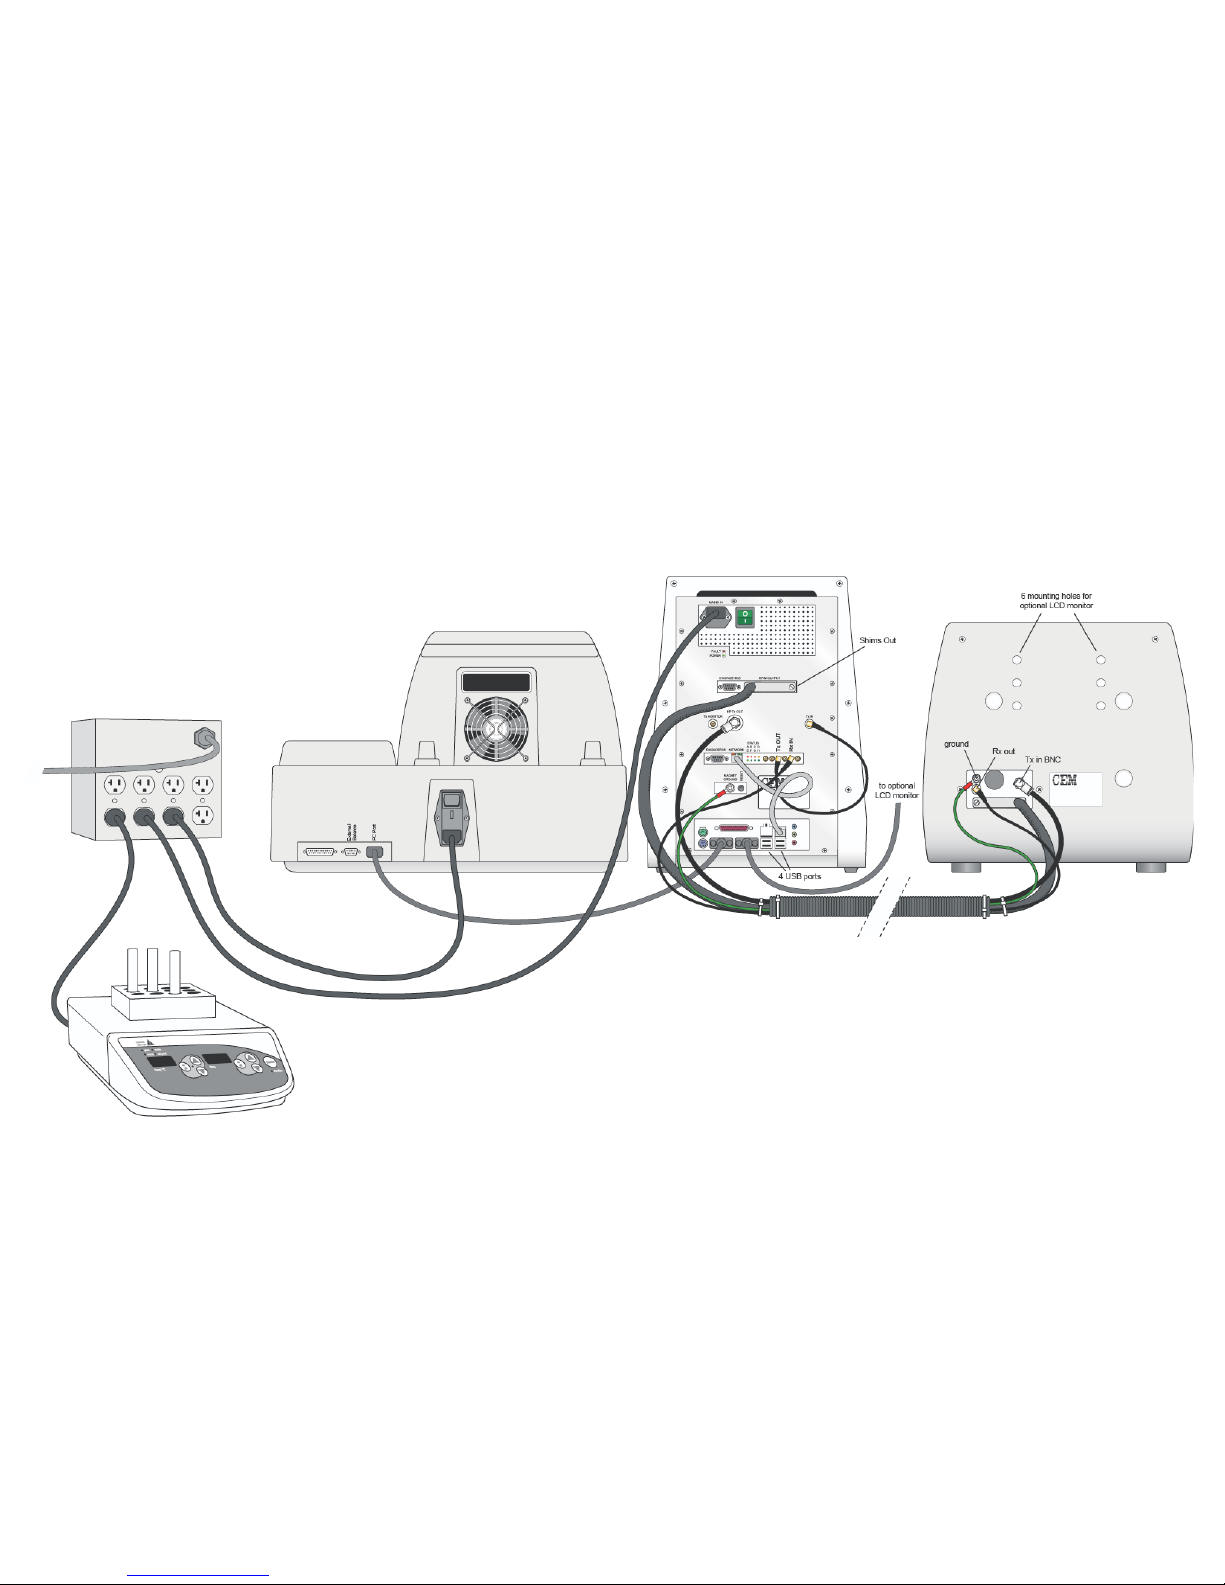
Heater & Heater Block
Cable Connections
4
Power Conditioner
Magnet
SMART Turbo
SMART Trac II Processor Module
Page 5
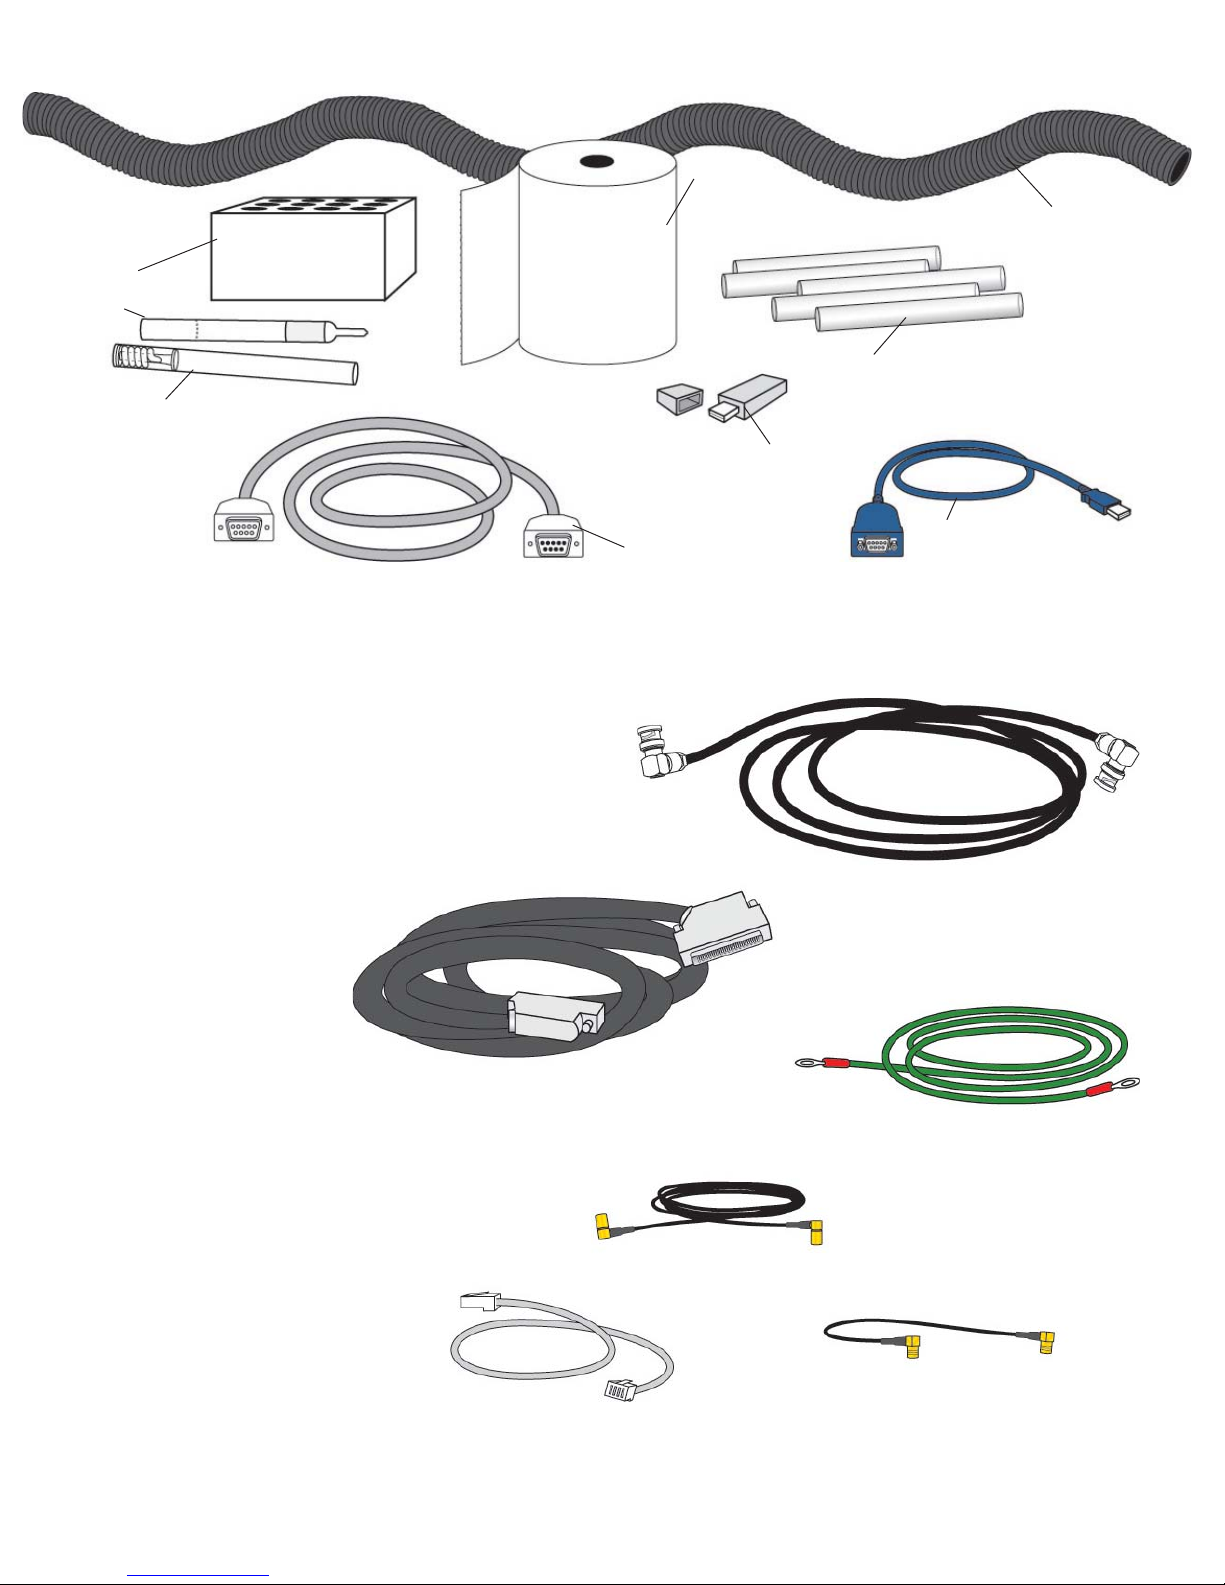
Heater
Block
Frequency
Oil Standard
Normalization
Standard
Trac
Film
Nylon
Split
Loom
Trac
Tubes
External
USB
Drive
Accessory Kit containing:
• Trac Tube (160505) 5
• Trac Film (159875)
• Standards Kit (568450)
• Frequency Oil Standard (160065)
• Normalization Standard (160570)
• Heater Block (159885)
• External USB Drive (277200)
• NMR/SMART Trac Cable (160270)
• 3/8” Nylon Split Loom (BR198859)
• SMART Trac Operation Manual (600xxx) (Not illustrated)
• Maintenance Guide (SM0044)
Cable Kit (160660) containing:
BNC Cable
•
Ground Cable
•
Shim Cable
•
Short SMB – SMB Cable
•
Long SMB – SMB Cable
•
Cross-over Ethernet Cable
•
Shim Cable
37-way
NMR/
SMART Trac
Cable
SMB – SMB
Long Cable
(Rx out to Rx in)
USB to
Serial Cable
for CEM
Service Use
(Do Not Discard)
BNC Cable
Tx out to Tx in)
Ground Cable
Cross-over
Ethernet Cable
SMB – SMB
Short Cable
(Tx in to Tx out)
5
Page 6
10. Unpack the power conditioner and place it on the work bench or the floor as far away from the SMART Trac II
Magnet as possible.
CAUTION
Ensure that the power conditioner is not placed in close proximity with the SMART Trac II magnet to prevent
demagnitization of the magnet.
11. Carefully connect each cable provided in the SMART Trac II cable kit and the cable in the accesssory kit. Ensure that
each cable is connected properly. (Refer to the illustration on pages 4 and 5. Use caution to prevent bending or
damaging the pins of the connectors.
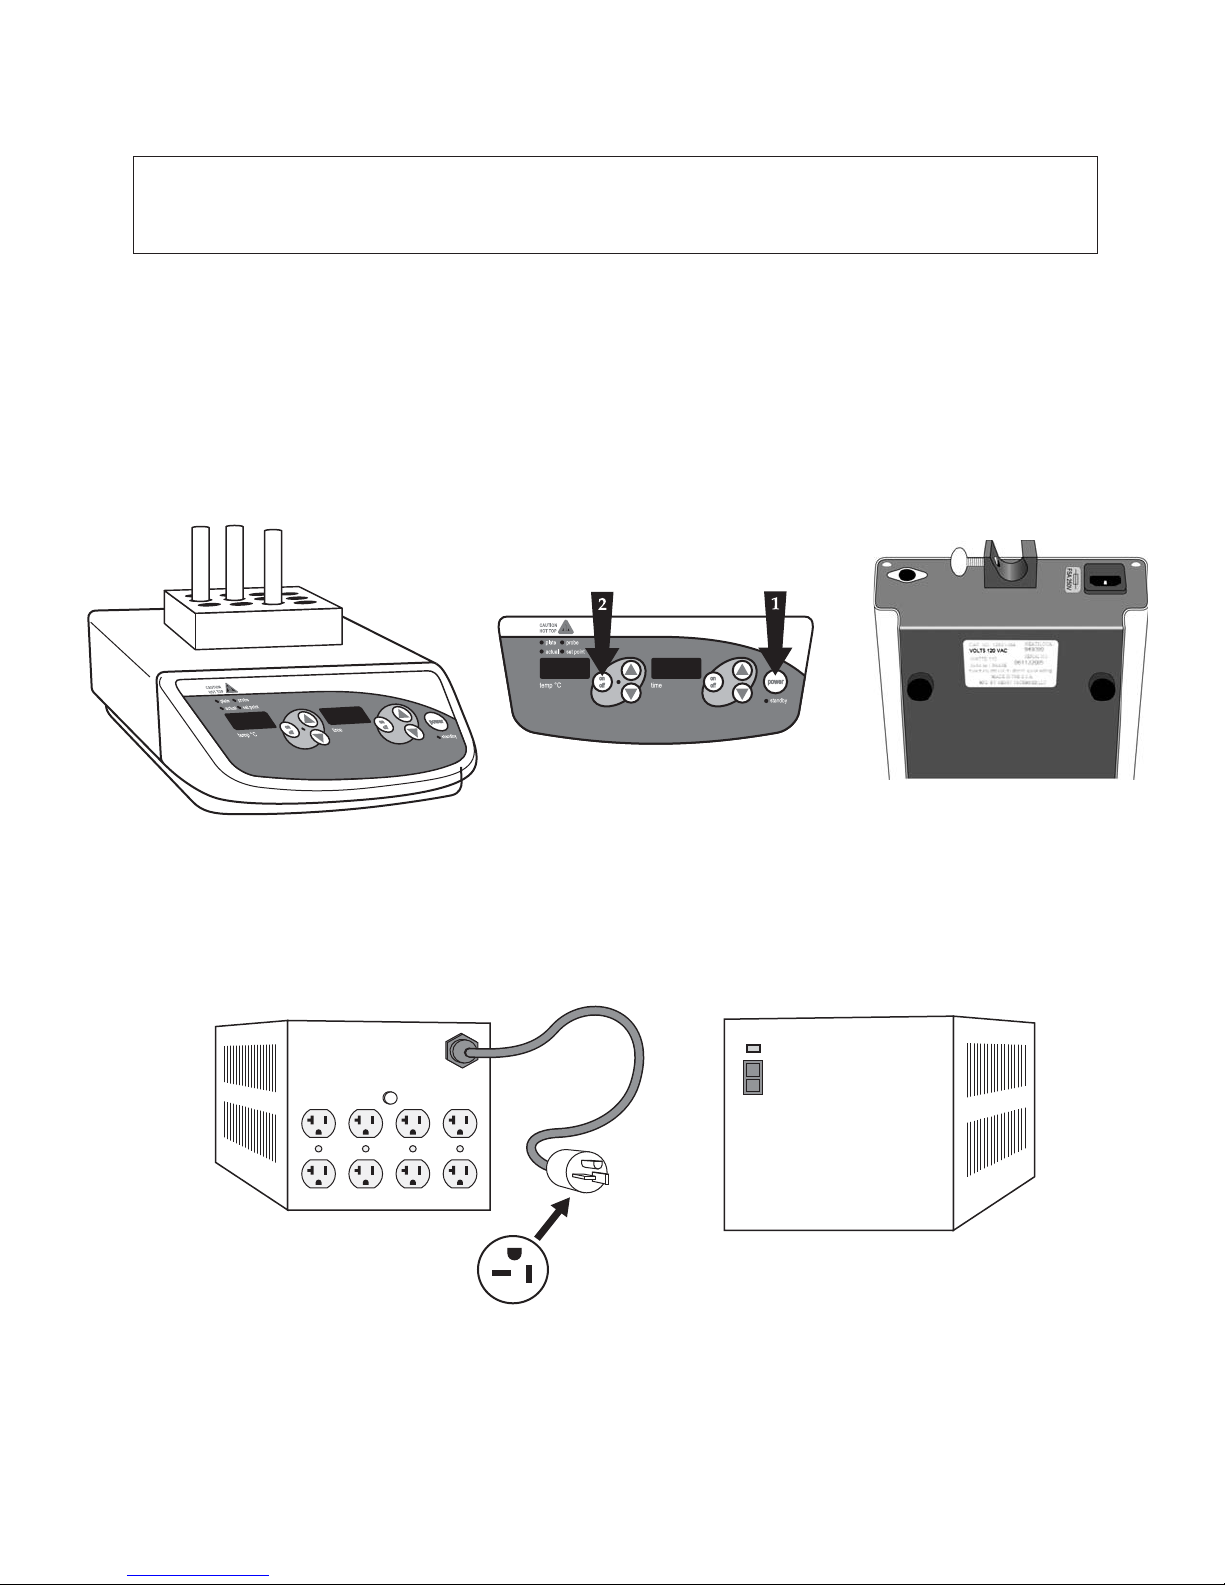
12. Unpack the heater and heater block. Plug the heater power cord into one of the receptacles of the power conditioner
as illustrated on page 4. Place the heater block inside the heater. Press the “Power” button first, then press the
“On/Off” button as illustrated below. Follow the manufacturer’s instructions included with the heater block to set the
temperature of the heater to 40 °C. Place the Trac Standards (p/n 160065 and 160570) in the heater block and
permit the standards to heat for at least four (4) hours. Note: The label on the bottom of the heater indicates the
actual voltage
13. Plug the power cords from the SMART Turbo and the processor module into the power conditioner.
14. Plug the power cord of the power conditioner into the appropriate electrical outlet. Turn the power conditioner on.
Note: The above power cord is applicable to the U.S. only. Power cords for instruments installed in other countries will be
supplied based on electrical specifications for the applicable country.
ON
OFF
15. Position the power switch of the SMART Turbo and the SMART Trac II processor module in the “on” position.
Note: CEM Corporation recommends that the SMART Trac II System power cords be connected to electrical outlets and
the power switches remain in the “on” position at all times. After 15 minutes of idle time, the SMART Turbo assumes a
“sleep” mode.
6
Page 7

16. Permit the system to warm up.
CAUTION
The SMART Trac II System requires a warm up period of at least4-8hours prior to operation. If the
instrument is switched off for an extended period of time (weekend, holidays, etc.), ensure that warmup
time is permitted prior to use.
17. When the warm-up time is complete, the blue indicator light on the front of the magnet will remain constant.
indicating that the heater is functioning properly.
18. Perform the QuickCheck MONITOR tests as outlined in the instructions supplied in the MONITOR package.
19. Perform the magnet temperature and homogeneity tests.
a. Temperature - From the SMART Turbo Main Menu, select “7 - SMART Trac.” Select “Next Page,” “1 - Diag-
nostics,” and “1-System Check.” Variable number 17 is the magnet temperature. The temperature should be
between 39 °C and 41 °C.
b. Homogeneity - Press any key on the keyboard. Select “4 - Magnet Homogeneity.” Follow the on-screen
instructions. The displayed homogeneity should be <20.0.
20. The SMART Trac II is ready for operation. Contact the local sales representative to arrange initial training or refer to
the SMART Trac II Operation Manual to begin analysis.
P.O. Box 200, Matthews • 3100 Smith Farm Road • Matthews, NC 28104 • (704) 821-7015 • Fax: (704) 821-7894
U. S. Sales and Application Support (800) 726-3331 Fax: (704) 821-5185 E-mail: sales@cem.com
U. S. Service Support (800) 726-5551 Fax: (704) 821-4368 E-mail: service@cem.com
E-mail: info@cem.com Web: http:\\www.cem.com
7
Page 8

System Setup
Page 9

SMART Trac™ II
Setup Guide
Page 10

1. Insert the Oil Standard and Normalization Standard into the heater block. Turn the SMART Trac II
instrument on and perform steps 2 through 6 immediately .
Note: Standards must be thermally conditioned at 40C
for at least 4 hours.
Oil Standard
Normalization Standard
Page 11

2. The SMARTNMR and CEM Communicator activate automatically upon instrument startup
SMARTNMR
System Tray Icon
CEM
Communicator
Page 12

3. Right-click SMARTNMR and select Tools System Setup
Page 13

4. Select on System Setup.
Page 14

5. Once the System Setup dialog window is open, select Auto Run.
“Auto Run” will automatically run the following procedures, stopping
between each procedure to prompt for user input:
• Magnet Temperature Offset
• SHIM Setup
• Cal-lock
• Frequency Optimization
• Pulse Width Optimization
Correct standard to use for each procedure:
SHIM Setup Oil Standard
Cal-lock Normalization Standard
Frequency Optimization Oil Standard
Pulse Width Optimization Oil Standard
Page 15

6. When prompted for the Magnet Temp. Offset, lift the blue cover on the magnet, and
enter the temperature offset number shown on the label. Select OK.
Page 16

SHIM Setup prompt for Oil
Standard
Cal-lock prompt for
Normalization Standard
Page 17

Frequency Optimization
Prompt for Oil Standard
Pulse Width Optimization Prompt
for Oil Standard
Page 18

7. When the Status window indicates Complete, select OK and proceed with Unit Normalization.
Record the data shown in Results:
Auto SHIM Complete
Offset
Frequency
P90
P180
Frequency Range: 23.3800 – 23.4200
P90 Range: 3.0 – 6.5
P180 Range: 6.0 – 15.0
Page 19

Unit Normalization
1. Main Menu
2. Press 7 – SMART Trac
3. Press 7 – Unit Normalization
Note: Methods can not be created or imported until unit
normalization is performed.
4. Select SMART Trac II. Press 1 to toggle between SMART Trac I & II.
5. Press Ready
6. Remove sample or oil standard if present on the magnet.
7. Press Ready.
Note: Process will take about 5mins.
8. Collecting data at gain 10, 25 and 50 will be shown on the screen.
Page 20

Unit Normalization
9. Insert Normalization Standard into SMART Trac II
10.Press Ready
Note: Process will take about 1 hour.
11.SUS Temperature Stabilization will be shown on the screen.
12.
Collecting data at gain 10, 25 and 50 will be shown on the screen.
13.When done, screen will go back to the SMART Trac menu.
After unit normalization, you can now begin developing/importing
method/s on the SMART Trac II.
Page 21

Backup SMART Trac™ II Methods
(for customer)
• Main Menu
• Press 7 – SMART Trac
• Press 5 – Export Method
•
Select Method
• Insert USB Stick
• Press Ready
• Leave USB stick with customer
Page 22

Complete Backup SMART Trac™ II
(for installer)
• Insert USB stick
• Right click the SMART NMR icon
• Highlight “Tools → Export Diagnostic Data”
•
Select “Export Diagnostic Data”
• Select “Yes”
Page 23

Method Importation
Page 24

Importing Methods for SMART Trac II
1. From the system Main Menu, press “7” on the instrument keypad for “7.SMART Trac”
2. From the SMART Trac menu, press “4” to select “4.IMPORT METHOD.”
3. Ensure that a USB stick co ntaining the method(s) to import is installed in the SMART Trac II USB port.
4. Press “Ready.”
5. Select the method(s” to import from the USB stick to the SMART Trac II system.
Page 25

Method Creation
Page 26

Create a Fat NMR Method on the SMART Trac II
From the Main Menu
Select #2. Edit/Create Method
Select #1 New Method
Name Method: (spell out name of method); Select (“Ready”)
Edit Method
#1. Moisture/Fat NMR (“toggle”)
Caution: Do Not Choose Moisture/Fat this selection is for the FAS-9001
#2. Constant Weight (Default)
#3. Turbo ON (Default)
Moisture/Fat NMR Type
#1. Standard
Enter Parameters for Moisture:
Power: 100%
Delta Weight: 0.2mg
Delta Time: 10sec
Max Time: 10min (Default)
Bias: +0 (Default)
Min Result: 0% (Default)
Max Result: 100% (Default)
(“Next Page”)
Max Temp: 100oC Based on AOAC oven method
Min Wt Range: 2.0g (2.0 is Default)
Max Wt Range: 2.5g
Wt Compensation: ON
(“Next Page”)
Fat Range <80%, >80% or <1% (<80 Default, <1% Condensed Skim)
Fat Bias: 0% 80% Butter, Mayonnaise
Warm up delay: 0 Used with Fat Only Option, powders
or butter.
● Run Time 8 sec. (Default)
(“Next Page”)
Page 27

Edit References: Need High, Middle, Low reference values to create Linear Fat Equation.
Example: 12.20%, 10.56%, 5.30% Fat
Press “ADD” for each reference value to be entered:
1. 12.20
2. 10.56
3. 5.30
Collect Standards Data: Choose item number “1” to collect data for 12.20.
EDIT Standard - 12.20 (Start with highest fat sample)
Press “ADD Standard” to collect standards data for 12.20 to generate
signal/mass.
Using the12.20%F sample, repeat “Add Standard” step a minimum of 3 times (up
to 8).
Edit Standard – 12.20%
%Fat S/M Mass
------------ ----- ------
*1. ------- 1539.6340 2.2315 g
*2. ------- 1534.0634 2.3152 g
*3. ------- 1537.0634 2.5315 g
Note: Fat calculation will not be displayed until standards data has been collected for at
least two reference points (12.20 and 5.30).
After enough data points have been collected for 12.20, Press “Prev Page”
and choose next item number “3” to collect data for the lowest fat sample (5.30).
EDIT Standard – 5.30 (lowest fat sample)
Press “ADD Standard” and repeat at least 3 times to collect signal/mass.
Now that you have the second point, the fat values will be calculated and shown.
Select the points (press line number to toggle on/off) that are within specifications
of reference to create your Linear Fat Equation.
Note: Each time you select a point it will recalculate the line and therefore recalculate
the other standards data (even those under 12.20).
Edit Standard – 5.30%
%Fat S/M Mass
------------ ----- ----------
*1. 5.26 1036.0111 2.1222 g
*2. 5.35 1040.1713 2.2231 g
*3. 5.30 1038.0225 2.1315 g
After enough data points have been collected, Press “
next item number “
2” to collect data for the middle point (10.60).
Prev Page” and choose
Edit Standard – 10.56 (middle point to validate line)
Press “ADD Standard” and repeat at least 3 times to collect signal/mass.
Select points (press line number to toggle on/off) that are within specifications.
Edit Standard – 10.56%
%Fat S/M Mass
------------ ----- ----------
*1. 10.56 1414.2478 2.4311 g
*2. 10.48 1409.0634 2.3315 g
*3. 10.61 1417.2236 2.5314 g
Page 28

Data In Review
Edit References:
1. 12.20
2. 10.56
3. 5.30
Edit Standard – 12.20%
%Fat S/M Mass
------------ ----- ----------
*1. 12.24 1539.6340 2.2315 g
*2. 12.15 1534.0634 2.3152 g
*3. 12.19 1537.0634 2.5315 g
Edit Standard – 10.56%
%Fat S/M Mass
------------ ----- ----------
*1. 10.56 1414.2478 2.4311 g
*2. 10.48 1409.0634 2.3315 g
*3. 10.61 1417.2236 2.5314 g
Edit Standard – 5.30%
%Fat S/M Mass
------------ ----- ----------
*1. 5.26 1036.0111 2.1222 g
*2. 5.35 1040.1713 2.2231 g
*3. 5.30 1038.0225 2.1315 g
Once appropriate points are selected and there are at least 3 points for each reference
within specification, exit to Main Menu (saves method). Then, EXPORT METHODS to a
USB stick (refer to REFERENCE PROCEDURES). Please, EMAIL METHODS to your
CEM Representative for back up.
Page 29

Reference Procedures
EXPORT METHODS - To Export Methods to USB Stick:
Exit to the Main Menu
Select #7. SMART Trac
Select #5. Export Method
EMAIL METHODS - To email methods:
After exporting methods to USB stick, place stick in computer’s USB port.
Create email for your CEM Representative
Under the cem folder, attach the corresponding .cal, .mth, and .pse files
For example: If emailing cream method attach: cream.cal, cream.mth, cream.pse
To Edit an Existing Method:
To Edit FAT References:
Exit to the Main Menu
Select #7. SMART Trac
Select #3. Edit Method Standards
Note: EXPORT edited method to a new USB Stick
To Edit Moisture Parameters:
Exit to the Main Menu
Select #2. Edit/Create Method
Select Method
Navigate Through Screens
Make Changes
Exit to the Main Menu
*Note: Do NOT go past the “fat range” screen. This will delete your method.
 Loading...