

Page 1
Liberty Blue
TM
Automated Microwave Peptide Synthesizer
Manual
Page 2

Page 3

Contents
Introduction
About the Instrument 1
Common Abbreviations and Units 1
How To Obtain Support
Applications Support 2
Technical Support 2
Requested Information 2
CEM Corporation Headquarters 2
CEM International Subsidiaries 3
Safety
Safety Notations 5
Personal Laboratory Safety 5
Waste Disposal 5
Fume Ventilation 5
Operating Precautions 6
System Requirements
Bench and/or Fume Hood Space 7
System Components Space Requirements 7
Environmental Conditions 7
Inert Gas Source 7
Electrical Requirements 7
Fuse Replacement 7
Introduction To The Liberty Blue
Components and Parts 8
Quick Setup Guide
Liberty Method Editor 22
Calculators 28
Edit Users and User Group 30
Setting up a Synthesis
Loading a Method 33
Standard Reagents and Concentrations 33
Recommended Reagents and Strategies for Microwave
SPPS on the Liberty Blue 33
Preparing Reagents 36
Setting up the Liberty Blue 37
Running the Liberty Blue 39
Generating A Run History Report 40
Cleavage 40
Maintenance of the Liberty Blue
Recommended Routine Maintenance Schedule 42
Maintenance Procedures 43
Maintenance Screen 47
Using the Change Bottle Operations 47
Calibration Screen 48
Advanced Features
Cycle Rules 50
Reagent Library 50
Bottle Setup 52
Rell Reagents Button 53
Diagnostics Screen 53
Settings Screen 53
Reaction Vessel Camera Option 54
Create and Load the Liberty Method 10
Prepare and Load Reagents 11
Run the Method 12
Operation of the Liberty Blue
Software Terminology 14
Liberty Blue Software Main Screen 14
Microwave Editor 16
Cycle Editor 18
Warranty
Limited Warranty Information 55
Page 4

Page 5

Introduction
About the Instrument
This manual is intended for use by both novice and experienced users for operation and maintenance of the
Liberty Blue Automated Microwave Peptide Synthesizer. Installation of the Liberty Blue must be completed by a
CEM certied service technician. Additional information, including, but not limited to: training notes and videos,
application notes, software updates, and parts can be viewed on CEM’s website at http://cem.com/peptidesynthesis. A registered account is required for certain downloads.
This manual refers to Liberty Blue Software version 2.2 for all software information, including screen shots and
technical information.
Common Abbreviations and Units
Abbreviation Denition Abbreviation Denition
°C degrees Celsius mL milliliter
AA amino acid mm millimeter
ACP acyl carrier protein 65-74 mmol millimole
DIC N,N’-Diisopropylcarbodiimide MW molecular weight
DMF N,N’-dimethylformamide OD outer diameter
Fmoc 9-uoroenylmethyloxycarbonyl Oxyma Pure ethyl 2-cyano-2-(hydroxyimino)acetate
g gram PN Part Number
Hz Hertz psi pounds per square inch
ID inner diameter RV reaction vessel
L liter s seconds
m meter VAC volts of alternating current
mg milligram W Watts
Introduction
1
Page 6

How To Obtain Support
Applications Support
For the latest Liberty Blue applications information, go to http://www.cem.com/liberty-blue.html. The CEM Liberty
Blue pages contain downloadable applications notes, a listing of recent microwave peptide synthesis publications,
and more. A registered account is required for download.
CEM is proud to provide applications support for any peptide synthesis related questions from a team of trained
chemists with a complete peptide synthesis lab. For applications support, call (800) 726-3331 (inside the
US) or (704) 821-7015 and ask for “Peptide Applications”, or email CEM Liberty Blue applications support at
peptide.support@cem.com.
Technical Support
For the latest technical support information, go to http://www.cemservice.us. The CEM Service website provides
access to the CEM Knowledge Base, which contains helpful troubleshooting information. From the website
requests for phone or email support can also be submitted.
CEM is proud to provide technical support for the Liberty Blue from a team of specially trained Service Technicians.
For technical support in the US and Canada, call (800) 726-5551 or (704) 821-7015 and ask for “Liberty Blue
Service”. For technical support outside the US and Canada, contact your local CEM Subsidiary or Distributor.
Requested Information
When contacting CEM for support, please provide the following information about the instrument:
Liberty Blue Serial Number
Liberty Blue Firmware Version
Discover Serial Number
Discover Firmware Version
Liberty Blue Software Version Number and Build Number
The report for the synthesis that was running when the error occurred
Troubleshooting Bundle (see below)
Firmware versions (both Liberty Blue and Discover) and Liberty Blue software version can be found within Liberty
Blue Software from the About Liberty Blue menu (Help Tab). Serial numbers can be found on the silver tags on the
rear of the Liberty Blue and on the side of the Discover.
In the event of a crash, the software will automatically create a Troubleshooting Bundle to be emailed to CEM
support for diagnosis. A Troubleshooting Bundle can be manually created from the Help Menu.
CEM Corporation Headquarters
Toll-Free Phone (US/Canada): (800) 726-3331
Phone: (704) 821-7015
Service Hotline: (800) 726-5551
Fax: (704) 821-7894
2
How To Obtain Support
Page 7

Mailing Address: PO Box 200
Matthews, NC 28106-0200
Physical Address: 3100 Smith Farm Rd
Matthews, NC 28104
Email (Applications Support): peptide.support@cem.com
Email (Technical Support): service@cem.com
CEM International Subsidiaries
France: CEM mWaves S.A.S.
Phone: (33-1) 69 35 57 80
Fax: (33-1) 60 19 64 91
Address: Immeuble Ariane Domaine Technologique de Saclay
4, rue René Razel
91892 ORSAY Cedex
France
Web Address: http://www.cemfrance.fr
Email: info.fr@cem.com
Germany: CEM GmbH
Phone: 011-49-2842-9644-0
Fax: 011-49-2842-9644-11
Address: Carl-Friedrich-GauB-Str. 9
47475 Kamp-Lintfort
Germany
Web Address: http://www.cem.de
Email: info@cem.de
Italy: CEM SRL
Phone: 390-35-896224
Fax: 390-35-891661
Address: Via Dell Artigianato, 6/8
24055 Cologno Al Serio (BG)
Italy
Web Address: http://www.cemmicroonde.it
Email: info.srl@cem.com
Japan: CEM Japan K.K.
Phone: +81-3-5793-8542
Fax: +81-3-5793-8543
Address: 2-18-10 Takanawa
Minato-Ku
Tokyo
108-0074
Japan
Web Address: http://www.cemjapan.co.jp
Email: info@cemjapan.co.jp
How To Obtain Support
3
Page 8

UK: CEM Microwave Technology Ltd.
Phone: +44-1-280-822873
Fax: +44-1-280-822342
Address: 2 Middle Slade
Buckingham Industrial Park MK18 1WA
Buckingham
Great Britain
Web Address: http://www.cemmicrowave.co.uk
Email: info.uk@cem.com
Ireland: CEM Technology (Ireland) Ltd.
Phone: +353 (0) 1 885-1752
Address: Sky Business Centre
9a Plato Business Park
Damastown Dublin 15
Ireland
Web Address: http://www.cemmicrowave.co.uk
Email: info.ireland@cem.com
CEM Distributors
For a complete list of distributors of CEM products, including contact information, go to the CEM website (http://
www.cem.com), select Contact CEM, and then select your region to see a list of distributors by country.
4
How To Obtain Support
Page 9

Safety
Safety Notations
This manual uses three safety alert words at points in the documentation where the user should be aware of
potential hazards. The safety alerts are shown in color-coded boxes. The three words–NOTE, CAUTION, and
WARNING–indicate differing levels of observation or action as described below:
NOTE
A NOTE is intended to provide emphasis of procedures that may be misinterpreted or overlooked, or to
otherwise clarify confusing situations.
CAUTION
A CAUTION is intended to provide essential information and to emphasize procedures which, if not strictly
followed, may result in improper instrument operation.
WARNING
A WARNING is intended to emphasize dangerous or hazardous conditions which may result in personal
injury to the user and damage or destruction of the instrument.
Personal Laboratory Safety
Solvents and chemical reagents used on the Liberty Blue can be hazardous and should only be handled under a
fume hood. Personal protective gear, including but not limited to safety glasses, chemical resistant gloves, and a
laboratory coat are highly recommended when operating the Liberty Blue. For detailed information on the safety
requirements for the chemicals used on the Liberty Blue, refer to the appropriate SDS documents.
Waste Disposal
Waste produced by the Liberty Blue can be hazardous. For detailed information on the safety requirements for the
chemicals used on the Liberty Blue, refer to the appropriate SDS documents.
WARNING
Handle all waste under a fume hood, and wear suitable protective clothing such as safety glasses,
chemical resistant gloves, and a laboratory coat. Dispose of all waste in accordance with all applicable
local, state, and federal health and safety recommendations.
Fume Ventilation
The Liberty Blue operates as a semi-closed system, with minimal venting of any hazardous solvent fumes through
the vent lines coming from the side of the unit. The vent lines must be vented into a proper chemical fume hood or
exhaust line no longer than six feet (6’)/two meters (2 m) from the instrument.
Safety
5
Page 10

In addition, adequate ventilation should be provided for preparation of reagents and solvents for use on the
system. All solvent bottles and the Waste Reservoir should be placed into proper secondary containers to minimize
the risk of exposure.
Operating Precautions
The Liberty Blue must be grounded. In the event of an electrical short circuit, grounding reduces the risk of electric
shock by providing an escape wire for electric current. This instrument is equipped with a cord having a grounding
wire with a grounding plug. The plug must be plugged into an outlet that is properly installed and grounded.
Consult a qualied electrician or service technician if the grounding instructions are not completely understood or
if doubt exists as to whether the instrument is properly grounded. If it is necessary to use an extension cord, use
only a 3-wire extension cord that has a 3-blade grounding plug and a 3-slot receptacle that will accept the plug
from the instrument. The marked rating of the extension cord must be equal to or greater than the electrical rating
of the instrument.
Do not replace detachable main supply cord with inadequately rated cords.
The possibility of instrument-induced electromagnetic interference (EMI) is minimal if the instrument is operated as
outlined in this manual. The instrument should not be placed close to any electrical device susceptible to EMI.
This instrument utilizes high voltages and microwave radiation. Only those trained in repair and maintenance of
high voltage and microwave power systems should perform instrument service and repair.
This instrument complies with United States Code of Federal Regulations 21 CFR Part 1030.10 (C) for microwave
leakage. This instrument complies with FCC Requirements in the United States Code of Federal Regulations
(47CFR Part 18) – Industrial, Scientic and Medical (ISM) Equipment – emissions requirements.
WARNING
Only accessories which meet the manufacturer’s specications shall be used.
Do not attempt to lift or move the Liberty Blue system. Contact CEM Corporation if the Liberty Blue system
needs to be moved.
If instrument is used in a manner not specied by CEM Corporation in this manual, then the protection provided by
the equipment may be impaired.
6
Safety
Page 11

System Requirements
Bench and/or Fume Hood Space
The Liberty Blue should be positioned on the bench such that access to the electrical outlets for the system is not
restricted.
System Components Space Requirements
Liberty Blue Instrument (Discover Module and Liberty Blue Module):
20 in (50.8 cm) W x 21 in (53.3 cm) D x 30 in (76.2 cm) H
(Depth includes 3” (7.62 cm) clearance behind instrument for unimpeded airow at rear fan ducts)
CEM Supplied Controller:
15 in (38.1 cm) W x 10 in (25.4 cm) D x 16 in (40.6 cm)
(Height includes 14.1” (35.8 cm) display)
Environmental Conditions
The Liberty Blue is designed for indoor use only.
Temperature Range: 50 °F – 85 °F (10 °C – 29 °C)
Relative Humidity Range: 10 – 85%
Inert Gas Source
The Liberty Blue requires an inert gas source (either high purity grade nitrogen or argon) capable of supplying 25
psi (20 L/min ow) within ten feet (10’)/three meters (3 m) of the right side of the instrument.
Electrical Requirements
The Liberty Blue requires electrical power of 120 VAC (60 Hz, 1.7 A) (or 240 VAC [50 Hz, 1.7 A] where applicable).
Specic power requirements (120 VAC vs. 240 VAC) can be found on the nameplate afxed to the rear of the
Liberty module and on the side of the Discover module.
Three (3) grounded electrical connections providing a total of 10 A are required for all components:
Liberty Blue power cord
Router power cord
Controller (laptop computer) power cord
Fuse Replacement
The Liberty Blue has four operator replaceable fuses located in the power inlet module (at the rear of the
instrument, where the power cord connects to the Liberty Blue module). The fuses are rated F 250 V 2 A. The
top pair of fuses (PN BR198826) are North American style, 5 mm x 20 mm size, and are rated F 250 V 2 A. The
bottom pair of fuses (PN 188340) are North American style, 5 mm x 20 mm size, and are rated F 250 V 10 A.
NOTE
Optionally, the router can be powered directly from the Liberty Blue module without the need for an
external connection (using Router-Serial Power Cable, PN 243290).
System Requirements
7
Page 12
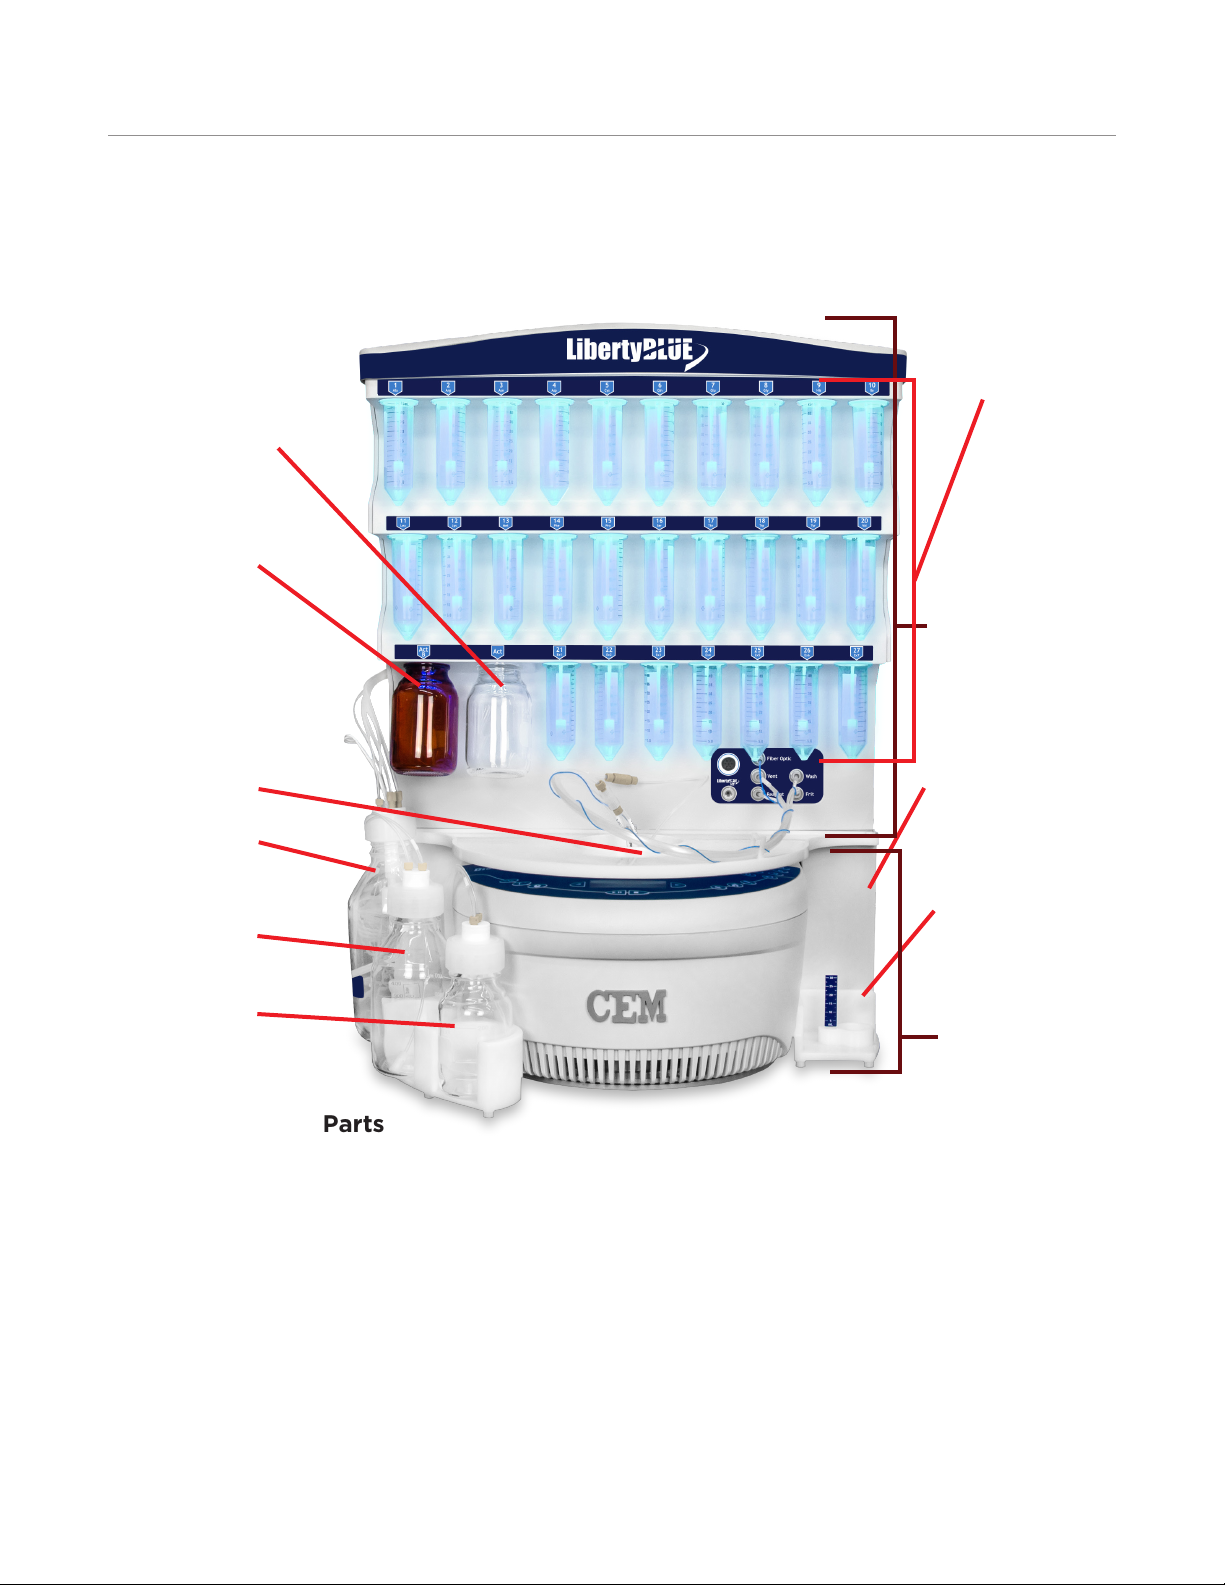
Introduction To The Liberty Blue
The Liberty Blue is the latest generation of automated microwave peptide synthesizer. Built on CEM’s exible
Discover microwave platform, the Liberty Blue is capable of synthesizing peptides faster and more efciently than
conventional synthesizers, thanks to the system’s patented circular microwave cavity. The Liberty Blue’s efcient
Flex-Add™ technology eliminates the need for sample loops and allows innite volume delivery options for a wide
range of synthesis scales.
Amino Acid
Manifolds
Activator Bottle
Activator Base Bottle
Liberty Blue
Module
Reaction Vessel
Waste Bottle
Solvent Bottle
Deprotection Bottle
Power Switches
Calibration
Stand
Discover Module
Components and Parts
Liberty Blue Module: The Liberty Blue handles all of the uid transfer into and out of the reaction vessel. In
addition, the Liberty Blue manages communications with the computer controller and the Discover during peptide
synthesis.
Discover Microwave Reactor: The Discover microwave reactor holds the reaction vessel and generates the
microwave energy used to irradiate the sample. The Discover is capable of operating independently of the Liberty
Blue.
Power Switches: There are two power switches, one for the Discover and one for the Liberty Blue. Both switches
must be on to operate the Liberty Blue.
External Bottles: Bottles for waste, main solvent, and deprotection connect to the manifold on the side of the
Liberty Blue using GL45 caps and tubing assemblies. The external bottles sit in a bottle holder magnetically
8
Introduction To The Liberty Blue
Page 13
secured to the front of the Liberty Blue module. Optimal large capacity pressure rated bottles are available (PN
551240, 551245, 551250, 551255).
Amino Acid Manifolds: There are 27 positions on the manifold for amino acids, 20 corresponding to a specic
amino acid, and 7 extra positions. Each position is labeled using the position number and 3-letter abbreviations of
the amino acids. These positions are designed for use with 50 mL centrifuge tubes for the amino acids and 250
mL bottles for activator and activator base. Optional 120 mL tubes (PN 216560-M, pack of 30) are available for
the amino acid positions. Up to one liter GL45 threaded bottles can be used with optional adapters (PN 909465),
for the activator and activator base positions.
NOTE
The 7 external positions are not available with the Liberty Lite.
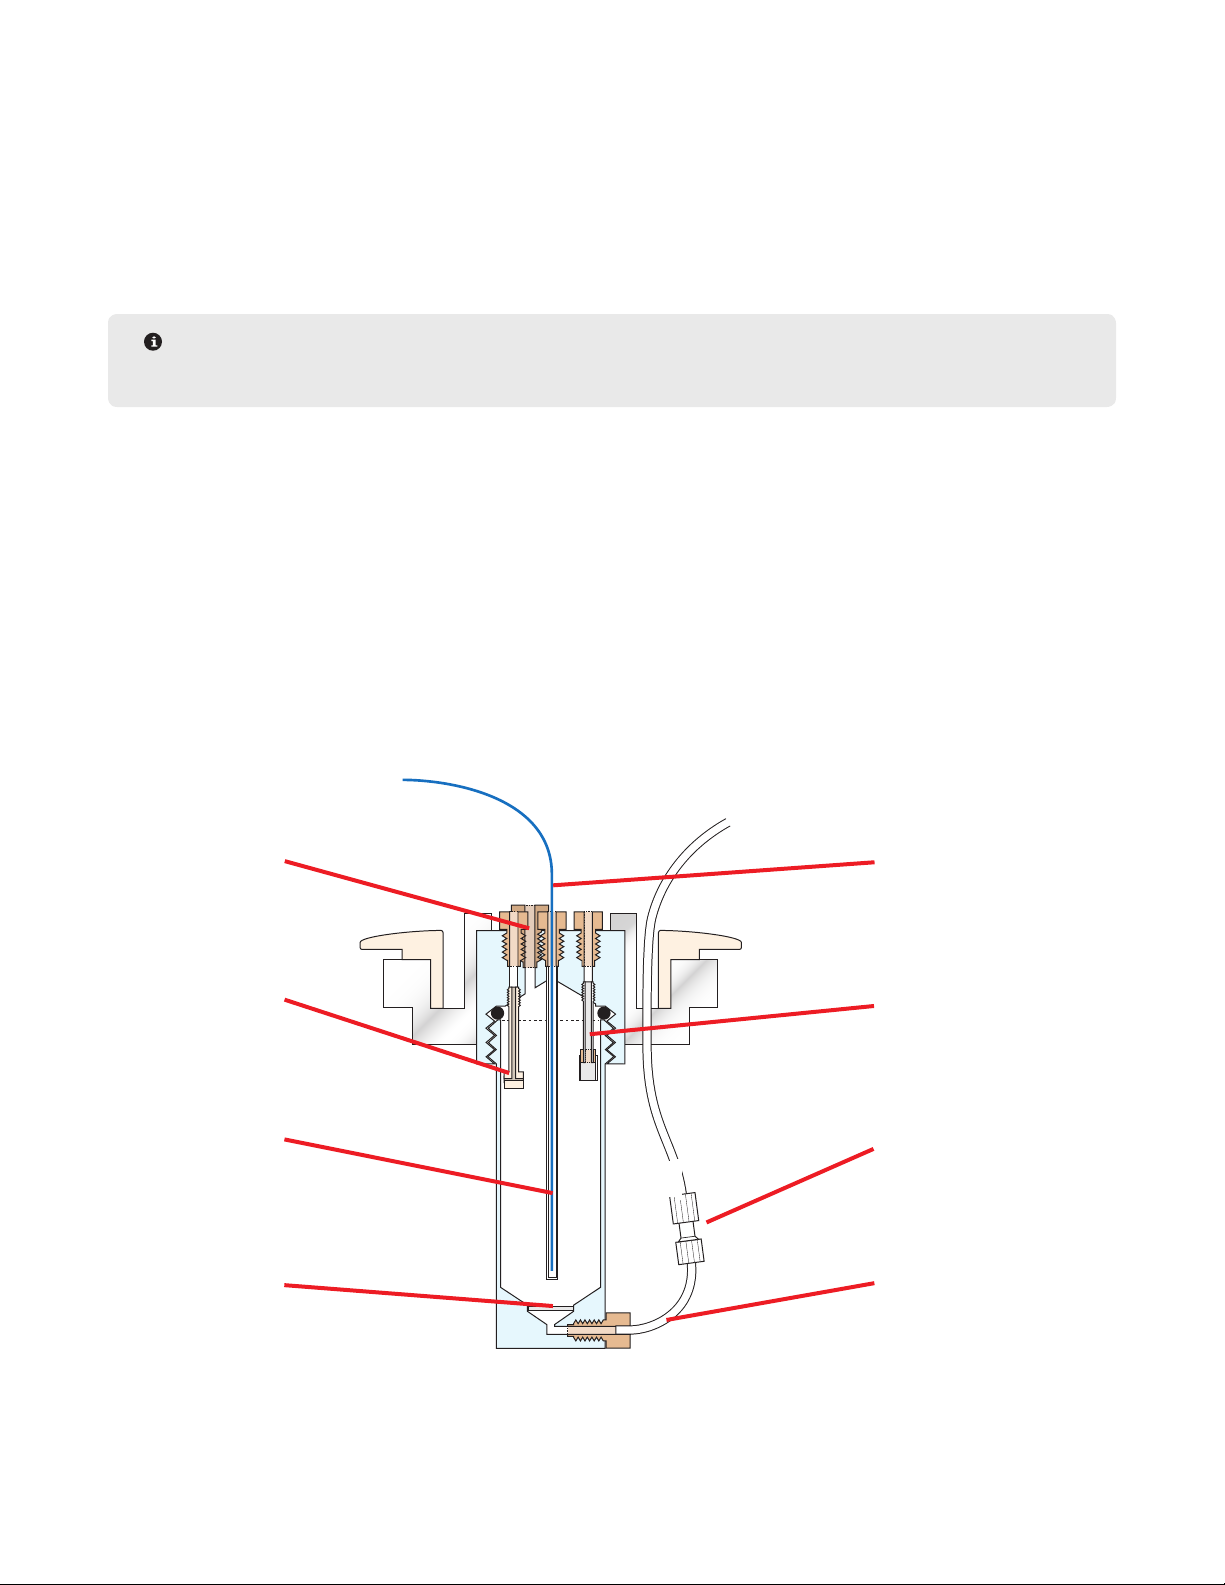
Reaction Vessel: The reaction vessel is where the synthesis takes place. Reagents are added to the vessel and
washed out throughout the synthesis of the peptide. There are different size vessels that can be used depending
on the scale of the synthesis.
Fiber Optic Temperature Probe: The ber optic probe is inserted in the top of the reaction vessel. It allows the
system to monitor the temperature of the reaction vessel.
Waste Container: The waste lines carry all of the system’s waste out into an external waste container. The waste
container is equipped with a level sensor and will trigger the system to pause if the container is full. An optional
large capacity (20 L) waste container is available (PN 909490).
Reaction Vessel Components
Vent Line
Wash Line
Thermowell
Glass Frit
Fiber Optic Probe
Reagent Line
Union
Drain Line
Introduction To The Liberty Blue
9
Page 14

Quick Setup Guide
Create and Load the Liberty Method
NOTE
To load an existing method, skip to step 9.
Create the Method
1. Open the appropriate folder or sub folder in the Methods box for the new method.
2. Click the New Method button.
3. The method will appear in the appropriate folder. Enter a name for the method and press Enter.
4. Click into the Sequence box. A list of the amino acids in the current bottle setup will drop down. To enter the
sequence, either click the appropriate amino acid positions in the drop-down, or type the one-letter abbreviation
for the desired amino acids.
NOTE
The amino acids in the sequence should be entered from N-terminus to C-terminus.
5. Select the scale (0.005 mmol to 5.0 mmol) from the Synthesis Scale box, then select the resin type (Standard
or High Swelling) from the Resin Type box.
NOTE
The scale and resin type must be selected before changing any of the other parameters, as each scale
and resin type has specic default options that will be loaded upon selection.
6. The remaining options can now be selected.
6.1. C-Terminus: The C-terminus (acid or amide) is only used to calculate the molecular weight, and does
not affect the synthesis conditions.
6.2. Resin Type: The resin type will determine the rst coupling step of the reaction. If Preloaded is
checked, the software assumes the C-terminal amino acid is already loaded on the resin and
therefore skips that coupling. If Not Preloaded is selected, the rst coupling will proceed as normal.
If Chloride Loading is selected, a chloride coupling step will be used for the C-terminal amino acid
coupling.
6.3. Resin Name: The resin name entered in this box will appear in the Method Report, but will not affect
the synthesis conditions.
6.4. Resin Loading: The substitution value entered in this box (in meq/g) will appear in the Method
Report, but will not affect the synthesis conditions.
6.5. Resin Cycle: The resin cycle determines the swelling conditions used to prepare the resin at the
beginning of the synthesis. Make sure the amino acid cycles match the Resin Swelling Cycle (HS
vs. non HS).
6.6. Final Deprotection Cycle: By default, the N-terminal protecting group is removed at the end of the
synthesis. Selecting an alternate Final Deprotection cycle allows control of this step.
6.7. Bottle Setup: If using a bottle setup other than the standard default, it must be selected prior to
entering the sequence.
10
Quick Setup Guide
Page 15

7. Assign cycles for each residue in the sequence that will not use the default cycle.
NOTE
For long peptides, clicking the Quick Jump button will open a shortcut to view all amino acids in the
sequence.
7.1. From the Amino Acid Cycles table, click on the amino acid to highlight it, then double-click the cycle
to open the drop-down of available amino acid cycles.
7.2. From the drop-down, select the desired cycle. This will change the cycle for that highlighted amino
acid only. To change the cycle for all amino acids to the selected cycle, right-click the cycle and
select “Apply this cycle to all”.
NOTE
To select multiple amino acids, hold Ctrl and left-click the desired amino acids. This will highlight multiple
rows in the Amino Acid Cycles table. When all the desired amino acids are highlighted, click the Mark Rows
button at the top of the Amino Acid Cycles table. The total number of selected rows will be listed next to
the ag icon. When multiple rows are marked (indicated by a blue highlight), any change made to one
row will be made to all selected rows. When all changes are made, click the Clear button to deselect all
rows.
8. When the method is complete, click Save to save the method, then close the Liberty Method Editor.
Load the Method
1. From the Liberty Blue application software main screen, open the appropriate folder in the Methods tab.
2. Click on the desired method, and drag the method to the resin position. Alternatively, right-click on the desired
method and select “Queue for run”.
3. The method name will appear in the Loaded Method indicator. The indicator will turn blue, meaning the method
is loaded and ready to run.
Prepare and Load Reagents
Prepare Reagents
1. To determine the amount of each reagent needed and how to prepare them, use the Usage and Reagent
Calculators.
1.1. From the Calculators tab, select the Usage Calculator.
1.1.1 If the method is not already loaded, from the Methods box at the bottom left of the Usage
Calculator, select the method to be included in the calculation and drag the method into the
table on the top left of the Usage Calculator.
1.1.2 The calculator will automatically determine the total usage for each reagent. For amino acids,
enter the desired concentration in the Amino Acid Concentration box, and the calculator will
automatically determine the mass of each amino acid to weigh out.
1.1.3 If desired, print a Usage Report.
1.2. From the Calculators menu, select the Reagent Calculator.
1.2.1 Resin: Enter the scale of the synthesis and the resin substitution to determine the mass of
resin needed.
Quick Setup Guide
11
Page 16

1.2.2 Other Reagents: For the other reagents, click on the appropriate tab (Activator, Activator Base,
Deprotection) and then select the appropriate reagent from the list. Enter the concentration
and nal volume needed, and the calculator will update with the mass required.
1.2.3 If desired, print a Reagent Report.
Load the Reagents onto the Liberty Blue
1. Load all reagents onto the Liberty Blue.
1.1. Connect centrifuge tubes with amino acid solution to the appropriate positions. Connect empty
centrifuge tubes to all unused positions.
1.2. Connect activator and activator base bottles to the appropriate positions on the system.
1.3. Check the level of solvent remaining in the solvent bottle. If more solvent is required, use the Change
Bottle Main Solvent operation to replace the bottle (see Change Bottle Main Solvent in Section 4).
1.4. Check the level of deprotection solution remaining in the deprotection bottle. If more deprotection
is required, use the Change Bottle Deprotection operation to replace the bottle (see Change Bottle
Deprotection in Section 4).
Load the Resin into the Reaction Vessel
1. Load the resin (100-200 mesh only) into the reaction vessel.
CAUTION
The 30 mL reaction vessel should be used for 0.005 - 0.25 mmol syntheses (up to 1 g of resin). The 125
mL reaction vessel should be used for 0.5 - 5 mmol syntheses (up to 8 g of resin).
1.1. Remove the reaction vessel from the microwave cavity.
1.2. Unscrew the bottom port of the beige union connector on the vessel drain line. Then, unscrew the
vessel body from the attenuator.
1.3. Weigh the appropriate amount of dry resin (100-200 mesh only) into the vessel body.
1.4. Connect the vessel body to the attenuator, then connect the drain line to the vessel body using the
union connector tting.
1.5. Place the vessel back into the microwave cavity, securing the attenuator.
Run the Method
Ensure the Liberty Blue is Ready to Run
1. Verify that the waste container has sufcient capacity.
2. Verify that the ber optic probe is fully inserted into the thermowell.
WARNING
If the probe is not inserted all the way to the bottom of the vessel the Liberty Blue will not accurately
measure the temperature, and signicant overheating of the vessel will occur. This will result in poor
synthesis quality and/or serious damage to the vessel.
3. Verify that the method is correct by looking at the steps outlined in the Liberty Methods widow, and then load the
method from the Methods tab. If there are any errors, make corrections and reload the method.
12
Quick Setup Guide
Page 17

3.1. Clear the method by clicking the small X at the top of the resin indicator.
3.2. To correct the method:
3.2.1 Open the Liberty Method Editor.
3.2.2 Open the folder where the method was saved, then click on the method to load it.
3.2.3 Click Save to save the method after editing, then close the Liberty Method Editor.
3.2.4 Load the corrected method as described above.
Run the Method
1. Click the Start button at the top of the Liberty Blue Software main screen.
2. The Loaded Method indicator will turn yellow to indicate the method is running.
3. The Liberty Blue will illuminate all required amino acids positions for the method. Ensure that all reagents
are connected to the correct reagent positions, empty centrifuge tubes are connected to any unused reagent
positions, and that there is sufcient solvent and deprotection solution, then click OK to continue.
4. The Liberty Blue will go through a series of initialization steps and leak checks.
5. During the run, the current step of the method is highlighted in yellow in the Cycle Steps table of the Current Run
tab. A status bar in the lower right of the main screen indicates relative progress of the run.
6. When the run is complete, the Loaded Method indicator will turn green, indicating the method was successfully
completed.
7. When the run is complete, remove the resin from the reaction vessel.
7.1. Remove the reaction vessel from the microwave cavity.
7.2. Unscrew the bottom port of the beige union connector on the vessel drain line. Then, unscrew the
vessel body from the attenuator.
7.3. Using dicholormethane (DCM) or another appropriate solvent, rinse the resin into a clean, empty
centrifuge tube.
NOTE
The Liberty Blue is not equipped to perform peptide cleavage. All cleavage must be carried out at either
room temperature or in the Razor™ Peptide Cleavage system.
7.4. Rinse any resin clinging to the thermowell into the centrifuge tube. Ensure there is no resin on the
top of the reaction vessel attenuator.
7.5. Connect the vessel body to the attenuator, then connect the drain line to the vessel body using the
beige union connector.
7.6. Place the vessel back into the microwave cavity, securing the attenuator.
8. The peptide is now ready to be cleaved and analyzed, and the Liberty Blue is ready for its next run.
Quick Setup Guide
13
Page 18
Operation of the Liberty Blue
The operation of the Liberty Blue is controlled through the Liberty Blue application software. The Liberty Blue
includes an external computer controller for running the Liberty Blue Software. This computer is connected to the
Liberty Blue and the Discover through an Ethernet connection or wireless router.
Software Terminology
Microwave Method: The specic microwave parameters used in a cycle. Microwave Methods can be created or
modied using the Microwave Editor.
Cycle: The specic steps used for each residue within a given sequence, including deprotection, washing, and
coupling. Cycles can be created or modied using the Cycle Editor.
Liberty Method: The specic parameters used to synthesize a peptide. For each Liberty Method, a sequence is
entered, and then parameters (individual coupling cycles for each residue, C-terminus type, nal deprotection, etc.)
are selected. Liberty Methods can be created or modied using the Liberty Method Editor.
Run: A specic instance of a method being loaded and started in Liberty Blue Software. A Run History le is
recorded for each run.
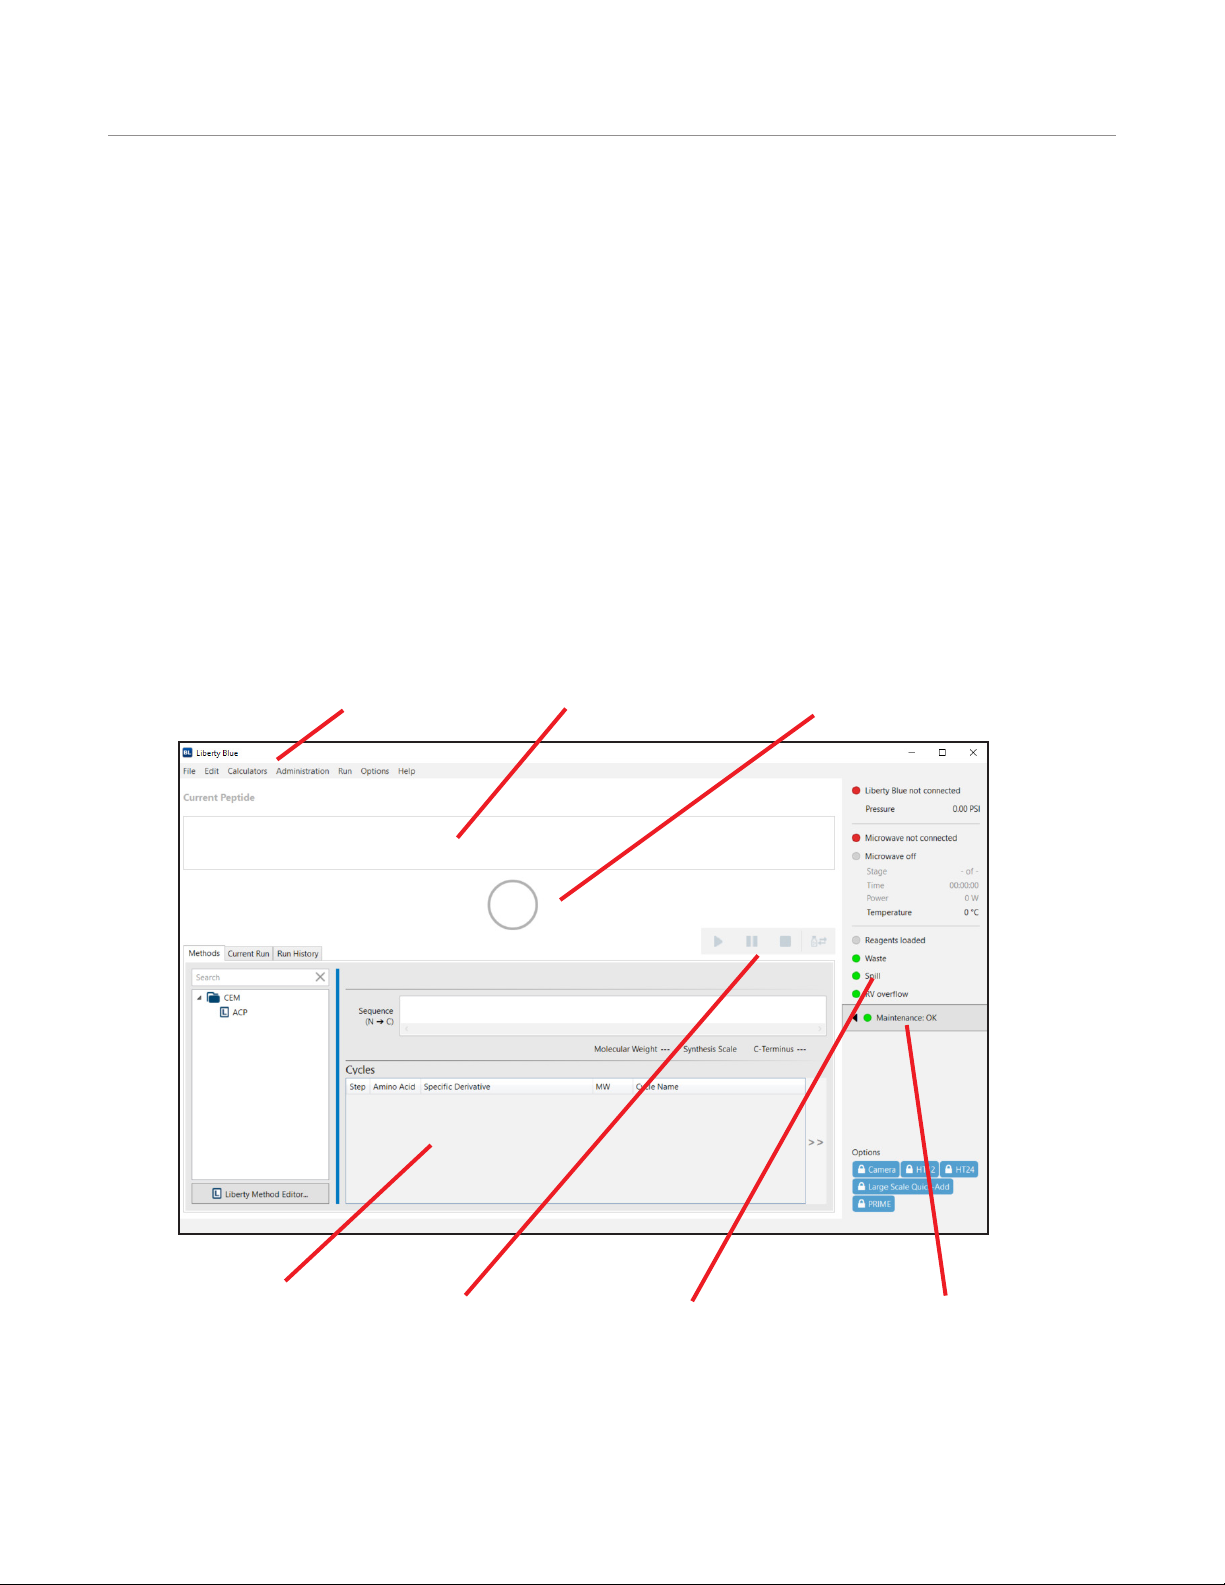
Liberty Blue Software Main Screen
Control Buttons
Menus
Peptide Synthesis Status
Resin Indicator
Current Method Detail
Start/Resume: This button starts the rst method in the queue, or resumes a paused method.
Pause: This button pauses the current method.
Stop: This button stops the current method. Liberty Blue Software will nish the operation it is currently performing
before stopping the method.
14
Control Buttons
Operation of the Liberty Blue
System Status Box
Maintenance Tracker
Page 19
Rell Reagents: This button allows for the replacement of reagent bottles (including amino acids, activator,
activator base, deprotection, and main solvent) without stopping the run.
Menus
File: This menu contains the Import and Export commands which will import and/or export a copy of selected
methods, associated cycles, and operations from the database. These les can be transferred to another Liberty
Blue database or submitted to CEM for troubleshooting purposes.
Edit: This menu contains the Liberty Method, Cycle, and Microwave editors, as well as the Reagent Library and
Bottle Setup editors, and the Notication screen.
Calculators: This menu contains Reagent and Usage Calculators.
Administration: This menu contains the View Audit Trail screen. If users are enabled, this menu also allows
administrators to create Users and User Groups.
Run: This menu contains the Control Buttons (Start/Resume, Pause, Stop).
Options: This menu contains the Maintenance, Diagnostics, Calibration, and Settings screens, and the Check Data
Integrity command (which will verify there are no problems with the Liberty Blue Software database).
Help: This menu contains the About Liberty Blue screen (which displays the software and rmware version
numbers), and allows you to create a troubleshooting bundle.
Indicators
Resin Indicator: The Resin Indicator shows the status for the currently loaded method: blue when ready to run,
yellow when running, red when stopped, green when complete.
Peptide Synthesis Status: This displays the peptide sequence being synthesized and indicates the status of the
synthesis.
Current Method Detail: This window displays the currently selected method.
System Status Box: The System Status Box contains indicators that show Liberty Blue and Discover
communication status, current temperature and system pressure readings, microwave method parameters, sensor
status for the waste container, spill tray, and reaction vessel overow sensors, and maintenance tracker.
Tabs
Methods: From this tab, methods are loaded into the resin position.
Current Run: This tab displays the Method that is currently running. The current step of the method is highlighted
in yellow. When the “Keep Cycles table synced” box is checked, the cycles tables will automatically move to the
next cycle as the method progresses.
Run History: From this tab, detailed logs of each run can be accessed.
Operation of the Liberty Blue
15
Page 20

Microwave Editor
The Microwave Editor allows for the control and customization of the microwave steps of any cycle. By editing
the power and duration of a microwave step, difcult peptides can be synthesized with higher purity and yield. The
Microwave Editor can be accessed from the Edit menu.
The specic microwave power setting required to obtain acceptable heating rates will vary from unit to unit. As
such, care must be taken to optimize the microwave settings.
There are two key times for optimal microwave heating:
• Ramp Time: This refers to the approximate time it takes to heat the reaction mixture from its starting
temperature to its desired temperature.
• Total Time: This refers to the total reaction time including both the ramp and hold time.
NOTE
It is important to note that the Liberty microwave methods are not programmed by specifying a set ramp
time. This term is only guidance for what should be observed when applying the method. The actual ramp
time is controlled by adjusting the MW power within each method. Default power settings are given that
serve as a starting point for optimizing the MW power settings.
Microwave Method Folders
The Microwave Editor contains a variety of optimized default microwave methods separated by scale and type
(deprotection or coupling).
Creating a New Microwave Method
Microwave Methods allow for detailed control of the microwave heating and reaction time for each step in the
synthesis. The Microwave Editor allows the user to select the microwave time, microwave power, maximum
temperature, and sample agitation.
To create a new Microwave Method:
1. Click on the lter buttons at the top of the Microwave Editor to open the lter list.
16
Operation of the Liberty Blue
Page 21

NOTE
A Microwave Method created at a specic scale will only be available for use in the Cycle Editor for
cycles created at the same scale.
2. Select a scale and method type (the currently selected parameters will be highlighted). Click out of the lter list
to open the selected cycle type.
3. Click the New Method button.
4. The new Microwave Method will appear in the selected folder. Enter a name for the Microwave Method and
press Enter.
5. Enter the temperature (in °C), Power (in W), Time (in s), and Delta T (in °C) for the rst step in the method.
6. Add the next step to the method by clicking the Add Step button, and then enter the power, temperature, and
time settings for the second step.
7. Repeat step 5 for each step in the method.
8. Enter the amount of time to bubble and the time between each bubbling pulse (the default setting is on for 2
seconds, off for 3 seconds).
9. Save the method by clicking the Save button.
NOTE
To delete a step, click the step to highlight it, then click the Delete Step button. To insert a new step
between existing steps, click a step to highlight it, then click the Insert Step button. The new step will
be inserted above the selected step. To move a step up or down, click the step to highlight it, then click
the Move Up or Move Down buttons.
Editing an Existing Microwave Method
The Microwave Editor allows for settings on existing methods to be modied and saved as needed. The most
common reason to modify an existing method is to increase or decrease the microwave power to optimize peptide
synthesis. To modify an existing method:
1. Click on the lter buttons at the top of the Microwave Editor to open the lter list.
2. Select a scale and method type (the currently selected parameters will be highlighted).Click out of the lter list
to open the selected cycle type.
3. Click on the Microwave Method to be modied.
4. Make any changes as needed.
5. Click Save to save the changes to the method.
Duplicating and Modifying an Existing Microwave Method
Often, it is easier to copy and modify an existing microwave method rather than creating an entirely new method.
Methods can easily be duplicated and modied within the Microwave Editor, and then be moved to different
scale folders as needed. To copy an existing method:
1. Click on the lter buttons at the top of the Microwave Editor to open the lter list.
2. Select a scale and method type (the currently selected parameters will be highlighted).Click out of the lter list
to open the selected cycle type.
3. Click on a Microwave Method to select it and click the Duplicate button.
4. The new Microwave Method will appear named “Copy of (method name)”. Type a new name and press Enter.
5. Make any changes to the method, then click Save to save the modied method.
Operation of the Liberty Blue
17
Page 22
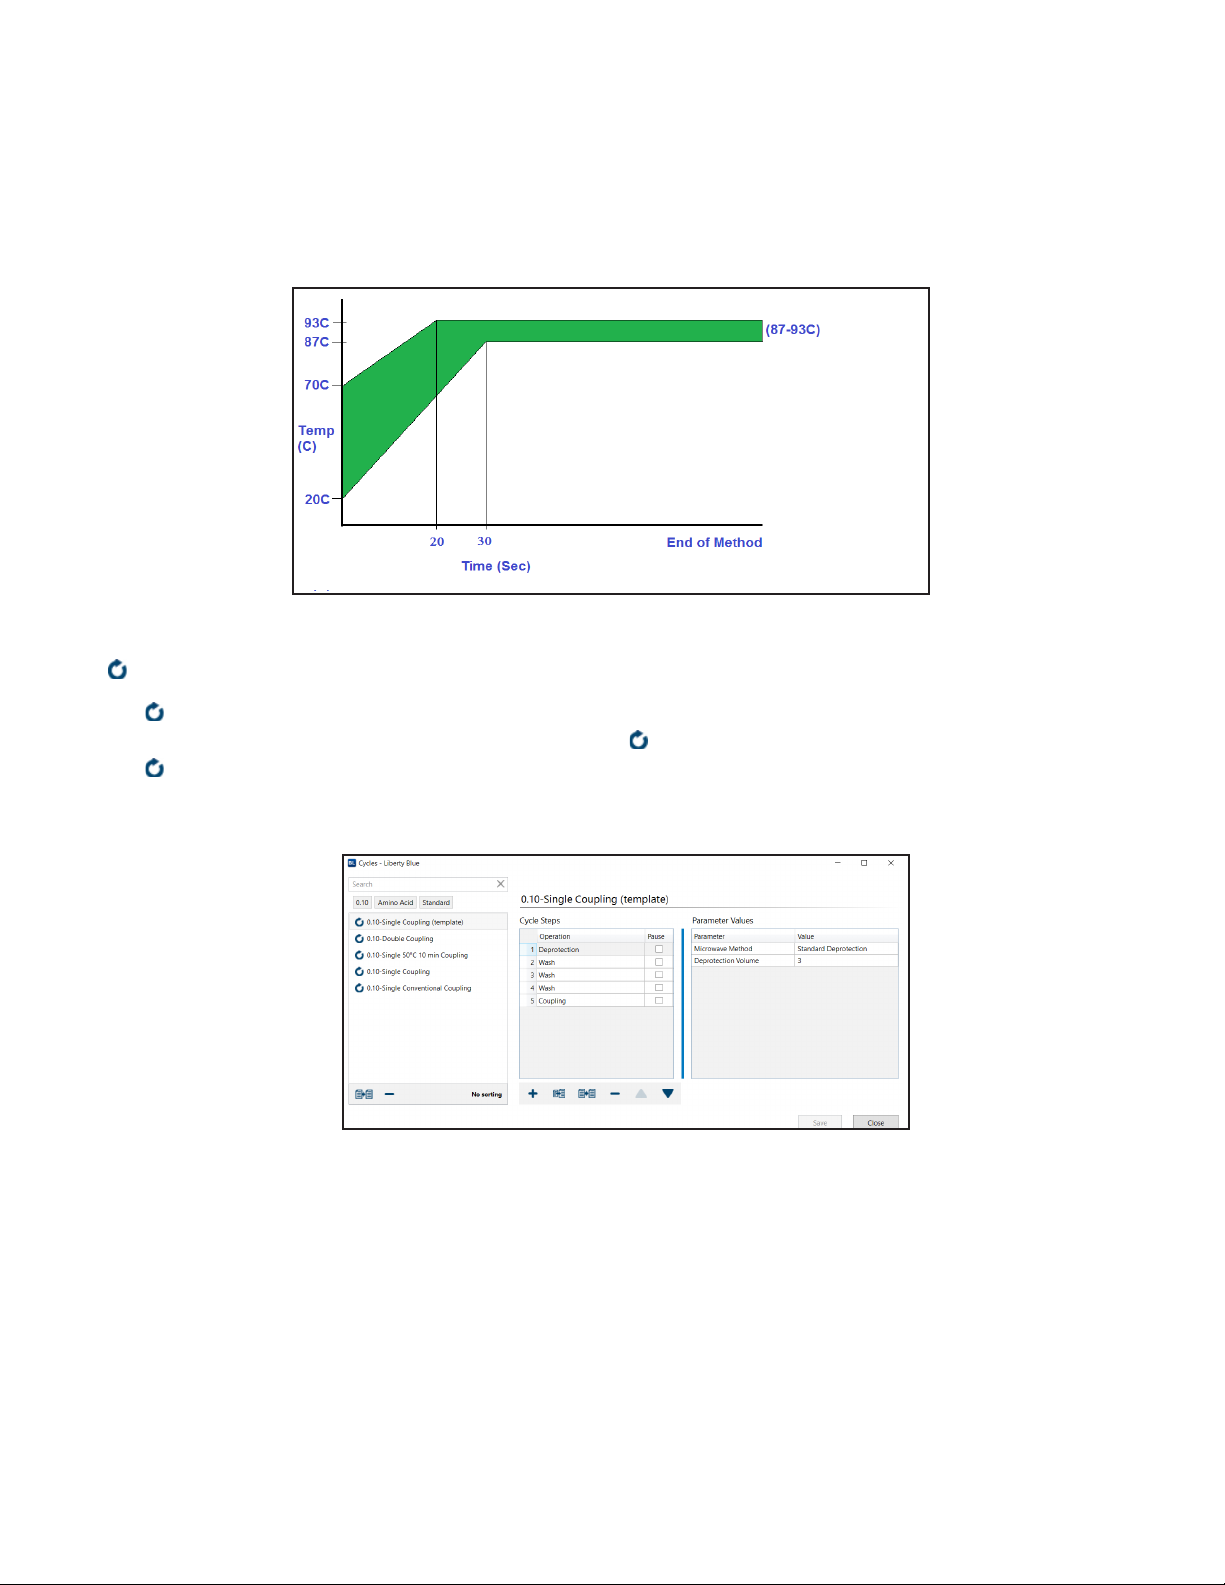
Calibrating Rapid Liberty Blue Microwave Methods
The rapid microwave methods used by the Liberty Blue employ rapid heating rates. For both the deprotection and
coupling methods the set temperature of 90 °C should be reached within 20-30 seconds and maintained for at
least 45 seconds and 100 seconds respectively. The starting temperature for each reaction will be signicantly
warmer than room temperature as residual heat will remain from the previous reaction. The graph below shows
the desired heating prole for Liberty Blue rapid deprotection and coupling microwave methods. The green area
represents the acceptable temperature range.
Cycle Editor
The Cycle Editor allows for the full control and customization of any step of a synthesis. This allows for
optimization of each step of a given peptide synthesis. The Cycle Editor can be accessed from the Edit menu.
The Cycle Editor contains separate cycles for each scale. Within each scale, cycles are sorted by type and then
by resin type, allowing for the development of optimized cycles for each scale. A cycle will only appear in the
Method Editor when creating a method of the same scale.
The Liberty Blue application software comes with optimized default cycles for resin swelling, amino acid addition,
and nal deprotection for each of the available synthetic scales for both standard and high swelling resins. The
default cycle for each scale is listed rst in the Cycle Editor.
Cycle Types
Resin: Resin cycles control the swelling of the resin before synthesis.
Amino Acid: Amino acid cycles control how the deprotection and coupling steps of any one amino acid in the
sequence occur.
Final Deprotection: Final deprotection cycles control the removal of the N-terminal protecting group, and also allow
for N-terminal acetylation of the peptide before cleavage.
18
Operation of the Liberty Blue
Page 23

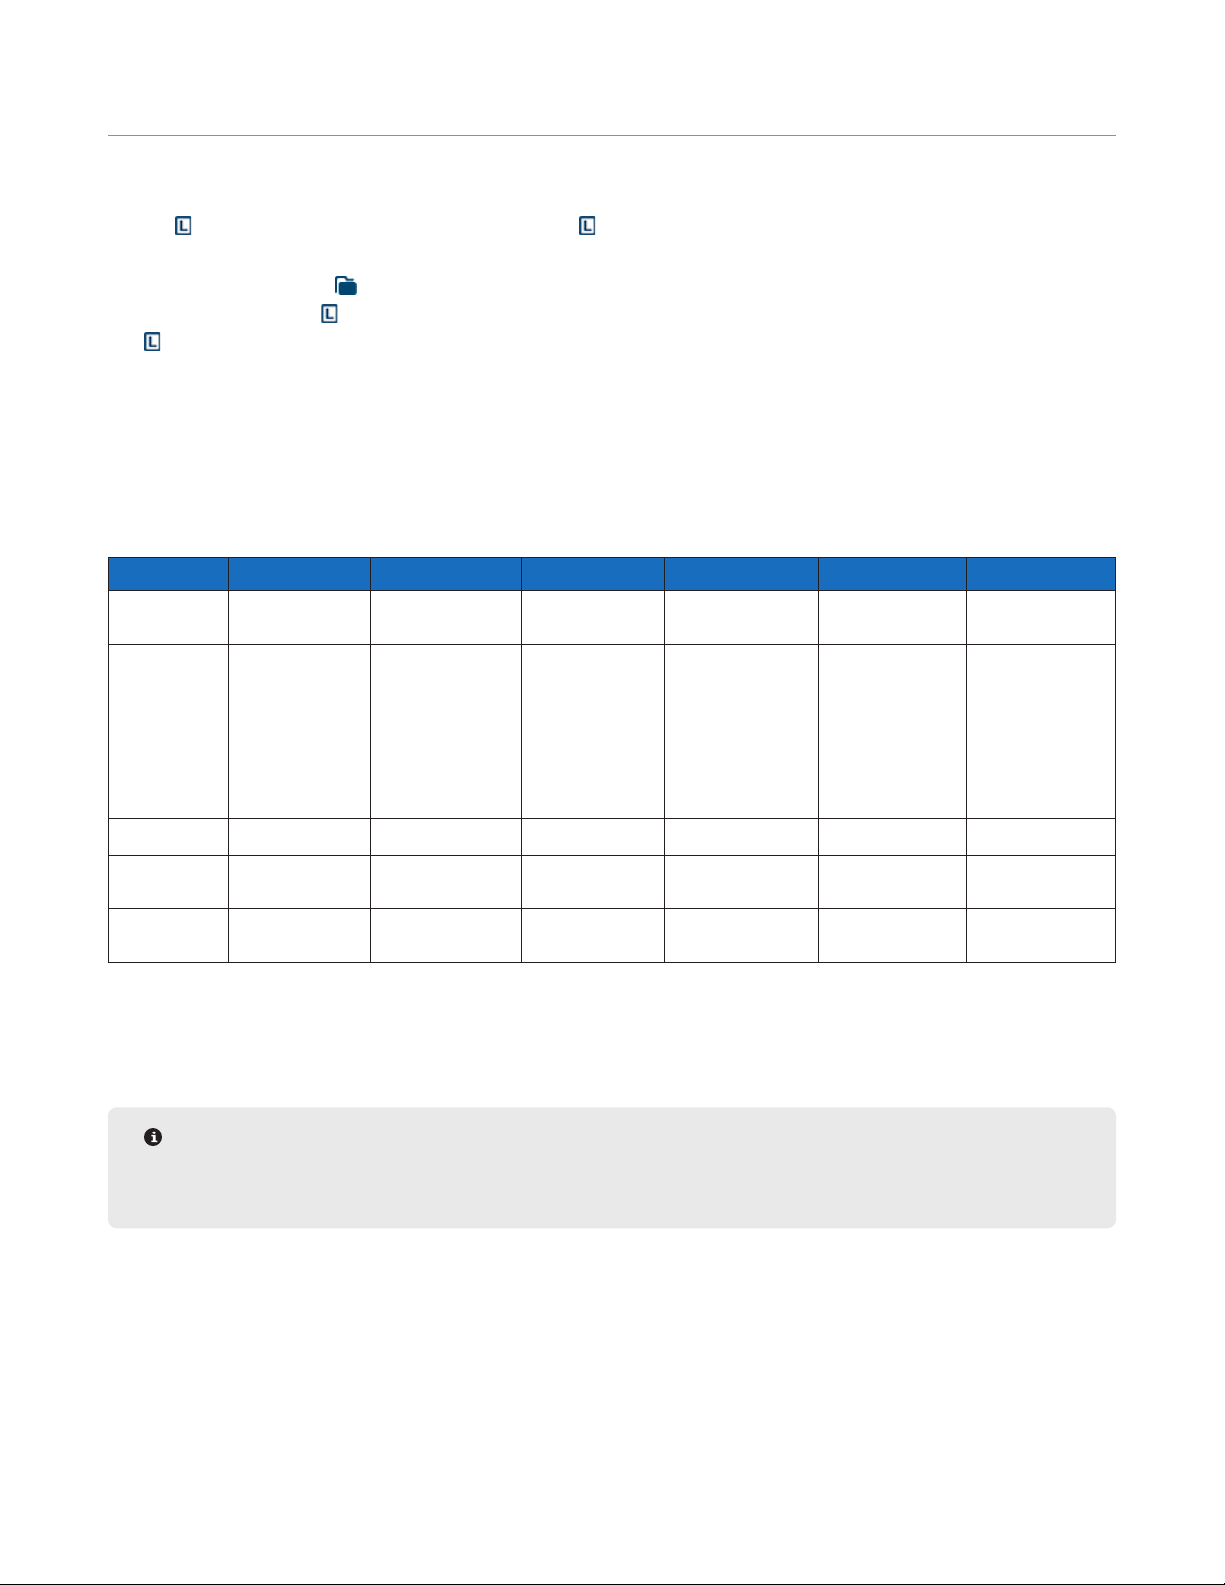
Operations in the Cycle Editor
The Cycle Editor allows for full customization of cycles using a number of modular, preset operations. An operation
is selected for a given step, and then the parameters for that operation are selected.
Addition Operations
Add Deprotection: This will add deprotection solution (in mL) from the deprotection bottle to the reaction vessel
through the bottom, then purge the line (in seconds) to the reaction vessel.
Add Reagent: This will add solution (in mL) from any of the 27 amino acid positions or from the activator or
activator base position through the Reagent line. Reagent: Any of the of the 27 amino acid positions, activator, or
activator base can be selected. Selecting “(from method)” will add from the amino acid the cycle is assigned to in
the method.
Add Main Solvent (MS2): This will add main solvent (in mL) to the reaction vessel through the Wash line.
Wash Operations
Wash: This will wash the vessel by adding main solvent (in mL) through the Wash line, bubbling the vessel, then
draining the vessel (in seconds).
Wash Thru Manifold: This will wash the manifolds and the vessel by adding main solvent (in mL) through the
Reagent line, purging the manifold to the vessel, bubbling, then draining the vessel (in seconds).
Microwave Operations
Microwave Deprotection: This will add deprotection solution (in mL) from the deprotection bottle to the reaction
vessel through the bottom, then purge the line to the reaction vessel. The microwave will then microwave the
vessel using the selected method, then drain the vessel.
Microwave Coupling: This will add amino acid, activator, and activator base (in mL) from the selected bottles to the
reaction vessel. The microwave will then microwave the vessel using the selected method, then drain the vessel.
• Amino Acid: This is the amino acid that will be added. Any of the of the 27 amino acid positions, activator, or
activator base can be selected. Selecting “(from method)” will add from the amino acid the cycle is assigned
to in the method.
• Delayed Reagent Time (After Purge): This is the time (in seconds) after the 30 second purge that the fourth
reagent (in mL) will be added to the reaction vessel. This should not exceed the total microwave time of the
selected microwave method.
• Delayed Reagent Bottle Position: Any of the of the 27 amino acid positions, activator, or activator base can
be selected. Selecting “(from method)” will add from the amino acid the cycle is assigned to in the method.
Microwave Coupling (Chloride Loading): This is the operation used for loading the rst amino acid on CEM
ProTide™ Chloride resin. The vessel is drained afterwards.
Microwave Method: This will run the selected microwave method and then drain the vessel.
Microwave Method NO DRAIN: This will run the selected microwave method, but will not drain the contents of the
reaction vessel after the method has nished.
Miscellaneous Operations
Swell Resin: This will add main solvent (in mL) to the reaction vessel through the Wash line, wait a specied time
(in seconds) to allow the resin to swell, then drain the reaction vessel.
Drain: This will drain the reaction vessel for the specied time (in seconds).
Creating a Cycle
Cycles allow for control of each action taken in a given step of a run. The Liberty Blue application software
comes with default cycles for each synthetic scale; however, cycles can be customized to accomplish a number of
Operation of the Liberty Blue
19
Page 24

non-standard chemistries.
To create a new cycle:
1. Click on the lter buttons at the top of the Cycle Editor screen to open the lter list.
2. Select a scale, cycle type, and resin type. The currently selected parameter for each will be displayed in bold.
Click out of the lter list to open the selected cycle type.
3. Select a default cycle to use as a template and click the Duplicate button.
NOTE
A cycle will only be available for use in the Method Editor for methods created at that scale and with that
resin type.
4. The new cycle will appear named “(cycle name) 2”. Type a new name and press Enter.
5. Make any desired changes to the cycle.
5.1. To modify an existing step:
5.1.1 Click on the step to be modied to highlight it.
5.1.1.1 To change the operation, double-click the Operation box to open the operations drop-down
and select the operation to be performed.
5.1.1.2 To change the parameters, double-click on the parameter value in the Parameter Values
table. A pop-up will appear to congure the parameter. Make any changes, then click OK
to close the pop-up.
20
Operation of the Liberty Blue
Page 25

5.1.1.3 To add a pause after the operation is carried out, check the Pause box.
NOTE
The method will not resume until the user presses the Start button on the main screen of Liberty Blue
Software.
5.2. To add a new step:
5.2.1 Click the Add Step button. The new step will appear at the end of the cycle.
5.2.2 Double-click the Operation box to open the operations drop-down and select the operation to
be performed.
5.2.3 The default parameters for the chosen operation will appear in the Parameter Values table.
Double-click on a Parameter Value to change the value.
5.2.4 To add a pause after the operation is carried out, check the Pause box.
5.3. To delete a step, click the step to highlight it, then click the Delete Step button.
5.4. To insert a new step between existing steps, click a step to highlight it, then click the Insert Step
button. The new step will be inserted above the selected step.
5.5. To copy a step, click a step to highlight it, then click the Duplicate Step button. The copy will be
inserted after the highlighted step.
5.6. To move a step up or down, click the step to highlight it, then click the Move Up or Move Down
buttons.
6. Click Save to save the cycle.
Operation of the Liberty Blue
21
Page 26

Editing an Existing Cycle
The Cycle Editor allows for settings on existing cycles to be modied and saved as needed. To modify an existing
cycle:
1. Click on the lter buttons at the top of the Cycle Editor screen to open the lter list.
2. Select a scale, cycle type, and resin type. The currently selected parameter for each will be displayed in bold.
Click out of the lter list to open the selected cycle type.
3. Click on the cycle to be modied.
4. Make any changes as needed.
5. Click Save to save the changes to the cycle.
6. Click the Add Step button. The new step will appear at the end of the cycle.
6.1. Double-click the Operation box to open the operations drop-down and select the operation to be
performed.
6.2. The default parameters for the chosen operation will appear in the Parameter Values table. Doubleclick on a Parameter Value to change the value.
6.3. To add a pause after the operation is carried out, check the Pause box.
7. To delete a step, click the step to highlight it, then click the Delete Step button.
8. To insert a new step between existing steps, click a step to highlight it, then click the Insert Step button. The
new step will be inserted above the selected step.
9. To copy a step, click a step to highlight it, then click the Duplicate Step button. The copy will be inserted
after the highlighted step.
10. To move a step up or down, click the step to highlight it, then click the Move Up or Move Down buttons.
11. Click Save to save the cycle.
Liberty Method Editor
The Liberty Method Editor is used to program the specic conditions to be used for a given synthesis. Once the
sequence is entered, several options for the run can be congured that will determine the specic steps to be
used in the synthesis. The Liberty Method Editor can be accessed from the Edit menu.
22
Operation of the Liberty Blue
Page 27

Creating a New Liberty Method
1. Open the appropriate folder or sub folder in the Methods box for the new method.
2. Click the New Method button.
3. The method will appear in the appropriate folder. Enter a name for the method and press Enter. Click into the
Sequence box. A list of the amino acids in the current bottle setup will drop down. To enter the sequence, either
click the appropriate amino acid positions in the drop-down, or type the one-letter abbreviation for the desired
amino acids.
NOTE
To delete an amino acid from the sequence, press the backspace key (to delete the residue before the
cursor) or click the delete button on the drop-down (to delete the highlighted residue).
To insert an amino acid into the sequence, click an amino aid in the sequence to highlight it, then either
click the desired amino acid in the drop-down, or type the one-letter abbreviation for the desired amino
acid. The new residue will be inserted before the highlighted amino acid.
4. Select the scale (0.005 mmol to 5.0 mmol) from the Synthesis Scale box, then select the resin swelling type
(Standard or High Swelling) from the Resin Swelling box.
NOTE
The scale and resin type must be selected before changing any other parameters, as each scale and resin
type has specic default options that will be loaded upon selection.
5. The remaining options can now be selected.
5.1. C-Terminus: The C-terminus (acid or amide) is only used to calculate the molecular weight, and does
Operation of the Liberty Blue
23
Page 28

not affect the synthesis conditions.
5.2. Resin Type: The resin type will determine the rst coupling step of the reaction. If Preloaded is
checked, the software assumes the C-terminal amino acid is already loaded on the resin and
therefore skips that coupling. If Not Preloaded is selected, the rst coupling will proceed as normal.
If Chloride Loading is selected, a chloride coupling step will be used for the C-terminal amino acid
coupling.
5.3. Resin Swelling: Choosing the correct resin swelling condition ensures the resin is completely
submerged during a run. Select (HS) for high swelling resins such as PEG-based resins, and Standard
for polystyrene resins.
5.4. Resin Name: The resin name entered in this box will appear in the Method Report, but will not affect
the synthesis conditions.
5.5. Resin Loading: The substitution value entered in this box (in meq/g) will appear in the Method
Report, but will not affect the synthesis conditions.
5.6. Resin Cycle: The resin cycle determines the swelling conditions used to prepare the resin at the
beginning of the synthesis. Make sure the amino acid cycles match the Resin Swelling Cycle (HS
vs. Standard).
5.7. Final Deprotection Cycle: By default, the N-terminal protecting group is removed at the end of the
synthesis. Selecting an alternate Final Deprotection cycle allows control of this step.
5.8. Bottle Setup: If using a bottle setup other than the standard default, it must be selected prior to
entering the sequence.
NOTE
The Chloride Loading resin type is not available for Liberty Lite.
6. Assign cycles for each residue that will not use the default cycle.
NOTE
By default, the Double Coupling cycle is used for arginine. The default standard bottle setup uses
His(Boc). For other His derivatives, use Single 50°C 10 min Coupling cycle. The Single Coupling cycle
is used for all other amino acids. To restore all amino acids in a method to the default cycles, click on
Reapply Cycle Rules.
NOTE
Clicking the Quick Jump button will open a shortcut to all amino acids in the sequence.
6.1. From the Amino Acid Cycles table, click on the amino acid to highlight it, then double-click the cycle
to open the drop-down of available amino acid cycles.
NOTE
To select multiple amino acids, hold Ctrl and left-click the desired amino acids. This will highlight multiple
rows in the Amino Acid Cycles table. When all the desired amino acids are highlighted, click the Mark Rows
button at the top of the Amino Acid Cycles table. The total number of selected rows will be listed next to
the ag icon. When multiple rows are marked (indicated by a blue highlight), any change made to one
row will be made to all selected rows. When all changes are made, click the Clear button to deselect all
rows.
24
Operation of the Liberty Blue
Page 29

6.2. From the drop-down, select the desired cycle. This will change the cycle for that highlighted amino
acid only. To change the cycle for all amino
“Apply this cycle to all”.
7. When the method is complete, click Save to save the method.
Importing a Sequence to the Method Editor
When creating a new method, the sequence can be copied and pasted from outside the Liberty Blue application
software, allowing for the importation of sequences from documents, presentations, websites, etc. To paste a
sequence:
1. Highlight the sequence in the source document and press CTRL + C to copy to the system clipboard.
2. In the sequence editor, click the Paste Sequence button. (If the object on the clipboard is not able to be imported,
the Paste Sequence button will be inactive.)
3. If there are any amino acids in the sequence that are not a part of the current bottle setup, the Sequence
Importer will open and display the sequence. The amino acids shown in red will not be imported.
4. The sequence should be in N-terminal to C-terminal order.
5. If the sequence appears correct, click Import Sequence. The sequence will be loaded into the method.
acids to the selected cycle, right-click the cycle and select
Importing a Batch of Sequences to the Method Editor
1. From the Liberty Blue Software, save the Batch Sequence Import Template (File -> Import -> Save Batch Sequence
Import Template).
2. Open the Batch Sequence Import Template.
Operation of the Liberty Blue
25
Page 30

3. Input the Name, Scale, and Sequence of each Liberty Method to be created, and save/rename the le.
NOTE
To load the Liberty Methods into the HT Grid immediately upon import, input the desired HT position for
each Liberty Method.
4. Import the Batch Sequence Import Template le into the Liberty Blue Software (File -> Impor t -> Sequences). The
Liberty Method Editor window will open, revealing the recently imported sequences.
Editing an Existing Liberty Method
1. Open the Liberty Method Editor.
2. Open the appropriate folder or sub folder in the Methods box for the new method.
26
Operation of the Liberty Blue
Page 31

3. Click on the method to be modied.
4. Make any changes to the method as needed.
5. Click Save to save the changes to the method, or click Save As to save the changes as a new Liberty method.
Duplicating and Modifying an Existing Liberty Method
Liberty methods can easily be duplicated and modied within the Liberty Method Editor, and then they can be
moved to different folders as needed. To copy an existing Liberty method:
1. Open the Liberty Method Editor.
2. Open the appropriate folder or sub folder in the Methods box for the new method.
3. Click on a Liberty method to select it and click the Duplicate button.
4. The new Liberty method will appear named “Copy of [method name]”. Type a new name and press Enter.
5. Make any changes to the method as needed, then click Save to save the changes to the method.
Generating a Method Report
A Liberty Method Report records all settings selected in the Method Editor when creating the method. Liberty
Method Reports are created as PDF les which can be saved and printed to allow for easy recording of
experimental parameters.
The level of detail included in a Liberty Method Report can be congured during report generation. To generate a
Liberty Method Report:
1. Open the Liberty Method Editor.
2. Open the appropriate folder or sub folder in the Methods box for the new method, then click on the method to
be reported.
3. Click the View Report button in the upper right corner of the Liberty Method Editor screen to open the Liberty
Method Report Generator.
4. Select the options to be included in the Liberty Method Report.
4.1. To include a header image, check the Image box under Header. To select a custom image, click the
image on the right, then open the desired image.
4.2. To include the calculated molecular weight in the header, check the Molecular Weight box.
4.3. Select the details to be included in the report by checking the appropriate boxes.
4.3.1 Selecting Sequence will include the sequence.
4.3.2 Selecting Method Details will include the synthesis scale, resin type, preloaded or not preloaded
status, C-terminus, resin cycle, nal deprotection cycle, resin name (if entered), and resin
loading (if entered).
4.3.3 Selecting Method Notes will include any text entered in the Notes eld.
4.3.4 Selecting Amino Acid Cycles will include a list of the cycles assigned to each amino acid in the
sequence. This list only includes the names of the cycles.
4.3.5 Selecting Cycle Details will include the details for each cycle used in the Liberty Method
(including all operations and parameters in the cycle).
4.4. To include a footer image, check the Image box under footer. To select a custom image, click the
image on the right, then open the desired image.
Exporting Microwave Methods and Operations
The Liberty Blue application software allows operations, microwave methods, and associated microwave cycles to
be transferred from one Liberty Blue Software database to another.
To export existing operations:
1. Open the Expor t Menu (File Export).
2. Click on the Operations tab and select the operations and categories to export. Click Select All to select all
operations.
Operation of the Liberty Blue
27
Page 32

3. Click Expor t. The selected operations will be saved as an XML le (.xml).
To export existing Liberty methods:
1. In the Export menu, click on the Methods tab and select the methods to export. Click Select All to select all
methods.
2. Click Expor t. The selected operations will be saved as a JSON le (.json).
CAUTION
All operations must be exported separately from the Liberty methods. Attempting to export methods and
operations at the same time will not work as two different le types cannot be created at the same time.
NOTE
When exporting Liberty methods, all associated cycles are also exported with the method. These include
default and custom resin, amino acid, and nal deprotection cycles.
Importing Microwave Methods, Operations, and Settings
The Liberty Blue application software allows settings, operations, Liberty methods, cycles, and associated
microwave methods to be transferred from one Liberty Blue Software database to another. To import existing
operations, settings, or Liberty methods:
1. To import les, select File then Import.
2. To import methods and cycles, select “Methods and Cycles…”. Select the appropriate JSON le from the
computer then click Open. The Liberty methods will automatically start importing to the current database.
3. To import operations, select “Operations…”. Select the appropriate XML le from the computer then click Open.
The operations will automatically start importing to the current database.
4. To import settings, select “Settings...”. Select the appropriate JSON le from the computer then click Open. The
settings will automatically start importing to the current database.
NOTE
When importing Liberty methods into a new database, all associated cycles are also imported. These
cycles include default and custom resin, amino acid, and nal deprotection cycles.
Calculators
The Liberty Blue application software contains two calculators that allow for easy determination of reagent needs
and reagent preparation: the Usage Calculator and the Reagent Calculator. These calculators are accessed
from the Calculators menu.
28
Operation of the Liberty Blue
Page 33

Usage Calculator
The Usage Calculator can be used to determine the amount of each reagent needed for a given method.
Multiple methods can be loaded into the calculator, so that sufcient reagents can be loaded onto the Liberty Blue
for multiple peptides.
To use the Usage Calculator:
1. From the Calculators menu, select Usage Calculator.
2. From the Methods box at the bottom left of the Usage Calculator, right-click the method to be included in the
calculation and select Add to Calculation. The method will then appear in the table at the top left of the Usage
Calculator.
3. The calculator will automatically determine the total usage for each reagent, as well as the mass of each amino
acid required, and estimate the total waste produced.
4. To prepare enough reagents for multiple runs, repeat step 2 for each method to be included in the calculation.
The calculator will automatically update the total usage for each reagent. To remove a selected method from
the calculation, uncheck the box next to the method name. If different amino acid concentrations are required
across the selected runs, a warning will appear to notify that amino acid concentration from the largest scale
will be used in the calculation.
5. To run using a different concentration of amino acid, enter the desired concentration in the box at the top of
the Required Reagent Amounts table. The calculator will automatically update to reect the new concentration.
6. To print a Usage Report, click the View Report button at the bottom of the Usage Calculator screen. This will
generate a report as a PDF which can be printed or saved for future reference.
Reagent Calculator
The Reagent Calculator can be used to determine how to prepare all reagents to be loaded on the system at
the correct concentrations. There are ve tabs: Resin, Deprotection, Activators, Activator Bases, and Amino Acids.
Resin Calculator Tab
1. Enter the scale for the synthesis.
2. Enter the resin substitution value in the Resin Substitution box. This value is provided by the supplier of the
resin, and is usually expressed in mmol/g or meq/g.
3. The mass required will automatically be calculated (in grams).
4. To include this reagent in the Reagent Report, check the Include In Report box.
Operation of the Liberty Blue
29
Page 34

Deprotection Calculator Tab
1. Click on the desired deprotection reagent from the list.
2. Enter the desired concentration (in percent volume).
3. Enter the total volume of deprotection solution required.
4. The required amount of deprotection reagent in milliliters (for liquids) and grams (for solids) will automatically
be calculated.
5. To include the desired reagent in the Reagent Report, check the Include In Report box.
Activators and Activator Bases Calculator Tabs
1. Click on the desired reagent from the list.
2. Enter the desired concentration (in M).
3. Enter the total volume of reagent solution needed.
4. The required mass or volume (in grams or mL respectively) will automatically be calculated.
5. To include the desired reagent in the Reagent Report, check the Include In Report box.
Amino Acids Calculator Tab
1. Click on an amino acid to select it, then double-click the volume and enter the desired volume (in mL).
2. Double-click the concentration and enter the desired concentration (in M).
3. The required mass (in grams) will automatically be calculated for the selected amino acid.
4. To calculate for all amino acids, right-click and select “Apply volume to all” and/or “Apply concentration to all”.
The required mass (in g) will automatically be recalculated for all amino acids using the selected parameter.
5. To include amino acids in the Reagent Report, check the Include In Report box for each amino acid to be reported.
Reagent Calculator Report
A Reagent Calculator Report includes the required masses and volumes for all selected reagents for a given
synthesis. The report will be generated as a PDF which can be printed or saved for future reference.
To Generate A Reagent Calculator Report:
1. For each reagent to be included in the report, check the Include in Report box for that specic reagent.
2. Click View Report to render the repor t.
Edit Users and User Group
New users and user authority is determined by the default administrator. User group privileges can also be edited
by the administrator. All changes are tracked in the audit trail. To enable users/user groups, click on the Options
tab and select Settings. In the Application folder, select User/Password Security. In the drop-down next to Enable
users - authentication type, select Local and click Save.
Creating a new user
1. Log in as administrator.
2. In the Administration menu, select Edit Users.
3. To edit a current user (Name, Group, or add picture), select the user name.
4. To create a new user, select the “+” icon.
5. Create user name, group type, and change password.
6. Follow the prompts. Password must be at least 8 character(s) and cannot contain any part of user name.
7. Select the green Save icon.
30
Operation of the Liberty Blue
Page 35

Removing a user
1. Log in as administrator.
2. In the Administration menu, select Edit Users.
3. Once a user is created, they cannot be removed. They can be deactivated.
4. Select the user.
5. Select the “-“ icon and select “Deactivate” to deactivate the account or “Cancel” to ignore.
6. To reactivate, select the “reactivate” icon (curved circular arrow).
7. Re-enter new password credentials.
Edit a User Group
1. Log in as administrator.
2. In the Administration menu, select Edit User Groups.
3. Select the user group and make edits as needed. The following is the comprehensive list of user groups and
default privileges.
Permission Administrator Power User User Guest
Admin
Edit users Permitted Denied Denied Denied
Edit system settings Permitted Permitted Denied Denied
Edit calibrations Permitted Permitted Permitted Denied
Approve changes Permitted Permitted Denied Denied
Make changes without approval Permitted Denied Denied Denied
View audit trail Permitted Permitted Denied Denied
View hardware conguration Permitted Permitted Denied Denied
View current operation step Permitted Denied Denied Denied
View components status Permitted Denied Denied Denied
View application state via OPC Permitted Permitted Permitted Denied
Call OPC methods Permitted Permitted Denied Denied
Methods
View methods (all) Permitted Permitted Denied Denied
View methods (group) Permitted Permitted Permitted Denied
View methods (lesser groups) Permitted Permitted Permitted Denied
Edit methods (all) Permitted Denied Denied Denied
Edit methods (group) Permitted Permitted Permitted Denied
Edit methods (lesser groups) Permitted Permitted Permitted Denied
Create methods Permitted Permitted Permitted Denied
Edit template cycles and microwave methods Permitted Denied Denied Denied
Import/Export methods Permitted Permitted Permitted Denied
Results
View results (all) Permitted Permitted Permitted Permitted
View results (group) Permitted Permitted Permitted Permitted
View results (lesser groups) Permitted Permitted Permitted Permitted
Miscellaneous
View camera Permitted Permitted Permitted Permitted
Operation of the Liberty Blue
31
Page 36

Data Integrity
The Liberty Blue provides a software solution for automated microwave peptide synthesis users to aid in achieving
compliance with the FDA’s guidance on electronic records and electronic signatures: 21 CFR Part 11.
1. Software allows viewing of records for validity. Records include a date of last modication and a revision number
which is incremented upon modication.
2. Software has the ability to authenticate individuals via local accounts within the application software. User
accounts can be created, disabled and re-enabled by the administrator.
3. Software authenticates users based on both a unique user name and password security. Each user is a member
of a particular user group. Each user group species a list of privileges allowed and disallowed to users of that
group.
4. Software stores records in encrypted databases to ensure easy retrieval and prevents records being read or
altered outside of the application.
5. Software requires user to sign records and reports as well as changes in methods with a unique user name
and password. User name, the date and time the signature was executed, and the meaning of the signing are
recorded.
6. Software records the signature(s) in the record audit trail which may also be viewed and printed.
32
Operation of the Liberty Blue
Page 37
Setting up a Synthesis
Loading a Method
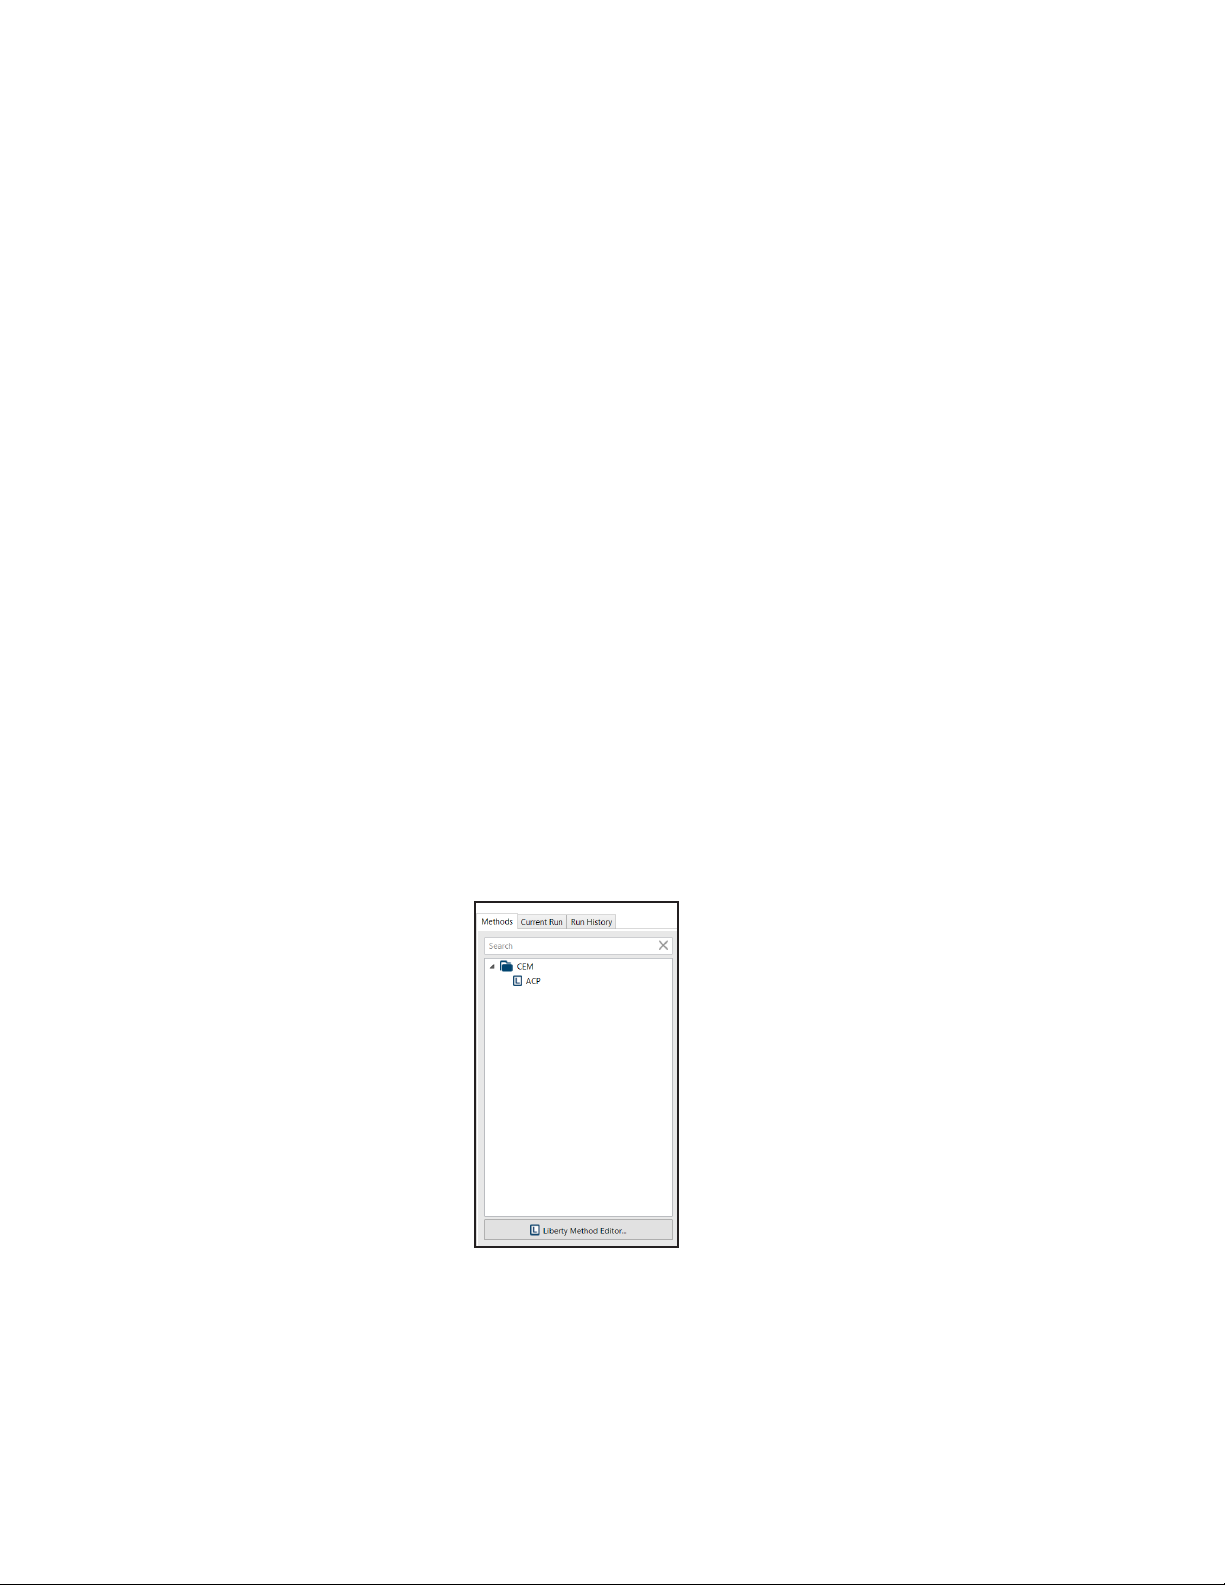
Once a method has been created and saved in the Liberty Method Editor, it is available from the Methods tab
on the main Liberty Blue Software screen. To load a method:
1. Open the appropriate folder in the Methods tab.
2. Click on the desired method, and drag the method to the resin position. Alternatively, right-click on the desired
method and select “Queue for run”.
3. The method name will appear in the Loaded Method indicator. The indicator will turn blue, meaning the method
is loaded and ready to run.
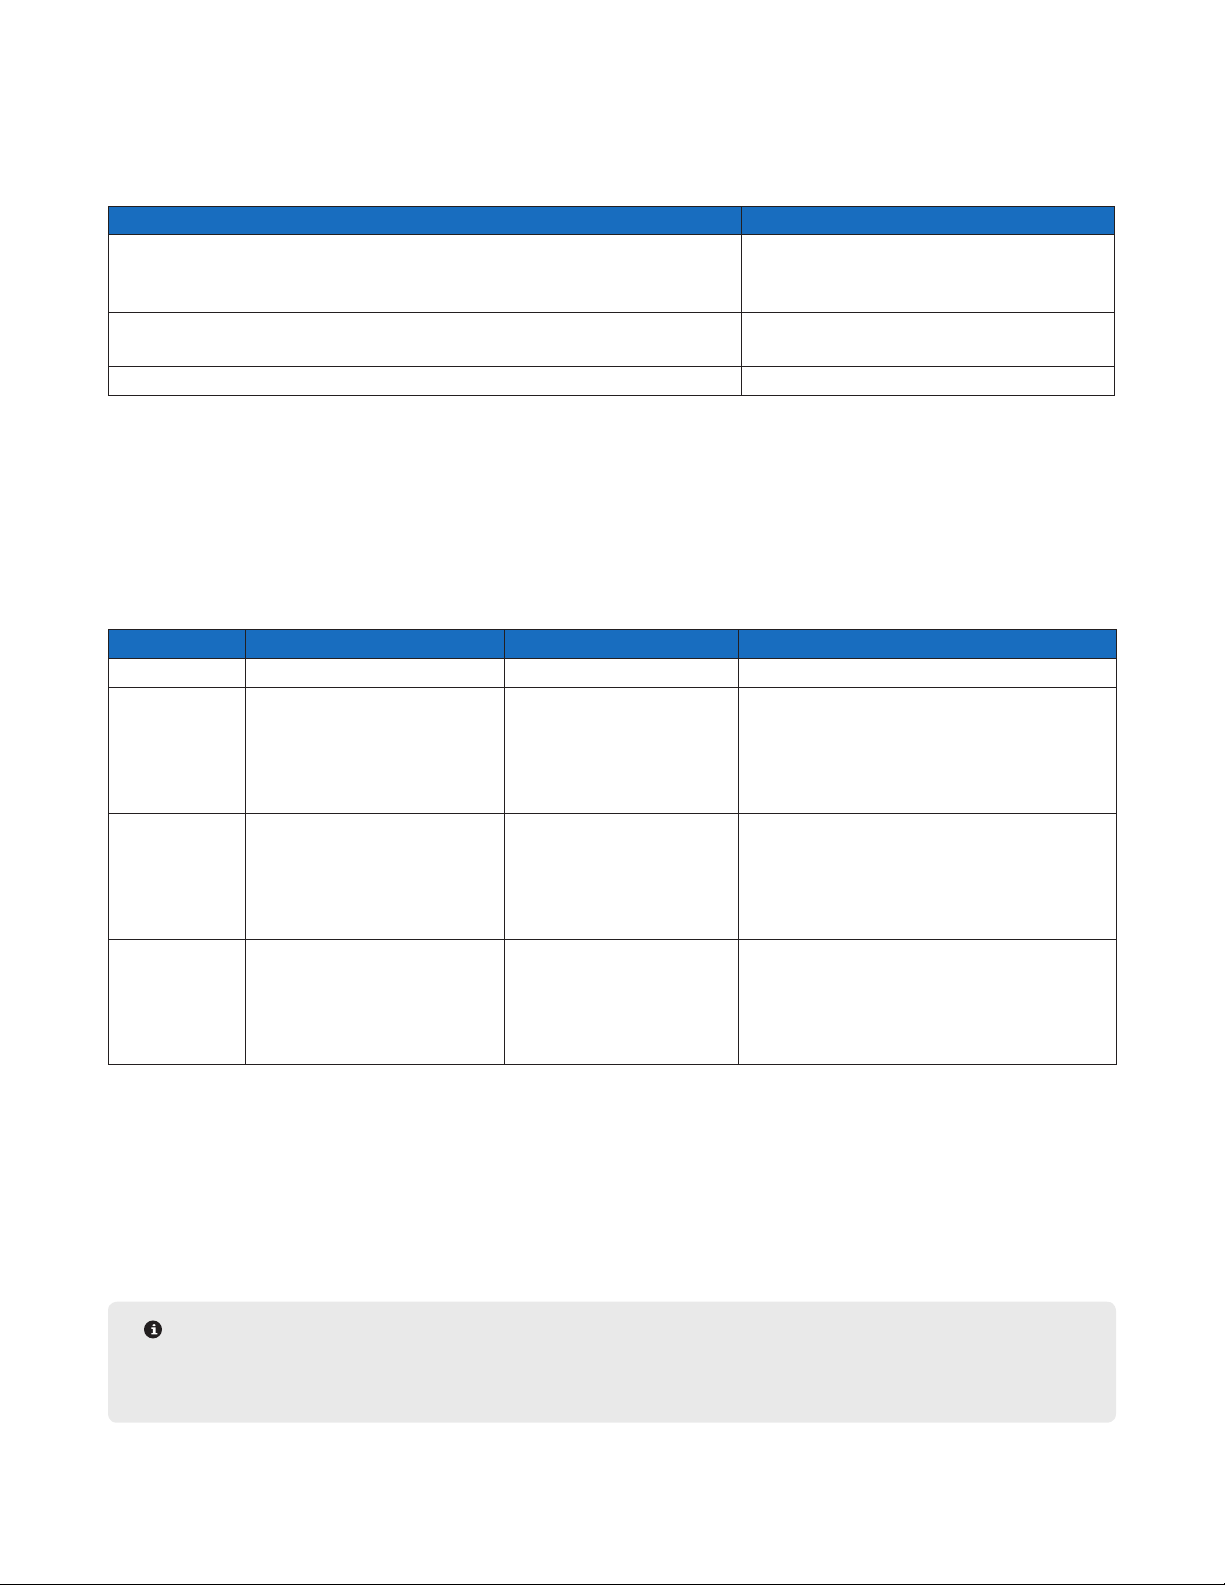
Standard Reagents and Concentrations
The Liberty Blue uses stock solutions of all reagents. The table below details the concentrations used on the
Liberty Blue and/or CEM’s preferred reagents.
Reagents 0.005 mmol 0.01 mmol 0.025 mmol 0.05 mmol 0.1 - 0.5 mmol 1.0 - 5.0 mmol
Wash
Solvent*
Deprotection
Cocktail
Amino Acids 0.04 M in DMF 0.08 M in DMF 0.2 M in DMF 0.2 M in DMF 0.2 M in DMF 0.4 M in DMF
Activator** 0.05 M DIC in DMF 0.10 M DIC in
Base 0.05 M Oxyma in
*NMP is suitable as a wash solvent or for dissolution/dilution of reagents, but requires 75°C coupling cycles to reduce the risk of
insertions.
**View the CarboMAX application note, ap0124, at www.cem.com for further details.
NOTE
The Liberty Blue is not equipped to perform peptide cleavages. Cleavages should be carried out at room
temperature or heated in the Razor™.
DMF DMF DMF DMF DMF DMF
4% Piperidine
in DMF
or
2% Piperazine
(w/v) in
EtOH:NMP
(10:90)
DMF
4% Piperidine in
DMF
or
2% Piperazine
(w/v) in
EtOH:NMP
(10:90)
DMF
0.1 M Oxyma in DMF 0.25 M Oxyma in
20% Piperidine in
DMF
or
10% Piperazine
(w/v) in
EtOH:NMP
(10:90)
0.25 M DIC in DMF 0.50 M DIC in
DMF
20% Piperidine
in DMF
or
10% Piperazine
(w/v) in
EtOH:NMP
(10:90)
DMF
0.5 M Oxyma in DMF 1.0 M Oxyma in DMF 1.0 M Oxyma
20% Piperidine
in DMF
or
10% Piperazine
(w/v) in
EtOH:NMP
(10:90)
1.0 M DIC in
DMF
20% Piperidine
in DMF
or
10% Piperazine
(w/v) in
EtOH:NMP
(10:90)
1.0 M DIC in
DMF
in DMF
Recommended Reagents and Strategies for Microwave SPPS on the Liberty Blue
This section is intended to provide general guidance for reagent selection when synthesizing peptides on the
Liberty Blue. For each case CEM’s preferences are ranked in order with #1 being the preferred choice. The
corresponding MW methods recommended are subsequently described in the Microwave Methods Selection.
Setting up a Synthesis
33
Page 38

WARNING
Handle all chemicals under a fume hood, and wear suitable protective clothing such as safety glasses,
chemical resistant gloves, and a laboratory coat. Dispose of all waste in accordance with all applicable
local, state, and federal health and safety recommendations. For detailed information on the safety
requirements for the chemicals used on the Liberty Blue, refer to the appropriate SDS documents.
Resin Selection
Default cycles are available for both standard resins (such as polystyrene) and high-swelling resins (such as PEG).
It is important to use the appropriate cycles for the resin being used in the synthesis. When the resin type is
selected in the Liberty Method Editor, the appropriate default cycles for that type will automatically be loaded.
Although most resins are compatible with microwave SPPS on the Liberty Blue, CEM recommends the resins
shown in the table below for optimal results.
Peptide Length C-Terminal Acid C-Terminal Amide
Standard (<25 residues) Cl-TCP(Cl) ProTide Fmoc Rink Amide ProTide
Long (>25 residues) Cl-MPA ProTide (LL) Fmoc Rink Amide ProTide (LL)
Mesh Size
Only 100-200 mesh (or lower) resin (>75 micron) should be used with the Liberty Blue. The use of higher mesh
resins will result in clogging of the reaction vessel frit and damage to the system.
Deprotection Solution Selection
General Strategy
Historically, piperidine has been the most common deprotection reagent. Piperazine, however, is a great alternative
and is growing in popularity; it is a non-controlled substance, relatively inexpensive, and less malodorous than
piperidine. Although piperizine has limited solubility in DMF and NMP, it shows improved solubility and deprotection
activity in a solution of 10% ethanol in NMP.
CEM Preference Deprotection Cocktail Microwave Method
1 20% Piperidine (v/v) in DMF or NMP Standard
2 10% (w/v) Piperazine in EtOH:NMP (10:90) Standard
For sequences where aspartimide formation is a concern, 0.1 M HOBt or 0.1 M Oxyma should be added to the
deprotection cocktail to suppress the side reaction.
NOTE
Allow up to 1 hour for piperazine to completely dissolve with stirring. If 0.1 M Oxyma is added then 30
minutes is enough to completely dissolve with stirring. Gentle heating on a hotplate can help. Calibration
of the deprotect timed addition should be performed for the particular reagent used (piperazine or
piperidine).
34
Setting up a Synthesis
Page 39
Special Case: Sequences Containing Asp-Gly (DG)
The Asp-Gly (DG) segment is particularly sensitive to base-catalyzed aspartimide formation. Simple addition
of HOBt or Oxyma to the standard deprotection solutions may not be sufcient to prevent this side reaction.
Therefore, less aggressive deprotection conditions should be used or a Dmb protected dipeptide that prevents this
side reaction. Below are a few additional approaches for combating aspartimide formation.
Supression Strategy Microwave Method
5% (w/v) Piperazine w/ 0.1 M Oxyma Pure in EtOH:NMP (10:90) Two step room temperature deprotection:
1. Conventional initial deprotection
2. Conventional deprotection
Use Fmoc-Asp(OtBu)-(Dmb)Gly-OH dipeptide and any deprotection cocktail applicable for
Standard
standard peptides
Use Fmoc-Asp(OMpe)-OH and any deprotection cocktail applicable for standard peptides. Standard
Activation Strategy Selection
General Strategy
The two most popular activation strategies for solid phase peptide synthesis are carbodiimide promoted coupling
(using a carbodiimide such as DIC with an additive such as HOBt or Oxyma to quickly convert the O-acylisourea
intermediate to a reactive ester) and onium salt promoted coupling (using a base such as DIEA to initiate
conversion of the amino acid to the activated ester through reaction with an onium salt such as HBTU). The table
below details CEM’s preferred strategies and recommended microwave conditions for each strategy.
CEM Preference Reagents Cycle Exceptions
1 AA/DIC/Oxyma1 in DMF Single Coupling
2 AA/HBTU3/DIEA4 in DMF
90°C 1 min Deprotection
Wash (x4)
75°C 5 min Single Coupling
2
Arg: Double Coupling
Cys: Single 50°C 10 min Coupling
His: Single 50°C 10 min Coupling
Arg:
1st Coupling: 25 min room temp, 75°C 2 min
2nd Coupling: 75°C 5 min
3 AA/DIC/Oxyma1 in NMP
90°C 1 min Deprotection
Wash (x4)
75°C 10 min Coupling
Cys: Double 50°C 10 min Coupling
His: Double 50°C 10 min Coupling
Arg:
1st Coupling: 25 min room temp, 75°C 2 min
2nd Coupling: 75°C 5 min
4 AA/HBTU3/DIEA4 in NMP
90°C 1 min Deprotection
Wash (x4)
75°C 5 min Single Coupling
Cys: Single 50°C 10 min Coupling
His: Single 50°C 10 min Coupling
Arg:
1st Coupling: 25 min room temp, 75°C 2 min
2nd Coupling: 75°C 5 min
1
HOBt, 6-Cl-HOBt, or HOAt can be used in place of Oxyma.
2
Recommended cycles assume employment of His(Boc). For other His derivatives, use Single 50°C 10 min Coupling cycle.
3
These conditions should be used for all onium activators (HBTU, 6-Cl-HBTU, HATU) and for the phosphonium activators (PyBOP,
PyAOP).
4
DIEA should be prepared in NMP.
NOTE
For assistance with cycle and microwave method programming, please contact CEM Applications Support
at peptide.support@cem.com.
Setting up a Synthesis
35
Page 40

Special Case: Hyper Acid Sensitive Resins (e.g. 2-chlorotrityl)
Acidic additives (HOBt, HOAt, Oxyma) can lead to premature cleavage of the peptide from the resin (low yields).
Activation methods containing DIEA are more basic and thus preferred to DIC/Oxyma for these resins at high
temperatures. Since lower temperatures should be used, the more aggressive HATU activator is recommended.
CEM Corporation offers Cl-TCP(Cl) ProTide which shows excellent stability to high temperatures and acidic additives
such as Oxyma Pure, yet still exhibits hyper-acid sensitivity. The Cl-TCP(Cl) ProTide resin can be cleaved under 1%
TFA/DCM conditions.
CEM Preference Reagents Resin/Linker Coupling Microwave Method
1 AA/DIC/Oxyma2 in DMF
2 AA/HBTU/DIEA5 in DMF
1
Standard deprotection (90°C 1 min) can be performed in all cases.
2
0.1 equivalents DIEA should be added to Oxyma solution
3
Recommended Coupling Microwave Method assumes employment of His(Boc). For other His derivatives, use 50°C 10 min Coupling
Microwave Method.
4
Coupling time can be extended to 10 min.
Cl-TCP(Cl) ProTide Resin Standard Coupling (90°C 2 min) N/A
2-Chlorotrityl resin 60°C 5 min Coupling
4
Cl-TCP(Cl) ProTide Resin 75°C 5 min Coupling Cys/His: 50°C 10 min Coupling
2-Chlorotrityl resin 50°C 10 min Coupling N/A
1
Exceptions
3
3
N/A
5
DIEA should be prepared in NMP.
NOTE
The rapid microwave methods used by the Liberty Blue employ rapid heating rates. For both the
deprotection and coupling methods the set temperature of 90 °C should be reached within 20-30 seconds,
and maintained for at least 45 seconds and 100 seconds respectively. The starting temperature for each
reaction will be signicantly warmer than room temperature as residual heat will remain from the previous
reaction.
Preparing Reagents
WARNING
Handle all chemicals under a fume hood, and wear suitable protective clothing such as safety glasses,
chemical resistant gloves, and a laboratory coat. Dispose of all waste in accordance with all applicable
local, state, and federal health and safety recommendations. For detailed information on the safety
requirements for the chemicals used on the Liberty Blue, refer to the appropriate SDS documents.
Preparing Activator Solution
1. Weigh out the appropriate amount of activator (as calculated using the Usage and Reagent Calculators) and
transfer to a 250 mL glass bottle.
2. Add the appropriate volume of solvent.
3. Put a cap on the bottle. Gently swirl the bottle to ensure that all of the activator has gone into solution.
36
Setting up a Synthesis
Page 41

Preparing Activator Base Solution
1. Measure out the appropriate amount of activator base (as calculated using the Usage and Reagent
Calculators) and transfer to a 250 mL glass bottle.
CAUTION
When using DIEA, NMP must be used as the solvent because DIEA is not miscible in DMF at the standard
concentration of 2 M. The nal concentration of DIEA in the reaction vessel is low enough that miscibility is
not an issue.
2. Add the appropriate volume of solvent to give the correct nal volume.
3. Put a cap on the bottle. Gently swirl the bottle to ensure all of the activator base has gone into solution.
Preparing Amino Acids
1. Weigh out the appropriate amount of each amino acid (as calculated using the Usage and Reagent
Calculators).
2. Transfer each amino acid to a clean 50 mL centrifuge tube.
3. Add the appropriate volume of DMF to each centrifuge tube.
4. Place a cap on each centrifuge tube and shake vigorously to ensure the amino acid has fully gone into solution.
CAUTION
All centrifuge tubes used on the system must be ultra-high performance grade, and must NOT use
CentriStar closures.
Preparing Deprotection Solution
1. Measure out the appropriate amount of deprotection reagent (as calculated using the Usage and Reagent
Calculators).
2. Transfer the deprotection reagent to a 250 mL glass bottle.
3. Add the appropriate volume of DMF to give the correct nal volume as calculated in the Reagent Calculator.
4. Add HOBt or Oxyma if necessary.
5. Place a cap on the bottle. Swirl the bottle gently to ensure the deprotection reagent (and HOBt/Oxyma, if used)
has fully gone into solution.
NOTE
Piperazine may take up to an hour to go into solution. It is helpful to add a magnetic stir bar and stir the
solution to speed dissolution.
Setting up the Liberty Blue
Loading Reagents onto the Liberty Blue
1. Connect amino acid centrifuge tubes to the appropriate positions on the system. Connect empty centrifuge tubes
to all unused positions.
Setting up a Synthesis
37
Page 42

NOTE
All reagent positions must have a centrifuge tube in place. If a given reagent is not required for a
synthesis, connect an empty centrifuge tube to that position.
2. Connect activator base and activator bottles to the appropriate positions on the system.
NOTE
It is important that the reaction vessel be empty before running the Change Bottle Deprotection operation.
The Change Bottle Deprotection operation will add deprotection solution to the reaction vessel as part of
the priming procedure, and then wash the reaction vessel with main solvent.
3. Check the level of deprotection solution remaining in the deprotection bottle. If more deprotection is required,
use the Change Bottle Deprotection operation to replace the bottle (see Change Bottle Deprotection in Section
4).
3.1. From the Options menu, select Maintenance.
3.2. From the Change Bottle folder, select the Change Bottle Deprotection operation and click Run
Operation.
3.3. The Change Bottle window will appear. Follow the on screen instructions to depressurize and remove
the existing bottle.
3.4. Add the required volume of deprotection solution to the bottle. Ensure the reagent line has a main
solvent lter in place (PN 551000), then connect the bottle to the cap.
3.5. Click OK to continue with the Change Bottle procedure. The Liberty Blue will automatically pressurize
the bottle and click OK to prime the lines.
4. Check the level of solvent remaining in the solvent bottle. If more solvent is required, use the Change Bottle Main
Solvent operation to replace the bottle. (see Change Bottle Main Solvent).
4.1. From the Options menu, select Maintenance.
4.2. From the Change Bottle folder, select the Change Bottle Main Solvent operation and click Run
Operation.
4.3. The Change Bottle window will appear. Follow the on screen instructions to depressurize and remove
the existing bottle.
4.4. Ensure the dip tube has a main solvent lter (PN 551000) in place, then screw the cap onto the
solvent bottle.
4.5. Click Next to continue with the Change Bottle procedure. The Liberty Blue will automatically pressurize
the bottle and prime the lines.
5. Add the resin to the reaction vessel.
WARNING
It is vital to use the appropriate reaction vessel for the scale of the synthesis. The standard (30 mL)
vessel should be used for syntheses between 0.005 and 0.25 mmol scale (up to 1 g of resin maximum).
The large (125 mL) vessel should be used for syntheses at 0.5 mmol scale and higher (up to 8 g of resin
maximum).
To replace the vessel:
1. Remove the reaction vessel from the microwave cavity.
2. Disconnect the bottom tting of the brown union connector.
3. Disconnect the vessel body from the attenuator.
4. Disconnect the ltered drain line from the vessel body at the brown tting.
5. Connect the bottom portion of the union to the new vessel body.
38
Setting up a Synthesis
Page 43

6. Connect the new vessel body to the attenuator.
7. Connect the ltered drain line to the new vessel body using the union, being careful not to cross
thread or over tighten the tting.
8. Place the vessel back into the microwave cavity, securing the attenuator.
5.1. Use Reagent Calculator to determine the amount of resin required for the synthesis.
5.2. Remove the reaction vessel from the microwave cavity.
5.3. Disconnect the ltered drain line from the vessel body using the union.
WARNING
The Liberty Blue reaction vessel is designed to work with 100-200 mesh resins only. The use of 200-400
mesh resins will clog the frit on the bottom of the reaction vessel, resulting in failure to drain the vessel
and a possible reaction vessel overow event.
5.4. Disconnect the vessel body from the attenuator.
5.5. Weigh the appropriate amount of dry resin (100-200) mesh into the vessel body.
5.6. Connect the vessel body to the attenuator.
5.7. Connect the ltered drain to the vessel body using the brown union.
5.8. Place the vessel back into the microwave cavity, securing the attenuator.
Running the Liberty Blue
Preparing the Liberty Blue to Run
1. Verify the level of the waste container to ensure there is sufcient room before starting another synthesis.
2. Verify the nitrogen supply to ensure there is sufcient nitrogen to complete the synthesis.
3. Verify that the ber optic probe is fully inserted into the thermowell.
WARNING
If the probe is not inserted all the way to the bottom of the vessel the Liberty Blue will not accurately
measure the temperature, and overheating of the vessel can occur. This will result in poor synthesis quality
and/or serious damage to the vessel.
4. Verify that the method is correct by looking at the steps outlined in the Method box. If there are any errors, make
corrections and reload the method.
4.1. Clear the method by clicking the small X at the top of the resin indicator.
4.2. To correct the method:
4.2.1 Open the Liberty Method Editor.
4.2.2 Open the folder where the method was saved, then click on the method to load it.
4.2.3 Make any corrections as needed and then click Save to save the method. Then, close the
Liberty Method Editor.
4.2.4 Load the corrected method as described above.
Setting up a Synthesis
39
Page 44

Running the Liberty Blue
1. Click the Start button at the top of the Liberty Blue Software main screen.
2. The Loaded Method indicator will turn yellow to indicate the method is running.
3. The Liberty Blue will illuminate all required amino acids positions for the method. Ensure that all reagents are
connected and have sufcient volume, empty centrifuge tubes are connected to any unused reagent positions,
and that there is sufcient solvent and deprotection solution, then click OK to continue.
4. The Liberty Blue will go through a series of initialization steps and leak checks.
5. During the run, the current step of the method is highlighted in yellow in the Cycle Steps table of the Current Run
tab. A status bar in the lower right of the main screen indicates relative progress of the run.
6. When the run is complete, the Loaded Method indicator will turn green, indicating the method was successfully
completed.
Generating A Run History Report
The Run History Report records each command executed by Liberty Blue Software during a run with a date/
time stamp. In addition, the Run History Report records any system errors that occur, allowing for easy
diagnosis and troubleshooting of failed syntheses.
Creating a Run History Report
From the Run History tab:
1. Open the folder for the date on which the method was run.
2. Click the desired run. The run history information will load into the table on the right.
3. Click the Generate Report button.
4. The Report Viewer window will open, and the method report will be rendered as a PDF.
5. Click Save to save the report.
40
Setting up a Synthesis
Page 45
Cleavage
Various scavenger molecules are added to the TFA to prevent cleaved protecting groups from reattaching to the
peptide. The particular scavengers used depend on the specic peptide sequence. Common scavengers include
water (scavenges t-butyl cations), triisopropylsilane (TIS, scavenges trityl and Pbf cations), ethanedithiol (EDT,
scavenges t-butyl cations, reduces oxidation of Cys/Met side chains), dioxa-1,8-octane-dithiol (DODT, scavenges
t-butyl cations, suppresses oxidation of Cys/Met side chains), phenol (protects Tyr and Trp side chains from
oxidation), and thioanisole (aids in removal of Pbf protecting groups from Arg(Pbf), suppresses oxidation of Cys/
Met side chains).
Cleavage can be performed heated, or at room temperature. The table below lists CEM’s recommended
parameters for both heated and room temperature cleavages.
CEM Preference Cleavage Cocktail Temperature Time
1 TFA/TIS/H2O/DODT (92.5/2.5/2.5/2.5) 40-42°C 30 min
2 TFA/TIS/H2O/DODT (92.5/2.5/2.5/2.5) Room Temperature 3 h
NOTE
If the peptide contains multiple arginines, cleavage time may need to be extended to ensure complete Pbf
removal.
Setting up a Synthesis
41
Page 46

Maintenance of the Liberty Blue
Recommended Routine Maintenance Schedule
A routine maintenance protocol is vital for the long-term operation of the Liberty Blue.
Daily Maintenance
• Ensure the ber optic probe is fully inserted into the thermowell of the reaction vessel.
• Empty waste reservoir and ll main wash position.
Biweekly Maintenance
• Backush all positions except Main Wash (see Backush Reagent Positions & Backush Deprotection).
• Replace amino acid, activator, and activator base solutions.
Monthly Maintenance
• Perform a timed addition calibration for all timed additions (see Timed Addition Calibration).
• Verify the performance of the ltered drain (see Reaction Vessel Drain Test).
• Review recent run history reports to ensure that the Liberty Blue is heating properly.
Semiannual Maintenance
• Replace all amino acid diptube lters.
• Replace the Main Solvent and Deprotection lters.
• Replace the reaction vessel (or as needed by software Maintenance Tracker).
• Verify performance of waste sensor (see Verication of Waste Sensor Operation).
Annual Maintenance
• Replace all amino acid and reagent manifold o-rings. If the HT resin loader option is included, replace these
manifold o-rings also.
• Tighten the diptube nuts in the manifold ports for each reagent position. If the HT resin loader option is
included, tighten these diptube nuts also.
The following chart is provided for a record of routine maintenance procedures. As each procedure is completed
as indicated in the record, either a check, a date, or the user’s initials should be entered in the appropriate box to
record the maintenance procedure as completed.
Biweekly
Week 2 4 6 8 10 12 14 16 18 20 22 24 26
System Backush
Monthly
Month 1 2 3 4 5 6 7 8 9 10 11 12
Timed Addition Calibration
Reaction Vessel Drain Test
View run history reports to
ensure proper heating*
42
Maintenance of the Liberty Blue
Page 47

Semiannual
Month 6 12 18 24 30 36 42 48 54 60 66 72
Replace AA Dip Tube Filters
Replace Main Solvent and
Deprotection Filters
Verify proper operation of the
waste sensor
Annual
Year 1 2 3 4 5 6 7 8 9 10 11 12
Replace all amino acid and
reagent manifold o-rings.
Tighten the diptube nuts in the
manifold ports for each reagent
position.
NOTE
A complete listing of spare and replacement parts with part numbers and images can be found on the
CEM website (www.cem.com).
Maintenance Procedures
Backflush Reagent Positions
1. Select “Maintenance” from the “Options” menu.
2. Select the Cleaning tab.
3. Replace the centrifuge tubes or bottles for positions to be backushed with empty tubes or bottles.
4. Ensure that all reagent positions have a bottle connected.
5. From the Cleaning Tab, check the box next to each position to be backushed. To backush all reagents, check
the box at the top of the table to select all positions.
6. Click the Perform Backush button. A warning box will pop up. Verify that empty bottles have been connected
and tightened for all positions to be backushed, and that there is sufcient solvent for the operation. Click OK
to continue.
7. A progress window will pop up showing the progress of the backush procedure for all amino acids.
Maintenance of the Liberty Blue
43
Page 48

NOTE
As each position is backushed, the Last Backush date will be updated to the current date and time.
8. Once all reagent positions have been backushed, the manifold will be cleared, and the system will perform a
backpurge of selected positions.
9. After backushing, observe the volume in the amino acid bottles. If the bottles have less than 2 mL of Main Wash
added, replace the dip tube lter in the bottle(s) that are low and perform a backush on those specic positions
again. If volume is still below 2 mL, contact CEM.
10. Once all positions have been backpurged, remove the bottles from those positions and dispose of the liquid.
Backflush Deprotection
1. Select “Maintenance” from the “Options” menu.
2. Select the Backush/Backpurge folder and then select the Backush Deprotection operation
3. Click Run Operation.
4. The software will prompt to verify the reaction vessel is empty. Ensure the reaction vessel is empty, then click
OK to continue.
5. Solvent will be added to the reaction vessel, then backpurged into the deprotection bottle. To avoid lling
the lines with the solvent, the software will prompt to replace the bottle. Replace the bottle, then click OK to
complete the backush operation.
Timed Addition Calibration
There are four timed additions that must be calibrated for optimal functionality of the Liberty Blue: Wash, Wash
Thru Manifold, Deprotection, and Wash Thru RV Bottom. To calibrate a timed addition:
1. Place the reaction vessel into the volume calibration stand.
1.1. Remove the reaction vessel assembly from the cavity of the Discover.
1.2. Insert the reaction vessel into the calibration stand so that the drain line from the bottom of the
vessel ts into the slot on the right of the stand.
2. From the Calibration screen, under the Timed Addition folder, select the addition to be calibrated. The table
on the right will update with the calibration history for the selected addition.
3. Click the Calibrate button to begin the calibration operation.
44
Maintenance of the Liberty Blue
Page 49
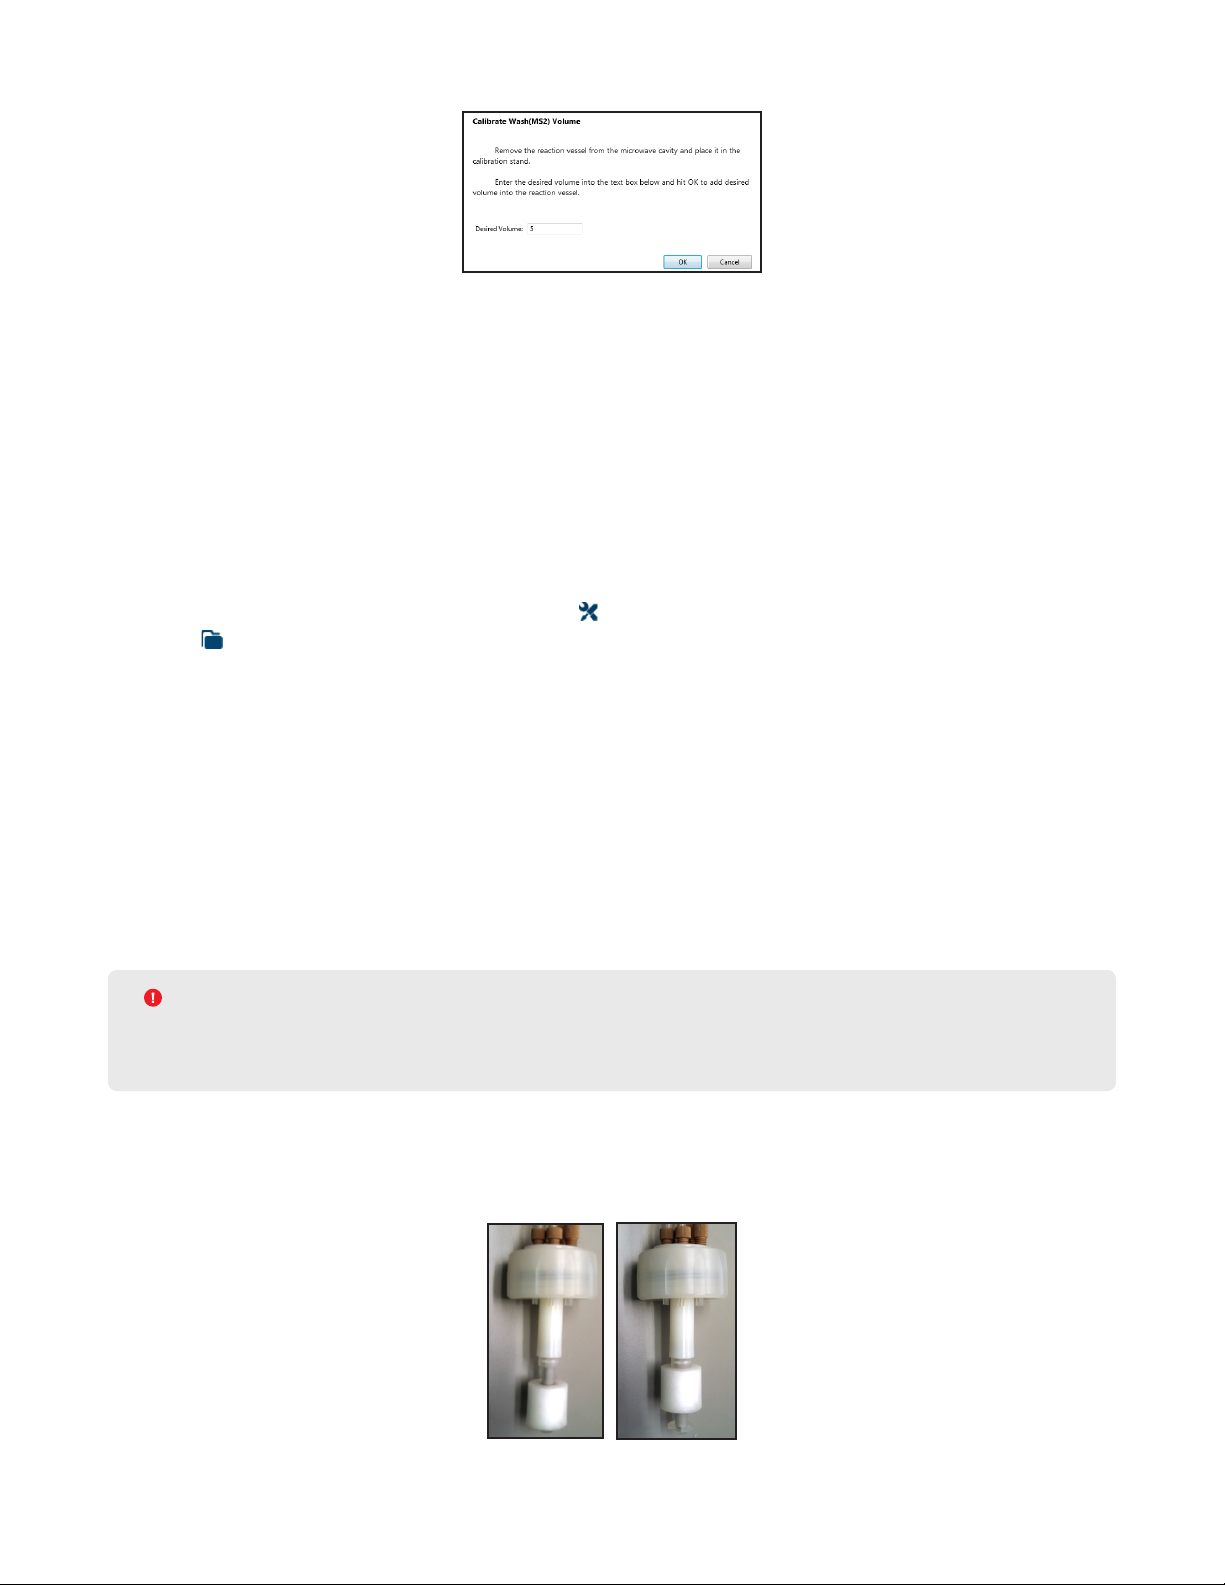
4. Enter the volume to be used for calibration, then click OK. Typically, 5 mL of reagent are used for calibration.
5. The selected reagent will be added to the reaction vessel. Once the addition is nished, measure the volume
delivered to the reaction vessel using the graduations on the calibration stand.
6. Enter the volume into the Delivered Volume box.
7. Click OK to drain the reaction vessel. The software will then calculate the new ow rate. Click OK to save the
new calibration values.
8. Once the new rate has been saved, click OK to complete the operation.
9. If the new timed addition ow rate is less than 1.0 mL/s, replace the position’s lter with PN 551000 and
recalibrate. If the ow rate is still below 1.0 mL/s, contact CEM.
Reaction Vessel Drain Test
1. In the Liberty Blue application software, open the Maintenance screen.
2. Under Addition, select the Add Main Wash (MS2) operation.
3. On the Parameters tab, double click the value for Volume, enter 10 in the pop-up, then click OK.
4. Click the Run Operation button to execute the operation. This will add 10 mL of solvent to the vessel.
5. Click the Drain button at the bottom of the Maintenance screen.
6. The liquid should drain within 10 seconds. If the liquid requires more than 10 seconds to fully drain, replace the
entire vessel (PN 167260).
Verification of Waste Sensor Operation
The Waste Sensor is a oat sensor located on the top of the waste bottle. It is connected to the Liberty Blue
through a 9-pin connector cable plugged into the left side of the Liberty Blue module. Periodically, operation of the
Waste Sensor should be veried.
WARNING
Handle all waste under a fume hood, and wear suitable protective clothing. Dispose of all waste in
accordance with all applicable local, state, and federal health and safety recommendations.
1. Ensure the Liberty Blue is idle.
2. Remove the cap from the waste container.
3. Lift the oat sensor.
Maintenance of the Liberty Blue
45
Page 50

4. The software should prompt a Waste Full error. In addition, the Waste indicator will turn red.
5. If the Waste Full error does not prompt, ensure the 9-pin connector is securely plugged into the Liberty Module.
If the plug is secure and the error does not prompt, replace the waste sensor assembly.
6. Release the oat sensor, connect the cap to the waste container, then click OK to clear the Waste Full error.
Standby Procedure
If the Liberty Blue will be idle for a period of two weeks or more:
1. Remove all reagents (amino acids, activator, activator base) from the system.
2. Select “Maintenance” from the “Options” menu.
3. Use the Change Bottle Deprotection operation to replace the deprotection bottle with an empty bottle and
properly clear the lines.
NOTE
During the priming step, the system will get an Empty Deprotection Bottle Error. This is normal. Click
Cancel to clear the error and end the Change Bottle operation.
4. Backush all positions, including deprotection.
5. Use the Change Bottle Main Solvent operation to replace the main was solvent bottle with an empty bottle and
properly clear the lines.
NOTE
During the priming step, the system will get an Empty Solvent Bottle Error. This is normal. Click Cancel to
clear the error and end the Change Bottle operation.
6. Use the Depressurize System operation to depressurize the system.
Prior to using the Liberty Blue after it has been in standby:
1. Connect the main wash solvent using the Change Bottle Main Solvent operation to properly prime the lines and
pressurize the bottles.
2. Connect the deprotect bottle using the Change Bottle Deprotection operation to properly prime the lines and
pressurize the bottle.
3. Perform a backush on all positions.
4. Perform a Timed Addition Calibration for all timed additions.
46
Maintenance of the Liberty Blue
Page 51
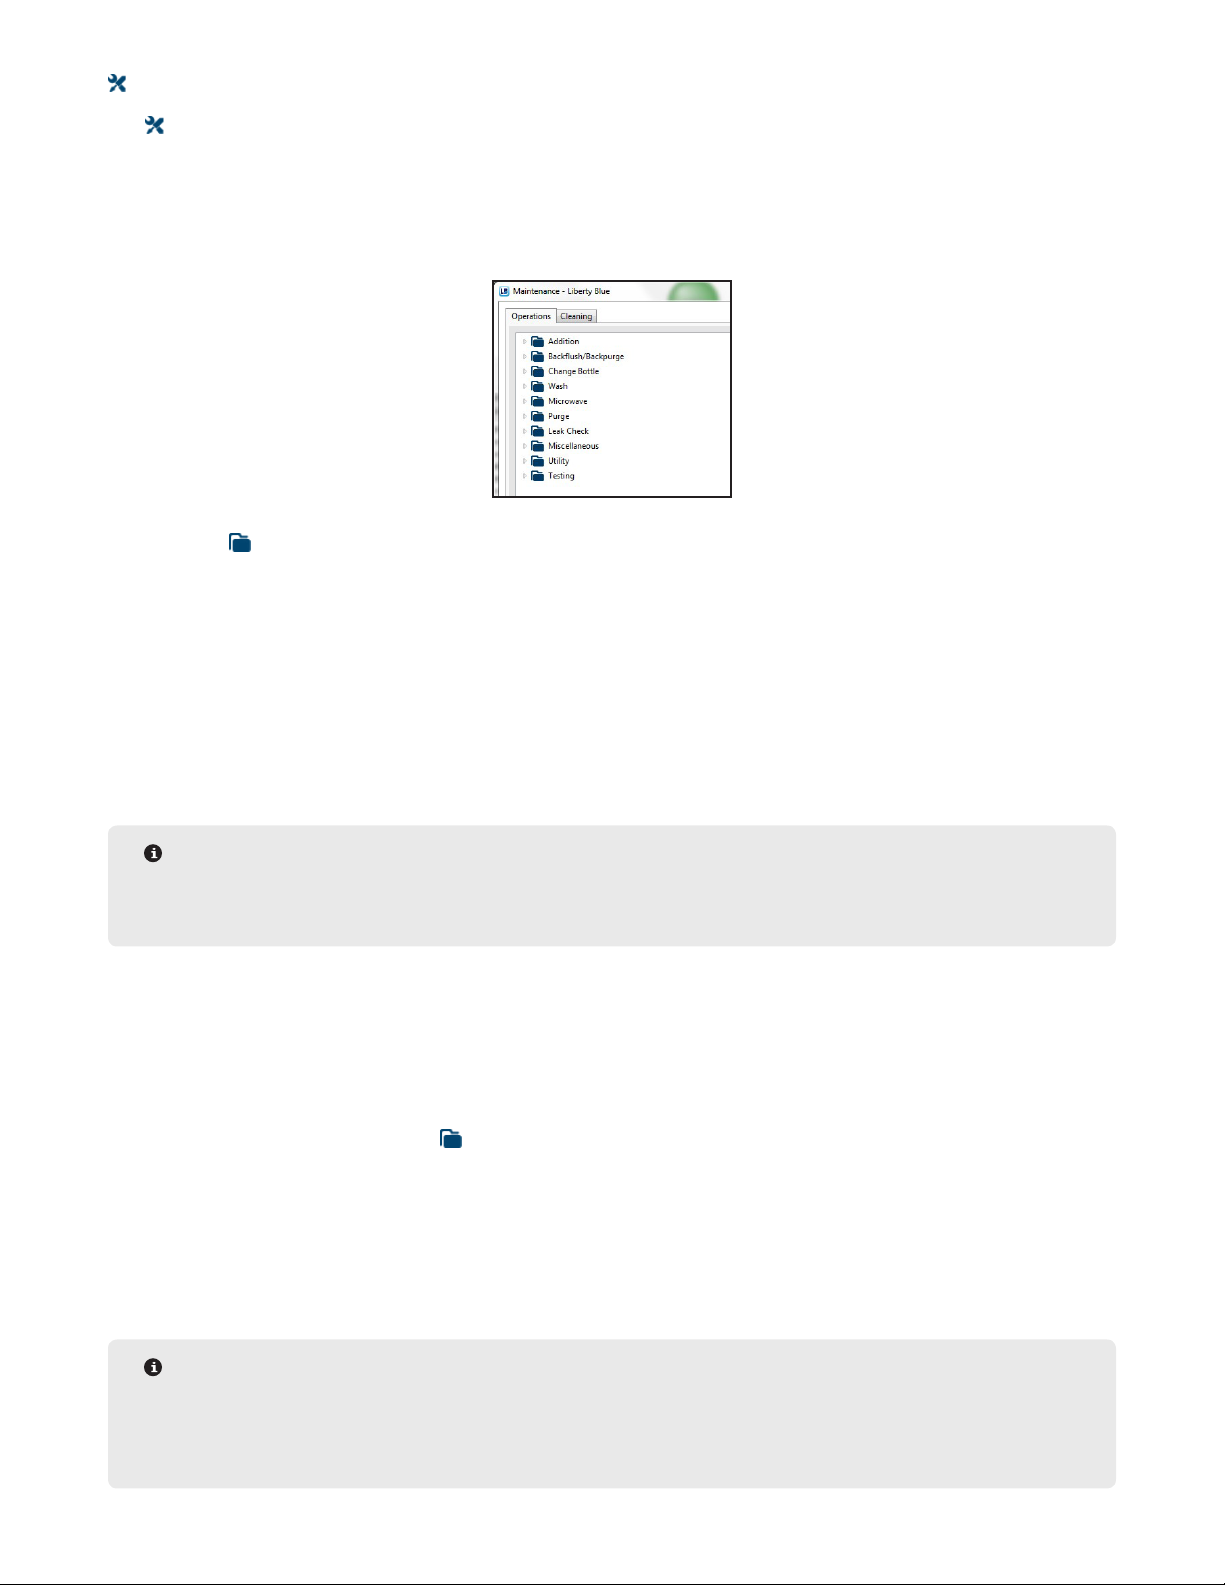
Maintenance Screen
The Maintenance screen is accessed from the Options menu. From the Maintenance screen, important
maintenance procedures and manual system commands can be accessed.
Operations Tab
From the Operations tab, various manual operations and cleaning procedures can be performed.
To perform an operation:
1. Open the folder for the operation type, and select the operation to be performed.
2. Select any parameters for the operation in the table to the right.
3. Click the Run Operation button to execute the operation.
Operations Folders and Specific Operations
Change Bottle Main Solvent: The Change Bottle operation will depressurize the main solvent bottle and prime the
lines for both the wash to the reaction vessel and the manifold wash.
Change Bottle Deprotection: The Change Bottle operation will depressurize the deprotection bottle, clear the lines
to the bottle, and prime the lines to the reaction vessel.
NOTE
Other Operations Folders/Specic Operations in the Operations Tab should only be performed under the
guidance of a CEM representative.
Using the Change Bottle Operations
The Change Bottle operations will depressurize the main solvent bottle and prime the lines for both the wash to
the reaction vessel and the manifold wash.
Change Bottle Main Solvent
1. From the Operations tab, open the Change Bottle folder and click on the Change Bottle Main Solvent operation.
2. Click the Run Operation button.
3. The Liberty Blue will vent the pressure from the system.
4. The software will prompt to replace the Main Solvent bottle. Remove the solvent bottle from the system and
either rell the bottle or connect a new bottle to the main solvent line.
5. Click OK to continue. The Liberty Blue will pressurize the bottle and prompt to begin priming the lines. Click OK
to begin the priming procedure, or click Cancel to skip priming the lines.
NOTE
Priming the lines will add solvent to the reaction vessel and drain the reaction vessel. The lines must be
primed if the main solvent bottle was empty or when changing to a different solvent (for example, when
changing from DMF to NMP). If the bottle was not empty, priming can be skipped.
Maintenance of the Liberty Blue
47
Page 52

6. The Liberty Blue will prime the line to the reagent manifold (through valve MS1), purge the liquid to the reaction
vessel, then drain the vessel. Next, the Liberty Blue will prime the direct wash line to the reaction vessel
(through valve MS2), then drain the vessel.
Change Bottle Deprotection
1. From the Operations tab, open the Change Bottle folder and click on the Change Bottle Deprotection operation.
2. Click the Run Operation button.
3. The Liberty Blue will vent the pressure from the deprotection bottle, then clear the lines to the deprotection
bottle.
4. The software will prompt to replace the deprotection bottle. Replace the bottle, then click OK to pressurize the
bottle.
5. The software will prompt to begin priming the lines. Click OK to begin the priming procedure, or click Cancel to
skip priming.
NOTE
The deprotection line must be primed or the rst deprotect addition will not be accurate.
6. The Liberty blue will prime the lines from the deprotection bottle to the reaction vessel, then drain the reaction
vessel.
7. Following the priming, the reaction vessel will be washed and drained.
Calibration Screen
The Calibration screen allows for the calibration of the timed delivery of reagents to the reaction vessel, as well
as all pressure and liquid sensors. The Calibration screen can be accessed from the Options menu.
Timed Addition Calibration
There are four timed additions that must be calibrated for optimal functionality of the Liberty Blue: Wash, Wash
Thru Manifold, Deprotection, and Wash Thru RV Bottom. Timed Addition Calibration should be performed monthly
as part of routine maintenance.
NOTE
Refer to the Timed Addition Protocol. All other calibrations should be performed under guidance of a CEM
representative.
48
Maintenance of the Liberty Blue
Page 53

Main Pressure Calibration
Main Pressure calibration is not necessary for routine maintenance.
WARNING
Main Pressure calibration should only be done on installation of the Liberty Blue or as part of a
troubleshooting protocol as advised by CEM service or applications support.
Liquid Sensor Calibration
The Liberty Blue uses four liquid sensors for various error monitoring functions: LS1 (Wash Solvent sensor), LS2
(Deprotection/Drain sensor), LS3 (Reaction Vessel Overow sensor), LS4, and LS7 (Spill sensor).
WARNING
Liquid sensor calibration of LS3, LS4, and LS7 should only be done on installation of the Liberty Blue or as
part of a Preventative Maintenance visit performed by a CEM-trained technician.
Maintenance of the Liberty Blue
49
Page 54

Advanced Features
Cycle Rules
Default cycles for resin swelling, amino acids, and nal deprotection are located in Cycle Rules. Please contact
CEM Applications Support at peptide.support@cem.com for assistance assigning/changing default cycles.
Reagent Library
The Reagent Library is a list of common reagents for peptide synthesis, including solvents, deprotection
reagents, amino acids, activators, and activator bases. The Reagent Library is fully customizable; reagents may be
added to or deleted from the library through the Reagent Library panel. Any reagent in the Library will appear in the
appropriate tab of the Reagent Calculator. The Reagent Library can be opened by selecting Reagents from the
Edit menu.
Adding a New Reagent to the Library
1. Open the folder for the appropriate reagent type.
2. Click the New Reagent button.
3. Enter the name and other properties into the blanks on the right side of the Reagent Library window. The name
in the reagent list will automatically update when the new name is entered in Reagent Properties.
4. Click the Save button to save the new reagent.
Creating a New Specific Derivative
The Reagent Library allows the user to select the specic derivative of an amino acid (including derivatives with
various side chain protection strategies) used in a particular Bottle Setup. Specic derivatives do not need to have
the same 1-letter code as their parent.
50
Advanced Features
Page 55
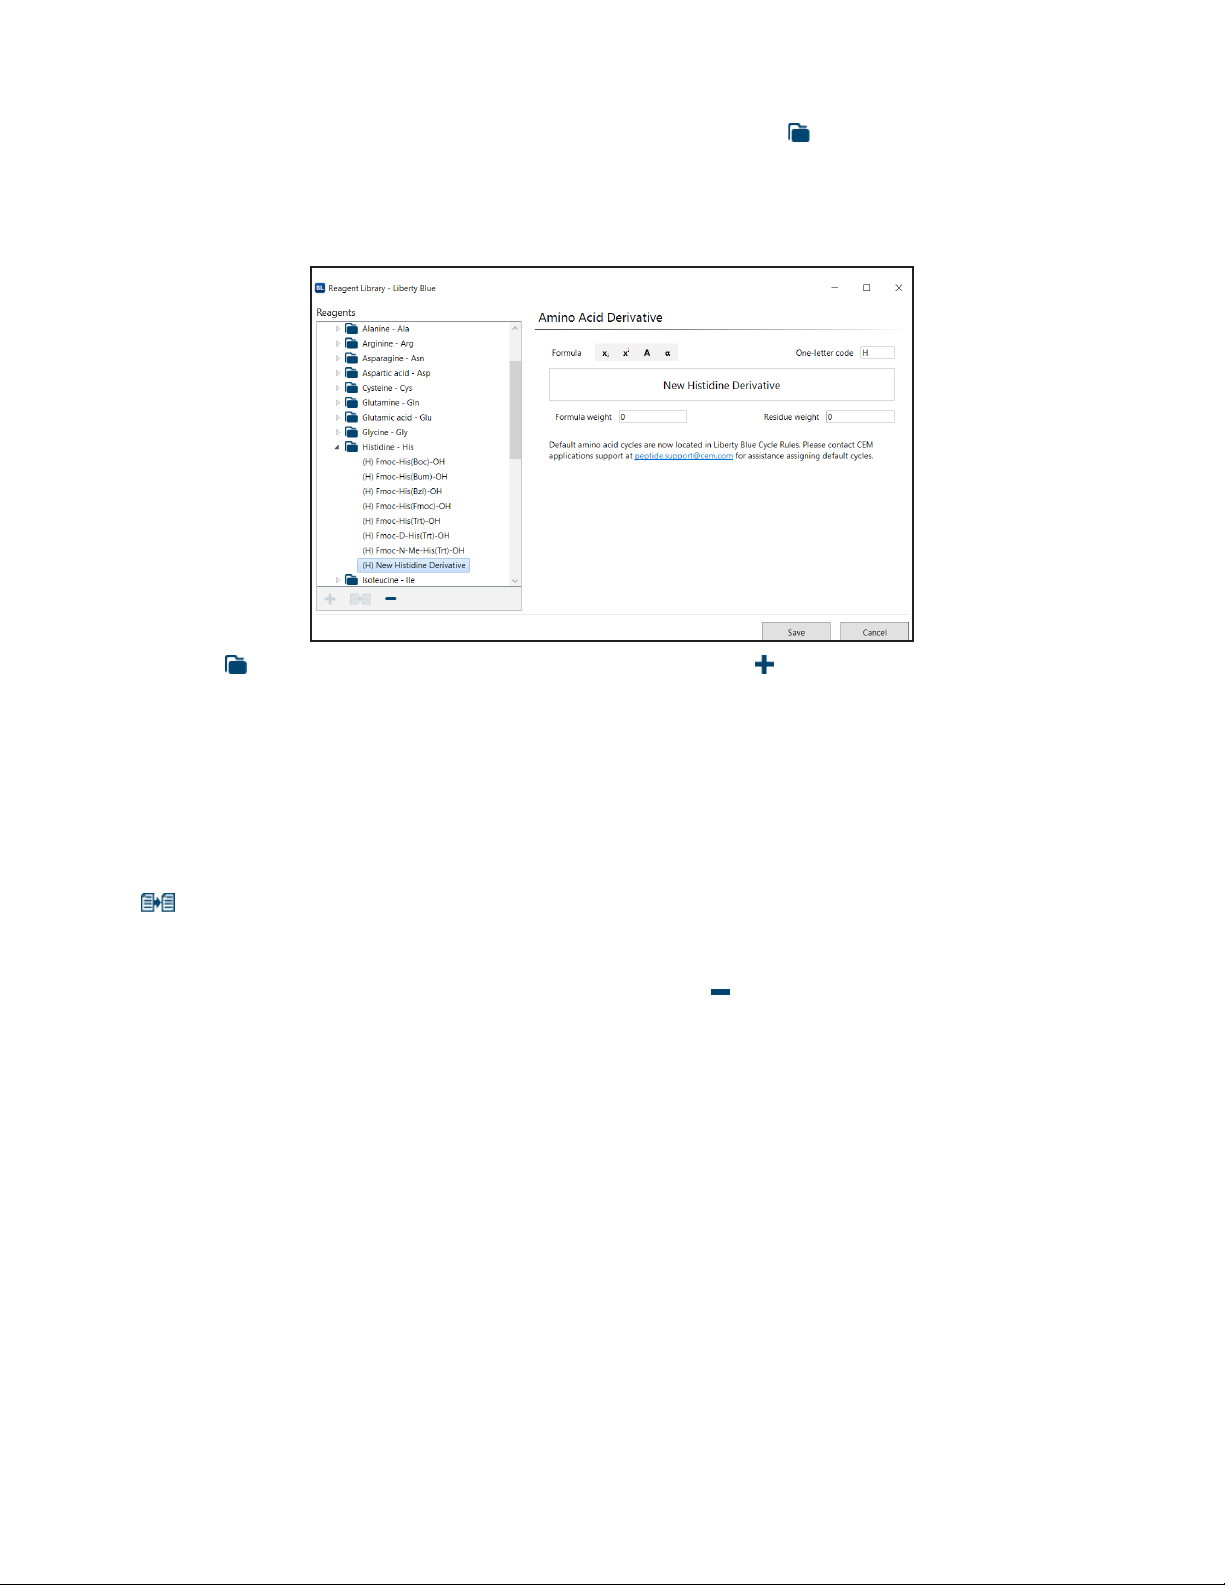
To create a new specic derivative:
1. Open the Amino Acid folder.
1.1. If the new derivative is a derivative of an existing amino acid, open the folder for the parent amino
acid, then proceed to step 2.
1.2. If the new derivative is not a derivative of an existing amino acid, select one of the External
(corresponding to external amino acid positions on the instrument) or Unusual - XXX folders in which
to add your new derivative.
2. With the folder for the parent amino acid type selected, click the New Specic Derivative button. A new
specic derivative will appear in the parent amino acid folder.
3. Enter the name, one-letter code, and other properties for the specic derivative; then click Save. By default, the
Single Coupling cycle will be assigned as the default for all scales and resin types. To assign a different default
cycle, a new cycle rule must be created.
Copying and Deleting Reagents
A new reagent can be created as a copy of an existing reagent by selecting a reagent from the list and clicking
the Duplicate Reagent button. When copying an existing specic derivative of an amino acid, the copy will be
created in the same parent amino acid folder.
To delete a reagent from the Library, select the reagent and click the Delete button. Select Yes to conrm the
deletion.
Advanced Features
51
Page 56

Bottle Setup
The Bottle Setup screen allows the user to assign any reagent to any position on the Liberty Blue from within
the Liberty Blue software. Individual instrument setups can be saved to allow for quick and easy conguration of
the instrument for a variety of syntheses. The Bottle Setup screen can be accessed from the Edit menu.
Creating a New Bottle Setup
1. Click the Copy Bottle Setup button.
2. A duplicated setup will appear in the Bottle Setup List. Name the new setup and press Enter.
3. To assign different amino acids and reagents, delete the appropriate reagent from the setup and replace it with
the desired reagent from the list to the left.
4. Once all amino acids and reagents have been assigned, click Save to save the current layout.
NOTE
Every position must have a reagent assigned to use the Bottle Setup.
Modifying an Existing Bottle Setup
1. From the Bottle Setup screen, select the desired setup from the Bottle Setup List.
2. Make any changes to the setup.
3. Click Save.
Deleting an Existing Bottle Setup
1. From the Bottle Setup screen, select the setup to be deleted from the Bottle Setup List.
2. Click the Delete Setup button.
NOTE
If the setup is used in a saved method, the software will not allow the setup to be deleted.
Selecting and Using a Bottle Setup
When creating a new Liberty Method, the bottle setup can be selected in the Method Editor. Select the new bottle
setup before typing in the peptide sequence. The Method Editor will use the reagents assigned in the selected
bottle setup to calculate the total molecular weight. When loading a method to run, the Usage Calculator will use
the formula weights from the selected bottle setup to calculate the mass of each amino acid required.
52
Advanced Features
Page 57

Refill Reagents Button
The Rell Reagents button allows for the replacement of insufciently lled reagent bottles while a method is
running without the need to stop and restart the method manually.
To use the Rell Reagents button:
1. While the run is in progress, press the Rell Reagents button to open the Rell Reagents window.
2. Check the box for each reagent to be relled.
3. The run will continue until it reaches a safe stopping point (at the end of a cycle). Once the run has reached a
stopping point, the system will depressurize the reagent bottles.
4. The system will prompt to rell the selected reagents. Remove the bottles, rell, replace the bottles, empty the
waste container (if needed), then click OK to resume the method.
NOTE
Only the selected reagent bottles will be depressurized.
NOTE
The Rell Reagents button re-pressurizes bottles but does not prime reagent lines. Therefore, use of the
Rell Reagents button is not recommended if deprotect or Main Wash bottles are empty.
5. The system will re-pressurize the reagent bottles, then automatically resume the run.
Diagnostics Screen
The Diagnostics Screen allows a number of manual controls and operations that are not intended for normal use.
The Diagnostics screen should only be accessed under the guidance of a CEM representative.
Settings Screen
The Settings Screen can be accessed from the Options menu. The Settings screen allows conguration of a
number of important system parameters.
CAUTION
The default values for each setting have been developed for optimal performance. These values should
only be changed under direction of CEM service or applications support.
Advanced Features
53
Page 58

Reaction Vessel Camera Option
The lightweight, easy-to-use reaction vessel camera captures full-color images which can be added to
presentations and publications, or for real time method optimization and troubleshooting.
Camera Hardware Installation
Liberty Blue instruments ordered with the camera option will have the camera hardware installed in the Discover
microwave prior to shipment. To connect the camera, plug the black USB camera cable into a USB port on the
computer.
For eld installation of the camera option, please contact your local CEM representative to order the Discover Bio
Camera Retrot Kit (PN 730125).
Camera Software
The Liberty Blue with camera option includes a USB drive with the necessary software driver for operating the
camera option. To download this driver, connect the USB drive to a computer and open the Dell Webcam folder.
Double click Setup to begin installation.
Enabling the Camera
1. Open the Settings screen in the Liberty Blue application software (
2. In the Application folder, select Vessel Camera.
3. Check the box next to Vessel Camera Enabled and save.
4. The vessel camera icon will appear in the bottom right corner of the application software.
Capturing Images During a Run
1. Install the camera spill cup (PN 169560).
2. Click on the vessel camera icon to open the camera window and view the vessel in real time. To capture an
image, click the snapshot icon. The camera window will ash briey, indicating a snapshot has been taken.
3. To view all captured images, click the gallery icon. Alternatively, select File then Show Vessel Camera
Snapshots. All images are saved to the computer hard drive (C:\ProgramData\CEM Corporation\Liberty Blue\
Snapshots).
Options -> Settings
).
54
Advanced Features
Page 59

Warranty
Limited Warranty Information
What Is Covered:
CEM Corporation warrants that the instrument will be free of any defect in parts or workmanship and will, at its
option, replace or repair any defective part (excluding consumables) or instrument.
For How Long:
This warranty remains in effect for 365 days from date of delivery to the original purchaser.
What Is Not Covered:
This warranty does not cover parts or workmanship damaged due to:
• Neglect, abuse or misuse,
• Damage caused by or to test samples,
• Damage incurred during instrument relocation,
• Damage caused by or to any attached equipment,
• Use of incorrect line voltages or fuses,
• Fire, ood, “acts of God” or other contingencies beyond the control of CEM Corporation,
• Improper or unauthorized repair, or
• Any other damage caused by purchaser or its agents.
Responsibilities of Purchaser:
To ensure warranty coverage, the purchaser must:
• Use the instrument according to directions,
• Connect the instrument properly to a power supply of proper voltage,
• Replace blown fuses,
• Replace consumables and
• Clean the instrument as required.
How to Get Service:
Purchaser should contact the Service Department of CEM Corporation or the nearest CEM subsidiary or distributor
for return authorization and for proper crating and shipping instructions to return instrument, freight prepaid, for
service. On-site repairs by an authorized service technician are available through the CEM Service Department.
Travel costs will be charged to the purchaser for on-site repairs.
Within the U.S. Outside the U.S.
CEM Corporation CEM Corporation
3100 Smith Farm Rd. 3100 Smith Farm Rd.
Matthews, NC 28105-5044 Matthews, NC 28105-5044
(800) 726-5551 (704) 821-7015
Fax: (704) 821-4368 Fax: (704) 821-4368
Warranty
55
Page 60

Warranty Disclaimer:
CEM Corporation hereby excludes and disclaims any warranty of merchantability or tness for any particular
purpose. No warranty, express or implied, extends beyond the face hereof. CEM Corporation shall not be liable
for loss of use of instrument or other incidental or consequential costs, expenses or damages incurred by the
purchaser or any other user. This warranty is not transferable.
Purchaser’s Rights under State Law:
This warranty gives the purchaser specic legal rights, and the purchaser may also have other rights that vary from
state to state.
56
Warranty
Page 61

Warranty
57
Page 62

Page 63

Copyright 2018 by CEM Corporation
All Rights Reserved. This guide contains
proprietary information which shall not
be reproduced or transferred to other
documents or disclosed to others without
prior written permission of CEM Corporation.
CEM® is a registered trademark of CEM
Corporation. Liberty BlueTM, CarboMAXTM,
Razor™, and ProTideTM are a trademark of
CEM Corporation.
Part Number 600291
November 12, 2018 11:53 AM
Rev. 6
Copyright CEM Corporation 2018
 Loading...