

Page 1
EDGE™
Operation Manual
1
Page 2

Table of Contents
Safety Information ..................................................................................................... 3
Safety Notations .................................................................................................... 3
Personal Laboratory Safety ....................................................................................... 3
Fume Ventilation ................................................................................................... 3
Waste Disposal ...................................................................................................... 3
Introduction ............................................................................................................. 4
System Hardware ................................................................................................... 4
Specifications ....................................................................................................... 4
Hardware Setup ........................................................................................................ 5
Assembly ............................................................................................................. 5
Calibration ........................................................................................................... 6
Bottle Setup ......................................................................................................... 11
Prepheat Temperature ............................................................................................ 16
Methods .................................................................................................................. 18
Classic Method ...................................................................................................... 18
One Touch Methods ................................................................................................ 18
Copying a Method .................................................................................................. 19
Editing a Method ................................................................................................... 20
Performing a Method .............................................................................................. 27
Limited Warranty ...................................................................................................... 31
600859
Rev.2
10/17
Copyright 2017 by
CEM Corporation
All Rights Reserved
This manual contains proprietary information, which shall not
be reproduced or transferred to other documents
or disclosed to others without prior written permission of
CEM Corporation.
CEM is a registered trademark of CEM Corporation.
Patents Pending
Manufactured in the
United States of America
2
Page 3

Safety Information
Safety Notations
This manual uses three safety alert words at points in the documentation where the user should be aware of
potential hazards. The safety alerts are shown in color-coded boxes. The three words – NOTE, CAUTION, and
WARNING – indicate differing levels of observation or action as described below:
NOTE
A NOTE is intended to provide emphasis of procedures that may be misinterpreted or
overlooked, or to clarify confusing situations.
CAUTION
A CAUTION is intended to provide essential information and to emphasize procedures which,
if not strictly followed, may result in improper instrument operation.
WARNING
A WARNING is intended to emphasize dangerous or hazardous conditions which may result in
personal injury to the user and/or damage or destruction of the instrument.
Personal Laboratory Safety
Solvents and chemical reagents used on the EDGE can be hazardous and should be handled under a fume hood
only. Personal protective equipment, including but not limited to safety glasses, chemical resistant gloves,
and a laboratory coat are highly recommended when operating the EDGE. For detailed information on the
safety requirements for the chemicals used on the EDGE, refer to the appropriate manufacturers’ documents.
Fume Ventilation
The EDGE operates as a semi-closed system with venting of any hazardous solvent fumes through the exhaust
line located on the upper rear of the unit. In addition, adequate ventilation should be provided for preparation
of all reagents and solvents used on the system. All solvent bottles and the waste bottle should be placed into
proper secondary containers to minimize the risk of exposure.
Waste Disposal
Waste produced by the EDGE can be hazardous. For detailed information on the safety requirements for the
chemicals used on the EDGE, refer to the appropriate manufacturers’ documents.
WARNING
Handle all solvents and waste under a fume hood, and wear appropriate personal protective
equipment including, safety glasses, chemical resistant gloves, and a laboratory coat. Dispose
of all waste in accordance with all applicable local, state, and federal health and safety
recommendations.
3
Page 4
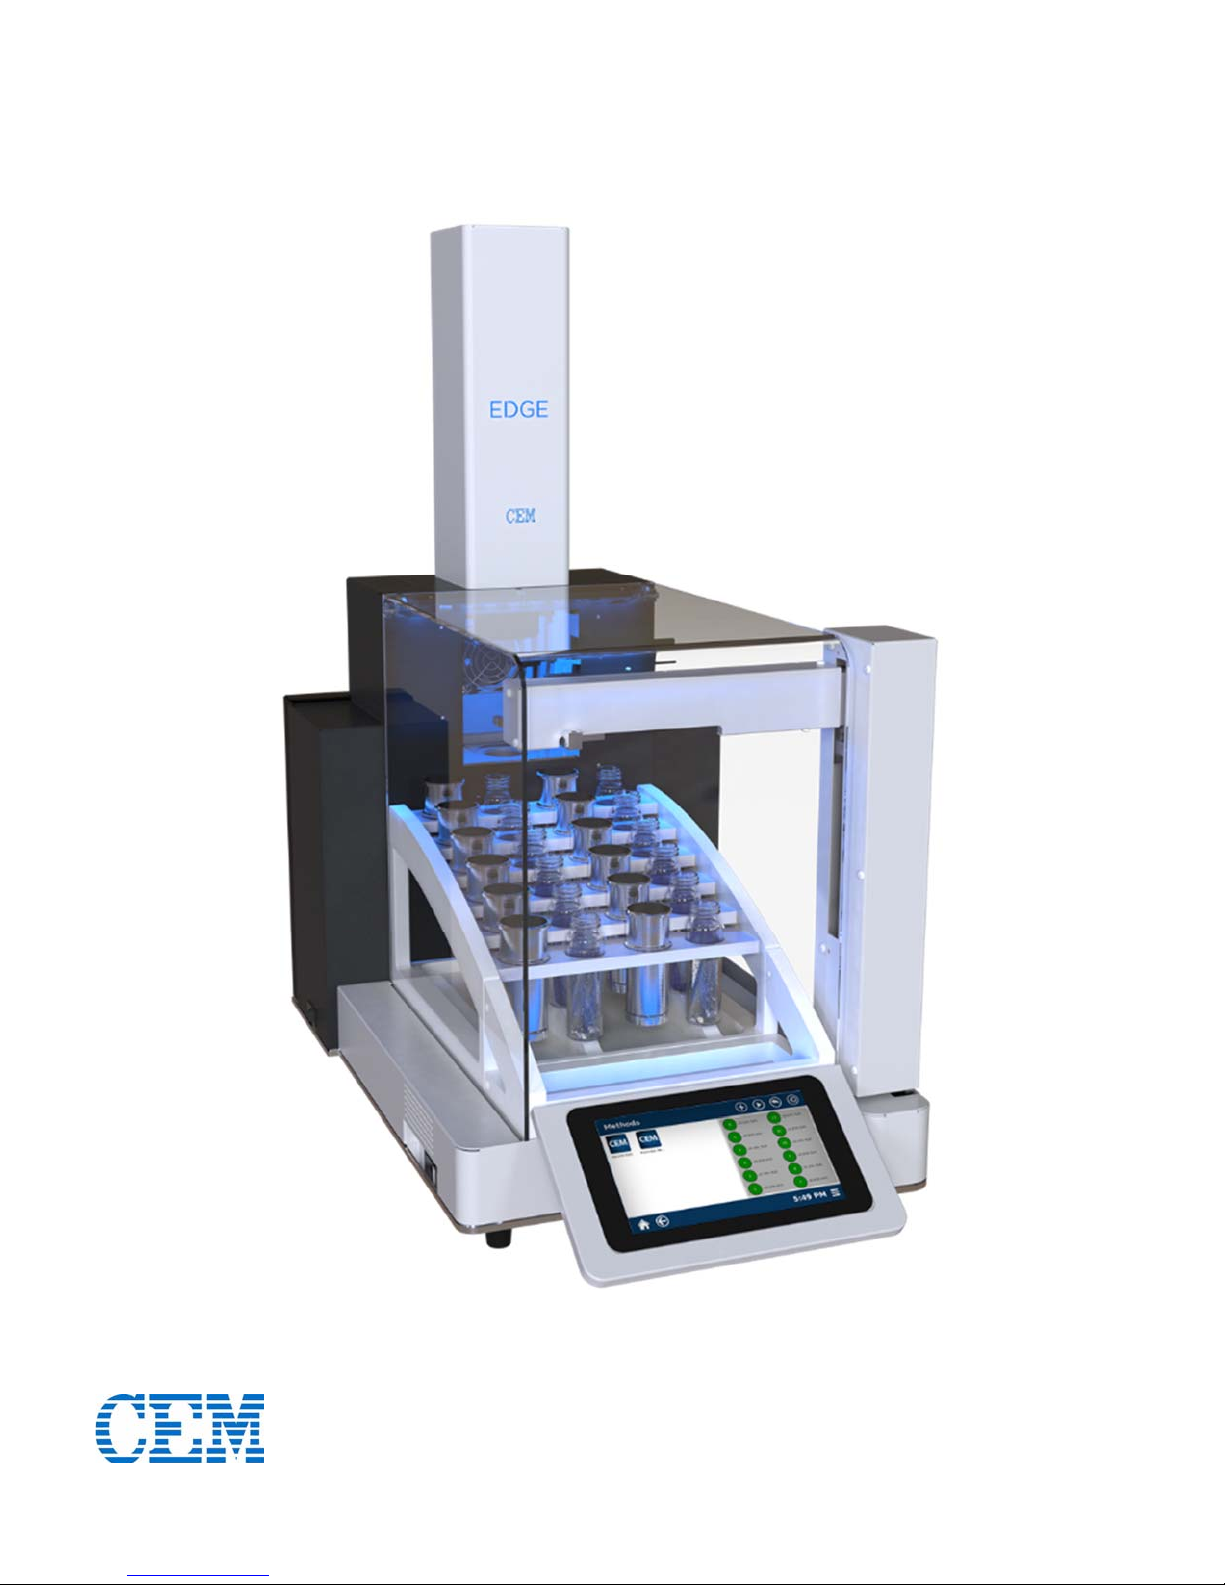
Introduction
The EDGE uses Q-Cup technology that combines the process of Pressurized Fluid Extraction and Dispersive
Solid Phase Extraction in one instrument that yields rapid and efficient extraction. The easy-to-assemble
Q-Cup contains the sample to be extracted, and offers a unique open cell concept that creates a dispersive
effect which promotes rapid extraction and filtration. The result is fast, simple and efficient extractions.
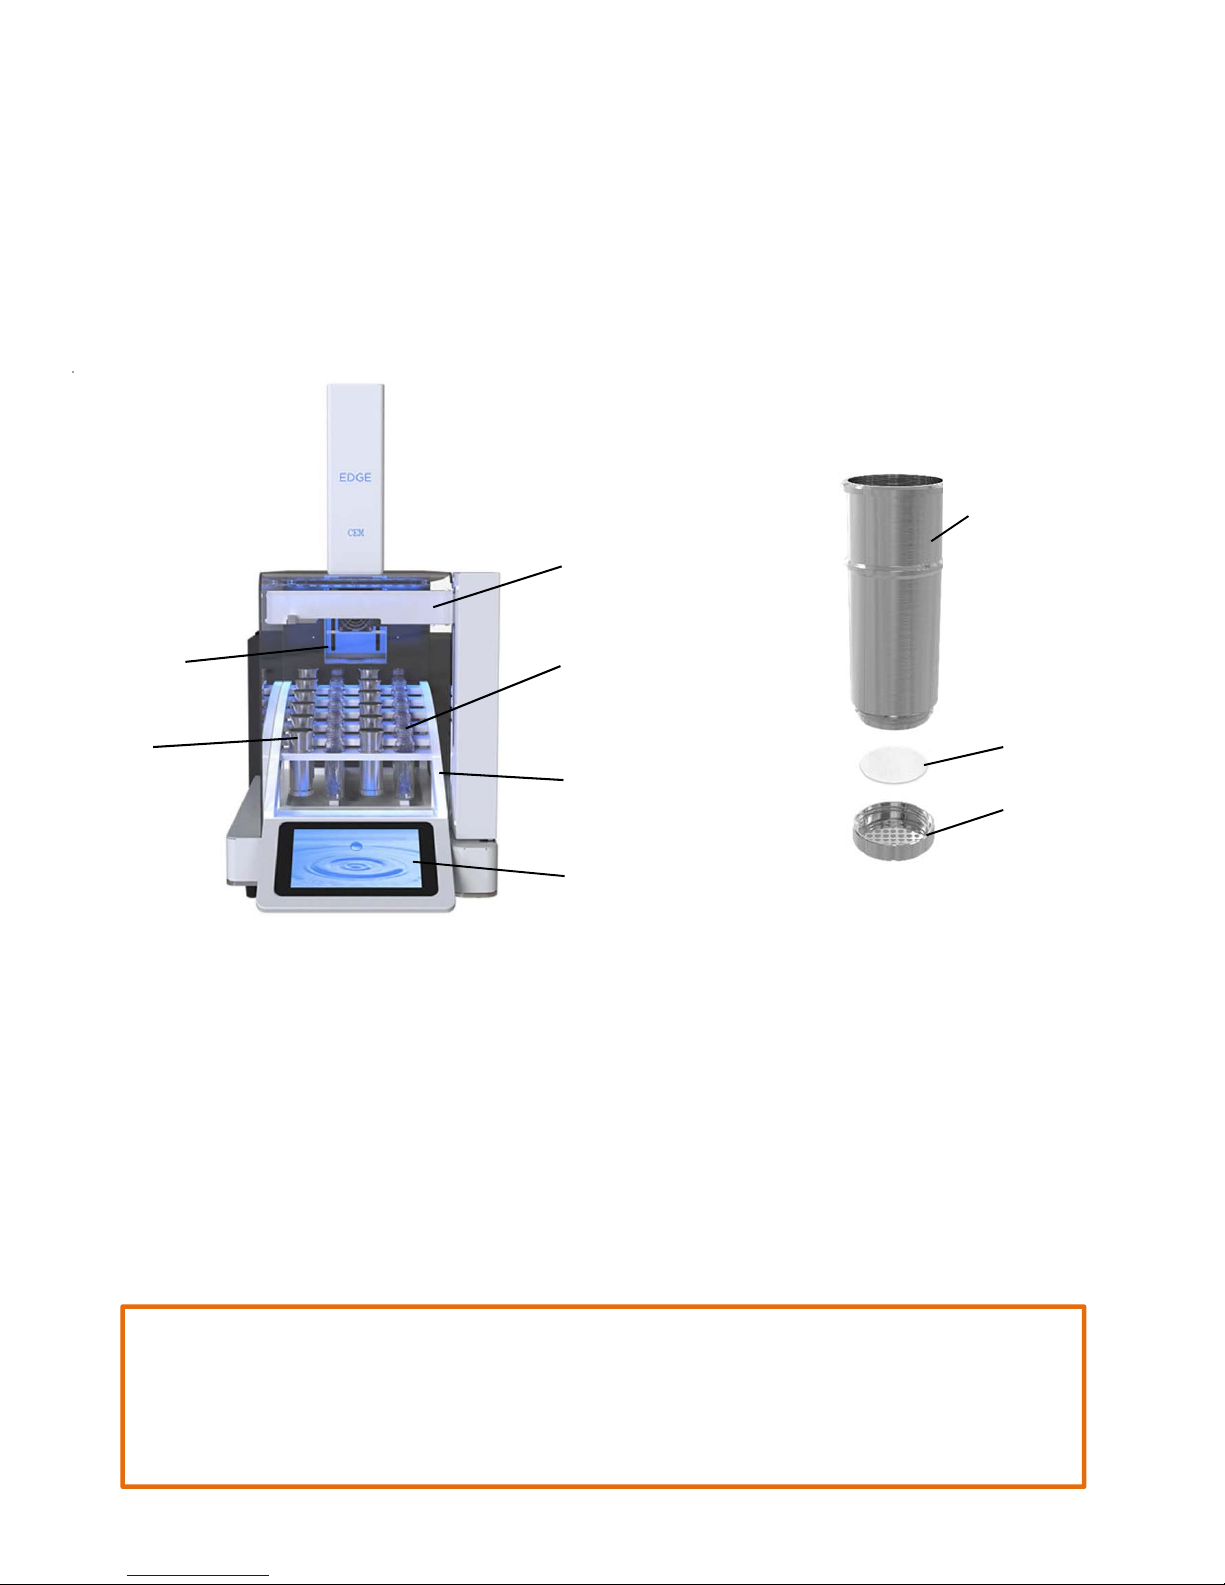
System Hardware
Autosampler
Q-Cup Cylinder
Sample
Chamber
Collection
Vials
Q-Cup
Sample
Holders
Removable
Rack
Touch Screen
Display
Q-Disc
Threaded
Bottom
Specifications
• Samples can range from sub 1g up to 30g and can be dry or wet.
• If needed, sorbents and salts can be added for inline sample drying or cleanup.
• An innovative, easy-to-assemble, two piece Q-Cup design can accommodate any sample type.
• The disposable Q-Discs allow for easy cleanup.
• Q-Cups allow for inline filtration and cooling.
• A total of 40mL can be used per extraction, including the solvent used for the extraction and rinse.
In addition, a maximum of 40mL can be used per wash immediately following the extraction.
• A maximum of 200
C can be reached.
CAUTION
Maximum pressure will be solvent dependent. The pressure in the vessel chamber is a result
of heating the solvent. For safety purposes, there is a pressure release valve. Certain solvent
or solvent combinations will exceed this pressure prior to reaching 200 °C. The EDGE methods
will allow only safe running conditions.
4
Page 5

• Internal temperature and pressure readings result in precise temperature control.
• Up to six solvents can be used at a time.
• Run 12 samples in sequence unattended.
• Each extraction can consist of an extraction, rinse and wash.
Hardware Setup
WARNING
Handle all chemicals under a fume hood, and wear appropriate protective equipment
including, safety glasses, chemical resistant gloves, and a laboratory coat. Dispose of all
waste in accordance with all applicable local, state, and federal health and safety
recommendations. For detailed information on the safety requirements for the chemicals
used on the EDGE, refer to the appropriate manufacturers’ documents.
Assembly
1. Attach the bottles.
1.1 Attach the waste tubing and sensor wire to the upper right side of the instrument.
1.2 Attach the waste bottle to the white cap with a sensor located on the EDGE.
1.3 Remove the blue caps from the solvent bottles and fill each with the desired solvent.
1.4 Securely screw the blue bottle caps on the solvent bottles.
1.5 Thread the solvent tubing attached to the EDGE through the appropriate solvent bottle cap to the
bottom of the solvent bottle.
NOTE
Be aware of which solvent line is in which solvent, as this will need to be set up in Bottle Setup.
2. Install the rack.
2.1 Place the rack on the EDGE so that the magnets hold it securely in place.
3. Power the instrument.
WARNING
Do not tamper with the EDGE such as removing any components of the housing or man ually
trying to move the automation components.
3.1 Attach the power cord to the EDGE at the bottom left of the rear of the instrument.
3.2 Plug the power cord into a power outlet.
3.3 Turn the EDGE power button located on the left corner of the EDGE to ON.
5
Page 6
Calibration
The autosampler fork, located in the load position for safe shipping will have to be moved from the
chamber prior to homing the autosampler.
1. Move the autosampler fork to a safe location.
1.1 Select the menu icon at the lower right hand side of the touchscreen.
NOTE
1.2 From the menu select “Tools” and scroll down to the Autosampler section at the bottom of the
page.
Do not ever move hands, or any object, past the automated arms into the area containing the
rack while the EDGE is running a method or the automation is being controlled via tools. Only
load or unload rack when the EDGE is in the idle state.
WARNING
6
Page 7
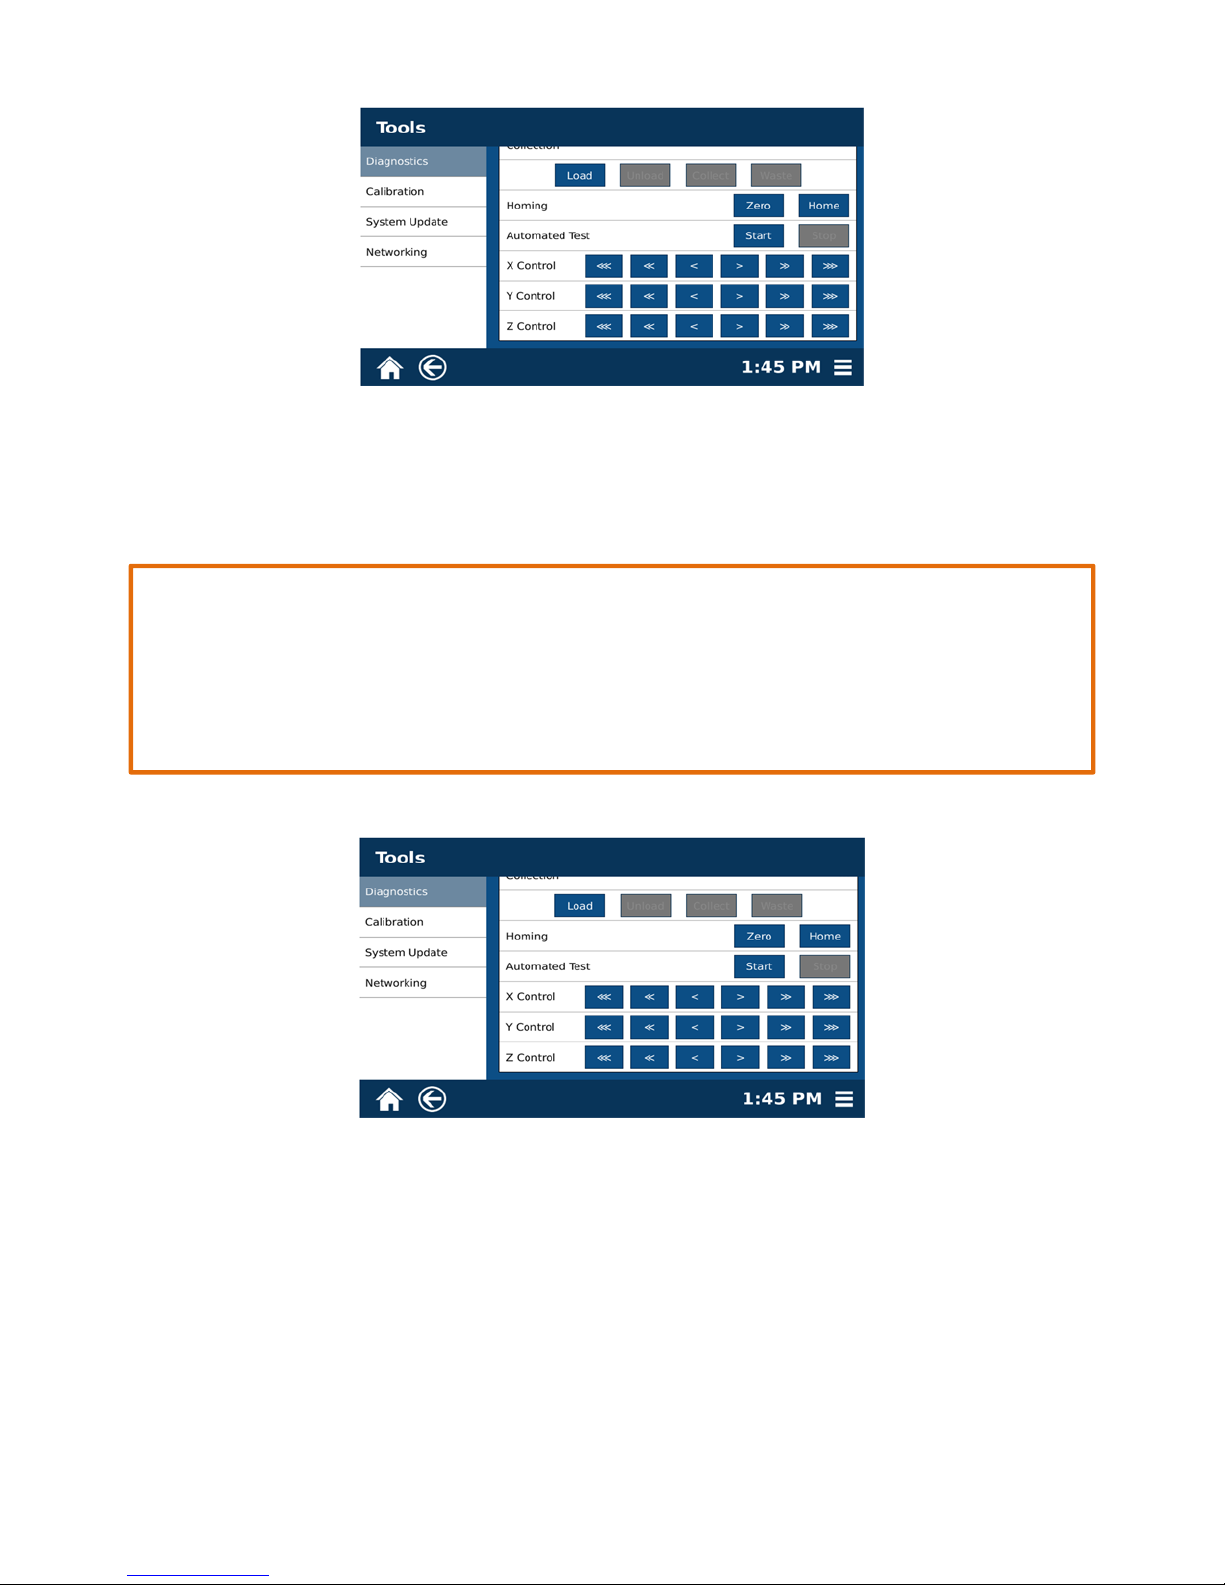
1.3 Under Y control, select the left triple arrow “<<<” at least twice, ensuring that the fork has
cleared the chamber.
2. Home the Autosampler.
Use caution when manually controlling the X, Y, and Z Controls. When homing the
autosampler, only select single arrows (< or >) for the Y and Z Control. The double arrow “<<”
may be pressed for the X Control. The arrows may require being pressed a number of times
before the axes stall. Listen for a gentle stall, not a loud grinding. If a loud grinding occurs,
repeat this step.
2.1 Select “Menu,” “Tools,” “Autosampler,” and “Home.”
CAUTION
2.2 From X Control, select the left double arrow “<<” multiple times until the axis audibly stalls.
The X-axis controls the left and right movement of the fork and the fork should no longer move
upon stalling.
2.3 From Y Control, select the left single arrow “<” until the axis audibly stalls. The Y-axis controls
the horizontal movement of the arm.
2.4 From Z Control, select the left single arrow “<” until the axis audibly stalls. The Z-axis controls
the vertical movement of the arm.
7
Page 8
NOTE
Do not select and hold the arrow buttons. Select and release and then select and release
again, repeating until the axes stall.
2.5 Select “Zero.”
2.6 Select “Home.”
3. Verify the Autosampler Calibration.
CAUTION
When verifying the autosampler calibration, always select “Load,” “Collect” and “Unload” in
that order without skipping a function. If there are problems verifying the autosampler
calibration, repeat step 2.
3.1 Place a Q-Cup and collection vial in position 4.
NOTE
Position 4 is used to verify the calibration. Moving the Q-Cup to and from this location
requires the most distance traveled for all axes and is therefore the best test for the
calibration.
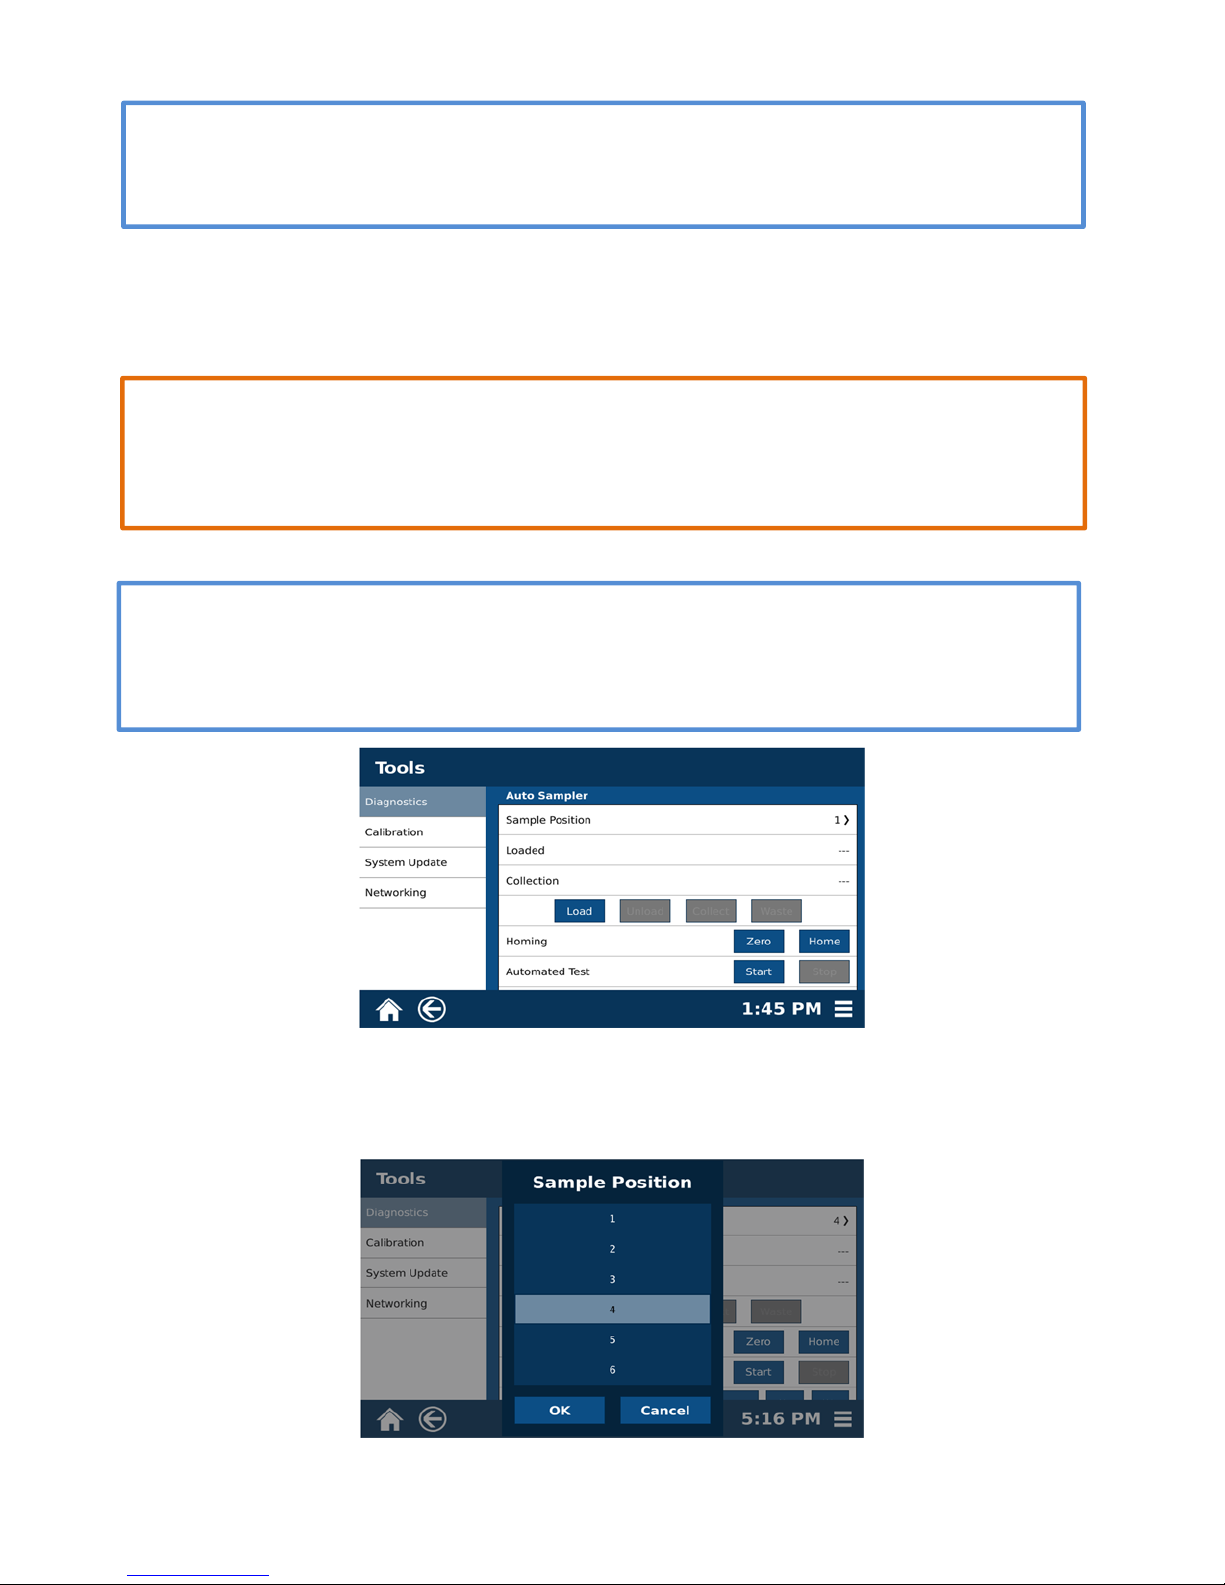
3.2 Select “Menu,” “Tools,” and “Autosampler.” Then select “1” from Sample Position to display
the sample position menu. (Scroll to view the entire Sample Position.)
8
Page 9
3.3 Select the Sample Position “4.”
3.4 Select “OK.”
3.5 Select “Load.” The autosampler will load the Q-Cup into position 4.
3.6 Select “Collect.” The autosampler will move to the position 4 collection vial.
3.7 Select “Unload.” The autosampler will unload the Q-Cup from the vessel chamber and place it
back into position 4.
4. Verify the Waste Calibration.
To verify the waste calibration, the vessel must be in the closed position. If there are any
problems verifying the waste calibration, repeat step 2.
Never place hands into the vessel chamber area when the EDGE is in use or powered on.
CAUTION
WARNING
9
Page 10
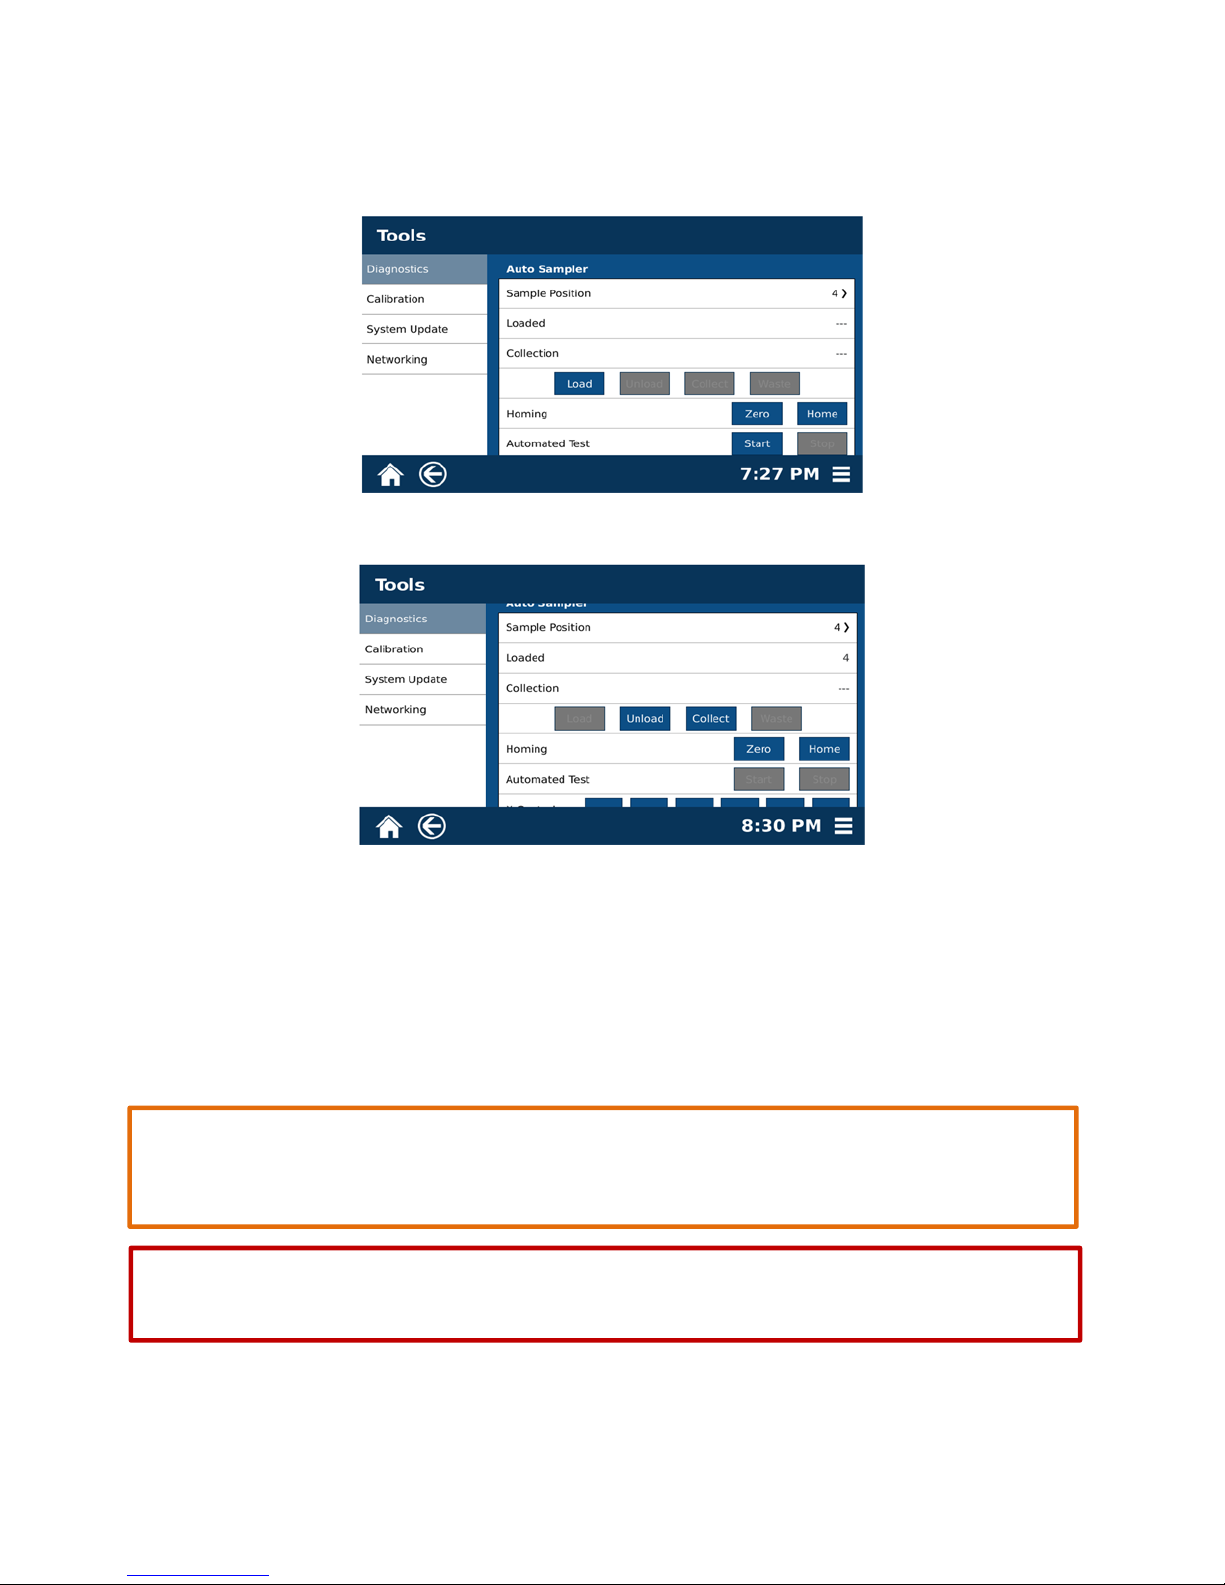
4.1 Select “Menu,” and “Tools.” Scroll the touchscreen upward to reveal the Vessel/Agitation
section.
4.2 Select “Close” for Vessel.
4.3 Scroll down to the Autosampler section.
4.4 Select “Waste.” The autosampler will travel to the waste position.
4.5 Select “Waste.” The autosampler will travel to the home position.
4.6 Scroll upward to the Vessel/Agitation section.
4.7 From Vessel, select “Open.”
10
Page 11
Bottle Setup
1. Add the solvent.
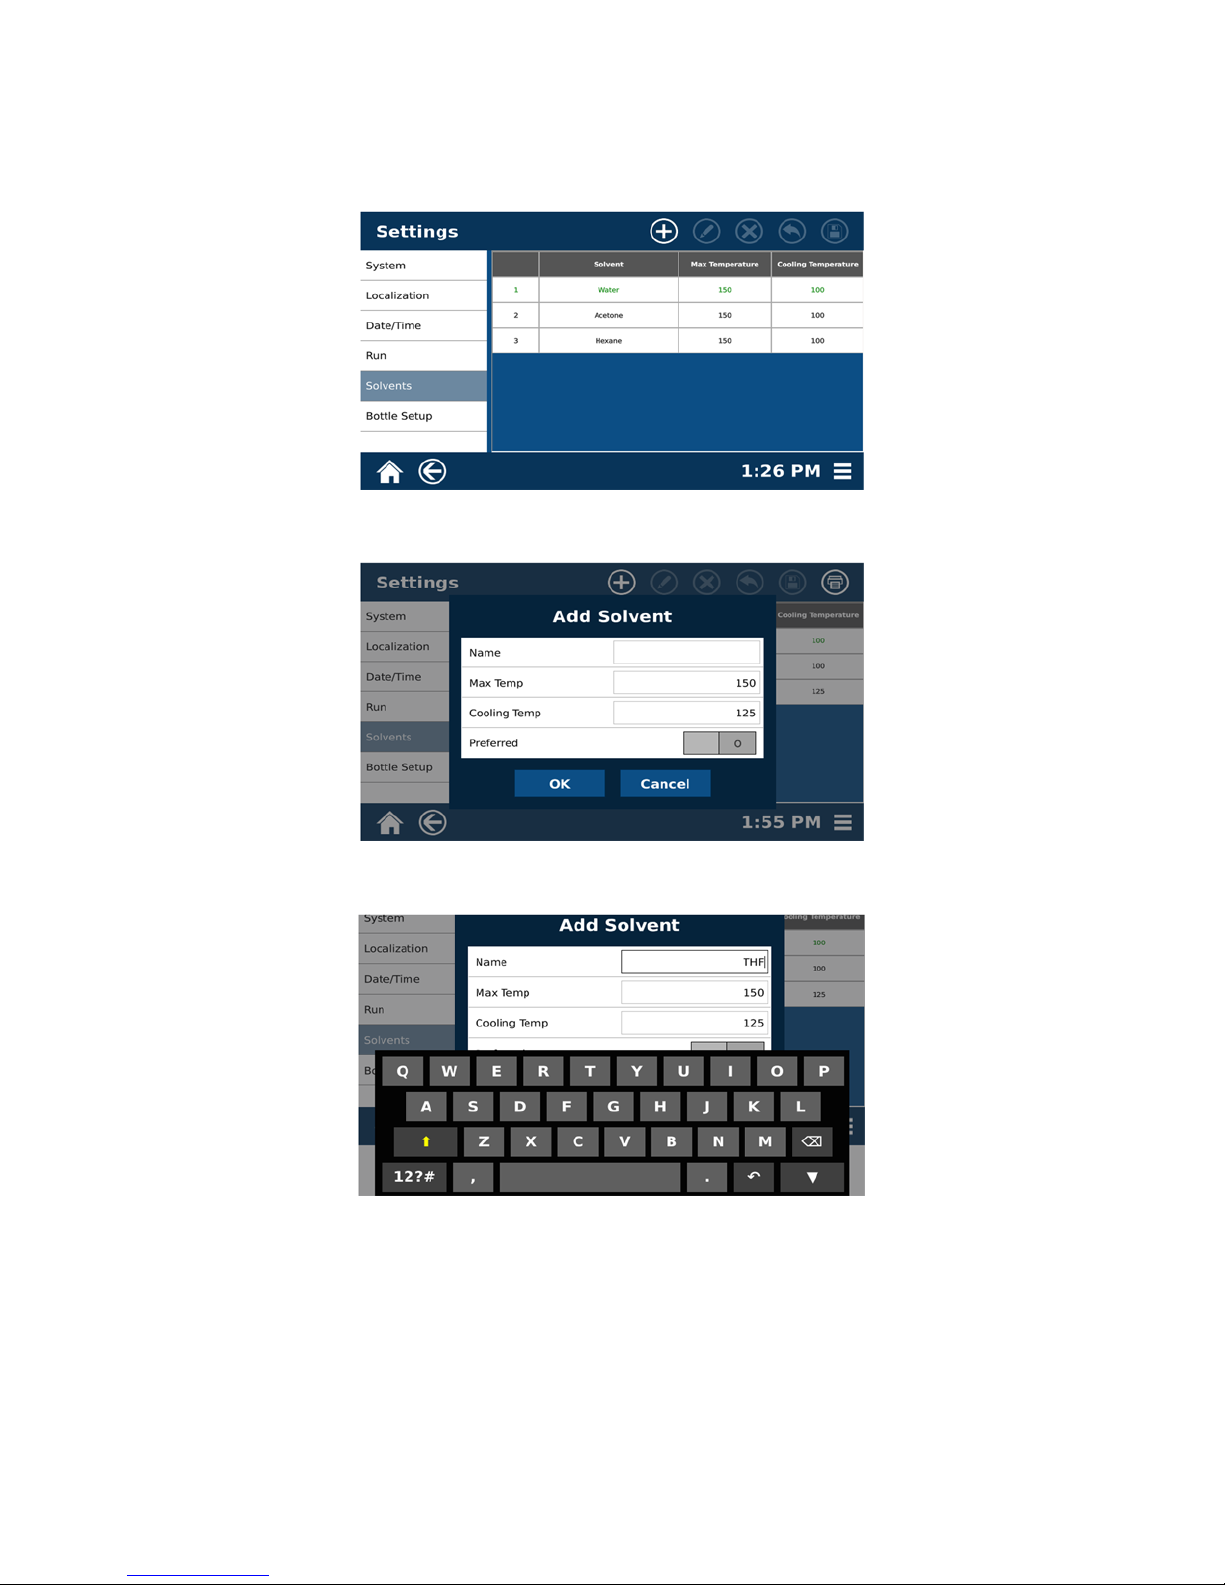
1.1 Select “Menu,” “Settings,” and “Solvents.”
1.2 Select the plus icon “+” at the top of the screen.
1.3 Select the text box for Name to display the keypad.
1.4 Type the solvent name and select “Enter.”
11
Page 12
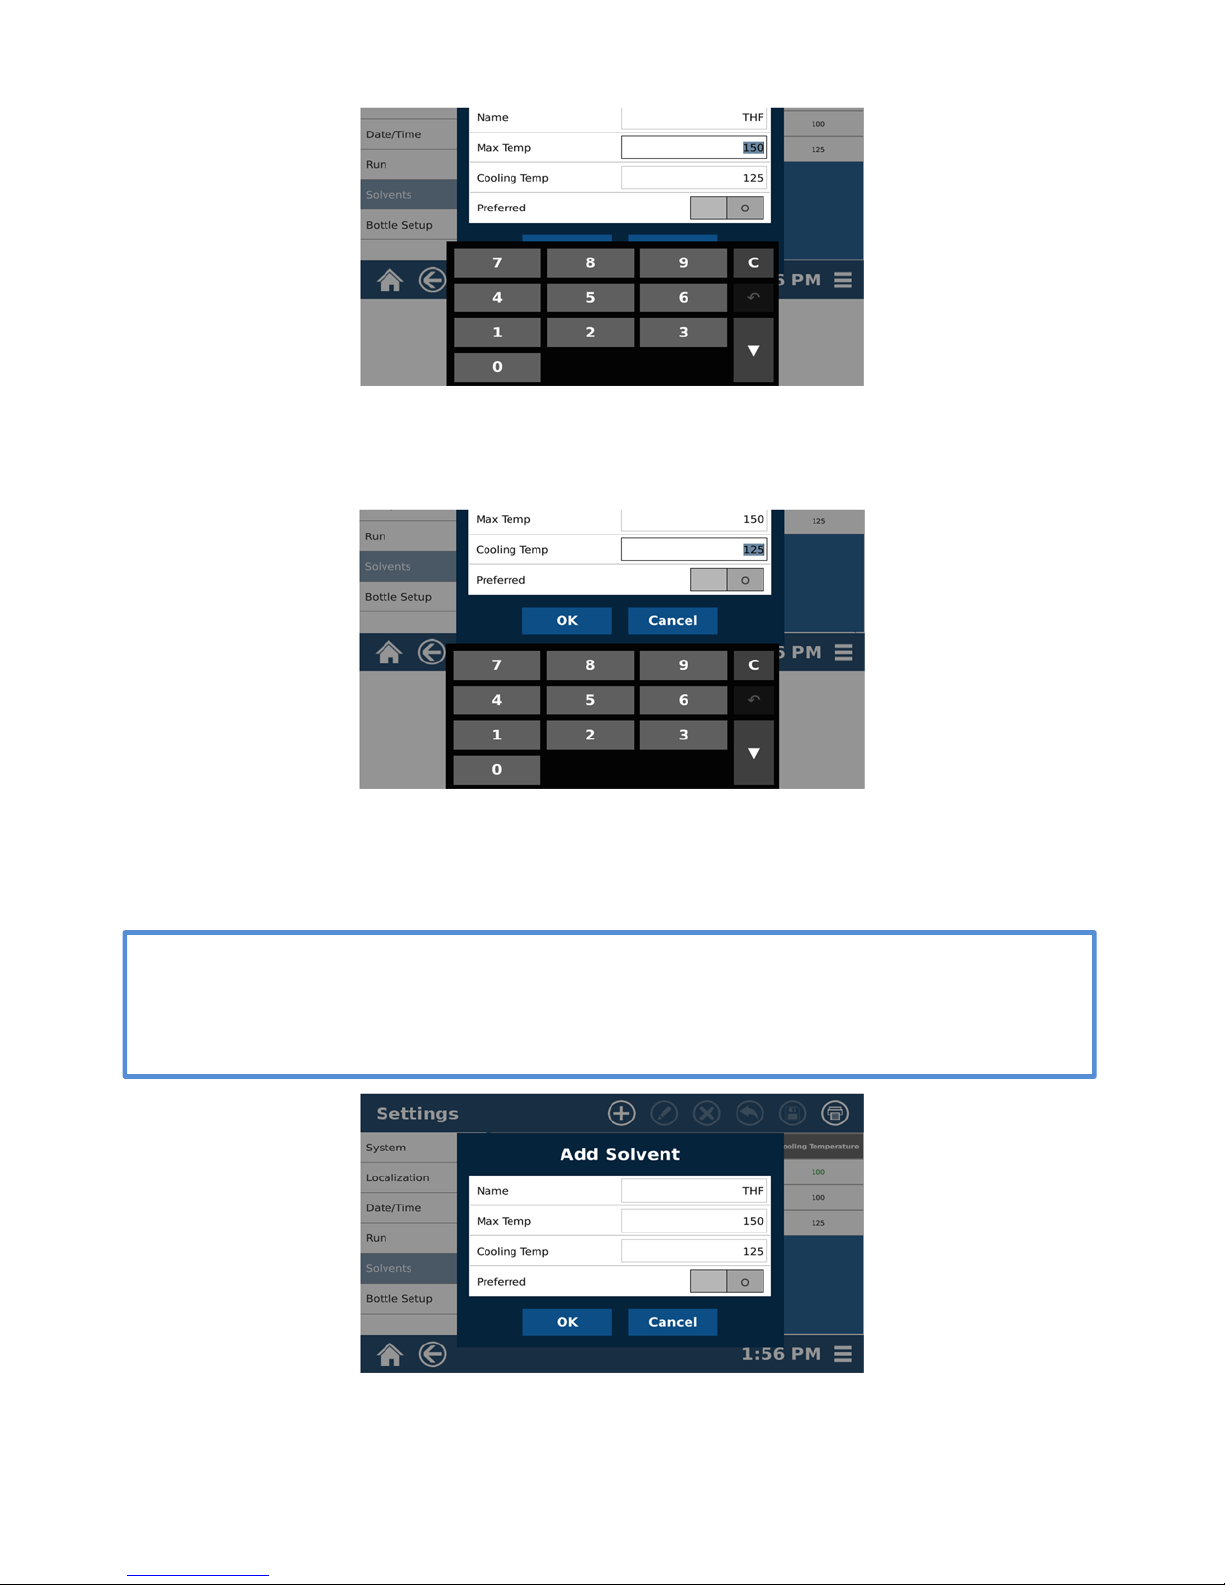
1.5 Select the text box for Max Temp to display the keypad.
1.6 Enter the maximum temperature to be used for the solvent and select the “Enter.”
1.7 Select the text box for Cooling Temp to display the keypad.
1.8 Enter the temperature at which another extraction can occur for the solvent and select
“Enter.”
NOTE
The Max Temp is the maximum temperature the system will heat the solvent and the Cooling
Temp is the maximum temperature at which the system will start another run using the
solvent.
1.9 Select “OK.”
12
Page 13

1.10 Select the icon for “Save.”
2. Edit the solvent.
2.1 Select “Menu,” “Settings,” “Solvents,” and the solvent to edit.
2.2 Select the edit icon at the top of the screen.
2.3 Make any desired changes to the Name, Max Temp and Cooling Temp.
2.4 Select “OK.”
2.5 Select the save icon at the top of the screen.
13
Page 14

3. Delete a solvent.
3.1 Select the solvent to delete.
3.2 Select the “X” icon at the top of the screen.
3.3 Select “Yes.”
3.4 Select the save icon from the top of the screen.
4. Assign a solvent to the bottle setup.
4.1 Select “Menu,” “Settings,” “Bottle Setup,” and the name of the solvent or “Not Used” to assign
a solvent to that position.
14
Page 15
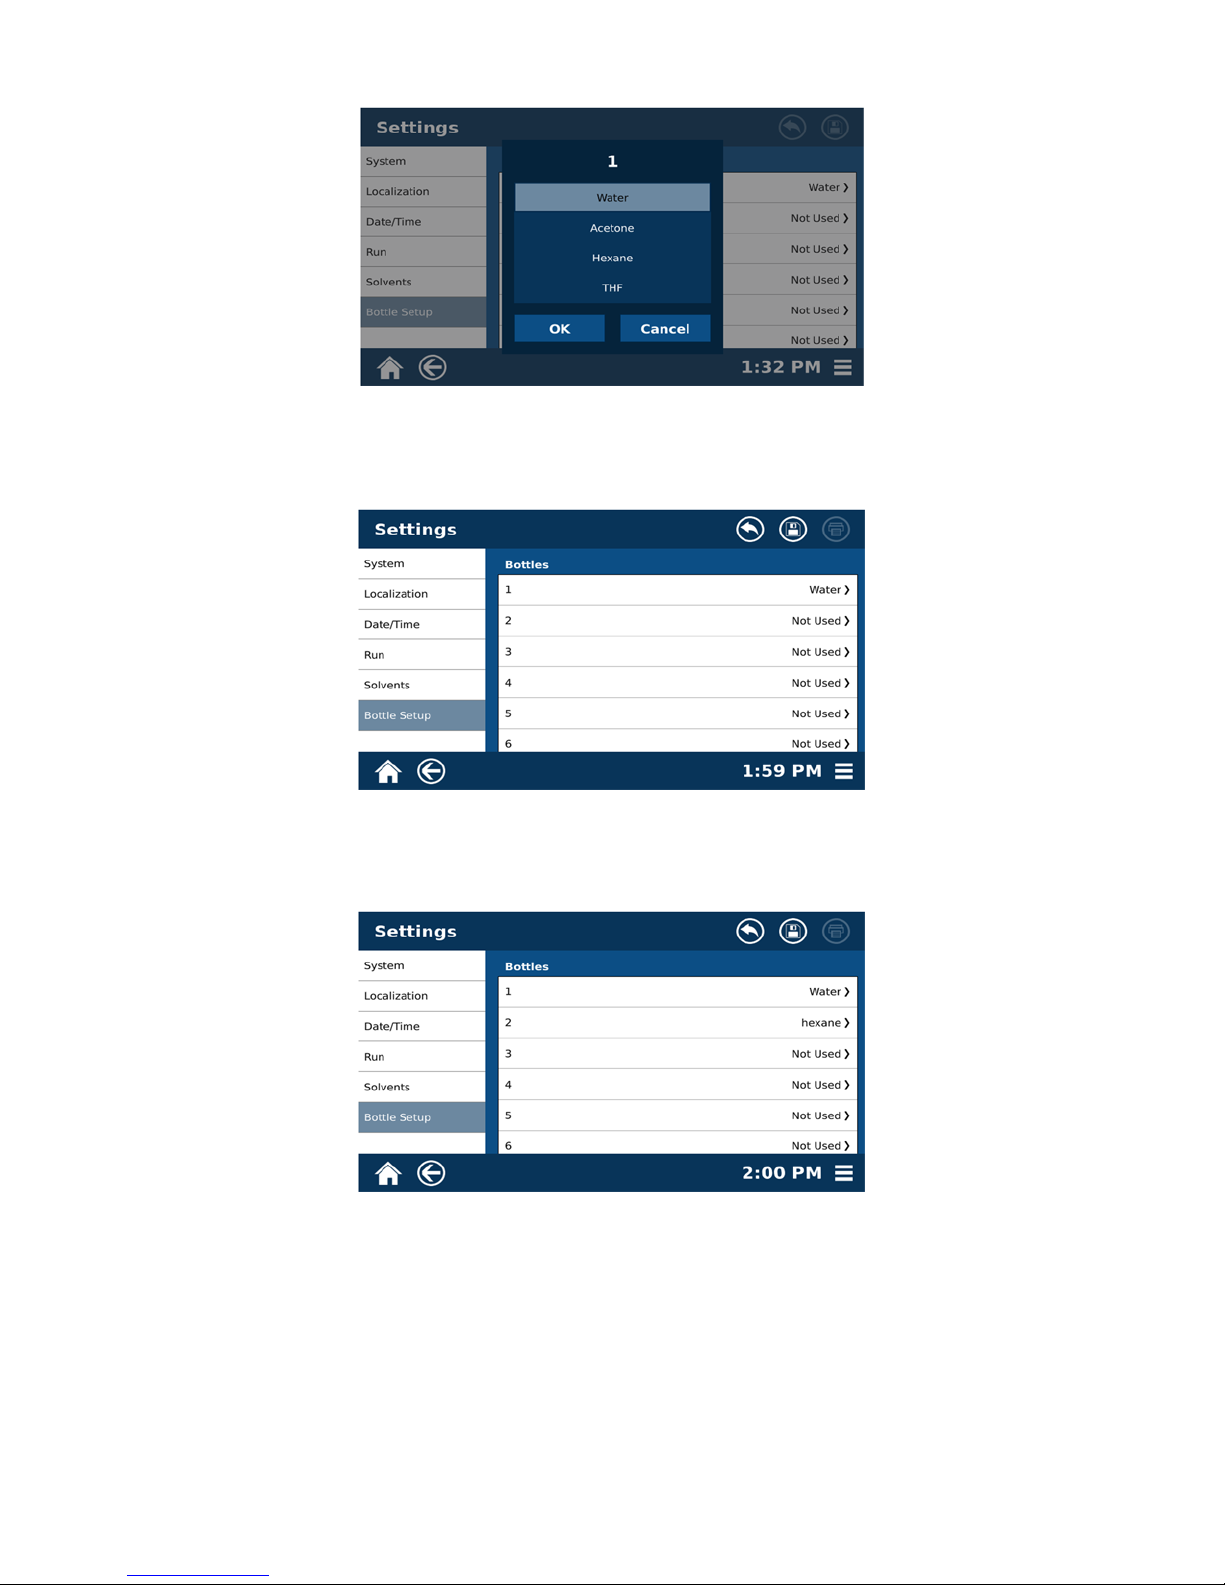
4.2 Select the solvent to assign to that position.
4.3 Select “OK.”
4.4 Select the save icon at the top of the screen.
5. Remove a solvent from the bottle setup.
5.1 Select “Menu,” “Settings,” “Bottle Setup.”
15
Page 16

5.2 From the solvent position menu, select the solvent to be removed.
5.3 Select OK.
5.4 Select the save icon at the top of the screen.
Preheat Temperature.
It is recommended that the EDGE be set with a preheat temperature of 100 C. The vessel chamber will stay
heated to the temperature at which the preheat temperature is set.
When a preheat temperature is set, the vessel chamber will remain set at that temperature
as long as the EDGE is powered on, even when the EDGE is not operating.
Never place hands into the vessel chamber area when the EDGE is in use or powered on.
CAUTION
WARNING
16
Page 17

1. Select “Menu,” “Settings,” and “Run.” Scroll the screen down to the Temperature Control section.
2. Select the text box for Preheat Temperature.
3. Using the keypad, enter the desired temperature (recommended 100
C) and select “Enter.”
17
Page 18
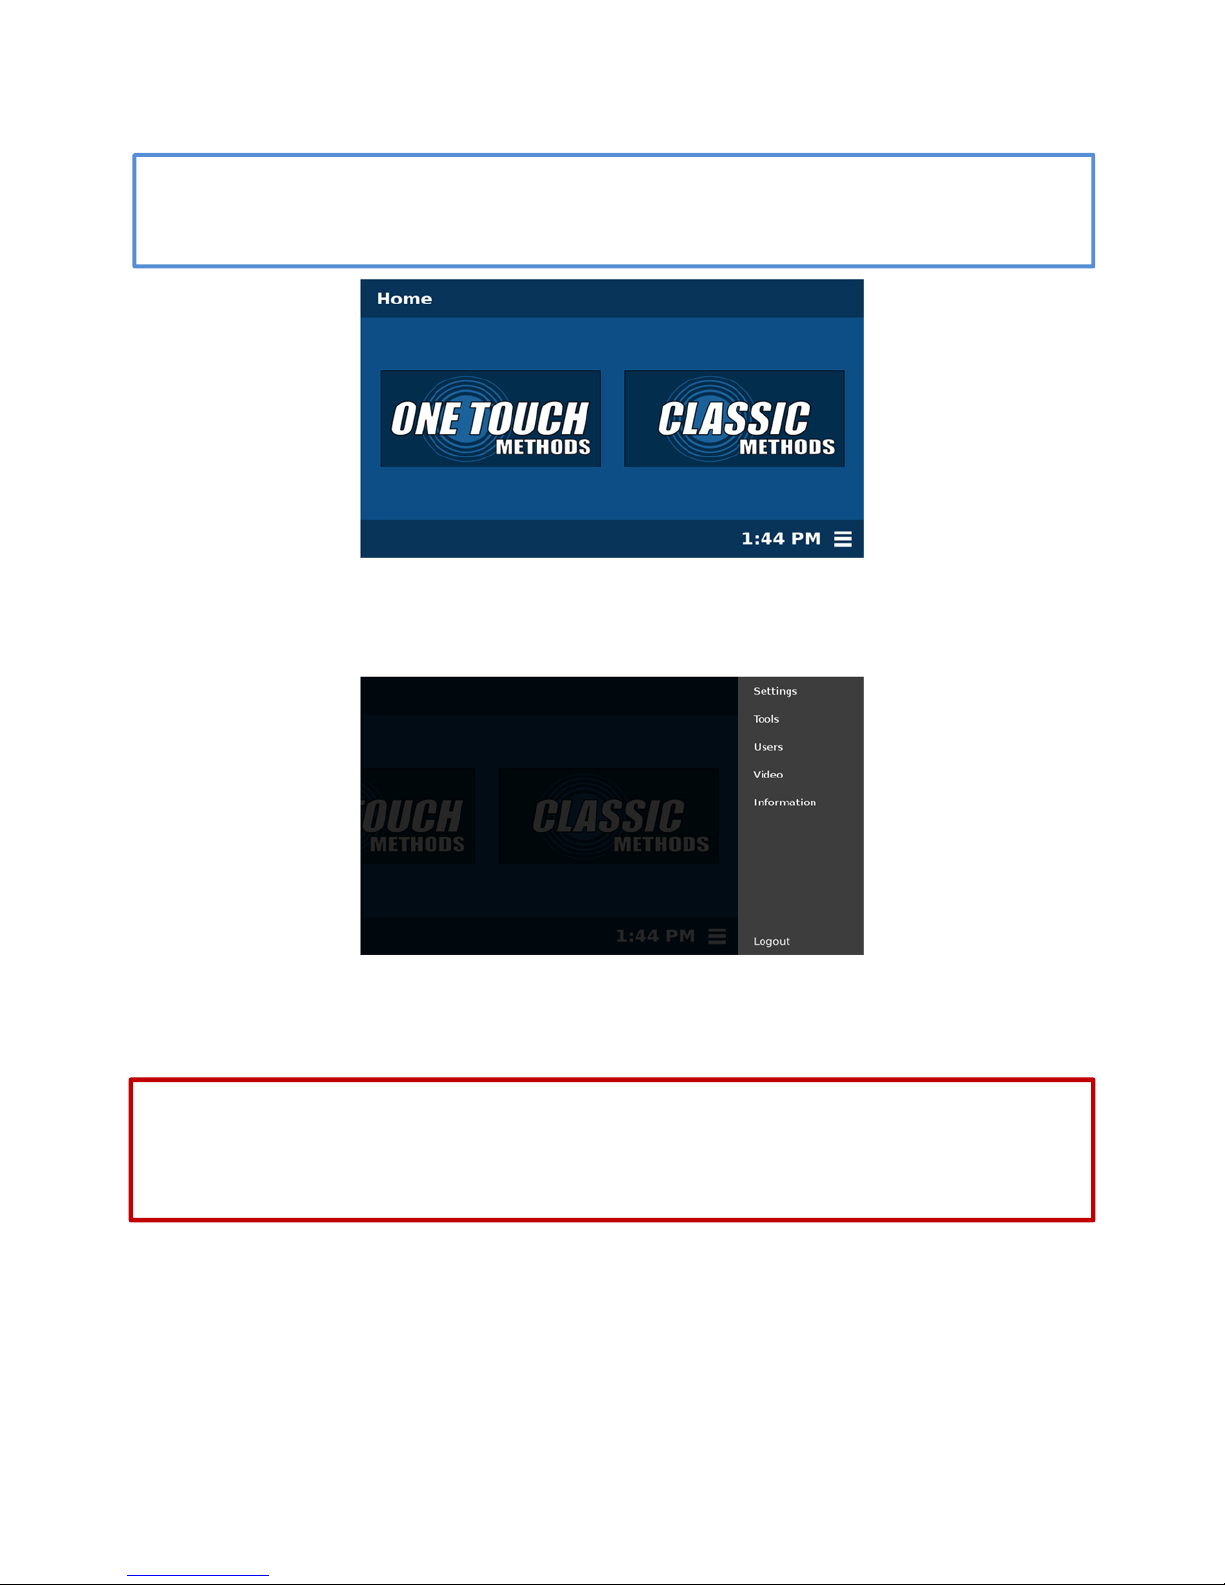
Methods
Classic Method
Classic methods are methods developed by CEM for specific applications. These methods can be copied and
edited, if desired. Refer to “Copying a Method,” “Editing a Method,” or “Performing a Method” sections in
this manual for additional information. All methods will appear in both Classic and One Touch Methods.
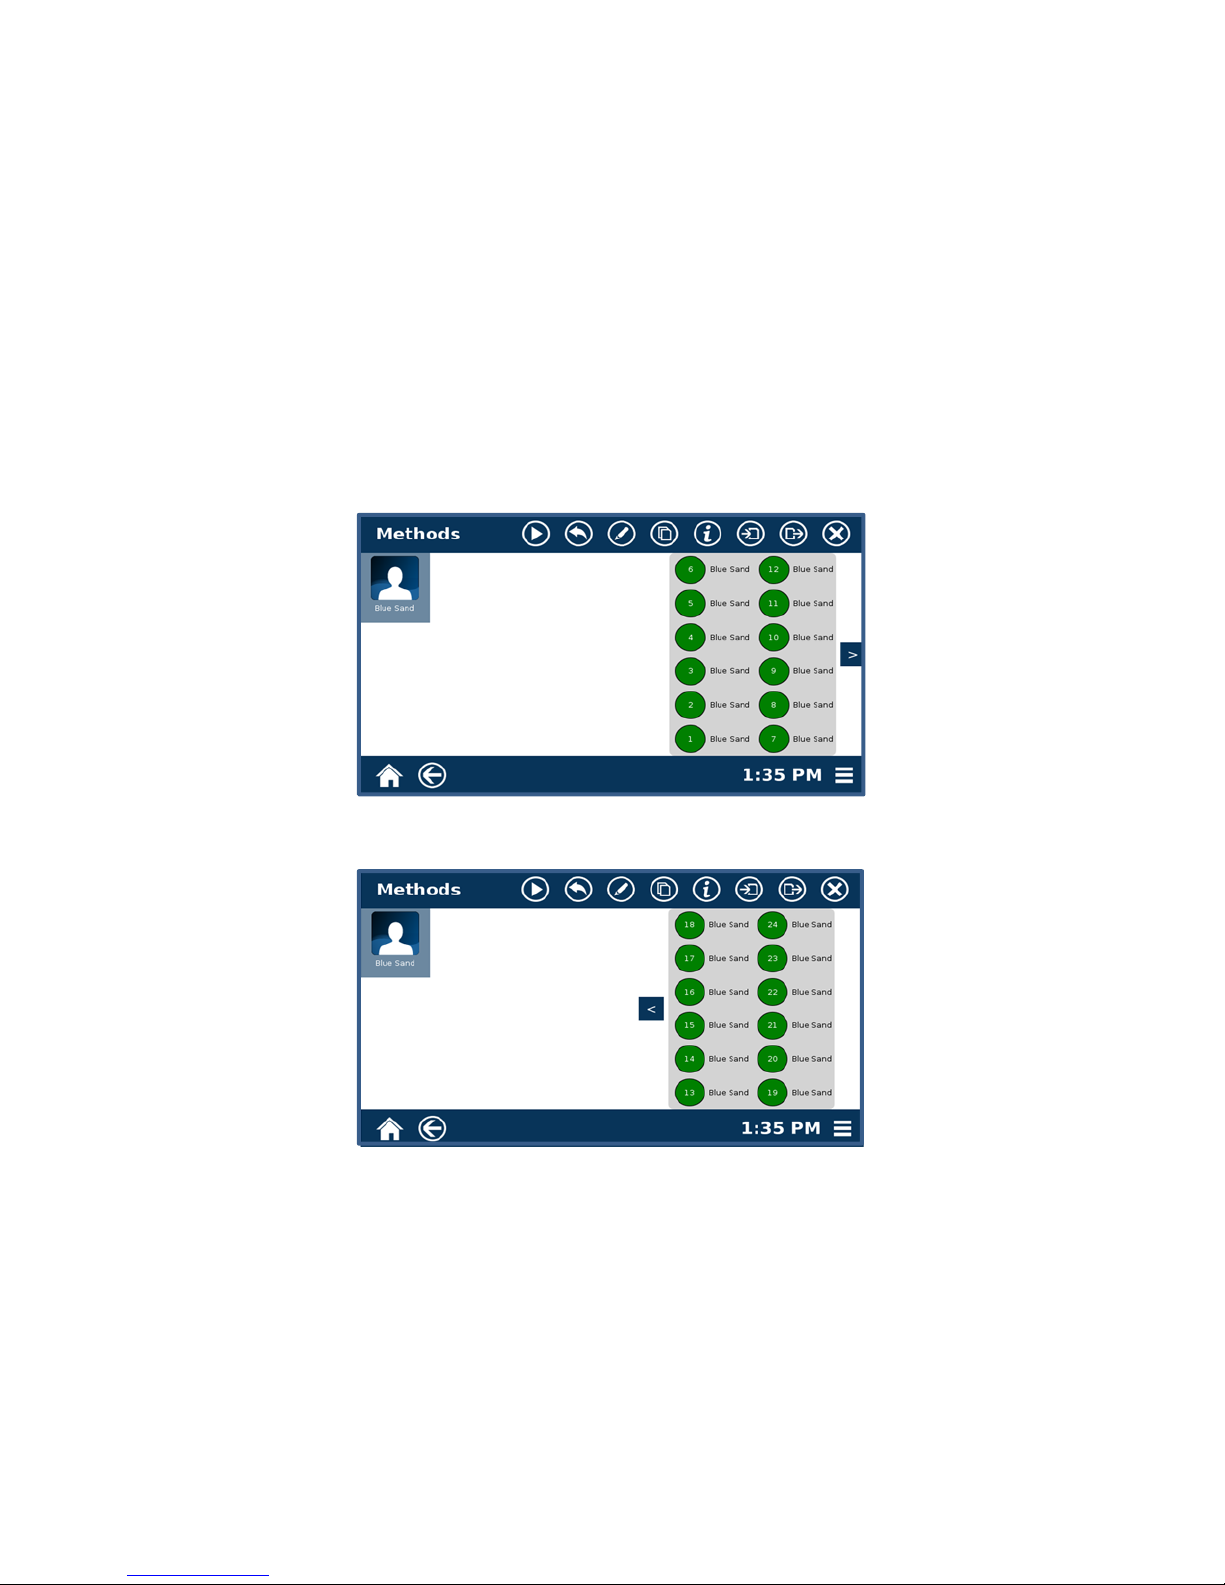
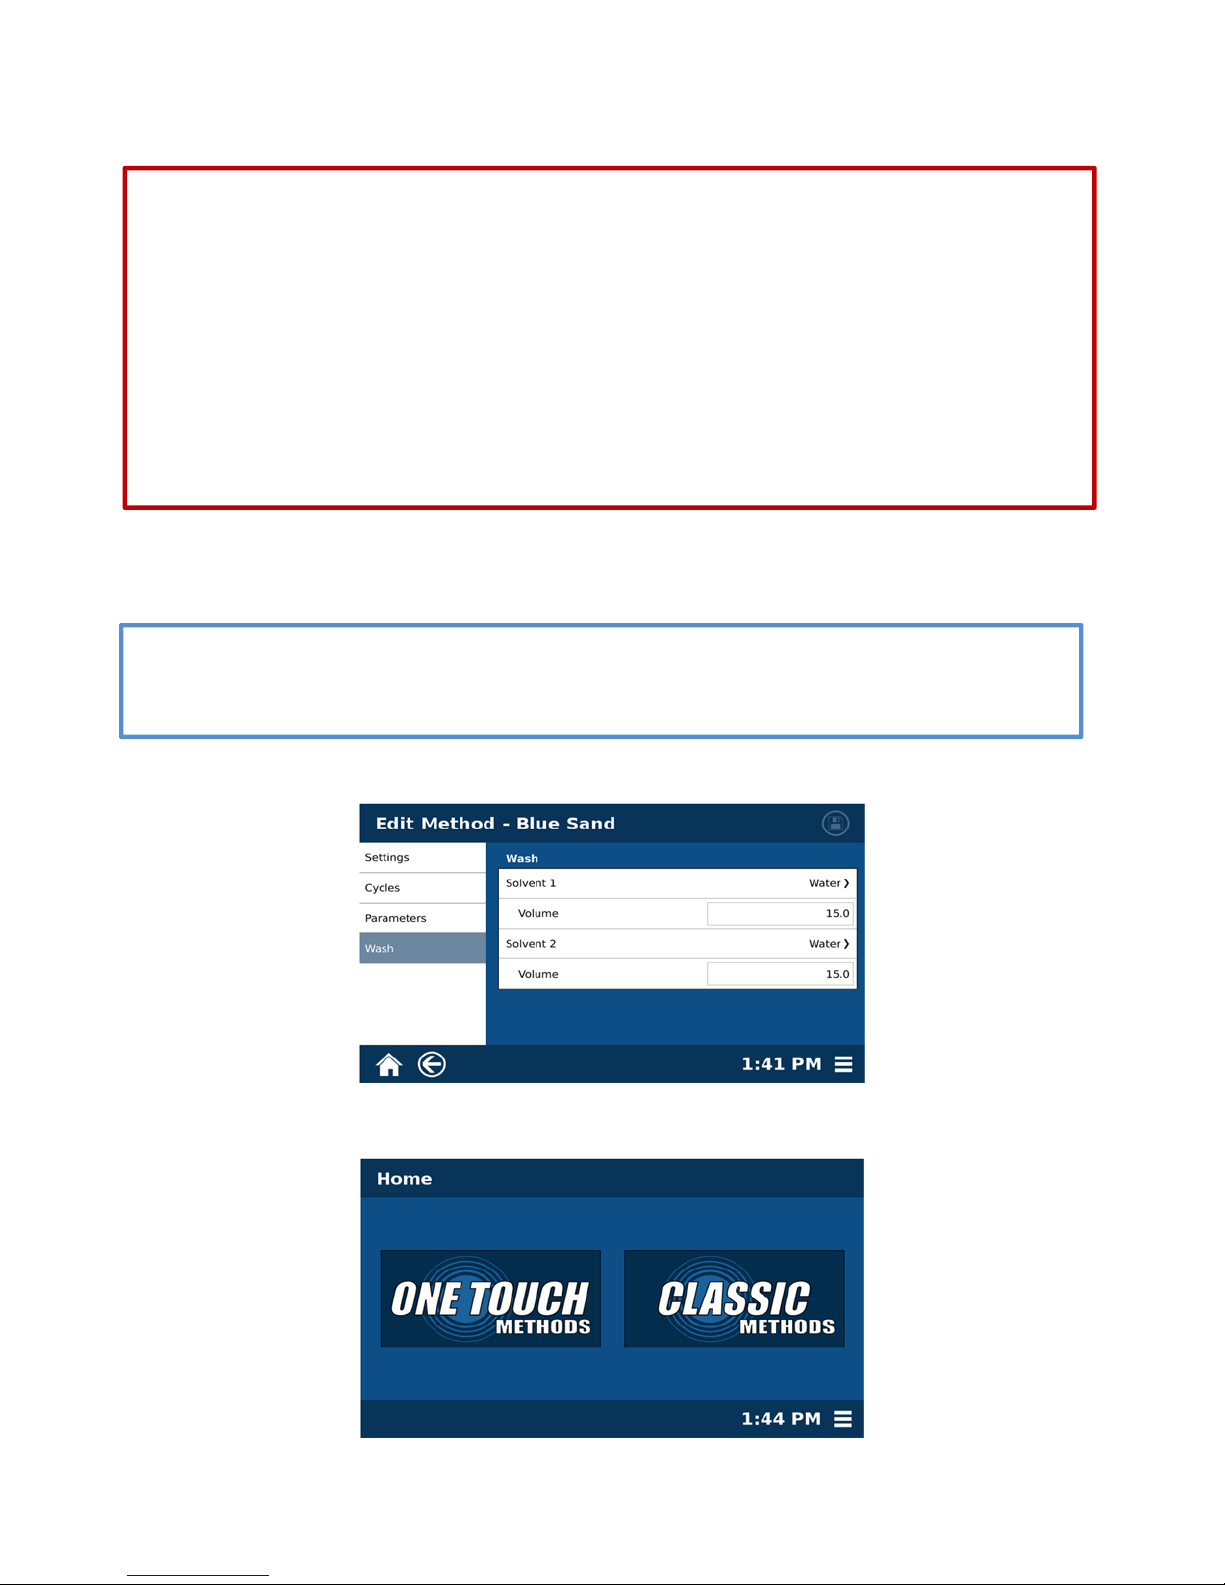
One Touch Methods
One Touch Methods are intended for customers who wish to extract a batch of 24 samples, consisting of two
complete 12-position racks using the same method.
1. 24 Sample Batch
1.1 Select the desired method. That method will load a batch of 24 samples.
1.2 To view positions 13-34, select the right arrow “>,” Select the left arrow “<” to return to
positions 1-12.
1.3 Positions can be individually deselected if desired. To deselect a method, select and hold the
position number.
18
Page 19

1.5 When the first rack is completed, a “Change Rack” prompt will appear.
1.6 Load the second full rack onto the EDGE.
1.7 Select “OK.”
Copying a Method
1. Select the method to be copied.
1.1 Select the copy icon on the top of the screen.
1.2 Input name of new method
1.3 Select “OK.”
19
Page 20
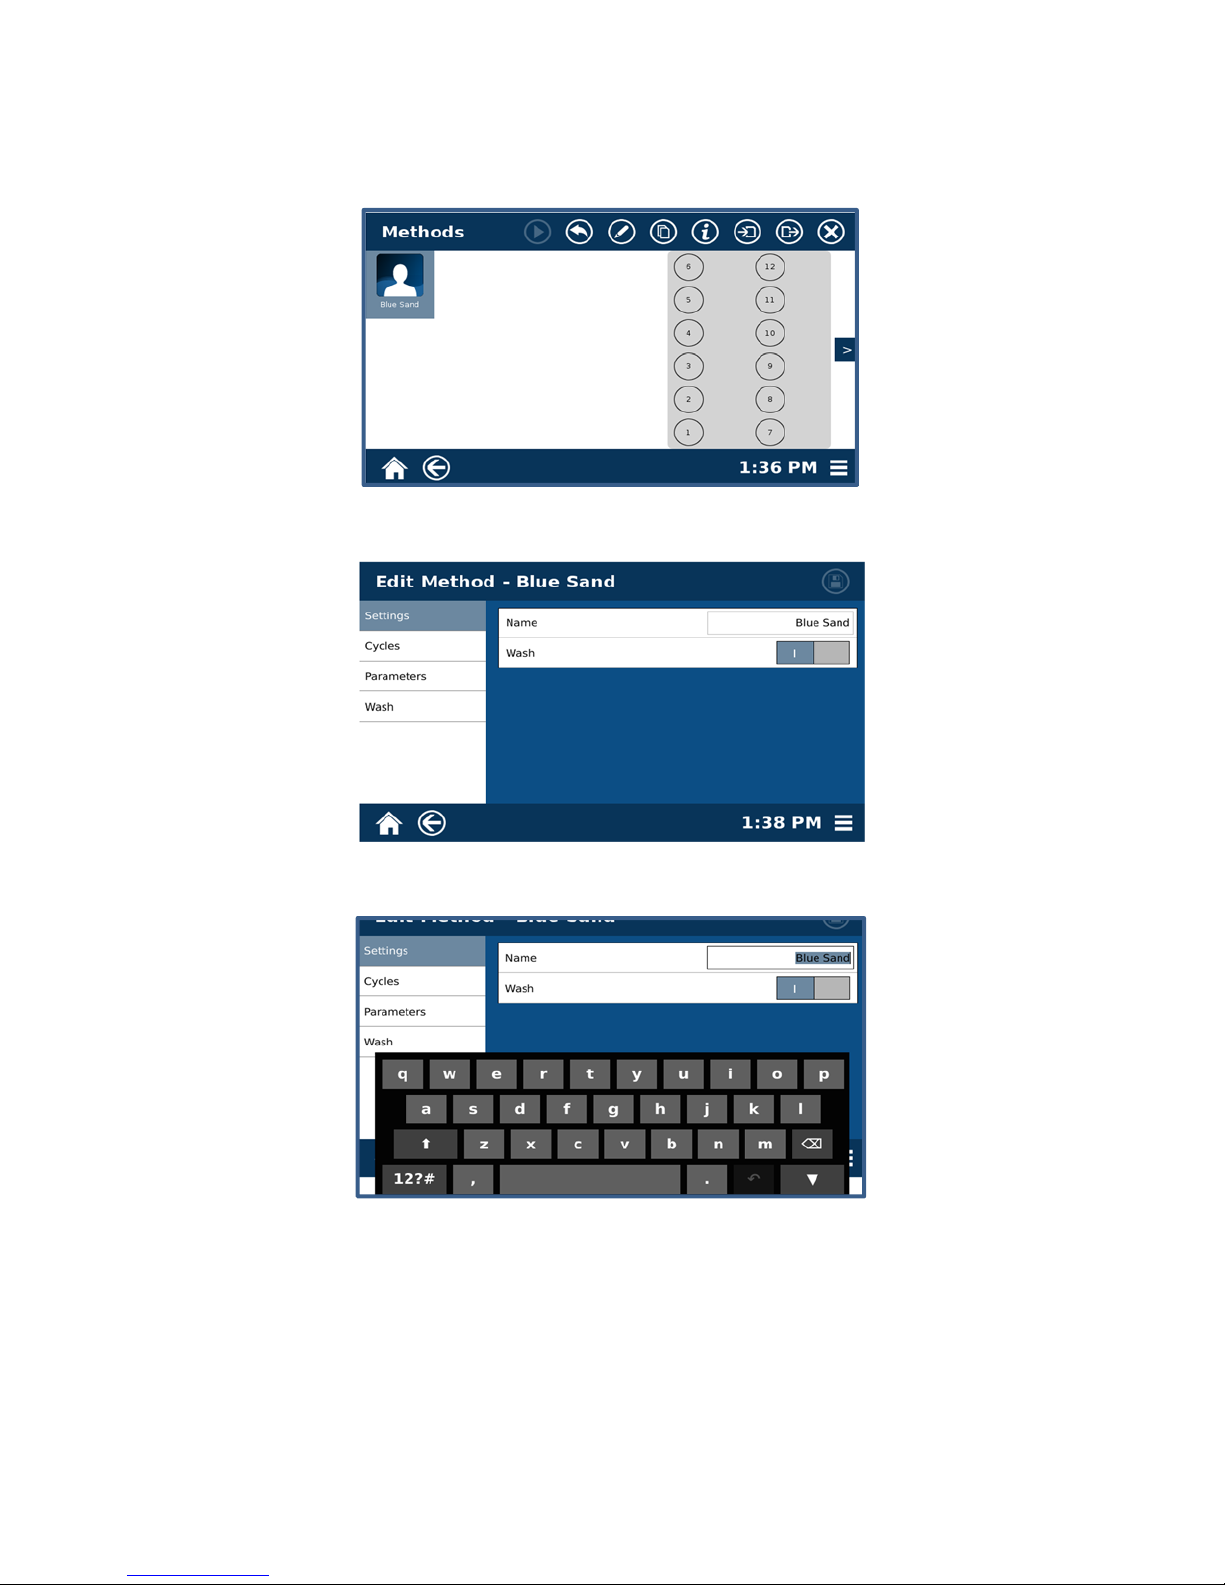
Editing a Method
1. Select the method to be edited.
2. Select the edit icon on the top of the screen.
3. Select the text box for Name.
3.1 Using the keypad, type the desired name and select “Enter.”
3.2 Activate or deactivate the wash function by using the toggle icon associated with the wash.
3.3 Select the save icon at the top of the screen to save any desired changes.
20
Page 21

4. Cycles
4.1 Select the plus icon at the top of the page to add a cycle.
4.2 Highlight a cycle to select it.
NOTE
When the parameters tab is selected, the determined parameters will be for the selected
cycle. The cycle number will be noted at the top of the parameters page. For two or more
cycles, select each cycle individually and determine its parameters.
4.3 Select the “X” icon to delete the selected cycle.
4.4 Select Yes or No to confirm or deny deleting a cycle.
21
Page 22
A maximum of 40mL can be used per extraction including top, bottom, and rinse volume for
all cycles. This does not include the washing solvent volume.
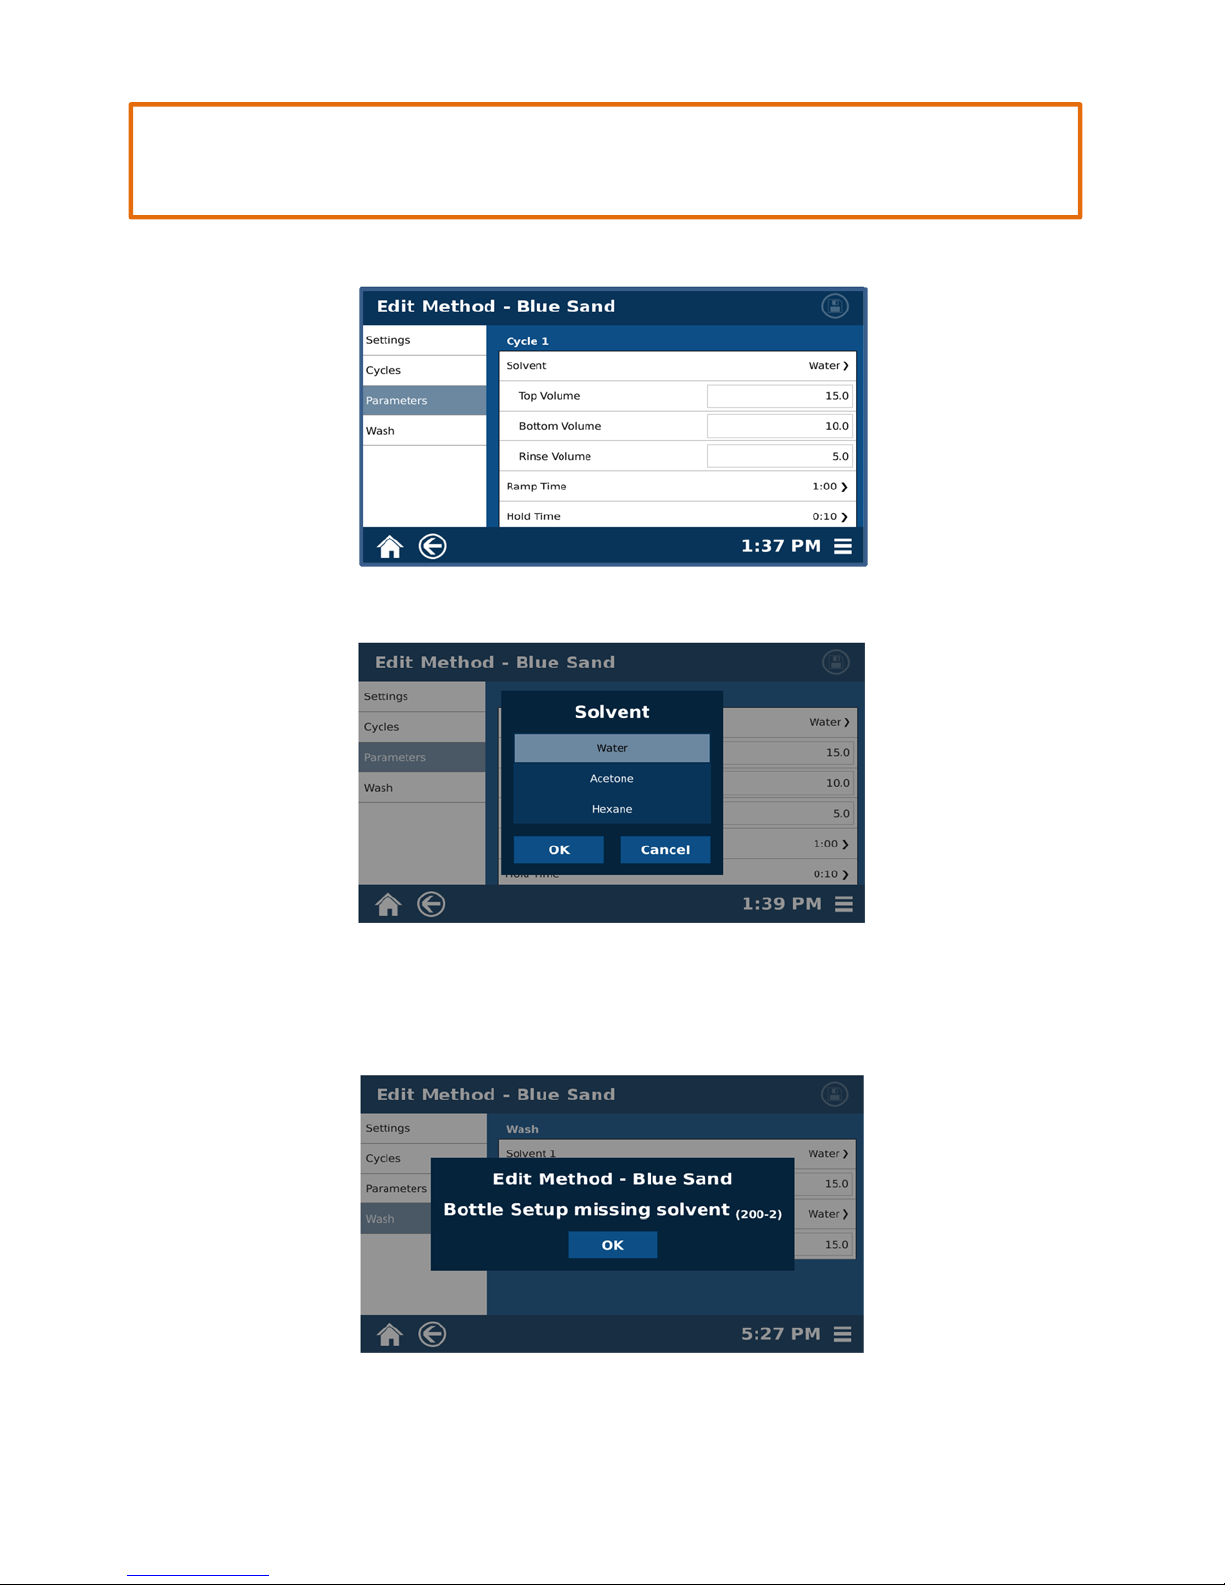
5. Parameters
CAUTION
5.1 Select the name of the solvent from the solvent section to display the solvent menu.
5.2 Select the desired solvent.
5.3 Select “OK.”
22
Page 23

NOTE
The selected solvent must be assigned in bottle setup. If you attempt to save a method using
a solvent that is not assigned in bottle setup, a “Bottle Setup Missing Solvent” error will
display. Refer to the Bottle Setup section in this manual to properly assign a solvent for the
Bottle Setup.
5.4
Select the text box for Top Volume.
5.5 Using the keypad, enter the desired volume and select “Enter.”
CAUTION
A maximum volume of 10 mL can be used for Bottom Volume.
5.6 Select the text box for Bottom Volume.
5.7 Using the keypad, enter the desired volume and select “Enter.”
23
Page 24
5.8 Select the text box for Rinse Volume.
5.9 Type in the desired volume and select the enter key.
CAUTION
A maximum of 40 Ml can be used per extraction; this includes top, bottom, and rinse volume
for all cycles. This does not include the washing solvent volume.
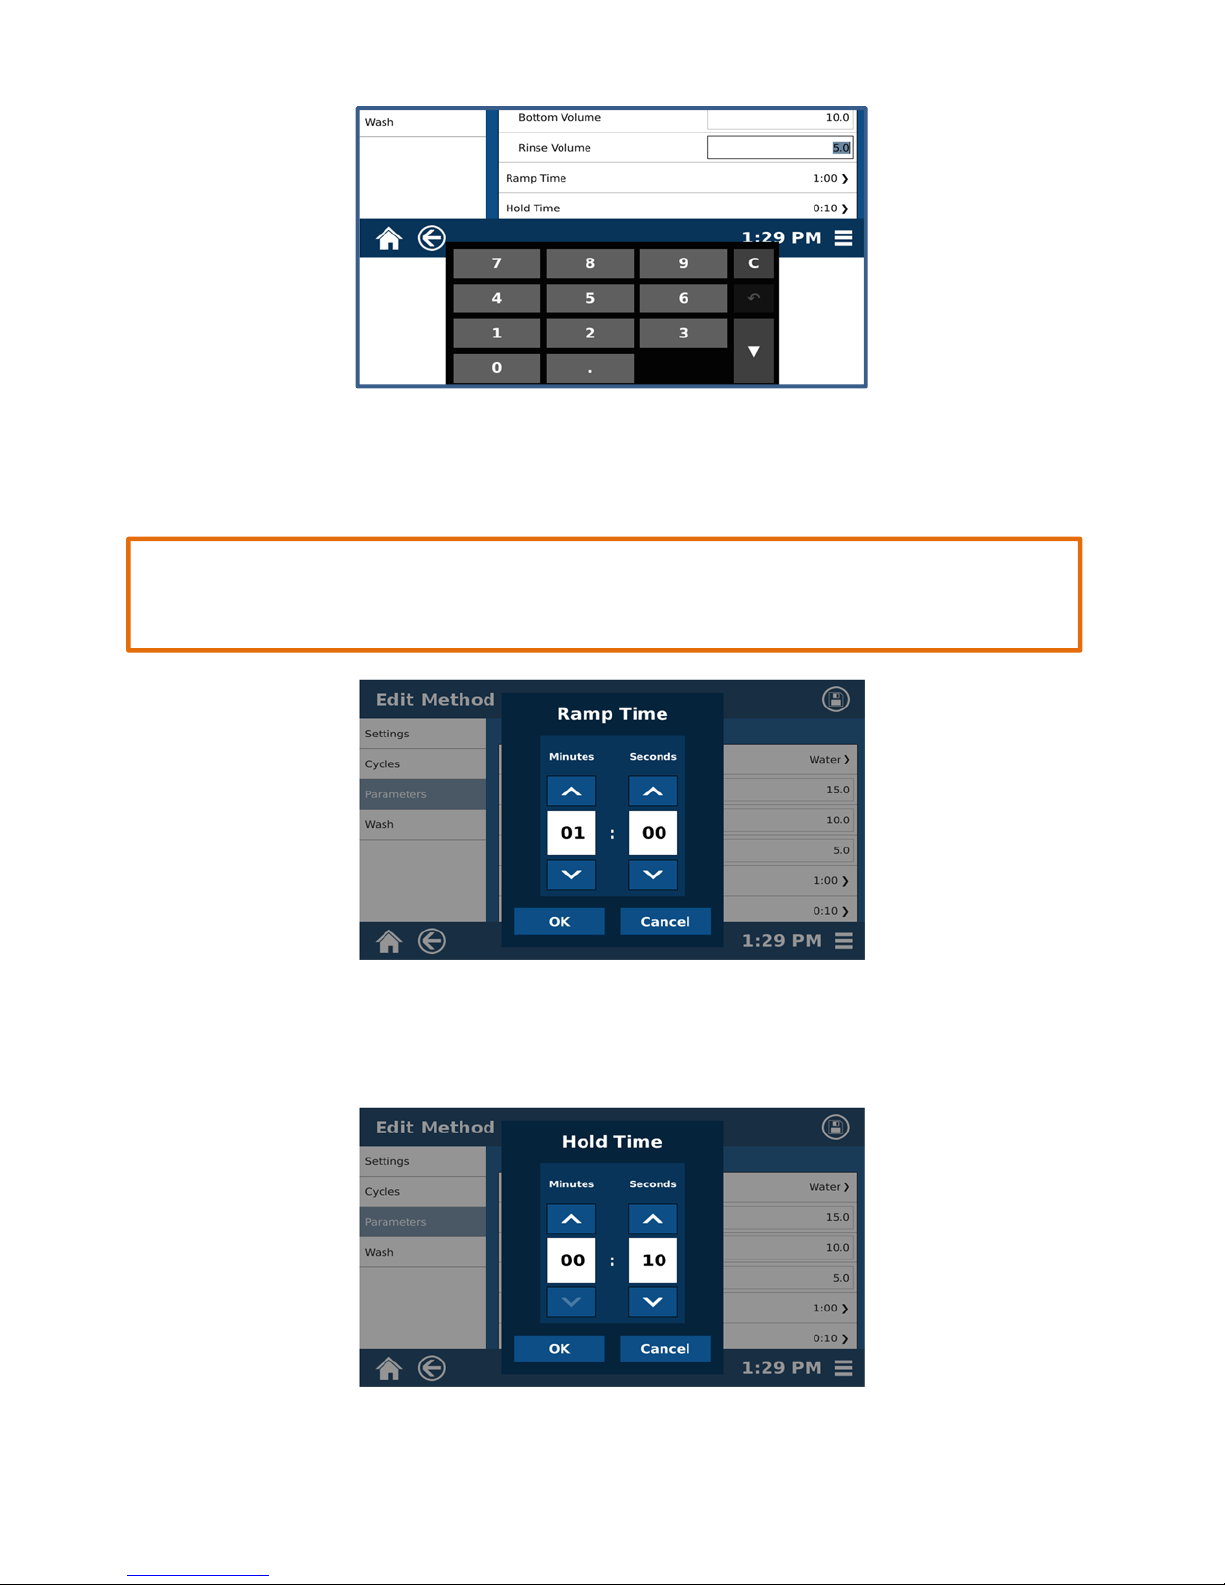
5.10 Using the “up” and “down” arrows, select the desired Ramp Time.
5.12 Select “OK.”
5.13 Using the “up” and “down” arrows, select the desired Hold Time.
24
Page 25

5.14 Select “OK.”
5.15 Select the text box for Max Temp.
5.16 Using the keypad, enter the desired maximum temperature and select “Enter.”
6. Wash
6.1 Select the solvent for Solvent 1 (Water) to display the solvent 1 menu.
6.2 Select the desired solvent.
6.3 Select “OK.”
25
Page 26

6.4 Select the text box for Volume under Solvent 1.
6.5 Using the keypad, enter the desired volume and select “Enter.”
6.6 Select the name of the solvent for Solvent 2 to display the solvent 2 menu.
6.7 Select the desired solvent.
6.8 Select “OK.”
6.9 Select the text box for Volume under Solvent 2.
6.10 Type in the desired volume and select “Enter.”
6.11 Select the save icon at the top of the screen to save any changes.
26
Page 27
Performing a Method
Handle all chemicals under a fume hood, and wear appropriate personal protective
equipment including, safety glasses, chemical resistant gloves, and a laboratory coat. Dispose
of all waste in accordance with all applicable local, state, and federal health and safety
recommendations. For detailed information on the safety requirements for the chemicals
used in the EDGE, refer to the appropriate manufacturers” documents.
Never move hands nor any object beyond the automated arms into the area containing the
rack while the EDGE is performing a method or the automation is being controlled via tools.
Load or unload the rack when the EDGE is in the idle state.
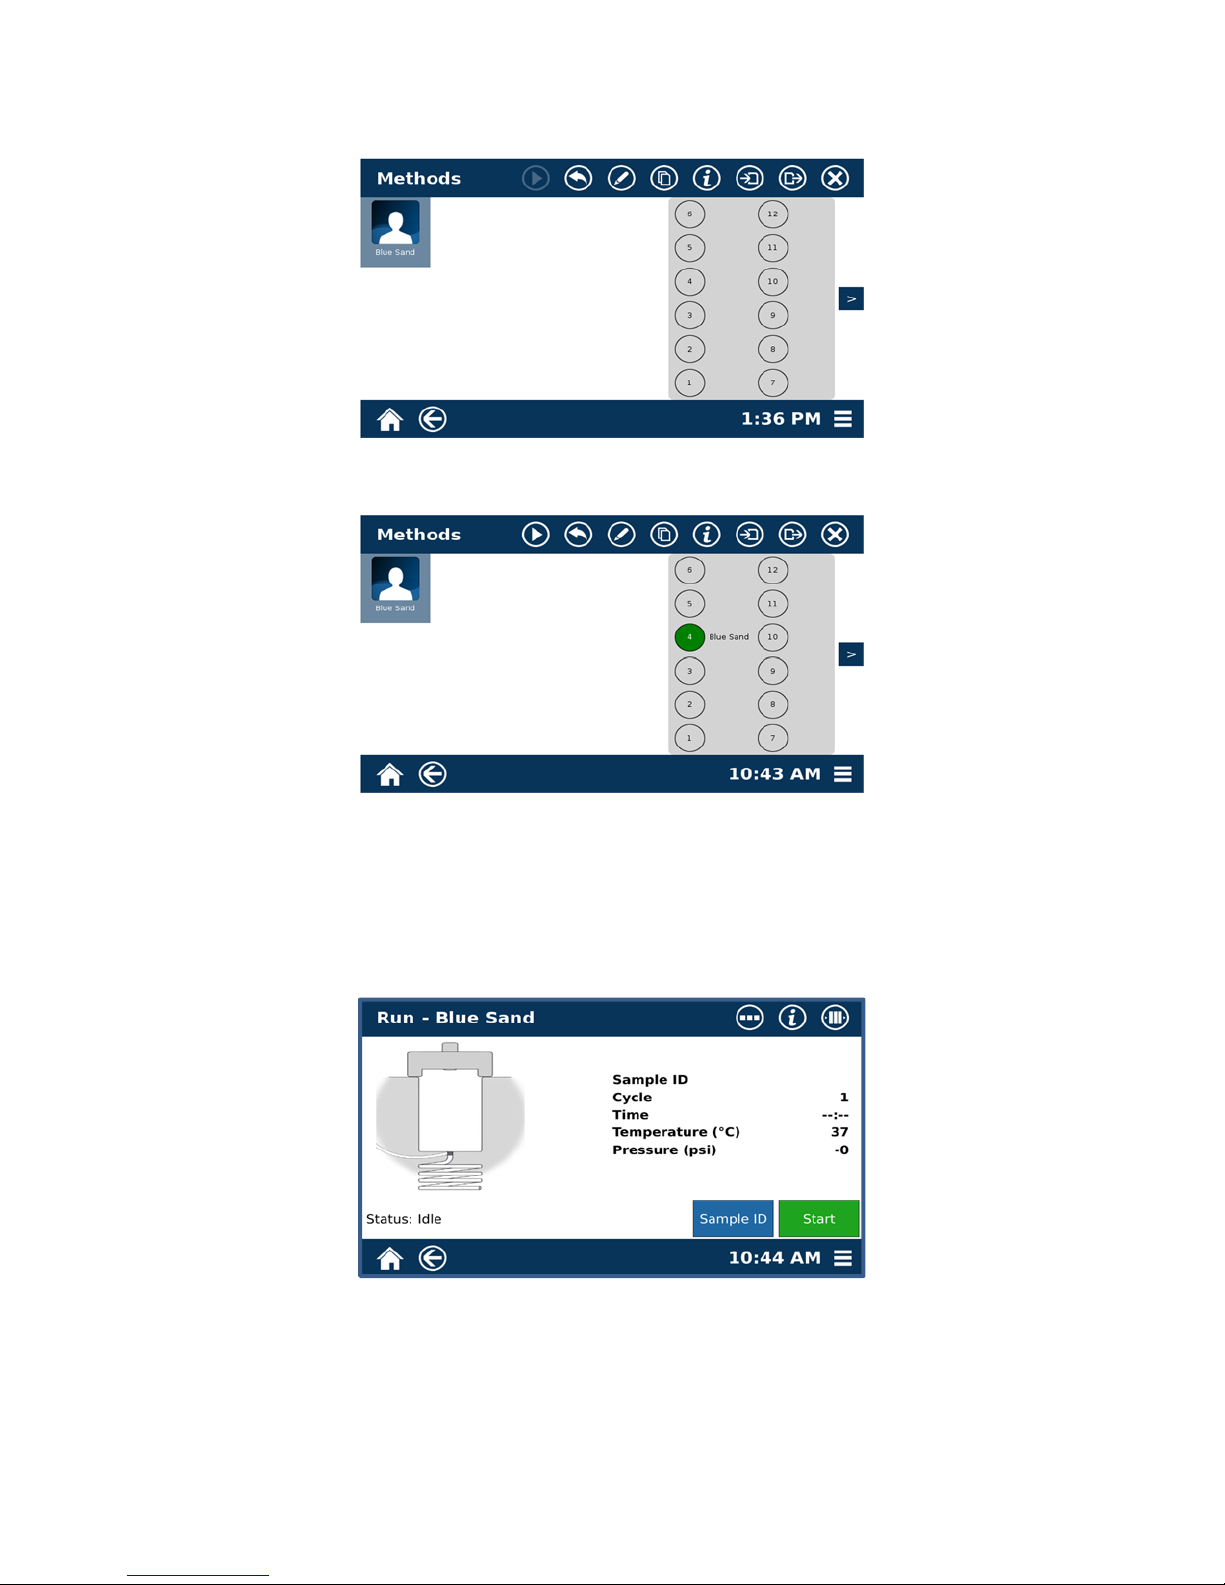
1. Blank Test
Performing a blank test will prime the lines in the EDGE. The volume recovery and maximum
temperature may be low on the first test.
Verify that there is a Q-Cup and collection vial in each positon to use.
1.1
WARNING
WARNING
NOTE
1.2
Select the Home Icon in the bottom left corner of the touchscreen.
27
Page 28
1.3
Select “Classic Methods.”
1.4 Select the desired method.
1.4 Select the positions in which the Q-Cups are loaded on the rack.
1.5 The method will be noted and the position will turn green.
1.6 Select the “Play" icon on the top of the screen.
1.7 Select “Start.”
28
Page 29

NOTE
While running you can view the samples loaded by touching the –III- icon at the top of the
screen. To unload a method select and hold the position.
2. Sample Run
2.1 Assemble each Q-Cup with a Q-Disc.
2.2 Add the sample to the Q-Cup.
2.3 Place the Q-Cups with collection vials in the positions on the rack in which you wish to
perform.
2.4 Repeat steps 1.2 - 1.8 of the blank test.
3. Sample ID
A sample ID can be assigned for all samples performed on the EDGE. If sample ID’s are desired, the sample
ID for the first sample slated to test must be assigned prior to starting the methods. All other methods
slated to be tested can be assigned after the first method has started.
3.1 To assign a sample ID, select “Sample ID.”
29
Page 30

3.2 Select the sample to assign.
3.3 Select the text box next to the Sample ID.
3.4 Using the keypad, enter the desired sample ID and select “Enter.”
3.5 Select Close.
30
Page 31

Limited Warranty
What Is Covered:
CEM Corporation warrants that the instrument will be free of any defect in parts or workmanship and will, at its
option, replace or repair any defective part (excluding consumables) or instrument.
For How Long:
This warranty remains in effect for 365 days from date of delivery to the original purchaser.
What Is Not Covered:
This warranty does not cover parts or workmanship damaged due to:
• Neglect, abuse or misuse,
• Damage caused by or to test samples,
• Damage incurred during instrument relocation,
• Damage caused by or to any attached equipment,
• Use of incorrect line voltages or fuses,
• Fire, flood, "acts of God" or other contingencies beyond the control of CEM Corporation,
• Improper or unauthorized repair, or
• Any other damage caused by purchaser or its agents.
Responsibilities of Purchaser:
To ensure warranty coverage, the purchaser must:
• Use the instrument according to directions,
• Connect the instrument properly to a power supply of proper voltage,
• Replace blown fuses,
• Replace consumables and
• Clean the instrument as required.
How to Get Service:
Purchaser should contact the Service Department of CEM Corporation or the nearest CEM subsidiary or distr ibutor for
return authorization and for proper crating and shipping instructions to return instrument, freight prepaid, for service.
On-site repairs by an authorized service technician are available through the CEM Service Department. Travel costs will
be charged to the purchaser for onsite repairs.
Within the U.S. Outside the U.S.
CEM Corporation CEM Corporation
3100 Smith Farm Rd. 3100 Smith Farm Rd.
Matthews, NC 28105-5044 Matthews, NC 28105-5044
(800) 726-5551 (704) 821-7015
Fax: (704) 821-4368 Fax: (704) 821-4368
Warranty Disclaimer:
CEM Corporation hereby excludes and disclaims any warranty of merchantability or fitness for any particular purpose.
No warranty, express or implied, extends beyond the face hereof. CEM
Corporation shall not be liable for loss of use of instrument or other incidental or consequential costs, expenses or
damages incurred by the purchaser or any other user. This warranty is not transferable.
Purchaser's Rights under State Law:
This warranty gives the purchaser specific legal rights, and the purchaser may also have other rights that vary from
state to state.
31
Page 32

01.704.821.7015 (phone outside of US)
France Subsidiary
CEM μWave S.A.S.
Immeuble Ariane
Domaine Technologique de Saclay
4, rue René Razel
91892 ORSAY Cedax
France
(33-1) 69.35.57.80 (phone)
info.fr@cem.com (email)
Germany Subsidiary
CEM GmbH
Carl-Friedrich-Gauss Strasse 9
47475 Kamp-Lintfort
Germany
49.2842.96440 (phone)
49.2842.964411 (fax)
info@cem.de (email)
Ireland Subsidiary
CEM Technology (Ireland) Ltd.
Sky Business Centre
9a Plato Business Park
Demastown
Dublin 15
Ireland
353 (0) 1-885-1752 (phone)
Info.ireland@cem.com (email)
Corporate Headquarters
CEM Corporation
Service Department
PO Box 200
3100 Smith Farm Road
Matthews, NC 28106-0200 USA
800.726.5551 (phone within USA)
01.704.821.4369 (fax)
service@cem.com (email)
www.cem.com (web site)
Italy Subsidiary
CEM S.r.l.
Via Dell’Artigianato, 6/8
24055 COLOGNO AL SERIO (bg)
Italy
390.35.896224 (phone)
390.35.891661 (fax)
info.srl@cem.com (email)
Japan Subsidiary
CEM Japan K.K.
2-18-10 Takanawa, Minato-ku
Tokyo 108-0074
Japan
+81-(0)3-5793-8542 (phone)
+81-(0)3-5793-8543 (fax)
info@cemjapan.co.jp (email)
United Kingdom Subsidiary
CEM Microwave Technology Ltd.
2 Middle Slade
Buckingham Industrial Park
Buckingham MK18 1WA
United Kingdom
44.1.280.822873 (phone)
44.1.280.822342 (fax)
info@uk@cem.com (email)
32
 Loading...