

Page 1
DISCOVER PROTEIN
HYDROLYSIS
INSTALLATION AND OPERATION
600313
Rev. 5
10/6/2008
INSTRUCTIONS
NOTE
The Discover Protein Hydrolysis is only compatable with Discover rmwave versions 201A14 or later.
The current rmware version on the Discover can be found by pressing EDIT and using the arrow keys
to select System Info.
HARDWARE ASSEMBLY AND SETUP
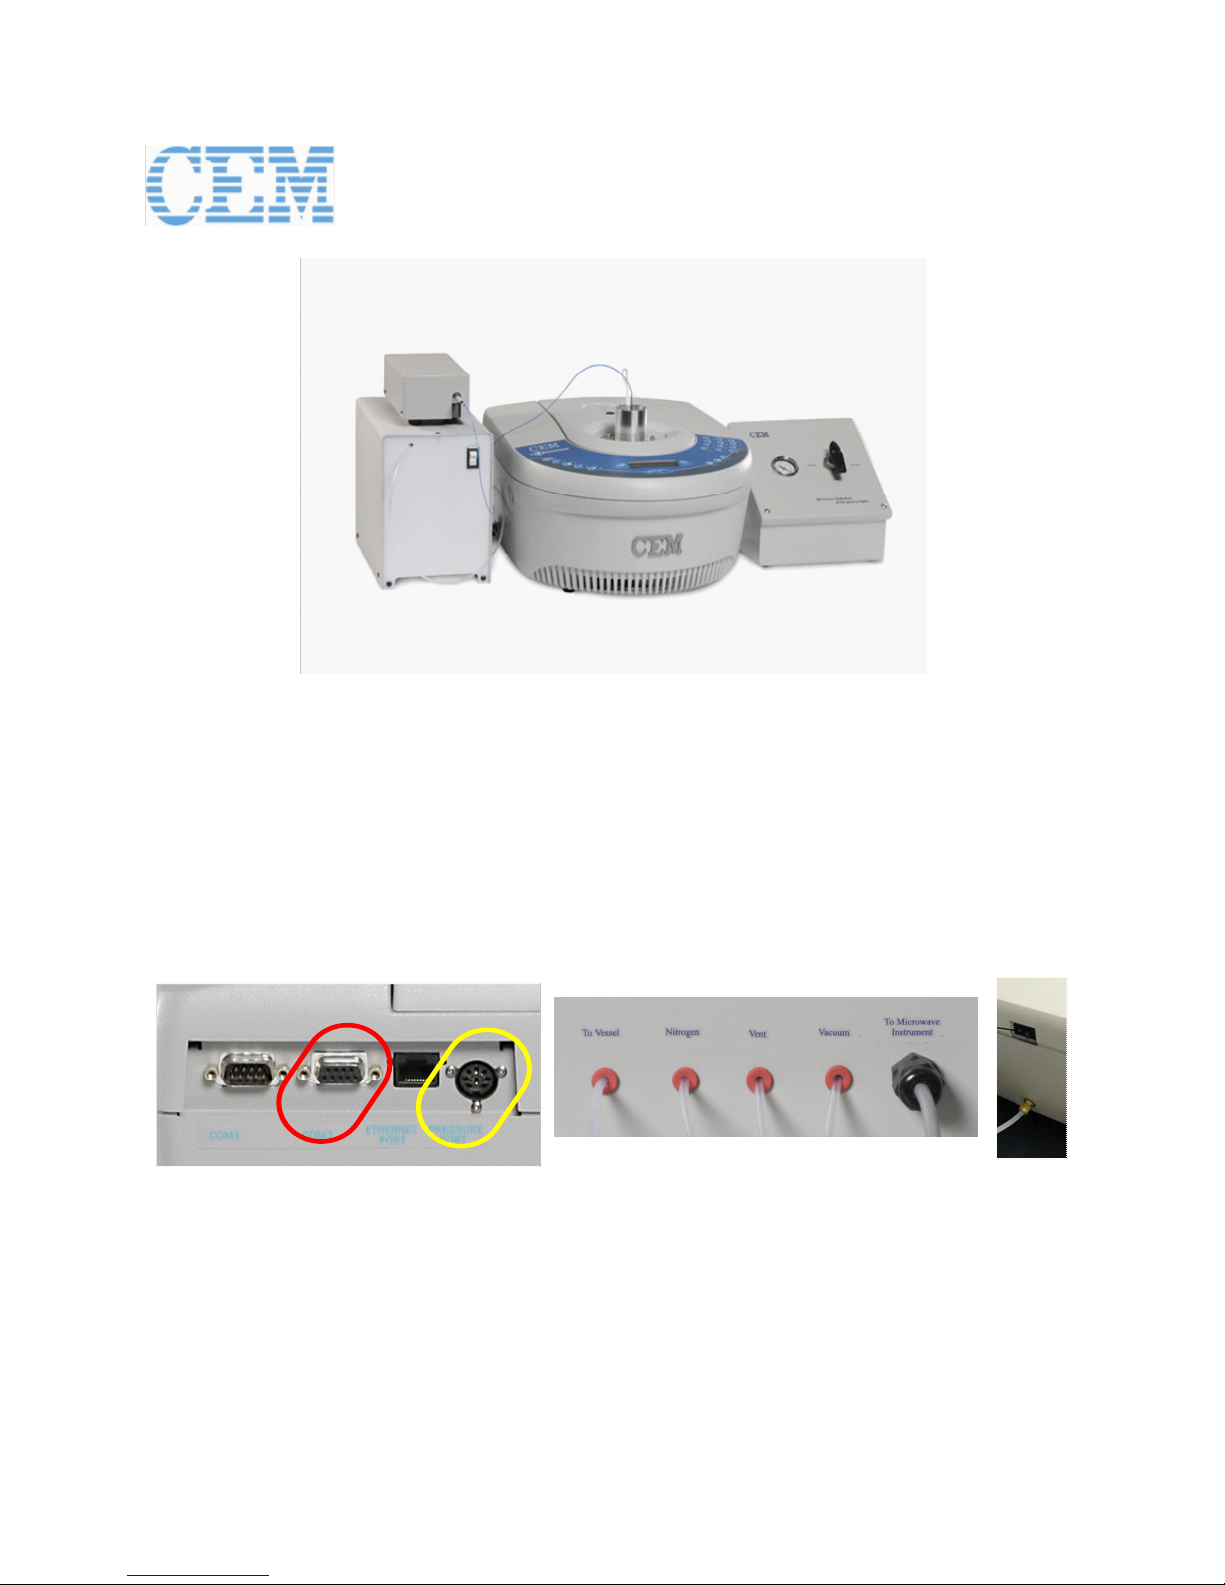
Figure 1. Instrument Connection Ports (COM2 indicated in red; Pressure Port indicated in yellow.)
PRESSURE SENSOR1.
Connect the 9-pin sensor connector from the valve panel into the pressure port (9-pin 1.1.
receptacle) on the rear of the Discover (Figure 1).
FIBER-OPTIC TEMPERATURE PROBE2.
Connect the end of the serial cable labeled “To Temperature Box” to the temperature control 2.1.
box. Connect the other end of the cable to COM2 on the read of the Discover (Figure 1).
Connect the blue ber-optic temperature probe to the temperature control box, taking care not 2.2.
to bend the probe.
Page 2

EXTERNAL AIR COOLING3.
On the lower rear side of the Discover install the pressure regulator to the Discover using the 3.1.
¼” polyethylene tubing (Figure 1).
Connect the other side of the pressure regulator to a source of compressed air and set the 3.2.
pressure regulator to 20 PSI.
NITROGEN SUPPLY, VACUUM, AND VENT4.
Connect the tubing labeled “Nitrogen” extending from the rear of the valve panel (Figure 1) to 4.1.
the pressure regulator of the nitrogen source.
Remove the ttings, including the yellow ferrule and nut, from the tubing attached to the 4.2.
vacuum pump. Use the union tting to connect the 1/8 in (3 mm) tube labeled “Vacuum”
extending from the rear of the valve panel to the tubing extending from the vacuum pump.
Place the open end of the tubing labeled “Vent” extending from the rear of the valve panel into 4.3.
a fume hood or waste trap.
CALIBRATE FIBER-OPTIC PROBE5.
Connect the power cord to the Discover. Locate the power switch (on the left side of the unit) 5.1.
and turn the power ON.
Press EDIT.5.2.
The screen should say “TEMPERATURE”. If yes, press ENTER. Otherwise, use the right 5.3.
arrow key to scroll to “TEMPERATURE” and press ENTER.
Use the right arrow key to scroll to “Select Alternate”.5.4.
Ensure that “DEVICE = FIBER-OPTIC”. If yes, press ENTER. If no, use the right arrow key to 5.5.
change to “DEVICE = FIBER-OPTIC” and press ENTER.
Press EDIT.5.6.
The screen should say “TEMPERATURE”. If yes, press ENTER. Otherwise, use the right 5.7.
arrow key to scroll to “TEMPERATURE” and press ENTER.
Highlight “Enter Calibration” and press ENTER.5.8.
Press EDIT, then enter the 7 digit GF# located on the white band at the base of the ber-optic 5.9.
probe.
Press ENTER. The calibration is now saved in the software.5.10.
Press HOME to return to the Home Screen.5.11.
CALIBRATE PRESSURE SENSOR6.
Press EDIT.6.1.
Use the right arrow key to scroll to “PRESSURE” and press ENTER.6.2.
Select “Enter Calibration” and press ENTER.6.3.
Press EDIT. The last digit of SLOPE should be ashing.6.4.
Use the keypad to enter the Slope value printed on the white band on the collar of the 9-pin 6.5.
connector, then press ENTER.
The last digit of INTERCEPT should be ashing. Use the keypad to enter the Intercept value 6.6.
printed on the white band, then press ENTER. The calibration is now saved in the software.
Press HOME to return to the Home Screen.6.7.
INSTRUMENT OPERATION
Choose a method.1.
To create a new method:1.1.
Press the Open Folder key.1.1.1.
Using the left arrow, select “New Method”.1.1.2.
Press the right arrow key until “Mode = Standard”. Press ENTER.1.1.3.
Set Power, then press ENTER. (150 W is recommended.)1.1.4.
Set Maximum Temperature, then press ENTER. (150° C is recommended.)1.1.5.
Set Pressure, then press ENTER. (100 psi is the MAXIMUM recommended pressure.)1.1.6.
Page 3

Set Run Time, then press ENTER. (2:30 is recommended but may be adjusted).1.1.7.
Set Hold Time, then press ENTER. (15:00 is recommended but may be adjusted.)1.1.8.
NOTE
Run Time is the time it takes for the Discover to reach the maximum temperature. The Hold Time is the
time the Discover maintains the maximum temperature.
Set Stirring to “OFF”, then press ENTER.1.1.9.
Set Cooling to “OFF”, then press ENTER.1.1.10.
Set “Next Stage = (N)”, then press ENTER.1.1.11.
Set “Save Method = (Y)”, then press ENTER.1.1.12.
Create a method name using the arrow keys, highlight “Exit”, and press ENTER. The 1.1.13.
method is now saved in the software.
To use an existing method:1.2.
Press the Open Folder key.1.2.1.
Use the right arrow key to scroll to the desired method name, then press ENTER.1.2.2.
Set up the vessel.2.
Figure 2. Thermowell Assembly.
Slide the thermowell (closed end rst) though the top of an open ferrule nut until the top of the 2.1.
thermowell is even with the top of the nut (Figure 2, center picture).
Pass the closed end of the thermowell through the center port of the 2-port vessel cap until 2.2.
the nut meets the threaded port. Tighten the nut nger tight onto the threaded port to create a
secure seal (Figure 2, right picture). Do not use a wrench, as this will damage the threads.
Add the protein solution to the microvials and dry using a vacuum centrifuge. Using forceps, 2.3.
insert the vials to the microvial insert tray.
Add 10 mL of 6N HCl with 1% Phenol to the vessel body.2.4.
Place the insert tray into the vessel body. Fit the condensation shield over the vials (Figure 3).2.5.
Figure 3. Microvial Loading.
Page 4

Figure 4. Vessel Assembly.
Insert the thermowell into the hole in the center of the condensation shield. Thread the vessel 2.6.
cap on hand tight (Figure 4).
Using the wrench set, seal the vessel by tightening the vessel cap onto the vessel body an 2.7.
additional 1/4 to 3/8 turn (Figure 4).
Place the sealed vessel in a 400-500 mL Pyrex beaker containing dry ice and acetone to 2.8.
freeze the acid in the bottom of the vessel.
NOTE
Freezing the acid solution may take up to 15 minutes.
Once the acid in the vessel is frozen, remove the vessel from the bath. Thread the tubing 2.9.
from the “To Vessel” port on the valve panel assembly through the top of the attenuator port
opening. Secure the end of the tubing onto the open port of the vessel using an open ferrule
nut (Figure 5).
Figure 5. Connecting Vessel to Valve Panel and Securing in Reactor.
Place the vessel assembly into the Discover microwave cavity. Secure the attenuator into 2.10.
position (Figure 5).
Insert the ber-optic probe though the attenuator port into the thermowell (through then center 2.11.
port of the vessel cap) just until resistance is felt.
Page 5

Figure 6. Valve Handle Positions.
Perform ve vacuum evacuation/nitrogen purge cycles.3.
With the pressure regulator set to 15 psi, turn the valve handle to the “Nitrogen” position for a 3.1.
period of 15 seconds.
Turn on the vacuum pump. Turn the valve handle to the “Vacuum” position.3.2.
Evacuate the sample vessels down to -25 in Hg as indicated on the valve panel vacuum 3.3.
gauge.
Once the vacuum has stabilized, turn the valve handle to the “Nitrogen” position.3.4.
Repeat steps 3.1 through 3.4 four more times.3.5.
Seal the samples under a 15 psi nitrogen atmosphere by turning the valve handle to “Nitrogen” 3.6.
and then to “Run.”
Press the PLAY key to run your selected hydrolysis program.4.
At the conclusion of the hydrolysis and cooling cycle, remove the temperature probe from the vessel 5.
assembly.
Remove the attenuator, then remove the vessel from the Discover cavity. (The vessel assembly will 6.
still be connected to the valve panel.)
Turn the valve handle to “Vent” to release the remaining nitrogen pressure. Disconnect the pressure 7.
sensing line from the vessel assembly.
Using the wrench set, remove the vessel cap.8.
Using micro-forceps, remove the microvials from the tray. Use a vacuum centrifuge to remove any 9.
remaining liquid that has condensed in the vials. After drying, samples are ready to dissolve and
cap for transfer to an HPLC system autosampler.
Page 6

RECOMMENDED PARAMETERS FOR PROTEIN HYDROLYSIS
Power = 150 W
Power Mode = STANDARD
Temperature = 150° C
Temperature Control = Fiber-optic
Pressure= 100 psi
Run Time = 2:30
Hold Time = 15:00
PARTS AND ACCESSORIES
SYSTEM
PRODUCT NAME PART #
Discover Protein Hydrolysis
(100-120V/50-60Hz)
Includes the Following:
Bioscience Discover (100-120V/50-60Hz) 908005
Discover Protein Hydrolysis Option 925590
Vacuum Pump (100-120V/50-60Hz) 544530
Fiber-Optic Temperature Control 541175
Discover Protein Hydrolysis
(200-240V/50-60Hz)
Includes the Following:
Bioscience Discover (200-240V/50-60Hz) 908010
Discover Protein Hydrolysis Option 925590
Vacuum Pump (200-240V/50-60Hz) 544540
Fiber-Optic Temperature Control 541175
925480
925482
ACCESSORIES
PRODUCT NAME PART #
Complete Valve Panel Assembly 908275
Reaction Vessel Top with 2 Ports 148460
Reaction Vessel Bottom 324015
Microvial Tray Insert 324020-P
Condensation Shield 324030
Fiber-Optic Temperature Probe 314325
Thermowell Assembly (Qty 2) 430676
Discover Protein Hydrolysis Operations Manual 600313
Wrench Set SP-1367
 Loading...