

Ref.: 49-MCEPB60EN02 Rev.: 02
PB-60 PRECISION WEIGHING
SCALES
User’s Manua
l


Series PB-60
49-MCEPB60EN02 USER’S MANUAL
I
CONTENTS
1. INTRODUCTION ....................................................................................................................................................1
2. SPECIFICATIONS ..................................................................................................................................................2
2.1. S
ERIES PB-60 ...................................................................................................................................................... 2
2.2. SPECIFICATIONS COMMON TO ALL MODELS ......................................................................................................... 2
3. INSTALLATION...................................................................................................................................................... 3
3.1. GENERAL INSTALLATION............................................................................................................................ 3
3.2. INSTALLING THE PB-60 SERIES .................................................................................................................. 3
4. DESCRIPTION OF KEYBOARD .......................................................................................................................... 4
5. OPERATION ............................................................................................................................................................ 5
5.1. MANUAL ZERO SETTING.............................................................................................................................. 5
5.2. SETTING THE TARE........................................................................................................................................ 5
5.3. SAMPLE WEIGHT............................................................................................................................................ 5
5.4. PERCENTAGE WEIGHT.................................................................................................................................. 5
5.5. ITEM COUNTING MODE ................................................................................................................................ 6
5.6. ACCUMULATION ............................................................................................................................................ 6
6. BATTERY OPERATION........................................................................................................................................ 7
7. RS-232 INTERFACE ............................................................................................................................................... 8
8. CONFIGURATION ................................................................................................................................................. 9
9. APPENDIX.............................................................................................................................................................. 10
9.1. ERROR CODES ............................................................................................................................................... 10
9.2. LIST OF UNITS OF WEIGHT ........................................................................................................................ 10


Series PB-60
49-MCEPB60EN02 USER’S MANUAL
1
1. INTRODUCTION
NOTE: These scales are not allowed for the uses mentioned in paragraph 2a of the article 1st of the Directive
90/384/CE, therefore they are not valid for commercial transactions.
The electronic weighing scales model PB-60 are precise, rapid and versatile, for all types of use including
item counting and percentage weight functions.
The series consists of 4 different models with a capacity of up to 3,000 g.
They all have stainless steel plates on an ABS base.
All the keypads have easy-to-press keys and the displays are all large-sized LCDs (liquid crystal displays)
which are easy to read. The LCDs have a backlight and item counting function.
All scales have automatic zero setting, automatic tare, and an accumulation function that permits to save
several operations in order to have a total accumulation.
Series PB-60
49-MCEPB60EN02 USERS’ MANUAL
2
2. SPECIFICATIONS
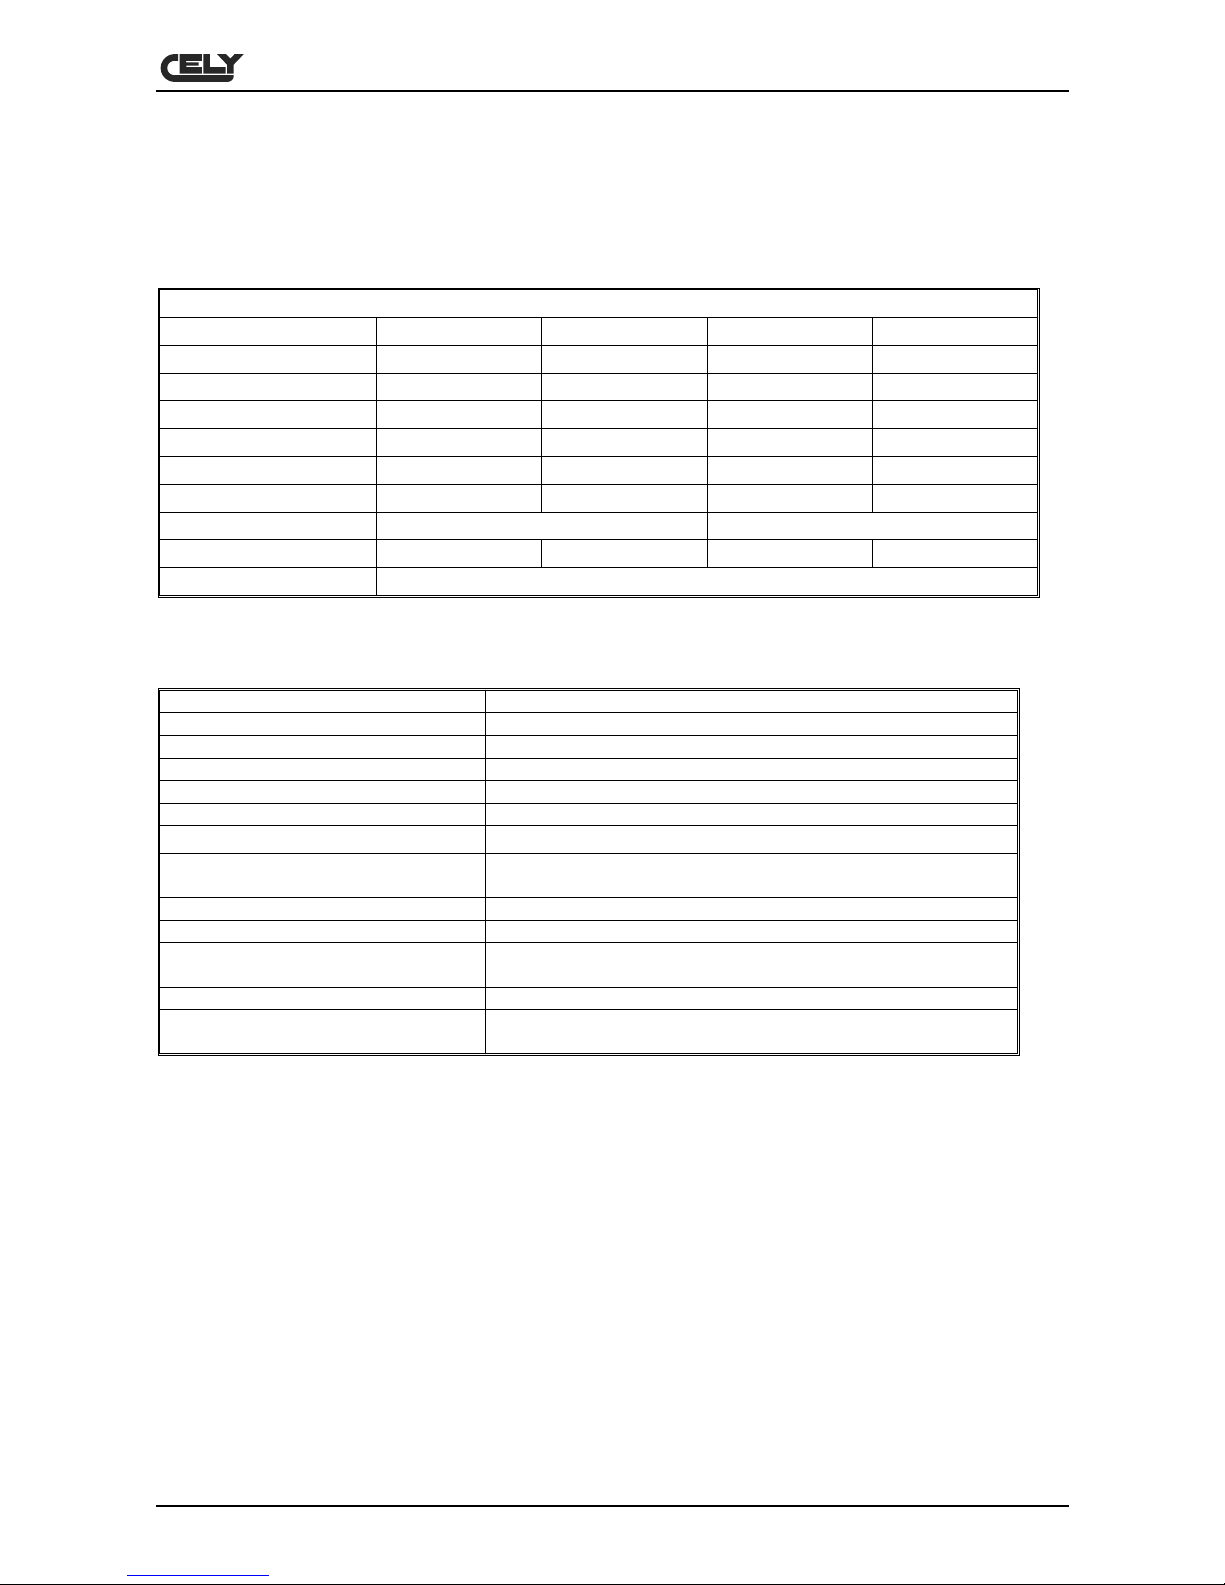
2.1. Series PB-60
SERIES PB-60
Model no. PB-60 -300 PB-60 -600 PB-60 -1500 PB-60 -3000
Range 300g 600g 1,500g 3,000g
Step 0.005g 0.01g 0.02g 0.05g
Resolution 1/60.000 1/60.000 1/60.000 1/60.000
Maximum tare 100g 300g 600g 1,000g
Minimum weight 0.1g 0.2g 0.4g 1g
Linearity ± 0.01g 0.02g 0.04g 0.1g
Plate dimensions Φ120mm 136mm×162mm
Wind protector Yes Yes No No
Units of weight g / ct / lb / oz / d / gn / ozt / dwt / mm / tl.T / tl.c / tl.t / t.
2.2. Specifications common to all models
Interface RS-232 output (optional)
Stabilisation time Normally 2 seconds
Operating temperature 0°C - 40°C / 32°F - 104°F
Power supply (external) 9V/800mA or internal rechargeable battery
Calibration Automatic, external
ADC Σ-∆
Internal divisions
1,000,000
Display LCD , height 20mm ; 6 dígits;
automatic background light; load bar graph
Manufacture materials ABS plastic, stainless steel plate
Tray size Φ120mm / 136mm×162mm
Overall dimensions (width x depth x
height)
180mm x 220mm x 85mm
Gross weight 1,4 kg (including rechargeable battery)
Other components and
specifications
Great precision in counting items and percentage weight
function

Series PB-60
49-MCEPB60EN02 USER’S MANUAL
3
3. INSTALLATION
3.1. GENERAL INSTALLATION
The scales should be placed on a firm, even surface.
Avoid extreme temperatures. Do not place the scales in direct sunlight or near air conditioning vents.
Avoid unstable tables. The tables and the ground should be firm and not vibrate. Do not place the scales
near vibrating machinery.
Avoid unstable electricity sockets. Do not use the scales near equipment with high electrical power
consumption such as soldering equipment or large motors.
Avoid draughts such as those from fans or open doors. Do not place the scales near open windows.
Keep the scales clean.
Keep the scales dry.
These scales do not have a waterproof design (IP44) and therefore high levels of humidity should be
avoided since this can cause condensation. Avoid direct contact with water. Do not spray water on the scales
or submerge them in water. If the scales come into contact with water, measurements may become unstable
or the scales may not operate correctly. Please unplug the scales immediately from the power supply.
Do not stack anything on the scales when they are not in use.
3.2. INSTALLING THE PB-60 SERIES
Ensure the scales are standing level, by adjusting the four feet. Adjust the scales so that the bubble in the
vial is in the centre and the scales are resting on all four feet. If the scales wobble, readjust the feet.
Plug in the power supply cable in the socket on the side of the scales. Check that the power supply is as per
the scale specifications.
Put together the protective hood using the five plastic parts included with all models except the 1,5 and 3kg
range models.
Put the protective hood in position so that it fits perfectly over the scales and does not move, checking that
the small notches in the corners of the hood are positioned downwards.
Make a weight calibration as shown in paragraph 8 (Configuration) in the function Normal
Calibration (P2CAL)

Series PB-60
49-MCEPB60EN02 USERS’ MANUAL
4
4. DESCRIPTION OF KEYBOARD
DESCRIPTIONKEY
PRIMARY FUNCTION SECONDARY FUNCTION
Manual zero setting
Displays shows zero.
Sets parameters and other functions.
Sets the tare of the scale, saving the
current weight in the memory as the tare
value, subtracting the value of the tare
weight and displays the result. This result
represents the net weight.
The scale enter weight control function
When the scale is in percentage mode and
the current weight value is zero, press this
key to return to normal weighing mode.
Prints results on a PC or printer using the
optional RS-232 interface.
It can also be used to add the value of the
accumulative memory if the accumulation
function is not automatic.
When the scales is in Configuration mode,
press this key to return to normal
operation.
Select kilograms, pounds, ounces, etc. as
the unit of weight when the scales is in
weighing mode.
In counting mode, this key is used to view
the weight, unit weight and number of items
when items are being counted.
This key modifies the current value of
parameters and other functions.
Press this key in the weighing mode to
change to item counting mode.
Press this key to change back from item
counting mode to normal weighing mode.
Use this key to switch the scale on and off.

Series PB-60
49-MCEPB60EN02 USER’S MANUAL
5
5. OPERATION
5.1. MANUAL ZERO SETTING
Press at any time in order to make a manual zero setting.. When zero is obtained, the display will show
the zero indicator.
The scales are provided with a manual zero setting function in order solve minor problems in weight
deviation or accumulation of materials on the platform. If the weight exceeds total capacity by 4%, this
function is disabled.
5.2. SETTING THE TARE
Set the scales to zero using if necessary. The zero indicator will appear.
Place the packaging on the platform and a weight value will appear.
Press
to set the tare of the scales. The weight that appeared on the display is saved as the tare value
and that value is deducted from the display, which returns to zero. The “NET” indicator will be activated.
When a product is added, only the product weight will be shown. The scales may be tared for a second time
if another type of product is added to the first. Again, only the additional weight will be shown after the tare
has been set.
When the packaging is removed, a negative value will be shown. If the scales are tared before the packaging
is removed, this value will be the gross weight of the packaging plus all the product that was removed. the
zero indicator will also light up because the platform returns to the same situation as when
was pressed.
5.3. SAMPLE WEIGHT
In order to determine the weight of a sample, first tare the packaging and then place the sample in the same
packaging. The display will show the weight and the unit of weight in current use.
5.4. PERCENTAGE WEIGHT
The scales permit a percentage weight to be shown as 100%. Any other type of weight that is placed on the
balance will be shown on the display as a percentage of the original sample. For example, if 350 g is placed
on the scales, and the
is pressed, the display will show 100.00%.
If the 350 g weight is removed from the scales and a weight of 300g is then placed on the scales, the display
will show 85.71% because 300g is 85.71% of 350g.
Note: the scales may fluctuate unexpectedly to a major degree if very small weights are used to set the
percentage weight at 100%. For example, if just 23.5 g are placed on the scales, with increasing steps of
0.5g, and the scales are set to 100%, the display will show 100.00. However, a small weight will make the
display jump to 102.12% because a 0.5g increase would imply that the weight has risen to 24.0g, i.e.,
equivalent to a 2.13% increase.
Press
again to return the scales to weighing mode.

Series PB-60
49-MCEPB60EN02 USERS’ MANUAL
6
5.5. ITEM COUNTING MODE
Before starting operation, set the tare of the weight of any packaging to be used, by placing the empty
packaging on the scales. Place a certain number of samples on the platform. The number must coincide
with the item counting options: 10, 20, 50, 100 or 200 items.
When the scales display the weight, press and the item counting function will start.
The scales will show "SP 10", in order to request a sample of 10 items. Press
and the display will
move through the different options: 10, 20, 50, 100, 200 and back to 10.
Press when the number coincides with the number of items used for the sample. When further weight is
added to the platform, the number of items on the display will also increase (pcs).
Press
to view the unit weight /g/pcs), total weight (kg) and total number (pcs). Press to return to
normal weighing mode.
5.6. ACCUMULATION
When the scales are set in manual accumulation mode, the weight that appears on the display can be saved
in the memory by pressing
(print) if the weight is stable.
The display will show “ACC ” and the total saved in the memory will be displayed for two seconds before
returning to normal mode. If the optional RS-232 interface is installed, the weight will be sent to a printer or
PC.
Remove the weight so that the scales return to zero and put another weight on the platform. Press
(print) and the display will show “ACC 2” followed by the new total.
Continue until all the weights have been added.
In order to view the totals in the memory, press
(print) when the scales show zero. The display will show
the total number of items “ACC xx” and the total weight before returning to zero. The totals will also be
printed through the RS-232 interface.
In order to delete the memory, press
(print), in order to see the totals and then press to delete the
memory.

Series PB-60
49-MCEPB60EN02 USER’S MANUAL
7
6. BATTERY OPERATION
When the battery needs recharging, the indicator will light up. Please charge the battery or use
alternating current when this indicator lights up.
The scales can operate with batteries if so required. The battery will last approximately 72 hours.
To charge the battery, simply plug it into an electricity socket. It is not necessary to switch on the scales.
Recharge the battery for 12 hours in order to completely recharge it.
There is a LED that indicates the battery charging status. When the scales are plugged in to the mains, the
internal battery will charge. A green LED indicates that the battery is fully charged. A red LED indicates that
the battery needs to be charged and yellow means that the battery is being recharged.
In the course of use, the battery may lose its capacity to be fully charged. If the battery does not last long
enough, please contact your distributor.
Note: new batteries are only partly charged. Before using the scales, insert and charge the battery following
the instructions provided below.
Some batteries will perform better after several full cycles of being charged/discharged.
Battery performance depends on many different factors, including the configuration of the backlight and
operation.
Never use a damaged battery charger or battery.
Never short-circuit the battery. An accidental short-circuit may occur if a
metallic object (coin, paper clip, ballpoint pen) makes a direct connection
between the battery’s + and – poles (the battery’s metal connectors), and
this may occur, for example, if the battery is carried in your pocket. Shortcircuiting the poles may damage the battery or the object that causes the
connection.
Do not throw batteries into fire.
Discard batteries in accordance with local policy (e.g., recycling bin).
Do not discard batteries in home rubbish bins.
Avoid charging the battery in a poorly ventilated room.
In order to maximise battery performance:
Always use original batteries and AC adapters. The scales’ guarantee does
not cover damage occurring as a result of the use of any other batteries and/or chargers that are not the
originals.
The AC adapter voltage output is 9V, but normal voltage range will be between 11 and 15V.
New batteries and batteries that have been stored for a long period of time may take longer to charge.
Keep the battery at room temperature or similar temperature when charging.
Do not expose batteries to temperatures of less than -10°C or more than 45°C.
After a long time, batteries gradually lose their charge capacity and require longer charging times.
If you charge the battery regularly and observe that the operating time is decreasing or the charging time is
increasing, it would probably be wise to purchase a new battery.

Series PB-60
49-MCEPB60EN02 USERS’ MANUAL
8
7. RS-232 INTERFACE
The scales PB-60 have as an option the possibility of include a RS-232 serial interface.
Specifications:
• RS-232 interface for weighing data.
• ASCII code
• 9600 bauds
• 8 data bits
• Non-parity
Connector: 9 pin SUB-D Type
• Pin 2: Tx
• Pin 3: Rx (NOT USED)
• Pin 5: GND
The PB-60 may be connected to a PC, remote display or mini printer. See section 8.

Series PB-60
49-MCEPB60EN02 USER’S MANUAL
9
8. CONFIGURATION
The scales have 8 configuration parameters that can be set-up by the user, and there is also a method for
performing weight calibration.
To enter parameter set-up, press
during auto-verification. The display will show the first function “F1
UNT".
Press
, to move through the other functions.
Press
to set-up the function. Use to leave a parameter without modifying it.
Note: When the display shows “TECH”, press
to enter, the display shows “PIN”, press , and
to enter the set-up mode of the technical parameters.
Parameter table.
FUNCTION DESCRIPTION
F1 UNT
This determines the unit of weight to be used: g / ct / lb / oz / d / gn / ozt / dwt / mm / tl.T /
tl.c / tl.t / t Press
to select, and to save.
F2 EL
This is for setting up the backlight. It can be set to on, automatic or off.
EL on: The backlight is always on
EL Au: The backlight will activate and desactivate automatically
EL off: The backlight is always off
Press
to select and to save.
F3 PRT
Set-up the RS-232
P1 connection PRT to mini printer
P2 connection RE to remote display or PC
Press
to select and to save.
TECH
Pin
Access the programming and calibration menus by entering the correct password (
) and press to save.
P1 LIN
Linear calibration
After pressing
, the display will show the PIN again. Press , , and to enter.
The display will show UNLOAD. Remove any weight from the tray and press
to set
zero.
The display will then request the first weight for calibration. Place this weight on the platform
and press
when it is stable. The scales must be stable before pressing in order to
accept a weight. The stability indicator will light up to show that the value is stable.
After the first weight calibration, the display will show the next weight for calibration. Place
the calibration weight as indicated by the display and press
.
When the weight has been calibrated, press
to complete calibration. The scales will
start a countdown to zero after the last weight has been selected.
P2 CAL
Normal calibration
After entering cal. mode, the display will show "unload”. Remove any weight from the tray
and press
to set zero. The display will then request the weight for calibration. Use to
select the calibration weight. Place the selected weight on the platform and press
when
it is stable. The scales must be stable before pressing
in order to accept a weight. The
stability indicator will light up to show that the value is stable. The scales will start a
countdown to zero after the last weight has been selected.
P3 CNT
This display will show xxxxx to indicate internal counts. Press
to exit.
P4 AZN
This option is used to select zero tracking options.
Options : 0,5d, 1d, 2d, 4d, press
to save and to exit.

Series PB-60
49-MCEPB60EN02 USERS’ MANUAL
1
0
9. APPENDIX
9.1. ERROR CODES
The scales may show an error message during initial operating tests or during normal operation. The
meaning of these error messages is described below.
If an error message appears, repeat the procedure that caused the message: switching-on of scales,
calibration, or other function. If the error message remains, contact your supplier for technical service.
ERROR CODE DESCRIPTION POSSIBLE CAUSES
Err 4
The initial zero is greater than the
permitted value (4% of the
maximum capacity) when the
scales are switched on or when
is pressed.
There is a weight on the tray when the scales
are switched on.
Excessive weight on the tray when the scales
are set to zero.
Incorrect calibration of scales.
Damaged load cell.
Damaged electronic components.
Err 5
Key error Incorrect scale operation.
Err 6
The A/D counts are not correct
when the scales are switched on.
Platform has not been installed.
Damaged load cell.
Damaged electronic components.
To view the A/D counts, press and simultaneously when the scales are undergoing initial revision
when switched on. Press
to return to normal operation.
9.2. LIST OF UNITS OF WEIGHT
No. Unit symbol Unit name Conversion (g)
1
ggram
2
g gram (high resolution)
3
ct Net carat =0.2g
4
libra pound =453.59237g
5
oz ounce =28.349523000g
6
d drachma =1.7718450g
7
gn grain =0.06479900g
8
ozt Troy ounce =31.1034770g
9
dwt scruple =1.55517400g
10
mm momme =3.749996g
11
tl.T tael twn =37.49995g
12
tl.c tael chn =37.799375g
13
Tl.t tael troy =37.4290020g
14
t tola =11.6638040g

Series PB-60
49-MCEPB60EN02 USER’S MANUAL
11
DECLARATION OF CONFORMITY
Manufacturer:
CELY
Type:
PB-60 Series
The aforementioned manufacturer declares that the apparatus described herein complies with the
requirements contained in Directive 89/336/CEE and 73/23/CEE and, where applicable, to the following
harmonised regulations:
- EN55022 Class B
- EN61000-4-2
- EN61000-4-3
- EN61000-4-4
- EN60950
Ref.: 49-MCEPB60EN02 Rev.:02
02/09/05


 Loading...