

Page 1
1
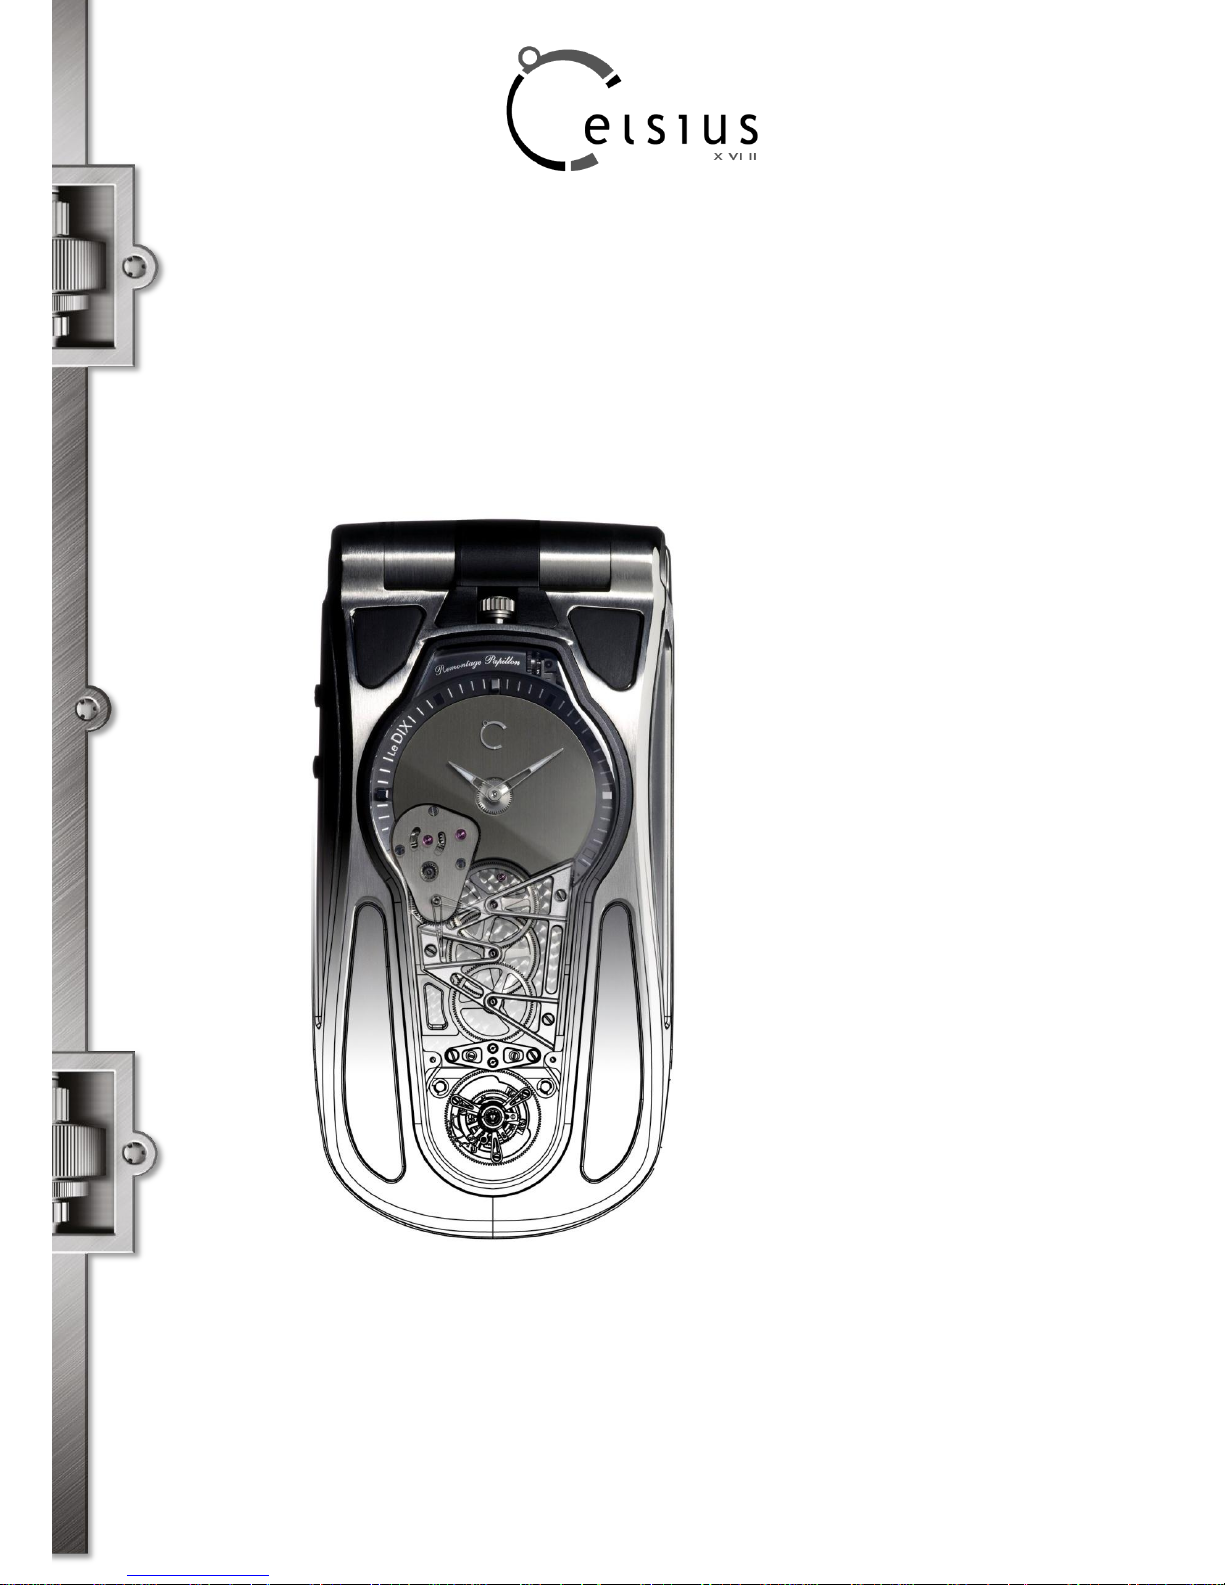
LeDIX
User Guide
Page 2

2
Contents
1 Introduction .....................................................................................................................................3
2 Quick start ..................................................................................................................................7
3 Phone menus ................................................................................................................................ 14
4 Calls .............................................................................................................................................. 15
5 Contacts ........................................................................................................................................ 17
6 Messages .................................................................................................................................. 19
7 Camera and Tools ..................................................................................................................... 21
8 Connection functions ................................................................................................................ 24
9 Phone customization ................................................................................................................. 26
10 Other functions ..................................................................................................................... 30
11 Appendix ............................................................................................................................... 32
Page 3

3
1 Introduction
This phone can be used internationally in the various networks (EDGE, GSM 900 MHz and DCS 1800 MHz or
PCS 1900 MHz) depending on the roaming arrangements with your operator.
Depending on the network configuration and associated subscription cards, certain functions may not be
available.
It is recommended that you read this handbook carefully in order to use your phone efficiently and in the best
conditions.
Trademarks:
– Celsius X VI II, LeDIX and Remontage Papillon are registered trademarks.
– T9® Text Input is a trademark of ©Tegic Communications Inc.
– Java™ and all Java™ based trademarks and logos are trademarks or registered trademarks of Sun
Microsystems, Inc. in the U.S. and other countries.
– The WAP navigator and the softwares included are the exclusive property of Openwave. For this reason, it is
forbidden to modify, translate, disassemble or even decompile all or part of these softwares.
– The Bluetooth® word mark and logos are owned by the Bluetooth® SIG, Inc.
– microSD™ is a trademark of SD Card Association.
– Windows is a trademark of Microsoft Corporation.
– Arkamys is a trademark of Arkamys SA.
Page 4
4
1.1 Description
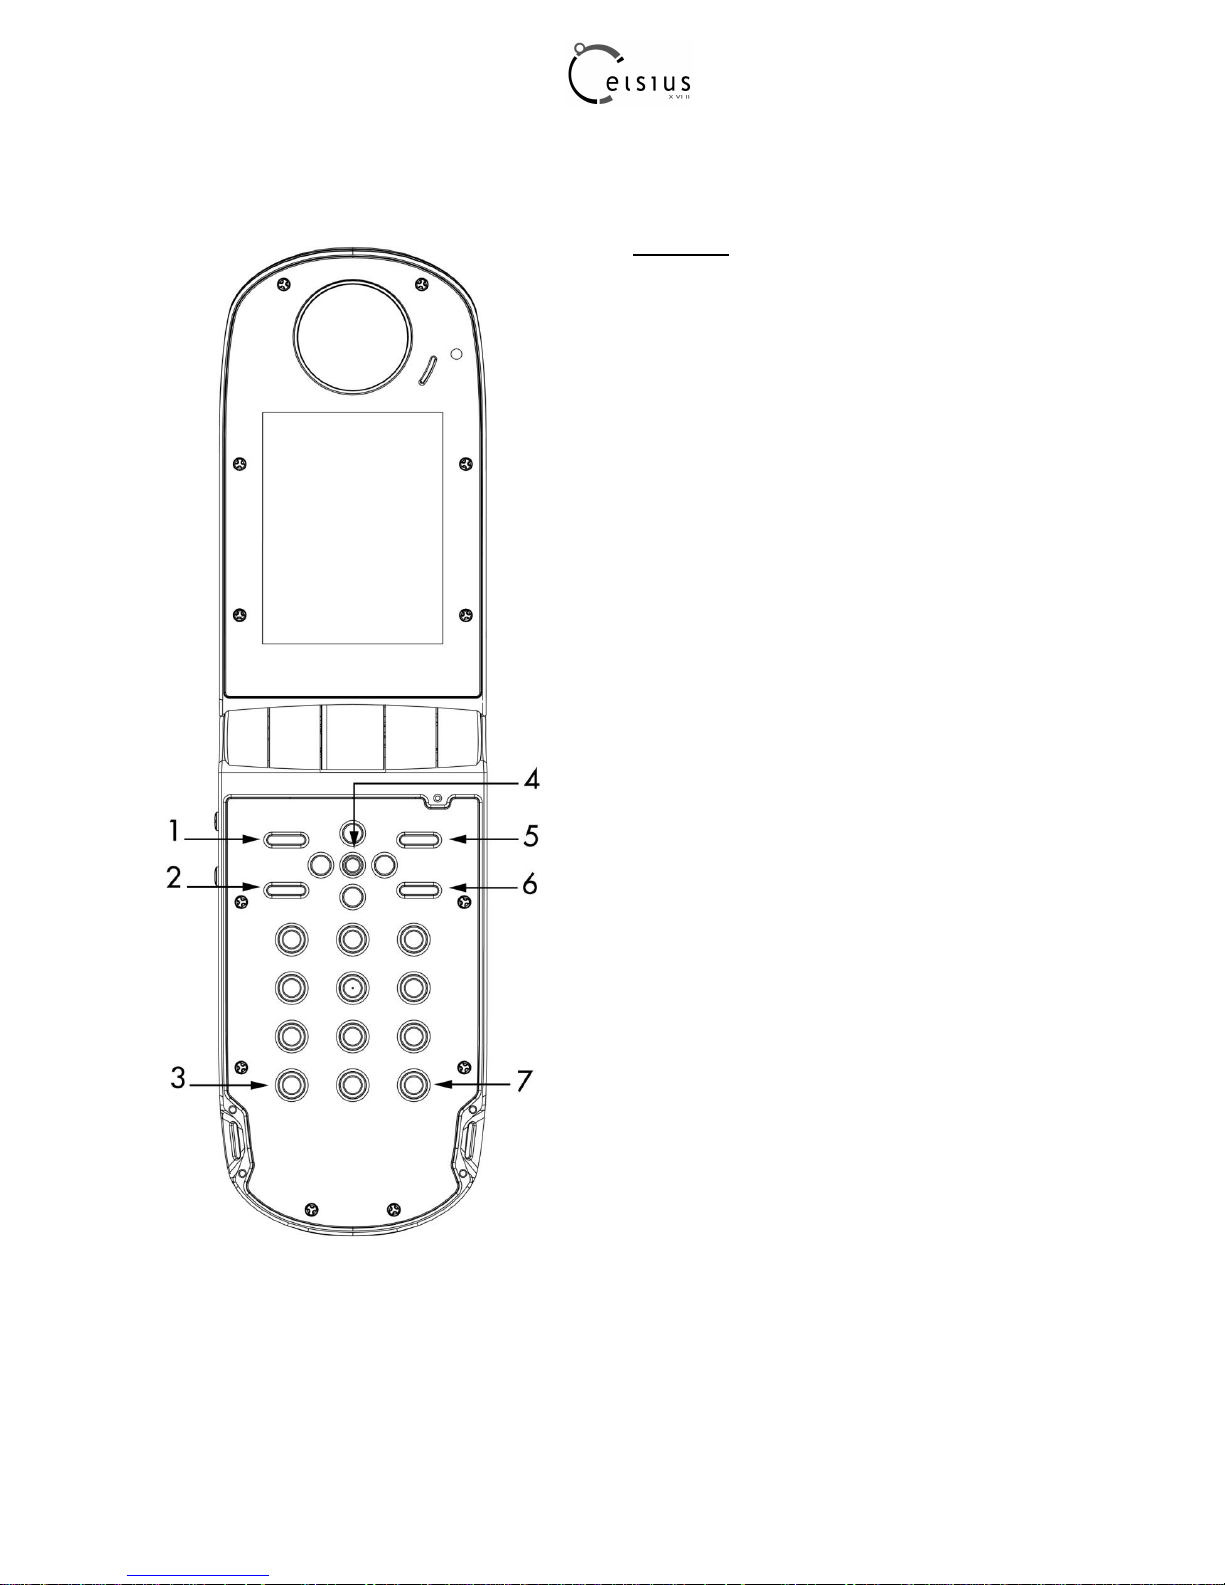
Keypad view
1] Left contextual key
In idle screen : shortcut to ―write a message‖
In menus: access to the selection shown on screen
2] Green key
During a call: activate /deactivate hands-free mode
In call context: make a call / accept a call
In idle screen: display the call log
Warning: in hands-free mode do not bring the
phone up to your ear.
3] Star Key
When composing a message :
Short press: switch from one input mode to another
(upper case/lower case, 123 mode)
Long press: activate/deactivate T9 mode
4] 5 keys navigator
Outcentered keys : navigation through menus
Central key : confirmation of a selection
5] Right contextual key
In idle screen: shortcut to ―set up alarm clock‖
In menus: access to the selection shown on screen
6] Red key
Short press: switch on the mobile
Long press: switch off the mobile
In call context: reject a call / hang up
In menus: return to idle screen
7] Hash key
When composing a message
Long press: modify the T9 mode language
Short press: display the symbol table
In other modes :
In idle screen: long press: silent mode
In call reception mode: mute the ring tone
When playing sounds: mute/unmute the sound
Page 5
5
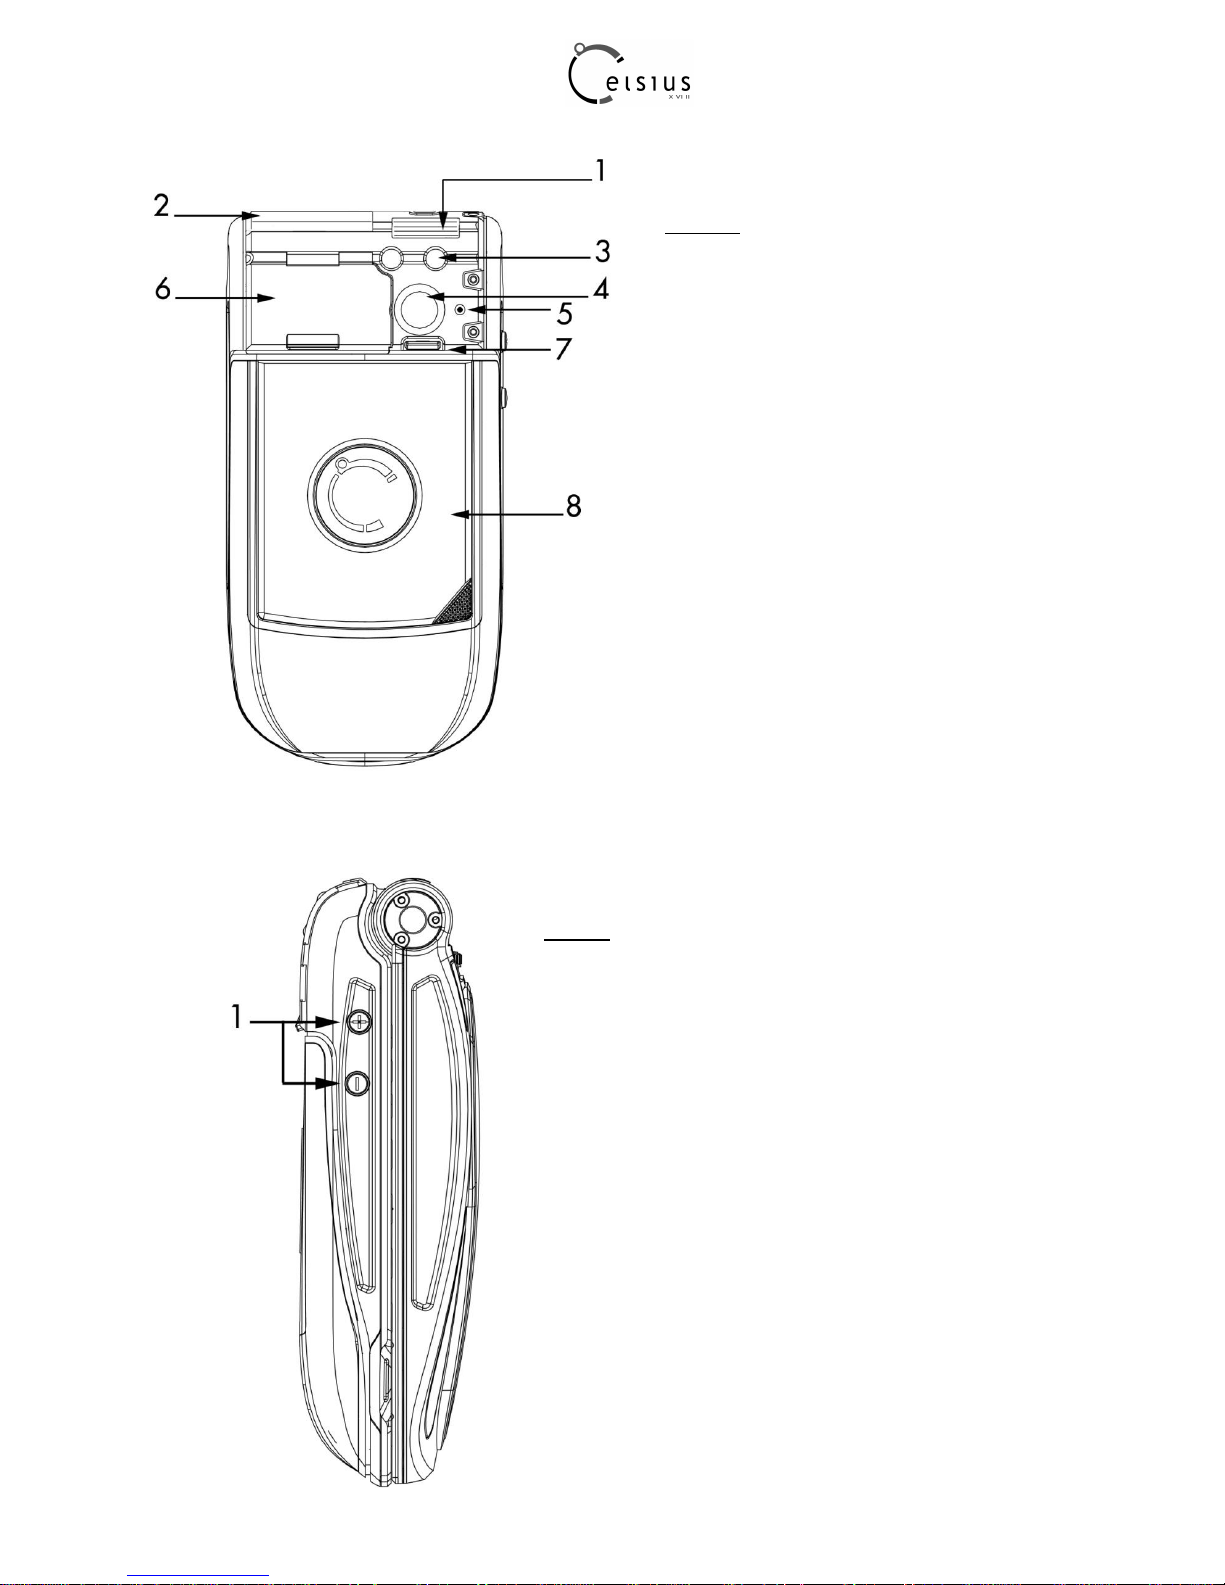
Rear view
1] Roll the knob [1] to open the connector cover
[2]
2] Connector cover
3] Flash
4] Camera lens
5] Microphone for video mode
6] SIM cover
7] Button to open the battery cover [8] and SIM
cover [6]
8] Battery cover
Left view
1] Set the volume
Page 6
6
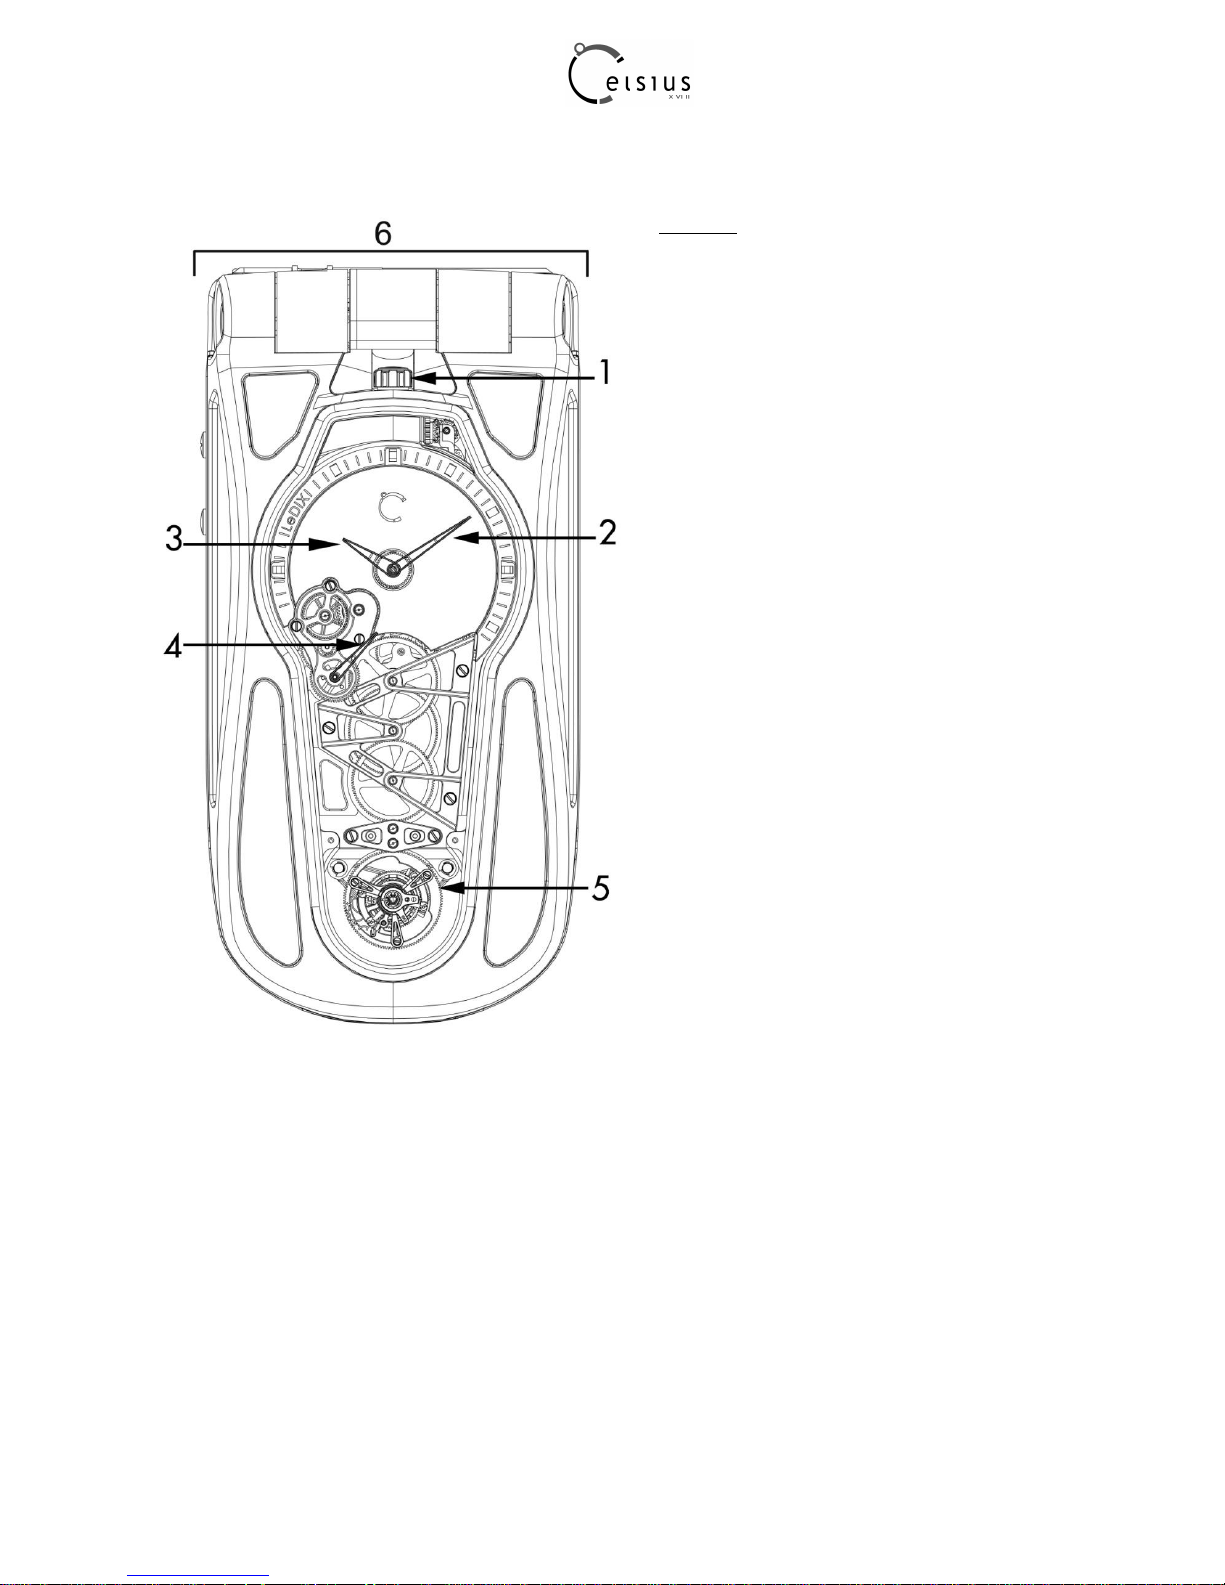
Front view
1] Pull the crown to setup the mechanical clock.
2] Minute hand
3] Hour hand
4] Power reserve hand
5] Excentred Tourbillon complication
6] Hinge : open and close the mobile phone in
order to wind up the mechanical clock
Page 7
7
2 Quick start
2.1 Information on the SIM card
To use your phone, you need a SIM card.
This card must be handled and stored with care in order not to be damaged.
If you should lose your SIM card, contact your network provider immediately.
Please keep your SIM card out of reach of young children.
Your phone is identified by its IMEI number.
Write this number down, and do not keep it with your phone, because you may be asked for it in the event of your
phone being stolen, in order to prevent it from being used, even with a different SIM card.
In order to display the IMEI on your phone screen, type: *#06#
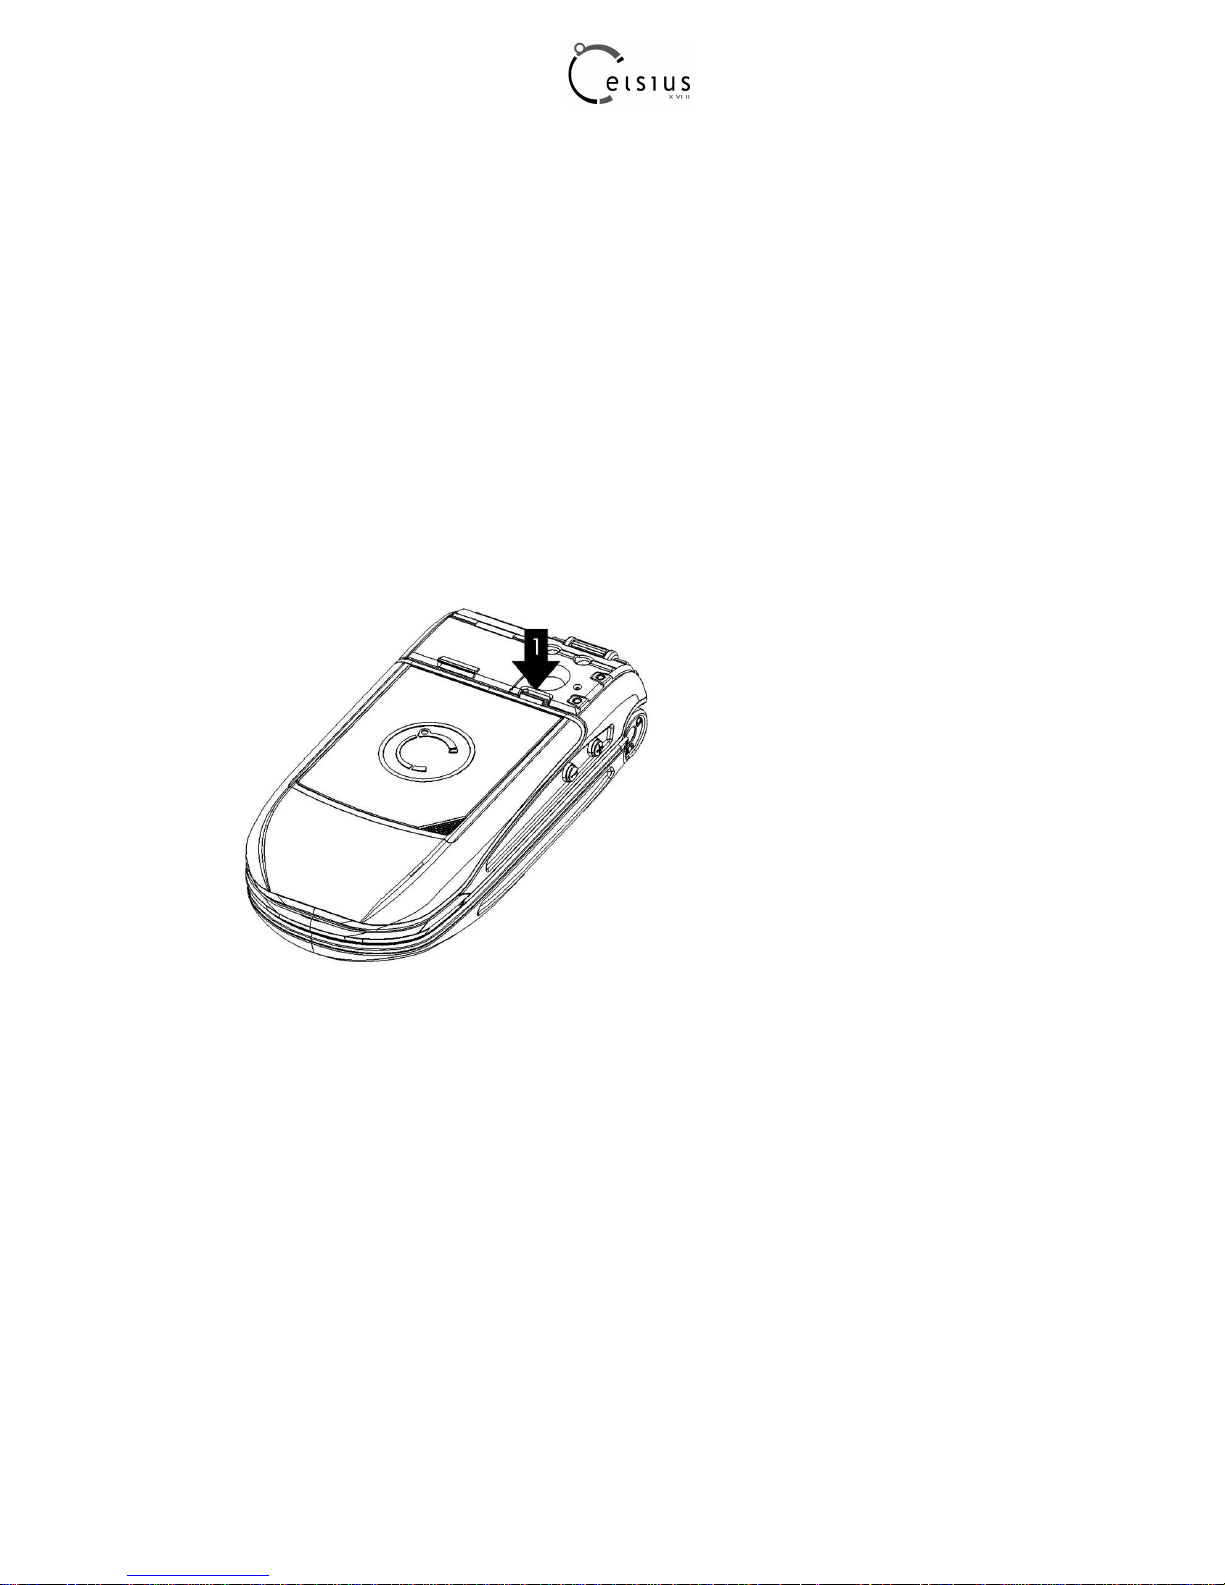
Installing the SIM card and the battery
Step 1 : Push on the ejection Button.
The Battery cover is open. You could take out or put the battery inside.
Page 8
8
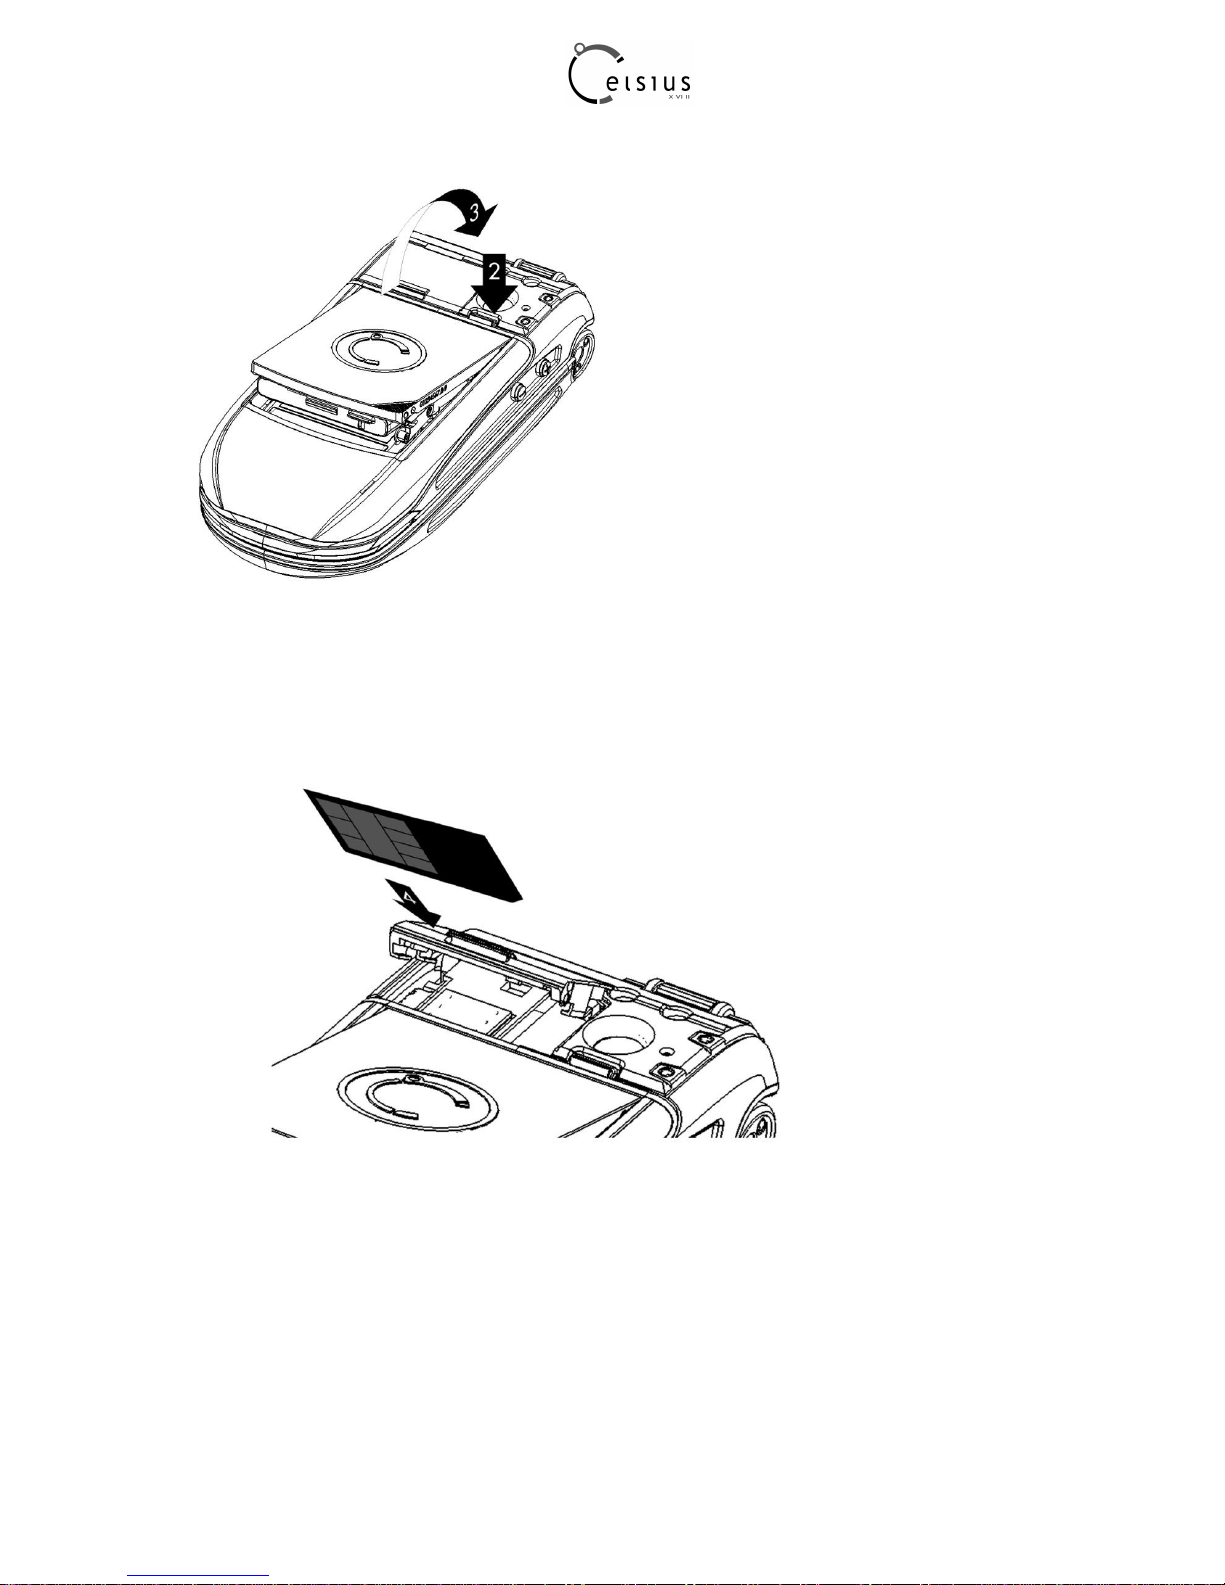
Step 2 : If there’s no SIM card already in the SIM rack, only the battery cover opens
Step 3: Push again on the ejection Button [2] and in the same time, use the notch as a lever to lift the Cover [3].
Step 4: Insert the SIM card inside the SIM cover as shown on the phone drawing.
Page 9
9
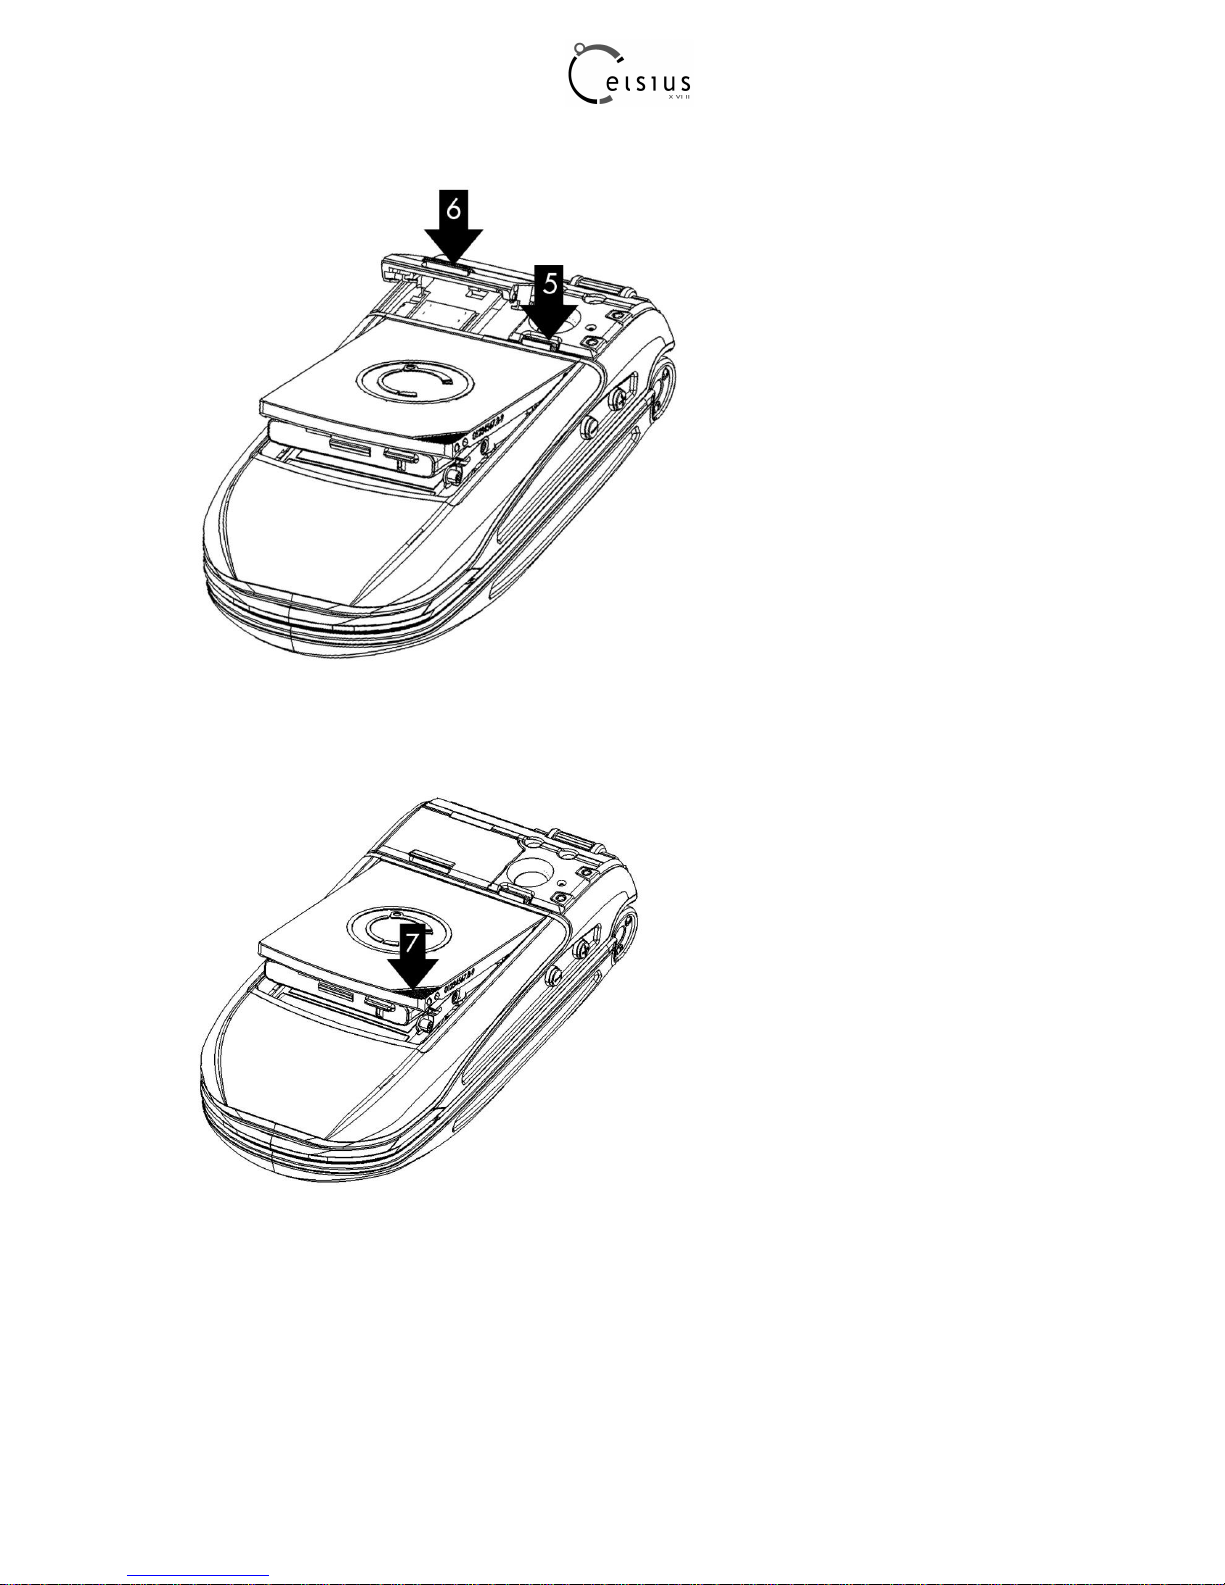
Step 5: Push the ejection button [5] and close se SIM cover [6].
Step 6: [7] Close the battery cover by pushing in the corner as shown on the phone drawing.
Page 10
10
2.2 Charging the battery
Your phone is powered by a rechargeable battery.
A new battery must be charged for 4 hours at least before being used for the first time.
When your battery has been discharged, the empty battery icon flashes. In this case charge your battery for at
least 15 minutes before making any calls in order not to be cut off quickly.
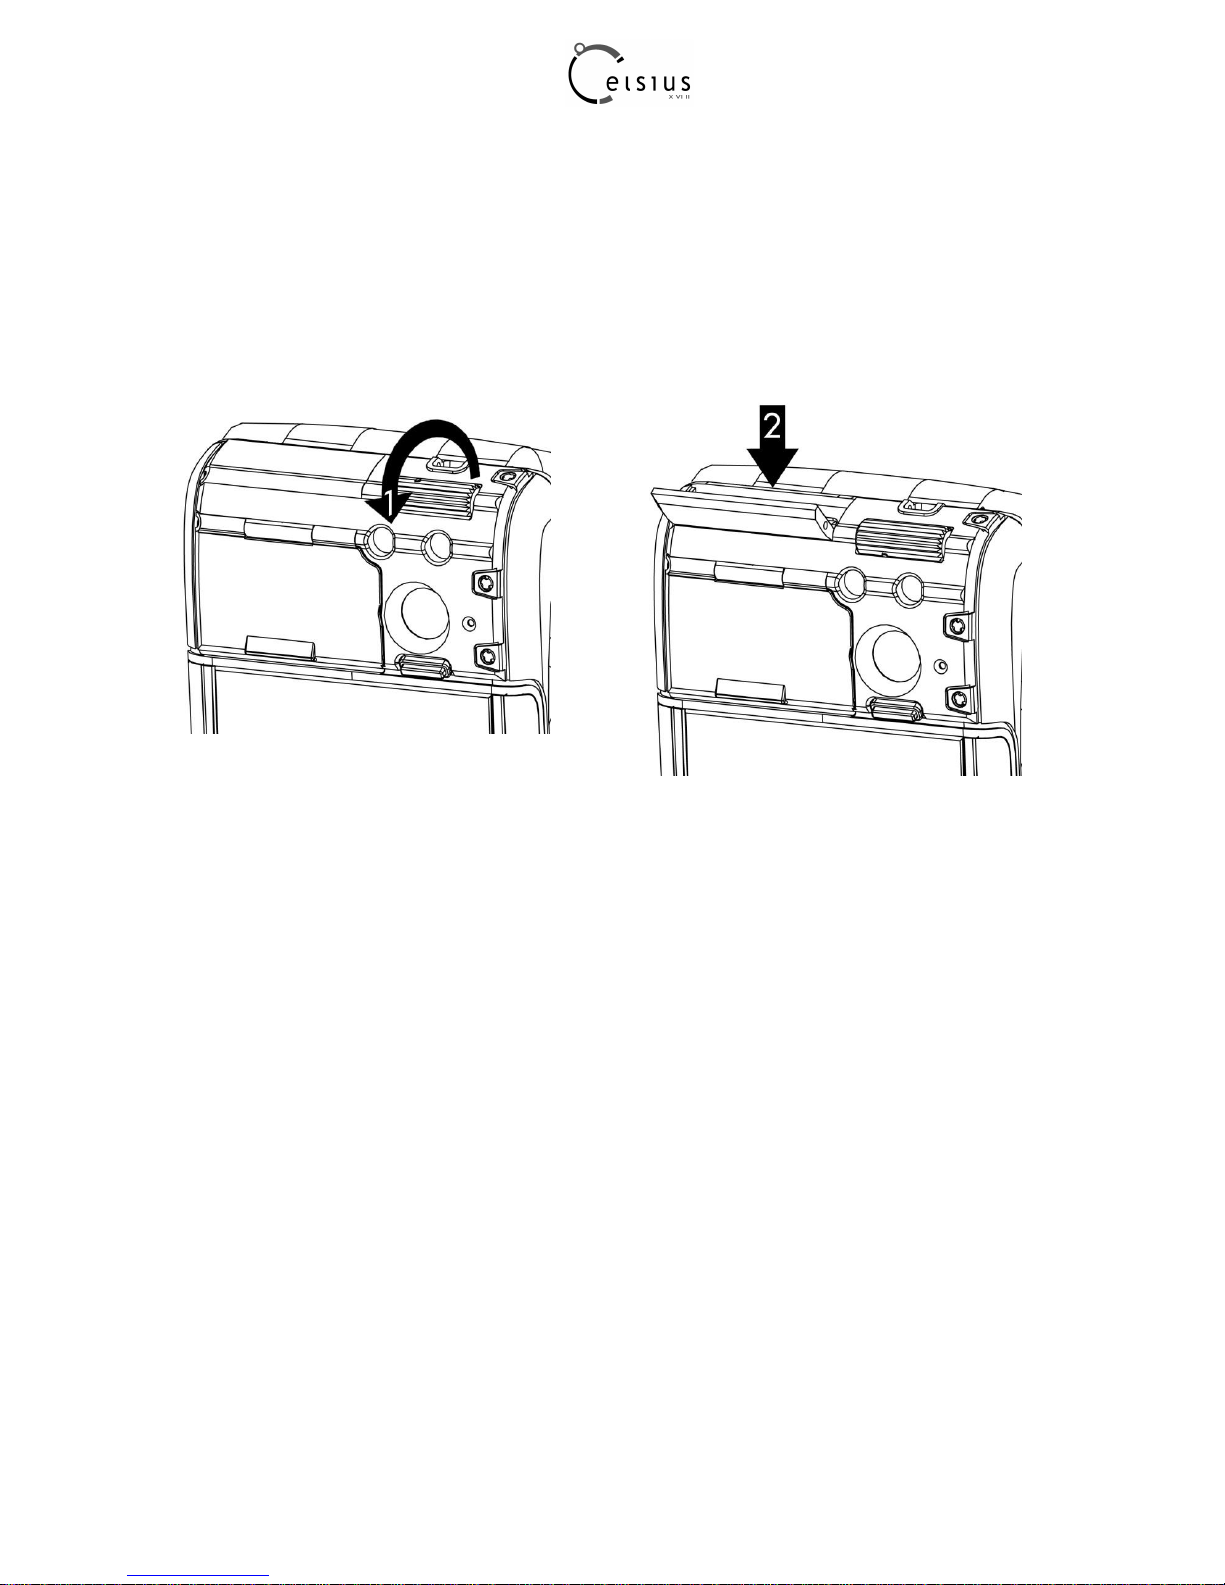
To charge the battery :
– Step 1 : open connector cover [1] by rolling the knob
– Step 2 : Plug the end of the cable [2] into the top connector of the phone.
The phone will then charge up when the charger will be put into a socket.
The battery icon scrolls up to indicate that it is charging.
When the battery is fully charged, the charging stops on its own. You may then disconnect the cable.
When charging, the battery may warm up, this is normal.
Warning: if the battery has entirely discharged, the phone cannot start. Plug the phone to the charger.
The phone will switch on after a few minutes of charge. You can use the phone again when the Start
option is displayed on the screen.
Warning: there is a danger of explosion if the battery is not fit properly or if it is exposed to fire. Do not
short circuit it.
The battery does not have any part that you can change.
Do not try to open the battery casing.
Use only the chargers and batteries delivered with the product.
The use of other types of chargers or batteries may be dangerous and will invalidate the warranty.
Used batteries must be disposed in the appropriate places.
We advise you to take the battery out if you plan not to use the phone for extended periods.
You are strongly advised not to connect your phone to the charger if it doesn’t contain a battery.
The charger is a safety step-down transformer, it is forbidden to modify, alter or replace it by another component.
Page 11
11
2.3 Using advice
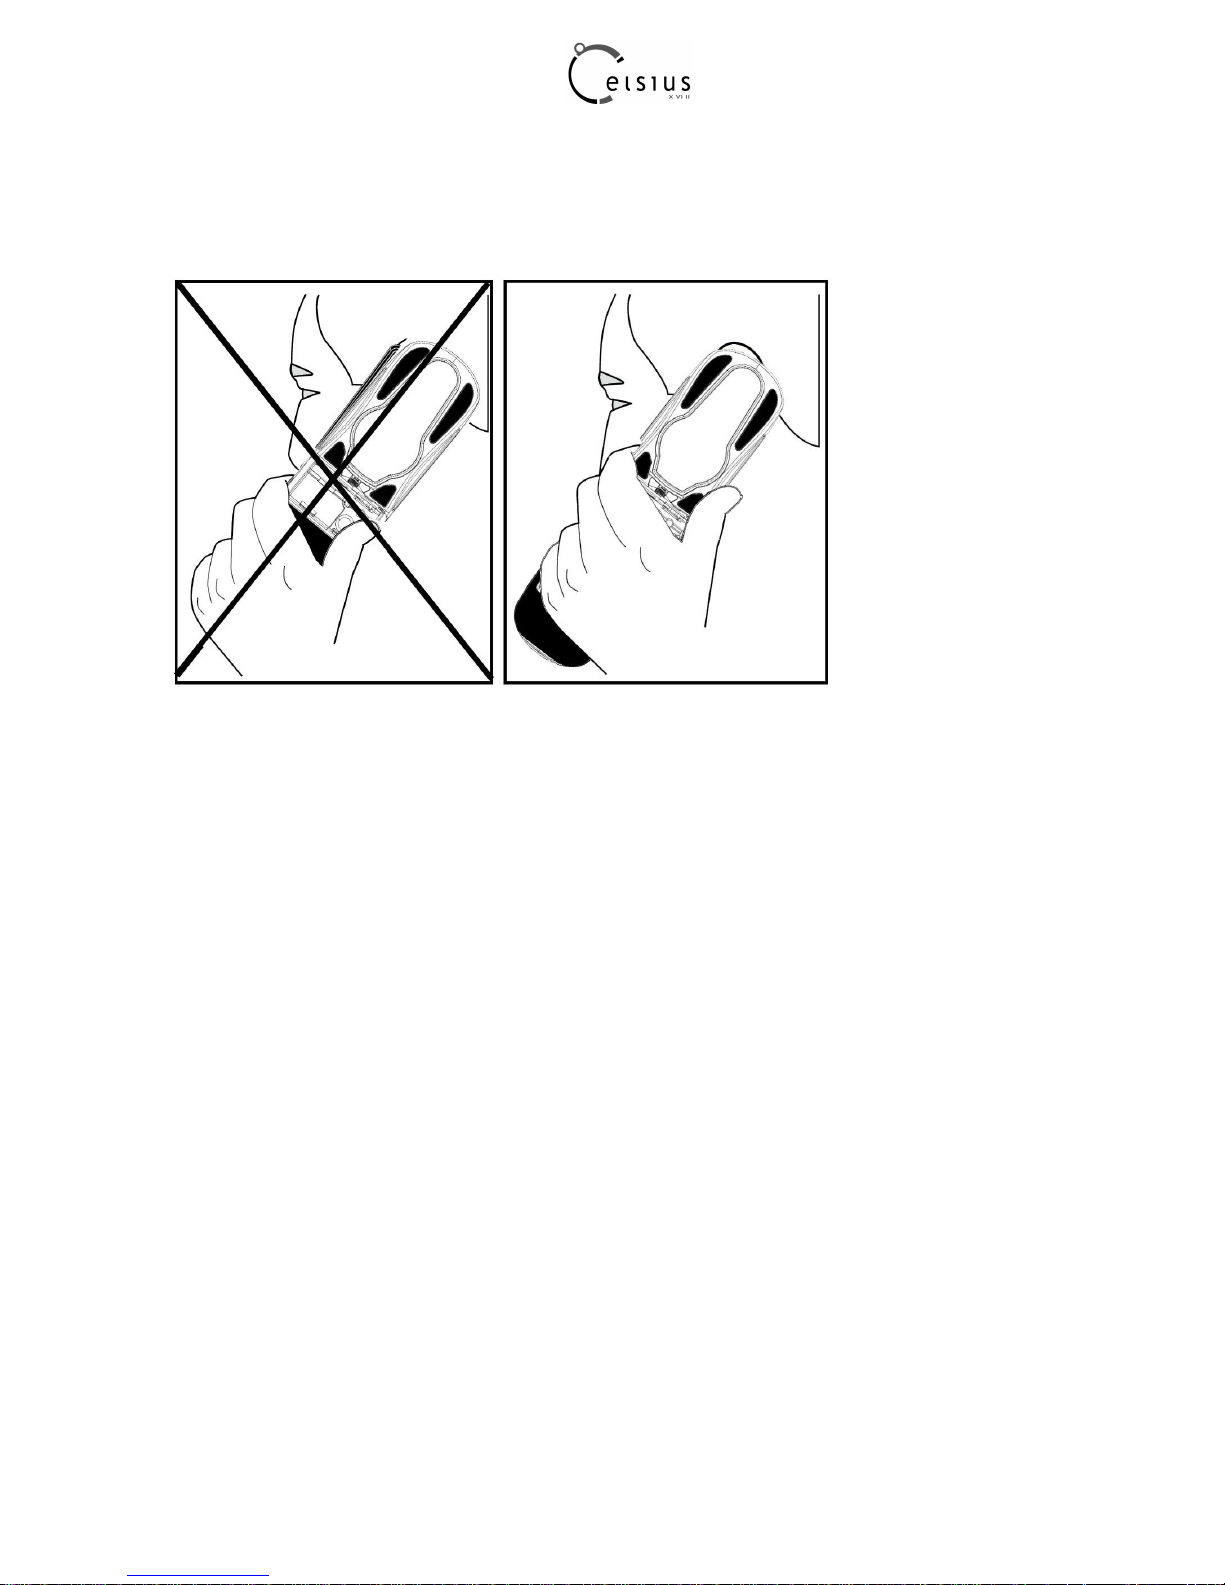
2.4.1 Improving antenna performance
The antenna is
integrated in your
phone, under the back cover at the bottom.
To increase the performance of your phone, please avoid putting your fingers on this area when using the phone.
2.4.2 Increasing the battery life of your phone
The Bluetooth® function reduces the phone battery life.
We advise you to deactivate it when you do not need it. Pourquoi ne pas virer cela ?
Page 12

12
2.4 Getting started
2.4.1 PIN (Personal Identification Number)
If the software access to the SIM card is protected, the device prompts you to enter the PIN.
Enter the code between 4 and 8 digits given to you when the SIM card was issued.
These digits do not appear on the screen for security reasons.
If there are contacts saved in your SIM card, you are invited, if you wish, to copy them in the phone contacts
memory.
Warning: if a wrong PIN is entered three times in a row, your SIM card is blocked.
You must then:
1. Enter the PUK [Personal Unblocking Key] provided by your operator, and validate.
2. Enter your PIN and validate.
3. Enter your PIN again and validate.
After 5 or 10 failed attempts [depending on the type of SIM card], the SIM card is definitely locked. You
must then contact your operator to obtain a new card.
2.4.2 Switching on/off (Red key)
When your phone is off, a short press on the red key will turn it on.
When you are in the idle screen, a long press on the red key will switch off the phone.
Page 13
13
2.6 The watch
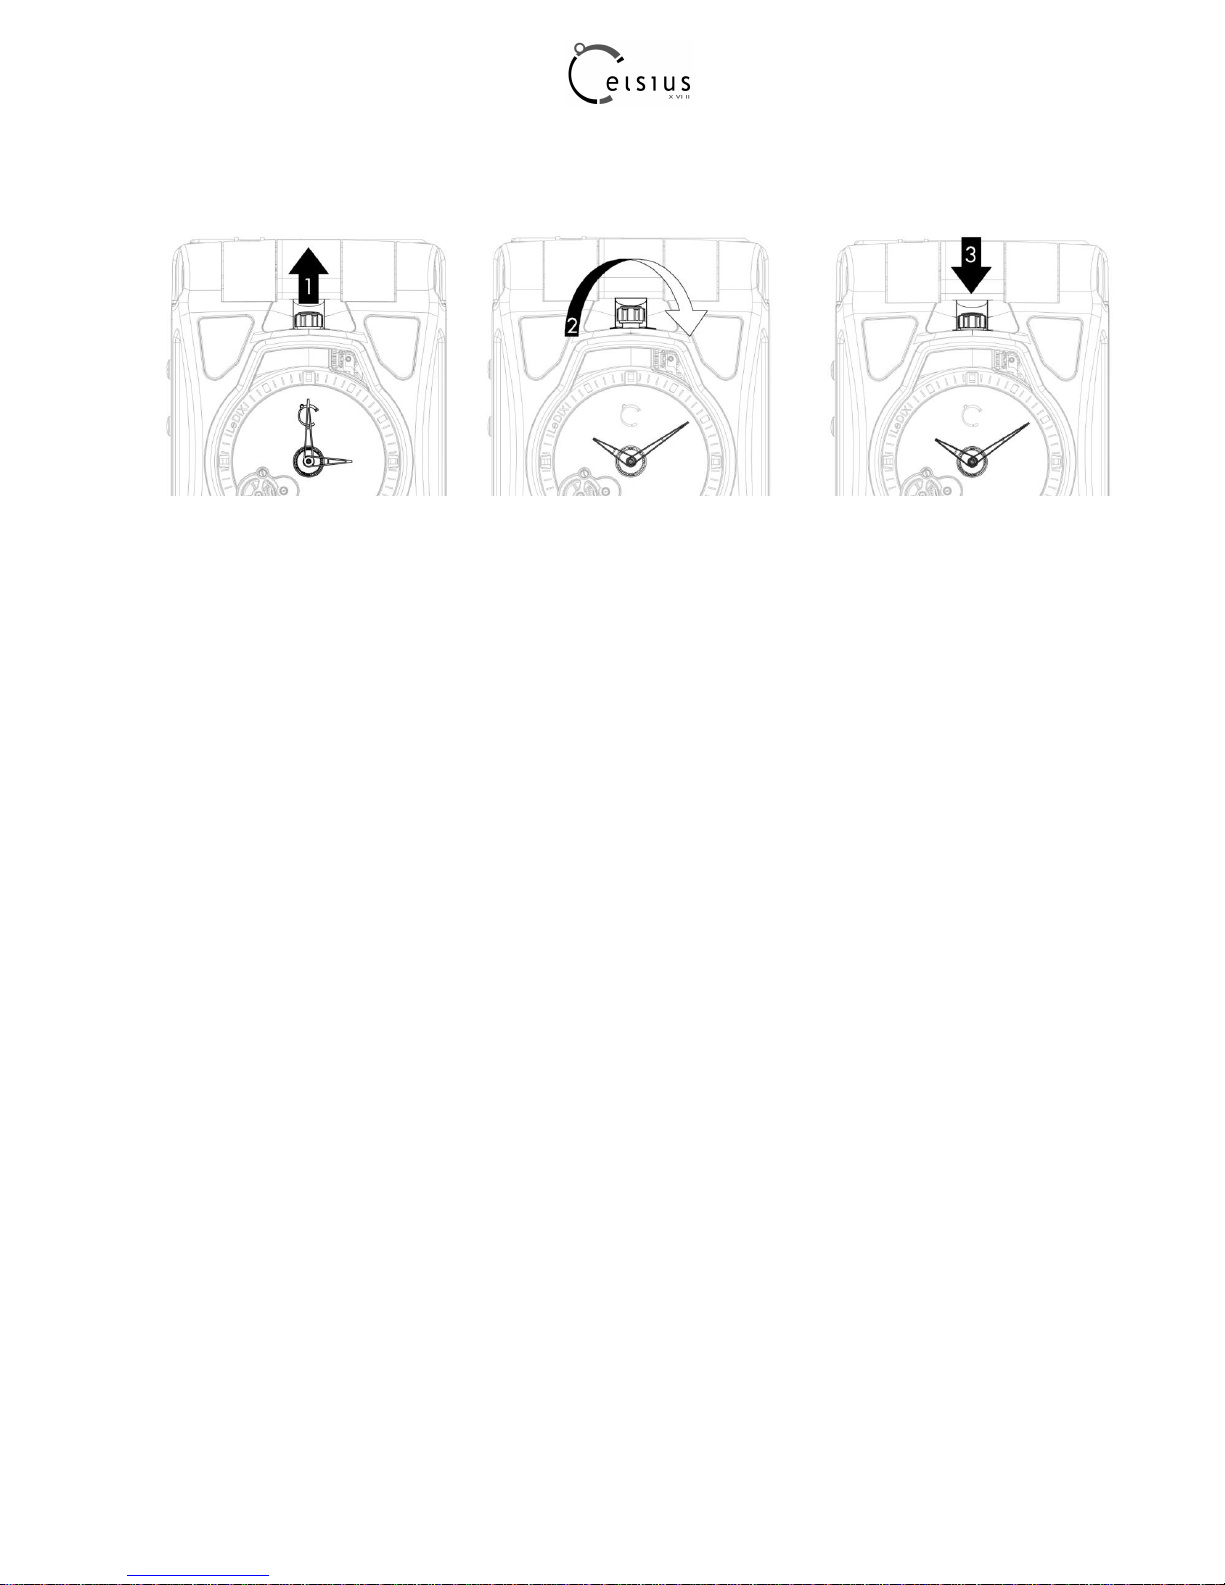
2.6.1 Setting up the clock
- Step 1 : Pull the crown
- Step 2 : Turn the crown to setup the clock
- Step 3 : Push the crown in the initial position
2.6.2 Rewinding up the clock
The only way to wind up the watch is to open and close the cell phone.
One opening adds 3 hours of power reserve to the mechanical clock.
The maximum power reserve of the watch is about 100 hours.
2.6.3 Care and Maintenance
The tourbillon movement integrated in the mobile makes it a relatively fragile piece that has to be used with care.
Ideally, the mechanical movement has to go through maintenance every 36 months at your specialized retailer.
Page 14
14
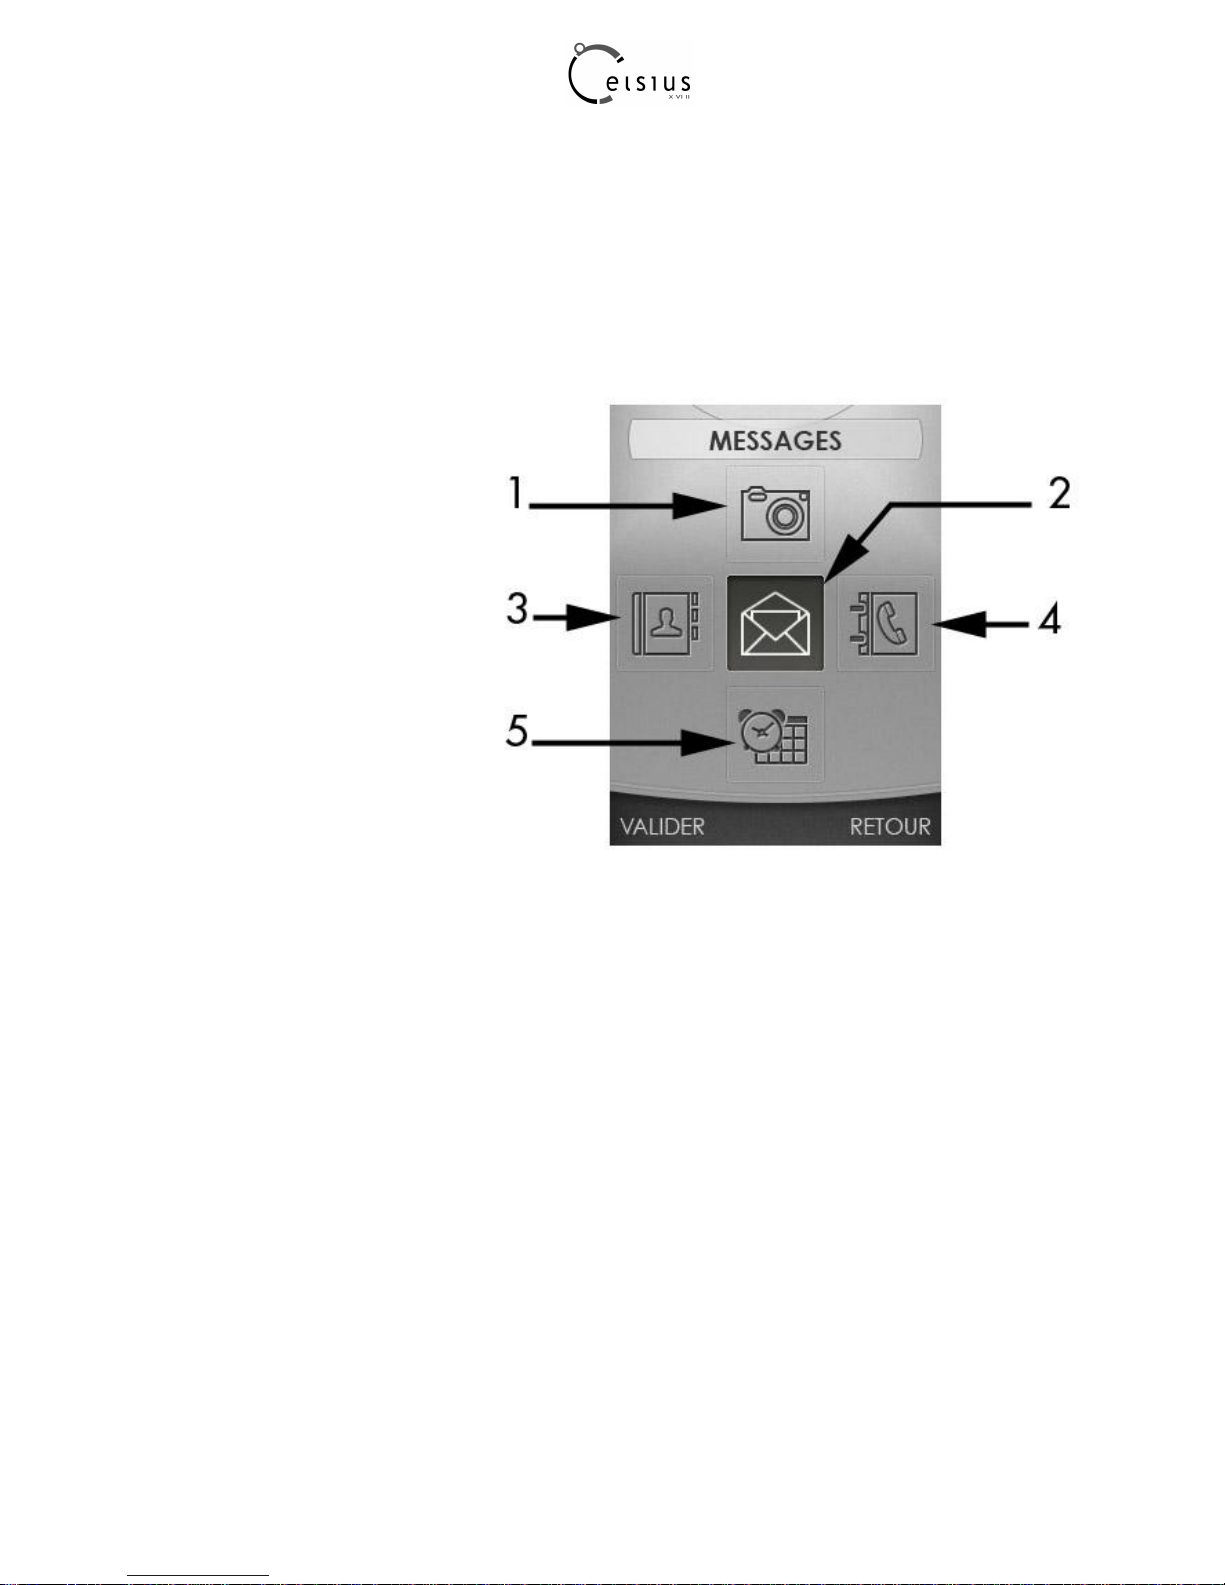
3 Phone menus
1] Camera
2] Messages
New
Inbox
Outbox
Sentbox
Drafts
Templates
Settings
Memory
Local info
Voice mail
Lists of contacts
3] Contacts
Contacts
Lists
4] Calls
Dialed
Missed
Received
Durations
5] Tools
Files
Settings
Celsius X VI II
Alarm
Diary
Calculator
Internet Player
Timer
To do
Java applets
Services
Page 15

15
4 Calls
4.1 Calling
Dial the number you want to call. Press the green key.
Tones may indicate the establishment of the call, then the phone icon and duration counter appear.
You can adjust the volume using the navigator up/down keys or the +/- side keys.
At the end of the conversation press the red key to hang up.
International call Press 0 [long press] to display "+", then dial the country code without waiting for the dial tone,
then the number of the called party.
Emergency services :
Depending on the network you can obtain the emergency service with or without SIM card.
You just have to be in an area served by a network.
To obtain the international emergency service, dial 112 then press the green key.
4.2 Receiving a call
When you receive a call, the number of your caller is displayed.
Press the green key to answer, and speak.
To refuse the call, press the red key.
To mute the ring tone or the vibration, without refusing the call, Press #.
Speaker Mode : during a call, make a short press on the green key and confirm, or press [Options] and select
Amplified mode ON then confirm.
Warning: in this mode do not bring the phone up to your ear.
All the numbers corresponding to incoming and outgoing calls are logged in the list of recent calls.
When on a call, pressing [Options] gives you access to different functions.
[Secret Mode ON] switches off the microphone so that your caller cannot hear you.
4.3 Call log
The call log is accessible from the idle screen by pressing the green key.
It is divided into four lists that you can display using the navigator left/right keys.
Various options are proposed: store a number in your phonebook, call, send a message, etc.
You can also make a call to a number by pressing the green key.
4.4 Calls parameters
The Settings/Calls menu allows you to manage all the calls functions [call forwarding, numbers display, call
waiting, voicemail number, etc.].
4.4.1 Call forward
Depending on your subscription, this service forwards incoming calls to a different number or to the voice mailbox.
4.4.2 View last calls
This option leads to the calls log.
4.4.3 Display numbers
Anonymous mode
You can decide whether or not your phone number will be displayed on the phone of the person you call.
Page 16

16
– Yes: your phone number will be displayed.
– No: your phone number will not be displayed.
– Preset: the phone default mode.
My number
– On outgoing calls: status of the Display numbers function.
– On incoming calls: status of the Display numbers function when you have forwarded the incoming calls to
another number.
Caller's Number
– On outgoing calls: status of the Display numbers function when your call is forwarded to another number.
– On incoming calls: status of the caller's Display numbers function.
4.4.4 Call waiting
[Operator-dependent service]
During a call, you may be informed that a caller is trying to reach you: you hear a special tone. The caller's identity
is displayed on the screen [name or number]. You can activate, deactivate, or get the status of the call waiting
service in order to check if it is active or not. During a call, if a second caller tries to contact you, the screen
displays the call warning.
4.4.5 Auto redial
This service automatically calls back a correspondent you could not reach at first attempt.
You can set the redial function to inactive, on request or systematic.
If you choose [On demand], your phone will offer to redial your caller automatically if his line is busy.
4.4.6 Blacklist
The blacklist is used to limit failures on automatic calls (calls generated by the automatic redial function or by
applications: fax for example).
When several automatic calls failed with a number [number busy or unknown], this number is put in the blacklist
and no automatic call will be done with this number any more until you delete it from the blacklist.
Note: this function does not apply to the calls performed manually.
4.4.7 Voicemail
This function is used to record your voicemail access number.
This number will be used during a call to the voice mailbox using the programmable keys.
4.4.8 New number
After an incoming or outgoing call with a number not stored in the phonebook, this option allows you to activate or
deactivate a request to store the number in the phonebook.
Page 17

17
5 Contacts
5.1 Using the phonebook
When a contact is selected, the SIM Card icon appears at the top of the screen if it is a contact stored in the SIM
card and the telephone icon is displayed instead if it is a contact stored in the phone
Note: you can quickly reach a contact by typing the first letters (up to three). Then you can display it by pressing
the navigator central key.
5.2 Storing a new contact
– Select the New contact option on top of the list.
– Select the location where the new contact will be stored.
– Enter the last name and press the navigator central key.
– Enter the number and press the navigator central key.
Note: you can fill other fields if you store the contact in the
phone memory [email, address, ringtone, photo, etc.].
– Press [Save] to store it.
5.3 Calling a contact from the phonebook
You can use any of the following ways:
– Select a contact and press the green key to start the call.
– Select a contact, press the navigator central key to display it, press [Call] to start the call.
– Direct call from the idle screen [only for the contacts stored in the SIM card memory]: type the number with
which the contact was saved then [#]. Press the green key to start the call.
5.4 Contact options
To display the various options, select a contact and press [Options].
5.4.1 Modify contact
Modify what you want and validate then select [Save] once the modifications are complete.
5.4.2 Send message
This option lets you write a new message that will be sent to the contact selected (see chapter Messages).
5.4.3 Send by message
A new message will be created that contains the selected contact information, so that you can send them to
another correspondent.
5.4.4 Send by Bluetooth
To send the details of one, several or all the contacts by Bluetooth®.
5.4.5 Copy to SIM/Copy to mobile
This option allows you to copy your phonebook contacts from one memory to the other. Only the name and the
first phone number will be copied.
Page 18

18
5.4.6 Export
The contact details are copied as a visit card in the Files/My Contacts directory.
5.4.7 My numbers
You can create the entries corresponding to your own numbers in order to consult them when necessary.
Select My numbers and validate. Enter the different details and validate.
5.4.8 Memory
Select SIM or Telephone and validate.
– Telephone: the memory capacity is shared between the phonebook and various other features. If you lack
memory, check if you can free some space.
– SIM: this memory is only available for contacts.
– Personal Memory
5.4.9 Delete/Delete all
This option deletes the contacts selected.
5.4.10 Set as my card/Business card
The details of a contact stored in the phone memory can be saved in a business card.
– Select a contact and press [Options].
– Select Set as my card and [OK]. The details are saved as Business card. From that point, you may use the
Business Card option to read it, modify it, send it by a message or exchange it by Bluetooth®.
5.4.11 Add to mailing list
This option adds a contact to a mailing list, so that you can easily send messages to a group of correspondents.
(see 5.5 Lists section)
5.4.12 Settings
– List choice: this menu lets you select the default phonebook (SIM, Phone, SIM and Phone) displayed when
the phone switches on.
– Sorting: this menu lets you change the way contacts are sorted (by name or first name).
5.5 Lists
A mailing list is a list of contacts, so that you can easily send messages to a group of correspondents.
To create a new mailing list (The contacts that are just on the SIM card cannot be added to a list. The Contacts
should be first be copied on the mobile to be added to a list)
– In the phonebook, select the Lists tab pressing the navigator right key.
– Press [Options].
– Select Add mailing list.
– Enter a name and press the navigator central key.
– Then, on a list press [Options]. Select Add contact each time you want to add a contact in the list.
Page 19

19
6 Messages
From this menu, you are able to send SMS and MMS.
MMS is a Multimedia Message Service, which allows you to enclose pictures, audio files, and others rich contents
to your messages; these messages can even be composed of several slides.
MMS are charged differently than SMS. Please contact your network provider to get more information on their
cost and the service availability.
6.1 Creating a text message (SMS or MMS)
– Select Messages/New/Message.
– Type your text. The T9 mode is applied by default.
Using the T9 text input mode The Easy Message T9® mode helps you to easily write your messages.
The language used is the one you can select with a long press on the # key (if the language selected is not
compatible with the Easy Message T9®, the English language will be automatically selected).
To type a word, type its letters by pressing once each of the corresponding keys. The Easy Message T9® will
guess the word accordingly. For example, type 4, 3, 5, 5, 6 to get the word hello.
The same key sequence can lead to several words from the dictionary. If the word that appears is not the word
you expected, press the navigator up/down keys to scroll through the words corresponding to this key sequence.
Once you agree with the word proposed on the screen, press the navigator right key to validate it or press the 0
key (which validates and inserts a space after the word), and go on writing the next word.
If the word you expected is not proposed, please add characters until you get the message ―Add a word?‖. Press
[Yes] and validate if the word displayed suits you or modify this word before adding it to the dictionary.
Note: you may change to capital letter, small letter or 123 (digit) mode at any time by pressing the * key.
You may also obtain the digits by pressing and holding the key you want. To change the language in T9 mode:
press and hold the # key.
Using another mode
To deactivate T9 mode press and hold the * key. The ABC mode then applies: press each key several times in a
row to get the letter you want (for example, press 2 twice to display B).
As in T9 mode, you may change to capital letter, small letter or 123 (digit) mode at any time by pressing the * key.
Note: you may change mode by pressing [Options].
Punctuation characters
Punctuation characters are obtained by pressing the 1 key (except in 123 mode), or with the help of the Symbol
input
mode (direct access with a short press on the # key).
Accented characters
Accented characters are generated automatically in T9 mode.
In ABC mode accented characters are available by pressing the key supporting the non-accented character
repeatedly.
6.2 Saving the message without sending it
Select [Options/Save] (the message is saved in the Drafts folder) or [Options/Save as Template] (the message is
saved in the Templates folder).
Page 20

20
6.2 Sending the message
– Once the text is complete, press the navigator central key or select [Options] then [Add recipient].
– Enter the receiver’s number or take it from your phonebook by selecting [Options], then [Contacts]. You can
also select a contacts list in your phonebook.
– Once the receiver is selected you may send the message by selecting [Options] then [Send].
6.3 Receiving messages
When you receive a message, the phone plays the ring tone that you selected, and a message icon appears.
This icon remains until you have read all your messages. When it flashes, the memory is full.
Note that you have two different possibilities to receive MMS: automatically or manually; if "manual mode" is
activated, then you will only receive a notification in your Inbox, meaning that a MMS is available on the MMS
Server; select Retrieve in the options when you want to retrieve the MMS from the network.
6.4 Messages menu
6.5.1 Inbox
Messages are listed in chronological order, the latest one being displayed first.
The number of Not Read and Not Retrieved messages is displayed on the top. The corresponding messages
titles are displayed in bold.
6.5.2 Outbox
The Outbox lists the messages that have not been sent. You may try again to send them.
6.5.3 Sentbox
The Sentbox is used to store all your sent messages if you activated the option ―Store sent messages‖ in the
Settings menu.
Warning: Too many messages saved will quickly fill up the available memory, and you will not be able to
receive more messages until you delete some.
6.5.4 Drafts
The Drafts list contains all the messages that have been saved but not sent yet. To modify such a draft message,
select it and press the navigator central key, or select [Options] then [Modify].
Once your message is complete, you can send it by the usual way.
6.5.5 Templates
Templates are messages you saved with the ―Save as template‖ option. You may use these templates as a
starting point when writing a new message.
6.5.6 Settings
This menu allows you to select various sending and receiving options.
6.5.7 Memory
– SMS: displays the memory available in the SIM card and in the phone to save SMS.
– MMS: displays how much memory is used by the MMS.
6.5.8 Local information
Page 21

21
This menu is used to activate reception of information broadcast by the network. You can choose whether you
want to receive this information or not [please contact your network provider].
6.5.9 Voicemail
This option calls your voicemail.
The number depends on the operator.
6.5.10 Lists of contacts
This option leads you to the mailing lists created in the phonebook [see chapter Contacts].
7 Camera and Tools
7.1 Camera
Warning: the camera is equipped with a flash. For safety reasons, use only from a reasonable distance
and do not aim it at a vehicle driver.
7.1.1 Taking a photo
On the main menu, select the camera icon. When you are ready to take a photo, slightly press the central key of
the navigation pad and hold it until the auto-focus is set, then fully press the key to take the picture.
To zoom in and out, use the + and - side keys. C’est le cas pour nous ?
Note: If the zoom selected does not match with the photo format, the photo is automatically saved in an
appropriate format.
To go into the photo settings menu, press on the left programmable key corresponding to the icon .
And then use the navigation buttons to choose an option: Applications, Flash, Photo format, Photo
quality, Focus, Saving location, Click sound, Timer, Modes, Effects or Exposure. Then navigate up/down to select
a setting and validate with a short press on the sensor.
Once the photo is taken, it is saved in the phone memory or in the memory card according to the saving location
you have selected.
If there is not enough memory to save the photo, a warning message appears, prompting you to confirm whether
you want to go on.
Note: Using the camera during a call may disturb the call quality.
7.1.2 Recording a video
Choose the Applications menu and press again to validate the Video camera option.
To start and stop recording, fully press the central key. You can also zoom in and out using the + and side keys.
7.1.3 Browsing in the Media album
Once you have taken photos and recorded videos, you can browse in the album from the camera position. Press
your finger on the fingerprint sensor to reach the settings menu, select the Media album option and validate with a
short press on the sensor.
Press the - side key to get a thumbnails view of your album and navigate even faster. When you reach the photo
or video you want, press the + side key to display it in full screen.
Page 22
22
7.2 Player
The integrated player is a fully featured audio/video player with full-screen rendering, equalizer, sound effects,
playlists and a library with support for tags. It lets you play music in the background while you are using any other
function of your mobile phone, and can still be commanded with the phone side keys or the headset's Remote
Control. Well…no.
Note: you can use any function of your mobile phone while still listening to music in the background. Just play
music, quit the Player and answer Yes.
You can download music by connecting your phone to a PC using a USB cable or Bluetooth®.
7.2.1 Player mode
You can control music playback from the Player menu. When you listen to music its title is displayed on the idle
screen. You may use the side keys for the following functions:
– Set the volume [short press]
– Change to the next or previous piece of music [long press]
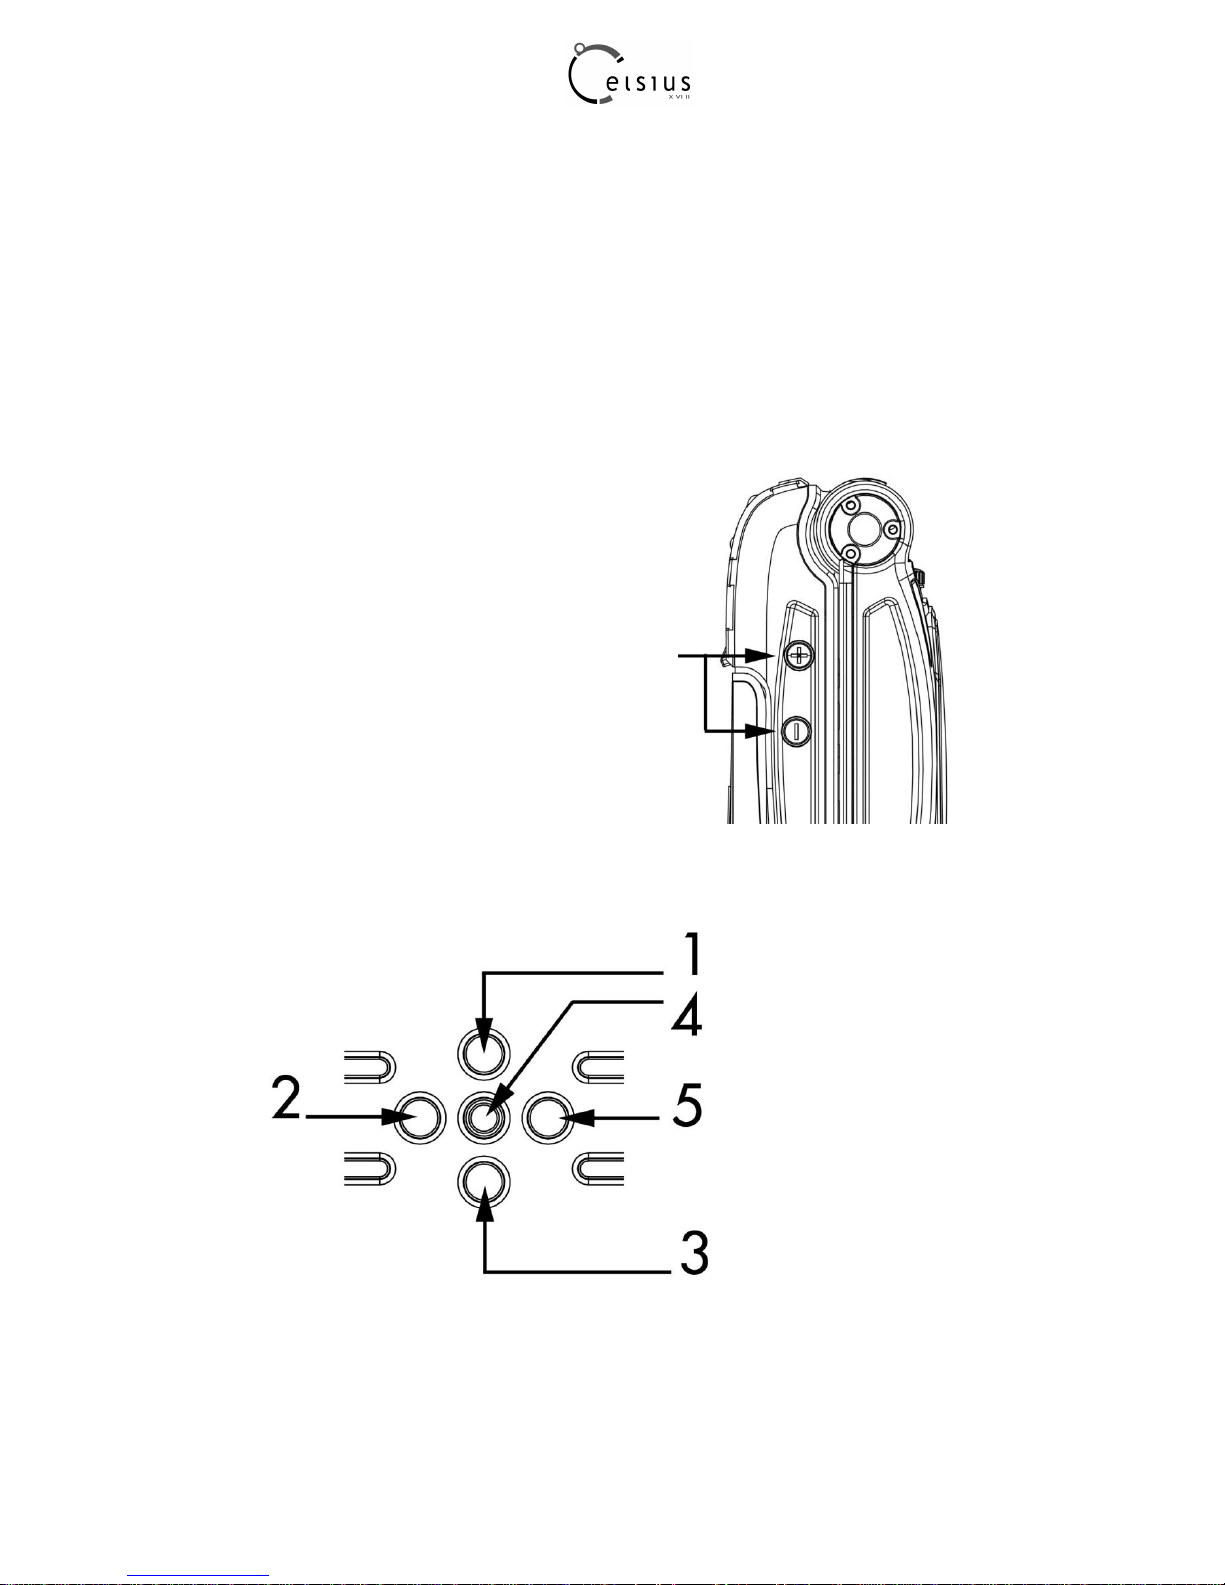
7.2.2 Control keys in the Player
1] previous
2] rewind
3] next
4] play/pause
5] fast forward
Page 23

23
[Back]: exits the player while continuing to listen to music.
Various options to listen to music:
– Playlist: displays the playlists.
– Library: lets you create playlists with all the music that is
stored in your phone and memory card. You can select music from regular directories [Phone, microSD™], from
playlists you created, from automatic lists [Recently played, Most played] or from the Sorted folders to take
advantage of the tags in your music files.
– Play: plays pieces of music from the playlist.
– Play options: lets you select the playback order.
– Repeat options: lets you replay the current playlist.
– Equalizer: offers a choice of equalization presets or custom settings.
– View mode: offers a choice of visuals to illustrate music.
– Sound effects: lets you add special effects like 3D rendering for both headset and speakers.
– Memory: displays the memory used by music files, along with the other objects.
– Details: displays the properties of the selected music file.
7.2.3 Video playback
You can play video as well as music, with the same options. Important note: to watch your video in full screen,
play it in the player then turn the display to the camera position [see chapter Camera].
7.2.4 Accessories
You can as well listen to music using the integrated stereo speakers.
7.3 Files
The Files menu contains all your files and directories, including those you may have downloaded. A file can be a
photo, a video, a ring tone, music or anything else just like a computer file.
There are two tabs that you can select by pressing the navigator left/right keys:
– Phone tab [phone memory]
– Personal memory
Note: the memory card is provided with the phone.
You can copy or move the files from the phone to your memory card, and from the card to your phone.
To display the various options of a directory, select it and press [Options].
– Browse: enters the directory to display its contents.
– Rename: lets you modify the directory name.
– Delete: allows you to delete the directory.
– New folder: creates a new directory.
– New...: lets you take a new photo or video or to record a sound.
– Format: deletes all the memory contents [phone or personal memory].
Warning: all the files saved in this memory will be deleted.
– Memory: displays the memory used and available for files and personal data.
To display the various options of a file, press [Options]. The list of available options depends on the file type
[photo, music, etc.] but always includes Rename, Delete, Copy, Move, New folder, New..., Format and Memory.
Page 24

24
8 Connection functions
8.1 Email
You can access your email account by using the Internet browsing.
8.2 Internet
WAP [Wireless Application Protocol] is a protocol that gives you access to dedicated Internet sites from your
mobile phone. Using a WAP browser, you will be able to get information and to download multimedia files such as
ring tones, screensavers, Java™ applets, videos and more.
You could also go true Internet after download Web browser. The web browser application will be ito the java
applets menu.
8.2.1 WAP connection
The connection to a WAP service on the GSM, GPRS or EDGE network is not interrupted if an incoming call is
received. You can answer the call.
8.2.2 Downloading objects
Some WAP sites allow you to download ring tones, screensavers, Java™ applets, videos and more. Just follow
the instructions displayed on the corresponding pages, and the files will be available from the Files menu.
8.2.3 WAP disconnection
To disconnect, press the red key. Disconnection happens automatically after a few seconds of inactivity if you
forget to disconnect. This period is defined by the linger time setting.
8.3 Local Connections
You can exchange various data with other devices (PC, mobile phones, printers, etc.) such as photos, videos,
music, To do tasks, Diary entries, contacts, etc.
Data exchange can be done over:
– a USB cable,
– a Bluetooth® connection.
8.3.1 Bluetooth®
Bluetooth® is a technology used to establish a wireless connection with other Bluetooth® equipped devices: for
example, with a pedestrian kit or a car kit to make phone calls or with a PC to swap data. The range is about 10
m.
Option [Paired devices]
This menu lets you draw up the list of devices with which the Bluetooth® connection is secure (by authentication
and encryption). A device must be added to this list before it can be used in Bluetooth® with your phone except
for exchanging objects.
When you select [send by Bluetooth®] (photo, Todo task, contact details, etc.) the phone displays the list of
devices. You do not need to select a device from this list at this time, you can start a one-off search for a device
when you initiate sending.
[Mode]
With this menu you can, on the one hand, activate and deactivate the Bluetooth® function and, on the other hand,
when the Bluetooth® function is activated, select whether you want other Bluetooth® devices to be able to detect
your device.
Page 25

25
– Off: the Bluetooth® function is not available.
– On and hidden: your phone is not visible. It cannot be detected by other Bluetooth® devices. In this mode, a
device can only connect to your phone using Bluetooth® if you have already paired it. This mode lets you detect
other devices and pair with them from your phone.
– On and visible: your phone is visible for a period of 3 minutes. During this period, it can be detected by other
Bluetooth® devices. Select this mode when a pairing with your phone has been initiated from another Bluetooth®
device.
– On and always: your phone is visible and can be detected by the other Bluetooth® devices as long as this mode
is selected.
Important:
– The Off option ensures the best battery life for your phone.
– Bluetooth® security is better guarded when your phone remains hidden to the other devices.
Select Paired devices/New device.
If the Bluetooth® function is not active, the phone prompts you to activate it using one of the 3 modes described
above. The phone searches for visible Bluetooth® devices and displays the list. Select the device concerned and
validate your choice.
Your phone then prompts you to enter a code which must be the same as the code entered on the other device.
Enter and validate this code. Your phone is now paired with the other device.
Note: refer to the user manual of the device with which you are pairing to find out how to set this device to the
mode allowing this operation. The code of the remote device may be predefined by the device manufacturer. In
this case, refer to the user manual of this device to find out this code.
Device options
To display the various options of a device, press [Options]:
– Delete: deletes the device. Warning: using this function requires you to start the pairing operation again if you
need this device later.
– Rename: lets you modify the name of the device.
– Delete all: deletes all your devices. Warning: using this function requires you to start the pairing operation again
if you need any of these devices later.
– Activate: activates the connection with the device.
– Deactivate: deactivates the connection with the device.
– Mark as trusted: makes this device one of the trusted devices, so that they can connect to your phone without
any confirmation. This option is only available if you have activated the Trusted devices mode [see section
Trusted devices].
– Set as favourite: gives priority to this device when several devices are competing to connect to your phone. This
is particularly convenient when you are using more than one headset, and one is preferred. For example, you
may want the integrated headset of your car to take over the headset in your pocket when you are driving.
My Bluetooth name
This is the name used to identify your phone when it is detected by another Bluetooth® device.
Trusted devices
You can select some devices as being trusted so that connection to your phone will be done automatically without
request of a code and a confirmation.
This is particularly convenient for a File Transfer Profile [FTP] device that will make multiple accesses to your
phone when transfering a group of files.
To make the trusted option available to devices, you need to activate the Trusted devices mode first.
8.3.2 USB mode
This menu lets you select the USB mode when connecting the phone to a peripheral using the USB cable.
– At plugging-in: if you select this option, you will be asked to select the mode you want each time you connect
your mobile phone.
– Modem: to exchange personal data between your phone and a PC.
– USB key: to exchange files between the phone memory or memory card, and a PC.
– Printer PictBridge: to connect the phone directly to a photo printer without using a PC.
Page 26

26
Data exchange between the phone and a PC with a USB cable connection:
– File exchange between the phone memory or memory card, and a PC
First select the USB key mode.
After connection of the USB cable between the phone and the PC, the memory card is considered as an
additional memory in the Windows explorer files directory; just copy files as you usually do on the PC.
Notes when the phone is connected to a PC in USB key mode:
The memory card cannot be used by the phone until the PC is disconnected. Consequently, if you have
configured your phone with a wallpaper or a ring tone stored in the memory card, those will not be available on
the phone during the connections. If your memory card is the default location for photos and videos, you will no be
able to take any during the connections.
– Personal data exchange between your phone and a PC
First select the Modem mode.
After connection of the USB cable between the phone and the PC, use the Celsius Mobile Manager software on
your PC to browse the contents of your mobile phone, to synchronize, backup and restore your personal data, to
connect to the Internet using your phone as a modem, etc.
Note: If a call comes in during an exchange of data with your PC, the link will be interrupted and will have to be
manually re-started.
8.3.3 Car kit or headset
This menu allows you to configure the behaviour of the phone when connected to a pedestrian kit.
Note: if you have activated the silent mode, it will still be activated after you have switched your phone off then on.
8.3.4 Synchronization
You can synchronize your contacts, your Diary entries and your To do tasks with your computer with the Celsius
Mobile Manager. You only have to activate Bluetooth® on your phone, or to configure a USB connection in
Modem mode.
9 Phone customization
Your phone can be customized by selecting in the [Tools] menu the [Settings] option, then [phone].
9.1 Phone
9.1.1 Ring tones
This menu allows you to allocate a ring tone to different events [incoming call, incoming message].
9.1.2 Silent mode
This menu allows you to switch to Silent mode.
Silent mode can also be activated from the idle screen with a long press on the key #. When the phone is in silent
mode, the related icon appears on the idle screen. In this mode, the ring tone will not ring, except for the alarm.
9.1.3 Vibrate
This menu allows you to activate the vibration along with ring tones.
9.1.4 Beeps
This menu allows you to activate a beep for the keypad, the network, the battery or the flap.
9.1.5 Languages
Page 27

27
This menu allows you to choose the phone language.
9.1.6 Date / Time
These menus allow you to modify the date and time, and the associated settings [Automatic update, Display,
Time zone, Daylight savings, etc.].
9.1.7 Active flip
Note: closing the flip always hangs up, except when you are using a Bluetooth® headset.
9.1.8 Shortcuts
This menu allows you to allocate functions to the left and right programmable keys.
9.2 Display
This menu allows you to customize your display with different presentations.
9.2.1 Wallpaper
This menu allows you to select a background picture. You can select a wallpaper from the phone default
wallpapers [Preloaded] or from your own files [Multimedia], or several wallpapers in a random way [Random].
You can also select the connection link [Download more] to download pictures from WAP sites.
In the [Preloaded] or [Multimedia] option, select a wallpaper in the list and:
– press [Select] to validate your wallpaper selection, or
– press the navigator central key: the picture is displayed.
Press [Select] to select it as your phone wallpaper or press the navigator up/down key to display the others.
9.2.2 Skins
This menu allows you to select the background picture when displaying menus.
9.2.3 Screensaver
This menu allows you to display an animation when the phone is in standby mode.
You can select a screensaver from the phone default screensavers [Preloaded] or from your own files
[Multimedia], or even a slide show of your own files [Slide show].
You can also select the connection link [Download more] to download pictures and animations from WAP sites.
In the [Preloaded] or [Multimedia] option, select a screensaver in the list and:
– Press [Select] to validate your screensaver selection, or
– Press the navigator central key: the picture is displayed.
Press [Select] to select it as your phone screensaver or press the navigator up/down key to display the others.
9.2.4 Operator logo
This menu allows you to display or hide the operator's logo on the idle screen.
9.2.5 Energy saving
Backlight
– Screen only: only the screen is lit.
– Full backlight: both the screen and the keypad are lit. Note: in any case, after a certain time of inactivity, the
backlight will be automatically turned off to save battery life.
9.2.6 Contacts
Page 28

28
This menu allows you to select the way to sort contacts in the list of contacts [by last name or first name] and to
select the default phonebook [SIM, Phone, SIM and Phone] displayed when the phone switches on.
9.2.7 Call Font
This menu allows you to select the size of the font used when dialing a phone number.
9.3 Multimedia
9.3.1 Media player
This menu allows you to select the play, view and repeat music options.
9.3.2 Camera
This menu allows you to modify the camera settings [Timer, Click sound, Photo format and quality].
9.4.3 Video
This menu allows you to modify the video settings.
– Video sound: lets you record a video with or without sound.
– Video size restriction: allows you to limit the video size so that you can send it in a message [MMS format] or to
record as long as you have memory left [None].
– Torch: lets you activate or not the torch when recording a video.
9.4.4 Storage
This menu allows you:
– to format the phone memory or memory card.
– to select where the files are saved [phone memory or memory card].
9.5 Calls
See section 4.4 Calls parameters.
9.6 Security
9.6.1 PIN
This menu allows you to activate and modify your phone PIN.
To modify the PIN, select Modify PIN and [Select].
Enter your current PIN and validate.
Enter your new PIN twice and validate.
To activate or deactivate the PIN, select the Control PIN menu and [Select].
Enter your PIN and validate.
Select On or Off and validate.
9.6.2 PIN2
You may need a second PIN to access certain functions.
These functions may or may not be available depending on your SIM card.
Proceed as above in order to activate, deactivate or modify the PIN 2 of your phone.
9.6.3 Confidentiality
The confidentiality settings prevent your personal data from being retrieved by another user of your phone.
When active for calls, the calls log will be deleted each time your phone is switched off.
Page 29

29
When active for messages or diary entries, those will be deleted when a different SIM card is inserted in your
phone.
9.6.4 Operator
This menu lets you modify the operator code required to modify the call barring settings [see hereafter].
Access to this service depends on your type of subscription.
9.6.5 Call barring
This menu allows you to block the sending or receiving of certain calls. Before you can use this service, a code
will be provided by your operator when you take out your subscription. Access to this service depends on your
subscription type.
To activate call barring:
– select incoming or outgoing calls.
– Select the call type for which you want to activate call barring.
– Select:
— either All,
— or If roaming, if you are away from your home country and if roaming is available, so that only
incoming calls will be blocked.
– Select Activation and enter password.
9.6.6 Fixed dialing
This menu allows you to restrict the outgoing calls.
The availability of this menu depends on your SIM card.
Proceed as for any other list of contacts.
When activating this function, only the numbers stored in that list of contacts can be called.
This phonebook is linked to the SIM card, and its size depends on the card's capacity.
9.7 Networks
This menu allows you to configure network preferences.
Choose Selection to activate [automatically or manually] one of the networks accessible in the area in which you
are located.
Choose Preferred to view all the pre-registered networks.
Choose Network type to select your network: GSM-DCS or PCS.
Choose GPRS to select the way you want to be attached on the GPRS network: always, or only when needed
[when launching a data connection].
9.8 Browsers
This menu allows you to set various parameters required for Internet and WAP connections [see chapter
Connection functions].
Page 30

30
10 Other functions
10.1 Java applets
This menu contains some applets for demonstration as well as the applets you have downloaded.
10.2 Calculator
This menu allows you to use your phone as a calculator.
Use the navigator keys to make calculations:
– Up: add
– Down: subtract
– Right: multiply
– Left: divide
The following keys are used for:
– Left programmable key: equals or convert
– Right programmable key: delete
– * or # : decimal point.
10.3 Alarm – Timer
These menus allow you to set and activate the alarm and the timer.
The alarm will ring even when the phone is switched off.
The alarm icon appears on the idle screen.
10.4 Diary
This menu gives you access to your diary, so that you can check a day, week, month or specific date.
The Calendar menu lets you add entries, access the global actions for all the entries and manage them by entry
category.
– New written meeting/New vocal meeting: adds an entry of text or voice type. Fill in the different items. Save the
entry.
– Delete: deletes entries that occured more than one day,week or month ago.
– Memory: displays the memory used by your diary.
– Delete all: deletes all the entries from your diary.
– Categories: allows you to display the different entry categories, assign a specific ring tone to each individual
category, display the number of entries in each category and display them.
The other menus are:
– See month: displays the entries on a month-by-month basis.
– See week: displays the entries on a week-by-week basis.
– See today: displays the entries for the current day and gives you access to the possible actions for any entry
[See, Modify, Delete and Send].
– See date: displays the entries at a specific date.
10.5 To do
This menu allows you to add To do’s, access category-based To do management and delete all the To do’s.
If there is no To do, the options below are displayed. If there is a To do, press [Options] to display the options.
– New written To do/New vocal To do: adds a To do of the text or voice type. Fill in the different items. Save the
To do.
– Delete all: deletes all the To do’s from your To do.
– Memory: displays the memory used by your To do’s.
– Categories: allows you to display the different To do categories, assign a specific ring tone to each individual
category, display the number of To do’s in each category and see them.
To display a To do, select it in the list and press the navigator central key.
To display the different options for a specific To do, press [Options].
– Modify To do: lets you modify the To do properties.
– Delete: deletes the To do.
Page 31

31
– Send by message: creates a new message that contains the To do properties, so that you can send them to
another correspondent.
– Send By Bluetooth: sends the To do by Bluetooth®.
– Export: copies the To do properties in a text file, that you can act on in the Files menu.
Page 32
32
11 Appendix
11.1 Technical features
Weight: 250 g
Original battery:
- Type: PI00200001AA
- 3.7V 750mAh 2.8Wh
Battery life calls/standby: up to 3 h/240 h [these values are
theoretical ones and given for information only]
Dock station: 5.0V, 600mA
Camera: 3.2 megapixels with auto-focus and flash
Multimedia objects supported:
– Audio formats: Midi, WAV, AMR NB, AMR WB, MP3, AAC,
AAC+, eAAC+
– Graphic formats: bmp, jpeg, png, gif
– Video formats: H.264, 3GP, MPEG4
Size of memory available for messages: 100 SMS
Size of memory available for MMS, the phonenook and the
multimedia objects: up to 22 MB
Personal memory : 2 GB
Maximum size of each message:
– SMS: < 160 characters
– MMS: < 100 kB for outgoing messages, 300 kB for
incoming messages [depends on the phone configuration
and on the operator reservations]
Compatible profiles for accessories:
– File transfer: FTP
– Stereo headset: AADP - AVRCP
– Car kit - Headset - Hands-free kit: HSP and HFP
– Object transfer: OPP
– Modem: SPP/DUNP
Using temperature: from - 10 °C to + 55 °C
11.2 Environment
Packaging
To facilitate the recycling of packaging materials, please obey the sorting rules instituted locally for this type of
waste.
Batteries
Spent batteries must be deposited at the designated collection points.
The product
The crossed-out waste bin mark affixed to the product [including its accessories] means that it
belongs to the family of electrical and electronic equipment. To promote the recycling and
recovery of waste electrical and electronic equipment [WEEE] and at the same time safeguard
the environment, European regulations require you to obey the sorting rules instituted locally for
this type of waste.
11.3 Certification and safety information for the united states and countries using fcc standards
Page 33

33
FCC Part 15 statement
This device complies with part 15, part 22 and part 24 of the FCC rules. Operation is subject to the following two
conditions: (1) this device may not cause harmful interference, and (2) this device must accept any interference,
including interference that may cause undesired operation.
This equipment has been tested and found to comply with the limits for a Class B digital device, pursuant to Part
15 of the FCC Rules. These limits are designed to provide reasonable protection against harmful interference in a
residential installation. This equipment generates, uses and can radiate radio frequency energy and, if not
installed and used in accordance with the instructions, may cause harmful interference to radio communications.
However, there is no guarantee that interference will not occur in a particular installation. If this equipment does
cause harmful interference to radio or television reception, which can be determined by turning the equipment off
and on, the user is encouraged to try to correct the interference by one or more of the following measures:
- Reorient or relocate the receiving antenna. Certification and safety information for the united states and
countries - Increase the separation between the equipment and receiver. - Connect the equipment into an outlet
on a circuit different from that to which the receiver is connected. - Consult the dealer or an experienced radio/TV
technician for help.
WARNING
Changes or modifications made to this equipment not expressly approved by Celsius X VI II for compliance could
void the user's authority to operate the equipment.
NOTICE:
This device complies with Part 15 of the FCC Rules [and with RSS-210 of Industry Canada].
Operation is subject to the following two conditions:
1.this device may not cause harmful interference, and
2.this device must accept any interference received, including interference that may cause undesired operation.
NOTICE:
Changes or modifications made to this equipment not expressly approved by (manufacturer name) may void the
FCC authorization to operate this equipment.
FCC SAR information
THIS MODEL PHONE MEETS THE FCC'S REQUIREMENTS FOR EXPOSURE TO
RADIO WAVES
Your wireless phone is a radio transmitter and receiver. It is designed and manufactured not to exceed the limits
for exposure to radiofrequency (RF) energy set by the United States Federal Communications Commission
(FCC). These limits are part of comprehensive guidelines and establish permitted levels of RF energy for the
general population. The guidelines are based on standards that were developed by independent scientific
organizations through periodic and thorough evaluation of scientific studies. The standards include a substantial
safety margin designed to assure the safety of all persons, regardless of age and health.
The exposure standard for wireless mobile phones employs a unit of measurement known as the Specific
Absorption Rate, or SAR. The SAR limit set by the FCC and Health Canada is 1.6W/kg (*). Tests for SAR are
conducted using standard operating positions accepted by the FCC with the phone transmitting at its highest
certified power level in all tested frequency bands. Although the SAR is determined at the highest certified power
level, the actual SAR level of the phone while operating can be well below the maximum value. This is because
the phone is designed to operate at multiple power levels so as to use only the power required to reach the
network. In general, the closer you are to a wireless base station antenna, the lower the power output.
Before a phone model is available for sale to the public, it must be tested and certified to the FCC that it does not
exceed the RF limit established by the government-adopted requirement for safe exposure. The tests are
performed in positions and locations (i.e., at the ear and worn on the body) as required by the FCC for each
model. The highest SAR value for these model phones as reported to the FCC when tested for use at the ear and
when worn on the body are (measured at a distance of 0.59 inches (1.5 cm)):
. SAR at the ear: 0.057W/kg
. SAR worn of the body: 0.123W/kg
(*)In the United States and Canada, the SAR limit for mobile phones used by the public is 1.6 watts/kilogram
(W/kg) averaged over one gram of tissue. The standard incorporates a substantial margin of safety to give
additional protection for the public and to account for any variations in measurements.
Page 34

34
While there may be differences between the SAR levels of various phones and at various positions, they all meet
the FCC requirement. The FCC has granted an Equipment Authorization for this model phone with all reported
SAR levels evaluated as in compliance with the FCC RF exposure guidelines. SAR information on this model
phone is on file with the FCC and can be found under the Display Grant section of http://www.fcc.gov/oet/fccid
after searching on FCC ID:YVQ2N1. Additional Information can be found on the website of the World Health
Organization (http://www.who.int/emf).
Safety Information
Aircraft: Switch off your wireless device whenever you are instructed to do so by airport or airline staff. If your
device offers a ―flight mode‖ or similar feature, consult airline staff as to its use in flight.
Driving: Full attention should be given to driving at all times, and regulations restricting the use of wireless
devices while driving must be observed. For further driving safety tips, please refer to Driving safety tips at page
70.
Hospitals: Mobile phones should be switched off whenever you are requested to do so in hospitals, clinics or
health care facilities. These requests are designed to prevent possible interference with sensitive medical
instruments.
Gas stations: Obey all posted signs with respect to the use of wireless devices or other radio equipment in
locations with flammable material and chemicals. Switch of your wireless device whenever you are instructed to
do so by authorized staff.
Interference with personal medical devices: You should always consult your physician and review the device
manufacturer's instructions to determine if operation of your phone may interfere with the operation of your
medical device.
As a general rule:
For pacemakers: Pacemaker manufacturers recommend that a minimum separation of 6 inches (15 cm) be
maintained between a mobile phone and a pacemaker to avoid potential interference with the pacemaker. To
achieve this, use the phone on the opposite ear to your pace maker and do not carry it in a breast pocket.
For hearing aids: Some digital wireless phones may interfere with some hearing aids. In the event of such
interference, you may want to consult your hearing aid manufacturer to discuss alternatives.
The ring tone, info tones, and handsfree talking are reproduced through the loudspeaker. Do not hold the phone
to your ear when it rings or when you have switched on the handsfree function (at least 3.9 inches (10 cm)).
Use only batteries and charging devices designed for your phone. Otherwise you risk serious damage to health
and property and may void any warranty.
CAUTION! Small parts like the SIM card could be swallowed by young children.
Do NOT open the phone. Only the battery and the SIM card may be removed. Do NOT open the battery.
Keep the battery out of chidren’s reach. Do not allow the battery to be put into the mouth.
Distance of operation
This phone is designed to comply with the FCC radio frequency (RF) exposure guidelines when used as follows:
- Against the ear: Place or receive a phone call and hold the phone as you would a wireline telephone.
- Body worn: When transmitting, place the phone in a carrying accessory that contains no metal and positions the
phone a minimum of 0.59 inches (1.5 cm) from your body. Use of other accessories may not ensure compliance
with exposure guidelines. If you do not use a body worn accessory and are not holding the phone at the ear,
position the phone a minimum of 0.59 inches (1.5 cm) from your body.
- Data operation: When using a data feature, position the phone a minimum of 0.59 inches (1.5 cm) from your
body for the whole duration of the data transmission.
FDA consumer information on wireless phones
The US Food and Drug Administration (FDA) provides consumer information on wireless phones at:
http://www.fda.gov/cellphones/qa.html.
Do wireless phones pose a health hazard?
The available scientific evidence does not show that any health problems are associated with using wireless
phones. There is no proof, however, that wireless phones are absolutely safe. Wireless phones emit low levels of
Page 35

35
radiofrequency energy (RF) in the microwave range while being used. They also emit very low levels of RF when
in the stand-by mode. Whereas high levels of RF can produce
health effects (by heating tissue), exposure to low level RF that does not produce heating effects causes no
known adverse health effects. Many studies of low level RF exposures have not found any biological effects.
Some studies have suggested that some biological effects may occur, but such findings have not been confirmed
by additional research. In some cases, other researchers have had difficulty in reproducing those studies, or in
determining the reasons for inconsistent results.
What is FDA's role concerning the safety of wireless phones?
Under the law, FDA does not review the safety of radiation-emitting consumer products such as wireless phones
before they can be sold, as it does with new drugs or medical devices. However, the agency has authority to take
action if wireless phones are shown to emit radiofrequency energy (RF) at a level that is hazardous to the user. In
such a case, FDA could require the manufacturers of wireless phones to notify users of the health hazard and to
repair, replace or recall the phones so that the hazard no longer exists.
Although the existing scientific data do not justify FDA regulatory actions, FDA has urged the wireless phone
industry to take a number of steps, including the following:
- Support needed research into possible biological effects of RF of the type emitted by wireless phones;
- Design wireless phones in a way that minimizes any RF exposure to the user that is not necessary for device
function; and
- Cooperate in providing users of wireless phones with the best possible information on possible effects of
wireless phone use on human health.
FDA belongs to an interagency working group of the federal agencies that have responsibility for different aspects
of RF safety to ensure coordinated efforts at the federal level. The following agencies belong to this working
group:
The National Institutes of Health participates in some interagency working group activities, as well.
FDA shares regulatory responsibilities for wireless phones with the Federal Communications Commission (FCC).
All phones that are sold in the United States must comply with FCC safety guidelines that limit RF exposure. FCC
relies on FDA and other health agencies for safety questions about wireless phones.
FCC also regulates the base stations that the wireless phone networks rely upon. While these base stations
operate at higher power than do the wireless phones themselves, the RF exposures that people get from these
base stations are typically thousands of times lower than those they can get from wireless phones. Base stations
are thus not the primary subject of the safety questions discussed in this document.
What is FDA doing to find out more about the possible health effects of wireless phone RF?
FDA is working with the U.S. National Toxicology Program and with groups of investigators around the world to
ensure that high priority animal studies are conducted to address important questions about the effects of
exposure to radiofrequency energy (RF).
FDA has been a leading participant in the World Health Organization International Electromagnetic Fields (EMF)
Project since its inception in 1996. An influential result of this work has been the development of a detailed
agenda of research needs that has driven the establishment of new research programs around the world. The
Project has also helped develop a series of public information documents on EMF issues.
FDA and the Cellular Telecommunications & Internet Association (CTIA) have a formal Cooperative Research
and Development Agreement (CRADA) to do research on wireless phone safety. FDA provides the scientific
oversight, obtaining input from experts in government, industry, and academic organizations. CTIA-funded
research is conducted through contracts to independent investigators. The initial research will include both
laboratory studies and studies of wireless phone users. The CRADA will also include a broad assessment of
additional research needs in the context of the latest research developments around the world.
What steps can I take to reduce my exposure to radiofrequency energy from my wireless phone?
If there is a risk from these products--and at this point we do not know that there is--it is probably very small. But if
you are concerned about avoiding even potential risks, you can take a few simple steps to minimize your
exposure to radiofrequency energy (RF). Since time is a key factor in how much exposure a person receives,
reducing the amount of time spent using a wireless phone will reduce RF exposure.
If you must conduct extended conversations by wireless phone every day, you could place more distance
between your body and the source of the RF, since the exposure level drops off dramatically with distance. For
example, you could use a headset and carry the wireless phone away from your body or use a wireless phone
connected to a remote antenna.
Again, the scientific data do not demonstrate that wireless phones are harmful. But if you are concerned about the
RF exposure from these products, you can use measures like those described above to reduce your RF exposure
from wireless phone use.
Page 36

36
What about children using wireless phones?
The scientific evidence does not show a danger to users of wireless phones, including children and teenagers. If
you want to take steps to lower exposure to radiofrequency energy (RF), the measures described above would
apply to children and teenagers using wireless phones. Reducing the time of wireless phone use and increasing
the distance between the user and the RF source will reduce RF exposure.
Some groups sponsored by other national governments have advised that children be discouraged from using
wireless phones at all.
Do hands-free kits for wireless phones reduce risks from exposure to RF emissions?
Since there are no known risks from exposure to RF emissions from wireless phones, there is no reason to
believe that handsfree kits reduce risks. Hands-free kits can be used with wireless phones for convenience and
comfort. These systems reduce the absorption of RF energy in the head because the phone, which is the source
of the RF emissions, will not be placed against the head. On the other hand, if the phone is mounted against the
waist or other part of the body during use, then that part of the body will absorb more RF energy. Wireless phones
marketed in the U.S. are required to meet safety requirements regardless of whether they are used against the
head or against the body. Either configuration should result in compliance with the safety limit.
Do wireless phone accessories that claim to shield the head from RF radiation work?
Since there are no known risks from exposure to RF emissions from wireless phones, there is no reason to
believe that accessories that claim to shield the head from those emissions reduce risks. Some products that
claim to shield the user from RF absorption use special phone cases, while others involve nothing more than a
metallic accessory attached to the phone. Studies have shown that these products generally do not work as
advertised. Unlike "hand-free" kits, these so-called "shields" may interfere with proper operation of the phone. The
phone may be forced to boost its power to compensate, leading to an increase in RF absorption.
Driving safety tips
Wireless phones give people the ability to communicate almost anywhere, anytime. But an important
responsibility accompanies those benefits, one that every wireless phone user must uphold. When driving a car,
driving is your first responsibility.
Below are safety tips to follow while driving and using a wireless phone that should be easy to remember.
Get to know your wireless phone and its features such as speed dial and redial.
When available, use a hands free device.
Position your wireless phone within easy reach and where you can grab it without removing your eyes from the
road. If you get an incoming call at an inconvenient time, if possible, let your voice mail answer it for you.
Let the person you are speaking with know you are driving; if necessary, suspend the call in heavy traffic or
hazardous weather conditions.
Do not take notes or look up phone numbers while driving.
Dial sensibly and assess the traffic; if possible, place calls when you are not moving or before pulling into traffic.
Try to plan your calls before you begin your trip. But if you need to dial while driving, follow this simple tip--dial
only a few numbers, check the road and your mirrors, then continue.
Do not engage in stressful or emotional conversations that may be distracting.
Use your wireless phone to call for help. Dial 9-1-1 or other local emergency number in the case of fire, traffic
accident, road hazard or medical emergency.
Use your wireless phone to help others in emergencies. If you see an auto accident, crime in progress or other
serious emergency where lives are in danger, call 9-1-1 or other local emergency number.
Call roadside assistance or a special wireless non-emergency assistance number when necessary. If you see a
broken-down vehicle posing no serious hazard, a broken traffic signal, a minor traffic accident where no one
appears injured or a vehicle you know to be stolen, call roadside assistance or other special non-emergency
wireless number.
CAUTION RISK OF EXPLOSION IF BATTERY IS REPLACED BY AN INCORRECT TYPE. DISPOSE OF USED
BATTERIES ACCORDING TO THE INSTRUCTIONS
use only the appropriate adaptors and batteries as shown in the phone manufacturer’s catalogue.
11.4 End User Licence Agreement [EULA]
Page 37

37
CONTEXT AND ACCEPTATION OF THE AGREEMENT
You have acquired a Mobile Phone device ["DEVICE"], manufactured by Celsius X VI II [MANUFACTURER], that
includes software either developed by the MANUFACTURER itself or licensed third party Software suppliers
["SOFTWARE COMPANIES"] to the MANUFACTURER with the rights to sublicense it to the purchaser of the
device. Those installed software products whatever their company of origin, and wherever the name of the
company of origin is indicated of not in the DEVICE documentation, as well as associated media, printed
materials, and "online" or electronic documentation ["SOFTWARE"] are protected by international intellectual
property laws and treaties.
The SOFTWARE is licensed, not sold. All rights reserved.
IF YOU DO NOT AGREE TO THIS END USER LICENSE AGREEMENT ["EULA"], DO NOT USE THE DEVICE
OR COPY THE SOFTWARE. INSTEAD, PROMPTLY CONTACT THE MANUFACTURER FOR INSTRUCTIONS
ON RETURN OF THE UNUSED DEVICE[S] FOR A REFUND. ANY USE OF THE SOFTWARE, INCLUDING
BUT NOT LIMITED TO USE ON THE DEVICE, WILL CONSTITUTE YOUR AGREEMENT TO THIS EULA [OR
RATIFICATION OF ANY PREVIOUS CONSENT]. SOFTWARE includes software already installed on the
DEVICE ["DEVICE Software"] and Software contained on the CD-ROM disk ["Companion CD"] or on the usb key,
if any is supplied with the product.
GRANT OF SOFTWARE LICENCE
This EULA grants you the following licence:
DEVICE Software. You may use the DEVICE Software as installed on the DEVICE. All or certain portions of the
DEVICE Software may be inoperable if you do not have and maintain a service account with an appropriate
Mobile Operator, or if the Mobile Operator's network facilities are not operating or configured to operate with the
DEVICE software.
COMPANION CD. If any is supplied, additional software for your personal computer is included with your
DEVICE. You may install and use the software component[s] contained in the Companion CD only in accordance
with the terms of the printed or online end user license agreement[s] provided with such component[s]. In the
absence of an end user license agreement for particular component[s] of the Companion CD, you may install and
use only one [1] copy of such component[s] on the DEVICE or a single computer with which you use the
DEVICE.
Security Updates. The SOFTWARE may include digital rights management technology. If SOFTWARE does
contain digital rights management technology, content providers are using the digital rights management
technology ["DRM"] contained in the SOFTWARE to protect the integrity of their content ["Secure Content"] so
that their intellectual property, including copyright, in such content is not misappropriated.
Owners of such Secure Content ["Secure Content Owners"] may, from time to time, request manufacturers or
SOFTWARE SUPPLIERS to provide security related updates to the DRM components of the SOFTWARE
["Security Updates"] that may affect your ability to copy, display and/or play Secure Content through the
SOFTWARE or third party applications that utilize the DRM.
You therefore agree that, if you elect to download a licence from the Internet which enables your use of Secure
Content, Suppliers may, in conjunction with such licence, also download onto your DEVICE such Security
Updates that a Secure Content Owner has requested that SOFTWARE.
SUPPLIERS distribute. The MANUFACTURER and SOFTWARE SUPPLIERS will not retrieve any personally
identifiable information, or any other information, from your DEVICE by downloading such Security Updates.
DESCRIPTION OF OTHER RIGHTS AND LIMITATIONS COPYRIGHT. All title and intellectual property rights in
and to the SOFTWARE [including but not limited to any images, photographs, animations, video, audio, music,
text and "applets," incorporated into the SOFTWARE], the accompanying printed materials, and any copies of the
SOFTWARE, are owned by the MANUFACTURER or the SOFTWARE SUPPLIERS. You may not copy the
printed materials accompanying the SOFTWARE. All title and intellectual property rights in and to the content
which may be accessed through use of the SOFTWARE is the property of the respective content owner and may
be protected by applicable copyright or other intellectual property laws and treaties. This EULA grants you no
rights to use such content. All rights not specifically granted under this EULA are reserved by the
MANUFACTURER and the SOFTWARE SUPPLIERS.
Limitations on Reverse Engineering, Decompilation and Disassembly. You may not reverse engineer, decompile,
or disassemble the SOFTWARE, except and only to the extent that such activity is expressly permitted by
applicable law notwithstanding this limitation.
Single DEVICE. The DEVICE Software is licensed with the DEVICE as a single integrated product. The DEVICE
Software installed in the memory of the DEVICE may only be used as part of the DEVICE.
Single EULA. The package for the DEVICE may contain multiple versions of this EULA, such as multiple
translations and/or multiple media versions [e.g., in the user documentation and in the software]. Even if you
receive multiple versions of the EULA, you are licensed to use only one [1] copy of the DEVICE Software.
If you have questions regarding this Notice, please contact MPEG LA, L.L.C., 250 Steele Street, Suite 300,
Denver, Colorado 80206; Telephone 303 331.1880; FAX 303 331.1879 Termination. Without prejudice to any
other rights, the MANUFACTURER may terminate this EULA if you fail to comply with the terms and conditions of
this EULA. In such event, you must destroy all copies of the SOFTWARE and all of its component parts.
Consent to Use of Data. You agree that SOFTWARE SUPPLIERS may collect and use technical information
Page 38

38
gathered in any manner as part of product support services related to the SOFTWARE. SOFTWARE SUPPLIERS
may use this information solely to improve their products or to provide customised services or technologies to
you. SOFTWARE SUPPLIERS may disclose this information to others, but not in a form that personally identifies
you.
Internet Gaming/Update Features. If the SOFTWARE provides, and you choose to use, the Internet gaming or
update features within the SOFTWARE, it is necessary to use certain computer system, hardware, and software
information to implement the features. By using these features, you explicitly authorise SOFTWARE SUPPLIERS
to use this information solely to improve their products or to provide customized services or technologies to you.
SOFTWARE SUPPLIERS may disclose this information to others, but not in a form that personally identifies you.
Internet-Based Services Components. The SOFTWARE may contain components that enable and facilitate the
use of certain Internet-based services. You acknowledge and agree that SOFTWARE SUPPLIERS may
automatically check the version of the SOFTWARE and/or its components that you are utilising and may provide
upgrades or supplements to the SOFTWARE that may be automatically downloaded to your Device.
Links to Third Party Sites. The SOFTWARE may provide you with the ability to link to third party sites through the
use of the SOFTWARE. The third party sites are not under the control of the MANUFACTURER.
Neither the MANUFACTURER nor its affiliates are responsible for [i] the contents of any third party sites, any links
contained in third party sites, or any changes or updates to third party sites, or [ii] webcasting or any other form of
transmission received from any third party sites. If the SOFTWARE provides links to third party sites, those links
are provided to you only as a convenience, and the inclusion of any link does not imply an endorsement of the
third party site by the MANUFACTURER or its affiliates.
Additional Software/Services. The SOFTWARE may permit the MANUFACTURER to provide or make available
to you SOFTWARE updates, supplements, add-on components, or Internet-based services components of the
SOFTWARE after the date you obtain your initial copy of the SOFTWARE ["Supplemental Components"].
If the MANUFACTURER provides or makes available to you Supplemental Components and no other EULA
terms are provided along with the Supplemental Components, then the terms of this EULA shall apply.
The MANUFACTURER reserves the right to discontinue any Internet-based services provided to you or made
available to you through the use of the SOFTWARE.
EXPORT RESTRICTIONS. You acknowledge that SOFTWARE is subject to U.S. export jurisdiction. You agree to
comply with all applicable international and national laws that apply to the SOFTWARE, including the U.S. Export
Administration Regulations, as well as end-user, end-use and destination restrictions issued by U.S. and other
governments.
UPGRADES AND RECOVERY MEDIA
– DEVICE Software. If the DEVICE Software is provided by the MANUFACTURER separate from the DEVICE on
media such as a ROM chip, CD ROM disk[s] or via web download or other means, and is labelled "For Upgrade
Purposes Only", you may install one copy of such DEVICE Software onto the DEVICE as a replacement copy for
the existing DEVICE Software and use it in accordance with this EULA, including any additional EULA terms
accompanying the upgrade DEVICE Software.
– COMPANION CD. If any Companion CD component[s] is provided by the MANUFACTURER separate from the
DEVICE on CD ROM disk[s] or via web download or other means, and labelled "For Upgrade Purposes Only" ,
you may [i] install and use one copy of such component[s] on the computer[s] you use to exchange data with the
DEVICE as a replacement copy for the existing Companion CD component[s].
RESPONSIBILITIES
SUPPORT AND INFORMATION Should you have any questions concerning this EULA, or if you desire to
contact the MANUFACTURER for any other reason, please refer to the address provided in the documentation for
the DEVICE. NO LIABILITY FOR CERTAIN DAMAGES. EXCEPT AS PROHIBITED BY LAW, THE
MANUFACTURER OR SOFTWARE COMPANIES SHALL HAVE NO LIABILITY FOR ANY INDIRECT, SPECIAL,
CONSEQUENTIAL OR INCIDENTAL DAMAGES ARISING FROM OR IN CONNECTION WITH THE USE OR
PERFORMANCE OF THE SOFTWARE. THIS LIMITATION SHALL APPLY EVEN IF ANY REMEDY FAILS OF
ITS ESSENTIAL PURPOSE.
WARRANTY DISCLAIMER
FOR APPLICABLE LIMITED WARRANTIES AND SPECIAL PROVISIONS PERTAINING TO YOUR
PARTICULAR JURISDICTION, PLEASE REFER TO YOUR WARRANTY BOOKLET INCLUDED WITH THIS
PACKAGE OR PROVIDED WITH THE SOFTWARE PRINTED MATERIALS.
11.5 Java™
Page 39

39
When running a Java™ application, you may be prompted to grant access to protected features. These features
are protected because using them could incur you cost, or involve your personal data. In case of doubt, don't
hesitate to refuse access by selecting the "No" button!
The security configuration menu is an expert feature! You must know exactly what you are doing before
attempting to change security parameters of a MIDlet.
Misunderstanding changes may render MIDlet non functional and/or lead to higher risks for your private data or
impact your airtime consumption. Any changes in the security configuration are done under your responsibility. In
no case shall Celsius X VI II and/or your network provider be liable for any damages deriving from or arising out of
such changes in the security configuration.
You must be aware that applications downloaded to your phone could cause the phone to perform actions for
which you will be billed, like making calls and sending SMS. Depending on your operator's billing policy, you may
also be charged to download the application because of airtime consumption.
Security considerations Java™ MIDP technology is an efficient way to provide
powerful applications in mobile phones.
All these MIDP 2.0 features cannot be simply exposed to any MIDlet installed in the handset: a careful access
control system is implemented in the device to protect your private data and airtime consumption.
Access controls are gathered in 9 security groups:
– Network access
– Auto invocation
– Phone call
– Local connectivity
– Messaging receive
– Messaging sending
– Read User data
– Write User data
– Multimedia recording
Each of these security groups has one among 5 possible authorizations levels [listed from the more restrictive to
the more permissive]:
– Never: The security group completely prevents access to the protected features.
– Per use: Each time MIDlet tries to use protected feature, user is prompted to grant access.
– Per session: First time a MIDlet uses a protected function, user is prompted to grant access like in "Per use"
authorization but access is granted until the MIDlet terminates.
– Single confirmation: The first time in the whole MIDlet life a MIDlet uses a protected feature, user is prompted to
grant access. It remains valid until the MIDlet is removed from the handset.
– Always: The security group unconditionally grants access to protected features.
A MIDlet has a security status which is either "uncertified", or else "certified".
An "uncertified" status means that the source of the MIDlet could not be verified by the mobile phone at
installation time.
As far as the phone knows, the MIDlet could have been written by anyone.
A "certified" status means that the MIDlet was digitally signed by a known party, whose name is displayed by the
mobile phone.
Security permissions are different for "uncertified" or "certified" MIDlets.
Security configuration menu
When a MIDlet is installed in the mobile phone, default security authorizations are applied. This default security
configuration may be altered through the "Settings/Security" menu of an installed MIDlet.
Once in the "Security" menu, the security status of the MIDlet is displayed.
If you do not want to enter the security menu, simply select "Back" button. You can proceed by selecting "OK"
button.
The menu displayed allows you to increase or decrease permissions currently applied to the current MIDlet for
each of the security groups. When you set a more permissive authorization to a security group than the current
value, mobile phone asks you to confirm your increased risk exposure.
The maximum risk exposure increase is limited by the security
status.
What is Java™?
Business applications and games are easily downloadable by the end-user on a Java™ featured handset.
Your mobile phone is a MIDP 2.0 compliant Java™ platform which implements WMA [SMS support] and MMAPI
[Multimedia support] options, providing an exciting environment to run highly graphical, networked and intuitive
MIDP applications.
Page 40

40
What is a MIDlet?
A Java™ application or a game designed to run in a mobile phone is named a MIDlet [MIDP applet].
A MIDlet is usually made of 2 files:
– The JAD file
– The JAR file
JAD file stands for Java™ Application Descriptor. It is a small file describing the content of a JAR file.
JAR file stands for Java™ Archive. It refers to the application data themselves [program, images, sound]. A JAR
file may be up to 200 kilo-bytes large.
Note: In rare circumstances, MIDlet vendors may provide no JAD file and the MIDlet is the JAR file alone. In such
a case it is your only responsibility to evaluate the risk to download the JAR file without possibility of consulting
the JAD file.
Downloading a MIDlet [Java™ game or application] MIDlets are easily downloaded in the mobile phone through
the Games or Applications menus or through the WAP browser. In almost all cases, you will first receive a JAD
file which will be displayed on the screen.
When you select a JAD file, your mobile phone downloads it, displays data contained and prompts you to
acknowledge the JAR file download.
The popup displays information below:
– Name of the MIDlet, Version, Size, Name, Security status, URL.
If you do not want to download the main data [JAR file], you shall refuse to acknowledge further airtime
consumption by selecting "Cancel".
If you agree on the MIDlet installation, just select [OK]. The MIDlet is installed with security levels set to default
values associated with its security status.
Before downloading an application, such a message may appear: "Your handset cannot identify the application,
please be sure of the source of the application before installing the application".
Trademarks Java™ and all other Java-based marks are trademarks or registered trademarks of Sun
Microsystems, Inc. in the U.S. and other countries.
Disclaimer
Some downloaded items may contain data or may induce actions which may cause malfunctioning of your mobile
phone or loss or corruption of data or abnormal increase of your airtime consumption.
You expressly acknowledge that the download of any applications including Java™ applications or games is done
under your exclusive responsibility. In no event shall Celsius X VI II, your network service provider or their
affiliates be liable for any lost profits or costs of procurement of substitute goods or services, loss of profits,
interruptions of business, loss of data or for any special, indirect, incidental, economic,
or consequential damages arising under contract, tort, negligence, or other theory of liability relating to the
download of any application by any means, including Java™ applications or games in the Celsius X VI II devices.
You expressly acknowledge that any applications including Java™ applications or games are provided strictly "as
is". Celsius X VI II and/or your network service provider extend no warranty whatsoever thereto. Celsius X VI II
and/or your network service provider disclaim any express, implied or statutory warranty of merchantability,
fitness of any applications including Java™ applications or games for a specific purpose, satisfactory quality,
security or otherwise.
FOR APPLICABLE LIMITED WARRANTIES AND SPECIAL PROVISIONS PERTAINING TO YOUR
PARTICULAR JURISDICTION, PLEASE REFER TO YOUR WARRANTY BOOKLET INCLUDED WITH THIS
PACKAGE OR PROVIDED WITH THE SOFTWARE PRINTED MATERIALS.
11.6 Warranty conditions
To avoid any possible inconvenience relating to the use of your equipment, please read the user manual carefully.
If, despite our efforts, you experience difficulties with this equipment, the following shall apply:
Celsius X VI II warrants in the country where the product has been sold by a Celsius X VI II LICENSEE that any
new equipment will be, subject to the terms and conditions below, free from any defect in workmanship and
material
[labour and replacement parts included] under normal usage*** during a period of thirty-six [36] months for the
handset and twelve [12] months for the accessories bundled with the phone, from the date of purchase by the first
customer.
***. except in the cases mentioned further in this document.
Proof of purchase, Warranty Certificate will be required so please keep the receipts in a safe place.
Celsius X VI II LICENSEE warrants any repaired equipment during the original warranty period here above
mentioned, for a period expiring three [3] months after the date of repair of such equipment or upon the expiration
of the warranty period applicable to the original equipment set out above, whichever is later. The defective parts
that have been replaced shall become the property of the Celsius X VI II LICENSEE.
Page 41

41
This warranty shall apply provided that the equipment is used properly for its intended purpose and under normal
conditions.
Under this warranty, your product will be exchanged or repaired free of charge at Celsius X VI II's convenience.
Include a copy of proof of purchase of the equipment and the warranty card duly dated and completed, at the date
of purchase, by the seller.
 Loading...