

Page 1
CDW12
Page 2
This manual contains sections of Safety
Instructions,Operating Instructions,
Installation Instructions and Troubleshooting
Tips etc. Carefully reading it before using the
dishwasher will help you to use and maintain
the dishwasher properly.
To review the section on Troubleshooting Tips
will help you to solve some common problems
by yourself and not need to ask for the help of
professional technic ians.
Con trol Panel . . . . . . . . . . . . . . . . . . . . . . . . 2
Dishwasher Features . .
Wash Cycle Ta ble . . . . . . . . . . . . . . . . . . . . 3
Det erge nt . . . . . . . . . . . . . . . . . . . . . . . . . . . 4
Rinse Aid . . . . . . . . . . . . . . . . . . . . . . . . . 4, 5
Loa ding t he Di shwas her Ra ck . . . . . . . . 5,6
Tur ning On the A pplianc e . . . . . . . . . . . . . . 6
Fi ltering Syste m . . . . . . . . . . . . . . . . . . . . . 7
Car ing f or the D ishw ashe r . . . . . . . . . . 8
. . . . . . . . . . . . . .. . 2
. . .7 ,
Abo ut Elect rici ty co nnect ion . . . . . . . . . . 8
Water Con nect ion . . . . . . . . . . . . . . . . . . . 9
Dimen sion s . . . . . . . . . . . . . . . . . . . . . . . . 9
Bef ore call ing f or ser vi ce. . . . . . . . . . 10,1 1
. . . . . . . . . . . . . . . . . . 1
The manufacturer, following a policy of constant
development and up-dating of the product, may
make modifications without giving prior notice.
Page 3
This appliance must be grounded. In the event
of a m alfunction o r breakdown , grounding will
reduce the risk of electric shock by providing a
path of least resistance of electric current. This
appliance is equipped with a cord having an
equipment-grounding conductor and a grounding
plug. The plug must be plugged into an appropriate
ou tlet that is instal led and grounde d in ac cordance
with all local codes and ordinances.
Under certain conditions, Hydroge n gas may be produced in a hot-water system that has not been
used for two wee ks or more. HYD ROGEN GAS IS EXPLOSIV E.
If the hot-water system has not been used for such a period, before using the dishwasher turn on all
hot-water faucets and let the water flow from each for several minu tes. T his wi ll relea se any
accumulated hydrogen gas. As the gas is flammable, do not smoke or u se an op en fl ame d urin g this
time.
1
Do not abuse, sit on, or stand on the door or dish
rack of the dishwasher.
Do not touch the heating element during or
immediately after use.
Do not wash plastic items unless they are marked
dishwasher safe or th e equivalen t. For pla stic
items not so marked, check the manufactures
recommendations.
Use onl y det erge nt an d rin se add itiv es d esig ned
for an automatic dishwasher. Never use soap ,
laundry detergent, or hand washing detergent
in y our di shwa sher . Ke ep these products ou t of
children.
The door should not be left in the open position
si nce this c ould p rese nt a tri ppin g haza rds.
Do not tamper with controls.
Do not place any heavy objects or stand on the door
when it is open. The appliance could tip forward.
When loading items to be washed:
1) Locate sharp items so that they are not likely to
dam age th e door seal;
2) Load sharp knives with the handles up to reduce
the risk of cut-type injuries.
When using your dishwasher, you should prevent
plastic item from contacting with heating element.
If t he sup ply co rd is da mage d, i t must b e repl aced
by t he manufa ctur er or its s ervice a gent o r a
similarly qualified person in order to avoid a
hazard.
Please dispose of packing materials properly.
Use the dishwasher only for its intended function.
Remove the door to the washing compartment when
removing an old dishwasher from service or discarding it.
The applia nce is not intended for use by young
children or infirm persons without supervision.
Dishwasher detergents are strongly alkaline,they
can be extremely dangerous if swallowed.Avoid
contact with skin and eyes and keep children away
from the dishwasher when the door is open.
Young children should be supervised to ensure that
they do not play with the appliance.
Check that the detergent receptable is empty after
completion of the wash cycle.
Page 4
To get the best performance from your dishwasher,read all operating instructions before using it for the
first time.
5
6
7
""
""
Ra
p
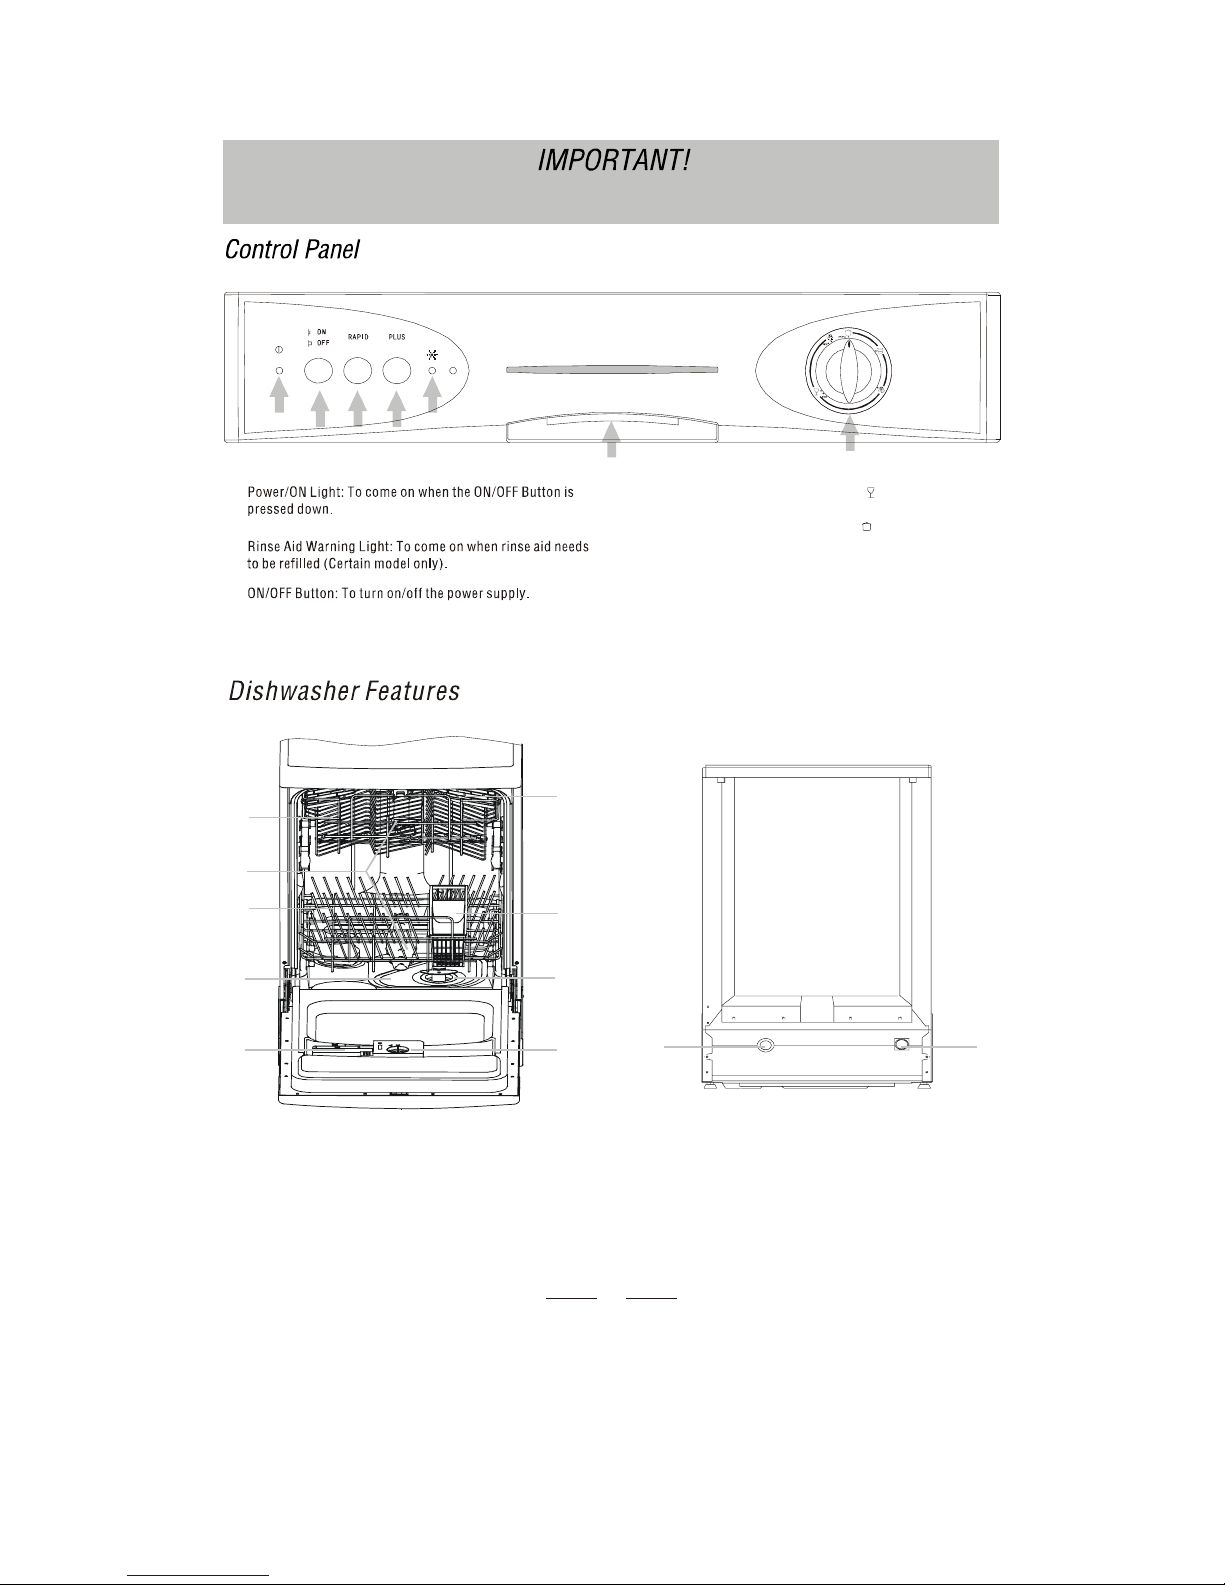
id Button: Only used with cycl e .
Plus Button: Only used with cycle
Door Handle: Pull it to open the door.
Washin
g
Pr ogram Selector: Turn the knob clockwise
to select wash cycles.
1
2
3
4
2
11
1
2
3
4
5
6
7
8
9
10
Upper Basket
Spray Arms
Lower Basket
Detergent Dispenser
Silverware Basket
Main Filter
Cup Shelf
5
6
7
8
Rinse Aid Dispenser
Coarse Filter
Drain
pip
e connect or
Inlet
pip
e connector
9
10
11
3
2
14
1 2
7
6
543
Page 5
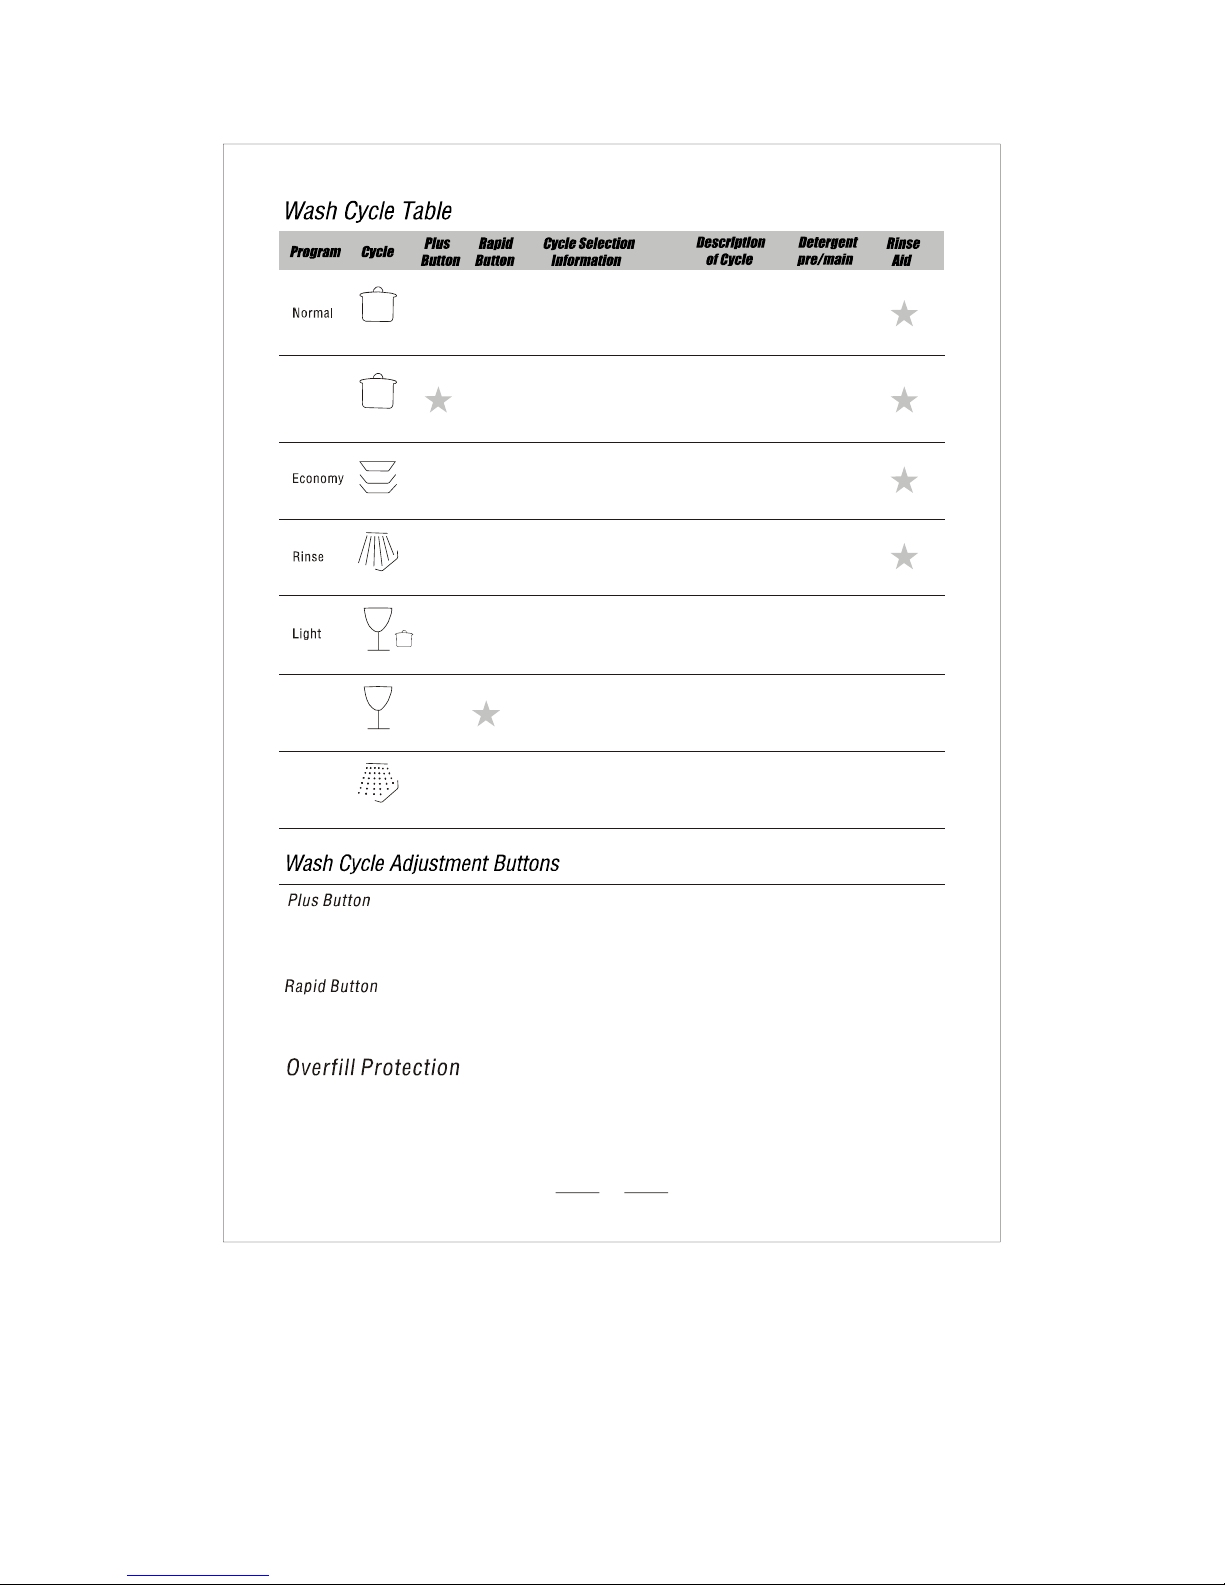
This button (see " Co ntrol panel " ) is use d with th e normal cycl e in the c ase wh ere pots and pans with dry cak ed-o n food must be
washed.
Thi s is no t reco mmend ed fo r deli cate i tems i n so fa r as the h igh temperature could make their surfaces opaque or lighten
decorative colors after repeated washing.
This button (see " Control panel " )when pressed with wash cycle 4(light)makes it possible to eliminates the drying phase.
Your dishwasher has an overfill protection device which could automatically shut off the inlet valve and starts the drain pump
if the water level in the unit is detected to be above the normal lev el. If this o ccur s, tur n off th e mai n wa te r su pply b efore calling for
servicing. If there is water in the base pan because of an overfill or small leak, the water should be removed before restarting the
dishwasher.
For normally soiled loads,
such as , plates,glasses
and lightly soiled pans.
standard daily cycle.
pots
Pre-rinse
-rinse
Wash (52 ℃)
Rinse (70 ℃)
Drying
Pre
For the heaviest soiled loads,
such as pots,pans,casserole
dishes and dishes that have
been sitting with dried food
on them for a while.
For lightly soiled loads,such
as plates,glasses,bowls and
lightly soiled pans.
For dishes that need to be
rin sed an d dried o nly.
For lightly soiled loads,
such as glasses, crystal and
fine china.
To rinse dishes that you
plan to wash later that day.
15 g.
15 g.
A shorter wash for lightly
soiled loads that do not
need drying.
Intensive
Rapid
Soak
5/20 g.
5/20 g.
20 g.
Pre-rinse
-rinse( 2℃
Wash (60 ℃)
Rinse
Rinse (70 ℃)
Drying
Pre 5 )
Wash (52 ℃)
Rinse (70 ℃)
Drying
Rinse (70 ℃)
Drying
Wash (52 ℃)
Rinse (62 ℃)
Drying
Wash (5 2 ℃)
Rinse
Pre-rinse
Normal Wash
(IEC-EN 50242)
3
Page 6
4
Dishwasher detergent is corrosive! Take care to keep it out
of reach of children.
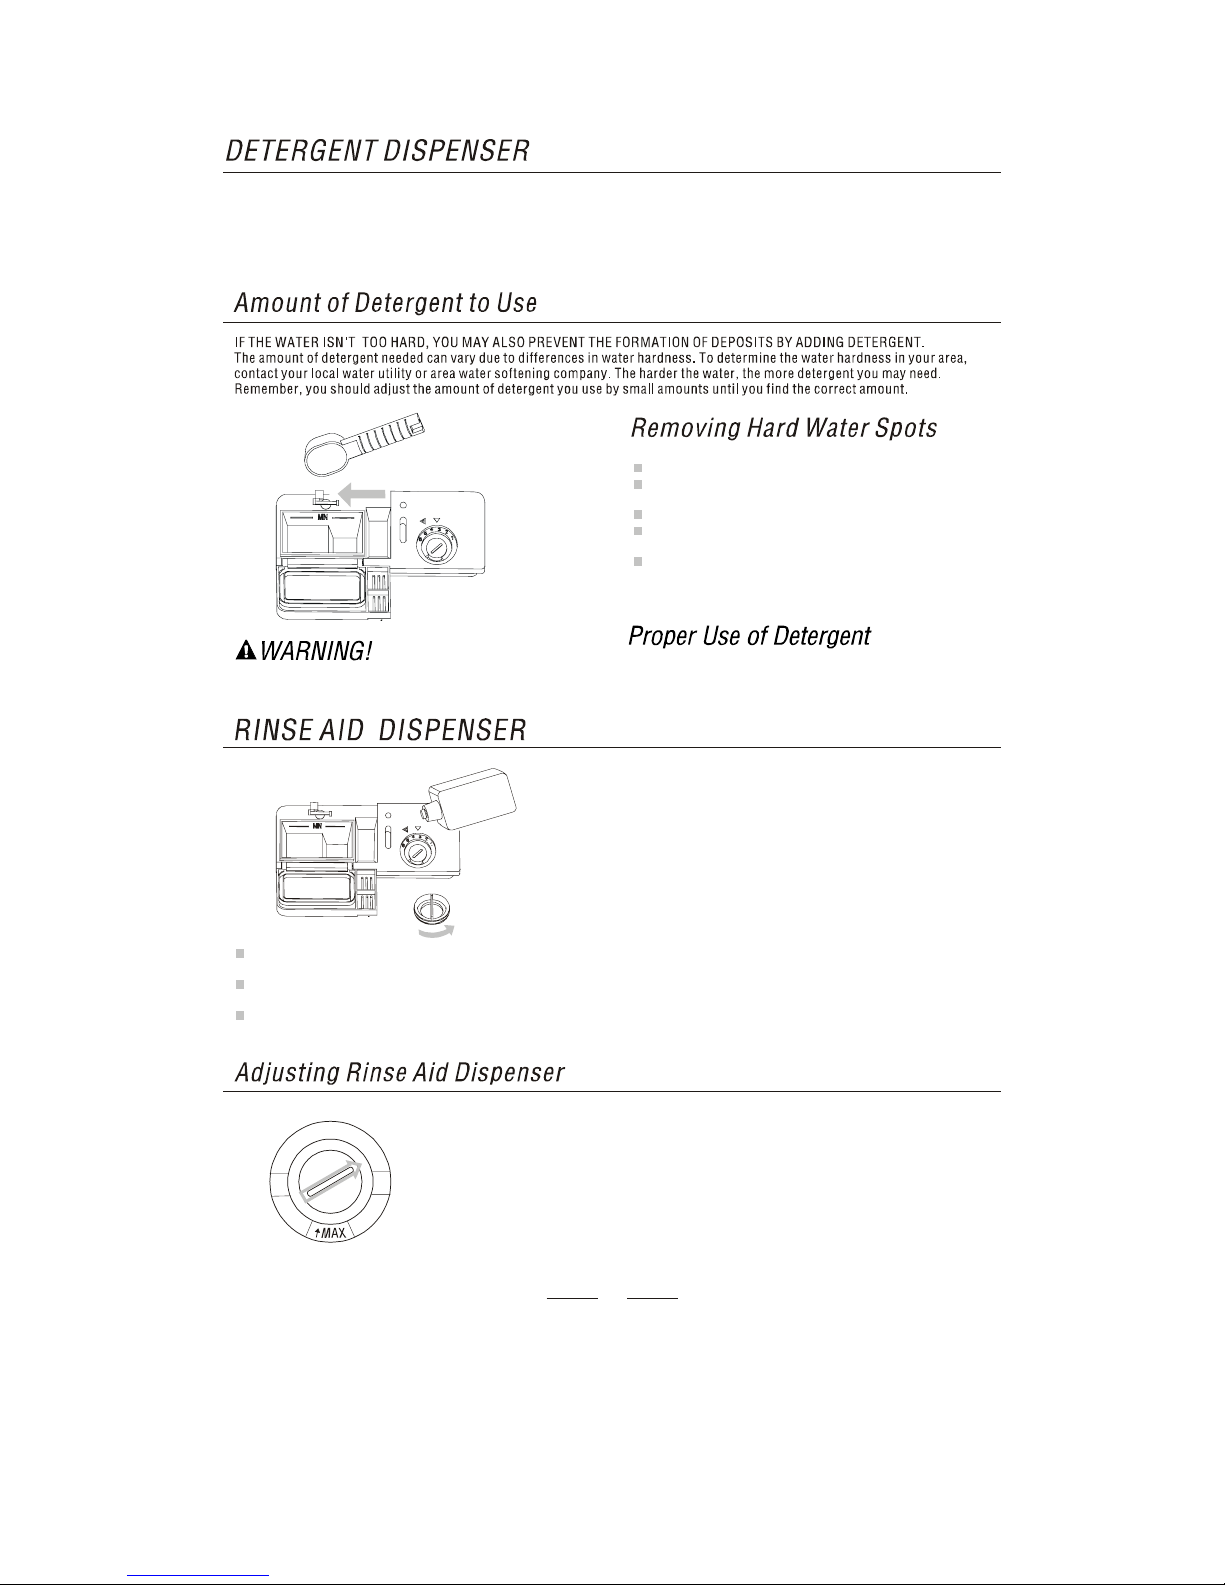
To remove hard water spots, try the following:
Run dishes throu
g
h a norm al wash program.
R em ov e all m etal dish wa re, s uc h as cu tler
y, p
ans, etc.,
from the dishwasher.
Do not a dd d eter gent .
P ou r two c u
p
s of vi negar into a bowl and set the bowl face
up on the lower rack of the dishwasher.
Run the dishes through a normal wash program.
If this doesn't work, try the same process with 1 / 4 cup of
citric acid crystals instead of vinegar.
Use only detergent specifically made for use in dishwashers.
Keep your detergent fresh and dry. Don't put powder detergent
into the dispenser until You're ready to wash dishes.
The rinse aid is released during the final rinse to prevent water
fr om formin g droplet s on yo ur dishes th at c an le ave s pots a nd
streaks. It also im
p
roves drying by allowing wa te r to "sheet" o ff
the dishes.
Your dishwashers are designed to use liquid rinse aids. The
rinse aid dispenser is located inside the door next to the
detergent dispenser. To fill the dispenser, open the cap and
pour the rinse aid into the dispenser until the level indicator
turns completely black. The volume of the rinse aid container is
about 140ml.
Be careful not to overfill the dispenser, because this could
cause oversudsingG. Wipe away any spills with a damp cloth.
Don't forget to replace the cap before you close the dishwasher
door.
If you have soft water, you may not need rinse aid for it may
cause a white film to develop on your dishes.
You should not use too much detergent to prevent the formation of deposits.
The dispenser must be refilled before the start of each wash cycle following the instructions provided in the" Wash Cycle
Table".Your dishwashers than conventional dishwashers. Generally, only one tablespoon of
deter
g
ent is needed for a normal wash load. Also, more heavily soiled items need more detergent. Always add the det ergent just
before starting dishwasher, otherwise it could get damp and will not dissolve properly.
use less detergent and rinse aid
To open the dispenser, turn the cap to the "open" (left)
arrow and lift it out.
Pour the rinse aid into the dispenser, being careful not to
overfill.
Replace the cap by inserting it aligned with "open" arrow
and turning it to the closed (right) arrow.
A measured amount of rinse aid is released during the fi nal rin se . As wi th de tergent, t he am ou nt
of rinse aid needed for your dishes depends on the hardness of the water in your area. Too much
rinse aid can result in lather of foaming and cause cloudiness or steaks on your dishes. If the
water in
y
our area is very soft, you may not need ri nse aid . If you do,you c an di lute th e rin se ai d
with an equal amount of water.
The rinse aid dispenser has six settings. Always start with the dispen se r set o n " 1 " . If spots a nd
poor drying are problems, increase the amount of rinse aid dispensed by removing the dispenser
lid and rotat in
g
the dial to "2 ". If t he dishes s till ar e not d rying properly or a re spotted, adjust the
dial to the next higher number until your dishes are spot-free. We sugg est you t o se t on "4" .
6
5
4
3
2
1
Page 7
5
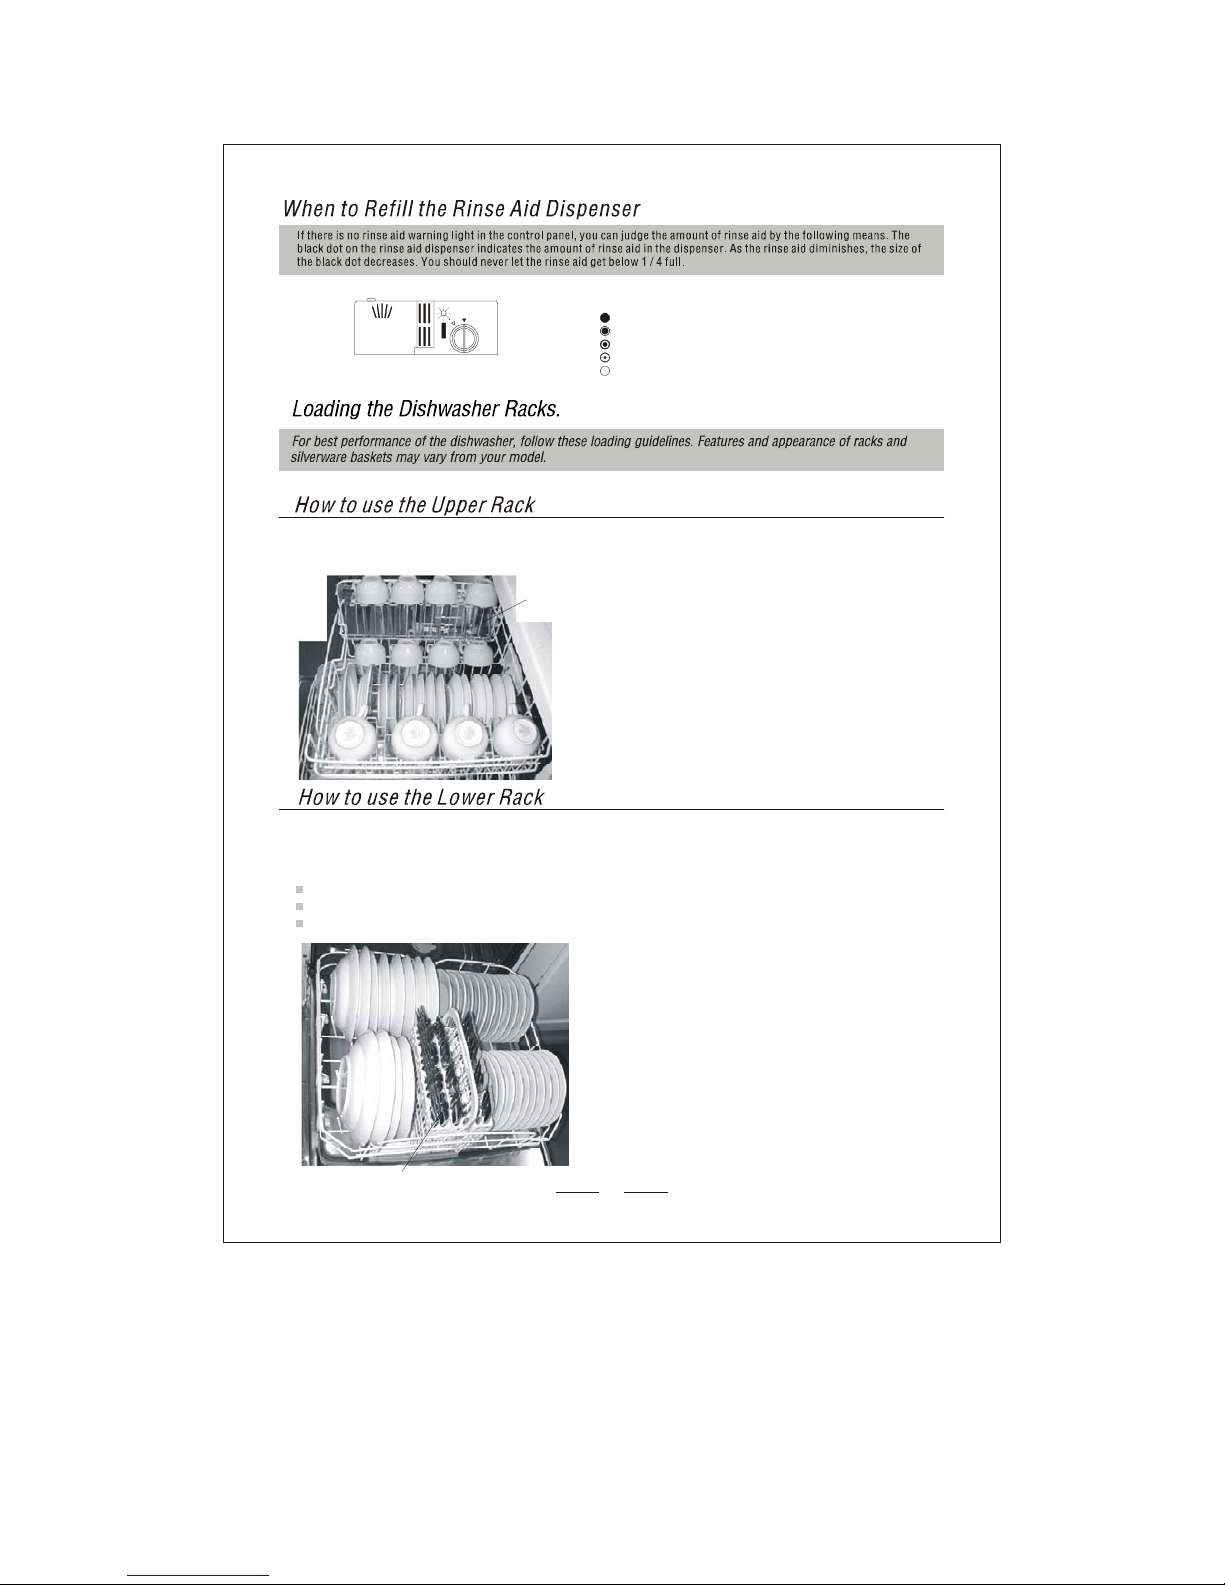
As the rinse aid diminishes, th e si ze of th e blac k dot o n the rins e
aid level indicator changes, as illustrated below.
Full
3 / 4 ful l
1 / 2 ful l
1 / 4 ful l - Shou ld re fill t o elim inat e spot ting
Em pty
The upper rack is designed to hold more delicate and lighter dishware such as glasses, coffee and tea cup and sauce rs, as w ell
as p lates, s mall b owls a nd sha llow p ans( as lon g as the y are n ot too dir ty).
Position the dishes and cookware so that they do not get moved by the spray of water.
The upper rack can be adjusted for height by putting wheels of different height into the rails.
1
Cups
2
Small serving bowl
3
Glasses
Saucers
4
5
Dish
6
Plates
We recommend that you place large items which are most difficult to clean into the lower rack: pots, pans, lids,
serving dishes and bowls, as shown in the figure to the right.
It is preferable to place serving dishes and lids on the side of the racks in order to avoid blocking the rotation of the
top spray arm.
Pots, serving bowls, etc, must always be placed top down.
Deep pots should be slanted to allow water to flow out.
The bottom rack feature fold down tine rows so that larger or more pots and pans can be loaded.
2
Soup plates
Dessert dishes
3
1
Dinner plates
4
Silverware basket
4
3
2
2
1
1
2
3
4
6
5
Page 8
6
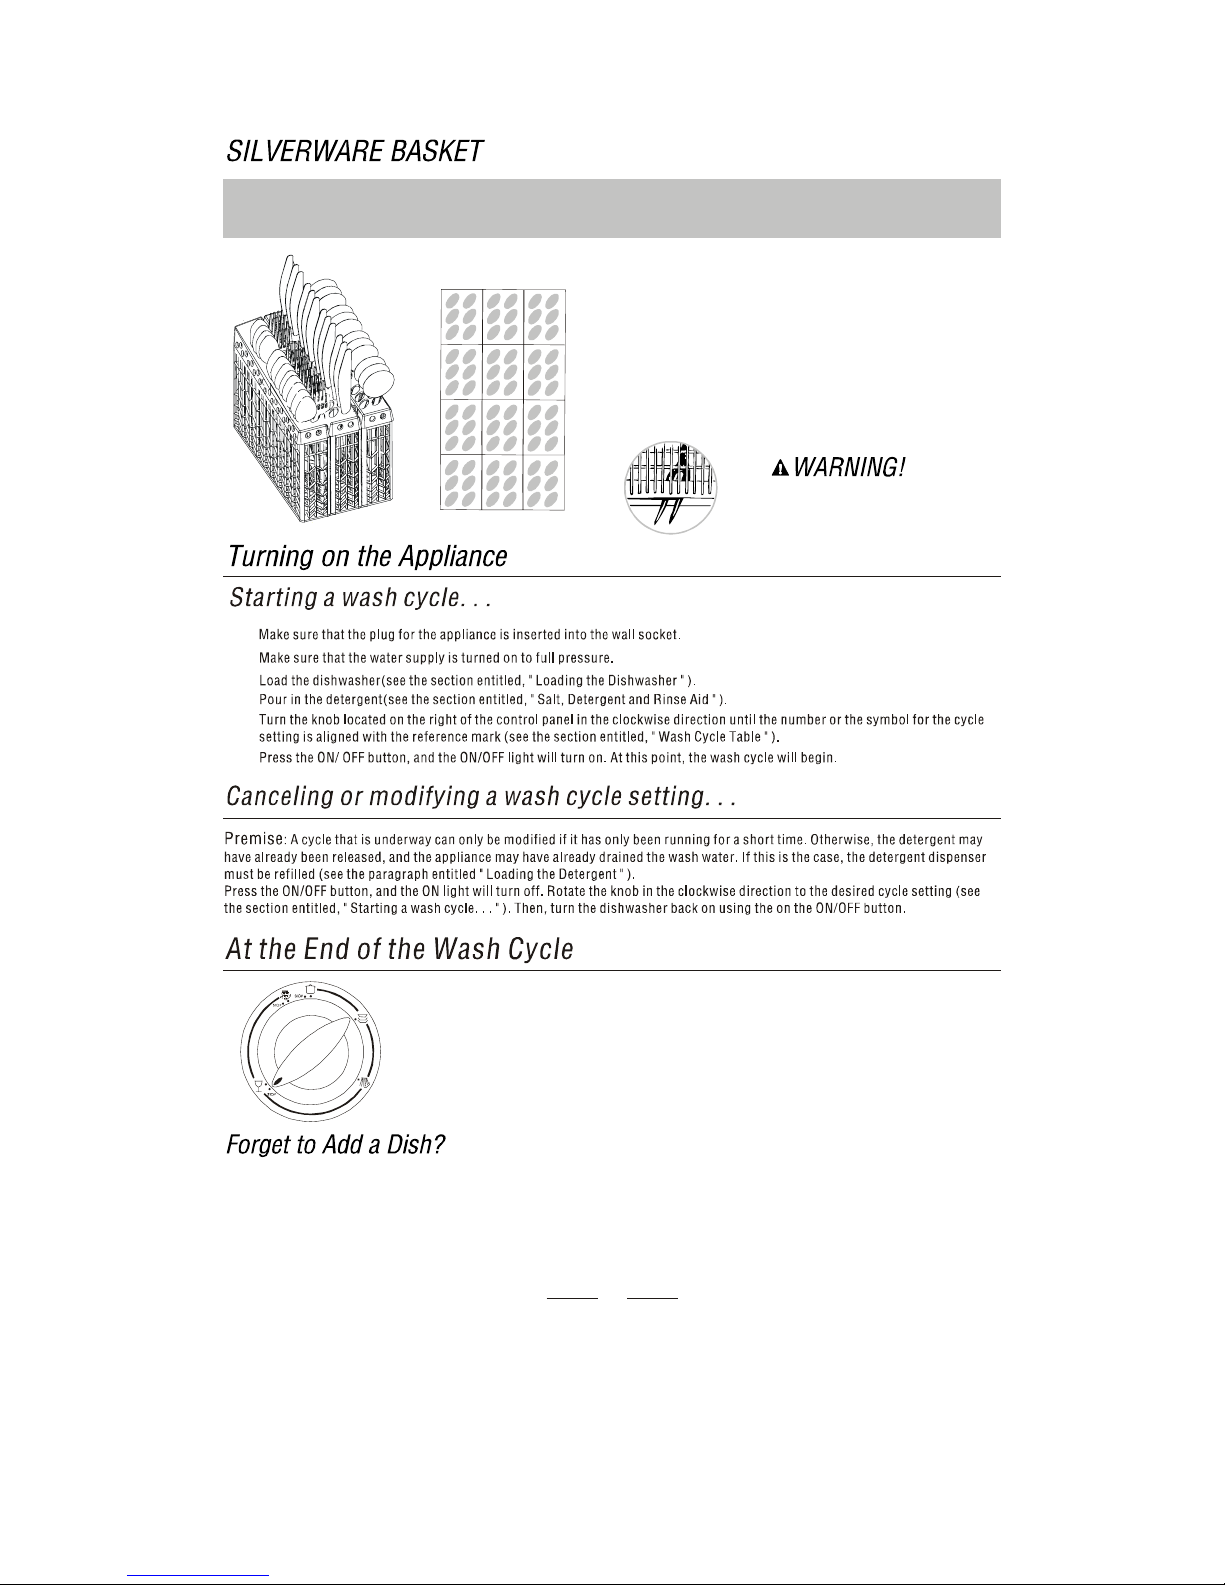
Silverware should be placed in the silverware basket with handles at the bottom: If the rack has side baskets, the spoon should
be loaded individually into the appropriate slots, Especially long utensils should be placed in the horizontal position at the
front of the upper rack.
4
4
3
2
4
4
4
5
4
4
4
4
1
1
1
1
1
1
1
1
1
4
4
4
1
1
1
5
5
5
5
5
5
5
5
5
5
5
2
2
2
2
2
2
2
2
2
2
2
3
3
3
3
3
3
3
3
3
3
3
Do not let any item extend through bott om.
Teaspoons
4
Soup spoons
2
Forks
1
Knife
5
3
Dessert spoons
When t he knob s tops turning and is aligned with a STOP mark(see figure), th e cycle has finished .
Turn off the appliance using the ON/OFF button, shut off the water supply and open the door of
th e di shwa sher . Wai t a f ew minute s b ef or e unl oa di ng th e dis h washer to avoid handling the
dishes and utensils while the
y
ar e stil l hot a nd more s usceptible to breakage. They will also dry
better.
A forgotten dish can be added any time before the detergent cup opens.
Pull the door handle.
Do not open the door until the water spray action stops.
Steam may rise out of the dishwasher.
Add forgotten dishes.
Close the door and make sure the latch has been locked.
4
3
2
1
2
3
4
5
6
1
Page 9
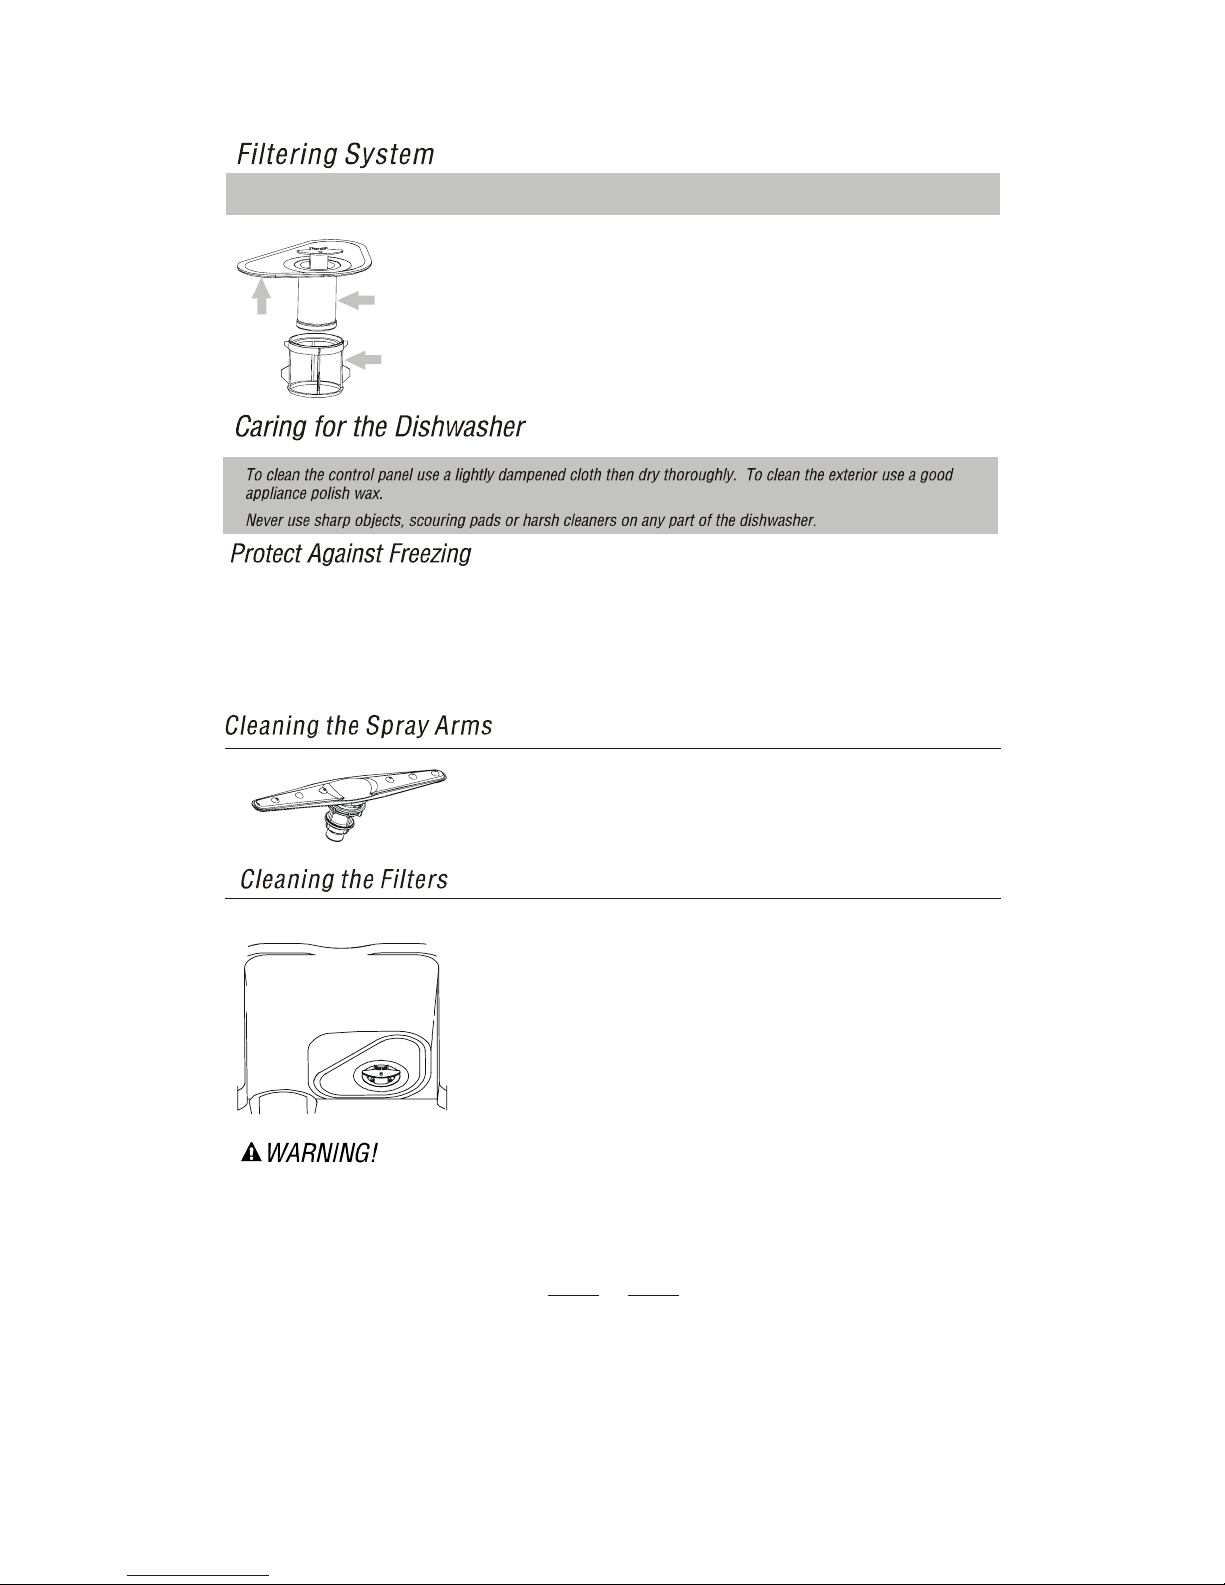
7
Coarse filter
Lar
g
er i tems , such as pieces of bone or glass, that could clog the drain a re trapped in the
coar se f ilter. To r emove a n item ca u
g
ht in this filt er, gently squeeze the tabs on top of t his
filter and lift it out.
For your convenience, we have placed filtering system within easy reach inside the tub. There are three components of the filtering
system: the main filter, the coarse filter, and the fine filter.
1
2
2
Fine filter
This f ilte r hol ds s oil and f ood re sidu e i n the s um p ar ea and pr events it from being
redeposited on the dishes during a cycle.
Main filter
Food and soil particles trapped by this filter are pulverized by a sp eci al jet on th e low er s pray
arm and washed down the drain.
1
3
3
Never run the dishwasher without the filters in place.
Filter assembly
For best
p
erformance and results, the filter assembly must be cleaned.
The filter efficientl
y
remo ves food particles from the wash water, allowing it t o be
recirculated durin
g
the cycl e. For th is reaso n, it i s a good id ea t o rem ov e the larger
food
p
articles trapped in the filter after each wash cycle by rinsing the semicircular
filt er and cup under runnin g wa ter. To r emove the fil ter asse mbly, pull on the cup
handle in the upward direction. The entire filter assembly should be cleaned once a week.
To c le an the co arse fi lter a nd the fine fi lter , use a c leanin
g
brus h. Then, reass embl e
the filter parts as shown in the figures left and reinsert the entire assembly in the
dishwasher, positioning in its seat and pressing downward.
The dishwasher must never be used without the filters. Improper replacement of th e
filter ma
y
re du ce th e performance level of the appliance a nd damage dishes and utensils.
If your dishwasher is left in an unheated place during the winter, ask a service technician to:
Cut off electrical power to the dishwasher.
Turn off the water supply and disconnect the water
inlet pipe from the water valve.
Drain water from the inlet and water valve. pipe
(Use a pan to catch the water.)
Reconnect the water inlet to the
water valve.
pipe
Remove the filter in the tub the bottom
and use a sponge to soak up water
in sump.
5
4
3
2
1
It is necessary to clean the spray arms regularly for hard water chemicals will clog the
spray arm jets and bearings. To remove the spray arm, screw off the nut to t ake out t he
washer on top of the spray arm an d remo ve the arm. Wash the arms i n soapy a nd war m
water and use a soft brush to clean the
j
ets. Replace them after rinsing them t horo ughly.
Page 10
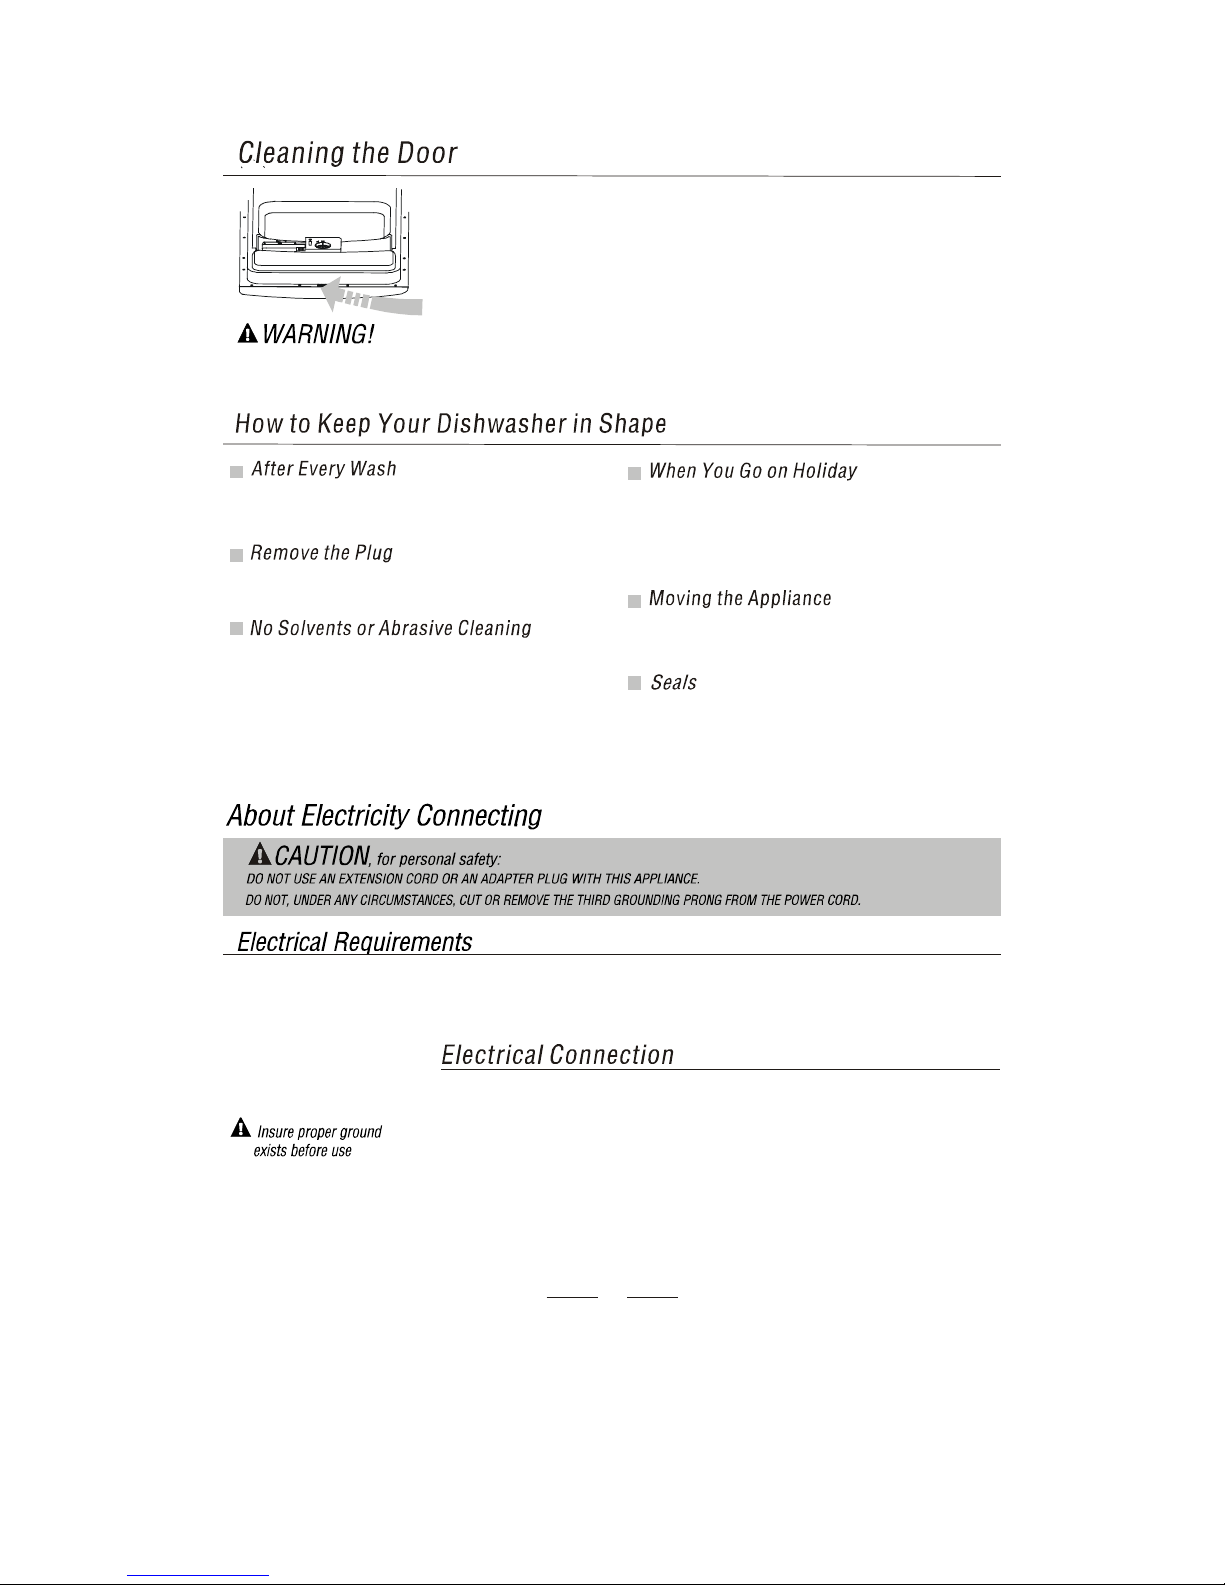
8
Never use a spray cleaner to clean the door panel for it could damage the door lock and electrical components. It is not allowed
to use the abrasive agent or some paper towel becauseof the risk of scratching or leaving spots on the stainless steel surface.
To c le an the edge around the door, you should use only a soft warm, damp rag. To prevent
p
enetration of water into the door lock and electrical components , do no t us e a spray cl ea ner
of a ny kind.
Also, never use abrasive cleaners or scouring pads on the outer surfaces because they will
scratch the finish. Some papers towels can also scratch or leave marks on the surface.
After every wash, turn off the water supply to the
appliance and leave the door slightly ajar so that
moisture and odors are not trapped inside.
Before cleaning or performing maintenance, always
remove the plug from the socket. Do not run risks.
To c le an the exte rior an d ru bber parts of the dishwasher,
do not use solvents or abrasive cleaning products.
Rather, use only a cloth and warm soapy water.
To r emov e spots o r sta in s fro m the s urfa ce of t he
in te rior, use a clo th dampen ed w ith wat er and a l it tl e
white vinegar, or a cleaning product made specifically
for dishwashers.
When you go on holi day, it is recommened that you run a
wash cycle with the dishwasher empty and then remove
the
plug
from the socket, turn off the water supply and
le ave the d oor of the a
pp
liance slightly ajar. This will help
the seals last longer and prevent odors from forming
within the appliance.
If the appliance must be moved, try to k eep it in the vertic al
position.If absolutely necessary, it can be positioned on
its back.
One of the factors that cause odors to form in the
dishwasher is food that remains tra
pp
ed in the seals.
Periodic cleanin
g
with a damp sponge will prevent this
from occurring.
This dishwasher is designed for operation on an adequately wired individual 220~240VAC,50~60HZ. Use required fus e 10 a mp.
Fused electrical supply is required-copper wire only. Time delay fuse or circuit breaker recommended and provide separate
circuit serving only this appliance. Outlet should be placed in adjacent cabinet.
After making sure that the voltage and the frequency values for the current in the home
correspond to those on the rating plate and that the electrical system is sized for the
maxi mu m volt age on th e ratin g plate , insert th e plug in to an e l ectrical socket which is
earthed properly. If the electrical socket to which the appliance must be connected is not
appr opriate fo r the , rep lace th e so cke t, rather th an us in g a adaptors or the like as
they c ould caus e overhea ti ng and bu rns.
plug
Page 11
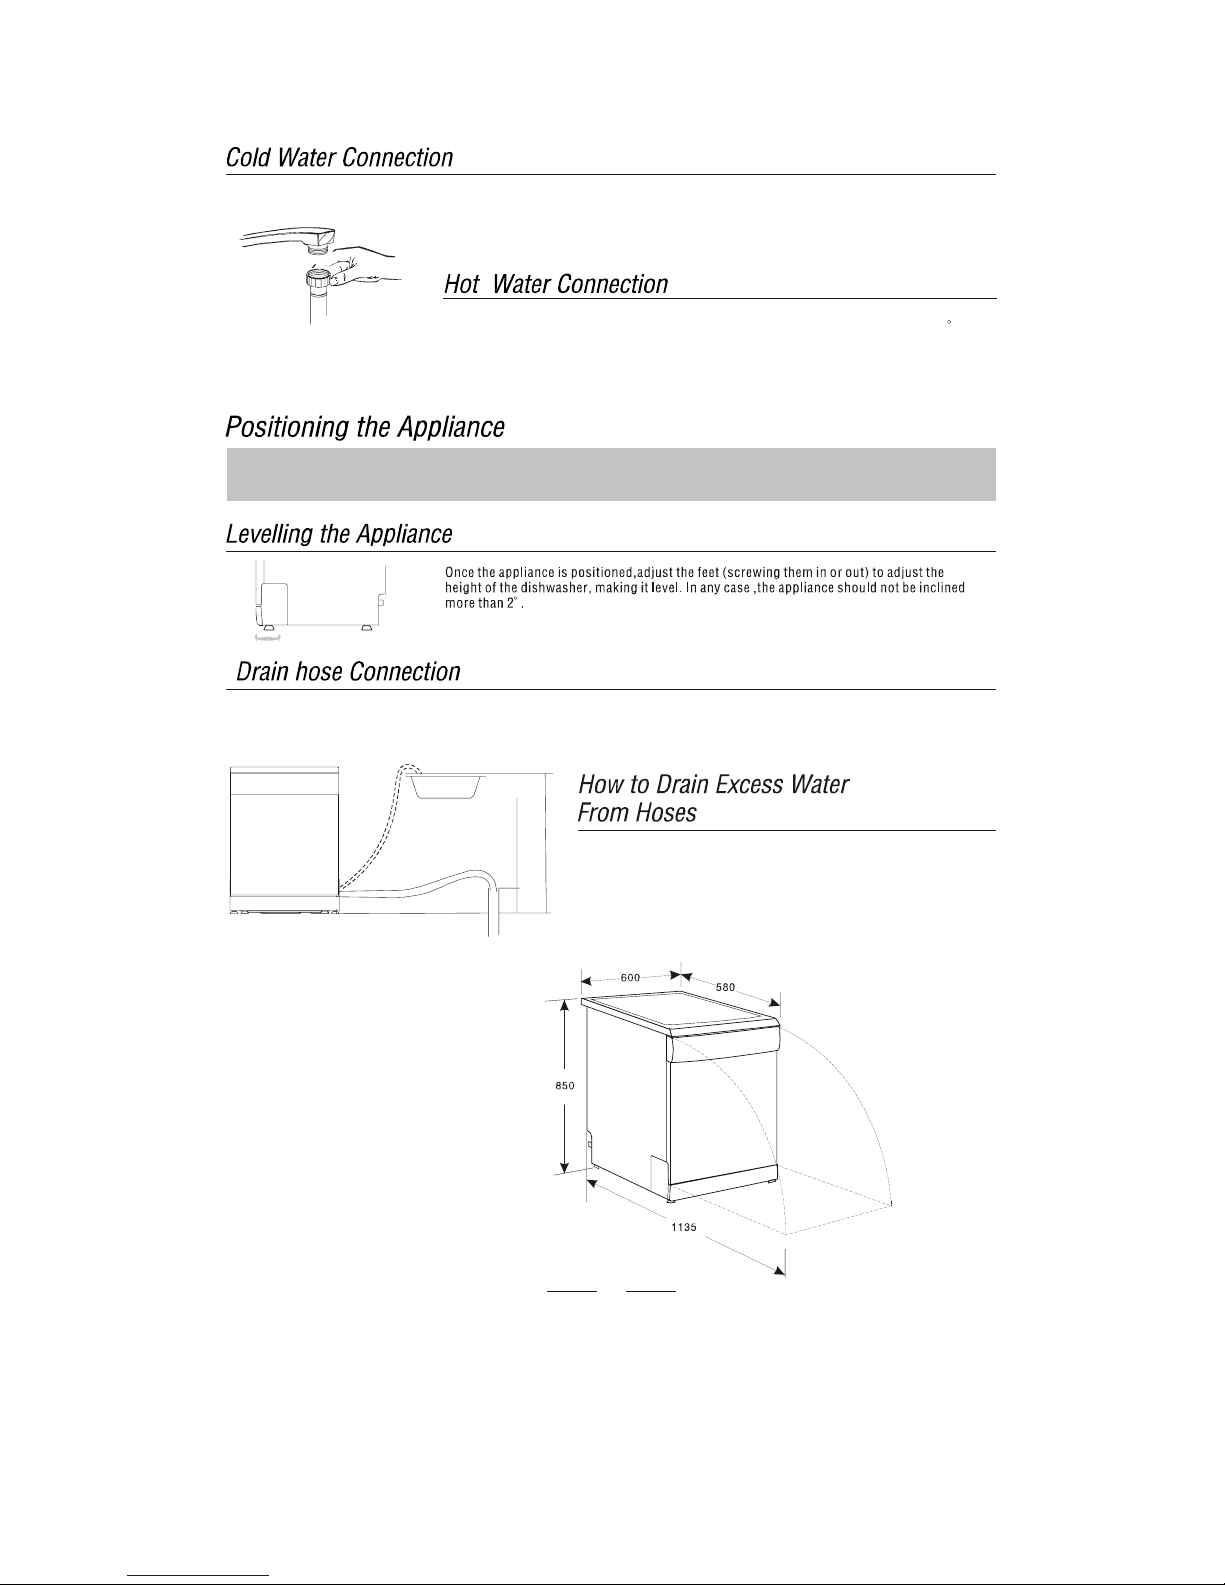
9
If the sink is 1000mm higher from the floor, the excesswater in Unicouple hoses
cannot be drained directly into the sink. It will be necessary to drain excess
water from hoses into a bowl or suitable container that is heldoutside and lower
than the sink.
Connect the cold water supply hose to a threaded 3/4(inch) connector and make sure that it is
fastened tightly in place.
If the w ater
pip
es are new or have not been used for an exten ded period of time, let the water
run to mak e sure that the water is cle ar and free of impurities. If this precaution is not taken,
ther e is a risk that the water inlet can get blocked and damag e the appliance.
The water supply to t he appliance can also be connected to the house hot water line
(
centralized system, heating system),as long as i t does not ex ceed a te mperature of 60 C.
In t hi s case, t he wash c yc le time w il l be sh or tened by ab out 15 mi nute s an d the was h
efficiency slightly reduced.
The connection must be made to the hot water line following the same procedures as those
for the connection to the cold water line.
DIMENTIONS(mm)
Connector of ModelⅡ
Insert t he drain ho se int o a dra in pipe with a minimum dia met er of 4 cm, or let it run into the sin k, mak ing sure to avoid bend ing
or crimping it. Use the special plastic su pport that co mes with the appliance. The free end of the hose must be at a height
between 40 and 10 0c m and mu st not be i mmer se d in wa ter.
Max 1000mm
Min 400mm
Pos itio n the app li an ce i n the desired l oc at ion. T he bac k shou ld rest against the wall behind it, and the sides, along the adjacent
cabinets or wall. The dishwasher is equipped with water supply and drain hoses that can be positioned to the right or the left to
facilitate proper installation.
Page 12
Sound from soft food shredding action and detergent cu
p
opening.
Utensils are not secure
in the baskets or something
small has dropped into
the basket
To ensure everything is secured in the dis hwasher.
Motor hums Dishwasher has not been used re
g
ularly. If you do not use it
often, remember to set it to fill and pump out every week,
which will help keep the seal moist.
Improper detergent
Add 4 litres of cold water to the tub. Close and latch the
dishwasher, then drain out the water by slowly turning the
Dial until a drain period is reached. Repeat if necessary.
Spilled rinse agent Always wipe up rinse agent
spills immediately.
Detergent with
colorant was used
Make sure that the detergent is the one without colorant.
Rinse agent dispenser
is empty
Make sure that the rinse agent dispense is filled.
Improper program
Improper rack loading Make sure that the action of the deter
g
ent dispenser and
spray arms are not blocked by large dishware.
Extremely hard water
Low inlet
temperature
Overloading the
dishwasher
Improper loading
Old or damp powder
detergent
Empty rinse a gent
dispenser
Incorrect dosa
g
e of
detergent
•
To remove spots from glassware:
Take out all metal utensils out of the dishwasher.
Do not add detergent.
Choose the longest cycle.
Start the dishwasher and allow it to run for about
18 to 22 minutes, then it will be in the main wash.
Open the door to pour 2 cups of white vinegar
into the bottom of the dishwasher.
Close the door and let the dishwasher complete
the cycle. If the vinegar does not work: Repeat
as above, exce
p
t use 1/4 cup (60 ml)of citric acid
crystals instead of vinegar.
Some audible sounds are
normal
'
Make sure the dishwasher is turned on and the door is
closed securely.
Check that the water supply is connected properly and
the water is turne d on.
Make sure the power cord is properly plugged into the
wall socket.
Power supply is not
turned on
Water pressure is low
'
Overflow The system is designed to detect an overflow. When it
does, it shuts off the circulation
pump
and turns on the
drain pump.
Select stronger program
•
Use only the special dishwasher detergent to avoid suds.
If this occurs, o
p
en the dishwasher and let suds evaporate.
11
Page 13
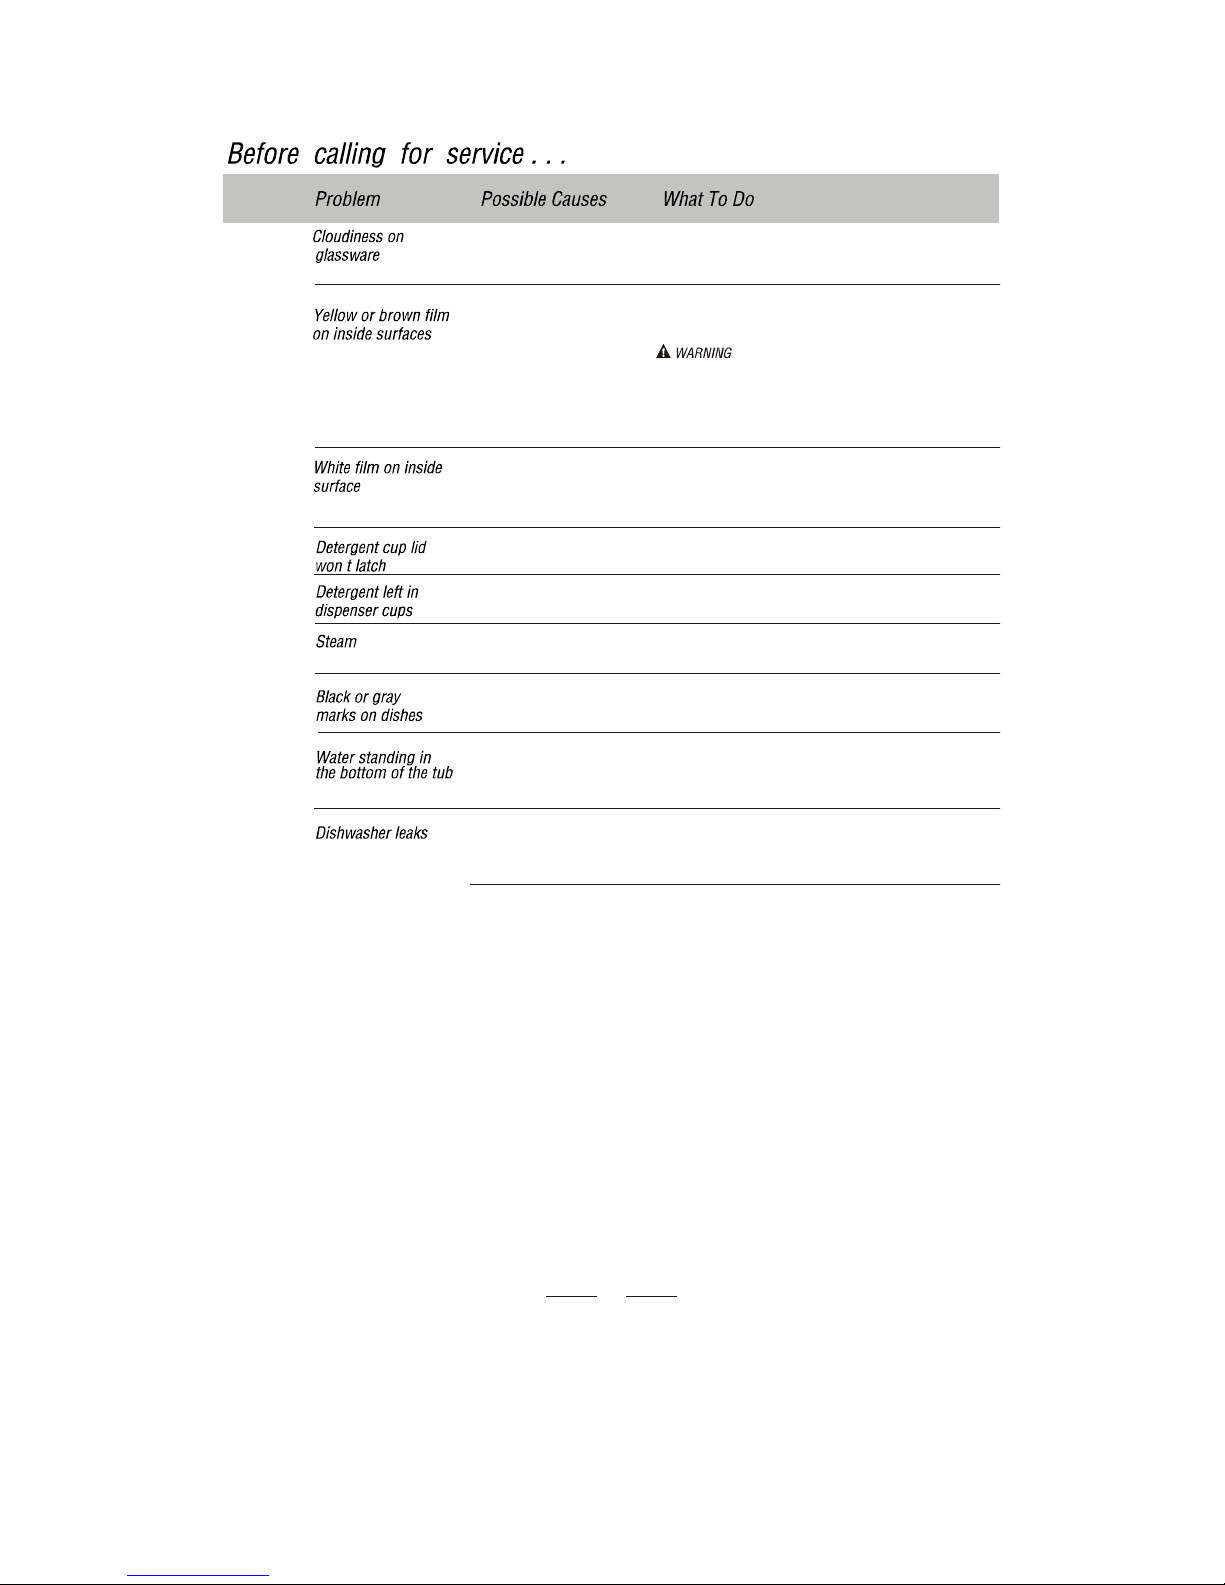
Combination of soft
water and too much
detergent
Use less detergent if you have soft water and select a
shortest c
y
cle to wash the glassware and to get them clean.
Tea or coffee stains
usin
g
a solution of 1/2 cup of bleach and 3 cups warm water
to remove the stains by hand.
You have to wait for 20 minutes after a cycle to let the heatin
g
elements cool down before cleaning interior; otherwise, burns
will happen.
Hard water minerals To clean the interior, use a damp sponge with dishwasher
deter
g
ent and wear rubber gloves. Never use any other cleaner
than dishwasher detergent for the risk of foaming or suds.
Dial is not in the
position
OFF Turn the Dial to OFF position
Dishes block detergent
cups
Re-loading the dishes properly.
Normal phenomenon
There is some steam comin
g
through the gap under the
door during drying and water draining.
Aluminum utensils have
rubbed against dishes
Use a mild abrasive cleaner to eliminate those marks.
'
This is normal A small amount of clean water around the outlet on
the tub bottom at the back of the tub kee
p
s the water
seal lubricated.
Be careful not to overfill the rinse aid dispenser.
Spilled rinse aid could cause oversudsing and lead
to overflowin
g
. Wipe away any spills with a damp cloth.
Make sure the dishwasher is level.
Overfill dispenser or rinse
aid spills
Dishwasher isn t level
'
12
 Loading...