

Page 1
User manual
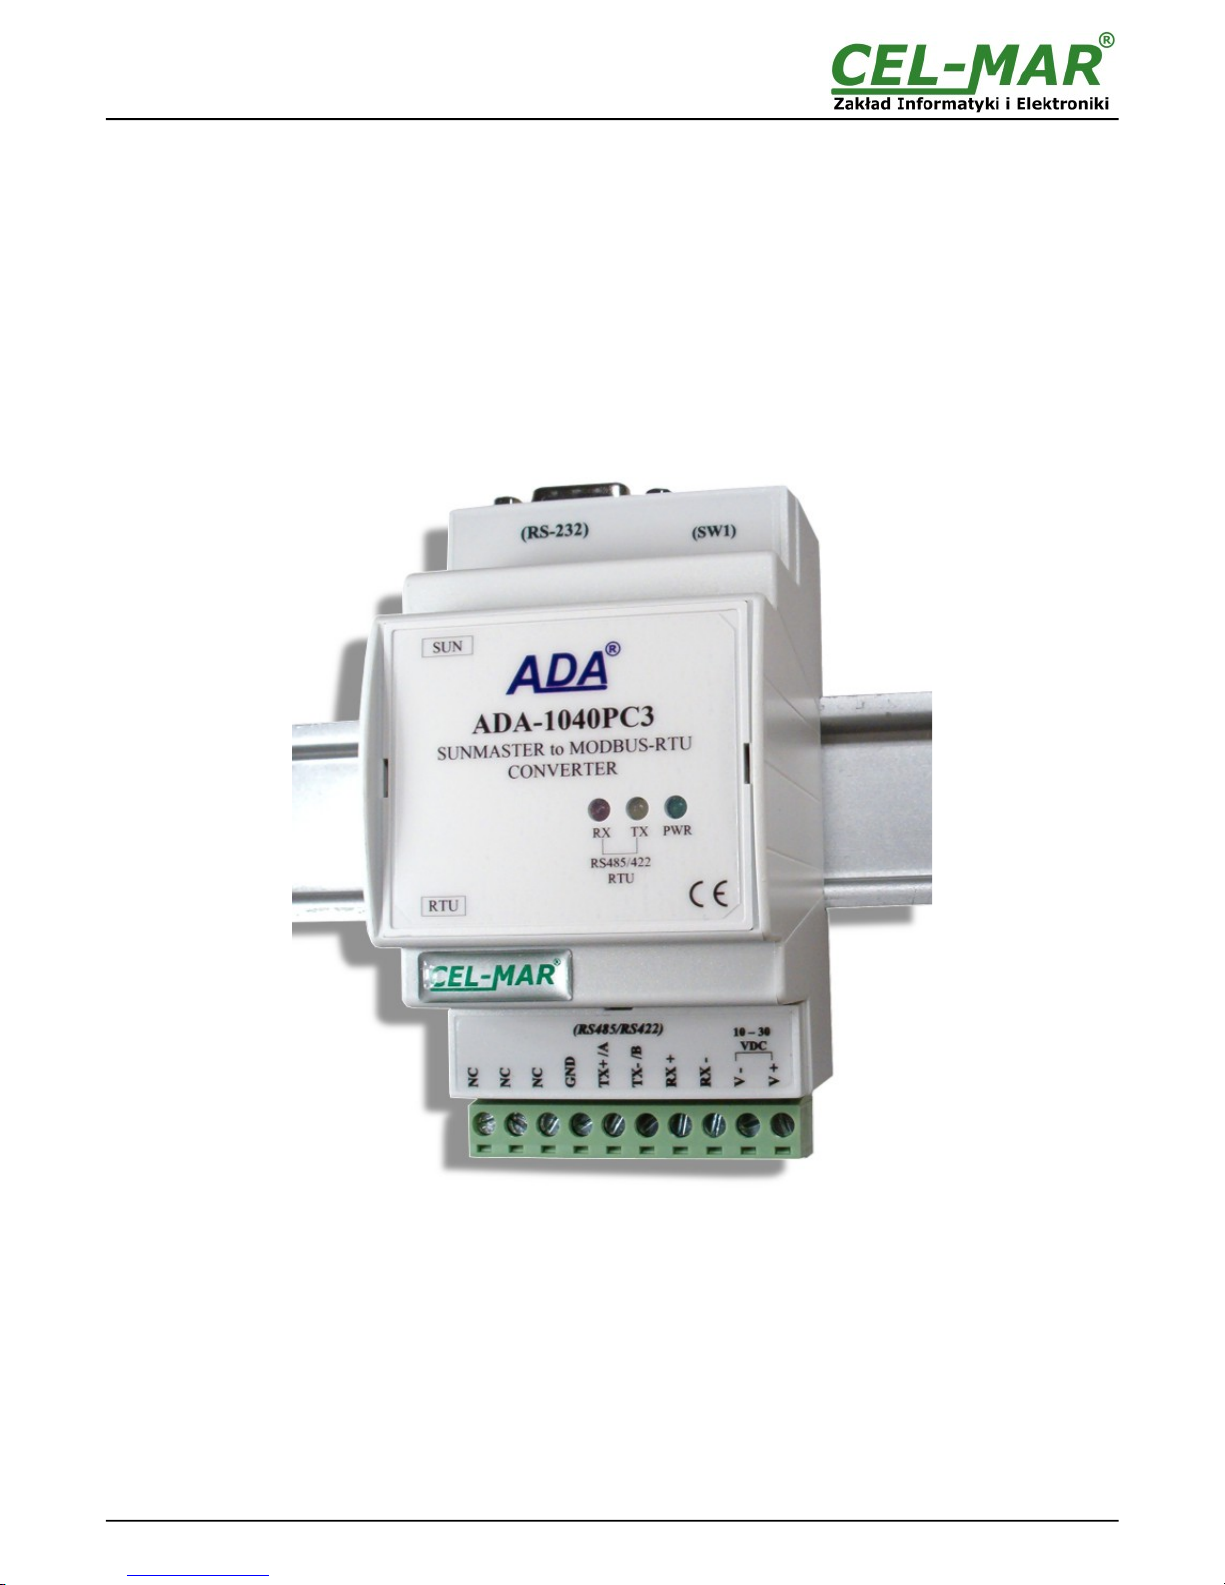
ADA-1040PC3
SunMaster to MODBUS-RTU converter
1
io_ada-1040pc3_v1.06_enCopyright © 2001-2017 CEL-MAR sp.j.
ADA-1040PC3
Page 2

Contents
1. GENERAL INFORMATION...................................................................................................................................................................... 3
1.1. WARRANTED INFORMATION.......................................................................................................................................................3
1.2. GENERAL CONDITIONS FOR SAFE USE....................................................................................................................................3
1.3. CE LABEL....................................................................................................................................................................................... 3
1.4. ENVIRONMENTAL PRESERVATION............................................................................................................................................ 3
1.5. SERVICE AND MAINTENANCE..................................................................................................................................................... 3
1.6. PACK CONTENTS.......................................................................................................................................................................... 3
2. PRODUCT INFORMATION.....................................................................................................................................................................3
2.1. PROPERTIES................................................................................................................................................................................. 3
2.2. DESCRIPTION................................................................................................................................................................................ 4
2.3. SUPPORTED INVERTERS OF MASTERVOLT* COMPANY......................................................................................................... 5
2.4. ISOLATION..................................................................................................................................................................................... 5
3. INSTALLATION....................................................................................................................................................................................... 5
3.1. ASSEMBLING.................................................................................................................................................................................5
3.2. CONNECTION TO COMPUTER.....................................................................................................................................................5
3.3. CONNECTION TO MASTERVOLT INVERTER WITH PC-LINK SOLADIN INTERFACES............................................................6
3.4. CONNECTION TO MASTERVOLT INVERTER WITH RS485 INTERFACE..................................................................................6
3.5. CONNECTION TO RS485/RS422 BUS.......................................................................................................................................... 7
3.5.1. CONNECTION OF INVERTER WITH SOLADIN INTERFACE TO RS485(4W) MODBUS-RTU BUS..................................7
3.5.2. CONNECTION OF INVERTER WITH SOLADIN INTERFACE TO RS485(2W) MODBUS-RTU BUS..................................8
3.5.3. GND TERMINAL CONNECTION........................................................................................................................................... 8
3.5.4. LINE TERMINATION Rt......................................................................................................................................................... 8
3.6. POWER SUPPLY CONNECTION.................................................................................................................................................. 8
4. ACTIVATION........................................................................................................................................................................................... 8
4.1. DESCRIPTION OF SIGNALLING LEDS......................................................................................................................................... 9
4.2. TROUBLESHOOTING.................................................................................................................................................................... 9
5. CONFIGURATION................................................................................................................................................................................... 9
5.1. OPERATION MODE....................................................................................................................................................................... 9
5.2. CONFIGURATION BY USING ADACONFIG..................................................................................................................................9
5.3. FACTORY DEFAULT.................................................................................................................................................................... 10
5.4. FIRMWARE UPDATE................................................................................................................................................................... 10
5.5. EMERGENCY FIRMWARE UPDATE...........................................................................................................................................11
6. DATA TRANSMISSION DIAGNOSTICS............................................................................................................................................... 11
7. OPERATION.......................................................................................................................................................................................... 12
8. IMPLEMENTATION OF MODBUS-RTU PROTOCOL........................................................................................................................... 13
8.1. TABLE OF MODBUS-RTU ADDRESSES.................................................................................................................................... 13
8.1.1. REGISTERS ACTUAL VALUE MEASUREMENTS AND CONDITION INVERTER, READOUT BY FUNCTION 04 (3X –
REFERENCES) INPUT REGISTERS............................................................................................................................................ 13
8.1.2. REGISTERS ACTUAL VALUES MEASUREMENTS AND CONDITION INVERTER , READOUT BY FUNCTION 03 (4X –
REFERENCES) HOLDING REGISTERS.......................................................................................................................................14
8.2. FRAME STRUCTURE OF MODBUS-RTU PROTOCOL.............................................................................................................. 14
8.3. USED FUNCTIONS OF MODBUS-RTU PROTOCOL.................................................................................................................. 14
8.3.1. FUNCTION 0x03 / 0x04 - READOUT VALUE MEASUREMENTS AND STATUS FROM INVERTER................................15
8.3.1.1. READOUT OF CURRENT MEASURED VALUE STORED IN 16-BIT REGISTER [4X / 3X-REFERENCES]............15
8.3.1.2. READOUT OF CURRENT MEASURED VALUE STORED IN TWO 16-BIT REGISTERS [4X / 3X-REFERENCES] 16
8.3.1.3. READOUT OF SOLAR PANEL VOLTAGE VALUE Usol FROM INVERTER [4X / 3X-REFERENCES].....................17
8.3.1.4. READOUT OF SOLAR PANEL CURRENT VALUE Isol FROM INVERTER [4X / 3X-REFERENCES]......................18
8.3.1.5. READOUT OF FREQUENCY VALUE Fac ALTERNATING VOLTAGE NETWORK, CONNECTED TO INVERTER
[4X / 3X-REFERENCES].......................................................................................................................................................... 18
8.3.1.6. READOUT OF VOLTAGE VALUE Uac ALTERNATING VOLTAGE NETWORK, CONNECTED TO INVERTER [4X /
3X-REFERENCES]................................................................................................................................................................... 18
8.3.1.7. READOUT OF CURRENT VALUE Iac ALTERNATING VOLTAGE NETWORK, CONNECTED TO INVERTER [4X /
3X-REFERENCES]................................................................................................................................................................... 19
8.3.1.8. READOUT OF POWER VALUE Pac ALTERNATING VOLTAGE NETWORK OF INVERTER [4X / 3X-
REFERENCES]........................................................................................................................................................................19
8.3.1.9. READOUT OF ENERGY VALUE Eac TRANSFERRED TO ALTERNATING VOLTAGE NETWORK, CONNECTED
TO INVERTER [4X / 3X-REFERENCES]................................................................................................................................. 19
8.3.1.10. READOUT OF VALUE INVERTER TEMPERATURE [4X / 3X-REFERENCES].......................................................20
8.3.1.11. READOUT OF VALUE INVERTER'S RUNNING TIME [4X / 3X-REFERENCES]....................................................20
8.3.1.12. READOUT OF INVERTER'S STATUS [4X / 3X-REFERENCES].............................................................................20
9. RS232 INTERFACE – PIN DESCRIPTION OF DSUB-9F-DCE SOCKET............................................................................................21
10. VERSIONS.......................................................................................................................................................................................... 22
11. SPECIFICATION................................................................................................................................................................................. 22
2
ADA-1040PC3
Page 3
1. GENERAL INFORMATION
Thank you for your purchase of CEL-MAR Company product. This product has been completely tested and is covered by a two year
warranty on parts and operation from date of sale.
If any questions or problems arise during installation or use of this product, please do not hesitate to contact Technical Support at +48
41 362-12-46 or e-mail [email protected].
1.1. WARRANTED INFORMATION
ADA-1040PC3 converter is covered by a two year warranty from date of sale. In case of being damaged it will be repair or the
damaged component will be replace. The warranty does not cover damage caused from improper use, materials consumption or any
unauthorized changes. If the product does not function (is damaged), or not operate in accordance with the instructions, will be
repaired or replaced.
All warranty and no warranty repairs must be returned with paid transport and insuring to the CEL-MAR Company.
CEL-MAR Company under no circumstances won't be responsible for ensuing damage from improper using the product or as a result
of random causes: the lightning discharge, the flood, the fire and the like.
CEL-MAR Company is not be held responsible for damages and loss including : loss of profits, loss of data, pecuniary losses ensuing
from using or the impossibility of using this product.
In specific cases CEL-MAR Company discontinue all warranties and in particular do not follow the user manual and do not accept
terms of warranty by the user.
1.2. GENERAL CONDITIONS FOR SAFE USE
The device should be installed in a safe and stable places (eg, electroinstallation cabinet), the powering cable should be arranged so
as not to be exposed to trampling, attaching, or pulling out of the circuit.
Do not put device on the wet surface.
Do not connect devices for nondescript powering sources,
Do not damage or crush powering wires.
Do not make connection with wet hands.
Do not adapt, open or make holes in casings of the device!
Do not immerse device in water or no other liquid.
Do not put the fire opened on device sources: candles, an oil lamps and the like.
Complete disable from the supply network is only after disconnecting the power supply circuit voltage.
Do not carry out the assembly or disassembly of the device if it is enabled. This may result to short circuit and damage the device.
The device can not be used for applications that determine human life and health (eg. Medical).
1.3. CE LABEL
The CE symbol on the device CEL-MAR means compatibility with electromagnetic compatibility Electromagnetic
Compatibility Directive EMC 2014/30/WE. Declaration of Conformity is available by contact with Technical Service
(email: [email protected]; phone: +48 41 362-12-46).
1.4. ENVIRONMENTAL PRESERVATION
This sign on the device inform about putting expended device with other waste materials. Device should send to the
recycling. (In accordance with the act about the Electronic Appliance Expended from day 29 of July 2005)
1.5. SERVICE AND MAINTENANCE
Converter ADA-1040PC3 does not require the servicing and maintenance.
Technical support is available at number +48 41 362-12-46 in 8.00-16.00, from Monday to Friday or e-mail [email protected].
1.6. PACK CONTENTS
The converter is delivered with the user manual, Line terminators resistors: Rt=120W (2 pcs.), CD with ADAConfig software.
2. PRODUCT INFORMATION
2.1. PROPERTIES
● Conversion of protocols Soladin – SunMaster (RS232) to MODBUS-RTU (RS485/422) and inversely,
● Parameters, baud rate and data format conversion between RS485/RS422 and RS232 converter's ports,
● Operating on 2 or 4 wire buses in RS485/RS422 standard in point-to-point and multipoint mode,
● Conversion TX, RX signals of RS232 standard to RS485/RS422 standard and inversely,
● Operation up to 32 devices on RS485 bus,
● Baud rate set on RS232 & RS485/RS422 interfaces (bps): 300, 600, 1200, 1800, 2400, 4800, 7200, 9600, 14400, 19200, 28800,
38400, 57600, 76800, 115200, 230400,
● Data format set on RS232 & RS485/RS422 interfaces: data bit: 5, 6, 7, 8; parity: None, Odd, Even; number of stop bits: 1, 2,
● Power supply 10 - 30 VDC stable min. 2W,
● ~3kV= optoisolation in signal channel between RS232 and RS485/422 interfaces,
● 1kV= or 3kV= galvanic isolation between RS232 & RS485/422 interfaces and power supply (depend on version),
● Implemented short circuit protection and over-voltage protection on RS485 / RS422 network,
● Implemented ESD 15kV surge protector of RS232 interface,
● Implemented protection against power supply reverse connection,
● Connection RS485/RS422 network and power supply via screw terminal block 2.5 mm2 .
● DB-9F connector for cable connection of RS232 interface to PC, controller etc.
● Cover compatible with DIN 43880 standard– mounting in typical electro-installation unit,
● Cover adapt to rail mounting according to DIN35 / TS35 standard,
3
ADA-1040PC3
Page 4
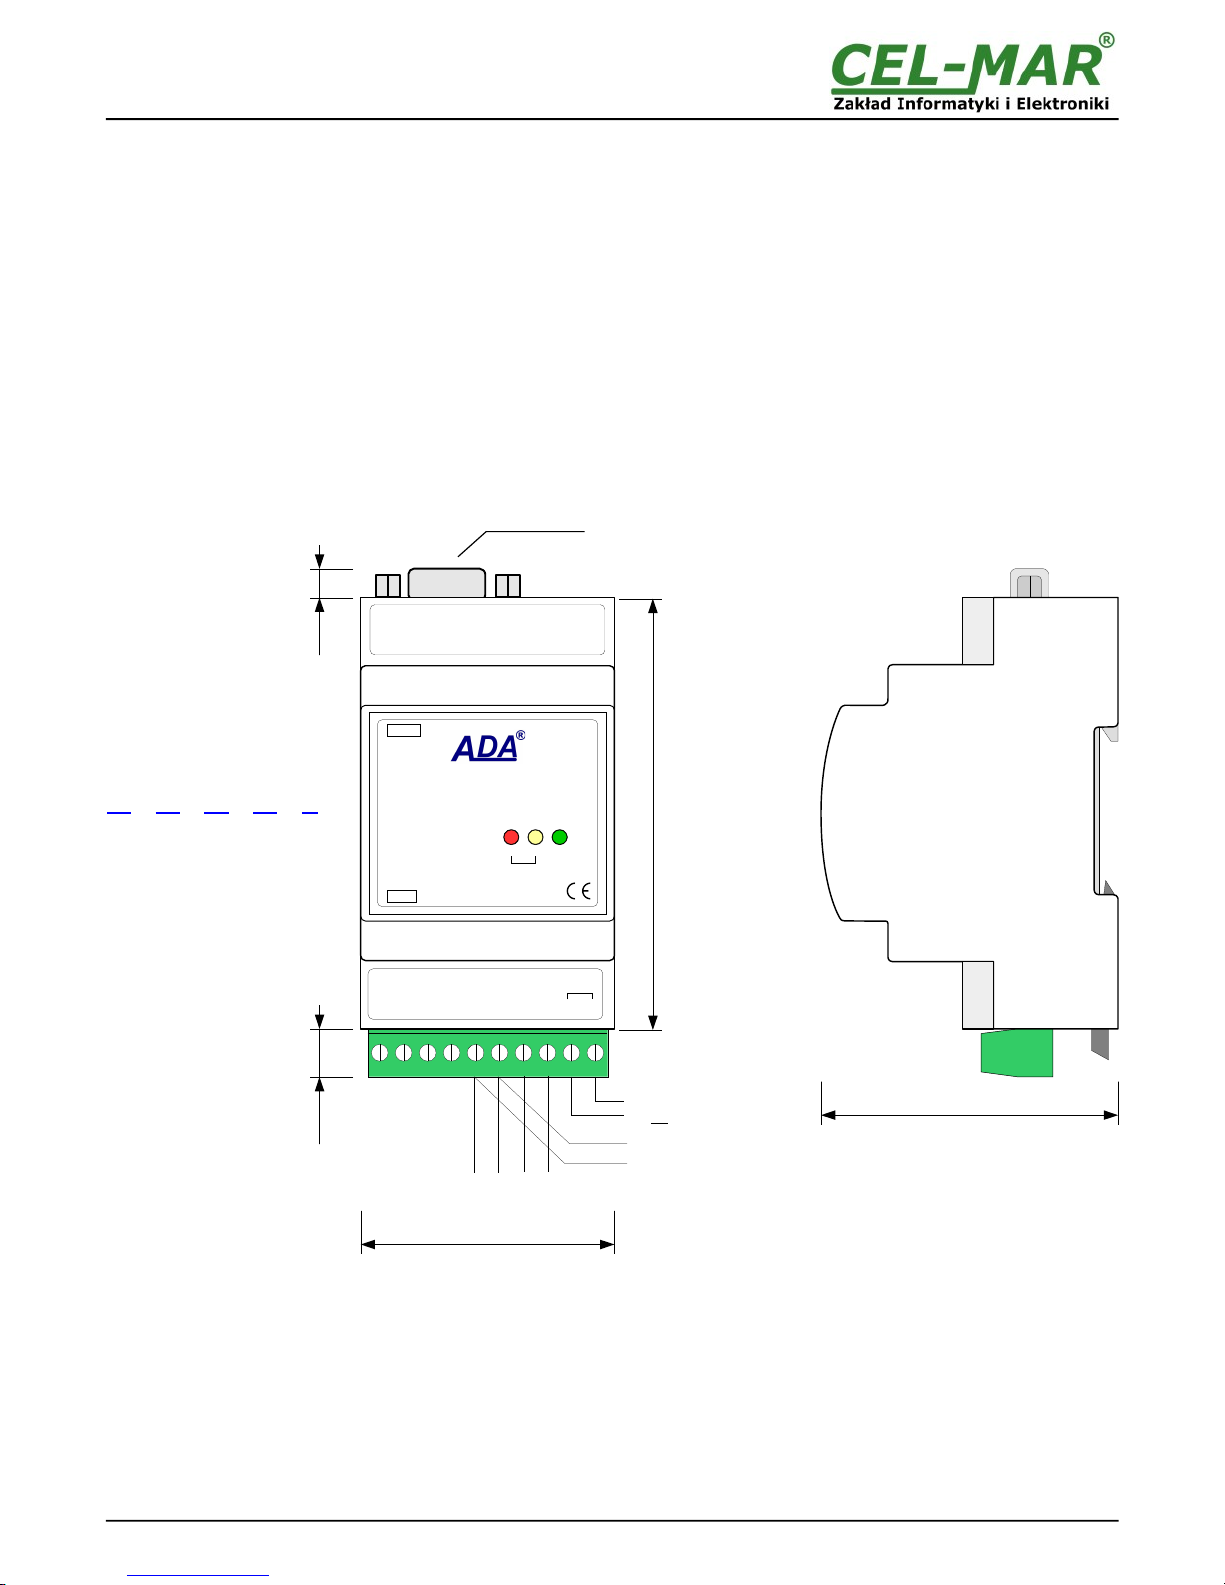
● Cover dimensions (W x D x H) 53mm x 63mm x 90mm,
2.2. DESCRIPTION
Protocol converter SunMaster to MODBUS-RTU ADA-1040PC3 is a device solves a problem of connection Inverters of
MASTERVOLT* company, equipped with Soladin interface and communicate by SunMaster protocol to multipoint RS-485 bus with
devices communicate by MODBUS-ASCII protocol.
Simultaneously, the converter convert RS232 to RS485/422 standards, with setting of data format. Depending on configurations, can
be set baud rate, data bits, parity, number of stop bits. The setting can be different for RS232 and RS485/RS422 port.
The converter does not require power supply from RS232 port and support the asynchronous transmission data with baud rate 230,4
kbps.
ADA-1040PC3 has DB-9F connector for connecting PC-Link RS232 interface to Soladin and screw terminal block for connection of
RS485/422 network and power supply. The DB-9F connector is DCE type to connecting RS232 interface. ADA-1040PC3 use Tx, Rx
and GND for communication with RS232 interface.
Overvoltage protection was made on base safety diodes and fuses on each RS485/RS422 lines.
Fig. 1. ADA-1040PC3 view and location of SW1
4
ADA-1040PC3
MODBUS-RTU
SUNMASTER
RS232 SUNMASTER
RS485/RS422 MODBUS-RTU
(RS-232)
(SW1)
NC
NC
NC
GND
TX+ /A
TX- /B
RX +
RX -
(RS485/RS422)
V -
V +
10 – 30
VDC
62mm
RS-232 interface
DB-9F connector
Power supply
10-24-30 VDC
53mm
10mm 6mm
90mm
RS-485 4-wires
or RS-422
RS-485
2-wires
PWRTXRX
ADA-1040PC3
SUNMASTER to MODBUS-RTU
CONVERTER
RS-485/422
RTU
RTU
SUN
Page 5
2.3. SUPPORTED INVERTERS OF MASTERVOLT* COMPANY
ADA-1040PC3 converter supports inverters MASTERVOLT* company like:
a/ XS series. Typ: 6500, 4300, 3200, 2000,
b/ WM series. Typ: 1500,
c/ XL series. Typ: 5000, 3300, 3300+,
d/ QS series. Typ: 6400, 3200, 2000, 1200, 1500, 2500,
e/ CS TL series. Typ: 15k, 20k, 30k, 100k,
f/ ES series. Typ: 2,2TL, 3.0TL, 3,6TL, 4,6TL, 5,0TL,
2.4. ISOLATION
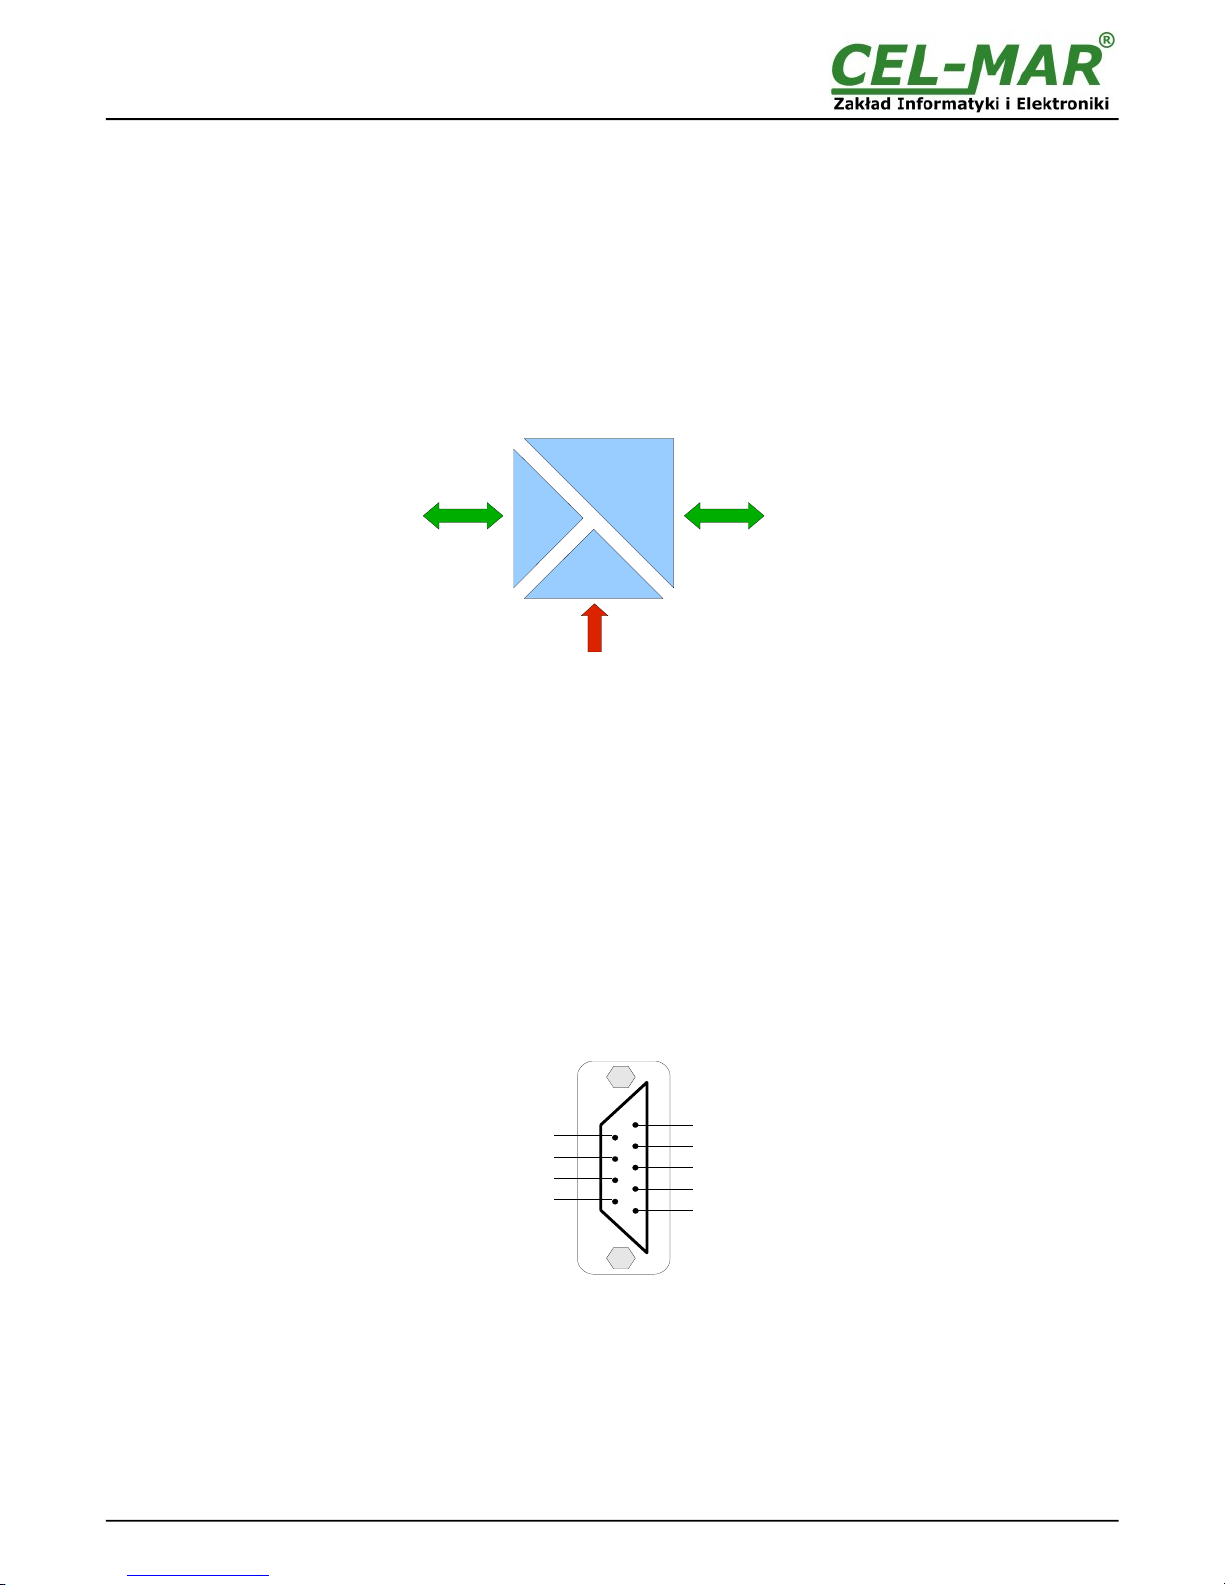
Converter ADA-1040PC3 has 3-way galvanic isolation on the levels 1kV= or 3kV=, depending on version described in section
VERSIONS.
Fig. 2. Isolation structure
3. INSTALLATION
This chapter will show how to use and connect ADA-1040PC3 to devices MASTERVOLT* company with Soladin interfaces (eg.
SOLADIN 600, WINDMASTER 500), RS485/RS422 network and power supply.
In the purpose of minimization of disruptions from environment is being recommended to:
- apply multipair type shielded cables, which shield can be connected to the earthing on one end of the cable,
- arrange signal cables in the distance not shorter than 25 cm from powering cables.
- apply cable of adequate cross-section due to voltage drops for converter powering,
- use suppression filters for powering converters that are installed within a single object.
- not supply converter from power circuit device that generates large impulse interference such as transmitters, contactors.
3.1. ASSEMBLING
The cover of ADA-1040PC3 converter is adapted to assembly on TS-35 (DIN35) rail. To install the converter, should be mounted on
the rail upper part of the cover, then press bottom part to hear characteristic „Click” sound.
3.2. CONNECTION TO COMPUTER
Fig. 3. RS232 interface signals of DB-9F (female) connector.
In case of connection ADA-1040PC3 converter to:
- RS232 computer port, should be made a cable according to diagram on Fig.4,
or
- USB computer port, should be used additional converter USB to RS232 (ADA-I9111 or ADA-I9110), which connect to RS232 port of
ADA-1040PC3 as on diagram Fig.5.
5
ADA-1040PC3
4 DSR Not use
2 TX
5 GND
Not use RI 9
RTS 8
Not use CTS 7
DTR 6
3 RX
1 DCD Not use
Power Supply
10 - 30VDC
RS232 RS485/422
3-WAY ISOLATION
Page 6
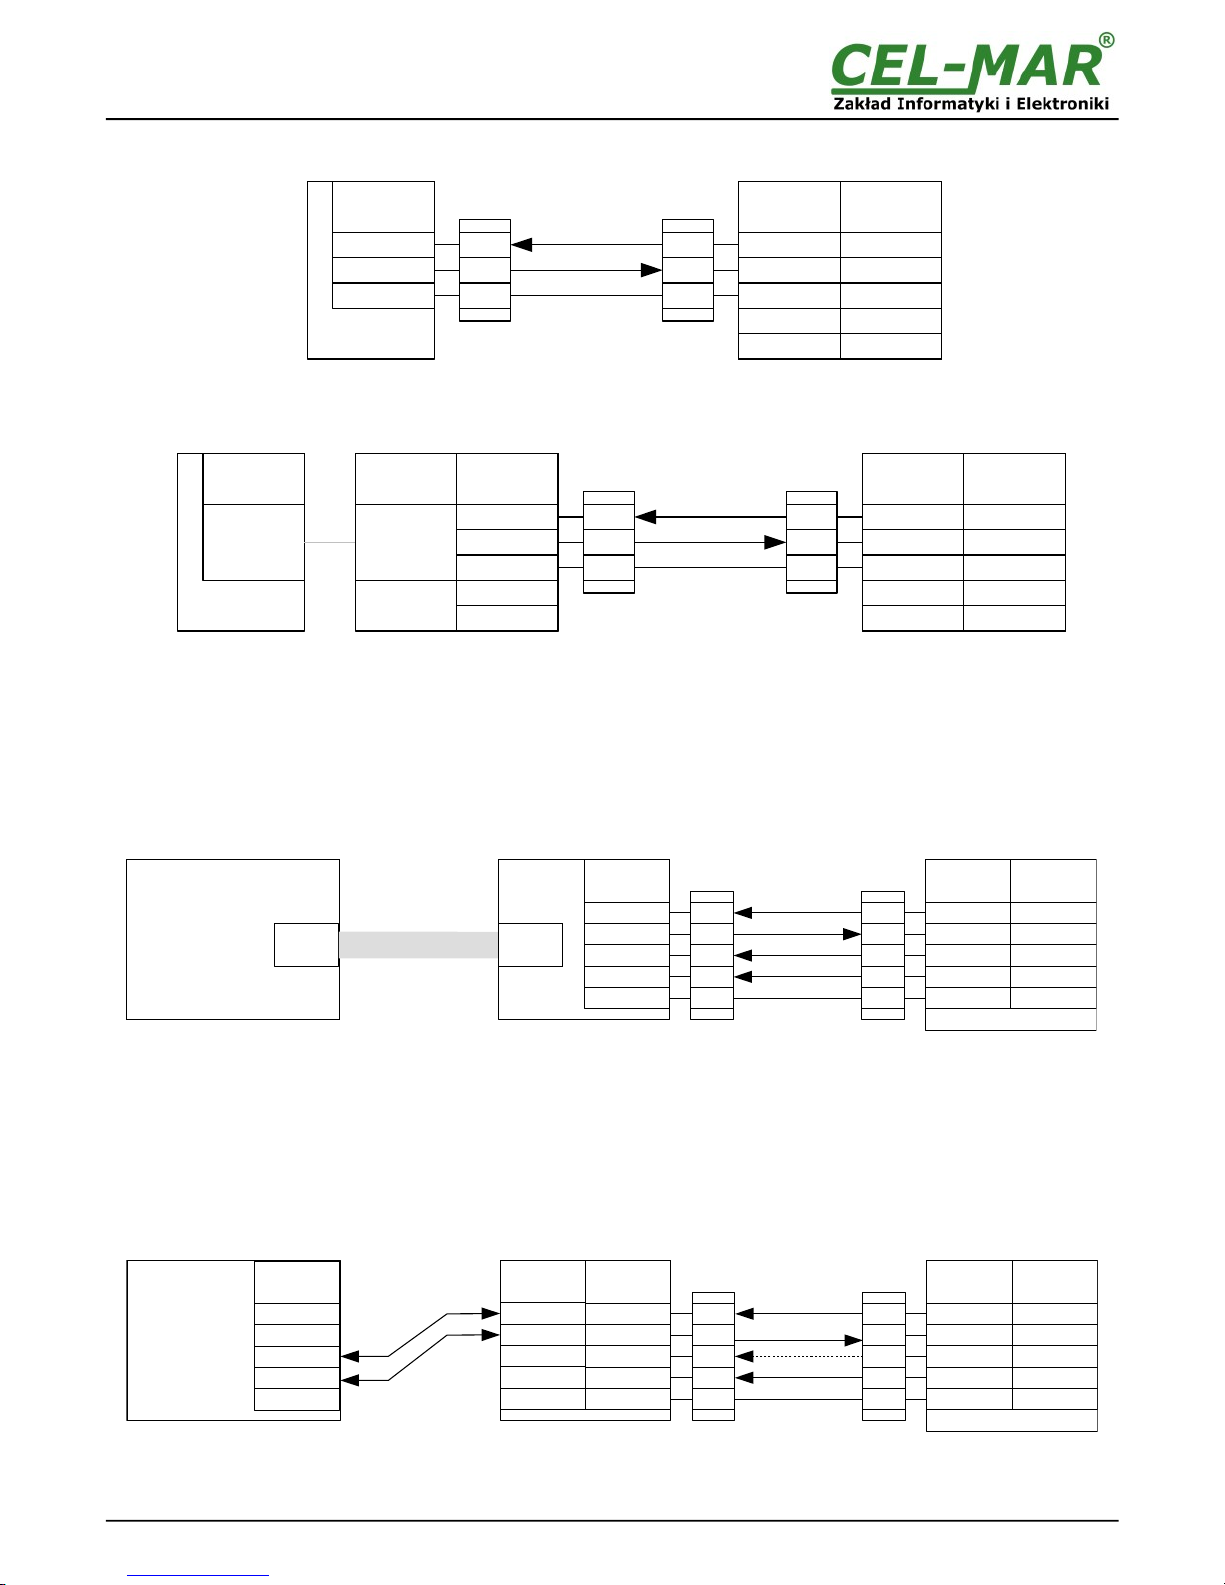
Fig. 4. ADA-1040PC3 connection to PC or RS232 device by the use of the cable.
Fig. 5. ADA-1040PC3 connection to PC by the use of additional converter USB to RS232 (ADA-I9111 or ADA-I9110).
3.3. CONNECTION TO MASTERVOLT INVERTER WITH PC-LINK SOLADIN INTERFACES
In case of connection ADA-1040PC3 converter to communication port of SOLADIN inverter, should equip with PC-Link Soladin
interface (RS232 to Soladin) and make a cable according to diagram on fig. bellow.
Fig.6a. ADA-1040PC1 connection to inverter with PC-Link Soladin interface by the use of RS-Soladin cable.
3.4. CONNECTION TO MASTERVOLT INVERTER WITH RS485 INTERFACE
In case of connection ADA-1040PC3 converter to communication RS485 port inverter, should equip with additional converter RS232
to RS485 eg. ADA-I1040 or ADA-1040 and make the cables RS232 and RS485 accordance to below schema.
Fig.6b. ADA-1040PC1 connection to inverter with RS485 interface by the use of RS232 & RS485 cables.
6
ADA-1040PC3
(5) GND
(2) Rx
(3) Tx
PC or RS232
device
(5)
(2)
(3)
GND
Tx+ / A
Tx- / B
Rx+
Rx-
ADA-1040PC3
.
Tx(2)
Rx(3)
.
GND(5)(5)
(2)
(3)
DB-9F
socket RS485/422
connector
DB-9F RS232
connector
DB-9M
plug
RS cable
DB-9M RS232
connector
.
USB
DB-9M RS232
connector
USB
Connector
PC
with USB
ADA-I9110
or ADA-I9111
USB
(5) GND
.
(2) Rx
(3) Tx
DB-9F
socket
(5)
(2)
(3)
GND
Tx+ / A
Tx- / B
Rx+
Rx-
DB-9F RS232
connector
ADA-1040PC3
.
Tx(2)
Rx(3)
.
GND(5)
DB-9M
plug
(5)
(2)
(3)
RS cable
USB
Connector
USB
Connector
RS485/422
connector
(5) GND
(4) DSR
(7) CTS
RS232
DB-9F
connector
Inverters
MASTERVOLT
with Soladin interface
RJ-11
socket
(5)
(4)
(7)
GND
RS485 / RS422
connector
Tx+ / A
Tx- / B
Rx+
Rx-
ADA-1040PC3
.
Tx(2)
Rx(3)
.GND(5)(5)
(6)
(8)
DB-9M
Plug
SOLADIN-600
WINDMASTER-500
(3) Rx
(2) Tx
(3)
(2)
(2)
(3)
DTR(6)
RTS(8)
RS-SOLADIN cable
RJ-11
socket
PC-Link Soladin interface
RS232 <> Soladin
DB-9M
Plug
RS232
DB-9F
connector
GND
Rx+
Rx-
Tx+/ A
Tx-/ B
(5) GND
(4) DSR
(7) CTS
Inverter MASTERVOLT
with RS485 interface
(5)
(4)
(7)
GND
Tx+ / A
Tx- / B
Rx+
Rx-
ADA-1040PC3
.
Tx(2)
Rx(3)
.GND(5)(5)
(6)
(8)
INWERTER
ES / CSTL / XL
XS / QS /
Sunmaster
(3) Rx
(2) Tx
(3)
(2)
(2)
(3)
DTR(6)
RTS(8)
RS232 cable
ADA-I1040
RS485
connector
RJ-45
A(5)
B(6)
B(3)
A(4)
RS232
DB-9F
connector
RS485 / RS422
connector
DB-9M
Plug
RS232
DB-9F
connector
DB-9M
Plug RS485 / RS422
connector
Page 7
3.5. CONNECTION TO RS485/RS422 BUS
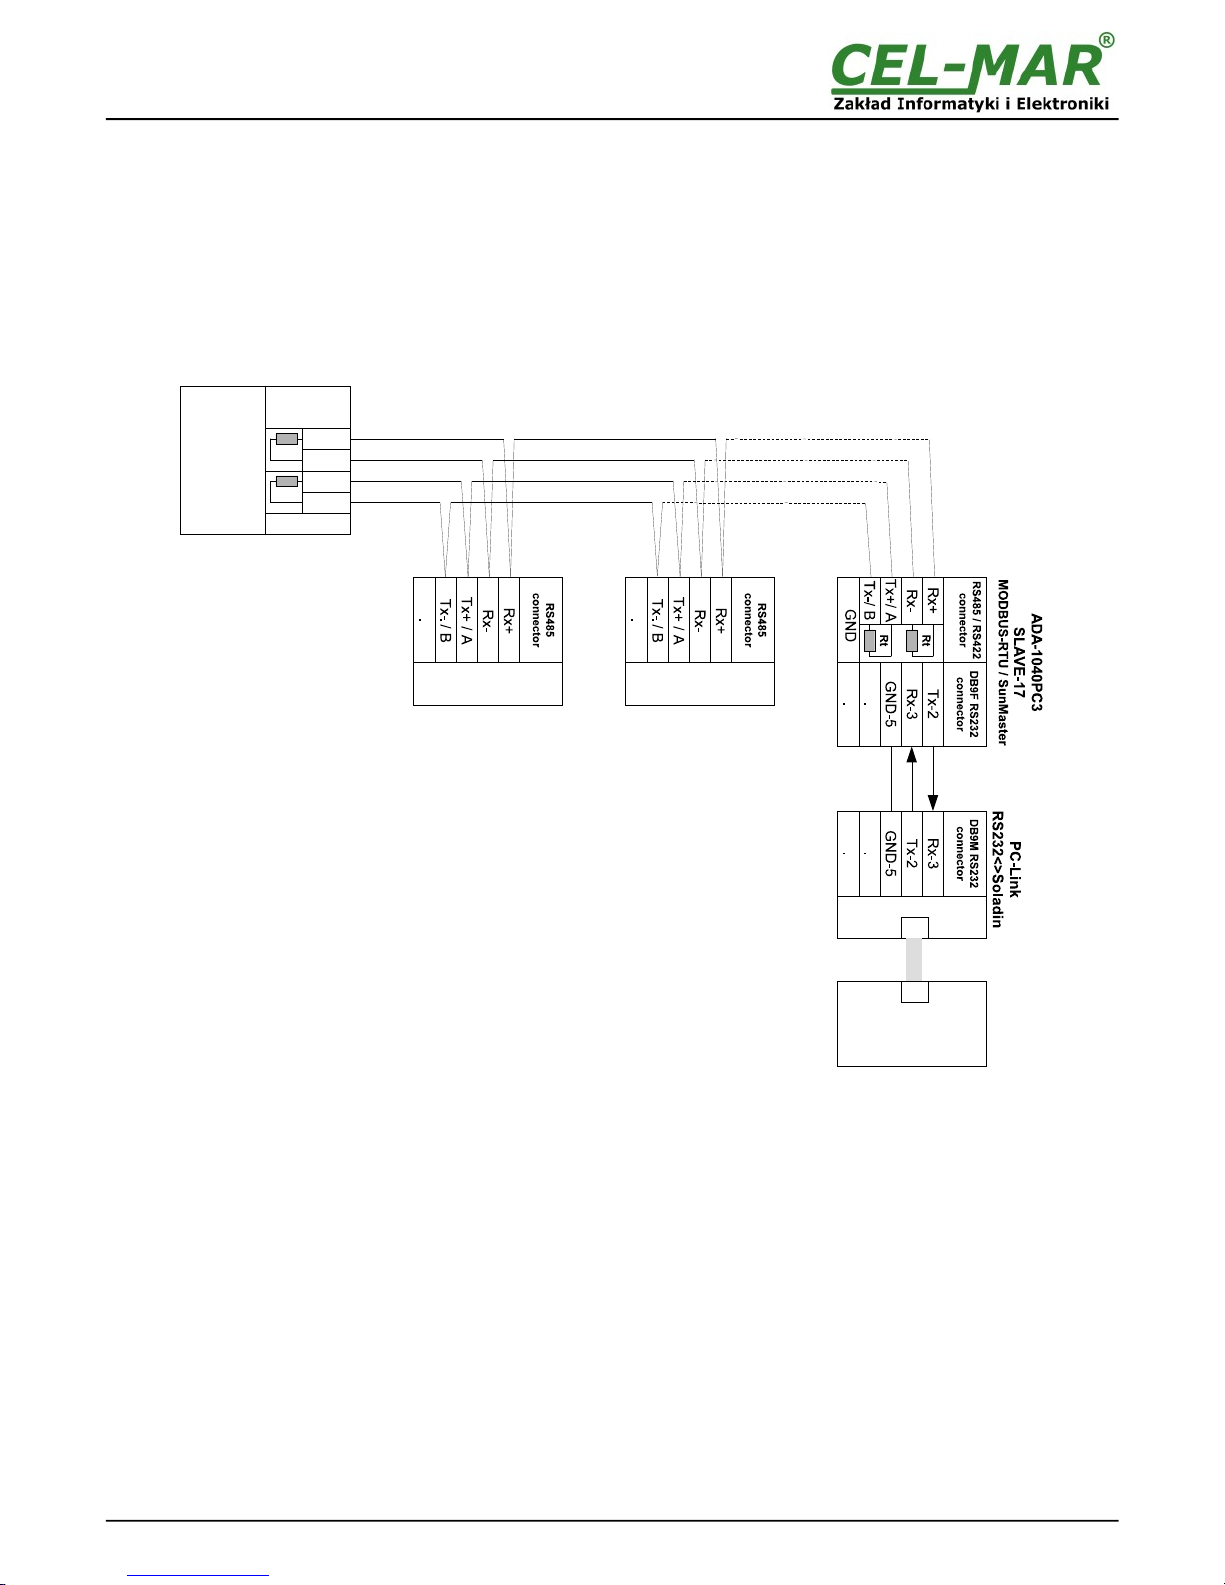
RS485/RS422 interface in ADA-1040PC3 converter is available on screw terminal block and is described as:
Tx+/A, Tx-/B, Rx+, Rx-, GND.
Connection of ADA-1040PC3 to RS485(4W) and RS485(2W) network are shown bellow.
3.5.1. CONNECTION OF INVERTER WITH SOLADIN INTERFACE TO RS485(4W) MODBUS-RTU
BUS
Fig 7. Example connection of SOLADIN inverter by the use of ADA-1040PC3 to RS485(4W) 4-wire bus.
7
ADA-1040PC3
RS485 / RS422
connector
RS485(4W) bus
19200Bd/8/N/1
MODBUS-RTU
Computer or
MASTER
MODBUS-RTU
device
MASTER MODBUS-RTU
Device
Rt
Rt
Rx+
Rx-
Tx+/ A
Tx-/ B
SLAVE-2
MODBUS-RTU
SLAVE-1
MODBUS-RTU
MASTERVOLT inverter
with Soladin interface
SOLADIN 600
WINDMASTER 500
GND
RS232
9600Bd/8/N/1
Page 8
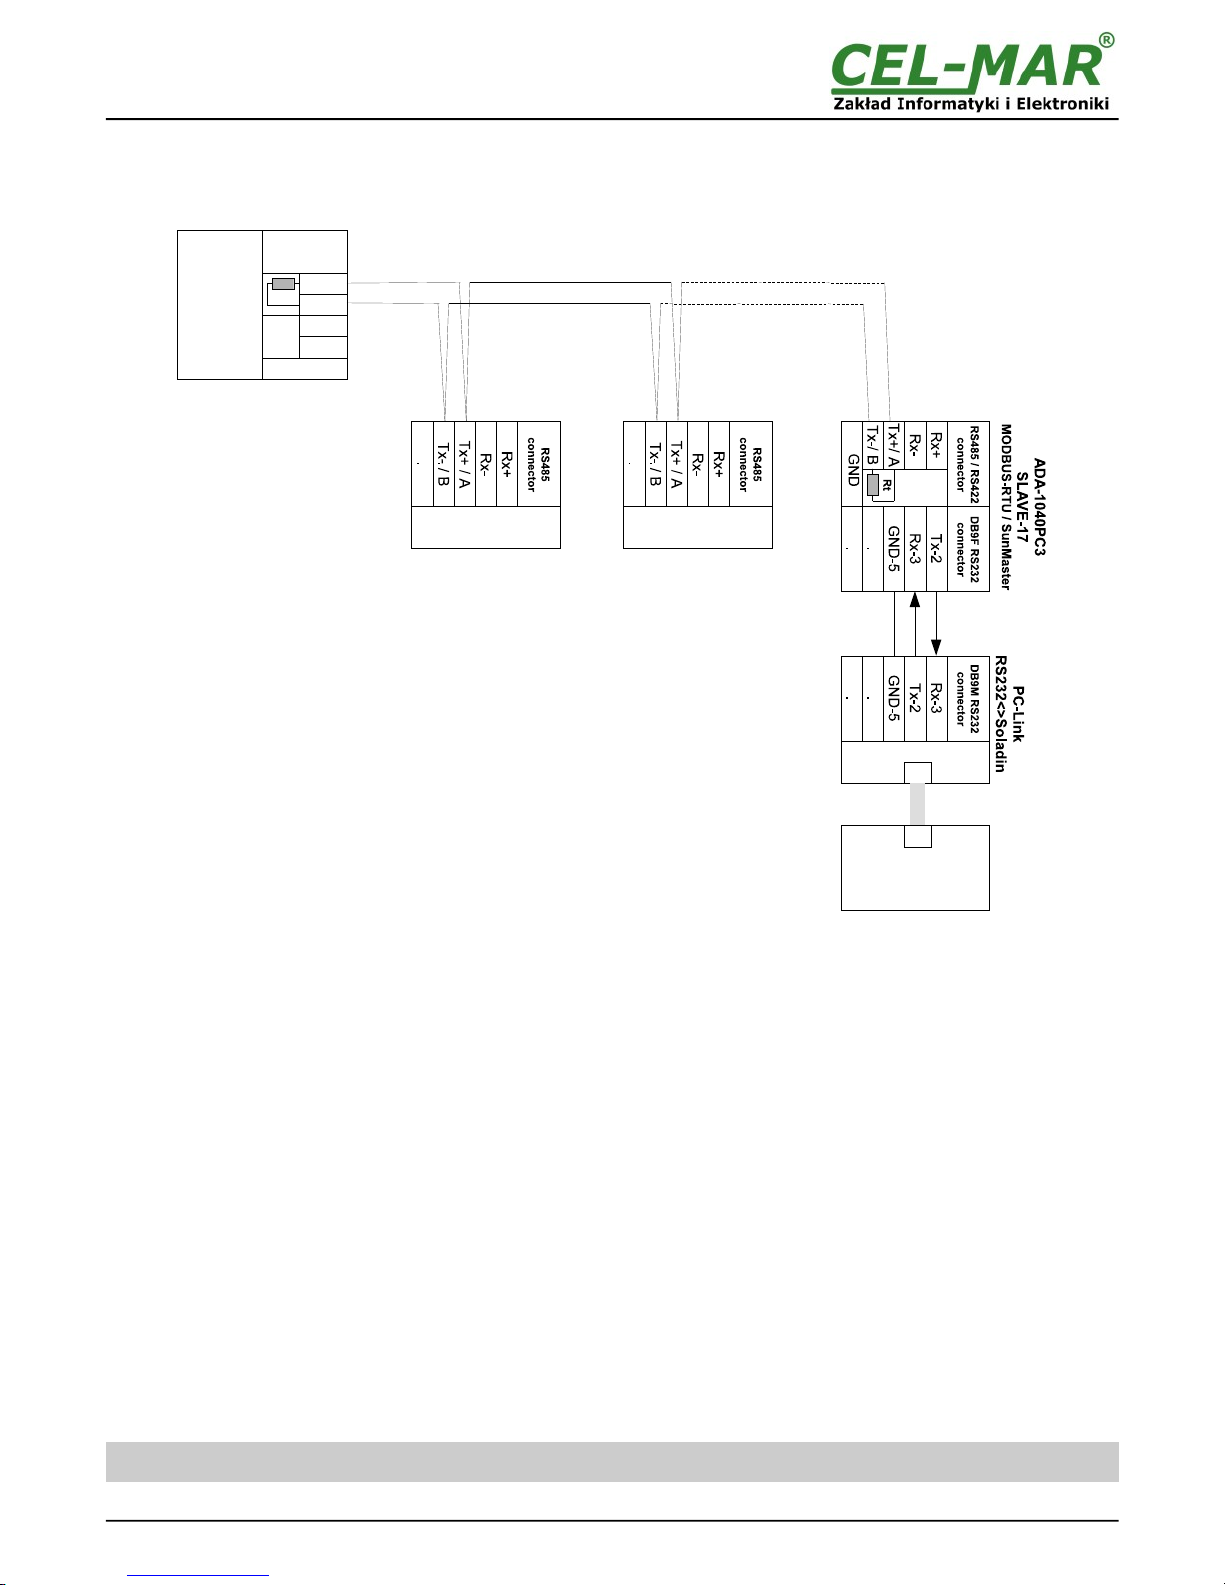
3.5.2. CONNECTION OF INVERTER WITH SOLADIN INTERFACE TO RS485(2W) MODBUS-RTU
BUS
Fig. 8. Example connection of SOLADIN inverter by the use of ADA-1040PC3 to RS485(2W) 2-wire bus.
3.5.3. GND TERMINAL CONNECTION
Connection of GND terminals of RS485/422 interfaces, devices connected to RS485/422 bus, should be done in the case of a
potential difference of the signals grounds on interfaces RS485 / RS422, which prevents proper data transmission.
Cannot connect to the GND terminal - cables screens, PE circuit of electrical installation, signals grounds of other devices.
3.5.4. LINE TERMINATION Rt
The application of Line Termination (terminator) Rt = 120 ohms will reduce electrical reflection in data line at high baud rate. It is not
needed below 9600Bd. Should be used the Line Termination resistor if the distance is over 1000m @ 9600Bd or 700m @ 19200Bd,
and if the disturbance in transmission will appear.
Example connection of Rt are shown on Fig. 7 & 8. Two Rt=120 W , 5%, 0,25W are delivered with the converters.
3.6. POWER SUPPLY CONNECTION
To connect power supply to the converter, should have DC power supplies (regulated) output voltage from 10 V= to 30V=, min.
nominal power 2W, e.g. ZS-12/250. Power cable from DC power supplies to device can not be longer than 3m.
Should connect positive (+) end of DC power supplies to V+ device terminal and negative (-) end to V- on terminal block. ADA1040PC3 has protection against power supply reverse connection.
4. ACTIVATION
The converter can be power on after properly connection according to section above.
If after connection power supply on front panel will not light green led PWR, check correctness of power supply connecting
(polarization). When data is present the LEDs Tx and Rx should blink.
ATTENTION!
AT BAUD RATE ABOVE 38.4 KBPS THE LED'S TX, RX WILL LIGHT WEAKLY DURING DATA TRANSMISSION
8
ADA-1040PC3
GND
Rt
Rx+
Rx-
Tx+/ A
Tx-/ B
SLAVE-2
MODBUS-RTU
SLAVE-1
MODBUS-RTU
MASTER MODBUS-RTU
device
Computer or
MASTER
MODBUS-RTU
device
RS485(2W) bus
19200Bd/8/N/1
MODBUS-RTU
MASTERVOLT inverter
with Soladin interface
SOLADIN 600
WINDMASTER 500
RS232
9600Bd/8/N/1
RS485 / RS422
connector
Page 9
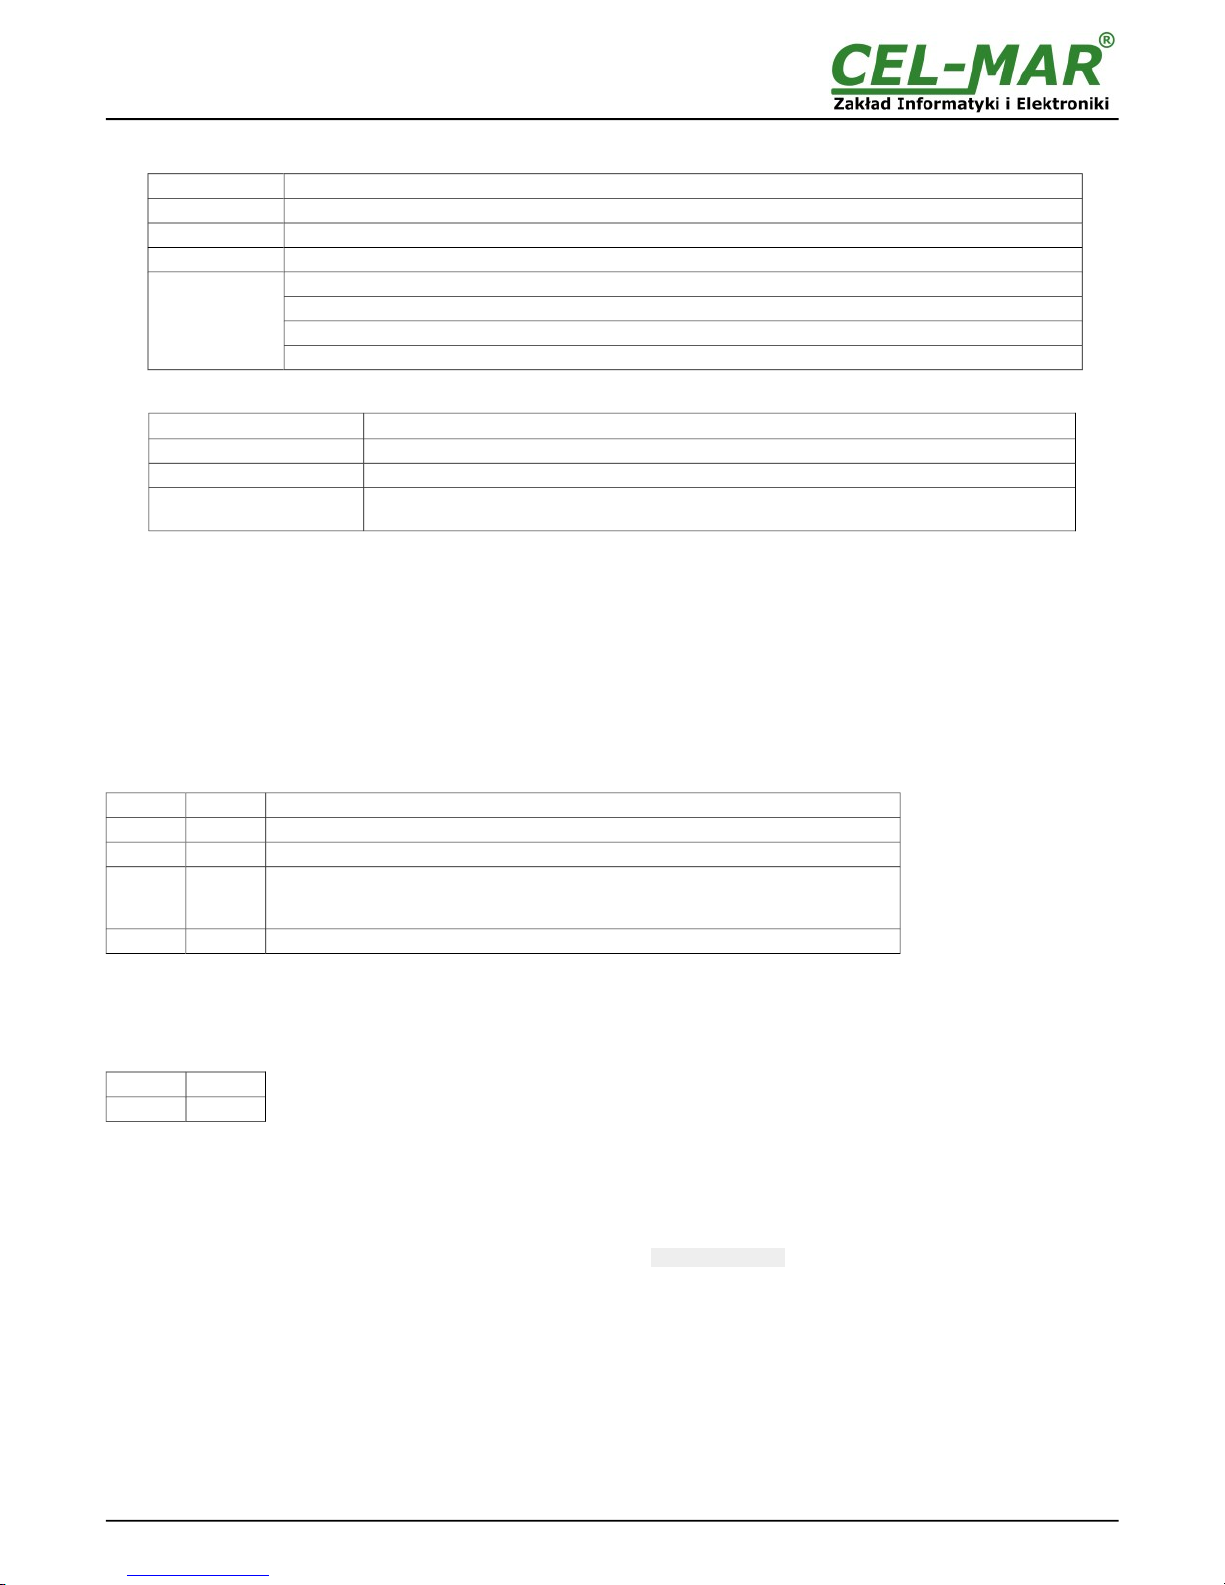
4.1. DESCRIPTION OF SIGNALLING LEDS
LED Description
PWR Signalling of Power Supply
RX Signalling of data receiving through ADA-1040PC3 from RS485/RS422 port – MODBUS-RTU
TX Signalling of data transmitting from ADA-1040PC3 through RS485/RS422 port – MODBUS-RTU
Yellow LED by
SW1
Not light – signalling of normal operating mode (RUN)
Blinking at frequency 1 Hz - signalling of configuration mode or software data flowing to the converter
Blinking at frequency 2 Hz - signalling of factory default mode
Lit continuously – signalling of emergency firmware update
4.2. TROUBLESHOOTING
Problem Solutions
PWR LED is not light Check polarization and parameters of connected power supply.
Rx LED lights continuously RS485(4W) /422 network. Wrong polarization on terminals: Rx+, Rx-; change polarization.
No transmission
Tx LED is blinking
RS485(4W) / RS422 network. Check correctness of connection to terminals Tx, Rx;
according to point 3 and the converter configuration.
5. CONFIGURATION
5.1. OPERATION MODE
The ADA-1040PC3 converter can operates in a few modes :
– run,
– configuration,
– factory default,
– emergency firmware update
Those modes can be set by use SW1 located by DB-9F connector, labelled as RS232. To set the switch section, should remove the
cover marked as SW1 and make the appropriate settings by the use a small, flat screwdriver.
All available adjusting the SW1 switch are shown in table below.
Converter operation modes
SW1- 1 SW1- 2 Mode
OFF OFF Run
ON OFF Configuration
OFF ON
Factory default
Turning OFF and ON the power of the converter, the configuration will be set to
factory default.
ON ON Emergency Firmware Update
5.2. CONFIGURATION BY USING ADACONFIG
The configuration of ADA-1040PC3 converter can be made by the use of ADAConfig Software - selling with converter.
To make the configuration, connect converter to computer and power supply. If after power, on the front panel is not lit green LED
PWR, check the power connection (polarity). If the PWR LED lights, set the section of SW1 switch to configuration mode as in table
below.
SW1-1 SW1-2
ON OFF
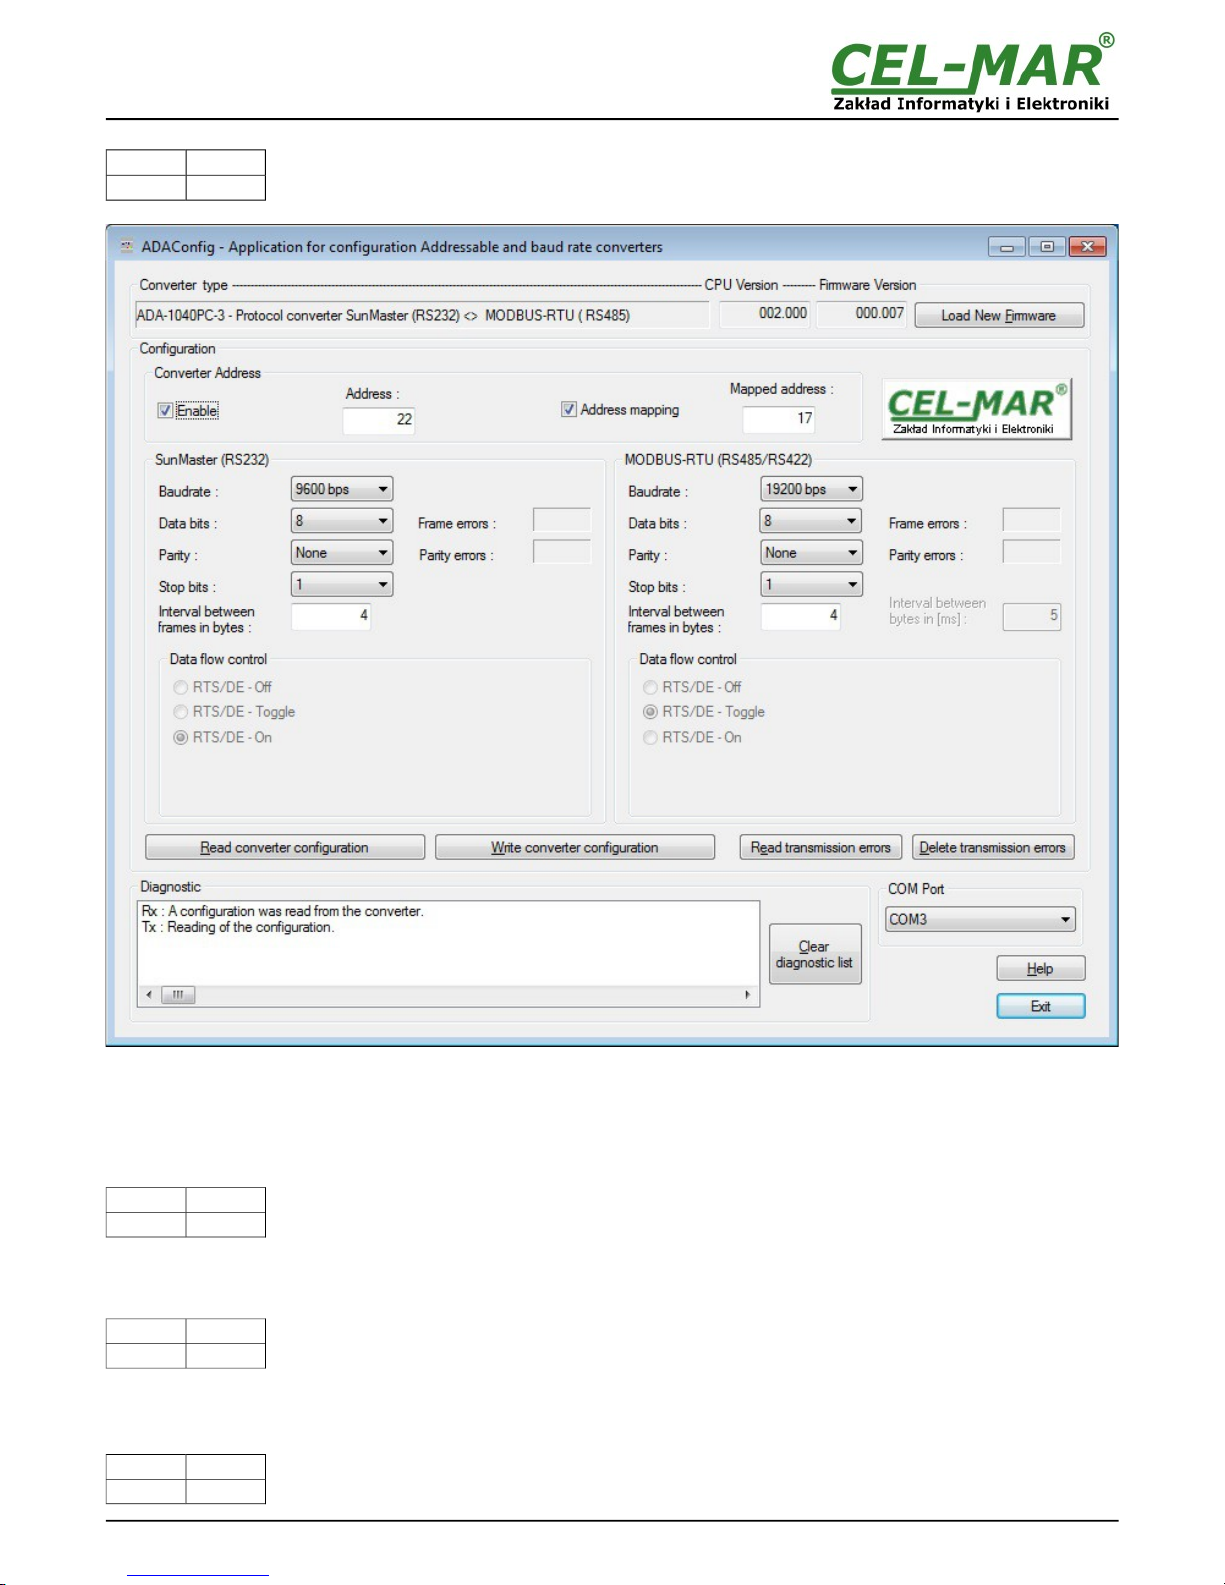
In the configuration mode the yellow LED located by SW1 micro-switch will blink with frequency 1 Hz. Start ADAConfig Software and
make the configuration of transmission parameters for each converter interfaces. First, should be set the number of COM port for
communication with the converter, then readout the configuration from ADA-1040PC3 memory using the button [Read converter
configuration] and make the proper changes of each interfaces setting, as below:
– setting of the converter address from the side of RS485 MODBUS-RTU bus - in group [Converter Address] select field [Enable]
and enter address MODBUS-RTU in field [Address] (scope 1-247),
– setting of address SunMaster inverter, connected to RS232 port, field [Mapped address] (scope 16-65535),
If SunMaster inverter address is known, in group [Converter Address] select field [Address mapping] and enter address of
SunMaster inverter in the field [Mapped address].
If SunMaster inverter address is unknown, in group [Converter Address] unselect field [Address mapping] and in the field [Mapped
address] don't enter any data.
– baud rate (kbps): 0.3, 0.6, 1.2, 1.8, 2.4, 4.8, 7.2, 9.6, 14.4, 19.2, 28.8, 38.4, 57.6, 76.8, 115.2, 230.4,
– number of data bites: 5, 6, 7, 8,
– control parity: no control, parity control, control of none parity,
– number of stop bits : 1, 2,
– frame spacing – range from 4 to 255 (time silence as frame's end),
– data flow control – not available yet.
After configuration, the setting should be saved on converter memory by using button [Write converter configuration].
9
ADA-1040PC3
Page 10
Return to work in RUN mode is made by using SW1 switch as below.
SW1-1 SW1-2
OFF OFF
In the RUN mode the yellow LED (located near the SW1), will turn off.
Fig.9. View of ADAConfig software interface
5.3. FACTORY DEFAULT
In case of faulty functioning ADA-1040PC3, can be restored the factory default setting of the converter internal registers.
Set SW1 microswitch mode as in the table below.
SW1-1 SW1-2
OFF ON
Disconnect the power and after while connect again the power. After that, will be loaded the factory default setting to the converter
internal registers.
After this operation, the converter parameters should be set again for operating in the application.
Set micro switch SW1 to run mode as shown in the table below.
SW1-1 SW1-2
OFF OFF
In the run mode the yellow LED (located near the SW1), will turn off.
5.4. FIRMWARE UPDATE
Set SW1 micro switch to configuration mode as in table below.
SW1-1 SW1-2
ON OFF
10
ADA-1040PC3
Page 11
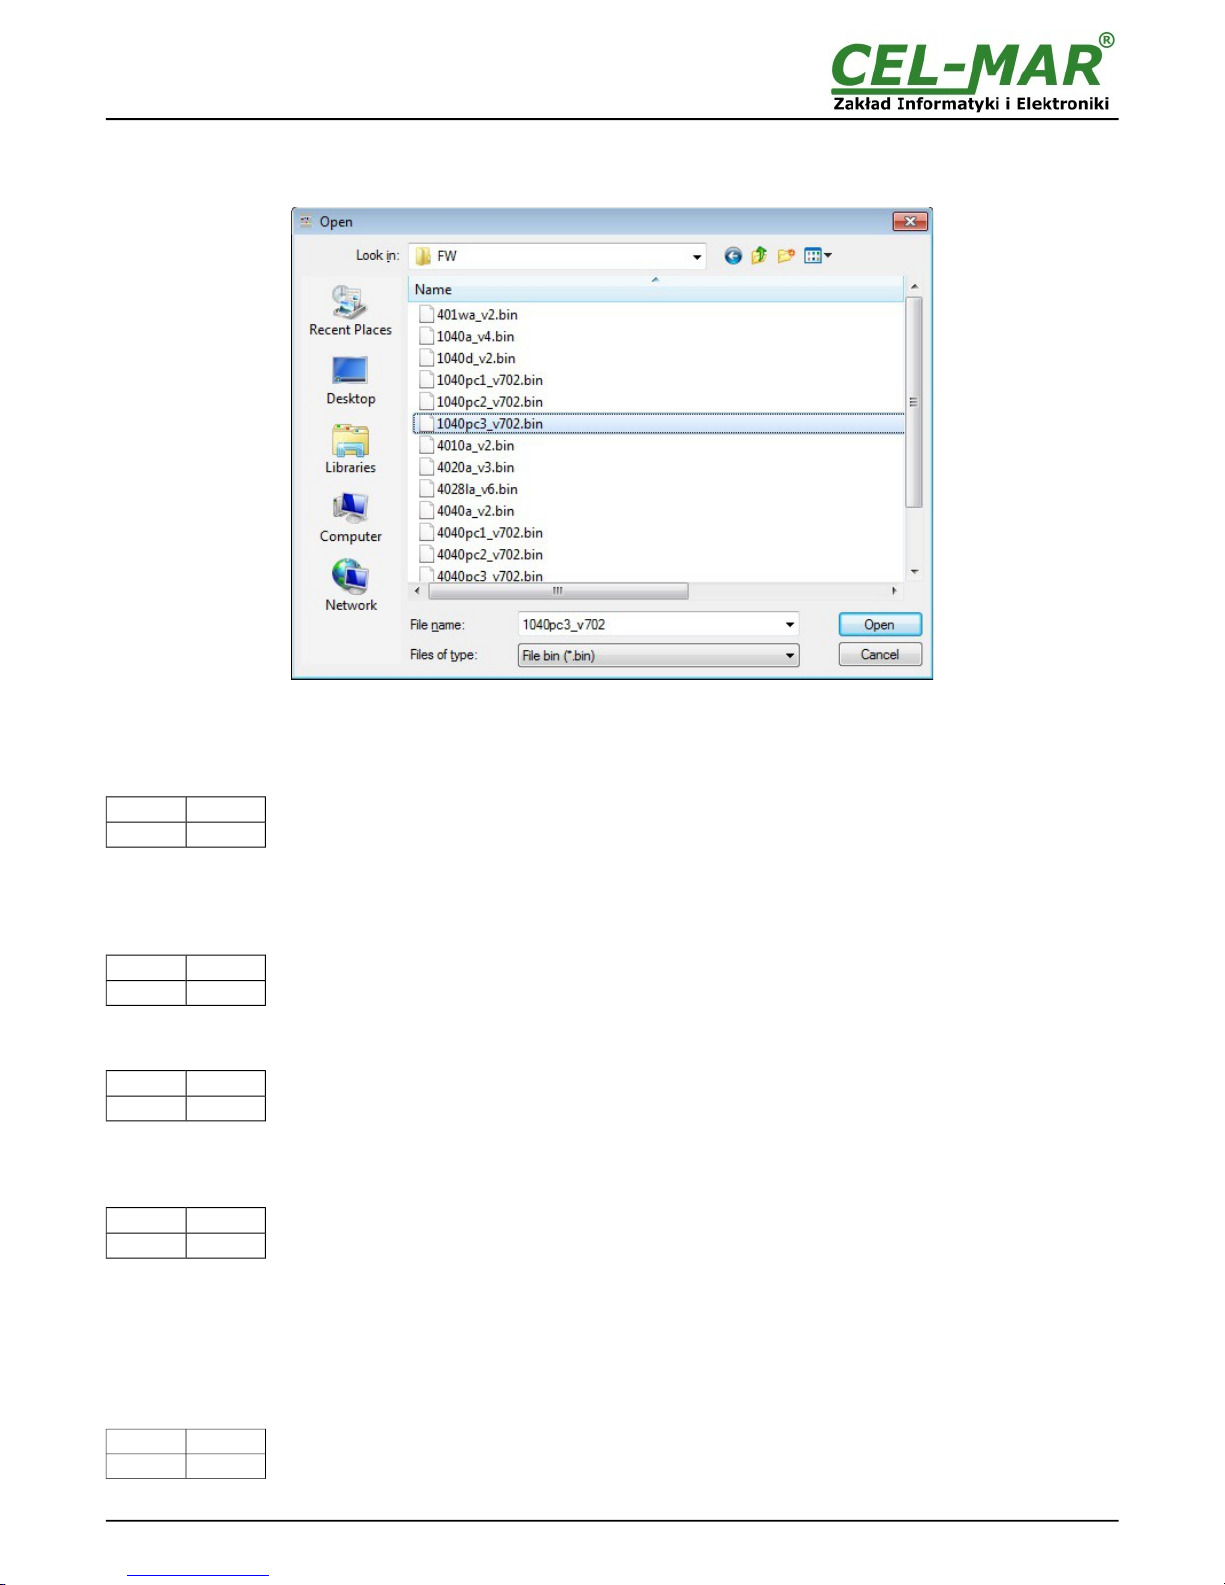
In the configuration mode the yellow LED will blink with frequency 1Hz. Press a button [Load New Firmware] to change the software
delivered by manufacturer. The Select File window will open (fig. below) and select the *.bin file then click [Open] - software will be
load to ADAConfig buffer storage and will be checked. If the ADAConfig not detect errors in loaded file, change converter software.
Process of updating is visualized by ADAConfig in use Progress Window and after proper changing confirmed by correct message.
Fig. 10. Selection of firmware file
During loading software the yellow LED located beside SW1 micro-switch will blink, showing data flow to the converter. If the software
was loaded correctly yellow LED will be blink again with frequency 1 Hz.
After that, set microswitch SW1 to run mode as shown in the table below.
SW1-1 SW1-2
OFF OFF
In the run mode the yellow LED (located near the SW1), will turn off.
5.5. EMERGENCY FIRMWARE UPDATE
In case of the unsuccessful update of the converter software, try again according to description in the above point. If the update is still
incorrect use emergency firmware update. Set SW1 microswitch mode as in the table below.
SW1-1 SW1-2
ON ON
After microswitch setting, should be restarted ADA-1040PC3, by turning OFF and then ON the power supply. The yellow LED will light
continuously and the converter will be in Emergency Firmware Update mode. Now follow the description in the above point.
After successful software update, set microswitch SW1 to the run mode as shown in the table below.
SW1-1 SW1-2
OFF OFF
In the run mode the yellow LED (located near the SW1), will turn off.
6. DATA TRANSMISSION DIAGNOSTICS
To readout diagnostics, the SW1 microswitch should be set to the configuration mode.
SW1-1 SW1-2
ON OFF
In the configuration mode the yellow LED will blink with frequency 1Hz.
Correctness of transmission proceed on RS232 and RS485 interfaces can be checked by readout the errors list by ADAConfig
Software from the converter memory. Frames error counter will be increased, in case of: improper speed set compared to real speed
of data transmission. Parity error counter will be count the errors which can arise in case of misrepresent bytes in transmitted sign.
This counter will not work in case of disable control parity
To check those counters press the button [Read transmission errors], and to delete (zeroing of counters in the memory of the
converter) press [Delete transmission errors]. In case of parity errors or frame errors, should be checked the ADA-1040PC3
converter's configuration and correctness connection of RS485 bus and RS232 device to converter ports.
After finishing the diagnostics, the SW1 microswitch should be set to the run mode as shown in the table below.
SW1-1 SW1-2
OFF OFF
In the run mode the yellow LED (located near the SW1), will turn off.
11
ADA-1040PC3
Page 12
7. OPERATION
ADA-1040PC3 is bidirectional protocol converter of SunMaster to MODBUS-RTU protocol, with possibility of conversion a baud
rate, a data format (number of data bits, parity bit, stop bits) and interface type RS232 to RS485/RS422.
Additionally, is a separator of RS232 (SunMaster) port to RS485/422 (MODBUS-RTU) port.
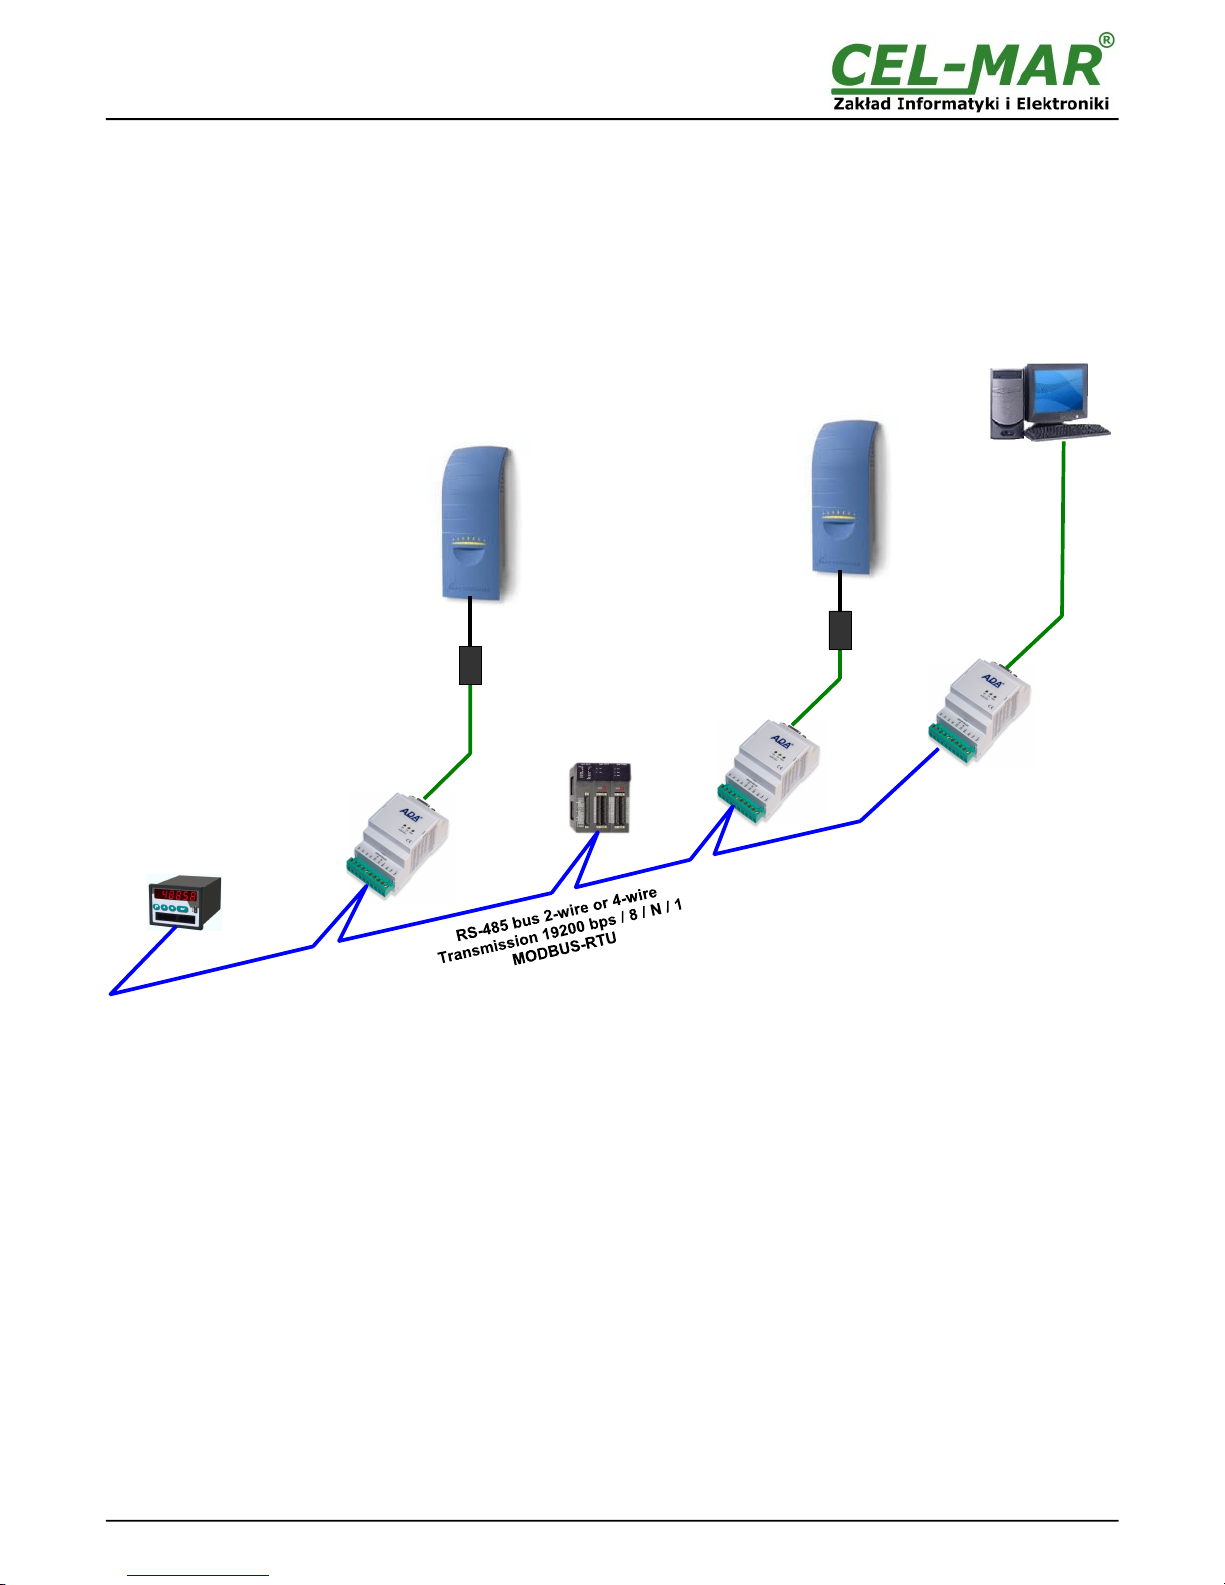
If connect to RS232 port the Inverter with Soladin (SunMaster) interface, should connect to RS485/RS422 port RS485 MODBUS-RTU
bus.
Frames of MODBUS protocol having the errors CRC are rejected by the converter.
Frames of SunMaster-Soladin having the errors CRC are also rejected by the converter.
Fig.11. Connection of Soladin- SunMaster inverters to RS485 MODBUS-RTU bus.
12
ADA-1040PC3
Transmisja
9600 bps / 8 / N / 1
RS485
SLAVE
MODBUS-RTU
device
ADA-1040PC3
ADA-1040PC3
ADA-1040
RS-232
MODBUS-RTU
Transmisja
9600 bps / 8 / N / 1
SCADA
MASTER
MODBUS-RTU
RS485
SLAVE
MODBUS-RTU
device
Soladin 600
device
PC-Link
RS232<>Soladin
Windmaster 500
device
PC-Link
RS232<>Soladin
Page 13
8. IMPLEMENTATION OF MODBUS-RTU PROTOCOL
ADA-1040PC3 protocol converter allows connecting Inverters with SunMaster-Soladin protocol as SLAVE to RS485 MODBUS-RTU
bus. The length of RS485 bus can be extended by the use of ADA-4040 repeaters or ADA-4044H HUBs RS485
The MODBUS-RTU protocol used for communication between ADA-1040PC3 converters and SCADA-type system or PLC controller
enable easy integration of SunMaster-Soladin inverters in existing automation systems BMS.
8.1. TABLE OF MODBUS-RTU ADDRESSES
8.1.1. REGISTERS ACTUAL VALUE MEASUREMENTS AND CONDITION INVERTER, READOUT
BY FUNCTION 04 (3X – REFERENCES) INPUT REGISTERS
Address3XRegisters
Address
Registers
description
Attribute Value
30001 0 TypeIDH = 0x00
TypeIDL 8-bit inverter type
R 16-bit register
30002 1
Status1
Status0 16-bit inverter status
R 16-bit register
30003 2
UsolH
UsolL 16-bit solar panel voltage DC measurement
R 16-bit register
30004 3
IsolH
IsolL 16-bit solar panel current DC measurement
R 16-bit register
30005 4
FacH
FacL 16-bit network voltage AC frequency measurement
R 16-bit register
30006 5
UacH
UacL 16-bit network voltage AC measurement
R 16-bit register
30007 6
IacH
IacL 16-bit network current AC measurement
R 16-bit register
30008 7
PacH
PacL 16-bit network power AC measurement
R 16-bit register
30009 8
Hi = 0x00
EacH (Low)
R 16-bit register
30010 9
EacM
EacL 24-bit energy counter - kWh
R 16-bit register
30011 10
TempH=0x00
TempL 8-bit internal temperature
R 16-bit register
30012 11 Hi=0x00
TonH (Lo)
R 16-bit register
30013 12
TonM
TonL 24-bit operating hour counter
R 16-bit register
30014 13
Trecl/UocH Status1, bit4=1 :
Trecl/UocL Status1, bit4=0 :
16-bit time from reclosing / 16-bit open terminal voltage
R 16-bit register
30015 14 Hi = 0x00
Rac/Phase network impedance measurement
R 16-bit register
13
ADA-1040PC3
Page 14
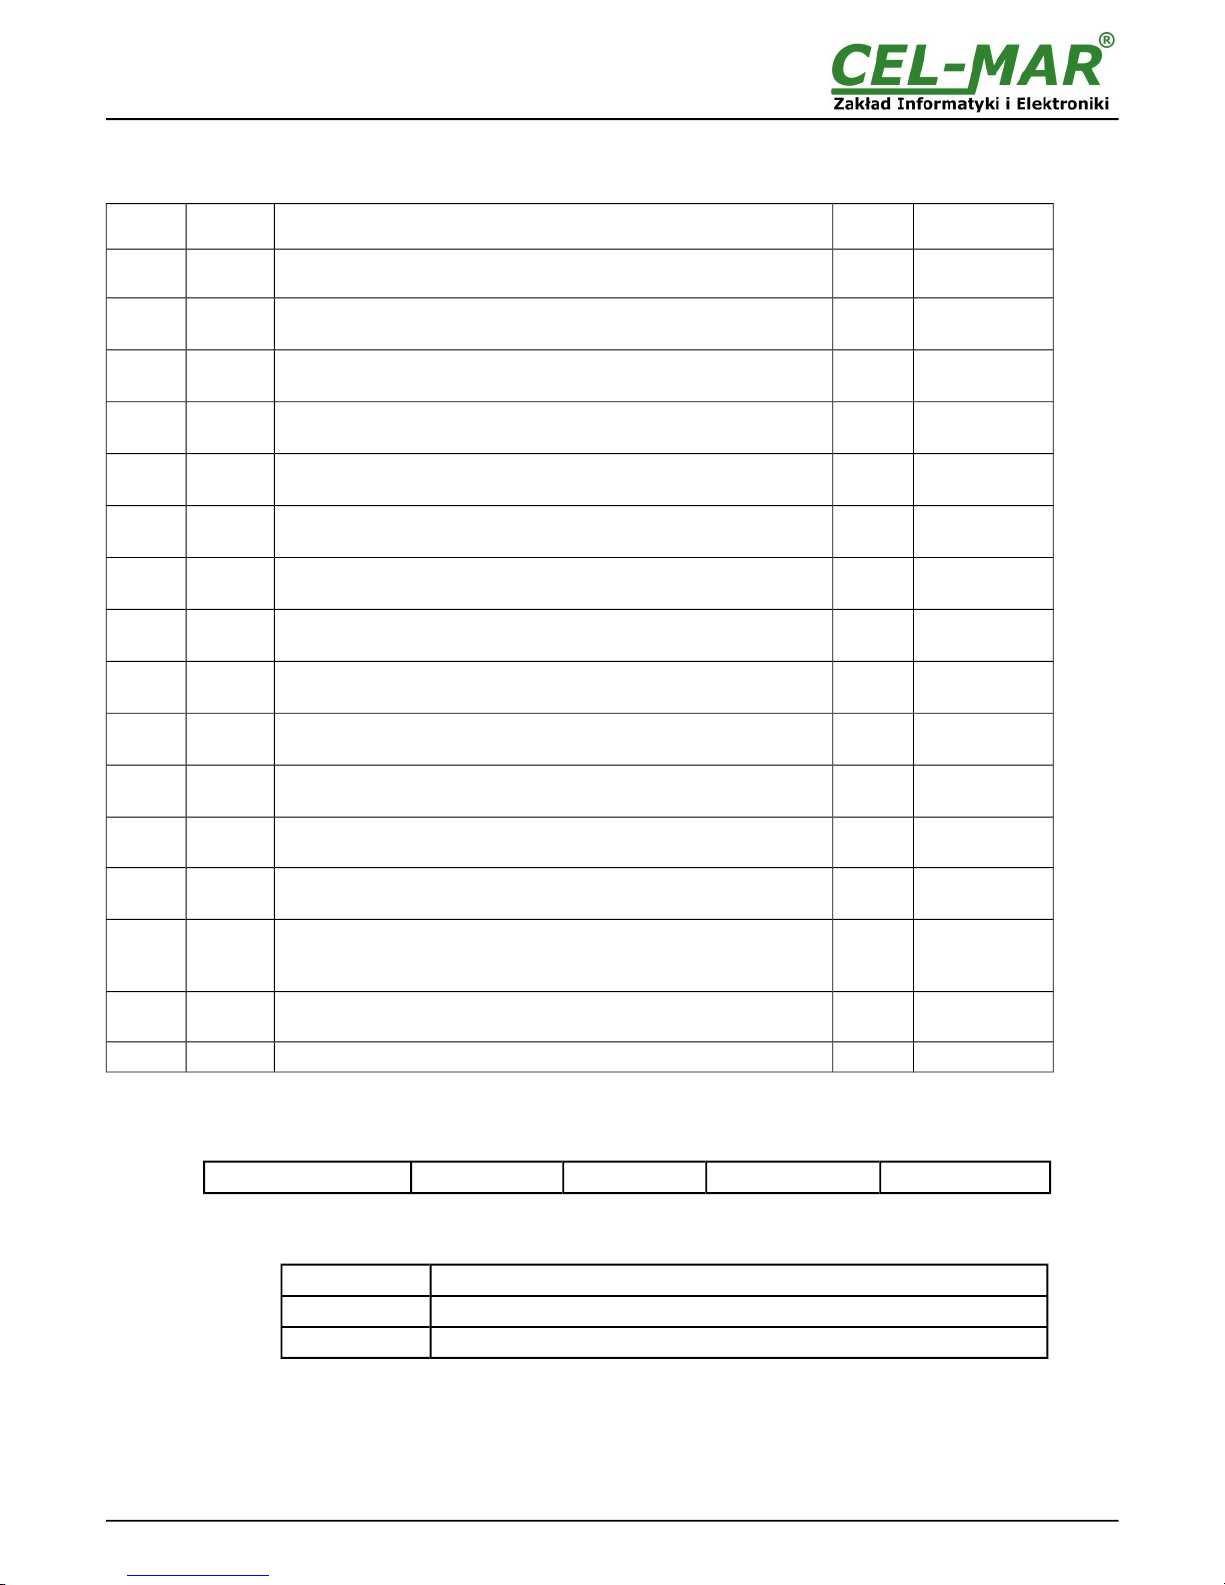
8.1.2. REGISTERS ACTUAL VALUES MEASUREMENTS AND CONDITION INVERTER , READOUT
BY FUNCTION 03 (4X – REFERENCES) HOLDING REGISTERS
Address 4XRegisters
Address
Registers
description
Attribute Value
40001 0 TypeIDH = 0x00
TypeIDL 8-bit inverter type
R 16-bit register
40002 1
Status1
Status0 16-bit inverter status
R 16-bit register
40003 2
UsolH
UsolL 16-bit solar panel voltage measurement DC
R 16-bit register
40004 3
IsolH
IsolL 16-bit solar panel current measurement DC
R 16-bit register
40005 4
FacH
FacL 16-bit network voltage frequency measurement AC
R 16-bit register
40006 5
UacH
UacL 16-bit network voltage measurement AC
R 16-bit register
40007 6
IacH
IacL 16-bit network current measurement AC
R 16-bit register
40008 7
PacH
PacL 16-bit network power measurement AC
R 16-bit register
40009 8
Hi = 0x00
EacH (Low)
R 16-bit register
40010 9
EacM
EacL 24-bit energy counter - kWh
R 16-bit register
40011 10
TempH=0x00
TempL 8-bit inverter's internal temperature
R 16-bit register
40012 11 Hi=0x00
TonH (Lo)
R 16-bit register
40013 12
TonM
TonL 24-bit operating hour counter
R 16-bit register
40014 13
Trecl/UocH Status1, bit4=1 :
Trecl/UocL Status1, bit4=0 :
16-bit time from reclosing / 16-bit open terminal voltage
R 16-bit register
40015 14 Hi = 0x00
Rac/Phase network impedance measurement
R 16-bit register
8.2. FRAME STRUCTURE OF MODBUS-RTU PROTOCOL
Device address (1-byte) Function (1-byte) Dane (n-bytes) CRC-16Lo (1-byte) CRC-16Hi (1-byte)
8.3. USED FUNCTIONS OF MODBUS-RTU PROTOCOL
Function code Description
03 (0x03) Readout measurement values and Inverter state from registers MODBUS-RTU
04 (0x04) Readout measurement values and Inverter state from registers MODBUS-RTU
14
ADA-1040PC3
Page 15
8.3.1. FUNCTION 0x03 / 0x04 - READOUT VALUE MEASUREMENTS AND STATUS FROM
INVERTER
8.3.1.1. READOUT OF CURRENT MEASURED VALUE STORED IN 16-BIT REGISTER [4X / 3XREFERENCES]
Function 0x03 / 0x04 are used for readout of status and measurement values from the INVERTER.
The measurement values readout form MODBUS-RTU register is presented by a 16-bit register.
The registers with the measurement value are in the integer format of 16-bit sign (in C/C++ type short int).
The actual measurement value is obtained from the read register using the following algorithms, using the appropriate factor value
DW (see table below).
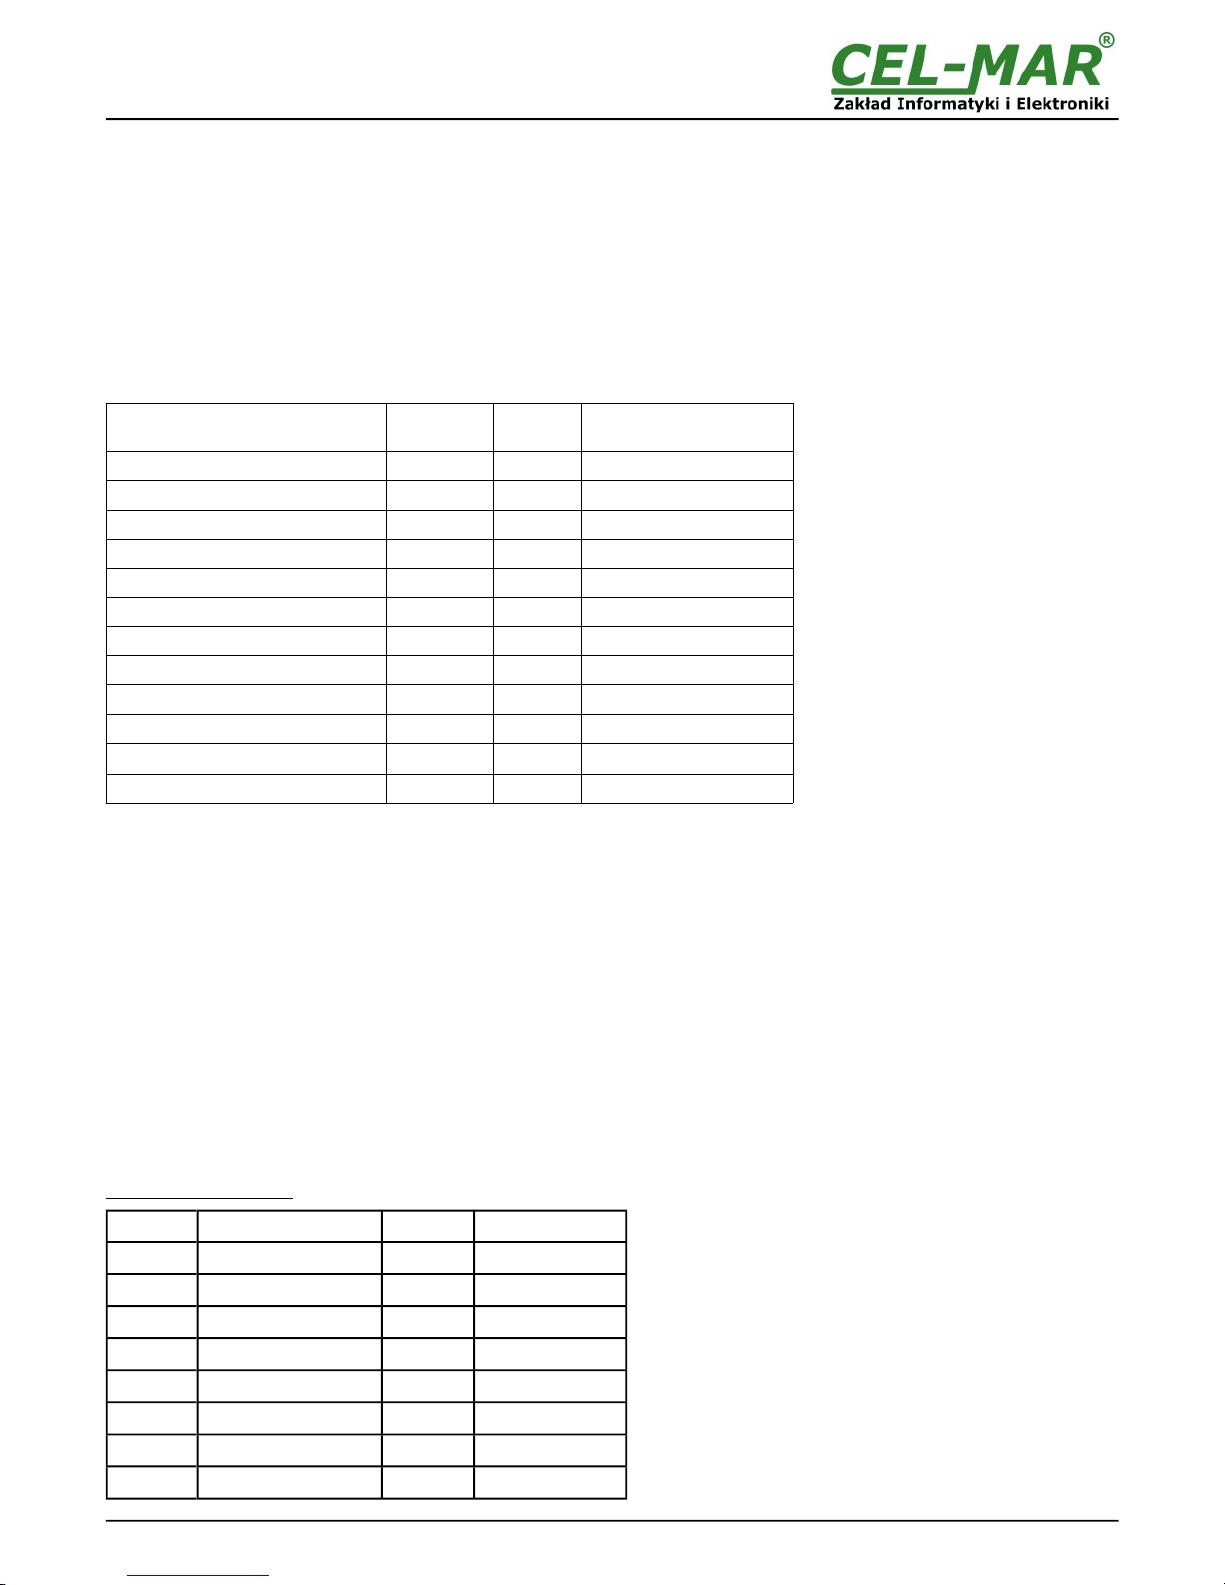
Table of divider values DW
Measurement
Register
Description
Unit of
measure
DW factor value
Solar panel voltage Usol [V] DC 10
Solar panel current Isol [A] DC 100
AC network voltage frequency Fac [Hz] 100
AC network voltage Uac [V] AC 1
AC network current Iac [A] AC 100
AC network power Pac [W] AC 1
AC network energy meter Eac [kWh] AC 100
Inverter's internal temperature Temp [°C] 1
Operating hour counter Ton [h] 60
Time from reclosing Trec [s] 1
Network impedance measurement Rac
[W]
100
Algorithm 1. Readout register is saved to regular type variable (float) and then divide it by the factor DW
// Fragment of code in C language (VS6.0) presenting above algorithm
short int siMeasurementReg;
float fMeasurmentValue
......
fMeasurmentValue = (float)siMeasurementRegister;
fMeasurmentValue = fMeasurmentValue / DW;
Algorithm 2. Readout register is saved to regular type variable 16-bit (short int) and then divide by the factor DW, received change of
the dividing it is a number of the hundredth parts of the measurement value.
// Fragment of code in C language (VS6.0) presenting above algorithm
short int siMeasurementReg;
div_t div_MeasurmentValue;
......
div_MeasurmentValue = div((int)siMeasurementRegister, DW)
printf( "Total measurement value = %d\n, hundredth parts of the measurement value = %d\n",
div_MeasurmentValue.quot, div_MeasurmentValue.rem );
Query of register Usole
Byte no Designation Size Value [hex]
00 Inverter address 1 byte
11 [ 11 to F7]
01 Function code 1 byte
03 / 04
02 Registry address Hi 1 byte
00
03 Registry address Lo 1 byte
02
04 Registry number Hi 1 byte
00
05 Registry number Lo 1 byte
01
06 CRC-Lo 1 byte
---
07 CRC-Hi 1 byte
---
15
ADA-1040PC3
Page 16
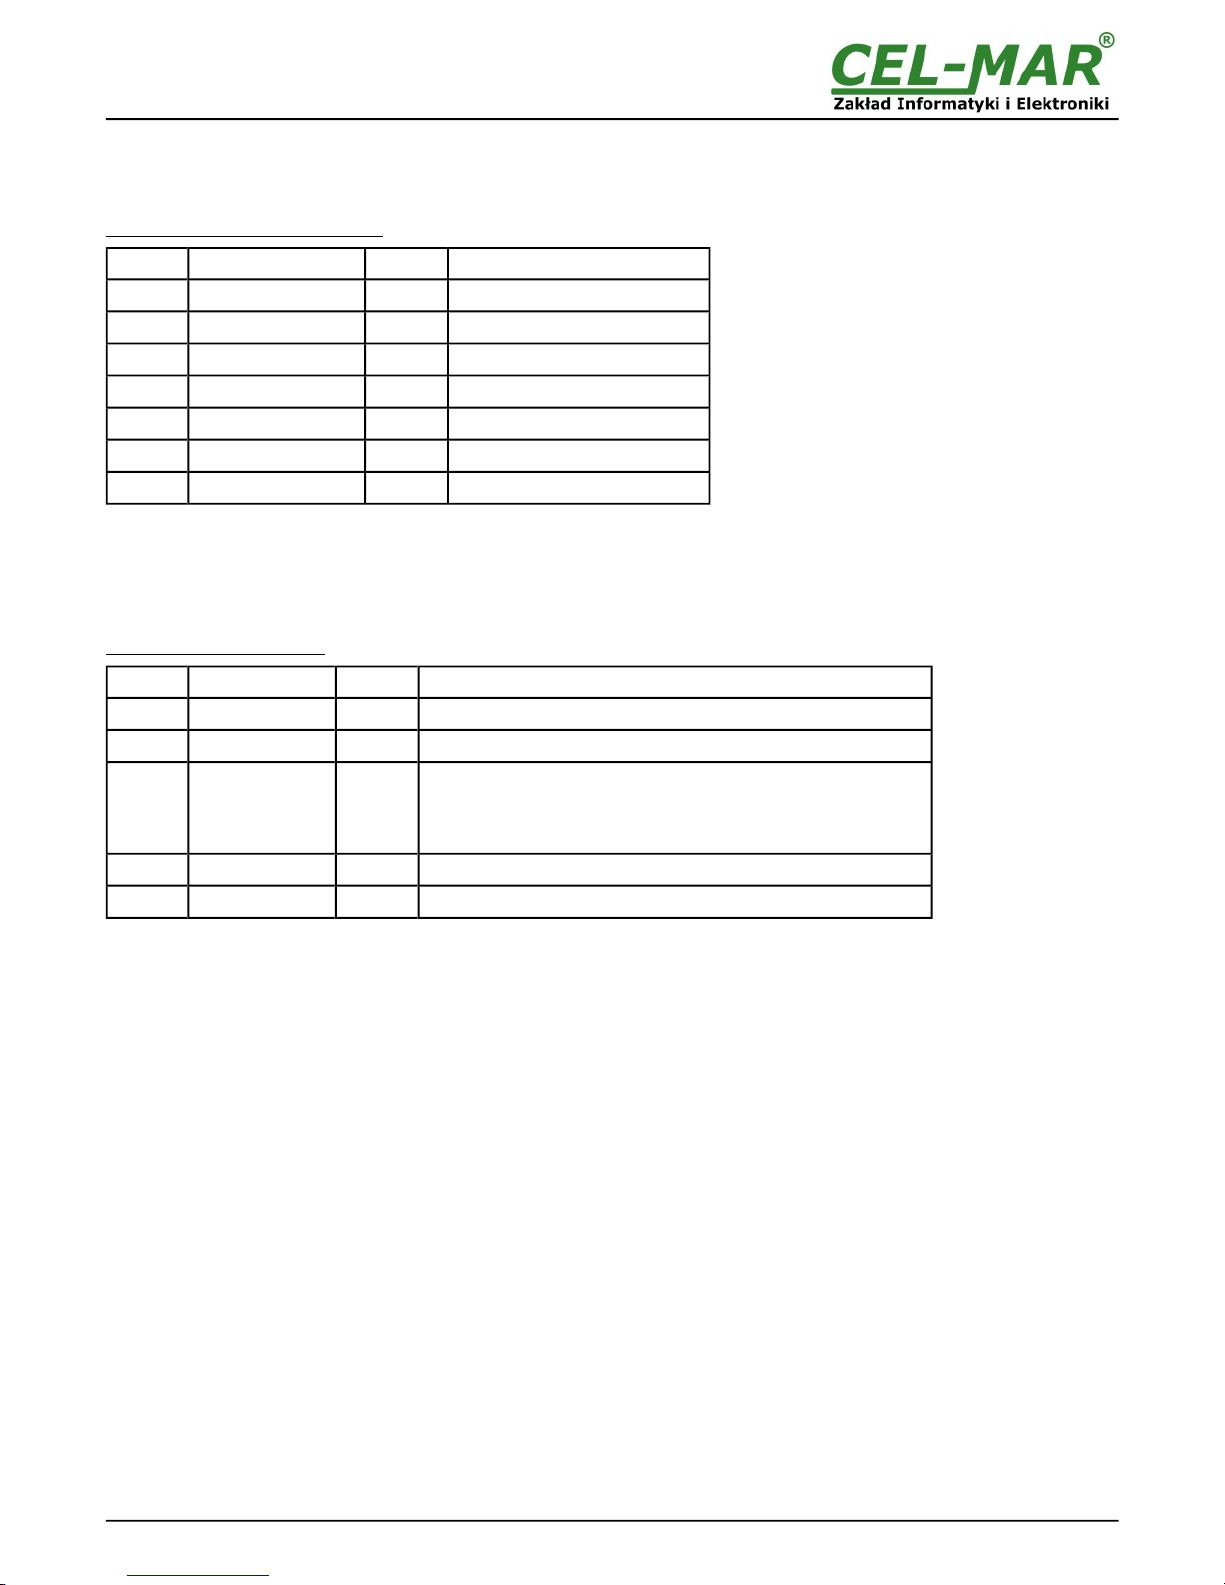
Example. Query of solar panel voltage Usol from registry address 40003 / address 30003
11-03-00-02-00-01-CRCLo-CRCHi
11-04-00-02-00-01-CRCLo-CRCHi
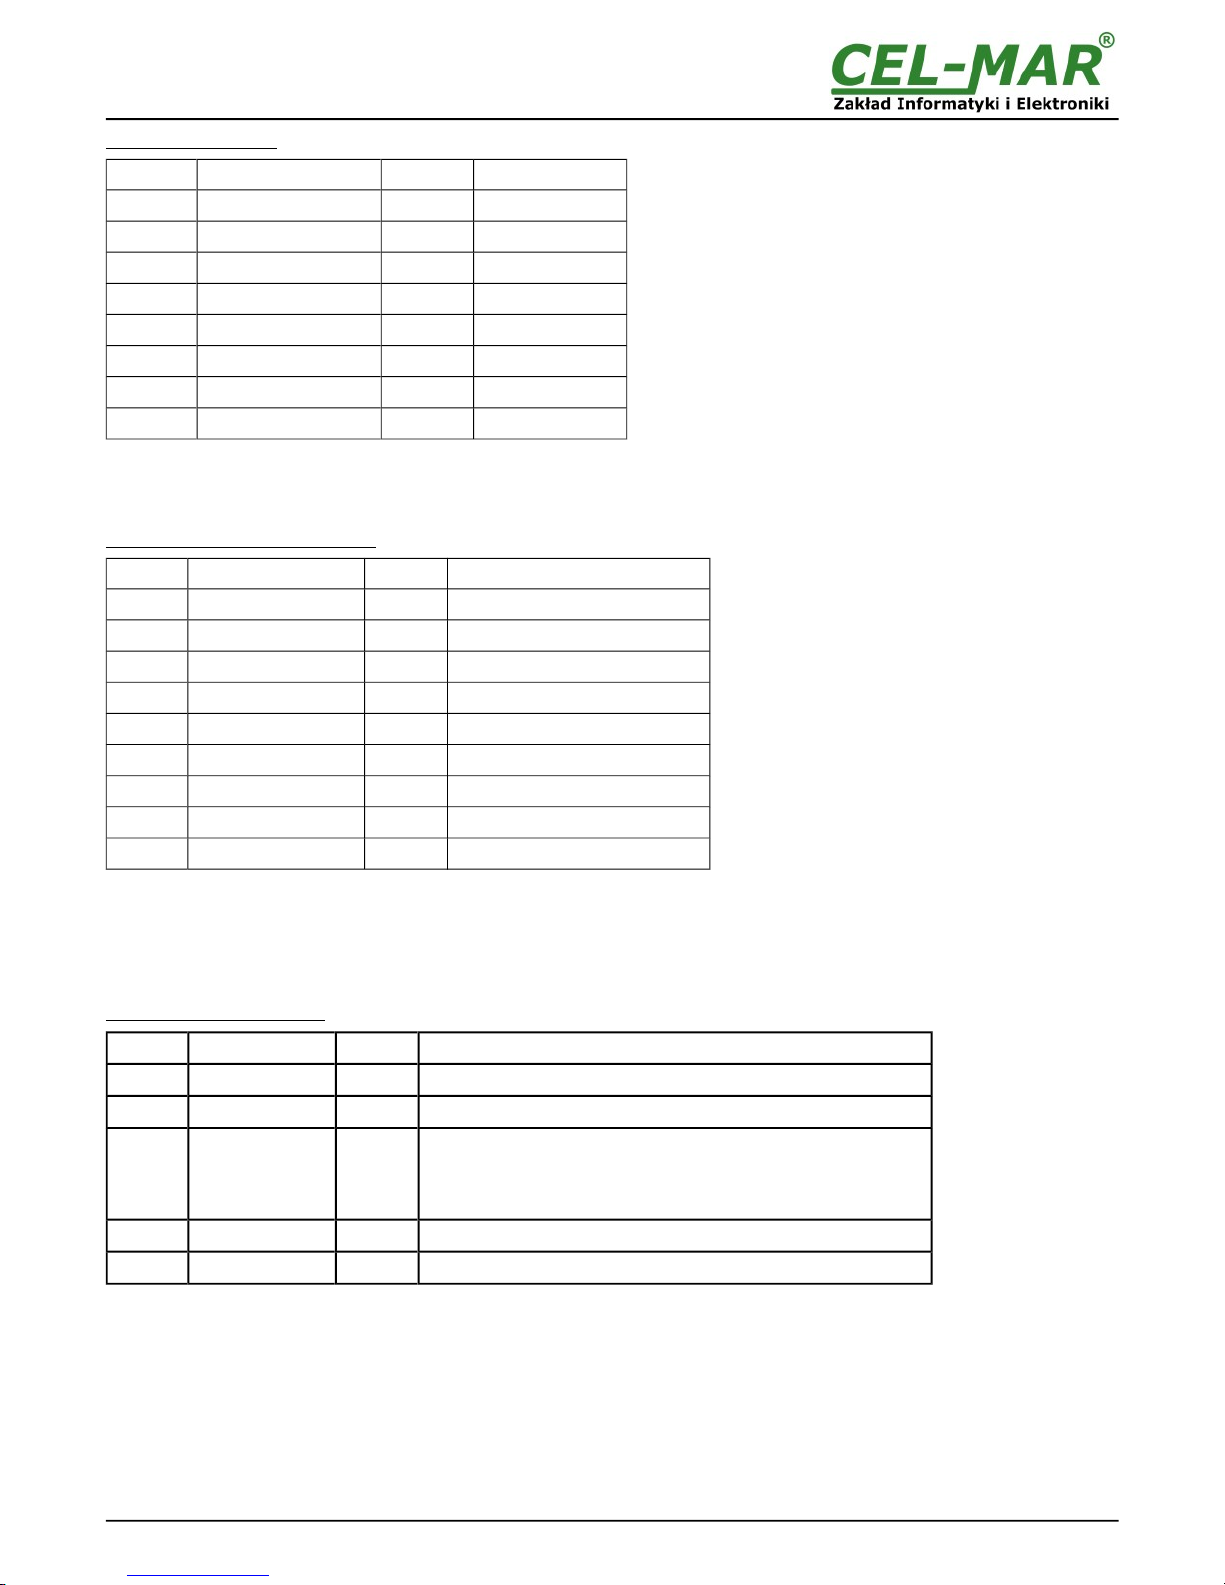
Response with register value Usol
Byte no Designation Size Value [hex]
00 Inverter address 1-byte
11 [ 11 to F7]
01 Function code 1-byte
03 / 04
02 Number of data bytes N-byte
02
03 Dane1-Hi 1-byte
09
04 Dane1-Lo 1-byte
60
05 CRC-Lo 1-byte
---
06 CRC-Hi 1-byte
---
Example. Readout of solar panel voltage Usol from registry address 40003 / address 30003
11-03-02-09-60-CRCLo-CRCHi
11-04-02-09-60-CRCLo-CRCHi
In respond solar panel voltage Usol is presented as 2-byte with values:
Usol = 0x0960 => 2400/100 => 24,00 V
Response - in case of error
Byte no Designation Size Value [hex]
00 Inverter address 1-byte
11 [ 11 to F7]
01 Function code 1-byte
83 / 84
02 Error code 1-byte
01 – unknown function
02 – unknown data address
03 – unknown data value
04 – SunMaster inverter not respond or is faulty
03 CRC-Lo 1-byte
04 CRC-Hi 1-byte
8.3.1.2. READOUT OF CURRENT MEASURED VALUE STORED IN TWO 16-BIT REGISTERS
[4X / 3X-REFERENCES]
Function 0x03 / 0x04 are used for readout of status and measurement values from the INVERTER.
The measurement values readout form MODBUS-RTU register is presented by two 16-bit registers.
The registers with the measurement value are in the integer format of 32-bit sign (in C/C++ type int).
The actual measurement value is obtained from the read register using the following algorithms, using the appropriate factor value DW
(see table above)
Algorithm 1. Readout register is saved to regular type variable (float) and then divide it by the factor DW.
// Fragment of code in C language (VS6.0) presenting above algorithm
int iMeasurementReg;
float fMeasurmentValue
......
fMeasurmentValue = (float)iMeasurementRegister;
fMeasurmentValue = fMeasurmentValue / DW;
Algorithm 2. Readout register is saved to regular type variable 32-bit (int) and then divide by the factor DW, received change of the
dividing it is a number of the hundredth parts of the measurement value.
// Fragment of code in C language (VS6.0) presenting above algorithm
int iMeasurementReg;
div_t div_MeasurmentValue;
......
div_MeasurmentValue = div((int)iMeasurementRegister, DW)
printf( "Total measurement value = %d\n, hundredth parts of the measurement value = %d\n",
div_MeasurmentValue.quot, div_MeasurmentValue.rem );
16
ADA-1040PC3
Page 17
Query of register Eac
Byte no Designation Size Value [hex]
00 Inverter address 1 byte
11 [ 11 to F7]
01 Function code 1 byte
03 / 04
02 Registry address Hi 1 byte
00
03 Registry address Lo 1 byte
08
04 Registry number Hi 1 byte
00
05 Registry number Lo 1 byte
02
06 CRC-Lo 1 byte
---
07 CRC-Hi 1 byte
---
Example. Query of AC network energy meter Eac from registry address 40009 / address 30009
11-03-00-08-00-02-CRCLo-CRCHi
11-04-00-08-00-02-CRCLo-CRCHi
Response with register value Eac
Byte no Designation Size Value [hex]
00 Inverter address 1-byte
11 [ 11 to F7]
01 Function code 1-byte
03 / 04
02 Number of data bytes N-byte
04
03 Dane1-Hi 1-byte
00
04 Dane1-Lo 1-byte
00
05 Dane2-Hi 1-byte
0B
06 Dane2-Lo 1-byte
90
07 CRC-Lo 1-byte
---
08 CRC-Hi 1-byte
---
Example. Readout of AC network energy meter Eac from registry address 40009 / address 30009
11-03-04-00-00-0B-90-CRCLo-CRCHi
11-04-04-00-00-0B-90-CRCLo-CRCHi
In respond the value of AC network energy meter Eac is presented as 4-byte with values:
Eac = 0x00000B90 => 2960/100 => 29,60 kWh
Response - in case of error
Byte no Designation Size Value [hex]
00 Inverter address 1-byte
11 [ 11 do F7]
01 Function code 1-byte
83 / 84
02 Error code 1-byte
01 - unknown function
02 - unknown data address
03 - unknown data value
04 - SunMaster inverter not respond or is faulty
03 CRC-Lo 1-byte
04 CRC-Hi 1-byte
8.3.1.3. READOUT OF SOLAR PANEL VOLTAGE VALUE Usol FROM INVERTER [4X / 3XREFERENCES]
The measurement value of solar panel voltage, readout from 16-bit register Usol MODBUS-RTU (see p.8.1.) is presented in the
format integer 16-bit with sign (in C/C++ type short int).
Query of solar panel voltage Usol from registry address 40003 / address 30003
11-03-00-02-00-01-CRCLo-CRCHi
11-04-00-02-00-01-CRCLo-CRCHi
17
ADA-1040PC3
Page 18

Readout of solar panel voltage Usol from registry address 40003 / address 30003
11-03-02-00-F0-CRCLo-CRCHi
11-04-02-00-F0-CRCLo-CRCHi
In respond the solar panel voltage Usol is presented as 2-byte with values: 0x00F0.
The actual measurement value expressed in [V] DC is obtained from the read register according to the above algorithms, using the
appropriate factor value DW for register Usol (see the Table of divider values DW above).
Usol = 0x00F0 => 240/10 => 24,00 [V] DC
8.3.1.4. READOUT OF SOLAR PANEL CURRENT VALUE Isol FROM INVERTER [4X / 3XREFERENCES]
The measurement value of solar panel current, readout from 16-bit register Isol MODBUS-RTU (see p.8.1.) is presented in the format
integer 16-bit with sign (in C/C++ type short int).
Query of solar panel current Isol from registry address 40004 / address 30004
11-03-00-03-00-01-CRCLo-CRCHi
11-04-00-03-00-01-CRCLo-CRCHi
Readout of solar panel current Isol from registry address 40004 / address 30004
11-03-02-00-F0-CRCLo-CRCHi
11-04-02-00-F0-CRCLo-CRCHi
In respond the solar panel current Isol is presented as 2-byte with values: 0x00F0 .
The actual measurement value expressed in [A] DC is obtained from the read register according to the above algorithms, using the
appropriate factor value DW for register Isol (see the Table of divider values DW above).
Isol = 0x00F0 => 240/100 => 2,40 [A] DC
8.3.1.5. READOUT OF FREQUENCY VALUE Fac ALTERNATING VOLTAGE NETWORK,
CONNECTED TO INVERTER [4X / 3X-REFERENCES]
The measurement value of frequency alternating voltage network to inverter, readout from 16-bit register Fac MODBUS-RTU (see
p.8.1.) is presented in the format integer 16-bit with sign (in C/C++ type short int).
Query of frequency network Fac from registry address 40005 / address 30005
11-03-00-04-00-01-CRCLo-CRCHi
11-04-00-04-00-01-CRCLo-CRCHi
Readout of frequency network Fac from registry address 40005 / address 30005
11-03-02-13-88-CRCLo-CRCHi
11-04-02-13-88-CRCLo-CRCHi
In respond the frequency network Fac is presented as 2-byte with values: 0x1388 .
The actual measurement value expressed in [Hz] is obtained from the read register according to the above algorithms, using the
appropriate factor value DW for register Fac (see the Table of divider values DW).
Fac = 0x1388 => 5000/100 => 50,00 [Hz]
8.3.1.6. READOUT OF VOLTAGE VALUE Uac ALTERNATING VOLTAGE NETWORK,
CONNECTED TO INVERTER [4X / 3X-REFERENCES]
The measurement value of network voltage and alternating voltage connected to the inverter, readout from 16-bit register Uac
MODBUS-RTU (see p.8.1.) is presented in the format integer 16-bit with sign (in C/C++ type short int).
Query of network voltage Uac from registry address 40006 / address 30006
11-03-00-05-00-01-CRCLo-CRCHi
11-04-00-05-00-01-CRCLo-CRCHi
Readout of network voltage Uac from registry address 40006 / address 30006
11-03-02-00-DF-CRCLo-CRCHi
11-04-02-00-DF-CRCLo-CRCHi
In respond the network voltage Uac is presented as 2-byte with values: 0x00DF .
18
ADA-1040PC3
Page 19

The actual measurement value expressed in [V] AC is obtained from the read register according to the above algorithms, using the
appropriate factor value DW for register Uac (see the Table of divider values DW above).
Uac = 0x00DF => 223/1 => 223 [V] AC
8.3.1.7. READOUT OF CURRENT VALUE Iac ALTERNATING VOLTAGE NETWORK,
CONNECTED TO INVERTER [4X / 3X-REFERENCES]
The measurement value of network current alternating voltage connected to the inverter, readout from 16-bit register Iac MODBUSRTU (see p.8.1.) is presented in the format integer 16-bit with sign (in C/C++ type short int).
Query of network current Iac from registry address 40007 / address 30007
11-03-00-06-00-01-CRCLo-CRCHi
11-04-00-06-00-01-CRCLo-CRCHi
Readout of network current Iac from registry address 40006 / address 30006
11-03-02-00-DF-CRCLo-CRCHi
11-04-02-00-DF-CRCLo-CRCHi
In respond the network current Iac is presented as 2-byte with values: 0x00DF .
The actual measurement value expressed in [A] AC is obtained from the read register according to the above algorithms, using the
appropriate factor value DW for register Iac (see the Table of divider values DW above).
Iac = 0x00DF => 223/100 => 2,23 [A] AC
8.3.1.8. READOUT OF POWER VALUE Pac ALTERNATING VOLTAGE NETWORK OF
INVERTER [4X / 3X-REFERENCES]
The measurement value of network power alternating voltage connected to the inverter, readout from 16-bit register Pac MODBUSRTU (see p.8.1.) is presented in the format integer 16-bit with sign (in C/C++ type short int).
Query of inverter power network Pac from registry address 40008 / address 30008
11-03-00-07-00-01-CRCLo-CRCHi
11-04-00-07-00-01-CRCLo-CRCHi
Readout of inverter power network Pac from registry address 40008 / address 30008
11-03-02-00-06-CRCLo-CRCHi
11-04-02-00-06-CRCLo-CRCHi
In respond the inverter power network Pac is presented as 2-byte with values: 0x0006 .
The actual measurement value expressed in [W] AC is obtained from the read register according to the above algorithms, using the
appropriate factor value DW for register Pac (see the Table of divider values DW above).
Pac = 0x0006 => 6/1 => 6 [W] AC
8.3.1.9. READOUT OF ENERGY VALUE Eac TRANSFERRED TO ALTERNATING VOLTAGE
NETWORK, CONNECTED TO INVERTER [4X / 3X-REFERENCES]
The measurement value of energy transferred to alternating voltage network connected to the inverter, readout from two 16-bit
registers Eac MODBUS-RTU (see p.8.1.) is presented in the format integer 32-bit with sign (in C/C++ type int).
Query of energy transferred to network Eac from registry address 40009 / address 30009
11-03-00-08-00-02-CRCLo-CRCHi
11-04-00-08-00-02-CRCLo-CRCHi
Readout of energy transferred to network Eac from registry address 40009 / address 30009
11-03-04-00-00-00-DF-CRCLo-CRCHi
11-04-04-00-00-00-DF-CRCLo-CRCHi
In respond the energy transferred to network Eac is presented as 4-byte with values: 0x000000DF .
The actual measurement value expressed in [kWh] AC is obtained from the read register according to the above algorithms, using the
appropriate factor value DW for register Eac (see the Table of divider values DW above).
Eac = 0x000000DF => 223/100 => 2,23 [kWh] AC
19
ADA-1040PC3
Page 20

8.3.1.10. READOUT OF VALUE INVERTER TEMPERATURE [4X / 3X-REFERENCES]
The measurement value of inverter temperature, readout from 16-bit register Temp MODBUS-RTU (see p.8.1.) is presented in the
format integer 16-bit with sign (in C/C++ type short int).
Query of inverter temperature Temp from registry address 40011 / address 30011
11-03-00-0A-00-01-CRCLo-CRCHi
11-04-00-0A-00-01-CRCLo-CRCHi
Readout of inverter temperature Temp from registry address 40011 / address 30011
11-03-02-00-20-CRCLo-CRCHi
11-04-02-00-20-CRCLo-CRCHi
In respond the inverter temperature Temp is presented as 2-byte with values: 0x0020 .
The actual measurement value expressed in [°C] is obtained from the read register according to the above algorithms, using the
appropriate factor value DW for register Temp (see the Table of divider values DW above).
Temp = 0x0020 => 32/1 => 32 [°C]
8.3.1.11. READOUT OF VALUE INVERTER'S RUNNING TIME [4X / 3X-REFERENCES]
The value of inverter's running time, readout from 16-bit register Ton MODBUS-RTU (see p.8.1.) is presented in the format integer 32bit with sign (in C/C++ type int).
Query of inverter's running time Ton from registry address 40012 / address 30012
11-03-00-08-0B-02-CRCLo-CRCHi
11-04-00-08-0B-02-CRCLo-CRCHi
Readout of inverter's running time Ton from registry address 40012 / address 30012
11-03-04-00-00-F0-DF-CRCLo-CRCHi
11-04-04-00-00-F0-DF-CRCLo-CRCHi
In respond the inverter's running time Ton is presented as 4-byte with values: 0x0000F0DF .
The actual measurement value expressed in [h] is obtained from the read register according to the above algorithms, using the
appropriate factor value DW for register Ton (see the Table of divider values DW above).
Ton = 0x0000F0DF => 61663/60 => 1027.72 [h]
8.3.1.12. READOUT OF INVERTER'S STATUS [4X / 3X-REFERENCES]
The value of inverter's status, readout from 16-bit register Status MODBUS-RTU (see p.8.1.) is presented in the format integer 16-bit
with sign (in C/C++ type short int).
Query of inverter's status Status from registry address 40002 / address 30002
11-03-00-01-00-01-CRCLo-CRCHi
11-04-00-01-00-01-CRCLo-CRCHi
Readout of inverter's status Status from registry address 40002 / address 30002
11-03-02-00-2A-CRCLo-CRCHi
11-04-02-00-2A-CRCLo-CRCHi
In respond the inverter's status Status is presented as 2-byte with values: 0x002A, Bin = 00000000:00101010.
Inverter's status can be read from table bellow.
20
ADA-1040PC3
Page 21
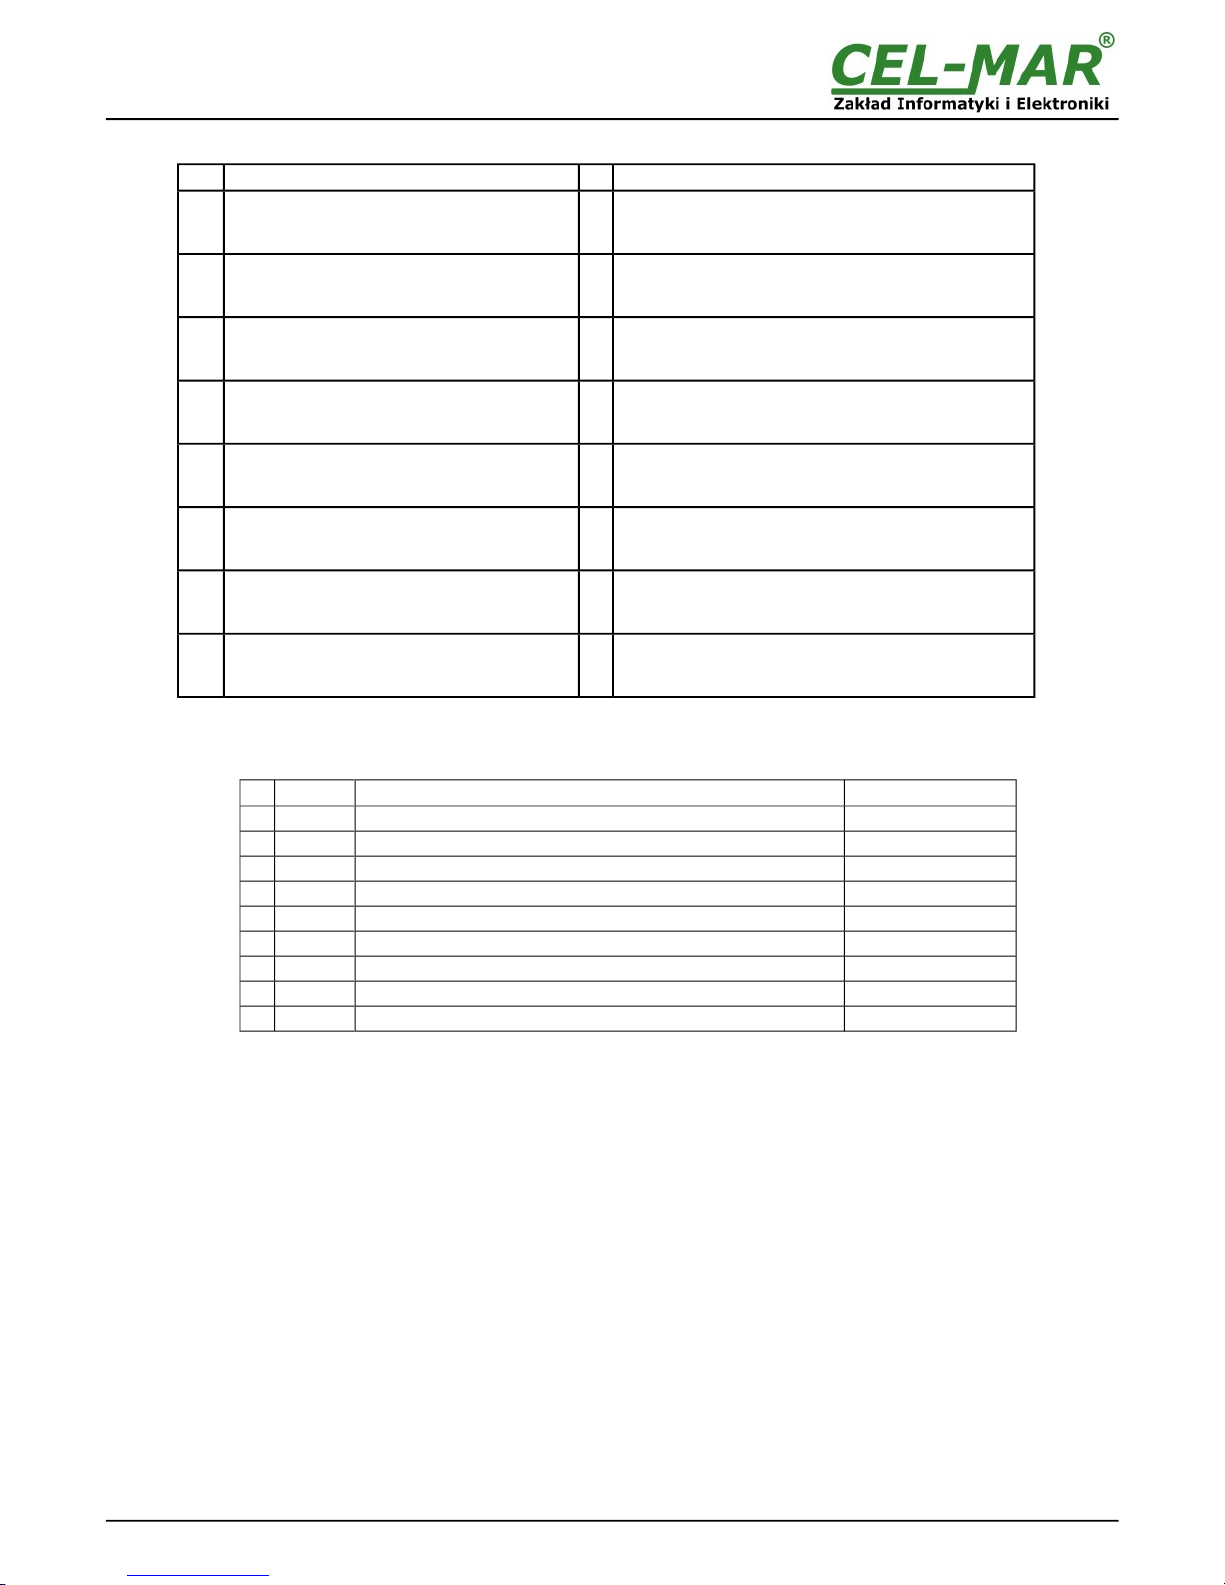
Table register of inverter's status
Bit High byte of State Inverter Bit Low byte of State Inverter
0
Insulation fault
0 - NO
1 - YES
0
Panel voltage Usol - High
0 - NO
1 - YES
1
Reserved (0)
1
Panel voltage - Low
0 - NO
1 - YES
2
Shutdown by any hardware failure
0 - NO
1 - YES
2
No network / Shutdown by any network error (ENS)
0 - NO
1 - YES
3
Reserved (0)
3
Network voltage Uac - High
0 - NO
1 - YES
4
Reserved (0)
4
Network voltage Uac - Low
0 - NO
1 - YES
5
Reserved (0)
5
Network frequency Fac - High
0 - NO
1 - YES
6
Inverter off remotely
0 - NO
1 - YES
6
Network frequency Fac - Low
0 - NO
1 - YES
7
Inverter on
0 - NO
1 - YES
7
Inverter temperature - High
0 - NO
1 - YES
9. RS232 INTERFACE – PIN DESCRIPTION OF DSUB-9F-DCE SOCKET
Pin Signal Description ADA-1040PC3
1 (DCD) Level of receiver signal Connected with DSR
2 (TxD) Data transmission from ADA-1040PC3 Transmitter
3 (RxD) Data receiving via ADA-1040PC3 Receiver
4 (DSR) Readiness of data receiving/ transmission Connected with DTR
5 (SG) Signal ground GND
6 (DTR) Readiness of data receiving/ transmission Connected with DSR
7 (CTS) Device confirms receiving RTS signal from ADA-1040PC3 Connected with RTS
8 (RTS) Device reports readiness to receive data Connected with CTS
9 (RI) Call rate Not connected
21
ADA-1040PC3
Page 22
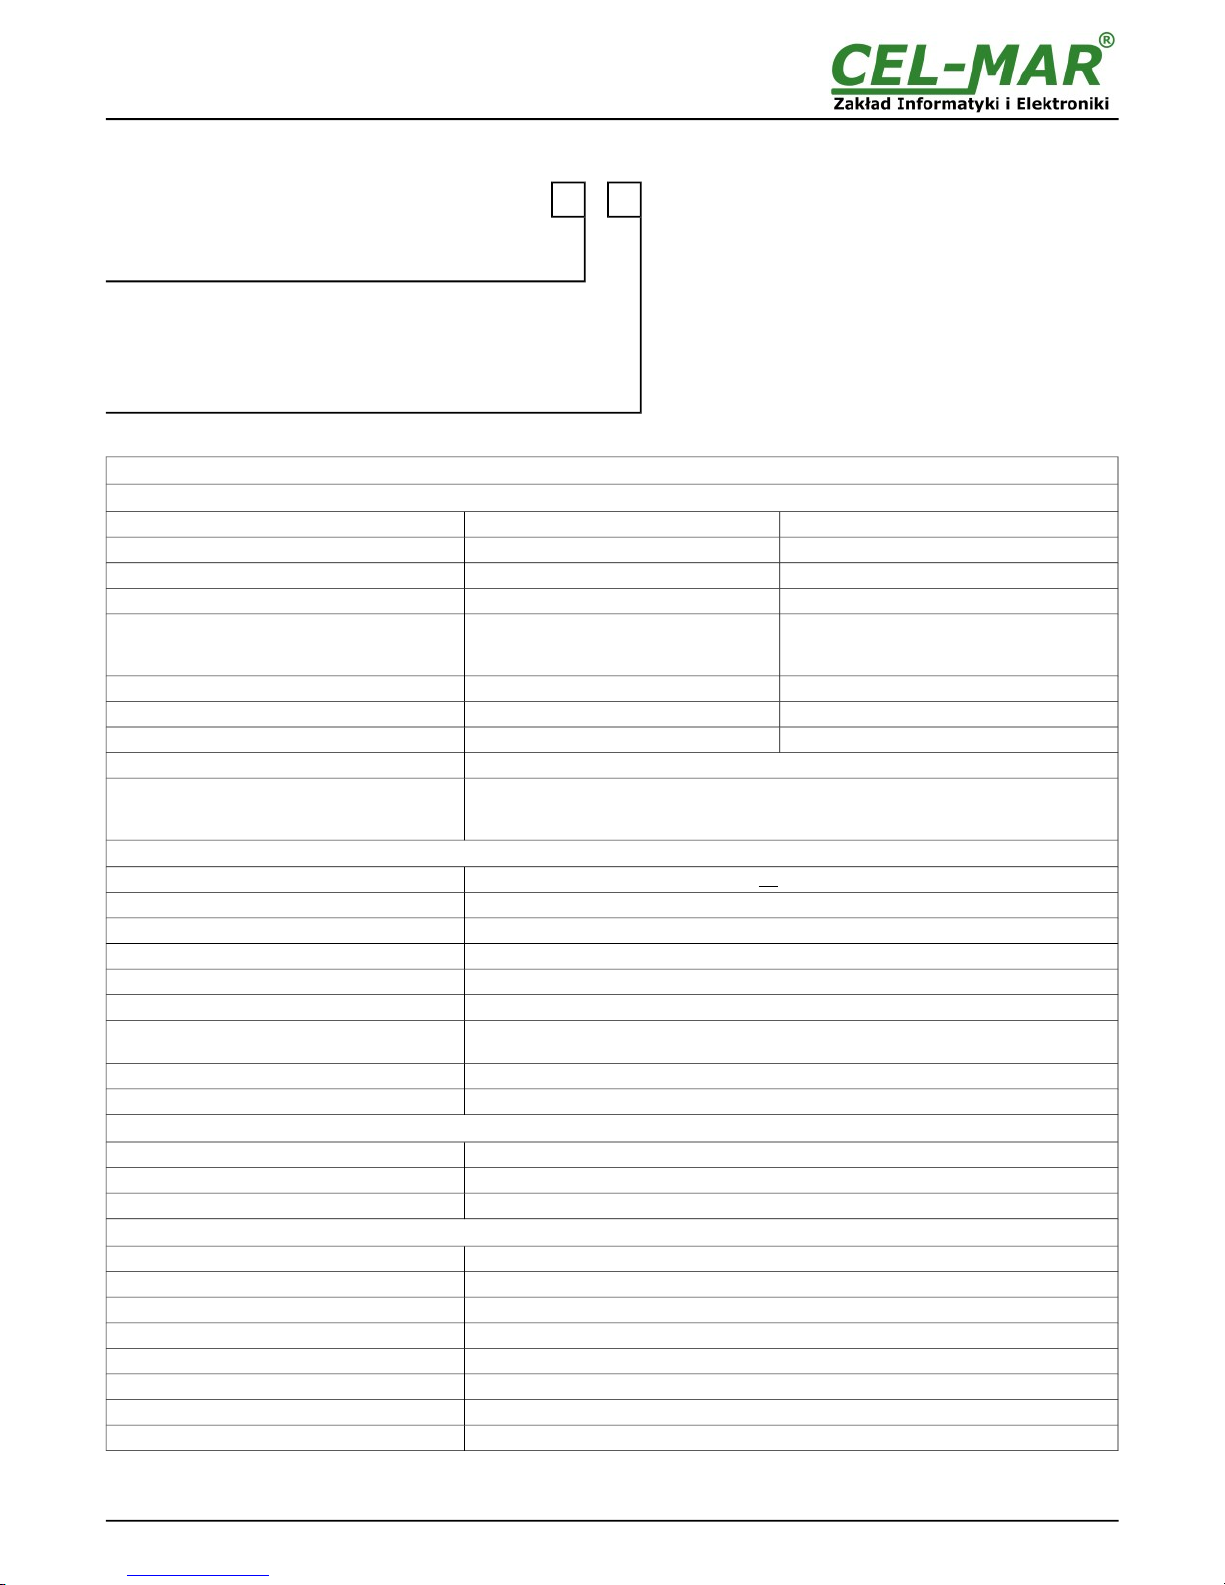
10. VERSIONS
ADA-1040PC3 - -
Order example:
Product Symbol: ADA-1040PC3-1-23
1 – standard version,
23 – 1kV=, 3-way galvanic isolation,
Version:
Standard
1
3-way galvanic isolation:
reserved
1
1kV=
23
3kV=
33
11. SPECIFICATION
TECHNICAL DATA
Transmission Parameters
Interface RS-232 RS-485/RS-422
Connector
DSUB-9 socket, female Screw terminal, wire max. Ø 2,5mm
2
Line length
up to 15m 1200m
Interface
1 32
Transmission line
DB9F/DB9M cable, multicore 9x0,34
shielded (up to 15m)
Twisted cable 1-pair or 2-pair , UTP Nx2x0,5
(24AWG), shield inside large interferences
STP Nx2x0,5(24AWG)
Standards
EIA-232, CCITT V.24, EIA-485, CCITT V.11
Protocol SunMaster Modbus-RTU
Baud rate
9600bps 8/N/1 Do 230,4 kbps
Transmission type
Asynchronism full duplex, half duplex.
Optical signalisation
• PWR – green LED power supply,
• RX - red LED data receiving from RS485/RS422 interface,
• TX - yellow LED data transmission through RS485/RS422 interface.
Electrical Parameters
Power requirements
10 - 24 – 30 V DC
Power Cable
Recommended length of power cable – up to 3m.
Power
< 2W
Protection from reverse power polarization
Yes
Galvanic Isolation
1kVDC or 3kVDC, between power circuit and RS232 and RS485/422 signal line,
Optoisolation
~3kV - between signal line RS-232 and RS485/422.
Electromagnetic compatibility
Resistance to disruptions according to the standard PN-EN 55024.
Emission of disruptions according to the standard PN-EN 55022.
Safety requiring According to the PN-EN60950 norm.
Environment Commercial and light industrial.
Environmental Parameters
Operating temperature
-30 ÷ 60°C
Humidity
5 ÷ 95% - non-condensing
Storage temperature
-40 ÷ 70°C
Casing
Dimensions 53 x 90 x 62 mm
Material Noryl UL. 94 V-O
Degree of casing protection IP40
Degree of terminal protection IP20
Weight 0,10 kg
According to standard DIN EN50022, DIN EN43880
Position during operation Free
Mounting Rail mounting according to DIN35 standard / TS35.
22
ADA-1040PC3
Page 23

23
ADA-1040PC3
Page 24

* - Names of companies and logotypes have been used only for informational purposes.
24
ADA-1040PC3
Dear Customer,
Thank you for purchasing CEL-MAR Company products.
We hope that this user manual helped connect and start up the ADA-1040PC3 converter. We also wish to inform you that we are a
manufacturer of the widest selections of data communications products in the world such as: data transmission converters with
interface RS232, RS485, RS422, USB, Current Loop, Fibre-Optic Converters and Ethernet or Wi-Fi.
Please contact us to tell how you like our products and how we can satisfy you present and future expectation.
CEL-MAR sp.j.
IT and Electronics Department
str. Ściegiennego 219C
25-116 Kielce, POLAND
Tel....................................................: +48 41 362-12-46
Tel/fax.............................................. : +48 41 361-07-70
Web................................................. : http://www.cel-mar.pl/en
Office............................................... : [email protected]
Sales department........................... .: [email protected]
Technical information ..................... : [email protected]
 Loading...