

Page 1
9
1
7
5
6
8
4
3
2
A
A
B
B B
www.interphone.cellularline.com
A
B
8
www.interphone.cellularline.com - www.cellularline.com
Export Dept. [email protected]
A - YELLOW
B - GREEN
for installation of audio kit refer to the help available
www.interphone.cellularline.com
QUICK GUIDE
EN
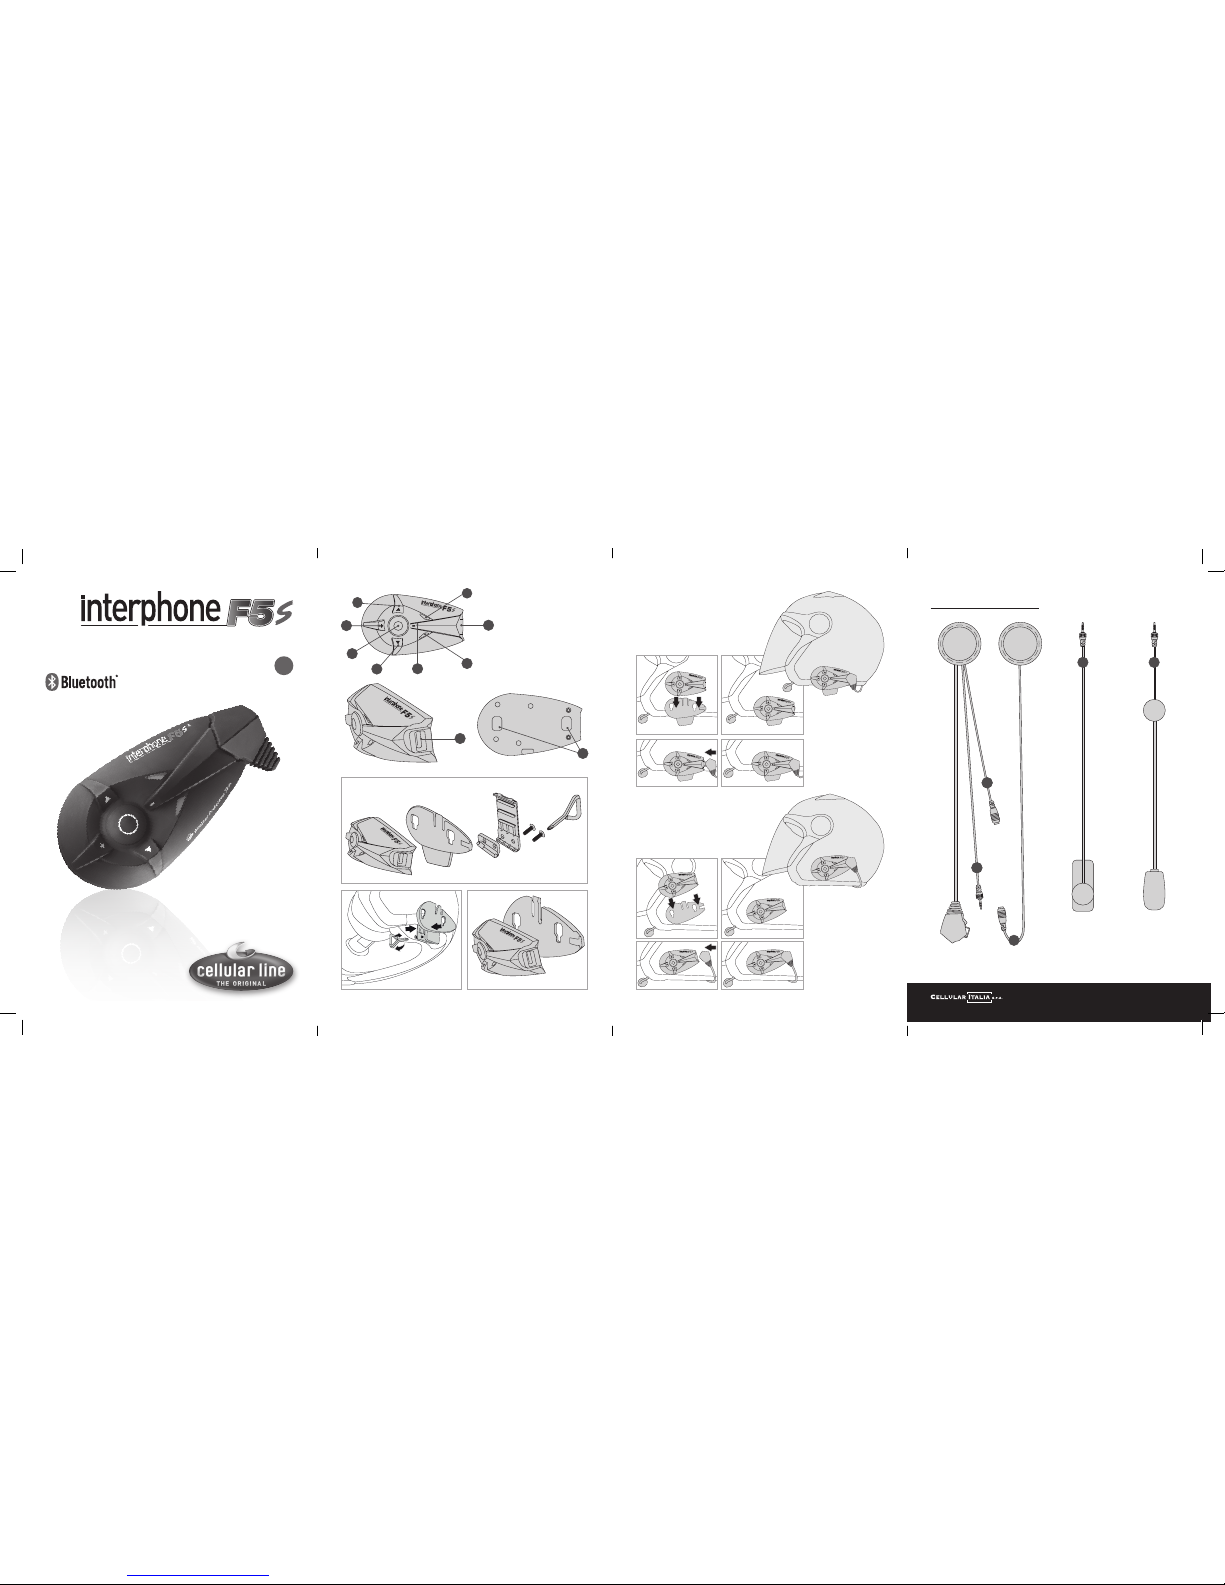
1 - MFB (multifunction button)
2 - Menu UP button
3 - Menu DOWN button
4 - + volume button
5 - – volume button
6 - Multifunction LED
7 - Multifunction LED
8 - Multifunction socket for charger
and accessories
9 - Mounting guides for Bluetooth®
module
10 - Speaker
11 - Microphone
ASSEMBLY OF THE SLIDE SUPPORT
WITH REMOVABLE CLIP
Take the support and note the best place
to fasten it to the side of the helmet. Insert
the rear part of the clip into the helmet and
couple the other part on the outside.
Insert the screws and tighten gently.
ASSEMBLY OF THE ADHESIVE SLIDE
SUPPORT
Take the adhesive support and look for the
best side and place to position it. Clean and
de-grease the part of the helmet where you
are going to stick the support (do not use
any detergents that could damage the hel-
Check position and move
the support if necessary, by sliding it along.
Tighten the screws with
the screwdriver supplied.
met’s nish). Remove the
protective lm from the
bi-adhesive, and apply the
support to the helmet.
As the support will not be
able to be moved once
stuck onto the helmet,
take great care with its positioning, when applying.
BEFORE USING, DOWNLOAD
THE UPDATE FROM WEBSITE
WWW.INTERPHONE.CELLULARLINE.COM
Page 2
ACHEUINTERPHONEF5-UK-AUS-JP
ACCMOTOADAPTERMICROCBRUSBDUAL
MICROCBRINTERPHF5
MICINTERPHONEF5
MICINTERPHONEF5FF
CUSBINTERPHONEF5
KITSPINTERPHONEF5 TESTKITF5
MICINTERPHONEF5UNI
ULTRASLIMF5FFKIT
Congratulations on your purchase of the Interphone F5S.
Before using this product, we recommend you carefully perform the operations
outlined in this Quick Guide.
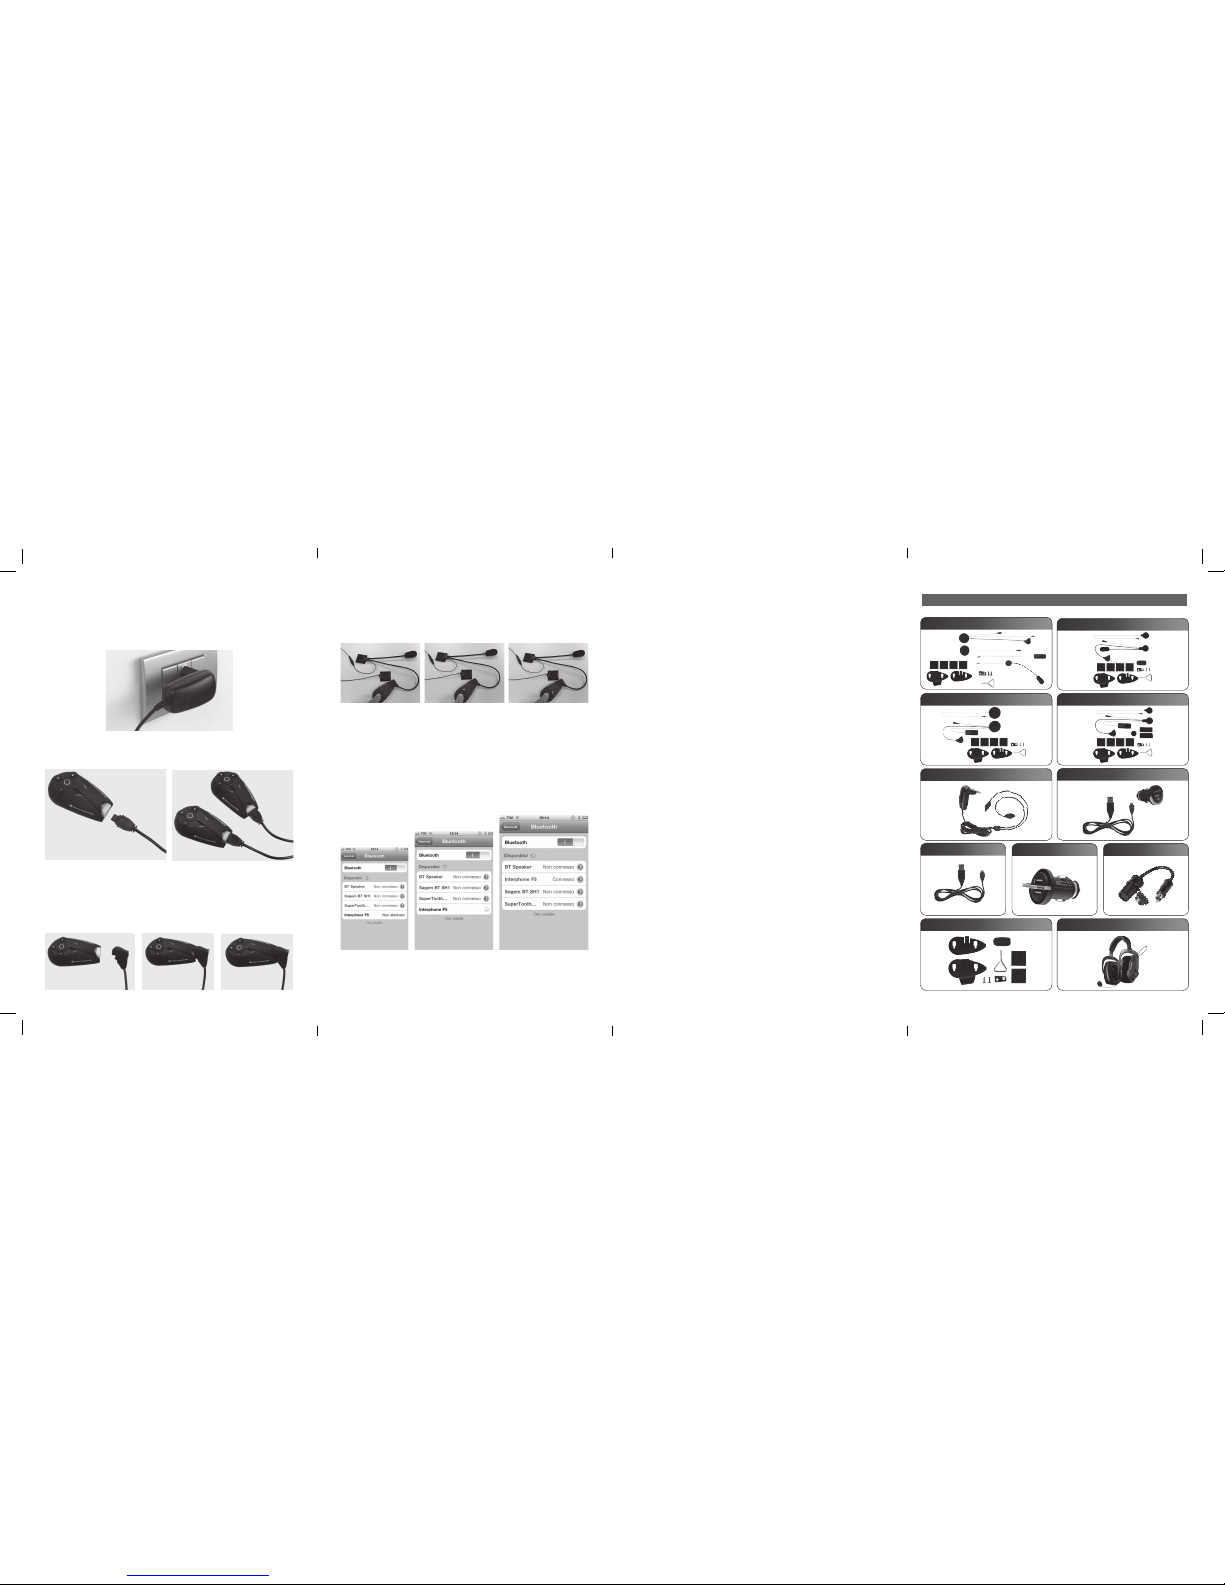
1 - Charging
Plug the battery charger into a 110/220 V socket.
With its dual output, the charger can charge two Interphone F5Ss at the same time.
Insert the plug on the battery charger into the connector on the Interphone F5S. If
you have another Interphone F5S, connect the second unit as well.
The LED lights up yellow/orange during charging.
The LED turns green when charging is complete.
When charging is complete, disconnect the units from the charger by pulling out
the plug, and also pull out the charger from the mains socket.
2 - Setup
Insert the plug on one of the two audio kits contained in the package into the
connector on the F5S.
Press and hold down the MFB button. After a few seconds, the blue LED will light
up. Hold down the button for three more seconds. The red LED will also light up,
and the two LEDs will ash with an alternating red/blue light. Now, release the
button.
During this alternating ashing, listen to the Voice Wizard. Turn up the volume by
pressing the + button, wait for the Voice Wizard to speak in your language and then
press the MFB button to select that language.
The two LEDs will continue to ash between red and blue. You can now connect to
a phone or to another Interphone.
3 - Connecting to a phone
From the Bluetooth menu on your mobile phone (such as the sample iPhone menu
shown below), search for a new device.
When the device is found, select Interphone F5S. Connection will take place
automatically after a few seconds.
If a password is required, enter 0000.
4 - Connecting two Interphone F5Ss or an F5S + an F4S
To pair the two kits, repeat step 2* with the F4S. Press and hold down the MFB
button until the LED begins to ash from red to blue.
Now, press the UP button** once.
* on both units to be paired - ** of one of the two F5S
When the UP button is pressed, the LEDs on the F5Ss will ash more quickly, which
shows that a device search is in progress. After around 10 seconds, the devices will
nd each other and pair automatically. Now, the LEDs will light up a steady blue,
which shows that intercom communication is established.
After connecting the two audio kits, place the headset on one of the two kits next
to your ear and, using two ngers, rub the microphone on the other kit. You should
hear the noise of the ngers through the headset. Next, invert the audio kits and
repeat the test.
Press the MFB button once to switch o intercom communication.
5 - Connecting three Interphone F5Ss or one F5S + two F4Ss
To connect three F5Ss or one F5S and two F4Ss, shut o the two Interphones that
have just been paired.
Turn on one F5S in the pairing mode (by pressing and holding down the MFB
button).
After three seconds, the blue LED will light up. Keep the button held down for three
more seconds. The red LED will also light up, and the two LEDs will alternate from
red to blue. Now, release the button.
Repeat this procedure for the third device (F5S or F4S).
Press the UP button on the rst F5S. The LEDs will ash more quickly, which shows
that a device search is in progress. After around 10 seconds, the devices will nd
each other and pair automatically. At this point, the respective LEDs will light up a
steady blue, which shows that intercom communication is established.
To activate 3-way communication, turn on the three F5Ss and press the MFB button
on the rst unit until you hear a beep. Full duplex intercom communication is now
established among the three Interphone F5Ss.
6 - Connecting four Interphone F5Ss or two F5Ss + two F4Ss
Two Interphones can be paired with each F5S.
After completing the procedure for pairing three Interphones, take the fourth kit
(F5S or F4S) and set it to the pairing mode using the normal procedure.
Perform the same procedure with one of the two F5Ss that were previously paired
with another unit.
Press the UP button on one of the two F5Ss. The LEDs will ash more rapidly, which
shows a device search in progress. After around 10 seconds, the devices will nd
each other and pair automatically. At this point, the respective LEDs will light up a
steady blue, which shows that intercom communication is established.
To establish communication with four users, press the MFB button on one of the
two F5Ss until you hear a beep. Intercom communication between the three
Interphone units is now established. To connect the fourth unit, press the MFB
button.
INTERPHONEF5 ACCESSORIES
 Loading...