

Page 1
*58'9%7/('
FHD LED TV
Page 2

Contents
Unpacking the TV / Accessory’s
Installing / Removing the Base Stand
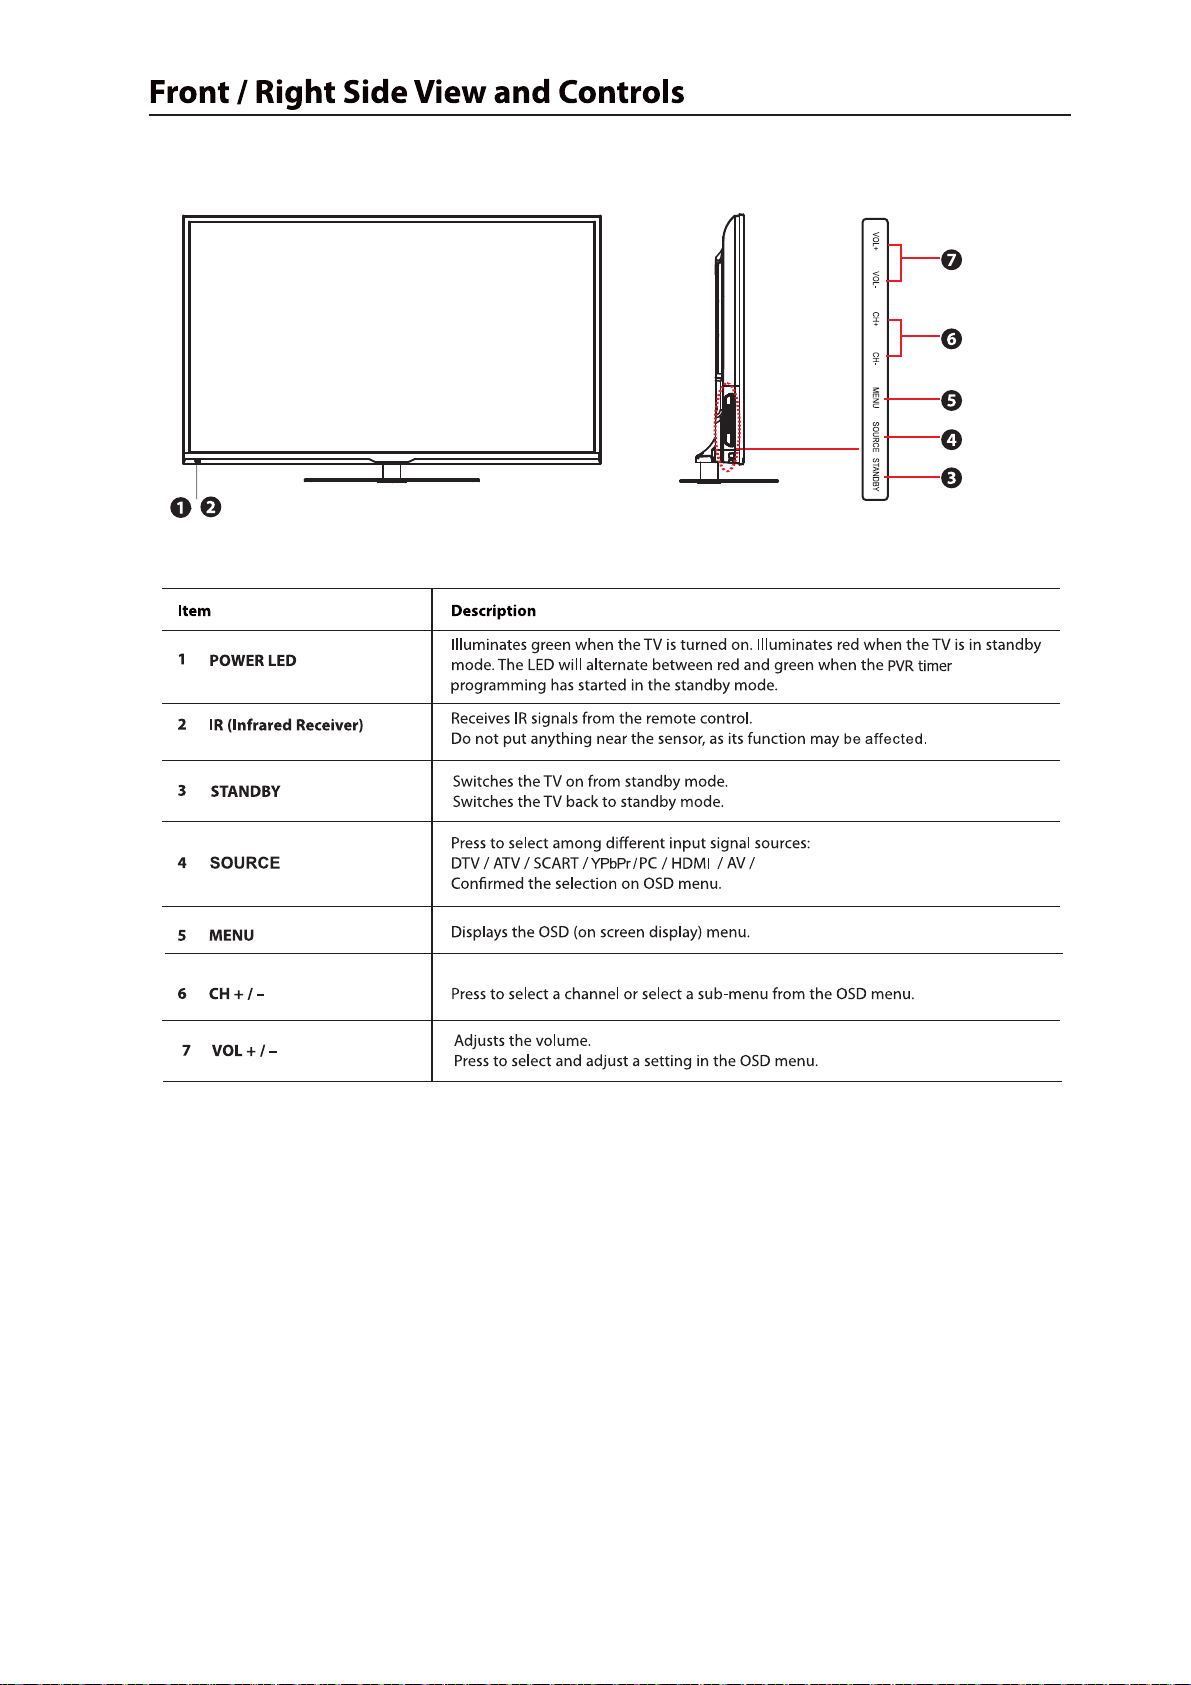
Front / Right Side View and Controls
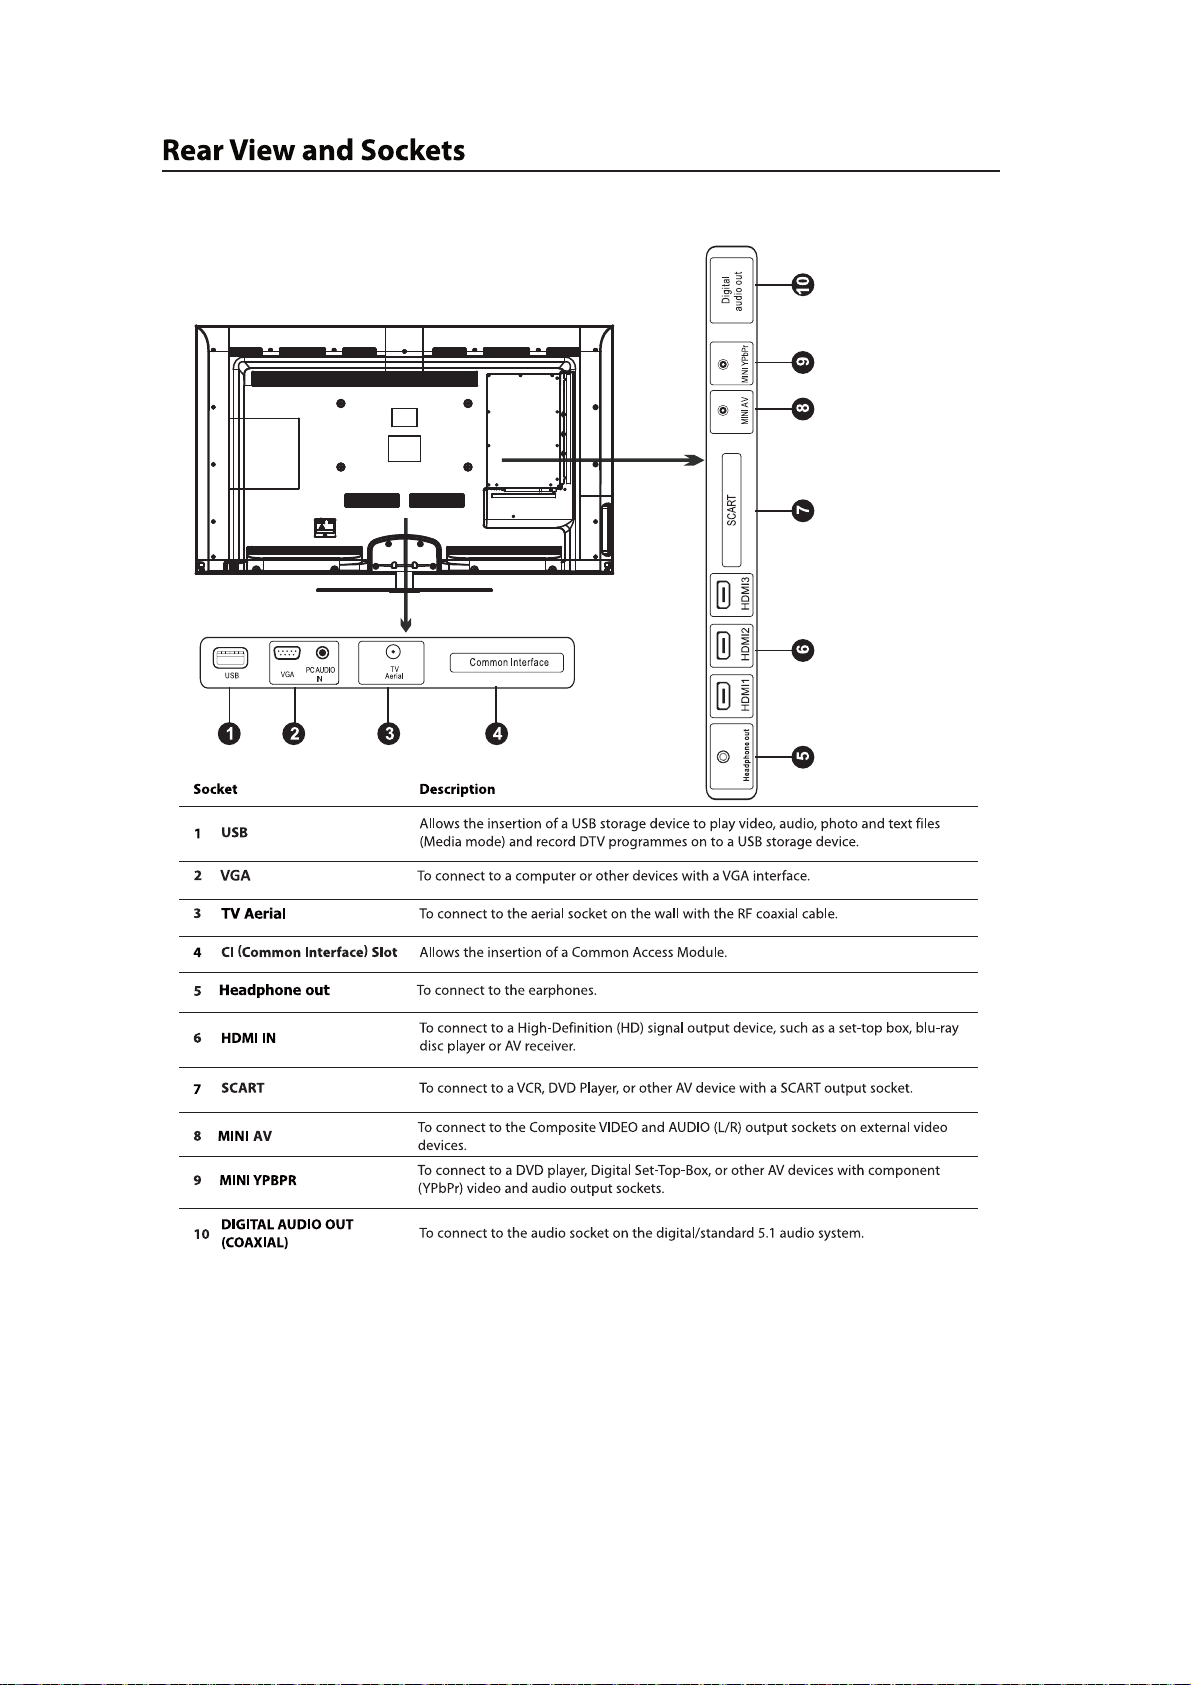
Rear View and Sockets
Remote Control
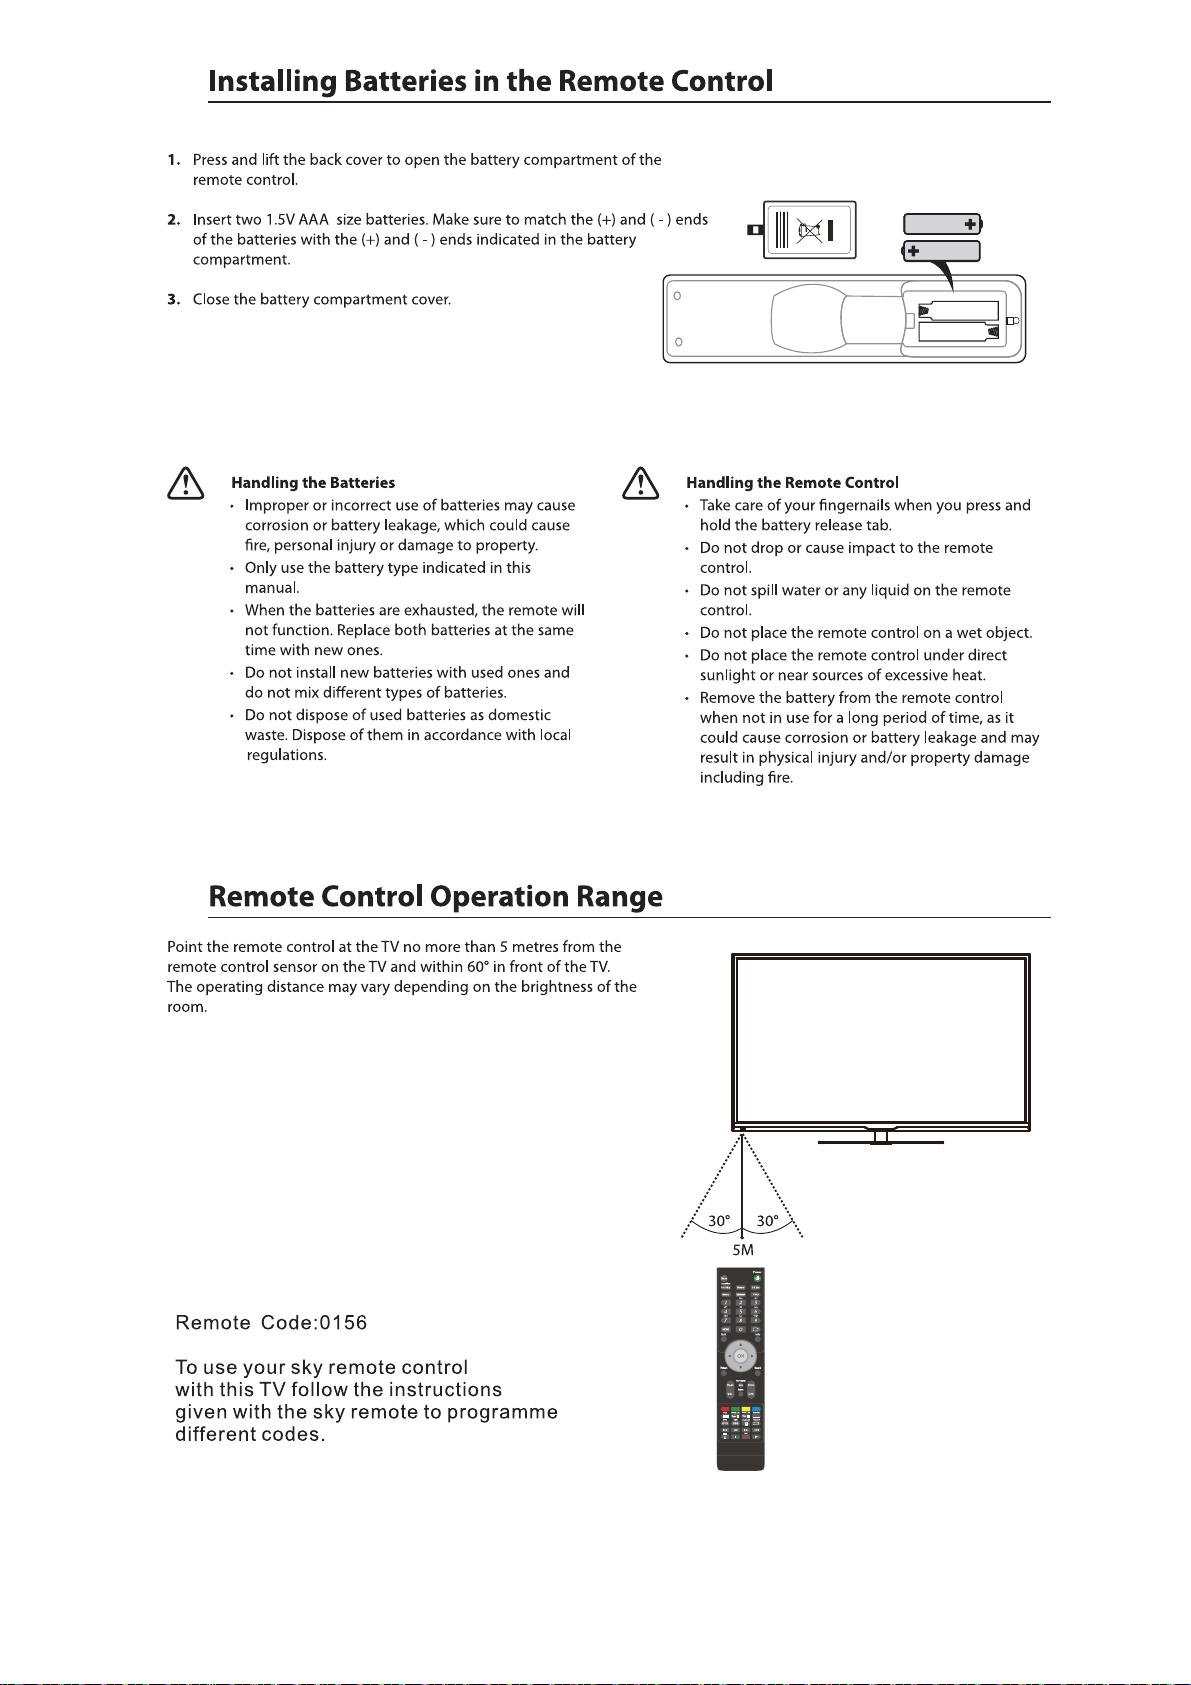
Installing Batteries in the Remote Control
Remote Control Operation Range
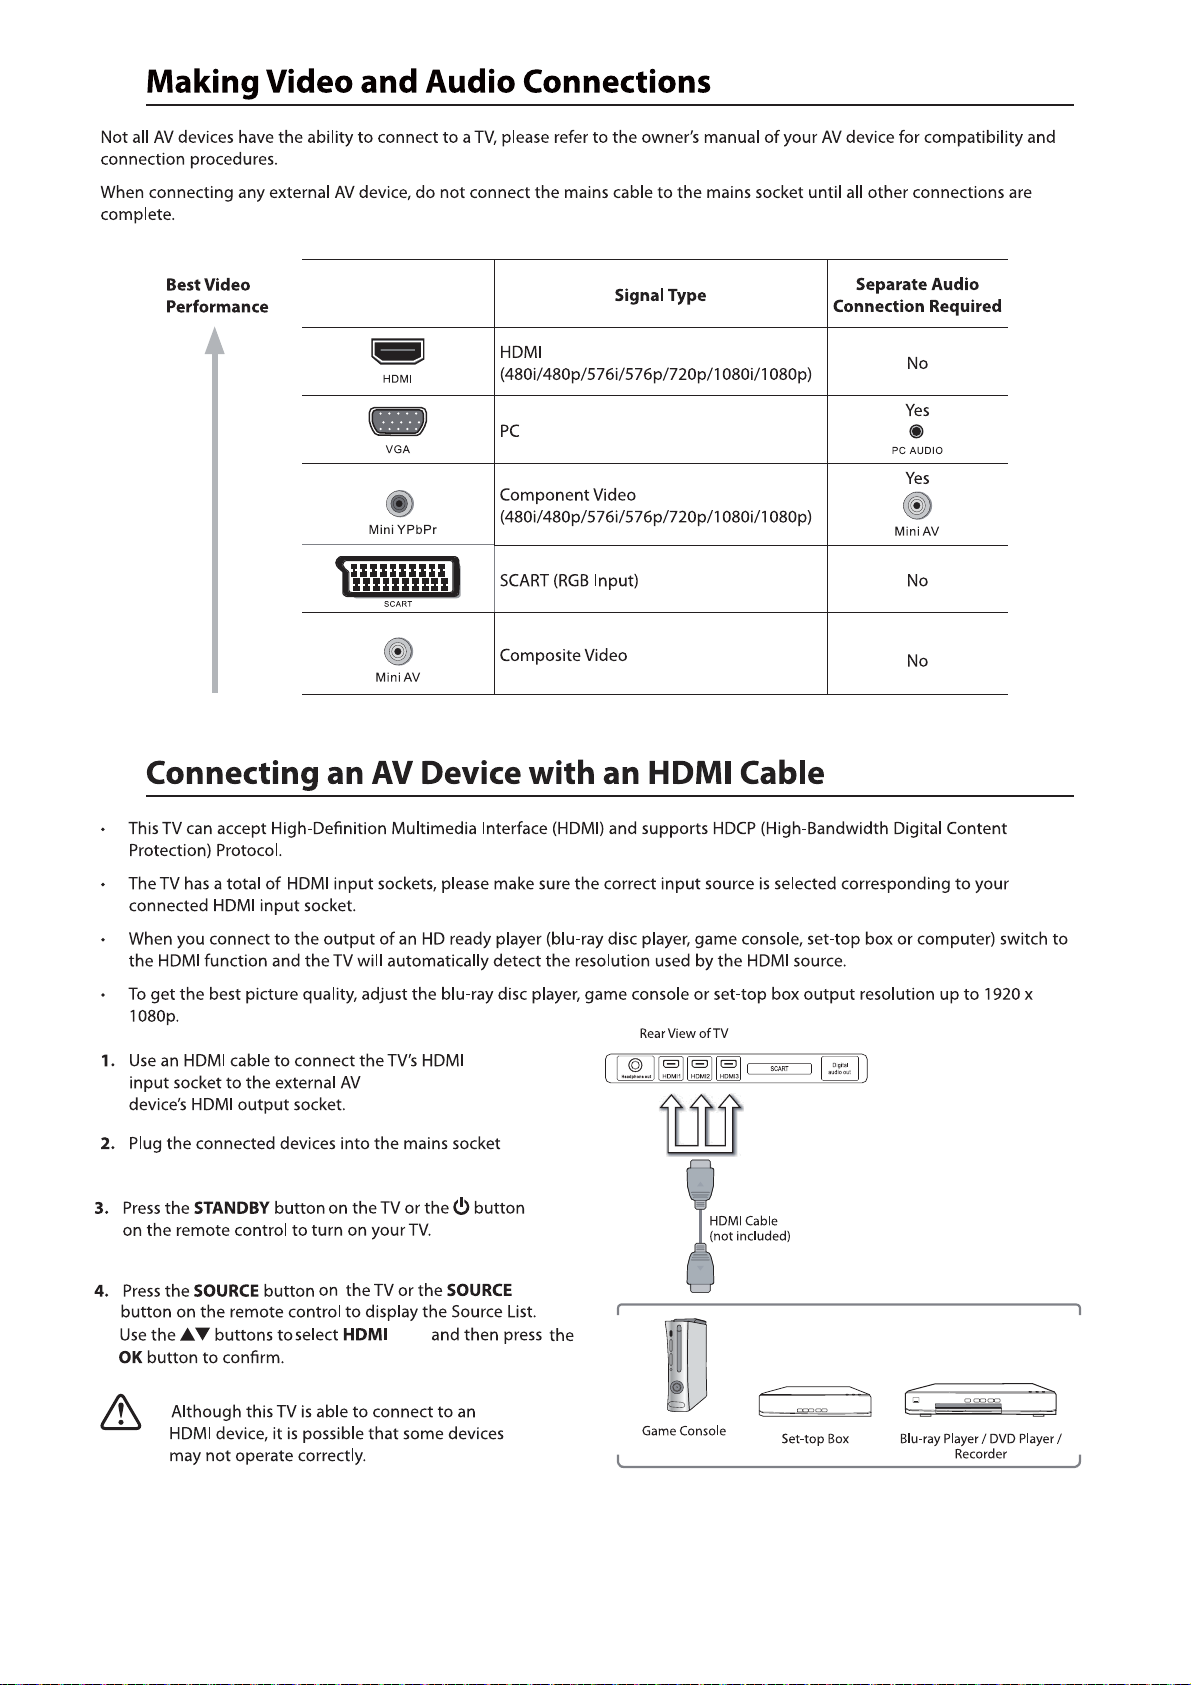
Making Video and Audio Connections
Connecting an AV Device with an HDMI Cable
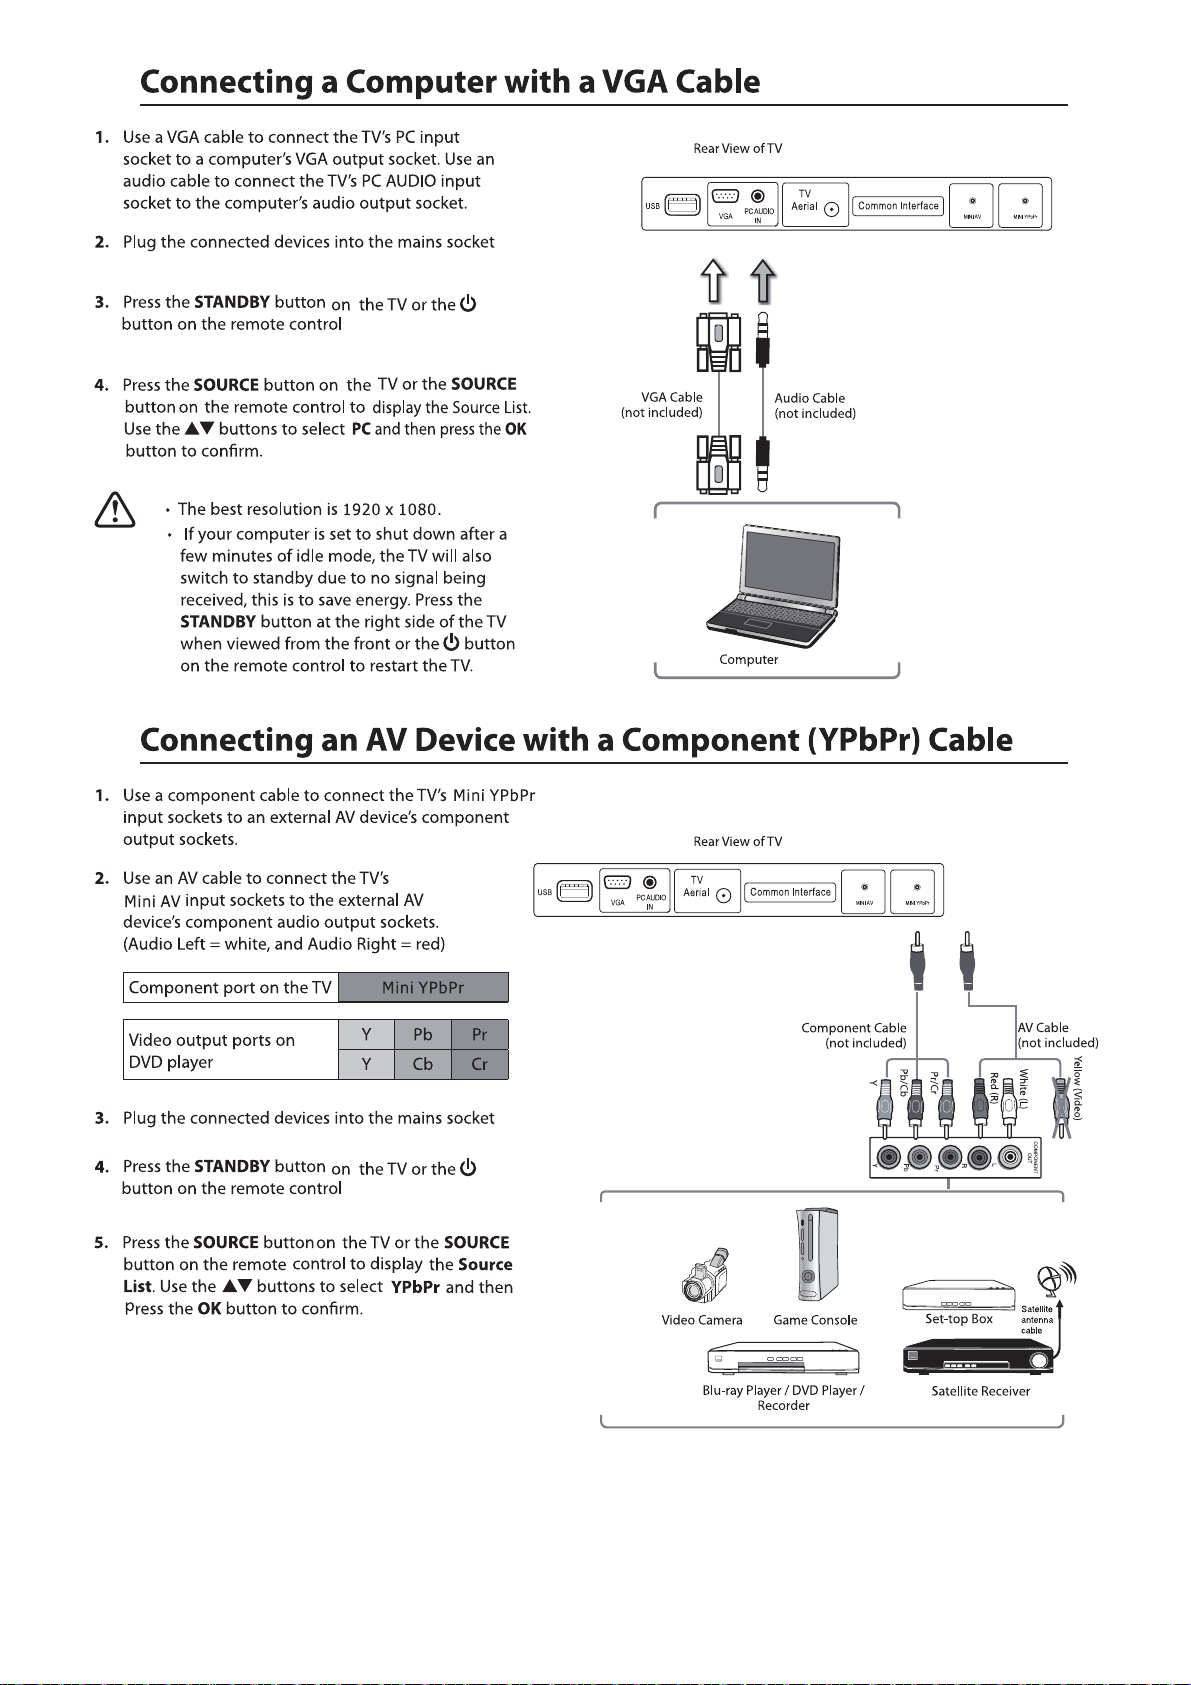
Connecting a Computer with a VGA Cable
Connecting an AV Device with a Component (YPbPr) cable
Connecting an AV Device with a SCART Cable
Connecting an AV Device with Composite Cable
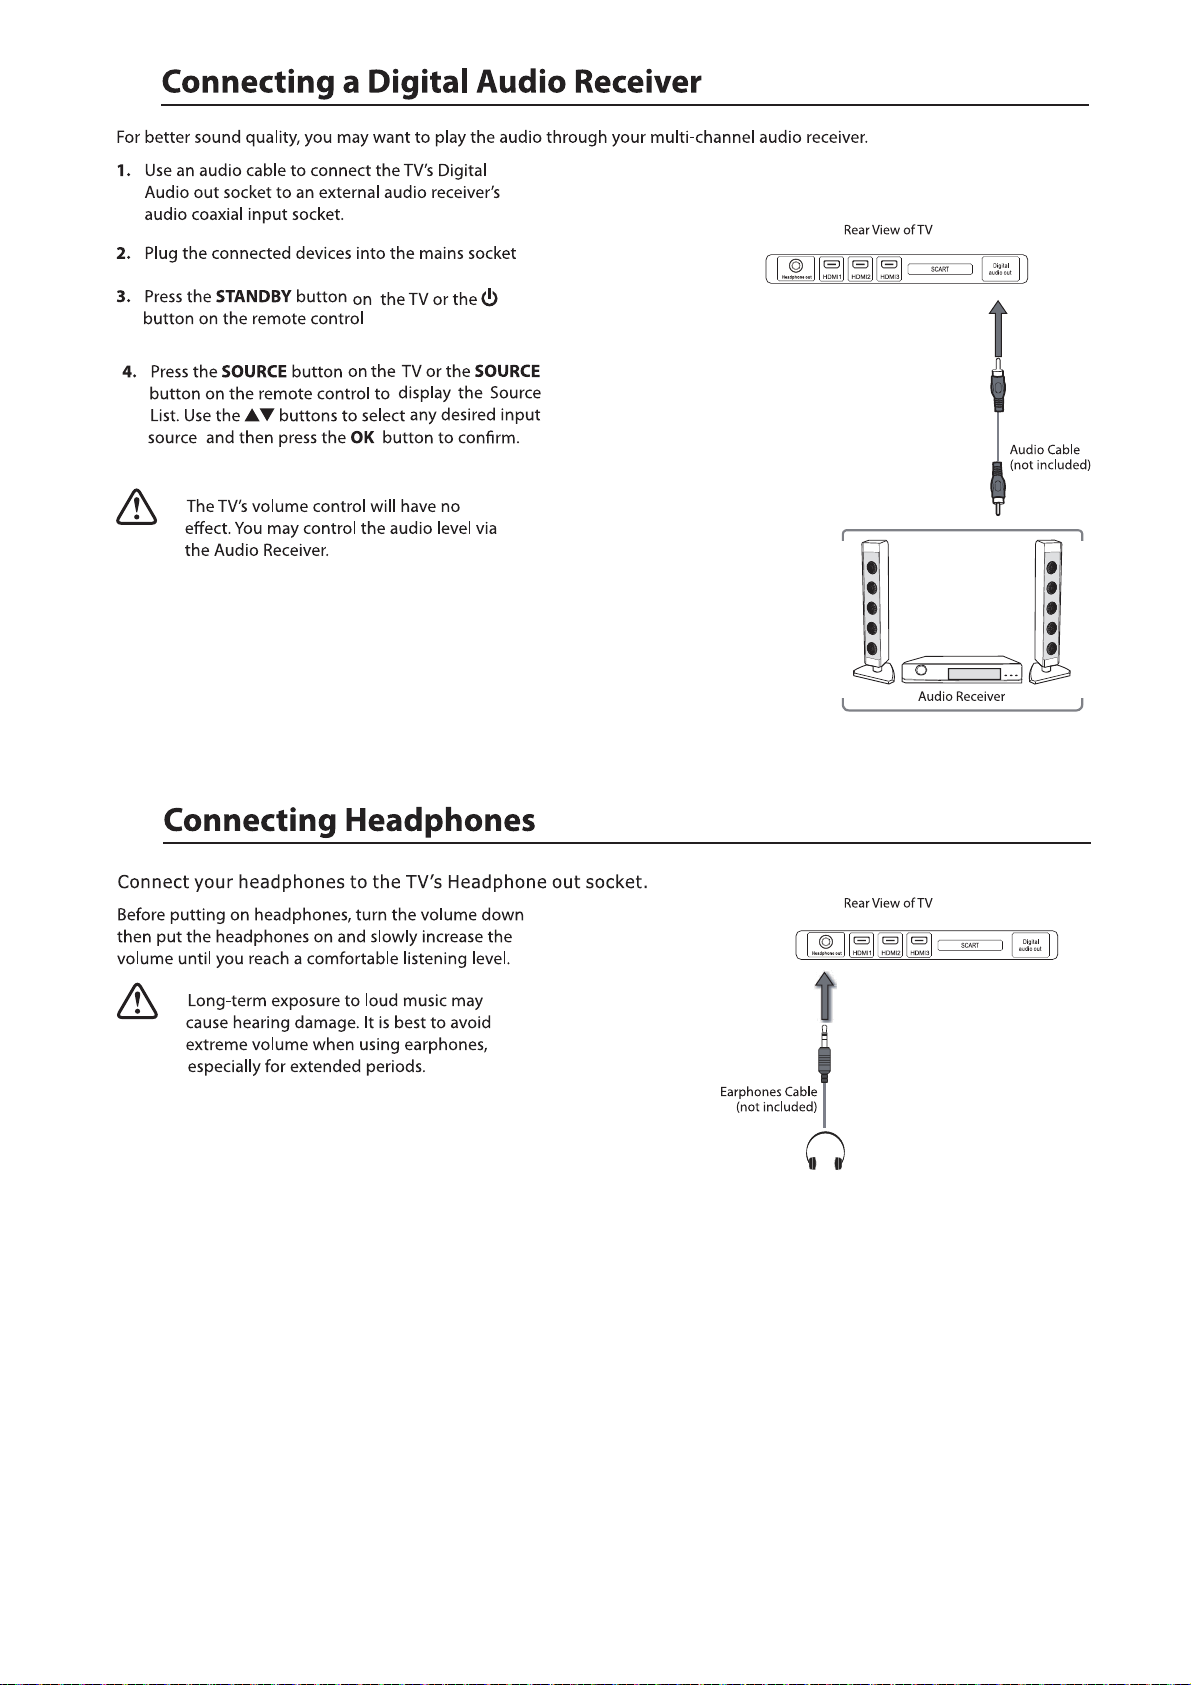
Connecting a Digital Audio Receiver
Connecting Headphones
Turning the TV on for the First Time
OSD Menu
1
. Picture Setting
2. Sound Setting
3. Channel Setting
4. Feature menu
5. Setup menu
1
2
3
4
5-6
7
7
8
8
9
9
10
10
11
11
12-13
31noitarepO cisaB
14-20
14-15
16
17-19
20-23
24
EPG(Electronic Programme Guide)(DTV Mode)
Teletext(ATV Mode)
Digital Teletext(DTV Mode)
Connecting a USB Storage Device
Viewing Photos
Listening to Music
Watching Movies
Viewing Texts
Time Shift Function(DTV Mode)
Recording DTV Programme onto a USB Storage Device
Timer Porgramming
Play Recorded Programme
Maintenance
spiT dna stniH
25
26
26
27
28
28-29
29-30
30
31
31
32
33
34
34-35
36sedoM yalpsiD
37snoitacificepS
38sgninraW ytefaS
Page 3
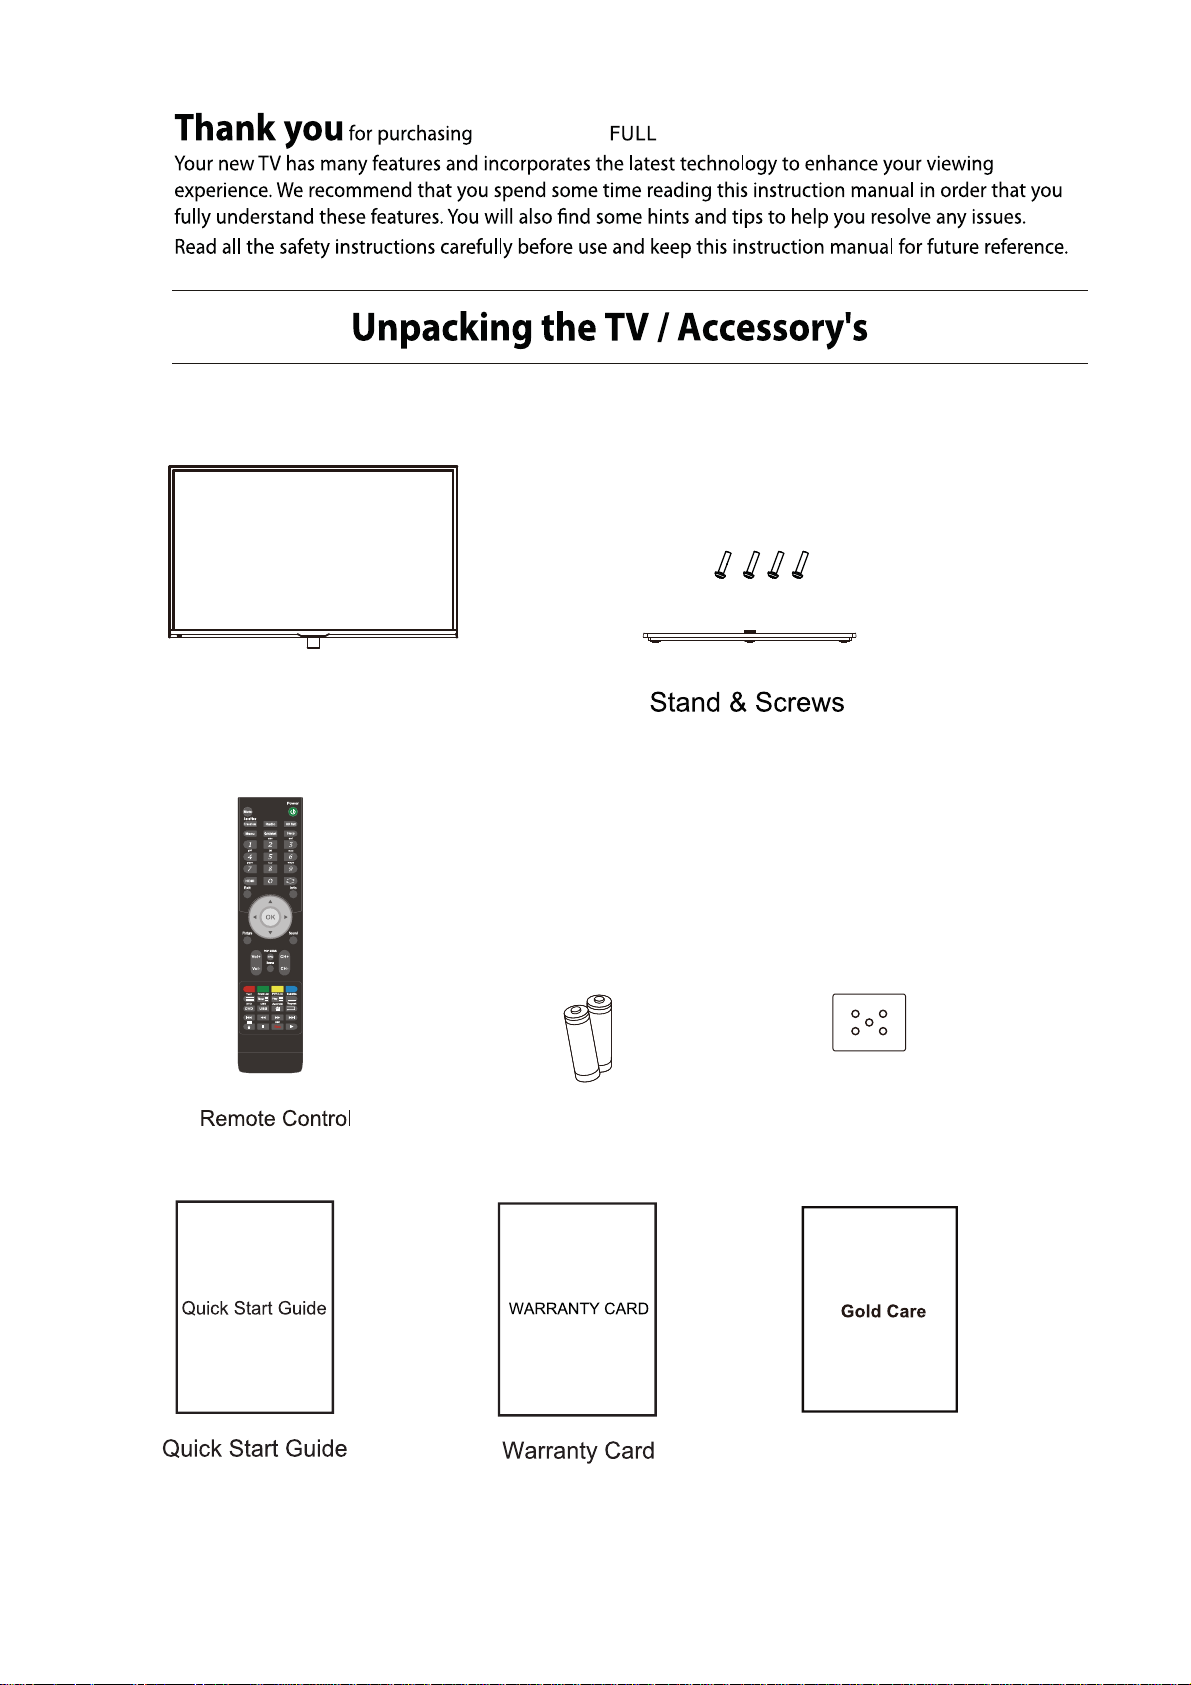
TV set
your new 58" HD LED TV.
Batteries
1
Metal Plate
Gold Care
Page 4
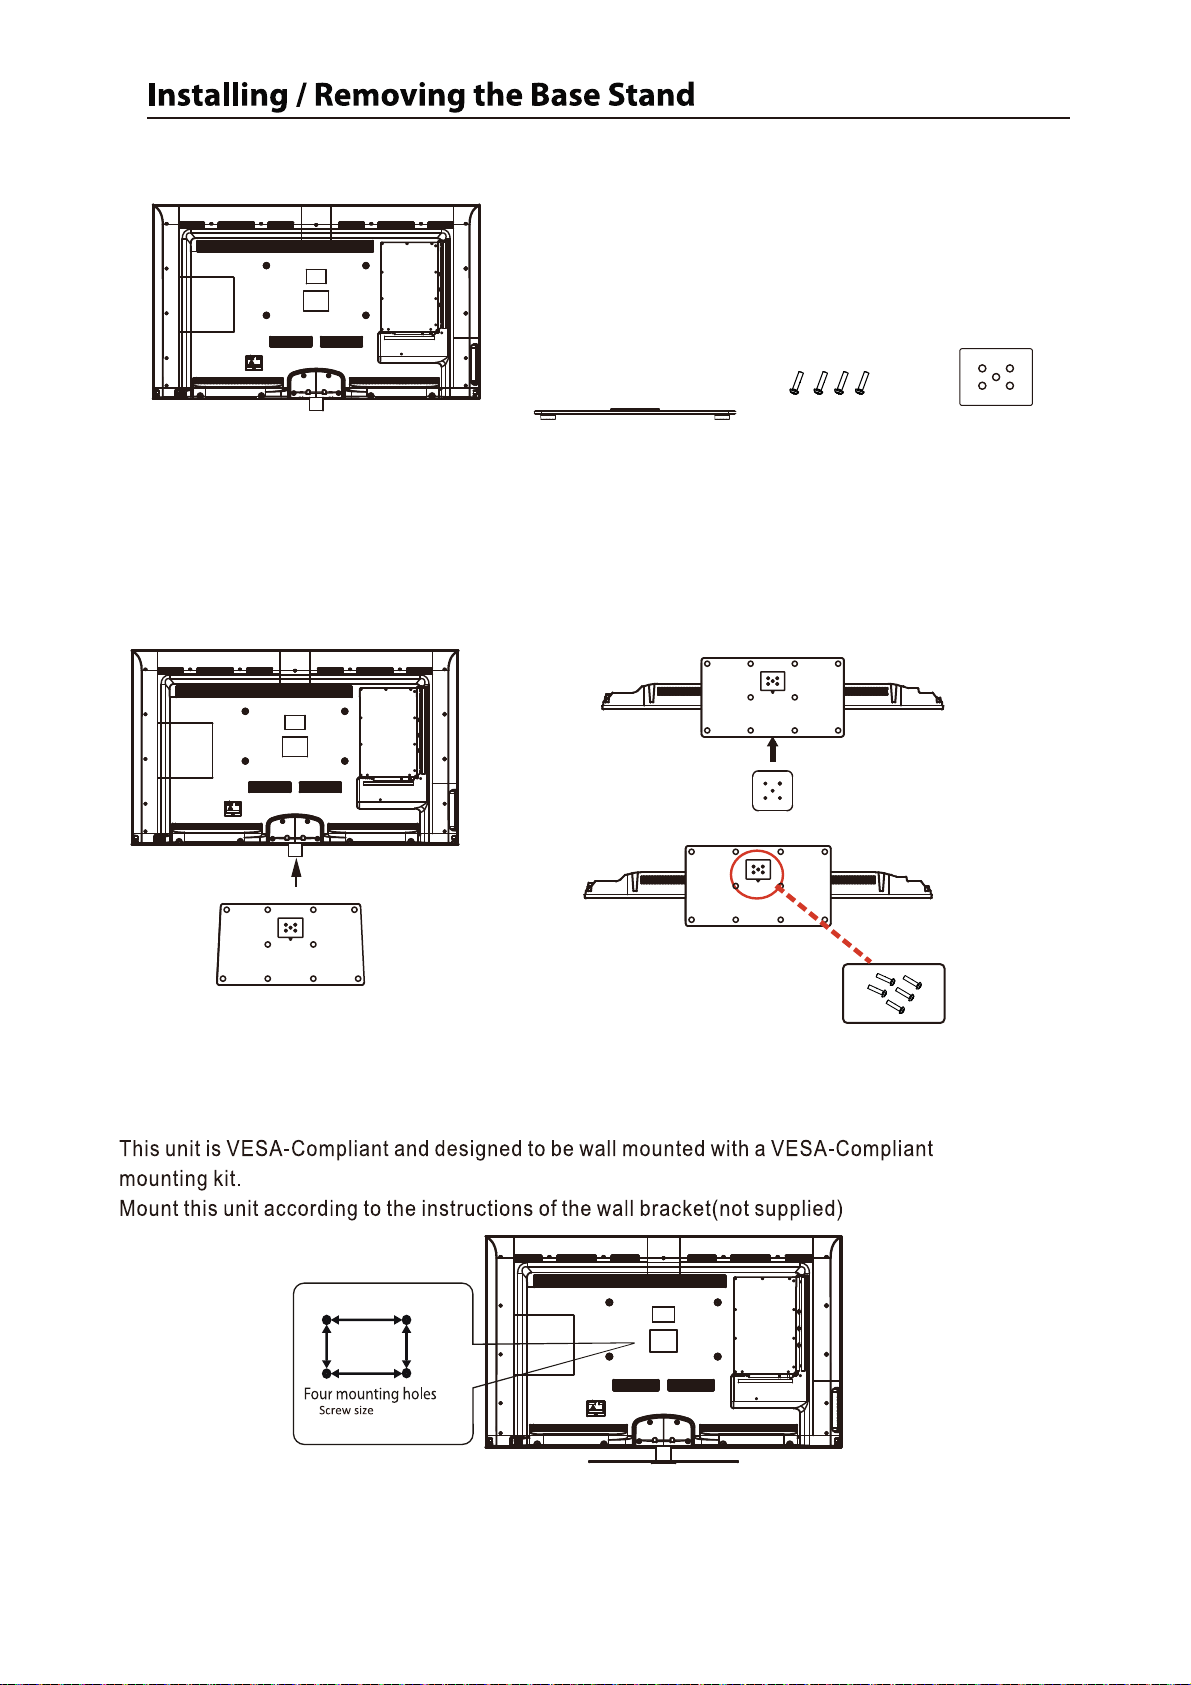
The par ts
TV set
Stand
Screws(supplied)
Metal Plate
Installation
Place the TV face down on a soft and flat surface (blanket, foam, cloth, etc.) to prevent any damage to the TV.
Put the stand to the neck of the TV set as shown below.
1
Metal plate
Note: Make sure all five holes are aligned.
TV
Stand
2
3
Note: Make sure the arrow mark towards
the front.
400mm
200mm
M5x12
1. Stick the metal plate to bottom of the glass stand.
2. Connect the stand to the TV.
3. Fix the stand with the 5 screws supplied.
400x200mm
2
Page 5
MEDIA.
3
Page 6
4
Page 7
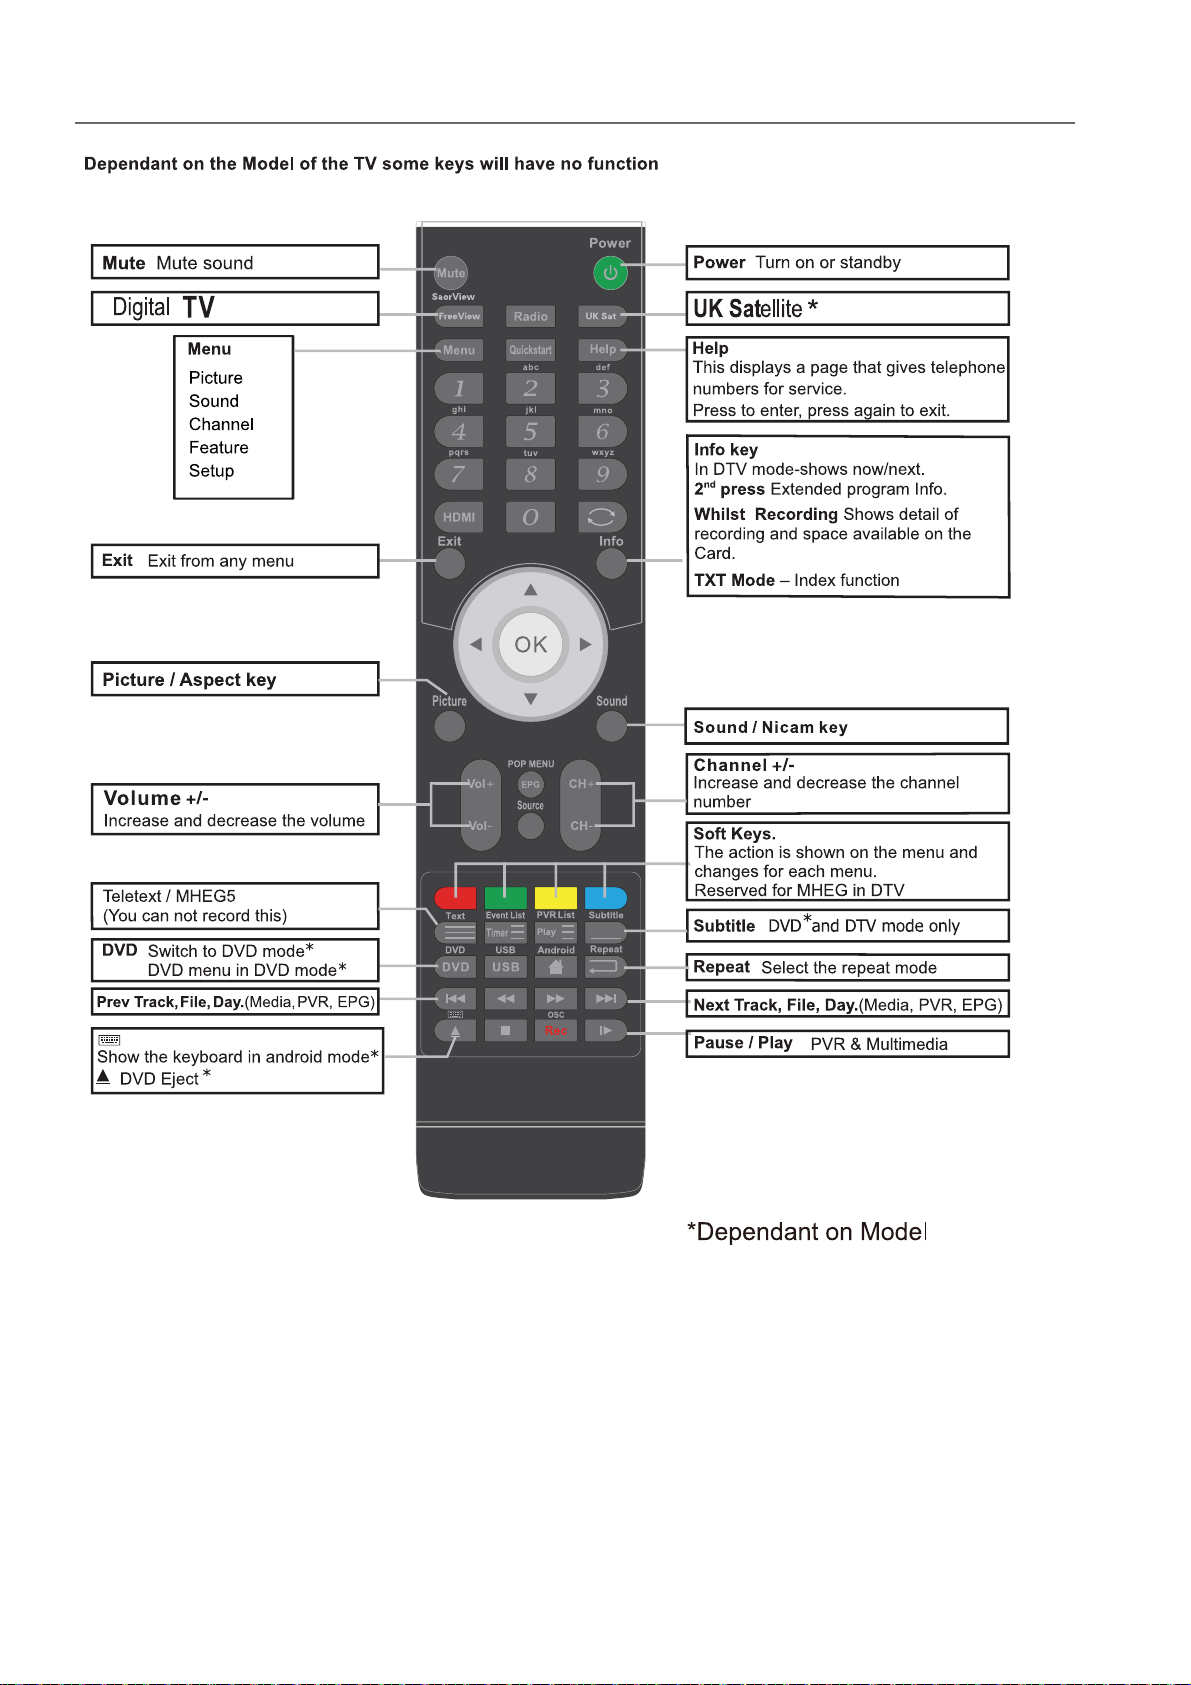
Remote Control
5
Page 8

Remote Control
6
Page 9
7
Page 10
1/2/3
8 9 10
Page 11
Page 12

Page 13
11
Page 14

5. If this is the first time you are turning on the TV and there are no programs in the TV memory, the 4XLFN6WDUWmenu
will appear on the screen. There are 4 setups as follow:
Ok
:egaugnal
- 1 -
Enter
Germany
UK
France
Italy
Spain
Exit
ExitMove
12
- 2 -
:yrtnuoC
Ok
- 4 -
Please select the method of
TV Connection.
Move
:noitcennoC VT
Ok
Enter
Enter
Germany
UK
France
Italy
Spain
Exit
ExitMove
ATV
Freeview
Cable
Exit
Exit
Page 15

Ensure your aerial, cable or dish is plugged in to the TV and
then press OK.
The TV will start to install the service you have selected.
This could take some time depending on your selected service.
You can tune an additional service at any time by pressing the
Quick Start button.
DTV, ATV, AV, SCART, YPBPR, HDMI1, HDMI2, HDMI3, PC, Media.
Radio
OK
Cancel
Ok
Enter
Exit
ExitMove
20
LOCK
/
Mut e Mute
13
Page 16

14
Page 17

15
Page 18

Picture
Sound
Channel
Feature
Setup
Picture
Sound
Channel
Feature
Setup
Move
Move
Sound
Sound Mode
Bass
Treble
Balance
Surround Off
SPDIF
Enter
Sound
Exit
Exit
Exit
Exit
OK
Sound Mode
Bass
Treble
Balance
Surround
SPDIF
OK
Enter
User
Standard
Movie
Music
Speech
User
Auto
Menu
User
Auto
Return
50
50
0
Menu
Return
Surround
Press the buttons to turn on / off the surround function by selecting “On” or “Off”.
16
Page 19

Allows you to set up a variety of channel options.
1. Press the Menu button and then press the buttons to select the
CHANNEL menu.
2. Press the OK
the following channel options ress the OK button
and then press the to select
buttons
and then p
Channel Management
To manage (Delete / Rename /Move / Lock / Skip) all channels.
Picture
Sound
Channel
Feature
Setup
Move
Channel Management
Favorite Management
C
ountry
TV Connection
Auto Search
DTV Manual Search
ATV Manual Search
OK
ok
Enter
Exit
Channel
Exit
ENTER
ENTER
UK
Freeview
ENTER
ENTER
ENTER
MENU
Return
1. Press theƷbuttons to Channel Managemen then press the
2. A channel management screen will pop up,
Press the Ʒ buttons to select the channel you want to edit.
Lock
3.
4.
OK button to confirm.
Favorite Management
To manage (Add / Delete ) favorite channels.
1. Press theƷ buttons to Favorite Management then press the OK button
to confirm.
2. A favorite management screen will pop up.
3.
4.
5.
17
Page 20

TV Connection
Select DTV type, you can choose Freeview, Cable as you like.
18
Page 21

ATV Manual Search
To search analogue channel by entering parameters manually.
1. Press the ▲▼ buttons to ATV Manual Search then press the OK button to confirm.
2. Select ATV manual search item to enter air channel manual search
in ATV source and the user operation interface as following.
Current Channe
Frequency
BG / DK / I / L / L’ .
3.
4.
19
Page 22

Feature Setting
Allows you to set up a variety of feature options.
1. Press the Menu button and then press the ▲▼ buttons to select the
Feature menu.
2. Press the OK or s ▲▼ buttons
the following feature options ress the OK button .
►button and then press the to select
and then p
Lock
.
1. Press the
2.
Lock Channel:
Parental Guidance:
Change Pin Code:
3.
4.
buttons to Lock then press the OK button to confirm.
▲▼
8899
ON: Turns on the Lock options. (This option must be set to
ON for the channel management Lock option to function)
Once the Lock option is activated (ON).
To view any locked channels you will need to give a password.
For Auto, Manual tune and TV reset a password will also
be needed.
OFF: Turn off the LOCK options. (All functions of the TV
will be available)
Off: turn off Parental Lock
4-18: turn on Parental Lock and set the age level that are
permitted to watch the program.
Press the OK or s to enter the pin code
changing page.
►button
Picture
Sound
Channel
Feature
Setup
Picture
Sound
Channel
Feature
Setup
Picture
Sound
Channel
Feature
Setup
Picture
Sound
Channel
Feature
Setup
Move
Move
Move
Lock
Language
Clock
Sleep Timer
Auto Standby
Hearing Impaired
CI Info
PVR/Pause TV
OK
Enter
Lock
Language
Password
Clock
Sleep Timer
Auto Standby
Hearing Impaired
CI Info
PVR/Pause TV
OK
Enter
Feature - Lock
Lock Channel
Parental Guidance
Change Pin Code
Hotel Mode
OK
Enter
Feature - Change Pin Code
Old Password
New Password
Confirm New Password
Exit
Exit
Feature
Exit
Feature
Exit
Exit
ENTER
ENTER
ENTER
Off
Never
Off
ENTER
ENTER
Menu
ENTER
ENTER
ENTER
Off
Never
Off
ENTER
ENTER
Menu
On
Off
ENTER
ENTER
Menu
Menu
Return
Return
Return
Return
Exit
Exit
Exit
____
____
____
Language
System language setting, includes OSD Language, Preferred Subtitle, Preferred Audio,
Digital Teletext Language, Anglog Teletext Language.
1. Press the ▲▼ buttons to Language then press the OK button to confirm.
OSD Language
Preferred Subtitle
Preferred Audio
DTV Teletext Language
ATV Teletext Language
3.
4.
2
Press the buttons to select the menu language.
Press the buttons to select the Preferred Subtitle.
Press the buttons to select the Preferred Audio.
Press the buttons to select the DTV Teletext Language.
Press the buttons to select the ATV Teletext Language.
Picture
Sound
Channel
Feature
Setup
Move
Feature - Language
OSD Language
1st Preferred Subtitle
2nd Preferred Subtitle
1st Preferred Audio
2nd Preferred Audio
DTV Teletext Language
ATV Teletext Language
OK
Enter
English
English
English
English
English
English
West
Exit
Menu
Exit
Return
Page 23

Feature Setting
Clock
1. Press the ▲▼ buttons to Clock then press the OK button to confirm.
Date
Time
DST
(daylight saving time)
Press the OK buttons to set date.
Press the OK buttons to set time.
)
(The Date and Time option are not available in UK. The Time and Date
are automatically set by the Digital TV signal.)
[On, Off] if it's On, it'll be an hour earlier than the GMT.
If Time Zone is set to Auto, it's not available.
Picture
Sound
Channel
Feature
Setup
Picture
Sound
Channel
Feature
Setup
Move
Move
Date
Time
Time Zone
DST
OK
Enter
Lock
Language
Clock
Sleep Timer
Auto Standby
Hearing Impaired
CI Info
PVR/Pause TV
OK
Enter
Feature - Clock
Exit
Exit
Feature
Exit
Exit
06/11/2012
11:02
+8:00
Off
Menu
ENTER
ENTER
ENTER
Off
Off
10 Mins
20 Mins
30 Mins
60 Mins
Menu
Return
Return
Auto Standby
Feature
Lock
hours after the4
Picture
Sound
Channel
Feature
Setup
Move
Picture
Sound
Channel
Feature
Setup
Move
Language
Clock
Sleep Timer
Auto Standby
Hearing Impaired
CI Info
PVR/Pause TV
OK
Enter
Lock
Language
Clock
Sleep Timer
Auto Standby
Hearing Impaired
CI Info
PVR/Pause TV
OK
Enter
Exit
Feature
Exit
ENTER
ENTER
ENTER
Off
Never
Never
4 Hour
Menu
ENTER
ENTER
ENTER
Off
Never
Off
Off
On
Return
Menu
Return
Exit
Exit
2
Page 24

Picture
Sound
Channel
Feature
Setup
Hearing Impaired
PVR/Pause TV
Move
No CI Module inserted
Lock
Language
Clock
Sleep Timer
Auto Standby
CI Info
OK
Enter
Common Interface
Feature
Exit
ENTER
ENTER
ENTER
Off
Never
Off
ENTER
ENTER
Menu
Exit
Return
22
Move
Enter
Menu
Return
OK
Exit
Exit
Page 25

Feature - PVR/Timeshift
Picture
Sound
Channel
Feature
Setup
Move
Partition Select
Pause TV Buffer
Timer
Record List
Recorder Start
OK
ok
Enter
ENTER
Auto
Enter
Enter
Enter
Exit
MENU
Exit
Return
Pause TV Buffer
30mins / 1hr / 2 hr.
23
Page 26

Setup
Picture
Sound
Channel
Feature
Setup
Move
OSD Ti mer
PC Steup
Home Mo de
Reset TV Setting
oftware Upgrade
S
OTA Upgrade
Factory Reset
OK
Enter Return
MENU
10 Seconds
ENTER
Home
NTER
E
ENTER
ENTER
ENTER
EXIT
Exit
OTA Upgrade
24
Page 27

EPG
EPG
There are 3 modes of EPG menu:
Daily mode: shows the information of the programs to be broadcasted
in daily mode.
RED (Weekly) Change to weekly mode.
GREEN (Reminder)
YELLOW (Prev Day) Update the program information of the current 7 channels in the channel
list to the previous day and the start time keeps the same.
BLUE (Next Day) Update the program information of the current 7 channels in the channel
list to the next day and the start time keeps the same.
Weekly mode: shows the information of the programs to be broadcasted
in weekly mode.
RED (Daily) Change to Daily mode.
YELLOW (Prev Day) If the cursor lies on the right event list, update the right event list to
display the event information of the previous day and move the cursor
to the same place in the updated page.
BLUE (Next Day) If the cursor lies on the right event list, update the right event list to
display the event information of the next day and move the cursor to
the same place in the updated page.
Extended mode: shows the detailed information of each program.
Extended detailed programme information can
be d is played by press in g the info button o n th e
remote control.
25
Page 28

26
Page 29

27
Page 30

/ GI F / TI FF.
function: Play / Pause / Stop / Prev. / Next / Rotate / Zoom /
Info / Photo Setup / Play list.
28
Page 31

WAVE / WMA / AAC / AC3 / MPEG.
function: Play / Pause / Stop / F B / FF / P re v. / Ne xt / Goto Time /
Repeat A ll / Play list / Music.
AVI / MPEG1/2 / MPEG4 / WMV / H.264.
29
Page 32

function: Play / Pause / Stop / FB / FF / Slo w mo de / Step mode /
Repeat A-B / Pre v. / Next / P la y list / Info / Movie Setup / Goto Time.
30
Page 33

Time shift input info menu:
Information Ti me s hift inpu t in fo m enu displ ay s as a flag of Time shift. After Time shift start this menu displays
all the time until. Time shift stop (except there is some other menu exist) .
Enter method After Time shift start, it will display automatically.
Time shift info banner menu:
Information Time shit info banner shows some current Time shift information.
Enter method After Time shift start, press Info to show the menu .
Function explain :
a Time is equal to current play time minus current recording time.
b Progress bar is for current recording length compared with the disk free space when REC start.
The black triangular icon is for current play length compared with current recording length.
c MB Free is the disk instantaneous free space.
d The right red time menu has the same function with the time in info banner menu(only when info banner menu closed it showed).
Time shift info menu
Time shift time menu
Rec
REC
REC info menu
Rec
31
Page 34

Timer
Timer
2. Press the ADD button enter the Time Edit menu for the channel.
Recorder Press the ▲▼ buttons to select the Recorder On or Off.
Type Press the ▲▼ buttons to select the Type
Channel Press the ▲▼ buttons to select the
Duration
Date Press the ▲▼ buttons to select the date of starting
recording, Format is day / month / year.
32
Page 35

Press the SOURCE but to n on the TV or th e SOURCE button on the remote
control then
33
Page 36

343536
Page 37

Page 38

Page 39

58 inch LED Panel
1920 (H) x 1080 (V) pixels
300
4000:1
AC 100-240V~ 50Hz/60Hz
Approx. 147cm(58 inch)
100W
146 kWh
400 x 200mm/M5 x 12
10W + 10W
1315 x 92 x 783 mm
1315 x 305 x 840 mm
25.5Kg
37
Page 40

38
Page 41

ŝƐĂďůĞƚŚŝƐĨĞĂƚƵƌĞďLJƐĞƚƚŝŶŐƚŚĞhdKWKtZK&&ŽƉƚŝŽŶ
ŝŶƚŚĞŵĂŝŶŵĞŶƵ&dhZƚŽEsZ
39
Page 42

40
 Loading...