

Page 1

C39222DVB-DLED
Page 2

Selecting Input Source..................................................................................................................................................................................................16
Auto Installation...............................................................................................................................................................................................................16
Picture Menu...............................................................................................................................................................................................................17-18
- Picture Mode..........................................................................................................................................................................................................17
- Brightness................................................................................................................................................................................................................17
- Contrast....................................................................................................................................................................................................................17
- Sharpness.................................................................................................................................................................................................................18
- Colour........................................................................................................................................................................................................................18
- Tint(Not available in DTV)..................................................................................................................................................................................18
- Colour Temperatur................................................................................................................................................................................................18
- Aspect Ratio............................................................................................................................................................................................................18
- Noise Reduction....................................................................................................................................................................................................18
8
9
9
0
0
Sound Menu................................................................................................................................................................................................................18-19
- Sound Mode...........................................................................................................................................................................................................18
- Bass(Avaliable just in USER Mode)..................................................................................................................................................................18
- Treble(Avaliable just in USER Mode)...............................................................................................................................................................18
- Balance......................................................................................................................................................................................................................19
- SRS TruSurround HD
...............................................................................................................................
..............................................................19
Channel Menu.............................................................................................................................................................................................................19-22
- Channel Management........................................................................................................................................................................................19
- Favorite Manager..................................................................................................................................................................................................21
- Country.....................................................................................................................................................................................................................21
- Auto Search.............................................................................................................................................................................................................21
- DTV Manual Search..............................................................................................................................................................................................22
- ATV Manual Search...............................................................................................................................................................................................22
Page 3

Feature Menu..............................................................................................................................................................................................................22-27
- Lock...........................................................................................................................................................................................................................23
- Language................................................................................................................................................................................................................25
- Clock.........................................................................................................................................................................................................................25
- Sleep Timer.............................................................................................................................................................................................................25
- Auto Standby .........................................................................................................................................................................................................25
- Hearing Impaired.................................................................................................................................................................................................25
- CI Info.......................................................................................................................................................................................................................25
- PVR/Timeshift.................................................................................................................................................................................................25-26
Setup Menu.................................................................................................................................................................................................................27-28
- OSD Timer...............................................................................................................................................................................................................27
- PC Setup(Select the source in PC).................................................................................................................................................................28
- HDMI Mode...........................................................................................................................................................................................................28
- Reset TV Setting..................................................................................................................................................................................................28
- Software Upgrade..............................................................................................................................................................................................28
Media Menu...............................................................................................................................................................................................................28-31
- Photo Menu..........................................................................................................................................................................................................28
- Music Menu..........................................................................................................................................................................................................29
- Moive Menu.........................................................................................................................................................................................................30
- e-book....................................................................................................................................................................................................................31
36
32-33
34
34
34
34
35
36
38
Page 4

12
Page 5
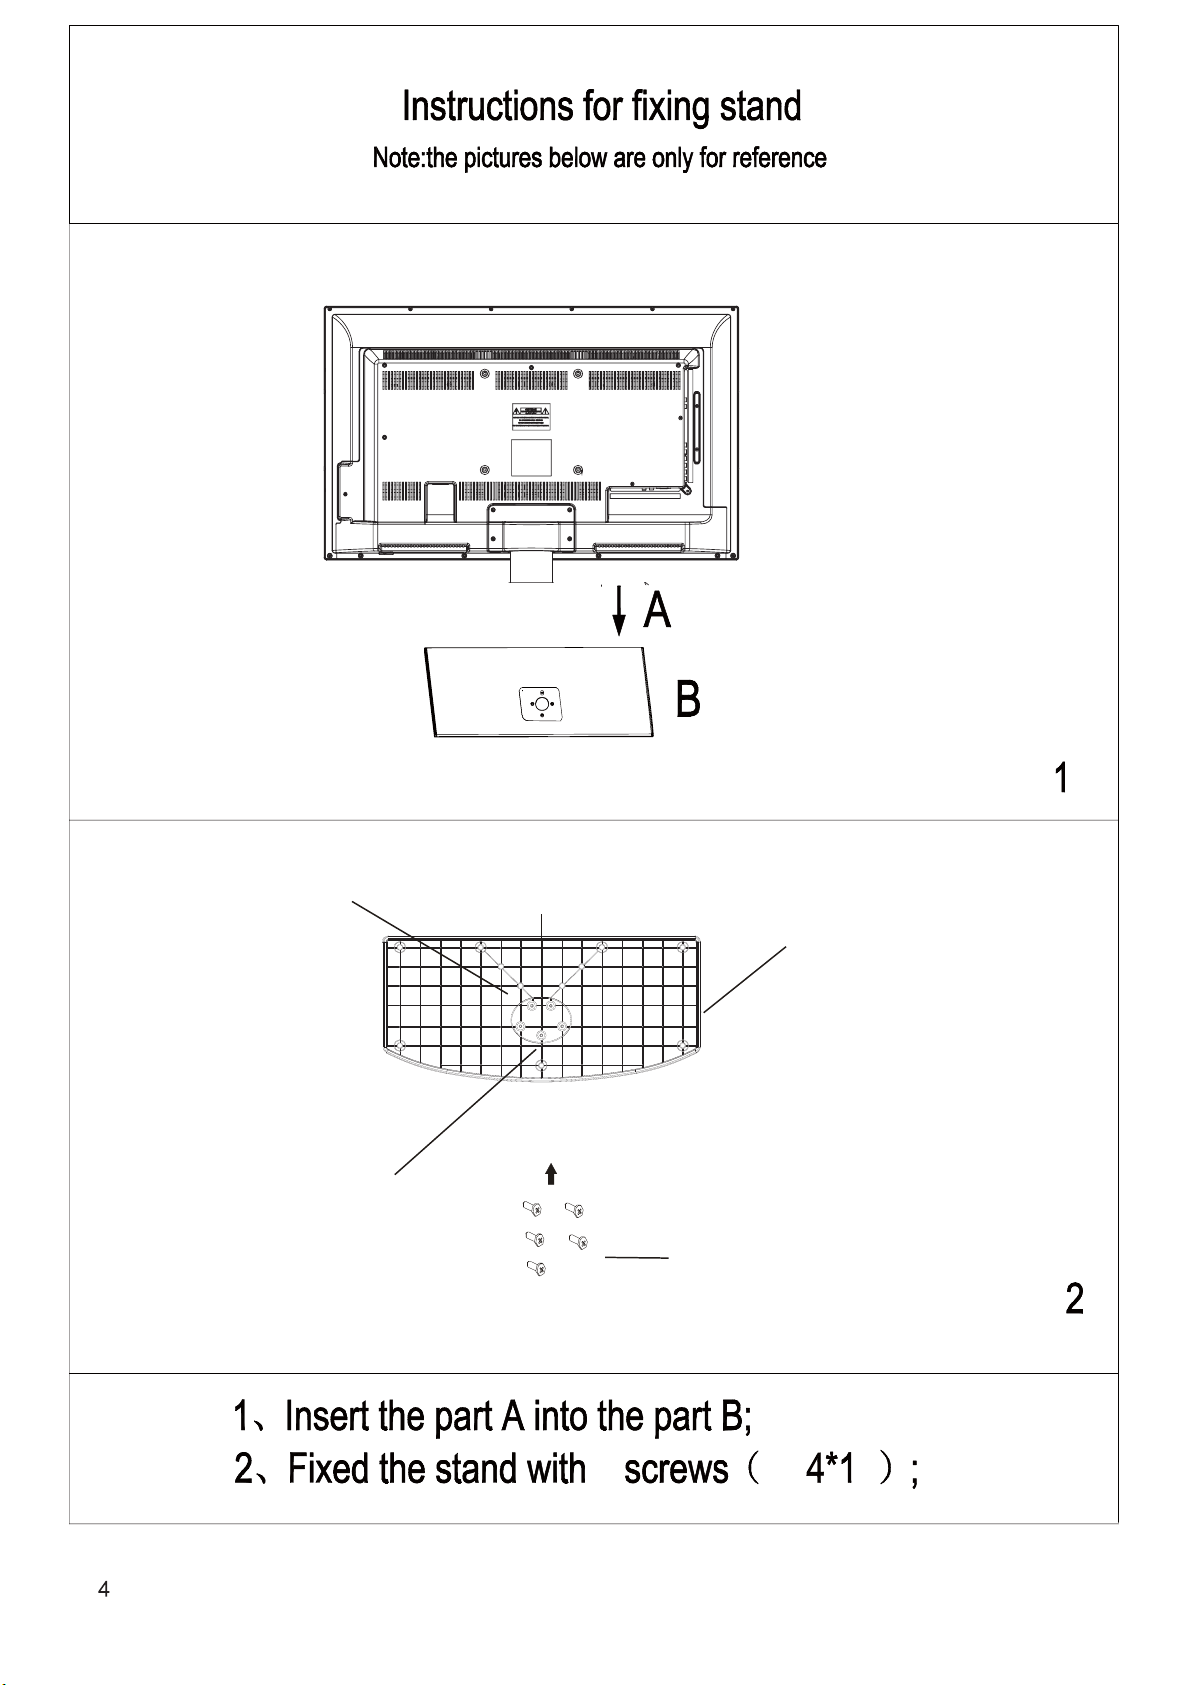
Limit
Screw holes
Front
Base cover
Screws
5
M 6
Page 6

Page 7

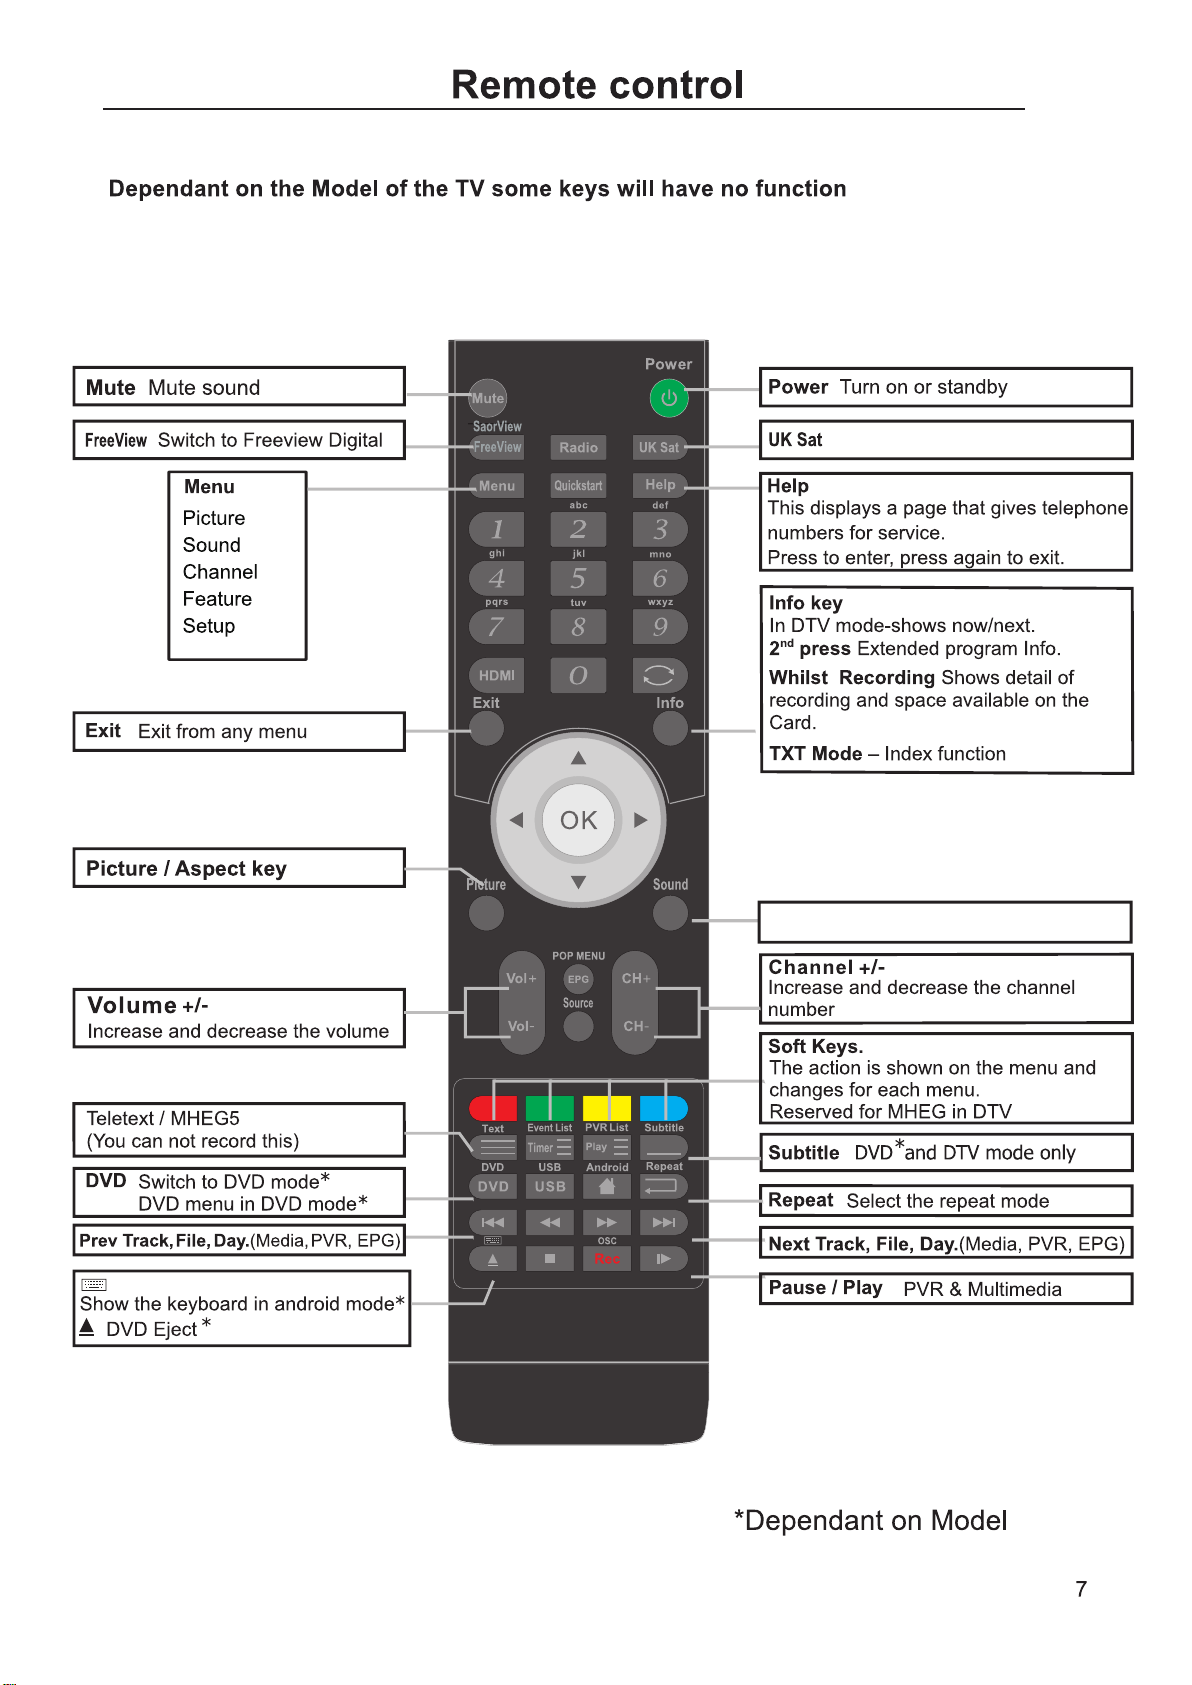
2/3/4
To connect to the audio sockets on the audio system.
Page 8
Switch to Satellite TV *
Sound options
Page 9

Searches all TV channels for the selected
TV connection.
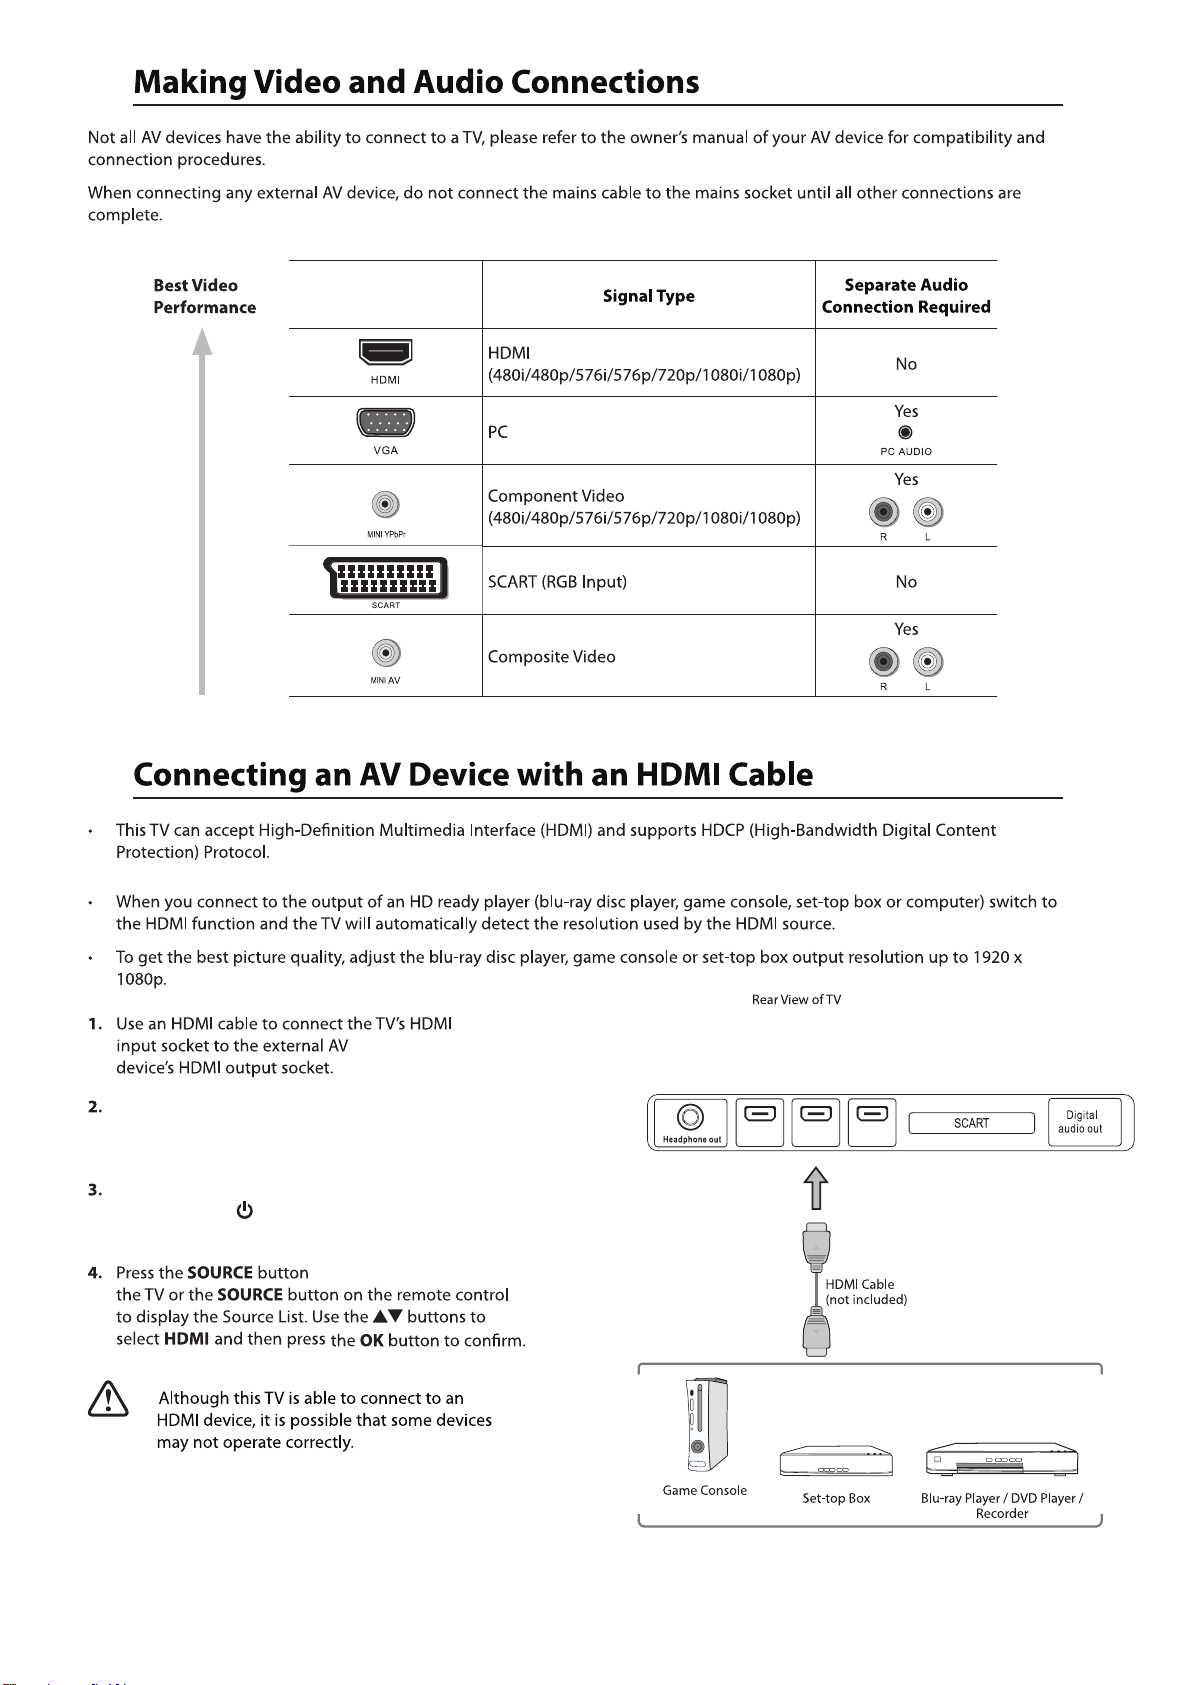
DTV
ATV
AV
SCART
YPBPR
HDMI1
HDMI2
HDMI3
PC
Media
Page 10
Page 11
Plug the connected devices into the mains socket before
powering on the TV.
Press the STANDBY button on the right hand side rear
of the TV or the button on the remote control to
turn on your TV.
on the right hand rear of
10
HDMI1 HDMI2 HDMI3
Page 12

Plug the connected devices into the mains socket before
powering on the TV.
Press the STANDBY button on the right hand side rear
of the TV or the button on the remote control to
turn on your TV.
on the right hand rear of the
1920x1080.
on the right hand rear of the TV
Plug the connected devices into the mains socket before
powering on the TV.
Press the STANDBY button on the right hand side rear
of the TV or the button on the remote control to
turn on your TV.
on the right hand rear
11
Page 13

Plug the connected devices into the mains socket before
powering on the TV.
Press the STANDBY button on the right hand side rear
of the TV or the button on the remote control to
turn on your TV.
HDMI1 HDMI2 HDMI3
Plug the connected devices into the mains socket before
powering on the TV.
Press the STANDBY button on the right hand side rear
of the TV or the button on the remote control to
turn on your TV.
on the right hand rear of the
12
Page 14

Plug the connected devices into the mains socket before
powering on the TV.
Press the STANDBY button on the right hand side rear
of the TV or the button on the remote control to
turn on your TV.
on the right hand rear of the
13
Page 15

Ariel socket on the rear right of your TV.
HDMI1 HDMI2 HDMI3
Power on the TV , the TV switches to the standby mode.
The red LED indicator will illuminate on the front panel
of the TV.
The STANDBY
button is located on the right hand rear
of the TV.
on the right hand rear of the TV
14
Page 16

Plug the connected devices into the mains socket
before powering on the TV.
on the right hand rear
on the right hand rear
15
Page 17

7. Menu Operation
Select Input Source
Press the SOURCE button on the remote control to display the input list.
Press the ▼/▲ buttons on the remote control to select the source.
Press the OK button or the ► button to activate the source.
Input
DTV
ATV
AV
SCART
YPBPR
HDMI1
HDMI2
HDMI3
PC
Media
Quick Start
When you initially power on the TV, you will see the Quick Start menu as below.
Navigate with the
1.Choose your Language. 2.Choose your country.
Previous Page
3.Choose your Auto Power Off preference. 4.Choose your preferred connection.
The TV will automatically
switch off after the selected
time has elapsed.
This setting can aslo be
changed in the main menu.
▼/▲ buttons and Press the OK button to confirm your option.
Quick Start
- 1 -
Language:
Next Page
OK OK
Quick Start
- 3 -
Auto Power Off:
Deutsch
English
Français
Italiano
Español
Never
1 Hour
2 Hours
3 Hours
4 Hours
Español
Previous Page
Please select the method of
TV Connection.
Quick Start
- 2 -
Country:
Next Page
Quick Start
- 4 -
TV Connection:
Germany
France
Spain
Freeview
UK
Italy
ATV
16
Previous Page
Next Page
OK
Previous Page
OK
Page 18

6. Choose your power saving mode.5.Ensure all cables are connected.
Quick Start
- 4 -
QUICK START: Please ensure the aerial is plugged
into the TV. Now choose “OK”, the TV will tune all
channels, pls wait
OK Cancel
OK OK
Quick Start
- 2 -
Home Mode:
Max Brightness
Home
Max Economy
Target Region Descriptor
During tuning your TV may have received signals from more than one transmitter. If this has occurred the
Target Region Descriptor screen will be displayed. This will enable you to select the correct regional transmission
for the local news service that you require.
Press the OK button to select each option setting and then press th OK button to confirm.
Country Code: This will be shown as GBR for the UK.
Primary Region: This will show the regional country(England, Wales, Scotland, Nl).
Secondary Region: This will allow you to set the region for your local news service on BBC and
ITV(London, Beds ad Cambs etc).
Tertiary Region: You may receive signals from more than one transmitter within the Secondary Region,
(e.g Beds and Cambs may have Luton or Sandy Heath).
Picture Menu
Press MENU button to display the main menu.
Press ▼ / ▲ button to select Picture in the main menu, then press OK button or ► button to enter.
Pic tu re
Pic ture Mode
Pic ture
Sound
Chann el
Fea ture
Setup
Move
Bri ghtness
Contr as t
Sha rpness
Colou r
Tin t
Colou r Temp eratu re
Asp ect Ratio
OK
ok
Enter
Exit
Exi t
1. Press ▼/▲ button to select the option that you want to adjust in the Picture menu, then press
OK button or ► button to enter.
2. Press ◄/► button to adjust or press ▼/▲ button to select.
3. After finishing your adjustment, press the MENU button to save and return to the previous menu, press
EXIT close the Menu.
icture Mode
P
Press ▼ / ▲ button to select Picture Mode, then press OK button or ► button to enter and press
▼/▲ button to select. (Picture mode: Standard, Vivid, Soft, Optimal, User).
You can change the value of brightness, contrast, sharpness, colour, when the picture is in
mode.(You can press PICTURE button on the remote control to change the Pictur
►
Sta ndard
50
50
5
50
50
Sta nd ar d
16:9
►
MENU
►
►
►
►
►
►
►
►
Retur n
Standard
e Mode directly.)
Brightness
Press ▼/▲ button to select Brightness, then press OK button or ► button t o ente r and press◄/►
button to ad
just.
Contrast
Press ▼/▲ button to select Contrast, then press OK button or ►button to ent er and p ress ◄ / ►
button to adjust.
Cont rast
-
+
50
17
Page 19

Sharpness
Press ▼/▲ button to select Sharpness, then press OK button or ► button to enter and press◄/►
button to adjust.
olour
C
Press ▼/▲ button to select Colour, then press OK button or ► button to enter and press◄/►b utto n
to adjust.
Tint (NTSC mode only)
Press ▼/▲ button to select Tint, then press ◄/► button to enter and press ◄/► bu tton t o adju st.
olour Temperature
C
Press ▼/▲ button to select Colour Temperature, then press button to select standard, warm,
▼/▲
cool.
spect Ratio
A
Press ▼/▲ button to select Aspect Ratio, then press ▼/▲ butto n to sel ect 16 :9, 4: 3, etc..
Noise Reduction
Press ▼/▲ button to select Noise Reduction, then press button to select Off, Low, Middle,
▼/▲
High.
Sound Menu
Press MENU button to display the main menu.
Press ▼ / ▲ button to select Sound in the main menu, then press OK button or ► button to enter.
Sound
Pic ture
Sou nd
Chann el
Fea ture
Set up
Move
Sou nd Mode
Bas s
Tre bl e
Bal ance
SRS TruSurround HD
OK
ok
Enter
Exit
Exi t
Sta nd ar d
50
50
0
Off
MENU
►
►
►
►
►
Retur n
1. Press ▼/▲ button to select the option that you want to adjust in the Sound menu, then press OK
button or ► button to enter.
2. Press ◄/► button to adjust or press ▼/▲ button to select.
3. After finishing your adjustment, press the MENU button to save and return to the previous menu, press
EXIT close the Menu.
Sound Mode
Press ▼/▲ button to select Sound Mode, then press button to select. (Available Sound
▼/▲
mode: User, Speech, Music, Movie, Standard).
You can change the values of Bass and Treble only in USER mode, Balance can be adjusted in any mode.
To apply the Sound options directly, press the picture button on the remote control.
Bass (USER mode only)
Press ▼/▲ button to select Bass, then press OK button or ► button to enter and press ◄/► butt on
to adjust.
Treble (USER mode only)
Press ▼/▲ button to select Treble, then pres
s OK button or ► button to enter and press ◄/►button
to adjust.
18
Page 20

Balance
Press ▼/▲ button to select Balance, then press OK button or ► button to enter and press
◄/►
button to adjust.
SRS TruSurround HD
Press ▼/▲ button select SRS TruSurround HD, then press OK button or ► button to enter and press
▼/▲ button to select On or Off.
Channel Menu
Press MENU button to display the main menu.
Press ▼/▲ button to select Channel in the main menu, then press OK button or ► button to enter.
Cha nnel
Pic ture
Sound
Chann el
Fea ture
Setup
Move
1. Press ▼/▲ b
Chann el M an ag eme nt
Fav or it e Ma nagem en t
Count ry
Aut o Se ar ch
DTV M an ua l Se arch
ATV Ma nu al S ear ch
OK
ok
Enter
Exit
Exi t
utton to select the option that you want to adjust in the Channel menu, then press
ENT ER
ENT ER
UK
ENT ER
ENT ER
ENT ER
MENU
►
►
►
►
►
►
Retur n
OK button or ► button to enter.
2. Press ◄/► button to adjust or press ▼/▲ button to se lect.
3. After finishing your adjustment, press the MENU button to save and return to the previous menu, press
EXIT close the Menu.
Channel Management
Press ▼/▲ button to select Channel Management, then press OK button or ► bu tton to enter.
Cha nnel- Chann el Mana ger
No.
000 1
000 2
000 3
000 4
000 5
000 6
000 7
000 8
000 9
Pro gram Na me
BBC O NE
BBC N ews 24
BBC T OW
CBB C Ch an ne l
CH + -
Pag e - +
DelLoc k
Exit
Exit Ret urnMov e
×
Swa pSki p
Menu
19
Page 21

Press red button to set the current channel to lock. if the current channel already lock, press red
button again will unlock.
Press green button to set the current channel to delete. if the current channel already delete, press
green button again will delete cancel.
Press yellow button to skip the current channel.
Use the cursor buttons to select the channel you wish to skip. Press yellow button and will be shown
at the channel selected. To remove the skip function, press the yellow button again.
If one of the stations has been incorrectly placed in the station listing, yo
u may move it to the correct
position, Using the cursor select the channel to be moved, press blue button, move the station to
the new location and press OK button , this will move the station to the new location.
If there is delete channel logo, press EXIT button or OK button, the menu will appear as follows:
Cha nnel- Chann el Mana ger
No.
Pro gram Na me
000 1
000 2
000 3
000 4
000 5
000 6
000 7
000 8
000 9
BBC O NE
BBC T OW
BBC N ews 24
CBB C Channel
CH + -
Pag e - +
DelLoc k
Exit
Exit Ret urnMov e
Delete the selected items if select “ OK ” and press OK button. Otherwise cancel to delete the
×
Password by default "0000
Swa pSki p
Menu
selected items. After a few second, the menu will appear as follows:
Mess age
TV
Do you w ant to de lete th e
sele cted it ems?
OK
Cancel
Succ essfu lly upd ated. ..
Press ◄ button to turn to the previous page, press ► button to turn to the next page.
Press ▼/▲ button to select channel, then press OK button to enter the rename channel menu.
Cha nnel- Chann el Mana ger-R ename C hanne l
Mov e
5
F
P
Z
Del
OK
6 7 8 9
G H I J
Q R S T
Ent er
-
EXIT
_ ?
.
Exi t
/Sa ve
4
E
O
Y
0
1 2
A
B C
K
L M
U
V W
3
D
N
X
Cap sSpa ce
20
Page 22

Note: Channel name is 8 characters.
Press green button to switch the size of the letters.
Press▼/▲ or / ◄/►b utto n to sel ect th e char acte r, then p ress O K butt on to co nfir m sele ction.
Press EXIT button, the menu will appear as follows:
Mess age
TV
Plea se conf irm sav ing?
Save s ucces sful
OK
Cancel
Exit the entire menu if select “Cancel ” and press OK button.
Save successful if select “ OK ” and press OK button.
Favorite Manager
Press ▼ / ▲ button to select Favorite Manager, then press OK button or ► button to enter.
Cha nnel/ Favor ite Man ager
No.
000 1
000 2
000 3
000 4
000 5
000 6
000 7
000 8
000 9
Pro gram Na me
CH + -
Pag e - +
Fav 1 Fav 2 Fa v3
Fav 2Fav 1
Exit
Fav 4Fav 3
Exit Ret urnMov e
Fav 4
Menu
Press ▼/▲ button to select Channel, press red button to set to Fav1.
Press ▼/▲ button to select Channel, press green button to set to Fav2.
Press ▼/▲ button to select Channel, press yellow button to set to Fav3.
Press ▼/▲ button to select Channel, press blue button to set Fav4.
If the current channel alread
y be one of your favorite channel, press red / green / yellow / blue
button again will set it to a normal channel.
Press MENU button or EXIT button, the successfully updated menu will appear.
Country
Press ▼/▲ button to select Country, then press OK button or ► button to e nter a nd pre ss ▼/▲
n to adjust.
butto
Auto Search
Press ▼/▲ button to select Auto Search, then press OK button or ► button to enter.
Cha nnel -A uto Sea rch
ENTER
ENTER
ENTER
MENU
►
►
►
Retur n
Pic tu re
Sou nd
Chann el
Fea ture
Set up
Move
All
DTV
ATV
OK
ok
Enter
t
Exi
Exi t
21
Page 23

Chann el Tu ni ng
Pic tu re
Sou nd
Chann el
Fea ture
Set up
ATV
Pro ce ss
ATV ch an ne ls fo un d:
DTV c ha nn el s found :
Radio c h
annel s fo un d:
270.00 MHz
Menn u
Ski p
5
21
6
30%
15%
Exit
Exi t
When auto search finish, the save successful menu will appear a few second.
DTV Manual Search
Press ▼/▲ button to select DTV Manual Search, the n pres s OK but ton or ► b utto n to enter.
Chann el - D TV M an ual S ea rc h
Pic ture
Sound
Chann el
Fea ture
Chann el
Fre quency( KH z)
Ban dWidth( KH z)
Str en gt h
Qua lity
21
47400 0
8
Sta rt
►
0%
0%
Set up
Move
OK
ok
Enter
Exit
Exi t
MENU
Retur n
ATV Manual Search
Press ▼/▲ button to select Manual Search, then press OK button or ► button to enter.ATV
Chann el - ATV M anual S ea rc h
Pic ture
Sound
Chann el
Fea ture
Set up
Move
Curre nt C ha nn el
Fre quency( KH z)
Color S ys te m
Sound S ys te m
Sav e
Ente r
ok
Enter
Searc h
Fin e Tu ne
Exit
Exi t
21
49.75 M Hz
ENTER
ENTER
Auto
I
MENU
►
►
►
►
►
Retur n
Feature Menu
Press MENU button to display the main menu.
Press ▼/▲ button to select Feature in the main menu, then press OK button or ► button t o ente r.
22
Page 24

Feature - Chang
e Pin Cod
e
Fea ture
Pictu re
Sound
Chann el
Fea ture
Set up
Move
Lock
Langu ag e
Clock
Sle ep Timer
Auto Standby
Heari ng I mp ai red
CI In fo
PVR /Time sh ift
OK
ok
Enter
Exit
Exi t
ENT ER
ENT ER
ENT ER
Off
4 Hours
Off
ENTER
ENTER
MENU
►
►
►
►
►
►
►
►
Retur n
1. Press ▼/▲ button to select the option that you want to adjust in the Feature m enu, t hen pr ess
OK button or ► button to enter.
2. Press ◄/► button to adjust or press ▼/▲ button to select.
3. After finishing your adjustment, Press MENU button to save and return back to the previous
menu, and press EXIT button to exit the entire menu.
Lock
Press ▼/▲ button to select Lock, then press ◄/► button to select On or Off(when the default lock
is on, please input the default password“0000”).
Fea ture-Lo ck
Pictu re
Sound
Lock Ch an ne l
Paren ta l Gu id anc e
Chang e Pi n Co de
Hoter Mode
Off
Off
ENT ER
ENTER
►
►
►
►
Chann el
Fea ture
Set up
Move
Parental Guidance
Ente r
ok
Enter
: Press ▼/▲ button to select Parental Guidance, then press OK or ► enter and
Exit
Exi t
MENU
Retur n
press ▼/▲ button to select.
C
hange Pin Code
: Press ▼/▲ button to select Change Pin Code, then press OK button or ► button,
change pin code menu will appear as follows:
MENU
__ _ _
__ _ _
__ _ _
Retur n
Pic ture
Sou nd
Cha nnel
Fea ture
Set up
Old P as sw or d
New Pas sw or d
Confi rm N ew P as swo rd
EXIT
Exit
Input old password at “Old Password”,if the old password is incorrect, the password will not be
allowed to modify.
Input new password at “New Password”.
Input new password again at “Confirm New Password”. if new password and confirm new password
consistent, the successfully updated menu will appear a few second. otherwise, the menu will
display the password mismatch.
If the original password is changed, the user most have special att
save in case of lost this issue wont b
e admitted as a defect or failure.
ention in kept the new passwords
23
Page 25

Press ▼/▲ button select the Hotel Mode, then press OK or ► button to enter Hotel Mode.
Hotel Lock Off
Channel Lock Off
Picture Lock Off
Sound Lock Off
Feature Lock Off
Setup Lock Off
Key Lock Off
Source Lock -->
Set Source Off
Channel Number Off
Max Volume Off
Default Volume Off
Next Page -->
Hotel Lock
Use ▲▼ to select the Hotel Lock, use ◄►to select On/Off.
On: Select Hotel Lock the following sub-menu.
Off: Unable to select Hotel Lock submenu.
Channel Lock/Picture Lock/
Sound Lock/Feature Lock/Setup Lock
Use ▲▼ to select the Channel/Picture/Sound/Feature/Setup Lock, use ◄►to select On/Off.
On: Unable to select Channel/Picture/
Off: Able to select Channel/Picture/
Sound/Feature/Setup setup in the menu.
Sound/Feature/Setup setup in the menu.
Key Lock
Use ▲▼ to select the Key Lock, use ◄►to select On/Off.
On: To lock&invalidate the function key.
Off: To unlock&enable the function key.
Source Lock
Use ▲▼ to select the Source Lock, use OK key enter , select DTV/ATV/AV/SCART/YPBPR/
HDMI1/HDMI2/HDMI3//PC/MEDIA source on/off.
On: Make the source can not be selected.
Off: Make the source available.
Set Source
Use ◄► to select the default source which appears on the screen after power on.
Channel Number(available )
Channel Number which appears on the screen after power on.
Max Volume
Use ▲▼ to select the Max Volume, use ◄►to select a volume as maximum.
Default Volume
If set it “On” and Select one of 10/20/30…./100 except Off, then TV will output the Selected value.
If Off, then TV will output the value of the Default Volume last shutdown after boot-strap.
And the volume value can not exceed the maximum volume setting.The default is Off.
24
Page 26

Language
Press ▼/▲ button to select Language, then press OK button or ► button to en ter su bmen u.
Fea ture - Lang ua ge
Pic ture
Sound
Chann el
Fea ture
Set up
Move
OSD Language
OSD L an gu ag e
Pre ferred Su bt it le
Pre ferred Aud io
DTV Tel et ex t Lan guage
ATV Tele te xt La ng ua ge
OK
ok
Enter
Exit
Exi t
:Press ▼/▲ button to select OSD Language, then press OK or ► enter and press
Eng lish
Eng lish
Eng lish
Eng lish
Wes t
MENU
►
►
►
►
►
Retur n
▼/▲ button to adjust.
referred Subtitle: Press ▼/▲ button to select Preferred Subtitle, the n pres s OK or ► en ter an d
P
press ▼/▲ button to adjust.
referred Audio: Press ▼/▲ button to select Preferred Audio, then press OK or ► enter and press
P
▼/▲ button to adjust.
DTV Teletext Language: Press ▼/▲ button to select T T t L anguage, then pr ess OK o r ►
D V ele ext
enter and press ▼/▲ button to adjust.
A
TV Teletext Language: Press ▼/▲ button to select ATV Teletext L angu age, then pr ess OK o r ►
enter and press ▼/▲ button to adjust.
lock
C
Press ▼ / ▲ button to select Clock, then press OK button or ► button to enter submenu.
Fea ture - Lang ua ge
Pic ture
Sound
Chann el
Fea ture
Set up
Move
OK
ok
Date
Tim e
Tim e Zone
DST
Enter
it
Ex
Exi t
01/01 /2 011
08:08
Aut o
On
MENU
Retur n
►
►
►
►
Sleep Timer
Press / button to select , then press OK or ► enter and press / button to select
the 15Mins,
▼ ▲ Sleep Timer ▼ ▲
30Mins, 45Mins,Off ...etc..
Auto Standby
Press ▼/▲ button to select Auto Standby, then press OK or ► enter and p ress ▼/▲ b utto n to
select the 1Hour,
2Hours,3Hours 4Hours and .
, Off
Hearing Impaired
Select the On/Off.
I Info
C
Display the Common Interface card information.
PVR/Timeshift
This function is only available under DTV mode and includes Record, Timeshift and playback functions.
25
Page 27

Fea ture - PV R/ Tim es hi ft
Pictu re
Sou nd
Chann el
Fea ture
Set up
Move
Parti ti on S el ect
Auto Tim es hi ft
Tim es hif t Bu ffer
Tim er
Recor d Li st
Recor de r St art
OK
ok
Ent er
Exit
Exi t
ENT ER
Off
Aut o
Ent er
Ent er
Ent er
MENU
Retur n
►
►
►
►
►
►
OK
Partition Select: Press OK button enter the submenu , then press ▼/▲ button to select partiti on.
A
uto Timeshift: Select the Auto /Off (Stop auto Timeshift).(Start auto Timeshift)
T
imeshift Buffer: Select the Auto, 30Mins, 1hr or 2hr.
Timer
Information: Timer menu manages the preengaged programs, user can add delete preengaged
programs in this menu.
Exit
Exit
R
ecord List
Press OK button to enter the record list menu.
Press red button to delete any program.
Press Info button to display program information.
26
Page 28

Recorder Start
Press OK button to enter the recording menu and start record. Press button on the remote control
or select Stop to stop record.
Messag e
Do you wan t to s ta rt
Record in g?
Messag e
Init ializ ing Rec order. ..
OK
(Conf irm rec ord win dow)
Cancel
(Init ializ ing rec order w indow)
0002 YLE TV2
REC
00:02:58
MB Free:
5295
Setup Menu
Press MENU button to display the main menu.
Press ▼/▲ button to select Setup in the main menu, then press OK button or ► butt on to en ter.
Setup
10 Seco nd s
ENT ER
Home
NTE R
E
ENT ER
EXIT
Exi t
Pic ture
Sou nd
Chann el
Fea ture
Setup
Mov e
OSD Ti me r
PC Steu p
HDMI Mo de
Reset T V Se tti ng
Softw ar e Up gr ade
OK
Ent er Ret urn
MENU
1. Press ▼/▲ button to select the option that you want to adjust in the Setup menu, then press OK
button or ►button to enter.
2. Press ◄/► button to adjust or press ▼/▲ button to adjust.
3. After finishing your adjustment, Press MENU button to save and return back to the previous menu,
and press EXIT button to exit the entire menu.
SD Timer
O
Press ▼/▲ button to select OSD Timer, then press OK or ► enter and press ▼/▲ button to adjust.
27
Page 29

C Setup(Select the source in PC)
P
Set up
Pictu re
Sound
Chann el
Fea ture
Setup
Mov e
Aut o Ad ju st
H Pos it io n
V Pos ition
Pha se
Clock
OK
Ent er Ret urn
MENU
ENT ER
50
50
50
50
EXIT
Exi t
Auto Adjust: Press ▼/▲ button to select Auto Adjust, then press ► button, the menu will appear
a few second.
H Position: Press ▼/▲ button to select H Position, then press ► button to enter and press ◄/►
button to adjust. Adjusts the picture horizontally.
V Position: Press ▼/▲ button to select V Position, then press ► button to enter and press ◄/►
button to adjust. Adjusts the picture vertically.
HDMI Mode
Press ▼ / ▲ button to select HDMI Mode, then press OK or ► enter and press ▼/▲ button to adjust.
eset TV Setting
R
Press ▼ / ▲ button to select Reset TV Setting, then press OK button or ► button. the password menu
will appear(when the child lock is on).
Software Upgrade
Press ▼ / ▲ button to select Software Upgrade, then press OK button or ► button to enter the
software upgrade menu.
Media Menu
Note: Before operation MEDIA menu, Plug in USB device or memory card, then press SOURCE
button to set the Source to Media.
Press ▼/▲ button to select MEDIA in the Source Menu, and then press ENTER or ► to enter.
You can also enter the Media by pressing MEDIA button on the remote control.
Photo Menu
Press button to select Photo in the main menu, then press ENTER button to enter.
Press EXIT button to return back to the previous menu.
◄/►
28
Page 30

1. Press button to select the option that you want to adjust in the Media menu, then press
ENTER or ► button to enter.
2. Press ▼/▲ button to adjust or press ▼/▲ button to select.
3. After finishing your adjustment, press MENU button to save and return back to the previous menu
and press EXIT button to exit the entire menu.
Press ▼/▲ to select the photos, press ENTER or button or ► button to view.
You can see the information of the current playing photo after press INFO button, then press
button to play or pause, you can see the playing state in the right.
Then press ▼/▲ or ◄/► button to ratite the picture.
Notes: Other menu and description are the same as that for Movie menu.
▼/▲
Music Menu
Press button to select Music in the main menu, then press ENTER button to enter.
Press EXIT button to return back to the previous menu.
◄/►
Press button to select the sonny you want to listen, and then press ENTER or or button
to play.
Press ◄ button to return back to the previous menu.
▼/▲ ►
29
Page 31

You can see the information of the current playing sonny at the left of the menu.
Moive Menu
Press button to select Movie in the main menu, then press ENTER button to enter.
Press EXIT button to return back to the previous menu.
◄/►
Press button to select the folder that you want to view.
▼/▲
Press ENTER button to select the sub folder.
30
Page 32

And rew Six ty
Unk nown
Press ENTER button or button to play,
Press button or EXIT button to stop playing.
Press the button to return back to previous page.
You can see the information of the current playing media at the first flew second or after press
INFO button.
e-book
Press button to select Music in the main menu, and then press ENTER button to enter.
◄/►
Press EXIT button to return back to the previous menu.
Press to select the Video, press ENTER or button or button to play.▼/▲ ►
31
Page 33

323334
Page 34

Page 35

1366 x 76 8
Page 36

C3 922 2DV B-D LED
39
19 20
1080
280
1500:1
99cm(3 9 inc h)
90W
20 0x2 00m m / M6x 8
8W + 8W
889 * 227.4*59 2.4mm
889 * 100*527.4 mm
8.7 Kg
3
39
Page 37

36
Page 38

SRS TruSurround HD™ creates an immersive, feature-rich surround sound experience from two
speakers, complete with rich bass, high frequenc y detail and clear dialogue.
TruSurround HD, SRS and the
All trademarks are the property of their respective owners and all rights are acknowledged.
symbol are trademarks of SRS Labs, Inc.
37
Page 39

38
 Loading...