

Page 1
LED
C20234F-LED
Page 2

Page 3
7- 8
10
10
12
12
13
13
14-15
15
15
15
15
16-17
18
18
18
3
4
5
6
9
9
11
11
Channel Management
Favorite Management
Country
Auto Search
DTV Manual Search
AT V Manual Search
Feature Setting
Lock
Language
Clock
Sleep Time
Auto Standby
Hearing Impaired
CI Info
PVR/Time Shift
Setup Setting
OSD Ti me
PC Setup
Bl ue S cree n
Home Mode
Reset TV Setting
19
19
19
20
20
21
21
22
22
22
23
23
23
23
24
25
26
26
26
26
26
26
1
Page 4
DVD Operation
Basic Operation
DV D Se tu p Me nu
En te r th e DVD Setup Menu
General Setup
Audio Setup
Dolby Digital Setup
Preference Setup
Di sc C are
27
27
27
27
27-28
28
28
28-29
29
30
30
31
31
31
31
32
33
33-34
34-35
35
36
36
37
38
39
39-40
41
41
41
41
42
43-44
45
2
Page 5

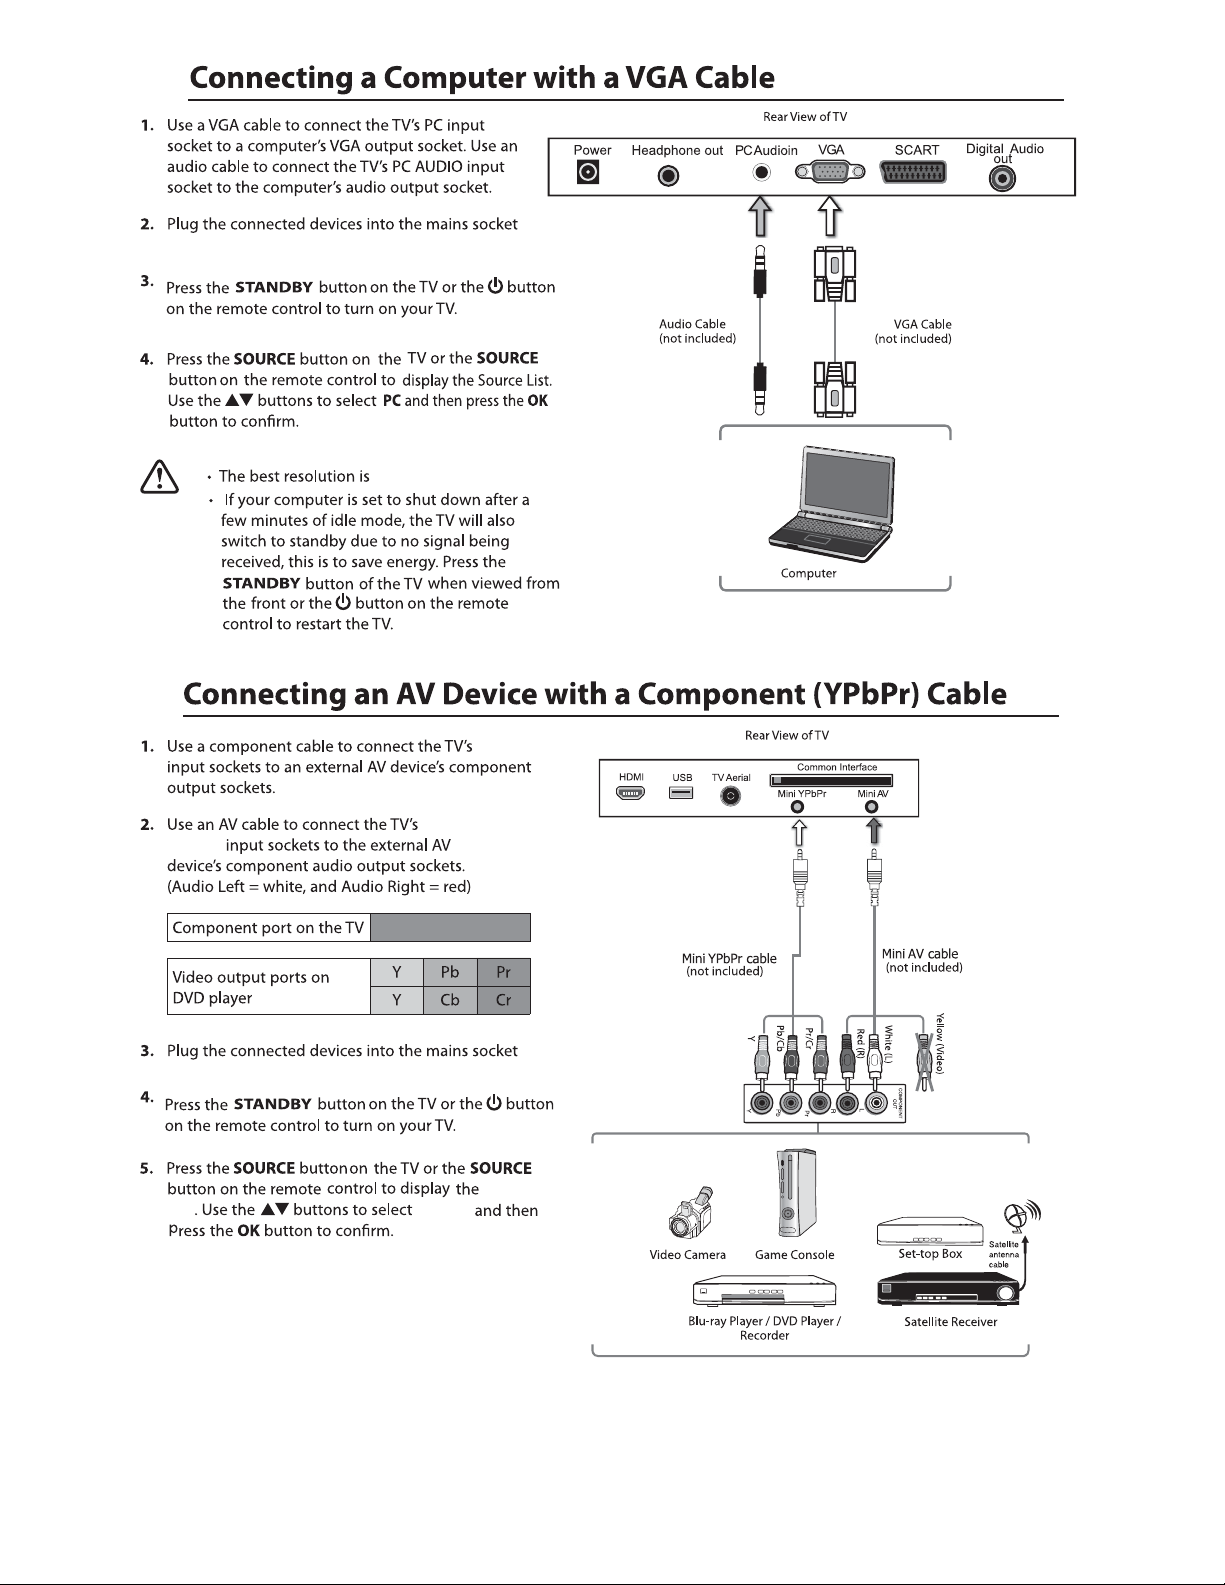
TV set
your new 20"
HD LED TV.
SaorView
FreeView
Stand
Stand fixing screws
QUICK START GUIDE
Adapter
WARRANTY CARD
Warranty Card
Gold Care
Cold Care
3
Page 6
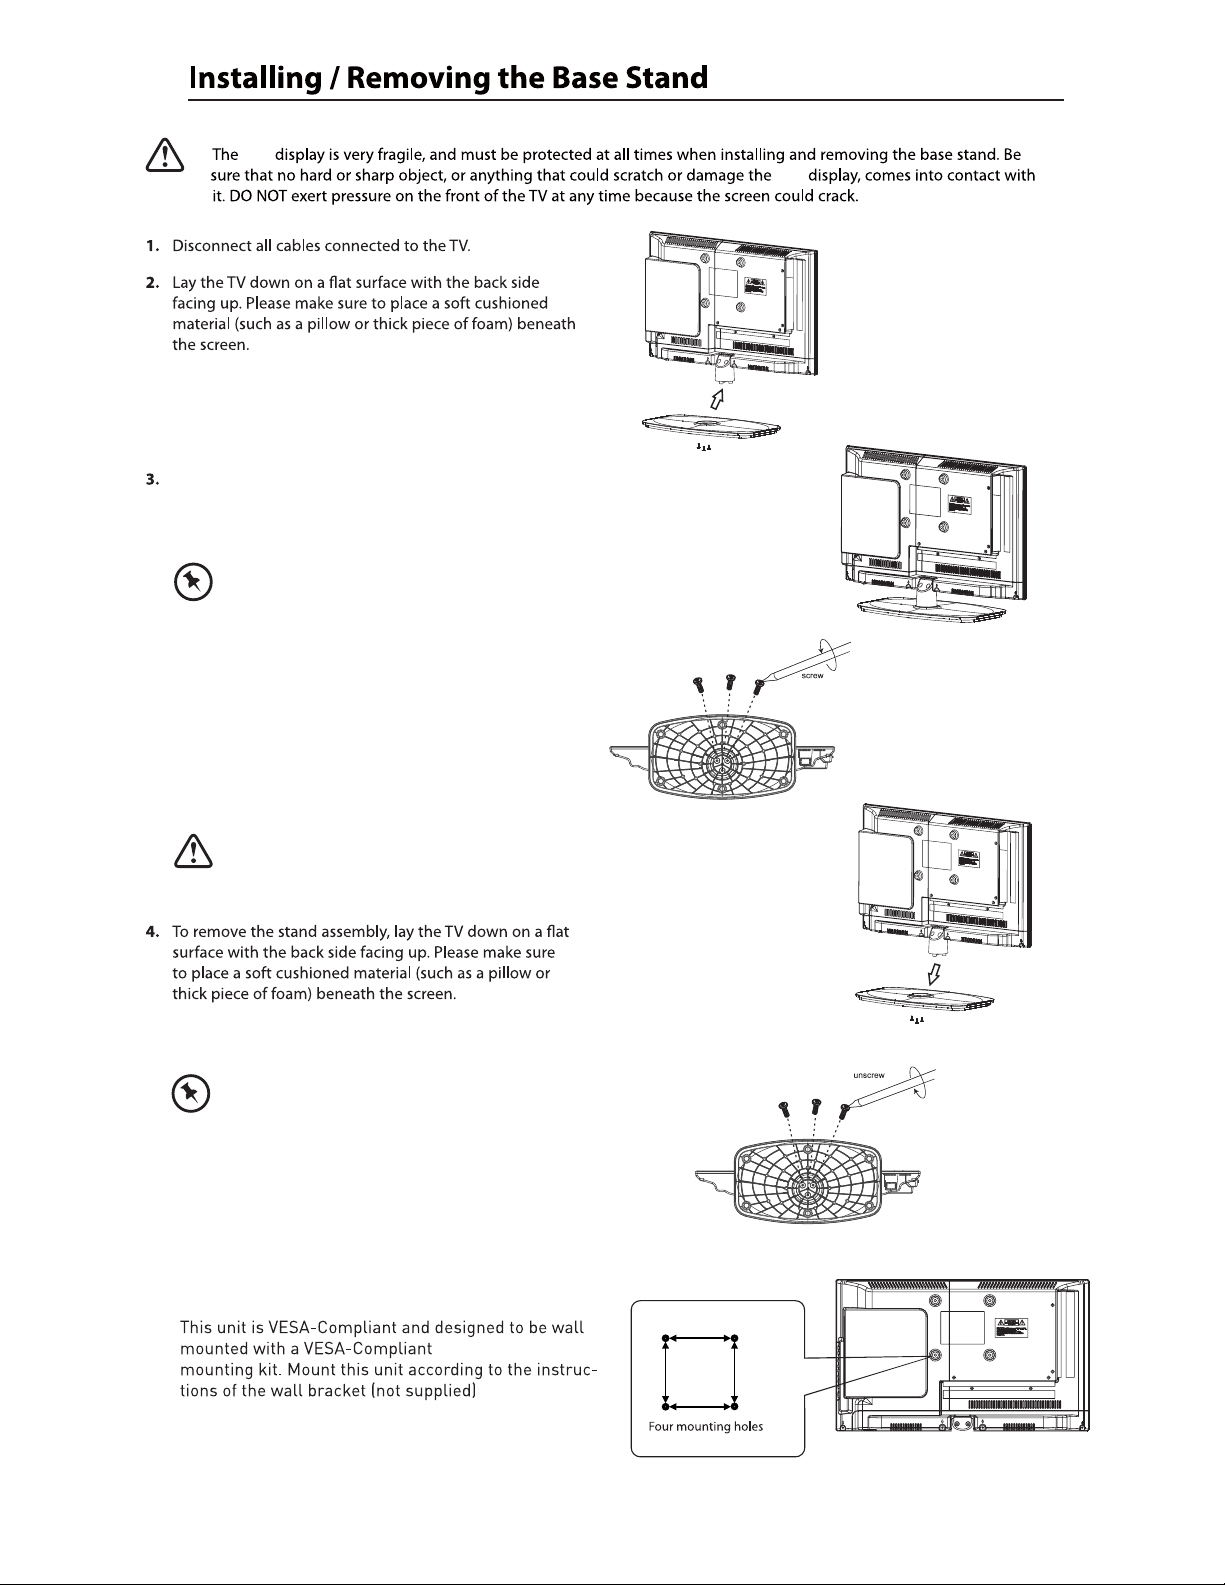
LED
To install the base stand first make sure you position
the front of the base stand facing towards the front of
the TV and then use the 3 supplied screws to fix the base
stand to the TV.
The screw holes will only align if the front of
the base stand is facing towards the front of the TV
LED
Remove the stand base before wall mounting the TV.
Remove the 3
screws that secure the stand base to the TV. Remove
the stand base by sliding it out.
Keep all the screws in a safe place, should
you want to attach the stand base at a later date.
100mmx100mm
100mm
100mm
(Screw size M4 x 8)
4
Page 7
PVR timer
Media / DV D.
8
PLAY/PAUSE
9
EJECT
' 9'6 /2 7
Play or pause.
Eject the disc.
,QVHUWWKH'9'GLVF
5
Page 8

Power
Connect to power supply.
Headphone out
VGA/PC AUDIO IN
TV Aerial
Mini YPbPr
Mini AV
To connect to the earphones.
To connect to a computer or other devices with a VGA interface.
6
Page 9
Mute Mute sound
Power Turn on or standby
Digital TV
Picture
Sound
Channel
Feature
Setup
Exit from any menu
Increase and decrease the volume
SaorView
FreeView
UK Satellite
This displays a page that gives telephone
numbers for service.
Increase and decrease the channel
number
DVD
Switch to DVD mode
DVD menu in DVD mode
Prev Track, File, Day.(Media, PVR)
Show the keyboard in android mode
DVD Eject
The action is shown on the menu and
changes for each menu.
Reserved for MHEG in DTV
DVD and DTV mode only
Repeat
Select the repeat mode
Next Track, File, Day.(Media, PVR)
7
Page 10
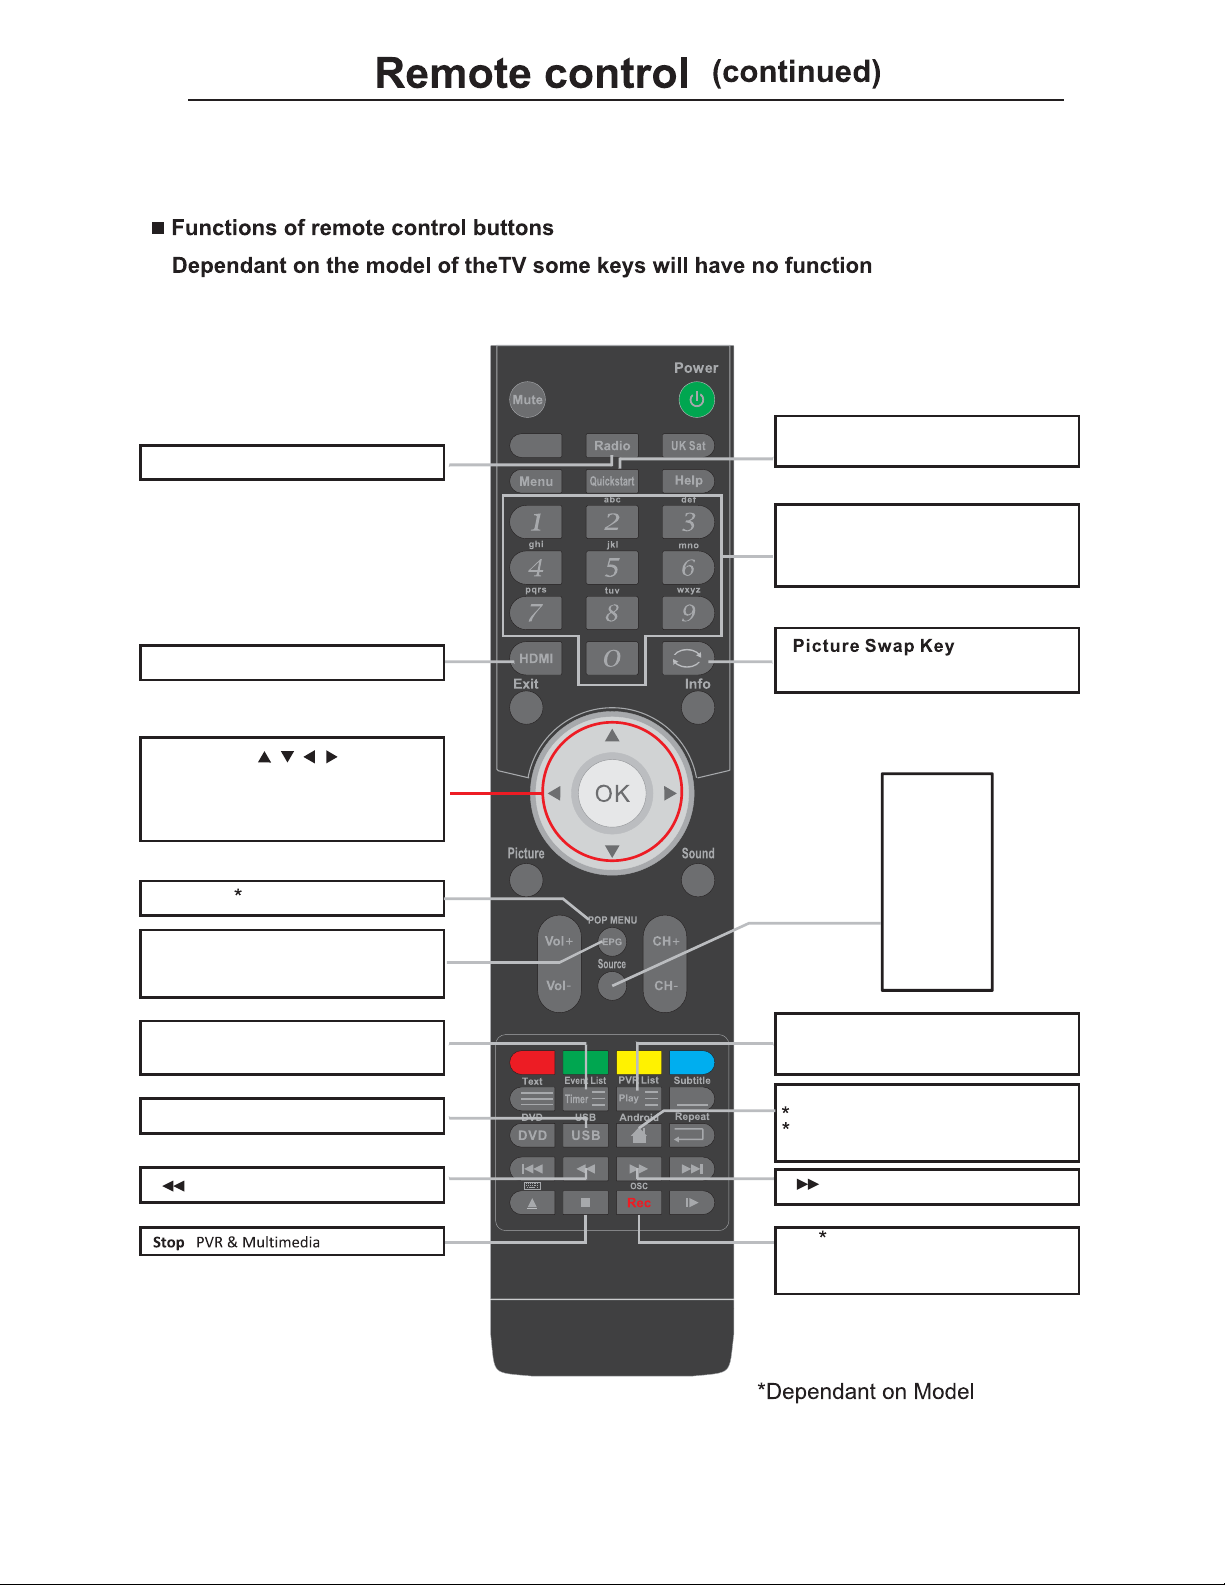
Radio Switch between DTV and Radio.
SaorView
FreeView
Quickstart
Recall the First Time Installation.
NUMBER BUTTONS
Press 0-9 to select a TV channel directly
when you are watching TV.
The channel change after 2 seconds.
HDMI Select the HDMI mode directly.
Thumb stick (
/ / / / OK)
Allows you to navigate the on-screen
menus and adjust the system settings to
your preference.
POP MENU in blu-ray DVDPOP MENU
EPG
Press to enter the EPG,and press
again to exit
Timer
Show the Schedule list. (DTV mode)
USB Switch to USB mode
Fast reverse
Back to last channel
Input
DTV
ATV
AV
SCART
YPBPR
HDMI
PC
Media
DVD
PVR List
Display List of Recorded Programms
(DTV mode)
Android
Switch to Android
Android homepage in Android mode
shortcut to DVB-C source.
Fast forward
OSC Show the OSC menu in
blu-ray DVD
Rec Start recording
8
Page 11
DTV
ATV
9
Page 12

Mini YPbPr
Mini AV
10
Page 13
Mini AV
ϭϯϲϲdžϳϲϴ
Mini Y PbPr
Mini YPbPr
List
Source
YPBPR
Page 14

Mini AV
12
Page 15
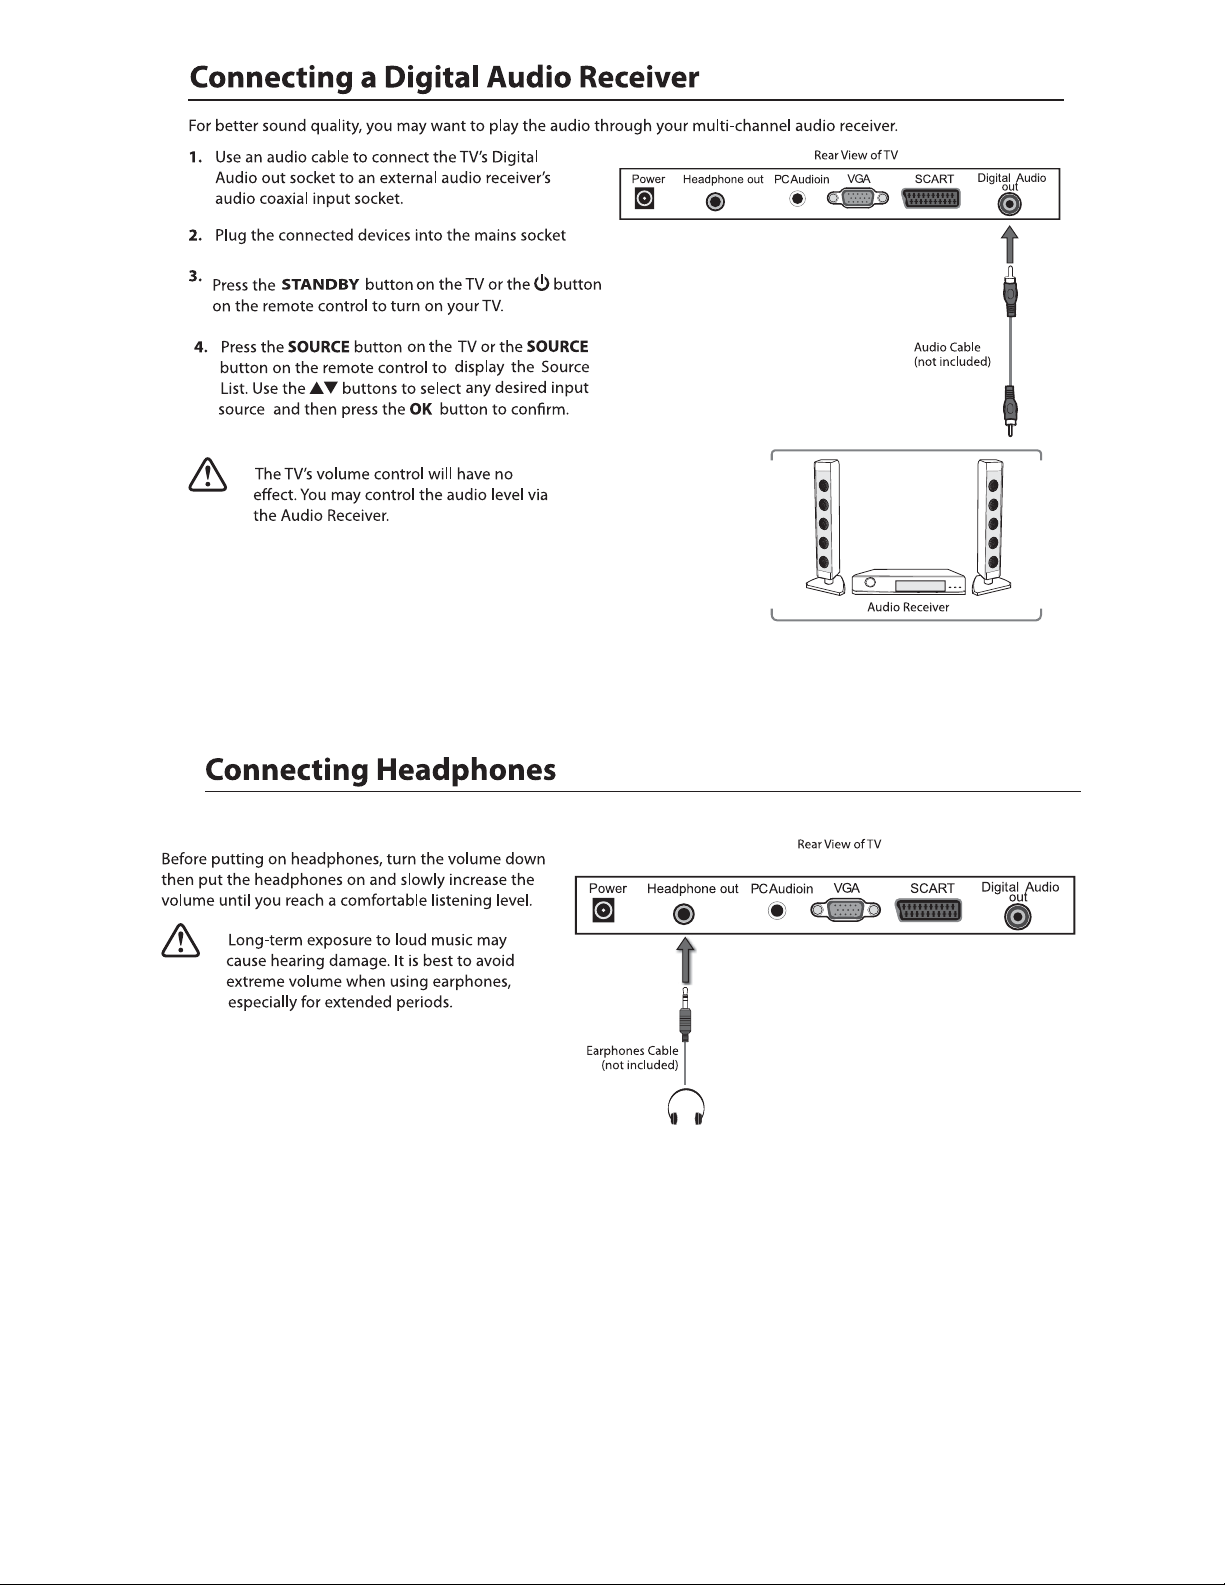
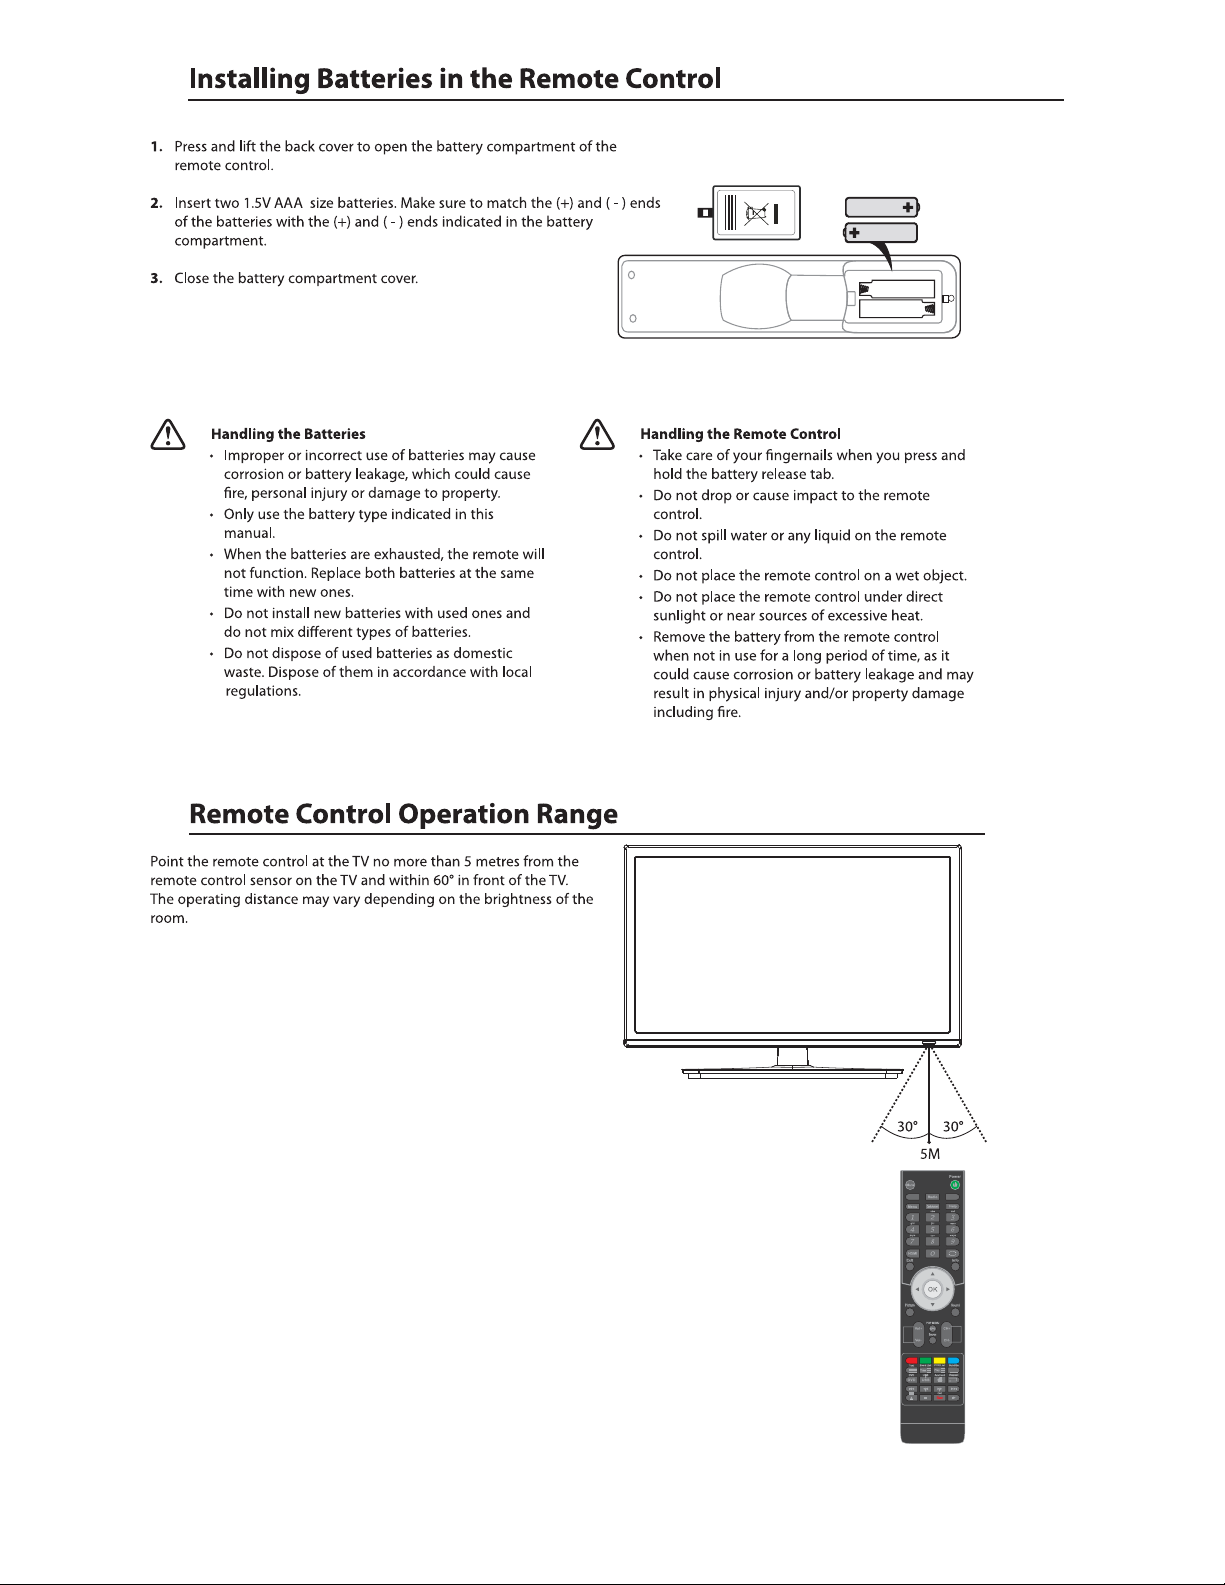
Connect your headphones to the TV’s Headphone out socket.
13
Page 16

mains power
100- 240V AC 50-60Hz
top
5. If this is the first time you are turning on the TV and there are no programs in the TV memory, the Quick Start menu
will appear on the screen. There are 4 setups as follow:
14
language :
Ok
Auto Power Off :
The TV will automatically
switch off after the selected
time has elapsed.
This setting can also be
changed in the main menu.
Move
Ok
- 1 -
- 3 -
Enter
Enter
English
Français
Italiano
~
Espanol
Nederlands
Exit
ExitMove
Never
1 Hour
2 Hours
4 Hours
Exit
Exit
- 2 -
Country :
Ok
- 4 -
TV Connection :
Please select the method of
TV Connection.
Move
Ok
Enter
Enter
UK
France
Italy
Spain
Netherland
Exit
ExitMove
ATV
Freeview
Cable
Exit
Exit
Page 17

6. Ensure your aerial, cable or dish is plugged in to the TV and
then press OK.
The TV will start to install the service you have selected.
This could take some time depending on your selected service.
You can tune an additional service at any time by pressing the
Quick Start button.
DTV, ATV, AV, SCART, YPBPR, HDMI, PC, Media, DVD.
Radio
OK
Cancel
Ok
Enter
Exit
ExitMove
Input
DTV
ATV
AV
SCART
YPBPR
HDMI
PC
Media
DVD
22
LOCK
/
Mute Mute
15
Page 18

Picture Setting
1. Press the Menu button and then press the ▲▼ buttons to select the
Picture menu.
2. Press the OK or
the following picture options ress the OK button.
►button and then press the to select
s
▲▼ buttons
and then p
User
Picture
Picture
Sound
Channel
Feature
Setup
Picture
Sound
Channel
Feature
Setup
Picture Mode
Colour Temperature
Aspect Ratio
OK
Move
Picture Mode
Brightness
Contrast
Sharpness
Colour Temperature
Aspect Ratio
OK
Move
(for User mode)
Brightness
Contrast
Sharpness
Colour
Tint
Enter
Colour
Tint
Enter
Picture
Exit
Picture
Exit
User
50
50
60
50
50
Standard
16:9
Menu
Return
Exit
User
Dynamic
50
Standard
50
Mild
User
50
50
Standard
16:9
Menu
Return
Exit
Aspect Ratio
(for User mode)
(for User mode)
Standard /
Cool / Warm
Standard
Press the ▲ ▼ buttons to cycle among aspect ratio: 4:3 / 16:9Auto /
Full /Zoom1 /Zoom2 /Cinema/Just scan and then press the OK button
to confirm.
Picture
Picture
Sound
Channel
Feature
Setup
Picture
Sound
Channel
Feature
Setup
Move
Move
(for User mode)
Picture Mode
Brightness
Contrast
Sharpness
Colour
Tint
Colour Temperature
Aspect Ratio
OK
Enter
Picture Mode
Brightness
Contrast
Sharpness
Colour
Tint
Colour Temperature
Aspect Ratio
OK
Enter
Picture
Exit
Picture
Exit
User
50
50
Standard
50
Cool
50
Warm
Standard
16:9
Menu
Return
Exit
User
50
50
4:3
16:9
50
Full
50
Zoom1
Zoom2
Standard
16:9
Menu
Return
Exit
16
Page 19

Picture Setting
Just scan
(in HDMI
mode only)
This selection will detect the
resolutionof the HDMI signal
and display an image. with the
same number of pixels
This selection will detect the
re solu tion of the HDMI signal
and display an image. with the
same number of pixels
Picture
Sound
Channel
Feature
Setup
Noise Reduction
OK
EnterMove
Picture
Exit
Middle
Off
Low
Middle
High
Menu
Return
Exit
17
Page 20

Sound Setting
1. Press the Menu button and then press the ▲▼ buttons to select the
Sound menu.
2. Press the OK or s
the following sound options ress the OK button.
►button and then press the to select
and then p
Standard / Movie / Music / Speech / User and then press the OK
button to confirm.
Sound
▲▼ buttons
sound mode.
Picture
Sound
Channel
Feature
Setup
Picture
Sound
Channel
Feature
Setup
Sound Mode
Treble
Balance
Surround Off
SPDIF
OK
Move
Enter
Sound Mode
Treble
Balance
Surround
SPDIF
OK
Move
()for user mode
()for user mode
Bass
Bass
Enter
Sound
Exit
Sound
Exit
User
50
50
0
Auto
Menu
Return
Exit
User
Standard
Movie
Music
Speech
User
Auto
Menu
Return
Exit
Surround
SPDIF
Press the buttons to turn on / off the surround function by selecting “On” or “Off”.
Press the buttons to select among Off, PCM, Auto and Multi .
Sound
NICAM STEREO
Sound
Sound
When a bilingual programme is received,you can switch among DUALI, DUALII and DUAL I+II.
While watching a D TV p rogramme ,you can press the Sound button to display
the audio language list (only applicable when the TV programme has this
feature).
Multi-Audio
Stereo
Italian
OTH
Left, Right and Stereo.
18
Move
Page 21

Al lo ws you to set up a variet y of channel options.
×
Channel
1. Press the Menu button and then press the ▲▼ buttons to select the
Channel menu.
Picture
Sound
Channel
2. Press the OK or s ▲▼ buttons
the following sound options ress the OK button.
►button and then press the to select
and then p
Feature
Setup
Channel Management
To manage (Delete / Rename / Lock / Skip) all channels.
1. P ress the bu ttons to Channel Management then press the OK button to confirm.
2. A c hannel management screen will pop up, press the
se le ct the channel you want to edit.
Lock
▲▼
▲▼buttons to
No.
0001
0002
0003
0004
0005
Move
Program Name
BBC1
C02
S02
C12
C21
Move
Channel Management
Favorite Management
Country
TV Connection
Auto Search
DTV manual Search
ATV Manual Search
OK
Enter
Channel - Channel Manager
Page + -
CH+-
ENTER
ENTER
UK
Freeview
ENTER
ENTER
ENTER
Exit
Menu
Return
Type
atv
atv
atv
atv
atv
atv
atv
atv
atv
MoveSkip
Menu
Return
Exit
LockDel
Exit
Exit
Move (this function for ATV mode only)
3.
4.
Favorite Management
To manage (Add / ) favorite channels.Delete
1. P ress the bu ttons to favo ri te Management then press the OK button
to confirm.
2. A channel management screen will pop up.
3.
4.
5.
▲▼
No.
0001
0002
0003
0004
0005
0006
0007
0008
0009
No.
0001
0002
0003
0004
0005
0006
0007
0008
0009
Program Name
BBC1
C02
S02
C12
S11
C21
Move
Program Name
BBC1
BBC1
C02
S02
C12
S11
C21
Move
Channel - Favorite Manager
Page + -
CH+-
Channel - Favorite Manager
Page + -
CH+-
Favorite 2Favorite 1
Favorite 2Favorite 1
Fav1 Fav2
Exit
Exit
Fav1 Fav2
Exit
Exit
Menu
Fav3
Fav3
Menu
Return
Return
Fav4
Fav4
Type
atv
atv
atv
atv
atv
atv
atv
atv
atv
Favorite 4Favorite 3
Type
atv
atv
atv
atv
atv
atv
atv
atv
atv
Favorite 4Favorite 3
19
Page 22

Country
Press the ▲ ▼ buttons to select the country and then
press the OK button to confirm.
Auto Search
To select auto search mode (All / Digital / Analogue).
Picture
Sound
Channel
Feature
Setup
Move
Channel Management
Favorite Management
Country
TV Connection
Auto Search
DTV manual Search
ATV Manual Search
OK
Enter
Channel
Exit
Exit
ENTER
ENTER
UK
Germany
UK
France
Italy
Spain
Menu
Return
1. Press the ▲ ▼ buttons to Auto Search then press the OK button to confirm.
2. Select Auto Search item to enter auto search user operation interface as following.
All Mode:
Select All to scan all available DTV and ATV channels and store
them. To skip the ATV search press the Menu button. To exit
the Tuning menu press Exit.
DTV Mode:
Select DTV to scan all available DTV (Freeview/Cable)
channels and store them.
ATV Mode:
Select ATV to scan all available Analogue Channels and store
them . To exit the tuning menu press Exit.
Picture
Sound
Channel
Feature
Setup
Picture
Sound
Channel
Feature
Setup
Move
OK
ATV channels found:
DTV channels found:
Radio channels found:
Cable
Process
Channel - Auto Search
All
DTV
ATV
Enter
Channel Tuning
ENTER
ENTER
ENTER
Exit
Menu
Exit
Return
0
0
0
0%
0%
Exit
Exit
20
3.
4.
Page 23

Exit
ATV Manual Search
To search analogue channel by entering parameters manually.
1. Press the ▲ ▼ buttons to ATV Manual Search then press the OK button to confirm.
2. Select ATV manual search item to enter air channel manual search
in ATV source and the user operation interface as following.
Current Channe
Frequency
Picture
Sound
Channel
Feature
Setup
Picture
Sound
Channel
Feature
Setup
Move
Move
Channel - DTV Manual Search
Frequency(KHz)
SymbolRate(KS/s)
Modulation(QAM)
Strength
Quality
OK
Enter
Current Channel
Frequency
Search
Fine Tune
Color System
Sound System
Save
OK
Enter
107500
6875
64QAM
Start
Exit
Exit
Exit
Menu
001
48.25MHz
ENTER
ENTER
PAL
DK
Menu
Exit
Channel - ATV manual Search
Return
Return
0%
0%
BG / DK / I .
3.
4.
21
Page 24

Feature Setting
Al lo ws you to set up a va ri et y of fea ture options.
1. Press the Menu button and then press the ▲▼ buttons to select the
Feature menu.
2. Press the OK or s ▲▼ buttons
the following feature options ress the OK button.
►button and then press the to select
and then p
Lock
.
1. Press the
2.
Lock Channel:
Parental Guidance:
Change Pin Code:
3.
4.
buttons to Lock then press the OK button to confirm.
▲▼
8899
ON: Turns on the Lock options. (This option must be set to
ON for the channel management Lock option to function)
Once the Lock option is activat ed ( ON ).
To view any locked channels you will need to give a password.
For Auto, M an ua l tu ne a nd TV reset a password will also
be needed.
OFF: Turn off the LOCK options. ( All fu nc ti on s of t he T V
wi ll b e available )
Off: turn off Par en ta l Lo ck
4-18 : turn on Paren ta l Lo ck a nd s et t he a ge l evel that are
perm itted to watch the pr og ra m.
Press the OK o r s to en ter the pin code
►button
changing page.
Picture
Sound
Channel
Feature
Setup
Picture
Sound
Channel
Feature
Setup
Picture
Sound
Channel
Feature
Setup
Picture
Sound
Channel
Feature
Setup
Move
Move
Move
Lock
Language
Clock
Sleep Timer
Auto Standby
Hearing Impaired
CI Info
PVR/Pause TV
OK
Enter
Lock
Language
Password
Clock
Sleep Timer
Auto Standby
Hearing Impaired
CI Info
PVR/Pause TV
OK
Enter
Feature - Lock
Lock Channel
Parental Guidance
Change Pin Code
Hotel Mode
OK
Enter
Feature - Change Pin Code
Old Password
New Password
Confirm New Password
Exit
Exit
Feature
Feature
Exit
Exit
ENTER
ENTER
ENTER
Off
Never
Off
ENTER
ENTER
Exit
____
____
____
ENTER
ENTER
ENTER
Off
Never
Off
ENTER
ENTER
On
Off
ENTER
ENTER
Menu
Menu
Menu
Return
Menu
Return
Return
Return
Exit
Exit
Exit
Language
System language setting, includes OSD Language, Preferred Subtitle, Preferred Audio,
Digital Teletext Language, Anglog Teletext Language.
1. Press the ▲ ▼ buttons to Language then press the OK button to confirm.
OSD Language
Preferred Subtitle
Preferred Audio
DTV Teletext Language
ATV Teletext Language
3.
4.
22
Pr ess th e buttons to select the menu language.
Pr ess th e buttons to sele ct the P re fe rr ed S ubtitle.
Pr ess th e buttons to sele ct the P re fe rr ed Audio.
Pr ess th e buttons to sele ct the DTV Tel et ex t La nguage.
Pr ess th e buttons to sele ct the ATV Teletext Language.
Picture
Sound
Channel
Feature
Setup
Move
Feature - Language
OSD Language
1st Preferred Subtitle
2nd Preferred Subtitle
1st Preferred Audio
2nd Preferred Audio
DTV Teletext Language
ATV Teletext Language
OK
Enter
English
English
English
English
English
English
West
Exit
Menu
Exit
Return
Page 25

Feature Setting
Clock
1. Press the ▲ ▼ buttons to Clock then press the OK button to confirm.
Date
Time
DST
(daylight saving time)
Press the OK buttons to set date.
Press the OK buttons to set time.
)
(The Dat e and T ime o pt ion a re no t ava ila ble in UK . The T ime a nd Date
are automatically set by the Digital TV signal.)
[On, Off] if it's On, it'll be an hour earlier than the GMT.
If Time Zone is set to Auto, it's not available.
Picture
Sound
Channel
Feature
Setup
Picture
Sound
Channel
Feature
Setup
Move
Move
Date
Time
Time Zone
DST
OK
Enter
Lock
Language
Clock
Sleep Timer
Auto Standby
Hearing Impaired
CI Info
PVR/Pause TV
OK
Enter
Feature - Clock
Exit
Exit
Feature
Exit
Exit
06/11/2012
11:02
+8:00
Off
Menu
ENTER
ENTER
ENTER
Off
Off
10 Mins
20 Mins
30 Mins
60 Mins
Menu
Return
Return
Auto Standby
Picture
Sound
Channel
Feature
Setup
Picture
Sound
Channel
Feature
Setup
Move
Move
Lock
Language
Clock
Sleep Timer
Auto Standby
Hearing Impaired
CI Info
PVR/Pause TV
OK
Enter
Lock
Language
Clock
Sleep Timer
Auto Standby
Hearing Impaired
CI Info
PVR/Pause TV
OK
Enter
Feature
Exit
Feature
Exit
ENTER
ENTER
ENTER
Off
Never
Never
1 Hour
2 Hour
4 Hour
Menu
ENTER
ENTER
ENTER
Off
Never
Off
Off
On
Return
Menu
Return
Exit
Exit
23
Page 26

Feature Setting
1. Press the ▲ ▼ buttons to CI Info then press the OK button to confirm.
Picture
Move
Sleep Timer
Auto Standby
Hearing Impaired
PVR/Pause TV
Sound
Channel
Feature
Setup
No CI Module inserted
Move
Lock
Language
Clock
CI Info
OK
Enter
Common Interface
OK
Enter
Feature
Exit
Menu
Exit
Return
ENTER
ENTER
ENTER
Off
Never
Off
ENTER
ENTER
Menu
Exit
Return
Exit
24
Page 27

Feature Setting
PVR/Time shift
Allows you to select your preferences in the PVR/Timeshift
1. Press the ▲ ▼ buttons to select PVR/Timeshift then press the OK button
to confirm.
Picture
Sound
Channel
Feature
Setup
Move
Feature - PVR/Timeshift
Partition Select
Auto Timeshift
Pause TV Buffer
Timer
Record List
Recorder Start
OK
Enter
ENTER
Off
Auto
ENTER
ENTER
ENTER
Exit
Menu
Exit
Return
Partition Select
Press the OK buttons to select the Partition Select menu.
Display partition’ s infom at io n / Format partition func ti on /
Set default partition function.
Partitions
Partitions' property
The list in the menu shows the partitions connected to system.
Total size and Free size.
Format Partition
Set default partition
Auto Time shift
Pause TV Buffer
Timer
Pr ess th e buttons to sele ct the T im er s hi ft b uf fer: Auto / 30Mins / 1hr / 2hr.
Press the OK button to select the Timer menu.
CH NO. Channel number.
Channel Channel name.
Start Start recording time.
Duration The total recording time.
Date
Mode Record Mod.e
On the left top of menu is current date and tim e .
OK
Timer
No.
Channel
Ch No.
0031
01
ITV2 +1
02
Film4
0029
03
0005
YLE FST
R
Start Duration
21:00 21:15
22:40
11:30
12/01/2008 18:02:25
12/04/2009
23:15
12/04/2009 Once
--:--
12/04/2009
Date
Mode
Once
Once
Record List
Recorder Start
Move
Edit
Del AllDel
Add
Exit
Menu
Exit
Return
OK
25
Page 28

Setup Setting
Al lo ws you to set up a va ri et y of s et up o ptions.
1. Press the Menu button and then press the ▲▼ buttons to select the
Setup menu.
2. Press the OK or s ▲▼ buttons
the following setup options ress the OK button .
►button and then press the to select
and then p
OSD Time
/ Never
Home Mode
Press the ▲▼ buttons to select the Home Mode:
Max Brightness / Home / Max Economy and then
press the OK button.
Picture
Sound
Channel
Feature
Setup
Picture
Sound
Channel
Feature
Setup
Picture
Sound
Channel
Feature
Setup
Move
Reset TV Setting
Software Upgrade
Move
Move
OSD Timer
PC Setup
Home Mode
OTA Upgrade
DVD Setup
Factory Reset
OK
Enter
Auto Adjust
H Position
V Position
Phase
Clock
OK
Enter
OSD Timer
PC Setup
Home Mode
Reset TV Setting
Software Upgrade
OTA Upgrade
DVD Setup
Factory Reset
OK
Enter
Setup
Exit
Exit
Setup - PC Setup
Exit
Exit
Setup
Exit
Exit
30 Seconds
ENTER
Home
ENTER
ENTER
ENTER
ENTER
ENTER
Menu
ENTER
0
0
3
0
Menu
30 Seconds
ENTER
Home
Max Brightness
Home
Max Economy
ENTER
ENTER
ENTER
Menu
Return
Return
Return
Reset TV Setting
Setup
Press the OK o r ubuttons and then press the pqbuttons to
se le ct Reset TV Setting and t he n pr es s th e OK button.
When activated the factory default settings will be applied to all
user settings. (No Channels will be lost)
Factory Reset
press the button to th en press the OK button to confirm.Factory Reset
the default password is “0000"
If you change the password, be sure to remember the
new password! If you forget the new password, press the
master password “8899"
Picture
Sound
Channel
Feature
Setup
Picture
Sound
Channel
Feature
Setup
Do you want to reset
Database to default?
Move
Move
OSD Timer
PC Setup
Message
Home Mode
Reset TV Setting
Software Upgrade
OK Cancel
DVD Setup
Factory Reset
OK
Enter
OSD Timer
PC Setup
Home Mode
Password
Reset TV Setting
Software Upgrade
OTA Upgrade
DVD Setup
Factory Reset
OK
Enter
Setup
Exit
Setup
Exit
Exit
Exit
30 Seconds
ENTER
Home
ENTER
ENTER
ENTER
ENTER
Menu
30 Seconds
ENTER
Home
ENTER
ENTER
ENTER
ENTER
ENTER
Menu
Return
Return
26
Page 29

DVD Operation
Setup menu
Exit Setup
Set TV Display Mode
ON
ON
Dolby
4:3 P an Scan
4:3 Letter Box
Wide
Dolby
Exit Setup
Picture
Sound
Channel
Feature
Setup
Move
Reset TV Setting
Software Upgrade
ON
ON
OSD Timer
PC Setup
Home Mode
OTA Upgrade
DVD Setup
Factory Reset
OK
Enter
Setup
Exit
Exit
Dolby
30 Seconds
ENTER
Home
ENTER
ENTER
ENTER
ENTER
ENTER
Menu
Return
Exit Setup
Set OSD Language
Exit Setup
Screen Saver
ON
ON
ON
ON
English
French
German
Spanish
Italian
Portuguese
Dolby
ON
Off
27
Page 30

DVD Operation
Dolby
Dolby
Exit Setup
Set Last Memory State
Speaker Setup
Go To Speaker Setup Page
Speaker Setup Page
Downmix STR
ON
ON
ON
TV System
Off
PAL
Multi
NTSC
Set TV Standard
Dolby
Multi
Dolby
TV System
English
French
German
Spanish
Italian
Dolby
Portuguese
Preferred Audio Language
LT/RT
Stereo
Set Downmix Mode
Dolby Digital Setup
Dynamic
Set DRC To Full
28
Dolby
Full
3 / 4
1 / 2
1 / 4
OFF
TV System
Preferred Subtitle Language
TV System
Preferred Menu Language
Dolby
English
French
German
Spanish
Italian
Portuguese
Off
Dolby
English
French
German
Spanish
Italian
Portuguese
Page 31

DVD Operation
TV System
Set Parental Control
1 KID S AF
2 G
3 PG
4 PG 13
5 PGR
6 R
7 NC 17
8 ADULT
Dolby
TV System
Dolby
Reset
Load Factory Setting
TV System
Change Password
Old Password
New Password
Confirm PWD
Dolby
Change
Dolby
OK
29
Page 32

EPG
EPG
There are 3 modes of EPG menu:
Daily mode: shows the information of the programs to be broadcasted
in daily mode.
RED (Weekly) Change to weekly mode.
GREEN (Reminder)
YELLOW (Prev Day) Update the program information of the current 7 channels in the channel
list to the previous day and the start time keeps the same.
BLUE (Next Day) Update the program information of the current 7 channels in the channel
list to the next day and the start time keeps the same.
Weekly mode: shows the information of the programs to be broadcasted
in weekly mode.
RED (Daily) Change to Daily mode.
YELLOW (Prev Day) If the cursor lies on the right event list, update the right event list to
display the event information of the previous day and move the cursor
to the same place in the updated page.
BLUE (Next Day) If the cursor lies on the right event list, update the right event list to
display the event information of the next day and move the cursor to
the same place in the updated page.
Extended mode:
shows the detailed information of each program
Extended detailed programme information can
be displayed by pressing the info but to n on the
remote control.
30
Page 33

Text
Text
Text
Text
or
31
Page 34

USB ou tput: DC 5V 500mA
32
Page 35

/ GIF / TIFF.
function: Play / Pause / Stop / Prev. / Nex t / Rotate / Zo om /
Info / Photo Setup / Pla y list.
33
Page 36

WAVE / WMA / AAC / AC3 / MPEG.
(Ti tle / Artist / Album / Ge nr e / Year).
function: Play / Pause / Stop / FB / FF / Pr ev. / Next / Goto Time /
Repeat All / Play lis t / Mu si c.
Backlight Off
34
AVI / MPEG1/2 / MPEG4 / WMV / H.264.
Page 37

function: Play / Pause / Stop / FB / FF / Sl ow m od e / St ep m od e /
Repeat A- B / Pr ev. / Next / Play list / Inf o / Mo vi e Se tu p / Goto Time.
e-Book
35
Page 38

Time shift input info menu:
Information Time shift input info m en u di sp la ys a s a flag o f Time shift. After Time shift start this menu di spla ys
all the t im e un ti l. T im e sh if t st op ( except there is some other menu exi st) .
Enter method A fter Time shift start, it will display automatically.
Time shift info banner menu:
Information T ime shit info banner shows some current Time shift information.
Enter method A ft er T im e sh if t star t, press Info to show t he m en u .
Function explain :
a Time is equal to current play time minus current recording time.
Progress bar is for current recording length compared with the disk free space when REC start.
b
The black triangular icon is for current play length compared with current recording length.
c MB Free is the disk instantaneous free space.
d The right red time menu has the same function with the time in info banner menu(only when info banner menu closed it showed).
Time shift info menu
Time shift time menu
36
Rec
REC
REC info menu
Rec
Page 39

Timer
Timer
2. Press the YELLOW button enter the Time Edit menu for the channel.
Recorder Press the ▲▼ buttons to select the Recorder On or Off.
Type Press the ▲▼ buttons to select the Type
Channel Press the ▲▼ buttons to select the
Timer
No.
Channel
Ch No.
0031
01
ITV2 +1
02
Film4
0029
03
0005
YLE FST
R
Recorder
Type
Channel
Start Time
Duration
Date
Mode
Move
Start Duration
21:00 21:15
22:40
11:30
Del AllDel
Timer Edit
23:15
--:--
Exit
Exit
On
DTV
BBC ONE
09:35
10:15
13/01/2008
Once
12/01/2008 18:02:25
Mode
Date
12/04/2009
Once
12/04/2009
Once
12/04/2009
Once
Edit
Add
Menu
Return
13/01/2008 18:02:25
Duration
Date Press the ▲▼ buttons to select the date of starting
recording, Format is day / month / year.
Daily / Monthly ./ Wee kl y
0~9
Move
0~9
OK
Timer
Start Duration
21:00 21:15
22:40
11:30
Del AllDel
Exit
Enter
Exit
23:15
--:--
Menu
Save
12/01/2008 18:02:25
Mode
Date
12/04/2009
Once
12/04/2009
Once
12/04/2009
Once
Edit
Add
Menu
Return
Move
No.
Channel
Ch No.
0031
01
ITV2 +1
02
Film4
0029
03
0005
YLE FST
R
OK
37
Page 40

Press the SOURCE b ut to n on the T V or the SOURCE button on the r em ot e
cont rol then
38
Page 41

PICTURE
39
Page 42

Mute
Lost Password
Change Pin Code
8899
FEATURE
40
Page 43

480i
576i
1080i
Full
1600 x 900
480i
576i
1080i
Full
Full
Just S can
41
Page 44

C20234F-LED
20 inch LED Panel
1600 (H) x 900 (V) pixels
PAL I / BG / DK
SECAM BG / DK
200
1000:1
Power Source
Operating Power consumption
Vesa Wall mou nt in g size / Screw size
12V 3A
A
49.5 (19.5 inch)
16 W
24
< 0.5 W
100 x 100 mm / M4x 8
2.5 W + 2.5W
466 x 54 x 279 mm
466 x 175 x 322 m m
2.8 kg
42
Page 45

LED
LED
LED
LED
43
Page 46

For MAINS powered apparatus and for apparatus producing
internal voltages greater than 35 V(peak) a.c. or d.c., having
no protection against splashing water, the apparatus shall not
be exposed to dripping or splashing and no objects filled
with liquids, such as vases, shall be placed on the apparatus.
To ensure correct and safe installation and interconnection
of the apparatus in multimedia systems
Where the MAINS plug or an appliance coupler is used as the
disconnect device, the disconnect device shall remain readily
operable;
This TV is fitted with the latest ECO friendly power saving
technol og y. If whil st v iewin g th e TV remo te c ontrol is n ot
used for a pe ri od of 4 hours , the Auto Stand by f eatur e wi ll
operate a nd p ower down t he TV. A wa rn ing messa ge w ill be
display ed t o inform yo u th at the TV i s about to powe r down.
44
Page 47

It fullfils the following EU regulatio:ns
45
 Loading...