

Cellartec CT1500ZD, CT2500ZD, CT3500ZD, CT4500ZD, CT6500ZD Installation, Use & Care Manual
...Page 1
wwwwww..cceellllaarrtteecc..ccoomm
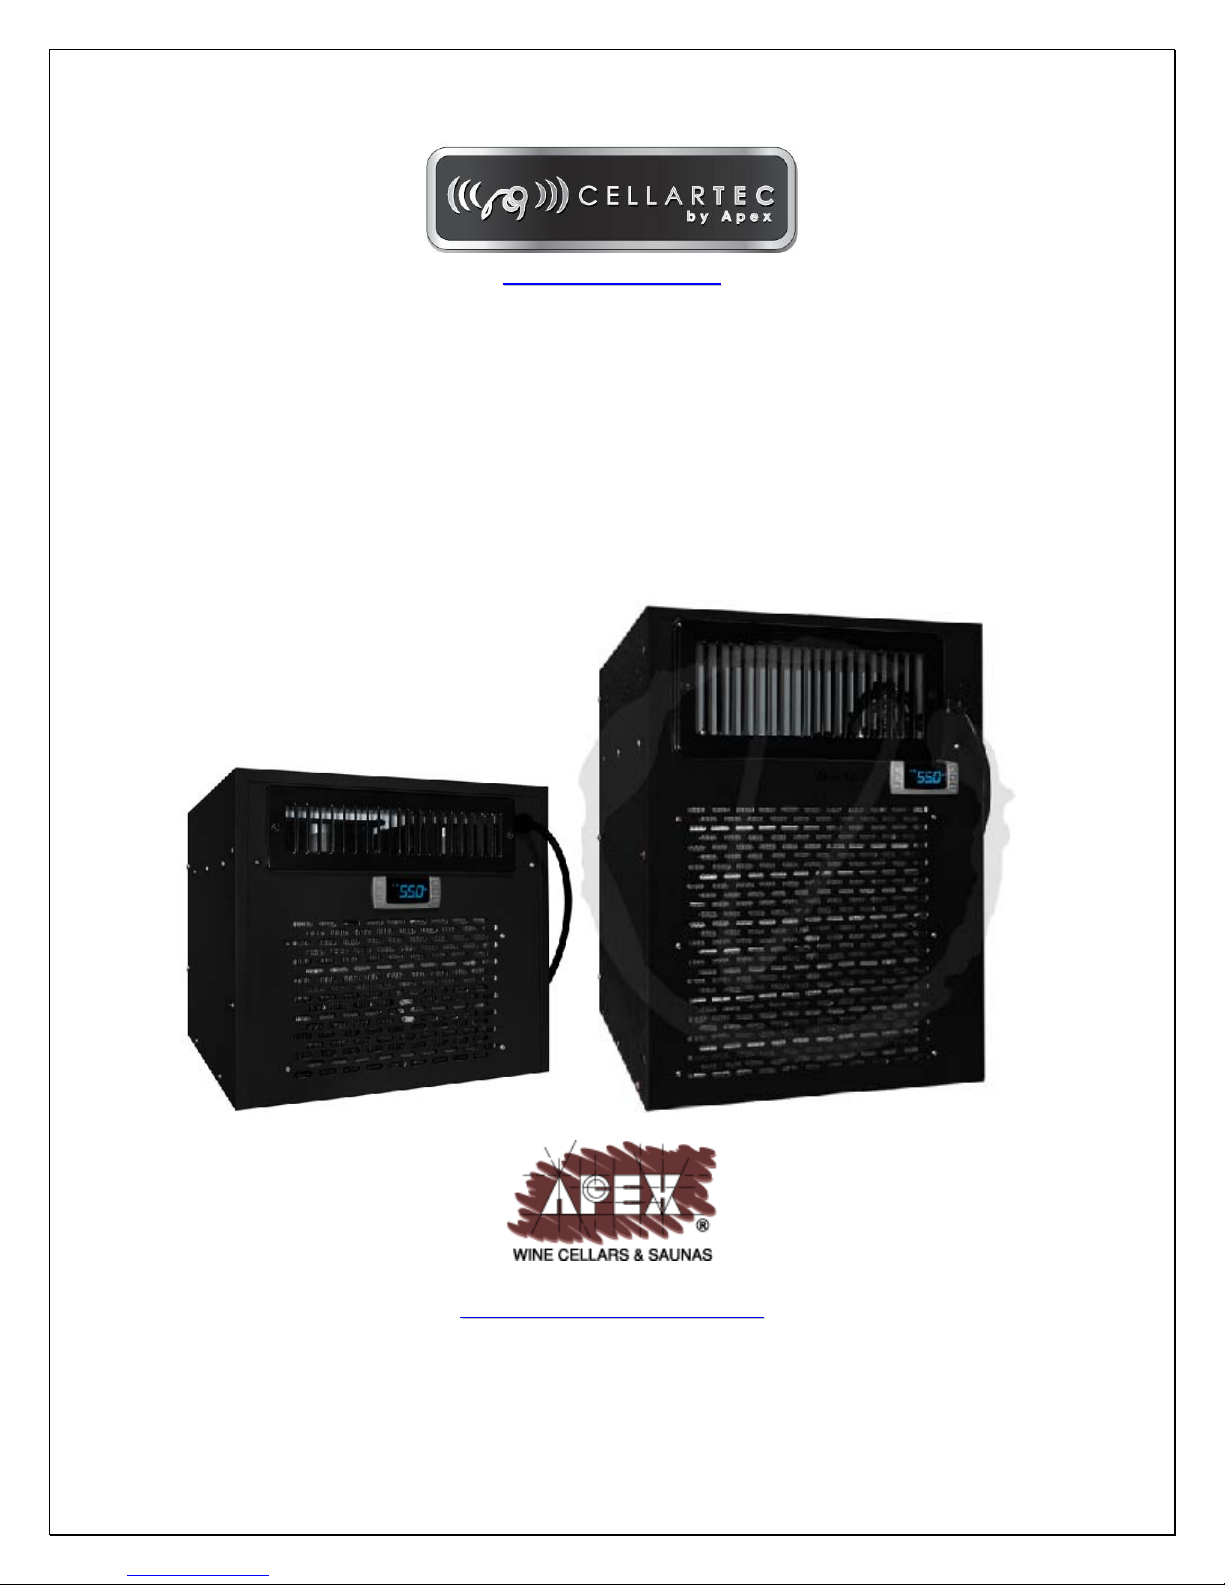
Wine Cooling System
CT1500ZD, CT2500ZD
CT3500ZD, CT4500ZD
CT6500ZD, CT8500ZD
Installation, Use & Care Manual
Read and save these instructions
wwwwww..aappeexxwwiinneecceellllaarrss..ccoomm
Page 2
Important Safety Information
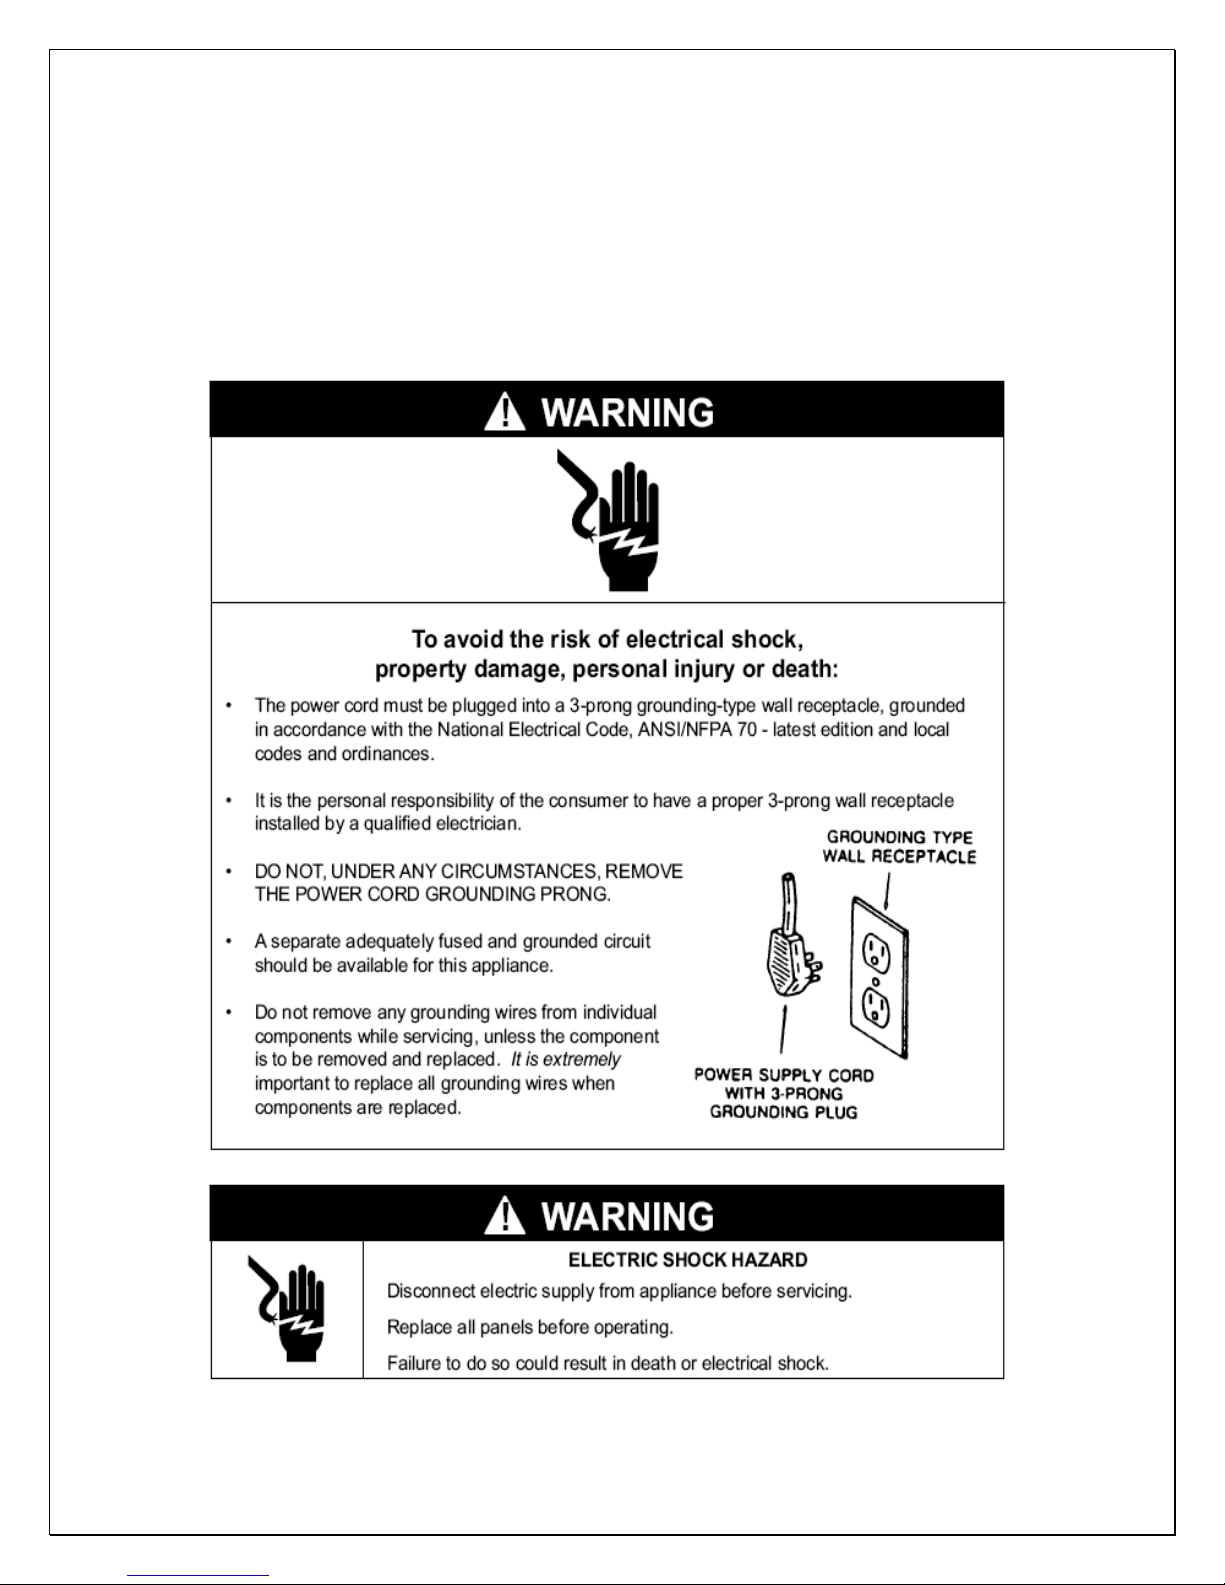
NOTES:
• Do not plug in until 24 hours after delivery.
• Do not use a ground fault interrupter (GFI).
• A dedicated 20 AMP circuit for CT1500-2500ZD and 30 AMP for
CT3500~8500ZD are required.
- 1 -
Page 3
Table of Contents
Features & Specifications.…………………….……………..3
Installation Instructions……………..………………………..6
Temperature & Humidity…………………………..………..16
Care Guide…………………………………………………….20
Troubleshooting………….…………………………………..21
Electrical Diagrams………………..…………………….…24
Customer Support…….…………..…………………….…25
Warranty……………………………………………………….26
- 2 -
Page 4
Features and Specifications
• ZD series cooling units are designed and used to provide a stable
temperature between 50~65 °F for a properly insulated space.
• The refrigerated space will maintain humidity ranges within 50~70% RH.
• These temperature and humidity ranges are optimized for long term
storage of wine.
• Temperature is controlled and humidity is adjusted using patented
technology.
• Horizontal cold-air supply is optimized for use in the wide cabinets or wine
rooms.
• The unit is self-contained ready for easy installation and use.
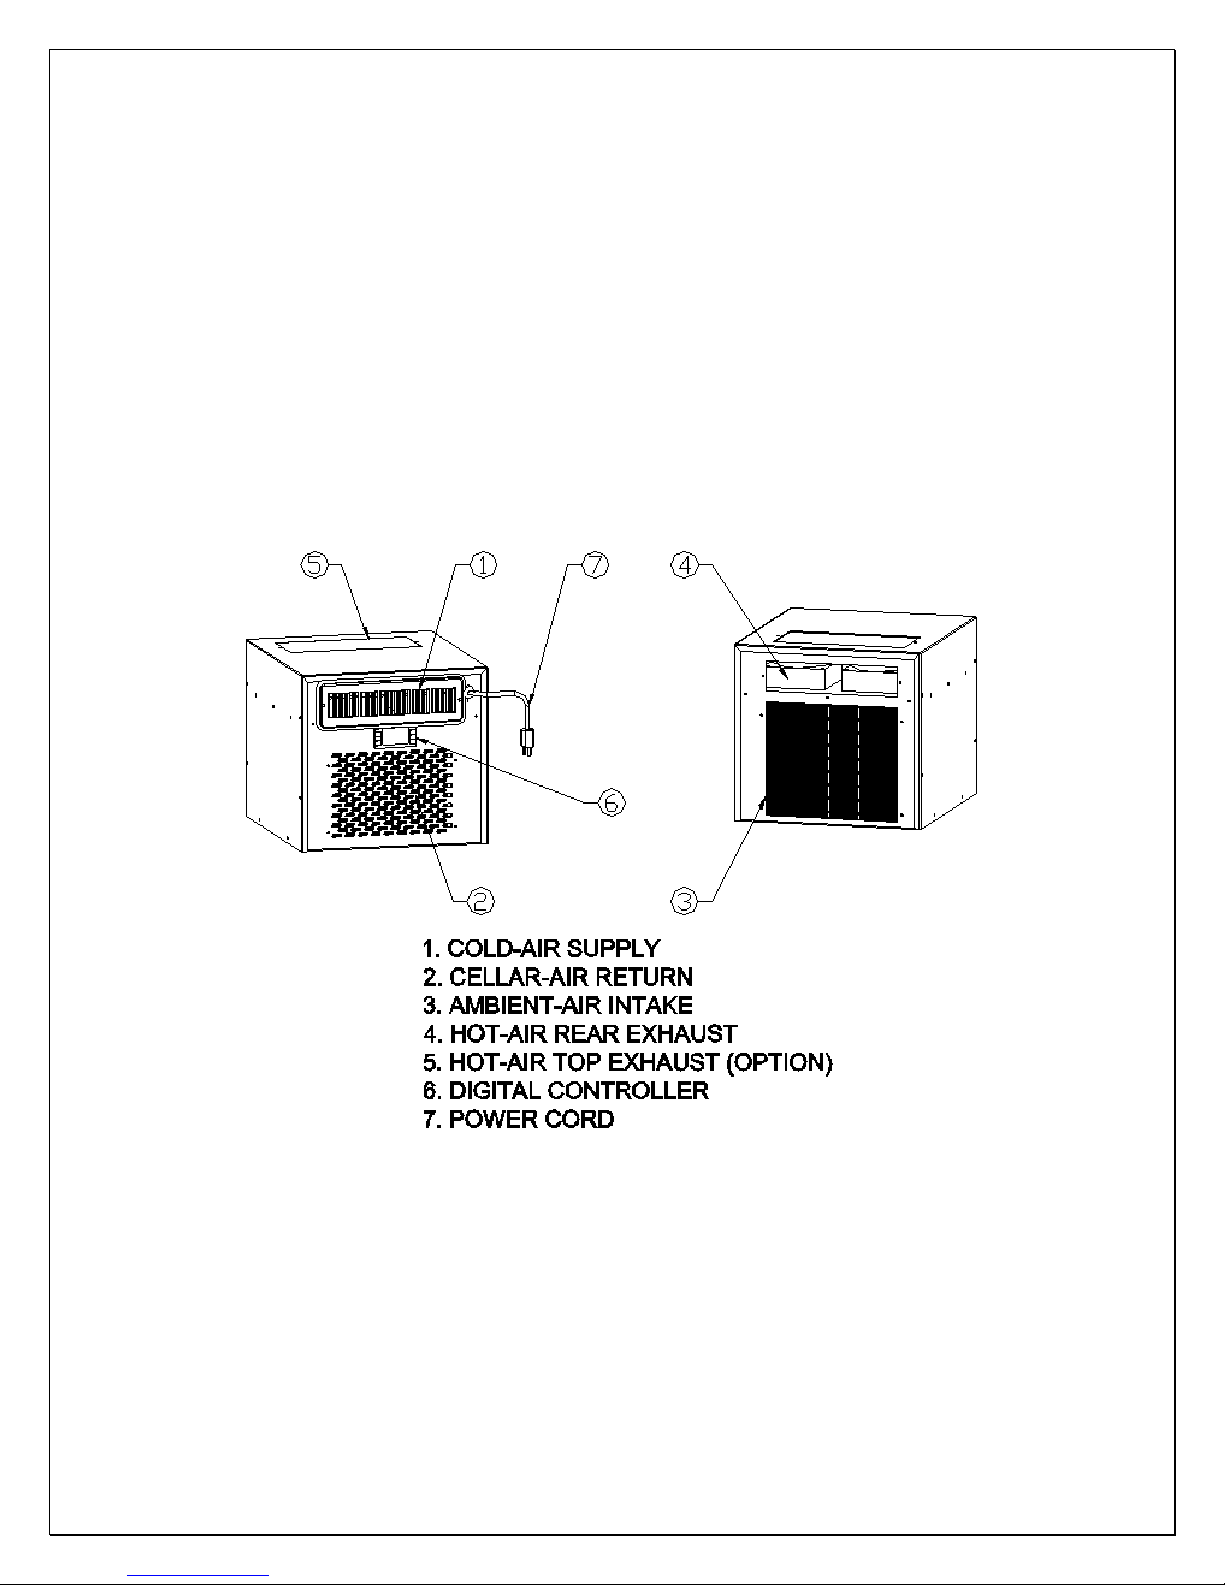
Fig. 1.1 CT1500~2500ZD FEATURE DESCRIPTIONS
- 3 -
Page 5
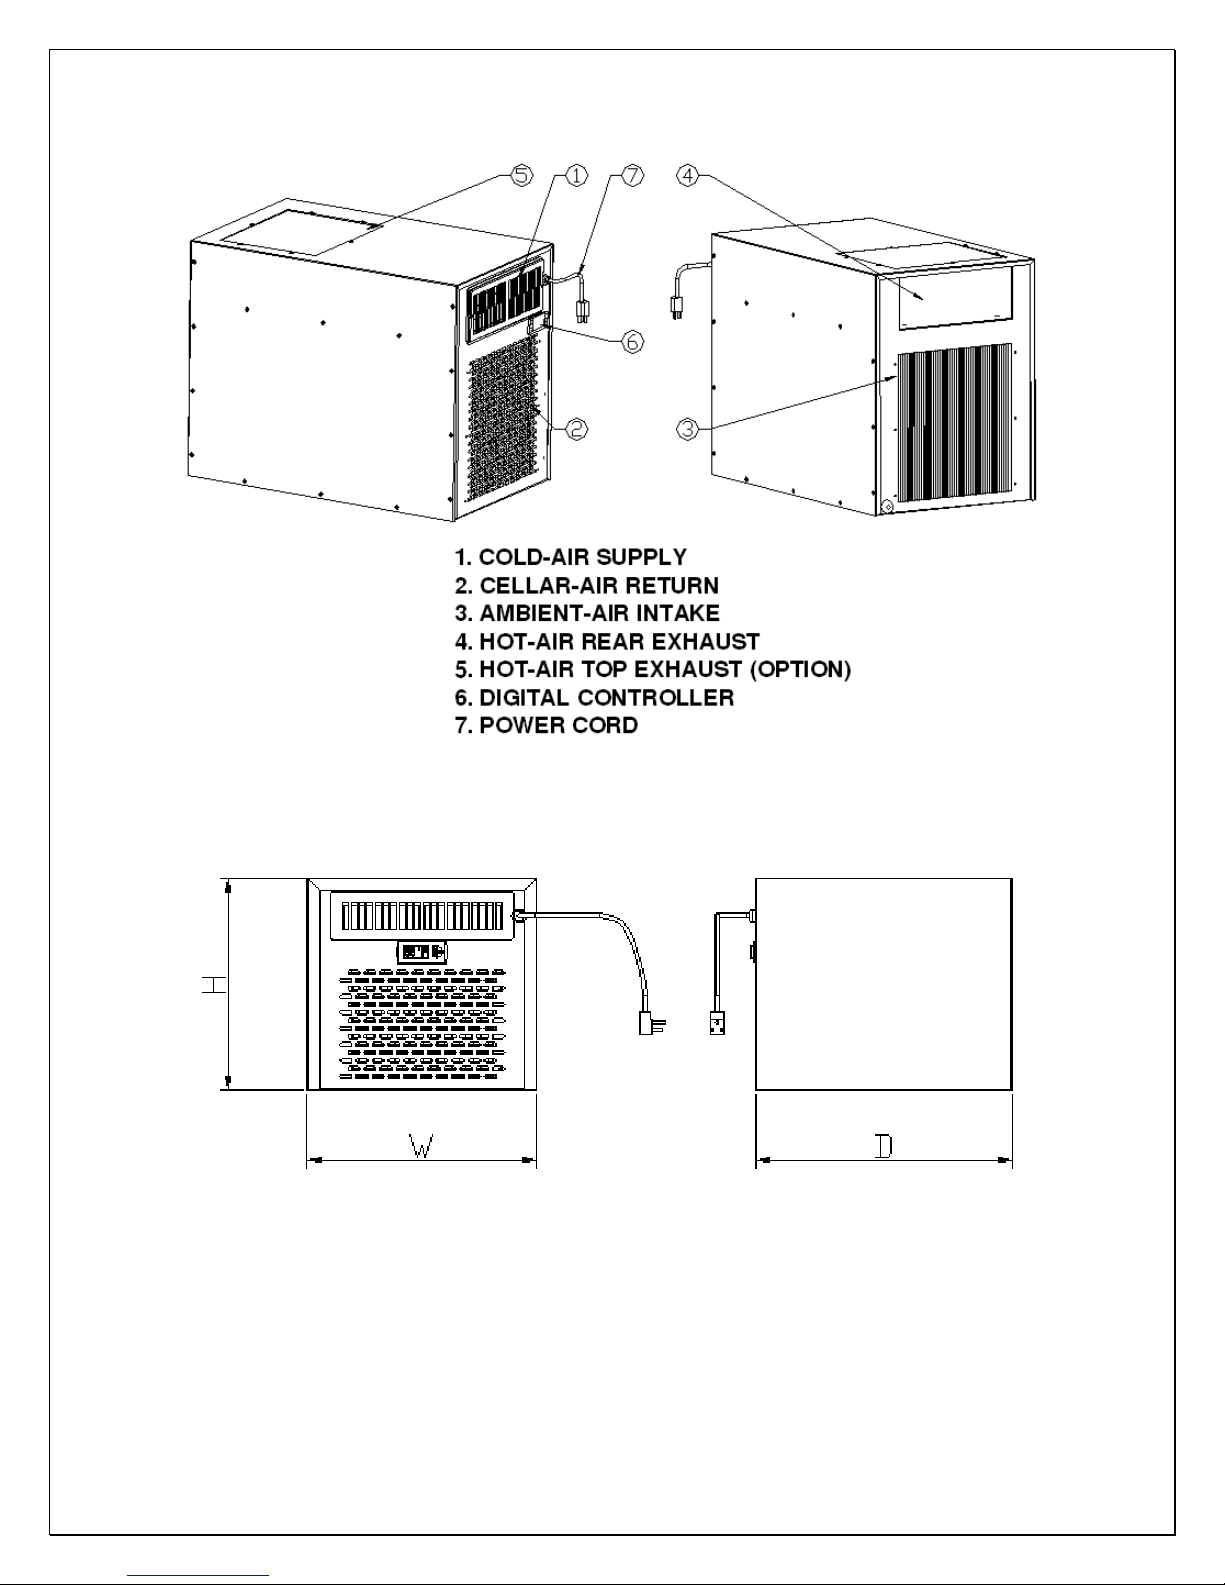
Fig. 1.2 CT3500~8500ZD FEATURE DESCRIPTIONS
Fig. 1.3 CT1500~2500ZD DIMENSIONS
- 4 -
Page 6
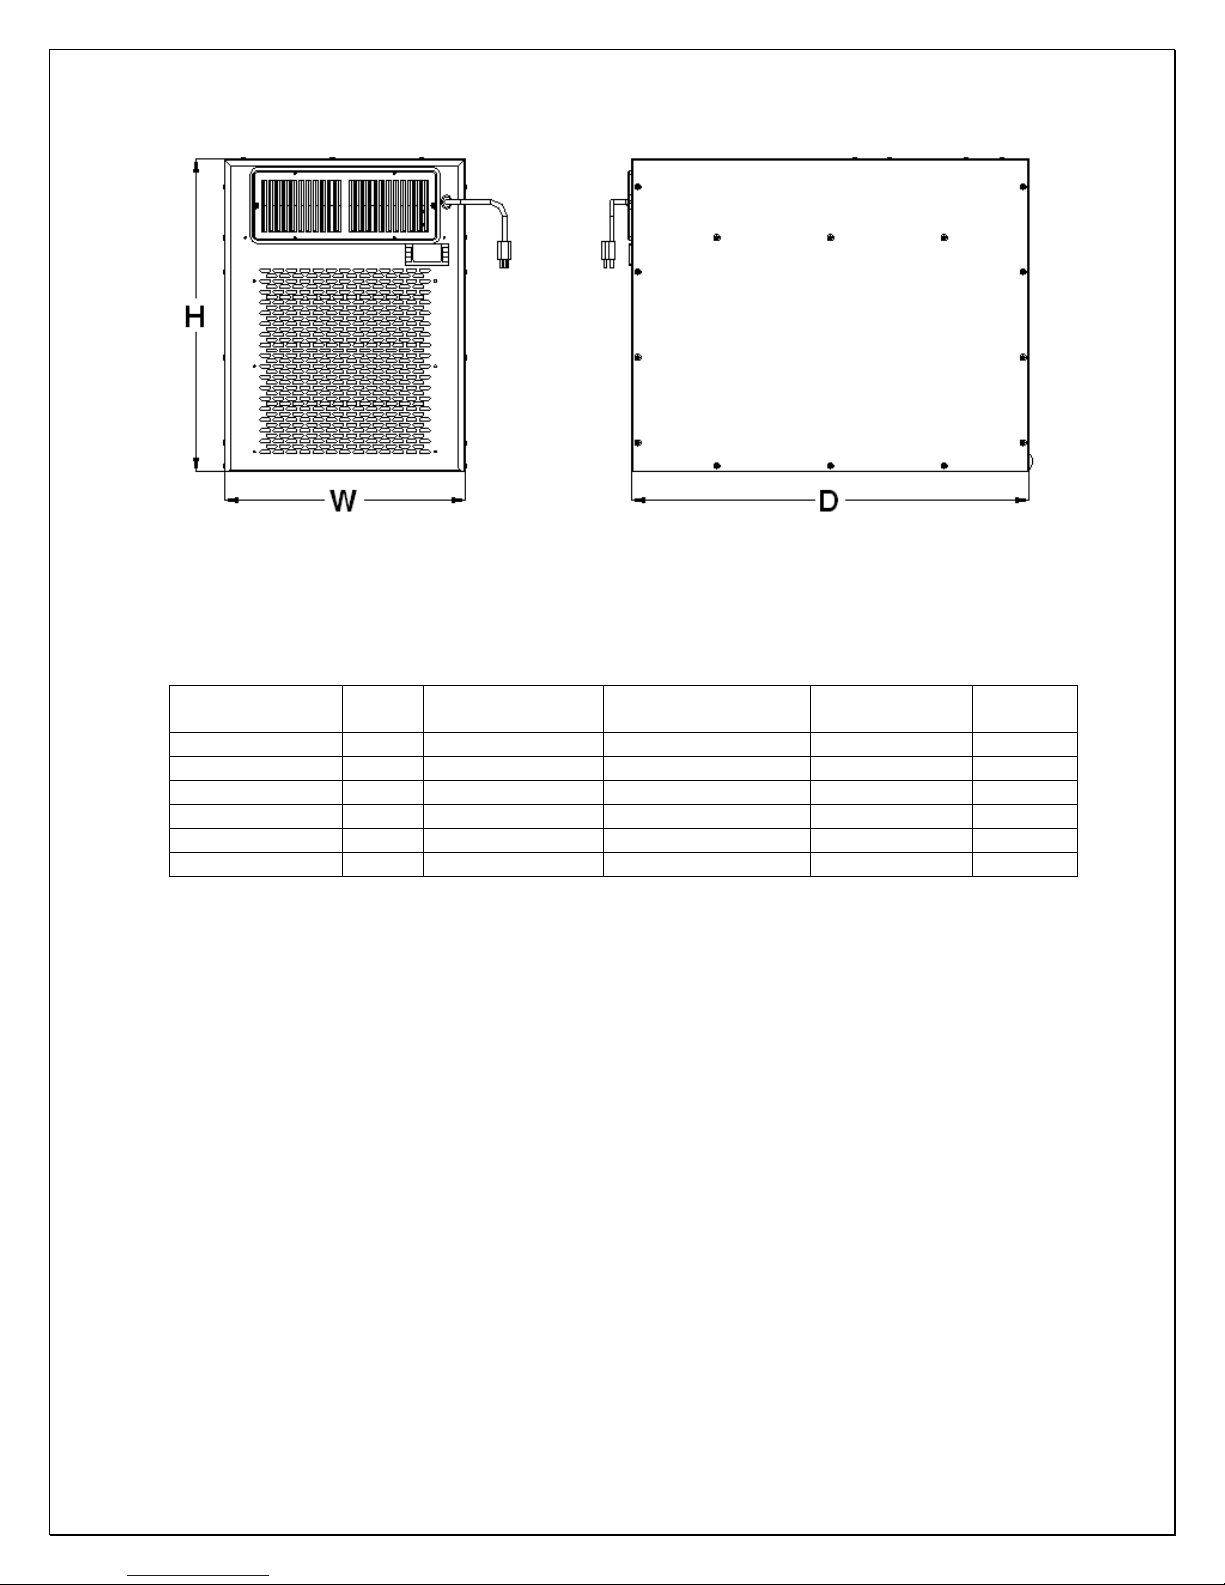
Fig. 1.4 CT3500~8500ZD DIMENSIONS
The specifications and dimensions are listed as follows:
Model CFM
CT1500ZD 120 90 14.25X16X13.25 115V/60HZ/4A 50
CT2500ZD 180 200 14.25X16X13.25 115V/60HZ/5A 55
CT3500ZD 250 650 14.25X21.25X19.75 115V/60Hz/6A 75
CT4500ZD 250 1000 14.25X21.25X19.75 115V/60Hz/9A 75
CT6500ZD 500 1500 17X28X22 115V/60Hz/14A 110
CT8500ZD 500 2000 17X28X22 115V/60Hz/16A 110
Cellar Size
(cu ft)
Dimensions
W”XD”XH”
Electrical
Weight
(lb)
NOTES:
• Also see the voltage, frequency and current specified on the label at the
cooling unit.
• The rated capacity is determined under the cellar and ambient
temperatures of 55
°F and 75°F with R13 interior and R19 exterior
insulations. Any lower cellar temperature, higher ambient temperature
and less insulation will cause reducing capacity and may not maintain
55
°F.
• The ambient temperatures for CT1500ZD shall not be higher than 78
°F
or lower than 50°F in order to operate properly.
• The ambient temperatures for CT2500ZD shall not be higher than 95
°F
or lower than 50°F in order to operate properly.
• The ambient temperatures for CT3500~8500ZD shall not be higher than
95°F or lower than 50°F in order to operate properly.
- 5 -
Page 7
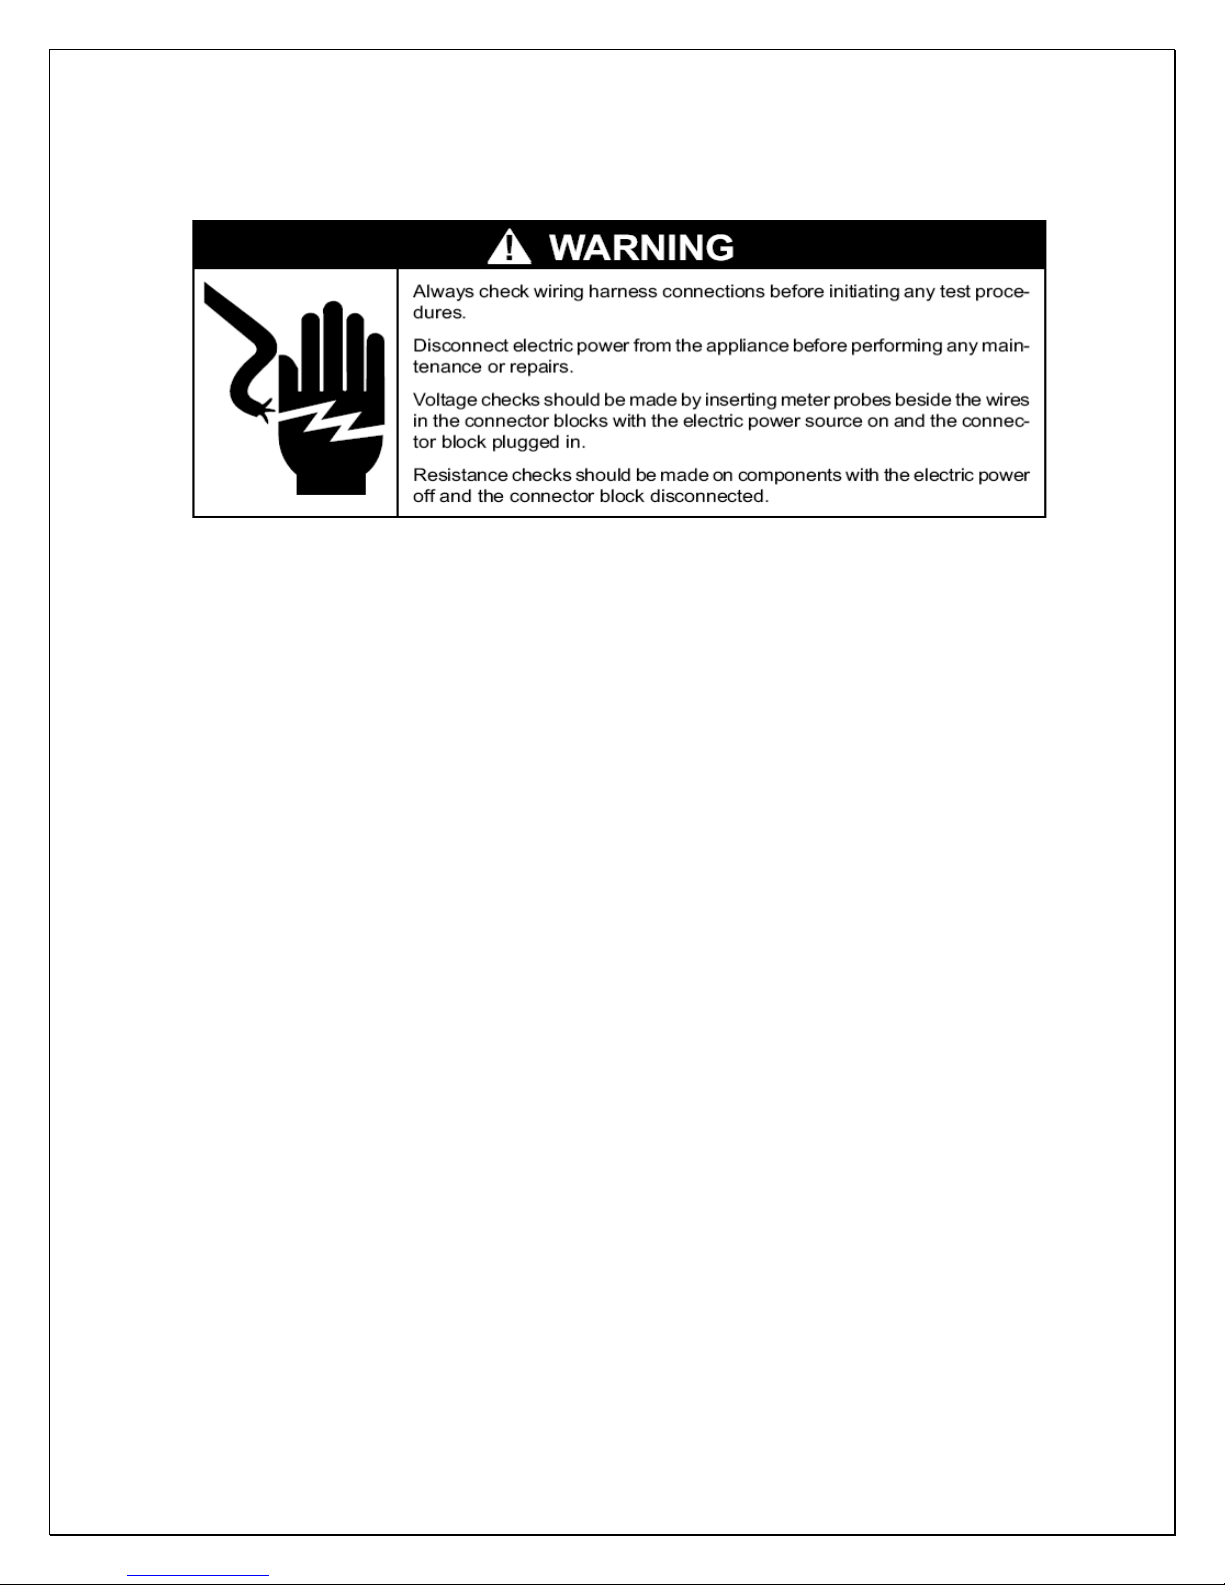
Installation Instructions
NOTES:
• Do not install any ducts onto the supply, return, intake and exhaust.
• Mounting brackets, screws, gaskets and other seal materials are not included.
• Because of potential safety hazards under a certain condition we strongly
recommend against the use of an extension cord. However, if you still select
to use an extension cord, it is absolutely necessary that it is a UL LISTED 3wire grounding type appliance extension cord having a 3-blade grounding
plug and a 3-slot receptacle that will plug into the appliance. The marked
rating of the extension cord shall be 115 V, 15 A or equivalent for
CT1500~2500ZD and 115 V, 20 A or equivalent for CT3500~8500ZD and not
greater than 15ft in length.
1. General Instructions
• The cooling unit produces cooling supplied into the cellar, meanwhile it also
generates heat that must be exhausted outside the cellar. So the cold- air
supply with cellar-air return side and the hot-air exhaust with ambient-air
intake side must be separated and sealed. Through-wall installations can
separate these two sides.
• Furthermore, the condenser of cooling unit must intake adequate fresh
ambient-air to work properly. The ambient-air intake and hot-air exhaust must
not be short-circulated. Both of them must remain unobstructed 36” clearance
all around. The area into which the hot air is exhausted must be well
ventilated. If it is not, heat generated by the unit will build up and the unit will
not operate properly.
• Additionally, cold-air supply from the front grille must remain unobstructed 36”
clearance.
• The ambient temperatures shall not be above and below what are specified.
- 6 -
Page 8
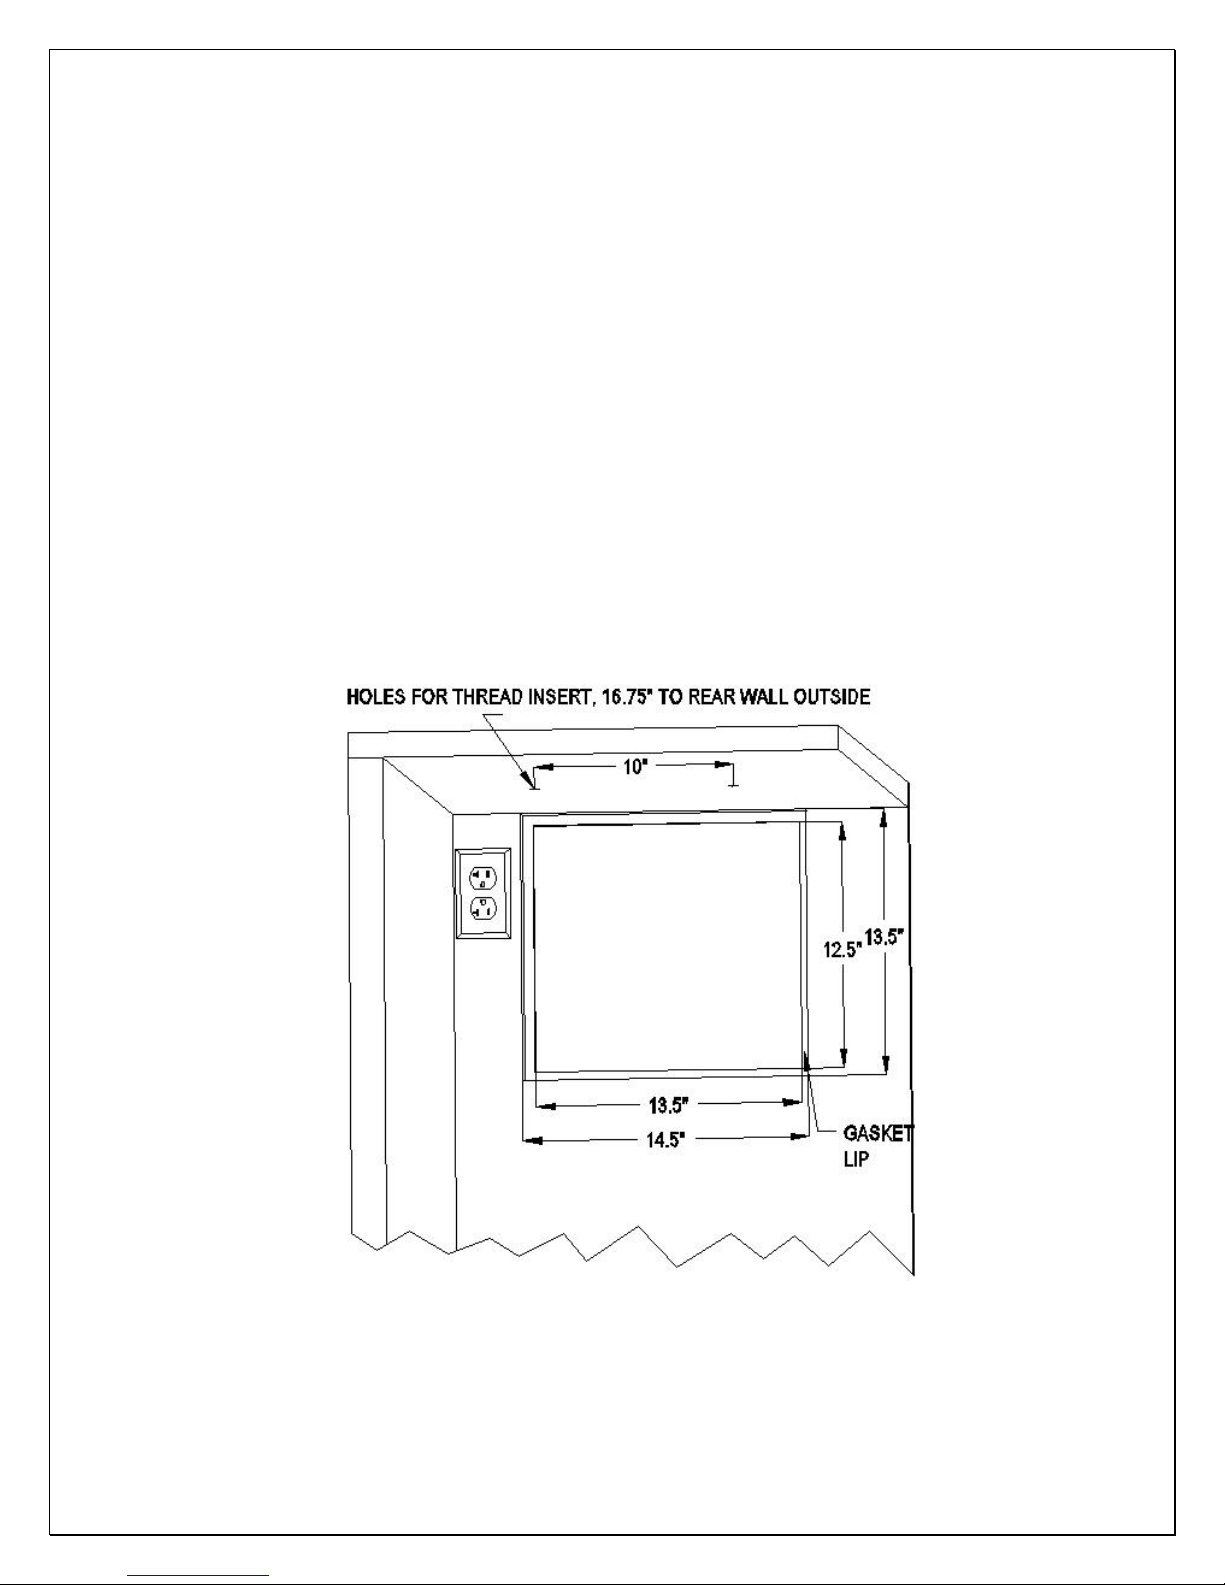
2. CT1500~2500ZD cabinet installation
• Cut a rectangular inside opening with the 1/4” clearance inwards to the width
and height of the cooling unit. By not going through, leave 1/2” lip inside at the
wall to place the gaskets (see Fig 2.1).
• If top exhaust installation, cut another rectangular opening at the top of the
cabinet to the length and width of the top exhaust.
• Install 2 pieces of 1/4” ID wood thread inserts at the ceiling (see Fig.2.1 & 2.2).
• Place the gaskets (1/2” foam tape) on the mounting lip sides (see Fig 2.3).
• If top exhaust installation, place another gaskets along the top exhaust at the
top of the cooling unit (see Fig.2.4).
• Move the cooling unit towards the mounting sides and push to press the
gaskets (see Fig 2.5).
• Use 2 brackets and ¼” screws with 7/16” wrench to secure the cooling unit
(see Fig 2.6).
• Install the cabinet grille on the cabinet exterior wall (see Fig. 2.7).
• Plug the cooling unit in the cabinet receptacle.
• Plug the wine cabinet.
Fig. 2.1 CABINET CUTOUT & GASKET LIP
- 7 -
Page 9
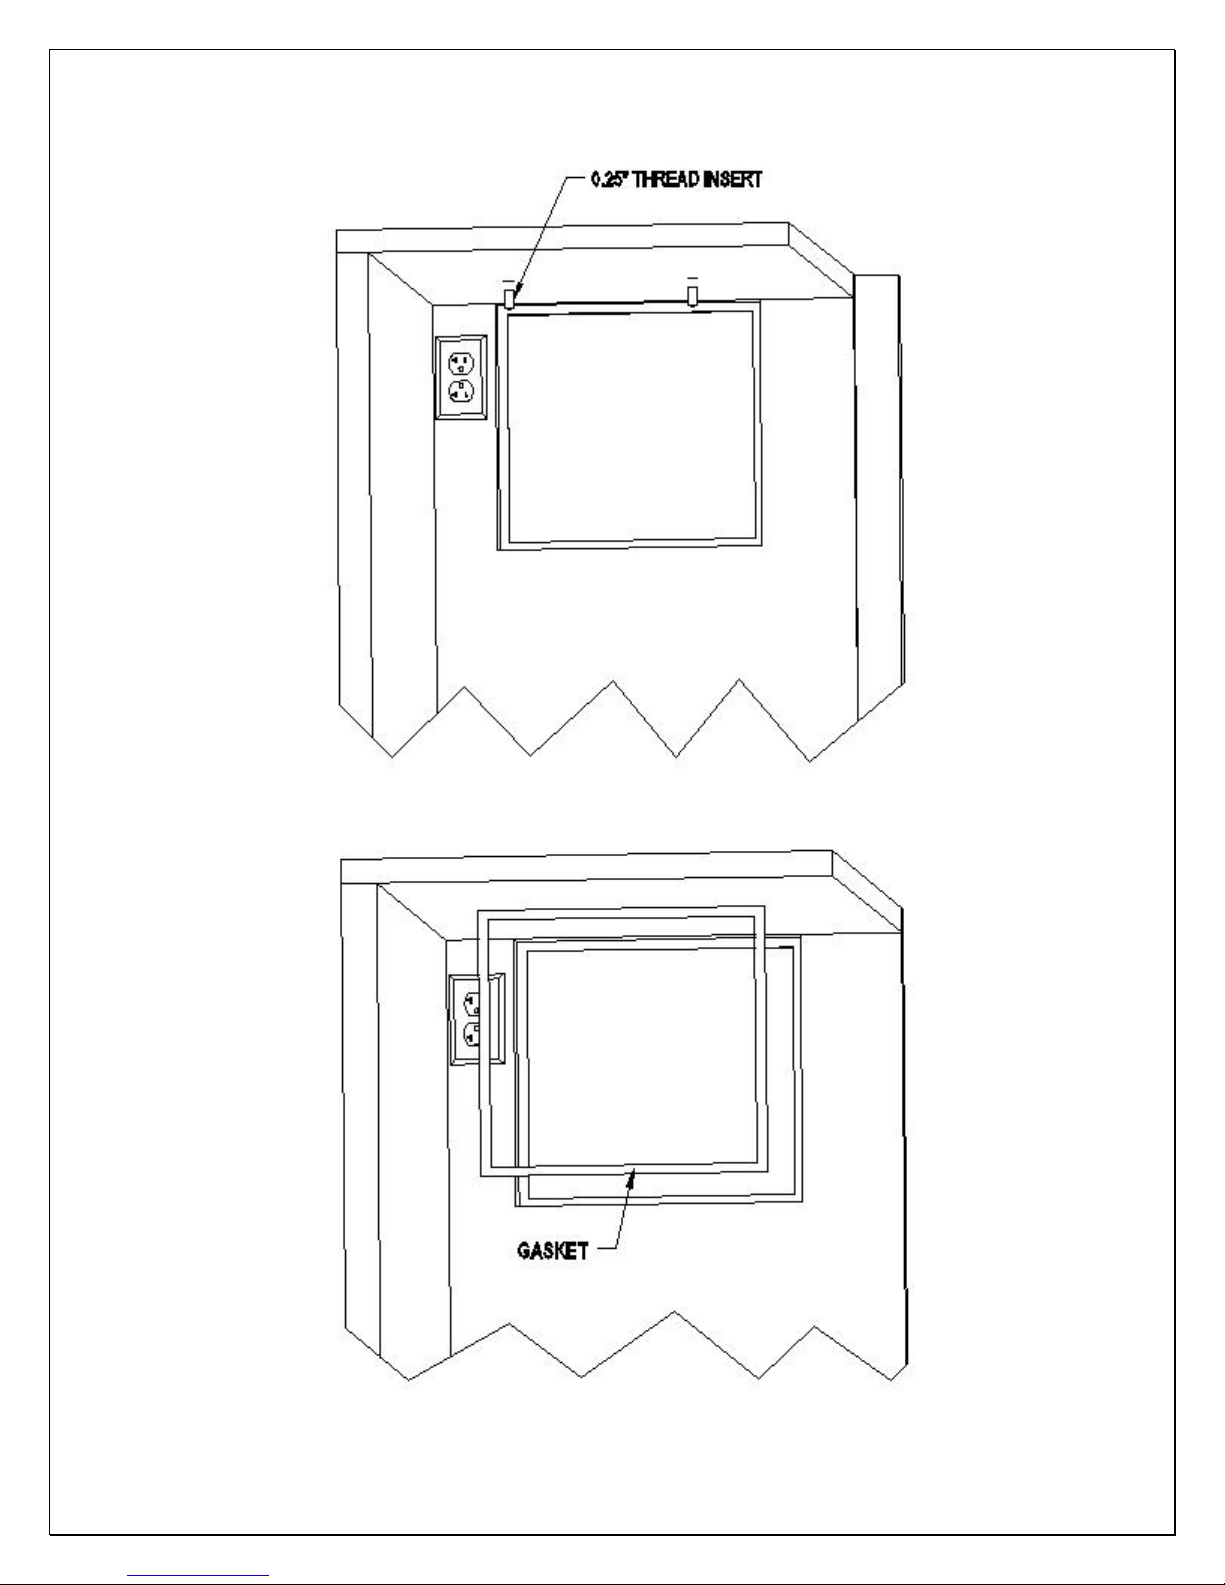
Fig. 2.2 THREAD INSERT
- 8 -
Fig. 2.3 REAR GASKET
Page 10
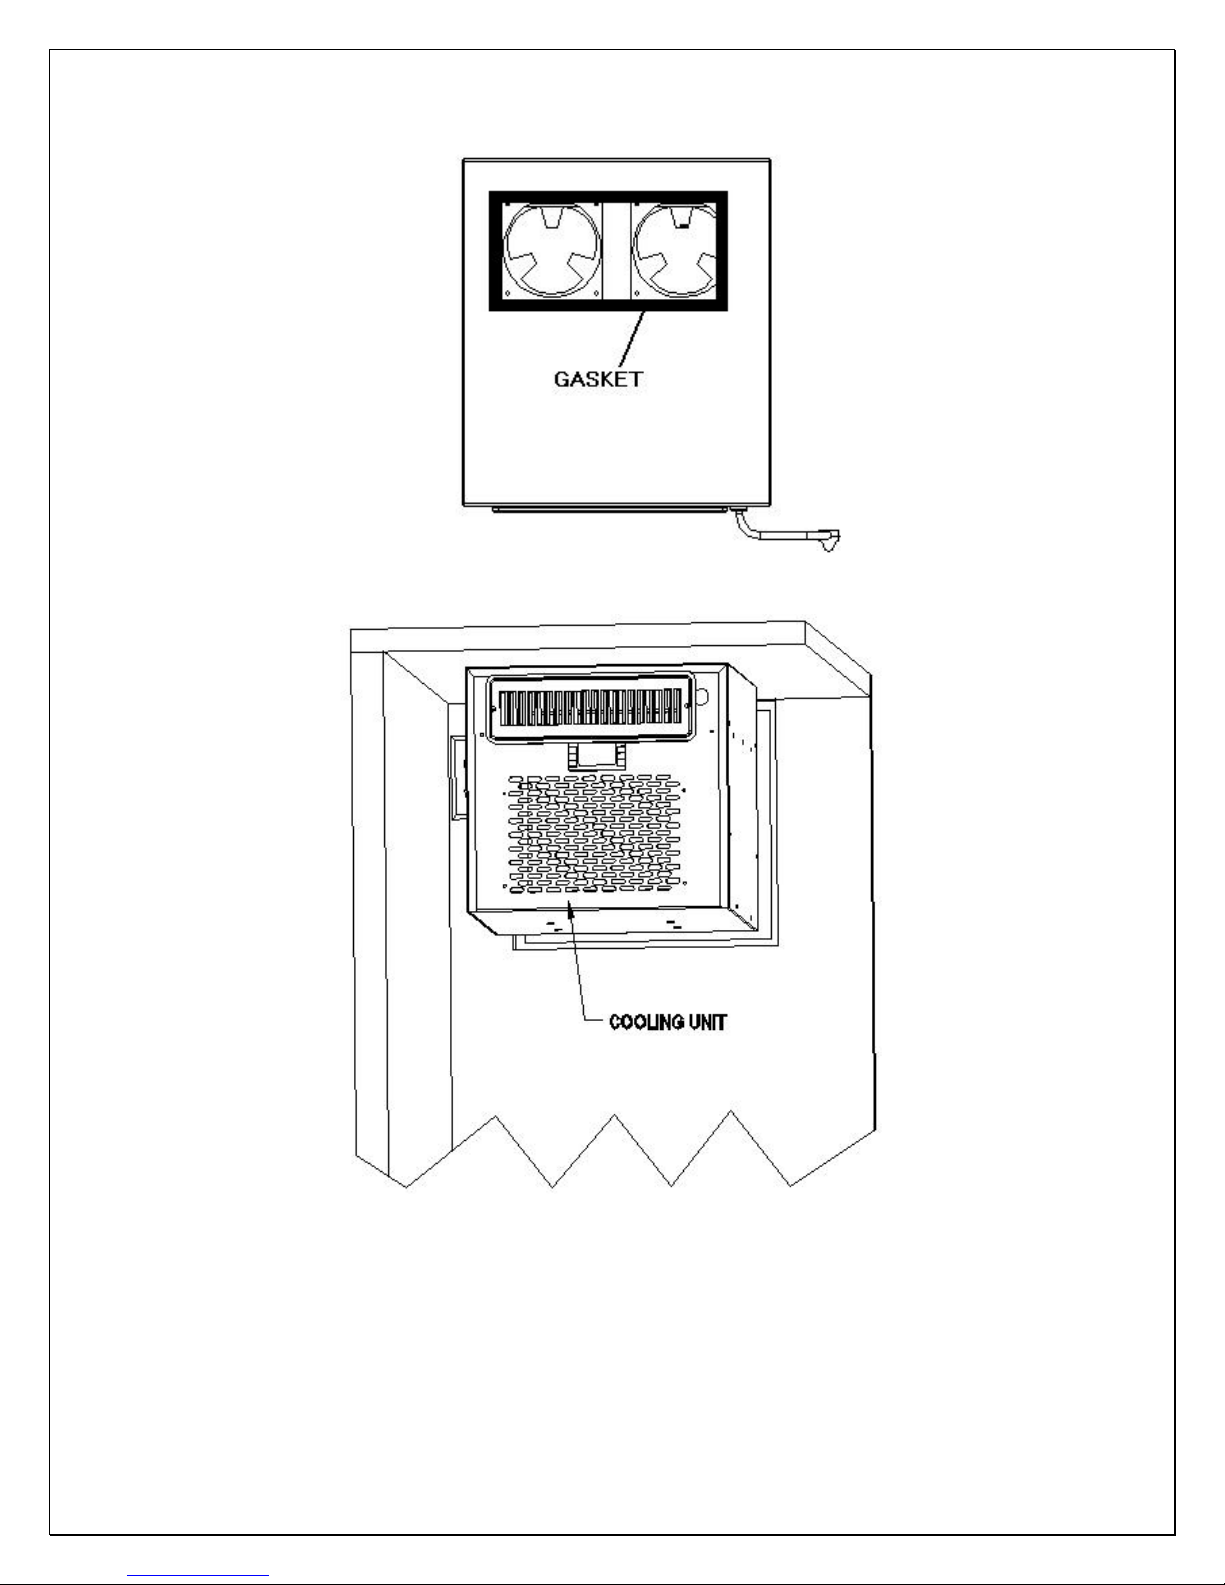
Fig. 2.4 TOP EXHAUST GASKET
Fig. 2.5 COOLING UNIT MOUNTING
- 9 -
Page 11
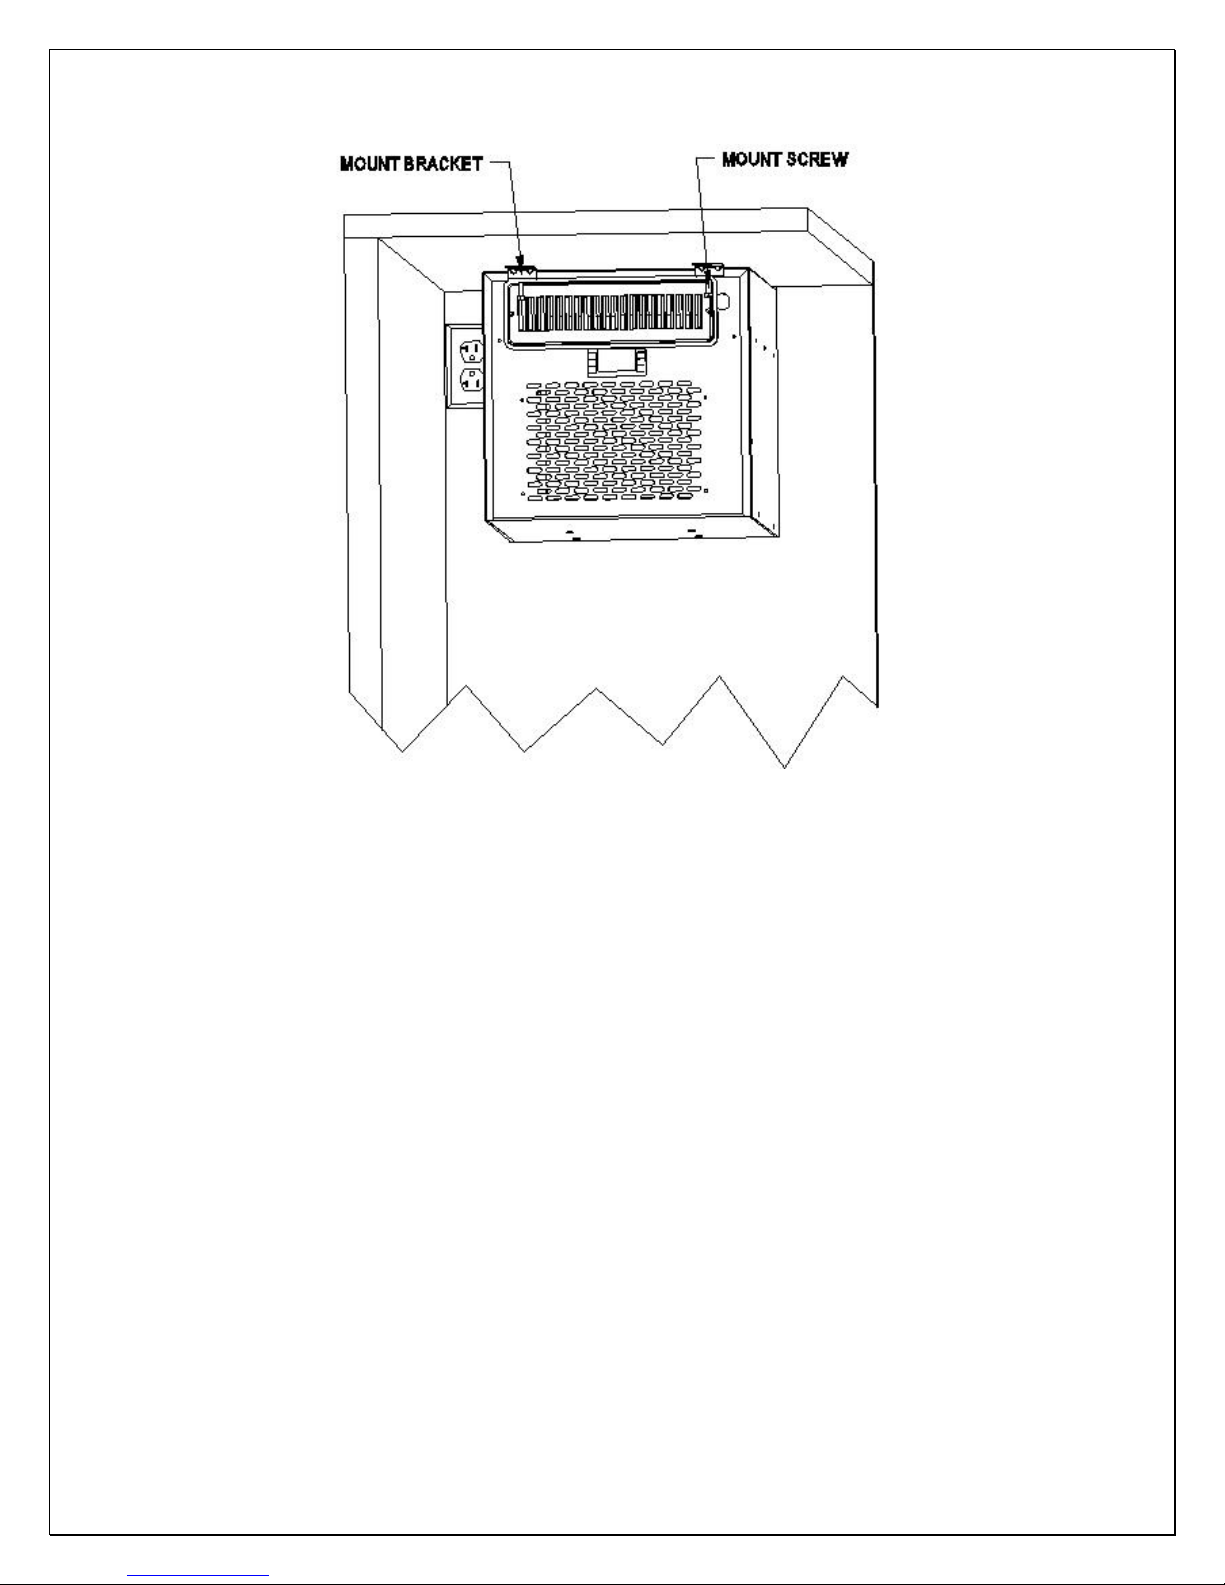
Fig. 2.6 SECURING BRACKET & SCREW
- 10 -
Page 12
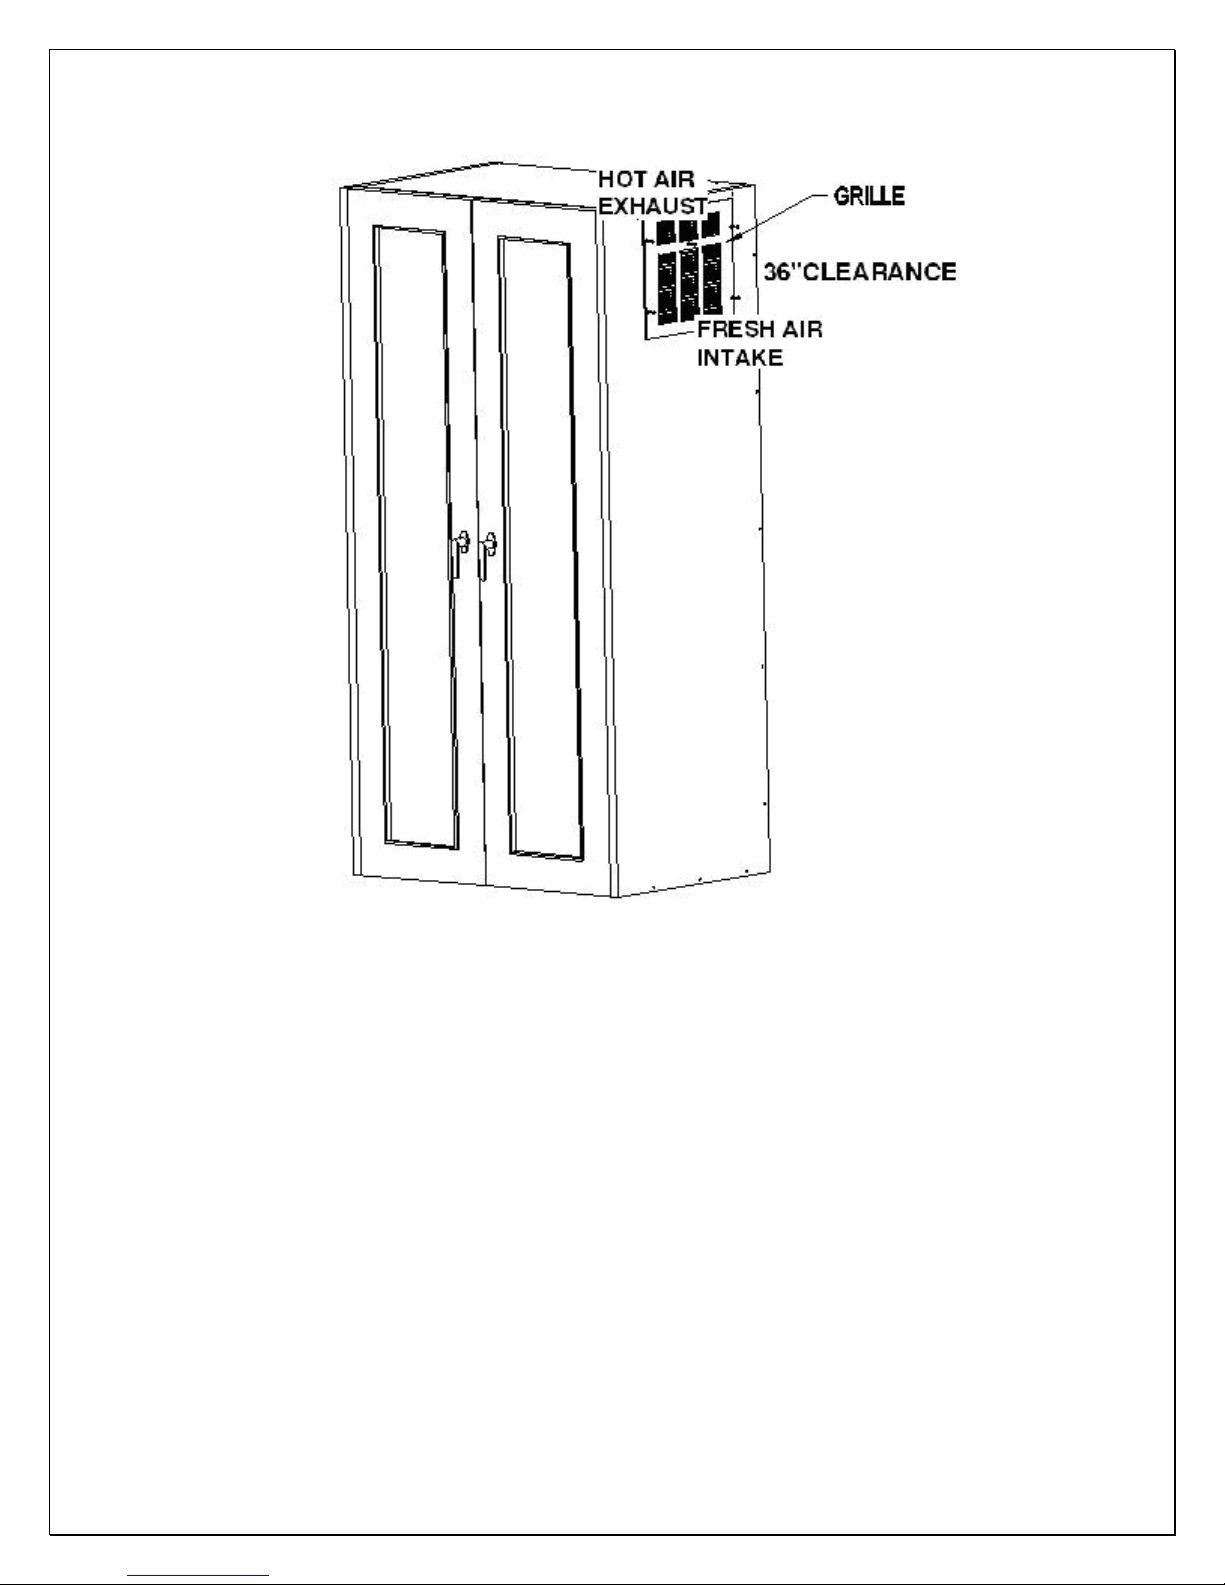
Fig. 2.7 CABINET GRILLE
- 11 -
Page 13
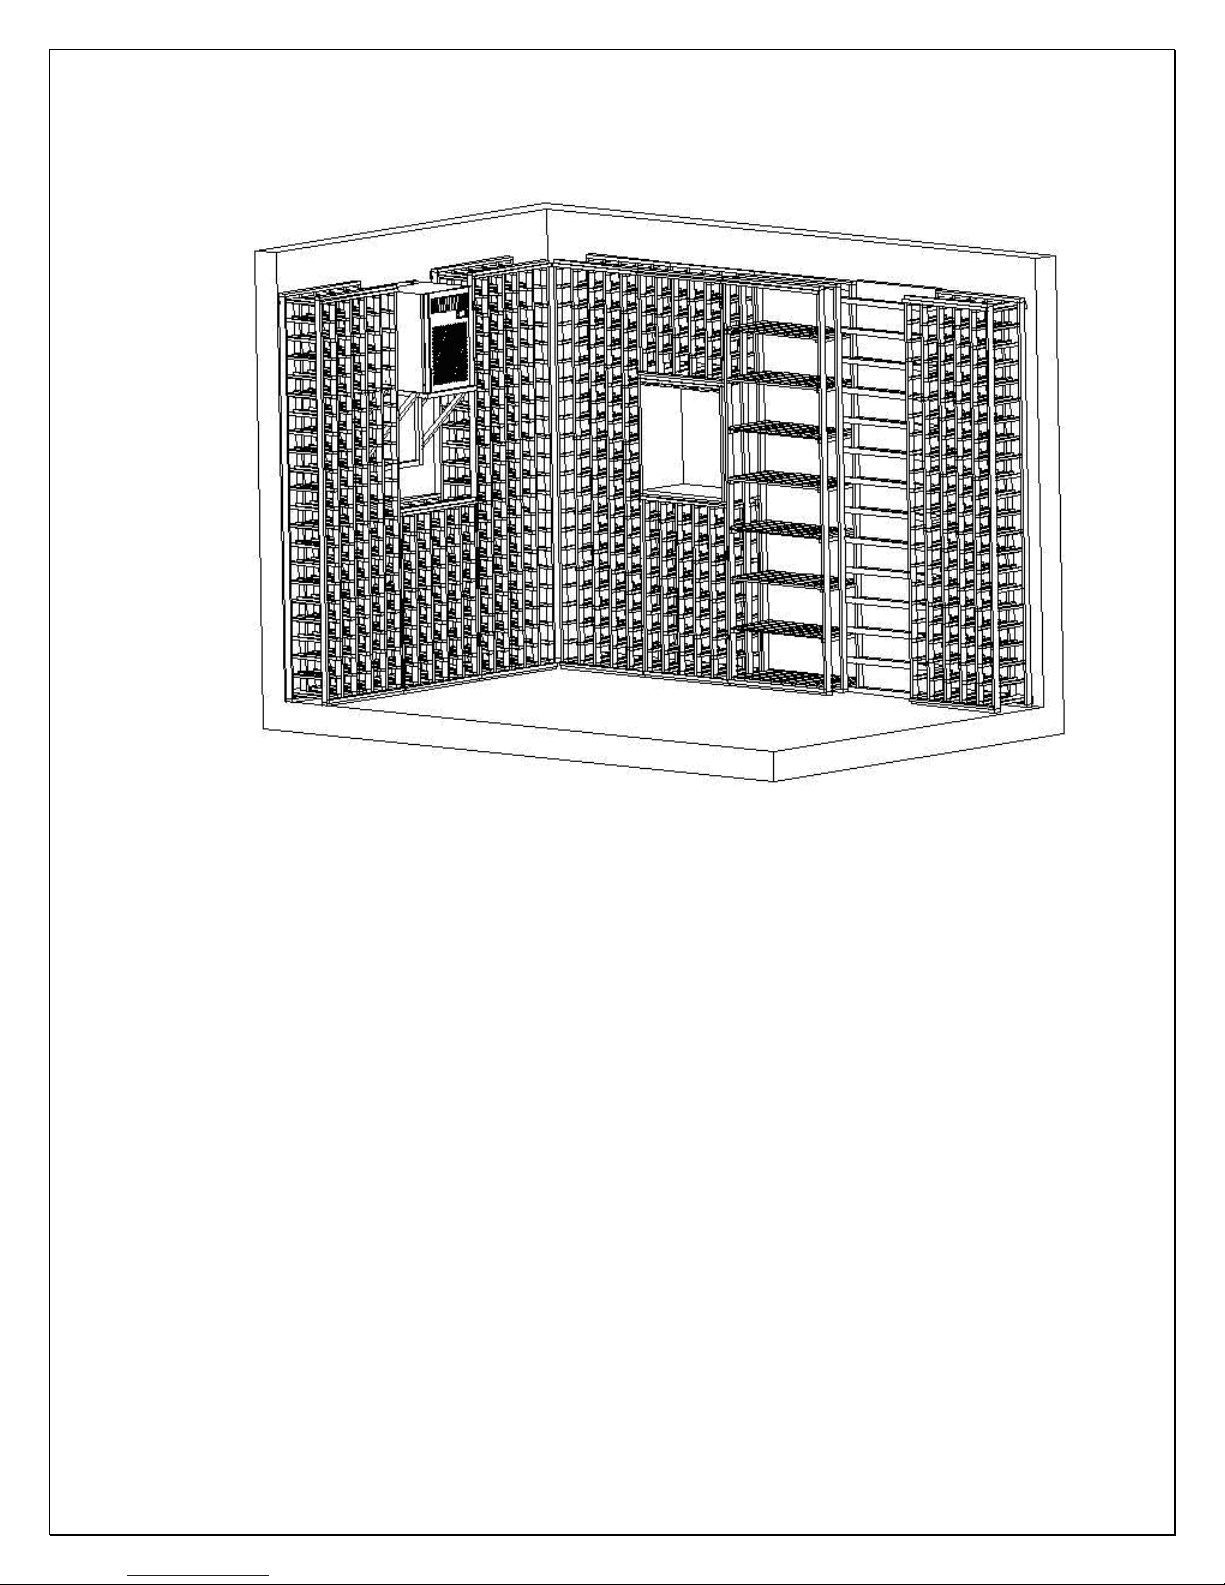
3. CT3500~8500ZD through-wall installation
Fig. 2.8 THROUGH- WALL INSTALLATION
• The cooling unit shall be mounted near the ceiling with equal distance from
each side of the room.
• Cut a rectangular opening at the wine room wall as illustrated. The
dimensions of the opening shall be 1/4” larger than the width and height of the
cooling unit.
• If top exhaust installation, cut another rectangular opening at the top of the
room to the length and width of the top exhaust.
• Construct a shelf as shown. The shelf must be capable of supporting the
weight of the cooling unit and preventing it from moving.
• Place the cooling unit on the shelf with the back of the unit flush with the
outside of the wall.
• Seal the clearance between the cooling unit and opening with a high quality
weather stripping, polyurethane spray foam, or foam tape. Cover the seal with
molding and attach the molding to the wall not the unit.
• If top exhaust installation, place another gaskets along the top exhaust at the
top of the cooling unit.
• Install a wall grille on the room exterior wall.
• Plug the unit into a properly grounded and dedicated outlet of adequate
capacity.
- 12 -
Page 14
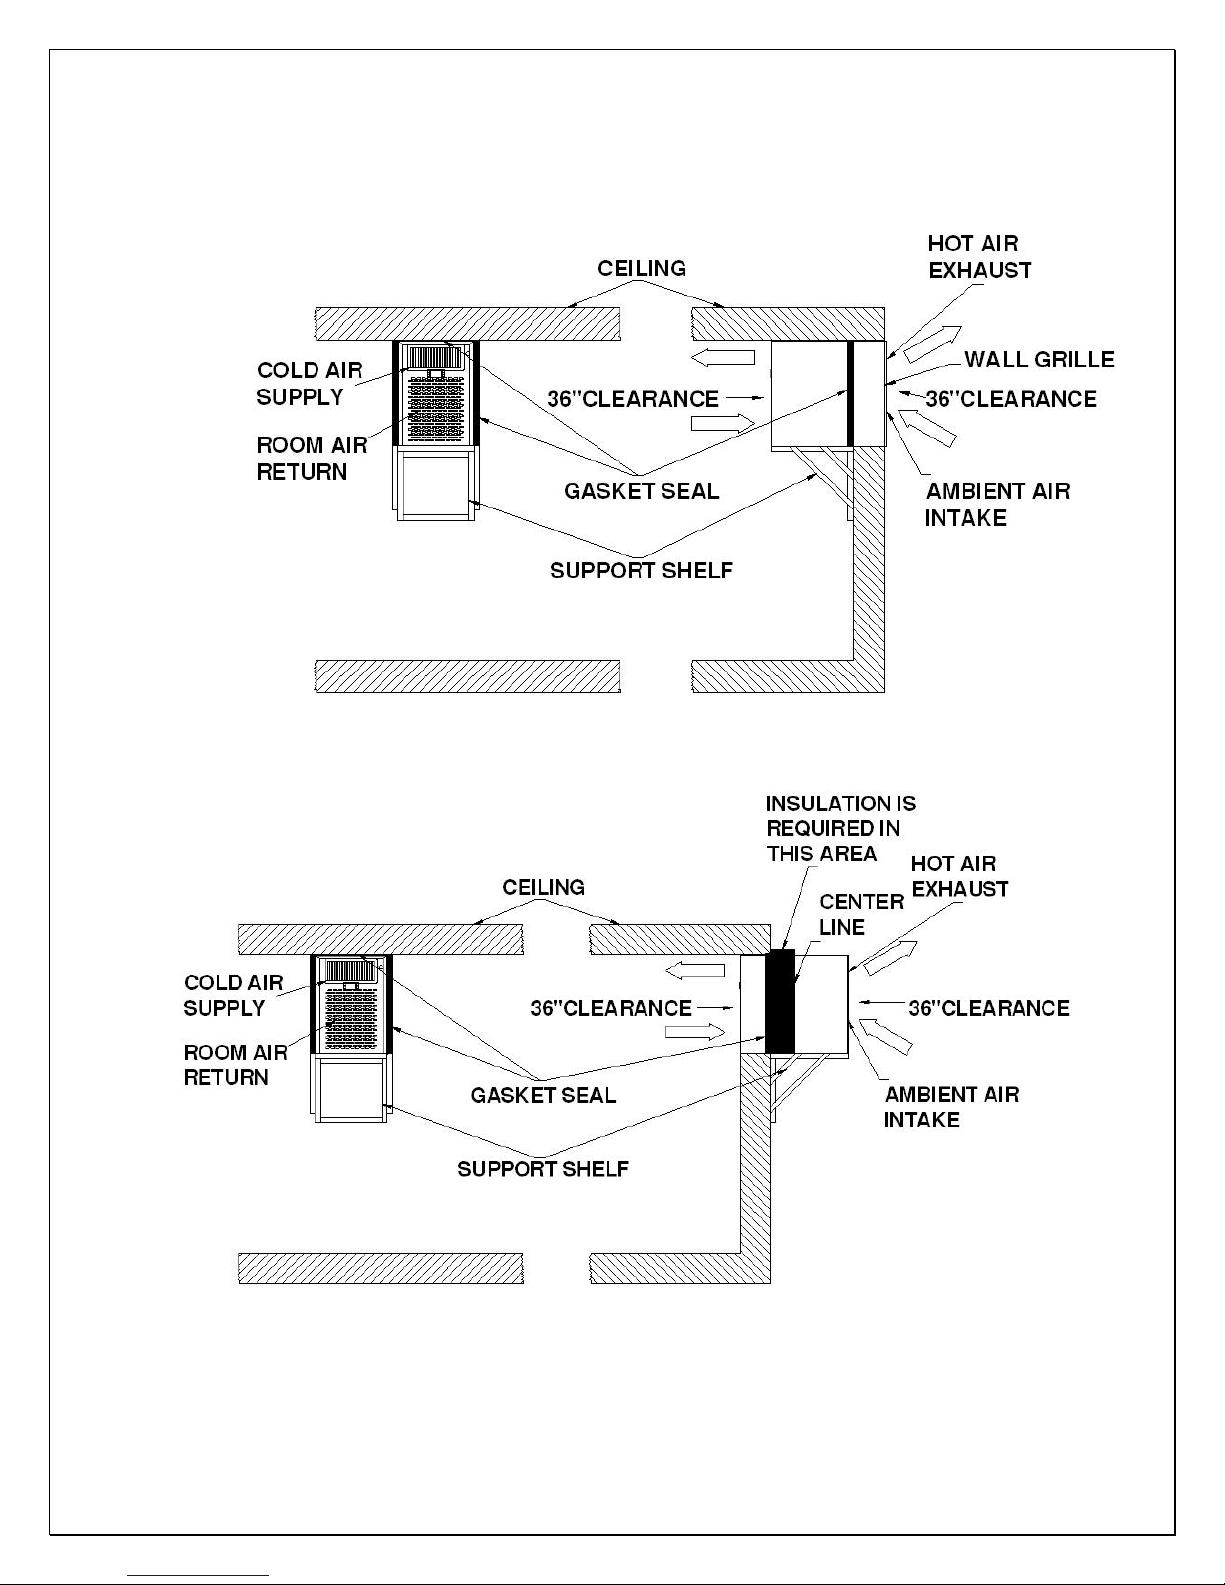
NOTE: The cooling unit can be installed with the front of the unit flush with
the inside of the wall. Construct a shelf outside the room accordingly.
Fig. 2.9 THROUGH-WALL INSTALLATION (OUTSIDE WALL FLUSH)
Fig. 2.10 THROUGH-WALL INSTALLATION (INSIDE WALL FLUSH)
- 13 -
Page 15
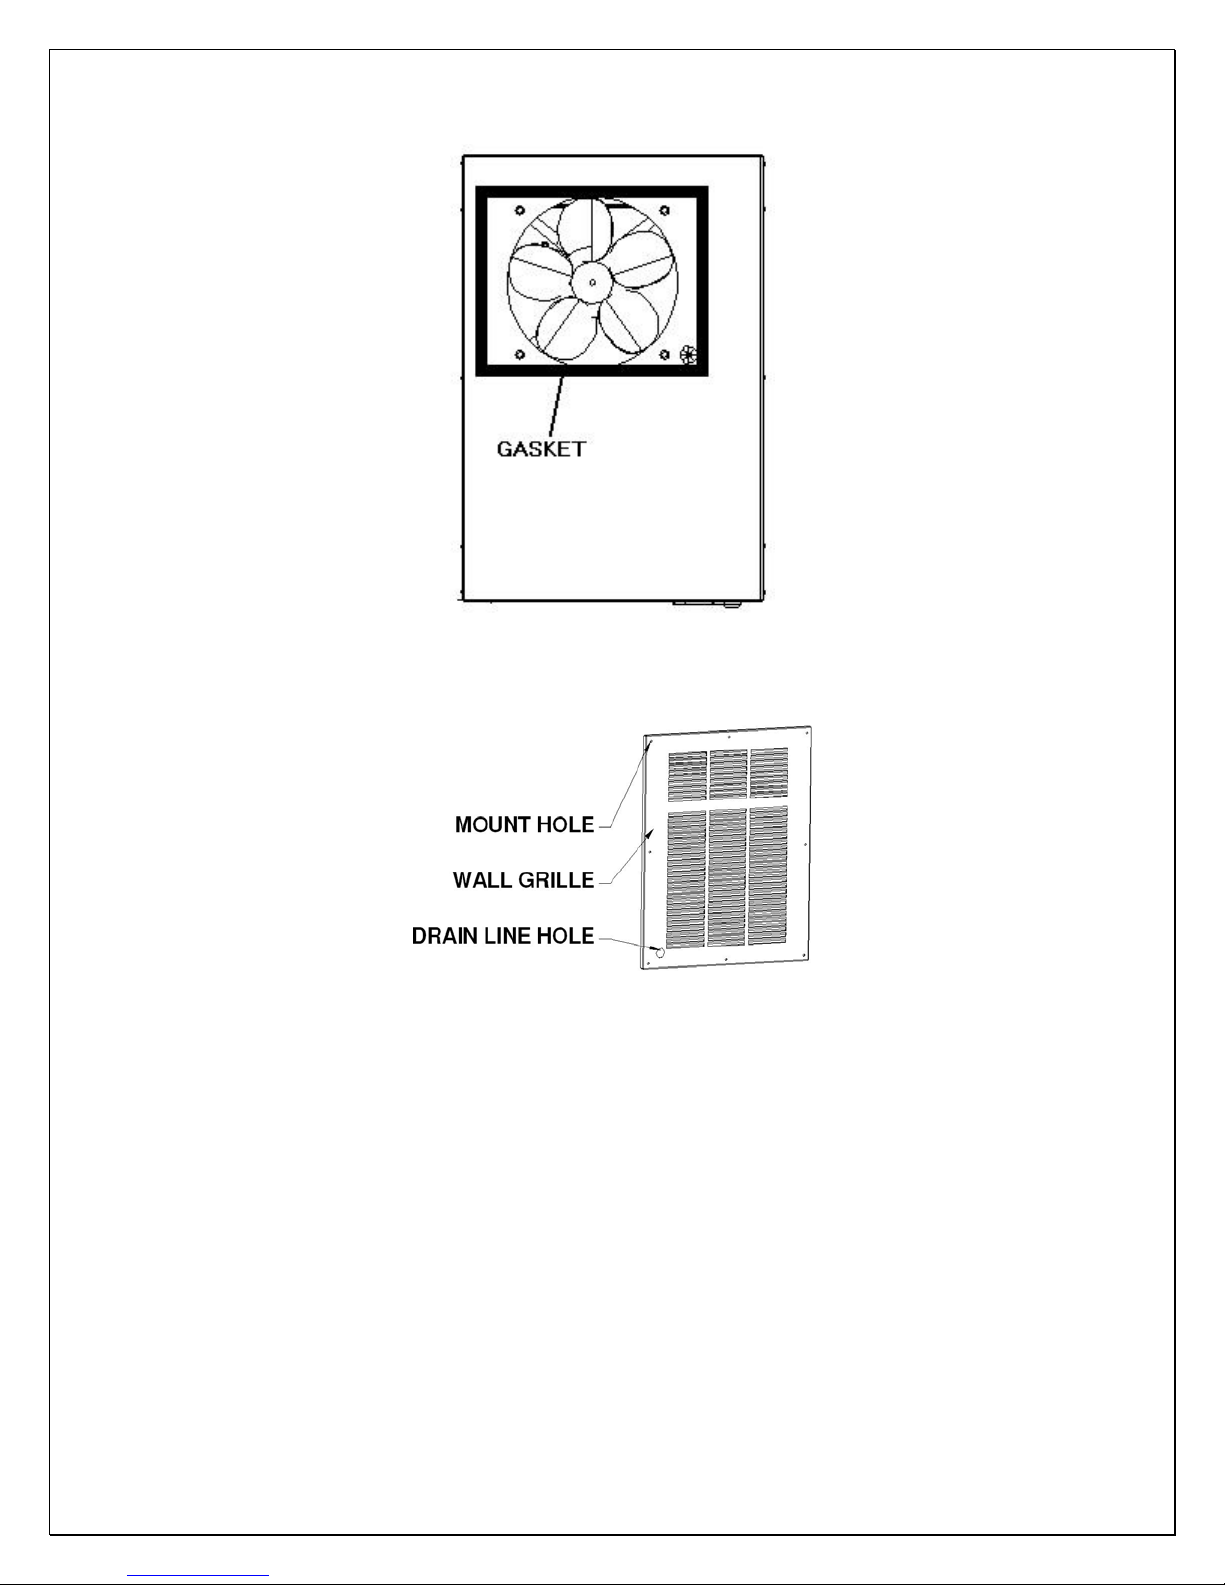
Fig. 2.11 TOP EXHAUST GASKET
Fig. 2.12 WALL GRILLE
4. Cellar Construction
This is only a guide and shall be considered as minimum requirements.
All interior walls and floors shall have a vapor barrier and a minimum of R13
insulation. All exterior walls and ceiling shall have a vapor barrier and a minimum
of R19 insulation. The vapor barrier shall be installed on the warm side of the
insulation. All joints, door frames, electrical outlets or switches and any pipes or
vents that go through the cellar shall be sealed to prevent air and moisture
leakage into the cellar. Concrete, rock, and brick are not insulation or vapor
barriers.
- 14 -
Page 16
Doors shall be of a minimum size, insulated to at least R13 and tightly sealed
with high quality weather stripping. Be sure to seal the bottom of the door and fill
gap between the door’s frame and wall before installing the cap molding.
In order to maintain 55 °F in the wine cellar, the ambient temperature
surrounding the enclosure shall not exceed the temperature of the cellar by more
than 25 °F. No cellar wall shall receive direct sun or strong wind.
Lighting shall be of low wattage, with a timer to insure lights are not left on when
the cellar is not occupied.
The cooling system will not be able to maintain the proper temperature if fresh
moisture-laden air is constantly being introduced to the cellar. Symptoms of this
condition are; cooling unit runs all the time with only a slight reduction in
temperature and/or water overflows from the unit. Because of the temperature
difference between the inside and outside, very small cracks can allow large
amounts of outside air to enter into the cellar. Please be aware that moisture can
pass through solid concrete, paint and wood. Often a newly constructed cellar
contains fresh wood, paint, concrete and other building materials. These
materials contain large amounts of moisture. When placed into operation in this
type of environment, the system will work harder to remove this extra moisture
resulting in increased “run” time.
- 15 -
Page 17
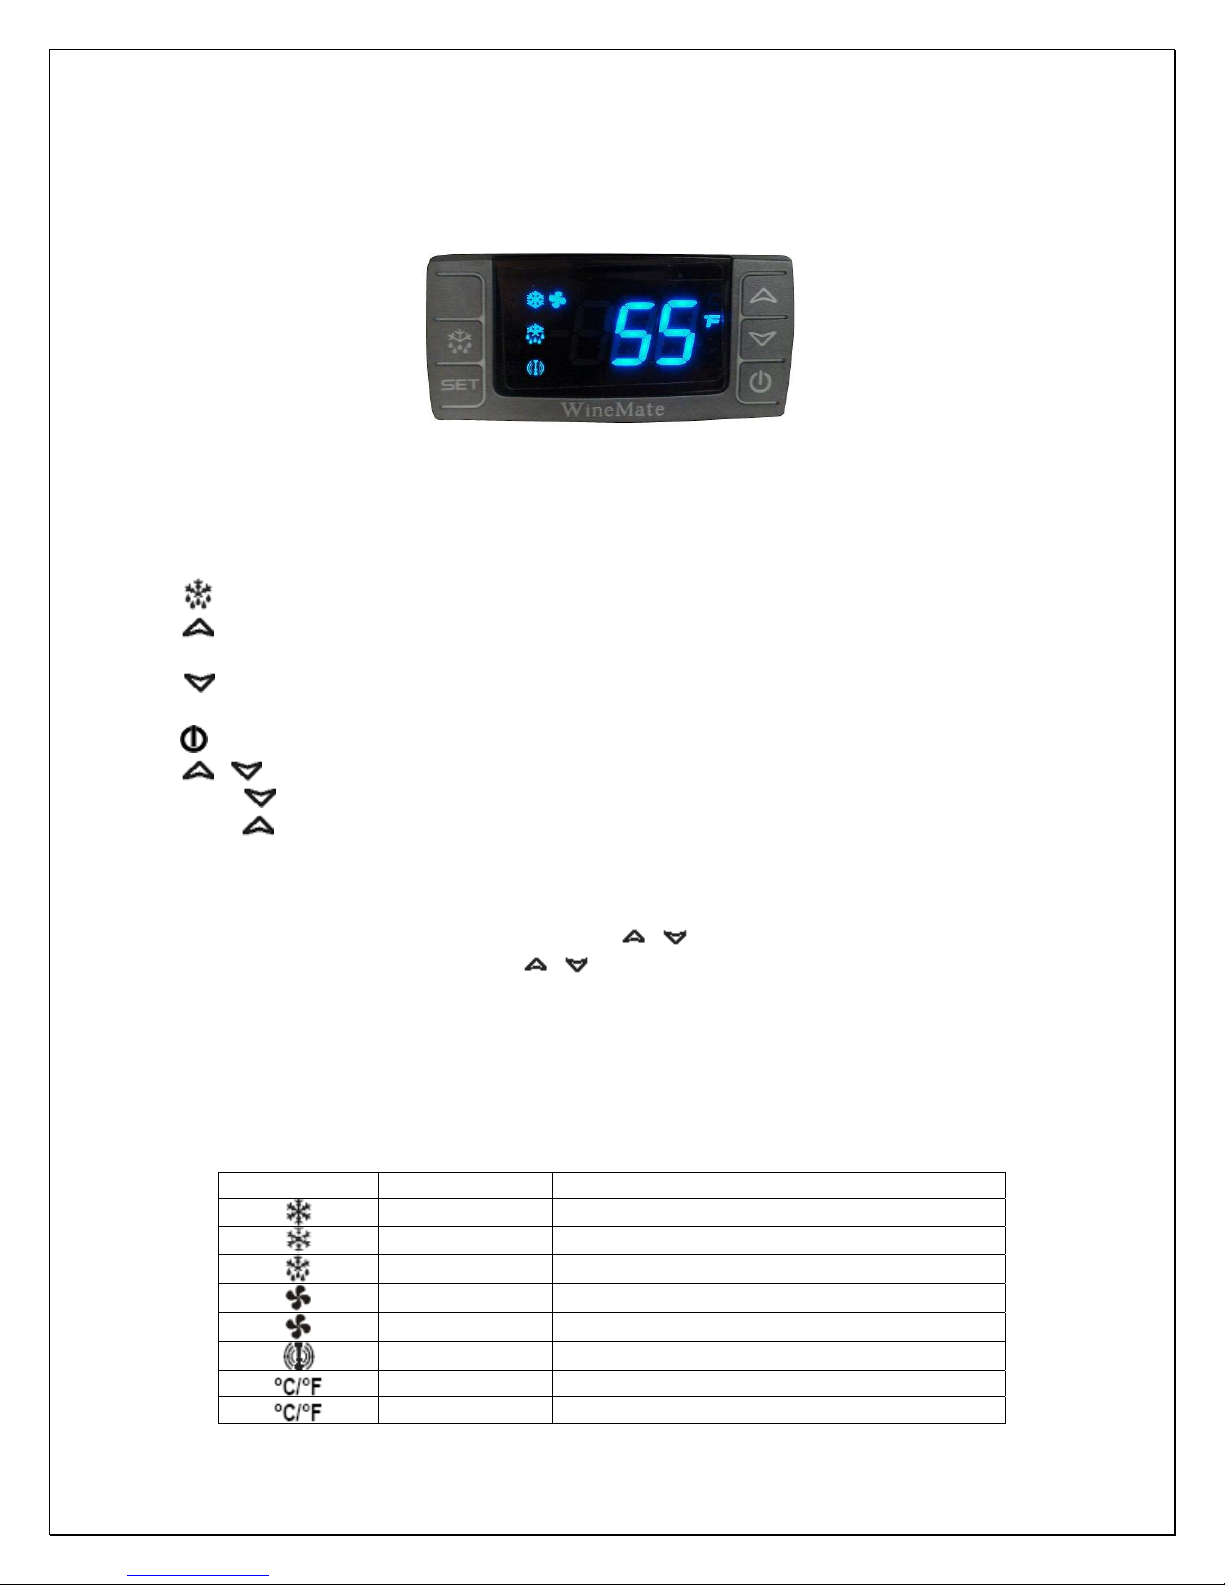
Temperature and Humidity
1. The controller
Fig. 3.1 TEMPERATURE CONTROLLER
1) Keys
SET: To display set-point; in programming mode it selects a parameter or
confirms an operation.
: To start a manual defrost.
: To see the maximum stored temperature; in programming mode it browses
the parameter codes or increases the displayed value.
: To see the minimum stored temperature; in programming mode it browses
the parameter codes or decreases the displayed value.
: To turn on/off the power to the unit.
+ : To lock/unlock the keypad.
SET+ : To enter in the programming mode.
SET+ : To return to the temperature display.
2) Lock and unlock the keys
To lock the keys, press up + down keys + until POF is displayed; to unlock
the keys, press up + down keys + until PON is displayed.
3) Display
During normal operating conditions, the display shows the value measured by
the air temperature probe. In case of active alarm, the temperature flashes
alternately to the code alarm. The LED functions are listed as follows.
LED MODE FUNCTION
ON Compressor enabled
Flashing Anti-short cycle enabled
ON Defrost cycle enabled
ON Fan enabled
Flashing Fan delay after defrost enabled
ON Alarm occurring
ON Temperature measuring unit
Flashing Programming mode
- 16 -
Page 18
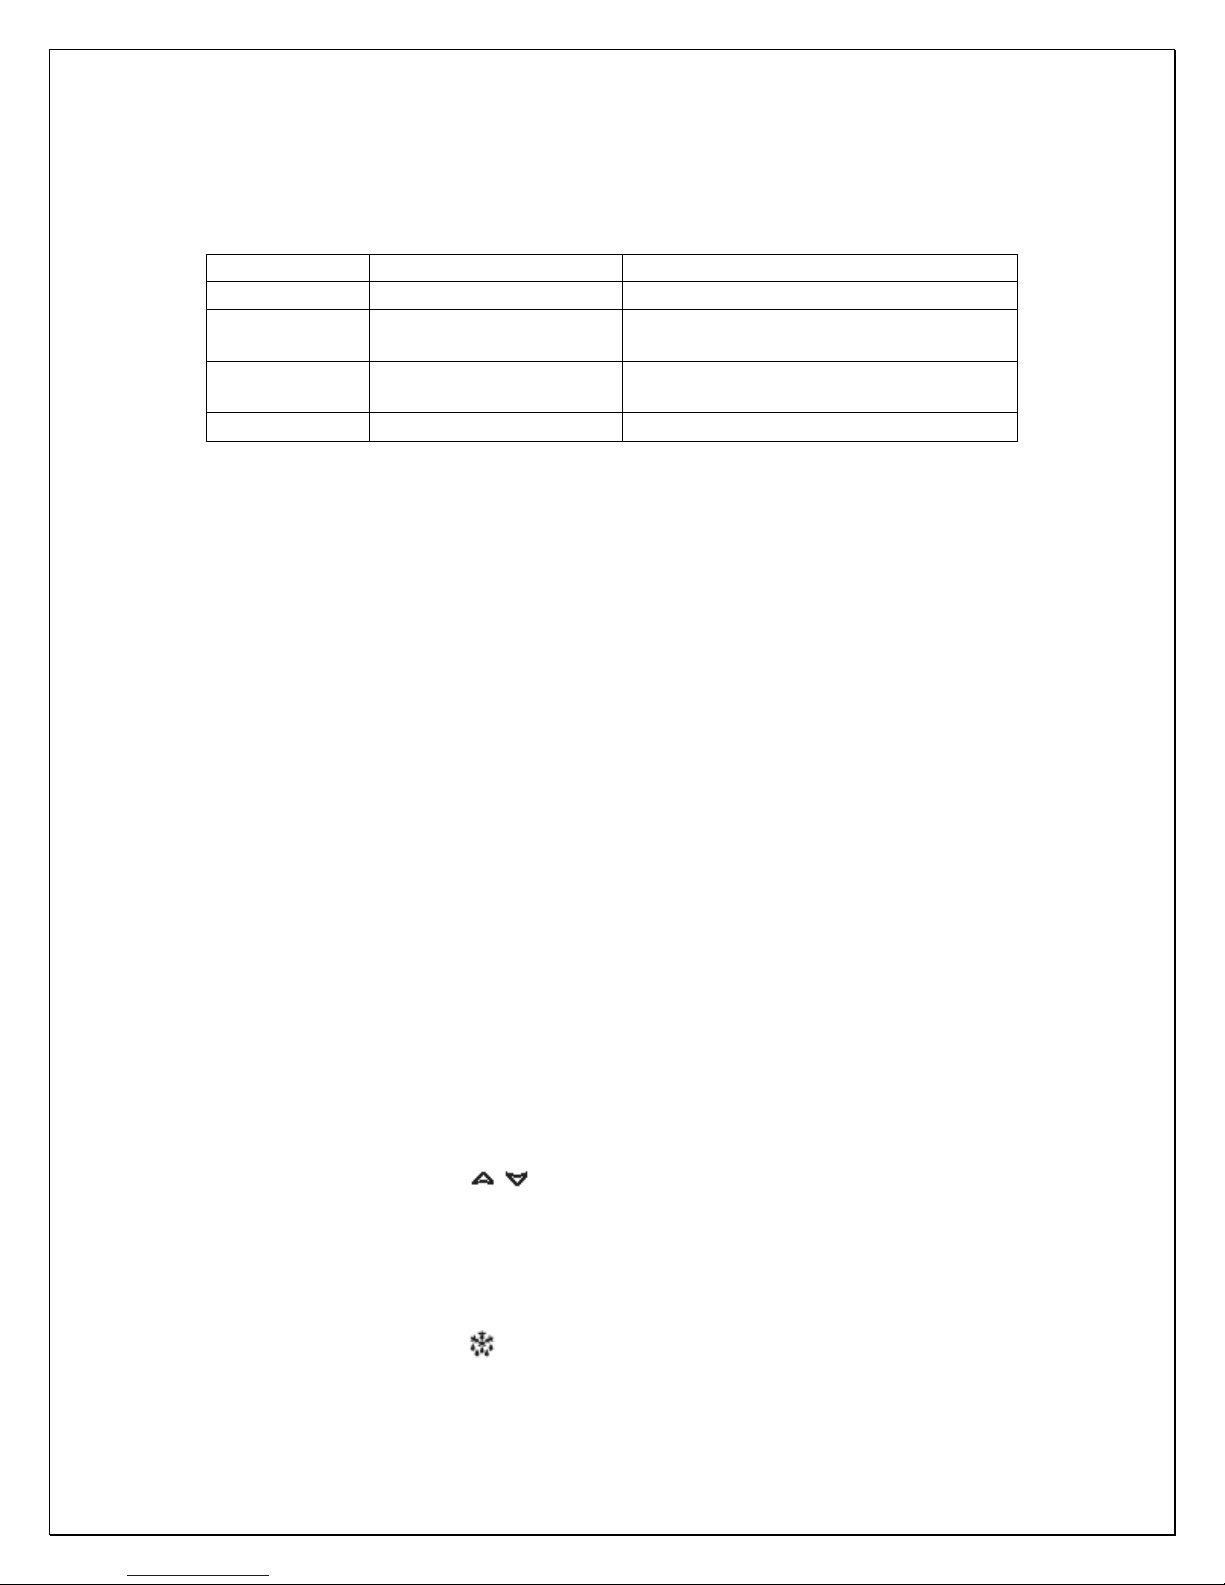
4) Alarm Signals
The alarm codes are described as follows.
MESSAGE CAUSE FUNCTION
P1
HA
LA
CA
Temperature probe faulty Compressor switching to Con and CoF
High temperature alarm
Low temperature alarm
External alarm All outputs off
Probe temperature ALU higher than the
setting temperature; Outputs unchanged
Probe temperature ALL lower than the
setting temperature; Outputs unchanged
Probe alarms P1”, start a few seconds after the fault in the related probe; they
automatically stop a few seconds after the probe restarts normal operation.
Check connections before replacing the probe. Temperature alarms “HA”, “LA”
automatically stops as soon as the temperature returns to normal value. Alarm
“CA” (with i1F=PAL) recovers only by switching off and on the instrument.
2. Temperature Setting
• Set the temperature at 55 °F for the optimum aging of wine
• On initial start-up, the time required to reach the desired temperature will
vary, depending on the quantity of bottles, temperature setting and
surrounding temperature.
• Allow 24 hours to stabilize the temperat ure for each new temperature setting
operation
3. How to see temperature set-point
1) Press and immediately release the SET key, the display will show the set-point
value.
2) Press again and immediately release the SET key to display the probe value.
4. How to change the set-point
1) Press and hold the SET key until the “°C” or “°F” LED starts flashing and the
set-point is displayed.
2) Press the up/down keys / to change the set-point value within 10 sec.
3) Press the SET key again to store the new set-point value.
NOTE: The unit turns on at set-point Set plus regulation differential Hy after antishort cycle AC has elapsed; the unit turns off at set-point Set.
5. Manual Defrost
Press and hold the defrost
key until defrost starts. The defrost indicator will be
on.
- 17 -
Page 19
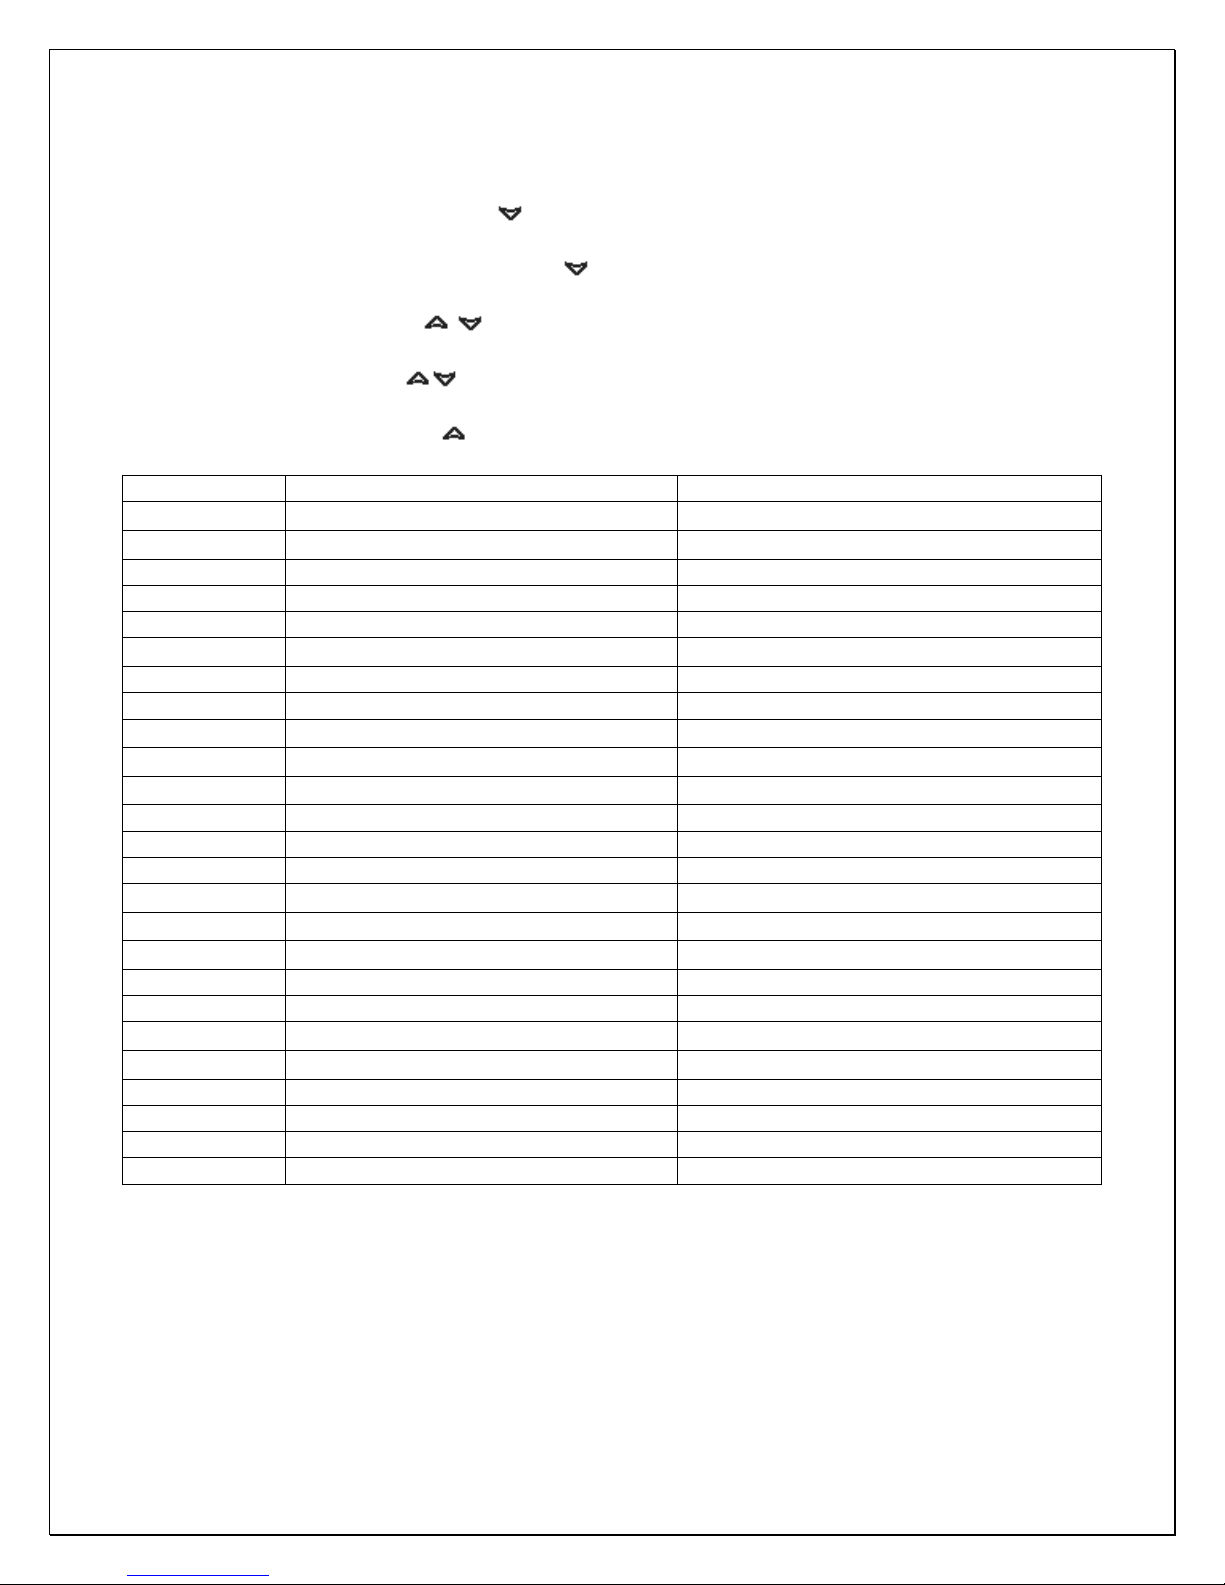
6. Parameter Programming
1) Press and hold the SET + keys until the “°C” or “°F” LED starts flashing,
then release the keys.
2) Press and hold again the SET + keys until the Pr2 label is displayed, then
release the keys. The first parameter Hy will be displayed.
3) Press up/down keys / to scroll to the required parameter within 10 sec.
4) Press the “SET” key to display its value.
5) Use up/down keys to change its value within 10 sec.
6) Press “SET” to store the new value and the display will flash 3 times.
7) To exit: Press SET + or wait 15sec without pressing a key.
PARAMETER DESCRIPTION DEFAULT VALUE
Set
Hy
AC anti-short cycle delay (min) 10
Con compress on with probe faulty (min) 15
CoF compress off with probe faulty (min) 30
CF
rES display resolution in: integer
dLy temperature display delay (min) 1
ot
LS
US
idF defrost cycle interval time (hour) 12
MdF defrost cycle endurance time (min) 30
ALC temperature alarm type rE: relative to set-point
ALU
ALL
AFH
ALd temperature alarm delay (min) 60
dAO temperature alarm delay on startup (hr) 23
SAA
SHy
FSU fan action Std
FnC fan operating mode C-n: on with compressor & off during defrost
Fon fan on with compressor off (min) 0
FoF fan off with compressor off (min) 15
temperature regulation differential (
temperature unit (
high temperature alarm (
low temperature alarm (
alarm recovery differential (
heater regulation differential (
set-point (
°)
°F/ °C)
probe calibration (
minimum set-point (
maximum set-point (
heater set-point (
°)
°)
°)
°)
°)
°)
°)
°)
°)
55
4
F: Fahrenheit
0
50
65
10
10
5
40
4
NOTE: Depending on the controller, not all parameters are used.
7. How to calibrate the air probe
If the actual cellar temperature differs from the setting temperature, set
parameter ot = actual cellar temperature minus set-point.
8. How to adjust defrost cycle
- 18 -
Page 20
In case there is excessive frost, the parameters FnC = C-y, idF = 4 and MdF =
20 can be used to avoid frost.
9. How to adjust the humidity
The parameter Fon is used to adjust the humidity in the wine cellar. Higher Fon
results in higher relative humidity. Use a separate hygrometer to monitor the
humidity.
10. How to set alarm call
1) Speech notice will be sent to your phones when the cellar temperature is ALU
higher or ALL lower than the set-point Set.
2) In order to test the call function, set parameters Ald = 0 and dAO = 0. After
testing, set Ald = 60 and dAO = 23.
11. How to set low cellar temperature heater
The heater turns on at SAA minus Shy; the heater turns off at SAA.
NOTES:
• Use a forced air heater to warm up the wine cellar.
• If there is a thermostat on the heater, bypass it or set the thermostat at the
highest level.
If the heater runs more than 10 A current, use a 120VAC coil contactor.
- 19 -
Page 21
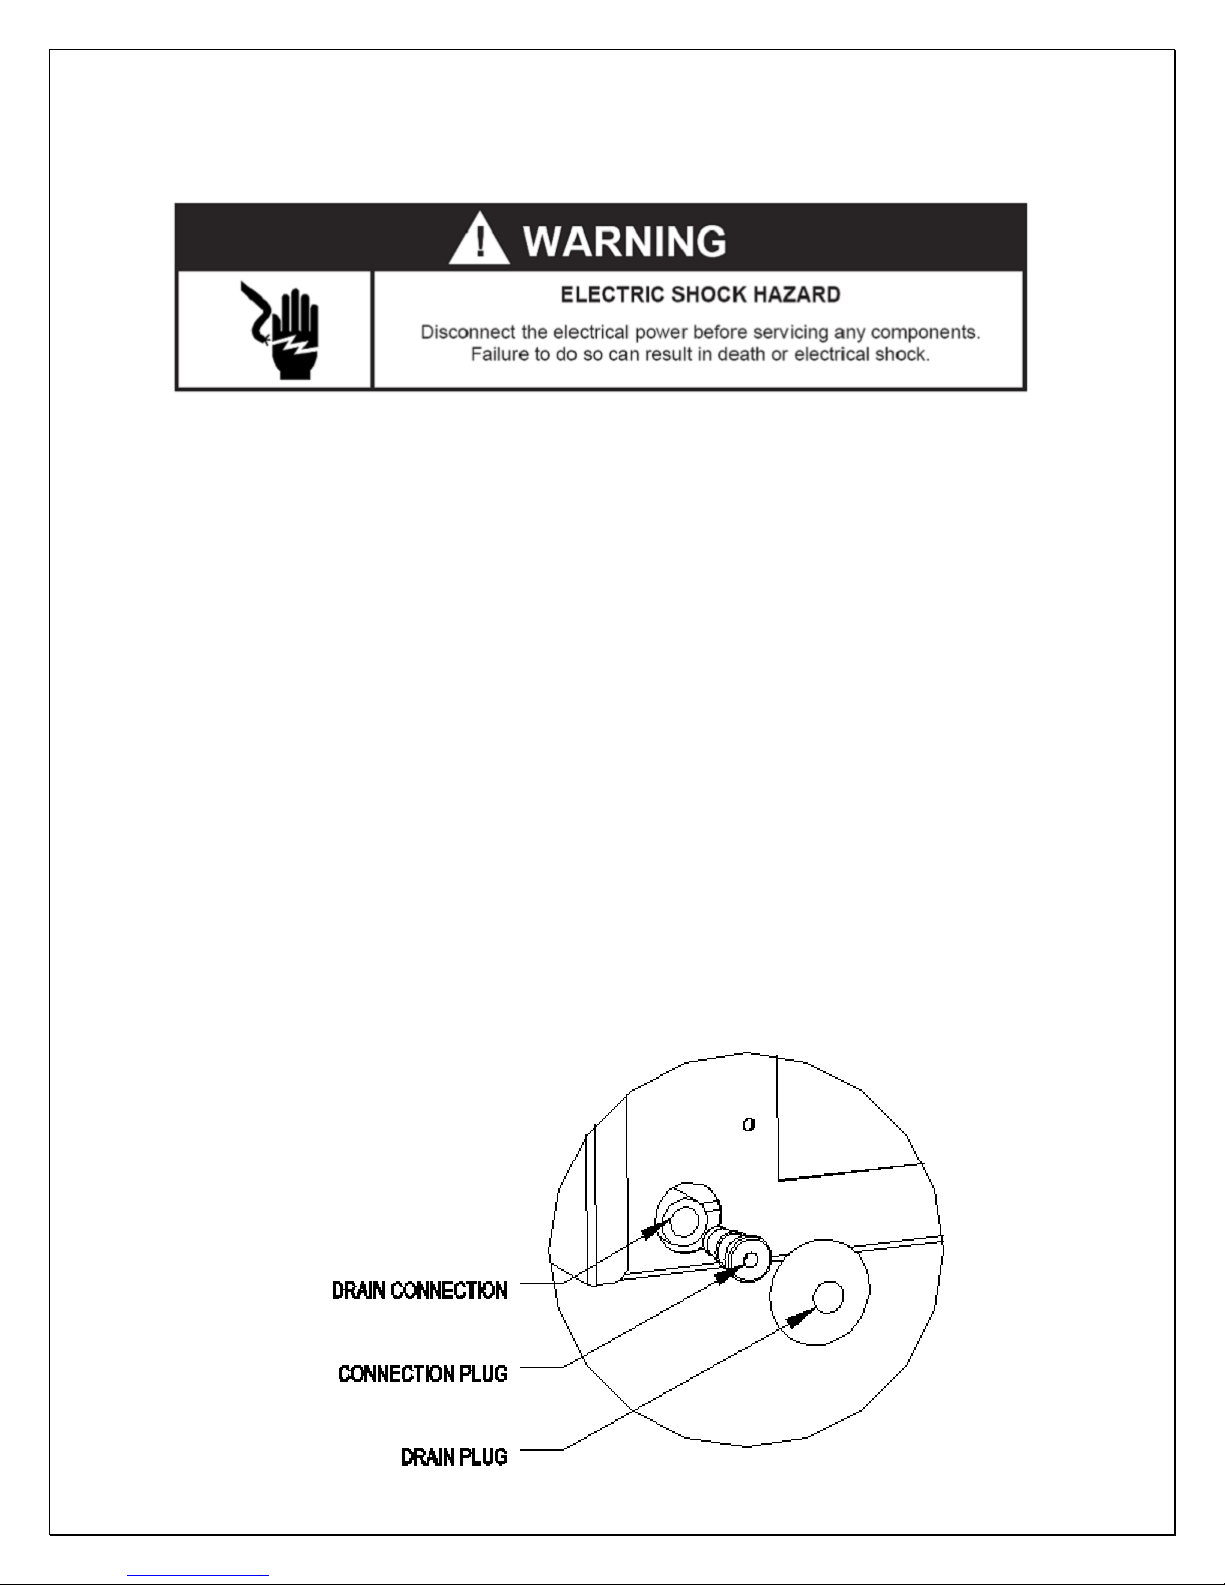
Care Guide
1. Cleaning Condenser
• Clean the condenser regularly at least every 6 months.
• Condenser is located on the ambient air intake side of the cooling unit.
• Use a condenser brush or a vacuum cleaner with an extended attachment to
clean the condenser.
2. Removing Condensate
Remove the excessive condensate if it is accumulated on the cooling unit in high
humidity conditions.
3. Removing Unit
When you remove the cooling unit, beware water may come out of the unit.
4. Installing Drain Line
CT3500~8500ZD units are equipped with an additional drain fitting. In case of
extreme humidity there is a drain line needed, remove the drain plug on the
bottom left at the rear, then remove the connection plug and fit a 0.375” OD drain
tube into the drain connection. Install the cooling unit with the front higher than
the rear.
- 20 -
Page 22
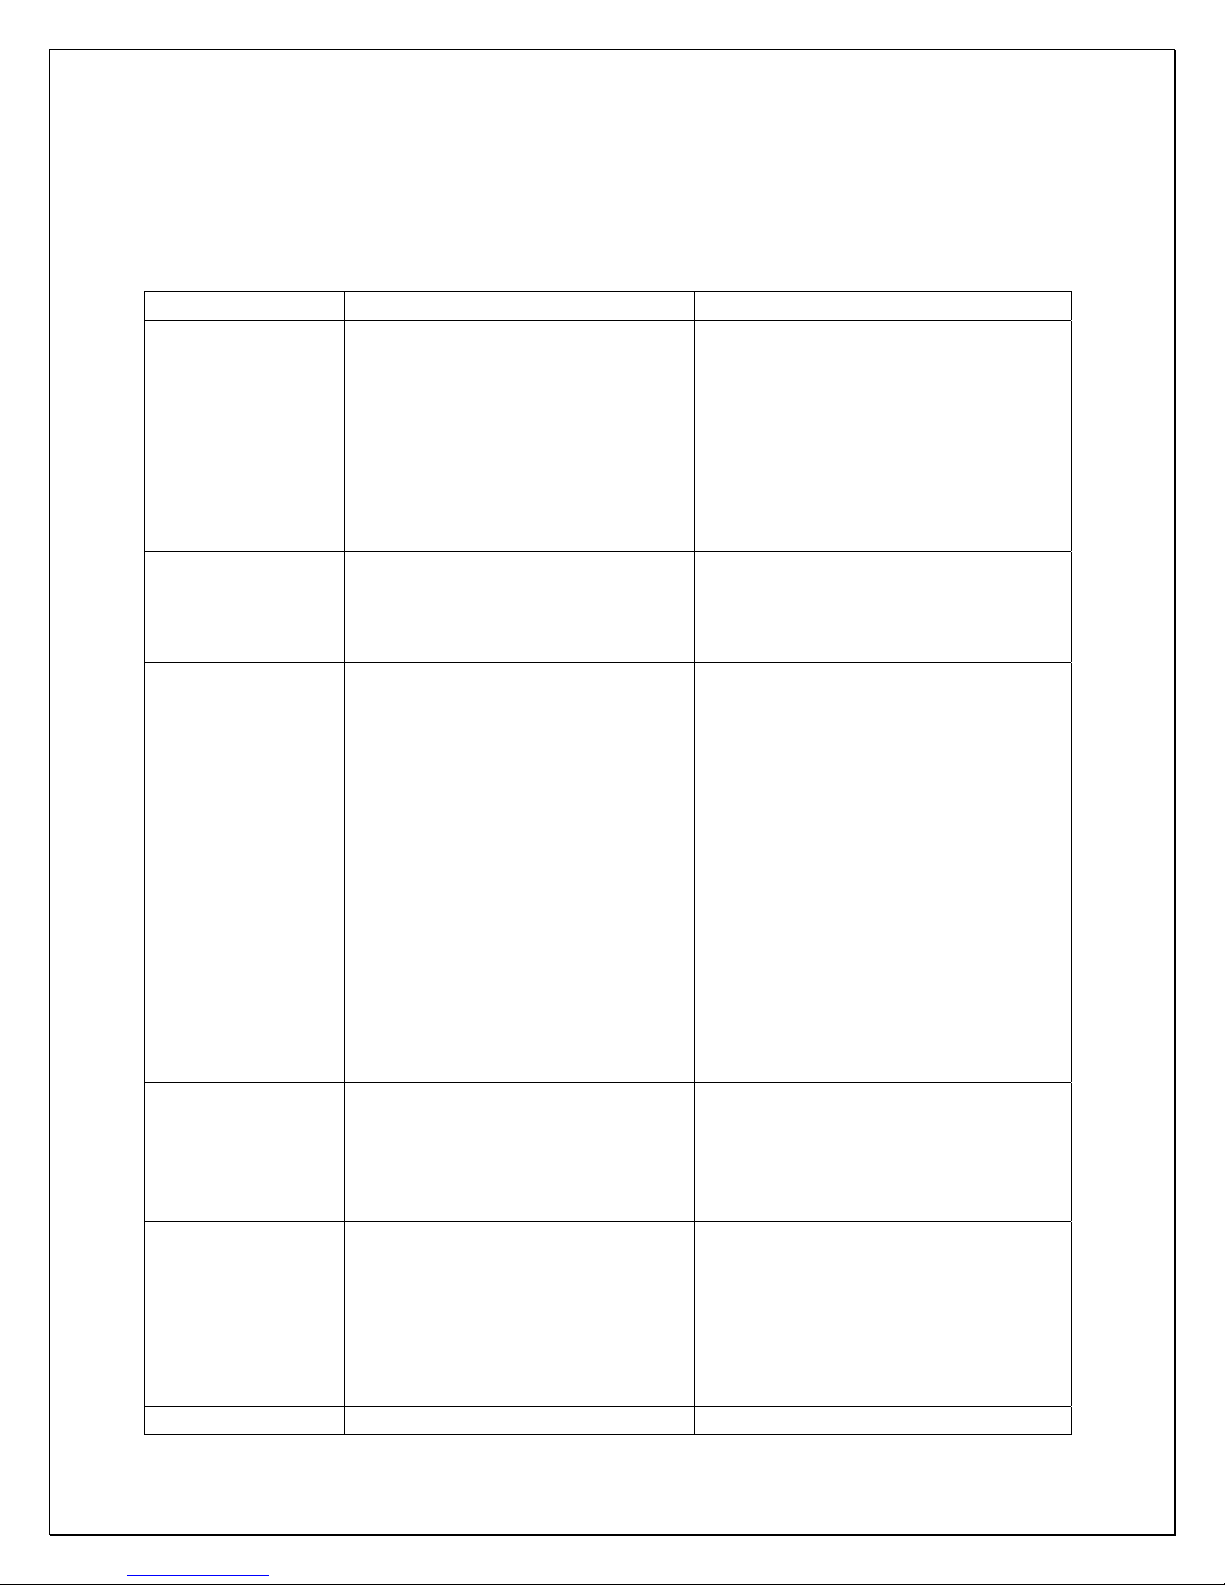
Troubleshooting
This Troubleshooting Chart is not prepared to replace the training required for a
professional refrigeration service person, not is it comprehensive
Complaint Possible Causes Response
1. Unit not
running
2. Unit not
starting , but
temperature
rising high
3. Temperature
fluctuating
4. Temperature
high, unit
stopping
and starting
normally
5. Temperature
high, unit
stopping
and starting
with short
running time
6. Temperature
a. Power cord not plugged
b. No power from supply
c. Incorrect or loose wirings
d. Low voltage
e. Setting higher than ambient
temperature
f. Cut-in too high
g. Defrost light blinking
h. Compressor light blinking
i. Defective controller
a. Anti-short cycle
a. Air probe
a. Temperature setting high
a. Air probe touching the
evaporator coil, displaying
temperature ok
b. Short circuit of air flow between
cold-air supply and cellar-air
return, displaying temperature
ok
c. Failed controller and pro be
a. Improper cellar insulation & seal a. Check insulation, gasket and door
a. Check power cord
b. Check receptacle and fuses
c. Check all wirings and connections
d. Contact an authorized electrician
e. Lower temperature setting
f. Reduce Hy
g. Unit is under defrost mode
h. Unit is under anti-short cycle delay
i. Call service for diagnosis
a. Reset AC
a. When using an air probe, the wine
bottle temperature is mainly
controlled by the average air
temperature. If the set-point is 55
with the differential 4F, the cooling
unit turns on at 59
temperature (It may be higher than
59
°F if it is in anti-short cycle or
defrost cycle) and turns off at 55
of air temperature. The average air
temperature is 57
wine temperature is around 57+/-
0.5
°F. The air is light enough to
change so quickly that it maintains
relatively constant average
temperature that would prevent wine
bottle temperature from fluctuating.
a. Lower the setting
a. Move the air probe away from the
evaporator
b. Deflect the supply air down
c. Call service for diagnosis
°F of air
°F, and then the
°F
°F
- 21 -
Page 23
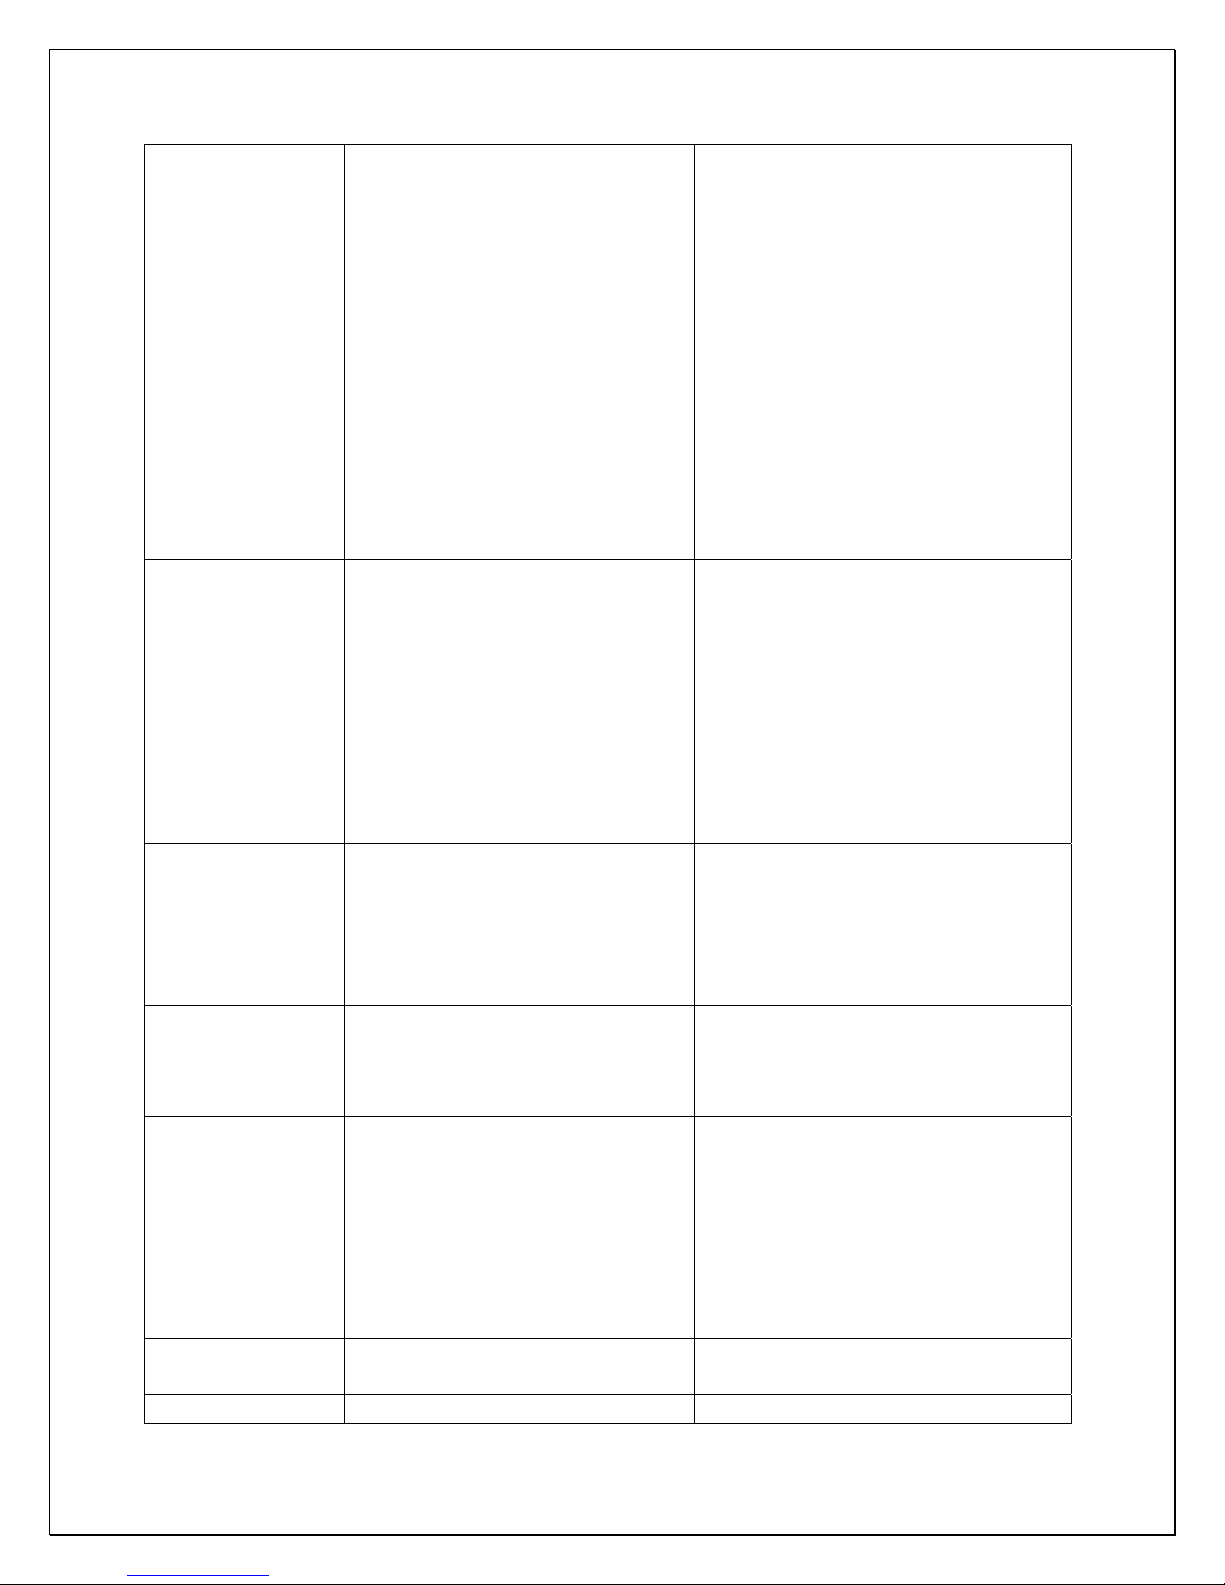
high or not
cooling and
running
continually
7. Unit running
too long
8. Fan motor
running but
compressor
not running
9. Compressor
running but
fan not
running
10.Temperature
high,
compressor
stopping
and starting
but very
short
running time
11.Fan running
too long
12.Temperature
b. Cellar too large
c. Ambient temperature too high
d. Exhaust restricted
e. Malfunctioning fans
f. Evaporator or condenser airflow
g. Dirty Condenser
h. Iced evaporator
i. Refrigeration system restriction
j. Refrigerant leak
k. Undercharge or overcharge
l. Failed components
a. Improper cellar insulation & seal
b. Cellar too large
c. Ambient temperature higher >
90
°F
d. Exhaust restricted
e. Dirty Condenser
f. Improper condenser air flow
a. Post-compressor fan running
mode
b. Incorrect or loose wirings
c. Failed components
d. Liquid refrigerant in the
compressor
a. Fan blade stuck
b. Incorrect or loose wirings
c. Failed motors
a. Failed components
b. Improper condenser airflow
c. Dirty condenser
d. Overcharge of refrigerant
e. Discharge or suction pressure
too high
a. Post-compressor fan running
mode for humidity modulation
a. Low temperature setting a. Raise the setting
opening, power cord grommet
b. Check for excessive size
c. Check installation location
d. Leave minimum 3 feet clearance for
the hot air exhaust side and leave
minimum 1 foot clearance for the
fresh air intake side
e. Check for both evaporator and
condenser fans
f. Check for air restrictions, air short-
circulation, grille directions
g. Clean condenser
h. Defrost and reset temperature
i. Call service
j. Call service
k. Call service
l. Check compressor windings, start
relay and overload protector
a. Check insulation, gasket and door
opening, power cord grommet
b. Check for excessive size
c. Check for installation location
d. Leave minimum 3 feet clearance for
the hot air exhaust side and leave
minimum 1 foot clearance for the
fresh air intake side
e. Clean condenser
f. Check for fan and air short
circulation
a. Check fan running time FON
b. Check all wirings and connections
c. Check start relay, start capacitor,
overload protector, compressor.
d. Call service.
a. Check for proper clearance
b. Check all wirings
c. Call service
a. Check compressor windings, start
relay and overload protector.
b. Check for condenser fan
c. Clean condenser
d. Call service for removing refrigerant
e. Call service for information
a. Reset FON
- 22 -
Page 24
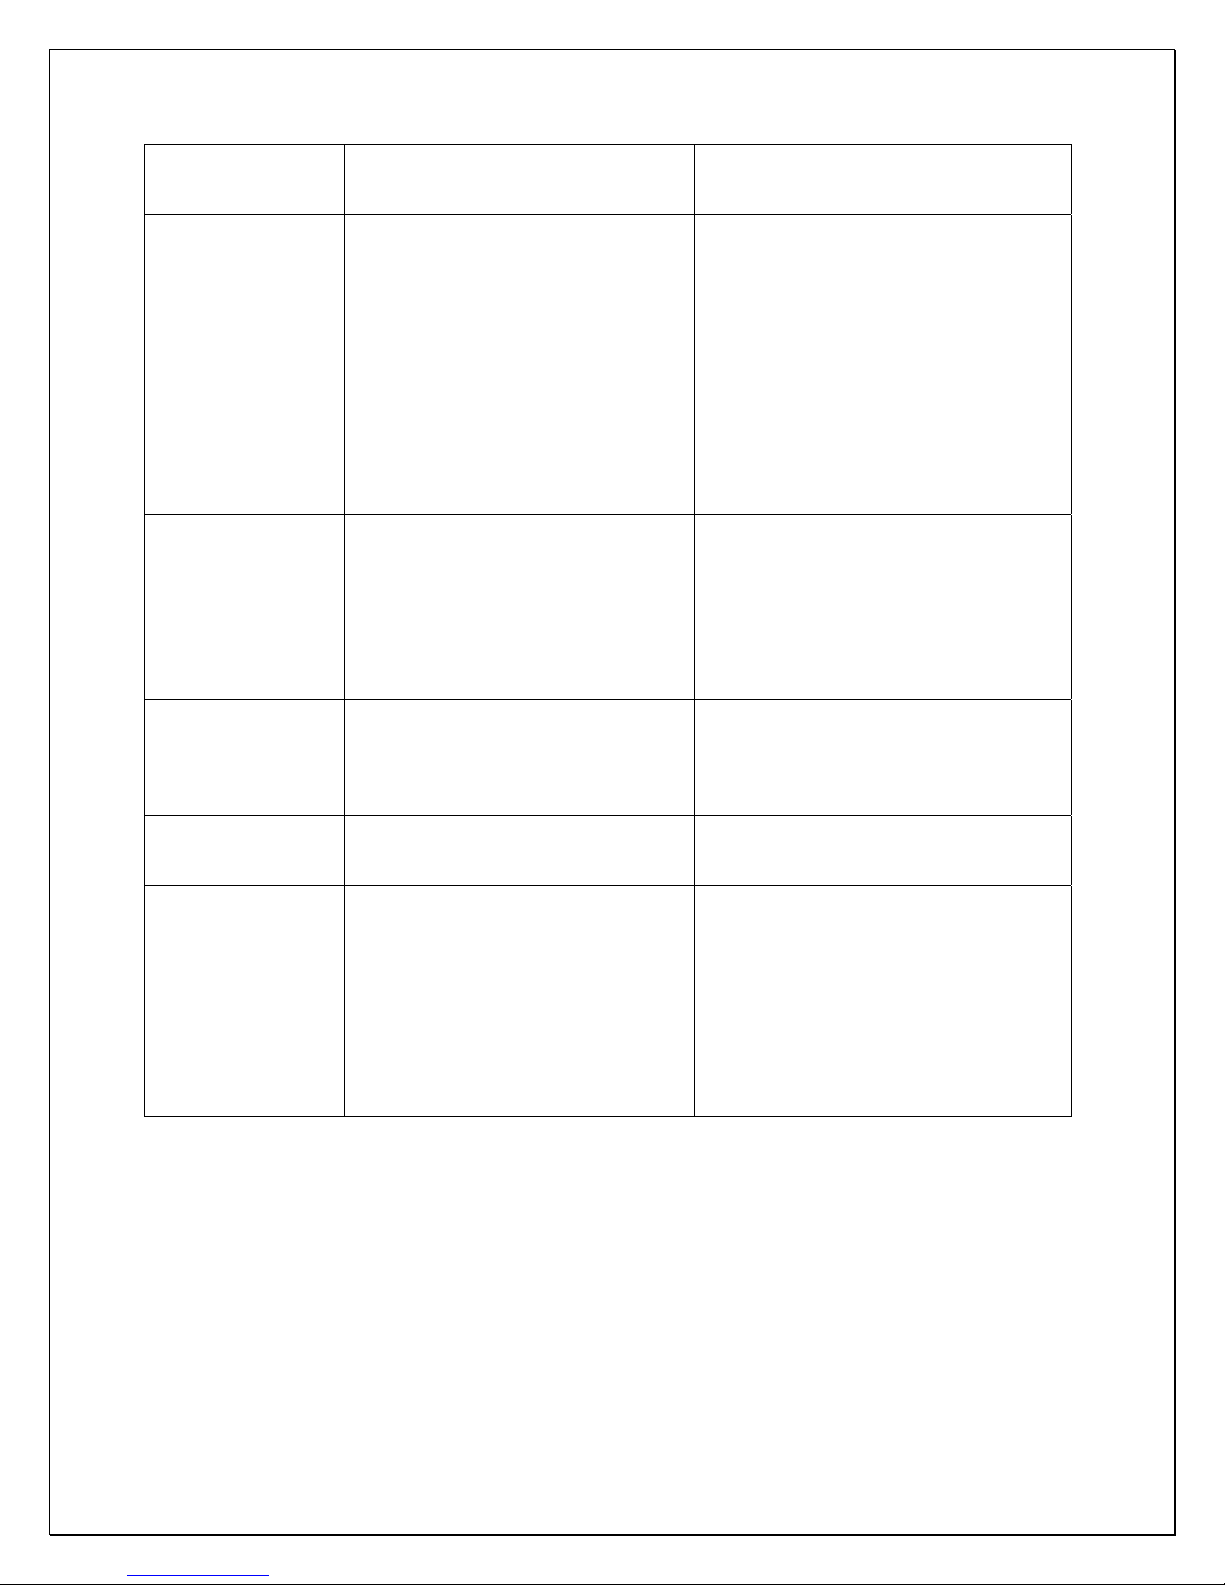
low
13.Evaporator
freezing up
14.Water leak
15.Excessive
condensate
in wine
cellar
16.Circuit
tripping
17.Noisy
operation
b. Low ambient temperature
c. Air probe fault
d. Temperature controller fault
a. Evaporator air flow restriction
b. Condenser air flow restriction
c. Not stopping due to air leak, high
ambient temperature, low
temperature setting or pull-down
cooling
d. Defective controller or probe
e. Low ambient temperature
f. Initially working then stopping,
moisture in the system
g. Refrigerant low or leaking
h. Capillary tube or expansion valve
blockage
a. Air leak in the wine cellar causing
excessive condensate
b. High humidity causing excessive
condensate
c. Evaporator air flow restriction
d. Water passages restricted, water
overflowing
e. Drip tray leak
a. Air leak in the wine cellar causing
excessive condensate
b. High humidity causing excessive
condensate
c. Water passages restricted
a. Incorrect fuse or breaker
b. Incorrect wirings
c. Failed components
a. Mounting area not firm
b. Loose parts
c. Compressor overloaded due to
high ambient temperatures or
airflow restriction
d. Defective components
b. Move to another location
c. Change a new one
d. Change a new one
a. Check for fans and CFM
b. Check for fans and CFM
c. Check for seal, door opening,
ambient temperature and
temperature setting
d. Check for controller and probe
e. Change defrost cycle
f. Call service
g. Call service
h. Call service
a. Check for air leak
b. Use drain line
c. Check supply air flow or air TD
d. Clean the drip tray
e. Seal the leak using silicone sealant
a. Check for any air leak
b. Use drain line
c. Clean the drip tray
a. Check for proper fuse or breaker
b. Check for wirings and connections
c. Call service
a. Add support to improve installation
b. Check fan blades, bearings,
washers, tubing contact and loose
screws.
c. Check for airflow
d. Call service for checking internal
loose, inadequate lubrication and
incorrect wirings
- 23 -
Page 25
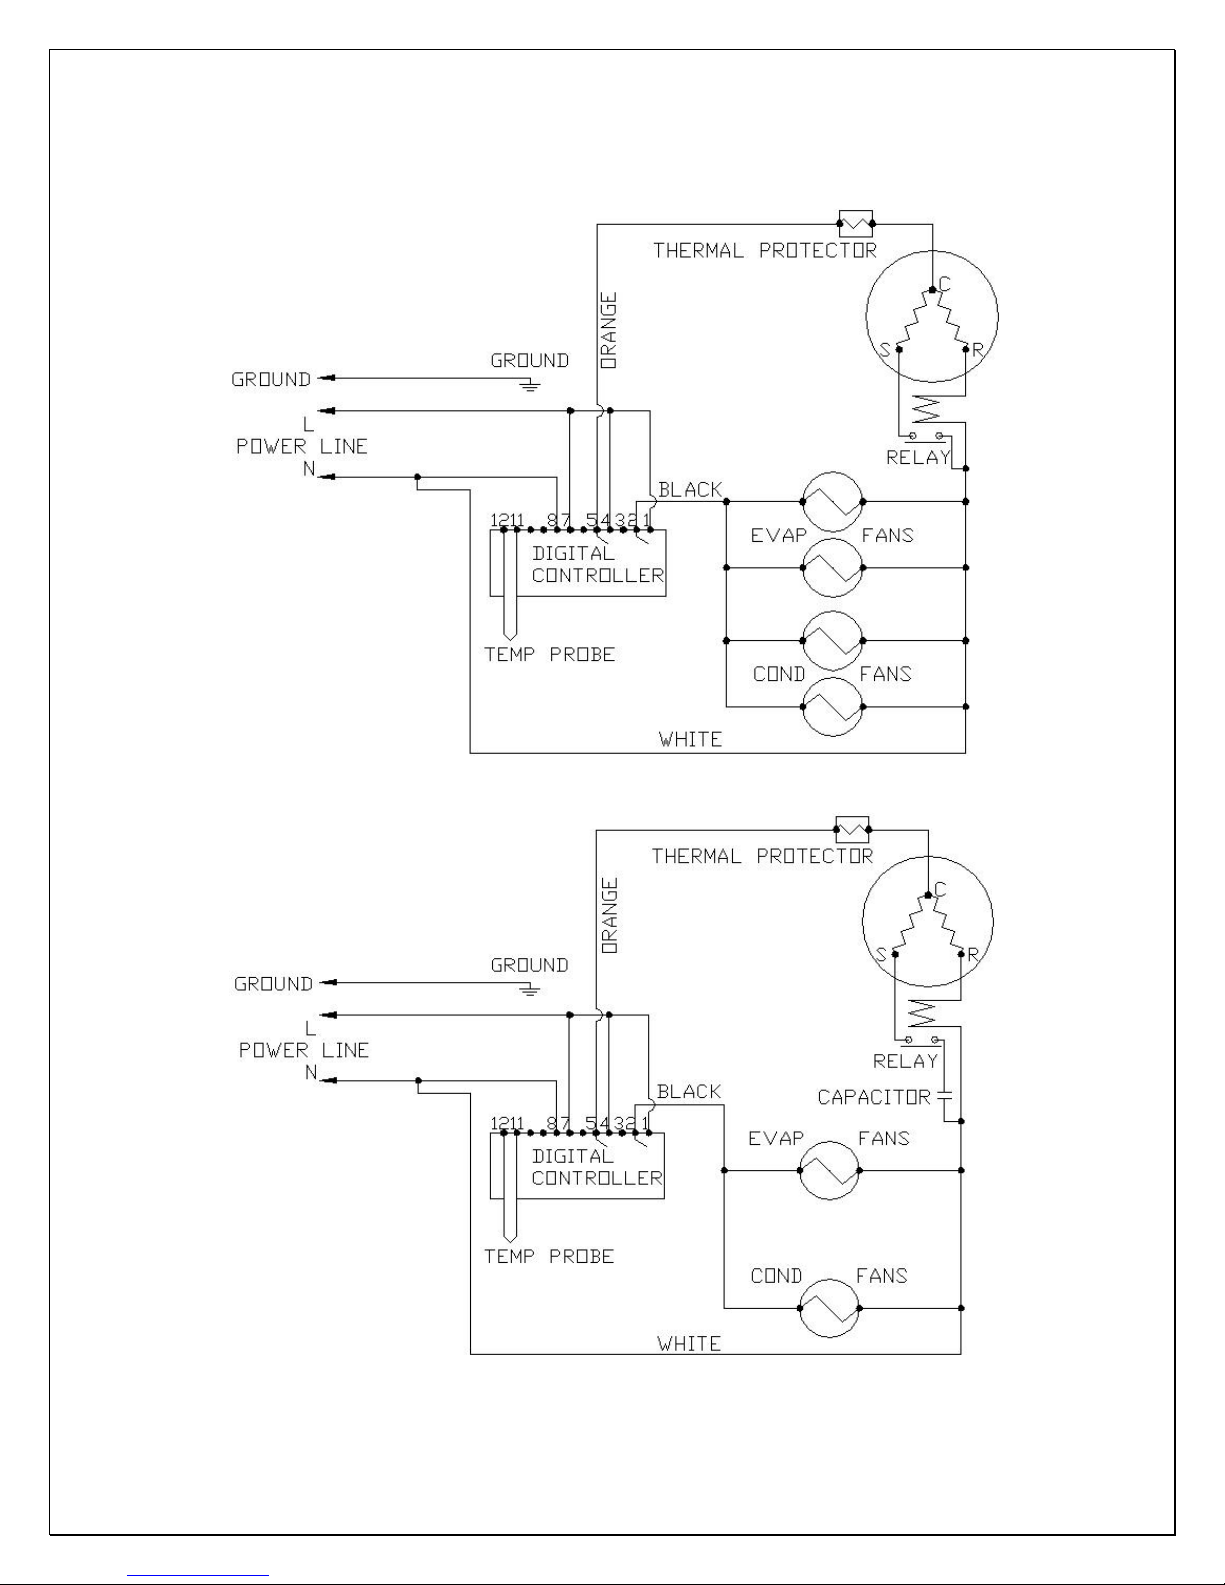
Electrical Wiring Diagrams
Fig. 6.1 CT1500~2500ZD WIRING DIAGRAM
Fig. 6.3 CT3500~8500ZD WIRING DIAGRAM
- 24 -
Page 26
Customer Support
If you need further assistance, please contact us at:
APEX
17631 South Susana Road
Rancho Dominguez, CA 90221
Tel: (310) 886-3332
Fax: (310) 886-3310
Email: [email protected]
- 25 -
Page 27
Warranty
Thank you for choosing an APEX cooling unit.
Please enter the complete model and serial numbers in the space provided:
Model_________________________________________________________
Serial No.______________________________________________________
Attach your purchase receipt to this owner’s manual.
1. Limited Warranty
APEX warrants its products to be free from defects due to workmanship or
materials under normal use and service, for twelve months after the initial sale. If
the product is defective due to workmanship or materials, is removed within
twelve months of the initial sale and is returned to APEX, in the original shipping
carton, shipping prepaid, APEX will at its option, repair or replace the product
free of charge. Additionally APEX warrants all parts to be free from defects for a
period of sixty months after initial sale.
This warranty constitutes the entire warranty of the APEX with respect to its
products and is in lieu of all other warranties, express or implied, including any of
fitness for a particular purpose. In no event shall APEX be responsible for any
consequential damages what is so ever. Any modification or unauthorized repair
of APEX products shall void this warranty.
Service under Warranty
This service is provided to customers within the continental UNITED STATES
only. APEX cooling units are warranted to produce the stated number of BTU/H.
While every effort has been made to provide accurate guidelines, APEX can not
warranty its units to cool a particular enclosure.
In case of failure, APEX cooling units must be repaired by the factory or its
authorized agent. Repairs or modifications made by anyone else will void the
warranty.
Shall an APEX cooling unit fail, contact the dealer for instructions, do not return
the unit to the factory without authorization from APEX. If the unit requires repair,
re-pack it in the original shipping carton and return it to the factory, shipping
prepaid. APEX will not accept COD shipments. If the unit is determined to be
- 26 -
Page 28
faulty and is within the twelve month warranty period APEX will, at its discretion,
repair or replace the unit and return it free of charge to the original retail
customer. If the unit is found to be in good working order, or beyond the initial
twelve month period, it will be returned freight collect.
2. Limitation of Implied Warranty
APEX’S SOLE LIABILITY FOR ANY DEFECTIVE PRODUCT IS LIMITED TO,
AT OUR OPTION, REPAIRING OR REPLACING OF UNIT.
APEX SHALL NOT BE LIABLE FOR:
DAMAGE TO OTHER PROPERTY CAUSED BY ANY DEFECTS IN THE UNIT,
DAMAGES BASED UPON INCONVENIENCE, LOSS OF USE OF THE UNIT,
LOSS OF TIME OR COMMERCIAL LOSS, ANY OUTER DAMAGES,
WHETHER INCIDENTAL, CONSEQUENTIAL OR OTHERWISE.
THIS WARRANTY IS EXCLUSIBE AND IS IN LIEU OF ALL OTHER
WARRANTIES, EXPRESSED OR INPLIED, INCLUDING BUT NOT LIMITED
TO, IMPLIED WARRANTIES OF MERCHANTABILITY OR FITNESS FOR A
PARTICULAR PURPOSE.
While great effort has been made to provide accurate guidelines APEX cannot
warrant its units to properly cool a particular enclosure. Customers are cautioned
that enclosure construction, unit location and many other factors can affect the
operation and performance of the unit. There for suitability of the unit for a
specific enclosure or application must be determined by the customer and cannot
be warranted by APEX.
- 27 -
 Loading...