

Page 1
Table of Contents
User Guide
Welcome to Your REDFLY 2
Getting Started 2
Connecting to the REDFLY for the First Time 6
Improved Productivity with the REDFLY 7
Navigating the REDFLY 7
Keyboard Shortcuts 7
Using Alt-Tab 11
Using the Touch Pad 11
Working with the Display 13
Using an external Monitor or Projector 14
Playing Video 15
Using Bluetooth 15
Using External Devices 22
Power-Saving Options 23
Uninstalling REDFLY Software 27
Troubleshooting 28
Cleaning the REDFLY 30
Customer Service 30
Warranty 30
Specications 31
Using the REDFLY Safely 31
End User License Agreement 32
Regulatory Compliance 34
1
Page 2
Welcome to Your REDFLY
Meet the REDFLY—the essential Windows Mobile Smartphone Companion. The REDFLY will greatly enhance your
productivity with its larger screen and keyboard, as well as its connectivity options. Like a great assistant, the REDFLY
simplies and accelerates getting your work done.
The most important tip to keep in mind about your REDFLY is that it uses all your smartphone capabilities. This means
that moving up to the REDFLY provides strong peace of mind since you don’t have to worry about:
•Constantly synchronizing data yet again with your phone to another device
•Learning yet another set of applications, procedures, and operating system
•Protecting yet another device from viruses, malware and other threats
•Losing company or personal data on yet another device
While the REDFLY may appear similar to a sub-notebook computer, it actually simplies your workday by completely
leveraging your familiar Windows Mobile applications and interface with the easier to use REDFLY keyboard and
larger screen.
Getting Started
You will need to install REDFLY software to your Windows Mobile phone to use the REDFLY. You can choose to install:
•Over-the-Air directly to your smartphone
•From your PC with an Internet connection
•From your PC with the REDFLY Installation CD
First, open the REDFLY and remove the protective plastic lm from the display. For best results, plug in your REDFLY to the
AC adapter and allow at least 3 hours to fully charge the battery.”
For best results, plug in your REDFLY to the AC adapter and allow at least 3 hours to fully charge the battery.
OVERTHEAIR SMARTPHONE INSTALLATION
Note: Cell phone data rates will apply to this download.
1. Power on your smartphone.
2. Activate your phone’s Internet connection (whether WiFi or over the cellphone network).
3. Use your smartphone browser to go to: http://www.celiocorp.com/install.
4. Select the Over The Air Installation link and follow the on screen directions.
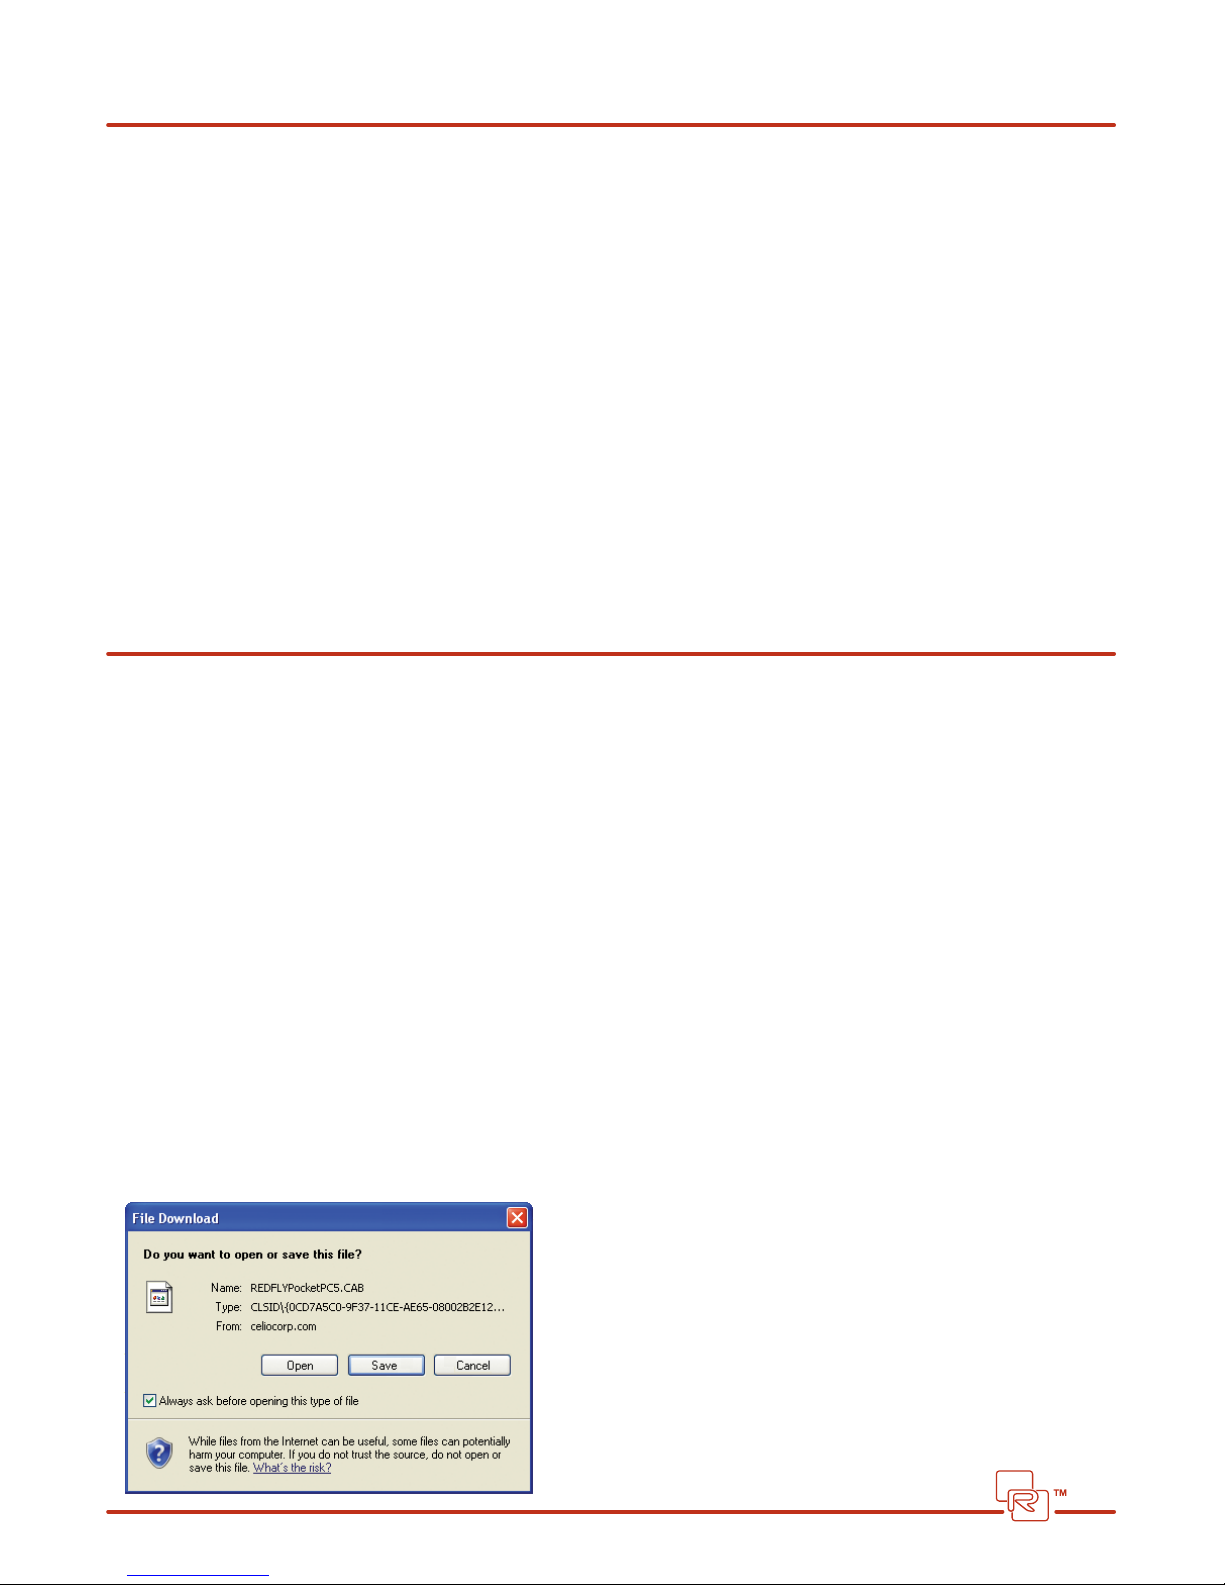
5. Choose “Yes” to download the le to your smartphone.
2
Page 3
6. Once the le has been downloaded, follow the on screen instructions on your smartphone to complete
the installation
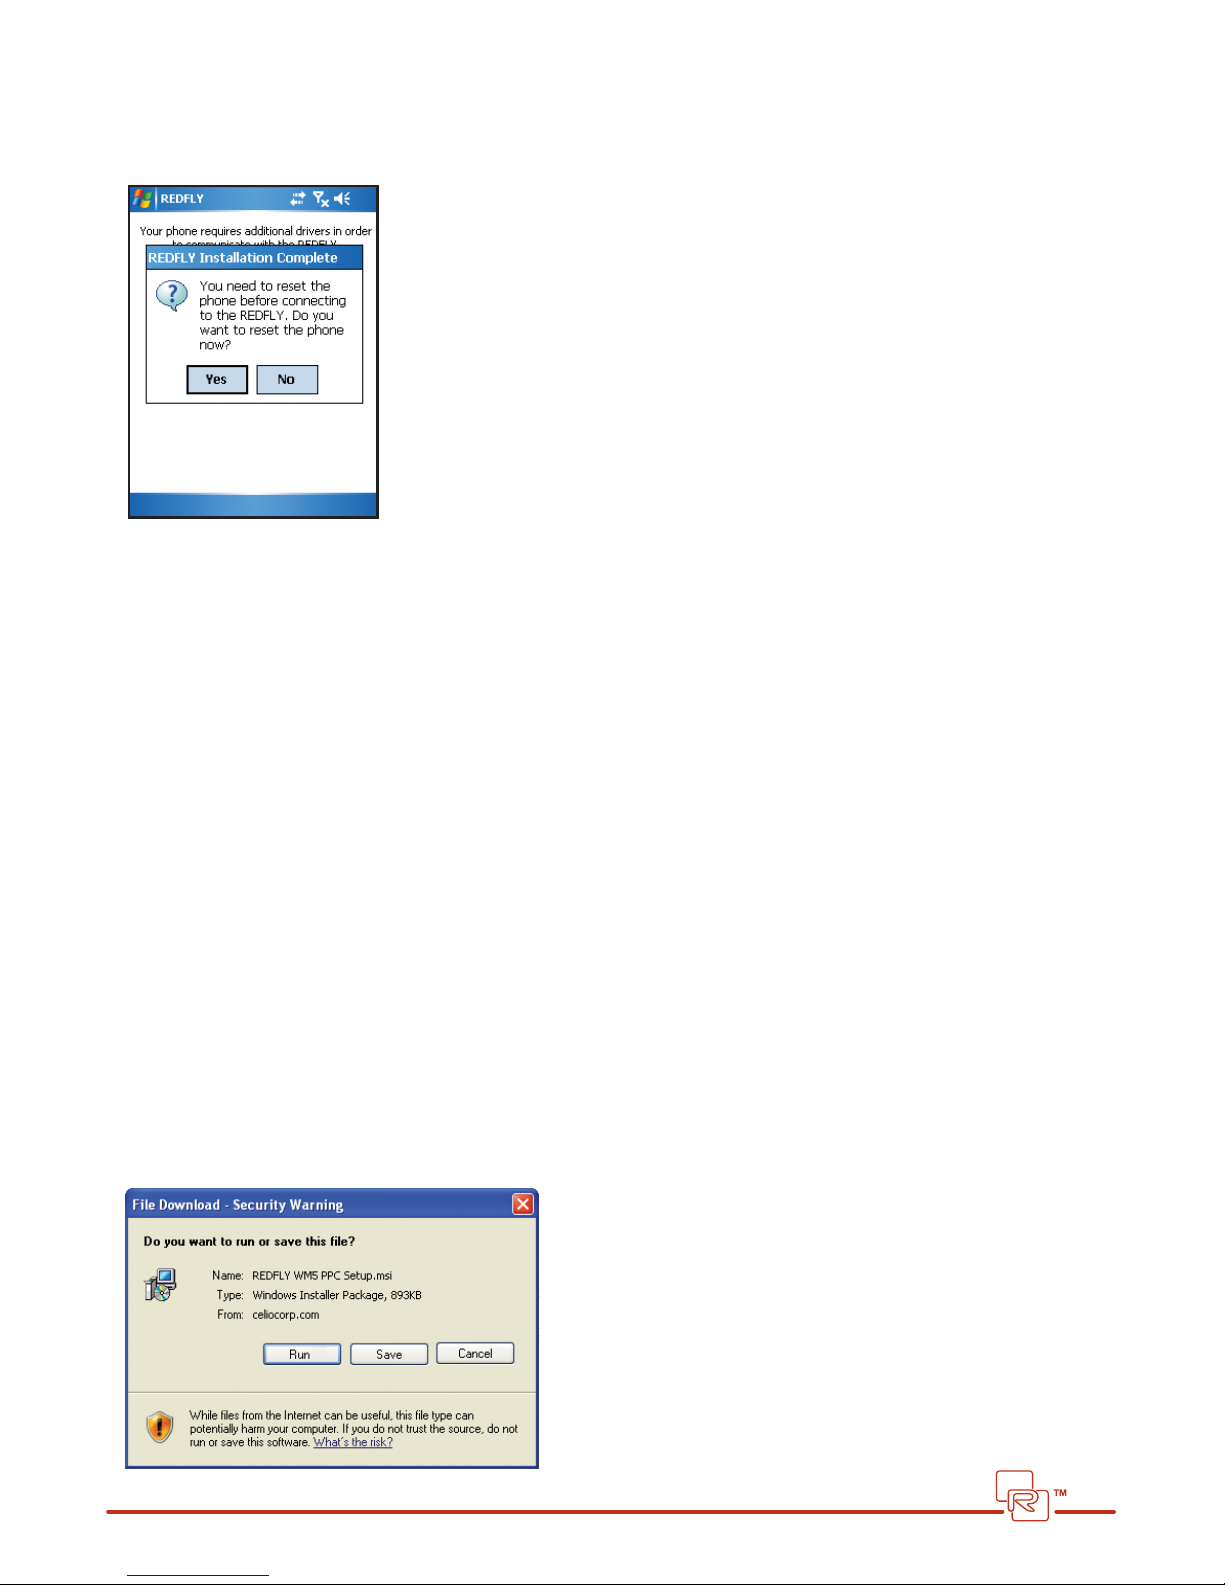
After installing the REDFLY software, the setup program will ask you to reset your phone:
Choose YES to complete the installation.
INSTALLING FROM YOUR COMPUTER
You can install the REDFLY software to your phone using your PC and the Internet. To do this you will need:
A. An active Internet connection.
B. Your smartphone’s USB connecting cable. (If you do not have this cable, contact your phone retailer for a replacement.)
C. Microsoft ActiveSync (or Windows Mobile Device Center for Microsoft Vista) installed on your PC.
To do the install:
1. Power on your smartphone.
2. Run ActiveSync (or Device Center). If you have not connected your phone to your PC via ActiveSync before,
please refer to your phones manual for instructions.
3. Plug your phone into your PC using the USB connecting cable. ActiveSync (or Device Center) will say “Connected”.
(If not, refer to your Microsoft documentation.)
4. Use your PC browser to go to: http://www.celiocorp.com/support/downloads/drivers/installation.htm
5. If you are downloading the REDFLY from the web site, select the Install From Your Computer link and follow the on
screen directions.
6. From the Installing From Your Computer section, click on the model and/or number of your smartphone.
7. Choose Run or Save from the dialog box to complete the installation. If you choose Save, you will need to
remember where you save it so you can run the installation later.
3
Page 4
Note: The Install program also archives a copy of the REDFLY Setup program
in this directory should you need it again.
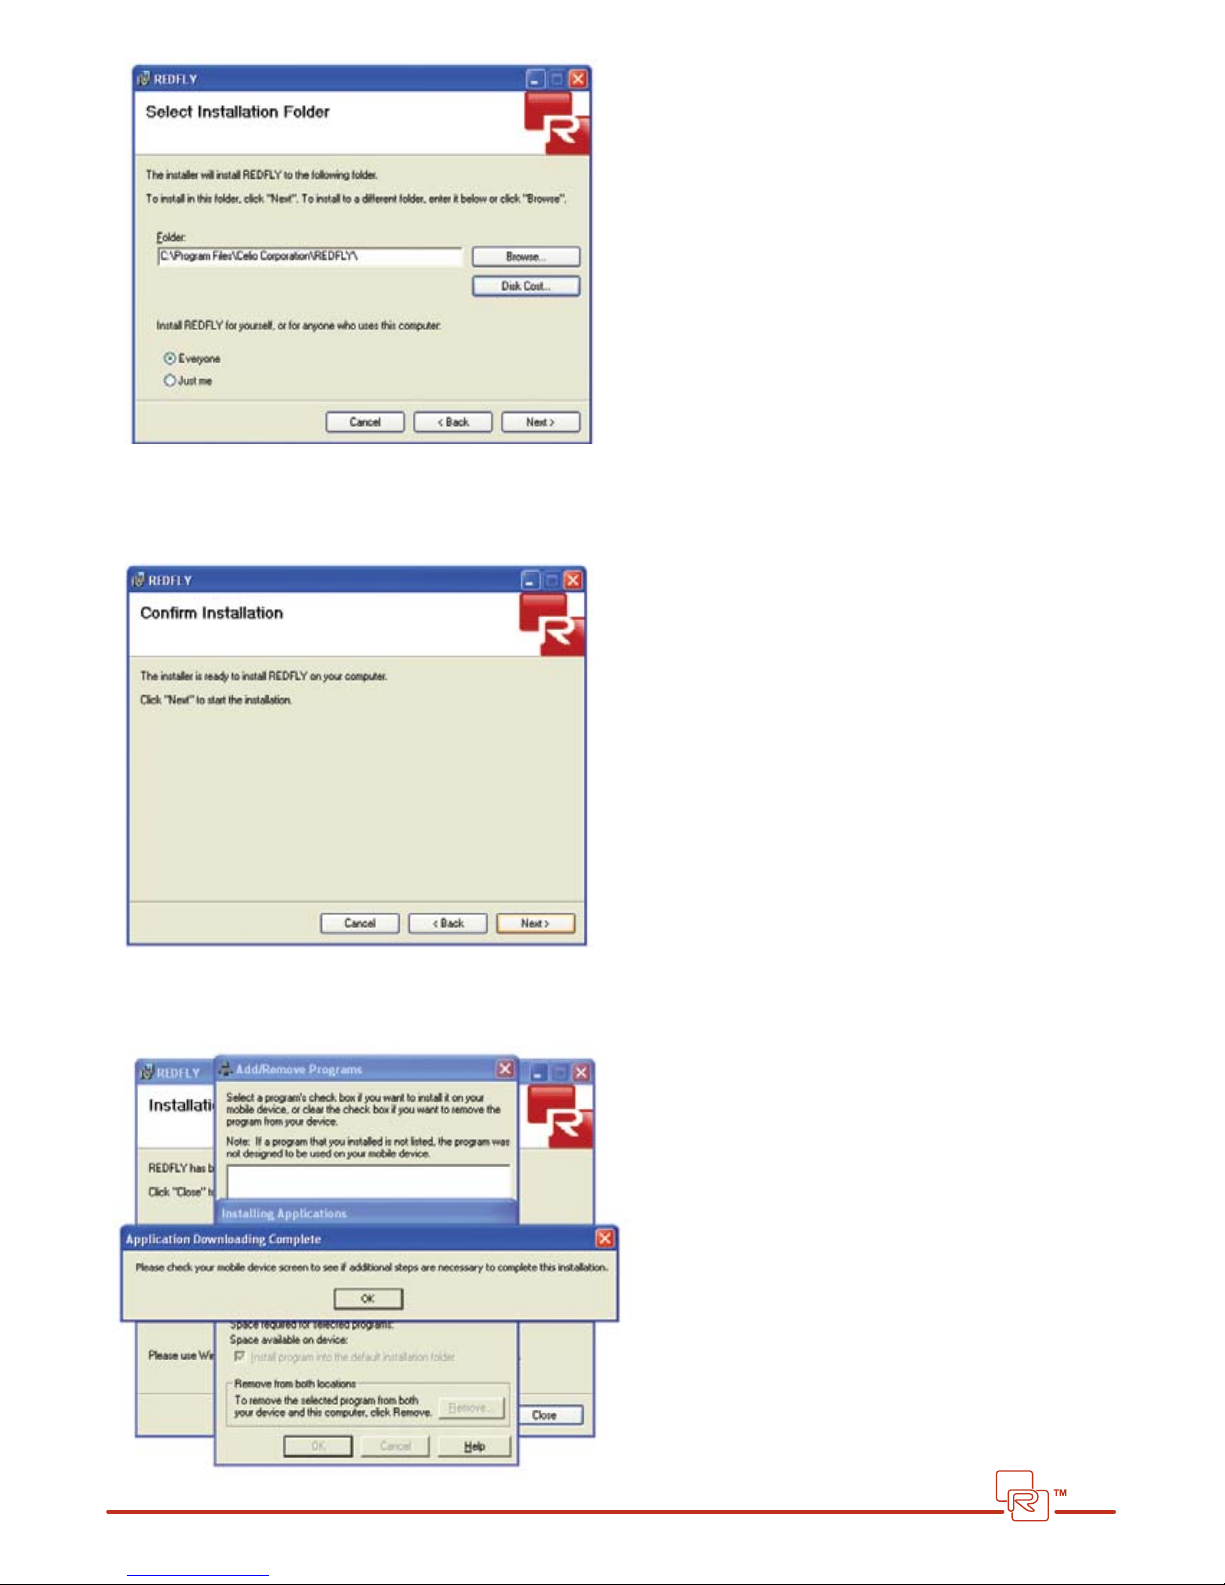
8. The Install program asks you to conrm the installation:
Choose “Next” to continue.
9. On your PC, the setup program will conrm the install:
4
Page 5
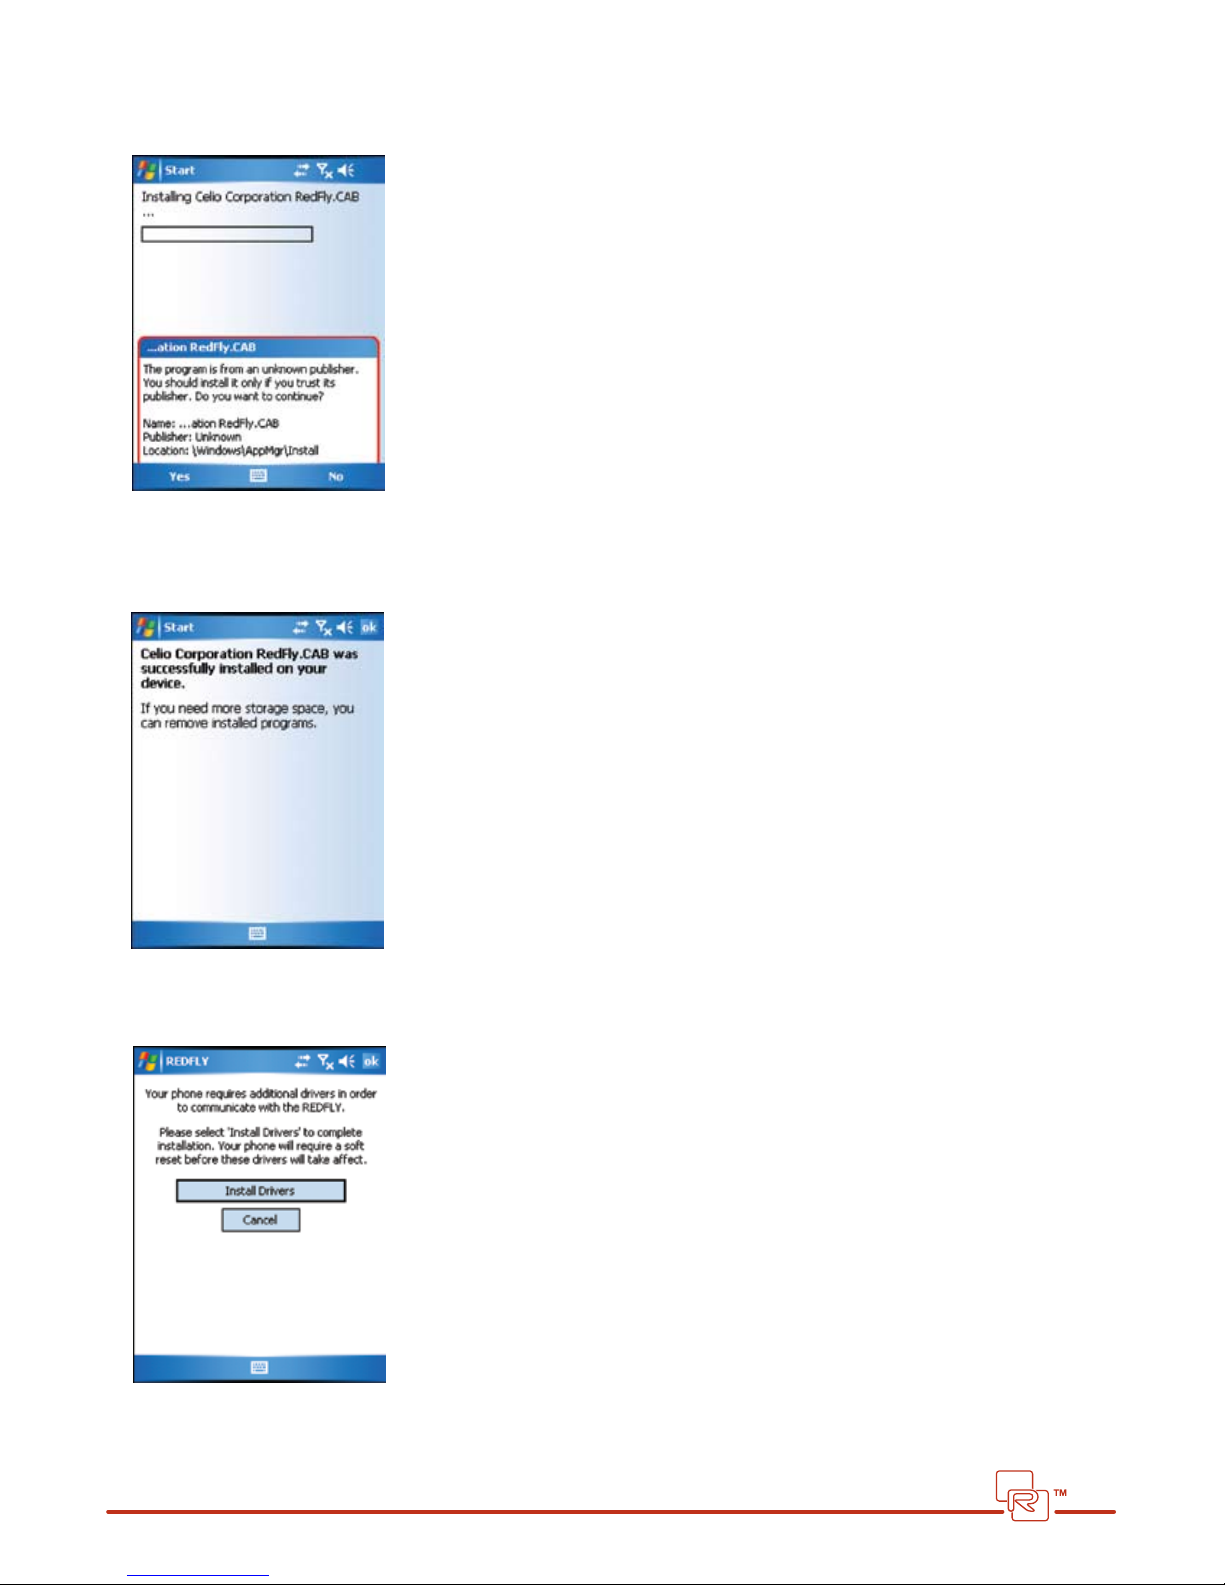
Choose OK and proceed to your smartphone to complete the install.
10. On some phones, Windows Mobile will ask you for permission to run the REDFLY setup program:
Choose “Yes” to continue.
11. The setup program will conrm the install:
Select OK to close this screen and run the REDFLY setup software.
12. Select Install Drivers from the installation screen:
After installing the REDFLY software, the setup program will automatically reset your phone.
5
Page 6
PC/CDROM INSTALLATION
You can install the REDFLY software to your phone using your PC and the included Install CD-ROM.
To do this you will need:
A. The REDFLY Install CD-ROM.
B. Your smartphone’s USB connecting cable. (If you do not have this cable, see your phone retailer for a replacement.)
C. Microsoft ActiveSync (or Windows Mobile Device Center for Microsoft Vista) installed on your PC.
To do the install:
1. Power on your smartphone.
2. Run ActiveSync (or Device Center) on your PC.
3. Plug your phone into your PC using the USB connecting cable. ActiveSync (or Device Center) will say your phone is
connected. (If not, refer to your Microsoft documentation.)
4. Insert the REDFLY Install CD into your PC’s drive. The Install program will automatically launch.
5. Click on the link for your type of phone from the MSI Installations link list.
6. Click “Run” to begin the installation process.
Connecting to the REDFLY for the First Time
Once you have the REDFLY software on your smartphone, you are ready to connect to the REDFLY companion.
1. Power on your phone.
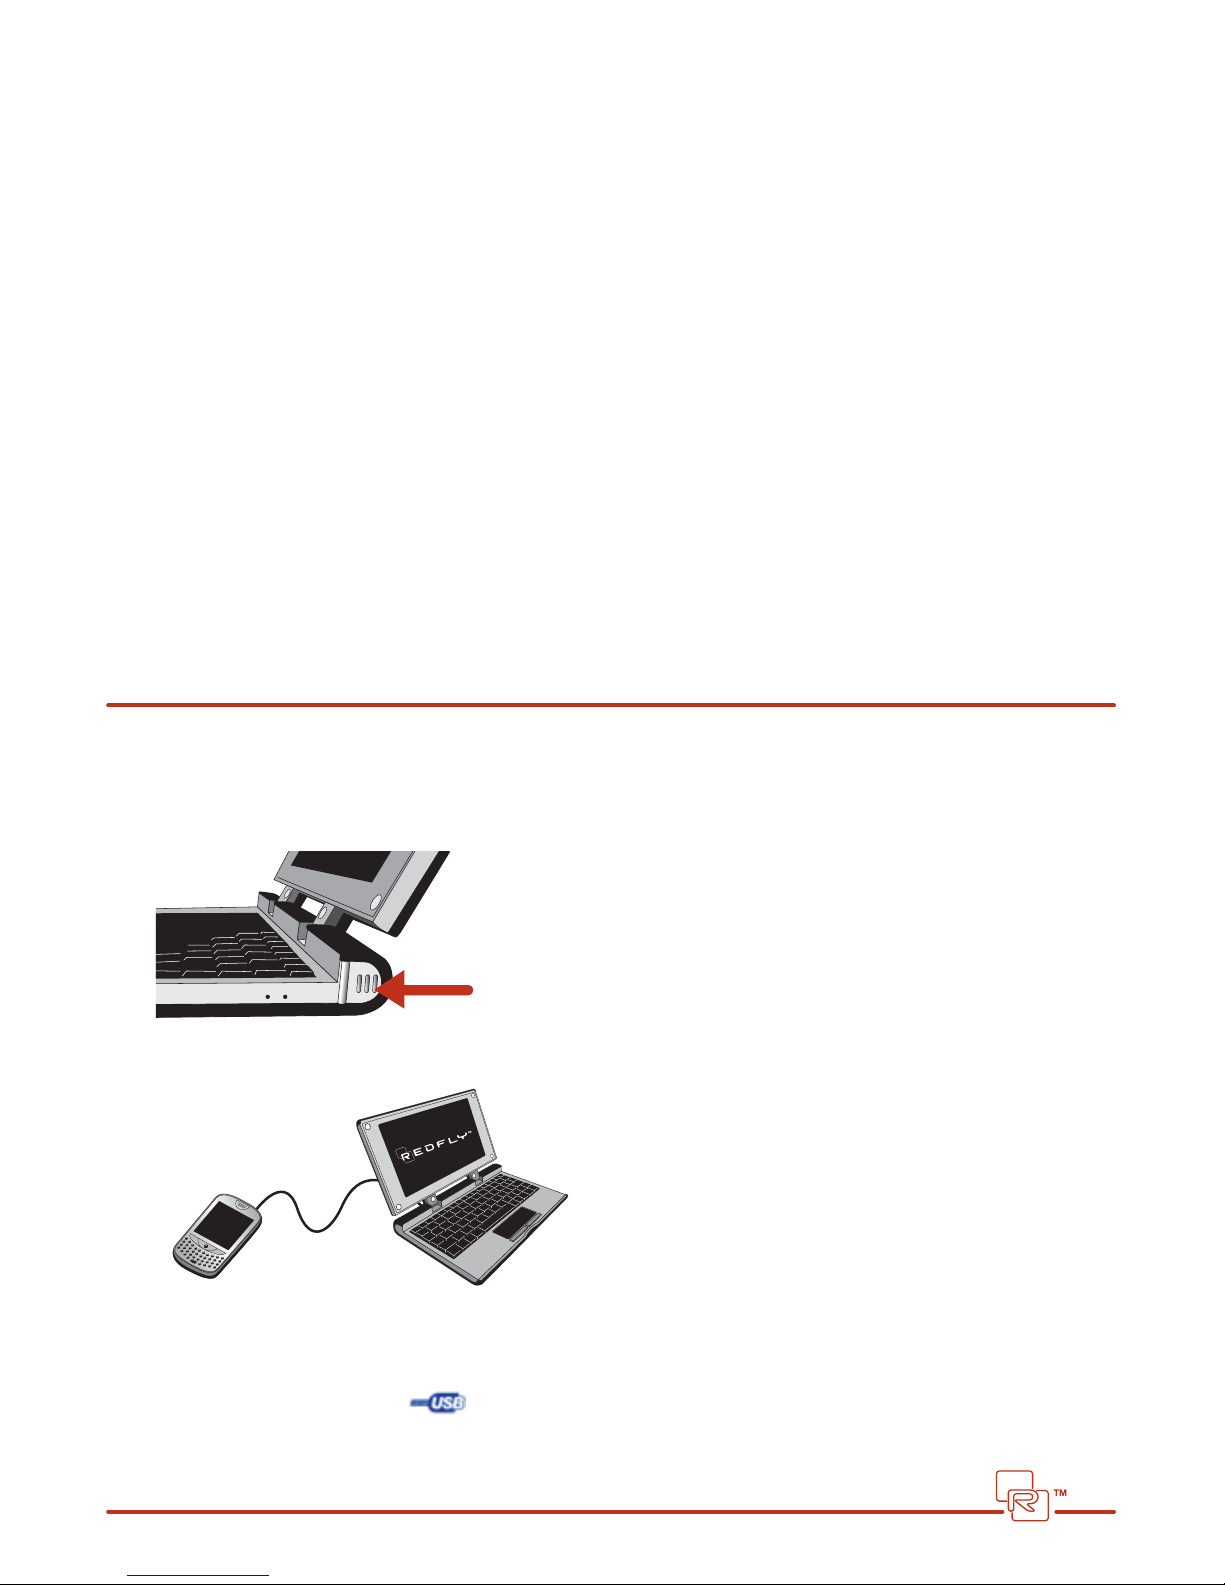
2. Press and hold the REDFLY’s On/O switch for one or two seconds to power on the REDFLY.
On/O switch
3. Plug your USB connecting cable into your phone and into your REDFLY.
Your phone will automatically detect the connection to the REDFLY. It will then switch your
phone display and keyboard functions to the REDFLY. The REDFLY system tray will now show
the “connected via USB” status icon:
6
Page 7
Navigating the REDFLY
Learning to navigate the REDFLY is easy as it uses typical PC keyboard and mouse actions:
•Use the REDFLY’s keyboard shortcuts to open applications
•Use the Alt-Tab feature to move between applications.
•Use the touch pad and buttons to move the cursor and select options
Keyboard Shortcuts
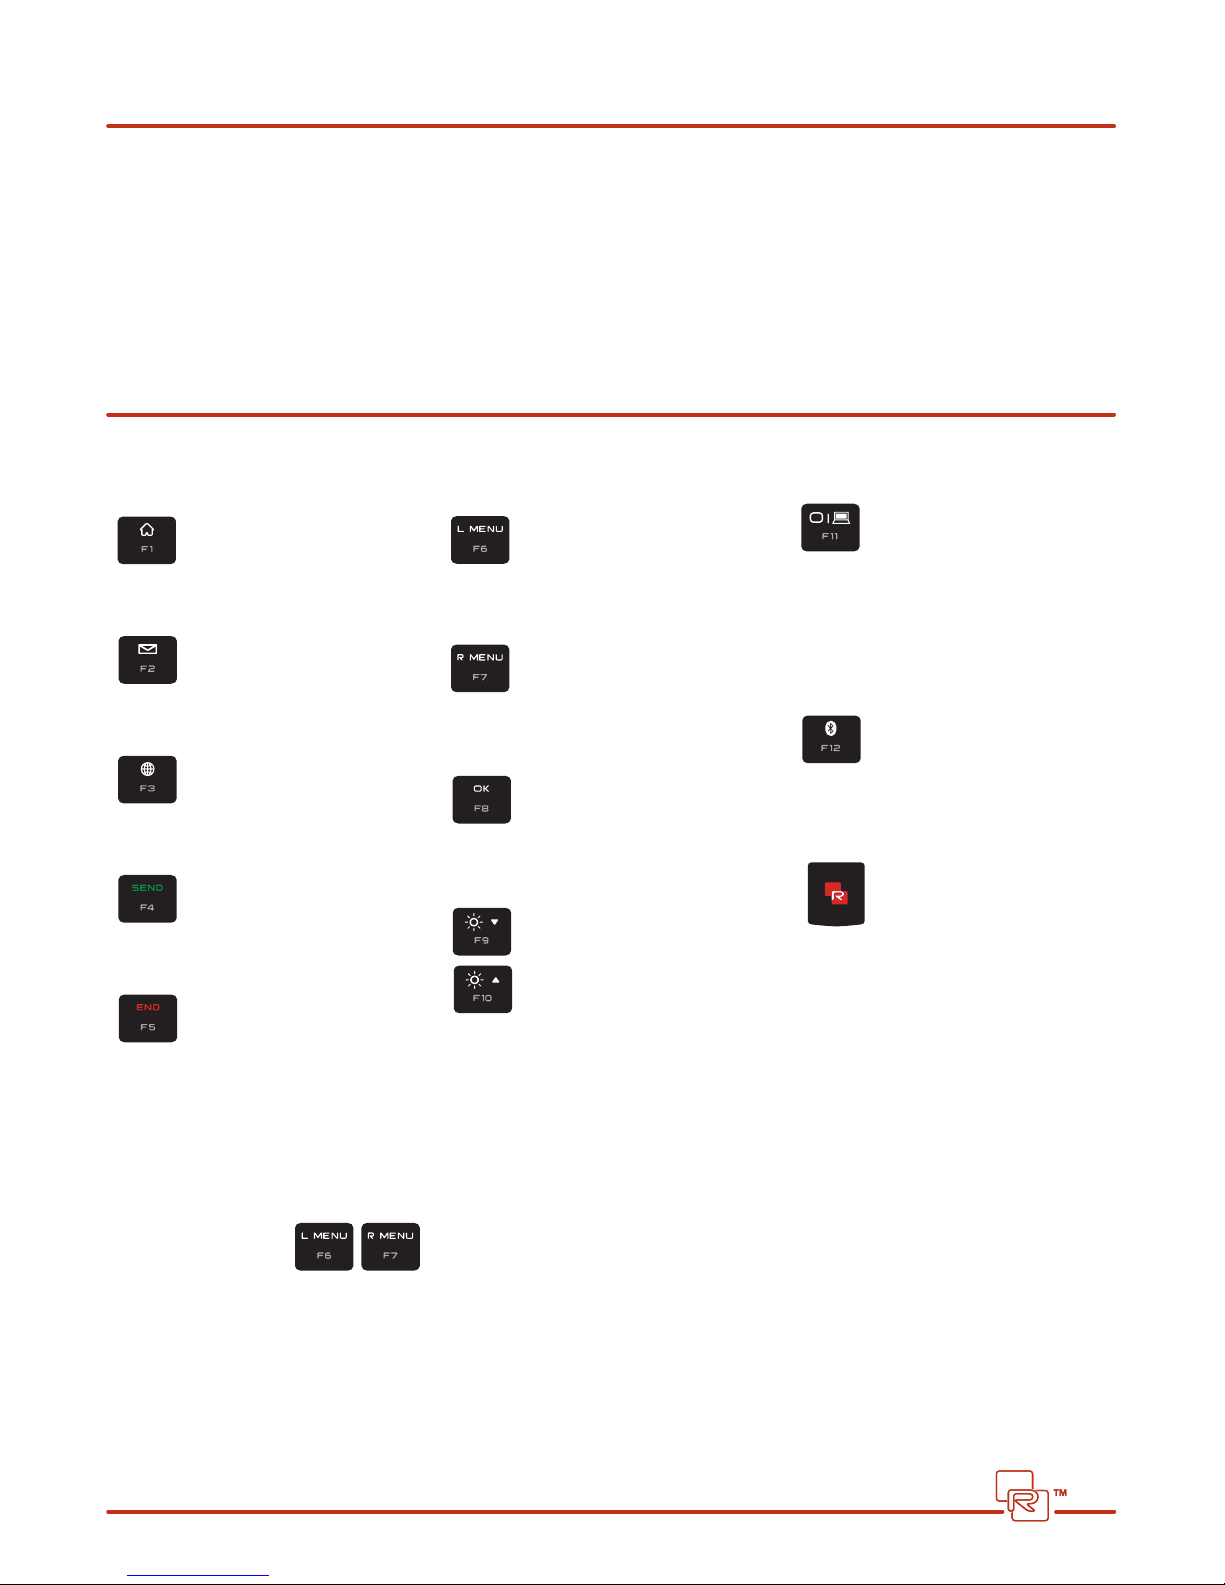
The REDFLY keyboard includes a variety of hot keys:
Home: This key opens
your Today menu.
Mail: This launches your
phone’s default browser.
Web: This launches the
phones default browser
Send: Acts like the Send
key on your smartphone
End: Acts like the End key
on your smartphone.
L Menu: Activates the
current application’s left
menu or option.
R Menu: Activates the
current application’s right
menu or option.
OK: Selects an onscreen
option, change, or preference
like the OK key on your phone.
Brightness Increase/Decrease:
F9 dims and F10 brightens
your REDFLY display.
External Monitor: Opens the
REDFLY Display menu. You can
then select to use a projector
or both the REDFLY screen
and a projector connected to
the VGA port.
Bluetooth: This key activates
or deactivates the REDFLY’s
Bluetooth connection with
your phone.
REDFLY: This key brings up
the REDFLY Settings screen.
HOT KEYS
The REDFLY keyboard includes a variety of hot keys to improve navigation.
L Menu and R Menu
The L Menu and R Menu keys activate the left and right menus (or options) respectively for the currently active program.
On some applications, there may be only a single option associated with the L Menu or R Menu, so pressing L Menu or R
Menu automatically performs that action. (For example, on the Incoming Call screen, the L Menu button answers the call.)
On other applications, pressing L Menu or R Menu will open a menu with a list of options. You can then use your cursor to
highlight the option you want.
7
Page 8
Use Send and End to make or receive calls with the REDFLY
Making calls with your REDFLY is much like using your smartphone:
1. Press the Send Key on the REDFLY keyboard or on your phone to display the phone keypad. (You can also use your
contact manager to dial the number.)
2. Dial the number using the cursor and the touch pad.
3. Press Send.
Use your smartphone handset as normal as both the speaker and microphone are active once you press the Send key.
Press the END Key on the REDFLY keyboard or on the phone to end the call.
Again, receiving calls is much like using your smartphone:
1. The REDFLY will display the Incoming Call screen.
2. Press the SEND Key to start talking on your smartphone.
3. Press the END Key on the REDFLY keyboard or on the phone to end the call.
User-Denable Hot Keys: Home, Mail & Web
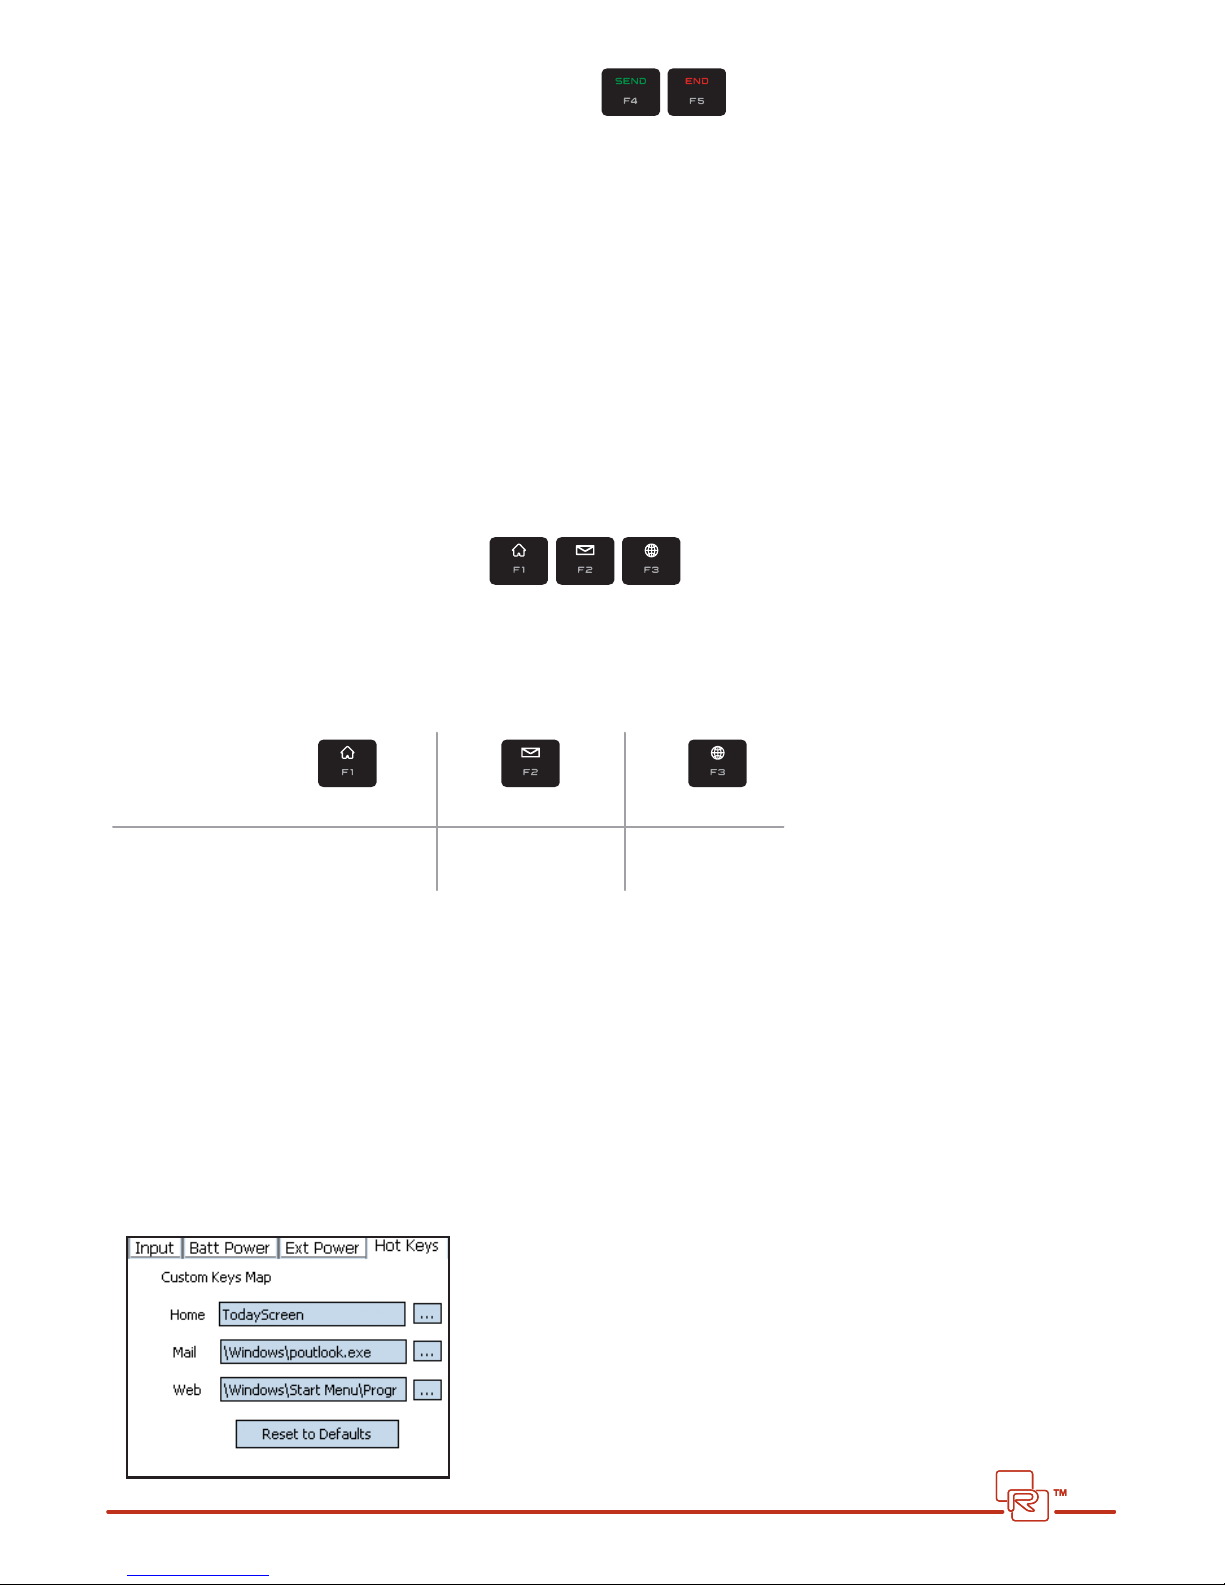
You can dene what applications your phone will launch from the REDFLY’s Home, Mail, and Web keys using the Key Map
tab in REDFLY Settings.
The REDFLY keyboard uses defaults for the three user-deneable hotkeys:
Hot Key Icon:
Home Mail Web
Default Program: Today Screen Messaging Internet Explorer
Press any of these three keys to launch the associated program (or display it if it is already running).
You may want to redene these keys. For example, you may want to use Opera Mobile as your default browser (rather
Internet Explorer) when you press the Web key. Or, you may want to use a dierent mail program or an RSS
newsfeed reader rather than Internet Explorer.
To change what these keys do:
1. Open the Start/Settings screen (Start/REDFLY Settings on non-touchscreen phones)
2. Select the System tab at the bottom of the screen (touchscreen only)
3. Select REDFLY Settings.
4. Choose the Hot Keys tab at the top of the screen:
8
Page 9
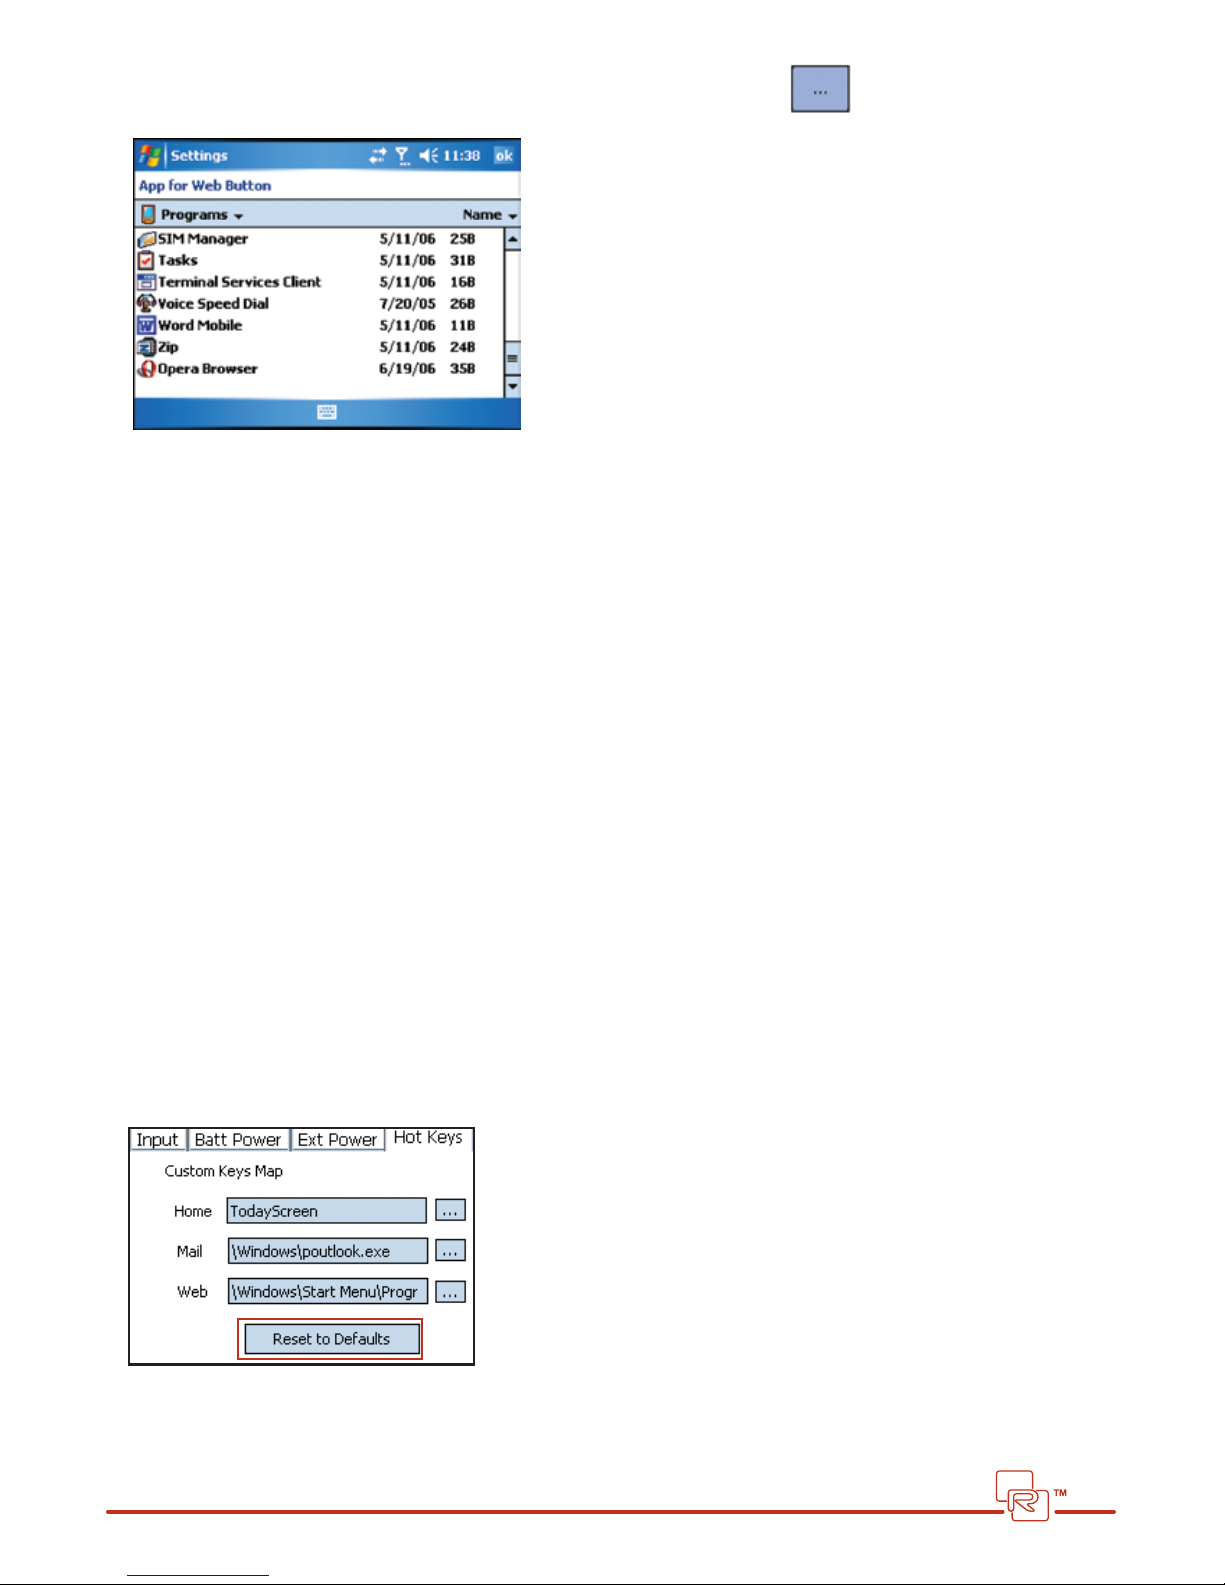
5. Select the Hot Key you wish to change and click on the File Explorer button: next to this key’s program
path box. A selection box of applications appears:
6. Use this screen like you would File Explorer to locate the program you want to use. For example, suppose you want
the Web key to open the Opera Mobile Browser rather than Internet Explorer. Use this screen to go to the Programs
folder, then select “Opera Browser” in that folder.
7. When you select the program, the path to that program automatically appears in the program path box in the
Hot Keys screen.
8. Click OK at the top-right of the screen or press the OK button on your keyboard to accept this change.
When you press the redened Hot Key, the new program will now appear.
Checking Program Paths
You may not see the complete path for many programs in the Program Paths box. If you want to read the entire path, including the name of the program you’ve chosen for a particular hot key, place your cursor into the Program Path box. Use
your left and right arrow keys to move your cursor to read the entire path and program name.
Reset Hot Key Default Programs
If you want to restore the REDFLY Home, Mail, and Web keys to their original settings of the Today Screen, Messaging, and
Internet Explorer:
1. Open the Start/Settings screen (Start/REDFLY Settings on non-touchscreen phones).
2. Select the System tab at the bottom of the screen (touchscreen only)
3. Select REDFLY Settings.
4. Choose the Hot Keys tab at the top of the screen:
5. Click on the Reset to Defaults button at the bottom of the screen.
6. Choose OK at the top right-hand side of the screen, or press OK on the keyboard, to accept this change.
9
Page 10
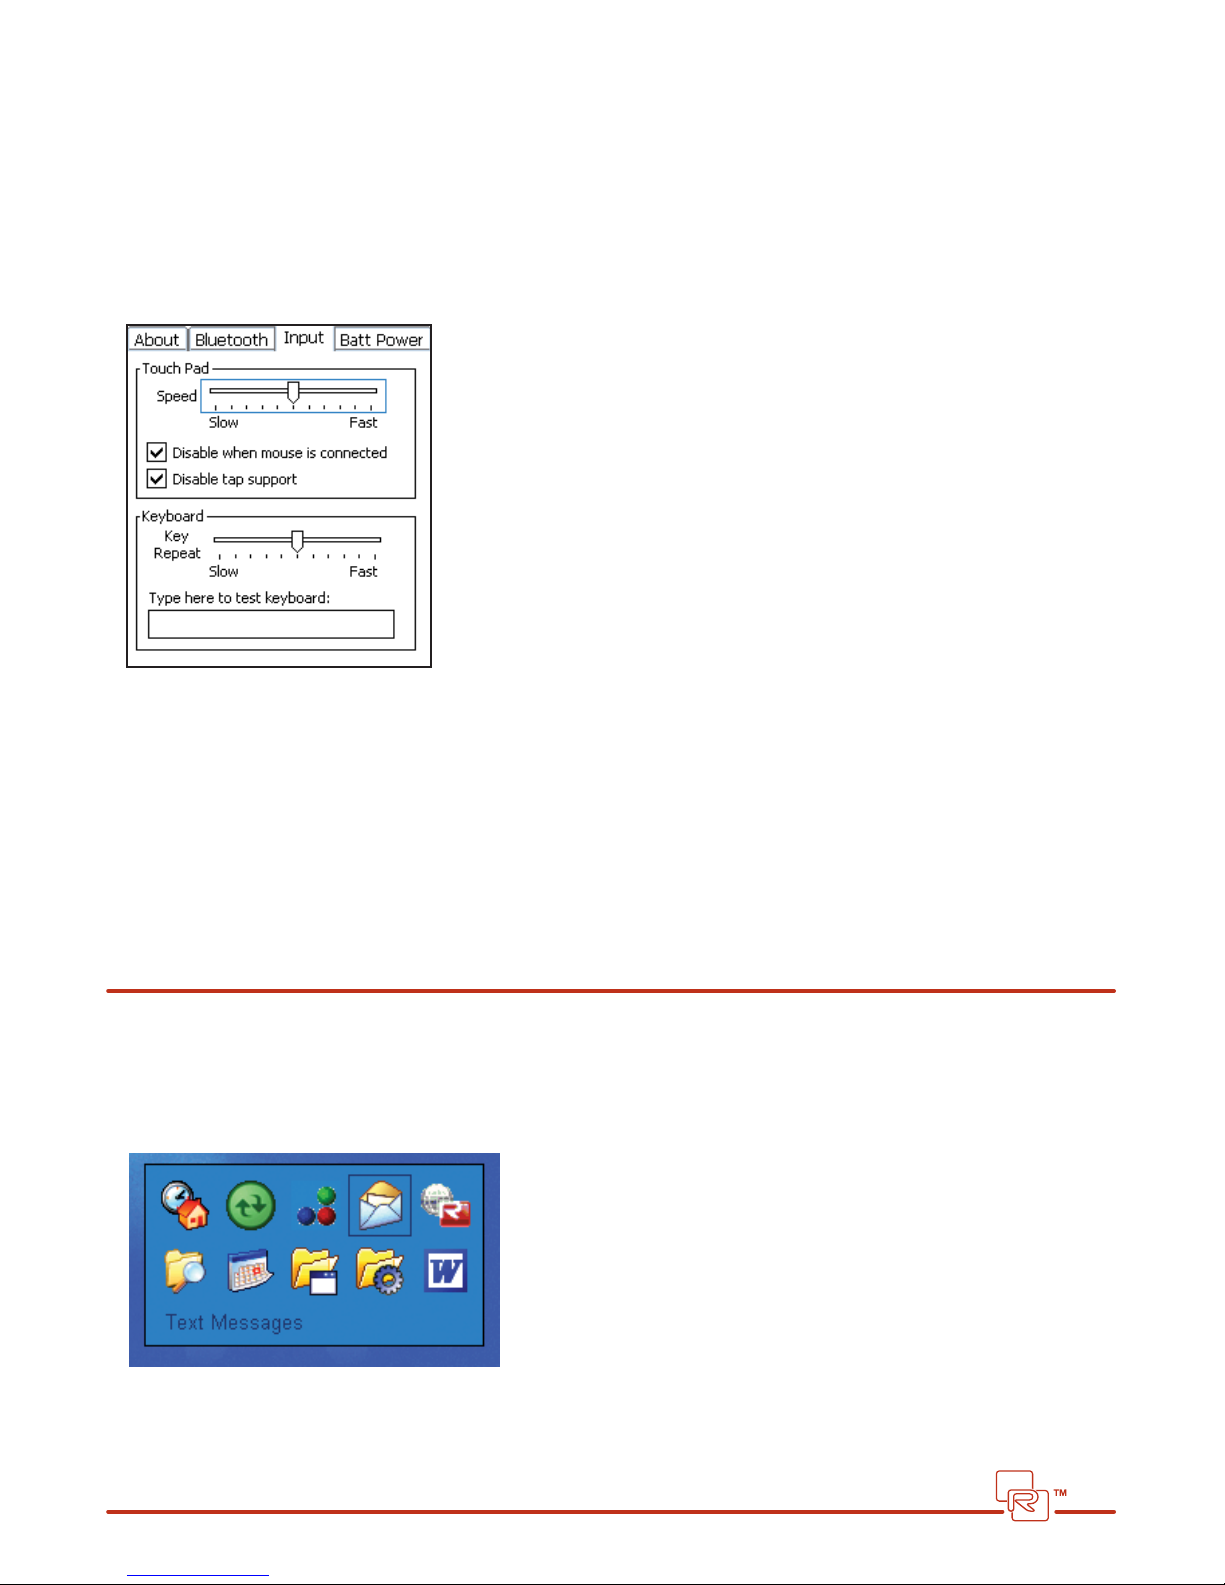
Keyboard Character Repeat Rate
A character repeats when you press and hold down a key on the keyboard. You can adjust the rate for the number of
characters using the Key Repeat Rate setting. To adjust this rate:
1. Open the Start/Settings screen (Start/REDFLY Settings on non touchscreen).
2. Select the System tab at the bottom of the screen (touchscreen only).
3 Select REDFLY Settings.
4. Choose the Input tab at the top of the screen:
5. In the Keyboard section, move the slider to your desired repeat speed.
6. Test this repeat rate in the small type-in box below the slider. Place your cursor in the box. Press and hold a key on
the keyboard.
7. Adjust the slider and retest the rate in the box to determine your optimal setting.
8. When you have this setting in the slider, click OK at the top right of the screen or press the OK button on the
keyboard to accept your changes.
Using Alt-Tab
The REDFLY software includes the ability to move between open applications by pressing the Alt-Tab keys. When you
have two or more applications loaded on your phone, you can now press Alt-Tab to move between the applications
(rather than having to choose them through the Start menu).
1. Press both the Alt and Tab keys simultaneously. This displays a dialog of the running applications:
2. Hold the Alt key down while pressing and releasing the Tab key to move through the list of running programs to
highlight the program you want.
3. Release the Alt-Tab keys to select that application.
10
Page 11
Using the Touch Pad
CHANGING CURSOR MOVEMENT
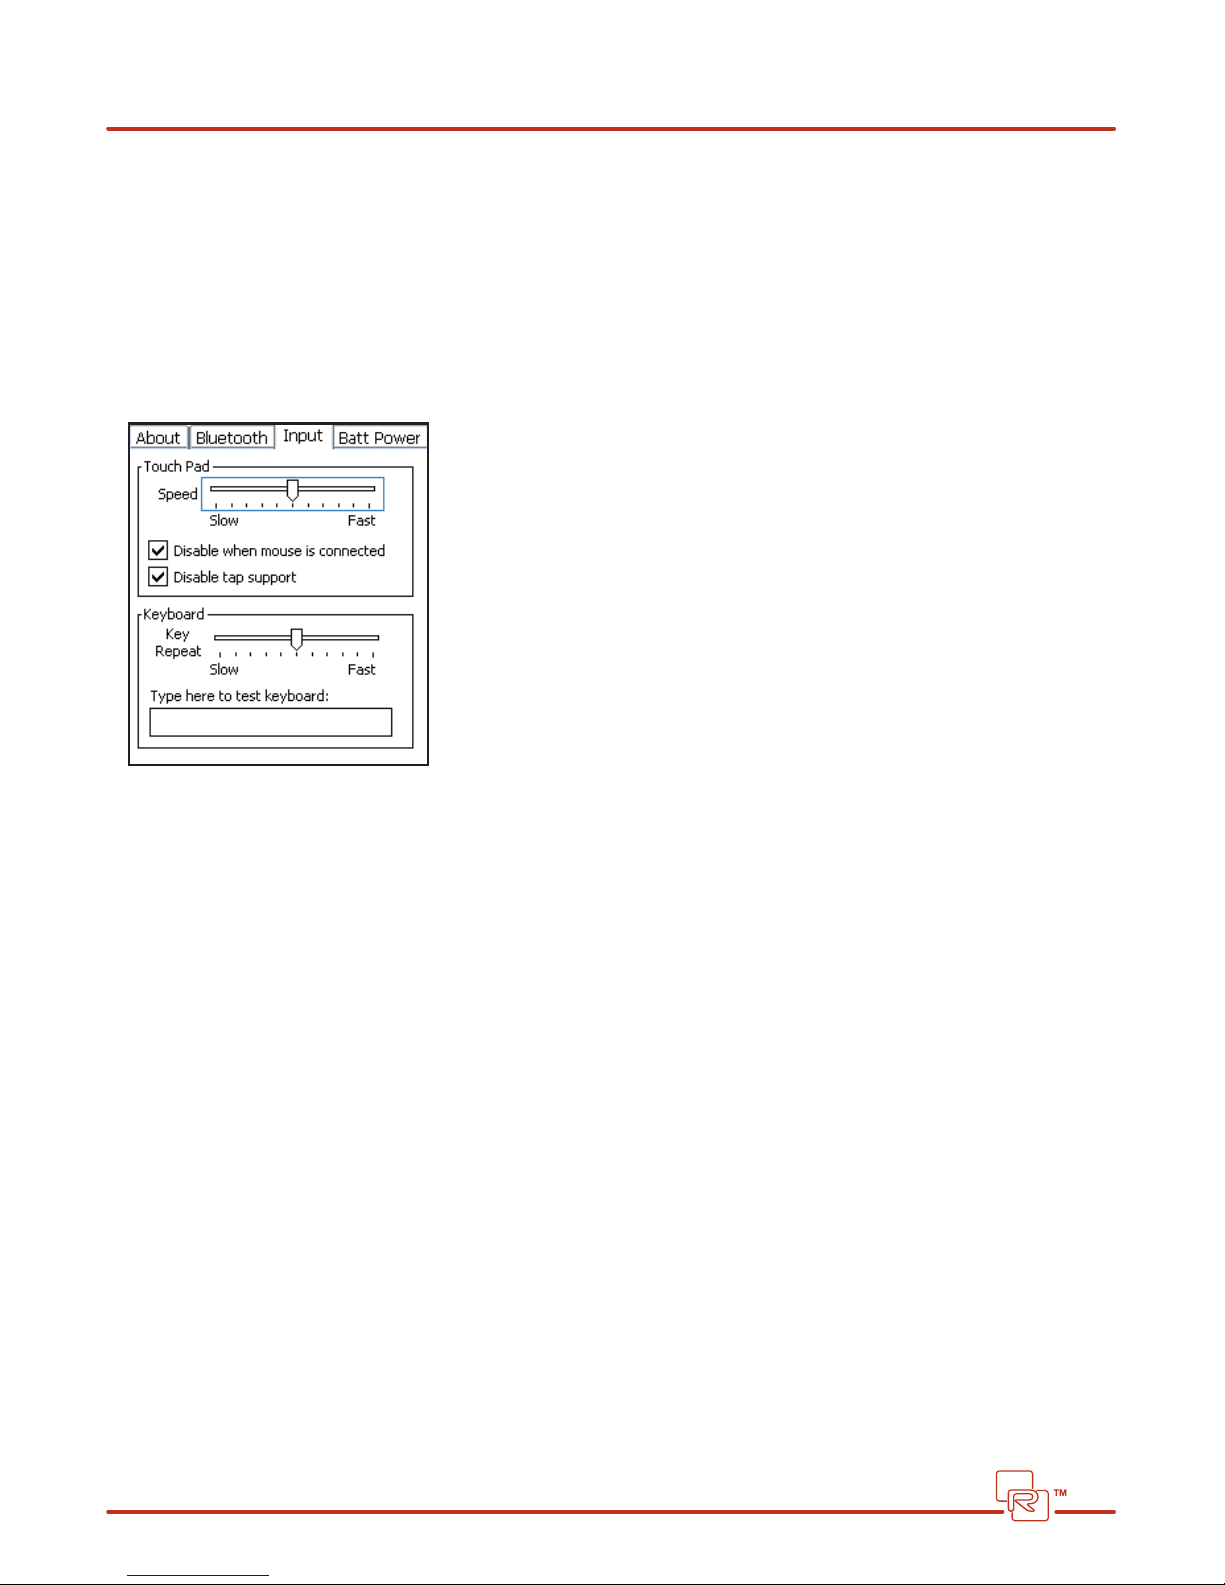
You can adjust how fast your cursor moves across the screen in response to your nger’s movement on the touch pad.
To have your cursor move faster or slower in response to your touch pad:
1. Open the Start/Settings screen (Start/REDFLY Settings on non-touchscreen phones)
2. Select the System tab at the bottom of the screen (touchscreen phones only)
3. Select REDFLY Settings.
4. Choose the Input tab at the top of the screen:
5. In the Touch Pad section, move the slider to your desired speed—Slow or Fast.
6. Click OK at the top right of the screen or press the OK button on your keyboard to accept your change.
Test your new setting with your cursor and touch pad. Repeat as needed to select your preferred speed.
USING THE LEFTMOUSE BUTTON/HOLD TOUCHSCREEN USERS ONLY
For touch-screen users, you can perform the “Tap and Hold” onscreen action (used to open a submenu in various
applications) on your REDFLY with the “Left Mouse Button-Hold” action on the keyboard.
Note: Some applications also support using the right mouse button to display sub-menus.
To display an onscreen item sub-menu:
1. Point your cursor at the active link item.
2. Press and hold the left mouse button on your touch pad. The related sub-menu will appear onscreen.
3. Move your cursor to highlight the option you want in this menu and click the left-mouse button. (You can also press
the ESC key to close the sub-menu.)
Touch Pad Tap Feature
You can tap twice on the REDFLY’s touch pad to activate an onscreen selection—the same as if you double-clicked the left
mouse button.
To deactivate this feature:
1. Open the Start/Settings screen (Start/REDFLY Settings on non-touchscreen phones)
2. Select the System tab at the bottom of the screen (touchscreen phones only)
11
Page 12
3. Select REDFLY Settings.
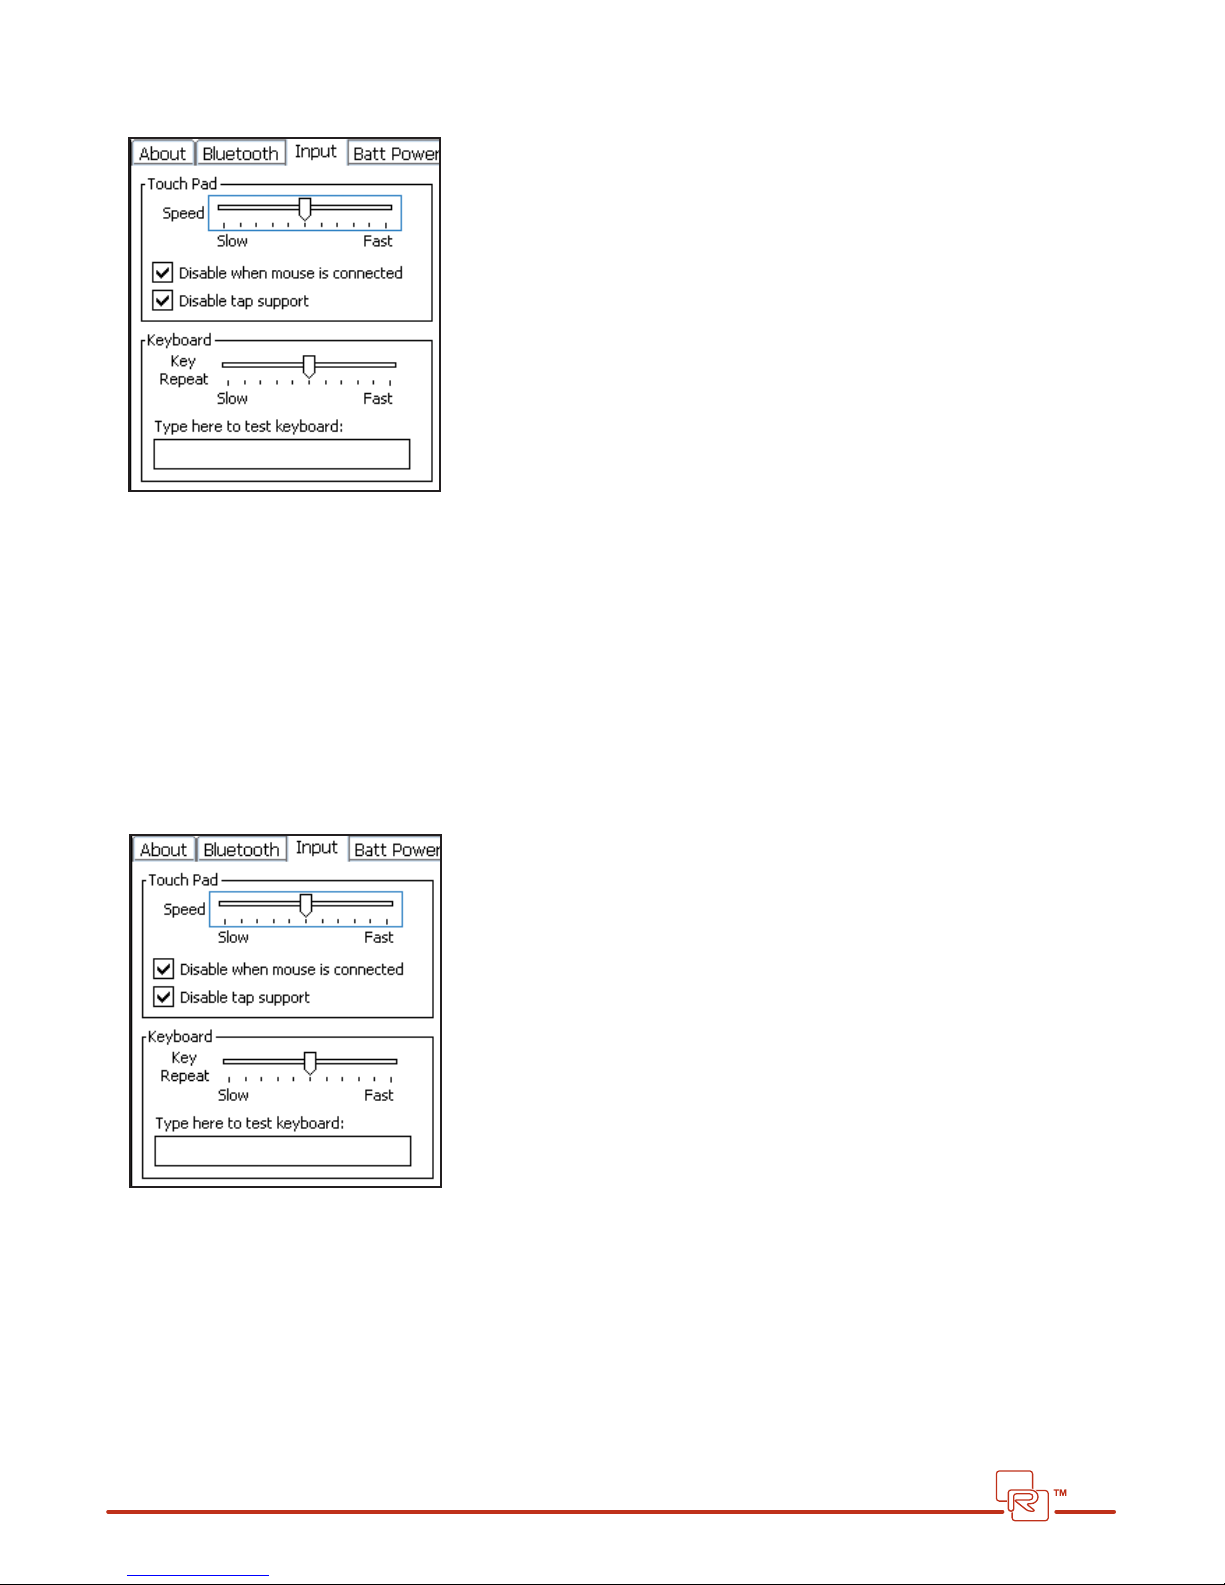
4. Choose the Input tab at the top of the screen:
5. In the Touch Pad section, check the box “Disable tap support”.
6. Click OK at the top right of the screen or press the OK button on the keyboard to accept your changes.
Disabling the touch pad when using an External Mouse
To disable your REDFLY’s touch pad when you connect an external mouse:
1. Open the Start/Settings screen (Start/REDFLY Settings on non-touchscreen phones).
2. Select the System tab at the bottom of the screen (touchscreen phones only).
3. Select REDFLY Settings.
4. Select the Input tab at the top of the Settings screen:
5. Check the box marked “Disable when mouse is connected” in the Touch pad section at the top.
6. Click OK at the top right of the screen or press the OK button on the keyboard to accept this change.
The next time you attach a mouse into your REDFLY, the REDFLY will disable the touch pad in favor of your mouse. When
you remove the mouse, the REDFLY will automatically restore the touch pad function.
12
Page 13
Working with the Display
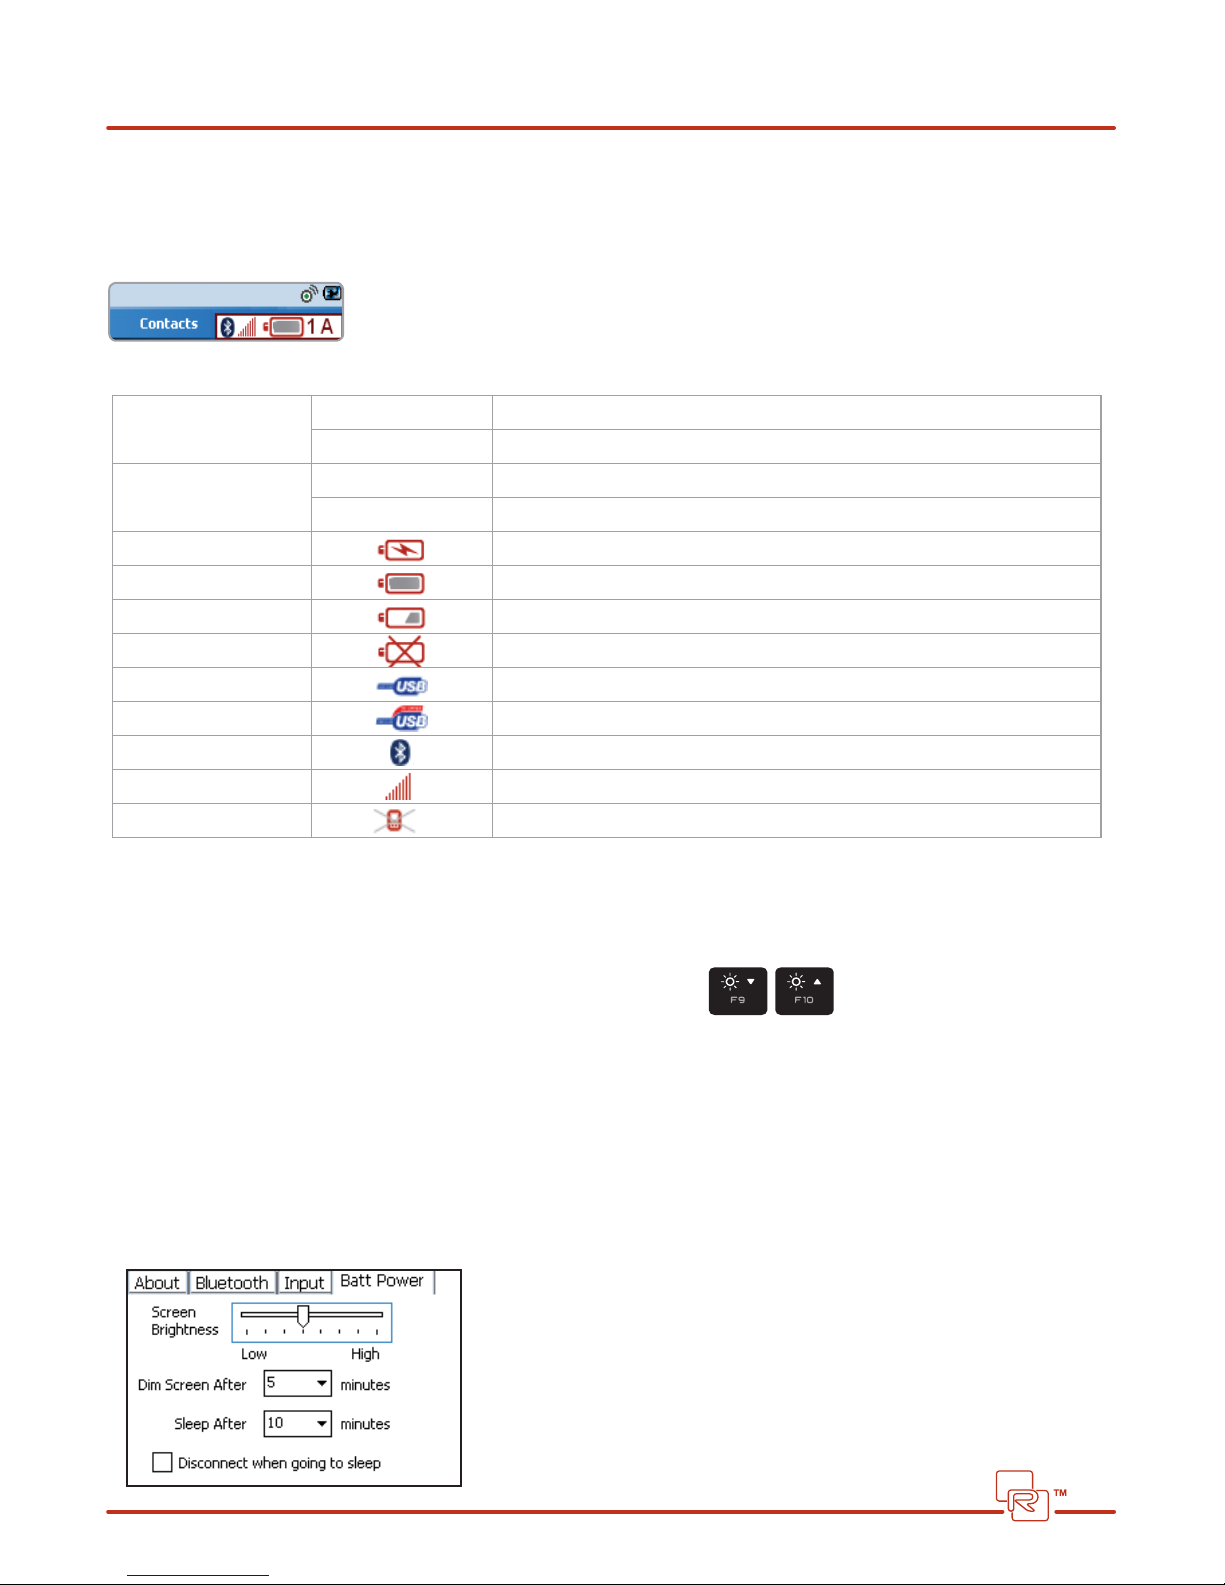
STATUS ICONS
The REDFLY status icons appear in a tray at the bottom-right of the screen (on the same line with the Left and Right Menu
options). To open this icon tray, move the cursor to the lower right-hand corner of the screen. The icons include:
REDFLY Tray Icon Symbol Description
Caps Lock Red capital letter “A” Indicates that “Caps Lock” is ON after pressing the “Caps Lock” key
Grey lower case “a” Indicates that “Caps Lock” is OFF after pressing the “Caps Lock” key
Num Lock
Battery Charging Appears when the REDFLY AC adapter is plugged in
Battery Fully Charged Appears when the REDFLY battery is completely charged
Battery 1/2 Charged Appears when the REDFLY battery has approximately 1/2 of its charge remaining
Battery Needs Charging Appears when the REDFLY battery needs to be charged
Red numeral “1” Indicates that “Num Lock” is ON after pressing the “Num Lk” key
Grey numeral “1” Indicates that “Num Lock” is OFF after pressing the “Num Lk” key
USB Connection
USB Hi-Speed Connection
Bluetooth Connection
Bluetooth Signal Strength
No Connection
Appears when the REDFLY is connected to your phone using USB 1.1 (Full Speed)
Appears when the REDFLY is connected to your phone using USB 2.0 (Hi-Speed)
Appears when the REDFLY is connected to your phone using Bluetooth
Shows the signal strength of the Bluetooth connection to your REDFLY
Appears when your REDFLY has no connection to your phone.
ADJUSTING SCREEN BRIGHTNESS
You can use F9 to dim or F10 to brighten the REDFLY display.
You can also set the default display brightness on either or both Battery Power and External Power.
Battery Power
1. Open the Start/Settings screen (Start/REDFLY Settings on non-touchscreen phones).
2. Select the System tab at the bottom of the screen (touchscreen phones only).
3 Select REDFLY Settings.
4. Choose the Batt Power tab at the top of the screen:
13
Page 14
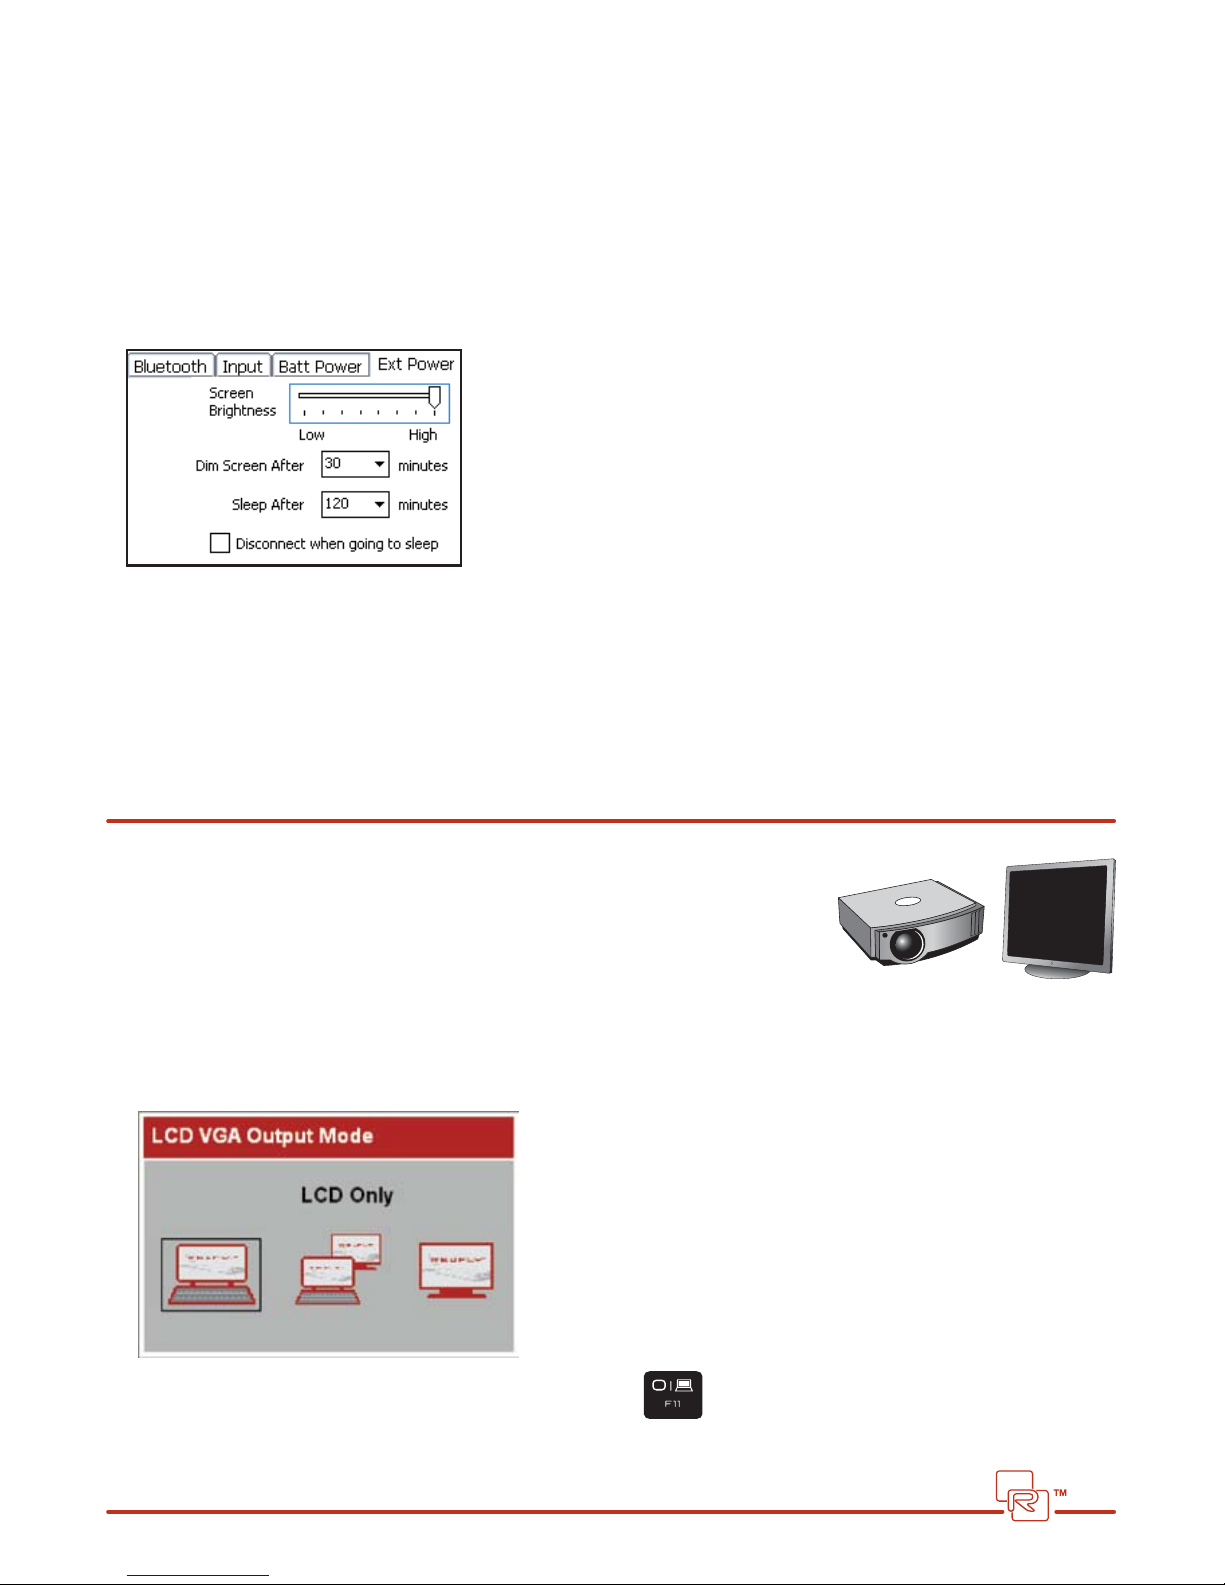
5. Use the slider marked “Screen Brightness” to set the default brightness level for your display when you are running
on battery power. (If you are on battery power, your display will brighten or dim as you move the slider.)
6. Click OK at the top right of the screen or press the OK button on your keyboard to accept the change.
External Power
1. Open the Start/Settings screen (Start/REDFLY Settings on non-touchscreen)
2. Select the System tab at the bottom of the screen (touchscreen only)
3. Select REDFLY Settings.
4. Choose the Ext Power tab at the top of the screen:
5. Use the slider marked “Screen Brightness” to set the default brightness level for your display when you are running
on battery power. (Your display will brighten or dim as you move the slider if you are plugged into the AC adapter.)
6. Click OK at the top right of the screen or press the OK button on your keyboard to accept the change.
Using an external monitor/projector
Your REDFLY includes a standard VGA port at the rear of the device for connecting
an external monitor or projector.
Note: The REDFLY supports a maximum video output resolution of 800 x 480 (WVGA).
To use an external display or projector:
1. Connect the projector or display’s VGA cable to the REDFLY’s VGA port.
2. Power on the projector or display.
3. Press the REDFLY’s F11/External Display key. The REDFLY Display menu appears:
Press the F11/External Display key once to show your screen
only on the REDFLY’s internal LCD display.
14
Page 15
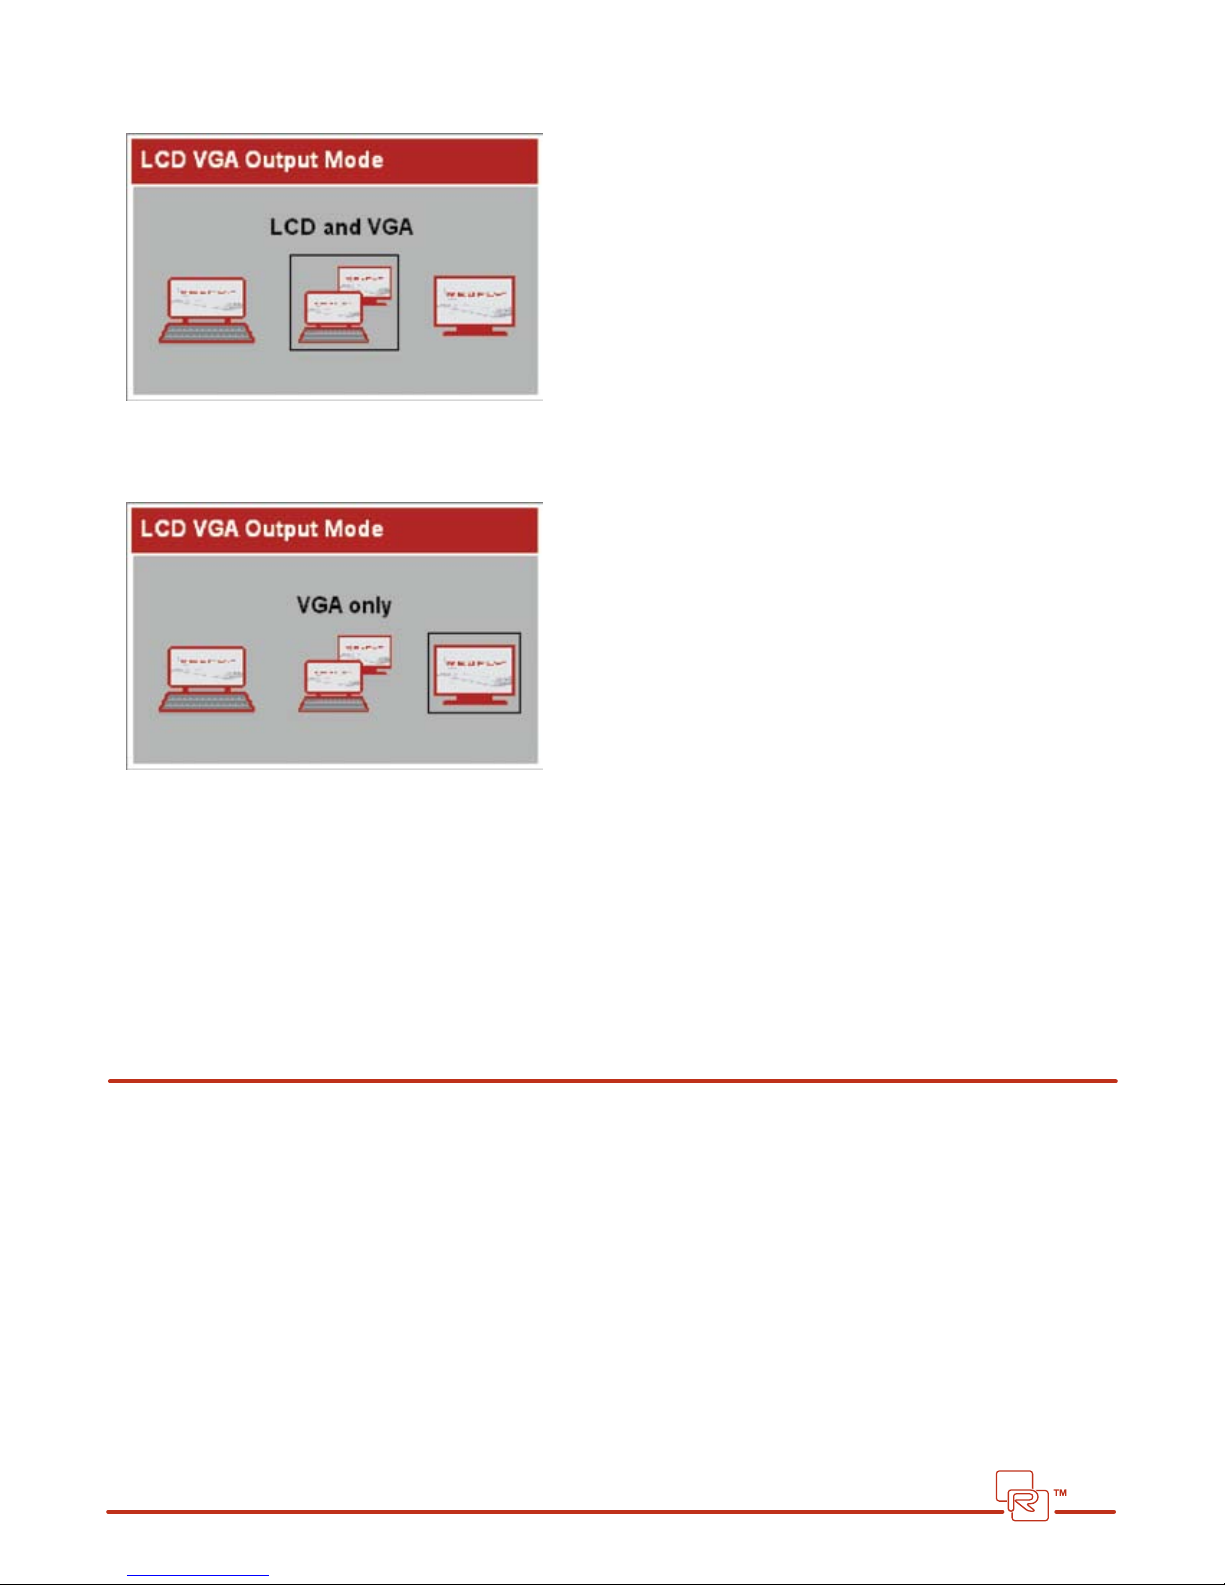
Press the F11/External Display key twice to move the indicator to LCD and VGA Output. This will show your screen on both
the REDFLY and the external display:
Press the F11/External Display key three times to move the indicator to VGA Only Output. This will show your screen on
the external display only:
When you are nished using the external display:
1. Press the REDFLY’s F11/External Display key to select the “LCD Only” option in the Display menu.
This will return your screen back to your REDFLY display.
2. Disconnect the external display or projector’s VGA cable from the REDFLY.
Playing Video
The REDFLY can support video playback. However, video playback is highly dependent on your phone’s processor, available memory, the type of Internet connection, as well as the type of connection between your phone and your REDFLY.
This may mean that a video may be slow, intermittent, or not play at all. Any audio track will come from your phone’s
speaker, headphone jack or headphones connected via Bluetooth to your phone.
Note: the default Windows Mobile Media Player software does not support:
1. Some video formats natively including Flash video as well as Apple’s QuickTime.
2. Increasing the video playback size on the REDFLY screen.
15
Page 16
Using Bluetooth
Connecting to the REDFLY over Bluetooth gives you greater exibility in using your mobile companion. You can leave
your REDFLY on your desk while you move about the oce and are only a button push away when you return to continue
working on the REDFLY.
Note: As with most Class 2 Bluetooth devices, the maximum designed range is 30 feet. Walls, partitions or other
obstructions may signicantly reduce this range
SETTING UP BLUETOOTH FOR THE FIRST TIME “PAIRING”
1. Have your REDFLY connected to your smartphone using the USB cable.
2. Turn on your phone’s Bluetooth connection (your phone’s manual will explain how.)
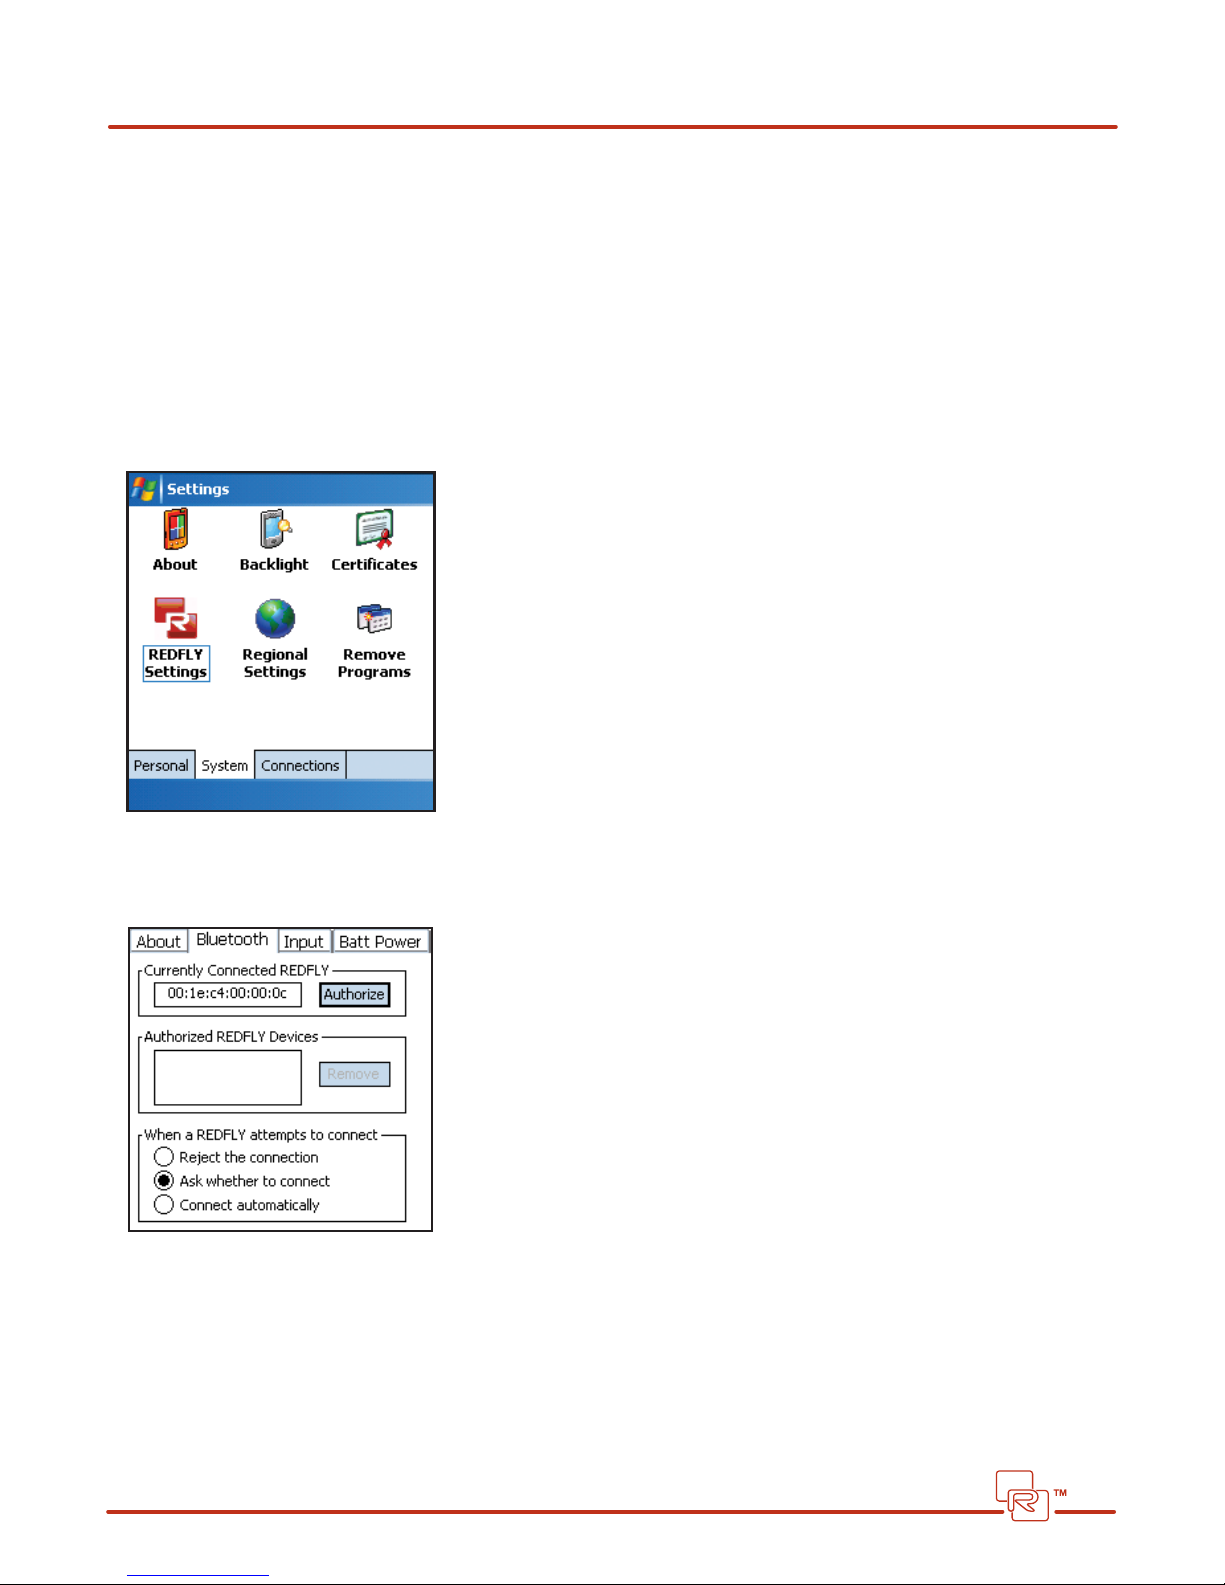
3. Select REDFLY Settings from your Start/Settings/System screen (touchscreen phones):
4. Select the Bluetooth tab at the top of the REDFLY Settings screen.
The Bluetooth address of your REDFLY appears in the Currently Connected REDFLY address box.
5. Click on the Authorize button.
16
Page 17
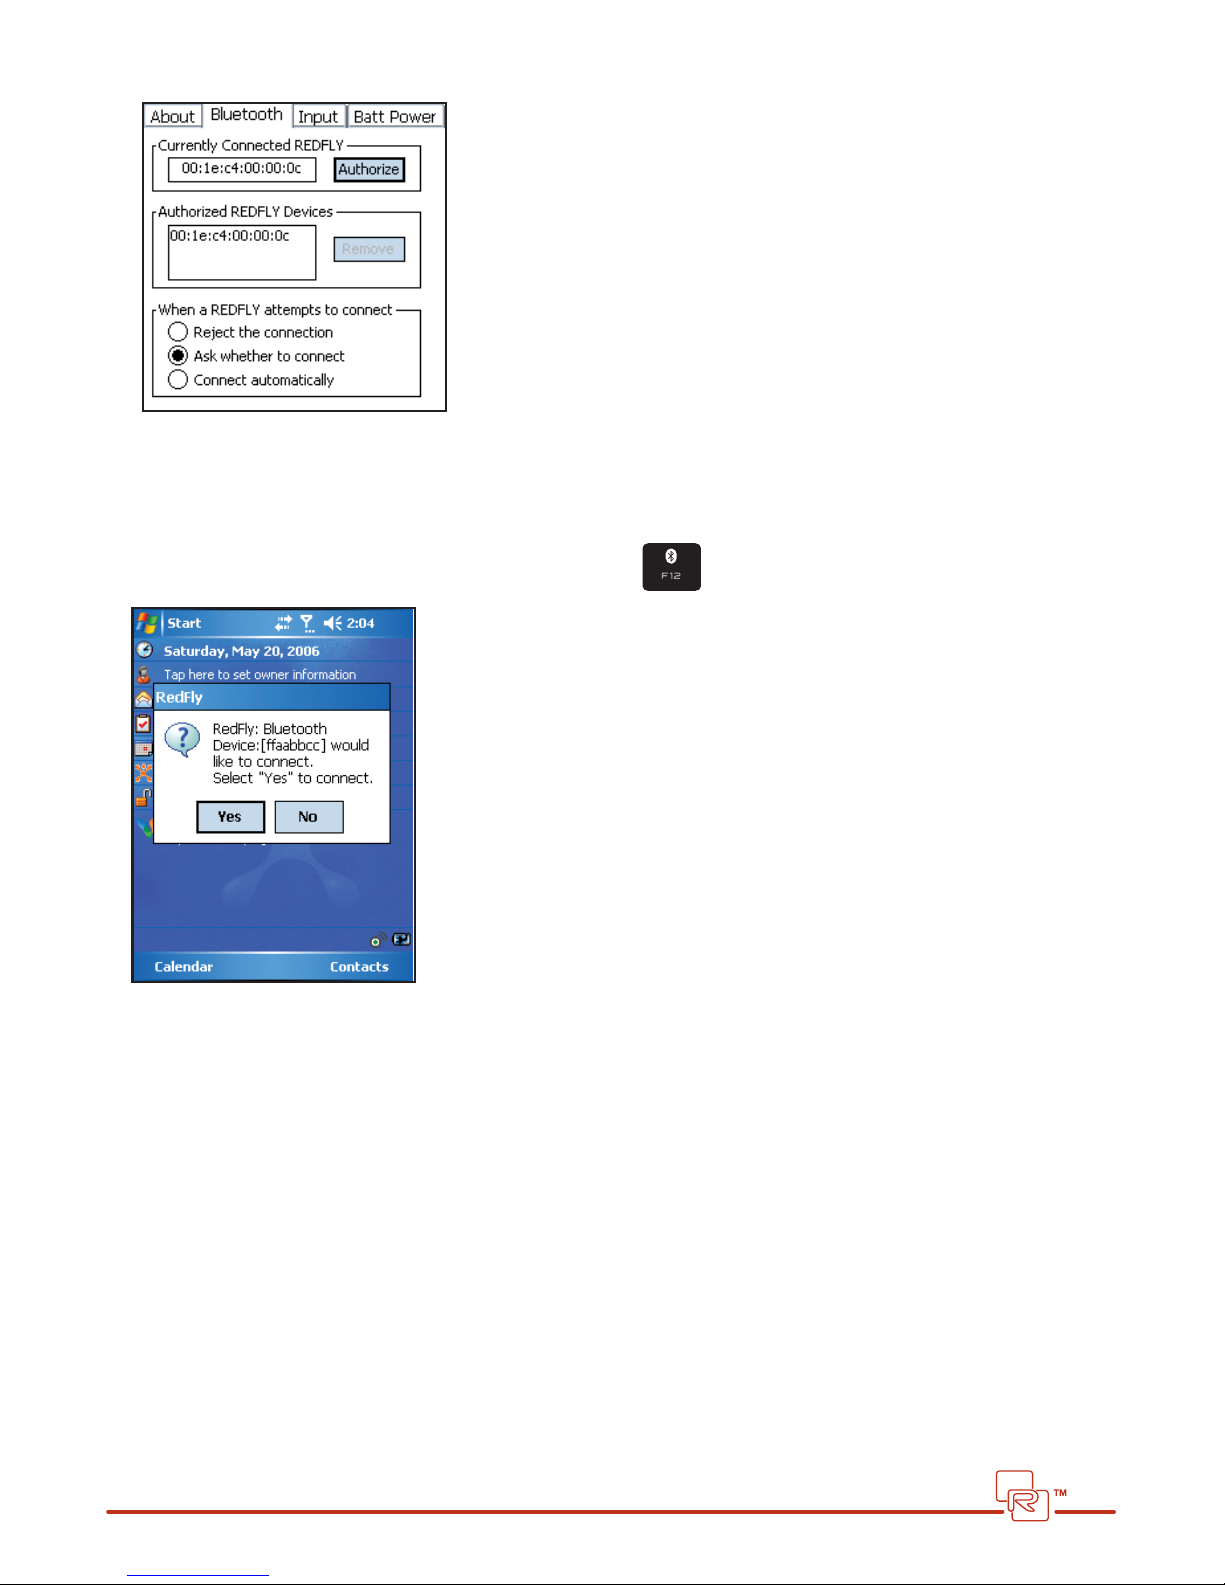
6. Your REDFLY’s address now appears in the Authorized List.
7. Review the setting for “When a REDFLY attempts to connect”. See the section below on Bluetooth Connection
Security Options for details.
8. Click on the Ok box in the upper right hand corner of the screen (or press the OK button on the keyboard) to close
the REDFLY Settings window.
9. Press the BLUETOOTH /F12 key on the REDFLY keyboard.
10.Your phone may ask you to allow the REDFLY to connect.
Choose YES on your phone if this is the case.
The REDFLY will start the Bluetooth connection. You can now disconnect the USB cable and work using Bluetooth.
BLUETOOTH CONNECTION SECURITY OPTIONS
You can choose how your smartphone reacts to a request from your REDFLY to connect over Bluetooth. Your phone can:
•Reject the connection
•Ask whether to connect (the Default)
•Connect Automatically
To choose these security options:
1. Open the Start/Settings screen (Start/REDFLY Settings on non-touchscreen phones).
2. Select the System tab at the bottom of the screen (touchscreen phones only).
3. Select REDFLY Settings.
17
Page 18
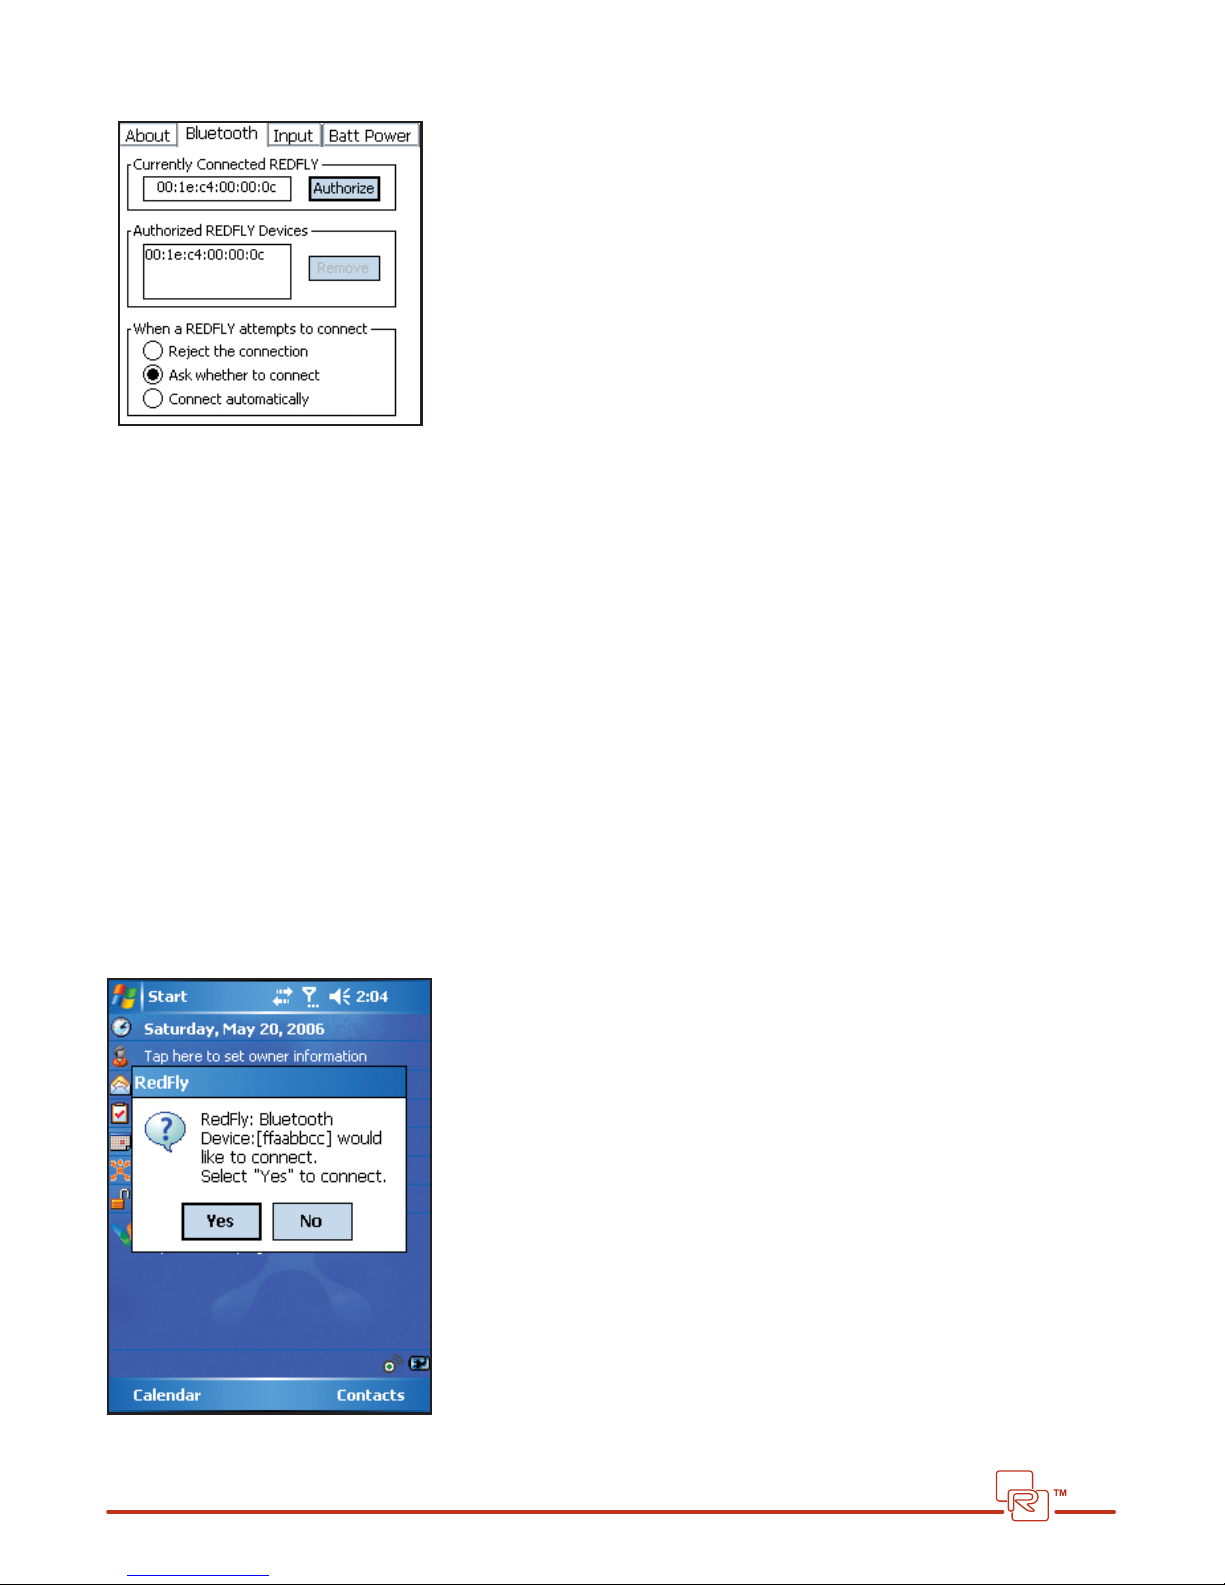
4. Select the Bluetooth tab at the top of the screen:
The Bluetooth Security options appear at the bottom under “When a REDFLY attempts to connect”.
Note: The option you choose in this Security list applies to any REDFLY that is authorized for this particular phone.
Remember, since these settings reside on the phone and not on the REDFLY, each phone can have its own individual
settings. Other smartphones authorized to use this REDFLY could connect using a dierent security level based on their
individual settings.
Reject the connection
This option causes your phone to automatically refuse the REDFLY’s Bluetooth connection request. You would use this option, for example, when you temporarily want to keep your smartphone from interruptions due to Bluetooth requests.
Note:: This “Reject the connection” option provides you with a way to put a temporary stop to Bluetooth connections from
REDFLYs. If you want to stop Bluetooth connections from one or more REDFLYs permanently, you would remove those
REDFLY addresses from the Authorized List. In eect, selecting “Reject the connection” is the same as if you removed all of the
addresses from the Authorized REDFLY Devices list.
Ask whether to connect (the Default)
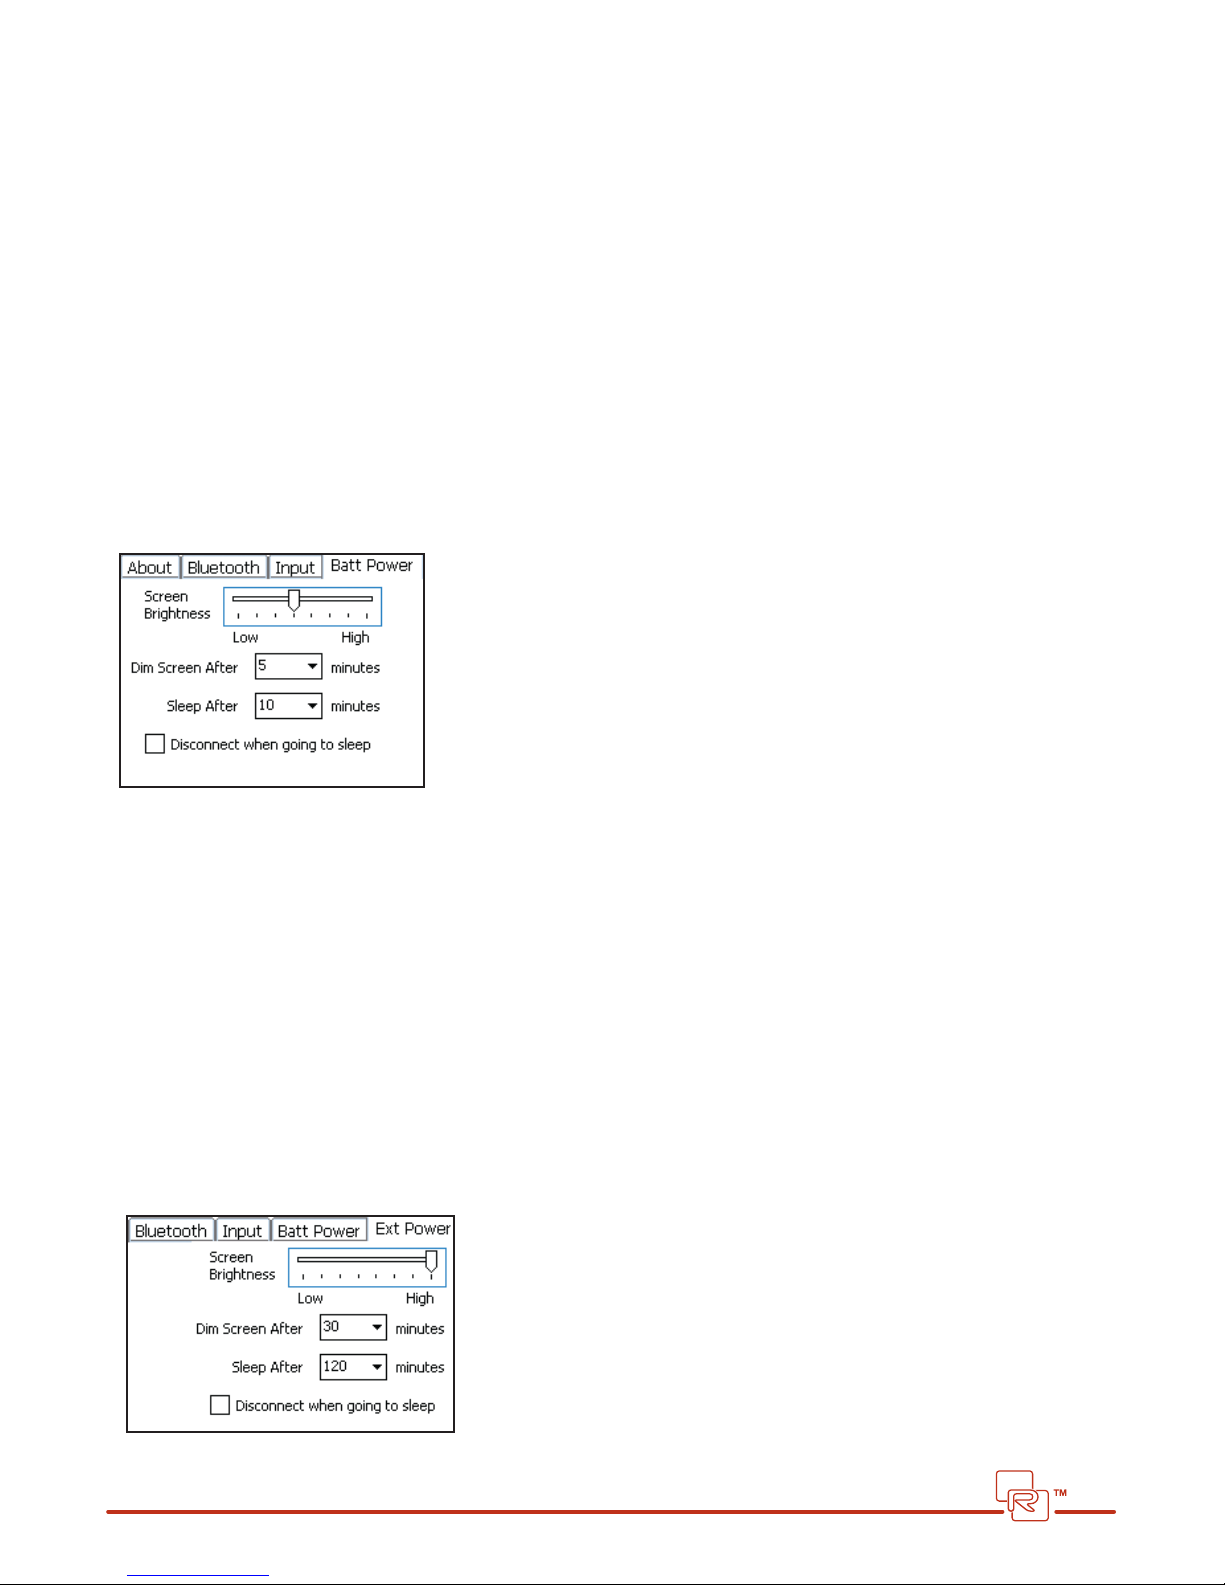
This option provides a greater level of security on the REDFLY connection than the “Connect Automatically” option. With
the Ask option checked, when you press the Bluetooth/F12 key on your REDFLY, you will see this message on your phone:
Tap or select Yes to accept the REDFLY’s Bluetooth connection to your phone.
18
Page 19
Connect Automatically
This is the simplest method for connecting to the REDFLY over Bluetooth. With this option checked, when you press the
REDFLY’s Bluetooth/F12 key, the REDFLY automatically links up with your phone and transfers the display over to the REDFLY.
DISCONNECTING AUTOMATICALLY
Your phone can automatically disconnect from your REDFLY when the REDFLY goes to sleep. (This occurs after 10 minutes of
inactivity when on battery power.) If you set your phone to disconnect, this will stop the Bluetooth connection drain on your
REDFLY battery.
Battery Power
To do this:
1. Open the Start/Settings screen (Start/REDFLY Settings on non-touchscreen)
2. Select the System tab at the bottom of the screen (touchscreen only)
3. Select REDFLY Settings.
4. Choose the Batt Power tab at the top of the screen:
5. Check the box marked “Disconnect when going to sleep”
6. Click OK at the top right of the screen or press the OK button on your keyboard to accept the change.
The next time your REDFLY enters Sleep Mode, it will automatically disconnect from your phone. You will need to press
the Bluetooth/F12 key to reestablish a Bluetooth connection.
External Power
You can set this same option to automatically disconnect your phone from the REDFLY while your REDFLY is plugged in to
External Power and it enters Sleep Mode. To adjust this setting:
1. Open the Start/Settings screen (Start/REDFLY Settings on non-touchscreen)
2. Select the System tab at the bottom of the screen (touchscreen only)
3. Select REDFLY Settings.
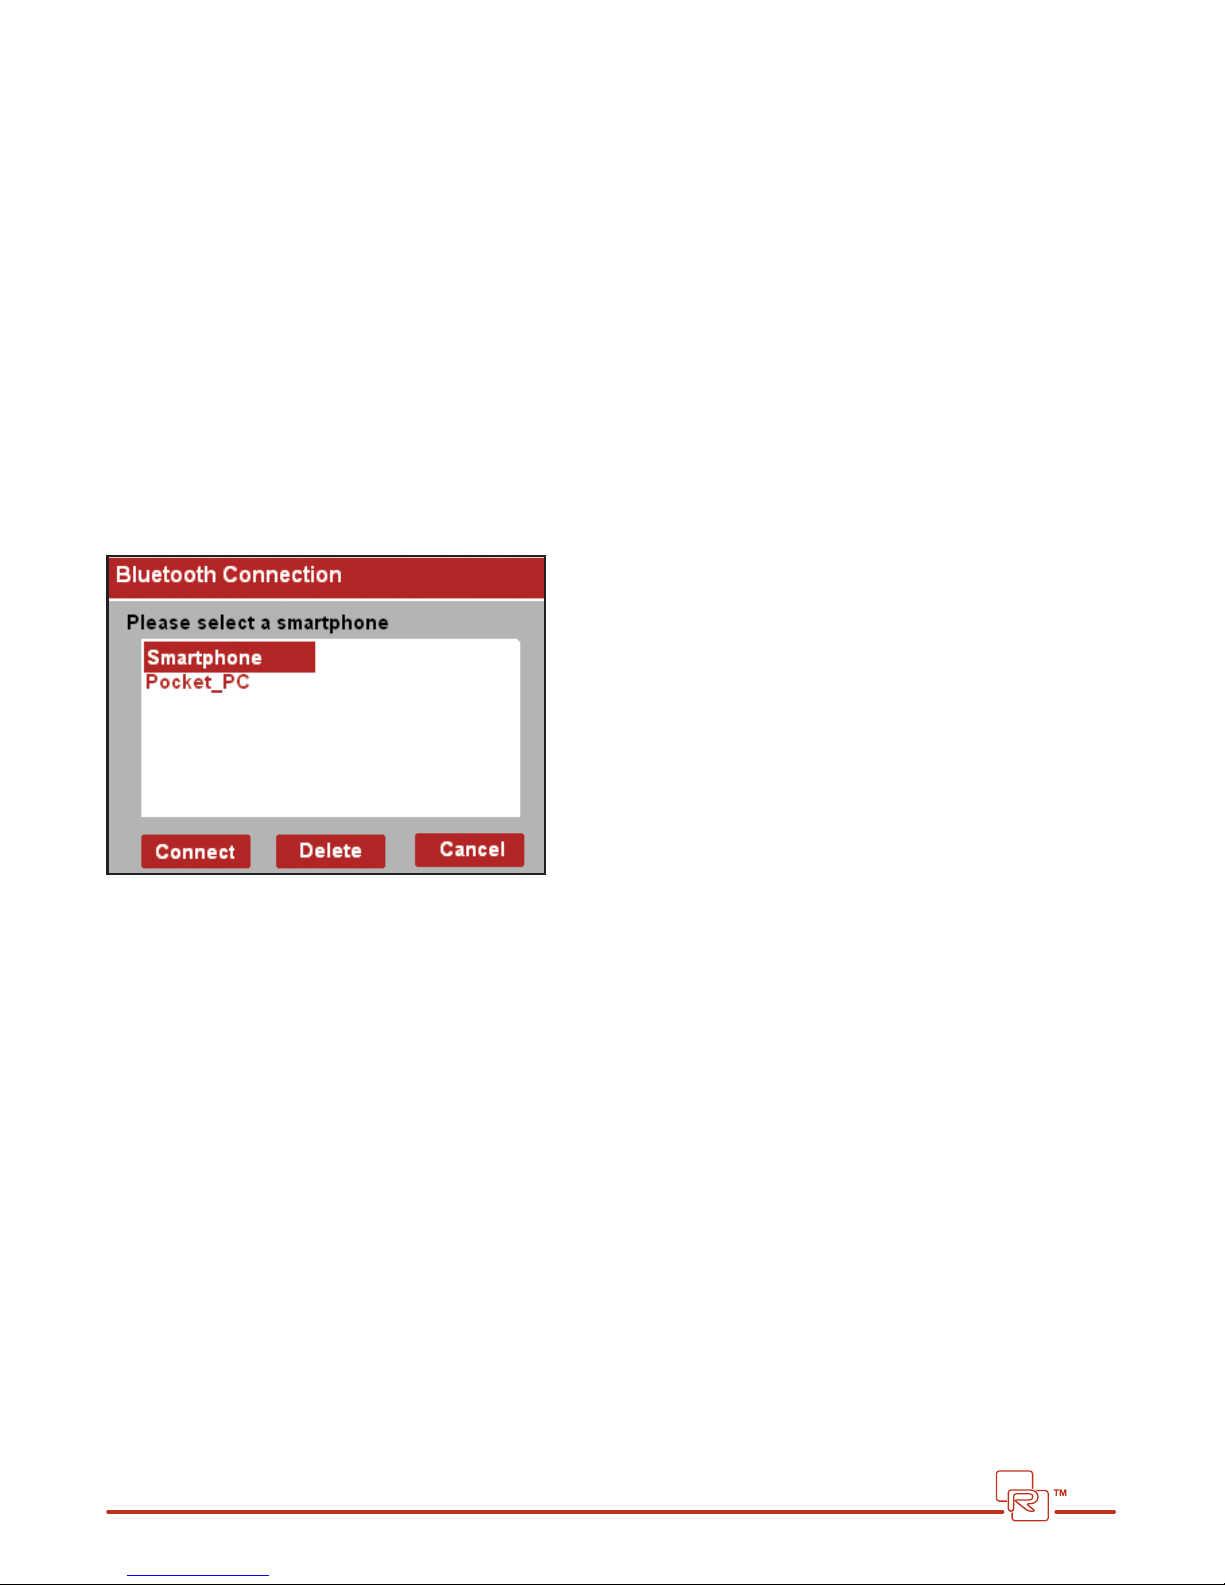
4. Choose the Ext Power tab at the top of the screen:
5. Check the box marked “Disconnect when going to sleep”
19
Page 20
6. Click OK at the top right of the screen or press the OK button on your keyboard to accept the change.
Your phone will now automatically disconnect from the REDFLY the next time your REDFLY enters Sleep Mode while
plugged in to the adapter. You will need to press the Bluetooth/F12 key to reestablish the connection.
USING TWO OR MORE PHONES WITH BLUETOOTH
You can authorize your REDFLY via Bluetooth with any number of smartphones (such as might be the case for using a
shared REDFLY in an oce). Naturally, you can only use the REDFLY with one phone at a time, but you can have a REDFLY
authorized on multiple phones.
To authorize this REDFLY on multiple phones, connect this REDFLY to each phone in turn. Follow the steps under “Setting
Up Bluetooth” for each phone to add this REDFLY to each phone’s “Authorized REDFLY Devices” list.
Multiple Phones Active with Bluetooth
If you do authorize a REDFLY on multiple phones using Bluetooth, and you press the Bluetooth/F12 key in an area where
these phones are active (that is, each phone has this REDFLY in its Authorized List), the REDFLY will show a list onscreen so
you can select which you want to connect to:
Click on the Connect button next to the phone you want the REDFLY to connect to. If you don’t select one, the REDFLY will
cancel the request (same as when you choose Cancel on the screen) and return you to the default REDFLY screen.
WHAT IS MY PHONE’S NAME?
This multiple Bluetooth phone list shows each phone by name. If you don’t know your phone’s name, or want to create a
unique one, you can view or set your phone’s name following these steps:
Touchscreen Phones
1. Select the Start/Settings screen.
2. Click on the System tab at the bottom of the screen.
3. Choose About in the screen.
4. Click on the Device ID tab at the bottom of the screen.
The About screen appears. Your phone’s current name is in the Device Name box:
20
Page 21
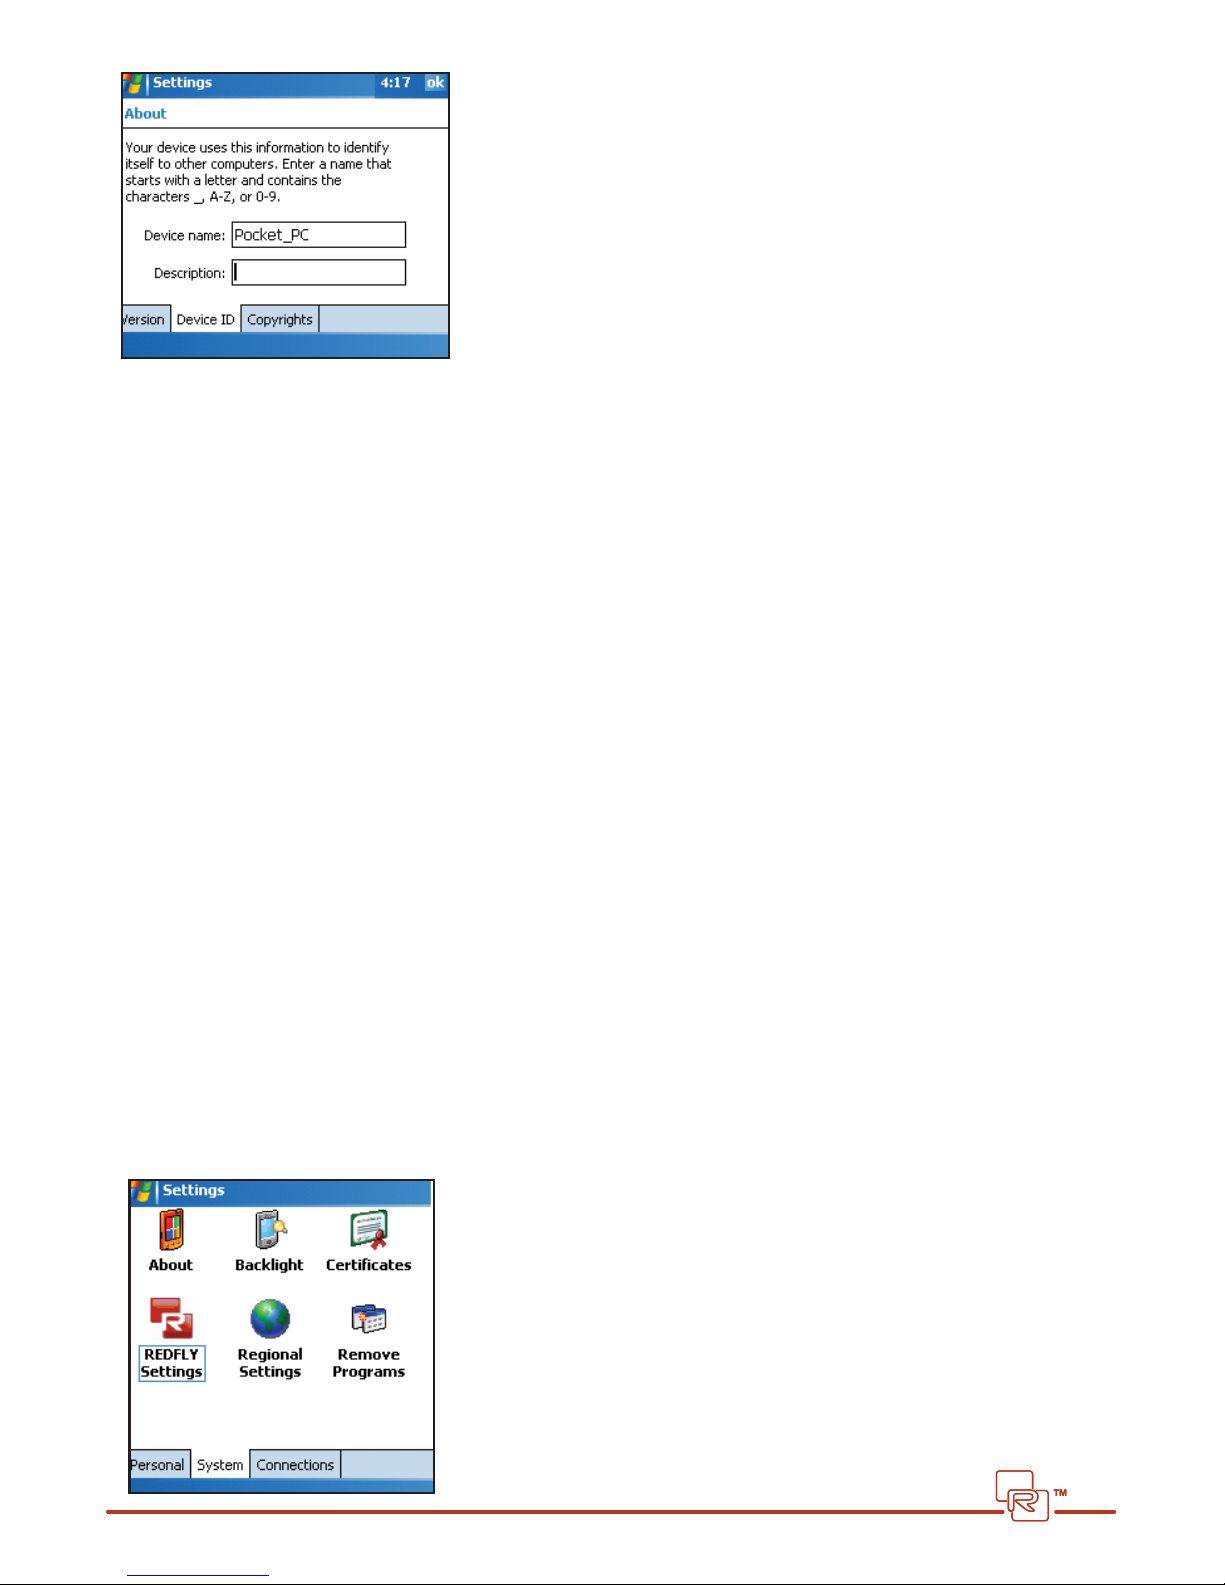
You can change your phone’s name (“Device ID” or “Device Name”) by typing in a new name into the box and choosing
OK at the top right of the screen or pressing OK on the keyboard.
Non-touchscreen Phones
1. Choose Start/Settings.
2. Select Connections.
3. Select Bluetooth.
Your phone’s name will appear under “Device Name”. You can change your phone’s name by highlighting the box and
entering a new name. Select Done when you are nished to save the name.
REFRESHING THE BLUETOOTH LIST
Your REDFLY keeps this discovered list of authorized Bluetooth phones to make connecting faster next time. However, at
that point, the phones actually available via Bluetooth will likely be dierent. You can clear phones from this list by high-
lighting a phone and choosing Delete at the bottom of the screen.
REMOVING A REDFLY FROM YOUR PHONE
You may want to remove a particular REDFLY from your Bluetooth Authorized list. (This might occur after you acquire your
own personal device.)
To remove a REDFLY:
1. Use USB to connect to the REDFLY you want to remove from your list.
2. Open the Start/Settings screen (Start/REDFLY Settings on non-touchscreen)
3. Select the System tab at the bottom of the screen (touchscreen only)
4. Select REDFLY Settings:
21
Page 22
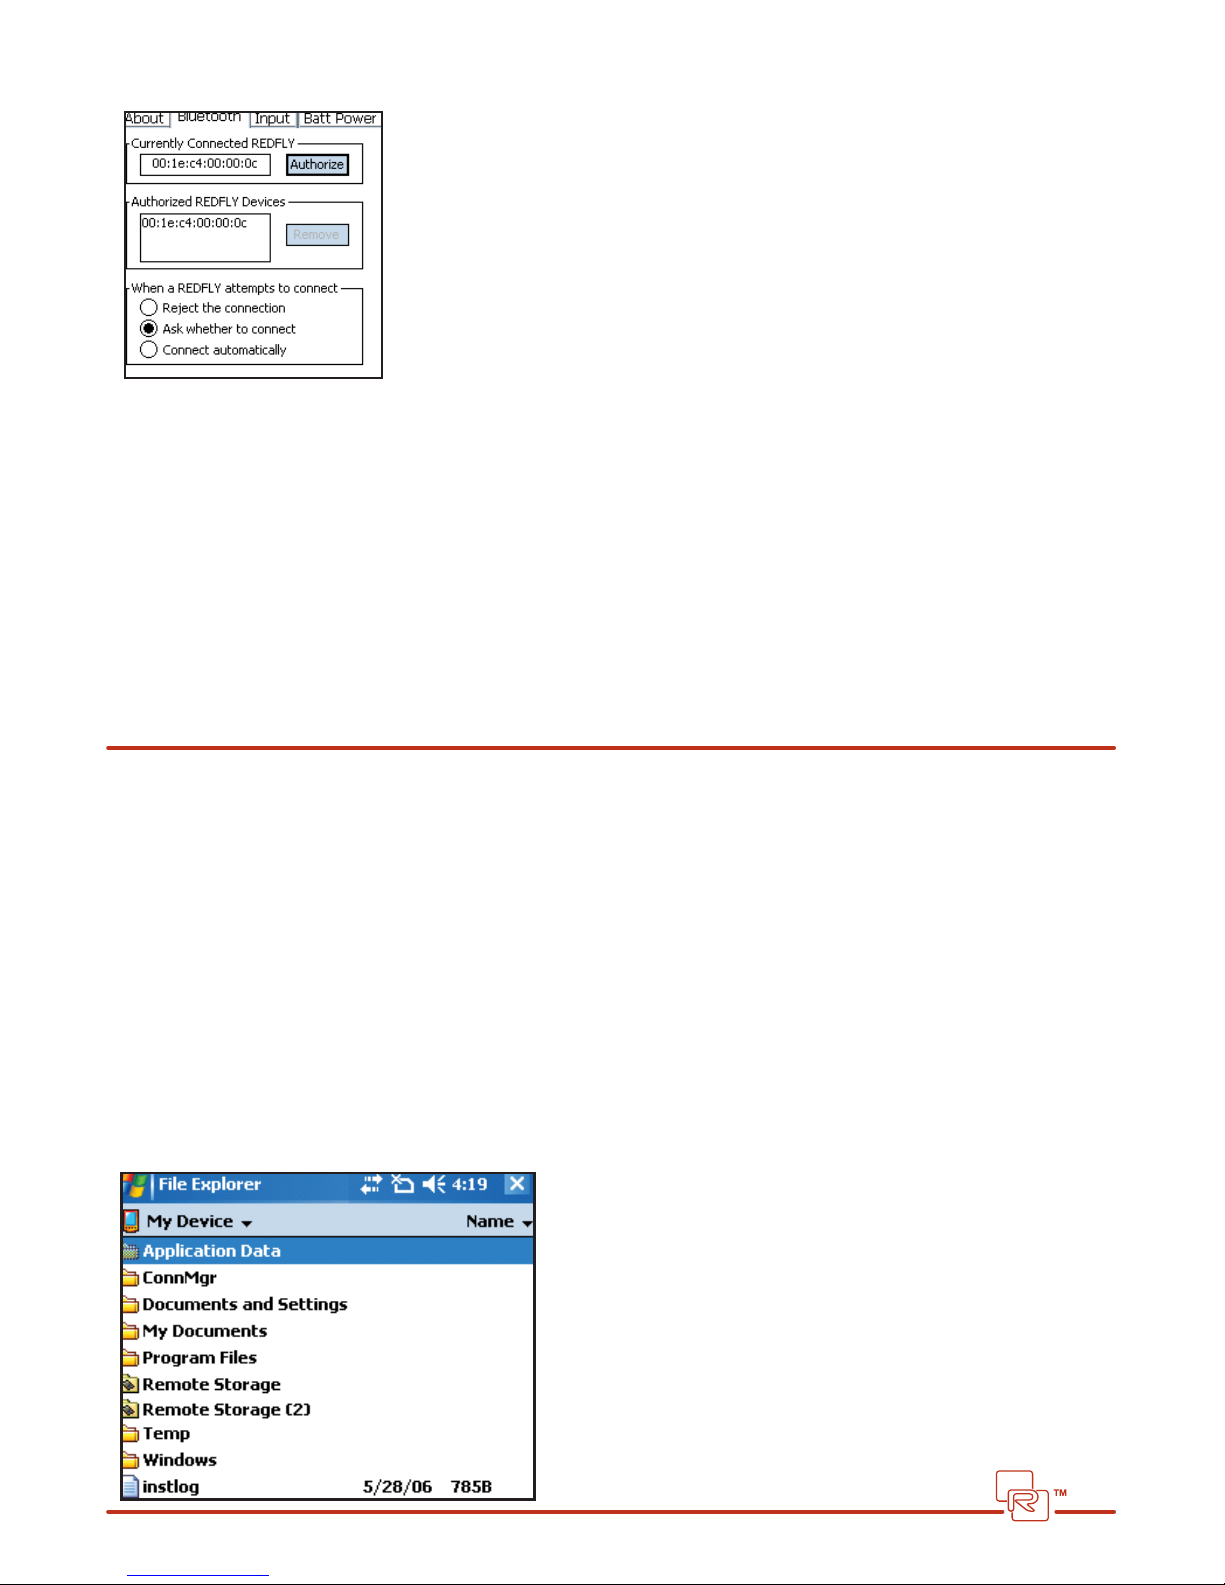
5. Select the Bluetooth Tab:
6. In the Authorized REDFLY Devices list, use your arrow key or mouse to highlight the REDFLY device address that
matches the one in the Currently Connected REDFLY list.
7. Click REMOVE. Windows Mobile removes this REDFLY from the Authorized list.
8. Click OK in the upper-right corner or press the OK key on the keyboard to accept this change.
If you want to restore this REDFLY to the Authorized list, you need to follow the steps outlined under “Setting Up
Bluetooth for the First Time”.
Using External Devices
The REDFLY includes two USB 2.0 ports at the rear of the device for use with a variety of external devices—including
thumb/ash drives and mice.
Note: If you want to use both ports for external devices, set up the REDFLY to connect via Bluetooth.
USING A THUMB/FLASH DRIVE
The REDFLY supports external drives on either or both of the two powered USB 2.0 ports.
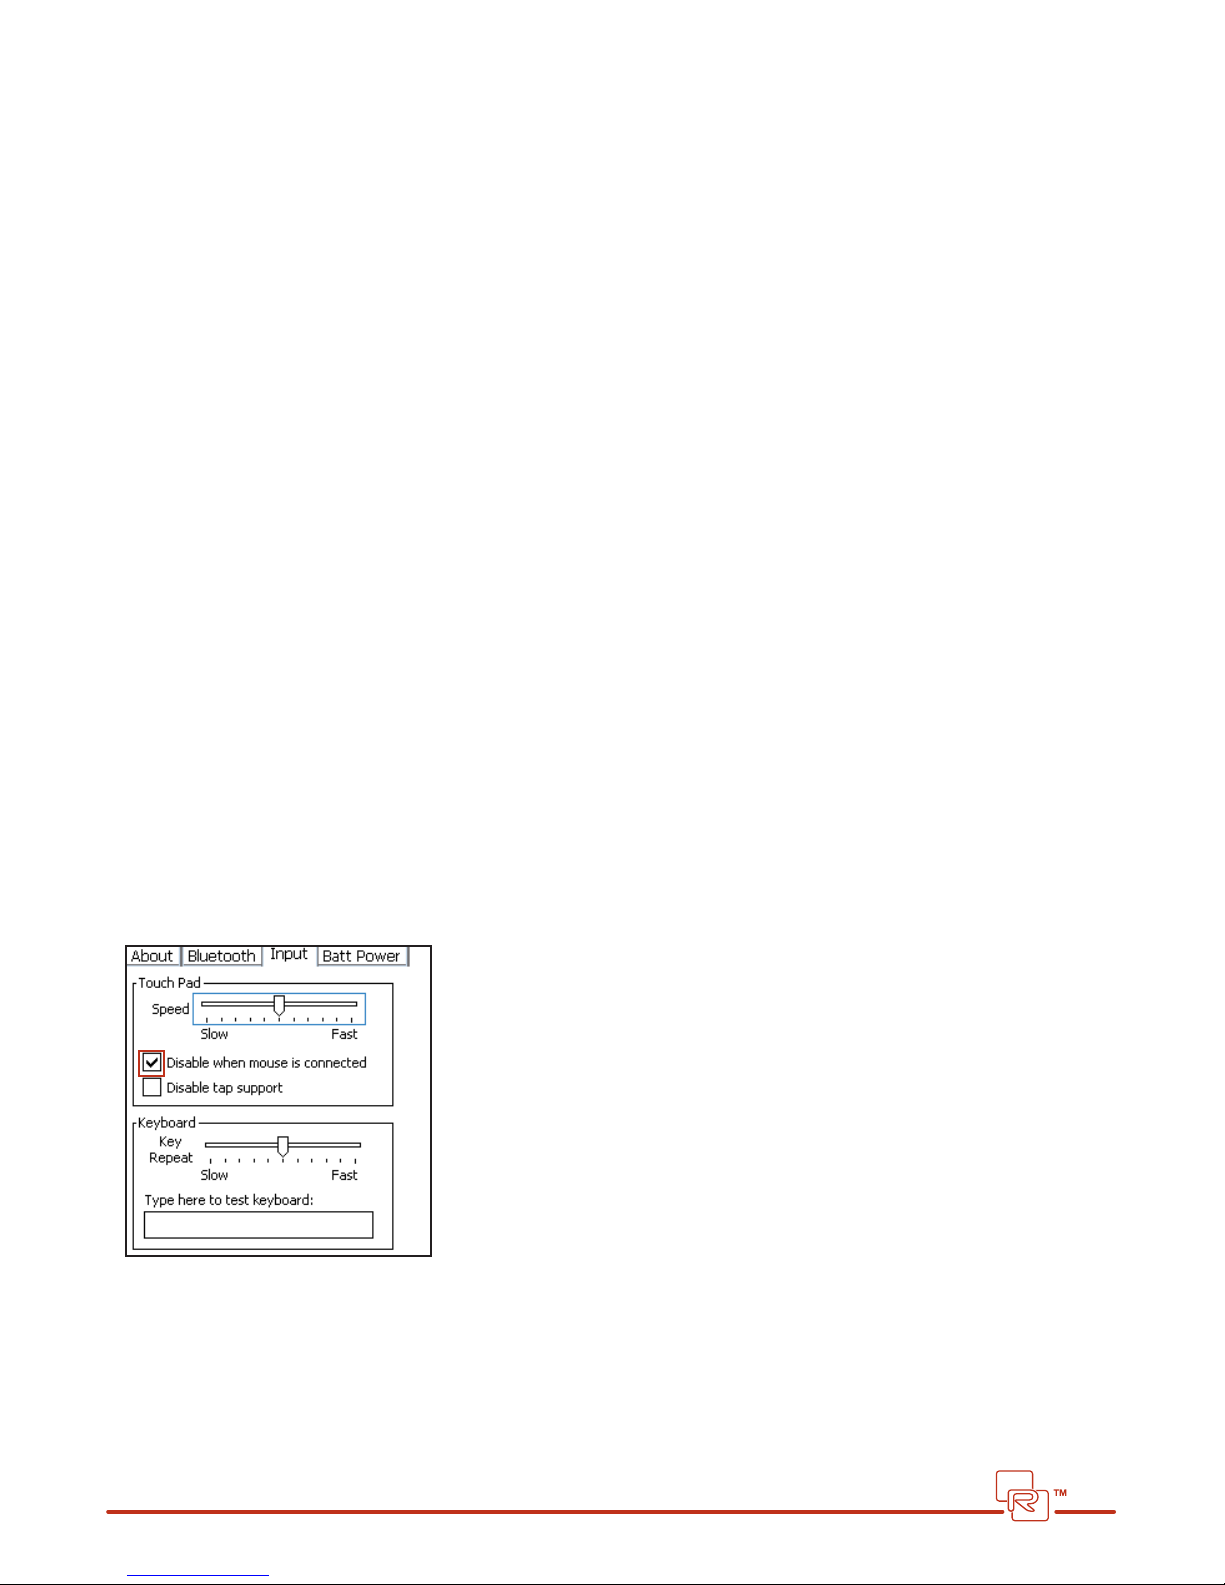
External drives will appear in Windows Mobile File Explorer as “Remote Storage” or similar description. (If you already
have an SD or CF card in your phone, it will be listed as “Remote Storage”. In that case, when you plug in the external drive,
File Explorer will list the second with the number “2” after it – “Remote Storage (2)”.
To access these drives, select “My Device” in File Explorer to see the list of folders and the “Remote Storage” external
device(s). Then select your particular external device:
22
Page 23
However, if the external device requires additional software or drivers to run, such as a CD or DVD device, Windows
Mobile will not recognize it. (Check with the device vendor to see if there is a Windows Mobile version of their software or
driver to support the device.)
USING EXTERNAL DRIVES WITH BLUETOOTH
If you have external drives attached to your REDFLY when you activate the Bluetooth connection, the REDFLY will disable
those drives. You will need to disconnect and reconnect these for the REDFLY to recognize them and have them appear in
the File Explorer list.
WARNING: Use caution with external drives if you are on a Bluetooth connection between your REDFLY and your
smartphone. As with any external drive on PCs, if you lose your connection with the device while an application is writing
to the drive, it can corrupt the drive and cause the loss of the data on that drive. Do NOT save documents to the drive when it
is likely to go out of range of the phone.
USING AN EXTERNAL MOUSE
The REDFLY also supports using a mouse via the USB port. (In fact, it is possible to have an external display, keyboard, and
mouse attached to the REDFLY as a productivity option.)
NOTE: The ability to scroll with the mouse is application-dependent.
If you attach an external mouse, you may want to disable the REDFLY’s touch pad.
Disabling the Touch pad when using an External Mouse
If you attach an external mouse, you may want to disable the REDFLY’s touch pad.
To disable the touch pad:
1. Open the Start/Settings screen (Start/REDFLY Settings on non-touchscreen)
2. Select the System tab at the bottom of the screen (touchscreen only)
3. Select REDFLY Settings.
4. Select the Input tab at the top of the Settings screen:
5. Check the box marked “Disable when mouse is connected” in the Touch pad section at the top.
6. Click OK at the top right of the screen or press the OK button on the keyboard to accept this change.
The next time you attach a mouse into your REDFLY, the REDFLY will disable the touch pad in favor of your mouse. When
you remove the mouse, the REDFLY will automatically restore the touch pad function.
23
Page 24
Power-Saving Options
The REDFLY has three options for extending the battery life of your REDFLY:
•Display Dimming
•Sleep Mode
•Auto Disconnect
DIMMING THE SCREEN
The REDFLY display uses the most power, so the REDFLY automatically dims the screen to its lowest setting after a period
of inactivity to extend battery life.
You can manually adjust screen brightness using the F9 and F10 keys. If you lower the screen brightness to its lowest
setting using the F9 key, the REDFLY will not dim it further.
Battery Power
The default for automatically dimming the REDFLY screen is ve minutes while on battery power. To adjust the length of time:
1. Open the Start/Settings screen (Start/REDFLY Settings on non-touchscreen)
2. Select the System tab at the bottom of the screen (touchscreen only)
3. Select REDFLY Settings.
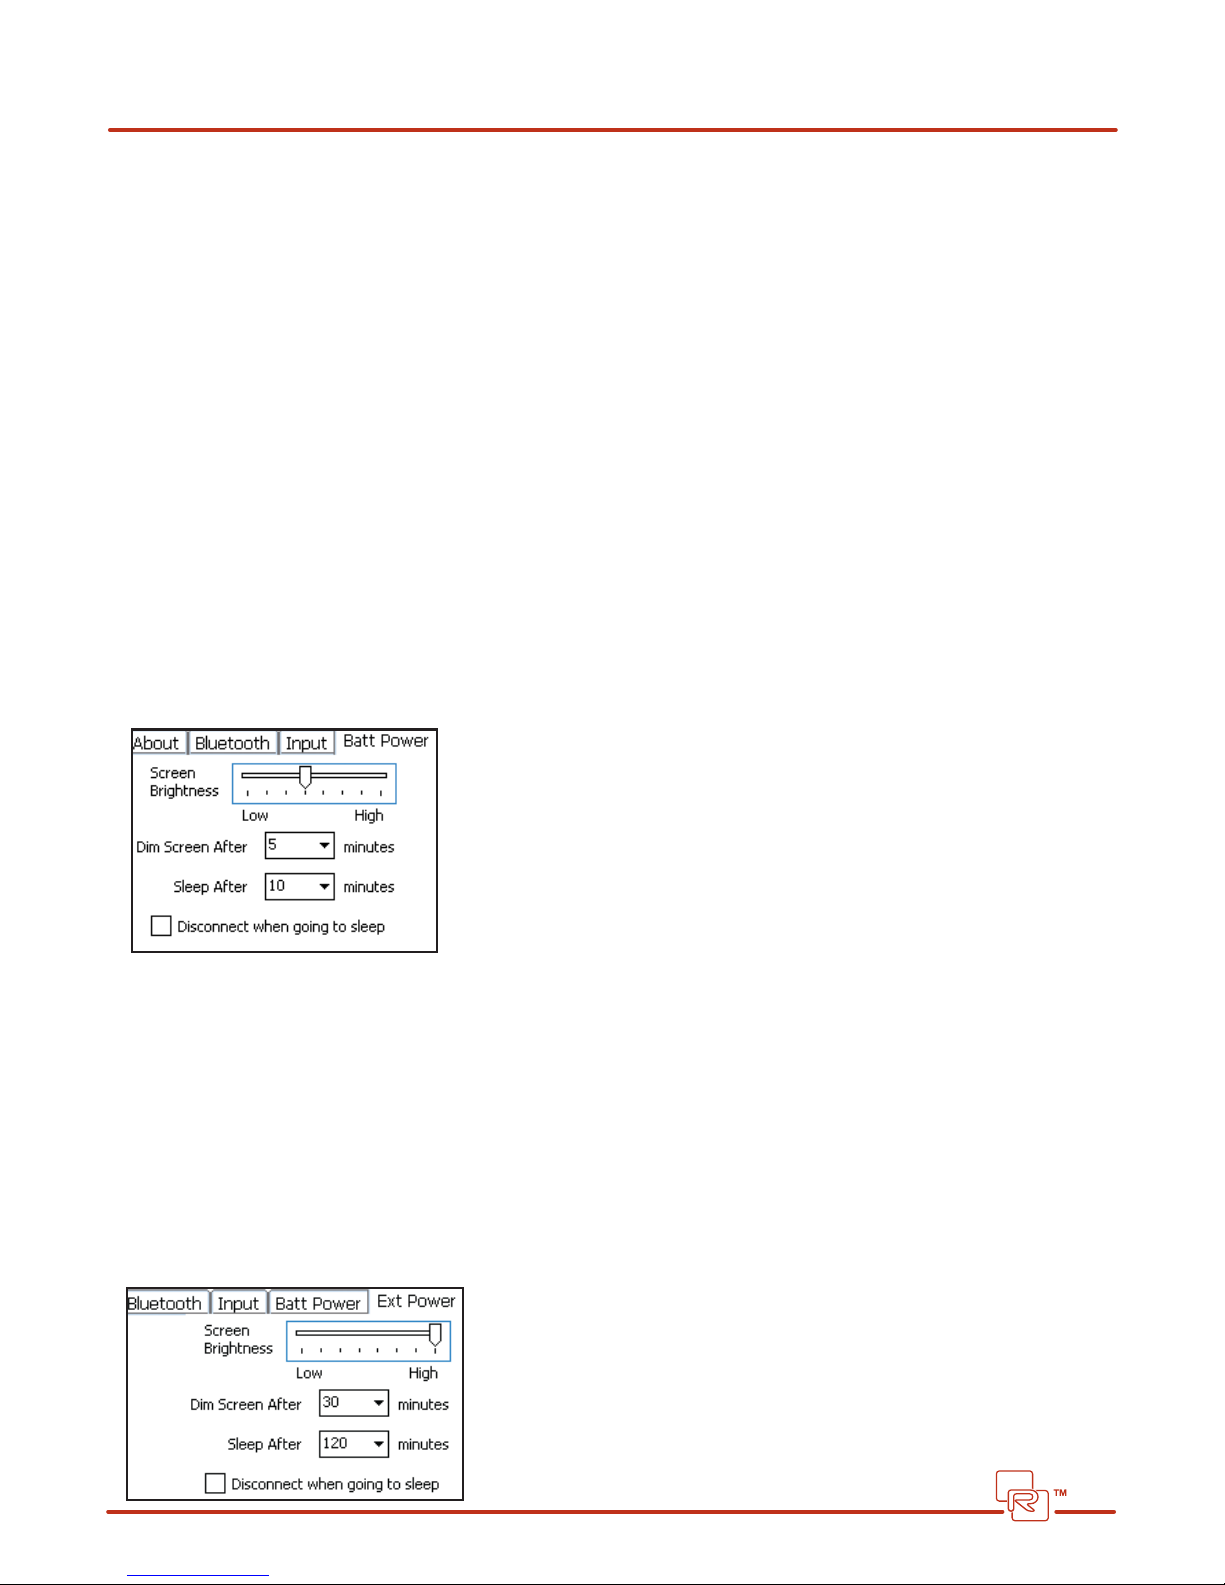
4. Choose the Batt Power tab at the top of the screen:
5. In the box marked “Dim Screen After”, select 1, 3, or 5 minutes from the drop-down box. (The option “Never” turns o
Automatic Dimming.) You can also type in any value from 1 to 1000 minutes in the box.
6. Click OK at the top right of the screen or press the OK button on your keyboard to accept the change.
External Power
The default for automatically dimming the REDFLY screen when plugged into the AC adapter is 30 minutes. To adjust this time:
1. Open the Start/Settings screen (Start/REDFLY Settings on non-touchscreen)
2. Select the System tab at the bottom of the screen (touchscreen only)
3. Select REDFLY Settings.
4. Choose the Ext Power tab at the top of the screen:
24
Page 25
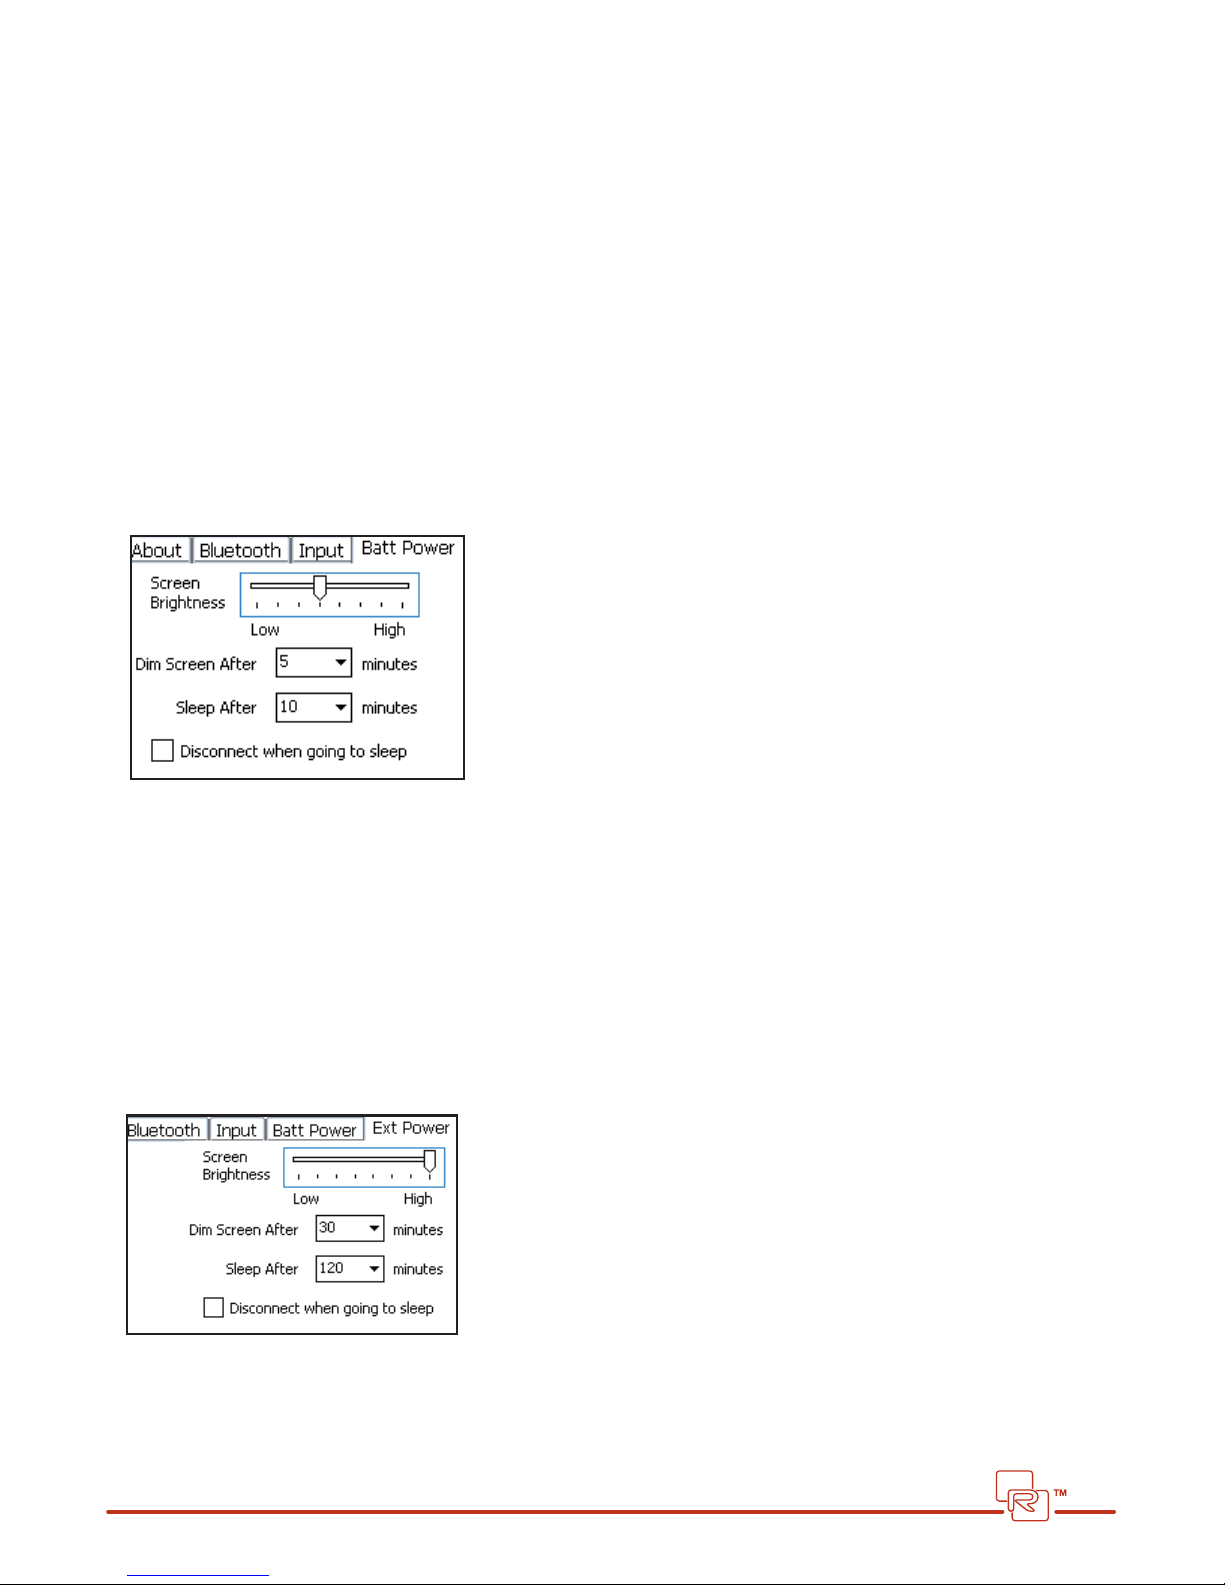
5. In the box marked “Dim Screen After”, select 10, 20, or 30 minutes from the drop-down box. (The option “Never”
turns o Automatic Dimming.) You can also type in any value from 1 to 1000 minutes in the box.
6. Click OK at the top right of the screen or press the OK button on your keyboard to accept the change.
ENTERING SLEEP MODE
The REDFLY also supports Sleep Mode—the display will go dark and the power LED on the right side of the unit will ash.
Battery Power
The default to automatically enter Sleep Mode is 10 minutes when on battery power. To adjust this time:
1. Open the Start/Settings screen (Start/REDFLY Settings on non-touchscreen)
2. Select the System tab at the bottom of the screen (touchscreen only)
3. Select REDFLY Settings.
4. Choose the Batt Power tab at the top of the screen:
5. In the box marked “Sleep After”, select 10, 20, or 30 minutes from the drop-down box. (There’s also the
option of “Never” which turns o Sleep Mode.) You can also type in any value from 1 to 1000 minutes in the box.
6. Click OK at the top right of the screen or press the OK button on your keyboard to accept the change.
External Power
The default on External Power is for the REDFLY to go into Sleep Mode only after 120 minutes. To adjust this time:
1. Open the Start/Settings screen (Start/REDFLY Settings on non-touchscreen)
2. Select the System tab at the bottom of the screen (touchscreen only)
3. Select REDFLY Settings.
4. Choose the Ext Power tab at the top of the screen:
5. In the box marked “Dim Screen After”, select 30, 60, or 120 minutes from the drop-down box. (The option “Never”
turns o Automatic Dimming.) You can also type in any value from 1 to 1000 minutes in the box.
6. Click OK at the top right of the screen or press the OK button on your keyboard to accept the change.
25
Page 26
DISCONNECT WHEN GOING TO SLEEP
If you use USB to connect to your phone, and your phone supports recharging over USB, you will have a drain on your
REDFLY battery as the REDFLY recharges your phone. This feature cannot be turned o while working over USB. (The benet is that your phone will be fully charged (or as fully charged as the REDFLY’s own battery status allows), so if the REDFLY
battery goes dead, your phone (and data) will remain active and safe.)
However, you can set your phone to automatically disconnect from the REDFLY when the REDFLY goes into Sleep Mode.
(The default is for the REDFLY to enter Sleep Mode after 10 minutes of inactivity while on battery power.) This will stop the
drain on your REDFLY battery in recharging your phone.
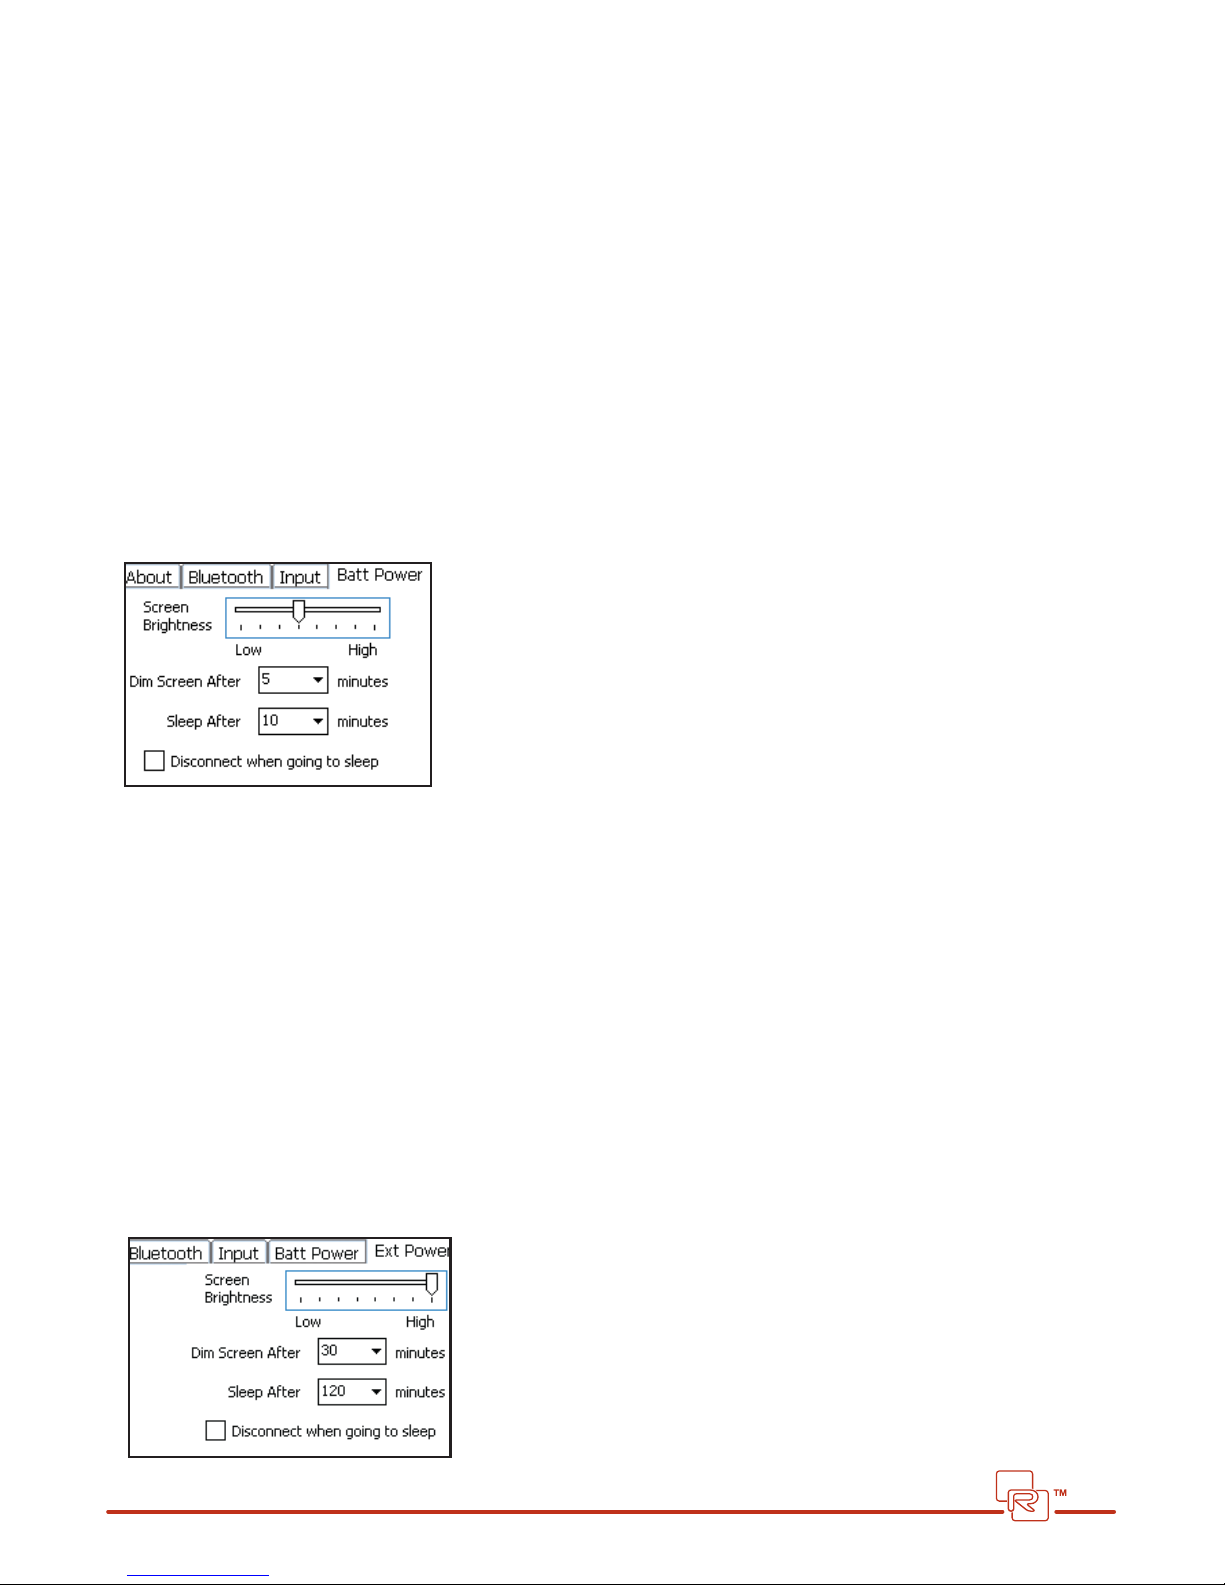
Battery Power
To do this:
1. Open the Start/Settings screen (Start/REDFLY Settings on non-touchscreen)
2. Select the System tab at the bottom of the screen (touchscreen only)
3. Select REDFLY Settings.
4. Choose the Batt Power tab at the top of the screen:
5. Check the box marked “Disconnect when going to sleep”
6. Click OK at the top right of the screen or press the OK button on your keyboard to accept the change.
External Power
This same “Disconnect when going to sleep” option is available in the EXT POWER settings tab as well. However, when
your REDFLY is on external power, the option to automatically disconnect from the REDFLY is a convenience rather than a
power-saving measure.
To set this option:
1. Open the Start/Settings screen (Start/REDFLY Settings on non touchscreen)
2. Select the System tab at the bottom of the screen (touchscreen only)
3. Select REDFLY Settings.
4. Choose the Ext Power tab at the top of the screen:
5. Check the box marked “Disconnect when going to sleep”
26
Page 27
6. Click OK at the top right of the screen or press the OK button on your keyboard to accept the change.
The next time your REDFLY enters sleep mode, it will automatically disconnect from your phone.
Reconnecting the REDFLY
Once your phone disconnects from the REDFLY, you will need to reconnect. To do this:
1. Disconnect and reconnect the USB cable OR
2. Press the Bluetooth/F12 key to reestablish a Bluetooth connection.
Uninstalling REDFLY Software
If you need to remove the REDFLY software and drivers from your smartphone (such as when you want to update your
REDFLY software):
TOUCHSCREEN
1. Select the Start/Settings screen.
2. Select the System tab at the bottom of the screen.
3. Select Remove Programs.
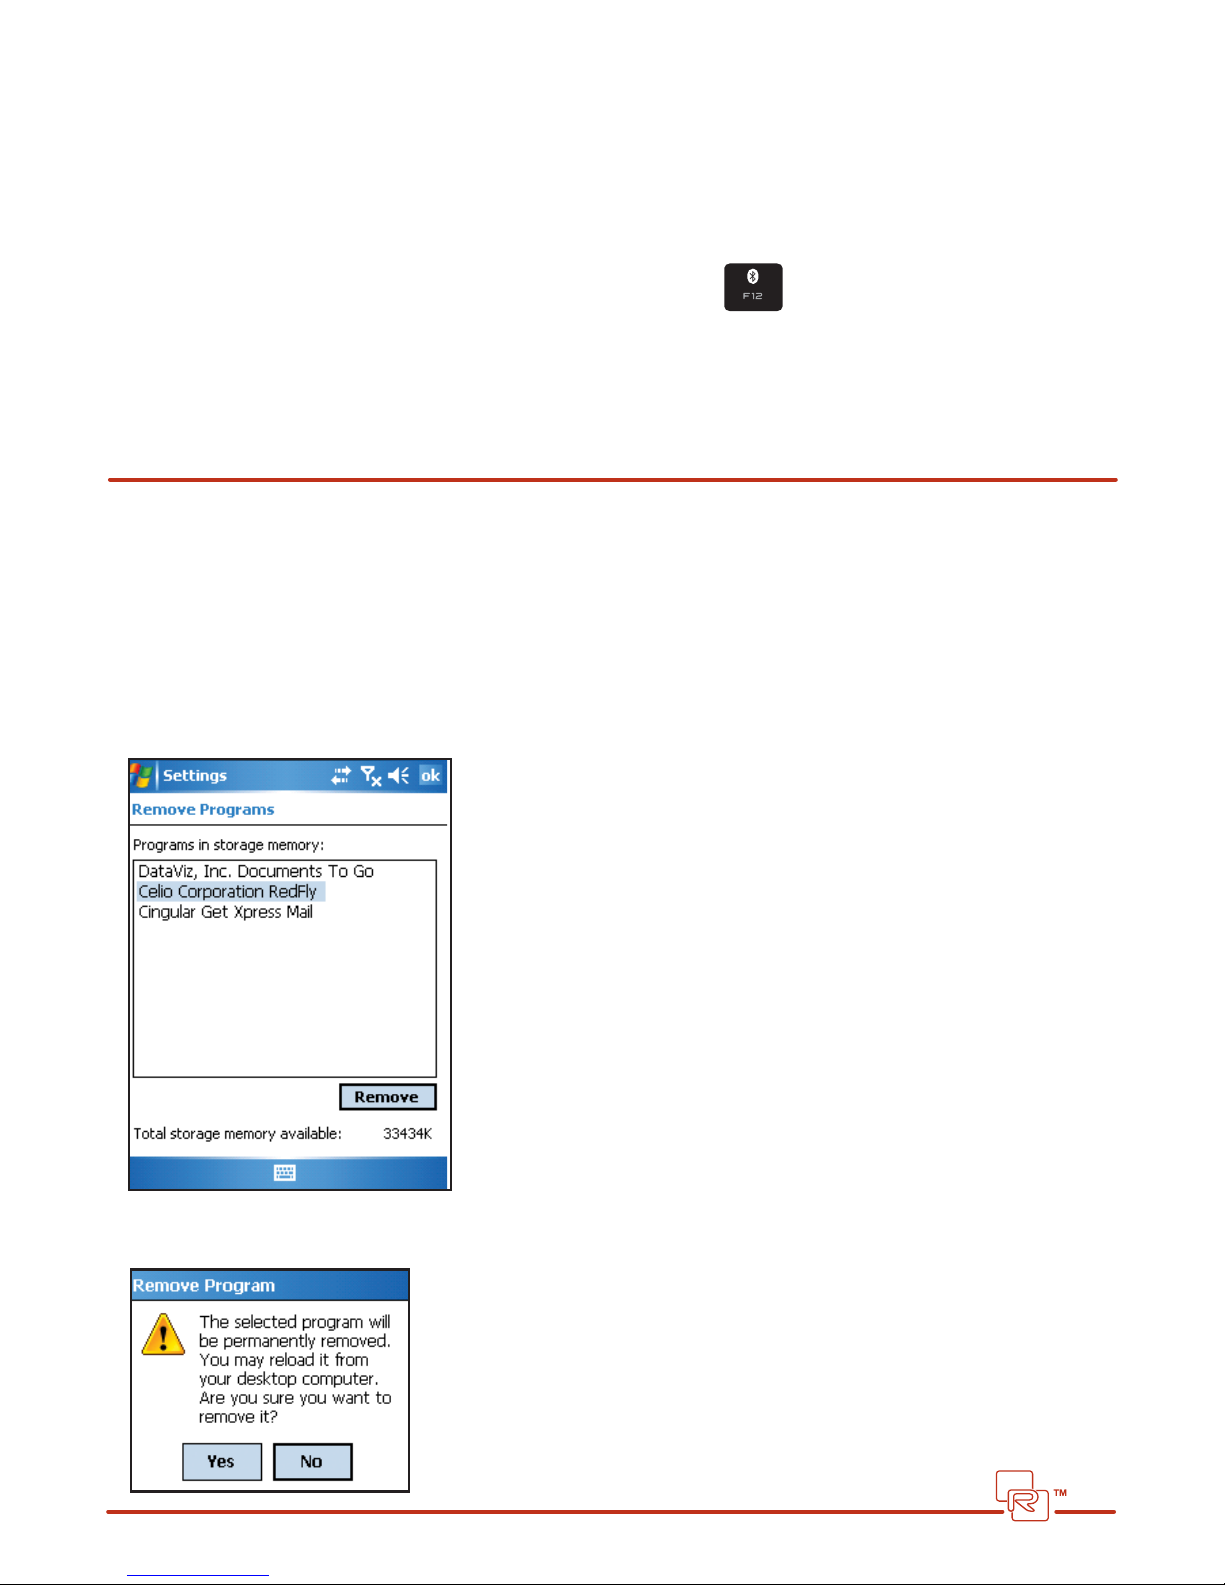
4. Select “Celio Corporation REDFLY” from the list:
5. Choose “REMOVE” at the lower-right of the screen.
6. Choose YES to conrm the deletion:
27
Page 28

Windows Mobile will remove the REDFLY software.
NONTOUCHSCREEN
1. Select Start/Settings/Remove Programs
2. Select Celio Corporation RedFly from the list.
3. Conrm the removal by choosing YES.
Windows Mobile will remove the REDFLY software.
Note: If your REDFLY is connected to your phone when you run the REMOVE process, it will automatically be disconnected as
part of the software removal.
You can remove the REDFLY Setup software from your PC (if you used it for the install on your phone) using the Windows
Add/Remove Programs function and selecting the REDFLY software.
If you need to restore the REDFLY software, repeat the steps in the “Installing the REDFLY Software” section.
Troubleshooting
I tried visiting certain websites with my browser on the REDFLY, but I couldn’t view them.
Support varies in Windows Mobile browsers to view all websites. In particular, web pages that use Java (Java applets or
Java Virtual Machine), Flash, Shockwave, VBScript, WML script, and other plug-ins, may not display in a Windows
Mobile browser.
I have erratic performance typing in text on the REDFLY.
For optimal typing performance, turn o the Word Completion function on your phone. (The REDFLY keyboard allows you
to enter text much faster than the Word Completion function expects.) To do this:
Touchscreen
1. Open the Start/Settings screen.
2. Select Input.
3. Select the Word Completion Tab at the bottom of the screen.
4. Uncheck the box marked “Suggest words when entering text”.
5. Click OK at the top right of the screen or press OK on your keyboard to accept this change.
Non-touchscreen
Word Completion is available through the T9 Mode on non-touchscreen phones. When you are in an application where
you can type in text:
1. Press and hold the *T9 key to see the T9 Settings menu.
2. Select T9 Settings.
3. Select Preferences.
4. Uncheck the box labeled “Word Completion”.
Select Done to save your change.
28
Page 29
I have erratic performance viewing video on my REDFLY.
29
Video playback is highly dependent on your phone’s processor power, available memory, the type of data connection you
have to the Internet, as well as the type of connection you have between your phone and your REDFLY. The default
Windows Mobile Media Player also does not natively support some types of video and audio les. Video playback then
may occur, but it may not be steady or may run with glitches, or not at all.
I have attached an external mouse, but I cannot scroll with it.
While Windows Mobile supports scrolling, there are a limited number of applications which support it. In the same way,
the right-mouse button has limited support on smartphones.
I tried running the Bubble Breaker game from the REDFLY, but the image isn’t right.
Some games, such as Bubble Breaker, currently aren’t supported on the REDFLY. Some may work if the game is launched
prior to connecting to the REDFLY, others won’t. These issues will be corrected in future releases.
I tried connecting via Bluetooth, and the REDFLY says “No device found”.
Check to see that you have Bluetooth activated on your smartphone. Check to see that your REDFLY is authorized with
your phone using the procedure under “Setting up Bluetooth”.
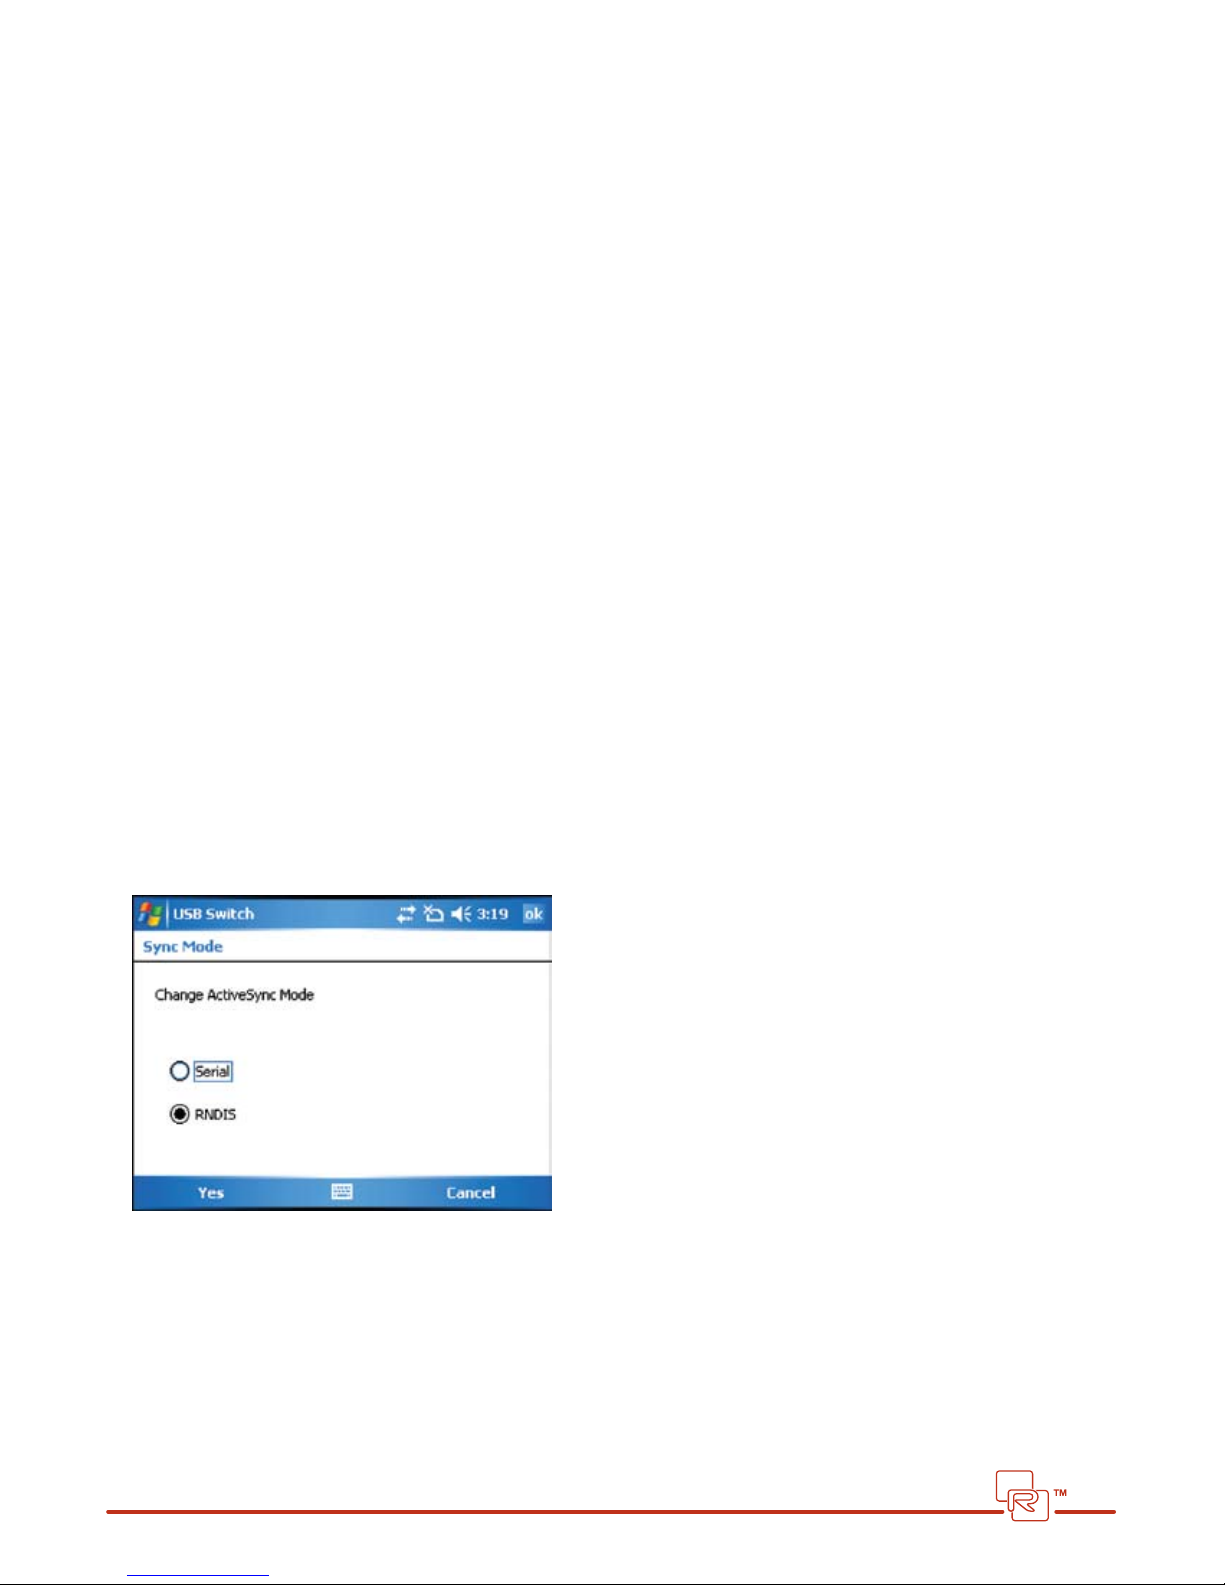
When I connect to the REDFLY using USB, the REDFLY displays an error message.
Some phones don’t automatically set the appropriate type of network connection for the REDFLY. To x this:
1. Go to your smartphone’s Start/Settings screen (on some phones go to the
Start/Programs screen).
2. Choose Connections (on some phones, choose Accessory).
3. Choose USB to PC (on some phones, choose USBSwitch).
4. Make sure that the box “Enable advanced network functionality” or “Enable RNDIS” is checked:
If not, mark the box and click Ok or choose Yes to accept the change.
Page 30

Cleaning the REDFLY
30
If you need to clean the REDFLY—display or keyboard—please turn o the REDFLY and unplug any cables. Use only a
clean, soft, lint-free cloth and a slight amount of dampness to remove any spots. DO NOT USE any spray cleaners—window cleaner, household spray, alcohol, or abrasive cleanser—on the REDFLY.
Customer Service
We want you to gain the most from your REDFLY. Please don’t hesitate to contact Celio via e-mail to support@celiocorp.
com to ask any questions you may have about using your REDFLY or to help resolve any issues you might encounter.
You will also nd a valuable FAQ online with additional suggestions and tips about using your REDFLY at
www.celiocorp.com/support.
REDFLY VERSION INFORMATION
You will need the REDFLY version information when you work with customer service. To view your REDFLY information:
1. Go to Start/Settings (touchscreen) or Start/REDFLY Settings (non-touchscreen).
2. Select the Systems tab at the bottom of the screen (touchscreen).
3. Choose REDFLY Settings.
4. Choose the About Tab.
Warranty
Celio Corp. warrants your REDFLY for a period of 90 days from purchase against defects in materials and workmanship
under normal use by the original purchaser. If a hardware defect occurs and Celio Corp. receives a valid claim within the
90 days, at its option and to the extent allowed by law, Celio Corp. will either (1) repair the hardware defect at no charge,
using new or refurbished parts, or (2) exchange the REDFLY with a new one or which has been manufactured from new
and/or serviceable used parts and which is at least functionally equivalent to the original product.
To return a REDFLY for service, please contact Celio Corp. for an RMA number.
Page 31
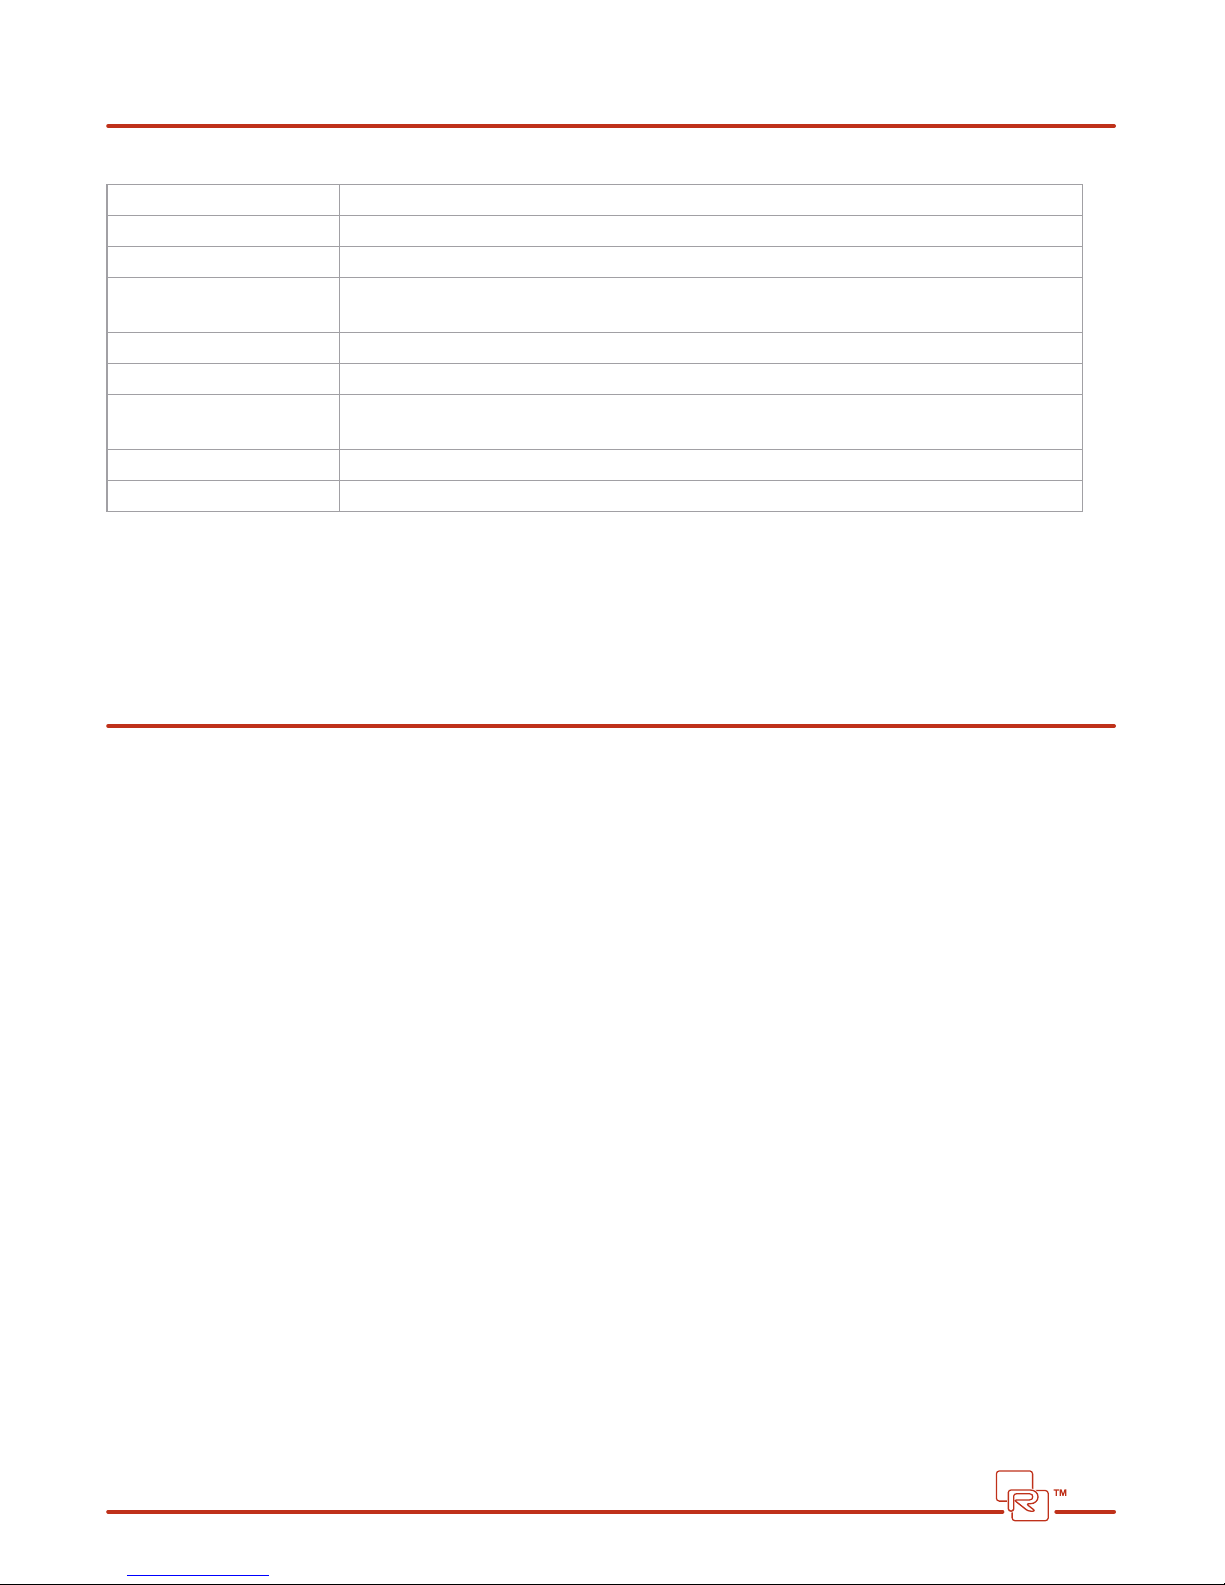
Specications
31
Display (Internal) 800x480
VGA Port 800x480 WVGA maximum resolution
USB Ports 2x2.0 powered (500mA maximum)
Bluetooth Compatible with Bluetooth 1.0 and 2.0. 30 feet (10 meters) maximum range, 1Mbps
maximum throughput
Weight 2 lbs (2 lbs 4 oz. with adapter) .9 Kilograms (1.02 Kg. with adapter)
Battery Lithium Polymer (8 hours average life)
OS Support Windows Mobile 5 (Pocket PC and Smartphone editions)
Windows Mobile 6 (Professional and Standard editions)
Operating Temperature 32 – 104 degrees F (0 – 40 degrees C)
Charger 9VDC 2.5A LiPo-compatible. 3 hours to completely recharge internal battery
Using the REDFLY Safely
Please read all the safety information in this guide before using the REDFLY to avoid injury. For updates to this
information, please see our website at www.celiocorp.com .
WARNING: Failure to follow these safety instructions could result in re, electric shock, or other injury or damage.
PROPER CARE AND FEEDING OF THE REDFLY
Do not take the REDFLY apart (there are no user-serviceable parts inside). Do not bend, fold, or otherwise deform the
REDFLY. Don’t drop it. In particular, the REDFLY’s LCD display is glass which could break or shatter if it suers an impact.
Do not get the REDFLY wet or spill liquids or food on it. If something like this should happen, let it air dry—don’t try to
microwave it or use a blow dryer on it. Contact Celio for the proper procedure to restore your REDFLY after a fall or
getting it wet.
Don’t force connectors into the REDFLY ports. Connectors should work easily. If the connector seems to need additional
pressure, it may be an incorrect connector for that port or a deformed connector.
ADAPTER SAFETY
Use only the included AC power adapter with your REDFLY. DO NOT USE your cellphone AC adapter to charge the REDFLY.
The REDFLY uses a long-lasting Lithium-Polymer battery which requires a specic adapter for LiPo recharging. Otherwise,
there is a risk of damage or catastrophic failure of the battery. Do not use the adapter if the cord becomes frayed or
broken. Contact Celio for a replacement.
USB CONNECTING CABLE SAFETY
Only use the appropriate connecting cable designed for your cellphone to connect to the REDFLY. In particular if your
cellphone supports charging via USB. Again, do not use the cable if it becomes frayed or broken.
Page 32

RADIO SAFETY
32
The REDFLY includes a Bluetooth radio transmitter and receiver. The REDFLY has been tested and meets the FCC, CE and
European Union rules, regulations, and guidelines for Bluetooth service. Do not attempt to modify or change the REDFLY,
as this could void regulatory compliance. If you use a heart pacemaker, keep the REDFLY at least six inches from your body
to avoid interference.
TRAVEL SAFETY
Do not use the REDFLY while operating a motor vehicle. Federal Aviation Administration (FAA) regulations may prohibit
you from using the REDFLY Bluetooth connection while in ight. (Use your USB connection instead.)
BATTERY SAFETY
As with all batteries, do not crush, incinerate, or puncture the REDFLY battery. Keep the REDFLY away from small children.
End User License Agreement
IMPORTANT - USE OF THE REDFLY SOFTWARE IS SUBJECT TO LICENSE RESTRICTIONS. CAREFULLY READ THIS LICENSE AGREEMENT BEFORE
USING THE SOFTWARE.
NOTICE TO USER: PLEASE READ THIS AGREEMENT CAREFULLY. THIS LICENSE IS A LEGAL “AGREEMENT” CONCERNING THE USE OF SOFTWARE
BETWEEN YOU, THE END USER, EITHER INDIVIDUALLY OR AS AN AUTHORIZED REPRESENTATIVE OF THE COMPANY OBTAINING THE LICENSE, AND
CELIO CORP. BY USING ALL OR ANY PORTION OF THE SOFTWARE YOU ACCEPT ALL THE TERMS AND CONDITIONS OF THIS AGREEMENT, INCLUDING, IN PARTICULAR THE LIMITATION ON: USE, TRANSFERABILITY, WARRANTY AND LIABILITY. YOU AGREE THAT THIS AGREEMENT IS ENFORCEABLE LIKE ANY WRITTEN NEGOTIATED AGREEMENT SIGNED BY YOU. IF YOU DO NOT AGREE, DO NOT USE THIS SOFTWARE. IF YOU ACQUIRED THE
SOFTWARE ON TANGIBLE MEDIA (E.G. CD) WITHOUT AN OPPORTUNITY TO REVIEW THIS LICENSE AND YOU DO NOT ACCEPT THIS AGREEMENT,
YOU MAY OBTAIN A REFUND OF THE AMOUNT YOU ORIGINALLY PAID IF YOU: (A) DO NOT USE THE SOFTWARE AND (B) RETURN IT, WITH PROOF
OF PAYMENT, TO THE LOCATION FROM WHICH IT WAS OBTAINED WITHIN FOURTEEN (14) DAYS OF THE PURCHASE DATE.
DEFINITIONS. “Software” means (a) all of the content of the les, disk(s), CD-ROM(s) or other media with which this agreement is provided,
including but not limited to (i) Celio Corp or third party computer information or software; (ii) digital images, stock photographs, clip art,
sounds or other artistic works (“Stock Files”); (iii) related explanatory written materials or les (“Documentation”); and (b) modied versions,
updates additions, and copies of the Software, if any, licensed to you by Celio Corp. “Use” or “Using” means to access, install, download, copy or
otherwise benet from using the functionality of the Software in accordance with the Documentation. “Permitted Number” means one (1) unless otherwise indicated under a valid license (e.g. volume license) granted by Celio Corp. “Computer” means an electronic device that accepts
information in digital or similar form and manipulates it for a specic result based on a sequence of instructions. “Smartphone” means any
mobile computing device that combines cellular communication capabilities with other computer capabilities that can accept information in
digital or similar form and manipulate it for specic results based on sequence of instructions. “Celio Corp” means a company duly organized
and validly existing under the laws of the state of Delaware, named as Celio Corp, and having its principal place of business at 265 East 100
South, Suite 280, Salt Lake City, UT 84111.
SOFTWARE LICENSE. As long as you comply with the terms of this End User License Agreement (the “Agreement”),Celio Corp grants to you a
non-exclusive license to Use the Software for the purposes described in the REDFLY User’s Guide.
General Use. You may use this program ONLY on up to the maximum number of smartphones and covered by the license package you have
purchased.
You may also make one backup copy of the Software, provided your backup copy is not installed or used on any other smartphone.
INTELLECTUAL PROPERTY RIGHTS. The Software and any copies that you are authorized by Celio Corp to make are the intellectual property of and are owned by Celio Corp. The structure, organization and code of the Software are the valuable trade secrets and condential
information of Celio Corp. The Software is protected by copyright, including without limitation by United States Copyright Law, international
treaties provisions and applicable laws in the country in which it is being used. You may not copy the Software, except as set forth in Section 2 (“Software License”). Any copies that you are permitted to make pursuant to this Agreement must contain the same copyright and
other proprietary notices that appear on or in the Software. You agree not to modify, adapt or translate the Software. You also agree not to
Page 33

reverse engineer, decompile, disassemble or otherwise attempt to discover the source code of the Software except to the extent you may be
33
expressly permitted to decompile under applicable law, if it is essential to do so in order to achieve operability of the Software with another
software program, and you have rst requested Celio Corp to provide information necessary to achieve such operability and Celio Corp
has not made such information available. Celio Corp has the right to impose reasonable conditions and to request a reasonable fee before
providing such information. Any information supplied by Celio Corp or obtained by you, as permitted hereunder, may only be used by you for
the purpose described herein and may not be disclosed to any third party or used to create any software which is substantially similar to the
extension of the Software. Requests for information should be directed to Celio Corp. Trademarks shall be used in accordance with accepted
trademark practice, including identication of trademarks owners’ names. Trademarks can only be used to identify printed output produced
by the Software and such use of any trademark does not give you any rights of ownership in that trademark. Except as expressly stated above,
this Agreement does not grant you any intellectual property rights in the Software.
TRANSFER. You may not rent, lease, sublicense, or authorize all or any portion of the Software to be copied onto another user’s computer
except as may be expressly permitted herein. You may, however, transfer all your rights to Use the Software to another person or legal entity
provided that: (a) you also transfer to each this Agreement, the Software and all other software or hardware bundled or pre-installed with
the Software, including all copies, Updates and prior versions to such person or entity; (b) you retain no copies, including backups and copies
stored on a computer/smartphone; and (c) the receiving party accepts the terms and conditions of this Agreement and any other terms and
conditions upon which you legally purchased a license to the Software. Notwithstanding the foregoing, you may not transfer education, prerelease, or not for resale copies of the Software.
MULTIPLE ENVIRONMENT SOFTWARE/ MULTIPLE LANGUAGE SOFTWARE/ DUAL MEDIA SOFTWARE/ MULTIPLE COPIES/ BUNDLES. If the
Software supports multiple platforms of languages, if you receive the Software on multiple media, if you otherwise receive multiple copies of
the Software, or if you received the Software bundled with other software, the total numbers of your computers on which all versions of the
Software are installed may not exceed the Permitted Number. You may not rent, lease, sublicense, lend or transfer any versions or copies of
such Software you do not Use.
NO WARRANTY. The Software is being delivered to you “AS IS” and Celio Corp makes no warranty as to its use or performance. CELIO CORP
AND ITS SUPPLIERS DO NOT AND CANNOT WARRANT THE PERFORMANCE OR RESULTS YOU MAY OBTAIN BY USING THE SOFTWARE. EXCEPT
FOR ANY WARRANTY, CONDITION, REPRESENTATION OR TERM TO THE EXTENT TO WHICH THE SAME CANNOT OR MAY NOT BE EXCLUDED
OR LIMITED BY LAW APPLICABLE IN YOUR JURISDICTION, CELIO CORP AND ITS SUPPLIERS MAKE NO WARRANTIES CONDITIONS, REPRESENTATIONS, OR TERMS (EXPRESS OR IMPLIED WHETHER BY STATUTE, COMMON LAW, CUSTOM, USAGE OR OTHERWISE) AS TO ANY MATTER
INCLUDING WITHOUT LIMITATION NONINFRINGEMENT OF THIRD PARTY RIGHTS, MERCHANTABILITY, INTEGRATION, SATISFACTORY QUALITY,
OR FITNESS FOR ANY PARTICULAR PURPOSE.
LIMITATION OF LIABILITY. IN NO EVENT WILL CELIO CORP OR ITS SUPPLIERS BE LIABLE TO YOU FOR ANY DAMAGES, CLAIMS OR COSTS
WHATSOEVER OR ANY CONSEQUENTIAL, INDIRECT, DIRECT, INCIDENTAL DAMAGES, OR ANY LOST PROFITS OR LOST SAVINGS, EVEN IF CELIO
CORP REPRESENTATIVE HAS BEEN ADVISED OF THE POSSIBILITY OF SUCH LOSS, DAMAGES, CLAIMS OR COSTS OR FOR ANY CLAIM BY ANY
THIRD PARTY. THE FOREGOING LIMITATIONS AND EXCLUSIONS APPLY TO EXTENT PERMITTED BY APPLICABLE LAW IN YOUR JURISDICTION.
CELIO CORP AGGREGATE LIABILITY AND THAT OF ITS SUPPLIERS UNDER OR IN CONNECTION WITH THIS AGREEMENT SHALL BE LIMITED TO
THE AMOUNT PAID FOR THE SOFTWARE, IF ANY. Celio Corp is acting on behalf of its suppliers for the purpose of disclaiming, excluding and/or
limiting obligations, warranties and liability as provided in this Agreement, but in no other respects and for no other purpose.
LIFE ENDANGERING ACTIVITIES. NEITHER CELIO CORP NOR ITS SUPPLIERS SHALL BE LIABLE FOR ANY DAMAGES RESULTING FROM OR IN
CONNECTION WITH THE USE OF SOFTWARE IN ANY APPLICATION WHERE THE FAILURE OR INACCURACY OF THE SOFTWARE MIGHT RESULT IN
DEATH OR PERSONAL INJURY. YOU AGREE TO INDEMNIFY AND HOLD HARMLESS CELIO CORP AND ITS SUPPLIERS FROM ANY CLAIMS, LOSS,
COST, DAMAGE, EXPENSE, OR LIABILITY, INCLUDING ATTORNEYS’ FEES, ARISING OUT OF OR IN CONNECTION WITH SUCH USE.
GENERAL PROVISIONS. This Agreement contains the entire understanding between the parties relating to its subject matter and supersedes
all prior or contemporaneous agreements, including but not limited to any purchase order terms and conditions, except valid license agreements related to the subject matter of this Agreement which are physically signed by you and an authorized agent of Celio Corp. This Agreement may only be modied by a physically signed writing between you and an authorized agent of Celio Corp. Waiver of terms or excuse of
breach must be in writing and shall not constitute subsequent consent, waiver or excuse.
COMPLIANCE WITH LICENSES. If you are a business or organization, you agree that upon request of Celio Corp or Celio Corp’s authorized
agent, you will within thirty (30) days fully document and certify that Use of any and all Celio Corp Software at the time of the request is in
conformity with your valid license obtained from Celio Corp.
If you have any questions regarding this agreement or if you wish to request any information from Celio Corp, please use the address and the
contact information included in this product to contact Celio Corp.
Page 34

Regulatory Compliance
34
FCC RADIO FREQUENCY EXPOSURE STATEMENT
The Redy C8 has been evaluated under FCC Bulletin OET 65 and found compliant to the requirements as set forth in CFR
47 Sections 2.1091, 2.1093, and 15.247 (b) (4) addressing RF Exposure from radio frequency devices. The radiated output
power of the Redy C8 is well below the FCC radio frequency exposure limits. Nevertheless, this device should be installed
in such a manner that the potential for human contact during normal operation is minimized. To ensure RF exposure
compliance and to comply with RF exposure limits established in the ANSI C95.1 standards, the distance between the
antenna and the user should not be less than 2 cm.
This device has been tested and found to comply with the limits of a Class B digital device, pursuant to Part 15 of the FCC
Rules. This device complies with Part 15 of the FCC Rules. Operating this device is subject to the following conditions:
1. This device may not cause harmful interference.
2. This device must accept any interference received, including interference that may cause undesired operation.
Note: This equipment has been tested and found to comply with the limits for a Class B digital device, pursuant to Part 15 of
the FCC Rules. These limits are designed to provide reasonable protection against harmful interference in a residential installation. This equipment generates, uses and can radiate radio frequency energy and, if not installed and used in accordance
with the instructions, may cause harmful interference to radio communications. However, there is no guarantee that interference will not occur in a particular installation. If this equipment does cause harmful interference to radio or television reception, which can be determined by turning the equipment o and on, the user is encouraged to try to correct the interference
by one or more of the following measures:
• Reorientorrelocatethereceivingantenna.
• Increasetheseparationbetweentheequipmentandreceiver.
• Connecttheequipmentintoanoutletonacircuitdierentfromthattowhichthereceiverisconnected.
• Consultthedealeroranexperiencedradio/TVtechnicianforhelp.
 Loading...