

Celestron XLT series, Omni XLT 102, Omni XLT 120, Omni XLT 150, Omni XLT 127 Instruction Manual
Page 1

O
mnnii
O
m
XXLLTT SSeerriieess TTeelleessccooppeess
IINNSSTTRRUUCCTTIIOONN MMAANNUUAALL
●● OOmmnnii XXLLTT 110022 ●● OOmmnnii XXLLTT 112200 ●● OOmmnnii XXLLTT 1
15500 ●● OOmmnnii XXLLTT112277
Page 2

TTaabbllee ooff CCoonntteennttss
INTRODUCTION .......................................................................................................................................................... 4
Warning...................................................................................................................................................... 4
ASSEMBLY ....................................................................................................................................................................8
Setting up the Tripod.................................................................................................................................. 8
Attaching the Equatorial Mount................................................................................................................. 9
Attaching the Center Leg Brace............................................................................................................... 10
Installing the Counterweight Bar.............................................................................................................. 10
Installing the Counterweights................................................................................................................... 11
Attaching the Slow Motion Knobs........................................................................................................... 11
Attaching the Telescope Tube to the Mount............................................................................................. 12
Installing the Finderscope......................................................................................................................... 13
Installing the Visual Back......................................................................................................................... 13
Installing the Star Diagonal...................................................................................................................... 14
Installing the Eyepieces............................................................................................................................ 14
Moving the Telescope Manually.............................................................................................................. 15
Balancing the Mount in R.A..................................................................................................................... 15
Balancing the Mount in DEC ................................................................................................................... 16
Adjusting the Mount................................................................................................................................. 16
Adjusting the Mount in Altitude............................................................................................................... 17
Adjusting the Mount in Azimuth.............................................................................................................. 17
TELESCOPE BASICS................................................................................................................................................. 18
Image Orientation..................................................................................................................................... 20
Focusing ................................................................................................................................................... 20
Aligning the Finderscope......................................................................................................................... 21
Calculating Magnification........................................................................................................................ 21
Determining Field of View....................................................................................................................... 22
General Observing Hints.......................................................................................................................... 22
ASTRONOMY BASICS............................................................................................................................................... 23
The Celestial Coordinate System ............................................................................................................. 23
Motion of the Stars................................................................................................................................... 24
Latitude Scale........................................................................................................................................... 25
Pointing at Polaris .................................................................................................................................... 25
Finding the North Celestial Pole .............................................................................................................. 26
Declination Drift Method of Polar Alignment.......................................................................................... 27
Aligning the R.A. Setting Circle .............................................................................................................. 28
Using the R.A. Vernier Scale................................................................................................................... 29
CELESTIAL OBSERVING......................................................................................................................................... 30
Observing the Moon................................................................................................................................. 30
Lunar Observing Hints............................................................................................................................. 30
Observing the Planets............................................................................................................................... 30
Observing the Sun .................................................................................................................................... 31
Solar Observing Hints.............................................................................................................................. 31
Observing Deep Sky Objects.................................................................................................................... 31
Seeing Conditions..................................................................................................................................... 31
Transparency............................................................................................................................................ 31
Sky Illumination....................................................................................................................................... 31
Seeing....................................................................................................................................................... 32
2
Page 3

Using the Lens Cap Aperture Stop with Refractor Telescopes................................................................ 32
ASTROPHOTOGRAPHY........................................................................................................................................... 33
Piggyback Photography............................................................................................................................ 33
Short Exposure Prime Focus Photography for Refractors & Newtonians................................................ 34
Short Exposure Prime Focus Photography for Schmidt-Cassegrains....................................................... 34
Eyepiece Projection for a Schmidt-Cassegrain......................................................................................... 35
Long Exposure Prime Focus Photography............................................................................................... 36
Planetary and Lunar Photography with Special Imagers.......................................................................... 37
CCD Imaging for Deep Sky Objects........................................................................................................ 38
Terrestrial Photography............................................................................................................................ 38
Metering ................................................................................................................................................... 38
Reducing Vibration.................................................................................................................................. 38
TELESCOPE MAINTENANCE................................................................................................................................. 39
Care and Cleaning of the Optics............................................................................................................... 39
Collimation of Refractors......................................................................................................................... 39
Collimation of a Schmidt-Cassegrain....................................................................................................... 40
Collimation of a Newtonian..................................................................................................................... 42
OPTIONAL ACCESSORIES..................................................................................................................................... 46
APPENDIX A TECHNICAL SPECIFICATIONS ................................................................................................. 49
APPENDIX B - GLOSSARY OF TERMS.................................................................................................................. 50
SKY MAPS.................................................................................................................................................................... 53
CELESTRON TWO YEAR WARRANTY ................................................................................................................59
3
Page 4

Congratulations on your purchase of an Omni XLT Series telescope. The Omni XLT Series of telescopes come in several
different models --- 102mm refractor, 120mm refractor, 150mm Newtonian, 127mm Schmidt-Cassegrain. The Omni Series is
made of the highest quality materials to ensure stability and durability. All this adds up to a telescope that gives you a lifetime of
pleasure with a minimal amount of maintenance. Furthermore, your Celestron telescope is versatile — it will grow as your
interest grows. This instruction manual covers all the different models of the Omni XLT telescopes.
.
No matter at what level you are starting out, the Omni XLT Series telescopes will unfold for you and your friends all the wonders
of the Universe.
Some of the many standard features of the Omni XLT include:
• Hand selected optical glass and hand figured optics resulting in superior images.
• Premium Celestron Starbright XLT optical coatings that provide maximum contrast and image sharpness.
• Heavy-duty equatorial mount with a rugged and very stable stainless steel tripod.
• Ball bearings in both axes of the mount ensure smooth performance.
• CD-ROM “The Sky” --- astronomy software which provides education about the sky and printable sky maps.
Many other high performance features!
The Omni XLT deluxe features combined with Celestron’s legendary optical systems give amateur astronomers the most
sophisticated and easy to use telescopes available on the market today.
Take time to read through this manual before embarking on your journey through the Universe. It may take a few observing
sessions to become familiar with your telescope, so you should keep this manual handy until you have fully mastered your
telescope’s operation. The manual gives detailed information regarding each step as well as needed reference material and
helpful hints guaranteed to make your observing experience as simple and pleasurable as possible.
Your telescope is designed to give you years of fun and rewarding observations. However, there are a few things to consider
before using your telescope that will ensure your safety and protect your equipment.
WWaarrnniinngg
Never look directly at the sun with the naked eye or with a telescope (unless you have the
proper solar filter). Permanent and irreversible eye damage may result.
Never use your telescope to project an image of the sun onto any surface. Internal heat build-up can damage the telescope
and any accessories attached to it.
Never use an eyepiece solar filter or a Herschel wedge. Internal heat build-up inside the telescope can cause these devices to
crack or break, allowing unfiltered sunlight to pass through to the eye.
Never leave the telescope unsupervised, either when children are present or adults who may not be familiar with the correct
operating procedures of your telescope
.
4
Page 5

12
11
10
9
1
2
3
4
5
6
7
8
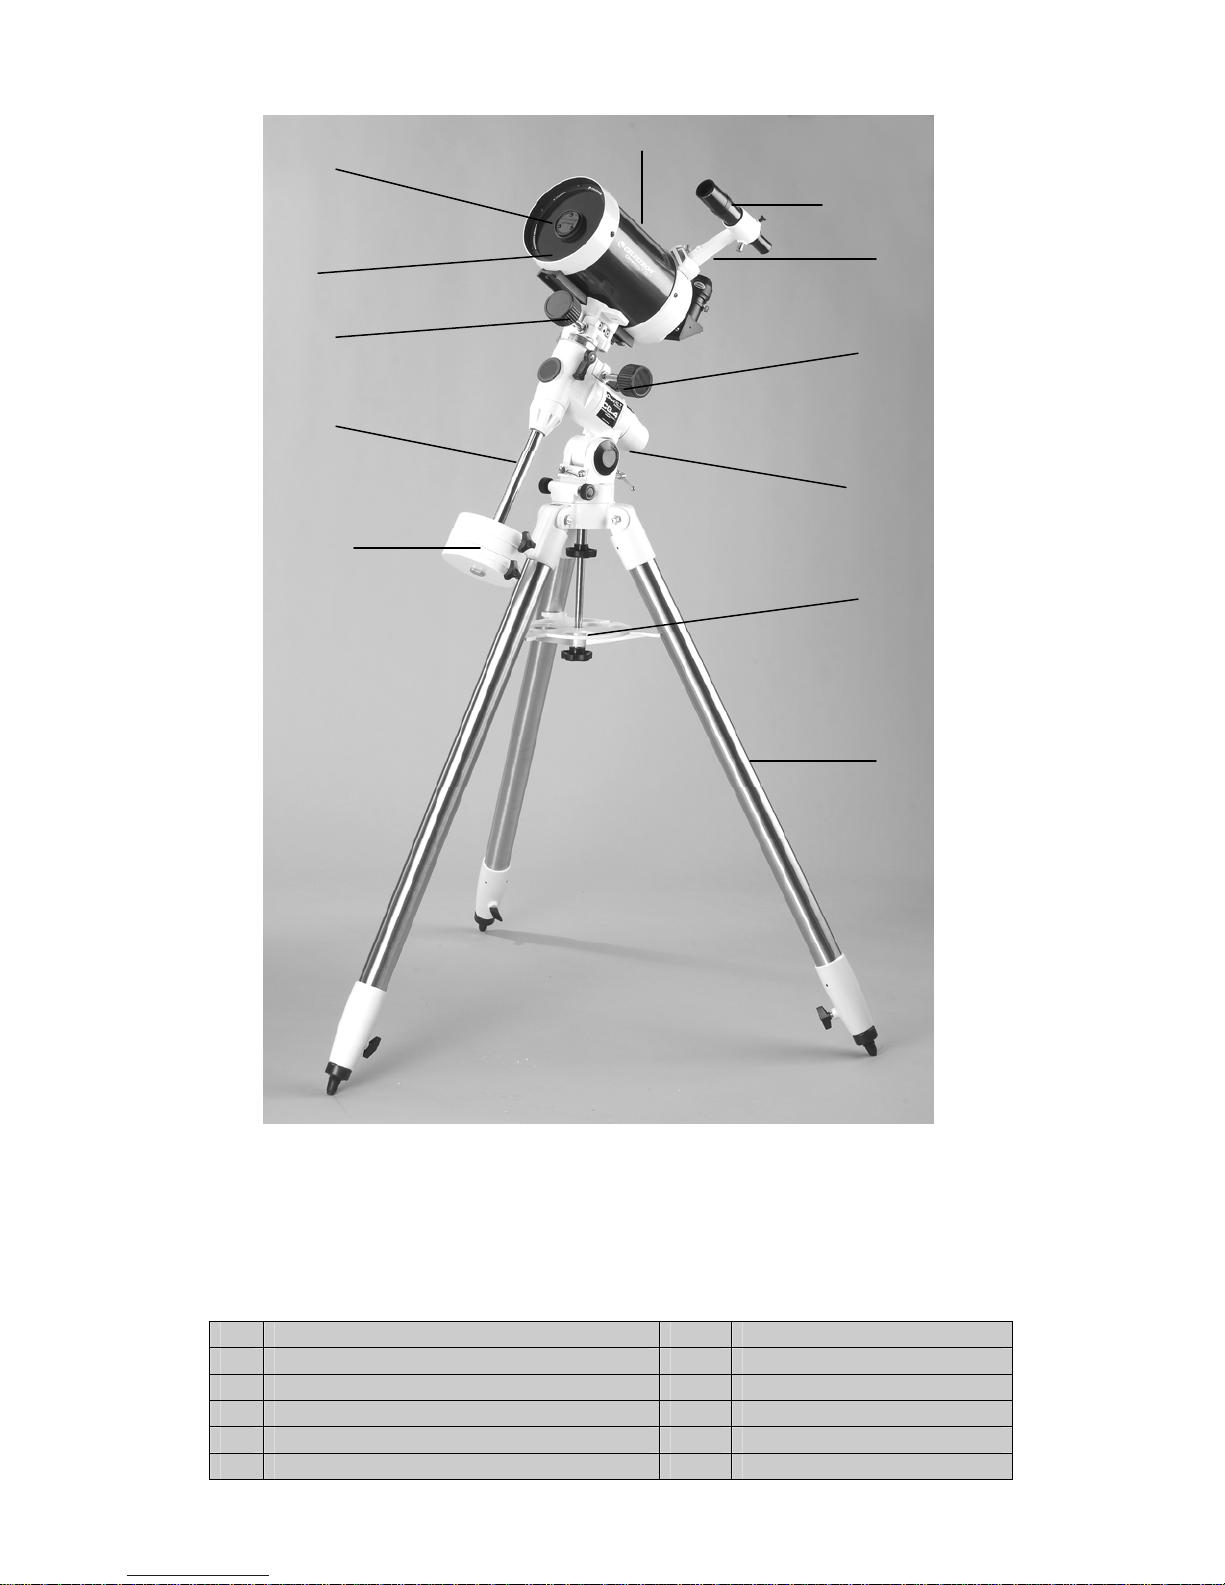
Figure 1-1 Omni XLT 102 Refractor
(Omni XLT 120 Refractor similar)
1. Optical Tube 7. 1.75" Steel Tripod
2. Tube Rings 8. Accessory Tray/ Leg Brace
3. Finderscope 9. Counterweights
4. Eyepiece 10. Counterweight Bar
5. Equatorial Mount 11. Dovetail Slide Bar
6. Latitude Adjustment Screw 12. Objective Lens Shade
5
Page 6

12
11
10
1
2
3
4
5
6
7
8 9
Figure 1-2 Omni XLT 150 Newtonian
1. Finderscope 7. 1.75" Steel Tripod
2. Finderscope Bracket 8. Accessory Tray/ Leg Brace
3. Focuser 9. Counterweights
4. Eyepiece 10. Counterweight Bar
5. Tube Rings 11. Dovetail Slide Bar
6. Equatorial Mount 12. Optical Tube
6
Page 7
12
11
10
1
2
3
4
9
5
8
6
7
1. Optical Tube 7. 1.75" Steel Tripod
2. Finderscope 8. Counterweights
3. Finderscope Bracket 9. Counterweight Bar
Figure 1-3 Omni XLT 127 Schmidt-Cassegrain
4. Equatorial Mount 10. Declination Setting Circle
5. Latitude Scale 11. Dovetail Slide Bar
6. Accessory Tray/ Leg Brace 12. Schmidt Corrector Lens
7
Page 8
This section covers the assembly instructions for your Celestron Omni XLT telescope. The equatorial mount is
exactly the same for all the Omni telescope models and the optical tubes have some differences which will be noted.
Your Omni telescope should be set up indoor the first time so that it is easy to identify the various parts and
familiarize yourself with the correct assembly procedure before attempting it outdoor.
Each Omni telescopes comes in two boxes. One box contains the tripod, tripod accessory tray/brace, equatorial
mount, counterweight bar, two counterweights, r.a. knob, dec. knob, polar axis polar cap, and a Phillips head
screwdriver. The second box contains the telescope optical tube assembly, finderscope and bracket, eyepiece, and
other standard accessory items per the specific model that you have.
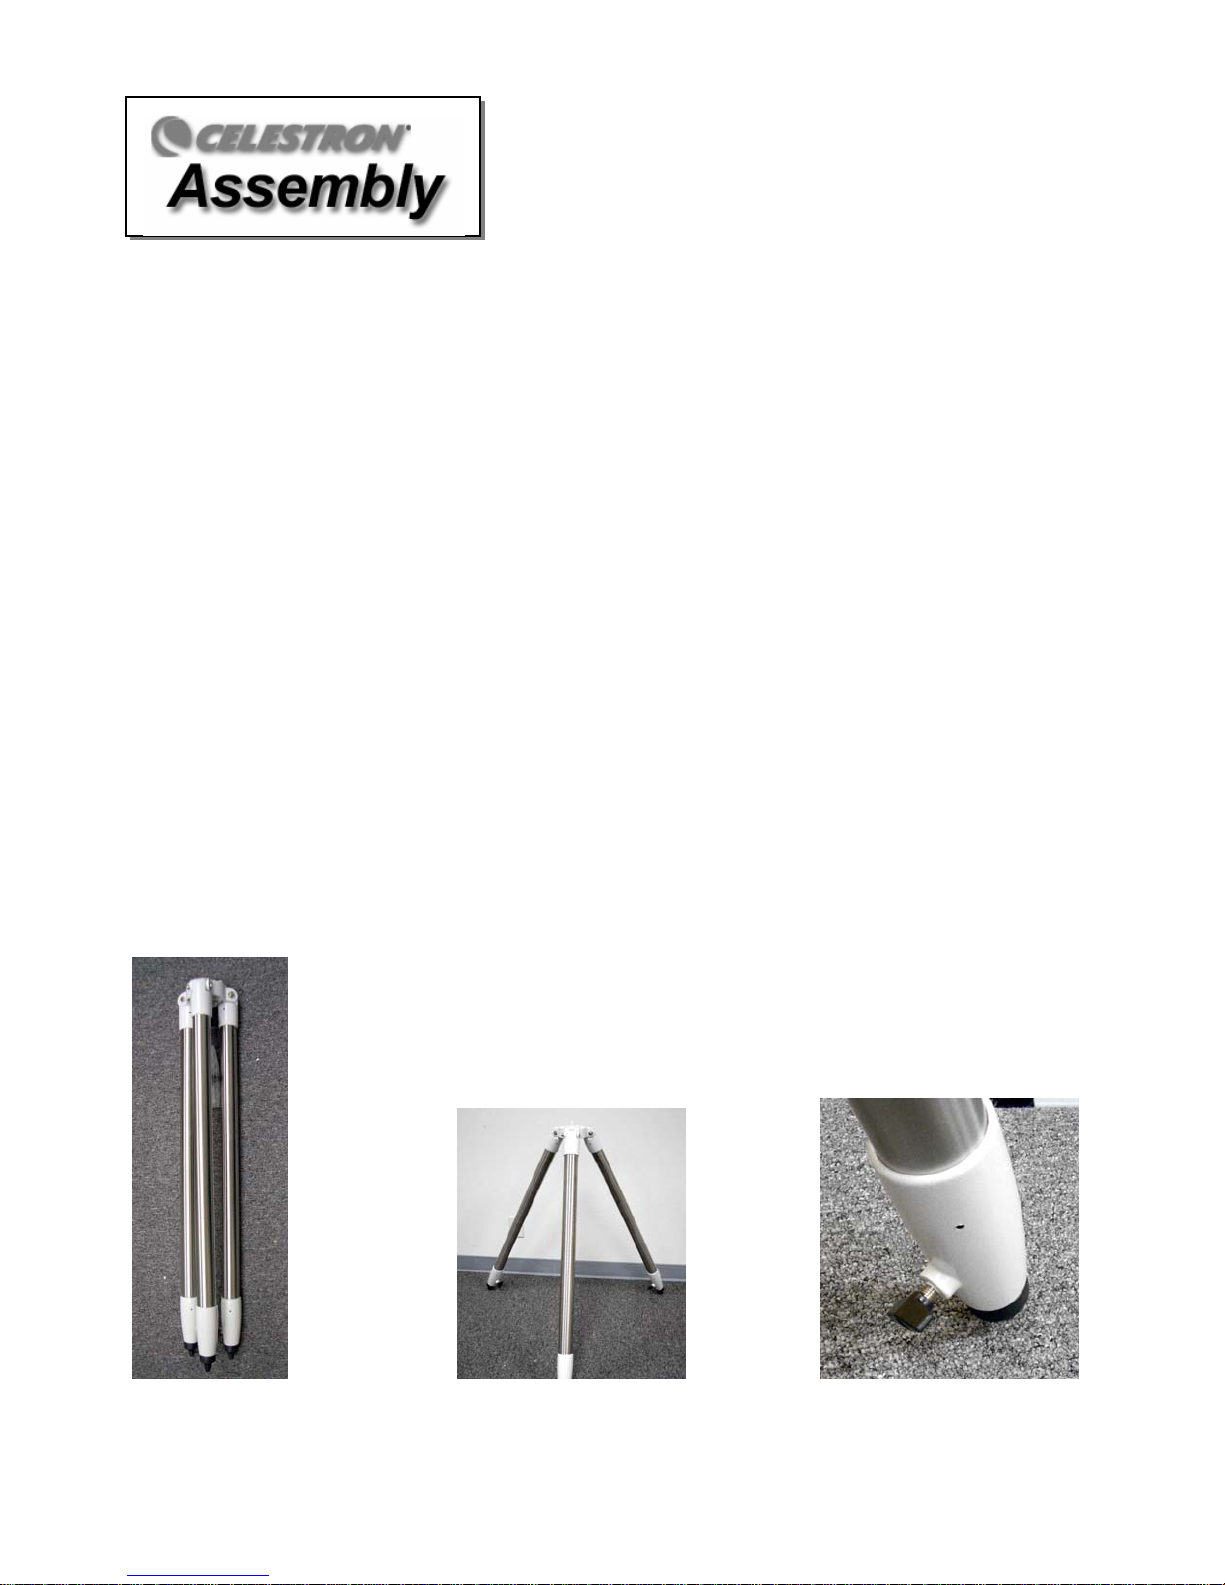
SSeettttiinngg uupp tthhee TTrriippood
Remove the tripod from the box that it is in (Figure 2-1). The Omni tripod comes with an all metal center leg brace
/ accessory tray to give rock solid support to the mount. The tripod comes fully assembled with a metal plate,
called the tripod head, that holds the legs together at the top. In addition, there is a central rod that extends down
from the tripod head that attaches the equatorial mount to the tripod. To set up the tripod:
1. Stand the tripod upright and pull the tripod legs apart until each leg is fully extended. The tripod will now stand by
itself (Figure 2-2). Once the tripod is set up, you can adjust the height at which it stands.
2. Loosen the lever (turn counterclockwise) on the leg clamp so that the tripod leg can be adjusted (Figure 2-3).
3. Slide the center portion of the tripod leg away from the tripod head until it is at the desired height.
4. Tighten the levers (turn clockwise) on each leg clamp to hold the legs in place.
5. The standard height of the tripod is 33” and it can be extended at any height up to a maximum of 47”. Remember
that the tripod will be the most rigid and stable at the lowest height.
d
Figure 2-1 Figure 2-2 Figure 2-3
8
Page 9
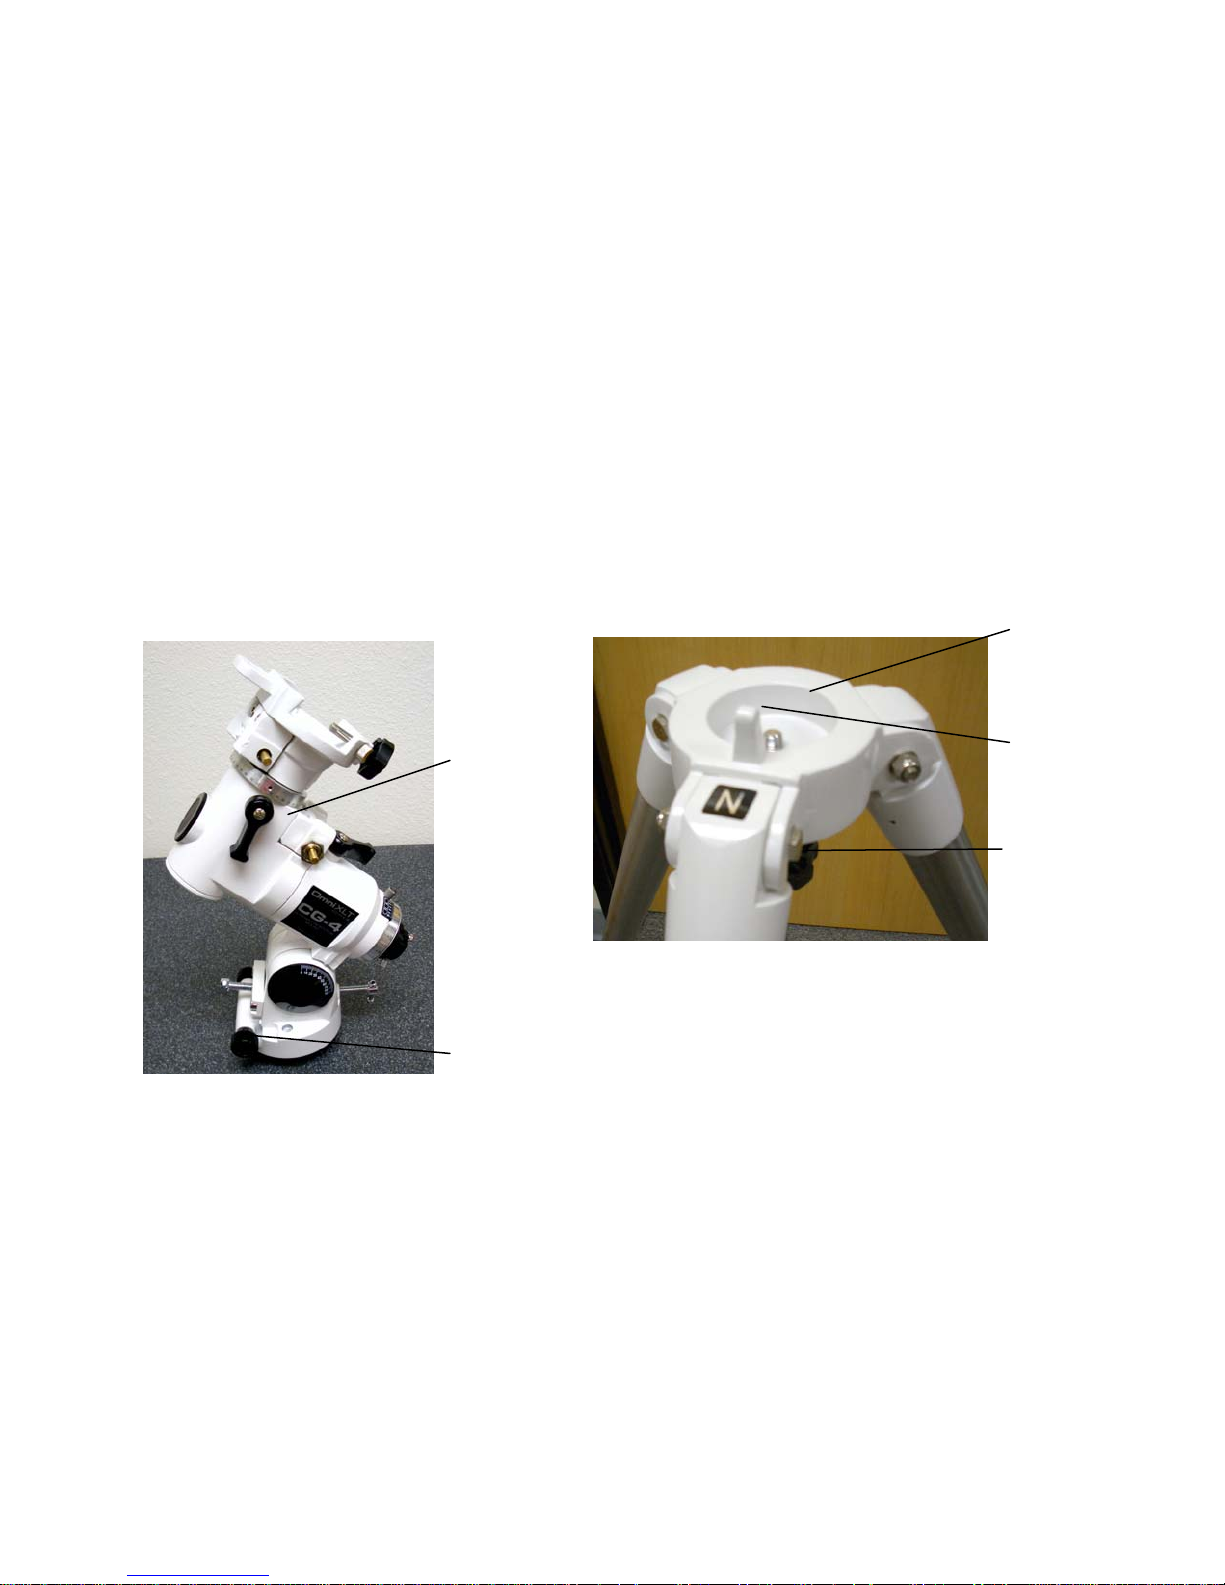
AAttttaacchhiinngg tthhee EEqquuaattoorriiaall MMoouunntt
The equatorial mount allows you to tilt the telescope’s axis of rotation so that you can track the stars as they move
across the sky. The Omni mount is a German equatorial mount that
tripod head there is a metal alignment peg for aligning the mount. This side of the tripod will face north when
setting up for an astronomical observing session. To attach the equatorial head:
1. Locate the azimuth adjustment screws on the equatorial mount (see Figure 2-4).
2. Retract the screws so they no longer extend into the azimuth housing on the mount. Do NOT remove
the screws since they are needed later for polar alignment.
3. Hold the equatorial mount over the tripod head so that the azimuth housing is above the metal peg.
4. Place the equatorial mount on the tripod head so that the two are flush. You can rotate the mount slightly
but the center position (where the front latitude adj ustment screw is directly over the “N” on the tripod.
ighten the azimuth adjustm
Then t ent screws.
5. Tighten the mounting knob (attached to the central rod) on th e underside of the tripod head to hold the
equatorial mount firmly in place.
Equatorial
Mount
Azimuth Adjustment
Figure 2-4
Screws
attaches to the tripod head. On one side of the
Figure 2-5
Tripod
Head
Alignment
Peg
Mounting
Knob
9
Page 10
AAttttaacchhiinngg tthhee CCeenntteerr LLeegg BBrraacce
e
Tripod
Mounting Knob
Central Rod
Accessory Tray
1. Remove the accessory tray knob an om the central rod.
2. Slide the acces
tripod legs.
. Thread the accessory tray knob onto the central rod and tighten.
3
Innssttaalllliinngg tthhee CCoouunntteerrwweeiigghhtt BBaarr
I
o properly balance the telescope, the mount comes with a counterweight bar and two counterweights. To install
T
th
e counterweight bar:
. Remove the counterweight safety screw from the counterweight bar (at the opposite end of the threaded end).
1
. Thread the counterweight bar through the counterweight bar locking nut.
2
3. Locate the opening in the equatorial mount on the
. Thread the counterweight bar into the opening until tight.
4
Once the bar is securely in place you are ready to attach the counterweights.
Exhibit 2-6
d washer fr
sory tray over the central rod so that each arm of the tray is pushing against the inside of the
n5. Tighten the counterweight bar lock
Counterweight Bar
Locking t
Counterweight
Screw
Nu
Safety Screw
Accessory Tray Knob
DEC axis.
ut fully for added support (see fig 2-7).
Locking
Counterweights
Counterweight
Bar
Figure 2-7
10
Page 11
Since the fully assembled telescope can be quite heavy, position the
to
wards north before the tube assembly and counterweights are attached. This will make the polar
a
lignment procedure much easier.
IInnssttaalllliinngg tthhee C
Each Omni mount comes with two counterweights (One weights lbs. and the other weights 4 lbs.) To install the
ounterweight(s):
c
1. rient the mount so that the counterweigh t bar points toward the ground.
O
. Loosen the locking screw on the side of the counterweights (it doesn’t matter which counterweight you attach first)
2
so that the threads do not protrude through the center hole of th
3.
Slide the counterweight onto the shaft (see Figure 2-7).
Tighten the locking screw on the side of the weight to hold the counterweigh
4. t in place.
S t onto the shaft and tighten as in # 4.
5. lide the second counterweigh
R
6. eplace the counterweight safety screw.
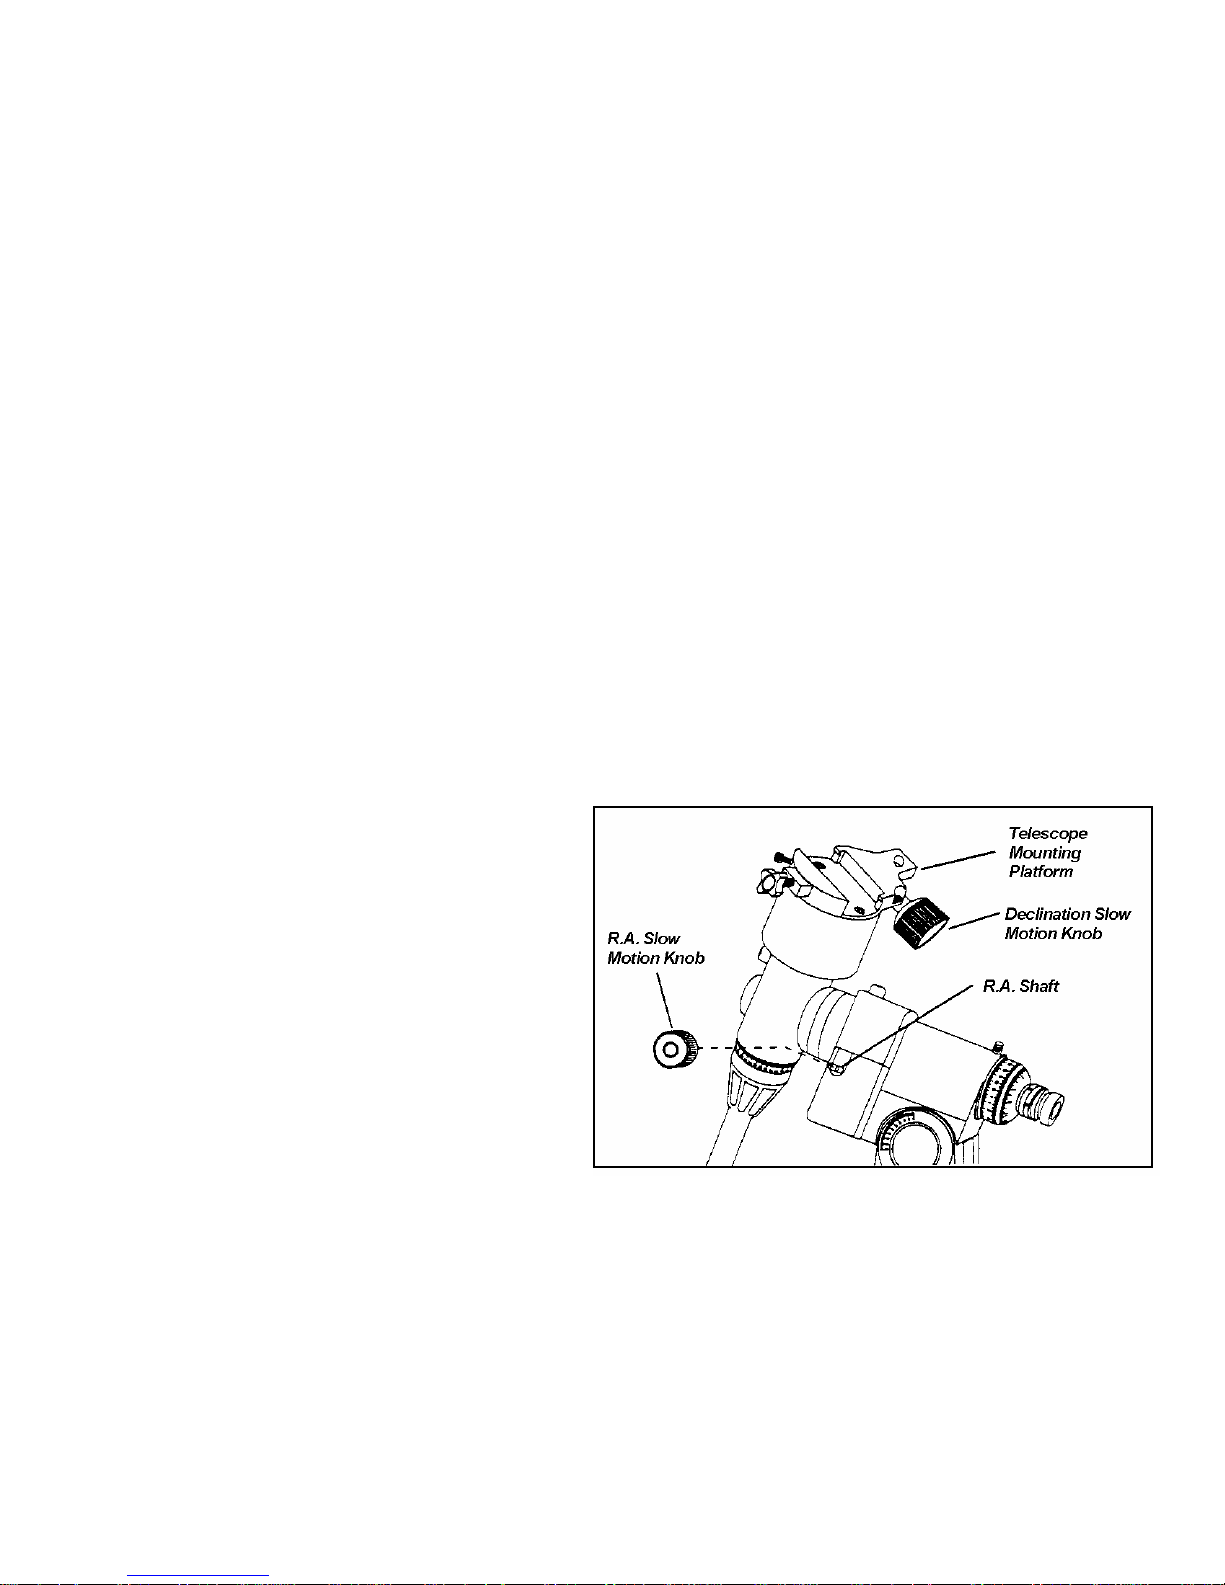
Attttaacchhiinngg tthhee SSllooww MMoottiioonn KKnnoobbss
A
he Omni mount comes with two slow motion
T
c
ontrol knobs that allows you to make fine pointing
a
djustments to
Declination.
Locate the two knobs (both are identical) and make
1.
sure the screw on each knob does not protrude
through the knob shaft opening. Use the supplied
Phillips head screwdriver.
. Line up the flat area on the inne
2
R.A. slow motion knob with the flat area on the
R.A. shaft (see Fig 2-8).
3. Slide the R.A. slow motion knob onto the R
shaft. There are two R.A. shafts, one on either side of
the mount. It makes no difference which shaft you
use since both w
c
onvenient. If, If If after a few observing sessions, you find the R.A. slow
motion knob is more accessible from the other side, reinstall it on the opp
.
4. Tighten the screw on the R.A. knob to hold it securely in place.
the telescope in both R.A. and
To install the knobs:
Coouunntteerrwweeiigghhttss
e counterweight.
r portion of the
.A.
ork the same. Use whichever one you find more
mount so that the polar axis is pointing
Figure 2-8
osite side
11
Page 12

5. The DEC slow motion knob attaches in the same manner as the R.A. knob. The shaft that the DEC slow motion
knob fits over is toward the top of the m
tw
o shafts to choose from. Use the shaft that is pointing toward the ground. This makes it easy to reach while
lo
oking through the telescope, something which is quite important wh en you are observing but again if it is more
convenient for you to use, then reinstall the knob that best
6
. Put the polar axis cap over the polar axis. It is held into place by a tension fit.
AAttttaacchhiinngg tthhee TTeelleessccooppee TTuub
he telescope optical tube attaches to the mount via a dovetail slide bar mounting bracket. For the refractors and the
T
Newtonian, the mounting bracket is the long bracket
Cassegrain the mounting bracket is attached along the b
tube, make sure that the declination and right ascen
the mount does not move su
emove the protective paper covering the optical tu
1 R be. You will have to remove the tube rings on the refractors
Newtonian before removing
and the paper.
2 Loosen the mounting knob and the mounting safety scre
protrude into the mounting platform
ddenly while attaching the telescope optical tube. To mount the telescope tube:
ount, just below the telescope mounting platform. Once again, you have
suits your needs.
bee ttoo
tthhee MMoouunntt
which is attached to the tube rings. For the Schmidt-
ottom of the telescope tube. Before you attach the optical
sion clutch knobs (clamps) are tight. This will ensure that
w on the side of the mount platform so they do not
3. Slide the dovetail mounting bracket into the recess
on the top of the mounting platform (see figure 2-9).
5 ighten the mounting knob on the Omni mounting
T
p
latform to hold the telescope in place.
6
Hand tighten the mounting platform safety screw
u
ntil the tip touches the side of the mounting bracket.
N
OTE: Never loosen any of the knobs on the
te
lescope tube or mount other than the R.A. and
DEC knobs.
Newtonian and Schmidt-Cassegrain attach
s
Figure 2-9 Refractor Optical Tube is shown. The
imilarly.
12
Page 13
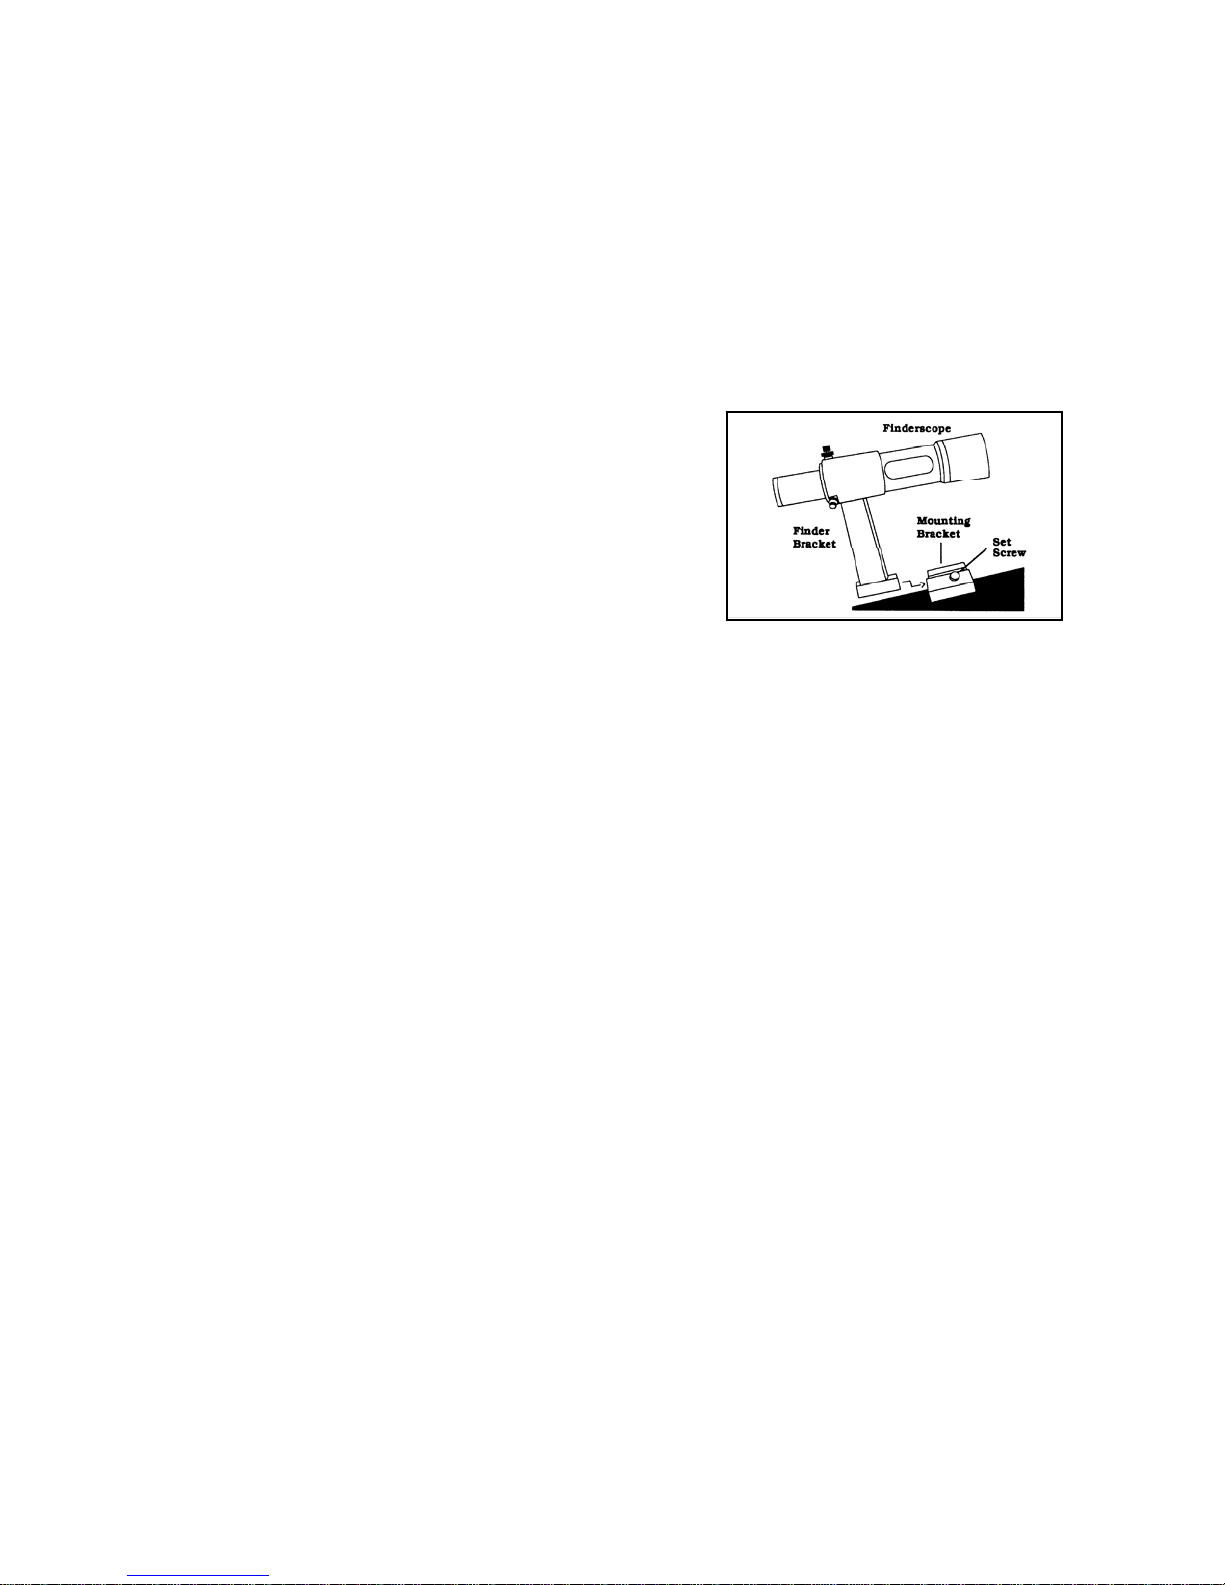
IInnssttaalllliinngg tthhee FFiinnddeerrssccooppe
e
To install the finderscope onto the telescope you must fi
then attach it to the telescope. Toward the rear of the t
fro
nt of the telescope tube (Newtonian), there is a small bracket with a set screw in it. This is where the
nderscope bracket will be mounted. To install the find
fi
Loosen the finderscope adjus
1. tment screws so they don’t protrude into the bracket. Then slide the rubber
O-ring over the eyepiece end of the finder
the slot (groove) in the finderscope.
2. Insert the eyepiece end of the findersc
narrow part of the bracket until the O-ring
between the finder and the inside of the brac
stops, then pull outward on the spring loaded adjustment
screw and continue inserting the finderscope until it is
approximately centered in the bracket.
3. Tighten the two adjustment screws until they make contact
with the finderscope body.
4. Locate the mounting bra
5. Loosen the set screw on the mounting bracket on the telescope
so it does not protrude in the bracket.
6. Slide the finder bracket (attached to the finderscope) into the mounting bracket on the telescope.
7. The finderscope bracket ill slide in from the back. The ted so that the
objective lens is toward e front (open) end of the telescope.
8. Tighten the set screw on the mounting bracket to hold the finderscope in place.
cket near the front (open) end of the telescope.
to
w finderscope should be orien
th
rst mount the finderscope through the finder bracket and
elescope tube (on refractors and Schmidt-Cassegrain) and
erscope:
scope (smallest diameter side) and roll it 2/3 of the way up into
ope through the
presses tightly
ket. Once it
Figure 2-10
or information on aligning your finderscope, see Telescope Basics section of this manual.
F
IInnssttaalllliinngg tthhee VViissuuaall BBaacck
Only applicable to the Schmidt-Cassegrain, the visual back is the accessory that allows you to attach all v
the telescope. The Omni Schmidt-Cassegrain normally comes wi
fo
llow these instructions for attaching it:
Remove the cover on the rear cell and then place the knurled slip ring on the visual back over the threads on
1. the rear
ll (Fig 2-11).
ce
Hold the visual back with the set screw in a convenient po
2. sitio til
t ht. Once this is done, you are ready to attach other accessories
ig hmidt-
assegrain), eyepieces, etc. If you want to remove the visual bac
C k, rotate the slip ring counterclockwise until it is
ee of the rear cell.
fr
k
isual accessories to
th the visual back installed. If in case it is not installed,
n and rotate the knurled slip ring clockwise un
, such as diagonals (for refractors and the Sc
13
Page 14

k
Innssttalllliinngg tthhee SSttaarr DDiiaaggoonnaall
I
a
TCar diagonal is a prism that diverts the light at a right angle to the light path of re
he st fractors and Schmidt-
rai telescopes. This allows you to observe in positions that
asseg n
ysically more comfortable than if you looked straight through.
are ph
T
o attach t Schmidt-
C
assegrain:
he star diagonal onto the optical tube of a
Tu he set screw on the visual back until its tip no longer extends
1. rn t
e., bstructs) the inner diameter of the visual back.
into (i. o
2. Slide t
3. ighten the set screw on the visual back to hold the star diagonal in
1. oosen the set screw on the eyepiece adapter so that
2.
3.
he chrome portion of the star diagonal into the visual back.
T
place.
If
you wish to change the orientation of the star diagonal, loosen the
set screw on the visual back until the star
diagonal to the desired position and tighten t
Refractors – To use the star diagonal on refractor telescopes, it is inserted into the 1 ¼” eyepiece adapter.
Innssttaalllliinngg
I
The eyep
Without
o
f refractors and or into the visual
b
ack on the Schmidt-Cassegrain To attach an ocular:
L
it does not obstruct the inner diameter of the ba
Slide the chrome portion of the eyepiece into the
focuser.
Tighten the set screw to hold the eyepiece in place.
To remove th
fo
cuser and slide the eyepiece out. You can replace
it with another ocular.
Many times it will be more comfortable to use a star diagonal on
refractors and Schmidt-Cassegrain for most areas of the sky.
an eyepiece into the star diagonal:
tthhee EEyyeeppiieeccees
iece, or ocular as it is also called, is an optical element that magnifies the image focused by the telescope.
the eyepiece it would be impossible to use the telescope visually. The eyepiece fits directly into the focuser
the Newtonian
e eyepiece, loosen the set screw on the
A. Loosen the set screw on the star diagonal until the tip no longer extends
into the inner diameter of the eyepiece end of the diagonal.
B. Slide the chrome portion of the eyepiece into the star
C. Tighten the set screw on the star diagonal to hold the eyepiece i
D. To remove the eyepiece, loosen the se
Slide the eyepiece out. You can replace it with other optional eyepieces.
diagonal rotates freely. Rotate the
he set screw.
s
rrel.
Focuser Knob
t screw on the star diagonal and
Star Diagonal
Visual Bac
Figure 2-11
Focuser Tension
Screw
the Figure 2-12
To install
diagonal.
n place.
Eyepiece
1 ¼" Eyepiece
Adapter
2" Focuser
Barrel
T-Adapter
14
Page 15
The refracting telescopes can use eyepieces and diagonals of a 2” barrel diameter. To use a 2” barrel eyepiece, the 1
¼
” eyepiece adapter must first be removed. To do this, simply loosen the two chrome thumbscrews located around
th
e focuser barrel (see figure 2-12) and remove the 1 ¼” adapter. Once removed, a 2” eyepiece or accessory can be
inserted directly into the focuser barrel an
Eyepieces are commonly referred to by focal length and barrel diameter. The focal length of each eyepiece is
printed on the eyepiece barrel. The longer the focal length (i.e., the larger the number) the lower the eyepiece
magnification (i.e., power) and the shorter the focal le
magnification. Generally, you will use low-to-modera
determine power, see the section on “Calculating Mag
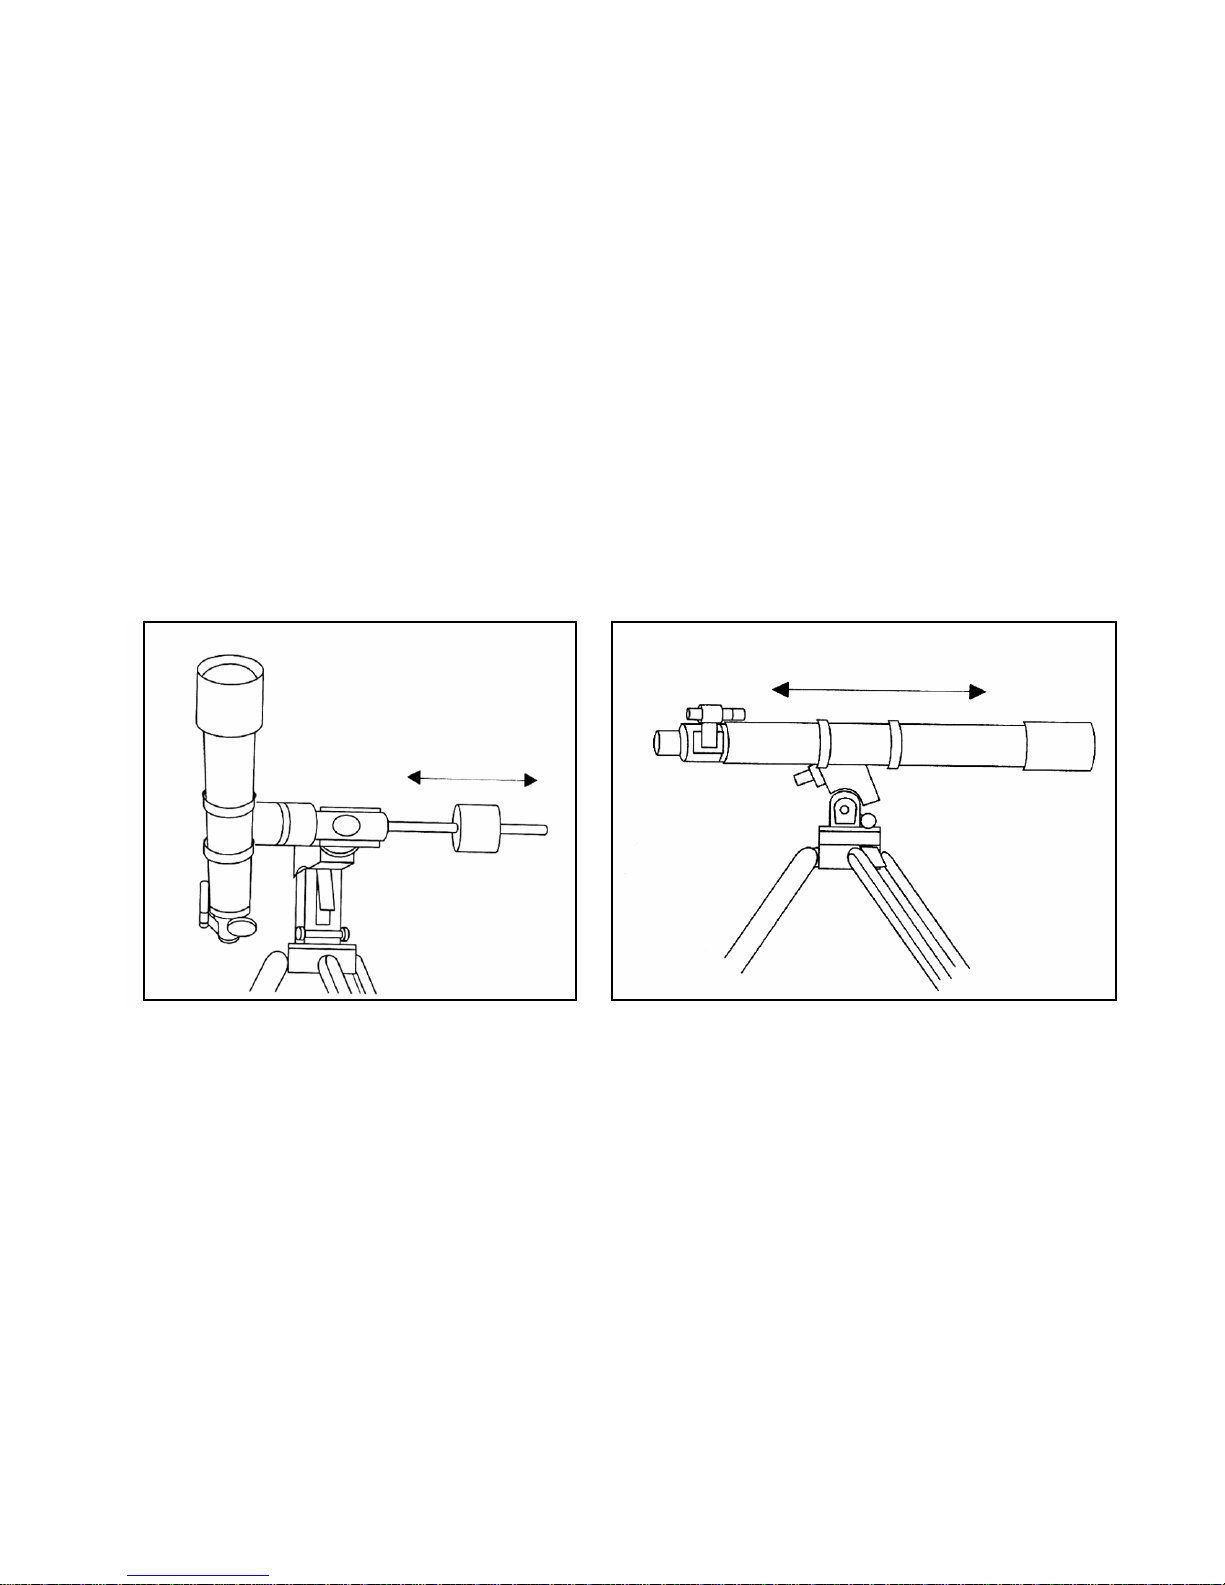
MMoovviinngg tthhee TTeelleessccooppee MMaannuuaalllly
In order to properly balance your telescope, you w
the sky to
and move the telescope in the desired direction.
Both the R.A. and DEC axis have lock levers to clutc
the telescope, rotate the lock levers counterclockwise
Baallaanncciinngg tthhee MMoouunntt iinn RR..AA..
B
To e nced around the polar axis. In
addi accurate tracking if using an optional motor drive. To balance the mount:
1. Release the R.A unt (make sure that the
mounting bracket sc on the opposite side of the mount
(see figure 2-12
2. Release the tele
3. Loosen the counterweight lock ing screw on the counterweight.
Move the counterweights to a point where they balance the telescope (i.e., it remains stationary when the R.A.
4.
clamp is released).
Tighten the locking screw to hold the counterweights in place.
5.
T
hese are general balance instructions and will reduce undue stress on the mount. When taking astrophotographs,
this balance process should be done for the specific area at which the telescope is pointing.
observe different objects. To make rough adjustments, lo osen the R.A. and DEC clutch knobs slightly
liminate undue stress on the mount, the telescope should be properly bala
tion, proper balancing is crucial for
. Clamp (see figure 2-13) and position the telescope off to one side of the mo
rew is tight). The counterweight bar will extend horizontally
).
scope — GRADUALLY — to see which way the telescope “rolls.”
DEC Clamp
d secured with the two thumb screws.
ngth (i.e., the smaller the number) the higher the
e power when viewing. For more information on how to
t
nification.”
y
ill need to move your telescope manually at various portions of
h down each axis of the telescope. To loosen the clutches on
.
Figure 2-13
R.A. Clamp
15
Page 16
BBaallaanncciinngg tthhee MMoouunntt iinn DDEEC
C
The telescope should also be balanced on the declination axis to prevent any sudden motions when the DEC clamp
(Fig 2-13) is released. To balance the telescope in DEC:
. amp and rotate the telescope so that it is on one side of the mount (i.e., as described in the
1
Release the R.A. cl
previous section on balancing the telescope in R.A.).
2. Lock the R.A. clamp to hold the telescope in place.
3. Release the DEC clamp and rotate the telescope until the tube is parallel to the ground (see figure 2-15).
4
. Release the tube — GRADUALLY — to see which way it rotates around the declination axis. DO NOT LET GO
OF THE TELESCOPE TUBE COMPLETELY!
Loosen the screws that hold the telescope tube inside the mounting rings and slide the telescope either forwards or
5.
backwards until it remains stationary when the DEC clamp is released.
6. .Tighten the tube ring screws firmly to hold the telescope in place.
Figure 2-14
Like the R.A. balance, these are general balance instructions and will reduce undue stress on the mount. When
taking astrophotographs, this balance process should b
Addjjuussttiinngg
A
In order for a motor drive to track accurately, the telescope’s axis of rotation must be parallel to the Earth’s axis o
rotation, a process known as polar alignment. Polar alignment is achie
DEC, but by adjusting the mount vertically, which is called altitud
section simply covers the correct movement of the telescope durin
of polar alignment, that is making the telescope’s axis of rotation parallel to the Earth’s, is described later in this
m
anual in the section on “Polar Alignment.”
tthhee MMoouunnt
t
Figure 2-15
e done for the specific area at which the telescope is pointing.
f
ved NOT by moving the telescope in R.A. or
e, and horizontally, which is called azimuth. This
g the polar alignment process. The actual process
16
Page 17

h
Rear Latitude
Adjustment Screw
AAddjjuussttiinngg tthhee MMoouunntt iinn AAllttiittuuddee
• To increase the latitude of the polar axis, tighten the rear latitude adjustment screw and loosen the front screw (if
necessary).
• To decrease the latitude of the polar axis, tighten the front (under the counterweight bar) latitude adjustment screw
and loosen the rear screw (if necessary).
The latitude adjustment on the Omni mount has a range from approximately 20° going up to 60°.
It is best to always make final adjustments in altitude by moving the mount against gravity (i.e. using the rear
latitude adjustment screw to raise the mount). To do this you should loosen both latitude adjustment screws and
manually push the front of the mount down as far as it will go. Then tighten the rear adjustment screw to raise the
mount to the desired latitude.
.
FrAdont Latitude
justment Screw
AzScimuth Adjustment
rew
Figure 2-16
AAddjjuussttiinngg tthhee MMoouunntt iinn AAzziimmuutth
For rough adjustments in azimuth, simply pick up the telescope and tripod and move it. For fine adjustments in
azimuth:
1. Turn the azimuth adjustment knobs located on either side of the azimuth housing (see Fig 2-14). While standing
behind the telescope, the knobs are on the front of the mount.
urning the right adjustment knob clockwise moves the mount toward the right. • T
Turning the left adjustment knob clockwise moves the mount to the left.
•
Both screws push off of the peg on the tripod head, which means you may have to loosen one screw while
tightening the other. The sc o the tripod may have to be loosened slightly.
eep in mind that adjusting the mount is done during the polar alignment process only. Once polar aligned, the
K
m
ount must NOT be moved. Pointing the telescope is done by moving the mount in right ascension and declination,
as described earlier in this manual.
rew that holds the equatorial mount t
17
Page 18
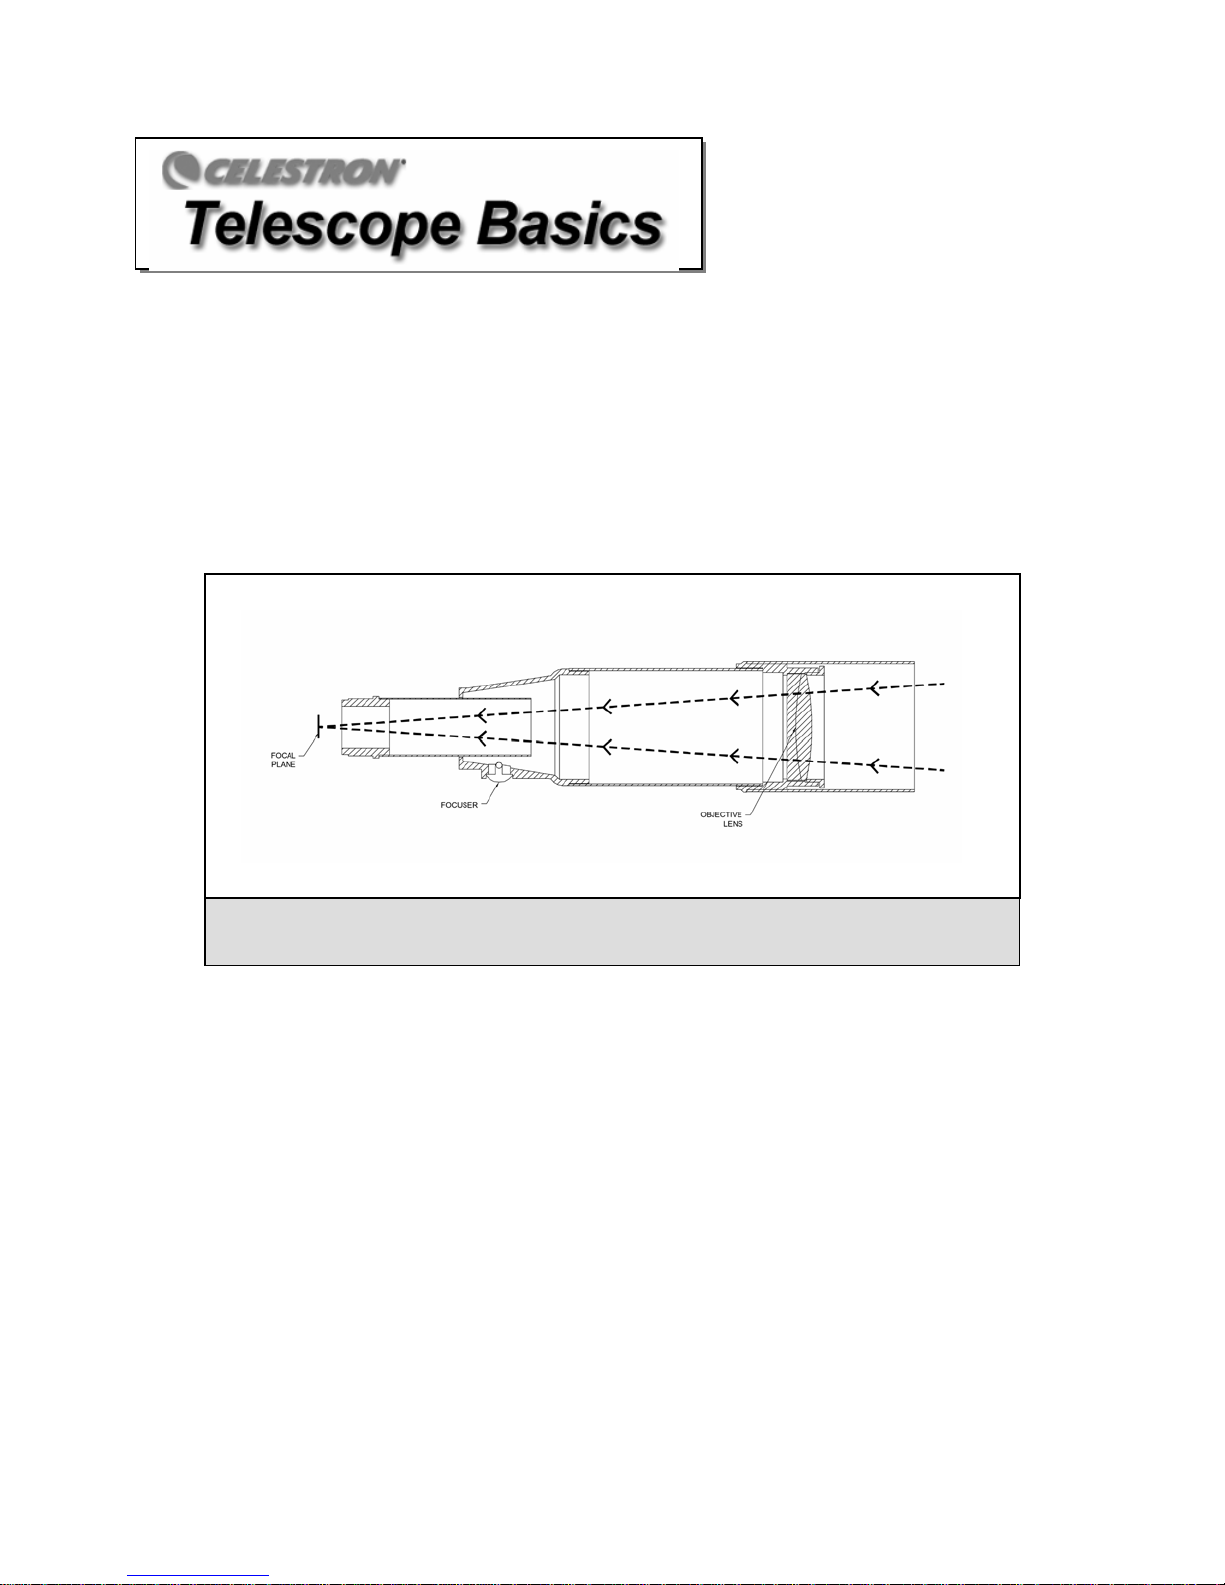
A telescope is an instrument that collects and focuses light. The nature of the optical design determines how the light is focused.
ome tele opes, known as re telescopes, known as reflectors (Newtonians), use mirrors. Then, the
S sc fractors, use lenses. Other
chmidt- ssegrai elescop ses. Each optical design is briefly discussed below:
S
D
in li . The refractor uses a l
designs used single element lenses. However, the single len
w
same point. Most two-element lenses, usually made of crown and flint glasses, are corrected for red and green light. Blue lig
may still be focused at a slightly different point.
Ca n t e uses both mirrors and len
evelope in the early 1600s, is the oldest telescope design. It derives its name from the method it uses to focus
d the refractor
coming ght rays ens to bend or refra
ainbow, a phenomenon known as chromatic aberration. Tor
as introduced. Each element has a different index of refraction allowing two different wavelengths of light to be focused at the
ct incoming light rays, hence the name (see Figure 4-1). Early
s acts like a prism and breaks light down into the colors of the
get around this problem, a two-element lens, known as an achromat,
ht
New
A
tonian reflector uses a single concave mirror as its primary. Light enters the tube traveling to the mirror at
e back end. There light is bent forward in the tube to a single point, its focal point. Since putting your head in
th
front of the telescope to look at the image with an eyepiece would keep the reflector from working, a flat mirror
called a diagonal intercepts the light and points it out the side of the tube at right angles to the tube. The eyepiece
p
laced there for easy viewing.
Newtonian Reflector telescopes replace heavy lenses with mirrors to collect and focus the light, providing much
more light-gathering power for the dollar. Because the light path is intercepted and reflected out to the side, yo
have focal lengths up to 1000mm and still enjoy a telescope that is relatively compact and portable. A Newtonian
Reflector telescope offers such impressive light-gathering characteristics you can take a serious interest in deep
space astronomy even on a modest budget. Newtonian Reflector telescopes do require more care and maintenance
because the primary mirror is exposed to air
te
lescope’s popularity with those who want an economical telescope that can still resolve faint, distant objects.
AA ccuuttaawwaayy vviieeww ooff tthhee lliigghhtt ppaatthh ooff tthhee RReeffrraaccttoorr ooppttiiccaall ddeessiiggn
and dust. However, this small drawback does not hamper this type of
Figure 3-1
n
is
u can
18
Page 19

A ccuuttaawwaayy
A
vviieeww ooff tthhee lliigghhtt ppaatthh ooff tthhe
Figure 3-2
e NNeewwttoonniiaann
oppttiiccaall
o
ddeessiiggn
n
The Schmidt-Cassegrain optical system (or Schmidt-Cass for short) uses a combination of mirrors and lenses and s referred
as a compound or catadioptric telescope. This unique design offers large-diameter optics while maintaining very short
lengths, making them extremely portable. The Schmidt-Cassegrain system consists of a zero power corrector plate, a spherica
primary mirror, and a secondary mirror. Once light rays enter the optical system, they travel the length of the optical tube thre
times.
T
he optics of the Advanced Series Schmidt-Cassegrain telescopes have Starbright coatings - enhanced multi-layer coatings on
th
e primary and secondary mirrors for increased reflectivity and a fully coated corrector for the finest anti-reflection
c
haracteristics.
In
side the optical tube, a black tube extends out from the center hole in the primary mirror. This is the primary baffle tube and it
p
revents stray light from passing through to the eyepiece or camera.
tube
to
l
e
AA ccuuttaawwaayy vviieeww ooff tthhee lliigghhtt ppaatthh ooff tthhee SScchhmmiiddtt--CCaasssseeggrraaiinn ooppttiiccaall ddeessiiggn
Figure 3-3
19
n
Page 20

maaggee OOrriieennttaattiioonn
IIm
he image orientation changes depending on how the eyepiece is inserted into the telescope. When using the star diagonal with
T
re
fractors and Schmidt-Cassegrains, the image is right-side-up, but reversed from left-to-right (i.e., mirror image). If inserting
e eyepiece directly into the focuser of a refractor or the visual back of the Schmidt-Cassegrain (i.e., without the star diagonal),
th
e image is upside-down and reversed from left-to-right (i.e., inverted).
th
ewtonian reflectors produce a right-side-up image but the image will appear rotated based on the location of the
N
epiece holder in relation to the ground. Newtonian reflectors are best for astronomical use where right-side-up
ey
d
oes not matter.
Actual image orientation as seen
with the unaided eye
Reversed from left to right, as
viewed using a Star Diagonal on a
refractor or Schmidt-Cassegrain
Figure 3-4
Inverted image, normal with
Newtonians and as viewed with
eyepiece directly in other scopes
FFooccuussiinng
g
To focus your refractor or Newtonian telescope, simply turn the focus knob located directly below the eyepiece
holder. Turning the knob clockwise allows you to focus on an
object that is farther than the one you are currently
observing. Turning the knob counterclockwise from you allows you to focus on an object closer than the one you
are currently observing.
The Schmidt-Cassegrain focusing mechanism controls the primary mirror which is mounted
on a ring that slides back and forth on the primary baffle tube. The focusing knob, which
moves the primary mirror, is on the rear cell of the telescope just below the star diagonal and
eyepiece. Turn the focusing knob until the image is sharp. If the knob will not turn, it has
reached the end of its travel on the focusing mechanism. Turn the knob in the opposite
direction until the image is sharp. Once an image is in focus, turn the knob clockwise to
focus on a closer object and counterclockwise for a more distant object. A single turn of the
focusing knob moves the primary mirror only slightly. Therefore, it will take many turns
(about 30) to go from close focus (approximately 60 feet) to infinity.
.For astronomical viewing, out of focus star images are very diffuse, making them difficult
to see. If you turn the focus knob too quickly, you can go right through focus without seeing
the image. To avoid this problem, your first astronomical target should be a bright object
(like the Moon or a planet) so that the image is visible even when out of focus. Critical
focusing is best accomplished when the focusing knob is turned in such a manner that the
mirror moves against the pull of gravity. In doing so, any mirror shift is minimized. For
astronomical observing, both visually and photographically, this is done by turning the focus
k
nob counterclockwise.
correct
for focusing your telescope
Figure 3-5
The emb
the focu
lem on the end of
s knob shows the
rotational direction
.
ote: If you wear corrective lenses (specifically glasses), you may want to remove them when observing with an
N
eyepiece attached to the telescope. However, when using a camera you should always wear corrective lenses to
ensure the sharpest possible focus. If you have astigmatism, corrective lenses must be worn at all times.
20
Page 21

Alliiggnniinngg tthhee FFiinnddeerrssccooppee
A
ccurate alignment of the finder makes it easy to find objects with the telescope, especially celestial objects. To
A
make aligning the finder as easy as possible, this procedure should be done in the daytime when it is easy to find
and identify objects. The finderscope has a spring-loaded adjustment screw th at puts pressure on the finderscope
while the remaining screws are used to adjust the finder horizontally and vertically. To align the finder:
C
1 hoose a target that is in excess of one mile away. This eliminates any possible parallax effect between the
telescope and finder.
Release the R.A.
2 and DEC clamps and point the telescope at your target.
3 Center your target in the main optics of the telescope. You may have to move the telescope slightly to center it.
4 Adjust the screw on the finder brack et that is on the right (when looking through the finder) until the cross hairs are
centered horizontally on the target seen through the telescope.
5 Adjust th e screw on the top of the finder bracket until the cross hairs are centered vertically on the target seen
through the telescope.
Image orientation through the finder is inverted (i.e., upside down and backwards left-to-right). This is normal for
most astronomical finderscopes. Because of this, it may take a few minutes to familiarize yourself with the
directional change each screw makes on the finder.
C
C
aallccuullaattiinngg MMaaggnniiffiiccaattiioonn
Y
ou can change the
telescope, simply divide the focal length of the telescope by the focal length of the eyepiece used. In equation format, the
formula looks like this:
Magnification =
Focal Length of Eyepiece
Let’s say, for example, you are using the 25mm eyepiece that came with your telescope. T
simply divide the focal length of your telescope (the Omni XLT 102 for this example has a fo
length of the eyepiece, 25mm. Dividing 1000 by 25 yields a magnification of 40 power.
power of your telescope just by changing the eyepiece (ocular). To determine the magnification of your
Focal Length of Telescope
⎯⎯⎯⎯⎯⎯⎯⎯⎯⎯⎯⎯⎯⎯
(mm)
(mm)
o determine the magnification you
cal length of 1000mm) by the focal
Although the power is variable, each instrument under average skies has a limit to the highest useful magnification. The general
rule is that 60 power can be used for every inch of aperture. For example, the Omni X
Multiplying 4 by 60 gives a maximum useful magnification of 240 power. Although this is t
most observing is done in the range of 20 to 35 power for every inch of aperture which is 80 to 140 times for the
telescope. You can determine the magnification for your telescope the same way.
21
LT 102 is 4 inches in diameter.
he maximum useful magnification,
Omni XLT 102
Page 22

DDeetteerrmmiinniinngg FFiieelldd ooff VViieew
Determining the field of view is important if you want to get an idea of the angular size of the object you are observing.
calculate the actual field of view, divide the apparent field of the eyepiece (supplied by the eyepiece manufacturer) by th
magnification. In equation format, the formula looks like this:
Apparent Field of Eyepiece
True Field
Magnification
As you can see, before determining the field of view, you must calculate the magnification. Using the example in the previou
section, we can determine the field of view using the same 25mm eyepiece that is supplied standard with all Omni XLT
telescopes. The 25mm eyepiece has an apparent field of view of 50°. Divide the 50° by the magnification, which is 40 power.
This yields an actual field of 1.25°.
To convert degrees to feet at 1,000 yards, which is more useful for terrestrial observing, simply multiply by 52.5. Conti
with our example
of one thousand yards. The
Catalog (# 93685).
, multiply the angular field of 1.25° by 52.5. This produces a linear field width of 65.6 feet at a dis
= ⎯⎯⎯⎯⎯⎯⎯⎯⎯⎯⎯⎯⎯
apparent field of each eyepiece that Celestron manufactures is found in the Celestron Accessory
w
s
nuing
tance
To
e
Geenneerraall OObbsseerrvviinngg HHiinnttss
G
When working with any optical instrument, there
• Never look through window glass. Glass found in household windows is optically imperfect, and as a result, may v
thickness from one
In most cases you will not be able to achieve a truly sharp image, while in some cases, you may actually see a double image.
• Never k across or over objects that are producing heat waves. Th
Hazy skies, fog, and mist can also make it difficult to focus when viewing terrestrially. The amount of detail seen under
•
loo is includes asphalt parking lots on hot summer days or
building rooftops.
these conditions is greatly reduced. Also, when photographing under these conditions, the processed film may come out a
little grainier than normal with lower contrast and underexposed.
part of a window to the next. This inconsistency can and will affect the ability to focus your telescope.
• If you wear corrective lenses (specifically glasses), you may want to remove them whe
attached to the telescope. When using a camera, however, you should always wear corrective lenses to ensure the sharpest
possible focus. If you have astigmatism, corrective lenses must be worn at all times.
are a few things to remember to ensure you get the best possible image.
ary in
n observing with an eyepiece
22
Page 23

Up to this point, this manual covered the assembly and basic operation of your telescope. However, to understand your
telescope more thoroughl t the night sky. This section deals with observational
astronomy t sky and polar alignment.
TThhee C
To help find objects in the sky, astronomers use a celestial coordinate system that is similar to our geographical
coordinate system here on Earth. The celestial coordinate system has poles, lines of longitude and latitude, and an
equator. For the most part, these remain fixed against the background stars.
The celestial equator runs 360 degrees around the Earth and separates the northern celestial hemisphere from the
southern. Like the Earth's equator, it bears a reading of zero degrees. On Earth this would be latitude. However, in the
sky this is referred to as declination, or DEC for short. Lines of declination are named for their angular distance above
and below the celestial equator. The lines are broken down into degrees, minutes of arc, and seconds of arc.
Declination readings south of the equator carry a minus sign (-) in front of the coordinate and those north of the
celestial equator
in general and includes information on the nigh
C
elleessttiiaall CCoooorrddiinnaattee
e
are either blank (i.e., no designation) or preceded by a plus sign (+).
y, you need to know a little abou
ysstteemm
SSy
The celestial equivalent of longitude is called Right Ascension, or R.A. for short. Like the Earth's lines of longitude,
they run from pole to pole and are evenly spaced 15 degrees apart. Although the longitude lines are separated by an
angular distance, they are also a measure of time. Each line of longitude is one hour apart from the next. Since the
Earth rotates once every 24 hours, there a
time. It begins with an arbitrary point in
other points are designated by how far (i.e., how long) they lag behind this coordinate after it passes overhead moving
toward the west.
re 24 lines total. As a result, the R.A. coordinates are marked off in units of
the constellation of Pisces designated as 0 hours, 0 minutes, 0 seconds. All
Figure 4-1
The celestial sphere seen from the outside showing R.A. and DEC.
23
Page 24

MMoottiioonn ooff tthhee SSttaarrss
aily motion of the Sun across the sky is familiar to even the m st casual observer. This daily trek is not the Sun
The d o
oving as early astronomers thought, but the result of the Earth's rotation. The Earth's rotation also causes the stars to
m
o the same, scribing out a large circle as the Earth completes one rotation. The size of the circular path a star follows
d
epends on where it is in the sky. Stars near the celestial equator form the largest circles rising in the east and setting in
d
the west. Moving toward the north celestial pole, the point around which the stars in the northern hemisphere appear to
rotate, these circles become smaller. Stars in the mid-celestial latitudes rise in the northeast and set in the northwest.
Stars at high celestial latitudes are always above the horizon, and are said to be circum
ever set. You will never see the stars complete one circle because the sunlight during the d
n
However, part of this circular motion of stars in this region o
and opening the shutter for a couple hours. The processed f
(This description of stellar motions also applies to the southern hemisphere except all stars south of the celestial equator
move around the south celestial pole.)
All stars appear to rotate around the celestial poles. However, the appearance of this m
varies depending on where you are looking in the sky. Near the north celestial pole the s
scribe out recognizable circles centered on the pole (1). Stars near the celestial equator
follow circular paths around the pole. But, the complete path is interrupted by the hori
These appear to rise in the east and set in the west (2). Looking toward the opposite pole,
curve or arc in the opposite direction scribing a circle around the opposite pole (3).
polar because they never rise and
ay washes out the starlight.
f the sky can be seen by setting up a camera on a tripod
ilm will reveal semicircles that revolve around the pole.
Figure 4-2
24
otion
tars
also
zon.
stars
Page 25

LLaattiittuuddee SSccaalle
he easiest way to polar align a telescope is with a latitude scale. Unlike other methods that require you to find the
T
celestial pole by identifying certain stars near it, this method works off of a known constant to determine how high the
polar axis should be pointed. The Omni CG-4 mount can be adjusted from about 20 to 60 degrees (see figure 5-3).
The constant, mentioned above, is a relationship between your latitude and the angular distance the celestial pole is
above the northern (or southern) horizon. The angular distance from the northern horizon to the north celestial pole is
always equal to your latitude. To illustrate this, imagine that you are standing on the north pole, latitude +90°. The
north celestial pole, which has a declination of +90°, would be directly overhead (i.e., 90 above the horizon). Now,
let’s say that you move one degree south — your latitude is now +89° and the celestial pole is no longer directly
overhead. It has moved one degree closer toward the northern horizon. This means the pole is now 89° above the
Figure 4-3
1. ake sure the polar axis of the mount is pointing due north. Use a landmark that you know faces north.
M
2. evel the tripod. There is a bubble level built into the mount for this purpose.
L
N
OTE: Leveling the tripod is only necessary if using this method of polar alignment. Perfect polar alignment is still
p
ossible using other methods described later in this manual without leveling the tripod.
A
3. djust the mount in altitude until the latitude indicator points to your latitude. Moving the mount affects the angle the
p
olar axis is pointing. For specific information on adjusting the equatorial mount, please see the section “Adjusting the
M
ount.”
T
his method can be done in daylight, thus eliminating the need to fumble around in the dark. Although this method
d
oes NOT put you directly on the pole, it will limit the number of corrections you will make when tracking an object.
It
will also be accurate enough for short exposure prime focus planetary photography (a couple of seconds) and short
e
xposure piggyback astrophotography (a couple of minutes).
Pooiinnttiinngg aatt PPoollaarriiss
P
his method utilizes Polaris as a guidepost to the celestial pole. Since Polaris is less than a degree from the celestial
T
p
ole, you can simply point the polar axis of your telescope at Polaris. Although this is by no means perfect alignment,
does get you within one degree. Unlike the previous method, this must be done in the dark when Polaris is visible.
it
1. et the telescope up so that the polar axis is pointing north.
S
2. oosen the DEC clutch knob and move the telescope so that the tube is parallel to the polar axis. When this is done,
L
th
e declination setting circle will read +90°. If the declination setting circle is not aligned, move the telescope so that
e tube is parallel to the polar axis.
th
3. djust the mount in altitude and/or azimuth until Polaris is in the field of view of the finder.
A
4. enter Polaris in the field of the telescope using the fine adjustment controls on the mount.
C
e
northern horizon. If you move one degree further south, the same
thing happens again. You would have to travel 70 miles north or
south to change your latitude by one degree. As you can see from
this example, the distance from the northern horizon to the celestial
pole is always equal to your latitude.
If you are observing from Los Angeles, which has a latitude of 34°,
then the celestial pole is 34° above the northern horizon. All
latitude scale does then is to point the polar axis of the teles
the right elevation above the northern (or southern) horizon
align your telescope:
25
a
cope at
. To
Page 26

Definition
Remember, while Polar al
t
elescope itself, but the pol
Like the previous method, this gets you close to the pole but not directly on it. The following methods help improve
your accuracy for more serious observations and photography.
FFiinnddiinngg tthhee NNoorrtthh CCeelleessttiiaall PPoolle
In each hemisphere, there is a point in the sky around which all the other stars appear to rotate. These points are called
the celestial poles and are named for the hemisphere in which they reside. For example, in the northern hemisphere all
stars move around the north celestial pole. When the telescope's polar axis is pointed at the celestial pole, it is pa
to the Earth's rotational axis.
Man y
y methods of polar alignment require that
identifying stars in the area. For those in the nort
not too difficult. Fortunately, we have a naked
Polaris, is the end star in the handle of the Little nically
called Ursa Minor) is not one of the brightest co tellations in the sky, it may be difficult to
locate from urban areas. If this is the case, use th
(the pointer stars). Draw an imaginary line throug
to Polaris (see Figure 4-5). The position of the
year and throughout the course of the night (see Fi
sky (i.e., near the horizon), it may be difficul these times, look for
Cassiopeia (see Figure 4-5). Observers in the sout rn hemisphere are not as fortunate as those
in the northern hemisphere. The stars around the h celestial pole are not nearly as bright as
those around the north. The closest star that is re tively bright is Sigma Octantis. This star is
just within naked eye limit (magnitude 5.5) and l s about 59 arc minutes from the pole.
The north celestial pole i
stars appear to rotate. The counterpart in the southern hemisphere is referred to as
the south celestial pole.
igning, do NOT move the telescope in R.A. or DEC. You do not want to move the
ar axis. The telescope is used simply to see where the polar axis is pointing.
e
ou know how to find the celestial pole by
hern hemisphere, finding the celestial pole is
eye star less than a degree away. This star,
Dipper. Since the Little Dipper (tech
ns
e two end stars in the bowl of the Big Dipper
h them toward the Little Dipper. They point
Big Dipper (Ursa Major) changes during the
gure 4-4). When the Big Dipper is low in the
t to locate. During
he
sout
la
ie
s the point in the northern hemisphere around which all
Figure 4-4 The position of
the Big Dipper changes
throughout the year and the
The two stars in the front of the bowl of the Big Dipper point to Polaris which is less
than one degree from the true (north) celestial pole.
constellation, is on the opposite side of the pole fr
Celestial Pole (N.C.P.) is marked by the “+” sign.
Figure 4-5
Cassiopeia, the “W” shaped
om the Big Dipper. The North
rallel
night.
26
Page 27

DDeecclliinnaattiioonn DDrriifftt MMeetthhoodd ooff PPoollaarr AAlliiggnnmmeennt
This method of polar alignment allows you to get the most accurate alignment on the celestial pole and is required if
ou want to do long exposure deep-sky astrophotography throughy
that you monitor the drift of selected stars. The drift of each
the true celestial pole and in what direction. Although de
reat deal of time and patience to complete when first attempted. The declination drift method should be done after
g
any one of the previously mentioned methods has been completed.
To perform the declination drift method you need to choose two bright stars. One should be near the eastern horizon
and one due south near the m
monitor the drift of each star one at a time and in declination only. While monitoring a star
misalignment in the east-west direction is revealed. While monitoring a star near the ea
misalignment in the north-south direction is revealed. It is helpful to have an illuminated reticle
recognize any drift. For very close alignment, a Barlow lens is also recommended since it incre
and reveals any drift faster. When looking due south, insert the diagonal so the eyepiece points
cross hair eyepiece and align the cross hairs so that one is parallel to the declination axis and the
right ascension axis. Move your telescope manually in R.A. and DEC to check parallelism.
eridian. Both stars should be near the celestial equator (i.e., 0° declination). You will
the telescope. The declination drift method requires
star tells you how far away the polar axis is pointing from
clination drift is simple and straight-forward, it requires a
t
on the meridian, any
st/west horizon, any
eyepiece to help you
ases the magnification
straight up. Insert the
other is parallel to the
First, choose your star near where the celestial equator and the meridian meet. The star should be
1/2 an hour of the meridian and within five degrees of the celestial equator. Center the sta
telescope and monitor the drift in declination.
• If the star drifts south, the polar axis is too far east.
•
If the star drifts north, the polar axis is too far west.
Make the appropriate adjustments to the polar axis to eliminate any drift. Once you have elim
to the star near the eastern horizon. The star should be 20 degrees above the horizon and w
celestial equator.
If the
• star drifts south, the polar axis is too low.
If the star drifts north, the polar axis is too high.
•
gain, make the appropriate adjustments to the polar a xis to eliminate any drift. Unfortuna tely, the latter adju stments
A
teract with the prior adjustments ever so slightly. So, repeat the process again to improve the accuracy checking both
in
es for minimal drift. Once the drift has been eliminated, the telescope is very accurately aligned. You can now do
ax
ime focus deep-sky astrophotography for long periods.
pr
OTE: If the eastern horizon is blocked, you may choose a star near the western horizon, but you must reverse the
N
polar high/low error directions. Also, if using this method in the southern hemisphere, the direction of drift is
reversed for both R.A. and DEC.
approximately within
r in the field of your
inated all the drift, move
ithin five degrees of the
27
Page 28

AAlliiggnniinngg tthhee RR..AA.. SSeettttiinngg CCiirrcclle
e
Before you can use the setting circles to find objects in the sky you need to align the R.A. setting circle.
The declination setting circle is aligned during the process of polar alignment.
In order to align the R.A. setting circle, you will need to know the names
of a few of the brightest stars in the sky. If you don’t, they can be learned
by using the Celestron Sky M
astronomy magazine.
Figure 4-6
To align the R.A. setting circle:
1. Locate a bright star near the celestial equator. The farther you are from the celestial pole the better your
reading on the R.A. setting circle will be. The star you choose to align the setting circle with should be a
bright one whose coordinates are known a
2. Center the star in the finderscope.
Lo k through the main telescope and see if the star is in th
3. o e field. If not, find it and center it.
If you purchased an optional motor drive, start it now so that it will track the star.
4.
Look up the coo
5. rdinates of the star.
Ro ate the circle until the proper coordinates line up
6. t with the R.A. indicator (the zero mark on the vernier
scale). The R.A. setting circle should rotate free
thumbscrew to the right of the scale.
NOTE: Because the R.A. setting circle does NOT move as the telescope moves in R.A., the setting circle
must be aligned each time you want to use it to find an object. This holds true even if you are using an
optional motor drive. However, you do not need to use
coordinates of the object you are currently observing.
Once the
accuracy ly related to the accuracy of your polar alignment.
S
1. elect an object to observe. Use a seasonal star chart to make sure the object you chose is above the
horizon. As you become more familiar with the night sky, this will no longer be necessary.
2. Look up the coordinates in a star atlas or reference book.
Hol
3. d the telescope and release the DEC clamp.
Mo
4. ve the telescope in declination until the indicator is pointing at the correct declination coordinate.
Loc
5. k the declination clamp to prevent the telescope from moving.
H
6. old the telescope and release the R.A. clamp.
M
7. ove the telescope in R.A. until the indicator points to the correct coordinate.
setting circles are aligned you can use them to find any objects with known coordinates. The
of your setting circles is direct
nd easy to look up.
ly. If the circle does not move freely, loosen the
a star each time. Instead, you can use the
aps (#93722) or consulting a current
28
Page 29

8. ipping in R.A. The telescope will track in R.A. as
Lock the R.A. clamp to prevent the telescope from sl
lo
ng as the motor drive is operating.
9.
Look through the finderscope to see if you have located the object and center the object in the finder.
10. Look in the main optics an
able to see them in the finder.
you can “star hop” through the fi
This process can be repeated for any given night.
UUssiinngg tthhee RR..AA.. VVeerrn
To increase the accuracy of the R.A. setting circle, the mount comes with a vernier scale. This device
allows you to get more precise re ings down to one minute of right ascension.
Before we go into the specifics o
re
ad it. First, the zero (0) mark o
It is on the extreme right end of the vernier scale with the other numbers increasing as you move toward the
left.
If
the R.A. indicator is right on one of the marks of the R.A. settin
telescope is pointing at. The problem a
marks on the R.A. setting circle. If this is the case
marks will line up with one of the marks on the setting circle. This mark indicates the number
that should be added to the R.A. reading of the indicator. Since the indicator is between two R
add the minutes to the lower value that the R.A. indicator falls between.
For example, let’s say the R.A. indic
would place it between the 5h 40m mark and the 5h 50m mark. If you look down the vernier scale, you
will see that the “4” is the only mark to line up with any of the marks on the R.A. setting circle (see figure
8). This means that you are 4 minutes to the left of the 5h and 40m mark or more simply a t 5h and
d the object should be there. For some of the fainter objects, you may not be
hen this happens, it is a good idea to have a star chart of the area so that
W
eld to your target.
each object throughout
ni
err SSccaallee
ie
ad
how to us
n e the vernier, let’s take a look at the scale and learn how to
n the vernier is the R.A. indicator and will hereafter be referred to as such.
g circle, then that is the coordinate the
rises when the R.A. indicator (zero mark) is in between two of the
you will notice that along the vernier scale, one of the
of minutes
.A. marks,
ator (zero mark on the vernier) is just left of the 5h 40m mark. This
44m.
H
ere’s how to use the vernier:
1. Look up the coordinates of the object you want to observe. For our example we will use the Ring Nebula
(M57) which is at 18h 53m right ascension.
2
. Release the R.A. clamp and rotate the telescope until the R
the 19h 00m mark on the R.A. setting circle.
3. Lock the R.A. clamp to hold the telescope in place.
4. Move the telescope in R.A. using the slow motion control h
lines up with one of the marks on the R.A. setting circle. Remember
between the 18h 50m mark and the 19h 0
5. Look through the telescope and the Ring Nebula should be within the field o
power eyepiece (assuming you have already set the DEC).
Figure 4-7 Vernier Scale
.A. indicator is between the 18h 50m mark and
andle until the three on the vernier scale
, the R.A. indicator must stay
0m mark on the R.A. setting circle!
29
f view if you are using a low
Page 30

With your telescope set up, you are ready to use it for observing. This section covers visual observing hints for both
lar system and deep sky objects as well as general observing conditions which will affect your ability to observe.
so
OObbsseerrvviinngg tthhee MMoooon
LLuunnaarr OObbsseerrvviinngg HHiinntts
To increase contrast and bring out detail on the lunar surface, use optional filters. A yellow filter works well at
improving contrast while a neutral density or polarizing filter will reduce overall surface brightness and glare.
n
Often, it is tempting to look at the Moon when it is full. At this time,
the face we see is fully illuminated and its light can be overpowering.
In addition, little or no contrast can be seen during this phase.
One of the best times to observe the Moon is during its partial phases
(around the time of first or third quarter). Long shadows reveal a gr
amount of detail on the lunar surface. At low power you will be able t
see most of the lunar disk at one time. For the Schmidt-Cassegra
telescope, the optional Reducer/Corrector lens allows for breath-takin
views of the entire lunar disk when used with low power eyepiece
Change to optional eyepieces for higher power (magnification) to focus
in on a smaller area.
s
eat
o
in
g
s.
OObbsseerrvviinngg tthhee PPllaanneettss
Other fascinating targets include the five naked eye planets. You can
see Venus go through its lunar-like phases. Mars can reveal a host of
surface detail and one, if not both, of its polar caps. You will be able to
see the cloud belts of Jupiter and the great Red Spot (if it is visible at
the time you are observing). In addition, you will also be able to see the
moons of Jupiter as they orbit the giant planet. Sat
rings, is easily visible at moderate power.
urn, with its beautiful
Planetary Observing Hints
• Remember that atmospheric conditions are usually the
limiting factor on how much planetary detail will be visible.
So, avoid observing the planets when they are low on the
horizon or when they are directly over
heat, such as a rooftop or chimney. See the "See
• To increase contrast and bring out detail on the p
a source of radiating
ing Conditions" section later in this section.
lanetary surface, try using Celestron eyepiece filters.
30
Page 31

n
s
to the eyepiece, watch the shadow of the telescope tube until it
o select the solar tracking rate.
e
s
cctts
tside the boundaries of our solar system. They include star clusters,
and other galaxies outs
oderat
re photographs. Instead, they appear black and white. And, because of their
served from a dark-sky location. Light pollution around large urban areas
ee through your telescope during an observing session. Conditions include
and the effect they have on observing
moisture, and other airborne particles. Thick
ile cirrus can be thin, allowing the light from the brightest stars through.
pper atmosphere from volcanic eruptions also affect transparency. Ideal conditions
OObbsseerrvviinngg tthhee SSuunn
Although overlooked by many amateur astronomers, solar observation is both rewarding and fun. However, because
e Sun is so bright, special precautions must be taken when observing our star so as not to damage your eyes or your
th
te
lescope.
N
ever project an image of the Sun through the telescope. Because of the folded optical design, tremendous heat build-
up will result inside the optical tube. This can damage the telescope and/or any accessories attached to the telescope.
For safe solar viewing, use a solar filter that reduces the intensity of the Sun's light, making it safe to view. With a
fi
lter you can see sunspots as they move across the solar disk and faculae, which are bright patches seen near the Sun's
ed
ge.
SSoollaarr OObbsseerrvviinngg HHiinntts
• The best time to observe the Sun is in the early morning or late afternoon when the air is cooler.
• To center the Sun without looking in forms a
circular shadow.
• To ensure accurate tracking, be sure t
OObbsseerrvviinngg DDeeeepp SSkkyy OObbjje
Deep-sky objects are simply those objects ou
planetary nebulae, diffuse nebulae, double stars ide our own Milky Way. Most deep-sky objects
have a large angular size. Therefore, low-to-m e power is all you need to see them. Visually, they are too faint to
reveal any of the color seen in long exposu
ow surface brightness, they should be ob
l
washes out most nebulae making them difficult, if not impossible, to observe. Light Pollution Reduction filters help
reduce the background sky brightness, thus increasing contrast.
Seeeeiinngg CCoonnddiittiioonnss
S
Viewing conditions affect what you can s
transparency, sky illumination, and seeing. Understanding viewing conditions
will help you get the most out of your telescope.
TTrraannssppaarreennccy
Transparency is the clarity of the atmosphere which is affected by clouds,
cumulus clouds are completely opaque wh
azy skies absorb more light than clear skies making fainter objects harder to see and reducing contrast on brighter
H
objects. Aerosols ejected into the u
he the night sky is inky black.
are w n
Il
SSkkyy I
General s ct transparency.
Whi o making
th
fr
polluted areas by blocking unwanted light while transmitting light from certain deep sky objects. You can, on the other
hand, observe planets and stars from light polluted areas or when the Moon is out.
llluummiinnaattiioon
ky brightening caused by the Moon, aurorae, natural airglow, and light pollution greatly affe
le n t a problem for the brighter stars and planets, bright skies reduce the contrast of extended nebulae
em difficult, if not impossible, to see. To maximize your observing, limit deep sky viewing to moonless nights far
om the light polluted skies found around major urban areas. LPR filters enhance deep sky viewing from light
y
31
Page 32

Seeeeiinngg
S
eeing conditions refers to the stabil
S
objects. The air in our atmosphere acts as a lens which bends and distorts incoming light rays. The amount of bending
depends on air density. Varying temperature layers have different densities and, therefore, bend light differently. Light
rays from the same object arrive slightly displaced creating an imperfect or smeared image. These atmospheric
isturbance
d
determines the "seeing" quality. Under good seeing conditions, fine detail is visible on the brighter planets like Jupiter
and Mars, and stars are pinpoint images. Under poor seeing conditions, images are blurred and stars appear as blobs.
The conditions described here apply to both visual and photographic observations.
s vary from time-to-time and place-to-place. The size of the air parcels compared to your aperture
ity of the atmosphere and directly affects the amount of fine detail seen in extended
Figure 5-1
Seeing condit
ions directly affect image quality. These drawings represent a
point source (i.e., star) under bad seeing conditions (left)
right). Most often, seeing conditions produce images tha
(
to excellent conditions
t lie some where
UUssiinngg tthhee LLeennss CCaapp AAppeerrttuurree SSttoopp wwiitthh RReeffrraaccttoorr TTeel
leessccooppeess
As mentioned earlier, all refractive optics will exhibit some amount of chromatic aberration due to the prism effect of
lenses. Chromatic aberration will become more pronounced the
th
rough the edge of the objective lens) and virtually unnoticeable on-axis (passing through the center of the objective
lens). This type of aberration is only
v
ery luminous stars (like Sirius). Th
c
hromatic aberration, these include; reducing the aperture and using filters.
The objective lens cap covering the objective lens of the telescope has a built-in aperture stop in the center. By leaving
the lens cap on the telescope with the aperture sto
center of the optical axis. S
from reducing the aperture
The lens cap should always be completely removed when observing deep-sky objects such as galaxies and nebulae,
where aperture (light gathering power) is essential and chromatic aberration is not an issue.
Another useful technique for reducing aberrations and improving planetary detail is the use of colored eyepiece filters.
Filters are commonly used to bring ou
zo
nes around Jupiter. The use of Celestron's Refractor Filter (# 94121) reduces the effect of chromatic aberration as
well as improves contrast and re
ince, most planets are extremely bright objects (visible to the unaided eye) any loss of light
will be unnoticeable.
evident when observing very bright sources of light, such as bright planets and
ere are several techniques that the observer can employ to suppress visible signs of
p removed, you will allow all the incoming light to pass closer to the
t particular planetary detail, such as the polar caps on Mars or the bands and
solution.
farther the incoming light rays are off-axis (i.e. passing
32
Page 33

After looking at the night sky for a while you may want to try photographing it. Several forms of photography are
possible with your telescope, including terrestrial and celestial photography. Both of these are discussed in moderate
detail with enough information to get you started. Topics include the accessories required and some simple techniques.
More information is available in various books on the subject matter.
Below is described the traditional photographic methods with traditional equipm
d
igital cameras have become very popular and you can use this latest technology to take images through telescop
it is re Lunar and
latively simple. In addition, CCD cameras (specifically made for astrophotography as well as
Planetary es for
fantasti
In addition a camera but not jus s state-of-the-art
equipm y or mirror lock up. Here are the mandator eatures a
camera needs for celestial photography. First, a “B” setting me exposures and this excludes point
and shoot cameras and limits the selection to SLR c ost common type of 35mm camera on the market
today.
Second, the s use the battery to
keep the sh
closes, whether osure or ot. Look for a camera that has a manual shutter when
operating in the time exposure mode. Canon, Olympus, Nikon, Pentax, Minolta, and others have made such camera
bodies.
The camera must have interchangeable lenses so you can attach it to the telescope and so you can use a varie
lenses for piggyback photography. If you can't find a new camera, you can purchase a used camera body that
1
exposure length manually.
You also need a cable release with a locking function to hold the shutter open while you do other things. Mechanical
and air release models are available.
PPiiggggyybbaacckk PPhhoottooggrraapphhy
photography have become more economical for hobbyists to procure and have opened new avenu
c images.
to the specific accessories required for each type of celestial photography, there is the need for
t any camera. The camera does not have to have many of the features offered on today'
ent. For example, you don't need auto focus capabilit y f
which allows for ti
ameras, the m
“B” or manual setting should NOT run off th battery. Many new electronic camera
utter open during time exposures. Once the batteries are drained, usually after a few minutes, the shutter
you were finished with the exp
00-percent functional. The light meter, for example, does not have to be operational since you will be determining the
y
e
n
ent. During the last several years,
es and
ty of
is not
The easiest way to enter the realm of deep-sky, long exposure astrophotography is via the piggyback
method. Piggyback photography is done with a camera and its normal lens riding on top of the telescope.
Through piggyback photography you can capture entire constellations and record large scale nebulae that
a
re too big for prime focus photography. Becau
se you are photographing with a low power lens and
guiding with a high power telescope, the margin for error is very large. Small mistakes made while guidi
the telescope will not show up on film. To attach the camera to the refractor or New
th
e piggyback adapter screw located on the top of the tube mounting ring. For the Schmidt-Cassegrain
tonian telescope, use
telescope there is an optional Piggyback Camera Mount available. The cameras have a threaded hole at the
bottom of the camera where the piggyback screw threads into.
As with any form of deep-sky photogra
phy, it should done from a dark sky observing site. Light
pollution around major urban areas washes out the fai t light of deep-sky objects. You can still practice
be
n
from less ideal skies.
1. Polar align the telescope (using one of the methods de cribed earlier) and start the optional motor drive.
s
2. Load your camera with slide fil m, ISO 100 or faster, or print film, ISO 400 or faster!
2a. When using digital cameras, experiment with vari us settings and read the camera instructions as each
o
is somewhat different than SLR cameras.
3. Set the f/ratio of your camera lens so that it is a half stop to one full stop down from completely open.
33
ng
Page 34

Set the shutter speed to the “B” setting and focus the lens to th
4. e infinity setting.
Locate the area of the sky that you want to photograph and move t
5. he telescope so that it points in that
direction.
Find a suitable guide star in the telescope eyepiece field of view. This is relatively easy since you can
6.
search a wide area without affecting the area covered by your camera lens. If you do not have an
illuminated cross hair eyepiece for guiding, simply defocus your guide star until it fills most of the field of
view. This makes it easy to detect any drift.
Release the shutter using a cable release.
7.
Monitor your guide star for the duration of the exposure making the necessary corrections needed to keep
8.
the star centered
SShhoorrtt EExxppoossuurree PPrriimmee FFooccuuss PPhhoottooggrraapphhyy ffoorr RReeffrraacctto
Neewwttoonniiaannss
N
Short exposure prime focus photography is the best way to begin recording celestial objects. It is done with
R camera attached to the telescope without an eyepiece or camera lens in place. To attach your SLR
the SL
camera, you need the T-adapter and a T-Ring for your specific camera (i.e., Minolta, Nikon, Pentax, etc.).
The focuser for the refractors and Newtonian have a built-in T-adapter and they are ready to accept a
35mm camera body. The T-Ring replaces the 35mm SLR camera’s normal lens. Prime focus photography
allows you to capture the entire solar disk (if using the proper filter) as well as the entire lunar disk. To
attach your camera to your telescope: See note about digital cameras below.
Remove the eyepiece from the 1
1
Unthread the 1
2
T-adapter.
in
Thread the T-ring onto the exposed
3 T-adapter threads.
Mount your camera body onto the T-Ring
4 the same as you would any other lens.
SShhoorrtt EExxppoossuurree PPrriimmee FFooccuuss PPhhoottooggrraapphhyy ffoorr SScchhmmiiddttCCaasssseeggrraaiinns
.
&&
orrss
1
/
" eyepiece holder.
4
1
/
" eyepiece holder from the focuser assembly. This will expose the male thread of the built-
4
-
s
Use a T-Adapter ( # 93633-A) which threads on to the back of the telescope. The T-Ring threads onto the
T-Adapter and then mount your camera body onto the T-Ring like you would any other lens.
Using Digital Cameras
o attach a digital camera to your telescope you will need the Universal Digital Camera Adapter
T
( # 93626). The adapter allows the camera to be mounted rigidly. You will follow your camera
instructions for capturing images as the information below relates to 35mm SLR cameras.
With your camera atta
o
bject like the Moon. Here’s how to do it:
. Load your camera with film that has a moderate-to-fast speed (i.e., ISO rating). Faster films are more
1
desirable when the Moon is a crescent. When the Moon is near full, and at its brightes
more desirable. Here are some film recommendations:
• T-Max 100
• T-Max 400
ched to the telescope, you are ready for prime focus photography. Start with an easy
t, slower films are
34
Page 35

p
• Any 100 to 400 ISO color slide film
• Fuji Super HG 400
2. Center the Moon in the field of your telescope.
3
. Focus the telescope by turning the focus knob until the image is sharp.
4.
Set the shutter speed to the appropriate setting (see table 7-1).
Trip the shutter using a cable release.
5.
6
. Advance the film and repeat the process.
Lunar Phase ISO 100 ISO 200 ISO 400
Crescent
Quarter
Full
Above is a listing of recommended exposure times when photographing the Moon at the
The exposure times listed in table 7-1 should be used as a starting point. Always make exposures that are longer and
shorter than the recommended time. Also, take a few photos at each shutter speed. This will ensure that you will get a
good photo.
• If using black and white film, try a yellow filter to reduce the light intensity and to increase contrast.
• Keep accurate records of your exposures. This information is useful if you want to repeat your results or
if you want to submit some of your photos to
• This technique is also used for photographing the Sun with the proper solar filter.
EEyyeeppiieeccee PPrroojjeeccttiioonn ffoorr aa SScchhmmiiddt
This form of celestial photography is designed for objects with small angular sizes, prim
P
lanets, although physically quite large, appear small in angular size because of their great distan
magnification is, therefore, required to make the image large enough to see any detail. U
camera/telescope combination alone does not provide enough magnification to produce a usable image
order to get the image larg
y
ou need two additional a
r your particular camera make (i.e., Minolta, Nikon, Pentax, etc.).
fo
Because of the high magnifications during eyepiece projection, the field of view is quite
all which makes it difficult to find and center objects. To make the job a little easier,
sm
align the finder as accurately as
lescope's field based on the find
te
Another problem introduced by the high magnification is vibration. Simply tripping the
shutter ⎯ even with a cable release ⎯ produces enough vibration to smear the image.
To get around this, use the camera's self-timer if the exposure time is less than one
second ⎯ a common occurrence when photographing the Moon. For exposures over
one second, use the "hat trick." This techniqu
placed over the aperture of the telescope to ac
from entering the telescope while the shutter is released. Once the shutter has been
released and the vibration has diminished (a few seconds), move the black card out of
the way to expose the film. After the exposure is complete, place the card over the front
o
f the telescope and close the shutter. Advance the film and
card should be h
process; one to r
eld a few inches in front of the telescope, and not touching it. It is easier if you use two people for this
elease the camera shutter and one to hold the card. Here's the process for making the exposure.
e enough, you must attach your camera to the telescope with the eyepiece in place. To do so,
ccessories; a deluxe tele-extender (#93643), which attaches to the visual back, and a T-ring
possible. This allows you to get the object in the
er's view alone.
ISO 50
1/2 1/4 1/8 1/15
1/15 1/30 1/60 1/125
1/30 1/60 1/125 1/250
Table 6-1
rime focus of your telescope.
various astronomy magazines for possible publication!
t--CCaasssseeggrraaiinn
arily the Moon and planets.
ces. Moderate to high
nfortunately, the
size on film. In
e incorporates a hand-held black card
t as a shutter. The card prevents light
Figure 6-1 - Accessorie
Projection Photograph
you're ready for your next shot. Keep in mind that the
s for
y
35
Page 36

p
1. Find and center the
2. Turn the focus knob until the image is as sharp a
3. Place the black card over the front of the telescope.
4. Release the shutter using a cable release.
5. Wait for the vibration caused by releasing the shutter to diminish. Also, wait for a moment of good seeing.
6. Remove the black card from in front of th
Replace the bl e fro telescop
7.
8. Close the cam .
Advance the film a are ready fo next expos t forget to take photo ing duration and keep
accurate records of what you have done. Record the da pe, exposure duration, eyepiece, f/ratio, film, and
some comments on t
he following table lists exposures for eyepiece projection with a 10mm eyepiece. All exposure times are listed in
T
conds or fractions of a second.
se
Planet ISO 50 ISO 100 ISO 200 ISO 400
Moon
Mercury
Venus
Mars
Jupiter
Saturn
The exposure times listed here should be used as a starting point. Always make expo re
han the recommended time. Also, take a few photos at each shutter speed. This will ensu
t
It is not uncommon to go through an entire roll of 36 exposures and have only one good shot.
NOTE: Don't expect to record more detail than you can see visually in the eyepiece at the time you are photographing.
Once you have mastered the technique, experiment with different films, different focal length eyepieces, and even
different filters.
LLoonngg EExxppoossuurree PPrriimmee FFooccuuss PPhhoottooggrraapphhy
This is the last form of celestial photography to be attempted after others have been mast
for deep sky objects, that is objects outside our so
it
may seem that high magnification is required for these objects, just the opposite is true. Most of these objects cover
large angular areas and fit nicely into the prime focus field of your telescope. The brightn
requires long exposure times and, as a result, are rather difficult.
There are several techniques for this type of photography, and the one chosen will deter
needed. The best method for long exposure deep sky astrophotography is with an off-axi
Schmidt-Cassegrain. This device allows you to photograph and guide through the telesco
offers a very special and advanced off-axis guider, called the Radial Guider (# 94176). In
Ring to attach your camera to the Radial Guider. With refractor and Newtonian telesc
about the Radial Guider but all else applies.
Other equipment needs include a guiding eyepiece. Unlike other forms of astrophotography which allows for fairly
loose guiding, prime focus requires meticulous guiding for long periods. To accomplish this you need a guiding ocular
desired target in the viewfinder of your camera.
s possible.
e telescope for the duration of the exposure (see accompanying table).
ack card over th nt of the e.
era's shutter
nd you r your ure. Don' s of vary
te, telesco
he seeing conditions.
4 2 1 1/2
16 8 4 2
1/2 1/4 1/8 1/15
16 8 4 2
8 4 2 1
16 8 4 2
Recommended ex
Table 6-2
osure time for photographing planets.
su s that are longer and shorter
re that you get a good photo.
y
ered. It is intended primarily
lar system which includes star clusters, nebulae, and galaxies. While
ess of these objects, however,
mine the standard accessories
s guider when you are using a
pe simultaneously. Celestron
addition, you will need a T-
you skip the comments
opes
36
Page 37

ith an illuminated reticle to monitor your guide star. For this purpose, Celestron offers the Micro Guide Eyepiece
w
(# 94171) Here is a brief summary of the technique.
Note: Digital Cameras – follow the camera instructions on foc
1. Polar align the telescope.
manual.
2
. Remove all visual accessories.
3
. Thread the Radial Guider onto your telescope.
4
. Thread the T-Ring onto the Radial Guider.
5
. Mount your camera body onto the T-Ring the same as you would any other lens.
6
. Set the shutter speed to the "B" setting.
7. Focus the telescope on a star.
8
. Center your subject in the field of your camera.
9. Find a suitable guide star in t
10. Op utter usin
en the sh g a cable release.
11. Monit
nee ections
de
12. Clos mer
When getting started, use fast films to record as m il in the shortest possible time. Here are proven
recommendations:
•
Ektar 1000 (color print)
• Konica 3200 (color print)
• Fujichrome 1600D (color slide)
• 3M 1000 (color slide)
•
Scotchchrome 400
• T-Max 3200 (black and white print)
• T-Max 400 (black and white print)
As you perfect your t
p
hotography. Here are some popular choices:
• Ektar 125 (color print)
•
Fujichrome 100D (color slide)
• Tech Pan, gas hypered (black and white print)
• T-Max 400 (black and white print)
There is no exposure determination table to help you get started. The best way to determine exposure length is look at
previously published photos to see what film/exposure combinat
v
arious parts of the sky while the drive is running. Always take exposures of various lengths to determine the best
exposure
r gu th con
or you ide star for the duration of the exposure using e buttons on the hand troller to make the
d corr .
e the ca a's shutter.
For more information on
he telescope field. This can be the most time consuming process.
uch deta
echnique, try specialized films, that is films that are designed or specially treated for celestial
PPllaanneettaarryy aanndd LLuunnaarr PPhhoottooggrraapphhyy wwiitthh SSppeecciiaall IImmaaggeer
During the last few years a new technology has evolved which makes taking superb images of the planets and moon
elatively easy and the results are truly amaz
r
and included is software for image processing. You can capture planetary mages your first night out which rivals what
professionals were doing with large telescopes just a few short years ago.
ing. Celestron offers the NexImage ( # 93712) which is a special camera
using and shutter data.
polar aligning, see the Polar Alignment section earlier in the
ions were used. Or take unguided sample photos of
rss
37
Page 38

CCD
CCD
IImmaaggiinngg ffoorr DDeeeepp SSkkyy OObbjjeecctts
s
pecial cameras have been developed for taking images of deep sky images. These have evolved over the last several
S
years to become much more economical and am
ow to get the best images possible. The technology continues to evolve with better and easier to use products on the
h
ma et.
rk
ateurs can take fantastic images. Several books have been written on
Teerrrreessttrriiaall PPhhoottooggrraapphhyy
T
Your telescope makes an excellent teleph
g R cameras are mounted directly to the telescope (using the built-in T-
on focal length telephoto lens. 35mm SLl
Adapter on the refractors and Newto
it ersal Digital Camera Adapter (# 93626).
d
ig al camera you will need the Univ
u e, nature, and just about anything. You will have to experiment
Y
o can take images of various scenic views, wildlif
with focusing, speeds, etc. to get the best image desired.
Meetteerriinngg
M
The Omni Series telescopes hav
hot graphically, you need to set
o your shutter speed accordingly. Most 35mm SLR cameras offer through-the-lens
p
metering which lets you know if
c
hanging the shutter speed. Consult your camera manual for specific information on metering and changing shutter
speeds.
Reedduucciinngg
R
le lly can cause vibrations, producing blurred photos. To reduce vibration when tripping the
Re asing the shutter manua
shutter, use a cable releas
possibility of introducing vibration. Mechani
Bl ry pictures can also result from shut
ur ter speeds that are too slow. To prevent this, use films that produce shutter
p ds greater than 1/250 of a second w
ee hen hand-holding the lens. If the lens is mounted on a tripod, the exposure
s
length is virtually unlimited.
nother way to reduce vibration is with
ground and tripod feet. They
VViibbrraattiio
e fixed apertures and, as a result, fixed f/ratios. To properly expose your subjects
your picture is under or overexposed. Adjustments for proper exposures are made by
onn
. A cable release keeps your hands clear of the camera and lens, thus eliminating the
e
reduce the vibration amplitude and vibration time.
oto lens for terrestrial (land) photography. Your telescope is in essence a
nian or using the # 93633-A T-Adapter for the Schmidt-Cassegrain). For using a
cal shutter releases can be used, though air-type releases are best.
ibration Suppression Pads (#93503). These pads rest between the
the VA
38
Page 39

Whil s at
e your telescope requires little maintenance, there are a few things to remember that will ensure your telescope perform
its be
st. Each optical design type has special collimation instructions described below.
a
CCa
Occa n the objective lens, the corrector plate, or primary mirror depending on which
type e taken when cleaning any instrument so as not to damage the optics.
If du to
the g ove
any r d
go fr
You ith
distill and 40% distilled water. Or, liquid dish soap diluted with water (a
couple of drops per one quart of water) can be used.
Occa experience dew build-up on the optics of your telescope during an observing session. If you want to
conti emoved, either with a hair dryer (on low setting) or by pointing the telescope at the ground
until e dew has evaporated.
If m ree
envir
To minimize the need to clean your telescope, replace all lens covers once you have finished using it. Since the cells are NOT
seale e covers should be placed over the openings when not in use. This will prevent contaminants from entering the optical
tube.
Inter e done only by the Celestron repair department. If your telescope is in need of internal
clean authorization number and price quote.
o
CCo
ndd CClleeaanniinngg ooff tthhee OOppttiiccss
rree aan
sionally, dust and/or moisture may build up o
of telescope you have. Special care should b
st has built up on the optics, remove it with a brush (made of camel’s hair) or a can of pressurized air. Spray at an angle
lass surface for approximately two to four seconds. Then, use an optical cleaning solution and white tissue paper to rem
emaining debris. Apply the solution to the tissue and then apply the tissue paper to the optics. Low pressure strokes shoul
om the center of the lens to the outer portion. Do NOT rub in circles!
can use a commercially made lens cleaner or mix your own. A good cleaning solution is isopropyl alcohol mixed w
ed water. The solution should be 60% isopropyl alcohol
sionally, you may
nue observing, the dew must be r
th
oisture condenses on the inside of the optics, remove the accessories from the telescope. Place the telescope in a dust-f
onment and point it down. This will remove the moisture from the telescope tube.
d, th
nal adjustments and cleaning should b
i
ng, please call the factory for a return
lllliimmaattiioonn ooff RReeffrraaccttoorrs
s
Be
sure to completely read carefully before attempting
colli
mation. Collimation is the process of aligning the
optic ent with each other and
al axis of each optical elem
with the mechanical axis of the telescope tube. For a
ctor telescope design this means aligning the optical
refra
of the objective lens with the optical axis of the
axis
e
eyepi ce on the other end of the tube. Your Omni refractor
was properly aligned at the factory, however rough
handling while traveling may eventually alter the alignment
of the lens. Your Celestron refractor telescope comes with
a fully adjustable objective lens housing to ensure proper
alignment of the optical axis.
To determine whether or not re-collimation is necessary,
the telescope should be set up outside at night. It should be
a still night and one in which you have let the telescope sit
outside for 15 to 30 minutes before attempting collimation.
You should also wait for a night with good seeing
conditions and avoid looking over anything that produces
heat waves (i.e., roof tops, car hoods, etc.).
Collimation Screws
(Allen head)
Mounting Screws
(Phillips head)
Figure 7-1 – Objective lens housing (with lens shade
removed) show mounting and collimation screws.
39
Page 40

Pick a bright star and center it in the field of the telescope. Study the image of the star while racking it in and out of focus using
an eyepiece that yields 30 to 60 power for every inch of aperture. If an unsymmetrical
necessary. (If the telescope is properly collimated, the out of focus star image will app
that shown in Figure 7-2).
To collimate, the telescope should be on either a motor driven (i.e., tracking) equatorial mount that
r pointed at a stationary star without the motor drive running. Polaris, the North Star, is the perfect collimation star for northern
o
hemisphere observers since it appears motionless against the background sky long enough to perform the collimation procedure.
Polaris is the last star in the handle of the Little Dipper (Ursa Minor) and its distance a
to
your latitude angle.
P
rior to collimating, locate the three (3) mounting screws o
attach the objective lens housing to the main tube and should not be removed). It may be necessary to remove the lens shade from
the front of the tube to allow easy access to the collimation screws. Next to each mounting screw is a shorter Allen screw
ollimation screw) that pushes against the optical tube to pivot the objective lens housing (see Figure 7-1). In order toc
adjustment, the mounting screw is loosened while the Allen screw is turned in or out. Then, the mounting screw is tightened.
Only one of the three (3) sets is adjusted at a time. Normally motions on the order of 1/8 turn will make a difference, with only
about 1/2 to 3/4 turn being the maximum required.
(2) turns!
Do NOT remove or back out the holder screws more than one (1) to two
n the objective lens housing on the front of the tube. (These screws
With Polaris or another bright star centered in the field of view, focus with your highest power
eyepiece (i.e., one with the shortest focal length). This includes eyepieces in the 4mm to 6mm range.
The star should be well centered in the field of view of the eyepiece. It may be helpful for two people
w
orking together, while one views and instructs the
how much. Start by loosening the Phillips head (mounting) screws about 1 turn and advancing the
Allen screw to see if the motion is correct. If not, undo what you did and try another set of screws.
A
fter making the first of each ad
again in the field of view. It can then be judged for symmetry by going just inside and outside of exact
focus and noting the star’s pattern. Improvement should be seen if the proper adjustments are made.
ince three (3) sets of screws are present, it may be necessary to move at least two (2) sS
achieve the necessary lens movement. Do NOT over tighten the outer mounting screws!
Once in collimation, your telescope should not need additional collimation unless the telescope has
bumped or jarred severely. In fact, most observers will find the telescope’s collimation right out
een
b
of the box to be satisfactory. Exact collimation is only necessary for discriminating observers that
require optimal imagery.
justment, it is necessary to re-aim the telescope tube to center the star
other which screws are correctly turned and by
Refractor Collimating Eyepiece- Your r
alignment of your telescope in the daytime. The
roperly aligned with the tube. With the focuser racked in all the way and the diagonal removed, place the collimating eyepiece
p
inside the focuser tube. If the telescope is properly collimat
when looking through the pin hole. If the objective lens ap
described above.
efractor includes a collimating eyepiece that can help you to roughly check the
collimating e
yepiece has a pin hole site that helps you determine if the optics are
ed, you should be able to see the entire edge of the objective lens
pears oval, then it may be necessary to collimate the telescope as
focus pattern is present, then collimation is
ear as a concentric ring pattern similar to
is approximately polar aligned
bove the northern horizon is always equal
make an
ets of screws to
Figure 7-2
A collimated telescope
should appear as a
symmetrical ring pattern
similar to the diffraction
disk seen here.
CCoolllliimmaattiioonn ooff aa SScchhmmiiddtt--CCaasssseeggr
The optical performance of your telescope is directly related to
raaiinn
its collimation, that is the alignment of its optical system. Your
telescope was collim
the telescope is dropp
collimated. The only opti
tilt of the secondary mirror.
To check the collimation
near the zenith is ide
sure that tracking (w
manually track the sta
Polaris. Its position
eliminating the need
Figure 7-3
The three collimation screws are located on the front of the secondary mirror housing.
ated at the factory after it was completely assembled. However, if
ed or jarred severely during transport, it may have to be
cal element that may need to be adjusted, or is possible, is the
of your telescope you will need a light source. A bright star
al since there is a minimal amount of atmospheric distortion. Make
ith an optional motor drive) is on so that you won’t have to
r. Or, if you do not want to power up your telescope, you can use
relative to the celestial pole means that it moves very little thus
to manually track it.
40
Page 41

Before you begin the collimation process, be sure that your telescope is in thermal equilibrium with the surroundings. Allow 45
minutes for the telescope to reach equilibrium if you move between large temperature extremes.
To verify collimation, view a star near the zenith. Use a medium to high power ocular — 12mm to 6mm focal length. It is
important to center a star in the center of the field to judge collimation. Slowly cross in and out of focus and judge the
symmetry of the star. If you see a systematic skewing of the star to one side, then re
Figure 7-4 -- Even though the star pattern appears the same on both sides of focus, they are asymmetric. The
dark obstruction is skewed off to the left side of the diffraction pattern indicating poor collimation.
To accomplish this, you need to tighten the secondary collimation screw(s) that move the star acro
direction of the skewed light. These screws are located in the secondary mirror holder (see figure 7-3).
1/8 adjustments to the collimation screws and re-center the star by moving the scope before making
making further adjustments.
To make collimation a simple procedure, follow these easy steps:
1. While looking through a medium to high power eyepiece, de-focus a bright star until a ring pa
appears (see figure 7-4). Center the de-focused star and notice in which direction th
2. Place your finger along the edge of the front cell of the telescope (be careful not to touch the c
towards the collimation screws. The shadow of your finger should be visible when looking in
your finger around the tube edge until its shadow is seen closest to the narrowest portion of
direction in whi
3. Locate the collimation screw closest to where your finger is positioned. This will be the collimation screw you will
need to adjust first. (If your finger is positioned exactly between two of the collimation screws, then you will need to
adjust the screw opposite where your finger is located).
4. Use the hand control buttons to move the de-focused star image to the edge of the field of view, in the same direction
that the central obstruction of the star image is skewed.
5. While looking through the eyepiece, use an Allen wrench to turn the collimation screw you located in step 2 and 3.
Usually a tenth of a turn is enough to notice a change in col
Figure 7-5
A collimated telescope
should appear
symmetrical with the
central obstruction
centered in the star's
diffraction pattern.
ch the central shadow is skewed).
the direction that the centra
screw the wrong way. Turn the screw in the opposite direction, so that the star image is
moving towards the center of the field of view.
If while turning you notice that the screws get very loose, then simply tighten the other
6.
two screws by the same amount. Conversely, if the collimation screw gets too tight,
then loosen the other two scr
7.
Once the star image is in the center of the field of view, check to see if the rings are
concentric. If the central obstruction is still skewed in the same direction, then continue
turning the screw(s) in the same direction. If you find that the ring pattern
a different direction, than simply repeat steps 2 through 6 as described
d
irection.
limation. If the star image moves out of the field of view in
l shadow is skewed, than you are turning the collimation
ews by the same amount.
-collimation is needed.
ss the field toward the
Make only small 1/6 to
any improvements or before
ttern with a dark shadow
e central shadow is skewed.
orrector plate), pointing
to the eyepiece. Rotate
the rings (i.e. the same
is skewed in
above for the new
41
Page 42

Perfect collimation will yield a star image very symmetrical just inside and outside of focus. In addition, perfect collimation
delivers the optimal optical performance specifications that your telescope is built to achieve.
If seeing (i.e., air steadiness) is turbulent, collimation is difficult to judge. Wait until a better night if it is turbulent or aim to a
steadier part of the sky. A steadier part of the sky is judged by steady versus twinkling stars.
C
C
oolllliimmaattiioonn ooff aa NNeewwttoonniiaann
The ng) the
optical performance of most Newtonian reflecting telescopes can be optimized by re-collimating (aligni
telescope's optics, as needed. To collimate the telescope simply means to bring its optical elements into balan
Poo
r collimation will result in optical aberrations and distortions.
Before collimating your telescope, take time to familiarize yourself with all its components. The primary mi
e large mirror at the back end of the telescope tube. This mirror is adjusted by loosening and tightening th
th e three
sc
rews, placed 120 degrees apart, at the end of the telescope tube. The secondary mirror (the small, elliptical mirror
u
nder the focuser, in the front of the tube) also has three adjustment screws. To determine if your telescope needs
c
ollimation first point your telescope toward a bright wall or blue sky outside.
Never look directly at the sun with the naked eye or with a telescope (unless you have the proper solar filter).
Permanent and irreversible
eye damage may result.
ce.
rror is
Ali n
gni g the Secondary Mirror
T fol wing describes the procedure for daytime collimation of your telescope using the optional Newtonian
he lo
ima on Tool (#94183) offered by Celestron. To collimate the telescope without the Collimation Tool, read the
Coll ti
followin
1 ¼” (# 9
If y
until its s
mirror, p gnore the silhouetted reflection from the primary
m
shou b
c
g section on night time star collimation. For very precise collimation, the optional Collimation Eyepiece
4182) is offered.
u h ve an eyepiece in the focuser, remove it. Rack the focuser tube in completely, using the focusing knobs,
o a
ilver tube is no longer visible. You will be looking through the focuser at a reflection of the secondary
rojected from the primary mirror. During this step, i
irror. Insert the collimating cap into the focuser and look through it. With the focus pulled in all the way, you
ld e able to see the entire primary mirror reflected in the secondary mirror. If the primary mirror is not
in the secondary mirror, adjust the secondary mirro
entered r screws by alternately tightening and loosening them
until the periphery of th
screw in the secondary mirror su
Aligning the Prim ry i
Now adjust the primary mirror s dary mirror, so it’s
silhouetted against the ew of the primary. As you look into the focuser, silhouettes of the mirrors should
look concentric. Repeat ste o
Remove the collimating cap and
the secondary mirror.
e primar
a M rror
vi
y mirror is centered in your view. DO NOT loosen or tighten the center
pport, because it maintains proper mirror position.
crews to re-center the reflection of the small secon
ps ne and two until you have achieved this.
look into the focuser, where you should see the reflection of your eye in
42
Page 43

43
Page 44

Night Time Star Collimating
After successfully completing daytime collimation, night time star collimation can be done by closely
adjusting the primary mirror while the telescope tube is on its mount and pointing at a bright star. The
telescope should be set up at night and a star's image should be studied at medium to high power (30-60
power per inch of aperture). If a non-symmetrical focus pattern is present, then it may be possible to
correct this by re-collimating only the primary mirror.
Procedure
(Please read this section completely before beginning)
To star collimate in the Northern Hemisphere, point at a stationary star like the North Star (Polaris). It can
be found in the north sky, at a distance above the horizon equal to your latitude. It’s also the end star in the
handle of the Little Dipper. Polaris is not the brightest star in the sky and may even appear dim, depending
upon your sky conditions.
Figure 7-6 Primary mirror. Large thumbscrews are for collimation and
Small thumbscrews are for locking the mirror in place
Prior to re-collimating the primary mirror, locate the collimation screws on the rear of the telescope tube.
The rear cell (shown in Figure 7-6) has three large thumbscrews which are used for collimation and three
sm .
all thumbscrews which are used lock the mirror in place. The collimation screws tilt the primary mirror
Y
ou will start by loosening the small locking screw a few turns each. Normally, motions on the order of
1
a
/8 turn will make a difference, with approximately a 1/
n
la
rge collimation screws. Turn one collimation screw at a time and with a collimation tool or eyepiece see
h
ow the collimation is affected (see the following paragraph below). It will take some experimenting but
y
ou will eventually get the centering you desire.
It is best to use the optional collimation tool or collimating eyepiece. Look into the focuser and notice
if
the secondary reflection has moved closer to the center of the primary mirror.
to 3/
turn being the maximum required for the
2
4
W
ith Polaris or a bright star centered within the field of view, focus with either the standard ocular or your
h
ighest power ocular, i.e. the shortest focal length in mm, such as a 6mm or 4mm. Another option is to use
a
longer focal length ocular with a Barlow lens. When a star is in focus it should look like a sharp pinpoint
o
f light. If, when focusing on the star, it is irregular in shape or appears to have a flare of light at its edge,
th
is means your mirrors aren’t in alignment. If you notice the appearance of a flare of light from the star
th
at remains stable in location, just as you go in and out of exact focus, then re-collimation will help
sh
arpen the image.
W
hen satisfied with the collimation, tighten the small locking screws.
44
Page 45

Fig 7-7 Even though the star pattern appears the same on both sides of focus, they are asymmetric. The dark
obstruction is skewed off to the left side of the diffraction pattern indicating poor collimation.
Take note of the direction the light appears to flare. For example, if it appears to flare
toward the three o'clock position in the field of view, then you must move whichever
screw or combination of collimation screws necessary to move the star’s image toward
the direction of the flaring. In this example, you would want to move the image of the
star in your eyepiece, by adjusting the collimation screws, toward the three o'clock
position in the field of view. It may only be necessary to adjust a screw enough to move
the star’s image from the center of the field of view to about halfway, or less, toward the
field's edge (when using a high power ocul r).
a
Collimation adjustments are best made while viewing the st
a
djustment screws simultaneously. This way, you can see exactly which way the movement occurs. It may
ar's position in the field of view and turning the
be helpful to have two people working together: one viewing and instructing which screws to turn and b
how much, and the other performing the adjustments.
IMPORTANT: After making the first, or each adjustment, it is necessary to re-aim the telescope tube to re
center the star again in the center of the field of view. The star image can then be judged for symmetry by
going just inside and outside of exact focus and noting the star's pattern. Improvement should be seen if the
proper adjustments are made. Since three screws are present, it may be necessary to move at least two of
them to achieve the necessary mirror movement.
Figure 7-8
A collimated telescope
should appear as a
symmetrical ring pattern
similar to the diffraction
disk seen here.
y
-
45
Page 46

You will find that additional accessories for your Omni telescope will enhance your viewing pleasure and expand the
usefulness of your telescope. For ease of reference, all the accessories are listed in alphabetical order. This is just a short
listing of various accessories and please visit the Celestron website for complete and detailed accessories available.
Barlow Lens - A Barlow lens is a negative lens that increases the focal length of a telescope. Used with any eyepiece, it
doubles the magnification of that eyepiece. Celestron offers two Barlow lens in the 1-1/4" size. The 2x Ultima Barlow
(# 93506) is a compact triplet design that is fully multicoated for maximum light transmission and parfocal when used with
the Ultima eyepieces. The OMNI Barlow (# 93326) is a compact achromatic Barlow lens that is under three inches long and
weighs only 4 oz. It works very well with all Celestron eyepieces.
ollimation Eyepiece 1 ¼” – The collimation eyepiece ( # 94182) is ideal for precise collimatio
C n of Newtonian telescopes
d helpful for aligning Schmidt-Cassegrains. This special eyepiece fits into 1 ¼” focusers and diagonals.
an
yepieces - Like telescopes, eyepieces come in a variety of designs. Each design has its own advantages and
E
isadvantages. Below are just some of the eyepiece series available.
d
•
• X-Cel - This 6 element design allows each X-Cel Eyepiece to have 20mm of eye
Filters Sets
different filters per set. Not only are these highly useful filt
an
OMNI Plössl -
offer razor sharp views across the entire field, even at the edges! In the 1-1/4" barrel diameter,
following focal lengths: 4mm, 6mm, 9mm, 12.5mm, 15mm, 20mm, 25mm, 32mm and
40mm.
relief, 55° field of view and more than 25mm of lens aperture (even with the 2.3mm). In
order to maintain razor sharp, color corrected images across its 55° field of view, extra-low
dispersion glass is used for the most highly curved optical elements. The excellent refractive
properties of these high grade optical elements, make the X-Cel line especially well suited
for high magnification planetary viewing w
appreciated. X-Cel eyepieces come in the following focal lengths for 1 ¼” barrels: 2.3mm,
5mm, 8mm, 10mm, 12.5mm, 18mm, 21mm, 25mm.
, Eyepiece - Celestron offers four convenient filter sets, which contain four
economical way to add versatility to your filter collection. All fit 1 ¼” eyepieces.
Plössl eyepieces have a 4-element lens designed for low-to-high power observing. The Plössls
they are available in the
here sharp, color-free views are most
er combinations, but they also offer
Series 1 – # 94119-10
Orange, Light Blue, ND13%T, Polarizing (#s 21, 80A, #15, Polarizing)
Series 2 – # 94119-20
Deep Yellow, Red, Light Green, ND25% T (#s 12, 25, 56, 96ND-25)
Series 3 – # 94119-30
Light Red, Blue, Green, ND50% T (#s 23A, 38A, 58, 96ND-50)
Series 4 – # 94119-40
Yellow, Deep Yellow, Violet, Pale Blue (#s 8, 47, 82A, 96ND-13)
Flashlight, Night Vision - (# 93588) - Celestron’s premium model for astronomy, using two red LED's to preserve night
vision better than red filters or other devices. Brightness is adjustable. Operates on a single 9 volt battery (included).
46
Page 47

Diagonal 2" Mirror (# 93519) - Celestron offers a 2" 90° Mirror Diagonal to
slides into the barrel of a 2" refractor focuser. This diagonal includes
multicoated mirror and smooth mechanics that are precision manufactured for
Digital Camera Adapter – Univeral ( # 93626) – A universal mounting platfor
(photography through the eyepiece of a lescope) using 1 ¼” or 2” eyepieces with your digital camera.
Erect Image Diagonal (#94112-A) - This accessory is an Amici prism arrangement that allows you to look into the
telescope at a 45° angle with images that are oriented properly (upright and correct from left-to-right). It is useful for
daytime, terrestrial viewing with refractor and Schmidt-Cassegrain telescopes.
Micro Guide Eyepiece (# 94171) - This multipurpose 1 ¼” 12.5mm illuminated reticle can be used for guiding deep-sky
astrophotos, measuring position angles, angular separations, and more. The laser etched reticle provides razor sharp lines
and the variable brightness illuminator is completely cordless.
Moon Filter (
and improving contrast, so greater detail can be observed on the lunar surface. The clear aperture is 21mm and the
ansmission is about 18%. tr
# 94119-A) - Celestron’s Moon Filter is an economical eyepiece filter for reducing the brightness of the moon
te
thread on Schmidt- Cassegrain telescopes or
an adapter to accept 1¼" eyepieces. It has a
reliability.
m that allows you to do afocal photography
Motor Drive, Dual Axis (# 93522) - This dual axis motor drive, with drive corrector capabilities, is designed for Celestron's
Omni CG-4 mounts. It precisely controls the telescope's tracking speed during long, timed exposures of celestial objects,
roducing the best possible image sharpness. Four speeds are available—1x (siderp
entering. These precision, state-of-the-art DC motor drives operate from 4 D-cell batteries (not included). The hand
c
controller module is very compact and fits easily in the palm of your hand. Motors for both axes are included, along with
brackets, clutches and hardware. Motor drives are a must for those with a serious interest in astrophotography or CCD
ima
ging.
e Solar System Imager (# 93712) – NexImage is a complete CCD solar system imager cap
xImage –N
gh qualit y images with greater light sensitivity and color fidelity than comparable CMOS imagers. Combined
h
i y planetar
th the N image that will rival
wi exImage software package, NexImage can bring out tremendous detail and reveal a final
tho barrel makes NexImage
se taken with astronomical CCD cameras costing thousands of dollars more. The 1 ¼” adapter
com
patible with most any telescope. Very easy to understand operating instructions included.
Po by providing a means of
lar Axis Finderscope (# 94221) – This useful accessory speeds accurate polar alignment
vis end more time observing
ually aligning your German equatorial mount with Polaris and true north. As a result, you can sp
and
less time setting up. The finderscope has an easy to use cross hair reticle.
adial Guider (# 9417 ) - The Celestron Radial Guider is specifically designed for use in prime focus, deep sky
R
astrophography with Schmidt-Cassegrain telescopes, and takes the place of the T-Adapter. T
photograph and guide simultaneously through the optical tube assembly of your telescope. This
the best results since what you see through the guiding eyepiece is exactly reproduc
Guider is a “T”-shaped assembly that attaches to the rear cell of the telescope. As light from the telescope enters the guider,
most passes straight thr
guiding eyepiece. This guider has two features not found on other off-a
rotate independently of the camera orientation making the acquisition of
tunable allowing you to
Reducer/Corrector (# 94175) - This lens reduces the focal length of t
6
ough to the camera. A small portion, however, is diverted by a prism at an adjustable angle up to the
xis guiders; first, the prism and eyepiece housing
a guide star quite easy. Second, the prism angle is
look at guide stars on-axis. This accessory works especially well with the Reducer/Corrector.
he telescope by
a 788mm f/6.3 instrument
aberrations to produce crisp im
used photographically, there is
the processed film. It also increases the field of view signi ficantly and is ideal for widefield, deep-space viewing. It is also perfect for beginning prime focus, long-exposure
astrophotography when used w
exposures much shorter.
. In addition, this unique lens also corrects inherent
ages all the way across the field when used visually. When
some vignetting that produces a 26mm circular image on
ith the radial guider. It makes guiding easier and
eal), 2x for guiding, 4x, and 8x for
able of producing
his device allows you to
type of guiding produces
ed on the processed film. The Radial
37%, making your Omni XLT127
47
Page 48

SkyScout ( # 93970) – A hand held personal planetarium that identifies and locates objects in the night sky. 6,000 object
database with audio descriptions of over 200 popular objects. Comes with earphones, carrying case and strap, SD card
expansion slot and USB cable.
Sky Maps (# 93722) - Celestron Sky Maps are the ideal teaching guide for learning the night sky. You wouldn’t set off on
a road trip without a road map, and you don’t need to try to navigate the night sky without a map either.
know your way around the major constellations, these maps can help you locate all kinds of fascinating objects.
-Adapter (# 93633-A) - T-Adapter (with additional T-Ring) allows you to attach your SLR camera to the rear cell of your
T
Schmidt-Cassegrain telescope. This turns your telescope into a
photography and short exposure lunar and filtered solar photography
high power telephoto lens perfect for terrestrial
.
T-Ring - The T-Ring couples your 35mm SLR camera body to the T-Adapter, radial guider, or tele-extender. This
accessory is mandatory if you want to do photography through the telescope. Each camera make (i.e., Minolta, Nikon,
entax, etc.) has its own uniqu
P
Tele-Extender, Deluxe (# j93643) - The tele-extender is a hollow tube that allows you to attach a camera to the SchmidtCassegrain telescope when the eyepiece is installed. This accessory is used for eyepiece projection photography
allows you to capture very high power views of the Sun, Moon, and planets on film. The tele-extender fits over the eyepie
onto the visual back.
UHC/LPR Filter 1 ¼” (# 94123) - These filters are designed to enhance your views of deep sky astronomical objec
when viewed from urban areas. LPR Filters selectively reduce the transmission of certain wavelengths of light, specificall
those produced by artificial lights. This includes mercury and high and low pressure sodium vapor lights. In addition, the
also block unwanted natural light (sky glow) caused by neutral oxygen emission in our atmosphere.
A full description of all Celestron accessories can be found in the Celestron Accessory Catalog (# 93685)
e mount and therefore, its own T-Ring. Celestron
has 8 different models for 35mm cameras.
Even if you already
which
ce
ts
y
y
48
Page 49

AAppppeennddiixx AA TTeecchhnniiccaall SSppeecciiffiiccaattiioonns
s
Omni XLT Series 21088 21090 31057 11084
O
ptical Design Refractor Refractor Newtonian
Aperture 102mm (4.0") 120mm (4.7") 150mm (6.0") 127mm (5.0")
Focal Length 1000mm 1000mm 750mm 1250mm
Focal Ratio f/10 f/8.3 f/5 f/10
O ght XLT Starbright XLT Starbright XLT ptical Coatings Starbright XLT Starbri
F ope 6x30 6x30 6x30 6x30 indersc
Star Diagonal 1.25" 1.25" n/a 1.25"
Eyepiece – (std) MC 50deg FOV 25mm (40x) 25mm (40x) 25mm (30x) 25mm (50x)
Mount - Equatorial Omni CG-4 Omni CG-4 Omni CG-4 Omni CG-4
T ripod Legs 1.75" Stainless 1.75" Stainless 1.75" Stainless 1.75" Stainless
C
ounterweights 1.8kg (4#) 1.8kg (4#) 1.8kg (4#) 1.8kg(4#)
Highest Useful Magnification 240x 283x 360x 300x
Lowest Useful Magnification 15x 17x 21x 18x
L ude 12.5 12.9 13.4 13.1 imiting Stellar Magnit
Resolution: Raleigh -arc seconds 1.36 1.19 0.92 1.1
Resolution: Dawest Limit 1.14 0.97 0.76 0.91
Light Gathering Power 212x 294x 459x 329x
Field of View - Angular w/25mm ep 1.25° 1.25° 1.67° 1.0°
Field of View - Linear w/25mm ep 66 ft. @1000yds 66 ft. @1000yds 88 ft. @1000yds 53 ft. @1000yds
Optical Tube Length 39.5" (1003mm) 40.0" (1016mm) 26.5" (673mm) 11.0" (279mm)
Optical Tube Weight 9.5 # ( 4.3kg) 12.5 # ( 5.7kg) 12.0 # (5.4kg) 6.5 # ( 3.0kg)
Mount & Counterweights - Weight 21.0 # ( 9.5kg) 21.0 # ( 9.5kg) 21.0 # ( 9.5kg) 21.0 # ( 9.5kg)
T eight 12.5 # ( 5.7kg) 12.5 # (5.7kg) 12.5 # ( 5.7kg) 12.5 # ( 5.7kg) ripod W
T otal Weight 43.0 # ( 19.5kg) 46.0 # ( 20.9kg) 45.5 # (20.6kg) 40.0 # (18.1kg)
Omni XLT 102 Omni XLT 120 Omni XLT 150 Omni XLT 127
3.2kg (7#) & 3.2kg (7#) & 3.2kg (7#) & 3.2kg (7#)&
SchmidtCas
segrain
49
Page 50

s
AAppppeennddiixx BB -- GGlloossssaarryy ooff TTeerrmms
A-
Abs The apparent mag at a star wou it were obser a standard di 10
olute magnitude nitude th ld have if ved from stance of
parsecs, or 32.6 li olut Sun e o
would just be visible lear m y .
y d o tar can neve
Air isk The apparent size f a star's disk produced even by a perfect optical system. Since the s r
be focused perfec t of the ligh trate into , and 1
a system of surrounding rings.
Alt-Azimuth Mounting A telescope moun depe of the
Altitude and Azim
tude altitud bject is it stance the c
Alti In astronomy, the e of a celestial o s Angular Di above or below elestial
horizon.
rture telescope's primar s or mirror; the la the aperture, the g r the
Ape the diameter of a y len rger reate
telescope's light- ng power.
arent Magnitude relative star or objec an obse
App A measure of the brightness of a other celestial t as perceived by rver on
Earth.
minute A unit of angu
Arc lar 60 of a
Arc A unit of angular /3,600 o
second size equal to 1 f a degree (or 1/60 of an arcminute).
erism
Ast
Ast A small, rocky bo star.
eroid
Ast
rology
Ast
ronomical unit
Aur
ora
Azi gular dista an object eastwa ng the horizon, red from due no tween
muth The an
B Binar
y Stars
(AU)
A small unoffici s in
The pseu
affairs; a
The dist
150,0
doscientific belie planets exert an influence o
strology has nothing in common with astronomy
ance between the Earth and the t is equal to 149, 0 km., usually rounded off to
00,000 km.
The emission
ules in
molec
th e
e astronomical meridian (the vertical line passing through th
south points on the horizon) tical line e celesti
be measured.
Binary
(Double) ars ir m al att
around a comm
is called a mul
or multiple system ndiv that tely
are called visual b lti tar , A
is actually our nearest example of a multiple star system, it consists of three stars
to our Sun and one dim, small, red star orbiting around one another.
C Celestial Equator The projection of the Earth's equator on to the celestial sphere. It divides the sky into two equal
hemispheres.
Celestial pole
Celestial Sphere An imaginary sphere surrounding the Earth, concentric with the Earth's center.
Collimation
D -
Declination
E -
Ecliptic The projection of the Earth's orbit on to the celestial sphere. It may also be defined as "the apparent
Equatorial mount A telescope mounting in which the instrument is set upon an axis which is parallel to the axis of the
(DEC)
The imaginary projection of Earth's rotational axis north or south pole onto the celestia l sphere.
The act of putting a telescope's optics into perfect alignment.
The angular distance of a celestial body north or south of the celestial equator. It may be said to
correspond to latitude on the surface of the Earth.
yearly path of the Sun against the stars".
Earth; the angle of the axis must be equal to the observer's latitude.
ght-years.
tly, 84 per cen t will concen a single disk
ting using two in ndent rotation axis allowing movement instrument in
uth.
gatheri
size equal to 1/ degree.
al grouping of star the night sky.
dy that orbits a
of l en charged par rom the solar w
ight wh ticles f ind slam ites at
a p upper atmosphe
lanet's
nce of
.
stars are pairs of
on Center
tip eved ly 50 rs be
le system. It is beli
s. Systems with i idual components can be seen separa by
inaries or visual mu ples. The nearest "s " to our solar system lpha Centauri,
F -
The abs
on Earth on a c
f that the positions of stars and
and the ver containing th al body whose position is to
of Ma
e magnitude of the
oonless night awa
is 4.8. at a distanc
m surface light
fro
f 10 parsecs, it
6 per cent into
n human
.
Sun. I 597,90
s into and exc oms and
re.
rds alo
st that, because of th
s. If r mo ound
a group of three o
s
that approximate long to binary
measu rth, be
r of the sky and the north and
cente
e utual gravitation
re stars revolve a
percent of all sta
r
raction, orbit
, two very similar
one another, it
a telescope
50
Page 51

b
Focal length The distance between a lens (or mirror) a
brought to focus. The focal length divide
ratio.
nd the point at which the image of an object at infinity is
d by the aperture of the mirror or lens is termed the focal
J Jovian Plan
K Kuiper Belt
L Light-Yea
M Magnitude Magnitude is a measure of the brightness of a cel
Meridian A reference line in the sky that starts at the North celestial pole and ends at the South celestial pole
Messier
N Nebula d of gas and dust. Also refers to any celestial object that has a cloudy appearance.
Nort
Nova
O Open Cluster
P Parallax fference in the apparent position of an object against a background when viewed by
Parfocal Refers to a group of eyepieces that all require the same distance from the focal plane of the
Parsec The distance at which a star would show parallax of one second of arc. It is equal to 3.26 light-years,
Point Source r away or too small is
R Reflector A telescope in which the light is collected by means of a mirror.
ets
(LY)
r
h Celestial Pole The point in the Northern hemisphere around which all the stars appear to rotate. This is caused by
Any of the four gas giant planets that are at a greater distance form the sun than the
planets.
A region beyond the orbit of Neptune extending to about 1000 AU which is a source of many short
period comets.
A light-year is the distance light traverses in a vacuum in one year at the speed of 299,792 k
With 31,557,600 seconds in a year,
trillion mi).
magnitude 1 and those increasingly fainter from 2 down to magnitude 5. The f
seen without a telescope is about magnitude 6. Each m
rightness. Thus a star of magnitude 1 is 2.5 times brighter than a star of magnitude 2, and 100 times
brighter than a magnitude 5 star. The b
full moon is -12.7, and the Sun's brightness, expressed on a magnitude scale, is -26.78. The zer
point of the apparent magnitude scale is arbitrary.
and passes through
horizon and passes directly overhead to the North celestial pole.
A French astronomer in the late 1700’s who was primarily looking for comets. Comets are hazy
diffuse objects and so Messier cataloged objects that were not comets to help his search. This
catalog became the Messier Catalog, M1 through M110.
Interstellar clou
the fact that the Earth is rotating on an axis that passes through the North and South celestial poles.
The star Polaris lies less than a degree from this point and is therefore refer
Although Latin for "new" it denotes a star that suddenly becomes explosively bright at the end of its
life cycle.
One of the groupings of stars that are concentrated along the plane of the Milky Way. Most have an
asymmetrical appearance and are loosely assembled. They contain from a dozen to many hundred
of
stars.
Parallax is the di
an observer from two different locations. These positions and the actual position of the object form a
triangle from which the apex angle (the parallax) and the distance of the object c
the length of the baseline between the observing positions is know
object from each position at the ends of the baseline has been mea
astronomy of determining the distance to a celestial object is to measure its parallax.
telescope to be in focus. This means when you focu
eyepieces, in a particular line of eyepieces, will be in focus.
206,265 astronomical units, or 30,8000,00
one parsec of us.)
An object which cannot be resolved into an image because it to too fa
considered a point source. A planet is far away but it can be resolved as a disk. Most stars cannot
be resolved as disks, they are too far away.
the zenith. If you are facing South, the meridian starts from your Southern
the light-year equals a distance of 9.46 X 1 trillion km (5.87 X 1
estial body. The brightest stars are assigned
agnitude step corresponds
rightest star, Sirius, has an apparent magnitude of -1.6, the
red to as the "Pole Star".
n and the angu
sured. The traditional method in
s one parfocal eyepiece all the other parfocal
0,000,000 km. (Apart from the Sun, no star lies within
terrestrial
m/ sec.
aintest star that can be
to a ratio of 2.5 in
o
an be determined if
lar direction of the
s
51
Page 52

Resolution The minimum detectable angle an optical system can detect. Because of diffraction, there is a limit
to the minimum angle, resolution. The larger the aperture, the better the resolution.
Right Ascension: (RA)
S -
idt Telescope Rated the most important advance in optics in 200 years, the Schmidt telescope combines the best
Schm
Sidereal Rate This is the angular speed at which the Earth is rotating. Telescope tracking motors drive the
T Terminator
U Universe The totality of astronomical things, events, relations and energies capable of being described
V -
ble Star A star whose brightness varies over time due to either inherent properties of the star or something
Varia
W Waning Moon
ular distance of a celestial object measured in hours, minutes, and seconds along the
The ang
elestial Equator eastward from the Vernal Equinox.
C
features of the refractor and reflector for photographic purposes. It was invented in 1930 by
Bernhard
telescope at this rate. The rate is 15 arc seconds per second or 15 degrees per hour.
The boundary line between
objectively.
eclipsing or obscuring the brightness of the star.
The period of the moon's cycle between full and new, when its illuminated portion is decreasing.
Voldemar Schmidt (1879-1935).
the light and dark portion of the moon or a planet.
Waxing Moon
Z -
Zenith The point on the Celestial Sphere directly above the observer.
Zodiac
The period of the moon's cycle between new and full, when its illuminated portion is increasing.
The zodiac is the portion of the Celestial Sphere that lies within 8 deg
Ecliptic. The apparent paths of the Sun, the Moon, and the planets
portions of the path of Pluto, lie within this band. Twelve divisions, or signs, each 30 deg
width, comprise the zodiac. These signs coincided with the zodiacal constellations about 2,000
ago. Because of the Precession of the Earth's axis, the Ver
about 30 deg
constellations.
rees since that time; the signs have moved with it and thus no longer coincide with the
nal Equinox has moved westward by
rees on either side of the
, with the exception of some
rees in
years
52
Page 53
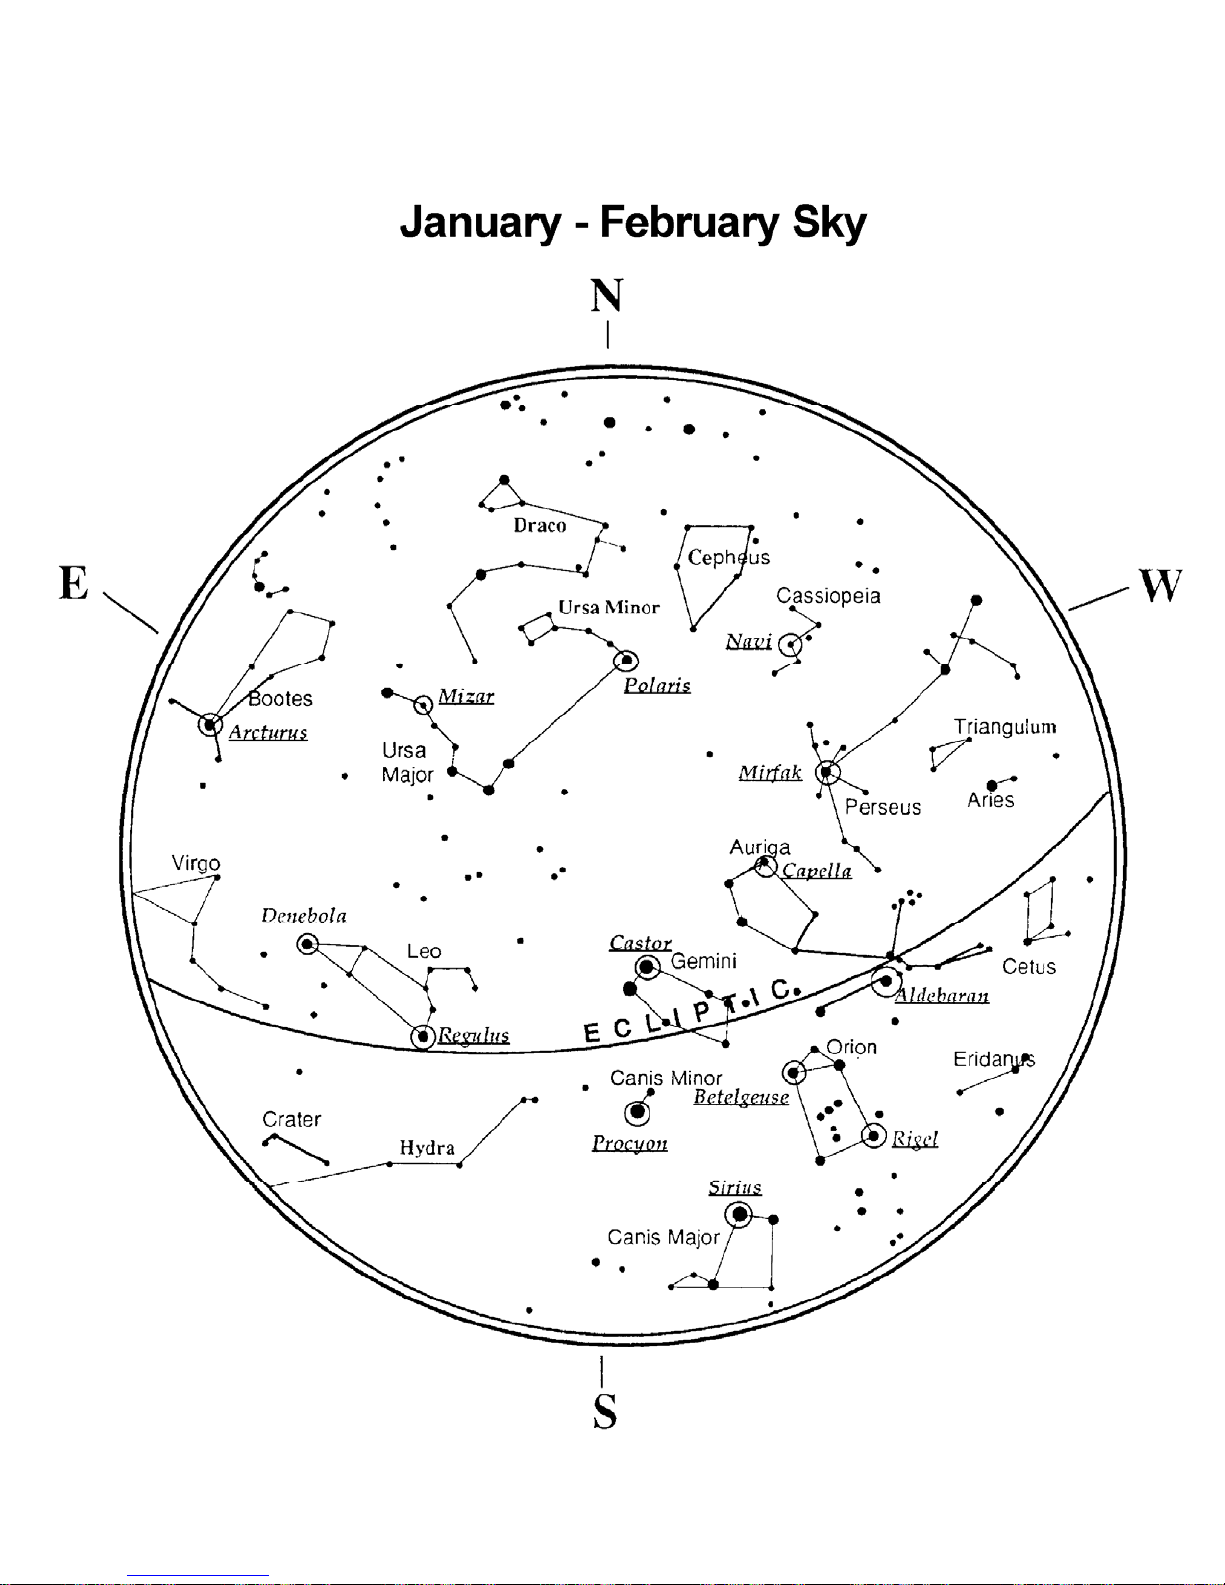
53
Page 54

54
54
Page 55

55
55
Page 56

56
56
Page 57
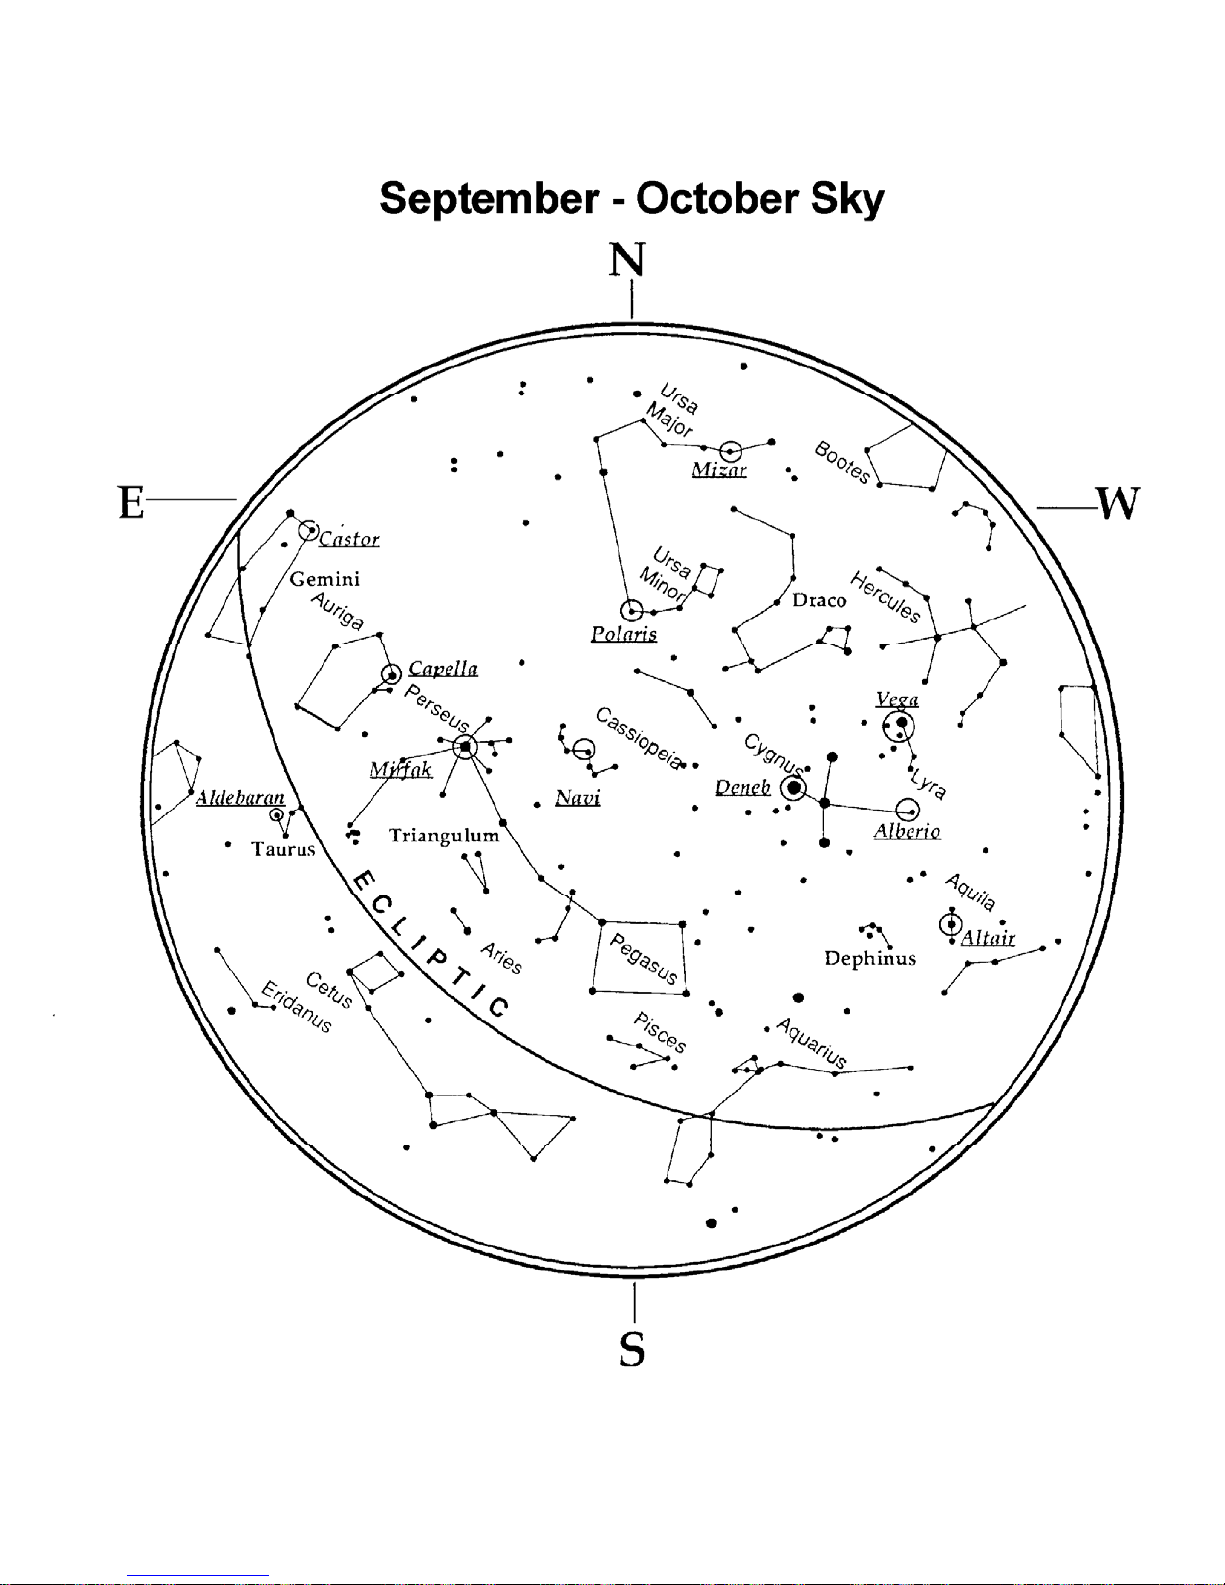
57
57
Page 58

58
Page 59

CCeelleessttrroonn TTwwoo YYeeaarr WWaarrrraannttyy
A. Celestron warrants this telescope to be free from defects in materials and workmanship for two years. Celest ron will repair or
replace such product or part thereof which, upon inspection by Celestron, is found to be defective in materials or workmanship.
As a condition to the obligation of Celestron to repair or replace such product, the product must be returned to Celestron
together with proof-of-purchase satisfactory to Celestron.
B. The Proper Return Authorization Number must be obtained from Celestron in advance of return. Call Celestron at (310) 328-
9560 to receive the number to be displayed on the outside of your shipping container.
All returns must be accompanied by a written statement setting forth the name, address, and daytime telephone number of the
owner, together with a brief description of any claimed defects. Parts or product for which replacement is made shall become
the property of Celestron.
The customer shall be responsible for all costs of transportation and insurance, both to and from the factory of
Celestron, and shall be required to prepay such costs.
Celestron shall use reasonable efforts to repair or replace any telescope covered by this warranty within thirty days of receipt. In
the event repair or replacement shall require more than thirty days, Celestron shall notify the customer accordingly. Celestron
reserves the right to replace any product which has been discontinued from its product line with a new product of comparable
value and function.
This warranty shall be void and of no force of effect in the event a covered product has been modified in design or
function, or subjected to abuse, misuse, mishandling or unauthorized repair. Further, product malfunction or
deterioration due to normal wear is not covered by this warranty.
CELESTRON DISCLAIMS ANY WARRANTIES, EXPRESS OR IMPLIED, WHETHER OF MERCHANTABILITY OF
FITNESS FOR A PARTICULAR USE, EXCEPT AS EXPRESSLY SET FORTH HEREIN.
THE SOLE OBLIGATION OF CELESTRON UNDER THIS LIMITED WARRANTY SHALL BE TO REPAIR OR
REPLACE THE COVERED PRODUCT, IN ACCORDANCE WITH THE TERM S SET FORTH HEREIN. CELESTRON
EXPRESSLY DISCLAIMS ANY LOST PROFITS, GENERAL, SPECIAL, INDIREC T OR CONSEQUENTIAL DAMAGES
WHICH MAY RESULT FROM BREACH OF ANY WARRANTY, OR ARISING OUT OF THE U SE OR INABILITY TO
USE ANY CELESTRON PRODUCT. ANY WARRANTIES WHICH ARE IMPLIED AND WHICH CANNOT BE
DISCLAIMED SHALL BE LIMITED IN DURATION TO A TERM OF TWO YEARS FROM THE DATE OF ORIGINAL
RETAIL PURCHASE.
Some states do not allow the exclusion or limitation of incidental or consequential damages or limitation on how long an implied
warranty lasts, so the above limitations and exclusions may not apply to you.
This warranty gives you specific legal rights, and you may also have other rights which vary from state to state.
Celestron reserves the right to modify or discontinue, without prior notice to you, any model or style telescope.
If warranty problems arise, or if you need assistance in using your telescope contact:
Celestron
Customer Service Department
2835 Columbia Street
Torrance, CA 90503 U.S.A.
Tel. (310) 328-9560
Fax. (310) 212-5835
Monday-Friday 8AM-4PM PST
This warranty supersedes all other product warranties.
NOTE: This warranty is valid to U.S.A. and Canadian customers who have purchased this product from an Authorized
Celestron Dealer in the U.S.A. or Canada. Warranty outside the U.S.A. and Canada is valid only to customers who purchased
from a Celestron Distributor or Authorized Celestron Dealer in the specific country and please contact them for any
warranty service.
Page 60

Celestron
5 Columbia Street
283
a
nce, CA 90503 U.S.A.
Torr
(310) 328-9560
Tel.
. (
Fax 310) 212-5835
Web site at http//www.celestron.com
right 2007 Celestron
Copy
All rights reserved.
(Products or instructions may change
out notice or obligation.)
with
I
tem # 21088-INST
P ted in China
rin
$10.00
01-07
 Loading...