

Page 1
NV-2 NIGHT VISION SCOPE
Model # 71221
ENGLISH
The Celestron NV-2 Night Vision Scope is designed for
use during the day or at night. It offers both standard
and night vision viewing, still image and video recording, and
in-device playback.
One AW 18650 3.7V 2,200 mAh rechargeable lithium ion battery
is included. This provides the NV-2 with 2-3 hours of battery
life. A USB 2.0 cable is included. This cable may be used
for charging the unit with a USB plug (not included), and to
transfer recorded fi les to a computer.
We encourage you to download the complete instruction
manual from the NV-2 web page at celestron.com, but we
know you’re eager to begin using your new scope, so here are
a few basics to get you started.
NOTES ON USE IN LOW LIGHT AND COMPLETE
DARKNESS
The night vision performance of the NV-2 will be enhanced in
complete darkness when the infrared beam is activated. This
will increase the clarity of the image.
Adjust the focus wheel of the infrared beam to observe subjects
at different distances. The NV-2 uses a low illumination CCD. It
can be used in low light (but not completely dark) environments
without infrared beams being activated.
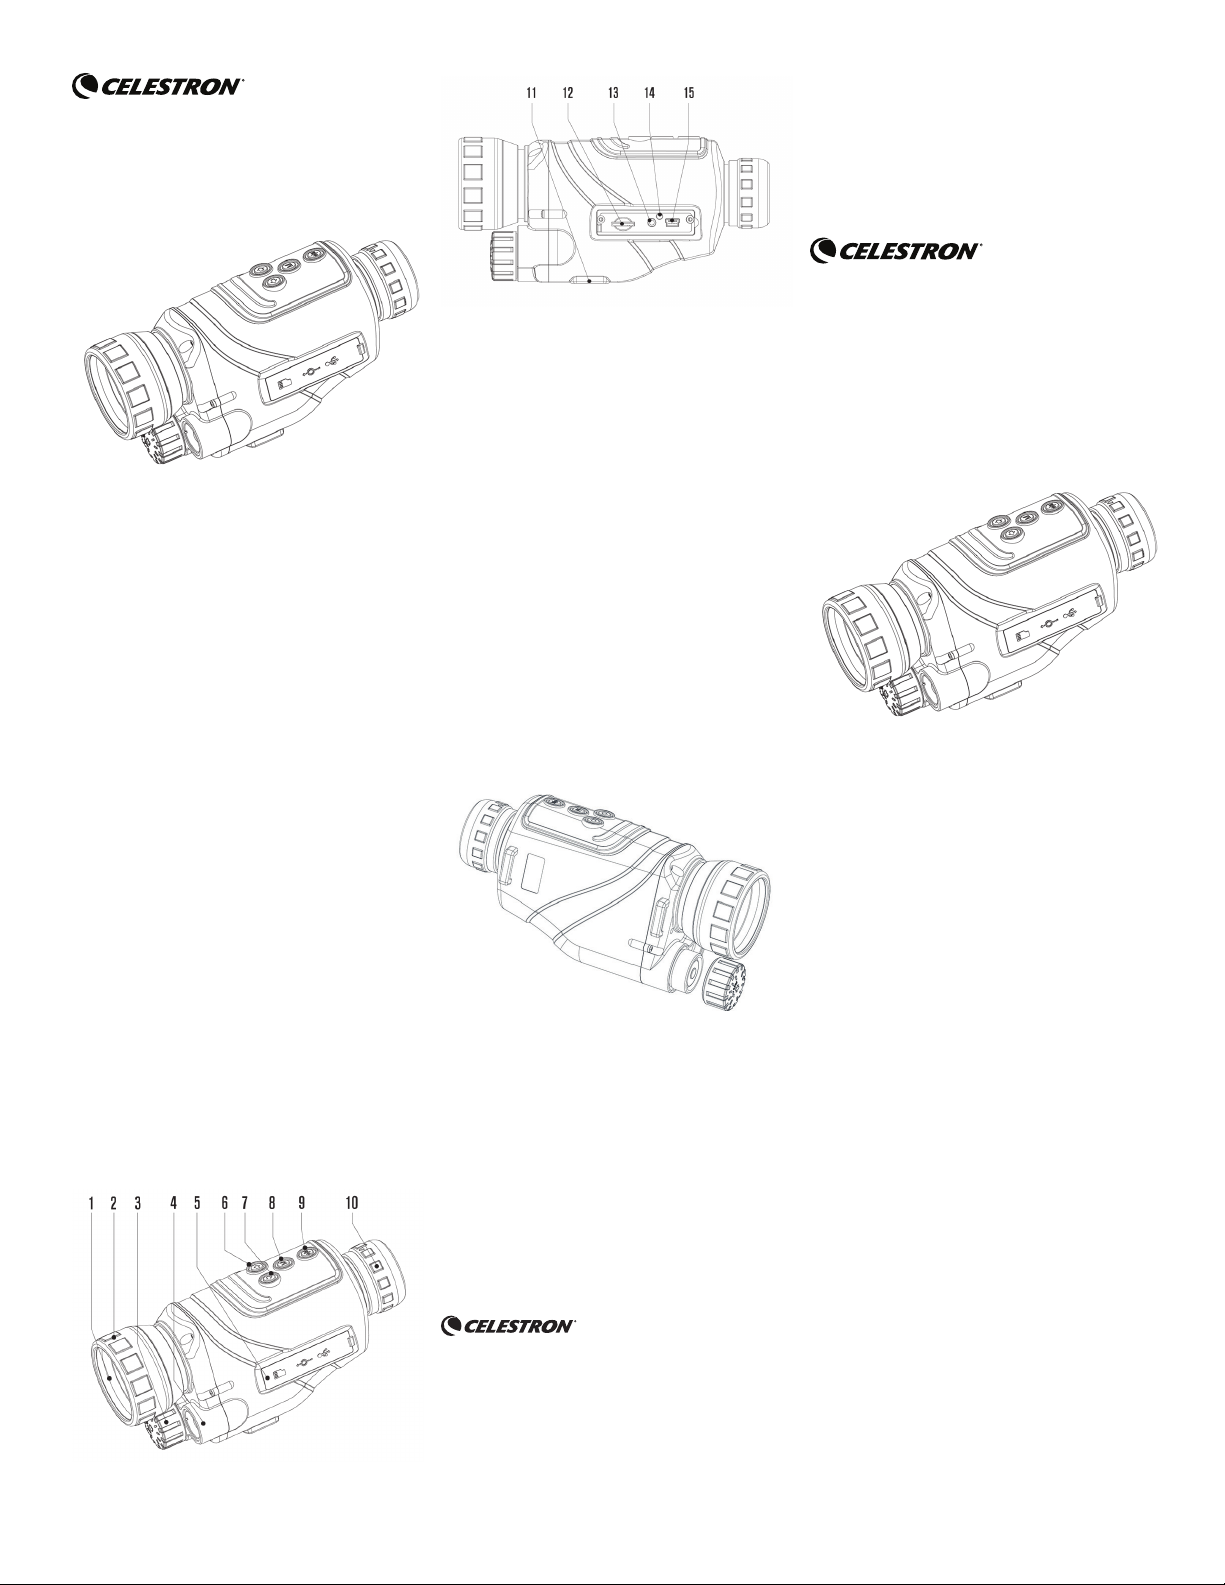
KEY PARTS
1. Objective Lens
2. Focus Wheel
3. Battery Compartment
4. Infrared Beam
5. Port Cover
6-7. +/- Button
8. Mode Button
9. Power/Enter Button
10. Eyepiece
11. Tripod Adapter
12. Memory Card Slot
13. Audio/Video Port
14. Charging Indication Light
15. USB Port
BATTERY INSTALLATION
Remove the battery compartment cover, insert the battery
with the cathode facing inward, then replace the battery
compartment cover tightly and turn on the device. Once the
screen is illuminated, the NV-2 is ready to use.
IMPORTANT:
• Only use the correct battery model
• The battery must be fully charged
• The battery should be installed correctly (cathode facing inward)
For the complete instruction manual go to this product’s page at
www.celestron.com and click on the SUPPORT section.
(Products or instructions may change without
notice or obligation).
Designed and intended for those 14 years of age
and older.
05-19
______________________________________
LUNETTE DE VISION
NOCTURNE NV-2
Modèle #71221
FRANÇAIS
La lunette de vision nocturne NV-2 est conçue pour être
utilisée de jour ou de nuit. Elle permet l’observation standard
et par vision nocturne, la capture de photos ou l’enregistrement
vidéo, ainsi que la visualisation du contenu.
Une pile au lithium-ion rechargeable AW 18650 3,7 V
2200 mAh est incluse. Cette dernière donne à la NV-2 environ
2 à 3 heures d’autonomie. Un câble USB 2.0 est inclus. Ce
câble peut être utilisé pour charger l’unité avec une fi che USB
(non incluse), et pour transférer des fi chiers enregistrés vers
un ordinateur.
Nous vous encourageons à télécharger le mode d’emploi
complet depuis la page Web du NV-2 sur celestron.com. Mais
nous savons que vous êtes impatient d’utiliser votre nouvelle
lunette, alors voici quelques instructions élémentaires pour
commencer.
NOTES CONCERNANT L’UTILISATION EN
ENVIRONNEMENT DE FAIBLE LUMINOSITÉ OU
DANS L’OBSCURITÉ TOTALE
Les performances de vision nocturne de la NV-2 seront
améliorées dans l’obscurité totale lorsque le faisceau
infrarouge est activé. Ce dernier améliore la clarté de l’image.
© 2019 Celestron • All rights reserved
celestron.com/pages/technical-support
2835 Columbia Street • Torrance, CA 90503 USA
Réglez la molette de mise au point du faisceau infrarouge
pour observer des sujets à différentes distances. La NV-2
utilise un CCD à faible illumination. Il peut être utilisé
dans des environnements de faible luminosité (mais pas
dans l’obscurité totale) sans que le faisceau infrarouge
soit activé.
Page 2
COMPOSANTS CLEFS
IMPORTANT :
• Utilisez exclusivement le modèle de pile correct
• La pile doit être complètement chargée
• La pile doit être installée correctement (la cathode orientée
vers l’intérieur)
Pour obtenir le mode d’emploi complet, rendez-vous sur la
page du produit à l’adresse www.celestron.com puis cliquez
sur la section SUPPORT.
© 2019 Celestron • Tous droits réservés.
celestron.com/pages/technical-support
2835 Columbia Street • Torrance, CA 90503 USA
HINWEISE ZUR VERWENDUNG BEI
SCHLECHTEN LICHTVERHÄLTNISSEN UND
VÖLLIGER DUNKELHEIT
Die Nachtsichtleistung des NV-2 verbessert sich bei völliger
Dunkelheit, wenn der Infrarotstrahler aktiviert wurde. Dies
erhöht die Bildschärfe.
Stellen Sie das Fokussierrad des Infrarotstrahlers ein, um
Motive in unterschiedlichen Entfernungen zu betrachten.
Das NV-2 verwendet einen CCD für schwache Beleuchtung. Es kann in Umgebungen mit wenig Licht (aber nicht
vollständig dunkel) verwendet werden, ohne dass der
Infrarotstrahler aktiviert werden muss.
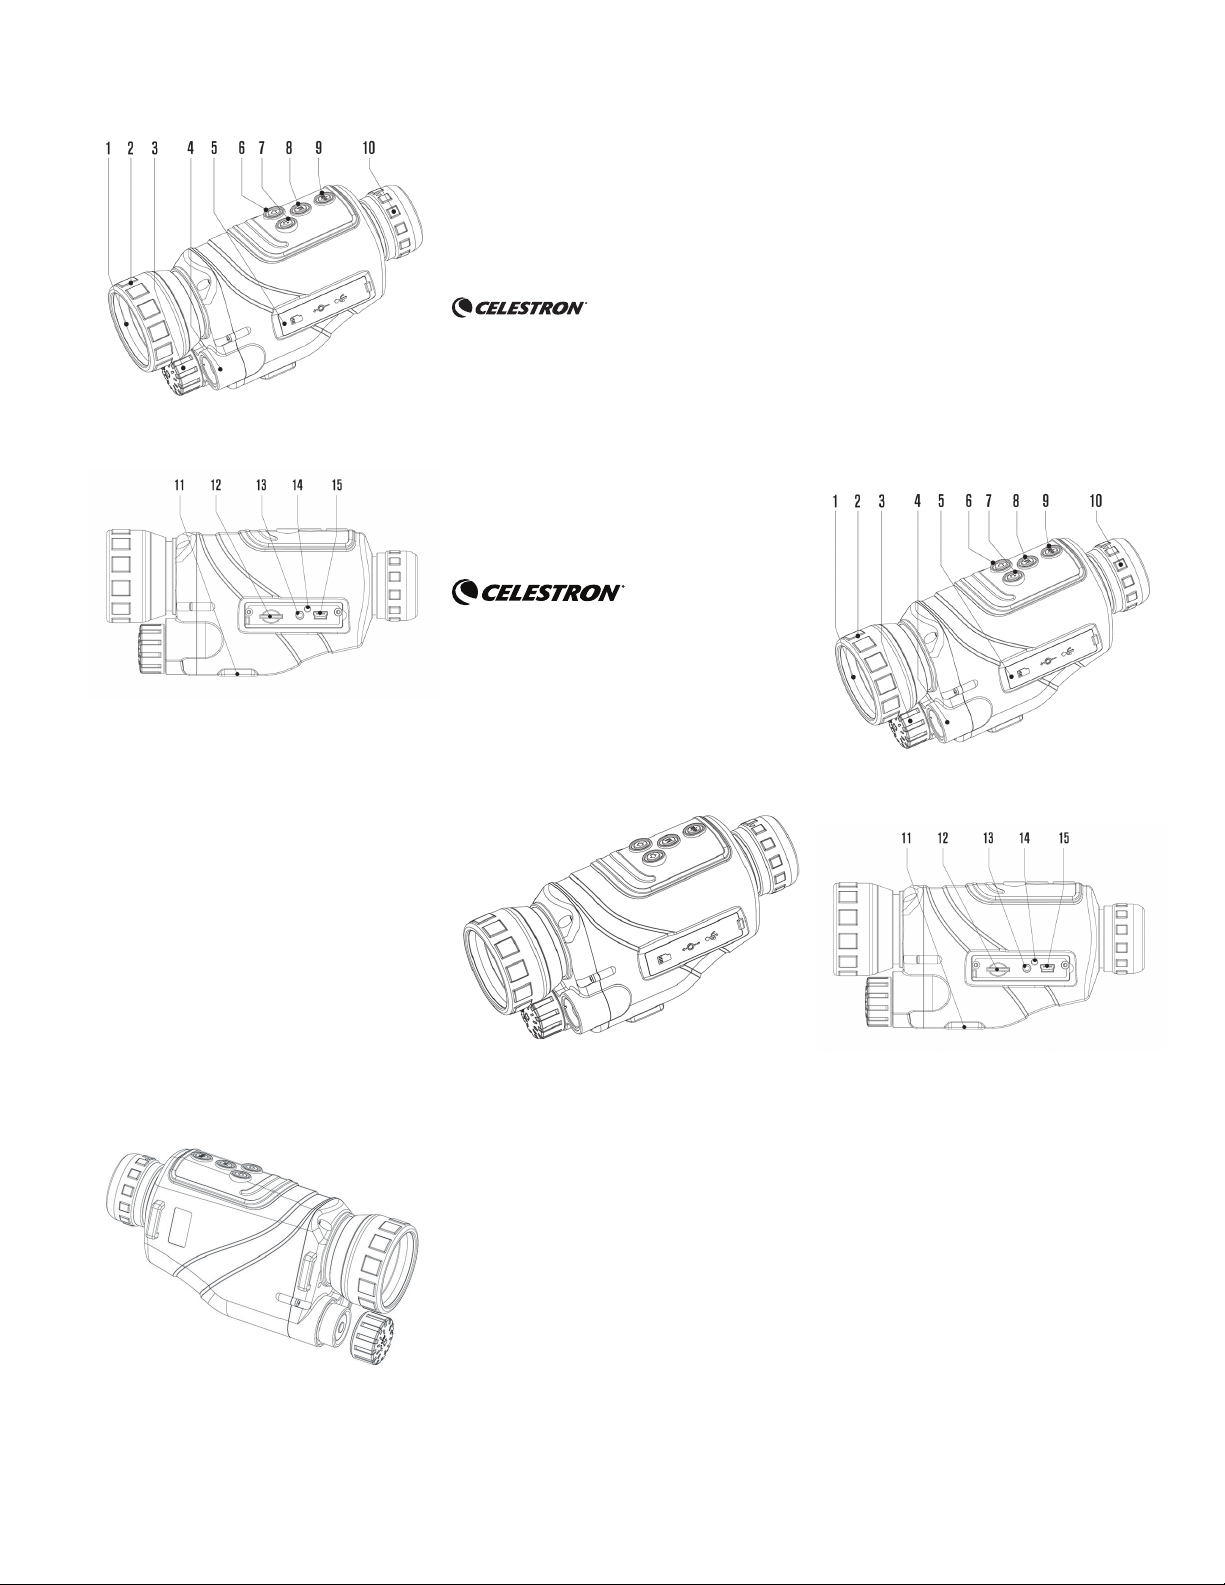
1. Lentille de l’objectif
2. Molette de mise au point
3. Compartiment de la pile
4. Faisceau infrarouge
5. Cache des ports
6-7. Bouton +/-
8. Bouton Mode
9. Bouton Entrée/Alimentation
10. Oculaire
11. Adaptateur de trépied
12. Logement pour carte mémoire
13. Port Audio/Vidéo
14. Voyant indicateur de charge
15. Port USB
(Les produits ou les instructions peuvent changer sans préavis ni
aucune obligation.)
Ce produit est conçu et prévu pour être utilisé par des personnes
âgées de 14 ans et plus.
05-19
_____________________________________
NV-2
NACHTSICHTGERÄT
Modellnr. 71221
DEUTSCH
SCHLÜSSELKOMPONENTEN
INSTALLATION DE LA BATTERIE
Retirez le cache du compartiment de pile, insérez la pile avec
la cathode orientée vers l’intérieur, puis remettez le cache
soigneusement en place et allumez l’appareil. La NV-2 est
prête à l’utilisation lorsque l’écran s’illumine.
Das Celestron NV-2 Nachtsichtgerät wurde für den Einsatz
bei Tag und Nacht entwickelt. Es bietet sowohl standardmäßige Betrachtung als auch Nachtsicht, Standbild- und
Videoaufzeichnung sowie geräteinterne Wiedergabe.
Ein wiederaufl adbarer Lithium-Ionen-Akku AW 18650 mit
3,7 V und 2200 mAh ist im Lieferumfang enthalten. Dieser
ermöglicht dem NV-2 eine Betriebsdauer von 2-3 Stunden.
Ein USB 2.0-Kabel wurde mitgeliefert. Mit diesem Kabel
können Sie das Gerät über ein USB-Steckernetzteil (nicht
im Lieferumfang enthalten) aufl aden und aufgezeichnete
Dateien auf einen Computer übertragen.
Wir empfehlen Ihnen, die vollständige Bedienungsanleitung
von der NV-2-Webseite unter celestron.com herunterzuladen.
Wir wissen jedoch, dass Sie mit dem Einsatz Ihres neuen
Nachtsichtgeräts beginnen möchten. Deshalb fi nden Sie hier
einige Grundlagen für den Einstieg.
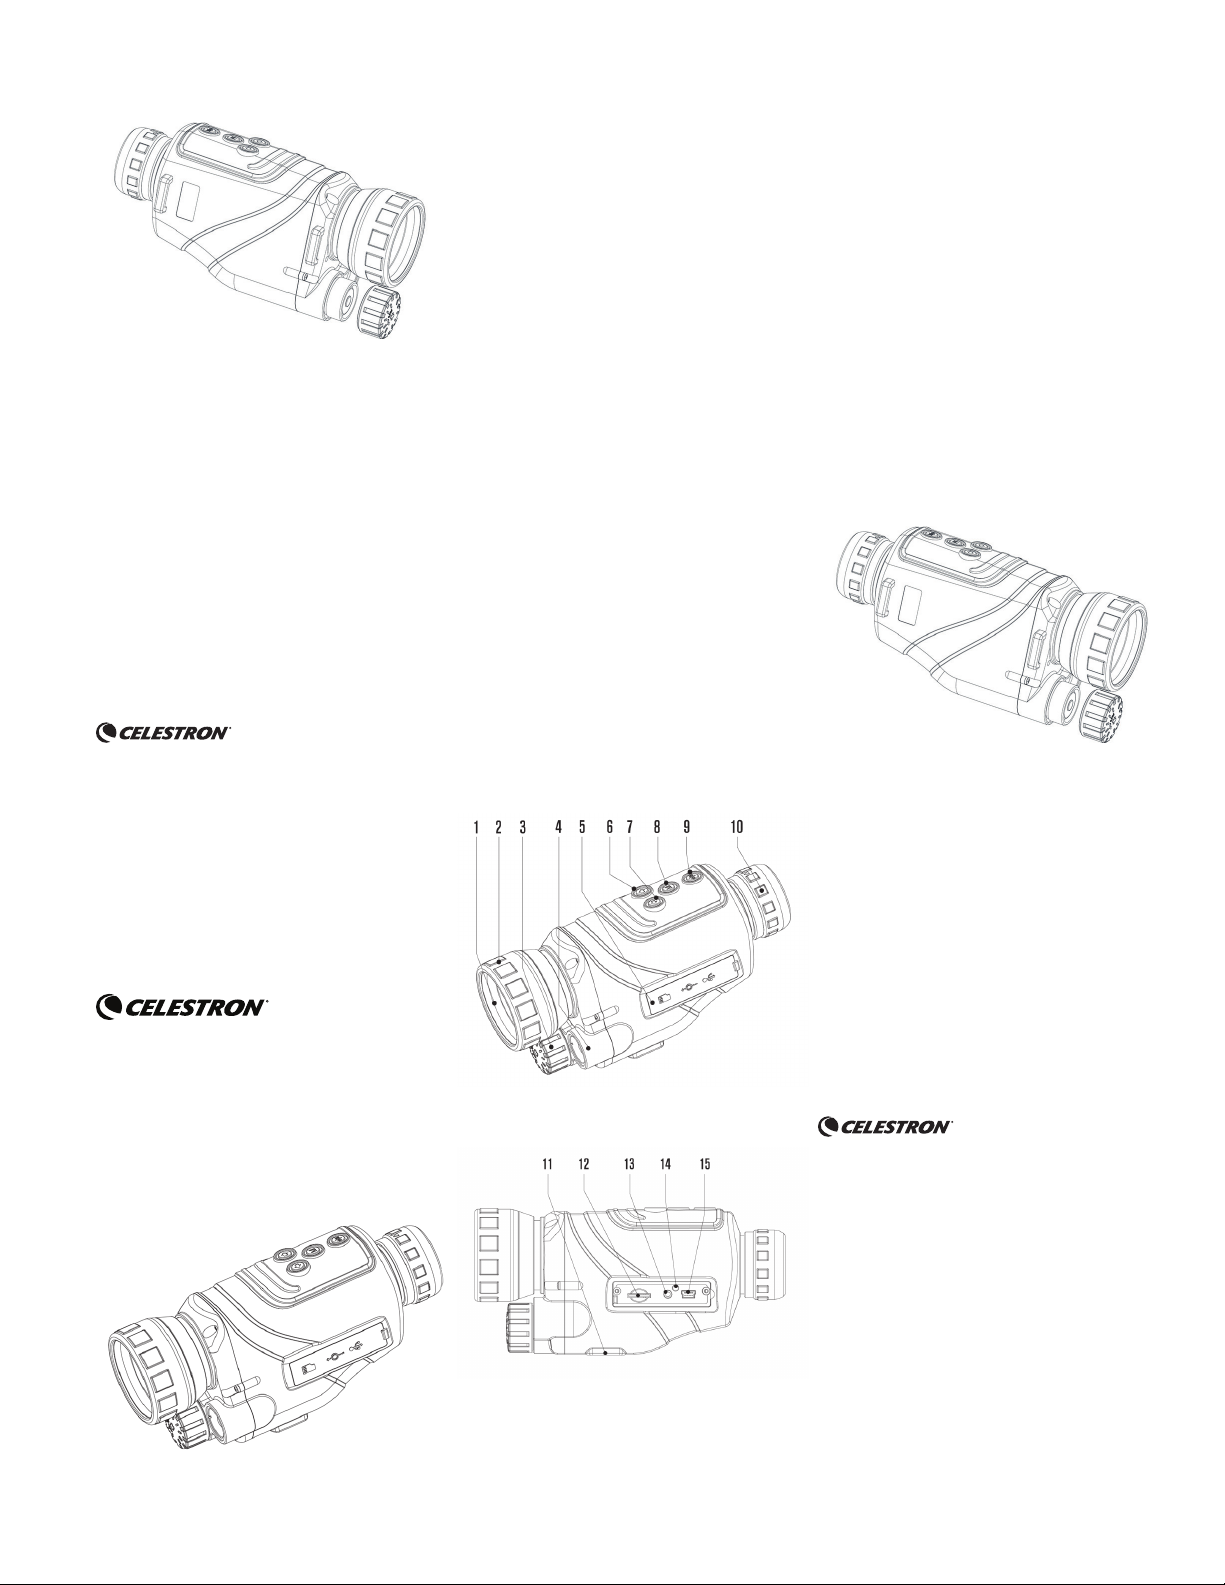
1. Objektivlinse
2. Fokussierrad
3. Akkufach
4. Infrarotstrahler
5. Anschlussabdeckung
6-7. +/- Tasten
8. Modustaste
9. Ein/Aus-/Eingabe-Taste
10. Okular
11. Stativadapter
12. Speicherkarteneinschub
13. Audio-/Video-Anschluss
14. Ladeanzeige-LED
15. USB-Anschluss
Page 3
EINSETZEN DES AKKUS
Entfernen Sie den Akkufachdeckel, legen Sie den Akku mit
dem Minuspol nach innen ein, schließen Sie den Akkufachdeckel wieder und schalten Sie das Gerät ein. Sobald der
Bildschirm aufl euchtet, ist das NV-2 einsatzbereit.
WICHTIG:
• Verwenden Sie nur das vorgeschriebene Akkumodell
• Der Akku muss voll aufgeladen sein
• Der Akku muss ordnungsgemäß eingelegt sein (Minuspol
nach innen gerichtet)
Die vollständige Bedienungsanleitung fi nden Sie auf der
Produktseite unter
www.celestron.com. Klicken Sie auf den Abschnitt SUPPORT.
Il telescopio monoculare per visione notturna NV-2 Celestron
è ideato per essere impiegato sia di giorno sia di notte.
Permette la visione diurna e notturna, consente di scattare
foto e registrare video, e offre la riproduzione integrata.
È in dotazione una batteria agli ioni di litio ricaricabile AW
18650 da 3,7 V e 2200 mAh. Ciò fornisce al dispositivo NV-2
una durata della batteria di 2-3 ore. È in dotazione un cavo
USB 2.0. Questo cavo può essere utilizzato per ricaricare
l’unità con una presa USB (non in dotazione) e per trasferire
i fi le registrati su un computer.
Si consiglia di scaricare il manuale d’istruzioni completo
dalla pagina web del dispositivo NV-2 su celestron.com, ma
per agevolare il desiderio di utilizzare subito il prodotto, ecco
di seguito alcuni elementi di base per iniziare.
NOTE SULL’UTILIZZO CON POCA LUCE E IN
COMPLETA OSCURITÀ
Le prestazioni in notturna del dispositivo NV-2 migliorano in
completa oscurità quando è attivato il raggio infrarossi. Ciò
migliora la chiarezza dell’immagine.
Regolare la ghiera di messa a fuoco del raggio infrarossi
per osservare soggetti a diversa distanza. Il dispositivo NV-2
utilizza una bassa illuminazione CCD. Può essere utilizzato in
ambienti con poca luce (ma non oscurità completa) senza
attivare i raggi infrarossi.
1. Lente obiettivo
2. Ghiera di messa a fuoco
3. Vano batterie
4. Raggio infrarossi
5. Sportellino porte
6-7. Pulsante +/-
8. Pulsante Modalità
9. Pulsante Accensione/Avvio
10. Oculare
11. Adattatore treppiede
12. Vano per scheda di memoria
13. Porta audio/video
14. Spia di indicazione ricarica
15. Porta USB
INSTALLAZIONE DELLE BATTERIE
© 2019 Celestron • Alle Rechte vorbehalten.
celestron.com/pages/technical-support
2835 Columbia Street • Torrance, CA 90503 USA
(Produkte oder Anleitungen können ohne
Mitteilung oder Verpfl ichtung geändert werden.)
Für den Gebrauch durch Personen von 14 Jahren
oder älter entworfen und bestimmt.
05-19
_____________________________________
TELESCOPIO
MONOCULARE PER
VISIONE NOTTURNA NV-2
Modello n. 71221
ITALIANO
COMPONENTI PRINCIPALI
Rimuovere lo sportellino del vano batterie, inserire la batteria
con il catodo rivolto verso l’interno, quindi riporre e serrare
lo sportellino del vano batterie e accendere il dispositivo.
Una volta illuminato lo schermo, il dispositivo NV-2 è pronto
all’uso.
IMPORTANTE:
• Utilizzare esclusivamente il modello di batteria corretto
• La batteria deve essere completamente carica
• Installare la batteria correttamente (il catodo rivolto verso
l’interno)
Per il manuale d’istruzioni completo, consultare la pagina
relativa al prodotto all’indirizzo www.celestron.com e fare
clic sulla sezione ASSISTENZA.
© 2019 Celestron • Tutti i diritti riservati.
celestron.com/pages/technical-support
2835 Columbia Street • Torrance, CA 90503 Stati Uniti
(Prodotti o istruzioni possono cambiare senza
previa notifi ca od obbligo.)
Questo dispositivo non è destinato all’uso da parte di minori di 14
anni.
05-19
_____________________________________
Page 4
CATALEJO DE VISIÓN
NOCTURNA NV-2
Modelo # 71221
ESPAÑOL
El catalejo de visión nocturna NV-2 de Celestron ha sido
diseñado para uso de día o de noche. Ofrece observación
normal y con visión nocturna, captura de fotografía y video y
reproducción en el mismo dispositivo.
Incluye una batería de litio ión recargable AW 18650 3,7V
2200mAh. Ofrece al NV-2 2-3 horas de duración de batería.
Incuye un cable USB 2.0. El cable puede usarse para cargar
la unidad con una toma USB (no incluida), y transferir
imágenes grabadas a un ordenador.
Le animamos a descargar el manual de instrucciones
completo de la página web del NV-2 en celestron.com,
pero sabemos que quiere comenzar a usar su nuevo
catalejo, por lo que a continuación presentamos algunos
fundamentos iniciales.
(Los productos o instrucciones pueden cambiar
sin previo aviso u obligación)
Diseñado y destinado a personas de 14 o más
años de edad.
05-19
_____________________________________
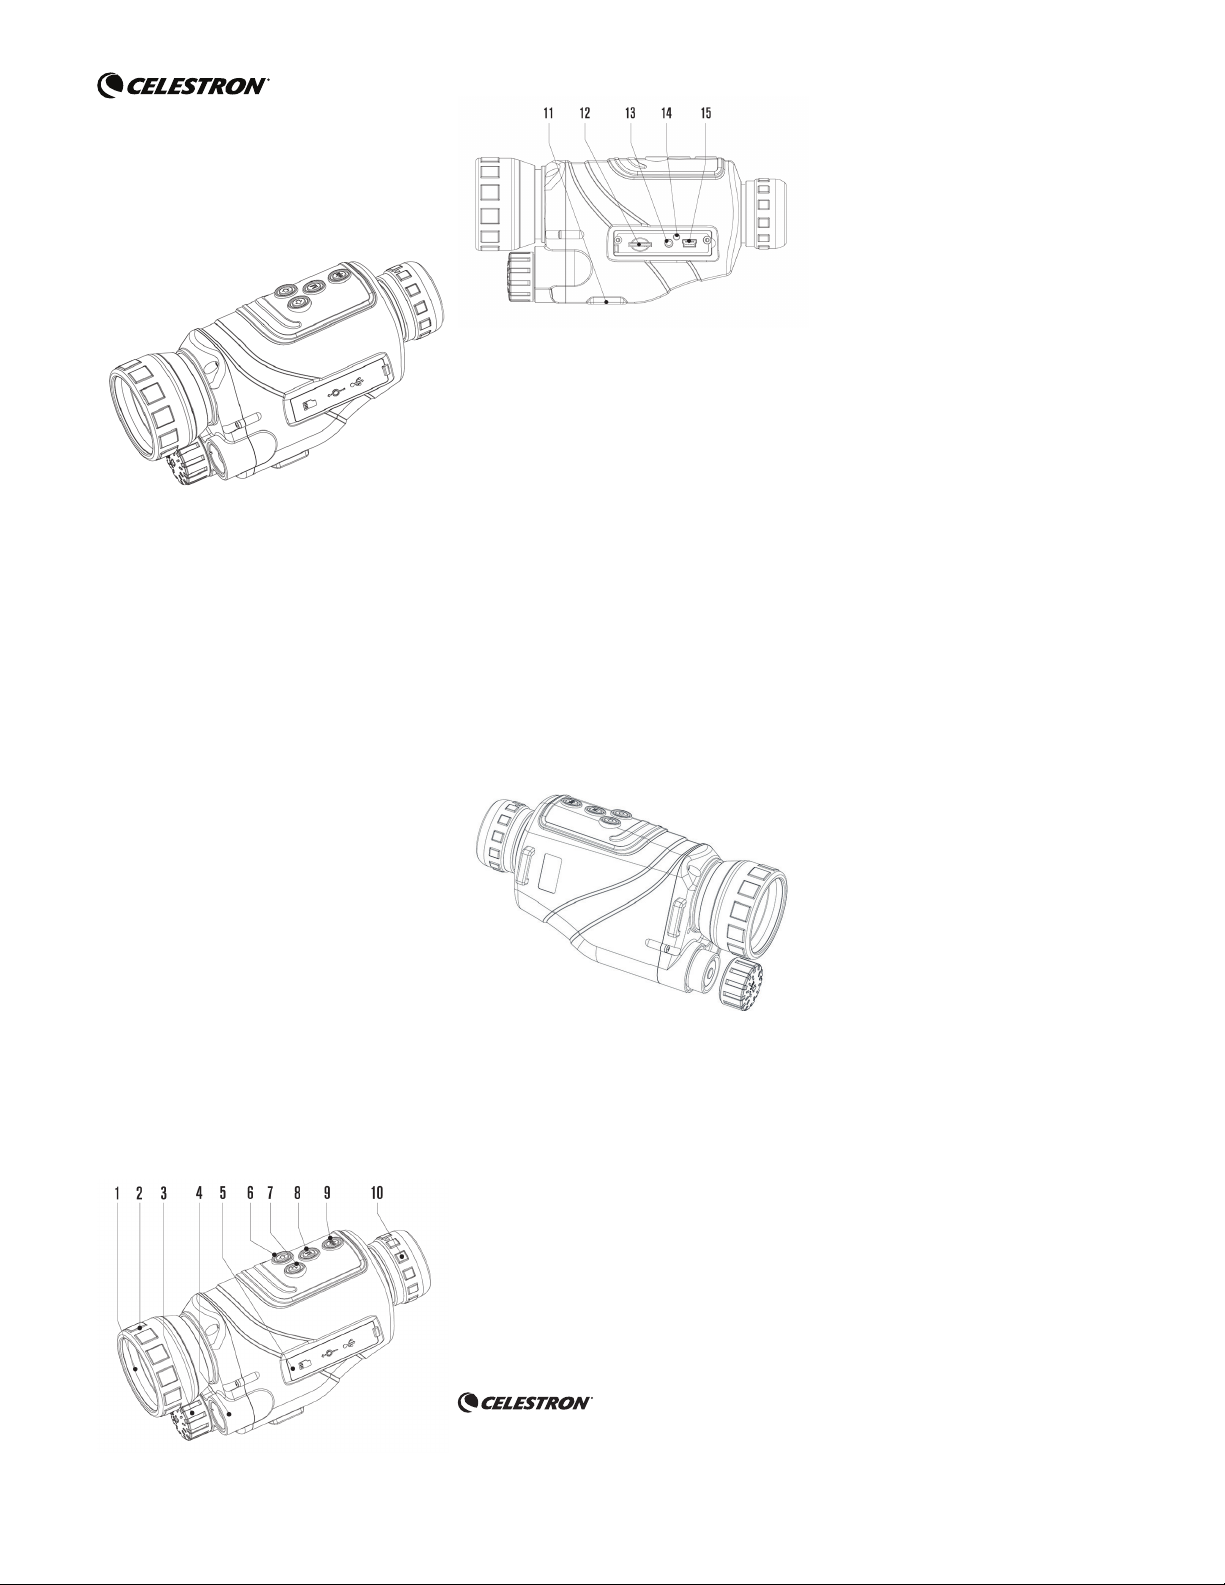
1. Lente de objetivo
2. Rueda de enfoque
3. Compartimiento de baterías
4. Luz infrarroja
5. Cubierta del puerto
6-7. Botón +/-
8. Botón de modo
9. Botón Encendido / Intro
10. Ocular
11. Adaptador para trípode
12. Ranura de tarjeta de memoria
13. Puerto audio/video
14. Testigo indicador de carga
15. Puerto USB
INSTALACIÓN DE BATERÍA
NOTAS SOBRE EL USO CON BAJA
LUMINOSIDAD Y OSCURIDAD TOTAL
El rendimiento de visión nocturna del NV-2 mejora en oscuridad total cuando se activa la luz infrarroja. De este modo se
aumenta la claridad de la imagen.
Ajuste la rueda de enfoque de la luz infrarroja para observar
sujetos a distintas distancias. El NV-2 usa un CCD de baja
iluminación. Puede usarse en entornos con baja luminosidad
(sin oscuridad total) sin activar la luz infrarroja.
PIEZAS CLAVE
Retire la cubierta del compartimiento de batería, introduzca la
batería con el cátodo orientado hacia dentro, vuelva a colocar
fi rmemente la cubierta y encienda el dispositivo. Cuando se
ilumine la pantalla el NV-2 estará listo para el uso.
IMPORTANTE:
• Use exclusivamente el modelo de batería correcto
• La batería debe estar totalmente cargada
• La batería debe instalarse correctamente (con el cátodo
orientado hacia dentro)
Para obtener el manual de instrucciones completo acceda a
la página de este producto en www.celestron.com y pulse en
la sección SOPORTE.
© 2019 Celestron • Todos los derechos reservados
celestron.com/pages/technical-support
2835 Columbia Street • Torrance, CA 90503 EE.UU.
 Loading...