

Page 1
NNeexxSSttaarr 6600
IINNSSTTRRUUCCTTIIOONN MMAANNUUAALL
..
NNeexxSSttaarr 8800
..
NNeexxSSttaarr 11114
4
Page 2

TTAABBLLEE OOFF CCOONNTTEENNTTSS
INTRODUCTION .............................................................................................................................................................4
Warning...........................................................................................................................................................................4
QUICK SETUP...................................................................................................................................................................5
ASSEMBLY.....................................................................................................................................................................10
Assembling the NexStar................................................................................................................................................10
Attaching the Telescope to the Tripod.......................................................................................................................11
The Hand Control Holder..........................................................................................................................................11
The Star Diagonal......................................................................................................................................................12
The Eyepiece.............................................................................................................................................................12
Focusing....................................................................................................................................................................13
The Star Pointer Finderscope ....................................................................................................................................13
Star Pointer Installation.........................................................................................................................................13
Star Pointer Operation...........................................................................................................................................14
HAND CONTROL ..........................................................................................................................................................15
Attaching the Hand Control.......................................................................................................................................15
Powering the NexStar................................................................................................................................................15
The Hand Control......................................................................................................................................................15
Hand Control Operation................................................................................................................................................17
Alignment Procedure.................................................................................................................................................17
Auto-Align ................................................................................................................................................................17
Two Star Alignment..................................................................................................................................................18
Quick-Align...............................................................................................................................................................19
NexStar Re-Alignment..............................................................................................................................................19
Object Catalog...............................................................................................................................................................20
Selecting an Object....................................................................................................................................................20
Slewing to an Object .................................................................................................................................................20
Tour Mode.................................................................................................................................................................20
Direction Buttons ..........................................................................................................................................................21
Rate Button................................................................................................................................................................21
Set Up Procedures.........................................................................................................................................................21
Tracking Mode..........................................................................................................................................................21
Tracking Rate............................................................................................................................................................22
View Time-Site .....................................................................................................................................................22
Sidereal Time ........................................................................................................................................................ 22
Filter Limits...........................................................................................................................................................22
RS-232...................................................................................................................................................................22
User Defined Objects ............................................................................................................................................22
Get RA/DEC .............................................................................................................................................................23
Get Alt-Az................................................................................................................................................................. 23
Goto R.A/Dec............................................................................................................................................................23
Goto Alt-Az...............................................................................................................................................................23
Utility Features..............................................................................................................................................................23
Steup Time-Site.....................................................................................................................................................23
Anti-backlash ........................................................................................................................................................23
Slew Limits ........................................................................................................................................................... 24
Direction Buttons ..................................................................................................................................................24
Light Control.........................................................................................................................................................24
Select Model..........................................................................................................................................................24
TELESCOPE BASICS....................................................................................................................................................26
Focusing....................................................................................................................................................................26
Image Orientation......................................................................................................................................................26
Calculating Magnification .........................................................................................................................................26
Determining Field of View........................................................................................................................................27
General Observing Hints...........................................................................................................................................27
CELESTIAL OBSERVING ...........................................................................................................................................28
Observing the Moon..............................................................................................................................................28
Lunar Observing Hints..........................................................................................................................................28
Observing the Planets............................................................................................................................................ 28
Planetary Observing Hints..................................................................................................................................... 28
2
Page 3

Observing the Sun .................................................................................................................................................29
Solar Observing Hints ...........................................................................................................................................29
Observing Deep Sky Objects.................................................................................................................................29
Seeing Conditions..................................................................................................................................................29
Transparency .........................................................................................................................................................29
Sky Illumination.................................................................................................................................................... 29
Seeing.................................................................................................................................................................... 30
TELESCOPE MAINTENANCE.......................................................................................................................................31
Care and Cleaning of the Optics....................................................................................................................................31
Collimation....................................................................................................................................................................31
OPTIONAL ACCESSORIES.......................................................................................................................................32
APPENDIX A - TECHNICAL SPECIFICATIONS ................................................................................................. 34
APPENDIX B – GLOSSARY OF TERMS ...................................................................................................................35
APPENDIX C – RS 232 CONNECTION ......................................................................................................................38
Communication Protocol:......................................................................................................................................38
APPENDIX D – TIME ZONE MAPS ...........................................................................................................................39
SKY MAPS ......................................................................................................................................................................41
3
Page 4

Congratulations on your purchase of the Celestron NexStar! The NexStar ushers in a whole new generation of computer
automated technology. Simple and friendly to use, the NexStar is up and running after locating just two alignment stars.
It’s the perfect combination of power and portability. If you are new to astronomy, you may wish to start off by using
the NexStar's built-in Sky Tour feature, which commands the NexStar to find the most interesting objects in the sky and
automatically slews to each one. Or if you are an experienced amateur, you will appreciate the comprehensive database
of over 4,000 objects, including customized lists of all the best deep-sky objects, bright double stars and variable stars.
No matter at what level you are starting out, the NexStar will unfold for you and your friends all the wonders of the
Universe.
Some of the many standard features of the NexStar include:
• Incredible 4°/second slew speed.
• Fully enclosed motors and optical encoders for position location.
• Computerized hand controller with 4,000 object database.
• Storage for programmable user defined objects; and
• Many other high performance features!
The NexStar’s deluxe features combined with Celestron’s legendary optical standards give amateur astronomers one of
the most sophisticated and easy to use telescopes available on the market today.
Take time to read through this manual before embarking on your journey through the Universe. It may take a few
observing sessions to become familiar with your NexStar, so you should keep this manual handy until you have fully
mastered your telescope’s operation. The NexStar hand control has built-in instructions to guide you through all the
alignment procedures needed to have the telescope up and running in minutes. Use this manual in conjunction with the
on-screen instructions provided by the hand control. The manual gives detailed information regarding each step as well
as needed reference material and helpful hints guaranteed to make your observing experience as simple and pleasurable
as possible.
Your NexStar telescope is designed to give you years of fun and rewarding observations. However, there are a few
things to consider before using your telescope that will ensure your safety and protect your equipment.
Warning
Y Never look directly at the sun with the naked eye or with a telescope (unless you have the proper solar filter).
Permanent and irreversible eye damage may result.
Y Never use your telescope to project an image of the sun onto any surface. Internal heat build-up can damage the
telescope and any accessories attached to it.
Y Never use an eyepiece solar filter or a Herschel wedge. Internal heat build-up inside the telescope can cause these
devices to crack or break, allowing unfiltered sunlight to pass through to the eye.
Y Never leave the telescope unsupervised, either when children are present or adults who may not be familiar with the
correct operating procedures of your telescope
.
4
Page 5
3
w
play
A
f
1
Fork Arm
Base
Tripod Head
Coupling
Scre
Accessory
Tray
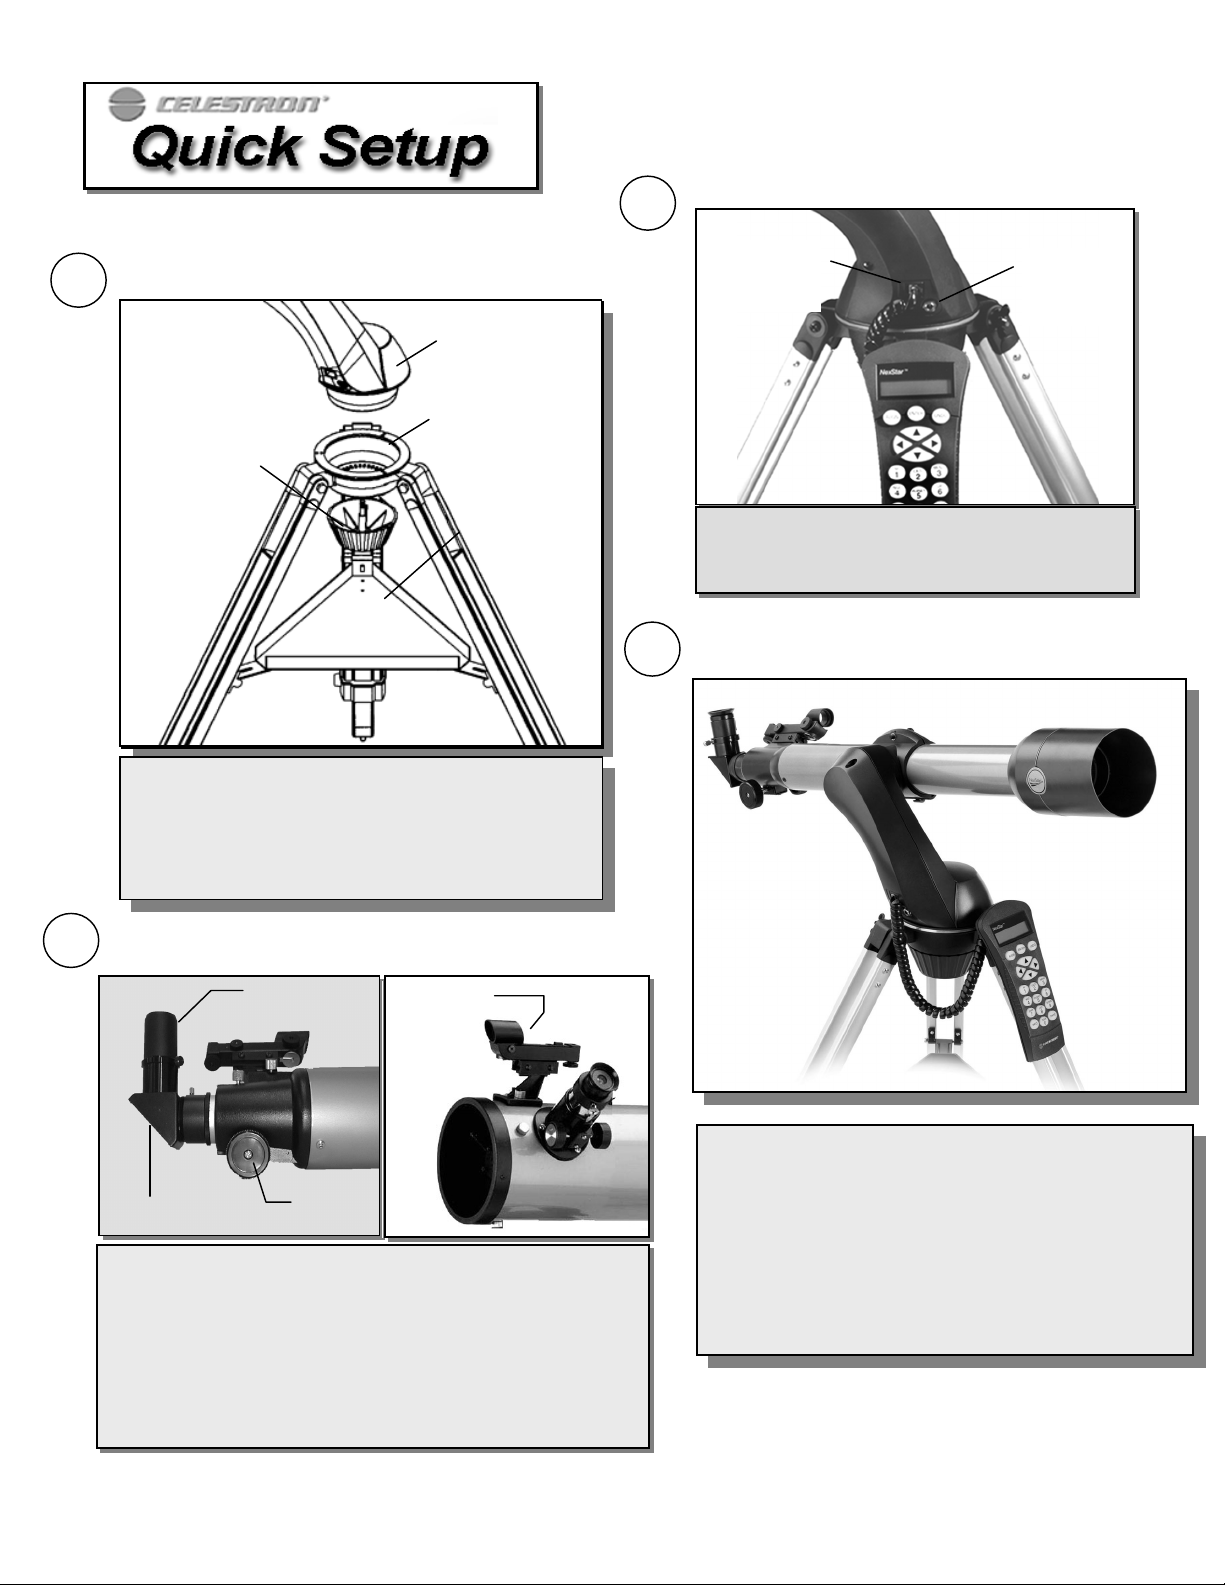
A) Remove the NexStar from its packaging. Spread the
tripod legs apart until the center leg brace is fully
extended and attach the accessory tray. B) Extend the
tripod legs to the desired height. C) Set the telescope fork
arm base into the tripod head and thread the coupling
screw into the bottom of the base.
2
A) Attach the included accessories. Loosen the thumb screw at the
end of the focuser and remove the protective plastic cap. Insert the
diagonal (60mm and 80mm models only) and low power eyepiece
(25mm or 20mm) into the barrel of the focuser. B) Remove the
front lens cover from the end of the telescope. C) Attach the Star
Pointer finderscope and remove the plastic cover over the battery
and turn-on the Star Pointer by rotating the dial on the side. (For
instructions on aligning the Star Pointer, see the Assembly section o
the manual).
Star Diagonal
Eyepiece
Focus Knob
Star Pointer
Hand
Control
Outlet
Battery
Pack
Outlet
Install 8 AA batteries into the battery pack. Plug in
the hand control and the battery pack into the
outlets on the fork arm base.
4
The first time the NexStar is powered on the display will
read Select Model. Use the Up and Down scroll buttons to
select your NexStar model from the list and press ENTER.
When the dis
utoAlign the NexStar. The hand control display will ask
you to move the telescope tube so that it is level with the
ground and facing the north horizon. Use the direction
arrow buttons on the hand control to position the telescope
north and level. (See Astronomy Basics for help on finding
north).
reads NexStar Ready, press ENTER to
5
Page 6
t
y
p
y
y
play
k
y
f
yep
p
j
j
5
7
Direction
Buttons
Up and Down
Scroll Buttons
Catalog Keys
Object Lis
Button
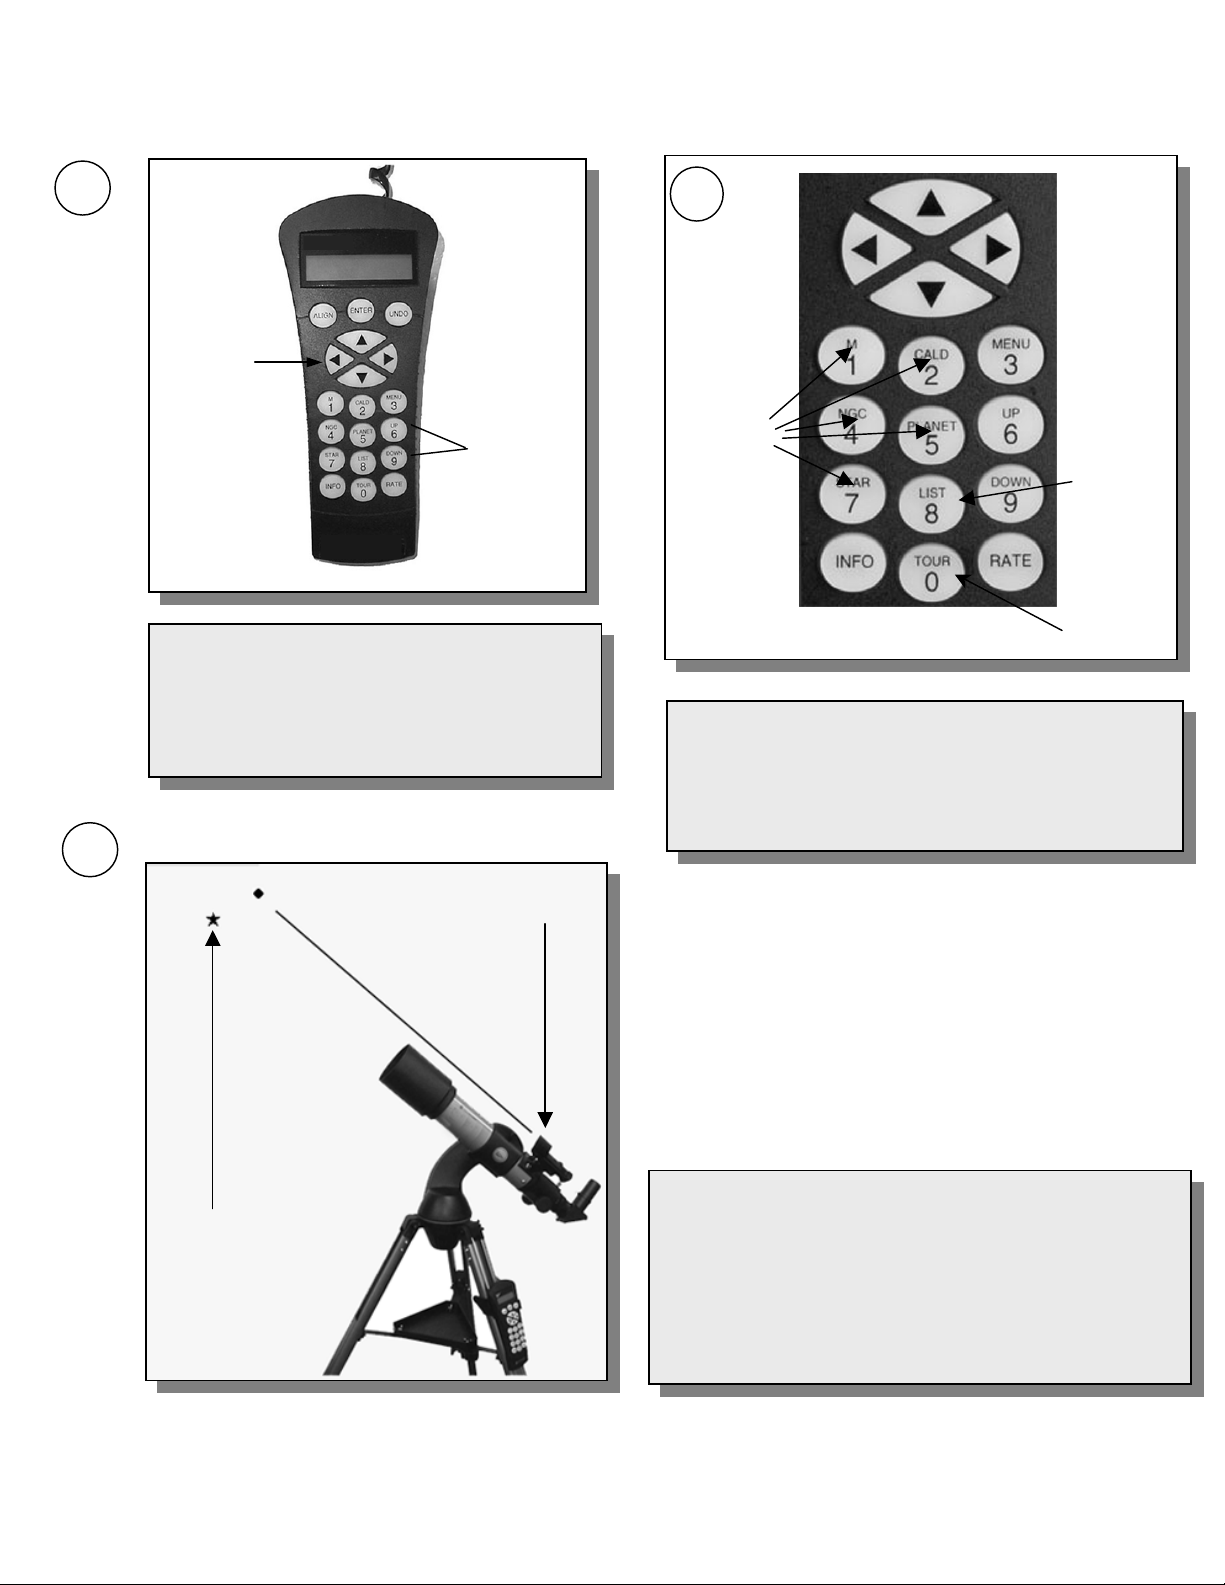
Use the Up and Down scroll buttons and choose from
the cit
location. Then in
information as instructed b
ENTER after each entry. (See Hand Control section
of the manual for detailed alignment procedures).
6
database the closest city to your present
ut the necessary date and time
the hand control. Press
Press the TOUR button on the hand control. The hand control
will display a list of objects that are visible for the date and
location entered. Press INFO to read information about the
ect displayed. Press the DOWN scroll key to display the
ob
next ob
ect. Press ENTER to slew to (go to) the displayed
object.
TOUR Button
StarPointer Finderscope
Alignment Star
The NexStar will automaticall
the telescope close to that star. Once there, the dis
ou to use the arrow buttons to aim the Star Pointer at the star. I
the star is not visible (perhaps behind a tree), press UNDO to
select a new star. Next, focus and center the star in the e
ress ALIGN. Repeat these steps for the second star
and
alignment. When complete, display will read "Alignment
Successful".
choose an alignment star and slew
will as
iece
6
Page 7
91753
10
4
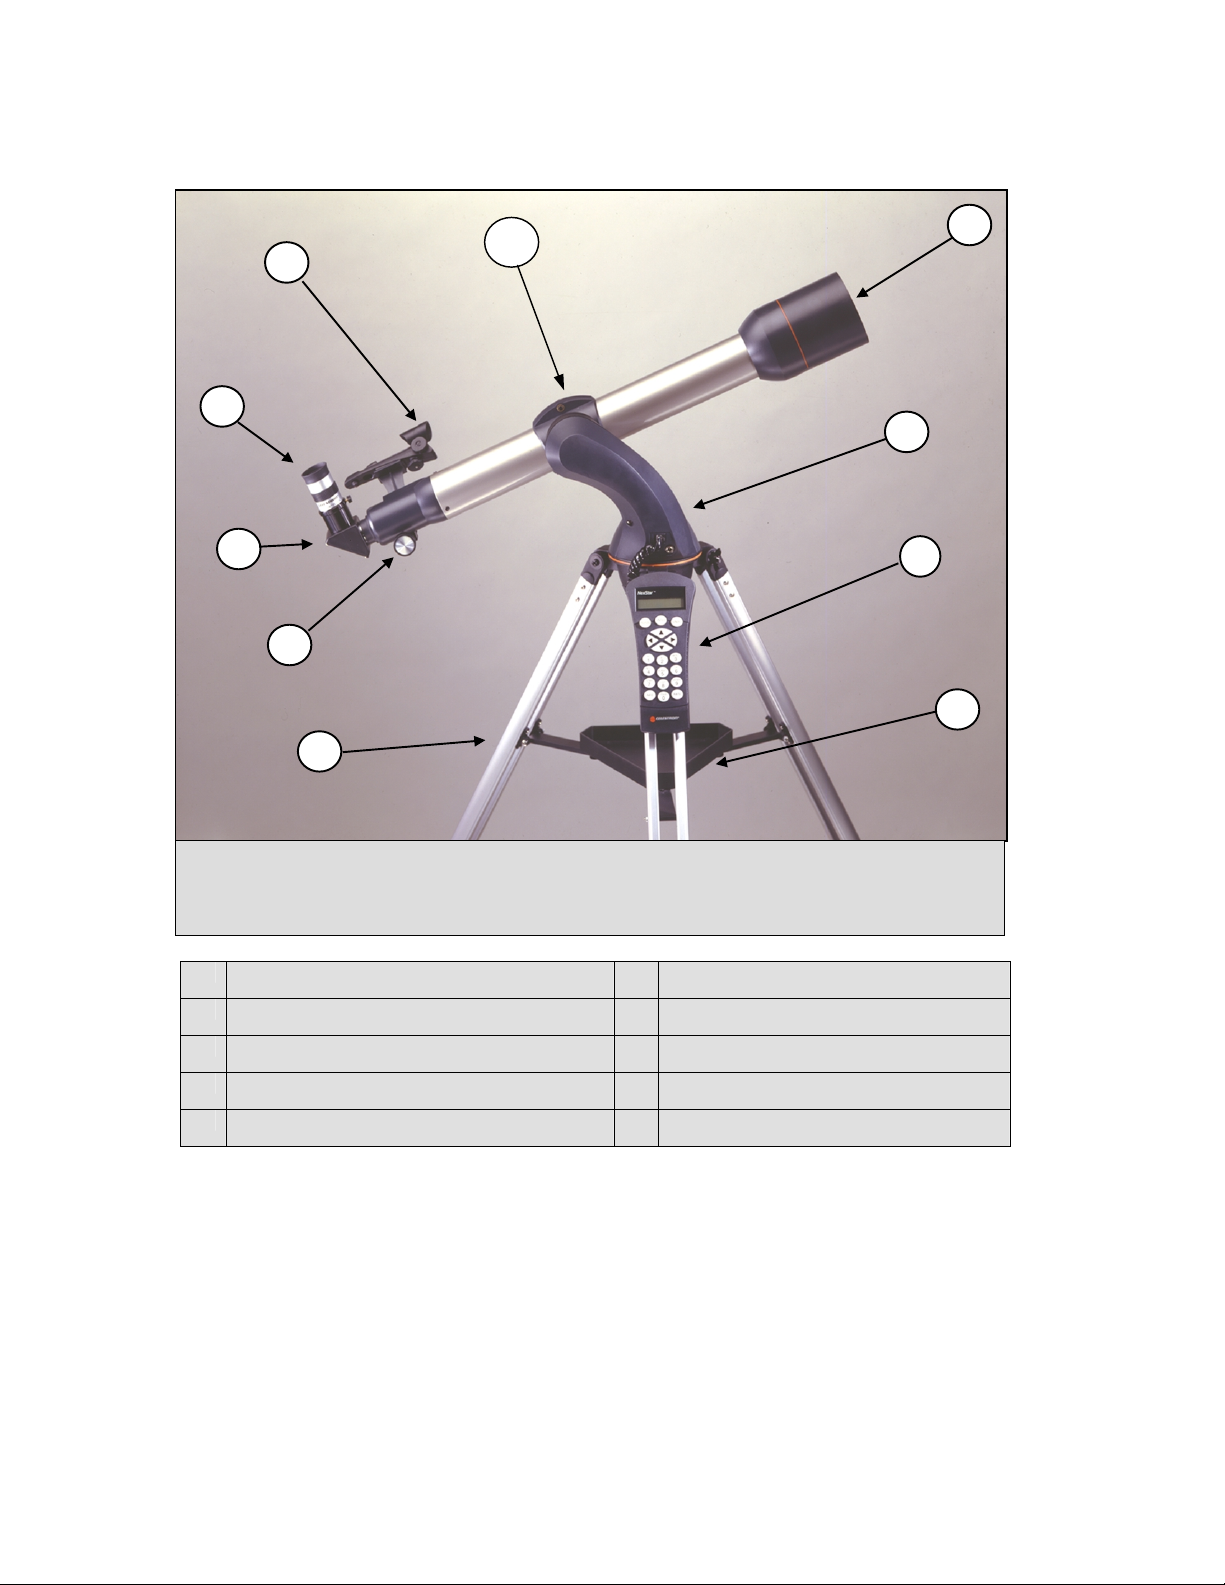
The NexStar 60 GT
Refractor Telescope
1 Objective Lens 6 Focuser Knob
2 Fork Arm 7 Star Diagonal
3 Hand Control 8 Eyepiece
4 Accessory Tray 9 Star Pointer Finderscope
5 Tripod 10 Tube Ring
7
Page 8
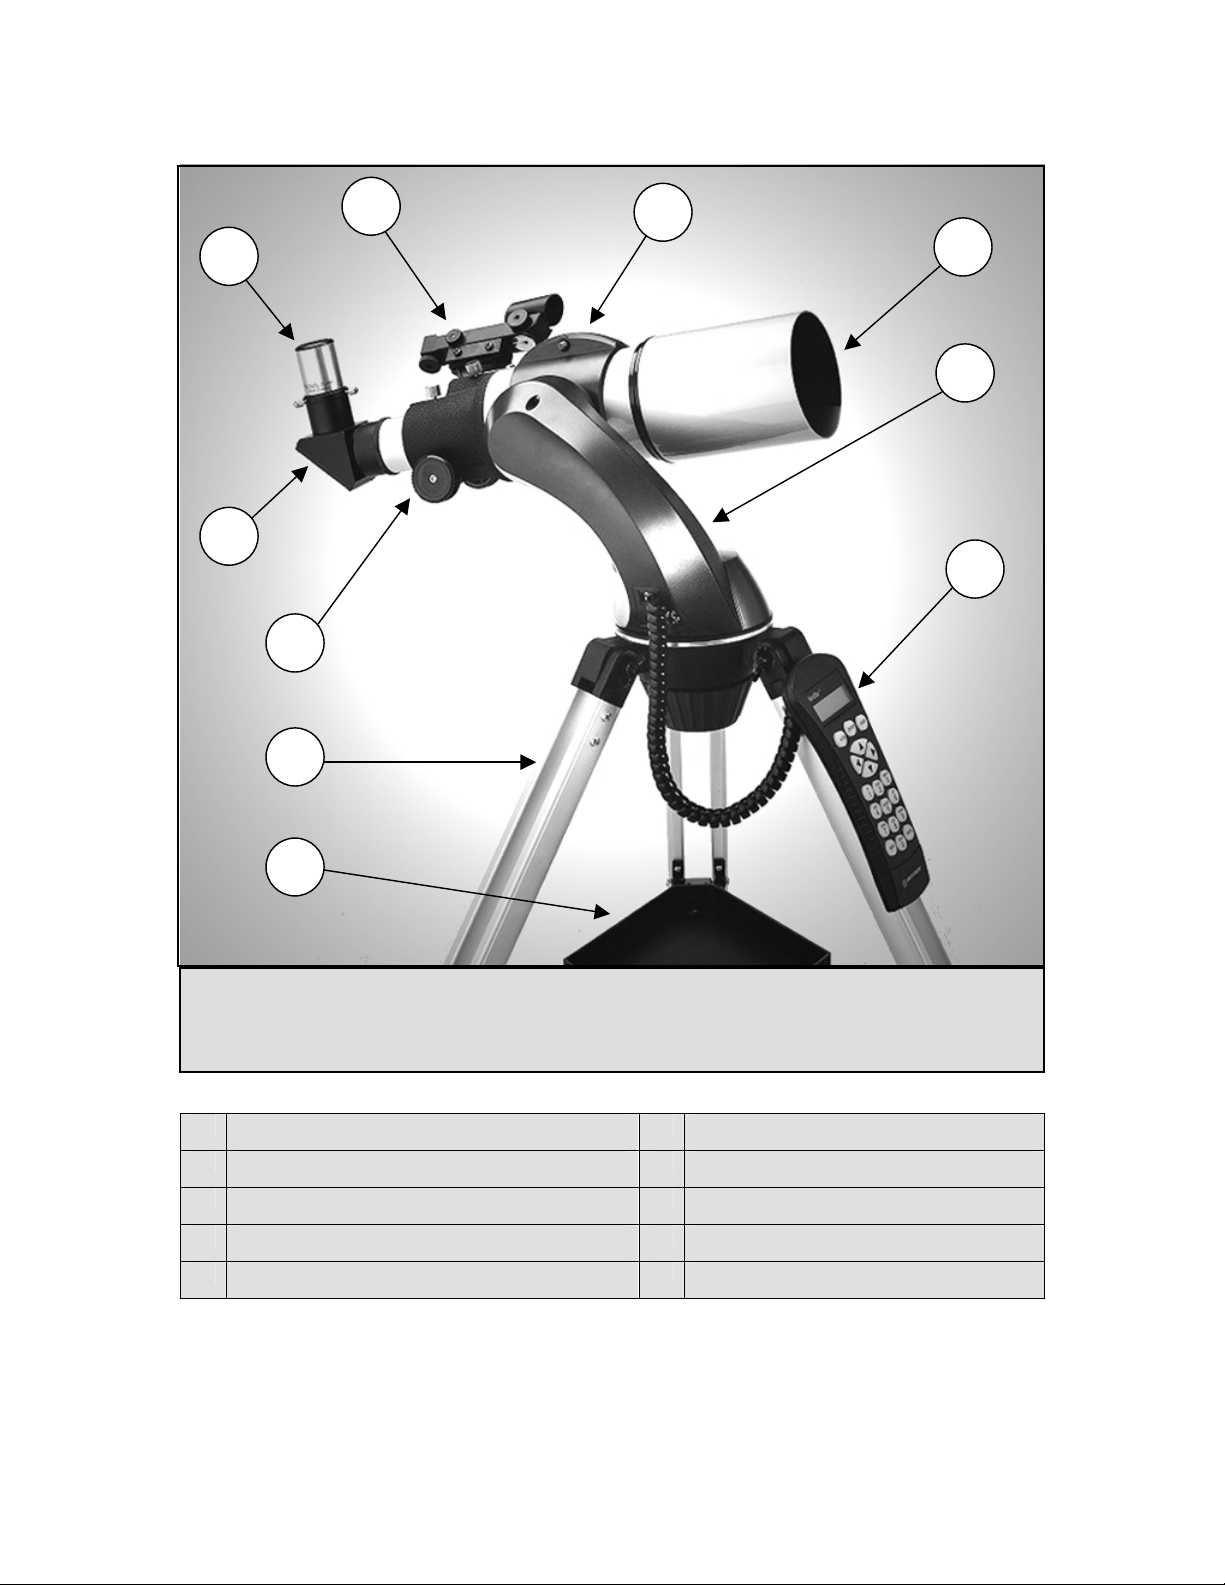
9
8
7
6
5
10
1
2
3
4
The NexStar 80 GT
Refractor Telescope
1 Objective Lens 6 Focuser Knob
2 Fork Arm 7 Star Diagonal
3 Hand Control 8 Eyepiece
4 Accessory Tray 9 Star Pointer Finderscope
5 Tripod 10 Tube Ring
8
Page 9
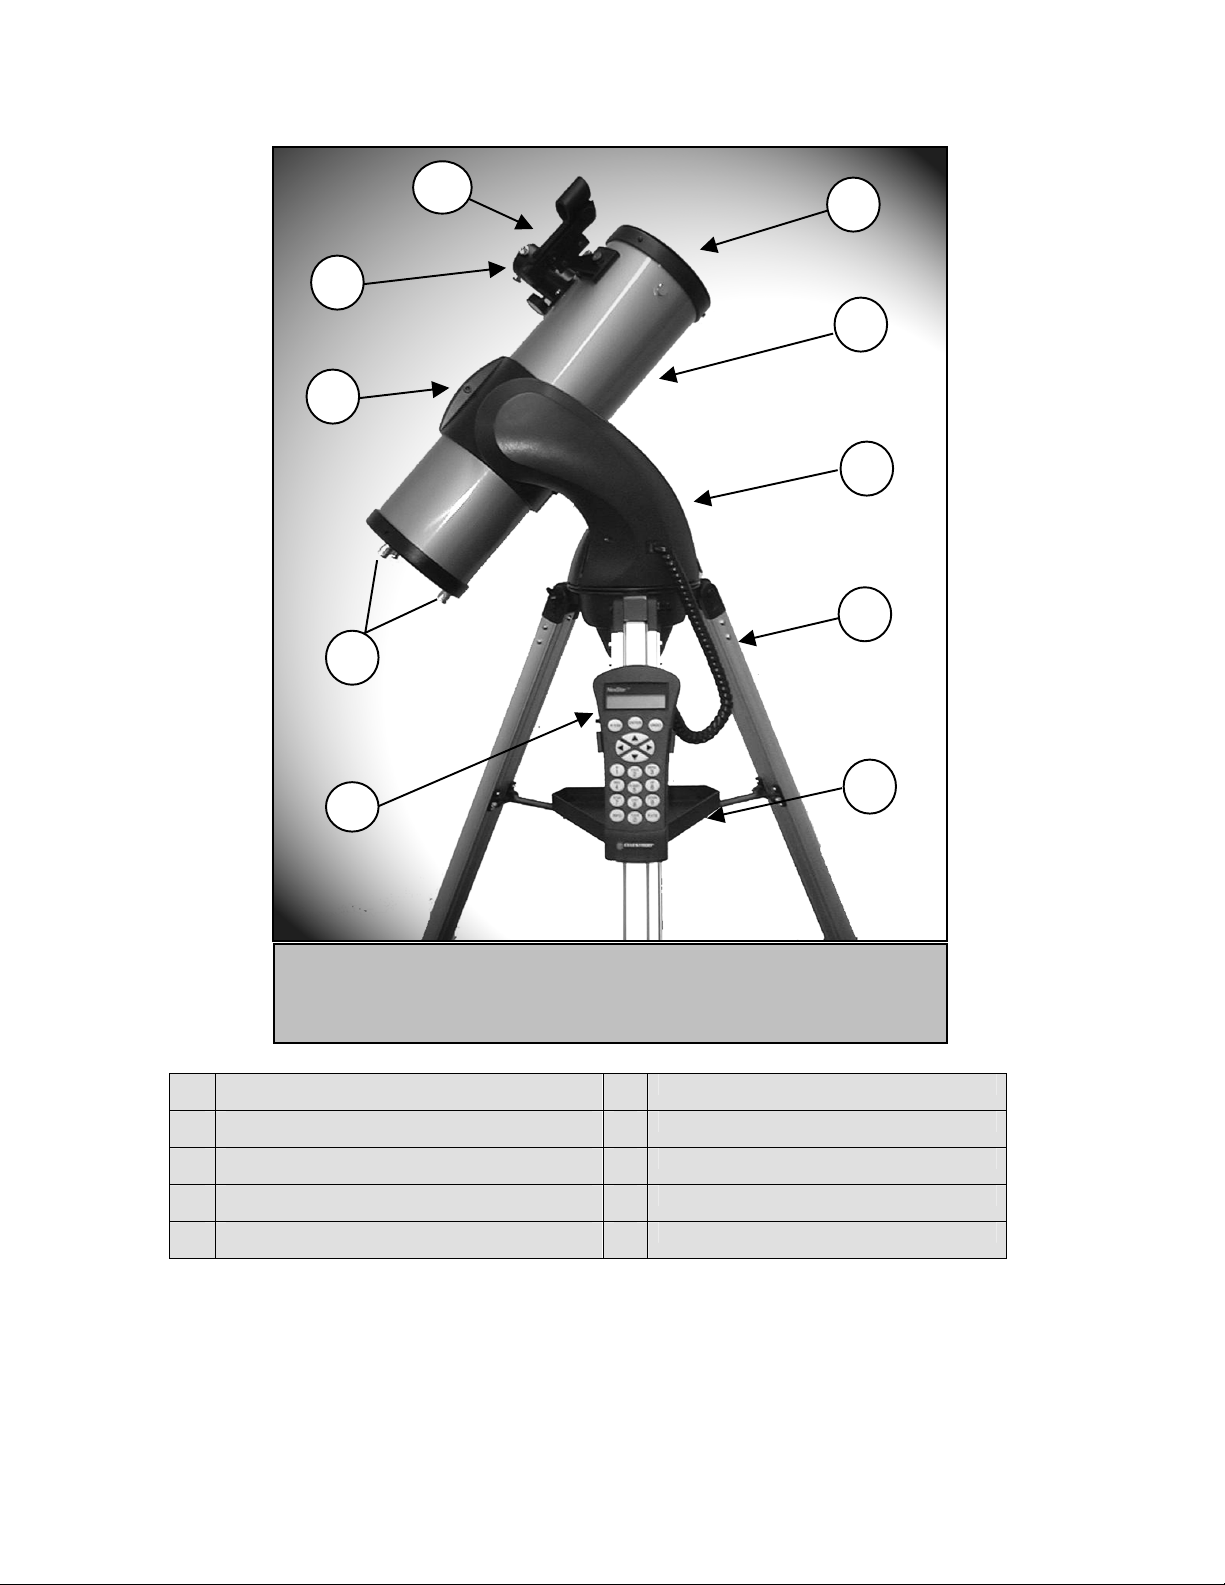
10
9
8
7
1
2
3
4
5
6
NexStar 114 GT
Reflecting Telescope
1 Lens Cover 6 Hand Control
2 Optical Tube 7 Collimation Adjustment Knobs
3 Fork Arm 8 Tube Ring
4 Tripod 9 Focuser
5 Accessory Tray 10 Star Pointer Finderscope
9
Page 10
The NexStar comes partially assembled and can be operational in a matter of minutes. The NexStar is conveniently
packaged in one reusable shipping carton that contains the following accessories:
NexStar 60 GT NexStar 80 GT NexStar 114 GT
20mm, 10mm, 4mm Eyepieces – 1¼" 25mm, 10mm Eyepieces – 1¼" 25mm Eyepiece – 1¼"
1¼" Star Diagonal 1¼" Star Diagonal 10mm Eyepiece – 1¼"
Star Pointer Finderscope and Mounting
Bracket
Deluxe Accessory Tray Deluxe Accessory Tray Deluxe Accessory Tray
Battery Pack Battery Pack Battery Pack
The Sky™ Level 1 Astronomy Software The Sky™ Level 1 Astronomy Software The Sky™ Level 1 Astronomy Software
Telescope Control Software Telescope Control Software Telescope Control Software
NexStar Hand Control w/ Object Database NexStar Hand Control w/ Object Database NexStar Hand Control w/ Object Database
Star Pointer Finderscope and Mounting
Bracket
Star Pointer Finderscope and Mounting
Bracket
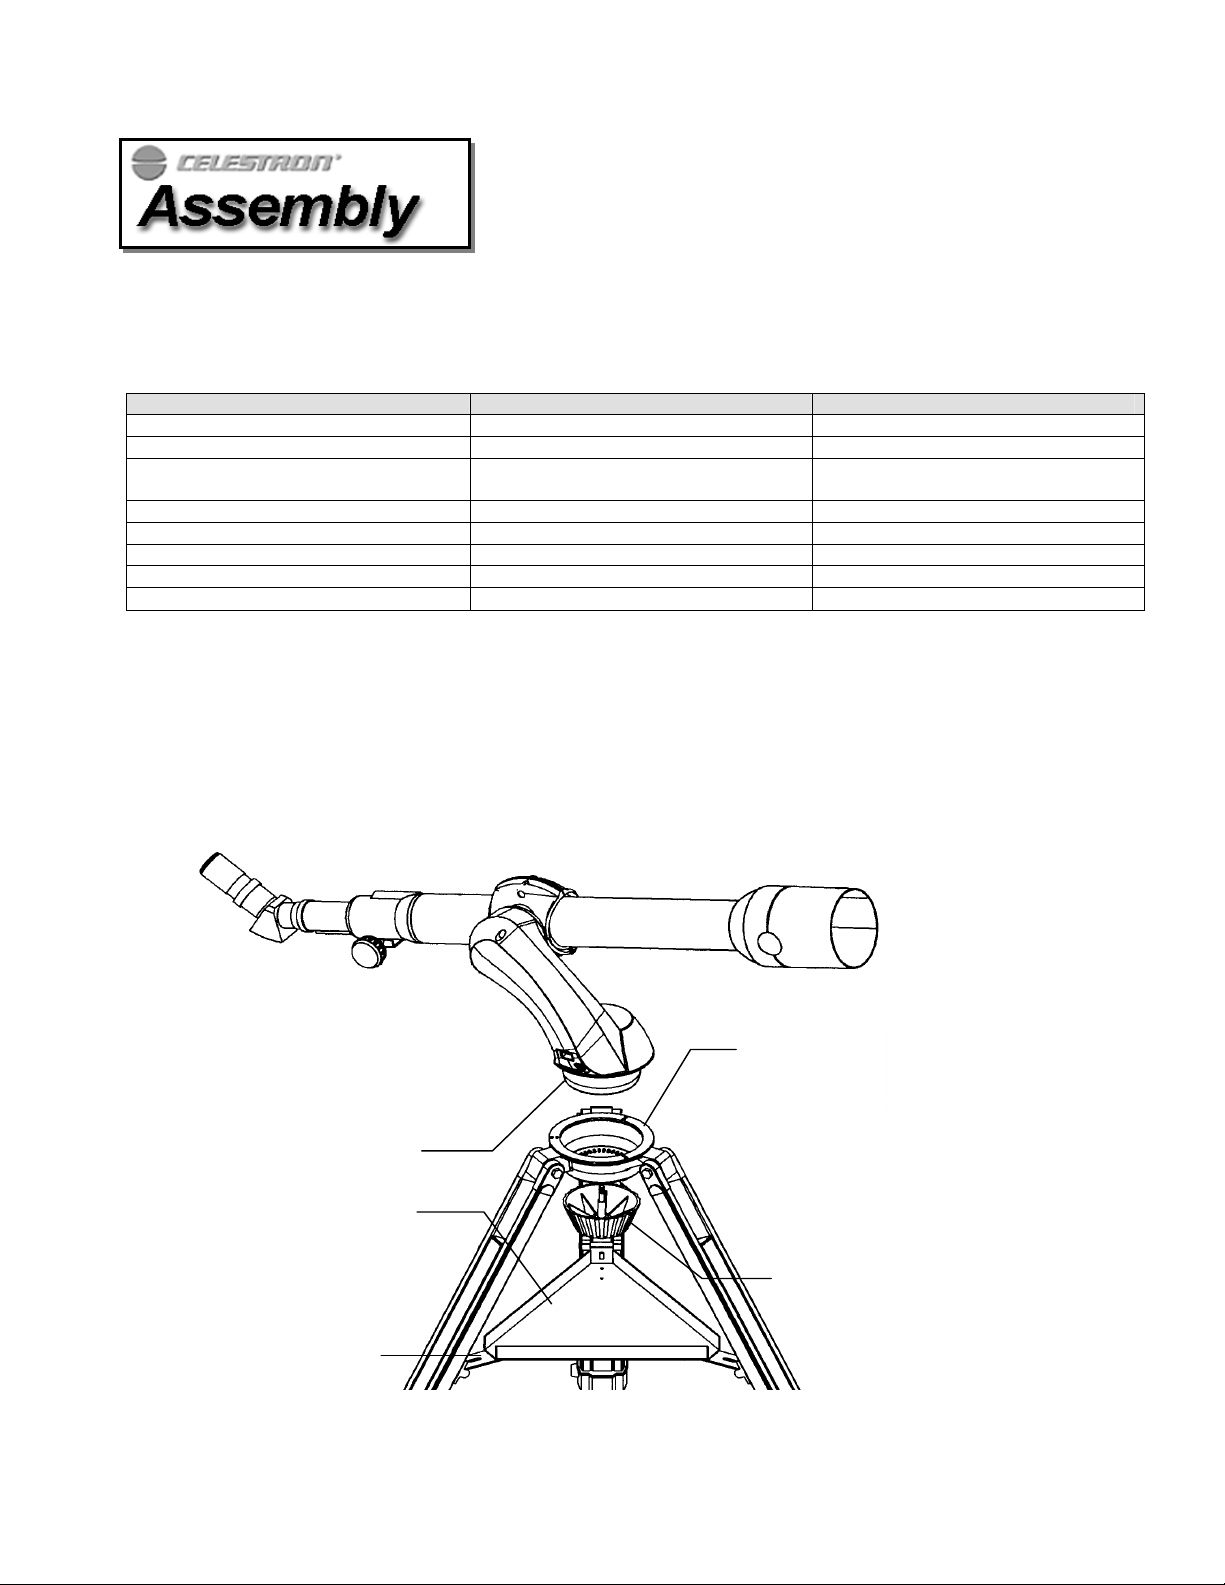
AAsssseemmbblliinngg tthhee NNeexxSSttaarr
Your NexStar comes in two major sections: the optical tube with fork arm and the tripod. These sections can be
attached in seconds using the quick release coupling screw located under the tripod mounting platform. Remove all of
the accessories from their individual boxes. Remember to save all of the containers so that they can be used to
transport the telescope. Before attaching the visual accessories, the telescope tube should be mounted to its tripod.
First, install the accessory tray onto the tripod legs:
Tripod
Mounting
Platform
Fork Arm
Base
Accessory
Tray
Center Support
Brace
Figure 2-1
10
Coupling
Screw
Page 11
1. Remove the tripod from the box and spread the legs apart until the center leg brace is fully extended.
2. Locate the accessory tray, and place it on top of the tripod center support brace in between the tripod legs
(see figure 2-1).
3. Insert the wing bolts through the holes from the bottom of the tripod support brace and thread them into the
holes in the accessory tray. Tighten all bolts to ensure proper stability to the mount.
It is a good idea to adjust the height of the tripod before attaching the fork arm and tube. Minor adjustments can be
made later. To adjust the height of the tripod legs:
1. Loosen the tripod leg locking bolt located on the side of each leg.
2. Slide the inner portion of each leg down 6" to 8" inches.
3. Tighten the tripod locking bolts to hold each leg in place.
AAttttaacchhiinngg tthhee TTeelleessccooppee ttoo tthhee TTrriippoodd
With the tripod properly assembled, the telescope tube and fork arm can easily be attached using the quick release
coupling screw located underneath the tripod mounting platform:
1. Hold the telescope tube assembly by the fork arm and place the fork arm base inside the tripod mounting
platform.
2. Thread the coupling screw into the hole at the bottom of the fork arm base and hand tighten.
Your NexStar is fully assembled and is ready to attach the accessories.
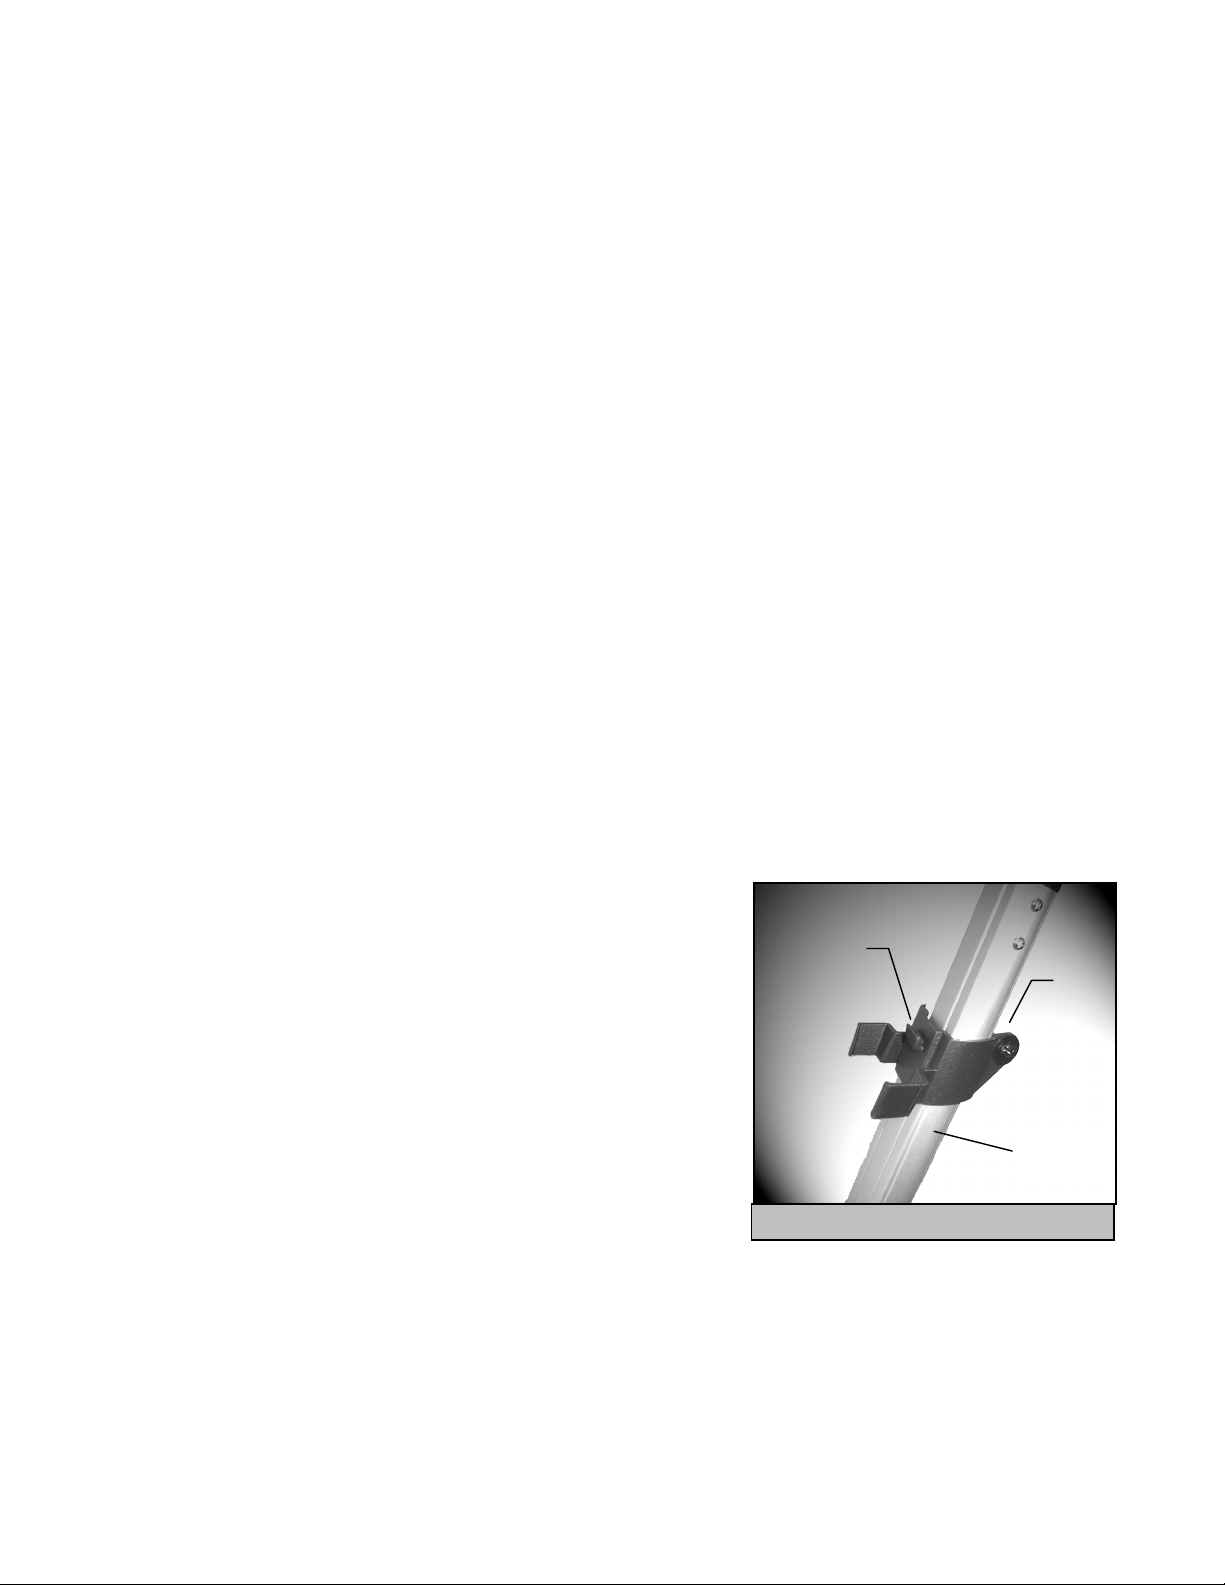
TThhee HHaanndd CCoonnttrrooll HHoollddeerr
The NexStar comes with a hand control that plugs into the side of the fork
arm and can be stored in a holder that attaches to the side of any tripod leg
(see figure 2-2). The back of the hand control has an opening that slides
over the clip on the inside of the holder. To remove the hand control from
its holder, gently lift the hand control upwards and remove it from the
holder.
To attach the hand control holder to the tripod leg:
1. Orient the holder so that the flanges with the holes go on either
side of the tripod leg with the flange facing the inside of the
tripod. Note: the tripod legs should be extended to the desired
height before installing the holder.
2. Insert the mounting bolt through the holes in the holder flange.
3. Thread the wing nut on the end of the bolt and tighten to secure
the holder.
Hand Control
Holder Clip
Figure 2-2 – The Hand Control Holder
Flange
Tripod
Leg
11
Page 12
TThhee SSttaarr DDiiaaggoonnaall
NexSta
(For 60mm and 80mm Models Only)
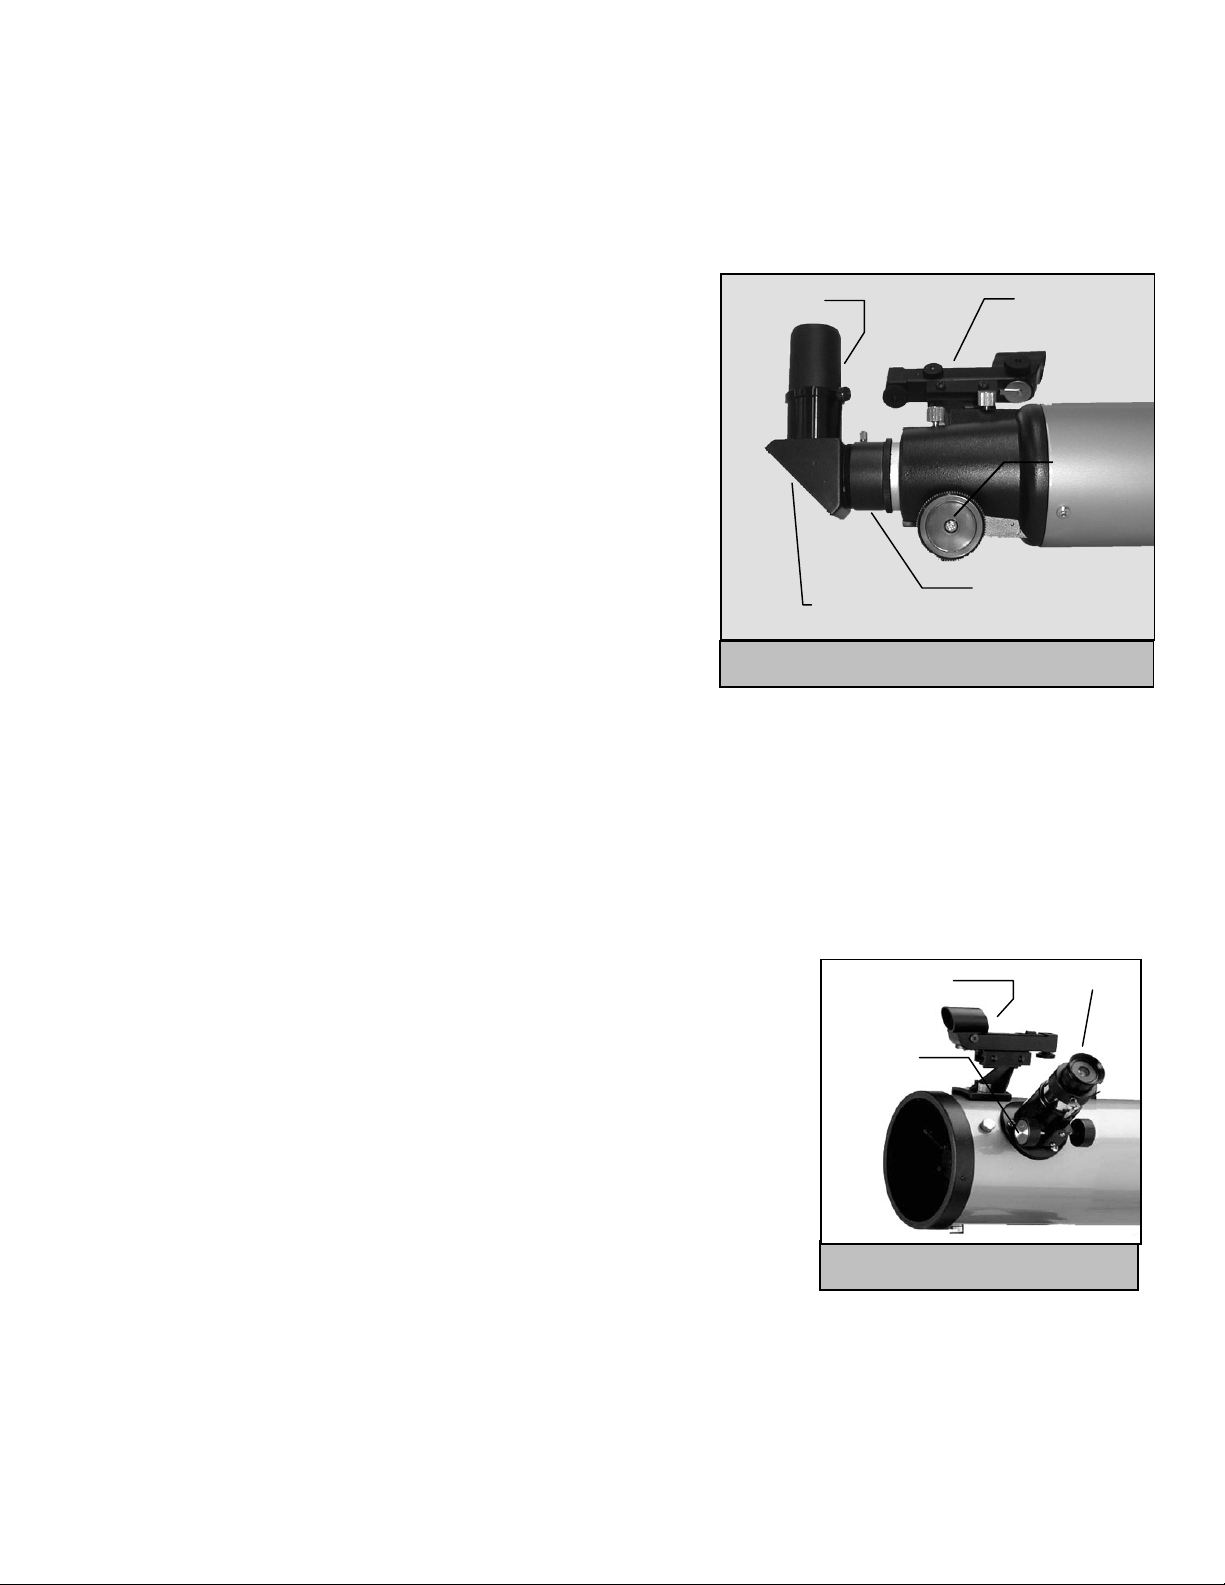
The star diagonal diverts the light at a right angle from the light path of the telescope. For astronomical observing, this
allows you to observe in positions that are more comfortable than if you were to look straight through. To attach the
star diagonal:
1. Turn the thumbscrew on the eyepiece adapter at the end of the focuser
barrel until it no longer extends into (i.e., obstructs) the inner diameter
of the focus barrel. Remove the protective dust cap from the focuser
barrel.
2. Slide the chrome portion of the star diagonal into the eyepiece adapter.
3. Tighten the thumbscrew on the eyepiece adapter to hold the star
diagonal in place.
Eyepiece
If you wish to change the orientation of the star diagonal, loosen the
thumbscrew on the eyepiece adapter until the star diagonal rotates
freely. Rotate the diagonal to the desired position and tighten the
thumbscrew.
TThhee EEyyeeppiieeccee
The eyepiece, or ocular, is the optical element that magnifies the image
focused by the telescope. The eyepiece fits either directly into the
focuser (114mm model) or into the star diagonal (60mm and 80mm models). To install the eyepiece:
Figure 2-3– Visual accessories for 60mm and 80mm models
Star Diagonal
Eyepiece Adapter
For 60mm and 80mm models:
1. Loosen the thumbscrew on the star diagonal so it does not obstruct the inner diameter of the eyepiece end of the
diagonal. Remove the protective dust cap from the star diagonal's barrel.
2. Slide the chrome portion of the low power 25mm eyepiece (20mm for the NexStar 60 model) into the star diagonal.
3. Tighten the thumbscrew to hold the eyepiece in place.
To remove the eyepiece, loosen the thumbscrew on the star diagonal and slide the eyepiece out.
For 114mm model:
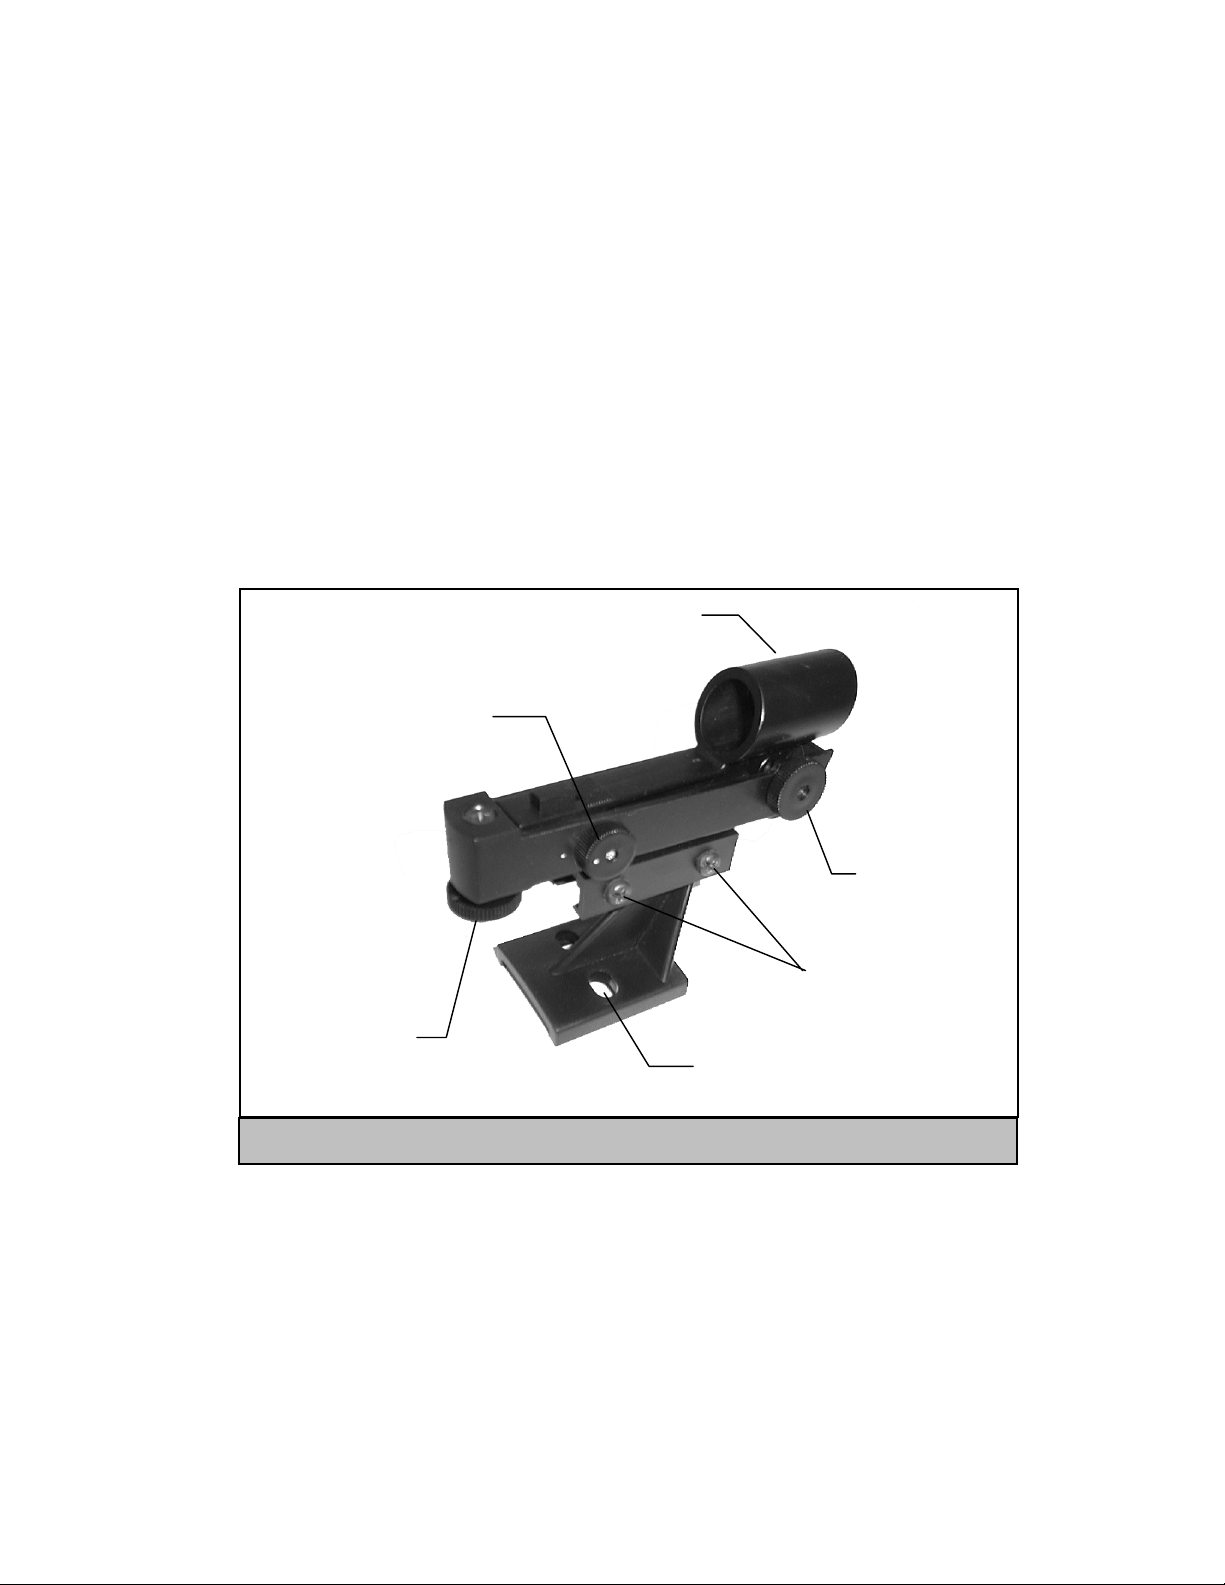
Star Pointer
1. Loosen the thumb screw on the eyepiece adapter at the end of the focuser barrel and
remove the protective dust cap from the focuser barrel.
2. Slide the chrome portion of the low power 25mm eyepiece into the eyepiece
adapter.
3. Tighten the thumbscrew to hold the eyepiece in place.
To remove the eyepiece, loosen the thumbscrew on the eyepiece barrel and slide the
eyepiece out.
Eyepieces are commonly referred to by focal length and barrel diameter. The focal
length of each eyepiece is printed on the eyepiece barrel. The longer the focal length
(i.e., the larger the number) the lower the eyepiece power or magnification; and the
shorter the focal length (i.e., the smaller the number) the higher the magnification. Generally, you will use low-tomoderate power when viewing. For more information on how to determine power, see the section on “Calculating
Magnification.”
Barrel diameter is the diameter of the barrel that slides into the star diagonal or focuser. The NexStar uses eyepieces
with a standard 1-1/4" barrel diameter.
Focus
Knob
Figure 2-4– Visual accessories for the
r 114
Star Pointer
Focus Knob
Eyepiece
12
Page 13
FFooccuussiinngg
t
To focus your telescope, simply turn either of the focus knobs at the eyepiece end of the optical tube (see figures 2-3
and 2.4). Turn the focus knob until the image is sharp. Once sharp, turn the knob towards you to focus on an object
that is closer than the one you are currently observing. Turn the knob away from you to focus on a more distant object
than the one you are currently observing.
TThhee SSttaarr PPooiinntteerr FFiinnddeerrssccooppee
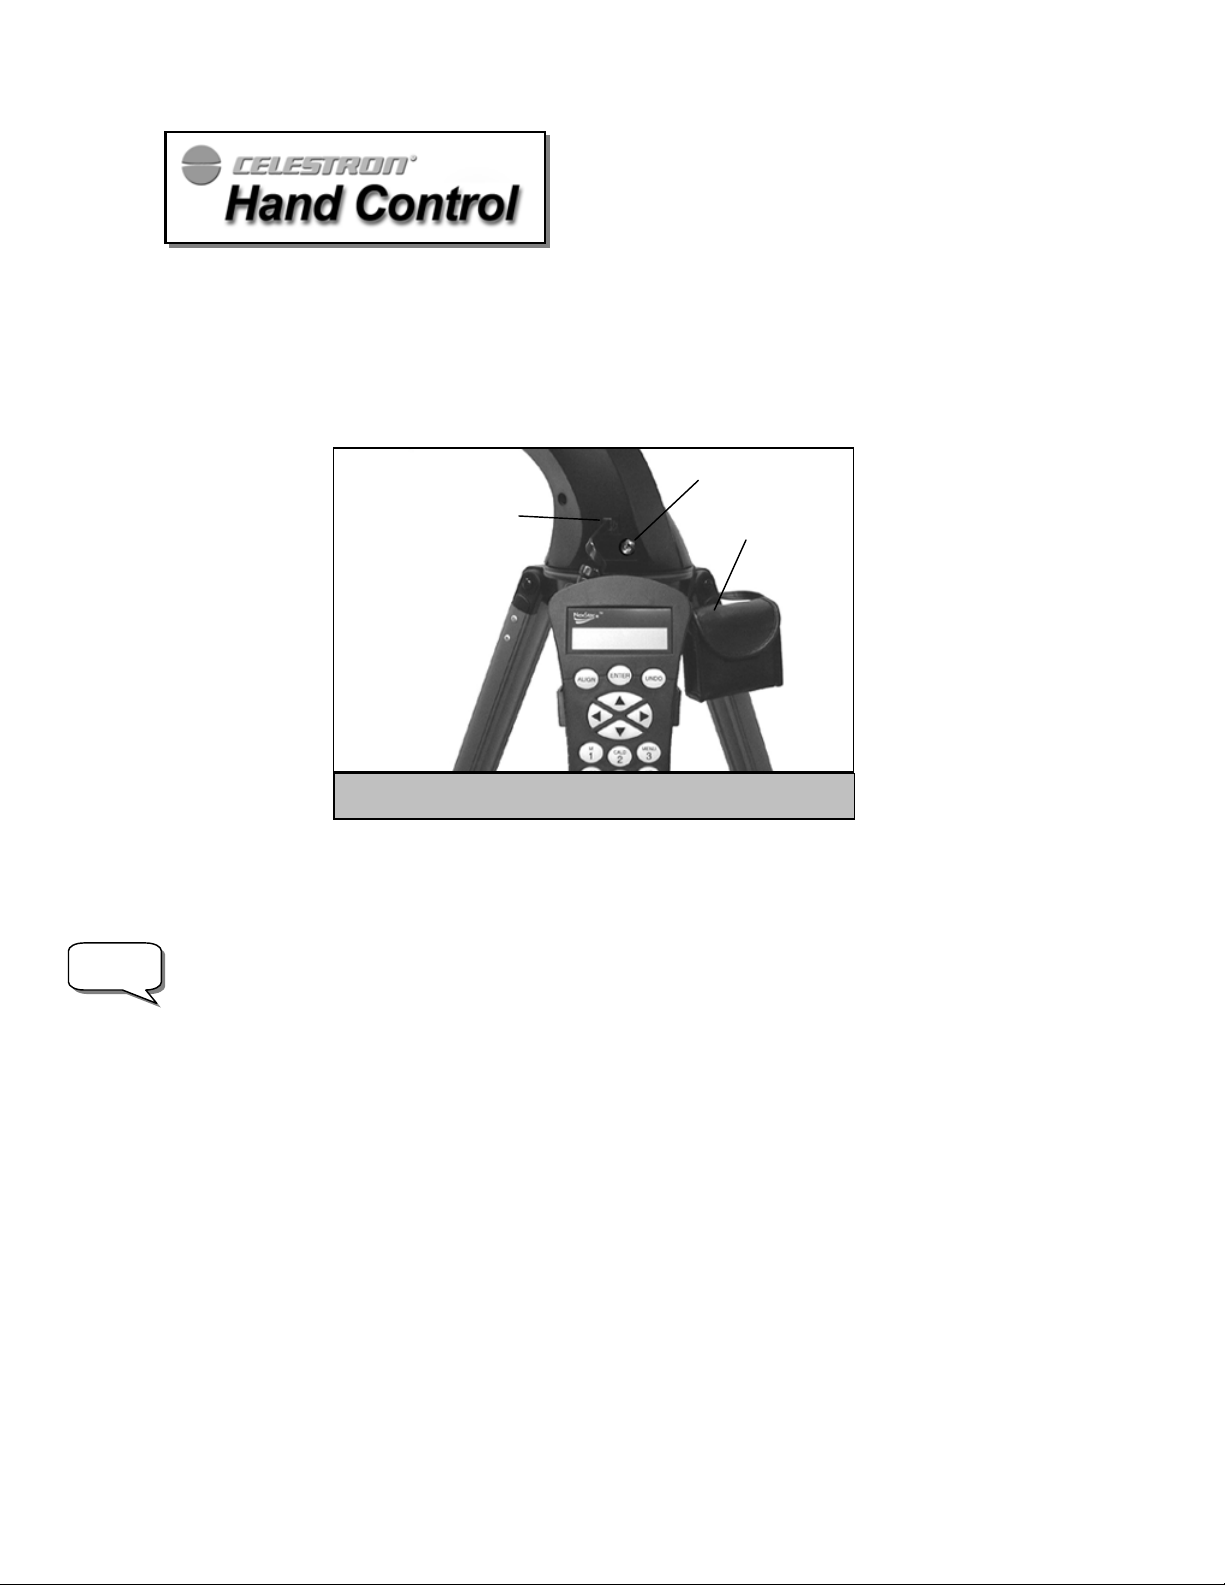
The Star Pointer is the quickest and easiest way to point your telescope exactly at a desired object in the sky. It's like
having a laser pointer that you can shine directly onto the night sky. The Star Pointer is a zero magnification pointing
tool that uses a coated glass window to superimpose the image of a small red dot onto the night sky. While keeping
both eyes open when looking through the Star Pointer, simply move your telescope until the red dot, seen through the
Star Pointer, merges with the object as seen with your unaided eye. The red dot is produced by a light-emitting diode
(LED); it is not a laser beam and will not damage the glass window or your eye. The Star Pointer comes equipped with
a variable brightness control, two axes alignment control and mounting brackets. Before the Star Pointer is ready to be
used, it must be attached to the telescope tube and properly aligned:
SSttaarr PPooiinntteerr IInnssttaallllaattiioonn
For 60mm model:
Sight Tube
Brightness Control
Adjustmen
1. Slide the Star Pointer onto the dovetail mounting platform on top of the focuser assembly so that the sight
tube is facing towards the front of the tube.
2. Tighten the two dovetail mounting screws to fasten the Star Pointer in place.
ON/OFF
Altitude
Control
Mounting Holes
(for 114 models)
Figure 2-5 – The Star Pointer Finderscope with Bracket
Azimuth
Adjustment
Control
Dovetail
Tightening
Screws
13
Page 14

Note
For 80mm model:
1. Slide the Star Pointer bracket into the dovetail mounting platform on top of the focuser assembly.
2. Orient the Star Pointer so that the sight tube is facing towards the front of the tube.
3. Secure the Star Pointer bracket by tightening the thumb screw on the mounting platform.
For 114mm model:
1. Remove the nuts from the studs where the Star Pointer will mount.
2. Mount the Star Pointer bracket by placing the bracket over the studs protruding from the tube and tightening
it down with the supplied nuts. Orient the Star Pointer so that the sight tube is facing towards the front of the
tube.
Star Pointer Operation
The star pointer is powered by a long life 3-volt lithium battery (#CR2032) located underneath the front portion of the
Star Pointer. Like all finderscopes, the Star Pointer must be properly aligned with the main telescope before it can be
used. This is a simple process using the azimuth and altitude control knobs located on the side and bottom of the Star
Pointer. The alignment procedure is best done at night since the LED dot will be difficult to see during the day. Note:
Before using the StarPointer, you must first remove the protective plastic cover over the battery.
1. To turn on the Star Pointer, rotate the variable brightness control (see figure 2-5) clockwise until you here a
"click". To increase the brightness level of the red dot, continue rotating the control knob about 180º until it stops.
Remember to remove the plastic cover over the battery, and always turn the power off after you have found an
object. This will extend the life of both the battery and the LED.
2. Locate a bright star or planet and center it in a low power eyepiece in the main telescope.
3. With both eyes open, look through the glass window at the alignment star.
If the Star Pointer is perfectly aligned, you will see the red LED dot overlap the alignment star. If the Star Pointer
is not aligned, take notice of where the red dot is relative to the bright star.
4. Without moving the main telescope, turn the Star Pointer's azimuth and altitude alignment controls until the red
dot is directly over the alignment star.
If the LED dot is brighter than the alignment star, it may make it difficult to see the star. Turn the variable brightness
control counterclockwise, until the red dot is the same brightness as the alignment star. This will make it easier to get
an accurate alignment. The Star Pointer is now ready to be used .
14
Page 15
t
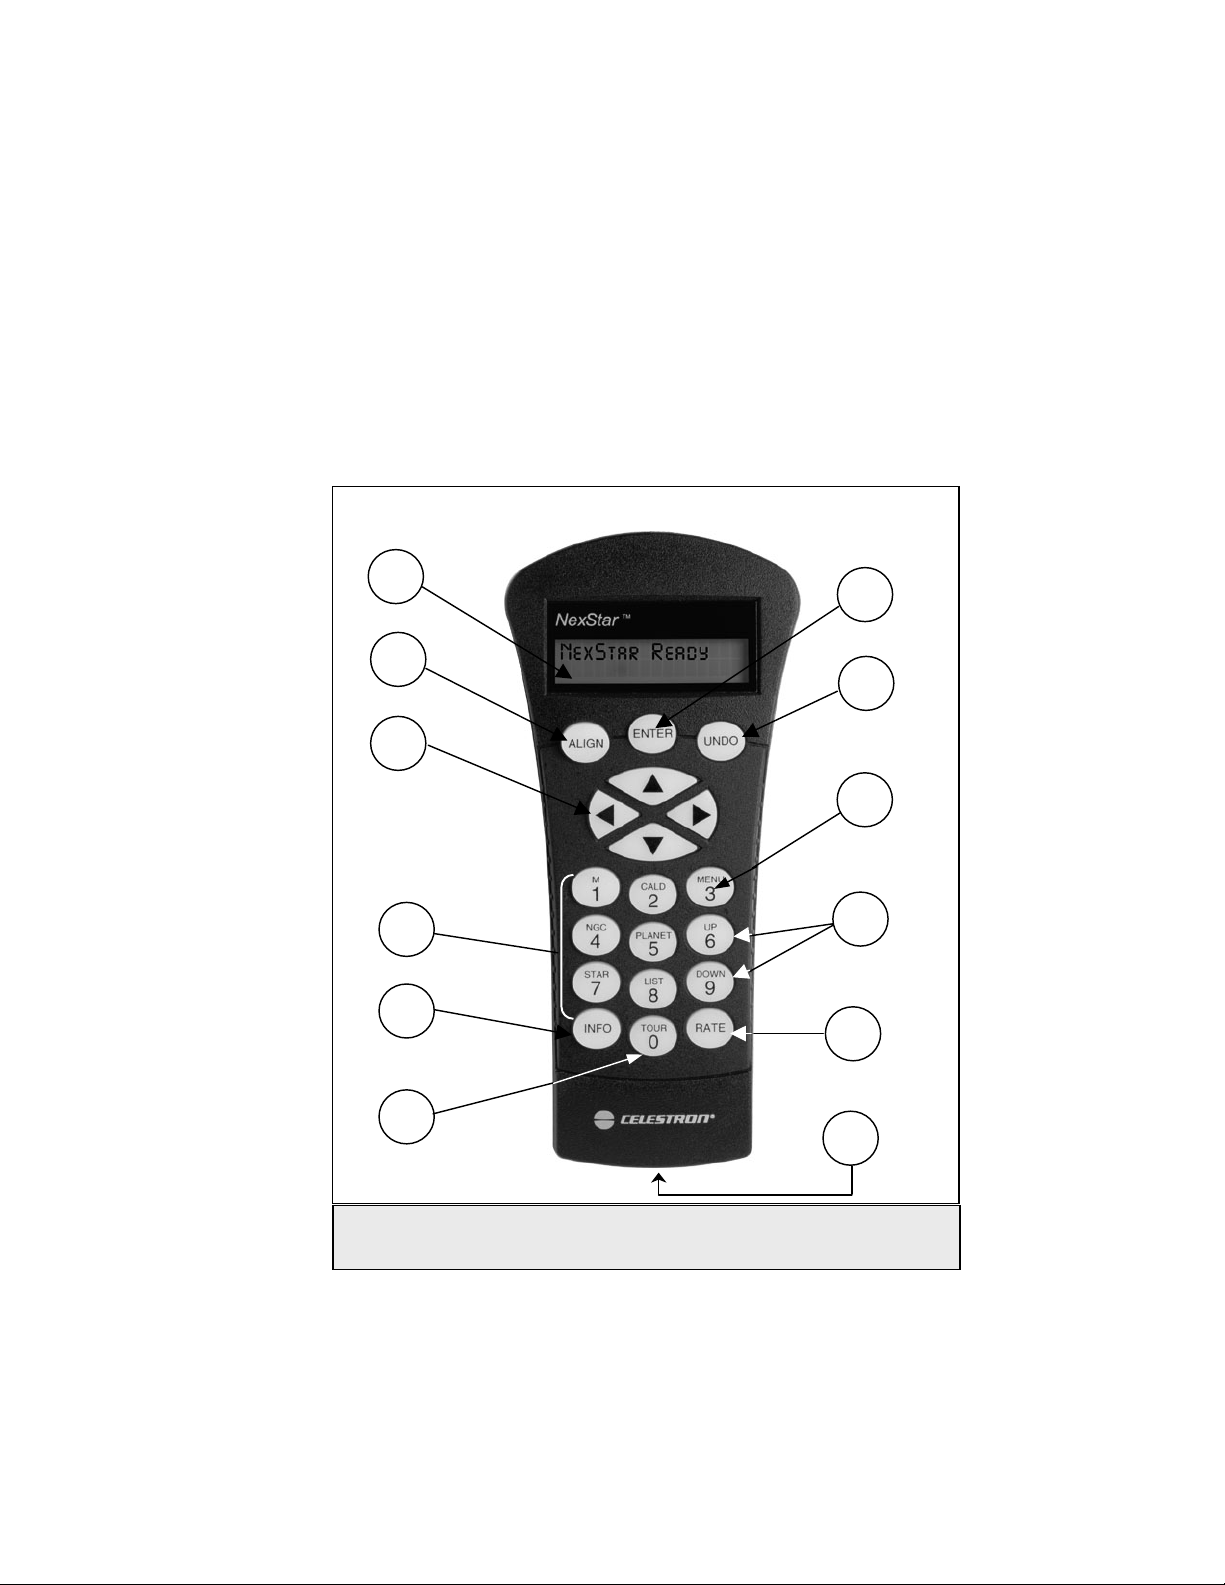
AAttttaacchhiinngg tthhee HHaanndd CCoonnttrrooll
The NexStar GT hand control has a phone jack type connector at the end of its cord. Plug the phone jack connector into the
outlet at the base of the telescope’s fork arm. Push the connector into the outlet until it clicks into place and place the hand
control into its holder as described previously in the Assembly section of the manual.
PPoowweerriinngg tthhee NNeexxSSttaarr
The NexStar GT can be powered by the supplied battery pack or an optional 12v AC adapter. The power pack requires 8
user supplied AA size alkaline batteries. To power the NexStar, insert the batteries into the battery pack and plug the round
post into the 12v outlet located on the side of the fork arm. Once the battery pack is plugged in, the NexStar will power on
Note
and the hand control will display the message NexStar Ready.
In case of a loss of power, the optical tube can be moved by hand. However, when powered on, the telescope should always
be controlled via the hand control. The NexStar will lose its star alignment if moved by hand when powered on.
TThhee HHaanndd CCoonnttrrooll
The NexStar GT's hand controller is designed to give you instant access to all the functions the NexStar has to offer. With
automatic slewing to over 4,000 objects, and common sense menu descriptions, even a beginner can master its variety of
features in just a few observing sessions. Below is a brief description of the individual components of the NexStar GT hand
controller
1. Liquid Crystal Display (LCD) Window: Has a dual-line, 16 character display screen that is backlit for comfortable
2. Align: Instructs the NexStar to use a selected star or object as an alignment position.
3. Direction Keys: Allows complete control of the NexStar in any direction. Use the direction keys to center objects in
4. Catalog Keys: The NexStar has a key on the hand control to allow direct access to each of the catalogs in its 4,000+
:
viewing of telescope information and scrolling text.
the StarPointer finderscope and eyepiece.
object database. The NexStar contains the following catalogs in its database:
Messier – Complete list of all Messier objects.
NGC – Many of the brightest deep sky objects from the Revised New General Catalog.
Hand Control
Outle
Figure 3-1 – The NexStar GT Outlets
Battery Pack
Outlet
Battery Pack
Page 16
Caldwell – A combination of the best NGC and IC objects.
Planets - All 8 planets in our Solar System plus the Moon.
Stars – A compiled list of the brightest stars from the SAO catalog.
List – For quick access, all of the best and most popular objects in the NexStar database have been broken
down into lists based on their type and/or common name:
Named Stars
Named Objects
Common name listing of the brightest stars in the sky.
Alphabetical listing of over 50 of the most popular deep
sky objects.
Double Stars
Alphabetical listing of the most visually stunning double,
triple and quadruple stars in the sky.
Variable Stars
Select list of the brightest variable stars with the shortest
period of changing magnitude.
Asterisms
A unique list of some of the most recognizable star
patterns in the sky.
1
7
2
8
3
9
4
10
5
11
6
12
The NexStar GT Hand Control
Figuurree 33--22
5. Info: Displays coordinates and useful information about objects selected from the NexStar database.
6. Tour: Activates the tour mode, which seeks out all the best objects for a given month and automatically slews the
NexStar to those objects.
7. Enter: Pressing Enter allows you to select any of the NexStar functions, accept entered parameters and slew the
telescope to displayed objects.
8. Undo: Undo will take you out of the current menu and display the previous level of the menu path. Press Undo
repeatedly to get back to a main menu or use it to erase data entered by mistake.
16
Page 17

9. Menu: Displays the many setup and utilities functions such as tracking rate and user defined objects and many others.
10. Scroll Keys: Used to scroll up and down within any of the menu lists. A double arrow symbol on the right side of the
LCD indicates that the scroll keys can be used to view additional information.
11. Rate: Instantly changes the rate of speed of the motors when the direction buttons are pressed.
12. RS-232 Jack: Allows use with a computer and software programs for point and click slewing capability.
HHaanndd CCoonnttrrooll OOppeerraattiioonn
This section describes the basic hand control procedures needed to operate the NexStar. These procedures are grouped into
three categories: Alignment, Setup and Utilities. The alignment section deals with the initial telescope alignment as well as
finding objects in the sky; the setup section discusses changing parameters such as tracking mode and tracking rate; finally,
the last section reviews all of the utility functions such as adjusting the telescopes slew limits and backlash compensation.
AAlliiggnnmmeenntt PPrroocceedduurree
In order for the NexStar to accurately point to objects in the sky, it must first be aligned with two known positions (stars) in
the sky. With this information, the telescope can create a model of the sky, which it uses to locate any object with known
coordinates.
AAuuttoo--AAlliiggnn
Auto-Align is the easiest way to get your NexStar aligned and ready to observe. Even if you do not know a single star in the
sky, the NexStar will align itself by guiding the user through the alignment procedure by asking for basic information like
the date, time and location. The NexStar will then automatically choose two stars for alignment and roughly center the stars
in the field of view of the Star Pointer. Before the telescope is ready to be aligned, it should be set up in an outside location
with all accessories (eyepiece, diagonal and Star Pointer) attached and lens cover removed as described in the Assembly
section of the manual.
1. Once the NexStar is powered on the display will read NexStar Ready. Press ENTER to begin alignment.
The first time that the NexStar is used, it will request information to help identify the model of telescope. Once powered on,
the hand control will display the message
different NexStar models. Press ENTER when your NexStar model is displayed on the hand control. This information will
be retained for future use and will not be displayed again. If for some reason the incorrect model was selected or you wish
to use your hand control on a different NexStar model, the Select Model utility feature allows you to re-select the proper
NexStar model from the displayed list (see Select Model later in this section).
2. Use the Up and Down scroll keys to select AutoAlign if it is not already displayed, and press ENTER.
3. The telescope will then ask you to use the direction keys (3) to level the telescope tube and point the front of the
4. The hand control display will then ask for the following information:
telescope towards north. North can be found by finding the direction of the North Star (Polaris) or by using a compass.
You do not need to point at the North Star, only the north horizon. Alignment only needs to be approximate, however a
close alignment will make the auto alignment more accurate. Once the telescope is in the north and level position, press
ENTER.
Location - The NexStar will display a list of cities to choose from. Choose the city from the database that is closest to
your current observing site. The city you choose will be remembered in the hand controls memory so that
it will be automatically displayed the next time an alignment is done. Alternatively, if you know the exact
longitude and latitude of your observing site, it can be entered directly into the hand control and
remembered for future use as well. To choose a location city:
Y Use the Up and Down scroll keys to choose between City Database and Custom Site. City Database will allow
you to select the closest city to your observing site from a list of either international or U.S. location. Custom Site
allows you to enter the exact longitude and latitude of your observing site. Select City Database and press
ENTER.
Y The hand control will allow you to choose from either U.S. or international locations. For a listing of U.S.
locations by state and then by city, press ENTER while United States is displayed. For international locations,
use the Up or Down scroll key to select International and press ENTER.
Select Model
Select Model. Use the Up and Down menu keys (10) to scroll through the
Select ModelSelect Model
17
Page 18

Helpful
O
Hints
bserving
TTiippss
Y To display a list of local cities, first select your state from the alphabetical listing (or a list of countries if
International locations was selected) and press ENTER.
Y Choose the closest city to your location from the displayed list and press ENTER.
Time - Enter the current time for your area. You can enter either the local time (i.e. 8:00), or you can enter military
time (i.e. 20:00).
Y Select PM or AM. If military time was entered, the hand control will bypass this step.
Y Choose between Standard time or Daylight Savings time. Use the Up and Down scroll buttons (10) to toggle
between options.
Y Select the time zone that you are observing from. Again, use the Up and Down buttons (10) to scroll through the
choices. For time zone information, refer to the Time Zone map in the appendix of this manual.
Date - Enter the month, day and year of your observing session. The display will read: mm/dd/yy.
• If the wrong information has been input into the hand control, the UNDO button will act as a backspace allowing
the user to re-enter information.
• The next time that your NexStar is auto aligned, the hand control will automatically display the last location
(either a city or longitude/latitude) that was entered. Pressing the UNDO button will allow you to go back and
select a new city location or longitude/latitude.
Based on this information, the NexStar will automatically select a bright star that is above the horizon and slew towards it. At
this point the telescope is only roughly aligned, so the alignment star should only be close to the field of view of the Star
Pointer finder. Once finished slewing, the display will ask you to use the arrow buttons to align the selected star with the red
dot in the center of the Star Pointer. If for some reason the chosen star is not visible (perhaps behind a tree or building) you
can press UNDO to select and slew to a different star. Once centered in the finder, press ENTER. The display will then
instruct you to center the star in the field of view of the eyepiece. When the star is centered, press ALIGN to accept this star
as your first alignment star. (There is no need to adjust the slewing rate of the motors after each alignment step. The NexStar
automatically selects the best slewing rate for aligning objects in both the Star Pointer and the eyepiece). After the first
alignment star has been entered the NexStar will automatically slew to a second alignment star and have you repeat the same
procedure for that star. When the telescope has been aligned to both stars the display will read
Successful
Successful
SuccessfulSuccessful
, and you are now ready to find your first object.
Align Failed
If the wrong star was centered and aligned to, the NexStar display will read
Align Failed. Press UNDO to begin the
Align FailedAlign Failed
alignment procedure again.
If you are not sure if the correct star was centered, always remember that the alignment star will be the brightest
star nearest the field of view of the finder. There may be other fainter stars visible that are closer to the center of the
Star Pointer, but the actual alignment star will be obviously brighter than any other star in the area.
When centering the alignment stars in the eyepiece of the NexStar 60/80, use the down arrow button and the right
arrow button on the hand control. Centering the star from this direction will eliminate much of the backlash between
the gears and assure the most accurate alignment possible. With the NexStar 114, center the star using the up arrow
button and the right arrow button on the hand control.
TTwwoo SSttaarr AAlliiggnnmmeenntt
With the two-star alignment method, the NexStar requires the user to know the positions of only two bright stars in order to
accurately align the telescope with the sky and begin finding objects. Here is an overview of the two-star alignment
procedure:
Two
Two----Star Align
1. Once the NexStar is powered on, use the Up and Down scroll keys to select
Star Align, and press
TwoTwo
Star AlignStar Align
ENTER.
Alignment
Alignment
Alignment Alignment
18
Page 19

2. The NexStar display will ask you to move the telescope tube until it is horizontal to the ground. To do this, use
the direction keys (3) to move the telescope until it is roughly level with the ground. Press ENTER.
SELECT STAR 1
3. Th e
4. NexStar then asks you to center in the eyepiece the alignment star you selected. Use the direction buttons to slew
5. Once the alignment star is centered in the field of view of the eyepiece, press the ALIGN key (2) to accept this
6. NexStar will then ask you to select and center a second alignment star and press the ALIGN key. It is best to
Once the second star alignment is completed properly, the display will read
hear the tracking motors turn-on and begin to track.
QQuuiicckk--AAlliiggnn
Quick-Align allows you to input all the same information as you would for the AutoAlign procedure. However, instead of
slewing to two alignment stars for centering and alignment, the NexStar bypasses this step and simply models the sky based
on the information given. This will allow you to roughly slew to the coordinates of bright objects like the moon and planets
and gives the NexStar the information needed to track objects in altazimuth in any part of the sky. Quick-Align is not meant
to be used to accurately locate small or faint deep-sky objects or to track objects accurately for photography. Note: Once a
Quick-Align has been done, you can use the Re-alignment feature (see below) to improve your telescopes pointing and
tracking accuracy.
To use Quick-Align:
1. Select Quick-Align from the alignment options.
2. Use the arrow buttons to level the tube and position the telescope tube towards north and press ENTER.
3. The hand control will then ask you to input all the same time and location information as you would for the
Once entered, the NexStar will model the sky based on this information and display
NNeexxSSttaarr RRee--AAlliiggnnmmeenntt
The NexStar has a re-alignment feature which allows you to replace either of the two original alignment stars with a new
star or celestial object. This can be useful in several situations:
SELECT STAR 1 message will appear in the top row of the display. Use the Up and Down scroll keys
SELECT STAR 1SELECT STAR 1
(10) to select the star you wish to use for the first alignment star. Press ENTER.
the telescope to the alignment star and carefully center the star in the eyepiece.
position.
choose alignment stars that are a good distance away from one another. Stars that are at least 40º to 60º apart from
each other will give you a more accurate alignment than stars that are close to each other.
Alignment Successful
Alignment Successful, and you will
Alignment SuccessfulAlignment Successful
AutoAlign procedure.
Alignment Successful
Alignment Successful.
Alignment SuccessfulAlignment Successful
• If you are observing over a period of a few hours, you may notice that your original two alignment stars have
drifted towards the west considerably. (Remember that the stars are moving at a rate of 15º every hour).
Aligning on a new star that is in the eastern part of the sky will improve your pointing accuracy, especially on
objects in that part of the sky.
• If you have aligned your telescope using the Quick-Align method, you can use re-align to align to two actual
objects in the sky. This will improve the pointing accuracy of your telescope without having to re-enter
addition information.
To replace an existing alignment star with a new alignment star:
1. Select the desired star (or object) from the database and slew to it.
2. Carefully center the object in the eyepiece.
3. Once centered, press the UNDO button until you are at the main menu.
4. With NexStar Ready displayed, press the ALIGN key on the hand control.
5. The display will then ask you which alignment star you want to replace.
6. Use the UP and Down scroll keys to select the alignment star to be replaced, and press ENTER. It is usually best
to replace the star closest to the new object. This will space out your alignment stars across the sky.
7. Press ALIGN to make the change.
19
Page 20

OObbjjeecctt CCaattaalloogg
SSeelleeccttiinngg aann OObbjjeecctt
Now that the telescope is properly aligned, you can choose an object from any of the catalogs in the NexStar's database. The
hand control has a key designated for each of the catalogs in its database. There are two ways to select objects from the
database; scrolling through the named object lists and entering object numbers:
•••• Pressing the LIST key on the hand control will access all objects in the database that have common names or types.
Each list is broken down into the following categories: Named Stars, Named Object, Double Stars, Variable Stars and
Asterisms. Selecting any one of these options will display an alpha-numeric listing of the objects under that list.
Pressing the Up and Down keys (10) allows you to scroll through the catalog to the desired object.
•••• Pressing any of the catalog keys (M, CALD, NGC, or STAR) will display a blinking cursor below the name of the
catalog chosen. Use the numeric key pad to enter the number of any object within these standardized catalogs. For
example, to find the Orion Nebula, press the "M" key and enter "042".
•••• Pressing the PLANET button will allow you to use the UP and DOWN arrow keys to scroll through and select the eight
planets as well as the moon.
To download a list of all the stars contained in the STAR Catalog with SAO number cross references, logon to our web site
at www.celestron.com
SSlleewwiinngg ttoo aann OObbjjeecctt
Once the desired object is displayed on the hand control screen, you have two options:
.
•••• Press the INFO Key. This will give you useful information about the selected object such as magnitude, constellation
and fascinating facts about many of the objects.
The speed at which information scrolls across the hand control display can be changed while the information is being
viewed:
Press the “1” key repeatedly to speed up the scroll speed.
Press the “4” key repeatedly to slow down the scroll speed.
Press the “7” key to freeze and unfreeze the information on the display.
•••• Press the ENTER Key. This will automatically slew the telescope to the coordinates of the object. While the
telescope is slewing to the object, the user can still access many of the hand control functions (such as displaying
information about the object).
If you slew to an object that is below the horizon, NexStar will notify you by displaying a message reminding you that you
have selected an object outside of your slew limits (see Slew Limits in the Utility Features section of the manual). Press
UNDO to go back and select a new object. Press ENTER to ignore the message and continue the slew. The NexStar hand
control will only display objects that are below the horizon if the Filter Limits are set below 0º in altitude. See Filter Limits
in the Utility Feature section of the manual for more information on setting the filter limits.
Caution: Never slew the telescope when someone is looking into the eyepiece. The telescope can move at fast slew
speeds and may hit an observer in the eye.
Object information can be obtained without having to do a star alignment. After the telescope is powered on, pressing any
of the catalog keys allows you to scroll through object lists or enter catalog numbers and view the information about the
object as described above.
TToouurr MMooddee
The NexStar includes a tour feature which automatically allows the user to choose from a list of interesting objects based on
the date and time in which you are observing. The automatic tour will display only those objects that are within your set
filter limits. To activate the Tour mode, press the TOUR key (6) on the hand control. The NexStar will display the best
objects to observe that are currently in the sky.
20
Page 21
• To see information and data about the displayed object, press the INFO key.
• To slew to the object displayed, press ENTER.
• To see the next tour object, press the Down key.
DDiirreeccttiioonn BBuuttttoonnss
The NexStar has four direction buttons in the center of the hand control which controls the telescope motion in altitude (up
and down) and azimuth (left and right). The telescope can be controlled at nine different speed rates.
RRaattee BBuuttttoonn
Pressing the RATE key (11) allows you to instantly change the speed rate of the motors from high speed slew rate to precise
guiding rate or anywhere in between. Each rate corresponds to a number on the hand controller key pad. The number 9 is
the fastest rate (approximately 4º per second, depending on power source) and is used for slewing between objects and
locating alignment stars. The number 1 on the hand control is the slowest rate (2x sidereal) and can be used for accurate
centering of objects in the eyepiece. To change the speed rate of the motors:
1 = 2x 6 = .5º / sec
2 = 4x 7 = 1º / sec
3 = 8x 8 = 2º / sec
4 = 16x 9 = 4º / sec
5 = 32x
Nine available slew speeds
•••• Press the RATE key on the hand control. The LCD will display the current speed rate.
•••• Press the number on the hand control that corresponds to the desired speed.
The hand control has a "double button" feature that allows you to instantly speed up the motors without having to choose a
speed rate. To use this feature, simply press the arrow button that corresponds to the direction that you want to move the
telescope. While holding that button down, press the opposite directional button. This will increase the speed to the
maximum slew rate.
When using the Up and Down buttons on the NexStar 60 and 80, the slower slew rates (6 and lower) move the motors in the
opposite direction than the faster slew rates (7- 9). This is done so that an object will move in the appropriate direction
when looking into the eyepiece (i.e. pressing the up arrow button will move the star upwards in the field of view of the
eyepiece). However, if any of the slower slew rates (rate 6 and below) are used to center an object in the Star Pointer, you
may need to press the opposite directional button to make the telescope move in the correct direction.
SSeett UUpp PPrroocceedduurreess
The NexStar contains many user defined setup functions designed to give the user control over the telescope's many
advanced features. All of the set up and utility features can be accessed by pressing the MENU key and scrolling through
the options:
Tracking Mode Once the NexStar is aligned the tracking motors will automatically turn on and begin tracking the
sky. However, the tracking can be turned off for terrestrial use:
Alt-Az
This is the default tracking rate and is used when the telescope has been
properly aligned.
21
Page 22

Observing
Tip!
EQ North
EQ South
Note: The EQ North and EQ South tracking modes are only needed with telescopes that can be polar aligned, such as the
NexStar 4, 5 and 8. The NexStar 60, 80 and 114 are exclusively Alt-Az mounted telescopes and do not require
equatorial tracking.
Used to track the sky when the telescope is polar aligned using an
equatorial wedge in the Northern Hemisphere.
Used to track the sky when the telescope is polar aligned using an
equatorial wedge in the Southern Hemisphere.
When using the telescope for terrestrial (land) observation the tracking
Off
can be turned off so that the telescope never moves.
Tracking Rate - In addition to being able to move the telescope with the hand control buttons, the NexStar will
continually track a celestial object as it moves across the night sky. The tracking rate can be
changed depending on what type of object is being observed:
Sidereal
Lunar
Solar
This rate compensates for the rotation of the earth by moving the
telescope at the same rate as the rotation of the earth, but in the opposite
direction. When tracking in Alt-Az mode, the telescope must make
corrections in both altitude and azimuth.
Used for tracking the moon when observing the lunar landscape.
Used for tracking the Sun when solar observing using a proper solar filter.
View Time-Site - View Time-Site will display the last saved time and longitude/latitude entered in the hand control.
Sidereal Time – Displays the Sidereal time for your current time and location. This is useful for knowing the right
ascension of celestial objects that are located on the local meridian at that time.
Filter Limits – When an alignment is complete, the NexStar automatically knows which celestial objects are above the
horizon. As a result, when scrolling through the database lists (or selecting the Tour function), the NexStar hand control
will display only those objects that are known to be above the horizon when you are observing. You can customize the
object database by selecting altitude limits that are appropriate for your location and situation. For example, if you are
observing from a mountainous location where the horizon is partially obscured, you can set your minimum altitude limit to
read +20º. This will make sure that the hand control only displays objects that are higher in altitude than 20º.
If you want to explore the entire object database, set the maximum altitude limit to 90º and the minimum limit to –90º. This
will display every object in the database lists regardless of whether it is visible in the sky from your location or not.
RS-232 - The NexStar has a RS-232 port located on the bottom of the hand control that allows it to communicate with
many popular astronomy computer programs. Before attempting to create a link with a computer , select the RS-232 option
and press Enter.
User Defined Objects - The NexStar can store up to 50 different user defined objects in its memory. The objects can
be daytime land objects or an interesting celestial object that you discover that is not included
in the regular database. There are several ways to save an object to memory depending on
what type of object it is:
Save Sky Object: The NexStar stores celestial objects to its database by saving its right ascension and
declination in the sky. This way the same object can be found each time the telescope is
aligned. Once a desired object is centered in the eyepiece, simply scroll to the "Save Sky
Obj" command and press ENTER. The display will ask you to enter a number between 1-25
to identify the object. Press ENTER again to save this object to the database.
Save Land Object: The NexStar can also be used as a spotting scope on terrestrial objects. Fixed land objects
can be stored by saving their altitude and azimuth relative to the location of the telescope at
the time of observing. Since these objects are relative to the location of the telescope, they
22
Page 23
Helpful
Hint
are only valid for that exact location. To save land objects, once again center the desired
object in the eyepiece. Scroll down to the "Save Land Obj" command and press
ENTER. The display will ask you to enter a number between 1-25 to identify the object.
Press ENTER again to save this object to the database.
Enter R.A. - Dec: You can also store a specific set of coordinates for an object just by entering the R.A. and
declination for that object. Scroll to the "Enter RA-DEC " command and press ENTER.
The display will then ask you to enter first the R.A. and then the declination of the desired
object.
GoTo Object: To go to any of the user defined objects stored in the database, scroll down to either GoTo
Sky Obj or Goto Land Obj and enter the number of the object you wish to select and
press ENTER. NexStar will automatically retrieve and display the coordinates before
slewing to the object.
To replace the contents of any of the user defined objects, simply save a new object using one of the existing identification
numbers; NexStar will replace the previous user defined object with the current one.
Get RA/DEC - Displays the right ascension and declination for the current position of the telescope.
Get Alt-Az - Displays the relative altitude and azimuth for the current position of the telescope.
Goto R.A/ Dec - Allows you to input a specific R.A. and declination and slew to it.
Goto Alt-Az - Allows you to enter a specific altitude and azimuth position and slew to it.
To store a set of coordinates (R.A./Dec) permanently into the NexStar database, save it as a User Defined Object as
described above.
MENU
UUttiilliittyy FFeeaattuurreess
Scrolling through the MENU options will also provide access to several advanced utility
functions such as anti-backlash compensation and slew limits.
Setup Time-Site - Allows the user to customize the NexStar display by changing time
and location parameters (such as time zone and daylight savings).
Anti-backlash
between the gears. This play is evident by how long it takes for a star to move in the
eyepiece when the hand control arrow buttons are pressed (especially when changing
directions). The NexStar's anti-backlash features allows the user to compensate for backlash
by inputting a value which quickly rewinds the motors just enough to eliminate the play
between gears. The amount of compensation needed depends on the slewing rate selected;
the slower the slewing rate the longer it will take for the star to appear to move in the
eyepiece. Therefore, the anti-backlash compensation will have to be set higher. You will
need to experiment with different values; a value between 20 and 50 is usually best for
most visual observing, whereas a higher value may be necessary for photographic guiding.
To set the anti-backlash value, scroll down to the anti-backlash option and press ENTER.
Enter a value from 0-100 for both azimuth and altitude directions and press ENTER after
each one to save these values. NexStar will remember these values and use them each time
it is turned on until they are changed.
– All mechanical gears have a certain amount of backlash or play
23
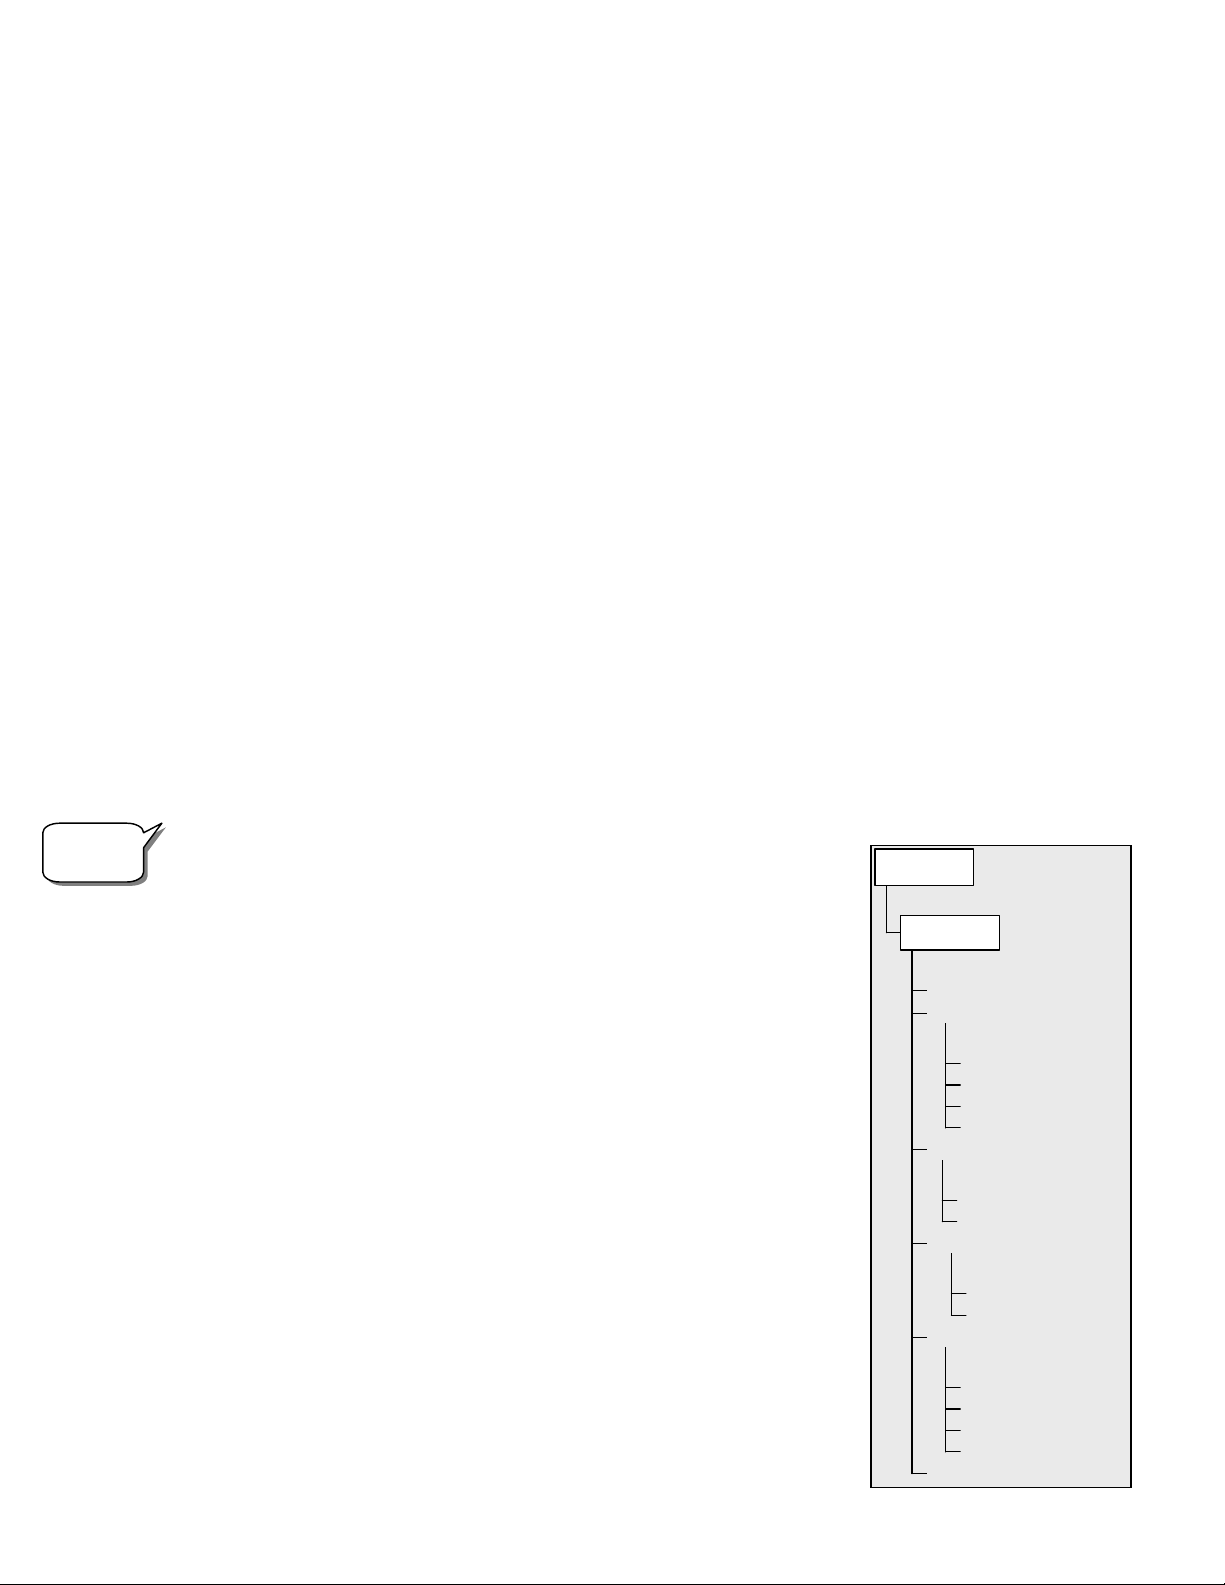
UTILITIES
SETUP TIME-SITE
ANTI-BACKLASH
AZM POSITIVE
AZM NEGATIVE
ALT POSITIVE
ALT NEGATIVE
SLEW LIMITS
SLEW ALT MAX
SLEW ALT MIN
DIRECTION BUTTONS
AZM BUTTONS
ALT BUTTONS
LIGHT CONTROL
DISPLAY OFF
DISPLAY ON
KEY PAD OFF
KEY PAD ON
SELECT MODEL
Page 24

Slew Limits – Sets the limits in altitude that the telescope can slew without displaying a warning message. The slew
limits prevent the telescope tube from slewing to an object below the horizon or slewing to an object that is high enough that
the tube might hit one of the tripod legs. However, the slew limits can be customized depending on your needs. For
example, if you would like to slew to an object that is close to the zenith and are certain that the tube will not hit the tripod
legs, you can set the slew limits to 90º in altitude. This will allow the telescope to slew to any object above the horizon
without warning.
Direction Buttons –The direction a star moves in the eyepiece varies depending on the accessories being used. This
can create confusion when guiding on a star using an off-axis guider versus a straight through guide scope. To compensate
for this, the direction of the drive control keys can be changed. To reverse the button logic of the hand control, press the
MENU button and select Direction Buttons from the Utilities menu. Use the Up/Down arrow keys (10) to select either the
Azimuth buttons (left and right) or Altitude buttons (up and down) and press ENTER. Pressing ENTER again will reverse
the direction of the hand control buttons from their current state. Direction Buttons will only change the eyepiece rates (rate
1-6) and will not affect the slew rates (rate 7-9).
Light Control – This feature allows you to turn off both the red key pad light and LCD display for daytime use to
conserve power and to help preserve your night vision.
Select Model – The first time the NexStar is powered on, the hand control display allows you to select your NexStar
from a list of different models. If for some reason the incorrect model was selected or you wish to use your hand control on
a different NexStar model, the Select Model utility feature allows you to re-select the proper NexStar model from the
displayed list. Once the correct NexStar model has been selected the power needs to be restarted before beginning the
alignment procedure. The Select Model feature will return the hand control to its original factory settings. Parameters such
as backlash compensation values along with slew and filter limits will be reset. However, stored parameters such as user
defined objects will remain saved even after the model has been changed.
24
Page 25
F
V
y
A
NexStar Ready
MENU
TRACKING
MODE
ALT-AZ
EQ NORTH
EQ SOUTH
OF
RATE
SIDEREAL
SOLAR
LUNAR
IEW TIME-SITE
SIDEREAL TIME
FILTER LIMITS
ALTMAX IN LIST
AL TM IN IN L IST
UTILITIES
SETUP TIME/SITE
ANTI-BACKLASH
SLEW LIMITS
DIRECTION BUTTONS
LIGHT CONTROL
SELECT MODEL
RS-232
USER OBJECTS
ALIGNMENT
UTO ALIGN
POINT TUBE NORTH & LEVEL
CITY DA TABASE
Unit ed States
Choose State
International
Choose Countr
CUSTOM SITE
Enter Long /Lat
Enter Time
Enter Date
TWO-STAR ALIGNMENT
LEVEL TUBE
LIST
NAMED STAR
NAMED OBJECT
ASTERISMS
TOUR
VARIABLE STAR
DOUBLE STAR
CALDWELL
MESSIER
NGC
SOLAR SYSTEM
SAO
Choose City
Enter Time
Enter Date
Choose City
GOTO SKY OBJ
SELECT STAR 1
SAVE SKY OBJ
ENTER RA & DEC
GOTO LAND OBJ
CENTER STAR 1
SELECT STAR 2
SAVE LAND OBJ
GET ALT-AZ
GOTO ALT -AZ
GET RA-DEC
GOTO RA-DEC
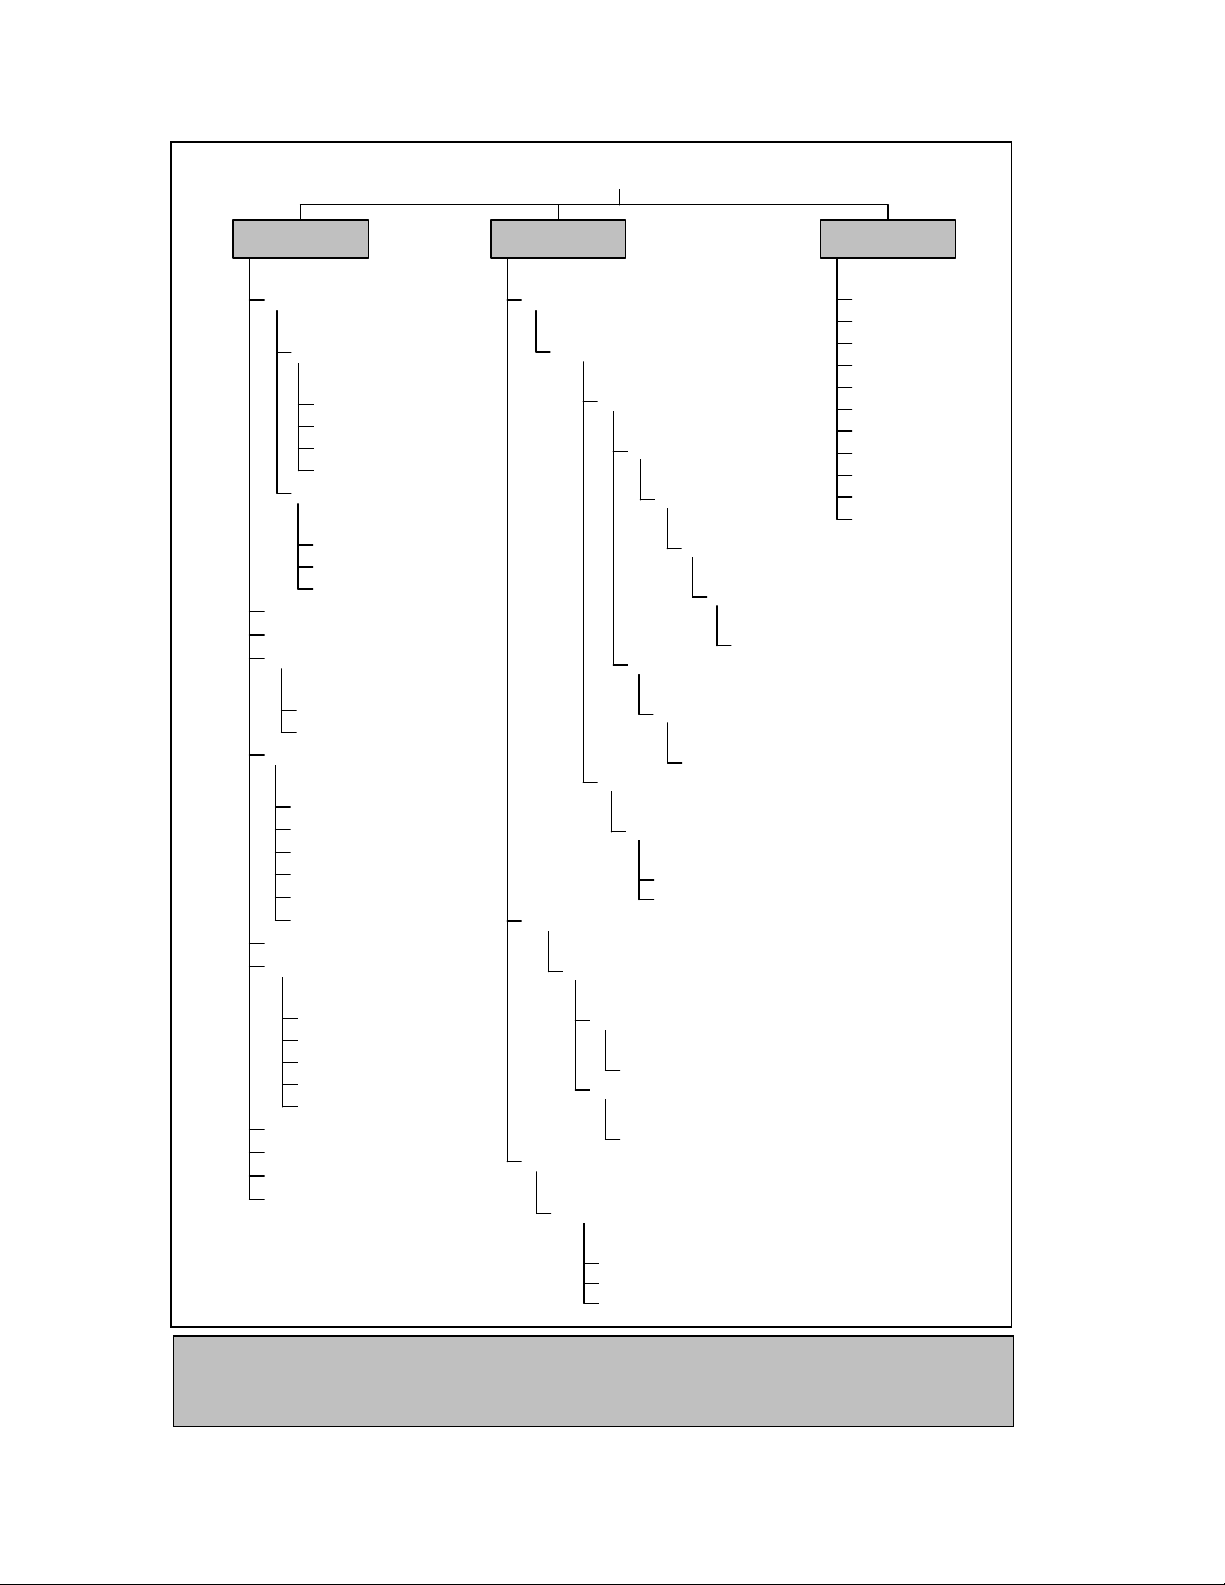
The following figure is a menu tree showing the sub-menus associated with the primary command
QUICK ALIGN
POINT TUBE NORTH & LEVEL
NexStar Menu Tree:
functions
CENTER STAR 2
SELECT LOCATION
ENTER TIME
ENTER DATE
25
Page 26
A telescope is an instrument that collects and focuses light. The nature of the optical design determines how the light is focused.
Some telescopes, known as refractors, use lenses. Other telescopes, known as reflectors, use mirrors. The NexStar 60 and
NexStar 80 telescopes are refractor telescopes that use an objective lens to collect its light. The NexStar 114 is a reflecting
telescope with a primary and secondary mirror to gather and focus light.
FFooccuussiinngg
Once you have found an object in the telescope, turn the focusing knob until the image is sharp. To focus on an object that is
nearer than your current target, turn the focusing knob toward the eyepiece (i.e., so that the focusing tube moves away from the
front of the telescope). For more distant objects, turn the focusing knob in the opposite direction. To achieve a truly sharp focus,
never look through glass windows or across objects that produce heat waves, such as asphalt parking lots.
IImmaaggee OOrriieennttaattiioonn
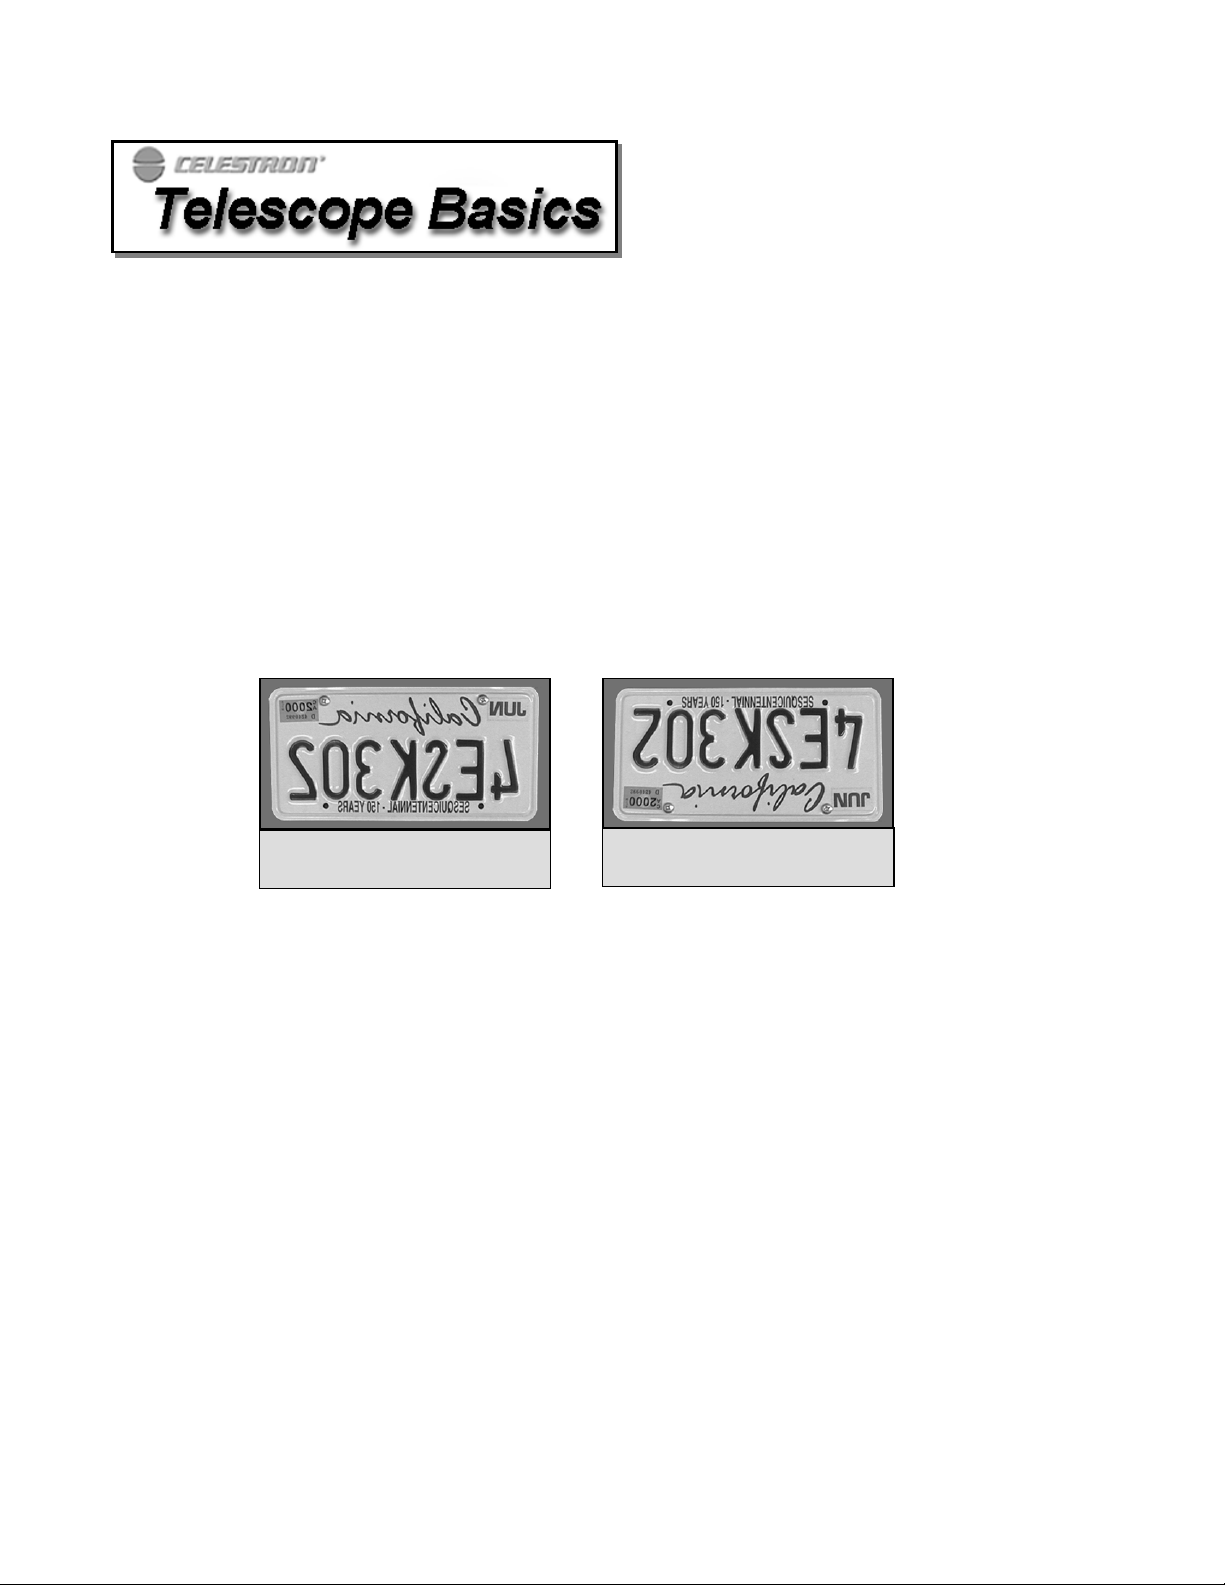
The image orientation of any telescope changes depending on how the eyepiece is inserted into the telescope. When observing
through the NexStar 60 or 80 using a diagonal, the image will be right side up, but reversed from left to right. When observing
straight through, with the eyepiece inserted directly into the telescope, the image will be inverted.
Reversed from left to right, as
viewed with a Star Diagonal
When observing through the NexStar 114, a reflecting telescope, the image will appear up-side-down when looking through the
eyepiece.
For astronomical viewing, out of focus star images are very diffuse, making them difficult to see. If you turn the focus knob too
quickly, you can go right through focus without seeing the image. To avoid this problem, your first astronomical target should
be a bright object (like the Moon or a planet) so that the image is visible even when out of focus.
CCaallccuullaattiinngg MMaaggnniiffiiccaattiioonn
You can change the power of your telescope just by changing the eyepiece (ocular). To determine the magnification of your
telescope, simply divide the focal length of the telescope by the focal length of the eyepiece used. In equation format, the
formula looks like this:
Focal Length of Telescope (mm)
Magnification =
Focal Length of Eyepiece (mm)
Let’s say, for example, you are using the 25mm eyepiece. To determine the magnification you simply divide the focal length of
your telescope (for example, the NexStar 114 has a focal length of 1000mm) by the focal length of the eyepiece, 25mm.
Dividing 1000 by 25 yields a magnification of 40 power.
Inverted image, as viewed with
the eyepiece directly in telescope
26
Page 27

Although the power is variable, each instrument under average skies has a limit to the highest useful magnification. The general
rule is that 60 power can be used for every inch of aperture. For example, the NexStar 80 is 3.2” (80mm) in diameter.
Multiplying 3.2 by 60 gives a maximum useful magnification of 192 power. Although this is the maximum useful magnification,
most observing is done in the range of 20 to 35 power for every inch of aperture which is 64 to 112 times for the NexStar 80
telescope.
DDeetteerrmmiinniinngg FFiieelldd ooff VViieeww
Determining the field of view is important if you want to get an idea of the angular size of the object you are observing. To
calculate the actual field of view, divide the apparent field of the eyepiece (supplied by the eyepiece manufacturer) by the
magnification. In equation format, the formula looks like this:
Apparent Field of Eyepiece
True Field =
Magnification
As you can see, before determining the field of view, you must calculate the magnification. Using the example in the previous
section, we can determine the field of view using the same 25mm eyepiece. The 25mm eyepiece has an apparent field of view of
56°. Divide the 56° by the magnification, which is 40 power. This yields an actual field of view of 1.4°.
To convert degrees to feet at 1,000 yards, which is more useful for terrestrial observing, simply multiply by 52.5. Continuing
with our example, multiply the angular field 1.4° by 52.5. This produces a linear field width of 73.5 feet at a distance of one
thousand yards. The apparent field of each eyepiece that Celestron manufactures is found in the Celestron Accessory Catalog
(#93685).
GGeenneerraall OObbsseerrvviinngg HHiinnttss
When working with any optical instrument, there are a few things to remember to ensure you get the best possible image:
• Never look through window glass. Glass found in household windows is optically imperfect, and as a result, may vary in
thickness from one part of a window to the next. This inconsistency can and will affect the ability to focus your telescope.
In most cases you will not be able to achieve a truly sharp image, while in some cases, you may actually see a double image.
• Never look across or over objects that are producing heat waves. This includes asphalt parking lots on hot summer days or
building rooftops.
• Hazy skies, fog, and mist can also make it difficult to focus when viewing terrestrially. The amount of detail seen under
these conditions is greatly reduced. Also, when photographing under these conditions, the processed film may come out a
little grainier than normal with lower contrast and underexposed.
• If you wear corrective lenses (specifically glasses), you may want to remove them when observing with an eyepiece
attached to the telescope. When using a camera, however, you should always wear corrective lenses to ensure the sharpest
possible focus. If you have astigmatism, corrective lenses must be worn at all times.
27
Page 28
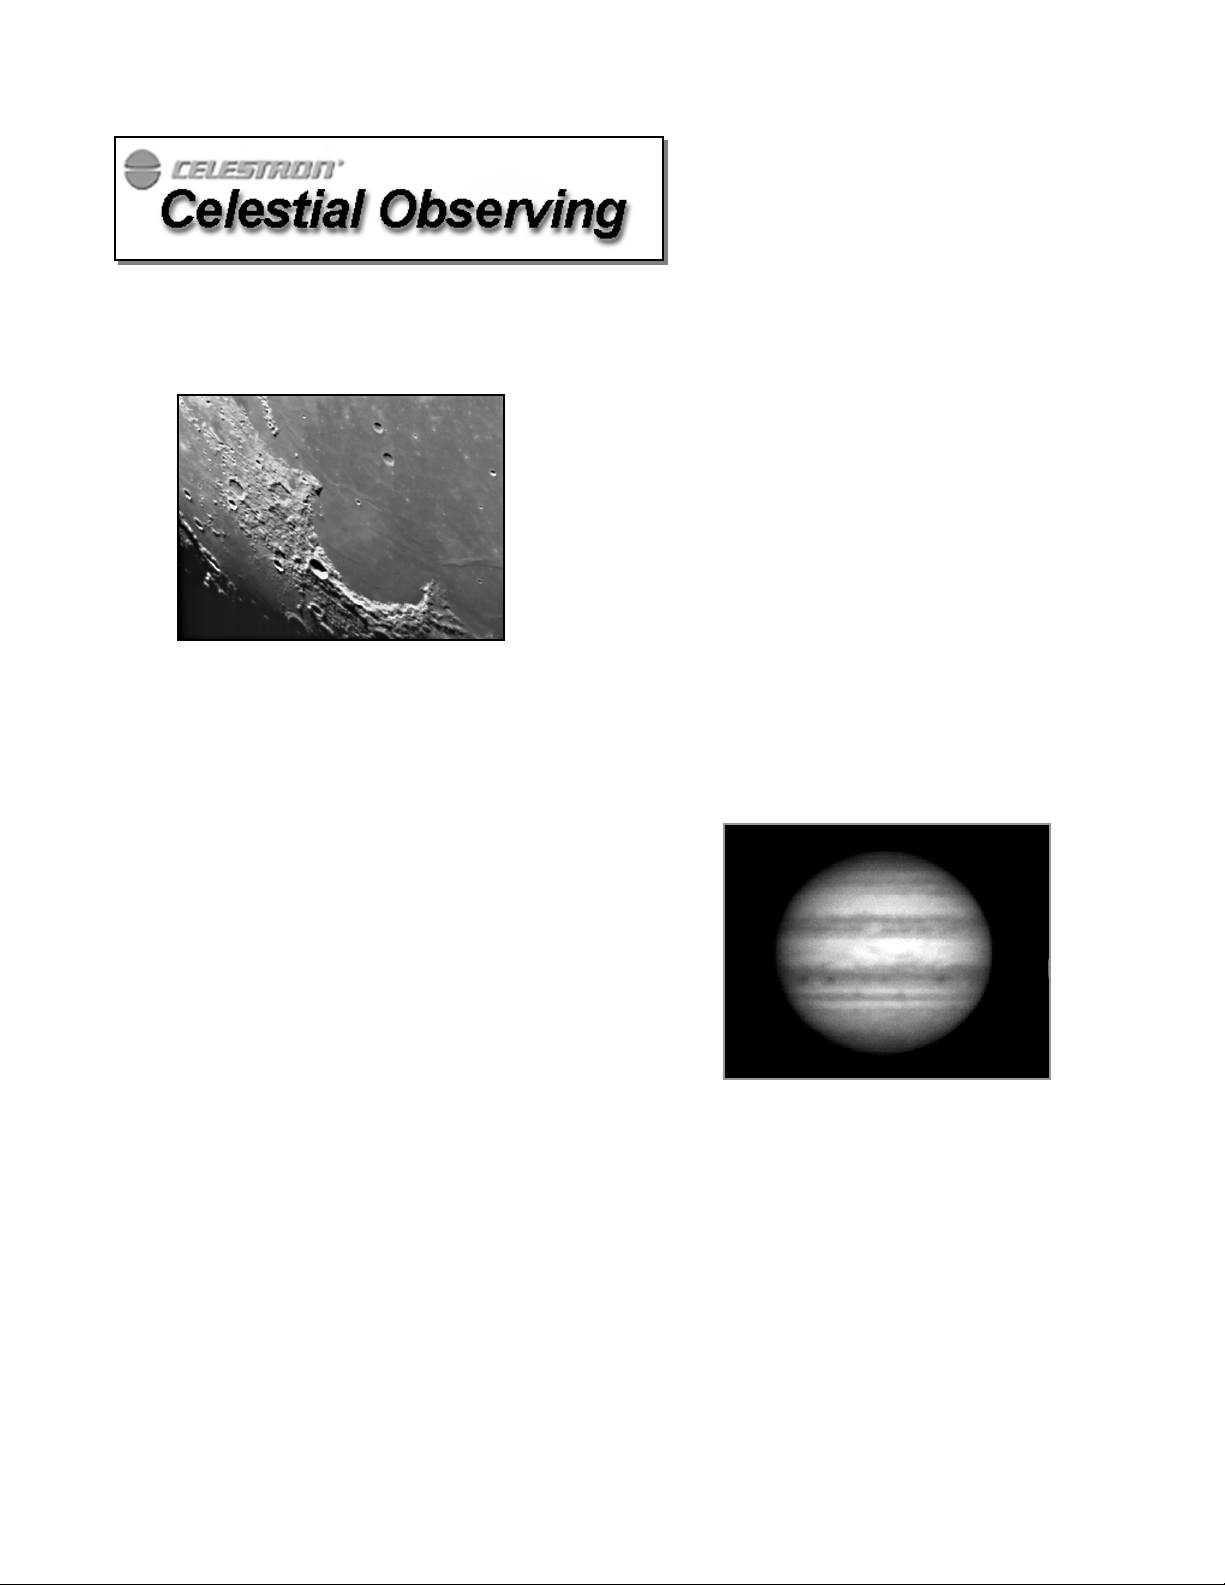
With your telescope set up, you are ready to use it for observing. This section covers visual observing hints for both
solar system and deep sky objects as well as general observing conditions which will affect your ability to observe.
OObbsseerrvviinngg tthhee MMoooonn
Often, it is tempting to look at the Moon when it is full. At this time,
the face we see is fully illuminated and its light can be overpowering.
In addition, little or no contrast can be seen during this phase.
One of the best times to observe the Moon is during its partial phases
(around the time of first or third quarter). Long shadows reveal a great
amount of detail on the lunar surface. At low power you will be able to
see most of the lunar disk at one time. Change to higher power
(magnification) to focus in on a smaller area. Choose the lunar tracking
rate from the NexStar's (GT models) MENU tracking rate options to
keep the moon centered in the eyepiece even at high magnifications.
LLuunnaarr OObbsseerrvviinngg HHiinnttss
•••• To increase contrast and bring out detail on the lunar surface, use eyepiece filters. A yellow filter works well at
improving contrast while a neutral density or polarizing filter will reduce overall surface brightness and glare.
OObbsseerrvviinngg tthhee PPllaanneettss
Other fascinating targets include the five naked eye planets. You can
see Venus go through its lunar-like phases. Mars can reveal a host of
surface detail and one, if not both, of its polar caps. You will be able to
see the cloud belts of Jupiter and the great Red Spot (if it is visible at
the time you are observing). In addition, you will also be able to see the
moons of Jupiter as they orbit the giant planet. Saturn, with its beautiful
rings, is easily visible at moderate power.
PPllaanneettaarryy OObbsseerrvviinngg HHiinnttss
•••• Remember that atmospheric conditions are usually the limiting
factor on how much planetary detail will be visible. So, avoid
observing the planets when they are low on the horizon or when
they are directly over a source of radiating heat, such as a rooftop
or chimney. See the "Seeing Conditions" section later in this section.
•••• To increase contrast and bring out detail on the planetary surface, try using Celestron eyepiece filters.
28
Page 29

OObbsseerrvviinngg tthhee SSuunn
Although overlooked by many amateur astronomers, solar observation is both rewarding and fun. However, because
the Sun is so bright, special precautions must be taken when observing our star so as not to damage your eyes or your
telescope.
Never project an image of the Sun through the telescope. Tremendous heat build-up may result inside the
optical tube. This can damage the telescope and/or any accessories attached to the telescope.
For safe solar viewing, use a Celestron solar filter (see Optional Accessories section of manual) that reduces the
intensity of the Sun's light, making it safe to view. With a filter you can see sunspots as they move across the solar disk
and faculae, which are bright patches seen near the Sun's edge.
SSoollaarr OObbsseerrvviinngg HHiinnttss
• The best time to observe the Sun is in the early morning or late afternoon when the air is cooler.
• To center the Sun without looking into the eyepiece, watch the shadow of the telescope tube until it
• To ensure accurate tracking on GT models, be sure to select solar tracking rate.
OObbsseerrvviinngg DDeeeepp SSkkyy OObbjjeeccttss
Deep sky objects are simply those objects outside the boundaries of our solar system. They include star clusters,
planetary nebulae, diffuse nebulae, double stars and other galaxies outside our own Milky Way. Most deep sky objects
have a large angular size. Therefore, low-to-moderate power is all you need to see them. Visually, they are too faint to
reveal any of the color seen in long exposure photographs. Instead, they appear black and white. And, because of their
low surface brightness, they should be observed from a dark sky location. Light pollution around large urban areas
washes out most nebulae making them difficult, if not impossible, to observe. Light Pollution Reduction filters help
reduce the background sky brightness, thus increasing contrast.
SSeeeeiinngg CCoonnddiittiioonnss
Viewing conditions affect what you can see through your telescope during an observing session. Conditions include
transparency, sky illumination, and seeing. Understanding viewing conditions and the effect they have on observing
will help you get the most out of your telescope.
TTrraannssppaarreennccyy
Transparency is the clarity of the atmosphere which is affected by clouds, moisture, and other airborne particles. Thick
cumulus clouds are completely opaque while cirrus can be thin, allowing the light from the brightest stars through.
Hazy skies absorb more light than clear skies making fainter objects harder to see and reducing contrast on brighter
objects. Aerosols ejected into the upper atmosphere from volcanic eruptions also affect transparency. Ideal conditions
are when the night sky is inky black.
SSkkyy IIlllluummiinnaattiioonn
General sky brightening caused by the Moon, aurorae, natural airglow, and light pollution greatly affect transparency.
While not a problem for the brighter stars and planets, bright skies reduce the contrast of extended nebulae making
them difficult, if not impossible, to see. To maximize your observing, limit deep sky viewing to moonless nights far
from the light polluted skies found around major urban areas. LPR filters enhance deep sky viewing from light
polluted areas by blocking unwanted light while transmitting light from certain deep sky objects. You can, on the other
hand, observe planets and stars from light polluted areas or when the Moon is out.
forms a circular shadow.
29
Page 30
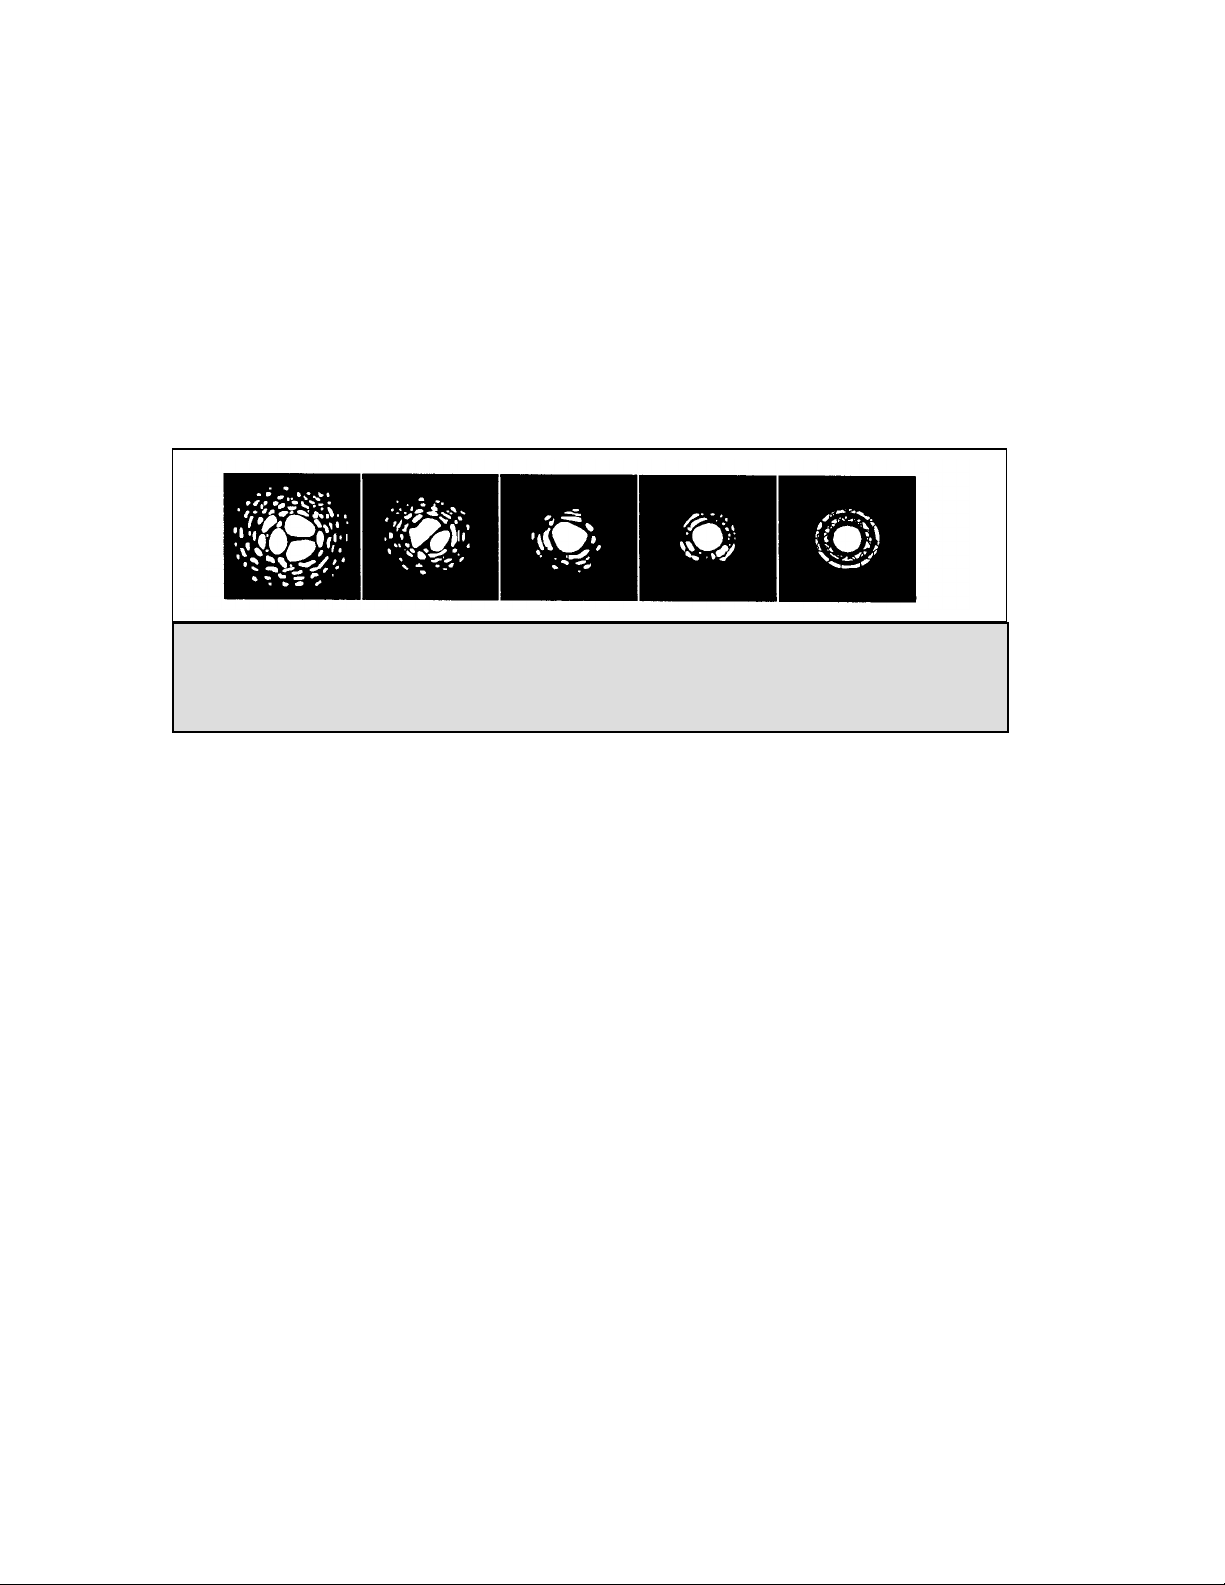
SSeeeeiinngg
Seeing conditions refers to the stability of the atmosphere and directly affects the amount of fine detail seen in extended
objects. The air in our atmosphere acts as a lens which bends and distorts incoming light rays. The amount of bending
depends on air density. Varying temperature layers have different densities and, therefore, bend light differently. Light
rays from the same object arrive slightly displaced creating an imperfect or smeared image. These atmospheric
disturbances vary from time-to-time and place-to-place. The size of the air parcels compared to your aperture
determines the "seeing" quality. Under good seeing conditions, fine detail is visible on the brighter planets like Jupiter
and Mars, and stars are pinpoint images. Under poor seeing conditions, images are blurred and stars appear as blobs.
The conditions described here apply to both visual and photographic observations.
Figure 5-1
Seeing conditions directly affect image quality. These drawing represent a point source (i.e., star) under
bad seeing conditions (left) to excellent conditions (right). Most often, seeing conditions produce images
that lie some where between these two extremes.
30
Page 31
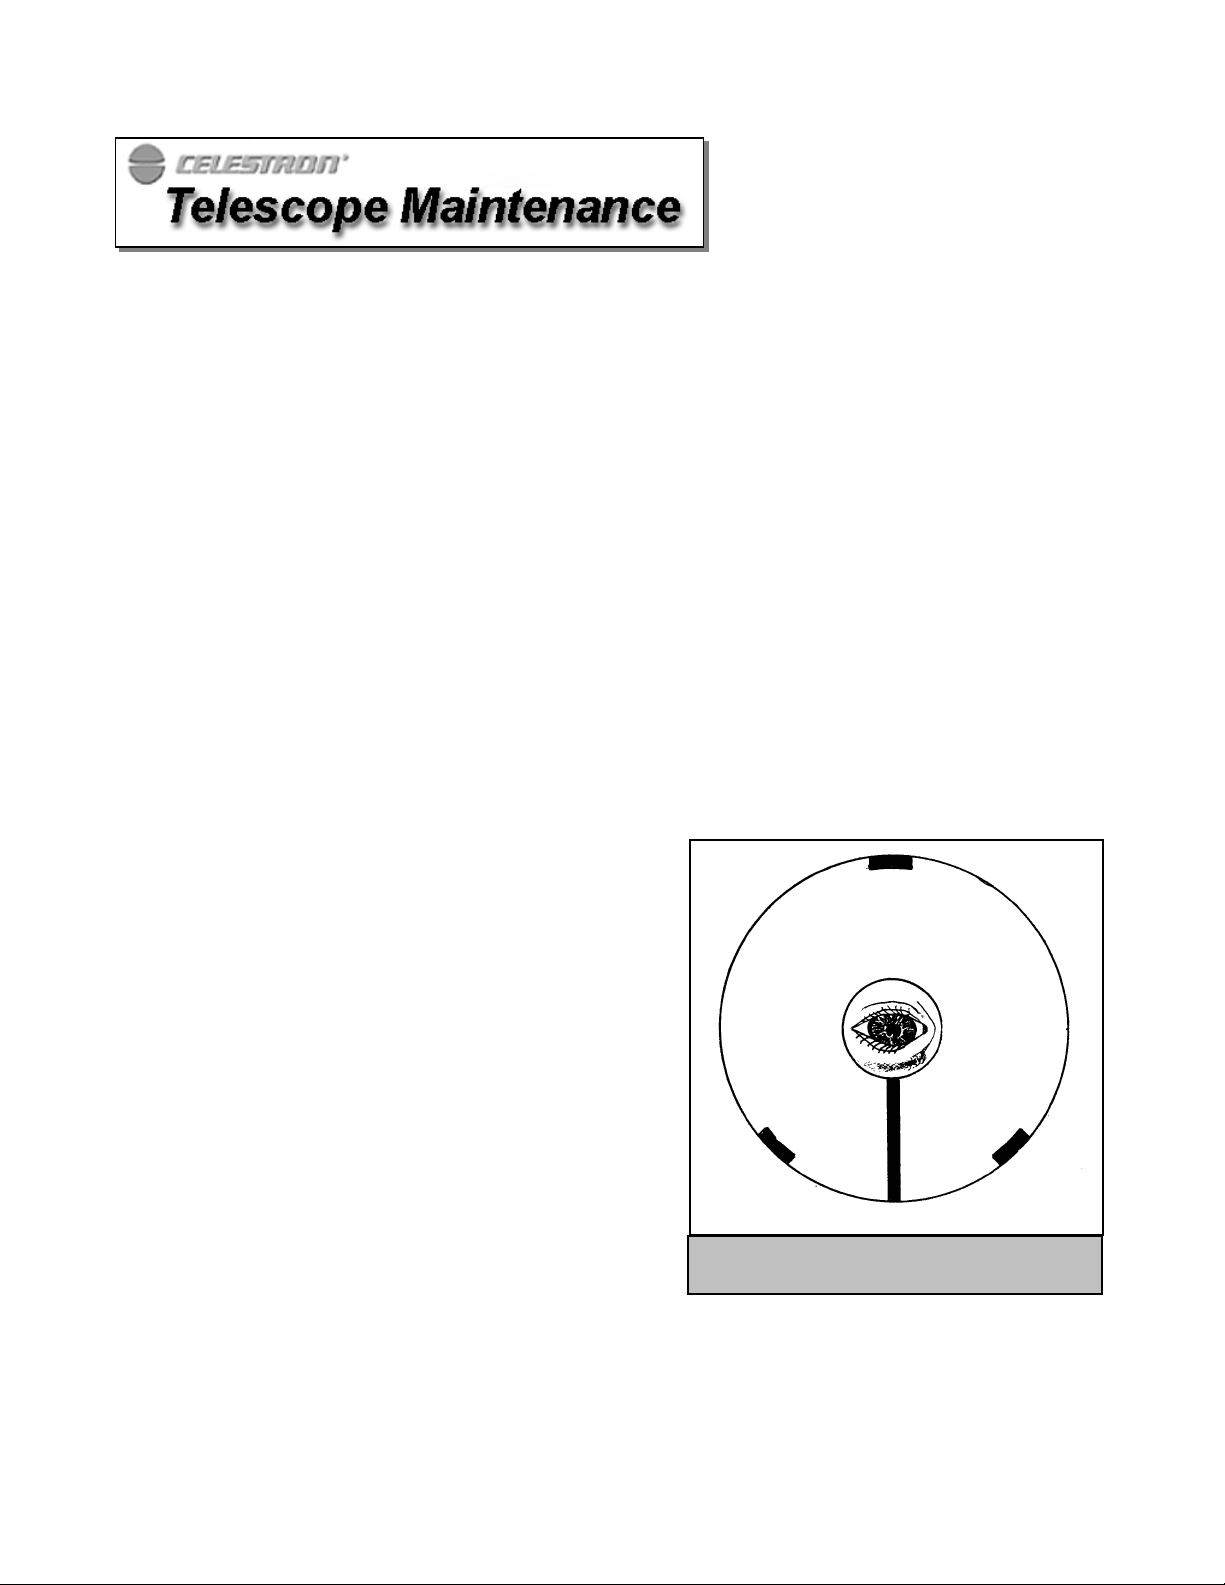
g
While your NexStar telescope requires little maintenance, there are a few things to remember that will ensure your telescope
performs at its best.
s
CCaarree aanndd CClleeaanniinngg ooff tthhee OOppttiiccs
Occasionally, dust and/or moisture may build up on the lens of your telescope. Special care should be taken when cleaning any
instrument so as not to damage the optics.
If dust has built up on the corrector plate, remove it with a brush (made of camel’s hair) or a can of pressurized air. Spray at an
angle to the lens for approximately two to four seconds. Then, use an optical cleaning solution and white tissue paper to remove
any remaining debris. Apply the solution to the tissue and then apply the tissue paper to the lens. Low pressure strokes should
go from the center of the corrector to the outer portion. Do NOT rub in circles!
You can use a commercially made lens cleaner or mix your own. A good cleaning solution is isopropyl alcohol mixed with
distilled water. The solution should be 60% isopropyl alcohol and 40% distilled water. Or, liquid dish soap diluted with water (a
couple of drops per one quart of water) can be used.
To minimize the need to clean your telescope, replace all lens covers once you have finished using it. This will prevent
contaminants from entering the optical tube.
CCoolllliimmaattiioonn
(For NexStar 114)
The optical performance of your NexStar telescope is directly related to
its collimation, that is the alignment of its optical system. Your NexStar
was collimated at the factory after it was completely assembled.
However, if the telescope is dropped or jarred severely during transport,
it may have to be collimated. The NexStar 60 and NexStar 80 are
refractor type telescopes that have fix optical systems that should not
come out of collimation. The NexStar 114, however has three
collimation screws that can be used to adjust the alignment of the
primary mirror.
To check if your telescope is in collimation the following diagram will
help you. If you look into the eyepiece adapter (without an eyepiece) at
the top of the focuser, this is what you should see. If the reflection of
your eye is off center, then collimation is necessary.
Adjustments to the collimation of the telescope can be made by turning
the collimation adjustment knobs located at the rear of the optical tube.
First loosen the three Phillips head screws on the rear cell of the tube.
Turn each collimation knobs, one at a time, until the reflected image of
your eye in the secondary mirror is centered in the primary mirror.
Once the telescope is collimated, tighten the Phillips head screws until
you feel a slight resistance. Do not over tighten the screw.
If your telescope is out of collimation, the best way to re-collimate it is with a good collimation tool. Celestron offers a
Newtonian Collimation Tool (#94183) with detailed instructions that make it an easy chore.
The view of a collimated telescope as seen
h the focuser of the NexStar 114 reflector
throu
31
Page 32
You will find that additional accessories enhance your viewing pleasure and expand the usefulness of your telescope. For
ease of reference, all the accessories are listed in alphabetical order.
Adapter, AC (#18770) – Allows DC (battery) powered telescopes to be converted for use with 120 volt AC power. The
adapter attaches to any standard wall outlet.
Adapter, Car Battery (#18769) - Celestron offers the Car Battery Adapter that allows you to run the NexStar drive off
an external power source. The adapter attaches to the cigarette lighter of your car, truck, van, or motorcycle.
Carrying Case, Soft NexStar 60/80 (#302160) - Lightweight yet durable, this
nylon case is ideal for transporting your NexStar telescope. The shoulder and back
straps provide hands-free convenience to make carrying your telescope anywhere
even easier.
Erect Image Diagonal (#94112-A) - This accessory is an Amici prism
arrangement that allows you to look into the telescope at a 45° angle with images
that are oriented properly (upright and correct from left-to-right). It is useful for daytime, terrestrial viewing.
Eyepieces - Like telescopes, eyepieces come in a variety of designs. Each design has its own advantages and
disadvantages. For the 1-1/4" barrel diameter there are four different eyepiece designs available:
•••• Super Modified Achromatic (SMA) Eyepieces: 1
The SMA design is an improved version of the Kellner eyepiece. SMA's are very good, economical, general purpose
eyepieces that deliver a wide apparent field, good color correction and an excellent image at the center of the field of
view. Celestron offers SMA eyepieces in 1-1/4" sizes in the following focal lengths: 6mm, 10mm, 12mm, 17mm and
25mm.
1
/4"
•••• Ultima - Ultima is not really a design, but a trade name for our 5-element, wide field eyepieces. In the 1-1/4" barrel
diameter, they are available in the following focal lengths: 5mm, 7.5mm, 12.5mm, 18mm, 30mm, 35mm, and 42mm.
These eyepieces are all parfocal.
•••• NexStar Plössl - Plössl eyepieces have a 4-element lens designed for
low-to-high power observing. The Plössls offer razor sharp views across
the entire field, even at the edges! In the 1-1/4" barrel diameter, they are
available in the following focal lengths: 3.6mm, 6mm, 8mm, 10mm,
13mm, 17mm, 25mm, 32mm and 40mm.
•••• Lanthanum Eyepieces (LV Series) - Lanthanum is a unique rare earth
glass used in one of the field lenses of this new eyepiece. The
Lanthanum glass reduces aberrations to a minimum. All are fully
multicoated and have an astounding 20mm of eye relief — perfect for
eyeglass wearers! In the 1-1/4" barrel diameter, they are available in the following focal lengths: 2.5mm, 4mm, 5mm,
6mm, 9mm, 10mm, 12mm and 15mm. Celestron also offers the LV Zoom eyepiece (#3777) with a focal length of 8mm
to 24mm. It offers an apparent field of 40º at 24mm and 60º at 8mm. Eye relief ranges from 15mm to 19mm.
Filters, Eyepiece - To enhance your visual observations of solar system objects, Celestron offers a wide range of colored
filters that thread into the 1-1/4" oculars. Available individually are: #12 deep yellow, #21 orange, #25 red, #58 green,
#80A light blue, #96 neutral density - 25%T, #96 neutral density - 13%T, and polarizing. These and other filters are also
sold in sets.
Flashlight , Night Vision - (#93588) - Celestron’s premium model for astronomy, using two red LEDs to preserve night
vision better than red filters or other devices. Brightness is adjustable. Operates on a single 9 volt battery (included).
32
Page 33
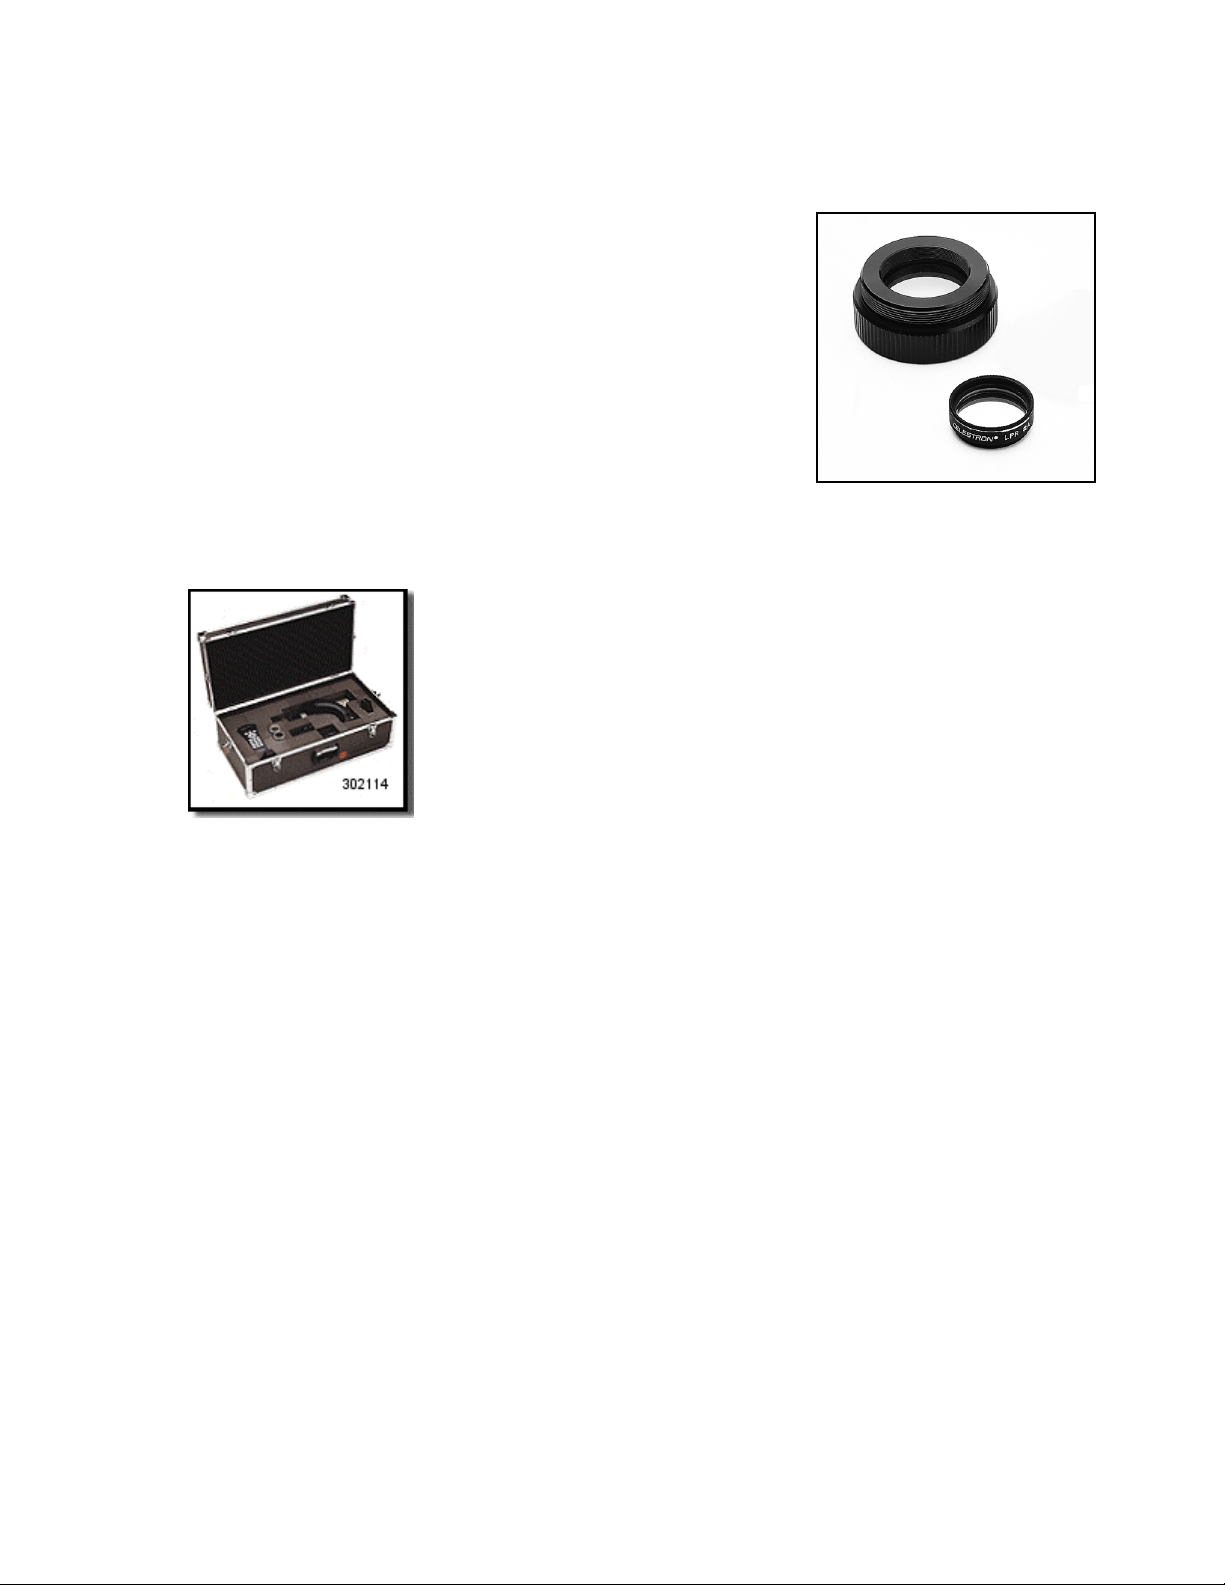
Flashlight, Red Astro Lite – (#93590) – An economical squeeze-type flashlight fitted with a red cap to help preserve your
night vision. Remove the red cap for normal flashlight operation. Very compact size and handy key chain.
Filter, Light Pollution Reduction –LPR (#94126A) - These filters are designed to
enhance your views of deep sky astronomical objects when viewed from urban areas.
LPR Filters selectively reduce the transmission of certain wavelengths of light,
specifically those produced by artificial lights. This includes mercury and high and
low pressure sodium vapor lights. In addition, they also block unwanted natural light
(sky glow) caused by neutral oxygen emission in our atmosphere.
Filter, Moon (#94119-A) - Celestron’s Moon Filter is an economical eyepiece filter
for reducing the brightness of the moon and improving contrast, so greater detail can
be observed on the lunar surface. The clear aperture is 21mm and the transmission is
about 18%.
Filter, Solar - The AstroSolar® filter is a safe and durable filter that covers the front
opening of the telescope. View sunspots and other solar features using this doublesided metal coated filter for uniform density and good color balance across the entire field. The Sun offers constant changes
and will keep your observing interesting and fun. Celestron offers filters for the NexStar 60/80 (#94135) and the NexStar
114 (#94134).
Hard Case NexStar 114 (#302114) -The ultimate protection of a sturdy case with high-
quality aluminum, edging fitted with die-cut foam to embrace each optic element in
padded protection. This case is sturdy enough for even the most arduous travel
conditions.
Planisphere (#93720) - A simple and inexpensive tool for all levels of observers, from
naked eye viewers to users of highly sophisticated telescopes. The Celestron
Planisphere makes it easy to locate stars for observing and is a great planet finder as
well. A map of the night sky, oriented by month and day, rotates within a depiction of
the 24 hours of the day, to display exactly which stars and planets will be visible at any
given time. Ingeniously simple to use, yet quite effective. Made of durable materials
and coated for added protection. Celestron Planispheres come in three different models,
to match the latitude from which you’re observing:
For 20° to 40° of latitude #93720-30
For 30° to 50°of latitude #93720-40
For 40° to 60° of latitude #93720-50
Polarizing Filter Set (#93608) - The polarizing filter set limits the transmission of light to a specific plane, thus increasing
contrast between various objects. This is used primarily for terrestrial, lunar and planetary observing.
RS-232 Cable (#93920) – Allows your NexStar telescope to be controlled using a laptop computer or PC. Once connected,
the NexStar can be controlled using popular astronomy software programs.
Sky Maps (#93722) - Celestron Sky Maps are the ideal teaching guide for learning the night sky. You wouldn’t set off on a
road trip without a road map, and you don’t need to try to navigate the night sky without a map either. Even if you already
know your way around the major constellations, these maps can help you locate all kinds of fascinating objects.
Vibration Suppression Pads (#93503) - These pads rest between the ground and tripod feet of your telescope. They reduce
the amplitude and vibration time of your telescope when shaken by the wind or an accidental bump.
A full description of all Celestron accessories can be found in the Celestron Accessory Catalog (#93685).
33
Page 34
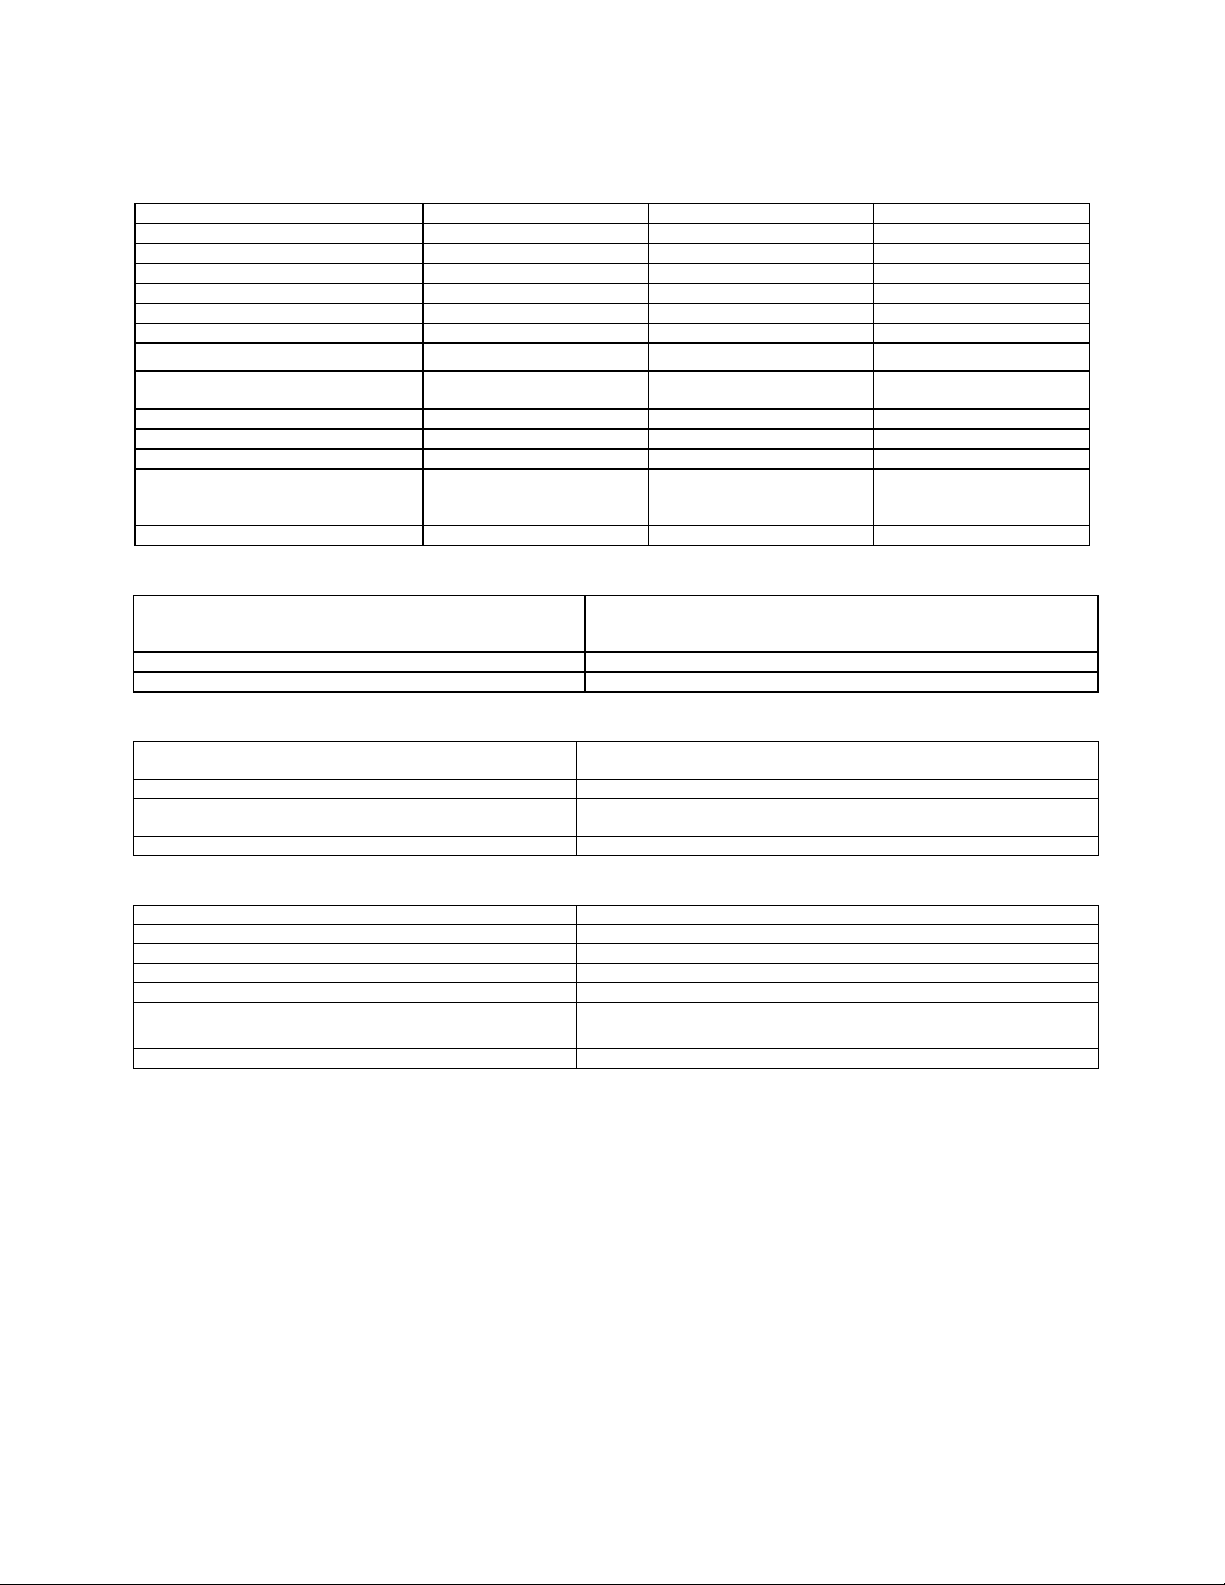
APPENDIX A - TECHNICAL SPECIFICATIONS
O
p
t
i
c
a
l
S
p
e
c
i
f
i
c
a
t
i
o
O
p
t
i
c
a
l
S
p
e
c
i
f
O
p
t
i
c
a
l
S
Design Refractor Refractor Reflector
Aperture 60mm 80mm 114mm
Focal Length 700mm 400mm 1000mm
F/ratio of the Optical System 12 5 9
Objective Coatings Multi Coated Multi Coated Aluminum
Highest Useful Magnification 175x ( ~ 4mm eyepiece) 189x (~2.5mm eyepiece) 269x (~4mm eyepiece)
Lowest Useful Magnification 20x ( ~ 32mm eyepiece) 11x (~40mm eyepiece) 16x (~55mm eyepiece)
Resolution: Rayleigh Criterion
Dawes Limit
Light Gathering Power 73x unaided eye 131x unaided eye 265x unaided eye
Field of View: Standard Eyepiece 1.6º 3.5º 1.4º
Linear Field of View (at 1000 yds) 75 feet 171 feet 68 feet
Eyepiece Magnification: 35x (20mm)
Optical Tube Length 28 inches 15.5 inches 18 inches
E
l
e
c
t
r
o
n
E
l
e
E
l
e
Input Voltage
Maximum
Minimum
Batteries Required 8 AA Alkaline
Power Supply Requirements 12 VDC-750 mA (Tip positive)
M
e
c
M
e
c
M
e
Motor: Type
Resolution
Slew speeds Nine slew speeds: 4º /sec, 2º /sec, 1º/sec, .5 /sec, 32x, 16x, 8x, 4x, 2x
Hand Control
Fork Arm Cast aluminum
S
o
f
S
o
f
S
o
f
Software Precision 16 bit, 20 arc sec. calculations
Ports RS-232 communication port on hand control
Tracking Rates Sidereal, Solar and Lunar
Tracking Modes Alt-Az, EQ North & EQ South
Alignment Procedures AutoAlign, 2-Star Alignment, Quick-Align
Database 25 user defined programmable object.
Total Object Database 4,033 Objects
i
c
t
r
o
n
i
c
t
r
o
n
i
h
a
n
i
c
h
a
n
i
c
c
h
a
n
i
c
t
w
a
r
e
t
w
a
r
e
t
w
a
r
e
i
p
e
c
i
f
c
S
p
e
c
S
p
e
c
S
p
e
a
l
S
p
a
l
S
p
a
l
S
p
S
p
e
c
S
p
e
c
S
p
e
c
n
c
a
t
i
o
i
n
c
a
t
i
o
n
NexStar 60mm NexStar 80mm NexStar 114mm
2.31 arc seconds
1.93 arc seconds
70x (10mm)
175x (4mm)
c
i
f
i
c
a
t
i
o
n
s
c
i
f
i
c
a
c
i
f
i
c
a
e
c
i
f
i
c
e
c
i
f
i
c
e
c
i
f
i
c
i
f
i
c
a
t
i
i
f
i
c
a
t
i
i
f
i
c
a
t
i
t
i
o
n
s
t
i
o
n
s
12 V DC Nominal
18 V DC Max.
8 V DC Min.
a
t
i
o
n
s
a
a
o
o
o
t
i
o
n
s
t
i
o
n
s
DC Servo motors with encoders, both axes
.26 arc sec
Double line, 16 character Liquid Crystal Display
19 fiber optic backlit LED buttons
n
s
n
s
n
s
Enhanced information on over 100 objects
1.73 arc seconds
1.45 arc seconds
16x (25mm)
40x (10mm)
1.21 arc seconds
1.02 arc seconds
40x (25mm)
100x (10mm)
34
Page 35

GLOSSARY OF TERMS
AAbsolute magnitude The apparent magnitude that a star would have if it were observed from a standard distance of 10
parsecs, or 32.6 light-years. The absolute magnitude of the Sun is 4.8. at a distance of 10 parsecs, it
would just be visible on Earth on a clear moonless night away from surface light.
Airy disk The apparent size of a star's disk produced even by a perfect optical system. Since the star can never
be focused perfectly, 84 per cent of the light will concentrate into a single disk, and 16 per cent into
a system of surrounding rings.
Alt-Azimuth Mounting A telescope mounting using two independent rotation axes allowing movement of the instrument in
Altitude and Azimuth.
Altitude In astronomy, the altitude of a celestial object is its Angular Distance above or below the celestial
horizon.
Aperture The diameter of a telescope's primary lens or mirror; the larger the aperture, the greater the
telescope's light-gathering power.
Apparent Magnitude A measure of the relative brightness of a star or other celestial object as perceived by an observer on
Earth.
Arc minute A unit of angular size equal to 1/60 of a degree.
Arc second A unit of angular size equal to 1/3,600 of a degree (or 1/60 of an arc minute).
Asterism A small unofficial grouping of stars in the night sky.
Asteroid A small, rocky body that orbits a star.
Astrology The pseudoscientific belief that the positions of stars and planets exert an influence on human
affairs; astrology has nothing in common with astronomy.
Astronomical unit (AU) The distance between the Earth and the Sun. It is equal to 149,597,900 km., usually rounded off to
150,000,000 km.
Aurora The emission of light when charged particles from the solar wind slams into and excites atoms and
molecules in a planet's upper atmosphere.
Azimuth The angular distance of an object eastwards along the horizon, measured from due north, between
the astronomical meridian (the vertical line passing through the center of the sky and the north and
south points on the horizon) and the vertical line containing the celestial body whose position is to
be measured. .
B Binary Stars Binary (Double) stars are pairs of stars that, because of their mutual gravitational attraction, orbit
around a common center of mass. If a group of three or more stars revolve around one another, it is
called a multiple system. It is believed that approximately 50 percent of all stars belong to binary or
multiple systems. Systems with individual components that can be seen separately by a telescope are
called visual binaries or visual multiples. The nearest "star" to our solar system, Alpha Centauri, is
actually our nearest example of a multiple star system, it consists of three stars, two very similar to
our Sun and one dim, small, red star orbiting around one another.
C Celestial Equator The projection of the Earth's equator on to the celestial sphere. It divides the sky into two equal
hemispheres.
Celestial pole The imaginary projection of Earth's rotational axis north or south pole onto the celestial sphere.
Celestial Sphere An imaginary sphere surrounding the Earth, concentric with the Earth's center.
Collimation The act of putting a telescope's optics into perfect alignment.
D Declination (DEC) The angular distance of a celestial body north or south of the celestial equator. It may be said to
correspond to latitude on the surface of the Earth.
E Ecliptic The projection of the Earth's orbit on to the celestial sphere. It may also be defined as "the apparent
yearly path of the Sun against the stars".
Equatorial mount A telescope mounting in which the instrument is set upon an axis which is parallel to the axis of the
Earth; the angle of the axis must be equal to the observer's latitude.
F -
Focal length The distance between a lens (or mirror) and the point at which the image of an object at infinity is
brought to focus. The focal length divided by the aperture of the mirror or lens is termed the focal
ratio.
35
Page 36

Jovian Planets Any of the four gas giant planets that are at a greater distance form the sun than the terrestrial
planets.
K Kuiper Belt A region beyond the orbit of Neptune extending to about 1000 AU which is a source of many short
period comets.
L Light-Year (ly) A light-year is the distance light traverses in a vacuum in one year at the speed of 299,792 km/ sec.
With 31,557,600 seconds in a year, the light-year equals a distance of 9.46 X 1 trillion km (5.87 X 1
trillion mi).
M Magnitude Magnitude is a measure of the brightness of a celestial body. The brightest stars are assigned
magnitude 1 and those increasingly fainter from 2 down to magnitude 5. The faintest star that can be
seen without a telescope is about magnitude 6. Each magnitude step corresponds to a ratio of 2.5 in
brightness. Thus a star of magnitude 1 is 2.5 times brighter than a star of magnitude 2, and 100 times
brighter than a magnitude 5 star. The brightest star, Sirius, has an apparent magnitude of -1.6, the
full moon is -12.7, and the Sun's brightness, expressed on a magnitude scale, is -26.78. The zero
point of the apparent magnitude scale is arbitrary.
Meridian A reference line in the sky that starts at the North celestial pole and ends at the South celestial pole
and passes through the zenith. If you are facing South, the meridian starts from your Southern
horizon and passes directly overhead to the North celestial pole.
Messier A French astronomer in the late 1700’s who was primarily looking for comets. Comets are hazy
diffuse objects and so Messier cataloged objects that were not comets to help his search. This
catalog became the Messier Catalog, M1 through M110.
N Nebula Interstellar cloud of gas and dust. Also refers to any celestial object that has a cloudy appearance.
North Celestial Pole The point in the Northern hemisphere around which all the stars appear to rotate. This is caused by
the fact that the Earth is rotating on an axis that passes through the North and South celestial poles.
The star Polaris lies less than a degree from this point and is therefore referred to as the "Pole Star".
Nova Although Latin for "new" it denotes a star that suddenly becomes explosively bright at the end of its
life cycle.
O Open Cluster One of the groupings of stars that are concentrated along the plane of the Milky Way. Most have an
asymmetrical appearance and are loosely assembled. They contain from a dozen to many hundreds
of stars.
P Parallax Parallax is the difference in the apparent position of an object against a background when viewed by
an observer from two different locations. These positions and the actual position of the object form a
triangle from which the apex angle (the parallax) and the distance of the object can be determined if
the length of the baseline between the observing positions is known and the angular direction of the
object from each position at the ends of the baseline has been measured. The traditional method in
astronomy of determining the distance to a celestial object is to measure its parallax.
Parfocal Refers to a group of eyepieces that all require the same distance from the focal plane of the
telescope to be in focus. This means when you focus one parfocal eyepiece all the other parfocal
eyepieces, in a particular line of eyepieces, will be in focus.
Parsec The distance at which a star would show parallax of one second of arc. It is equal to 3.26 light-years,
206,265 astronomical units, or 30,8000,000,000,000 km. (Apart from the Sun, no star lies within
one parsec of us.)
Point Source An object which cannot be resolved into an image because it to too far away or too small is
considered a point source. A planet is far away but it can be resolved as a disk. Most stars cannot
be resolved as disks, they are too far away.
R Reflector A telescope in which the light is collected by means of a mirror.
Resolution The minimum detectable angle an optical system can detect. Because of diffraction, there is a limit
to the minimum angle, resolution. The larger the aperture, the better the resolution.
Right Ascension: (RA) The angular distance of a celestial object measured in hours, minutes, and seconds along the
Celestial Equator eastward from the Vernal Equinox.
S Sidereal Rate This is the angular speed at which the Earth is rotating. Telescope tracking motors drive the
telescope at this rate. The rate is 15 arc seconds per second or 15 degrees per hour.
T Terminator The boundary line between the light and dark portion of the moon or a planet.
36
Page 37

U Universe The totality of astronomical things, events, relations and energies capable of being described
objectively.
V Variable Star A star whose brightness varies over time due to either inherent properties of the star or something
eclipsing or obscuring the brightness of the star.
W Waning Moon The period of the moon's cycle between full and new, when its illuminated portion is decreasing.
Waxing Moon The period of the moon's cycle between new and full, when its illuminated portion is increasing.
Z -
Zenith The point on the Celestial Sphere directly above the observer.
Zodiac The zodiac is the portion of the Celestial Sphere that lies within 8 degrees on either side of the
Ecliptic. The apparent paths of the Sun, the Moon, and the planets, with the exception of some
portions of the path of Pluto, lie within this band. Twelve divisions, or signs, each 30 degrees in
width, comprise the zodiac. These signs coincided with the zodiacal constellations about 2,000 years
ago. Because of the Precession of the Earth's axis, the Vernal Equinox has moved westward by
about 30 degrees since that time; the signs have moved with it and thus no longer coincide with the
constellations.
37
Page 38
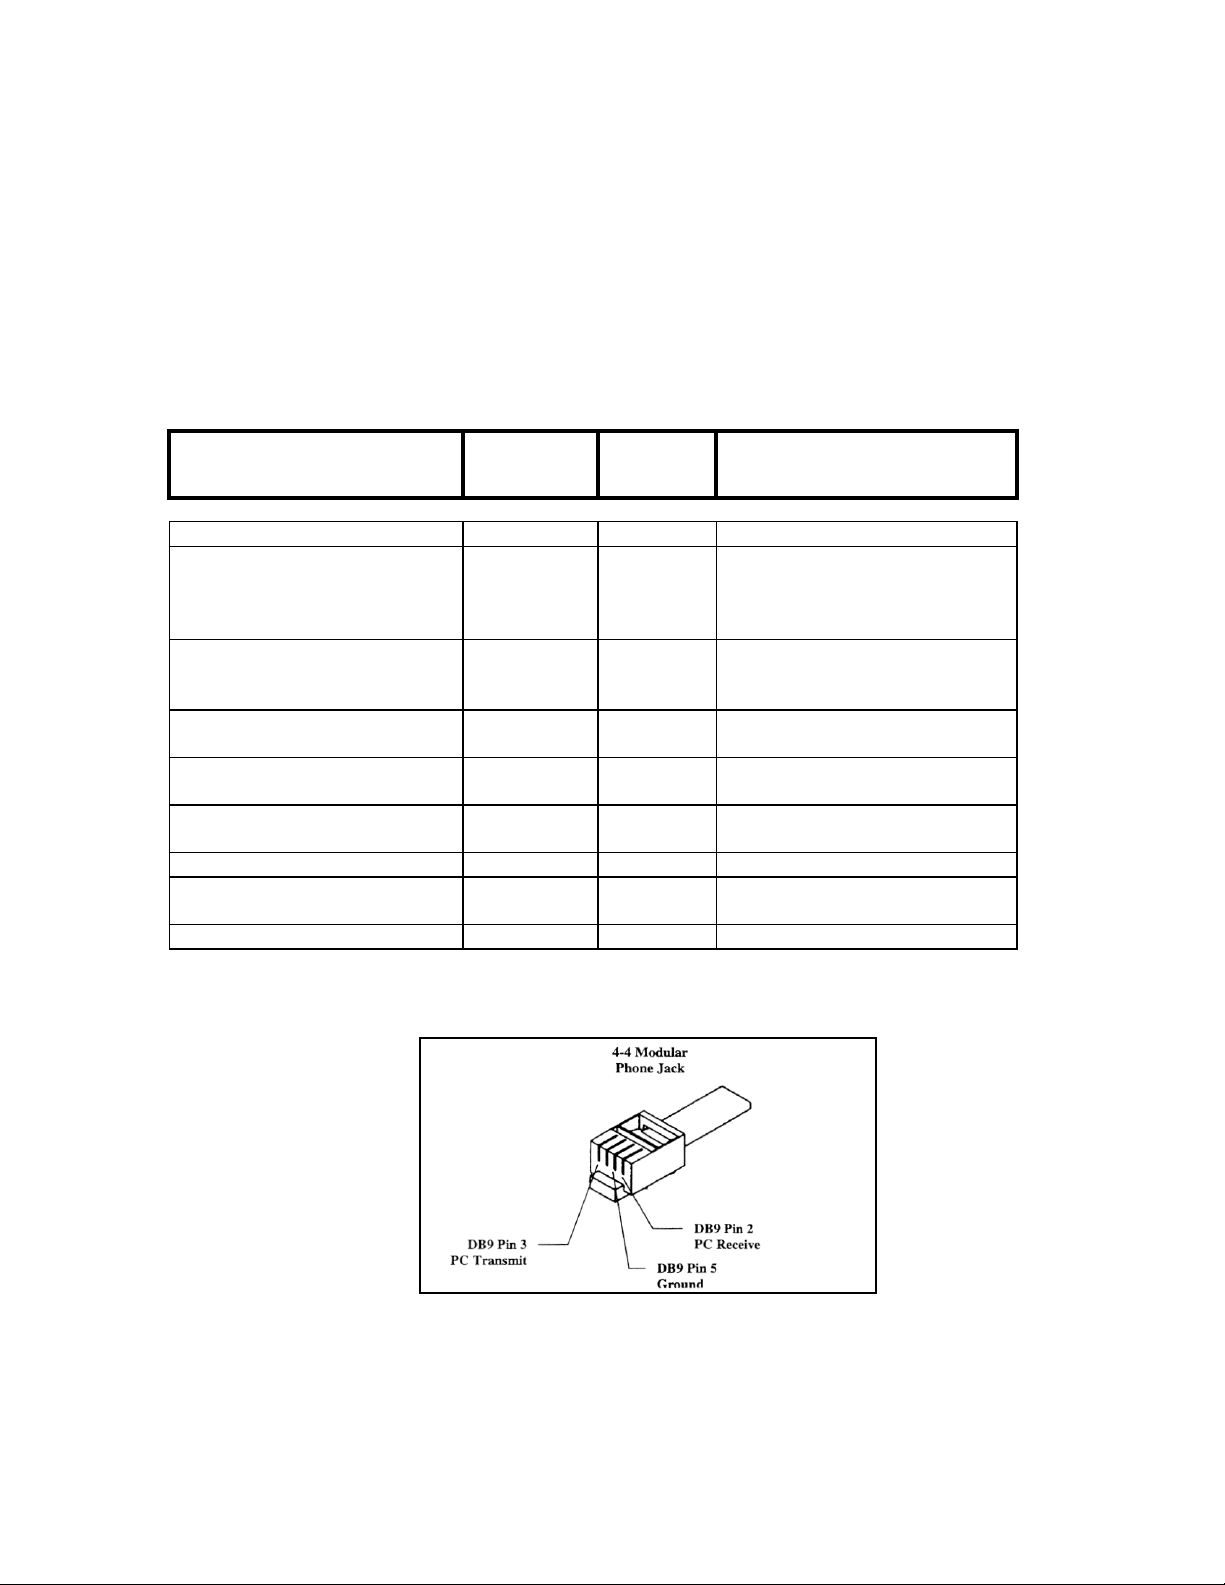
Appendix C - RS-232 Connection
You can control your NexStar telescope with a computer via the PC port on the hand control and using an optional RS232 cable (see Optional Accessories section of manual). Once connected, the NexStar can be controlled using popular
astronomy software programs.
CCoommmmuunniiccaattiioonn PPrroottooccooll::
The NexStar telescopes communicate at 9600 bits/sec, No parity and a stop bit. All angles are communicated with 16
bit angle and communicated using ASCII hexadecimal.
Description
Echo Kx X# Useful to check communication
Goto Azm/Alt B12AB, 4000 # 10 characters sent. B=Command,
Goto Ra/Dec R34AB,
Get Azm/Alt Z 12AB,
Get RA/Dec E 34AB,
Set Azm-Alt S12AB, 4000 # 10 characters sent. S=Command,
Cancel Goto M #
Is Goto in Progress L 0# or 1# 0=No, 1=Yes; "0" is ASCII
Is Alignment Complete J 0# or 1# 0=No, 1=Yes
The cable required to interface to the telescope has an RS-232 male plug at one end and a 4-4 telephone jack at the
other end. The wiring is as follows:
PC Command
ASCII
Hand
Control
Response
Notes
12AB=Azm, comma, 4000=Alt.
If command conflicts with slew
limits, there will be no action.
# Scope must be aligned. If
12CE
command conflicts with slew
limits, there will be no action.
10 characters returned,
4000#
12AB=Azm, comma, 4000=Alt, #
Scope must be aligned
12CE#
12AB=Azm, comma, 4000=Alt
character zero
38
Page 39
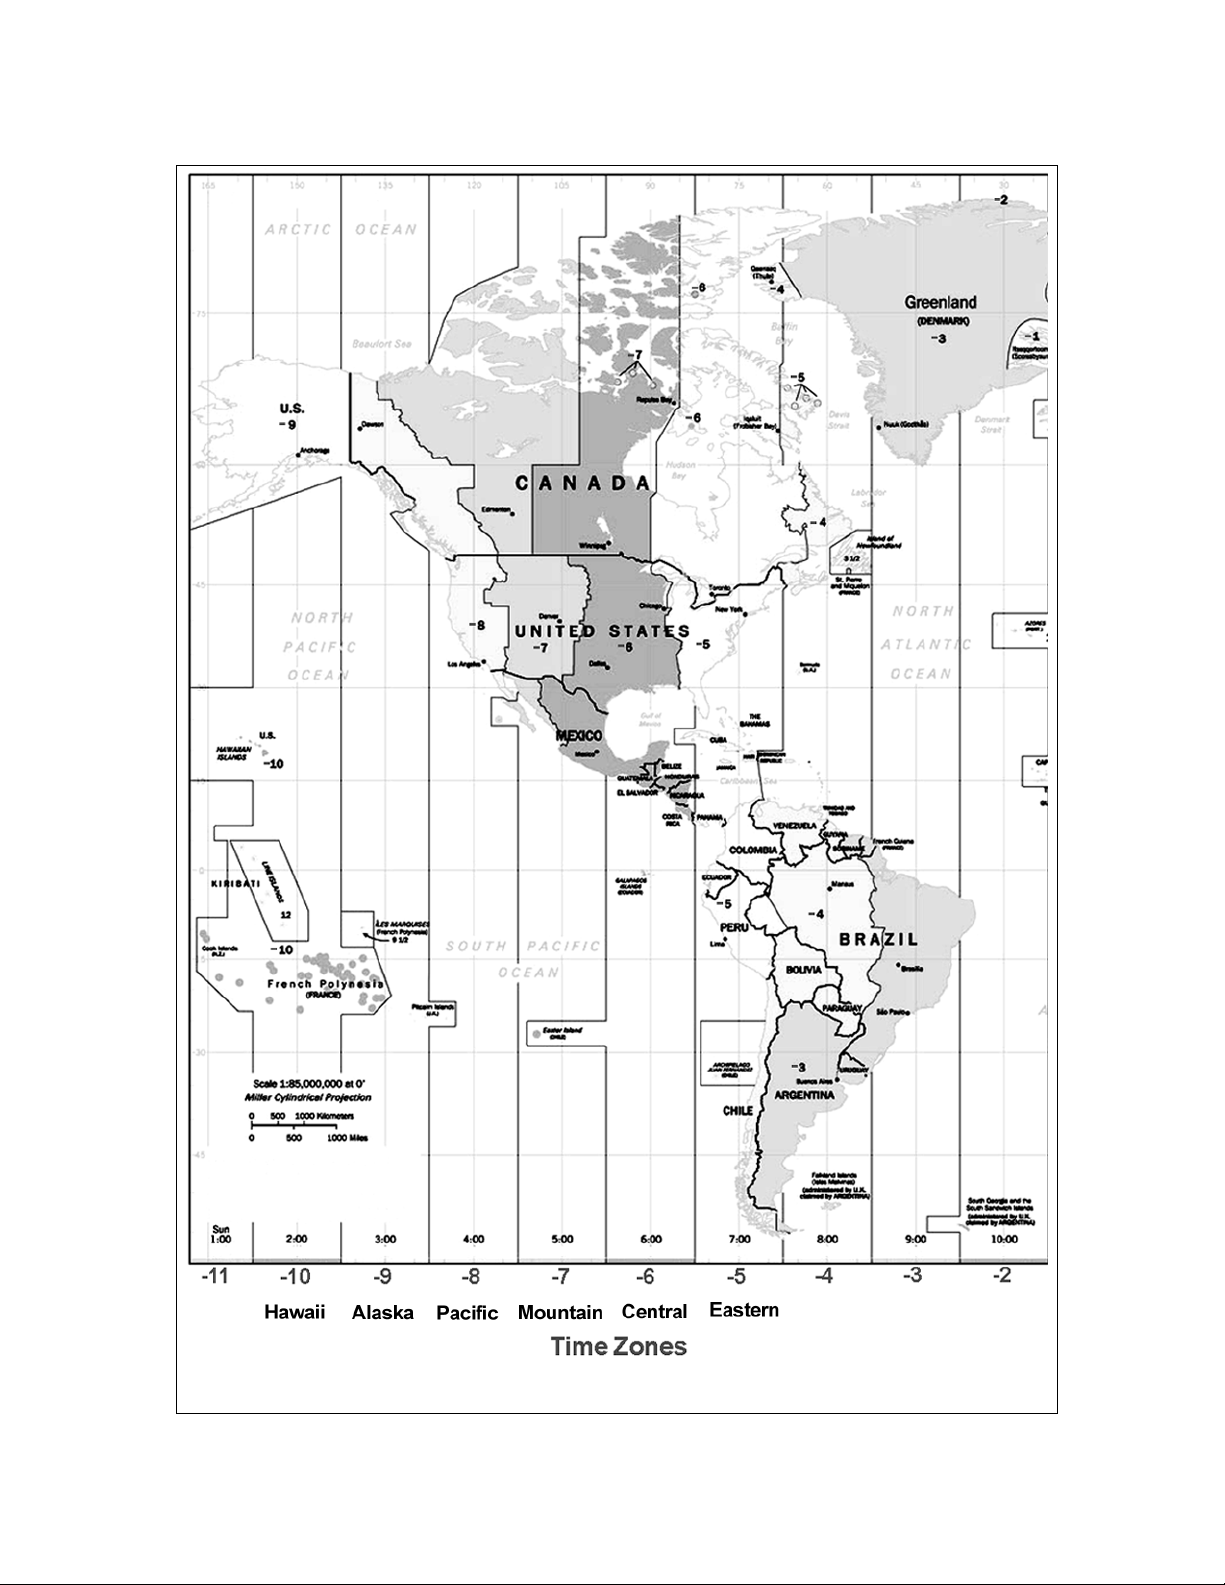
A
PPENDIX D – MAPS OF TIME ZONES
39
Page 40
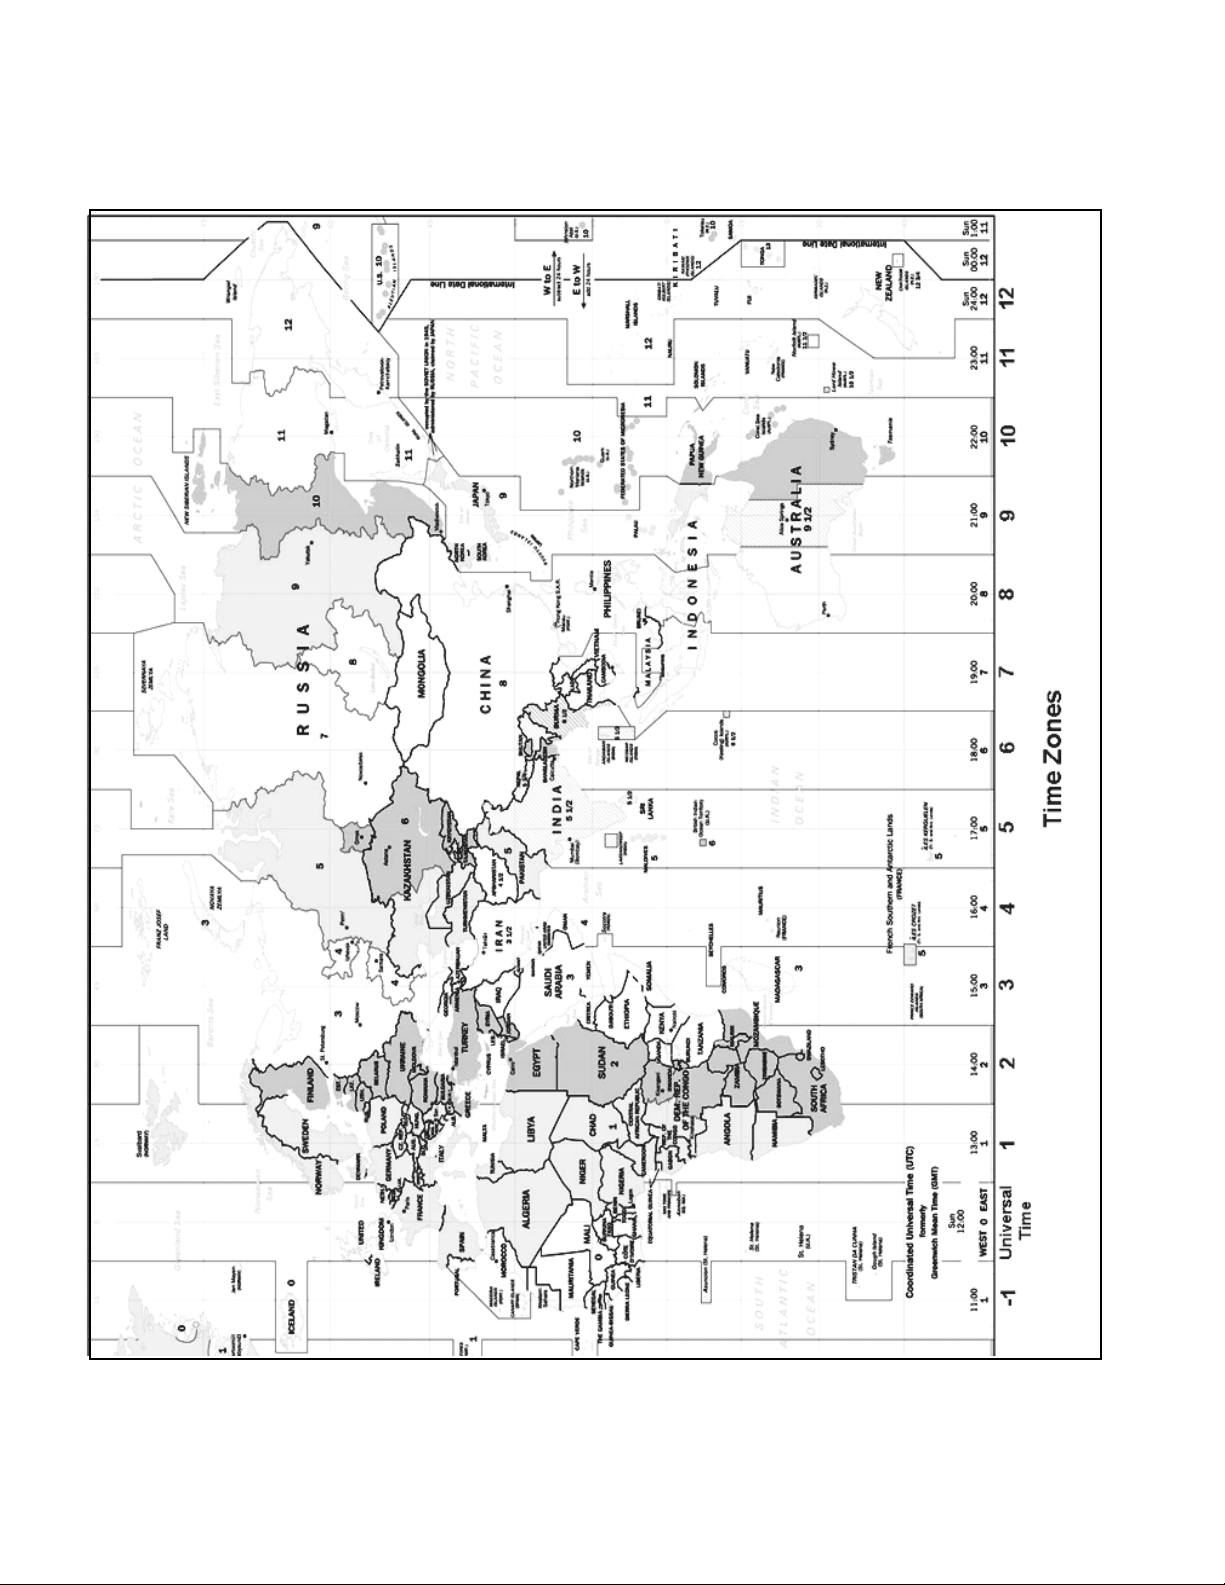
40
Page 41
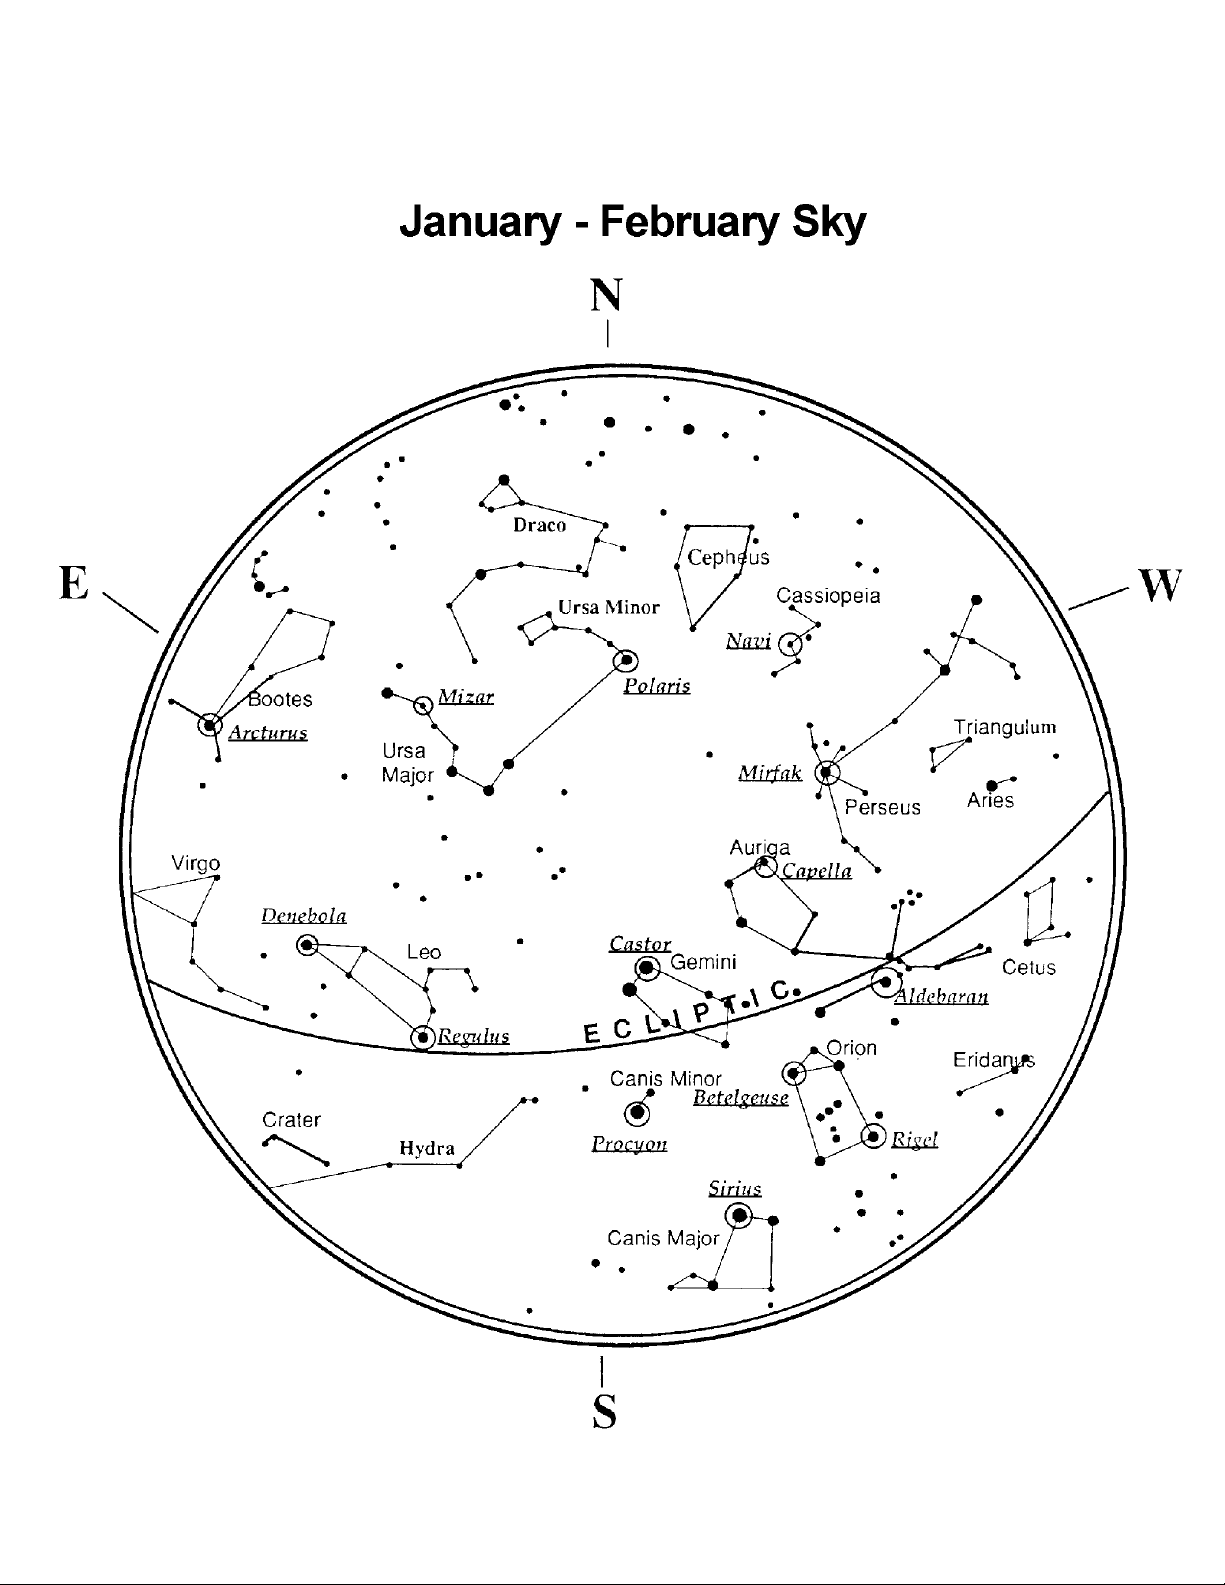
Page 42
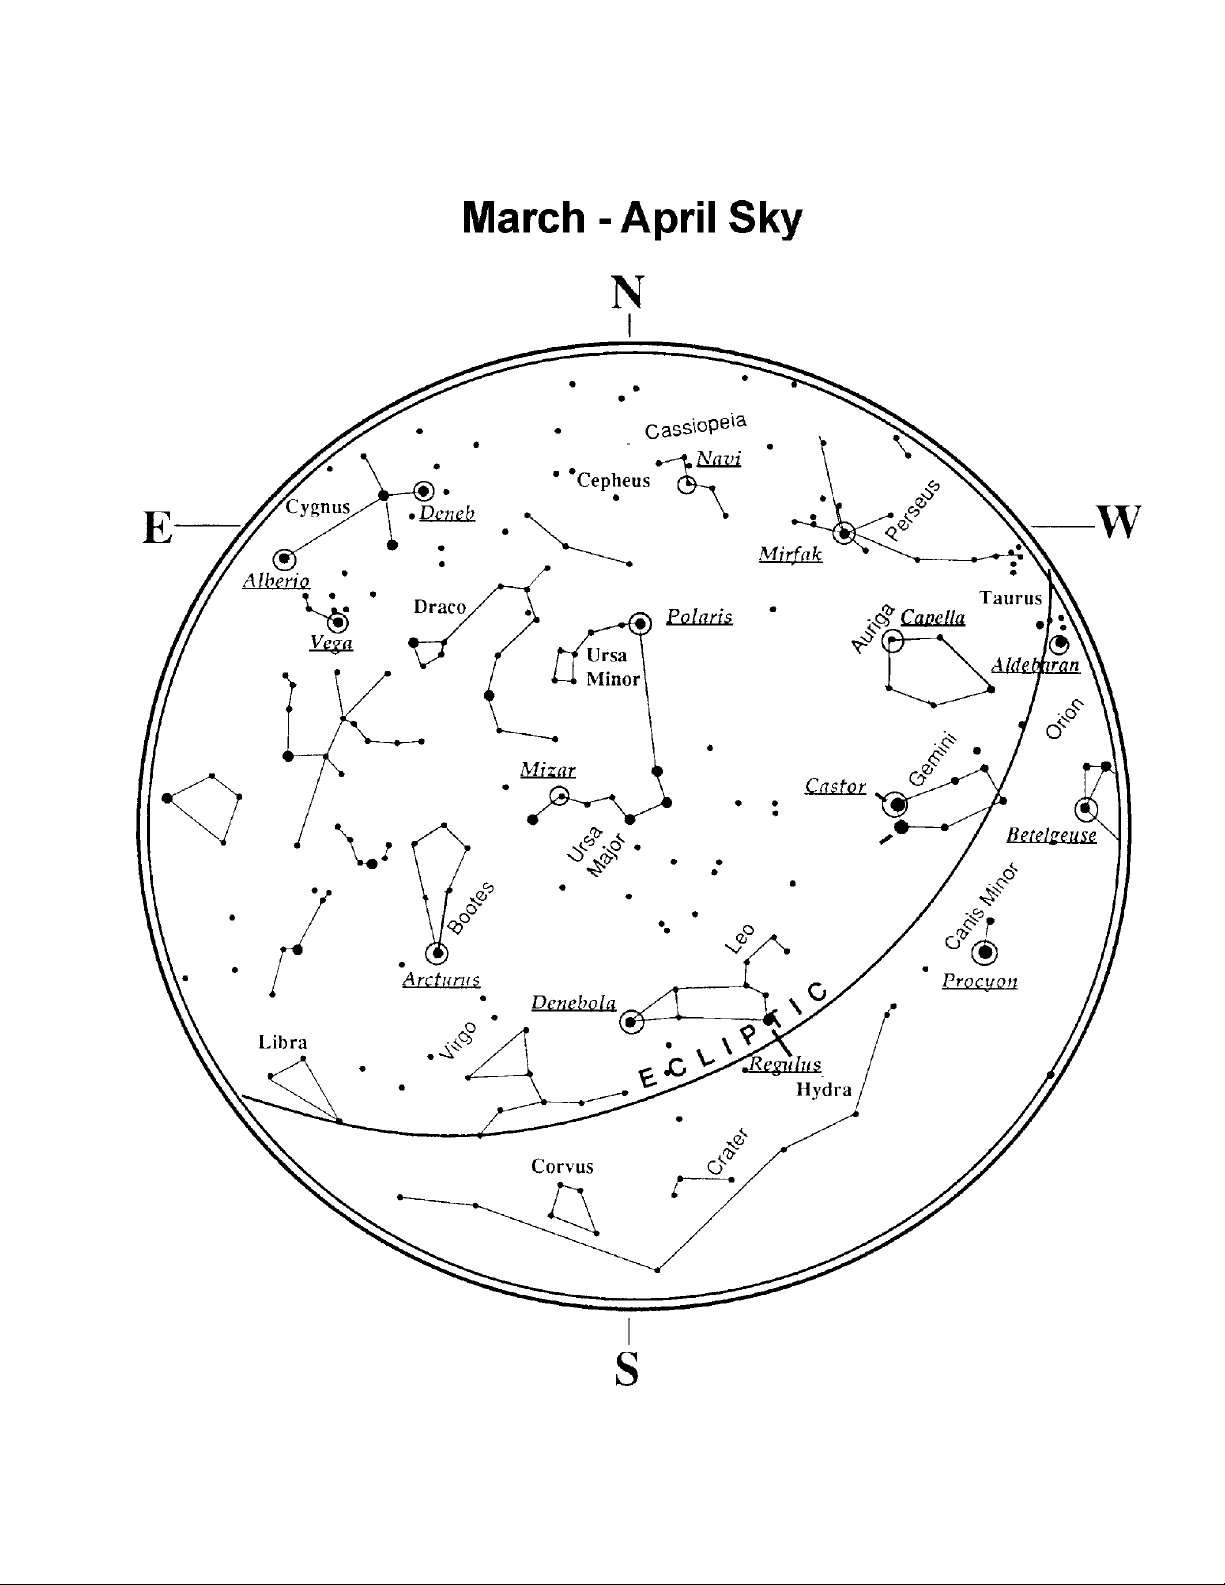
Page 43
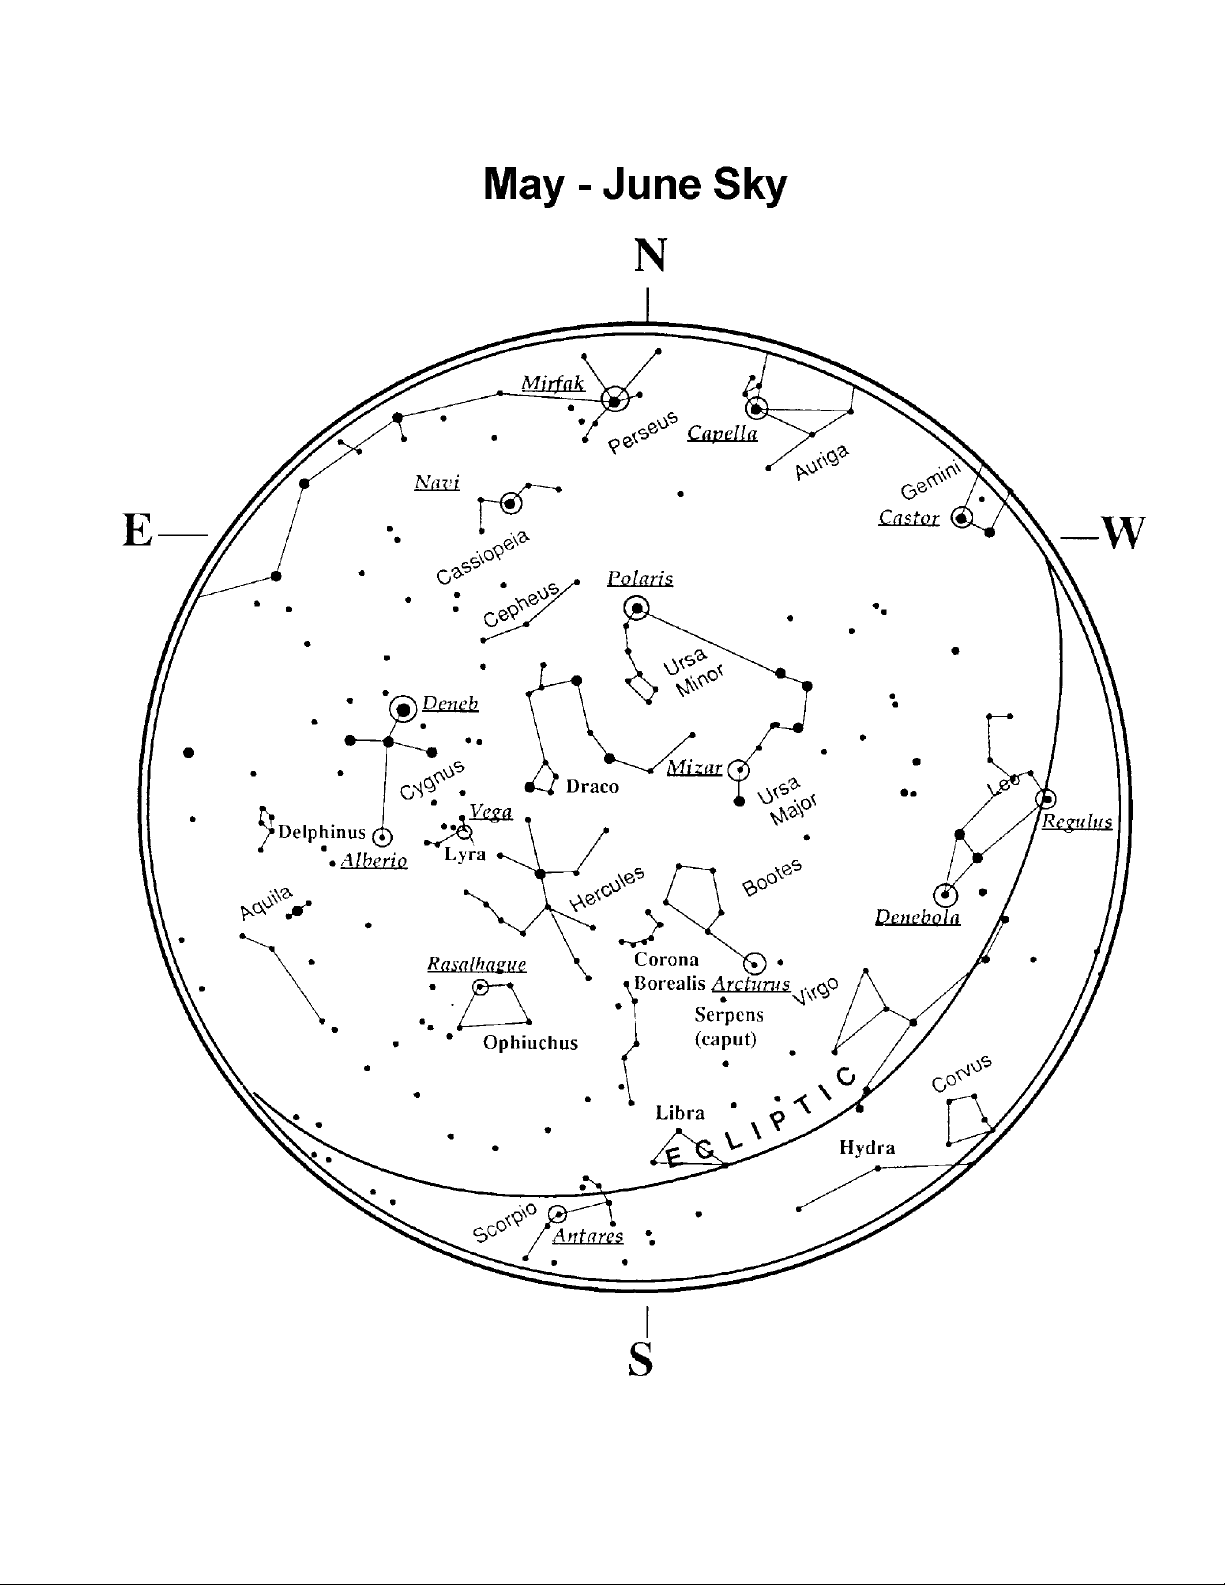
Page 44
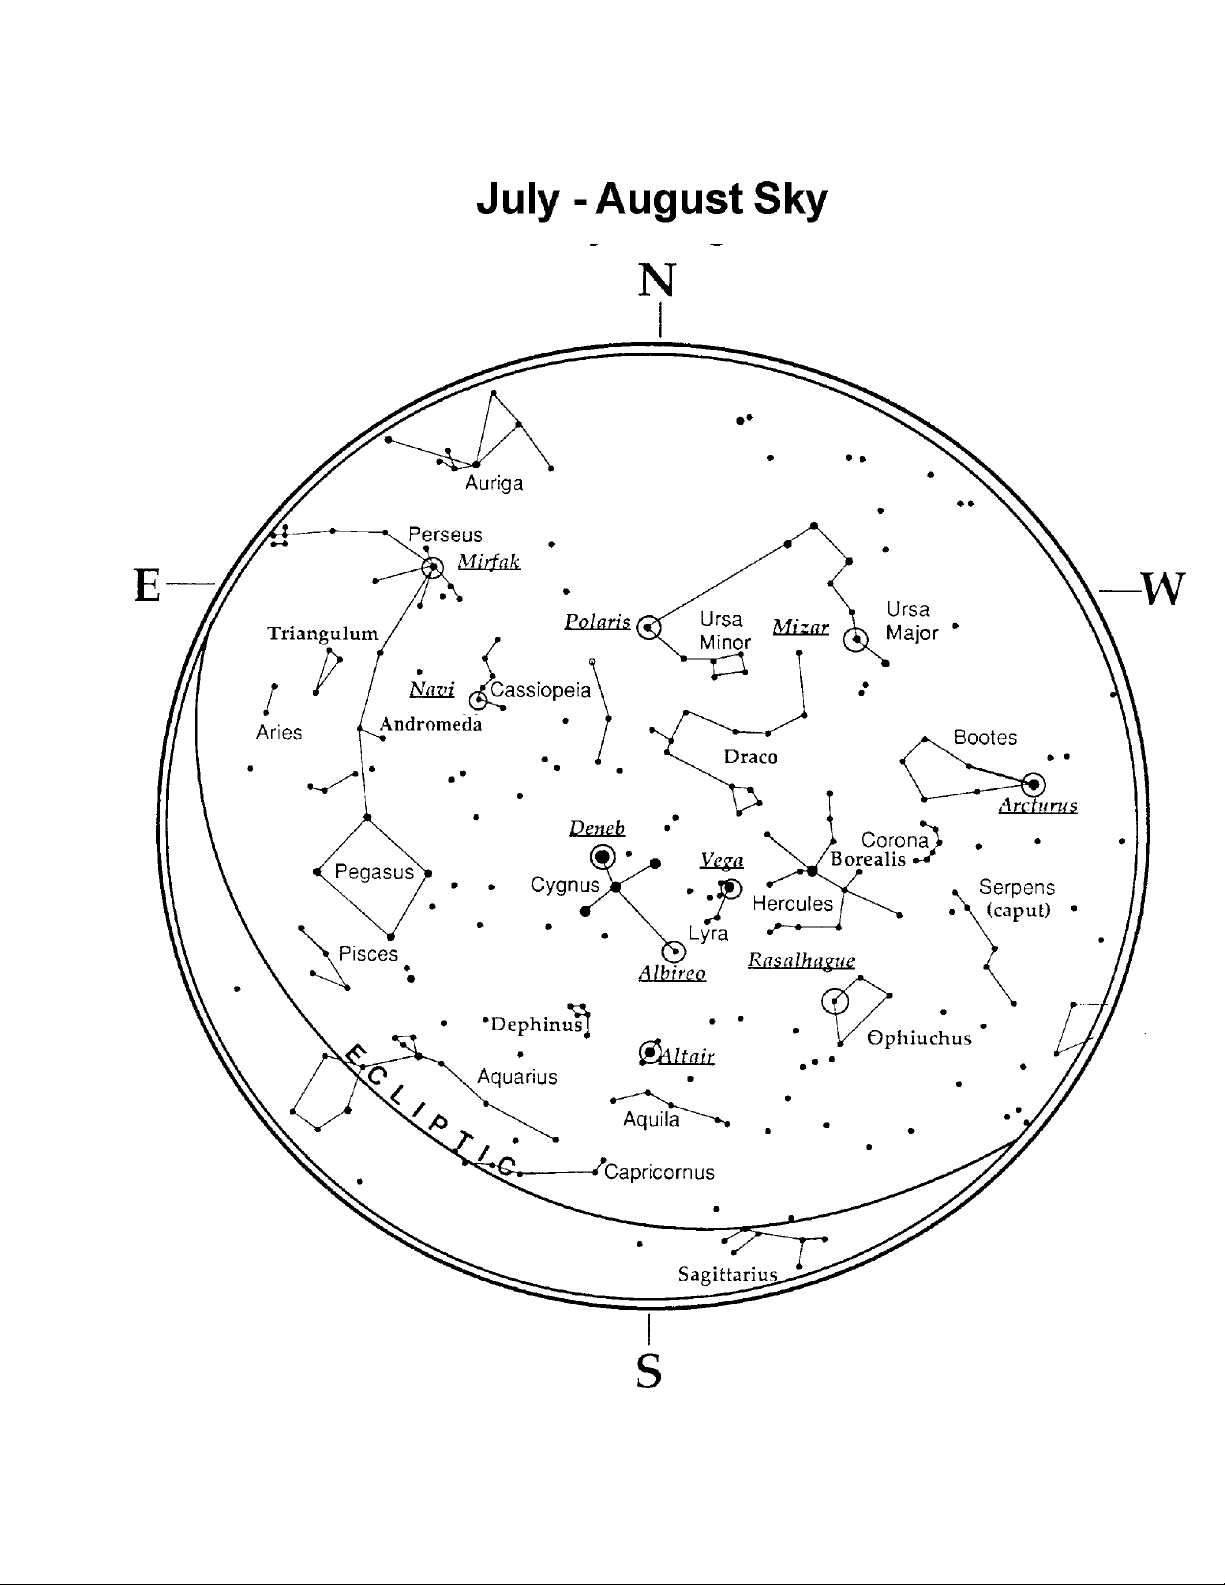
Page 45
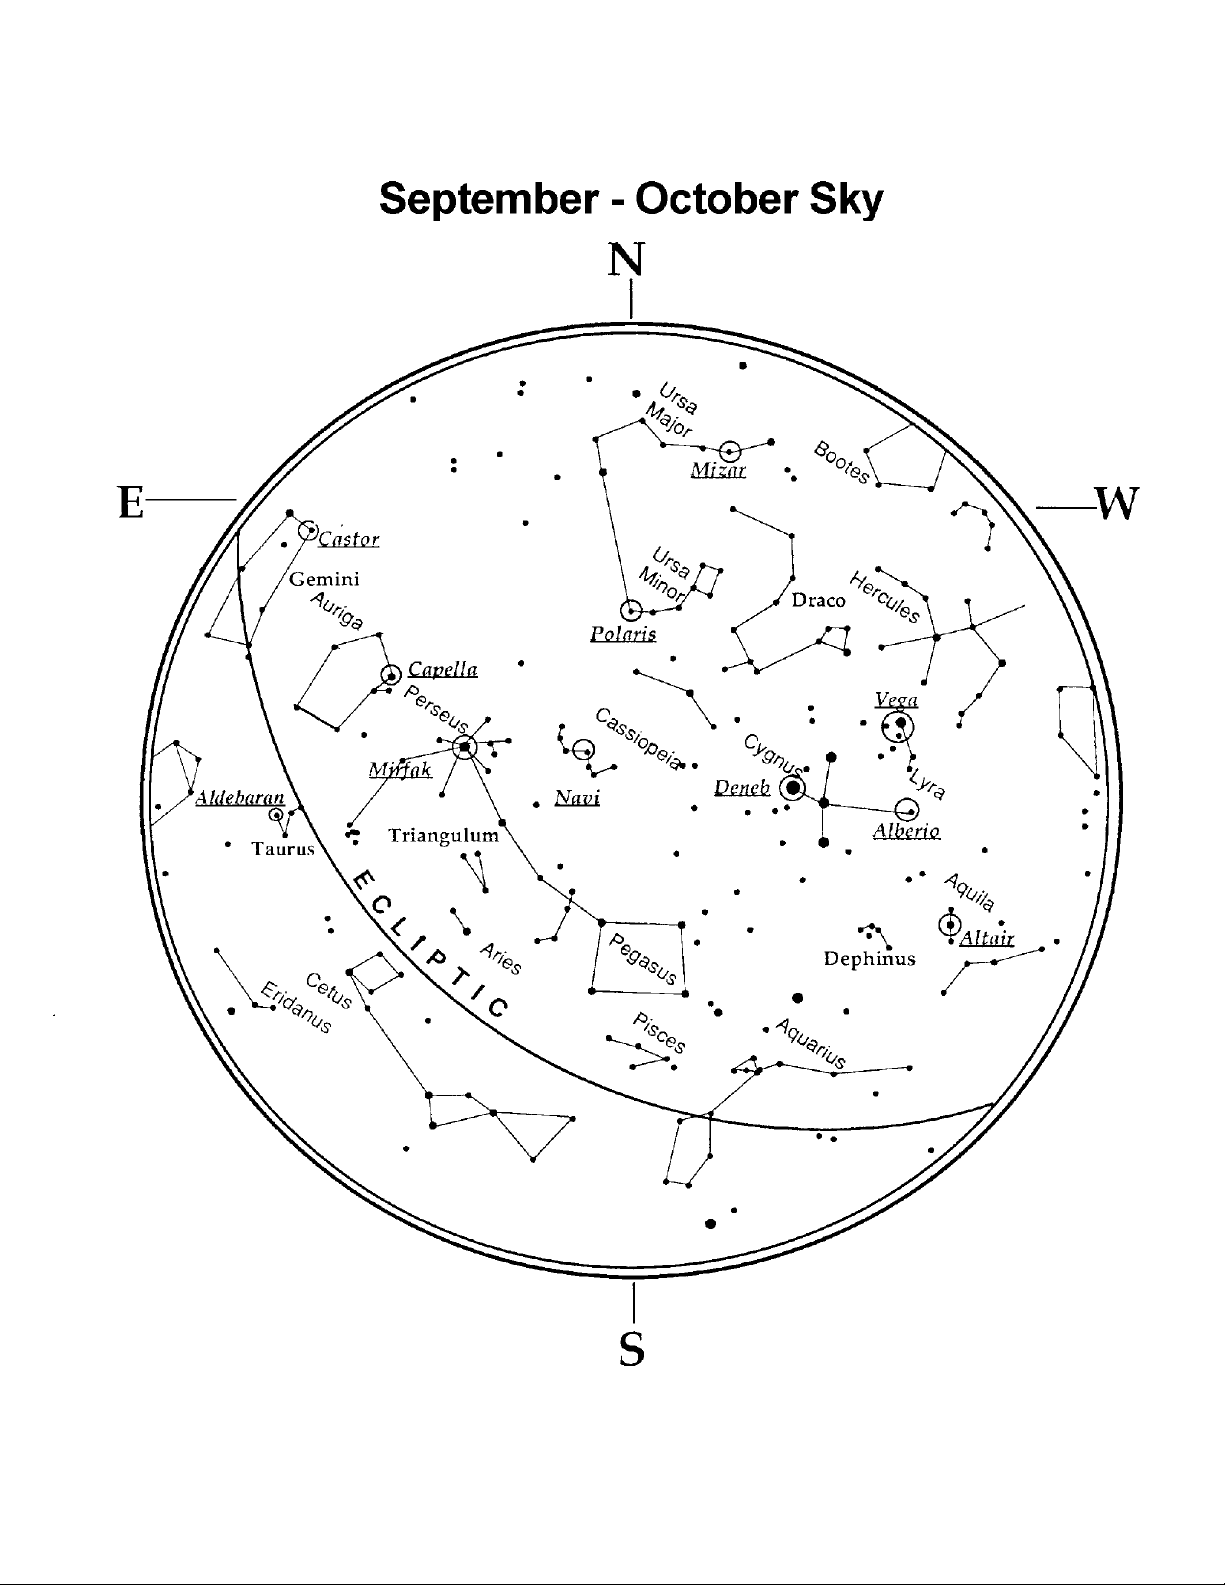
Page 46
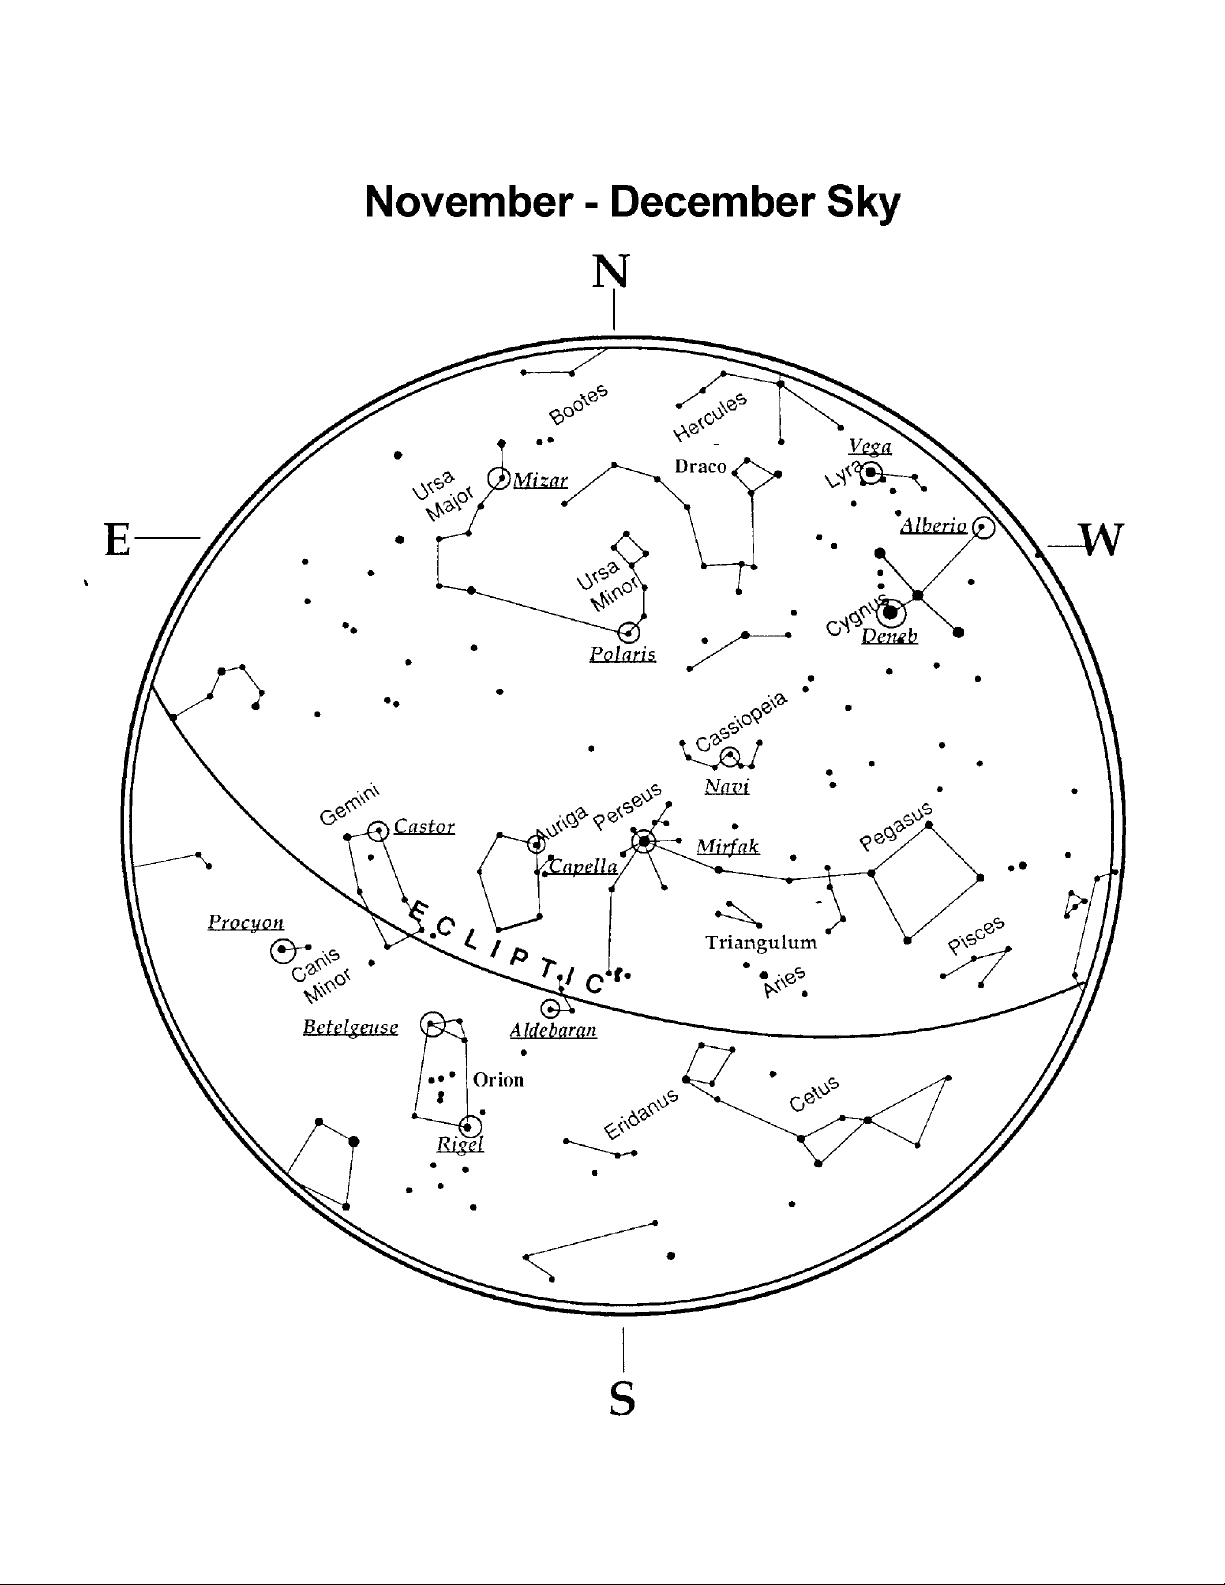
Page 47

CELESTRON ONE YEAR WARRANTY
A. Celestron warrants this telescope to be free from defects in materials and workmanship for one year. Celestron will repair or
replace such product or part thereof which, upon inspection by Celestron, is found to be defective in materials or workmanship.
As a condition to the obligation of Celestron to repair or replace such product, the product must be returned to Celestron
together with proof-of-purchase satisfactory to Celestron.
B. The Proper Return Authorization Number must be obtained from Celestron in advance of return. Call Celestron at (310) 328-
9560 to receive the number to be displayed on the outside of your shipping container.
All returns must be accompanied by a written statement setting forth the name, address, and daytime telephone number of the
owner, together with a brief description of any claimed defects. Parts or product for which replacement is made shall become
the property of Celestron.
The customer shall be responsible for all costs of transportation and insurance, both to and from the factory of
Celestron, and shall be required to prepay such costs.
Celestron shall use reasonable efforts to repair or replace any telescope covered by this warranty within thirty days of receipt. In
the event repair or replacement shall require more than thirty days, Celestron shall notify the customer accordingly. Celestron
reserves the right to replace any product which has been discontinued from its product line with a new product of comparable
value and function.
This warranty shall be void and of no force of effect in the event a covered product has been modified in design or
function, or subjected to abuse, misuse, mishandling or unauthorized repair. Further, product malfunction or
deterioration due to normal wear is not covered by this warranty.
CELESTRON DISCLAIMS ANY WARRANTIES, EXPRESS OR IMPLIED, WHETHER OF MERCHANTABILITY OF
FITNESS FOR A PARTICULAR USE, EXCEPT AS EXPRESSLY SET FORTH HEREIN.
THE SOLE OBLIGATION OF CELESTRON UNDER THIS LIMITED WARRANTY SHALL BE TO REPAIR OR
REPLACE THE COVERED PRODUCT, IN ACCORDANCE WITH THE TERMS SET FORTH HEREIN. CELESTRON
EXPRESSLY DISCLAIMS ANY LOST PROFITS, GENERAL, SPECIAL, INDIRECT OR CONSEQUENTIAL DAMAGES
WHICH MAY RESULT FROM BREACH OF ANY WARRANTY, OR ARISING OUT OF THE USE OR INABILITY TO
USE ANY CELESTRON PRODUCT. ANY WARRANTIES WHICH ARE IMPLIED AND WHICH CANNOT BE
DISCLAIMED SHALL BE LIMITED IN DURATION TO A TERM OF ONE YEAR FROM THE DATE OF ORIGINAL
RETAIL PURCHASE.
Some states do not allow the exclusion or limitation of incidental or consequential damages or limitation on how long an implied
warranty lasts, so the above limitations and exclusions may not apply to you.
This warranty gives you specific legal rights, and you may also have other rights which vary from state to state.
Celestron reserves the right to modify or discontinue, without prior notice to you, any model or style telescope.
If warranty problems arise, or if you need assistance in using your telescope contact:
Celestron
Customer Service Department
2835 Columbia Street
Torrance, CA 90503
Tel. (310) 328-9560
Fax. (310) 212-5835
Monday-Friday 8AM-4PM PST
This warranty supersedes all other product warranties.
NOTE: This warranty is valid to U.S.A. and Canadian customers who have purchased this product from an Authorized
Celestron Dealer in the U.S.A. or Canada. Warranty outside the U.S.A. and Canada is valid only to customers who purchased
from a Celestron Distributor or Authorized Celestron Dealer in the specific country and please contact them for any
warranty service.
Page 48
Celestron
2835 Columbia Street
Torrance, CA 90503
Tel. (310) 328-9560
Fax. (310) 212-5835
Web site at http//www.celestron.com
Copyright 2002 Celestron
All rights reserved.
(Products or instructions may change
without notice or obligation.)
This device complies with Part 15 of the FCC Rule. Operation is subject to the
following two conditions: 1) This device may not cause harmful interference,
and 2) This device must accept any interference received, including interference
that may cause undesired operations.
08-02
Printed in China
$10.00
 Loading...