

Page 1

INSTRUCTION MANUAL
Model #22401- Inspire 70AZ
Model #22402- Inspire 80AZ
Model #224 03- Inspire 100AZ
ENGLISH
Page 2

WHAT’S IN THE BOX
We recommend saving your telescope box so it can be used to store the telescope when it is not in use. Unpack the box carefully
as some parts are small. Use the parts list below to verify that all parts and accessories are present.
PARTS LIST
1
2
3
4
5
6
7
8
9
10
11
12
13
14
15
16
1. Telescope Tube
2. StarPointer Pro Finderscope
3. 20 mm Eyepiece
4. Erect Image Diagonal
5. Focus Knob
6. Focus Micrometer
7. Panning Handle/Altitude Clutch Knob
8. Tripod
9. Accessory Tray Lock Knob
10. Folding Accessory Tray
11. Lens Cap/Smartphone Adapter
12. Tube Mounting Bolt
13. Altazimuth Mount
14. Removable Flashlight
15. Accessory Tray Tension Knob
16. 10 mm Eyepiece
SOLAR WARNING
Never look directly at the Sun with the naked eye or with a telescope unless you have the proper solar filter. Permanent and irreversible eye damage may result.
Never use your telescope to project an image of the Sun onto any surface. Internal heat build-up can damage the telescope and any accessories attached to it.
Never use an eyepiece solar fi lter or a Herschel wedge. Internal heat build-up inside the telescope can cause these devices to crack or break, allowing unfi ltered sunlight to pass through to the eye.
Do not leave the telescope unsupervised, especially when children or adults unfamiliar with the correct operating procedures of your telescope are present.
ASSEMBLING YOUR TELESCOPE
THE MOUNT
The Inspire mount and tripod come fully assembled, so setting it
up is easy.
1. Remove the tripod and mount from the box.
2. Loosen the hand knobs at the bottom of each leg and extend
the inner section of the leg to the desired length. Tighten the
knobs to secure the legs, being careful not to over tighten.
3. Stand the tripod upright and pull the tripod legs apart until the
folding accessory tray snaps into place.
4. Line up the tabs on the spring-loaded accessory tray locking
knob with the notches in the accessory tray and press
downward. Turn the locking knob clockwise about 20 degrees
to fully lock the tray in place.
5. Turn the accessory tray tension knob clockwise until it stops.
Do not over tighten.
NOTE: When closing the tripod at the end of the observing session, be sure to fi rst loosen the tension
knob all the way, then loosen the locking knob by turning it counterclockwise until the spring
pops the locking knob upward. Grab the knob and lift upward and the tripod will fold up.
2 | ENGLISH
Tension Knob
Locking Knob
Page 3

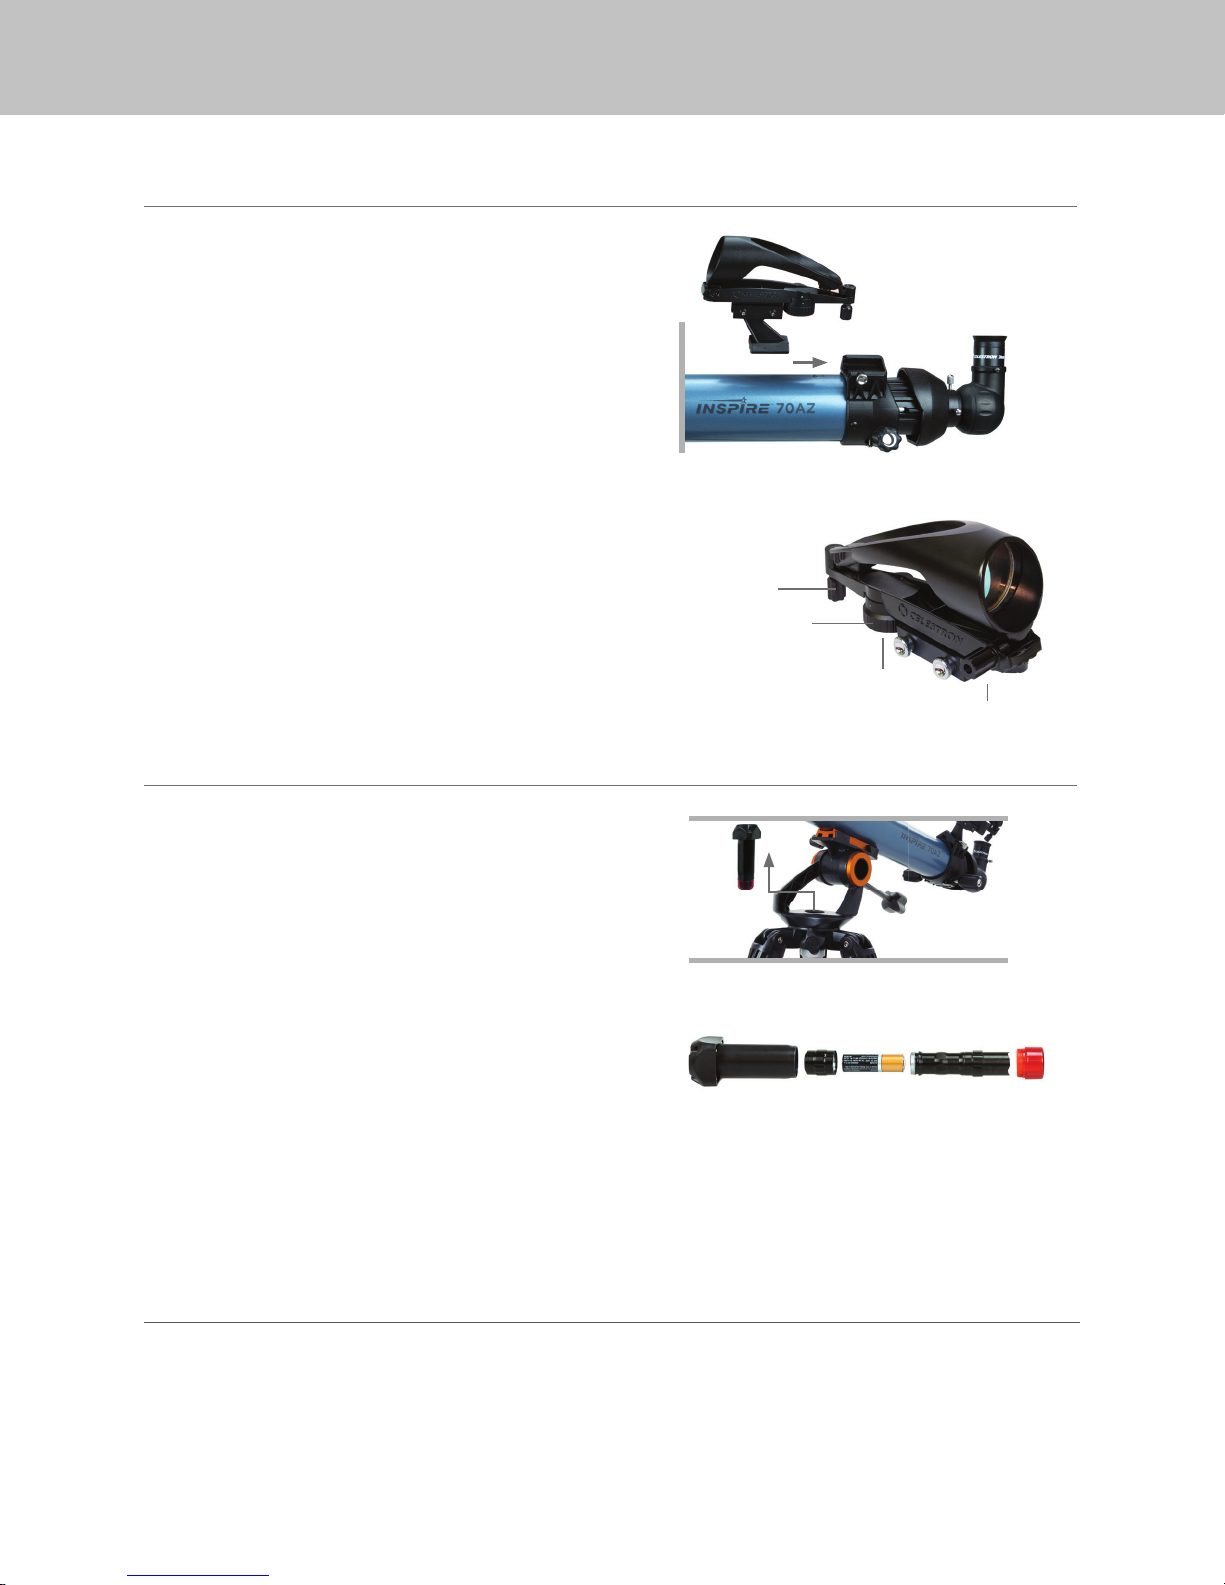
THE TELESCOPE TUBE
To attach the telescope tube to your tripod and mount:
1. Loosen the two tube mounting bolts on the side of the dovetail
saddle on top of the mount.
2. Locate the dovetail bar on the bottom of the telescope tube
and slide it into the saddle. The eyepiece end of the telescope
tube should point in the same direction as the panning handle
on the mount.
3. When the dovetail is centered in the saddle, tighten the two
tube mounting bolts, starting with the larger one fi rst. Finish by
tightening the smaller one.
4. Remove the lens cap when you are ready to observe by simply
pulling it off the lens shade.
THE ERECT DIAGONAL
The Inspire telescopes come with a 90° erect image diagonal.
This accessory uses a prism to bend the light at a 90° angle,
providing a more comfortable viewing position. It also gives you
a 100% correctly oriented image allowing you to easily use this
telescope for daytime terrestrial observing.
To install the erect image diagonal:
1. Remove the caps from both sides of the diagonal.
2. Loosen the setscrews on the back of the telescope focuser and
pull out the small dust cap.
3. Insert the smaller tube on the diagonal into the back of the
focuser and secure it by tightening the setscrews.
THE EYEPIECES
Your Inspire telescope comes with two eyepieces, a low power
(20 mm eyepiece) and a higher power eyepiece (10 mm eyepiece).
Whenever you set up your telescope, always start with the 20
mm eyepiece. Once you have your target centered in the 20 mm
eyepiece, you can switch to your higher power 10 mm eyepiece to
increase magnifi cation and get a more detailed view.
To install an eyepiece:
1. Loosen the setscrews on the open end of the erect im age diagonal.
2. Insert the silver barrel of the 20 mm eyepiece into the diagonal.
3. Tighten the setscrews to secure the eyepiece.
4. To see the sharpest image possible, you need to adjust the
telescope’s focus. Look through the eyepiece and slowly turn
the focusing knobs until you see the sharpest image possible.
NOTE: You should always adjust focus whenever you change eyepieces or if another person views
through the telescope as the focus may be different for each individual.
ENGLISH | 3
Page 4

THE STARPOINTER PRO FINDERSCOPE
Your Inspire telescope comes with a StarPointer Pro Finderscope
that you will use as a sighting tool when aiming the telescope at
a target.
To install the fi nderscope:
1. Slide the fi nderscope bracket into the dovetail slot on the
telescope on the top of the focuser. The large window on the
fi nder should be facing the front of the telescope.
2. Secure the bracket by tightening the setscrew on the
dovetail slot.
The StarPointer Pro uses a CR-2032 button battery. To change
the battery, turn the StarPointer over. The battery compartment is
located in the center of the on/off/brightness switch. Use a coin
in the slot on the cover to unscrew the cap counter-clockwise until
the cap comes off. Insert the new battery with the Positive (+) side
facing upward and screw the cover back on. If your StarPointer
Pro does not immediately turn on, open the battery compartment
to remove the small plastic disk that lies between the battery
and the battery cover. This is used to prevent the battery from
accidentally discharging during shipment.
If you are going to store your telescope for a long period of time,
it is best to remove the battery to prevent accidental corrosion.
THE FLASHLIGHT
Horizontal
Adjustment Knobs
On/off/brightness switch
Battery Cover
Vertical
Adjustment Knobs
The Inspire mount comes with a built-in red LED fl ashlight located in
the central hub of the mount’s left and right axis. To remove it from
the mount, simply grab the top and pull straight up.
To install the single AA battery:
1. Unthread the red lens at the end of the fl ashlight.
2. Slide the fl ashlight out of its protective cover.
3. Unthread the cap on the back of the flashlight to expose the
battery compartment.
4. Insert the AA battery into the fl ashlight, positive (+) side fi rst
and replace the compartment cap.
5. Slip the fl ashlight back into its protective housing and thread
the red lens to lock it in place.
To turn on the fl ashlight, simply depress the rubber covered button on the back.
The fl ashlight was designed to be stored in the mount and can actually be used in this position. Turn on the light and it will provide a
diffused red glow onto your accessory tray, making it easy to identify your eyepieces and fi lters in the dark.
NOTE: Don’t forget to turn off the fl ashlight when it is not in use. If you are going to store your telescope for a long period of time, it is best to remove the battery to prevent accidental corrosion.
THE FOCUS MICROMETER
Your Inspire telescope tubes come with a focus micrometer that allows you to repeatedly dial in focus for objects at different distances
quickly and easily before you even move the scope to the target. The window on the side of the focuser allows you to see a numbered
scale displaying a number from 0 to 10. The 0 on the scale represents the closest point at which you can achieve focus using the
standard eyepieces and diagonal. The 10 represents infi nity focus. While astronomical objects will generally be at infi nity focus, you may
wish to use the telescope to view terrestrial objects, such as bird nests or other targets at fi xed distances. Once you have focused in a
terrestrial target, make a note of the number shown on the scale. The next time you observe that same target from the same observing
location, you can quickly dial the focuser to that same number and the image should be in focus when you view through the eyepiece.
4 | ENGLISH
Page 5

MOVING THE TELESCOPE
The Inspire altazimuth mount is simple to use. To move the scope
left and right, loosen the azimuth tension knob at the base of the
mount between two of the tripod legs. Grab the knob at the end
of the panning handle and move the scope to the desired location.
You can adjust the tension of the left and right motion by adjusting
the azimuth tension knob.
To move the scope up and down, loosen the altitude clutch by turning
the knob at the end of the panning handle counter-clockwise. Mov e the
handle up or down as required and turn the knob clockwise to lock
the scope on target.
ALIGNING THE STARPOINTER PRO FINDERSCOPE
The StarPointer Pro fi nderscope helps you aim your telescope by looking through its round glass window and covering your target with the
red reticle projected in the window. The fi rst time you assemble your telescope, you will need to align the fi nderscope with the main optics
of the telescope. Although this step can be done at night, it is signifi cantly easier during the day. Once you have completed the fi nderscope
alignment, you should not have to repeat this step unless the fi nderscope is bumped or the telescope is dropped.
1. Take the telescope outside during the day. Using your naked eye, fi nd an easily recognizable object, such as a streetlight, car license plate,
or tall tree. The object should be as far away as possible, but at least a quarter mile away.
2. Remove the main dust cover from the telescope and make sure your 20 mm eyepiece is installed.
3. Move the telescope left and right or up and down so that it is roughly pointing toward the object you chose in step 1.
4. Look through the telescope’s eyepiece and manually move the telescope until the object you chose lies in the center of the view. If the
image is blurry, gently turn the focus knobs until it comes into sharp focus.
5. Once the object is centered in your 20 mm eyepiece, turn on the fi nderscope by turning the on/off/brightness switch knob on the bottom
of the unit as far as it will go.
6. With your head positioned about a foot behind the fi nder, look through the round window and locate the red reticle. It will probably be
close to, but not on top of, the object you see when you are looking through the 20 mm eyepiece.
7. Without moving the telescope, use the two adjustment knobs on the side and underneath the fi nderscope. One controls the left-right
motion of the reticle, while the other controls the up-down motion. Adjust both until the reticle appears over the same object you are
observing in the 20 mm eyepiece.
Now choose some other distant targets to practice aiming your telescope. Look through the StarPointer Pro fi nderscope window and place
the red reticle over the target you are trying to view and verify that it appears in the eyepiece of the scope.
With your fi nderscope aligned, your telescope is fully assembled and you are ready to observe!
NOTE: Be sure to turn off the StarPointer Pro fi nderscope when not in use to conserve battery power.
YOUR FIRST ASTRONOMICAL OBSERVING SESSION
THE MOON
Now you are ready to take your telescope out at night and do some real observing!
Let’s start with the Moon. The Moon takes about one month go through a complete phase cycle, from new Moon to full Moon and back
again. Try observing it at different points during this cycle.
While you can observe the Moon any time it is visible in the sky, the best time to view it is from two days after a New Moon up to a few days
before a Full Moon. During this period, you will be able to see the most detail in craters and lunar mountain ranges. Consult a calendar or
moon phase app to fi nd out when the next new Moon will be.
ENGLISH | 5
Page 6

1. With a clear view of the Moon, set up your telescope with the 20 mm eyepiece.
2. Turn on the fi nderscope and look through it to fi nd the red reticle.
3. Move the telescope until you can see the Moon through the fi nderscope’s window and the reticle is centered on the Moon.
4. Look through the 20 mm eyepiece. Gently turn the focus knob to adjust the sharpness of the image.
CONGRATULATIONS! YOU HAVE NOW OBSERVED YOUR FIRST CELESTIAL OBJECT!
To get a closer view of the Moon, replace the 20 mm eyepiece with the 10 mm eyepiece. It will give you more magnifi cation, making the
Moon appear much larger. You may need to adjust the focus knobs when you change eyepieces to ensure you are getting the sharpest image.
You can view many other celestial objects, such as planets, star clusters and nebulae using this same basic technique.
IMAGING WITH YOUR SMARTPHONE
Now that you have observed with your telescope, the next step
is taking a picture of what you are seeing. The Inspire telescopes
have a smartphone adapter built right into the lens cap. To use
this feature:
1. Start by pulling the orange plug out of the camera opening in
the lens cap. You can do this by pulling on the orange rubber
lanyard located on the inside of the lens cap. The plug should
pop right out. The plug and lanyard can be stowed out of the
way by pressing the lanyard into the retaining clip located on
the back of the lens cap next to the eyepiece holder.
2. Turn the cap so that the outside of the cap is facing upward.
Lift the bungee straps and slide your smartphone between the
straps and the lens cap so that the camera is looking through
the camera opening. The straps should give plenty of tension
to hold the device against the cap and the black silicon ring will
give enough friction to prevent the phone from sliding around.
HINT: Depending on the design of your smartphone, the camera may be in the middle of
the device or in one corner. You may want to change the angle of the bungee straps
to better secure the phone. There are eight different anchor points to choose from
around the edge of the lens cap. Simply reposition them to different anchor points to
achieve the best results.
3. Turn the cap over and make sure your camera lens is centered
in the opening in the lens cap. The better you have this centered,
the easier it will be to take images through the telescope.
4. Take the 20 mm eyepiece and remove the rubber eyecup by
pulling it straight off the eyepiece body. There is an eyecup
retainer built-in to the inside of the lens cap so you don’t lose it.
Just stretch the eyecup around the round retainer and slide the
eyecup all the way to the bottom.
6 | ENGLISH
Page 7

5. Loosen the set screws located on the eyepiece holder on the
inside of the lens cap. Place the black portion of the eyepiece
into the eyepiece holder and tighten the screws to secure the
eyepiece in place.
6. Now take the lens cap with the phone and eyepiece attached
and insert the chrome barrel of the eyepiece into the diagonal
on the back of the telescope’s focuser. Secure it in place by
tightening the set screws on the diagonal.
7. Activate your camera app on your smartphone and adjust the
focus, just as you would the eyepiece, this time using the image
that appears on your screen.
NOTE: Make sure you turn the phone’s fl ash off.
8. When the image appears sharp snap your image.
It is best to try this in the daytime fi rst, then, once everything is setup
correctly, take it outside and try shooting the Moon. Once you have
practiced and are comfortable using the 20 mm eyepiece, try using
the camera adapter with the 10 mm eyepiece for higher magnifi cation.
IMAGING TIPS AND TRICKS
Camera Controls
The standard camera apps that come preinstalled with your smartphone offer very rudimentary controls and are designed to automatically
adjust focus and exposure. This is not a problem for everyday photography such as landscapes or portraits, but can be a problem for
imaging a planet or the Moon where you have a very bright object against a very black sky. The phone’s camera tries to compensate for
the imbalance of lighting by brightening up the dark areas, but this causes the bright areas to overexpose and blow-out the details. If your
camera app settings do not allow you to manually select the focus point or have an option to disable the autofocus or auto-exposure, you
may want to consider using a different camera app. You can fi nd lots of aftermarket apps for iOS and Android that offer a greater amount
of control for your camera. Many of these are free.
Vibration
To help eliminate any vibration induced when you touch the camera to snap the image, try using a shutter delay. Some apps offer a 2, 5, or
10 second delay before snapping the image. This will give the vibrations a chance to dissipate before actually taking the images.
Subjects to Shoot
Using this method, you should be able to take images of daytime terrestrial objects and nighttime astronomical images of the Moon and
bright planets (Venus, Mars, Jupiter and Saturn). Unfortunately, smartphone camera sensors are not designed to work well in very low light,
so it will not be possible to capture faint astronomical objects such as galaxies or nebulae in this manner.
Magnifi cation
When looking at the Moon or planets with a stationary telescope, you will notice that the object appears to drift across the fi eld of view.
This is actually caused by the Earth’s rotation. If you were looking visually through your 20 mm eyepiece, a planet would take approximately
3.0 minutes to drift across the entire eyepiece’s fi eld of view. If you are using the 10 mm eyepiece, it would only take 1.5 minutes. The
smartphone does not use the entire eyepiece’s fi eld of view and only uses the center of it, making the motion appear even faster. When
centering an astronomical object in the phone’s fi eld of view, try leading the target. Try to point the scope ahead of the planet so that it is
just entering the fi eld of view. This will maximize the amount of time it takes to drift across the entire fi eld, allowing you more time to take
images before needing to re-aim the telescope. The 10 mm will have a narrower fi eld of view and will need to be adjusted more often as a
result. Working with the 20 mm eyepiece will be easier at the start. Once you are comfortable with it, try stepping up to the 10 mm eyepiece.
ENGLISH | 7
Page 8

CELESTRON TWO YEAR LIMITED WARRANTY
A. Celestron warrants your telescope to be free from defects in materials and workmanship for two years. Celestron will repair or replace
such product or part thereof which, upon inspection by Celestron, is found to be defective in materials or workmanship. As a condition to
the obligation of Celestron to repair or replace such product, the product must be returned to Celestron together with proof-of-purchase
satisfactory to Celestron.
B. The Proper Return Authorization Number must be obtained from Celestron in advance of return. Call Celestron at (310) 328-9560 to
receive the number to be displayed on the outside of your shipping container.
All returns must be accompanied by a written statement setting forth the name, address, and daytime telephone number of the owner, together
with a brief description of any claimed defects. Parts or product for which replacement is made shall become the property of Celestron.
The customer shall be responsible for all costs of transportation and insurance, both to and from the factory of Celestron, and shall be
required to prepay such costs.
Celestron shall use reasonable efforts to repair or replace any telescope covered by this warranty within thirty days of receipt. In the event
repair or replacement shall require more than thirty days, Celestron shall notify the customer accordingly. Celestron reserves the right to
replace any product which has been discontinued from its product line with a new product of comparable value and function.
This warranty shall be void and of no force of effect in the event a covered product has been modifi ed in design or function, or subjected
to abuse, misuse, mishandling or unauthorized repair. Further, product malfunction or deterioration due to normal wear is not covered by
this warranty.
CELESTRON DISCLAIMS ANY WARRANTIES, EXPRESS OR IMPLIED, WHETHER OF MERCHANTABILITY OF FITNESS FOR A PARTICULAR USE, EXCEPT AS EXPRESSLY SET FORTH HEREIN. THE SOLE OBLIGATION
OF CELESTRON UNDER THIS LIMITED WARRANTY SHALL BE TO REPAIR OR REPLACE THE COVERED PRODUCT, IN ACCORDANCE WITH THE TERMS SET FORTH HEREIN. CELESTRON EXPRESSLY DISCLAIMS ANY
LOST PROFITS, GENERAL, SPECIAL, INDIRECT OR CONSEQUENTIAL DAMAGES WHICH MAY RESULT FROM BREACH OF ANY WARRANTY, OR ARISING OUT OF THE USE OR INABILITY TO USE ANY CELESTRON
PRODUCT. ANY WARRANTIES WHICH ARE IMPLIED AND WHICH CANNOT BE DISCLAIMED SHALL BE LIMITED IN DURATION TO A TERM OF TWO YEARS FROM THE DATE OF ORIGINAL RETAIL PURCHASE.
Some states do not allow the exclusion or limitation of incidental or consequential damages or limitation on how long an implied warranty
lasts, so the above limitations and exclusions may not apply to you.
This warranty gives you specifi c legal rights, and you may also have other rights which vary from state to state.
Celestron reserves the right to modify or discontinue, without prior notice to you, any model or style telescope.
If warranty problems arise, or if you need assistance in using your telescope contact: Celestron - 800.421.9649
NOTE: This warranty is valid to U.S.A. and Canadian customers who have purchased this product from an authorized Celestron dealer in the U.S.A. or Canada. Warranty outside the U.S.A. and Canada is valid only to
customers who purchased from a Celestron’s International Distributor or Authorized Celestron Dealer in the specifi c country. Please contact them for any warranty service.
FCC NOTE: This equipment has been tested and found to comply with the limits for a Class B digital device, pursuant to part 15 of the FCC Rules. These
limits are designed to provide reasonable protection against harmful interference in a residential installation. This equipment generates, uses, and can
radiate radio frequency energy and, if not installed and used in accordance with the instructions, may cause harmful interference to radio communications.
However, there is no guarantee that interference will not occur in a particular installation. If this equipment does cause harmful interference to radio or
television reception, which can be determined by turning the equipment off and on, the user is encouraged to try to correct the interference by one or more
of the following measures:
• Reorient or relocate the receiving antenna.
• Increase the separation between the equipment and receiver.
• Connect the equipment into an outlet on a circuit different from that to which the receiver is connected.
• Consult the dealer or an experienced radio/TV technician for help.
Product design and specifi cations are subject to change without prior notifi cation.
This product is designed and intended for use by those 14 years of age and older.
© 2016 Celestron • All rights reserved
www.celestron.com
2835 Columbia Street • Torrance, CA 90503 U.S.A.
Telephone: 800.421.9649
8 | ENGLISH
03 -16
Printed in China
Page 9

MODE D'EMPLOI
Modèle N°. 22401- Inspire 70AZ
Modèle N°. 22402- Inspire 80AZ
Modèle N°. 22403- Inspire 100AZ
FRANÇAIS
Page 10

VOUS TROUVEREZ DANS LA BOÎTE
Nous vous recommandons de conserver la boîte de votre télescope afi n de pouvoir l'utiliser pour son rangement lorsqu'il n'est pas
utilisé. Déballez le contenu de la boîte avec soin, car certaines pièces sont petites. Utilisez la liste des pièces ci-dessous pour vous
assurer que toutes les pièces et tous les accessoires sont inclus dans la boîte.
LISTE DES PIÈCES
1. Tube de télescope
1
2
3
4
5
6
7
8
9
10
11
12
13
14
15
16
2. Lunette de recherche StarPointer Pro
3. Oculaire 20 mm
4. Diagonale coudée
5. Molette de mise au point
6. Micromètre de mise au point
7. Poignée d'orientation/ Altitude Bouton d’embrayage
8. Trépied
9. Molette de verrouillage du plateau pour accessoires
10. Plateau pour accessoires repliable
11. Capuchon de lentille/ Adaptateur Smartphone
12. Boulon de monture du tube
13. Monture altazimutale
14. Lampe torche amovible
15. Molette de tension du plateau pour accessoires
16. Oculaire 10 mm
AVERTISSEMENT CONCERNANT LE SOLEIL
Ne regardez jamais directement le soleil à l'œil nu ou avec un télescope, à moins d'utiliser un fi ltre adapté. Cela pourrait entraîner des lésions oculaires permanentes et irréversibles.
Ne jamais utiliser votre télescope pour projeter une image du Soleil sur n'importe quelle surface. L'augmentation de la température dans le télescope peut endommager ce dernier et les accessoires qui y sont attachés.
Ne jamais utiliser un fi ltre solaire d'oculaire ou une cale de Herschel. La concentration de chaleur au sein du télescope peut faire en sorte que ces accessoires se fi ssurent ou se cassent, laissant la lumière du Soleil
non fi ltrée arriver directement à vos yeux.
Ne laissez pas le télescope sans surveillance, particulièrement en présence d’enfants ou d’adultes qui ne sont pas familiarisés avec son utilisation.
ASSEMBLAGE DE VOTRE TÉLESCOPE
LA MONTURE
La monture et le trépied de l'Inspire sont livrés entièrement
assemblés, facilitant ainsi son installation.
1. Sortez le trépied et la monture de la boîte.
2. Desserrez les molettes au bas de chaque pied et étendez la
partie intérieure du pied à la longueur souhaitée. Serrez les
molettes pour fi xer les pieds, en veillant à ne pas trop les serrer.
3. Mettez le trépied en position verticale et écartez l'un de l'autre
ses pieds jusqu'à ce qu'un déclic confi rme que le plateau à
accessoires est bien en place.
4. Faites correspondre les languettes du loquet à ressort du
plateau à accessoires avec celles du plateau et appuyez vers
le bas. Faites tourner le loquet dans le sens horaire à environ
20 degrés pour le verrouiller.
5. Faites tourner la molette de tension du plateau à accessoires
jusqu'à ce qu'il s'arrête. Ne pas serrer de manière excessive.
NOTE : Avant de refermer le trépied après une session d'observation, souvenez-vous de
desserrer d'abord la molette de tension en la faisant tourner dans le sens anti
horaire jusqu'à ce que le ressort fasse ressortir le loquet. Tenez le loquet et tirez
vers le haut pour replier le trépied.
Molette de tension
Loquet de
verrouillage
10 | FRANÇAIS
Page 11

LE TUBE DU TÉLESCOPE
Pour fi xer le t ube du télesco pe sur votre trépie d et votre monture :
1. Desserrez les deux écrous de fi xation du tube de chaque côté du
support en queue d'aronde sur le dessus de la monture.
2. Repérez la barre de queue d'aronde située sur le bas du télescope
puis faites-la glisser dans le support. L'extrémité du tube du
télescope comportant l'oculaire doit être orientée dans la même
direction que la poignée d'orientation de la monture.
3. Lorsque la queue d'aronde est centrée sur le support, serrez les
deux écrous de fi xation du tube, en commençant par le plus grand
des deux. Finissez avec le plus petit.
4. Retirez le cache de la lentille lorsque vous êtes prêt à observer ,
en tirant simplement dessus.
DIAGONALE COUDÉE
Les télescopes Inspire sont livrés avec une diagonale coudée à
90°. Cet accessoire utiliser un prisme pour dévier la lumière à 90°,
permettant un plus grand confort d'observation. Cet accessoire
vous donne également une image correctement orientée à 100 %.
Vous pouvez donc utiliser facilement ce télescope pour l'observation
terrestre pendant la journée.
Pour installer la diagonale coudée :
1. Retirez les capuchons des deux extrémités de la diagonale coudée.
2. Desserrez les vis de fi xation situées sur l'arrière du dispositif de
mise au point du télescope et retirez le petit cache de protection.
3. Insérez le plus petit tube de la diagonale coudée à l'arrière du
dispositif de mise au point et fi xez-le en serrant les vis de fi xation.
LES OCULAIRES
Votre télescope est vendu avec deux oculaires, un de faible
puissance (oculaire 20 mm) et un de puissance plus élevée (oculaire
10 mm). Chaque fois que vous installez votre télescope, commencez
toujours par l'oculaire de 20 mm. Une fois que votre objectif est
centré dans l'oculaire 20 mm, vous pouvez le remplacer par l'oculaire
de puissance plus élevée 10 mm pour augmenter l'agrandissement
obtenir une vue plus détaillée.
Pour installer l'oculaire :
1. Desserrez les vis de réglage situées à l'extrémité ouverte de la
diagonale coudée.
2. Insérez le barille t argenté de l'oculaire 20 mm dans de la diagonale coudée.
3. Serrez les vis de réglage pour fi xer bien en place l'oculaire.
4. Pour obtenir l'image la plus nette possible, vous devez régler la
mise au point du télescope. Regardez dans l'oculaire et faites
doucement pivoter la molette de pise au point, jusqu'à obtention
de l'image la plus nette possible.
NOTE : Il est nécessaire d'effectuer la mise au point après chaque changement d'occulaire ou
si le télescope a été utilisé par une autre personne, car le réglage de la mise au point
peut varier selon les personnes.
FRANÇAIS | 11
Page 12
LE CHERCHEUR STARPOINTER PRO
Votre télescope est livré avec un chercheur StarPointer Pro que
vous utiliserez comme outil d'observation lorsque pour pointer le
télescope en direction d'une cible.
Pour installer le chercheur :
1. Faites glisser le support du chercheur dans la rainure de
fi xation sur la queue d'aronde située sur le télescope près
du porte-oculaire. La grande fenêtre du chercheur doit être
orientée vers l'avant du télescope.
2. Fixez le support en serrant la vis de réglage située sur la rainure
de fi xation sur la queue d'aronde.
Le StarPointer Pro est alimenté par une pile-bouton CR-2032.
Pour changer la pile, retourner le StarPointer. Le compartiment à
pile se trouve au centre du bouton on/off/luminosité. Utilisez une
pièce de monnaie pour dévisser le capot dans le sens anti horaire,
jusqu'à ce que le cache se libère. Insérez une nouvelle batterie
pôle positif (+) orienté vers le haut et revissez le cache. Si votre
StarPointer Pro ne s'allume pas immédiatement, ouvrez le cache
de nouveau et retirez la pastille de plastique qui se trouve entre la
pile et le cache. Cette pastille est présente pour éviter que la pile
ne se décharge pendant la livraison du produit.
Molettes de réglage
horizontale
Bouton on/off/luminosité
Si vous prévoyez de ne pas utiliser le télescope pendant une
période prolongée, nous vous recommandons d'en retirer le pile
pour éviter la corrosion éventuelle.
Capot de la batterie
Molettes de réglage
vertical
LAMPE TORCHE
Le télescope Inspire est livré avec une lampe torche DEL rouge
installée dans le moyeu central de l'axe horizontal de la monture.
Pour la retirer de la monture, prenez-la par le haut et tirez-la
simplement du logement.
Installer la pile AA :
1. Dévissez la lentille rouge à l'extrémité de la lampe torche.
2. Faites sortir la lampe torche de sa protection.
3. Dévissez le cache de la lampe torche pour révéler le
compartiment à pile.
4. Insérez une pile AA dans la torche, pôle positif (+) en premier
puis remettez le cache en place.
5. Remettez la lampe torche dans sa protection et revissez la
lentille rouge.
Pour allumer la lampe torche, appuyez simplement sur le bouton caoutchouté situé sur l'arrière de cette dernière.
La lampe torche est conçue pour être installée dans la monture, et peut être utilisée telle-quelle. Allumez-la pour qu'elle diffuse une
luminescence rouge sur le plateau à accessoires, et ainsi voir plus aisément les oculaires et fi ltres que vous désirez utiliser.
NOTE : N'oubliez pas d'éteindre la torche lorsque vous n'en avez pas besoin. Si vous prévoyez de ne pas utiliser le télescope pendant une période prolongée, nous vous recommandons d'en retirer
le pile pour éviter la corrosion éventuelle.
MICROMÈTRE DE MISE AU POINT.
Les tubes de votre télescope Inspire sont livrés avec un micromètre de mise au point qui vous permet de régler la mise au point
directement selon différentes distances rapidement, avant même que vous ayez orienté le télescope sur une cible. La fenêtre sur le côté
de l'ensemble de mise au point vous permet de voir une graduation numérotée de 1 à 10. La graduation 0 représente le point le plus
proche sur lequel vous pouvez effectuer une mise au point avec l'oculaire et la diagonale standard. Le chiffre 10 représente l'infi nité. Bien
que les corps célestes soient présents au-delà du point d'infi nité, vous pouvez également utiliser le télescope pour observer des objets
terrestres, comme des nids d'oiseaux ou autres, à distances fi xes. Une fois la mise au point effectuée sur un objet terrestre, notez le
chiffre correspondant à la graduation. La prochaine fois que vous souhaitez observer le même sujet, depuis le même point, vous pouvez
donc sélectionner cette graduation au préalable en étant sûr que la mise au point est déjà effectuée.
12 | FRANÇAIS
Page 13

ORIENTER LE TÉLESCOPE
La monture altazimutale du télescope est simple à utiliser. Pour
orienter le télescope horizontalement, desserrez la molette de
tension azimutale située à la base de la monture, entre deux des
pieds du trépied. Tenez la poignée à l'extrémité de la poignée
d'orientation et orientez le télescope comme désiré. Vous pouvez
régler la tension du mouvement horizontal en réglant la molette de
tension azimutale.
Pour orienter le télescope verticalement, libérez le loquet en
faisant tourner la poignée située à l'extrémité de la poignée
d'orientation dans le sens anti horaire. Déplacez la poignée vers
le haut ou le bas et faitez tourner la poignée dans le sens horaire
pour verrouiller le tube.
ALIGNEMENT DU CHERCHEUR STARPOINTER PRO
Le chercheur StarPointer Pro vous aide à pointer votre télescope lorsque vous regardez par sa fenêtre ronde en couvrant votre cible
avec le réticule rouge projeté sur la fenêtre. La première fois que vous assemblez votre télescope, vous devez aligner le chercheur avec
le système optique principal du télescope. Bien que cette étape puisse être effectuée de nuit, il est beaucoup plus facile de l'effectuer
en journée. Une fois que vous avez terminé l'alignement du chercheur, vous ne devriez pas avoir à répéter cette étape à moins que le
chercheur est heurté ou le télescope est tombé.
1. Installez le télescope à l'extérieur pendant la journée. À l'œil nu, trouvez un objet facilement reconnaissable, comme un lampadaire, une
plaque d'immatriculation de voiture ou un grand arbre. L'objet doit être le plus loin possible, de préférence à au moins 400 m (un quart de mille).
2. Retirez la housse de protection principale du télescope et assurez-vous que votre oculaire 20 mm a été installé.
3. Orientez le télescope horizontalement et verticalement afi n qu'il pointe à approximativement vers l'objet que vous avez choisi à l'étape 1.
4. Regardez à travers l'oculaire du télescope et déplacez manuellement le télescope jusqu'à ce que l'objet que vous avez choisi se trouve
dans le centre de vision. Si l'image est fl oue, tournez tout doucement les molettes de mise au point jusqu'à ce que l'image soit nette.
5. Une fois que l'objet est centré dans votre oculaire 20 mm, allumez le chercheur en tournant jusqu'à la fi n de sa course la molette de
réglage on/off/luminosité. Cette molette est située au bas de l'appareil.
6. Avec votre tête située à environ 30 cm (1 pied) derrière le chercheur, regardez par la fenêtre ronde et localisez le réticule rouge. Il sera
probablement près de, mais pas au-dessus, de l'objet que vous voyez lorsque vous regardez à travers l'oculaire de 20 mm.
7. Sans déplacer le télescope, utilisez les deux molettes de réglage situées sur le côté et en dessous du chercheur. L'une contrôle le
mouvement gauche-droite du réticule, tandis que l'autre contrôle le mouvement haut-bas. Ajustez les deux molettes jusqu'à ce que le
réticule couvre l'objet que vous observez dans l'oculaire 20 mm.
Choisissez maintenant d'autres cibles lointaines pour vous exercer à pointer votre télescope vers une cible. Regardez par la fenêtre du chercheur
StarPointer Pro et placez le point rouge sur la cible que vous essayez de visualiser et vérifi ez qu'elle est visible dans l'oculaire du télescope.
Votre chercheur étant maintenant aligné, l'installation de votre télescope est terminée et vous êtes prêt pour l'observation!
REMARQUES : N'oubliez pas d'éteindre le chercheur StarPointer Pro lorsqu'il n'est pas utilisé afi n d'économiser les piles.
VOTRE PREMIÈRE SESSION D'OBSERVATION ASTRONOMIQUE
LA LUNE
Vous êtes maintenant prêt à installer votre télescope à l'extérieur et faire de véritables observations pendant la nuit!
Commençons par la lune. Les phases de la lune s'étendent sur un cycle complet d'environ un mois, de la nouvelle lune à la pleine lune et
vice versa. Essayez de l'observer à différents moments au cours de ce cycle.
Bien que vous pouvez observer la Lune à n'importe quel moment lorsqu'elle est visible dans le ciel, le meilleur moment pour la voir est deux
jours après une nouvelle lune jusqu'à quelques jours avant une pleine lune. Durant cette période, vous pourrez voir plus de détails relatifs aux
cratères et aux chaînes de montagnes lunaires. Consultez un calendrier pour connaître la prochaine apparition de la nouvelle lune.
FRANÇAIS | 13
Page 14

1. Lorsque la Lune se voit clairement, installez votre télescope avec l'oculaire 20 mm.
2. Allumez le chercheur et regardez à travers celui-ci pour trouver le réticule rouge.
3. Déplacez le télescope de façon à voir la lune par la fenêtre du chercheur et le réticule centré sur la lune.
4. Regardez dans l'oculaire 20 mm. Tournez doucement les molettes de mise au point pour régler la netteté de l'image.
FÉLICITATIONS! VOUS AVEZ OBSERVÉ VOTRE PREMIER OBJET CÉLESTE!
Pour observer avec plus de détails, remplacez l'oculaire de 20 mm par l'oculaire de 10 mm. Cela permettra de faire apparaître la Lune en bien
plus grand. Vous pourriez avoir besoin de régler les molettes de mise au point après avoir changé d'oculaire, pour garantir que vous obtenez
l'image la plus nette possible.
Vous pouvez utiliser cette technique de base pour observer d'autres corps célestes, tels que des planètes, des amas d'étoiles ou des nébuleuses.
PHOTOGRAPHIE AVEC VOTRE SMARTPHONE
Maintenant que vous avez effectué une observation, vous pouvez
essayer de prendre des clichés de ce que vous voyez. Le télescope
Inspire est équipé d'un adaptateur de smartphone intégré au
cache de lentille. Pour utiliser cette fonctionnalité:
1. Retirez le bouchon orange de l'ouverture pour appareil photo
du cache. Faites cela en tirant sur l'attache de caoutchouc
présente sur l'intérieur du cache. Le bouchon sort aisément
de son logement. Vous pouvez ranger le bouchon et l'attache
directement sur le cache d'oculaire en pressant l'attache dans
le clip présent sur sa face arrière.
2. Faites tourner le cache de manière à ce que la face arrière
du cache soit orienté vers le haut. Soulevez les attaches à
élastique et glissez votre téléphone entre elles et le cache de
lentille de manière à ce que l'objectif de l'appareil photo soit
aligné avec l'ouverture. Les attaches sont assez fortes pour
tenir votre téléphone contre le cache, et l'anneau de silicone le
tiendra en place pour éviter qu'il ne bouge.
ASTUCE: L'emplacement de l'objectif est différent selon les modèles de téléphone. Certains ont
la lentille au milieu de ce dernier, d'autres, dans un coin. Vous pouvez donc modifi er
l'angle des attaches à élastique selon vos besoins. Le cache dispose de huit points
d'ancrage pour les attaches sur son pourtour. Réorganisez-les simplement en les
ancrant à différents points selon les besoins.
3. Retournez le cache et confi rmez que l'objectif de l'appareil
photo est centré sur l'ouverture du cache. Un meilleur centrage
vous permettra d'obtenir de meilleurs clichés avec le télescope.
4. Retirez l'œillet de caoutchouc de l'oculaire de 20 mm en tirant
simplement dessus. Vous pouvez placer l'œillet sur la face
interne du cache, pour ne pas l'égarer. Étirez simplement l'œillet
autour support et faites-le glisser au maximum vers le bas.
14 | FRANÇAIS
Page 15

5. Desserrez les vis présentes sur le support de l'oculaire,
sur la face interne du cache de lentille. Placez la portion
noire de l'oculaire dans le support d'oculaire et serrez les
vis pour le fixer.
6. Tenez le cache de lentille, avec le téléphone et l'oculaire
attachés et insérez le barillet chromé de l'oculaire dans la
diagonale situées à l'arrière de l'ensemble de mise au point.
Sécurisez l'oculaire en serrant les vis sur la diagonale.
7. Lancez l'appareil photo de votre smartphone et effectuez
la mise au point, comme vous le feriez avec l'oculaire, en
observant l'image sur l'écran.
NOTE: Assurez-vous que le fl ash du téléphone est désactivé.
8. Lorsque l'image est nette, effectuez la prise de vue.
Nous vous conseillons de vous entraîner en journée, et lorsque
vous avez confi rmé que tout fonctionne correctement, vous
pouvez essayer de prendre un cliché de la Lune. Lorsque vous
êtes confortables avec l'utilisation de l'oculaire de 20 mm, essayez
l'adaptateur d'appareil photo avec l'oculaire de 10 mm pour un
agrandissement plus puissant.
CONSEILS ET ASTUCES DE PHOTOGRAPHIE
Contrôles de l'appareil photo
L'application d'appareil photo préinstallée sur la majorité des smartphones offre des contrôles très simplifi és et est conçue pour effectuer
la mise au point et le réglage d'exposition automatiquement. Cela ne pose pas de problème dans la majorité des cas pour prendre des
photos de paysages ou de portraits, mais cela peut être trop limité pour prendre des clichés d'une planète ou de la Lune, qui sont
des objets brillants sur un fond très sombre. L'appareil photo du téléphone essayera donc de compenser en augmentant la luminosité
des zones sombres, ce qui a pour effet négatif de surexposer les zones claires et ainsi d'en masquer les détails. Si l'application de
votre téléphone ne vous permet pas de régler manuellement le centre de mise au point ou n'offre pas la possibilité de désactiver la
mise au point et l'exposition automatique, nous vous recommandons d'en installer une autre. Vous pouvez trouver une grande variété
d'applications tierce-partie sur iOS ou Android qui donnent plus de contrôle sur l'appareil photo. Beaucoup d'entre elles sont gratuites.
Vibration
Pour limiter les vibrations induites par la pression sur le déclencheur, nous vous conseillons de défi nir un délai avant la prise d'image.
Certaines applications permettent de défi nir un délai de 2,5 ou 10 secondes avant la capture. Cela permettra de garantir que la vibration
de la pression sur le déclencheur n'interférera pas avec la capture.
Choisir un sujet
Avec cette méthode, vous pouvez prendre des clichés d'objets terrestres de jour, ainsi que des photos astronomiques nocturnes, comme
la Lune et autres planètes brillantes (Venus, Mars, Jupiter et Saturne). Malheureusement, les capteurs de photo des smartphones ne
sont pas conçus pour fonctionner de manière adéquate en condition de très faible luminosité. Pour cette raison, il se pourrait que vous
ne puissiez pas prendre de photos d'objets peu brillants, comme des galaxies ou des nébuleuses.
Agrandissement
Lorsque vous observez la Lune ou d'autres planètes avec un télescope fi xe, vous pouvez remarquer que l'objet en question semble se
déplacer dans le champ de vision. Cela est dû à la rotation de la Terre. Si vous observiez une planète dans votre oculaire de 20 mm,
cette dernière prendrait approximativement 3 minutes pour traverser le champ de vision. Si vous utilisiez un oculaire de 10 mm, alors
cet intervalle est réduit à 1,5 minute. Votre smartphone ne tire pas profi t du champ de vision en entier, seulement de son centre. Cela
rend cet effet d'autant plus visible. Lorsque vous centrez un objet astronomique dans le champ de vision du téléphone, essayez de
compenser ce mouvement. Essayez autant que possible de pointer le télescope au-devant du mouvement de la planète, juste en bordure
de cette dernière. Cela permettra d'augmenter l'intervalle de déplacement de cette planète, vous donnant ainsi un peu plus de temps
pour prendre le cliché avant que vous ne deviez recentrer l'ensemble. Si vous utilisez un oculaire de 10 mm, alors le champ de vision est
encore plus étroit, et vous devrez régler l'orientation télescope plus souvent. Nous vous recommandons donc de commencer en utilisant
un oculaire de 20 mm. Une fois confortable avec ce type, vous pouvez essayer avec un oculaire de 10 mm.
FRANÇAIS | 15
Page 16

GARANTIE LIMITÉE DE DEUX ANS DE CELESTRON
A. Celestron garantit que votre monture de télescope sera exempte de tout défaut de matériaux ou de fabrication pour une période de deux
ans. Celestron réparera ou remplacera ce produit ou une partie de celui-ci lorsqu'il a été déterminé, lors d'une inspection par Celestron,
que le produit est défectueux en raison d'un défaut de matériaux ou de fabrication. Comme condition à l'obligation de Celestron de réparer
ou remplacer un tel produit, le produit doit être retourné à Celestron avec la preuve d'achat satisfaisante pour Celestron.
B. Un numéro d'autorisation de retour valide doit être obtenu de Celestron avant le renvoi. Appelez Celestron au (310) 328-9560 pour
recevoir le numéro à affi cher à l'extérieur de votre colis d'expédition.
Tous les retours doivent être accompagnés d'une déclaration écrite indiquant le nom, l'adresse et le numéro de téléphone de jour du
propriétaire, ainsi qu'une brève description des prétendus défauts. Les pièces ou le produit ayant été l'objet d'un remplacement deviendront
la propriété de Celestron.
Le client sera responsable de tous les frais de transport et d'assurance, à la fois vers et depuis l'usine de Celestron, et devra payer à
l'avance ces coûts.
Celestron fera des efforts raisonnables pour réparer ou remplacer tout télescope couvert par cette garantie dans les trente jours suivant
sa réception. Dans le cas où une réparation ou un remplacement nécessitera plus de trente jours, Celestron en avisera le client en
conséquence. Celestron se réserve le droit de remplacer tout produit qui a été retiré de sa gamme de produits disponibles avec un nouveau
produit ayant une valeur et des fonctions équivalentes.
Cette garantie sera nulle et sans effet dans le cas où la conception ou la fonction d'un produit couvert a été modifi ée, ou lorsque le produit a
été soumis à un usage abusif, à de mauvaises manipulations ou à une réparation non autorisée. En outre, une défaillance ou une détérioration
du produit due à l'usure normale n'est pas couverte par cette garantie.
CELESTRON DÉCLINE TOUTE GARANTIE, EXPRESSE OU IMPLICITE, DE QUALITÉ MARCHANDE OU D'ADAPTATION À UN USAGE PARTICULIER, À MOINS DE DISPOSITIONS EXPRESSES DANS CE DOCUMENT. LA SEULE
OBLIGATION DE CELESTRON EN VERTU DE CETTE GARANTIE LIMITÉE SERA DE RÉPARER OU REMPLACER LE PRODUIT COUVERT, EN CONFORMITÉ AVEC LES DISPOSITIONS DE CE DOCUMENT. CELESTRON DÉCLINE
TOUTE RESPONSABILITÉ POUR TOUTE PERTE DE PROFITS, TOUT DOMMAGE GÉNÉRAL, PARTICULIER OU INDIRECT POUVANT RÉSULTER DE LA VIOLATION DE TOUTE GARANTIE, OU EN RAISON DE L'UTILISATION DE, OU
DE L'INCAPACITÉ À UTILISER, UN PRODUIT CELESTRON. TOUTE GARANTIE IMPLICITE QUI EST ET QUI NE PEUT ÊTRE DÉCLINÉE SERA LIMITÉE À UNE DURÉE DE DEUX ANS À PARTIR DE LA DATE D'ACHAT INITIALE.
Certains états ou certaines provinces ne permettent pas l'exclusion ou la limitation des dommages accessoires ou indirects ou une limitation
sur la durée d'une garantie implicite, alors dans ces cas les limitations et exclusions susmentionnées pourraient ne pas s'appliquer à vous.
Cette garantie vous donne des droits légaux spécifi ques, et vous pouvez également avoir d'autres droits qui varient d'un état ou d'une
province à l'autre.
Celestron se réserve le droit de modifi er ou de cesser la production de tout modèle ou style de télescope, et cela sans préavis.
Si des problèmes liés à la garantie surviennent, ou si vous avez besoin d'assistance pour utiliser votre télescope, contactez :
Celestron - 800.421.9649
NOTE: Cette garantie est valable pour les clients américains et canadiens qui ont acheté ce produit auprès d'un revendeur autorisé Celestron aux États-Unis ou au Canada. La garantie en dehors des É.-U. et du Canada n'est
valable que pour les clients ayant acheté le produit d'un distributeur international de Celestron ou d'un distributeur agréé dans le pays en question. Veuillez communiquer avec eux pour toute réparation sous garantie.
Remarque relative à la FCC : Cet équipement a été testé et jugé conforme aux limites établies pour un dispositif numérique de classe B, conformément
à la partie 15 de la réglementation de la FCC. Ces limites ont étés mises en place pour offrir une protection raisonnable contre les inter férences dans
un complexe résidentiel. Cet équipement génère, utilise et peut diffuser des ondes radio. S’il n’est pas installé et utilisée convenablement pourrait créer des
interférences sur les communications radio. Il n'existe cependant aucune garantie que des inter férences ne seront pas produites dans le cadre d'une
installation particulière. Si cet équipement crée des interférences à la réception radio ou télévisée, ce qui peut être confi rmé en éteignant puis en rallumant
l'équipement en question, nous recommandons à l'utilisateur d'appliquer une ou plusieurs des solutions suivantes pour corriger les problèmes d'interférences :
• Réorientez ou déplacez l'antenne de réception.
• Augmentez la distance séparant l'équipement et le récepteur.
• Connectez l'équipement à une prise ou à un circuit différent de celui du récepteur.
• Contactez le revendeur ou un technicien radio ou TV d'expérience pour obtenir de l'assistance.
L'apparence et les caractéristiques du produit peuvent être modifi ées sans préavis.
Ce produit est conçu et destiné pour les personnes de 14 ans et plus.
© 2016 Celestron • Tous droits réservés.
www.celestron.com
2835 Columbia Street • Torrance, CA 90503 É.-U.
Téléphone : 800.421.9649
16 | FRANÇAIS
03 -16
Imprimé en Chine
Page 17

BEDIENUNGSANLEITUNG
Modell #22401 - Inspire 70AZ
Modell #22402 - Inspire 80AZ
Modell #22403 - Inspire 100AZ
DEUTSCH
Page 18

LIEFERUMFANG
Wir empfehlen Ihnen, die Verpackung Ihres Teleskops aufzubewahren, um das Teleskop bei Nichtverwendung darin zu verstauen.
Gehen Sie beim Auspacken vorsichtig vor, da Kleinteile enthalten sind. Überprüfen Sie anhand der untenstehenden Teileliste die
Vollständigkeit aller Teile und Zubehörteile.
TEILELISTE
1
2
3
4
5
6
7
8
9
10
11
12
13
14
15
16
1. Teleskoptubus
2. StarPointer Pro-Sucher
3. 20-mm-Okular
4. Aufricht-Diagonalspiegel
5. Fokusknopf
6. Fokus-Mikrometer
7. Schwenkgriff/ Höhe Kupplungsknopf
8. Stativ
9. Arretierungsknopf für die Zubehörablage
10. Klappbare Zubehörablage
11. Objektivkappe/Smartphone Adapter
12. Montagebolzen des Suchers
13. Azimuthmontierung
14. Abnehmbare Taschenlampe
15. Spannknopf für die Zubehörablage
16. 10-mm-Okular
SONNENSTRAHLEN-WARNHINWEIS
Niemals mit bloßem Auge oder mit einem Teleskop direkt in die Sonne schauen, außer bei Verwendung eines vorschriftsmäßigen Sonnenfi lters. Sie könnten permanente und irreversible Augenschäden davontragen.
Das Teleskop keinesfalls zur Projektion eines Bildes der Sonne auf eine Oberfl äche verwenden. Durch die interne Wärmeakkumulation können das Teleskop und etwaiges daran angeschlossenes Zubehör beschädigt werden.
Niemals einen Okularsonnenfi lter oder einen Herschelkeil verwenden. Die interne Wärmeakkumulation im Teleskop kann zu Rissen oder Brüchen dieser Instrumente führen. Dadurch könnte ungefi ltertes
Sonnenlicht ins Auge gelangen.
Lassen Sie das Teleskop nicht unbeaufsichtigt, vor allem wenn sich Kinder oder Erwachsene, die mit der korrekten Bedienung Ihres Teleskops nicht vertraut sind, in der Nähe befi nden.
DAS TELESKOP AUFBAUEN
DIE MONTIERUNG
Der Aufbau gestaltet sich einfach, da Stativ und Montierung des
Inspire werden vollständig montiert geliefert werden.
1. Nehmen Sie Stativ und Montierung aus der Schachtel.
2. Lösen Sie die Drehknöpfe an der Unterseite jedes Beins und
stellen Sie die inneren Beinabschnitte auf die gewünschte Länge
ein. Drehen Sie die Knöpfe zum Sichern der Beine an, doch
achten Sie darauf, diese nicht zu fest anzuziehen.
3. Stellen Sie das Stativ auf und ziehen Sie die Stativbeine
auseinander, bis die klappbare Zubehörablage einrastet.
4. Richten Sie die Laschen an der Verriegelung der federbelasteten
Zubehörablage an den Kerben der Zubehörablage aus und
drücken Sie sie nach unten. Drehen Sie den Verriegelungsknopf im
Uhrzeigersinn um 20 Grad, um die Ablage vollständig einzurasten.
5. Drehen Sie den Spannknopf der Zubehörablage im Uhrzeigersinn
bis zum Anschlag. Wenden sie dabei nicht zu viel kraft auf.
HINWEIS: Wenn am Ende der Beobachtungssitzung das Stativ eingeklappt wird, müssen
zuerst die Spannungsknöpfe gelöst werden. Dann den Arretierungsknopf lösen,
indem Sie ihn gegen den Uhrzeigersinn drehen, bis die Feder nach oben aus
dem Arretierungsknopf springt. Den Knopf greifen, nach oben anheben und das
Stativ einklappen.
18 | DEUTSCH
Spannknopf
Arretierungsknopf
Page 19

DER TELESKOPTUBUS
So bringen Sie den Teleskoptubus an Ihrem Stativ mit
Montierung an:
1. Lösen Sie die beiden Schrauben an der Seite des
Schwalbenschwanzsattelsoben an der Montierung.
2. Suchen Sie die Schwalbenschwanzführung am unteren Rand
des Teleskoptubus und schieben Sie diese in den Sattel. Das
Okularende des Teleskoptubus sollte in die gleiche Richtung
zeigen wie der Schwenkgriff an der Montierung.
3. Wenn der Schwalbenschwanz im Sattel zentriert ist, werden
die beiden Schrauben am Tubus angezogen, wobei zuerst die
größere angezogen wird. Ziehen Sie dann die kleinere an.
4. Wenn Sie für eine Beobachtung bereit sind, können Sie die
Objektivkappe einfach abziehen.
DIAGONALSPIEGEL
Die Inspire Teleskope sind mit einem 90°-Zenitspiegel mit
aufrechtem Bild ausgestattet. Dieses Zubehör verwendet
ein Prisma, das Licht in einem Winkel von 90° biegt, um eine
bequemere Betrachtungsposition zu ermöglichen. Dies sorgt auch
für ein 100% korrekt orientiertes Bild, so dass Sie dieses Teleskop
leicht für terrestrischen Beobachtung am Tag verwenden können.
Den Diagonalspiegel installieren.
1. Nehmen Sie beide Kappen vom Zenitspiegel ab.
2. Lösen Sie die Feststellschrauben auf der Rückseite des
Fokussierers und ziehen Sie die kleine Staubschutzkappe ab.
3. Setzen Sie den kleineren Tubus des Zenitspiegels in die
Rückseite des Fokussierers ein und sichern Sie diesen durch
Anziehen der Feststellschrauben.
DIE OKULARE
Ihr Teleskop ist mit zwei Okularen ausgestattet, eines weist eine
niedrige Vergrößerung (20-mm-Okular), das andere eine hohe
Vergrößerung (10-mm-Okular) auf. Wählen Sie nach jedem Aufbau
Ihres Teleskops immer zuerst das 20-mm-Okular. Nachdem Ihr
Zielobjekt im 20-mm-Okular zentriert ist, können Sie zum 10-mmOkular mit höherer Vergrößerung wechseln, um ein detaillierteres
Bild zu erhalten.
Installation des Okulars:
1. Lösen Sie die Feststellschrauben am offenen Ende
des Diagonalspiegels.
2. Schieben Sie den Chromabschnitt des 20-mm-Okulars in
den Diagnoalspiegel.
3. Ziehen Sie die zwei Feststellschrauben wieder an, um das
Okular zu fi xieren.
4. Um ein scharfes Bild zu erhalten, muss dasTeleskop fokussiert
werden. Schauen Sie durch das Okular und drehen Sie langsam
an den Fokussierknöpfe, bis Sie das schärfste Bild erhalten.
HINWEIS: Sie sollten den Fokus immer dann nachstellen, wenn Sie Okulare wechseln
und wenn eine andere Person durch das Teleskop betrachtet, da jeder für ein
scharfes Bild eine andere Einstellung benötigen kann.
DEUTSCH | 19
Page 20

STARPOINTER PRO SUCHERFERNROHR
Ihr Inspire-Teleskop ist mit einem StarPointer Pro-Sucherfernrohr
ausgestattet, mit dessen Hilfe Sie ein fernes Zielobjekt im Teleskop
anvisieren können.
Installation des Suchfernrohrs:
1. Schieben Sie die Halterung des Star Pointers in den
Schwalbenschwanz-Schlitz oben auf dem Fokussierer. Das große
Fenster des Sucherfernrohrs muss in Richtung der Vorderseite
des Teleskops weisen.
2. Befestigen Sie die Halterung, indem Sie die Stellschraube am
Schwalbenschwanz-Schlitz anziehen.
Das StarPointer Pro benötigt eine CR-2032-Knopfzelle. Zum
Austauschen der Batterie muss der StarPointer umgedreht
werden. Das Batteriefach befi ndet sich in der Mitte des Netz-/
Helligkeitsschalters. Drehen Sie eine Münze im Schlitz auf der
Abdeckung, um die Kappe gegen den Uhrzeigersinn loszudrehen, bis
sich die Kappe abnehmen lässt. Setzen Sie die neue Batterie mit dem
Pluspol (+) nach oben ein und schrauben Sie die Abdeckung wieder
auf. Wenn sich Ihr Starpointers Pro nicht sofort einschalten lässt,
das Batteriefach öffnen und die kleine Plastikscheibe entfernen,
die zwischen der Batterie und der Batterieabdeckung liegt. Diese
Scheibe verhindert, dass sich die Batterie während des Transports
versehentlich entlädt.
Wenn Sie Ihr Teleskop für eine längere Zeit verstauen, sollte die
Batterie zur Vermeidung versehentlicher Korrosion entfernt werden.
DIE TASCHENLAMPE
Horizontal
Einstellknopf
An-/Ausschalter/
Helligkeitsregler
Batteriefachabdeckung
Vertikal
Einstellknopf
Die Inspire-Montierung verfügt über eine eingebaute rote LEDTaschenlampe in der zentralen Vertiefung an der Links-Rechts-Achse
der Montierung. Zum Abnehmen einfach greifen und senkrecht nach
oben herausziehen.
Die AA-Batterie einlegen:
1. Schrauben Sie die rote Linse am Ende der Taschenlampe ab.
2. Schieben Sie die Taschenlampe aus der Schutzhülle.
3. Schrauben Sie die Kappe auf der Rückseite der Taschenlampe
ab, um das Batteriefach freizulegen.
4. Legen Sie die AA-Batterie mit dem Pluspol (+) voraus in die
Taschenlampe ein und bringen Sie die Batteriefachabdeckung
wieder an.
5. Schieben Sie die Taschenlampe wieder in das Schutzgehäuse und
schrauben Sie die rote Linse wieder auf.
Zum Einschalten der Taschenlampe einfach auf die von Gummi verdeckte Taste auf der Rückseite drücken.
Die Taschenlampe wurde zur Aufbewahrung in der Montierung entworfen und kann in dieser Position auch verwendet werden. Schalten
Sie die Taschenlampe ein, um einen diffusen roten Lichtschein über Ihrer Zubehörablage zu erzeugen, um Ihre Okulare und Filter im
Dunklen leicht zu erkennen.
HINWEIS: Schalten Sie die Taschenlampe bei Nichtverwendung aus. Wenn Sie Ihr Teleskop für eine längere Zeit verstauen, sollte die Batterie zur Vermeidung versehentlicher Korrosion entfernt werden.
DAS FOKUS-MIKROMETER
Ihre Inspire-Teleskoptuben sind mit einem Fokus-Mikrometer ausgestattet, mit dem Sie ohne das Teleskop zu bewegen, Objekte in
unterschiedlichen Entfernungen scharf stellen können. Das Fenster auf der Seite des Fokussierers zeigt eine nummerierte Skala von 0
bis 10. Die 0 auf der Skala stellt den nächsten Punkt dar, den Sie mit dem Standard-Okular und -Diagonalspiegel fokussieren können.
Die 10 steht für den unendlichen Fokus. Während astronomische Objekte im Allgemeinen im Unendlichen scharfgestellt werden, können
Sie mit dem Teleskop auch terrestrische Objekte, wie Vogelnester oder andere Ziele in fi xen Entfernungen betrachten. Sobald Sie ein
terrestrisches Ziel fokussiert haben, wird die Nummer auf der Skala notiert. Bei der nächsten Betrachtung dieses Ziels vom gleichen
Beobachtungsstandort aus, können Sie den Fokussierer schnell auf die von Ihnen notierte Zahl einstellen und wenn Sie durch das
Okular blicken, sollten Sie ein scharfes Bild erhalten.
20 | DEUTSCH
Page 21

DAS TELESKOP SCHWENKEN
Die Inspire-Azimutmontierung ist sehr anwenderfreundlich.
Um das Teleskop nach links und rechts zu schwenken, den
Azimut-Spannknopf an der Basis zwischen den Stativbeinen
der Montierung lösen. Greifen Sie den Knopf am Ende des
Schwenkgriffs und bewegen Sie das Teleskop in die gewünschte
Position. Sie können die Spannung der Links- und RechtsBewegung einstellen, indem Sie den Azimut-Spannknopf justieren.
Um das Teleskop nach oben und unten zu bewegen, müssen Sie
die Höhenkupplung lösen, indem Sie den Knopf am Ende des
Schwenkgriffs gegen den Uhrzeigersinn drehen. Bewegen Sie
den Griff nach oben oder unten je nach Bedarf und drehen Sie
den Knopf im Uhrzeigersinn, um das Teleskop zu arretieren.
DAS STARPOINTER PRO SUCHERFERNROHR AUSRICHTEN
Das StarPointer Pro-Sucherfernrohr unterstützt Sie beim Ausrichten Ihres Teleskops, indem Sie beim Blick durch das runde Glasfenster
Ihr Zielobjekt mit einem roten Fadenkreuz, das auf das Fenster projiziert wird, abdecken können. Nach dem ersten Aufbau Ihres Teleskops
müssen Sie das Sucherfernrohr an der Hauptoptik Ihres Teleskops ausrichten. Obwohl dies auch bei Nacht vorgenommen werden kann, ist
es bei Tag bedeutend einfacher. Einmal ausgerichtet, muss Ihr Sucherfernrohr nicht erneut ausgerichtet werden, es sei denn, auszuwirken
oder das Teleskop fällt es ausgesetzt ist.
1. Nehmen Sie Ihr Teleskop bei Tag nach draußen. Suchen Sie mit dem bloßen Auge ein leicht erkennbares Objekt, wie eine Straßenlaterne,
ein Autokennzeichen oder einen hohen Baum. Das Objekt sollte 400 Meter oder weiter entfernt sein.
2. Nehmen Sie die große Schutzabdeckung vom Teleskop ab und vergewissern Sie sich, dass das 20-mm-Okular angebracht ist.
3. Schwenken Sie das Teleskop nach links und rechts bzw. auf und ab, um das in Schritt 1 gewählte Objekt grob anzuvisieren.
4. Schauen Sie durch das Okular Ihres Teleskops und schwenken Sie dieses manuell, bis das ausgewählte Objekt im Zentrum des
Sichtfelds liegt. Ist das Bild unscharf, drehen Sie langsam am Fokussierknopf, bis das Bild scharf gestellt ist.
5. Sobald das Objekt im 20-mm-Okular zentriert ist, können Sie das Sucherfernrohr einschalten, indem Sie den Netzschalter/
Helligkeitsregler unten am Instrument bis zum Anschlag drehen.
6. Bringen Sie Ihren Kopf etwa 30 cm hinter den Sucher, schauen Sie durch das runde Fenster und suchen Sie das rote Fadenkreuz. Dieser
befi ndet sich höchstwahrscheinlich nahe, jedoch nicht direkt auf dem Objekt, das Sie durch das 20-mm-Okular betrachten.
7. Drehen Sie nun, ohne das Teleskop zu bewegen, an den beiden Einstellknöpfen seitlich und unterhalb des Sucherfernrohrs. Der eine
Drehknopf steuert die Links-Rechts-Bewegung und der andere die Auf- und Abbewegung des Fadenkreuzes. Stellen Sie beide so ein,
dass das rote Fadenkreuz direkt über dem Objekt erscheint, dass Sie im 20-mm-Okular betrachten.
Visieren Sie nun einige andere entfernte Zielobjekte an, um das Ausrichten Ihres Teleskops zu üben. Schauen Sie durch das StarPointer
Pro-Fenster und führen Sie das rote Fadenkreuz über das Zielobjekt; vergewissern Sie sich dabei, dass Sie durch das Okular schauen.
Nach dem Ausrichten des Sucherfernrohrs ist Ihr Teleskop vollständig montiert und bereit für die erste Beobachtung!
ANMERKUNG: Achten Sie darauf, das StarPointer Pro-Sucherfernrohr bei Nichtverwendung auszuschalten, um die Batterie zu schonen.
IHRE ERSTE ASTRONOMISCHE BEOBACHTUNG
DER MOND
Jetzt können Sie Ihr Teleskop bei Nacht nach draußen nehmen und ans Beobachten gehen!
Fangen wir mit dem Mond an. Der Mond benötigt für einen vollständigen Phasenzyklus vom Neumond über den Vollmond zurück zum
Neumond ungefähr einen Monat. Versuchen Sie, ihn zu verschiedenen Stadien dieses Zyklus zu beobachten.
Während Sie den Mond jederzeit beobachten kann ist es in den Himmel sichtbar, ist die beste Zeit zwei Tage nach dem Neumond bis ein
paar Tage vor dem Vollmond. Innerhalb dieses Zeitfensters zeigen sich Krater und Mondgebirge am detailreichsten. Schauen Sie in einem
Kalender nach, wann Neumond ist.
DEUTSCH | 21
Page 22

1. Bauen Sie Ihr Teleskop mit dem 20-mm-Okular auf, sobald Sie eine freie Sicht auf den Mond haben.
2. Schalten Sie das Sucherfernrohr ein und schauen Sie hindurch, um das rote Fadenkreuz auszumachen.
3. Schwenken Sie Ihr Teleskop, bis Sie den Mond durch das Sucherfernrohr-Fenster sehen können und sich das rote Fadenkreuz mittig auf
dem Mond befi ndet.
4. Schauen Sie durch das 20-mm-Okular. Drehen Sie vorsichtig am Fokussierknopf, um das Bild scharfzustellen.
HERZLICHEN GLÜCKWUNSCH! SIE HABEN GERADE IHR ERSTES HIMMELSOBJEKT BEOBACHTET!
Tauschen Sie das 20-mm-Okular gegen das 10-mm-Okular aus, um den Mond näher heranzuholen. Es stellt eine höhere Vergrößerung
bereit, wodurch der Mond um einiges größer erscheint. Nach dem Okularwechsel könnte ein erneutes Fokussieren nötig sein, um ein
scharfes Bild zu erhalten.
Sie können mithilfe dieser grundlegenden Technik viele weiter Himmelsobjekte, wie Planeten, Sternhaufen und Nebel, beobachten.
BILDER MIT IHREM SMARTPHONE AUFNEHMEN
Nachdem Sie nun mit Ihrem Teleskop einige Beobachtungen
vorgenommen haben, können Sie Fotos von Ihren Objekten
machen. Das Inspire-Teleskop verfügt über einen SmartphoneAdapter, der sich direkt in der Objektivkappe befi ndet. Diesen
Adapter nutzen:
1. Ziehen Sie den orangefarbenen Stecker aus der Kameraöffnung
in der Objektivkappe. Ziehen Sie dazu am orangefarbenen
Gummiband auf der Innenseite der Objektivkappe. Der Stecker
sollte direkt herausspringen. Stecker und Band können auf der
Rückseite der Objektivkappe neben der Okularhalterung in der
Halteklammer verstaut werden.
2. Drehen Sie den Deckel, so dass die Außenseite der Kappe nach
oben zeigt. Heben Sie die fl exiblen Riemen an und schieben Sie
Ihr Smartphone zwischen die Riemen und die Objektivkappe, so
dass die Kamera durch die Kameraöffnung "blickt". Die Riemen
sollten so viel Spannung aufweisen, dass das Instrument an
der Kappe gehalten wird. Der schwarze Silikonring muss so viel
Reibung erzeugen, dass das Smartphone nicht verrutschen kann.
HINWEIS: Je nach Gestaltung des Smartphones kann die Kamera mittig oder seitlich liegen. Sie
können den Winkel der fl exiblen Riemen so abändern, dass das Telefon sicher sitzt.
Es gibt acht verschiedene Ankerpunkte für den Rand de r Objektivkappe. Einfach an
anderen Ankerpunkten befestigen, um einen optimalen Sitz zu gewährleisten.
3. Drehen Sie die Kappe um stellen Sie sicher, dass Ihre
Kameralinse in der Öffnung in der Objektivkappe zentriert ist.
Je besser Sie diese Zentrierung vornehmen, desto leichter
lassen sich die Bilder durch das Teleskop aufnehmen.
4. Nehmen Sie das 20 mm-Okular und entfernen Sie die
Gummiaugenmuschel, indem Sie sie gerade vom Okular
abziehen. An der Innenseite der Objektivkappe befi ndet sich
eine Halterung für die Augenmuschel, die Sie nicht verlieren
dürfen. Ziehen Sie die Augenmuschel einfach um die runder
Halterung herum in die Länge und vollständig nach unten.
22 | DEUTSCH
Page 23

5. Lösen Sie die Feststellschrauben der Okularhalterung im
Inneren der Objektivkappe. Platzieren Sie den schwarzen
Teil des Okulars in der Okularhalterung und ziehen Sie die
Schrauben zum Feststellen des Okulars an.
6. Nehmen Sie die Objektivkappe mit dem angebrachten Telefon
und Okular und setzen Sie den Chromlauf des Okulars in
den Diagonalspiegel auf der Rückseite des Fokussierers ein.
Ziehen Sie die Feststellschrauben des Diagonalspiegels an.
7. Aktivieren Sie Ihre Kamera-App auf Ihrem Smartphone
und stellen Sie den Fokus ein, wie Sie auch das Okular
einstellen würden, doch verwenden Sie dieses Mal das
Bild auf dem Bildschirm.
ANMERKUNG: Vergewissern Sie sich, dass der Blitz am Telefon ausgeschaltet ist.
8. Wenn das Bild scharf erscheint, können Sie Ihr Foto machen.
Am besten starten Sie Ihren ersten Versuch bei Tageslicht. Sobald
alle Einstellungen korrekt vorgenommen wurden, können Sie Ihre
Instrumente nach draußen bringen und den Mond aufnehmen.
Wenn Sie mit dem 20-mm-Okular geübt und vertraut sind, können
Sie den Kamera-Adapter zusammen mit dem 10-mm-Okular für
eine höhere Vergrößerungsleistung verwenden.
HINWEISE UND TRICKS ZUM AUFNEHMEN VON BILDERN
Kamerasteuerung
Die Standard-Kamera-Apps, die auf Ihrem Smartphone vorinstalliert sind, bieten recht eingeschränkte Steuerungen und stellen den
Fokus und die Belichtung automatisch ein. Für die alltägliche Fotografi e wie Landschaften oder Porträts stellt das kein Problem dar.
Doch bei Aufnahmen eines Planeten oder des Mondes ist es problematisch, da ein sehr helles Objekt vor einem sehr schwarzen
Himmel steht. Die Kamera des Telefons versucht, das Ungleichgewicht der Lichtverhältnisse durch Aufhellung der dunklen Bereiche
auszubalancieren, wodurch überbelichtet wird und die Details verschwimmen. Wenn Sie unter den Einstellungen Ihrer Kamera-App
den Fokuspunkt nicht manuell einstellen oder den Autofokus oder die automatische Belichtung nicht deaktivieren können, sollten Sie
eine andere App auswählen. Es stehen etliche Apps für iOS und Android zur Verfügung, die eine umfangreiche Kamera-Steuerung
ermöglichen. Viele davon sind kostenlos.
Vibration
Damit die Kamera in keiner Weise bewegt wird, wenn Sie den Auslöser betätigen, können Sie eine Auslöserverzögerung nutzen. Einige
Apps bieten eine Verzögerung von 2, 5 oder 10 Sekunden, bevor das Bild aufgenommen wird. Dadurch können jegliche Vibrationen
verebben, bevor das eigentliche Bild aufgenommen wird.
Motive
Mit dieser Methode können Sie bei Tag Bilder von terrestrischen Objekten sowie nächtlichen astronomischen Objekten, wie dem
Mond und hellen Planeten (Venus, Mars, Jupiter und Saturn) machen. Da die Kamerasensoren eines Smartphones bei sehr geringen
Helligkeiten an Ihre Grenzen stoßen, sind Aufnahmen lichtschwacher astronomischer Objekte, wie Galaxien und Nebel, auf diese Weise
leider kaum möglich.
Vergrößerung
Wenn Sie durch ein stationäres Teleskop den Mond oder einen Planeten beobachten, werden Sie feststellen, dass das Objekt durch
das Sichtfeld wandert. Verantwortlich dafür ist die Erddrehung. Wenn Sie durch Ihr 20-mm-Okular blicken, benötigt ein Planet etwa 3
Minuten, bis er durch das gesamte Gesichtsfeld des Okulars gewandert ist. Verwenden Sie das 10-mm-Okular, dauert dies lediglich
1,5 Minuten. Das Smartphone nutzt jedoch nicht das gesamte Sichtfeld des Okulars, sondern nur dessen Mitte, wodurch die Bewegung
noch viel schneller erscheint. Wenn ein astronomisches Objekt im Sichtfeld des Telefons zentriert wird, sollten Sie versuchen, einen
Punkt anzuvisieren, den das Ziel demnächst passieren wird. Richten Sie das Teleskop so aus, dass es dem Planeten voraus ist und
dieser gerade in das Sichtfeld eintritt. Dadurch wird die Zeit, die das Wandern durch das gesamte Sichtfeld, in Anspruch nimmt,
maximiert, wodurch Sie mehr Zeit zum Aufnehmen der Bilder zur Verfügung haben, bevor ein erneutes Anvisieren des Teleskops nötig
wird. Das 10-mm-Okular hat ein engeres Sichtfeld, wodurch Sie häufi ger nachstellen müssen. Zu Anfang ist das 20-mm-Okular daher
einfacher zu handhaben. Sobald Sie damit geübt sind, können Sie zum 10-mm-Okular übergehen.
DEUTSCH | 23
Page 24

ZWEIJÄHRIGE EINGESCHRÄNKTE GARANTIE VON CELESTRON
A. Celestron garantiert, dass Ihr Teleskop für zwei Jahre frei von Material- und Verarbeitungsfehlern ist. Celestron wird ein solches Produkt
oder Teile davon, wenn nach Inspektion durch Celestron ein Defekt an Material oder Verarbeitung gefunden wurde, reparieren oder
austauschen. Die Verpfl ichtung von Celestron, ein solches Produkt zu reparieren oder auszutauschen, unterliegt der Bedingungen, dass
das Produkt zusammen mit einem für Celestron zufriedenstellenden Kaufbeleg an Celestron zurückgesendet wird.
B. Die korrekte Rücksende-Autorisationsnummer muss zuvor von Celestron angefordert werden. Rufen Sie Celestron unter (310) 328-9560
an, um die Nummer, die auf der Außenseite Ihres Versandcontainers aufgebracht ist, zu erhalten.
Alle Rücksendungen müssen eine schriftliche Erklärung enthalten, aus der der Name, die Adresse und die Telefonnummer des Eigentümers,
zu der er tagsüber erreichbar ist, zusammen mit einer kurzen Beschreibung aller beanstandeten Defekte, hervorgeht. Ausgetauschte Teile
oder Produkte werden Eigentum von Celestron.
Der Kunde ist für alle Kosten für Versand und Versicherung zu und vom Celestron-Werk verantwortlich und muss diese Kosten im
Voraus begleichen.
Celestron muss vernünftige Maßnahmen ergreifen, um jedes Teleskop unter dieser Garantie innerhalb von 30 Tagen nach Erhalt zu reparieren
oder auszutauschen. Für den Fall, dass Reparatur oder Austausch mehr als dreißig Tage in Anspruch nimmt, muss Celestron den Kunden
entsprechen in Kenntnis setzen. Celestron behält sich das Recht vor, ein Produkt, das aus der Produktlinie ausgeschieden ist, durch ein
neues oder in Wert und Funktion vergleichbares Produkt zu ersetzen.
Diese Garantie erlischt und wird außer Kraft gesetzt, für den Fall, dass ein Produkt unter der Garantie in Design oder Funktion
modifi ziert wurde oder Missbrauch, unsachgemäße Handhabung oder unautorisierter Reparatur unterzogen wurde. Des Weiteren sind
Produktfehlfunktionen oder Wertminderung aufgrund von normalem Verschleiß von dieser Garantie nicht abgedeckt.
CELESTRON LEHNT JEGLICHE GEWÄHRLEISTUNG, OB AUSDRÜCKLICH ODER STILLSCHWEIGEND, OB DER MARKTGÄNGIGKEIT ODER DER EIGNUNG FÜR EINEN BESTIMMTEN ZWECK, AUSSER DEM HIERIN
GENANNTEN, AB. DIE ALLEINIGE VERPFLICHTUNG VON CELESTRON UNTER DIESER EINGESCHRÄNKTEN GARANTIE BESTEHT DARIN, DAS DURCH DIE GARANTIE ABGEDECKTE PRODUKT IN ÜBEREINSTIMMUNG
MIT DEN HIERIN FESTGEHALTENEN BEDINGUNGEN ZU REPARIEREN ODER AUSZUTAUSCHEN. CELESTRON LEHNT AUSDRÜCKLICH JEGLICHE HAFTUNG FÜR ENTGANGENE PROFITE, ALLGEMEINE, SPEZIELLE,
INDIREKTE ODER FOLGESCHÄDEN AB, DIE SICH AUS EINER GARANTIEVERLETZUNG ERGEBEN KÖNNTEN ODER DIE DURCH NUTZUNG BZW. UNFÄHIGKEIT ZUR NUTZUNG JEGLICHEN CELESTRON-PRODUKTS
ERGEBEN. JEGLICHE STILLSCHWEIGENDE ODER NICHT BEANSPRUCHBARE GEWÄHRLEISTUNGEN IST ZEITLICH AUF ZWEI JAHRE AB DATUM DES URSPRÜNGLICHEN KAUFS BESCHRÄNKT.
Einige Staaten erlauben keinen Ausschluss oder keine Beschränkung von zufälligen oder Folgeschäden sowie keine zeitliche Begrenzung
einer stillschweigenden Garantie; daher könnten die oben genannten Beschränkungen und Ausschlüsse auf Sie nicht zutreffen.
Diese Garantie gibt Ihnen bestimmte Rechte und darüber hinaus könnten Sie auch weitere Rechte haben, die von Land zu Land variieren.
Celestron behält sich das Recht vor, jegliches Modell und jeglichen Teleskoptyp zu modifi zieren oder aus der Produktlinie auszuschließen,
ohne Ihnen dies vorher anzukündigen.
Wenn ein Garantiefall eintritt oder wenn Sie Hilfestellung bei der Verwendung Ihres Teleskops benötigen, wenden Sie sich bitte an:
Celestron - 800.421.9649
HINWEIS: Diese Garantie ist für Kunden in den USA und Kanada gültig, die dieses Produkt von einem autorisierten Celestron-Händler in den USA oder Kanada gekauft haben. Eine Garantie außerhalb der USA
und Kanada gilt nur für Kunden, die bei einem internationalen Celestron-Vertrieb oder einem autorisierten Celestron-Händler im jeweiligen Land eingekauft haben. Bitte wenden Sie sich für jeden
Garantieservice an diese Ansprechpartner.
FCC-ERKLÄRUNG: Dieses Gerät wurde getestet und entspricht den Grenzwerten für digitale Geräte der Klasse B in Übereinstimmung mit Artikel 15
der FCC-Bestimmungen. Diese Grenzwerte bieten einen angemessenen Schutz vor Störungen in Wohnanlagen. Diese Dieses Gerät erzeugt, verwendet
Hochfrequenzenergie und kann diese ausstrahlen und kann, wenn es nicht in Übereinstimmung mit den Anweisungen installiert und verwendet wird,
Störungen im Funkverkehr verursachen. Es kann jedoch nicht garantiert werden, dass in einer bestimmten Einrichtung keine Störungen auftreten. Falls
dieses Gerät Störungen des Radio- oder Fernsehempfangs verursacht, was durch ein vorübergehendes des Geräts festgestellt werden kann, wird der
Benutzer dazu angehalten, die Störung durch eine oder mehrere der nachstehenden Maßnahmen zu beheben:
• Neuausrichtung oder Positionsveränderung der Empfangsantenne.
• Den Abstand zwischen dem Gerät und dem Empfänger vergrößern.
• Anschluss des Geräts an eine Steckdose, die nicht am selben Stromkreis angeschlossen ist, wie die des Empfängers.
• Den Händler oder einen erfahrenen Radio- und Fernsehtechniker um Hilfe bitten.
Produktdesign und technische Daten können ohne Vorankündigung geändert werden.
Dieses Produkt wurde für die Verwendung durch Personen von 14 Jahren und darüber entworfen und vorgesehen.
© 2016 Celestron • Alle Rechte vorbehalten.
www.celestron.com
2835 Columbia Street • Torrance, CA 90503 U.S.A.
In China gedruckt
Telefon: 800.421.9649
24 | DEUTSCH
03 -16
Page 25

MANUAL DE INSTRUCCIONES
Modelo #22401- Inspire 70AZ
Modelo #22402- Inspire 80AZ
Modelo #22403- Inspire 100AZ
ESPAÑOL
Page 26

CONTENIDO DE LA CAJA
Recomendamos guardar la caja de su telescopio para poder usarla para guardarlo cuando no lo use. Desembale cuidadosamente la
caja, algunas piezas son pequeñas. Use la lista de piezas siguiente para comprobar que dispone de todas las piezas y accesorios.
LISTA DE PIEZAS
1. Tubo de telescopio
1
2
3
4
5
6
7
8
9
10
11
12
13
14
15
16
2. Localizador StarPointer Pro
3. Ocular de 20 mm
4. Diagonal de imagen recta
5. Mando de enfoque
6. Micrómetro de enfoque
7. Mango de desplazamiento/Mando del embrague altitud
8. Trípode
9. Mando de bloqueo de bandeja de accesorios
10. Bandeja de accesorios plegable
11. Tapa de lente/Adaptador de teléfono inteligente
12. Perno de montaje del tubo
13. Soporte altazimut
14. Linterna extraíble
15. Mando de tensión de bandeja de accesorios
16. Ocular de 10 mm
AVISO SOLAR
No mire nunca directamente al Sol con los ojos descubiertos o un telescopio, a menos que tenga un fi ltro solar adecuado. Puede producir daños oculares permanentes e irreversibles.
No use nunca su telescopio para proyectar una imagen del Sol sobre ninguna superfi cie. La acumulación interna de calor puede dañar el telescopio y cualquier accesorio que tenga instalado.
No use nunca un fi ltro solar de ocular ni una cuña Herschel. La acumulación interna de calor en el telescopio puede hacer que los dispositivos se agrieten o rompan, permitiendo pasar la luz solar sin fi ltrar hasta el ojo.
No deje el telescopio sin supervisión, especialmente cuando estén presentes niños o adultos no familiarizados con los procedimientos operativos correctos del telescopio.
MONTAJE DEL TELESCOPIO
SOPORTE
El trípode y el soporte del Inspire se entregan totalmente
montados, por lo que la instalación es sencilla.
1. Saque el trípode y el soporte de la caja.
2. Afl oje los mandos de la parte inferior de cada pata y extienda
la sección interna de la pata a la longitud deseada. Apriete
los mandos para asegurar las patas, con cuidado de no
apretarlos en exceso.
3. Ponga el trípode de pie y separe las patas hasta que la bandeja
de accesorios plegable encaje en posición.
4. Alinee las pestañas del mando de bloqueo de la bandeja
de accesorios de muelle con muescas en la bandeja de
accesorios y presione hacia abajo. Gire el mando de bloqueo
en el sentido de las agujas del reloj aproximadamente 20
grados para bloquear la bandeja en posición.
5. Gire el mando de tensión de la bandeja de accesorios hasta
que se detenga. No lo apriete en exceso.
NOTA: Cuando cierre el trípode al fi nalizar la sesión de observación, asegúrese de afl ojar
primero el mando de tensión por completo, y afl oje a continuación el mando de
bloqueo girándolo en sentido contrario a las agujas del reloj jasta que el muelle eleve
el mando de bloqueo. Agarre el mando y levántelo, el trípode se plegará.
Mando de tensión
Mando de bloqueo
26 | ESPAÑOL
Page 27

TUBO DEL TELESCOPIO
Para fi jar el tubo del telescopio al trípode y el soporte:
1. Afl oje los dos pernos de montaje del tubo del lateral de la base
de fi jación en la parte superior del soporte.
2. Localice la barra de fi jación de la parte inferior del tubo del
telescopioy deslícela en la base. El extremo del ocular del
tubo del telescopio debe apuntar en la misma dirección que el
mango de desplazamiento del soporte.
3. Cuando la fi jación esté centrada en la base, apriete los dos
pernos de montaje del tubo, comenzando primero por el más
grande. Termine apretando el más pequeño.
4. Retire la tapa de la lente cuando esté preparado para observar
tirando de ella para sacarla del parasol de la lente.
DIAGONAL RECTA
Los telescopios Inspire incluyen una diagonal de imagen recta
de 90º. Este accesorio usa un prisma para desviar la luz en un
ángulo de 90º, ofreciendo una posición de observación más
cómoda. También le ofrece una imagen con orientación 100%
correcta, permitiendo que pueda usar fácilmente el telescopio
para observación terrestre diurna. Para instalar la diagonal de
imagen recta:
1. Saque las tapas de ambos extremos de la diagonal.
2. Afl oje los tornillos de la parte posterior del enfoque y saque la
tapa pequeña.
3. Introduzca el tubo más pequeño de la diagonal en la parte
posterior del enfoque y asegúrelo apretando los tornillos.
OCULARES
Su telescopio incluye dos oculares, uno de baja potencia (ocular
de 20 mm) y uno de una potencia superior (ocular de 10 mm).
Siempre que instale el telescopio, comience por el ocular de 20
mm. Cuando haya centrado el objetivo en el ocular de 20 mm,
puede cambiar al ocular de mayor potencia de 10 mm para
obtener una visión más detallada.
Para instalar un ocular:
1. Afl oje los tornillos del extremo abierto de la diagonal estelar.
2. Introduzca el cañón cromado del ocular de 20 mm en la diagonal estelar.
3. Apriete los tornillos para asegurar el ocular.
4. Para ver la imagen lo más defi nida posible, debe ajustar el
enfoque del telescopio. Mire por el ocular y gire lentamente
los mandos de enfoque hasta ver la imagen lo más defi nida
posible.
NOTA: Siempre debería ajustar el enfoque cuando cambie de oculares o si otra persona
observa por el telescopio, dado que el enfoque puede ser distinto para cada persona.
ESPAÑOL | 27
Page 28

LOCALIZADOR STARPOINTER PRO
Su telescopio Inspire incluye un localizador StarPointer Pro que
se utiliza como herramienta de mira al apuntar el telescopio a un
objetivo lejano.
Para instalar el localizador:
1. Deslice el soporte del localizador en la ranura de la fi jación
del telescopio, en la parte superior del enfoque. La apertura
grande del localizador debe estar orientada a la parte anterior
del telescopio.
2. Asegure el soporte apretando el tornillo de la ranura de la fi jación.
El StarPointer Pro usa una batería de botón CR-2032. Para
cambiar la batería, gire el StarPointer. El compartimiento de la
batería se encuentra en el centro del interruptor para encender/
apagar/luminocidad. Use una moneda en la ranura de la tapa
para desenroscarla en sentido contrario a las agujas del reloj
hasta que se suelte la tapa. Introduzca la nueva baterías con
el lado positivo (+) orientado hacia arriba y vuelva a enroscar
la tapa. Si el StarPointer Pro no se enciende de inmediato,
abra el compartimiento de batería para retirar el pequeño disco
de plástico que se encuentra entre la batería y la cubierta
de la batería. Sirve para evitar que se descargue la batería
accidentalmente durante el transporte.
Si va a guardar el telescopio un tiempo prolongado, es preferible
retirar la batería para evitar una corrosión accidental.
Mandos de ajuste
Horizontal
Interruptor para encender/
apagar/luminocidad
Tapa de batería
Mandos de ajuste
Vertical
LINTERNA
El soporte Inspire incluye una linterna LED roja integrada situada
en el centro de los ejes izquierdo y derecho del soporte. Para
sacarla del soporte, agarre la parte superior y tire hacia arriba.
Para instalar la batería AA:
1. Desenrosque la lente roja del extremo de la linterna.
2. Saque la linterna de su cubierta protectora.
3. Desenrosque la tapa de la parte posterior de la linterna para
mostrar el compartimiento de batería.
4. Introduzca la batería AA en la linterna, con el lado positivo (+)
primero y vuelva a colocar la tapa del compartimiento.
5. Vuelva a colocar la linterna en su chasis protector y enrosque la
lente roja para fi jarla en posición.
Para encender la linterna, pulse el botón con recubrimiento de goma de la parte posterior.
La linterna ha sido diseñada para guardarse en el soporte y puede usarse en esta posición. Encienda la luz y obtendrá una luz difusa roja
sobre la bandeja de accesorios, facilitando la identifi cación de sus oculares y fi ltros en la oscuridad.
NOTA: No olvide apagar la linterna cuando no la use. Si va a guardar el telescopio un tiempo prolongado, es preferible retirar la batería para evitar una corrosión accidental.
EL MICRÓMETRO DE ENFOQUE
Los tubos de su telescopio Inspire incluuyen un micrómetro de enfoque que permite enfocar repetidamente objetos a distintas distancias
rápida y fácilmente incluso antes de mover el telescopio hacia el objetivo. La ventana del lateral del enfoque permite ver una escala
numérica que muestra un número del 1 al 10. El 0 en la escala representa el punto más cercano en el que se puede obtener enfoque con
los oculares y diagonal estándar. El 10 representa el enfoque a infi nito. Aunque los objetos astronómicos se encontrarán habitualmente
en el enfoque a infi nito, puede que desee usar el telescopio para ver objetos terrestres, como nidos de aves u otros objetivos a
distancias fi jas. Cuando haya enfocado un objetivo terrestre, anote el número mostrado en la escala. La próxima vez que observe el
mismo objetivo desde la misma ubicación de observación, puede girar rápidamente el enfoque al mismo número y la imagen debería
quedar enfocada cuando observe por el ocular.
28 | ESPAÑOL
Page 29

MOVER EL TELESCOPIO
El soporte altazimut Inspire es fácil de usar. Para mover el
telescopio a izquierda y derecha, afl oje el mando de tensión de
azimut en la base del soporte entre dos de las patas del trípode.
Afl oje el mando del extremo del mango de desplazamiento y
mueva del telescopio a la ubicación deseada. Puede ajustar la
tensión del movimiento a izquierda y derecha ajustando el mando
de tensión de azimut.
Para mover el telescopio arriba y abajo, afl oje el bloqueo de altitud
girando el mando del extremo del mango de desplazamiento en
sentido contrario a las agujas del reloj. Mueva el mango arriba
o abajo según sea necesario y gire el mando en sentido de las
agujas del reloj para bloquear el telescopio en el objetivo.
ALINEAR EL LOCALIZADOR STARPOINTER PRO
El localizador StarPointer Pro le ayuda a apuntar el telescopio mirando por la ventana redonda y cubriendo el objetivo con la retícula roja
proyectada en la ventana. La primera vez que monte el telescopio, deberá alinear el localizador con la óptica principal del telescopio. Aunque
puede realizar este paso de noche, es notablemente más sencillo de día. Cuando haya fi nalizado la alineación del localizador, no deberá
repetir este paso a menos que se golpee el localizador o se caiga el telescopio.
1. Saque su telescopio al exterior durante el día. Con el ojo desnudo, localice un objeto fácilmente reconocible, como una farola, una
matrícula de coche o un árbol alto. El objeto debe estar lo más lejos posible, al menos a 400 m.
2. Saque la cubierta contra el polvo principal del telescopio y asegúrese de que el ocular de 20 mm esté instalado.
3. Mueva el telescopio a izquierda y derecha o arriba y debajo de forma que apunte aproximadamente al objeto elegido en el paso 1.
4. Mire por el ocular del telescopio y muévalo manualmente hasta que el objeto elegido quede en el centro del campo de visión. Si la imagen
está borrosa, gire suavemente los mandos de enfoque hasta que quede enfocada.
5. Cuando el objeto esté centrado en el ocular de 20 mm, active el localizador girando el mando de encendido/brillo de la parte inferior de la
unidad al máximo.
6. Con la cabeza a aproximadamente 30cm tras el localizador, mire por la ventana redonda del localizador y localice la retícula roja.
Probablemente esté cercana, pero no encima, del objeto que observe por el ocular de 20 mm.
7. Sin mover el telescopio, use los dos mandos de ajuste del lateral y bajo el localizador. Uno controla el movimiento a izquierda-derecha de
la retícula, y el otro controla el movimiento arriba-abajo. Ajuste ambos hasta que la retícula roja aparezca sobre el mismo objeto que esté
observando con el ocular de 20 mm.
Ahora elija otro objetivo distante para practicar el apuntado con el telescopio. Mire por la ventana del localizador StarPointer Pro y coloque
la retícula roja sobre el objetivo que esté intentando ver, y compruebe que aparezca en el ocular del telescopio.
Con el localizador alineado, el telescopio está totalmente montado y está a punto para observar.
NOTA: Asegúrese de apagar el localizador StarPointer Pro cuando no esté en uso para conservar batería.
PRIMERA SESIÓN DE OBSERVACIÓN ASTRONÓMICA
LA LUNA
Ahora está a punto para sacar su telescopio de noche y realizar observaciones reales.
Comencemos con la Luna. La Luna tarda aproximadamente un mes en realizar un ciclo de fases completo, de Luna nueva a Luna llena y
vuelta a empezar. Pruebe a observarla en distintos momentos de este ciclo.
Aunque puede observar la Luna siempre que esté visible en el fi rmamento, el mejor momento para observarla es a partir de dos días
después de Luna nueva hasta algunos días antes de Luna llena. Durante este periodo podrá ver el máximo detalle de los cráteres y riscos
lunares. Consulte un calendario para saber cuándo será la siguiente Luna nueva.
ESPAÑOL | 29
Page 30

1. Con una vista clara de la Luna, instale el telescopio con el ocular de 20 mm.
2. Encienda el localizador y mire por él para localizar la retícula roja.
3. Mueva el telescopio hasta que pueda ver la Luna por la ventana del localizador y la retícula esté centrada en la Luna.
4. Mire por el ocular de 20 mm. Gire suavemente los mandos de enfoque para ajustar la defi nición de la imagen.
FELICIDADES. HA OBSERVADO SU PRIMER OBJETO CELESTE.
Para tener una vista más cercana de la Luna, cambie el ocular de 20 mm por el ocular de 10 mm. Obtendrá un mayor aumento, haciendo
que la Luna se vea mucho más grande. Puede tener que ajustar los mandos de enfoque cuando cambie oculares, para asegurarse de
obtener la imagen más defi nida posible.
Puede observar muchos otros objetos celestes, como planetas, clústeres estelares y nebulosas usando esta misma técnica elemental.
FOTOGRAFIAR CON SU TELÉFONO
Ahora que ha observado con su telescopio, el paso siguiente
es capturar una imagen de lo que está viendo. Los telescopios
Inspire tienen un adaptador de teléfono integrado en la tapa de la
lente. Para usar esta característica:
1. Comience sacando la tapa naranja de la apertura para
cámara en la tapa de la lente. Puede hacerlo tirando de la
pestaña de goma naranja del interior de la tapa de la lente. La
tapa debería salir directamente. La tapa y la pestaña pueden
apartarse presionando la pestaña contra el clip de sujeción
situado en la parte posterior de la tapa de la lente, al lado del
soporte del ocular.
2. Gire la tapa de forma que el exterior de ésta mire hacia arriba.
Levante las correas y deslice el teléfono entre ellas y la tapa
de la lente, de forma que la cámara esté orientada mirando por
la apertura para la cámara. Las correas deberían ofrecer una
tensión sufi ciente para aguantar el dispositivo contra la tapa, y
la arandela de silicona negra ofrecerá la fricción sufi ciente para
evitar que el teléfono se desplace.
RECOMENDACIÓN: Dependiendo del diseño del teléfono, la cámara puede estar en el centro
del dispositivo o en una esquina. Puede que desee cambiar el ángulo de las
correas para asegurar mejor el teléfono. Dispone de ocho puntos de anclaje
distintos para elegir por el borde de la tapa de la lente. Recolóquelos en
distintos puntos de anclaje para obtener el mejor resultado posible.
3. Gire la taqpa y asegúrese de que la lente de la cámara
esté centrada en la apertura de la tapa de la lente. Cuanto
mejor centrada esté, más fácil será capturar imágenes por
el telescopio.
4. Tome el ocular de 20 mm y saque la almohadilla de goma
tirando de ella para sacarla del cuerpo del ocular. En el
interior de la tapa de la lente se encuentra una sujeción para la
almohadilla para evitar perderla. Estire la almohadilla alrededor
de la sujeción redonda y deslice la almohadilla hasta el fondo.
30 | ESPAÑOL
Page 31

5. Afl oje los tornillos situados en el soporte del ocular, en el interior
de la tapa de la lente. Coloque la sección negra del ocular en el
soporte del ocular y apriete los tornillos para asegurar el ocular
en posición.
6. Tome la tapa de la lente con el teléfono y el ocular instalados
e introduzca el cañón cromado del ocular en la diagonal en
la parte posterior del enfoque del telescopio. Asegúrelo en
posición fi jando los tornillos de la diagonal.
7. Active su app de cámara en el teléfono y ajuste el enfoque,
como lo haría con el ocular, usando la imagen que aparezca en
la pantalla.
NOTA: Asegúrese de apagar el fl ash del teléfono.
8. Cuando aparezca la imagen defi nida, capture la imagen.
Es preferible intentarlo durante el día primero, y cuando todo esté
confi gurado correctamente, salir al exterior e intentar fotografi ar
la Luna. Cuando haya practicado y se sienta cómodo usando
el ocular de 20 mm, intente usar el adaptador de cámara con el
ocular de 10 mm para un aumento superior.
RECOMENDACIONES Y TRUCOS PARA FOTOGRAFIAR
Controles de cámara
Las app de cámara estándar que están preinstaladas en el teléfono ofrecen controles muy rudimentarios y han sido diseñadas para
ajustar automáticamente el enfoque y la exposición. No resulta un problema para la fotografía habitual, por ejemplo en paisajes y
retratos, pero puede ser un problema para capturar imágenes de un planeta o la Luna, en la que se dispone de un objeto muy brillante
contra un fi rmamento muy oscuro. La cámara del teléfono intenta compensar el desequilibrio de iluminación haciendo más claras las
zonas oscuras, lo que provoca que las zonas claras tengan una exposición excesiva y se pierda el detalle. Si la confi guración de su
app de cámara no le permite seleccionar manualmente el punto de enfoque o tiene la opción de desactivar el autofocus o exposición
automática, puede que quiera considerar usar una app de cámara distinta. Puede encontrar muchas apps para iOS y Android que
ofrecen un mayor control de la cámara. Muchas son gratuitas.
Vibración
Para ayudar a eliminar cualquier vibración producida cuando toque la cámara para capturar la imagen, intente usar un retraso del
obturador. Algunas apps ofrecen un retraso de 2, 5 o 10 segundos antes de capturar la imagen. De este modo se pueden disipar las
vibraciones antes de capturar la imagen.
Sujetos de fotografía
Con este método debería poder capturar imágenes de objetos terrestres de día e imágenes astronómicas nocturnas de la Luna y
planetas brillantes (Venus, Marte, Júpiter y Saturno). Por desgracia, los sensores de la cámara de un teléfono no han sido diseñados
para funcionar correctamente con muy poca luz, por lo que no será posible capturar objetos astronómicos tenues como galaxias o
nebulosas de este modo.
Aumento
Cuando observe la Luna o planetas con un telescopio estacionario, observará que el objeto parece moverse por el campo de visión.
Este movimiento es causado por la rotación de la Tierra. Si observa por el ocular de 20 mm, un planeta tardará aproximadamente 3,0
minutos para moverse por el campo de visión completo del ocular. Si usa el ocular de 10 mm, solamente tardará 1,5 minutos. El teléfono
no usa el campo de visión completo del ocular, solamente usa su centro, haciendo que el movimiento parezca más rápido aún. Cuando
centre un objeto astronómico en el campo de visión del teléfono, intente anticiparse al objeto. Pruebe a apuntar el telescopio por delante
del planeta de forma que apenas entre en el campo de visión. De este modo se maximizará el tiempo que tarda en recorrer todo el campo
de visión, permitiendo disponer de más tiempo para capturar imágenes antes de necesitar volver a apuntar el telescopio. El ocular de
10 mm tendrá un campo de visión más estrecho, y deberá por tanto ajustarse más a menudo. Al principio será más sencillo trabajar con
el ocular de 20 mm. Cuando se sienta cómodo con él, pruebe a pasar al ocular de 10 mm.
ESPAÑOL | 31
Page 32

GARANTÍA LIMITADA POR DOS AÑOS DE CELESTRON
A. Celestron garantiza que su telescopio está libre de defectos de material y mano de obra durante dos años. Celestron reparará o sustituirá
el producto o parte del mismo si, al ser inspeccionado por Celestron, demuestra tener defectos de materiales o mano de obra. Como
condición de la obligación de Celestron de reparar o sustituir dicho producto, el producto debe ser devuelto a Celestron junto con una
prueba de compra adecuada para Celestron.
B. Debe obtener un número de autorización de devolución adecuado de Celestron antes de la devolución. Llame a Celestron al
(310) 328-9560 para recibir el número que se mostrará en el exterior del recipiente de transporte.
Cualquier devolución debe ir acompañada de una declaración por escrito en la que conste el nombre, dirección y número de teléfono de
contacto durante el día del propietario, junto con una breve descripción de cualquier defecto reclamado. Las piezas o productos sustituidos
pasarán a ser propiedad de Celestron.
El cliente será responsable de cualquier coste de transporte y seguros, tanto hacia como desde la fábrica de Celestron, y deberá
cubrir dichos costes.
Celestron realizará todos los esfuerzos razonables para reparar o sustituir cualquier telescopio cubierto por esta garantía en los treinta
días siguientes a su recepción. En caso de que la reparación o sustitución precise de más de treinta días, Celestron se lo notifi cará
al cliente. Celestron se reserve el derecho de sustituir cualquier producto que haya sido dejado de fabricar por un nuevo producto de
valor y función comparables.
Esta garantía será nula y sin efecto en caso de que un producto cubierto haya sido modifi cado en su diseño o función, o sometido a abuso,
mal uso, mala manipulación o reparación no autorizada. Además, las averías o deterioro del producto por desgaste normal no están cubiertos
por esta garantía.
CELESTRON RECHAZA TODA RESPONSABILIDAD POR GARANTÍAS, EXPLÍCITAS O IMPLÍCITAS, SEAN DE ADECUACIÓN COMERCIAL PARA UN USO ESPECÍFICO, SALVO LAS EXPLÍCITAMENTE AQUÍ DECLARADAS. LA ÚNICA
OBLIGACIÓN DE CELESTRON EN ESTA GARANTÍA LIMITADA SERÁ REPARAR O SUSTITUIR EL PRODUCTO CUBIERTO, DE ACUERDO CON LOS TÉRMINOS AQUÍ ESTABLECIDOS. CELESTRON RECHAZA EXPLÍCITAMENTE
CUALQUIER PÉRDIDA DE BENEFICIOS, DAÑOS GENERALES, ESPECIALES, INDIRECTOS O CONSIGUIENTES QUE PUEDAN RESULTAR DE LA VULNERACIÓN DE CUALQUIER GARANTÍA, O SURJAN DEL USO O INCAPACIDAD PARA
USAR CUALQUIER PRODUCTO CELESTRON. CUALQUIER GARANTÍA IMPLÍCITA QUE NO PUEDA REHUSARSE SERÁ LIMITADA EN SU DURACIÓN A UN TÉRMINO DE DOS AÑOS DESDE LA FECHA DE COMPRA ORIGINAL.
Algunos estados no permiten la exclusión o limitación de datos incidentales o consiguientes, ni permiten limitar el tiempo que dura una
garantía implícita, por lo que las limitaciones indicadas o exclusiones pueden no serle aplicables.
Esta garantía le ofrece derechos legales específi cos, y puede tener otros derechos, que varían según el estado.
Celestron se reserva el derecho de modifi car o cesar, sin previo aviso, cualquier modelo o estilo de telescopio.
Si surgen problemas de garantía, o necesita asistencia al usar su telescopio, contacte con: Celestron - 800.421.9649
NOTA: Esta garantía tiene validez para clientes de EE.UU. y Canadá que hayan adquirido este producto en un vendedor autorizado de Celestron en EE.UU. y Canadá. La garantía fuera de EE.UU. y Canadá solamente tiene
validez para clientes que hayan comprado en un distribuidor internacional de Celestron o un vendedor de Celestron autorizado en el país específi co. Contacte con ellos para obtener servicio de garantía.
NOTA FCC: Este equipo ha sido probado y cumple con los límites de un dispositivo digital de Clase B, según el apartado 15 de las normas FCC. Estos
límites están diseñados para proporcionar una protección razonable contra interferencias dañinas en una instalación doméstica. Este equipo genera, usa
e irradia energía de radiofrecuencia y, si no se instala y utiliza de acuerdo con las instrucciones, puede provocar interferencias dañinas en comunicaciones
por radio. Sin embargo, no existe ninguna garantía de que no se produzcan interferencias en una instalación concreta. Si este equipo causa interferencias
perjudiciales en la recepción de radio o televisión, lo que puede determinarse encendidendo y apagando el equipo, se recomienda al usuario que intente
corregir la interferencia con una o más de las medidas siguientes:
• Reorientar o recolocar la antena receptora.
• Aumentar la separación entre el equipo y el receptor.
• Conectar el equipo a una toma de un circuito distinto al que esté conectado el receptor.
• Consultar al vendedor o aun técnico experimentado de radio/TV para obtener ayuda.
El diseño y las especifi caciones del producto están sujetos a cambios sin notifi cación previa.
Este producto ha sido diseñado y está pensado para ser usado por personas de 14 años o más de edad.
© 2016 Celestron • Todos los derechos reservados
www.celestron.com
2835 Columbia Street • Torrance, CA 90503 EE.UU.
Teléfono: 800.421.9649
32 | ESPAÑOL
03 -16
Impreso en China
Page 33

MANUALE DI ISTRUZIONI
Modello #22401- Inspire 70AZ
Modello #22402- Inspire 80AZ
Modello #224 03- Inspire 100AZ
ITALIANO
Page 34

CONTENUTO DELLA CONFEZIONE
Si consiglia di conservare la confezione del telescopio per riporre il telescopio quando non è in uso. Disimballare con attenzione la
confezione poiché alcuni componenti sono di piccole dimensioni. Utilizzare l'elenco dei componenti fornito di seguito per verifi care che
siano presenti tutti i componenti e gli accessori.
ELENCO COMPONENTI
1. Tubo del telescopio
1
2
3
4
5
6
7
8
9
10
11
12
13
14
15
16
2. Cercatore StarPointer Pro
3. Oculare 20 mm
4. Diagonale raddrizzatore d'immagine
5. Manopola di messa a fuoco
6. Micrometro di messa a fuoco
7. Maniglia di rotazione/Altitudine manopola della frizione
8. Treppiede
9. Manopola di blocco del vassoio porta-accessori
10. Vassoio porta-accessori
11. Tappo dell'obiettivo/Adattatore Smartphone
12. Bullone di montaggio del tubo
13. Montatura altazimutale
14. Torcia removibile
15. Manopola di tensionamento del vassoio porta-accessori
16. Oculare 10 mm
AVVERTENZA SOLARE
Mai guardare direttamente il Sole a occhio nudo o con un telescopio, a meno che non si disponga di un fi ltro solare adeguato. Ciò potrebbe causare danni irreversibili agli occhi.
Mai utilizzare il telescopio per proiettare un'immagine del Sole su una qualsiasi superfi cie. L'accumulo interno di calore può danneggiare il telescopio e i relativi accessori ad esso fi ssati.
Mai utilizzare un fi ltro solare per oculare o un prisma di Herschel. L'accumulo di calore all'interno del telescopio può causare l'incrinatura o la rottura di tali dispositivi, lasciando che la luce solare
non fi ltrata passi attraverso l'occhio.
Mai lasciare il telescopio incustodito, sia in presenza di bambini sia di adulti che potrebbero non avere familiarità con le corrette procedure di funzionamento del telescopio
MONTAGGIO DEL TELESCOPIO
MONTATURA
La montatura e il treppiede Inspire sono forniti completamente
assemblati, pertanto il montaggio è semplice.
1. Rimuovere il treppiede e la montatura dalla confezione.
2. Allentare le manopole manuali sulla parte inferiore di ciascuna gamba
ed estendere la sezione interna della gamba all'altezza desiderata.
Stringere le manopole per fi ssare le gambe, prestando attenzione a
non stringere in modo eccessivo.
3. Mettere il treppiede in posizione verticale e tirare le gambe dello
stesso verso l’esterno fi no a quando il vassoio porta-accessori
pieghevole non scatta in posizione.
4. Allineare le linguette sulla manopola di blocco del vassoio porta-
accessori caricato a molla con le scanalature presenti nel vassoio e
premere verso il basso. Ruotare la manopola di blocco in senso orario
di circa 20 gradi per bloccare completamente in posizione il vassoio.
5. Ruotare la manopola di tensionamento del vassoio porta-accessori
in senso orario fi no all'arresto.
NOTA: quando viene chiuso il treppiede al termine della sessione di osservazione, assicurarsi
di allentare innanzitutto la manopola di tensionamento completamente, quindi allentare la
manopola di blocco ruotandola in senso antiorario fi no a quando la molla spinge verso l'alto la
manopola di blocco. Afferrare la manopola e sollevarla verso l'alto per ripiegare il treppiede.
34 | ITALIANO
Non serrare eccessivamente.
Manopola di
tensionamento
Manopola di blocco
Page 35

TUBO DEL TELESCOPIO
Per fi ssare il tubo al treppiede e alla montatura procedere
come segue.
1. Allentare i due bulloni del tubo a lato della sella a coda di
rondine in cima alla montatura.
2. Localizzare la barra a coda di rondine alla base del tubo del
telescopio e farla scorrere sulla sella. L'estremità dell'oculare
sul tubo del telescopio deve puntane nella stessa direzione
della maniglia di rotazione della montatura.
3. Quando la coda di rondine è centrata sulla sella, serrare i due
bulloni, partendo da quello più grande. Terminare serrando
quello più piccolo.
4. Rimuovere il tappo dell'obiettivo quando si è pronti per
l'osservazione semplicemente estraendolo.
IL DIAGONALE RADDRIZZATORE
I telescopi Inspire sono forniti con un diagonale raddrizzatore
d'immagine 90°. Questo accessorio usa un prisma per deviare la
luce di 90°, fornendo una posizione di osservazione più comoda.
Fornisce inoltre un'immagine perfettamente orientata, consentendo
di utilizzare facilmente il telescopio per l'osservazione terrestre
diurna. Per installare il diagonale raddrizzatore d'immagine
procedere come segue.
1. Rimuovere i coperchi da entrambi i lati della diagonale.
2. Allentare le viti sul retro del focheggiatore del telescopio ed
estrarre il piccolo tappo protettivo.
3. Inserire il tubo più piccolo del diagonale sul retro del
focheggiatore e fi ssarlo serrando le viti..
OCULARI
Il telescopio Inspire è dotato di due oculari, uno a bassa potenza
(oculare da 20 mm) e uno ad alta potenza (oculare da 10 mm).
Quando si prepara il telescopio, iniziare sempre con l'oculare da
20 mm. Una volta che l'oggetto target si trova al centro dell'oculare
da 20 mm, è possibile passare all'oculare più potente da 10 mm per
aumentare l'ingrandimento e ottenere una visione più dettagliata.
Per installare l'oculare:
1. Allentare le viti sull'estremità aperta del diagonale
raddrizzatore d'immagine.
2. Inse rire il ba rilotto co lor argento de ll’oculare da 2 0 mm nel diagon ale.
3. Serrare le viti per fi ssare l'oculare.
4. Per vedere l'immagine più nitida possibile, è necessario
regolare la messa a fuoco del telescopio. Guardare attraverso
l'oculare e ruotare lentamente the manopole di messa a fuoco
fi no a vedere l'immagine più nitida possibile.
NOTA: regolare sempre la messa a fuoco quando si cambia oculare o se un'altra
persona osserva attraverso il telescopio, poiché la messa a fuoco può variare
a seconda della persona.
ITALIANO | 35
Page 36

CERCATORE STARPOINTER PRO
Il telescopio Inspire è dotato di un cercatore StarPointer Pro
che viene utilizzato come strumento di visione quando si punta il
telescopio a un oggetto.
Per installare il cercatore procedere come segue.
1. Far scorrere la staffa del cercatore nella scanalatura a coda
di rondine del telescopio in cima al focheggiatore. L'ampia
fi nestrella del cercatore dovrebbe essere rivolta verso la parte
anteriore del telescopio.
2. Fissare la staffa serrando la vite sulla sc analatura a coda di rondine.
Lo StarPointer Pro utilizza una batteria a bottone CR-2032. Per
sostituire la batteria, capovolgere lo StarPointer. Il vano batteria
si trova al centro dell'interruttore On/Off/Luminosità. Inserire
una moneta nella scanalatura dello sportellino e svitarlo in senso
antiorario fi no ad estrarre il coperchio. Inserire la nuova batteria
con il lato positivo (+) rivolto verso l'alto e avvitare nuovamente lo
sportellino. Se StarPointer Pro non si accende immediatamente,
aprire il vano batteria per rimuovere il piccolo disco in plastica che
si trova tra la batteria e lo sportellino. Ciò impedisce che la batteria
si scarichi accidentalmente durante il trasporto.
In caso di inutilizzo prolungato del telescopio, è preferibile
rimuovere la batteria per evitare che si corroda.
TORCIA
Orizzontale
Manopole di regolazione
Interruttore di accensione/
spegnimento/luminosità
Sportellino della batteria
Verticale
Manopole di regolazione
La montatura Inspire è dotata di una torcia rossa LED integrata posta
al centro degli assi destro e sinistro della montatura. Per rimuoverla
dalla montatura, afferrarla semplicemente dall'alto ed estrarla.
Per installare la batteria AA procedere come segue.
1. Svitare la lente rossa in cima alla torcia.
2. Far scorrere via la luce dal coperchio protettivo.
3. Svitare il coperchio sul retro della luce per esporre il vano batteria.
4. Inserire la batteria AA nella torcia, prima il lato positivo (+), e
posizionare nuovamente il coperchio del vano.
5. Inserire la torcia nuovamente nel vano e avvitare la lente rossa
per bloccarla in posizione.
Per accendere la torcia, premere semplicemente il pulsante in gomma sul retro.
La torcia è ideata per essere conservata nella montatura e può dunque essere usata in questa posizione. Accendere la torcia per avere
una luce rossa diffusa sul vassoio porta-accessori, semplifi cando l'identifi cazione degli oculari e dei fi ltri al buio.
NOTA: Non dimenticare di spegnere la torcia quando non in uso. In caso di inutilizzo prolungato del telescopio, è preferibile rimuovere la batteria per evitare che si corroda.
IL MICROMETRO DI MESSA A FUOCO
I tubi del telescopio Inspire sono dotati di un micrometro di messa a fuoco che consente una continua messa a fuoco degli oggetti a
diverse distanze in modo facile e veloce prima anche di spostare il telescopio sull'oggetto. La fi nestra al lato del focheggiatore consente
di vedere la scala graduata con numerazione da 0 a 10. Lo 0 rappresenta il punto più vicino a cui è possibile ottenere la messa a fuoco
utilizzando gli oculari e il diagonale standard. Il 10 rappresenta la messa a fuoco verso l'infi nito. Mentre gli oggetti astronomici richiedono
generalmente la messa a fuoco verso l'infi nito, si può anche desiderare di osservare oggetti terrestri, come nidi di uccelli o altri oggetti
a distanze fi sse. Una volta messo a fuoco un oggetto terrestre, prendere nota del numero mostrato nella scala. La volta successiva che
si osserva lo stesso oggetto dallo stesso punto, è possibile spostare il focheggiatore verso lo stesso numero e l'immagine sarà messa a
fuoco quando si osserva attraverso l'oculare.
36 | ITALIANO
Page 37

SPOSTAMENTO DEL TELESCOPIO
La montatura altazimutale Inspire è semplice da utilizzare. Per spostare il
telescopio a sinistra e a destra, allentare la manopola di tensionamento azimuth
alla base della montatura tra due delle tre gambe del treppiede. Afferrare la
manopola all'estremità della maniglia di rotazione e spostare il telescopio nella
posizione desiderata. È possibile regolare la tensione del movimento sinistro
e destro regolando la manopola di tensionamento azimuth.
Per spostare il telescopio verso l'alto o il basso, allentare il fermo dell'altitudine
ruotando la manopola all'estremità della maniglia di rotazione in senso antiorario.
Spostare la maniglia verso l'alto o il basso come necessario e ruotare la
manopola in senso orario per bloccare il telescopio sull'oggetto osservato.
ALLINEAMENTO DEL CERCATORE STARPOINTER PRO
Il cercatore StarPointer Pro aiuta a puntare il telescopio mediante l'osservazione attraverso la fi nestrella circolare, segnalando l'oggetto con
il punto rosso proiettato nella fi nestrella. Al primo assemblaggio del telescopio è necessario allineare il cercatore con le ottiche principali
del telescopio. Sebbene questa operazione possa essere effettuata di notte, è decisamente più facile da eseguire di giorno. Una volta
completato l'allineamento del cercatore, non è necessario ripetere questo passaggio salvo che il cercatore riceva un colpo o il telescopio cade.
1. Portare fuori il telescopio durante il giorno. A occhio nudo, individuare un oggetto facilmente riconoscibile, come ad esempio un semaforo,
la targa di un'auto o un albero di grandi dimensioni. L'oggetto deve trovarsi il più lontano possibile, ma almeno a 400 metri.
2. Rimuovere dal telescopio il tappo principale e assicurarsi che l'oculare da 20 mm sia installato.
3. Muovere il telescopio verso destra o sinistra, verso l'alto o il basso in modo tale che il telescopio sia puntato verso l'oggetto
individuato al punto 1.
4. Osservare attraverso il telescopio mediante l'oculare e muovere manualmente il telescopio fi no a quando l'oggetto scelto non si trova al
centro del campo visivo.. Se l'immagine è sfuocata, ruotare le manopole di messa a fuoco fi no a raggiungere una buona messa a fuoco.
5. Una volta centrato l'oggetto nell'oculare da 20 mm, accendere il cercatore ruotando la manopola di accensione/luminosità sulla base
dell'unità fi no a fi ne corsa.
6. Con la testa a circa 30 cm dal cercatore, osservare attraverso la fi nestrella circolare e individuare il reticolo rosso. Sarà probabilmente
vicino, non al di sopra dell'oggetto quando si guarda attraverso l'oculare da 20 mm.
7. Senza muovere il telescopio, ruotare le due manopole di regolazione sul lato e sotto il cercatore. Una controlla il movimento sinistra-destra
del reticolo, mentre l'altra controlla il movimento su-giù. Regolare entrambe fi no a quando il reticolo appare sopra l'oggetto che si sta
osservando attraverso l'oculare da 20 mm.
Ora scegliere altri oggetti lontani per fare pratica nel puntare il telescopio. Osservare attraverso la fi nestrella dello StarPointer Pro e collocare
il reticolo rosso sull'oggetto che si desidera osservare verifi cando che si trovi nell'oculare del telescopio.
Dopo l'allineamento, il telescopio è montato e tutto è pronto per l'osservazione.
NOTA: per risparmiare batteria, assicurarsi di spegnere il cercatore StarPointer Pro quando non in uso.
PRIMA SESSIONE DI OSSERVAZIONE ASTRONOMICA
LA LUNA
Ora il telescopio è pronto per delle vere osservazioni notturne!
Iniziamo con la Luna. La Luna impiega circa un mese per completare un intero ciclo da Luna nuova a Luna piena. Provare ad osservarla
nelle diverse fasi.
La Luna è osservabile ogni qualvolta è visibile nel cielo, tuttavia il periodo migliore per osservarla è a partire dal terzo giorno di Luna nuova
e fi no a qualche giorno prima della Luna piena. Durante questo periodo, è possibile osservare maggiori dettagli sui crateri e sui monti lunari.
Consultare un calendario per sapere quando sarà la prossima Luna nuova.
ITALIANO | 37
Page 38

1. Quando si ha una buona visione della Luna, impostare il telescopio con l'oculare da 20 mm.
2. Accendere il cercatore e osservare attraverso per trovare il reticolo rosso.
3. Muovere il telescopio fi no a vedere la Luna attraverso la fi nestrella del cercatore e centrare la Luna nel reticolo.
4. Guardare attraverso l'oculare da 20 mm. Ruotare delicatamente le manopole di messa a fuoco per regolare la nitidezza dell'immagine.
CONGRATULAZIONI! HAI APPENA OSSERVATO IL TUO PRIMO CORPO CELESTE!
Per avere una visione ravvicinata della Luna, sostituire l'oculare da 20 mm con quello da 10 mm. Fornirà un maggiore ingrandimento, facendo
apparire la Luna più grande. Potrebbe essere necessario regolare le manopole di messa a fuoco quando si cambia oculare per garantire
sempre la visione di un'immagine nitida.
È possibile osservare numerosi corpi celesti, come pianeti, ammassi di stelle e nebulose utilizzando la stessa tecnica base.
CATTURARE IMMAGINI CON LO SMARTPHONE
Ora che si è osservato con il telescopio, il passo successivo è
catturare le immagini di ciò che si osserva. I telescopi Inspire
sono dotati di un adattatore per smartphone integrato nel tappo
dell'obiettivo. Per usare questa funzione procedere come segue.
1. Iniziare estraendo il tappo arancione dall'apertura della
fotocamera nel tappo dell'obiettivo. È possibile fare ciò tirando
il cordino arancione posto all'interno del tappo dell'obiettivo. Il
tappo deve saltare fuori. Il tappo e il cordino possono essere
conservati sistemando il cordino nella clip posta sul retro del
tappo dell'obiettivo vicino al supporto dell'oculare.
2. Ruotare il tappo in modo che l'esterno del tappo sia rivolto
verso l'alto. Sollevare le fasce elastiche e far scorrere lo
smartphone tra le fasce e il tappo dell'obiettivo in modo che
la fotocamera sia rivolta verso l'apertura. Le fasce forniscono
abbastanza tensione per tenere il dispositivo contro il tappo
e l'anello nero in silicone fornisce l'aderenza necessaria per
evitare che il cellulare scivoli via.
SUGGERIMENTO: A seconda del tipo di smartphone, la fotocamera può trovarsi al centro del
dispositivo oppure in un angolo. Modifi care l'angolatura delle fasce elastiche
per fi ssare meglio il cellulare. Sono presenti otto diversi punti di ancoraggio
intorno al bordo del tappo dell'obiettivo. Sistemare le fasce in diversi punti
di ancoraggio per ottenere risultati ottimali.
3. Capovolgere il tappo e assicurarsi che la lente della
fotocamera sia centrata sull'apertura del tappo dell'obiettivo.
Più la fotocamera è centrata, più facile sarà catturare immagini
attraverso il telescopio.
4. Prendere l'oculare da 20 mm e rimuovere la conchiglia oculare
in gomma dell'oculare estraendolo dal corpo dell'oculare.
È presente un blocco della conchiglia oculare all'interno del
tappo dell'obiettivo per non perderla. Tirare la conchiglia
oculare intorno al blocco e rimuoverlo completamente dalla
parte inferiore.
38 | ITALIANO
Page 39

5. Allentare le viti poste sul supporto dell'oculare all'interno del tappo
dell'obiettivo. Sistemare la parte nera dell'oculare nel supporto
dell'oculare e serrare le viti per fi ssare l'oculare in posizione.
6. Prendere quindi il tappo dell'obiettivo e l'oculare montato
e inserire il barilotto cromato dell'oculare nel diagonale sul
retro del focheggiatore del telescopio. Fissarlo in posizione
serrando le viti di regolazione sul diagonale.
7. Attivare l'app della fotocamera sullo smartphone e regolare
la messa a fuoco, come si farebbe per l'oculare, questa volta
utilizzando l'immagine che appare sullo schermo.
NOTA: assicurarsi di spegnere il fl ash del cellulare.
8. Quando appare l'immagine scattare la foto.
È preferibile provare ciò durante il giorno; quindi, una volta che tutto è
confi gurato correttamente, portare fuori il telescopio e provare a fare
una foto alla Luna. Una volta fatta pratica e acquisita familiarità con
l'uso dell'oculare da 20 mm, provare l'adattatore della fotocamera
con l'oculare da 10 mm per un maggiore ingrandimento.
SUGGERIMENTI E TRUCCHI PER CATTURARE LE IMMAGINI
Comandi fotocamera
Le app standard della fotocamera pre-installate nello smartphone offrono dei comandi rudimentali e sono ideati per regolare
automaticamente la messa a fuoco e l'esposizione. Per scattare semplici fotografi e come ritratti o paesaggi ciò non è un problema, ma
può esserlo quando si scattano fotografi e di un pianeta o della Luna dove abbiamo un oggetto molto luminoso su uno sfondo molto
scuro. La fotocamera del cellulare cerca di compensare lo sbilanciamento della luce illuminando le zone scure, ma ciò provoca una
sovraesposizione delle zone luminose e annulla i dettagli. Se le impostazioni dell'app della fotocamera non consentono di selezionare
manualmente il punto di messa a fuoco o presentano l'opzione di disabilitare la messa a fuoco o l'esposizione automatica, prendere
in considerazione la possibilità di utilizzare una diversa app. Sono disponibili numerose app per iOS e Android che offrono un elevato
controllo della fotocamera. La maggior parte sono gratuite.
Vibrazione
Per eliminare le vibrazioni date dal tocco della fotocamera per scattare l'immagine, provare a usare una funzione di ritardo di
scatto dell'otturatore. Alcune app offrono un ritardo di 2, 5 o 10 secondi prima di scattare l'immagine. Ciò consente di dissipare le
vibrazioni prima di catturare le immagini.
Soggetti da catturare
Utilizzando questo metodo è possibile scattare immagini di oggetti terrestri di giorno e immagini astronomiche notturne della Luna
e dei pianeti più luminosi (Venere, Marte, Giove e Saturno). Purtroppo i sensori delle fotocamere degli smartphone non sono
ideati per funzionare a ridotta luminosità, pertanto non è possibile catturare in questo modo oggetti astronomici con luce tenue
come galassie e nebulose.
Ingrandimento
Quando si osserva la Luna o i pianeti con un telescopio fi sso, è possibile notare che l'oggetto sembra spostarsi all'interno del campo
visivo. Ciò è dovuto alla rotazione della Terra. Se si osserva attraverso l'oculare da 20 mm, un pianeta impiega circa 3 minuti per
percorrere l'intero campo visivo. Se si utilizza un oculare da 10 mm, impiega circa 1,5 minuti. Lo smartphone non utilizza l'intero campo
visivo dell'oculare e usa solo il centro, facendo apparire il movimento ancora più veloce. Quando si centra un oggetto astronomico nel
campo visivo del cellulare, cercare di anticipare l'oggetto. Cercare di puntare il telescopio davanti al pianeta in modo che stia per entrare
all'interno del campo visivo. Ciò ottimizza il tempo per percorrere il campo visivo, fornendo più tempo per scattare le immagini prima di
ri-puntare il telescopio. L'oculare da 10 mm ha un campo visivo più stretto e necessita di conseguenza di essere regolato più spesso.
All'inizio è più facile lavorare con l'oculare da 20 mm. Una volta acquisita familiarità, è possibile passare all'oculare da 10 mm.
ITALIANO | 39
Page 40

GARANZIA LIMITATA DI DUE ANNI CELESTRON
A. Celestron garantisce che il telescopio è privo di difetti nei materiali e nella fabbricazione per due anni.. Celestron riparerà o sostituirà tale
prodotto o parte dello stesso che, dopo una verifi ca da parte di Celestron, risulti essere difettoso nei materiali o nella fabbricazione. Come
condizione dell’obbligo di Celestron di riparare o sostituire detto prodotto, il prodotto deve essere restituito a Celestron assieme a una
prova d’acquisto che sia soddisfacente per Celestron.
B. Prima dell'invio del prodotto per la restituzione è necessario ottenere da Celestron un codice di autorizzazione alla restituzione. Chiamare
Celestron al numero (310) 328-9560 per ricevere il numero da mostrare all’esterno della confezione di spedizione.
Tutte le restituzioni devono essere accompagnate da una dichiarazione scritta indicante il nome, l’indirizzo e un numero di telefono del
proprietario, assieme a una breve descrizione del difetto reclamato. Le parti del prodotto per cui si effettua la sostituzione diventano
proprietà di Celestron.
Il cliente è responsabile di tutti i costi di trasporto e assicurazione, da e verso la fabbrica di Celestron, che devono essere pagati in anticipo.
Celestron si impegna a riparare o sostituire ogni telescopio coperto da garanzia entro 30 giorni dalla ricezione. In caso la riparazione o la
sostituzione richieda più di trenta giorni, Celestron notifi cherà il cliente di conseguenza. Celestron si riserva il diritto di sostituire qualsiasi
prodotto di cui sia stata interrotta la produzione con un prodotto nuovo di valore e funzione simile.
La presente garanzia sarà annullata e non sarà più in vigore o effi cace nel caso in cui un prodotto coperto da garanzia sia stato modifi cato
nel design o nelle funzioni, o si sospetti l’abuso, l’uso improprio, cattiva gestione o riparazioni non autorizzate. Inoltre, il malfunzionamento o il
deterioramento del prodotto dovuti alla normale usura del prodotto non sono coperti dalla garanzia.
CELESTRON DECLINA QUALSIASI GARANZIA, ESPRESSA O IMPLICITA, SIA DI COMMERCIABILITÀ SIA DI ADEGUATEZZA PER UN DETERMINATO SCOPO, ECCETTO NEI CASI ESPRESSAMENTE QUI INDICATI. IL SOLO
OBBLIGO DI CELESTRON RELATIVO A QUESTA GARANZIA LIMITATA È QUELLO DI RIPARARE O SOSTITUIRE IL PRODOTTO COPERTO DALLA GARANZIA SECONDO I TERMINI QUI INDICATI. CELESTRON DECLINA
QUALSIASI GARANZIA PER PERDITE DI PROFITTI O DANNI GENERALI, SPECIALI, INDIRETTI O CONSEGUENTI DERIVATI DALLA VIOLAZIONE DELLA GARANZIA, O DALL'USO O L'INCAPACITÀ DI UTILIZZO DI QUALSIVOGLIA
PRODOTTO CELESTRON. LE GARANZIE IMPLICITE E CHE NON POSSONO ESSERE DECLINATE SONO LIMITATE NELLA DURATA A UN TERMINE DI DUE ANNI DALLA DATA D'ACQUISTO.
Alcuni Stati non consentono l'esclusione o la limitazione di danni accidentali o conseguenti, o limitazioni sulla durata di una garanzia implicita,
per cui le limitazioni ed esclusioni sopra indicate potrebbero non essere applicabili.
La presente garanzia dà all'utente specifi ci diritti legali, oltre ad altri diritti che possono variare da Stato a Stato.
Celestron si riserva il diritto di modifi care o sospendere la produzione, senza previa notifi ca, di qualsivoglia modello o stile di telescopio.
Nel caso in cui sorgano problemi di garanzia, o se si necessita di assistenza per l'uso del telescopio, contattare: Celestron - 800.421.9649
NOTA: La presente garanzia è valida per i clienti di Stati Uniti e Canada che hanno acquistato il proprio prodotto da un rivenditore Celestron autorizzato negli Stati Uniti o in Canada. La garanzia al di fuori di
Stati Uniti e Canada è valida esclusivamente per i clienti che hanno effettuato l’acquisto da un distributore internazionale Celestron o da un rivenditore autorizzato Celestron nello specifi co Paese. Contattare
tali rivenditori per qualsiasi tipo di assistenza relativamente alla garanzia.
NOTA FCC: la presente apparecchiatura è stata testata ed è risultata conforme ai limiti imposti per i dispositivi digitali di Classe B, ai sensi della Parte
15 delle Norme FCC. Tali limiti sono stati ideati per fornire un’adeguata protezione nei confronti di interferenze dannose in installazioni residenziali.
Questa La presente apparecchiatura genera, utilizza e può irradiare energia in radio frequenza e, se non installata e utilizzata conformemente alle
istruzioni, può causare interferenze dannose alle comunicazioni radio. Tuttavia, non esiste alcuna garanzia che l’interferenza non si verifi chi in una
particolare installazione. Nel caso in cui la presente apparecchiatura causi interferenze dannose alla ricezione radio o televisiva, il che potrebbe
essere determinato dall'accensione e dallo spegnimento dell'apparecchiatura, l'utente è incoraggiato a tentare di correggere l'interferenza mediante
una o più delle misure seguenti:
• Riorientare o riposizionare l’antenna di ricezione.
• Aumentare la distanza tra l’apparecchiatura e il ricevitore.
• Collegare l’apparecchiatura a una presa su un circuito diverso da quello a cui è collegato il ricevitore.
• Consultare il rivenditore o un tecnico specializzato per ricevere assistenza.
Il design del prodotto e le specifi che sono soggetti a modifi che senza previa notifi ca.
Questo prodotto è progettato per essere utilizzato da persone di età pari o superiore ai 14 anni.
© 2016 Celestron • Tutti i diritti riservati.
www.celestron.com
2835 Columbia Street • Torrance, CA 90503 U.S.A.
Stampato in Cina
03 -16
Telefono: 800.421.9649
40 | ITALIANO
 Loading...