

Page 1

INSTRUCTION MANUAL
MODEL #44314, 44315
ENGLISH 1
Page 2

1. INTRODUCTION
Thank you for purchasing the Celestron FlipView™ Handheld LCD Digital Microscope with a 5 MP sensor and fl ip out 3.0inch full color TFT LCD screen. Your microscope is a precision optical instrument, made of the highest quality materials to
ensure durability and long life. It is designed to give you a lifetime of pleasure with a minimal amount of maintenance.
FlipView provides low power viewing up to 120x using
the built-in LCD screen. For additional magnifi cation
(up to 300x), connect the microscope to your PC.
(Magnifi cation depends on monitor size.)
FlipView is a low magnifi cation microscope, mainly
suited for examining specimens like coins, stamps, rocks,
electronics, insects, and other 3D objects. Specimens
on slides can be viewed with top illumination, but this
microscope is not ideal for this purpose. For high
power viewing of slide specimens, see our full line of
microscopes at Celestron.com.
FlipView does not use an eyepiece like a traditional
microscope. Instead, the built-in camera sensor
“sees” the specimen and the image is then displayed
on the high-resolution color LCD screen. This makes
IN THE BOX
viewing fun, reduces neck and eyestrain, and allows
for easy sharing with others. You can also view on
external monitors, projectors and TV screens with the
included AV out cable.
Saving, transferring and sharing your image files is
quick and easy with FlipView. Save to your Micro SD
card for transferring later, or use the included USB
cable to directly connect to your computer.
Before attempting to use your microscope, please
read through the instructions and reference the
diagrams below. Take some time to read the simple
care, maintenance, and troubleshooting tips in this
manual to ensure that your FlipView microscope
provides you with years of quality performance.
2 I ENGLISH
FlipView Handheld LCD
Digital Microscope (1)
AC Adapter (1)
CD (1) QSG (1) Cleaning Fabric (1) Calibration Ruler (1)
Lithium Battery (1) USB cable (1) Video Out cable (1)
Carry bag (1)Metal stand (1)
Page 3

PARTS
1. Shutter trigger
2. Flip out LCD screen
3. Flip out leg
4. Settings button
5. Color mode button/up button
6. Playback/left button
7. Illuminator adjustment wheel
8. Battery compartment
9. Zoom control button
10. 5 V AC in port
11. Mini USB port
12. Video out port
13. Micro SD card slot
14. Battery charge indicator
15. OK button
16. Down button
17. On/Off switch
18. Focus wheel
19. Microscope barrel
20. ¼-20” threaded insert
1
2
3
4
5
9
10
11
12
13
14
15
16
20
6
17
7
8
18
19
ENGLISH 3
Page 4

SPECIFICATIONS
Magnification Range 10x-120x (up to 300x when using PC)
Sensor 5 MP CMOS 1/3.2 in
LCD screen 3.0-inch full color TFT LCD screen (hinges in both X (90°) and Y (180°) axes)
Lens 5 element IR Cut (infrared reducing) high quality glass lens
Focuser Range Manual focus from 10 mm to 300 mm
Illumination 8 adjustable white LEDs in ring configuration
Shutter trigger On housing
Still Image Resolution 5 MP, 3 MP, 1.3 MP, VGA (12 MP interpolation)
Video Capture Resolution VGA, 30 fps
Video Compression Format MJPEG
Video Output Video out cable (included)
PC connection Interface USB 2.0 cable (included)
OS systems supported Windows XP/Vista/7/8
Memory Micro USB card slot (supports up to 32 GB) (Micro SD card NOT included)
Power Internal rechargeable lithium ion battery (1050 mAh)
Measuring Software Celestron Portable Capture Pro software with note taking capabilities. Calibration tool
Software languages supported English, German, French, Spanish, Russian, Italian, Portuguese, Dutch, Japanese, Korean,
Dimensions Microscope: 4.625 in x 2.5 in x 4.25 in (117.5 mm x 63.5 mm x 108 mm)
Weight Microscope: 7.4 oz/212 g
NOTE: Interpolation refers to software adding pixels to an image to artificially make it larger. This can be beneficial when printing in larger formats.
Effective Focal Length: 15.8 mm
Image distortion: 0.10%
FOV: 13.0°
Mac OSX 10.6-10.9
AC adapter universal input 100 to 240 volt 50/60 Hz (44315- EU version has multi-plug)
included.
Chinese
Stand: 3.0 in x 1.75 in x 2.75 in (76.2 mm x 44.5 mm x 70 mm)
Microscope and stand: 11.2 oz/317 g
4 I ENGLISH
2. SETUP
INSTALL BATTERY
Open the battery compartment (8) and insert the battery,
making sure to align the connection points correctly.
NOTE: FlipView’s battery ships with a partial charge. However, if you are going to use the
microscope with the battery only, be sure to charge the battery fully before the
first use.
CHARGING THE BATTERY
• Plug the small end of the power adapter into the 5 V/AC in
port (10) on the back of the microscope. Plug the other end
into a standard AC wall outlet.
* The battery charge indicator LED (14) will light up red to show
the battery is charging.
* When battery is fully charged, the battery charge indicator
LED will turn off. You can now unplug FlipView and use it
without an external power source for up to 2 hours.
* You can monitor the battery power level on the LCD screen.
Look for the battery power indicator icon described later in this
section.
10 50 m Ah
Page 5

INSERT MICRO SD CARD
To capture images with your microscope while not
connected to a computer, insert a Micro SD card in the
card slot (13) on the back of the unit. Press fi rmly until
the card clicks into place.
NOTE: A MicroSD card is NOT included. To capture images without a MicroSD
card, see section 7 in this manual for instructions on installing the computer
software and saving images directly to your computer.
NOTE: Format your MicroSD card before use. See section 4 for details on formatting
the card.
DISPLAY ICONS
Small Image Capture
Video Capture
Time Lapse Capture
Number of Images Taken/Number of
Images Remaining
Video Capture Time Remaining
(Hours:Minutes:Seconds)
MicroSD Card Recognized
Video Capture Setting
Current Resolution Setting
Battery Power Indicator
NOTE: The display icons can be turned off by pressing down on the zoom control button
ENGLISH 5
Page 6

3. OBSERVING AND CAPTURING IMAGES:
DIGITAL IMAGING
VIEW A SPECIMEN
Power FlipView on and aim it at your specimen. Adjust the
illuminator by rotating the illuminator adjustment wheel (7).
Adjust the focus wheel (18) until the specimen is in focus.
CAPTURE AN IMAGE
To capture a still image, press the shutter trigger (1).
CHANGE MODE
To toggle between still image, video and preview modes, press
the playback button (6). From still image press twice to get to
video mode. To determine the current mode, look for the icons
in the upper left corner of the LCD screen.
6 I ENGLISH
CHANGE COLOR MODE:
To change between color, negative and B&W streaming preview
modes, press the color mode button (5).
A.
B.
C.
Page 7

ADJUST DIGITAL ZOOM:
When observing your specimen, you can zoom in and out using the
zoom control button (9)
CAPTURE VIDEO:
In video mode, press the shutter trigger (1) to start recording. Press
it again to stop recording.
REVIEW IMAGES
Press the playback button (6) once from still image mode or twice
from video mode. Videos and still images will be displayed with the
last image or video displayed fi rst. Press the up button (5) or down
button (16) to scroll through images/videos.
PREVIEW VIDEO
When a video fi le is displayed, press the OK button (15) to start the
video. Press it again to stop the video.
DELETE IMAGES
To delete a still image or video fi le, press the setup button (4) to
bring up the menu. Press the down button (16) to scroll to “Delete.”
Press OK.
You will prompted to select “This Image” or “All.” Use the down button
again to scroll through the choices and select OK. You will be asked
one more time if you want this to be completed. Select “Execute.”
ENGLISH 7
Page 8

PROTECT IMAGES
This feature protects images or videos from being deleted
from the MicroSD card. To protect an image or video fi le,
press the the setup button (4) to bring up the menu. Press
the down button (16) to scroll to “Protect.” Press OK. Follow
the prompts and select “OK” when done.
SLIDE SHOW
Use this feature to preview all the images on the SD card.
Use the buttons to choose the desired interval between
images.
8 I ENGLISH
Page 9

4. SOFTWARE MENU INTRODUCTIONS
MENU
From the preview mode, press the setup button (4) to enter
the main menu. The menu choices will vary depending on the
mode you are in: still image or video. Use the down button (16),
the up button (5) and the OK button(15) to navigate the menu.
When in still image mode, you will see the following settings:
1. Resolution
2. Time Lapse
3. Quality
4. Sharpness
There is only one setting in video mode:
1. Resolution
RESOLUTION SETTINGS
In still image mode, the choices are:
1. 12.0 MP (interpolated*)
2. 9.0 MP
3. 5.0 MP
4. 3.0 MP
5. 1.3 MP
6. VGA
TIME LAPSE
FRAMES: Sets the number of frames to capture.
INTERVAL: Sets the interval between shots.
Once you have made your selections, press OK to confi rm and
press the menu button to go back to preview mode.
NOTE: The number above represents 32 frames.
ENGLISH 9
Page 10

When you press the capture button, the icon will be displayed in
the upper left corner of the LCD screen.
When all the frames have been taken, FlipView will return to the
preview screen.
To stop the auto capture before it completes, press the capture
button once.
NOTE: The time lapse setting only works in still image mode.
QUALITY
The quality settings determine the level of image compression. The
more compression you use, the less detail the image will contain,
and the smaller the file size will be.
There are 3 choices in the quality setting window:
1. Super Fine (largest files, least compressed, most detail)
NOTE: The number above represents 15 seconds.
2. Fine
3. Normal (smallest file, most compressed)
SHARPNESS
Sharpness increases the differences the imaging process detects
between the edges of the pixels. There are no rules when it
comes to the sharpness settings. Experiment to find out which
works best for your specimens.
The 3 choices for sharpness are:
1. Hard
2. Normal
3. Soft
10 I ENGLISH
Page 11

SETUP MENU
While in the main menu press the playback button (6) button to enter
setup. The choices here are:
1. Language
2. Power Save
3. Frequency
4. Date Stamp
5. TV out
6. Date/Time
7. Format SD
8. System Reset
9. Version
LANGUAGE
FlipView supports 11 languages:
1. English
2. German
3. French
4. Spanish
5. Italian
6. Portuguese
7. Japanese
8. Simples Chinese
9. Traditional Chinese
10. Dutch
11. Russian
Use the arrow buttons to scroll to your language preference and
press OK (15) to save.
POWER SAVE
Power save mode conserves battery power by setting the unit to turn
off automatically. The choices for times are:
1. OFF - Power Save feature is off; unit will not turn off automatically
2. 5 min. - Unit will turn off after 5 minutes of non-use
3. 10 Min. - Unit will turn off after 10 minutes of non-use
4. 15 Min. - Unit will turn off after 15 minutes of non-use
5. 30 Min. - Unit will turn off after 30 minutes of non-use
FREQUENCY
This setting has to do with your TV’s refresh rate. For USA (NTSC),
use 60Hz; for others, use 50Hz.
ENGLISH 11
Page 12

DATE STAMP
If you wish, you can display a date stamp on image fi les (but not on
video fi les).
The choices are:
1. DATE/TIME: Displays both DATE and TIME on the saved image
fi l e
2. DATE: Displays only the date on the image fi le
3. OFF: Will NOT display any DATE/TIME information
TV OUT
Set your TV out setting to either NTSC or PAL, depending on your
location.
1. Choose NTSC for
• North America
• South America (excluding Brazil, Argentina, Uruguay and
French Guiana)
• Myanmar, South Korea, Taiwan, Japan and the Philippines
NOTE: The DATE and/or TIME will NOT be displayed in the preview mode-
only on the recorded image fi le.
2. Choose PAL for all other countries
NOTE: See map below
12 I ENGLISH
Page 13

DATE/TIME
Here you can set the correct time of day and determine how the time will
be displayed.
Choose from the following options:
1. YY/MM/DD
2. DD/MM/YY
3. MM/MM/DD
FORMAT MICRO SD CARD
Choose this option to format your Micro SD card. We recommend always
formatting Micro SD cards before using them with FlipView for the first time.
Formatting the card will erase all other data it contains.
SYSTEM RESET
Choose this option to return FlipView to its default factory settings.
VERSION
The version screen will display information on your firmware version.
No changes can be made here.
5. TRANSFER FILES TO COMPUTER
+
Connect FlipView to your computer using the USB cable provided.
+
Choose “Upload Images” on the LCD screen by pressing the OK button (15).
+
Your computer will now read the Micro SD card like a digital camera and download
the images your PC.
+
When the transfer is complete, you can open and view the images on your PC using
your favorite software.
6. CONNECT TO TV
+
Insert the 1/8-inch plug on the end of the supplied AV cable into FlipView’s AV out port
(12) on the back of the unit.
+
Insert the yellow RCA plug on the video cable into the TV or projector’s yellow video
input connectors.
+
Turn on the television or projector. Be sure your television is tuned to the appropriate
input channel.
+
You should now see an image of the specimen you are viewing.
ENGLISH 13
Page 14
7. USING THE CELESTRON PORTABLE CAPTURE
PRO SOFTWARE
1. Install Software. Using the included CD, install the software on
your computer. You may need to restart your computer before
launching software for the fi rst time.
2. Connect FlipView to your computer using the USB cable provided
as described above..
3. Choose “Preview on Computer” on the LCD screen, by pressing
the OK button (15).
4. Open the Celestron Portable CapturePro Software on your PC by
clicking the desktop icon.
5. View the streaming image in the software interface.
NOTE: Once the software is launched, the LCD screen will go blank. You will now control the
microscope from the computer. However, you will still control focus, zoom and illumination
manually on the device.
NOTE: When you connect to the PC via USB, FlipView’s internal lithium ion battery will begin
charging.
NOTE: If the microscope does not connect, the following error message will be displayed: “No
device detected. Please connect your microscope directly to an open USB port.” Try
restarting the software.
8. USING THE SOFTWARE
CAPTURE A STILL IMAGE AND VIDEO
+
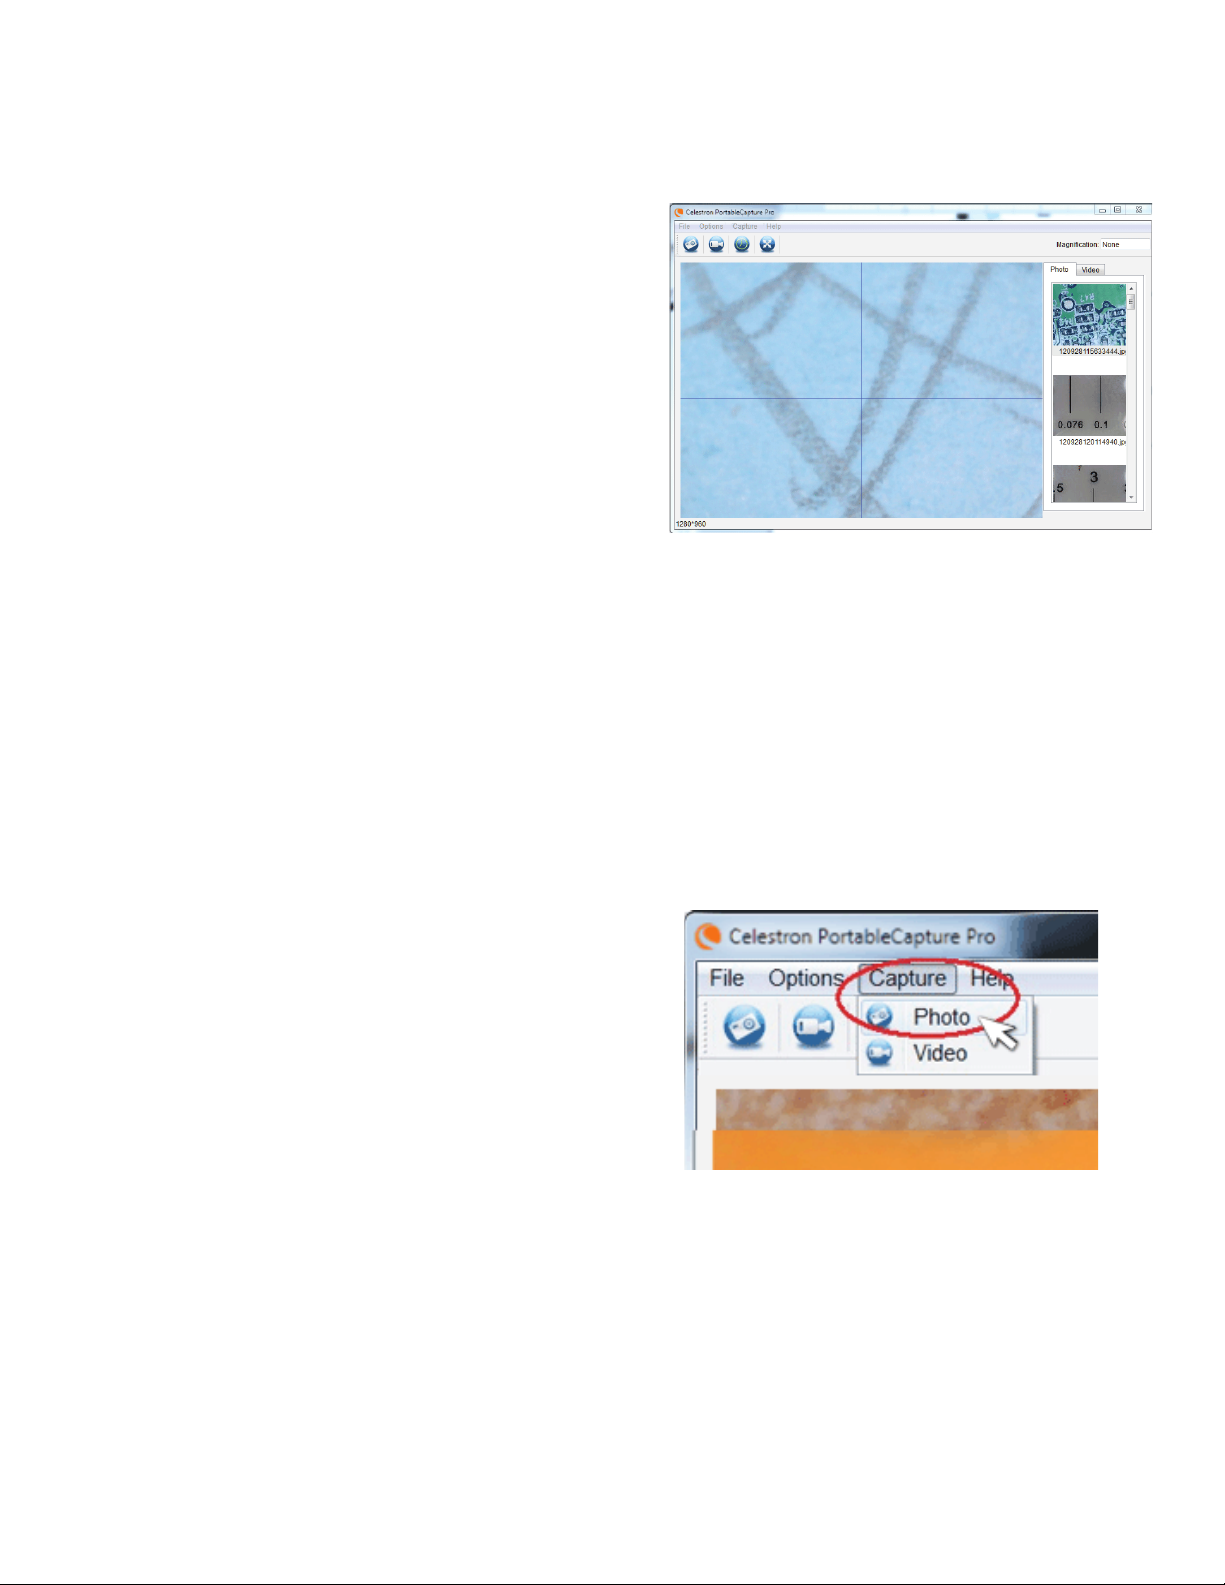
To capture a still image, click on the capture menu and select
Photo.
+
To begin recording video, click on the Capture menu and scroll
down to Video. Repeat to stop recording.
+
You should now see an image of the specimen you are viewing.
OTHER MENU ITEMS
FILE MENU Under the File menu item, you will fi nd:
PHOTOS DIRECTORY: Directs you to a folder on
your hard drive to save still images.
VIDEOS DIRECTORY: Directs you to a folder on
your hard drive to save videos.
EXIT: Closes the software.
14 I ENGLISH
Page 15

OPTIONS: Under the Options menu item, you will fi nd:
RESOLUTION: Sets the sensor image resolution. Choose from 2 resolution settings:
- 320 x 240
- 640 x 480
NOTE: When connected to a PC, FlipView cannot capture high-resolution images, but can be used for demonstration and streaming. To take advantage of full 5 MP resolution, unplug FlipView
from the computer.
DATE/TIME: Turns the Date and Time stamp on or off.
LANGUAGE: Changes the language setting. Choose from 12 languages:
- English, German, French, Spanish, Russian,
Italian, Portuguese, Dutch, Polish, Japanese, Korean and Chinese
X,Y RETICLE: Turns the reticle guide on the preview screen on or off.
FULL SCREEN MODE: Uses the full screen of your monitor. Press Esc key to revert back.
ICONS: Along with the menu items, there are icons which mean the following:
A. Take a still image (photo)
B. Start videos/stop video
C. Full screen mode
ENGLISH 15
Page 16

9. CALIBRATION AND MEASUREMENT
+
The Celestron Portable CapturePro software includes a
measurement feature. To use this feature, you must fi rst
perform a measurement calibration.
+
Make sure the X,Y Guide is set to “On” by selecting it in
the Options Menu.
+
Take a still image. The image will be displayed in the
column on the right side of the screen.
+
Set the height of the microscope and focus on your
specimen. Then, replace your specimen with the
calibration ruler.
+
Re-adjust the focus and align the calibration ruler so that
the lines on the ruler are parallel with the vertical line on
the X,Y Guide.
+
Double click the saved image to open it in the Image
Preview screen.
16 I ENGLISH
+
Click on the Calibration icon
+
Click and drag a line across a “known value” on the ruler image.
Try to keep the line as perpendicular to the lines on the ruler as
possible.
+
The “Adjust magnifi cation” window will pop up as shown here.
+
In the box “Actual Dimension”, enter the “known value” from the
calibration ruler
Page 17

+
To ensure that calibration was successful, go back to the Image
Capture screen.
+
Click the ruler icon and from the dropdown menu
select the option “Any Angle Line”
+
Click and drag a line across the same “known value” as before.
+
If the calibration was successful, the distance you measured
should be exact to the “known value”
+
To capture images without changing the height or magnifi cation,
click on the Calibration icon. In the dropdown menu, select “Set
Magnifi cation,” then “Set Capture Magnifi cation.”
+
A pop-up window will appear. Type in the magnifi cation shown in
the upper right corner of the main window.
MEASURING TOOLS
You will notice in the measuring drop down menu there are many
tools. Here is the list of measurements you can take:
MAIN
1. Any Angle: Measures from point A to point B in a
straight line.
2. Continuous Line: Measures the total distance
between multiple points. Start by measuring a straight
line from point A to point B. Then, click and drag to
continue measuring from point B to point C. (Can be
repeated as many times as you like.)
3. Radius Circle: Measures a circle’s radius. Starting at
the center, drag the cursor out to any edge.
4. Diameter Circle: Measures a circle’s diameter.
Starting at one outside edge, drag the cursor across to
the opposite edge.
5. Three Point Angle: Measures an angle between two
points, starting from a radius point or an intersection
point. Click on point A, (radius point) drag and click on
point B, then click on point C. The angle will be drawn
and the angle degree will be displayed.
SETTINGS
1. Line Properties: Changes the settings for line type,
width, size and color.
2. Text Properties: Changes the settings for font type,
size, style and color.
3. Set Units: Changes the units setting. Choose from
millimeters, centimeters, pixels or inches.
ENGLISH 17
Page 18

TAKING NOTES AND MARKING THE IMAGE
Portable CapturePro includes functionality to mark, draw on, or and add notes to saved images. This can be handy for
quick note taking and pointing out features on your specimen image.
1. MARKING
+
+
To use this feature, click the Draw icon in the Image Preview window.
The complete choices in the Draw dropdown menu are:
MAIN
1. Line: Draws a straight line on the image.
2. Arrow: Draws a line with an arrow on the image.
3. Freehand: Allows user to draw freehand. Good for quick, handwritten notes.
4. Rectangle: Draws a box. Good for calling out features on the image or framing text.
SETTINGS
1. Line Properties: Allows for setting the line type, size and color
18 I ENGLISH
2. ADD TEXT
+
+
To type notes on the image, select the Type icon
In the dropdown menu, you can choose the font type, size and color.
Page 19

IMAGE PREVIEW ICONS EXPLAINED
B.
A.
D.
C.
F.
E.
G.
A. Save: Save your file
B. Copy to clipboard: Copy to open in other program
C. Copy: Save as a copy
D. Previous: Takes you back to the previous image
in save folder
E. Next: Takes you forward to the next image in
save folder
10. MULTI-PLUG
I.
H.
J.
K.
F. Undo: Takes you back one step
G. Redo: Takes you forward one step
H. Draw
I. Text/Notes
J. Measure
K. Calibration
L. Current Magnification (based on the latest calibration)
L.
If you have purchased your FlipView outside of North America
(model 44315), you will notice a multi-plug AC adapter.
There are 3 interchangeable plug heads that will fit outlets in
Europe, the United Kingdom/Hong Kong and China.
To change the plug head:
- Grasp the main plug housing with one hand
and the plug head of choice with the other.
- Press the small button release on the plug
housing (circled in below image).
- Locate and interlock the tabs on the plug head
with the grooves on the plug housing.
- Rotate the plug head clockwise 90° until you
hear a “click” as the plug head locks into place
To remove the plug head, press the small button release and
rotate the plug head counterclockwise until it releases.
ENGLISH 19
Page 20

11. CARE AND MAINTENANCE
Your microscope with digital camera is a precision optical instrument and should be treated with care at all times. Follow these
care and maintenance suggestions and your microscope will need very little maintenance throughout its lifetime.
+
Store your microscope in a dry, clean place.
+
Never use your microscope where operation of such
devices is restricted. Improper use creates the risk of
serious accident.
+
Do not try to access the internal components of your
microscope or attempt to modify it in any way. Only
authorized technicians should perform maintenance
or repairs.
+
Keep your microscope away from water and other liquids.
Never use it in the rain or snow. Moisture creates the danger
of fire and electric shock.
+
To clean dust or smudges from the LCD screen or other
optical component, first blow the dust off with a camel’s hair
brush or air blower. Then use the included dry, microfiber
cloth to wipe the surface.
+
If the exterior surfaces of your microscope need cleaning,
wipe with a moist cloth.
12. TROUBLESHOOTING
PROBLEMS SOLUTION
The unit does not turn on. Check the battery power. If necessary, recharge by plugging into AC power.
+
The screen is blank.
There are smudges or blemishes on the
screen.
Microscope is connected to a television, but
no image appears on the television screen.
The battery indicator LED is not illuminating,
even though the power adapter is connected
and plugged into a wall socket.
-orThe battery is not charging.
Ensure that the power is on.
+
Check the battery power and recharge the battery if necessary.
+
Verify that the object you want to magnify is positioned correctly under the lens.
+
Make sure the illuminator is ON
+
Clean the screen and lens carefully with the included microfiber cloth.
+
Ensure that the television is on.
+
Switch to the appropriate video input channel on your television. (This will vary by
manufacturer.)
+
Ensure that the video cable is securely connected to the microscope’s Video Out port
and plugged into the correct video input on your television
+
Make sure the cable is plugged into the proper port.
+
Check that the outlet has power and is not malfunctioning. If the outlet is connected
to a wall switch, make sure that the switch is on.
20 I ENGLISH
13. WARRANTY
Your FlipView LCD Microscope has a two year limited warranty. Please visit the Celestron website for detailed
information on all Celestron microscopes:
© 2014 Celestron • All rights reserved. • celestron.com
2835 Columbia Street • Torrance, CA 90503 U.S.A.
Telephone: 1(800) 421-9649 • Printed in China 2013
FCC Note: This equipment has been tested and found to comply with the limits for a Class B digital device, pursuant to part 15 of the FCC Rules. These limits are designed to provide reasonable protection against
harmful interference in a residential installation. This equipment generates, uses, and can radiate radio frequency energy and, if not installed and used in accordance with the instructions, may cause harmful
interference to radio communications. However, there is no guarantee that interference will not occur in a particular installation. If this equipment does cause harmful interference to radio or television reception,
which can be determined by turning the equipment off and on, the user is encouraged to try to correct the interference by one or more of the following measures:
+ Reorient or relocate the receiving antenna.
+ Increase the separation between the equipment and receiver.
This product is designed and intended for use by those 14 years of age and older. Product design and specifications are subject to change without prior notification. 44314, 44315
+ Connect the equipment into an outlet on a circuit different from
that to which the receiver is connected.
+ Consult the dealer or an experienced radio/TV technician for help.
Page 21

MICROSCOPE NUMÉRIQUE LCD PORTABLE
MANUEL
D'INSTRUCTIONS
MODÈLES N° 44314, 44315
FRANÇAIS | 21
Page 22

1. INTRODUCTION
Merci d'avoir acheté le microscope numérique LCD portable Celestron FlipView™ équipé d'un capteur 5 Mp et écran LCD
TFT pleines couleurs 3" déployable. Votre microscope est un instrument optique de précision, fabriqué avec des matériaux
de la plus grande qualité afi n de garantir sa durabilité et qu'il vous accompagnera pendant de longues années. Il est conçu
pour permettre un grand confort d'utilisation avec un minimum d'entretien.
Le FlipView permet une observation basse puissance
maximum de x120 à l'aide de l'écran LCD intégré. Pour
obtenir un agrandissement plus puissant (jusqu'à x300),
connectez le microscope à votre PC. (L'agrandissement
est limité par la taille de l'écran).
Le FlipView est un microscope à faible agrandissement,
adapté à l'observation de spécimens tels que des
pièces, des timbres, des minéraux, des composants
électroniques, des insectes et autres objets en 3D.
Les spécimens contenus sur des lames peuvent être
observés, mais ce microscope n'est pas adapté pour
ce type de spécimen. Pour observer des spécimens sur
lames, consultez notre gamme complète de microscopes
adaptés à ce type d'observation sur Celestron.com.
Le FlipView ne comporte pas d'oculaire comme un
microscope traditionnel. Au lieu de cela, le capteur intégré
de la caméra "voit" le spécimen et l'image est ensuite
affi chée sur l'écran LCD couleurs haute résolution. Cela
DANS LA BOÎTE
rend l'observation amusante, limite la fatigue des yeux et
du cou et permet de partager les images plus aisément.
Vous pouvez également affi cher l'image sur des écrans
externes, des écrans TV ou via des projecteurs externes à
l'aide du câble AV livré.
L'enregistrement, le transfert et le partage des fi chiers
image est d'une grande simplicité avec FlipView.
Enregistrez les fi chiers sur votre carte Micro SD pour les
transférer ultérieurement, ou utilisez le câble USB fourni
pour raccorder le microscope directement à votre PC.
Avant d'utiliser votre microscope pour la première fois,
lisez ces instructions et les schémas d'illustration cidessous dans leur totalité. Prenez le temps de lire les
conseils simples d'entretien et de maintenance présentés
dans ce manuel pour garantir la plus longue durée de
fonctionnement et les meilleures performances possibles
pour votre microscope FlipView.
22 I FRANÇAIS
(1) Microscope numérique
LCD portable FlipView
(1) Adaptateur CA
(1) CD (1) Guide de
(1) Pile au Lithium (1) Câble USB (1) Câble de sortie TV
démarrage rapide
(1) Poche de transport(1) Socle métallique
(1) Tissu de nettoyage (1) Règle de calibration
Page 23

CONTENU
1. Déclencheur
2. Écran LCD déployable
3. Pied déployable
4. Bouton Paramètres
5. Bouton de mode de couleurs/haut
6. Bouton lecture/gauche
7. Molette de réglage de l'illuminateur
8. Compartiment de pile
9. Bouton de contrôle de zoom
10. Port d'alimentation 5 VCA
11. Port mini USB
12. Port de sortie vidéo.
13. Fente pour carte Micro SD
14. Voyant de charge de la batterie
15. Bouton OK
16. Bouton bas
17. Bouton Marche/Arrêt
18. Molette de mise au point
19. Barillet du microscope
20. Insert fi leté ¼-20”
1
2
3
4
5
9
10
11
12
13
14
15
16
20
6
17
7
8
18
19
FRANÇAIS | 23
Page 24

FICHE TECHNIQUE
Plage d'agrandissement 10x-120x (jusqu'à 300x si vous utilisez un PC)
Capteur Capteur CMOS 1/3.2" 5 Mp
Écran LCD Écran LCD TFT pleines couleurs 3.0" (orientable sur charnières en axe X (90°) et Y (180°))
Objectif Verre de haute qualité à coupe IR 5 éléments (réduction des infrarouges), distance focale
Plage de focale Mise au point manuelle de 10 mm à 300 mm
Illumination 8 DEL blanches réglables disposées en anneau
Déclencheur sur le boîtier
Résolution des captures d'image 5 Mp, 3 Mp, 1,3 Mp, VGA (interpolation 12 Mp)
Résolution vidéo VGA, 30 ips
Format de compression vidéo MJPEG
Sortie vidéo Câble de sortie vidéo (inclus)
Interface pour connexion avec un PC Câble USB 2.0 (inclus)
Systèmes d'exploitation pris en charge Windows XP/Vista/7/8
Mémoire Port pour carte Micro USB (jusqu'à 32 Go) (carte Micro SD NON inclue)
Alimentation Batterie rechargeable au lithium ion (1050 mAh)
Logiciel de mesure Logiciel Celestron Portable Capture Pro avec fonction de prise de notes. Outil de calibration
Langages pris en charge par le logiciel Anglais, Allemand, Français, Espagnol, Russe, Italien, Portugais, Néerlandais, Japonais,
Dimensions Microscope: 4,625 po x 2,5 po x 4,25 po (117,5 mm x 63,5 mm x 108 mm)
Poids Microscope: 7,4 oz/212 g
effective: 15,8 mm
Distortion visuelle: 0,10%
Champ de vision: 13,0°
Mac OSX 10.6-10.9
Adaptateur secteur universel CA 100-240V 50/60 Hz (La version 44315- EU est livrée
avec plusieurs types de prises)
inclus.
Coréen Et Chinois
Socle: 3,0 po x 1,75 po x 2,75 po (76,2 mm x 44,5 mm x 70 mm)
Microscope avec socle: 11,2 oz/317 g
REMARQUE: l'interpolation est une technique logicielle qui consiste à ajouter des pixels à une image pour l'agrandir artificiellement. Cela peut être utile si vous
souhaiter imprimer une image en grand format.
2. CONFIGURATION
INSTALLATION DE LA PILE
Ouvrez le compartiment de la pile (8) puis insérez-y la pile, en veillant
à l'aligner correctement avec les points de connexion.
REMARQUE: La pile du FlipView est livrée partiellement chargée. Pensez donc à la recharger
complètement si vous souhaitez utiliser le microscope en mode d'alimentation
autonome uniquement.
CHARGER LA BATTERIE
• Branchez la petite extrémité du chargeur dans le port 5 VCA (10)
situé à l'arrière du microscope. Branchez l'autre extrémité du
chargeur à la prise murale.
* Le voyant de charge DEL (14) s'illuminera en rouge pour indiquer
que la pile est en cours de recharge.
* Le voyant de charge DEL s'éteindra lorsque la batterie sera
complètement chargée. Vous pouvez maintenant débrancher
FlipView et l'utiliser sans chargeur externe pendant 2 heures au
maximum.
10 50 m Ah
24 I FRANÇAIS
* Vous pouvez consulter l'état de la pile à tout moment sur l'écran
LCD. Cherchez l'icône de pile décrit plus bas dans cette section.
Page 25

INSÉRER UNE CARTE MICRO SD
Pour pouvoir prendre des images même si le microscope
n'est pas raccordé à un ordinateur, insérez une carte
Micro SD dans la fente pour carte (13) présente sur
l'arrière du microscope. Appuyez fermement jusqu'à ce
que la carte s'enclenche.
REMARQUE: Le microscope est livré SANS carte Micro SD. Pour prendre des
REMARQUE: Formatez votre carte Micro SD avant de l'utiliser. Voyez la section 4
images sans carte SD, voyez la section 7 de ce mode d'emploi
pour savoir comment installer le logiciel sur votre ordinateur et y
enregistrer les images directement.
pour en savoir plus sur comment formater la carte.
ICÔNES À L'ÉCRAN
Capture d'une petite image
Capture d'une vidéo
Capture en accéléré
Nombre d'images prises/capacité
restante
Durée d'enregistrement vidéo restante
(Heures:Minutes:Secondes)
Carte micro SD détectée
Qualité de capture vidéo
Résolution actuellement sélectionnée
Voyant de charge de la batterie
REMARQUE: vous pouvez masquer les icônes en appuyant sur le bouton de contrôle de
zoom
FRANÇAIS | 25
Page 26

3. OBSERVER ET CAPTURER DES IMAGES:
IMAGERIE NUMÉRIQUE
OBSERVER UN SPÉCIMEN
Allumez le FlipView et dirigez-le vers votre spécimen. Réglez
l'illumination en faisant pivoter le molette de réglage de l'illumination (7). Faites tourner la molette de mise au point (18)
jusqu'à la mise au point sur l'échantillon.
CAPTURER UNE IMAGE
Pour capturer une photo, appuyez sur le déclencheur (1).
CHANGER DE MODE
Pour basculer entre les modes photo, vidéo et lecture,
appuyez sur le bouton Lecture (6). Depuis le mode, appuyez
deux fois pour basculer en mode vidéo. Pour savoir quel
mode est actuellement actif, regardez dans le coin supérieur
gauche de l'écran LCD.
26 I FRANÇAIS
CHOISIR UN MODE DE COULEURS:
Appuyez sur le bouton de mode de couleur (5) pour choisir entre l'affi chage couleurs, en négatif ou noir et blanc.
A.
B.
C.
Page 27

RÉGLAGE DU ZOOM NUMÉRIQUE:
Lors de l'observation de votre spécimen, faites un agrandissement ou un
réduction de l'image en utilisant le bouton de contrôle de zoom (9)
EFFECTUER UN ENREGISTREMENT VIDÉO:
En mode vidéo, appuyez sur le déclencheur (1) pour commencer à enregistrer. Appuyez de nouveau sur pour arrêter l'enregistrement.
VISUALISER LES IMAGES
Appuyez sur le bouton de Lecture (6) Les vidéos et les images seront
listées selon les plus récentes en haut de la liste. Appuyez sur haut (5) ou
bas (16) pour faire défi ler les images et les vidéos.
VISUALISER LES VIDÉOS
Lorsqu'un fi chier vidéo est sélectionné, appuyez sur OK (15) pour
commencer la lecture. Appuyez dessus de nouveau pour arrêter la vidéo.
SUPPRIMER DES IMAGES
Pour supprimer un fi chier image ou vidéo, appuyez sur le bouton Paramètres (4) pour affi cher le menu. Appuyez sur bas (16) pour mettre
"Supprimer" en surbrillance. Appuyez sur OK.
Il vous sera demandé si vous souhaitez supprimer "Cette image" ou
"Toutes". Appuyez sur bas pour faire votre choix, puis sélectionnez avec
OK. Une confi rmation vous sera demandée avant la suppression. Sélectionnez "Exécuter".
FRANÇAIS | 27
Page 28

PROTÉGER DES IMAGES
Cette fonctionnalité permet de protéger des images et des
vidéos contre la suppression depuis la carte Micro SD. Pour
protéger un fi chier image ou vidéo, appuyez sur le bouton
Paramètres (4) pour affi cher le menu. Appuyez sur bas
(16) pour mettre "Protéger" en surbrillance. Appuyez sur
OK. Suivez les instructions à l'écran puis appuyez sur "OK"
lorsque vous avez terminé.
DIAPORAMA
Cette fonctionnalité permet de visualiser tour à tour chaque
image présente sur la carte SD. Utilisez les boutons pour
choisir un intervalle désiré entre chaque image.
28 I FRANÇAIS
Page 29

4. PRÉSENTATION DU MENU LOGICIEL
MENU
Dans le mode d'aperçu, appuyez sur Paramètres (4) pour
affi cher le menu principal. Les choix offerts par le menu varieront selon le mode actuellement sélectionné: image ou vidéo.
Appuyez sur bas (16), haut (5) et OK (15) pour naviguer dans
le menu.
Si le mode image est sélectionné, les paramètres suivant
seront disponibles:
1. Résolution
2. Accéléré
3. Qualité
4. Netteté
Le mode vidéo n'offre qu'une option:
1. Résolution
PARAMÈTRES DE RÉSOLUTION
En mode image, les choix sont:
1. Capteur 12,0 Mp (interpolation*)
2. 9,0 Mp
3. 5,0 Mp
4. 3,0 Mp
5. 1,3 Mp
6. VGA
CAPTURE ACCÉLÉRÉE
NOMBRE D'IMAGES: pour défi nir le nombre d'images à
capturer.
INTERVALLE: pour défi nir l'intervalle entre les prises.
REMARQUE: le chiffre ci-dessus représente 32 images.
FRANÇAIS | 29
Page 30

Une fois vos choix effectués, appuyez sur OK pour confirmer et
appuyez sur le bouton menu pour revenir au viseur.
Lorsque vous appuyez sur le déclencheur, l'icône apparaît dans le
coin supérieur gauche de l'écran LCD.
Une fois toutes les images capturées, FlipView reviendra au viseur.
Pour arrêter le processus de capture auto avant la fin, appuyez sur
le déclencheur une fois.
REMARQUE: le mode de capture accélérée ne fonctionne qu'en mode image.
QUALITÉ
Le paramètres de qualité modifie le niveau de compression de
l'image. Plus élevée est la valeur de compression, moins grande
sera la quantité de détails visibles sur l'image, et plus petite sera la
taille du fichier.
3 choix sont disponibles dans la fenêtre de qualité:
REMARQUE: le chiffre ci-dessus représente 15 secondes.
1. Super fine (fichiers les plus grands, compression la plus faible,
le plus grand nombre de détails)
2. Fine.
3. Normale (fichiers les plus petits, compression la plus élevée)
NETTETÉ
La netteté augmente le nombre de différences détectées entre
les bordures des pixels. Le paramètre de netteté est laissé au
choix de l'utilisateur, selon ses goûts et ses spécimens. Effectuez
des essais pour savoir quel paramètre est le plus adapté à vos
spécimens.
3 choix sont disponibles:
1. Accentuée
2. Normale
3. Doux
30 I FRANÇAIS
MENU CONFIGURATION
Page 31

Dans le menu principal, appuyez sur Lecture (6) pour affi cher la confi guration. Les éléments de menu disponibles sont:
1. Langage
2. Économie d'énergie
3. Fréquence
4. Incrustation de la date
5. Sortie TV
6. Date/Heure
7. Formatage de la carte SD
8. Réinitialisation du système
9. Version
LANGUE
FlipView prend en charge 11 langages:
1. Anglais
2. Allemand
3. Français
4. Espagnol
5. Italien
6. Portugais
7. Japonais
8. Chinois simplifi é
9. Chinois traditionnel
10. Néerlandais
11. Russe
Utilisez les boutons fl échés pour choisir le langage qui vous convient,
puis appuyez sur OK (15) pour confi rmer.
ÉCONOMIE D'ÉNERGIE
Le mode d'économie d'énergie permet d'économiser la charge de
la pile en défi nissant un intervalle de mise hors tension automatique.
Les choix disponibles sont:
1. DÉSACTIVÉ - La fonction d'économie d'énergie est désactivée et
le microscope ne s'éteindra pas automatiquement.
2. 5 min. - Le microscope s'éteindra après 5 minutes d'inactivité.
3. 10 min. - Le microscope s'éteindra après 10 minutes d'inactivité.
4. 15 min. - Le microscope s'éteindra après 15 minutes d'inactivité.
5. 30 min. - Le microscope s'éteindra après 30 minutes d'inactivité.
FRÉQUENCE
Ce paramètres est utilisé pour l'affi chage sur un téléviseur. Si vous
résidez aux USA (NTSC), choisissez 60 Hz, sinon, choisissez 50 Hz.
INCRUSTATION DE LA DATE ET DE
FRANÇAIS | 31
Page 32

L'HEURE
Vous pouvez horodater vos fi chiers images (mais pas les photos)
si vous le désirez.
Les choix sont:
1. DATE ET HEURE: affi che à la fois la DATE et l'HEURE sur
l'image enregistrée.
2. DATE: affi che uniquement la date sur le fi chier image
3. DÉSACTIVÉ: NI la DATE NI l'HEURE ne seront affi chées.
SORTIE TV
Réglez le paramètre de sortie TV sur NTSC ou PAL, selon votre
lieu de résidence.
1. Choisissez NTSC si vous résidez:
• Amérique du nord
• Amérique du sud (sauf le Brésil, l'Argentine, l'Uruguay ou la
Guinée Française)
• Myanmar, Corée du sud, Taiwan, Japon ou les Philippines
2. Choisissez PAL pour tous les autres pays
REMARQUE
: Consultez la carte ci-dessous
REMARQUE: La DATE et/ou l'HEURE ne seront pas visibles sur le viseur,
seulement sur le fi chier enregistré.
32 I FRANÇAIS
Page 33

DATE/HEURE
Utilisez ce menu pour définir l'heure du jour correcte et déterminer comment l'heure sera affichée.
Les formats suivants sont disponibles:
1. AA/MM/JJ
2. JJ/MM/AA
3. MM/MM/JJ
FORMATER LA CARTE MICRO SD
Choisissez cette option pour formater votre carte Micro SD. Nous vous
recommandons de toujours formater la carte Micro SD avant de l'utiliser
pour la première fois avec votre FlipView. Le formatage de la carte effacera toutes les données qu'elle contient.
RÉINITIALISATION DU SYSTÈME
Utilisez cette option pour définir la configuration du FlipView tel-quel à la
sortie d'usine.
VERSION
L'écran de version affichera les informations concernant la version du
micrologiciel actuel de votre microscope.
Cet écran ne peut être que consulté.
5. TRANSFÉRER DES FICHIERS VERS UN ORDINATEUR
+
Connectez FlipView à votre ordinateur avec le câble USB livré.
+
Choisissez “Envoyer des images” sur l'écran LCD en appuyant sur OK
(15).
+
Votre ordinateur lira ensuite le contenu de la carte Micro SD comme s'il
s'agissait d'un appareil photo numérique et transférera le contenu sur
votre PC.
+
Une fois le transfert terminé, vous pouvez ouvrir et visualiser vos images
avec votre logiciel préféré.
6. CONNEXION À UN TÉLÉVISEUR
+
Insérez la prise de 1/8 de pouce d'une extrémité du câble AV au port AV
out (12) situé sur l'arrière de votre FlipView.
+
Branchez la prise RCA jaune du câble sur le connecteur vidéo du télévi-
seur ou du projecteur.
+
Allumez le téléviseur ou le projecteur. Veillez à ce que la source adéquate
est sélectionnée dans votre téléviseur.
+
Le téléviseur devrait alors afficher une image du spécimen que vous
observez.
FRANÇAIS | 33
Page 34

7. MODE D'EMPLOI DU LOGICIEL CELESTRON PORTABLE
CAPTURE PRO
1. Installation du logiciel. Utilisez le CD inclus pour installer
le logiciel sur votre ordinateur. Il pourrait être nécessaire
de redémarre l'ordinateur avant de lancer le logiciel pour la
première fois.
2. Connectez FlipView à votre ordinateur avec le câble USB
inclus comme décrit ci-dessus.
3. Choisissez “Utiliser l'ordinateur comme viseur” sur l'écran LCD
en appuyant sur OK (15).
4. Ouvrez le logiciel Portable CapturePro de Celestron sur votre
PC en cliquant sur l'icône correspondante.
5. Observez votre spécimen via l'interface de vidéo en direct.
REMARQUE: l'écran LCD sera désactivé si vous activez l'observation en directe avec le
REMARQUE: La batterie au lithium ion du FlipView sera également chargée lorsque vous le
REMARQUE: si le microscope ne peut pas se connecter, alors le message d'erreur suivant
logiciel. Le contrôle du microscope se fera alors via l'ordinateur. Cependant, vous
contrôlerez toujours la mise au point, le niveau de zoom et l'illumination sur le
microscope.
raccordez à votre ordinateur via USB.
s'affi che: "Aucun dispositif détecté. Branchez le microscope directement à un
port USB disponible". Essayez de redémarrer le logiciel.
8. MODE D’EMPLOI DU LOGICIELCAPTURE PRO
CAPTURER UNE IMAGE OU
ENREGISTRER UNE VIDÉO
+
Pour capturer une image, cliquez sur le menu de capture et
sélectionnez Photo.
+
Pour enregistrer une vidéo, cliquez sur le menu Capture puis
faites défi ler jusqu'à Vidéo. Répétez pour arrêter l'enregistrement.
+
Le téléviseur devrait alors affi cher une image du spécimen que
vous observez.
34 I FRANÇAIS
AUTRES ÉLÉMENTS DU MENU
MENU DES FICHIERS Le menu des fi chiers comporte les
éléments suivants:
RÉPERTOIRE DES PHOTOS: vous permet de
sélectionner un dossier de votre
disque dur pour l'enregistrement
des images.
RÉPERTOIRE DES VIDÉOS: Vous permet de
sélectionner un dossier de votre
disque dur pour l'enregistrement
des vidéos.
QUITTER: pour fermer le logiciel.
Page 35

OPTIONS: le menu contient les options suivantes:
RÉSOLUTION: Pour sélectionner la résolution d'imagerie du capteur. Choisissez entre 2 paramètres de résolution:
- 320 x 240
- 640 x 480
REMARQUE: Lorsque le FlipView est connecté à un PC, il ne peut pas capturer d'images en haute résolution, mais il peut servir pour faire des démonstrations ou des vidéos en direct.
Pour profi ter de la résolution pleine 5 Mp, débranchez le FlipView de l'ordinateur.
DATE ET HEURE: Pour affi cher ou masquer l'horodatage.
LANGAGE: Pour sélectionner la langue d'interface. 12 langues ay choix:
- Anglais, Allemand, Français, Espagnol, Russe, Italien, Portugais, Néerlandais, Polonais, Japonais, Coréen et Chinois
CADRE DE GUIDE X,Y: pour affi cher ou masquer le cadre de guide en superposition sur l'écran.
MODE PLEIN ÉCRAN: affi che l'image sur l'écran en entier. Appuyez sur Échap. pour quitter ce mode.
ICÔNES: En plus des éléments du menu, d'autres icônes sont présentes:
A. Prendre une image (photo)
B. Commencer l'enregistrement vidéo/arrêter
C. Mode plein écran
FRANÇAIS | 35
Page 36

9. CALIBRATION ET MESURE
+
Le logiciel Portable CapturePro de Celestron comporte
une fonction de mesure. Vous devez effectuer une
calibration avant d'utiliser la fonction de mesure.
+
Vérifi ez que le guide X, Y est "Affi ché" dans les options
en le sélectionnant dans le menu Options.
+
Prenez une photo. L'image sera affi chée dans la colonne
de la droite de l'image.
+
Réglez la hauteur du microscope et effectuez la mise au
point sur votre spécimen. Remplacez ensuite le spécimen
avec la règle de calibration.
+
Effectuez la mise au point de nouveau et alignez la règle
de calibration de manière à ce que les lignes de la règle
soient parallèles avec les lignes verticales du guide X, Y.
+
Double-cliquez sur l'image enregistrée pour ouvrir l'image
dans l'écran de visualisation.
36 I FRANÇAIS
+
Cliquez sur l'icône de calibration .
+
Cliquez et tirez une ligne sur une "Valeur connue" sur l'image
de la règle. Conservez la ligne aussi perpendiculaire avec les
lignes de la règle que possible.
+
La fenêtre "Régler l'agrandissement" apparaît comme indiqué
ci-dessous.
+
Dans la boîte "Dimensions réelles", saisissez la "Valeur
connue" trouvée sur la règle de calibration.
Page 37

+
Pour confi rmer que la calibration à été effectuée avec succès,
retournez à l'écran de capture d'image.
+
Cliquez sur l'icône de la règle
et dans le menu
déroulant qui apparaît, sélectionnez "Ligne de n'importe quel
angle".
+
Cliquez et tirez une ligne sur la même « Valeur connue » que celle
précédemment utilisée.
+
Si la calibration est correcte, la distance mesurée sera
exactement identique à la "valeur connue".
+
Pour effectuer des prises de vue sans modifi er la hauteur ou la
valeur d'agrandissement, cliquez sur l'icône de calibration. Dans
le menu déroulant, sélectionnez « Défi nir l'agrandissement », puis
« Défi nir l'agrandissement de prise de vue ».
+
Une boîte de dialogue apparaît. Saisissez-y la valeur d'agrandissement affi chée dans le coin supérieur droit de la fenêtre
principale.
OUTILS DE MESURE
Vous allez constater que le menu déroulant Mesure comporte un
grand nombre d'outils. Voici la liste des mesures que vous pouvez
effectuer:
PRINCIPAL
1. N'importe quel angle: pour mesurer la distance
entre un point A et un point B en ligne droite.
2. Ligne continue: pour mesurer la distance totale
entre des points multiples. Commencez par mesurer la
distance entre un point A et un point B en ligne droite.
Ensuite, faites cliquer puis glisser pour continuer la
mesure entre B et C (peut être répété autant de fois
que désiré.)
3. Rayon d'un cercle: pour mesurer le rayon d'un
cercle. En commençant par le centre, faire glisser le
curseur sur n'importe quel bord.
4. Diamètre d'un cercle: Pour mesurer le diamètre
d'un cercle. En commençant depuis une bordure, faire
glisser le curseur vers la bordure opposée.
5. Angle à trois points: pour mesure l'angle entre
deux points, en commençant par un point de rayon ou
d'intersection. Cliquez sur le point A (point de rayon),
faites glisser puis cliquez sur le point B, puis sur le
point C. L'angle sera dessinné et le degré de l'angle
sera affi ché.
PARAMÈTRES
1. Paramètres des lignes: pour modifi er les paramètres
de type, d'épaisseur, de taille et de couleur de ligne.
2. Paramètres du texte: pour modifi er les paramètres
de type, de style, de taille et de couleur du texte.
3. Paramètres des unités: pour sélectionner le
type d'unité à utiliser. Choisissez entre millimètres,
centimètres, pixels ou pouces.
FRANÇAIS | 37
Page 38

PRENDRE DES NOTES ET MARQUER L'IMAGE
Portable CapturePro comporte des fonctions pour marquer, dessiner, ou ajouter des notes sur les images
enregistrées. Cela peut être pratique pour prendre des notes rapidement et mettre en évidence des caractéristiques
précises de l'image du spécimen.
1. MARQUER
+
+
Pour utiliser ces fonctions, cliquez sur l'icône de dessin dans l'écran de visualisation d'image.
Les options du menu déroulant Dessiner sont les suivantes:
PRINCIPAL
1. Ligne: pour dessiner une ligne droite sur l'image.
2. Flèche: pour dessiner une ligne avec fl èche sur l'image.
3. Dessin libre: pour effectuer un dessin libre. Pratique pour la prise de notes manuscrites rapides.
4. Rectangle: Pour dessiner une boîte. Pratique pour mettre une caractéristique en évidence ou encadrer
du texte.
RÉGLAGES
1. Propriétés des lignes: Pour modifi er les paramètres de type, de taille et de couleur de ligne.
38 I FRANÇAIS
2. INSCRIRE DU TEXTE
+
+
Pour saisir des notes sur l'image, sélectionnez l'icône .
Dans le menu déroulant, vous pouvez sélectionner le type de police, la taille et la couleur.
Page 39

DÉFINITION DES ICÔNES DE L'ÉCRAN DE VISUALISATION
B.
A.
D.
C.
F.
E.
G.
A.Enregistrer: pour enregistrer votre fichier
B. Copier dans le presse-papier: pour copier et pouvoir
coller dans un autre programme
C. Copier: pour enregistrer une copie
D. Précédent: pour revenir à l'image précédente du
même dossier.
E. Suivant: pour aller à l'image suivante du même dossier.
F. Annuler: pour revenir d'une action en arrière
10. MULTI-PRISES
I.
H
J.
K.
G. Rétablir: pour rétablir une action annulée
H. Dessiner
I. Texte/Notes
J. Mesure
K. Calibration
L. Agrandissement actuel (selon la dernière calibration
effectueé)
L.
Si vous avez acheté votre FlipView hors d'Amérique du nord
(modèle 44315), vous remarquerez que la boîte contient
un adaptateur secteur multi-prises. Vous pouvez y fixer 3
différentes têtes de prise pour pour pouvoir le brancher en
Europe, en Angleterre ou Hong Kong et en Chine.
Pour changer de tête de prise:
- Tenez le corps de la prise d'une main,
et insérez de l'autre la tête de prise voulue.
- Appuyez sur le petit bouton de libération
sur le corps de la prise (encerclé dans l'image
ci-dessous).
- Localisez et faites s'enclencher les languettes
de la tête de prise dans les fentes du corps de la
prise.
- Faites pivoter la tête dans le sens des aiguilles
d'une montre à 90°
jusqu'à ce que vous entendiez un "clic".
Pour retirer la tête de prise, appuyez sur le bouton et faitesla pivoter dans le sens inverse des aiguilles d'une montre
jusqu'à sa libération.
FRANÇAIS | 39
Page 40

11. NETTOYAGE ET ENTRETIEN
Votre microscope avec caméra numérique Celestron est un instrument optique de précision et doit être traité avec soin,
sans exception. Suivez ces conseils de soin et d'entretien et votre microscope restera en bonne condition pendant des
années.
+
Entreposez le microscope dans un endroit propre et sec.
+
Ne jamais utiliser votre microscope dans les lieux ou de
tels dispositifs sont interdits. Une utilisation incorrecte
peut entraîner des accidents sérieux.
+
Ne pas essayer d'atteindre les composants internes de
votre microscope ou essayer de les modifier de quelque
manière que ce soit. Seuls les techniciens qualifiés sont
habilités à effectuer la maintenance ou des réparations.
12. DÉPANNAGE
+
Conservez le microscope à distance de l'eau ou autres
liquides. Ne jamais l'utiliser sous la pluie ou la neige.
L'humidité entraîne des risques d'incendie ou de choc
électrique.
+
Pour retirer la poussière ou nettoyer les traces de l'écran
LCD ou d'un autre composant optique, soufflez ou utilisez
une brosse de poil de chameau sur le composant en
question pour en retirer la poussière. Utilisez ensuite un
tissu de microfibres sec pour essuyer la surface.
+
Si la surface extérieure du microscope doit être nettoyée,
essuyez-la à l'aide d'un tissu humide.
PROBLÈMES SOLUTION
L'appareil ne s'allume pas. Vérifiez le niveau de la batterie. Si nécessaire, rechargez le microscope en le branchant au
L'écran reste éteint.
L'écran comporte des traces ou de la saleté.
Le microscope est raccordé à un téléviseur,
mais aucune image n'apparaît dessus.
Le voyant de la pile ne s'illumine pas, même
si le chargeur est connecté et branché à une
prise murale.
Ou
La pile ne se charge pas.
chargeur.
+
Vérifiez que la prise est alimentée.
+
Vérifiez l'état de charge de la pile et rechargez-la si nécessaire.
+
Vérifiez que l'objet à observer est correctement positionné sous la lentille.
+
Vérifiez que l'illumination est active.
+
Nettoyez l'écran et la lentille avec soin à l'aide d'un tissu de microfibres.
+
Vérifiez que téléviseur est allumé.
+
Basculez sur la source d'image appropriée sur votre téléviseur. (cela varie selon les
fabricants).
+
Vérifiez que le câble vidéo est correctement connecté au port Video out du
microscope et que le câble est bien raccordé au téléviseur.
+
Vérifiez que le câble est raccordé au port approprié.
+
Vérifiez que la prise murale elle-même est alimentée et qu'elle fonctionne correctement.
Si la prise murale est contrôlée
par un interrupteur, vérifiez que l'interrupteur est activé.
40 I FRANÇAIS
13. GARANTIE
Votre microscope LCD FlipView est couvert par une garantie limitée de deux ans. Rendez-vous sur le site web de Celestron pour obtenir des informations détaillées sur tous les microscopes Celestron.
© 2014 Celestron • Tous droits réservés. • celestron.com
2835 Columbia Street • Torrance, CA 90503 U.S.A.
Téléphone: 1 (800) 421-9649 • Imprimé en Chine 2013
Remarque relative à la FCC: Cet équipement a été testé et jugé conforme aux limites établies pour un dispositif numérique de classe B, conformément à la partie 15 de la réglementation de la FCC. Ces
limites ont étés mises en place pour offrir une protection raisonnable contre les interférences dans un complexe résidentiel. Cet équipement génère et peut émettre des fréquences radio et, s'il n'est pas
installé et utilisé conformément aux instructions du manuel, peut causer des interférences nuisibles aux communications radio. Mais il n'existe aucune garantie que des interférences ne seront pas produites
dans une installation particulière. Si cet équipement crée des interférences pour la réception radio ou télévisuelle, ce qui peut être constaté en l'allumant et en l'éteignant, alors il vous est conseillé d'y
remédier d'une des manières suivantes:
+ Réorientez ou déplacez l'antenne de réception.
+ Augmentez la distance séparant l'équipement et le récepteur.
Ce produit a été conçu pour être utilisé par les personnes de 14 ans et plus. La conception et les caractéristiques du produit peuvent être modifiées sans préavis.
+ Connectez l'équipement à une prise ou à un circuit différent de celui du récepteur.
+ Consultez le distributeur ou un technicien radio ou TV d'expérience pour obtenir de
l'assistance.
44314, 44315
Page 41

DIGITALEN LCD-HANDMIKROSKOPS
BEDIENUNGSANLEITUNG
MODELLE 44314, 44315
DEUTSCH | 41
Page 42

1. EINLEITUNG
Vielen Dank für den Kauf des digitalen LCD-Handmikroskops FlipView™ von Celestron mit 5MP-Sensor und 3,0-ZollTFT-LCD-Farbbildschirm. Bei Ihrem Mikroskop handelt es sich um ein präzises optisches Instrument, das aus Materialien
höchster Qualität gefertigt wurde, um Haltbarkeit und Langlebigkeit zu gewährleisten. Es wurde konzipiert, um Ihnen bei
minimalem Wartungsaufwand ein Leben lang Freude zu bereiten.
Das FlipView™ bietet über den LCD-Bildschirm ein
Betrachten bei niedriger, bis zu 120-facher Vergrößerung.
Für zusätzliche Vergrößerungen (bis zu 300-fach)
wird das Mikroskop an Ihren PC angeschlossen. (Die
Vergrößerung hängt von der Monitorgröße ab.)
Das FlipView™ ist ein Mikroskop mit niedriger
Vergrößerungsleistung und ist hauptsächlich für das
Untersuchen von Proben wie Münzen, Briefmarken,
Elektronikteilen, Insekten und anderen 3D-Objekte
geeignet. Proben auf Objektträgern können mithilfe
des Aufl ichts betrachtet werden, doch ist dieses
Mikroskop für diesen Zweck nicht ideal. Möchten Sie Ihre
Objektträger mit höherer Vergrößerung betrachten, fi nden
Sie unsere gesamte Mikroskoppalette auf Celestron.com.
Das FlipView™ verwendet kein Okular wie herkömmliche
Mikroskope. Stattdessen “sieht” der Kamerasensor die
Proben und das Bild wird auf dem hochaufl ösenden
LCD-Farbbildschirm angezeigt. Dadurch macht das
Betrachten Spaß, die Nacken- und Augenermüdung
wird verringert und das leichte Teilen mit anderen wird
ermöglicht. Über das enthaltene Kabel für den AVAusgang können ein externer Monitor, Projektor oder
Fernseher zum Betrachten angeschlossen werden.
Mit dem FlipView™ können Bilddateien schnell und
einfach gespeichert, übertragen und geteilt werden. Für
späteres Übertragen einfach auf eine microSD-Karte
speichern oder per USB-Kabel direkt an Ihren Computer
anschließen.
Lesen Sie bitte diese Anleitung und gehen Sie die
nachfolgenden Schaubilder durch, bevor Sie Ihr
Mikroskop verwenden. Nehmen Sie sich die Zeit, die
einfachen Hinweise zu Pfl ege, Instandhaltung und
Fehlerbehebung in diesem Handbuch durchzulesen, um
sicherzustellen, dass Ihr FlipView™-Mikroskop jahrelang
einen hohen Qualitätsstandard beibehält.
LIEFERUMFANG
Digitales LCDHandmikroskop FlipView™ (1)
Netzteil (1)
Metallständer (1)
Lithium-Akku (1) USB-Kabel (1)
Transporttasche (1)
Kabel für den VideoAusgang (1)
42 I DEUTSCH
CD (1) QSG (1) Reinigungstuch (1) Kalibrierungslineal (1)
Page 43

TEILE
1. Auslöser
2. Ausklappbarer LCD-Bildschirm
3. Ausklappbares Bein
4. Einstellungstaste
5. Taste für Farbmodus/Aufwärts
6. Taste für Wiedergabe/links
7. Beleuchtungseinstellrad
8. Batteriefach
9. Zoom
10. AC-Eingangsport mit 5 V
11. Mini USB-Anschluss
12. Video-Ausgangsport
13. MicroSD-Kartensteckplatz
14. Akkuladeanzeige
15. OK-Taste
16. Nach-unten-Taste
17. An-/Ausschalter
18. Fokussierrad
19. Mikroskopobjektiv
20. ¼-20” Gewindeeinsatz
1
2
3
4
5
9
10
11
12
13
14
15
16
20
6
17
7
8
18
19
DEUTSCH | 43
Page 44

TECHNISCHE DATEN
Vergrößerungsbereich 10- bis 120-fach (mit PC bis zu 300-fach)
Sensor 5MP-CMOC 1/3.2 Zoll
LCD-Bildschirm 3-Zoll-TFT-LCD-Farbbildschirm (Scharniere in der X-Achse (90°) und der Y-Achse (180°)
Linse 5-Elemente-Infrarotsperre (Infrarot-Reduzierung), Qualitätsglas, Effektive Brennweite: 15,8
Reichweite des Okularauszugs Manueller Fokus von 10 bis 300 mm
Beleuchtung 8 weiße, einstellbare LEDs in Ringschaltung
Auslöser Auf dem Gehäuse
Bildauflösung 5 MP, 3 MP, 1,3 MP, VGA (12 MP Interpolation)
Videoauflösung VGA, 30 fps
Videokompressionssformat MJPEG
Videoausgabe Kabel für den Video-Ausgang (enthalten)
PC-Schnittstelle USB 2.0-Kabel (enthalten)
OS-Systeme unterstützt Windows XP/Vista/7/8
Speicher Micro-USB-Kartensteckplatz (unterstützt bis zu 32 GB) (microSD-Karte NICHT enthalten)
Vergrößerungsleistung Wiederaufladbarer Lithium-Ionen-Akku (1050 mAh)
Messsoftware Portable Capture Pro-Software mit Notizfunktion. Kalibrierungsfunktion inbegriffen.
Von der Software unterstützte Sprachen: englisch, deutsch, französisch, spanisch, russisch, italienisch, portugiesisch, niederländisch,
Abmessungen Mikroskop: 4,625 Zoll x 2,5 Zoll x 4,25 Zoll (117,5 mm x 63,5 mm x 108 mm)
Gewicht Mikroskop: 7,4 oz/212 g
mm
Bildverzerrung: 0,10 %
FOV: 13,0°
Mac OSX 10.6-10.9
Netzteil mit Universalanschluss 100 bis 240 Volt 50/60 Hz (die Version 44315- EU verfügt
über einen Mehrfachstecker)
japanisch, koreanisch und chinesisch
Ständer: 3,0 Zoll x 1,75 Zoll x 2,75 Zoll (76,2 mm x 44,5 mm x 70 mm)
Mikroskop und Ständer: 11,2 oz/317 g
HINWEIS: Bei der Interpolation fügt die Software einem Bild weitere Pixel hinzu, um es künstlich zu vergrößern. Dies kann beim Ausdrucken in größeren Formaten
nützlich sein.
2. EINSTELLEN
DEN AKKU EINSETZEN
Öffnen Sie das Akku-Fach (8) und setzen Sie einen Akku ein, wobei
sichergestellt werden muss, dass die Kontakte korrekt ausgerichtet sind.
HINWEIS: Der Akku des FlipView™ wird teilweise geladen geliefert. Sie sollten ihn zuerst aufladen, bevor Sie
das Mikroskop im Akkubetrieb verwenden.
DEN AKKU AUFLADEN
• Schließen Sie das schmale Ende des Netzteils an den AC-Anschluss mit
5 V an (10), der sich auf der Geräterückseite befindet. Schließen Sie das
andere Ende an eine standardmäßige Wechselstrom-Wandsteckdose an.
* Die Ladeanzeige-LED (14) leuchtet rot, wenn der Akku aufgeladen wird.
* Wenn der Akku vollständig aufgeladen ist, erlischt die Ladeanzeige-LED
Nun können Sie das FlipView™ ohne externe Stromversorgung für bis zu 2
Stunden nutzen.
10 50 m Ah
44 I DEUTSCH
* Sie können den Akkustand über den LCD-Bildschirm überwachen. Dies ist
über das später beschriebene Akku-Symbol möglich.
Page 45

EINSETZEN DER
MICROSD-KARTE
Möchten Sie Bilder aufnehmen, ohne Ihr Mikroskop an
einen Computer anzuschließen, wird eine microSD-Karte
in den Steckplatz (13) auf der Geräterückseite eingeschoben. Sie wird hineingedrückt, bis sie einrastet.
HINWEIS: Die MicroSD-Karte ist im Lieferumfang NICHT enthalten. Um Bilder
HINWEIS: Eine neue MicroSD-Karte sollte vor Gebrauch formatiert werden.
ohne microSD-Karte aufzunehmen, siehe Abschnitt 7 in dieser
Betriebsanleitung über die Installation der Computer-Software und wie
man diese zum Speichern auf Ihrem Computer verwendet.
Weitere Informationen über das Formatieren der Karte siehe Abschnitt 4.
BILDSCHIRMSYMBOLE
Bildaufnahme
Videoaufnahme
Zeitrafferaufnahme
Anzahl aufgenommener Bilder/Anzahl
verbleibender Bilder
Verbleibende Videoaufzeichnungszeit
(Stunden:Minuten:Sekunden)
MicroSD-Karte erkannt
Videoaufnahmeeinstellung
Aktuell eingestellte Aufl ösung
Akkustandanzeige
HINWEIS: Über einen Druck auf die Zoom-Taste können die Bildschirmsymbole
ausgeschaltet werden
DEUTSCH | 45
Page 46

3. BILDER BETRACHTEN UND AUFNEHMEN:
DIGITALE BILDGEBUNG
EINE PROBE BETRACHTEN
Schalten Sie das FlipView™ ein und richten Sie es auf die Probe.
Drehen Sie zur Beleuchtungseinstellung am Beleuchtungseinstellrad (7). Drehen Sie am Fokussierrad (18), bis die Probe
scharfgestellt ist.
FOTOS AUFNEHMEN
Drücken Sie zum Aufnehmen eines Fotos auf den Auslöser (1).
MODUS ÄNDERN
Um zwischen dem Foto-, Video- und Vorschaumodus zu wechseln, auf die Wiedergabetaste (6) drücken. Im Fotomodus zwei
Mal drücken, um in den Videomodus zu gelangen. Der aktuelle
Modus wird oben links im LCD-Bildschirm mit einem Symbol
angezeigt.
46 I DEUTSCH
FARBMODUS ÄNDERN:
Drücken Sie auf die Farbmodustaste (5), um zwischen Farbe, Negativ und schwarz-weiß zu wechseln.
A.
B.
C.
Page 47

DEN DIGITALEN ZOOM EINSTELLEN:
Über die Zoom-Taste (9) können Sie beim Betrachten von Proben
zoomen.
EIN VIDEO AUFNEHMEN:
Drücken Sie im Videomodus auf den Auslöser (1), um mit der
Aufzeichnung zu beginnen. Zum Beenden der Aufzeichnung erneut
drücken.
BILDERVORSCHAU
Hierzu im Fotomodus einmal und im Videomodus zweimal auf die
Wiedergabetaste (6) drücken. Angezeigt werden Fotos und Videos
ausgehend von der zuletzt vorgenommenen Aufnahme. Zum Blättern
in Fotos/Videos auf die Auf- (5) oder Abwärts-Taste (16) drücken.
VIDEOVORSCHAU
Wird eine Videodatei angezeigt, zum Starten auf OK drücken (15).
Zum Beenden erneut drücken.
BILDER LÖSCHEN
Zum Löschen einer Bild- oder Videodatei muss das Menü über die
Einstellungstaste (4) aufgerufen werden. Drücken Sie auf die Abwärtstaste (16), um zu "Löschen" zu gelangen. Auf OK drücken.
Wählen Sie "Dieses Bild" oder "Alle" aus. Blättern Sie mithilfe der
Abwärtstaste durch die Dateien und wählen Sie OK. Sie müssen
diesen Vorgang erneut bestätigen. "Ausführen" auswählen.
DEUTSCH | 47
Page 48

BILDER SCHÜTZEN
Diese Funktion verhindert, dass Bilder oder Videos von der microSD-Karte gelöscht werden können. Zum Schützen einer Bildoder Videodatei muss das Menü über die Einstellungstaste (4) aufgerufen werden. Drücken Sie auf die Abwärtstaste (16), um
zu "Schützen" zu gelangen. Auf OK drücken. Befolgen Sie die Eingabeaufforderungen und wählen Sie "OK".
DIASHOW
Diese Funktion bietet eine Vorschau aller Bilder auf der SD-Karte. Das gewünschte Intervall zwischen den Bildern kann über
die Tasten eingestellt werden.
48 I DEUTSCH
Page 49

4. EINFÜHRUNG IN DAS SORTWAREMENÜ
MENÜ
Drücken Sie im Vorschaumodus auf die Einrichtungstaste
(4), um das Hauptmenü aufzurufen. Die Menüauswahlmöglichkeiten unterscheiden sich in Abhängigkeit davon, ob Sie sich
im Foto- oder Videomodus befi nden. Über die Tasten Abwärts
(16), Aufwärts (5) und OK (15) navigieren Sie durch das Menü.
Im Fotomodus stehen folgende Einstellungen zur Verfügung:
1. Aufl ösung
2. Zeitraffer
3. Qualität
4. Schärfe
Im Videomodus ist lediglich eine Einstellung vorhanden:
1. Aufl ösung
DIE AUFLÖSUNG EINSTELLEN
Im Fotomodus stehen folgende Einstellungen zur Verfügung:
1. 12,0 MP (interpoliert*)
2. 9,0 MP
3. 5,0 MP
4. 3,0 MP
5. 1.3 MP
6. VGA
ZEITRAFFER
BILDER PRO SEKUNDE (FRAMES): Hier wird die Anzahl
der Frames eingestellt.
INTERVALL: Hier wird das Intervall zwischen den einzelnen
Aufnahmen eingestellt.
Drücken Sie nach getroffener Auswahl zur Bestätigung auf OK
sowie auf die Menü-Taste, um zum Vorschaumodus zurückzukehren.
Wenn Sie auf den Auslöser drücken, wird das Symbol oben
HINWEIS: Die obige Nummer repräsentiert 32 Bilder pro Sekunde.
DEUTSCH | 49
Page 50

links im Bildschirm angezeigt.
Sind alle Frames aufgenommen, schaltet das FlipView™ zurück in
den Vorschaumodus.
Zum Abbrechen der automatischen Aufnahme bevor diese vollständig ist, einmal auf den Auslöser drücken.
HINWEIS: Die Einstellung Zeitraffer ist nur im Fotomodus verfügbar.
QUALITÄT
Über die Qualitätseinstellungen wird das Niveau der Bildkompression festgelegt. Je mehr Kompression verwendet wird, desto weniger Details enthält das Foto und umso kleiner ist die Dateigröße.
Im Fenster Qualitätseinstellungen stehen 3 Auswahlmöglichkeiten
zur Verfügung:
1. Superfein (größte Dateien, kleinste Kompression, Maximum an
Details)
HINWEIS: Die obige Nummer repräsentiert 15 Sekunden.
2. Fein
3. Normal (kleinste Dateien, größte Kompression)
SCHÄRFE
Die Schärfe erhöht die Unterschiede, die der Bildprozess
zwischen den Pixelrändern erkennt. Es können für die Schärfeneinstellung keine Regeln aufgestellt werden. Finden Sie durch
Ausprobieren heraus, welche Einstellung sich für Ihre Proben am
besten eignet.
Zwei Schärfeneinstellung sind möglich:
1. Hart
2. Normal
3. Weich
SETUP-MENÜ
50 I DEUTSCH
Page 51

Öffnen Sie den Setup, indem Sie auf die Wiedergabetaste (6) drücken.
Folgendes steht zur Auswahl:
1. Sprache
2. Energieeinsparung
3. Frequenz
4. Datumsstempel
5. TV-AUSGANG
6. Datum/Uhrzeit
7. SD formatieren
8. Systemwiederherstellung
9. Version
SPRACHE
Das FlipView™ unterstützt 11 Sprachen:
1. Englisch
2. Deutsch
3. Französisch
4. Spanisch
5. Italienisch
6. Portugiesisch
7. Japanisch
8. Vereinfachtes Chinesisch
9. Traditionelles Chinesisch
10. Holländisch
11. Russisch
Wählen Sie mithilfe der Pfeiltasten Ihre Sprache aus und speichern Sie
die Einstellung über OK (15).
ENERGIEEINSPRARUNG
Die Energieeinsparung erlaubt Ihnen den Akku zu schonen, indem das
Gerät automatisch abschaltet. Folgende Zeiten können eingestellt
werden:
1. AUS - Die Energiesparfunktion ist aus; das Gerät schaltet nicht
automatisch ab
2. 5 Min. - Das Gerät schaltet nach 5 Minuten ohne Bedienung ab
3. 10 Min. - Das Gerät schaltet nach 10 Minuten ohne Bedienung ab
4. 15 Min. - Das Gerät schaltet nach 15 Minuten ohne Bedienung ab
5. 30 Min. - Das Gerät schaltet nach 30 Minuten ohne Bedienung ab
FREQUENZ
Diese Einstellung steht mir der Aktualisierungsrate Ihres Fernsehers in
Verbindung. Verwenden Sie 60 Hz für die USA (NTSC) und 50 Hz für
andere Länder.
DATUMSSTEMPEL
DEUTSCH | 51
Page 52

Wenn Sie dies wünschen, können Sie Bilddateien ( jedoch keine
Videodateien) mit einem Datumsstempel versehen.
Für die Schärfe steht Folgendes zur Auswahl.
1. DATUM/UHRZEIT: DATUM und UHRZEIT werden auf der gespei-
cherten Bilddatei angezeigt.
2. DATUM: Lediglich das Datum wird auf der Bilddatei angezeigt.
3. AUS: DATUM/UHRZEIT-Angaben werden NICHT angezeigt.
TV-AUSGANG
Stellen Sie Ihren TV-Ausgang je nach Standort entweder auf NTSC
oder PAL ein.
1. Wählen Sie NTSC für:
• Nordamerika
• Südamerika (außer Brasilien, Argentinien, Uruguay und Französisch-Guyana)
• Myanmar, Südkorea, Taiwan, Japan und die Philippinen
2. Wählen Sie für alle anderen Länder PAL
ANMERKUNG: siehe untenstehende Karte
HINWEIS: DATUM und/oder UHRZEIT werden NICHT im Vorschaumodus
sondern lediglich auf der aufgenommenen Bilddatei angezeigt.
52 I DEUTSCH
Page 53

DATUM/UHRZEIT
Hier können Sie die aktuelle Uhrzeit einstellen und festlegen, wie diese
angezeigt werden soll.
Folgendes steht zur Auswahl:
1. JJ/MM/TT
2. TT/MM/JJ
3. MM/MM/TT
FORMATIEREN DER MICROSD-KARTE
Wählen Sie diese Option, wenn Sie Ihre microSD-Karte formatieren möchten. Wir empfehlen, jede microSD-Karte vor der erstmaligen Verwendung im
FlipView zu formatieren. Durch das Formatieren werden alle vorhandenen
Daten gelöscht.
SYSTEMWIEDERHERSTELLUNG
Wählen Sie diese Option, um das FlipView auf die Werkseinstellungen
zurückzusetzen.
VERSION
Der Versionsbildschirm zeigt Informationen über Ihre Firmware-Version an.
Hier können keine Veränderungen vorgenommen werden.
5. DATEIEN AUF DEN COMPUTER ÜBERTRAGEN
+
Verbinden Sie Ihr FlipView über das enthaltene USB-Kabel mit dem
Computer.
+
Wählen Sie auf dem LCD-Bildschirm "Bilder hochladen" und drücken
Sie OK (15).
+
Ihr Computer liest die Daten der microSD-Karte nun wie Daten von der
Digitalkamera und lädt sie herunter.
+
Nach Abschluss der Übertragung können Sie Ihre Bilder mit der von
Ihnen gewünschten Software auf dem PC ansehen.
6. AN EINEN FERNSEHER ANSCHLIESSEN
+
Schließen Sie den 1/8-Zoll-Stecker am Ende des mitgelieferten AV-Ka-
bels an den AV-Ausgangs (12) an der Geräterückseite an.
+
Schließen Sie den gelben RCA-Stecker des Videokabels an einen der
gelben Videoeingangsanschlüsse Ihres Fernsehers an.
+
Fernseher oder Projektor einschalten. Vergewissern Sie sich, dass Ihr
Fernseher auf den richtigen Eingangskanal eingestellt ist.
+
Sie sollten nun ein Bild der auf dem Mikroskop betrachteten Probe
sehen.
DEUTSCH | 53
Page 54

7. VERWENDUNG DER PORTABLE CAPTURE PRO
SOFTWARE VON CELESTRON
1. Die Software installieren. Installieren Sie die Software mithilfe der
enthaltenen CD auf Ihrem Computer. Eventuell müssen Sie Ihren
Computer neu starten, bevor Sie die Software zum ersten Mal
verwenden.
2. Verbinden Sie Ihr FlipView über das enthaltene USB-Kabel, wie
oben beschriebenen, mit dem Computer.
3. Wählen Sie auf dem LCD-Bildschirm "Vorschau auf dem
Computer" und drücken Sie OK (15).
4. Öffnen Sie auf Ihrem PC die Portable CapturePro-Software von
Celestron, indem Sie auf das Symbol auf dem Desktop klicken.
5. Sie können nun das gestreamte Bild auf der Software-Oberfl äche
sehen.
HINWEIS: Sobald die Software läuft, wird der Bildschirm schwarz Nun steuern Sie das Mikroskop über den
HINWEIS: Wenn Sie den Computeranschluss über USB vornehmen, wird der interne Lithium-Ionen-Akku Ihres
HINWEIS:: Wenn das Mikroskop nicht angeschlossen ist, wird folgende Fehlermeldung angezeigt: “Kein Gerät
Computer. Doch Fokus, Zoom und Beleuchtung werden manuell über das Gerät gesteuert.
FlipView aufgeladen.
erkannt. Schließen Sie Ihr Mikroskop bitte direkt an einen freien USB-Port an.” Starten Sie die
Software neu.
8. DIE SOFTWARE VERWENDEN
FOTOS UND VIDEOS AUFNEHMEN
+
Klicken Sie zum Aufnehmen eines Fotos auf das Aufnahmemenü und
wählen Sie Foto.
+
Klicken Sie zum Aufnehmen eines Videos auf das Aufnahmemenü
und scrollen Sie abwärts zu Video. Wiederholen, um die Aufnahme zu
beenden.
+
Sie sollten nun ein Bild der auf dem Mikroskop betrachteten Probe
sehen.
ANDERE MENÜPUNKTE
54 I DEUTSCH
DATEIMENÜ Unter den Elementen im Dateimenü fi nden Sie:
FOTO VERZEICHNIS: Führt Sie zum Erstellen eines
Ordners auf Ihrer Festplatte, in den Fotos gespeichert
werden.
VIDEO VERZEICHNIS: Führt Sie zum Erstellen eines
Ordners auf Ihrer Festplatte, in den Videos gespeichert werden.
VERLASSEN: Die Software schließen.
Page 55

OPTIONEN: Im Menü Optionen steht Folgendes zur Auswahl:
AUFLÖSUNG: Stellt die Sensorbildaufl ösung ein. 2 Aufl ösungseinstellungen stehen zur Auswahl:
- 320 x 240
- 640 x 480
HINWEIS: Ist das FlipView an einen PC angeschlossen, können keine hochaufl ösenden Bilder aufgenommen werden. Es eignet sich nun für Demonstration und ein Streaming. Um die
Aufl ösung von 5 MP voll zu nutzen, müssen Sie das FlipView vom Computer trennen.
DATUM/UHRZEIT: Schaltet den Datums- und Uhrzeitstempel an bzw. aus.
SPRACHE: Ändert die Spracheinstellung: 12 Sprachen stehen zur Auswahl:
- englisch, deutsch, französisch, spanisch, russisch, italienisch, portugiesisch, niederländisch, polnisch, japanisch, koreanisch und chinesisch
X-Y-FADENKREUZ Schaltet die Fadenkreuz-Führung auf dem Vorschaubildschirm an bzw. aus.
VOLLBILDMODUS: Ihr Bildschirm wird in den Vollbildmodus geschaltet. Drücken Sie zum Aufheben auf Esc.
SYMBOLE: Neben den Menüelementen haben nachstehende Symbole folgende Bedeutung:
A. Standbildaufnahme (Foto)
B. Ein Video starten/stoppen
C. Vollbildmodus
DEUTSCH | 55
Page 56

9. KALIBRIERUNG UND MESSUNGEN
+
Die PortableCapturePro-Software von Celestron enthält
eine Messfunktion. Um diese Funktion nutzen zu können,
muss zuvor eine Messkalibrierung durchgeführt werden.
+
Vergewissern Sie sich, dass die X-Y-Führung auf “An”
gestellt ist, indem sie im Menü Optionen ausgewählt
wurde.
+
Nehmen Sie ein Standbild auf. Das Bild wird in der
rechten Bildschirmspalte angezeigt.
+
Stellen Sie die Mikroskophöhe ein und stellen Sie Ihre
Probe scharf. Ersetzen Sie nun Ihre Probe durch das
Kalibrierungslineal.
+
Passen Sie den Fokus an und richten Sie das
Kalibrierungslineal aus, sodass die Linien auf dem Lineal
parallel zur vertikalen Linie auf der X-Y-Führung laufen.
+
Das gespeicherte Bild doppelklicken, um es im Bildvorschaubildschirm zu öffnen.
56 I DEUTSCH
+
Klicken Sie auf das Kalibrierungssymbol
+
Eine Linie anklicken und über einen “bekannten Wert” auf dem
Linealbild ziehen. Versuchen Sie dabei, die Linie so senkrecht
wie möglich zu den Linien auf dem Lineal zu halten.
+
Das Fenster “Vergrößerung anpassen” erscheint wie unten
dargestellt.
+
Geben Sie den “bekannten Wert” vom Kalibrierungslineal in den
Kasten “Tatsächliche Maße” ein.
Page 57

+
Um sicherzustellen, dass die Kalibrierung erfolgreich war, zum
Bildaufnahmebildschirm zurückkehren.
+
Klicken Sie auf das Linealsymbol und wählen Sie auf
dem Dropdown-Menü die Option “Beliebige Winkellinie” an.
+
Eine Linie anklicken und wie zuvor über denselben “bekannten
Wert” ziehen.
+
War die Kalibrierung erfolgreich, entspricht der gemessene
Abstand genau dem "bekannten Wert".
+
Klicken Sie zum Aufnehmen von Bildern ohne die Anpassung
von Höhe oder Vergrößerung auf das Kalibrierungssymbol.
Wählen Sie im Dropdown-Menü “Vergrößerung einstellen” und
anschließend “Aufnahme-Vergrößerung einstellen”.
+
Ein Pop-kp-Fenster öffnet sich. Geben Sie die oben rechts im
Hauptfenster angezeigte Vergrößerung ein.
MESSTOOLS
Im Dropdown-Menü fi nden Sie allerhand Tools. Hier eine Liste von
Messungen, die Sie vornehmen können.
HAUPT
1. Beliebiger Winkel: Misst in gerader Linie von Punkt
A zu Punkt B.
2. Durchgehende Linie: Misst den Gesamtabstand
zwischen mehreren Punkten. Es wird zuerst eine
gerade Linie von Punkt A zu Punkt B gemessen.
Anschließend anklicken und zur durchgehenden
Messung von Punkt B zu Punkt C ziehen. (Dies kann
beliebig oft wiederholt werden.)
3. Kreis mit Radius: Misst den Radius eines Kreises.
Ziehen Sie den Cursor ausgehend von der Mitte nach
außen auf ein beliebiges Randstück.
4. Kreis mit Durchmesser: Misst den Durchmesser
eines Kreises. Ziehen Sie den Cursor ausgehend von
einem äußeren Rand über den gegenüberliegenden
Rand.
5. Dreipunktewinkel: Misst einen Winkel zwischen
zwei Punkten, ausgehend von einem Radius- oder
einem Schnittpunkt. Klicken Sie auf einen Punkt A
(Radiuspunkt), ziehen und klicken Sie auf Punkt B
und klicken Sie anschließend auf Punkt C. Der Winkel
wird gezeichnet und die Winkelangabe (Grad) wird
angezeigt.
EINSTELLUNGEN
1. Linieneigenschaften: Ändert die Einstellungen der
Linienart, -breite, -größe- und –farbe.
2. Texteigenschaften: Ändert die Einstellungen der
Schriftart, -größe-, des Stils sowie der Farbe.
3. Einheiten einstellen: Ändert die Einstellung von
Einheiten. Zur Auswahl stehen Millimeter, Zentimeter,
Pixel und Zoll.
DEUTSCH | 57
Page 58

ANMERKUNGEN HINZUFÜGEN UND BILDER MARKIEREN
Die PortableCapturePro beinhaltet Funktionen zum Markieren, Zeichnen und/oder Hinzufügen von Anmerkungen
in gespeicherten Bildern. Damit können Sie praktischerweise schnell Anmerkungen hinzufügen, um Merkmale Ihrer
Probenbilder herauszustellen.
1. MARKIERUNGEN
+
+
Klicken Sie für diese Funktion auf das Zeichnen-Symbol im Bildvorschaufenster
Die Optionen des Lineal-Dropdown-Menü umfassen:
HAUPT
1. Linie: Zeichnet auf dem Bild eine gerade Linie.
2. Pfeil: Zeichnet auf dem Bild eine Linie mit Pfeil.
3. Freihand: Ermöglicht dem Benutzer das Freihandzeichnen. Damit können schnell handgeschriebene
Notizen hinzugefügt werden.
4. Rechteck: Zeichnet einen Kasten. Hiermit können Besonderheiten des Bilder hervorgehoben und Texte
umrahmt werden.
EINSTELLUNGEN
1. Linieneigenschaften: Ändert die Einstellungen der Linienart, -größe- und –farbe
58 I DEUTSCH
2. TEXT HINZUFÜGEN
+
+
Wählen Sie zum Eintippen von Anmerkungen auf dem Bild auf das Tippen-Symbol .
Im Dropdown-Menü können Schriftart, -größe und –farbe gewählt werden.
Page 59

ERLÄUTERUNG DER BILDVORSCHAUSYMBOLE
B.
A.
D.
C.
F.
E.
G.
A. Speichern: Datei speichern
B. In den Zwischenspeicher kopieren: Kopieren, um den
Inhalt in einem anderen Programm zu öffnen
C. Kopieren: Als Kopie speichern
D. Voriges: Sie gelangen zurück zum vorherigen Bild im
Speicherordner
E. Nächstes: Sie gelangen zum nächsten Bild im Speicher-
ordner
F. Rückgängig: Macht den letzten Bedienschritt rückgängig
10. MEHRFACHSTECKER
I.
H.
J.
K.
L.
G. Wiederholen: Wiederholt den letzten Bedienschritt
H. Zeichnen
I. Text/Anmerkungen
J. Messen
K. Kalibrierung
L: Aktuelle Vergrößerung (basierend auf der letzten Kalibrie-
rung)
Wenn Sie Ihr FlipView™ nicht in Nordamerika bezogen
haben (Modell 44315), verfügen Sie über ein Mehrfachstecker-Netzteil. Es verfügt über 3 austauschbare Steckerköpfe für Steckdosen in Europa, Großbritannien, Hongkong und
China.
So wechseln Sie den Steckerkopf:
- Halten Sie mit einer Hand das Hauptsteckergehäuse und mit der anderen Hand den Steckerkopf Ihrer Wahl.
- Drücken Sie auf die kleine Entriegelungstaste
auf dem Steckergehäuse (dargestellt im untenstehenden Bild).
- Nun werden die Flachstifte des Steckerkopfes
in den Nuten des Steckergehäuses verriegelt.
- Drehen Sie den Steckerkopf um 90 ° im Uhrzeigersinn, bis er “hörbar einrastet”.
Drücken Sie zum Abnehmen des Steckerkopfes die kleine
Entriegelungstaste und drehen Sie den Steckerkopf zum
Entriegeln gegen den Uhrzeigersinn.
DEUTSCH | 59
Page 60

11. PFLEGE UND INSTANDHALTUNG
Ihr Mikroskop mit Digitalkamera ist ein präzises optisches Instrument und sollte zu jeder Zeit mit Vorsicht behandelt werden. Befolgen Sie diese Pflege- und Wartungsvorschläge, und ihr Mikroskop wird während seiner Lebensdauer nur sehr
wenig Wartung benötigen.
+
Lagern Sie das Mikroskop an einem trockenen und
sauberen Ort.
+
Verwenden Sie Ihr Mikroskop keinesfalls an Orten, an
denen die Bedienung solcher Geräte beschränkt ist.
Unsachgemäße Nutzung führt zur Gefahr von schweren
Unfällen.
+
Versuchen Sie nicht, an die internen Komponenten Ihres
Mikroskops zu gelangen oder es in irgendeiner Weise zu
modifizieren. Nur autorisierte Techniker sollten Wartungsoder Reparaturarbeiten vornehmen.
+
Halten Sie Ihr Mikroskop von Wasser und anderen
Flüssigkeiten fern. Verwenden Sie es keinesfalls im
Regen oder Schnee. Feuchtigkeit führt zur Brand- oder
Stromschlaggefahr.
+
Befreien Sie den LCD-Bildschirm oder andere optische
Komponenten mit einer Kamelhaarbürste oder einem
Gebläse von Staub und Verschmutzungen. Wischen Sie
die Oberfläche anschließend mit dem mitgelieferten
trockenen Mikrofasertuch ab.
+
Wenn die Außenflächen Ihres Mikroskops gereinigt
werden müssen, können Sie diese mit einem feuchten
Tuch abwischen.
12. FEHLERBEHEBUNG
PROBLEME LÖSUNG
Das Gerät lässt sich nicht einschalten. Überprüfen Sie den Akkustand. Wenn nötig, durch Anschließen an eine Wechselstromquelle
Der Bildschirm ist leer.
Auf dem Bildschirm sind Verschmutzungen
oder Flecken.
Das Mikroskop ist an einen Fernseher
angeschlossen, auf dem Fernsehbildschirm
erscheint jedoch kein Bild.
Die Akkuanzeige-LED leuchtet nicht,
obwohl das Netzteil verbunden und an eine
Wandsteckdose angeschlossen ist.
-oderDer Akku lädt nicht auf.
aufladen.
+
Sicherstellen, dass das Gerät eingeschaltet ist.
+
Den Akkustand überprüfen und wenn nötig aufladen.
+
Vergewissern Sie sich, dass das zu vergrößernde Objekt korrekt unter dem Objektiv
positioniert ist.
+
Stellen sie sicher, dass die Beleuchtung“AN” ist
+
Reinigen Sie Bildschirm und Objektiv vorsichtig mit dem mitgelieferten Mikrofasertuch.
+
Sicherstellen, dass der Fernseher eingeschaltet ist.
+
Schalten Sie auf Ihrem Fernseher zum richtigen Videoeingangskanal. (Dieser variiert je
nach Hersteller.)
+
Vergewissern Sie sich, dass das Videokabel sicher an den Videoausgangsport des
Mikroskops sowie korrekt an den Videoeingang Ihres Fernsehers angeschlossen ist.
+
Stellen Sie sicher, dass das Kabel an den richtigen Anschluss angeschlossen ist.
+
Überprüfen Sie, ob die Steckdose stromversorgt ist und keine Fehlfunktion aufweist.
Wenn die Steckdose an einen Wandschalter angeschlossen ist, sicherstellen, dass der
Schalter an ist.
60 I DEUTSCH
13. GARANTIE
Ihr LCD-Mikroskop FlipView™ verfügt über eine zweijährige eingeschränkte Gewährleistung. Besuchen Sie bitte für weitere
Informationen bezüglich Celestron-Mikroskopen die Celestron-Website:
© 2014 Celestron • Alle Rechte vorbehalten. • celestron.com
2835 Columbia Street • Torrance, CA 90503 U.S.A.
Telefon: 1(800) 421-9649 • Gedruckt in China 2013
FCC-Erklärung: Dieses Gerät wurde getestet und entspricht den Grenzwerten für digitale Geräte der Klasse B in Übereinstimmung mit Artikel 15 der FCC-Bestimmungen. Diese Grenzwerte bieten einen
angemessenen Schutz vor Störungen in Wohnanlagen. Dieses Gerät erzeugt, verwendet und strahlt Hochfrequenzenergie aus und kann den Funkverkehr stören, wenn es nicht gemäß den Anweisungen
installiert und verwendet wird. Es kann jedoch nicht garantiert werden, dass in einer bestimmten Einrichtung keine Störungen auftreten. Falls dieses Gerät Störungen des Radio- oder Fernsehempfangs
verursacht, was durch ein vorübergehendes Ausschalten des Geräts festgestellt werden kann, wird der Benutzer dazu angehalten, die Störung durch eine oder mehrere der nachstehenden Maßnahmen zu
beheben:
+ Neuausrichtung oder Positionsveränderung der Empfangsantenne.
+ Den Abstand zwischen dem Gerät und dem Empfänger vergrößern.
Dieses Produkt wurde für die Verwendung durch Personen von 14 Jahren und darüber entworfen und vorgesehen. Produktdesign und technische Daten können ohne Vorankündigung geändert werden.
+ Anschluss des Geräts an eine Steckdose, die nicht am selben Stromkreis angeschlossen ist, wie
die des Empfängers.
+ Den Händler oder einen erfahrenen Radio- und Fernsehtechniker um Hilfe bitten.
44314, 44315
Page 61

MICROSCOPIO DIGITAL LCD
MANUAL DE INSTRUCCIONES
MODELOS 44314, 44315
ESPAÑOL | 61
Page 62

1. INTRODUCCIÓN
Gracias por adquirir el microscopio digital manual LCD PlipView™ de Celestron con sensor de 5MP y monitor LCD TFT a
todo color desplegable de 3,0 pulgadas. Su microscopio es un instrumento óptico de precisión, fabricado con materiales
de la mejor calidad para garantizar su resistencia y larga vida útil. Está diseñado para ofrecerle toda una vida de satisfacción
con un mantenimiento mínimo.
Flipview ofrece observación de baja potencia, hasta
120x, mediante la pantalla LCD integrada. Para un mayor
aumento (hasta 300x) conecte el microscopio a su PC.
(El aumento depende del tamaño del monitor).
FlipView es un microscopio de baja potencia de aumento,
adecuado para examinar especímenes como monedas,
sellos, minerales, electrónica, insectos y otros objetos 3D.
Los especímenes sobre portamuestras pueden verse
con iluminación superior, pero este microscopio no es
idóneo para este fi n. Para observar especímenes sobre
portamuestras con un aumento elevado, consulte nuestra
línea de microscopios en Celestron.com.
Flipview no usa un ocular como hacen los microscopios
tradicionales. En su lugar, el sensor de cámara integrado
"ve" el especimen y la imagen se muestra en la pantalla
LCD a color de alta resolución. Esto hace más divertida
CONTENIDO DEL EMBALAJE
la observación, reduce los esfuerzos de nuca y ojos y
permite compartir la observación con terceros fácilmente.
También puede observar en monitores externos,
proyectores y pantallas de TV con el cable de salida AV
incluido.
Guardar, transferir y compartir sus archivos de imagen
es fácil y sencillo con FlipView. Guárdelas en su tarjeta
Micro SD para transferirlas más tarde, o use el cable USB
incluido para conectar directamente con su ordenador.
Antes de intentar usar su microscopio, lea por
completo las instrucciones y consulte los diagramas
siguientes. Tómese un tiempo para leer las sencillas
recomendaciones de cuidados, mantenimiento y solución
de problemas de este manual para garantizar que su
microscopio FlipView le ofrezca años de rendimiento de
calidad.
62 I ESPAÑOL
Microscopio digital manual
LCD FlipView (1)
Adaptador CA (1)
CD (1) QSG (1) Gamuza de limpieza (1) Regla de calibración (1)
Batería de litio (1) Cable USB (1) Cable de salida vídeo (1)
Soporte metálico (1)
Bolsa de transporte
(1)
Page 63

PIEZAS
1. Activador del obturador
2. Pantalla LCD desplegable
3. Pata desplegable
4. Botón de confi guración
5. Botón de modo de color/arriba
6. Botón reproducir/izquierda
7. Rueda de ajuste del iluminador
8. Compartimiento de batería
9. Botón de control de zoom
10. Puerto de entrada 5 V CA
11. Puerto Mini USB
12. Puerto de salida vídeo
13. Ranura de tarjeta Micro SD
14. Indicador de carga de batería
15. Botón OK
16. Botón abajo
17. Interruptor de encendido/apagado
18. Rueda de enfoque
19. Cañón del microscopio
20. Accesorio estriado de 1/4-20"
1
2
3
4
5
9
10
11
12
13
14
15
16
20
6
17
7
8
18
19
ESPAÑOL | 63
Page 64

ESPECIFICACIONES
Gama de aumento 10x-120x (hasdta 300x usando PC)
Sensor 5 MP CMOS 1/3.2 pulgadas
Pantalla LCD Pantalla LCD TFT a todo color de 3,0 pulgadas (bisagras en ejes X (90º) e Y (180º))
Lente Lente de cristal de 5 elementos de alta calidad con corte IR (reducción por infrarrojos)
Alcance de enfoque Foco manual de 10 mm a 300 mm
ILUMINACIÓN 8 LED blancos ajustables en configuración de anillo
Activador del obturador En el chasis
Resolución de imagen fija 5 MP, 3 MP, 1.3 MP, VGA (12 MP interpolación)
Resolución de captura de video VGA, 30 fps
Formato de compresión video MJPEG
Salida video Cable de salida vídeo (incluido)
Interfaz de conexión PC Cable USB 2.0 (incluido)
Sistemas operativos soportados Windows XP/Vista/7/8
Memoria Ranura de tarjeta micro USB (soporta hasta 32 GB) (tarjeta micro SD NO incluida)
Alimentación Batería de litio ión recargable (1050 mAh)
Software de medición Software Celestron Portable Capture Pro con capacidad de anotación. Herramienta de
Idiomas de software soportados inglés, alemán, francés, español, ruso, italiano, portugués, holandés, japonés, coreano, chino
Dimensiones Microscopio: 4,625 in x 2,5 in x 4,25 in (117,5 mm x 63,5 mm x 108 mm)
Peso Microscopio: 7,4 oz/212 g
Distancia focal efectiva: 15,8 mm
Distorsión de imagen: 0,10%
FOV: 13,0°
Mac OSX 10.6-10.9
Entrada universal de adaptador CA de 100 a 240 voltios 50/60 Hz (la versión de la UE
44315 tiene toma múltiple)
calibración incluida.
Soporte: 3,0 in x 1,75 in x 2,75 in (76,2 mm x 44,5 mm x 70 mm)
Microscopio y soporte: 11,2 oz/317 g
NOTA: Interpolación se refiere al añadido de píxeles por el software a una imagen para hacerla más grande de forma artificial. Puede ser útil al imprimir en formatos más grandes.
2. INSTALACIÓN
INSTALACIÓN DE BATERÍA
Abra el compartimiento de batería (8) e introduzca la batería, asegurándose de alinear correctamente los puntos de conexión.
NOTA: La batería del FlipView se entrega con una carga parcial. Sin embargo, si va a usar el
microscopio solamente con la batería, asegúrese de cargar la batería por completo antes del
primer uso.
CARGAR LA BATERÍA
• Conecte el extremo pequeño del adaptador de alimentación al puerto
de entrada 5 V/CA (10) situado en la parte trasera del microscopio.
Conecte el otro extremo a una toma de corriente CA normal.
* El LED indicador de carga de batería (14) se encenderá en rojo para
mostrar que la batería se está cargando.
* Cuando la batería esté totalmente cargada, el LED indicador de carga
de batería se apagará. Ahora puede desconectar el FlipView y usarlo
sin una fuente de alimentación externa hasta 2 horas.
10 50 m Ah
64 I ESPAÑOL
* Puede comprobar el nivel de energía de la batería en la pantalla LCD.
Mire el icono indicador de energía de batería descrito más adelante.
Page 65

INTRODUCCIÓN DE TARJETA
MICRO SD
Para capturar imágenes con su microscopio cuando no
esté conectado a un ordenador, introduzca una tarjeta
micro SD en la ranura de tarjeta (13) en la parte trasera
de la unidad. Presione con fi rmeza hasta que la tarjeta
encaje en posición.
NOTA: La tarjeta MicroSD NO está incluida. Para capturar imágenes sin tarjeta
MicroSD, consulte la sección 7 de este manual para ver las instrucciones de
instalación del software en el ordenador y su uso para guardar imágenes en
su ordenador.
NOTA: Formatee su tarjeta MicroSD antes del uso. Consulte la sección 4 para ver
detalles sobre el formateado de la tarjeta.
ICONOS DE PANTALLA
Captura de imagen pequeña
Captura de video
Captura de lapso temporal
Número de imágenes capturadas/
Número de imágenes restantes
Tiempo restante de captura de video
(Horas:Minutos:Segundos)
Tarjeta microSD reconocida
Confi guración de captura de video
Confi guración de resolución actual
Indicador de energía de batería
NOTA: Los iconos de pantalla pueden apagarse pulsando el botón de control de zoom
ESPAÑOL | 65
Page 66

3. OBSERVAR Y CAPTURAR IMÁGENES:
CAPTURA DIGITAL
OBSERVAR UN ESPÉCIMEN
Encienda el FlipView y apúntelo a su espécimen. Ajuste
el iluminador girando la rueda de ajuste del iluminador (7).
Ajste la rueda de enfoque (18) hasta que el espécimen esté
enfocado.
CAPTURAR UNA IMAGEN
Para capturar una imagen fi ja, pulse el activador del obturador (1).
CAMBIAR MODO
Para cambiar entre modo de imagen fi ja, video y vista previa,
pulse el botón de reproducción (6). Cuando esté en imagen fi ja pulse dos veces para acceder al modo video. Para
determinar el modo actual, observe los iconos de la esquina
superior izquierda de la pantalla LCD.
66 I ESPAÑOL
CAMBIAR EL MODO DE COLOR:
Para cambiar entre los modos color, negativo, b/n y emisión de vista previa, pulse el botón de modo de color (5).
A.
B.
C.
Page 67

AJUSTAR EL ZOOM DIGITAL:
Cuando observe su espécimen, puede aumentar y reducir mediante el botón de control de zoom (9)
CAPTURAR VIDEO:
En modo video, pulse el activador del obturador (1) para iniciar la
grabación. Púlselo de nuevo para detener la grabación.
REVISAR IMÁGENES
Pulse el botón de reproducción (6) una vez en el modo de imagen fi ja o dos veces en el modo video. Los videos e imágenes
fi jas se mostrarán con la última imagen o video mostrado en
primer lugar. Pulse el botón arriba (5) o abajo (16) para pasar
por las imágenes/videos.
VISTA PREVIA DE VIDEO
Cuando se muestra un archivo de video, pulse el botón OK (15)
para iniciar el video. Púlselo de nuevo para detener el video.
BORRAR IMÁGENES
Para borrar un archivo de imagen fi ja o video, pulse el botón de
confi guración (4) para mostrar el menú. Pulse el botón abajo
(16) para ir a "Borrar". Pulse OK.
Se le solicitará que elija "Esta imagen" o "Todo". Use de nuevo el
botón abajo para moverse por las opciones y seleccione OK. Se
le solicitará otra vez si desea completar la operación. Seleccione
"Ejecutar".
ESPAÑOL | 67
Page 68

PROTEGER IMÁGENES
Esta función protege imágenes o videos del borrado de la tarjeta microSD. Para proteger un archivo de imagen fi ja o video,
pulse el botón de confi guración (4) para mostrar el menú. Pulse el botón abajo (16) para ir a "Proteger". Pulse OK. Siga las
indicaciones y seleccione "OK" cuando termine.
PRESENTACIÓN
Use esta función para realizar una vista previa de todas las imágenes de la tarjeta SD. Use los botones para elegir el intervalo
entre imágenes deseado.
68 I ESPAÑOL
Page 69

4. INTRODUCCIÓN AL MENÚ DEL SOFTWARE
MENÚ
Desde el modo vista previa, pulse el botón de confi guración (4) para acceder al menú principal. Las selecciones del
menú variarán según se encuentre en modo de: imagen fi ja o
video. Use el botón abajo (16), el botón arriba (5) y el botón
OK (15) para navegar por el menú.
Cuando esté en modo de imagen fi ja verá la confi guración
siguiente:
1. Resolución
2. Lapso de tiempo
3. Calidad
4. Defi nición
Solamente tiene una confi guración en el modo video:
1. Resolución
CONFIGURACIÓN DE RESOLUCIÓN
En modo de imagen fi ja las selecciones son:
1. 12,0 MP (interpolado*)
2. 9,0 MP
3. 5,0 MP
4. 3,0 MP
5. 1,3 MP
6. VGA
LAPSO DE TIEMPO
FOTOGRAMAS: Establece el número de fotogramas que se
capturarán.
INTERVALO: Establece el intervalo entre capturas.
Cuando haya realizado sus selecciones, pulse OK para confi rmar y pulse el botón de menú para volver al modo de vista
previa.
NOTA: El número superior representa 32 fotogramas.
ESPAÑOL | 69
Page 70

Cuando pulse el botón de captura, el icono se mostrará en la
esquina superior izquierda de la pantalla LCD.
Cuando se hayan capturado todos los fotogramas, el FlipView
volverá a la pantalla de vista previa.
Para detener la captura automática antes de que termine, pulse
una vez el botón de captura.
NOTA: La configuración de lapso de tiempo solamente funciona en modo de imagen fija.
CALIDAD
La configuración de calidad determina el nivel de compresión
de la imagen. Cuanta más compresión use, menos detalle contendrá la imagen, y menor será el tamaño de archivo.
NOTA: El número superior representa 15 segundos.
Dispone de 3 selecciones en la ventana de configuración de
calidad:
1. Súper buena (archivos de mayor tamaño, menor compre-
sión, máximo detalle)
2. Buena
3. Normal (archivos más pequeños, mayor compresión)
DEFINICIÓN
La definición aumenta las diferencias que detecta el procesado
de imagen entre los bordes de los píxeles. No hay normas
cuando se trata de la configuración de definición. Experimente
para ver la que mejor funciona con sus especímenes.
Las 3 selecciones de definición son:
1. Dura
2. Normal
70 I ESPAÑOL
3. Suave
Page 71

MENÚ CONFIGURACIÓN
Cuando esté en el menú principal, pulse el botón de reproducción
(6) para acceder a la confi guración. Las selecciones son:
1. Idioma
2. Ahorro de energía
3. Frecuencia
4. Marca de fecha
5. Salida TV
6. Fecha / Hora:
7. Formatear SD
8. Reiniciar sistema
9. Versión
IDIOMA
FlipView soporta 11 idiomas:
1. Inglés
2. Alemán
3. Francés
4. Español
5. Italiano
6. Portugués
7. Japonés
8. Chino simplifi cado
9. Chino tradicional
10. Holandés
11. Ruso
Use los botones de fl echa para ir al idioma que desee
pulse OK (15) para guardar.
AHORRO DE ENERGÍA
El ahorro de energía le permite ahorrar la energía de la batería
confi gurando la unidad para que se apague automáticamente. Las
selecciones de tiempo son:
1. APAGADO: Función de ahorro de energía apagada; la unidad no
se apagará automáticamente.
2. 5 min. - La unidad se apagará pasados 5 minutos sin uso
3. 10 min. - La unidad se apagará pasados 10 minutos sin uso
4. 15 min. - La unidad se apagará pasados 15 minutos sin uso
5. 30 min. - La unidad se apagará pasados 30 minutos sin uso
FRECUENCIA
Esta confi guración tiene relación con la tasa de refresco de su TV.
Para EE.UU. (NTSC), use 60 Hz, para otros use 50 Hz.
ESPAÑOL | 71
Page 72

MARCA DE FECHA
Si lo desea puede mostrar una marca de tiempo en archivos de
imagen (pero no en archivos de video).
Las selecciones son:
1. FECHA/HORA: Muestra tanto FECHA como HORA en el
archivo de imagen guardado
2. FECHA: Muestra solamente la fecha en el archivo de imagen
3. APAGADO: NO se mostrará información de FECHA/HORA
SALIDA TV
Establezca la confi guración de salida de TV en NTSC o PAL,
según su ubicación.
1. Elija NTSC para
• Norteamérica
• Sudamérica (excluyendo Brasil, Argentina, Uruguay y
Guayana Francesa)
• Myanmar, Corea del Sur, Taiwán, Japón y Filipinas
NOTA: La FECHA y/u HORA NO se mostrarán en el modo de visto previa –
solamente en el archivo de imagen grabado.
2. Elija PAL para los demás países
NOTA: Consulte el mapa siguiente
72 I ESPAÑOL
Page 73

FECHA/HORA
Aquí puede establecer la hora correcta y establecer el modo en que
se mostrará la hora.
Elija entre las siguientes opciones:
1. AA/MM/DD
2. DD/MM/AA
3. MM/MM/DD
FORMATEAR TARJETA MICRO SD
Elija esta opción para formatear su tarjeta Micro SD. Recomendamos
formatear siempre las tarjetas Micro SD antes de usarlas por primera
vez con el FlipView. Formatear la tarjeta borrará los demás datos que
contenga.
REINICIAR SISTEMA
Elija esta opción para devolver FlipView a su configuración de fábrica por
defecto.
VERSIÓN
La pantalla de versión mostrará información sobre la versión de firmware.
En esta pantalla no puede realizar cambios.
5. TRANSFERIR ARCHIVOS AL ORDENADOR
+
Conecte el FlipView a su ordenador usando el cable USB incluido.
+
Elija "Cargar imágenes" en la pantalla LCD pulsando el botón OK (15).
+
Su ordenador leerá la tarjeta Micro SD como una cámara digital y
descargará las imágenes en su PC.
+
Cuando se complete la transferencia, puede abrir y ver las imágenes en
su PC usando su software preferido.
6. CONEXIÓN A TV
+
Introduzca la toma de 1/8 de pulgada en el extremo del cable AV incluido
en el puerto de salida AV (12) de la parte posterior de la unidad.
+
Introduzca la toma RCA amarilla del cable de video en uno de los
conectores de entrada de video amarillos de la TV o proyector.
+
Encienda el televisor o proyector. Asegúrese de que el televisor esté
sintonizado al canal de entrada adecuado.
+
Debería ver una imagen del espécimen que esté observando.
ESPAÑOL | 73
Page 74

7. USO DEL SOFTWARE CELESTRON PORTABLE
CAPTURE PRO
1. Instalación del software. Usando el CD incluido, instale el
software en su ordenador. Puede tener que reiniciar su
ordenador antes de ejecutar por primera vez el software.
2. Conecte el FlipView a su ordenador usando el cable USB
incluido del modo descrito anteriormente.
3. Elija "Vista previa en ordenador" en la pantalla LCD, pulsando
el botón OK (15).
4. Abra el software Celestron Portable CapturePro en su PC
pulsando el icono del escritorio.
5. Puede ver la imagen emitida en la interfaz del software.
NOTA: Cuando se ejecute el software, la pantalla LCD se quedará en negro. Ahora controlará
el microscopio desde el ordenador. Sin embargo, aún controlará el enfoque, zoom e
iluminación manualmente en el dispositivo.
NOTA: Cuando conecte al PC por USB, la batería interna de litio ión del FlipView iniciará la carga.
NOTA: Si el microscopio no está conectado se mostrará el siguiente mensaje de error: “No se
detecta dispositivo. Conecte el microscopio directamente a un puerto USB disponible.”
Pruebe a reiniciar el software.
8. USO DEL SOFTWARE
CAPTURAR UNA IMAGEN FIJA Y
VIDEO
+
Para capturar una imagen fi ja, pulse en el menú de captura y
seleccione Foto.
+
Para comenzar a grabar video, pulse en el menú de captura y
vaya a Video. Repita para detener la grabación.
+
Debería ver una imagen del espécimen que esté observando.
OTROS ELEMENTOS DE MENÚ
MENÚ DE ARCHIVO En el elemento de menú Archivo
encontrará:
DIRECTORIO DE FOTOS: Le lleva a una carpeta
en el disco duro para guardar
imágenes fi jas.
DIRECTORIO DE VIDEO: Le lleva a una carpeta
en el disco duro para guardar
videos.
SALIR: Cierra el software.
74 I ESPAÑOL
Page 75

OPCIONES: En el elemento de menú Opciones, encontrará:
RESOLUCIÓN: Establece la resolución de imagen del sensor. Puede elegir entre 2 resoluciones:
- 320 x 240
- 640 x 480
NOTA: Al conectar a un PC, FlipView no puede capturar imágenes en alta resolución, pero puede usarse para demostración y emisión. Para aprovechar la resolución de 5 MP completa,
desconecte FlipView del ordenador.
FECHA / HORA: Activa o desactiva la marca de fecha y hora.
IDIOMA: Cambia la selección del idioma. Puede elegir entre 12 idiomas:
- inglés, alemán, francés, español, ruso,
italiano, portugués, holandés, polaco, japonés, coreano y chino
RETÍCULA X, Y: Activa o desactiva la guía de retícula en la pantalla de vista previa.
MODO PANTALLA COMPLETA: Usa la pantalla completa de su monitor. Pulse la tecla Esc para volver.
ICONOS: Junto con los elementos del menú, dispone de iconos que signifi can lo siguiente:
A. Capturar una imagen fi ja (foto)
B. Iniciar/detener video
C. Modo pantalla completa
ESPAÑOL | 75
Page 76

9. CALIBRACIÓN Y MEDICIÓN
+
El software Celestron Portable CapturePro incluye una
función de medición. Para usar esta función debe realizar
primero una calibración de medición.
+
Asegúrese de que la Guía X,Y esté en “Activado”
seleccionándola en el menú Opciones.
+
Tome una imagen fi ja. La imagen se mostrará en la
columna del lado derecho de la pantalla.
+
Establezca la altura del microscopio y enfoque el
espécimen. Sustituya a continuación el espécimen por la
regla de calibración.
+
Reajuste el foco y alinee la regla de calibración de forma
que las líneas estén paralelas con la línea vertical de la
guía X,Y.
+
Pulse dos veces en la imagen guardada para abrirla en la
pantalla de vista previa de imagen.
76 I ESPAÑOL
+
Pulse en el icono de Calibración
+
Pulse y arrastre una línea cruzando un “valor conocido” de la
imagen de la regla. Intente mantener la línea tan perpendicular
a las líneas de la regla como sea posible.
+
Se mostrará la ventana emergente “Ajustar aumento” como se
muestra a continuación.
+
En la casilla “Dimensiones reales”, introduzca el “valor conocido”
de la regla de calibración.
Page 77

+
Para garantizar que la calibración haya tenido éxito, vuelva a la
pantalla de Captura de imagen.
+
Pulse en el icono de regla
y seleccione en el menú
desplegable la opción “Cualquier línea de ángulo”
+
Pulse y arrastre una línea cruzando el mismo “valor conocido” que
anteriormente.
+
Si la calibración ha tenido éxito, la distancia medida debe ser
exactamente el "valor conocido"
+
Para capturar imágenes sin cambiar la altura o el aumento, pulse
en el icono Calibración. En el menú desplegable, seleccione “Establecer aumento” y luego “Establecer aumento de captura”.
+
Se mostrará una ventana emergente. Introduzca el aumento mostrado en la esquina superior derecha de la ventana principal.
HERRAMIENTAS DE MEDICIÓN
Observará que existen muchas herramientas en el menú
desplegable de medición. Aquí dispone de la lista de mediciones
que puede tomar:
PRINCIPAL
1. Cualquier ángulo: Mide del punto A al punto B en
línea recta.
2. Línea continua: Mide la distancia total entre múltiples
puntos. Comience midiendo una línea recta del punto
A al punto B. Luego, pulse y arrastre para continuar
midiendo del punto B al punto C. (Puede repetirlo
tantas veces como desee).
3. Radio de círculo: Mide el radio de un círculo:
Comenzando por el centro, arrastre el cursor hasta
cualquier borde.
4. Diámetro de círculo: Mide el diámetro de un círculo:
Comenzando por un borde externo, arrastre el cursor
hasta el borde opuesto.
5. Ángulo con tres puntos: Mide el ángulo entre dos
puntos, comenzando desde un punto de radio o un
punto de intersección. Pulse en el punto A (punto
de radio), arrastre y pulse en el punto B, y pulse en
el punto C. Se trazará el ángulo y se mostrarán los
grados de éste.
CONFIGURACIÓN
1. Propiedades de línea: Cambia la confi guración de
tipo de línea, anchura, tamaño y color.
2. Propiedades de texto: Cambia la confi guración de
tipo de fuente, tamaño, estilo y color.
3. Unidades establecidas: Cambia la selección de
unidades. Elija entre milímetros, centímetros, píxeles o
pulgadas.
ESPAÑOL | 77
Page 78

TOMAR NOTAS Y MARCAS EN LA IMAGEN
Portable CapturePro incluye funciones para marcar, dibujar encima o añadir notas a las imágenes guardadas. Puede
ser útil para tomar notas rápidamente e indicar características de la imagen de su espécimen.
1. MARCADO
+
+
Para usar esta función pulse en el icono Dibujo de la ventana de vista previa de imagen.
Todas las opciones del menú menú desplegable de dibujo son:
PRINCIPAL
1. Línea: Dibuja una línea recta sobre la imagen.
2. Flecha: Dibuja una línea con fl echa sobre la imagen.
3. Libre: Permite al usuario dibujar libremente. Útil para notas manuscritas rápidas.
4. Rectángulo: Dibuja una caja. Útil para marcar características en la imagen o para enmarcar texto.
CONFIGURACIÓN
1. Propiedades de línea: Permite confi gurar el tipo de línea, tamaño y color
78 I ESPAÑOL
2. AÑADIR TEXTO
+
+
Para teclear notas en la imagen, seleccione el icono de texto
En el menú desplegable puede elegir el tipo de fuente, el tamaño y el color.
Page 79

EXPLICACIÓN DE LOS ICONOS DE VISTA PREVIA DE IMAGEN
B.
A.
D.
C.
F.
E.
G.
A. Guardar: Guardar el archivo
B. Copiar al portapapeles: Copiar o abrir en otro progra-
ma
C. Copiar: Guardar como copia
D. Anterior: Vuelve a la imagen anterior
en la carpeta de guardado
E. Siguiente: Avanza a la imagen siguiente
en la carpeta de guardado
10. TOMA MÚLTIPLE
I.
H.
J.
K.
F. Deshacer: Retrocede un paso
G. Rehacer: Avanza un paso
H. Dicujar
I. Texto/Notas
J. Medir
K. Calibración
L. Aumento actual (según la última calibración)
L.
Si ha adquirido su FlipView fuera de Norteamérica (modelo 44315), observará que el adaptador CA es de toma
múltiple. Tiene 3 enchufes intercambiables que se adaptan
a tomas de Europa, Reino Unido/Hong Kong y China.
Para cambiar el enchufe:
- Tome el cuerpo del enchufe con una mano y
el cabezal del enchufe deseado con la otra.
- Pulse el pequeño botón de soltado del cuerpo
del enchufe (en un círculo en la imagen siguiente).
- Localice y bloquee las pestañas del cabezal del
enchufe con las ranuras del cuerpo del enchufe.
- Gire el cabezal del enchufe en el sentido de
las agujas del reloj 90º hasta que escuche un
chasquido cuando encaje en posición.
Para sacar el cabezal del enchufe, pulse el pequeño botón
de soltado y gire el cabezal del enchufe en el sentido contrario a las agujas del reloj hasta que se suelte.
ESPAÑOL | 79
Page 80

11. CUIDADOS Y MANTENIMIENTO
Su microscopio con cámara digital es un instrumento óptico de precisión y debe tratarse con cuidado en todo momento. Siga estas recomendaciones de cuidados y mantenimiento y su microscopio necesitará de muy poco mantenimiento
durante su vida útil.
+
Guarde el microscopio en un lugar seco y limpio.
+
No use nunca el microscopio donde esté restringido el
uso de este tipo de dispositivos. Un uso inadecuado crea
riesgos de accidentes graves.
+
No intente acceder a los componentes internos de su
microscopio ni intente modificarlo en modo alguno. El
mantenimiento y las reparaciones deben ser realizados
exclusivamente por técnicos autorizados.
+
Mantenga su microscopio alejado de agua y otros
líquidos. No lo use nunca en la lluvia o la nieve. La
humedad crea riesgos de incendio y electrocución.
+
Para limpiar el polvo o manchas de la pantalla LCD u
otros componentes ópticos, saque el polvo con un pincel
de pelo de camello o perilla. Use la gamuza de microfibras
incluida, seca, para limpiar la superficie.
+
Si la superficie exterior del microscopio necesita limpieza,
límpiela con una gamuza humedecida.
12. RESOLUCIÓN DE ROBLEMAS
PROBLEMAS SOLUCIÓN
La unidad no se enciende. Compruebe la batería. Si es necesario, recárguela conectando el microscopio a la
La pantalla está vacía.
Hay manchas o suciedad en la pantalla.
El microscopio está conectado a un televisor,
pero no aparece ninguna imagen en la
pantalla del televisor.
El LED indicador de batería no se enciende,
aunque el adaptador de alimentación esté
conectado y enchufado a una toma de
corriente.
-oLa batería no carga.
alimentación CA.
+
Asegúrese de que esté encendido.
+
Compruebe la batería y recárguela si es necesario.
+
Compruebe que el objeto que quiera ampliar esté correctamente colocado bajo la lente.
+
Asegúrese de que el iluminador esté encendido.
+
Limpie la pantalla y la lente cuidadosamente con la gamuza de microfibras incluida.
+
Asegúrese de que el televisor esté encendido.
+
Pase al canal de entrada de video correspondiente de su televisor. (Variará según el
fabricante).
+
Asegúrese de que el cable de video esté firmemente conectado al puerto de salida de
video del microscopio y a la entrada de video adecuada de su televisor.
+
Asegúrese de que el cable esté conectado al puerto correcto.
+
Compruebe que la salida tenga alimentación y no funcione incorrectamente. Si la toma
está conectada a un interruptor, asegúrese de que el interruptor esté encendido.
80 I ESPAÑOL
13. GARANTÍA
Su microscopio LCD FlipView tiene una garantía limitada por dos años. Visite el sitio web de Celestron para obtener información detallada de todos los microscopios Celestron:
© 2014 Celestron + Todos los derechos reservados. • celestron.com
2835 Columbia Street • Torrance, CA 90503 EE.UU.
Teléfono: 1 (800) 421-9649 • Impreso en China 2013
Nota FCC: Este equipo ha sido probado y cumple con los límites de un dispositivo digital de Clase B, según el apartado 15 de las normas FCC. Estos límites están diseñados para proporcionar una protección
razonable contra interferencias dañinas en una instalación doméstica. Este equipo genera, usa e irradia energía de radiofrecuencia y, si no se instala y utiliza de acuerdo con las instrucciones, puede provocar
interferencias dañinas en comunicaciones por radio. Sin embargo, no existe ninguna garantía de que no se produzcan interferencias en una instalación concreta. Si este equipo causa interferencias dañinas
en la recepción de radio o televisión, lo que puede determinarse apagando y encendiendo el equipo, se recomienda al usuario intentar corregir las interferencias con una o varias de las medidas siguientes:
+ Reorientar o recolocar la antena receptora.
+ Aumentar la separación entre el equipo y el receptor
Este producto ha sido diseñado y está pensado para ser usado por personas de 14 años o más de edad. El diseño y las especificaciones del producto están sujetos a cambios sin notificación previa.
+ Conecte el equipo a una toma de corriente o circuito distinto de aquél al que esté
conectado el receptor.
+ Consultar al vendedor o a un técnico experimentado de radio/TV para obtener
ayuda.
44314, 44315
Page 81

MICROSCOPIO DIGITALE CON SCHERMO LCD
MANUALE DI ISTRUZIONI
MODELLI 44314 E 44315
ITALIANO I 81
Page 82

1. INTRODUZIONE
Grazie per aver acquistato il microscopio digitale portatile Celestron FlipView™, dotato di sensore da 5 megapixel e schermo
LCD TFT orientabile a colori da 3,0”. Questo microscopio è uno strumento ottico di precisione prodotto con i migliori
materiali, che gli assicurano una lunga durata. È ideato per fornire un intrattenimento duraturo con interventi minimi di
manutenzione.
FlipView, mediante il suo schermo LCD integrato,
garantisce una visualizzazione a bassa potenza con
fattore di ingrandimento fi no a 120x. Per ingrandimenti
fi no a 300x, collegare il microscopio a un computer
(l'ingrandimento dipende dalle dimensioni del monitor).
FlipView è un microscopio a basso ingrandimento,
ideale soprattutto per esaminare piccoli oggetti come
monete, francobolli, rocce, componenti elettronici, insetti
e altri oggetti 3D. È possibile visualizzare i campioni
sui vetrini mediante illuminazione dall'alto, tuttavia il
presente microscopio non è ideale per tale scopo. Per la
visualizzazione ad alta potenza dei campioni sui vetrini,
consultare la linea completa di microscopi Celestron su
Celestron.com.
FlipView non possiede un oculare come i microscopi
tradizionali. Il sensore della videocamera integrata “vede”
il campione e l'immagine rilevata viene poi visualizzata
sullo schermo LCD ad alta risoluzione a colori. Ciò rende
piacevole l'utilizzo del microscopio, limita gli sforzi di collo
CONTENUTO DELLA CONFEZIONE
e occhi e permette una facile condivisione delle immagini
con altre persone. Utilizzando il cavo TV incluso è inoltre
possibile visualizzare le immagini su monitor esterni,
proiettori e schermi TV.
Con FlipView, salvare, trasferire e condividere immagini
è facile e veloce. È possibile salvare le immagini su
una scheda Micro SD per trasferirle in seguito oppure
utilizzare il cavo USB fornito per collegare il microscopio
direttamente al computer.
Prima di iniziare a utilizzare il microscopio, leggere le
istruzioni e utilizzare le fi gure illustrate a continuazione
come riferimento. Per assicurare il funzionamento ottimale
del microscopio Flipview durante un lungo periodo,
dedicare qualche minuto alla lettura dei semplici consigli
per la cura, la manutenzione e la risoluzione dei problemi
dell'apparecchio contenuti nel presente manuale.
82 I ITALIANO
Microscopio digitale portatile
FlipView con schermo LCD
(1)
Adattatore CA (1)
CD (1) Guida introduttiva (1) Panno per la pulizia (1) Righello di calibrazione (1)
Batteria al litio (1) Cavo USB (1) Cavo uscita video (1)
Custodia in tessuto (1)Piedistallo in metallo (1)
Page 83

PANORAMICA DEL PRODOTTO
1. Tasto otturatore
2. Schermo LCD orientabile
3. Supporto orientabile
4. Tasto Impostazioni
5. Tasto Modalità colore/Su
6. Tasto di riproduzione/sinistro
7. Rotella di regolazione dell'illuminatore
8. Vano batteria
9. Tasto di regolazione dello zoom
10. Ingresso CA 5 V
11. Porta mini USB
12. Porta uscita video
13. Slot per scheda Micro SD
14. Indicatore di caricamento della batteria
15. Tasto OK
16. Tasto Giù
17. Interruttore di accensione/spegnimento
18. Rotella di messa a fuoco
19. Tubo del microscopio
20. Inserto fi lettato ¼-20”
1
2
3
4
5
9
10
11
12
13
14
15
16
20
6
17
7
8
18
19
ITALIANO I 83
Page 84

SPECIFICHE
Intervallo di ingrandimento 10x-120x (fino a 300x quando utilizzato con un computer)
Sensore CMOS da 5 MP, dimensione 1/3.2 di pollice
Schermo LCD Schermo LCD TFT a colori da 3" (cardini su entrambi gli assi X (90°) e Y (180°))
Lente Lente in vetro di alta qualità a 5 elementi con filtro IR Cut (riduzione infrarossi)
Intervallo di messa a fuoco Messa a fuoco manuale da 10 mm a 300 mm
Illuminazione 8 luci a LED bianche regolabili disposte a cerchio
Tasto otturatore Sul corpo del microscopio
Risoluzione fermo immagine 5 MP, 3 MP, 1,3 MP, VGA (interpolazione 12 MP)
Risoluzione video VGA, 30 fps
Formato di compressione video MJPEG
Uscita video Cavo video (incluso)
Interfaccia di collegamento a computer Cavo USB 2.0 (incluso)
Sistemi operativi compatibili Windows XP/Vista/7/8
Memoria Slot per scheda Micro USB (fino a 32 GB) (scheda Micro SD NON inclusa)
Alimentazione Batteria interna ricaricabile agli ioni di litio (1050 mAh)
Software di misurazione Celestron PortableCapture Pro con funzionalità di creazione note. Strumento per la
Lingue supportate dal software Inglese, tedesco, francese, spagnolo, russo, italiano, portoghese, olandese, polacco,
Dimensioni Microscopio: 117,5 mm x 63,5 mm x 108 mm (4,625" x 2,5" x 4,25")
Peso Microscopio: 212 g (7,4 oz)
EF (distanza focale effettiva): 15,8 mm
Distorsione immagine: 0,10%
FOV (angolo di campo): 13,0°
Mac OSX 10.6/10.9
Adattatore CA universale 100-240 V, 50/60 Hz (multipresa nella versione 44315 per
l'Europa)
calibrazione incluso.
giapponese, coreano, cinese
Piedistallo: 76,2 mm x 44,5 mm x 70 mm (3,0" x 1,75" x 2,75")
Microscopio e piedistallo: 317 g (11,2 oz)
NOTA: il termine interpolazione indica l'aggiunta di pixel da parte del software per rendere più grande un'immagine in modo artificiale. Questa funzione può essere utile
quando si stampa utilizzando grandi formati.
2. OPERAZIONI PRELIMINARI
INSERIMENTO DELLA BATTERIA
Aprire il vano batteria (8) e inserire la batteria al litio, accertandosi di allineare i
punti di collegamento in modo corretto.
NOTA: al momento dell'acquisto di FlipView la batteria è parzialmente carica. Tuttavia, se si pianifica di utilizzare il
microscopio solo mediante batteria, assicurarsi di caricarla completamente prima dell'utilizzo.
CARICAMENTO DELLA BATTERIA
• Inserire l'estremità piccola dell'adattatore di alimentazione nell'ingresso CA 5
V (10) sul retro del microscopio. Quindi inserire l'altra estremità nella presa
CA a muro standard.
* L'indicatore LED di caricamento della batteria (14) si illumina in rosso per
indicare che la batteria è in caricamento.
* Al termine del caricamento, l'indicatore LED di caricamento della batteria
si spegne. A quel punto, FlipView™ può essere utilizzato in modo continuo
senza ricorrere a una fonte di alimentazione esterna per un periodo di tempo
massimo di 2 ore.
10 50 m Ah
84 I ITALIANO
* È possibile monitorare il livello di carica della batteria sullo schermo LCD.
Consultare le informazioni sull'icona dello stato di carica della batteria
presentate più avanti in questa sezione.
Page 85

INSERIMENTO DI UNA SCHEDA
MICRO SD
Per acquisire immagini con il microscopio quando non è
collegato a un computer, inserire una scheda Micro SD
nel relativo slot (13) sul retro del microscopio. Spingere
la scheda con decisione fi no a quando non scatta in
posizione.
NOTA: nella confezione NON è inclusa alcuna scheda Micro SD. Per acquisire
immagini senza una scheda Micro SD, consultare la sezione 7 del presente
manuale per istruzioni sulla modalità di installazione del software per
computer e su come utilizzarlo per salvare le immagini sul computer.
NOTA: formattare la scheda Micro SD prima di iniziare a utilizzarla. Per maggiori
dettagli su come effettuare la formattazione della scheda, consultare la
sezione 4.
ICONE DELLO SCHERMO
Acquisizione immagine
Acquisizione video
Acquisizione immagini in sequenza
N. di immagini scattate/N. di immagini
rimanenti
Tempo residuo acquisizione video
(Ore:Minuti:Secondi)
Riconoscimento scheda Micro SD
Impostazione acquisizione video
Impostazione risoluzione corrente
Indicatore stato di carica batteria
NOTA: è possibile disattivare la visualizzazione delle icone sullo schermo scorrendo verso il
basso il tasto di regolazione dello zoom.
ITALIANO I 85
Page 86

3. OSSERVAZIONE E ACQUISIZIONE DI IMMAGINI
IMMAGINI DIGITALI
OSSERVAZIONE DI UN CAMPIONE
Accendere FlipView e puntarlo sul campione. Regolare
l'illuminatore ruotando la relativa rotella di regolazione (7).
Ruotare gradualmente la rotella di messa a fuoco (18) fi no a
quando il campione non risulta a fuoco.
ACQUISIZIONE DI UN'IMMAGINE
Per acquisire un fermo immagine, premere il tasto otturatore
(1).
MODIFICA DELLA MODALITÀ
Per passare dalla modalità di fermo immagine alla modalità di
acquisizione video o alla modalità di visualizzazione anteprima e viceversa, premere il tasto di riproduzione (6). Dalla
modalità di fermo immagine premere il tasto due volte per
passare alla modalità di acquisizione video. Per determinare
la modalità corrente, controllare l'icona nell'angolo superiore
sinistro dello schermo LCD.
86 I ITALIANO
MODIFICA DELLA MODALITÀ COLORE
Per selezionare una modalità di visualizzazione tra negativo, bianco e nero, e a colori,
premere il tasto Modalità colore (5).
A.
B.
C.
Page 87

REGOLAZIONE DELLO ZOOM
DIGITALE
Durante l'osservazione del campione, è possibile effettuare lo
zoom dell'immagine utilizzando il relativo tasto di regolazione (9).
ACQUISIZIONE DI UN VIDEO
Dalla modalità Video, per avviare la registrazione premere il tasto
otturatore (1). Per arrestare la registrazione, premerlo di nuovo.
RIPRODUZIONE DELLE IMMAGINI
Premere il tasto di riproduzione (6) una volta dalla modalità di
fermo immagine o due volte dalla modalità Video. I video o le
immagini vengono visualizzate a partire dall'ultimo video o l'ultima
immagine acquisiti. Per scorrere le immagini o i video premere il
tasto Su (5) o il tasto Giù (16).
RIPRODUZIONE DI UN VIDEO
Durante la visualizzazione di un fi le video, premere il tasto OK
(15) per avviarne la riproduzione. Premerlo di nuovo per arrestare
la riproduzione.
ELIMINAZIONE DELLE IMMAGINI
Per eliminare un fermo immagine o un video, premere il tasto
Impostazioni (4) per visualizzare il relativo menu. Premere il tasto
Giù (16) per scorrere fi no alla voce “Elimina”. Quindi, selezionare
OK.
Sullo schermo viene richiesto di selezionare un'opzione tra
“Questa immagine” o “Tutte”. Utilizzare nuovamente il tasto Giù
per scorrere tra le opzioni, quindi selezionare OK. Sullo schermo
viene richiesto di confermare l'azione. Selezionare “Esegui”.
ITALIANO I 87
Page 88

PROTEZIONE DELLE IMMAGINI
Mediante questa funzione è possibile proteggere le immagini o i video dall'eliminazione dalla scheda Micro SD. Per proteggere
un'immagine o un video, premere il tasto Impostazioni (4) per visualizzare il relativo menu. Premere il tasto Giù (16) per scorrere
fi no alla voce “Proteggi”. Quindi, selezionare OK. Seguire i messaggi di richiesta e al termine selezionare OK.
PRESENTAZIONE
Utilizzare questa funzione per visualizzare l'anteprima di tutte le immagini contenute nella scheda SD. Utilizzare i tasti Su e giù
88 I ITALIANO
per selezionare l'intervallo di visualizzazione tra un'immagine e l'altra.
Page 89

4. INTRODUZIONE AI MENU DEL SOFTWARE
MENU
Dalla modalità di anteprima, premere il tasto Impostazioni
(4) per accedere al menu principale. Le opzioni del menu
variano in base alla modalità corrente (fermo immagine o
video). Per navigare nel menu utilizzare i tasti Giù (16), Su (5) e
OK (15).
Dalla modalità di fermo immagine, sono disponibili le seguenti
opzioni:
1. Risoluzione
2. Immagini in sequenza
3. Qualità
4. Nitidezza
In modalità Video è presente un'unica opzione.
1. Risoluzione
IMPOSTAZIONI RISOLUZIONE
In modalità di fermo immagine, le opzioni disponibili sono:
1. 12,0 MP (con interpolazione*)
2. 9,0 MP
3. 5,0 MP
4. 3,0 MP
5. 1.3 MP
6. VGA
IMMAGINI IN SEQUENZA
FOTOGRAMMI: consente di impostare il numero di fotogram-
mi da acquisire.
INTERVALLO: consente di impostare l'intervallo tra uno scatto
e l'altro.
Una volta impostate le diverse opzioni, premere OK per con-
NOTA: il numero nell'immagine sopra indica 32 fotogrammi.
ITALIANO I 89
Page 90

fermare, quindi selezionare il pulsante Menu per tornare alla
modalità di visualizzazione anteprima.
Quando si preme il tasto otturatore, nell'angolo superiore
sinistro dello schermo LCD viene visualizzata l'icona dell'impostazione Immagini in sequenza.
Quando tutti i fotogrammi sono stati acquisiti, FlipView torna
alla schermata di visualizzazione anteprima.
Per interrompere l'acquisizione automatica prima che sia completata, premere una volta il tasto otturatore.
NOTA: l'impostazione IMMAGINI IN SEQUENZA funziona solo in modalità Fermo immagine.
QUALITÀ
Le impostazioni relative alla qualità determinano il livello di
compressione delle immagini. A una maggiore compressione
corrispondono un minor numero di dettagli contenuti nelle
immagini e una minore dimensione dei file.
La finestra di impostazione contiene 3 opzioni:
1. Elevata (file di maggiori dimensioni, compressione al mini-
mo)
2. Buona
3. Normale (file di dimensioni inferiori, compressione al mas-
simo)
NOTA: il numero nell'immagine sopra indica 15 secondi.
90 I ITALIANO
NITIDEZZA
La nitidezza aumenta le differenze tra i bordi dei pixel rilevate
durante il processo di creazione dell'immagine. Non esistono
regole per quanto riguarda le impostazioni di nitidezza. Per
individuare l'impostazione ottimale per i campioni osservati
procedere per tentativi.
Le opzioni tra cui scegliere sono le seguenti:
1. Elevata
2. Normale
3. Lieve
Page 91

MENU CONFIGURAZIONE
Dal menu principale, premere il tasto di riproduzione (6) per accedere
al menu Confi gurazione. Le voci contenute nel menu sono le seguenti:
1. Lingua
2. Risparmio energetico
3. Frequenza
4. Timbro data
5. Uscita TV
6. Data/Ora
7. Formattazione scheda SD
8. Ripristino del sistema
9. Versione
LINGUA
FlipView supporta 11 lingue:
1. Inglese
2. Tedesco
3. Francese
4. Spagnolo
5. Italiano
6. Portoghese
7. Giapponese
8. Cinese semplifi cato
9. Cinese tradizionale
10. Olandese
11. Russo
Utilizzare i tasti direzionali per selezionare la lingua desiderata,
quindi premere OK (15) per confermare.
RISPARMIO ENERGETICO
La funzione Risparmio energetico consente di risparmiare la carica
della batteria impostando lo spegnimento automatico del microscopio.
Le opzioni tra cui scegliere sono le seguenti:
1. OFF - la funzione Risparmio energetico è disattivata; l'unità non si
spegne in automatico.
2. 5 min - l'unità si spegne dopo 5 minuti di inutilizzo.
3. 10 min - l'unità si spegne dopo 10 minuti di inutilizzo.
4. 15 min - l'unità si spegne dopo 15 minuti di inutilizzo.
5. 30 min - l'unità si spegne dopo 30 minuti di inutilizzo.
FREQUENZA
Questa impostazione riguarda la frequenza di aggiornamento del
televisore. Per gli USA (NTSC) usare 60 Hz; per gli altri Paesi usare
50 Hz.
ITALIANO I 91
Page 92

TIMBRO DATA
Se si desidera, è possibile mostrare la data sui fi le immagine (ma non
sui fi le video).
Le opzioni tra cui scegliere sono le seguenti:
1. DATA/ORA: consente di mostrare DATA e ORA sul fi le immagine
salvato.
2. DATA: consente di mostrare solo la data sul fi le immagine.
3. OFF: NON mostra alcuna informazione relativa a DATA/ORA.
USCITA TV
Impostare l'uscita TV su NTSC o PAL, a seconda della propria posizione.
1. Selezionare NTSC per:
• Nord America
• Sud America (esclusi Brasile, Argentina, Uruguay e Guyana
francese)
• Birmania, Corea del Sud, Taiwan, Giappone e Filippine
2. Selezionare PAL per tutti gli altri Paesi.
NOTA: la DATA e/o l'ORA NON vengono visualizzate in modalità anteprima,
sono visualizzate solo sul fi le immagine salvato.
NOTA: consultare la mappa fornita a continuazione.
92 I ITALIANO
Page 93

DATA/ORA
Da questa impostazione è possibile impostare l'ora esatta e deciderne la modalità di visualizzazione.
Le opzioni tra cui scegliere sono le seguenti:
1. AA/MM/GG
2. GG/MM/AA
3. MM/MM/GG
FORMATTAZIONE DELLA SCHEDA MICRO SD
Selezionare questa opzione per procedere alla formattazione della scheda
Micro SD. Prima di iniziare a utilizzare una scheda SD con FlipView, si consiglia
di formattarla sempre. Formattando una scheda si eliminano tutti i dati in essa
contenuti.
RIPRISTINO DEL SISTEMA
Selezionare questa opzione per ripristinare FlipView alle impostazioni di fabbrica.
VERSIONE
La schermata Versione mostra le informazioni relative alla versione del firmware.
Da questa schermata non è possibile effettuare alcuna modifica.
5. TRASFERIMENTO DI FILE A UN COMPUTER
+
Collegare FlipView a un computer utilizzando il cavo USB fornito.
+
Selezionare l'opzione “Carica immagini” sullo schermo LCD premendo il
tasto OK (15).
+
Il computer avvia la lettura della scheda Micro SD e scarica le immagini.
+
Al termine del trasferimento, le immagini possono essere aperte e visua-
lizzate sul computer utilizzando il programma di visualizzazione immagini
preferito.
6. COLLEGAMENTO A UN TELEVISORE
+
Inserire la spina da 1/8" del cavo video in dotazione nell'uscita AV (12) di
FlipView sul retro dell'unità.
+
Inserire la spina RCA gialla del cavo video nel connettore video giallo del
televisore o del proiettore.
+
Accendere il televisore o il proiettore. Assicurarsi che il televisore sia impo-
stato sul canale di ingresso appropriato.
+
A quel punto è possibile visualizzare l'immagine del campione nel microsco-
pio direttamente sullo schermo del televisore o sul proiettore.
ITALIANO I 93
Page 94

7. UTILIZZO DEL SOFTWARE CELESTRON
PORTABLECAPTURE PRO
1. Installare il software. Utilizzando il CD fornito, installare il
software su un computer. Al primo utilizzo, prima di lanciare il
software potrebbe essere necessario riavviare il computer.
2. Collegare FlipView al computer utilizzando il cavo USB fornito.
3. Selezionare l'opzione “Visualizza anteprima sul computer” sullo
schermo LCD premendo il tasto OK (15).
4. Aprire il software Celestron PortableCapture Pro facendo clic
sulla relativa icona sul desktop.
5. L'immagine viene visualizzata in streaming sull'interfaccia del
software.
NOTA: una volta lanciato il software, lo schermo LCD si disattiva e il microscopio può essere gestito
mediante computer. Solo la messa a fuoco, lo zoom e l'illuminatore dovranno essere regolati
manualmente dal dispositivo.
NOTA: quando si collega FlipView a un computer mediante cavo USB, la batteria agli ioni di litio
interna viene ricaricata.
NOTA: se il microscopio non è collegato alla porta USB, viene visualizzato il seguente messaggio di
errore: “Nessun dispositivo rilevato. Collegare il microscopio a una porta USB direttamente.”
Provare a riavviare il software.
8. UTILIZZO DEL SOFTWARE
ACQUISIZIONE DI FERMI IMMAGINE E
VIDEO
+
Per acquisire un fermo immagine, fare clic sul menu Acquisizione
e selezionare la voce Foto.
+
Per avviare la registrazione di un video, fare clic sul menu Acquisizione e selezionare la voce Video. Per arrestare la registrazione
selezionare di nuovo Video.
+
A quel punto sullo schermo dovrebbe essere visualizzata l'immagine del campione.
ALTRE VOCI DI MENU
MENU FILE La voce di menu File contiene le seguenti voci:
DIRECTORY
FOTO: consente di accedere a una specifi ca cartella
sul disco fi sso dedicata all'archiviazione dei fermi
immagine.
DIRECTORY VIDEO: consente di accedere a una
specifi ca cartella sul disco fi sso dedicata all'archiviazione dei video.
94 I ITALIANO
ESCI: consente di uscire dal software.
Page 95

OPZIONI: la voce di menu Opzioni contiene le voci indicate a continuazione.
RISOLUZIONE: consente di impostare la risoluzione del sensore di immagine. È possibile scegliere tra 2 impostazioni:
- 320 x 240
- 640 x 480
NOTA: quando è collegato a un computer, FlipView non è in grado di acquisire immagini ad alta risoluzione, tuttavia può essere utilizzato per dimostrazioni e per lo streaming delle immagini.
Per sfruttare a pieno la risoluzione da 5 MP, scollegare FlipView dal computer.
DATA/ORA: consente di attivare o disattivare il timbro data e ora.
LINGUA: consente di modifi care l'impostazione della lingua. È possibile scegliere tra 12 lingue:
inglese, tedesco, francese, spagnolo, russo,
italiano, portoghese, olandese, polacco, giapponese, coreano e cinese.
RETICOLO X,Y: consente di attivare o disattivare il reticolo guida sulla schermata di anteprima.
MODALITÀ SCHERMO INTERO: consente di utilizzare l'intera schermata del monitor. Per tornare alla modalità normale pre-
mere il tasto Esc.
ICONE: insieme alle voci di menu, l'interfaccia del software presenta anche delle icone la cui funzione è spiegato a continuazione.
A. Consente di acquisire fermi immagine.
B. Consente di avviare o arrestare la riproduzione di video.
C. Consente di accedere alla modalità a schermo intero.
ITALIANO I 95
Page 96

9. CALIBRAZIONE E MISURAZIONE
+
Il software PortableCapture Pro è provvisto di una
funzione di misurazione. Per utilizzare questa funzione è
necessario prima di tutto eseguire una calibrazione.
+
Assicurarsi che la voce Guida X,Y nel menu Opzioni
sia impostata su "Attiva".
+
Acquisire un fermo immagine. L'immagine viene
visualizzata nella colonna sul lato destro dello schermo.
+
Regolare l'altezza del microscopio e la messa a fuoco sul
campione. Quindi, sostituire il campione con il righello di
calibrazione.
+
Regolare di nuovo la messa a fuoco e allineare il righello
di calibrazione in modo che la scala graduata del righello
sia parallela alla linea verticale sulla guida X,Y.
+
Fare doppio clic sull'immagine salvata per aprirla nella
schermata Anteprima immagine.
96 I ITALIANO
+
Fare clic sull'icona di calibrazione .
+
Fare clic e trascinare una linea lungo un "valore conosciuto"
sull'immagine del righello. Cercare di mantenere la linea il più
perpendicolare possibile rispetto alle linee sul righello.
+
La fi nestra “Regola ingrandimento” compare come illustrato in
fi gura.
+
Inserire nella casella “Dimensione effettiva” il “valore
conosciuto” indicato sul righello di calibrazione.
Page 97

+
Per assicurarsi che la calibrazione sia avvenuta correttamente,
tornare alla schermata di acquisizione immagini.
+
Fare clic sull'icona del righello
e dal menu a discesa
selezionare l'opzione Qualsiasi angolo di una linea.
+
Fare clic e trascinare una linea come in precedenza lungo lo
stesso "valore conosciuto".
+
Se la calibrazione è avvenuta correttamente, la distanza misurata
dovrebbe essere uguale al “valore conosciuto”.
+
Per acquisire immagini senza modifi care l'altezza o l'ingrandimento, fare clic sull'icona di calibrazione. Dal menu a discesa,
selezionare Imposta ingrandimento, quindi selezionare Imposta
ingrandimento dell'acquisizione.
+
Viene visualizzata una fi nestra a comparsa. Digitare un valore
nella casella Ingrandimento nell'angolo superiore destro della
fi nestra principale.
STRUMENTI DI MISURAZIONE
Nel menu di misurazione a discesa sono disponibili molti strumenti.
A continuazione è fornito un elenco delle misurazioni eseguibili.
PRINCIPALE
1. Qualsiasi angolo: consente di misurare da un punto
A a un punto B in una linea retta.
2. Linea continua: consente di misurare la distanza
totale tra più punti. Iniziare misurando una linea
retta da un punto A a un punto B, quindi fare clic e
trascinare per continuare la misurazione da un punto B
a un punto C (è possibile ripetere l'operazione quante
volte lo si desidera).
3. Raggio di un cerchio: consente di misurare il raggio
di un cerchio. Iniziando dal centro, trascinare il cursore
verso un punto qualsiasi del bordo.
4. Diametro di un cerchio: consente di misurare il
diametro di un cerchio. Iniziando da un punto qualsiasi
del bordo, trascinare il cursore verso un punto opposto
del bordo.
5. Tre punti di un angolo: consente di misurare un
angolo tra due punti, iniziando dal punto di un raggio
o da un punto di intersezione. Fare clic su un punto A
(punto di un raggio). trascinare e fare clic su un punto
B, quindi fare clic su un punto C. Vengono visualizzati
l'angolo e i suoi gradi.
IMPOSTAZIONI
1. Proprietà linea: consente di modifi care le
impostazioni per tipo di linea, larghezza, dimensione e
colore.
2. Proprietà testo: consente di modifi care le
impostazioni per tipo di carattere, dimensione, stile e
colore.
3. Imposta unità: consente di modifi care l'impostazione
dell'unità di misura. È possibile selezionare tra
millimetri, centimetri, pixel e pollici.
ITALIANO I 97
Page 98

CREARE ANNOTAZIONI E SEGNARE LE IMMAGINI
Il software PortableCapture Pro include alcune funzioni che consentono di aggiungere delle note alle immagini salvate,
segnarle o disegnarci sopra. Ciò può essere utili per scrivere annotazioni ed effettuare segnalazioni direttamente sulle
immagini in modo rapido.
1. INSERIMENTO DI SIMBOLI
+
+
Per utilizzare tale funzione, fare clic sull'icona Disegna dalla fi nestra Anteprima immagine.
Le opzioni presenti nel menu a discesa Disegna sono:
PRINCIPALE
1. Linea: consente di disegnare una linea retta sull'immagine.
2. Freccia: consente di disegnare una linea con una freccia sull'immagine.
3. Mano libera: consente di disegnare a mano libera. Utile per scrivere delle veloci annotazioni.
4. Rettangolo: consente di disegnare una casella. Utile per richiamare l'attenzione su alcuni aspetti
dell'immagine o per incorniciare del testo.
IMPOSTAZIONI
1. Proprietà linea: consente di modifi care le impostazioni per tipo di linea, dimensione e colore.
98 I ITALIANO
2. INSERIMENTO DI TESTO
+
+
Per inserire delle annotazioni sull'immagine, selezionare l'icona Testo .
Dal menu a discesa è possibile selezionare tipo di carattere, dimensione e colore.
Page 99

DESCRIZIONE DELLE ICONE DELLA FINESTRA ANTEPRIMA IMMAGINE
B.
A.
D.
C.
F.
E.
G.
A. Salva: consente di salvare il file corrente.
B. Copia negli appunti: consente di copiare per aprire in
un altro programma.
C. Copia consente di salvare una copia.
D. Precedente: consente di tornare all'immagine prece-
dente nella cartella di archiviazione.
E. Successiva: consente di passare all'immagine succes-
siva nella cartella di archiviazione.
F. Annulla: consente di annullare l'ultima azione eseguita.
10. MULTIPRESA
I.
H.
J.
K.
G. Ripristina: consente di ripristinare l'ultima azione
eseguita.
H. Disegna
I. Testo/Note
J. Misura
K. Calibrazione
L. Ingrandimento corrente (basato sull'ultima calibrazio-
ne).
L.
Se FlipView™ è stato acquistato al di fuori del Nord America
(modello 44315), nella confezione è presente un adattatore
CA multipresa. Sono presenti 3 teste per spina intercambiabili, adatte alle prese di Europa, Regno Unito, Hong Kong e
Cina.
Per cambiare la testa della spina, procedere come segue:
- Afferrare il corpo della spina principale con una
mano e la testa della spina prescelta con l'altra
mano.
- Premere il piccolo pulsante di rilascio sul corpo
della spina (cerchiato nell'immagine di seguito).
- e bloccare le alette sulla testa della spina nelle
scanalature del corpo della spina.
- Ruotare la testa della spina di 90° in senso
orario fino a quando non scatta in posizione con
un “clic”.
Per rimuovere la testa della spina, premere il piccolo pulsante di rilascio e ruotare la testa della spina in senso antiorario
fino al completo rilascio.
ITALIANO I 99
Page 100

11. CURA E MANUTENZIONE
Il microscopio con videocamera digitale è uno strumento ottico di precisione e deve essere sempre trattato con cura.
Seguire questi consigli per la cura e la manutenzione e il microscopio avrà bisogno di pochissima manutenzione durante il
suo ciclo di vita.
+
Conservare il microscopio in un luogo asciutto e pulito.
+
Non utilizzare mai il microscopio in luoghi in cui l'uso ne
è limitato. Un uso non corretto può creare il rischio di
incidenti.
+
Non cercare di accedere ai componenti interni del
microscopio né di modificarlo in alcun modo. Solo tecnici
autorizzati possono eseguire interventi di manutenzione o
riparazione.
+
Tenere il microscopio al riparo da acqua o altri liquidi. Non
utilizzare il microscopio in presenza di pioggia o neve.
L'umidità crea pericoli di incendio e scosse elettriche.
+
Per rimuovere polvere o macchie dallo schermo LCD o
da un altro componente ottico, rimuovere innanzitutto
la polvere con una spazzola di peli di cammello o con
un asciugacapelli. Quindi utilizzare il panno asciutto in
microfibra fornito per pulire la superficie.
+
Se le superfici esterne del microscopio necessitano di
pulizia, utilizzare un panno umido.
12. RISOLUZIONE DEI PROBLEMI
PROBLEMA SOLUZIONE
L'unità non si accende. Controllare la carica della batteria. Se necessario, ricaricare inserendo la spina nella presa
Lo schermo è vuoto.
Sono presenti sbavature o difetti sullo
schermo.
Il microscopio è collegato al televisore, ma
non appare alcuna immagine sullo schermo
del televisore.
L'indicatore LED della batteria non si illumina,
anche se l'adattatore di alimentazione è
collegato alla presa a muro
-oppurela batteria non si carica.
CA.
+
Assicurarsi che sia presente l'alimentazione.
+
Verificare la carica della batteria e ricaricarla se necessario.
+
Verificare che l'oggetto che si vuole ingrandire sia posizionato correttamente sotto la lente.
+
Assicurarsi che l'illuminatore sia acceso.
+
Pulire con cura lo schermo e la lente con il panno in microfibra fornito.
+
Assicurarsi che il televisore sia acceso.
+
Impostare il televisore sul canale video corretto (può variare a seconda del produttore).
+
Assicurarsi che il cavo video sia collegato correttamente all'uscita video del microscopio
e la spina inserita nell'ingresso video corretto del televisore.
+
Assicurarsi che il cavo sia collegato alla porta corretta.
+
Verificare che l'uscita sia alimentata e funzioni correttamente. Se l'uscita è collegata
a un interruttore a muro, assicurarsi che l'interruttore sia accesso.
100 I ITALIANO
13. GARANZIA
Il microscopio FlipView con schermo LCD è dotato di una garanzia limitata di due anni. Per informazioni dettagliate sulla
gamma completa dei microscopi Celestron visitare il sito web Celestron:
© 2014 Celestron • Tutti i diritti riservati. • celestron.com
2835 Columbia Street • Torrance, CA 90503 U.S.A.
Telefono: 1(800) 421-9649 • Stampato in Cina 2013
Nota FCC: la presente apparecchiatura è stata testata ed è risultata conforme ai limiti imposti per i dispositivi digitali di Classe B, ai sensi della Parte 15 delle Normative FCC. Tali limiti sono stati ideati per
fornire un’adeguata protezione nei confronti di interferenze dannose in installazioni residenziali. La presente apparecchiatura genera, utilizza e può irradiare energia a radio frequenza e, se non installata e
utilizzata conformemente alle istruzioni, può causare interferenze dannose alle radiocomunicazioni. Tuttavia, non vi è alcuna garanzia che l’interferenza non si verifichi in una particolare installazione. Nel
caso in cui la presente apparecchiatura dovesse causare interferenze dannose alla ricezione radio o televisiva, che potrebbero essere determinate spegnendo e riaccendendo l’apparecchiatura, l’utente è
incoraggiato a tentare di correggere l’interferenza utilizzando una o più delle seguenti misure:
+ Orientare o posizionare nuovamente l’antenna di ricezione.
+ Aumentare la distanza tra il dispositivo e il ricevitore.
Il presente prodotto è progettato per l’uso da parte di persone di età pari o superiore ai 14 anni. Il design del prodotto e le specifiche sono soggetti a modifiche senza previa notifica.
+ Collegare l’apparecchiatura a una presa su un circuito diverso da quello a cui è collegato il
ricevitore.
+ Consultare il rivenditore o un tecnico radio/TV esperto per richiedere assistenza.
44314, 44315
 Loading...