


102A Z
102 MM REFRACTOR
TELESCOPE
ENGLISH
INSTRUCTION MANUAL
22065 AstroMaster 102AZ

2 | ENGLISH

TABLE OF CONTENTS
INTRODUCTION . . . . . . . . . . . . . . . . . . . . . . . . . . . . . . . . . . . . . . . . . . . . . . . . . . . . . 4
ASSEMBLY
Setting up the Tripod
Moving the Telescope Manually
Installing the Telescope Tube to the Mount
Installing the Diagonal & Eyepieces
TELESCOPE BASICS
Image Orientation
Focusing
Aligning the Finderscope
Calculating Magnification
Determining Field of View
General Observing Hints
ASTRONOMY BASICS
CELESTIAL OBSERVING
Observing the Moon
Observing the Planets
Observing the Sun
Observing Deep Sky Objects
Star Hopping
Seeing Conditions
ASTROPHOTOGRAPHY
Planetary & Lunar Photography with Special Imagers
Terrestrial Photography
TELESCOPE MAINTENANCE
Care and Cleaning of the Optics
OPTIONAL ACCESSORIES
AstroMaster Specifications
. . . . . . . . . . . . . . . . . . . . . . . . . . . . . . . . . . . . . . . . . . . . . . . . . . . . . . . .6
. . . . . . . . . . . . . . . . . . . . . . . . . . . . . . . . . . . . . . . . . . . . . . . . . . . . . 6
. . . . . . . . . . . . . . . . . . . . . . . . . . . . . . . . . . . . . . . . . . . . . . . .7
. . . . . . . . . . . . . . . . . . . . . . . . . . . . . . . . . . . . . . . . . .7
. . . . . . . . . . . . . . . . . . . . . . . . . . . . . . . . . . . . . . . . . . . . .8
. . . . . . . . . . . . . . . . . . . . . . . . . . . . . . . . . . . . . . . . . . . . . . . . . . 9
. . . . . . . . . . . . . . . . . . . . . . . . . . . . . . . . . . . . . . . . . . . . . . . . . . . . . . . 9
. . . . . . . . . . . . . . . . . . . . . . . . . . . . . . . . . . . . . . . . . . . . . . . . . . . . . . . . . . . .10
. . . . . . . . . . . . . . . . . . . . . . . . . . . . . . . . . . . . . . . . . . . . . . . . . . . 10
. . . . . . . . . . . . . . . . . . . . . . . . . . . . . . . . . . . . . . . . . . . . . . . . . . . 11
. . . . . . . . . . . . . . . . . . . . . . . . . . . . . . . . . . . . . . . . . . . . . . . . . . .11
. . . . . . . . . . . . . . . . . . . . . . . . . . . . . . . . . . . . . . . . . . . . . . . . . . .12
. . . . . . . . . . . . . . . . . . . . . . . . . . . . . . . . . . . . . . . . . . . . . . . . . 12
. . . . . . . . . . . . . . . . . . . . . . . . . . . . . . . . . . . . . . . . . . . . . . . . 13
. . . . . . . . . . . . . . . . . . . . . . . . . . . . . . . . . . . . . . . . . . . . . . . . . . . . . .13
. . . . . . . . . . . . . . . . . . . . . . . . . . . . . . . . . . . . . . . . . . . . . . . . . . . . .13
. . . . . . . . . . . . . . . . . . . . . . . . . . . . . . . . . . . . . . . . . . . . . . . . . . . . . . 13
. . . . . . . . . . . . . . . . . . . . . . . . . . . . . . . . . . . . . . . . . . . . . . . . .14
. . . . . . . . . . . . . . . . . . . . . . . . . . . . . . . . . . . . . . . . . . . . . . . . . . . . . . . . . 14
. . . . . . . . . . . . . . . . . . . . . . . . . . . . . . . . . . . . . . . . . . . . . . . . . . . . . . .16
. . . . . . . . . . . . . . . . . . . . . . . . . . . . . . . . . . . . . . . . . . . . . . . . 17
. . . . . . . . . . . . . . . . . . . . . . . . . . . . . . . . . . . . 17
. . . . . . . . . . . . . . . . . . . . . . . . . . . . . . . . . . . . . . . . . . . . . . . . . . . .17
. . . . . . . . . . . . . . . . . . . . . . . . . . . . . . . . . . . . . . . . . . . . . 18
. . . . . . . . . . . . . . . . . . . . . . . . . . . . . . . . . . . . . . . . . . . . . . . 18
. . . . . . . . . . . . . . . . . . . . . . . . . . . . . . . . . . . . . . . . . . . . . . .19
. . . . . . . . . . . . . . . . . . . . . . . . . . . . . . . . . . . . . . . . . . . . . . . . . . 20
ENGLISH | 3

INTRODUCTION
Congratulations on your purchase of an AstroMaster series telescope. Your AstroMaster
series is made of the highest quality materials to ensure stability and durability. With proper
care, your telescope will provide a lifetime of pleasure with a minimal amount of
maintenance.
The AstroMaster series features a compact and portable design with ample optical performance to introduce any
newcomer to the exciting world of amateur astronomy. In addition, your AstroMaster telescope is ideal for terrestrial
observations with superb high power viewing.
AstroMaster telescopes carry a two year limited warranty. For details see our website at www.celestron.com
Your AstroMaster features
• All coated glass optical elements for clear, crisp images.
• Smooth functioning, rigid alt-azimuth mount with a large pan handle with built-in clutch for easy targeting.
• A preassembled tripod with 1.25-inch steel legs, which provides a stable platform.
• Quick and easy no-tool set up.
• TheSkyX-First Light Edition astronomy software with information about celestial objects and printable sky maps.
• Terrestrial and astronomical observing capability.
Read this manual carefully before embarking on your journey through the Universe. It may take a few observing sessions
to become familiar with your telescope, so keep this manual handy until you have fully mastered your telescope’s operation.
The manual provides detailed instructions, reference material and helpful hints guaranteed to make your observing
experience as simple and pleasurable as possible.
Your telescope is designed to give you years of fun and rewarding observations. However, there are a few things to
consider before using your telescope to ensure your safety and protect your equipment.
SOLAR WARNING
Never look directly at the Sun with the naked eye or with a telescope unless you have the proper solar filter. Permanent and irreversible eye damage may result.
Never use your telescope to project an image of the Sun onto any surface. Internal heat build-up can damage the telescope and any accessories attached to it.
Never use an eyepiece solar filter or a Herschel wedge. Internal heat build-up inside the telescope can cause these devices to crack or break, allowing unfiltered sunlight to
pass through to the eye.
Do not leave the telescope unsupervised, especially when children or adults unfamiliar with the correct operating procedures of your telescope are present.
4 | ENGLISH
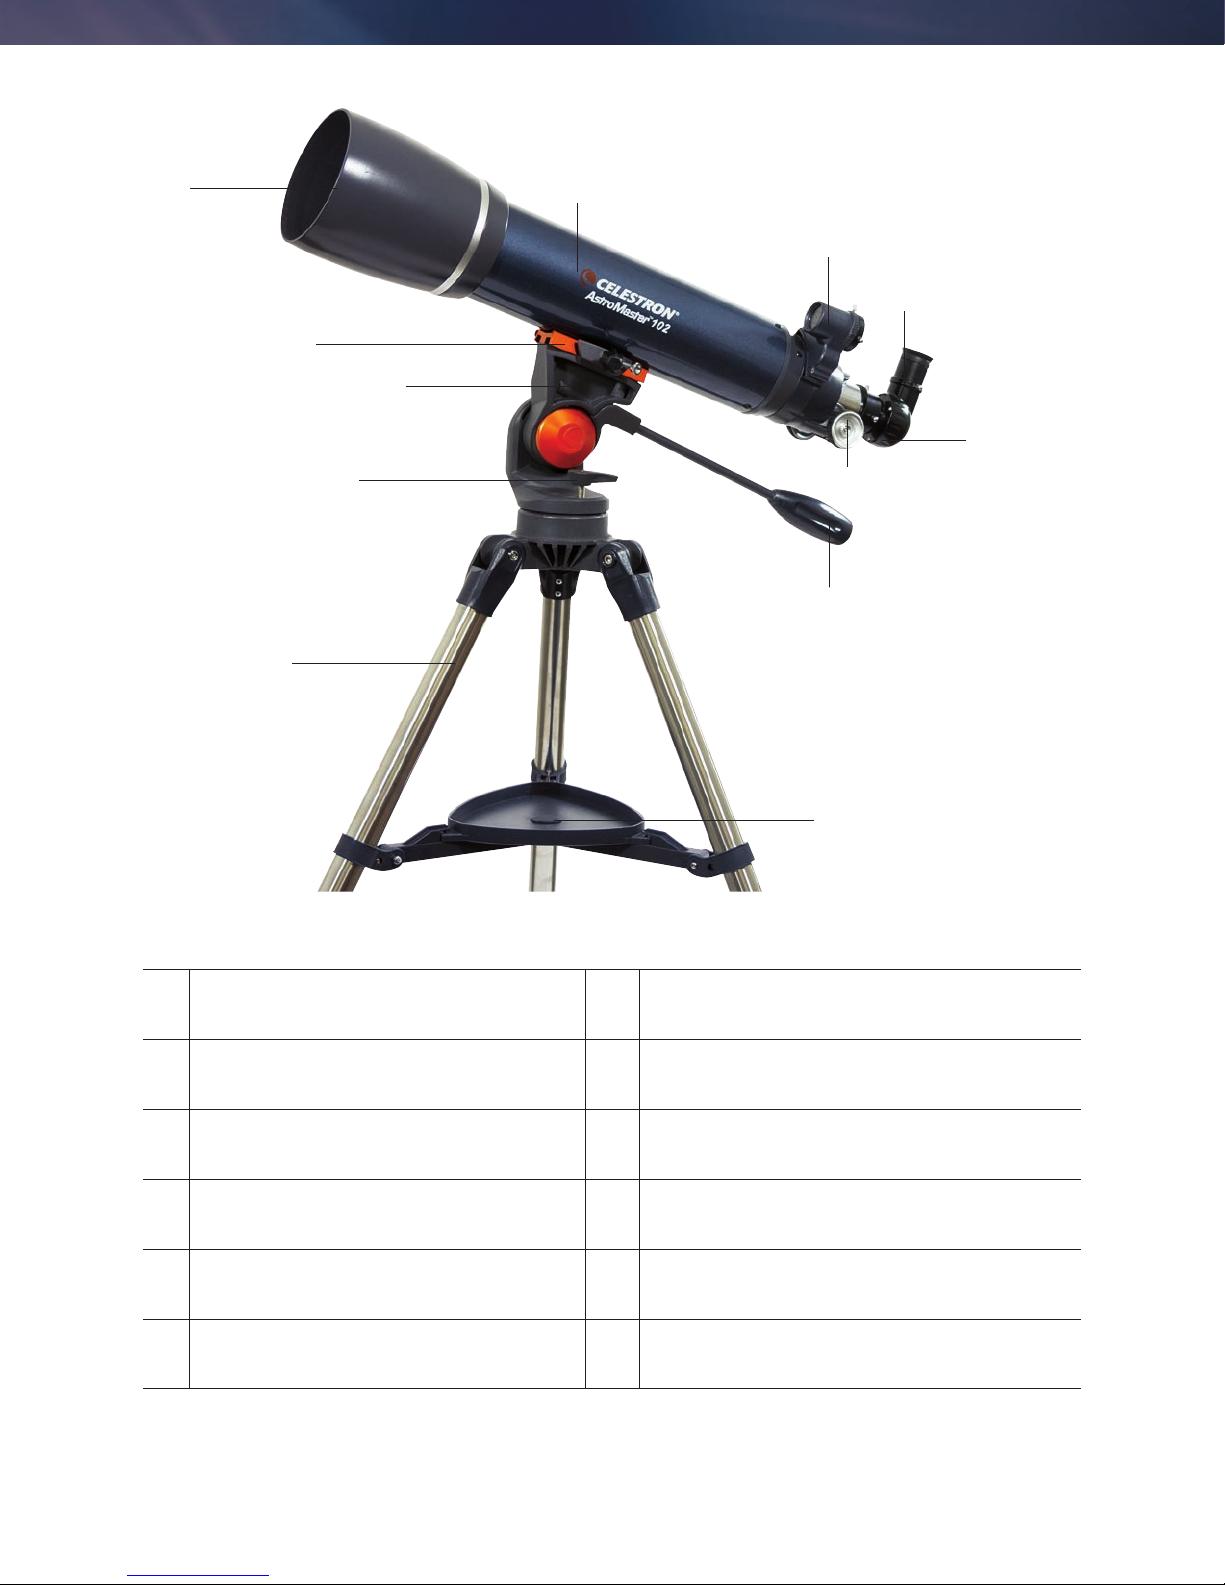
1
2
3
4
12
11
5
10
6
7
9
Objective Lens
1.
Telescope Optical Tube
2.
Red Dot Finder
3.
Eyepiece
4.
Diagonal
5.
Focus Knob
6.
Fig. 1
Pan Handle
7.
Accessory Tray
8.
Tripod
9.
Azimuth Lock
10.
Alt-Az Mount
11.
Dovetail Mounting Bracket
12.
8
ENGLISH | 5
ASSEMBLY
Set up your telescope indoors the first time before attempting to assemble it outdoors.
Each AstroMaster comes in one box. The pieces in the box are: altazimuth mount with attached pan handle,10 mm 1.25”
eyepiece, 20 mm 1.25” eyepiece, 1.25” erect image diagonal, “TheSkyX-First Light Edition astronomy software”.
SETTING UP THE TRIPOD
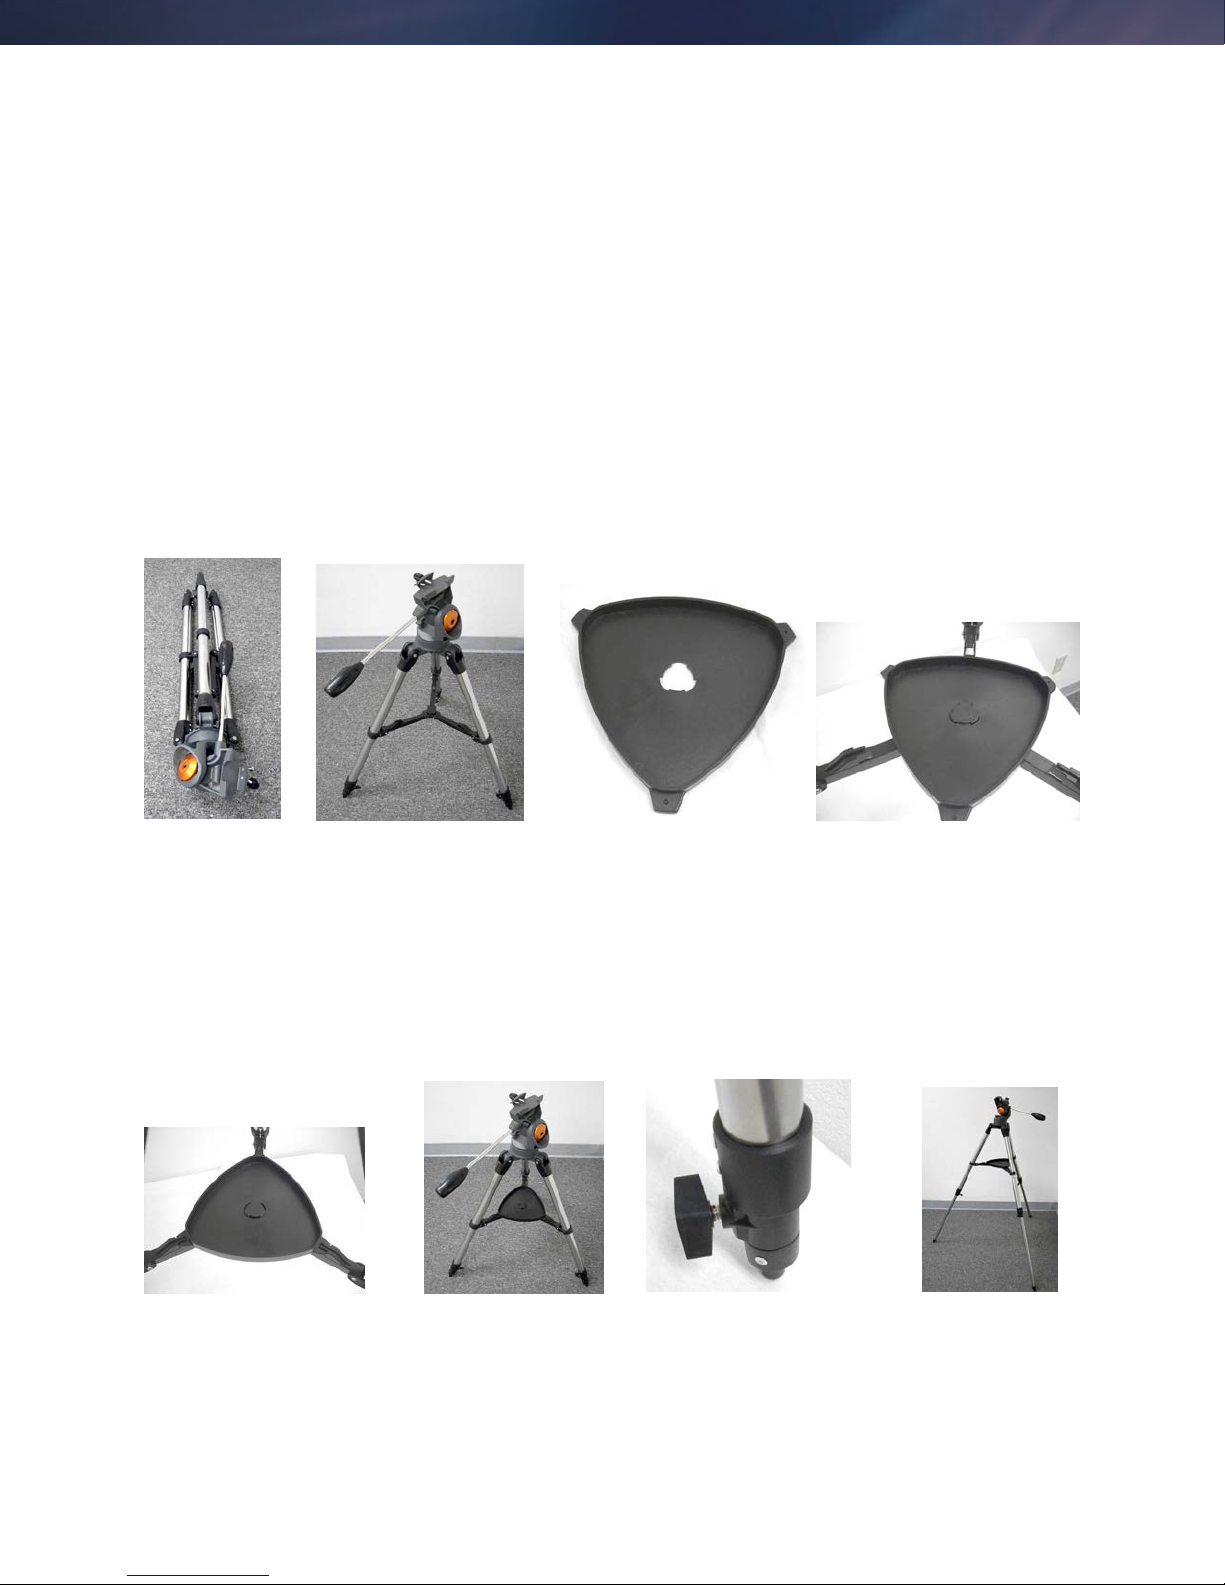
1. Remove the tripod from the box (Figure 2-1). The tripod comes preassembled.
2. Stand the tripod upright and pull the tripod legs apart until each leg is fully extended and then push down slightly on the
tripod leg brace (Figure 2-2).
3. Next, we will install the tripod accessory tray (Figure 2-3) onto the tripod leg brace (center of Figure 2-2).
Hold the tray flat side facing down. Align the center of the tray to match the center of the tripod brace and push down
slightly (Figure 2-4).
Fig. 2-1 Fig. 2-2 Fig. 2-3 Fig. 2-4
4. Rotate the tray until the ears are under the leg brace support of each leg and push slightly. They will lock in place (Figure
2-5). The tripod is now completely assembled (Figure 2-6).
5. You can extend the tripod legs to the height you desire. At the lowest level the height is 24” (61 cm) and extends to
41” (104 cm). Unlock the tripod leg lock knob at the bottom of each leg (Figure 2-7) and pull the legs out to the desired
height. Then, lock the knob securely. A fully-extended the tripod looks like the image in Figure 2-8. Keep in mind that the
tripod is the most stable and rigid at the lowest height.
Fig. 2-5 Fig. 2-6 Fig. 2-7 Fig. 2-8
6 | ENGLISH
 Loading...