

Page 1

powerseeker
80AZS
®
80 MM REFRACTOR
INCLUDES PRE-ASSEMBLED ALUMINUM TRIPOD WITH ACCESSORY TRAY
ENGLISH
TELESCOPE
INSTRUCTION MANUAL
#21087
Page 2

Page 3

TABLE OF CONTENTS
INTRODUCTION . . . . . . . . . . . . . . . . . . . . . . . . . . . . . . . . . . . . . . . . . . . . . . . . . . . . .5
ASSEMBLY
What’s in the Box
Setting up the tripod . . . . . . . . . . . . . . . . . . . . . . . . . . . . . . . . . . . . . . . . . . . . . . . . . . . . .7
Attaching the Telescope Tube to the Mount . . . . . . . . . . . . . . . . . . . . . . . . . . . . . . . . . . . . . . . . .8
Moving the Telescope . . . . . . . . . . . . . . . . . . . . . . . . . . . . . . . . . . . . . . . . . . . . . . . . . . . . .8
Installing the Diagonal & Eyepiece . . . . . . . . . . . . . . . . . . . . . . . . . . . . . . . . . . . . . . . . . . . . . .9
Installing the Finderscope . . . . . . . . . . . . . . . . . . . . . . . . . . . . . . . . . . . . . . . . . . . . . . . . . . .9
Aligning the Finderscope . . . . . . . . . . . . . . . . . . . . . . . . . . . . . . . . . . . . . . . . . . . . . . . . . . . 9
PowerSeeker 80AZS SPECIFICATIONS . . . . . . . . . . . . . . . . . . . . . . . . . . . . . . . . . . . . . . . 10
Warranty . . . . . . . . . . . . . . . . . . . . . . . . . . . . . . . . . . . . . . . . . . . . . . . . . . . . . . . . . . . .11
. . . . . . . . . . . . . . . . . . . . . . . . . . . . . . . . . . . . . . . . . . . . . . . . . . . . . . . 7
. . . . . . . . . . . . . . . . . . . . . . . . . . . . . . . . . . . . . . . . . . . . . . . . . . . . . . .7
ENGLISH I 3
Page 4

4 I ENGLISH
Page 5

INTRODUCTION
Congratulations on purchasing your Celestron PowerSeeker 80AZS telescope! The
PowerSeeker is made of high-quality materials to ensure stability and durability. It features
a compact and portable design with ample optical performance to help you discover the
exciting world of amateur astronomy. This telescope is also ideal for terrestrial observations. It
comes with an easy-to-use tripod and mount, which allow you to move the telescope up and
down or left to right to point at a distant target. Your PowerSeeker will give you a lifetime of
pleasure with a minimal amount of maintenance.
Celestron backs the PowerSeeker telescope with a two-year limited warranty. For details, see our website at
www.celestron.com
Your Celestron PowerSeeker features:
• Fully coated glass optical elements for clear, crisp images
• Smooth functioning, rigid altazimuth mount
• Preassembled aluminum tripod
• Quick and easy no-tool setup
• Erect image prism, which ensures a correctly-oriented image when viewing terrestrial objects
• “TheSkyX – First Light Edition” astronomy software, which provides information about the night sky and printable sky maps
Take time to read through this manual before setting up your telescope. Try setting it up a few times during the day until
you become familiar with the use of your telescope. It is much easier to do this in the daytime than trying to set the telescope up for the first time in the dark.
Your telescope is designed to give you years of fun and rewarding observations. However, there are a few things to consider before using your telescope that will ensure your safety and protect your equipment.
WARNING:
Never look directly at the sun with the naked eye or with a telescope (unless you have the proper solar filter).
Permanent and irreversible eye damage may result.
Never use your telescope to project an image of the sun onto any surface. Internal heat build-up can damage the telescope and any accessories attached to it.
Never use an eyepiece solar filter or a Herschel wedge. Internal heat build-up inside the telescope can cause these devices to crack or break, allowing unfiltered sunlight to
pass through to the eye.
Do not leave the telescope unsupervised, especially when adults unfamiliar with your telescope or children are present.
ENGLISH I 5
Page 6

2
3
4
5
6
1
12
11
10
7
8
9
Fig. 1-1
1. Objective Lens 7. Altitude Slow Motion Rod
2. Telescope Optical Tube 8. Accessory Tray
3. Finderscope 9. Tripod
4. Eyepiece 10. Azimuth Locking Knob
5. Erect Image Diagonal 11. Altazimuth Mount
6. Focus Knob 12. Altitude Locking Knob
6 I ENGLISH
Page 7
ASSEMBLY
WHAT’S IN THE BOX
• Telescope tube
• Altazimuth mount and tripod
• H20mm (20x) – 1.25”
• SR4mm (100x) – 1.25”
• 3x Barlow Lens
• Erect image diagonal – 1.25”
• Finderscope: 5x24
• Accessory tray
• TheSkyX – First Light Edition DVD-ROM
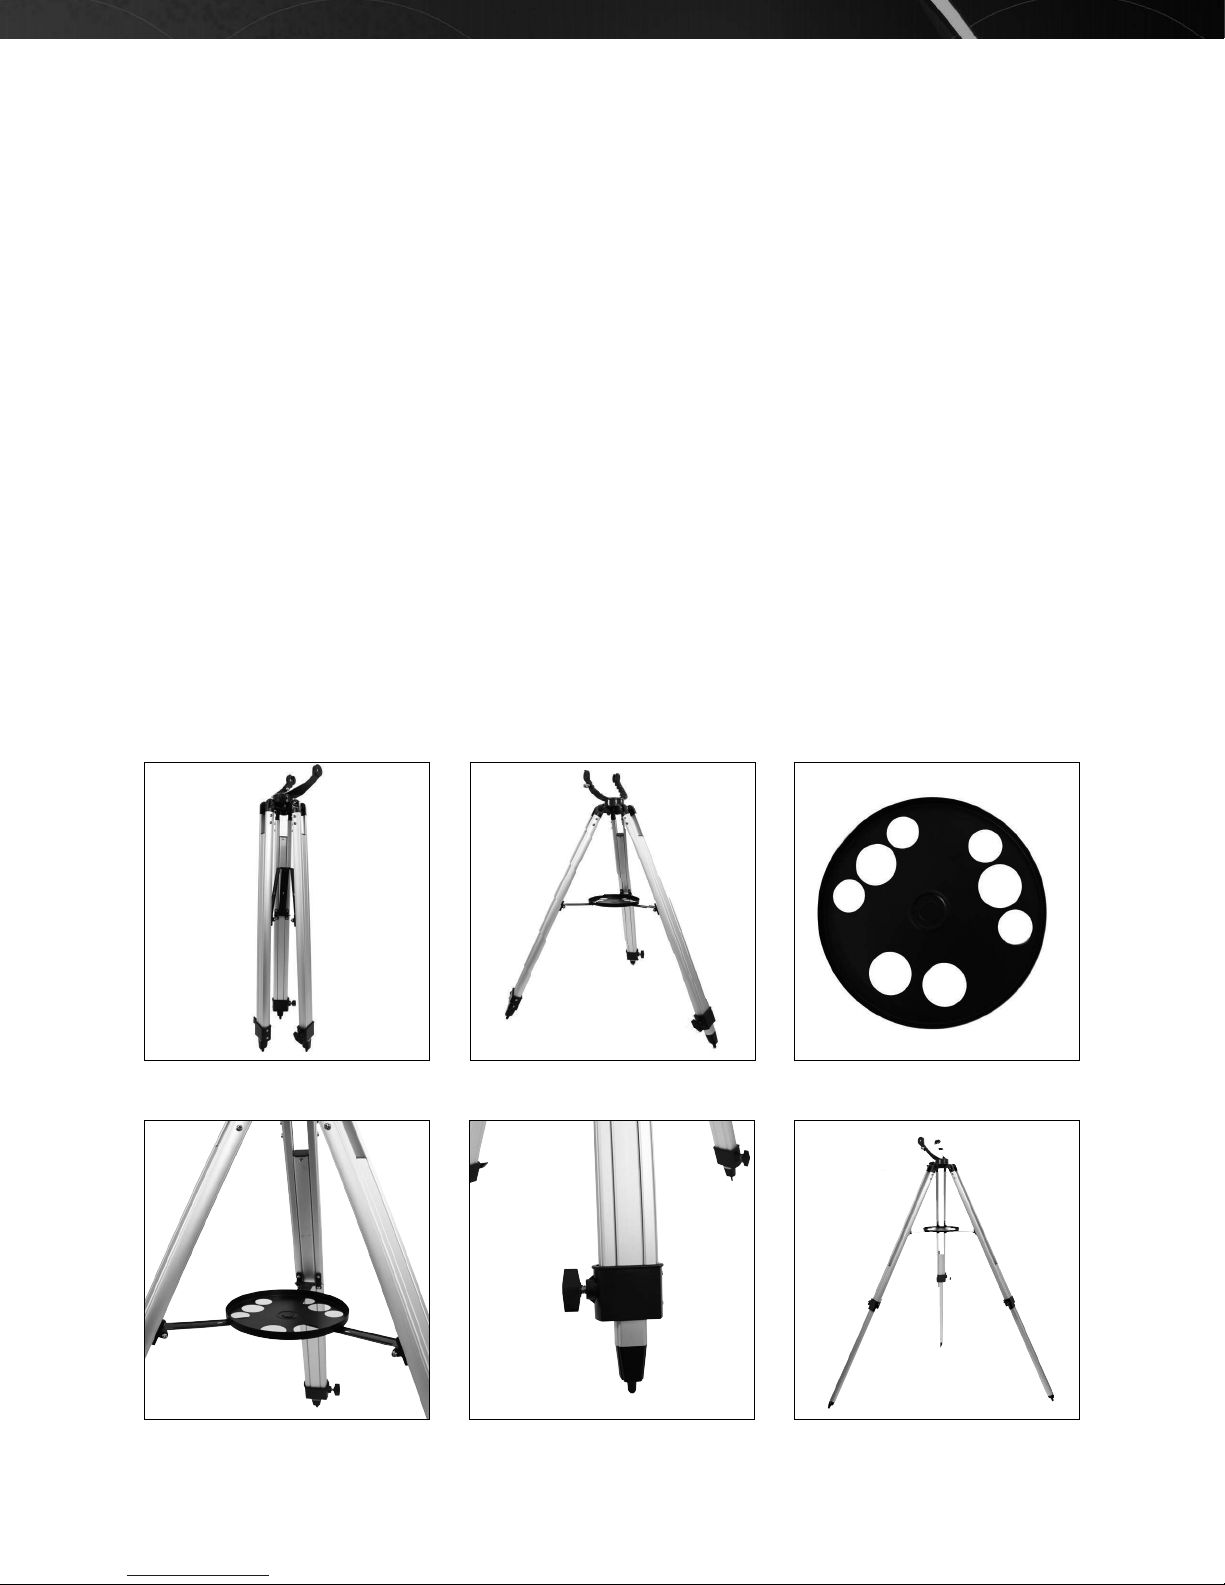
SETTING UP THE TRIPOD
1. Remove the tripod from the box (Figure 2-1). Stand the tripod upright and separate the tripod legs. Then, push down
slightly on the tripod leg brace (Figure 2-2). Note: The very top of the tripod is called the altazimuth mount.
2. Next, install the tripod accessory tray (Figure 2-3) by placing the threaded post on the bottom of the tray over the hole
in the center of the leg support bracket (Figure 2-4). Turn the entire accessory tray clockwise to screw the tray in place.
Be careful not to over tighten.
3. Extend the legs to the desired height. Unlock the tripod leg lock knobs at the bottom of each leg (Figure 2-5) by turning
them counterclockwise and pull the legs out. Then lock the knobs securely. A fully extended tripod looks similar to the
image in Figure 2-6.
NOTE: The tripod will be the most rigid and stable at lower height settings.
Fig. 2-1 Fig. 2-3
Fig. 2-4 Fig. 2-5
Fig. 2-2
Fig. 2-6
ENGLISH I 7
Page 8

ATTACHING THE TELESCOPE TUBE TO THE MOUNT
1. Loosen the silver lock knob on the right side of the altazimuth mount.
2. While holding the telescope tube above the altazimuth mount, insert the long, silver rod on the right side of the optical
tube into the hole under the lock knob (see Figure 2-7).
3. Move the telescope tube until you can insert the two altitude hubs on either side of the tube into the notches at the top
of the altazimuth mount (see Figure 2-8).
4. Tighten the silver lock knob.
5. Thread the two hand bolts through the altazimuth mount and into the two altitude hubs on the telescope tube to secure
the tube in place (see Figure 2-9).
Fig. 2-7 Fig. 2-8 Fig. 2-9
MOVING THE TELESCOPE
The PowerSeeker is easy to move wherever you want to point it. Adjust the altitude (up-and-down position) by loosening
the altitude lock knob and moving the telescope tube up or down. To move the telescope in the azimuth (left-to-right) direction, loosen the azimuth lock knob and move the telescope. When the telescope is centered on your target, lock down
the altitude and azimuth lock knobs.
For fine adjustments in altitude, turn the ring of the altitude slow motion rod (when the altitude lock is tight) in either direction (see Figure 2-10).
Fig. 2-10
8 I ENGLISH
Page 9

INSTALLING THE DIAGONAL & EYEPIECE
Other The mirror diagonal is a prism that corrects the image to be right side up and oriented correctly left-to-right. The
diagonal can be rotated to the most comfortable viewing position. To install the diagonal and eyepiece:
1. Loosen the thumbscrews and insert the small barrel of the diagonal into the 1.25” eyepiece adapter on the telescope
tube (see Figure 2-11).
2. Loosen the thumbscrew on the diagonal and insert the chrome barrel of one of the eyepieces all the way down.
Tighten the set screw to secure the eyepiece in place.
Fig. 2-11
INSTALLING THE FINDERSCOPE
1. Remove the two silver nuts on the top left side of the telescope tube near the focuser.
2. Place the finderscope bracket over the two threaded posts and secure it in place with the nuts (see Figure 2-12).
NOTE: The larger diameter lens of the finderscope is pointed toward the front of the main telescope.
ALIGNING THE FINDERSCOPE
1. Look through the main telescope using a 20 mm eyepiece and locate a distant target such as a streetlight or stop sign.
The target should be as far away as possible or at least ¼ mile away. Center this target in the 20 mm eyepiece.
2. Look through the finderscope and note the position of the same object.
3. Without moving the main telescope, turn the thumbscrews located around the finderscope bracket until the crosshairs
of the finderscope are centered on the object seen in the center of the telescope’s 20 mm eyepiece.
ENGLISH I 9
Page 10

POWERSEEKER 80AZS SPECIFICATIONS
Model Number 21087
Description 80 AZS
Optical Design Air-spaced doublet achromatic refractor
Aperture 80 mm
Focal Length 400 mm
Focal Length f/5
Optical Coatings Fully Coated
Finderscope 5x24
Diagonal Erect Image
Eyepiece H 20 mm (20x) - 1.25”
Eyepiece SR 4 mm (100x) - 1.25”
Limiting Stellar Magnitude 11x
Resolution -- Raleigh (arc seconds) 1.74 arc seconds
Resolution -- Dawes Limit (arc seconds) 1.45 arc seconds
Light Gathering Power 131x the human eye
Mount Type Altazimuth
Tripod Adjustable height, aluminum
Telescope Tube Length 17 inches
Telescope Tube Width 4.25 inches
10 I ENGLISH
Page 11

CELESTRON TWO YEAR LIMITED WARRANTY
A. Celestron warrants your telescope to be free from defects in materials and workmanship for two years. Celestron will repair or
replace such product or part thereof which, upon inspection by Celestron, is found to be defective in materials or workmanship. As
a condition to the obligation of Celestron to repair or replace such product, the product must be returned to Celestron together with
proof-of-purchase satisfactory to Celestron.
B. The Proper Return Authorization Number must be obtained from Celestron in advance of return. Call Celestron at (310) 328-9560
to receive the number to be displayed on the outside of your shipping container.
All returns must be accompanied by a written statement setting forth the name, address, and daytime telephone number of the owner,
together with a brief description of any claimed defects. Parts or product for which replacement is made shall become the property of
Celestron.
The customer shall be responsible for all costs of transportation and insurance, both to and from the factory of Celestron, and shall be
required to prepay such costs.
Celestron shall use reasonable efforts to repair or replace any telescope covered by this warranty within thirty days of receipt. In the
event repair or replacement shall require more than thirty days, Celestron shall notify the customer accordingly. Celestron reserves the
right to replace any product which has been discontinued from its product line with a new product of comparable value and function.
This warranty shall be void and of no force of effect in the event a covered product has been modified in design or function, or
subjected to abuse, misuse, mishandling or unauthorized repair. Further, product malfunction or deterioration due to normal wear is not
covered by this warranty.
CELESTRON DISCLAIMS ANY WARRANTIES, EXPRESS OR IMPLIED, WHETHER OF MERCHANTABILITY OF FITNESS FOR A PARTICULAR USE, EXCEPT AS EXPRESSLY
SET FORTH HEREIN. THE SOLE OBLIGATION OF CELESTRON UNDER THIS LIMITED WARRANTY SHALL BE TO REPAIR OR REPLACE THE COVERED PRODUCT, IN
ACCORDANCE WITH THE TERMS SET FORTH HEREIN. CELESTRON EXPRESSLY DISCLAIMS ANY LOST PROFITS, GENERAL, SPECIAL, INDIRECT OR CONSEQUENTIAL
DAMAGES WHICH MAY RESULT FROM BREACH OF ANY WARRANTY, OR ARISING OUT OF THE USE OR INABILITY TO USE ANY CELESTRON PRODUCT. ANY
WARRANTIES WHICH ARE IMPLIED AND WHICH CANNOT BE DISCLAIMED SHALL BE LIMITED IN DURATION TO A TERM OF TWO YEARS FROM THE DATE OF
ORIGINAL RETAIL PURCHASE.
Some states do not allow the exclusion or limitation of incidental or consequential damages or limitation on how long an implied
warranty lasts, so the above limitations and exclusions may not apply to you.
This warranty gives you specific legal rights, and you may also have other rights which vary from state to state.
Celestron reserves the right to modify or discontinue, without prior notice to you, any model or style telescope.
If warranty problems arise, or if you need assistance in using your telescope contact:
Celestron
Customer Service Department
2835 Columbia Street
Torrance, CA 90503
Tel. (310) 328-9560
Fax. (310) 212-5835
Monday-Friday 8AM-4PM PST
NOTE: This warranty is valid to U.S.A. and Canadian customers who have purchased this product from an authorized Celestron dealer in the U.S.A. or Canada. Warranty
outside the U.S.A. and Canada is valid only to customers who purchased from a Celestron’s International Distributor or Authorized Celestron Dealer in the specific
country. Please contact them for any warranty service.
ENGLISH I 11
Page 12

Product design and specifications are subject to change without prior notification.
This product is designed and intended for use by those 14 years of age and older.
© 2014 Celestron • All rights reserved
www.celestron.com
2835 Columbia Street • Torrance, CA 90503 U.S.A.
Telephone: 800.421.9649
21087
12-13
Printed in China
Page 13

powerseeker
80AZS
LUNETTE ASTRONOMIQUE DE 80 MM
COMPREND LE TRÉPIED PRÉASSEMBLÉ EN ALUMINIUM AVEC PLATEAU POUR ACCESSOIRES
FRANÇAIS
TÉLESCOPE
®
GUIDE DE L’UTILISATEUR
#21087
Page 14

TABLE DES MATIÈRES
Introduction . . . . . . . . . . . . . . . . . . . . . . . . . . . . . . . . . . . . . . . . . . . . . . . . . . . . . . . 15
Assemblage
Contenu de la boîte
Installation du trépied . . . . . . . . . . . . . . . . . . . . . . . . . . . . . . . . . . . . . . . . . . . . . . . . . . . . . 17
Installation du tube sur la monture . . . . . . . . . . . . . . . . . . . . . . . . . . . . . . . . . . . . . . . . . . . . . . 18
Mouvement du télescope . . . . . . . . . . . . . . . . . . . . . . . . . . . . . . . . . . . . . . . . . . . . . . . . . . . 18
Installation du renvoi coudé et de l’oculaire . . . . . . . . . . . . . . . . . . . . . . . . . . . . . . . . . . . . . . . . . 19
Installation du chercheur . . . . . . . . . . . . . . . . . . . . . . . . . . . . . . . . . . . . . . . . . . . . . . . . . . . 19
Alignement du chercheur . . . . . . . . . . . . . . . . . . . . . . . . . . . . . . . . . . . . . . . . . . . . . . . . . . . `19
Caractéristiques du Powerseeker 80AZS . . . . . . . . . . . . . . . . . . . . . . . . . . . . . . . . . . . . . . 20
Garantie . . . . . . . . . . . . . . . . . . . . . . . . . . . . . . . . . . . . . . . . . . . . . . . . . . . . . . . . . . . . 21
. . . . . . . . . . . . . . . . . . . . . . . . . . . . . . . . . . . . . . . . . . . . . . . . . . . . . . . 17
. . . . . . . . . . . . . . . . . . . . . . . . . . . . . . . . . . . . . . . . . . . . . . . . . . . . . . 17
14 I FRANÇAIS
Page 15

INTRODUCTION
Nous vous félicitons de l’achat de votre télescope Celestron PowerSeeker 80AZS! Le
PowerSeeker est fait de matériaux de haute qualité pour garantir la stabilité et la durabilité.
Il se démarque par son design compact et portatif et ses grandes performances optiques
pour vous aider à découvrir le monde fascinant de l’astronomie amateur. Ce télescope est
également idéal pour des observations terrestres. Il est livré avec un trépied et une monture
faciles à utiliser, qui vous permettent de déplacer le télescope de haut en bas ou de gauche
à droite afin de viser une cible éloignée. Votre PowerSeeker est conçu pour vous donner
satisfaction pendant toute la vie et cela avec un minimum d’entretien.
Celestron soutient le télescope PowerSeeker avec une garantie limitée de deux ans. Pour plus d’informations, consultez
notre site Web au www.celestron.com
Votre télescope Celestron PowerSeeker est doté des caractéristiques suivantes:
• Éléments optiques en verre entièrement traité, pour des images claires et nettes
• Monture azimutale rigide au fonctionnement en douceur
• Trépied en aluminium préassemblé
• Installation rapide et facile sans outils
• Prisme redresseur d’image, ce qui assure une image correctement orientée lors de l’affichage des objets terrestres
• Le logiciel d’astronomie « TheSkyX - First Light Edition », lequel fournit des informations sur le ciel nocturne et des cartes
du ciel imprimable
Prenez le temps de lire entièrement ce manuel avant d’installer votre télescope. Essayez de l’installer à quelques reprises
pendant la journée jusqu’à ce que vous vous soyez familiarisé avec l’utilisation de votre télescope. Il est plus facile de le
faire pendant la journée que d’essayer d’installer le télescope pour la première fois dans l’obscurité.
Votre télescope est conçu pour vous donner des années d’observations amusantes et enrichissantes. Cependant, il y a
quelques points à considérer avant d’utiliser votre télescope afin d’assurer votre sécurité et la protection de votre équipement.
AVERTISSEMENT :
Ne regardez jamais directement le soleil à l’œil nu ou avec un télescope (à moins d’utiliser un filtre adapté). Cela pourrait entraîner des lésions oculaires permanentes et
irréversibles.
N’utilisez jamais votre télescope pour projeter une image du soleil sur une surface quelconque. Une accumulation de chaleur interne pourrait endommager le télescope et
tout accessoire qui s’y rattache.
N’utilisez jamais un filtre solaire oculaire ou un prisme (hélioscope) de Herschel. Une accumulation de chaleur à l’intérieur du télescope peut endommager ces dispositifs,
laissant alors la lumière non filtrée du soleil atteindre les yeux.
Ne laissez pas le télescope sans surveillance, ou particulièrement en présence d’enfants ou d’adulte qui ne sont pas familiarisés avec votre télescope.
FRANÇAIS I 15
Page 16

2
3
4
5
6
1
12
11
10
7
8
9
Fig. 1-1
1. Objectif 7. Tige de mouvement lent en altitude
2. Tube optique 8. Plateau pour accessoires
3. Chercheur (viseur) 9. Trépied
4. Oculaire 10. Molette de verrouillage de l’azimut
5. Renvoi redresseur d’image 11. Monture azimutale
6. Molette de mise au point 12. Molette de verrouillage de l’altitude
16 I FRANÇAIS
Page 17

ASSEMBLAGE
CONTENU DE LA BOÎTE
• Tube de télescope
• Trépied et monture azimutale
• H20 mm (20x) - 1,25 po
• SR4 mm (100x) - 1,25 po
• Lentille de Barlow 3x
• Renvoi redresseur d’images - 1,25 po
• Chercheur 5x24
• Plateau pour accessoires
• DVD-ROM du logiciel « TheSkyX First Light Edition »
INSTALLATION DU TRÉPIED
1. Retirez le trépied de la boîte (Figure 2-1). Mettez le trépied en position verticale et écartez les pieds du trépied. Ensuite,
appuyez légèrement sur l’entretoise du trépied (Figure 2-2). Remarque : La partie supérieure du trépied est appelée
monture azimutale.
2. Ensuite, installez le plateau pour accessoires du trépied (Figure 2-3) en plaçant le poteau fileté situé sous le plateau
par-dessus le trou au centre de l’entretoise (Figure 2-4). Tournez dans le sens horaire le plateau pour accessoires pour
visser le plateau en place. Veillez à ne pas trop le serrer.
3. Étendez les pieds à la hauteur souhaitée. Déverrouillez les molettes de verrouillage des pieds du trépied à la base de
chacun des pieds (Figure 2-5) en les tournant dans le sens horaire et tirez sur les pieds. Resserrez ensuite fermement
les molettes. La Figure 2-6 illustre une extension complète du trépied.
REMARQUE : Le trépied sera plus rigide et stable avec des réglages plus bas en hauteur. settings.
Fig. 2-1 Fig. 2-3
Fig. 2-4 Fig. 2-5
Fig. 2-2
Fig. 2-6
FRANÇAIS I 17
Page 18

INSTALLATION DU TUBE SUR LA MONTURE
1. Desserrez la molette de verrouillage argenté située sur le côté droit de la monture azimutale.
2. Tout en tenant le tube au-dessus de la monture azimutale, insérez la tige longue et argentée située sur le côté droit du
tube optique dans le trou situé sous la molette de verrouillage (voir la Figure 2-7).
3. Déplacez le tube jusqu’à ce que vous puissiez insérer les deux moyeux d’altitude situés de chaque côté du tube dans
les encoches au-dessus de la monture azimutale (voir la Figure 2-8).
4. Serrez la molette de verrouillage argentée.
5. Vissez les deux boulons à serrage à main dans la monture azimutale, puis dans les deux moyeux de moyeux d’altitude
situés sur le tube pour fixer fermement le tube en place (voir la Figure 2-9).
Fig. 2-7 Fig. 2-8 Fig. 2-9
MOUVEMENT DU TÉLESCOPE
Il est facile de déplacer le télescope dans la direction où vous voulez l’orienter. Ajustez l’altitude (position de haut en bas)
en desserrant légèrement la molette de verrouillage de l’altitude et en déplaçant le tube vers le haut ou vers le bas. Pour
déplacer le télescope en direction azimutale (gauche à droite), desserrez la molette de verrouillage de l’azimut et déplacez
le télescope. Quand le télescope est centré sur votre cible, serrez à fond les molettes de verrouillage de l’altitude et de
l’azimut.
Pour effectuer des réglages de l’altitude, tournez la bague moletée de la tige de contrôle lent de l’altitude (une fois le verrouillage de l’altitude effectué) dans l’une ou l’autre des directions (voir la Figure 2-10).
Fig. 2-10
18 I FRANÇAIS
Page 19

INSTALLATION DU RENVOI COUDÉ ET DE L’OCULAIRE
Le renvoi coudé est un prisme qui corrige l’orientation de l’image (haut-bas et gauche-droite). Le renvoi coudé peut être
tourné à la position de visionnement la plus confortable. Pour installer le renvoi coudé et l’oculaire :
1. Desserrez les vis à serrage à main et insérez le petit barillet du renvoi coudé dans l’adaptateur d’oculaire 1,25 po du
tube (voir la Figure 2-11).
2. Desserrez la vis à serrage à main du renvoi coudé et insérez complètement vers le bas le barillet chromé de l’un des
oculaires. Serrez la vis de fixation pour maintenir l’oculaire bien en place.
Fig. 2-11
INSTALLATION DU CHERCHEUR
1. Retirez les deux écrous argentés situés sur le côté gauche supérieur du tube, près du porte-oculaire.
2. Placez le support du chercheur au-dessus des deux poteaux filetés et fixez-le en place à l’aide des écrous
(voir la Figure 2-12).
REMARQUE: La lentille de plus grand diamètre du chercheur est dirigée vers l’avant du télescope principal.
ALIGNEMENT DU CHERCHEUR
1. Regardez dans le télescope principal à l’aide d’un oculaire de 20 mm et localisez une cible éloignée comme un lampadaire ou un panneau d’arrêt. La cible doit être le plus loin possible, de préférence à au moins un quart de mille (au
moins 400 m). Centrez cette cible dans l’oculaire de 20 mm.
2. Regardez à travers le chercheur et notez la position de cet objet.
3. Sans déplacer le télescope principal, tournez les vis à serrage à main situées près du support de chercheur jusqu’à ce
que les réticules du chercheur soient centrés sur l’objet observé au centre de l’oculaire du télescope.
FRANÇAIS I 19
Page 20

CARACTÉRISTIQUES DU POWERSEEKER 80AZS
Numéro de modèle 21087
Description 80 AZS
Conception optique Réfracteur achromatique à doublet, avec espaces d’air
Ouverture 80 mm
Distance focale 400 mm
Distance focale f/5
Revêtements optiques Entièrement traité
Chercheur 5x24
étoile Redresseur d’image
Oculaire H 20 mm (20x) - 1.25 po
Oculaire SR 4 mm (100x) - 1.25 po
Magnitude stellaire limite 11x
Résolution -- Raleigh (secondes d’arc) 1,74 seconde d’arc
Résolution -- Limites de Dawes (secondes d’arc) 1,45 seconde d’arc
Puissance de captage de la lumière 131x l’œil humain
Type de monture Altazimutale
Trépied Réglable en hauteur, en aluminium
Longueur du tube 17 pouces
Largeur du tube 4,25 pouces
20 I FRANÇAIS
Page 21

GARANTIE LIMITÉE DE 2 ANS DE CELESTRON
A. Celestron garantit que votre monture de télescope sera exempte de tout défaut de matériaux ou de fabrication pour une période de
deux (2) ans. Celestron réparera ou remplacera ce produit ou une partie de celui-ci lorsqu’il a été déterminé, lors d’une inspection
par Celestron, que le produit est défectueux en raison d’un défaut de matériaux ou de fabrication. Comme condition à l’obligation de
Celestron de réparer ou remplacer un tel produit, le produit doit être retourné à Celestron avec la preuve d’achat satisfaisante pour
Celestron.
B. Un numéro d’autorisation de retour valide doit être obtenu de Celestron avant le renvoi. Appelez Celestron au (310) 328-9560 pour
recevoir le numéro à afficher à l’extérieur de votre colis d’expédition.
Tous les retours doivent être accompagnés d’une déclaration écrite indiquant le nom, l’adresse et le numéro de téléphone de jour
du propriétaire, ainsi qu’une brève description des prétendus défauts. Les pièces ou le produit ayant été l’objet d’un remplacement
deviendront la propriété de Celestron.
Le client sera responsable de tous les frais de transport et d’assurance, à la fois vers et depuis l’usine de Celestron, et devra payer à
l’avance ces coûts.
Celestron fera des efforts raisonnables pour réparer ou remplacer tout télescope couvert par cette garantie dans les trente jours
suivant sa réception. Dans le cas où une réparation ou un remplacement nécessitera plus de trente jours, Celestron en avisera le client
en conséquence. Celestron se réserve le droit de remplacer tout produit qui a été retiré de sa gamme de produits disponibles avec un
nouveau produit ayant une valeur et des fonctions équivalentes.
Cette garantie sera nulle et sans effet dans le cas où la conception ou la fonction d’un produit couvert a été modifiée, ou lorsque le
produit a été soumis à un usage abusif, à de mauvaises manipulations ou à une réparation non autorisée. En outre, une défaillance ou
une détérioration du produit due à l’usure normale n’est pas couverte par cette garantie.
CELESTRON DÉCLINE TOUTE GARANTIE, EXPRESSE OU IMPLICITE, DE QUALITÉ MARCHANDE OU D’ADAPTATION À UN USAGE PARTICULIER, À MOINS DE
DISPOSITIONS EXPRESSES DANS CE DOCUMENT. LA SEULE OBLIGATION DE CELESTRON EN VERTU DE CETTE GARANTIE LIMITÉE SERA DE RÉPARER OU
REMPLACER LE PRODUIT COUVERT, EN CONFORMISTE AVEC LES DISPOSITIONS DE CE DOCUMENT. CELESTRON DÉCLINE TOUTE RESPONSABILITÉ POUR TOUTE
PERTE DE PROFITS, TOUT DOMMAGE GÉNÉRAL, PARTICULIER OU INDIRECT POUVANT RÉSULTER DE LA VIOLATION DE TOUTE GARANTIE, OU EN RAISON DE
L’UTILISATION DE, OU DE L’INCAPACITÉ À UTILISER, UN PRODUIT CELESTRON. TOUTE GARANTIE IMPLICITE QUI EST ET QUI NE PEUT ÊTRE DÉCLINÉE SERA LIMITÉE
À UNE DURÉE DE DEUX ANS À PARTIR DE LA DATE D’ACHAT INITIALE.
Certains états ou certaines provinces ne permettent pas l’exclusion ou la limitation des dommages accessoires ou indirects ou une
limitation sur la durée d’une garantie implicite, alors dans ces cas les limitations et exclusions susmentionnées pourraient ne pas
s’appliquer à vous.
Cette garantie vous donne des droits légaux spécifiques, et vous pouvez également avoir d’autres droits qui varient d’un état ou d’une
province à l’autre.
Celestron se réserve le droit de modifier ou de cesser la production de tout modèle ou style de télescope, et cela sans préavis.
Si des problèmes liés à la garantie surviennent, ou si vous avez besoin d’assistance pour utiliser votre télescope, contactez :
Celestron
Service à la clientèle
2835 Columbia Street
Torrance, CA 90503
Tél. (310) 328-9560
Fax. (310) 212-5835
Du lundi au vendredi, de 8 h à 16 h HNP
REMARQUE : Cette garantie est valable pour les clients américains et canadiens qui ont acheté ce produit auprès d’un revendeur autorisé Celestron aux États-Unis ou au
Canada. La garantie en dehors des É.-U. et du Canada n’est valable que pour les clients ayant acheté le produit d’un distributeur international de Celestron
ou d’un distributeur agréé dans le pays en question. Veuillez communiquer avec eux pour toute réparation sous garantie.
FRANÇAIS I 21
Page 22

La conception et la spécification du produit peuvent être modifiées sans préavis.
Ce produit a été conçu à l’intention des utilisateurs âgés de 14 ans et plus.
© 2014 Celestron • Tous droits réservés.
www.celestron.com
2835 Columbia Street • Torrance, CA 90503 É.-U.
Tél : 800.421.9649
21087
12-13
Imprimé en Chine
Page 23

powerseeker
80AZS
80 MM REFRAKTOR
MIT VORMONTIERTEM ALUMINIUM-STATIV UND ABLAGEPLATTE FÜR ZUBEHÖR
DEUTSCH
TELESKOP
BEDIENUNGSANLEITUNG
#21087
Page 24

INHALT
Einführung . . . . . . . . . . . . . . . . . . . . . . . . . . . . . . . . . . . . . . . . . . . . . . . . . . . . . . . .25
Zusammenbau . . . . . . . . . . . . . . . . . . . . . . . . . . . . . . . . . . . . . . . . . . . . . . . . . . . . . .27
Lieferumfang
Aufbau des Stativs
Montage des Teleskops auf der Montierung
Bewegen des Teleskops
Montage von Zenitprisma und Okular
Montage des Suchers
Justage des Suchers
Technische Daten
Garantiechers
. . . . . . . . . . . . . . . . . . . . . . . . . . . . . . . . . . . . . . . . . . . . . . . . . . . . . . . . . 27
. . . . . . . . . . . . . . . . . . . . . . . . . . . . . . . . . . . . . . . . . . . . . . . . . . . . . . 27
. . . . . . . . . . . . . . . . . . . . . . . . . . . . . . . . . . . . . . . . . . . . . . . . . . . 28
. . . . . . . . . . . . . . . . . . . . . . . . . . . . . . . . . . . . . . . . . . . . 29
. . . . . . . . . . . . . . . . . . . . . . . . . . . . . . . . . . . . . . . . . . . . . . . . . . . . 29
. . . . . . . . . . . . . . . . . . . . . . . . . . . . . . . . . . . . . . . . . . . . . . . . . . . . . 29
. . . . . . . . . . . . . . . . . . . . . . . . . . . . . . . . . . . . . . . . . . . . . . . . . . . . 30
. . . . . . . . . . . . . . . . . . . . . . . . . . . . . . . . . . . . . . . . . . . . . . . . . . . . . . . . .31
. . . . . . . . . . . . . . . . . . . . . . . . . . . . . . . . . . . . . . . . .28
24 I DEUTSCH
Page 25

EINFÜHRUNG
Wir gratulieren Ihnen zum Kauf des Celestron PowerSeeker 80AZS Teleskops! Das Fernrohr
besteht aus hochwertigen und haltbaren Materialien, sodass Sie an ihm lange Freude haben
können. Es verbindet ein kompaktes und transportables Design mit überzeugender optischer
Leistung, damit Sie in die Welt der Amateurastronomie einsteigen können. Das Teleskop ist
außerdem für die Erdbeobachtung geeignet. Zum Lieferumfang gehört ein Stativ mit einer
benutzerfreundlichen Montierung, mit der Sie das Teleskop intuitiv nach oben und unten sowie
nach rechts und links bewegen können. Bei pfleglicher Behandlung wird Ihnen der PowerSeeker
viele Jahre lang gute Freude bereiten.
Celestron gibt auf das Teleskop zwei Jahre Garantie.
Eigenschaften Ihres PowerSeeker Teleskops:
• Vollvergütete Linsen aus Glas für helle, scharfe Bilder
• Stabile, azimutale Montierung
• Vormontiertes Aluminium-Stativ
• Schneller und einfacher Aufbau ohne Werkzeug
• Bildaufrichtendes Prisma für ein korrekt orientiertes Bild bei der Erdbeobachtung
• Planetariumsprogramm „The SkyX – First Light Edition“ mit druckbaren Sternkarten und Informationen über den Nachthimmel
Nehmen Sie sich die Zeit, um diese Anleitung in Ruhe durchzulesen, bevor Sie das Teleskop aufbauen und benutzen.
Bauen Sie es ein paar Mal bei Tag auf, um sich mit dem Gerät vertraut zu machen. Das ist wesentlich einfacher, als wenn
Sie es gleich beim ersten Mal im Dunkel der Nacht aufstellen.
Ihr Teleskop ermöglicht es Ihnen, über viele Jahre hinweg den Nachthimmel zu erkunden und neues zu entdecken. Es gibt
jedoch ein paar Punkte zu berücksichtigen, die Ihrer eigenen Sicherheit und der des Geräts dienen.
WARNUNG!
• Sehen Sie niemals mit dem Teleskop oder dem bloßen Auge in die Sonne – verwenden Sie immer einen geeigneten
Sonnenfilter vor dem Objektiv. Ohne geeigneten Schutzfilter riskieren Sie bleibende Augenschäden bis hin zur Blindheit.
• Benutzen Sie das Teleskop nicht für die Sonnenprojektion. Die Hitze im Inneren des Tubus kann das Teleskop oder
angebautes Zubehör beschädigen.
• Benutzen Sie keinen Okularsonnenfilter oder Herschelkeil. Sie können durch die Hitze im Inneren des Teleskops zerstört
werden, sodass das Sonnenlicht ungedämpft in Ihr Auge gelangen und bleibende Schäden verursachen kann.
• Lasen Sie das Teleskop nicht unbeaufsichtigt stehen – vor allem dann nicht, wenn Kinder in der Nähe sind oder
Erwachsene, die im Umgang mit dem Gerät nicht vertraut sind.
DEUTSCH I 25
Page 26

2
3
4
5
6
1
12
11
10
7
8
9
Abb. 1-1
1. Objektiv 7. Feineinstellung der Höhenachse
2. Tubus 8. Zubehörablage
3. Sucher 9. Stativ
4. Okular 10. Klemmschraube der Azimut-Achse
5. Bildaufrichtendes Prisma 11. Azimutale Montierung
6. Fokussiertrieb 12. Klemmschraube der Höhenachse
26 I DEUTSCH
Page 27

ZUSAMMENBAU
LIEFERUMFANG:
• Teleskop (Optik mit Tubus)
• Azimutale Montierung und Stativ
• H 20 mm Okular
• Bildaufrichtendes Prisma
• 5x24 Sucher
• „The SkyX – First Light Edition“ Planetariumsprogramm
• Erect image diagonal – 1.25”
• Finderscope: 5x24
• Accessory tray
• TheSkyX – First Light Edition DVD-ROM
AUFBAU DES STATIVS
1. Nehmen Sie das Stativ aus dem Karton (Abb. 2-1). Stellen Sie das Stativ aufrecht auf den Boden und klappen Sie die
Stativbeine aus. Drücken Sie leicht auf die Verbindungsstreben zwischen den Stativbeinen (Abb. 2-2). Hinweis: Am
oberen Ende des Stativs ist die azimutale Montierung.
2. Befestigen Sie nun die Ablageplatte (Abb. 2-3), indem Sie den Gewindestift an der Unterseite der Ablage in das Loch
in der Mitte der Stativverstrebung schrauben (Abb. 2-4). Drehen Sie dazu die gesamte Ablageplatte im Uhrzeigersinn,
bis sie festgeschraubt ist. Ziehen Sie sie nicht zu fest an, um die Gewinde nicht zu beschädigen.
3. Ziehen Sie die Stativbeine auf die gewünschte Höhe aus. Lösen Sie dazu die Klemmschrauben an den Stativbeinen,
indem Sie sie im Gegenuhrzeigersinn drehen. Ziehen Sie dann die Stativbeine heraus und ziehen die Klemmschrauben
wieder an. Ein auf volle Höhe ausgefahrenes Stativ sieht etwa so aus wie in Abb. 2-6. Hinweis: Das Stativ steht stabiler,
wenn Sie die Beine nicht auf die volle Länge ausziehen.
HINWEIS: Das Stativ wird der festesten und stabilsten bei niedrigeren Höheneinstellungen sein.
Abb. 2-1 Abb. 2-3
Abb. 2-4 Abb. 2-5
Abb. 2-2
Abb. 2-6
DEUTSCH I 27
Page 28

MONTAGE DES TELESKOPS AUF DER MONTIERUNG
1. Lösen Sie die silberne Klemmschraube auf der rechten Seite der Montierung.
2. Halten Sie den Teleskoptubus über die Montierung und führen Sie die lange, silberne Stange auf der rechten Seite des
Tubus in das Loch unterhalb der Klemmschraube (Abb. 2-7).
3. Bewegen Sie den Teleskoptubus so, dass die Höhenachse auf beiden Seiten des Tubus in die Aufnahmen an der Montierung
rutschen (Abb 2-8).
4. Ziehen Sie die silberne Klemmschraube an.
5. Schrauben Sie die beiden Schrauben durch die Montierung und in ihre Gegenstücke am Teleskop, um den Tubus sicher
an seinem Platz zu halten.
Abb. 2-7 Abb. 2-8 Abb. 2-9
BEWEGEN DES TELESKOPS
Sie können das Teleskop leicht in jede Richtung schwenken. Die Höhe stellen Sie ein, indem Sie die Klemmschraube an
der Stange lösen und das Teleskop nach oben oder unten schwenken. Um das Teleskop in Azimut zu bewegen (rechts/
links), lösen Sie die Azimutklemmung und bewegen Sie das Teleskop. Wenn Sie Ihr Ziel gefunden haben, ziehen Sie die
Klemmungen wieder an.
Für die Feineinstellung der Höhe drehen Sie einfach den Ring an der Feineinstellung der Höhenachse, wenn die Höhenachse
geklemmt ist (Abb. 2-10)
Abb. 2-10
28 I DEUTSCH
Page 29

MONTAGE VON ZENITPRISMA UND OKULAR
Das Zenitprisma des PS80AZS ist kein simples Prisma, sondern dreht das Bild so, dass es aufrecht und seitenrichtig ist
– so fällt die Orientierung auf der Erde wie auch am Himmel leicher. Das Prisma kann im Okularauszug gedreht werden,
sodass Sie einen bequemen Einblick haben. Der Anbau ist einfach:
1. Lösen Sie die kleine Sicherungsschraube und stecken Sie die kleine Hülse des Prismas in den 1,25“-Adapter des
Teleskops (Abb. 2-11). Ziehen Sie die Schraube anschließend wieder vorsichtig an
2. Lösen Sie die Sicherungsschraube am Prisma und stecken Sie die Chromhülse des Okulars in das Prisma. Ziehen Sie
die Schraube anschließend wieder vorsichtig an.
Abb. 2-11
MONTAGE DES SUCHERS
1. Entfernen Sie die beiden silbernen Muttern von den beiden Gewindestangen auf der linken Seite des Teleskops
(nahe des Okularauszugs).
2. Setzen Sie die Sucherhalterung auf die beiden Gewindestangen und sichern Sie sie mit den beiden Muttern
(Abb. 2-12)
HINWEIS: Die größere der beiden Linsen des Suchers muss nach vorne zeigen, zum Objektiv des Teleskops.
JUSTAGE DES SUCHERS
1. Sehen Sie mit dem 20 mm-Okular durch das Teleskop und suchen Sie ein entferntes Ziel wie eine Bergspitze, eine
Straßenlaterne oder einen Kirchturm. Das Ziel sollte mindestens einen halben Kilometer entfernt sein. Zentrieren Sie es
im 20mm-Okular.
2. Sehen Sie nun durch den Sucher und peilen das Ziel im Sucher an. Bewegen Sie dabei das eigentliche Teleskop nicht!
3. Drehen Sie an den Justageschrauben der Sucherhalterung, bis das Ziel im Sucher ebenfalls zentriert ist. Überprüfen
Sie, ob es auch im Teleskop noch zentriert ist.
DEUTSCH I 29
Page 30

PowerSeeker 80AZS Technische Daten
Modell 21087
Beschreibung 80 AZS
Optisches Design Achromatischer Doublett-Refraktor mit Luftspalt
Öffnung 80 mm
Brennweite 400 mm
Öffnungsverhältnis F/5
Vergütung Vollvergütet
Sucher 5x24
Zenitprisma Bildaufrichtend, seitenrichtig
Okular H 20 mm (20x), 1,25“
Okular SR 4 mm (100x) - 1.25”
Grenzgröße 11 mag
Auflösung (Raleigh) 1,74 Bogensekunden
Auflösung (Dawes) 1,45 Bogensekunden
Lichtsammelvermögen 31x zum bloßen Auge
Montierung azimutal
Stativ Höhenverstellbar, Aluminium
Tubuslänge 43 cm
Tubusdurchmesser 11 cm
30 I DEUTSCH
Page 31

ZWEIJÄHRIGE EINGESCHRÄNKTE GARANTIE VON CELESTRON
A. Celestron garantiert, dass Ihre Teleskop-Montierung für zwei Jahre frei von Material- und Verarbeitungsfehlern ist. Celestron wird ein
solches Produkt oder Teile davon, wenn nach Inspektion durch Celestron ein Defekt an Material oder Verarbeitung gefunden wurde,
reparieren oder austauschen. Die Verpflichtung von Celestron, ein solches Produkt zu reparieren oder auszutauschen, unterliegt der
Bedingungen, dass das Produkt zusammen mit einem für Celestron zufriedenstellenden Kaufbeleg an Celestron zurückgesendet
wird.
B. Die korrekte Rücksende-Autorisationsnummer muss zuvor von Celestron angefordert werden. Rufen Sie Celestron unter (310) 328-
9560 an, um die Nummer, die auf der Außenseite Ihres Versandcontainers aufgebracht ist, zu erhalten.
Alle Rücksendungen müssen eine schriftliche Erklärung enthalten, aus der der Name, die Adresse und die Telefonnummer des
Eigentümers, zu der er tagsüber erreichbar ist, zusammen mit einer kurzen Beschreibung aller beanstandeten Defekte, hervorgeht.
Ausgetauschte Teile oder Produkte werden Eigentum von Celestron.
Der Kunde ist für alle Kosten für Versand und Versicherung zu und vom Celestron-Werk verantwortlich und muss diese Kosten im
Voraus begleichen.
Celestron muss vernünftige Maßnahmen ergreifen, um jede Teleskopmontierung unter dieser Garantie innerhalb von 30 Tagen nach
Erhalt zu reparieren oder auszutauschen. Für den Fall, dass Reparatur oder Austausch mehr als dreißig Tage in Anspruch nimmt, muss
Celestron den Kunden entsprechen in Kenntnis setzen. Celestron behält sich das Recht vor, ein Produkt, das aus der Produktlinie
ausgeschieden ist, durch ein neues oder in Wert und Funktion vergleichbares Produkt zu ersetzen.
Diese Garantie erlischt und wird außer Kraft gesetzt, für den Fall, dass ein Produkt unter der Garantie in Design oder Funktion
modifiziert wurde oder Missbrauch, unsachgemäße Handhabung oder unautorisierter Reparatur unterzogen wurde. Des Weiteren sind
Produktfehlfunktionen oder Wertminderung aufgrund von normalem Verschleiß von dieser Garantie nicht abgedeckt.
CELESTRON LEHNT JEGLICHE GEWÄHRLEISTUNG, OB AUSDRÜCKLICH ODER STILLSCHWEIGEND, OB DER MARKTGÄNGIGKEIT ODER DER EIGNUNG FÜR EINEN
BESTIMMTEN ZWECK, AUSSER DEM HIERIN GENANNTEN, AB. DIE ALLEINIGE VERPFLICHTUNG VON CELESTRON UNTER DIESER EINGESCHRÄNKTEN GARANTIE
BESTEHT DARIN, DAS DURCH DIE GARANTIE ABGEDECKTE PRODUKT IN ÜBEREINSTIMMUNG MIT DEN HIERIN FESTGEHALTENEN BEDINGUNGEN ZU REPARIEREN
ODER AUSZUTAUSCHEN. CELESTRON LEHNT AUSDRÜCKLICH JEGLICHE HAFTUNG FÜR ENTGANGENE PROFITE, ALLGEMEINE, SPEZIELLE, INDIREKTE ODER
FOLGESCHÄDEN AB, DIE SICH AUS EINER GARANTIEVERLETZUNG ERGEBEN KÖNNTEN ODER DIE DURCH NUTZUNG BZW. UNFÄHIGKEIT ZUR NUTZUNG JEGLICHEN
CELESTRON-PRODUKTS ERGEBEN. JEGLICHE STILLSCHWEIGENDE ODER NICHT BEANSPRUCHBARE GEWÄHRLEISTUNGEN IST ZEITLICH AUF ZWEI JAHRE AB
DATUM DES URSPRÜNGLICHEN KAUFS BESCHRÄNKT.
Einige Staaten erlauben keinen Ausschluss oder keine Beschränkung von zufälligen oder Folgeschäden sowie keine zeitliche
Begrenzung einer stillschweigenden Garantie; daher könnten die oben genannten Beschränkungen und Ausschlüsse auf Sie nicht
zutreffen.
Diese Garantie gibt Ihnen bestimmte Rechte und darüber hinaus könnten Sie auch weitere Rechte haben, die von Land zu Land
variieren.
Celestron behält sich das Recht vor, jegliches Modell und jeglichen Teleskoptyp zu modifizieren oder aus der Produktlinie
auszuschließen, ohne Ihnen dies vorher anzukündigen.
Wenn ein Garantiefall eintritt oder wenn Sie Hilfestellung bei der Verwendung Ihrer Teleskopmontierung benötigen, wenden Sie sich
bitte an:
Celestron
Kundendienstabteilung
2835 Columbia Street
Torrance, CA 90503
Tel. (310) 328-9560
Fax. (310) 212-5835
Montag – Freitag 8.00 – 16.00 PST (pazifische Zeitzone)
ANMERKUNG: Diese Garantie ist für Kunden in den USA und Kanada gültig, die dieses Produkt von einem autorisierten Celestron-Händler in den USA oder Kanada
gekauft haben. Eine Garantie außerhalb der USA und Kanada gilt nur für Kunden, die bei einem internationalen Celestron-Vertrieb oder einem autorisierten
Celestron-Händler im jeweiligen Land eingekauft haben. Bitte wenden Sie sich für jeden Garantieservice an diese Ansprechpartner.
DEUTSCH I 31
Page 32

Produktdesign und technische Daten können ohne Vorankündigung geändert werden.
Dieses Produkt wurde für die Verwendung durch Personen von 14 Jahren und darüber entworfen und vorgesehen.
©2014 Celestron • Alle Rechte vorbehalten.
www.celestron.com
2835 Columbia Street • Torrance, CA 90503 U.S.A.
Telefon: 800.421.9649
21087
12-13
Gedruckt in China
Page 33

powerseeker
80AZS
®
REFRACTOR DE 80MM
INCLUYE TRÍPODE DE ALUMINIO PREMONTADO CON BANDEJA DE ACCESORIOS
ESPAÑOL
TELESCOPIO
MANUAL DE INSTRUCCIONES
#21087
Page 34

ÍNDICE
Introducción . . . . . . . . . . . . . . . . . . . . . . . . . . . . . . . . . . . . . . . . . . . . . . . . . . . . . . . 35
Montaje . . . . . . . . . . . . . . . . . . . . . . . . . . . . . . . . . . . . . . . . . . . . . . . . . . . . . . . . . .37
Contenido De La Caja
Instalación Del Trípode . . . . . . . . . . . . . . . . . . . . . . . . . . . . . . . . . . . . . . . . . . . . . . . . . . . . 37
Fijar El Tubo Del Telescopio Al Soporte . . . . . . . . . . . . . . . . . . . . . . . . . . . . . . . . . . . . . . . . . . . 38
Mover El Telescopio . . . . . . . . . . . . . . . . . . . . . . . . . . . . . . . . . . . . . . . . . . . . . . . . . . . . . .38
Instalación De La Diagonal Y El Ocular . . . . . . . . . . . . . . . . . . . . . . . . . . . . . . . . . . . . . . . . . . .39
Instalación Del Localizador . . . . . . . . . . . . . . . . . . . . . . . . . . . . . . . . . . . . . . . . . . . . . . . . . .39
Alinear El Localizador . . . . . . . . . . . . . . . . . . . . . . . . . . . . . . . . . . . . . . . . . . . . . . . . . . . . . 39
Especificaciones del Powerseeker 80AZS . . . . . . . . . . . . . . . . . . . . . . . . . . . . . . . . . . . . . . 40
Garantía . . . . . . . . . . . . . . . . . . . . . . . . . . . . . . . . . . . . . . . . . . . . . . . . . . . . . . . . . . . .41
. . . . . . . . . . . . . . . . . . . . . . . . . . . . . . . . . . . . . . . . . . . . . . . . . . . . .37
34 I ESPAÑOL
Page 35

INTRODUCCIÓN
Felicidades por adquirir su telescopio PowerSeeker 80AZS de Celestron. El PowerSeeker
ha sido fabricado con materiales de alta calidad para garantizar su estabilidad y resistencia.
Dispone de un diseño compacto y portátil con un amplio rendimiento óptico para ayudarle
a descubrir el emocionante mundo de la astronomía diletante. Este telescopio también es
idóneo para la observación terrestre. Incluye un trípode y soporte fáciles de usar, que le
permiten mover el telescopio arriba y abajo o a izquierda y derecha para apuntar a un objetivo
distante. Si PowerSeeker le ofrecerá toda una vida de satisfacción con un mantenimiento
mínimo.
Celestron apoya el telescopio PowerSeeker con una garantía limitada de dos años. Para obtener más detalles, visite nuestro sitio web en www.celestron.com
Su PowerSeeker de Celestron incluye:
• Elementos ópticos de cristal con recubrimiento total para unas imágenes claras y definidas
• Suave funcionamiento, soporte altazimut rígido
• Trípode de aluminio premontado
• Fácil y rápida instalación sin herramientas
• Prisma de imagen recta, que garantiza una imagen con la orientación correcta al observar objetos terrestres
• Software de astronomía “TheSkyX - First Light Edition”, que proporciona información sobre el firmamento nocturno y mapas
celestes imprimibles
Tómese el tiempo de leer por completo este manual antes de instalar el telescopio. Pruebe a instalarlo algunas veces
de día hasta que se familiarice con el uso de su telescopio. Es mucho más sencillo hacerlo de día que intentar instalar el
telescopio por primera vez de noche.
Su telescopio está diseñado para ofrecerle años de diversión y observaciones gratificantes. Sin embargo, existen ciertas
consideraciones a tener en cuenta antes de usar su telescopio que garantizarán su seguridad y protegerán su equipo.
ADVERTENCIA:
No mire nunca directamente al Sol con los ojos descubiertos o un telescopio (a menos que tenga un filtro solar adecuado). Puede producir daños oculares permanentes e
irreversibles.
No use nunca su telescopio para proyectar una imagen del Sol sobre ninguna superficie. La acumulación interna de calor puede dañar el telescopio y cualquier accesorio
que tenga instalado.
No use nunca un filtro solar de ocular ni una cuña Herschel. La acumulación interna de calor en el telescopio puede hacer que los dispositivos se agrieten o rompan,
permitiendo pasar la luz solar sin filtrar hasta el ojo.
No deje el telescopio sin supervisión, especialmente cuando estén presentes niños o adultos no familiarizados con el telescopio.
ESPAÑOL I 35
Page 36

2
3
4
5
6
1
12
11
10
7
8
9
Fig. 1-1
1. Lente de objetivo 7. Mango de movimiento lento de altitud
2. Tubo óptico del telescopio 8. Bandeja de accesorios
3. Localizador 9. Trípode
4. Ocular 10. Mando de bloqueo de azimut
5. Diagonal de imagen recta 11. Soporte altazimut
6. Mando de enfoque 12. Mando de bloqueo de altitud
36 I ESPAÑOL
Page 37

MONTAJE
CONTENIDO DE LA CAJA
• Tubo de telescopio
• Soporte altazimut y trípode
• H20mm (20x) - 1.25”
• SR4mm (100x) – 1.25”
• 3 lentes Barlow
• Diagonal de imagen recta – 1.25”
• Localizador: 5x24
• Bandeja de accesorios
• DVD-ROM TheSkyX - First Light Edition
INSTALACIÓN DEL TRÍPODE
1. Saque el trípode de la caja (Figura 2-1). Coloque el trípode de pie y separe las patas. Empuje ligeramente hacia abajo
la abrazadera de las patas del trípode (Figura 2-2). Nota: La parte superior del trípode se llama soporte altazimut.
2. A continuación, instale la bandeja de accesorios del trípode (Figura 2-3) colocando el poste estriado en la parte infe-
rior de la bandeja, sobre el agujero en el centro del soporte para las patas (Figura 2-4). Gire la bandeja de accesorios
entera a la derecha para enroscarla en posición. Tenga cuidado en no apretarla en exceso.
3. Extienda las patas a la altura deseada. Desbloquee los mandos de bloqueo del trípode en la parte inferior de cada pata
(Figura 2-5) girándolos a la izquierda y separe las patas. Bloquee con seguridad los mandos. Un trípode totalmente
extendido es parecido a la imagen de la Figura 2-6.
NOTA: El trípode será más rígido y estable en posiciones más bajas.
Fig. 2-1 Fig. 2-3
Fig. 2-4 Fig. 2-5
Fig. 2-2
Fig. 2-6
ESPAÑOL I 37
Page 38

FIJAR EL TUBO DEL TELESCOPIO AL SOPORTE
1. Afloje el mando de bloqueo plateado del lado derecho del soporte altazimut.
2. Aguantando el tubo del telescopio sobre el soporte altazimut, introduzca la varilla plateada larga en el
lado derecho del
tubo óptico en el agujero bajo el mando de bloqueo (consulte la Figura 2-7).
3. Mueva el tubo del telescopio hasta que pueda introducir los dos centros de altitud a cada lado del tubo en las hendedu-
ras superiores del soporte altazimut (consulte la Figura 2-8).
4. Apriete el mando de bloqueo plateado.
5. Pase los dos pernos manuales por el soporte altazimut y en los dos centros de altitud del tubo del telescopio para
asegurar el tubo en posición (consulte la Figura 2-9).
Fig. 2-7 Fig. 2-8 Fig. 2-9
MOVER EL TELESCOPIO
El PowerSeeker es fácil de mover a cualquier lugar al que quiera orientarlo. Ajuste la altitud (posición arriba y abajo)
aflojando el mando de bloqueo de altitud y moviendo el tubo del telescopio arriba o abajo. Para mover el telescopio en dirección de azimut (izquierda a derecha), afloje el mando de bloqueo de azimut y mueva el telescopio. Cuando el telescopio
esté centrado en el objetivo, bloquee los mandos de bloqueo de altitud y azimut.
Para ajustes de altitud precisos, gire la arandela del mango de altitud lentamente (cuando el bloqueo de altitud esté apretado) en cualquier dirección (consulte la Figura 2-10).
Fig. 2-10
38 I ESPAÑOL
Page 39

INSTALACIÓN DE LA DIAGONAL Y EL OCULAR
La diagonal de espejo es un prisma que corrige la imagen para que esté recta y orientada correctamente de izquierda a
derecha. La diagonal puede girarse para obtener la posición de observación más cómoda. Para instalar la diagonal y el
ocular:
1. Afloje los tornillos e introduzca el cañón pequeño de la diagonal en el adaptador del ocular de 1,25” en el tubo del
telescopio (consulte la Figura 2-11).
2. Afloje el tornillo de la diagonal e introduzca el cañón cromado de uno de los oculares hasta el fondo. Apriete el tornillo
para asegurar el ocular en posición.
Fig. 2-11
INSTALACIÓN DEL LOCALIZADOR
1. Saque las dos roscas plateadas de la parte superior izquierda del tubo del telescopio, cerca del foco.
2. Coloque el soporte del localizador sobre los dos postes estriados y fíjelo en posición con las roscas
(consulte la Figura 2-12).
NOTA: La lente de diámetro mayor del localizador apunta a la parte delantera del telescopio principal.
ALINEAR EL LOCALIZADOR
1. Mire por el telescopio usando el ocular de 20 mm y localice un objetivo distante, como una farola o señal de tráfico. El
objeto debe estar lo más lejos posible, al menos a 400 m. Centre el objetivo en el ocular de 20 mm.
2. Mire por el localizador y tenga en cuenta la posición del mismo objeto.
3. Sin mover el telescopio principal, gire los tornillos situados alrededor del soporte del localizador hasta que la mira del
localizador esté centrada en el objeto observado en el centro del ocular de 20 mm del telescopio.
ESPAÑOL I 39
Page 40

ESPECIFICACIONES DEL POWERSEEKER 80AZS
Número de modelo 21087
Descripción 80 AZS
Diseño óptico Refractor acromático doublet con cámara de aire
Apertura 80 mm
Longitud focal 400 mm
Longitud focal f/5
Recubrimiento de ópticas Recubrimiento total
Localizador 5x24
Diagonal Imagen recta
Ocular H 20 mm (20x) - 1.25”
Ocular SR 4 mm (100x) - 1.25”
Magnitud estelar límite 11x
Resolución – Raleigh (arcosegundos) 1,74 arcosegundos
Resolución – Límite Dawes (arcosegundos) 1,45 arcosegundos
Capacidad de captura lumínica 131x el ojo humano
Tipo de soporte Altazimut
Trípode Aluminio de altura ajustable
Longitud del tubo del telescopio 17 pulgadas (43 cm)
Ancho del tubo del telescopio 4.25 pulgadas (10,80 cm)
40 I ESPAÑOL
Page 41

GARANTÍA LIMITADA POR DOS AÑOS DE CELESTRON
A. Celestron garantiza que su telescopio está libre de defectos de material y mano de obra durante dos años. Celestron reparará o
sustituirá el producto o parte del mismo si, al ser inspeccionado por Celestron, demuestra tener defectos de materiales o mano
de obra. Como condición de la obligación de Celestron de reparar o sustituir dicho producto, el producto debe ser devuelto a
Celestron junto con una prueba de compra adecuada para Celestron.
B. Debe obtener un número de autorización de devolución adecuado de Celestron antes de la devolución. Llame a Celestron al (310)
328-9560 para recibir el número que se mostrará en el exterior del recipiente de transporte.
Cualquier devolución debe ir acompañada de una declaración por escrito en la que conste el nombre, dirección y número de teléfono
de contacto durante el día del propietario, junto con una breve descripción de cualquier defecto reclamado. Las piezas o productos
sustituidos pasarán a ser propiedad de Celestron.
El cliente será responsable de cualquier coste de transporte y seguros, tanto hacia como desde la fábrica de Celestron, y deberá
cubrir dichos costes.
Celestron realizará todos los esfuerzos razonables para reparar o sustituir cualquier telescopio cubierto por esta garantía en los treinta
días siguientes a su recepción. En caso de que la reparación o sustitución precise de más de treinta días, Celestron se lo notificará
al cliente. Celestron se reserve el derecho de sustituir cualquier producto que haya sido dejado de fabricar por un nuevo producto de
valor y función comparables.
Esta garantía será nula y sin efecto en caso de que un producto cubierto haya sido modificado en su diseño o función, o sometido a
abuso, mal uso, mala manipulación o reparación no autorizada. Además, las averías o deterioro del producto por desgaste normal no
están cubiertos por esta garantía.
CELESTRON RECHAZA TODA RESPONSABILIDAD POR GARANTÍAS, EXPLÍCITAS O IMPLÍCITAS, SEAN DE ADECUACIÓN COMERCIAL PARA UN USO ESPECÍFICO,
SALVO LAS EXPLÍCITAMENTE AQUÍ DECLARADAS. LA ÚNICA OBLIGACIÓN DE CELESTRON EN ESTA GARANTÍA LIMITADA SERÁ REPARAR O SUSTITUIR EL PRODUCTO
CUBIERTO, DE ACUERDO CON LOS TÉRMINOS AQUÍ ESTABLECIDOS. CELESTRON RECHAZA EXPLÍCITAMENTE CUALQUIER PÉRDIDA DE BENEFICIOS, DAÑOS
GENERALES, ESPECIALES, INDIRECTOS O CONSIGUIENTES QUE PUEDAN RESULTAR DE LA VULNERACIÓN DE CUALQUIER GARANTÍA, O SURJAN DEL USO O
INCAPACIDAD PARA USAR CUALQUIER PRODUCTO CELESTRON. CUALQUIER GARANTÍA IMPLÍCITA QUE NO PUEDA REHUSARSE SERÁ LIMITADA EN SU DURACIÓN A
UN TÉRMINO DE DOS AÑOS DESDE LA FECHA DE COMPRA ORIGINAL.
Algunos estados no permiten la exclusión o limitación de datos incidentales o consiguientes, ni permiten limitar el tiempo que dura una
garantía implícita, por lo que las limitaciones indicadas o exclusiones pueden no serle aplicables.
Esta garantía le ofrece derechos legales específicos, y puede tener otros derechos, que varían según el estado.
Celestron se reserva el derecho de modificar o cesar, sin previo aviso, cualquier modelo o estilo de telescopio.
Si surgen problemas de garantía, o necesita asistencia al usar su telescopio, contacte con:
Celestron
Departamento de servicio al cliente
2835 Columbia Street
Torrance, CA 90503
Tel. (310) 328-9560
Fax. (310) 212-5835
Lunes-Viernes 8AM-4PM PST
NOTA: Esta garantía tiene validez para clientes de EE.UU. y Canadá que hayan adquirido este producto en un vendedor autorizado de Celestron en EE.UU. y Canadá. La
garantía fuera de EE.UU. y Canadá solamente es válida para clientes que hayan adquirido de un distribuidor internacional de Celestron o un vendedor autorizado
de Celestron en el país en cuestión. Contacte con ellos para obtener servicio de garantía.
ESPAÑOL I 41
Page 42

El diseño y las especificaciones del producto están sujetos a cambios sin notificación previa.
Este producto ha sido diseñado y está pensado para ser usado por personas de 14 años o más de edad.
© 2014 Celestron • Todos los derechos reservados
www.celestron.com
2835 Columbia Street • Torrance, CA 90503 EE.UU.
Teléfono: 800.421.9649
21087
12-13
Impreso en China
Page 43

powerseeker
80AZS
®
RIFRATTORE DA 80 MM
INCLUDE TREPPIEDE IN ALLUMINIO PREASSEMBLATO E VASSOIO PORTACCESSORI
ITALIANO
TELESCOPIO
MANUALE DI ISTRUZIONI
#21087
Page 44

INDICE
Introduzione . . . . . . . . . . . . . . . . . . . . . . . . . . . . . . . . . . . . . . . . . . . . . . . . . . . . . . .45
Montaggio
Contenuto della confezione
Montaggio del treppiede . . . . . . . . . . . . . . . . . . . . . . . . . . . . . . . . . . . . . . . . . . . . . . . . . . . 47
Fissaggio del tubo del telescopio al supporto . . . . . . . . . . . . . . . . . . . . . . . . . . . . . . . . . . . . . . . . 48
Movimento del telescopio . . . . . . . . . . . . . . . . . . . . . . . . . . . . . . . . . . . . . . . . . . . . . . . . . . .48
Fissaggio di diagonale e oculare . . . . . . . . . . . . . . . . . . . . . . . . . . . . . . . . . . . . . . . . . . . . . . . 49
Fissaggio del mirino . . . . . . . . . . . . . . . . . . . . . . . . . . . . . . . . . . . . . . . . . . . . . . . . . . . . . .49
Allineamento del mirino . . . . . . . . . . . . . . . . . . . . . . . . . . . . . . . . . . . . . . . . . . . . . . . . . . . . 49
Specifiche del Telescopio Powerseeker 80AZS . . . . . . . . . . . . . . . . . . . . . . . . . . . . . . . . . . . 50
Garanzia . . . . . . . . . . . . . . . . . . . . . . . . . . . . . . . . . . . . . . . . . . . . . . . . . . . . . . . . . . . . 51
. . . . . . . . . . . . . . . . . . . . . . . . . . . . . . . . . . . . . . . . . . . . . . . . . . . . . . . . 47
. . . . . . . . . . . . . . . . . . . . . . . . . . . . . . . . . . . . . . . . . . . . . . . . . .47
44 I ITALIANO
Page 45

INTRODUZIONE
Congratulazioni per l’acquisto del telescopio PowerSeeker 80AZS Celestron! Il telescopio
PowerSeeker è costruito con materiali di alta qualità, che ne garantisco stabilità e lunga
durata. Il telescopio ha un design compatto pensato per il trasporto e offre ampie prestazioni
ottiche che rendono l’astronomia amatoriale realmente emozionante. Questo telescopio è
anche ideale per osservazioni terrestri. PowerSeeker è accompagnato da un treppiede e un
supporto di facile utilizzo, che consentono di muovere il telescopio in verticale e orizzontale
per il puntamento verso oggetti distanti. PowerSeeker regala all’utente infiniti momenti di
divertimento con una manutenzione minima.
PowerSeeker è coperto da una garanzia limitata di due anni Per maggiori informazioni, visitare il sito web www.celestron.com.
Caratteristiche del telescopio PowerSeeker Celestron:
• Elementi ottici in vetro completamente rivestito per immagini chiare e nitide
• Funzionamento fluido, supporto altazimutale rigido
• Treppiede in alluminio preassemblato
• Installazione facile e veloce senza attrezzi
• Prisma raddrizzatore di immagine, per la visualizzazione diritta degli oggetti terrestri
• Software astronomico “TheSkyX - First Light Edition”, che fornisce informazioni sul cielo notturno e mappe del cielo stampabili
Prima di iniziare a installare il telescopio leggere con attenzione questo manuale. Per acquisire familiarità con il telescopio
eseguirne l’installazione più volte di giorno. Al principio è molto più semplice durante il giorno che di notte.
Il telescopio è progettato per offrire molti anni di osservazioni divertenti e interessanti. Tuttavia, prima di iniziare a utilizzare il
telescopio ci sono alcuni punti da considerare per garantire la propria sicurezza e proteggere l’apparecchiatura.
ATTENZIONE:
Mai guardare direttamente il Sole a occhio nudo o con un telescopio (a meno che non si disponga di un filtro solare adeguato). Ciò potrebbe causare danni permanenti e
irreversibili agli occhi.
Mai utilizzare il telescopio per proiettare un’immagine del Sole su una qualsiasi superficie. L’accumulo interno di calore può danneggiare il telescopio e i relativi accessori ad
esso fissati.
Mai utilizzare un filtro solare per oculare o un prisma di Herschel. L’accumulo di calore all’interno del telescopio può causare l’incrinatura o la rottura di tali dispositivi,
lasciando che la luce solare non filtrata passi attraverso l’occhio.
Non lasciare il telescopio incustodito, in modo particolare in presenza di bambini o adulti che non abbiano familiarità con il telescopio.
ITALIANO I 45
Page 46

2
3
4
5
6
1
12
11
10
7
8
9
Fig. 1-1
1. Lente obiettivo 7. Leva movimento verticale lentod
2. Tubo ottico del telescopio 8. Vassoio portaccessori
3. Mirino 9. Treppiede
4. Oculare 10. Manopola di bloccaggio azimut
5. Diagonale raddrizzatore d’immagine 11. Supporto altazimutale
6. Manopola di messa a fuoco 12. Manopola di bloccaggio altitudine
46 I ITALIANO
Page 47

MONTAGGIO
CONTENUTO DELLA CONFEZIONE
• Tubo del telescopio
• Supporto altazimutale e treppiede
• H 20 mm (20x) - 1,25”
• H 20 mm (20x) - 1,25”
• Lente di Barlow 3x
• Diagonale raddrizzatore d’immagine - 1,25”
• Mirino: 5x24
• Vassoio portaccessori
• TheSkyX - DVD-ROM First Light Edition
MONTAGGIO DEL TREPPIEDE
1. Rimuovere il treppiede dalla confezione (Fig. 2-1). Mettere il treppiede in posizione verticale e separarne le gambe.
Quindi spingere leggermente verso il basso sul supporto centrale (Fig. 2-2). Nota: la parte superiore del treppiede è
denominata supporto altazimutale.
2. Posizionare il vassoio portaccessori (Fig. 2-3) collocando i perni filettati sul fondo del vassoio sul foro
al centro della staffa di supporto delle gambe (Fig. 2-4). Girare il vassoio portaccessori in senso orario per avvitarlo.
Non serrarlo troppo stretto.
3. Estendere le gambe all’altezza desiderata. Svitare le manopole di bloccaggio nella parte inferiore di ciascuna gamba
(Fig. 2-5) girandole il senso antiorario e spingere le gambe verso l’esterno. Quindi riavvitarle per fissare le gambe in
posizione. Il treppiede completamente esteso appare come nell’immagine in Fig. 2-6.
NOTA: minore è l’altezza del treppiede maggiori sono la rigidità e la stabilità.
Fig. 2-1 Fig. 2-3
Fig. 2-4 Fig. 2-5
Fig. 2-2
Fig. 2-6
ITALIANO I 47
Page 48

FISSAGGIO DEL TUBO DEL TELESCOPIO AL SUPPORTO
1. Allentare la manopola di bloccaggio argentata sul lato destro del supporto altazimutale.
2. Tenendo il tubo del telescopio sopra il supporto altazimutale, inserire la leva argentata lunga sul lato destro del tubo
ottico nel foro sotto la manopola di bloccaggio (vedi Fig. 2-7).
3. Muovere il tubo del telescopio fino a quando è possibile inserire i due anelli su entrambi i lati del tubo nelle tacche nella
parte superiore del supporto altazimutale (vedi Fig. 2-8).
4. Serrare la manopola di bloccaggio argentata.
5. Inserire le due viti attraverso il supporto altazimutale nei due anelli sul tubo del telescopio per fissare il tubo in posizione
(vedi Fig. 2-9).
Fig. 2-7 Fig. 2-8 Fig. 2-9
MOVIMENTO DEL TELESCOPIO
Il telescopio è facilmente orientabile verso qualsiasi punto si desideri. Regolare l’altitudine (posizione verticale) allentando
la manopola di bloccaggio dell’altitudine e muovendo il tubo del telescopio verso l’alto o verso il basso. Per muovere il
telescopio in direzione azimutale (sinistra-destra) allentare la manopola di bloccaggio azimut e muovere il telescopio. Una
volta centrato il telescopio sull’oggetto desiderato, serrare le manopole.
Per affinare l’altitudine, ruotare l’anello della leva di movimento verticale lento (quando la manopola di bloccaggio altitudine
è serrata) verso l’alto o verso il basso (vedi Fig. 2-10).
Fig. 2-10
48 I ITALIANO
Page 49

FISSAGGIO DI DIAGONALE E OCULARE
Il diagonale a specchio è un prisma che corregge l’orientamento dell’immagine affinché venga visualizzata diritta e nella
corretta direzione sinistra-destra. Il diagonale può essere ruotato nella posizione di osservazione più comoda. Per fissare il
diagonale e l’oculare:
1. Allentare le viti e inserire la canna piccola del diagonale nell’adattatore per oculare da 1,25” sul tubo del telescopio
(vedi Fig. 2-11).
2. Allentare la vite sul diagonale e inserire fino in fondo la canna cromata di uno degli oculari. Serrare la vite per fissare
l’oculare in posizione.
Fig. 2-11
FISSAGGIO DEL MIRINO
1. Rimuovere i due dadi argentati nella parte superiore sinistra del tubo del telescopio vicino al
focalizzatore.
2. Collocare la staffa del mirino sui due perni filettati e fissarlo in posizione utilizzando i due dadi (vedi Fig. 2-12).
NOTA: la lente di maggior diametro del mirino è puntata verso la parte anteriore del telescopio principale.
ALLINEAMENTO DEL MIRINO
1. Osservare attraverso il telescopio principale utilizzando l’oculare da 20 mm e identificare un oggetto distante, come ad
esempio un semaforo o un segnale stradale di stop. L’oggetto dovrebbe trovarsi il più lontano possibile, minimo a 400
metri. Centrare l’oggetto nell’oculare da 20 mm.
2. Osservare attraverso il mirino e individuare la posizione dello stesso oggetto.
3. Senza muovere il telescopio principale, ruotare la vite sulla staffa del mirino fino a quando il reticolo di puntamento del
mirino è centrato sull’oggetto visualizzato al centro dell’oculare da 20 mm.
ITALIANO I 49
Page 50

SPECIFICHE DEL TELESCOPIO POWERSEEKER 80AZS
Numero di modello 21087
Descrizione 80 AZS
Design ottico Rifrattore acromatico doppio spaziato in aria
Apertura 80 mm
Lunghezza focale 400 mm
Lunghezza focale f/5
Rivestimenti ottici Rivestimento completo
Mirino 5x24
Diagonale Raddrizza l’immagine
Oculare H 20 mm (20x) - 1.25”
Oculare SR 4 mm (100x) - 1.25”
Limite di magnitudine stellare 11x
Risoluzione – Raleigh (secondi d’arco) 1,74 secondi d’arco
Risoluzione – Limite di Dawes (secondi d’arco) 1,45 secondi d’arco
Potere di raccolta di luce 131x occhio nudo
Tipo di supporto Altazimutale
Treppiede In alluminio, ad altezza regolabile
Lunghezza tubo telescopio 43,18 cm
Larghezza tubo telescopio 10,8 cm
50 I ITALIANO
Page 51

GARANZIA LIMITATA DI DUE ANNI CELESTRON
A. Celestron garantisce che il cannocchiale è privo di difetti nei materiali e nella fabbricazione per due anni. Celestron si riserva di
riparare o sostituire prodotti o parti di prodotti che, dopo un’ispezione da parte di Celestron, risultino essere difettosi nei materiali o
nella fabbricazione. Come condizione per l’obbligo di Celestron di riparare o sostituire il prodotto, il prodotto deve essere presentato
a Celestron insieme a una prova d’acquisto valida.
B. Prima dell’invio del prodotto per la restituzione è necessario ottenere da Celestron un codice di autorizzazione alla restituzione.
Contattare Celestron al (310) 328-9560 per ricevere il codice da applicare all’esterno del pacco di invio.
Tutte le restituzioni devono essere accompagnate da una dichiarazione scritta indicante il nome, l’indirizzo e un numero di telefono
del proprietario, assieme a una breve descrizione di qualsiasi difetto reclamato. Le parti del prodotto per cui si effettua la sostituzione
devono diventare proprietà di Celestron.
I costi di trasporto e assicurazione alla e dalla fabbrica Celestron sono a carico dell’utente, che è tenuto a pagare in anticipo.
Celestron si impegna a riparare o sostituire ogni telescopio coperto da garanzia entro 30 giorni dalla ricezione. Se la riparazione o la
sostituzione dovessero richiedere più di 30 giorni, Celestron si impegnar a notificare il cliente di conseguenza. Celestron si riserva il
diritto di sostituire qualsiasi prodotto di cui sia stata sospesa la produzione con un nuovo prodotto di valore e con funzioni similari.
La presenta garanzia è resa nulla o priva d’effetto nel caso in cui il prodotto venga alterato nel design o nelle funzioni, o sia soggetto ad
abusi, usi impropri o riparazioni non autorizzate. Inoltre, il malfunzionamento o il deterioramento del prodotto dovuti alla normale usura
del prodotto non sono coperti dalla garanzia.
CELESTRON DECLINA QUALSIASI GARANZIA, ESPRESSA O IMPLICITA, SIA DI COMMERCIABILITÀ SIA DI ADEGUATEZZA PER UNA DETERMINATA FINALITÀ, ECCETTO
NEI CASI ESPRESSAMENTE QUI INDICATI. IL SOLO OBBLIGO DI CELESTRON RELATIVO A QUESTA GARANZIA LIMITATA È QUELLO DI RIPARARE O SOSTITUIRE
IL PRODOTTO COPERTO DALLA GARANZIA SECONDO I TERMINI QUI INDICATI. CELESTRON DECLINA QUALSIASI GARANZIA PER PERDITE DI PROFITTI O DANNI
GENERALI, SPECIALI, INDIRETTI O CONSEGUENTI DERIVATI DALLA VIOLAZIONE DELLA GARANZIA, O DALL’USO O L’INCAPACITÀ DI UTILIZZO DI QUALSIVOGLIA
PRODOTTO CELESTRON. LE GARANZIE IMPLICITE E CHE NON POSSONO ESSERE DECLINATE SONO LIMITATE NELLA DURATA A UN TERMINE DI DUE ANNI DALLA
DATA D’ACQUISTO.
Alcuni Stati non consentono l’esclusione o la limitazione di danni accidentali o conseguenti, o limitazioni sulla durata di una garanzia
implicita, per cui le limitazioni ed esclusioni sopra indicate potrebbero non essere applicabili.
La presente garanzia dà all’utente specifici diritti legali, oltre ad altri diritti che possono variare da Stato a Stato.
Celestron si riserva il diritto di modificare o sospendere la produzione, senza previa notifica, di qualsivoglia modello o stile di telescopio.
Nel caso in cui sorgano problemi di garanzia, o se si necessita di assistenza per l’uso del telescopio, contattare:
Celestron
Centro di assistenza clienti
2835 Columbia Street
Torrance, CA 90503
Tel. (310) 328-9560
Fax. (310) 212-5835
Dal lunedì al venerdì, dalle 8:00 alle 16:00 (fuso orario convenzionale del Pacifico)
NOTA: la presente garanzia è valida per i clienti di Stati Uniti e Canada che hanno acquistato il proprio binocolo da un rivenditore Celestron autorizzato negli Stati Uniti
o in Canada. La garanzia al di fuori degli Stati Uniti e il Canada è valida solo per i clienti che hanno acquistato da un distributore Celestron internazionale o un
distributore Celestron autorizzato nel specifico Paese. Per l’assistenza in garanzia contattare il rivenditore.
ITALIANO I 51
Page 52

Il design e le specifiche del prodotto sono soggetti a modifiche senza previa notifica.
Il presente prodotto è progettato e destinato all’uso da parte di persone di età pari o superiore ai 14 anni.
© 2014 Celestron • Tutti i diritti riservati.
www.celestron.com
2835 Columbia Street • Torrance, CA 90503 U.S.A.
Telefono: 800.421.9649
21087
12-13
Stampato in Cina
 Loading...