

Page 1
Digital Camera Specifications
Image sensor
Lens
Field of View
Image Resolution
(Still Image)
Video Resolution
Image Capacity
Image Type
Video measure
Digital Zoom
Exposure
White Balance
Memory
LCD open angle
Language select
Interface
TV-out
Power Source
2.0 Mega pixels, CMOS sensor
300mm(8X)
7-8
HI -2048x1536 (3.1)
MI -1600x1200 (2.0)
LO -640x480 (0.3)
320x240, 12 Fps AVI format
HI 36 P
MI 46 P
LO 250 P
(*Upon 16MB Flash Memory)
MPEG format
6~8 min
4 X
Auto / Manual Mode
Auto
Built-in 16MB Flash Memory
SD/MMC card socket expandable
0 / 105
English
USB 1.1
NTSC / PAL
1.5V AAA alkaline battery x 4
Binocular specifications
Size
Field of View
Exit pupil
Close Focusing
Eye Relief
Coatings
8 x 32 mm
Field of View5.6°Field of view :
92.7m(304 ft) at 914m(1000 YDS)
4.0 mm
3.5 m
12.5 mm
Multi coating on the first surface.
Single layer for other surface, fully coated.
Package Contents
USB Cable
User Guide
Video Cable
Software CD
Pouch
Binocular Dimensions
System Requirements:
1. Window 98/ 98SE/ ME/ 2000/ XP
2. The processor above Pentium 233MHz
3. 128MB SDRAM
4. Video(VGA) card with 2MB of RAM for
minimum 16-bit (High Color) display.
x 1
x 1
x 1
x 1
x1
156mm x 102mm x 60mm(LCD Close)
5. CD-ROM
6. USB port
7. 600MB of free hard
disk space.
U.S. Patent No. 6,088,053. Other patents pending
8x32
Binocular & Digital Camera
Model #72212
Page 2
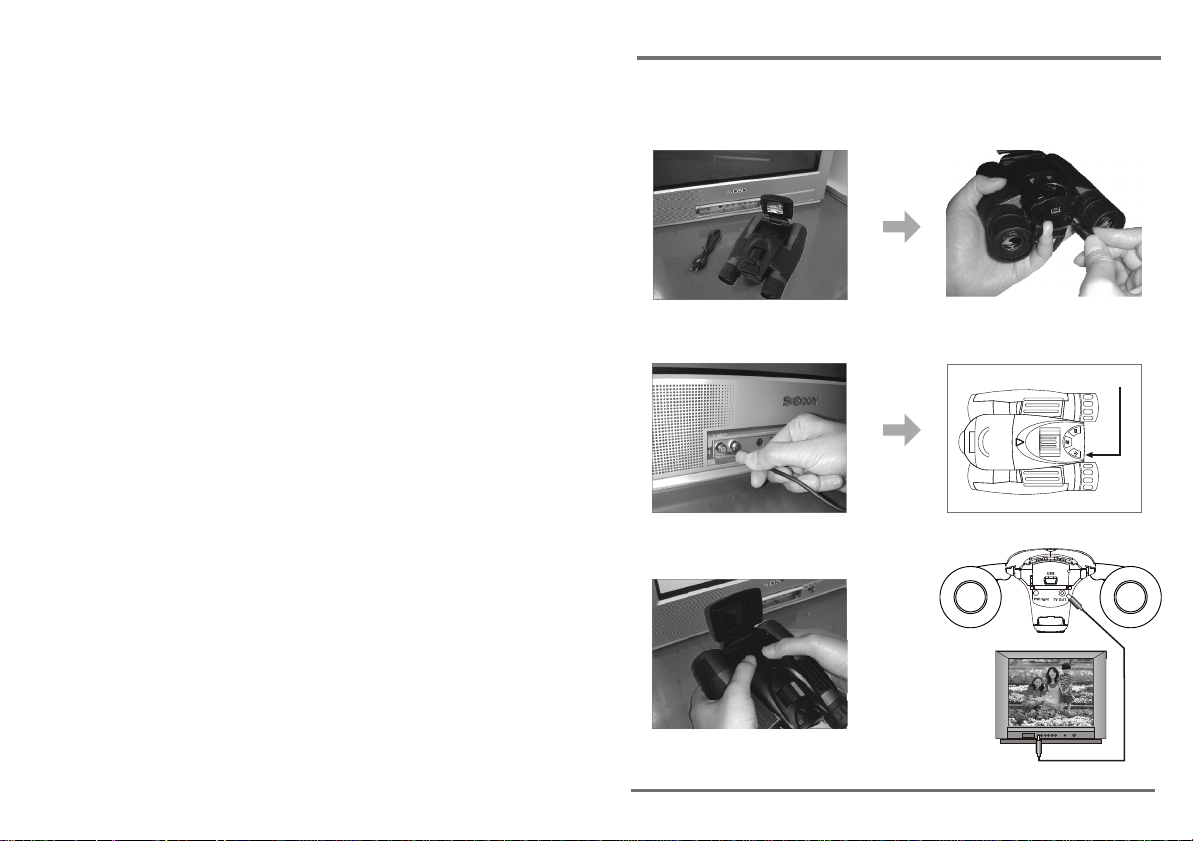
Steps to view TV images
1. TV and dedicated Video cable. 2. Plug the dedicated Video
cable into the TV out port of
VistaPix.
3. Connect the dedicated Video
cable to AV terminal of the TV
(video side).
4. Press power button.
The screen will jump to
browsing screen.
Power Button
SET/OK
Del
MODE
5. Press Up-down button to view
images on TV.
AV port
Video cable
P.19
Page 3
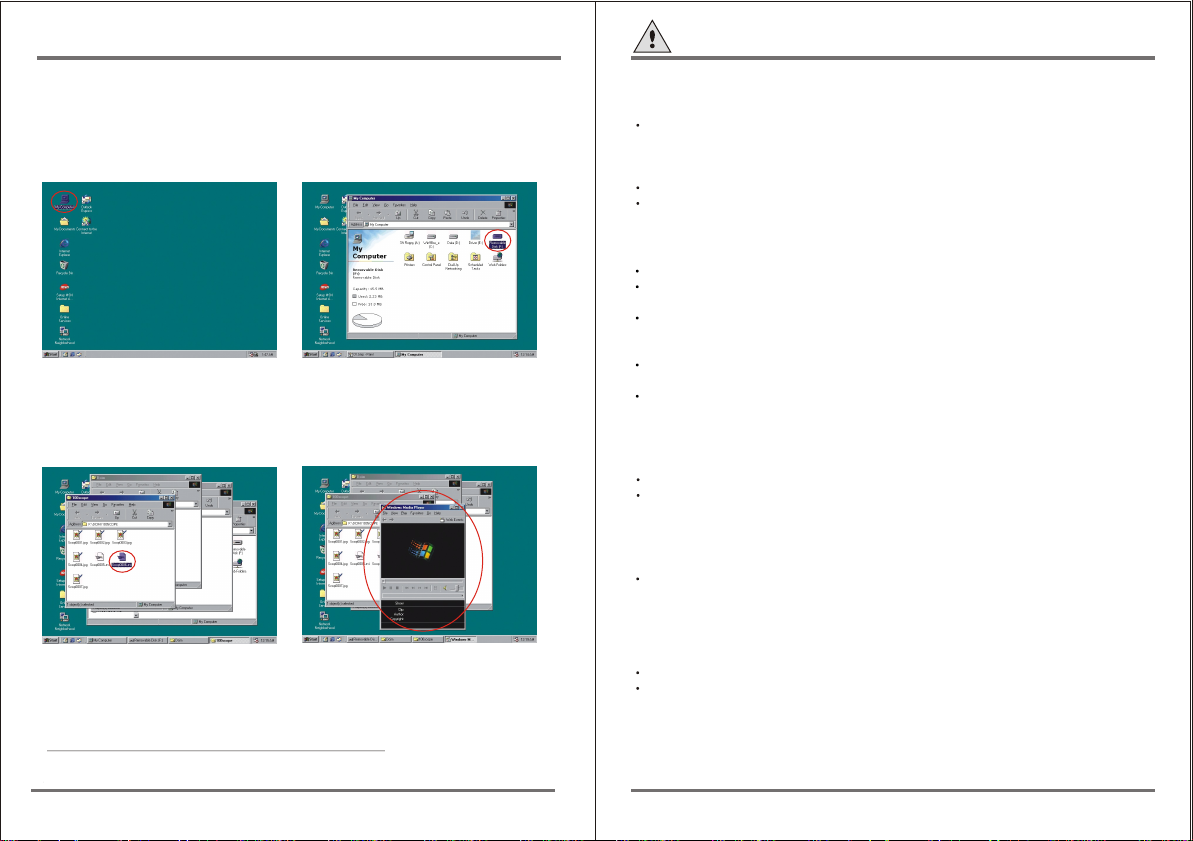
Viewing (Movie) recorded images on PC
Cautions
1. Use the USB cable to connect the USB port from PC to VistaPix.After
connection the "PC" display on LCD.
2. Double click "MY COMPUTER"
on the PC's desktop.
4. Open \DCIM\100scope\
In order to use Windows Media Player to view the video AVI file taken with
your VistaPix, the computer viewing the AVI file needs to be running
Microsoft DirectX version 8.0a or later. If you experience problems viewing
AVI files from Media Player you can upgrade DirectX to the most current
version by going to the Microsoft DirectX Web Page at:
www.microsoft.com/windows/directx/default.aspx
Follow the download instructions given on the web site. The download is free.
3. Double click "Removable Device".
5. Select the video file (*.AVI) and
double click it, the images video
will play through "Windows Media
Player" software or other software.
Cautions
Never immerse VistaPix into any fluid or liquid.
Remove dust or stains with a soft cloth dampened with water or neutral
detergent. Keep in a dry and cool dust-free environment or a container
when it is not used.
Take the batteries out when VistaPix is not to be used over a long period.
Avoid dropping the VistaPix. Do not disassemble VistaPix.
Warning:
Avoid using under combustibility gas environment.
Do not look at the sun with the Binocular, which will damage the eyes
even lead to blindness.
Please take care when using the hanging tape, and do not let children
twist it around their necks and bodies to avoid danger due to improper
operation.
Please don't throw the product with the gallus in hand to avoid damage
to others or malfunction of the product.
Keep the product away from babies to prevent them from putting the
batteries or silica gels into their mouths, which causes danger.
Usage of the battery
Please always use Alkaline Battery (AAA Alkaline Battery)
Please take out the batteries and keep them separately with the product
if you'll not use the product for a long time.
About usage
Do Not place the product under the following environments to avoid any
damage.
1.Places in temperature higher that 70C
2.Damp or dusty places
3.Places with strong electromagnetic field.
Please do not disassemble or repair the product to avoid malfunction.
Please do not drop the product to the ground to avoid malfunction.
o
P.18
Page 4
Contents
1.Introduction......................................................P.1
2.Notice to user.....................................................................P.2
3.Product Identification.........................................................P.3
4.Memory & Image Download.............................................P.4
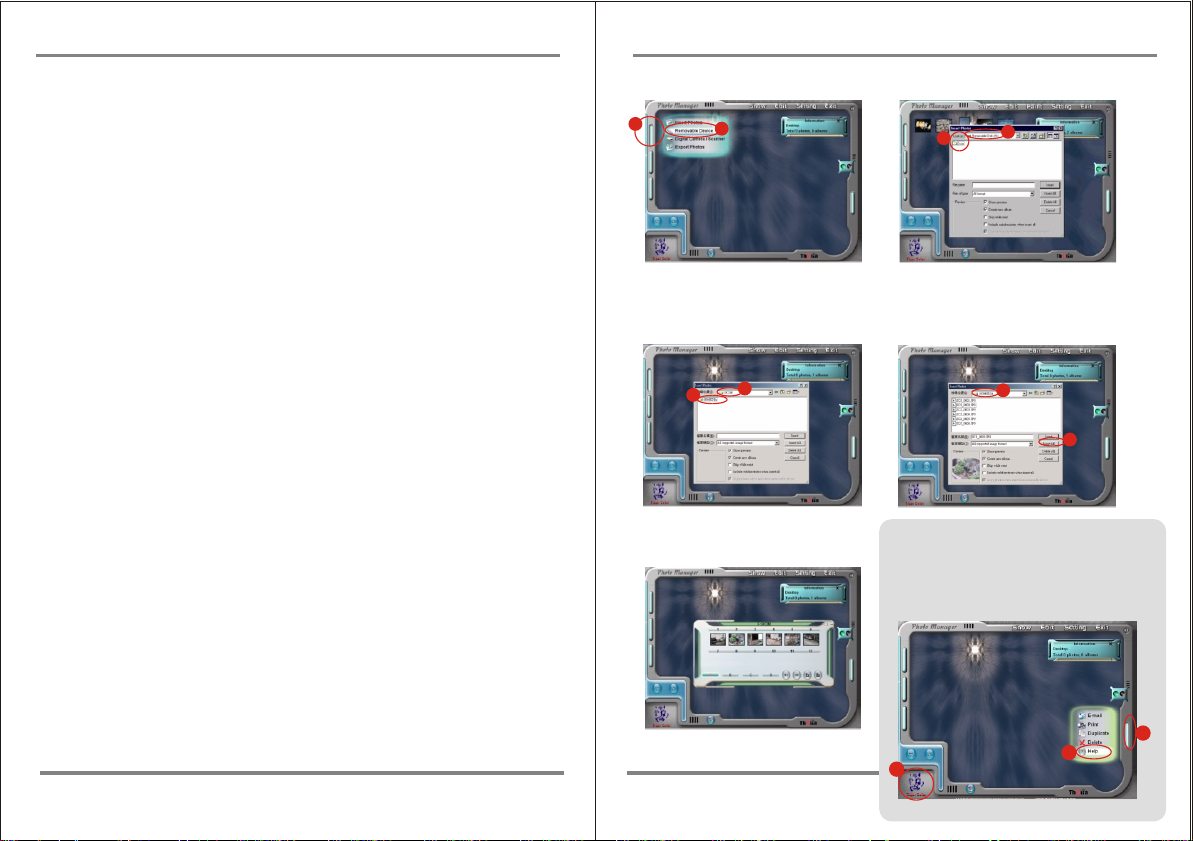
1.To execute Photo Manager.
Select the buttons as indicated.
1
2
Steps to download image file
2.Enter " Removable Disk " to open
"DCIM" file.
4
3
5.Using the camera........................................................P.5
6.How to use the binocular.............................................P.10
7.System requirements............................................P.11
8.Basic maintenance..........................................................P.12
9.Steps to install VistaPix driver.........................................P.13
10.Steps to install Photo Manager....................................P.15
11.Steps to download image file........................................P.17
12.Viewing ( Movie ) recorded images on PC...............P.18
13.Steps to view TV images..............................................P.19
3.In " DCIM " file, open"100MEDIA "
data file.
5
6
5.Images download finished.
4.In " 100MEDIA " Data file, choose the
pictures you want or choose all Images.
7
8
How To Use the PhotoManager
Select the buttons as indicated. "Help" will give you
detailed information on Photo Manager's many
features. To learn more about Photo Mangaer you
can click on the Icon (3) in the lower left side of the
screen to directly to the PhotoManager web site
www.photo-diy.com.tw/
3
2
1
P.17
Page 5

Steps to install Photo Manager
8. Choose "Custom" or "Typical"
form of installation.
10. Begin installing software 11.Software installation finished,
After installing VistaPix driver & software. Please restart your computer.
9.Please confirm the file location
please press "Finish"for
confirmation
1.Introduction
VistaPix is a binocular integrated with a digital camera that is great
for sporting events, concerts and wildlife activities such a shuntin go r
bird-watching. VistaPix lets you record memories and sights a t the
touch of a button. Use the full-featured binocula r fo r close r views an d
capture images to take home with you at the same time.
VistaPix makes it possible to share your fun with others by
downloading images from the camera right to your computer
to e-mail to your friends and family.
Battery installation manner
1. Hold tight the bottom of battery cover, and lift to open.
2. Install four AAA batteries into the battery compartment as shown below.
2
P.16
1
P.1
Page 6

Steps to install Photo Manager
2.Notice to User
WARNING !
Never use a VistaPix to look at the sun !
Looking at or near the sun will cause instant and irreversible damage
to your eye. Eye damage is often painless, so there is no warning to
the observer that damage has occurred until it is too late. Do not
point the binocular at or near the sun.
Children should always have adult supervision while observing.
2-1. When no action is performed with your binocular, the VistaPix will
automatically turn off after 90 seconds.
2-2. The VistaPix has a battery level display in the right lower corner of
the LCD. When the battery is low you will hear a long "beep". If no
action is taken , VistaPix will automatically turn-off after 10 seconds.
2-3. Please use alkaline battery for this product.
2-4. VistaPix comes with a SD card slot that enables you to expand the
memory. To install an optional SD card:
Open the cover of the SD card slot and install the card (with the
gold strips facing up) into the SD card slot (7) until it clicks into the
position.
1. Insert the CD ROM
2. Select "Install Thalia Photo Manager"
4.Enter installing screen 5.After confirming, please press
6.After confirming, please press "Yes"
3.Choose the language and press
confirm button
"Next" button
7.The serial number is located on the
front of the CD.Press "Next" when
complete
P.2
SD card lid closed SD card lid opened
Foil face up
P.15
Page 7

Steps to install VistaPix driver
5. Computer will automatically install
the driver.
6. If you see the "Microsoft digital sign"
request appear on screen as you
are installing the driver , please press
"Yes" button to continue installing.
7. Installation complete. Please press
"Finish" button.
After installing VistaPix driver. Please restart your computer.
3. Product Identification
3
10
3
13
11
13
11
2
12
1
1. Diopter Knob(on underside)
9
2. Center Focus Knob
5
7
6
8
3. Objective Lens
4
4. Power/Menu Button
9
5. Shutter/OK Button
6.Movie/Delete
7. USB Port/SD card slot
8.TV out port
9. Eyepiece
10. Camera Lens
11. LCD Screen
12. Battery Compartment Lid
13. Barrel
Button
P.14
P.3
Page 8

Memory & Image Download
Steps to install VistaPix driver
Using SD memory card
The VistaPix has built in flash memory, so when you take images, the
images will be saved into the flash memory inside your VistaPix until
the
memory is full.
Whenever you insert an optional SD memory card to take images, the
taken with the SD card and flash memory are stored separately.
images
So when downloading the images, the internal flash memory and the
memory must be downloaded separately.
card
Download images
When downloading the photos, the internal memory and the card memory
must be downloaded separately.
Download from flash memory
Take out the SD card (if necessary) and connect the to the computer,
then follow the downloading steps and all the photos in the flash
memory can be downloaded.
Download from Optional SD card
Insert the SD card and connect the to the computer, then follow the
downloading steps and all the photos in the SD card memory can be
downloaded.
(Once the SD card memory is full, you can remove the card and continue
the VistaPix until the internal memory is full as well).to use
1.Before you install the driver, please make sure that your VistaPix is not
connected to the computer.
2.If you have windows ME/ 2000/ XP operation system installed in your computer,
you should not need to install the VistaPix driver. Simply view and save images
through your My Computer icon.
1. Insert the CD included with your
VistaPix.
2. Click the mouse on "Installation
Driver" to begin installation.
3. Begin "InstallShield Wizard"
and your computer will
automatically execute the
installation of driver program.
4. Follow the "InstallShield Wizard"
steps to guide you through the
driver installation.
Click on "Next" when complete.
P.4
P.13
Page 9

7.Basic maintenance
Operating Environment: 41 to104 F(5 to 40 C). 20%-85% relative
humidity,non-condensing.
oooo
Care of your VistaPix
7 -1.Never immerse VistaPix into any fluid or liquid. Remove dust or stains
with a soft cloth dampened with water or neutral detergent. Keep in a dry
and cool dust-free environment when not in use.
7 -2.Take the batteries out when VistaPix is not to be used over a long
period.
7 -3. Avoid dropping the VistaPix. Do not disassemble VistaPix.
4.Using the Camera
Use this product under good lighting conditions, avoid facing light source
directly. Remember to keep a distance of at least 49 feet (15 meters) away
from the target when taking a photo. As you press the "Shutter/Set" button,
hold the binocular very steady until you hear a "Beep" sound. If the binocular
is unsteady, the camera will not focus well and blurred images will result.
4-1 Turn on the power by pressing button for 3 seconds and you will hear
two beep sounds. The monitor will display picture number and resolution.
Press again to power off.
4-2 Press Up-down button to zoom in and out. It can magnify the image
up to 32x as seen on the LCD display.
4-3 Press the Shutter button to take pictures. Shooting is completed when
you hear a beep sound.
4-4 Press the Movie button and a beep sound will signal that recording
has begun. The green power indicator light will blink while recording is in
progress. Press the Movie button again to stop recording.
Function
5
DOWN /
/ UP
Del
4
1
2
Button
NO INDICATORS ITEMS
1 Power / menu
3
SET/OK
2 Movie / delete
2
3 Shutter / OK
1
MODE
4 Zoom in / up
5 Zoom out / down
Monitor
NO INDICATORS ITEMS
3
1
4
2 Image resolution
5
0.3MP, 2.0MP, 3.0MP
Number of Images Remaining
3 Movie mode
4 SD card mode
5 Auto shooting mode
6
6 Battery level
7
7 Memory gauge
P.12
P.5
Page 10

(Play back mode)
Press the Menu button , select "Play Back" and press OK button. Use
Up-Down button to select the pictures, press OK button to display
the picture in full screen. Press the Shutter button again to return to a menu
of nine thumbnail images.
MEMUMEMU
Play back
Play back
Auto shutter
Auto shutter
Setting
Setting
Power off
Power off
Erasing Pictures
Press the delete button while the thumbnail menu or full-screen image
is displayed. Select "Erase one" and press OK Button to erase a single
frame. Select "Erase all" and press OK button to erase all frames.
ERASEERASE
One erase
One erase
Erase all
Erase all
Auto shutter mode(Timer)
Press the Menu button and select "Auto Shutter". Press the OK button
again to take an image automatically after 10 seconds.
ONE ERASEONE ERASE
YesNoYes
No
ERASEERASE
One erase
One erase
Erase all
Erase all
ERASE ALL ERASE ALL
YesNoYes
No
6.System requirements
6-1.Windows 98SE / 2000 / ME / XP
6-2.Pentium 233MHz or higher
6-3.128MB SDRAM
6-4.Video(VGA) Card with 2MB of RAM for minimum 16-bit(High Color)display.
6-5.CD-ROM
6-6.USB port
6-7.600MB of free hard disk space.
Installation of driver
Since VistaPix is a Mass Storage Device you can access captured images just as
if it were a hard drive, therefore no software driver is needed (See Mass Storage
Mode ).If using VistaPix with an older version of Windows 98SE it may be
necessary to install the software Driver.
MEMUMEMU
Play back
Play back
Auto shutter
Auto shutter
Setting
Setting
Power off
Power off
(Setting mode)
Press the Menu button and select "Setting". Press the OK button
to enter the menu.
MEMUMEMU
Play back
Play back
Auto shutter
Auto shutter
Setting
Setting
Power off
Power off
P.6
again
VistaPix
A
B
PC with USB port
P.11
Page 11

5. How to use the binocular
To adjust the eye-relief for eyeglass wearers: Fold down the rubber eyecups
and place them against your glasses to get the best viewing result.
Adjusting the eyepieces
The distance between your eyes is called interpupillary distance.
The interpupillary distance is different from one person to another.
It is important to adjust your interpupillary distance before using the VistaPix:
- Hold VistaPix firmly in the normal viewing position.
- Adjust the barrels by pushing together or pulling apart until you see a single
circular image with both of your eyes.
Focusing the Binocular
A. Set the Diopter Knob on underside of VistaPix to its center point between
- and + .
B. Choose an object that is at least 15 meters (49 ft) away.
C. Looking with just your left eye, rotate the Center Focus Knob(2) until the object
you are viewing is in best focus.
D. Looking with just your right eye, rotate the Diopter Knob(1) until the object you
are viewing is in best focus.
E. Viewing your object with both eyes, turn the Center Focus Knob to bring it in
best focus.
Resolution Adjustment
Select "Resolution" and press OK Button. Choose the desired resolution
and press OK button to change the image resolution. Indicates 0.3MP,
indicates 2.0MP, and indicates 3.0MP on the LCD screen.
SETUPSETUP
Resolution
Resolution
Exposure value
Exposure value
Date/Time
Date/Time
TV out
TV out
Time stamp
Time stamp
Exposure Value
Select "Exposure value" and press the OK button. This allows you to change
the exposure setting suggested by the camera. Press the Up or Down button
to select a value between -1.5 and 1.5 and press OK button to accept the
exposure value. Negative exposure values tend to underexpose (darken) your
object while positive values will overexpose (brighten) the object.
SETUPSETUP
Resolution
Resolution
Exposure value
Exposure value
Date/Time
Date/Time
TV out
TV out
Time stamp
Time stamp
Setup the Date
Select "Date / Time" and press the OK button to set the internal clock. Edit
the correct date (y/m/d) and time (h/m/s) by pressing the Up-down button.
Press the OK button again to complete the setting.
SETUPSETUP
Resolution
Resolution
Exposure value
Exposure value
Date/Time
Date/Time
TV out
TV out
Time stamp
Time stamp
TV-out Display Mode
Select "TV out" and press OK button. Choose the corresponding output
(NTSC for United States or PAL for Europe) and press OK button to
complete setting.
SETUPSETUP
Resolution
Resolution
Exposure value
Exposure value
Date/Time
Date/Time
TV out
TV out
Time stamp
Time stamp
RESOLUTLONRESOLUTLON
3.0M
3.0M
2.0M
2.0M
0.3M
0.3M
EVEV
0.00.0
Date/TimeDate/Time
2004 01 31
2004 01 31
24:00:01
24:00:01
TV OUTTV OUT
NTSC
NTSC
PAL
PAL
EVEV
0.60.6
P.10
P.7
Page 12

Time stamp on photo
Select "Time stamp" from setting menu,press OK button ,select ON to
display time on photo.OFF to skip time on photo.Press OK button again to
complete the setting.
SETUPSETUP
Resolution
Resolution
Exposure value
Exposure value
Date/Time
Date/Time
TV out
TV out
Time stamp
Time stamp
Beep Sound
Select "Beep" from setting menu. Press OK button ,select ON to turn on the
beep sound.OFF to turn off the beep sound.Press OK button to complete
the setting.
SETUPSETUP
Beep
Beep
Auto power OFF
Auto power OFF
Format
Format
Reset
Reset
Auto power
Auto power allows you to select the duration of time that your VistaPix can
be inactive before it automatically power itself down. Select "Auto power OFF"
from setting menu, press OK button. Select the indicated time of auto power
inactivity shutdown. Press OK button again to complete the set-up.
SETUPSETUP
Beep
Beep
Auto power OFF
Auto power OFF
Format
Format
Reset
Reset
Formatting
Select "Format" and press OK button. When you choose "Yes" and press
Shutter button ,a confirmation screen is displayed. Press OK button
to start formatting the internal memory. Warning all stored image will be
erased after formatting is complete.
SETUPSETUP
Beep
Beep
Auto power OFF
Auto power OFF
Format
Format
Reset
Reset
Time stampTime stamp
ON
OFFONOFF
Beep SoundBeep Sound
ON
ON
OFF
OFF
Auto power OFFAuto power OFF
90 seconds
90 seconds
3minutes
3minutes
5minutes
5minutes
10minutes
10minutes
15minutes
15minutes
FORMATFORMAT
YesNoYes
No
Reformat
Reformat
Do not power off
Do not power off
Yes
Yes
No
No
Reset
Select "Reset" from setting menu, press OK button to make the selection.
Select "Yes" to return the original factory setting. Select "No" to retain the
current settings. Press OK button to complete the set-up.
SETUPSETUP
Beep
Beep
Auto power OFF
Auto power OFF
Format
Format
Reset
Reset
Power Off mode
Press menu button and select "Power off". Press OK button. to power
off.
MEMUMEMU
Play back
Play back
Auto shutter
Auto shutter
Setting
Setting
Power off
Power off
Reset settingReset setting
YesNoYes
No
P.8
P.9
 Loading...