

Page 1
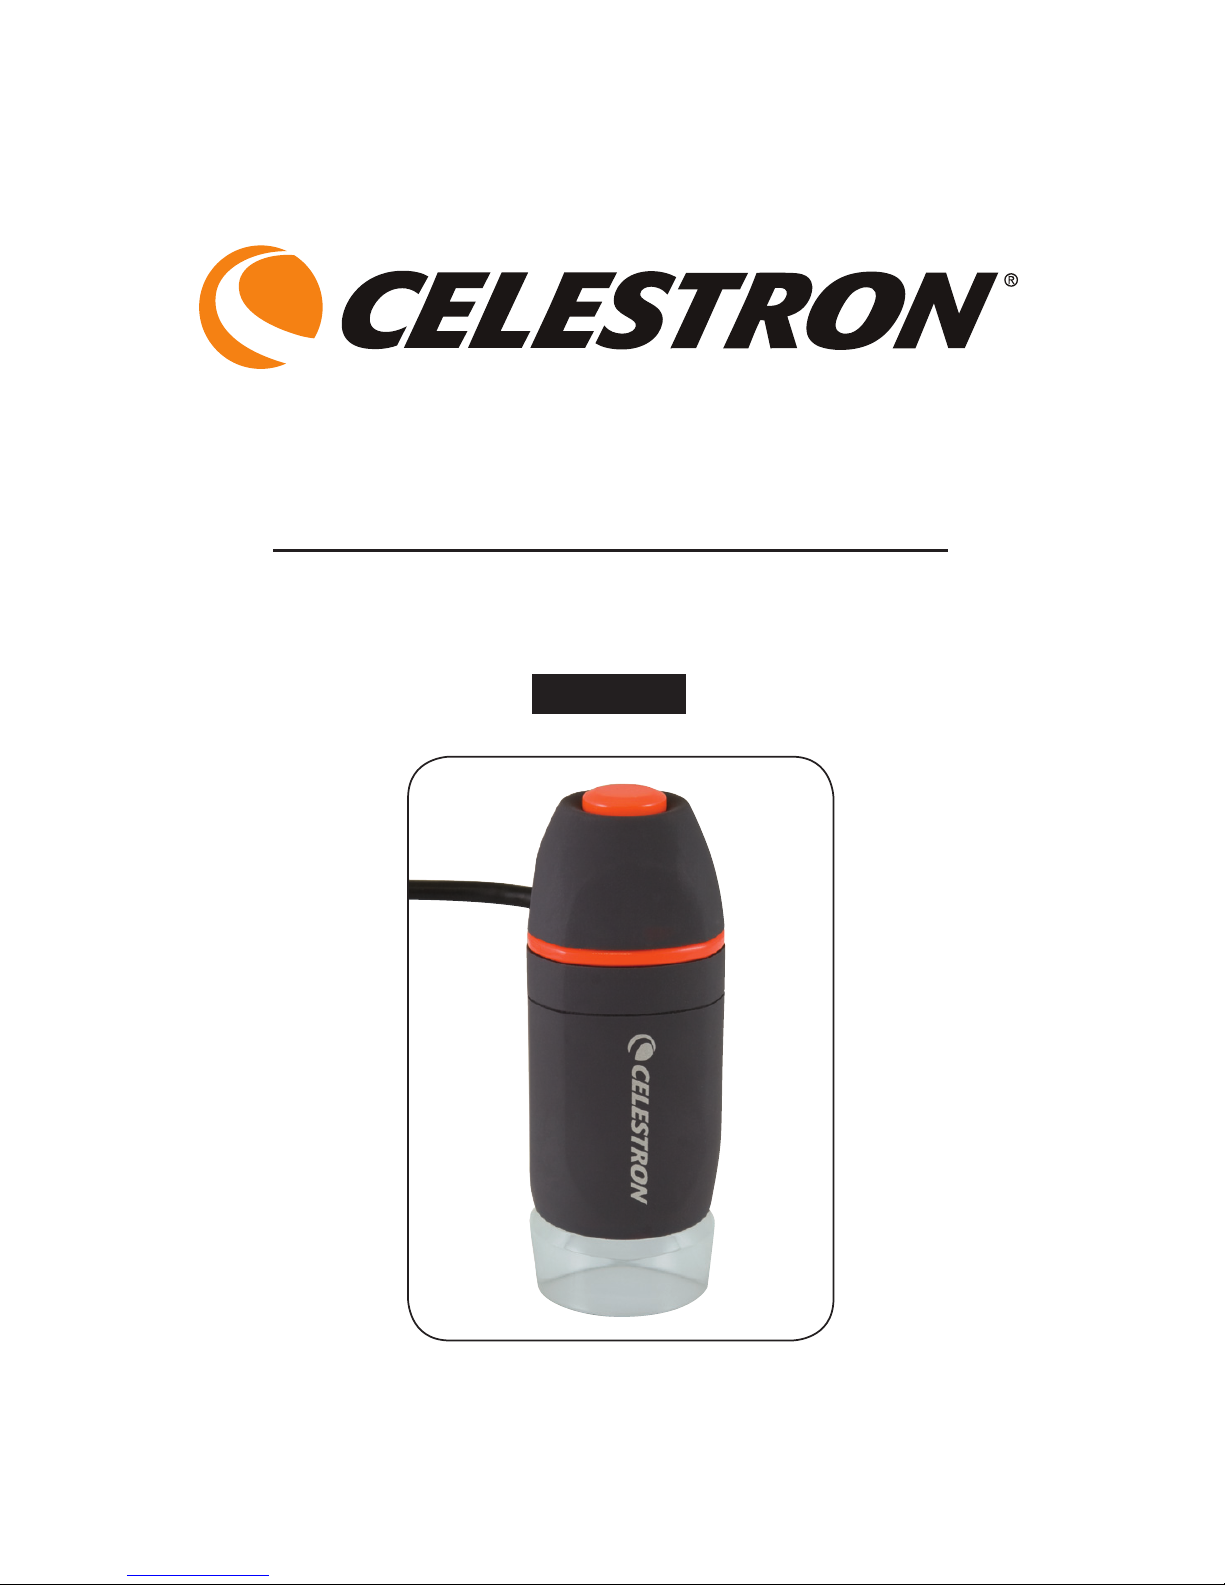
Mini HandHeld
digital Microscope
INSTRUCTION MANUAL
MODEL #44301
ENGLISH
Page 2

1
IntroductIon
Congratulations on your Celestron microscope purchase. Your new
microscope is a precision optical instrument made of high quality materials
to ensure durability and long life, and is designed to give you a lifetime of
pleasure with minimal maintenance.
This microscope can be used for virtually anything that traditional microscopes
are used for: Hobbyists, Educators, Medical Labs, Industrial Inspection,
Engineering Applications, Teachers, Students, Science Applications, Doctor’s
Offices, Police Agencies, Government Testing, and general use by consumers.
Before attempting to use your microscope, please read through the
instructions to familiarize yourself with the functions and operations to
make usage easier for you. See the microscope diagram to locate the parts
discussed in this manual.
The microscope provides powers from 15x to 30x (powers with a 19”
monitor). It is ideally suited for examining solid objects such as coins, stamps,
rocks, relics, insects, plants, skin, gems, circuit boards, various materials, and
many other objects. You can also examine specimen slides.
With the included software, you can observe the magnified images or capture
video or take snapshots with Microsoft Windows 7, XP and Vista operating
systems. You can also use the microscope with most image capture software
that you may have on Windows 7, XP & Vista Os’s. If you are using a MAC,
you can take videos and snapshots but you need image/photo capture
software for MAC (like a combination of iChat with Photo Booth, etc.). You will
also need a CD/DVD drive as well as an open USB port.
Note: This product was designed and intended for ages 13 and older!
Page 3
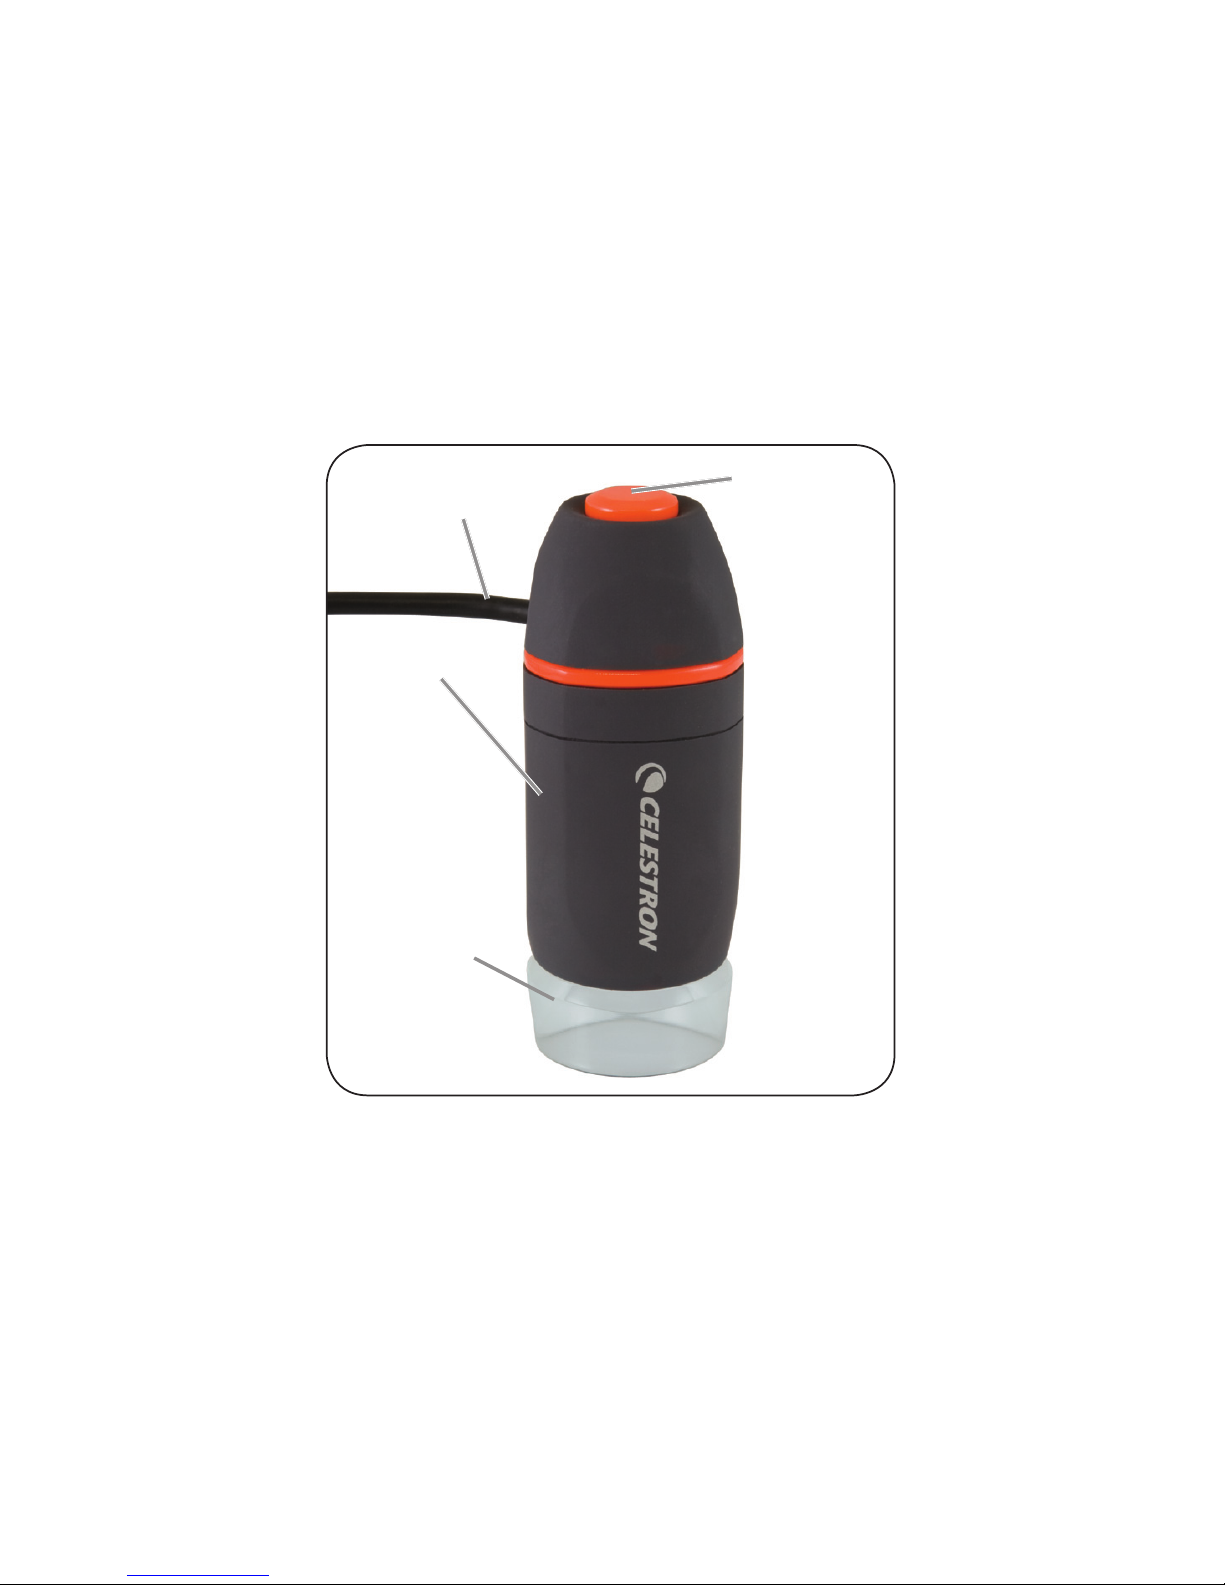
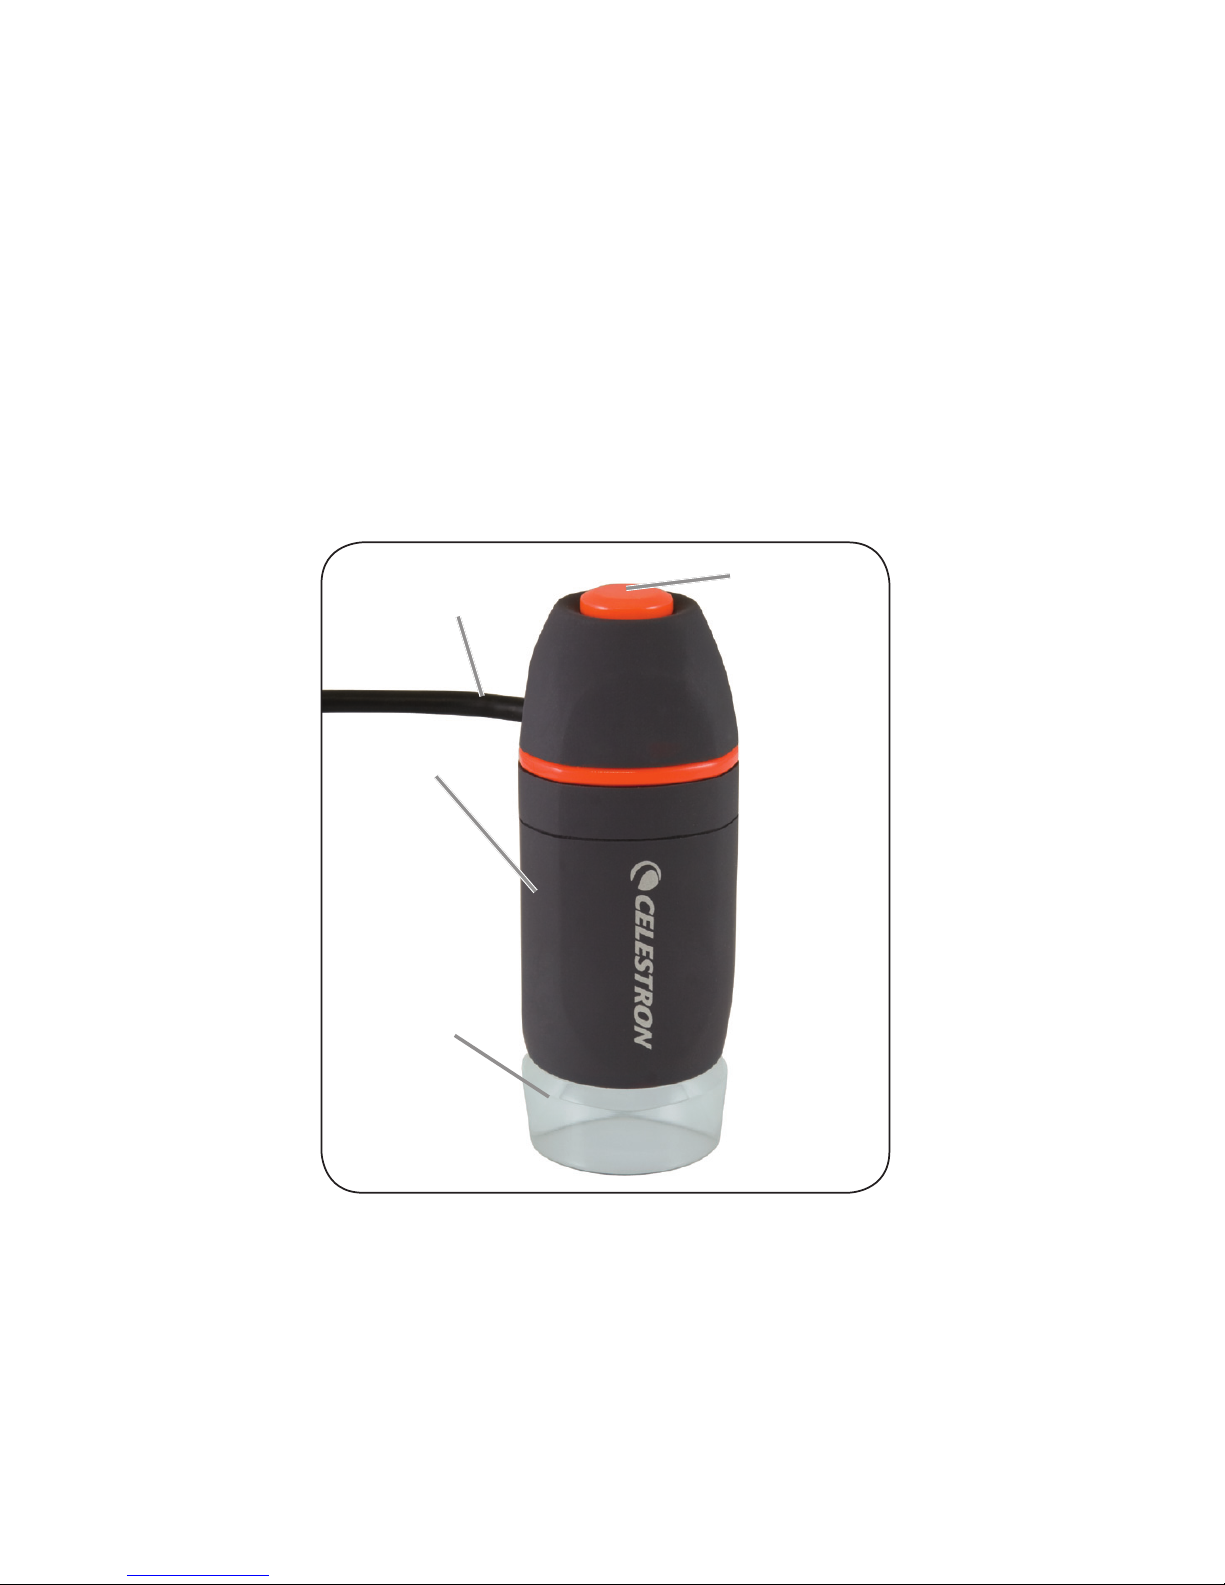
2
USB
Cable
Snapshot
Button
Microscope
Focus
Ring
Page 4

3
SpecIfIcatIonS — Model # 44301
Power 15 to 30x using a 19” Monitor
USB Cable 2.0 for power from a computer
Illuminator 6 White LEDs
Digital Camera 1.3MP CMOS Sensor – 1280x1024 pixel array
(snapshots up to 5MP with interpolation)
Weight and Dimensions 2.9 oz (82 g) 3.5” x 1.25” (89 mm x 32 mm)
Standard Accessories Included with your Microscope
• Digital Camera with USB Cable — Built-in
• LED Illuminator — Built-in
• CD-ROM — Digital Microscope Suite
• Instruction Manual
Page 5

4
SettIng up Your MIcroScope
1. Carefully remove the microscope from the box and set it on a table, desk,
or other flat surface.
2. Remove the plastic bag covering the microscope.
MIcroScope operatIon
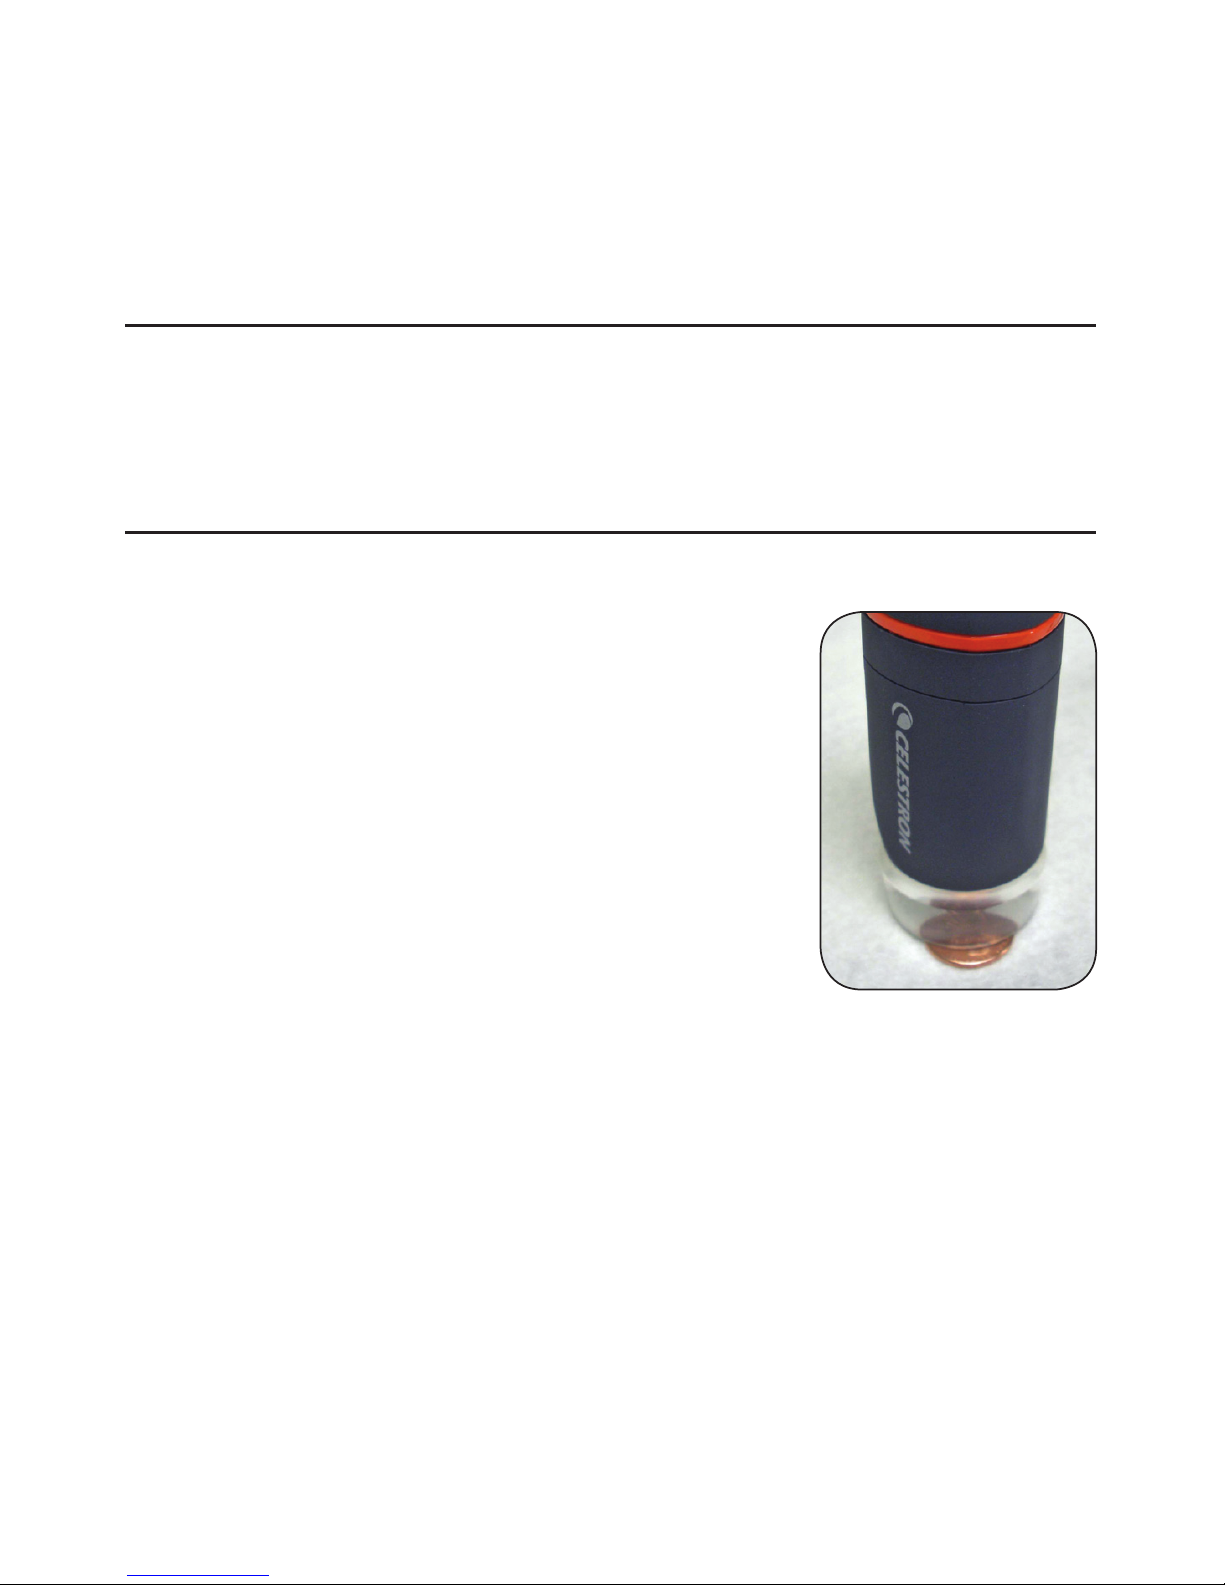
Viewing Objects and Slides — You can view coins,
stamps, currency, gems, plants, foods, circuit boards,
specimen slides, and many other things. You need
to read the information about focusing, power, and
illumination below before proceeding.
Focusing & Changing Power (Magnification) —
When the microscope is placed directly on/over the
object or slide; use the focus ring to obtain a sharp
focus. The focus ring takes some getting used to –
rotate past the focus and then back as you will see
how to obtain the best focus position. After some
usage the sharp focus position will be easy to find.
1. Always start with the higher power (30x) which
is obtained when the focus ring is on/over the
object. Focus should be sharp if using for the first time but if not you need
to turn the focus ring slightly to obtain a sharp focus.
2. If you hold the microscope slightly above the object the power will
decrease gradually to 15x as you move further away (up to about 14 mm).
You will have to refocus at each position.
Page 6

5
Illumination —The LEDs of the microscope are automatically turned on when
the USB cable is inserted into the USB port on your computer. There is no
illumination adjustment on this microscope but you may be able to position
the microscope over the object you are viewing at different angles
(or positions) to give the optimum illumination.
uSIng the MIcroScope for VIewIng and/or IMagIng
Before using your microscope for viewing or imaging on your computer
screen, you will have to ensure the driver is recognized by your computer. Your
microscope is a “Plug and Play” type where the computer should automatically
recognize the driver type on Microsoft Windows 7, XP & Vista operating
systems as well as Apple MAC version 10.4.9 and later operating systems.
Plug the USB cable of the microscope into the USB port of your computer. Each
computer system will have slightly different messages. For example, on some
Vista OSs when plugged in the message may say “Installing Device Driver
Software” and shortly thereafter you may see a message “Your Devices Are
Ready to Use.” Just follow any instructions shown on the screen.
You will need to install the Digital Microscope Suite software (on Windows
OS’s) to actually view and/or image. Prior to doing this you will need to
unplug the USB cable until the installation is complete. You can also use most
other image/photo capture software that you may have on your Windows
system if you desire.
To use the microscope with MAC operating systems you will need to
have MAC Version 10.4.9 and higher – must use a MAC compatible
image/photo capture program (iChat with Photo Booth, etc). To find
Page 7

6
Photo Booth on a Mac, go to your hard drive and click on Applications.
Choose Photo Booth from the list of applications. If a camera is already
attached to computer, Photo Booth will show up as your default.
You will need to change this to “Celestron Microscope.” You will
then be able to take photos with your microscope using the capture
button. Please note: Many keyboards on Macs have a USB port. The
microscope will not work through this USB port because it does not
have enough power. You will have to connect the USB directly to your
computer tower.
When viewing or imaging, you can change the orientation of the image on the
computer screen by rotating the microscope to the position you desire.
InStallIng the dIgItal MIcroScope SuIte (dMS)
Software
Your microscope comes with the Digital Microscope Suite CD-ROM which
allows you to use your microscope for visual purposes and for imaging with
your computer when using Microsoft Windows OS’s.
Before installing the software, remove the USB cable of the Digital Camera
from your computer and do not connect it until the software installation
is complete. Insert the CD-ROM into your CD-ROM drive and it should
automatically begin. Messages will appear (each operating system may show
something somewhat different) to guide you through the installation process.
If the software did not begin automatically, double click on “My Computer”
and right click the CD-ROM icon and it should start.
Page 8

7
• You will see “Files Currently on the CD” and notice “Digital Microscope
Suite” as a folder. Double click on it and then among the choices double
click on “Setup” (InstallShield Setup Launcher).
• InstallShield Wizard will appear. Next, select the default choices,
“Next,”etc. until “Finish” is seen and click on it.
Your software was properly installed. You will have a desktop icon called
“Digital Microscope Suite,” if not that will be the program you select from
your installed programs when you want to use the digital microscope.
uSIng the dIgItal MIcroScope SuIte (dMS)
Software
Plug in the USB cable of the Microscope to your computer and then start DMS.
The DMS contains basic image capture and organization for your photos
(snapshots) and videos. Click on the DMS icon to begin.
The software is very intuitive and easy to use. You can change settings
by using File and Settings – the Video Device should have as a default
“Celestron Digital Microscope,” if not please change it so the DMS will
function properly.
You can take snapshot images by using the snapshot button on the
microscope (only with Windows OS’s) or you can also use the keyboard by
clicking enter on “Capture an Image.” For videos you need to start/stop on
the icon shown on the screen. If the image delays or starts/stops, you should
lower the video resolution in the “Settings.”
Page 9

8
Measuring Function — DMS has a simple measuring function which measures
the distance between two points in millimeters. Click the “Measure” button
on the bottom right of the screen. Click where you want your starting point
and then click again to set the ending point and it will display the distance
between the two points. You can adjust either point by dragging the pin. You
can click “Clear” to start over.
The measurement function works accurately when the microscope is directly
on the object.
You are now ready to begin your digital adventure!
Page 10

9
care, MaIntenance, and warrantY
Your microscope is a precision optical instrument and should be treated with
care at all times. Follow these care and maintenance suggestions and your
microscope will need very little maintenance throughout its lifetime.
• Store the microscope in a dry and clean place.
• Be very careful if using your microscope in direct sun light to prevent
damage to the microscope or your eyes.
• Never point the microscope towards the sun or the camera can be
damaged and cease working.
• Clean the outside surfaces with a moist cloth.
• Blow dust off the optical surfaces with a camel’s hair brush or an air blower.
• Never disassemble or clean internal optical surfaces. This should be done
by qualified technicians at the factory or other authorized repair facilities.
• Do not disassemble or take apart the microscope or damage can occur.
• When handling glass specimen slides, use care as the edges can be sharp.
Your MIcroScope haS a two Year lIMIted warrantY.
pleaSe VISIt the celeStron webSIte for detaIled
InforMatIon on all celeStron MIcroScopeS at
www.celeStron.coM.
Page 11

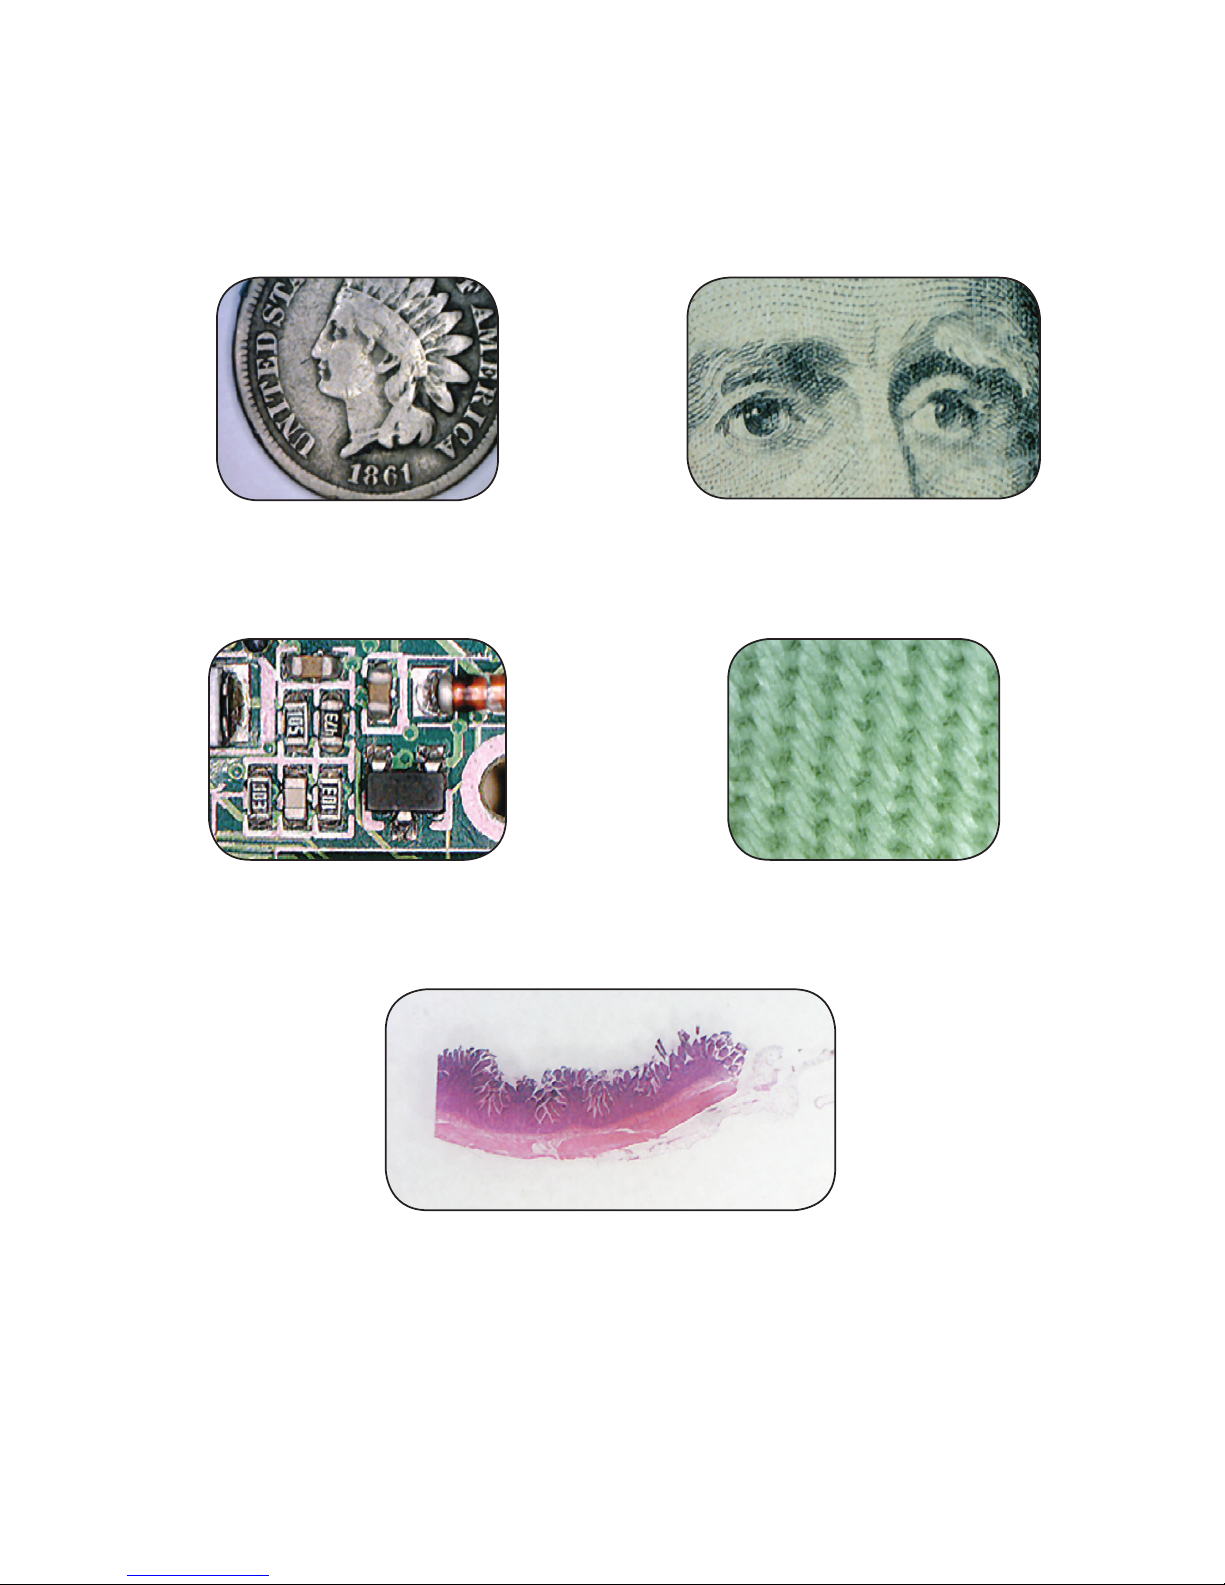
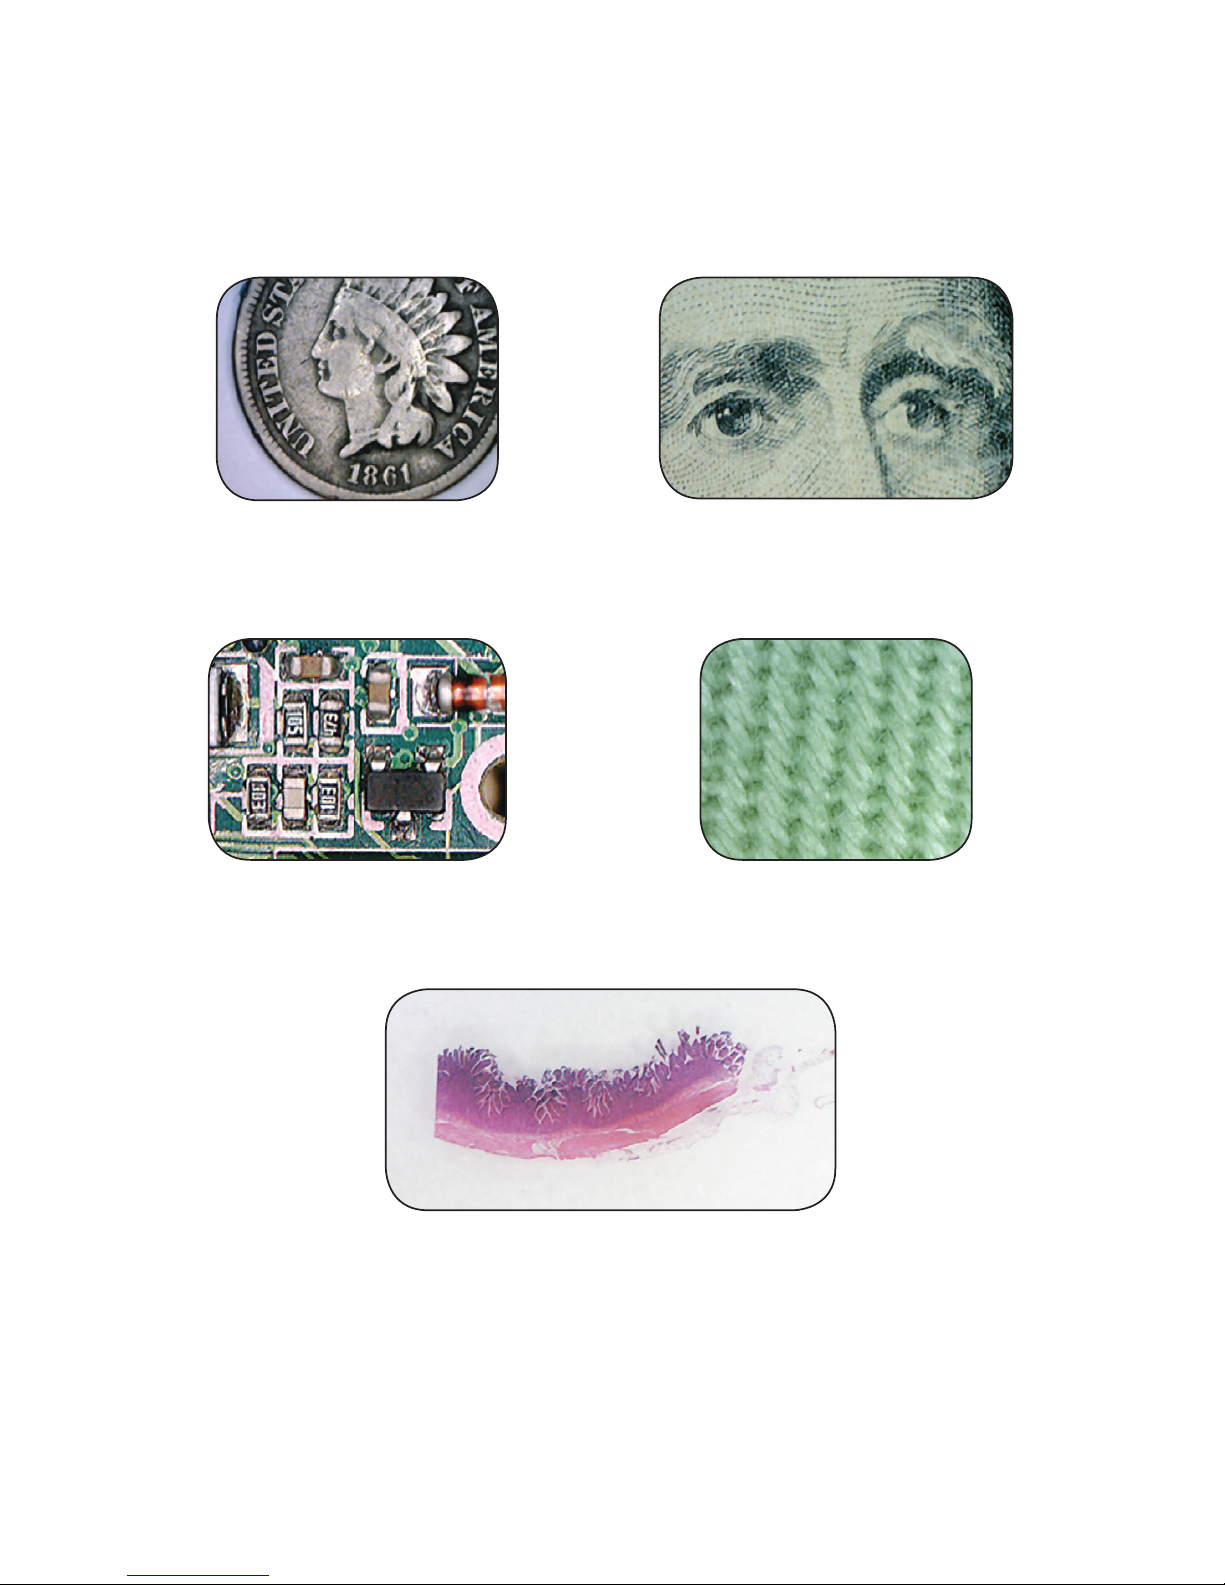
10
Coin @ 20x
Circuit Board @ 30x
Specimen Slide @ 25x
Currency @ 20x
Textile @ 20x
Page 12

www.celestron.com
FCC Statement
This device complies with Part 15 of FCC Rules. Operation is subject to
the following two conditions:
1. This device may not cause harmful interference, and
2. This device must accept any interference received, including interference
that may cause undesired operation.
2835 Columbia Street • Torrance, CA 90503 U.S.A.
Telephone: 310.328.9560 • Fax: 310.212.5835
©2011 Celestron Designed and intended
All rights reserved. • Printed in China • 01-11 for those 13 years of age and older.
Page 13

Mini Microscope
nuMérique portable
GUIDE DE L’UTILISATEUR
MODÈLE N° 44301
FRANÇAIS
Page 14

1
IntroductIon
Nous vous félicitons d’avoir fait l’acquisition de ce microscope Celestron.
Votre nouveau microscope est un instrument de précision optique fabriqué à
partir de matériaux d’excellente qualité pour lui assurer une grande durabilité
et longévité. Il est conçu pour vous donner une vie entière de satisfaction
avec un entretien minimum.
Ce microscope peut offrir quasiment toutes les utilisations d’un microscope
traditionnel. Il vise amateurs, éducateurs, laboratoires médicaux, enseignants,
étudiants, cabinets médicaux, commissariats de police, inspection industrielle,
applications techniques, projets de recherche, tests gouvernementaux et
usage à caractère général.
Avant de tenter d’utiliser votre microscope, veuillez lire attentivement le
mode d’emploi an de vous familiariser avec ses différentes fonctions et
son mode opérationnel pour vous en servir avec facilité. Reportez-vous
aux schémas du microscope pour repérer les différentes pièces dont il est
question dans ce manuel.
Ce microscope offre des grossissements de 15x à 30x (grossissements
obtenus avec un moniteur de 19 po). Il convient parfaitement à l’observation
d’objets solides tels que des pièces, timbres, pierres, reliques, insectes,
plantes, peau, gemmes, circuits imprimés, matières diverses et bien d’autres
encore. Vous pouvez aussi examiner les lames porte-objets avec des
grossissements faibles et élevés.
Grâce au logiciel livré avec, vous pouvez observer des images grossies
ou encore capturer des vidéos ou prendre des photos avec les systèmes
d’exploitation Microsoft Windows 7, XP et Vista. Vous pouvez également
utiliser le microscope avec les logiciels de capture d’image déjà installés
sous Windows 7, XP et Vista. Si vous utilisez un MAC, votre ordinateur doit
Page 15
2
être équipé d’un logiciel de capture d’image/photo (par exemple, une
combinaison de « iChat » et de « Photo Booth », etc). Il vous faut encore un
lecteur CD/DVD ainsi qu’un port USB libre.
Remarque : Ce produit a été conçu et s’adresse à des personnes de
13 ans ou plus !
Câble
USB
Déclencheur
photo
Microscope
Bague de
mise au
point
Page 16

3
SpécIfIcatIonS Modèle n° 44301
Grossissement 15 à 30x sur un moniteur 19 po
Câble USB 2.0 pour l’alimentation électrique à partir d’un
ordinateur
Illuminateur 6 LED blanches
Appareil photo Capteur CMOS 1,3MP – matrice de pixels
numérique 1280x1024
(clichés jusqu’à 5MP avec interpolation)
Poids et dimensions 82 g (2,9 oz) 89 mm x 32 mm (3,5 x 1,25 po)
Accessoires standard livrés avec votre microscope
• Appareil photo numérique avec câble USB - intégré
• Illuminateur LED - intégré
• CD-ROM – « Digital Microscope Suite » (Suite logicielle pour
microscope numérique)
• Manuel de l’utilisateur
Page 17

4
InStallatIon de Votre MIcroScope
1. Retirez délicatement le microscope et le socle de la boîte et installez-les
sur une table, un bureau ou toute autre surface plane.
2. Retirez l’emballage plastique protégeant le microscope.
fonctIonneMent du MIcroScope
Observation d’objets et de lames porte-objets —
Vous pouvez observer des pièces de monnaie, des
timbres, des billets, des gemmes, des plantes, des
aliments, des circuits imprimés, des échan tillons, et
bien d’autres choses encore. Avant de poursuivre, il
vous faut lire les informations ci-dessous concernant
la mise au point, le grossissement et l’éclairage.
Mise au point et changement de puissance
(grossissement) — Lorsque le microscope est
placé directement sur un objet ou une lame porte-
objets, tournez la bague de mise au point pour
obtenir une image nette. Il faut s’habituer un peu à
la bague de mise au point au départ - tournez de
manière à dépasser la mise au point, puis revenez
progressivement jusqu’à obtenir la plus grande netteté d’image. Après
quelque temps, vous trouverez facilement la position de mise au point
optimale.
1. Commencez toujours par le grossissement le plus élevé (30x), qui
s’obtient lorque la bague du dispositif de mise au point se trouve sur
l’objet. L’image a mise au point devrait être très nette lors d’une première
utilisation mais si ce n’est pas le cas, il faudra tourner légèrement la bague
de mise au point jusqu’à obtention de la netteté voulue.
Page 18

5
2. Si vous placez le microscope légèrement au-dessus de l’objet, vous
diminuez le grossissement à 15x à mesure que vous vous éloignez (sur
environ 14 mm). Vous devrez refaire une mise au point pour chaque position.
Illumination — Les LED du microscope s’allument automatiquement lorsque
vous insérez le câble USB dans le port USB de votre ordinateur. Il n’existe
aucun réglage de l’illuminateur sur ce microscope. Vous pouvez toutefois
positionner l’instrument à des angles différents (ou positions) sur l’objet que
vous observez an d’obtenir un éclairage optimum.
utIlISatIon du MIcroScope pour la VISualISatIon
et/ou l’IMagerIe
Avant d’utiliser votre microscope pour visualiser des images sur l’écran de
votre ordinateur ou pour de l’imagerie, vous devez vous assurer que le pilote
est reconnu par votre ordinateur. Votre microscope est un appareil de type «
Plug and Play » (prêt-à-tourner) et l’ordinateur reconnaîtra automatiquement
son pilote avec les systèmes d’exploitation Windows 7, XP et Vista, de même
que sur Apple MAC 10.4.9 et versions ultérieures.
Branchez le câble USB du microscope dans le port USB de votre ordinateur.
Chaque système informatique présente des messages légèrement différents.
Par exemple, sur certains systèmes d’exploitation Vista, le message obtenu
lors du raccordement d’un nouveau périphérique est « Installation du pilote
en cours », suivi, tout de suite après, du message « Vos périphériques sont
prêts à l’emploi. » Il suft simplement de suivre les instructions à l’écran.
Vous devrez installer le logiciel « Digital Microscope suite » (Suite pour
microscope numérique) (sur système d’exploitation Windows) pour être en
mesure d’afcher et/ou d’acquérir des images. Auparavant, il vous faudra
débrancher le câble USB jusqu’à ce que l’installation soit terminée. Si vous le
souhaitez, vous pouvez également utiliser le microscope avec les logiciels de
capture d’image/photo déjà installés sous votre système Windows.
Page 19

6
Pour utiliser ce microscope sur des systèmes d’exploitation MAC,
vous devez avoir la Version MAC 10.4.9 ou supérieure – votre
ordinateur doit par ailleurs être équipé d’un logiciel de capture
d’image/photo compatible (iChat avec Photo Booth, etc.). Pour
trouver Photo Booth sur votre MAC, allez sur le disque dur et cliquez
sur Applications. Choisissez Photo Booth dans la liste d’applications.
Si un appareil photo est déjà connecté à l’ordinateur, Photo Booth
apparaît comme sélection par défaut. Vous devez remplacer cette
sélection par « Celestron Microscope ». Vous pouvez alors prendre
des photos avec votre microscope en utilisant le bouton de capture.
À noter : les claviers des ordinateurs MAC sont fréquemment équipés
d’un port USB. Le microscope ne fonctionnera pas sur ce port USB
car l’alimentation fournie est insuffisante. Vous devez connecter
l’instrument sur l’une des prises USB de votre tour informatique.
Lorsque vous visualisez ou que vous prenez une image, vous pouvez changer
l’orientation de l’image sur l’écran de l’ordinateur en tournant le microscope
sur la position recherchée.
InStallatIon du logIcIel dMS (SuIte pour
MIcroScope nuMérIque)
Votre microscope est livré avec le CD-Rom « Digital Microscope Suite » (Suite
pour microscope numérique) qui vous permet d’utiliser l’instrument à des ns
d’observation et d’imagerie sur votre ordinateur s’il est équipé du système
d’exploitation Microsoft Windows.
Avant d’installer le logiciel, retirez le câble USB de l’appareil photo numérique
de votre ordinateur et attendez que l’installation du logiciel soit terminée
pour le rebrancher. Insérez le CD-ROM dans votre lecteur de CD-ROM.
Il devrait se lancer automatiquement. Des messages s’affichent (chaque
Page 20

7
système d’exploitation peut avoir des messages sensiblement différents) pour
vous guider pendant le processus d’installation.
Si le logiciel ne se lance pas automatiquement, faites un double clic sur «
Poste de travail » et un clic droit sur l’icône du CD-ROM. Il devrait
alors démarrer.
• Sous « Files Currently on the CD » (Fichiers actuellement sur le CD), vous
remarquerez le dossier « Digital Microscope Suite ». Double-cliquez dessus,
puis sur « Setup » (Installation) parmi les choix proposés (InstallShield Setup
Launcher).
• L’assistant d’installation InstallShield s’afche. Sélectionnez ensuite les
choix par défaut, « Next » (Suivant), etc. jusqu’à ce que « Finish » (Terminer)
s’affiche, puis cliquez dessus.
Votre logiciel a été correctement installé. Une icône intitulée « Digital
Microscope Suite » (Suite pour microscope numérique) a été installée sur
votre bureau. Si vous ne trouvez pas cette icône, il vous suft de sélectionner
le programme parmi les programmes installés lorsque vous voulez utiliser le
microscope numérique.
utIlISatIon du logIcIel dMS (SuIte pour MIcroScope
nuMérIque)
Branchez le câble USB du Microscope dans votre ordinateur puis lancez la
suite DMS.
La suite DMS contient la capture d’image et l’organisation de base pour
vos photos (clichés instantanés) et vidéos. Cliquez sur l’icône DMS pour
commencer.
Le logiciel est particulièrement intuitif et facile à utiliser. Vous pouvez changer
les paramètres en allant sous « File » (Fichier) puis « Settings » (Paramètres) –
Page 21

8
Le pilote vidéo devrait indiquer par défaut « Celestron Digital Microscope ».
Dans le cas contraire, veuillez le modifier pour assurer le bon fonctionnement
de la suite DMS.
Vous pouvez prendre des clichés à l’aide du bouton prévu à cet effet sur le
microscope (uniquement avec le SE Windows) ou utiliser le clavier et cliquer
sur « Capture an Image » (Capturer une image). Pour les vidéos, il vous faut
utiliser la fonction « start/stop » (marche/arrêt) de l’icône qui apparaît sur
l’écran. En cas de délai ou de démarrage/d’arrêt de l’image, réduisez la
résolution vidéo sous « Settings » (Paramètres).
Fonction de mesure — La suite DMS possède une fonction de mesure
simple qui permet de calculer en millimètres la distance entre deux points.
Cliquez sur le bouton « Measure » (Mesurer) situé dans l’angle inférieur droit
de l’écran. Cliquez sur le point de départ et cliquez à nouveau sur le point
d’arrivée. La distance entre les deux points s’afche. Vous pouvez ajuster
le premier ou le second point en faisant glisser le curseur. Si vous souhaitez
recommencer, cliquez sur « Clear » (Effacer).
La fonction de mesure est précise lorsque le microscope est directement
sur l’objet.
Vous pouvez maintenant vous lancer dans votre aventure numérique !
Page 22

9
entretIen, nettoYage et garantIe
Votre microscope est un instrument de précision optique qu’il convient de
toujours manipuler avec soin. Si vous respectez ces conseils de nettoyage
et d’entretien, votre microscope ne nécessitera qu’un entretien minimum
pendant toute sa durée de vie.
• Rangez le microscope dans un lieu propre et sec.
• Si vous utilisez votre microscope sous la lumière directe du soleil, faites très
attention à ne pas endommager l’instrument ni à vous abîmer les yeux.
• N’orientez jamais le microscope en direction du soleil sous peine
d’endommager l’appareil photo et de l’empêcher de fonctionner.
• Nettoyez les surfaces externes avec un chiffon humide.
• Éliminez la poussière des surfaces optiques avec une brosse en poils de
chameau ou une buse de pulvérisation.
• Ne jamais démonter ni nettoyer les surfaces optiques internes. Une telle
intervention doit être conée à des techniciens qualiés en usine ou à des
centres de réparations agréés.
• Ne pas démonter le microscope pour ne pas risquer de l’endommager.
• Lors de la manipulation des lames porte-objets en verre, faites attention
aux bords coupants.
Votre MIcroScope bénéfIcIe d’une garantIe lIMItée de
deux anS. VeuIllez conSulter le SIte web celeStron
pour deS InforMatIonS détaIlléeS Sur toute la gaMMe de
MIcroScopeS celeStron à www.celeStron.coM.
Page 23
10
Pièce à 20x
Circuit imprimé à 30x
Lame porte-objets à 25x
Billet à 20x
Textile à 20x
Page 24

www.celestron.com
Déclaration FCC
Ce dispositif est conforme à la partie 15 de la réglementation de la Commission Fédérale
sur les Communications. Son fonctionnement est sujet aux deux conditions suivantes :
1. Ce dispositif ne doit pas provoquer d’interférences dangereuses, et
2. Ce dispositif doit accepter toute interférence reçue, y compris les interférences pouvant
provoquer un fonctionnement indésirable.
2835 Columbia Street • Torrance, CA 90503, U.S.A.
Tél. : 310.328.9560 • Fax: 310.212.5835
©2011 Celestron Conçu et destiné aux personnes
Tous droits réservés. • Imprimé en Chine • 01-11 âgées de 13 ans et plus.
Page 25

MiniMicroscopio
digital portátil
MANUAL DE INSTRUCCIONES
MODELO NO. 44301
ESPAÑOL
Page 26

1
IntroduccIón
Le felicitamos por su compra del microscopio de Celestron. Su nuevo
microscopio es un instrumento óptico de precisión fabricado con materiales
de gran calidad para asegurar durabilidad, y está diseñado para ofrecerle
gran entretenimiento con un mantenimiento mínimo.
Este microscopio se puede utilizar con el mismo fin que cualquiera de los
tradicionales: acionados, educadores, laboratorios médicos, inspecciones
industriales, aplicaciones de ingeniería y científicas, profesores, estudiantes,
ocinas médicas, departamentos de policía, pruebas realizadas por
administraciones públicas y un uso general para el consumidor.
Antes de intentar usar su microscopio, lea todas las instrucciones para
familiarizarse con las funciones y operaciones a fin de hacer más fácil el
uso del mismo. Vea los diagramas del microscopio para ubicar las piezas
detalladas en este manual.
El microscopio proporciona grandes potencias de 15x a 30x (potencias con
un monitor de 19 pulgadas). Es ideal para examinar objetos como monedas,
sellos, piedras, reliquias, insectos, plantas, piel, piedras preciosas, tarjetas de
circuitos, diferentes materiales y muchas cosas más. También puede examinar
muestras en el portaobjetos.
Con el software que se incluye, podrá observar las imágenes aumentadas
u obtener vídeos o fotos con los sistemas operativos Windows 7, XP y Vista
de Microsoft. También puede utilizar el microscopio con la mayoría software
de obtención de imágenes que pueda tener en los sistemas operativos de
Windows 7, XP y Vista. Si está utilizando un MAC puede obtener videos y
fotos pero necesita el software apropiado para este tipo de ordenador
Page 27

2
(por ejemplo una combinación de “iChat con “PhotoBooth”, etc.) También
deberá tener una unidad de CD/DVD y un puerto USB abierto.
Nota: Este producto ha sido diseñado para usuarios a partir de los
13 años de edad.
Cable
USB
Botón para
la obtención
de fotos
Microscopio
Aro de
enfoque
Page 28

3
eSpecIfIcacIoneS Modelo no. 44301
Potencia 15x a 30x usando un monitor de 19 pulg.
Cable USB 2.0 para obtener energía a través de un
ordenador
Iluminador 6 LED blancas
Cámara digital Sensor CMOS 1,3 MP – matriz de píxeles
1280 x 1024
(fotos hasta 5MP con interpolación)
Peso y dimensiones 2,9 oz (82 g) 3,5 x 1,25 pulg. (89 x 32 mm)
Accesorios estándar que se incluyen con su microscopio
• Cámara digital con cable USB, incorporada
• Iluminador LED, incorporado
• CD-ROM del Digital Microscope Suite
• Manual de instrucciones
Page 29

4
InStalacIón del MIcroScopIo
1. Saque con cuidado el microscopio y las otras piezas de la caja y póngalos en
una mesa, en un escritorio u en otra superficie plana.
2. Retire la bolsa de plástico que cubre el microscopio.
funcIonaMIento del MIcroScopIo
Visualización de objetos y portaobjetos — Puede
ver monedas, sellos, billetes, piedras preciosas,
plantas, alimentos, tarjetas de circuitos, portaobjetos
de especímenes y muchas otras cosas. Debe leer la
información sobre enfoque, potencia e iluminación a
continuación antes de continuar.
Enfoque y cambio de potencia (aumento) —
Cuando el microscopio se coloca directamente sobre
el objeto o muestra, utilice el aro de enfoque para
obtener una imagen nítida. Hay que acostumbrarse
a utilizar el aro de enfoque: gire hasta pasar el
enfoque y después retroceda hasta que obtenga el
mejor enfoque. Cuando adquiera más experiencia,
se le hará más fácil encontrar la mejor posición de
enfoque.
1. Comience siempre con la mayor potencia (30x), que se obtiene cuando
el aro de enfoque se posiciona sobre el objeto. Si se está utilizando
por primera vez, el enfoque debe de ser preciso, si no, necesitará girar
ligeramente el aro de enfoque para obtener el enfoque preciso.
Page 30

5
2. Si coloca el microscopio ligeramente por encima del objeto, la potencia
disminuirá gradualmente a 15x a medida que se aleja del mismo (hasta
aproximadamente 14 mm). Tendrá que volver a enfocar en cada posición.
Iluminación — Las luces LED del microscopio se encienden automáticamente
cuando se inserta el cable USB en el puerto USB de su ordenador.
No hay un ajuste de la iluminación en este microscopio pero podrá situar
el mismo sobre el objeto que esté visualizando en diferentes ángulos (o
posiciones) para obtener la iluminación óptima.
uSo del MIcroScopIo para VISualIzar Y obtener
IMágeneS
Antes de utilizar su microscopio para la visualización en la pantalla del
ordenador o para obtener imágenes, tendrá que asegurarse de que el
controlador es reconocido por su ordenador. Su microscopio es de tipo
“Plug and Play” (enchufar y reproducir) y el ordenador deberá reconocer
automáticamente el tipo de controlador, tanto en los sistemas operativos
Windows 7, XP y Vista como en Apple MAC versión 10.4.9 o posterior.
Enchufe el cable USB del microscopio en el puerto USB de su ordenador.
Cada sistema informático tendrá un mensaje ligeramente diferente. Por
ejemplo, en algunos sistemas operativos Vista, al conectarse, el mensaje
podría decir “Installing Device Driver Software” (Instalando software del
controlador del dispositivo) y a continuación podría ver el mensaje “Your
Devices Are Ready to Use” (Ya puede utilizar sus dispositivos). Simplemente
siga las instrucciones que se muestran en la pantalla.
Tendrá que instalar el software Digital Microscope Suite (en el sistema
operativo de Windows) para observar u obtener imágines. Antes de hacer
esto, tendrá que desenchufar el cable USB hasta que la instalación se haya
Page 31

6
nalizado. También puede utilizar el software de imágenes y fotos que tenga
en su sistema Windows si así lo desea.
Para utilizar el microcopio con el sistema operativo MAC necesitará la
versión 10.4.9 o posterior. Deberá de utilizar un programa compatible
de obtención de imágines o fotos (iChat con Photo Booth, etc). Para
localizar Photo Booth en el sistema operativo MAC, haga clic en el
icono Aplicaciones localizado en el disco duro. Seleccione Photo Booth
de la lista de aplicaciones. Si la cámara está conectada al ordenador,
Photo Booth mostrará como determinada. Necesitará de cambiarlo a
“Celestron Microscope”. Después podrá capturar fotos utilizando el
microscopio usando el botón de captura de imágenes. Nota: Varios
de los teclados Mac tienen un puerto para USB. El microscopio no
funcionará utilizando el puerto USB porque no tiene suficiente poder.
Tendrá que conectar el USB directamente a su ordenador.
Al visualizar u obtener imágenes podrá cambiar la orientación de las
mismas en la pantalla del ordenador al rotar el microscopio hacia la posición
que desee.
InStalacIón del Software dIgItal MIcroScope SuIte
(dMS)
Su microscopio viene con un CD-ROM del Digital Microscope Suite que le
permite utilizar su microscopio para visualizar y obtener imágenes con su
ordenador al utilizar los sistemas operativos Windows de Microsoft.
Antes de instalar el software, extraiga de su ordenador el cable USB de la cámara
digital y no lo conecte hasta que la instalación del software se haya completado.
Introduzca el CD-ROM en la unidad de disco de su ordenador; el CD-ROM
comenzará automáticamente. Aparecerán mensajes (cada sistema operativo
puede mostrar algo diferente) para guiarle durante el proceso de instalación.
Page 32

7
Si el software no comienza automáticamente, haga doble clic en “Mi PC” y
con el botón derecho del ratón haga clic en el icono CD-ROM para iniciarlo.
• Podrá ver “Archivos que están actualmente en el CD” y observará que
“Digital Microscope Suite” es una carpeta. Haga doble clic en la carpeta y
a continuación seleccione con otro doble clic “Setup” (InstallShield Setup
Launcher).
• Inmediatamente aparecerá el asistente de InstallShield. A continuación,
seleccione las opciones predeterminadas, tales como “Next” (Siguiente)
hasta llegar a “Finish” (Terminar).
Si su software se instaló correctamente. En el escritorio tendrá un icono
llamado “Digital Microscope Suite”, pero si no es así, ése será el nombre del
programa que tendrá que seleccionar en los programas instalados cuando
desee utilizar el microscopio digital.
uSo del Software dIgItal MIcroScope SuIte (dMS)
Enchufe el cable USB del microscopio a su ordenador y después inicie
el software DMS.
El DMS contiene obtención y organización básicas de imágenes para sus
fotos y vídeos. Haga clic en el icono de DMS para comenzar.
El software es muy intuitivo y fácil de utilizar. Puede cambiar los valores
de configuración utilizando “File” (archivo) y “Settings” (configuración); el
dispositivo de vídeo deberá tener como valor predeterminado “Celestron
Digital Microscope” (microscopio digital de Celestron), pero si no es así,
cámbielo para que el software DMS funcione de forma apropiada.
Puede obtener fotos utilizando el botón de fotos en el microscopio (sólo
con Windows) o también puede utilizar el teclado al hacer clic en entrar en
Page 33

8
“Capture an Image” (capturar una imagen). Para vídeos, tiene que iniciar/
interrumpir en el icono que se muestra en la pantalla. Si la imagen se retrasa
o inicia/interrumpe, tendrá que bajar la resolución del video usando la opción
“Settings” (configuración).
Función de Medidas — El software DMS tiene una función simple de
medidas que mide la distancia entre dos puntos en milímetros. Haga clic
en el botón “Measure” (medida) en la parte inferior derecha de la pantalla.
Haga clic donde desee que esté su punto de inicio y a continuación donde
quiera establecer el punto final; aparecerá entonces la distancia entre esos
dos puntos. Puede ajustar cualquiera de los puntos arrastrando el indicador.
Puede hacer clic en “Clear” (borrar) para comenzar de nuevo.
La función de medidas funciona adecuadamente cuando el microscopio está
enfocado sobre el objeto.
¡Ya puede comenzar su aventura digital!
Page 34

9
cuIdado, MantenIMIento Y garantía
Su microscopio es un instrumento óptico de precisión y debe tratarse siempre
con cuidado. Siga estas sugerencias de cuidado y mantenimiento y su
microscopio necesitará muy poco mantenimiento durante toda su vida útil.
• Guarde el microscopio en un lugar limpio y seco.
• Tenga mucho cuidado si usa el microscopio bajo la luz directa del sol para
evitar daños en el microscopio o en los ojos.
• Nunca apunte el microscopio hacia el sol, ya que la cámara puede dañarse
y dejar de funcionar.
• Limpie las supercies exteriores con un paño húmedo.
• Retire el polvo de las supercies ópticas con un cepillo de pelo de camello
o un soplador de aire.
• Nunca desmonte ni limpie las supercies ópticas internas. Esto debe ser
realizado por técnicos calicados en la fábrica u otros centros de reparación
autorizados.
• No desensamble o desarme el microscopio, ya que lo puede dañar.
• Cuando manipule los portaobjetos de vidrio, tenga cuidado porque los
bordes pueden ser afilados.
Su MIcroScopIo tIene una garantía lIMItada de doS
añoS. conSulte la InforMacIón detallada de todoS loS
MIcroScopIoS celeStron en el SItIo web de celeStron
www.celeStron.coM.
Page 35
10
Moneda a 20x
Tarjeta de circuitos
a 30x
Muestra a 25x
Billete a 20x
Textil a 20x
Page 36

www.celestron.com
Declaración FCC
Este dispositivo cumple con la parte 15 de la normativa FCC. Su funcionamiento está
sujeto a las siguientes dos condiciones:
1. Este dispositivo no puede causar interferencias perjudiciales, y
2. Este dispositivo debe aceptar todas las interferencias recibidas, incluyendo las
interferencias que podrían causar un funcionamiento no deseado.
2835 Columbia Street • Torrance, CA 90503 U.S.A.
Teléfono: 310.328.9560 • Fax: 310.212.5835
©2011 Celestron
Todos los derechos reservados. Diseñado para edades
Impreso en China • 01-11 de 13 años en adelante.
Page 37

digitales
HandHeld-Mini-Mikroskop
BEDIENUNGSANLEITUNG
MODELL 44301
DEUTCSH
Page 38

1
eInführung
Herzlichen Glückwunsch zum Kauf Ihres Celestron-Mikroskops. Ihr neues
Mikroskop ist ein optisches Präzisionsinstrument, das aus hochwertigen
Materialien besteht, um Haltbarkeit und eine lange Lebensdauer
zu gewährleisten. Es wurde entwickelt, um Ihnen mit minimalen
Wartungsanforderungen viele Jahre Freude zu bereiten.
Dieses Mikroskop kann für praktisch alle Anwendungen traditioneller
Mikroskope verwendet werden: Amateure, Pädagogen, medizinische
Labors, Industriekontrollen, technische Anwendungen, Lehrer, Schüler,
wissenschaftliche Anwendungen, Arztpraxen, Polizeibehörden, Behördentests
und allgemeine Verwendung von Verbrauchern.
Lesen Sie diese Anleitung durch, bevor Sie versuchen, das Mikroskop zu
benutzen, um sich mit den Funktionen und Arbeitsabläufen vertraut zu
machen. Es erleichtert Ihnen die Anwendung. Die in diesem Handbuch
beschriebenen Teile sind in der Abbildung veranschaulicht.
Das Mikroskop bietet eine Vergrößerungsleistung von 15x bis 30x
(Vergrößerungsleistungen mit 19-Zoll-Monitor). Es ist ideal für die Betrachtung
von massiven Objekten wie zum Beispiel Münzen, Briefmarken, Steinen,
Relikten, Insekten, Pflanzen, Haut, Edelsteinen, Platinen, verschiedenen
anderen Materialien u.v.m. geeignet. Sie können auch Objektträger mit
geringen und hohen Vergrößerungsleistungen betrachten.
Die im Lieferumfang enthaltene Software ermöglicht Ihnen die Beobachtung
der vergrößerten Bilder oder Videoaufnahmen und Schnappschüsse mit
den Betriebssystemen Microsoft Windows 7, XP und Vista. Sie können das
Mikroskop auch mit der gängigsten Bilderfassungssoftware unter Windows
7, XP und Vista verwenden. Wenn Sie mit einem MAC arbeiten, können Sie
Videoaufnahmen und Schnappschüsse machen, aber Sie benötigen Bild-/
Page 39

2
Fotoerfassungssoftware für MAC (z.B. eine Kombination von iChat und
Photobooth etc.). Sie benötigen auch ein CD/DVD-Laufwerk und einen freien
USB-Anschluss.
Hinweis: Dieses Produkt ist für Anwender im Alter von mindestens
13 Jahren bestimmt!
USB-
Kabel
Schnappschuss-
Knopf
Mikroskop
Fokussierring
Page 40

3
technISche daten Modell 44301
Vergrößerung 40 x und 30x auf 19-Zoll-Monitor
USB-Kabel 2.0 für Stromversorgung vom Computer
Beleuchtung 6 weiße LEDs
Digitalkamera 1,3 MP CMOS-Sensor – 1280 x 1024 Pixel-Array
(Schnappschüsse bis zu 5 MP mit Interpolation)
Gewicht und 82 g (2,9 oz) 89 x 32 mm (3,5 x 1,25 Zoll)
Abmessungen
Im Lieferumfang des Mikroskops enthaltenes Standardzubehör
• Digitalkamera mit USB-Kabel - integriert
• LED-Beleuchtung - integriert
• CD-ROM – Digitalmikroskop-Suite
• Bedienungsanleitung
Page 41

4
aufbau deS MIkroSkopS
1. Nehmen Sie das Mikroskop vorsichtig aus dem Karton und stellen Sie es
auf einen Tisch, Schreibtisch oder eine andere flache Oberfläche.
2. Entfernen Sie den Plastikbeutel, mit dem das Mikroskop geschützt ist.
betrIeb deS MIkroSkopS
Betrachtung von Objekten und
Objektträgern — Sie können Münzen, Briefmarken,
Geldscheine, Edelsteine, Pflanzen, Lebensmittel,
Platinen, Objektträger und viele andere Dinge
untersuchen. Lesen Sie, bevor Sie fortfahren, zuerst
die nachstehenden Informationen zu Fokussieren,
Ändern der Vergrößerung und Beleuchtung.
Fokussieren & Ändern der Vergrößerung — Wenn
das Mikroskop direkt auf/über dem Objekt oder
Objektträger steht, drehen Sie den Fokusring zur
Scharfstellung. An die Verwendung des Fokusrings
müssen Sie sich etwas gewöhnen. Drehen Sie ihn
über die Scharfstellung hinaus und dann wieder
zurück, um die beste Fokuseinstellung zu erhalten.
Nach etwas Gewöhnung werden Sie die scharfe Einstellung leicht nden.
1. Beginnen Sie immer mit der höheren Vergrößerung (30x), die erzielt wird,
wenn der Fokusring auf/über dem Objekt steht. Der Fokus sollte bei der
rsten Verwendung scharf sein. Drehen Sie anderenfalls den Fokusring leicht
zur Scharfstellung.
Page 42

5
2. Wenn Sie das Mikroskop etwas über das Objekt stellen, nimmt die
Vergrößerungsleistung allmählich bis 15x ab, je mehr Sie sich vom Objekt
entfernen (bis zu ca. 14 mm oder 1 Zoll). Sie müssen in jeder Position neu
scharf stellen.
Beleuchtung — Die LEDs des Mikroskops werden automatisch eingeschaltet,
wenn das USB-Kabel am USB-Anschluss des Computers angeschlossen wird.
Es erfolgt keine Beleuchtungsanpassung am Mikroskop, aber Sie können
versuchen, das Mikroskop in verschiedenen Winkeln (oder Positionen) über
das betrachtete Objekt zu stellen, um eine optimale Beleuchtung zu erhalten.
Verwendung deS MIkroSkopS zur betrachtung
und/oder bIldgebung
Vor der Verwendung Ihres Mikroskops zur Betrachtung auf Ihrem
Computerbildschirm oder für Aufnahmen müssen Sie zuerst sicherstellen, dass
der Treiber vom Computer erkannt wird. Ihr Mikroskop ist vom „Plug-andPlay“-Typ, d.h. der Computer sollte den Treibertyp automatisch auf Microsoft
Windows 7, XP- und Vista-Betriebssystemen sowie Apple MAC Version
10.4.9- und höheren Betriebssystemen erkennen.
Schließen Sie das USB-Kabel des Mikroskops am USB-Anschluss des
Computers an. Die verschiedenen Computersysteme zeigen etwas andere
Meldungen an. Zum Beispiel erscheint bei manchen Vista-Betriebssystemen
nach dem Anschluss der Kamera die Meldung „Installing Device Driver
Software“ (Gerätetreiber-Software wird installiert), kurz darauf gefolgt von
„Your Devices Are Ready to Use“ (Ihre Geräte sind betriebsbereit). Befolgen
Sie einfach die Anweisungen auf dem Bildschirm.
Um Betrachtungen und/oder Aufnahmen vornehmen zu können, müssen
Sie die „Digital Microscope Suite“ Software installieren (unter WindowsBetriebssystemen). Vorher müssen Sie das USB-Kabel abziehen, bis die
Page 43

6
Installation abgeschlossen ist. Sie können, wenn Sie es wünschen, auch die
meiste andere Bild-/Fotoerfassungssoftware verwenden, die Sie auf Ihrem
Windows-System haben.
Um das Mikroskop mit MAC-Betriebssystemen verwenden zu können,
müssen Sie MAC-Version 10.4.9 und höher haben – und Sie müssen
MAC-kompatible Bild-/Fotoerfassungssoftware verwenden („iChat“
mit „PhotoBooth“ etc.). Um Photobooth auf einem MAC aufzufinden,
gehen Sie zur Festplatte und klicken Sie auf „Anwendungen“.
Wählen Sie Photobooth aus der Liste der Anwendungen. Wenn die
Kamera bereits am Computer angeschlossen ist, wird Photobooth
als Standard angezeigt. Sie müssen dann zu „Celestron Microscope“
wechseln. Dann können Sie Fotos mit Ihrem Mikroskop mit Hilfe der
Aufnahmetaste machen. Hinweis: Zur Beachtung: Viele MAC-Tastaturen
haben einen USB-Anschluss. Das Mikroskop funktioniert über diesen
USB-Anschluss nicht, weil es nicht genug Leistung hat. Sie müssen den
USB direkt am Computertower anschließen.
Bei der Betrachtung oder Aufnahme von Objekten können Sie die
Ausrichtung des Bildes auf dem Computerbildschirm ändern, indem Sie das
Mikroskop in die gewünschte Position drehen.
InStallatIon der dIgItal MIcroScope SuIte (dMS)-
Software
Im Lieferumfang des Mikroskops ist die Digital Microscope Suite-CD-ROM
enthalten. Sie ermöglicht die Verwendung des Mikroskops für visuelle
Anwendungen und Darstellung/Aufnahmen auf dem Computer bei
Verwendung von Microsoft Windows-Betriebssystemen.
Nehmen Sie vor der Installation der Software das USB-Kabel der
Digitalkamera vom Computer ab und schließen Sie es erst dann wieder an,
Page 44

7
wenn die Software-Installation beendet ist. Legen Sie die CD-ROM im CDROM-Laufwerk ein. Der Installationsprozess sollte automatisch beginnen.
Um Sie durch das Installationsverfahren zu führen, werden Meldungen
eingeblendet (diese können je nach Betriebssystem etwas abweichen).
Wenn die Software nicht automatisch gestartet wird, doppelklicken Sie auf
„My Computer“ (Arbeitsplatz) und klicken dann mit der rechten Maustaste auf
das CD-ROM-Symbol. Dann sollte sie gestartet werden.
• Sie sehen dann „Files Currently on the CD“ (Aktuell auf der CD bendliche
Dateien) und „Digital Microscope Suite“ als Ordner. Doppelklicken Sie
zuerst darauf und dann unter den Auswahlmöglichkeiten auf „Setup“
(InstallShield Setup Launcher).
• Dann erscheint der InstallShield-Assistent. Wählen Sie dann die
Standardoptionen, „Next“ (Weiter) etc., bis „Finish“ (Fertig stellen)
erscheint. Klicken Sie darauf.
Die Software wurde jetzt richtig installiert. Sie haben jetzt das Desktop-
Symbol „Digital Microscope Suite“. Wenn nicht, wählen Sie das Programm
mit diesem Namen unter Ihren installierten Programmen aus, wenn Sie das
Digitalmikroskop verwenden wollen.
Verwendung der dIgItal MIcroScope SuIte (dMS)-
Software
Schließen Sie das USB-Kabel des Mikroskops am Computer an und starten Sie
dann DMS.
DMS enthält die grundlegende Bilderfassung und Organisation für Ihre
Fotos (Schnappschüsse) und Videos. Klicken Sie auf das DMS-Symbol, um zu
beginnen.
Page 45

8
Die Software ist sehr intuitiv und benutzerfreundlich. Sie können die
Einstellungen unter „File“ (Datei) und „Settings“ (Einstellungen) ändern.
Für das „Video Device“ (Videogerät) sollte standardgemäß „Celestron Digital
Microscope“ eingestellt sein. Wenn das nicht der Fall ist, ändern Sie es, damit
DMS richtig funktioniert.
Sie können Schnappschüsse mit der Schnappschusstaste auf dem
Mikroskop machen (nur mit Windows-Betriebssystem). Das ist auch über
die Tastatur möglich, indem Sie bei „Capture an Image“ (Bild aufnehmen)
die Eingabetaste drücken. Für Videos müssen Sie auf dem Symbol auf dem
Bildschirm Start/Stopp wählen. Bei Bildverzögerungen oder Start/Stopps
sollten Sie die Videoauflösung in den „Einstellungen“ verringern.
Messfunktion — DMS hat eine einfache Messfunktion, die den Abstand
zwischen zwei Punkten in Millimeter misst. Klicken Sie auf die Schaltfläche
„Measure“ (Messen) unten rechts am Bildschirm. Klicken Sie, um den
Anfangspunkt festzulegen, und klicken Sie noch einmal, um den Endpunkt
einzustellen. Dann wird der Abstand zwischen den beiden Punkten angezeigt.
Sie können beide Punkte einstellen, indem Sie den Pin ziehen. Um von vorn
zu beginnen, klicken Sie auf „Clear“ (Löschen).
Die Messfunktion funktioniert präzise, wenn das Mikroskop direkt über dem
Objekt steht.
Jetzt sind Sie bereit für Ihr digitales Abenteuer!
Page 46

9
pflege, wartung und garantIe
Ihr Mikroskop ist ein optisches Präzisionsinstrument, das stets mit
der erforderlichen Sorgfalt behandelt werden sollte. Wenn Sie diese
Empfehlungen zur Pflege und Wartung befolgen, erfordert Ihr Mikroskop
während seiner Lebensdauer nur sehr wenig Wartung.
• Das Mikroskop an einem trockenen, sauberen Ort aufbewahren.
• Bei Gebrauch des Mikroskops in direktem Sonnenlicht sehr vorsichtig
vorgehen, um Beschädigung des Mikroskops oder Augenverletzungen zu
verhüten.
• Niemals das Mikroskop auf die Sonne richten. Die Kamera könnte
beschädigt werden und nicht mehr funktionieren.
• Reinigen Sie die Außenächen mit einem feuchten Lappen.
• Staub mit einem Kamelhaarpinsel oder einem Luftgebläse von den
optischen Oberflächen abpusten.
• Die internen optischen Oberächen nicht zerlegen oder reinigen. Solche
Arbeiten dürfen nur von qualifizierten Technikern im Herstellungswerk oder
von anderen autorisierten Reparatureinrichtungen vorgenommen werden.
• Das Mikroskop wegen Beschädigungsgefahr nicht zerlegen oder
auseinandernehmen.
• Beim Umgang mit Objektträgern aus Glas vorsichtig vorgehen. Sie können
scharfe Kanten haben.
Ihr MIkroSkop hat eIne eIngeSchränkte
zweI-JahreS-garantIe. auf der celeStron-webSIte
www.celeStron.coM fInden SIe detaIllIerte
InforMatIonen zu allen celeStron-MIkroSkopen.
Page 47

10
Münze mit 20x
Platine mit 30x
Objektträger mit 25x
Geldschein mit 20x
Stoff mit 20x
Page 48

www.celestron.com
FCC-Erklärung
Dieses Gerät entspricht Teil 15 der FCC-Bestimmungen. Der Betrieb unterliegt den
folgenden zwei Bedingungen:
1. Das Gerät darf keine schädlichen Störungen verursachen, und
2. Dieses Gerät muss alle empfangenen Störungen annehmen, einschließlich Störungen,
die einen unerwünschten Betrieb verursachen.
2835 Columbia Street • Torrance, CA 90503 U.S.A.
Tel: 310.328.9560 • Fax: 310.212.5835
©2011 Celestron
Alle Rechte vorbehalten Für Benutzer von mindestens
Gedruckt in China • 01-11 13 Jahren entwickelt und bestimmt.
Page 49

MiniMicroscopio
digtale portatile
MANUALE DI ISTRUZIONI
MODELLO N. 44301
ITALIANO
Page 50

1
IntroduzIone
Congratulazioni per l’acquisto di un microscopio Celestron. Il microscopio
è uno strumento ottico di precisione realizzato con materiali di qualità per
assicurarne la lunga durata, ed è concepito perché si possa goderne per tutta
la vita con una manutenzione minima.
Questo microscopio può essere usato praticamente per tutto ciò per cui
vengono usati i tradizionali microscopi: hobbistica, istruzione, laboratori
medici, ispezione industriale, applicazioni di ingegneria, insegnamento,
studenti, applicazioni scientifiche, studi medici, agenzie di ordine pubblico,
prove governative ed uso generale da parte dei consumatori.
Prima di cercare di usare il microscopio, vi preghiamo di leggere le istruzioni e
di acquistare dimestichezza con le funzioni e le operazioni dello strumento per
facilitarvene l’uso. Per individuare le varie parti esaminate in questo manuale,
consultate il diagramma del microscopio.
Il microscopio offre potenze da 15x a 30x (potenze con un monitor da 19
pollici). È perfetto per esaminare oggetti solidi come monete, francobolli,
pietre, resti di oggetti antichi, insetti, piante, pelle, pietre preziose, schede di
circuito, vari materiali e molti altri oggetti. Si possono anche esaminare vetrini
di preparati.
Con il software in dotazione, potete osservare le immagini ingrandite o
catturare filmati o scattare istantanee con i sistemi operativi Microsoft
Windows 7 XP e Vista. Potete anche usare il microscopio con altro software
per l’acquisizione di immagini di cui potreste disporre su sistemi operativi
Windows 7, XP e Vista. Se si sta usando un MAC, si possono acquisire filmati
e istantanee, ma per farlo occorre software specifico per il MAC (come una
Page 51
2
combinazione di iChat con Photobooth, e così via). Sarà anche necessario
disporre di un lettore di CD/DVD e di una porta USB disponibile.
Nota: questo prodotto è stato progettato e concepito per l’uso da parte di
persone di almeno 13 anni di età!
Cavo
USB
Pulsante
per le
istantanee
Microscopio
Anello
di messa
a fuoco
Page 52

3
datI tecnIcI Modello n. 44301
Potenza Da 15 a 30x su un monitor da 19 pollici
Cavo USB 2.0 per l’alimentazione da un computer
Illuminatore 6 LED bianchi
Fotocamera/ Sensore CMOS 1.3 MP – 1280 x 1024 pixel
telecamera digitale (istantanee sino a 5 MP con interpolazione)
Peso e dimensioni 82 g (2,9 once) 89 mm x 32 mm (3,5 x 1,25 pollici)
Accessori standard inclusi con il microscopio
• Fotocamera digitale con cavo USB - incorporata
• Illuminatore a LED - incorporato
• CD-ROM – Suite per microscopio digitale (Digital Microscope Suite)
• Manuale di istruzioni
Page 53
4
approntaMento del MIcroScopIo
1. Estrarre con cautela il microscopio e il supporto dalla confezione e
sistemarli su un tavolo, una scrivania o un’altra superficie piana.
2. Togliere la borsa di plastica che copre il microscopio.
funzIonaMento del MIcroScopIo
Visualizzazione di oggetti e vetrini — Si possono
visualizzare monete, francobolli, banconote, pietre
preziose, piante, alimenti, schede di circuito e molte
altre cose. Prima di procedere, occorre leggere qui
sotto le istruzioni sulla messa a fuoco, sulla potenza
di ingrandimento e sull’illuminazione.
Messa a fuoco e Modifica della potenza di
ingrandimento — Quando il microscopio viene
messo direttamente sopra l’oggetto o il vetrino,
usare l’anello di messa a fuoco per ottenere una
messa a fuoco nitida. Occorre un po’ di tempo per
abituarsi ad usare l’anello di messa a fuoco – ruotarlo
oltre il punto focale e poi ritornare indietro notando
come ottenere la migliore posizione di focalizzazione.
Dopo alcuni usi sarà facile trovare la posizione di messa a fuoco più nitida.
1. Cominciare sempre con la potenza d’ingrandimento maggiore (30x) che
si ottiene quando l’anella di messa a fuoco è sopra/sull’oggetto. Il fuoco
dovrebbe essere nitido quando si usa l’unità per la prima volta ma, se non
lo fosse, ruotare leggermente l’anello di messa a fuoco sino a quando si
ottiene un’immagine nitida.
Page 54

5
2. Se si tiene il microscopio leggermente sopra l’oggetto, la potenza
diminuisce gradualmente fino a 15x man mano che ci si allontana (fino a
circa 14 mm). Ad ogni posizione occorrerà rimettere a fuoco.
Illuminazione — I LED del microscopio vengono accesi automaticamente
quando il cavo USB viene inserito nella porta USB del computer. Non c’è
regolazione dell’illuminazione su questo microscopio, ma si potrebbe essere
in grado di posizionare il microscopio sopra l’oggetto che si sta visualizzando
ad angolazioni (o posizioni) diverse per ottenere l’illuminazione ottimale.
uSo del MIcroScopIo per la VISualIzzazIone
e/o la creazIone dI IMMagInI
Prima di usare il microscopio per la visualizzazione sullo schermo o per la
creazione di immagini del computer, occorre assicurarsi che il driver venga
riconosciuto dal computer. Il microscopio è un dispositivo di tipo “Plug and
Play” in cui il computer dovrebbe riconoscere automaticamente il tipo di
driver sui sistemi operativi Microsoft Windows 7, XP e Vista oltre che sui
sistemi operativi Apple MAC versione 10.4.9 e successive.
Inserire il cavo USB del dispositivo di imaging nella porta USB del computer.
Il messaggio sullo schermo sarà lievemente diverso da computer a computer.
Per esempio, su alcuni sistemi operativi Vista, quando si inserisce il dispositivo
il messaggio potrebbe essere “Installazione driver di dispositivo in corso” e
poco dopo si potrebbe visualizzare il messaggio “È ora possibile utilizzare i
dispositivi”. Basta seguire le eventuali istruzioni mostrate sullo schermo.
Occorre installare il software Digital Microscope Suite (sul sistema operativo
Windows) per poter effettivamente visualizzare e/o creare immagini. Prima
di poterlo fare si dovrà scollegare il cavo USB e lasciarlo scollegato sino a
quando l’installazione non è terminata. Se lo si desidera, si può anche usare
Page 55

6
la maggioranza degli altri software per l’acquisizione di immagini/foto di cui si
disponga sul proprio sistema Windows.
Per usare il microscopio con i sistemi operativi del MAC, è necessario
avere installato la versione 10.4.9 o una versione più recente; si deve
usare software per la cattura di immagini/foto compatibile con il MAC
(iChat con Photo Booth, ecc.). Per trovare Photo Booth sul MAC,
andare sul disco fisso e fare clic su Applicazioni. Dall’elenco delle
applicazioni, scegliere Photo Booth. Se vi è una fotocamera collegata
al computer, Photo Booth apparirà come scelta predefinita. Occorrerà
cambiarlo con “Celestron Microscope” (Microscopio Celestron).
A questo punto si potranno scattare foto con il microscopio premendo
il pulsante di cattura. Notare: molte tastiere dei computer Mac sono
dotate di porta USB. Il microscopio non funzionerà se è collegato
con tali porte perché esse non possiedono alimentazione sufficiente.
Occorre collegarsi a una porta USB situata sull’armadietto
del computer.
Quando si osservano o si creano immagini, si può cambiare l’orientamento
dell’immagine sullo schermo del computer ruotando il microscopio nella
posizione desiderata.
InStallazIone del Software dIgItal MIcroScope SuIte
(dMS)
Il microscopio ha in dotazione il CD-ROM del software Digital Microscope
Suite, che permette di usare il microscopio a fini di visualizzazione e creazione
di immagini insieme al computer quando si usano i sistemi operativi
Microsoft Windows.
Prima di installare il software, staccare il cavo USB della fotocamera digitale
dal computer e non collegarlo fino al termine dell’installazione del software.
Page 56

7
Inserire il CD-ROM nell’unità apposita e il software dovrebbe avviarsi
automaticamente. Appariranno messaggi (ogni sistema operativo mostra
qualcosa di diverso) che guidano l’utente attraverso il processo
di installazione.
Se il software non si avvia automaticamente, fare doppio clic su “Il mio
computer” e poi fare clic con il pulsante destro del mouse sull’icona del CD-
ROM: a questo punto il software dovrebbe avviarsi.
• Si vedranno i “File attualmente sul CD” e si noterà “Digital Microscope
Suite” come cartella. Fare doppio clic su “Digital Microscope Suite” e
poi fra le scelte presentate fare doppio clic su “Setup” (Installazione)
(InstallShield Setup Launcher).
• Appare quindi l’installazione guidata InstallShield. Selezionare quindi le
scelte predenite, “Next” (Avanti) e così via, nché non si vede “Finish”
(Fine); fare clic su di esso.
Il software è stato ora installato correttamente. Si avrà un’icona sul desktop
chiamata “Digital Microscope Suite”; nel caso l’icona non fosse presente,
quello sarà comunque il programma da selezionare fra i programmi installati
quando si vuole usare il microscopio digitale.
uSo del Software dIgItal MIcroScope SuIte (dMS)
Inserire il cavo USB del microscopio nel computer e poi avviare il DMS.
DMS contiene funzioni di base per catturare e organizzare le immagini
(istantanee) e i video. Per iniziare fare clic sull’icona di DMS.
Il software è facile da usarsi e il suo uso è intuitivo. Si possono cambiare le
impostazioni usando le voci File e Settings (Impostazioni) - il Video Device
(dispositivo video) dovrebbe avere come impostazione predefinita “Celestron
Page 57

8
Digital Microscope”, ma in caso contrario cambiarla in modo che il DMS
possa funzionare adeguatamente.
Si possono scattare foto istantanee usando il pulsante dell’istantanea sul
microscopio (solo sistemi operativi Windows) oppure si può usare la tastiera
facendo clic su “Capture an Image” (cattura un’immagine). Per i video si
dovrà usare l’icona di avvio/arresto mostrata sullo schermo. Se l’immagine
ritarda o si ferma/riparte, si dovrà ridurre la risoluzione video in
“Settings” (Impostazioni).
Funzione di misurazione — Il DMS dispone di una semplice funzione di
misurazione che misura la distanza fra due punti in millimetri. Fare clic sul
pulsante “Measure” (Misura) nella parte inferiore destra dello schermo. Fare
clic dove si desidera avere il proprio punto iniziale e poi fare clic di nuovo per
impostare il punto nale, e questo visualizzerà la distanza fra i due punti. Si
può regolare uno o l’altro punto trascinando il pin. Per ricominciare, si può
fare clic su “Clear” (Cancella).
La funzione di misurazione opera in modo accurato quando il microscopio è
situato direttamente sopra l’oggetto.
Ora si è pronti ad iniziare la propria avventura digitale!
Page 58

9
cura, ManutenzIone e garanzIa
Questo microscopio è uno strumento ottico di precisione e va trattato sempre
con cura. Seguire questi suggerimenti per la cura e la manutenzione per
assicurare che il microscopio richieda pochissima manutenzione nel corso
della sua durata utile.
• Conservare il microscopio in un luogo pulito e asciutto.
• Fare molta attenzione se si usa il microscopio alla luce diretta del sole, per
evitare danni al microscopio o ai propri occhi.
• Non puntare mai il microscopio verso il sole, per evitare che la fotocamera
venga danneggiata e smetta di funzionare.
• Pulire le superci esterne con un panno umido.
• Rimuovere la polvere dalle superci ottiche con una spazzolina di setole di
cammello o una bomboletta di aria compressa.
• Non smontare mai né pulire le superci ottiche interne. Questa operazione
va eseguita da tecnici qualificati presso la fabbrica o presso altre strutture
di riparazione autorizzate.
• Non smontare né aprire il microscopio, onde evitare danni.
• Fare attenzione quando si manipolano vetrini di preparati, in quanto i bordi
possono essere taglienti.
Il MIcroScopIo è coperto da una garanzIa lIMItata dI due
annI. per InforMazIonI dettaglIate Su tuttI I MIcroScopI
celeStron, VISItare Il SIto web dI celeStron all’IndIrIzzo
www.celeStron.coM.
Page 59

10
Moneta a 20x
Scheda di circuito a
30x
Vetrino di preparato a 25x
Banconota a 20x
Tessuto a 20x
Page 60

www.celestron.com
Dichiarazione FCC
Questo dispositivo risulta conforme alla Parte 15 delle norme FCC. Il funzionamento è
soggetto alle seguenti due condizioni:
1. Questo dispositivo non può causare interferenze dannose, e
2. Questo dispositivo deve accettare qualsiasi interferenza ricevuta, comprese le
interferenze che potrebbero causare un funzionamento indesiderato
2835 Columbia Street • Torrance, CA 90503 U.S.A.
Tel: 310.328.9560 • Fax: 310.212.5835
©2011 Celestron
Tutti i diritti sono riservati Progettato e concepito per
Stampato in Cina • 01-11 persone di almeno 13 anni di età.
 Loading...