

Page 1
127AZ
Quick Setup Guide
ENGLISH
ITEM #22453
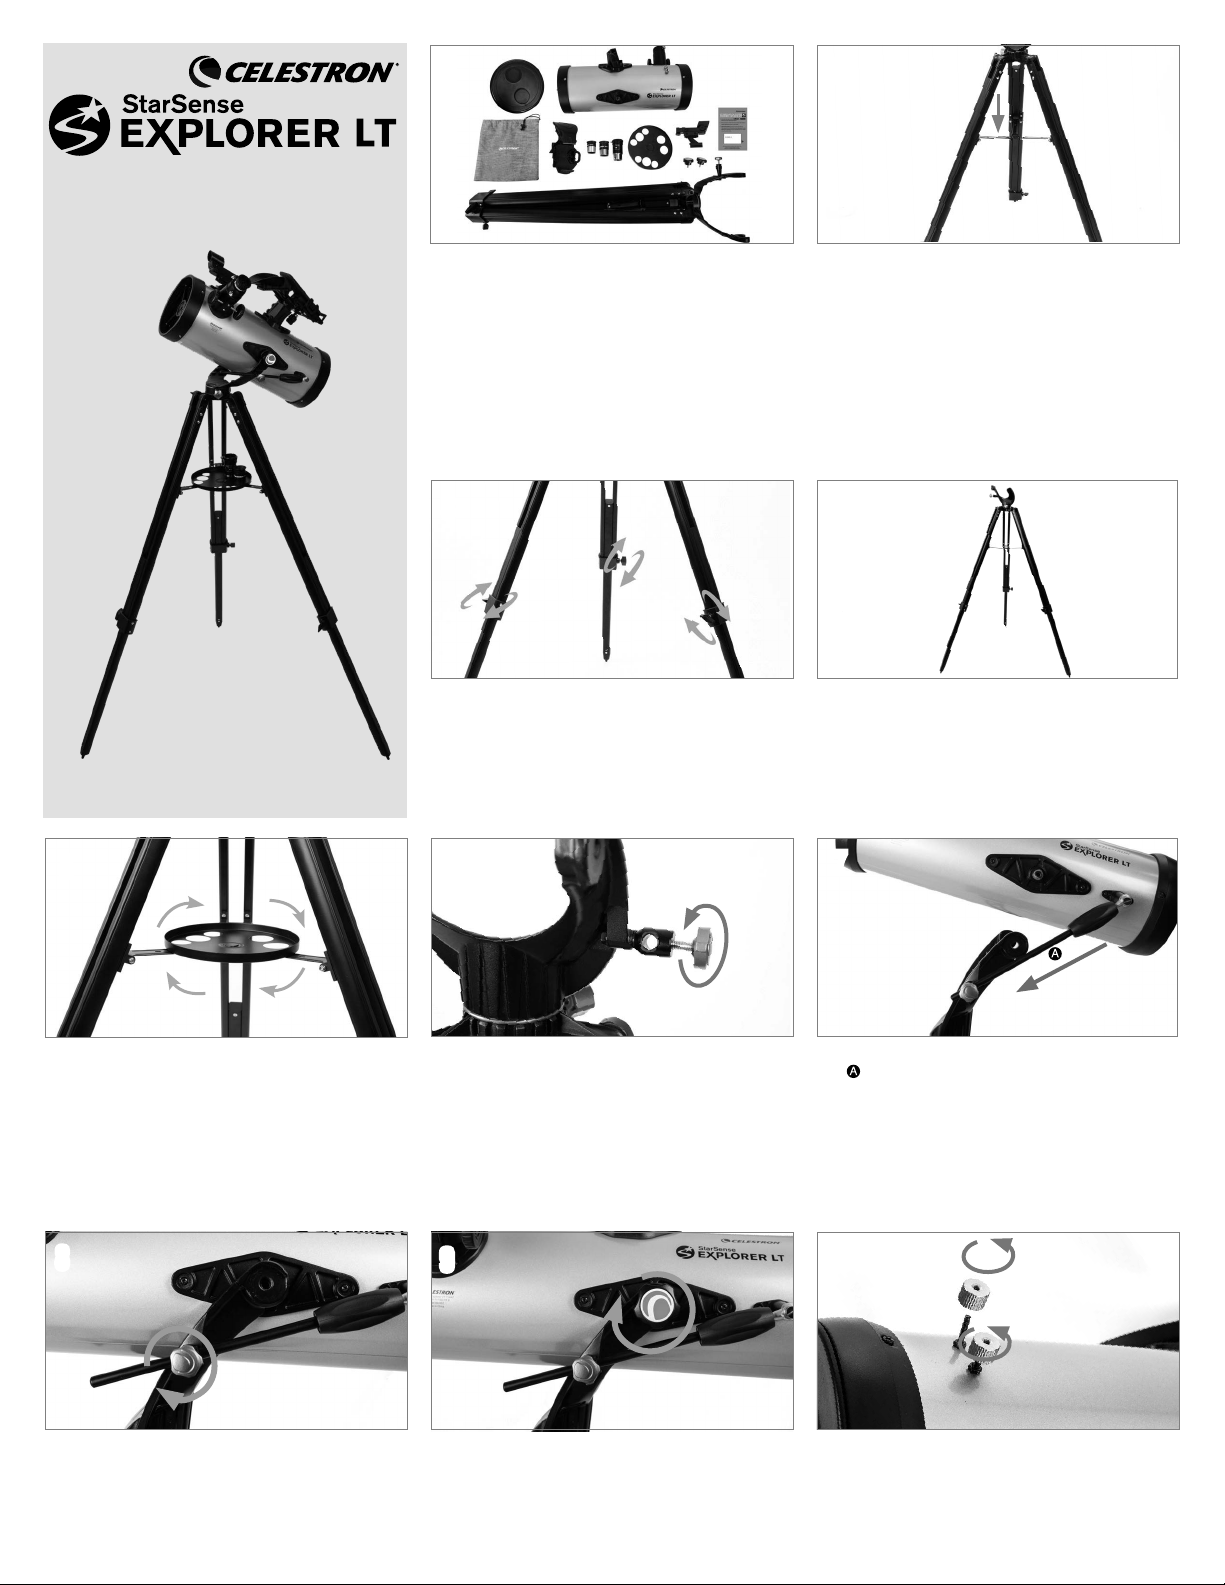
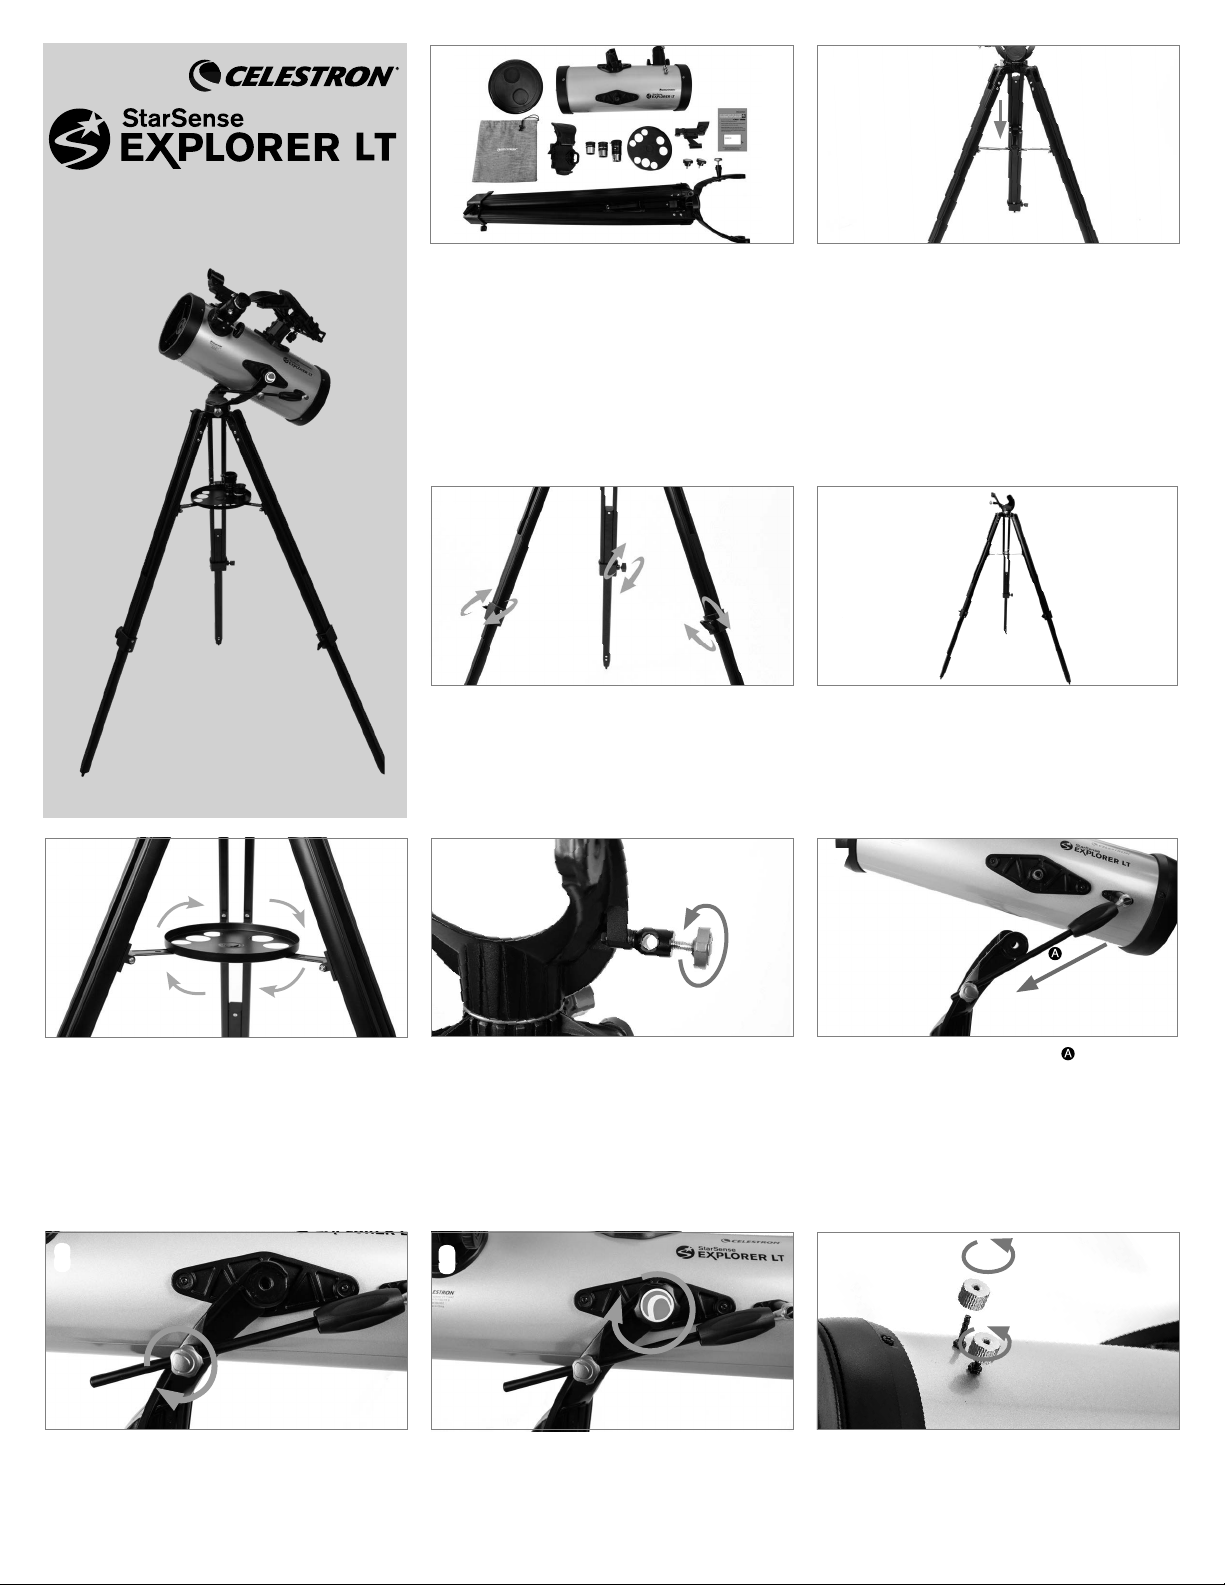
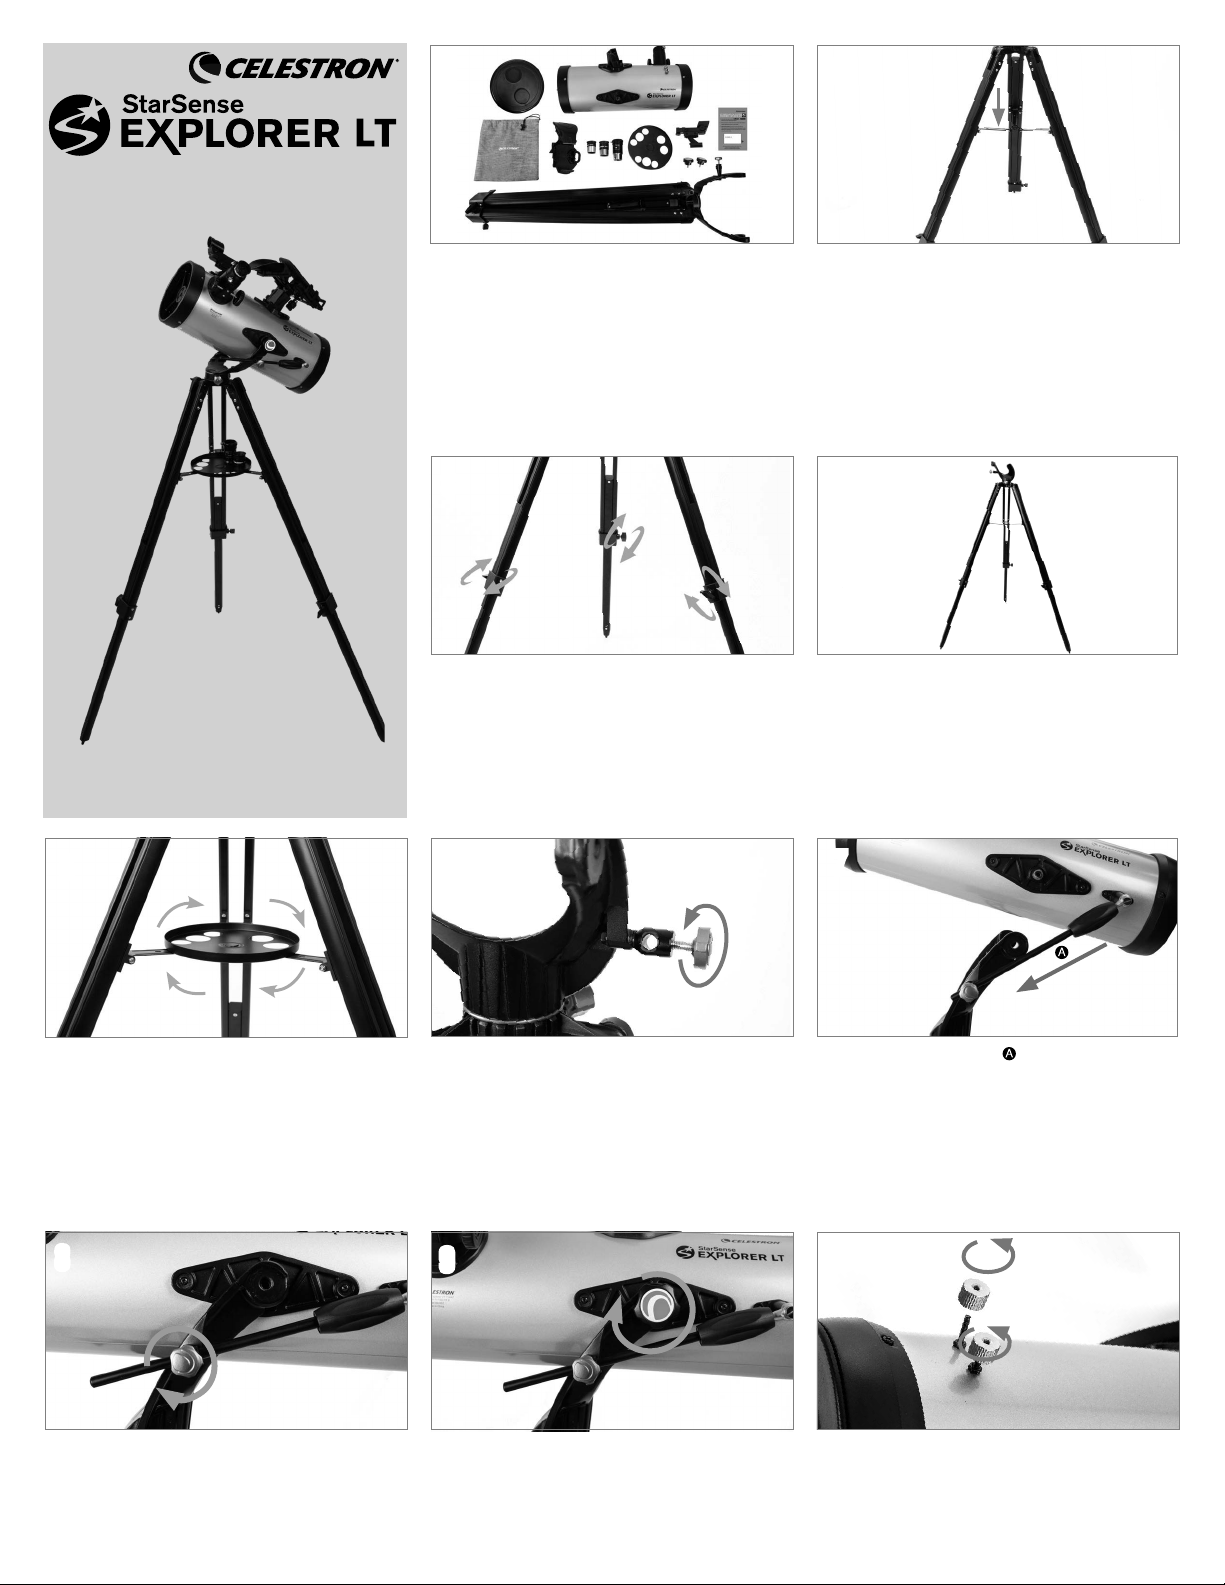
1
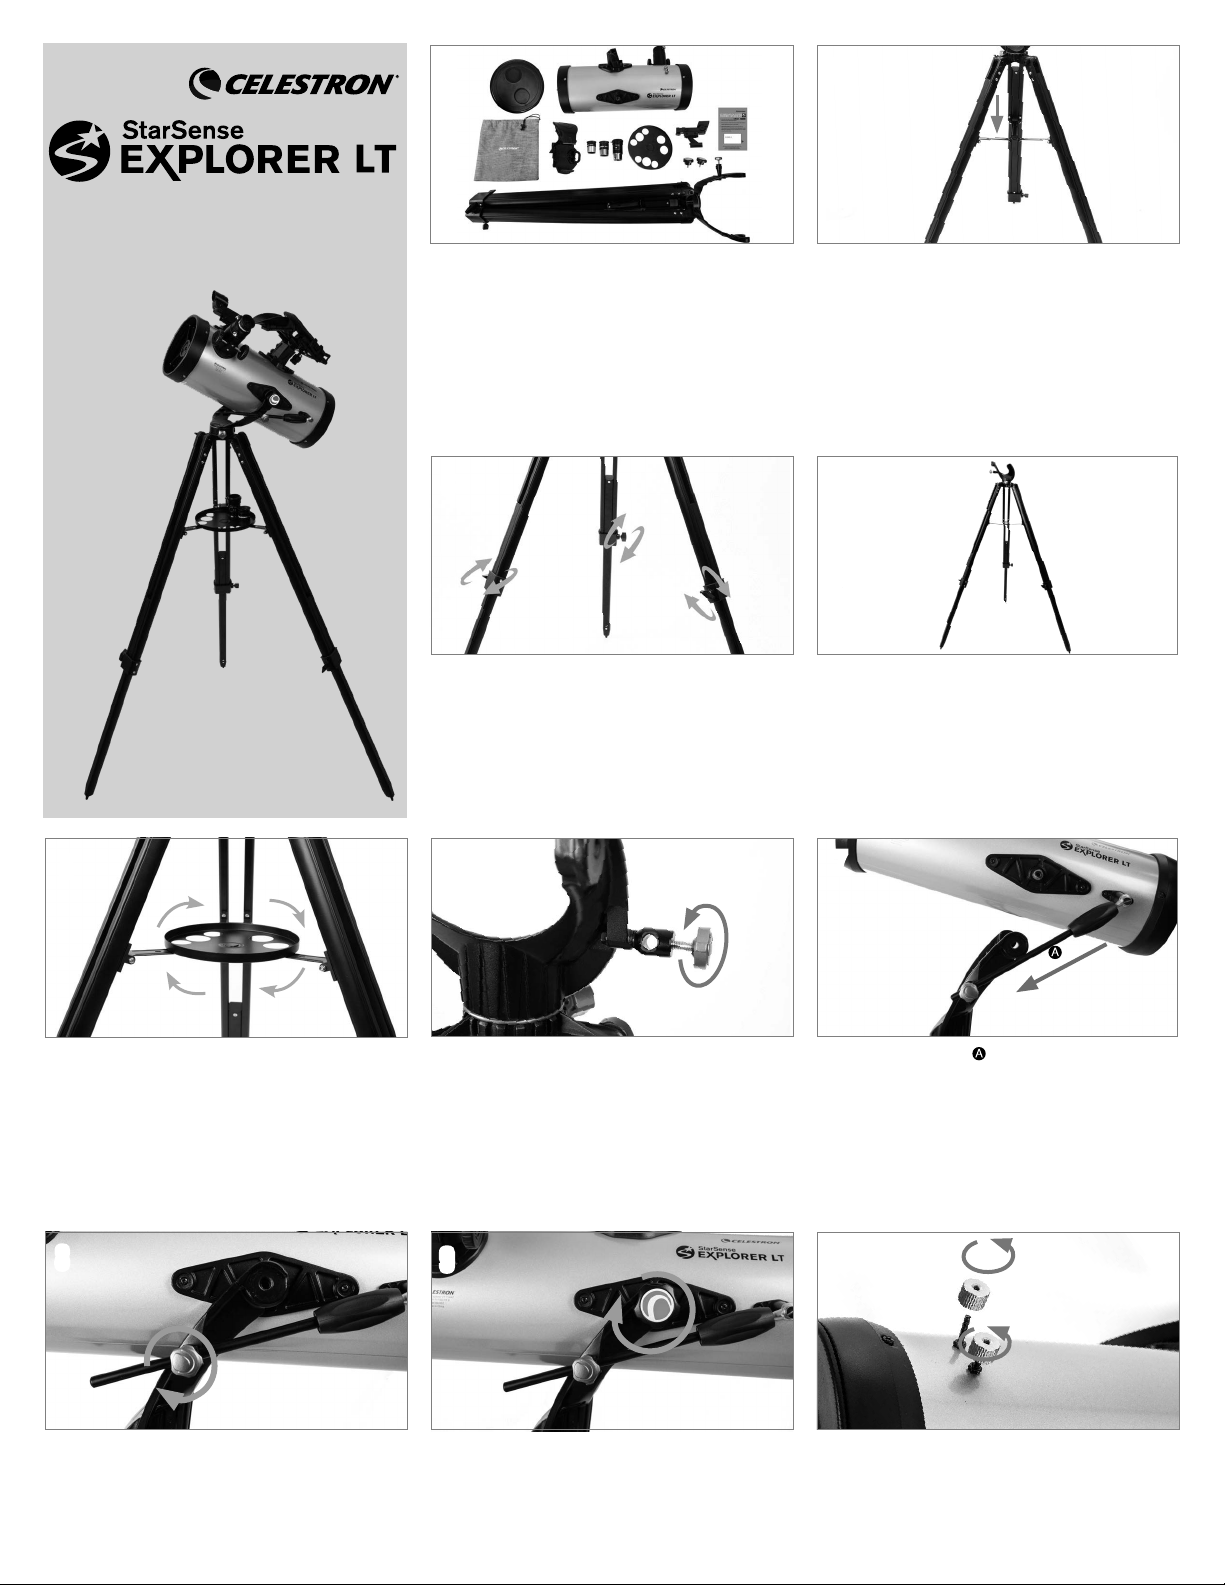
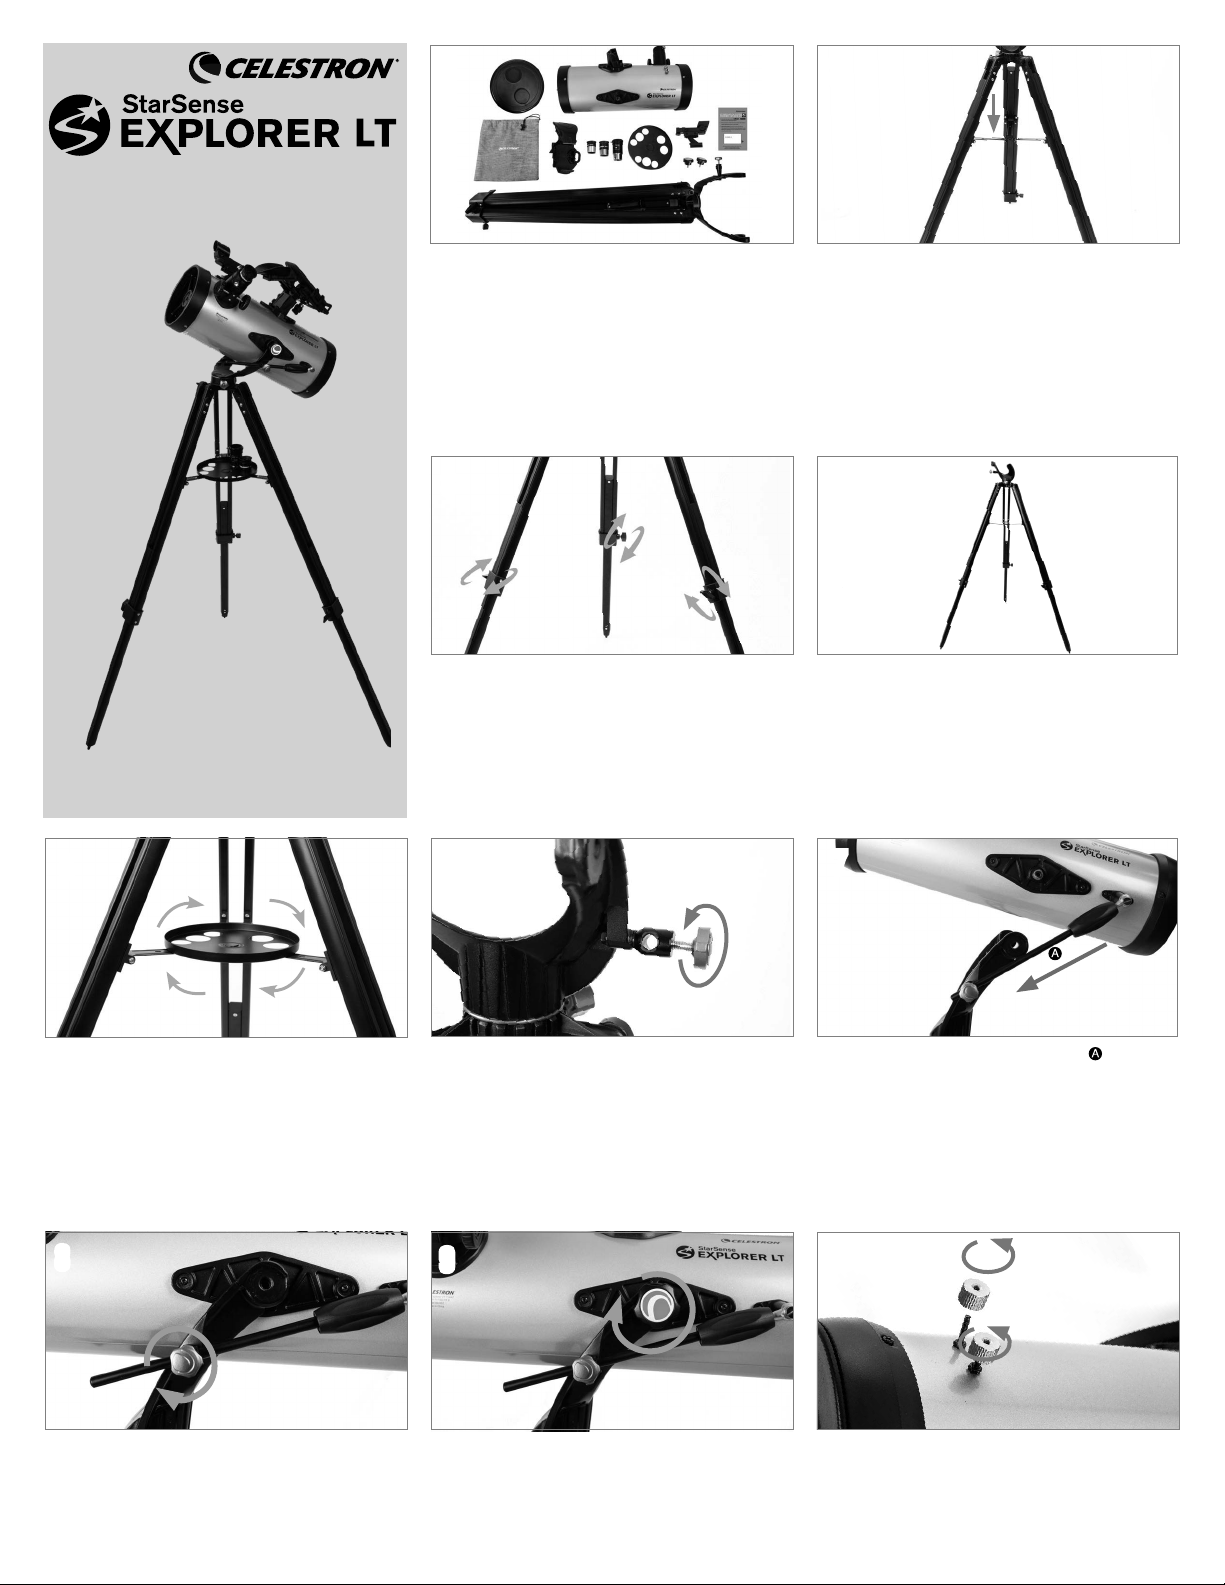
Unpack your telescope and verify that all parts
are present. Your StarSense Explorer LT includes:
a telescope tube with altitude slow motion rod
attached, a lens cap, an accessory bag, a tripod
with alt-azimuth yoke mount and center leg brace
attached, two tube mounting screws, a StarSense
smartphone dock, two eyepieces, a 2x Barlow
lens, an eyepiece accessory tray, a StarPointer
finderscope and StarSense Explorer app code card.
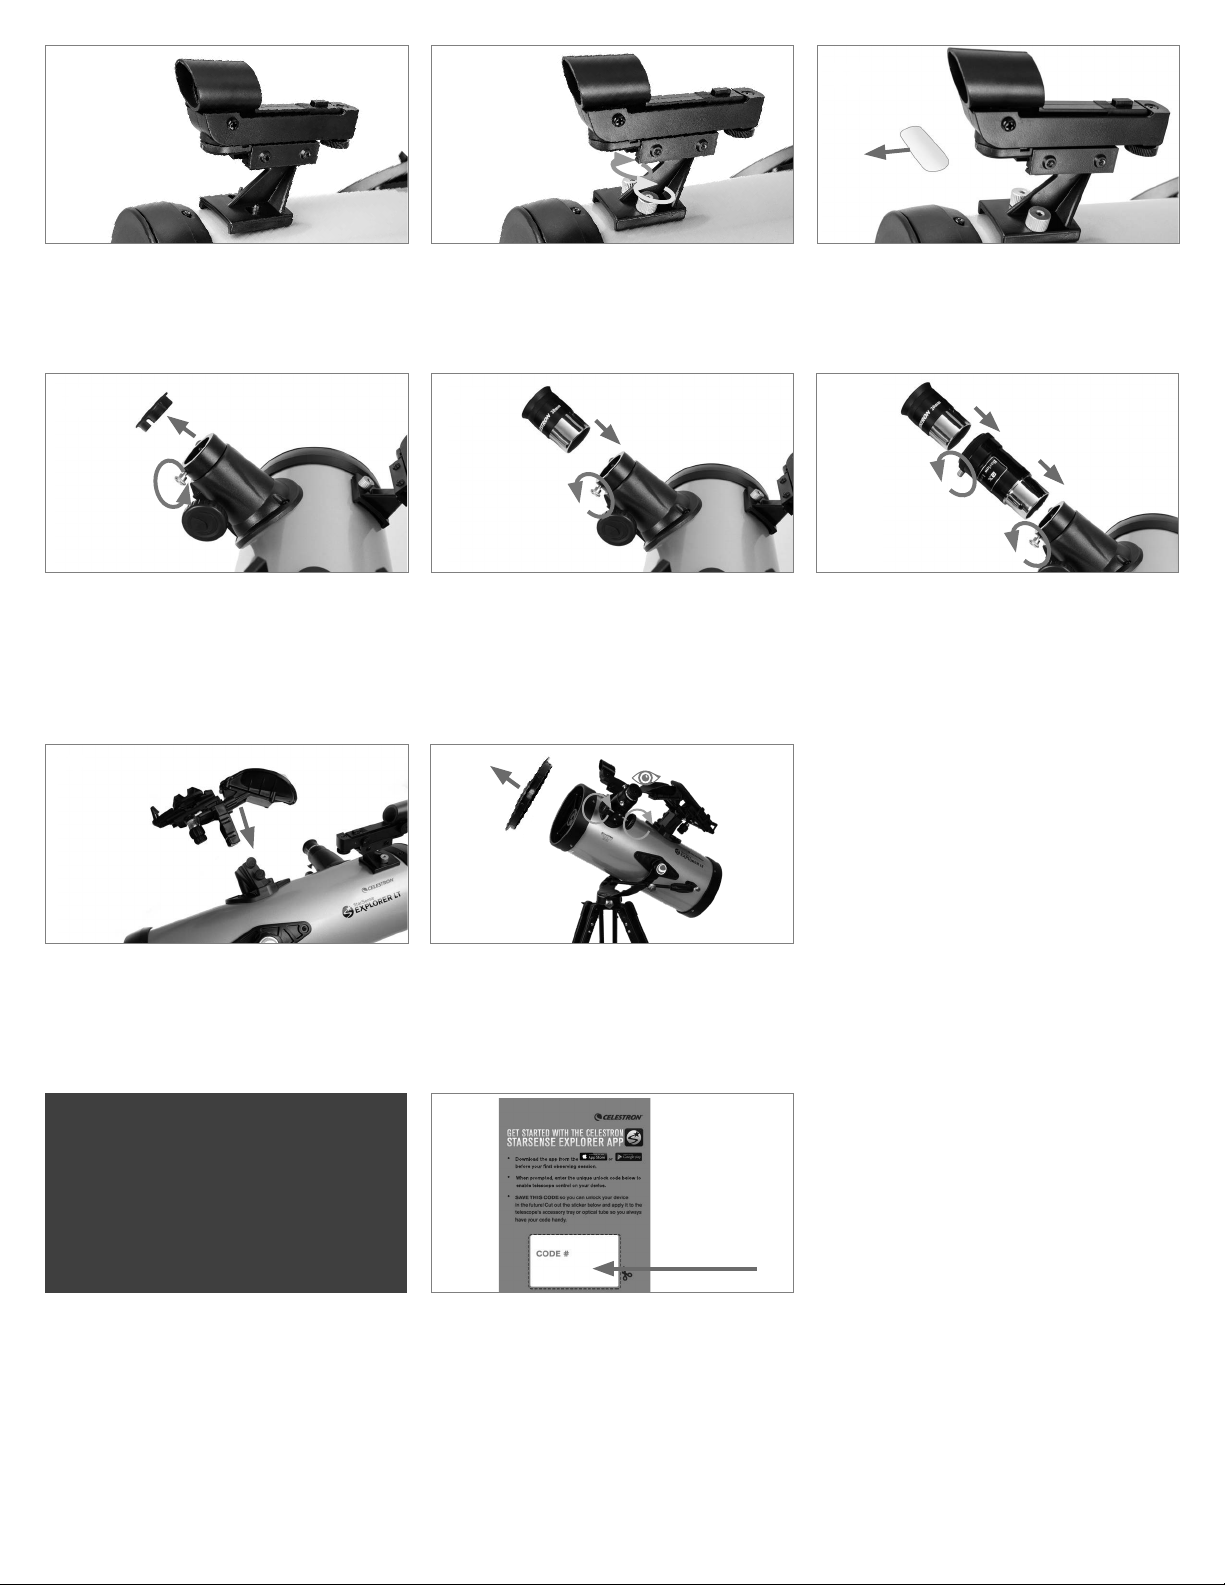
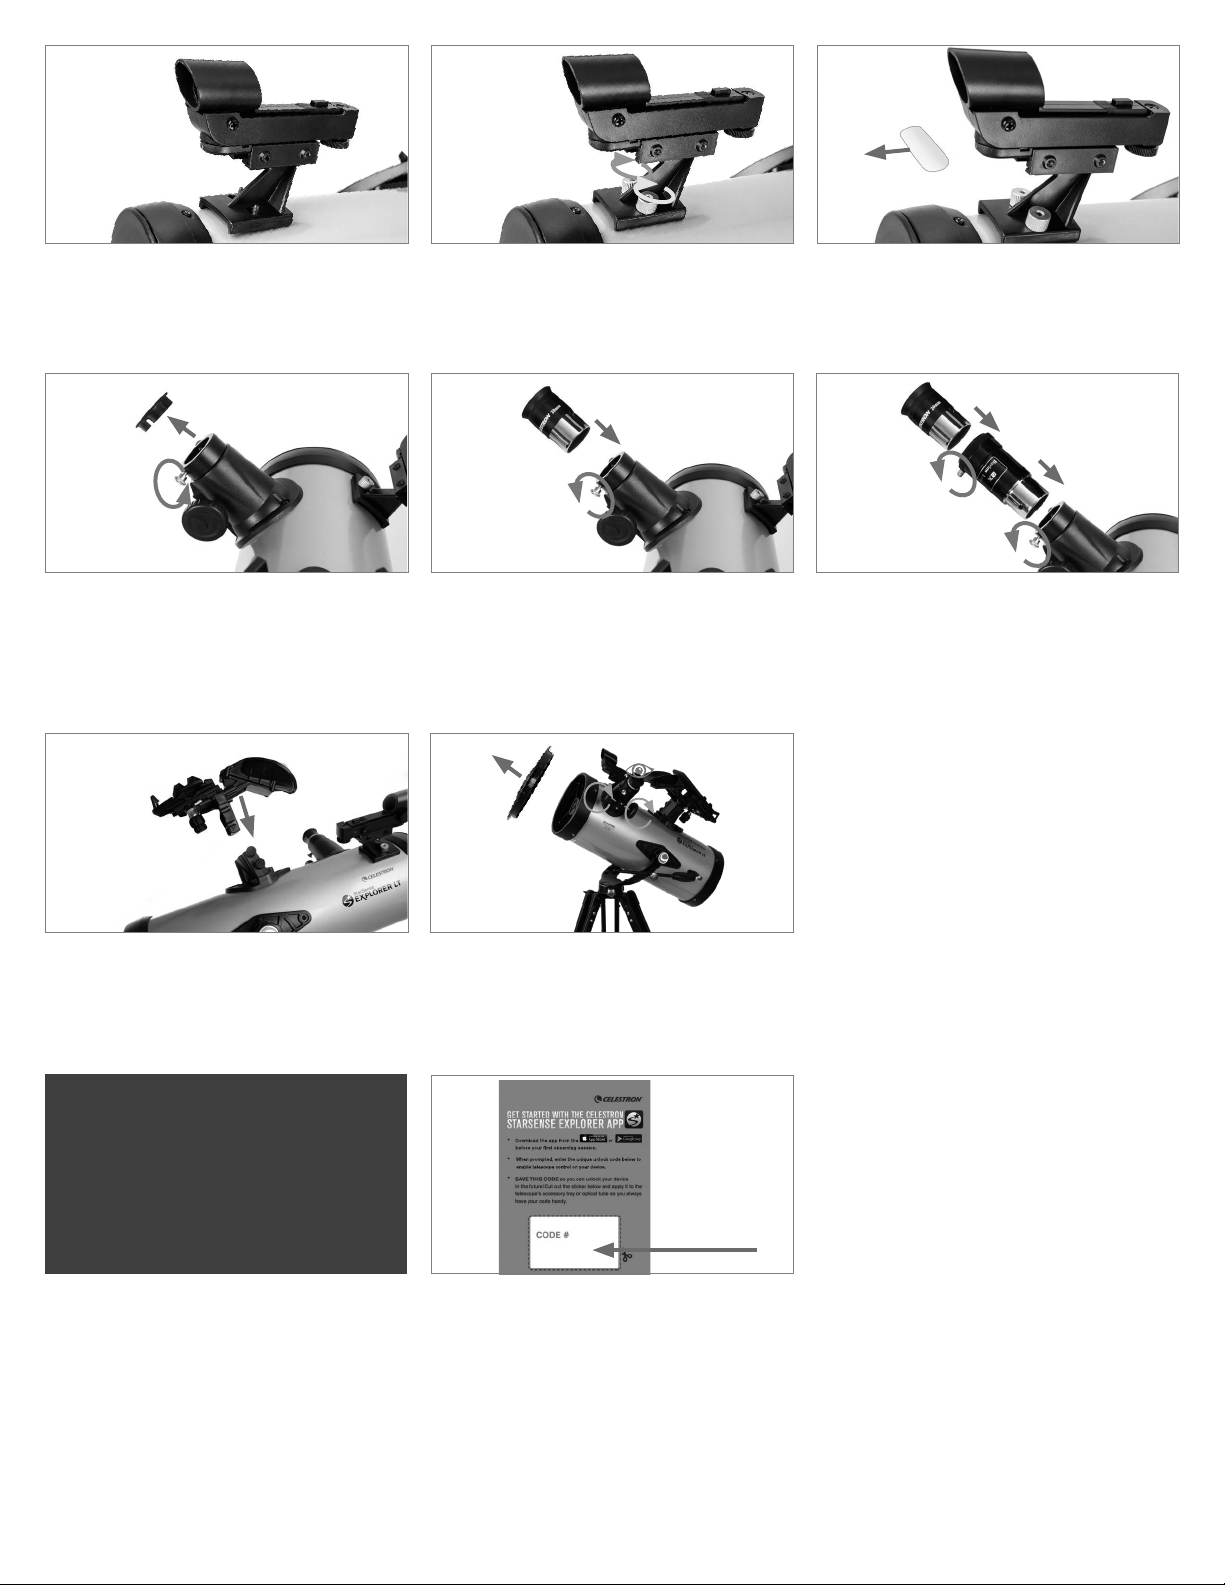
2
To set up the tripod, spread the legs outward until
they are fully extended and push down the center
leg brace.
5
Place the eyepiece accessory tray on top of the
tripod’s center leg brace. Thread the tray into the
threaded hole in the center of the leg brace until it
is fully seated.
NOTE:
If necessary, rotate the accessory tray
counterclockwise until the accessory holes
are not covered by the leg brace arms as
shown here.
3
Extend the center portion of each of the three tripod
legs down about 6 to 12 inches. Use the tightening
screw on each leg to secure the extended leg in
place.
6
Loosen the knob on the altitude rod guide on the
side of the yoke mount so the hole is unobstructed.
4
Check to ensure that all three legs are the same
height once extended to provide a level platform for
the telescope.
7
Slide the altitude rod into the rod guide on the
mount and lower the altitude hubs on the telescope
tube into the cradles on the top of each yoke arm.
8
Tighten the altitude rod guide screw to hold the
telescope in place.
9
Insert the two tube mounting screws through the
yoke mount and into the hubs on the telescope tube
to secure it in place.
10
To install the finderscope, remove the two silver
nuts from the threaded posts on the top of the tube,
near the focuser.
ENGLISH | 1
Page 2
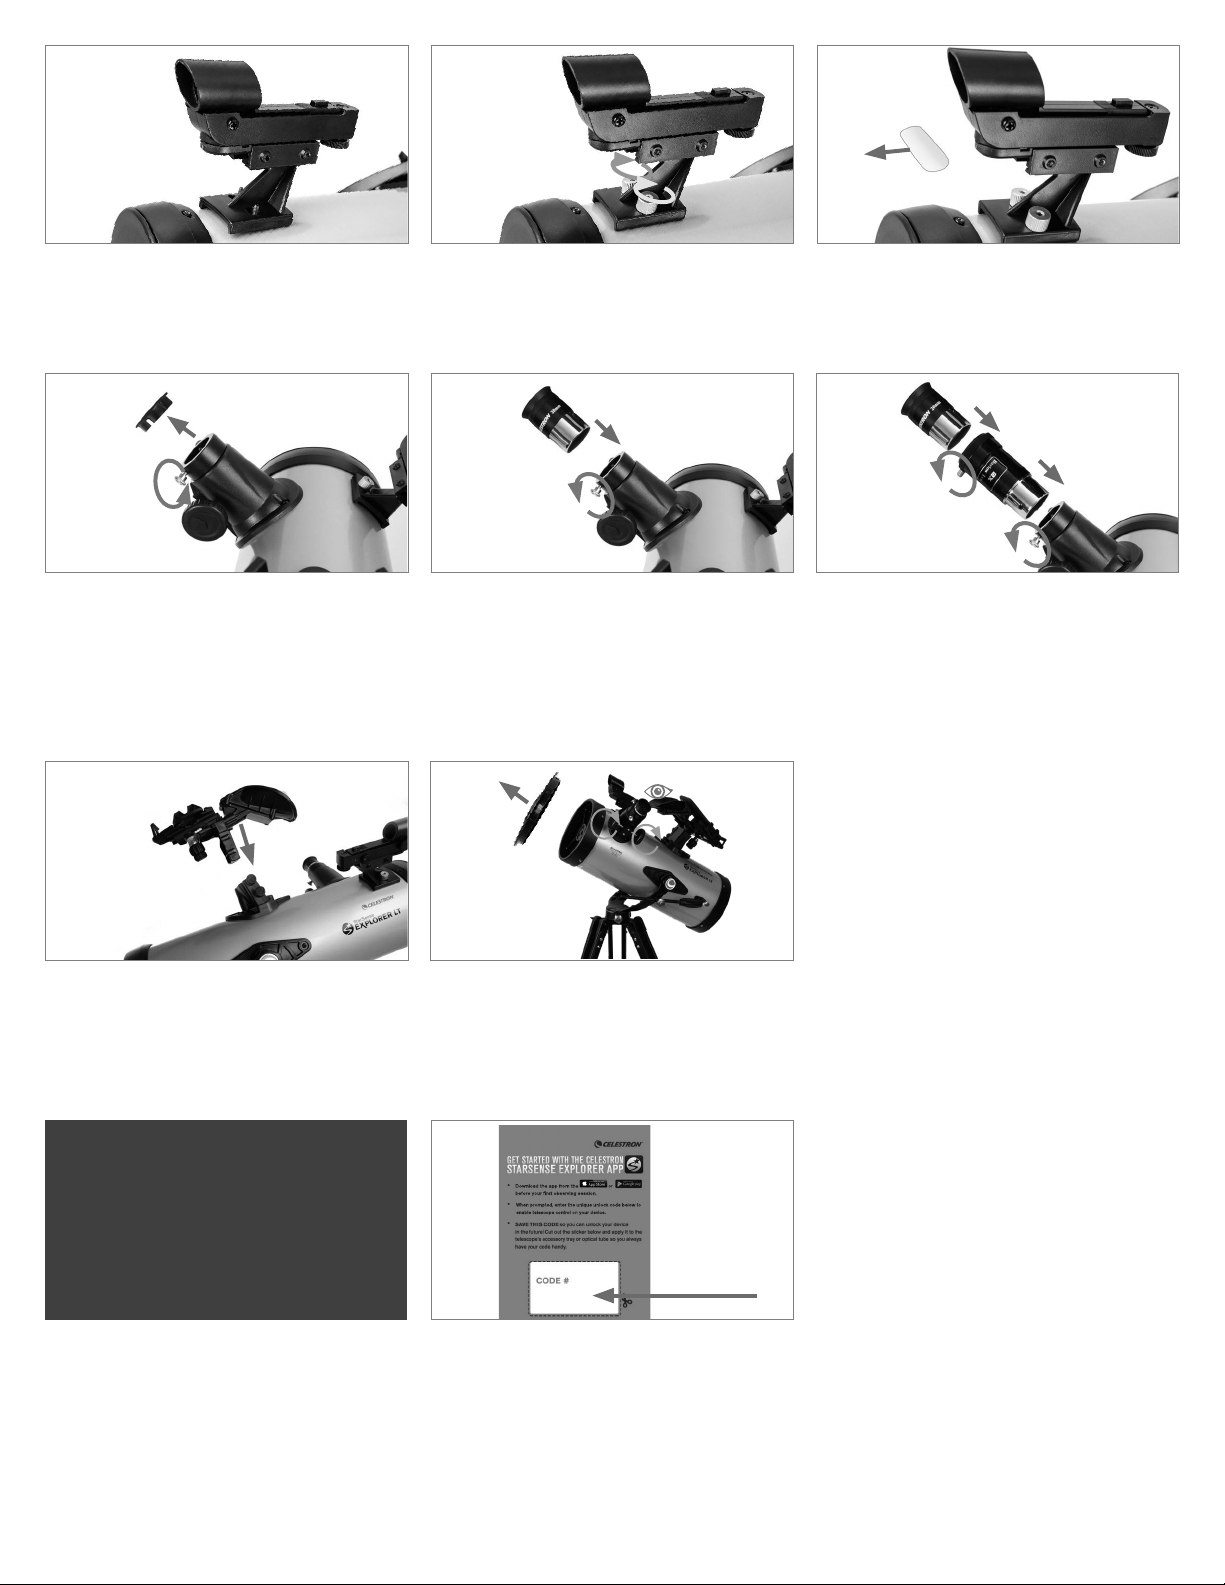
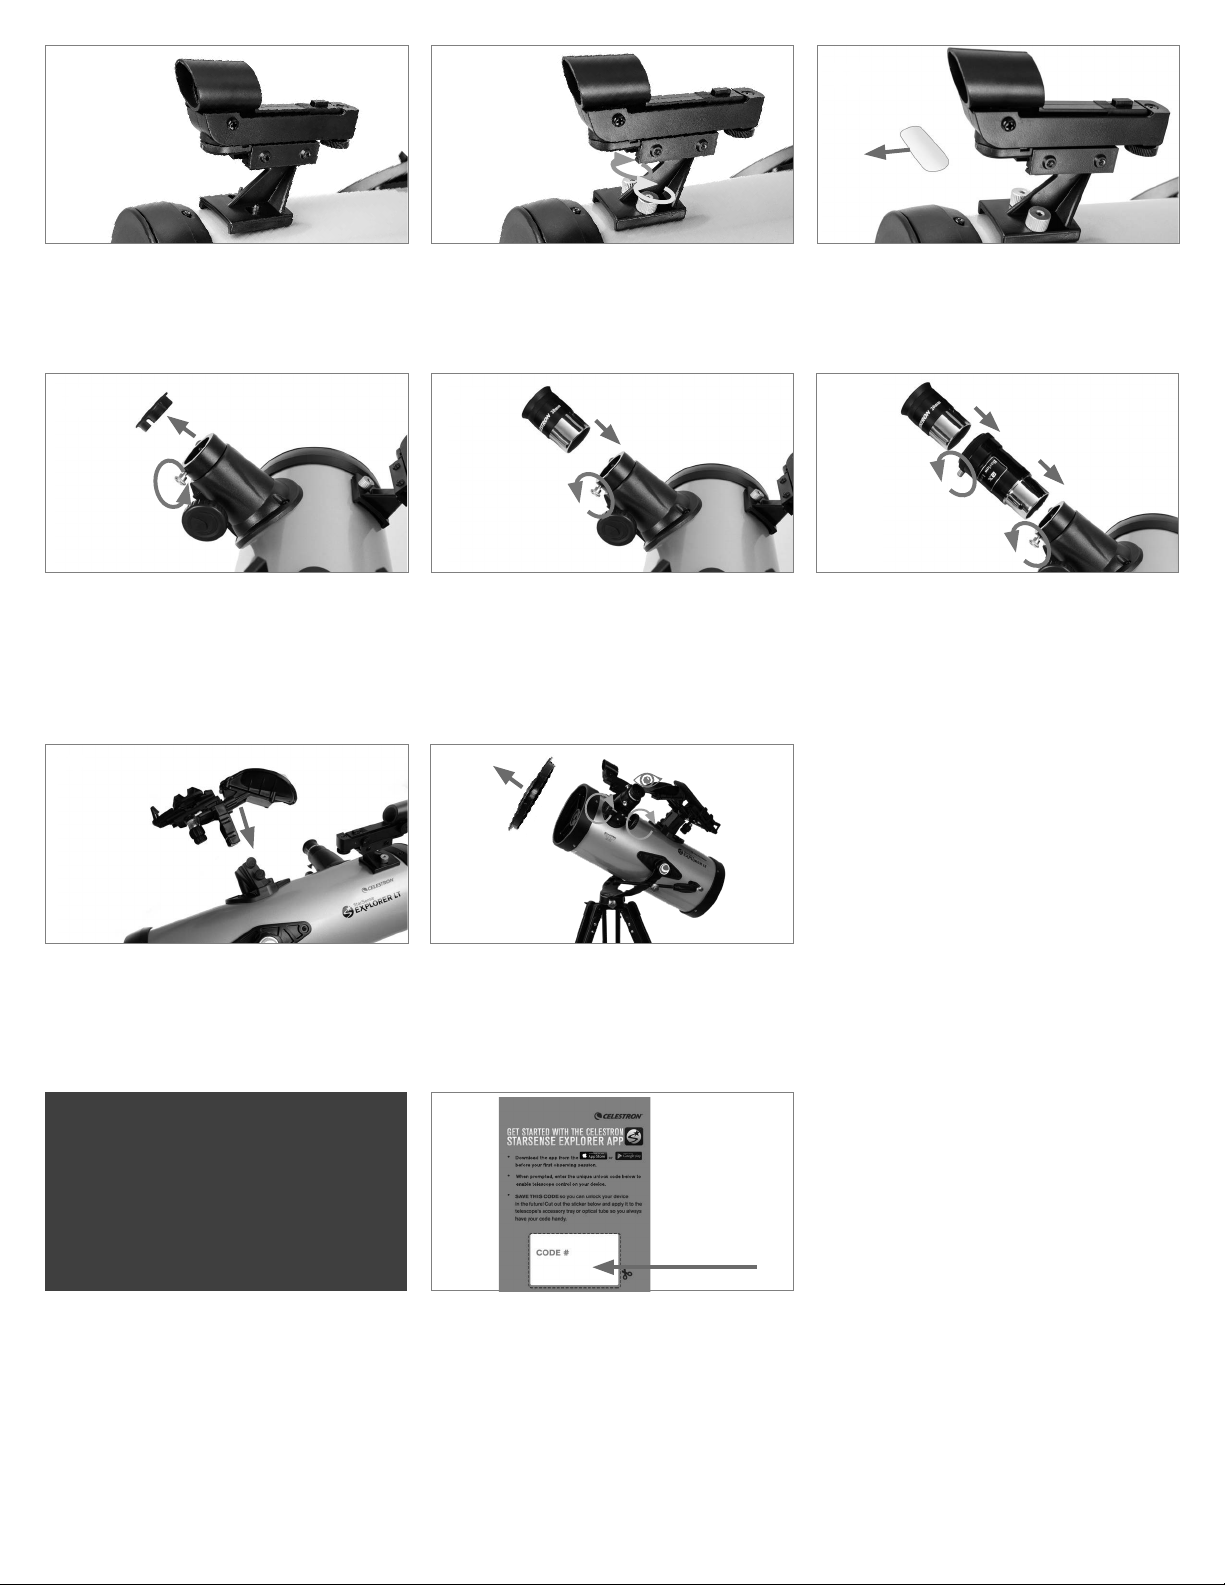
Download the app from the
before your first observing session
.
or
When prompted, enter the unique unlock code below to
enable telescope control on your device.
11 13
12
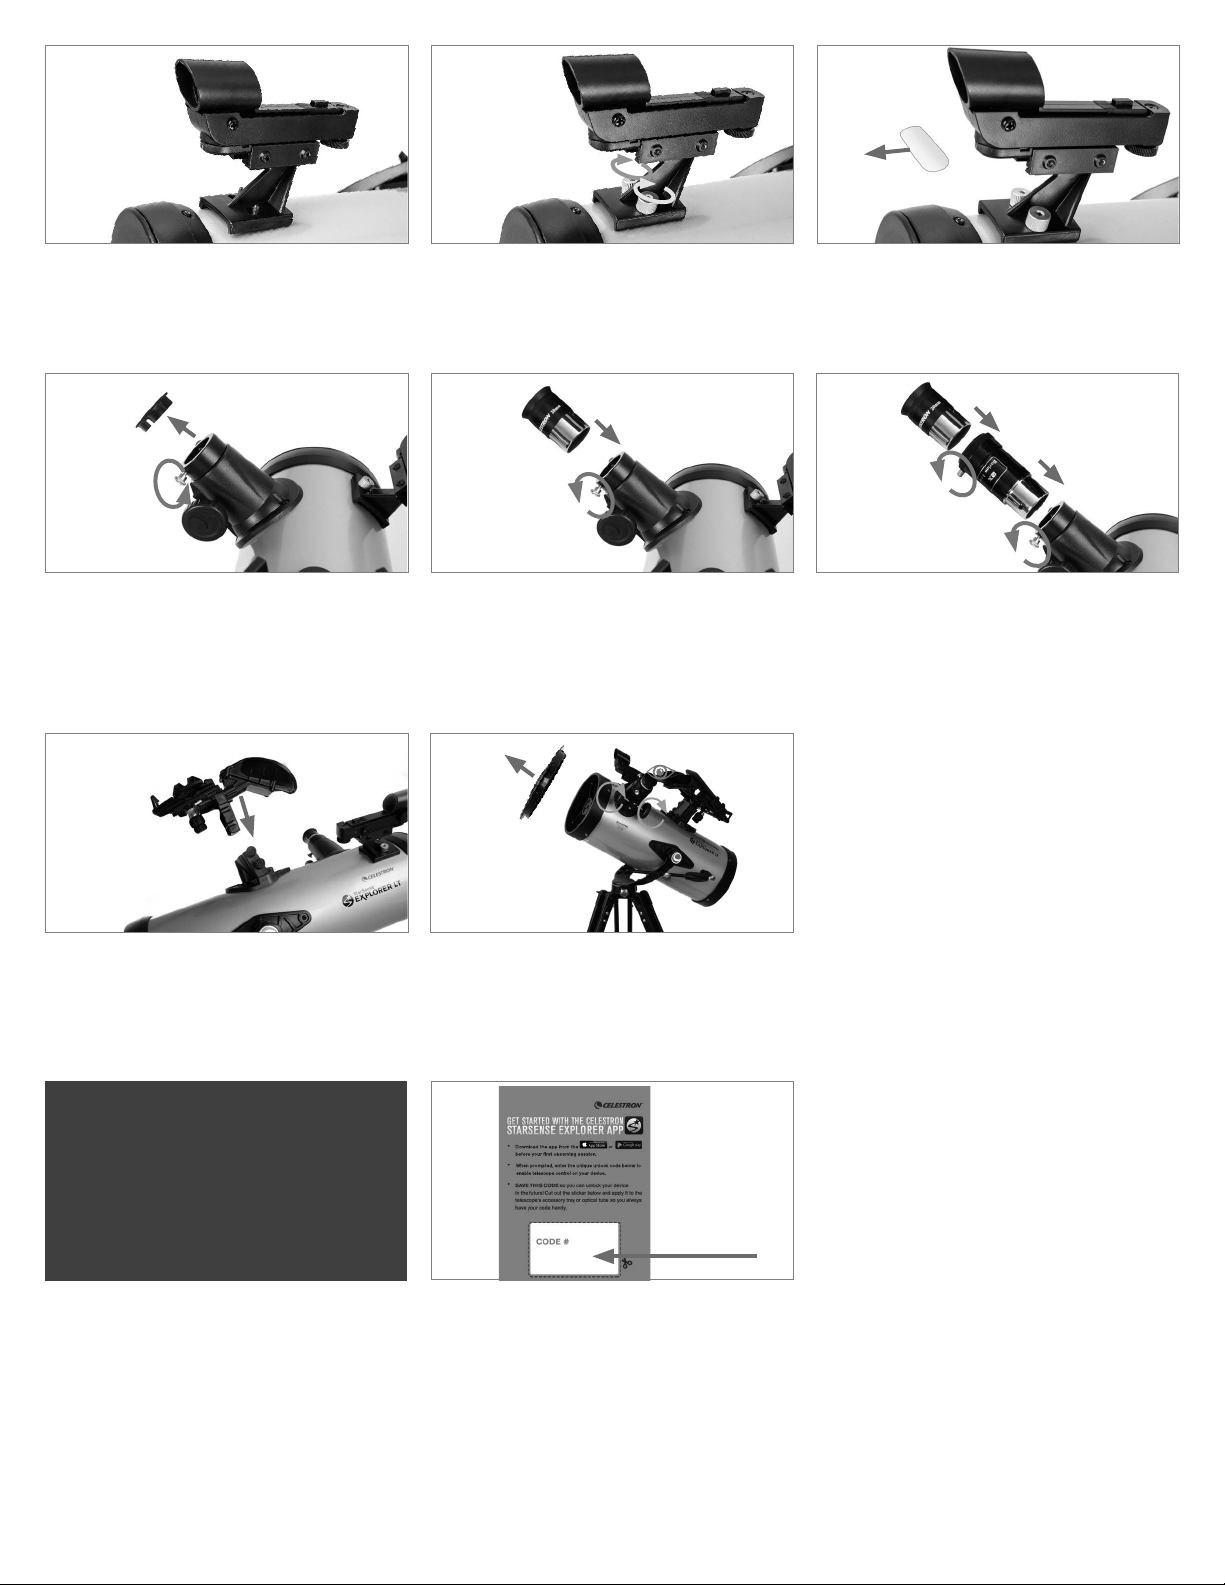
Place the two holes in the base of the finderscope
over the threaded posts so the finderscope base
sits flush on the telescope tube. Make sure that the
round window on the finderscope is pointed away
from the focuser.
Thread the two nuts back onto the threaded posts. There is a small clear plastic tab inserted between the
battery and the contact. This was included to prevent
the battery from discharging during shipment. Pull
this out to allow your battery to work.
14 15 16
Loosen the setscrews on the telescope focuser and
remove the dust cap.
To install the eyepiece, loosen the setscrews on the
focuser. Insert the silver barrel on the bottom of the
eyepiece into the focuser and secure by tightening
the setscrews. Always start using your low-power
eyepiece (25 mm) to help you find the target you
wish to view. You can always change to your highpower eyepiece (10 mm) later.
To use the Barlow lens, remove your eyepiece
from the telescope focuser, insert the Barlow lens
into the focuser and insert your eyepiece into the
Barlow lens. This will double the magnification of
whatever eyepiece you use it with.
17 18
To install the StarSense smartphone dock, loosen
the two setscrews on the dock mount on the top
of the telescope tube and slide the dovetail on the
bottom of the dock into the mount. Secure in place
by tightening both screws.
Downloading and
Activating the App
Before you take your telescope outside, download
the StarSense Explorer app to your mobile device.
Search for “Celestron StarSense Explorer” in the
Apple App Store or Google Play. The app is large,
so we recommend downloading it while connected
to Wi-Fi.
Remove the lens cap from the front of the telescope.
To observe, look through the eyepiece as shown
above. Focus the image by turning the knobs below
the focuser.
1
Once you have downloaded the app, locate the
orange postcard in your telescope box. Launch the
app. When prompted, enter the activation code on
the postcard to activate the app. Your code will
unlock up to 5 devices.
2 | ENGLISH
Page 3
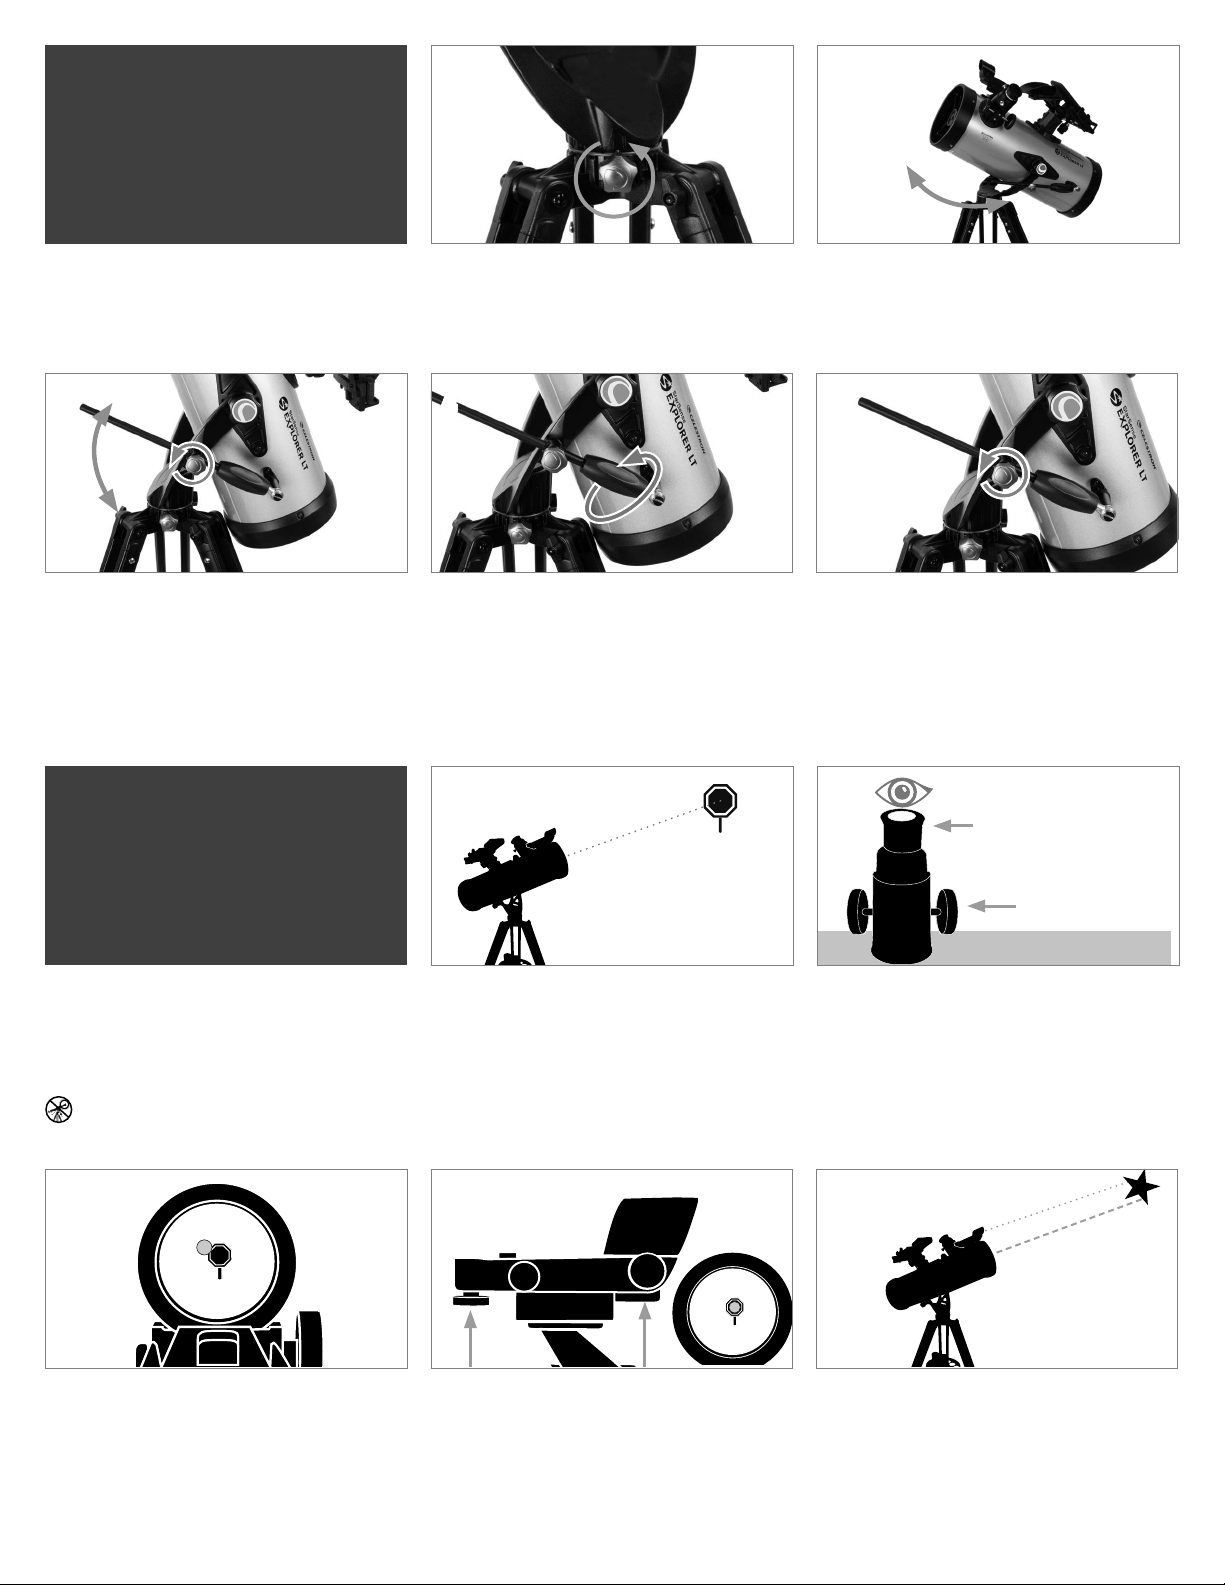
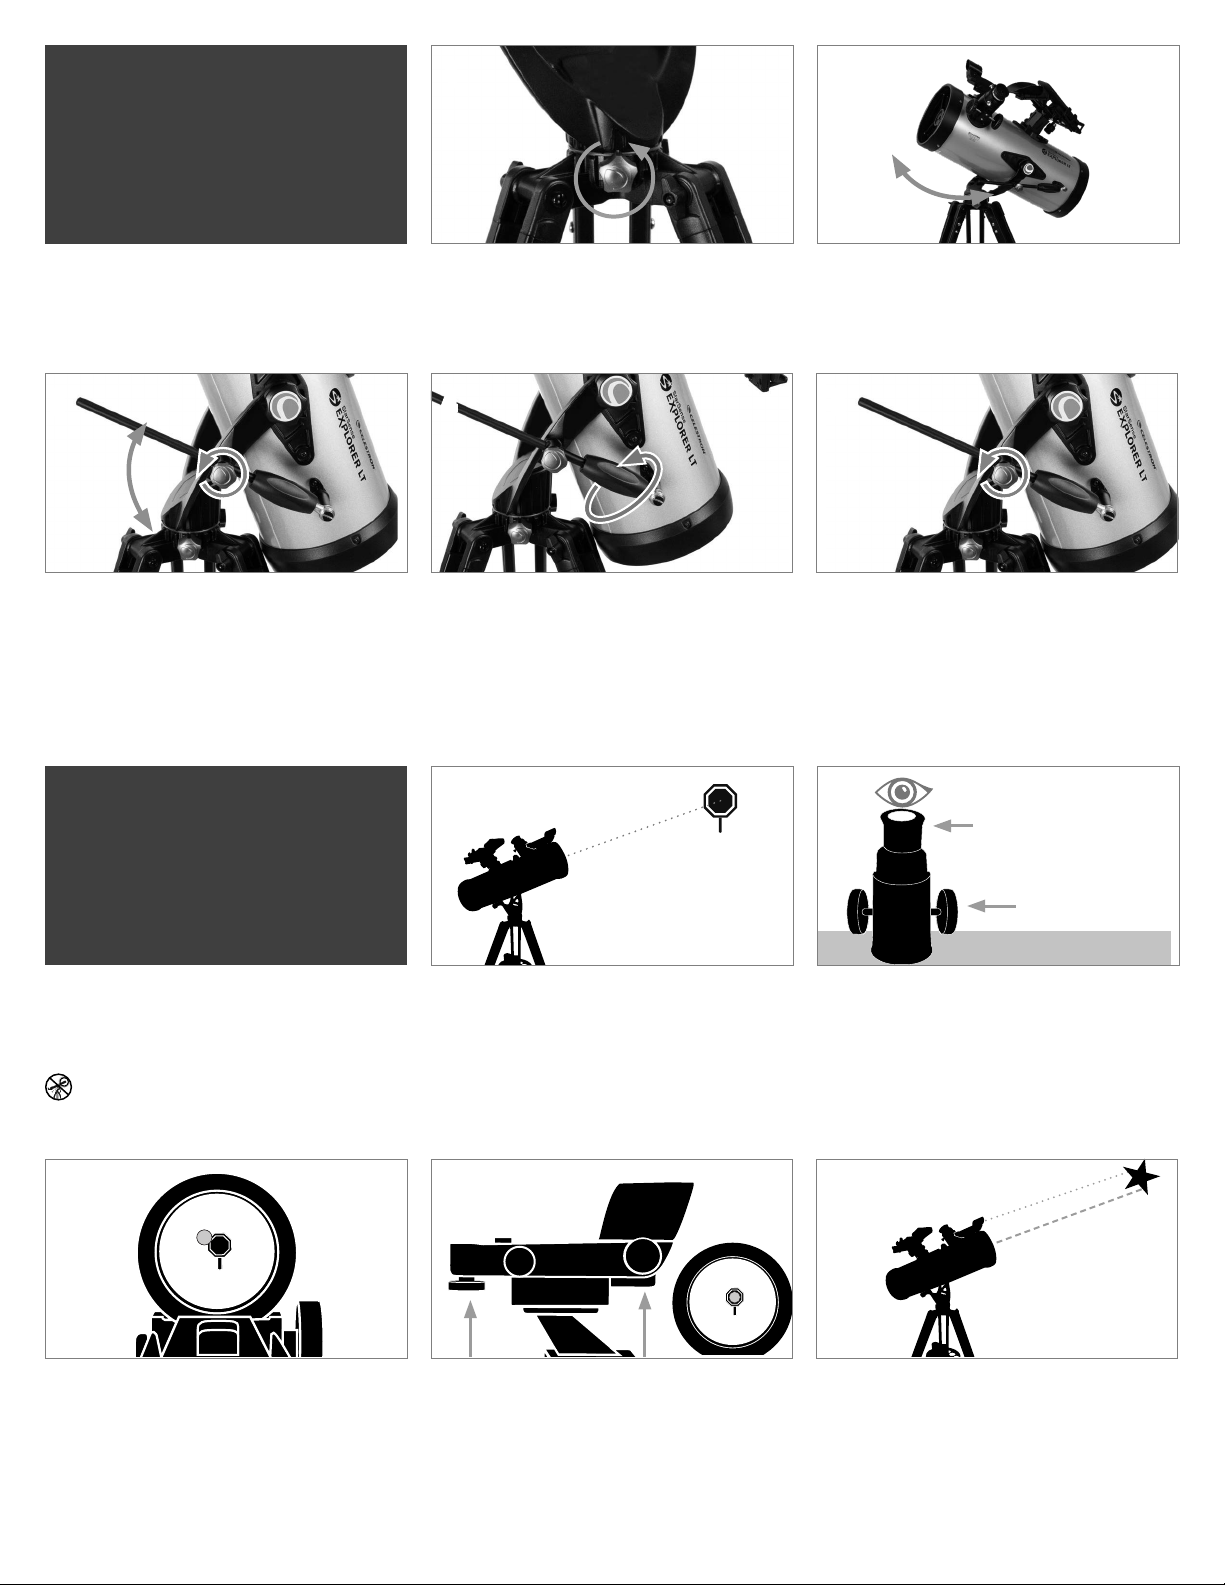
Moving the
Telescope
1
2
3
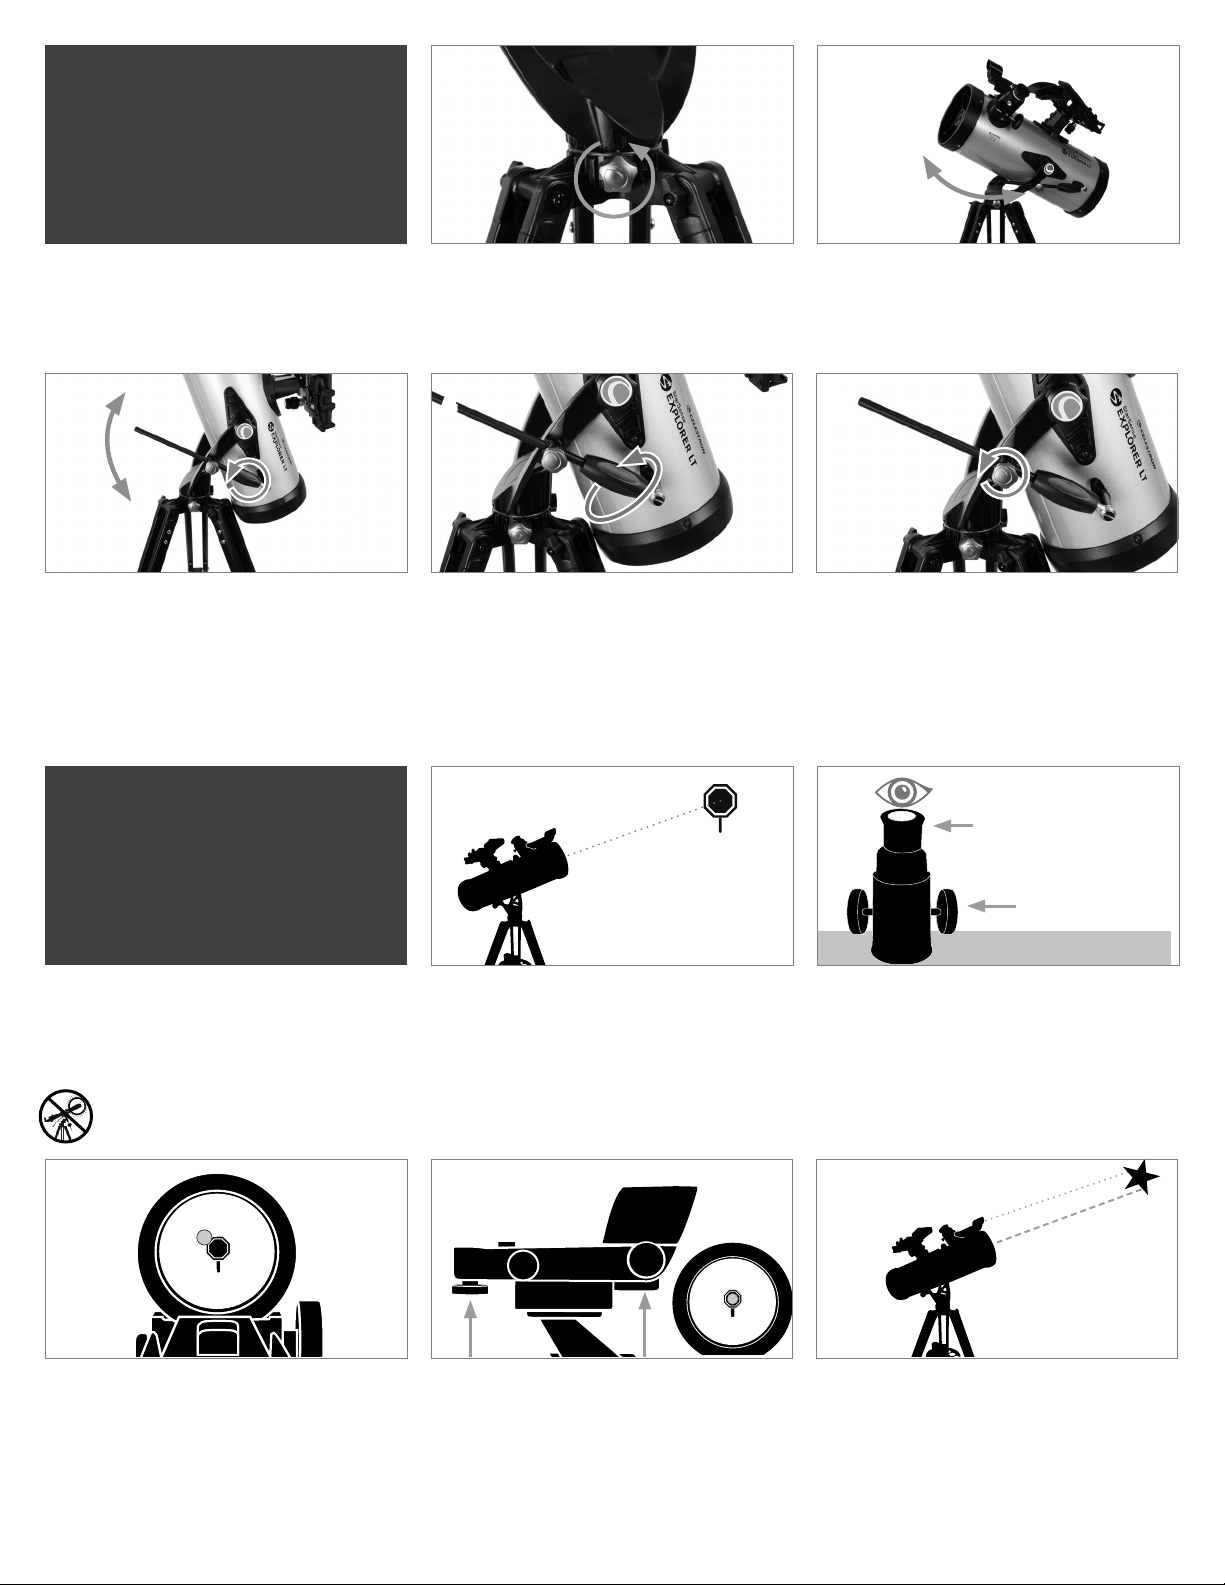
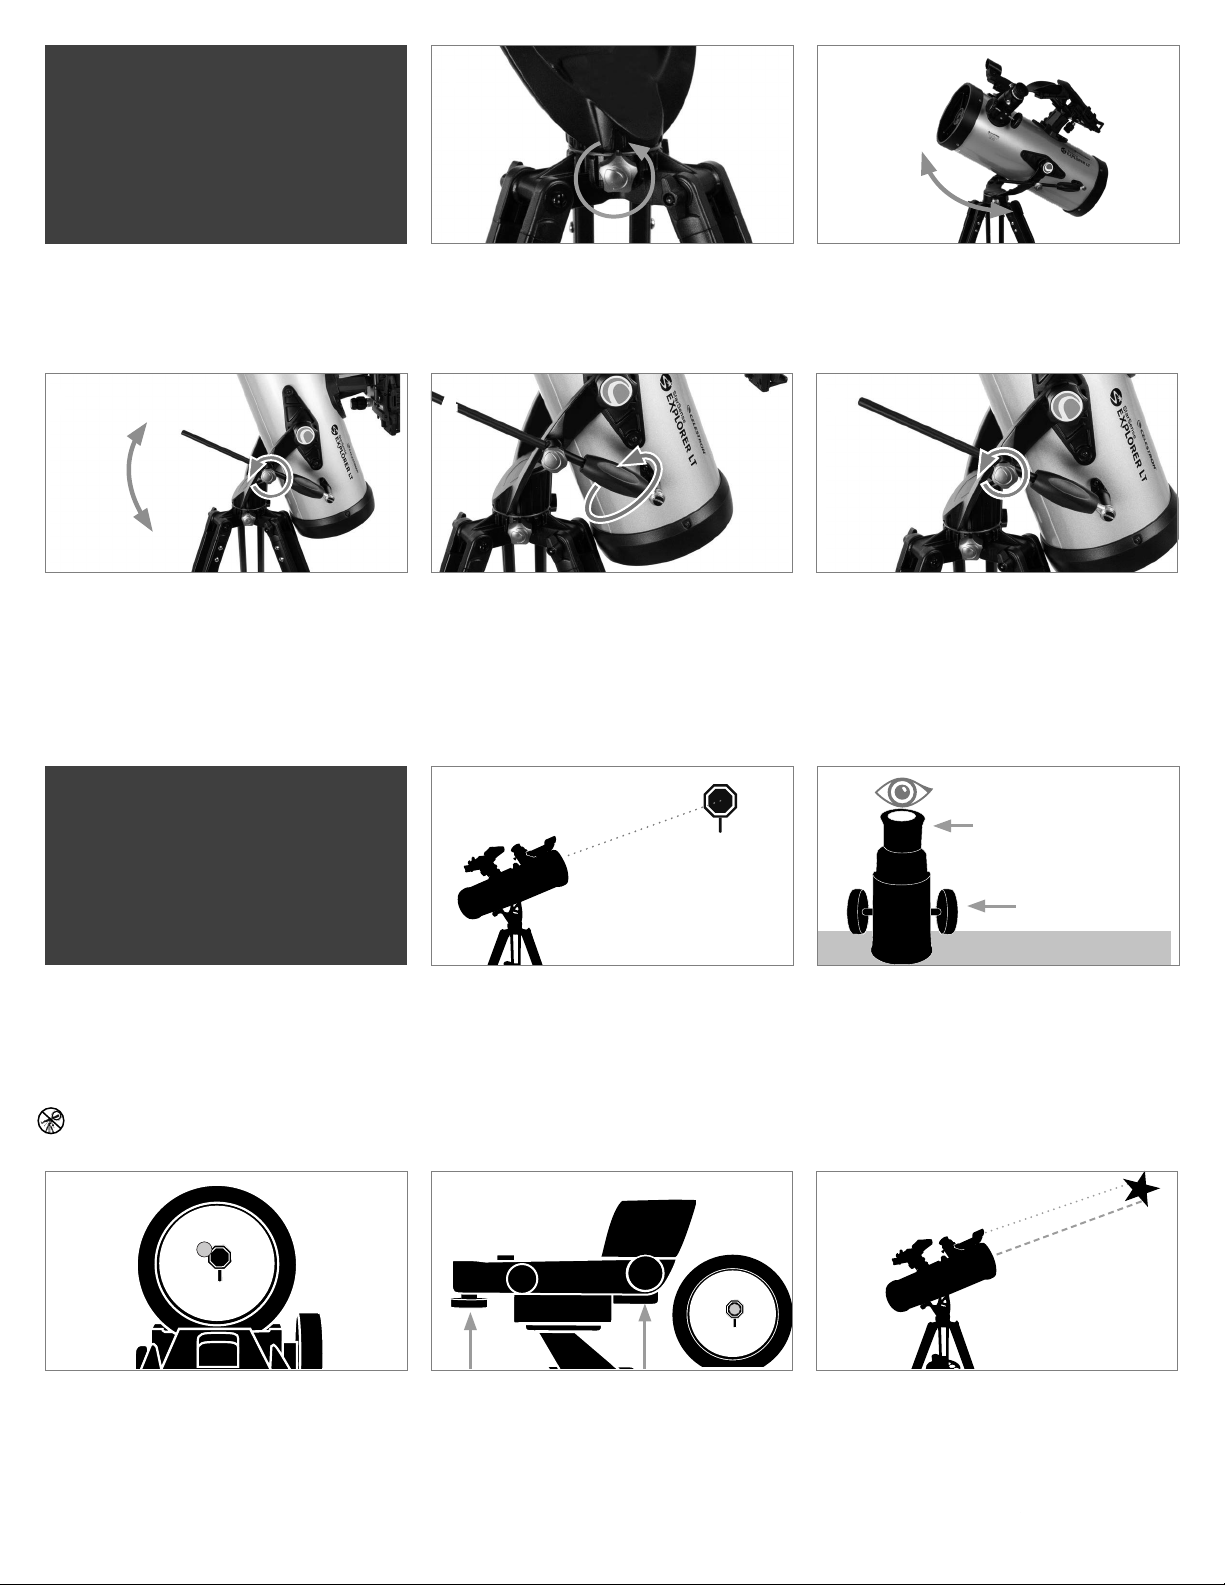
To move the telescope up and down, hold the
focuser of the telescope in one hand and loosen the
knob on the slow motion rod guide. The telescope
can now be moved up or down as desired. When
you are close to your target, tighten the knob to
secure the telescope in place.
Aligning the
To move the mount left and right, loosen the azimuth
tension knob located on the yoke mount between
two of the tripod legs.
4
Fine adjustment in the up-and-down direction can be
done using the altitude slow motion rod. Keep the
rod guide knob locked and rotate the black handle
on the slow motion rod. This allows you to move the
telescope in small increments to help center objects
or follow celestial objects in the night sky.
1
Hold the tripod leg with one hand and grab the
telescope tube focuser and move it left or right
as desired. The amount of tension you feel when
moving the telescope can be adjusted by tightening
or loosening the knob to a level that is comfortable
for you.
5
The altitude slow motion rod has a limited range of
motion of about 15 degrees. If you run into the end of
travel and the knob will no longer turn, you can reset
it by loosening the rod guide knob and turning the
slow motion rod handle the opposite direction until
you are in the middle of its travel, then retighten the
rod guide knob.
2
25 mm eyepiece
Finderscope
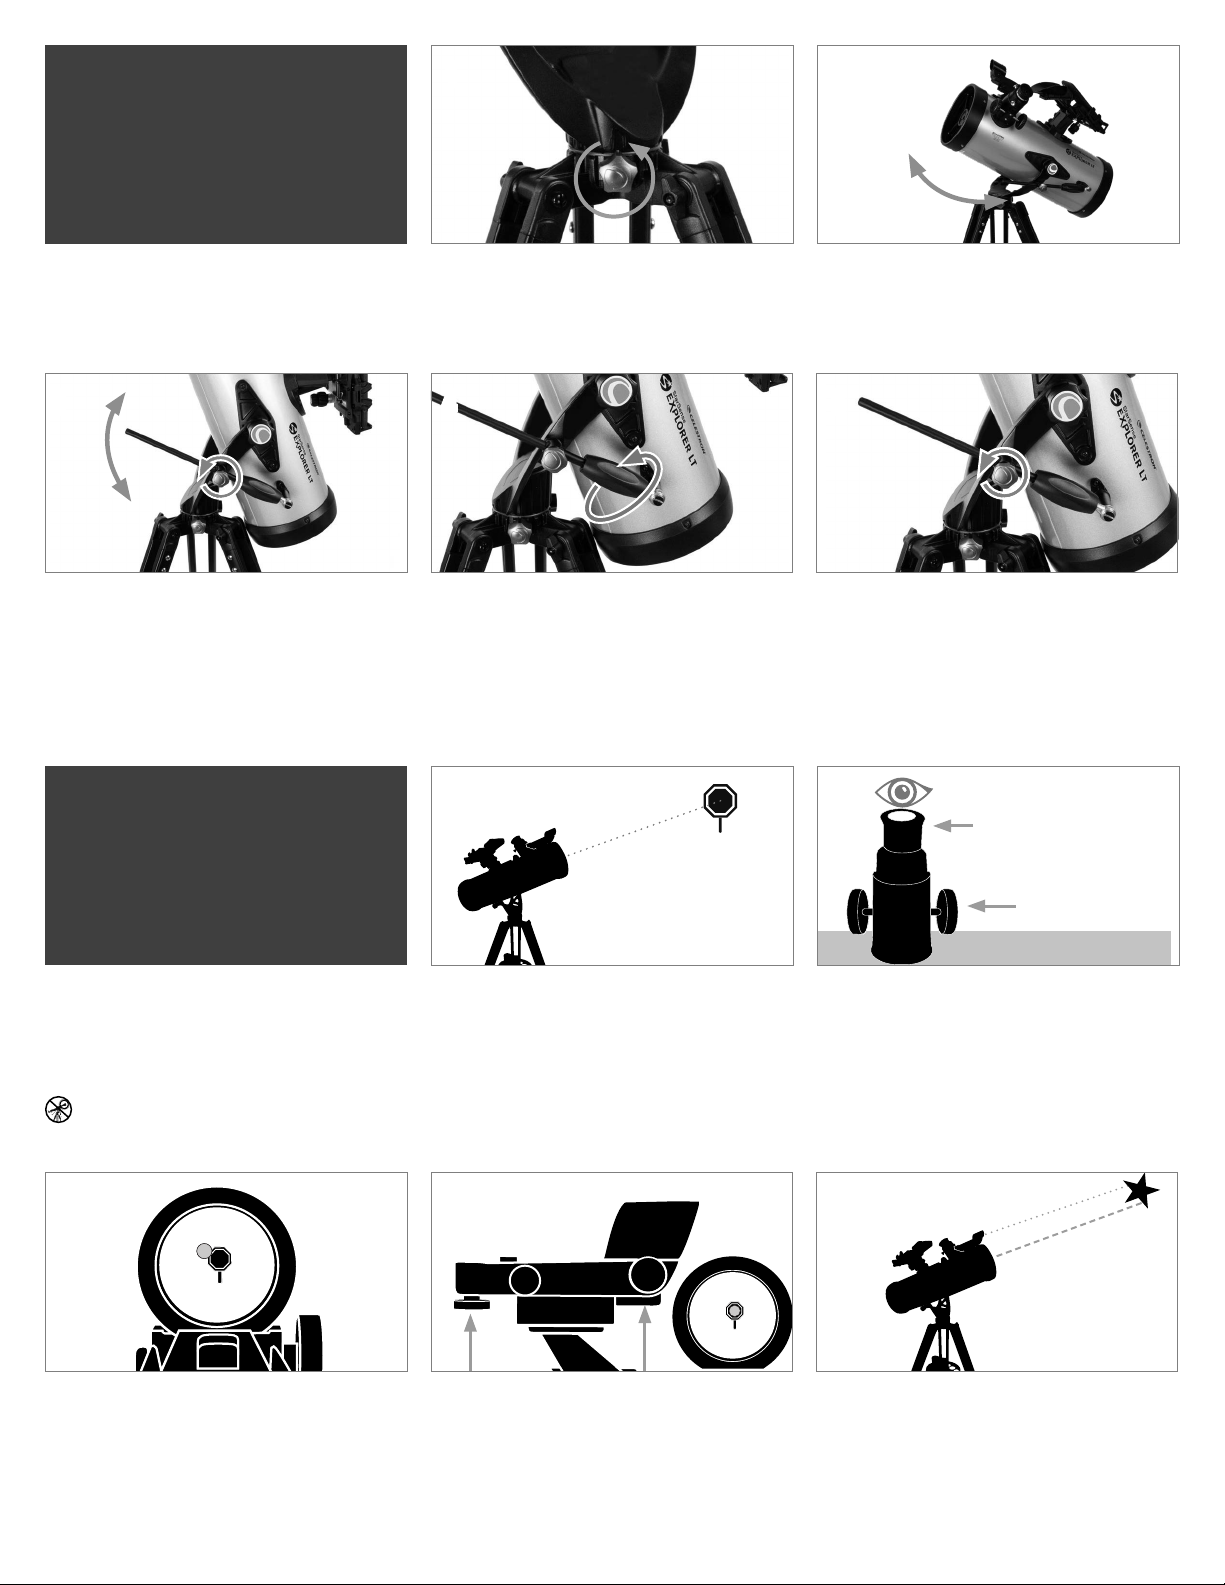
The finder is one of the most important parts of your
telescope. It helps you locate objects and center
them in the eyepiece. The first time you assemble
your telescope, you need to align the finder to the
telescope’s main optics. It’s best to do this during
the day*.
*SOLAR WARNING! Never attempt to
view the Sun through any telescope without
a proper solar filter!
3
LOOK THROUGH FINDERSCOPE
Once the object is centered in your 25 mm eyepiece,
look through the finderscope and locate the red dot.
CHOOSE A TARGET
Take the telescope outside during the day and find
an easily recognizable object, such as a streetlight,
car license plate or sign. The object should be as
far away as possible, but at least a quarter mile
away.
4
ADJUST THE FIND ER SCOPE
Without moving the telescope, use the two
adjustment knobs to move the finder around until
the red dot appears over the same object you are
observing in the telescope’s 25 mm eyepiece.
Focus Knobs
CENTER THE TARGET IN THE EYE PIECE
Look through the telescope using your lower
powered eyepiece. Move the telescope until the
object you chose lies in the center of the view. If the
image is blurry, gently turn the focus knobs on either
side of the telescope until it comes into sharp focus.
NOTE: The image in your telescope may appear
inverted. This is perfectly normal in an
astronomical telescope.
5
YOUR FINDERSCOPE IS NOW ALIGNED!
It should not require realignment unless it is bumped
or dropped.
ENGLISH | 3
Page 4
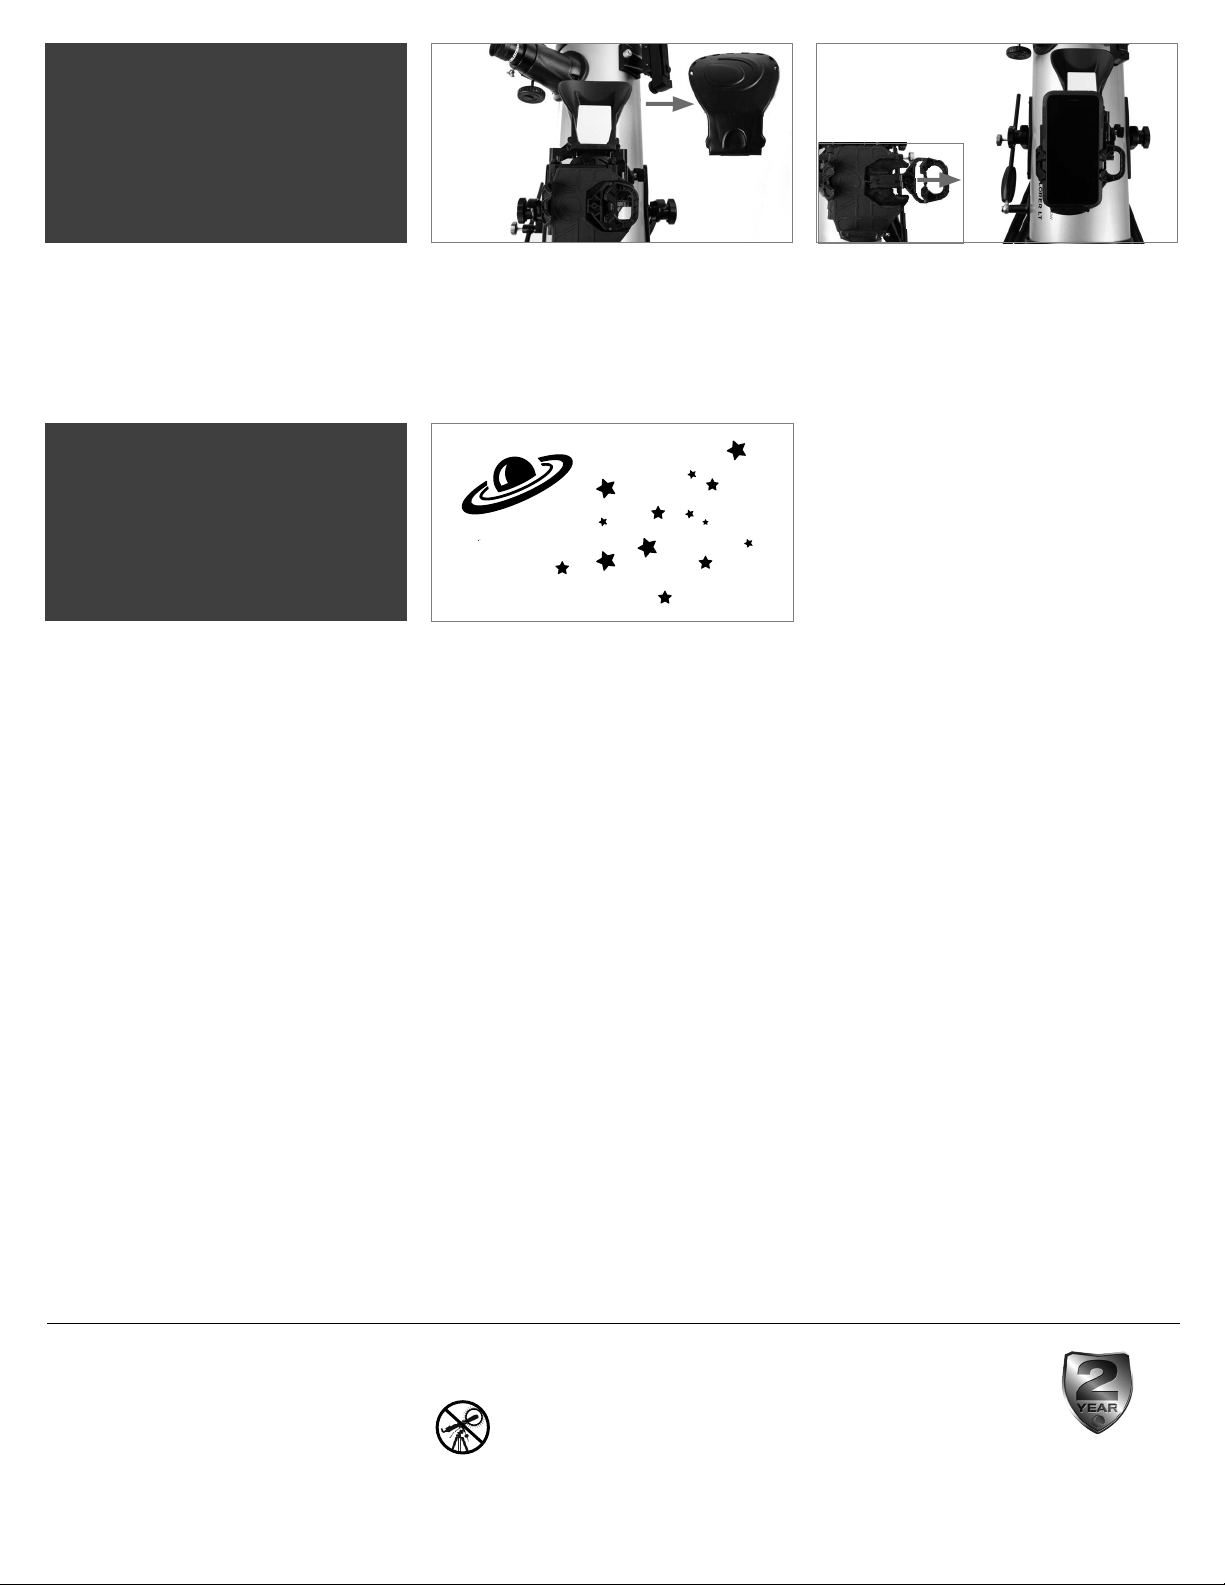
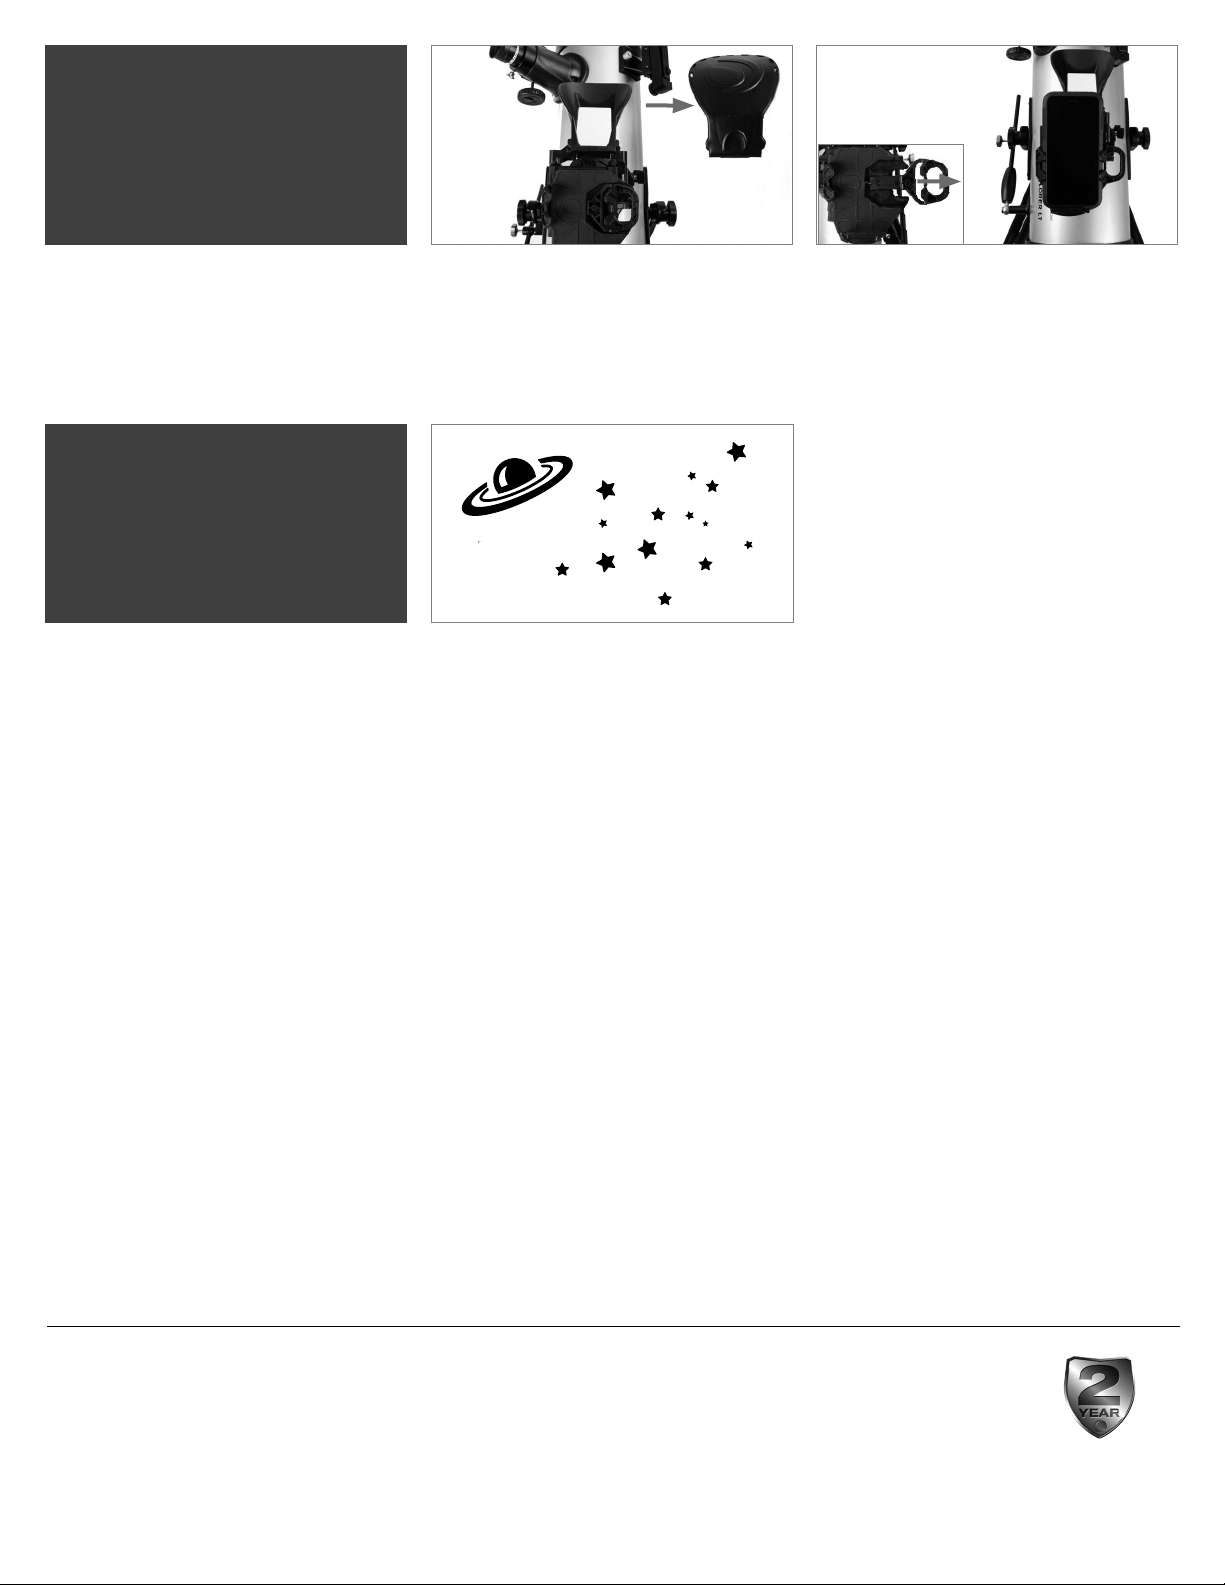
Attaching the
Smartphone
1 2
Your First
Night Out
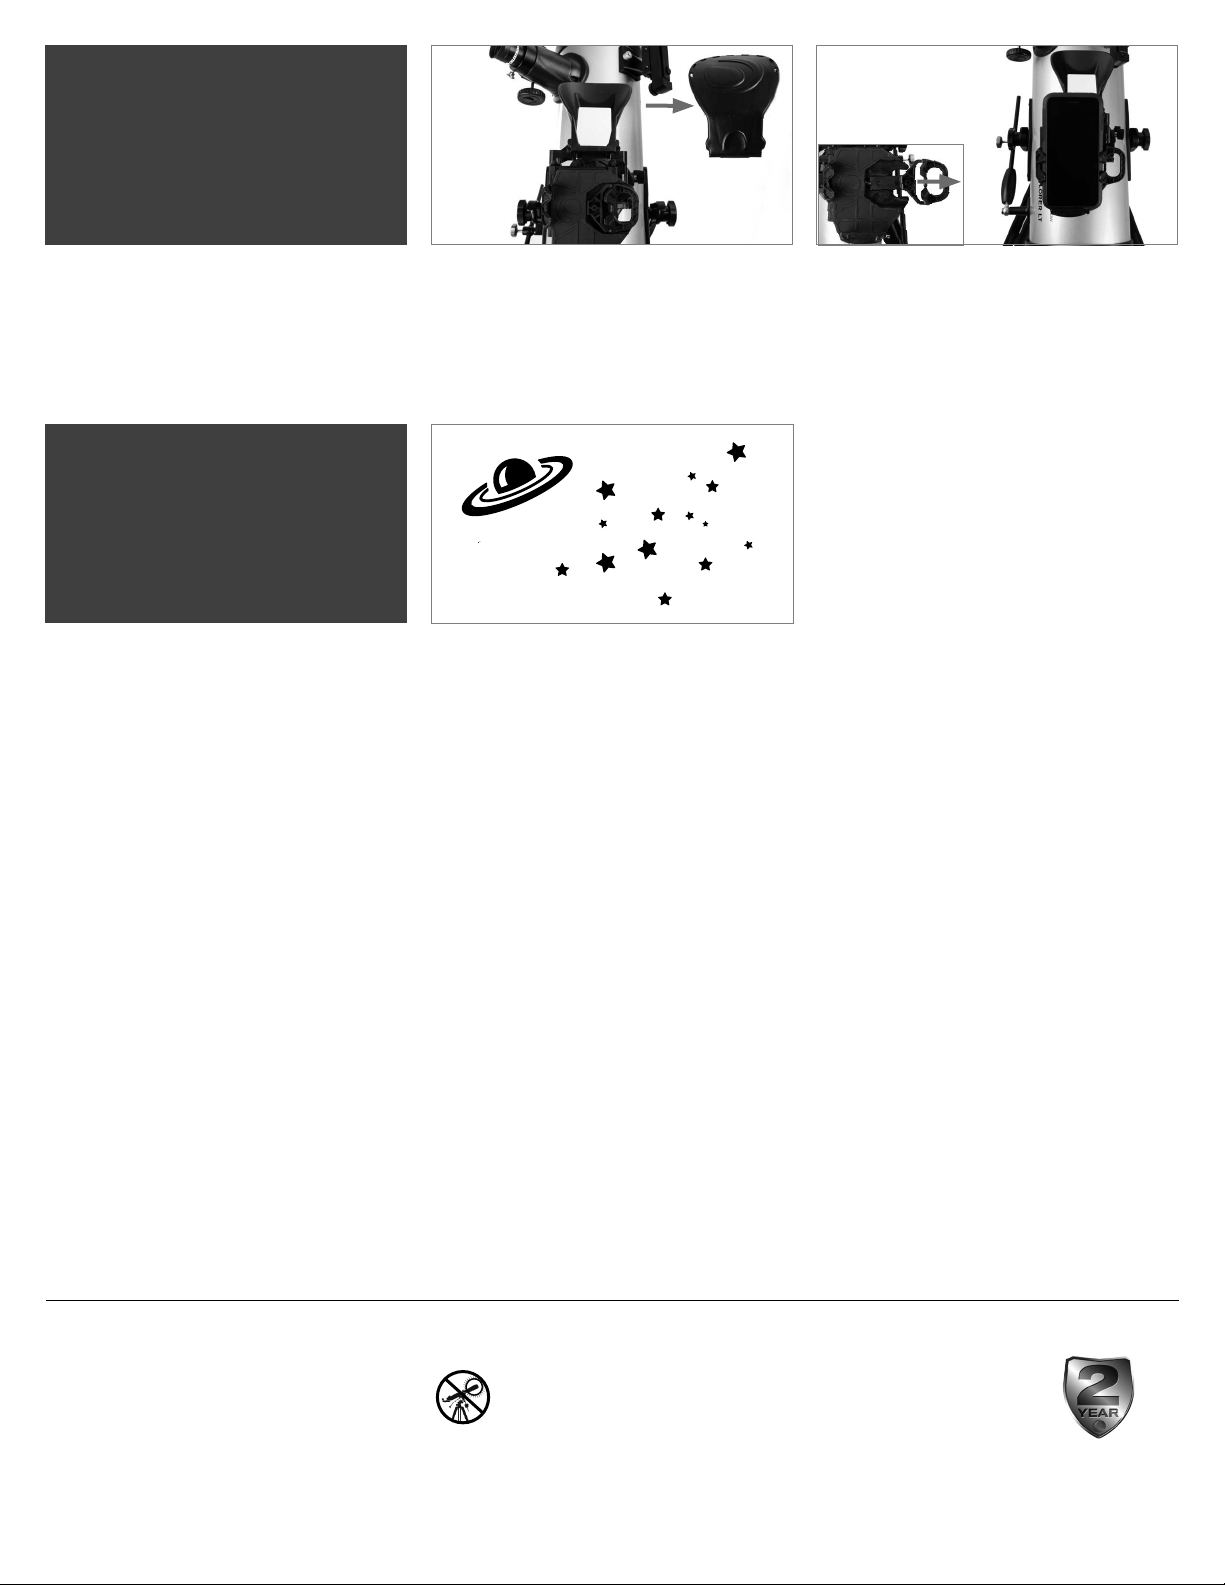
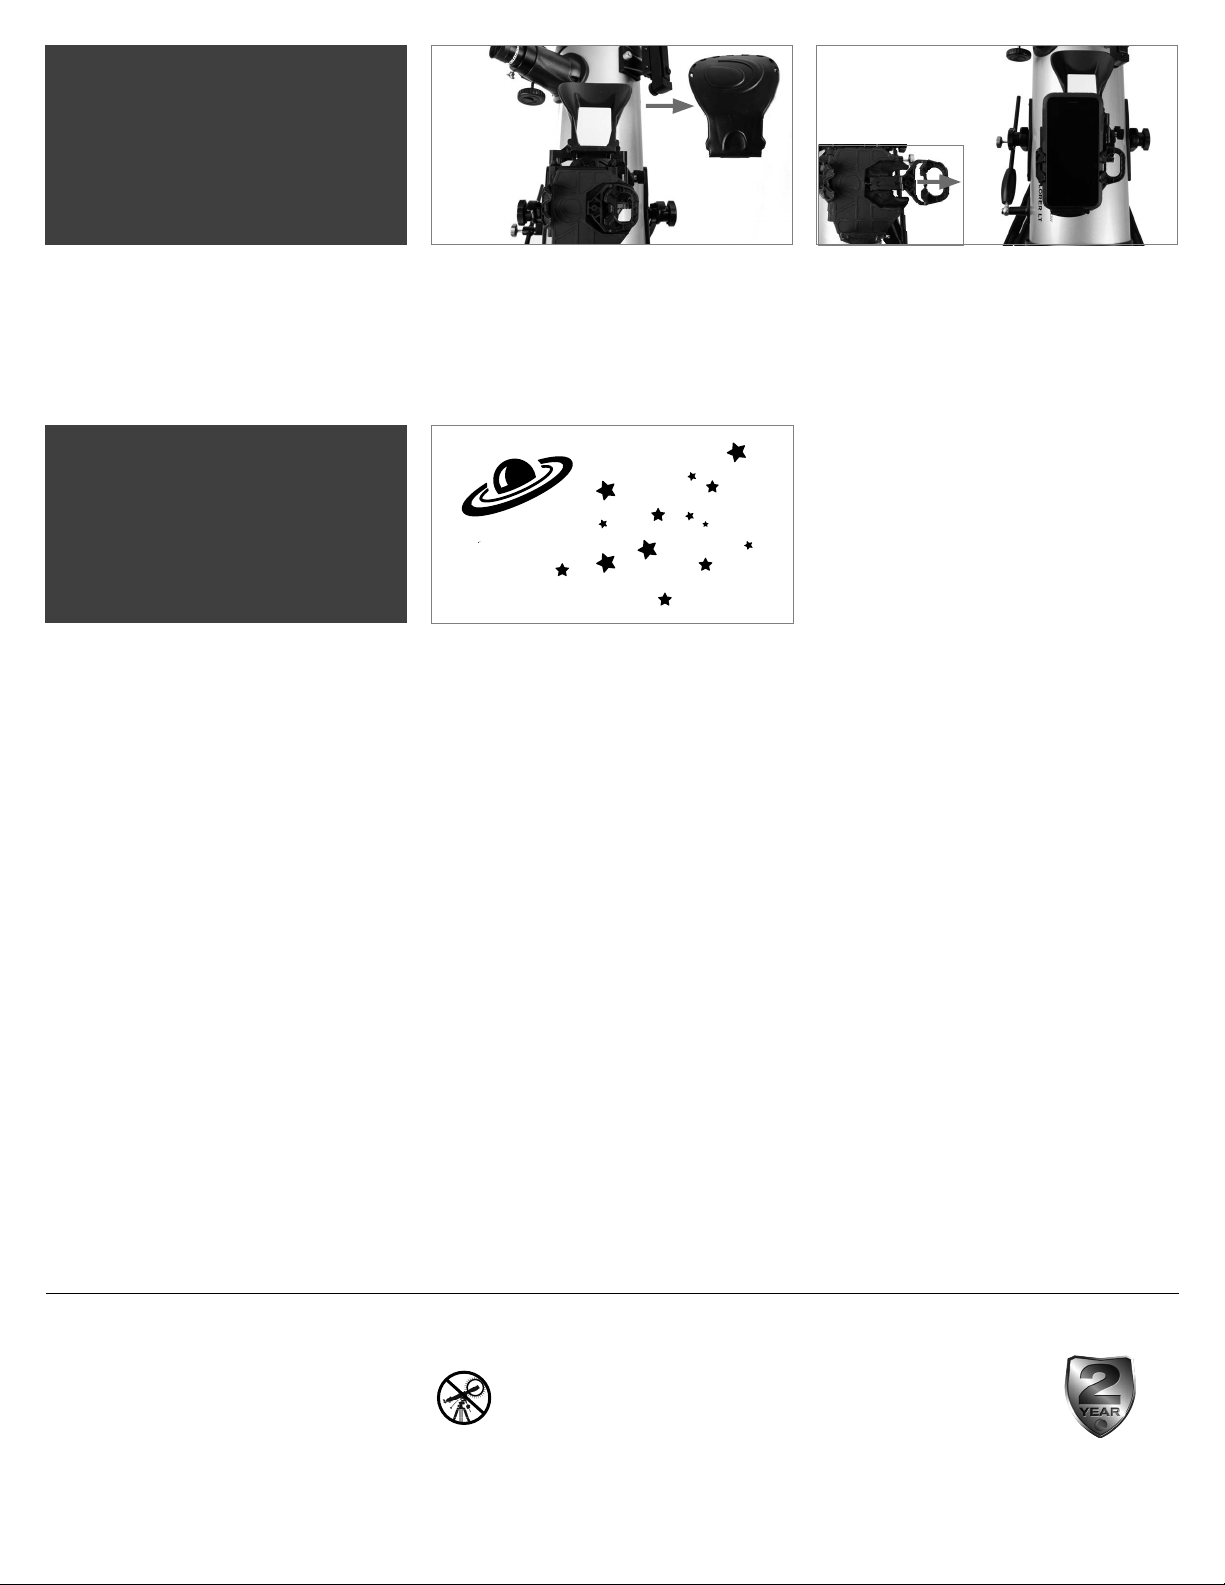
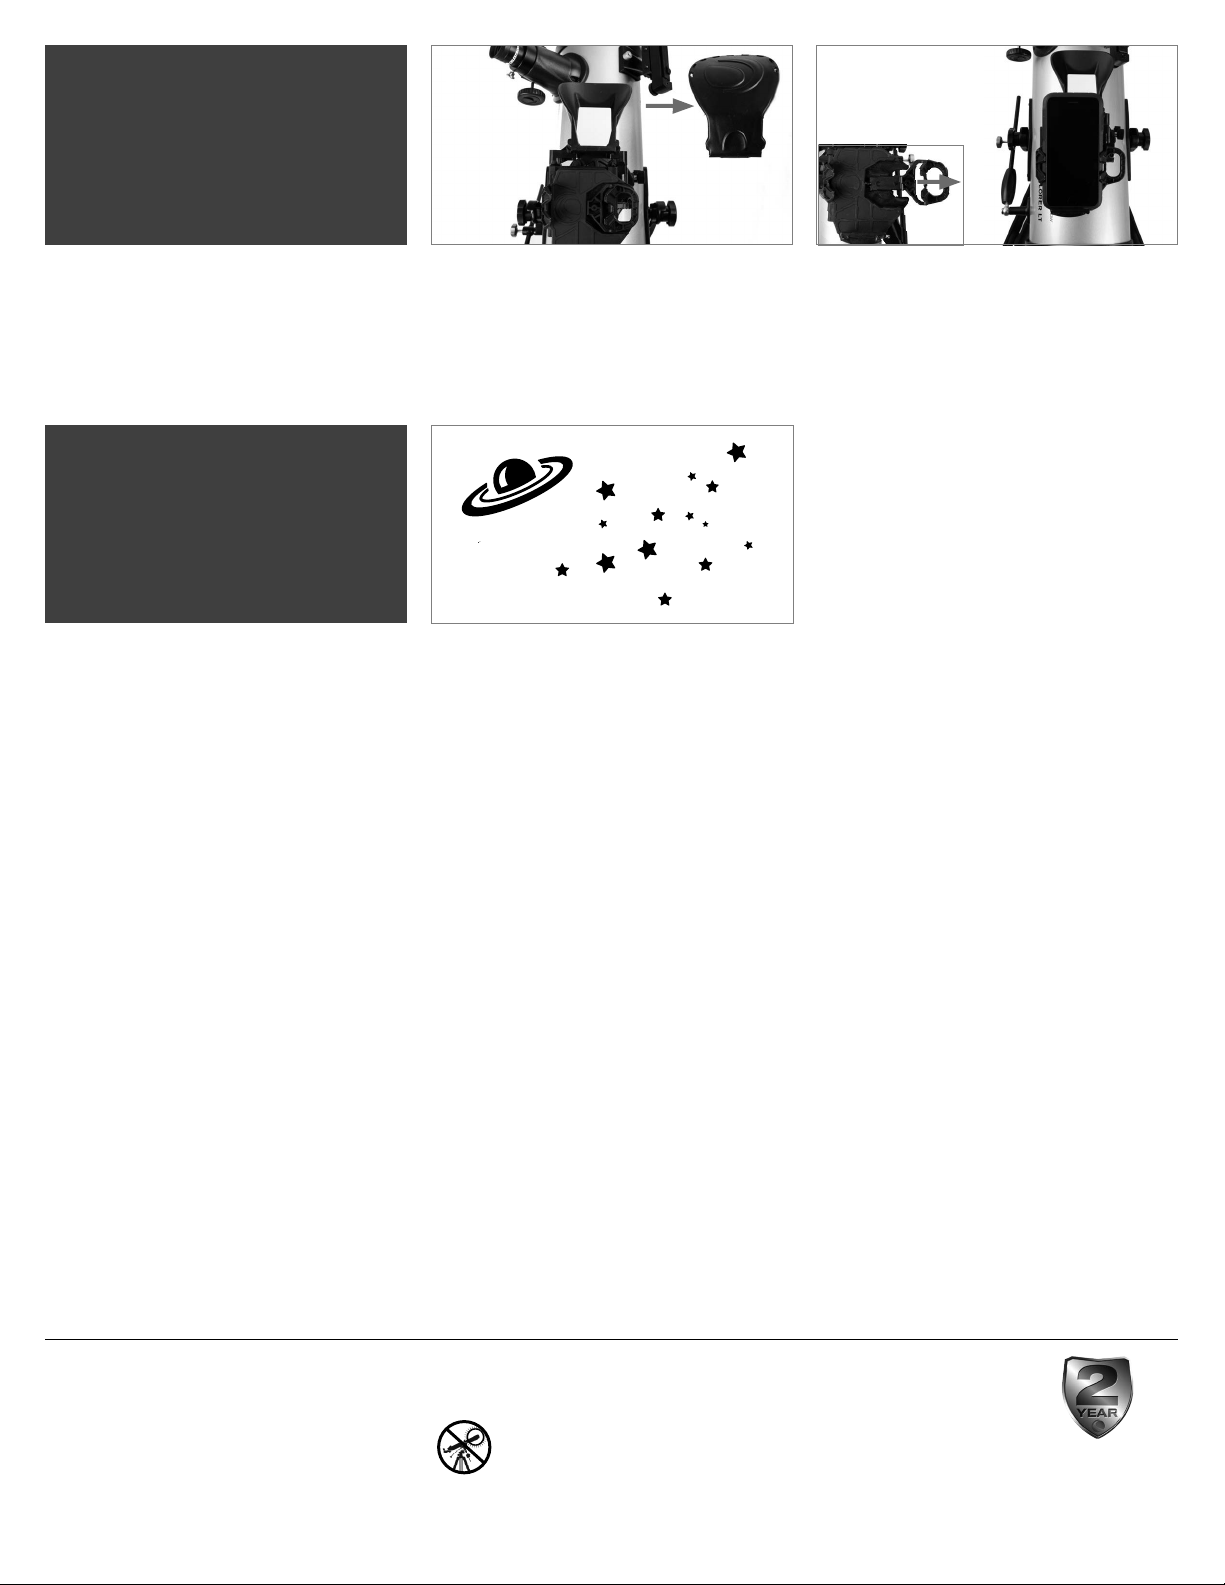
Remove the large cap covering the mirror on the front
of the StarSense dock.
Congratulations! Your telescope is now set up
and you are ready to explore the cosmos. Take the
telescope outside, insert your 25 mm eyepiece,
remove the lens cap, insert your smartphone into the
holder, and launch the StarSense Explorer app. The
tutorial in the app will walk you through the steps on
finding your first astronomical target.
Pull open the spring-loaded slider on the top of the
phone dock and set the phone into the holder so
it is flush with the bottom lip of the phone holder.
Slowly release the slider to secure the phone in
place.
4 | ENGLISH
For more information on this product, please visit the respective product page
on celestron.com
SOLAR WARNING:
Never attempt to view the sun through any telescope without a proper solar filter.
Need assistance?
Contact Celestron Technical Support celestron.com/pages/technical-support
08-19
www.celestron.com/pages/warranty
Page 5
127AZ
Guide d'installation rapide
FRANÇAIS
ARTICLE #22453
1
Déballez votre télescope, et vérifiez que toutes les
pièces sont présentes. Votre StarSense Explorer
LT comprend : un tube de télescope avec la tige de
mouvement ralenti en altitude attachée, un cache de
lentille, une sacoche à accessoires, un trépied avec
une monture à fourche altazimutale et l’entretoise
centrale attachée, une base d’accueil pour téléphone
intelligent, deux oculaires, une lentille de Barlow 2x,
un plateau à accessoires d’oculaire, deux vis de
monture du tube, un chercher StarPointer et une
carte avec un code pour l’application StarSense
Explorer.
2
Pour installer le trépied, écartez les pieds vers
l’extérieur jusqu’à ce qu’ils soient complètement
étendus et appuyez sur l’entretoise centrale.
5
Installez le plateau à accessoires sur l'entretoise
centrale du trépied. Vissez le plateau dans le trou
fileté au centre de l'entretoise jusqu'à ce qu'il soit
complètement à niveau.
NOTE:
Si nécessaire, faites tourner le plateau à
accessoires dans le sens inverse des aiguilles
d'une montre de manière que les trous pour
les accessoires ne soient pas couverts par les
bras de l'entretoise, comme illustré ici.
3
Étendez la portion centrale de chacun des trois pieds
du trépied sur une longueur de 6 à 12 pouces. Utilisez
la vis de serrage de chaque pied pour sécuriser le
pied en position étendue.
6
Desserrez la molette sur la tige-guide d’altitude, sur
le côté de la monture à fourche, pour libérer le trou.
4
Vérifiez que les trois pieds sont de la même longueur
une fois étendus, pour garantir que la plateforme est
à niveau sur le télescope.
7
Faites glisser la tige d’altitude dans le guide de la
tige sur la monture et abaissez les axes d’altitude
du tube du télescope dans les nacelles situées en
haut de chaque bras de la fourche.
8
Serrez la vis de la tige-guide d’altitude pour maintenir
le télescope en place.
9
Insérez les deux vis de monture du tube dans la
monture à fourche, et dans les moyeux sur le tube du
télescope pour le maintenir en place.
10
Pour installer le chercheur, retirez les deux écrous
argentés des tiges filetées sur le haut du tube, près
du système de mise au point.
FRANÇAIS | 5
Page 6
Download the app from the
before your first observing session
.
or
When prompted, enter the unique unlock code below to
enable telescope control on your device.
11 13
12
Placez les deux trous sur la base du chercheur sur les
tiges filetées, de manière que la base du chercheur
soit installée étroitement sur le tube du télescope.
Assurez-vous que la fenêtre ronde du chercheur est
pointée à l’opposée du système de mise au point.
Revissez les deux écrous dans les tiges filetées. Une petite languette de plastique est insérée entre la
pile et son contact. Cette languette est présente pour
éviter que la pile ne se décharge pendant le transport.
Retirez-la pour activer la pile.
14 15 16
Desserrez les vis de fixation du système de mise au
point et retirez le cache à poussière.
Pour installer l’oculaire, desserrez les vis de fixation
dans le système de mise au point. Insérez le barillet
argenté sur le bas de l’oculaire dans le système de
mise au point, et fixez-le en serrant les vis de fixation.
Commencez toujours par utiliser votre Oculaire basse
puissance (25 mm) pour vous aider à trouver la cible
désirée. Vous pouvez toujours le changer par votre
oculaire de grande puissance (10 mm) plus tard.
Pour utiliser la lentille de Barlow, retirez votre oculaire
du système de mise au point du télescope, insérez la
lentille de Barlow dans le système de mise au point
et insérez votre oculaire dans la lentille de Barlow.
Cela permettra de doubler le grossissement offert
par l’oculaire que vous utilisez.
17 18
Pour installer le support pour téléphone intelligent
StatSense, desserrez les deux vis de fixation sur
la monture du support sur le dessus du tube du
télescope et faites glisser la queue d'aronde fixée audessous du support dans la monture. Fixez-la en place
en serrant les boulons.
Télécharger et
activer l’application
Avant de sortir votre télescope de chez vous,
téléchargez l’application StarSense Explorer sur votre
appareil mobile. Recherchez « Celestron StarSense
Explorer » dans l’Apple App Store ou Google Play.
L’application est de grande taille, alors nous vous
recommandons de la télécharger via une connexion
Wi-Fi.
6 | FRANÇAIS
Retirez le capuchon de la lentille de l'avant du
télescope. Pour effectuer l'observation, regardez
dans l'oculaire comme illustré ci-dessus. Faites le
point sur l'image en faisant tourner les molettes sous
le système de mise au point.
1
Une fois que vous avez téléchargé l’application,
munissez-vous de la carte orange présente dans
la boîte de votre télescope. Lancez l’application.
Lorsqu’il vous est demandé de le faire, saisissez le
code indiqué sur la carte pour activer l’application.
Votre code est valable pour activer 5 appareils au
maximum.
Page 7
Orienter le télescope
1
2
3
Pour orienter le télescope vers le haut ou vers le
bas, tenez le système de mise au point d’une main
et desserrez la molette sur le guide de la tige de
mouvement ralenti. Vous pouvez maintenant orienter
le télescope vers le haut ou vers le bas comme désiré.
Lorsque vous êtes proche de votre cible, serrez le
télescope pour fixer le télescope en place.
Pour orienter la monture vers la gauche ou la droite,
desserrez la molette de tension sur la monture à
fourche située entre deux pieds du trépied.
4
Vous pouvez régler l’orientation vers le haut et le bas
finement à l’aide de la tige d’altitude à mouvement
ralenti. Laissez la molette du guide de la tige serrée
et faites pivoter la poignée noire sur la tige de
mouvement ralenti. Cela vous permet d’orienter le
télescope par petits incréments pour vous aider à
centrer des objets ou à suivre des objets célestes
dans le ciel nocturne.
1
Tenez le pied du trépied d’une main et tournez le
système de mise au point du tube du télescope vers la
gauche ou la droite comme désiré. La résistance que
vous sentez lorsque vous déplacez le télescope peut
être réglée en serrant ou en desserrant la molette à un
niveau confortable.
5
La tige de mouvement lent dispose d’une plage de
mouvement limitée d’environ 15 degrés. Lorsque
vous arrivez en bout de la course permise par la
molette et qu’elle ne peut plus tourner, vous pouvez
la réinitialiser en desserrant la molette du guide de la
tige et en tournant la poignée de la tige de mouvement
ralenti dans la direction opposée jusqu’au milieu de
sa course. Resserrez ensuite la molette du guide de
la tige.
2
Oculaire de 25 mm
Aligner le chercheur
Le chercheur est l'un des composants les importants
de votre télescope. Il vous aide à localiser des objets
et à les centrer dans votre oculaire. La première fois
que vous assemblez votre télescope, vous devez
aligner le chercheur avec le système optique principal
du télescope. Il est plus facile d'effectuer cette
opération pendant la journée*.
* AVERTISSEME NT SUR LE SOLEIL!
N’essayez jamais d’observer le soleil à l’aide d’un
télescope sans utiliser un filtre solaire adéquat.
3
REGARDER DANS LE CHERCHEUR
Une fois l’objet centré dans votre oculaire de 25 mm,
regardez dans le chercheur et localisez point rouge.
CHOISIR UNE CIBLE
Installez le télescope à l’extérieur en journée, et
repérez un objet aisément reconnaissable, comme
un feu de signalisation, une plaque d’immatriculation
ou un panneau. L’objet doit se situer aussi loin que
possible, mais à au moins un quart de mile de vous.
4
AJUSTER LE CHERCHE UR
Sans déplacer le télescope, utilisez les deux molettes
de réglage pour orienter le chercheur, jusqu’à ce que
point rouge apparaisse en superposition avec l’objet
observé dans l’oculaire de 25 mm.
Molettes de mise
au point
CENTRER LA CIB LE DANS L'OCULAIRE
Regardez dans le télescope en utilisant votre oculaire
basse puissance. Déplacez le télescope jusqu’à que
l’objet choisi se trouve au centre du champ de vision.
Si l’image est floue, faites doucement tourner l’une
ou l’autre molette de mise au point jusqu’à ce que
l’image soit nette.
NOTE: L’image observée dans votre télescope peut
apparaître inversée. Cela est parfaitement normal
pour un télescope astronomique.
5
VOTRE CHERCHEUR EST MAINTENANT
ALIGNÉ !
Il n’aura pas besoin d’être aligné de nouveau tant qu’il
n’aura pas subi un choc ou qu’il sera tombé.
FRANÇAIS | 7
Page 8
Attacher le
téléphone intelligent
1 2
Votre première nuit
d’observation
Retirez le grand cache couvrant le miroir sur le devant
du support StarSense.
Félicitations! Votre télescope est maintenant
configuré et vous êtes prêt à explorer le cosmos.
Sortez avec votre télescope, insérez votre oculaire
de 25 mm, retirez le cache de lentille, insérez votre
téléphone intelligent dans le support et lancez
l’application StarSense Explorer. Le tutoriel de
l’application vous expliquera les étapes nécessaires
pour trouver votre première cible astronomique.
Ouvrez la glissière à ressort située sur le dessus du
support de téléphone et installez le téléphone pour
qu’il soit à niveau sur le rebord du bas du support
de téléphone. Relâchez la glissière en douceur pour
maintenir le téléphone en place.
8 | FRANÇAIS
Pour en savoir plus sur ce produit, visitez la page correspondante du produit sur
celestron.com.
AVERTISSEMENT SUR LE SOLEIL:
N’essayez jamais d’observer le soleil à l’aide d’un télescope sans utiliser un filtre solaire adéquat.
Besoin d'assistance?
Prenez contact avec l’assistance technique de Celestron à l’adresse celestron.com/pages/technical-support
08-19
www.celestron.com/pages/warranty
Page 9
127AZ
Kurzanleitung zur Einrichtung
DEUTSCH
ARTIKELNR. 22453
1
2
Packen Sie Ihr Teleskop aus und überprüfen Sie die
Vollständigkeit aller Teile. Ihr StarSense Explorer LT
enthält: einen Teleskoptubus mit angebrachter HöhenFeineinstellungsregler, eine Objektivkappe, eine
Zubehörtasche, ein Stativ mit Altazimut-Jochmontierung
und angebrachter mittlerer Beinstrebe, zwei
Tubusbefestigungsschrauben, StarSense SmartphoneDock, zwei Okulare, eine 2-fach Barlowlinse, eine
Okular-Zubehörablage, ein StarPointer Sucherfernrohr
und eine StarSense Explorer App-Codekarte.
3
Den mittleren Teil jeder der drei Beinstreben ca. 15
bis 30 cm nach unten ausziehen. Die ausgezogenen
Beine mit den drei Feststellschrauben unten an jedem
Bein sichern.
Zum Aufbau des Stativs die Beine nach außen
ziehen, bis sie vollständig ausgezogen sind. Drücken
Sie die mittlere Beinstrebe nach unten.
4
Achten Sie darauf, dass alle drei Beine nach
dem Ausziehen die gleiche Höhe haben, um eine
waagerechte Plattform für das Teleskop zu bilden.
5
Platzieren Sie die Okular-Zubehörablage oben auf der
mittleren Stativstützstrebe. Schrauben Sie die Ablage
in die Gewindeöffnung in der Mitte der Beinstrebe,
bis sie fest sitzt.
HINWEIS:
Drehen Sie ggf. die Zubehörablage gegen
den Uhrzeigersinn, bis die Zubehörlöcher
nicht durch die Arme der Beinstrebe
verdeckt sind, wie hier dargestellt.
8
Ziehen Sie die Schraube der Höhenstangenführung
fest, um das Teleskop in Position zu halten.
6
Lösen Sie den Knopf an der Höhenstangenführung
auf der Seite der Jochmontierung , damit die Öffnung
frei ist.
9
Führen Sie die beiden Tubusbefestigungsschrauben
durch die Jochmontierung und in die Naben am
Teleskoptubus ein, um ihn zu sichern.
7
Schieben Sie die Höhenstange in die
Stangenführung auf der Montierung und senken
Sie die Höhennaben am Teleskoptubus in die
Halterungen an der Oberseite jedes Jocharms.
10
Entfernen Sie zum Installieren des Sucherfernrohrs
die zwei silberfarbenen Muttern von den
Gewindestiften oben am Tubus in der Nähe des
Fokussierers.
DEUTSCH | 9
Page 10
Download the app from the
before your first observing session
.
or
When prompted, enter the unique unlock code below to
enable telescope control on your device.
11 13
12
Setzen Sie die beiden Bohrungen im Fuß des
Sucherfernrohrs so über die Gewindestifte, dass der
Fuß bündig auf dem Teleskoptubus sitzt. Stellen Sie
sicher, dass das runde Fenster am Sucherfernrohr
vom Fokussierer weg zeigt.
Schrauben Sie die beiden Muttern wieder auf die
Gewindestifte.
Zwischen Batterie und Kontakt befindet sich ein
kleiner durchsichtiger Kunststoff-Abstandshalter.
Dieser wurde eingesetzt, um während des Versands
ein Entladen der Batterie zu verhindern. Ziehen
Sie diesen Abstandshalter zur Inbetriebnahme der
Batterie heraus.
14 15 16
Lösen Sie die Stellschrauben am Fokussierer des
Teleskops und entfernen Sie die Staubschutzkappe.
Lösen Sie zum Installieren des Okulars die
Stellschrauben am Fokussierer. Stecken Sie die
silberfarbene Steckhülse am unteren Ende des Okulars
in den Fokussierer und ziehen Sie die Stellschrauben
fest. Verwenden Sie stets Ihr Okular mit geringer
Vergrößerungsleistung (25 mm), um das gewünschte
Ziel zu suchen. Sie können später jederzeit auf Ihr
Okular mit hoher Vergrößerung (10 mm) umsteigen.
Um die Barlowlinse zu verwenden, entfernen Sie das
Okular vom Fokussierer des Teleskops, setzen Sie
die Barlowlinse in den Fokussierer ein und stecken
Sie das Okular in die Barlowlinse. Dies verdoppelt
die Vergrößerung jedes Okulars, das Sie mit ihr
verwenden.
17 18
Lösen Sie zum Installieren des StarSense
Smartphone-Docks die beiden Stellschrauben an
der Dockmontierung oben am Teleskoptubus und
schieben Sie den Schwalbenschwanz unten am Dock
in die Montierung. Sichern Sie ihn, indem Sie beide
Schrauben festziehen.
App herunterladen
und aktivieren
Laden Sie die StarSense Explorer-App auf Ihr
Mobilgerät herunter, bevor Sie Ihr Teleskop mit nach
draußen nehmen. Suchen Sie im Apple App Store
oder bei Google Play nach „Celestron StarSense
Explorer“. Die App ist groß. Daher empfehlen
wir, sie über eine bestehende WLAN-Verbindung
herunterzuladen.
10 | DEUTSCH
Nehmen Sie den Objektivdeckel vorne am Teleskop
ab. Schauen Sie zum Beobachten durch das Okular,
wie oben dargestellt. Stellen Sie das Bild scharf,
indem Sie die Knöpfe unterhalb des Fokussierers
drehen.
1
Nehmen Sie nach dem Herunterladen der
App die orangefarbene Postkarte aus Ihrer
Teleskopverpackung. Starten Sie die App. Wenn
Sie dazu aufgefordert werden, geben Sie den
Aktivierungscode auf der Postkarte ein, um die App zu
aktivieren. Ihr Code kann bis zu 5 Geräte entsperren.
Page 11
Bewegen des
Teleskops
1
2
3
Um das Teleskop auf- und abwärts zu bewegen,
halten Sie den Fokussierer des Teleskops mit
einer Hand und lösen Sie den Knopf an der
Zeitlupenführungsstange. Das Teleskop kann nun
wie gewünscht nach oben oder unten bewegt
werden. Wenn Sie sich Ihrem Ziel nahe sind, ziehen
Sie den Knopf fest, um das Teleskop zu sichern.
Ausrichten des
Um die Montierung nach links und rechts zu
bewegen, lösen Sie den Azimut-Spannknopf an der
Jochmontierung zwischen zwei Stativbeinen.
4
Die Feineinstellung in Auf- und Abwärtsrichtung kann
mit der Zeitlupenstange für die Höhe erfolgen. Lassen
Sie den Stabführungsknopf verriegelt und drehen
Sie den schwarzen Griff an der Zeitlupenstange.
Auf diese Weise können Sie das Teleskop in kleinen
Schritten bewegen, um Objekte zu zentrieren oder
Himmelsobjekten am Nachthimmel zu folgen.
1
Halten Sie das Stativbein mit einer Hand, ergreifen
Sie den Fokussierer des Teleskoptubus und bewegen
Sie ihn wie gewünscht nach links oder rechts. Der
Widerstand, den Sie beim Bewegen des Teleskops
spüren, kann durch Festziehen oder Lösen des Knopfes
auf ein für Sie angenehmes Maß eingestellt werden.
5
Die Zeitlupenstange für die Höhe hat einen begrenzten
Bewegungsbereich von etwa 15 Grad. Wenn Sie am
Ende des Wegs angelangt sind und der Knopf sich
nicht mehr drehen lässt, können Sie ihn zurücksetzen,
indem Sie den Stangenführungsknopf lösen und
den Zeitlupenstangengriff in die entgegengesetzte
Richtung drehen, bis Sie sich in der Mitte seines
Wegs befinden. Ziehen Sie anschließend den
Stangenführungsknopf wieder fest.
2
25-mm-Okular
Sucherfernrohrs
Das Sucherfernrohr ist eines der wichtigsten Teile
Ihres Teleskops. Es hilft Ihnen, Objekte zu suchen
und im Okular zu zentrieren. Wenn Sie Ihr Teleskop
zum ersten Mal zusammenbauen, müssen Sie das
Sucherfernrohr auf die Hauptoptik des Teleskops
ausrichten. Dies tun Sie am besten tagsüber*.
*SONNENSTRAHLEN-WARNHINWEIS!
Niemals ohne einen vorschriftsmäßigen
Sonnenfilter durch ein Teleskop in die Sonne
schauen!
3
SCHAUEN SIE DURCH DAS
SUCHERFERNROHR
Sobald das Objekt im 25-mm-Okular zentriert ist,
schauen Sie durch das Sucherfernrohr und suchen
das den roten Punkt.
WÄHLEN SIE EIN ZIEL
Nehmen Sie das Teleskop tagsüber mit nach draußen
und suchen Sie ein leicht erkennbares Objekt wie
z.B. eine Straßenlaterne, ein Kfz-Kennzeichen oder
ein Schild. Das Objekt sollte so weit wie möglich,
aber mindestens 400 Meter entfernt sein.
4
STELLEN SIE DAS SUCHERFERNROHR EIN
Ohne das Teleskop zu bewegen, drehen Sie nun an
den zwei Einstellknöpfen um den Sucher zu bewegen
bis der rote Punkt über dem gleichen Objekt erscheint,
das Sie im 25-mm-Okular des Teleskops beobachten.
Fokussierknöpfe
ZENTRIEREN SIE DAS ZIEL IM OKULAR
Schauen Sie mit Ihrem Okular bei niedrigerer
Vergrößerungsleistung durch das Teleskop.
Schwenken Sie das Teleskop, bis das ausgewählte
Objekt im Zentrum des Sichtfelds liegt. Ist
das Bild unscharf, drehen Sie langsam an den
Fokussierknöpfen, bis das Bild scharf wird.
HINWEIS: Das Bild in Ihrem Teleskop erscheint
möglicherweise invertiert. Das ist für ein AstronomieTeleskop völlig normal.
5
IHR SUCHERFERNROHR IST JETZT
AUSGERICHTET!
Es ist keine Neuausrichtung erforderlich, es sei denn,
es wurde einem Stoß ausgesetzt oder fiel um.
DEUTSCH | 11
Page 12
Anbringen des
Smartphones
1 2
Ihre erste
Nacht im Freien
Entfernen Sie die große Kappe, die den Spiegel auf
der Vorderseite des StarSense-Docks abdeckt.
Herzlichen Glückwunsch! Nun ist Ihr Teleskop
vollständig zusammengebaut und Sie sind bereit, den
Kosmos zu erforschen. Nehmen Sie das Teleskop nach
draußen, setzen Sie Ihr 25-mm-Okular ein, entfernen
Sie den Objektivdeckel, setzen Sie Ihr Smartphone
in die Halterung ein und starten Sie die StarSense
Explorer-App. Das Tutorial der App führt Sie durch die
Schritte zum Auffinden Ihres ersten astronomischen
Ziels.
Öffnen Sie den federgespannten Schieber oben
am Telefondock durch Ziehen und setzen Sie das
Telefon so in die Halterung ein, dass es bündig mit
der unteren Lippe der Telefonhalterung abschließt.
Lassen Sie den Schieber langsam los, um das
Telefon zu sichern.
12 | DEUTSCH
Für weitere Informationen zu diesem Produkt, besuchen Sie die entsprechende
Produktseite auf celestron.com
SONNENSTRAHLEN-WARNHINWEIS:
Niemals ohne einen vorschriftsmäßigen Sonnenfilter durch ein Teleskop in die Sonne schauen.
www.celestron.com/pages/warranty
Brauchen Sie Unterstützung?
Wenden Sie sich an die technische Unterstützung von Celestron unter celestron.com/pages/technical-support
08-19
Page 13
Guida rapida
ITALIANO
127AZ
ARTICOLO N. 22453
1
Disimballare il telescopio e verificare che siano
presenti tutti i componenti. Il StarSense Explorer LT
comprende: un tubo del telescopio con affissa asta
del movimento lento per l’altitudine, un coperchio
per lenti, una borsa degli accessori, un treppiede
con montatura altazimutale e supporto centrale delle
gambe, due viti di montaggio del tubo, un aggancio
per smartphone StarSense, due oculari, una lente
Barlow 2x, un vassoio porta accessori dell’oculare,
un cercatore StarPointer e una scheda con codice per
l’app StarSense Explorer.
2
Per configurare il treppiede, allargare le gambe verso
l’esterno fino a quando non saranno completamente
estese e spingere verso il basso il supporto centrale
delle gambe.
5
Sistemare il vassoio porta accessori dell’oculare
sul supporto centrale delle gambe del treppiede.
Avvitare il vassoio nel foro filettato al centro
del supporto delle gambe fino a quando non è
completamente posizionato.
NOTA:
Se necessario, ruotare il vassoio porta
accessori in senso antiorario fino a quando i
fori non sono coperti dai bracci del supporto
delle gambe come mostrato qui.
3
Allungare la parte centrale di ciascuna delle tre gambe
del treppiede verso il basso di 15-30 cm. Usare la vite
di fissaggio situata su ciascuna gamba per fissare la
gamba allungata in posizione.
6
Allentare la manopola sulla guida dell'asta
dell'altitudine a lato della montatura in modo che il
foro non sia ostruito.
4
Assicurarsi che tutte e tre le gambe siano alla stessa
altezza una volta estese per fornire una piattaforma a
livello per il telescopio.
7
Fare scorrere l'asta dell'altitudine nella relativa
guida sulla montatura e abbassare i mozzi
dell'altitudine sul tubo del telescopio negli agganci in
cima a ciascun braccio.
8
Serrare la vite della guida dell'asta dell'altitudine per
mantenere in posizione il telescopio.
9
Inserire le due viti di montaggio del tubo attraverso
la montatura e nei mozzi del tubo del telescopio per
fissarlo in posizione.
10
Per installare il cercatore, rimuovere i due dadi
argentati dai perni filettati nella parte superiore del
tubo, vicino al focheggiatore.
ITALIANO | 13
Page 14
Download the app from the
before your first observing session
.
or
When prompted, enter the unique unlock code below to
enable telescope control on your device.
11 13
12
Collocare i due fori alla base del cercatore sui perni
filettati, in modo che la base del cercatore sia a
contatto con il tubo del telescopio. Accertarsi che la
finestrella rotonda sul cercatore non sia rivolta verso
il focheggiatore.
Serrare nuovamente i due dadi nei perni filettati. È presente una piccola linguett a in plastica trasparente
tra la batteria e il contatto. Ciò è presente per impedire
che la batteria si scarichi durante il trasporto. Estrarla
per consentire il funzionamento della batteria.
14 15 16
Allentare le viti sul focheggiatore del telescopio e
rimuovere il coperchio antipolvere.
Per installare l'oculare, allentare le viti sul focheggiatore.
Inserire il barilotto color argento alla base dell'oculare
nel focheggiatore e fissare serrando le viti. Iniziare
sempre con l'Oculare basso indice di ingrandimento
(25 mm) per agevolare l'identificazione dell'oggetto
che si desidera osservare. È sempre possibile passare
in un secondo momento a un oculare con maggiore
potenza (10 mm).
Per utilizzare la lente Barlow, rimuovere l'oculare dal
focheggiatore del telescopio, inserire la lente Barlow
nel focheggiatore e inserire l'oculare nella lente
Barlow. Ciò consente di raddoppiare l'ingrandimento
di qualsiasi oculare utilizzato.
17 18
Per installare l'aggancio per smartphone StarSense,
allentare le due viti sulla montatura dell'aggancio in cima
al tubo del telescopio e fare scorrere la coda di rondine
sulla parte inferiore dell'aggancio sulla montatura.
Fissare in posizione serrando entrambe le viti.
Come scaricare e
attivare l’app
Prima di portare fuori il telescopio, scaricare l’app
StarSense Explorer sul proprio dispositivo mobile.
Cercare “Celestron StarSense Explorer” nell’App
Store Apple o su Google Play. L’app è di grandi
dimensioni, pertanto si consiglia di scaricarla mentre
si è connessi al Wi-Fi.
14 | ITALIANO
Rimuovere il tappo della lente dalla parte anteriore
del telescopio. Per osservare, guardare attraverso
l'oculare come mostrato sopra. Mettere a fuoco
l'immagine ruotando le manopole al di sotto del
focheggiatore.
1
Una volta scaricata l’app, individuare la cartolina
arancione all’interno della scatola del telescopio.
Avviare l’app. Quando richiesto, inserire il codice di
attivazione presente sulla cartolina per attivare l’app. Il
codice consente di sbloccare fino a 5 dispositivi alla
volta.
Page 15
Spostamento del
telescopio
1
2
3
Per spostare il telescopio verso l'alto e verso il
basso, tenere il focheggiatore del telescopio con una
mano e allentare la manopola sulla guida dell'asta
del movimento lento. Il telescopio può essere ora
spostato verso l'alto e verso il basso a piacimento.
Quando si è vicino all'oggetto, serrare la manopola
per fissare il telescopio in posizione.
Allineamento del
Per spostare la montatura a sinistra e a destra, allentare
la manopola di tensionamento azimuth alla base della
montatura tra due delle gambe del treppiede.
4
È possibile regolare in modo preciso la direzione
verso l'alto e verso il basso mediante l'asta del
movimento lento per l'altitudine. Mantenere bloccata
la manopola della guida dell'asta e ruotare la leva
nera dell'asta del movimento lento. Ciò permette di
spostare il telescopio poco a poco per rendere più
facile centrare gli oggetti o seguire i corpi celesti nel
cielo.
1
Tenere la gamba del treppiede con una mano e
afferrare il focheggiatore del telescopio e spostarlo
a sinistra o a destra come desiderato. Il grado di
tensione percepito quando si sposta il telescopio può
essere regolato serrando o allentando la manopola a
un livello comodo per l'utente.
5
L'asta del movimento lento per l’altitudine ha un
intervallo di movimento limitato di circa 15 gradi.
Se si arriva al finecorsa e la manopola non può
essere ulteriormente ruotata, è possibile ripristinarla
allentando la manopola della guida dell'asta e
ruotando la leva dell'asta del movimento lento in
direzione opposta fino a quando non si torna a metà
del percorso disponibile, quindi serrare nuovamente la
manopola della guida dell'asta.
2
Oculare da 25 mm
cercatore
Il cercatore è uno dei componenti più importanti del
telescopio. Aiuta a localizzare gli oggetti e a centrarli
nell'oculare. Al primo assemblaggio del telescopio
è necessario allineare il cercatore con le ottiche
principali del telescopio. È preferibile eseguire questa
operazione durante il giorno*.
* AVVERTENZA SOLARE! Non tentare mai
di osservare il Sole attraverso un telescopio
senza un filtro solare adeguato.
3
OSSERVARE ATTRAVERSO I L CERCATORE
Una volta che l’oggetto è centrato nell’oculare da
25 mm, guardare attraverso il cercatore e localizzare
puntino rosso.
SCEGLIER E UN OGGETTO DA OSSERVARE
Portare il telescopio all’esterno durante il giorno e
individuare un oggetto facilmente riconoscibile,
come ad esempio un semaforo, la targa di un’auto o
un cartello. L’oggetto dovrebbe trovarsi il più lontano
possibile, minimo a 400 metri.
4
REGOLARE IL CE RCATORE
Senza spostare il telescopio, utilizzare due manopole
di regolazione per spostare il cercatore fino a quando
puntino rosso appare sullo stesso oggetto che si sta
osservando nell’oculare da 25 mm.
Manopole della
messa a fuoco
CENTRARE L'OGGETTO NE LL'OCULAR E
Guardare attraverso il telescopio utilizzando l’oculare
con minore ingrandimento. Muovere il telescopio fino
a quando l’oggetto prescelto si trova al centro del
campo visivo. Se l’immagine è sfocata, ruotare con
delicatezza le manopole di messa a fuoco a lato del
telescopio fino a quando l’immagine non è nitida.
N O TA :
L’immagine del telescopio potrebbe apparire
capovolta. Ciò è perfettamente normale per
un telescopio astronomico.
5
IL CERCATORE È ORA ALLIN EATO!
Non occorre effettuare un nuovo allineamento salvo
colpi o cadute.
ITALIANO | 15
Page 16
Collegamento dello
smartphone
1 2
La prima
osservazione
notturna
Rimuovere il coperchio grande che copre lo specchio
nella parte anteriore dell'aggancio StarSense.
Congratulazioni! Il telescopio è ora configurato e tutto
è pronto per esplorare il cosmo. Portare all'esterno il
telescopio, inserire l'oculare da 25 mm, rimuovere il
tappo dalla lente, inserire lo smartphone nel supporto
e avviare l'app StarSense Explorer. Il tutorial dell'app
guida l'utente attraverso i vari passaggi necessari per
localizzare il primo oggetto astronomico.
Tirare per aprire il binario caricato a molla in cima
all'aggancio per telefono e sistemare il telefono nel
supporto in modo che sia a contatto con il lembo
inferiore del supporto del telefono. Rilasciare
lentamente il binario per fissare il telefono in
posizione.
16 | ITALIANO
Per maggiori informazioni sul prodotto, visitare la pagina relativa al prodotto su
celestron.com
AVVERTENZA SOLAR E:
Non tentare mai di osservare il sole attraverso un telescopio senza un filtro solare adeguato.
Bisogno di aiuto?
Contattare l'assistenza tecnica Celestron su celestron.com/pages/technical-support
08-19
www.celestron.com/pages/warranty
Page 17
127AZ
Guía de instalación rápida
ESPAÑOL
PRODUCTO # 22453
1
2
Desembale el telescopio y compruebe que estén
presentes todas las piezas. Su StarSense Explorer
LT incluye: un tubo de telescopio con mango de
movimiento lento de altitud, una tapa de lente, una
bolsa de accesorios, un trípode con soporte de fijación
altazimut y soporte central instalado, dos tornillos de
montaje del tubo, un soporte de teléfono StarSense,
dos oculares, una lente Barlow 2x, una bandeja de
accesorios oculares, un localizador StarPointer y una
tarjeta de código para la app StarSense Explorer.
3
Extienda la sección central de cada una de las tres
patas del trípode hacia abajo entre 6 y 12 pulgadas
(15 y 30 cm). Use el tornillo de fijación en cada pata
para asegurar la para extendida en posición.
Para instalar el trípode, separe las patas hacia fuera
hasta que estén totalmente extendidas y empuje el
soporte de las patas central.
4
Asegúrese de que las tres patas tengan la misma
altura extendidas para ofrecer una plataforma
nivelada para el telescopio.
5
Coloque la bandeja de accesorios oculares sobre la
abrazadera central del trípode. Enrosque la bandeja
en el agujero estriado del centro del soporte de las
patas hasta que esté totalmente asentada.
NOTA:
Si es necesario, gire en sentido contrario a
las agujas del reloj la bandeja de accesorios
hasta que los agujeros de los accesorios no
queden cubiertos por los brazos del soporte
de la pata como se indica a continuación.
8
Apriete el tornillo de guía del mango de altitud para
sujetar el telescopio en posición.
6
Afloje el mando de la guía del mango de altitud en
el lateral del soporte de sujeción de forma que el
agujero quede despejado.
9
Introduzca los dos tornillos de montaje del tubo por
el soporte de sujeción en los agujeros del tubo del
telescopio para asegurarlo en posición.
7
Deslice el mango de altitud en la guíadel soporte y
baje los pernos de altitud del tubo del telescopio en
los soportes sobre cada brazo de la sujeción.
10
Para instalar el localizador saque las dos roscas
plateadas de los soportes estriados en la parte
superior del tubo, cerca del enfoque.
ESPAÑOL | 17
Page 18
Download the app from the
before your first observing session
.
or
When prompted, enter the unique unlock code below to
enable telescope control on your device.
11 13
12
Ponga los dos agujeros en la base del localizador
sobre los soportes estriados de forma que la base del
localizador quede lisa sobre el tubo del telescopio.
Asegúrese de que la ventana redonda del localizador
esté orientada en dirección contraria al enfoque.
Vuelva a poner las dos roscas en los soportes
estriados.
Entre la batería y el contacto hay una pequeña pestaña
de plástico transparente. Se ha incluido para evitar
que la batería se descargue durante el transporte.
Sáquela para que funcione la batería.
14 15 16
Afloje los tornillos del enfoque del telescopio y saque
la tapa.
Para instalar el ocular, afloje los tornillos del enfoque.
Introduzca el cañón plateado de la parte inferior
del ocular en el enfoque y asegúrelo apretando los
tornillos. Comience siempre usando el Ocular de baja
potencia (25 mm) para ayudarle a localizar el objetivo
que desee ver. Siempre puede cambiar al ocular de
alta potencia (10 mm) más tarde.
Para usar la lente Barlow, saque el ocular del
enfoque del telescopio, introduzca la lente Barlow en
el enfoque e introduzca su ocular en la lente Barlow.
Doblará el aumento del ocular con el que la use.
17 18
Para instalar el soporte de teléfono StarSense afloje
los dos tornillos del soporte en la parte superior del
telescopio y deslice el encaje de la parte inferior
del conector en el soporte. Asegúrelo en posición
apretando ambos tornillos.
Descarga y
activación de la app
Antes de sacar el telescopio al exterior, descargue
la app StarSense Explorer en su dispositivo móvil.
Busque «Celestron StarSense Explorer» en Apple
App Store o Google Play. La app tiene un gran
tamaño, recomendamos que la descargue cuando
esté conectado a WiFi.
Saque la tapa de la lente de la parte anterior del
telescopio. Para observar, mire por el ocular como
se indica anteriormente. Enfoque la imagen girando
los mandos bajo el enfoque.
1
Cuando haya descargado la app, localice la tarjeta
naranja en la caja de su telescopio. Ejecute la
app. Cuando se solicite, introduzca el código de
activación de la tarjeta para activar la app. Su código
desbloqueará hasta 5 dispositivos.
18 | ESPAÑOL
Page 19
Movimiento del
telescopio
1
2
3
Para mover el telescopio arriba y abajo, aguante
el enfoque del telescopio con una mano y afloje el
mando de la guía del mango de movimiento lento. El
telescopio podrá moverse arriba o abajo como desee.
Cuando esté cerca de su objetivo, apriete el mando
para asegurar el telescopio en posición.
Alinear el
Para mover el soporte a izquierda y derecha, afloje el
mando de tensión de azimut situado en el soporte de
sujeción entre dos de las patas del trípode.
4
El ajuste preciso en dirección arriba y abajo puede
realizarse con el mango de movimiento lento de altitud.
Mantenga bloqueado el mando de la guía del mango
y gire el mango negro del mango de movimiento lento.
Podrá mover el telescopio en incrementos pequeños,
para ayudarle a centrar objetos o seguir objetos
celestes en el firmamento nocturno.
1
Aguante la pata del trípode con una mano y agarre
el enfoque del tubo del telescopio, moviéndolo
a izquierda o derecha como desee. La cantidad
de tensión que note al mover el telescopio puede
ajustarse apretando o aflojando el mando a un nivel
que le resulte cómodo.
5
El mango de movimiento lento de altitud tiene un
alcance de movimiento limitado, de aproximadamente
15 grados. Si llega al final del recorrido y el mando ya
no puede girar más, puede restablecerlo aflojando el
mando de guía del mango y girando el mango de
movimiento lento en dirección opuesta hasta mitad
de recorrido, y apretando de nuevo el mando de guía
del mango.
2
Ocular de 25 mm
localizador
El localizador es una de las piezas más importantes
de su telescopio. Le ayuda a localizar objetos y
centrarlos en el ocular. La primera vez que monte el
telescopio, deberá alinear el localizador con la óptica
principal del telescopio. Es preferible hacerlo de día.
* ¡AVISO SOLAR! No intente nunca observar
el sol por un telescopio sin un filtro solar
adecuado.
3
MIRAR POR EL LOCALIZADOR
Cuando el objeto esté centrado en el ocular de
25 mm, mire por el localizador y localice punto rojo.
ELEGIR UN OBJETO
Saque el telescopio de día y localice un objeto
fácilmente reconocible, como una farola, una matrícula
de coche, o una señal. El objeto debe estar lo más
lejos posible, al menos a 400 m.
4
AJUSTAR EL LOCALIZADOR
Sin mover el telescopio, use los dos mandos de
ajuste para moverlo hasta que el punto de mira/punto
rojo aparezca sobre el objeto que está observando en
el ocular de 25 mm del telescopio.
Mandos de
enfoque
CENTRAR EL OBJETO EN E L OCULAR
Mire por el telescopio usando el ocular con menor
potencia. Mueva el telescopio hasta que el objeto
elegido quede en el centro del campo de visión. Si la
imagen se ve borrosa, gire suavemente los mandos
de enfoque a cada lado del telescopio hasta que
quede definida.
N O TA : La imagen del telescopio puede aparecer
invertida. Es normal en un telescopio astronómico.
5
SU LOCALIZADOR ESTÁ ALINEADO.
No debería realinarse a menos que reciba golpes o
caiga.
ESPAÑOL | 19
Page 20
Instalación del
teléfono
1 2
Su primera
noche fuera
Saque la tapa grande que cubre el espejo de la parte
anterior del conector StarSense.
Felicidades. El telescopio está totalmente montado
y listo para explorar el cosmos. Saque el telescopio
al exterior, introduzca el ocular de 25 mm, saque la
tapa de la lente, introduzca el teléfono en su soporte
y ejecute la app StarSense Explorer. El tutorial de la
app le guiará por los pasos para localizar su primer
objetivo astronómico.
Abra el deslizador de muelle de la parte superior
del conector del teléfono y coloque el teléfono en
el soporte de forma que quede llano con el borde
inferior del soporte del teléfono. Suelte lentamente
el deslizador para asegurar el teléfono en posición.
20 | ESPAÑOL
Para obtener más información de este producto, visite la página de producto
correspondiente en celestron.com
AVISO SOLAR:
No intente nunca observar el sol por un telescopio sin un filtro solar adecuado.
¿Necesita ayuda?
Contacte con el soporte técnico de Celestron celestron.com/pages/technical-support
08-19
www.celestron.com/pages/warranty
 Loading...