

Page 1

CelestixEdge E Series Appliance
Installation Guide
Page 2

The information containedin this document represents the currentview of Celestix Networks on the issues discussed as of the date of publication.
Because Celestix Networks mustrespond to changing market conditions, it shouldnotbe interpreted to be a commitmentonthepartof Celestix Networks,
and Celestix Networks cannot guarantee the accuracy ofany information presented after the date of publication.
These instructions are for informational purposes only. CELESTIX MAKES NO WARRANTIES, EXPRESS OR IMPLIED, IN THIS DOCUMENT.
Complyingwithall applicable copyright laws is the responsibility of the user. Withoutlimitingthe rights undercopyright,nopartof this document may be
reproduced, stored in, or introduced into a retrievalsystem, or transmitted inany form orby any means (electronic, mechanical, photocopying, recording, or
otherwise), or for any purpose, withoutthe express written permissionofCelestix Networks.
Celestix Networks may have patents, patent applications, trademarks, copyrights, orother intellectualproperty rights covering subject matter inthis
document. Except as expressly provided in any writtenlicense agreement from Celestix Networks, the furnishingofthis document does not give youany
license to these patents, trademarks, copyrights, or otherintellectual property.
CelestixEdge E Series Appliance Installation Guide
Document Number: EDG2100-120-001
Updated:November 11 2015
Part Number: (CCD) 2101-30000001
Productversion:ESeries2.1
© 2015 Celestix Networks, Inc. All rights reserved.
The example companies, organizations, products, domainnames, email addresses,logos, people, places, and events depicted herein are fictitious. No
association withany real company, organization, product, domainname, emailaddress, logo, person, place, or event is intended or shouldbe inferred.
HOTPin, Celestix and Celestix logo are eithertrademarks or registered trademarks of Celestix Networks, Inc.
Microsoft,Microsoftlogo, Microsoft Windows Server,MicrosoftForefront, Threat Management Gateway, Unified Access Gateway, Active Directory,
Windows, Windows NT, Office 365,Azure, ActiveX, Internet Explorer, Windows Phone, and Zune are eitherregistered trademarks or trademarks of Microsoft
Corporationinthe United States and/or other countries.
The names of actual companies and products mentionedherein may be the trademarks of theirrespective owners.
i
Page 3

Table of Contents
Introduction 1
Guide Usage Notes 2
Verify Package Contents 3
Appliance Hardware Features 4
System Overview 6
The Next Step 11
Install the Appliance 12
Installation Notes 12
Rack the Appliance 16
Connect the Appliance to the Network 17
Front Panel Controls Overview 19
Power the Celestix Appliance 19
Initial Access 20
The Next Step 21
Appliance Setup 22
General Information 22
Access the Web User Interface 23
Quick Setup Wizard 24
The Next Step 26
Configure Features: Installation 27
General Features Management 27
Feature Details 28
The Next Step 33
Configure Features: Remote Access Setup Wizard 34
General Information 34
Setup Wizard 36
The Next Step 42
ii
Page 4

Configure Features: Web Application Proxy Setup Wizard 43
General Information 43
Setup Wizard 44
The Next Step 45
Configure Features: Work Folders Setup Wizard 46
General Information 46
Initial Configuration 47
Setup Wizard 48
The Next Step 49
Create a System Image 50
LGV 50
Create a Backup 52
Update Software 53
Appendix 54
Glossary 55
Web User Interface Content Overview 61
Safety Precautions 62
Product Reclamation and Recycling 63
Index 64
Resource Worksheet 68
iii
Page 5

Introduction
Celestix Networks delivers an exceptional combination of perimeter security features, scalability, and
simplicity in cost-efficient virtual and hardware appliances. Ready-to-deploy appliances offer easier
management that reduces the risk and cost of security solutions. The Celestix® line of security
appliances provides key security framework components: firewall, branch-office connectivity, web
cache/proxy, wireless policies/authentication, remote access, two-factor authentication, patch
management, and anti-spam/anti-virus gateway deployments. Celestix products provide the best
option for the emergent need to manage IT security for every level of infrastructure complexity.
The Celestix® CelestixEdge E Series Appliance provides simplified configuration for diverse remote
access and desktop virtualization needs. The E Series delivers secure connectivity to an organization’s
network and cloud resources with Microsoft® Windows Server® 2012 R2 Remote Access. Supporting
technologies include access management, bring your own device (BYOD) facilitation, and anywhere
access to work files.
A well-planned BYOD blueprint can help users to work how and when they are most productive.
Through the E Series, organizations can choose the connectivity options best suited to organizational
goals.
l Always-on remote connection for both end user access and client management.
l RADIUS and multifactor authentication.
l Encrypted access to internal resources without a VPN.
l Streaming access to hosted applications from any device.
l Synced work files access by supported devices from wherever, even without network con-
nectivity.
The foundation of your Celestix appliance is the award-winning Comet engine. Comet provides a web
user interface (web UI) for convenient access to administration functions like setup, network
configuration, and server task management. For the E Series, it also provides simplified installation and
configuration for Remote Access and supporting technologies.
The Celestix E Series is a hardened and secure appliance platform that is optimized for secure Windows
deployment out of the box.
The 2.1 E Series offers the following functionality:
l Web Application Proxy single sign-on portal
l SIEM support
l DirectAccess configuration updates
1 E Series Installation Guide
Page 6

Guide Usage Notes
This guide will help system administrators to efficiently install and configure a new appliance with a
base level setup. The instructions cover steps for some common deployment scenarios. They usually
offer one option to accomplish a task, though there may be other ways to achieve the same thing. The
guide does not provide extensive reference information. Online help in the web UI can usually provide
additional information.
Document Conventions
l Using a PDF viewer besides Adobe® Reader® may disable some of this document’s func-
tionality and may change how the content displays.
l Instructions are generally intended for administrators to manage the server installation through
Comet’s web user interface administration tool, referred to as the web UI.
l Instructions are presented in the best order to follow for setup.
l The following text formats are used for clarification:
n Web UI on-screen items are noted in this style.
n Features on the appliance front and rear panels are noted in this style.
n File names are delineated as filename.xxx.
n Titles are delineated as documentname.
n Examples and code are delineated in thisstyle.
l When referring to subsections in this document, the hierarchy is delineated by the symbol for a
colon (:).
For example, the location of the section To find updates would be delineated as:
Update Software : To find updates.
l Instructions assume the reader will navigate from the web UI main menu bar to access features.
For example, to access Software Updates, the navigation path from the menu bar would be
delineated as:
System|Software Updates.
l Though network interface connections are commonly referred to as NICs, ports, and adapters,
documentation uses the term networkadapters.
l Documentation generally refers to the appliance when discussing the E Series Appliance.
Web User Interface
The web UI is a management tool to access the most common Celestix product features. Initially, use it
to quickly set up the server. Subsequently, use the web UI to access administrative features for both
Comet and Remote Access roles.
2 E Series Installation Guide
Page 7
See the Appendix topic Web User Interface Content Overview for features included in the web UI. See
the online help topic Web User Interface Overview for more information about using the web UI
(Help|Web UI Overview).
Verify Package Contents
Use the following information to confirm the package contains the necessary appliance accessories.
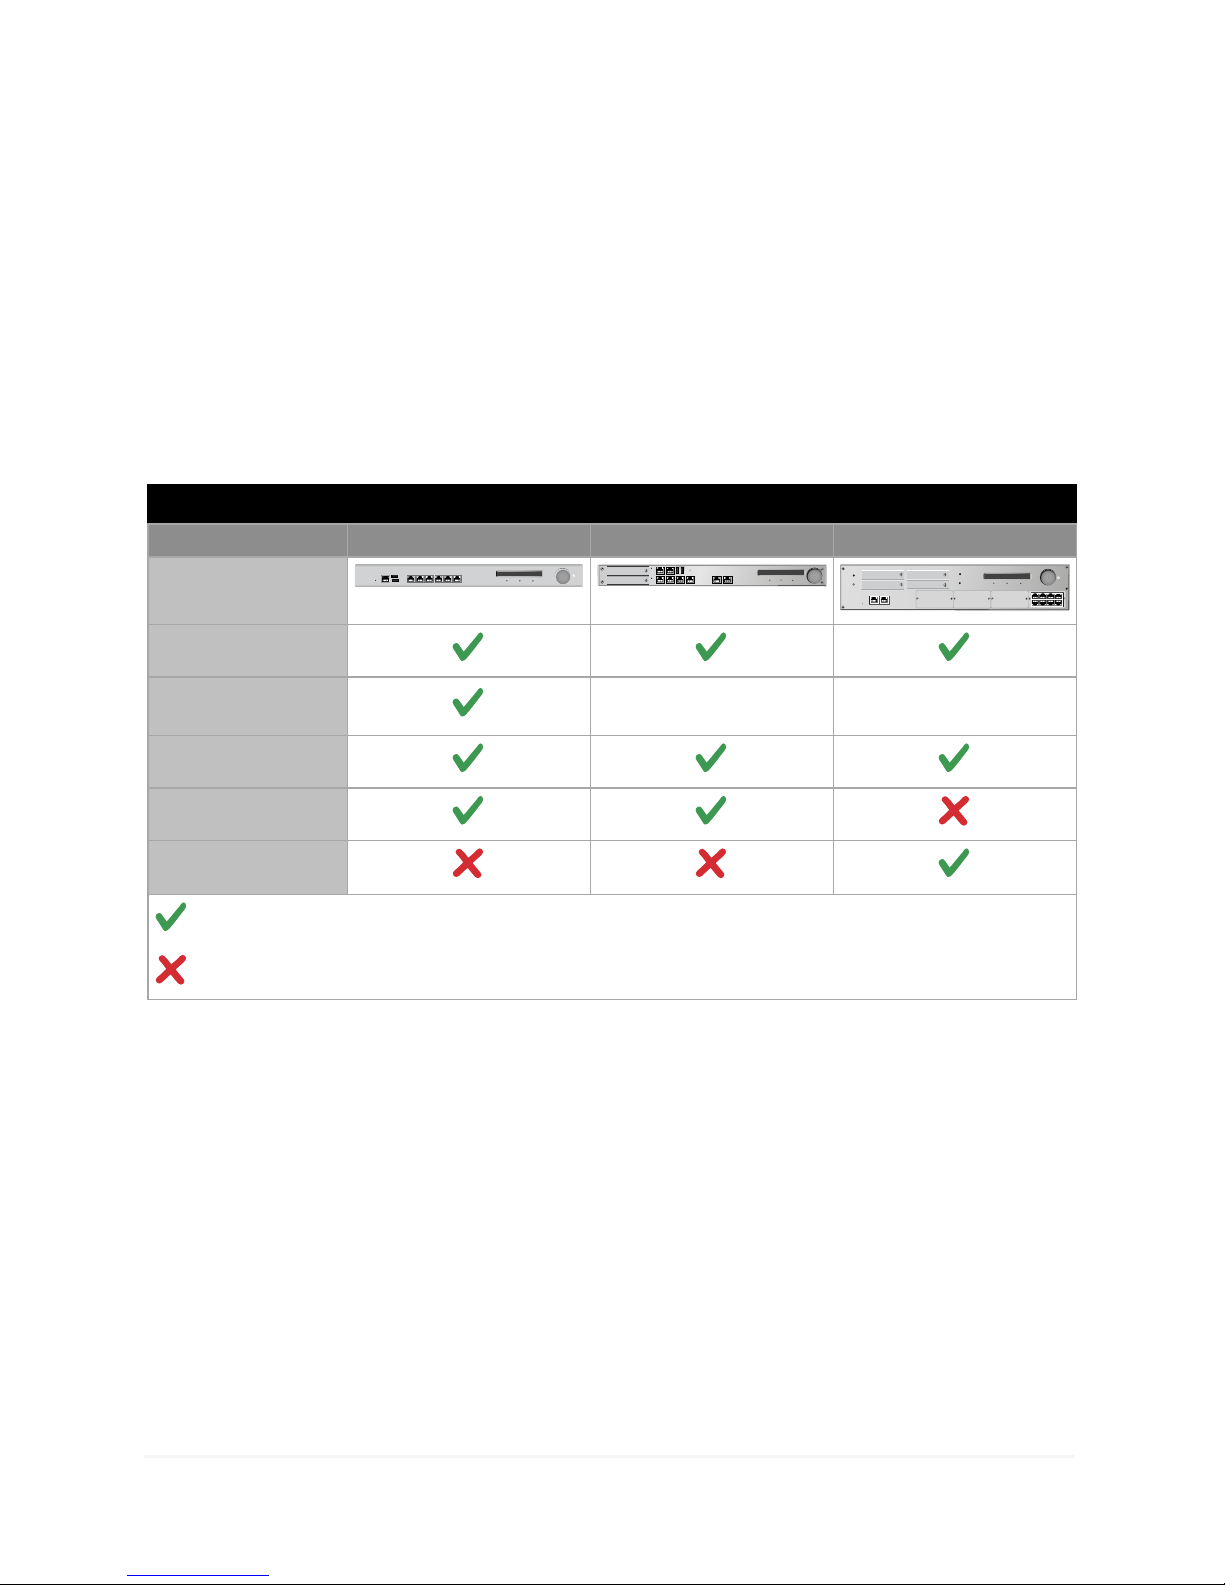
Appliance Series Accessory List
Table: Accessory List
Appliance Series 3400 6400 8400
Contents
CAT6 Ethernet Cable
Power Cable
2 2
RJ45 Connec tor Cable
Mounting Brackets & Hardware
Rac kMounting Slides & Hard-
ware
- included
- not included
Accessories Illustrations
The illustrations below will help to identify the items in the package. Only items appropriate for the
appliance series are included.
3 E Series Installation Guide
Page 8
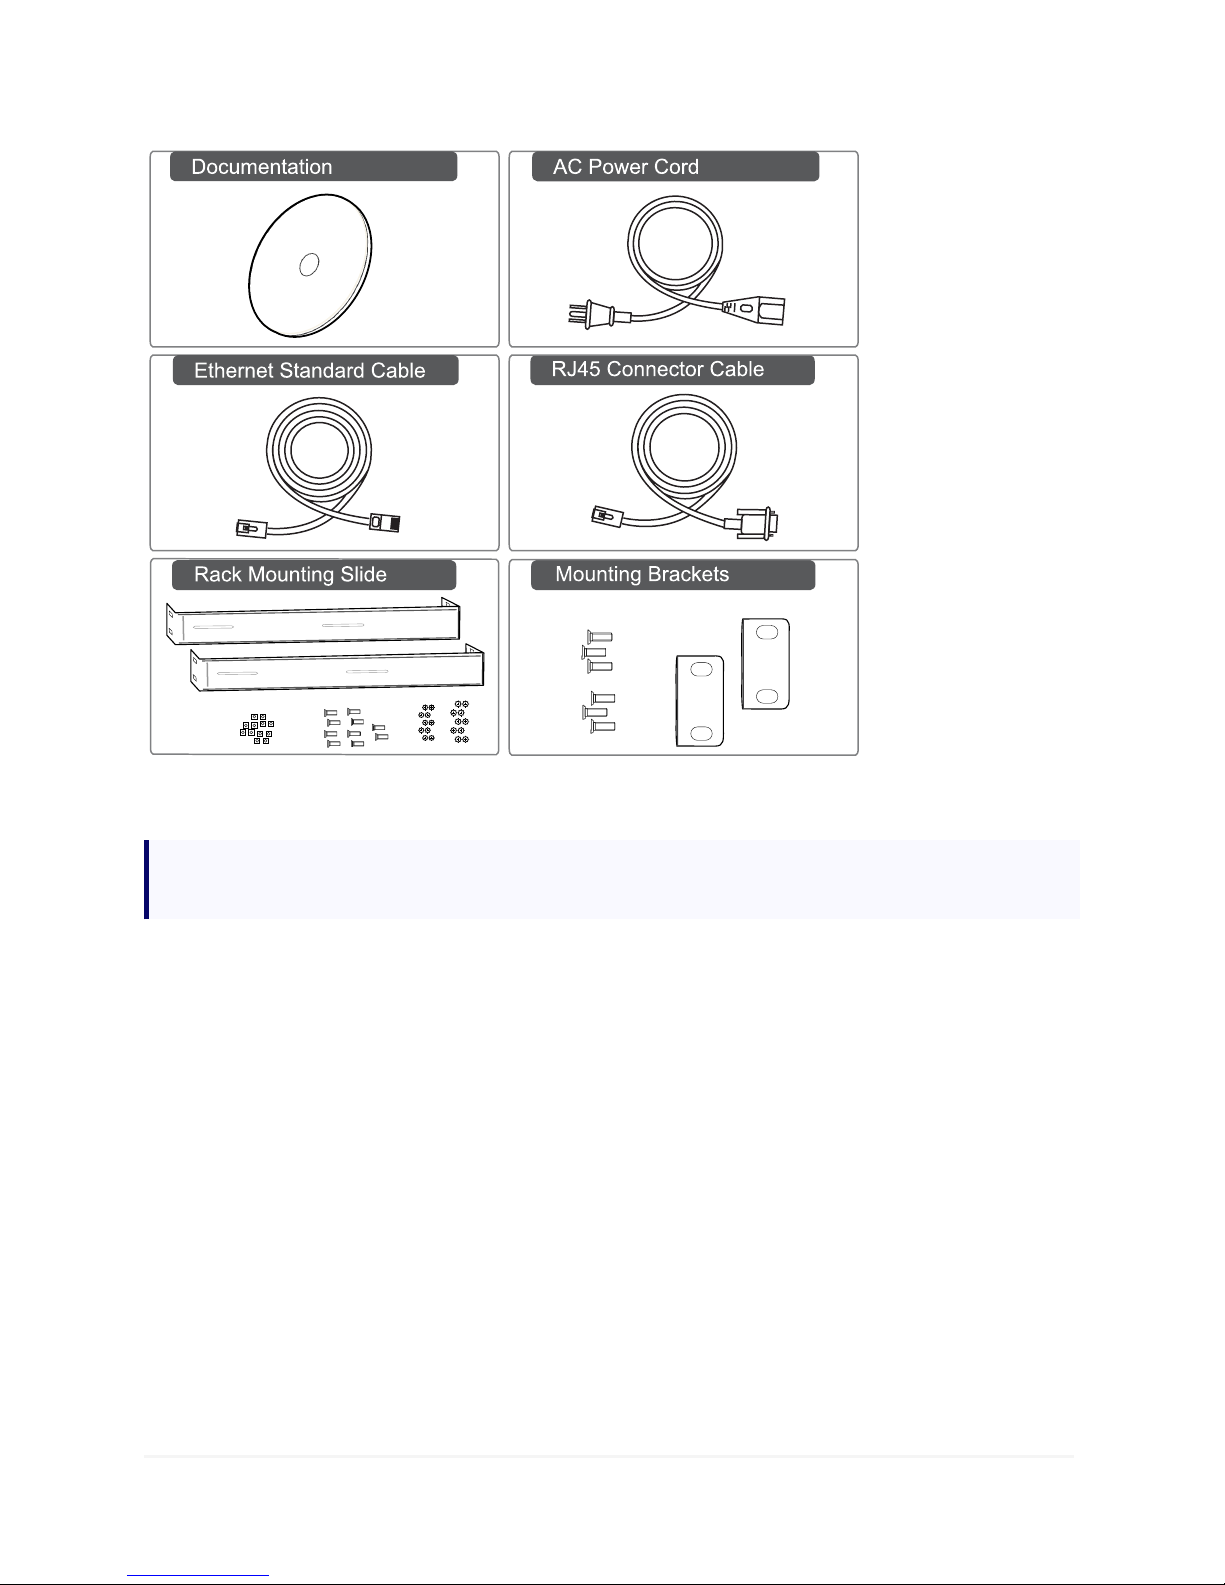
Illustration 1: Appliance Package Contents
Note: Fasteners to attach brackets or slides to the appliance are provided. Fasteners to bolt the
appliance to the rack are not supplied.
If an item is missing from the package, contact Celestix Networks via email:
Appliance Hardware Features
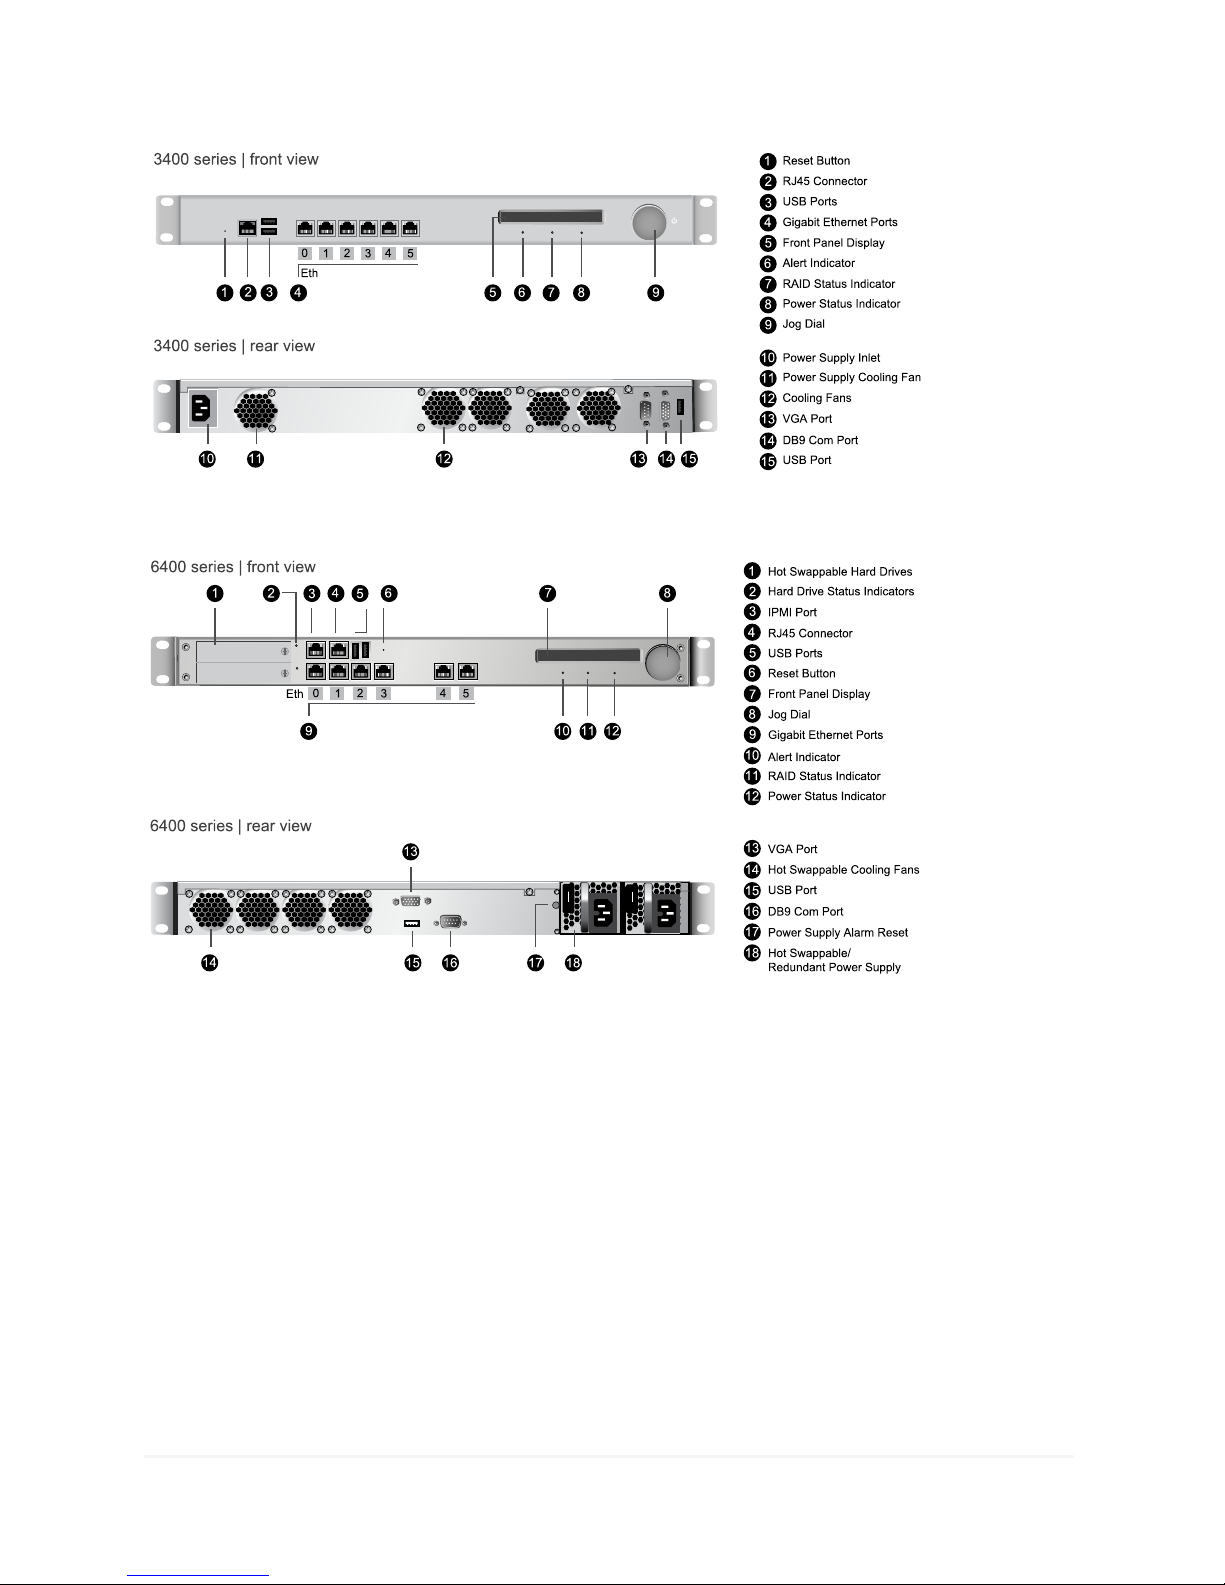
Each of the feature lists below include a legend to help identify components on the appliance.
4 E Series Installation Guide
Page 9
5 E Series Installation Guide
Page 10
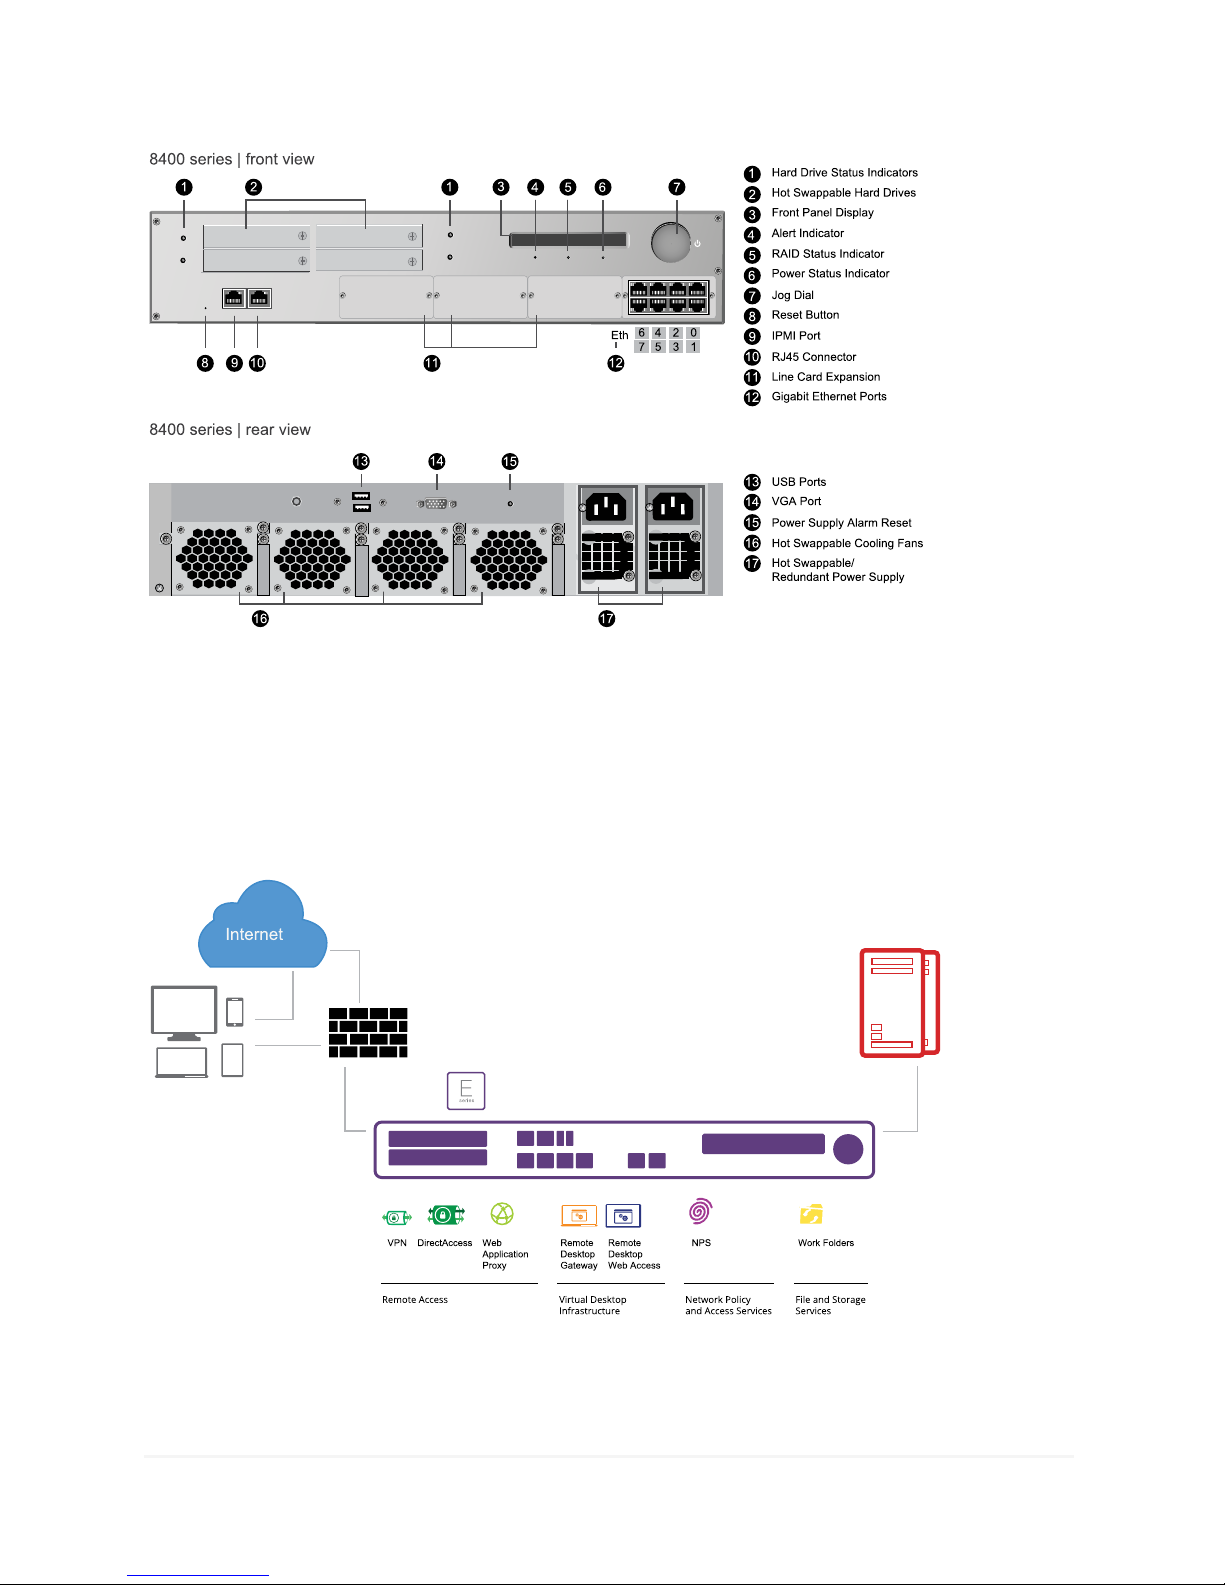
Illustration 2: Appliance Illustrations with Delineated Features
System Overview
The CelestixEdge appliance simplifies the process to set up and manage access to IT resources. The
diagram below provides a reference for features that are available on the appliance.
Illustration 3: E Series Connectivity Features
6 E Series Installation Guide
Page 11
Example Deployment Topologies
The diagrams that follow are intended to provide reference for IT administrators or architects. The
examples provide a few scenarios for common aspects of CelestixEdge appliance deployment, while
the potential options are certainly numerous.
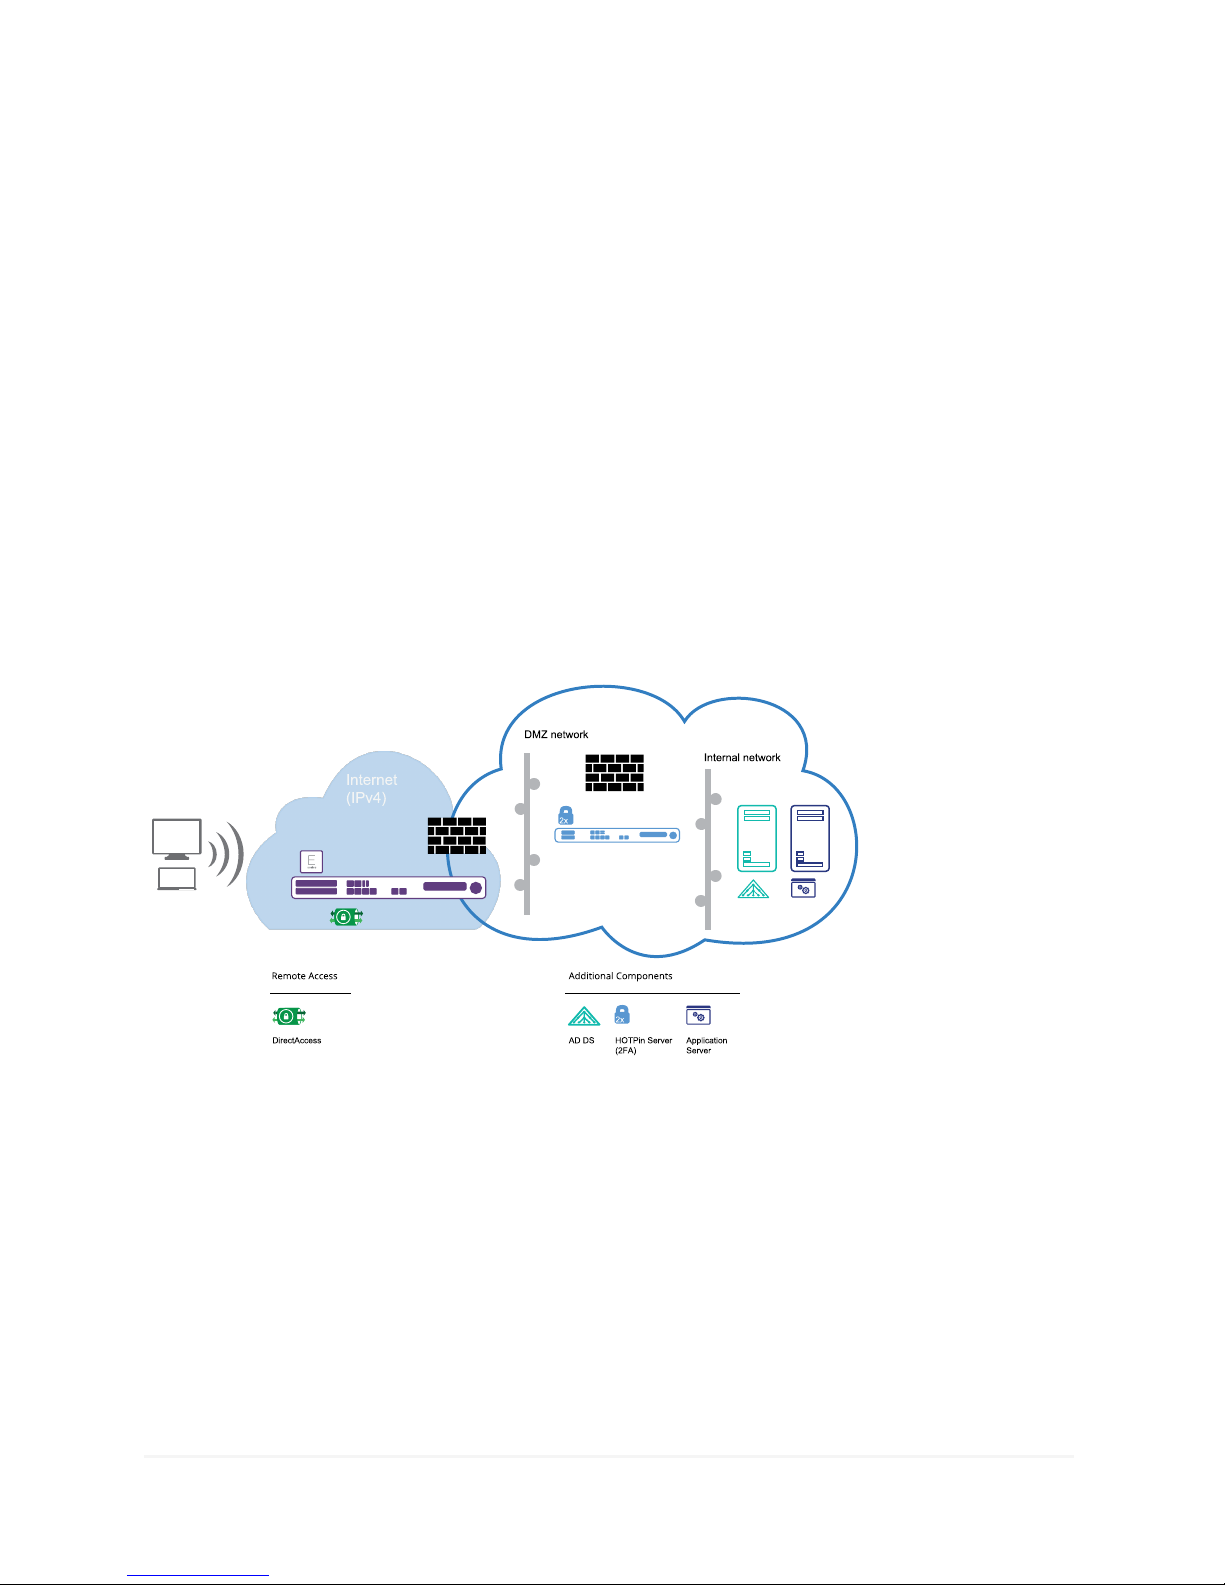
DirectAccess Deployment with Manage-Out
Access for external users with strong authentication that allows system administrators to support and
manage remote clients.
Requirements:
l Secure remote access for managed Windows 7 and Windows 8 clients.
l Anytime, anywhere access to applications and data on the organization network.
l Compliance mandate for One-Time Password (OTP) authentication.
l System administrators inside the organization network need connectivity to initiate remote
desktop sessions and push software updates to remote clients.
Illustration 4: DirectAccess Role
VPN
Access for external users that includes a wide range of systems, like PCs, Macs, tablets, and smart
phones.
Requirements:
7 E Series Installation Guide
Page 12
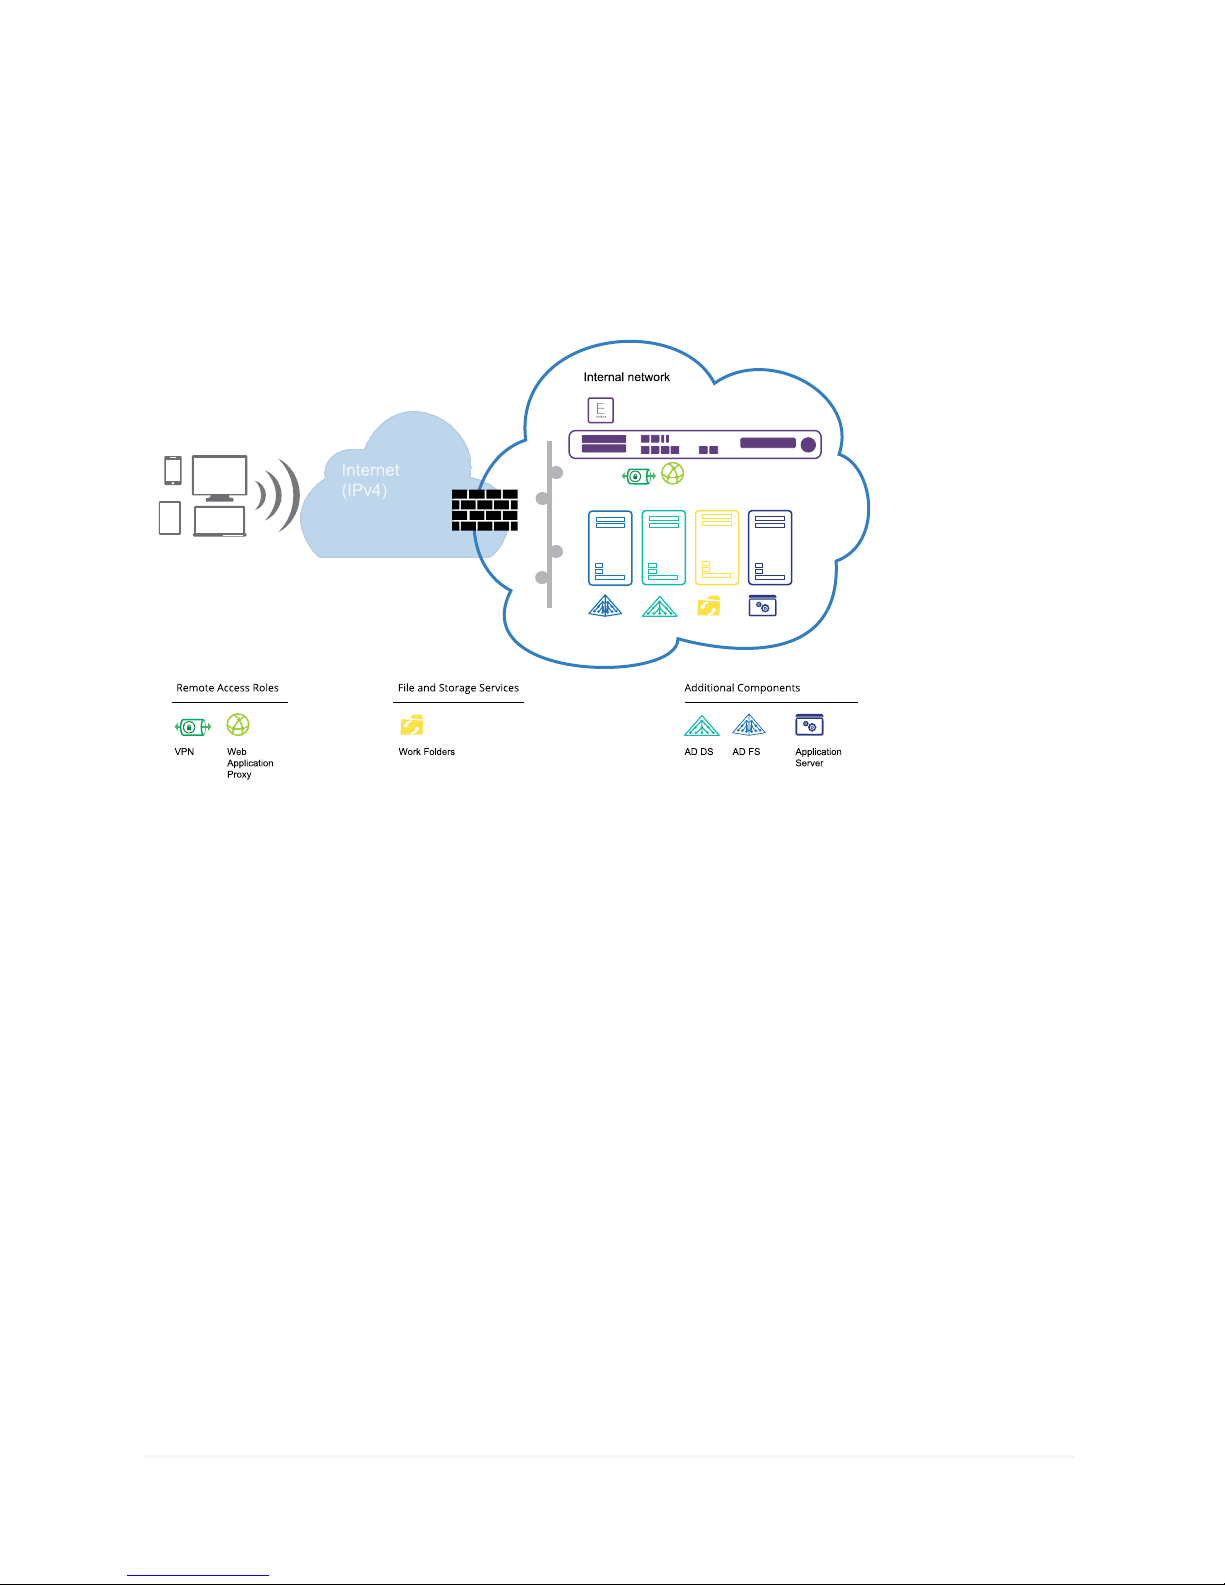
l Secure remote access for nonmanaged clients that include commonly used operating systems
(Windows, Linux, OS X, Android, and iOS).
l Remote access to applications and data on the organization network.
l Web-based applications need users to be pre-authenticated at the edge.
l Applications individually provisioned based on user roles.
Illustration 5: VPN Role With Web Application Proxy
Gateway
Cross-premises network connectivity for internally hosted and cloud resources.
Requirement: Seamless connectivity between on-premises data center and virtual machines hosted in
the public cloud.
8 E Series Installation Guide
Page 13
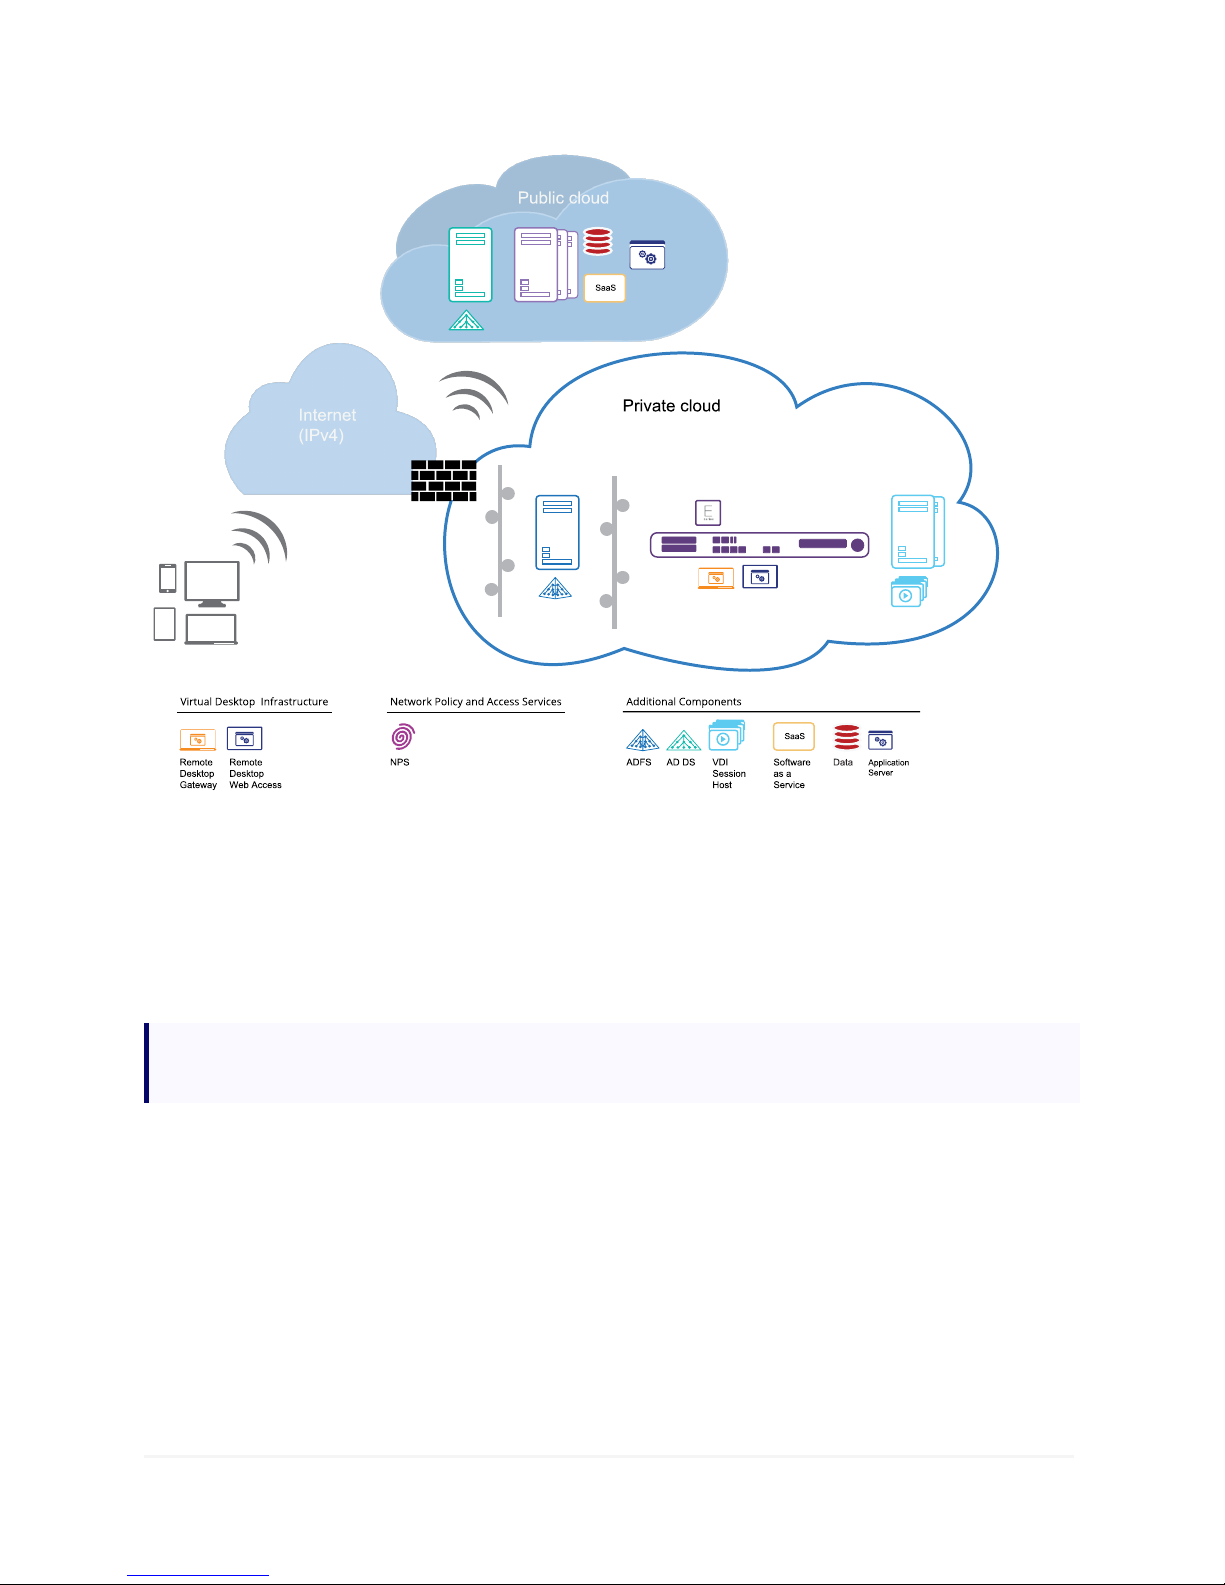
Illustration 6: VDI Role
General Setup Information
The following lists network components that most commonly require configuration to support feature
deployments.
Note: Some items are optional. Details for feature configuration are discussed in the topic Resource
Worksheet.
Network Policy Server
l CelestixEdge appliance serves as the RADIUS server; it must be domain joined
l Network Access Server (RADIUS Client)
l IP Address
l Shared secret
l Network policies
l Authentication protocol options
9 E Series Installation Guide
Page 14

Remote Access
DirectAccess
l
n An Active Directory® Domain Services (AD DS) domain
n At least one domain-joined DirectAccess server (E Series)
n A public key infrastructure (PKI) [recommended]
n Network location server (optional)
n DirectAccess clients running Windows 7 Enterprise or Ultimate, or Windows 8.x Enter-
prise
VPN
l
n SSL certificate (if using SSTP)
n External firewall exceptions for configured ports
Web Application Proxy
l
n CelestixEdge appliance serves as the reverse proxy
n AD FS installed on separate Windows 2012 R2 server
n SSL certificate
n Firewall rules for traffic between Web Application Proxy server (E Series) and AD FS server
Virtual Desktop Infrastructure (VDI) Components
Remote Desktop Gateway
l
n CelestixEdge appliance must be domain joined
n RD Connection Broker and RD Web Access Server
n RD Session Host server
n RD Gateway server
n SSL certificate
n AD DS Group Managed Service Account
n Firewall exceptions maybe required
n End Users: RDP client that supports RD Gateway (like Windows Remote Desktop Client)
Remote Desktop Web Access
l
n CelestixEdge appliance must be domain joined
n Remote Desktop Connection Broker
n RD Session Host server with RemoteApp programs configured
n SSL certificate
n Firewall exceptions will be required for the WMI Service
n Option – virtual desktop: Remote Desktop Virtualization Host server
Work Folders
l CelestixEdge appliance serves as the sync server; it must be domain joined
l Domain-joined Windows Server 2012 R2 as the sync share; share volume formatted as NTFS
l Sync share DNS entry (recommended)
10 E Series Installation Guide
Page 15

l SSL certificate
l User group (recommended)
l End users: Windows 8.1/RT 8.1
Version Information
Version information for appliance components are noted on the main web UI page. Click the E Series
logo link from any page to access:
The Next Step
The following sections cover general setup, which includes appliance installation and configuration,
then feature installation.
11 E Series Installation Guide
Page 16

Install the Appliance
The guide provides a system administrator with concise instructions for a base deployment. The
document covers common installation requirements and is not intended to be comprehensive. Every
network environment is different, and some installations may require additional configuration.
Installation instructions first cover assumptions the guide takes into account for a common
deployment to help administrators plan for the skills and resources they may need. Assumptions are
followed by the Resource Worksheet. The worksheet helps to gather necessary information that will
aid in the installation process. Preparation steps are followed by instructions to rack, connect to the
network, and power the appliance.
Installation Notes
The following topics cover resources to prepare for installing the appliance on the network.
Assumptions
The following sections provide information about necessary skills and knowledge administrators
should have and the assumptions that cover appliance installation for a majority of network
environments.
Skills and Knowledge
System administrators should be familiar with:
l Networking technology
l Windows Server management
l Microsoft Active Directory®
l Microsoft Unified Remote Access
l Network Policy Server*
l Work Folders*
l Remote Desktop Web Access*
*As required for deployment.
Network Settings
The following general conditions apply to the instructions contained in this guide. If alternatives apply,
they are noted. Again, every network is different and may require some adjustment to the general
12 E Series Installation Guide
Page 17
information presented herein.
l Active Directory is used for the domain controller.
l The LAN is configured for DHCP. Use DHCP initially to assign an IP address to the LAN0 network
adapter. Find the assigned IP address through the front panel controls.
Note: If DHCP is not deployed, use the front panel controls to assign an IP address to LAN0.
l Static IP addresses are reserved for network adapters as needed.
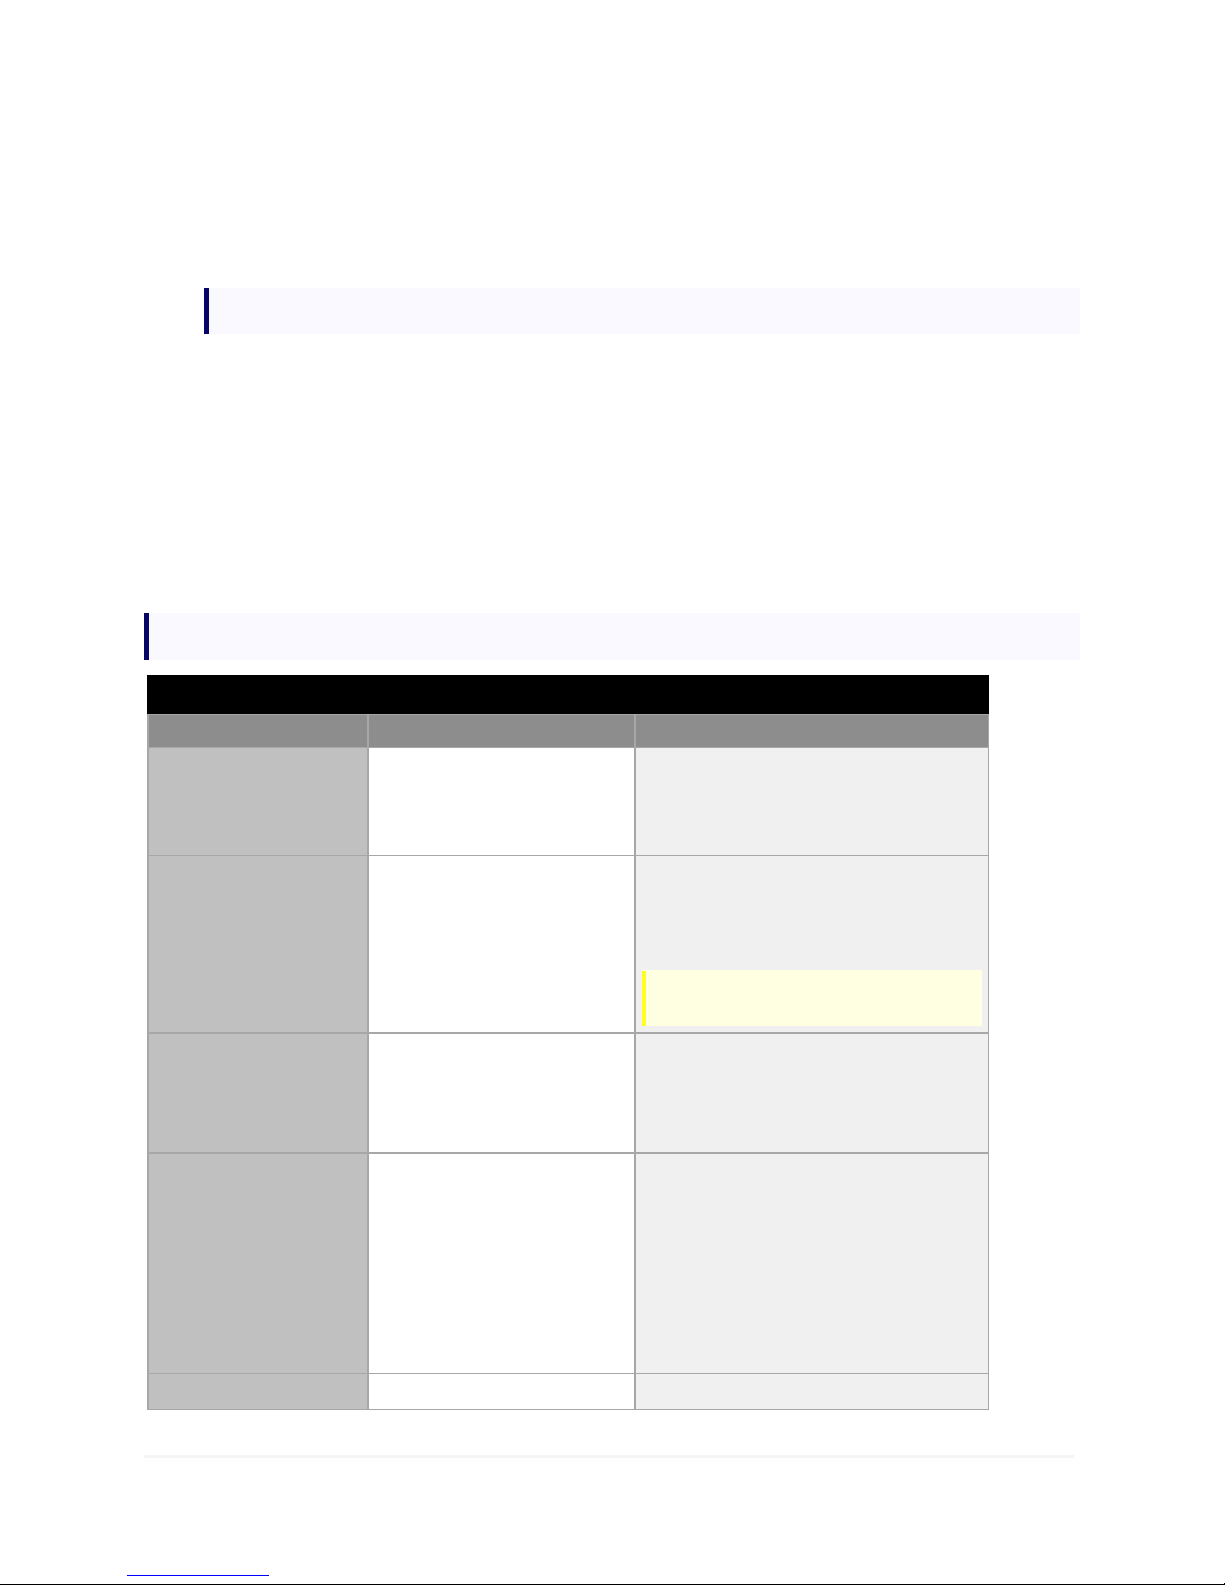
Resource Worksheet
It will expedite the process to gather and verify resource information in the Resource Worksheet below
before starting appliance installation and setup. An example of the worksheet is provided below with
descriptions for the information it includes. A blank copy of the worksheet, which can be printed, is
included in the Appendix.
Note: Incorrect network configuration could compromise or impede the appliance.
Table: Worksheet Form Example
Property Detail Notes
Computer name Used in IG: Configure the Appliance > Quick Setup Wizard.
The appliance must be assigned a computer name. The
computer name must be 15 alphanumeric characte rs or
less.
Administrator password
[Celest1x] (default; to be changed during
setup)
Used in IG: Configure the Appliance > Quick Setup Wizard.
The administrator ac count is a member of the loc al
administrator group. The defa ult password is case
sensitive with brac kets include d.
Workgroupor domain name Used in IG: Configure the Appliance > Quick Setup Wizard.
LAN information(LAN0)
Private or interna l network
interface
WAN information (LAN1) IP address
IP address
Subnet mask
Default gateway
Primary/secondary DNS server(s)
Static route s:
Network address
Gateway address
13 E Series Installation Guide
Important: The default should be changed as it is public
knowledge.
Required for appliance setup.
Rec ord the name of the Workgroup or D omain that will be
joined during setup.
Used in IG: Configure the Appliance > Quick Setup Wizard.
Required for appliance setup.
The LAN (private network interfac e) adapter of the
applianc e isthe interface assigned to internal network
traffic.
May be nee ded in IG: Configure the Appliance > Quick
Page 18
Public or external network
interface
DMZ (LAN2 +) information
Additiona l network interface s
SMTPserver IP address
Public domain registrar Credentials In SSO portal de ployments, the portal FQDN should be
Active Directory Domain Services
(AD DS)
AD FS AD D S FQDN
Web Application Proxy (WAP) AD FS FQDN
Subnet mask
Default gateway
Primary/secondary DNS server(s)
Static route s:
Network address
Gateway address
Include the IPa ddress/subnet mask for
eac h adapter to be used.
SMTPgateway name
IP address
Hostname
User account/password
Administrator account
SSL certificate
Setup Wizard > Network I nterfaces
The WAN (public network interfac e) adapter of the
applianc e isthe interface assigned to external network
traffic.Thisc onfigures how the WAN, or public interfa ce,
connects to the Internet.
May be nee ded in IG: Configure the Appliance > Quick
Setup Wizard > Network I nterfaces.
The DMZ adaptersare optionalconfiguration.This
information is only necessary if you will assign static IP
addre sses to these adapters.
Used in IG: Configure the Appliance > Quick Setup Wizard.
Optional c onfiguration: SMTPisre quired for Alert Email.
adde d as a record to the public DNS host service for the
fede rated domain.
Used in IG: Configure the Appliance > Quick Setup Wizard.
Used in IG: Configure Features: Web Application Proxy
AD FS is required for Web Application Proxy.
Used in IG: Configure Features: We b Application Proxy
Setup Wizard.
Note: Root certificate required.
SSO Portal Firewall rules for HTTPS and SSH
Application requirements:
URL
Certificate
Hostname
Port
File format
Syslog SIEM:
FQDN/IP
Port
Certificate
DNS
Workplac e Join AD D S FQDN
AD FS FQDN
Host/cluster IP
AD D S service account
AD FS IP address
AD FS FQDN
DRS DNS entry
The SSO portal is a WAPfe ature.
Rules need to be created in the edge firewall to allow
applica tion communication.
While e ach application type is different, the list of
applica tion requirementscovers common information for
publishing a variety of applications.
The Logging feature, sometimes referre d to as syslog, is a
security information and event manage ment solution
(SIEM) feature. Server information is needed if a SIEM
server is deployed on the network . An SSLcertificate is
require d for encrypted remote logging.
DNS must be update d to resolve the SSO portal FQDN to
the WAP IPaddress.
This information would be used to exte nd functionality
nee ded to set up BYOD access.
14 E Series Installation Guide
Page 19
Network Policy Server Network Acc ess Server (RADIUS Client)
IP Address
Shared sec ret
Network policy criteria
Authe ntication protoc ol options
Direc tAcce s/VPN DA server
Static IPaddress(es)
Public addre ss for client connections
GPOs (if using customized policies)
NLS certificate (if using external server)
Infrastructure server(s)
DA c lient
Public addre ss
Subnet mask
Default gateway
DNS
VPNserver
Client IPaddress pool (if not using
DHCP)
RAD IUSserver information (if not using
Windows authentication)
PKI (if applicable ) IP address May be nee ded in post-configuration for DirectAcce ss.
May be nee ded in post-configuration for NPS or Remote
Desktop Gate way.
Setting up RADIUSauthentic ation require sde signating
the NPS clients that will forward accessrequests, the
criteria that willservice as the policyto grant acc ess, and
the protocols that willbe used for authentication.
Used in IG: Configure Features: Remote Access Setup
Wizard.
The Remote Acc ess/VPN wizard will require server
information. The client information will be required to set
up remote device s.
Note: Infrastructure server information refers to
resources not discoverable by Active D irectory.
PKI isrecommended but no longer required for
Direc tAcce ss deployment, with a few exce ptions, like OTP
authe ntication.
Remote Desktop Gateway RD Ga teway (join domain)
IP address
Hostname
External FQD N
AD D S
IP address
Subnet mask
Default gateway
DNS
RD Session Host (domain joined)
IP address
Hostname
RD Conne ction Broker (domain joined)
IP address
Hostname
RD Web Access (domain joined)
IP Address
Hostname
Note: Root certificate required.
Used in IG: Configure Features > Feature Details >
Remote Desk top Gateway(RD Gateway) > Required
Configuration After I nstallation.
15 E Series Installation Guide
Page 20
Firewall rules
Remote Desktop Web A ccess RD Web Access Server (domain joined)
IP address
Hostname
AD D S
IP address
Subnet mask
Default gateway
DNS
RD Session Host (domain joined)
IP address
Hostname
RD Conne ction Broker (domain joined)
IP address
Hostname
Remote Desktop Virtualization Host server
(optional)
IP address
Hostname
Firewall rules
Work Folders Sync share name
SSL certificate
AD sec uritygroup for user accounts
Sync share DNS entry (recommende d)
Application server IP address
Hostname
RAD IUSserver IP address
Hostname
RAD IUSclients IP address
Hostname
Application server IP address
Hostname
Bolditems arerequired
Used in IG: Configure Features > Feature Details >
Remote Desk top Gateway(RD Gateway) > Required
Configuration After I nstallation.
Used in IG:
ard
May be nee ded in post-configuration for:
May be nee ded to set up Re mote Ac cess with VPNor NPS.
May be nee ded to set up Re mote Ac cess with VPNor NPS.
This information would be used to exte nd functionality.
Configure Features>Work Folders Setup Wiz-
.
Web Application Proxy
Remote Desktop Gateway
RD Web Access
Rack the Appliance
Celestix appliances are either 1U or 2U and should be attached to a standard 19-inch equipment rack
as follows.
16 E Series Installation Guide
Page 21
Note: If the appliance came with slides instead of brackets, see the instructions included in the slide
packaging for the rack mounting procedure.
Caution:
l Do not place the appliance on the floor.
l Keep it in an upright position.
l Place it in a well-ventilated area that is out of direct sunlight.
1. Select a secure location where only authorized personnel can access the appliance.
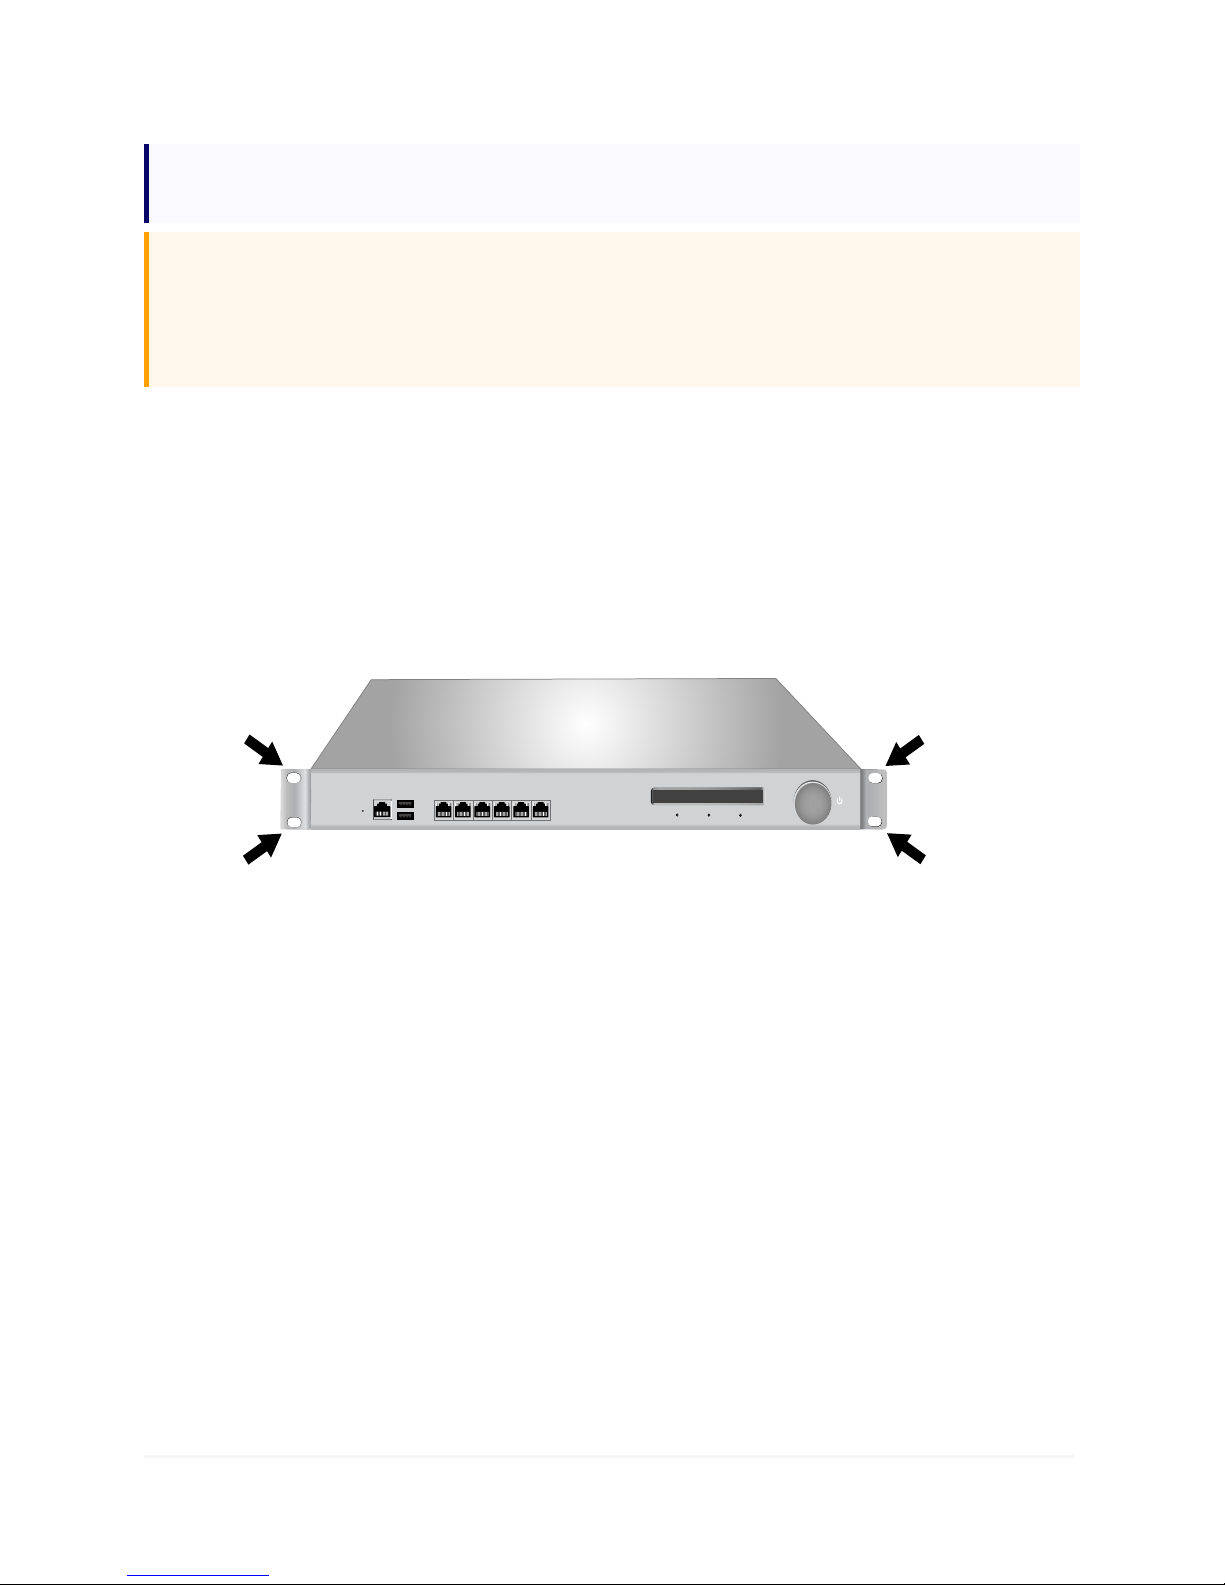
2. Mount the appliance to the rack:
a. Use all the provided fasteners to attach mounting hardware to the front right and left
sides of the appliance.
b. Attach the appliance to the front supports of the equipment rack using a fastener (not
provided) for each of the holes on each of the brackets.
The diagram below provides a reference.
Illustration 7: Appliance Mounting Brackets
Connect the Appliance to the Network
Once the appliance is racked, it must be connected to the network.
It is most common that an IP address will be assigned through DHCP, and then configuration for a
static address is covered in the Quick Setup Wizard interfaces instructions. If DHCP is not deployed,
the section Configure IP Address without DHCP explains how to add the IP address to the network
adapter.
To connect the appliance
1. Connect an Ethernet cable from the LAN0 network adapter on the Celestix appliance to the
internal network hub or switch.
2. [Optional] For additional network connections, use the LAN1 adapter (or above) on the appli-
ance.
17 E Series Installation Guide
Page 22
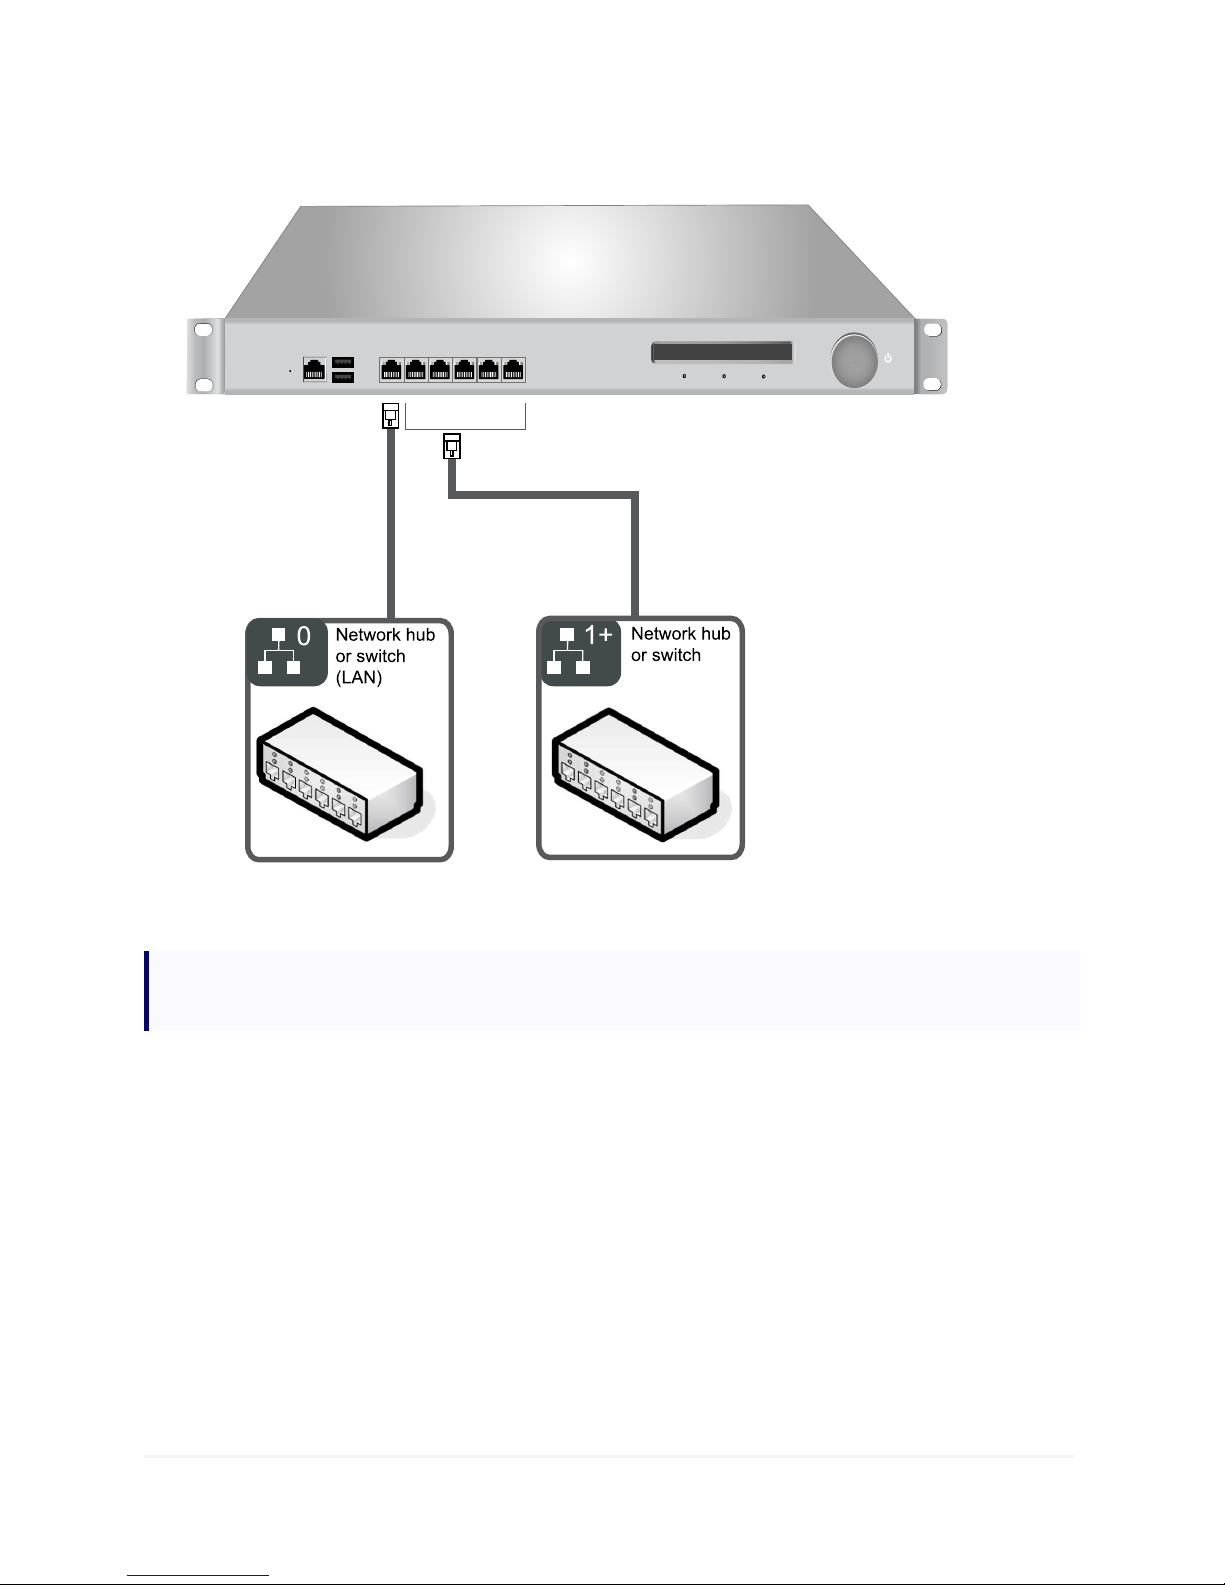
The diagram below provides a reference.
Illustration 8: Ethernet Connections
Note: Hardware models vary and may look somewhat different from the example, but network
connections will be similar.
Network Interface LED indicators
When the appliance is powered on, each of the network adapters displays a pair of lights to help
identify connection speed and usage. See below for details (listed by model number):
3400
n Right light – displays connection speed: green = 100 Mbit, amber = 1 Gbit
n Left light – amber indicates link, blink indicates activity
6400/8400
n Right light – displays connection speed: green = 100 Mbit, amber = 1 Gbit
n Left light – amber blinks on activity
18 E Series Installation Guide
Page 23

Front Panel Controls Overview
The front panel contains an LED display and Jog Dial. These controls show system information and
allow direct management for some settings on the appliance. At a minimum, they power on/off the
appliance and provide access to retrieve or set IP addresses.
Front Panel Display
The front panel display operates in two modes:
l Idle mode – the default mode; display cycles through status screens.
l Configuration mode – pressing the Jog Dial to enters configuration mode; the Jog Dial Oper-
ation section explains functionality.
Jog Dial Operation
The Jog Dial on the appliance front panel is used to navigate the LED display to perform on-screen
commands.
l Turn to scroll through options.
n The square brackets cursor [ ] scrolls through items
on the screen when the front panel display is in
configuration mode.
The following example shows the Add option
selected by the cursor:
[ Add ]
n The angle brackets cursor > < allows editing after a selection when the front panel display
is in configuration mode.
The following example shows the Delete option selected by the cursor:
> Delete <
l Press to select options.
Power the Celestix Appliance
Connect power and turn on the appliance.
19 E Series Installation Guide
Page 24
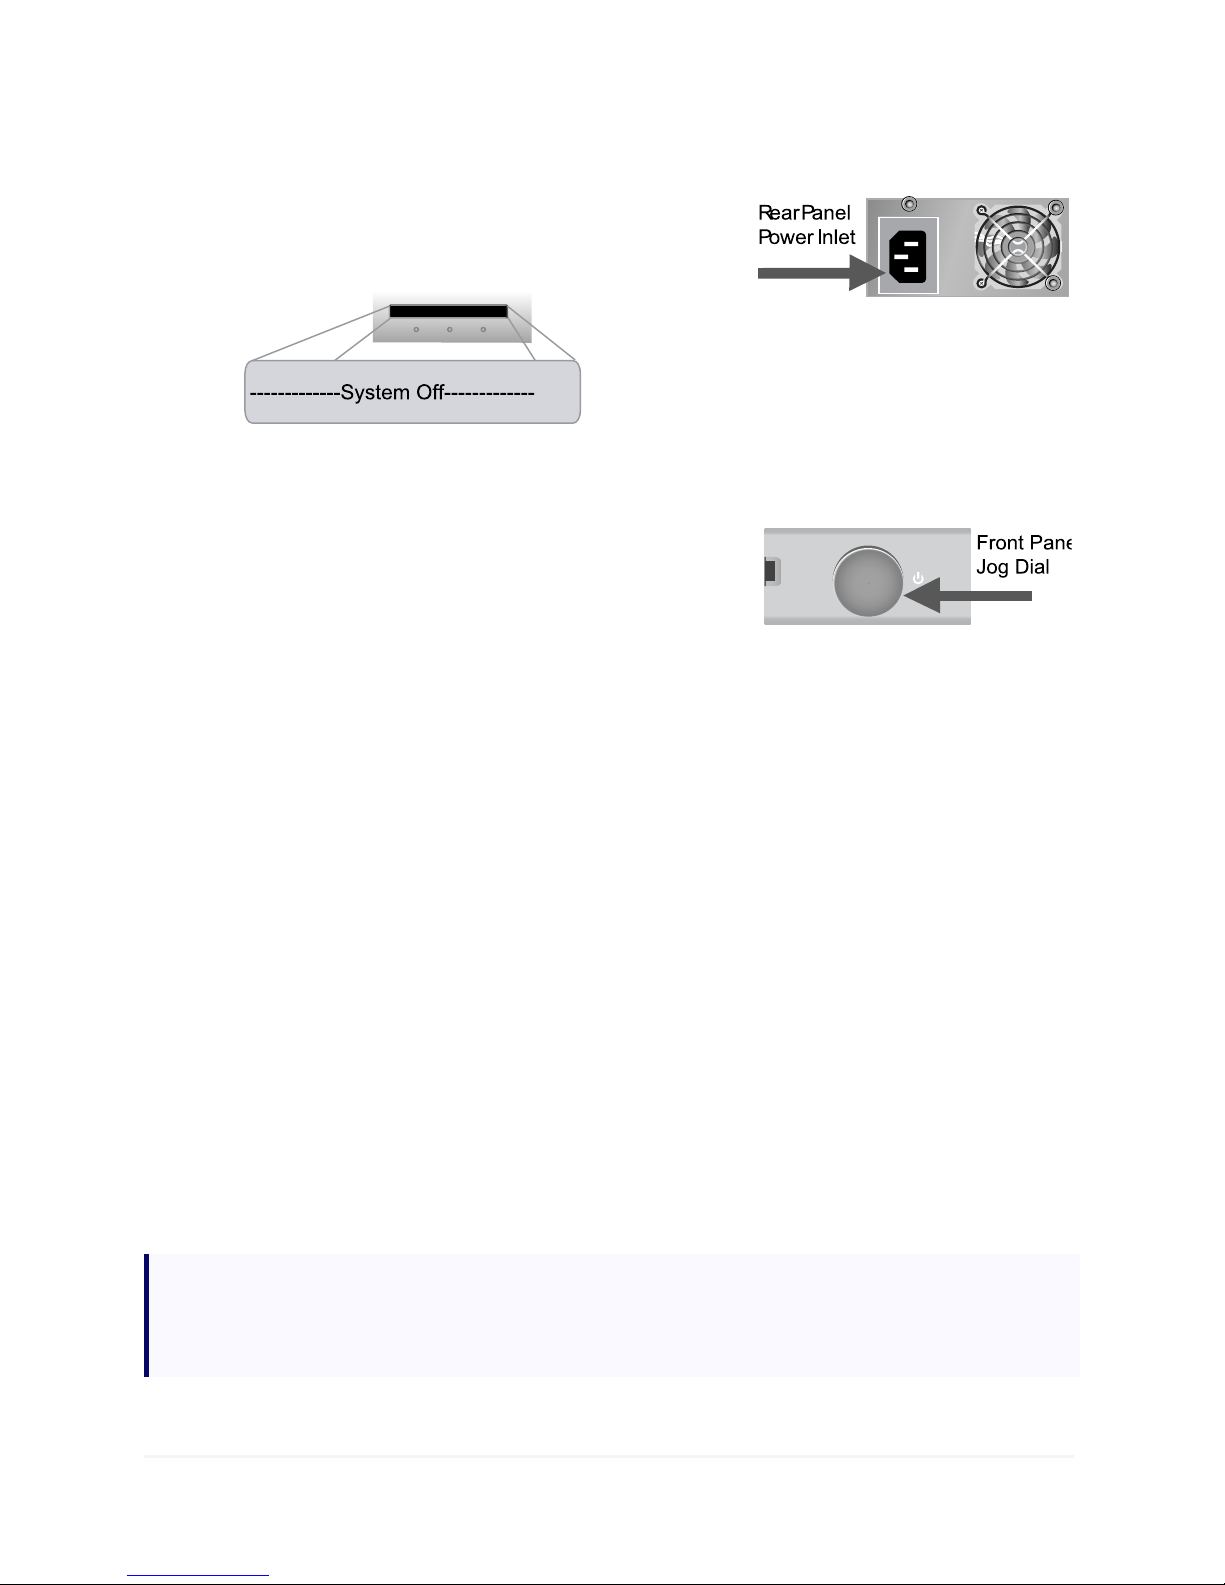
Connect Power
1. Connect the included power cable from a power source,
typically a UPS, to the power inlet on the rear panel.
2. The display will show the System Off message:
Power On/Off the Appliance
Power on and boot the appliance by pressing the Jog Dial.
While it is possible to power off the appliance by pressing the Jog
Dial for 5 seconds, it is far better to use the Shutdown option from
the front panel display menu to power off the appliance gracefully.
Initial Access
The internal network adapter (LAN0) IP address is used to access the web UI. The adapter needs to be
configured with a static IP address. The following describes two options.
l With DHCP: initially assigns a dynamic IP address to the LAN0 network adapter. Use front panel
controls to access the assigned address, then log in to the web UI and assign a static IP address
through the instructions covered in the quick setup wizard interfaces instructions.
l Without DHCP: use front panel controls to assign a static address; instructions are explained in
the section Configure IP Address without DHCP.
Configure IP Address without DHCP
These instructions cover adding a static IP address to the LAN0 network adapter using front panel
controls. The LAN0 IP address is used to manage the appliance through the web UI.
To configure the internal network IP address
Notes:
l Follow these instructions for deployments when DHCP is not used.
l Keep track of the IP address; it will be required to access the web UI.
20 E Series Installation Guide
Page 25

1. Press the Jog Dial and scroll to > Configure Network <.
2. Press the Jog Dial again to select.
3. If necessary, press the Jog Dial and scroll to and select LAN.
The display should show [ LAN0 ].
4. Scroll to and select [ Next ] to continue.
5. Scroll to and select [ Static IP ].
6. Enter the IP address:
a. Press the Jog Dial to edit the first octet of the IP address.
b. Turn the dial to change the number.
c. Press the Jog Dial again to complete entry.
d. Repeat for the remaining octets.
7. Scroll to and select [ Next ] to continue.
8. Enter a Netmask if needed.
9. Scroll to and select [ Proceed to Configure ] to save the entry.
The display returns to the Configure Network screen when the process has completed.
10. Scroll to and select > Back < to return the front panel display to idle mode.
To configure other adapters, repeat the instructions above as necessary.
The Next Step
Once the appliance is installed, next configure general network and appliance information.
21 E Series Installation Guide
Page 26

Appliance Setup
After the appliance has been installed on the network, settings need to be configured. General setup
uses a wizard to step through configuration in the web UI. Instructions cover the minimum
functionality common to most deployments; however, an individual organization may need different or
additional configuration. The section General Information provides necessary information about
setup.
General Information
The following deployment notes provide information to understand feature configuration.
Domain Terminology Disambiguation
The following list explains how terms to describe components are used in documentation.
l On-premises domains are sometimes referred to as AD domains, but documentation uses the
term internal domain.
l Off-premises domains are sometimes qualified by the terms external or public, but doc-
umentation uses the term federated domain.
l Servers configured with the role Active Directory Domain Services may be referred to as the
domain controller (DC)or designated by the acronym AD DS. The acronym AD is used as a gen-
eral referent for the internal domain directory.
l Unified Remote Access refers to the collection of technologies that Microsoft offers to allow
external clients to access internal network resources. Documentation uses the short name
Remote Access. The E Series includes the Remote Access features Direct Access, VPN, and Web
Application Proxy.
l The terms roles, services, and features are used to refer to Server 2012 R2 functionality for
remote connectivity.
l Virtual Desktop Infrastructure (VDI) refers to the collection of technologies that Microsoft offers
to allow organizations to publish cloud resources. The E Series can be used for the VDI roles
Remote Desktop Gateway (RD Gateway) and Remote Desktop Web Access (RD Web Access).
l Network Policy Server (NPS) is the Microsoft implementation of RADIUS authentication.
Deployment Assumptions
Information presented in the E Series setup instructions is based on the following:
22 E Series Installation Guide
Page 27

l The LAN is configured for DHCP. Use DHCP initially to assign an IP address to the LAN0 network
adapter. Find the assigned IP address through the front panel controls.
Note: If DHCP is not deployed, use the front panel controls to assign an IP address to LAN0.
l Active Directory (AD) is used as the domain controller.
l The local administrator account for the appliance is used for first login to the web UI.
Requirement Checklist
Items below will be required to set up the appliance. Plan ahead so that items are available when
needed to complete configuration.
l Domain administrator credentials
l Necessary static IP addresses are reserved
l Windows 2008 R2 environments: WinRM 3.0 must be installed and running, and firewall rules
must allow traffic on port 5985.
Example Information
To help make the instructions clear, the following examples are used to identify components.
CelestixEdge Appliance
FQDN
Host Name
Domain Name
Cel esti xEdg e01. exam ple.com
Cel esti xEdg e01
exa mple .com
Access the Web User Interface
Accessing the web UI is necessary to continue setup. The IP address for the internal network (LAN0)
adapter is used to access the web UI.
Web UI Login
From a client computer on the network, default access to the appliance web UI is through a web
browser at https://ServerName|IP address:8098.
For example, if the server LAN0 IP address is 192.168.30.4, the web UI URL would be
https://192.168.30.4:8098
Note: If the LAN IP address was assigned through DHCP, use the Jog Dial on the appliance front
panel to scroll to LAN and then use the assigned IP address for initial access.
23 E Series Installation Guide
Page 28

The factory default local administrator credentials are:
User name: administrator
Password: [Celest1x]
The password is case-sensitive and the brackets are included. The “domain\administrator” user name
format may be required.
Important: A certificate warning may display because the site uses a self-signed certificate. Accept
the certificate to access the web UI.
Quick Setup Wizard
While working through the wizard to configure General Settings, the appliance may need to reboot.
1. Administrator Password – the default local administrator password should be changed as a
security precaution because it is public knowledge. However, once the appliance has been joined
to the internal domain, domain administrator credentials must be used to access features.
n User name – the Administrator Password feature only changes the local administrator
password, which must be the logged in account.
n Password – enter and confirm a new password. Complexity requirements are noted on
the screen.
2. Date and Time – use onscreen controls to enter the date, time, and time zone, then configure
for daylight savings if necessary.
3. Network Interfaces – if DHCP was used initially to assign an IP address, select the LAN network
adapter to set a static address. A static address includes these settings:
Internet Protocol (IP) address
n
Subnet mask
n
Gateway address
n
Automatic or preferred DNS server
n
Hostname and Domain
4.
Note: Fields will be autopopulated with available settings if the appliance was joined to the
domain previously; the reboot will be skipped if they are left unchanged.
n Hostname – specify a name for the appliance; it must be unique.
For example: CelestixEdge
n Domain – enter the name for the internal domain the appliance will join.
For example: example.com.
n Username – enter an account with domain administrator access to AD
(domain\username).
24 E Series Installation Guide
Page 29

For example: example\adminuser
n Password – provide the account password.
Reboot
5.
n Click Next to apply changes and reboot the appliance.
Note: Domain administrator credentials (example: example\adminuser) will be
required to access the web UI after the reboot.
6. Alerts Email – optional; general appliance notifications can be sent to designated recipients
through a connection to a network SMTP server.
a. Select Enable alert email.
b. Complete the following:
Alert Message settings
l
l To – indicate one or multiple recipients. For multiple addresses, use a
comma to separate addresses.
l From – enter an address that recipients will recognize.
l §Select check boxes for the alert levels that will generate email.
l Send error alert email – includes alert types where the level is set to
Error.
l Send warning alert email – includes alert types where the level is set
to Warning.
l Send informational alert email – includes types where the level is set
to Information.
SMTP server settings
l
l Name – indicate the network SMTP server name or IP address.
l Port – enter the number used for SMTP communication.
l Use SSL/TLS – select to require encryption.
l SMTP settings – select and provide credentials with permission to access
the SMTP server.
l Send Test Message – create a test email using the settings entered above.
Note: The alert email function will indicate whether a test email was sent. If
the test email is not received after the alert email feature indicates that one
was sent, the error is most likely due to SMTP server settings. An error will
occur if the SMTP service is not running or if the appliance is not correctly
configured to see the SMTP server. Confirm the SMTP server and network
settings before trying to test again.
c. Click Save to add configuration.
The wizard is complete when the congratulations screen displays.
25 E Series Installation Guide
Page 30

The Next Step
This completes the initial setup. Now it's time to install features.
26 E Series Installation Guide
Page 31

Configure Features: Installation
Now that the appliance is up and running, use the Features configuration tool to install roles and
services necessary for the deployment. Instructions cover the functionality common to most
deployments for a CelestixEdge E Series Appliance; however, an individual organization may need
different or additional configuration.
The following features are available:
l Network Policy Server – basic RADIUS authentication or RADIUS proxy; can also serve as a NAP
policy server.
l Remote Access with VPN – configuration for DirectAccess with an option for VPN. DirectAccess
provides always-on remote connectivity and management for Internet-connected Windows 7
and 8 computers. VPN provides access for nonmanaged devices.
l Web Application Proxy – external access by authenticated users to published applications.
l Remote Desktop Gateway – VDI component; firewall friendly external access to internal network
remote desktop servers.
l Remote Desktop Web Access – VDI component; access to RemoteApp in Windows 7, or to
Desktop Connection through a web browser. RD Web Access can also include remote access to
internal computers through a browser.
l Work Folders – a server sync share that hosts work files for anywhere access from supported
devices (BYOD functionality).
General Features Management
The instructions below explain how to use feature management tools.
Installation
Use the one-click installation function to install Remote Access or VDI roles.
To install a feature
1. Navigate to CelestixEdge|Features.
2. Click the toggle button to On for a feature.
3. Click Apply to confirm.
4. The feature's status indicator will rotate while the system processes the request.
5. A confirmation will display when the process is complete.
6. Click the restart system link if prompted.
See the topic Feature Detailsfor more information about feature options.
27 E Series Installation Guide
Page 32

Feature Management Tools
Once installed, some of the features include links that launch RDP applications to management
consoles (MMCs). These links serve two purposes:
l Some features require additional configuration that can only be accomplished through the
MMC.
l The links provide convenient access to advanced management functions.
Some features do not do not contain an RDP link, usually because no additional configuration is
required.
To access management tools
1. Navigate to CelestixEdge|Features.
2. Click a feature name with a link in the list.
A RemoteApp will download: confirm if necessary.
3. Launch the app.
4. Enter administrator credentials for the appliance when prompted.
Important: When the E Series is joined to an AD domain, a valid domain administrator account
is required for logon.
Notes:
l If prompted, allow the connection.
l If a self-signed certificate is used, accept the certificate when prompted.
l Once launched the app opens as a Remote Desktop Connection.
5. Use the MMC to configure settings as needed.
6. When done, navigate to File|Exit in the remote desktop window to close and return to the
DirectAccess screen in the web UI. Closing the application logs off the RDP session to the
appliance and is recommended to release management resources.
Note: If the File menu is not visible, use the quick close button (boxed x).
Feature Details
The Need to Knows section in the feature descriptions below cover important details about
configuration. They are organized as follows:
l Installs – lists roles and features that will be installed.
l Affected Appliance Features – notes any conditions that may affect other features available on
the appliance.
28 E Series Installation Guide
Page 33

l Required Configuration After Installation – notes any configuration that will be necessary once
the feature is installed.
Network Policy Server (NPS)
NPS provides basic RADIUS authentication, authorization, and accounting, or RADIUS proxy
(connection request referral).
Need to Knows
The following summary information is provided for reference.
Installs
Role Service: Network Policy Server
Feature: RSAT - Network Policy and Access Service Tools
Affected Appliance Features
NPS is required for Remote Desktop Gateway (RD Gateway). If RD Gateway is deployed, the NPS
role is installed automatically as part of that feature setup.
Required Configuration After Installation
Configuration must be customized for an environment. Use the Network Policy Server link to open an
RDP session in the browser to access RADIUS server/client configuration.
Remote Access with VPN
Remote Access with VPN configures DirectAccess (DA) on the E Series appliance. DirectAccess
provides an automated, always-on secure connection for end user access to internal network
resources in addition to manage-out functionality for remote domain-joined computers. Remote
Access includes the option to enable a VPN that can be used for nonmanaged devices.
Need to Knows
The following summary information is provided for reference.
Installs
Role Service: DirectAccess and VPN (RAS)
Feature: RSAT – Remote Access Management Tools (GUI and Command-Line Tools, module for
29 E Series Installation Guide
Page 34

Windows PowerShell)
Feature: Group Policy Management
Feature: RAS Connection Manager Administration Kit (CMAK)
Affected Appliance Features
Deployments with nonmanaged remote devices will require the VPN option to be enabled.
Cannot be colocated with Web Application Proxy
Required Configuration After Installation
Configuration must be customized for an environment; there are two options:
l Click the Wizard button to open the Remote Access configuration tool.
l Click the Remote Access with VPN link to open the Remote Access console as an RDP applic-
ation.
Web Application Proxy
Web Application Proxy publishes access to internal web applications for external users. The E Series
adds a portal to make accessing applications more convenient. It also leverages authentication,
authorization, and SSO functionality. It is configured for deployments where AD FS runs on a separate
server.
Notes:
l Web Application Proxy cannot be colocated with the following roles:
n AD FS – Web Application Proxy requires AD FS, but cannot be installed on the same
server.
n DirectAccess
l The E Series only supports forms based authentication.
Need to Knows
The following summary information is provided for reference.
Installs
Role Service: Web Application Proxy
Feature: RSAT – Remote Access Management Tools (GUI and Command-Line Tools, module for
Windows PowerShell)
30 E Series Installation Guide
Page 35

Affected Appliance Features
Web Application Proxy requires the Remote Access role to be installed.
Web Application Proxy is deployed when AD FS is intended to reside on a separate server from the
E Series; information for that server will be used in Web Application Proxy configuration.
DirectAccess cannot be colocated.
Required Configuration After Installation
Configuration must be customized for an environment; there are two options:
l Click the Wizard button to open the Web Application Proxy configuration tool.
l Click the Web Application Proxy link to open the Remote Access console as an RDP application.
Remote Desktop Gateway (RD Gateway)
RD Gateway provides secure access to internal resources for remote users. Access is through the
Remote Desktop Connect (RDC) client, and avoids the need for a VPN. User connections are encrypted
and authorization policies set standards for client access.
Important: RD Gateway requires NPS.
Need to Knows
Installs
Role Services: Network Policy Server, Remote Desktop Gateway, RPC over HTTP Proxy
Features: RSAT – Network Policy and Access Service Tools, Remote Desktop Services
Tools/Remote Desktop Gateway Tools
Affected Appliance Features
RD Gateway requires NPS, which will be installed at the same time unless NPS is already installed, in
which case the installation process proceeds just for RD Gateway.
Required Configuration After Installation
Configuration must be customized for an environment. Use the Remote Desktop Gateway link to open
an RDP session to the Remote Desktop Gateway Manager Console in the browser.
Note: Firewall rules may need to be adjusted to allow traffic.
31 E Series Installation Guide
Page 36

Remote Desktop Web Access
RD Web Access (RD Web Access) provides streaming access to hosted applications. Windows 7 uses
RemoteApp to start an RD Services session. Other devices can use a web browser to access them
through Desktop Connection. RD Web Access also lets users access computers with Remote Desktop
enabled through RD Web Connection.
Need to Knows
The following summary information is provided for reference.
Installs
Role Service: RD Web Access
Affected Appliance Features
None
Required Configuration After Installation
Firewall rules must be adjusted to allow WMI traffic.
Work Folders
Work Folders uses an internal file server to host work files for anywhere access from supported
computers and devices. Data is synced across devices over an Internet connection. This supports a
bring your own device (BYOD) program without sacrificing control over data. Once synced, files can be
worked on from wherever and will be updated on the sync share when the device has Internet
connectivity.
Important: Work Folders is supported for use with Windows 8.1/8.1 RT devices.
Work Folders provides options to:
l Use a folder that already contains user data so Work Folders can be employed without migrating
servers and data, or affecting existing share options (for example, Folder Redirection, Offline
Files, and home folders).
l Add policies for encryption and lock-screen passwords.
Need to Knows
The following summary information is provided for reference.
32 E Series Installation Guide
Page 37

Installs
Role Services: File Server, File Server Resource Manager, Work Folders
Feature: RSAT – File Server Resource Manager Tools
Affected Appliance Features
None
Required Configuration After Installation
Configuration must be customized for an environment:
1. Click the Wizard button to run the Work Folders configuration tool.
2. Next, use the Remote Desktop management console (System|Remote Desktop) to open an RDP
session from the local computer to the E Series appliance.
n In Windows Server, open the Server Manager.
n Navigate to File and Storage Services|Work Folders.
n Click the link to create a sync share to open the Windows configuration wizard.
The Next Step
Once Remote Access features are installed, the next step depends on the deployment. Some features
require configuration; these instances are noted in the Feature Details described above. Once any
additional configuration is done, saving a copy of the system image to preserve initial configuration is
recommended.
33 E Series Installation Guide
Page 38

Configure Features: Remote Access
Setup Wizard
The wizard provides the steps to configure DirectAccess and VPN settings for the CelestixEdge E
Series Appliance. It covers the minimum functionality common to most deployments; however, an
individual organization may need different or additional configuration.
Remote Access setup requires configuration in the E Series Appliance web UI. General Information
provides necessary information about setup. The topic Additional Configuration Notes provides
details about conditional configuration that applies to some deployments.
General Information
The following deployment notes provide information that qualifies setup processes to understand
Remote Access configuration.
Remote Access Terminology Disambiguation
The terms below describe components that are used in documentation.
l Computer account security groups (security groups) can be created in AD to manage client
access efficiently by using group policy objects (GPOs).
Deployment Assumptions
Information presented in the E Series setup instructions is based on the following:
l The Remote Access with VPN feature has been installed through the web UI.
l Deployment is a single server.
l Network planning for appliance placement is complete.
l Necessary certificates have been acquired for:
n IPsec
n IP-HTTPS
n NLS
l Firewall rules have been configured to allow traffic if the DirectAccess server is on an IPv4 net-
work:
n Teredo
n 6to4
n IP-HTTPS
34 E Series Installation Guide
Page 39

n If the appliance only has one configured network adapter, TCP port 62000 must be
opened on the appliance.
l If using a security group to manage access for clients, the group has been created in AD prior to
running the setup up wizard.
l If customized GPOs will manage settings for clients and servers, they have been created prior to
running the setup wizard.
l AD will be used for DirectAccess authentication and authorization.
l DNS needs to resolve to either the public host name of the DirectAccess entry point, or the NAT
device for the DirectAccess server.
Requirement Checklist
The following items will be required to set up Remote Access. Plan ahead so that items are available
when needed to complete configuration.
l Domain controller – DirectAccess requires Windows Server 2003 or higher.
l IP address – one or two address have been reserved.
l Public address – usually an FQDN that clients will use to connect to the network.
l DirectAccess clients – must be Windows clients that are domain joined. Supported options:
n 8 Enterprise and higher
n 7 (Ultimate, Enterprise)
l SSL certificate – an IPsec root certificate is required for Windows 7 DirectAccess client con-
nections, and is a best practice for Windows 8.
l Email account – an account will be required to receive diagnostic reports for client access
trouble shooting.
Additional Configuration Notes
The notes below discuss options that may apply to some deployments. They exceed the scope of
these instructions, but will be helpful to consider when planning deployment.
l DirectAccess
n Network Location Server – the wizard will configure a default NLS on the appliance if an
external server is not designated.
n Group Policy Objects – the wizard will create the two required GPOs with default settings
unless customized group policies are available to assign.
n Security group – an AD security group is required to apply customized group polices to
client computers. All remote computers in the domain can use DirectAccess unless an AD
client group is specified to restrict access.
n RADIUS – configuration for an external RADIUS server can be included to add strong
authentication methods like one-time passwords (OTPs).
35 E Series Installation Guide
Page 40

l VPN
n VPN deployments using static IP addresses for clients need a defined range; otherwise,
DHCP should be used.
n VPN deployments not using Windows authentication need settings for a RADIUS server.
Example Information
To help make the instructions clear, the following examples are used to identify components.
InternalDomain CelestixEdge Appliance Public Domain
FQDN
Host Name
Domain Name
ad0 1.in texa mple .com Cel esti xEdg e01. inte xample.com da. exam ple.com
ad0 1 C eles tixE dge0 1
int exam ple. com int exam ple. com
Setup Wizard
The setup wizard is a walk-through to configure components for Remote Access.
Access the screen through the web UI at CelestixEdge|Features|Remote Access with VPN|Wizard.
Wizard Instructions
While working through the wizard, the appliance may need to reboot.
Component Selection
Select a Remote Access configuration option.
Note: DirectAccess should be enabled for managed clients, while VPN should be enabled to support
unmanaged clients.
Configure both services DirectAccess and VPN
Select to add access through both DirectAccess and a VPN.
DirectAccess
1.
a. Basic – define the appliance location and the URL that clients will use to access
resources.
i. Select the type of network environment:
l Edge – requires two network adapters; one to the public Internet and one to
the internal network.
36 E Series Installation Guide
Page 41

l Behind an edge device (with two network adapters) – one adapter con-
nects to the perimeter network, and the other connects to the internal net-
work.
l Behind an edge device (with one network adapter) – the adapter connects
to the internal network.
ii. Public address – enter the address that external clients will use to connect to the
network.
Note: While using an IP address is supported, the FQDN is a best practice.
For example: da.example.com
b. Advanced – define client parameters and assign the appliance network adapter that Dir-
ectAccess service will use.
i. Installation type – select the DirectAccess functionality to deploy:
l Full DirectAccess installation – bidirectional tunnels for remote client
access and management.
l Client management only – configure tunnel for remote client management.
ii. Client Group – designate an AD security group that will manage devices that con-
nect through DirectAccess; leave blank to include all remote devices.
iii. Internal – specify the internal network adapter in the drop menu.
GPO and NLS
c.
i. Group Policy Object (GPO) – leave fields blank to configure the default options, oth-
erwise designate predefined AD policy groups that will manage settings for devices
and servers.
1. Client GPO – specify the name for the AD policy that will manage client
access.
2. Server GPO – specify the name for the AD policy that will manage access to
the DirectAccess server.
ii. Network Location Server – the NLS server will be installed on the appliance unless
an external server is designated.
1. Certificate – if an SSL certificate will be used, navigate to and select it.
a. Click the Import button.
b. Complete the following:
i. Certificate Import – navigate to and select the certificate that
will be used for authentication.
ii. Password – enter the certificate passphrase.
iii. Click the Import button.
c. The imported certificate should display in the Certificate field. If not,
use the drop menu to select it.
2. NLS URL – if an external NLS server is deployed, enter the HTTPS URL.
Client Settings
d.
37 E Series Installation Guide
Page 42

2.
VPN
i. Connection Name – create a name for the network connection that end users will
recognize.
ii. Support Email – enter the email account that will receive diagnostic reports
created by the DirectAccess Diagnostics tool.
Note: This option allows local name resolution when the server name does not
exist in intranet DNS or if the DNS servers are unreachable.
iii. Allow local name resolution – select to use the recommended level of DNS local
name resolution.
iv. Enable for mobile computers only – allow only mobile computers in the specified
security groups to connect through DirectAccess.
Important: Remote Access will create a WMI filter that will only allow mobile
computers to join DirectAccess security groups. This setting requires that the
administrator account configured for Remote Access have create/modify
privileges.
v. Enable Windows 7 Client Support – select for environments that require support
for Windows 7 clients.
vi. IPsec Root Certificate – conditional; designate a certificate to validate
authentication for client connections; required for Windows 7 users, and
recommended for Windows 8. See the following:
l If GPOs are used to push security certificates to domain servers, use the
Certificate drop menu to select the certificate issued from the domain root
CA.
l If the certificate needs to be added manually, use the import feature:
1. Click the Import button.
a. Certificate Import – navigate to and select the certificate that
will be used for authentication.
b. Password – enter the certificate passphrase.
c. Click the Import button.
2. The imported certificate should display in the Certificate field. If not,
use the drop menu to select it.
vii. Intermediate CA – select if the certificate was not imported from the domain root
CA.
viii. Click Next.
Address Assignment
a.
i. Assign addresses automatically – use DHCP to assign client addresses.
ii. Assign addresses from a static address pool – enter a range of IP addresses that
38 E Series Installation Guide
Page 43

RRAS will assign to clients when they connect to the network.
Enter the start and end IP addresses to define the range.
Authentication
b.
i. Use Windows Authentication – use AD to authenticate users.
ii. Use RADIUS Authentication – configure VPN connections to use RADIUS authen-
tication.
1. Radius Server – designate the server name or IPaddress.
2. Shared Secret – create a secret to authenticate communication between the
appliance and RADIUS server.
3. Confirm – confirm the shared secret.
4. Timeout – the default is usually sufficient, but the duration the appliance will
try to connect to the RADIUS server can be customized as necessary.
5. Score – the default is usually sufficient, but customize the initial respons-
iveness score as necessary.
6. Port – the default is UPD 1812 for authentication. Legacy RADIUS servers
may use 1646.
7. Always use message authenticator – select if the attribute Request must
contain the Message Authenticator attribute has been configured on the
RADIUS server.
3. Finish – review the settings; click Next to configure.
Configure DirectAccess services only
Select to add access through DirectAccess connections.
DirectAccess
1.
a. Basic – define the appliance location and the URL that clients will use to access
resources.
i. Select the type of network environment:
l Edge – requires two network adapters; one to the public Internet and one to
the internal network.
l Behind an edge device (with two network adapters) – one adapter con-
nects to the perimeter network, and the other connects to the internal net-
work.
l Behind an edge device (with one network adapter) – the adapter connects
to the internal network.
ii. Public address – enter the address that external clients will use to connect to the
network.
Note: While using an IP address is supported, the FQDN is a best practice.
For example: da.example.com
39 E Series Installation Guide
Page 44

b. Advanced – define client parameters and assign the appliance network adapter that Dir-
ectAccess service will use.
i. Installation type – select the DirectAccess functionality to deploy:
l Full DirectAccess installation – bidirectional tunnels for remote client
access and management.
l Client management only – configure tunnel for remote client management.
ii. Client Group – designate an AD security group that will manage devices that con-
nect through DirectAccess; leave blank to include all remote devices.
iii. Internal – specify the internal network adapter in the drop menu.
GPO and NLS
c.
i. Group Policy Object (GPO) – leave fields blank to configure the default options, oth-
erwise designate predefined AD policy groups that will manage settings for devices
and servers.
1. Client GPO – specify the name for the AD policy that will manage client
access.
2. Server GPO – specify the name for the AD policy that will manage access to
the DirectAccess server.
ii. Network Location Server – the NLS server will be installed on the appliance unless
an external server is designated.
1. Certificate – if an SSL certificate will be used, navigate to and select it.
a. Click the Import button.
b. Complete the following:
i. Certificate Import – navigate to and select the certificate that
will be used for authentication.
ii. Password – enter the certificate passphrase.
iii. Click the Import button.
c. The imported certificate should display in the Certificate field. If not,
use the drop menu to select it.
2. NLS URL – if an external NLS server is deployed, enter the HTTPS URL.
Client Settings
d.
i. Connection Name – create a name for the network connection that end users will
recognize.
ii. Support Email – enter the email account that will receive diagnostic reports
created by the DirectAccess Diagnostics tool.
Note: This option allows local name resolution when the server name does not
exist in intranet DNS or if the DNS servers are unreachable.
iii. Allow local name resolution – select to use the recommended level of DNS local
name resolution.
iv. Enable for mobile computers only – allow only mobile computers in the specified
40 E Series Installation Guide
Page 45

security groups to connect through DirectAccess.
Important: Remote Access will create a WMI filter that will only allow mobile
computers to join DirectAccess security groups. This setting requires that the
administrator account configured for Remote Access have create/modify
privileges.
v. Enable Windows 7 Client Support – select for environments that require support
for Windows 7 clients.
vi. IPsec Root Certificate – conditional; designate a certificate to validate
authentication for client connections; required for Windows 7 users, and
recommended for Windows 8. See the following:
l If GPOs are used to push security certificates to domain servers, use the
Certificate drop menu to select the certificate issued from the domain root
CA.
l If the certificate needs to be added manually, use the import feature:
1. Click the Import button.
a. Certificate Import – navigate to and select the certificate that
will be used for authentication.
b. Password – enter the certificate passphrase.
c. Click the Import button.
2. The imported certificate should display in the Certificate field. If not,
use the drop menu to select it.
vii. Intermediate CA – select if the certificate was not imported from the domain root
CA.
viii. Click Next.
Configure VPN services only
Select to add access through a VPN connection.
Note: VPN should be enabled to support unmanaged clients.
VPN
1.
Address Assignment
a.
i. Assign addresses automatically – use DHCP to assign client addresses.
ii. Assign addresses from a static address pool – enter a range of IP addresses that
RRAS will assign to clients when they connect to the network.
Enter the start and end IP addresses to define the range.
Authentication
b.
i. Use Windows Authentication – use AD to authenticate users.
ii. Use RADIUS Authentication – configure VPN connections to use RADIUS authen-
tication.
41 E Series Installation Guide
Page 46

1. Radius Server – designate the server name or IPaddress.
2. Shared Secret – create a secret to authenticate communication between the
appliance and RADIUS server.
3. Confirm – confirm the shared secret.
4. Timeout – the default is usually sufficient, but the duration the appliance will
try to connect to the RADIUS server can be customized as necessary.
5. Score – the default is usually sufficient, but the initial responsiveness score
can be customized as necessary.
6. Port – the default is UPD 1812 for authentication. Legacy RADIUS servers
may use 1646.
7. Always use the same message authenticator – select if the attribute
Request must contain the Message Authenticator attribute has been con-
figured on the RADIUS server.
The wizard is complete when the congratulations screen displays. Depending on the configuration to
be completed, this may take some time.
The base level setup for Remote Access options is now complete. Clients can now be configured to
access resources.
The Next Step
The next step depends on the deployment. Once all features for the deployment are configured, saving
a copy of the system image to preserve initial configuration is recommended.
42 E Series Installation Guide
Page 47

Configure Features: Web Application
Proxy Setup Wizard
The wizard provides the steps to configure Web Application Proxy (WAP) settings for the CelestixEdge
E Series Appliance. It covers the minimum functionality common to most deployments; however, an
individual organization may need different or additional configuration.
Resources for Web Application Proxy setup are as follows:
l Required: E Series appliance web UI
l Conditional: SSO Portal deployment requires additional DNS records and firewall rules
General Informationprovides necessary information about setup.
General Information
The following deployment notes provide information to understand Web Application Proxy
configuration.
Remote Access Terminology Disambiguation
The terms below describe components that are used in documentation.
l A federation service namespace is sometimes referred to as the AD FS or authentication
namespace, but documentation generally uses the shortened term federation namespace. It is
used as the Service Principle Name (Service Name) for AD FS. The federation namespace is
based on the FQDN that represents the SSL certificate Subject (or Common Name).
Deployment Assumptions
Information presented in the A Series setup instructions is based on the following:
l The Web Application Proxy feature has been installed through the web UI.
l Deployment is a single proxy server.
l AD will be used for authentication and authorization through AD FS.
l Internal DNS entries have been configured for Web Application Proxy to resolve hostnames for
backend servers.
l Public DNS entries have been configured to resolve external URLs for each published applic-
ation.
l Firewall rules have been configured to allow traffic for the following connectivity:
n To AD FS through port 443
n To AD
43 E Series Installation Guide
Page 48

n To published applications as required
Requirement Checklist
The following items will be required to set up the proxy. Plan ahead so that items are available when
needed to complete configuration.
l AD FS – must be deployed on a separate server.
l AD FS administrator account – required to access AD FS for authentication.
l Publicly signed certificate – an SSL certificate is required; it is strongly recommended to use a
third-party certificate from a trusted vendor. The certificate subject is the same as the fed-
eration service namespace.
l SSO portal address – if the portal is deployed, an FQDN will be needed to assign to the SSO
portal for end user access to hosted applications.
Example Information
To help make the instructions clear, the following examples are used to identify components.
InternalDomain FederatedDomain CelestixEdge Appliance
FQDN
Host Name
Domain Name
ad0 1.in texa mple .com adf s.fe dexa mple .com Cel esti xEdg e01. inte xample.com
ad0 1 adf s CelestixEdge 01
int exam ple. com fed exam ple. com int exam ple. com
Setup Wizard
The setup wizard is a walk-through to configure components for proxy services.
Access the screen through the web UI at CelestixEdge|Features|Web Application Proxy|Wizard.
Wizard Instructions
1. ADFS Services– complete the following:
a. ADFS Service – enter the fully qualified domain name.
Example: adfs.fedexample.com
b. Username – enter AD FS administrator account.
For example: intexample\adminuser
c. Password – enter the password for the AD FS account.
d. SSO Portal – if WAP will be used to publish applications for remote users, enter the
44 E Series Installation Guide
Page 49

address end users will need to access those applications.
Note: Entering the address creates the portal.
Certificate
2.
a. Click the Import button.
b. Complete the following:
i. Certificate – navigate to and select the certificate that will be used for authen-
tication.
ii. Password – enter the certificate passphrase.
iii. Click the Import button.
c. The imported certificate should display in the Certificate field. If not, use the drop menu
to select it.
d. Click Next.
3. Finish – review the settings; click Next to configure.
4. The wizard is complete when the congratulations screen displays.
5. SSO portal deployment: Click the PowerShell link to download a script that must be run on the
AD FS server to set up a relying party trust.
The base level setup for Web Application Proxy is now complete.
The Next Step
The next step depends on the deployment. Once all features for the deployment are configured, saving
a copy of the system image to preserve initial configuration is recommended.
45 E Series Installation Guide
Page 50

Configure Features: Work Folders
Setup Wizard
The wizard provides the steps to configure Work Folders settings for the CelestixEdge E Series
Appliance. It covers the minimum functionality common to most deployments; however, an individual
organization may need different or additional configuration.
Work Folders setup requires configuration in the following places:
l The domain controller
l The E Series appliance web UI
l Windows Server Manager
The information below covers each of these components: complete the tasks in the order presented to
deploy the feature efficiently. General Informationprovides necessary information about setup.
General Information
The following deployment notes provide information to understand Work Folders configuration.
Terminology Disambiguation
The terms below describe components that are used in documentation.
l A Sync share is a collection of user folders that use the same policy settings.
l A Sync server has the Work Folders role installed. It can contain multiple sync shares.
Deployment Assumptions
Information presented in the E Series setup instructions is based on the following:
l The Work Folders feature has been installed through the web UI.
l Deployment is a single sync server with a single sync share.
l The user security group is created prior to setting up the sync share.
l If DNS is configured for Work Folders access, it is completed before using the setup wizard.
Requirement Checklist
The following items will be required to set up the Work Folders service. Plan ahead so that items are
available when needed to complete configuration.
46 E Series Installation Guide
Page 51

l Domain controller – Windows Server 2012 or higher.
l Publicly signed certificate – an SSL certificate is required for Work Folders; it must be a third-
party certificate from a trusted vendor. Additional requirements:
n The certificate subject needs to be the same as the Work Folders public URL (format:
workfolders.<domain_name>)
n Certificate subject alternative names (SANs) must list the server name for each sync
server in use.
Note: A certificate is required for each server hosting the Work Folders feature.
l AD security group – a user group to control access to the sync share.
l Clients – supported options:
n Windows 8.1, 8.1 R, 7 (Professional, Ultimate, Enterprise)
n iPad with iOS 8.1 or later
Additional Configuration Notes
The notes below discuss options that can extended Work Folders functionality. They exceed the scope
of these instructions, but will be helpful to consider when planning deployment.
l DNS configuration is required for the following instances:
n To sync files over the Internet, a public domain name with a DNS Host (A) record is
required to allow clients to resolve the Work Folders URL.
n To sync files on an intranet, a DNS alias record is required on the internal network for the
Work Folders URL that resolves to the server names of all sync servers on the network.
l AD FS facilitates the following services:
n Device Registration Service for Workplace Join
n RADIUS and multifactor authentication.
l Web Application Proxy allows clients to sync files over the Internet.
Initial Configuration
Before setting up federation components, there are some tasks that need to be completed.
ADSecurity Group Configuration
Set up security groups in AD to manage Work Folder access. Configuration is described briefly and
requires familiarity with AD domain administration.
47 E Series Installation Guide
Page 52

User Group
1. Create a dedicated Work Folders user group with these settings:
n Scope: Global
n Type: Security
2. Add user accounts to the group.
Setup Wizard
The setup wizard is a walk-through to assign a certificate to encrypt remote access to work files.
Access the screen through the web UI at CelestixEdge|Features|Work Folders|Wizard.
Wizard Instructions
Use the following instructions to import the SSL certificate for Work Folders.
1. Certificate – import a certificate to encrypt authentication:
a. Click the Import button.
b. Complete the following:
i. Certificate Import – navigate to and select the Work Folders certificate that will be
used for authentication.
ii. Password – enter the certificate passphrase.
iii. Click the Import button.
c. The imported certificate should display in the Certificate field. If not, use the drop menu
to select it.
d. Click Next.
2. Finish – review the settings; click Next to configure.
The wizard is complete when the congratulations screen displays. Next, a sync share directory must
designated on the appliance.
Required Configuration After Setup Wizard
Configuration must be customized for an environment:
1. Open an RDP session from the local computer to the E Series appliance, using Remote Access
Console (CelestixEdge|System|Remote Desktop).
a. In Windows Server, open the Server Manager.
b. Navigate to File and Storage Services|Work Folders.
c. Click the link to create a sync share to open the Windows configuration wizard.
2. When done, navigate to File|Exit in the remote desktop window to close and return to the
48 E Series Installation Guide
Page 53

Maintenance screen. Closing the application logs off the RDP session to the appliance and is
recommended to release management resources.
Note: If the File menu is not visible, use the quick close button.
The base level setup that allows external access to work files is now complete. Supported clients can
now be configured to access sync services.
The Next Step
The next step depends on the deployment. Once all features for the deployment are configured, saving
a copy of the system image to preserve initial configuration is recommended.
49 E Series Installation Guide
Page 54

Create a System Image
Creating a system image, or snapshot, will provide an option to help remediate issues that may result
from future updates or changes to the saved configuration. The image is created in the recovery
system process where the main operating system is not running. Thus the system can be restored to
the saved configuration, even if the operating system performance or functionality has been affected.
Important: A system image is intended to complement, not replace, regular backups through the
Windows® OS.
The instructions below cover the appliance front panel Last Good Version (LGV) feature, which is
accessed through the Jog Dial. LGV is an offline tool and requires that the system be rebooted to
access it, but is convenient during setup because it can be run from the front panel.
Note: The web UI also contains a System Imaging feature (System|System Imaging). It requires the
use of a web browser, but can run when the operating system is loaded (online), or after a restart
before the appliance boots into the operating system (offline). Online, or real-time images use more
disk space than offline imaging, but they don’t interrupt the services the appliance provides.
LGV
The LGV instructions below require direct access to the Celestix appliance.
To create an LGV
Notes:
l The appliance must be shut down and then started again to access the system recovery pro-
cess.
l It may help to read through all of the instructions before starting the procedure.
1. Shutdown the appliance.
2. The front panel display shows the System Off message after shutdown has completed.
3. Press the Jog Dial to start the appliance; the front panel display shows System On, and the appli-
ance beeps for system startup.
4. Next, the front panel display shows the System Ready message, and the system will beep again.
On this second beep, turn the Jog Dial clockwise two full rotations to initiate the recovery
system.
Note: Timing when to turn the Jog Dial is more important than how long it gets turned it. Two
full rotations should suffice to start the recovery system process.
50 E Series Installation Guide
Page 55

5. The front panel display will show Celestix Appliance Installer when the recovery process
launches. Menu options will display when the recovery system has loaded.
6. Turn the Jog Dial to scroll to the option Create Last Good Version << and press to select.
7. Confirm when prompted.
The Saving System Image screen will show a progress indicator and an estimated time to completion
for the image copy process.
Caution:
l DO NOT ACCESS OR TURN OFF THE APPLIANCE DURING THIS PROCESS.
l The appliance will shut down when the LGV process is complete.
51 E Series Installation Guide
Page 56

Create a Backup
Once configuration is complete, creating a backup will provide another option to help remediate issues
that may result from future system updates or changes. Celestix recommends running the Windows
backup utility (System|Backup).
Now that the configuration steps, system image creation and backup are complete, check for software
updates.
52 E Series Installation Guide
Page 57

Update Software
The Software Update Service allows administrators to keep system software current through hotfixes,
service packs, and upgrades. They are necessary for the security and proper functioning of the
appliance.
Access the update service through the web UI (System|Software Updates).
To find updates
1. Navigate to System|Software Updates|Appliance Updates.
2. Complete the following:
a.
b. Select an item.
c. Install – install selected update.
3. Confirm if prompted.
Once applicable updates are installed, Celestix recommends checking for Windows updates
(System|Windows Updates).
– click the Check for Updates button.
Thank you for choosing the CelestixEdge E Series Appliance for your remote connectivity solution.
This completes the setup and configuration steps for base-level deployment.
Email questions to [email protected]
53 E Series Installation Guide
Page 58

Appendix
Use the links to jump to a topic:
l Web User Interface Content Overview
l Safety Precautions
l Product Reclamation and Recycling
l Glossary
l Index
l Resource Worksheet
54 E Series Installation Guide
Page 59

Glossary
A
Active Directory
Microsoft's directory service for Windows domains.
Active Directory Federation Services
The Microsoft implementation of single sign-on (SSO).
AD
Acronym for Active Directory
ADFS
Acronym for Active Directory Federation Services
C
CA
Acronym for certificate authority
Certificate
The tool that TLS/SSL uses to encrypt communication.
Certificate authority
An entity that issues certificates to encrypt digital communication.
Certificate revocation list
A list of certificates that are no longer valid for encryption.
CRL
Acronym for certificate revocation list
D
DA
Acronym for DirectAccess
55 E Series Installation Guide
Page 60

Device Registration Service
A feature of ADFS that facilitates Workplace Join, which allows users to
register unmanaged devices to be known entities to the domain.
DirectAccess
A secure Remote Access connection that provides remote access to the
internal network and manage-out capabilities.
Directory synchronization
A Microsoft tool that synchronizes users, groups, and attributes (like distribution groups or user phone numbers) to an Office365 instance.
DirSync
Abbreviation for Directory Synchronization
DNS
Acronym for Domain Name System
Domain Name System
A service that translates domain names into IP addresses.
DRS
Acronym for Device Registration Service
F
Failover
A part of high availability where switching from failed to redundant components occurs, usually automatically.
Federation
Federation refers to the mechanism that creates trust relationships for identity
management. These trust relationships then allow single sign-on for multiple
independent systems.
56 E Series Installation Guide
Page 61

H
HA
Acronym for high availability
High availability
A system implementation that minimizes downtime, meaning unavailability to
users.
I
Identity provider
An entity that authenticates a user to a service provider.
M
Multifactor authentication
Employs additional forms of user data for authentication. Two-factor authentication using one-time passwords is a common example.
N
namespace
A unique identifier for the authentication environment.
Network access server
A component of RADIUS authentication. Abbreviated NAS.
Network Policy Server
How Microsoft implements RADIUS.
NPS
Acronym for NPS
O
Office 365
The cloud implementation of the Microsoft Office productivity suite.
57 E Series Installation Guide
Page 62

P
Password Sync
A component of the Microsoft Directory Synchronization tool that coordinates
password hashes between internal Active Directory and Office365.
portal page
The portal page consolidates external access to published applications.
R
RADIUS
Remote Access Dial In User Service (RADIUS) is an authentication protocol
(RFC 2865). The HOTPin system uses the Microsoft application Network Policy
Server (NPS) to implement RADIUS.
RADIUS client
A RADIUS client is a network access server (NAS) that facilitates authentication requests between access clients and the HOTPin system when
RADIUS is used as the authentication protocol.
Redundancy
A part of high availability design that employs additional resources, like extra
servers, to carry out required functionality in the event one component fails.
Relying party trust
Designates a service provider as a partner organization for ADFS. The service
provider is a relying party that ADFS will trust authentication requests from.
Remote Access Dial In User Service
See RADIUS.
S
Service provider
An entity that trusts an identity provider for user authentication in a federated
system.
58 E Series Installation Guide
Page 63

Single sign-on
Allows login to multiple system using one set of credentials. In ADFS, once
users log in with their organization AD credentials, they can access federated
resources without being prompted further for authentication.
SSO
Acronym for single sign-on
U
UAG trunk
A repository of published applications for user access; this term only applies to
Celestix WSA environments or other UAG deployments.
V
Virtual Private Network
A secure Remote Access connection that provides access remote access to
the internal network.
VPN
Acronym for virtual private network
W
WAP
Acronym for Web Application Proxy
Web Application Proxy
A reverse proxy solution that publishes internal web applications for external
access.
WID
Acronym for Windows Internal Database
59 E Series Installation Guide
Page 64

Windows Internal Database
A version of SQL Server Express that is automatically included with Windows
Server. It is the default data store option for ADFS.
Workplace Join
The function that allows users to register devices with the domain through
DRS; devices can then access application resources based on trust.
60 E Series Installation Guide
Page 65
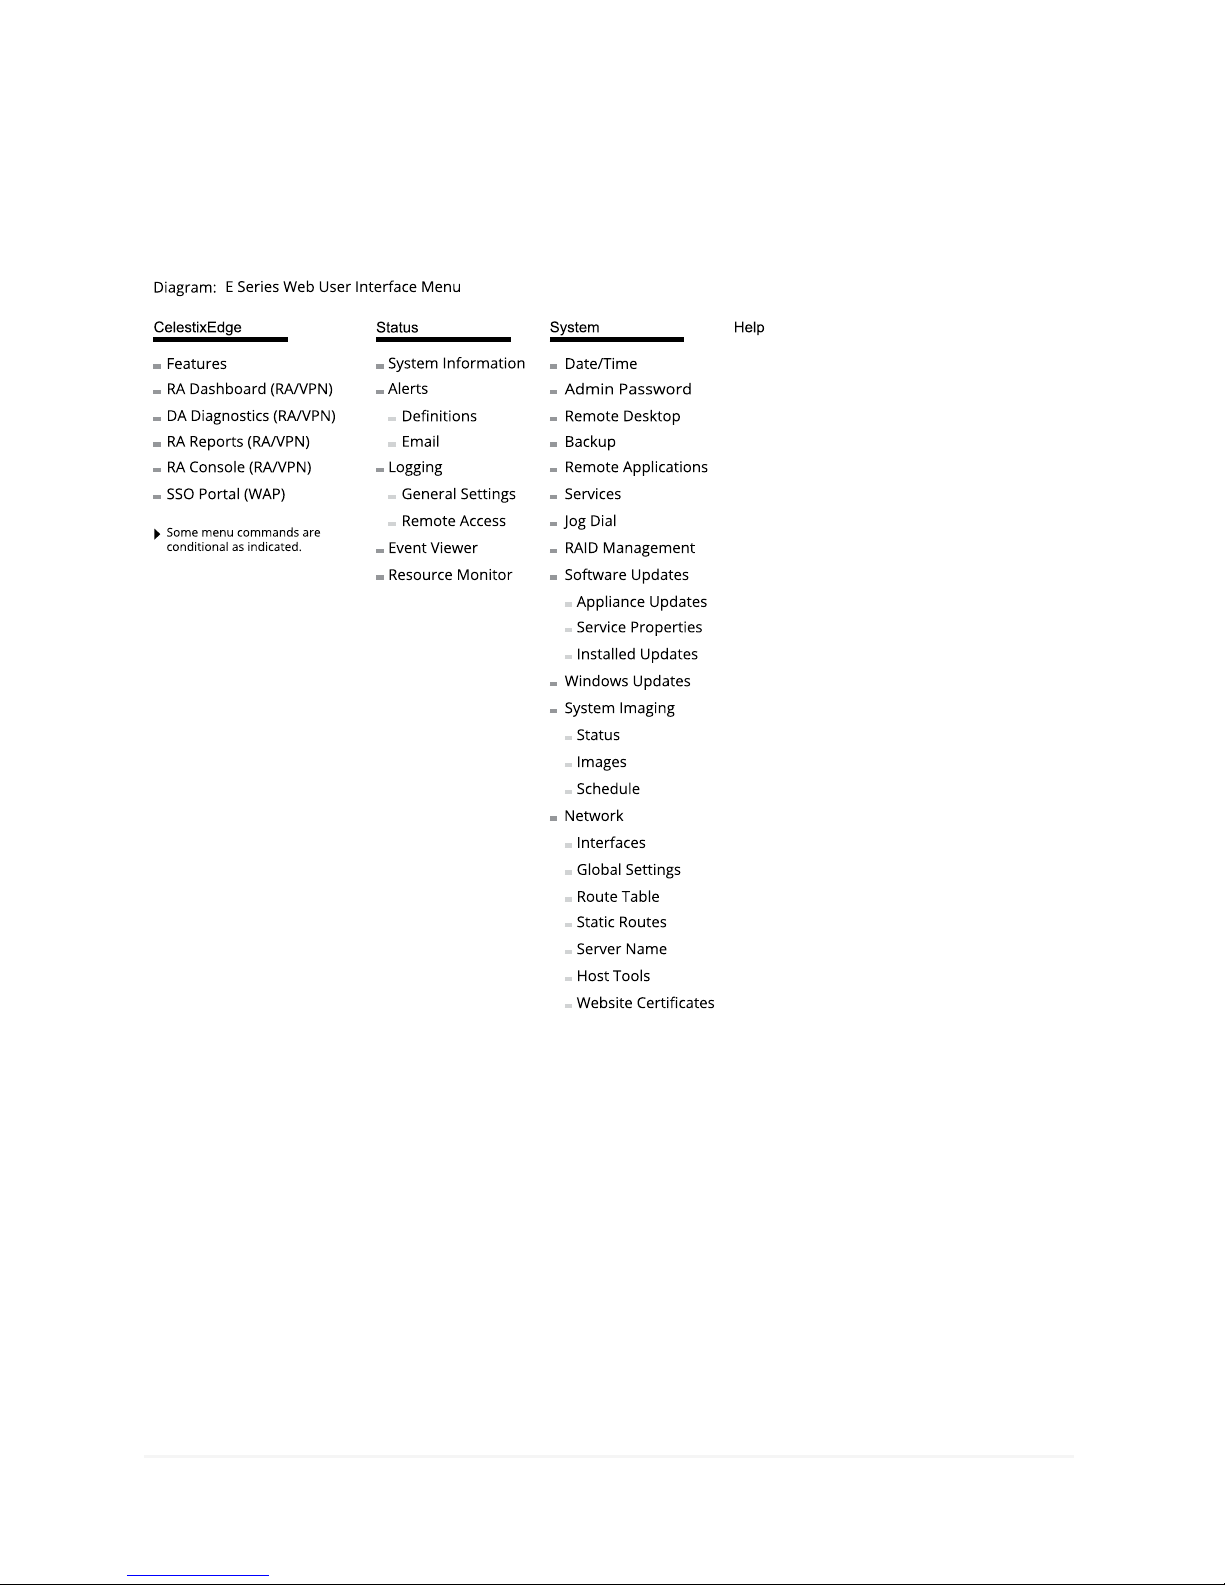
Web User Interface Content Overview
The menu structure for the web UI is outlined below. Use it to quickly find features.
61 E Series Installation Guide
Page 66

Safety Precautions
l Do not overload the AC supply branch circuit that provides power to the server.
l Do not disable the power cord grounding plug. The grounding plug is an important safety fea-
ture.
l Plug the power cord into a grounded electrical outlet that is easily accessible at all times.
l Unplug the power cord from the inlet on the appliance rear panel to disconnect power to the
server.
l Do not place anything on the power cords or cables. Arrange them so that no one can acci-
dentally step on or trip over them. Do not pull on a cord or cable. When unplugging the cord
from the electrical outlet, grasp the cord by the plug.
l Do not plug telecommunications/telephone connectors into the NIC connectors.
l This server contains an internal lithium battery. There is a risk of fire and burns if battery is not
handled properly. Do not attempt to recharge the battery. Do not expose the battery to tem-
peratures higher than 60° C. Do not disassemble, crush, puncture, short external contact, or dis-
pose of battery in fire or water.
l Danger of explosion if battery is incorrectly replaced. Replace only with the same or equivalent
type recommended by Celestix. Dispose of used batteries according to local regulations for haz-
ardous waste.
WARNING:
n RISK OF EXPLOSION IF BATTERY IS REPLACED BY AN INCORRECT TYPE.
n DISPOSE OF USED BATTERIES ACCORDING TO HAZARDOUS WASTE PROCEDURES AS
REQUIRED IN YOUR AREA.
n HAZARDOUS MOVING PARTS.
n KEEP FINGERS AND OTHER BODY PARTS AWAY.
62 E Series Installation Guide
Page 67

Product Reclamation and Recycling
Celestix Networks is committed to environmentally responsible behavior. As part of this commitment,
we work to comply with environmental standards such as the European Union’s Waste Electrical and
Electronic Equipment (WEEE) Directive and the Restriction of Hazardous Substances (RoHS) Directive.
These directives and other similar regulations from countries outside the European Union regulate
electronic waste management and the reduction or elimination of specific hazardous materials in
electronic products. The WEEE Directive requires electrical and electronics manufacturers to provide
mechanisms for the recycling and reuse of their products. The RoHS Directive restricts the use of
certain substances that are commonly found in electronic products today. Restricted substances
include heavy metals, like lead and polybrominated materials. The RoHS Directive, with some
exemptions, applies to all electrical and electronic equipment.
In accordance with Article 11(2) of Directive 2002/96/EC (WEEE), products put on the market after 13
August 2005 are marked with the following symbol or include it in their documentation: a crossed-out
wheeled waste bin with a bar beneath.
Celestix Networks provides recycling support for our equipment to comply with the WEEE Directive.
For recycling information, send email to [email protected] indicating the type of Celestix
Networks equipment needing to be disposed of and the country where it is currently located, or
contact a Celestix Networks account representative.
Products returned through our reclamation process are recycled, recovered, or disposed of in a
responsible manner.
63 E Series Installation Guide
Page 68

Index
A
ADFS
Requirement Checklist 23
Appendix
reclamation/recycling 63
Resource Worksheet 68
Safety Precautions 62
web UI navigation 61
appliance hardware features 4
appliance installation 12
connect to network 17
front panel 19
network information worksheet examples 13
power on appliance 19
appliance setup 22
B
Backup and Restore
system image 50
C
certificate
WAP Requirement Checklist 44
Work Folders Requirement Checklist 47
connect to network
network adapter 17
conventions
document usage 2
64 E Series Installation Guide
Page 69

D
Deployment Assumptions 22
Deployment Assumptions for Remote Access 34
Deployment Assumptions for WAP 43
Deployment Assumptions for Work Folders 46
DirectAccess setup 36
E
E Series version information 11
F
front panel controls 19
Jog Dial 19
G
Glossary 55
J
Jog Dial 19
L
Last Good Version 50
LED
network adapter indicators 18
login
web UI 23
N
network adapter indicators 18
network settings
overview 12
O
overview 6
P
Power the Appliance 19
65 E Series Installation Guide
Page 70

R
Remote Access
Deployment Assumptions 34
Requirement Checklist 35
Requirement Checklist 23
Requirement Checklist for Remote Access 35
Requirement Checklist for WAP 44
Requirement Checklist for Work Folders 46
S
setup
Remote Access with VPN 36
WAP 44
Work Folders 48
Setup Wizard for Remote Access with VPN 36
Setup Wizard for WAP 44
Setup Wizard for Work Folders 48
Software
update 53
system image 50
Last Good Version 50
U
Update software 53
V
version information 11
VPN setup 36
W
WAP
Deployment Assumptions 43
66 E Series Installation Guide
Page 71

Requirement Checklist 44
setup 44
web UI 2
access 23
navigation 61
web UI login 23
Work Folders
Deployment Assumptions 46
Requirement Checklist 46
Work Folders setup 48
67 E Series Installation Guide
Page 72

Resource Worksheet
Table: Worksheet Form Example
Property Detail Your Information
Computer name
Administrator password
Workgroupor domain name
LAN information(LAN0)
Private or interna l network
interface
WAN information (LAN1)
Public or external network
interface
DMZ (LAN 2 +) information
Additiona l network interface s
Active Directory server
AD FS
Network Policy Server Network Acc ess Server (RADIUS Client)
Direc tAcce s/VPN DA server
[Celest1x] (default; to be changed during setup)
IP address
Subnet mask
Default gateway
Primary/secondary DNS server(s)
Static route s:
Network address
Gateway address
IP address
Subnet mask
Default gateway
Primary/secondary DNS server(s)
Static route s:
Network address
Gateway address
Include the IPa ddress/subnet mask for each
adapter to be used.
IP address
Hostname
AD D S FQDN
Administrator account
IP Address
Shared sec ret
Network policy criteria
Authe ntication protoc ol options
Static IPaddress(es)
Public addre ss for client connections
GPOs (if using customized policies)
NLS certificate (if using external server)
Infrastructure server(s)
DA c lient
68 E Series Installation Guide
Page 73

Public addre ss
Subnet mask
Default gateway
DNS
VPNserver
Client IPaddress pool (if not using DHCP)
RAD IUSserver information (if not using
Windows authentication)
PKI (if applicable ) IP address
Web Application Proxy AD FS FQDN
SSL certificate
SSO Portal Firewall rules for HTTPS and SSH
communication
Application requirements:
URL
Certificate
Hostname
Port
File format
Syslog SIEM:
FQDN/IP
Port
Certificate
Remote Desktop Gateway RD Ga teway (join domain)
IP address
Hostname
External FQD N
AD D S
IP address
Subnet mask
Default gateway
DNS
RD Session Host (domain joined)
IP address
Hostname
RD Conne ction Broker (domain joined)
IP address
Hostname
RD Web Access (domain joined)
IP Address
Hostname
Firewall rules
Remote Desktop Web A ccess RD Web Access Server (domain joined)
IP address
Hostname
69 E Series Installation Guide
Page 74

AD D S
IP address
Subnet mask
Default gateway
DNS
RD Session Host (domain joined)
IP address
Hostname
RD Conne ction Broker (domain joined)
IP address
Hostname
Remote Desktop Virtualization Host server
(optional)
IP address
Hostname
Firewall rules
Work Folders Sync share name
SSL certificate
AD sec uritygroup for user accounts
Sync share DNS entry (recommende d)
Application server IPaddress
Hostname
RAD IUSserver IP address
Hostname
RAD IUSclients IP address
Hostname
DNS
Public domain registrar Credentials
SMTPserver IP address
Workplac e Join AD D S FQDN
AD FS FQDN
Host/cluster IP
SMTPgateway name
AD D S service account
AD FS IP address
AD FS FQDN
DRS DNS entry
Bolditems arerequired
70 E Series Installation Guide
 Loading...