

Celabs QMPro 1100, QMPro 1100i, QMPro 1200i, QMPro 1200 Instruction Manual

Encoder / Modulators

01
Contents
03 Package Contents
04 Features
05 Introduction
06 Installation
07 Specifications
09 Visual Identification Illustrations
10 Encoder Programming and Setup via GUI Interface
16 Virtual Channel Number
18 Streaming Setup
19 Output Setup
21 Management IP Setup
24 Initial Setup & Configuration
25 Front Panel LCD Menu Tree
26 Encoder Setup: QMPro1100/I
26 Encoder Setup: QMPro1200/I
30 Encoder Setup
37 Administration
38 Network Setup
41 Output Setup
44 Streaming Setup
47 Warranty

02
The presence of this symbol is to alert the installer and
user to the presence of uninsulated dangerous voltages within
the product’s enclosure that may be of sufficient magnitude to
produce a risk of electric shock.
TO REDUCE THE RISK OF FIRE OR ELECTRIC SHOCK, DO NOT
EXPOSE THIS DEVICE TO RAIN OR MOISTURE. DO NOT OPEN THE
UNIT. REFER SERVICING TO QUALIFIED PERSONNEL ONLY.
➢DO NOT apply power to the unit until all connections have been
made, all components have been installed and all wiring has been
properly terminated.
➢DO NOT terminate, change or uninstall any wiring without first
disconnecting the unit’s power adapter from the device.
➢This device is supplied with the appropriately rated power supply.
The use of any other power supply could cause damage and
invalidate the manufacturer’s warranty.
➢DO NOT connect the power cord to the device if the power cord is
damaged.
➢DO NOT cut the power cord.
➢DO NOT plug the power cord into an AC outlet until all cables and
connections to the device have been properly connected.
➢The device should be installed in an environment consistent with
its operating temperature specifications. Placement next to heating
devices and ducts is to be avoided as doing so may cause damage.
The device should not be placed in areas of high humidity.
➢DO NOT cover any of the device’s ventilation openings.
➢DO NOT cover or obstruct the device’s fan or fan openings.
➢If the device has been in a cold environment allow it to warm to
room temperature for at least 2 hours before connecting to an AC
outlet.
03
This package contains one of the following:
➢ - QMPro1100/1100i or QMPro1200/1200i Encoder / Modulator
➢ - DIN cable(s)
➢ - One installation / configuration manual
Inspect the package before starting installation to ensure there is
no damage and all supplied contents are present.
Package Contents
04
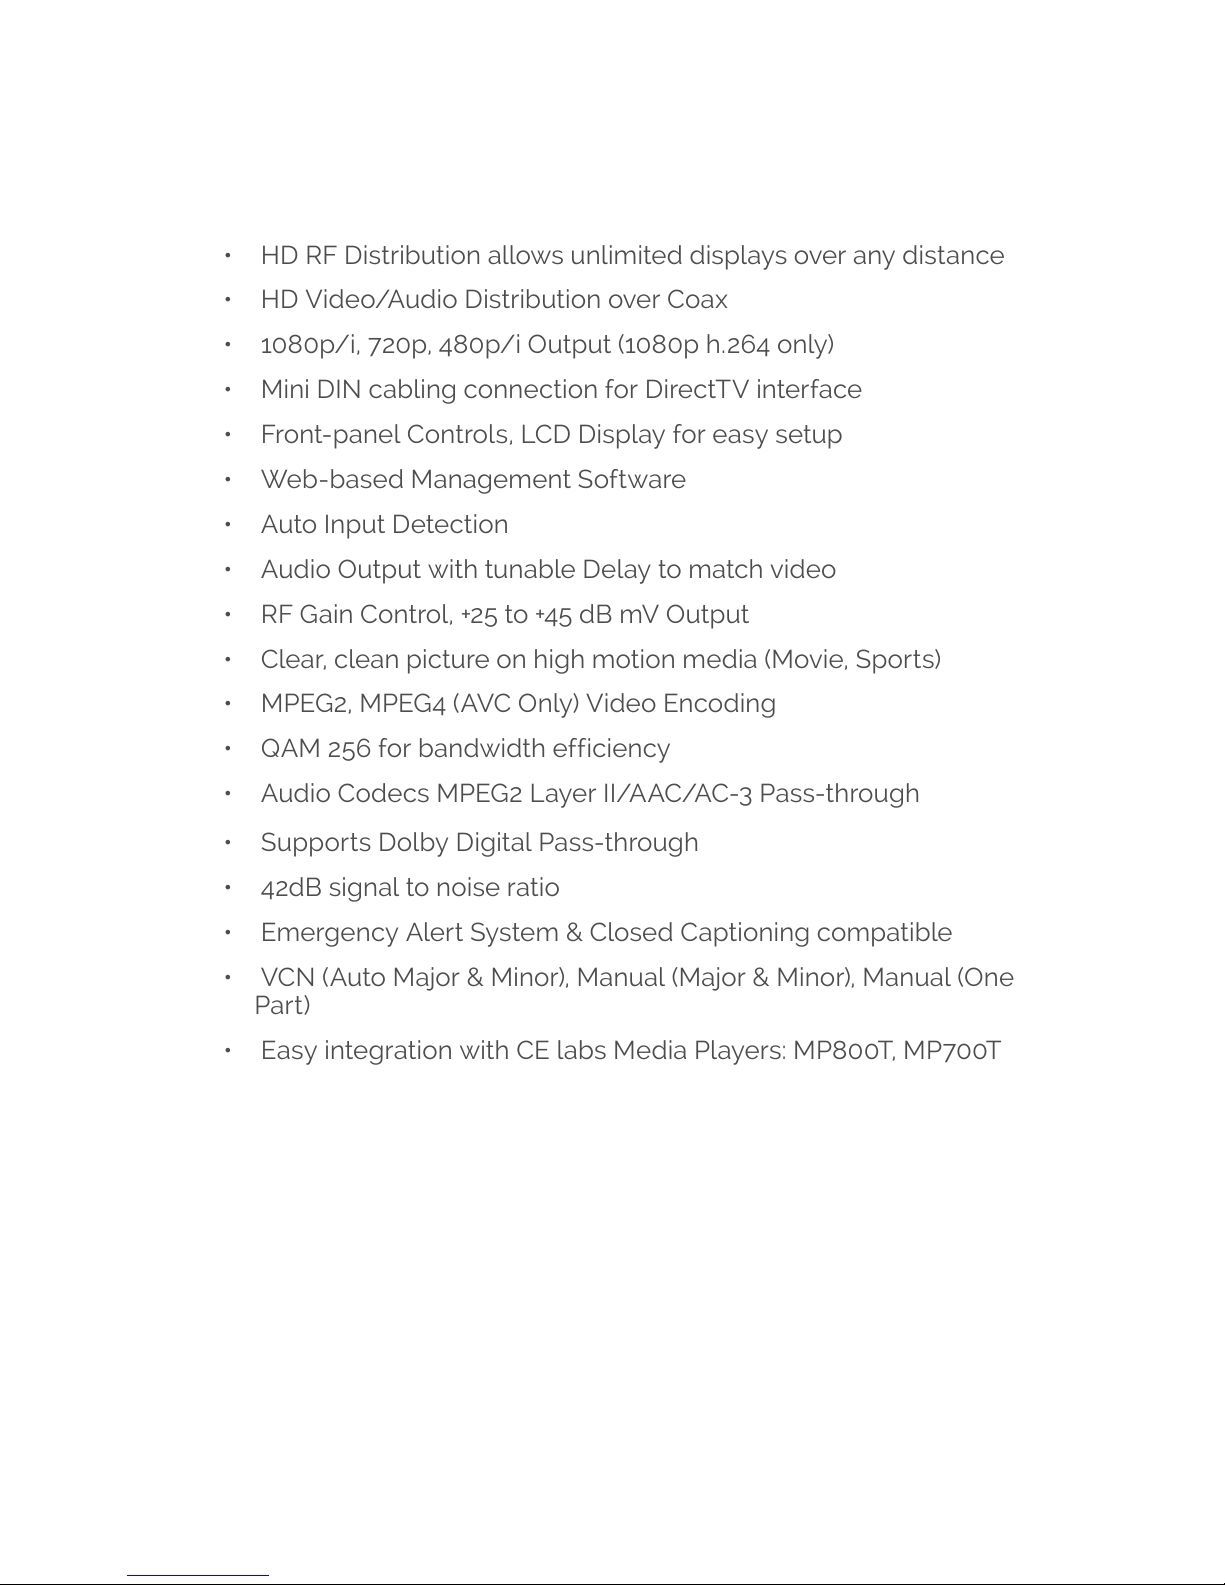
Features
• HD RF Distribution allows unlimited displays over any distance
• HD Video/Audio Distribution over Coax
• 1080p/i, 720p, 480p/i Output (1080p h.264 only)
• Mini DIN cabling connection for DirectTV interface
• Front-panel Controls, LCD Display for easy setup
• Web-based Management Software
• Auto Input Detection
• Audio Output with tunable Delay to match video
• RF Gain Control, +25 to +45 dB mV Output
• Clear, clean picture on high motion media (Movie, Sports)
• MPEG2, MPEG4 (AVC Only) Video Encoding
• QAM 256 for bandwidth efficiency
• Audio Codecs MPEG2 Layer II/AAC/AC-3 Pass-through
• Supports Dolby Digital Pass-through
• 42dB signal to noise ratio
• Emergency Alert System & Closed Captioning compatible
• VCN (Auto Major & Minor), Manual (Major & Minor), Manual (One
Part)
• Easy integration with CE labs Media Players: MP800T, MP700T

05
Introduction
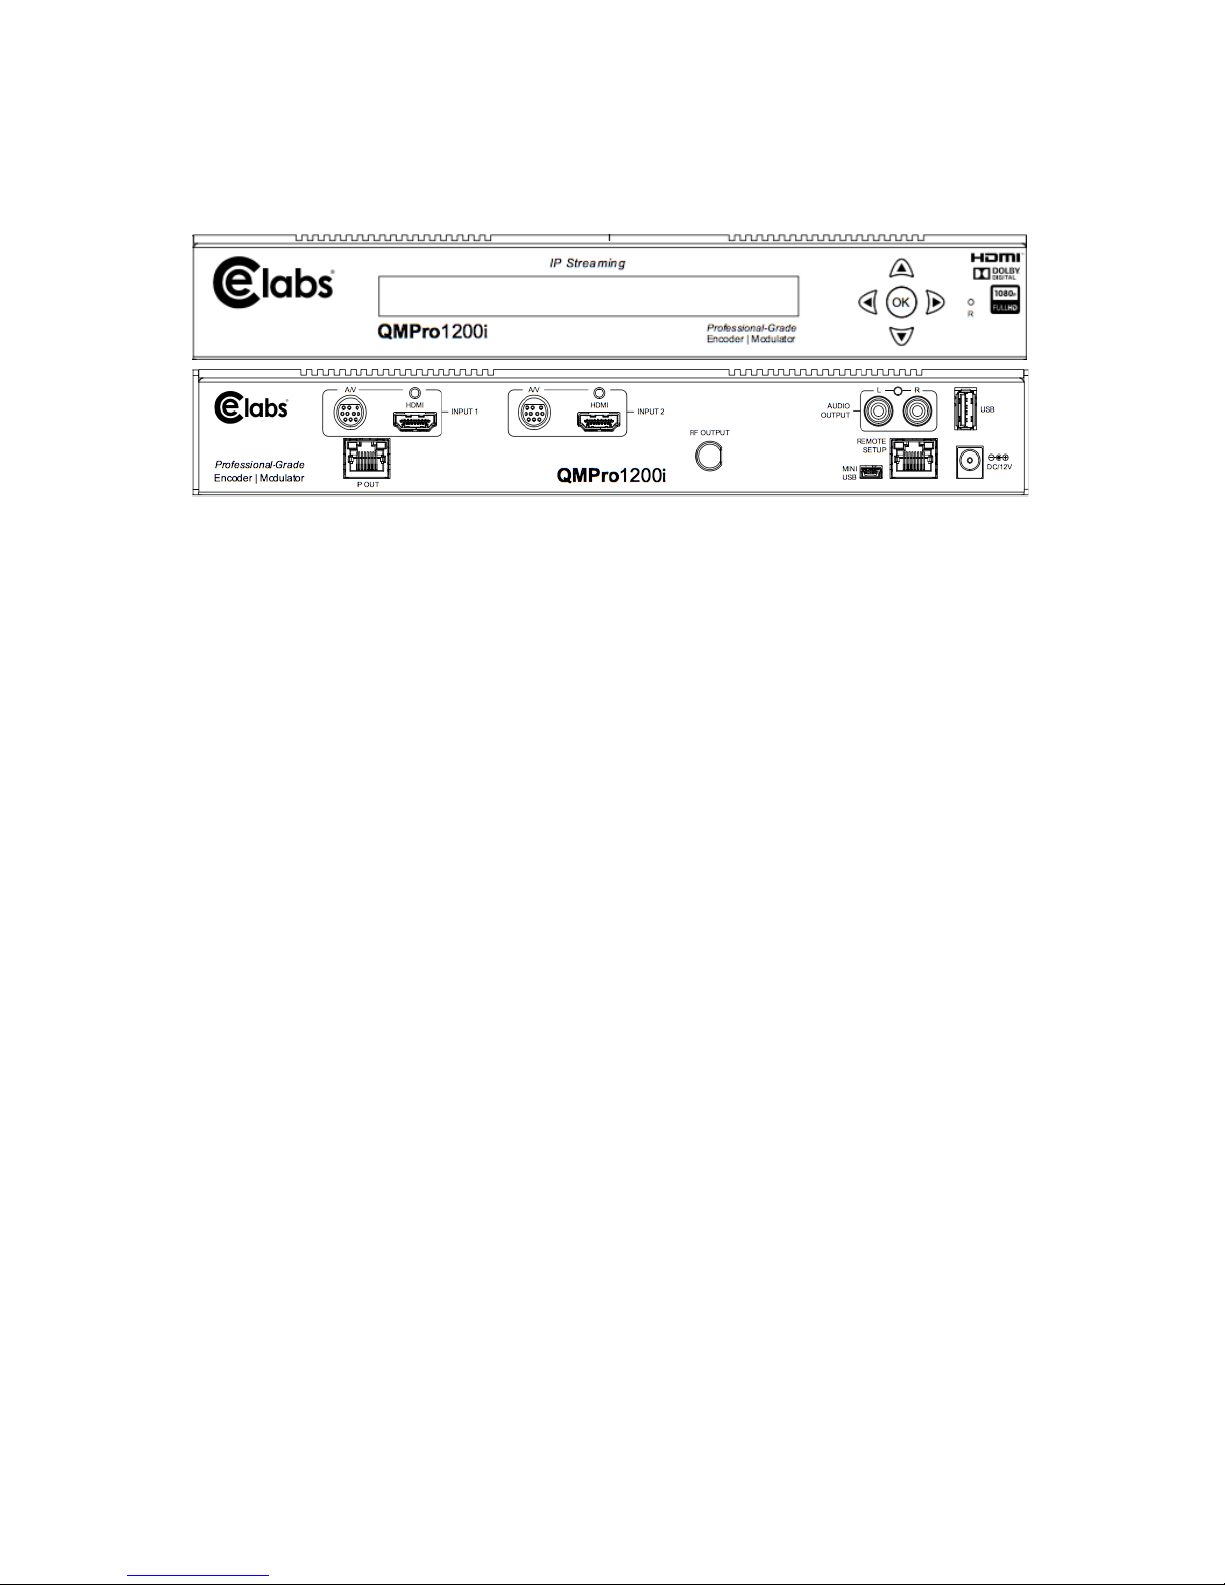
The QMPro1100/i (Single) and QMPro1200/i (Dual) is CE labs®
technology series of encoders/modulators that convert Digital
Video Broadcasting (DVB) Standard or High definition video and
audio signals to a QAM RF output. This RF signal may be routed
throughout a building using traditional CATV coax and distribution
network. This allows the HD RF signal to be used on as many TVs
as desired.
The QMPro1100/i and QMPro1200/i are perfect for multi-video
distribution solutions in the commercial and institutional market
(hotels, motels, sports bars, restaurants, hospitals, casinos,
business and university campuses, etc.), as well as home
entertainment systems.
The QMPro i-series (1100i or 1200i) adds the additional functionality
of AV streaming IP packets over an Ethernet network.

06
System Installer must adhere to Article 820-40 of the NEC that
provides guidelines for proper grounding and specifies that the
cable ground shall be connected to the grounding system of the
building, as close to the point of cable entry as possible.
Each unit is shipped factory tested. Ensure all items are removed
from the container prior to discarding any packing material.
Thoroughly inspect the unit for shipping damage with particular
attention to connectors and controls. If there is any sign of damage
to the unit or damaged or loose connectors contact your distributor
immediately. Do not put the equipment into service if there is any
indication of defect or damage.
It is highly recommended that quality cables and connectors be
used for all video and audio source connections.
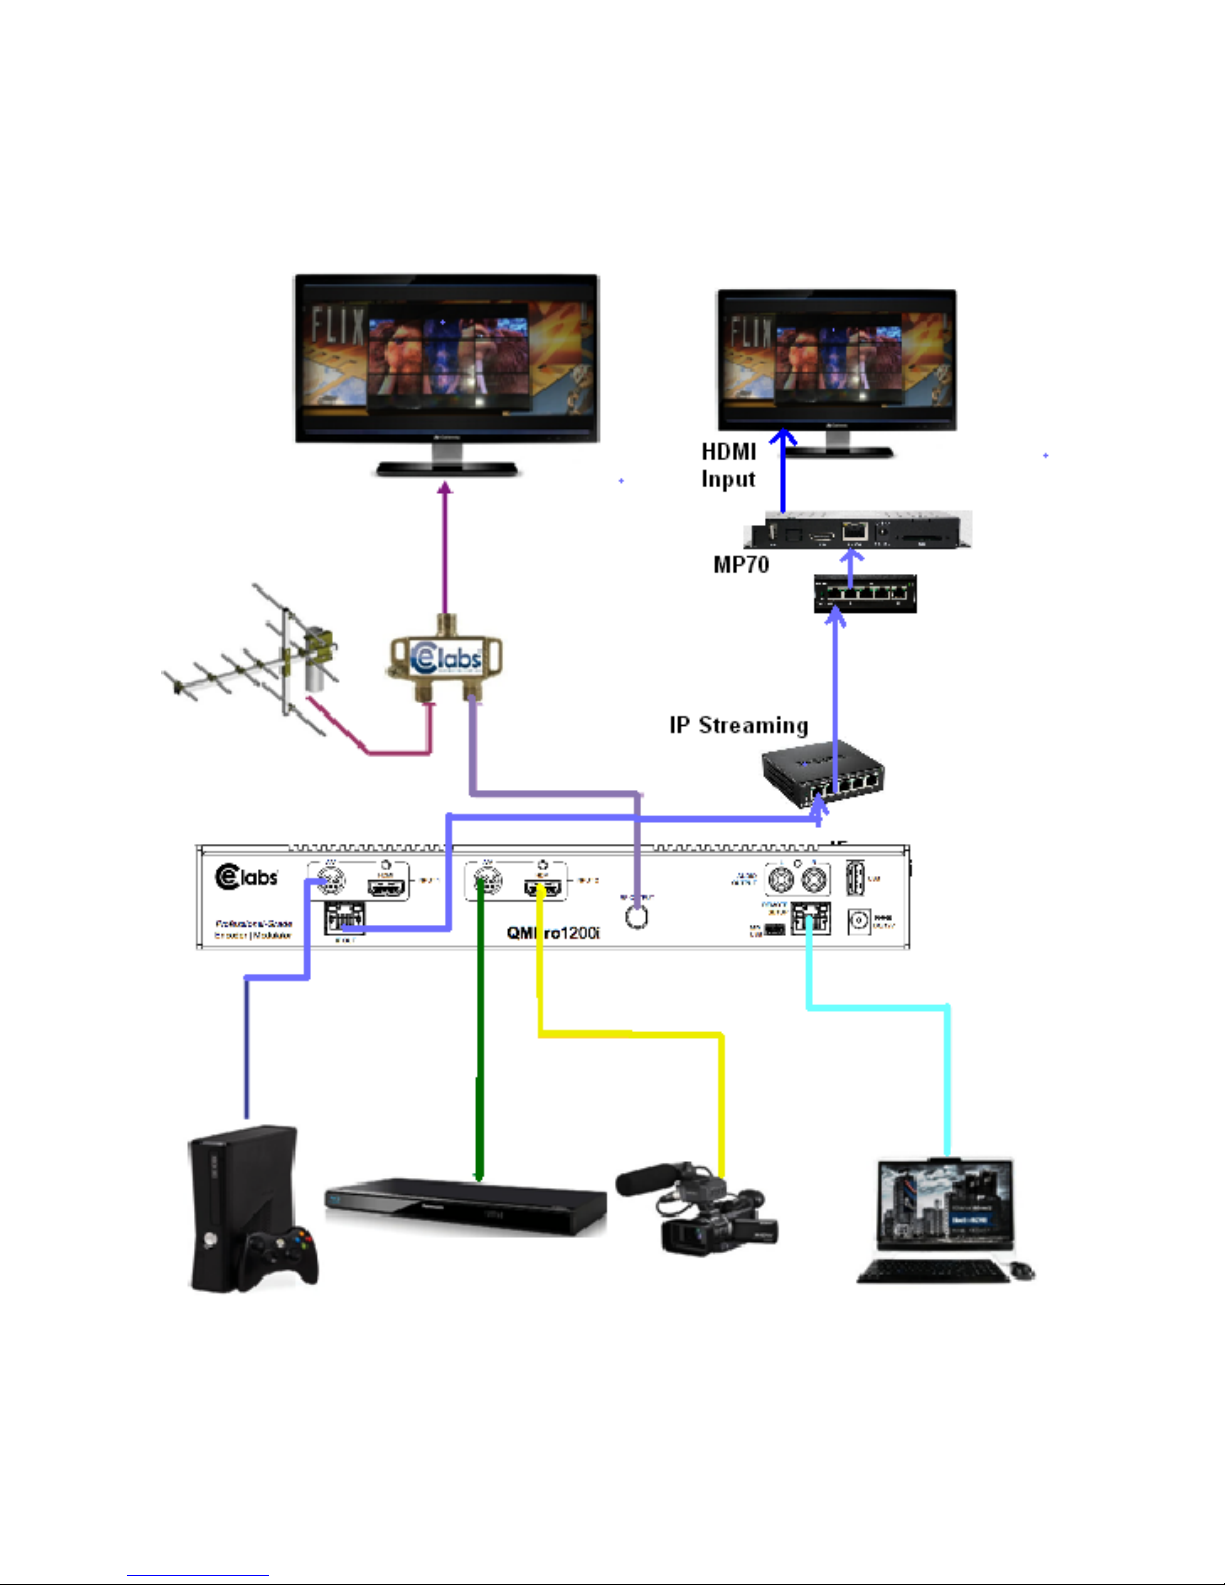
Installation
1.
The unit can be rack mounted in a standard EIA19” rack using the provided
rack ears kit. Connect the right and left rack mount ears (if rack-mounting).
2.
The unit comes with HDMI and Component/Composite (via DIN) inputs.
Connect the required cables to the back of the unit using a HDMI or DIN
cables. If your source is High Definition, it is possible that the HDMI signal
could be encrypted with HDCP. In this case, you may need to use the DIN
cable to connect to the source Component video output. When using the
DIN cable, the Right and Left audio should also be connected if the display
requires audio.
3.
Repeat this step for each video source connection.
4.
Be sure the connections for each source are consistent with the unit’s inputs
(IN1…IN2).
5.
Use a quality 75Ω coaxial cable with “F” connectors from the unit’s RF Output.
6.
IP output: connect the Ethernet cable to the IP output RJ45 connector to your
IGMP capable switch.
7.
Connect the included power cord to the unit’s POWER plug.
8.
Connect the power cord to an appropriately rated AC power outlet.
DEVICE Programming and Setup:
Connecting to the Web GUI Interface:
Factory Default IP: 192.168.1.9
1.
Connect an Ethernet cable to the Remote Setup Port of the QMPro and to your
PC/Laptop.
2.
Modify your PC/Laptop’s IP address to 192.168.1.50 and the sub-net to
255.255.255.0.
3.
Enter ‘192.168.1.9’ into your web browser.
4.
Make all required parameter changes.
5.
Save all changes.
07
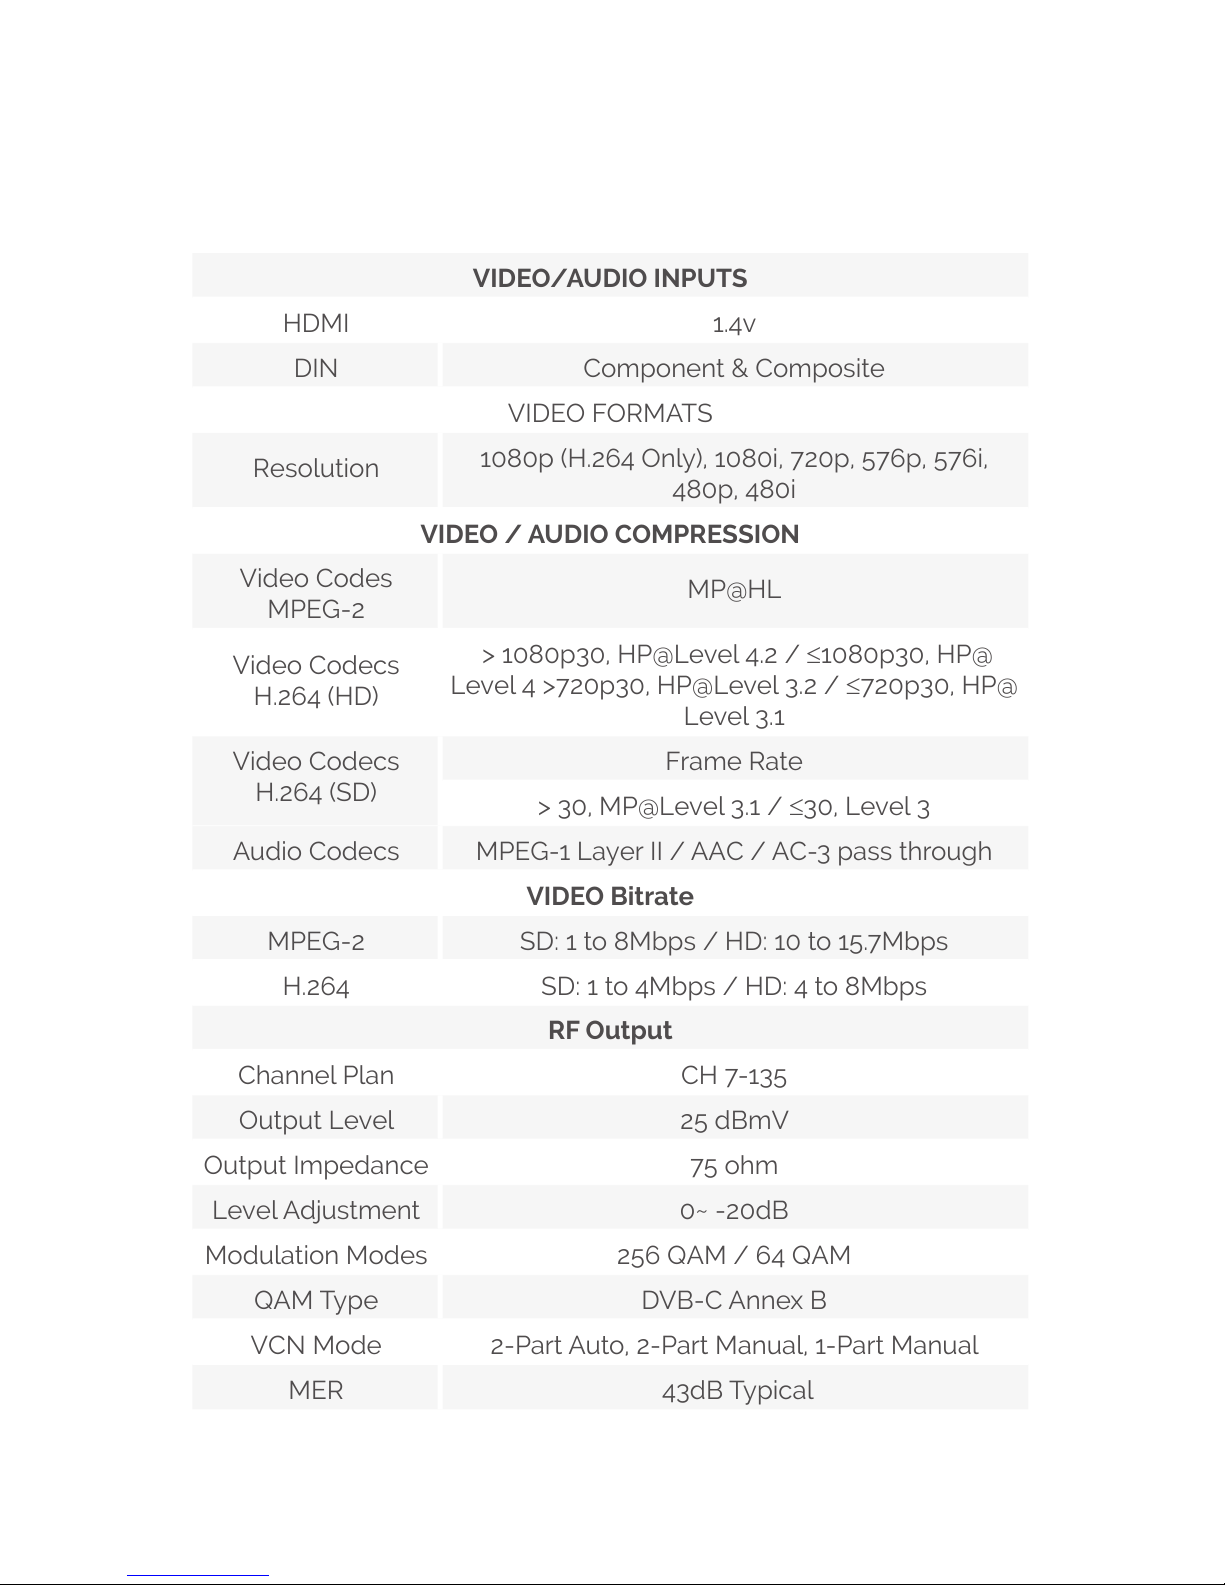
Specications
VIDEO/AUDIO INPUTS
HDMI 1.4v
DIN Component & Composite
VIDEO FORMATS
Resolution
1080p (H.264 Only), 1080i, 720p, 576p, 576i,
480p, 480i
VIDEO / AUDIO COMPRESSION
Video Codes
MPEG-2
MP@HL
Video Codecs
H.264 (HD)
> 1080p30, HP@Level 4.2 / ≤1080p30, HP@
Level 4 >720p30, HP@Level 3.2 / ≤720p30, HP@
Level 3.1
Video Codecs
H.264 (SD)
Frame Rate
> 30, MP@Level 3.1 / ≤30, Level 3
Audio Codecs MPEG-1 Layer II / AAC / AC-3 pass through
VIDEO Bitrate
MPEG-2 SD: 1 to 8Mbps / HD: 10 to 15.7Mbps
H.264 SD: 1 to 4Mbps / HD: 4 to 8Mbps
RF Output
Channel Plan CH 7-135
Output Level 25 dBmV
Output Impedance 75 ohm
Level Adjustment 0~ -20dB
Modulation Modes 256 QAM / 64 QAM
QAM Type DVB-C Annex B
VCN Mode 2-Part Auto, 2-Part Manual, 1-Part Manual
MER 43dB Typical
08
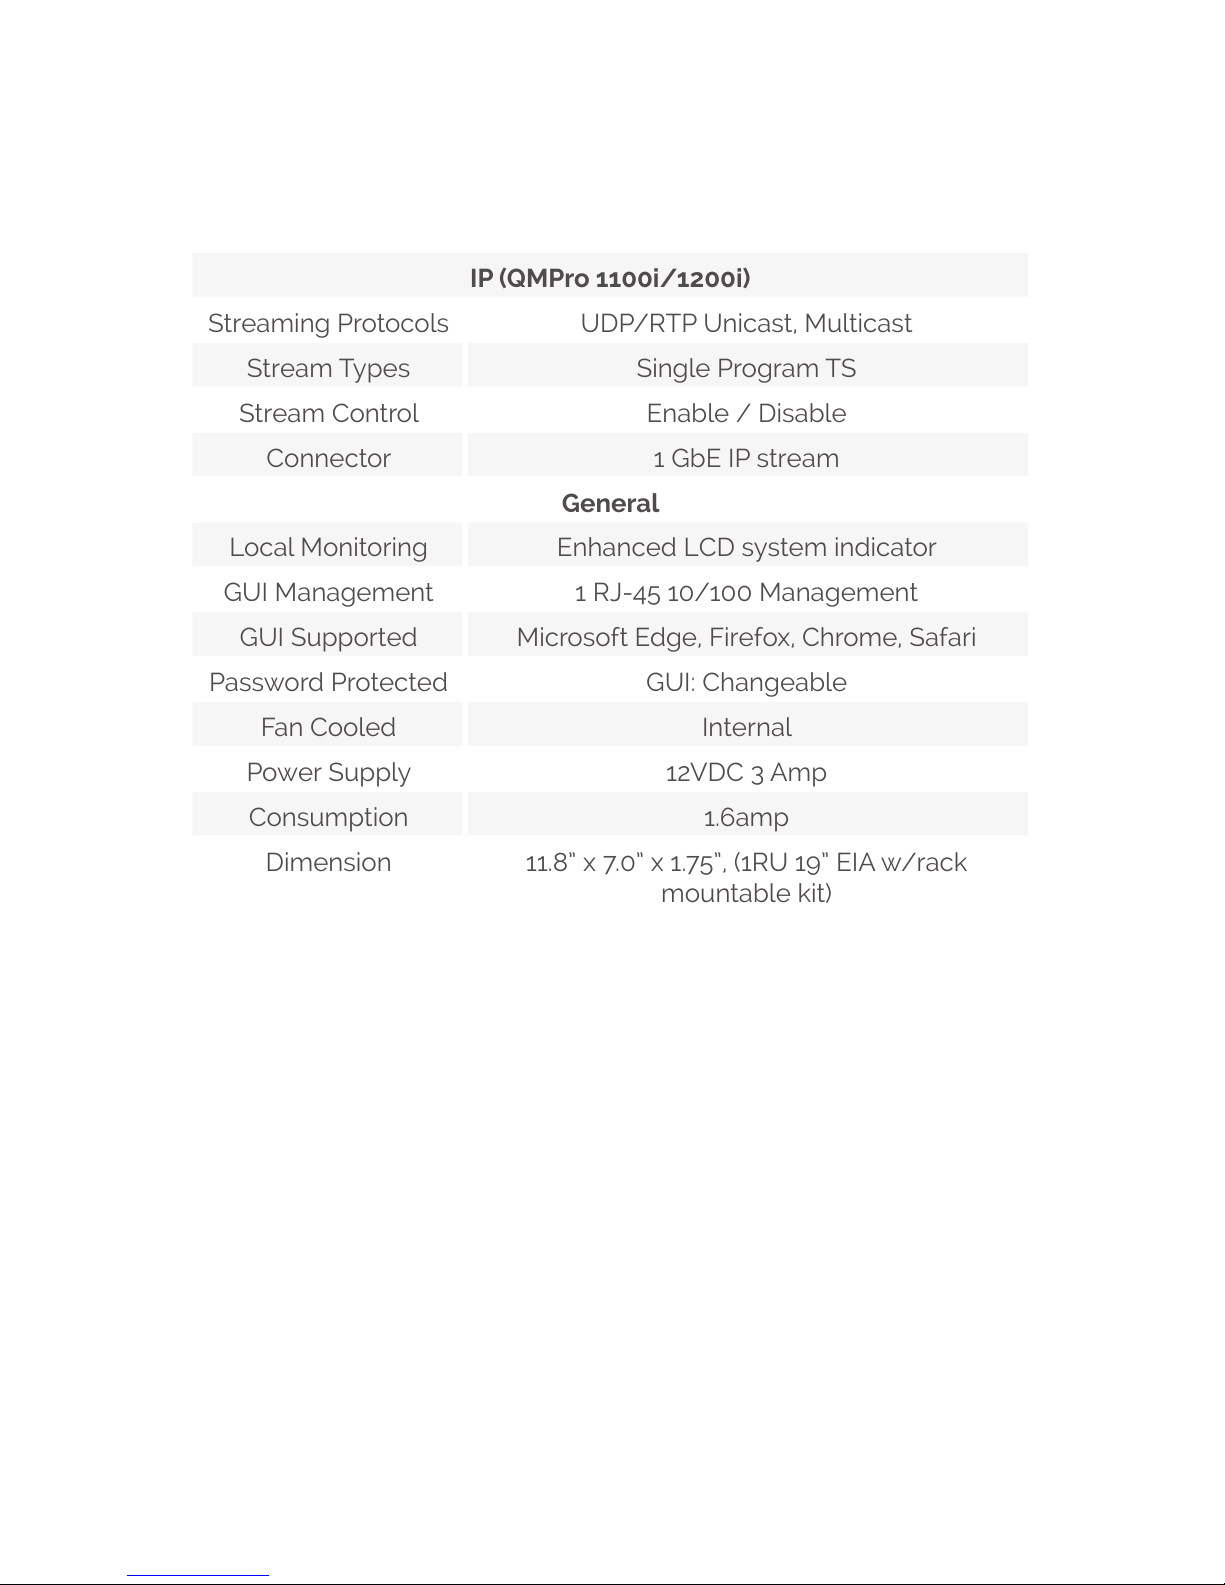
IP (QMPro 1100i/1200i)
Streaming Protocols UDP/RTP Unicast, Multicast
Stream Types Single Program TS
Stream Control Enable / Disable
Connector 1 GbE IP stream
General
Local Monitoring Enhanced LCD system indicator
GUI Management 1 RJ-45 10/100 Management
GUI Supported Microsoft Edge, Firefox, Chrome, Safari
Password Protected GUI: Changeable
Fan Cooled Internal
Power Supply 12VDC 3 Amp
Consumption 1.6amp
Dimension 11.8” x 7.0” x 1.75”, (1RU 19” EIA w/rack
mountable kit)
* Specifications subject to change without notification
09
Visual Identication Illustrations

10
Encoder Programming and Setup via GUI
Interface:
After connecting the device to the Remote Setup port located on
the rear of the device and connecting to a PC / Laptop.
Step 1: Enter Device's IP address in web browser.
(QMPro1200i shown)
Command Processing:
Please not that upon system initialization, the hardware will boot in a few
minutes and then populate system parameters. There may be a small delay in
the menu page updates that are performed after the hardware changes are
complete.
11
Step 1: Enter Device's IP address in web browser.
(QMPro1200i shown)
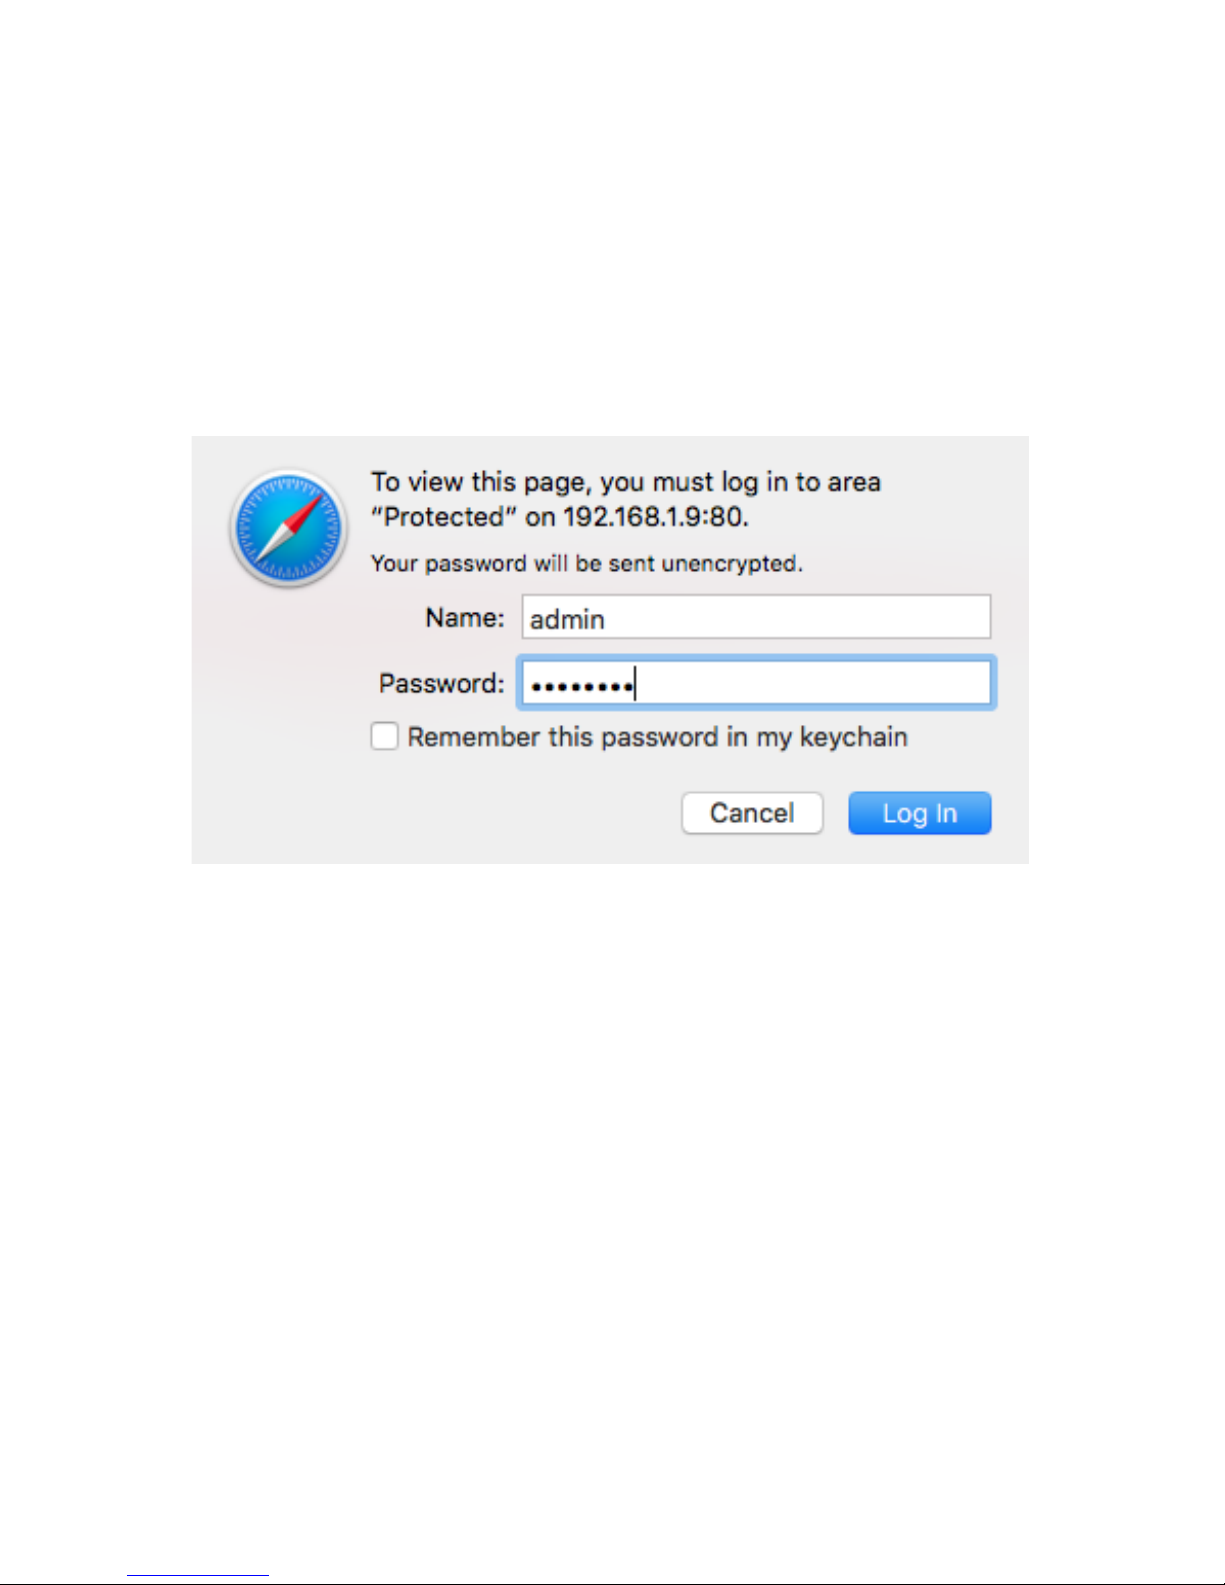
Step 2: Enter User Name/Password
Select Encoder Setup
After selecting the Encoder Setup Tab the user will be prompted to
enter the user name and password for device.
GUI Login Password:
Default User Name: admin
Default Password: Admin123
Note: To change the Password for the GUI go to the Administration
Tab.
12
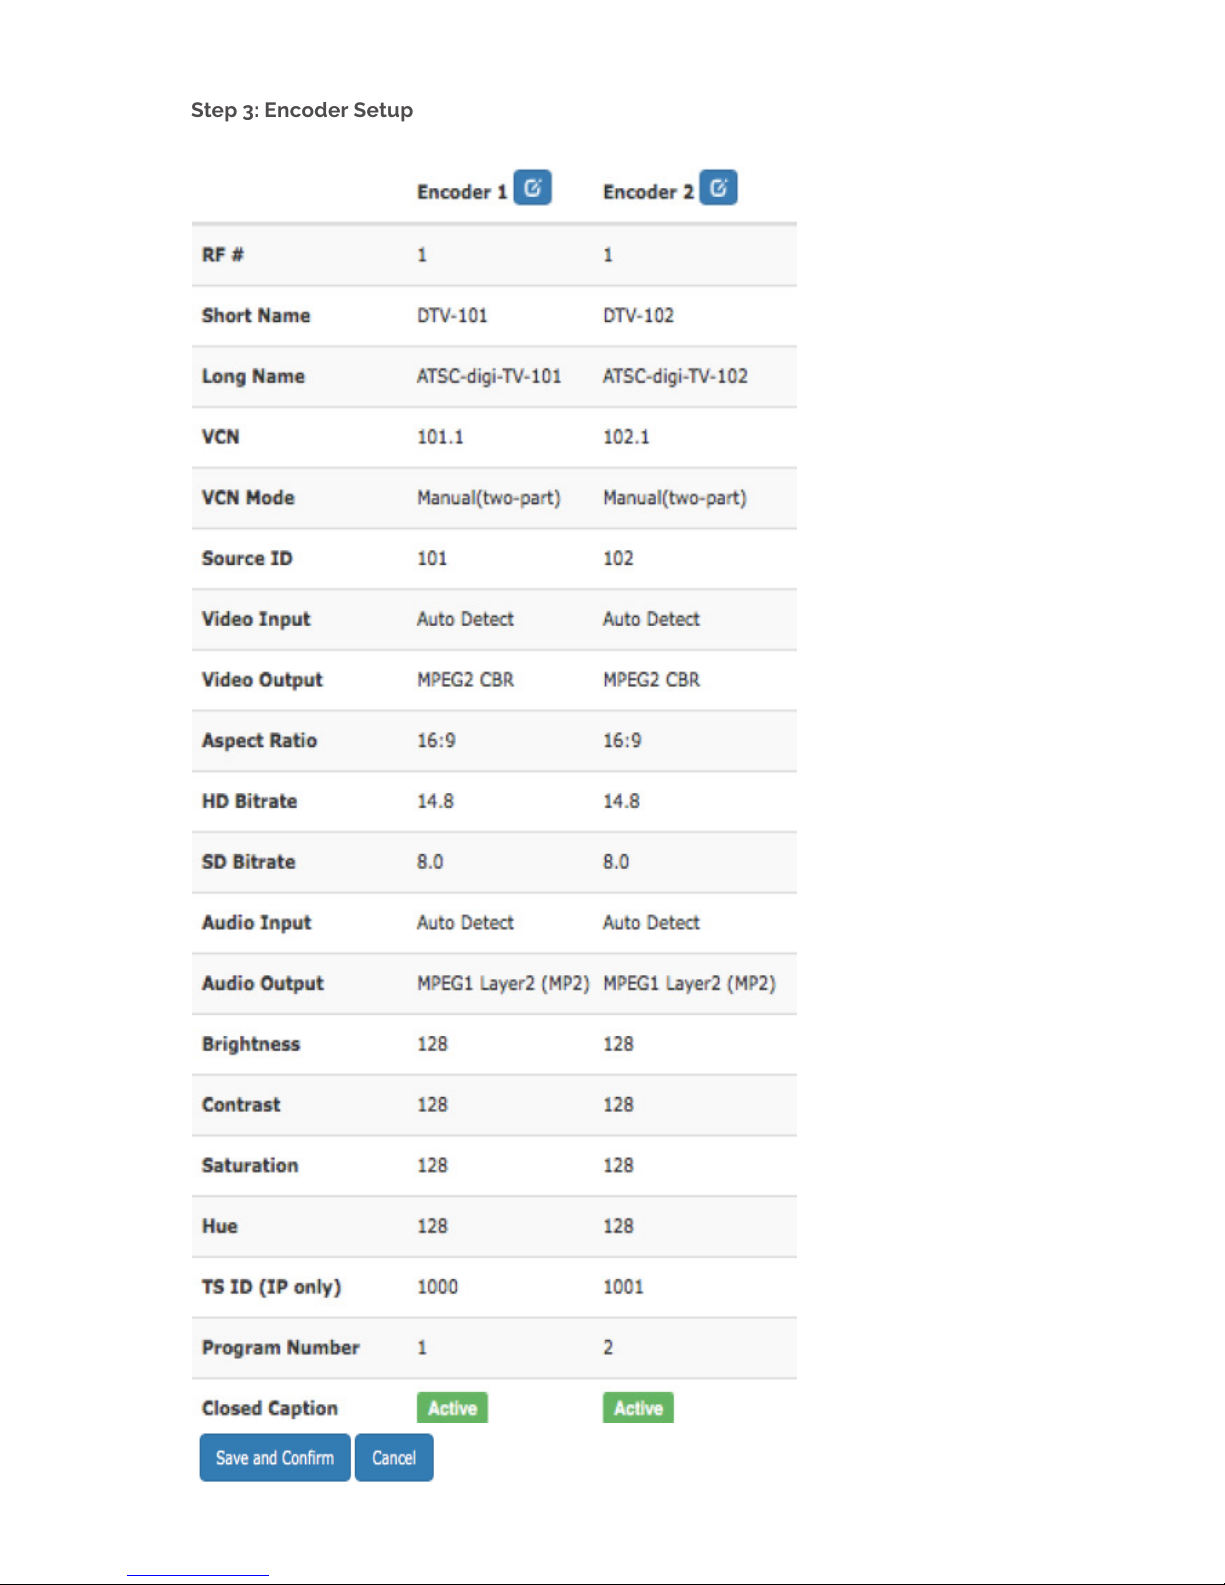
Step 3: Encoder Setup
This page allows the user to congure the parameters of each encoder. After changes are made, use
the Save and Conrm button. The modulator(s) will apply the new settings.
13
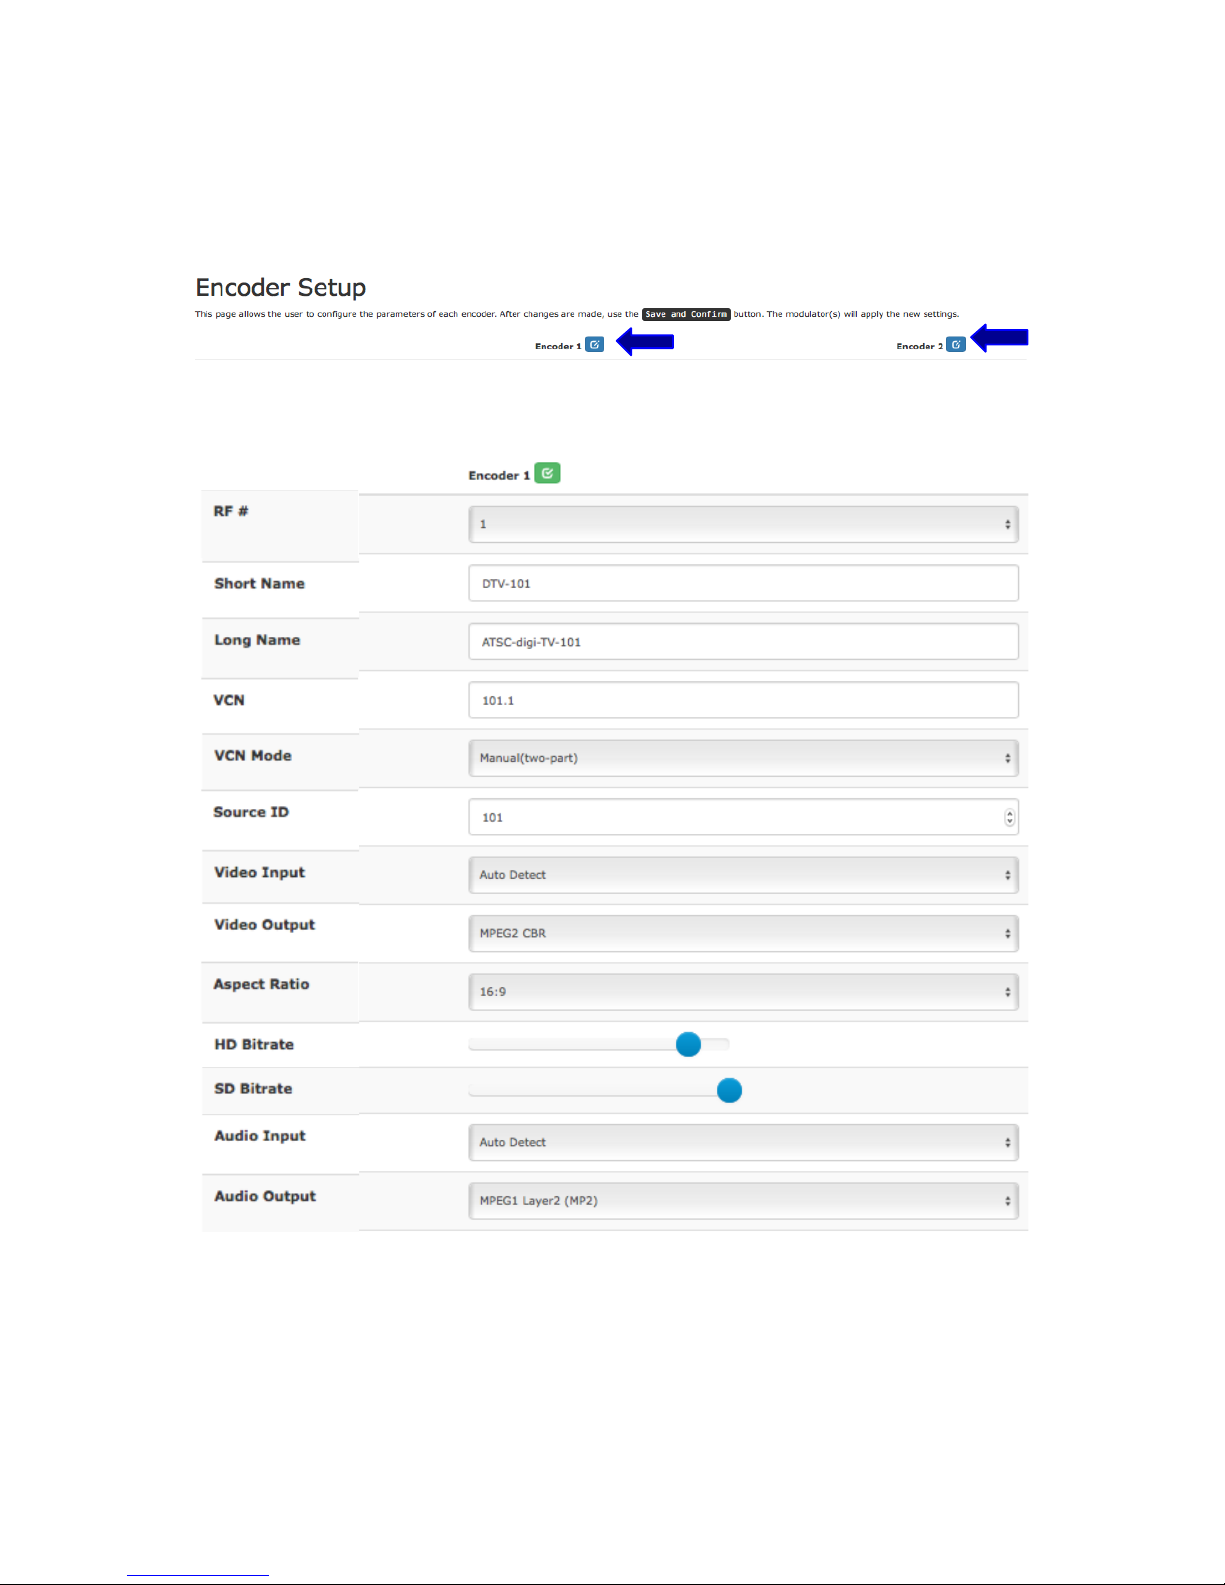
Encoder Setup page allows the integrator to select and set the
parameters needed for each stream.
1. Select the “Edit” Icons for the Encoders. (Both Encoders can be
managed at the same time)
2. Select and set the specific parameters settings as required.
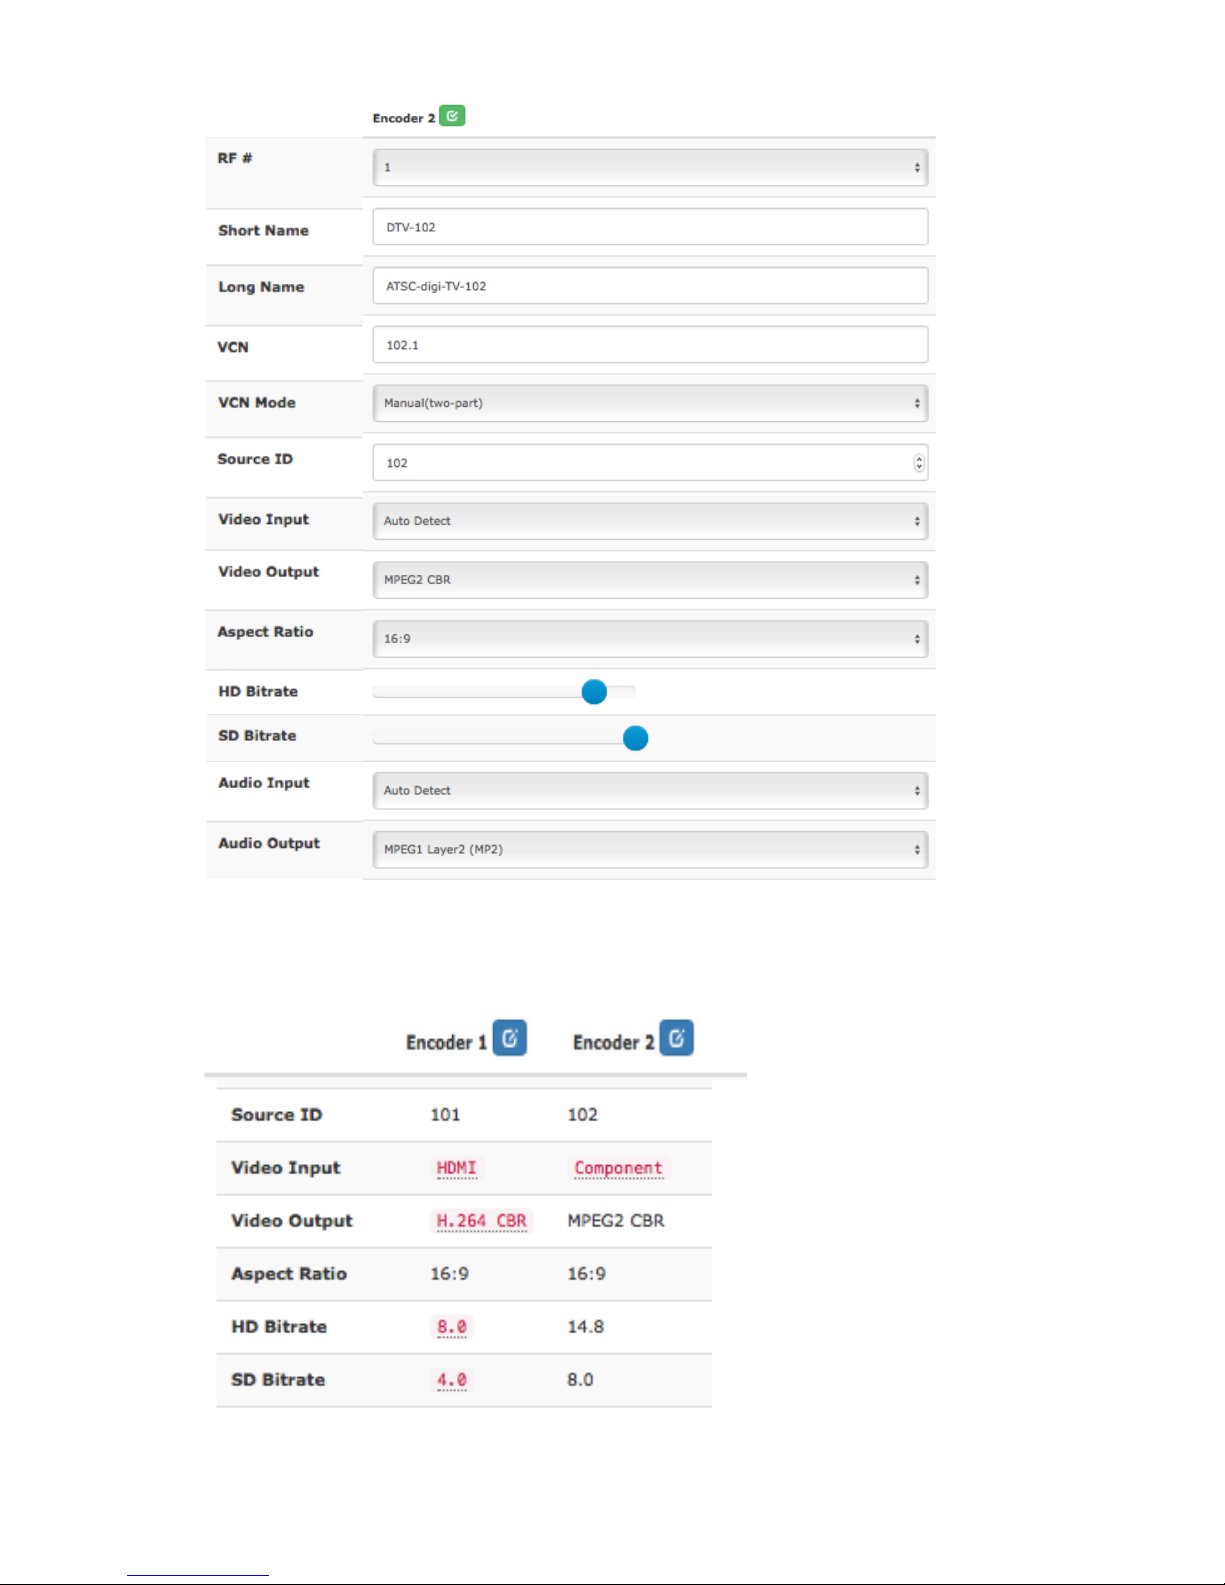
14
3. After setting all the required parameters- Select the edit icon
again. (Note: All changed parameters will be shown in red)
 Loading...