

CE Labs MP700 Instruction Manual
MP700
High Defi nition Media Player
LAUNAM NOITCURTSNI

THIS PAGE IS LEFT
INTENTIONALLY BLANK

1
Safety and Notice
1. Read these instructions.
2. Keep these instructions.
3. Heed all warnings.
4. Follow all instructions.
5. Do not use this apparatus near water.
6. Clean only with dry cloth.
7. Do not block any ventilation openings. Install in accordance with
the manufacturer’s instructions.
8. Do not install near any heat sources such as radiators, heat registers,
stoves, or other apparatus (including amplifi ers) that product heat.
9. Do not defeat the purpose of the polarized or grounding-type plug.
A polarized plug has two blades with one wider that the other. A
grounding type plug has two blades and a third grounding prong.
The wide blade or the third prong is provided for your safety. If the
provided plug does not fi t into your outlet, consult an electrician for
replacement of the obsolete outlet.
10. Protect the power cord from being walked on or pinched
particularly at plugs, convenience receptacles, and the point where
the exit from the apparatus.
11. Only use the attachments/accessories specifi ed by the manufacturer.
12. Use only with the cart, stand, tripod, bracket, or
table specifi ed by the manufacturer, or sold with
the apparatus. When a cart is used, use caution
when moving the cart/apparatus combination to
avoid injury from tip-over.
13. Unplug this apparatus during lightning storms or
when unused for long periods of time.
14. Refer all servicing to qualifi ed service personnel.
Servicing is required when the apparatus has been damaged in
any way such as power supply cord or plug is damaged, liquid has
been spilled or objects have fallen into the apparatus, the apparatus
has been exposed to rain or moisture, does not operate normally,
or has been dropped.
TO REDUCE THE RISK OF FIRE OR ELECTRIC SHOCK, DO NOT
EXPOSE THIS DEVICE TO RAIN OR MOISTURE. DO NOT OPEN
THE UNIT. REFER SERVICING TO QUALIFIED PERSONNEL ONLY.

2
Table of Contents
INTRODUCTION..................................................…......3
FEATURES...........................................................………4
SPECIFICATIONS........................…………………………..5
SUPPORTED RESOLUTIONS………………………………….6
PACKAGE CONTENTS & QUICK FACTS…………………...7
INSTALLATION..............................................................8
Detailed Player View...………………………………8
Remote Control…………....................................9
Connections……………………...........................10
Mounting……………..………………………………12
CONTROL SOFTWARE……...........................................13
Hardware…………………………………………….13
Software……………………………………………...13
OPERATION………..………………………........................24
EXTENDED APPLICATIONS (XAPP)..................................28
TROUBLESHOOTING………………..……………………….33
APPENDIX…................................................................35
WARRANTY……………………………………………………45

3
INTRODUCTION
The MP700 is a high quality advertising solution that allows users to play
content from multiple sources such as a solid state memory device, hard
drive, or IP streams from Ethernet or ATSC tuner (MP700T model). It has an
extremely effective performance versus cost ratio and provides a great return
on investment.
The MP700 is a commercial grade, application specific graphics processor,
specifically designed for driving digital signage. Do not let the small size fool
you; the powerful internal video processor rivals the performance of a PC
costing many times more. The graphics capability is on par with a BluRay
player but with much greater reliability because there are no moving parts.
The MP700 HD Media Player is a fully customizable platform designed by
CE Labs with a latest “System on Chip” technology specifically to meet high
requirements in commercial digital media market.
This HD Media Player provides an affordable and flexible method for High
Definition MPEG2/4, H.264, and WMV9 streaming media delivery without
using a PC. It supports both real time streaming from a centralized network
media source and localized playback from the unit’s flash drive, an attached
USB drive, or SD card.
This HD Media Player comes with full-featured integrated playlist providing
advanced scheduling of media and display control without interaction from
an external source.
With its dual screen capability through HDMI for HD video contents and VGA
for graphics contents, you can easily design a custom interactive Kiosk with
just one player.
Quicksign Pro 700 content management application provides a convenient
method for control, status, and media distribution to the HD Media Players
over a local LAN.
For WAN platform, please inquire about our hosted CCM Enterprise content
management server.
Applications:
• Digital Signage • Hospitality
• Education and Campus Environments • IPTV STB
• Corporate Communications • PC Media Extender

• Media engine is a Sigma Designs SMP8670 series
• Highly Reliable 100% Solid State HD Embedded Media Player
with Fanless Commercial Grade Metal Chassis Design
• High Denition MPEG2/4, H.264, WMV9 real time decoding
over Ethernet or from internal storage up to 40Mbps
• UDP/RTP/RTSP Multicast or TCP/IP connectivity (push or pull)
• Integrated Full-featured Browser with HTML, JavaScript
• Layered screen capable: Simultaneous HD Video & Browser Layers
• Dual screen capable: HDMI (HD video) & VGA (Graphics)
• IR remote & Button control for Setup and Playing content
• Full-featured playlist
– Media files
– Schedule
– RS232 control
– Multiple playlist support
• Multiple control methods
– IR remote & push-button controlled OSD
– RS232 control
– HDMI CEC 1.3a
– Fully supported SNMP API for 3rd party Software Integration
– Quicksign Pro Software
• Integrated event logging
• Remote conguration and in-circuit Firmware update capability
• Watch Dog Timer for self-recovery
• Congurable auto-start content for continuous play
• RS232 port for external device control
• Customizable XApp for custom control / play features
• Digital Optical Audio Output
• Customizable GPIO control for external input/output
• Congurable content verication
• USB 2.0 Host x 2
• SD card 2.0 slot
• Optional SATA Hard drive
• Optional ATSC / Open QAM tuner
• Optional 802.11b/g/n USB-based wireless
• Optional Touchscreen
Features
4
Specifi cations
5
MP700G- Includes internal GPIO board with 8 pushbutton interfaces
MP700R – Base model for streaming applications
MP700T – Includes ATSC / QAM RF tuner module
(Contact sales @ 1-800-767-6189 for other models)
Video Output:
Status Display:
Audio Output:
Control I/O:
Network
Connection:
Video Format
Support:
Graphics
Format:
Audio Format:
Network Protocol:
File System Support:
Web-browser
Specifi cations:
System Stability:
Certifi cations:
Power:
Environment:
General:
• Component: Up to 1080p • VGA: Up to 1600x1200
• Composite: 480i • HDMI: Up to 1080p
14 digital LED, IP Address, System status
• L/R Stereo: RCA x 2 • Digital: Optical/Toslink
• GPIO (General Purpose I/O): 8x4 pin connectors
8 inputs x 8 outputs
• RS-232: 9 pin male D-sub (DTE)
• USB2.0: Host x 2
• IR Sensor: Remote Control Receiver
• IR Pickup: 3.5mm jack (for external IR RX)
• IR Output (Blaster): 3.5mm jack
LAN: 10/100/10 00 BASE-T
WiFi: 802.11 b/g/n (USB optional)
• MPEG2: MP@HL
• MPEG4.2: ASP@L5
• MPEG4.10(H.264): MP@L4.0
• WMV9: MP@HL
• VC-1: AP@L3
JPEG: Baseline, Progressive, GIF, PNG
Recommended resolution 1920x1080
• MPEG1: Layers I, II and III (MP3) 2.0 • WMA9: 2.0
• MPEG4: AAC-LC 5.1/ HE-AAC 5.1 • FLAC
• Dolby Digital: 5.1 • MP3: Optional
IP•TCP•UDP•ICMP•ARP•DHCP•HTTP
FTP•IGMP•RTP•RTSP•SNMP•NTP•DNS
• USB/SD card • FAT, FAT32, NTFS
• HTML: v4.0 (Partial v5.0)
• Javascript: ECMA262 ed3, Firefox 1.7, InternetExplorer 5.7
• CSS: v2.1 (Partial v3.0)
Non-volatile storage for FW & Confi g, Watch Dog Timer, RTC
UL / CE / FCC Section 15
• Input voltage: 12VDC
• Power dissipation: 7 watts (max)
• AC/DC Adapter: 100/240VAC 50/60Hz
Optional screw on connector
• Operating Temp: 0 – 40
o
C
• Operating Humidity: 80% max, relative humidity, non-cond
• Dimensions: 1” H x 8” W x 4” D
• Unit Weight: 2 lbs
The MP700 is capable of many output resolutions. There may be changed
by SNMP network command, via QuickSign Pro v700, or by pressing the TV
Mode button on the IR remote. Pressing the TV Mode button on the remote
repeatedly will cycle through several different Video Resolutions.
Modes: 1080i59, 1080i60, 1080p59, 1080p60, 480i, 720p60, 720p50
Supported Resolutions
6
0
1
2
3
4
5
6
7
8
9
10
11
12
13
14
15
16
17
18
19
20
21
22
23
24
25
26
27
36
37
38
39
40
41
42
43
44
45
46
47
48
49
50
51
52
53
54
55
56
57
58
59
60
61
62
63
RESOLUTION
RESOLUTION
VESA_1600x1200x60
VESA_1360x768x60
VESA _1280x1024x60
VESA_1280x768x60
VESA_1024x768x60
VESA_800x600x60
RGB_1080i50
HDMI_1080i50
HDMI_1080p60
HDMI_1080i60
HDMI_720p60
HDMI_40p60
HDMI_480i60
HDMI_720p50
HDMI _ 576p50
HDMI_640x480p59
HDMI_640x480p60
HDMI_480p59
HDMI_720p59
HDMI_1080i59
HDMI_480i59
HDMI_720x240p59
HDMI_720x240p60
HDMI_2880x480i59
HDMI_2880x480i60
HDMI_2880x240p59
HDMI_2880x240p60
HDM I _1440x480p59
HDMI_1080p24
HDMI_1080p25
HDMI_1080p29
HDMI_1080p30
HDMI_2880x480p59
HDMI_2880x480p60
HDMI _ 2880x576 p 5 0
HDMI_1080i50_1250
HDMI_1080i100
HDMI_720p10 0
HDMI _ 576p10 0
HDMI _ 576i10 0
H D M I _108 0 i119
HDMI_1080i120
H D M I _ 7 2 0 p119
HDMI_720p120
H D M I _ 4 8 0 p119
HDMI_480p120
H D M I _ 4 8 0 i119
HDMI_480i120
HDMI _ 576p20 0
HDMI_576i200
HDMI_480p239
HDMI_480p200
TVSTD_1080i60
HDMI_480i240
TVSTD_480p
TVSTD_480p59

7
Package Contents
• 1x MP700 Media Player
• 1x 12 Volt DC Universal Input Power Supply
• 1x Remote Control
• 2x AAA batteries
• 1x HDMITM cable
• 1x Quick Start Guide
• (optional) DB-15 to RCA Component Video Cable
• (optional) L/R Stereo Audio Cable
MP700 Quick Facts
Use the remote control to locally start and stop the player.
• Press the STOP button to stop the currently playing le.
• Press the “MENU” button on the remote and then “FILE BROWSER” on the
OSD to browse the files on the internal memory card.
• Look under VIDEO to see video les. Highlight a le name and press
“Enter” to preview or press “Play” to start the file in full screen mode.
Pressing ENTER will start the video in the upper right hand preview
window. The file will play one time. In order to loop a file, it must be
in a playlist.
• Look under HTML to launch the locally stored HTML les such as Menu
boards and other signage layer content.
• Under SETUP, the network settings can be congured. This is where you
find the unit’s IP address. You may also view network settings and firmware
information on the INFORMATION page.
• The me dia p l a yer is compatible with WMV, MPEG2, and H.26 4. Quicktime
and Flash files are not compatible.
• To change the unit video output resolution, press the TV MODE button on
the remote control. Each time the button is pressed, it will advance to
another resolution (480i, 720p50, 720p60, 1080i, 1080p, etc.).
8
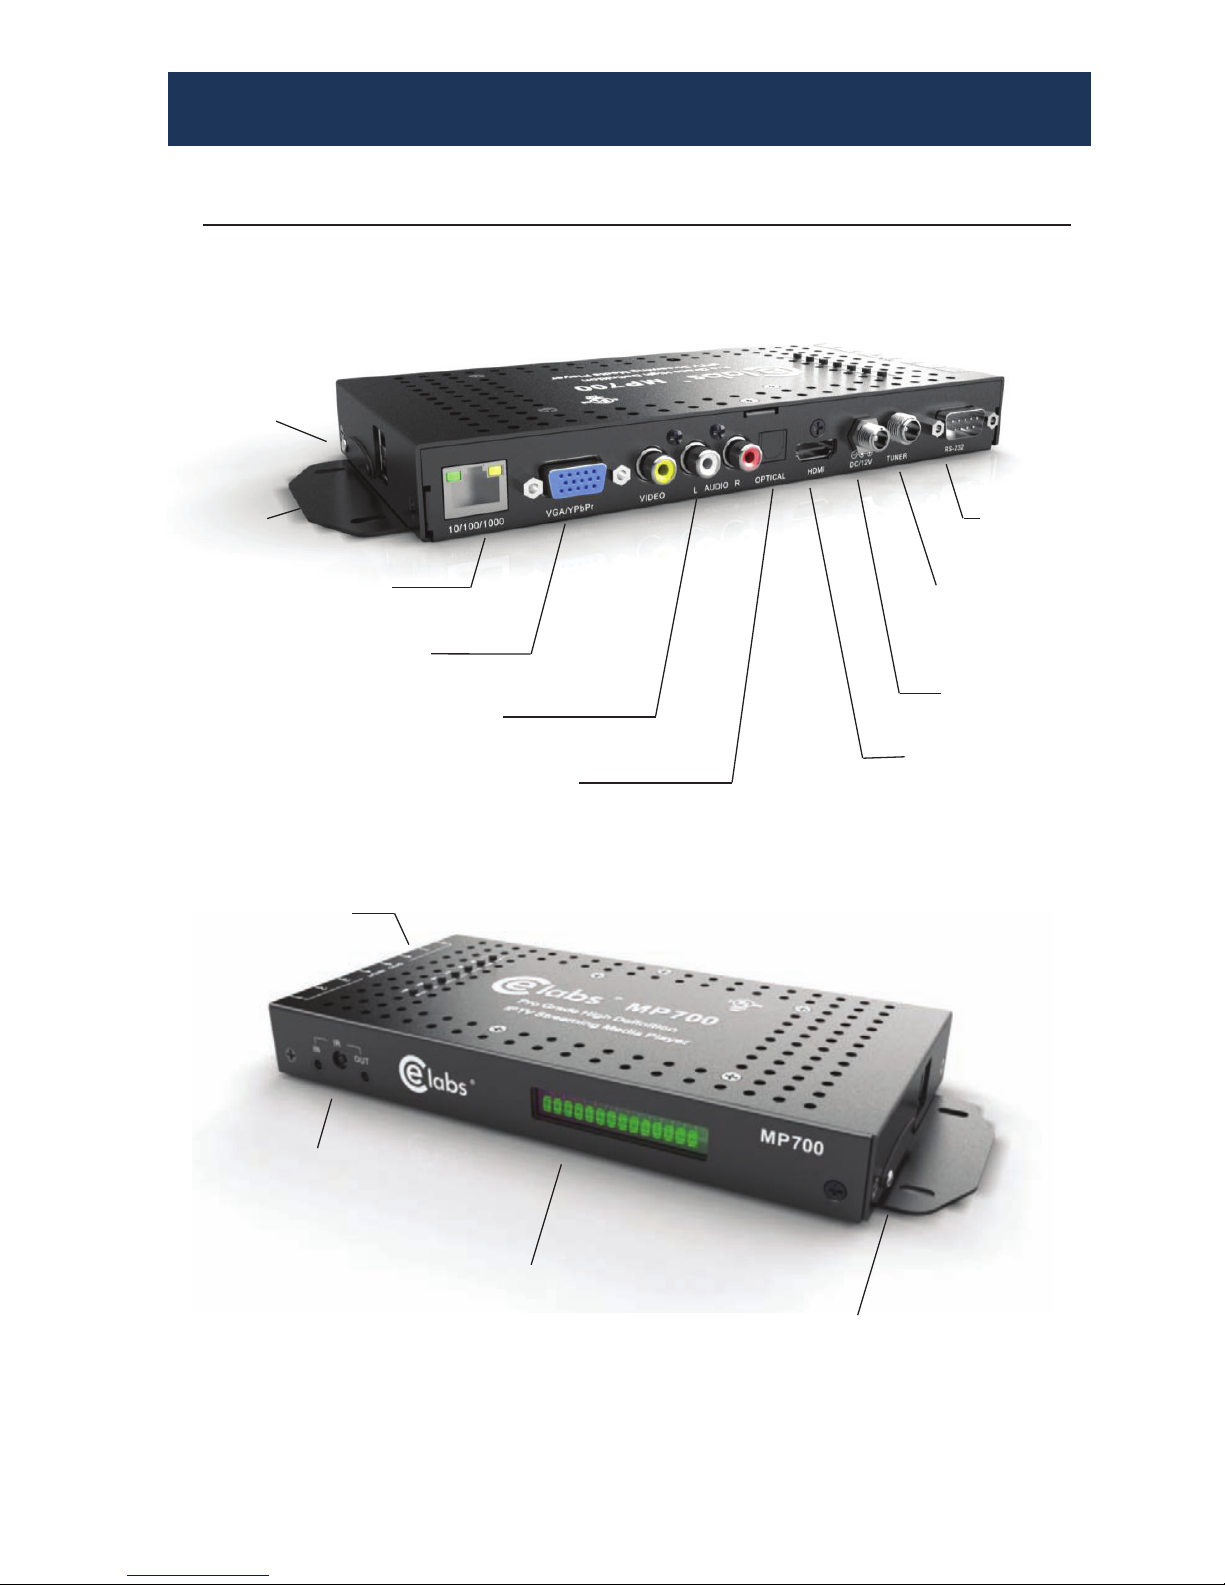
INSTALLATION
Detailed Player View
ETHERNET
10/100/1000
VGA/COMPONENT
VIDEO OUTPUT
COMPOSITE VIDEO
R/L AUDIO OUT
HDMI OUTPUT
12V DC INPUT
750mA
RS-232
CONTROL
IR IN
LCD STATUS PANEL
2 USB IN
SD SOCKET
RF INPUT
(MP700T only)
DIGITAL AUDIO OUT
SD MEMORY SOCKET
WITH SECURITY DOOR
8 PORT
PUSH BUTTON
INTERFACE
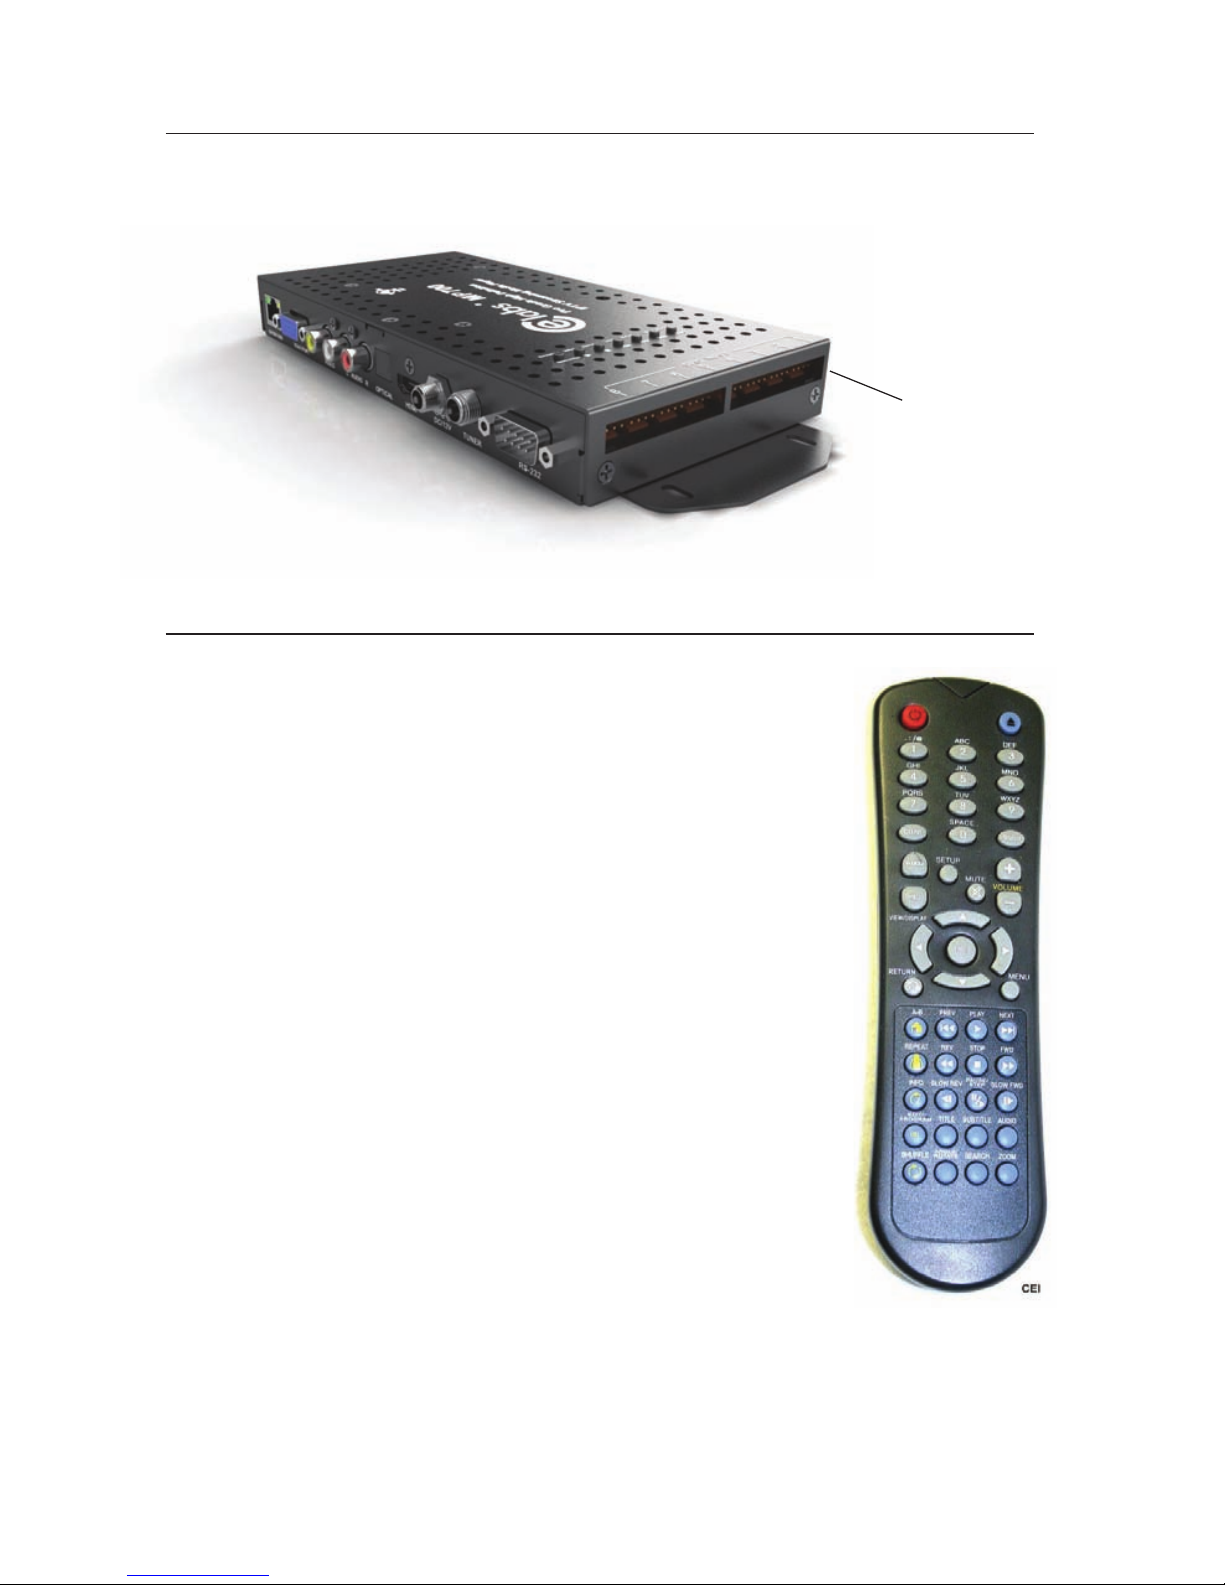
The unit includes a remote control for accessing the On
Screen Display. Press the MENU button to bring up the
OSD menu. Use the Arrow keys to navigate and press
ENTER to select an item. If you wish to exit the On
Screen Display, press MENU repeatedly until the OSD
is removed.
If you require a different Video output resolution, the TV
MODE button when pressed will toggle through several
options (Composite Only, 720p 60, 720p 50, 1080i
59.94, 1080i 60, 1080p 59.94, and 1080p 60.
In the blue button section you may use: PLAY, STOP,
FWD, REV, PREV, and NEXT. Pressing PLAY will
alternate between PLAY and PAUSE.
The numerical buttons may be used to enter a RF
channel on the MP700T unit. the format is: '041' to
tune in channel 4-1. To tne upper channels, use '331'
to select channel 33-1. These channel selections are
temporary and will not be kept on a power cycle. In
order to keep a RF channel, it must be programmed into
a playlist.
Note: Before the tuner may be used, it may be necessary to perform
a RF channel scan to populate the local channel table. An alternative
is to use the fi xed channel table. This can be set on the unit OSD
under Menu, Player Setup, Confi guration, Tuner Settings, and then
Tuner Channel Mode.
Remote Control
9
Detailed Player View
The MP700 may be ordered with or without the GPIO push button board. See
the GPIO section in this document for a description of the connector pinout.
8 PORT
PUSH BUTTON
INTERFACE

10
The MP700 is capable of driving a wide variety of displays at up to 1080P
resolution at bit rates up to 40 Mbps (mpeg2 file type). Depending upon your
application, connect the following cables to operate the unit.
• Display cable – Depending on the application, plug in the cable
from the media player to the display, switch, or first distribution
amplifier. The HDMI and Component outputs are both active
simultaneously if the resolution is set to one that is compatible
with both interfaces.
• The component video output (for connection to CElabs AV901HD distribution
amplifier) uses a DB-15 to RCA cable to break out the video signal. The L/R
audio ports can be used in conjunction with the component or the composite
video ports.
• IF the TV wall uses CE labs HDMI distribution ampliers, connect the
HDMI cable.
• If your application uses an older monitor or if you need to drive a modulator,
the composite video port is always on regardless of the output resolution.
• The DB-15 VGA/YPrPb port supports the output of component and VGA
video. Only one or the other is available at one time. In order to set the
output resolution to a VGA mode, use Quick Sign Pro 700 and select TOOLS,
Set Video Output, and Custom.
Note: Video output resolution has been pre-set at the factory for 1080p (in most applications)
on the HDMI and Component Video Outputs (unless another resolution is requested).
Standard 480i video is available on the composite video port at all times. The output
and resolution can be specified at time of order and pre-set to your requirements.
• Audio cable – The analog audio output is via two RCA jacks on the rear
panel. Connect a patch cable from the rear jacks to the display
or audio system as desired.
Note: If HDMI cables being used, separate audio cables are not required as long as the
monitor has internal speakers.
• Toslink – Digital Multi-channel audio is available on the optical
connector. You may select between PCM or AC3 on the OSD
by selecting Menu, Player Setup, and Audio Settings. Save your
selection before exiting.
• GPIO – These ports are generally used to interface with pushbuttons that
can be used to trigger certain videos. Refer to the GPIO section
later in this manual for a full description of the eight GPIO ports.
• RS-232 – The media player may be controlled via the serial port. Call
Customer Support for the RS-232 control X-app and the proper
command protocol.
Connections

11
• Tuner Input (ATSC Tuner Option on the MP700T) – Connect the
F-connector cable from the off-air antenna or High Definition
modulator to the Tuner Input. Tighten the F-connector securely.
Ensure the RF level at the input is greater than -20dBmV
(unit mutes @ -25dBmV). The ATSC channel may be changed by
remote PC application or by IR remote control. Press the up or
down arrow keys to increase or decrease the channels one at
a time. You may also type in the channel number directly on the
remote. Typing a 0 first is necessary on single digit channels.
Example: To tune to channel 4-1, type 0 then 4 then 1 and press the Enter key.
• Power – The MP700 uses a 12VDC, 2A power supply. Total power
consumption is approximately 7 Watts which leaves a large
reserve in the power supply. Insert the power supply 12 VDC plug
into the MP700 power jack. Turn the knurled ring clockwise to
tighten the security ring if this option is purchased. Insert the AC
Plug of the power supply into an electrical outlet. After a few
seconds, the front panel green LCD will light up (The panel will
display the unit’s IP address for a brief period during boot up).
• Ethernet – If this is a networked installation, connect the Ethernet Port to
a Switch or Router via an Ethernet cable. The unit will automatically
obtain an IP address as long as unit’s DHCP is selected as ON
and there is a DHCP server somewhere on the local subnet.
Please wait for approximately 1 1/2 minutes until the unit completes the boot-up process. The
media player can be configured to have a default start-up item such as a video file or ATSC
RF channel (ATSC option). If the default startup item has been configured, Video should start
playing automatically when the unit has completed its boot-up process.
• IR Remote – The IR remote is used to access the unit’s On Screen Display
menu for configuring the unit and perform basic unit controls
such as setting volume and selecting RF channels. If you need to
determine the IP address for the unit, go to the network settings
window. In certain applications, with channel setting pre-set at
the factory, the infrared remote is not needed. There are
applications for the MP700 that use of the remote could be helpful.
Please store the remote in a safe location for possible later use.
• IR IN Jack – A remote IR receiver may be plugged into the front panel
IR jack. This allows use of the Remote Control even when the unit
may be installed in an enclosure or behind a TV where IR access
is difficult. The connections are: Tip=Signal, Ring=GND, and
Sleeve=+5V. Inserting a plug into this jack will defeat the onboard
IR receiver.
• IR Eye – There is an internal IR receiver just to the right of the IR input jack.
Point the IR remote at this target when accessing the OSD menu.
• IR OUT Jack – This is a future option that will allow customers to control
certain products by issuing IR commands from the MP700. The
connections are Tip=+5V, Ring=Signal, Sleeve=Signal.
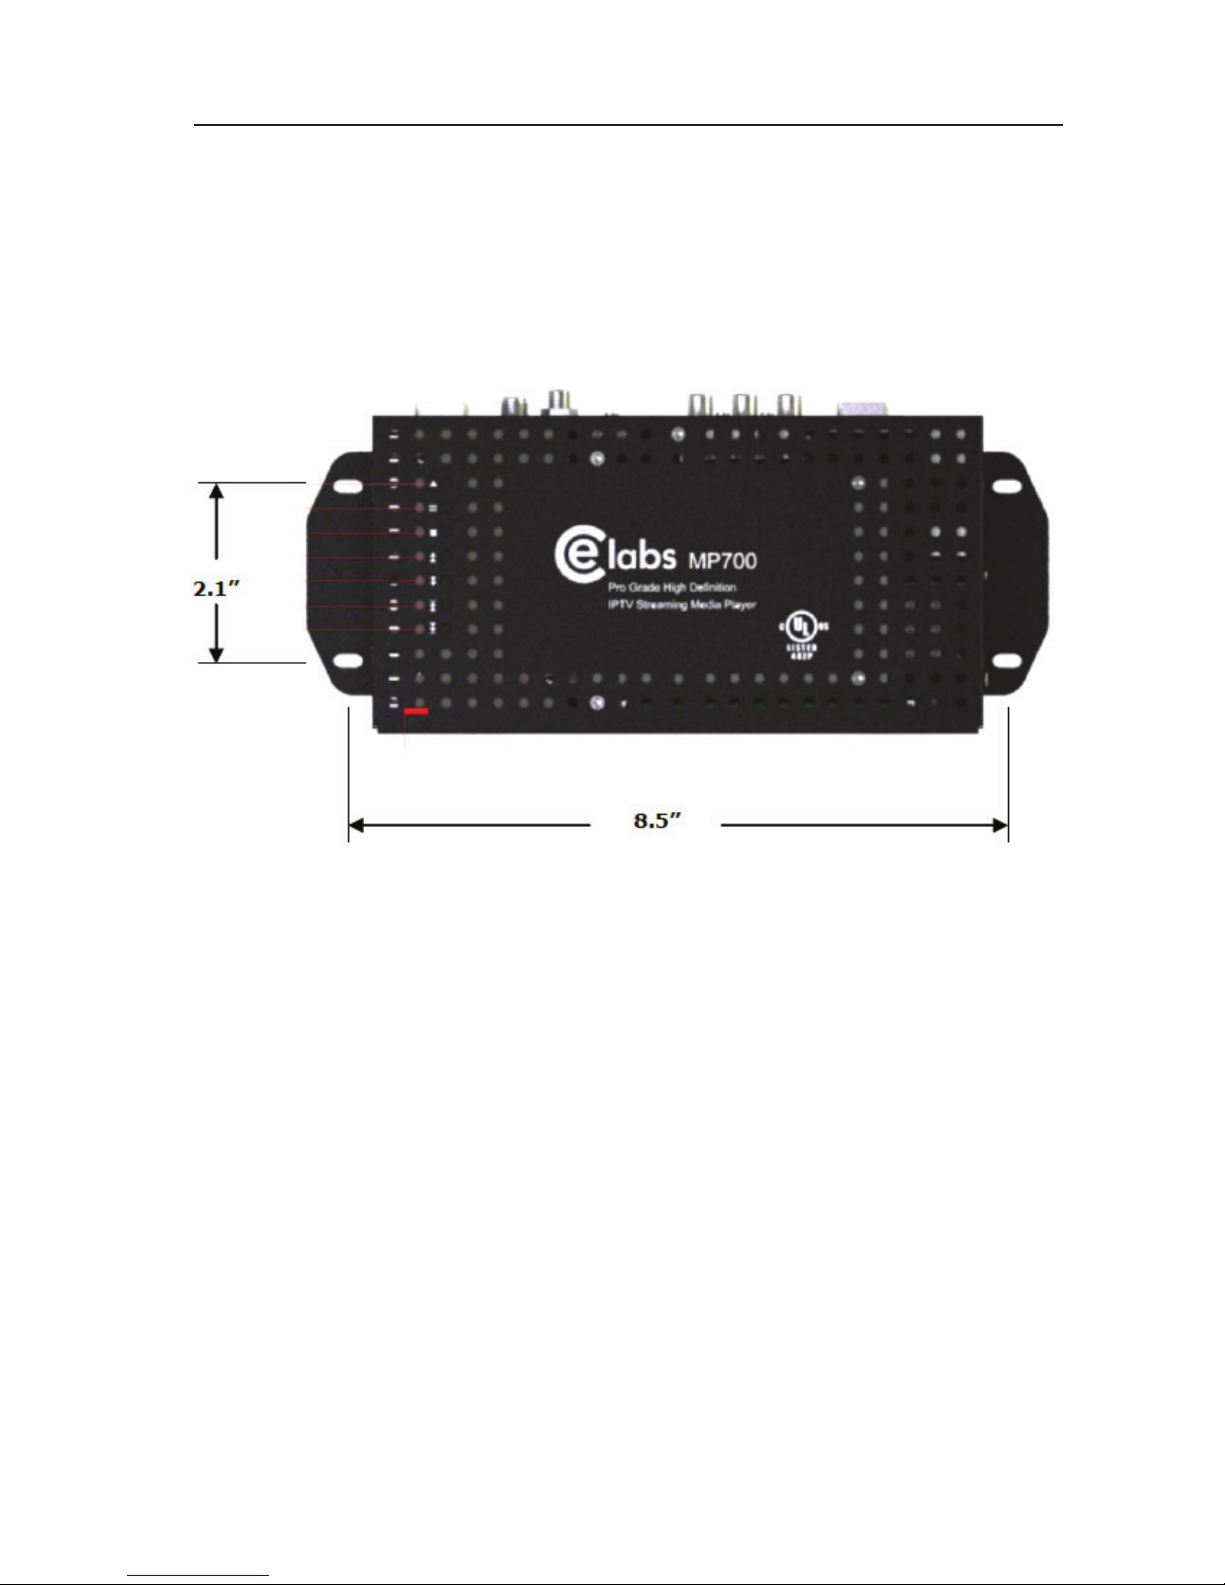
12
The media player should be located in a well ventilated air conditioned space
for best operation. The overall dimensions of the units are 4.3” x 9.6” x 1.1”.
The mounting dimensions given below are measured from center to center of
the mounting holes. The mounting holes will accommodate a #6 screw.
Mounting
The unit has ventilation holes all along the top. Theses should remain
uncovered during operation. There are no ventilation openings on the bottom
of the chassis, so it may be bolted directly to a shelf or monitor.
13
CONTROL SOFTWARE
Hardware & Software Requirements
Hardware
– Platform: Pentium4 2.0GHz Class Processor or better
– Operating System: Windows XP Pro/Vista Premium, Windows 7 or 8
– RAM: 512 Mbyte or more
– Ports: Ethernet 10/100
– Communications: Players use ports 80 and 161 for HTTP and SNMP
Software
CE labs
®
QuickSign Pro v.700
The MP700 can be remotely controlled from within a LAN (restricted to local
sub-net) via the CE labs QuickSign Pro700® software. This application allows
you to scan your network to discover installed players or you can manually
add them. Once the player is input, the software may be used to check status,
set video resolution, add or delete content, create playlists, etc.
The Quick Sign Pro software is available at no cost with the media player. It
may be downloaded from http://www.celabs.net/software/qp700_rel . The
help tab in Quick Sign Pro will show you how to use the software to get
started controlling your players. Please see Appendix for Installation details.
Please refer to the Help tab in Quick Sign Pro for a complete
reference of available command options.

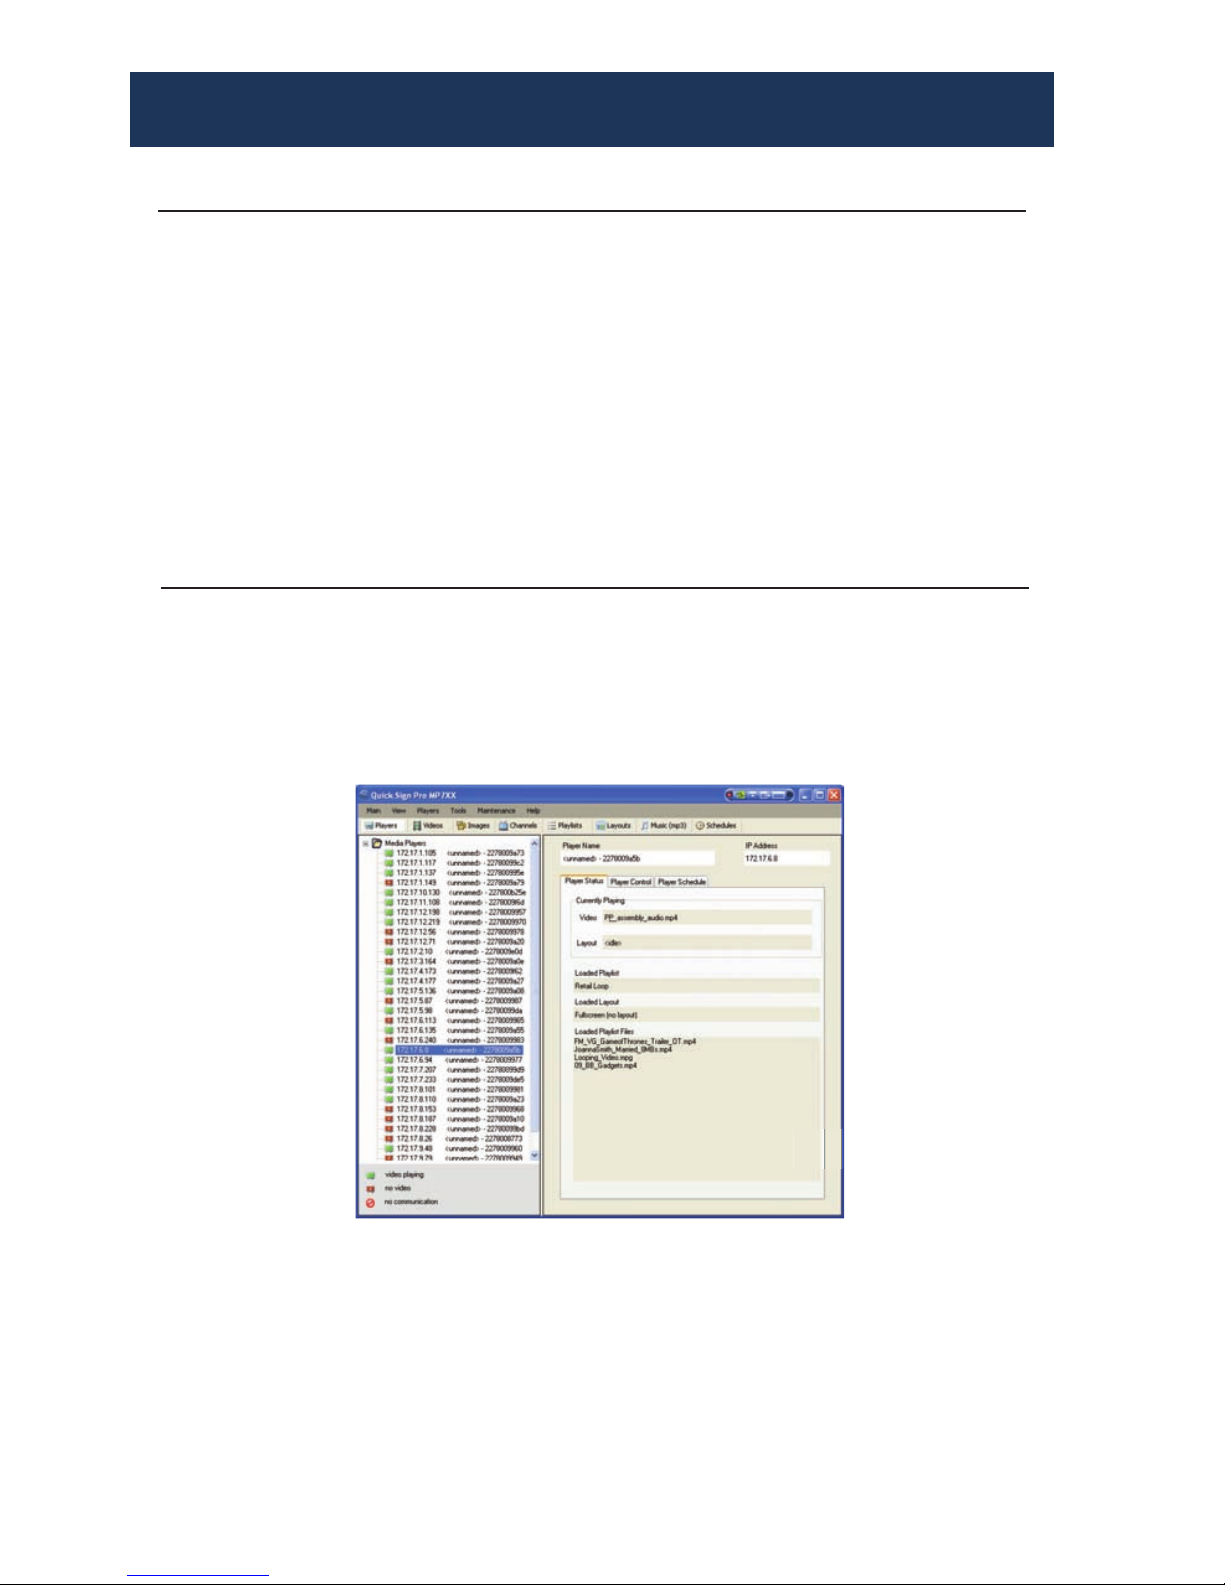
14
Software (continued)
The fi rst screen you see on QuickSign Pro is
Player Search
. Click OK to add
the discovered players to the Media Player database.
The main screen with
Player Status
selected will show you what is loaded
and playing on the selected media player.
 Loading...