

Page 1
www.cel-robox.com
Version 1.0
Quick Start Guide
including AutoMaker
™
Page 2
22
www.cel-robox.com
Welcome
Package Contents
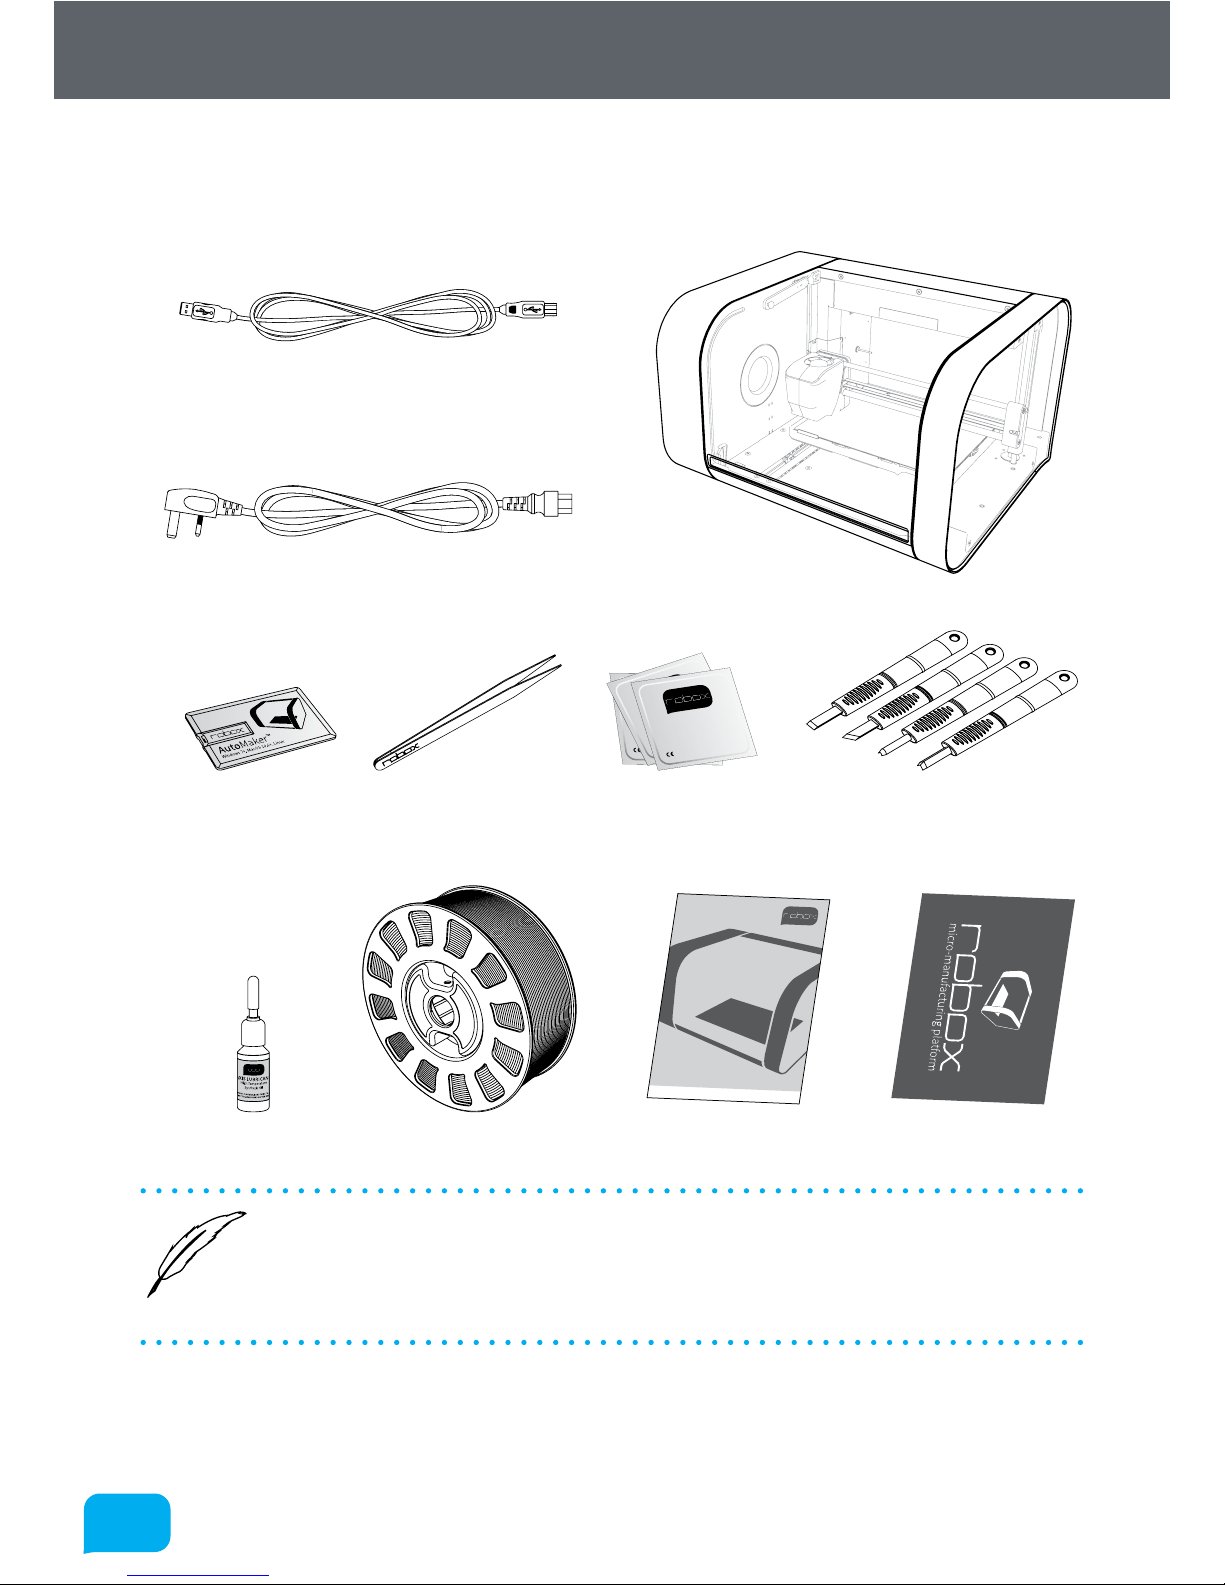
Check your product package for the following items.
• If any of the above items are damaged or missing, contact your retailer.
• The illustrated items above are for reference only. Actual product
specifications may vary with dierent models.
Set of 4 Cleanup ToolsUSB Flash Drive Tweezers 10x Bed Wipes
Axis Lubricant
SmartReel™
2m USB A-B Cable
IEC C5 Power Cable
Safety Guide Warranty Card
Robox®
BED CLEANING WIPE
70% Isopropyl Alcohol
NOT FOR MEDICAL USE
0197
BED CLEANING WIPE
70% Isopropyl Alcohol
NOT FOR MEDICAL USE
0197
BED CLEANING WIPE
70% Isopropyl Alcohol
NOT FOR MEDICAL USE
0197
w
ww.cel-robox.com
Safety
Information
Versi
o
n
1
.0
Page 3
33
www.cel-robox.com
Welcome
Unpacking Robox®
This section explains how to safely unpack your new Robox® and get it ready
for production! Your new micro manufacturing platform has been carefully
assembled and packaged at our factory to arrive with you in perfect condition.
Please follow the instructions below carefully to avoid causing any damage.
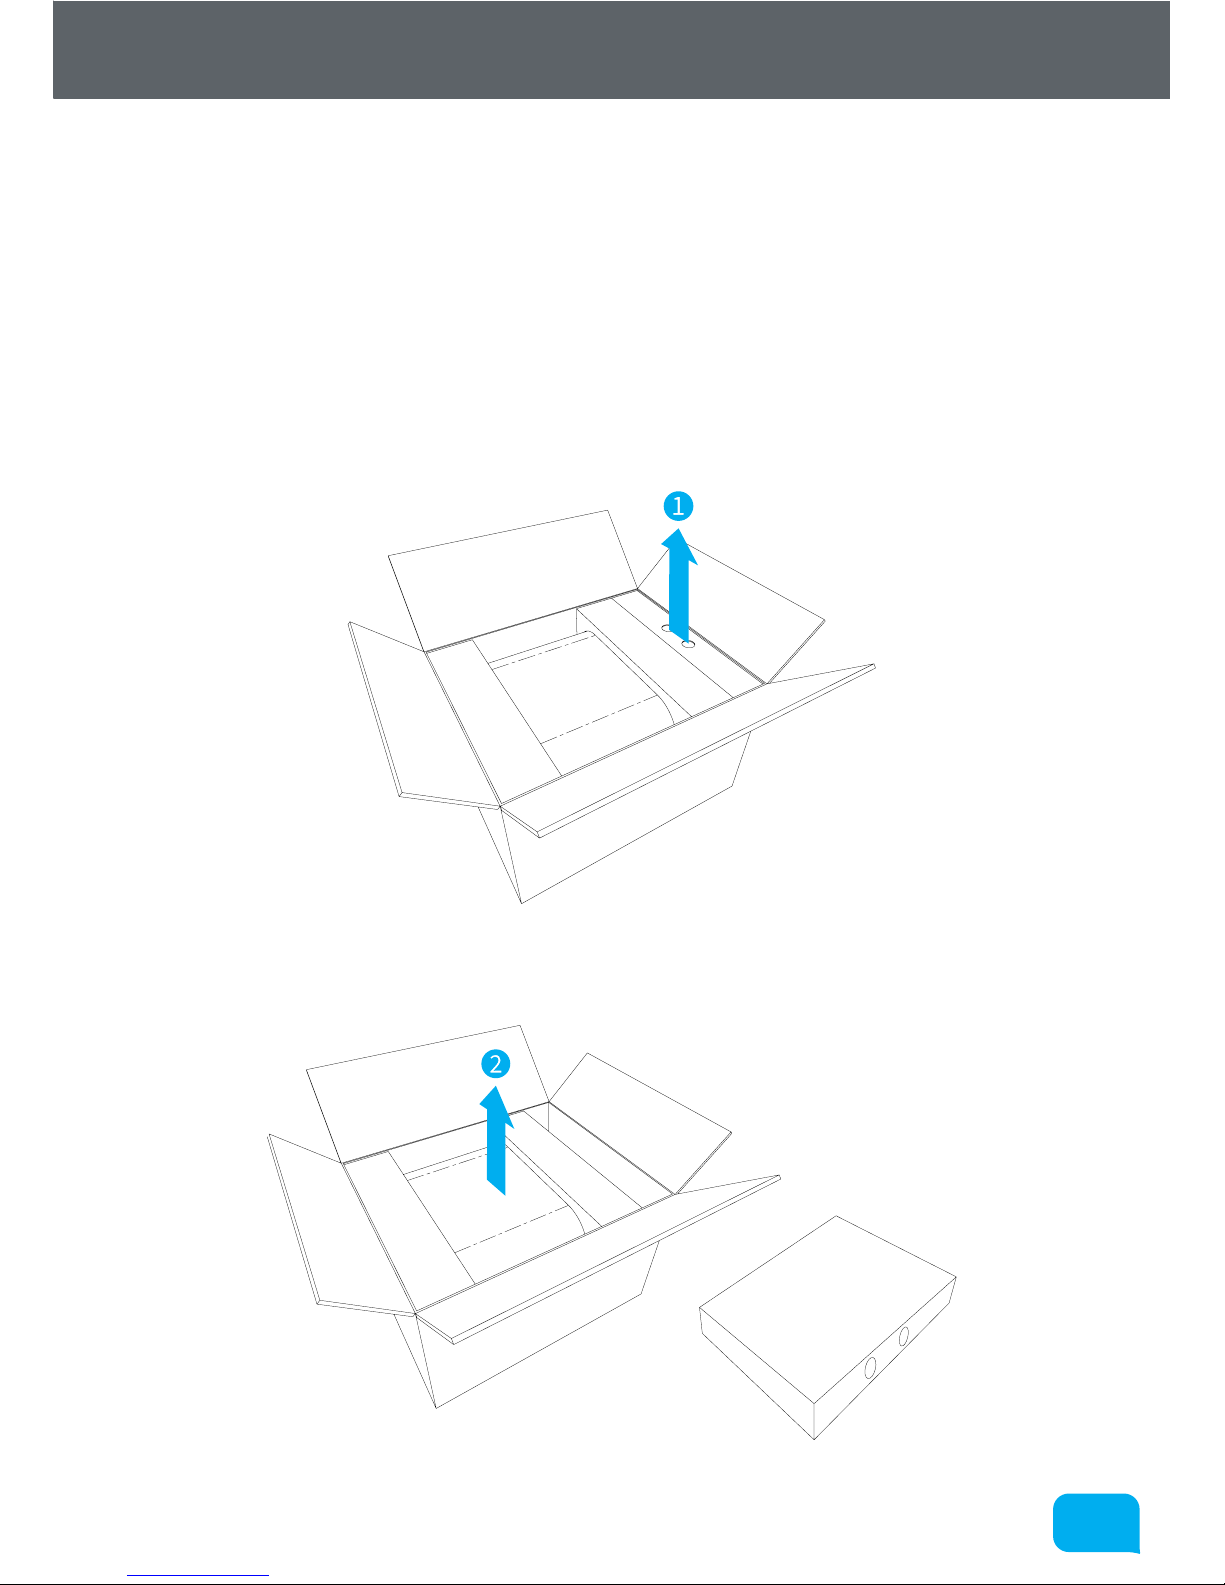
1. Carefully cut the tape along the top of the box, being careful not to cut too
deep, and open the box.
2. Remove the accessories box from the side by pulling on the plastic handle.
3. Li Robox® from the box using the two handles in the packing trays on either
side.
Page 4
44
www.cel-robox.com
Welcome
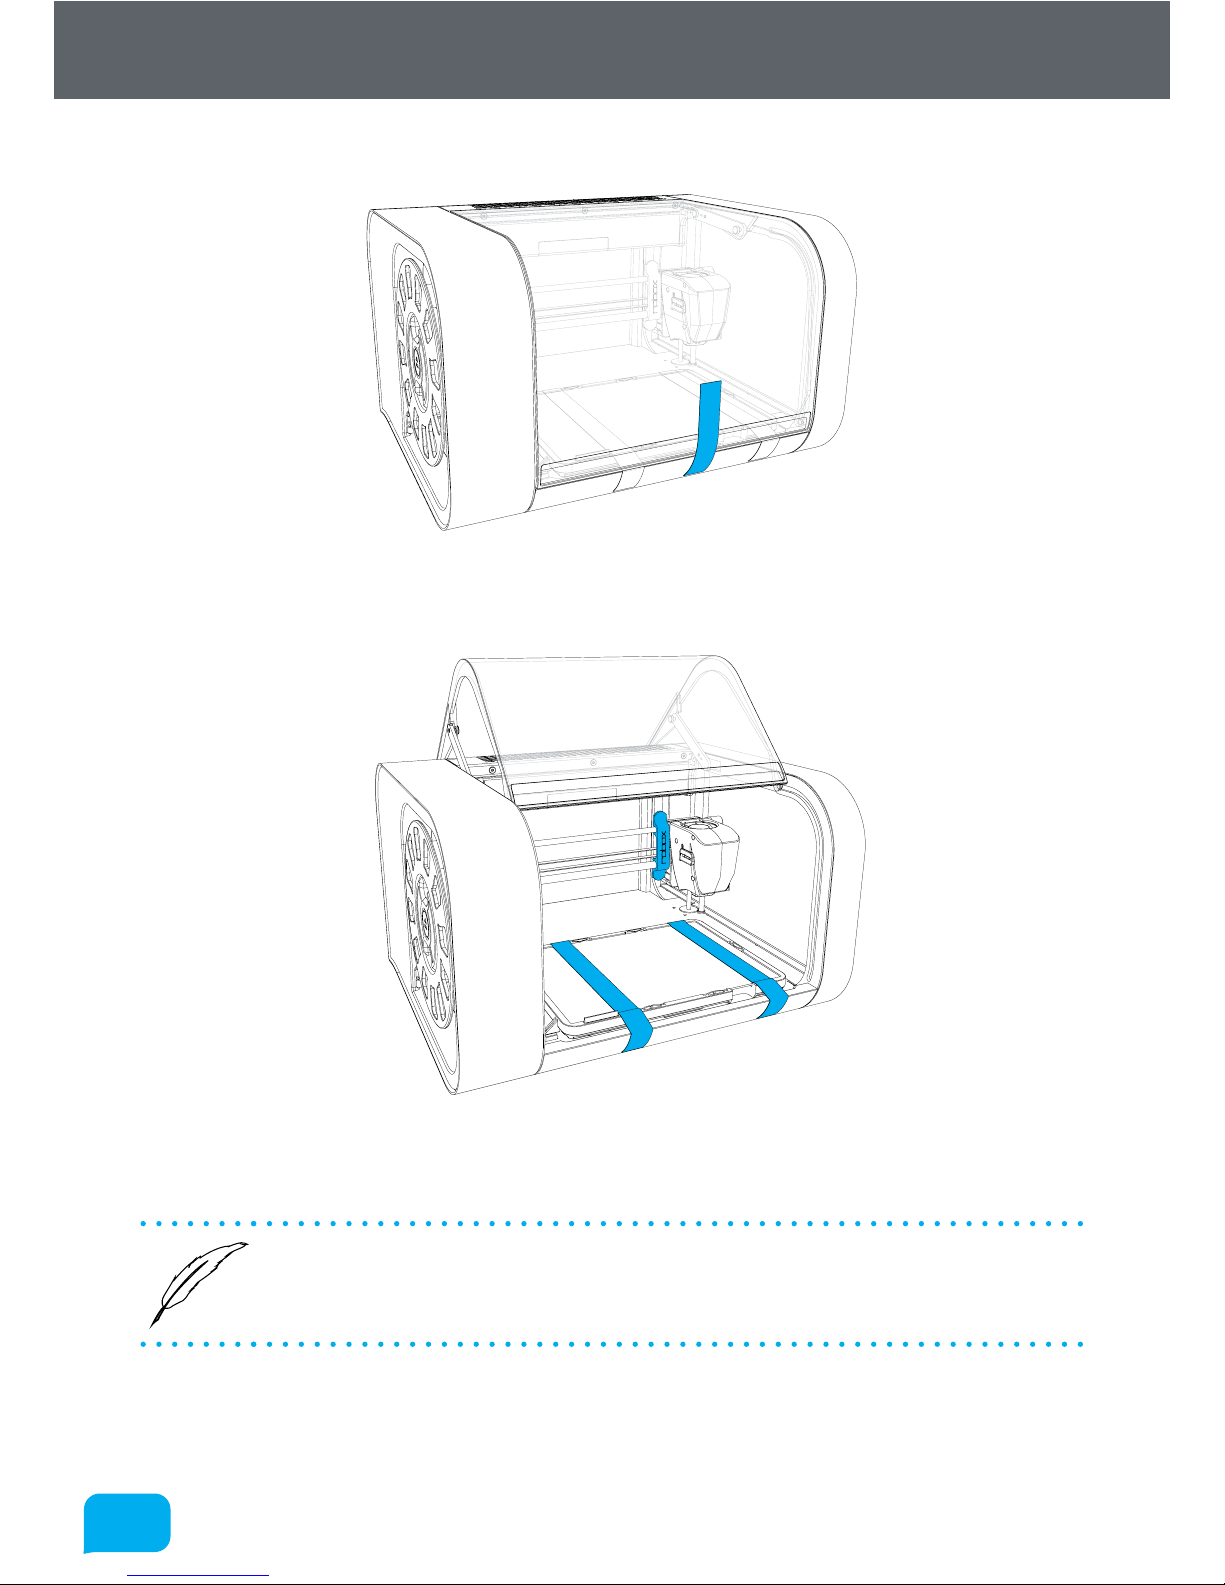
4. Remove the packing tape which is used to secure the door.
5. Remove the packing tape and warranty card which are secured to the bed
and the blue plastic packing clip used to secure the printhead.
6. Ensure that the head and bed are free to move before proceeding. You can
move them both by hand to check.
• We recommend that you keep hold of all of your packaging materials,
should you need to return any parts to us.
Page 5
55
www.cel-robox.com
Hardware Overview
At A Glance
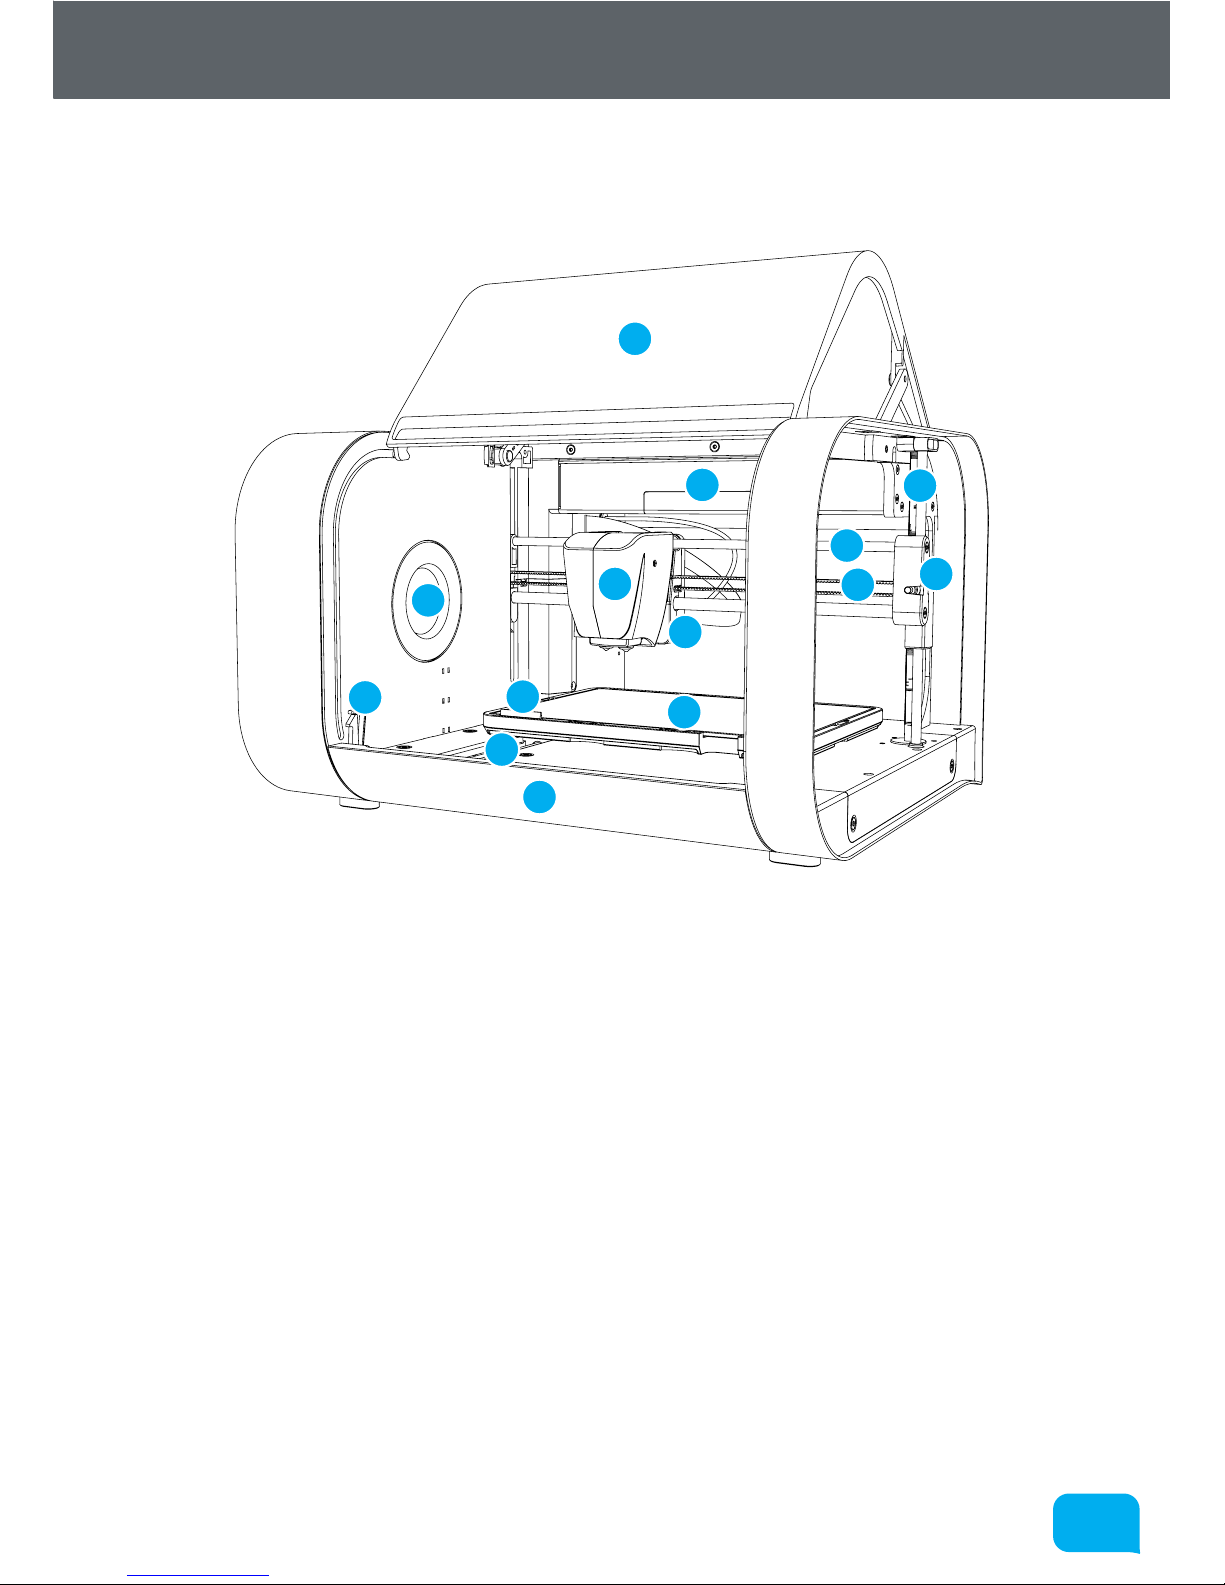
This section highlights all the major features of Robox®.
1
2
8
3
6
7
12
13
4
10
11
9
5
14
1 Print Head 8 X Axis Belt
2 X Carriage 9 Tip Wipe Blade
3 X Axis Rails 10 Reel Hub Cover
4 Print Bed 11 Door Interlock Latch
5 Y Axis Rail 12 Enclosure Door
6 Z Axis Rail and Drive Screw 13 Internal Ambient Lighting
7 Z Carriage (Right) 14 Front Tray Cover
Page 6
66
www.cel-robox.com
Hardware Overview
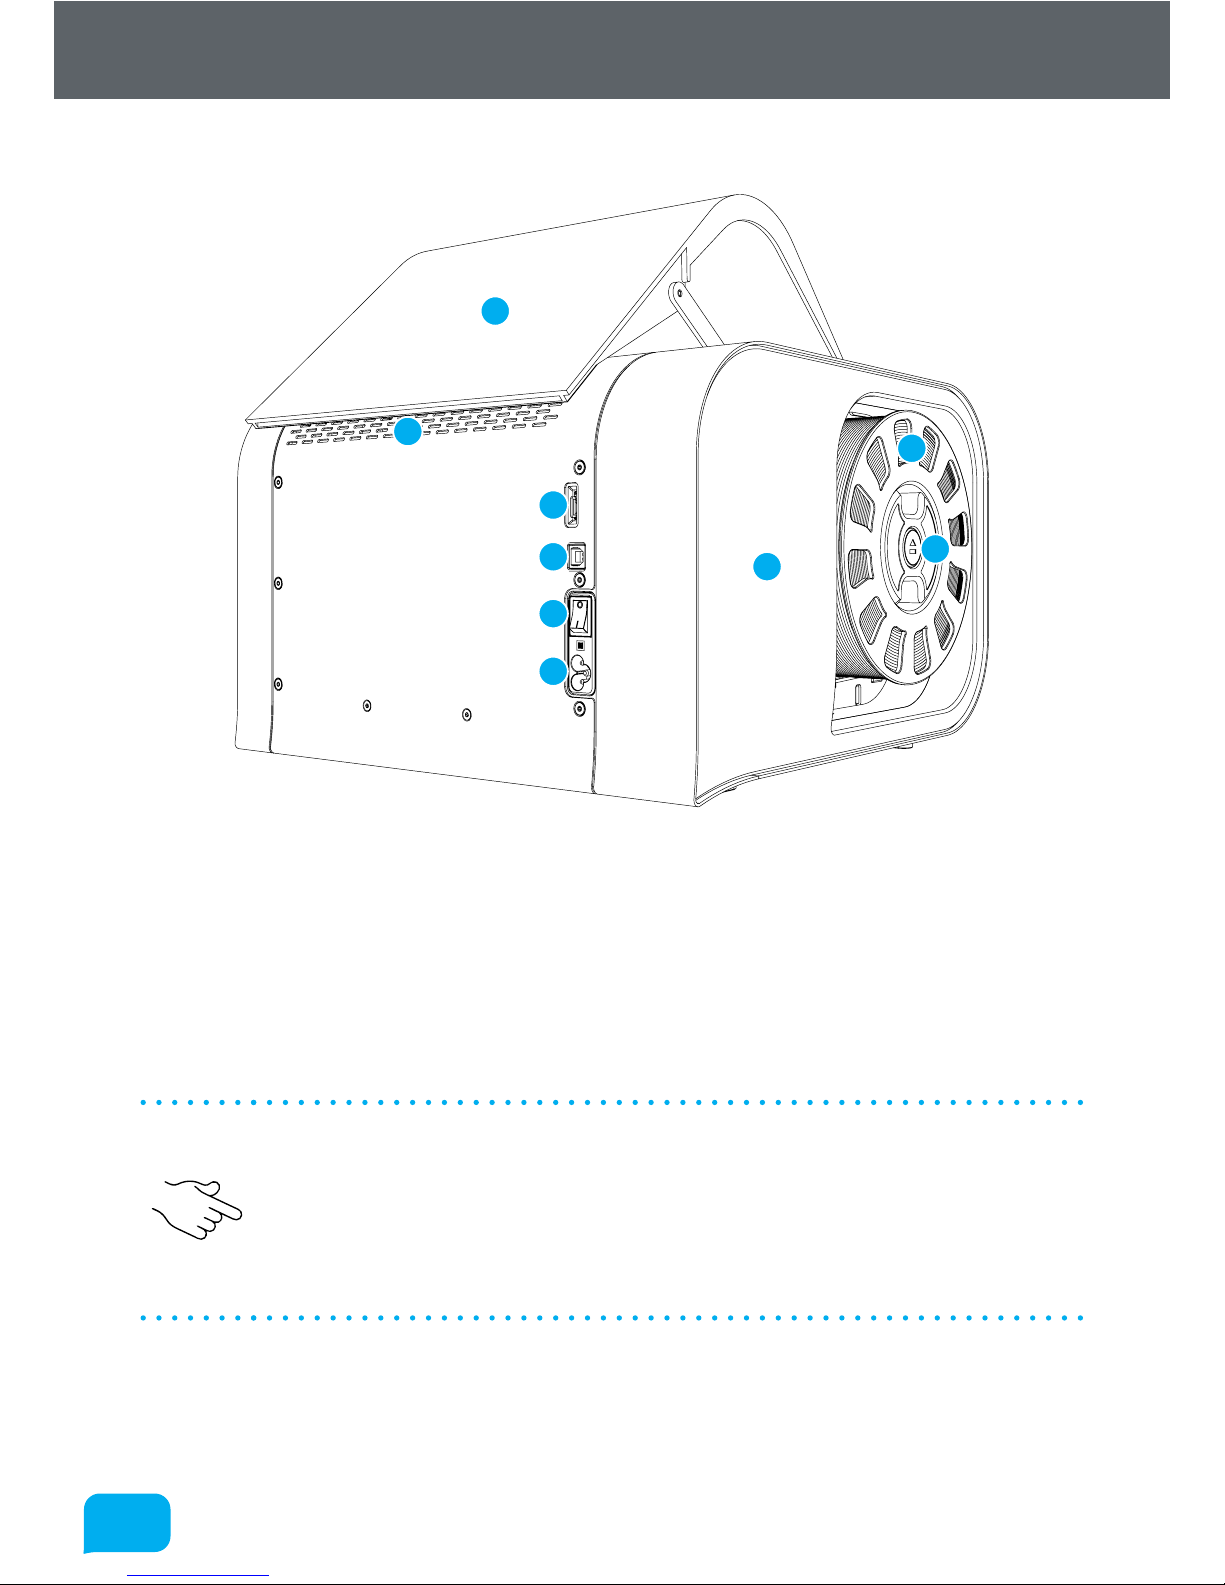
This view shows the rear connections of Robox® and the SmartReel™ location.
1
2
8
3
6
7
4
9
5
1 microSD Card Flash Storage 6 Pause/Resume/Eject Button
2 USB Type B Socket 7 Outlet Vents
3 Power Switch 8 Door
4 C5 ‘Cloverleaf’ Power Inlet 9 Side Cover
5 Robox® SmartReel™
• Although there is a microSD card accessible from the back of Robox®, this
cannot be read by any other machine and is only for use as internal flash
storage - access is provided only for diagnostic/repair purposes.
• Do NOT connect the USB cable until you have completed the soware
installation on the following page.
Page 7
77
www.cel-robox.com
Installing AutoMaker™
Soware Installation
This section explains in detail how to install the AutoMaker™ soware package for
controlling your Robox®. The included USB card drive contains this soware and
an electronic version of this document, as well as some sample .stl files for you to
print.
These steps may vary slightly depending on your operating system, all provided
screenshots and instructions are from Windows 8 for reference.
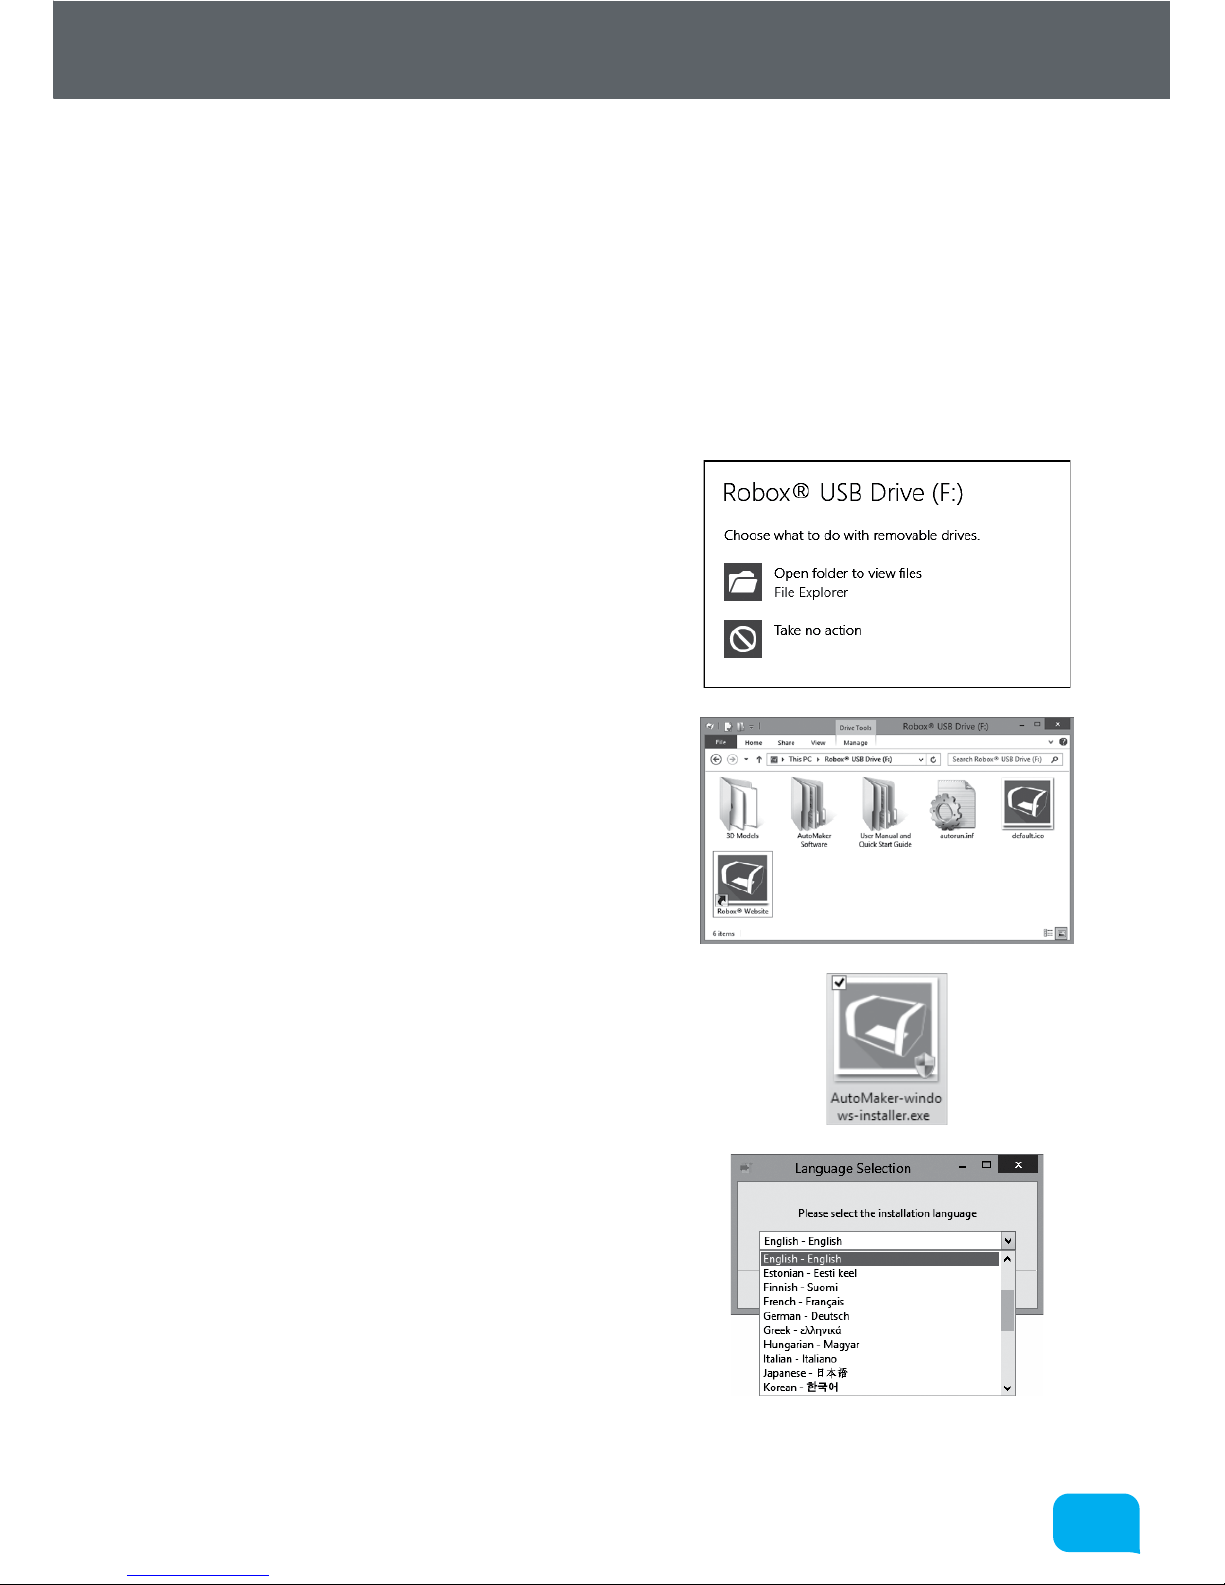
1. Plug your included USB drive into an
available USB port (drive letter may vary)
- choose Open folder to view files:
If this is not displayed, you can access the
drive through My Computer.
2. The contents of the drive will be
displayed in File Explorer as shown
(view mode may vary).
3. Navigate to \AutoMaker Soware\
Windows and run the installer
by double-clicking on the icon -
AutoMaker-windows-installer.exe
4. Select the installation language from the
dropdown menu, and then click OK to
continue.
Page 8
88
www.cel-robox.com
Installing AutoMaker™
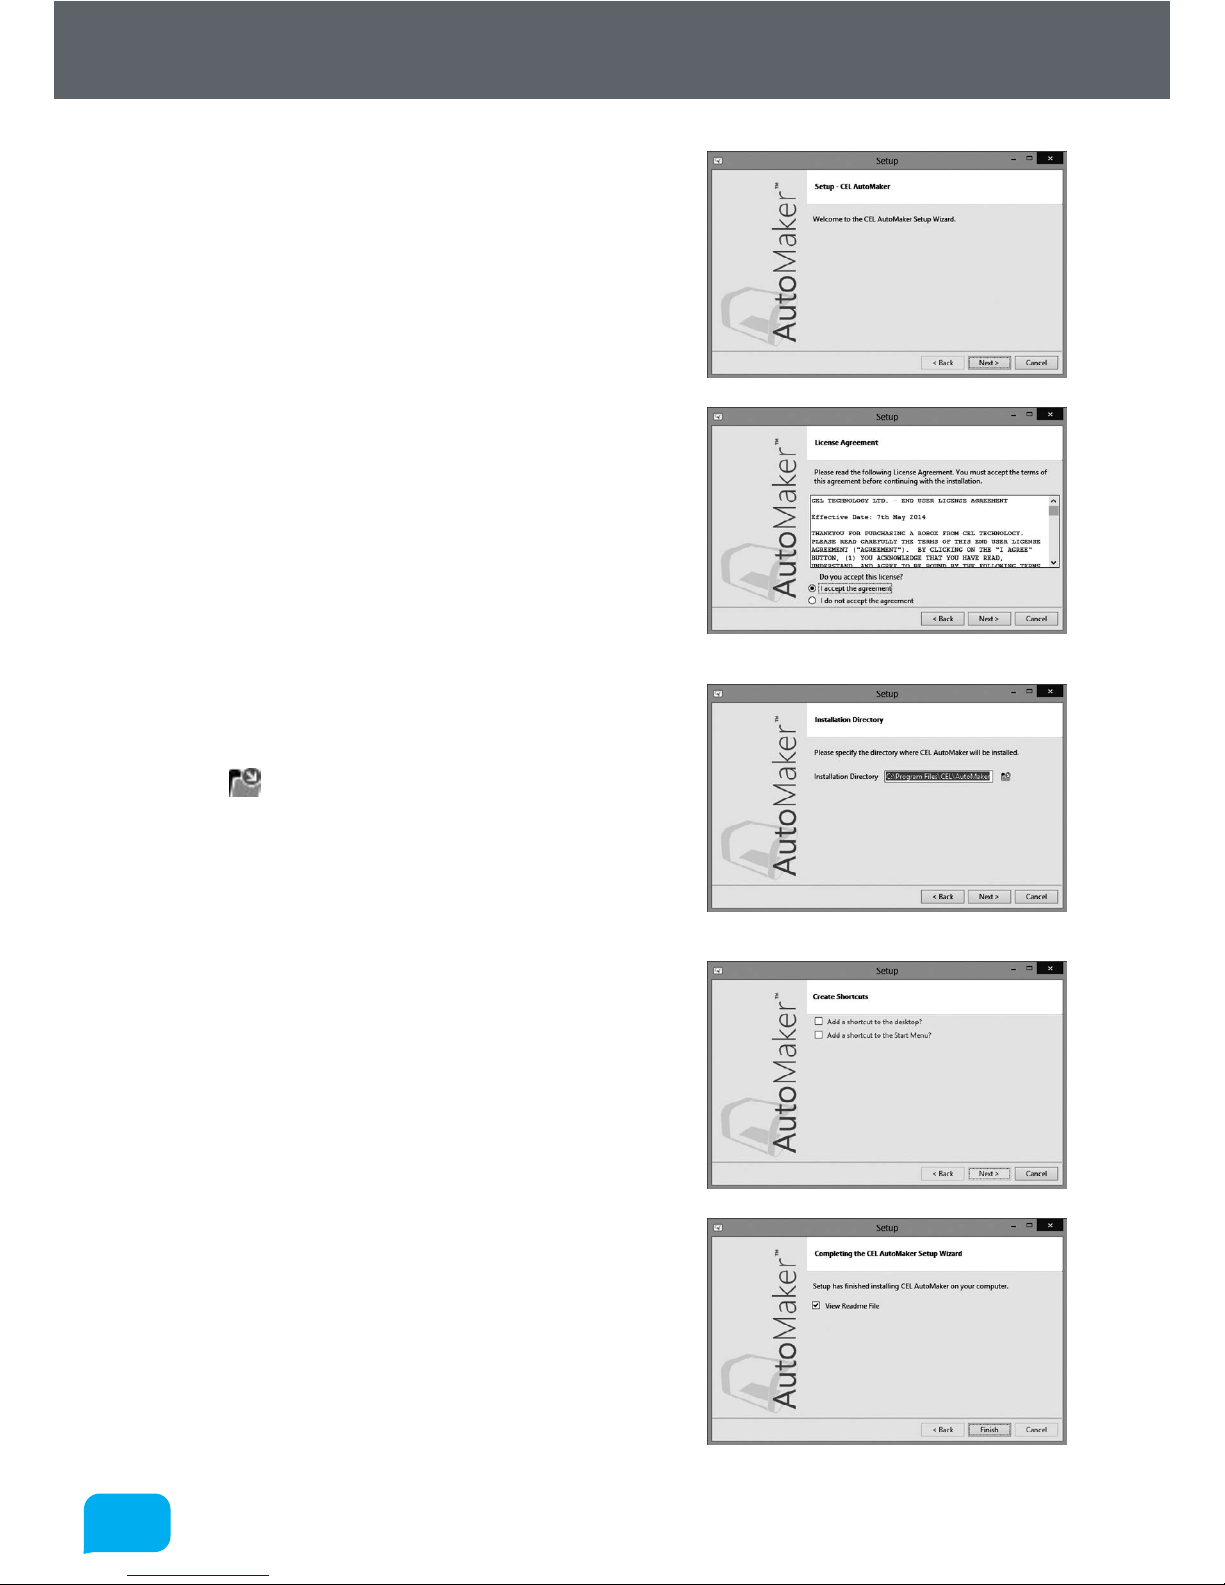
5. The installer will start, click Next > to
continue.
6. Please carefully read the Licence
Agreement and select ‘I accept the
agreement’, then select Next > to
continue.
7. Please choose where you would like
to install AutoMaker™, either by typing
the path directly, or by clicking the
button. Click Next > to continue
and accept the path and begin the
installation. N.B. To facilitate future
support we recommend using the
default install location.
8. Choose whether you would like to
add Shortcuts to the Start Menu or
Desktop. Then click Next > and wait as
AutoMaker™ is installed to your hard
drive.
9. Installation is complete. Tick the
checkbox if you would like to read the
‘Readme’ file aer clicking Finish.
Page 9
99
www.cel-robox.com
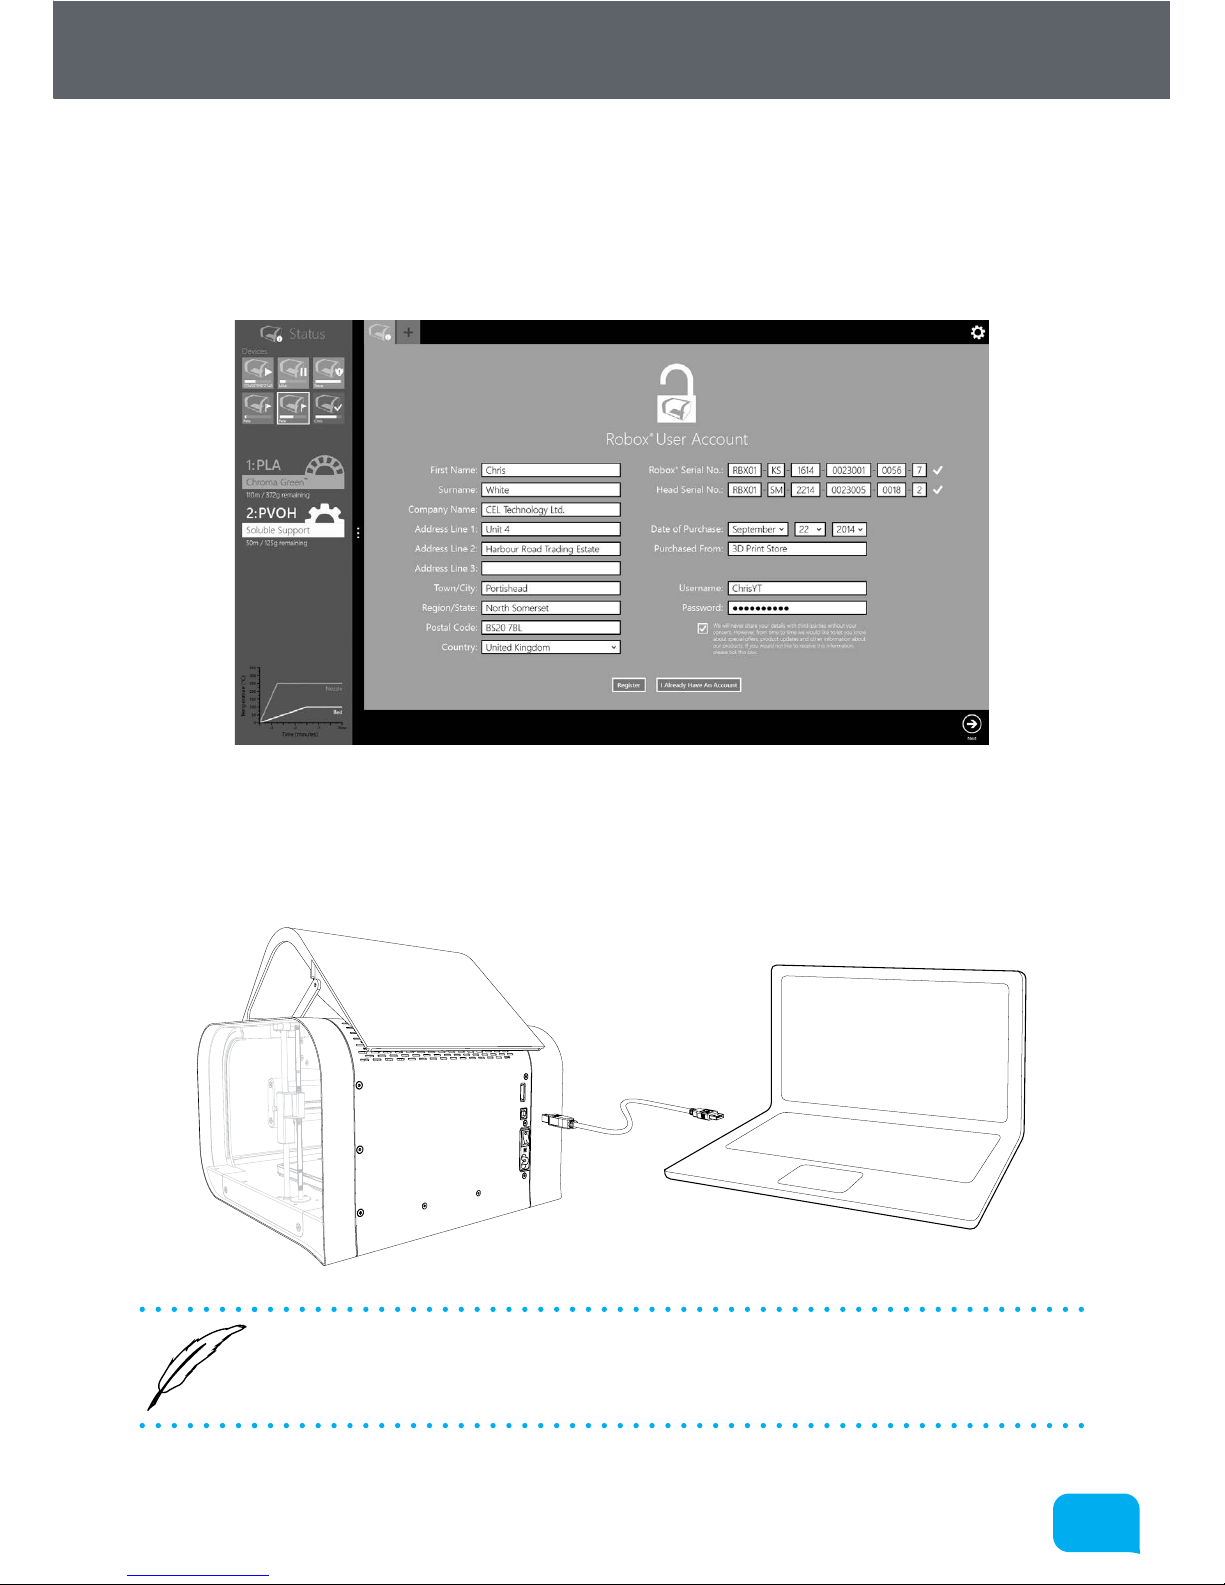
Account and Hardware Setup
Setting Up Your Robox® Account
When you start AutoMaker™ for the first time, the product and customer
registration screen will be displayed, allowing you to register for product updates,
support and warranty repairs. Please complete all sections before continuing.
Attaching the USB Cable
Robox® comes supplied with a 2 metre USB Type A-Type B cable for connecting
to your PC. Please connect as shown.
• DO NOT connect your Robox® until you have been through the soware
installation steps on the previous page and started AutoMaker™.
Page 10
1010
www.cel-robox.com
Hardware Setup
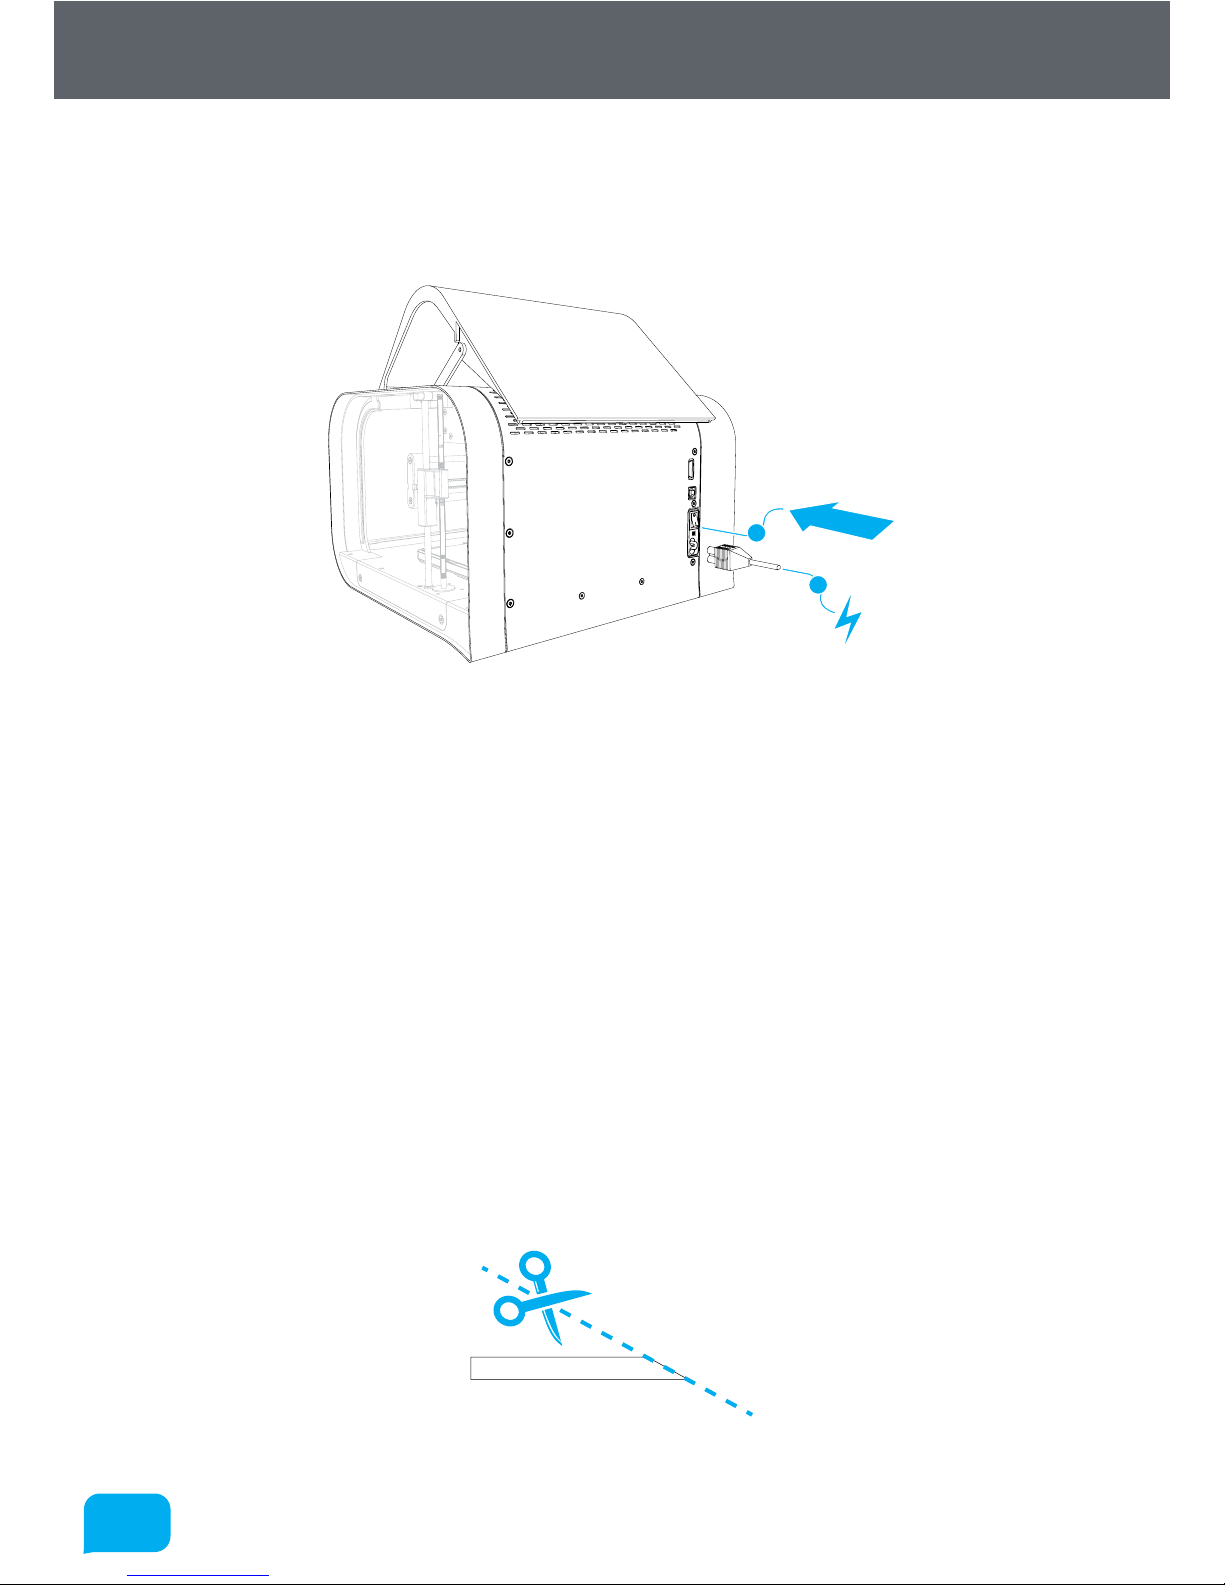
Attaching the Power Cable and Powering On
Connect the supplied AC power lead to Robox® and switch on using the rear
power switch.
1
2
This will install the necessary drivers for connecting your Robox® and could take
a few minutes. When correctly installed and switched on, it should appear in
Device Manager as a COM port called “Robox v1.0 (COM3)” (COM number may
vary). It should also appear on the Status Page of AutoMaker™, along with what
reel and head are installed - for more information please refer to the user manual.
Loading Filament
This section explains how to load your chosen 3D printing plastic filament
into Robox® ready to produce your first print! It is designed to be a very simple
process with most functions taking place automatically.
Preparing the Filament
Before attempting to load filament, it is advisable to cut the end at a shallow
angle using a knife or sharp scissors to produce a sharp tip as shown below. This
will allow the filament to enter the extruder and melt chamber more easily.
Page 11
1111
www.cel-robox.com
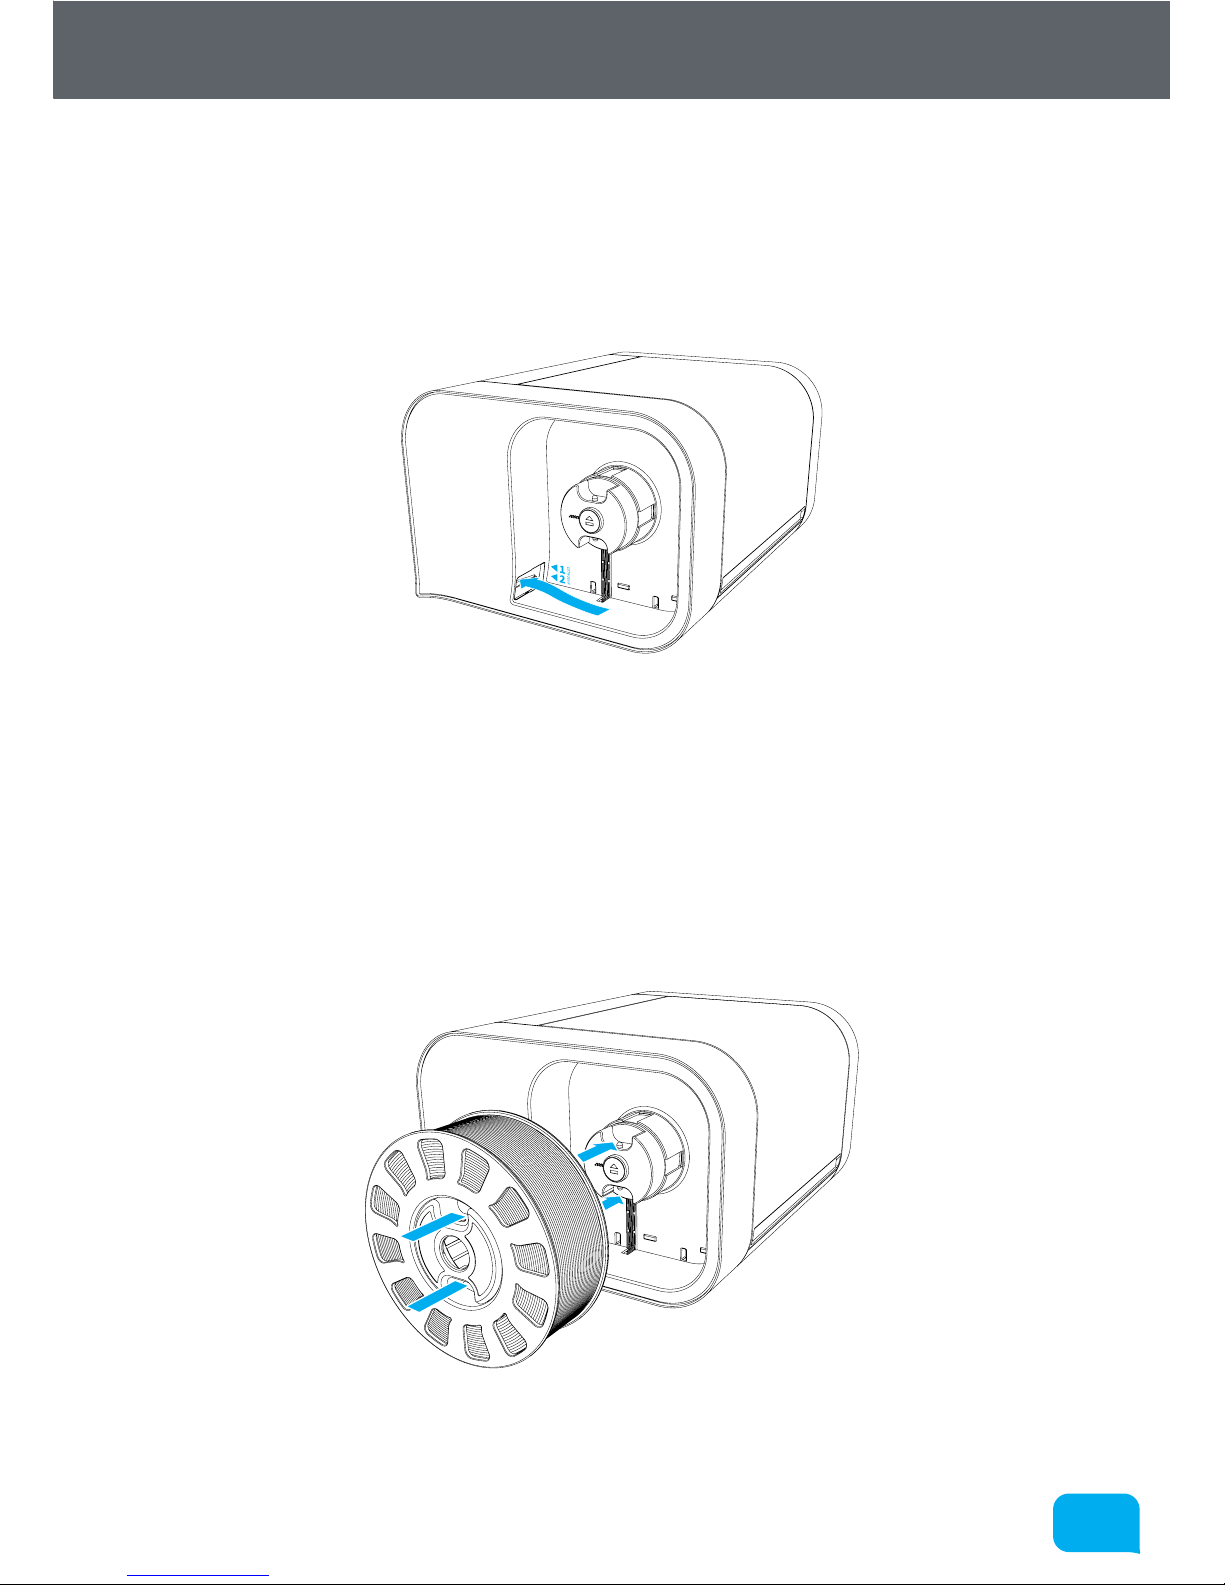
Feeding to the Head
Simply feed the end of the filament into one of the two extruder entrances
located in the bottom-le of the reel storage dock. If only one extruder is installed
in your machine, use the top path marked ‘1’. It is much easier to perform this
operation BEFORE installing the reel into the dock.
Once the filament reaches the extruder, you will hear the motor start; at this point
continue to feed in until you feel the filament has been grabbed. Robox® will then
automatically feed the material all the way to the head.
Installing the Reel
Finally, install the SmartReel™ into the dock, you should hear a click when it
is correctly located, and it should appear as a recognised reel in AutoMaker™.
Congratulations! You’re now ready to print.
Hardware Setup
Page 12
1212
www.cel-robox.com
AutoMaker™ Overview
Print Workflow
Now you’re ready to start manufacturing, this section leads you through the
simplest workflow for producing a model from an .stl file. For information on
other soware features, please refer to the user manual and website.
Status Screen
On starting AutoMaker™, the status screen will be the first screen that is
displayed. This screen gives you a broad overview, showing you what printers are
connected and what filament is installed. From here you can unlock the door,
eject filament and start a new project.
To start a new project, click the Next icon in the bottom right hand corner (in
the toolbar) to move to the Layout Screen.
Layout Screen
This part of AutoMaker™ is used for laying out the parts you want to print and for
manipulating them (size, rotation, position). To add a new model, click the
Add Model button. This will display the Select a model dialog, which will allow
you to browse your computer for a model file in either .stl or .obj format. You will
find some sample models on the included USB Drive under ‘3D Models’. Once
you have selected a model, click Open to add to your project.
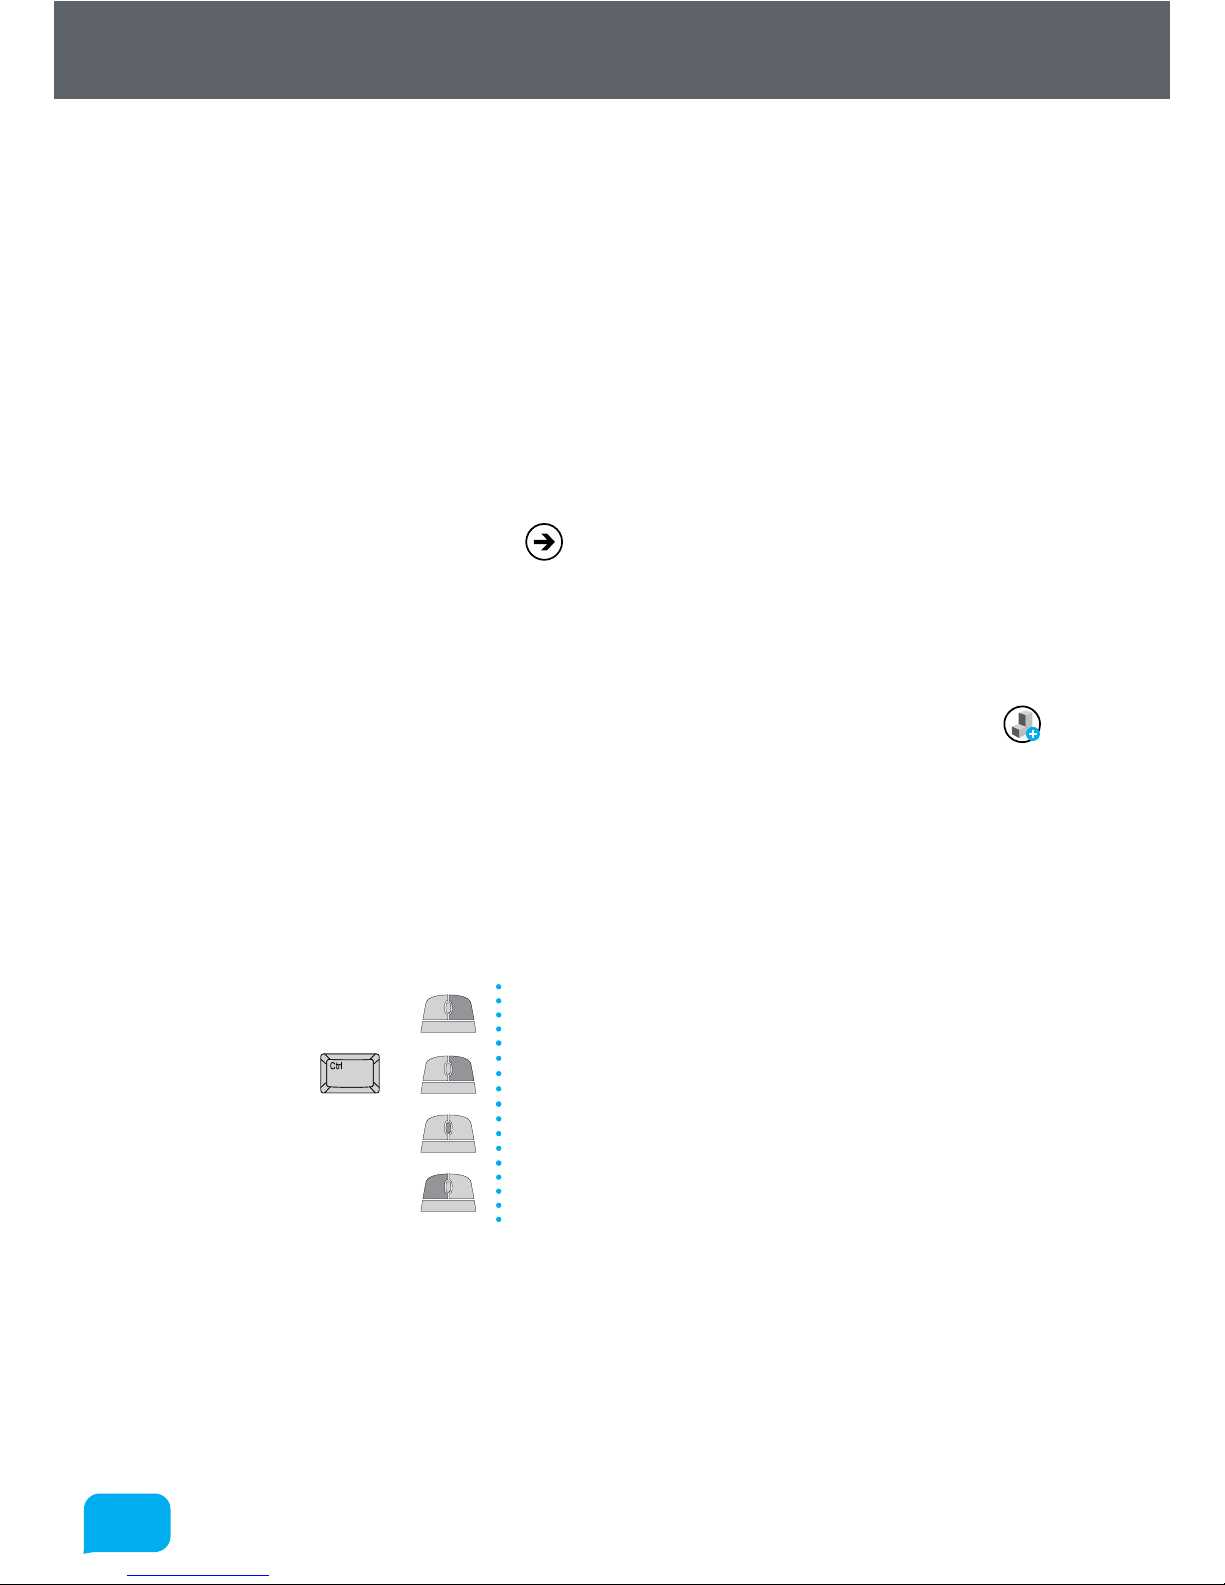
You will then see your chosen model displayed on the bed. You can manipulate
the view using the right mouse button:
Rotate View (click and drag)
+
Pan View (click and drag)
Zoom (roll wheel)
Select and manipulate models
To move an object around on the bed, simply select it with the le mouse button
and drag it to where you’d like it to be. <Ctrl> + le mouse click will allow you
to select multiple models, and <Ctrl> + <A> will select them all. If it is outside of
the build volume or overlapping with another object, the model will turn red to
indicate it cannot be printed. You can also scale and rotate models by typing
values into the input boxes on the le hand side of the screen.
Page 13
1313
www.cel-robox.com
AutoMaker™ Overview
Once you are happy with your layout, click the Next icon to proceed to the
Settings Screen.
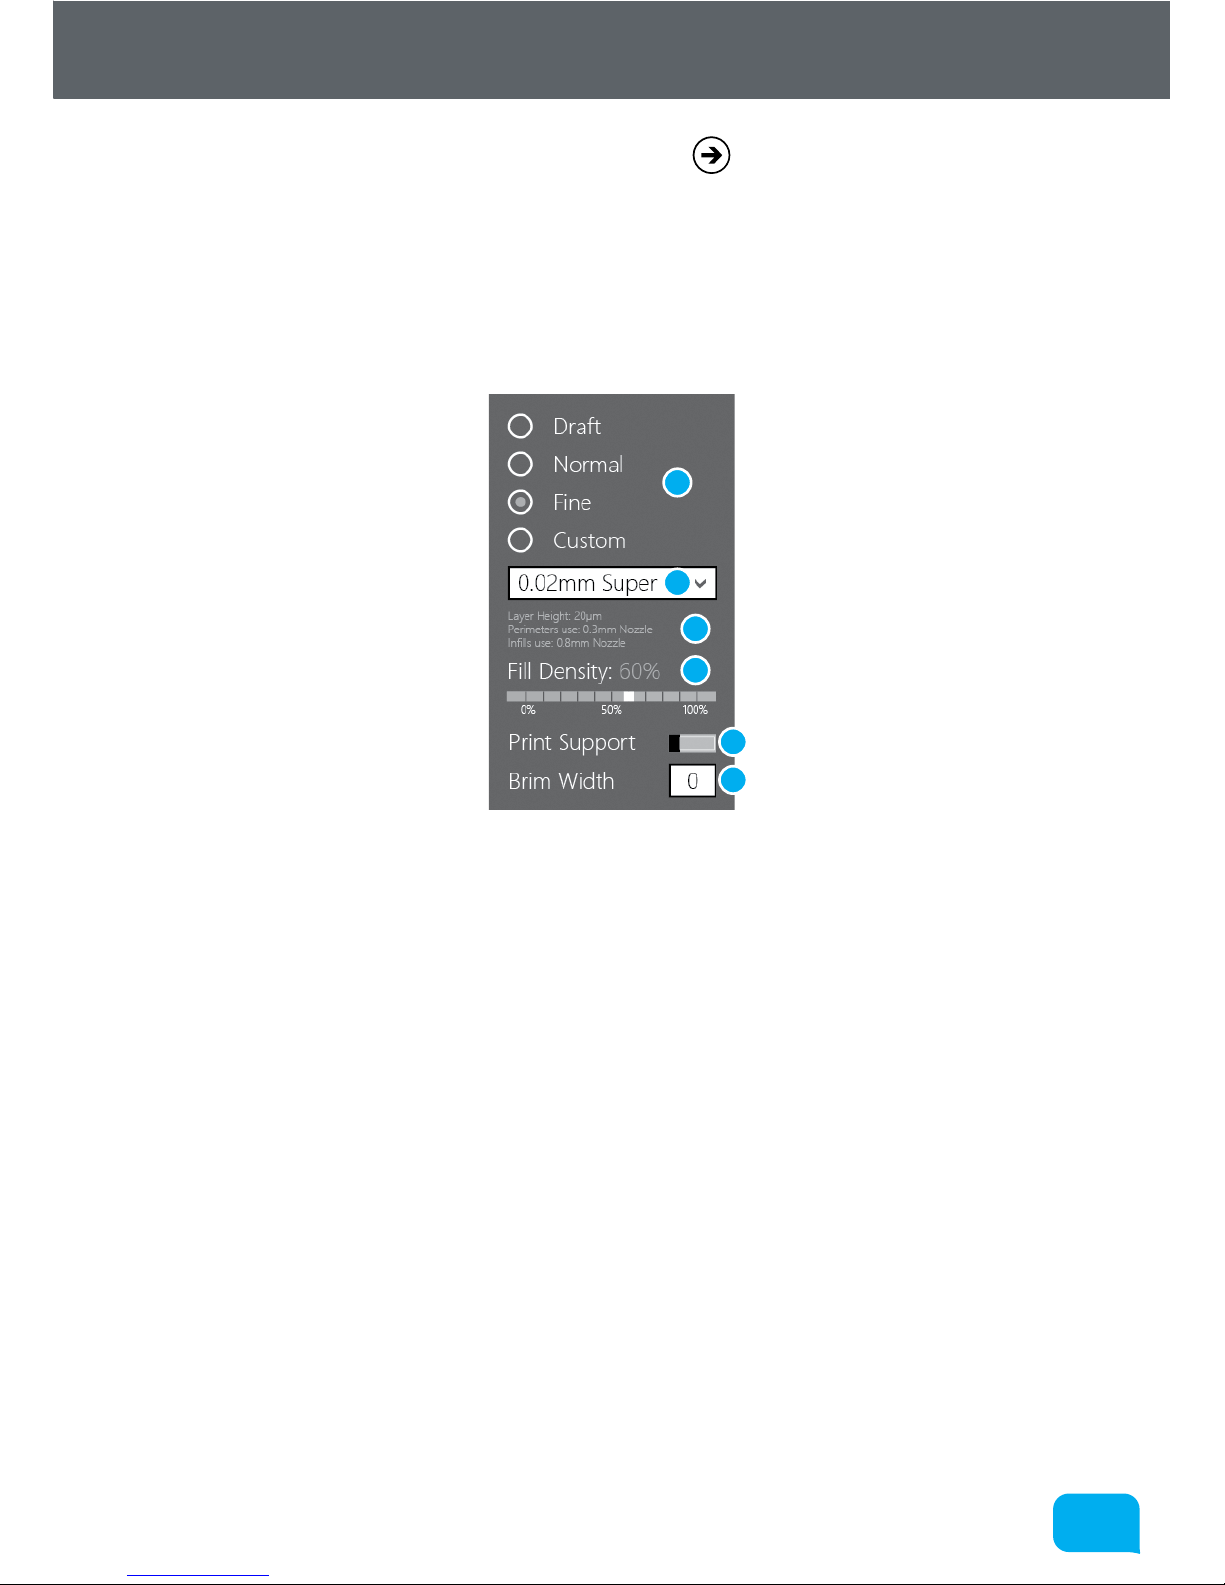
Settings Screen
This part of AutoMaker™ is used for modifying any settings relating to the print
before proceeding to production, including support material, speed/quality and
fill density.
1 Quality Setting 4 Fill Density
2 Custom Print Profile 5 Support Material Setting
3 Profile Summary 6 Brim Width
• Quality Setting
This allows you to select a basic quality setting from the list of options - Dra,
Normal or Fine. The final option - Custom allows you to create a new profile
or to select from a previously created one. To create a new profile, click the
selection box and choose Create New... - for more information on this, see
the User Guide.
• Profile Summary
This displays a brief summary of the currently selected print settings. The
information available is as follows:
• Layer Height in microns (µm).
• Perimeters use - which nozzle is used to print the outside surface
• Infills use - which nozzle is used to print the inside fill of the object.
1
2
3
4
5
6
Page 14
1414
www.cel-robox.com
AutoMaker™ Overview
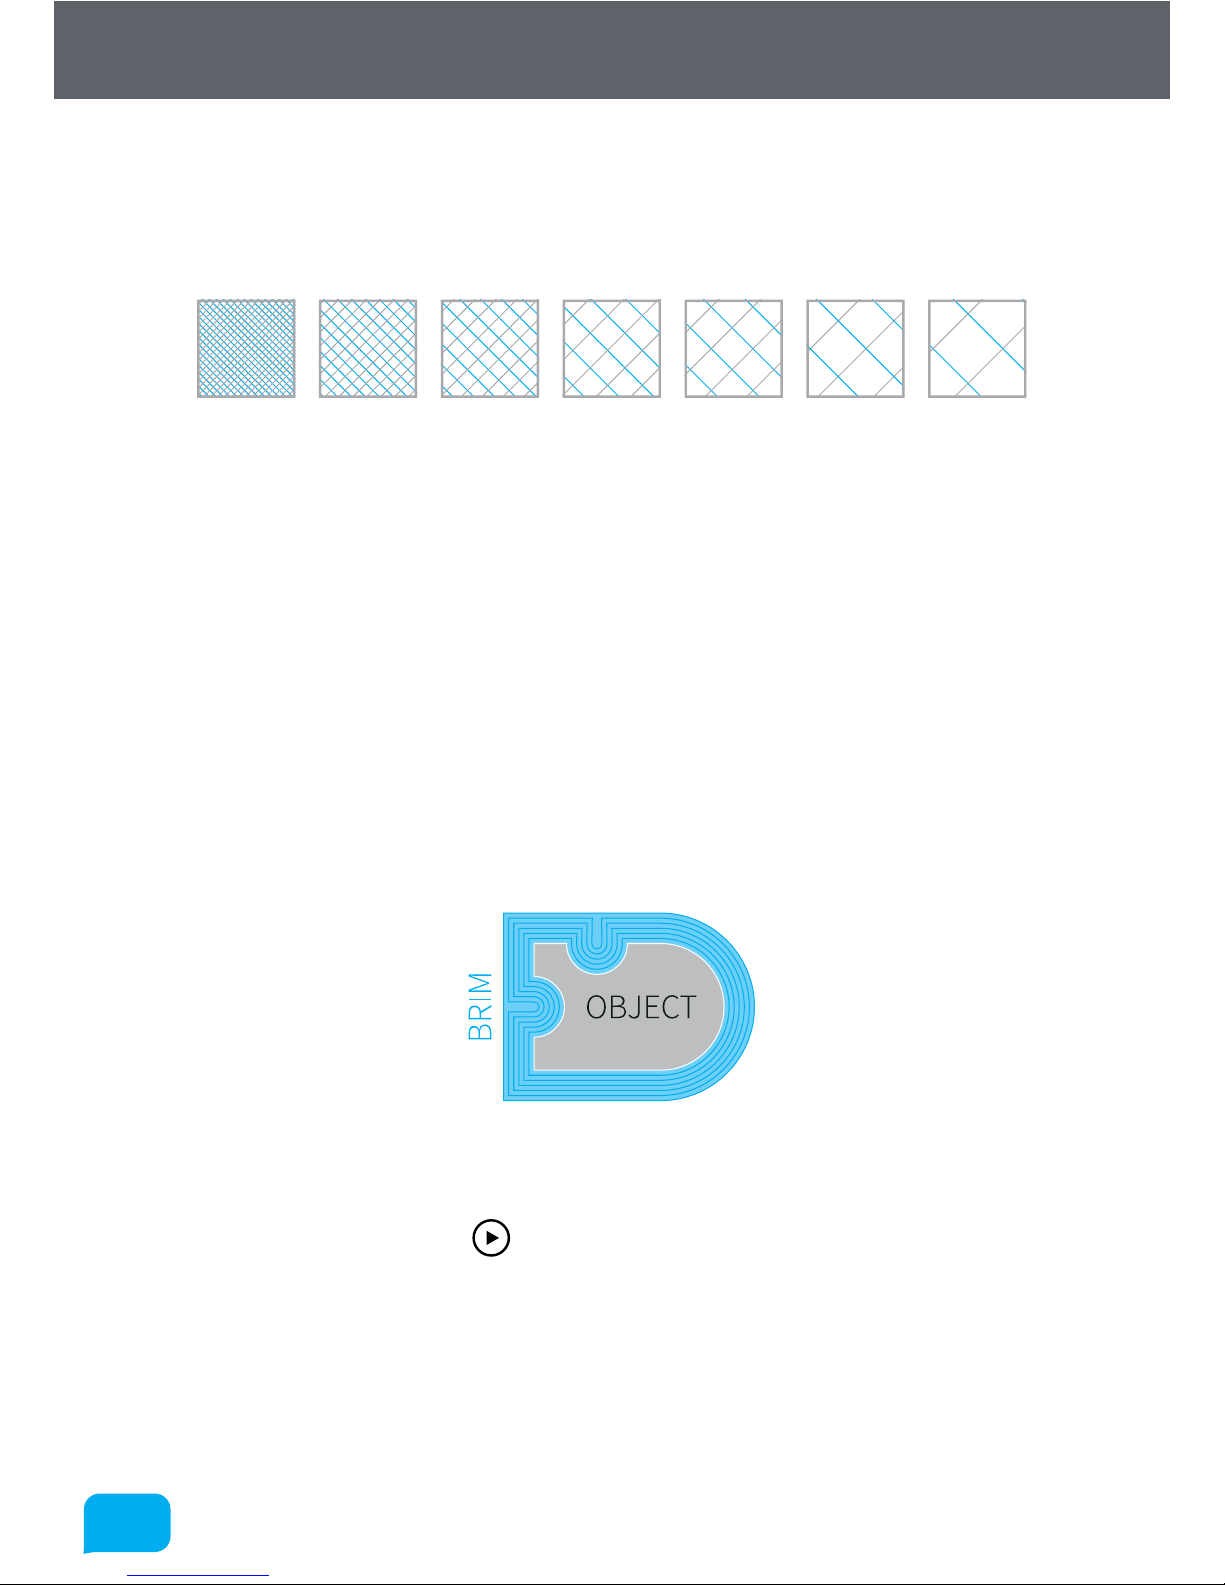
• Fill Density
This setting allows you to choose how ‘solid’ you would like the finished
object to be. The fill pattern can also be changed using a custom profile - for
more information on this, see the User Guide.
90% Fill 80% Fill 70% Fill 60% Fill 50% Fill 40% Fill 30% Fill
• Support Material
This switch toggles the printing of support material. If you are printing a part
with large overhangs, you may wish to print structures at the same time
to support the object. Support settings (e.g. density and type) can also be
changed when using Custom profile - for more information on this, see the
User Guide.
• Brim Width
‘Brim’ is a term applied to FFF (Fused Filament Fabrication) which describes
a large flat area which is printed around the part to help with bed adhesion
and warping. It can be easily trimmed o aer printing, but may greatly
increase the success rate of prints with a small surface area at the base. This
number specifies the number of loops (and therefore the width) of the brim.
Starting Production
Once you are happy with your project layout and settings, you can proceed to
production by clicking the Make! button - watch as your creation appears
before your eyes! AutoMaker™ will provide you with an estimated time to
complete, and a progress bar which shows the percentage completed.
For more information on all aspects of operation - hardware and soware, please
refer to the User Manual which you will find pre-loaded onto the enclosed USB
drive, or to our website, shown below. Happy Manufacturing!
Page 15
1515
www.cel-robox.com
Contact Us
This section contains contact information for CEL Technology Ltd. There are
separate details for Support, Sales and Feedback.
Support
For product support, we have a ticketing system available online which allows
you to track the progress of your support request. Please sign up for an account
and submit a ticket at:
robox.freshdesk.com
Sales
For sales of accessories and consumables you can contact:
Or visit our website at:
www.cel-robox.com
Feedback
Please send all general feedback on Robox® to:
Distributor Contact Details
If you purchased your Robox® from an authorised CEL reseller - please find
their contact details below:
Please direct all support and sales enquiries here in the first instance.
Page 16
© 2014 CEL Technology Ltd. All rights reserved.
RBX01-ACC-QSG
 Loading...