

Page 1

User Manual
Innovation from
C Enterprise Ltd
24V Cordless
Cylinder Mower
CY1
POWERmow
Page 2
THANK YOU
Thank you for investing in a CEL product. The 24V Cordless Cylinder Mower
has been engineered and made to demanding high quality standards; ease of
operations and Proper care of
your product will give you years of trouble-free use.
Normal wear and tear, including accessory wear, is not covered under
guarantee. The product is guaranteed for domestic use against manufacturing
faults for a period of 12 months (for additional guarantee period please
refer to the store or agent from which you purchased the product or contact the
nearest authorized dealer). This product is not guaranteed for HIRE purposes.
If you have any questions, please contact us at:
It is possible to download updated user manuals, view demonstration videos
and find information about new products at: www.cel-garden.com
Warning: User must read and understand the user manual before using the product to
reduce the risk of injury. Failure to follow all instructions may result in electric shock, fire
and/or serious personal injury. The product must be used only for its prescribed purpose.
Any use other than those mentioned in this manual will be considered a case of misuse.
The manufacturer shall NOT be liable for any damage or injury resulting from such
cases of misuse, use of force, partially or completely dismantled appliances.
safety have taken a major role in development.
(if any)
3170303
Page 3

GETTING STARTED
Manual Version: 2009-0A
Designed and edited in the UK
Printed in PRC
Contents
1.0 Important Safety Notes
2.0 Unpacking
3.0 Assembly
4.0 Safety Key
5.0 Battery
5.1 Charging
MOWING
CARE
11.0 Care and Maintenance
11.1 Storage
11.2 Environment
12.0 FAQ
13.0 Technical Specifications
6.0 Cutting Height
7.0 Battery Level Warning
8.0 Blade Adjustment
9.0 Mowing Tips
9.1 Emptying Grass Collector
10.0 Starting & Stopping
10.1 Over Work Protection
Page 4

Important Safety Notes
1.0
READ ALL INSTRUCTIONS BEFORE USE.
RETAIN INSTRUCTIONS FOR FUTURE REFERENCE.
THIS MACHINE CAN CAUSE SERIOUS INJURIES.
WARNING:
When using an electrical appliance, basic safety precautions should be observed, including the
following, to reduce the risk of fire, electrical shock or injury:
1. Read the instructions carefully. Be familiar with the controls and the proper use of the
appliance.
2. Do not use it as a toy.
3. Never allow children or people unfamiliar with these instructions to use the appliance. Local
regulations may restrict the age of the operator.
4. Never mow while people, especially children, or pets are nearby.
5. The operator or user is responsible for accidents or hazards occurring to other people at their
property.
6. Mow only in daylight or in good artificial light.
7. Avoid operating the appliance in wet grass, where feasible.
8. Do not operate the mower in rain.
9. Walk, never run, when operating.
10. Do not operate the mower when barefoot or wearing open sandals. Always wear substantial
footwear and long trousers.
11. Thoroughly inspect the area where the mower is to be used, and move any object which may
jam or be thrown by the machine.
12. Ensure the mower blade rotates freely and carefully removed any obstructions prior to use.
13. Always be sure of your footing on slopes, do NOT mow excessively steep slopes.
14. Mow across the face of slopes, never up and down.
15. Exercise extreme caution when changing direction on slopes.
16. Use extreme caution when reversing or pulling the appliance towards you.
17. Do not put hands or feet near rotating parts. Keep clear of the discharge opening at all times.
18. Never pick up or carry the appliance while the motor is running.
19. Remove the Safety Key from the machine whenever left unattended.
Page 5

Important Safety Notes
1.0
20. Stop the blade if the appliance has to be tilted for transportation when crossing surfaces
other than grass, and when transporting the appliance to and from the area to be mowed.
21. Never operate the appliance with defective guards, or without safety devices, for example
deflectors and/or grass catchers in place.
22. Switch on the motor according to instructions and with feet well away from the blade.
23. Do not tilt appliance when switching on the appliance.
24. Keep all nuts, bolts and screws tight to be sure the equipment is in safe working
condition.
25. Replace worn or damaged parts for safety.
26. Be careful when adjusting height, ensure that the battery is removed and keep fingers
away from all moving parts.
27. Do not handle charger or mower with wet hands.
28. Use only as described in this manual.
29. Do not attempt to use the charger with any other product nor attempt to charge this
product with another charger.
30. Do not abuse the charger cord; never carry the charger by the cord or pull cord to
disconnect from an outlet; grasp the plug and pull to disconnect.
31. Keep charger cord away from hot surfaces.
32. This product includes lead acid (Pb) batteries; do not incinerate batteries or expose to
high temperatures, as they may explode.
33. Leaks from battery cells can occur under extreme conditions. If the liquid gets on the
skin wash immediately with soap and water. If the liquid gets into the eyes, flush them
immediately with clean water for a minimum of 10 minutes and seek medical attention.
34. Keep hair, clothing, fingers and all parts of body clear of moving parts.
35. Dress properly! Do not wear loose clothing or jewellery which can be caught by moving
parts. Use of non-slip footwear is recommended.
36. Do not attempt to repair any damaged parts on this product unless you are qualified to
do so.
Page 6
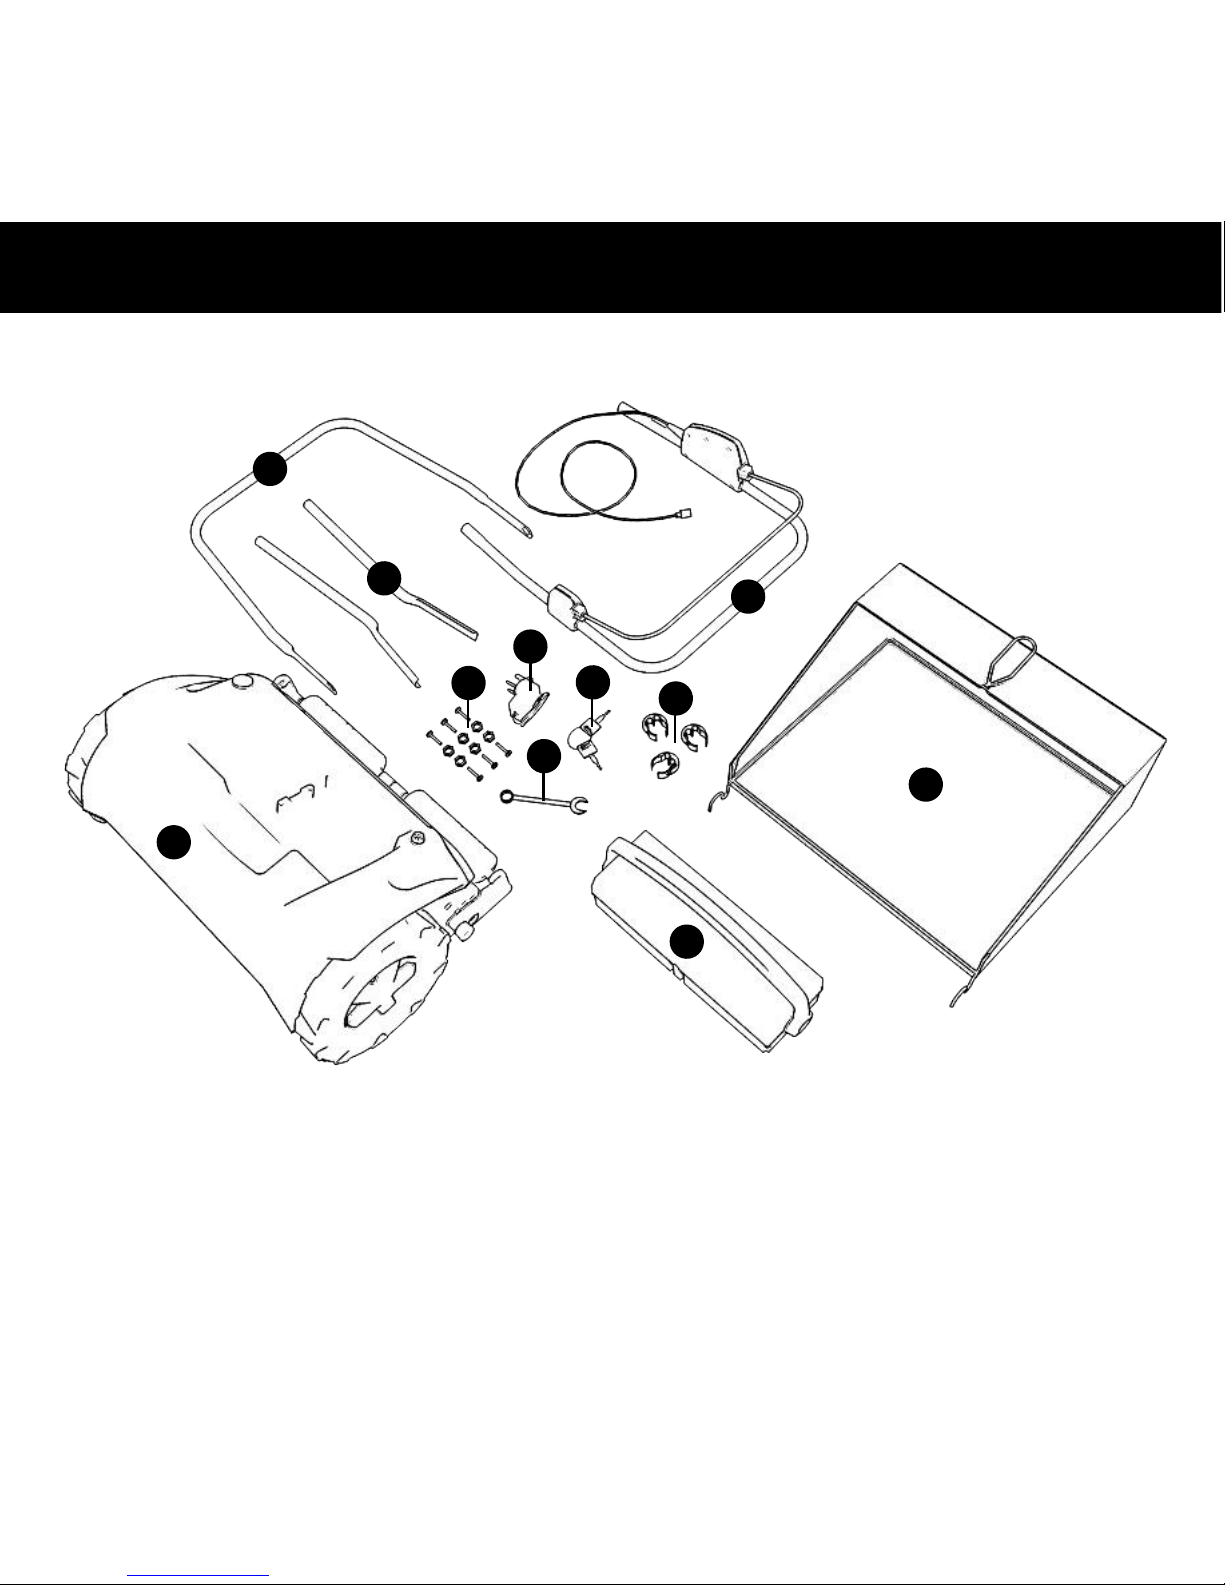
figure1
1. Main Unit 7. Cable Clips x3
2. Battery Pack 8. Charging Adaptor
3. Lower Frame 9. Keys x2
4. Middle Frame x2 10. Grass Collector
5. Upper Frame 11. Tool
6. Nut & Bolts x6
Unpacking
2.0
1
2
3
4
5
10
7
9
1
1
8
6
Page 7
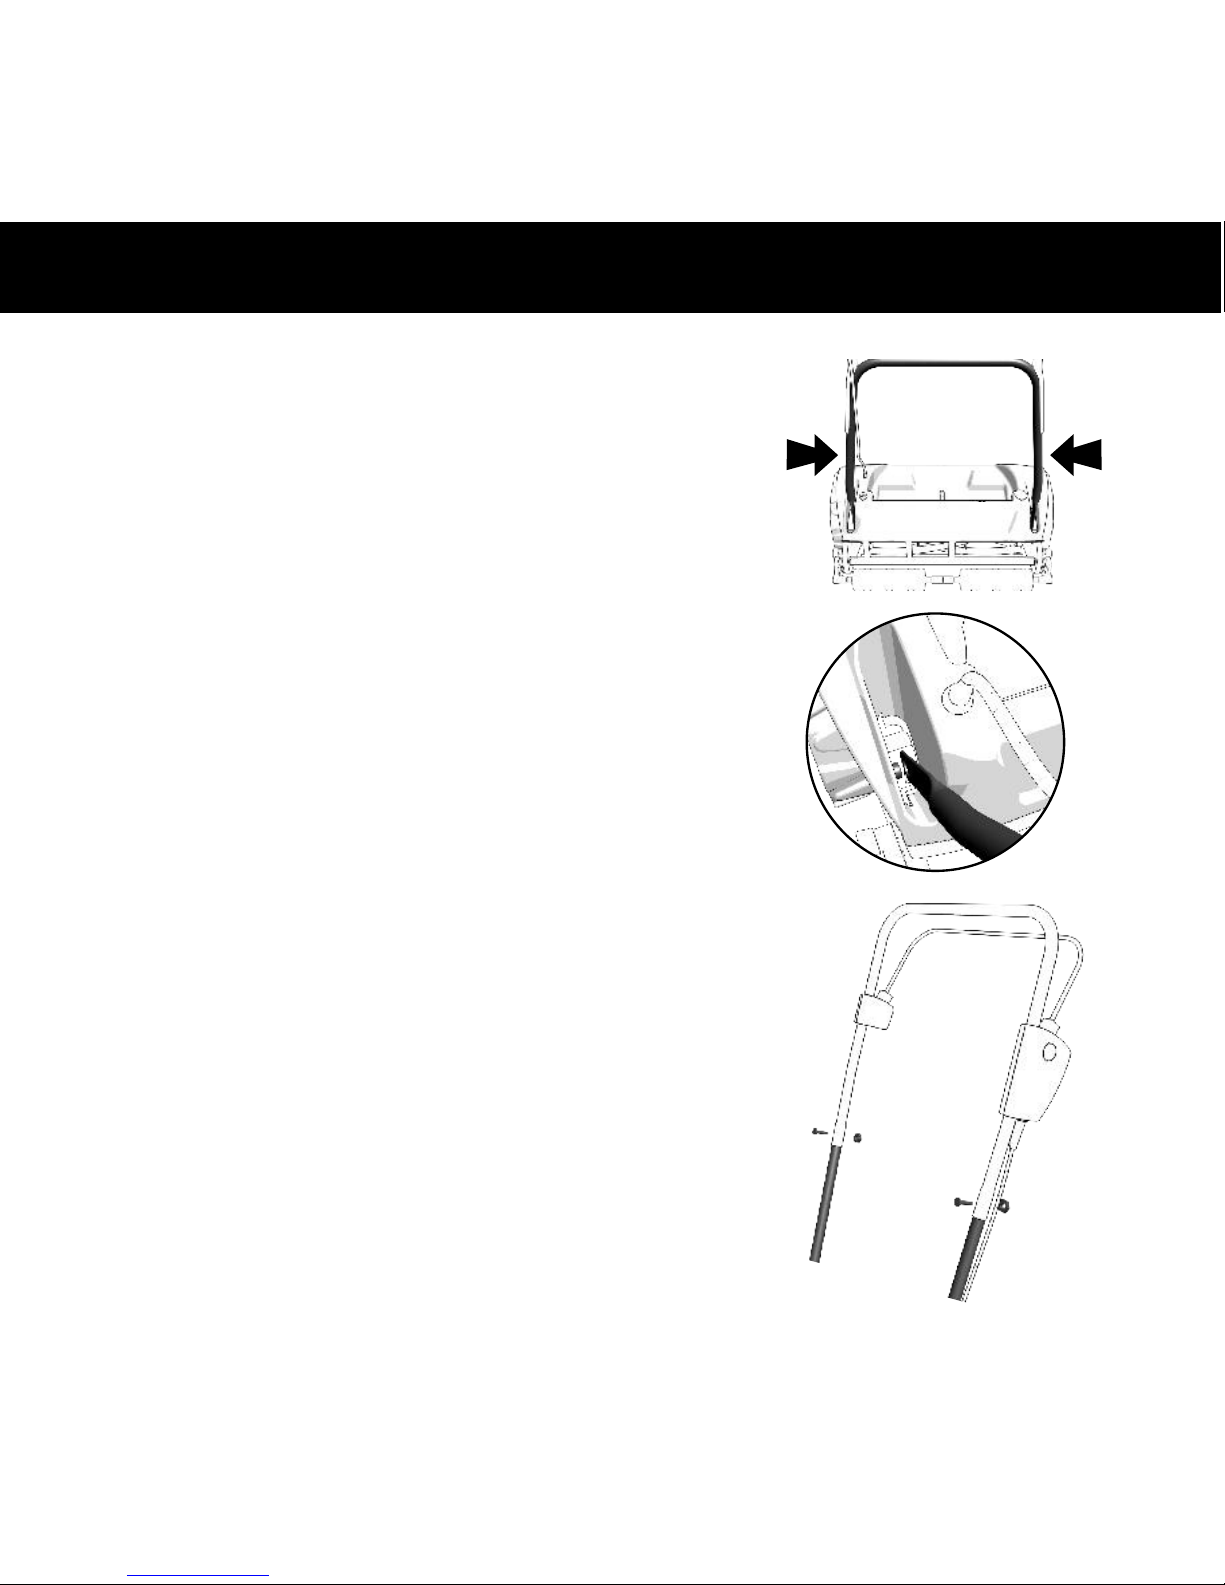
1. Unpack and remove the whole unit from its
packaging, and ensure all the parts are present.
(See figure1)
Caution: Remove the Safety Key and Battery
from the mower to safely work on the
product.
2. Fit the Lower Frame onto the two large lugs
on the Main Unit.
Fit one side and then flex the other side of the
frame until it fits over the opposite lug.
3. To assemble the Upper Frame to the 2
Middle Frame parts. Hold the Upper Frame so
that the Safety Lever faces downward, insert
the Middle Frame sections so that they bend
outwards and the holes are aligned. Insert bolt
from the top so that the nut is underneath the
frame then secure each one.
Assembly
2.0
2.0
Unpacking
Page 8
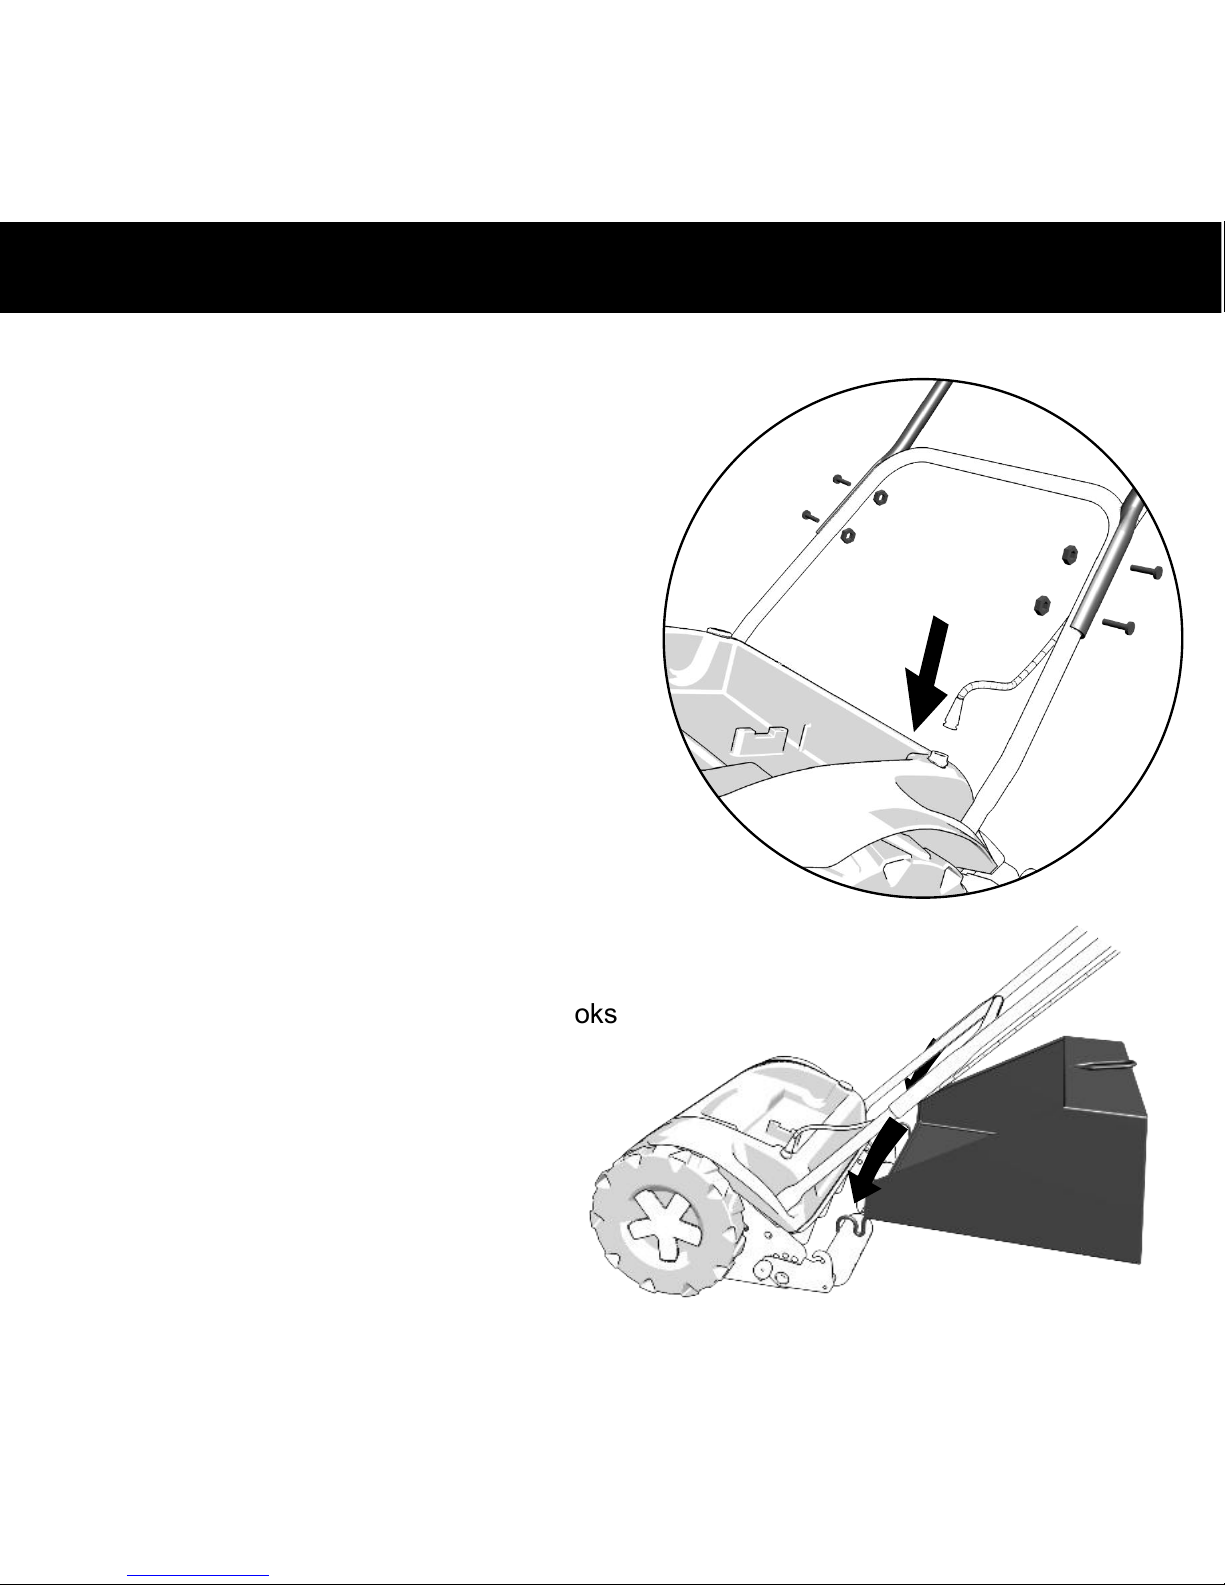
8. To fit the Grass Collector position the hooks
onto the rear roller axle of the Main Unit.
.
Assembly
3.0
5. Use 4 nuts and 4 bolts to hold the upper and
middle sections in place on the Lower Frame.
Insert the bolts from the outside and fit the nuts
on the inside of the frame.
6. Once the frame is assembled, connect the
plug on the handle cable to the socket on the
main unit. Tighten the screw ring to secure the
cable.
7. Secure the cable to the handle using the 3
cable clips, leave some slack on the cable to
allow free movement.
Page 9
Safety Key
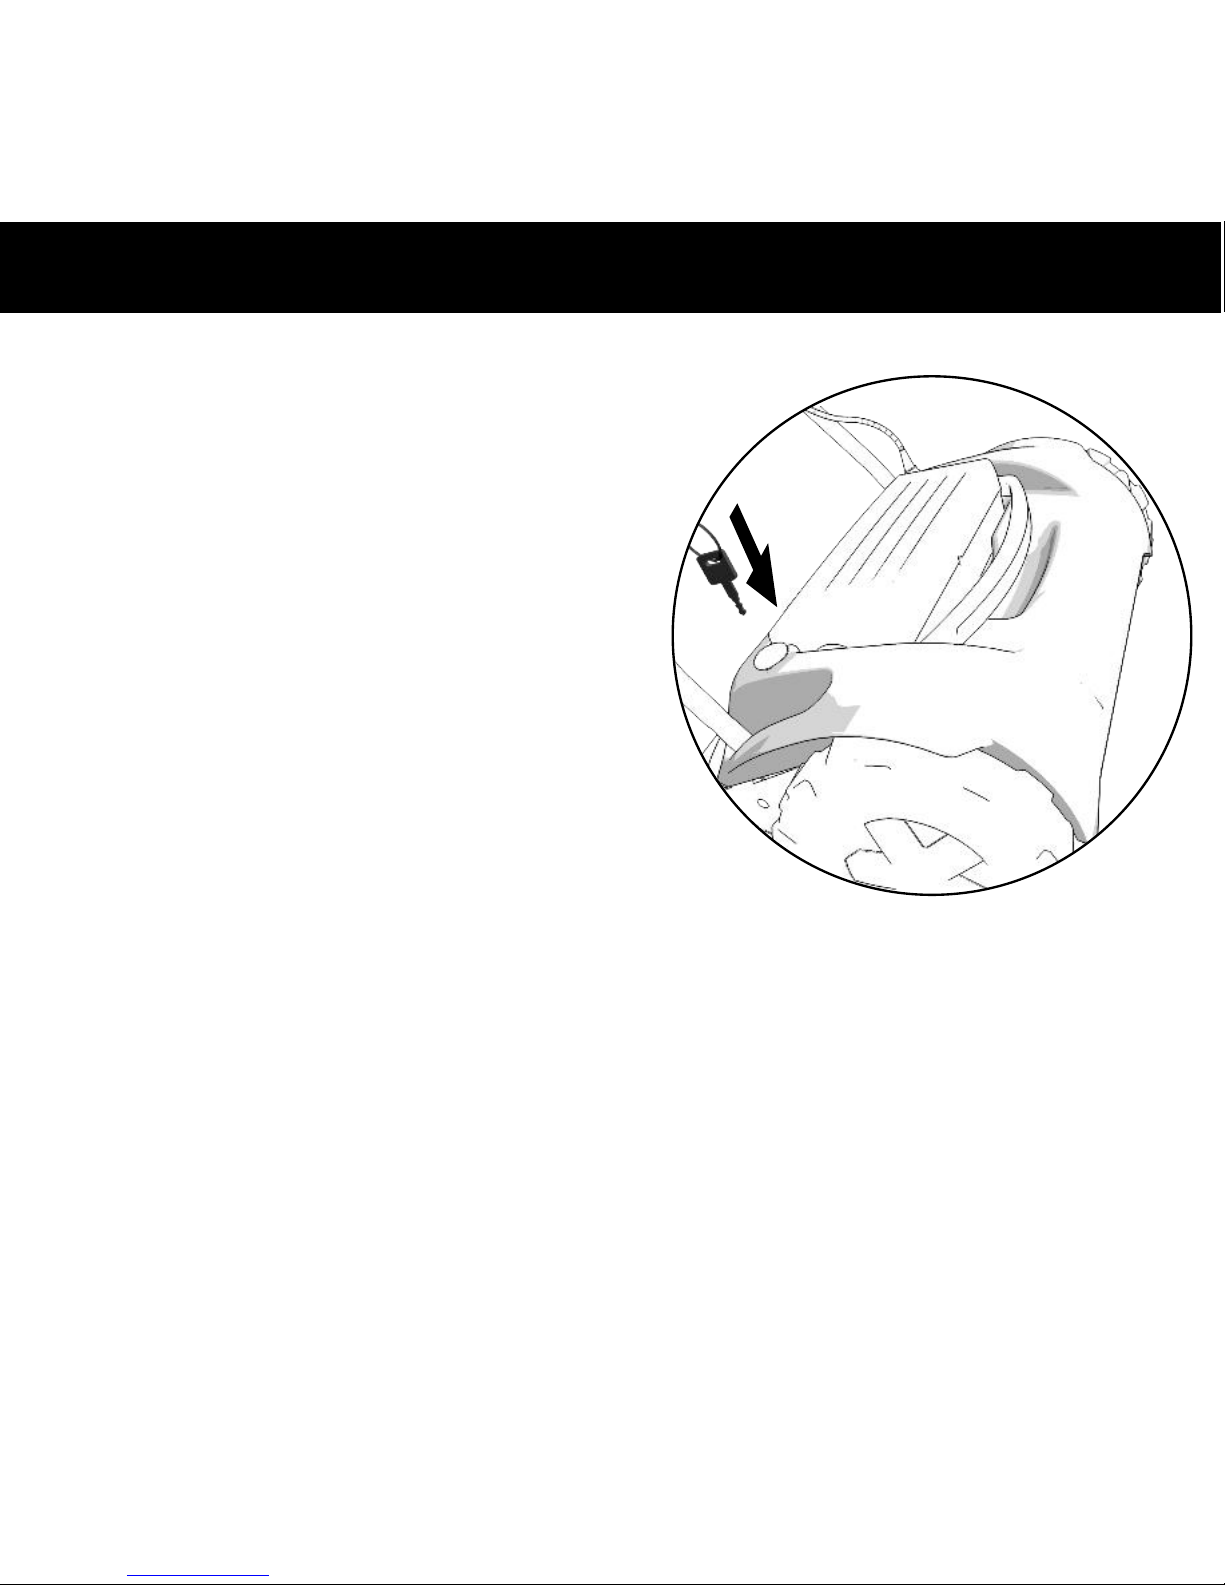
4.0
IMPORTANT : There is a safety key fitted to
this device, the product will not work without it.
.
The key needs to be fitted and turned to the on
position for the product to operate.
Always remove the key and battery before
carrying out any adjustments or
maintenance on the mower, or if the mower
is left unattended.
Before first use charge the battery for 16 hours.
Please refer to the section on charging and
recharging.
Page 10
If the battery is damaged in any way do not
attempt to charge it and replace
immediately.
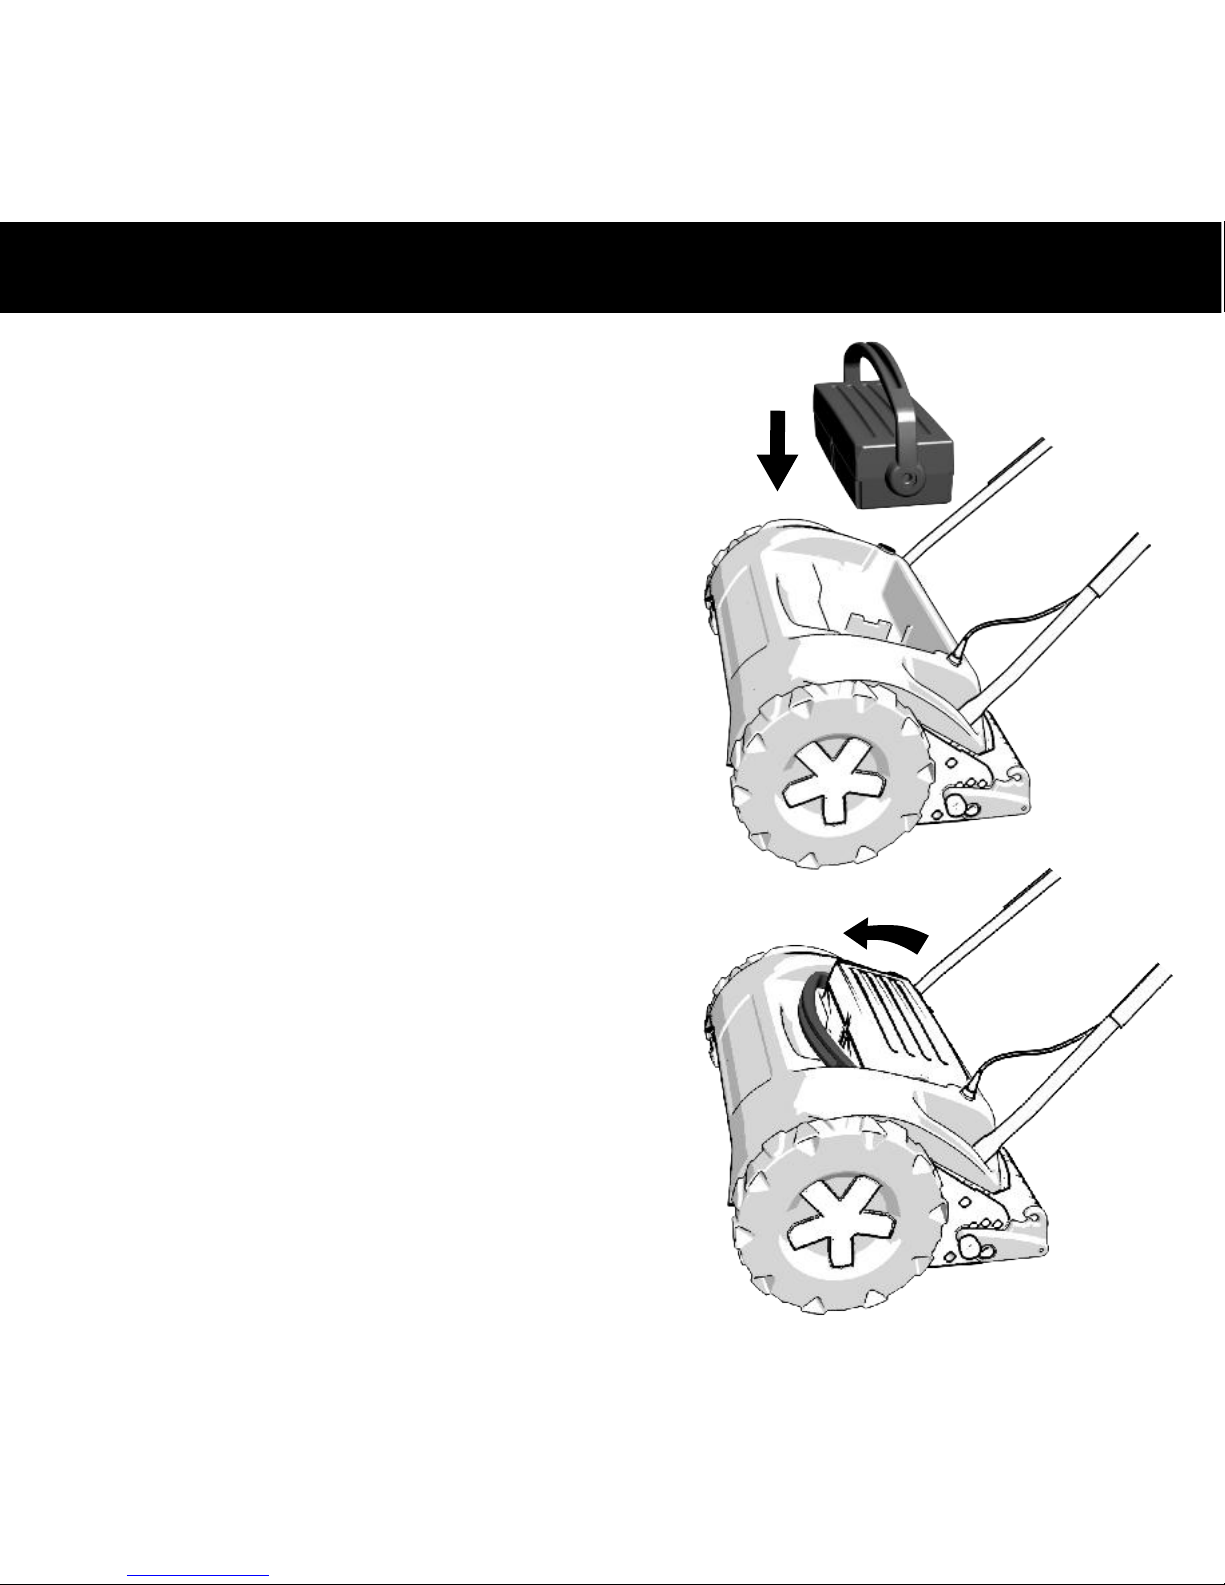
Remove the battery from the product by rotating
and lifting with the handle
Keep clear of any moisture, direct sunlight or
temperature extremes.
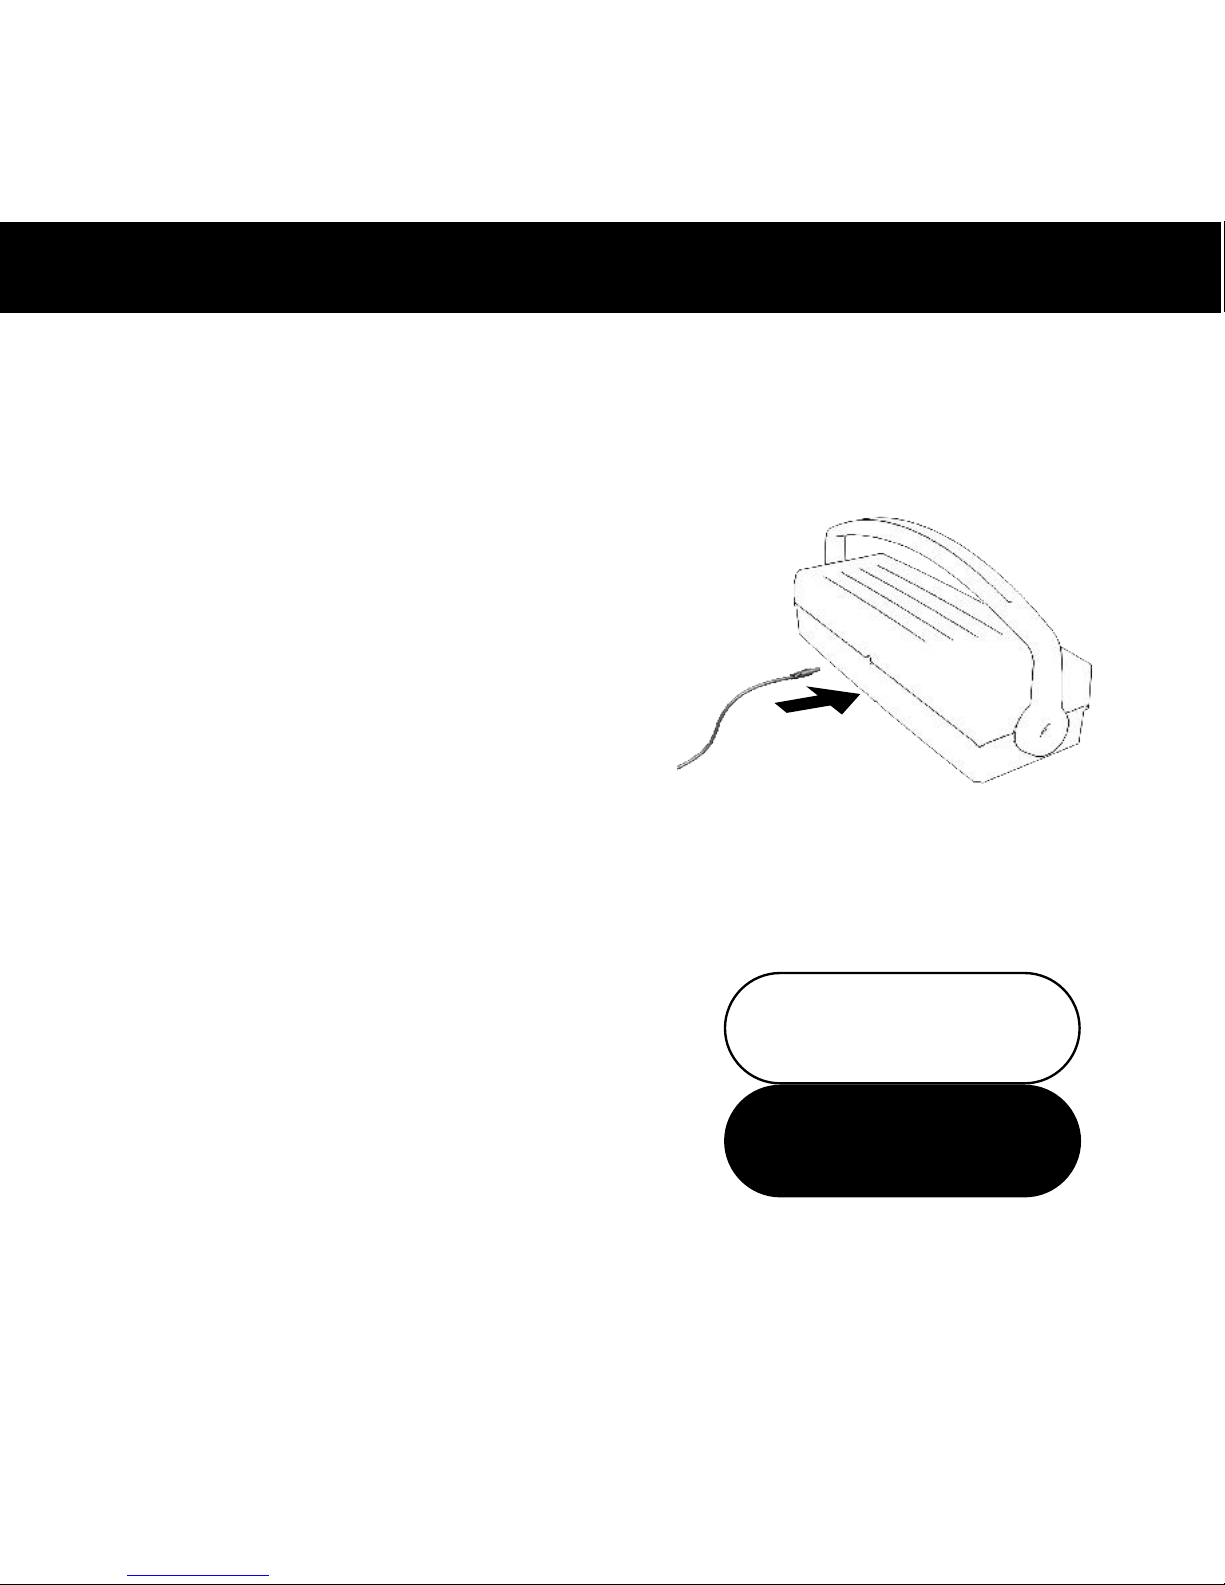
Fully unwind the charger cable, plug into a
suitable mains outlet, the light on the charger
will turn green. Fit the plug securely into the
socket on the battery. The light will turn red
while the battery is charging and back to green
once the battery is fully charged.
The battery requires 16 hours to charge fully
from flat.
To refit the battery, remove the charger lead
and lower it into the cavity on the top of the
product in the correct orientation. If the battery
does not fit correctly remove it and check there
are no obstructions in the cavity.
Rotate the top handle to the front of the mower
to lock into position.
To keep the battery in prime condition it is
best to charge the battery after each use,
and every 3 months if stored. IMPORTANT:
Charge the Battery After Each Use.
Battery
5.0
Page 11
Remove the Battery before charging.
Do not attempt to charge the battery while in
the mower.
Never store the mower with a flat Battery.
The battery should ideally be stored
between 10º C and 24º C (50º F and 75º F).
The battery will not be damaged if it is charged
for longer than 16 hours, but it is advisable not
to leave it on for more than 48 hours, as this
might shorten the battery life.
Warning: Only use the charger supplied with
this product. Do not attempt to charge this
product with any other charger nor attempt to
charge any other product with this charger, as it
can cause damage and will invalidate your
guarantee.
USE ONLY A REPLACEMENT BATTERY AS
SUPPLIED BY THE MANUFACTURER
Replacement batteries can be purchased from:
C Enterprise Limited
tel: 08453 88 97 69
email: [email protected]
www.cel-garden.com
POWERmow can be used as a push
mower if the battery needs charging.
Red Light
Unit Charging
Green Light
Unit Fully Charged
Charging
5.1
Page 12
Caution: For safety ensure that the Safety Key
and Battery are removed from the Mower before
adjusting the height.
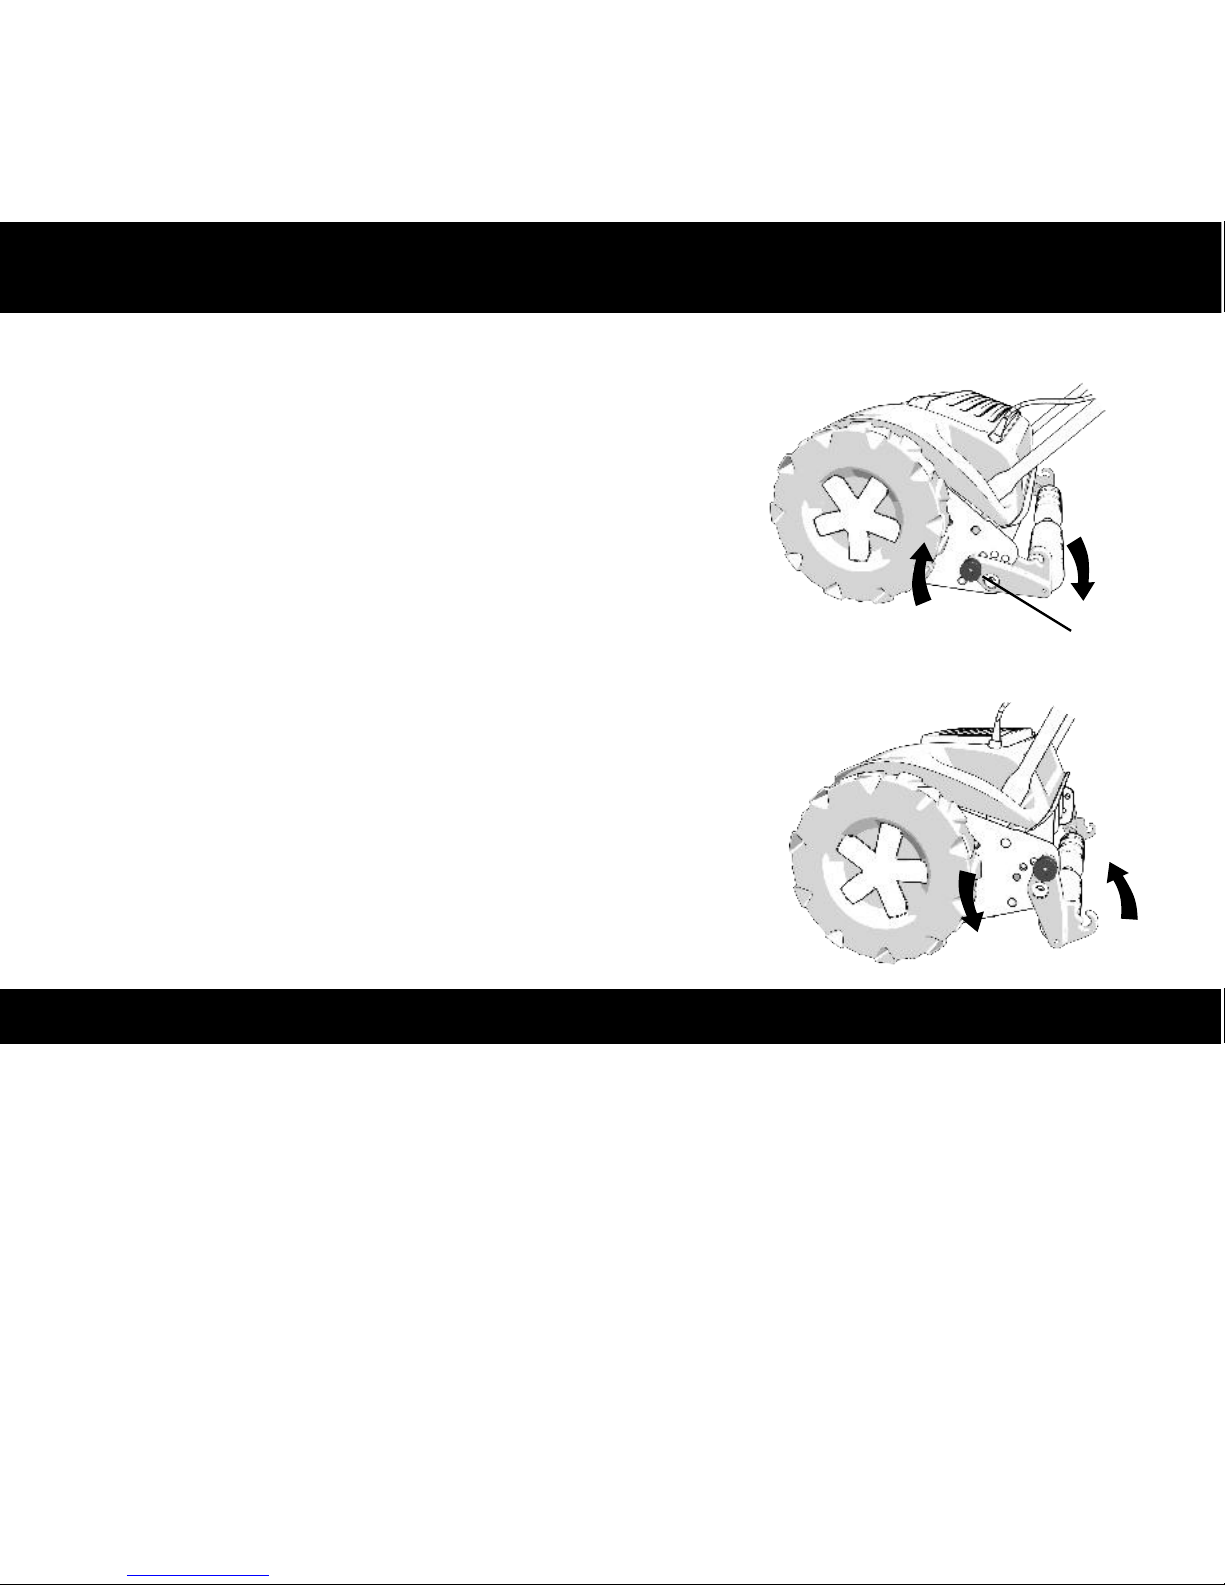
To ensure that the roller is aligned correctly, it is
recommended that the height is adjusted on a level
surface. It is also recommended that the Grass Collector
be removed as this will allow easier access to the Locking
Knobs.
1. Pull out the knobs on both sides of the roller.
2. Holding both knobs, raise or lower the mower to the
desired height.
3. Allow the knobs to spring into the holes, ensure they sit
fully into the hole, are at the same height and properly
secured.
Cutting Height
6.0
Lower
Raise
Locking
Knob
Pull out
This mower uses sealed Pb lead acid batteries, which like all batteries can be damaged if
they are over-discharged. The electronic circuit will warn of low battery level and then will
break the circuit before the battery is damaged, the battery should be recharged at this
point.
GREEN LED ON–Normal operation.
GREEN LED FLASHING–Over work protection, release trigger to reset. (see section 9.1)
RED LED FLASHING–Battery is getting low.
RED LED ON–Battery flat, please charge to prevent over discharge damage.
Battery Level Warning
7.0
Page 13
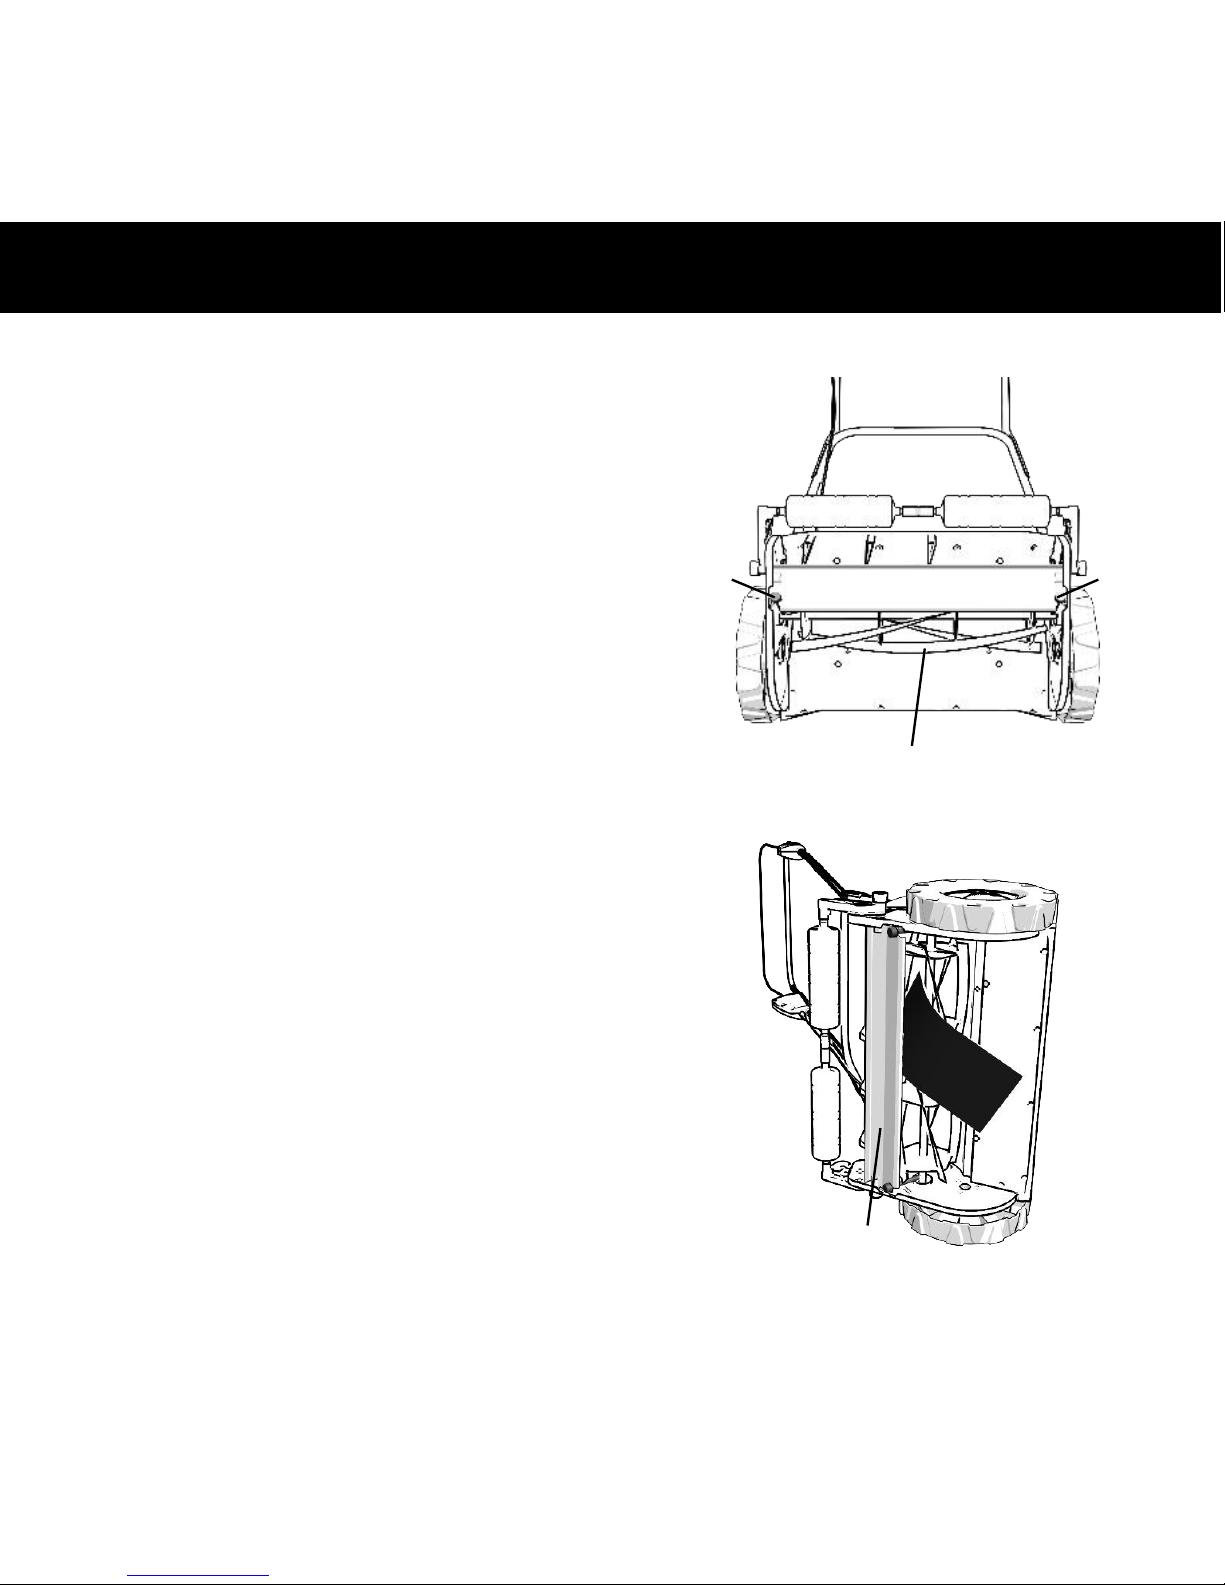
Blade Adjustment
8.0
SHARP BLADES-BE VERY
CAREFUL.
Caution: for safety ensure that the
Safety Key and Battery are removed
from the Mower before adjusting the
blade.
To adjust the blade turn the 2 bolts on the blade
shield. The cylinder should almost touch the
blade, but do not over tighten it.
If the cylinder hits the blade it is too tight and
will damage the cutting edge; loosen the nuts.
To check for correct adjustment, insert a piece
of paper between the blade and the cutting
cylinder. When the cutting cylinder is turned by
hand the paper should be cut cleanly.
CAUTION: DO NOT TURN THE
WHEELS AS THE BLADES WILL
ALSO TURN.
Cutting Cylinder
Paper
Blade
Bolt Bolt
Page 14
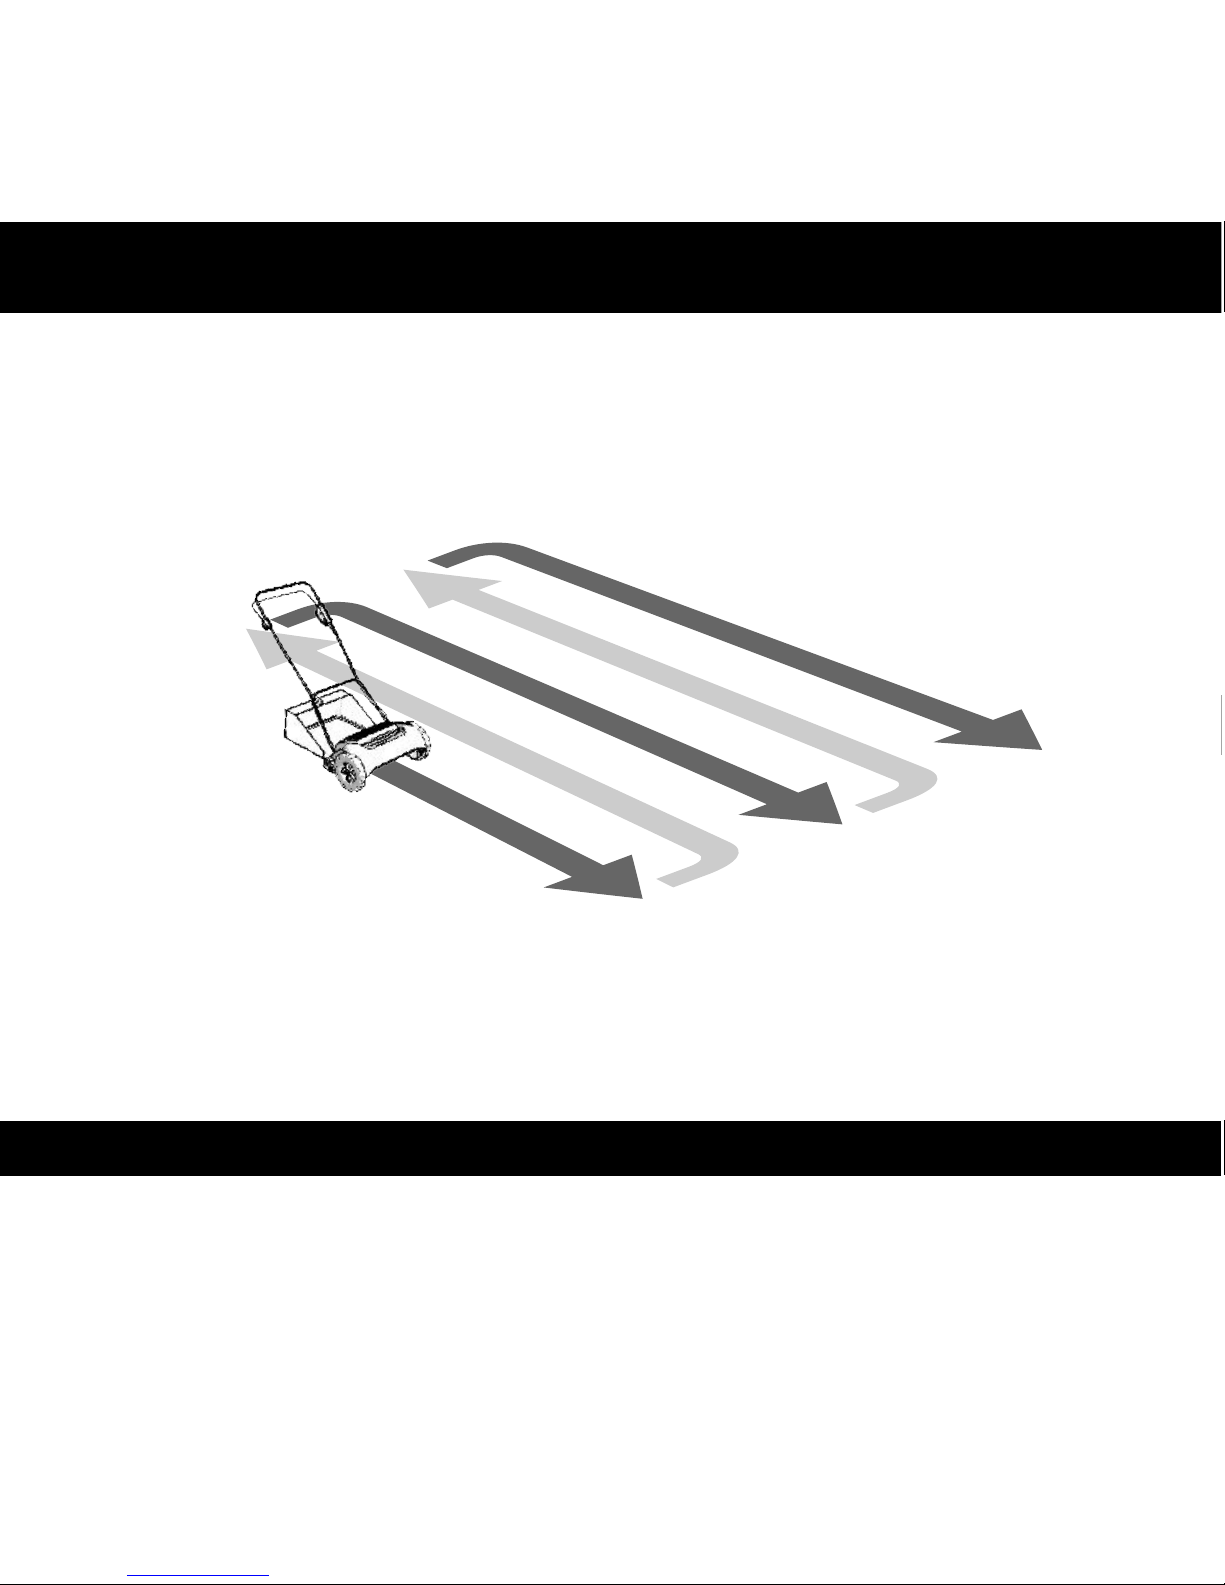
Mowing Tips
9.0
Before mowing ensure the area to be cut is clear of stones or other objects, which may
damage the mower or cause injury.
Start by mowing around the edges of your lawn, then cut the centre area in stripes. Mow
twice a week during growing season, the grass will be weakened if more than a third of
the length is cut away at one time. The mower should be parked, the operation lever
released and the blades allowed to stop before the grass collector is removed for
emptying.
Do Not Overload the Mower
If you hear the motor in the mower change pitch dramatically while mowing, it may be
overloaded.
If the grass is very thick or long, a first cut with the cutting height set higher will help
reduce the load on the motor. (see Cutting Adjustment Section 5.0)
Push the mower more slowly when cutting thick grass.
If the grass is particularly thick you can release the safety handle and use the
POWERmow as a push mower.
Before removing the grass box for emptying, release the operation lever and wait
for the blades to stop turning.
Lift the basket up and toward the mower to release the hooks.
Lift up and clear of the mower. Always empty clippings before storage.
Replacing the grass collector is the reverse of the removal process.
Emptying the Grass Collector
9.1
POWERmow
can be used
as push mower
without battery power
Page 15
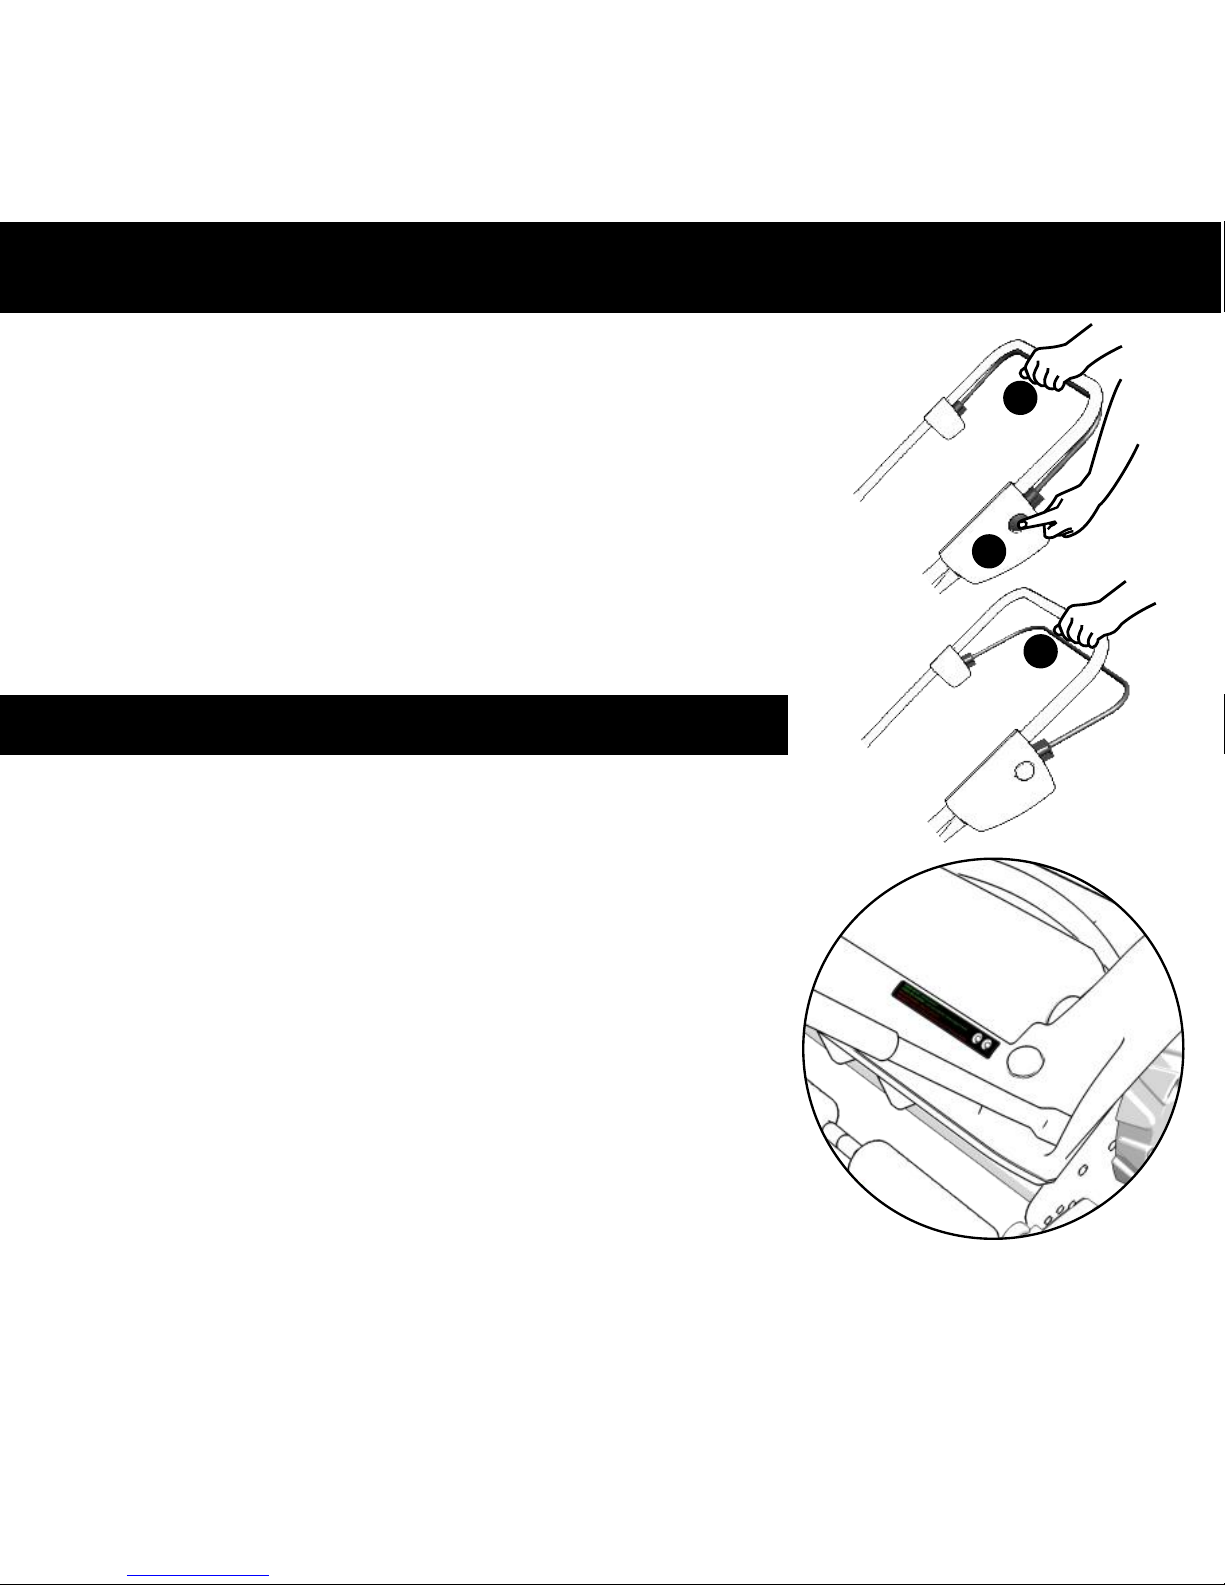
The handle is designed with a safety button to prevent
accidental starting.
1. Press and hold the safety button ‘A’ located on the left of
the upper handle, then squeeze the operation lever ‘B’
towards the upper handle.
2. Release the operation lever ‘B’ to stop the mower.
IMPORTANT : when releasing the operation lever, wait
for the blades to stop turning before clearing any grass
or putting your hands near the blades!
There are 2 levels of protection: Electronic(1.) and
Mechanical Clutch(2.). Both prevents damage to the
battery, motor and gearbox due to overload or jamming.
1. Electronic - If the blade jam or the mower is over
worked, the blade will stop and the green LED will flash.
2. Mechanical Clutch - If the blade suddenly stop, you
may hear a load noise which is the clutch, the electronic
protection will eventually stop the motor.
To restart, release the lever, ensure the blades are clear of
debris, wait a few then restart with the lever.
Please Note : cutting long, thick, or wet grass could
overload the mower or make the blade stall.
If the over work protection operates then the following
actions are recommended:
1. Make a first higher cut then make a second cut with the required cutting height.
2. Push the mower more slowly or release the lever and use the push powered function.
3. Check the blade is correctly adjusted so the grass is cut cleanly.
seconds
Starting & Stopping
10.0
Over Work Protection
A
B
B
10.1
Page 16

Before storing, remove the Safety key and Battery.
Turn the machine on its side and clean the blade area. If grass cuttings are compacted in
the blade area, remove with a wooden or plastic implement. Remove all grass and debris.
Clean the exterior of the machine thoroughly using a soft brush or cloth.
Do not use water, solvents or polish.
Store the lawnmower in a dry place and oil the blades.
Do not place other objects on top of the machine.
Care and Maintenance
11.0
CAUTION : Remove the key and Battery before carrying out any maintenance.
Do not accidentally turn the unit on while cleaning it.
Check for any faults such as loose or damaged blades, loose fittings and worn or
damaged components. Ensure the mower is in full working order before operating it.
Check that covers and guards are correctly fitted and are not damaged in any way.
Carry out any repairs before using the lawnmower again.
Clean the lawnmower using a soft brush or cloth.
Do not use abrasive materials to clean the product or immerse it in water.
Don't use on wet ground.
Don't allow pieces of string, rope, stones or fabrics to enter the unit.
Beware of raised areas such as paving stones or manhole covers that can damage the
blades.
Storage
11.1
Page 17

C a r e
When the time comes to dispose of this product please consider the environment and
take it to a recognised recycling facility instead of disposing with general household
waste.
The mower contains a sealed lead acid (Pb) battery which must be disposed of properly.
Call your local council, civic amenity site, or recycling centre for information on the
recycling and disposal of electrical products and lead acid (Pb) batteries.
Storage (continued)
11.1
Environment
For storage in confined spaces the handles can be removed from the mower. Disconnect
the power cord and flex the lower handles to remove from the frame locating lugs.
Never Store the Mower With a Flat Battery.
The battery should ideally be stored between 10ºC and 24ºC (50ºF and 75ºF).
To keep the battery in prime condition it is best to charge the battery after each
use, and every 3 months if stored. After each use charge for 16 hours to ensure the
battery is fully charged..
IMPORTANT: Charge the Battery After Each Use.
11.2
Page 18

FAQ
12.0
Why does my mower stop?
Make sure the battery is charged, properly seated and
locked in position.
Ensure the key is fitted and in the ON position.
The overload electronics is preventing damage, allow a
few minutes for the mower to cool clear any debris and
resume)
Press the safety button and hold the operation lever up to
restart the mower.
Where should I keep my battery?
My lawn is very hard to cut, what can I do?
Cut the grass more often to keep it shorter.
Ensure the mower is maintained correctly.
Do a high cut before cutting the grass short.
Ensure blades are adjusted correctly. (see Section 6.0)
Charge the battery.
CAUTION : Remove the key and battery before carrying
out any maintenance.
Remove any build-up of grass or debris from the blade
area. Check the blade for damage and oil if necessary.
(see Section 4.0)
(see Section 3.0)
(see Section 8.1)
(see Section 8.0)
Due to the high startup torque the mechanical clutch may
operate momentary, the noise you can hear is the clutch
slipping, this is normal. If it does not stop quickly please
check that the blades are adjusted correctly and free from
all grass buildup and debris.
The battery should ideally be stored between 10ºC and
24ºC (50ºF and 75ºF) so the best place would be i
IMPORTANT: Charge Battery After
Each Use.
(see Section 4.0)
(see Section 5.0)
(see Section 4.0)
My mower makes a noise when I start it?
nside
your house or garage.
My mower is noisy or won’t cut the
grass.
POWERmow can be used as a push mower if the
battery needs charging or if the grass is very thick.
Ask at your retailer or visit
www.cel-garden.com
How can I get my mower repaired if it is
damaged?
Contact your retailer.
Where do I find my serial number?
In front of the Main Unit and under the Battery.
What is your returns policy?
See inside cover of manual.
Check the blades are correctly adjusted to give a
clean cut. (see Section 6.0)
My battery runs out before I finish
mowing my lawn.
Battery life is approximately 2 years under normal
use, replace if necessary.
Where can I get replacement parts,
advice or help?
Ask at your retailer or visit www.cel-garden.com
Page 19
- 25 to 90 minutes*
- 40 cm
- 15, 25, 35, 45 mm
- 24V DC
- 16 hours
- 54 W
- 28.6V DC 800mA
- 70 dB(A)
- 94 dB(A)
- 1,0 m/s
- 18.2 Kg (including battery)
Unit operating cycle with full battery
Cutting width
Cutting height
Battery operating voltage
Charging period for fully discharged battery
Motor output power
Battery charger output
Sound Power Level, LPA,d
Sound Pressure Level, LWA,d
Vibration
Weight
© Copyright C Enterprise Limited 2009
13.0 Technical specifications
*Dependant on grass length & thickness
C Enterprise Limited
email: [email protected]
If you experience any problems with the product please contact
C Enterprise Limited Tel: 08453 88 97 69 email: [email protected]
www.cel-garden.com
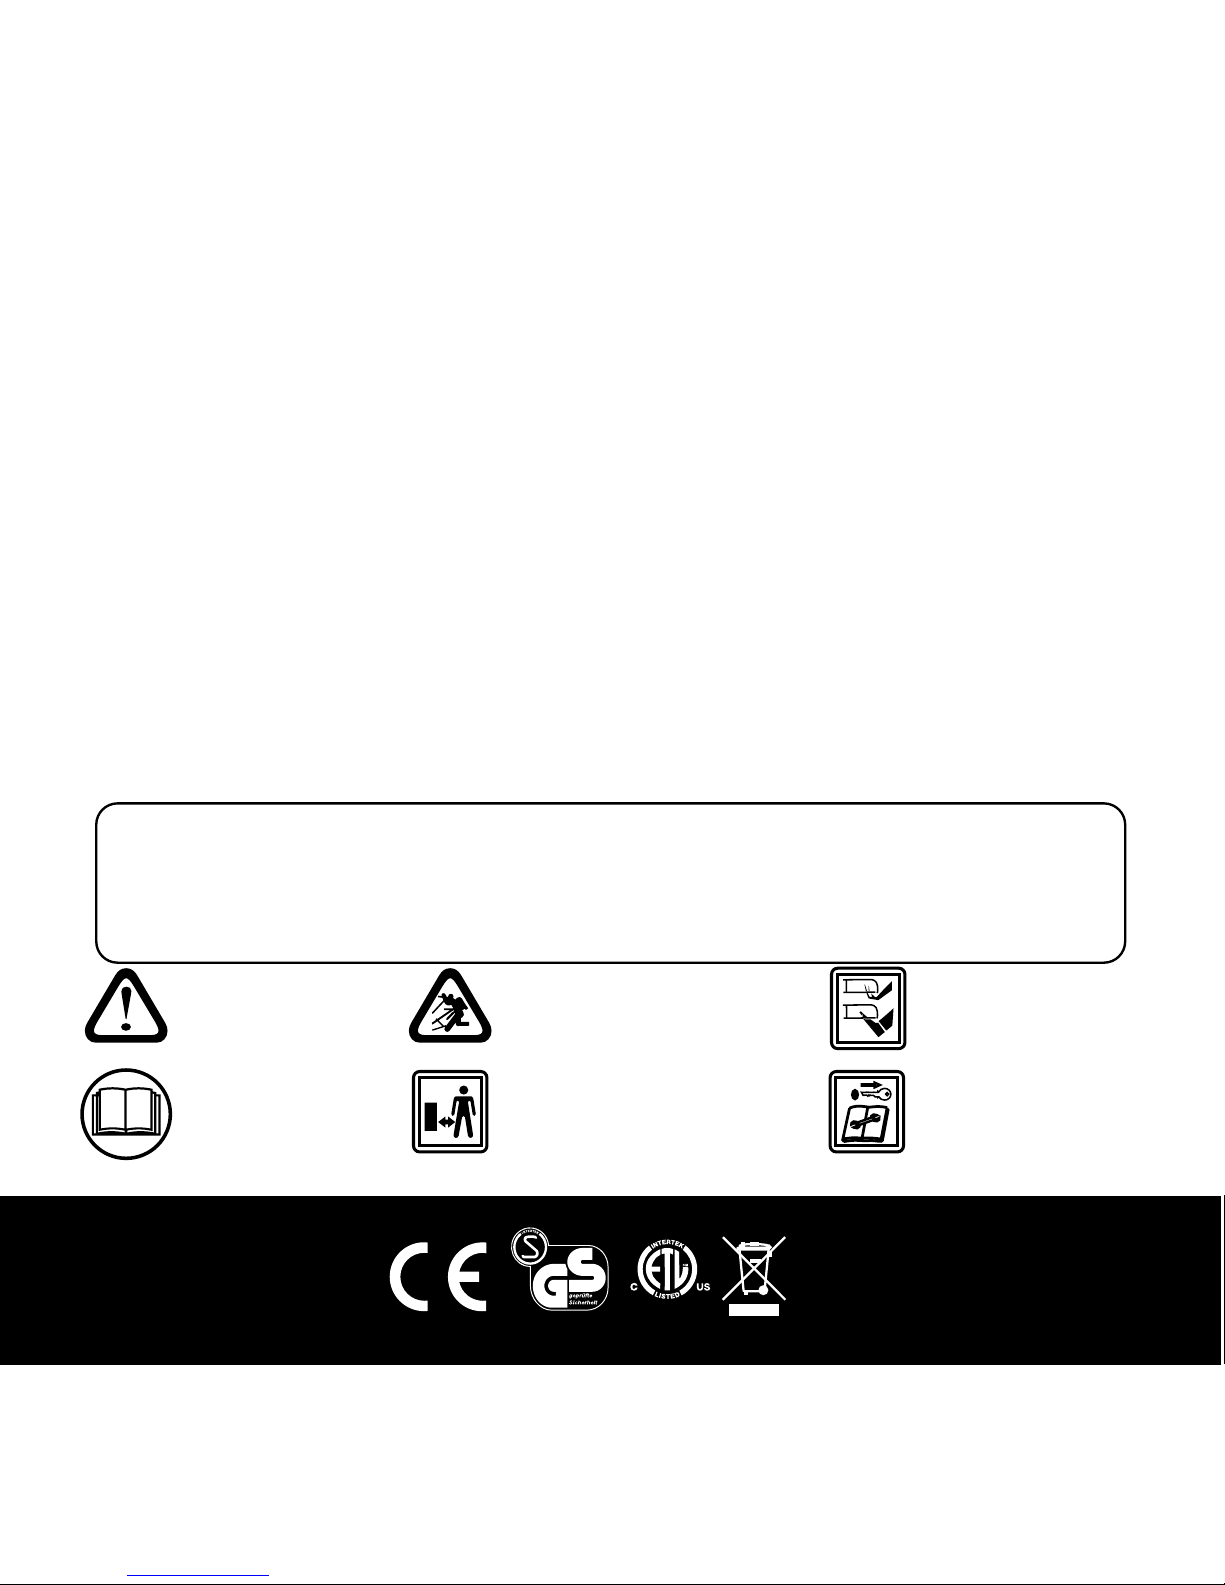
GENERAL HAZARD
SAFETY ALERT
READ
INSTRUCTION
MANUAL
BEWARE OF FLYING
OBJECTS AND DEBRIS
KEEP BYSTANDERS
AWAY
BEWARE OF SHARP
BLADES, BLADES
CONTINTUE ROTATE AFTER
MOTOR SWITCHED OFF
REMOVE DISABLING
DEVICE BEFORE
MAINTENANCE
2
3170303
Page 20

C Enterprise Limited www.cel-global.com [email protected]
UK HK USA China Europe Australia Japan• • • • • •
C Enterprise Ltd
 Loading...