


1
This document is subject to change without notice.
B1010SP0-EVB-1 Evaluation Board User Guide
Document No:
0019-02-08-01-000
B1010SP0-EVB-1 Bluetooth® Smart Evaluation Board User Guide
0019-02-08-01-000 (issue B)
INTRODUCTION
CEL's Bluetooth Smart Evaluation Board is a simple yet comprehensive way for designers to develop Bluetooth
®
Smart applications using CSR's µEnergy
Development Kit, but has been populated with a CEL B1010SP0 Mini Module. For m ore information on the CEL
B1010SP0 Mini Modules, please visit
B1010SP0-EVB-1 is design ed to be used i n conjunc tio n with CSR' s µEnerg y platf orm f or software de velopm ent, and
is a complete development environment for rapid prototyping of Bluetooth Smart products. It provides access to
CSR's µEnergy and CSRmesh
including:
• Software Development Kit (SDK)
• Example embedded applications for popular Bluetooth Smart and CSRmesh profiles
• Example host applications for iOS and Android
• xIDE for µEnergy (includes compiler)
• Production test and configuration tools
http://meshconnect.cel.com/B1010.
®
stacks for developing interoperable BLE 4.x and CSRmesh-based designs,
solution. B1010SP0-EVB-1 is based on CSR's µEnergy Starter
This User Guide describes the kit contents, SDK installation, and running the first application for both the µEnergy
and CSRmesh SDKs, used for BLE and CSRmesh applications, respectively.
Document No: 0019-02-08-01-000 (Issu e B )
Date Publ ished: September 9, 20 15

2
This document is subject to change without notice.
B1010SP0-EVB-1 Evaluation Board User Guide
TABLE OF CONTENTS
INTRODUCTION ............................................................................................................................................................................... 1
TABLE OF CONTENTS..................................................................................................................................................................... 2
KIT CONTENTS ................................................................................................................................................................................ 3
SOFTWARE INSTALLATION ............................................................................................................................................................ 4
CONNECTING THE HARDWARE: µENERGY SDK ......................................................................................................................... 6
RUNNING THE FIRST APPLICATION: µENERGY SDK .................................................................................................................. 7
USING B1010SP0-EVB-1 UART DEBUG PORT ............................................................................................................................ 10
COMPANION PHONE APPS: µENERGY SDK ............................................................................................................................... 11
CONNECTING THE HARDWARE: CSRMESH SDK ...................................................................................................................... 12
RUNNING THE FIRST APPLICATION: CSRMESH SDK................................................................................................................ 12
COMPANION PHONE APPS: CSRMESH SDK .............................................................................................................................. 15
NEXT STEPS .................................................................................................................................................................................. 15
REFERENCE: MEASURING CURRENT ON B1010SP0-EVB-1 .................................................................................................... 16
REFERENCE: BATTERY OPERATION .......................................................................................................................................... 16
REFERENCE: J101 AND J102 HEADER PINOUTS ....................................................................................................................... 17
REFERENCES ................................................................................................................................................................................ 18
REVISION HISTORY ...................................................................................................................................................................... 18
DISCLAIMER ................................................................................................................................................................................... 18
FOR MORE INFORMATION ........................................................................................................................................................... 18
TECHNICAL ASSISTANCE ............................................................................................................................................................. 18
Document No: 0019-02-08-01-000 (Issu e B )
Date Publ ished: September 9, 20 15

3
This document is subject to change without notice.
B1010SP0-EVB-1 Evaluation Board User Guide
KIT CONTENTS
The following components are included in B1010SP0-EVB-1:
1. Target Board:
Figure 1 - Evaluation Kit Target Board
For proper operation of the B1010SP0 Mini Module, ensure that the VDD_PADS, SPI_ENABLE, and VDD_BAT
jumpers are installed as shown in Figure 1.
2. A Mini-USB cable to connect the target board to the development PC:
Figure 2 - Mini-USB Cable
3. Card with website link to view/download the documentation.
Document No: 0019-02-08-01-000 (Issu e B )
Date Publ ished: September 9, 20 15

4
This document is subject to change without notice.
B1010SP0-EVB-1 Evaluation Board User Guide
SOFTWARE INSTALLATION
The following steps are required to complete the CSR µEnergy SDK setup:
1. Obtain the activation code for the kit. This is printed on a label on the side of the kit box, and looks similar to Figure 3. For
more information, visit
https://wiki.csr.com/wiki/Activation_Codes.
2. Register your kit at
information, visit
http://www.csrsupport.com using the activation code to create a CSR Support account. For more
https://wiki.csr.com/wiki/CSR_Support_Registration.
Figure 3 - B1010SP0-EVB-1 Activation Code
Figure 4 - CSR Support Registration
Document No: 0019-02-08-01-000 (Issu e B )
Date Publ ished: September 9, 20 15

5
This document is subject to change without notice.
B1010SP0-EVB-1 Evaluation Board User Guide
3. Once you have approved the terms and conditions and ECA agreement been approved for access you will be able to login
the CSR Support.
Note: Please make sure you use your company email address or you may be required to change your email address to gain
access. This is done through your account setting which will require an additional email be sent to your email address to be
verified for access requests.
Once authorized, it is possible to download the uEnergy SDK from CSRsupport with the CSRmesh level of access.
For access to CSRmesh SDK, click on the link highlighted below in green (at
activation code following steps at
https://wiki.csr.com/wiki/Activation_Codes
https://wiki.csr.com/wiki/Main_Page) and enter
Figure 5 – uEnergy SDK and CSRMesh SDK
Document No: 0019-02-08-01-000 (Issu e B )
Date Publ ished: September 9, 20 15

6
This document is subject to change without notice.
B1010SP0-EVB-1 Evaluation Board User Guide
4. Once you have successfully created a CSR Support account, download and install the latest version of the µEnergy SDK
(for BLE applications) or the CSRmesh SDK (for CSRmesh applications) from
configuration options are recommended during the installation process.
Note: always install the software before plugging in the hardware.
To continue with the µEnergy SDK, please see the section below called "Connecting the Hardware: µEnergy SDK".
To continue with the CSRmesh SDK, please see the section later in this document called "Connecting the
Hardware: CSRmesh SDK".
http://www.csrsupport.com. The default
Figure 6 - CSR µEnergy SDK Installer
CONNECTING THE HARDWARE: µENERGY SDK
1. Remove the target board from the anti-static packaging.
2. Connect the mini-USB cable to the target board USB port and connect the other end of the cable to a free USB port on the
development PC. The device drivers necessary to connect to the target board are automatically installed on the PC.
Figure 7 - Evaluation Kit Target Board Showing USB Port Location
Document No: 0019-02-08-01-000 (Issu e B )
Date Publ ished: September 9, 20 15

7
This document is subject to change without notice.
B1010SP0-EVB-1 Evaluation Board User Guide
RUNNING THE FIRST APPLICATION: µENERGY SDK
1. Launch xIDE by clicking on the xIDE shortcut on the desktop or navigating to it using the Windows Start Menu.
Figure 8 - xIDE Shortcut
Figure 9 - xIDE Window
2. Open the Heart Rate project by clicking on "Project" in the menu bar and selecting "Open Workspace". Navigate to the SDK
installation folder. If the default installation path was chosen, this will be C:\CSR_uEnergy_SDK-x.x.x.x\apps\hr_sensor.
Figure 10 - Default Location of hr_sensor Project
Document No: 0019-02-08-01-000 (Issu e B )
Date Publ ished: September 9, 20 15

8
This document is subject to change without notice.
B1010SP0-EVB-1 Evaluation Board User Guide
3. Some of the default settings need to be customized for your particular evaluation kit, including:
a. Bluetooth Address
b. Crystal Trim
c. Device Nam e
The Bluetooth Address and Crystal Trim need to match the values printed on the target board label.
Figure 11 - Example Target Board Label
4. Open the hr_sensor_cs101x_A05.keyr file in the SDK and change the values &BDADDR and &CRYSTAL_FTRIM to match
the label.
Figure 12 - Location of Bluetooth Address and Crystal Trim Values to be Modified
5. For the Bluetooth Address, the Endian format of the value on the label must be converted as shown below.
Figure 13 - Example Bluetooth Address Conversion
Document No: 0019-02-08-01-000 (Issu e B )
Date Publ ished: September 9, 20 15

9
This document is subject to change without notice.
B1010SP0-EVB-1 Evaluation Board User Guide
6. For the Crystal Trim value, the decimal value on the label must be converted to hexadecimal as shown below.
Figure 14 - Example Crystal Trim Value Conversion
7. To customize the Device Name, search for the declaration g_device_name in gap_service.c within the SDK.
Figure 15 - Location of Device Name Value to be Modified
8. Replace the word "Sensor" with the serial number on the label.
Figure 16 - Modification to Device Name
Document No: 0019-02-08-01-000 (Issu e B )
Date Publ ished: September 9, 20 15

10
This document is subject to change without notice.
B1010SP0-EVB-1 Evaluation Board User Guide
9. Compile the Heart Rate application by clicking on Build in the SDK menu bar. Select Build Active Project or press F7
shortcut key. This will build all of the files included in the active project in the current workspace using the selected
configuration into an application image for the Target board.
The build is incremental, so the minimum set of builds are performed in order to reflect changes to source files and
configurations. The Target board must remain connected during compilation.
Figure 17 - Successfully Built Project
10. Download the application to the hardware by selecting Run from the Debug menu or press the F5 shortcut key. The Heart
Rate application will now be running on the hardware.
Note that it will stop advertising after a few minutes so will not be visible to any searching phones. To re-enable
advertisements, the button can be connected to PIO11 with a jumper (not supplied) or the eval board can be power cycled.
For more information on the heart rate application, see the Heart Rate Sensor Application Note installed with the SDK. If the
default installation path was chosen, this will be located at C:\CSR_uEnergy_SDK-2.4.5.13\apps\hr_sensor\ CS-227117-
AN_CSRuEnergyHeartRateSensorApplicationNote.pdf
USING B1010SP0-EVB-1 UART DEBUG PORT
The B1010SP0-EVB-1 does not include a 3.3V level shifter required to connect to a computer's USB or RS232 interface.
CEL recommends purchasing an external 3.3V to USB level shifter.
For more information about debugging please see the debug module of the xIDE. It's located under the Navigator window by
selecting Help Documents -> Firmware Library, select the Modules tab and scroll to the bottom and select the Debug module.
The Debug module contains a number of functions to allow an application to send basic text strings across the UART, primarily
for sending debugging messages to a serial terminal.
Document No: 0019-02-08-01-000 (Issu e B )
Date Publ ished: September 9, 20 15

11
This document is subject to change without notice.
B1010SP0-EVB-1 Evaluation Board User Guide
COMPANION PHONE APPS: µENERGY SDK
Reported pulse information from the Heart Rate application can be viewed with an iOS or Android phone. Visit the "Mobile
Applications" section at
http://wiki.csr.com for information on downloading the example apps.
Figure 18 - CSR Profile Demonstrator App for iOS
Figure 5 - Heart Rate App for Android
Document No: 0019-02-08-01-000 (Issu e B )
Date Publ ished: September 9, 20 15

12
This document is subject to change without notice.
B1010SP0-EVB-1 Evaluation Board User Guide
CONNECTING THE HARDWARE: CSRMESH SDK
This section follows the "Software Installation" section (earlier in this document) for users developing with the
CSRmesh SDK.
1. Remove the target board from the anti-static packaging.
2. Connect the mini-USB cable to the target board USB port and connect the other end of the cable to a free USB port on
the development PC. The device drivers necessary to connect to the target board are automatically installed on the PC.
3. Connect a jumper wire (not supplied) between J101 pin 14 (PIO10) and the LED control pin as shown in the figure
below. This wire will be used to control the LED.
Figure 20 - Evaluation Kit Target Board Showing USB Port Location & Jumper Wire
RUNNING THE FIRST APPLICATION: CSRMESH SDK
1. Launch xIDE by clicking on the xIDE shortcut on the desktop or navigating to it using the Windows Start Menu.
Figure 21 - xIDE Shortcut
Document No: 0019-02-08-01-000 (Issu e B )
Date Publ ished: September 9, 20 15

13
This document is subject to change without notice.
B1010SP0-EVB-1 Evaluation Board User Guide
Figure 22 - xIDE Window
2. Open the Light Control pr oj ect by clicking on "Pr oje ct" in the menu bar and select ing "O pen Workspace" . Navigate to the
SDK installation folder. If the default installation path was chosen, this will be
C:\CSR_uEnergy_CSRmesh\applications\CSRmeshLight.
The Light Control application allows a Bluetooth Smart-enabled phone to send and receive CSRmesh commands and
enables the user to control the LED on the Target board.
Figure 23 - Default Location of CSRmeshLight Project
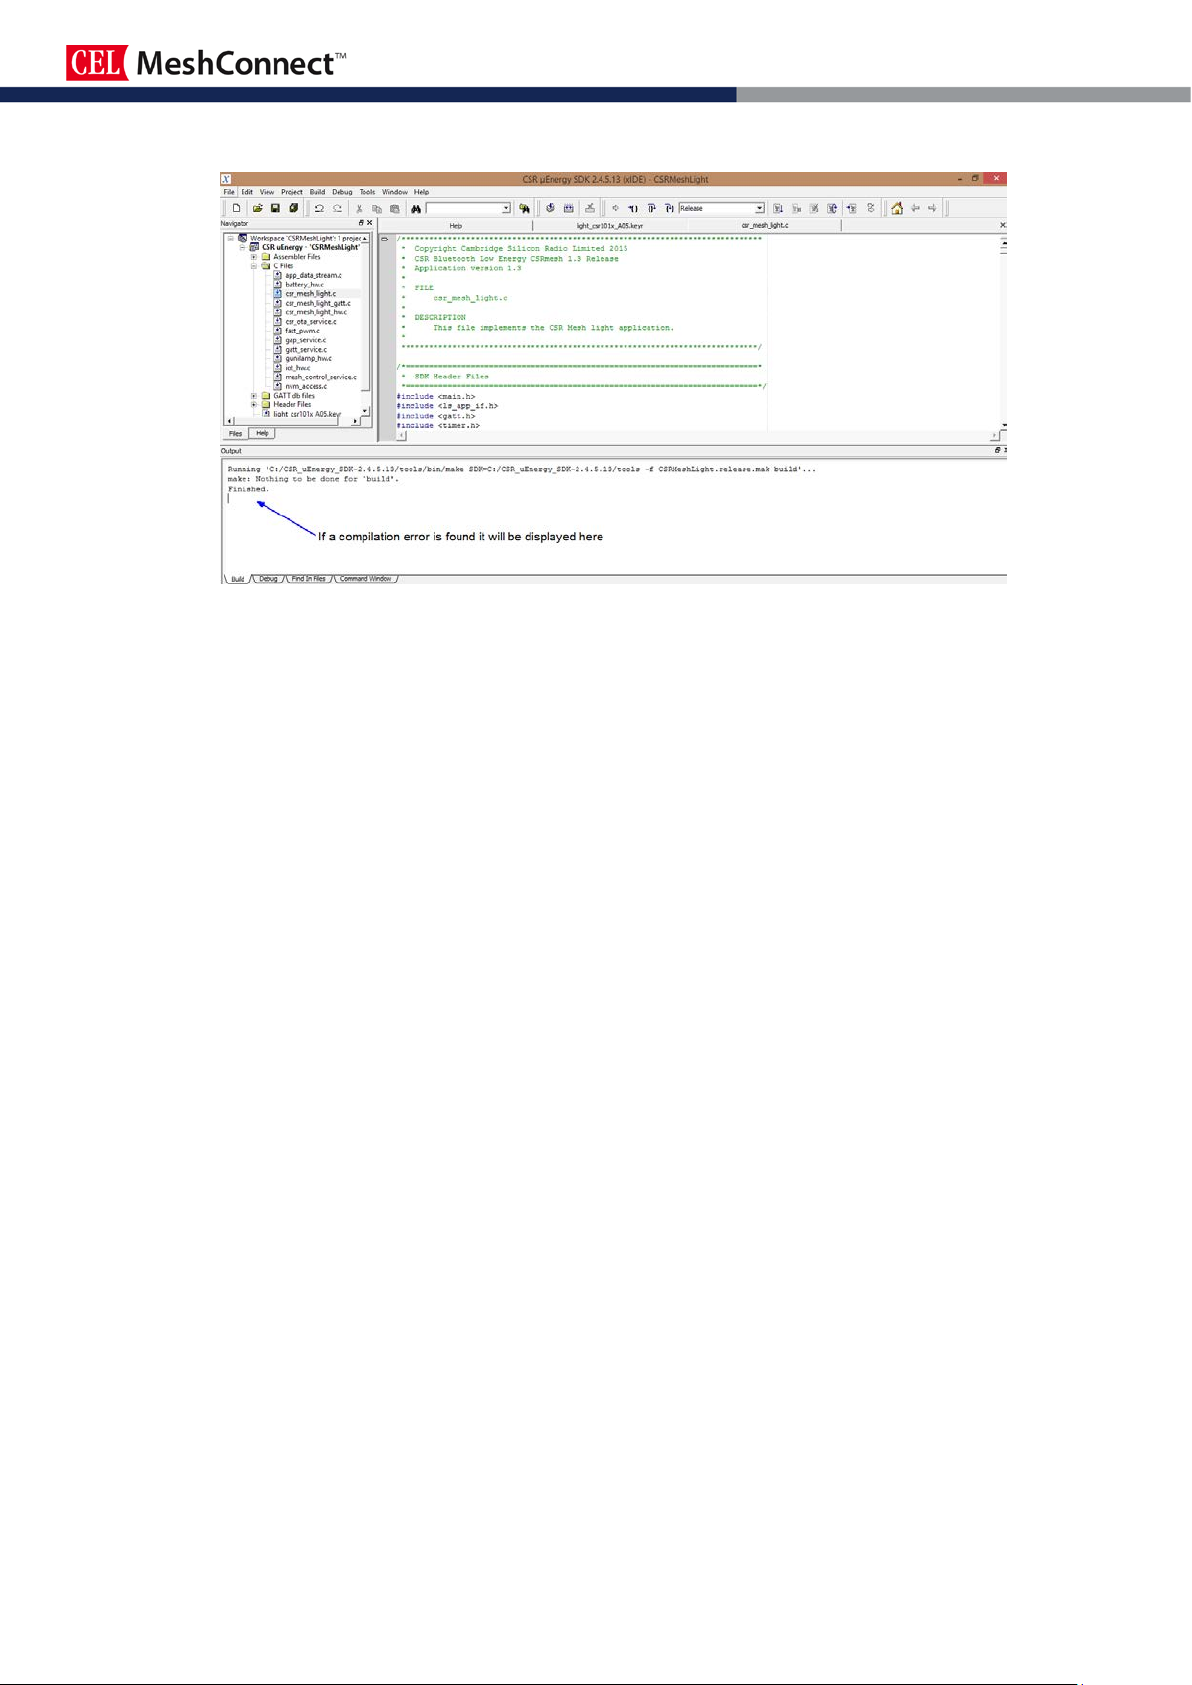
3. Compile the Light Control application by clicking on Build in the SDK menu bar. Select Build Active Project or press F7
shortcut key. This will build all of the files included in the active project in the current workspace using the selected
configuration into an application image for the Target board.
The build is incremental, so the minimum set of builds are performed in order to reflect changes to source files and
configurations. The Target board must remain connected during compilation.
Document No: 0019-02-08-01-000 (Issu e B )
Date Publ ished: September 9, 20 15
14
This document is subject to change without notice.
B1010SP0-EVB-1 Evaluation Board User Guide
Figure 24 - Successfully Built Project
4. Download the application to the hardware by selecting Run from the Debug menu or press the F5 shortcut key. The Light
Control application will now be running on the hardware.
For more information on the Light Control application, see the CSRmesh Light Application Note available for download
from the CSR Support website.
If desired, add additional B1010SP0-EVB-1 eval boards to the setup, following the same steps listed above. The eval
boards will automatically mesh.
Document No: 0019-02-08-01-000 (Issu e B )
Date Publ ished: September 9, 20 15

15
This document is subject to change without notice.
B1010SP0-EVB-1 Evaluation Board User Guide
COMPANION PHONE APPS: CSRMESH SDK
The Target board LED can be controlled via a companion Android or iOS app. The apps can be downloaded from the CSRmesh
portion of the CSR Support website. This section will describe the operation of the Android app.
The app will connect to a CSRmesh device. The device acts as a bridge from the phone app to the rest of the CSRmesh
network.
1. When the app is launched, the initial screen shown below is displayed.
2. Tap on "Device Association" to search for devices that support CSRmesh.
3. Tap a discovered device to connect to it.
4. The app may ask you for a network passphrase. Enter any suitable passphrase to be used by all your trusted devices.
Select the check box "Authorise Devices" only
(private keys) for each of your end devices.
5. To control the Target board LED, select the Light Control menu option. Tap on the red portion of the color wheel and
switch the control to "On". You should see the Target board LED toggle off/on as you tap between "Off" and "On".
Note: The app was designed to be used with a tri-color LED, while this eval board only has a single-color red LED, so
ensure that the red region on the color wheel is selected. Also, the dimming feature of the app is not supported.
if you wish to use optional device authentication and know the short codes
Figure 25 - Initial Screen, Device Association Screen, Light Control Screen
NEXT STEPS
For the µEnergy SDK, CSR provides application notes for many different BLE example applications, including an Alert Tag,
Blood Glucose Sensor, Blood Pressure Sensor, Keyboard, Mouse, etc. Visit the "Example Applications" section at
http://wiki.csr.com for a complete list.
For the CSRmesh SDK, CSR provides application notes for many different CSRmesh example applications, including a Switch,
Heater, Temperature Sensor, etc. Visit the CSRmesh portion of the CSR Support website for a complete list.
Document No: 0019-02-08-01-000 (Issu e B )
Date Publ ished: September 9, 20 15

16
This document is subject to change without notice.
B1010SP0-EVB-1 Evaluation Board User Guide
REFERENCE: MEASURING CURRENT ON B1010SP0-EVB-1
To measure the total current consumed by the CEL module, a precision digital multi-meter can be used in place of the VDD_BAT
jumper. This measures all of the current flowing to the module.
In order to measure the correct current, it is also necessary to temporarily remove the SPI_ENABLE jumper on the module. This
is because in SPI mode the module has a 47kΩ pull-down resistor that is pulled high. See the figure below for the location of the
VDD_BAT and SPI_ENABLE jumpers.
Figure 26 - SPI_ENABLE, VDD_BAT, BATT/USB Jumper Settin gs
REFERENCE: BATTERY OPERATION
The Target board can be powered from a CR2032 3V Lithium Ion battery (not supplied). It should be fitted to the battery holder
with the positive (+) side upwards.
When the battery is in use, the BATT/USB jumper should be moved to the BATT position. The location of this jumper is shown in
the above figure.
Document No: 0019-02-08-01-000 (Issu e B )
Date Publ ished: September 9, 20 15

17
This document is subject to change without notice.
B1010SP0-EVB-1 Evaluation Board User Guide
AIO0
25
13 3 4
15
20
PIO1/UART_RX
PIO3
10
16 7 8
17
15
PIO4
PIO7/MOSI
23
20
11
12
22
24
PIO8/MISO
N/C
N/C
N/C 3 4
N/C
N/C
N/C
N/C
N/C
N/C 7 8
N/C
N/C
N/C
N/C
N/C
N/C
11
12
N/C
N/C
N/C
1, 2, 12,
31, 33
1, 2, 12,
31, 33
REFERENCE: J101 AND J102 HEADER PINOUTS
The following tables describe the breakout connections J101 and J102 (MOD2 connections) and are intended to show where the
corresponding J101 and J102 pins can be used to make a connection to the CEL B1010SP0. CSR1010 IC pin information is
also included below.
J101 Breakout Connections:
Description
CEL B1010SP0
Module Pin
CSR1010
IC Pin
J101
Header Pin
J101
Header Pin
CSR1010
IC Pin
CEL B1010SP0
Module Pin
Description
N/C N/C N/C 1
PIO0/UART_TX 19 14 5
PIO5/D_CLK 27 18 9
PIO9 18 23 13
PIO11 29 25 15
N/C N/C N/C 17
N/C N/C N/C 19
J102 Breakout Connections:
Description
CEL B1010SP0
Module Pin
CSR1010
IC Pin
I2C_SDA 11 29 1
N/C N/C N/C 5
J102
Header Pin
2 N/C N/C N/C
6 N/C N/C N/C
10 19 22 PIO6/CSB
14 24 21 PIO10
16 N/C N/C N/C
18 N/C N/C N/C
20 N/C N/C N/C
J102
Header Pin
CSR1010
IC Pin
CEL B1010SP0
Module Pin
Description
2 28 14 I2C_SCL
6 N/C N/C N/C
N/C N/C N/C 9
N/C N/C N/C 13
AIO1 28 12 15
VDD_BAT 13 1 17
GND
* See CSR1010 and B1010SP0 datasheets for detail pin descriptions.
Document No: 0019-02-08-01-000 (Issu e B )
Date Publ ished: September 9, 20 15
PAD 19
10 N/C N/C N/C
14 11 30 AIO2
16 4 7 WAKE
18 N/C N/C N/C
20 PAD
GND

18
This document is subject to change without notice.
B1010SP0-EVB-1 Evaluation Board User Guide
Reference Documents
Download
California Eastern Laboratories
0019-00-07-00-000 B1010SP0 Mini Module Datasheet
Link
CSR
CSR1010 Datasheet
Link
CSR Wiki
Link
(Issue A) July 20, 2015
(Issue B) Sept. 9, 2015
Added section Using B1010SP0-EVB-1 UART Debug Port
The information in this document is current as of the published date. The information is subject to change without notice. For actual
REFERENCES
REVISION HISTORY
Previous Versions Changes to Current Version Page(s)
0019-02-08-01-000
0019-02-08-01-000
Initial Release N/A
Updated Login and CSR software download procedure and figure numbers.
DISCLAIMER
design-in, refer to the latest publications of CEL Data Sheets or Data Books, etc., for the most up-to-date specifications of CEL
products. Not all products and/or types are available i n every count r y. Pl ease c heck with a CEL sales representative for availabilit y and
additional information.
No part of this document may be copied or reproduced in any form or by any means without the prior written consent of CEL.
CEL assumes no responsibility for any errors that may appear in this document.
CEL does not assume any liabili t y for inf ri ngement of patents, copyrights or other intellectual property rights of thi rd parties by or arising
from the use of CEL products listed in this document or any other liability arising from the use of such products. No license, express,
implied or otherwise, is granted under any patents, copyrights or other intellectual property rights of CEL or others.
Descriptions of circuits, software and other related inform ation in this document are provided for ill ustrative purposes in semiconductor
product operation and application examples. The incorporat ion of these circuits, soft ware and information in the design of a customer’s
equipment shall be done under the full responsibility of the customer. CEL assumes no responsibility for any losses incurred by
customers or third parties arising from the use of these circuits, software and information.
All
FOR MORE INFORMATION
For more information about CEL MeshConnect products and solutions, visit our website at www.cel.com/MeshConnect.
TECHNICAL ASSISTANCE
For Technical Assistance, visit http://www.cel.com/MeshConnectHelp
Document No: 0019-02-08-01-000 (Issu e B )
Date Publ ished: September 9, 20 15
 Loading...