

Page 1
Sharing life’s special moments
all around the world.
SHARING MADE EASY
© 2004 CeivaTMLogic, Inc., Burbank, CA 91502. All Rights Reserved.
Protected by United States Patent No. 6,442,573. Other Patents
P ending. Owner’s Guide for model LF-2003 OGC20704.
SHARING MADE EASY
Page 2

2
TABLE OF CONTENTS
PRODUCT INFORMATION
31
Table of Contents
Sharing Made Simple and Easy . . . . . . . . . . . . . . . . . . . . . . . . . . . . . . . . . . . . . . . . . . . . . . .p. 3
Product Diagrams List of Components
Quick Start Instructions
. . . . . . . . . . . . . . . . . . . . . . . . . . . . . . . . . . . . . . . . . . . . . . . . . . . .p. 5
Inviting Friends & Family to Send You Photos
What Do The Buttons Do?
Advanced Features
Accessories
. . . . . . . . . . . . . . . . . . . . . . . . . . . . . . . . . . . . . . . . . . . . . . . . . . . . . . . .p. 10
. . . . . . . . . . . . . . . . . . . . . . . . . . . . . . . . . . . . . . . . . . . . . . . . . . . . . . . . . . . . .p.15
. . . . . . . . . . . . . . . . . . . . . . . . . . . . . . . . . . . . . . . . . . . . . . . . .p. 10
Sending Photos (and getting creative)
Frequently Asked Questions
Troubleshooting
Product Information
. . . . . . . . . . . . . . . . . . . . . . . . . . . . . . . . . . . . . . . . . . . . . . . . . . . . . . . . . .p.24
. . . . . . . . . . . . . . . . . . . . . . . . . . . . . . . . . . . . . . . . . . . . . . . . . . . . . . .p. 27
. . . . . . . . . . . . . . . . . . . . . . . . . . . . . . . . . . . . . . . . . . . . . . . .p.20
. . . . . . . . . . . . . . . . . . . . . . . . . . . . . . . . . . . . . . . .p. 4
. . . . . . . . . . . . . . . . . . . . . . . . . . . . . . . . . . .p. 9
. . . . . . . . . . . . . . . . . . . . . . . . . . . . . . . . . . . . . . . . .p.17
following USOC jacks: one RJ11 jack.An FCC compliant telephone cord and modular plug is provided with this
equipment.This equipment is designed to be connected to the telephone network or premises wiring using a compatible
modular jack which is Part 68 compliant. See Installation Instructions for details.The REN is useful to determine the
quantity of devices, you may be connected to the telephone line and still have all those devices ring when your telephone
number is called. In most, but not all areas, the sum of RENs should not exceed five (5.0).To be certain of the number of
devices you may connect to your line, as determined by the total RENs, you should contact your local Telephone
Company to determined the maximum REN for your calling area. If the terminal equipment, LF2000, causes harm to the
telephone network, the Telephone Company may discontinue your service temporarily. If possible, they will notify you in
advance. But if advance notice isn’t practical, the Telephone Company will notify you as soon as possible.You will be
informed of your right to file a complaint with the FCC.The telephone company may make changes in it’s facilities, equipment, operations or procedures that could affect the operation of the equipment, if this happens the telephone company
will provide advance notice in order for you to make necessary modifications to maintain uninterrupted service. If you
experience trouble with this telephone equipment, please contact CEIVA Logic Inc. at 1-877-MYCEIVA (1-877-692-3482)
for information on obtaining service or repair. If the equipment is causing harm to the telephone network, the Telephone
Company may request you to disconnect the equipment until the problem is resolved.There are no user serviceable parts
in this equipment.This equipment is not hearing aid compatible This equipment may not be used on public coin phone
service provided by the Telephone Company. Connection to party line service is subject to state tariffs.
MANUFACTURER,WARRANTOR
CEIVA Logic, Inc.
214 East Magnolia Boulevard
Burbank, CA 91502
IMPORTANT SAFEGUARDS
When using an electrical appliance basic safety precautions should be followed, including the following:
1. To prevent against the risk of electrical shock, do not put your CEIVA Digital Photo
Receiver in water or other liquid.
2. Do not use this product where it could be splashed or fall into water; for example, near
a bath tub, wash bowl, kitchen sink, laundry tub, or near a swimming pool.
3. Do not operate any appliance with a damaged cord or plug, or after it malfunctions, or
becomes damaged in any manner. Contact CEIVA Support 1-877-MYCEIVA (1-877-692-3482) for proper
return and repair or replacement of the CEIVA Receiver.
WARNING: TO REDUCE THE RISK OF ELECTRICAL SHOCK OR FIRE, DO NOT
4.
REMOVE THE BACK PANEL. NO USER SERVICEABLE PARTS ARE INSIDE. REPAIR
SHOULD BE DONE BY AUTHORIZED PERSONNEL.
SHARING MADE EASY
Page 3
30 3
PRODUCT WARRANTY
INTRODUCTION
This product may include or be bundled with third party software, the use of which is governed by a separate end user
license agreement.This warranty does not apply to such third party software. For the applicable warranty, please refer
to the end user license agreement governing the use of such software.
LIMITATION OF DISCLAIMER
SOME STATES DO NOT ALLOW THE EXCLUSION OR LIMITATION OF INCIDENTAL OR CONSEQUENTIAL
DAMAGES SO THE ABOVE LIMITATION OR EXCLUSION MAY NOT APPLY TO YOU. SOME STATES DO NOT
ALLOW LIMITATIONS ON HOW LONG AN IMPLIED WARRANTY LASTS SO THE ABOVE LIMITATION MAY NOT
APPLY TO YOU.THIS EXPRESS WARRANTY IS LIMITED TO THE DURATION OF TIME SET FORTH HEREIN AND ALL
IMPLIED WARRANTIES FOR MERCHANTABILITY OR FITNESS FOR PARTICULAR PURPOSE ARE LIMITED IN DURATION TO THE TIME OF THIS EXPRESS WARRANTY PERIOD IF THE DISCLAIMER OF THE IMPLIED WARRANTY IS
NOT PERMITTED. IF A PROVISION IS DEEMED VOID,THE BALANCE OF THE WARRANTY SHALL BE INTERPRETED
TO ACHIEVE THE INTENT OF THE PARTIES.THIS CONTRACT CONSTITUTES THE COMPLETE AGREEMENT
BETWEEN THE PARTIES, SUPERSEDING ALL PRIOR WRITTEN AND ORAL AGREEMENTS.
A buyer of this product in California has the right to have this product serviced or repaired during the warranty period.
The warranty period will be extended for the number of whole days that the product has been out of the buyer’s hands
for warranty repairs. If a defect exists within the warranty period, the warranty will not expire until the defect has been
fixed.The warranty period will also be extended if the warranty repairs have not been performed due to delays caused
by circumstances beyond the control of the buyer, or if the warranty repairs did not remedy the defect and the buyer
notifies the manufacturer or seller of the failure of the repairs within 60 days after they were completed. If, after a reasonable number of attempts, the defect has not been fixed, the buyer may return this product for a replacement or a
refund subject, in either case, to deduction of a reasonable charge for usage.This time extension does not affect the
protections or remedies the buyer has under other laws.The buyer has the right to bring any action at law or equity
to resolve disputes concerning or to enforce the provisions of this warranty. Buyer must bring an action for breach of
warranty within fifteen months from delivery of product.The laws of the State of California and applicable Federal laws
relating to warranties on consumer goods shall govern this agreement excluding conflicts of laws principles and excluding
the United Nations Convention on Contracts for the International Sale of Goods.The manufacturer and buyer consent
to the jurisdiction of Federal or State courts residing in California.This warranty gives you specific legal rights, and you
may also have other rights that vary from State to State.
EXHIBIT J ( F C C PA R T 6 8 )
CUSTOMER INFORMATION
This equipment complies with Part 68 of the FCC rules. On the back, in the lower left hand corner of this equipment is a
label that contains, among other information, the FCC registration number and ringer equivalence number (REN) for this
equipment.You must, upon request, provide this information to your Telephone Company.This equipment uses the
Sharing Made Simple and Easy
Share life’s special and precious moments—even if your family
and friends live hundreds of miles away! The Digital Photo
Receiver
and share your life with the people you care about most.
Here are some of the unique ways your CEIVA (pronounced
SEE-va) Digital Photo Receiver
with your loved ones:
If you have a computer you can also:
Two designer frames are included—one in Elegant Black and one in Silverstone Grey.
Mix and match frames and mattes to fit the décor of your home or office. For additional frame
finishes and matte colors,
TM
by CEIVATMis a revolutionary way to stay connected
TM
can help keep you in touch
• Receive new photos each day from family and friends
anywhere in the world.
• Display and rotate 30 of your personal digital pictures
in a continuous slide show.
• Order a print by mail directly from your Receiver.
• Customize your slide show rotation time.
• Set your Receiver to turn on and off automatically so that it’s awake when you are.
• Access your CEIVA
TM
account from any web browser to manage your pictures and
albums, and set up your add and delete picture commands for your Receiver’s next
TM
dial-in to the CEIVA Network
.
• Send photos to your own Receiver, or to others’ Receivers.
• Turn photos into one-of-a-kind cards with personal messages.
• View personalized entertainment and information slides such as news,
sports and local weather.*
please visit the CEIVA StoreTMat www.ceiva.com.
SHARING MADE EASY
Page 4
4 29
COMPONENTS
PRODUCT WARRANTY
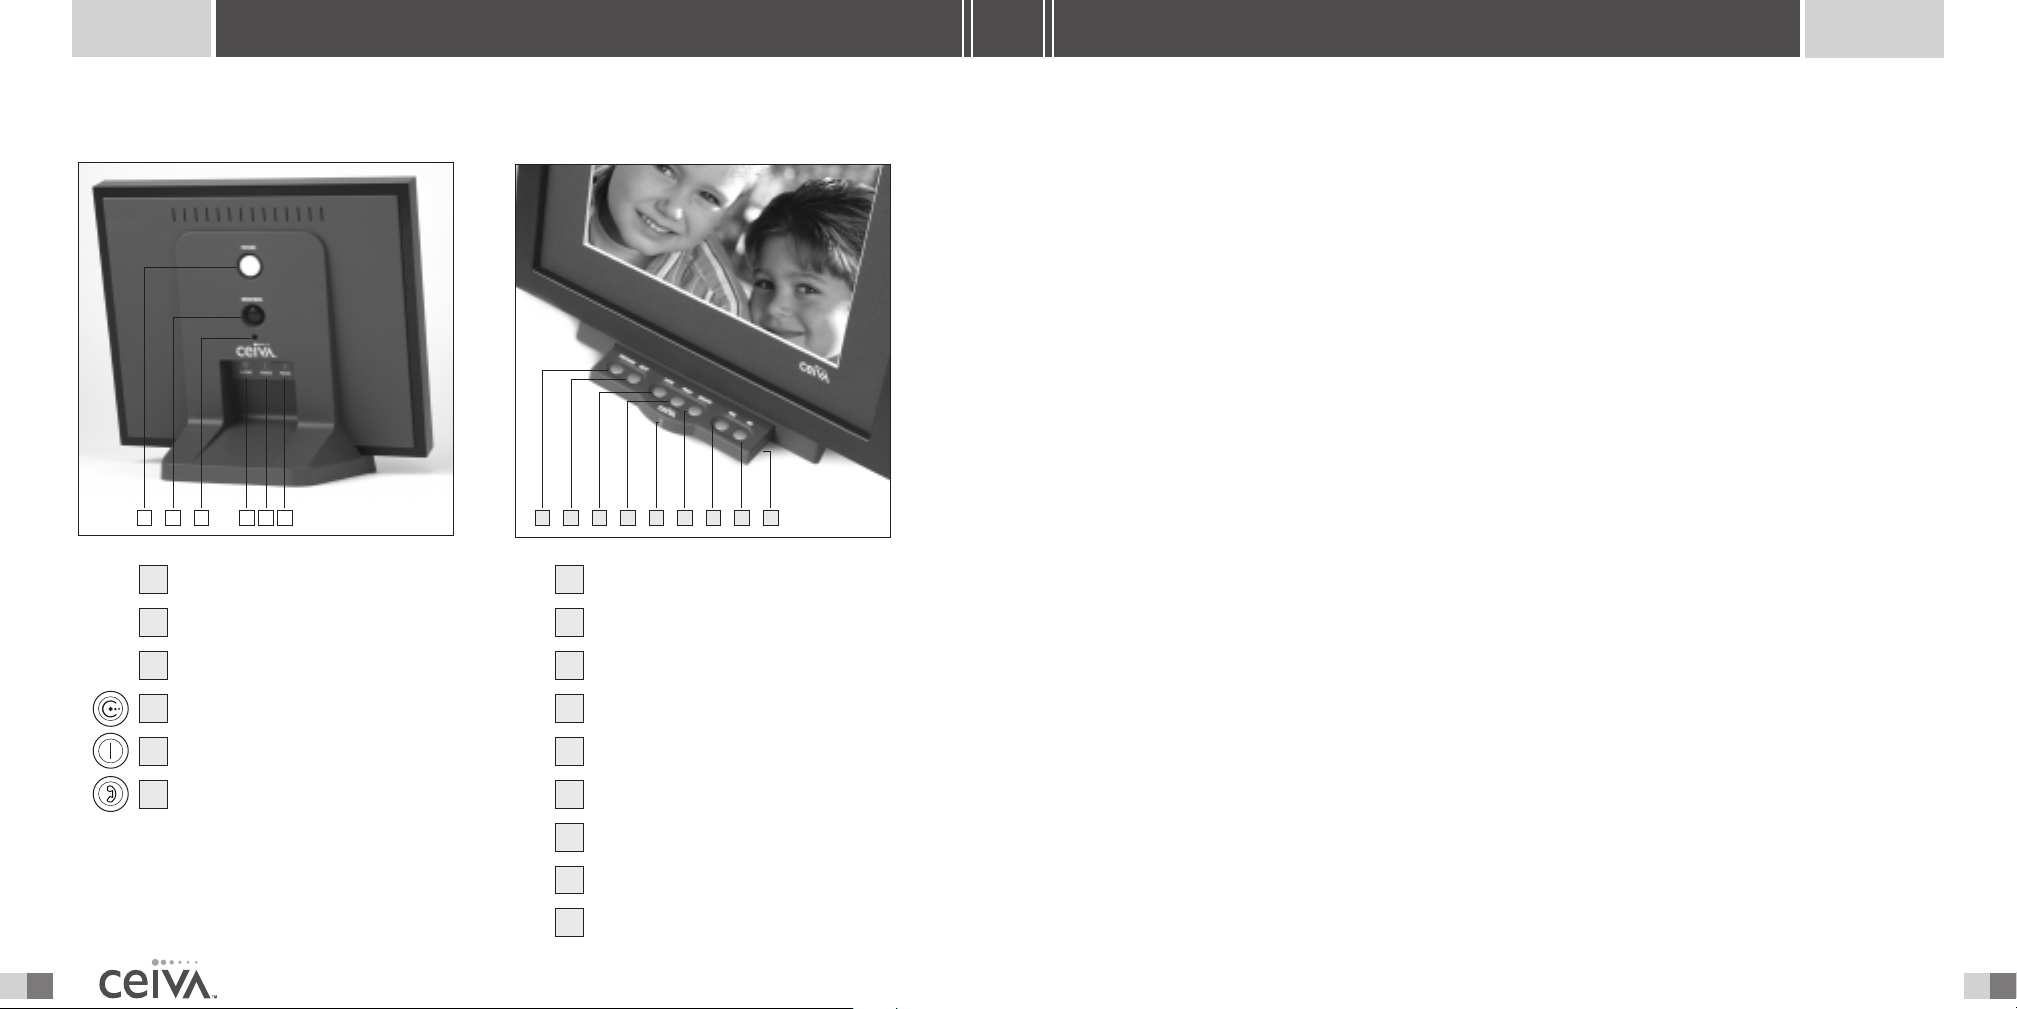
Product Diagrams: List of Components
1 2 3 4 5 6
PICTURE BUTTON
1
BRIGHTNESS
2
POWER INDICATOR
3
C-PORT
4
POWER
5
PHONE LINE
6
1 2 3 4 5 6 7 8 9
PREVIOUS PICTURE
1
NEXT PICTURE
2
LOCK PICTURE
3
PRINT PICTURE
4
NEW PICTURE ALERT
5
DELETE PICTURE
6
7
“YES” BUTTON
8
“NO” BUTTON
package, and sent prepaid and packaged appropriately for safe shipment, and it is recommended that they be insured
or sent by a method that provides for tracking of the package. Responsibility for loss or damage does not transfer to
manufacturer until the returned item is received.The repaired or replaced item will be shipped to buyer, at manufacturer’s expense, not later than thirty (30) days after seller or manufacturer receives the defective product. Manufacturer
shall not be responsible for software, firmware, information, or memory data of buyer contained in, stored on, or
integrated with any products returned to manufacturer for repair, whether under warranty or not.
TM
If the buyer and CEIVA
submit the matter for resolution to the Better Business Bureau:Attention-Dispute Resolution Department.The buyer
will not be responsible for expenses incurred in submitting a dispute for resolution under the terms of this paragraph.
The buyer is required to submit any dispute for resolution under this paragraph before pursuing any legal remedies to
which he or she may be entitled under federal Magnuson-Moss Warranty Act for breach of warranty. Certain states
may allow you to sue without using this informal procedure.
DISCLAIMER OF WARRANTIES
WARRANTIES EXCLUSIVE: IF MANUFACTURER’S PRODUCT DOES NOT OPERATE AS WARRANTED ABOVE,
BUYER’S SOLE REMEDY FOR BREACH OF THAT WARRANTY SHALL BE REPAIR, REPLACEMENT, OR REFUND
OF THE PURCHASE PRICE PAID,AT MANUFACTURER’S OPTION.TO THE FULL EXTENT ALLOWED BY LAW,
THE FOREGOING WARRANTIES AND REMEDIES ARE EXCLUSIVE AND ARE IN LIEU OF ALL OTHER WARRANTIES,TERMS, OR CONDITIONS, EXPRESS OR IMPLIED, EITHER IN FACT OR BY OPERATION OF LAW,
STATUTORY OR OTHER-WISE, INCLUDING WARRANTIES,TERMS, OR CONDITIONS OF MERCHANTABILITY,
FITNESS FOR A PARTICULAR PURPOSE, SATISFACTORY QUALITY, CORRESPONDENCE WITH DESCRIPTION,
AND NONINFRINGEMENT,ALL OF WHICH ARE EXPRESSLY DISCLAIMED.
LIMITATION OF REMEDIES
TO THE FULL EXTENT ALLOWED BY LAW, MANUFACTURER ALSO EXCLUDES FOR ITSELF AND ITS SUPPLIERS
ANY LIABILITY,WHETHER BASED IN CONTRACT OR TORT (INCLUDING NEGLIGENCE), FOR INCIDENTAL,
CONSEQUENTIAL, INDIRECT, SPECIAL, OR PUNITIVE DAMAGES OF ANY KIND, OR FOR LOSS OF REVENUE OF
PROFITS, LOSS OF BUSINESS, LOSS OF INFORMATION OR DATA, OR OTHER FINANCIAL LOSS ARISING OUT
OF OR IN CONNECTION WITH THE SALE, INSTALLATION, MAINTENANCE, USE, PERFORMANCE, FAILURE,
OR INTERRUPTION OF ITS PRODUCTS, EVEN IF MANUFACTURER OR ITS AUTHORIZED RESELLER HAS BEEN
ADVISED OF THE POSSIBILITY OF SUCH DAMAGES,AND LIMITS ITS LIABILITY TO REPAIR, REPLACEMENT, OR
REFUND OF THE PURCHASE PRICE PAID,AT MANUFACTURER’S OPTION.THIS DISCLAIMER OF LIABILITY FOR
DAMAGES WILL NOT BE AFFECTED IF ANY REMEDY PROVIDED HEREIN SHALL FAIL OF ITS ESSENTIAL PURPOSE.
Logic, Inc. disagree over either’s performance under the terms of this warranty, the buyer may
9
B UTTON TRAY
SHARING MADE EASY
Page 5
28 5
PRODUCT WARRANTY
QUICK START
L I MI T E D WA R R A N T Y
Warranty Coverage
THIS IS TO CERTIFY that the CEIVATMphoto display product, Model Number LF2003 (hereafter referred to as the
“CEIVA Product”) is warranted to be free of all defects in material and workmanship for three hundred and sixty (360)
days from the date of purchase, if proof of purchase is presented within the warranty period to the manufacturer,
TM
CEIVA
any part proving defective in material or workmanship, excluding the CEIVA
Logic, Inc. (“manufacturer”.) Within the period of this warranty, manufacturer is obliged to authorize repair to
TM
Receiver and glass, or replace the CEIVA
Product. Repair service center(s) can be located by calling 1-877-MYCEIVA (1-877-692-3482). Expenses related to
replacing or repairing a defective part under this warranty will be assumed by manufacturer except for the following
expenses, which will be assumed by the buyer: cost of transporting the product to our service center, including all
packaging which adequately protects the CEIVA
TM
Product. Manufacturer’s sole obligation under this express warranty
shall be, at manufacturer’s option and expense, to repair the defective product or part, deliver to buyer an equivalent
product or part to replace the defective item, or if neither of the two foregoing options is reasonably available,
manufacturer may, in its sole discretion, refund to buyer the purchase price paid for the defective product.All products
that are replaced will become the property of manufacturer. Replacement parts may be new or factory refurbished “like
new” parts. Manufacturer warrants any replaced or repaired product or part for three hundred and sixty (360) days
from shipment, or the remainder of the initial warranty period, whichever is longer.
What This Warranty Does Not Cover
This warranty does not apply to any defects caused by negligence, misuse, accidents, acts of God, commercial use,
modification to any part of the CEIVA
accessories.This warranty does not apply to improper operation or maintenance, connection to improper electrical
supply, or attempted repair by anyone other than a facility authorized by manufacturer to service the CEIVA
This warranty is invalid if the factory applied serial number has been altered or removed from the CEIVA
TM
Product, including A/C adapter, CEIVATMReceiver, glass or telephone cable, or
TM
Product.
TM
Product.This
warranty is valid for purchases within the United States only.We reserve the right to make changes or improvements
in our products without incurring any obligation to similarly alter products previously purchased.
Buyer’s Obligations for Warranty Coverage
The buyer must notify seller or manufacturer of any defect, malfunction, or nonconformity promptly upon discovery.
Within 30 days after receiving notice from the buyer, the manufacturer will authorize repair of the CEIVA
TM
Product.
Improper or incorrectly performed maintenance or repairs by buyer or an unauthorized repair facility voids this
warranty.This warranty is effective only if proof of purchase is presented within the warranty period to the seller or
manufacturer.We neither assume nor authorize any representative or other person to assume for us any other liability
in connection with the sale or shipment of our products.This warranty does not apply to CEIVA
TM
Products after the
first purchase. Such products are subsequently sold “as is” or “with all faults”. Returned products should include a
Return Material Authorization (RMA) number or User Service Order (USO) number marked on the outside of the
Quick Start Instructions
HERE’S HOW IT WORKS
Each night while you sleep, your personal photo Receiver automatically and silently dials in to
TM
get any pictures sent to you.There is no interruption to your phone service and no need for
a computer.You don’t have to do a thing.The next morning you wake up to a slide show of
up to 30 new photos from the people you care about most.
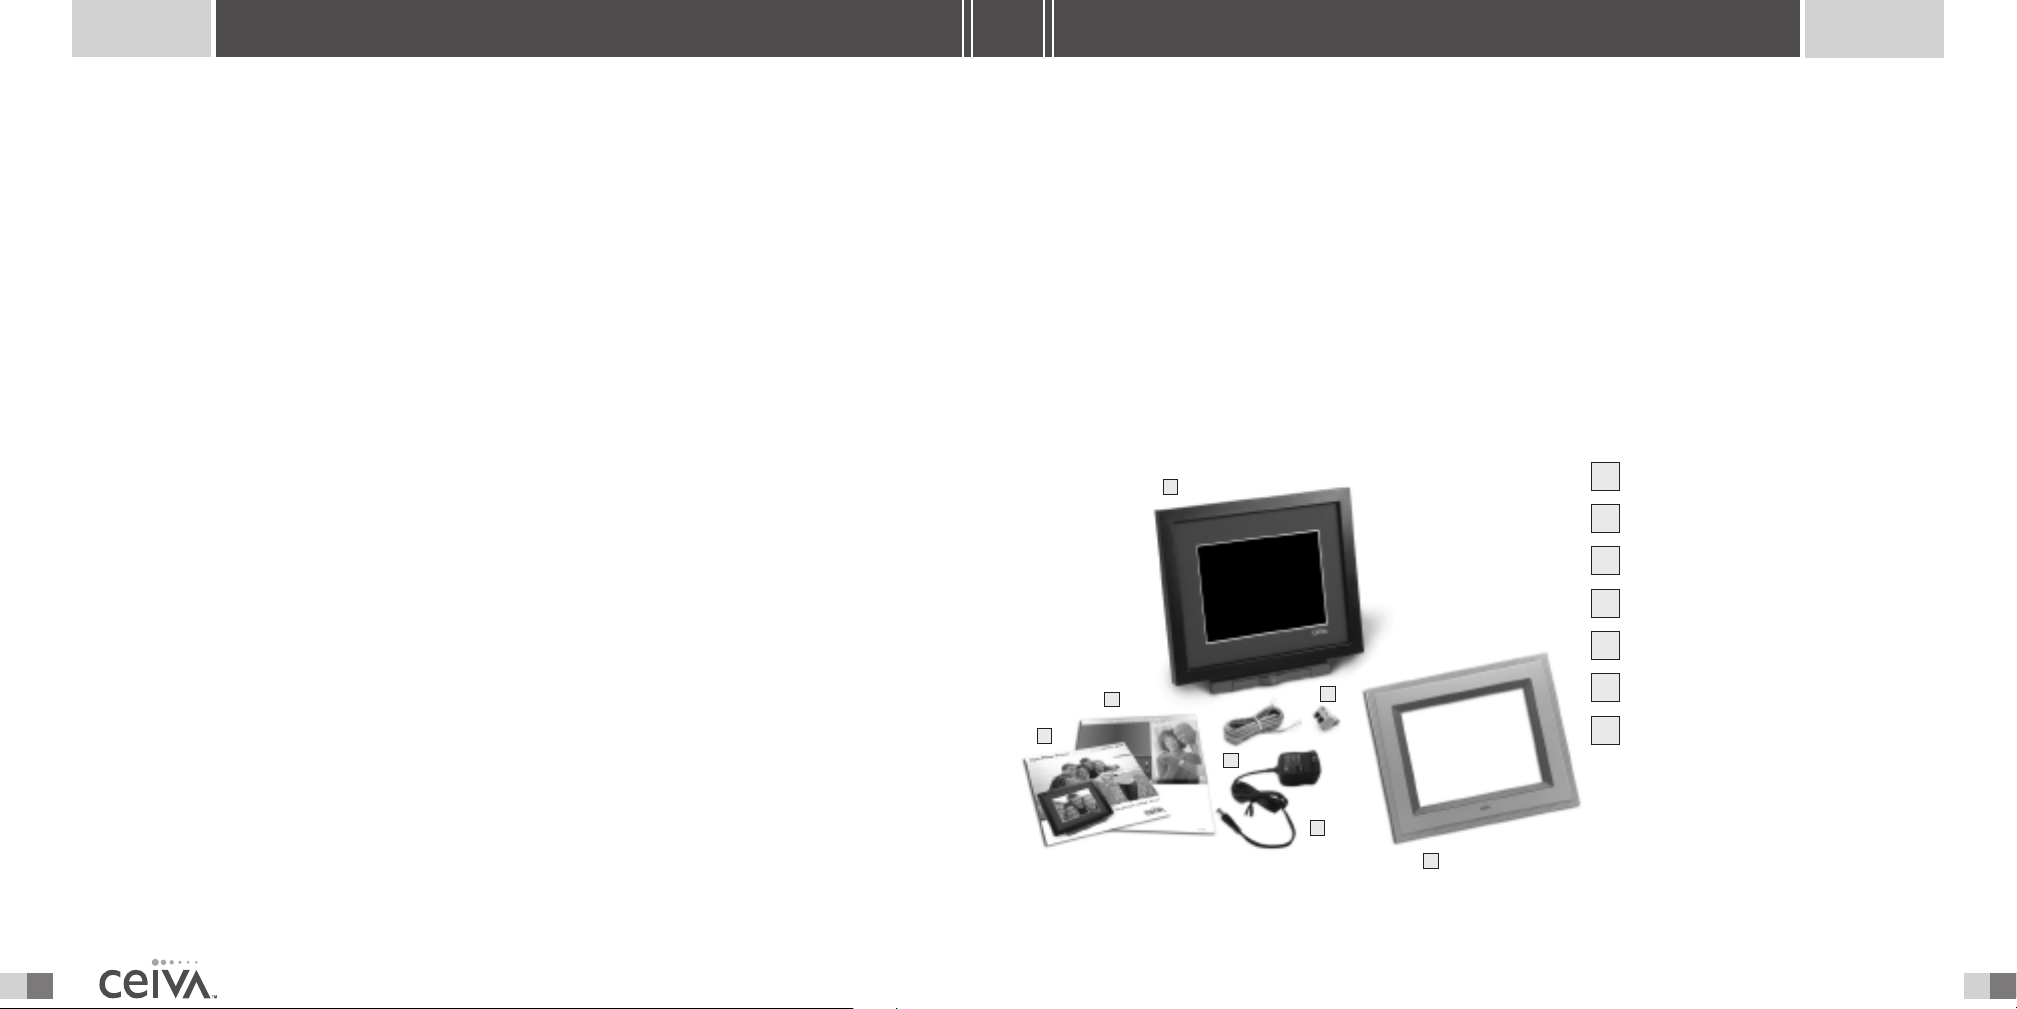
IN THE BOX
Here’s everything you’ll need to set up your personal
photo Receiver and begin receiving pictures.
CEIVA DIGITAL PHOTO RECEIVER
1
2
3
4
5
6
7
1
QUICK START GUIDE
2
3
OWNER’S GUIDE
4
TELEPHONE CORD
5
DUAL PHONE JACK
6
AC POWER SUPPLY
7
ADDITIONAL FRAME
TM
SHARING MADE EASY
Page 6
6 27
SETTING UP
PRODUCT WARRANTY
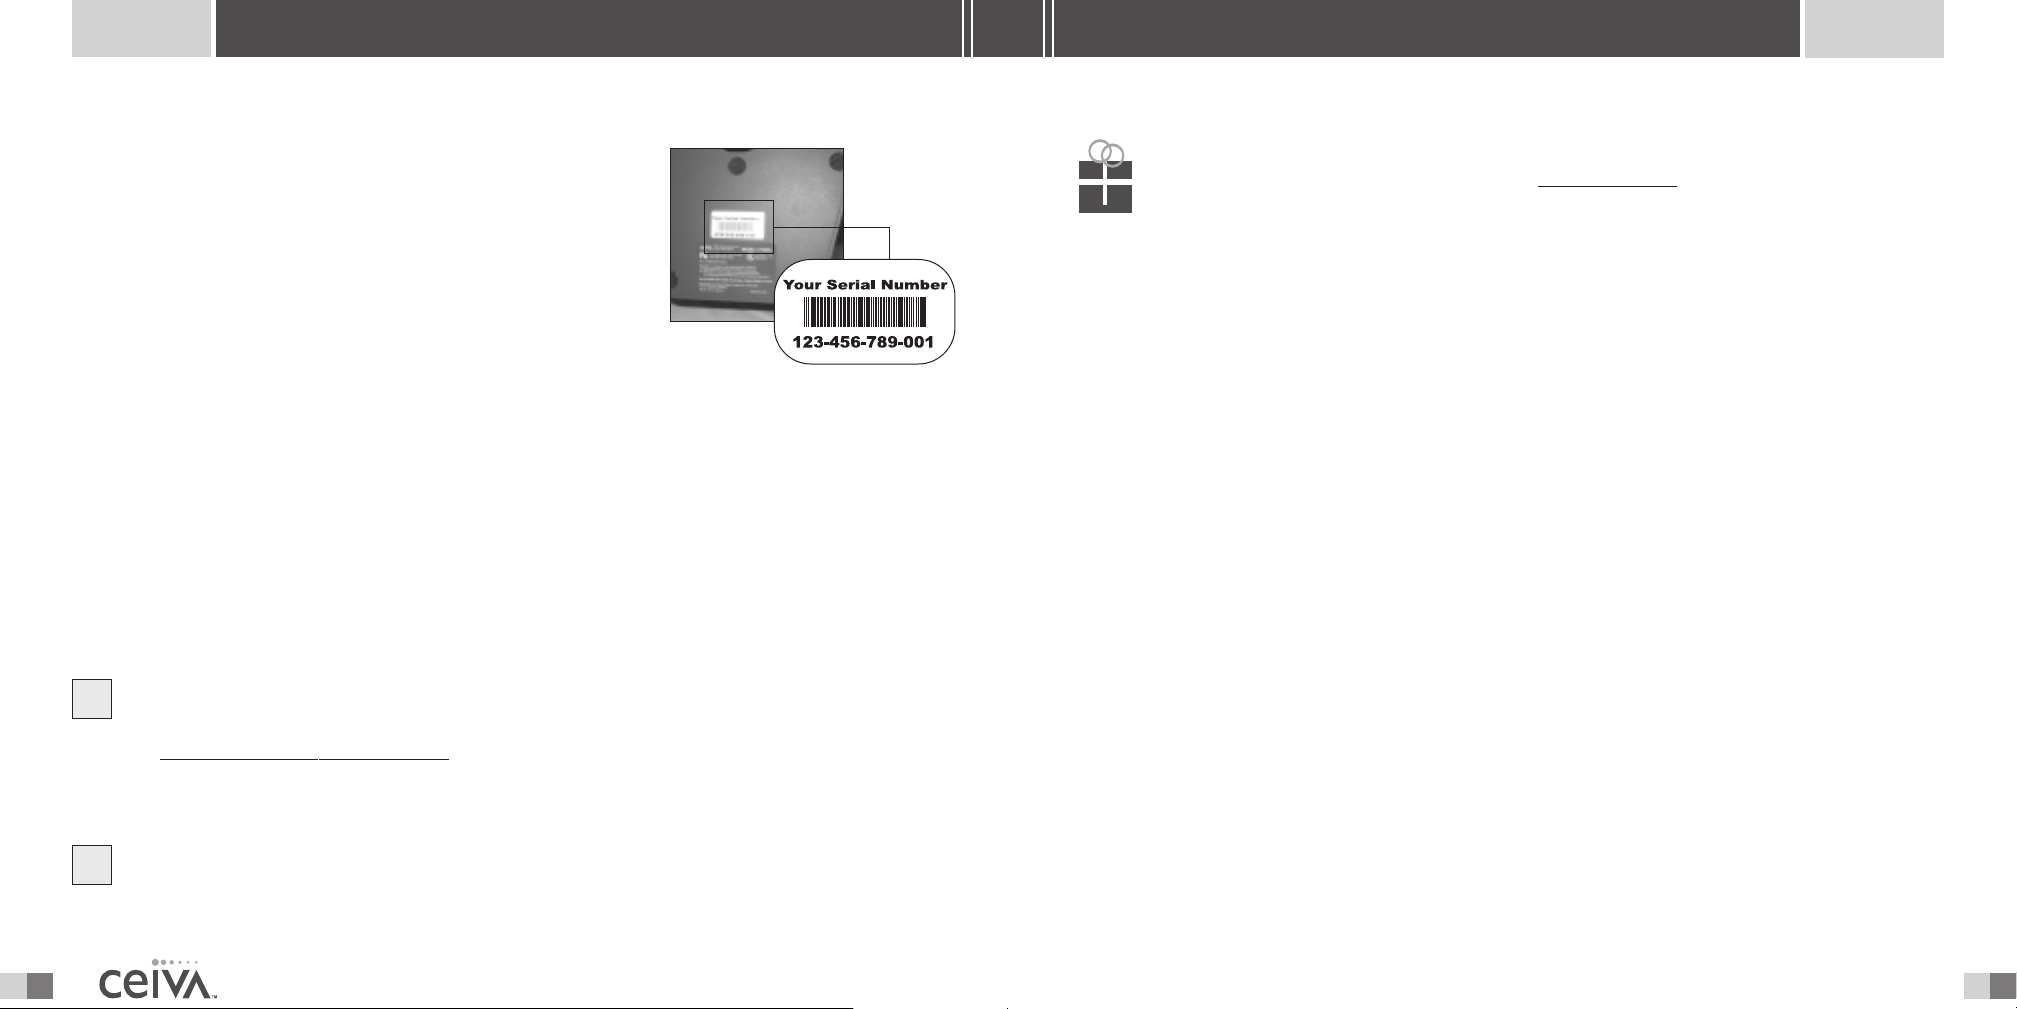
MISSING SOMETHING? SOMETHING DAMAGED?
Locate the 12 digit serial number on the bottom of your CEIVA
TM
Receiver’s stand, or on the sides of the product box, and call
1-877-MYCEIVA (1-877-692-3482) to speak with the CEIVA
TM
Customer Care Team.
NOTE: Please keep the original product packaging, should you
need to return your CEIVA Digital Photo Receiver
GETTING TO KNOW YOUR RECEIVER
TM
for repairs.
When choosing a location for your CEIVA Digital Photo ReceiverTMremember to:
• Place the CEIVA Digital Photo Receiver
TM
where it’s going to be easy to see and is
away from direct sunlight, water, moisture or exposure to extreme temperatures.
TM
• Place the CEIVA Digital Photo Receiver
near a power outlet and an existing
telephone jack.
Set Up Is Easy!
1
REGISTER YOUR RECEIVER AT HTTP://GETTINGSTARTED.CEIVA.COM
SAMPLE
LOOKING FOR GIFT IDEAS?
Don’t forget to visit the CEIVA Store at www.ceiva.com.
Check there frequently for special and great gift ideas!
Product Information
WARNING STATEMENT
( C F R 4 7 , § 1 5 . 1 0 5 , § 1 5 . 2 1 , a n d § 1 5 . 2 7 )
This equipment has been tested and found to comply with the limits for a Class B digital device, pursuant to part 15
of the FCC Rules.These limits are designed to provide reasonable protection against harmful interference in a residential
installation.This equipment generates, uses and can radiate radio frequency energy and, if not installed and used in accordance with the instructions, may cause harmful interference to radio communications. However, there is no guarantee
that interference will not occur in a particular installation. If the equipment does cause harmful interference to radio
or television reception, which can be determined by turning the equipment off and on, the user is encouraged to try to
correct the interference by one of the following measures with respect to radios or televisions: • Reorient or relocate
the receiving antenna. Increase the separation between the equipment and Receiver. Connect the equipment into an
outlet on a circuit different from that to which the Receiver is connected. Ensure that card mounting screws, connector
attachment screws and all ground wires are secured and tight. Consult the dealer or an experienced radio/TV technician
for help.
TM
Changes or modifications not expressly approved by CEIVA
equipment.This product was FCC certified under test conditions that included the use of shielded I/O cables and
connectors between system components.To be in compliance with FCC regulations, the user must use shielded cables
and connectors and install them properly.
Logic, Inc. could void the user’s authority to operate the
Log onto http://gettingstar
Photo Receiver
and that a PicturePlan
TM
. Remember that you need to have an account established at the CEIVATMwebsite
TM
subscription is necessary to receive pictures on your CEIVATMReceiver.
▲
PLEASE HAVE AVAILABLE
ted.ceiva.com
or call Customer Care to register your CEIVA Digital
• Receiver’s serial number
TM
• Valid credit card or PicturePlan
gift code
Warning About Water Proximity
Do not use this product where it could be splashed or fall into water; for example, near a bath tub, wash bowl, kitchen
sink, laundry tub, or near a swimming pool.
SHARING MADE EASY
Page 7
26 7
TROUBLESHOOTING
SETTING UP
THE RECEIVER DISPLAYS AN ERROR MESSAGE.
If the CEIVA Digital Photo ReceiverTMis having difficulties performing its dial-in connections
to the CEIVA Network
TM
, it will display a variety of error messages. Here are a few things you’ll
want to check:
Make sure the phone number in your
>
is the actual location from where the CEIVA Digital Photo Receiver
Make sure there is a variety of dial-in numbers (3 different local dial-in numbers are
>
preferred) in your
Verify that all connections to the CEIVA Digital Photo ReceiverTMand wall outlets
>
Settings section. (NOTE: Toll-Free accounts will only have one number).
Settings (located on your CEIVATMHome Page)
TM
is dialing.
(both power supply and phone line) are securely plugged in.
Make sure there isn’t anything unnecessary in the
>
Dialing Prefix (located in your
Receiver Settings) of your Receiver’s account (e.g. A 1, 9, 7 etc.).
For example: If the Dialing Prefix in your Receiver’s account had a 9 in it, your CEIVA Digital Photo ReceiverTMwould
try to dial 9, 515-000-0000. If your phone system doesn’t need a 9 to access a dial tone, this would of course be too
many numbers, and be the cause of a failed connection attempt.
NEED MORE ASSISTANCE?
If you have a computer, take a few minutes to access Customer Care or go directly to the
Help section at help.ceiva.com.The Customer Care section was designed with your time in
mind, providing fast and easy to understand answers to all your questions. It’s a wonderful and
powerful resource that is available 24 hours a day, every day of the year. Loaded with information
about your personal Receiver, the
reach Customer Care via e-mail at [email protected]. If you don’t have a computer, the CEIVA
Help library is a wealth of information and ideas.You can also
TM
Customer Care Team can be reached by dialing 1-877-MYCEIVA (1-877-692-3482).
The serial number is located on the sides of the product box and on the bottom of the CEIVA
TM
Digital Photo Receiver
and before you know it your CEIVA Digital Photo Receiver
NOTE: If your Receiver is dialing from a location which has “Pulse Dialing” or is in need of a dialing prefix, please visit
the CEIVA
Your CEIVA Digital Photo ReceiverTMrequires an analog phone line to place its daily call to the CEIVA
Network
commonly used in offices and hotels. Please ask your phone company what type of line you have
if you are unsure.
TM
Care Support pages (available at help.ceiva.com) to learn more.
TM
. A digital line could cause damage to the CEIVA Digital Photo ReceiverTM. Digital lines are most
stand.The CEIVATMwebsite will walk you through the registration process,
TM
will be ready to receive pictures!
IF YOU RECEIVED YOUR CEIVA DIGITAL PHOTO RECEIVERTMAS A GIFT
Your Receiver may already be registered with a subscription. Please check with the individual that
provided you with your gift.
NOTE: If you install your Receiver before registering it to the CEIVA NetworkTMand try to retrieve images, an error
message will be displayed on the LCD screen.
For assistance, contact the CEIVATMCustomer Care Team at 1-877-MYCEIVA (1-877-692-3482).
2
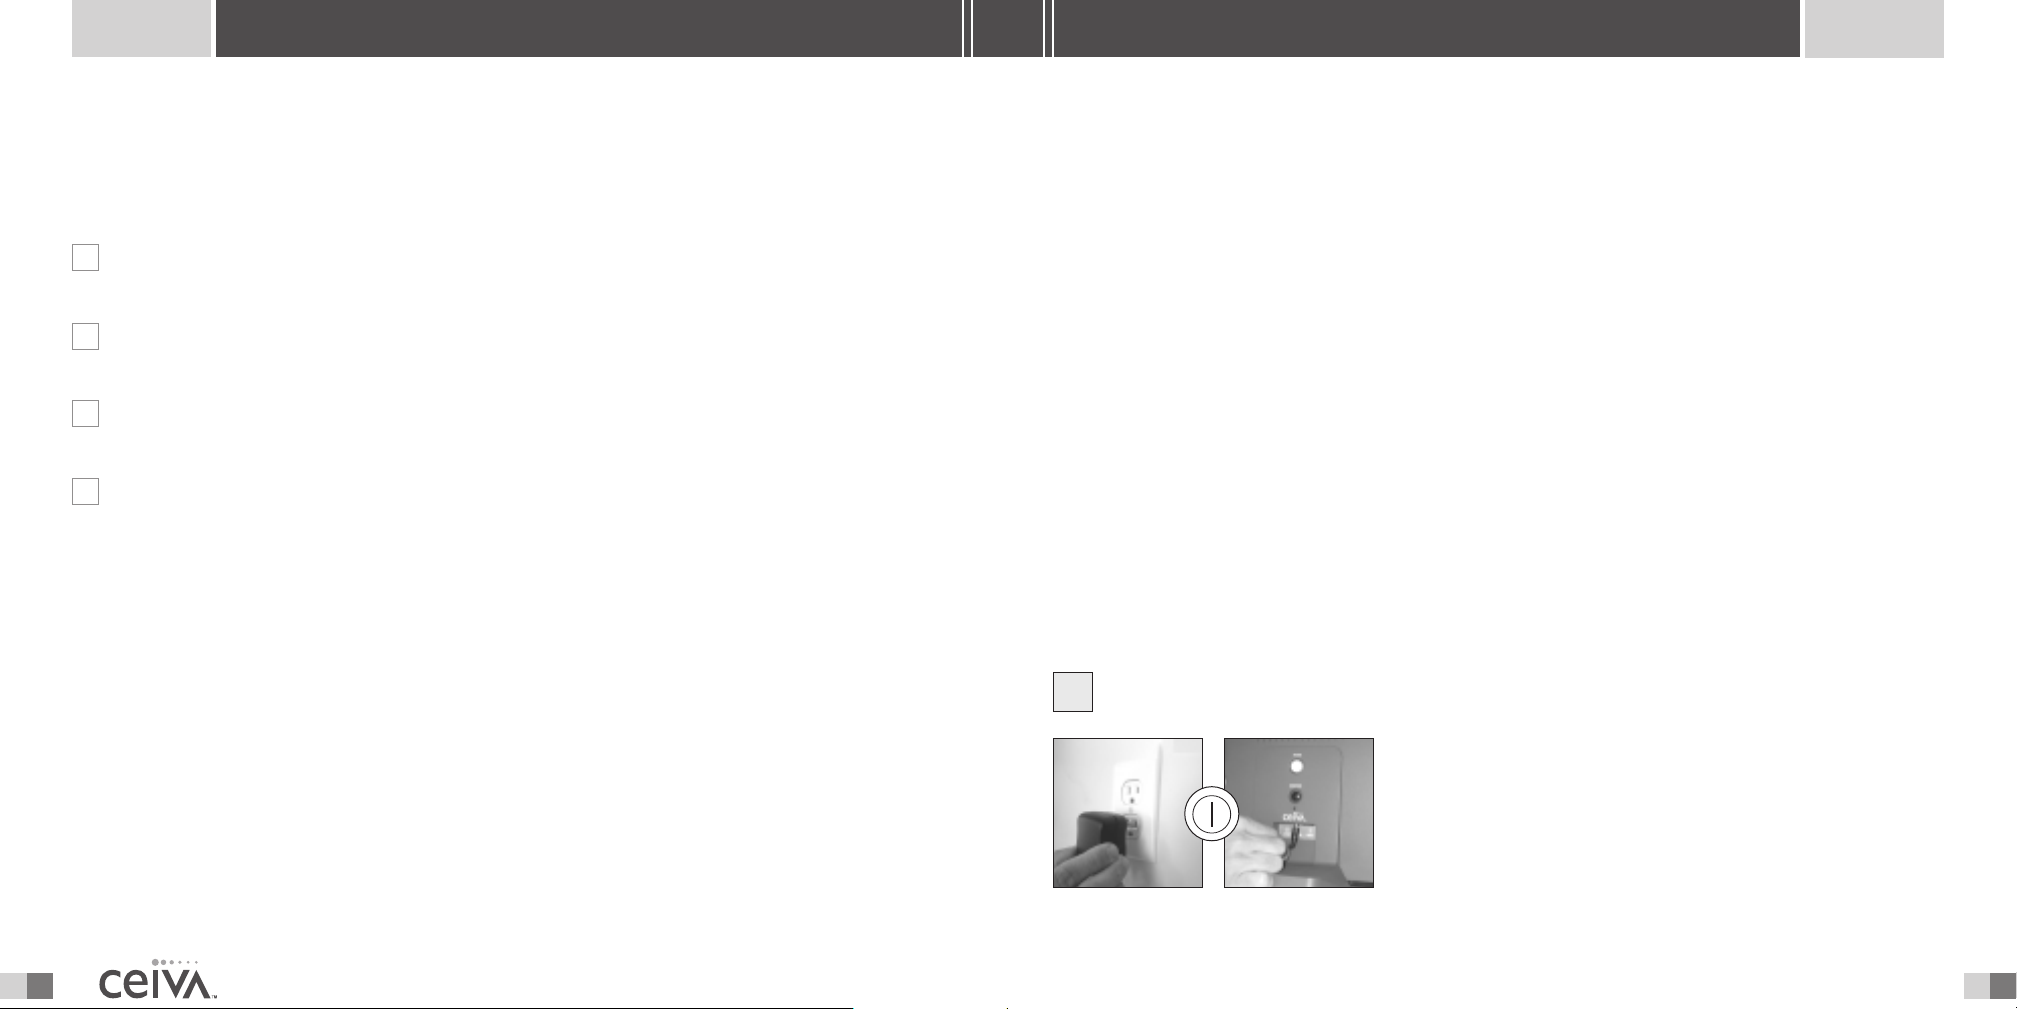
PLUG IN PHONE AND POWER CORDS
Plug one end of the power cord into the round Power
Access hole on the back of the CEIVA Digital Photo
TM
Receiver
, if it is not already plugged in. Plug the other
end of the power cord into an electrical outlet that
is not controlled by a light switch. As with most
electronic items, we suggest making use of a “surge
protector” or “power strip” extension cord to protect
TM
your CEIVA
Receiver against surges of electrical current.
SHARING MADE EASY
Page 8
8 25
SETTING UP
TROUBLESHOOTING
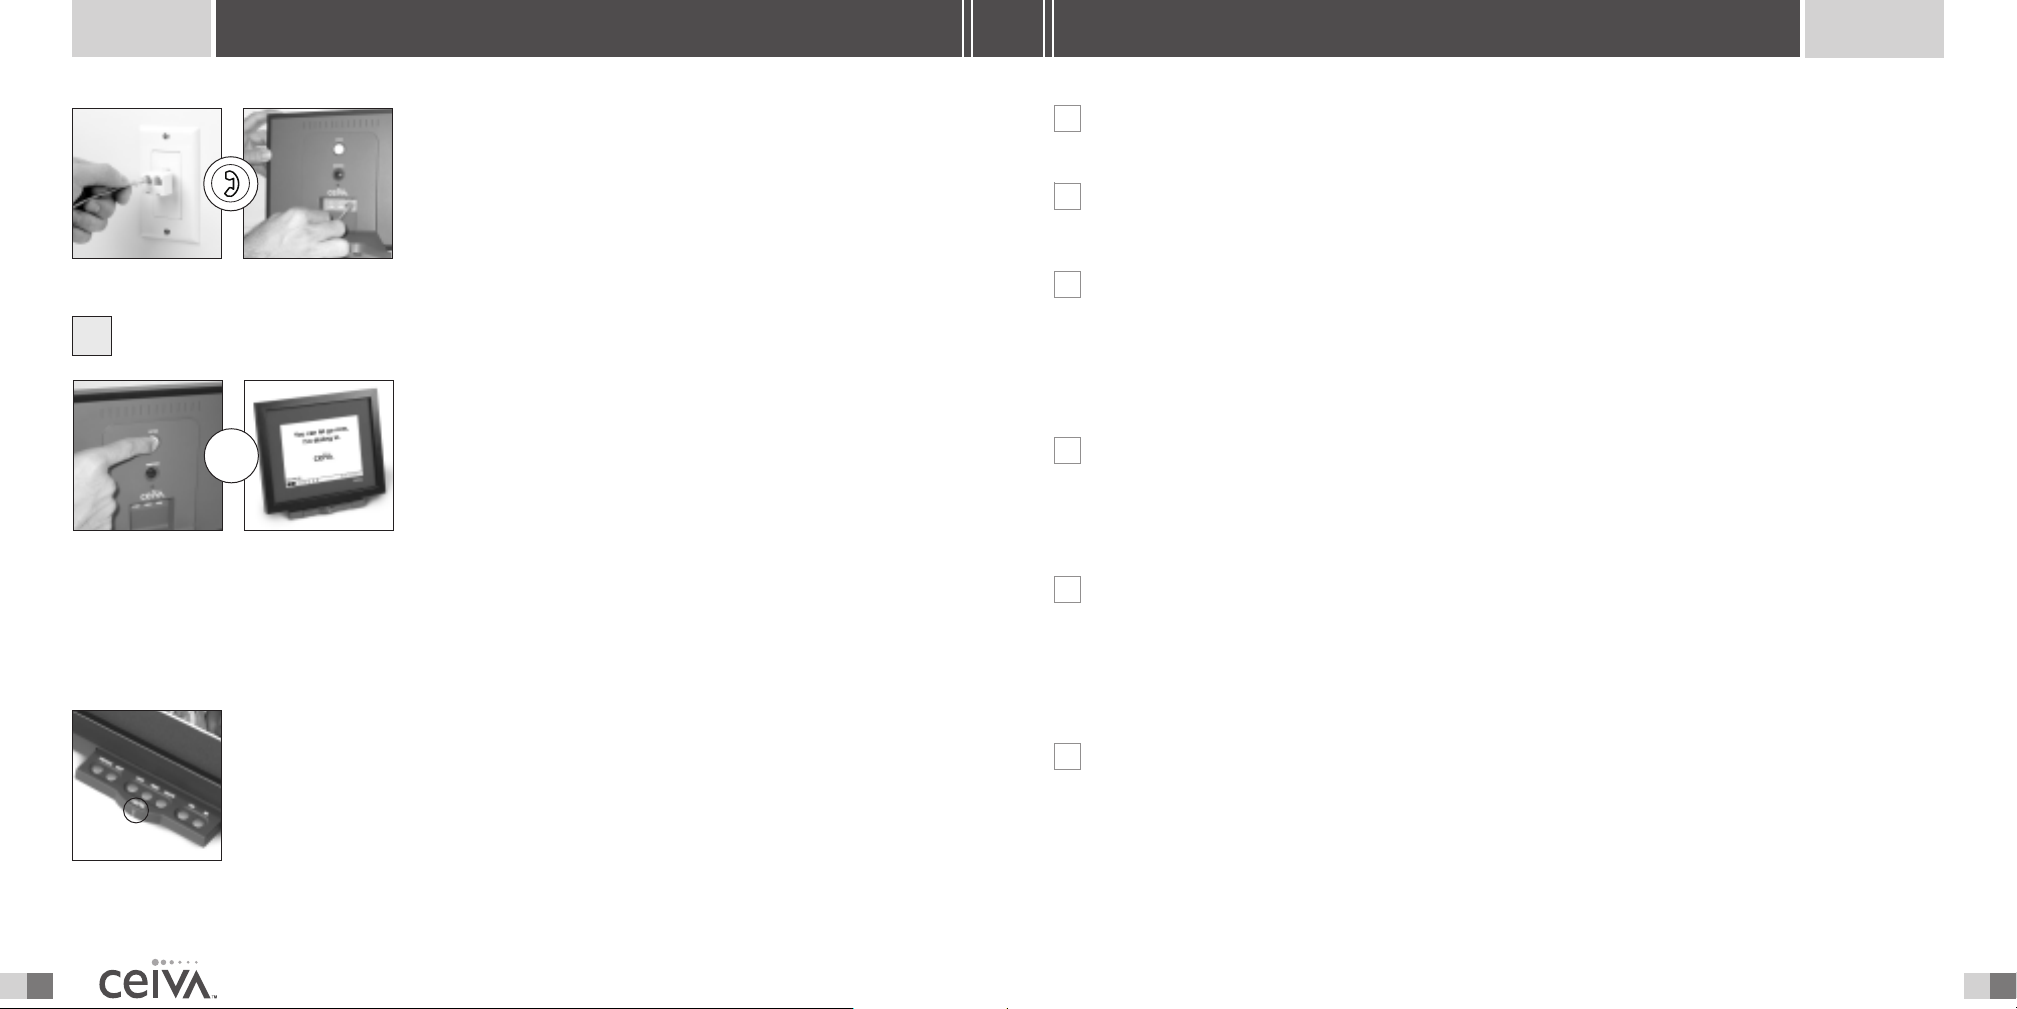
If you need to share a phone jack with an answering
machine, fax machine or another phone, use the dual
phone jack (included). It will provide you with an
additional outlet. Insert the other end of the phone
cord into the square phone access hole on the back
of the CEIVA Digital Photo Receiver
3
PUSH AND HOLD IN THE WHITE
“PICTURE” BUTTON ON BACK
Push and hold in the white Picture button located on
the back of your Receiver until you see the following
▲
message, “You can let go now, I’m dialing in”.
Wait as it dials in to pick up your personal photos. A
status bar is displayed at the bottom of the screen,
slowly moving from left to right.
Your CEIVA Digital Photo Receiver
TM
is now ready to receive photos! When new photos have
arrived, the green light on the front of your CEIVA
NEW PICTURE LIGHT INDICATOR
TM
.
TM
Receiver will glow to alert you.
That’s it!
Make sure the phone line is not being used by another device at the same time
>
(fax machine, answering machine, etc.).
Check to make sure there is no delay in hearing a dial tone on your phone line.
>
THE RECEIVER TURNS OFF AFTER A FEW MINUTES OF OPERATING.
Make sure the CEIVA Digital Photo ReceiverTMis properly plugged in to an active outlet.
>
Check
Settings at the CEIVA web site to verify the “turn on and turn off” times for
your CEIVA Receiver. Press the black button on the back of your Receiver a few times
to make sure your Receiver has not defaulted to the “lights out” mode.
WHY DON’T THE PICTURES SCROLL?
Make sure that you have at least two pictures on your Receiver.Then, press the white
>
button on the back of the Receiver until you see the message that reads,“You can let
go now to start the slide show, or keep holding to connect.”
HOW DO I STOP THE PICTURES FROM SCROLLING?
To stop the slide show, press the white button on the back of the CEIVA Digital Photo
>
Receiver
TM
once.Your Receiver will continue to display the current picture, until you
restart the slide show (see Pictures Won’t Scroll, above) or advance to the next picture
by manually pressing the white button once.
This light will glow to alert you when new pictures have been received on
TM
your CEIVA Digital Photo Receiver
. Touching any button on the Receiver
will turn the light off.
TM
A photo congratulating you on joining the CEIVA
Community and informing
you that you are ready for your own personal pictures will appear.
THE RECEIVER’S SCREEN IS DARK.
Make sure the power supply is securely plugged in to the back of the CEIVA Digital Photo
>
Receiver
TM
, as well as into a working power outlet.You’ll want to make sure the outlet you
have selected is not a switched outlet (controlled by a light switch). Press the black button
TM
on the back of the Receiver a few times to ensure that the CEIVA
Receiver is not in the
lights out mode.
SHARING MADE EASY
Page 9
24 9
TROUBLESHOOTING
SHARING PHOTOS
ABOUT YOUR ACCOUNT AND REGISTRATION
WHAT HAPPENS IF I MOVE?
When you move your CEIVA Digital Photo ReceiverTMto a new location (different area code
or phone number), you should first (before moving), update your phone information at your
TM
CEIVA
Once your new phone number is entered into your
Home Page under the Settings option.*
Settings (remember to click on Update
before leaving the Settings area), simultaneously press and hold the white button on the back
of your CEIVA Receiver. Once the screen is dark, release the button and allow the Receiver to
dial into the CEIVA Network
do not dial in the CEIVA Digital Photo Receiver
TM
to update its account information. Once you have completed this,
TM
again, until it is plugged in at your new location.
If you have already moved, simultaneously press and hold the black and white buttons on the back
of your Receiver after updating your phone information at your CEIVA
screen is dark, release the buttons and allow the Receiver to dial into the CEIVA Network
TM
My Home page. Once the
TM
to
update its account information. Once you have completed this, do not dial in the your Receiver
again until it is plugged in at your new location.
Troubleshooting Your CEIVA Digital Photo Receiver
THE RECEIVER DOESN’T SEEM TO DIAL IN TO RETRIEVE PICTURES.
TM
From this point forward, your CEIVA Digital Photo ReceiverTMwill automatically dial into its
personal
In-Box each night, retrieving up to 30 new photos. In the event you wish to retrieve
the next set of photos waiting in your In-box, simply press and hold in the white button again
until “ You can let go now, I’m dialing in” appears.
NOTE: To help you receive the most enjoyment from your CEIVATMReceiver, the “31st” slide (which may not be deleted
and can only be viewed when manually stepping through the slide show) is the “Tip Of The Month” provided by CEIVA.
Sharing Made Easy: Invite Friends & Family to Send You Photos!
IF YOU HAVE ACCESS TO A COMPUTER
You can invite family and friends to send you photos. Just log into your CEIVA account
and click on
friends an invitation (from you) to join CEIVA
we’ll automatically add them to your CEIVA
times you can use the
you can expect!
Remember that only CEIVA
your personal Photo Receiver.
IF YOU DO NOT HAVE ACCESS TO A COMPUTER
Invite-a-Buddy. Enter names and e-mail addresses.We’ll send your family and
TM
(which is FREE). Once they’ve become a member,
Buddy ListTM.There’s no limit to the number of
Invite-a-Buddy feature, and the more guests you have, the more photos
TM
Members listed on your Buddy List are able to send pictures to
Perform the following checks to help troubleshoot this problem:
Make sure the phone line is securely plugged into the wall jack, as well as the back of
>
the CEIVA Digital Photo Receiver
Check
>
Settings located on your CEIVATMaccount home page to make sure the correct
TM
, and that both plugs are free of dust and debris.
location phone number is entered.
Invite your friends and family who do have web access to register as members at www.ceiva.com
FREE!). After they’ve completed the brief registration process, have them inform you of their
(it’s
“Sign-In” name. Call the CEIVA
to add your family and friends to your CEIVA
TM
Customer Care Team at 1-877-MYCEIVA (1-877-692-3482)
Buddy ListTM. It takes just a minute, and when you’re
finished, your Guests will have permission to send pictures to your personal Photo Receiver.
SHARING MADE EASY
Page 10
10 23
BUTTONS
FAQ’S
What Do The Buttons Do?
WHITE BUTTON
The white button on the back of the Receiver performs a variety of functions.
To start the slide show, press down on the button until the message “You can
let go now to start the slide show” is displayed on the screen. If you have new
photos you want to view right away and don’t want to wait until the next day,
simply press down on the button until the message,“You can let go now, I’m
connecting” is displayed on the screen.
To stop the slide show on your favorite picture, simply press the button once when the picture
you are looking for is displayed.This will also display the picture sender’s information on the
screen for a moment.Your Receiver has been set to automatically return to the slide show
mode after 2 minutes.This setting may be turned off or adjusted at the CEIVA
BLACK BUTTON
The black button on the back of the CEIVATMReceiver adjusts the brightness
setting of your screen. Pressing the black button will display a“brightness bar”
on the left side of the Receiver’s screen. Press and release the black button to
advance to the next setting, or to turn your CEIVA
TM
button once, after the screen is dark, will turn the screen back on. Holding
down the black button will allow you to scroll through the brightness settings.
Advanced Features of the CEIVA Digital Photo Receiver
So far we have discussed some of the basic features and functions of the CEIVA Digital Photo
Receiver
Receiver, read on!
TM
, however, it can do a lot more! To learn about the advanced features of your CEIVA
TM
website.
Receiver off. Pressing the
TM
TM
ABOUT YOUR CEIVA Digital Photo ReceiverTMAND DIALING
HOW DO I ADD A DIALING PREFIX TO MY CEIVA RECEIVER?
If your telephone system requires a prefix such as a 9 to dial out, then you will need to program
your Receiver to use this prefix in order for it to successfully retrieve pictures.
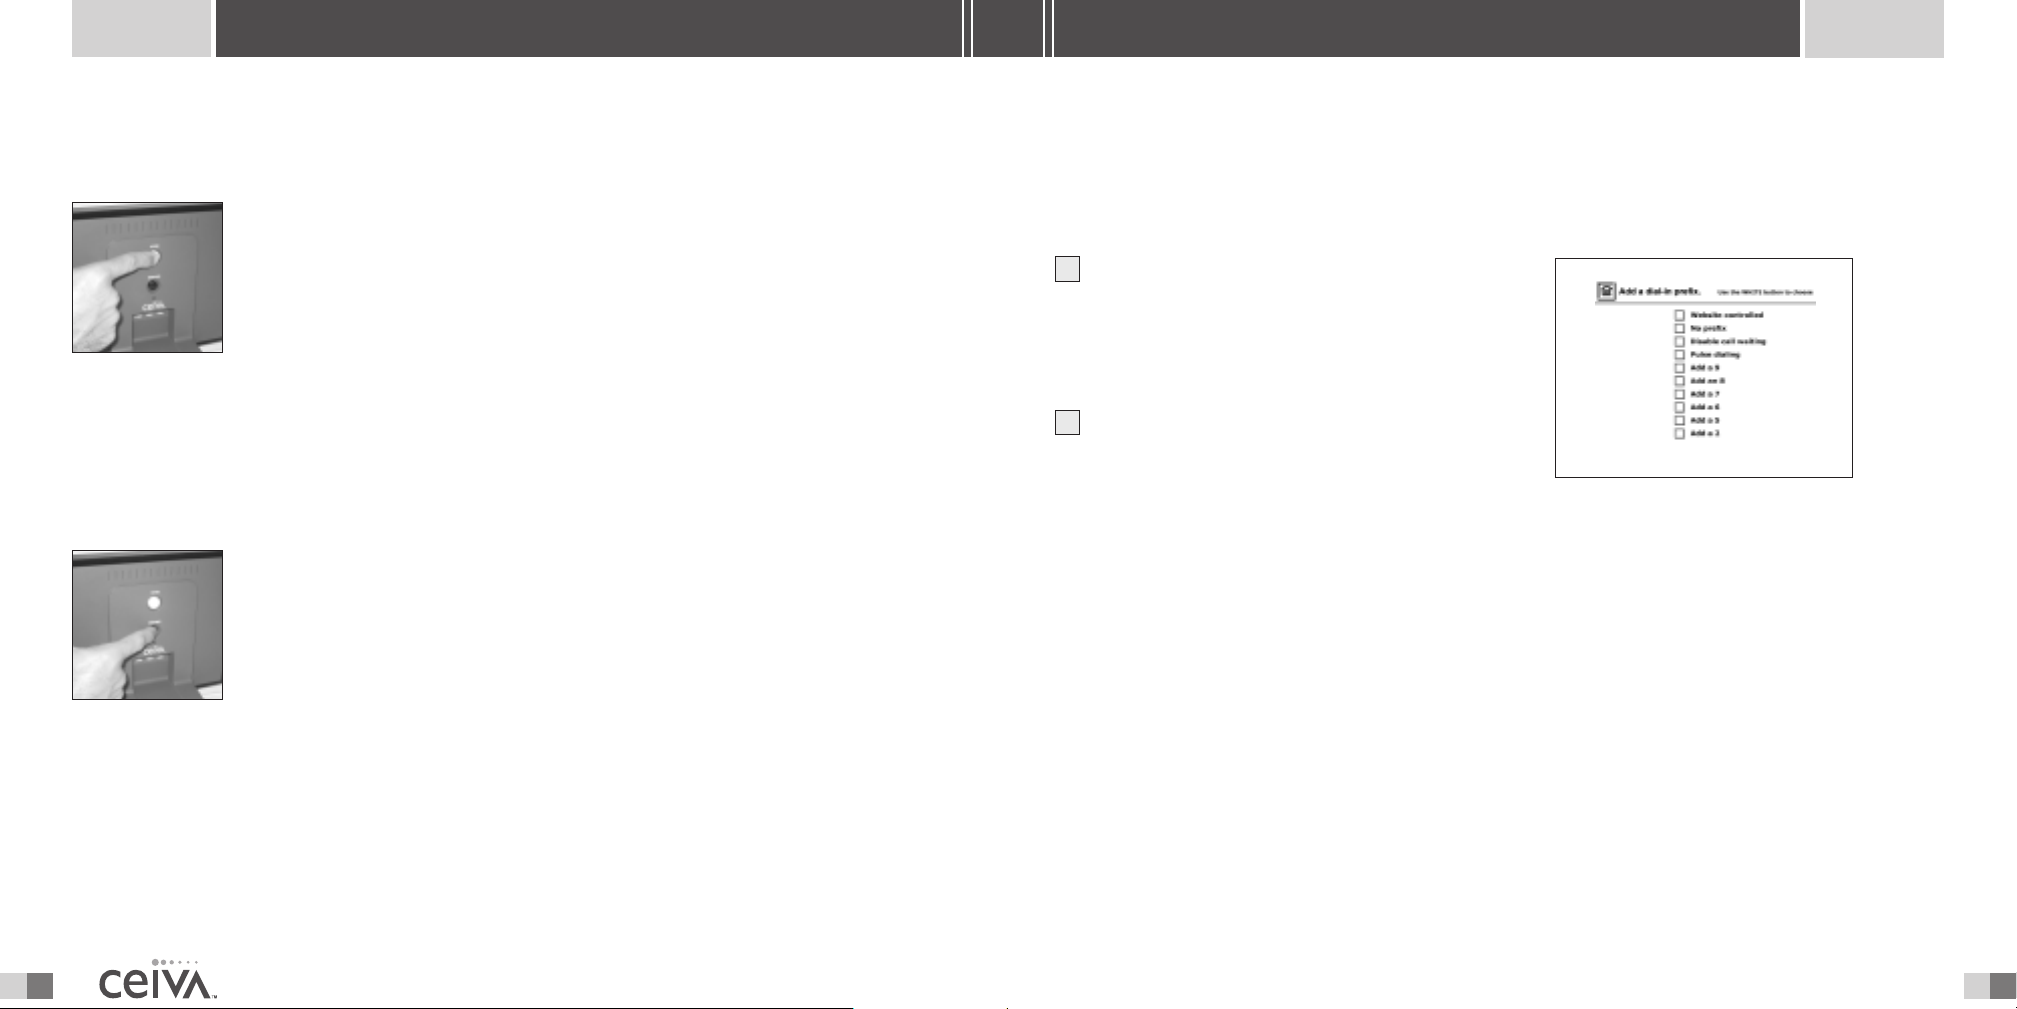
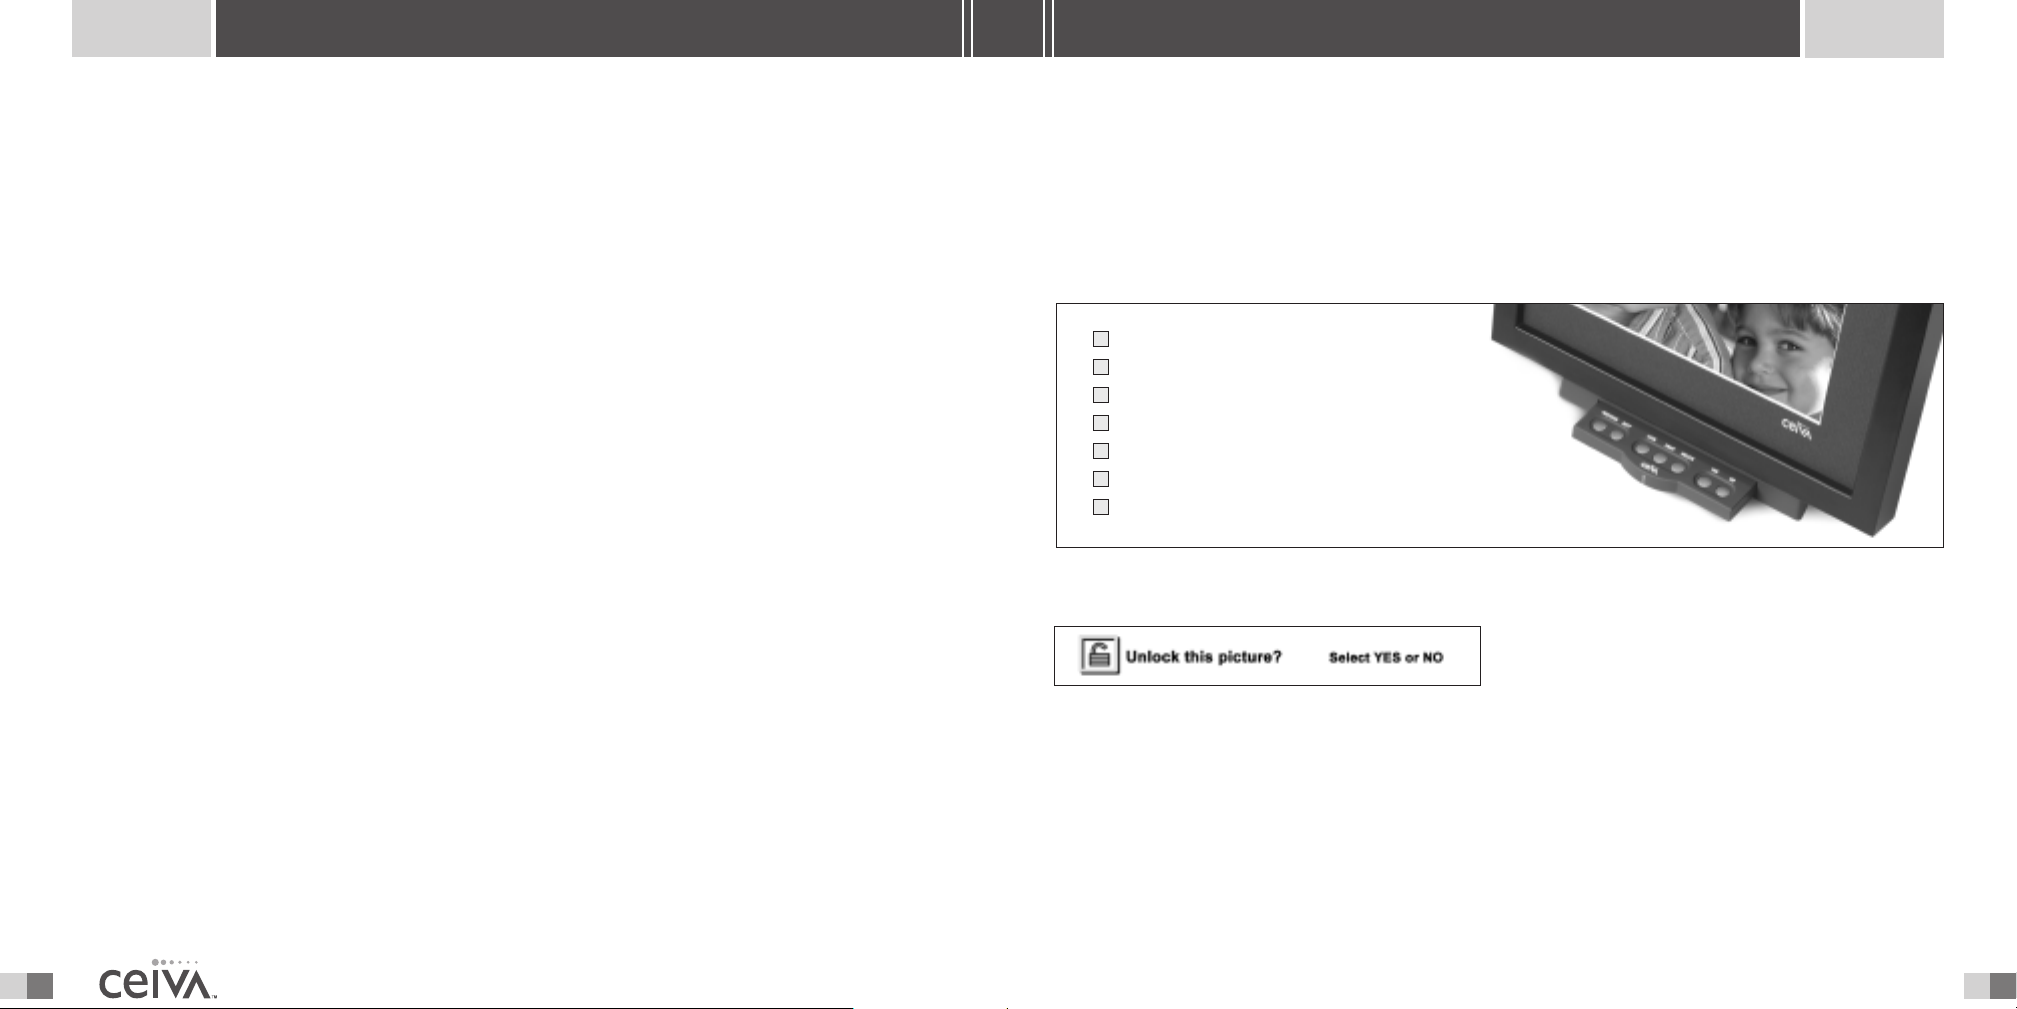
1
Press and hold the white button on the back
of the Receiver. Continue holding it past the
Slide Show and Dial In messages until you
see the
Dialing Prefix screen. Release the
white button.
2
Press and hold the black button until the check
box for your dialing prefix is selected. Release
the black button.Your Receiver will return to
slide show mode.
The next time your Receiver dials in, it will make use of this prefix.To remove the prefix, simply
repeat the above steps and set your prefix to “no prefix.”
WHAT HAPPENS IF I AM USING THE PHONE OR PICK UP THE HANDSET
WHEN MY RECEIVER IS TRYING TO RETRIEVE PICTURES?
In the event that you are using the phone when the CEIVA Digital Photo ReceiverTMtries to
dial out, or you pick up the phone while the Receiver is using the phone line to retrieve pictures,
your personal Photo Receiver will cancel its attempt, and retry again later. Depending on when
this happens, your Receiver may wait until the following night before it retrieves new pictures.
To update your pictures right away, press and hold the white button on the back of the Receiver
until the following message is displayed on the screen,“You can let go now, I’m connecting.”
SHARING MADE EASY
Page 11
22 11
FAQ’S
ADVANCED FEATURES
CAN I USE A RECEIVER IN MY OFFICE?
The answer is yes, however, there is one requirement.Your office must have an analog phone line.
If your office uses a digital phone system, your Receiver can share the same phone line your fax
machine uses, as this will be an analog phone line. If a dialing prefix, such as dialing a 9 or 8 is
needed to access a dial tone, it will be necessary to adjust your Receiver Settings to reflect this
dialing requirement.
NOTE: Do not plug the CEIVATMReceiver into a digital phone jack. If you have questions regarding the type of phone
service used in your home or office, please contact your local phone company.
HOW DO I DELETE OR LOCK PICTURES THAT ARE DISPLAYED
ON MY RECEIVER?
Gently push in on the button tray located on the front of the Receiver. Using the Next or Previous
buttons, locate the picture you wish to Delete or Lock. Once you have located the picture, press
the button of the action you wish to perform.Then simply use the Yes or No button to answer the
on screen instructions. Photos deleted in this manner are removed from the slide show and will be
physically removed from your Receiver the next time it dials in.
HOW DO I ORDER PRINTS DIRECTLY FROM MY RECEIVER?
Gently push the button tray located on the front of the Receiver.To find the photo you want to
make a print of, use the
Next and Previous buttons on your Receiver. Push the Print button
and answer the on screen questions.The next time your Receiver dials in, it will send your print
order to us. If you wish to cancel the print order for a specific picture, first locate the picture and
Print.Then simply answer the on screen questions to cancel the order. Remember that once
press
your CEIVA
TM
Receiver has dialed into the CEIVA NetworkTM, the order has been placed and cannot
be canceled.
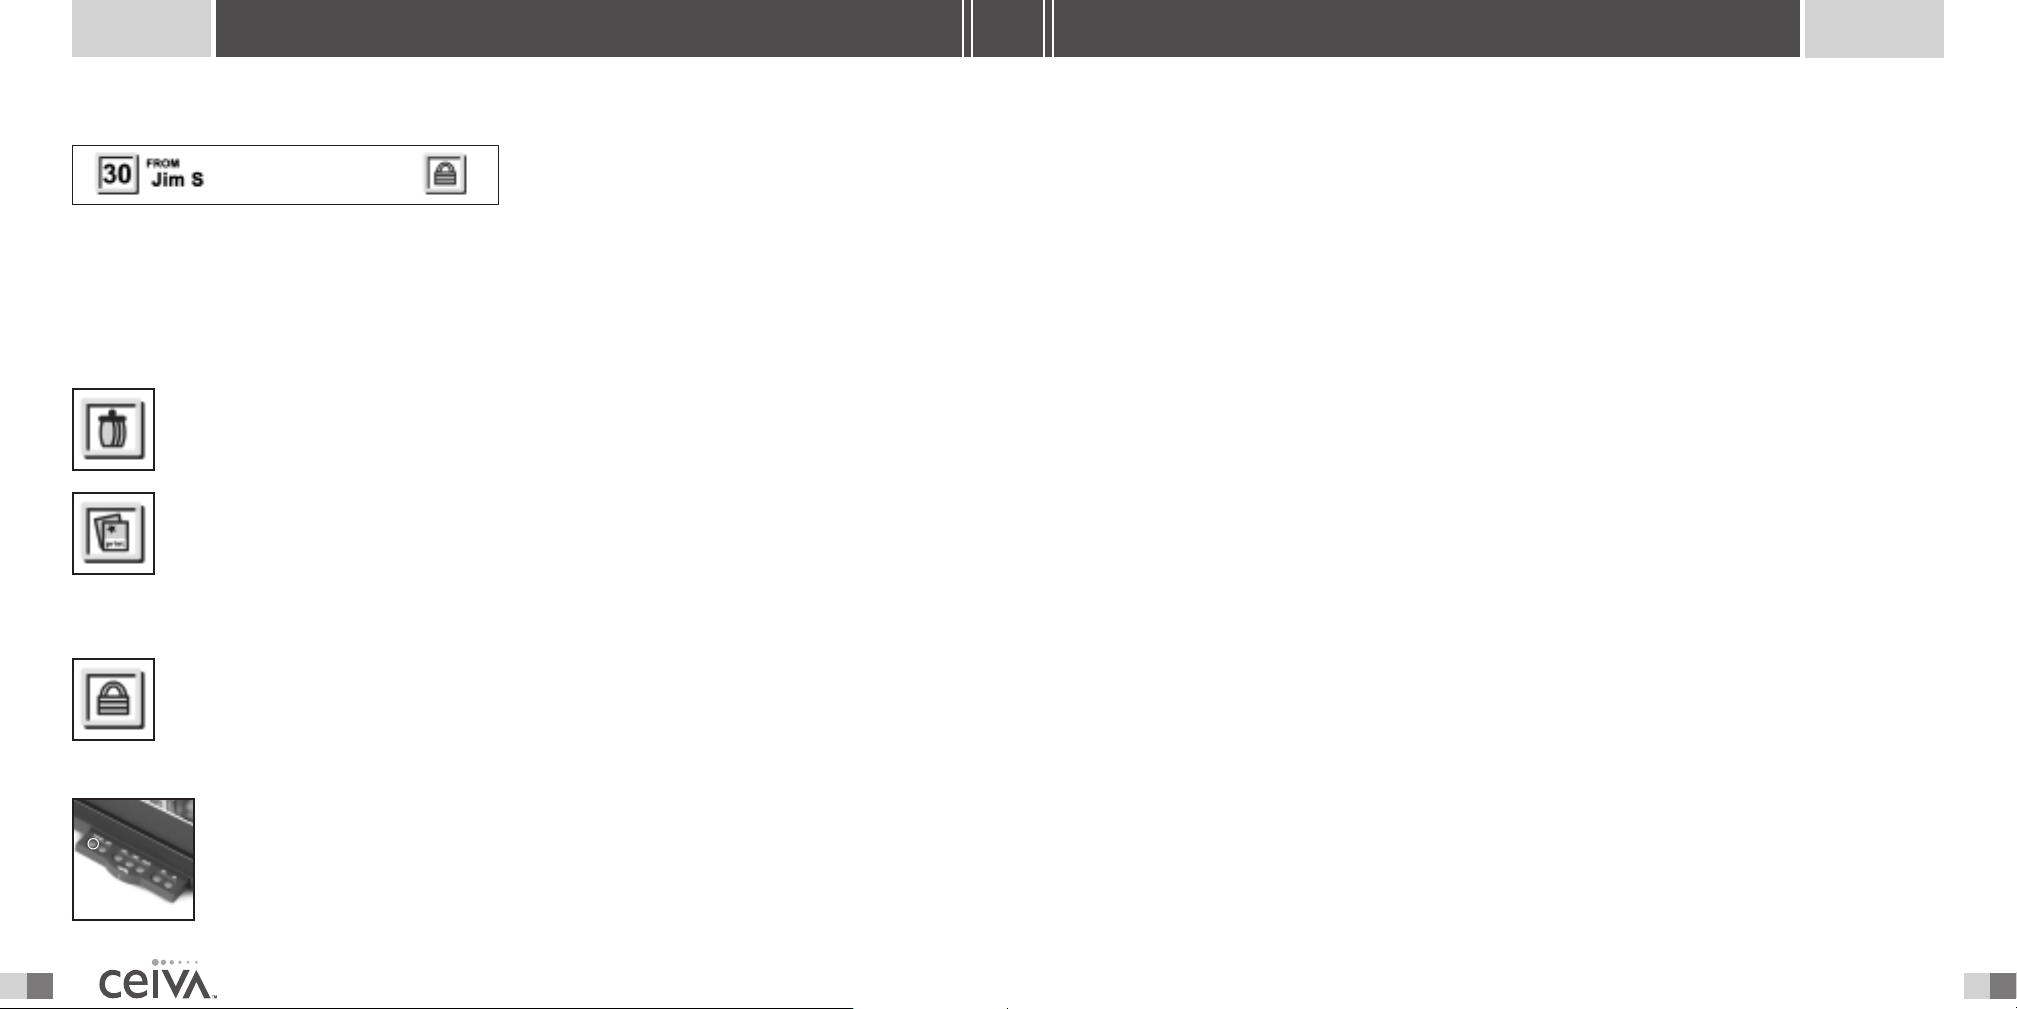
Your Digital Photo Receiver
TM
has many features that will add to your viewing pleasure.To access
these features, gently push in on the “button tray” on the front of your Receiver, just below the
image screen.The tray will slowly glide open, and reveal the buttons which are displayed in the
diagram below. Instructions on the next pages explain its functions.The
Advanced Features
allow you to make use of a variety of functions directly from your Receiver.The following pages
will describe each feature in detail.
1
PREVIOUS
2
NEXT
3
LOCK
4
5
6
7
PRINT
DELETE
YES
NO
1
2
3
4
5
6
7
ACTION BAR
The Action Bar is displayed, at the top of
the Receiver’s screen anytime an action such
Deleting, Locking or Ordering a print
as
is requested. Simply answer “Yes” or “No” to the question displayed on the Receiver’s screen
to confirm or deny the action requested.
NOTE: Any action performed on the CEIVATMReceiver will override any action requested on the website
(e.g. A picture marked for deletion at the CEIVA
Locked on the CEIVA
TM
Receiver).
TM
website will not be Deleted if the picture is currently
SHARING MADE EASY
Page 12
12 21
ADVANCED FEATURES
FAQ’S
INFO BAR
The Info Bar is displayed at the bottom of
the Receiver’s screen and displays a variety of
TM
whom you have approved on your CEIVA
TM
information. The name of any CEIVA
Receiver’s Buddy List will appear on the left side of
the Info Bar.Additionally, the number of each of the 30 images displayed on your CEIVA
is displayed on the left side of the Info Bar.The icon of any action performed (such as
Delete
ON-SCREEN ICONS
or Order A Print) on an image will be displayed on the right side of the Info Bar.
This icon is displayed in the right corner of the Info Bar when a picture on the
Receiver has been marked for deletion.This action will be performed the next
time your CEIVA
This icon is displayed in the right corner of the
been placed.This action will be performed the next time your CEIVA
dials into the CEIVA Network
NOTE: Canceling a Print Order of a specific picture does not cancel any remaining print orders
which may have been placed.
TM
Receiver dials into the CEIVA NetworkTM.
Info Bar when a print order has
TM
.
TM
Receiver
This icon is displayed in the right corner of the Info Bar when a picture on the
Receiver has been locked.A locked picture can only be deleted once it has been
unlocked or the
Delete action is performed on it.
member
TM
Receiver
Lock,
HOW DO I CONTROL THE PICTURE “ON” AND “OFF” TIMES?
Adjusting your Receiver’s automatic on and off times may be done by logging into your account
at www.ceiva.com, and selecting the
remember to click on
TM
your CEIVA
Receiver On or Off, simply press the black button on the back of your Receiver
Update Receiver to confirm your changes.To turn the LCD screen of
Settings option. Once you have selected the desired times,
until the screen is dark.To turn the LCD screen on, simply press the black button again.
NOTE: If you’ve selected to have your Receiver’s display turned off during the night hours, your CEIVA Receiver will
still dial into the CEIVA Network to receive new pictures and update Content Channels. It should also be noted that
TM
when the LCD screen is on, the back of the CEIVA Digital Photo Receiver
may be warm to the touch.
HOW MANY PICTURES ARE STORED ON MY RECEIVER?
Your CEIVA Digital Photo ReceiverTMcan store up to 30 images at a time. Images can be actual
photos or Content Channels you have selected for your Receiver. If you scroll through the slide
show manually (by pressing and releasing the white button on the back of the Receiver), you
TM
will see the “CEIVA
Tip of the Month” image.This image sits in the 31st slot of your Receiver,
and may only be viewed when scrolling through the pictures manually.The Tip Of The Month
cannot be deleted.
WHAT IF MY RECEIVER DIDN’T UPDATE LAST NIGHT?
If your Receiver did not successfully connect to the CEIVA NetworkTMlast night, please allow for a
second evening’s dial-in attempt. Connection problems are usually due to heavy Internet traffic, or
temporary phone network problems, which, in almost all cases, resolve themselves within 24 hours.
PREVIOUS
The Previous button enables you to manually scroll through photos in reverse
order on your CEIVA
TM
Receiver. Press the button once to reverse to the previous
picture. Continue to press and release the button until you reach the photo you
are searching for. Pressing and holding the button down will resume the automatic
slide show in reverse order.
Your CEIVA Digital Photo Receiver
TM
has been designed to retry its call to the Ceiva Network
TM
periodically when a connection attempt has failed. If you would prefer not to wait, you may press
and hold down the large white
Picture button on the back of your Receiver until it displays the
message “You can let go now, I’m connecting”.To cancel, press the button again.
SHARING MADE EASY
Page 13
20 13
FAQ’S
ADVANCED FEATURES
Frequently Asked Questions
NOTE: FAQ’s are also available on-line at help.ceiva.com and are updated on a regular basis.
HOW DO I GET MY PHOTOS ONTO MY RECEIVER?
There are several ways to get your personal photos to display on your Receiver. First of all, you
need digital pictures.You can use a scanner to scan in some of your old prints to preserve them
or use pictures from your digital camera or camera phone. If you are using a traditional camera,
most film developers now can supply you with a CD with your photos on it.
From there, either go to www
you can use the CEIVA Sender
the CEIVA Network
TM
from there. Photos are also sent directly from your camera phone to
your Receiver.
WHAT DO I NEED TO USE MY RECEIVER?
To use your Receiver, you will need a standard AC power outlet, and a working analog phone line.
Make use of the provided dual jack splitter if necessary. Remember, a PicturePlan
to the CEIVA Network
WHO CAN SEND PHOTOS TO MY RECEIVER?
TM
With the owner’s permission, anyone with Internet access can send pictures to a CEIVA Digital
TM
Photo Receiver
from anywhere in the world. Remember, anyone sending pictures must sign up for
a FREE membership at CEIVA
CEIVA Receiver, allowing them to send you pictures.The free membership also allows members to
store up to 200 pictures in on-line albums, customize pictures, add captions and messages.
HOW DO I CARE FOR MY RECEIVER?
Dust regularly with a clean, soft, dry cloth. Do not spray liquids directly onto your CEIVA Digital
Photo Receiver
TM
CEIVA
in any location where it may become wet.
TM
. Do not submerse the CEIVA Digital Photo ReceiverTMin water, or use your
.ceiva.com and log in to send your photos to your Receiver or
TM
and prepare your photos on your hard drive and then send to
TM
subscription
is necessary so that your personal Photo Receiver may receive photos.
TM
.The member’s sign-in name is then put on the Buddy List of your
NEXT
The Next button enables you to manually scroll through pictures in a forward
direction. Press the
Next button once to advance to the next photo. Continue
to press the button until you reach the photo you are looking for. Pressing and
holding the button down will resume the automatic slide show.
NOTE: Using the Previous and Next buttons will stop the slide show mode for a brief time.Your CEIVATMReceiver will
automatically resume the slide show after 2 minutes.The amount of time your CEIVA
the slide show may be adjusted in the Receiver Settings area of the website.
PRINT
TM
Receiver waits before resuming
When you see a photo displayed on your CEIVATMReceiver that you would like to
order a traditional print of, push the
Print button. Simply follow the on-screen
questions to confirm your order. The next time your Receiver dials into the CEIVA
Network
TM
, your order will be placed. If you change your mind, you may cancel your
order by scrolling through your pictures until you locate the picture you ordered.
Push the Print button again and follow the on-screen instructions to cancel your order. Remember
TM
that once your Receiver dials into the CEIVA Network
, your order will be processed. Please allow
5-7 days to receive your print in the mail. Please note that your Receiver must be “print enabled”
TM
at the CEIVA
If you received your CEIVA Digital Photo Receiver
website to be able to place print orders.
TM
as a gift, the person who gave it to you may
have already enabled the print function.
CEIVA PrintsTMare competitively priced. Check the website or call Customer Service.
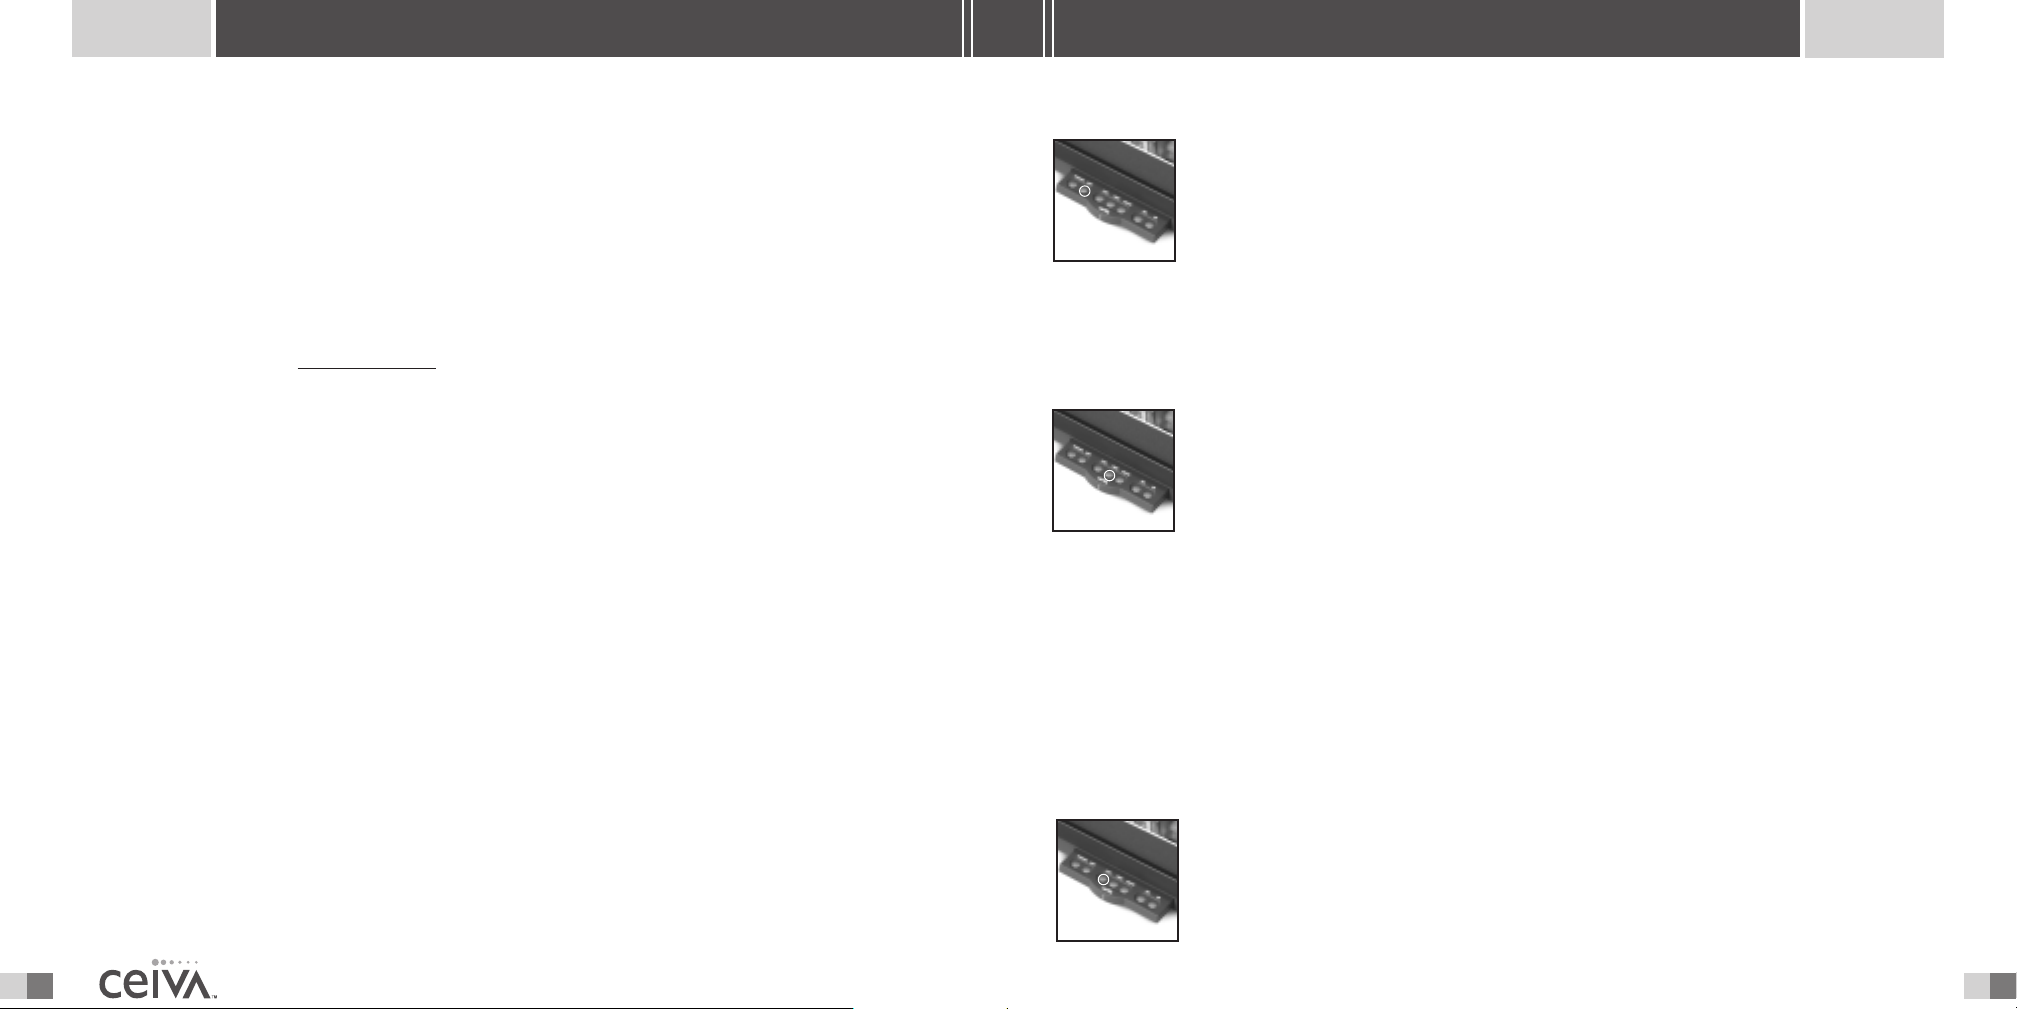
LOCK
The Lock button assures that a favorite picture isn’t deleted from your Receiver
when new pictures are added.To lock a picture, scroll to the picture you wish to
lock, then press the
of your Receiver’s screen. Simply press the
Lock button.The Action Bar will be displayed at the top
Ye s button to Lock the desired
SHARING MADE EASY
Page 14
14 19
ADVANCED FEATURES
SENDING PHOTOS
picture, or No to cancel your request. Pressing Ye s will confirm your request and will display the
Info Bar at the bottom of the Receiver’s screen.A padlock icon in the right corner of the Info
indicates you have now successfully locked this picture.To unlock the picture, simply press the
Bar
Lock button (once the picture is displayed on the Receiver’s screen) and answer the Action Bar
question at the top of the screen.
PRINTS
GET PRINTS AND COOL STUFF
DELETE
Pushing the Delete button will allow you to remove a photo from your Receiver’s
slide show. Push the
delete.The
Action Bar will be displayed at the top of your Receiver’s screen.
Simply press the
request. Pressing
the bottom of the Receiver’s screen. A trash can icon in the right corner of the
Delete button when you see the picture you would like to
Ye s button to Delete the desired picture, or No to cancel your
Ye s will confirm your request and will display the Info Bar at
Info Bar indi-
cates you have now successfully marked this picture for deletion.To cancel your request, simply
press the
Delete button again when the picture appears on screen, and answer the Action Bar
question at the top of the screen. Once a picture has been marked for deletion, the photo will be
physically removed from your Receiver the next time it dials in. Canceling the
Delete request will
once again place the picture in slide show rotation.
YES / NO BUTTONS
The Ye s / No buttons allow you to confirm or deny any Advanced Feature
actions. Simply press the appropriate button to answer the on-screen question
posted in the
NOTE: Content Channels cannot be deleted, printed or locked directly from your Receiver.You may change your
CEIVA Content Channel
Customer Care Team at 1-877-MYCEIVA (1-877-692-3482). The CEIVATMTip Of The Month, which occupies the 31st
slot is an information service provided to you as a CEIVA
features and options available to you, the CEIVA
TM
selection at any time by logging into your account at www.ceiva.com or by calling the CEIVA
Action Bar at the top of the Receiver’s screen.
TM
TM
Tip Of The Month cannot be deleted.
Receiver owner. Designed to keep you informed of new
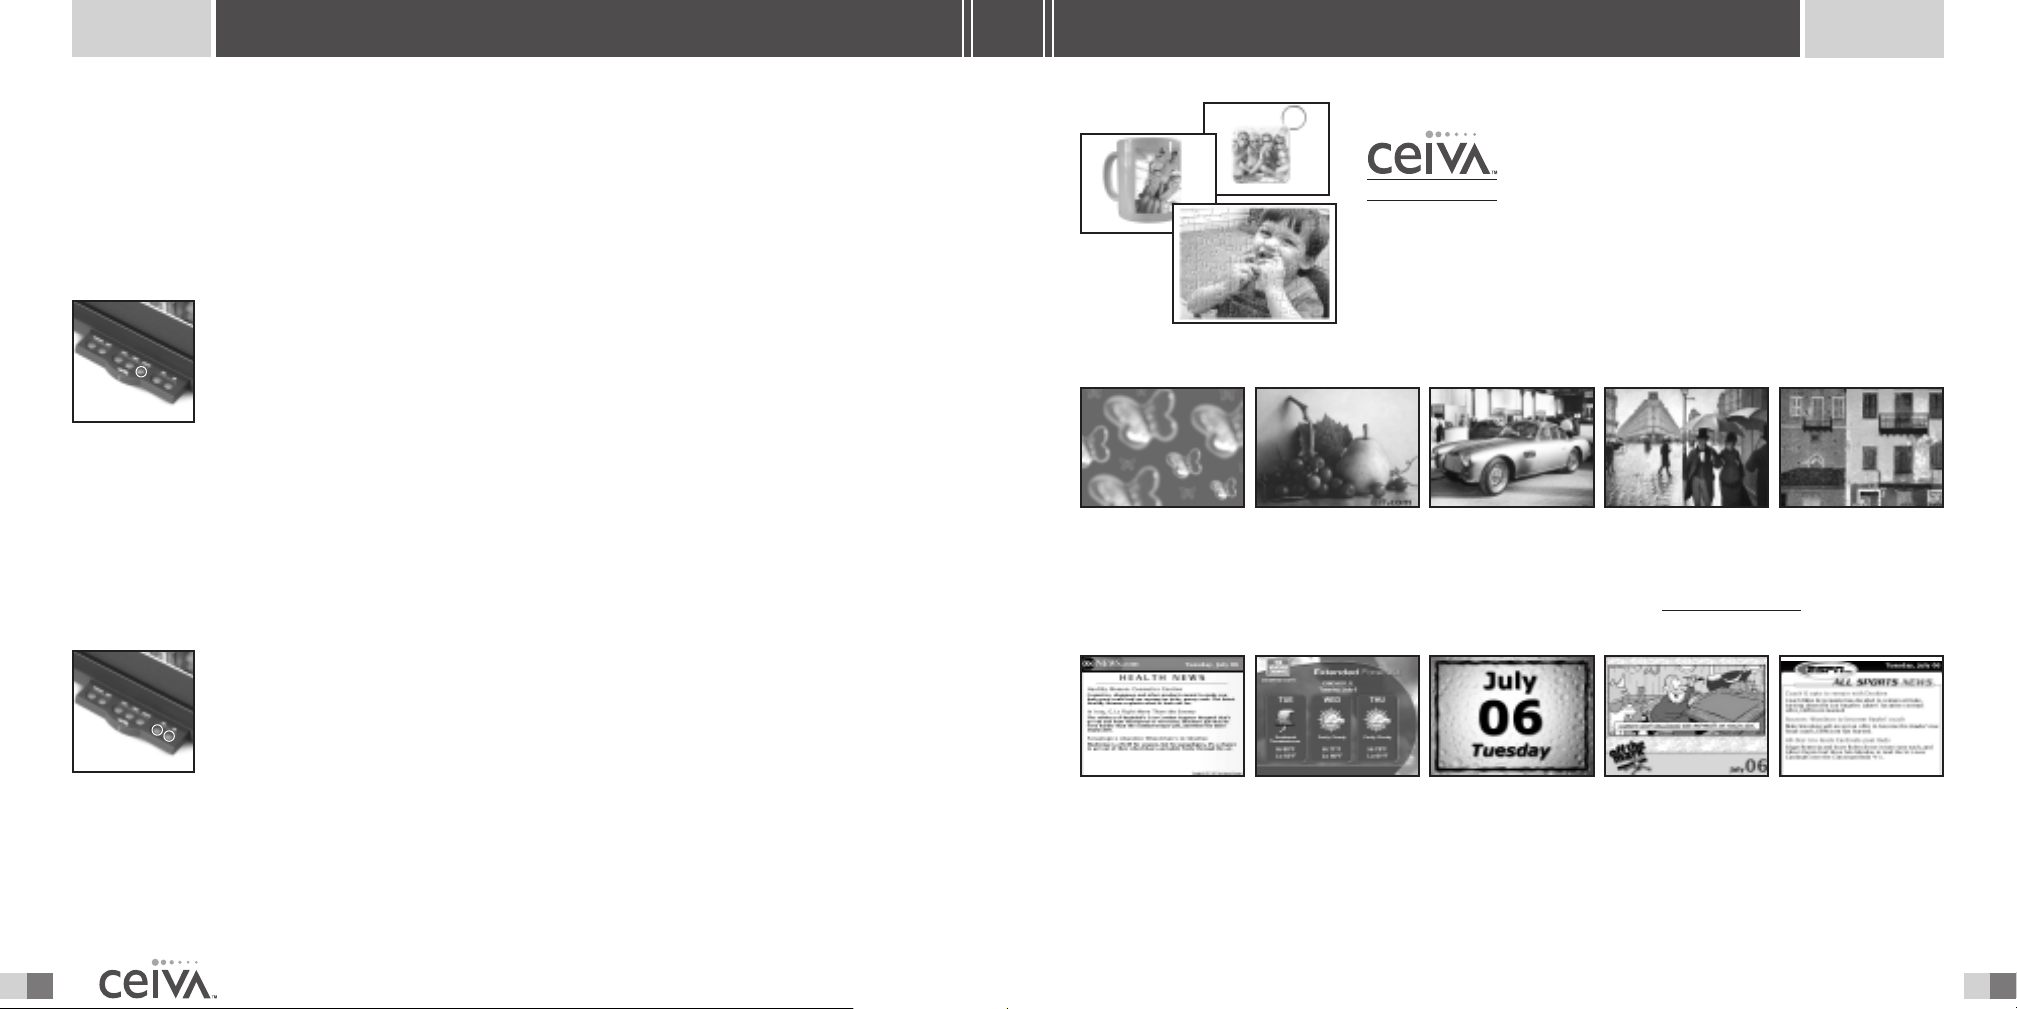
Using CEIVA PrintsTM, you can order different sized prints, magnets,
puzzles, mugs and key chains... all with your favorite photos on them!
You can also order by calling 1-877-MYCEIVA
USE OUR ONLINE GALLERIES
(1-877-692-3482)
.
You’ll find a great selection of perfect ready-made images, artwork, and cards
to send to others... all within our gallery section at www
TM
GET NEWS, WEATHER, SPORTS....
.ceiva.com!
...and more! Select free channels and you’ll receive
daily updates on your favorite topics, even stuff for kids!
You can also order content channels by calling 1-877-MYCEIVA (1-877-692-3482).
SHARING MADE EASY
Page 15
18 15
SENDING PHOTOS
ACCESSORIES
CEIVA CAMERA PHONE FEATURE
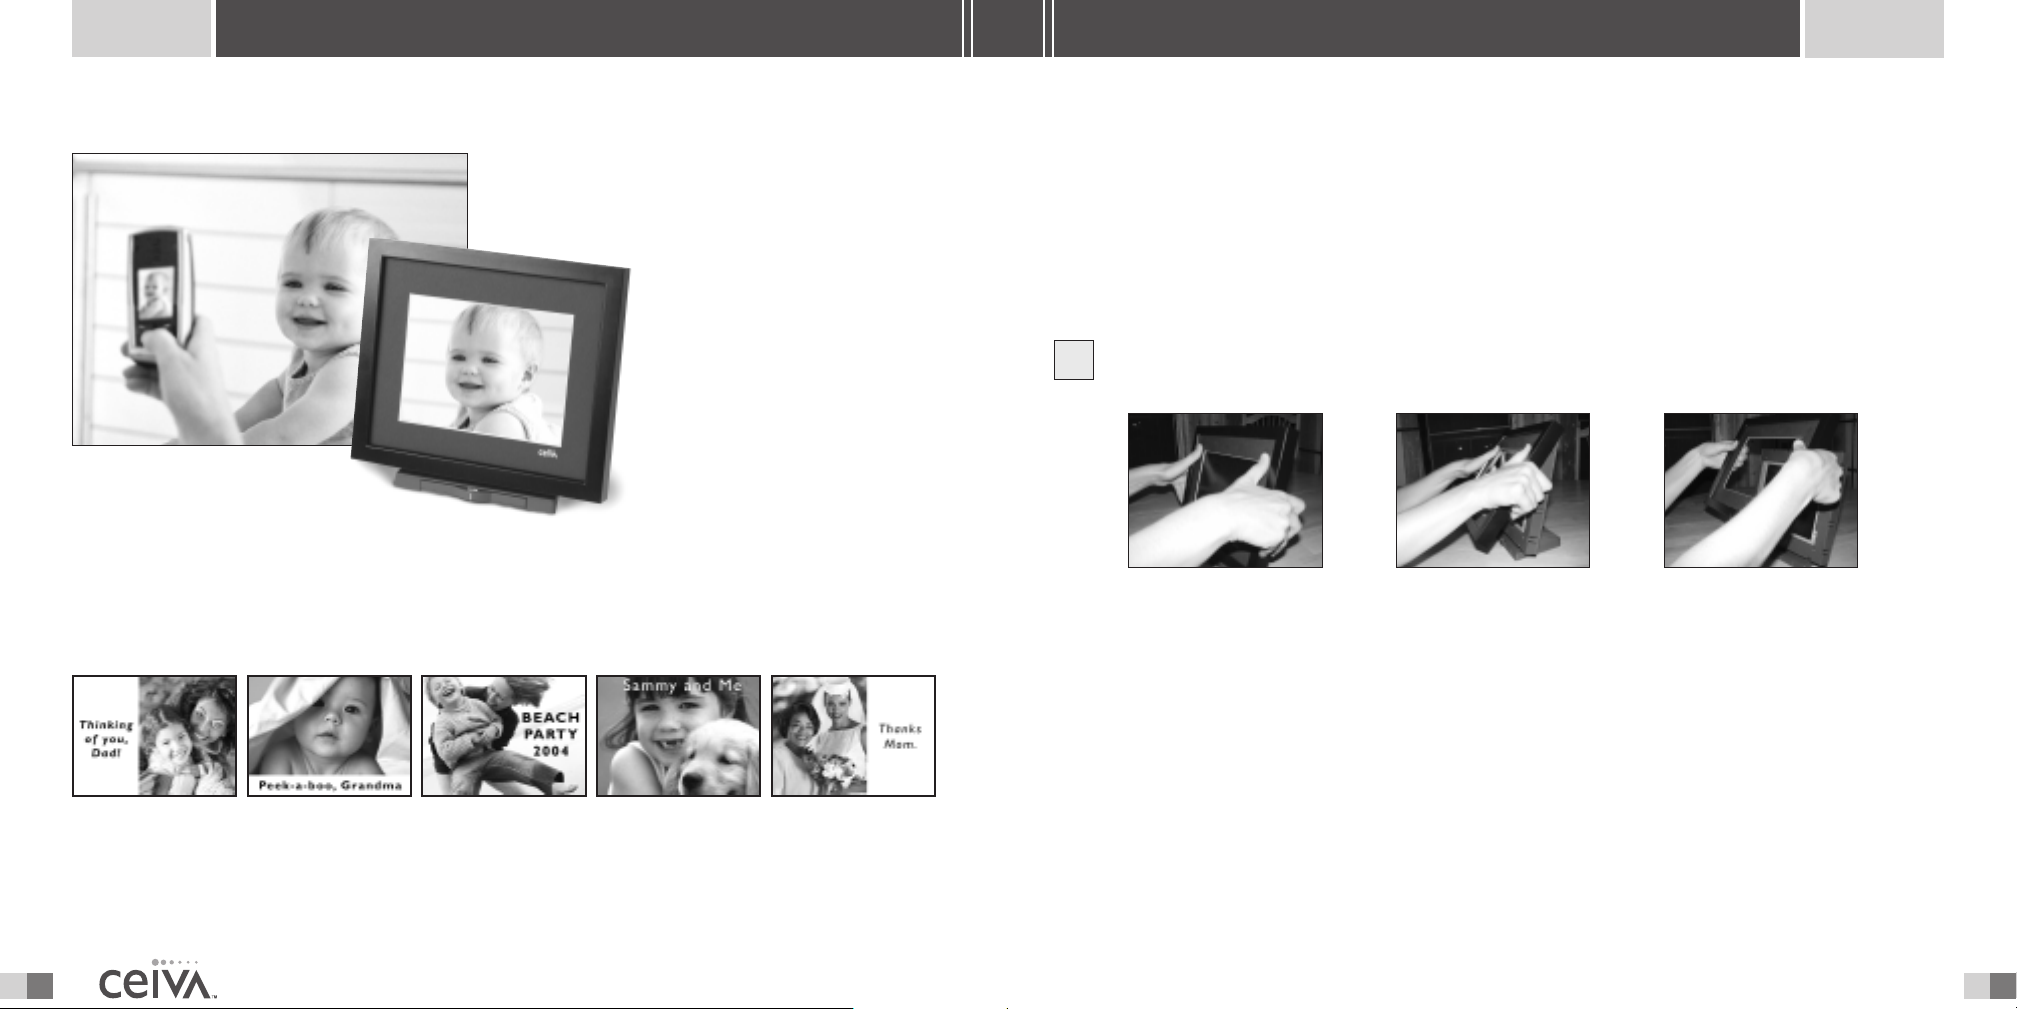
Cutting edge, innovative, yet so easy to use,
your CEIVATMpersonal photo Receiver can
even receive digital photos straight from a
camera phone
!
No computers! No fuss! Shots
are zapped directly from phone
to your personal Receiver.
For more information, go to
http://cameraphone.ceiva.com.
BE CREATIVE
If you love receiving photos on your Receiver, and have a computer, here are some creative
things you can do when you send photos to other Receivers.
If you don’t have a computer, you may want to suggest some of these ideas to the family and
friends who send photos to you.
Accessories
We are very proud to announce our new line of designer mattes and frames! Now you
can customize the appearance of your Receiver to match nearly any room in your home or office.
Just follow the instructions below:
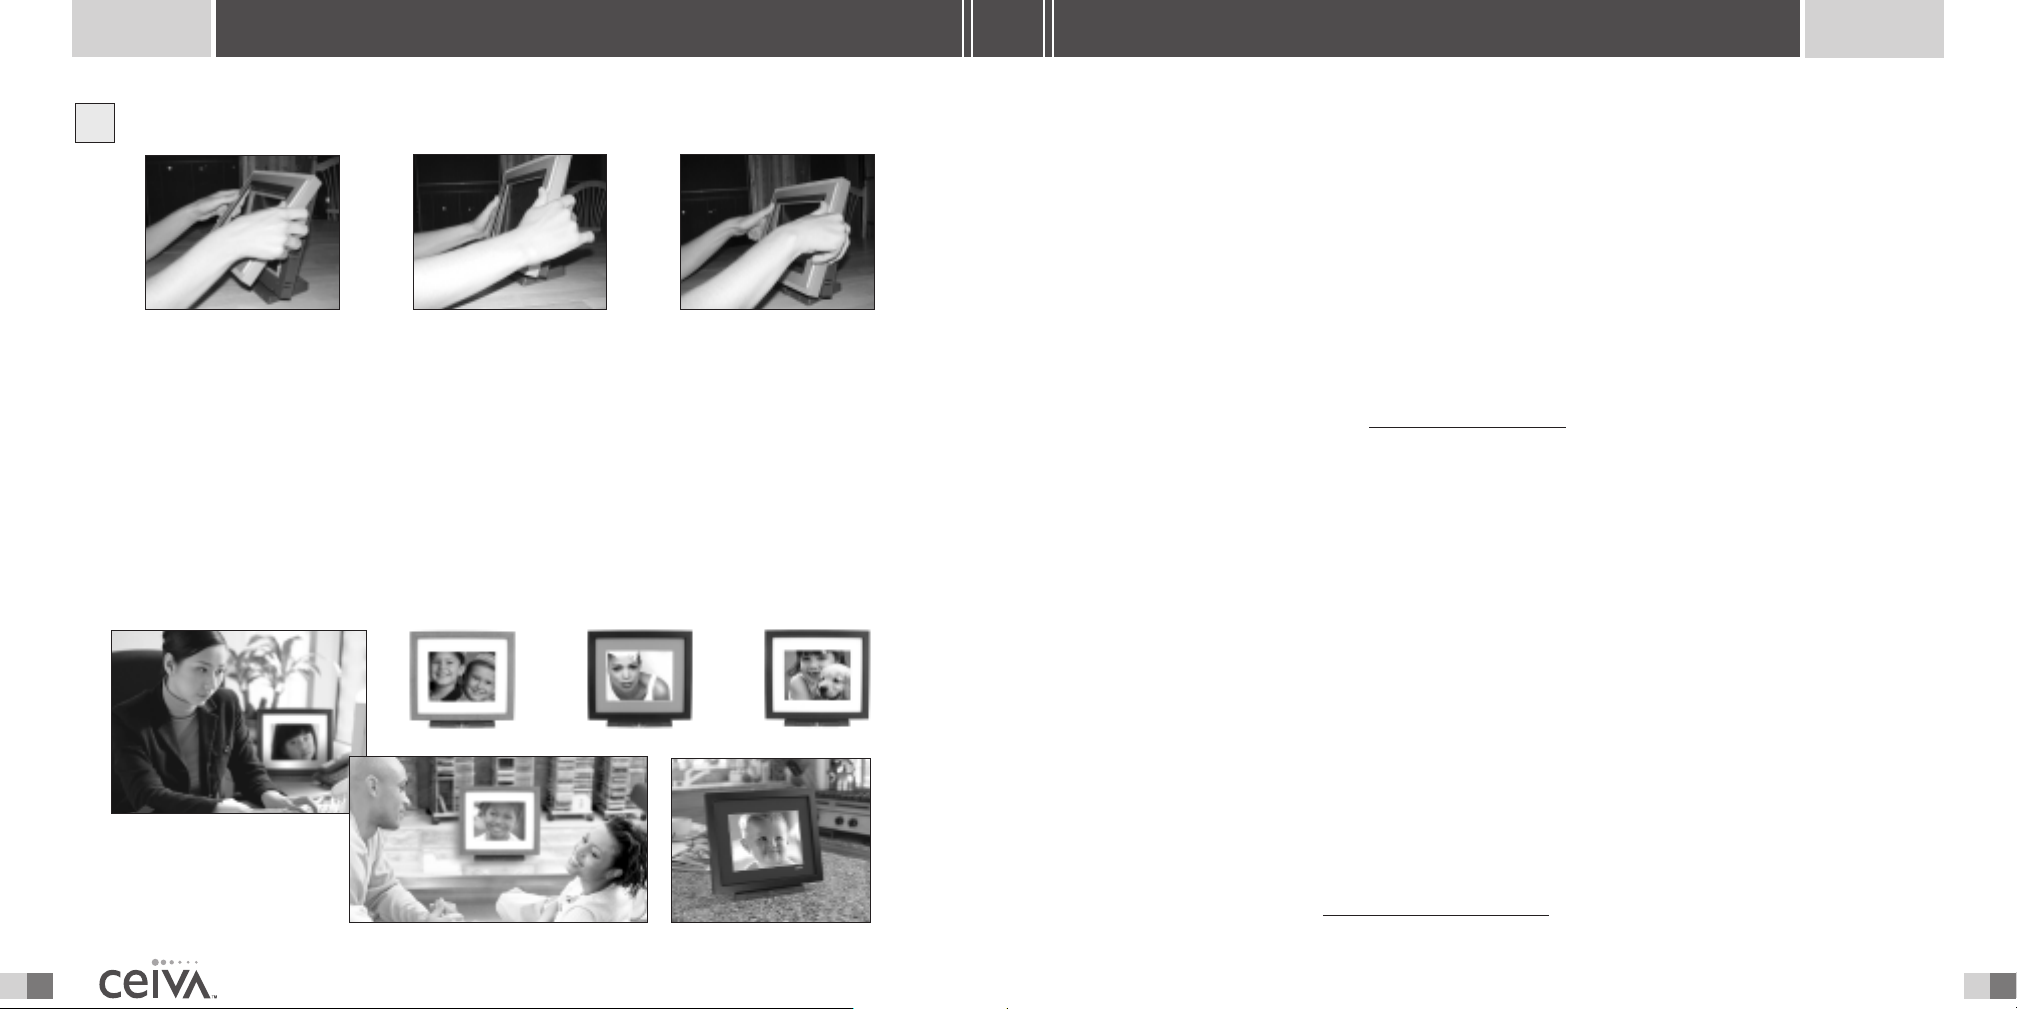
1
REMOVE THE FRAME
Place your thumbs on
each side of the black
matte approximately
1/3 of the way down
from the top of frame.
With your thumbs
firmly holding matte
in place, gently slide
frame forward, apart
from Receiver
and matte.
It should slide right off.
Make sure you place
matte back inside
frame for storage.
This will protect it
for future use.
POSTCARDS AND PERSONAL GREETINGS
What better way to say hello than with CEIVATM? You can send
the perfect Greeting Card at any time for any occasion!
SHARING MADE EASY
Page 16
16 17
ACCESSORIES
SENDING PHOTOS
ATTACH THE NEW FRAME
2
Take your Silverstone
Grey frame out of the
package. Place your
hands on either
side of frame.
Be sure to retain your original matte and frame for future use.
Holding at an angle,
slide top of the
frame on to
Receiver first.
And there you have it!
Continue to guide
frame on to Receiver
from top to bottom.
Make sure bottom of
Frame snaps on
to Receiver.
Sending Photos
Anyone can send digital photos to your Receiver for FREE. Remember, you must first give them
permission using the
“spamming” or unauthorized photos being sent to you.
ONCE YOU’RE A MEMBER, SENDING PHOTOS IS EASY!
• Simply go to http://sendingphotos.ceiva.com. If you’re already emailing your digital
photos to friends and family, sending them to your personal Receiver is just as easy.
• Choose from images already stored on the CEIVA
using the CEIVA Sender
CEIVA Network
TM
• CEIVA
members without a CEIVATMReceiver may store 200 pictures on the website
(members with a CEIVA
and rotate them for future sending and re-sending.The CEIVA
wonderful features when sending pictures, such as the ability to customize pictures,
store pictures in your own online albums and create special messages for friends
and family members with CEIVA
• You can also send photos directly from your camera phone to your receiver. For
more information see the next page.
We encourage all those interested in sending pictures to go to www.ceiva.com to
learn about all the amazing features available to you when sending and using your
CEIVA Digital Photo Receiver
Invite-A-Buddy feature.This safeguards your CEIVATMReceiver against any
TM
TM
TM
fast. Go to www.ceivasender.com to download it today!
—free software to help you send multiple photos to the
TM
Receiver may store up to 2,000 pictures per Receiver),
TM
Receivers.
TM
.
website, or send your own photos
TM
website offers many
THE CEIVA SENDER
TM
If you are using a PC, download the CEIVA SenderTM.The CEIVA SenderTMis FREE software available
to all members. It includes our full photo editing studio so you can crop, rotate, add personal
TM
greetings, remove red-eye from pictures and even prepare albums.The CEIVA Sender
TM
many photos as you want to the CEIVA Network
TM
the CEIVA Sender
, go to www.ceivasender.com.
much faster! For more information about
sends as
SHARING MADE EASY
 Loading...