

Page 1
CEEWA S1
User Manual
V1.03
2016/06/03 Revision
Please follow the user manual to finish flight procedures!
DO NOT disable Beginner Mode at first ten flights!
If errors occur, please refer to the user manual at first, and then ask customer
service. DO NOT violate any step in the user manual.
Page 2

2
Contents
Package Contents .....................................................................................1
Standard: ........................................................................................................................................................... 1
Optional
: .................................................................................................................................................................1
Tips ...........................................................................................................2
1. Symbol Instructions ........................................................................................................................................ 2
2. Before Flight ...................................................................................................................................................2
Disclaimer .................................................................................................3
Flight Environment Requirements .............................................................3
I. About CEEWA S1 ..................................................................................... 4
1. About Drone ................................................................................................................................................... 4
2. About Sports Watch .......................................................................................................................................5
3. About Remote Controller ...............................................................................................................................6
4. About Follow Module ..................................................................................................................................... 7
5. About Digital Image Transmission ..................................................................................................................8
II. Sports Watch Version: Check before Flight ............................................ 9
Overview ............................................................................................................................................................ 9
Download CEEWA APP .......................................................................................................................................9
Step 1: Check Drone ......................................................................................................................................... 10
Step 2: Check Arms & Buckles .......................................................................................................................... 10
Step 3: Check Smart Battery ............................................................................................................................. 10
Step 4: Check Battery Level ..............................................................................................................................10
Step 5: Check AV-OUT Mode & AV cable & TF Card ......................................................................................... 13
Step 6: Turn on/off Devices .............................................................................................................................. 13
Step 7: Initialization Binding ............................................................................................................................. 15
Step 8: Check Drone Working Condition .......................................................................................................... 16
Step 9:Turn on CEEWA APP & Pair to Watch .................................................................................................17
Step 10: Calibration .......................................................................................................................................... 17
III. Sports Watch Version: Flight Test ........................................................ 21
Overview .......................................................................................................................................................... 21
Step 1: Finish Check before Flight .................................................................................................................... 22
Step 2: Check Flight Environment ..................................................................................................................... 22
Step 3: Height Calibration .................................................................................................................................22
Step 4: Check GPS Status & Connection Status ................................................................................................22
Step 5: Switch to P Mode .................................................................................................................................24
Step 6: Drone Test ............................................................................................................................................24
Step 7: Attach / Detach Propellers ...................................................................................................................24
Step 8: One-Key Take-off .................................................................................................................................. 25
Step 9: Check Status ......................................................................................................................................... 26
Step 10: Adjust Drone’s Attitude ......................................................................................................................26
Step 11: Follow Mode.......................................................................................................................................27
Step 12: Nav. Mode ..........................................................................................................................................35
Step 13: Go-Home ............................................................................................................................................ 37
Step 14: One-key Land ......................................................................................................................................40
Step 15: Turn Off All Devices ............................................................................................................................ 40
Page 3

3
IV. Remote Controller Version: Check before Flight ................................. 42
Overview .......................................................................................................................................................... 42
Download CEEWA APP .....................................................................................................................................42
Step 1: Check Drone ......................................................................................................................................... 43
Step 2: Check Arms & Buckles .......................................................................................................................... 43
Step 3: Check Smart Battery ............................................................................................................................. 43
Step 4: Check Battery Level ..............................................................................................................................43
Step 5: Check AV-OUT Mode & AV cable & TF Card ......................................................................................... 46
Step 6: Turn on/off Devices .............................................................................................................................. 46
Step 7: Initialization Binding ............................................................................................................................. 48
Step 8: Check Drone Working Condition .......................................................................................................... 49
Step 9:Turn on CEEWA APP & Pair to Remote Controller .............................................................................. 50
Step 10: Calibration .......................................................................................................................................... 50
Step 11: Check Image Transmission .................................................................................................................54
V. Remote Controller Version: Flight Test ................................................. 56
Overview .......................................................................................................................................................... 56
Step 1: Finish Check before Flight .................................................................................................................... 57
Step 2: Check Flight Environment ..................................................................................................................... 57
Step 3: Height Calibration .................................................................................................................................57
Step 4: Check GPS Status & Connection Status ................................................................................................57
Step 5: Switch to P Mode .................................................................................................................................58
Step 6: Drone Test ............................................................................................................................................ 59
Step 7: Attach / Detach Propellers ...................................................................................................................59
Step 8: One-Key Take-off .................................................................................................................................. 59
Step 9: Check Status ......................................................................................................................................... 60
Step 10: Adjust Drone’s Attitude ......................................................................................................................61
Step 11: Follow Mode.......................................................................................................................................63
Step 12: Nav. Mode ..........................................................................................................................................69
Step 13: Check Live Image ............................................................................................................................... 71
Step 14: Go-Home ............................................................................................................................................ 71
Step 15: One-key Land ......................................................................................................................................73
Step 16: Turn Off All Devices ............................................................................................................................ 74
VI. Specifications ..................................................................................... 75
VII. LED Indicators & Vibrations .............................................................. 77
1. Drone Status LEDs ........................................................................................................................................77
2. Follow Module LEDs ..................................................................................................................................... 77
3. Remote Controller LEDs ................................................................................................................................78
4. Image Transmission LEDs .............................................................................................................................. 78
5. Sports Watch Vibration................................................................................................................................. 78
6. Remote Controller Vibration ........................................................................................................................ 79
VIII. FAQ .................................................................................................. 80
Appendix: Mount/Detach Image Transmission ........................................ 82
Mount ............................................................................................................................................................... 82
Detach .............................................................................................................................................................. 82
Appendix: Mount Follow Module ............................................................83
Page 4
1
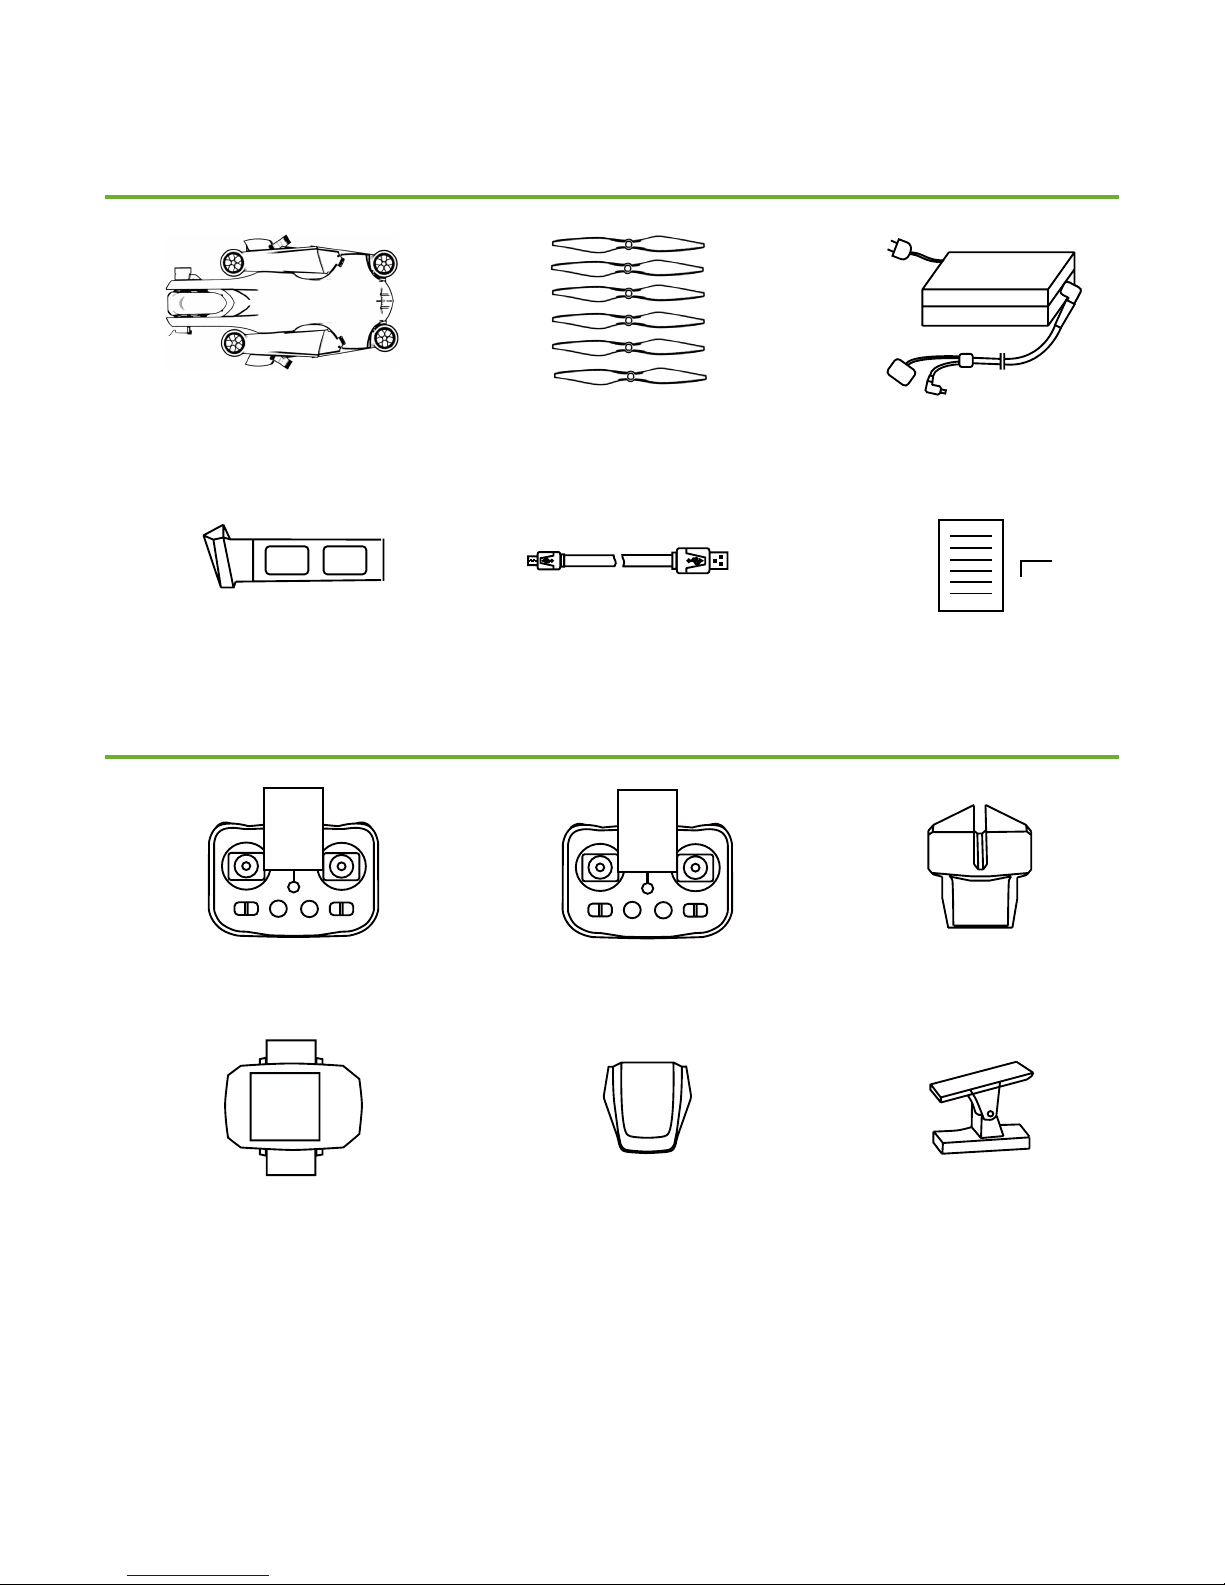
Package Contents
Standard:
Optional
:
Before using the product, please make sure all the following checked items are included in the package. If any item is missing,
please contact your local sellers.
Starter Edition: Standard *1 + Remote Controller *1
Classic Edition: Standard *1 + Sports Watch *1 + Follow Module *1 + Charging Chip *1
Premium Edition: Standard *1 + Sports Watch *1 + Follow Module *1 + Charging Chip *1 + Smart Battery (extra) *1
Limited Edition: Standard *1 + Sports Watch *1 + Follow Module *1 + + Remote Controller (With Image Transmission
Ground System)*1 + Charging Chip *1
Gimbal*1
(
With Sports Camera &
Gimbal
)
Remote Controller
*1
Sports Watch
*1
Follow Module
*1
Charging Chip
*1
Remote Controller*1
(With Image Transmission
Ground System)
Image Transmission*1
(already mounted
on the Drone)
Battery Charger
*1
USB Cable
*1
Accessories Kit ( With Quick
Start, Warranty Card and
Hex screwdriver )
Propellers(Pair
)
*3
Smart Battery
*1
Page 5
2
Tips
1. Symbol Instructions
2. Before Flight
(1) Document Symbol
(1) Manuals
(1) Firmware Upgrade Kit
(3 Video
(4) CEEWA APP
Attentions!
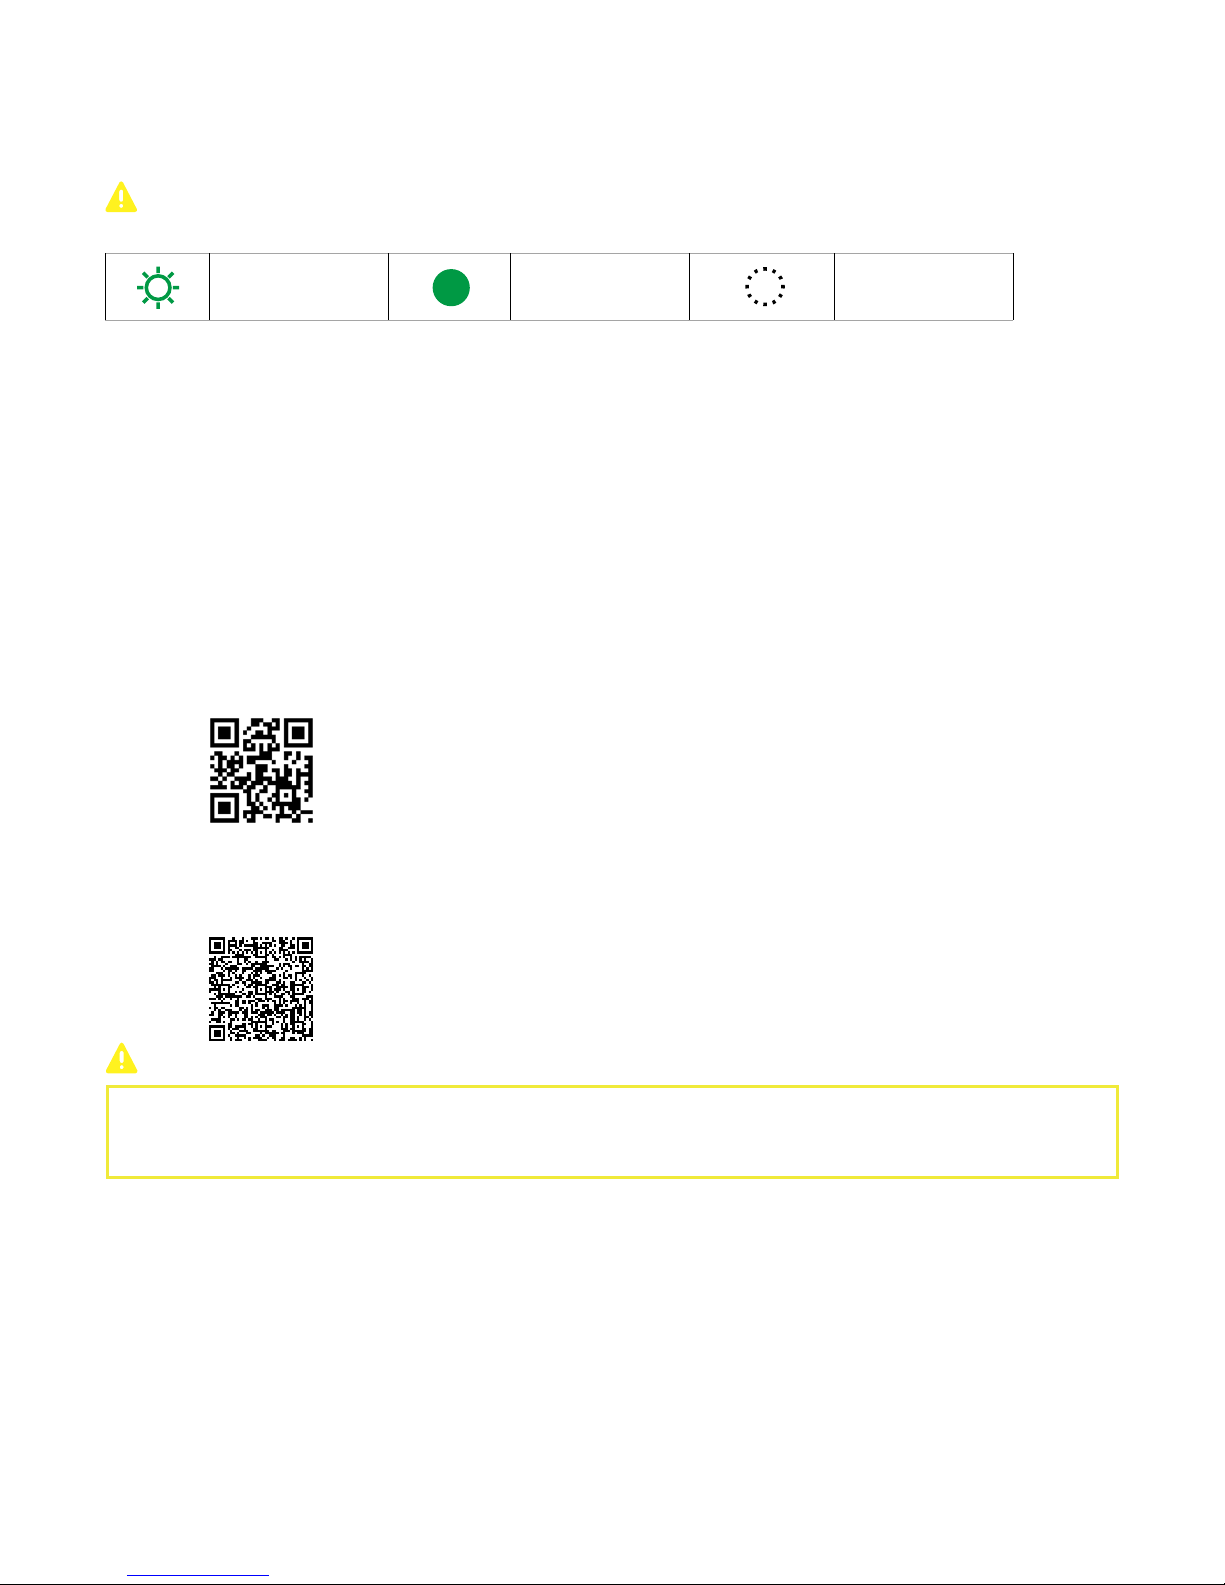
(2) LED Indicator Symbols
OnBlink
CEEWA provides the following tutorials and manuals:
CEEWA S1 User Manual
CEEWA Quick Start
Disclaimer
CEEWA Drone Firmware Upgrade Manual
CEEWA S1 Update Tool
CEEWA S1 USB Driver
Watch the tutorial video below to learn how to use CEEWA S1 safely and correctly.
Website: www.ceewa.com
QR Code
:
Website:
http://www.ceewa.com/index.php?case=archive&act=list&catid=15
QR Code:
CEEWA APP requires: iOS 8.0 or later.
Android OS4.3 or above with Bluetooth 4.0.
Image Transmission: 5G Wi-Fi should be supported by your smartphone.
Off
Page 6

3
Disclaimer
Flight Environment Requirements
CEEWA accepts no liability for damage(s), injuries or any legal responsibilities incurred directly or indirectly from the use of this
product in the following conditions:
1. Damage(s), injuries or any legal responsibilities incurred when users are drunk, taking drugs, under the influence of anesthesia,
dizziness, fatigue, nausea, and any other conditions both physical and mental that could impair your ability.
2. Damage(s), injuries or any legal responsibilities caused by subjective intentional operations.
3. CEEWA takes no responsibility for any misuse due to you fail to follow the CEEWA S1 Disclaimer, Quick Start, User Manual and
warnings found on www.ceewa.com.
4. Damage(s), injuries or any legal responsibilities caused by non-CEEWA accessories and parts.
5. Damage(s), injuries or any legal responsibilities caused by using third party products or fake Ceewa products.
6. Damage(s), injuries or any legal responsibilities caused by improper operation or subjective misjudgment.
7. Damage(s), injuries or any legal responsibilities caused by mechanical failures due to products aging.
8. Damage(s), injuries or any legal responsibilities caused by continued flying after Low Battery Alarm is triggered.
9. Damage(s), injuries or any legal responsibilities caused by flying the drone in abnormal conditions (such as when water, oil, sand
or other unknown materials are in inside the drone, incomplete assembly, the main components have obvious faults, defect and
missing accessories ).
10. Damage(s), injuries or any legal responsibilities caused by flying in the following situations such as in magnetic interference areas
(such as high voltage lines, power stations, broadcasting towers and mobile base stations), radio interference areas, and government
regulated no-fly zone.
11. Damage(s), injuries or any legal responsibilities caused by using the drone in bad weather, such as rain, heavy wind, snow, hail,
lightning, tornadoes and hurricanes.
12. Damage(s), injuries or any legal responsibilities caused when Drone is in the following situations: collision, fire, explosion, floods,
tsunamis, subsidence, ice trapped, avalanche, debris flow, landslide, earthquake, etc.
13. Damage(s), injuries or any legal responsibilities caused by the misuse of the battery, protection circuit, RC model and battery
chargers.
14. Damage(s), injuries or any legal responsibilities caused by infringement such as any data, audio or video material recorded by the
use of Drone.
15. Damage(s), injuries or any legal responsibilities caused by insufficient training.
16. Damage(s), injuries or any legal responsibilities caused by flying in the areas prohibited by laws, regulations or related entities.
17. Other losses that are not covered by the scope of CEEWA liability.
1. Please activate One-Key Take-off/Land on a level ground.
2. During the first three taking-off, ensure that there is no obstacle within 50 meters around the taking-off position and the
surrounding flight environment.
3. Only fly in open areas. Buildings with large metal structures may affect the accuracy of the compass and GPS system.
4. Avoid obstacles, crowds, trees, rivers and high voltage power lines.
5. Larger dust or fine sand will affect motors.
6. Avoid flying in areas with high levels of electromagnetism, including base stations and radio transmission towers.
7. P Mode cannot be activated within the polar areas, but A Mode can.
8. Please read international and domestic airspace regulations and rules before using CEEWA Drone. Do Not violate any law or
administrative rules.
9. If you are not prepared to use the Drone, Remote Controller, Sports Watch and Follow Module for a long time ( more than 10
days ), please do not keep them with full battery.
Page 7
4
I. About CEEWA S1
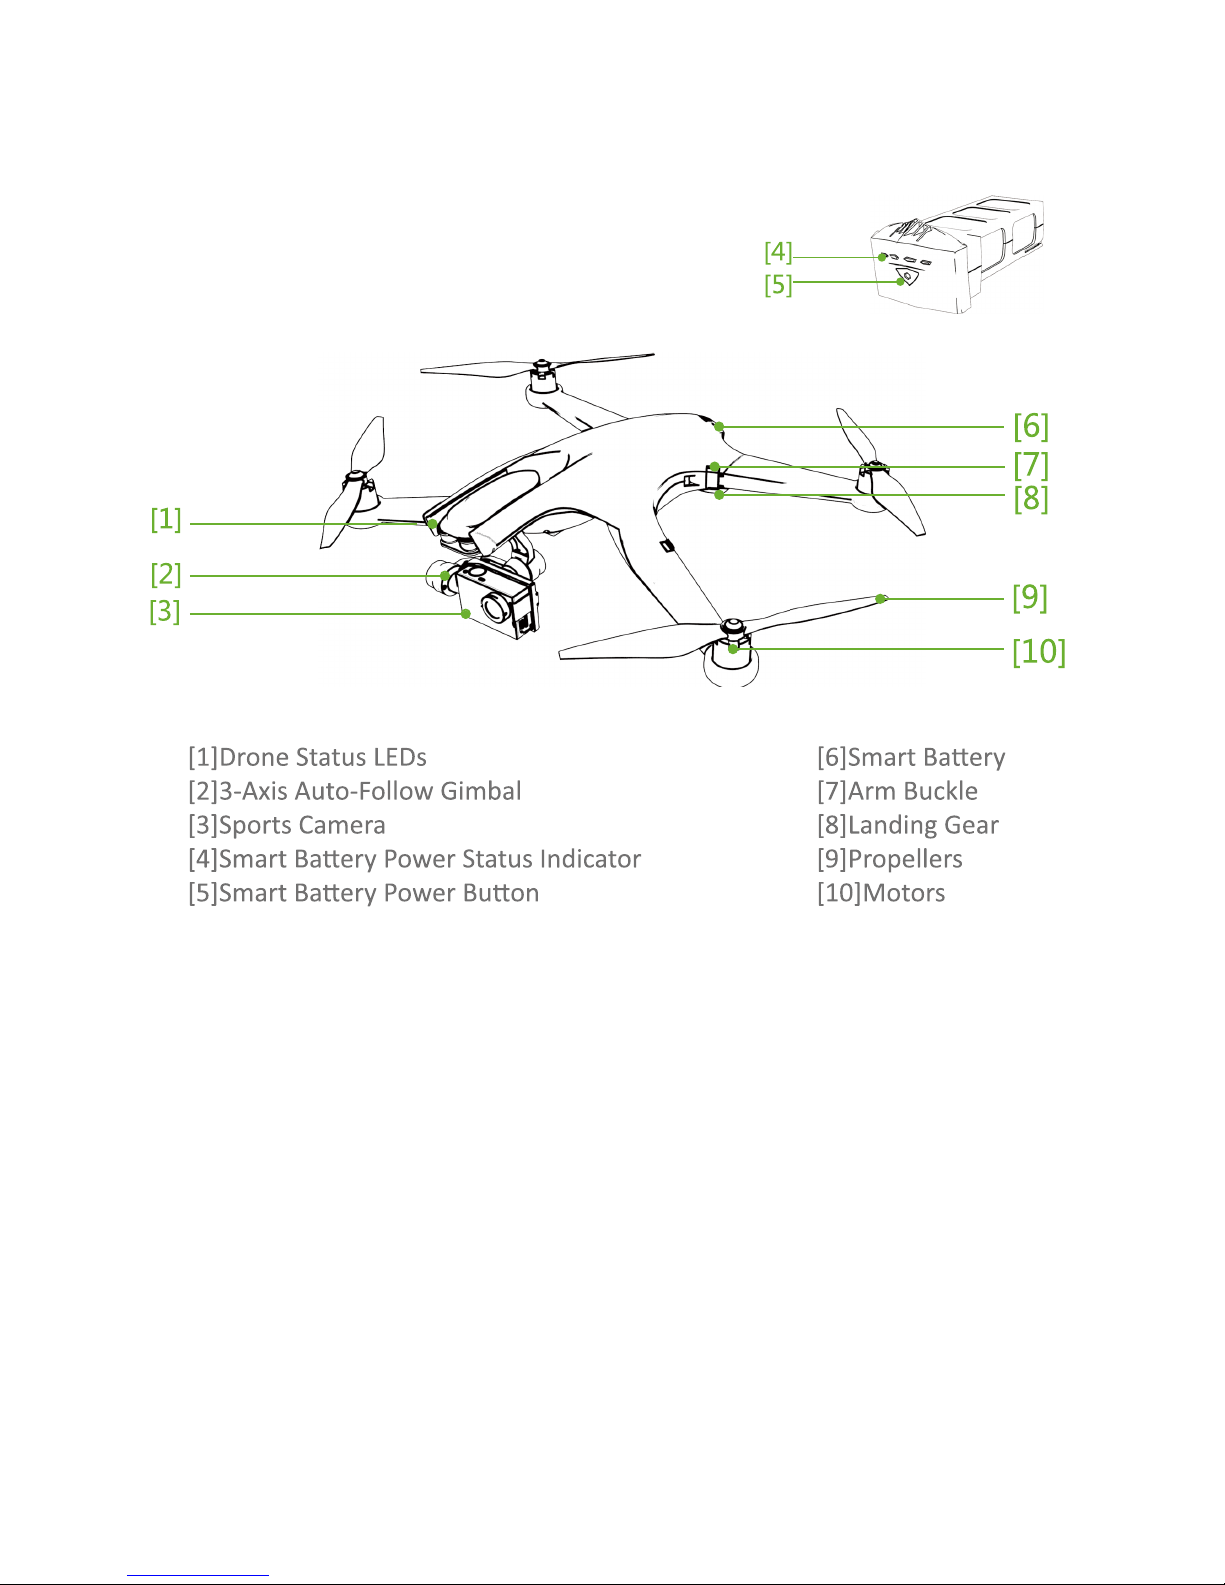
1. About Drone
Page 8
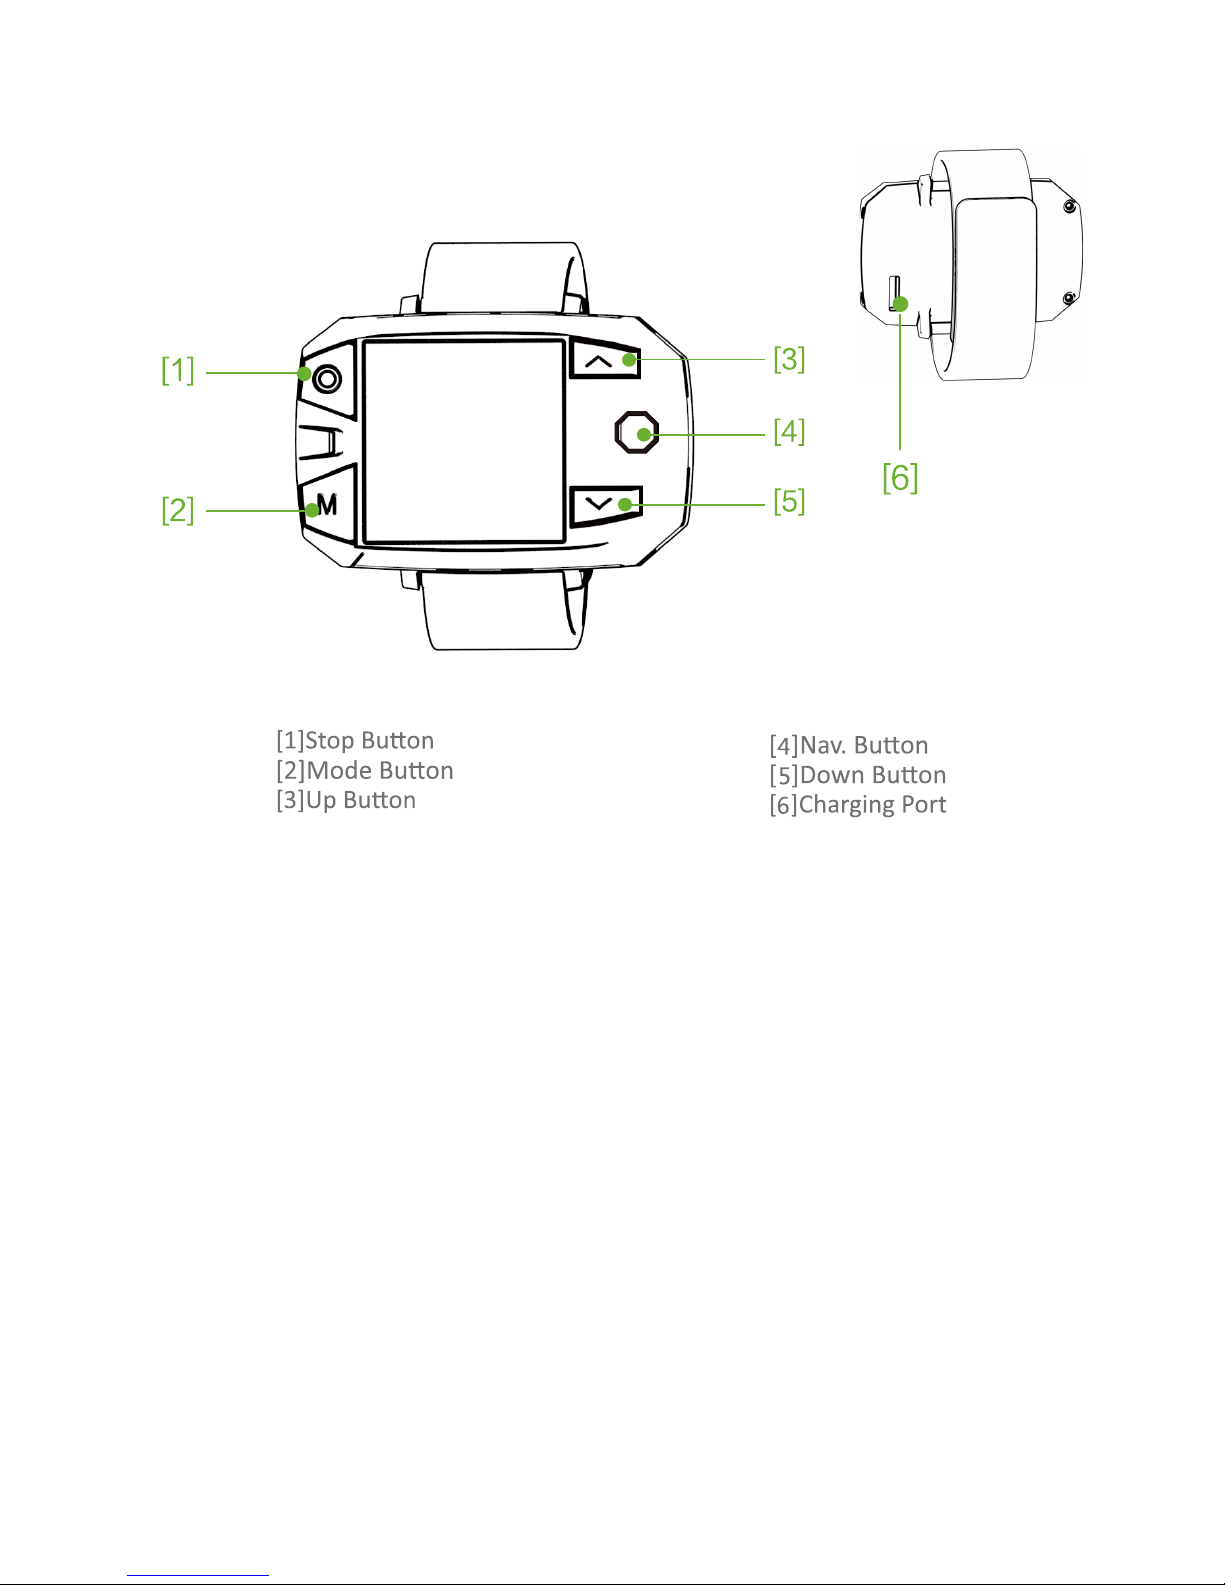
5
2. About Sports Watch
Page 9
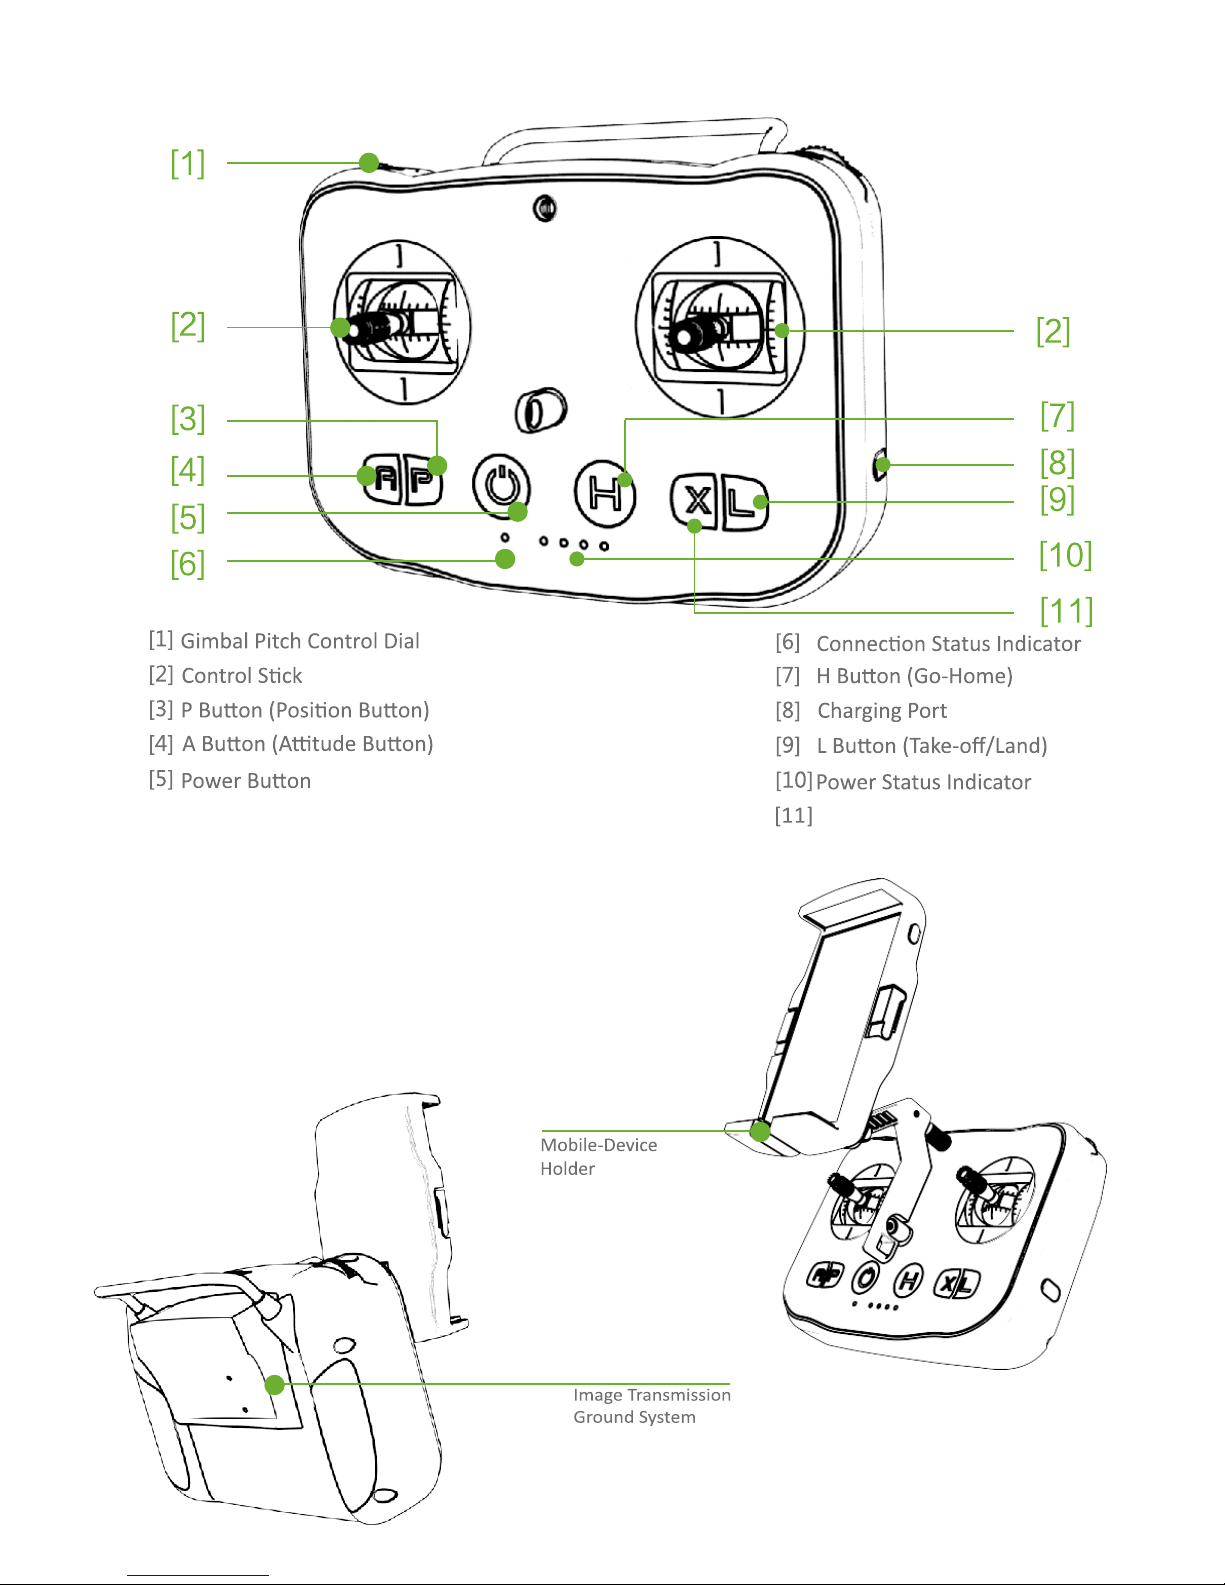
6
With Image Transmission Ground System
3. About Remote Controller
Undened
Page 10
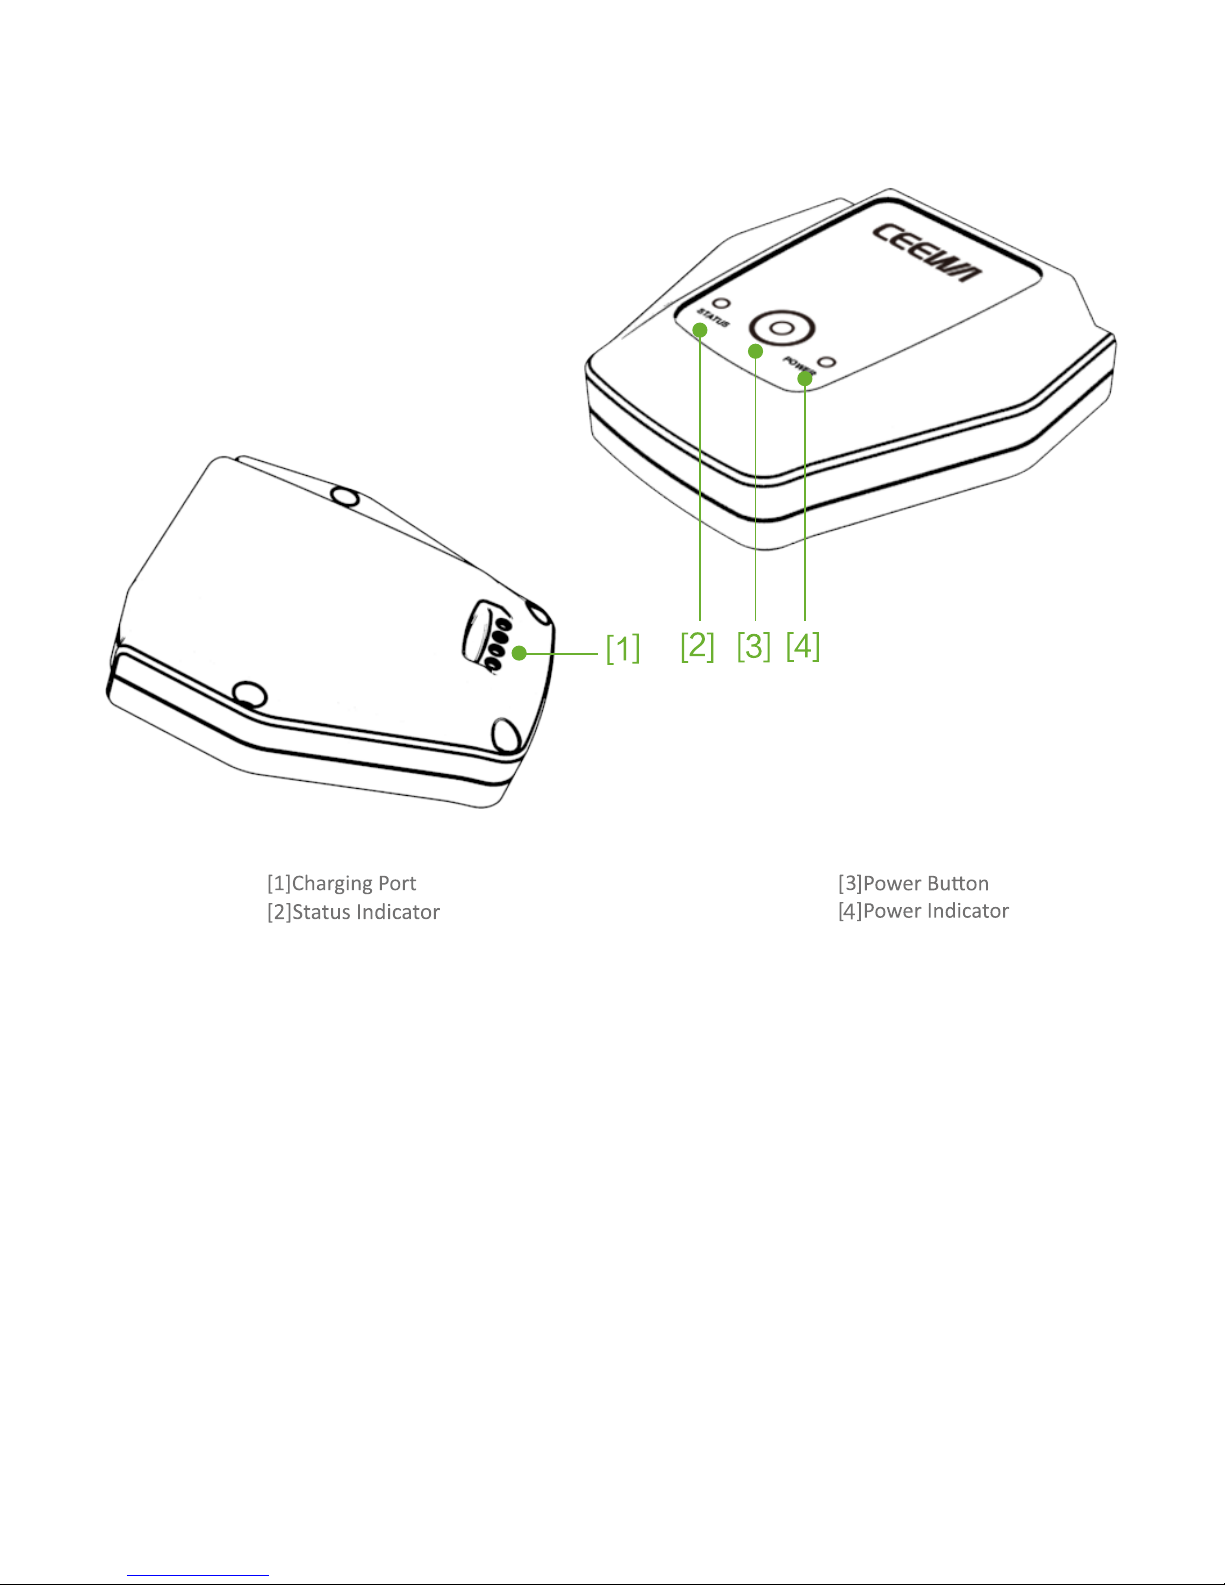
7
4. About Follow Module
Page 11
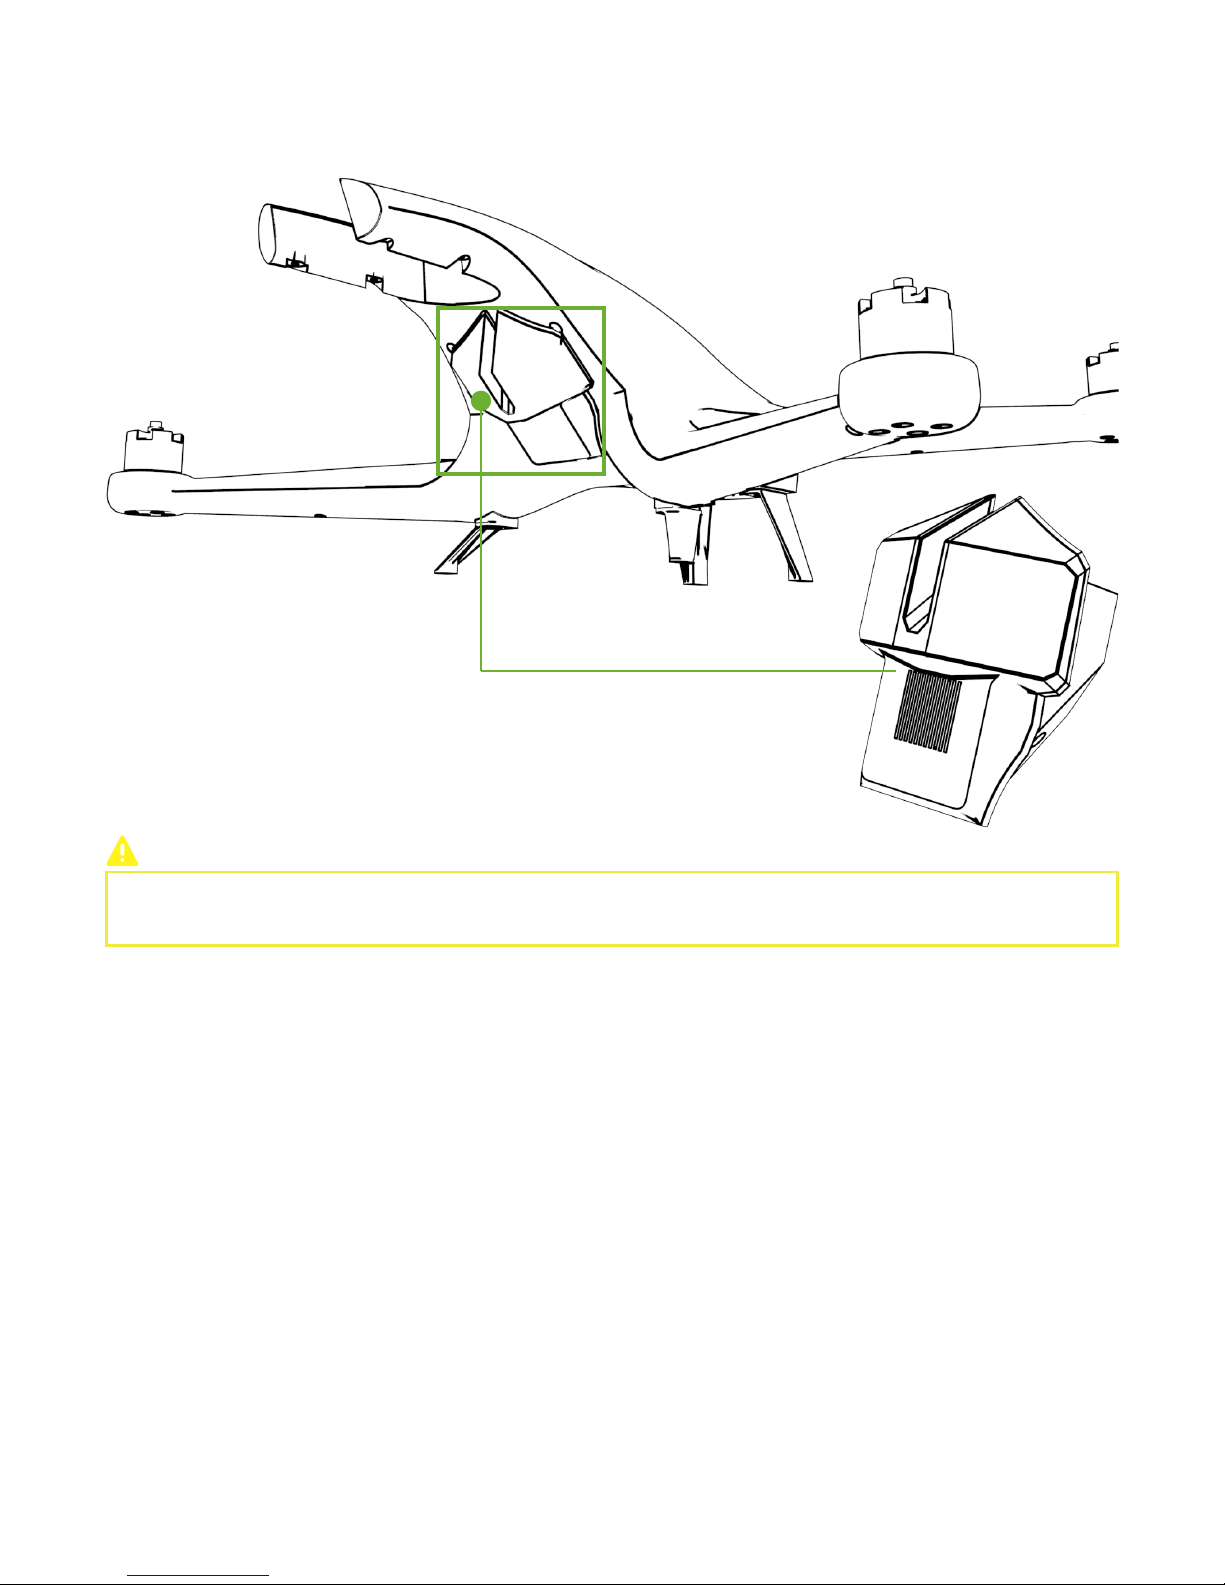
8
5. About Digital Image Transmission
How to install Image Transmission?
Please refer to Chapter Appendix: Image Transmission→ Mount/Detach Image Transmission
Image transmission of Limited Version has been
mounted into the front hatch of Drone.
If you purchase it separately, please refer to the
detailed installation steps in the
User Manual
.
Page 12
9
II. Sports Watch Version: Check before Flight
Overview
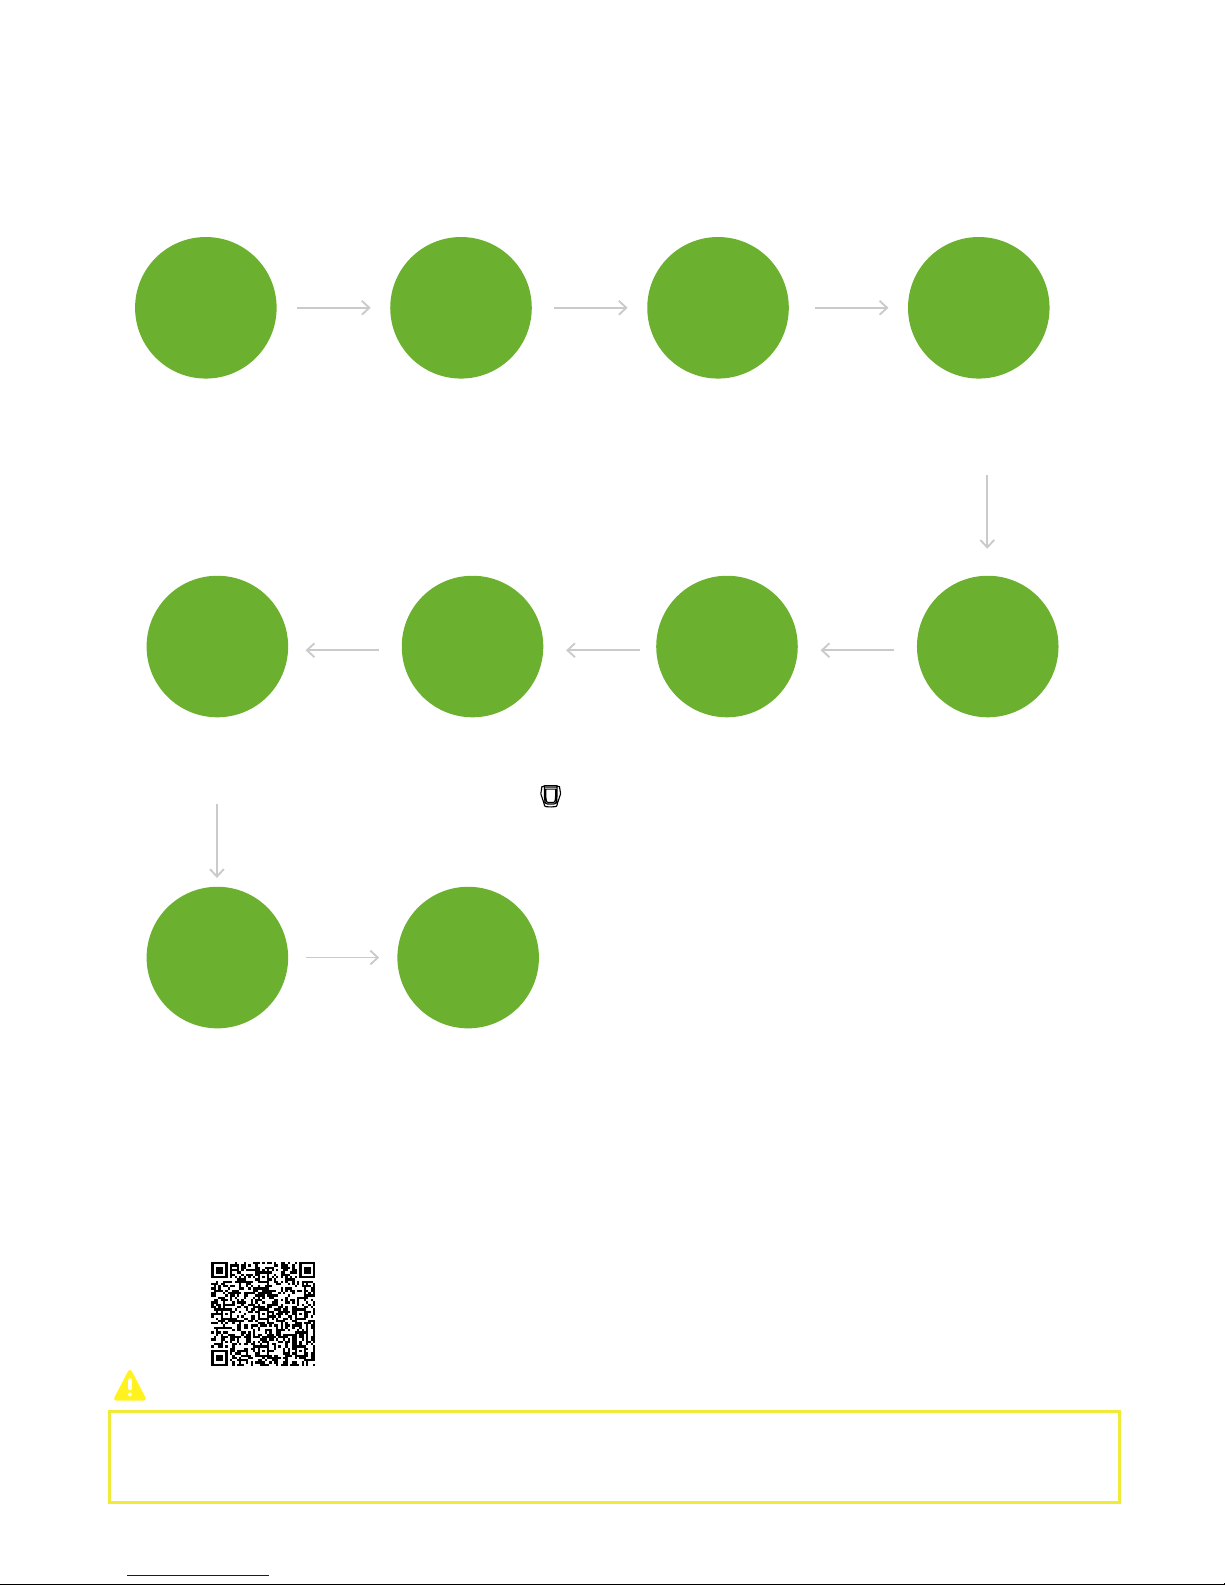
Before doing the following steps, please ensure you have read user manual carefully and thoroughly.
Download CEEWA APP
Website:
http://www.ceewa.com/index.php?case=archive&act=list&catid=15
QR Code:
CEEWA APP requires: iOS 8.0 or later.
Android OS4.3 or above with Bluetooth 4.0.
Image Transmission: 5G Wi-Fi should be supported by your smartphone.
3GQKY[XKZNKGXSY
IGTLURJGTJ[TLURJ
YSUUZNR_H[IQRKYIGT
HKZ[XTKJUTGTJULL
+TY[XK9SGXZ(GZZKX_IGTHK
OTYKXZKJOTZUZNKJXUTKGTJ
RUIQZOMNZR_*545:JGSGMK
ZNKVOTYOTYOJKZNKJXUTK
)NKIQ*XUTK
)NKIQOZYIUSVUTKTZY
GTJKTY[XKZNK_GXK
TUZHXUQKTUXGMOTM
)NKIQ'XSY
([IQRKY
)NKIQ9SGXZ
(GZZKX_
+TY[XKIGSKXGNGYHKKTYKZZU
'<5;:3UJK:,)GXJNGYHKKT
OTYKXZKJOTZUZNKIGSKXGGTJ'<
IGHRKNGYIUTTKIZKJZU'<6UXZYOT
ZNKIGSKXGGTJMOSHGR
)NKIQ'<5;:
3UJK'<
IGHRK:,
)GXJ
)NKIQ]NKZNKXUXTUZHOTJOTM
YNU[RJHKJUTK,UXOTYZGTIKOL
,URRU]3UJ[RKOIUTOTZNK
,ROMNZ/TZKXLGIKYNU]Y
,URRU]3UJ[RKGTJ9VUXZY
=GZINYNU[RJHKHOTJGZLOXYZ
3GQKY[XKZNKHGZZKX_UL
9SGXZ(GZZKX_9VUXZY=GZIN
,URRU]3UJ[RKGTJ)GSKXGOY
KTU[MN
)NKIQ
(GZZKX_2K\KR
:[XTUTULL
*K\OIKY
/TOZOGRO`GZOUT
(OTJOTM
:[XTUT*XUTKGTJINKIQZNK
]UXQOTMIUTJOZOUTULMOSHGR
+TY[XK]NKZNKXUXTUZZNK
?KRRU]2+*YHROTQIUXXKIZR_
)NKIQ*XUTK
=UXQOTM
)UTJOZOUT
:[XTUT9SGXZ(GZZKX_
9VUXZY=GZIN,URRU]
3UJ[RKGTJ)GSKXG
,OTOYNZNKIGROHXGZOUT
VXUIKJ[XKYHGYKJUT
ZNK;YKX3GT[GR
)NKIQZNKIUTTKIZOUT
HKZ]KKT)++=''66
GTJ9VUXZY=GZIN
:[XTUT)++='
'666GOXZU
9VUXZY=GZIN
)GROHXGZOUT
Page 13
10
Step 1: Check Drone
Step 2: Check Arms & Buckles
Step 3: Check Smart Battery
Step 4: Check Battery Level
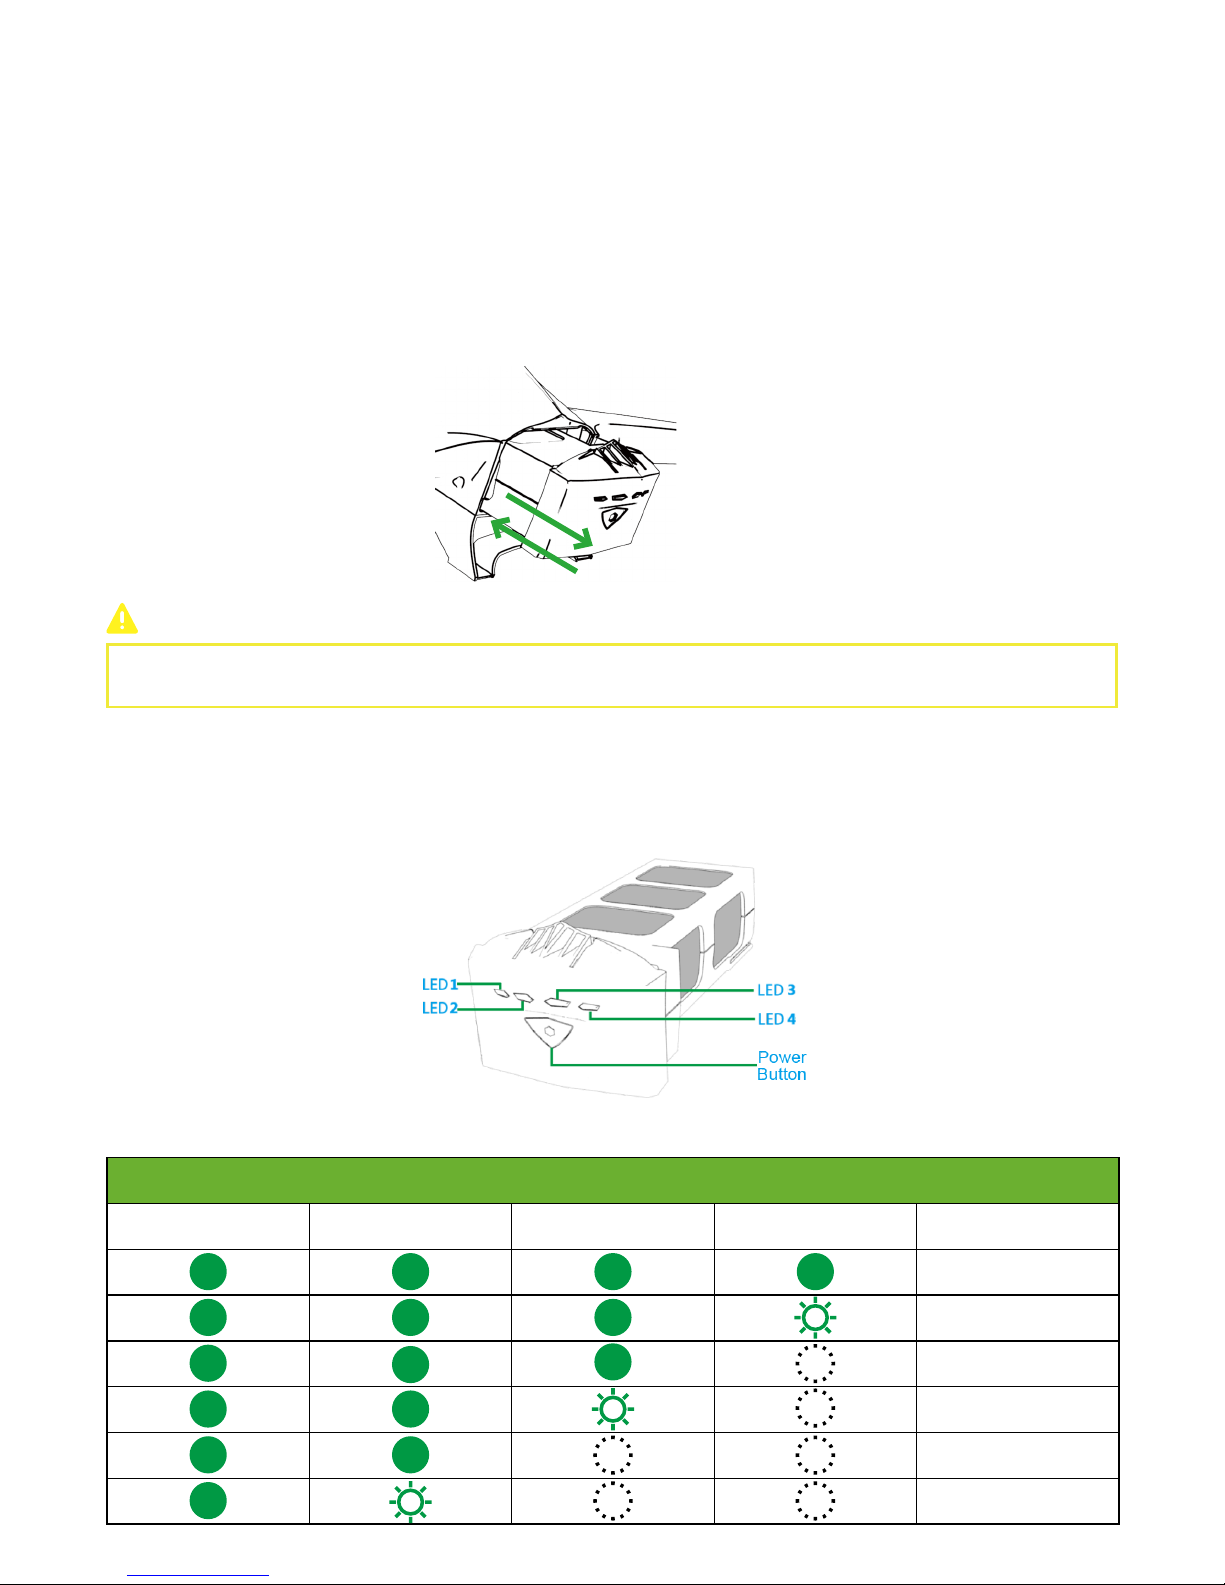
Before using the drone, check its components and ensure they are not broken or aging.
Make sure the battery of Smart Battery, sports watch, follow module and camera is enough.
Make sure the arms can fold and unfold smoothly, buckles can be turned on and off.
If you find buckles cannot be fixed tightly and correctly, please ask to change new buckles from costumer service.
Ensure Smart Battery can be inserted into the drone and lock tightly.
When inserting the battery, DO NOT damage the pins inside the drone.
Smart Battery Level Check & Charging
Press the Power Button once to check the battery level.
LEDs are defined below:
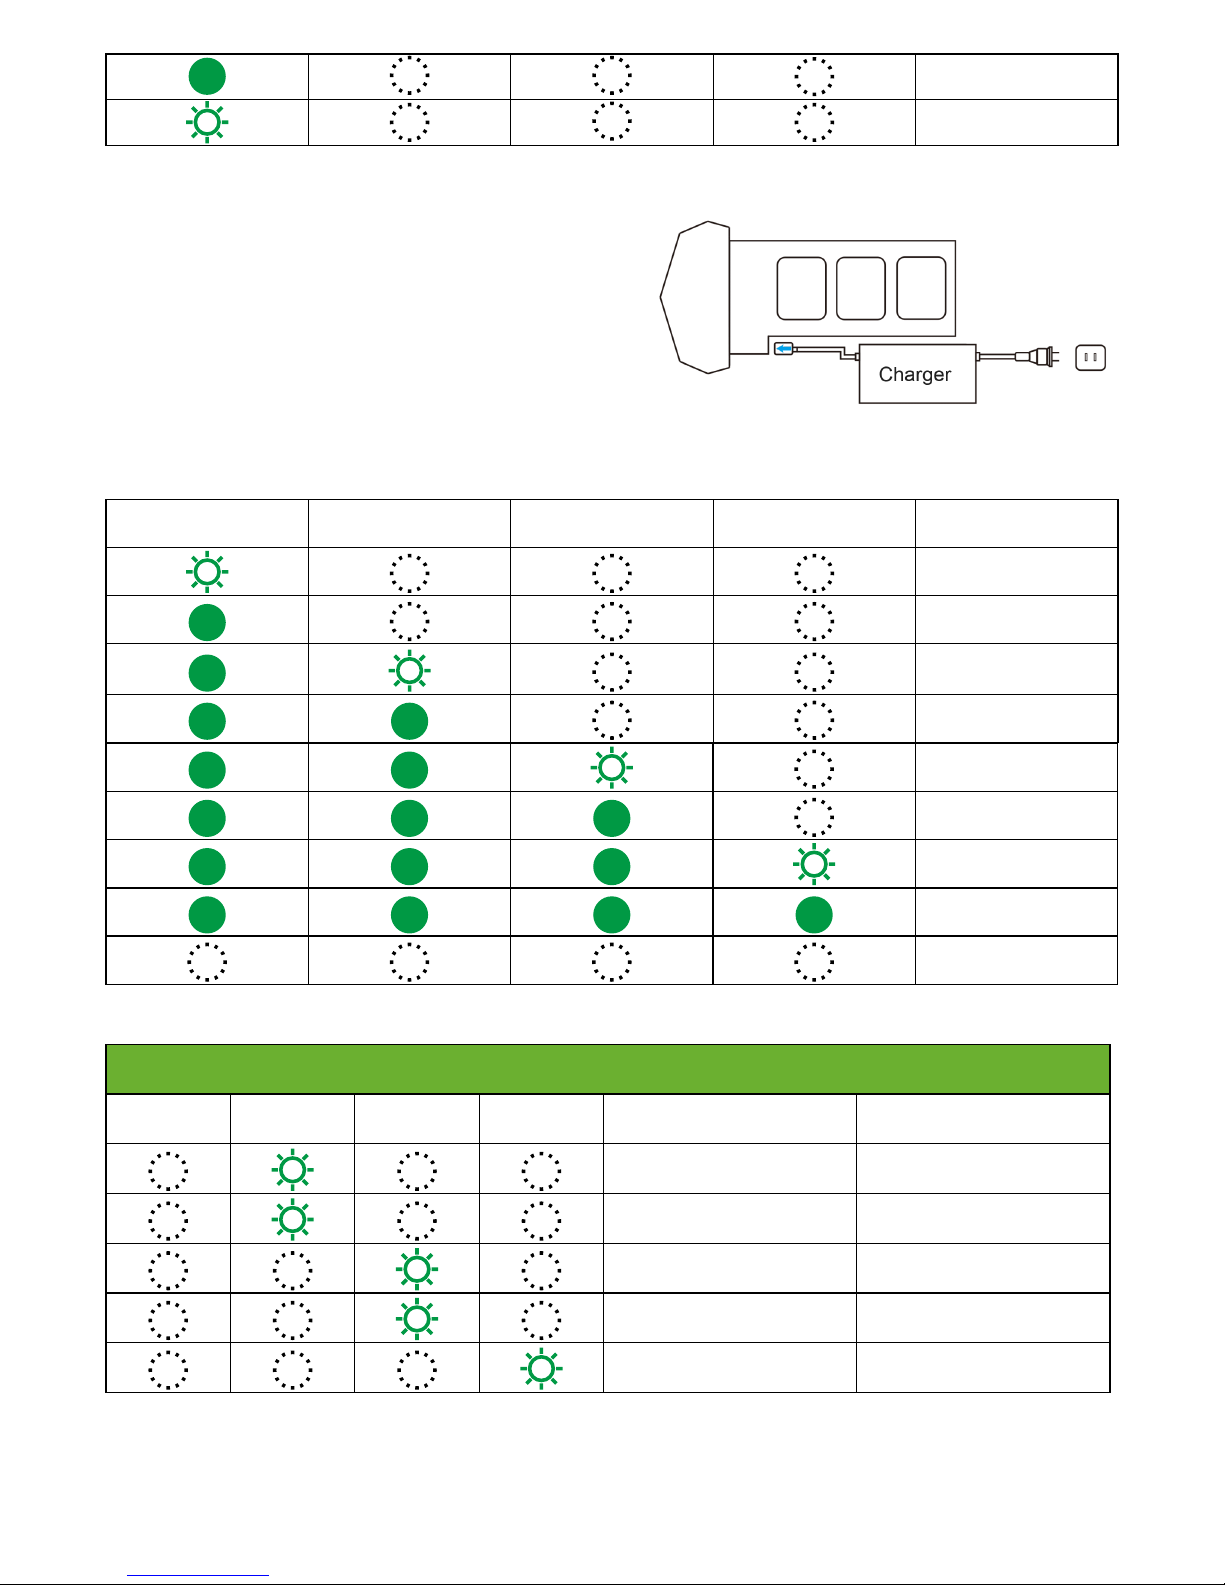
1. Check Battery Level
Battery Level
LED1 LED2 LED3 LED4 Current Level
87.5%~100%
75%~87.5%
62.5%~75%
50%~62.5%
37.5%~50%
25%~37.5%
Page 14
11
12.5%~25%
0%~12.5%
① Connect Battery Charger to a power source (100V-240V, 50/60Hz;).
② Connect the Smart Battery to Battery Charger (when the battery is
powered off).
③ The Battery Level LEDs will blink to indicate the current battery
level.
④ Smart Battery is fully charged when Battery LEDs are full. Please
disconnect the battery and charger.
⑤ After flight, the battery temperature is a litter high. You should
wait until it drops to room temperature, and then charge the battery.
⑥ The most appropriate charging temperature should be 0 to 40
degrees Celsius (32 to 104 degrees Fahrenheit).
2. Charging
LED1 LED2 LED3 LED4 Current Level
0%~12.5%
12.5%~25%
25%~37.5%
37.5%~50%
Battery Level LEDs while charging
50%~62.5%
62.5%~75%
75%~87.5%
87.5%~100%
Full
Battery Level LEDs Error
Errors
LED1 LED2 LED3 LED4 Pattern Errors
LED 2 blinks once per second Over Current
LED 2 blinks three times per
second
Over Charge
LED 3 blinks once per second
Charging temperature is higher
than 40 degrees.
LED 3 blinks three times per
second
Short Circuit
LED 4 blinks twice per second Battery Damaged
After any of the above errors are solved, press Power button to turn off the battery. Unplug the Smart Battery and plug it back to the
charger.
Page 15
12
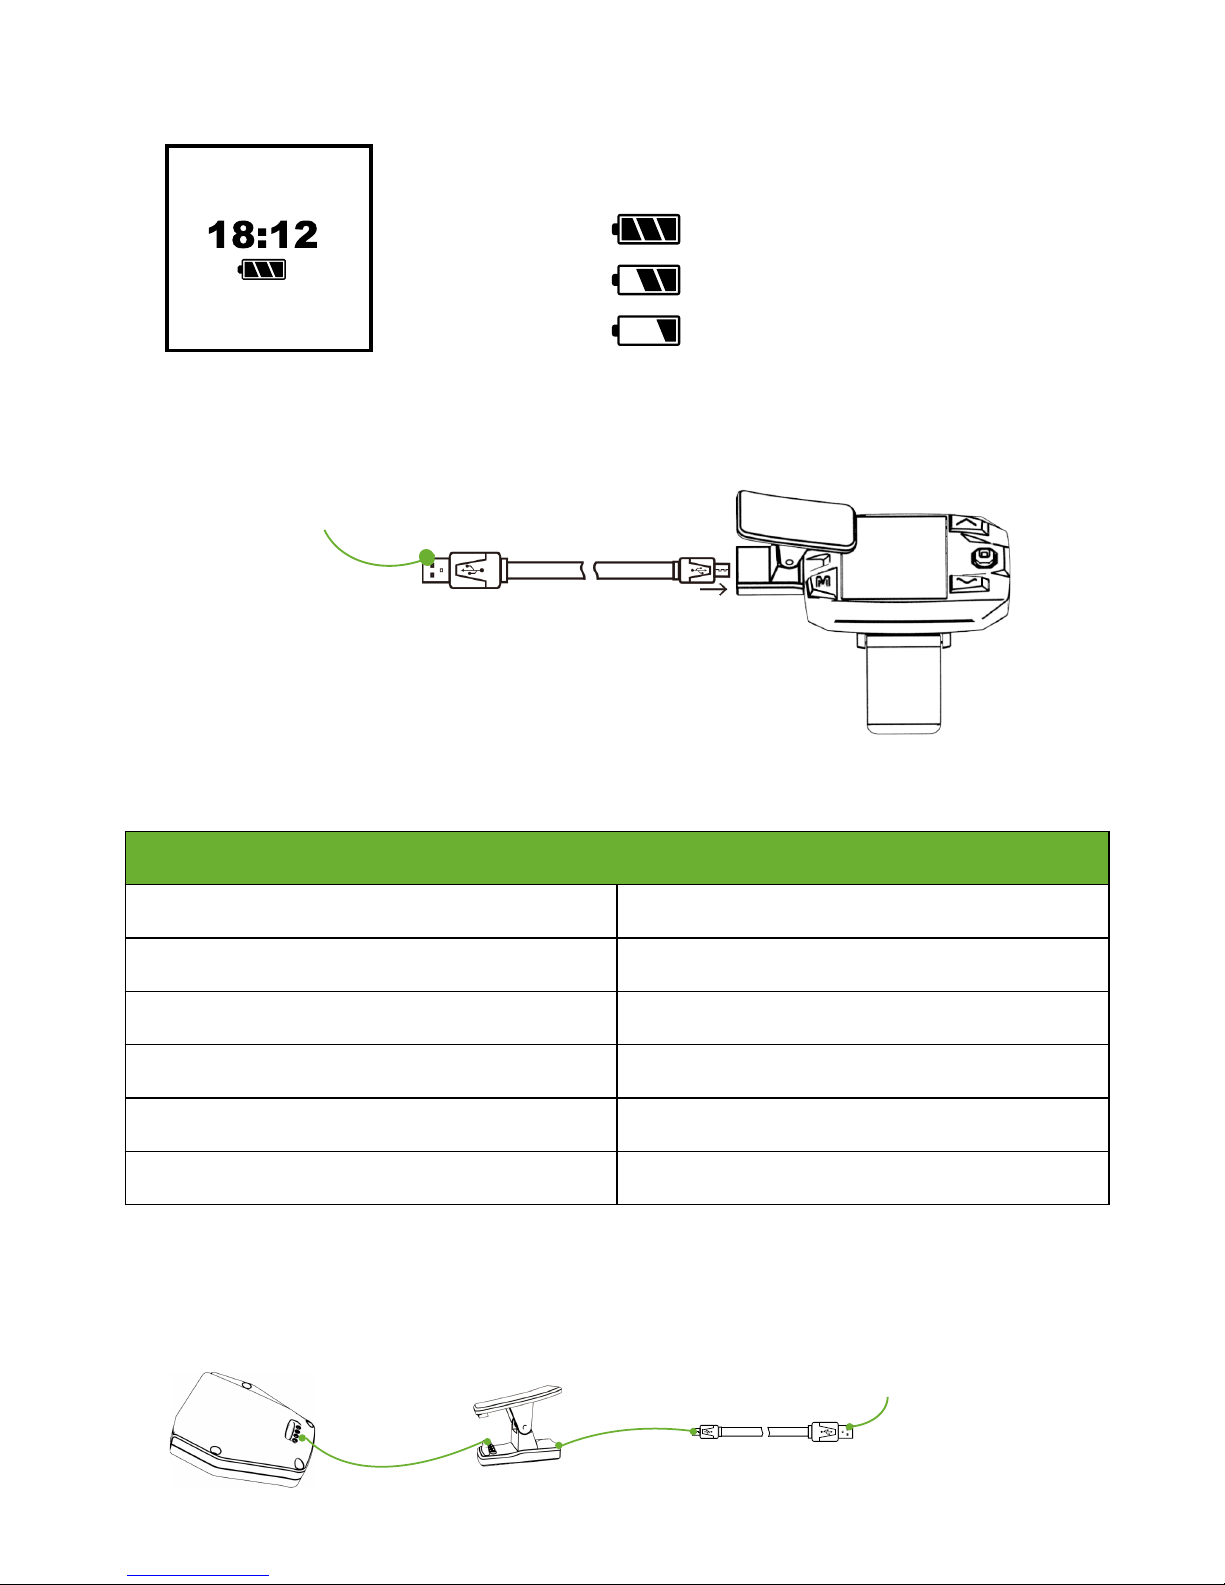
Sports Watch Battery Level Check & Charging
1. Check Battery Level
2. Charging
When the Sports Watch is not powered on, just press the STOP button to check the
current battery level and current time.
When the Sports Watch is powered on, enter Flight Interface to check.
Connect Charging Chip with Sports Watch, and connect Charging Chip with USB cable to finish charging. The whole charging time is
about 1.5 hours.
Connect to USB port
of Computer or 1A~5A
Charger.
High
OK
Low
After turning on, Red Power LED will blink to indicate the current battery level.
Connect Charging Chip with Follow Module, and connect Charging Chip with USB cable to finish charging.
Follow Module Battery Level Check & Charging
1. Check Battery Level
Current Level
Red Power LED blinks 4 times. full
Red Power LED blinks 3 times.
75%
Red Power LED blinks 2 times.
50%
Red Power LED blinks 1 times.
25%
Red Power LED blinks quickly.
10%
Red Power LED blinks twice and then turns off. 0%
2. Charging
Connect to USB port
of Computer or 1A~5A
Charger.
Page 16
13
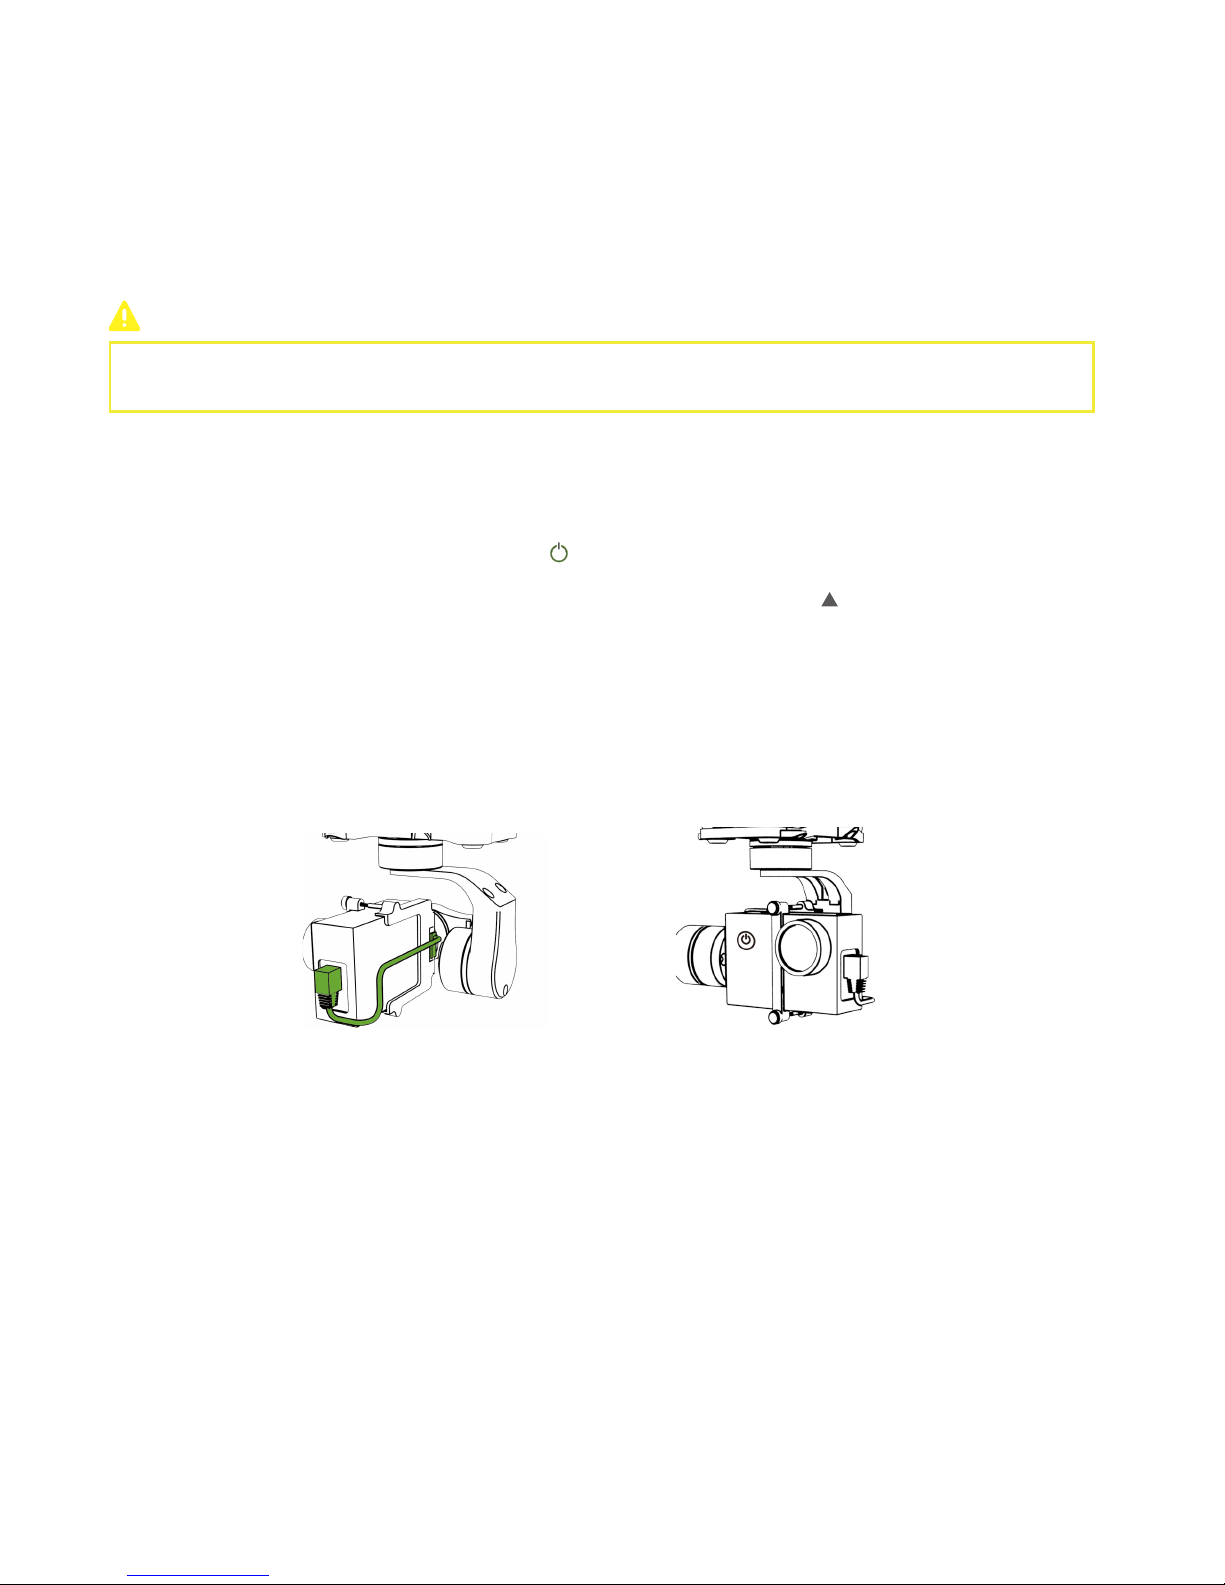
Step 5: Check AV-OUT Mode & AV cable & TF Card
Detach the camera from the gimbal. Press Power Button ( ) over 5s. When GREEN LED is blinking, the camera has been turned on.
If there is no image in the screen, AV-OUT Mode is enabled.
If there are images from the screen, AV-IN Mode is enabled. Please press the Up Button ( ) on the side of camera until image
disappears.
Check TF Card
Ensure TF card has been inserted into the camera.
Check AV-OUT Mode
Mount the camera back to the gimbal and fix all the screws. Connect the AV port and gimbal like the diagram.
Check AV Cable
Turn on/off Smart Battery
4K Camera:Refer to 4K Camera User Manual for details. (from Download Page of CEEWA.COM)
1080P Camera:Refer to 1080P Camera User Manual for details. (from Download Page of CEEWA.COM)
4K Camera:Connect Camera to Charging Dock or USB port of the computer by the USB cable. When charging, RED LED is on.
After finishing charging, RED LED is off.
1080P Camera:Connect Camera to Charging Dock or USB port of the computer by the USB cable.
4K Camera:Refer to 4K Camera User Manual for details. (from Download Page of CEEWA.COM)
1080P Camera:Refer to 1080P Camera User Manual for details. (from Download Page of CEEWA.COM)
Turn on Smart Battery, Sports Watch, Follow Module and Camera.
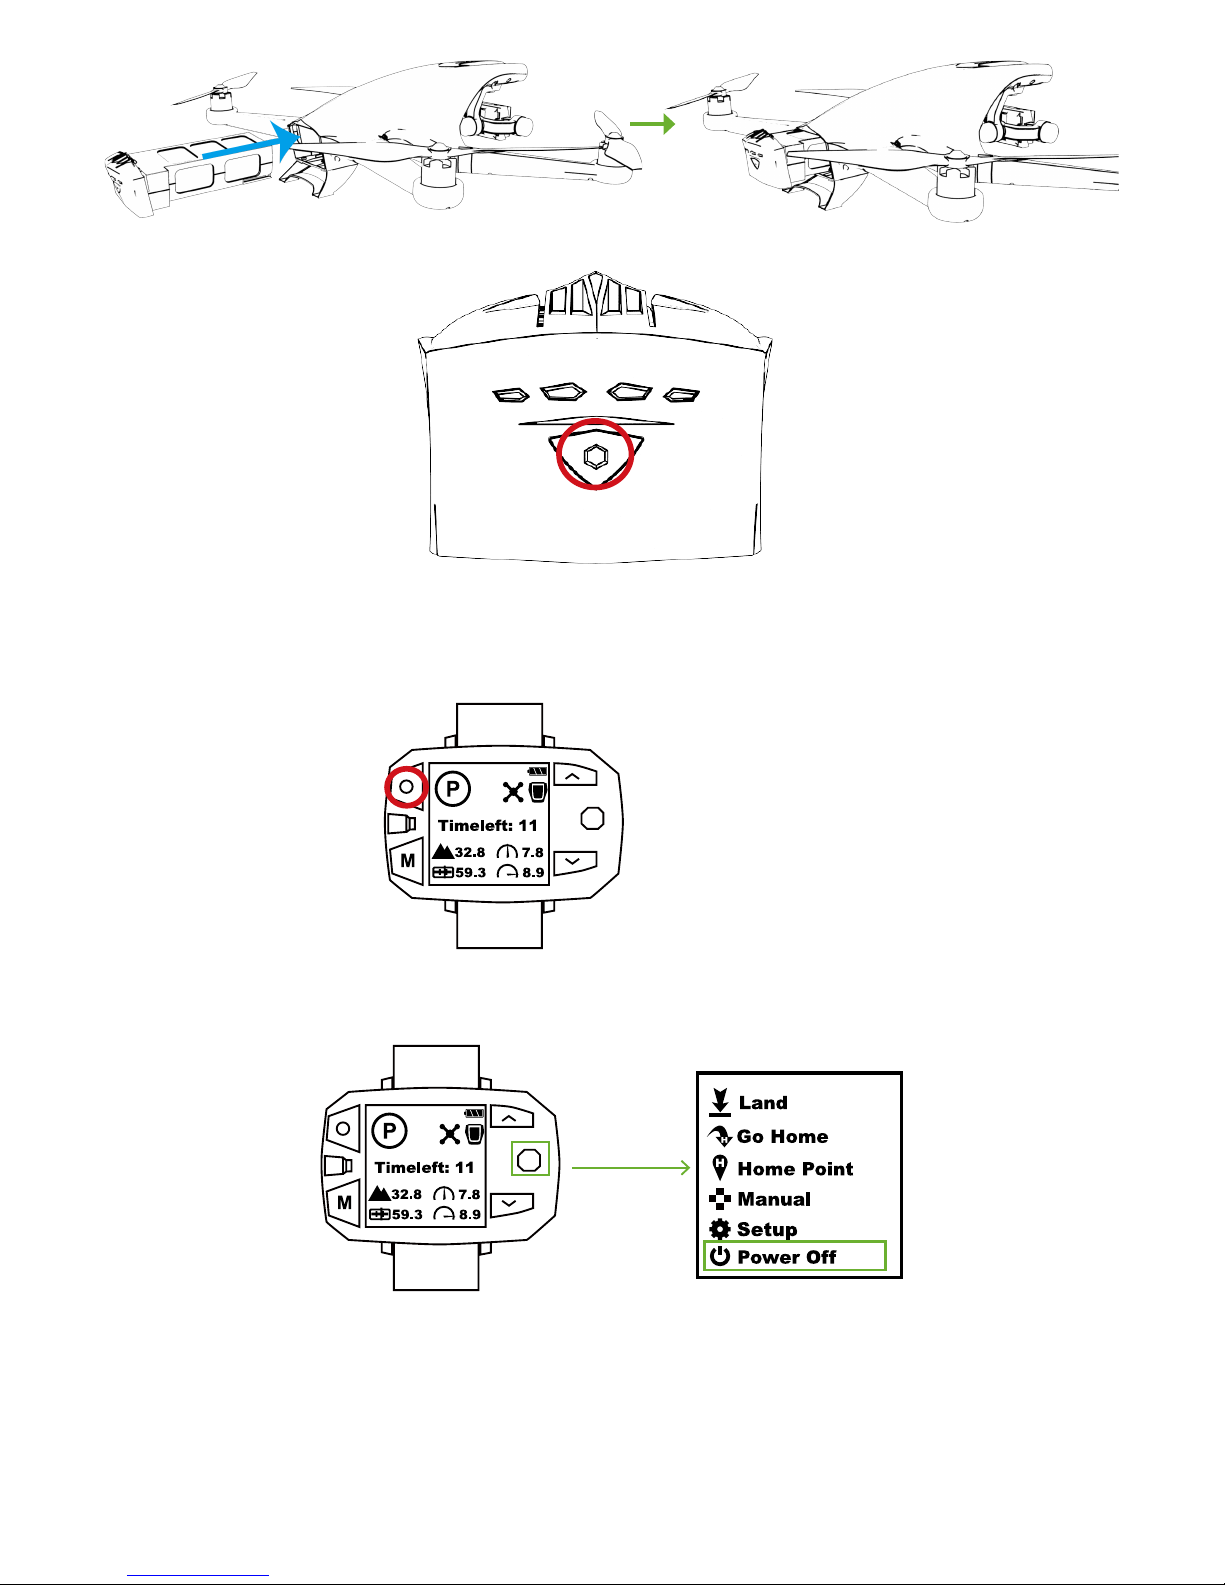
Step 6: Turn on/off Devices
Mount Smart Battery into the drone and fix it tightly.
Power ON:
Press the Power Button once, and then press this button for over 3s till all LEDs have blinked once.
Power OFF:
Press the Power Button once, and then press this button for over 3s till all LEDs turn off.
Camera Battery Level Check & Charging
1. Check Battery Level
2. Charging
Page 17
14
Power ON:
Press the Stop Button once, and then press this button for over 3s to enter Flight Interface.
Power OFF:
Toggle Nav. Button to the right & enter Menu Interface. Select "Power-off" option and choose "OK" in the pop-up window.
Turn on/off Sports Watch
Turn on/off Follow Module
Power ON:
Press the Power Button once, and then press this button for over 3s to turn on. Red Power LED will blink to indicate the current
battery level.
Power OFF:
Press the Power Button once, and then press this button for over 3s till all LEDs turn off.
Page 18
15
Turn On/Off Camera
Turn On
:
4K Camera:Press the Power Button until the LED Indicator on the screen side blinks. Camera turns on.
1080P Camera:Press the Power Button until the LED Indicators blink. Camera turns on.
Turn Off
:
4K Camera:Press the Power Button until the LED Indicator on the screen side turns off.
1080P Camera:Press the Power Button until the LED Indicators turn off.
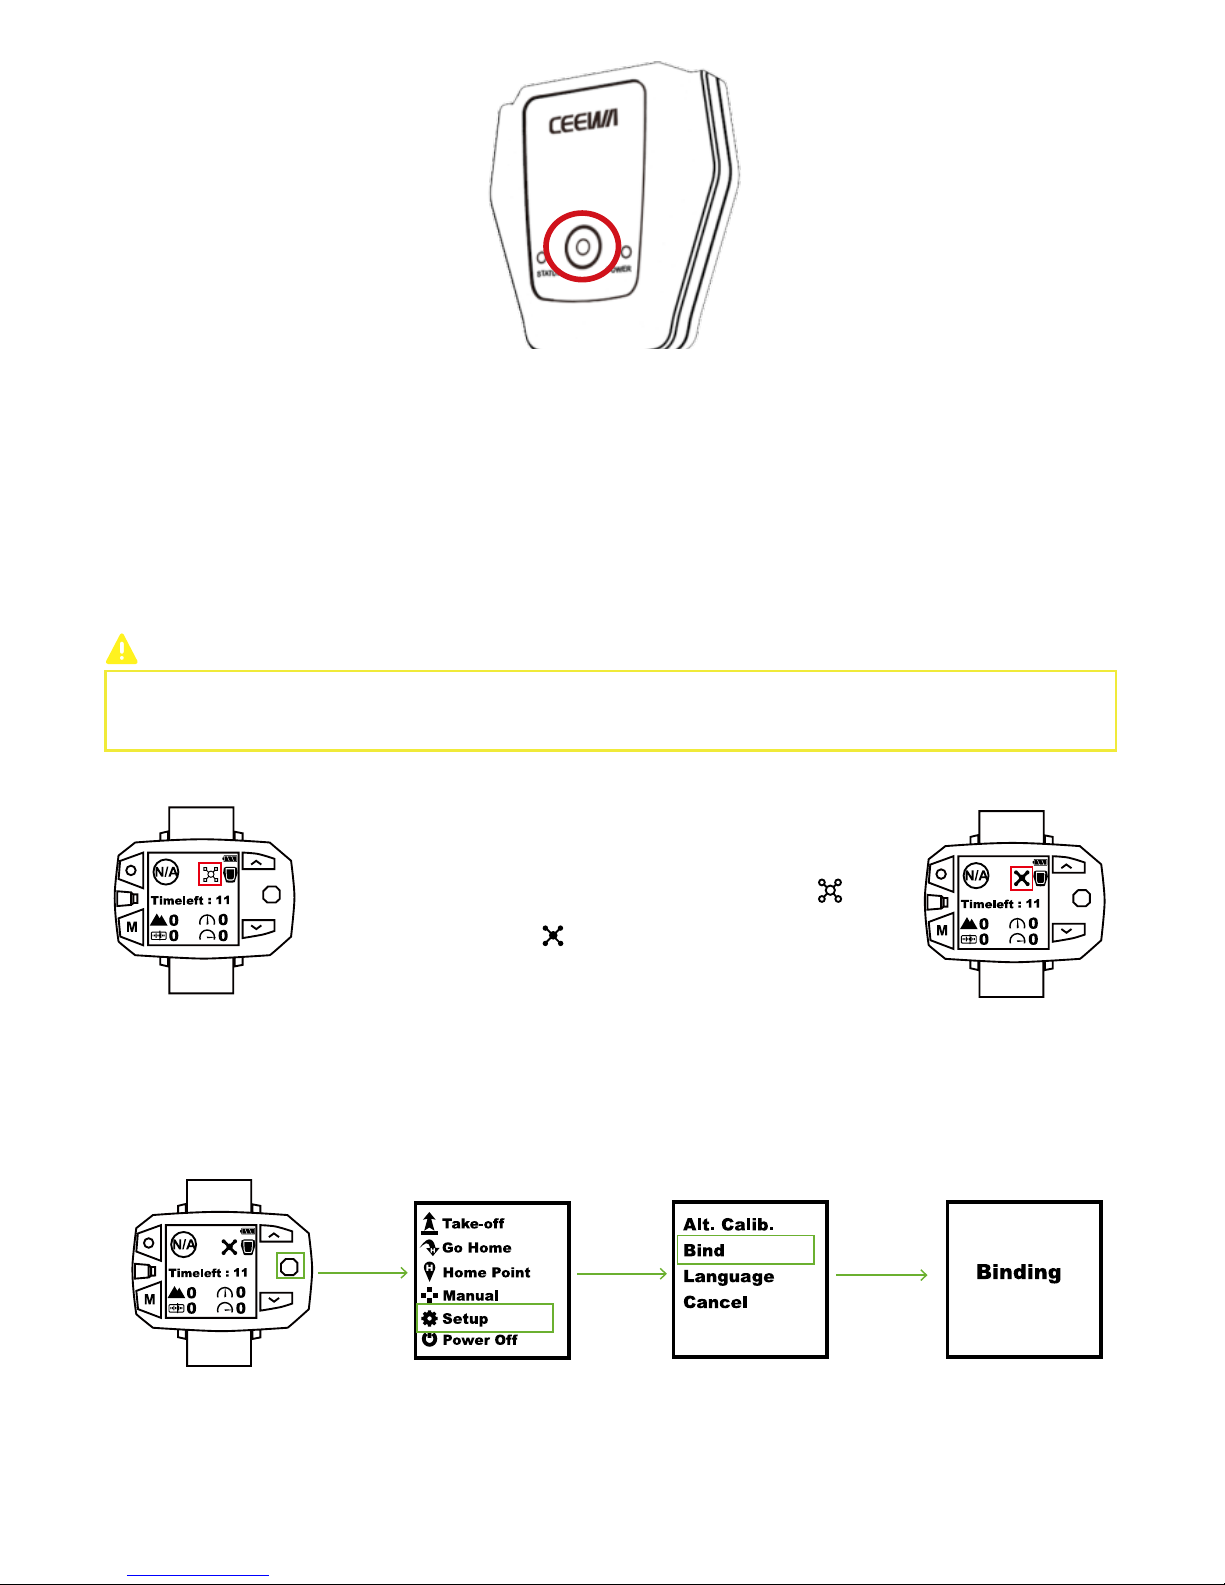
Step 7: Initialization Binding
① Please turn on Drone and Sports Watch.
② In Flight Interface of Sports Watch, if the drone icon shows as , please
finish binding procedures.
③ If the drone icon shows as , please ignore this step.
When should I bind Drone & Sports Watch?
During binding, please DO NOT power on any other related devices. For instance, when binding Drone &
Sports Watch, please DO NOT turn on Remote Controller and Follow Module.
How to bind?
1.
Activate Drone Binding Mode
① Insert Smart Battery.
② Place the drone upside down and turn on Smart Battery.
③ When Yellow Light of Status Indicator blinks 3 times at intervals of 0.5s, Drone Binding Mode activates.
2.
Activate Sports Watch Binding Mode
① In Flight Interface of Sports Watch, toggle Nav. Button to right to enter Menu Interface.
② In Menu Interface, choose Setup option.
③ Select Bind option.
④ Binding between Drone and Sports Watch will auto begin.
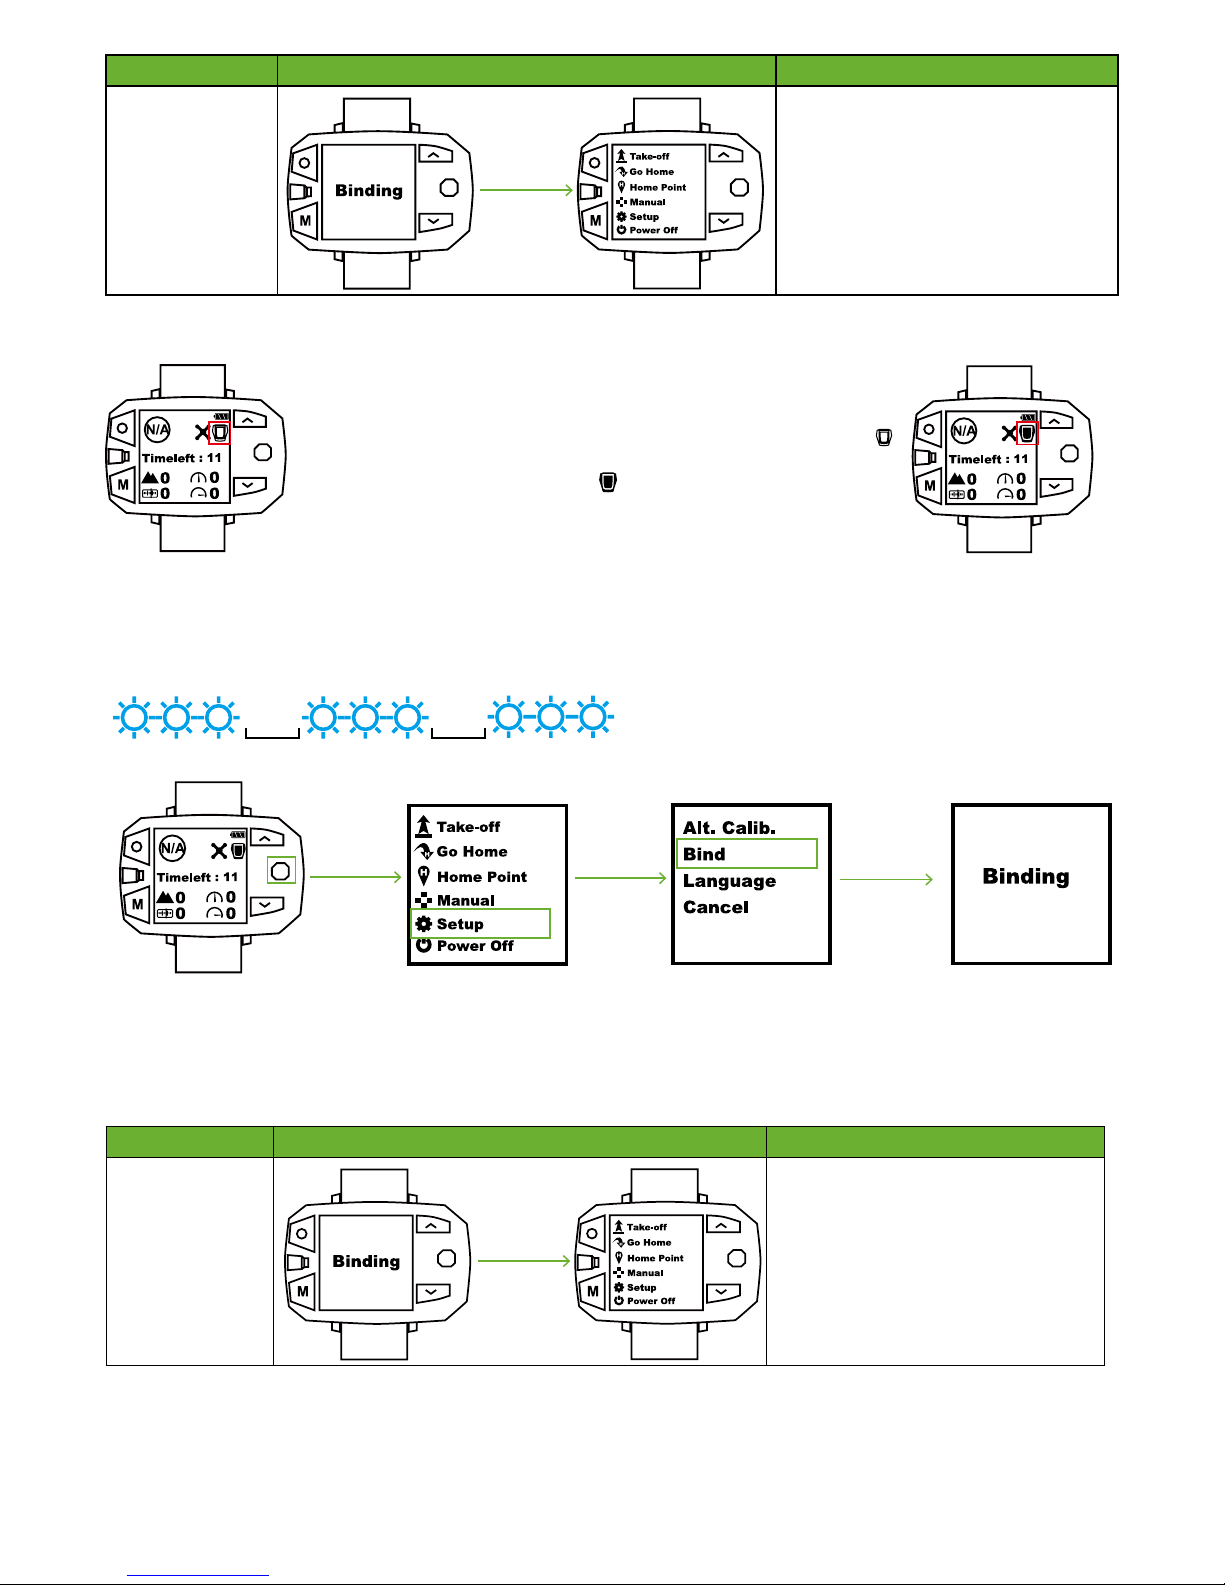
3. How to know binding is OK?
Page 19
16
Step 8: Check Drone Working Condition
When should I bind Follow Module & Sports Watch?
1. Activate Follow Module Binding Mode
After Follow Module has been turned on, press Power button for five to six times to enter binding mode.
When Blue Light of Follow Module blinks 3 times at intervals of 0.5s, binding mode enables.
0.5s
0.5s
Turn on Drone and check the working condition of gimbal. Ensure whether or not the Yellow LEDs blink correctly.
Devices OK Symbol Instructions
Drone & Sports
Watch
If Bind is OK, Sports Watch will switch to
Menu Interface.
If binding fails, Sports Watch will stay in
the “Binding…” Interface. You should press
STOP button to disable binding mode.
Power cycle Drone and Sports Watch to
enter binding procedures again.
3. How to know binding is OK?
2. Activate Sports Watch Binding Mode
① In Flight Interface of Sports Watch, toggle Nav. Button to right to enter Menu Interface.
② In Menu Interface, choose Setup option.
③ Select Bind option.
④ Binding between Follow Module and Sports Watch will auto begin.
Devices OK Symbol Instructions
Follow Module &
Sports Watch
If Bind is OK, Sports Watch will switch to
Setup Interface.
If binding fails, Sports Watch will stay in
the “Binding…” Interface. You should press
STOP button to disable binding mode.
Power cycle Follow Module and Sports
Watch to enter binding procedures again.
① Please turn on Follow Module and Sports Watch.
② In Flight Interface of Sports Watch, if the Follow Module icon shows as
, please finish binding procedures.
③ If the Follow Module icon shows as , please ignore this step.
How to bind?
Page 20
17
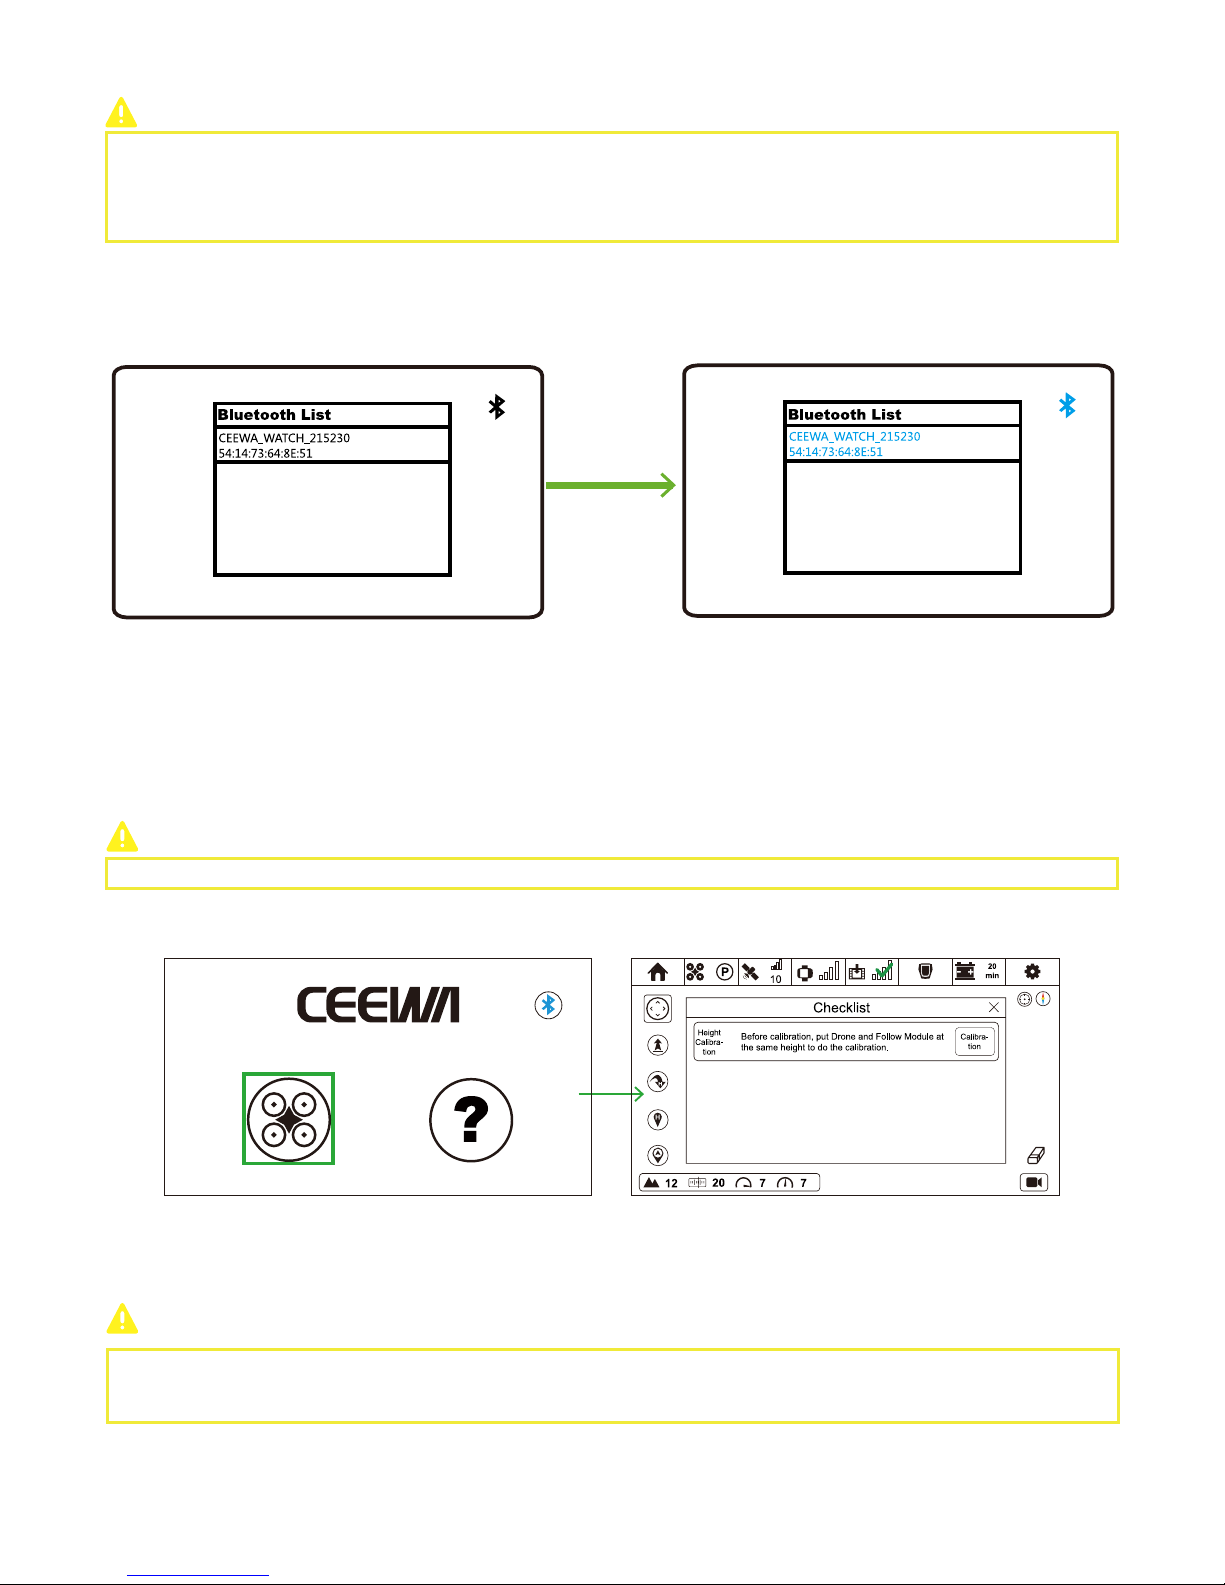
Step 10: Calibration
Please turn on BLUETOOTH of your smartphone.
CEEWA APP requires: iOS 8.0 or later.
Android OS4.3 or above with Bluetooth 4.0.
You should pair Sports Watch to CEEWA APP through Bluetooth.
① Power on Sports Watch.
② Turn on CEEWA APP and choose your desired device in the pop-up window. The Bluetooth name of Sports Watch usually starts
with CEEWA_WATCH.
③ Choose Sports Watch in the window and wait for connection. When the device name and Bluetooth icon on the upper right
corner turn to blue, pairing finishes. All the above steps show when you pair them for the first time, and CEEWA APP will auto
connect it since then.
④ If you want to change the auto-pairing device, just tap the Bluetooth icon on the upper right corner and select your desired
device in the pop-up window.
If the Bluetooth icon becomes white, it implies that CEEWA APP disconnects with Sports Watch or RC.
If the Bluetooth icon alternately blinks blue and white, it means that CEEWA APP is trying to connect.
If the Bluetooth icon becomes blue, connection has been built.
Drone Compass Calibration and Follow Module Compass Calibration should be finished outdoors.
After pairing, please click Flight icon to enter Flight Interface.
Sports Watch and Remote Controller cannot be used at the same time.
Step 9:Turn on CEEWA APP & Pair to Watch
Page 21
18
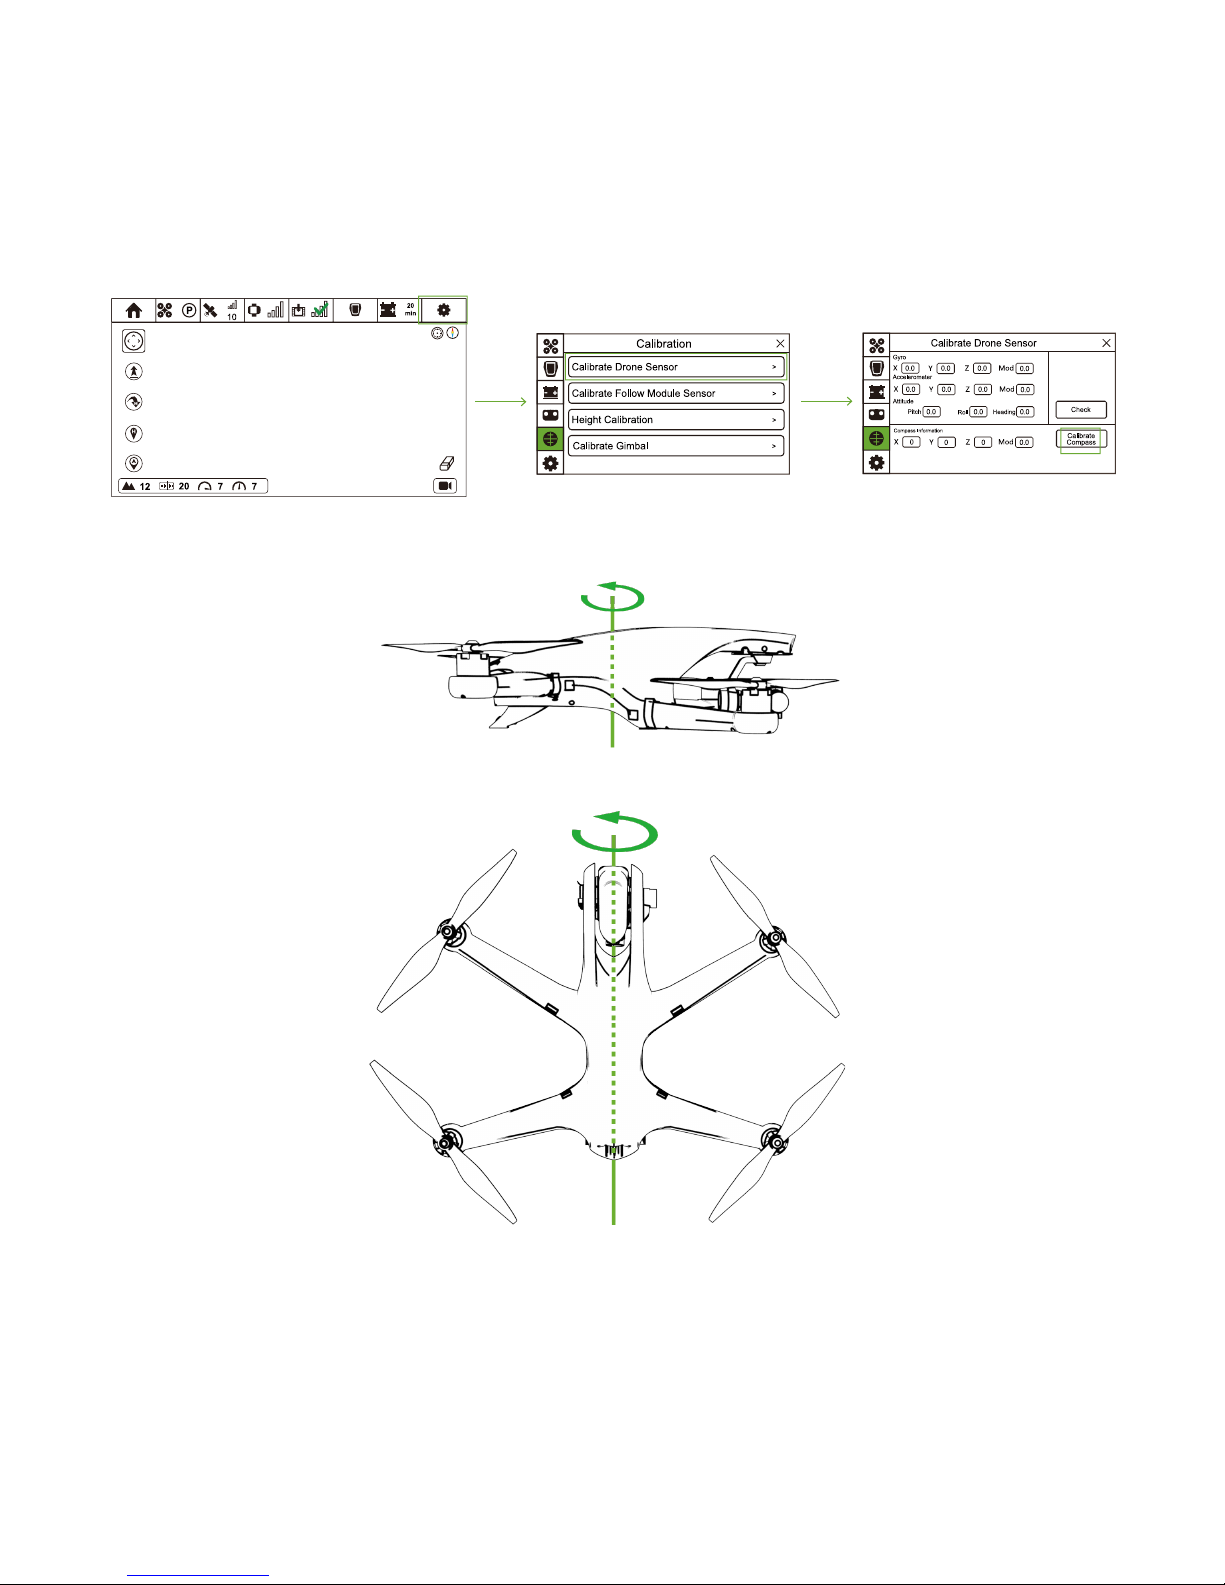
1. Drone Compass Calibration
(1)When should I Calibrate?
① It is suggested to calibrate compass when you first use Drone.
② Regularly calibrate the compass because it is easily interrupted by other electronic devices.
③ If RED Status LEDs on Drone blink twice per second, please do compass calibration before taking-off. If Drone has taken off,
please land as soon as possible and calibrate the compass.
(2)Calibration Steps
① Turn on CEEWA APP and enter Flight Interface. Tap "Others" icon and choose Calibration icon to enter Calibration interface.
② Select "Calibrate Drone Sensor" option and choose "Calibrate Compass".
③ When Drone Yellow Status LEDs are on, hold and rotate the drone horizontally until Green LEDs are on.
④ When Green LEDs are on, hold the drone vertically with its nose pointing upwards. Rotate the drone around the center axis until
Yellow LEDs are blinking.
⑤ If calibration fails, Red LEDs are blinking twice per second. Please repeat step 3 and 4.
(3)Attentions!
① DO NOT calibrate your compass where there is strong magnetic interference around, such as magnetite, parking structure, and
steel reinforcements underground.
② DO NOT carry ferromagnetic materials with you during calibration such as keys.
③ DO NOT calibrate beside massive metal objects.
④ If calibration fails, there may be interference around. Please re-calibrate in another place.
⑤ Before calibration, please make sure Drone and CEEWA APP has connected.
Page 22
19
(1) When should I Calibrate?
① When drifts happen in A mode, calibration should be finished.
② It is suggested to do Gyro calibration regularly by putting the drone on the horizontal ground.
(2)Calibration Steps
① Ensure Drone has connected to CEEWA APP.
② Place Drone in the level ground.
③ Turn on CEEWA APP and enter Flight Interface. Tap “Others” icon and choose Calibration icon to enter Calibration interface.
④ Select “Calibrate Drone Sensor” option and choose “Check”. Drone will auto check its status. If calibration should be done,
“Calibrate” will be replaced by “Calibration” and do the calibration according to the tips.
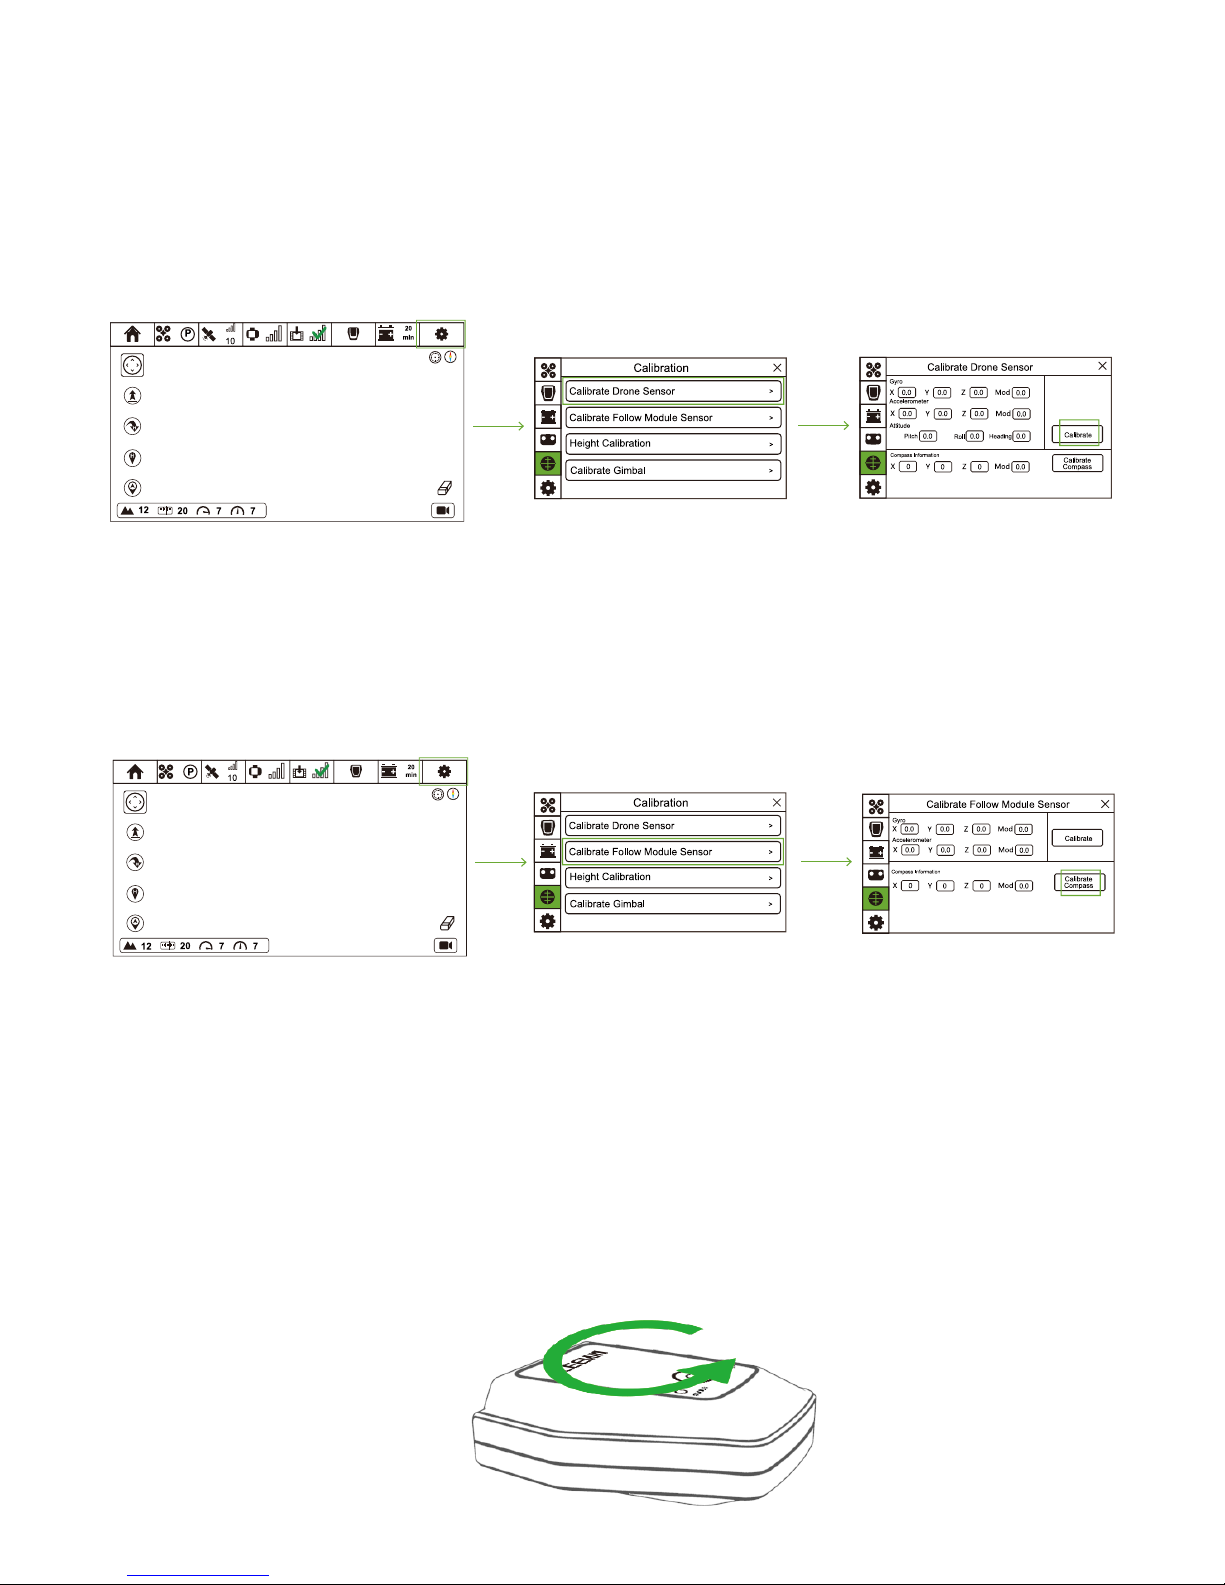
2. Gyro Calibration
3. Calibrate Follow Module Gyro
(1)When should I Calibrate?
It is suggested to calibrate Follow Module Sensor regularly on the horizontal ground to achieve a better flight experience.
(2)Calibration Steps
① Turn on CEEWA APP and enter Flight Interface. Tap “Others” icon and choose Calibration icon to enter Calibration interface.
② Select “Calibrate Follow Module Sensor” option and choose “Check”. Drone will auto check its status. If calibration should be
done, “Check” will be replaced by “Calibration” and do the calibration according to the tips.
③ If calibration fails, please repeat Step 1-2.
4. Follow Module Compass Calibration
(1)When should I Calibrate?
① It is suggested to finish Follow Module Compass Calibration at first time.
② Moreover, finish the calibration regularly to achieve a better flight experience.
(2)Calibration Steps
① Turn on CEEWA APP and enter Flight Interface. Tap “Others” icon and choose Calibration icon to enter Calibration interface.
② Select “Calibrate Follow Module Sensor” option and choose “Calibrate Compass”.
③ When Blue Status LED blinks slowly, rotate the Follow Module horizontally.
Page 23
20
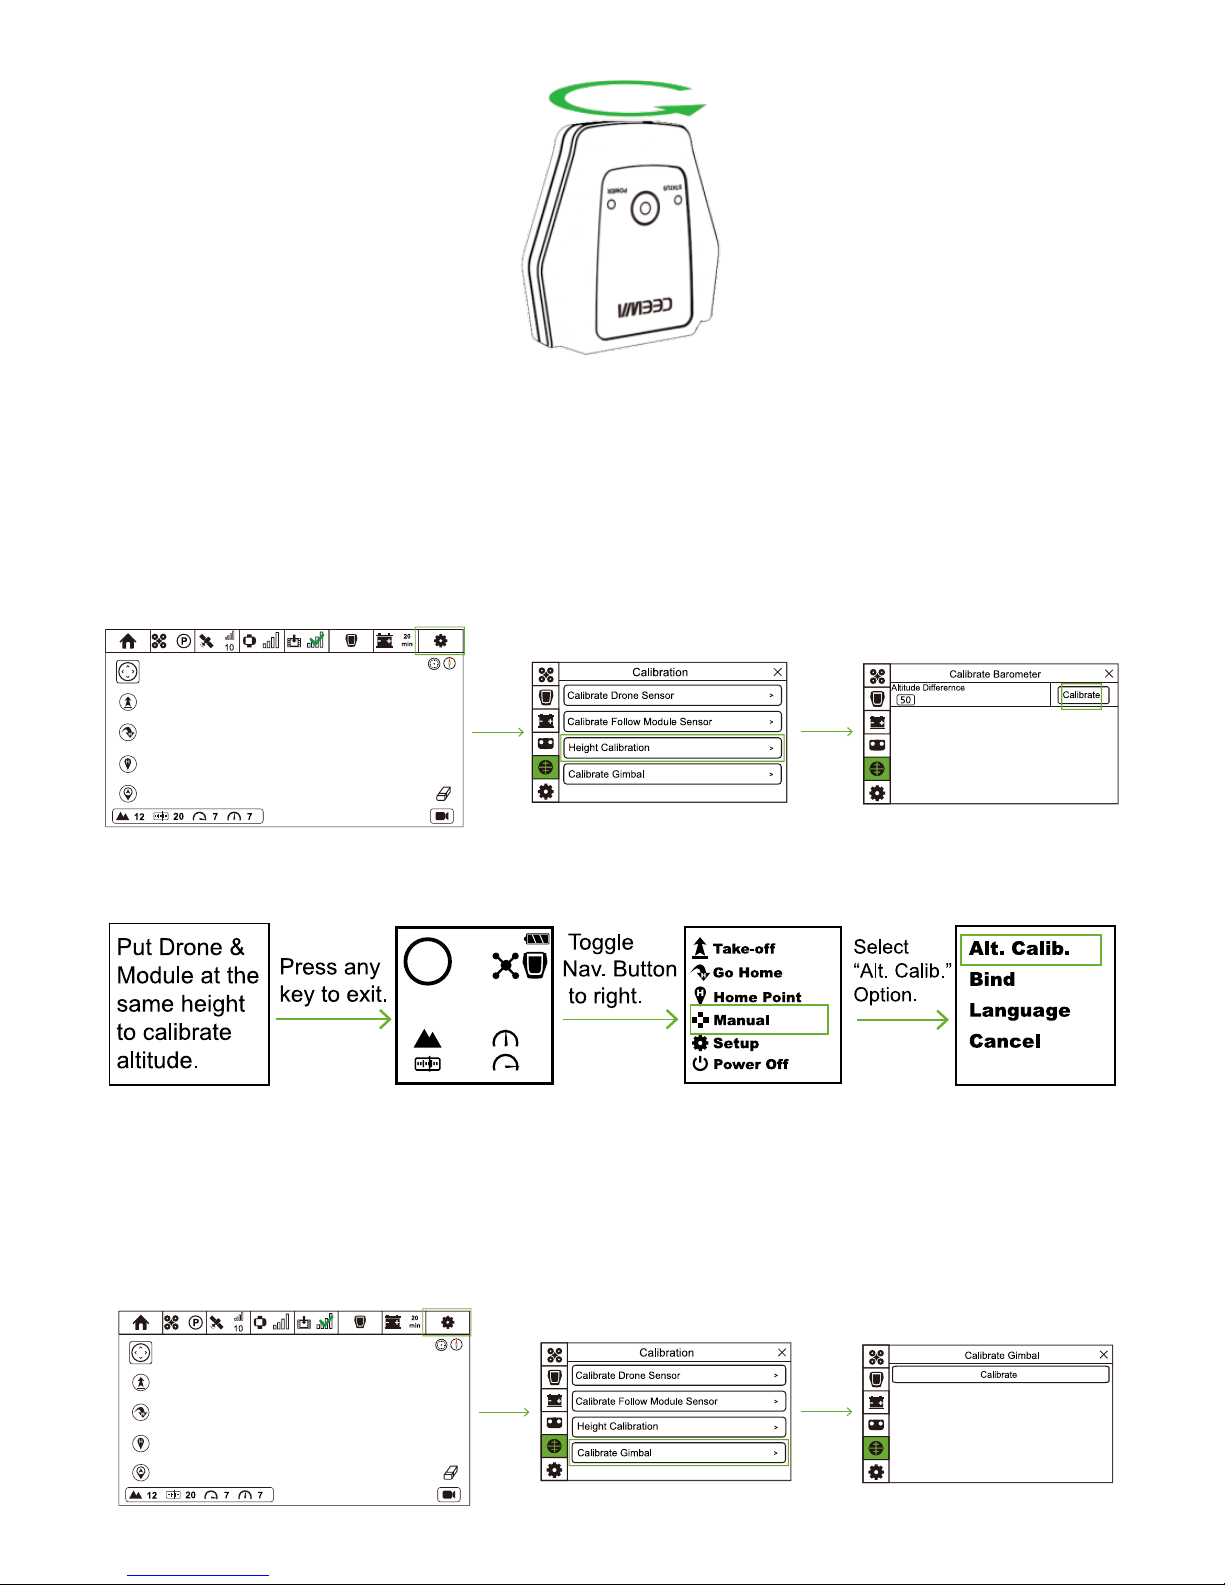
④ When Blue Status LED blinks quickly, rotate the Follow Module vertically.
⑤ If Blue Status LED turns to be constantly on, calibration finishes. If calibration fails, please repeat step 1 to 4.
5. Height Calibration
(1)When should I Calibrate?
Before using Follow Mode, you need put Drone and Follow Module at the same height and do the calibration.
(2)Calibration Steps
CEEWA APP:
You could enter Calibration interface to do the calibration.
① Turn on CEEWA APP and enter Flight Interface. Tap “Others” icon and choose Calibration icon to enter Calibration interface.
② Put Drone and Follow Module at the same height.
③ Select “Calibrate Height” option and choose “Calibrate”.
Sports Watch:
When Sports Watch connects with Drone, there is a warning to do the height calibration.
Put Drone & Module at the same height to calibrate altitude.
Timeleft: 24
P
10
7
2
4
6. Calibrate Gimbal
(1)When should I Calibrate?
When drifts happen or gimbal angle is not horizontal, you need to do gimbal calibration.
(2)Calibration Steps
① Ensure Drone has connected to CEEWA APP. Place Drone on the level ground.
② Turn on CEEWA APP and enter Flight Interface. Tap “Others” icon and choose Calibration icon to enter Calibration interface.
③ Select “Calibrate Gimbal” option and tap “Calibrate”.
Page 24
21
III. Sports Watch Version: Flight Test
Overview
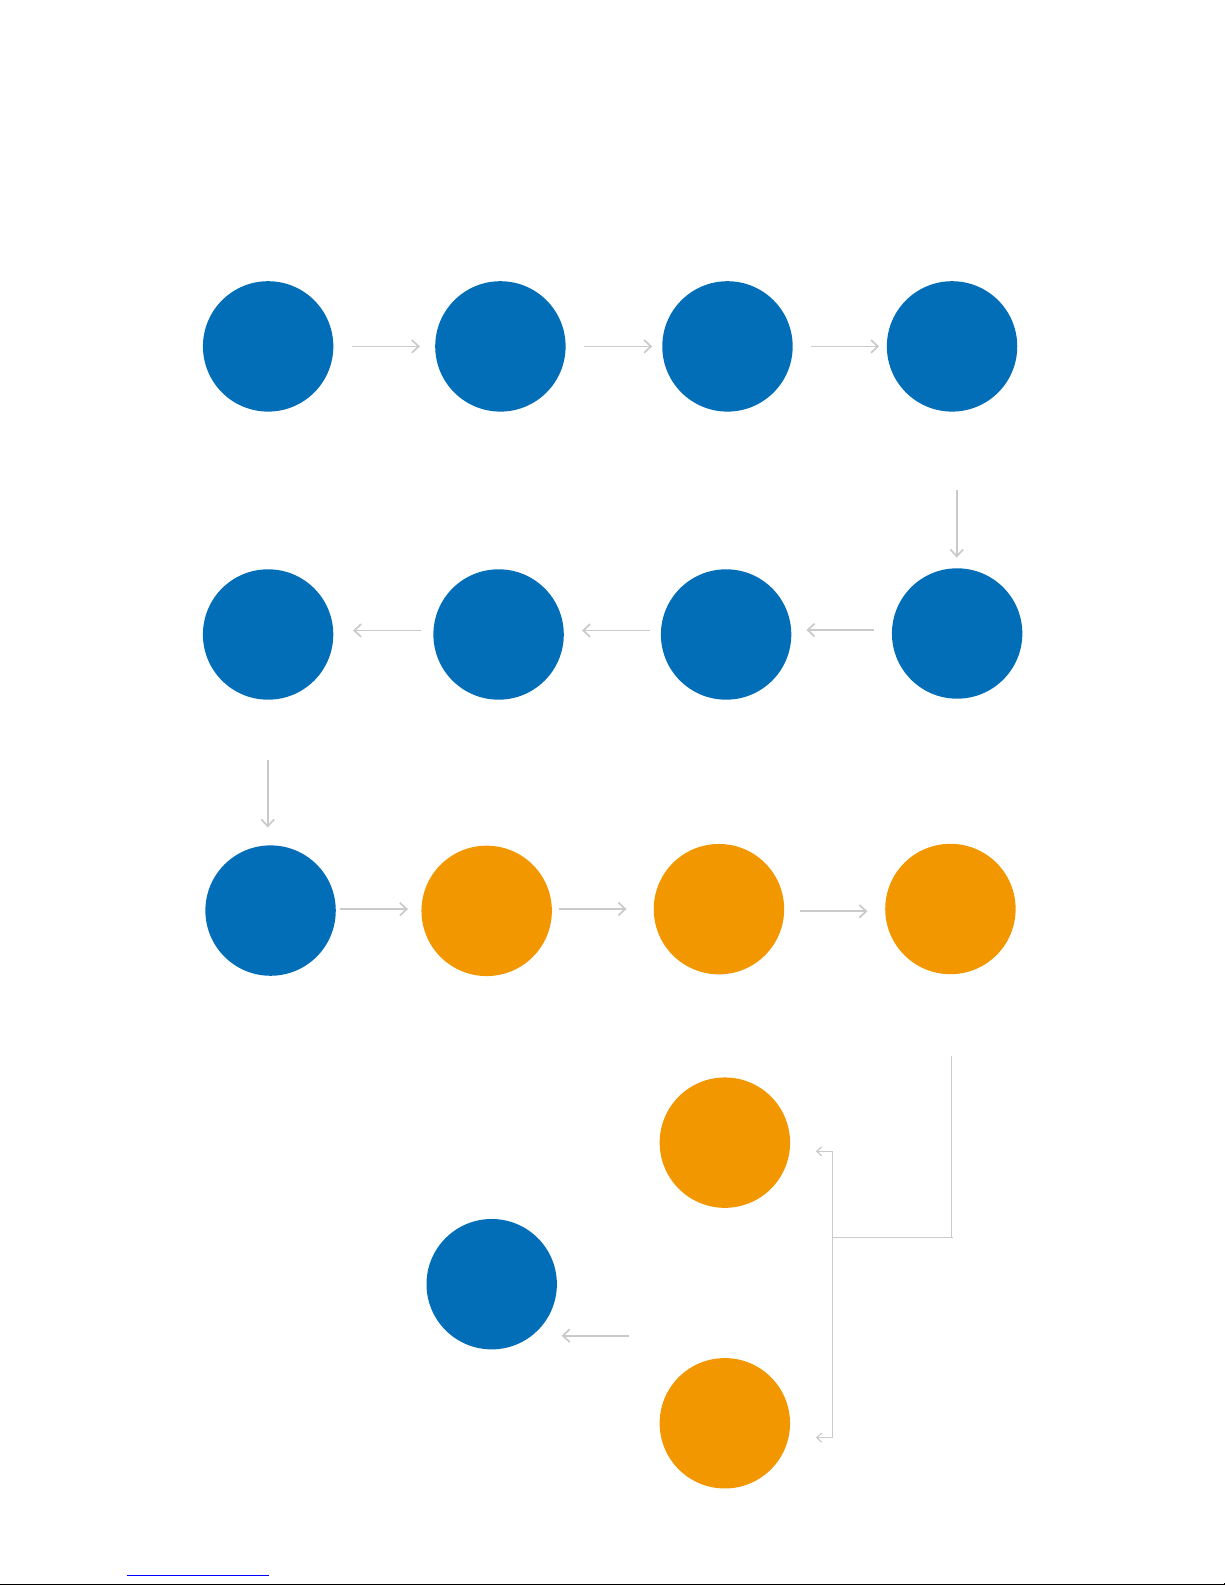
Before taking-off, put Drone on the ground for over 70 seconds and wait for GPS reach 10 satellites. All the flight procedures should
follow the flow chart below!
CEEWA APP enables Beginner Mode by default.
Blue Rounds are required, while orange rounds are optional. Please choose flight mode based on your needs.
Except step 1, please finish all the following steps on wide open outdoor areas.
-U.USK
For instance, make the drone fly
away take-off position from about
100 meters. Enable Smart
Go-Home ,and Drone would go
back and land in the take-off
position automatically.
Finish Check
before Flight
Please ensure you have
finishes all the steps in
Check before Flight.
Check Flight
Environment
Ensure there is no obstacle
around the 50 meters of take-off
position.
There is no huge building or trees
around flight area.
Check GPS
Status &
Connection
Status
Sports Watch: switch to
Signal-Connection Interface to
check whether or not over 10
satellites have been found.
Height
Calibration
Before Follow Mode, please
put Drone and Follow Module
at the same height to do
height calibration.
Switch to P
Mode
Sports Watch: press STOP Button
and check whether or not P Mode
has been enabled.
One-key
Take-off
Drone will ascend to 5 meters and
hover to wait for the next order.
Check Status
If drifts happen after hovering or
warning tips show on the screen
of APP and Watch, please land
the drone as soon as possible.
:[XTULLGRR
JK\OIKY
Turn off Drone, Sports Watch,
Follow Module and camera.
Adjust
Drone’s
Attitude
Sports Watch: toggle Nav.
Button and Up/Down to
adjust drone’s attitude in
the manual interface.
Attach propellers and fix them
tightly.
Attach
Propellers
Ensure all the motors can rotate
properly.
Drone Test
,URRU]
3UJK
For instance, keep safe distance
and enable Simple Follow Mode.
Check whether or not the camera
faces to Follow Module and
gimbal moves with Follow Module.
4G\3UJK
'IZO\GZK4G\3UJKZNXU[MN
)++=''66
5TKQK_
2GTJ
Drone would land gradually.
Page 25
22
Step 1: Finish Check before Flight
Step 2: Check Flight Environment
Please ensure you have finishes all the steps in Check before Flight.
Ensure there is no obstacle around the 50 meters of take-off position.
There is no huge building or trees around flight area.
Flight environment meets Flight Environment Requirements.
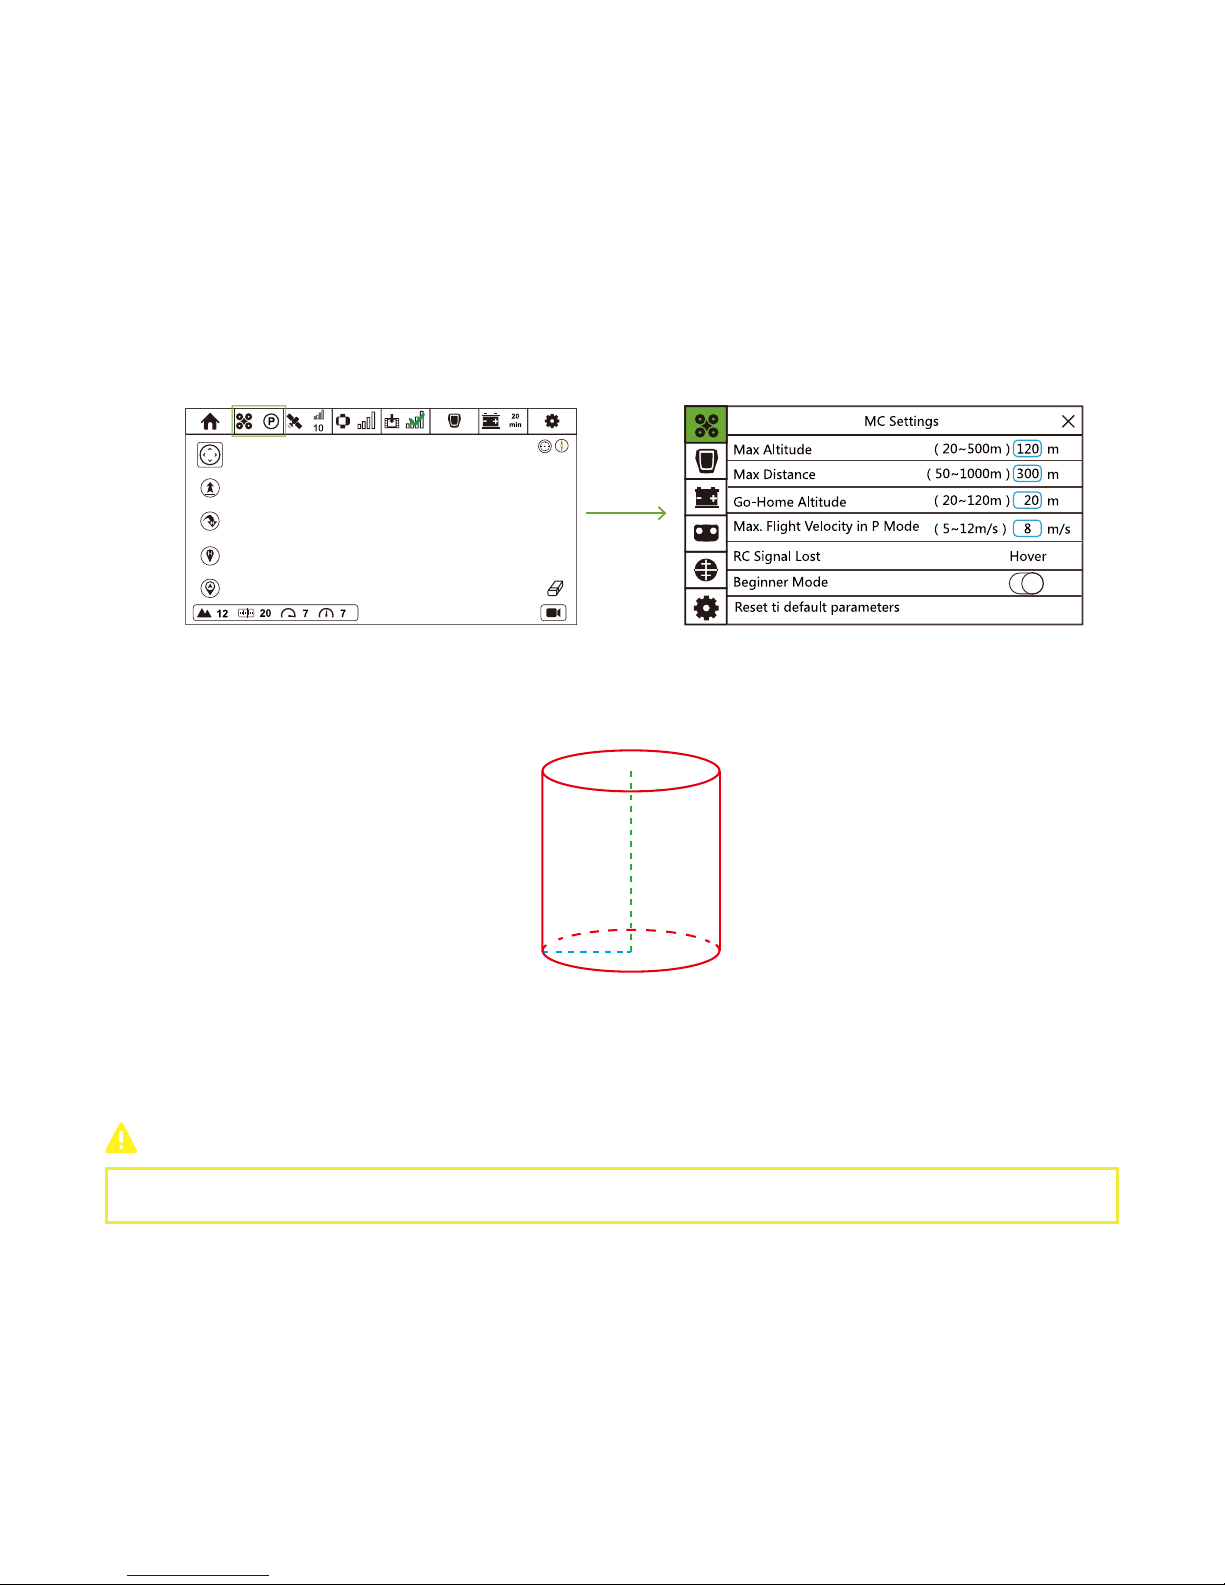
It is suggested to build an electronic fence before first ten flights to set max height and distance to ensure the drone would not break
its boundary.
Set Max Height and Max Distance
In Flight Interface, tap “Drone Current Mode” icon to enter Flight Controller interface.
Modify values of Max Altitude and Max Distance in the blue box. These two values would form a cylinder, and the drone would fly
within the cylinder. When it reaches the max value, Drone will hover. Green dashed line represents the max altitude, while blue
dashed line represents max distance. Both values support the generation of red cylinder.
Meanwhile, to ensure safety, you could modify the max flight velocity in P Mode. Drone would not fly over the limited speed.
Step 3: Height Calibration
Step 4: Check GPS Status & Connection Status
Before Follow Mode, please put Drone and Follow Module at the same height to do height calibration.
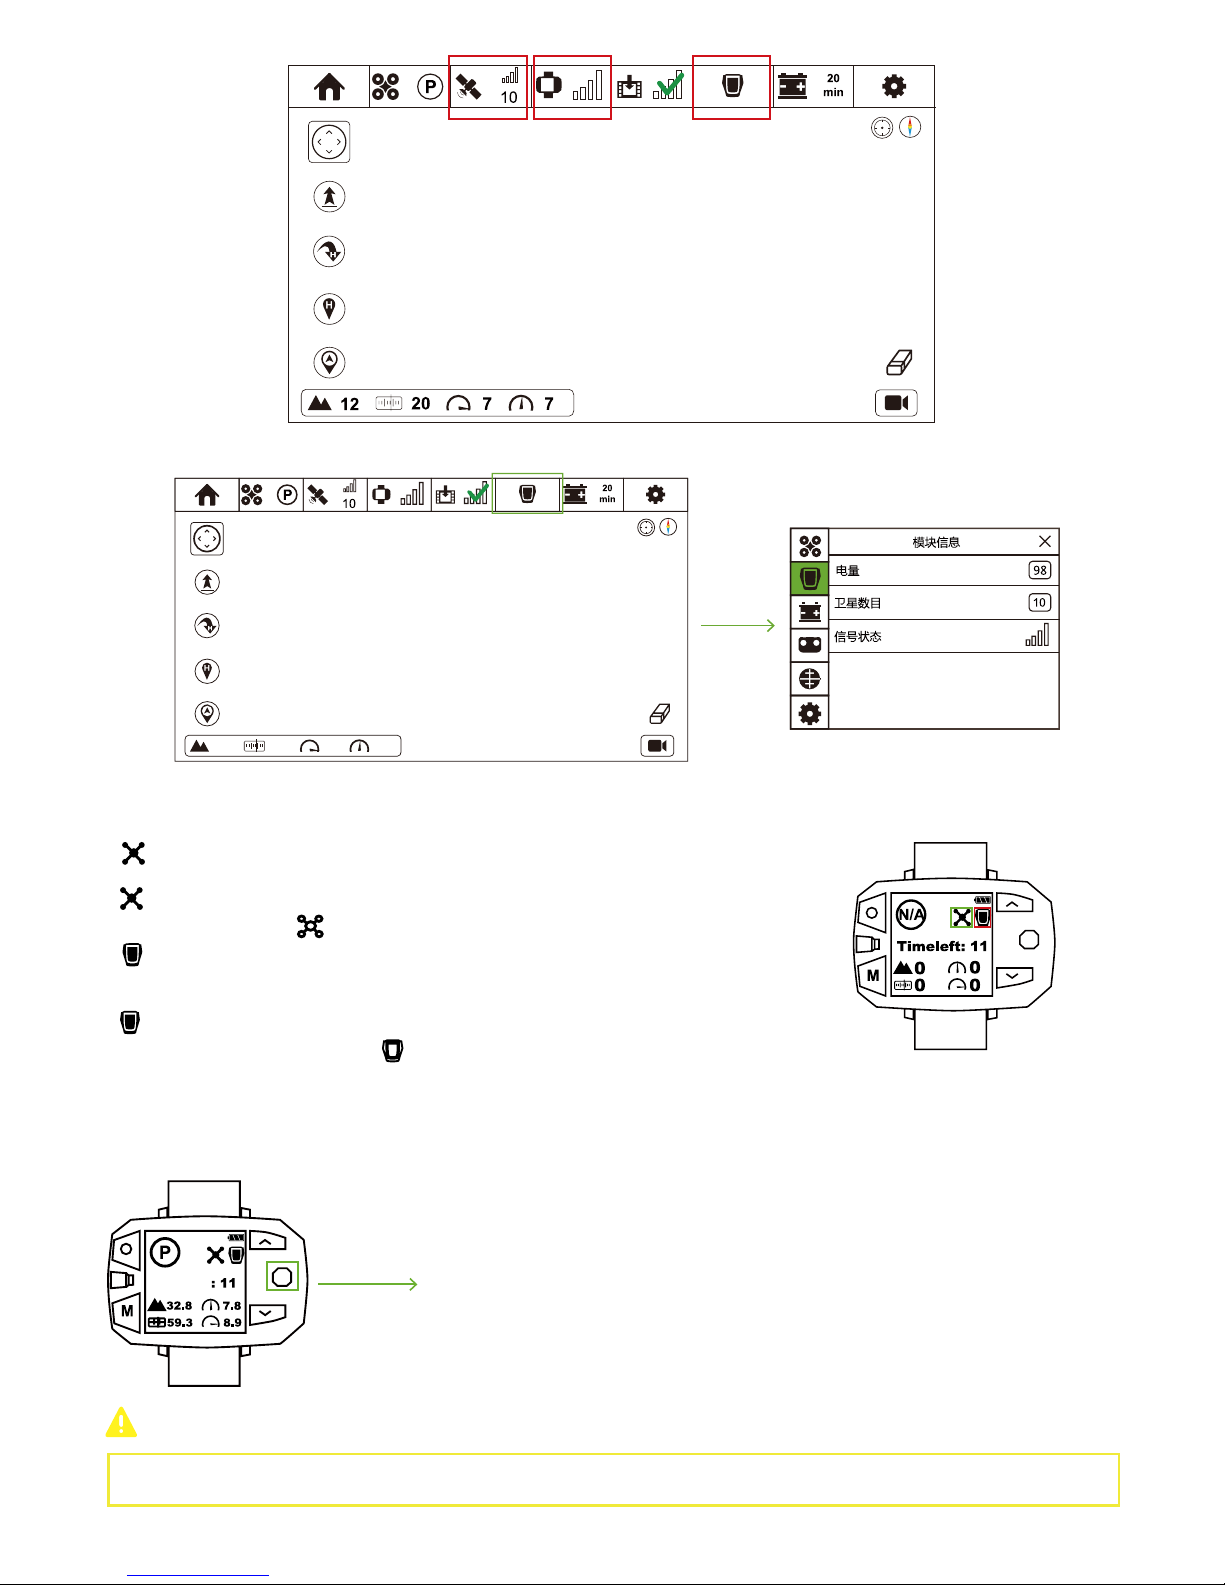
In Flight Interface, check whether or not over 10 satellites have been found and Sports Watch has connected to Smartphone.
DO NOT INGORE THIS STEP!
CEEWA APP:
Refer to Chapter Sports Watch Version: Check before Flight → Step 10: Calibration → 5. Height Calibration for detailed calibration
procedures.
Page 26
23
Timeleft
Sports Watch:
Click Follow Module Status to check the remaining power, satellite number and connection status of Follow Module.
In Flight Interface, toggle Nav. Button to right twice to enter . In this interface, you can get these information:
In Flight Interface,
If icon blinks, there may be something wrong between Watch and Drone, including
weak connection, GPS Positioning problem of Drone or low-voltage of Drone.
If icon is constantly on, Sports Watch has connected to Drone.
If drone icon is shown as , Sports Watch has not connected or bound with Drone.
If icon blinks, there may be something wrong between Watch and Follow Module,
including weak connection, GPS Positioning problem of Follow Module or low-voltage of
Follow Module.
If icon is constantly on, Sports Watch has connected to Follow Module.
If Follow Module icon is shown as , Sports Watch has not connected or bound with
Follow Module.
Please ensure there are more than 10 GPS satellites.
Page 27
24
Step 5: Switch to P Mode
Sports Watch:
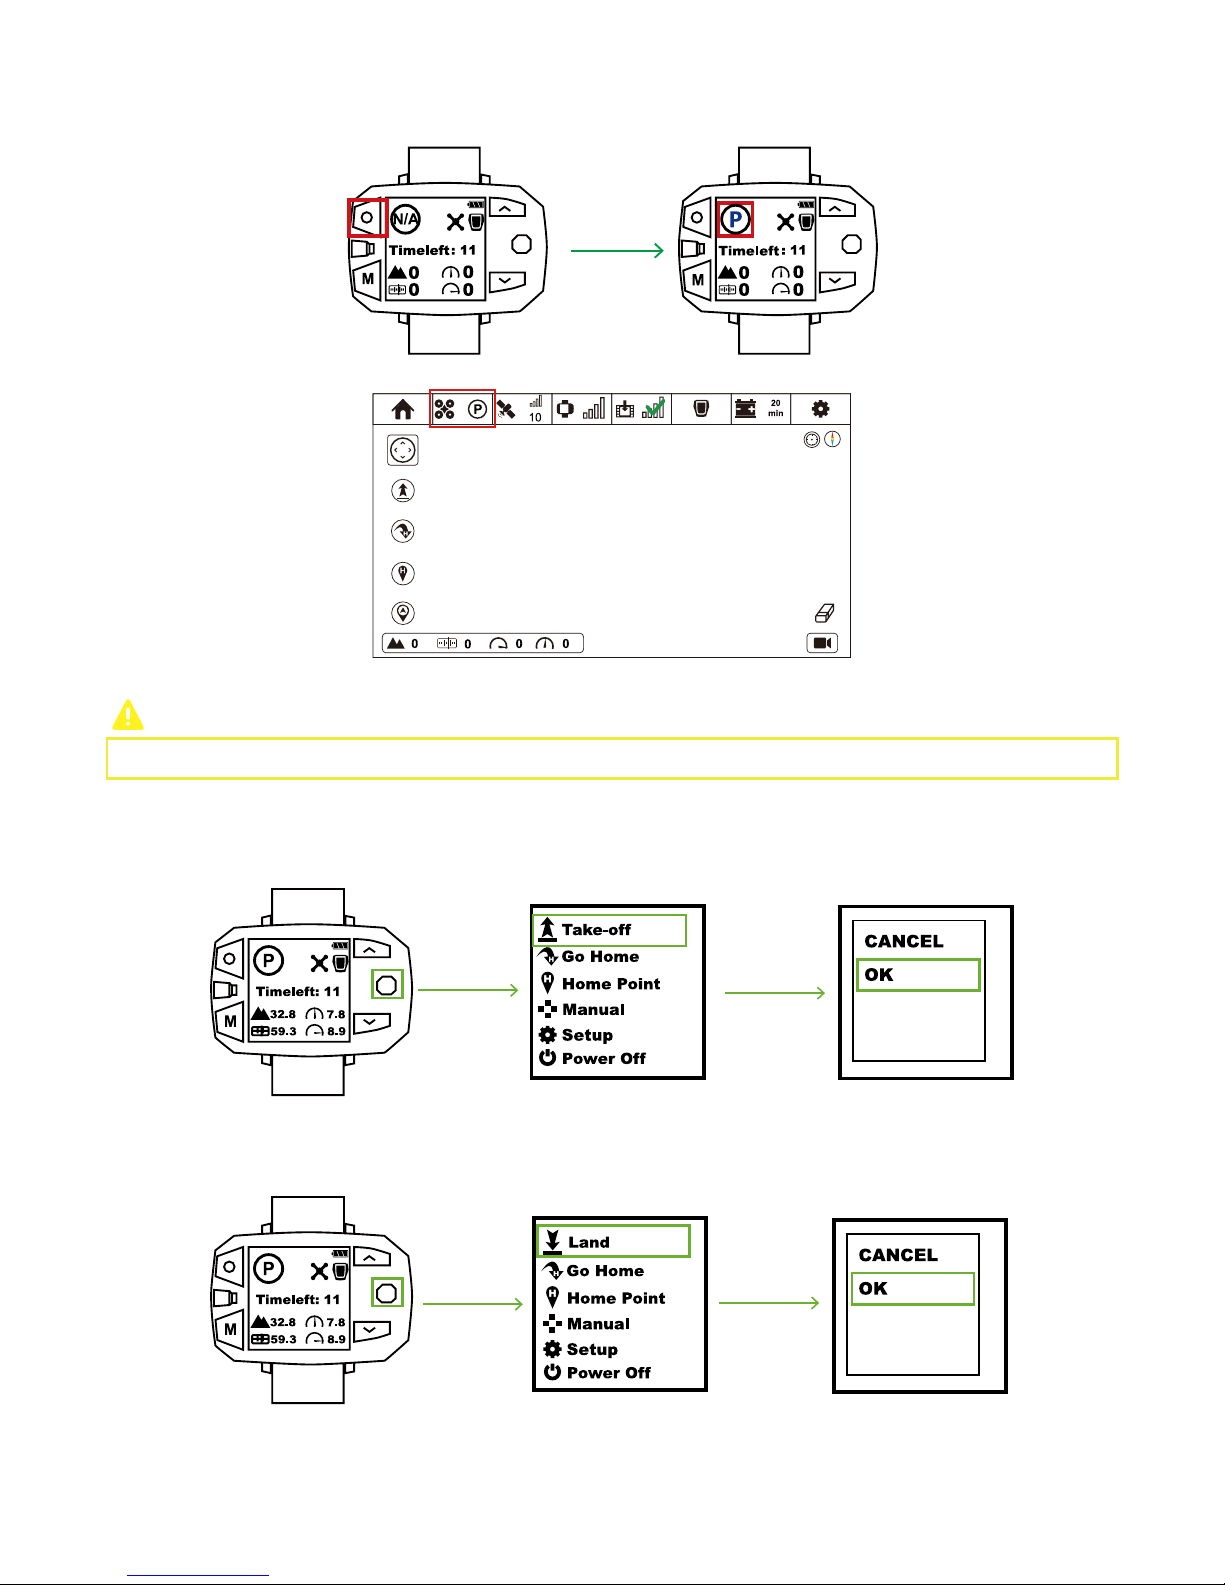
Press STOP Button and observe whether or not P Mode has been activated.
You can also check P Mode in Status Bar of CEEWA APP:
Please DO NOT attach any propeller to the drone in this step!
① Enable One-key take-off and check whether or not four motors can turn on properly. If lacking any one of them, drone will fall
down directly.
Step 6: Drone Test
Step 7: Attach / Detach Propellers
Attach Propellers
CEEWA Drone uses 10-inch propellers. White and Black nuts on the propellers indicate the rotation direction of propellers and where
it should be attached.
② Press STOP Button for over 5s to enter Manual Interface. Toggle Nav. Button and press UP/DOWN to observe whether or not
motors can rotate normally.
③ Enable One-key land and check whether or not four motors can stop.
Toggle Nav. Button to the right & enter Menu Interface. Select “Take-off” option and choose “OK” in the pop-up window. One-Key
Take-off activates.
Page 28
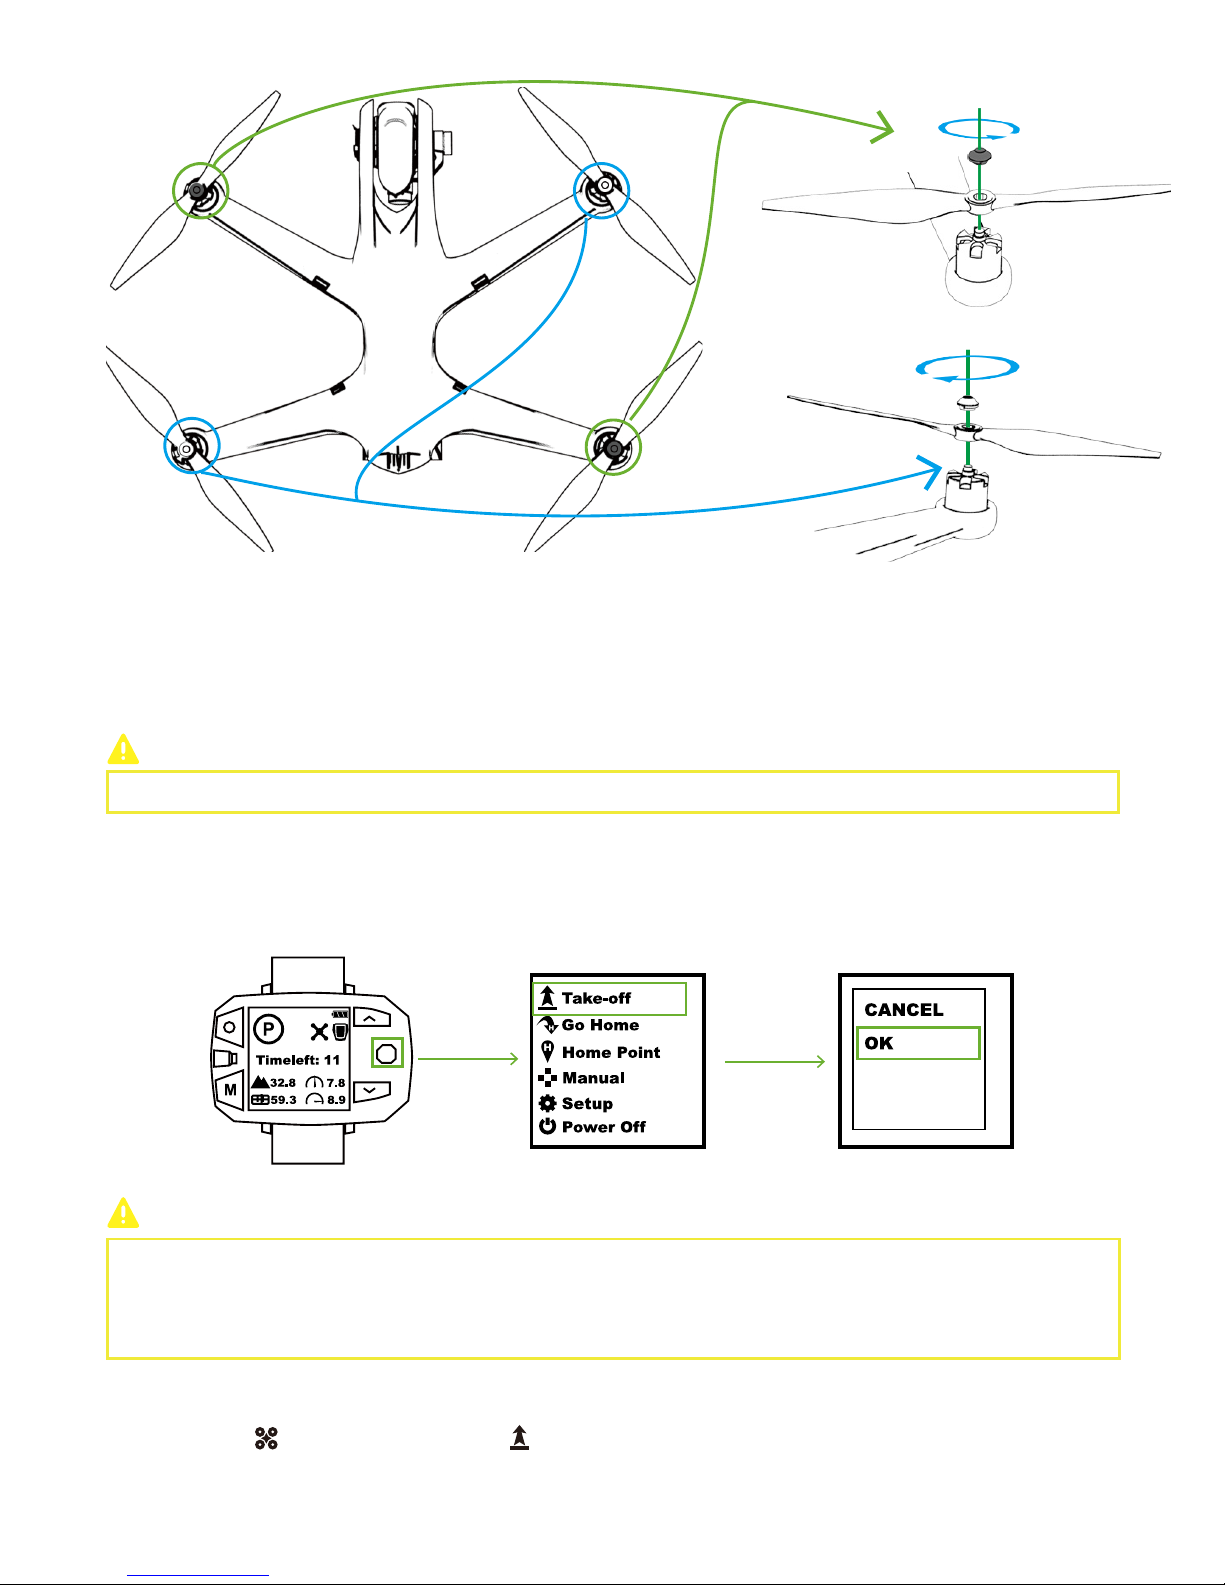
25
M1
M2
M3 M4
Black Nut
Please fix each propeller tightly before flight.
Please activate One-key Take-off on the level surface.
(2)Detach
Hold the motor. Counter-clockwise spin propellers on M1 and M3, while clockwise spin propellers on M2 and M4
.
Step 8: One-Key Take-off
Sports Watch:
CEEWA APP:
Make sure the connection between Drone and Follow Module is correct.
Toggle Nav. Button to the right & enter Menu Interface. Select “Take-off” option and choose “OK” in the pop-up window. One-Key
Take-off activates.
When Drone has connected to Sports Watch:
Drone will ascend to 5 meters and hover to wait for the next order.
When Drone has NOT connected to Sports Watch:
Drone cannot take off.
In Flight Interface ( ), tap One-Key Take-off icon ( ) and slide the white slider to confirm take-off.
Black Nut
White Nut
White Nut
Page 29
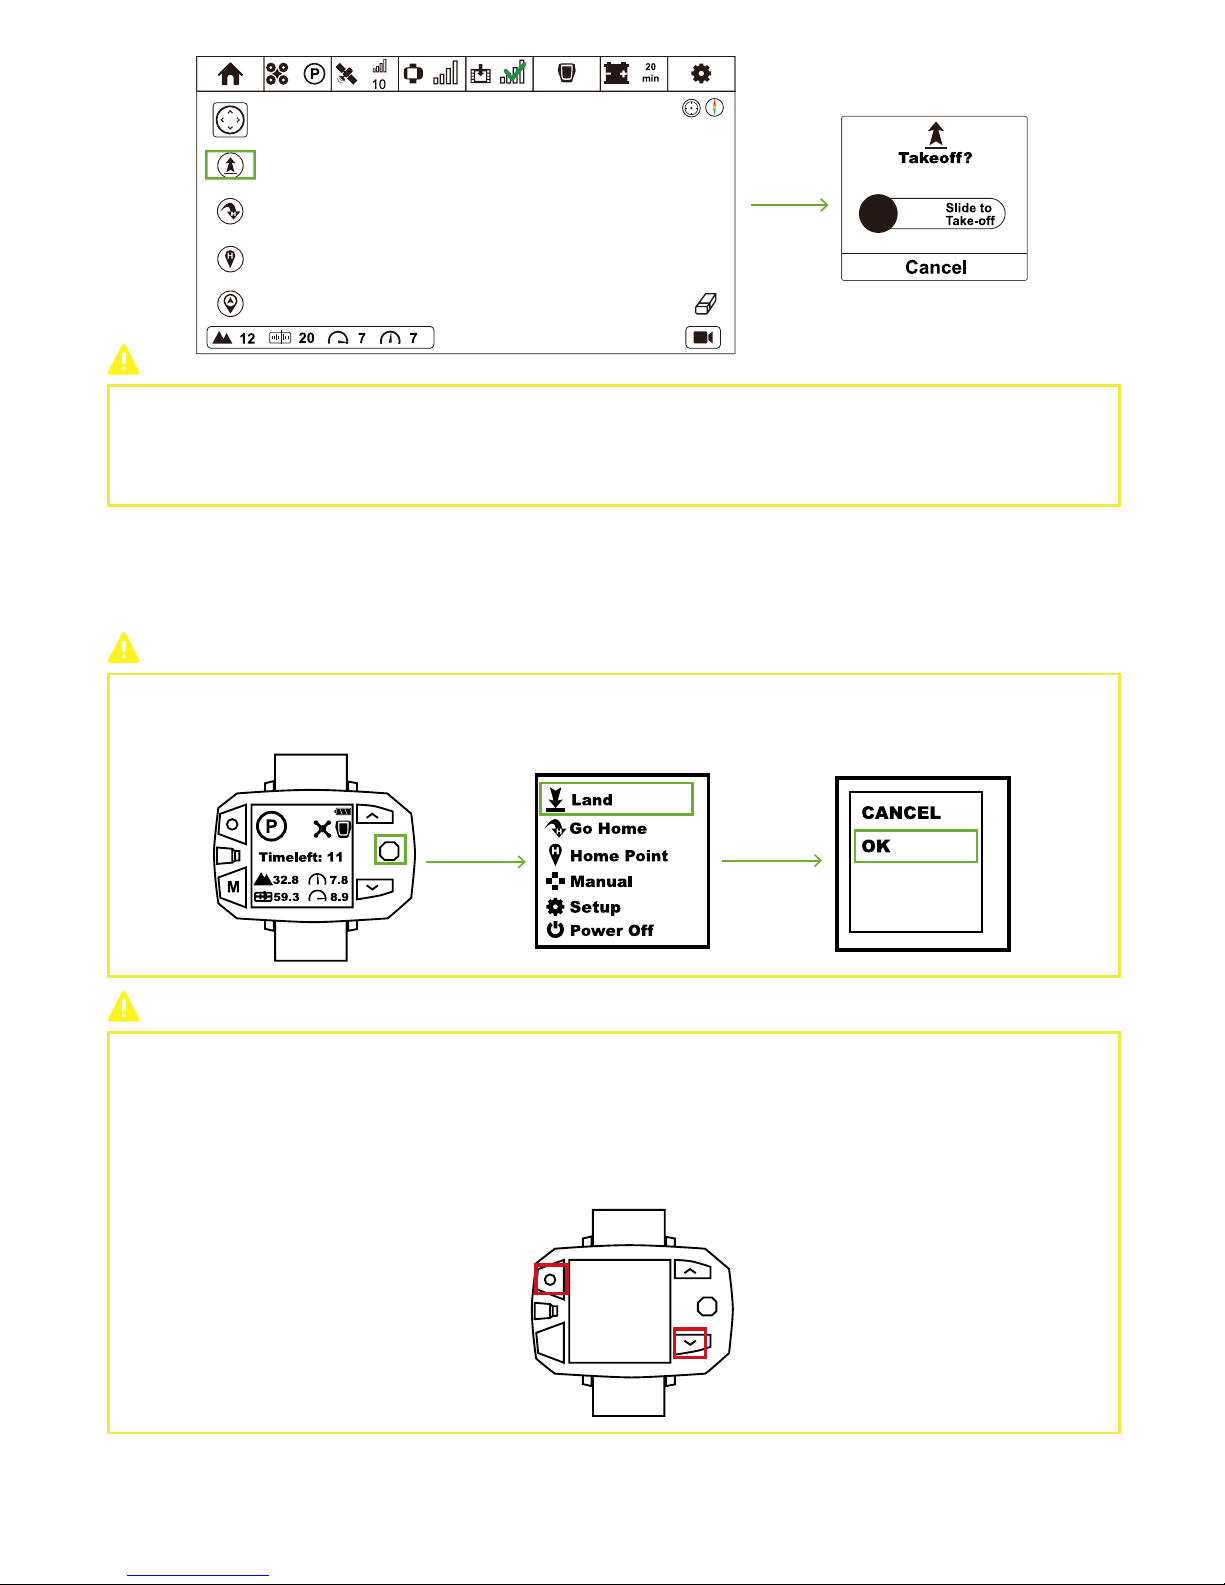
26
Step 9: Check Status
Step 10: Adjust Drone’s Attitude
If drone hover steadily after taking-off, over ten GPS Satellites have been found, connection between Smartphone & Sports Watch
and Follow Module & Sports Watch are normal, and P Mode enables, please move to next step.
If drifts happen after hovering or warning tips show on the screen of APP and Watch, please land the drone as soon as possible.
In Flight Interface, toggle the Nav. Button to the right to enter Menu Interface. Select Manual option to adjust the attitude of Drone.
Otherwise, press STOP Button for over 5s wo enter Manual Interface.
When Drone has connected to Sports Watch:
Drone will ascend to 5 meters and hover to wait for the next order.
When Drone has NOT connected to Sports Watch:
Drone cannot take off.
How to land?
How to react when losing control of Drone?
If something emergent occur, like losing control of drone, you could make the drone motor stop to avoid dangers.
Please be cautious to enable this function.
Once being triggered, motors would stop immediately and fall down directly.
Sports Watch:
press STOP button and Down Button at the same time.
Toggle Nav. Button to the right & enter Menu Interface. Select “Land” option and choose “OK” in the pop-up window. One-Key
Land activates.
Page 30
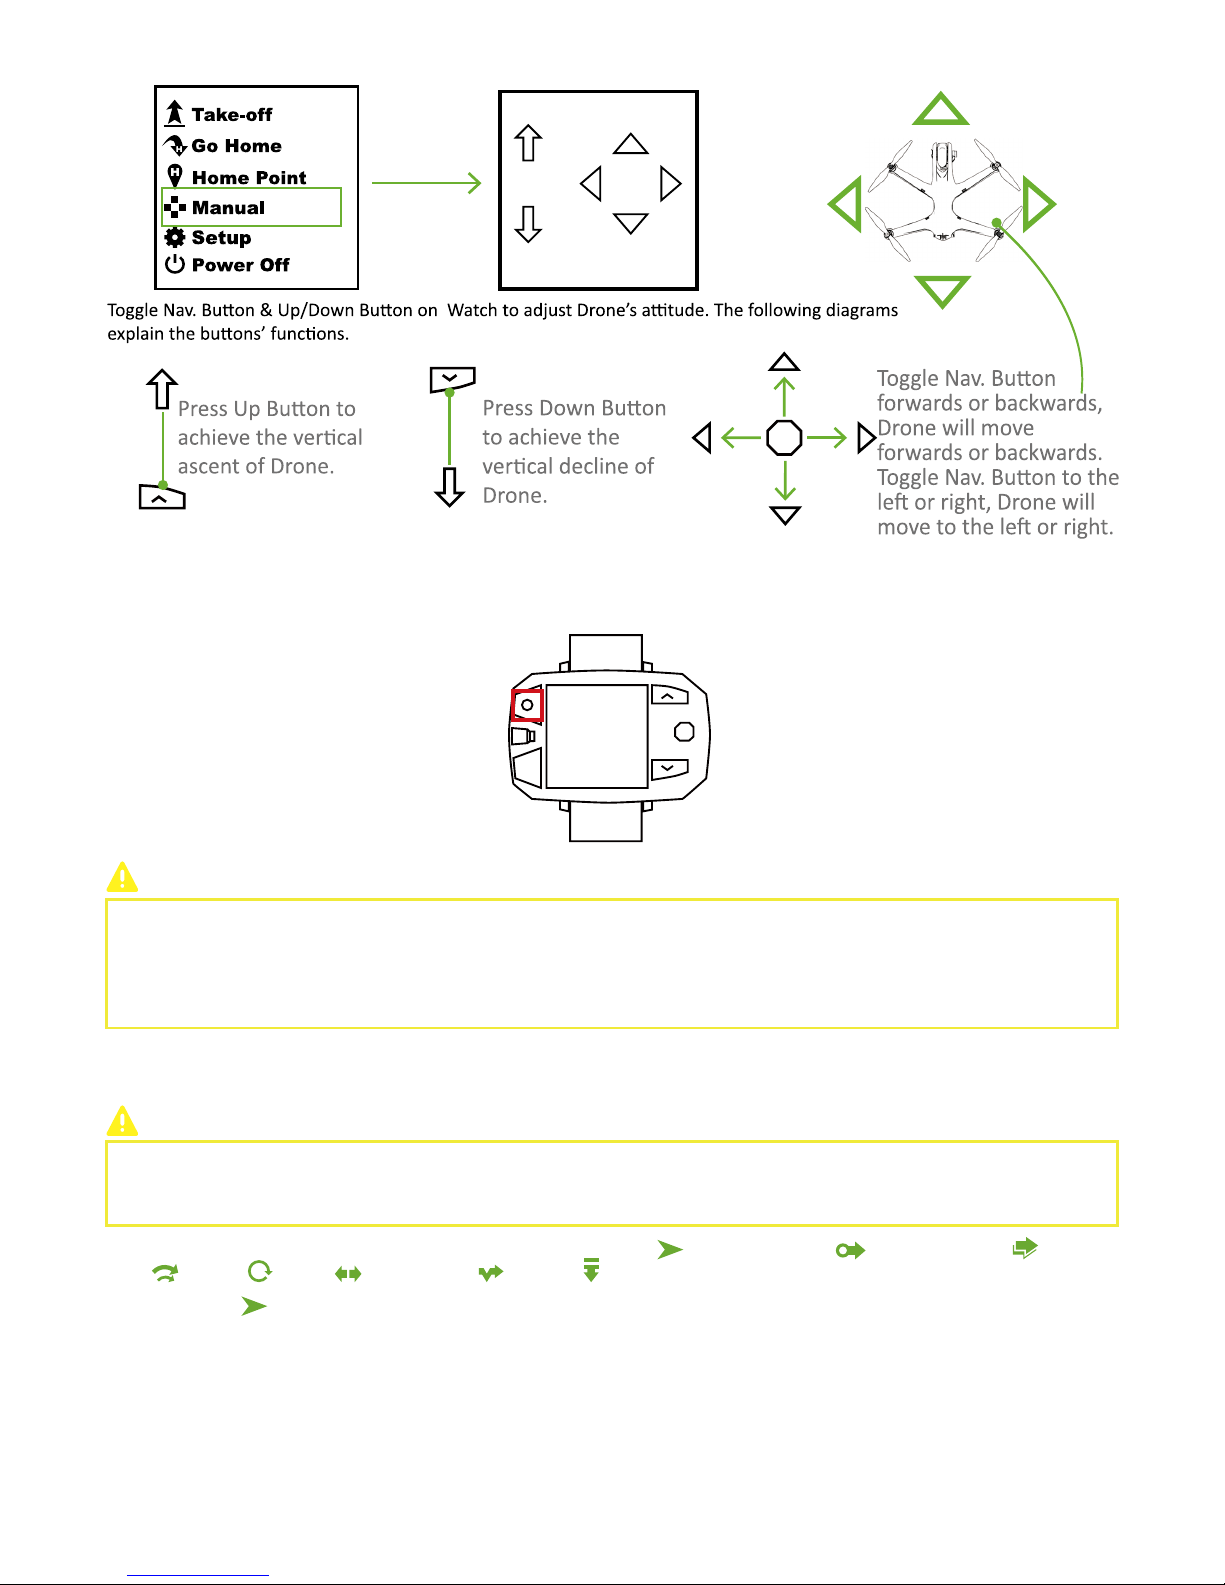
27
How to deactivate?
Press STOP Button to exit Manual Interface.
After activating Follow Mode, the camera will always focus on the target. If you need to adjust Drone’s attitude, please pay
attention to the position and direction of nose. It is suggested to adjust drone’s attitude gradually and make sure you have set the
drone to the correct direction.
When head of drone faces Follow Module, you should pay special attentions because its orientation may be in the opposite
direction.
Step 11: Follow Mode
Before switching, please ensure parameters have been set correctly, flight environment is safe (e.g. no tall buildings and
interference sources), and distance between Drone & target is suitable.
Before Follow Mode, please put Drone & Follow Mode at the same height to calibrate!
There are 8 Follow Mode supported by CEEWA Drone: Simple-Follow ( ),Hover-and-Aim ( ),Follow-Shadow( ),FollowTrack( ),Orbit( ), Selfie( ),Follow-Line( ),Freeze( ) .
Simple Follow
Drone will auto follow the target with a fixed distance and altitude.
Attentions: ONLY activate Simple-Follow after taking-off. When this mode has been triggered, Drone will remain the relative altitude
and distance between Drone & Follow Module.
Keep a safe distance between Drone & Follow Module.
How to activate?
CEEWA APP
:
Page 31
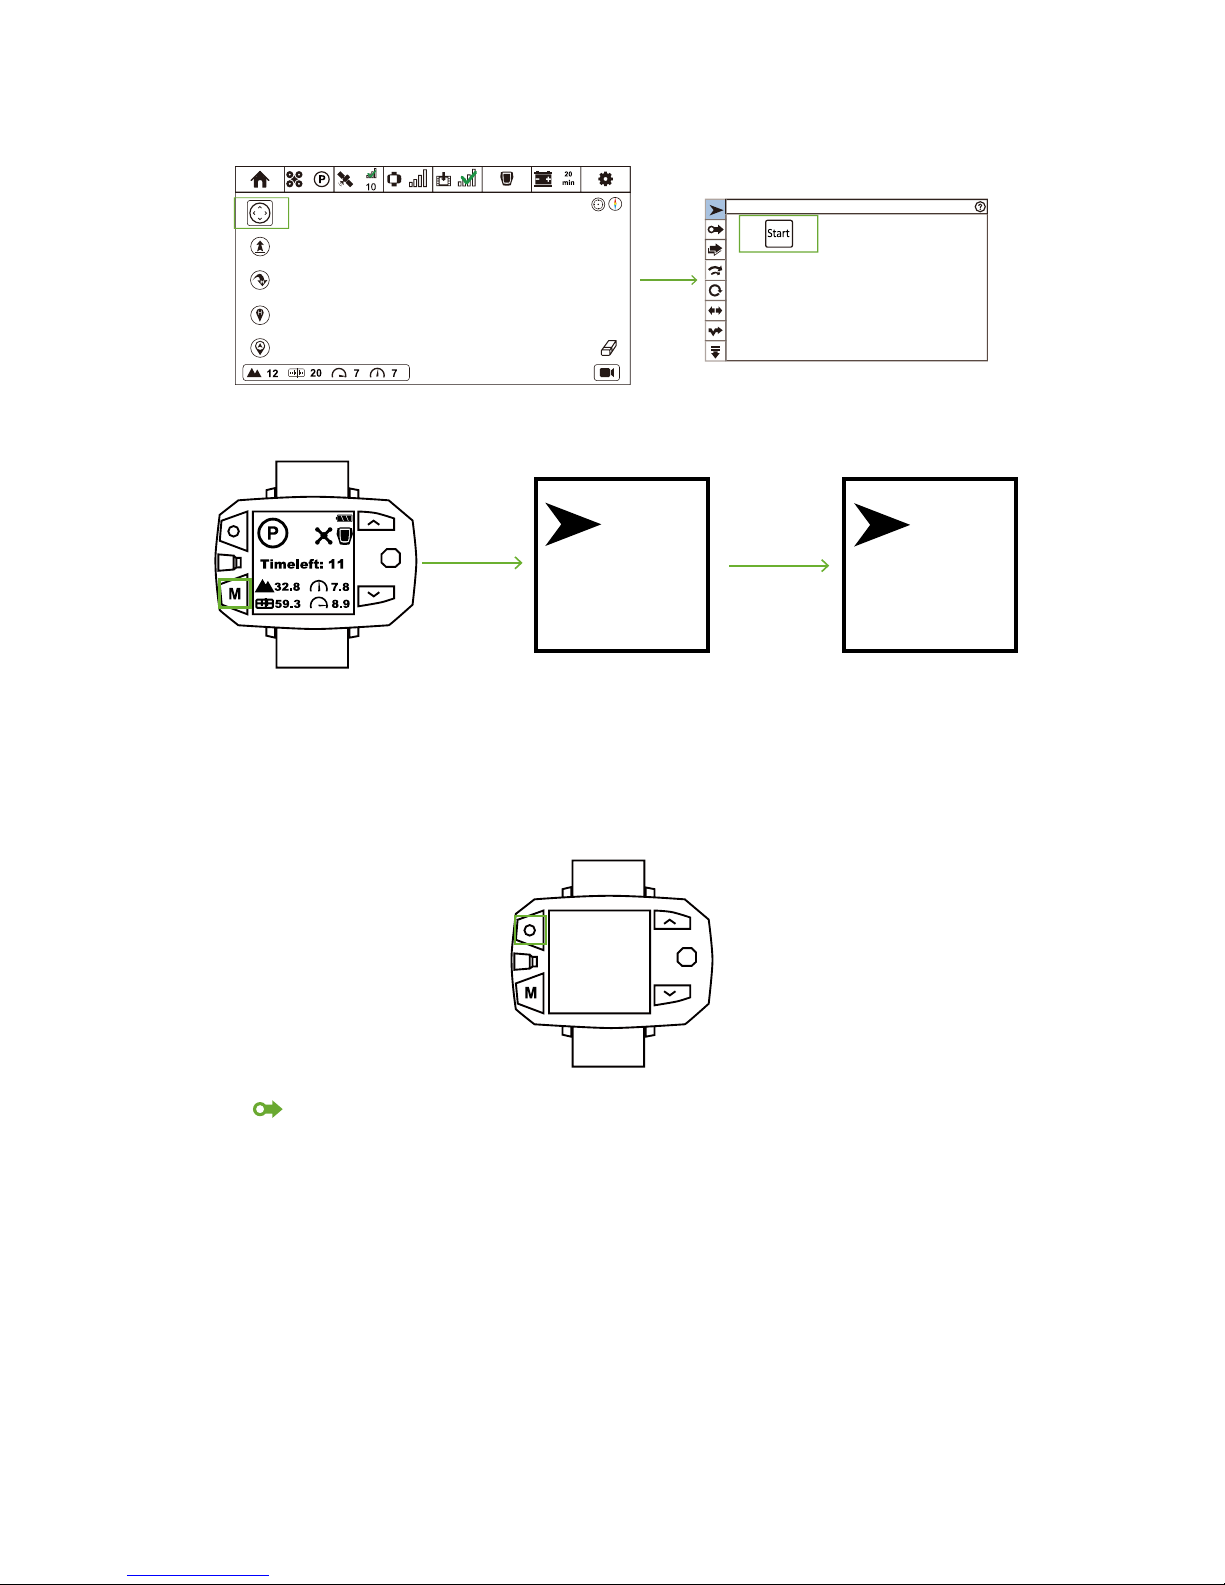
28
In this mode, Drone will hover, but its nose and camera will rotate with the target. In other words, when target (Follow Module)
moves, Drone will stay hovering, but its nose and camera will move with Follow Module to capture images.
Keep a safe distance between Drone & Follow Module.
① Ensure Drone has taken-off.
② Click Follow Mode icon and enter Follow Mode menu.
③ Click Simple Follow icon and enter Simple Follow menu.
④ Click "Start". After all parameters have been uploaded, Simple Follow enables.
Simple Follow
Sports Watch:
Simple
Follow
Simple
Follow
3
GO
When connection is OK, press Mode Button repeatedly until Simple Follow icon shows on the screen. After 3 times of beeps, Simple
Follow enables.
How to deactivate?
Sports Watch:
When pressing STOP button, “Hovering…” shows in the screen and Sports Watch vibrates once. At this moment, Follow Mode has
been cancelled.
Hovering
Hover-and-Aim
① Ensure Drone has taken-off.
② Click Follow Mode icon and enter Follow Mode menu.
③ Click Hover-and-Aim icon and enter Hover-and-Aim menu.
④ Click "Start". After all parameters have been uploaded, Hover-and-Aim enables.
How to activate?
CEEWA APP
:
Page 32
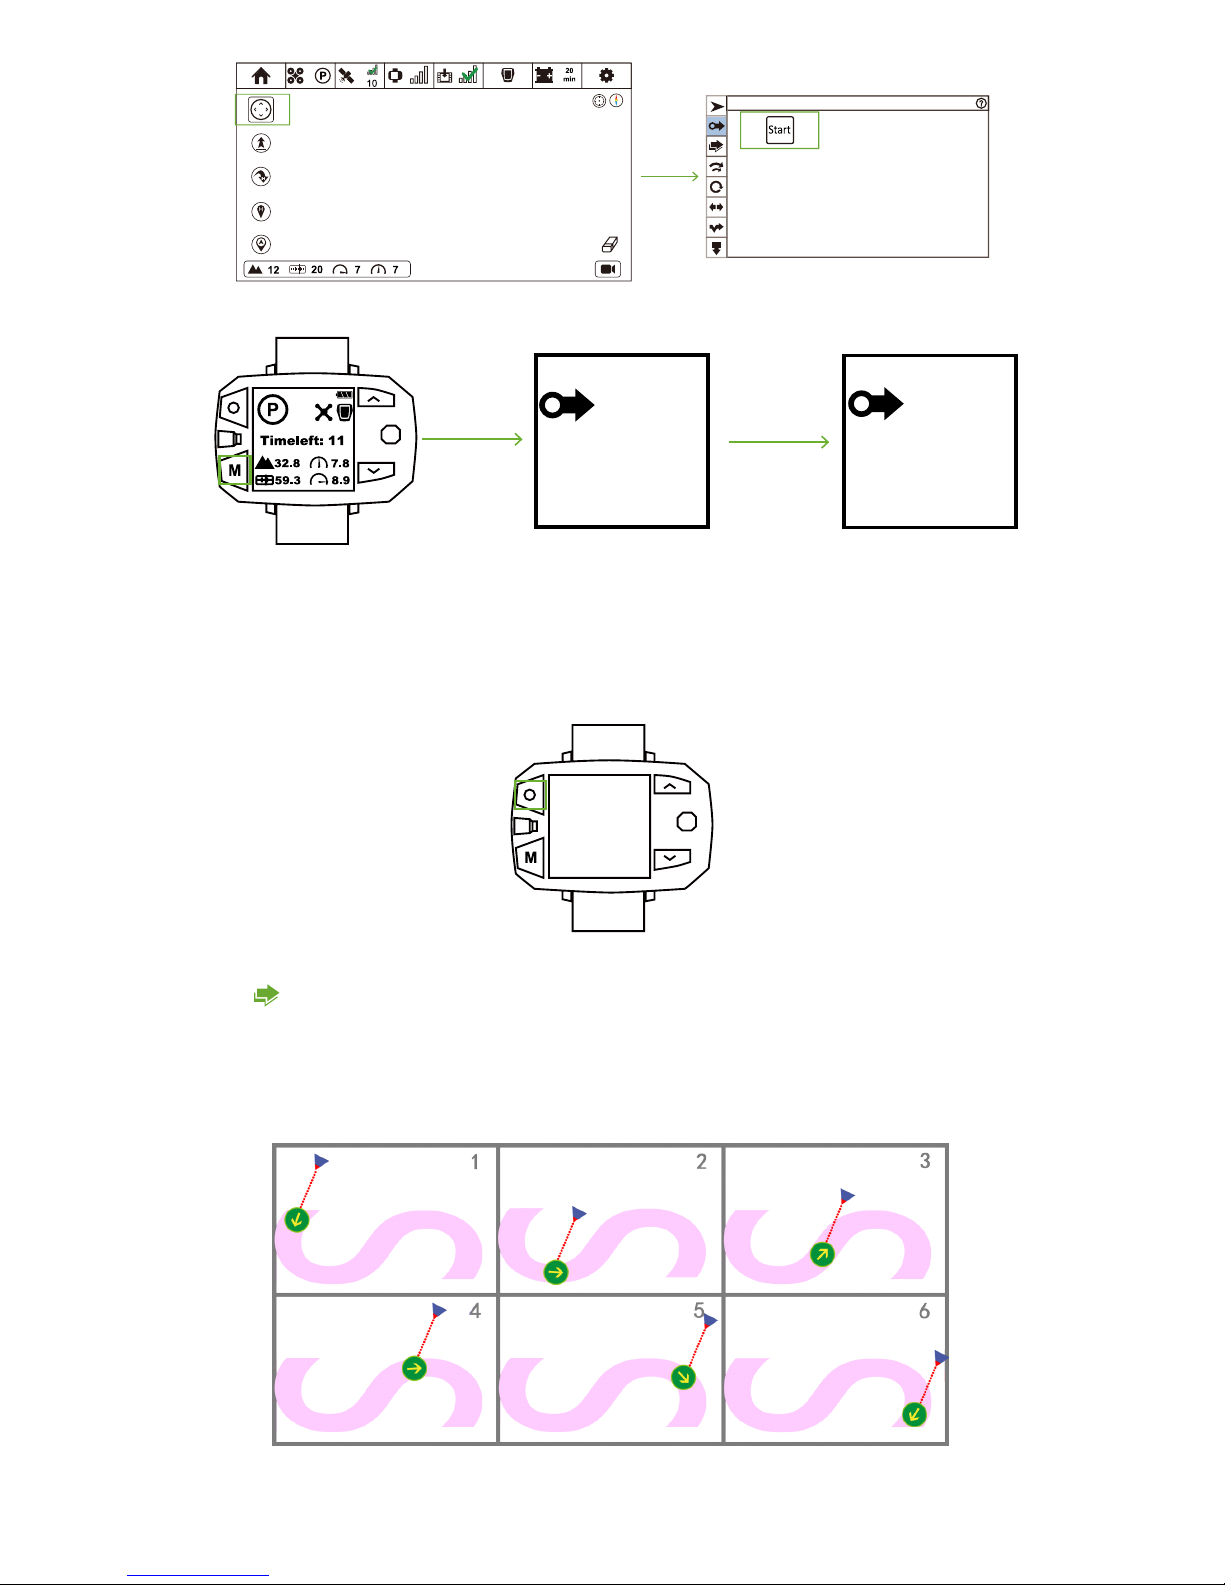
29
Hover-and-Aim
Sports Watch:
Hoverand-Aim
Hoverand-Aim
3
GO
When connection is OK, press Mode Button repeatedly until Hover-and-Aim icon shows on the screen. After 3 times of beeps, Hoverand-Aim enables.
You need set relative distance, altitude and angle between Drone & Follow Module in APP. After activating, Drone will fly based on
the preset distance, altitude and angle.
In the following diagram, Green Circle represents Follow Module, while the Golden Arrow stands for the moving direction of Follow
Module. The Blue Triangle represents Drone.
How to deactivate?
Sports Watch:
When pressing STOP button, “Hovering…” shows in the screen and Sports Watch vibrates once. At this moment, Follow Mode has
been cancelled.
Hovering
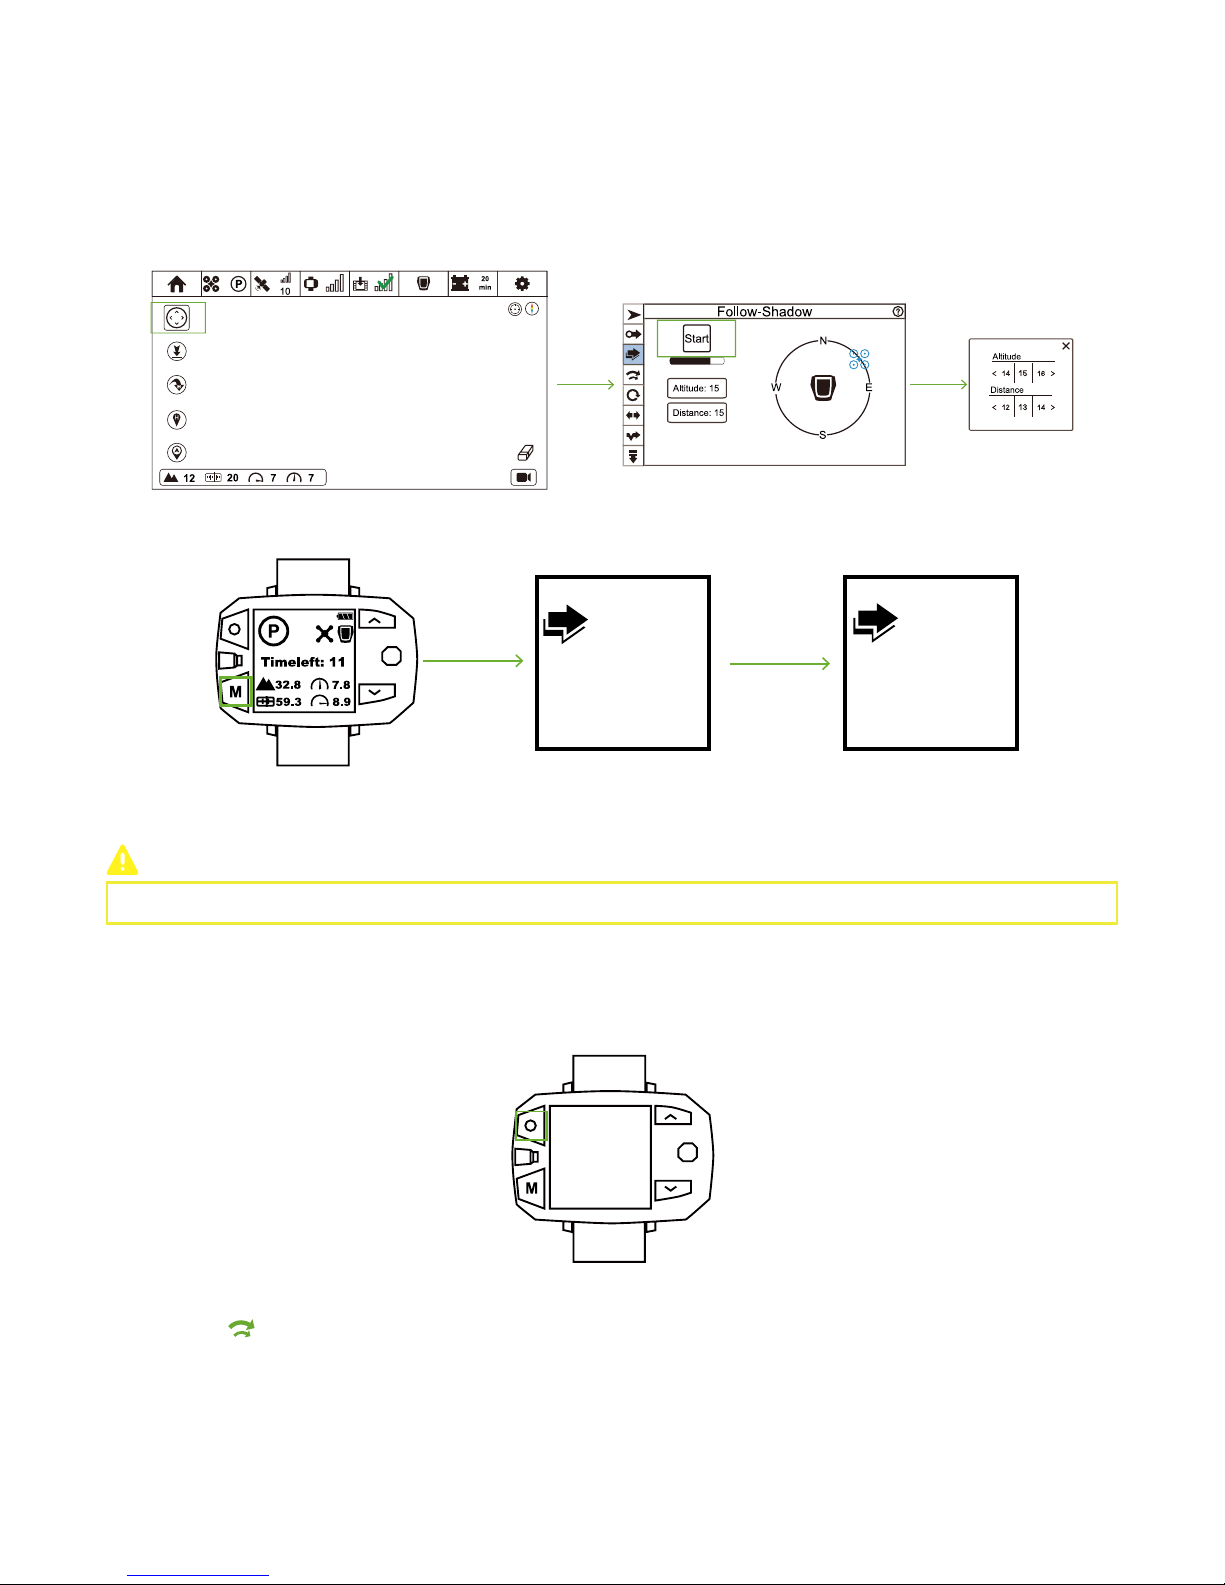
Follow-Shadow
Page 33
30
When connection is OK, press Mode Button repeatedly until Follow-Shadow icon shows on the screen. After 3 times of beeps,
Follow-Shadow enables.
You need set relative distance, altitude and angle between Drone & Follow Module in APP. After activating, whatever the angle and
speed the Follow Module is, Drone will remain the preset altitude and distance. Moreover, it always keeps a same flight direction
and speed with Follow Module.
After activating, if you don't move Follow Module, Drone will stay hovering. However, once Follow Module moves, Drone would
fly to your preset altitude and distance.
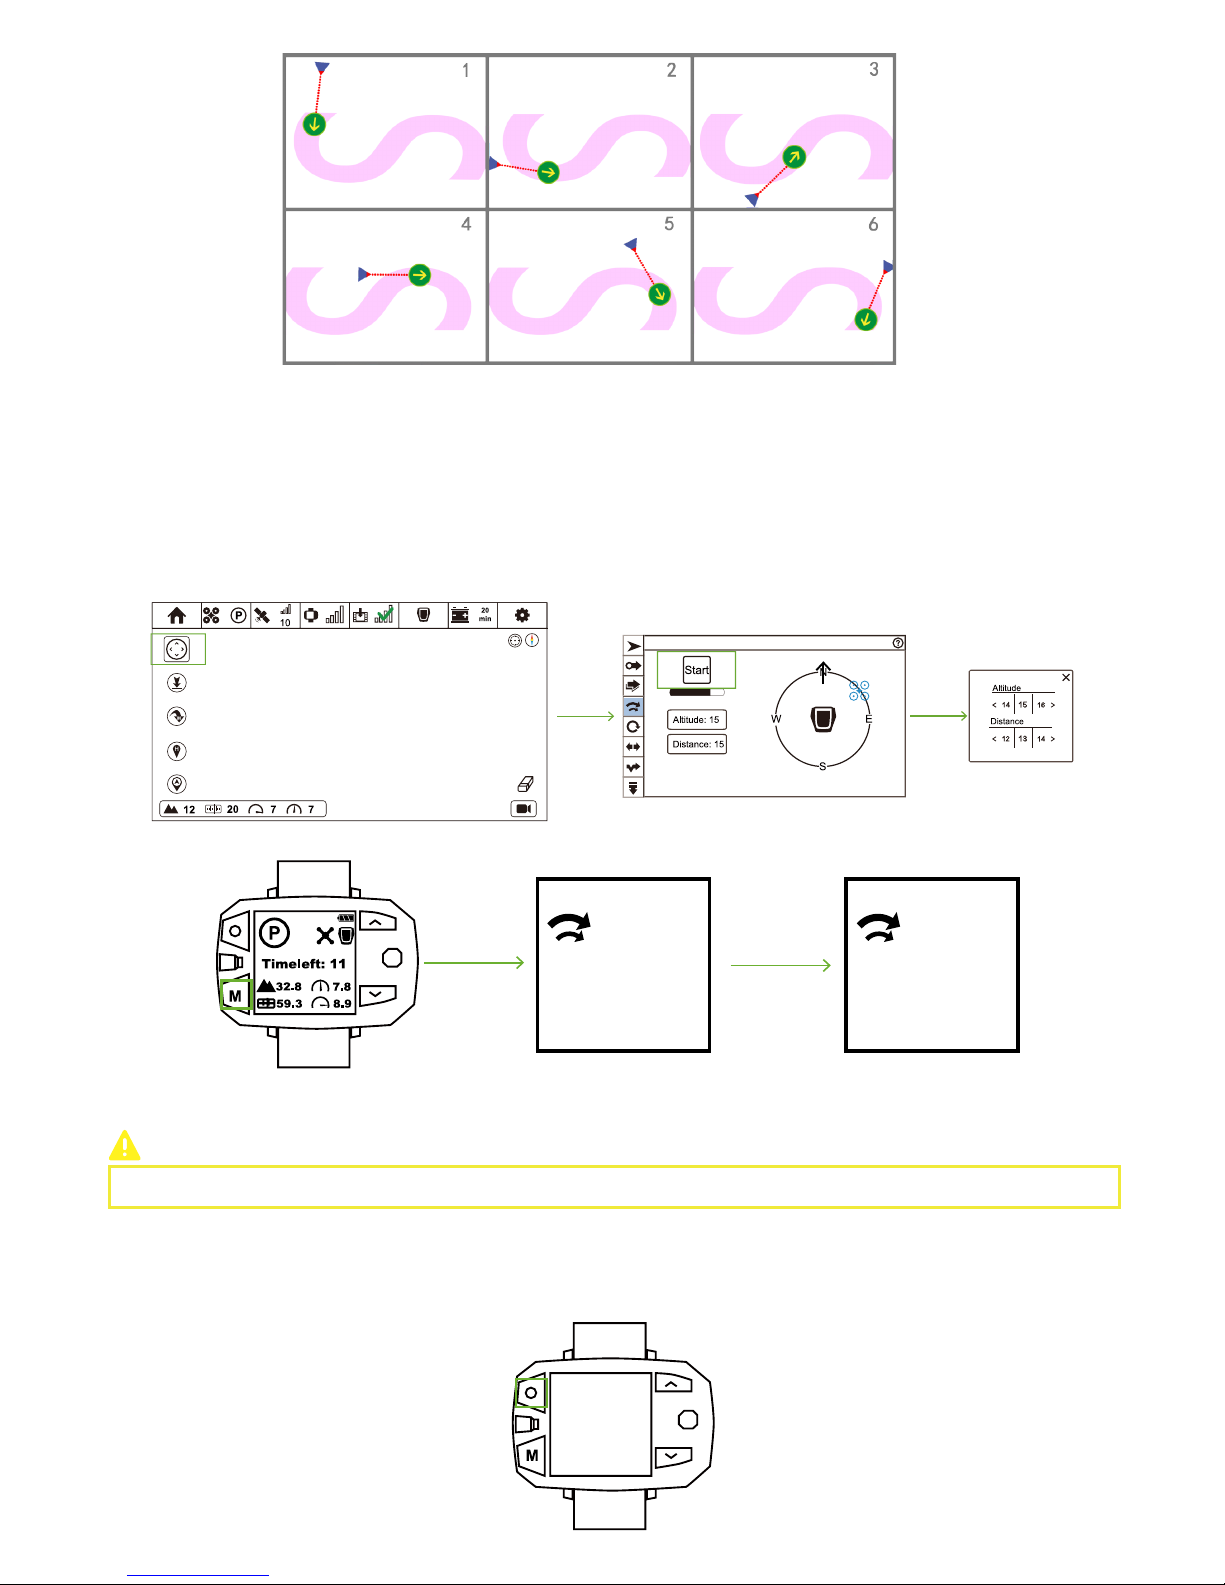
Follow-Track
① Ensure Drone has taken-off.
② Click Follow Mode icon and enter Follow Mode menu.
③ Click Follow-Shadow icon and enter Follow-Shadow menu.
④ Drag Blue Drone icon to set the angle between Drone and Follow Module.
⑤ Click Altitude and Distance to adjust appropriate flight parameters in the pop-up window.
⑥
Click "Start". After all parameters have been uploaded, Follow-Shadow enables.
How to activate?
CEEWA APP
:
Sports Watch:
FollowShadow
H: 15
D: 13
H: 15
D: 13
FollowShadow
3
GO
How to deactivate?
Sports Watch:
When pressing STOP button, “Hovering…” shows in the screen and Sports Watch vibrates once. At this moment, Follow Mode has
been cancelled.
Hovering
Please modify parameters through CEEWA APP.
Page 34
31
① Ensure Drone has taken-off.
② Click Follow Mode icon and enter Follow Mode menu.
③ Click Follow-Track icon and enter Follow-Track menu.
④ Drag Blue Drone icon to set the angle between Drone and Follow Module.
⑤ Click Altitude and Distance to adjust appropriate flight parameters in the pop-up window.
⑥
Click "Start". After all parameters have been uploaded, Follow-Track enables.
How to activate?
CEEWA APP
:
Follow-Track
When connection is OK, press Mode Button repeatedly until Follow-Track icon shows on the screen. After 3 times of beeps, FollowTrack enables.
Sports Watch:
FollowTrack
H: 15
D: 13
H: 15
D: 13
FollowTrack
3
GO
How to deactivate?
Sports Watch:
When pressing STOP button, “Hovering…” shows in the screen and Sports Watch vibrates once. At this moment, Follow Mode has
been cancelled.
Hovering
Please modify parameters through CEEWA APP.
Page 35
32
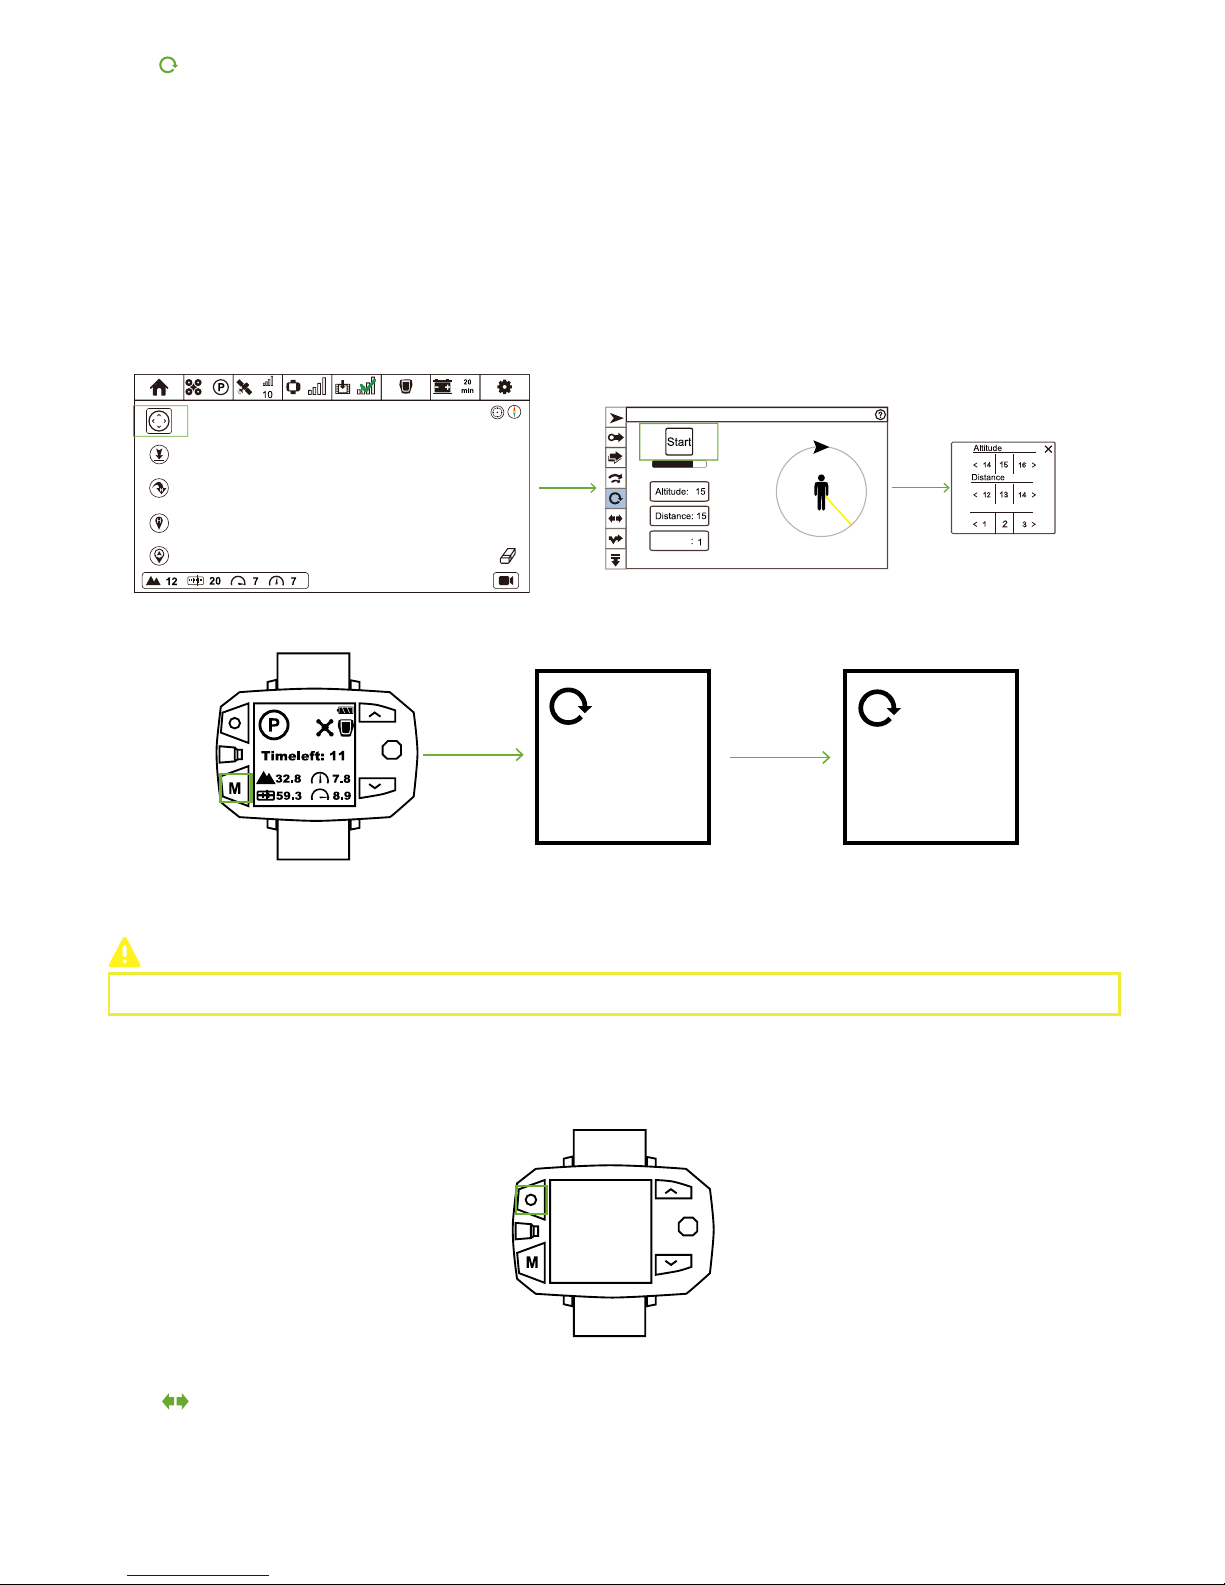
Drone will fly in a preset speed and radius surrounding the target. After activating, Drone will fly in the preset speed and radius
around the Follow Module. When the speed value is positive, Drone will orbit the target clockwise. When the speed value is
negative, Drone will orbit the target counter-clockwise.
Set a terminal coordinate and flight speed in APP at first. Drone will fly from current position along in a straight line to the terminal.
After reaching the end coordinate, Drone will auto return to the initial point. During flight, the camera will be always pointing to the
Follow Module.
Through Selfie, you can get the transitional footage from small scene to large scene, and from large scene to small scene. Set a
reasonable distance, altitude and angle.
Orbit
Selfie
① Ensure Drone has taken-off.
② Click Follow Mode icon and enter Follow Mode menu.
③ Click Orbit icon and enter Orbit menu.
④ Click Altitude, Distance and to adjust appropriate flight parameters in the pop-up window.
⑤ Click "Start". After all parameters have been uploaded, Orbit enables.
How to activate?
CEEWA APP
:
Orbit
Vcircle
R
Vcircle
Sports Watch:
Orbit
H: 15
D: 13
S: 1
H: 15
D: 13
S: 1
Orbit
3
GO
When connection is OK, press Mode Button repeatedly until Orbit icon shows on the screen. After 3 times of beeps, Orbit enables.
How to deactivate?
Sports Watch:
When pressing STOP button, “Hovering…” shows in the screen and Sports Watch vibrates once. At this moment, Follow Mode has
been cancelled.
Hovering
Please modify parameters through CEEWA APP.
Page 36
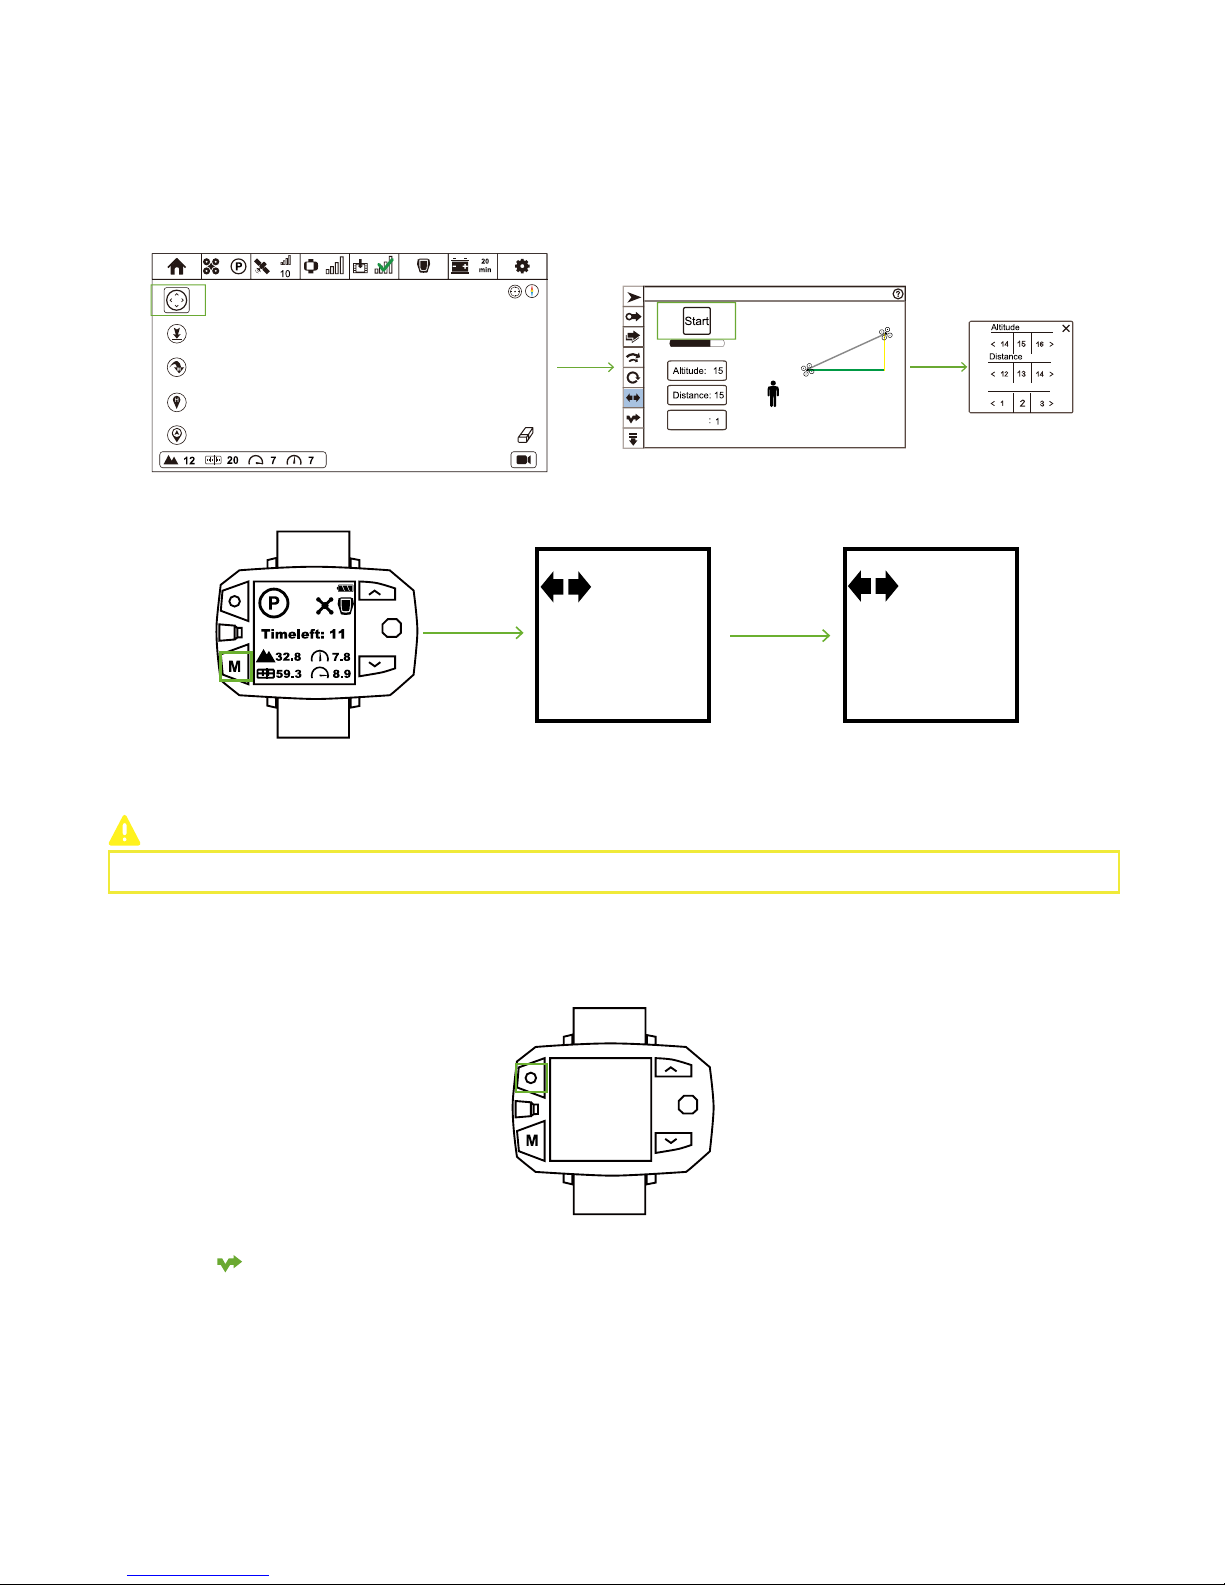
33
① Ensure Drone has taken-off.
② Click Follow Mode icon and enter Follow Mode menu.
③ Click Selfie icon and enter Selfie menu.
④ Click Altitude, Distance and to adjust appropriate flight parameters in the pop-up window.
⑤ Click "Start". After all parameters have been uploaded, Selfie enables.
How to activate?
CEEWA APP
:
Orbit
Vcircle
Vcircle
D
H
Sports Watch:
Sele
H: 15
D: 13
S: 1
H: 15
D: 13
S: 1
Sele
3
GO
When connection is OK, press Mode Button repeatedly until Selfie icon shows on the screen. After 3 times of beeps, Selfie enables.
How to deactivate?
Sports Watch:
When pressing STOP button, “Hovering…” shows in the screen and Sports Watch vibrates once. At this moment, Follow Mode has
been cancelled.
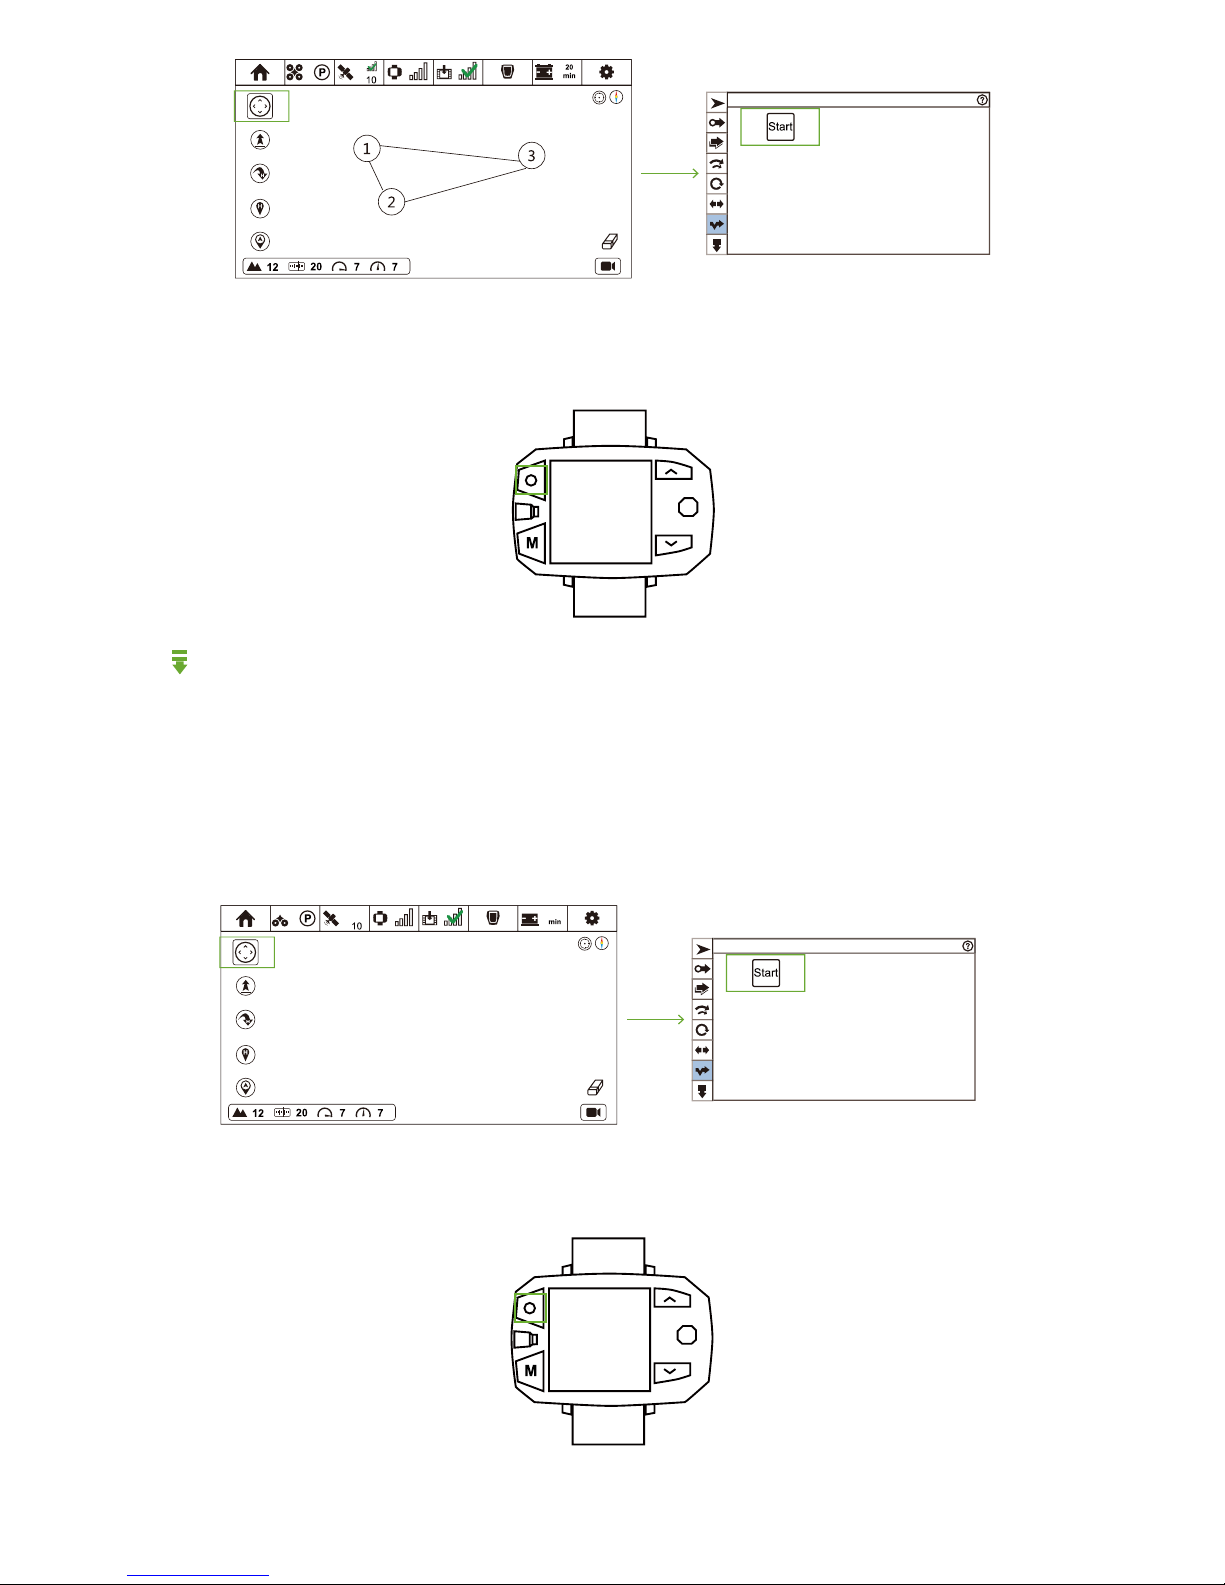
You need to set more than one waypoint in the map. These waypoints will auto generate route, and Drone will fly along this route
with Follow Module. If Follow Module goes beyond the route range, Drone will stay and hover at the nearest waypoint with camera
pointing to the direction of Follow Module.
CEEWA APP will auto check the reliability of route. If the route is not reasonable, waypoints will turn to red.
Hovering
Please modify parameters through CEEWA APP.
Follow-Line
① Ensure Drone has taken-off.
② Set waypoints in the map and these waypoints will automatically turn form a route. Click these waypoints to set different height.
③ Click Follow Mode icon and enter Follow Mode menu.
④ Click Follow-Line icon and enter Follow-Line menu. Click "Start". After all parameters have been uploaded, Follow-Line enables.
How to activate?
CEEWA APP
:
Page 37
34
Follow-Line
How to deactivate?
Sports Watch:
When pressing STOP button, “Hovering…” shows in the screen and Sports Watch vibrates once. At this moment, Follow Mode has
been cancelled.
Drone will hover in the sky, but its gimbal will point straight down to support the camera to shoot. In this mode, the position of
Follow Module has nothing to do with Drone.
Hovering
Freeze
① Ensure Drone has taken-off and achieve your desired position.
② Click Follow Mode icon and enter Follow Mode menu.
③ Click Freeze icon and enter Freeze menu.
④ Click "Start". After all parameters have been uploaded, Freeze enables.
How to activate?
CEEWA APP
:
Freeze
How to deactivate?
Sports Watch:
When pressing STOP button, “Hovering…” shows in the screen and Sports Watch vibrates once. At this moment, Follow Mode has
been cancelled.
Hovering
Page 38
35
Step 12: Nav. Mode
Please activate Nav. Mode in CEEWA APP.
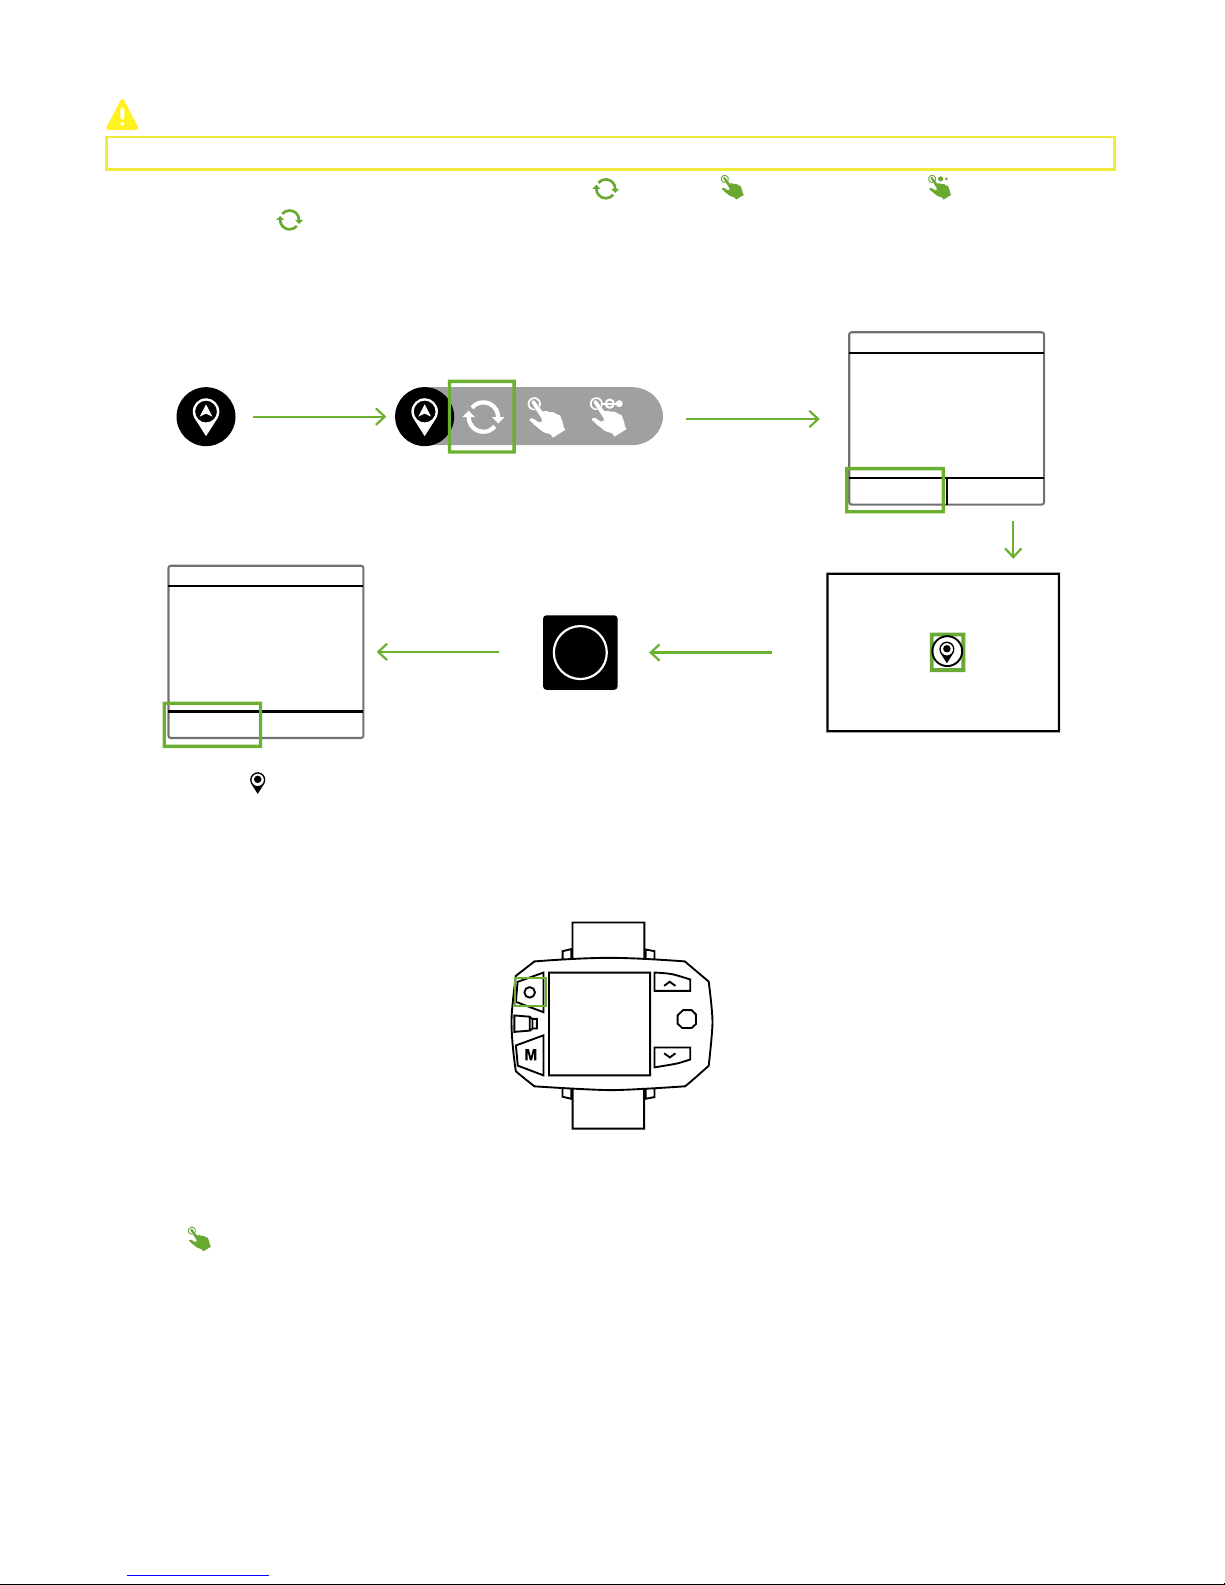
CEEWA Drone S1 supports three Nav. Mode : Single-Point Orbit( ),Pointing( ),Multiple-Points Nav.( ).
After finishing setting the waypoint in the map, Drone will orbit the waypoint constantly.
Tap the waypoint ( ) in the map to edit its altitude, speed, vcircle and radius in the pop-up window. Also, delete this waypoint in
this pop-up window.
Single-Point Orbit
Confirm Orbit
Please set an orbit point in the
map.
Orbit Velocity 3
Orbit Radius 5
Time Left 15
Single-Point Orbit
How to activate?
CEEWA APP
:
OK Cancel
OK Cancel
Start
How to deactivate?
Sports Watch:
When pressing STOP button, “Hovering…” shows in the screen and Sports Watch vibrates once. At this moment, Nav. Mode has been
cancelled.
You should set one waypoint in the map at first, and Drone will fly towards the waypoint.
Hovering
Pointing
How to activate?
CEEWA APP
:
Page 39
36
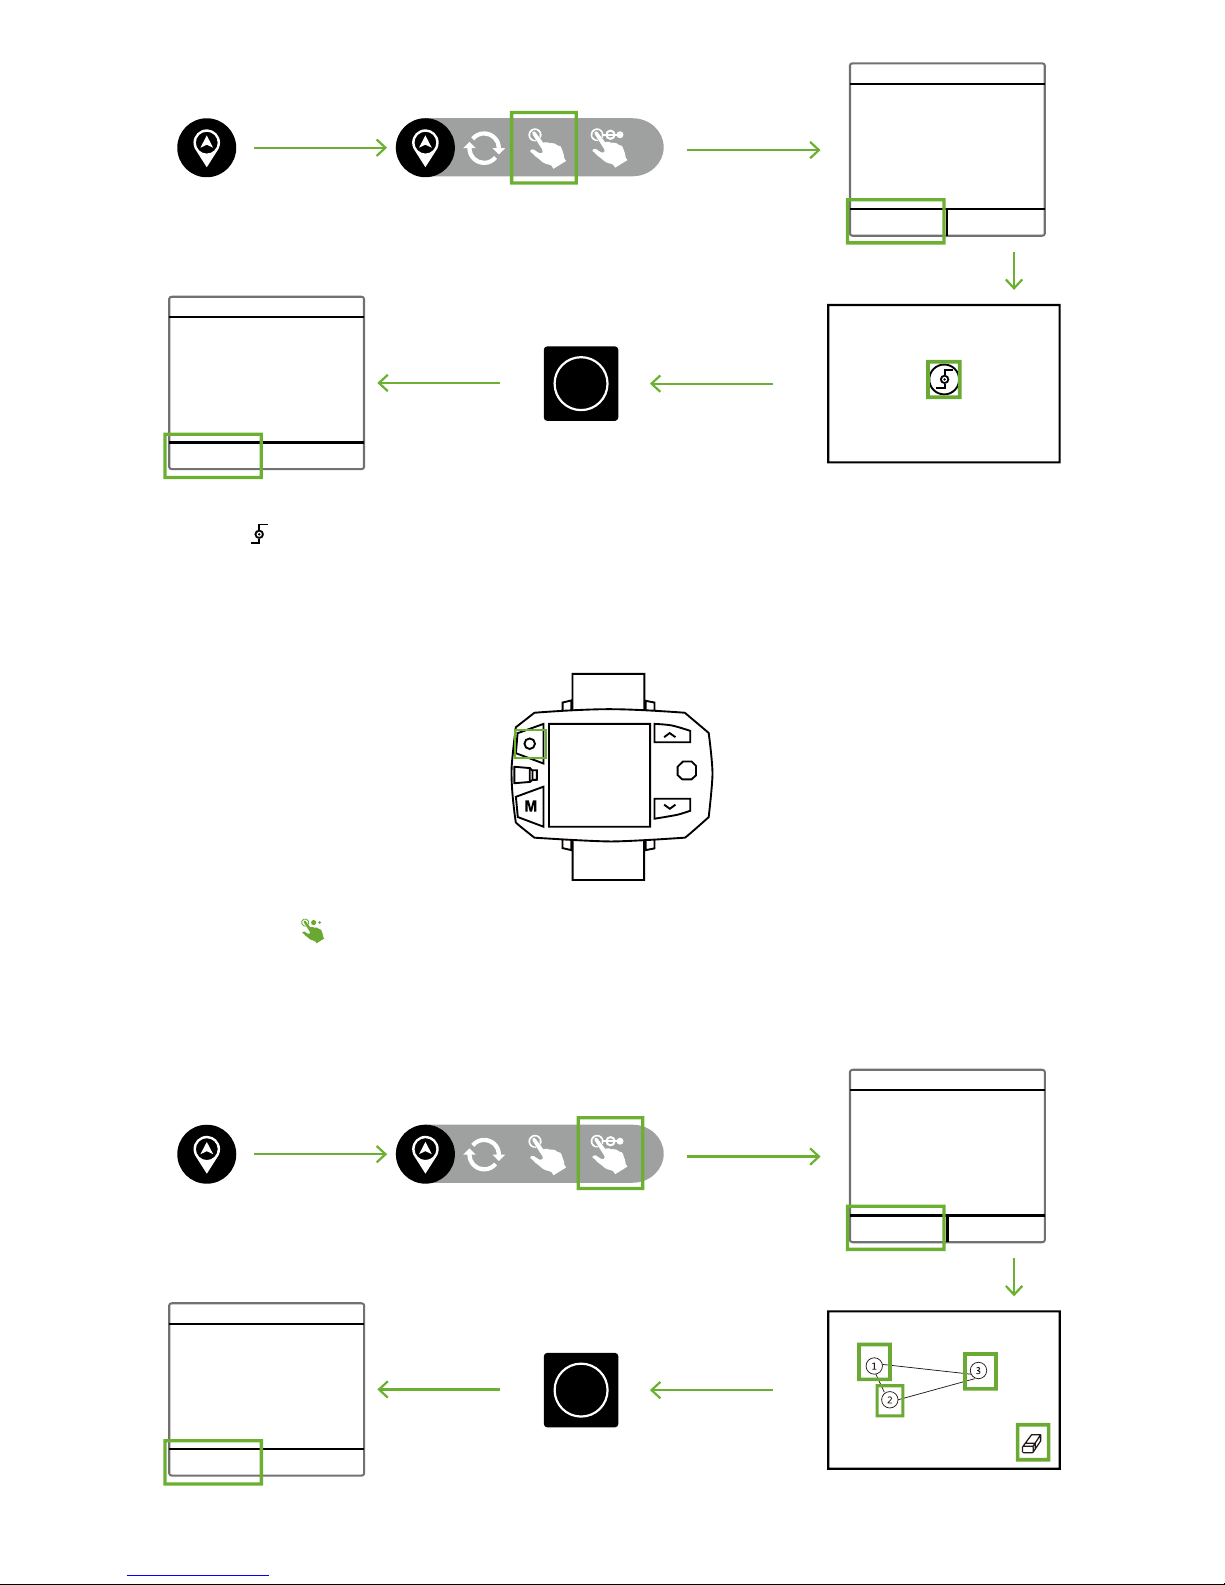
In Multiple-Points Nav., Drone will fly along the route of waypoints. After reaching the last waypoint, it will fly to the first waypoint
and repeat the route.
How to activate?
CEEWA APP
:
Pointing
Confirm Route
Please set a destination point in
the map.
Distance 32
Flight Velocity 5
Time Left 15
OK Cancel
OK Cancel
Start
Tap the waypoint ( ) in the map to edit its altitude and velocity in the pop-up window. Also, delete this waypoint in this pop-up
window.
How to deactivate?
Sports Watch:
When pressing STOP button, “Hovering…” shows in the screen and Sports Watch vibrates once. At this moment, Nav. Mode has been
cancelled.
Hovering
Multiple-Points Nav.
Multiple-Points Nav.
Confirm Orbit
Please set waypoints in the map.
Route Length 65
Number 3
Time Left 15
OK Cancel
OK Cancel
Start
Page 40
37
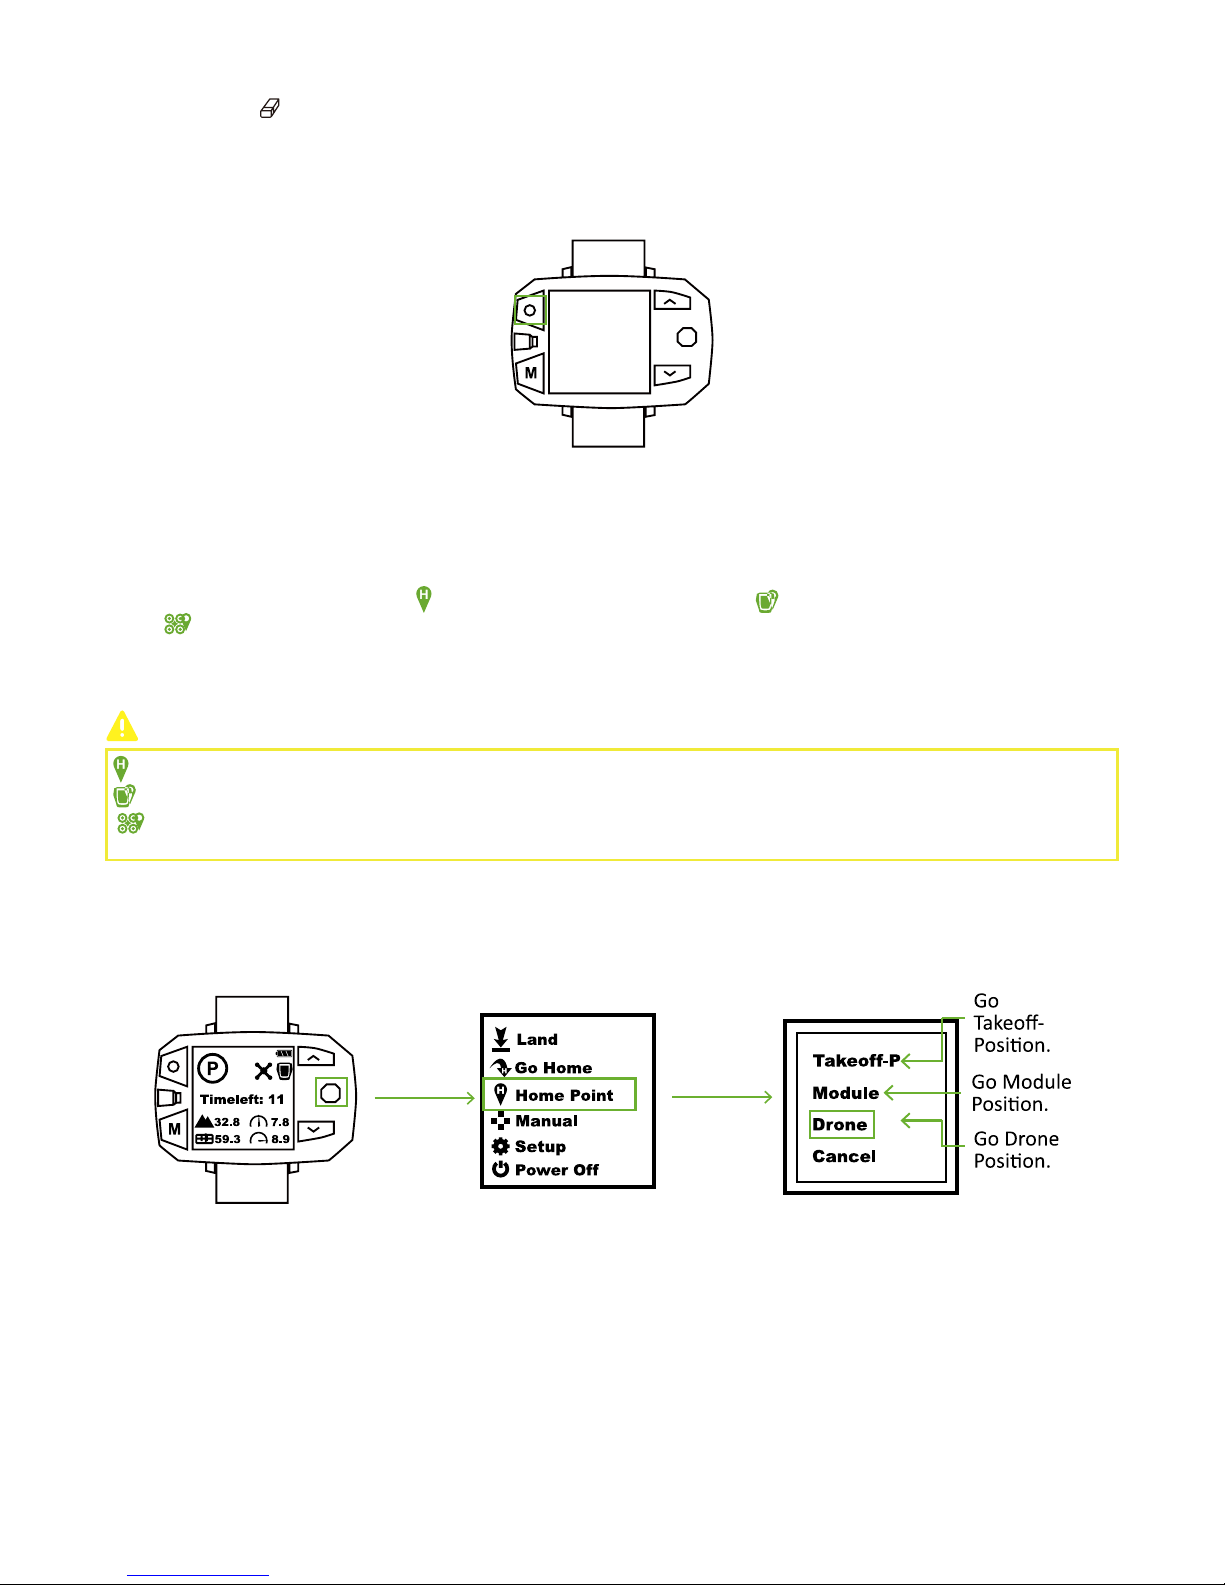
Tap each waypoint in the map to edit its altitude and velocity in the pop-up window. Also, delete this waypoint in this pop-up
window.
Tap the eraser icon ( ) to delete all the waypoints.
How to deactivate?
Sports Watch:
Sports Watch:
CEEWA APP:
When pressing STOP button, “Hovering…” shows in the screen and Sports Watch vibrates once. At this moment, Nav. Mode has been
cancelled.
Hovering
Step 13: Go-Home
Go-Home brings the drone back to the latest recorded Home Point.
CEEWA Drone supports three kinds of Go-Home, including Smart Go-Home, Low-Battery Go-Home, and Failsafe Go-Home.
Before going-home, you should set Home Point through Sports Watch or CEEWA APP. Three are three kinds of Home Points, including
“Set Take-off Position as Home Point” ( ), “Set Module Position as Home Point”( ) and “Set Current Drone Position as Home
Point”( ).
If you have not set Home Point, Drone would return to Take-off position by default.
:
Set Take-off Position as Home Point
: Set Module Position as Home Point
: Set Current Drone Position as Home Point
Set Home Point
Take “Go Drone Position” as an example.
Toggle the Nav. Button to the right, and enter Menu Interface. Select “Home Point” option and choose ”Drone” in the pop-up
window. Home Point activates.
If you want to enable Go-Home, it is suggested to set Home Point at first. Otherwise, Drone will return to take-off position by
default.
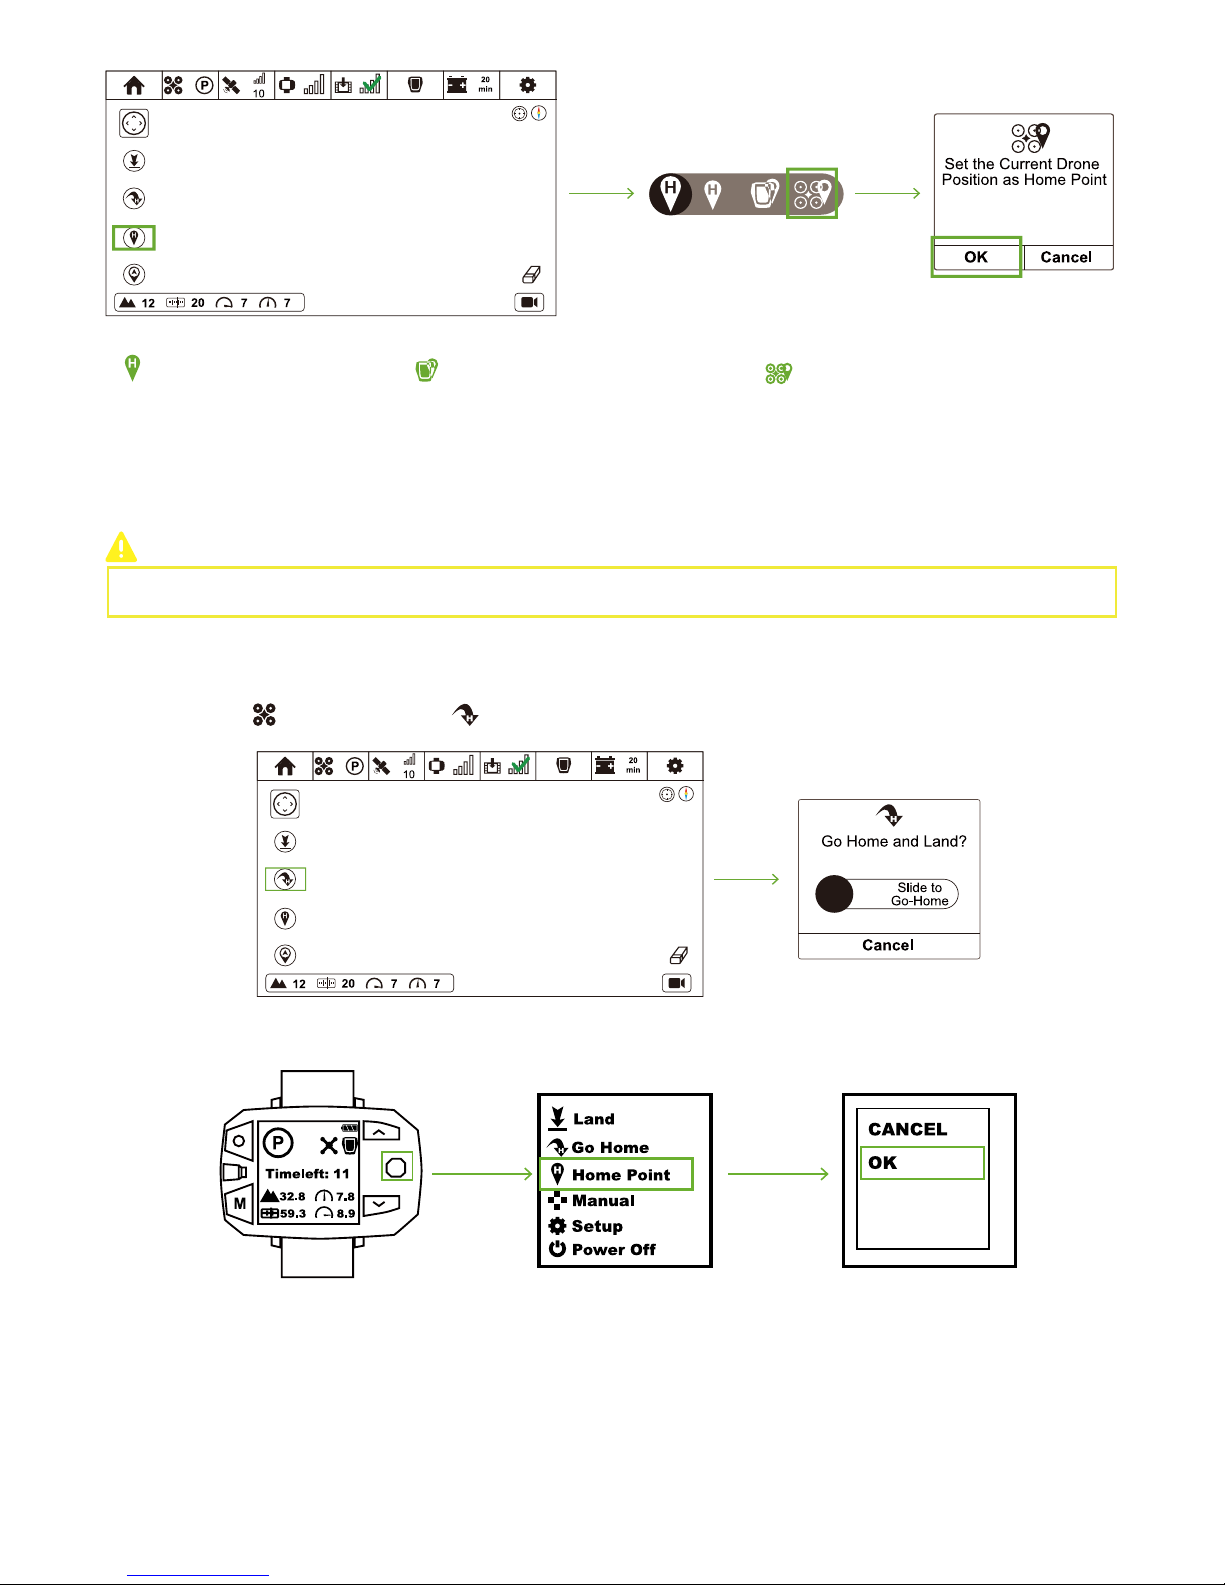
Take “Set Drone Current Coordinate as the New Home Point” as an example.
Page 41
38
Smart Go-Home
Set Take-off Coordinate as
the New Home Point
Set Follow Module Current
Coordinate as the New Home Point
Set Drone Current Coordinate as the
New Home Point
Enable Go-Home by Sports Watch / CEEWA APP. During Smart Go-Home procedures, you can control its orientation and height
through Watch.
It is suggested to enable Smart Go-Home in a safe and reliable environment to avoid obstacles.
How to activate?
CEEWA APP
:
Sports Watch
:
In Flight Interface ( ), tap Go-Home icon ( ) and slide the white slider to confirm going home.
How to deactivate?
Sports Watch:
When pressing STOP button, “Hovering…” shows in the screen and Sports Watch vibrates once. At this moment, Nav. Mode has been
cancelled.
Page 42
39
Hovering
Low-Battery Go-Home
Failsafe Go-Home
How to Go-Home?
The content of this table shows the go-home procedures in Smart Go-Home, Low-Battery Go-Home and Failsafe Go-Home.
In order to avoid dangers of low-battery, the main controller system will calculate the distance between Drone & Home Point and go-
home time in real-time. When the remaining battery is ONLY enough for going-home, Low-Battery Go-Home is triggered. During the
process, you could control Drone's attitude through Sports Watch and Remote Controller to avoid obstacles.
Moreover, you could switch to P Mode to cancel Low-Battery Go-Home. However, after canceling, if the battery is ONLY for landing,
Drone will auto land. You cannot disable this procedure, but can control Drone's attitude through Sports Watch to avoid obstacles.
When more than 10 satellites have been found & compass work properly & Home Point has been recorded, if Drone disconnects
with Sports Watch, Drone will auto return to the latest Home Point.
During Go-Home process, if the signal is recovered, Failsafe Go-Home can be cancelled and you can regain control over the drone by
Watch.
-------------------------------------------------------------------------------------------------------------------------------------------------------------------------------
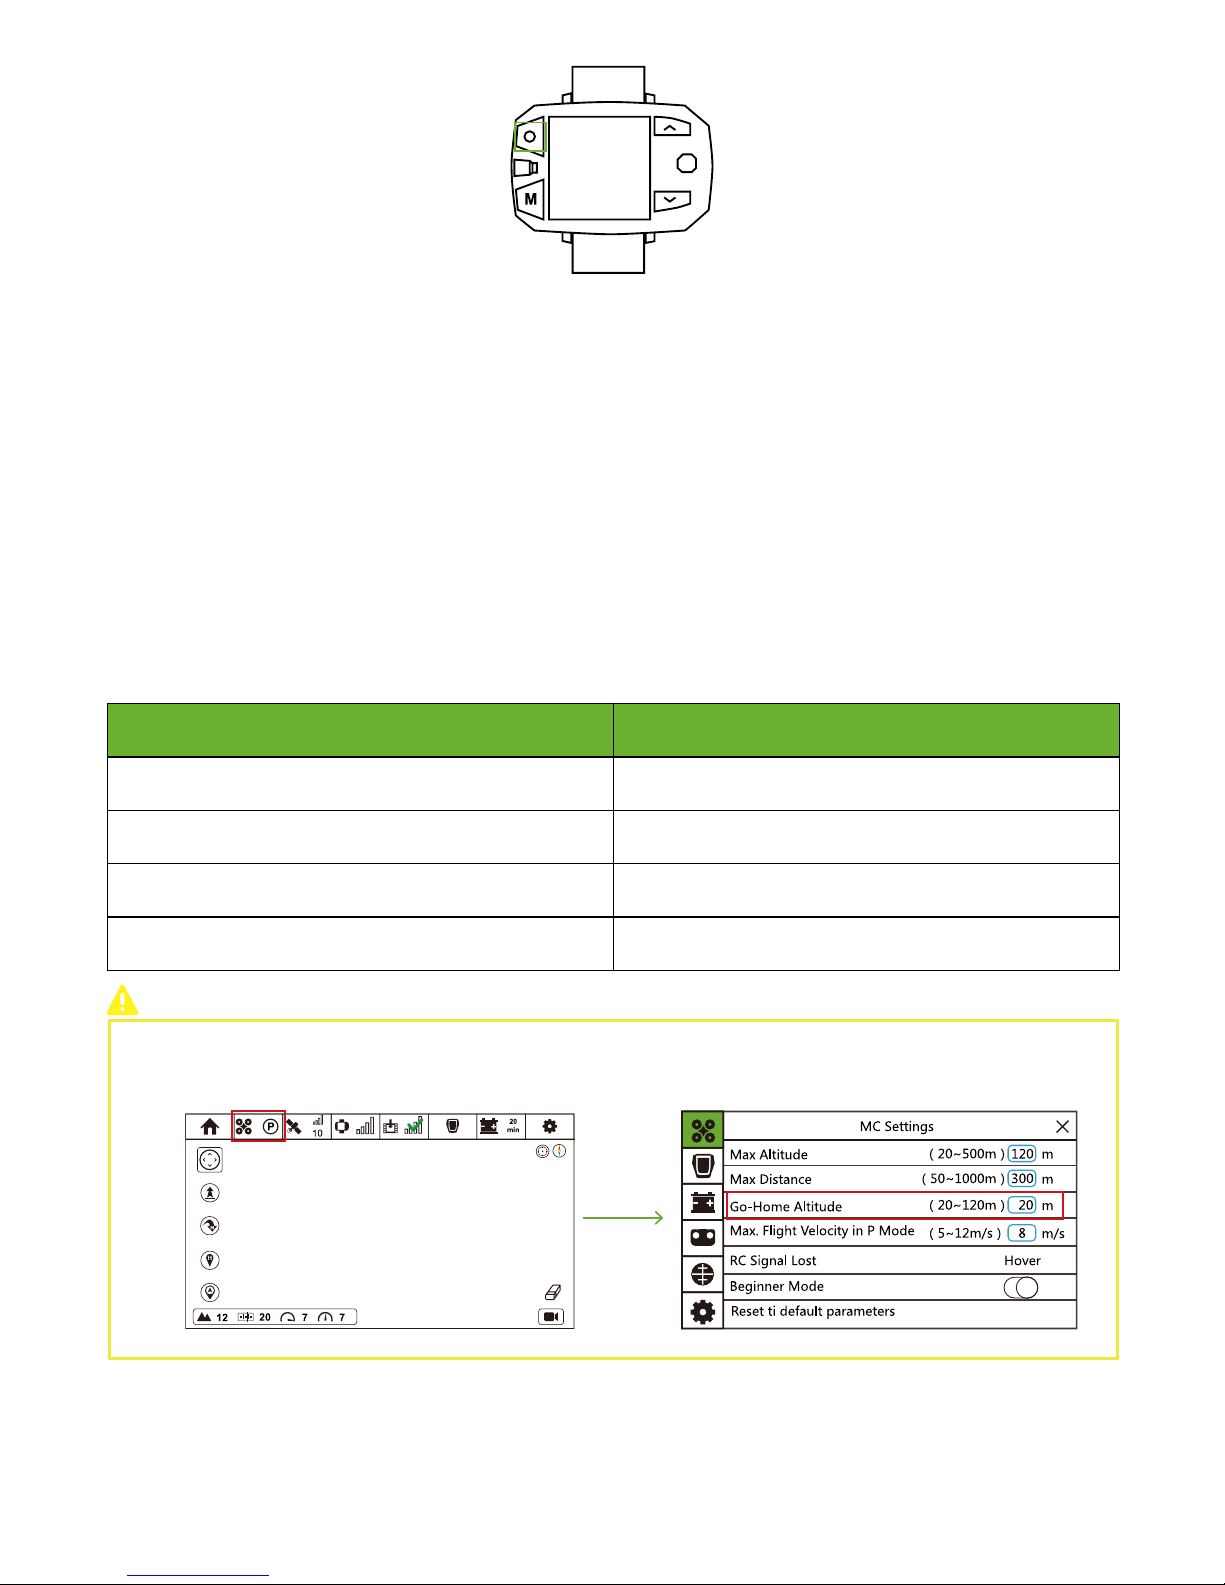
Before Go-Home, Altitude & Distance between Drone and
Home Point:
How to go home?
Distance>5m
Altitude<Preset Go-Home Altitude
Drone will ascend to your preset Go-Home Altitude, and then go
home.
Distance>5m
Altitude ≥ Preset Go-Home Altitude
Drone will go home directly.
Distance<5m
Altitude<5m
Drone will ascend to 5 meters, and then go home.
Distance≤5m
Altitude≥5m
Drone will go home directly.
How to set Go-Home Altitude?
In flight interface, tap "Drone" icon to enter MC setting interface. Set a reasonable value in Go-Home Altitude column.
Page 43
40
Step 14: One-key Land
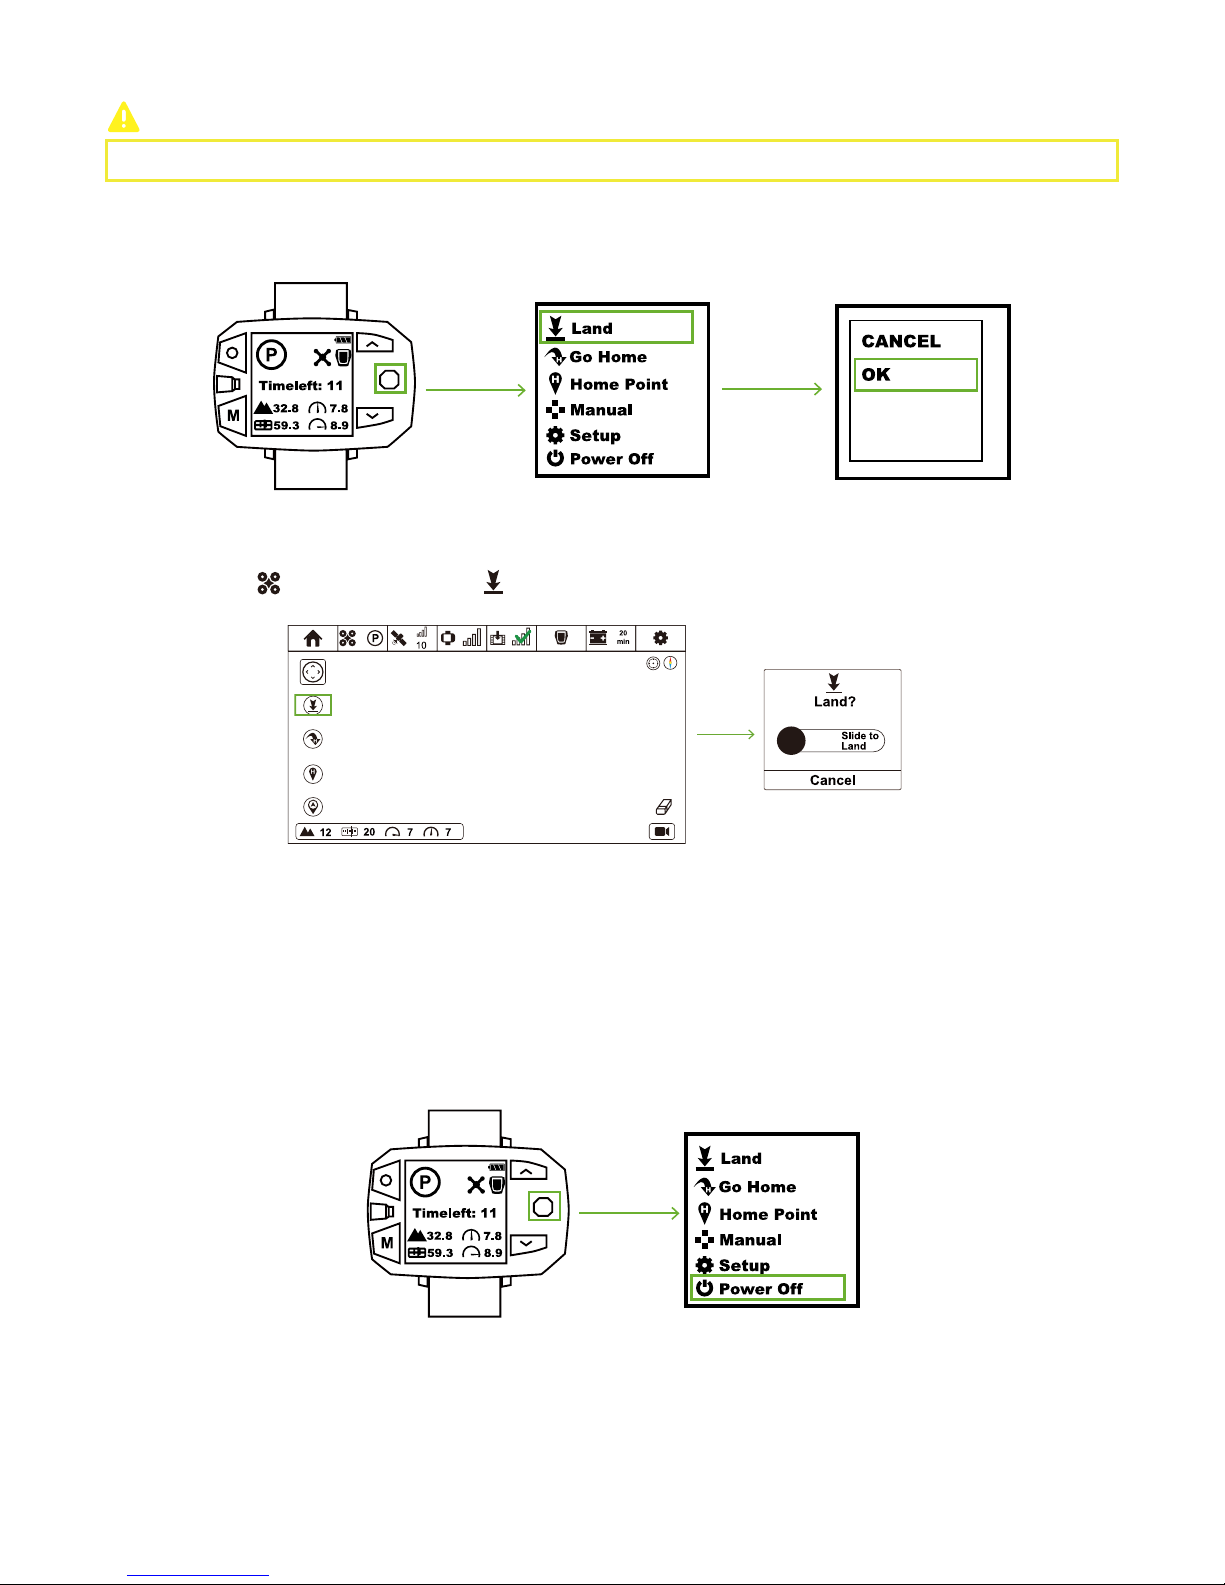
Please land the drone on the level ground.
Toggle Nav. Button to the right & enter Menu Interface. Select “Land” option and choose “OK” in the pop-up window. One-Key Land
activates.
CEEWA APP:
Smart Battery:
Sports Watch:
Follow Module:
Sports Watch:
In Flight Interface ( ), tap One-Key Land icon ( ) and slide the white slider to confirm landing.
Step 15: Turn Off All Devices
Turn off Smart Battery, Sports Watch, Follow Module and Camera.
Press the Power Button once, and then press this button for over 3s till all LEDs turn off.
Toggle Nav. Button to the right & enter Menu Interface. Select "Power-off" option and choose "OK" in the pop-up window.
Press the Power Button once, and then press this button for over 3s till all LEDs turn off.
Page 44
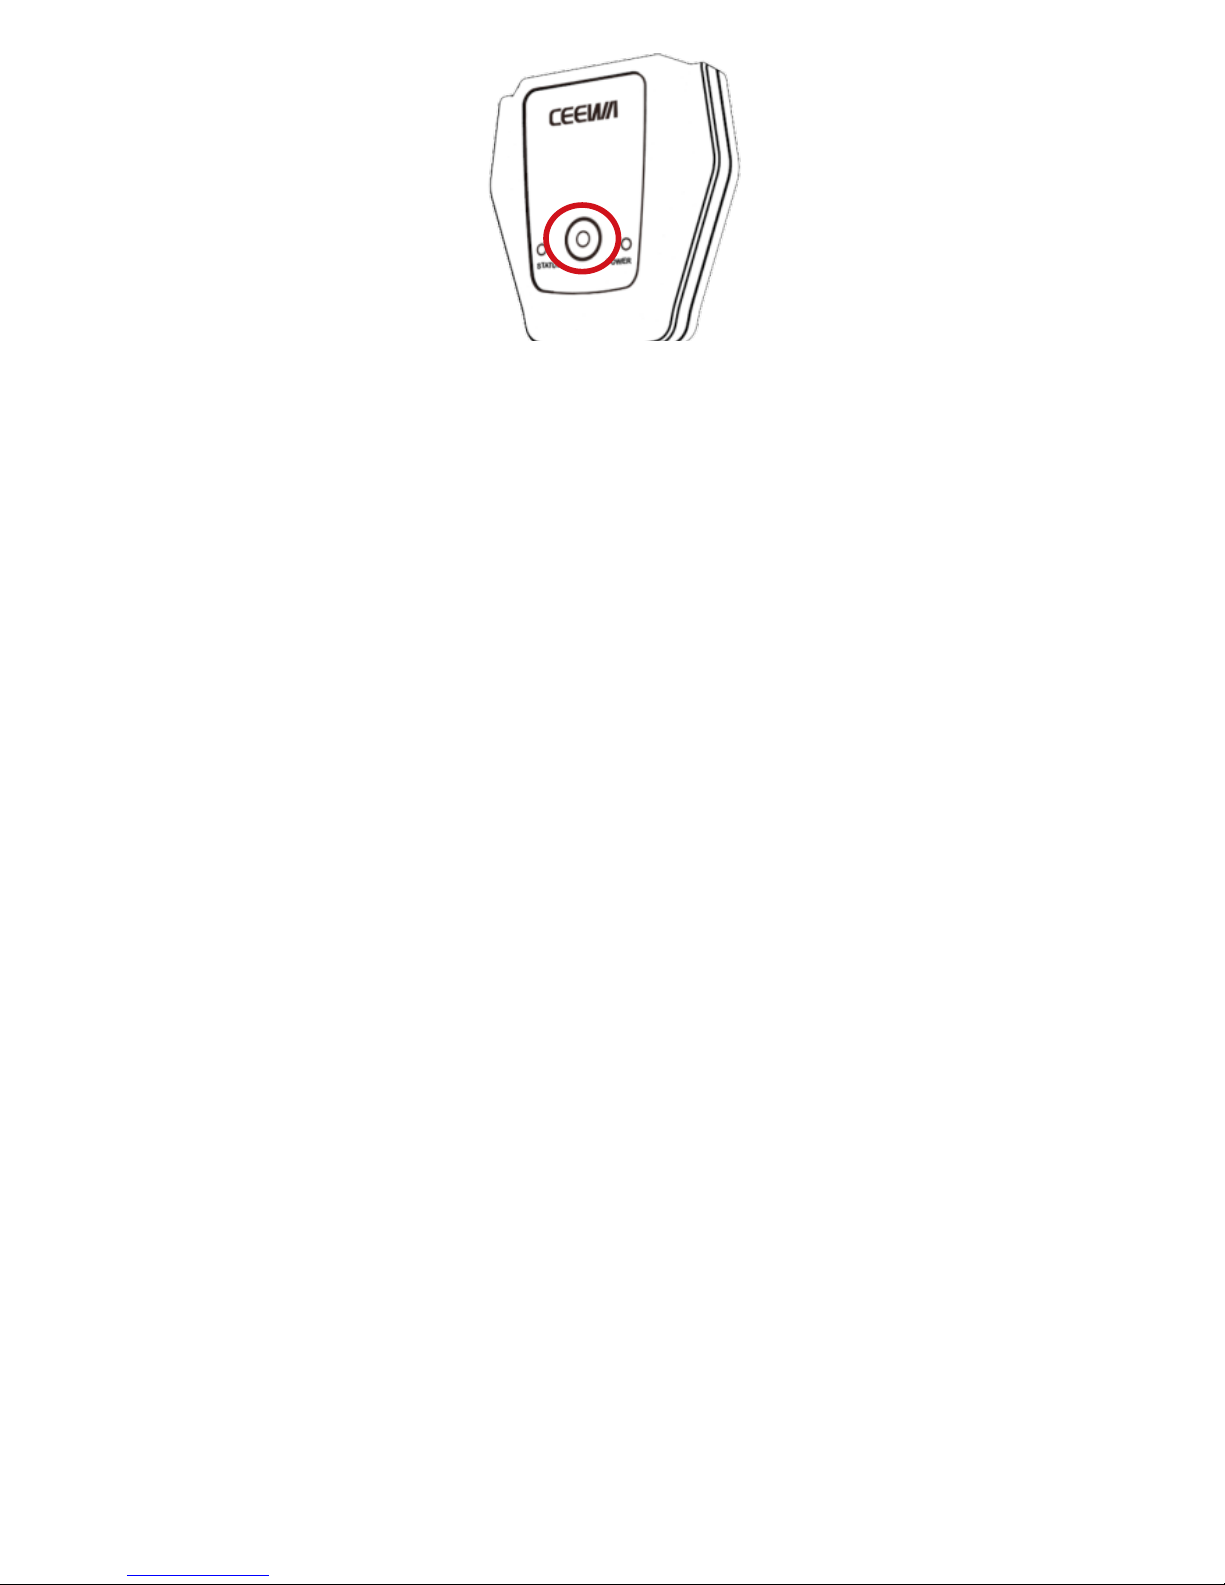
41
Camera
4K Camera:Press the Power Button until the LED Indicator on the screen side turns off.
1080P Camera:Press the Power Button until the LED Indicators turn off.
Page 45
42
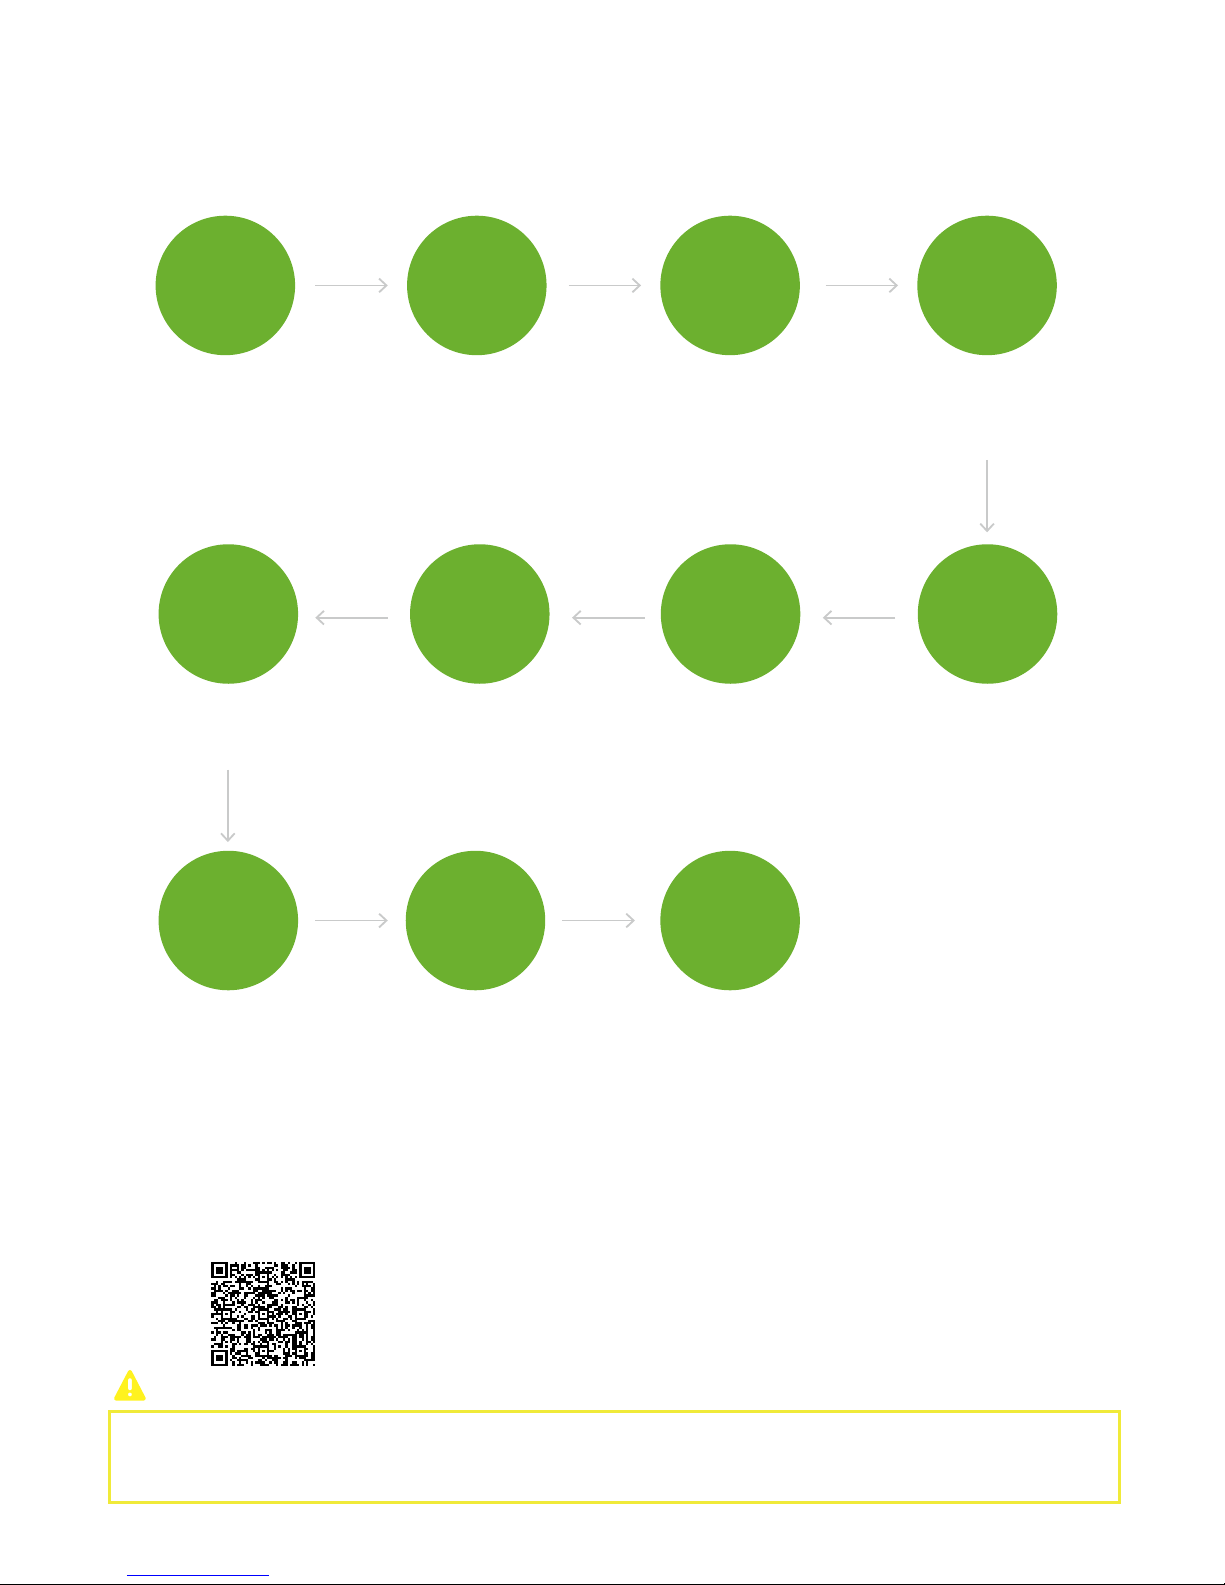
IV. Remote Controller Version: Check before Flight
Overview
Before doing the following steps, please ensure you have read user manual carefully and thoroughly.
Download CEEWA APP
Website:
http://www.ceewa.com/index.php?case=archive&act=list&catid=15
QR Code:
CEEWA APP requires: iOS 8.0 or later.
Android OS4.3 or above with Bluetooth 4.0.
Image Transmission: 5G Wi-Fi should be supported by your smartphone.
3GQKY[XKZNKGXSY
IGTLURJGTJ[TLURJ
YSUUZNR_H[IQRKYIGT
HKZ[XTKJUTGTJULL
,OTOYNZNKIGROHXGZOUT
VXUIKJ[XKYHGYKJUT
ZNK;YKX3GT[GR
+TY[XK9SGXZ(GZZKX_IGTHK
OTYKXZKJOTZUZNKJXUTKGTJ
RUIQZOMNZR_*545:JGSGMK
ZNKVOTYOTYOJKZNKJXUTK
)NKIQ]NKZNKXUXTUZHOTJOTM
YNU[RJHKJUTK,UXOTYZGTIKOL
8KJ2OMNZUL8KSUZK)UTZXURRKX
9ZGZ[Y2+*OYUTJXUTKGTJ
8KSUZK)UTZXURRKXYNU[RJHK
HOTJGZLOXYZ
)NKIQ*XUTK
)NKIQOZYIUSVUTKTZY
GTJKTY[XKZNK_GXK
TUZHXUQKTUXGMOTM
)NKIQ'XSY
([IQRKY
)NKIQZNKIUTTKIZOUT
HKZ]KKT)++=''66
GTJ8KSUZK
)UTZXURRKX
)NKIQZNKIUTTKIZOUTHKZ]KKT
/SGMK:XGTYSOYYOUT-XU[TJ9_YZKS
GTJ/SGMK:XGTYSOYYOUT+TY[XK
9SGXZVNUTKNGYIUTTKIZKJZUZNK
=O,ONUZYVUZGTJOSGMKIGTHK
YNU]TOT/SGMK:XGTYSOYYOUT
/TZKXLGIKUL)++=''66
)NKIQ/SGMK
:XGTYSOYYOUT
)NKIQ9SGXZ
(GZZKX_
3GQKY[XKZNKHGZZKX_UL
9SGXZ(GZZKX_8KSUZK
)UTZXURRKX,URRU]3UJ[RKGTJ
)GSKXGOYKTU[MN
)NKIQ
(GZZKX_2K\KR
:[XTUT9SGXZ(GZZKX_
8KSUZK)UTZXURRKX
,URRU]3UJ[RKGTJ
)GSKXG
:[XTUTULL
*K\OIKY
/TOZOGRO`GZOUT
(OTJOTM
:[XTUT*XUTKGTJINKIQZNK
]UXQOTMIUTJOZOUTULMOSHGR
+TY[XK]NKZNKXUXTUZZNK
?KRRU]2+*YHROTQIUXXKIZR_
)NKIQ*XUTK
=UXQOTM
)UTJOZOUT
:[XTUT
)++=''66
6GOXZU8)
+TY[XKIGSKXGNGYHKKTYKZZU
'<5;:3UJK:,)GXJNGYHKKT
OTYKXZKJOTZUZNKIGSKXGGTJ'<
IGHRKNGYIUTTKIZKJZU'<6UXZYOT
ZNKIGSKXGGTJMOSHGR
)NKIQ'<5;:
3UJK'<
IGHRK:,
)GXJ
)GROHXGZOUT
Page 46
43
Step 1: Check Drone
Step 2: Check Arms & Buckles
Step 3: Check Smart Battery
Step 4: Check Battery Level
Before using the drone, check its components and ensure they are not broken or aging.
Make sure the battery of Smart Battery, remote controller, follow module and camera is enough.
Make sure the arms can fold and unfold smoothly, buckles can be turned on and off.
If you find buckles cannot be fixed tightly and correctly, please ask to change new buckles from costumer service.
Ensure Smart Battery can be inserted into the drone and lock tightly.
When inserting the battery, DO NOT damage the pins inside the drone.
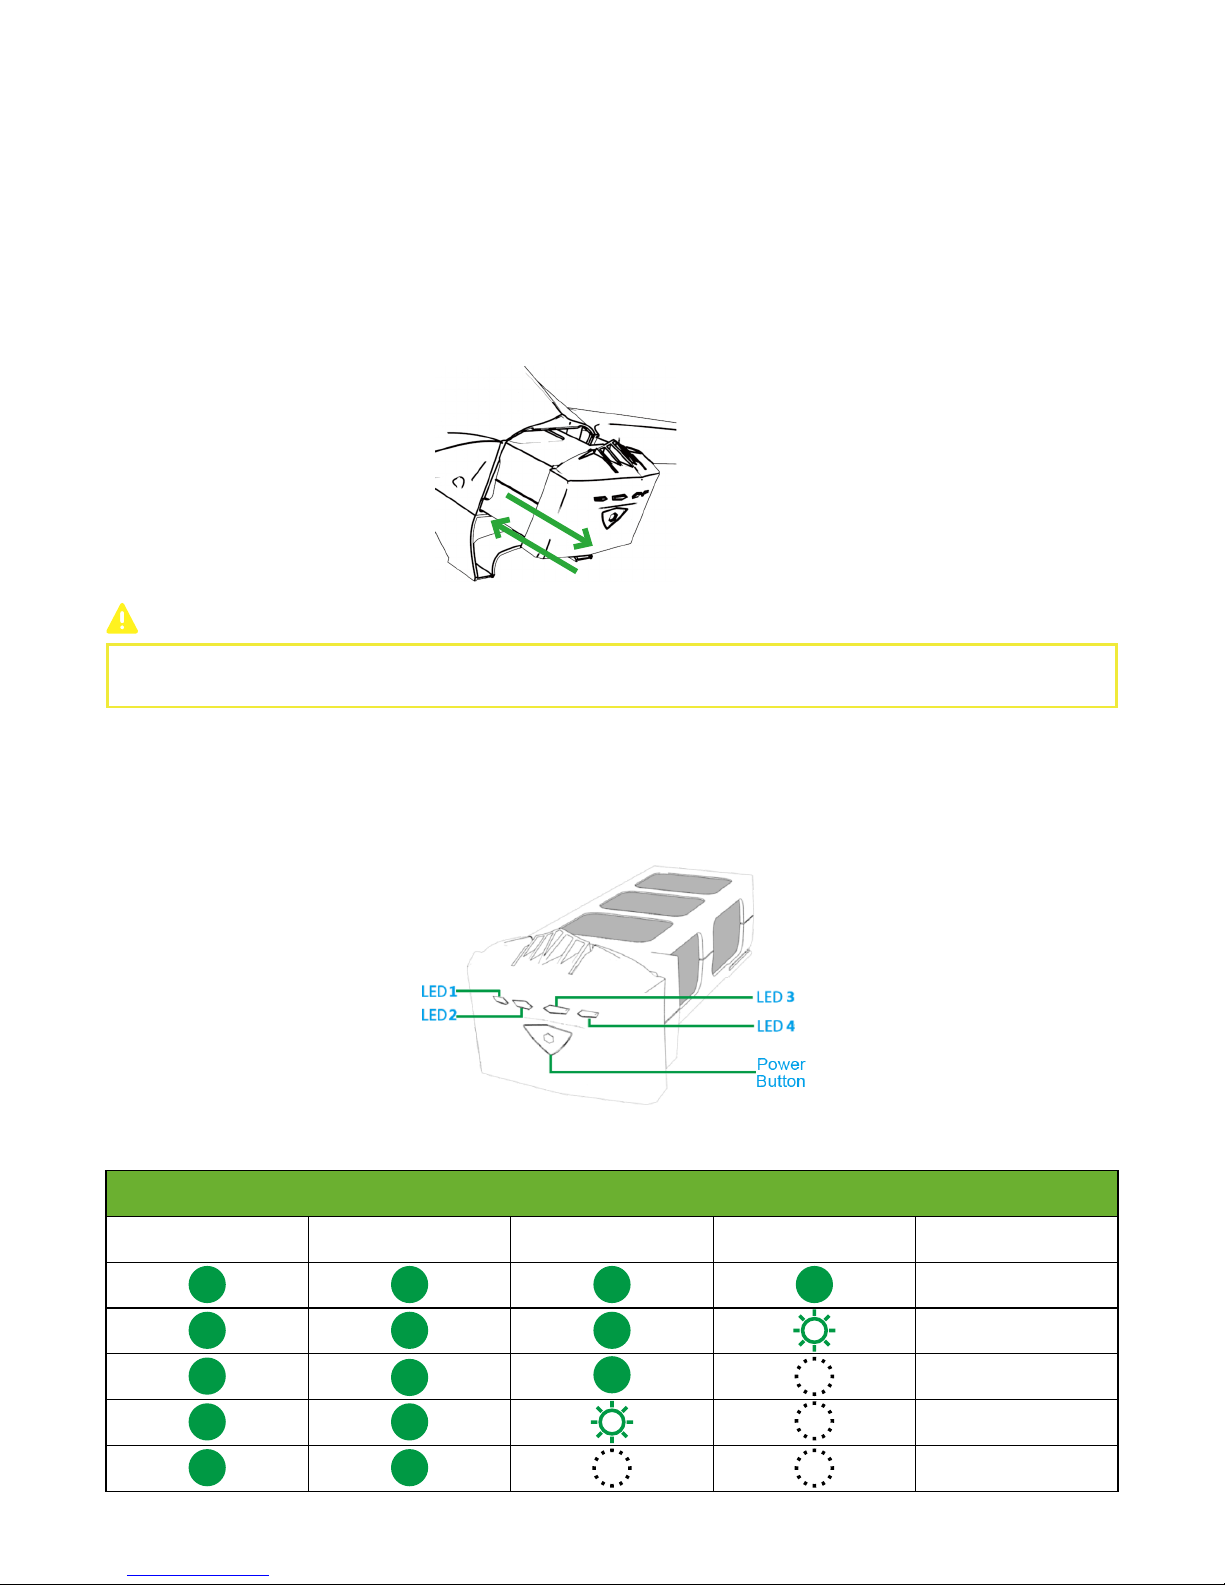
Smart Battery Level Check & Charging
Press the Power Button once to check the battery level.
LEDs are defined below:
1. Check Battery Level
Battery Level
LED1 LED2 LED3 LED4 Current Level
87.5%~100%
75%~87.5%
62.5%~75%
50%~62.5%
37.5%~50%
Page 47
44
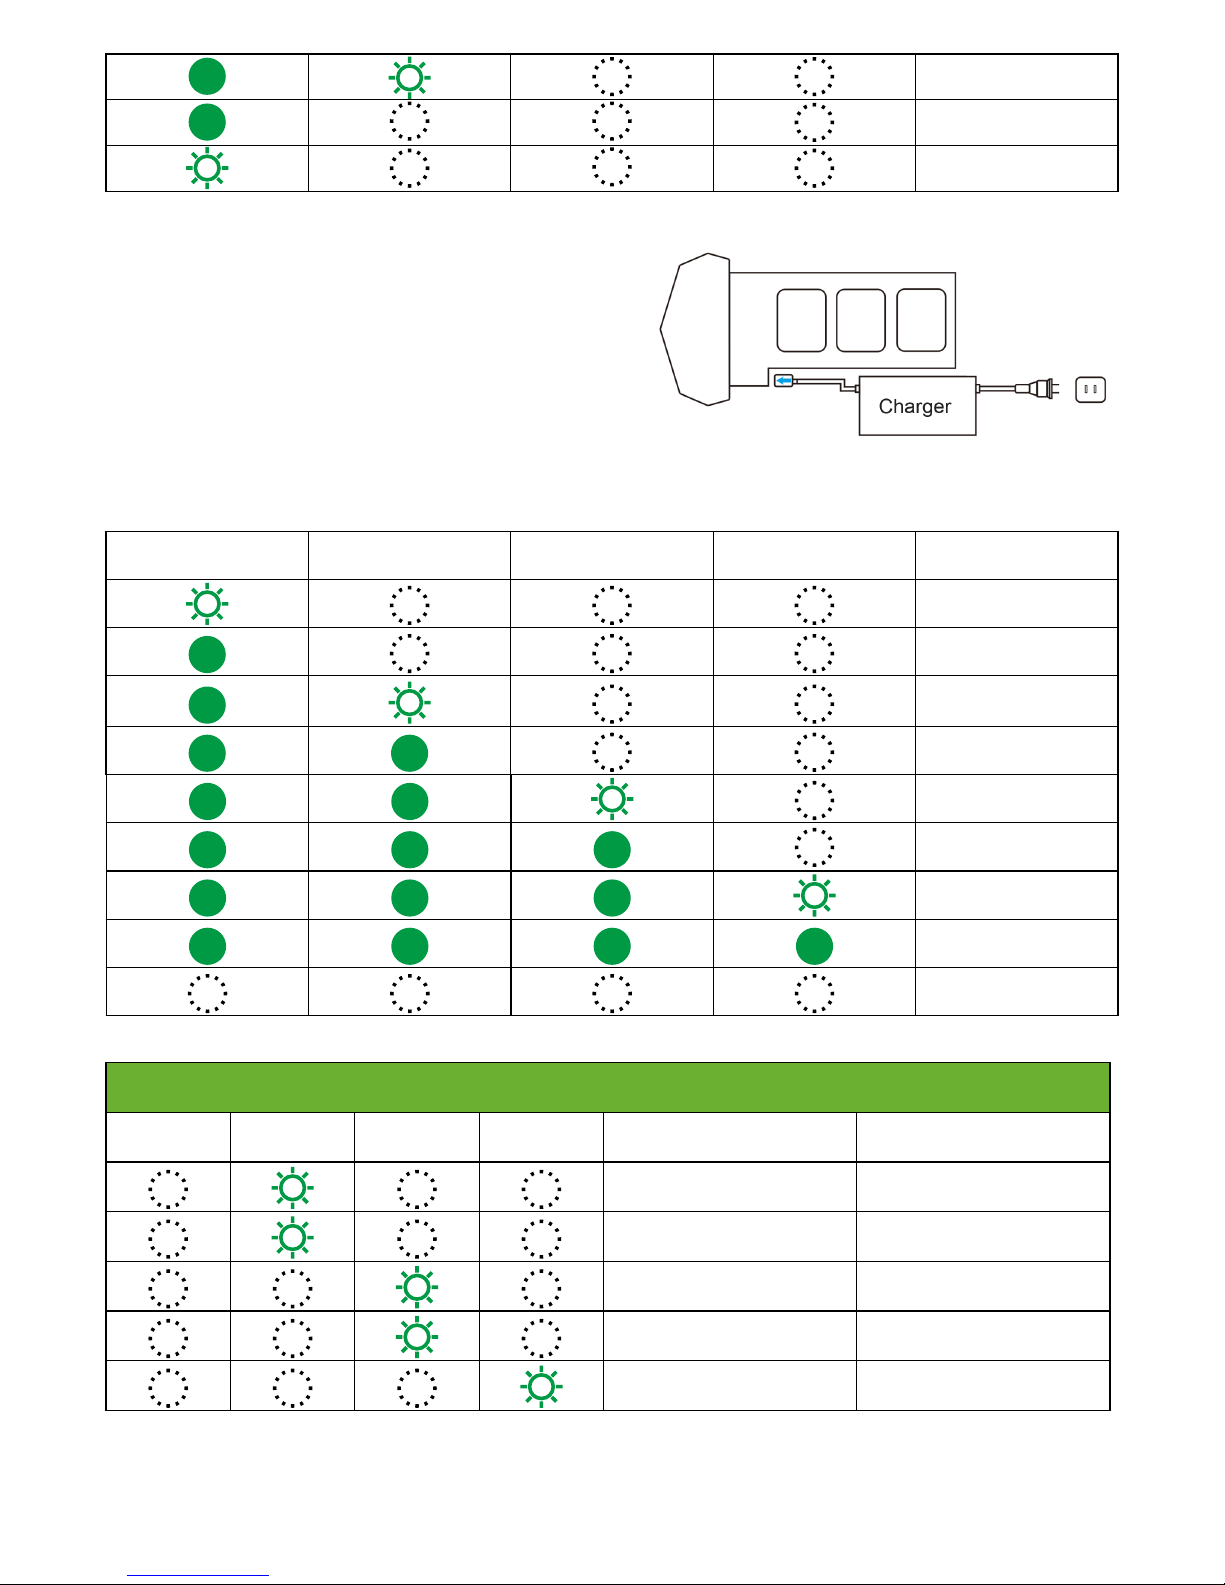
① Connect Battery Charger to a power source (100V-240V, 50/60Hz;).
② Connect the Smart Battery to Battery Charger (when the battery is
powered off).
③ The Battery Level LEDs will blink to indicate the current battery
level.
④ Smart Battery is fully charged when Battery LEDs are full. Please
disconnect the battery and charger.
⑤ After flight, the battery temperature is a litter high. You should
wait until it drops to room temperature, and then charge the battery.
⑥ The most appropriate charging temperature should be 0 to 40
degrees Celsius (32 to 104 degrees Fahrenheit).
2. Charging
LED1 LED2 LED3 LED4 Current Level
0%~12.5%
12.5%~25%
25%~37.5%
37.5%~50%
Battery Level LEDs while charging
50%~62.5%
62.5%~75%
75%~87.5%
87.5%~100%
Full
Battery Level LEDs Error
Errors
LED1
LED2 LED3 LED4
Pattern Errors
LED 2 blinks once per second Over Current
LED 2 blinks three times per
second
Over Charge
LED 3 blinks once per second
Charging temperature is higher
than 40 degrees.
LED 3 blinks three times per
second
Short Circuit
LED 4 blinks twice per second Battery Damaged
After any of the above errors are solved, press Power button to turn off the battery. Unplug the Smart Battery and plug it back to the
charger.
25%~37.5%
12.5%~25%
0%~12.5%
Page 48
45
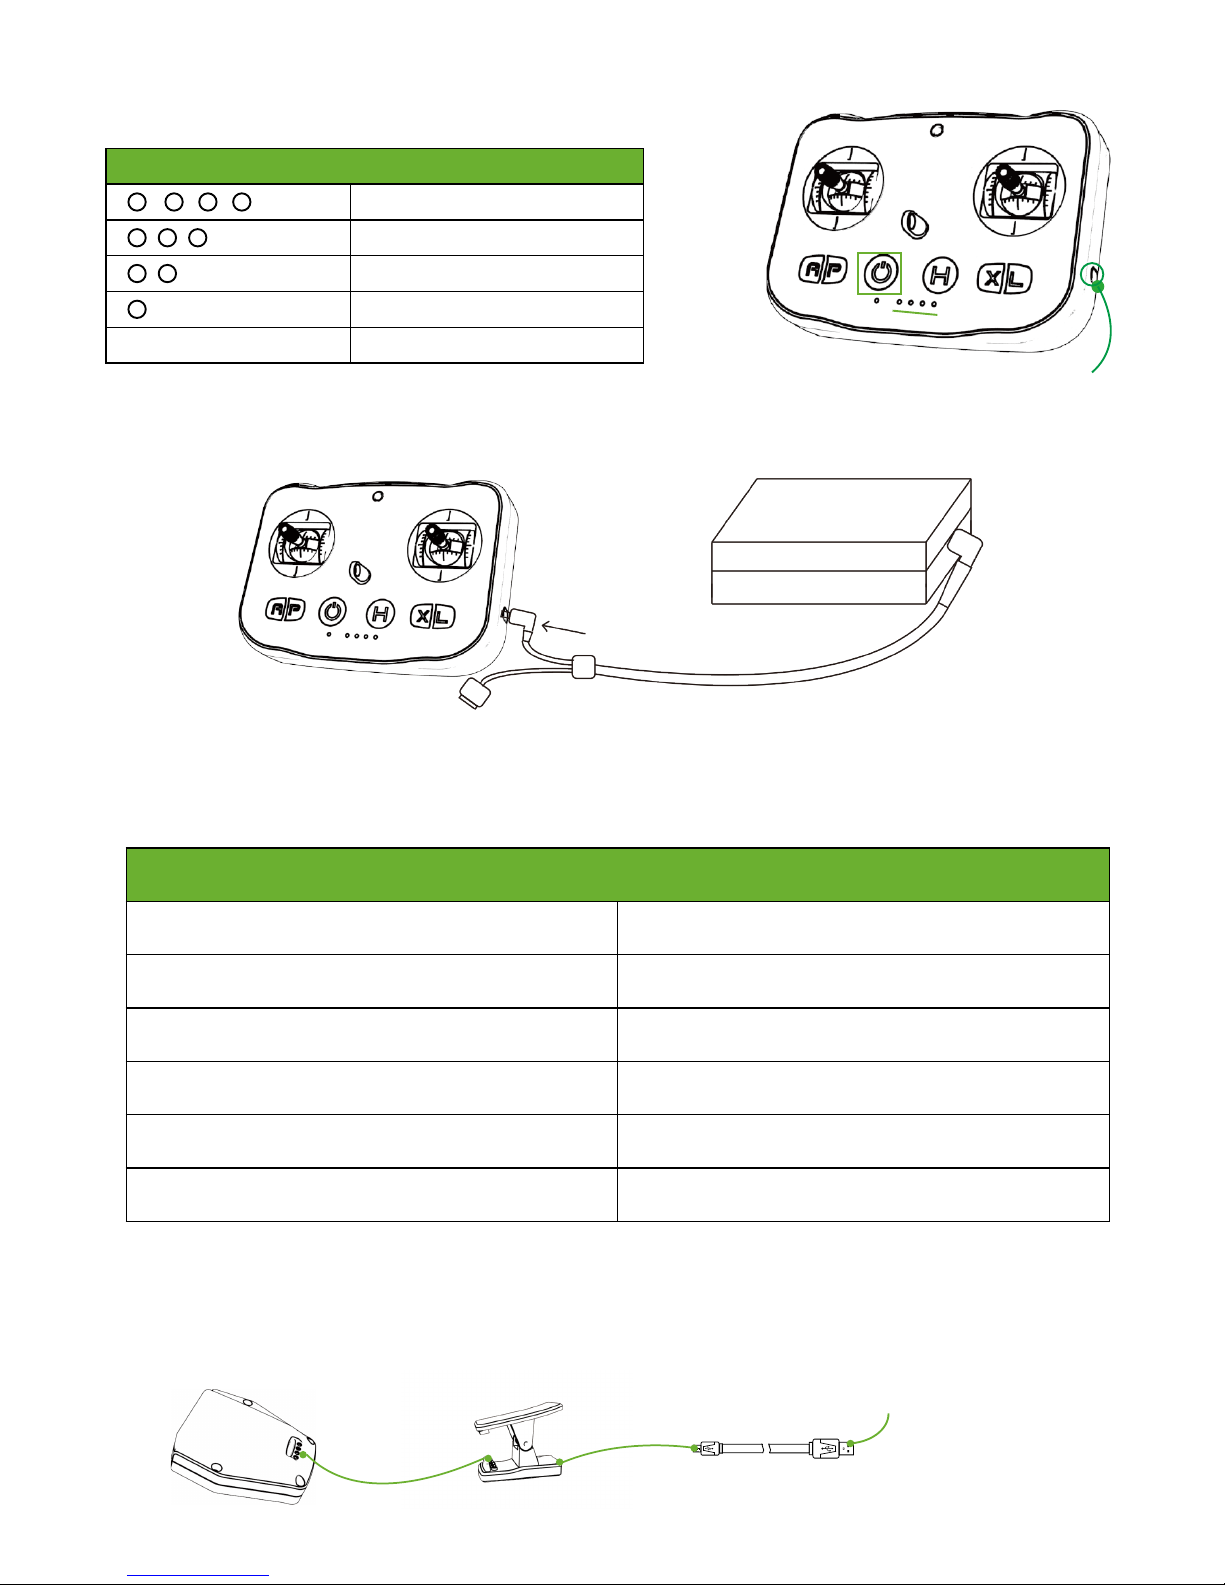
Remote Controller Battery Level Check & Charging
1. Check Battery Level
2. Charging
Press Power Button once to check battery level.
Current Battery Level
Full
75%
50%
25%
No
0%
Charging Port
After turning on, Red Power LED will blink to indicate the current battery level.
Connect Charging Chip with Follow Module, and connect Charging Chip with USB cable to finish charging.
Follow Module Battery Level Check & Charging
1. Check Battery Level
Current Level
Red Power LED blinks 4 times. full
Red Power LED blinks 3 times.
75%
Red Power LED blinks 2 times.
50%
Red Power LED blinks 1 times.
25%
Red Power LED blinks quickly.
10%
Red Power LED blinks twice and then turns off. 0%
2. Charging
Connect to USB port
of Computer or 1A~5A
Charger.
Page 49
46
Turn on/off Smart Battery
4K Camera:Refer to 4K Camera User Manual for details. (from Download Page of CEEWA.COM)
1080P Camera:Refer to 1080P Camera User Manual for details. (from Download Page of CEEWA.COM)
4K Camera:Connect Camera to Charging Dock or USB port of the computer by the USB cable. When charging, RED LED is on.
After finishing charging, RED LED is off.
1080P Camera:Connect Camera to Charging Dock or USB port of the computer by the USB cable.
4K Camera:Refer to 4K Camera User Manual for details. (from Download Page of CEEWA.COM)
1080P Camera:Refer to 1080P Camera User Manual for details. (from Download Page of CEEWA.COM)
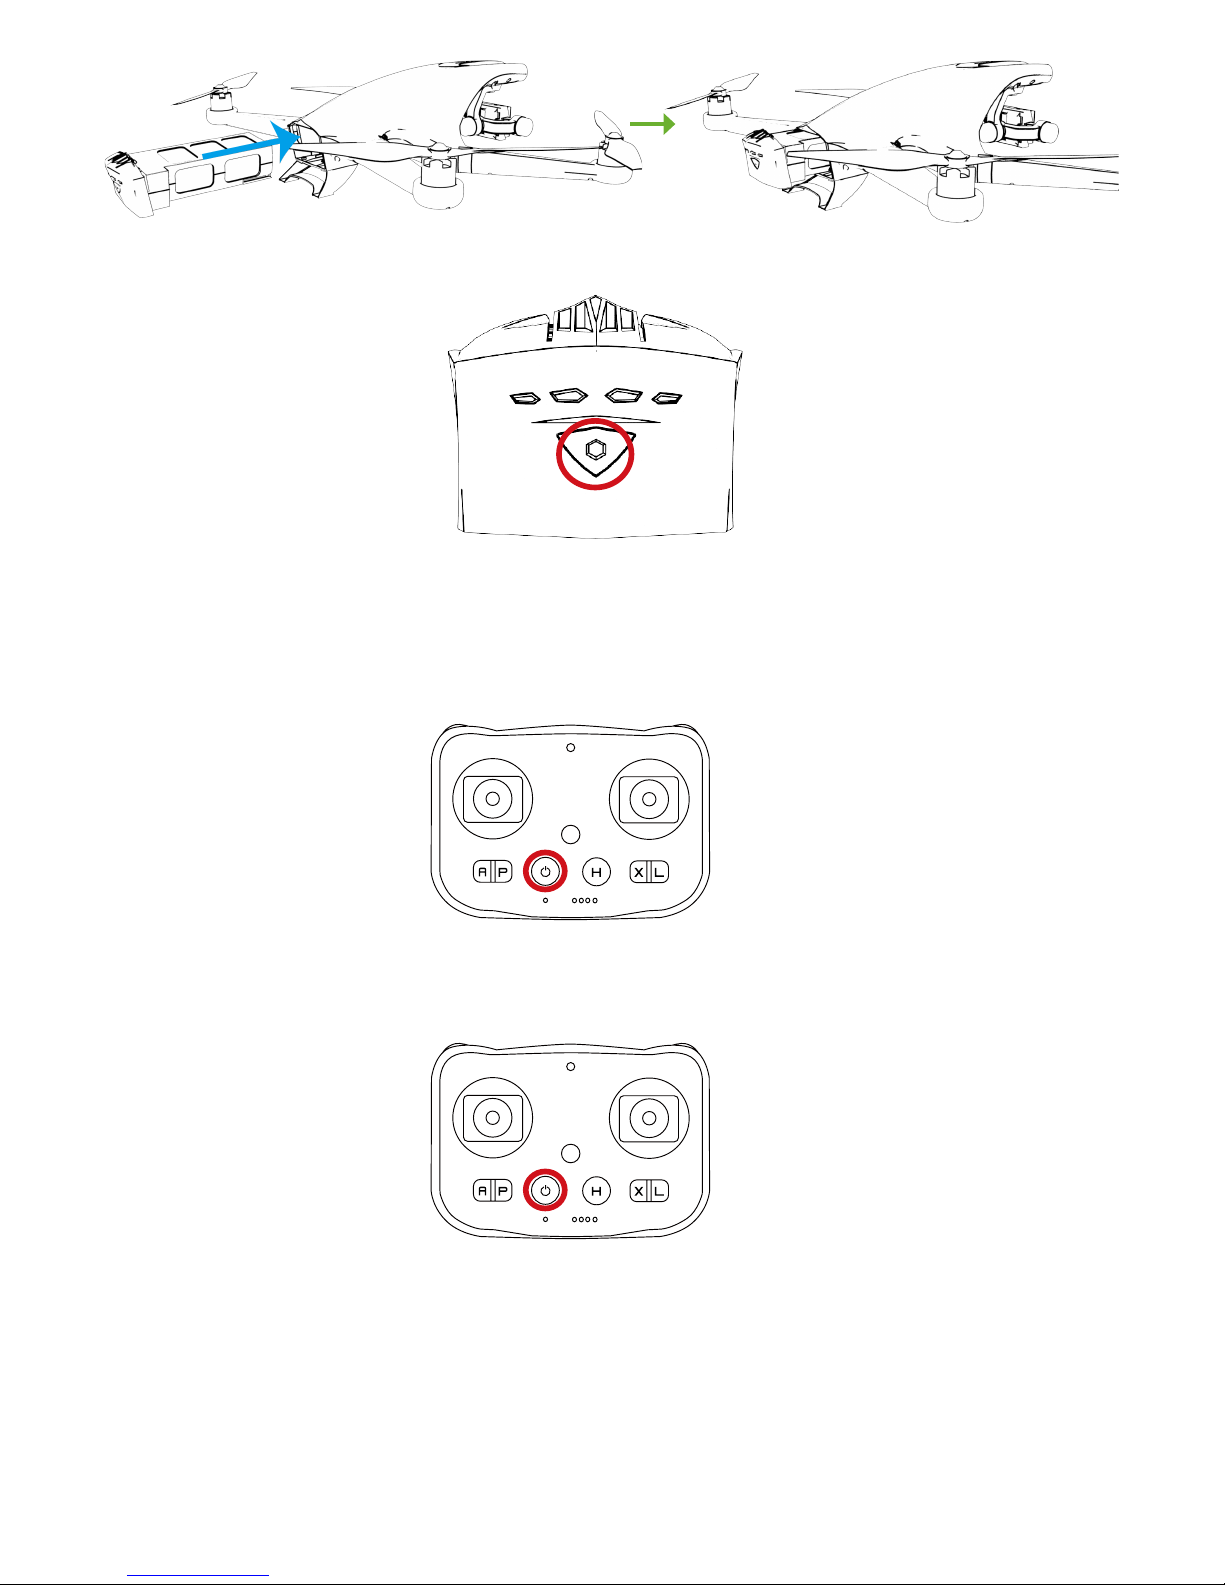
Turn on Smart Battery, Remote Controller, Follow Module and Camera.
Step 6: Turn on/off Devices
Mount Smart Battery into the drone and fix it tightly.
Power ON:
Press the Power Button once, and then press this button for over 3s till all LEDs have blinked once.
Power OFF:
Press the Power Button once, and then press this button for over 3s till all LEDs turn off.
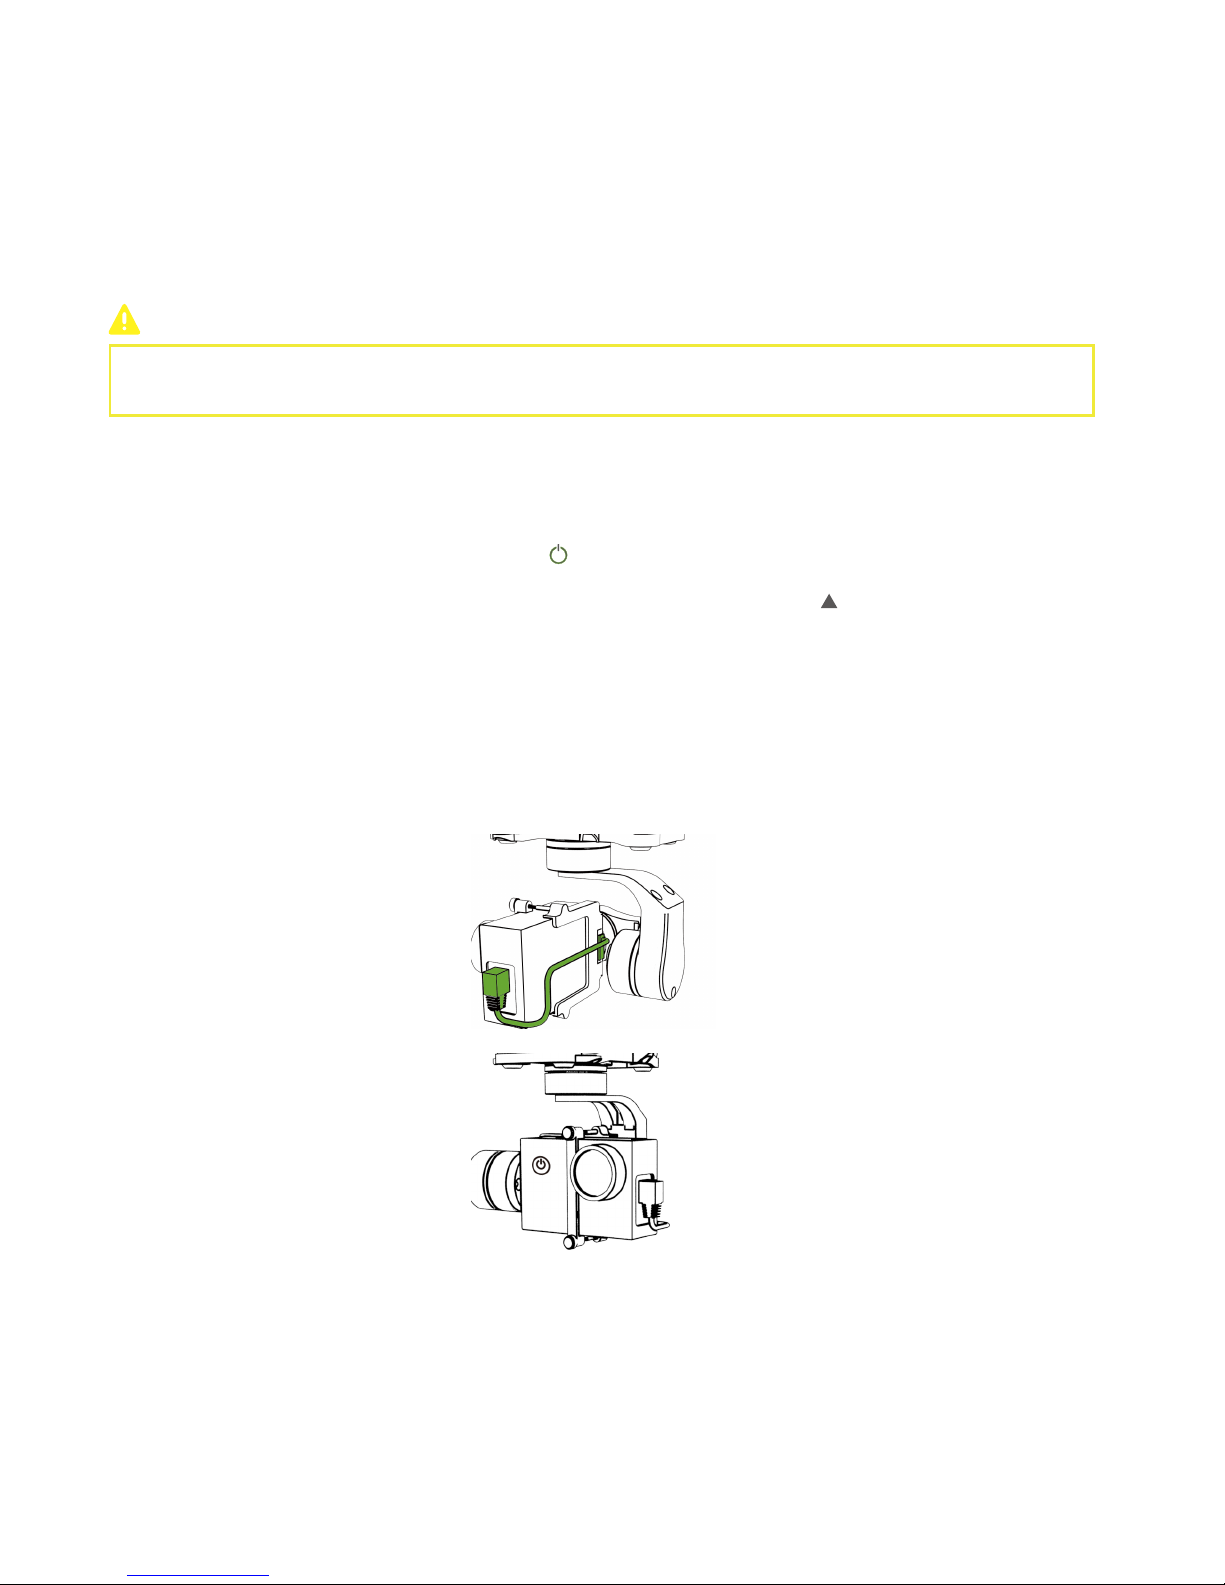
Camera Battery Level Check & Charging
1. Check Battery Level
2. Charging
Step 5: Check AV-OUT Mode & AV cable & TF Card
Detach the camera from the gimbal. Press Power Button ( ) over 5s. When GREEN LED is blinking, the camera has been turned on.
If there is no image in the screen, AV-OUT Mode is enabled.
If there are images from the screen, AV-IN Mode is enabled. Please press the Up Button ( ) on the side of camera until image
disappears.
Check TF Card
Ensure TF card has been inserted into the camera.
Check AV-OUT Mode
Mount the camera back to the gimbal and fix all the screws. Connect the AV port and gimbal like the diagram.
Check AV Cable
Page 50
47
Power ON:
Press Power Button once, and then press this button for over 3s till all LEDs have blinked once.
Power OFF:
Press the Power Button once, and then press this button for over 3s till all LEDs turn off.
Turn on/off Remote Controller
Turn on/off Follow Module
Power ON:
Press the Power Button once, and then press this button for over 3s to turn on. Red Power LED will blink to indicate the current
battery level.
Power OFF:
Press the Power Button once, and then press this button for over 3s till all LEDs turn off.
Page 51
48
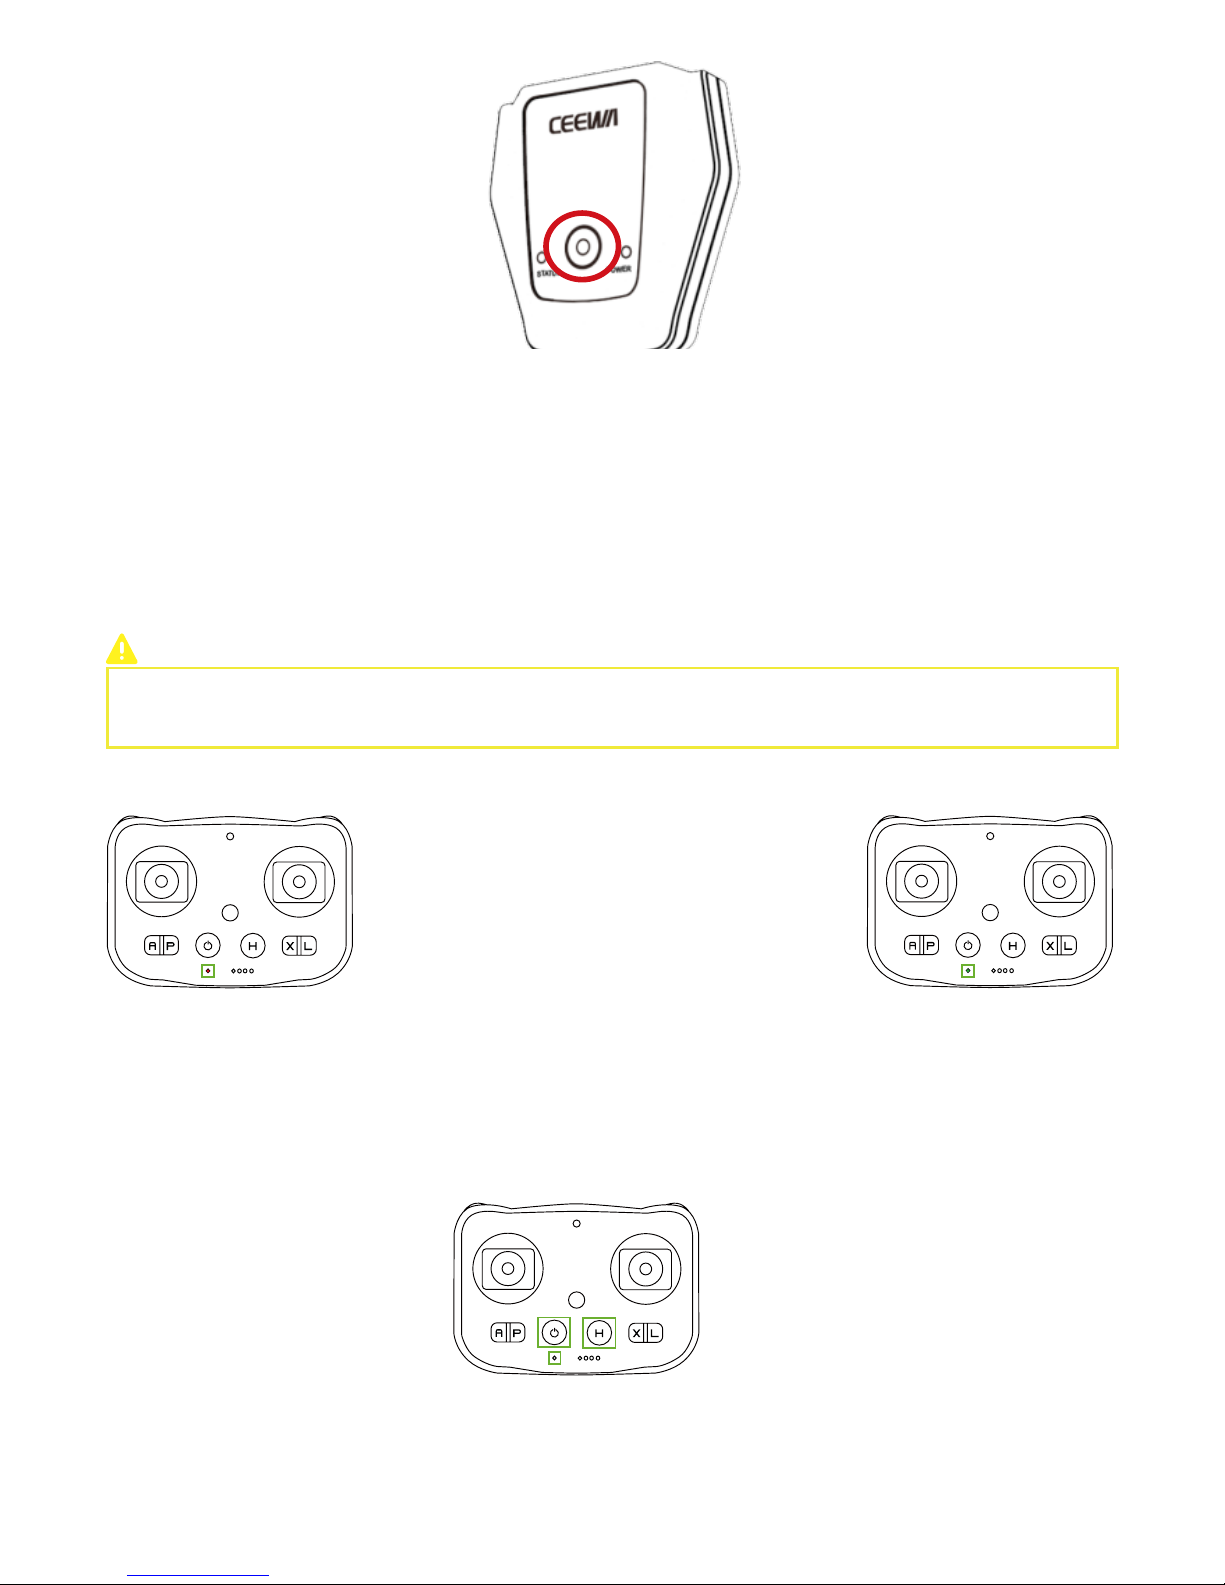
Turn On/Off Camera
Turn On
:
4K Camera:Press the Power Button until the LED Indicator on the screen side blinks. Camera turns on.
1080P Camera:Press the Power Button until the LED Indicators blink. Camera turns on.
Turn Off
:
4K Camera:Press the Power Button until the LED Indicator on the screen side turns off.
1080P Camera:Press the Power Button until the LED Indicators turn off.
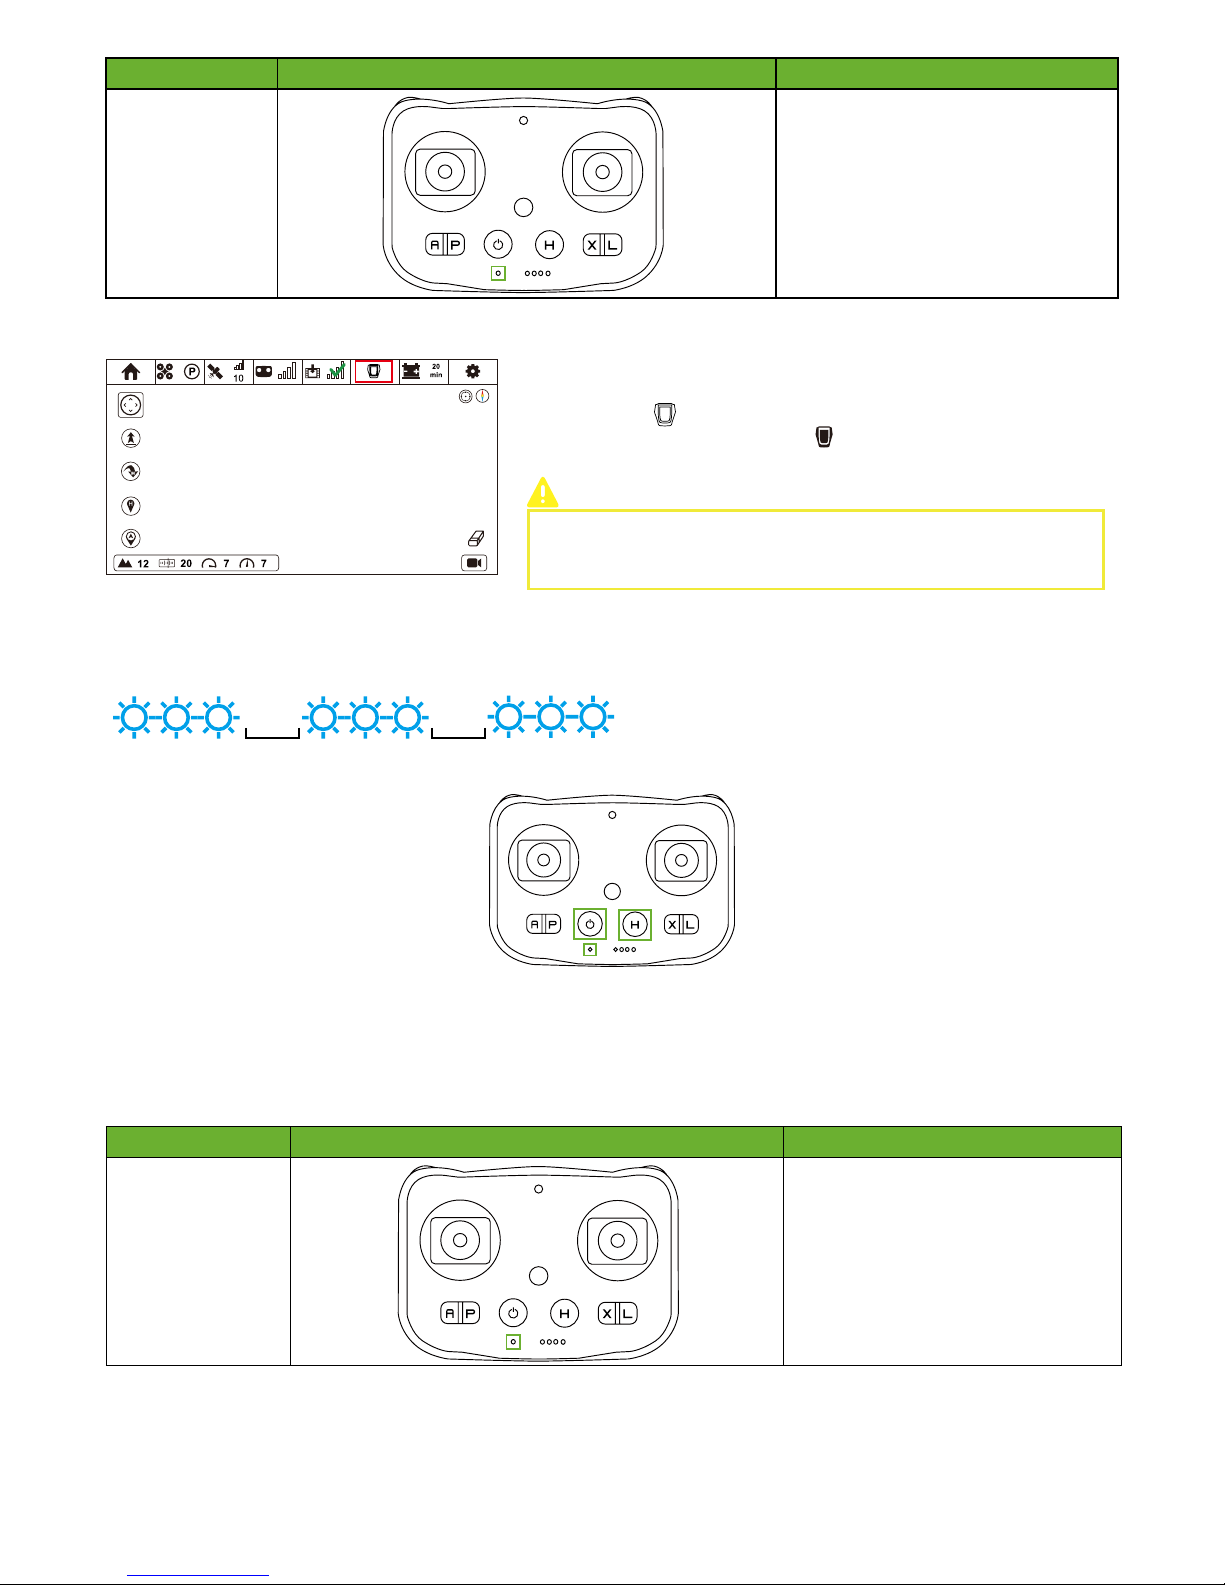
Step 7: Initialization Binding
When should I bind Drone & Remote Controller?
During binding, please DO NOT power on any other related devices. For instance, when binding Drone &
Remote Controller, please DO NOT turn on Sports Watch and Follow Module.
How to bind?
1.
Activate Drone Binding Mode
① Insert Smart Battery.
② Place the drone upside down and turn on Smart Battery.
③ When Yellow Light of Status Indicator blinks 3 times at intervals of 0.5s, Drone Binding Mode activates.
2.
Activate Remote Controller Binding Mode
① When pressing H Button, turn on Remote Controller. Red Status LED blinks.
② Binding between Drone and Remote Controller will auto begin.
3. How to know binding is OK?
① Turn on Drone and Remote Controller at first.
② If Red Status LED is on, please finish binging procedures.
③ If Green Status LED is on, please ignore this step.
Page 52
49
Step 8: Check Drone Working Condition
When should I bind Follow Module & Sports Watch?
1. Activate Follow Module Binding Mode
After Follow Module has been turned on, press Power button for five to six times to enter binding mode.
When Blue Light of Follow Module blinks 3 times at intervals of 0.5s, binding mode enables.
0.5s
0.5s
Turn on Drone and check the working condition of gimbal. Ensure whether or not the Yellow LEDs blink correctly.
3. How to know binding is OK?
2. Activate Remote Controller Binding Mode
① When pressing H Button, turn on Remote Controller. Red Status LED blinks.
② Binding between Drone and Remote Controller will auto begin.
Devices OK Symbol Instructions
Follow Module &
Remote Controller
When binding finishes, Red Light of RC
Status Indicator would not blink.
If binding fails, Red Light of RC Status
Indicator would not stop blinking. You need
to power cycle Drone and RC to bind again.
How to bind?
Devices OK Symbol Instructions
Drone & Remote
Controller
When binding finishes, Red Light of RC
Status Indicator would not blink.
If binding fails, Red Light of RC Status
Indicator would not stop blinking. You need
to power cycle Drone and RC to bind again.
① Turn on Follow Module and Remote Controller, and enter CEEWA APP.
② Enter Flight Interface of CEEWA APP, and wait for 60s. If Follow Module
icon is shown as like the left diagram, binding should be done.
③ If Follow Module icon is shown as (constantly on or blinking), you can
ignore this step.
How to pair Remote Controller and CEEWA APP?
Refer to Chapter IV. Remote Controller → Step 9. Turn on CEEWA APP &
Pair to Remote Controller
Page 53
50
Step 10: Calibration
Please turn on BLUETOOTH of your smartphone.
CEEWA APP requires: iOS 8.0 or later.
Android OS 4.3 or above with Bluetooth 4.0.
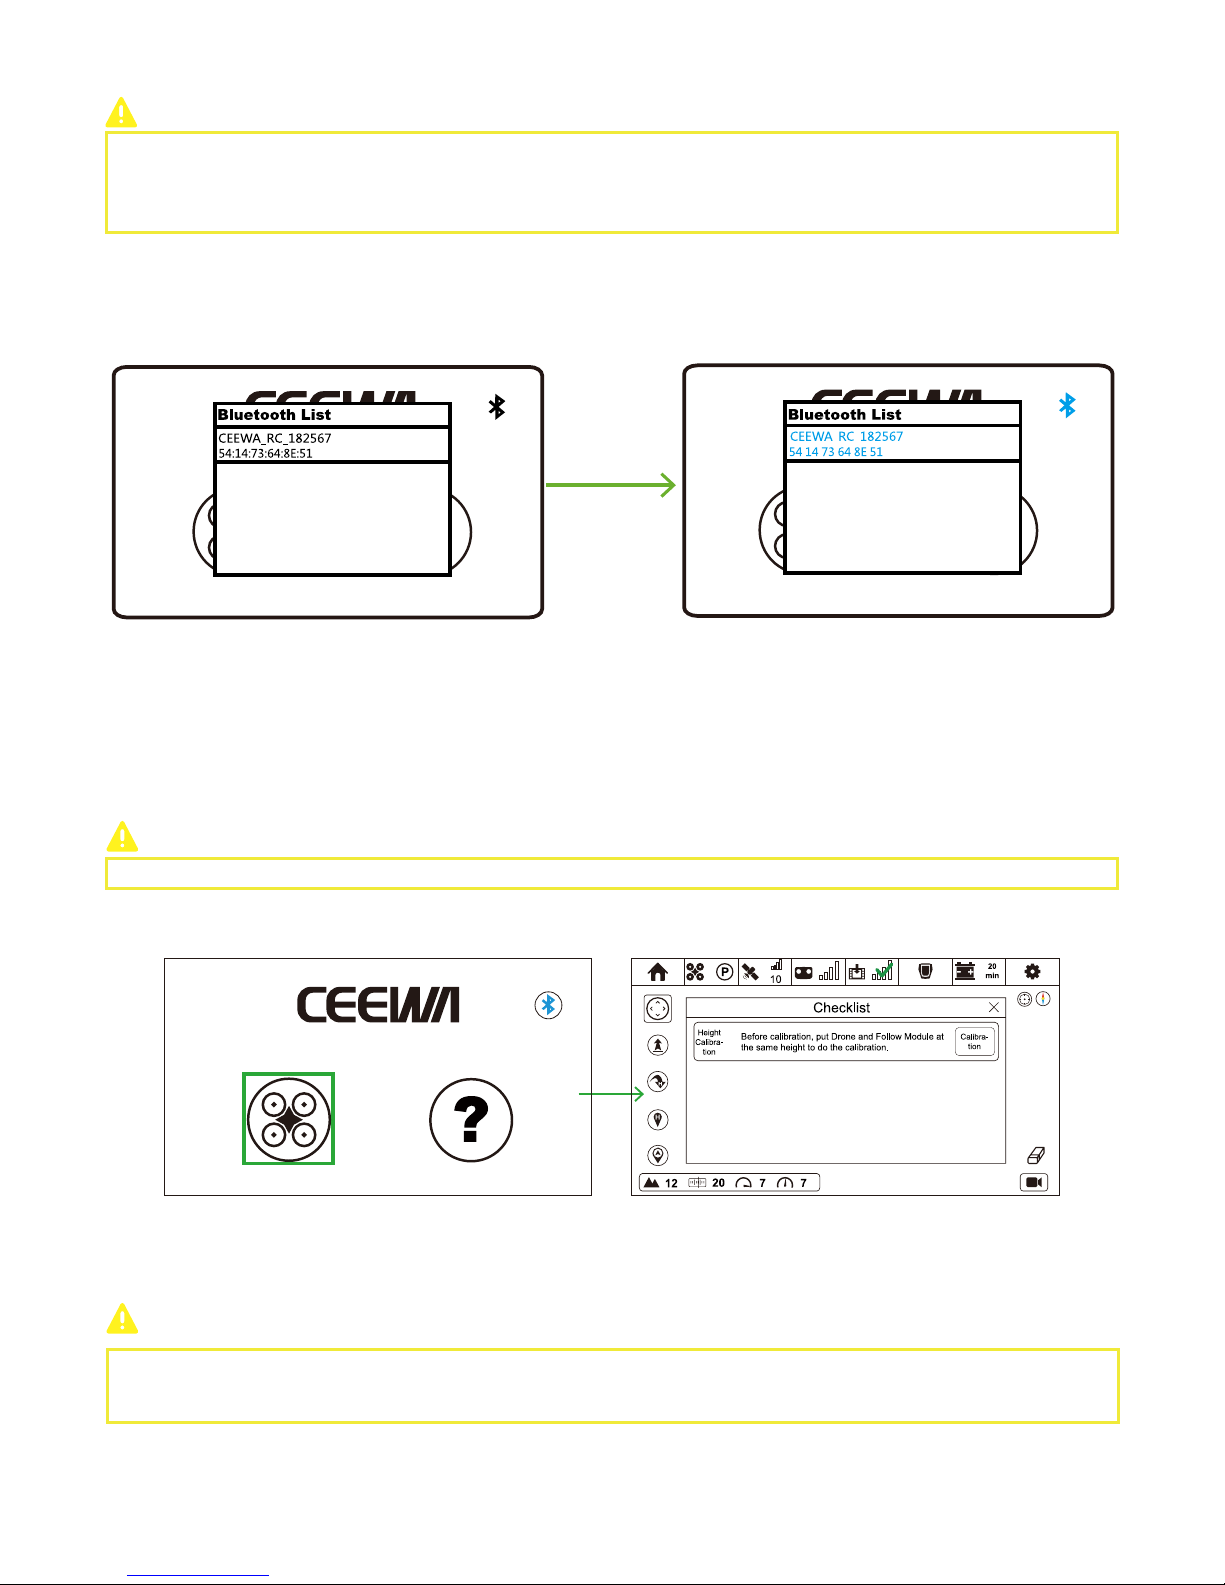
You should pair Remote Controller to CEEWA APP through Bluetooth.
① Power on Remote Controller.
② Turn on CEEWA APP and choose your desired device in the pop-up window. The Bluetooth name of Remote Controller usually
starts with CEEWA_RC.
③ Choose Remote Controller in the window and wait for connection. When the device name and Bluetooth icon on the upper
right corner turn to blue, pairing finishes. All the above steps show when you pair them for the first time, and CEEWA APP will auto
connect it since then.
④ If you want to change the auto-pairing device, just tap the Bluetooth icon on the upper right corner and select your desired
device in the pop-up window.
If the Bluetooth icon becomes white, it implies that CEEWA APP disconnects with Remote Controller.
If the Bluetooth icon alternately blinks blue and white, it means that CEEWA APP is trying to connect.
If the Bluetooth icon becomes blue, connection has been built.
Drone Compass Calibration and Follow Module Compass Calibration should be finished outdoors.
After pairing, please click Flight icon to enter Flight Interface.
Sports Watch and Remote Controller cannot be used at the same time.
Step 9:Turn on CEEWA APP & Pair to Remote Controller
Page 54
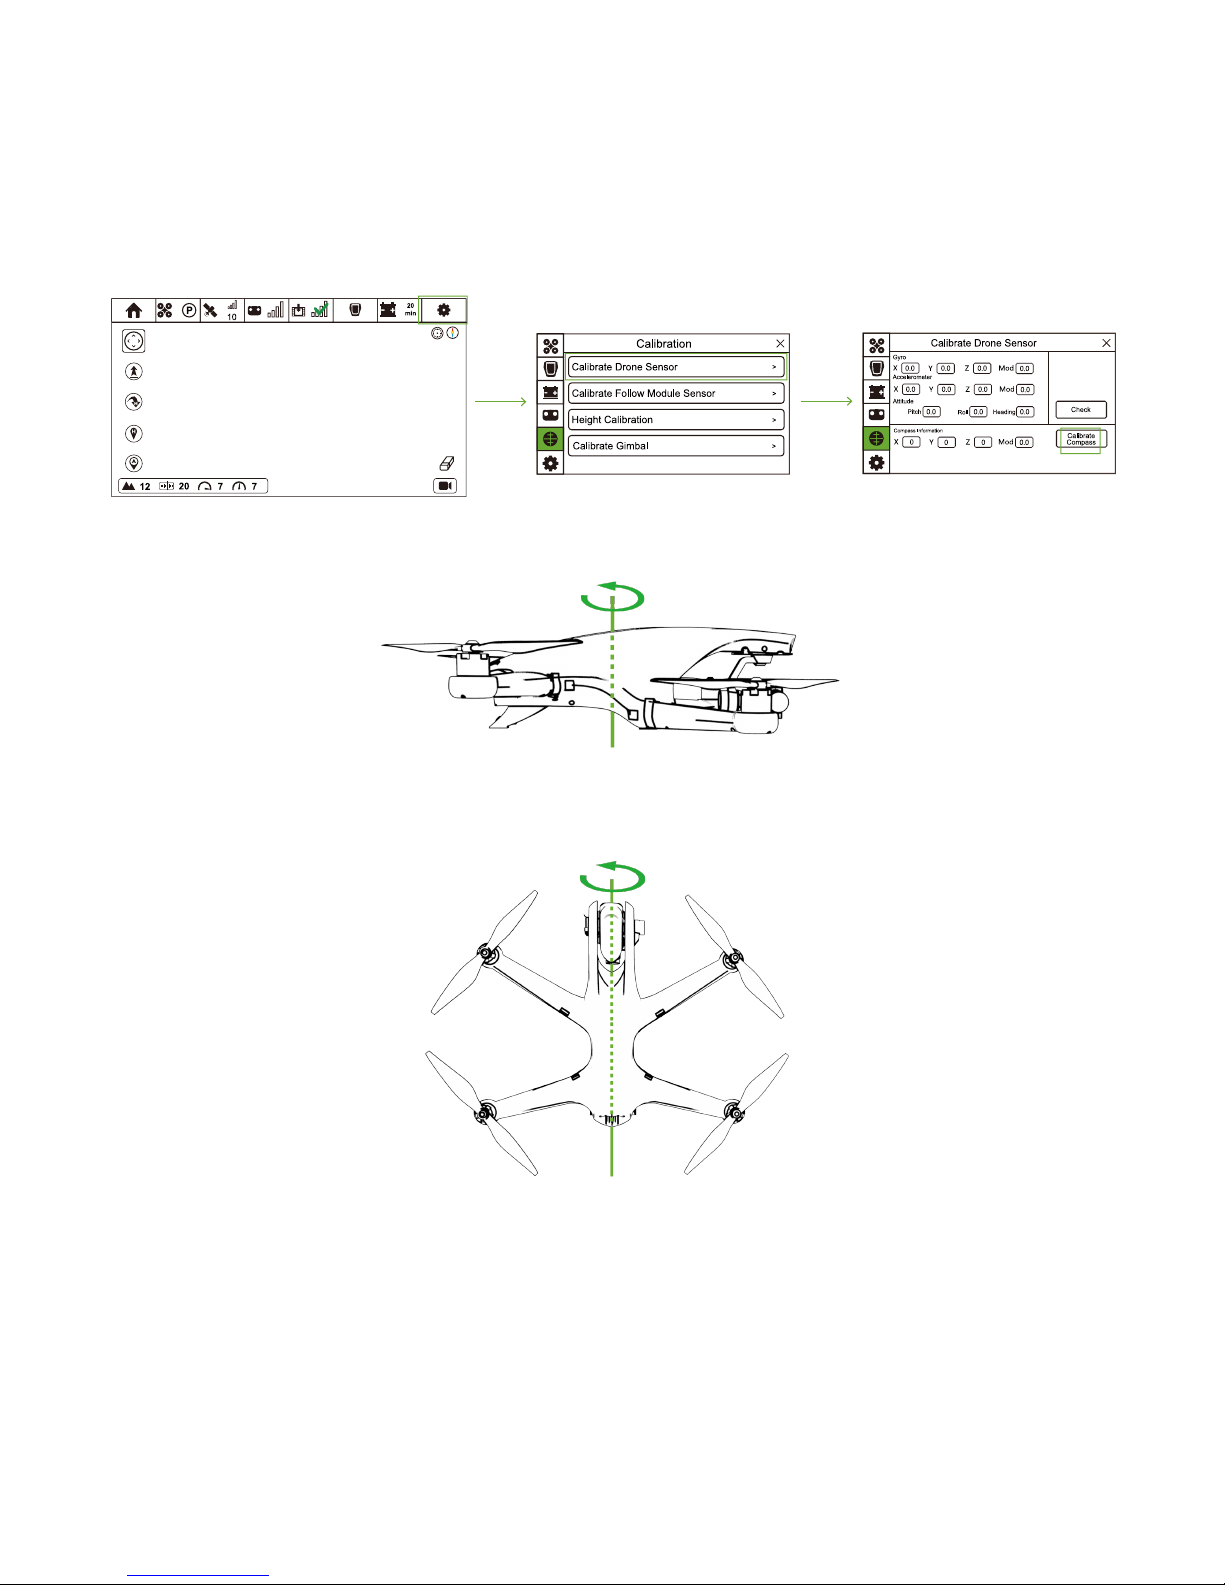
51
1. Drone Compass Calibration
(1)When should I Calibrate?
① It is suggested to calibrate compass when you first use Drone.
② Regularly calibrate the compass because it is easily interrupted by other electronic devices.
③ If RED Status LEDs on Drone blink twice per second, please do compass calibration before taking-off. If Drone has taken off,
please land as soon as possible and calibrate the compass.
(2)Calibration Steps
① Turn on CEEWA APP and enter Flight Interface. Tap "Others" icon and choose Calibration icon to enter Calibration interface.
② Select "Calibrate Drone Sensor" option and choose "Calibrate Compass".
③ When Drone Yellow Status LEDs are on, hold and rotate the drone horizontally until Green LEDs are on.
④ When Green LEDs are on, hold the drone vertically with its nose pointing upwards. Rotate the drone around the center axis until
Yellow LEDs are blinking.
⑤ If calibration fails, Red LEDs are blinking twice per second. Please repeat step 3 and 4.
(3)Attentions!
① DO NOT calibrate your compass where there is strong magnetic interference around, such as magnetite, parking structure, and
steel reinforcements underground.
② DO NOT carry ferromagnetic materials with you during calibration such as keys.
③ DO NOT calibrate beside massive metal objects.
④ If calibration fails, there may be interference around. Please re-calibrate in another place.
⑤ Before calibration, please make sure Drone and CEEWA APP has connected.
Page 55
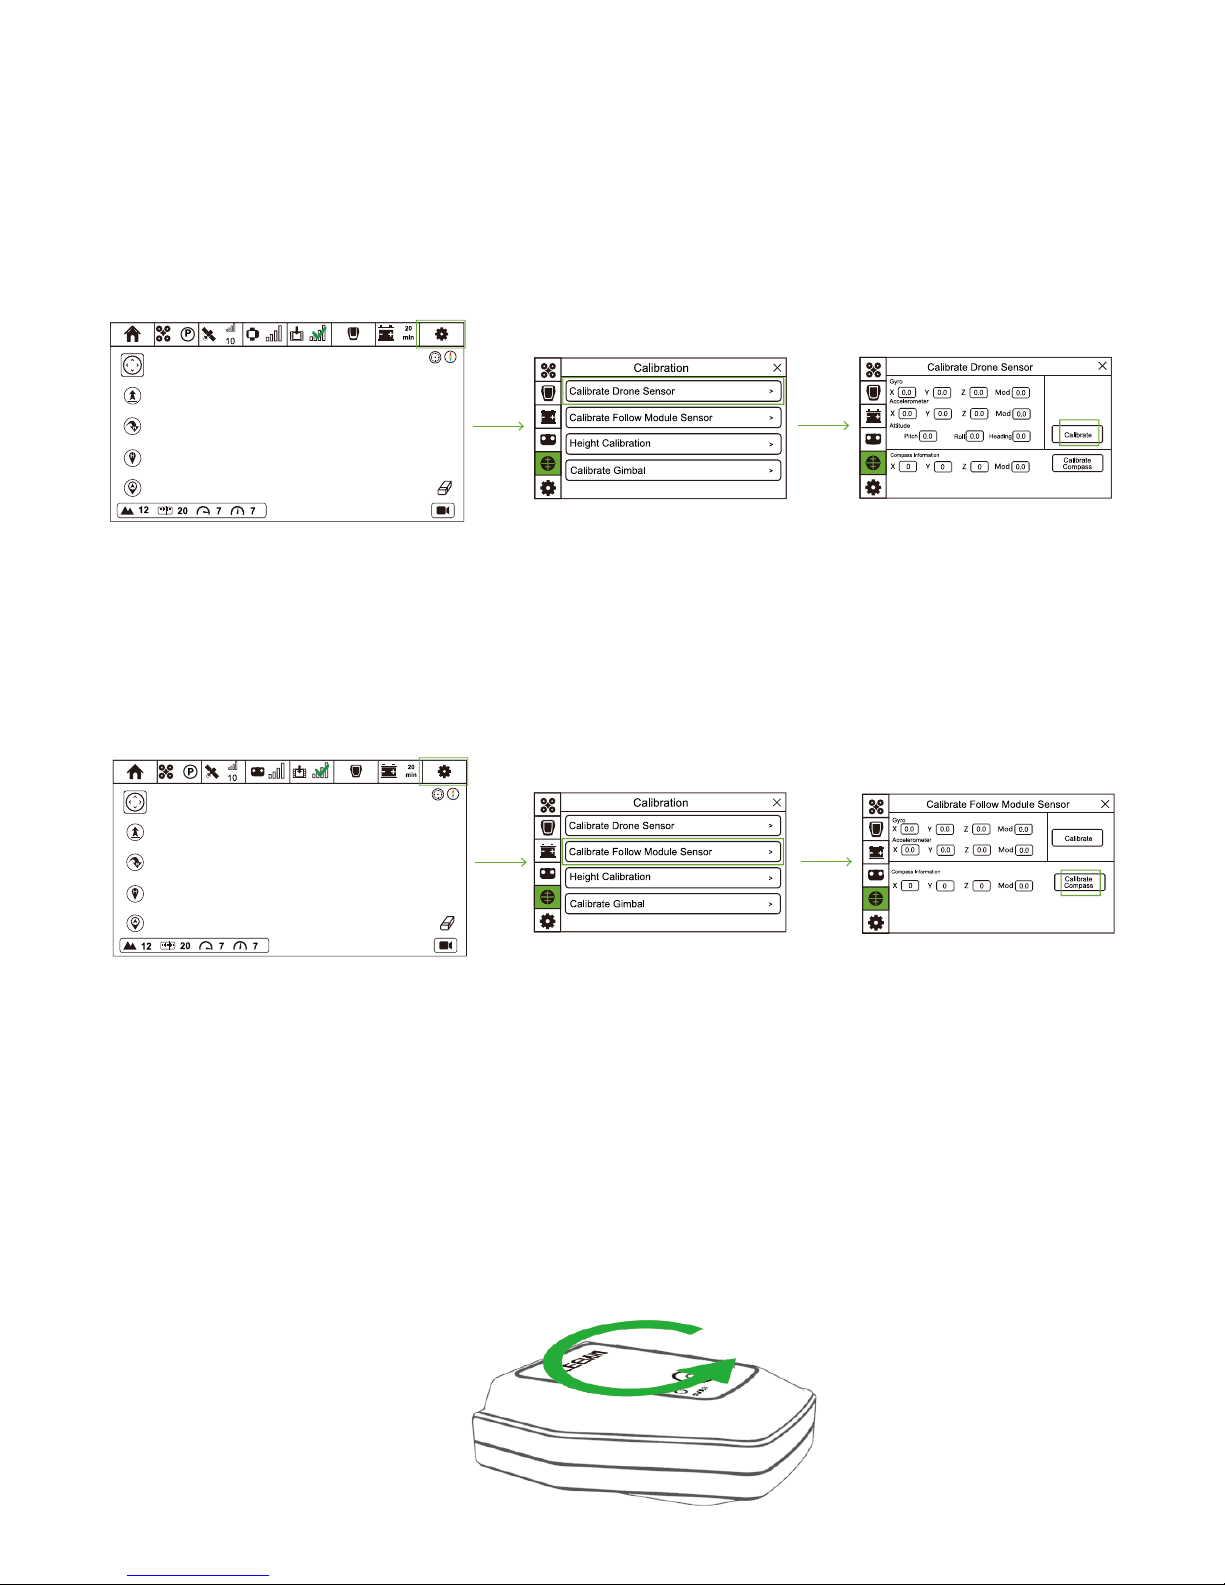
52
(1) When should I Calibrate?
① When drifts happen in A mode, calibration should be finished.
② It is suggested to do Gyro calibration regularly by putting the drone on the horizontal ground.
(2)Calibration Steps
① Ensure Drone has connected to CEEWA APP.
② Place Drone in the level ground.
③ Turn on CEEWA APP and enter Flight Interface. Tap “Others” icon and choose Calibration icon to enter Calibration interface.
④ Select “Calibrate Drone Sensor” option and choose “Check”. Drone will auto check its status. If calibration should be done,
“Calibrate” will be replaced by “Calibration” and do the calibration according to the tips.
2. Gyro Calibration
3. Calibrate Follow Module Gyro
(1)When should I Calibrate?
It is suggested to calibrate Follow Module Sensor regularly on the horizontal ground to achieve a better flight experience.
(2)Calibration Steps
① Turn on CEEWA APP and enter Flight Interface. Tap “Others” icon and choose Calibration icon to enter Calibration interface.
② Select “Calibrate Follow Module Sensor” option and choose “Check”. Drone will auto check its status. If calibration should be
done, “Check” will be replaced by “Calibration” and do the calibration according to the tips.
③ If calibration fails, please repeat Step 1-2.
4. Follow Module Compass Calibration
(1)When should I Calibrate?
① It is suggested to finish Follow Module Compass Calibration at first time.
② Moreover, finish the calibration regularly to achieve a better flight experience.
(2)Calibration Steps
① Turn on CEEWA APP and enter Flight Interface. Tap “Others” icon and choose Calibration icon to enter Calibration interface.
② Select “Calibrate Follow Module Sensor” option and choose “Calibrate Compass”.
③ When Blue Status LED blinks slowly, rotate the Follow Module horizontally.
Page 56
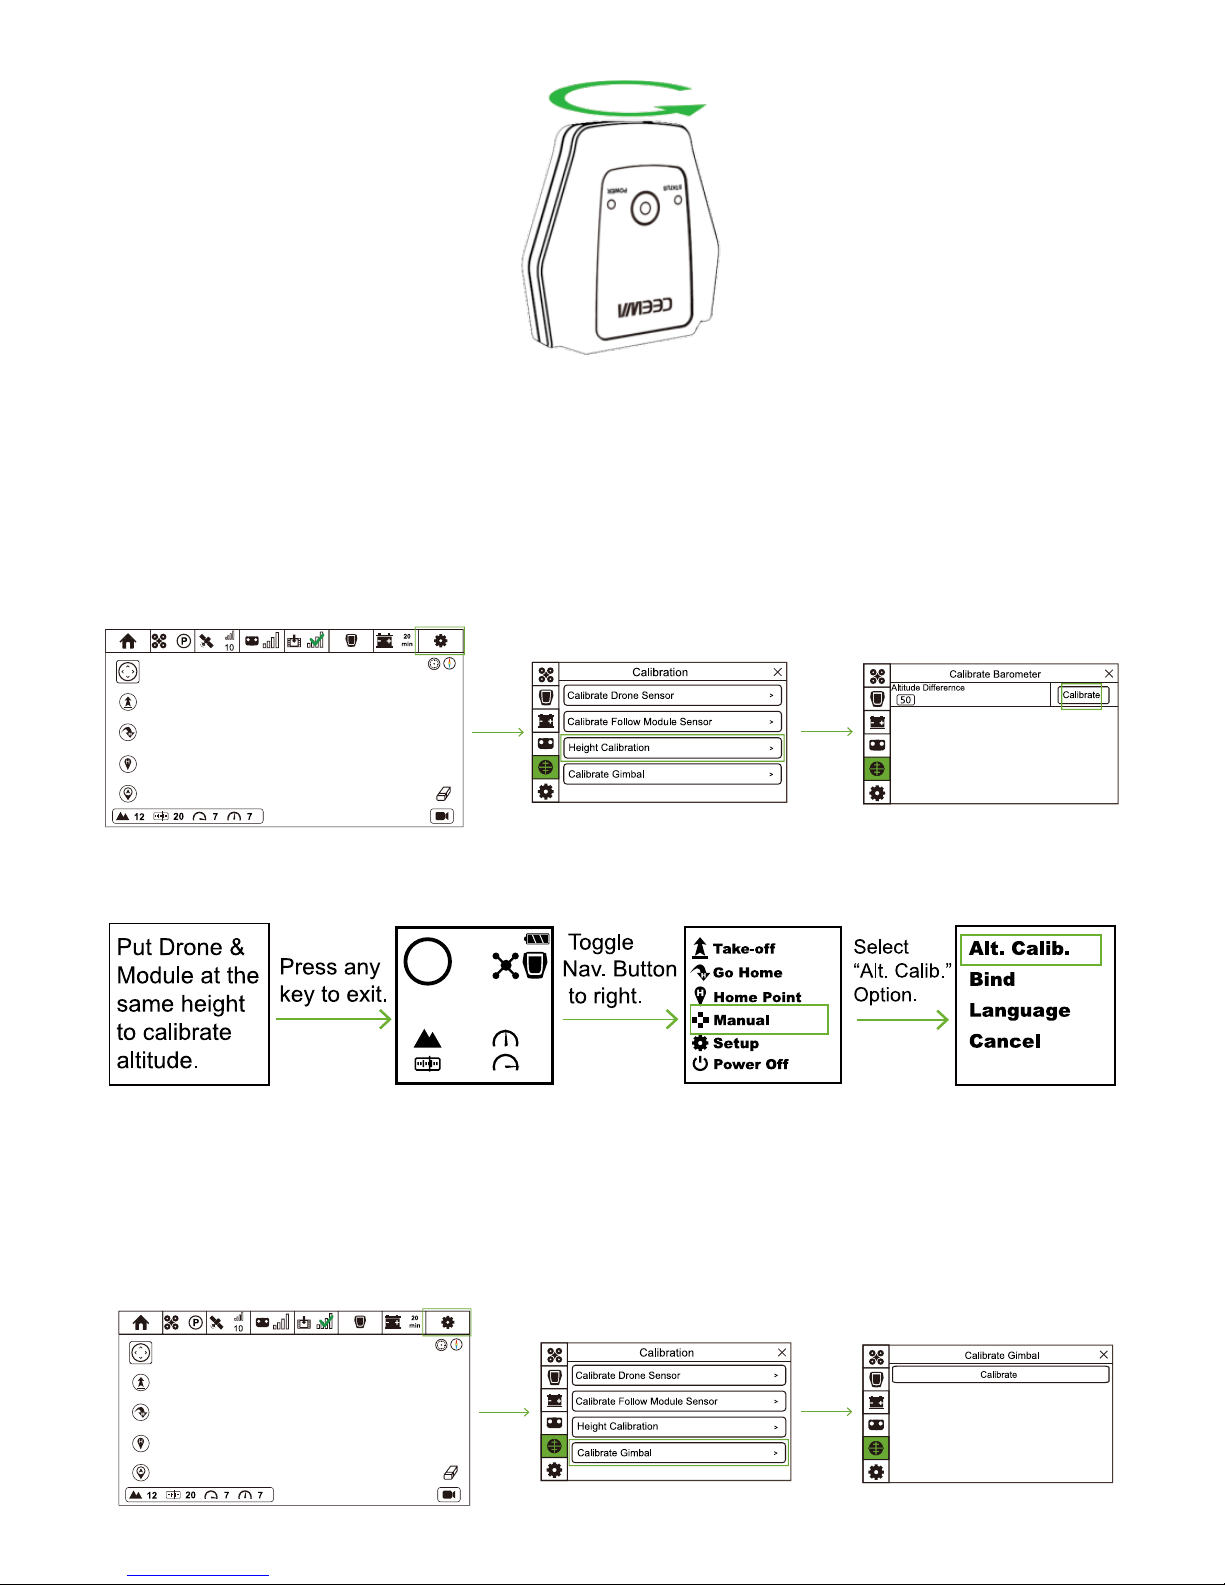
53
④ When Blue Status LED blinks quickly, rotate the Follow Module vertically.
⑤ If Blue Status LED turns to be constantly on, calibration finishes. If calibration fails, please repeat step 1 to 4.
5. Height Calibration
(1)When should I Calibrate?
Before using Follow Mode, you need put Drone and Follow Module at the same height and do the calibration.
(2)Calibration Steps
CEEWA APP:
You could enter Calibration interface to do the calibration.
① Turn on CEEWA APP and enter Flight Interface. Tap “Others” icon and choose Calibration icon to enter Calibration interface.
② Put Drone and Follow Module at the same height.
③ Select “Calibrate Height” option and choose “Calibrate”.
Sports Watch:
When Sports Watch connects with Drone, there is a warning to do the height calibration.
Put Drone & Module at the same height to calibrate altitude.
Timeleft: 24
P
10
7
2
4
6. Calibrate Gimbal
(1)When should I Calibrate?
When drifts happen or gimbal angle is not horizontal, you need to do gimbal calibration.
(2)Calibration Steps
① Ensure Drone has connected to CEEWA APP. Place Drone on the level ground.
② Turn on CEEWA APP and enter Flight Interface. Tap “Others” icon and choose Calibration icon to enter Calibration interface.
③ Select “Calibrate Gimbal” option and tap “Calibrate”.
Page 57
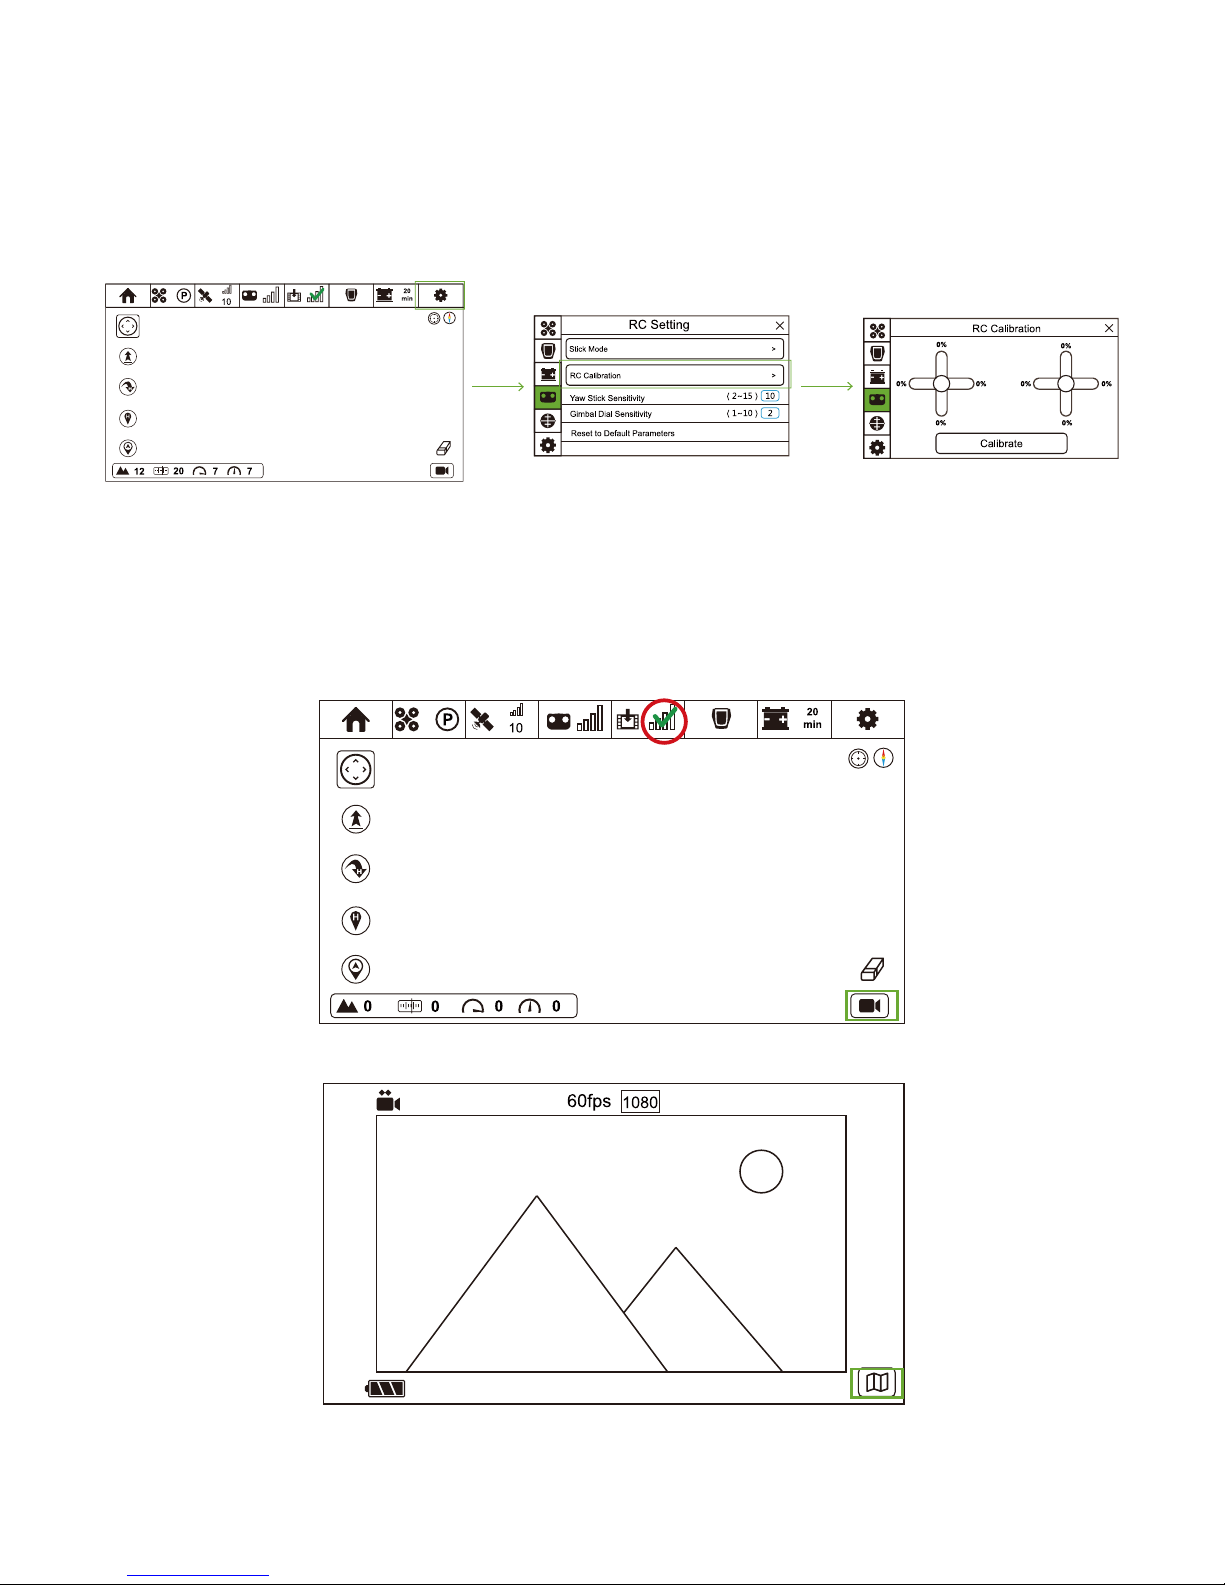
54
6. Calibrate RC
(1)When should I Calibrate?
① It is suggested to finish RC Calibration at first time.
② When adjusting drone's attitude and deviation happens, please finish RC calibration.
(2)Calibration Steps
① Ensure all the connection is OK.
② Turn on CEEWA APP and enter Flight Interface. Tap “Others” icon and choose Calibration icon to enter RC Setting interface.
③ Select “RC Calibration” option and tap “Calibrate”.
④ Push both sticks to 100% in every direction, and observe whether or not the value in the interface has reached 100%.
Check the connection between Image Transmission Ground System and Image Transmission. Ensure Smartphone has connected to
the Wi-Fi hotspot and image can be shown in Image Transmission Interface of CEEWA APP.
① Turn on the Wi-Fi of your smartphone and connect to the hot spot which starts with FS, such as FS_5G_AP_251694.
② When Green checkmark shows on Image Transmission Connection Status icon, it indicates that Image Transmission has
successfully connected to APP.
③ Enter Image Transmission Interface of CEEWA APP by tapping the icon on the bottom right side.
④ In Image Transmission Interface, you could return Flight Interface by tapping the icon on the bottom right side.
⑤ In Image Transmission Interface, tap the screen to activate Menu Bar and Status Bar. Except Nav. Mode and Follow-Line, you
could use all the functions as usual.
Step 11: Check Image Transmission
Page 58
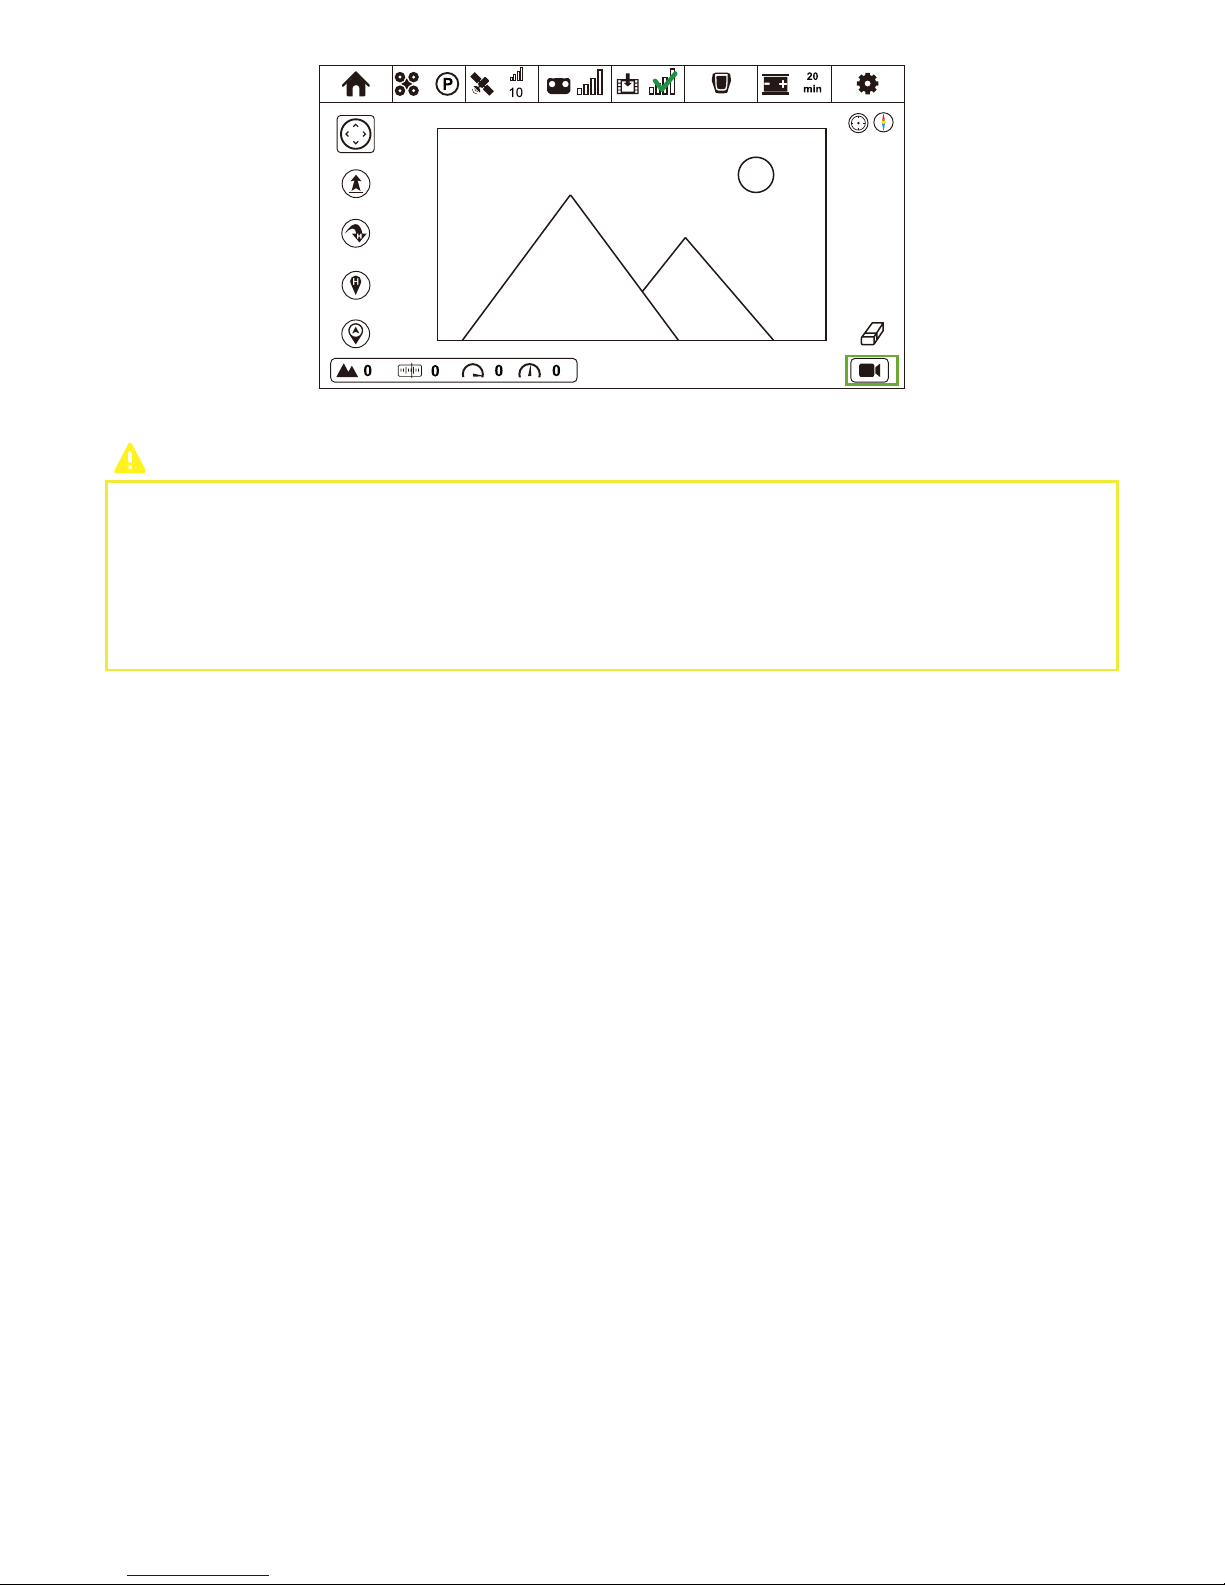
55
⑥ In Image Transmission Interface, drag the real-time image for over 5s to adjust camera’s angle.
Why Blue Screen shows in the Image Transmission Interface, instead of images?
1. Check whether or not the AV cable has connected to the AV port in the gimbal and camera.
2. Camera has been turned on.
3. AV-OUT Mode of Camera enables.
4. Exit CEEWA APP from iOS / Android background and re-enter CEEWA APP.
5. If none of the above solutions solve the problem, please check whether or not Power Safe Mode of camera enables. How to
check? Please refer to Chapter VII. Troubleshooting.
Page 59
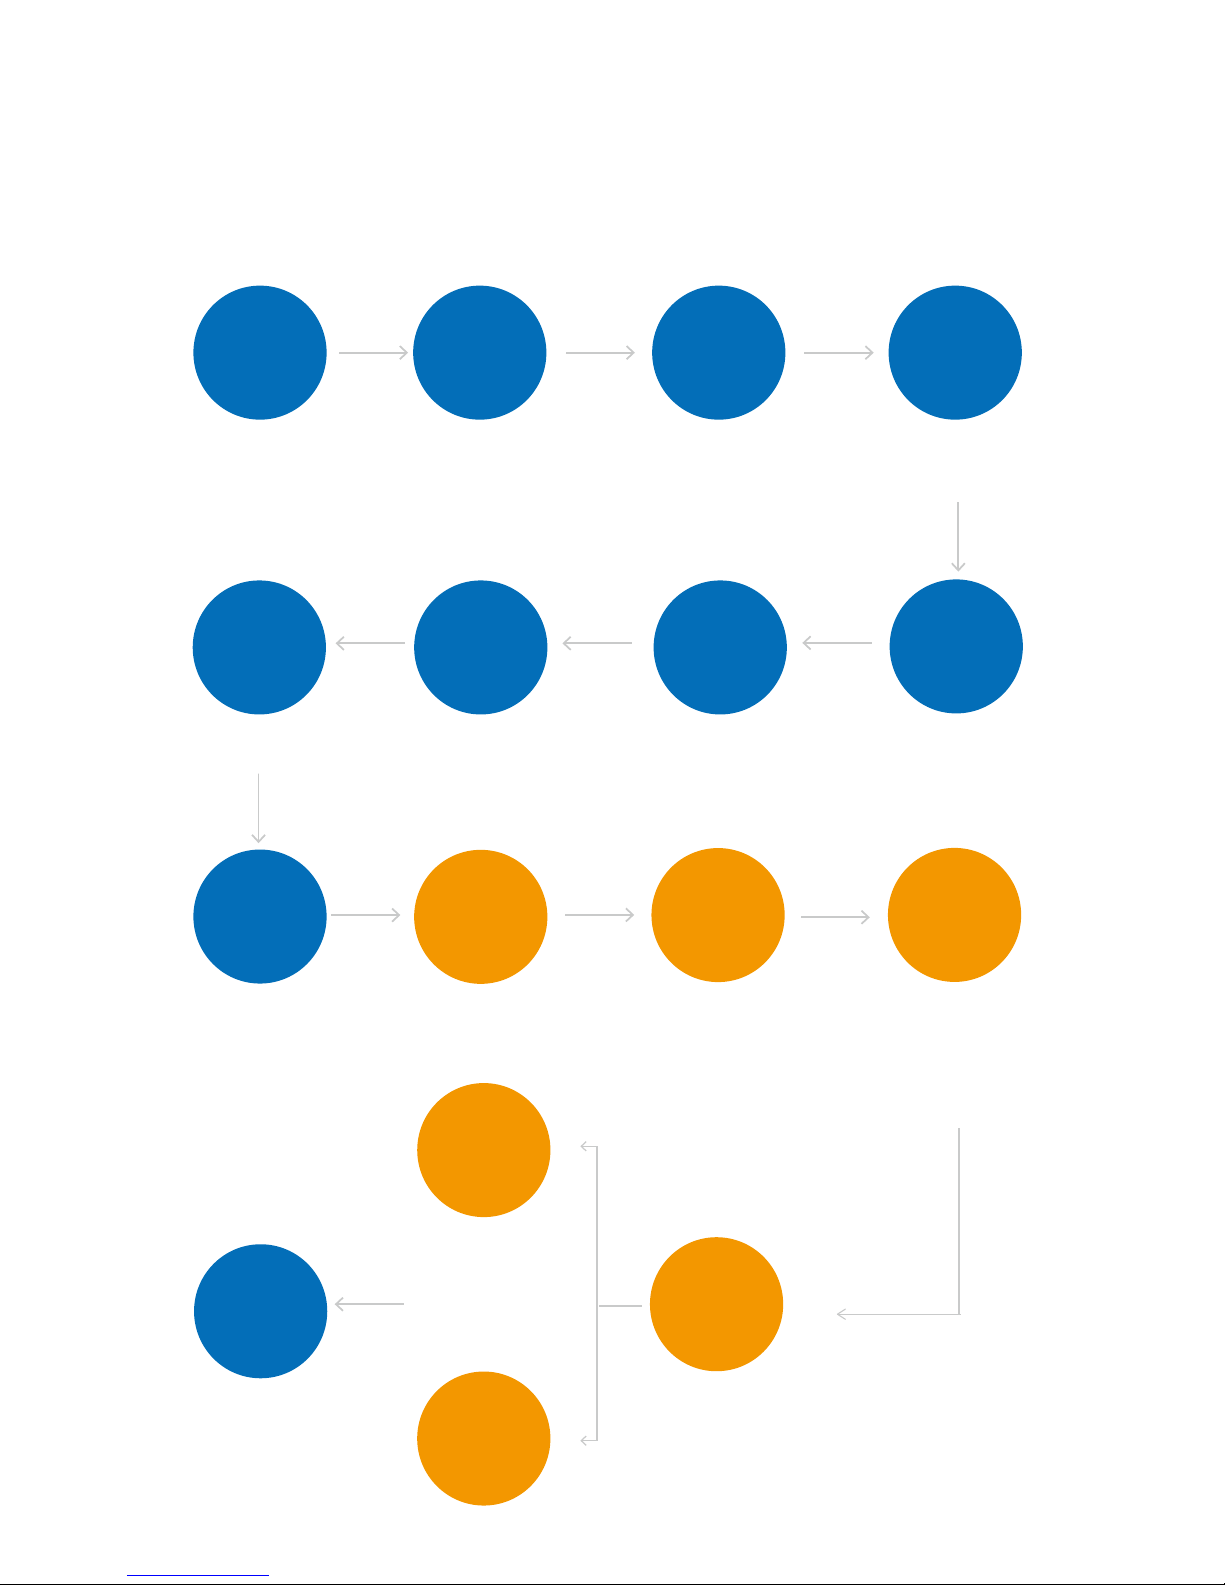
56
V. Remote Controller Version: Flight Test
Overview
Before taking-off, put Drone on the ground for over 70 seconds and wait for GPS reach 10 satellites. All the flight procedures should
follow the flow chart below!
CEEWA APP enables Beginner Mode by default.
Blue Rounds are required, while orange rounds are optional. Please choose flight mode based on your needs.
Except step 1, please finish all the following steps on wide open outdoor areas.
Turn off Drone, Remote Controller,
Follow Module and camera.
9]OZINZU/SGMK:XGTYSOYYOUT
/TZKXLGIKZUINKIQRO\KOSGMK
Finish Check
before Flight
Please ensure you have
finishes all the steps in
Check before Flight.
Check Flight
Environment
Ensure there is no obstacle
around the 50 meters of take-off
position.
There is no huge building or trees
around flight area.
Check GPS
Status &
Connection
Status
Remote Controller: switch to Flight
Interface in CEEWA APP to check
whether or not over 10 satellites
have been found.
Height
Calibration
Before Follow Mode, please
put Drone and Follow Module
at the same height to do
height calibration.
Switch to P
Mode
Remote Controller: press P Button
and check whether or not P Mode
has been enabled.
One-key
Take-off
Drone will ascend to 5 meters and
hover to wait for the next order.
Attach propellers and fix them
tightly.
Attach
Propellers
Ensure all the motors can rotate
properly.
Drone Test
Check Status
If drifts happen after hovering or
warning tips show on the screen
of APP and Watch, please land
the drone as soon as possible.
Adjust
Drone’s
Attitude
Sports Watch: Push sticks
to adjust drone’s attitude.
,URRU]
3UJK
)NKIQ2O\K
/SGMK
For instance, keep safe distance and
enable Simple Follow Mode. Check
whether or not the camera faces to
Follow Module and camera moves
with Follow Module.
4G\3UJK
'IZO\GZK4G\3UJKZNXU[MN
)++=''66
-U.USK
For instance, make the
drone fly away take-off
position from about 100
meters. Enable Smart
Go-Home ,and Drone
would go back and land in
the take-off position
automatically.
5TKQK_
2GTJ
Drone would land gradually.
:[XTULLGRR
JK\OIKY
Page 60
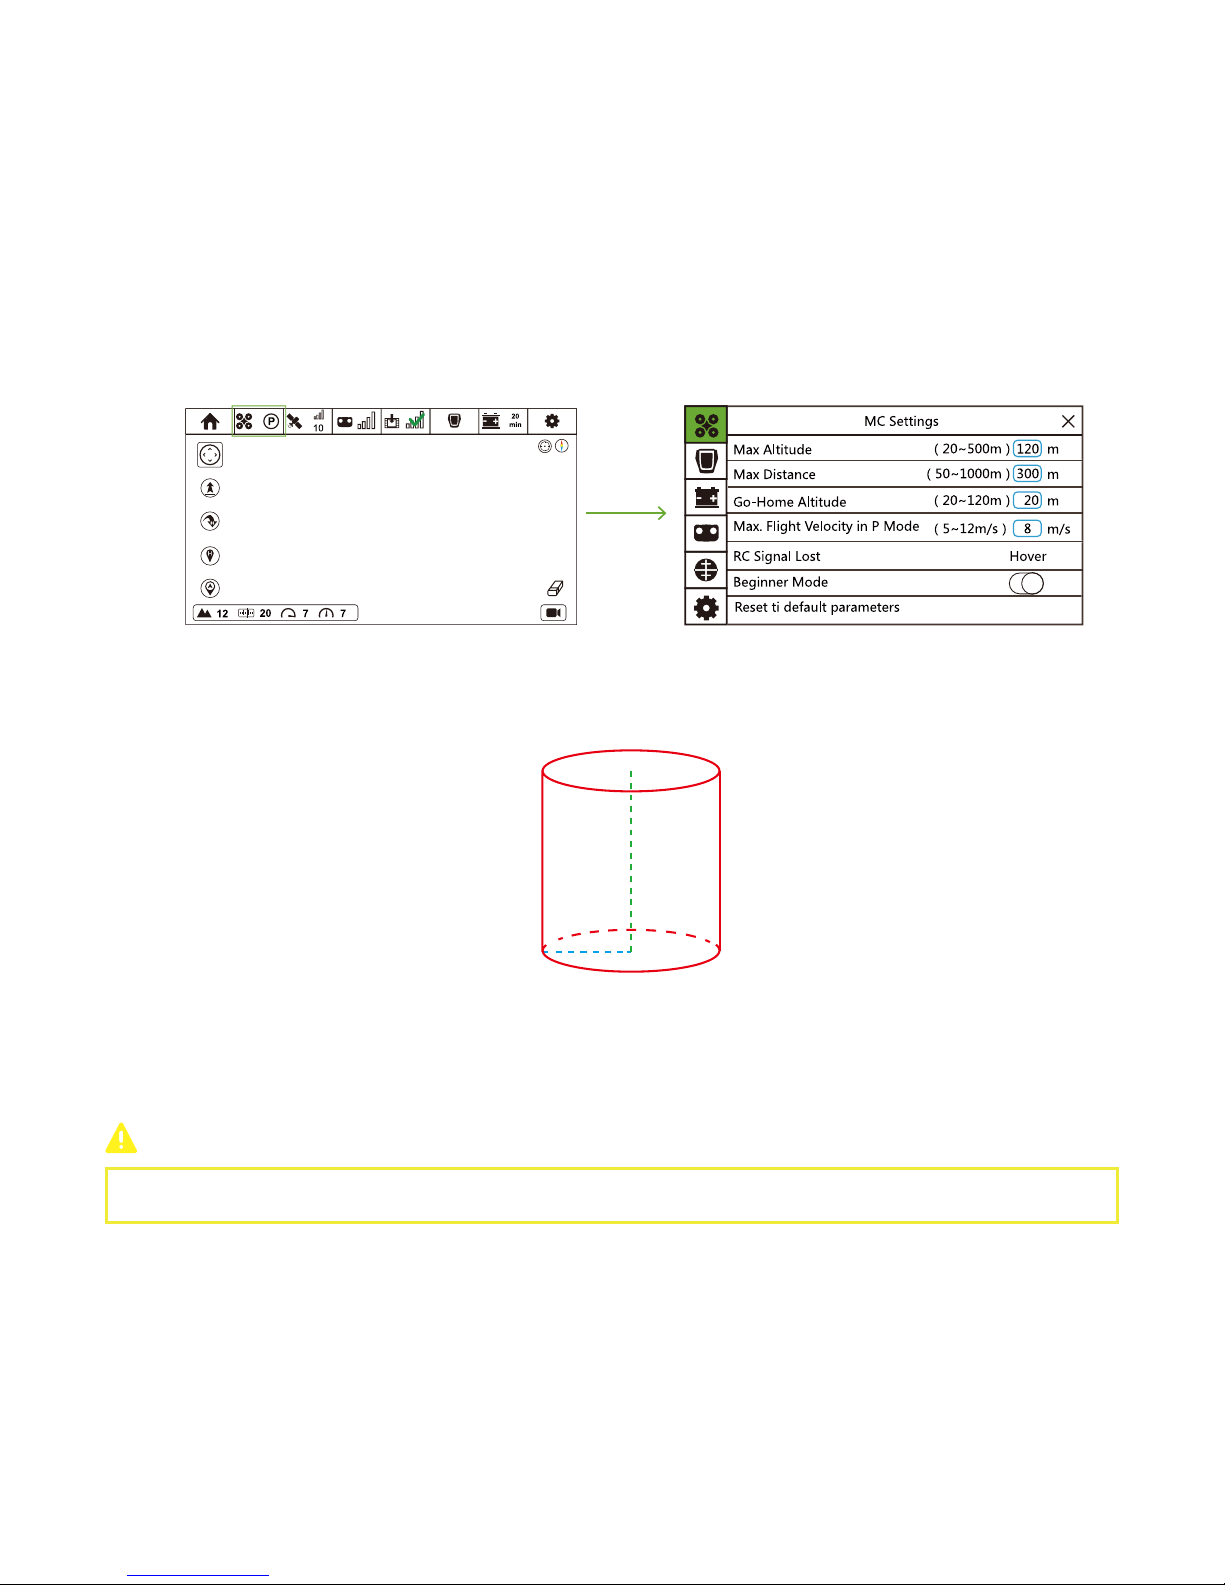
57
Step 1: Finish Check before Flight
Step 2: Check Flight Environment
Please ensure you have finishes all the steps in Check before Flight.
Ensure there is no obstacle around the 50 meters of take-off position.
There is no huge building or trees around flight area.
Flight environment meets Flight Environment Requirements.
It is suggested to build an electronic fence before first ten flights to set max height and distance to ensure the
drone would not break its boundary.
Set Max Height and Max Distance
In Flight Interface, tap “Drone Current Mode” icon to enter Flight Controller interface.
Modify values of Max Altitude and Max Distance in the blue box. These two values would form a cylinder, and the drone would fly
within the cylinder. When it reaches the max value, Drone will hover. Green dashed line represents the max altitude, while blue
dashed line represents max distance. Both values support the generation of red cylinder.
Meanwhile, to ensure safety, you could modify the max flight velocity in P Mode. Drone would not fly over the limited speed.
Step 3: Height Calibration
Step 4: Check GPS Status & Connection Status
Before Follow Mode, please put Drone and Follow Module at the same height to do height calibration.
In Flight Interface, check whether or not over 10 satellites have been found and Sports Watch has connected to Smartphone.
DO NOT INGORE THIS STEP!
CEEWA APP:
Refer to Chapter Remote Controller Version: Check before Flight → Step 10: Calibration → 5. Height Calibration for detailed
calibration procedures.
Page 61
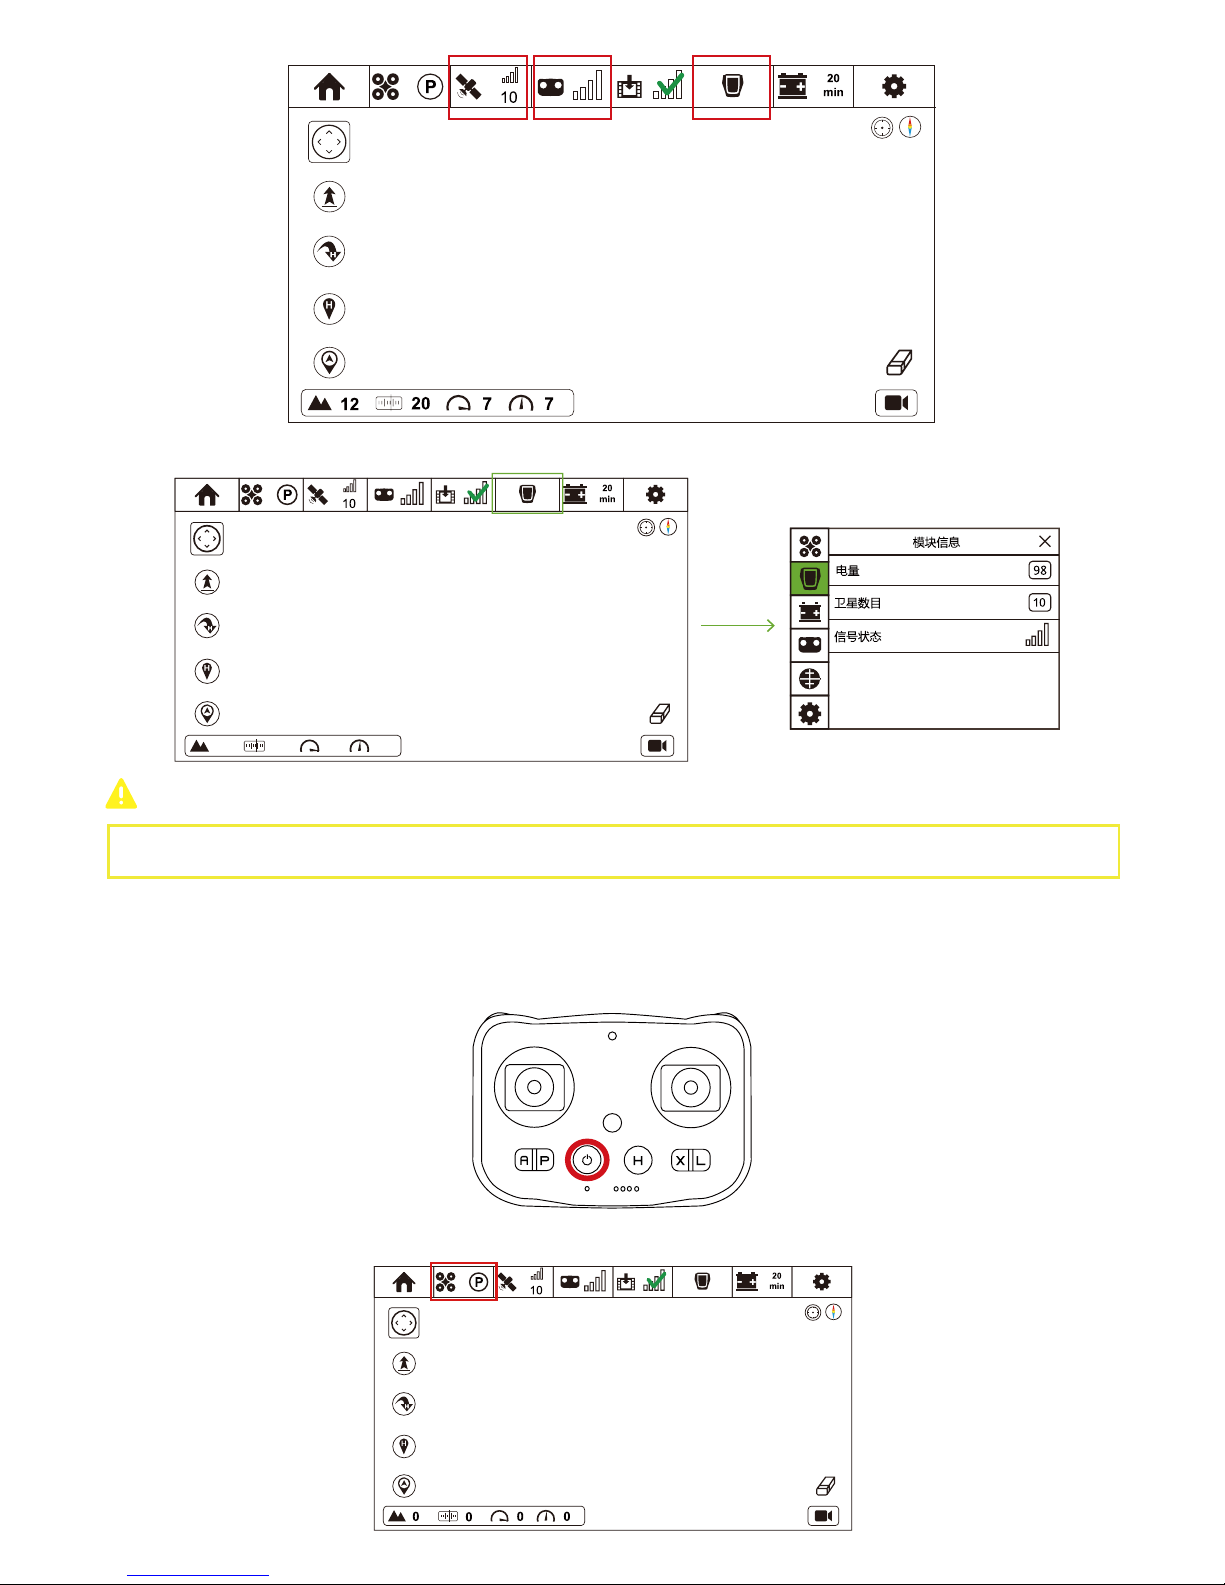
58
Click Follow Module Status to check the remaining power, satellite number and connection status of Follow Module.
Please ensure there are more than 10 GPS satellites.
Step 5: Switch to P Mode
Remote Controller:
Press P Button. When RC vibrates once P Button Status LED is constantly on, P Mode has been activated.
You can also check P Mode in Status Bar of CEEWA APP:
Page 62
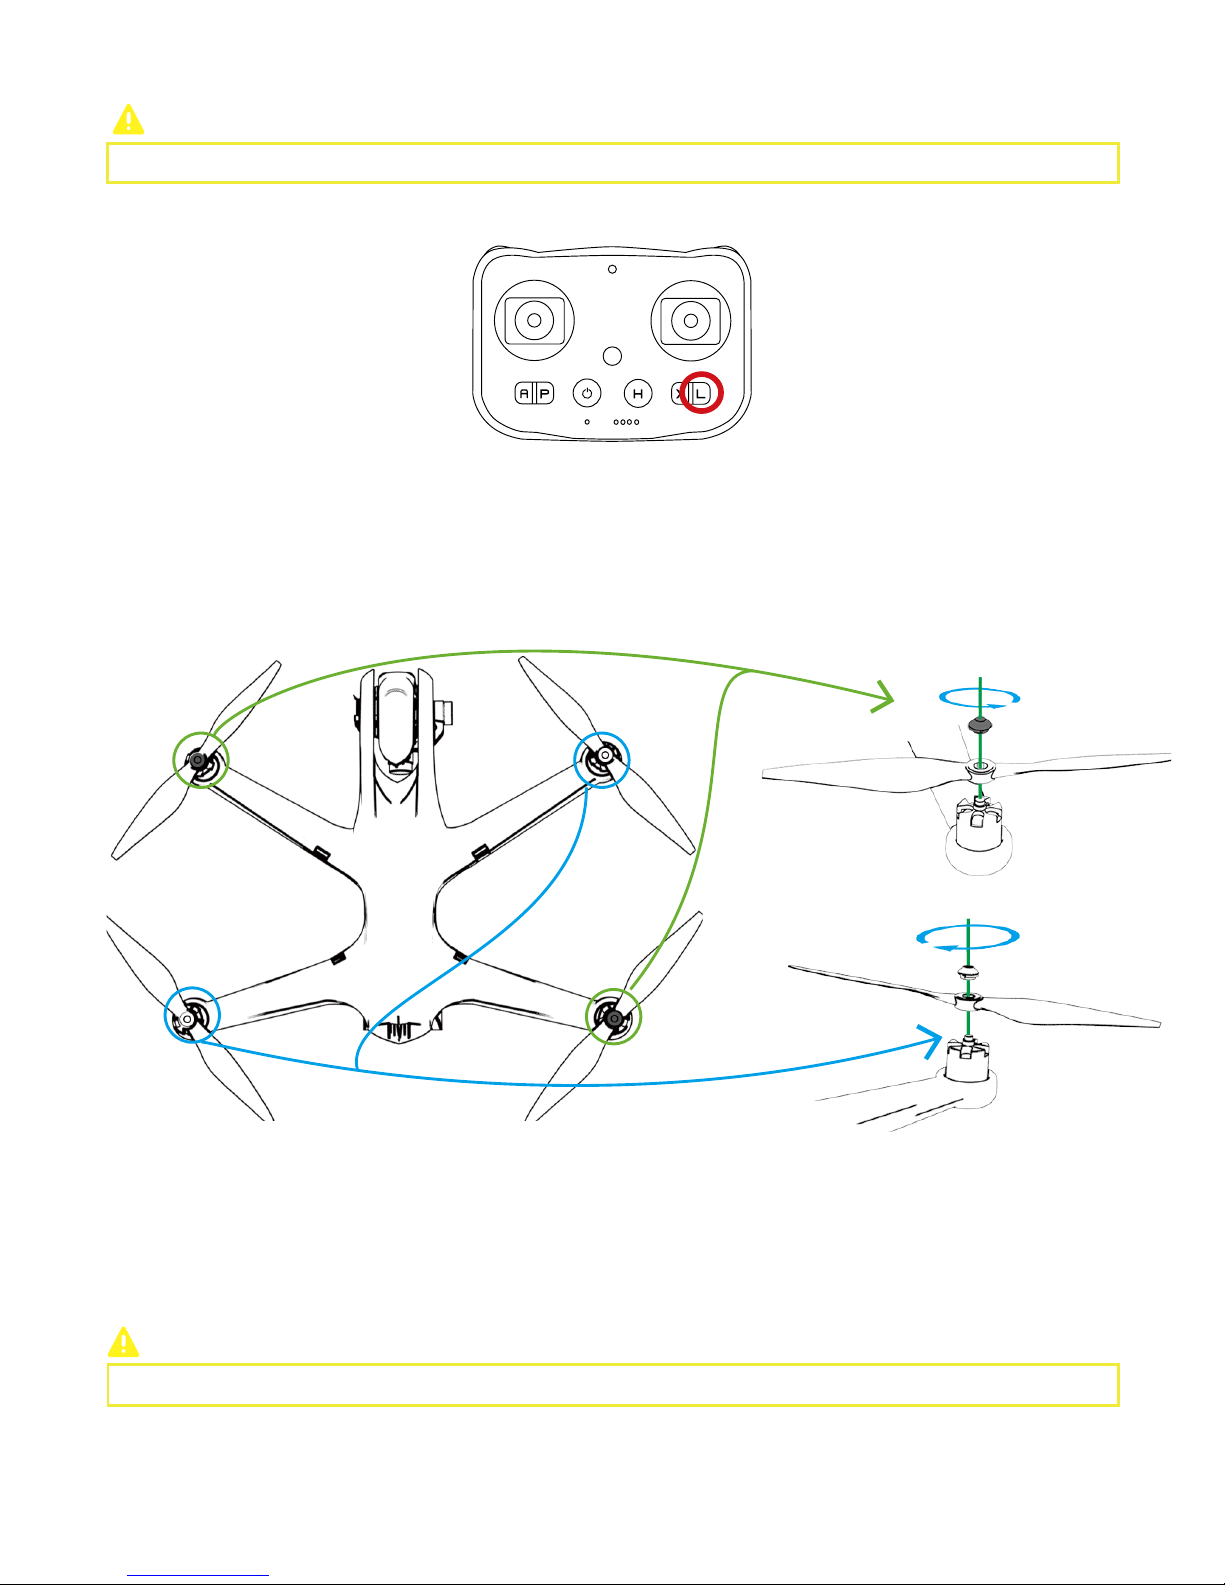
59
Please DO NOT attach any propeller to the drone in this step!
① Enable One-key take-off (press and hold L Button for over 3s) and check whether or not four motors can turn on properly. If
lacking any one of them, drone will fall down directly.
Step 6: Drone Test
Step 7: Attach / Detach Propellers
Attach Propellers
CEEWA Drone uses 10-inch propellers. White and Black nuts on the propellers indicate the rotation direction of propellers and where
it should be attached.
Please activate One-key Take-off on the level surface.
(2)Detach
Hold the motor. Counter-clockwise spin propellers on M1 and M3, while clockwise spin propellers on M2 and M4
.
Step 8: One-Key Take-off
Remote Controller:
Make sure the connection is OK.
Press L Button until Remote Controller vibrates twice shortly and then vibrates once for a longer time. One-Key Take-off activates.
During taking-off, the buzzer will beep to warn.
② Toggle Sticks to observe whether or not motors can rotate normally.
③ Enable One-key land (press and hold L Button for over 3s) and check whether or not four motors can stop.
M1
M2
M3 M4
Black Nut
Please fix each propeller tightly before flight.
Page 63
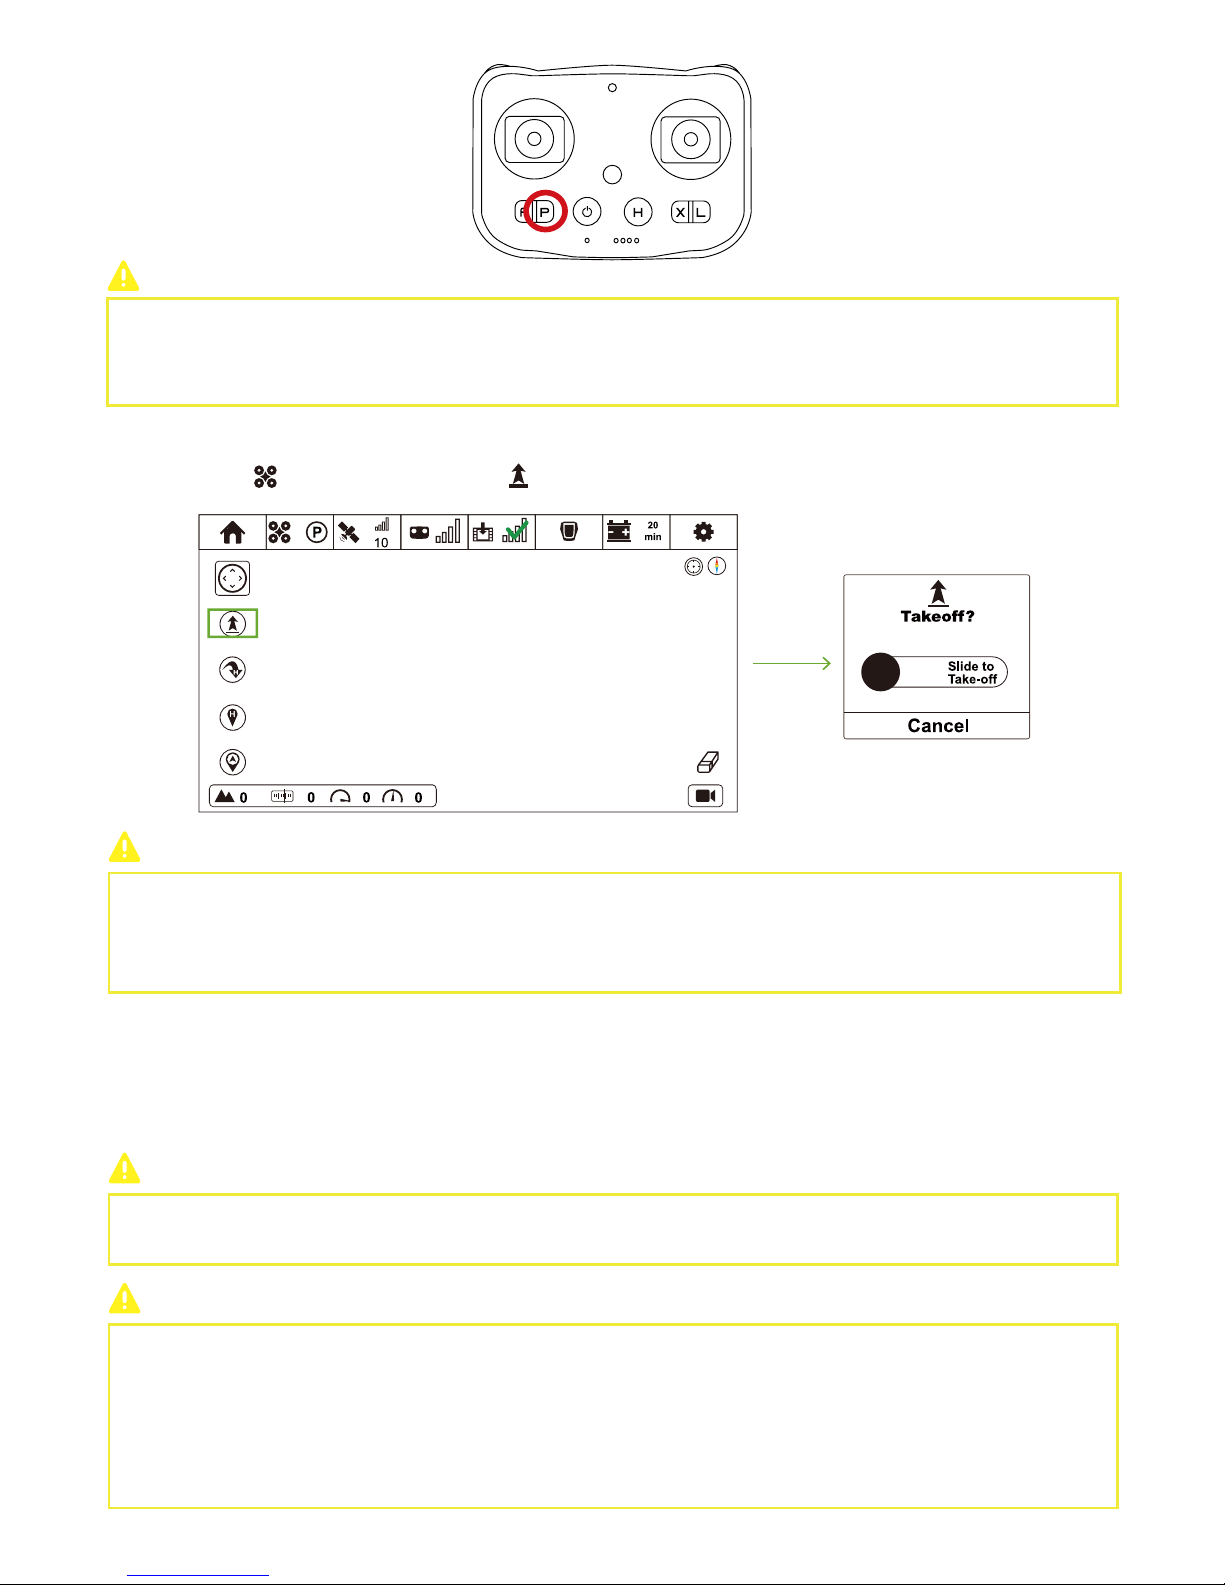
60
CEEWA APP:
In Flight Interface ( ), tap One-Key Take-off icon ( ) and slide the white slider to confirm take-off.
When Drone has connected to Remote Controller:
When Drone has not connected to Remote Controller:
One-key Take-off cannot be activated. ( In Beginner Mode )
When Drone has connected to Remote Controller:
Drone will ascend to 5 meters and hover to wait for the next order.
When Drone has NOT connected to Remote Controller:
Drone cannot take off.
Step 9: Check Status
If drone hover steadily after taking-off, over ten GPS Satellites have been found, connection between Smartphone & Sports Watch
and Follow Module & Sports Watch are normal, and P Mode enables, please move to next step.
If drifts happen after hovering or warning tips show on the screen of APP and Watch, please land the drone as soon as possible.
How to land?
Press L Button, and One-Key Land activates. During landing, Remote Controller vibrates to alert.
How to react when losing control of Drone?
If something emergent occur, like losing control of drone, you could make the drone motor stop to avoid dangers.
Please be cautious to enable this function.
Once being triggered, motors would stop immediately and fall down directly.
Remote Controller:
press Power button and X Button at the same time.
Page 64
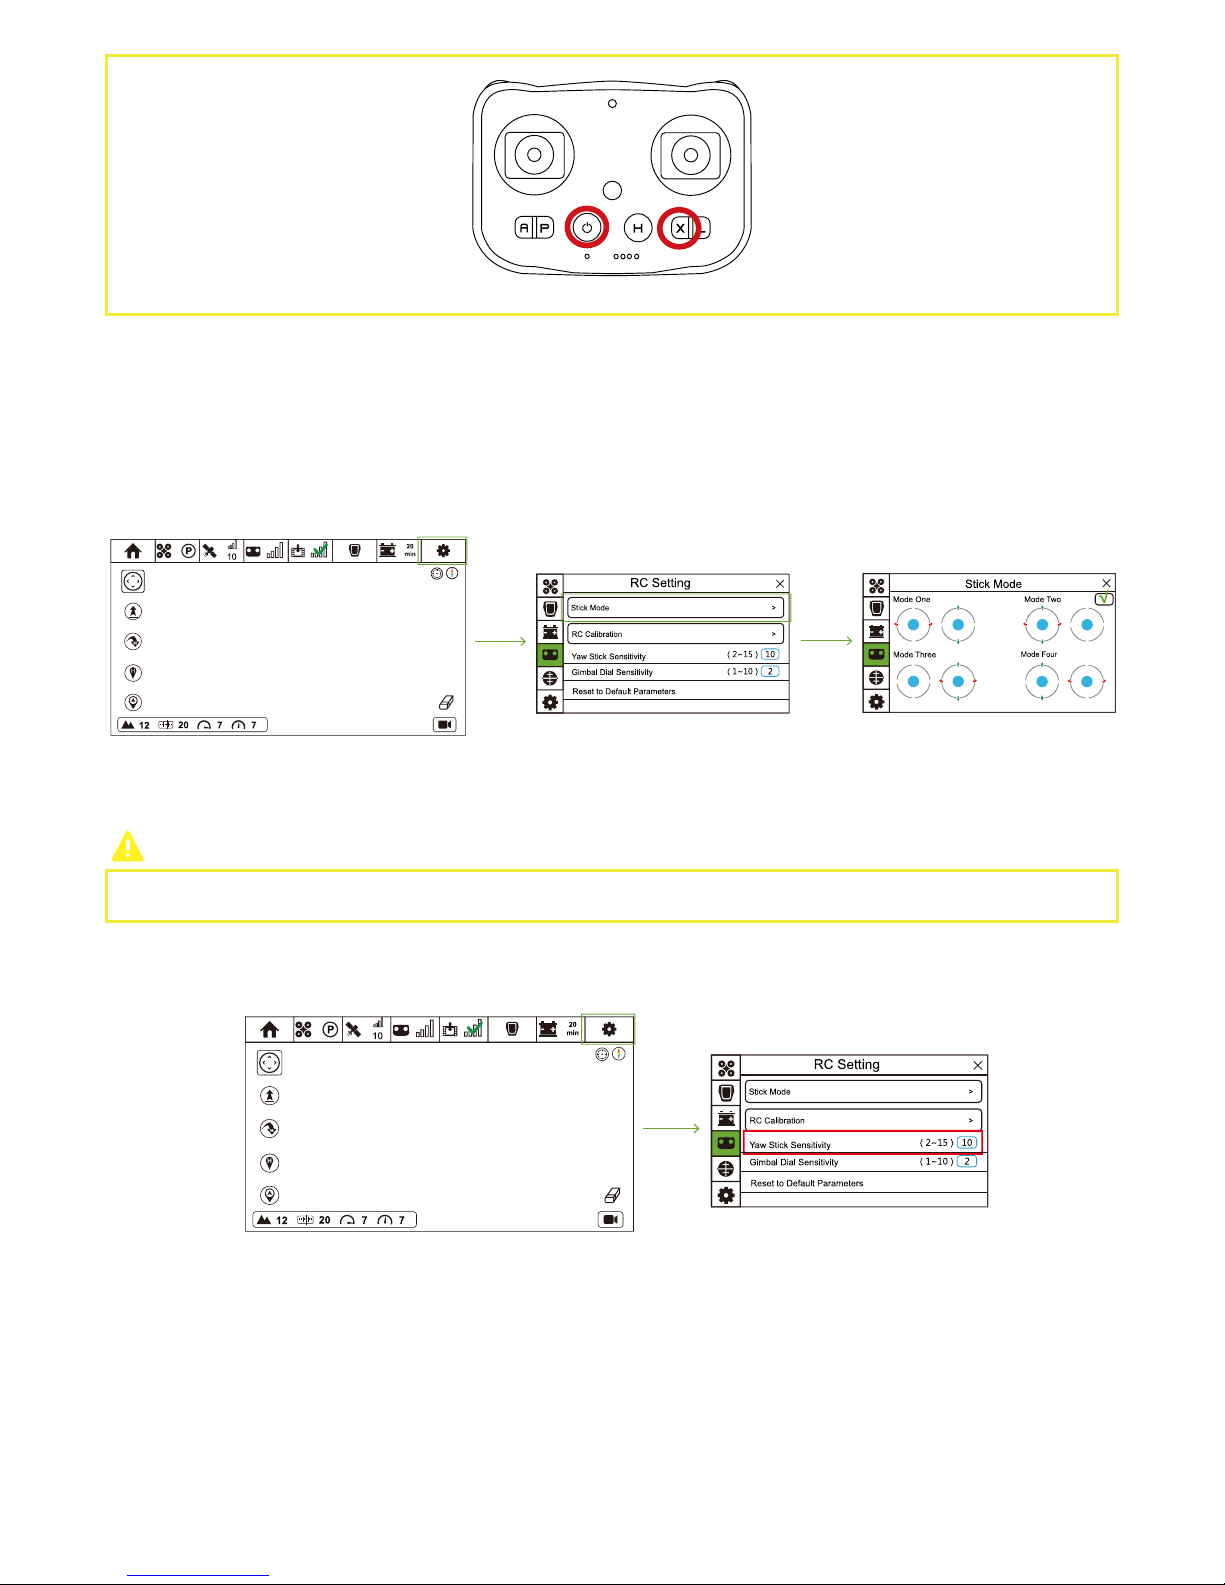
61
Step 10: Adjust Drone’s Attitude
The default stick mode is Mode 2. Please change Stick Mode through CEEWA APP.
Change Default Stick Mode
Change Yaw Stick Sensitivity
Change Gimbal Dial Sensitivity
① Ensure Remote Controller and CEEWA APP has been connected.
② Turn on CEEWA APP and enter Flight Interface. Tap “Others” icon and choose Calibration icon to enter RC Setting interface.
③ Select “Stick Mode” option and choose your preference mode.
① Ensure Remote Controller and CEEWA APP has been connected.
② Turn on CEEWA APP and enter Flight Interface. Tap “Others” icon and choose Calibration icon to enter RC Setting interface.
③ Fill an appropriate value in the Yaw Stick Sensitivity box.
Yaw Stick Sensitivity: when pushing yaw stick, the rotation speed of drone head.
Gimbal Dial Sensitivity: Toggling gimbal dial, and the rotation speed of drone head.
It is not suggested to modify default value without flight experience.
Page 65
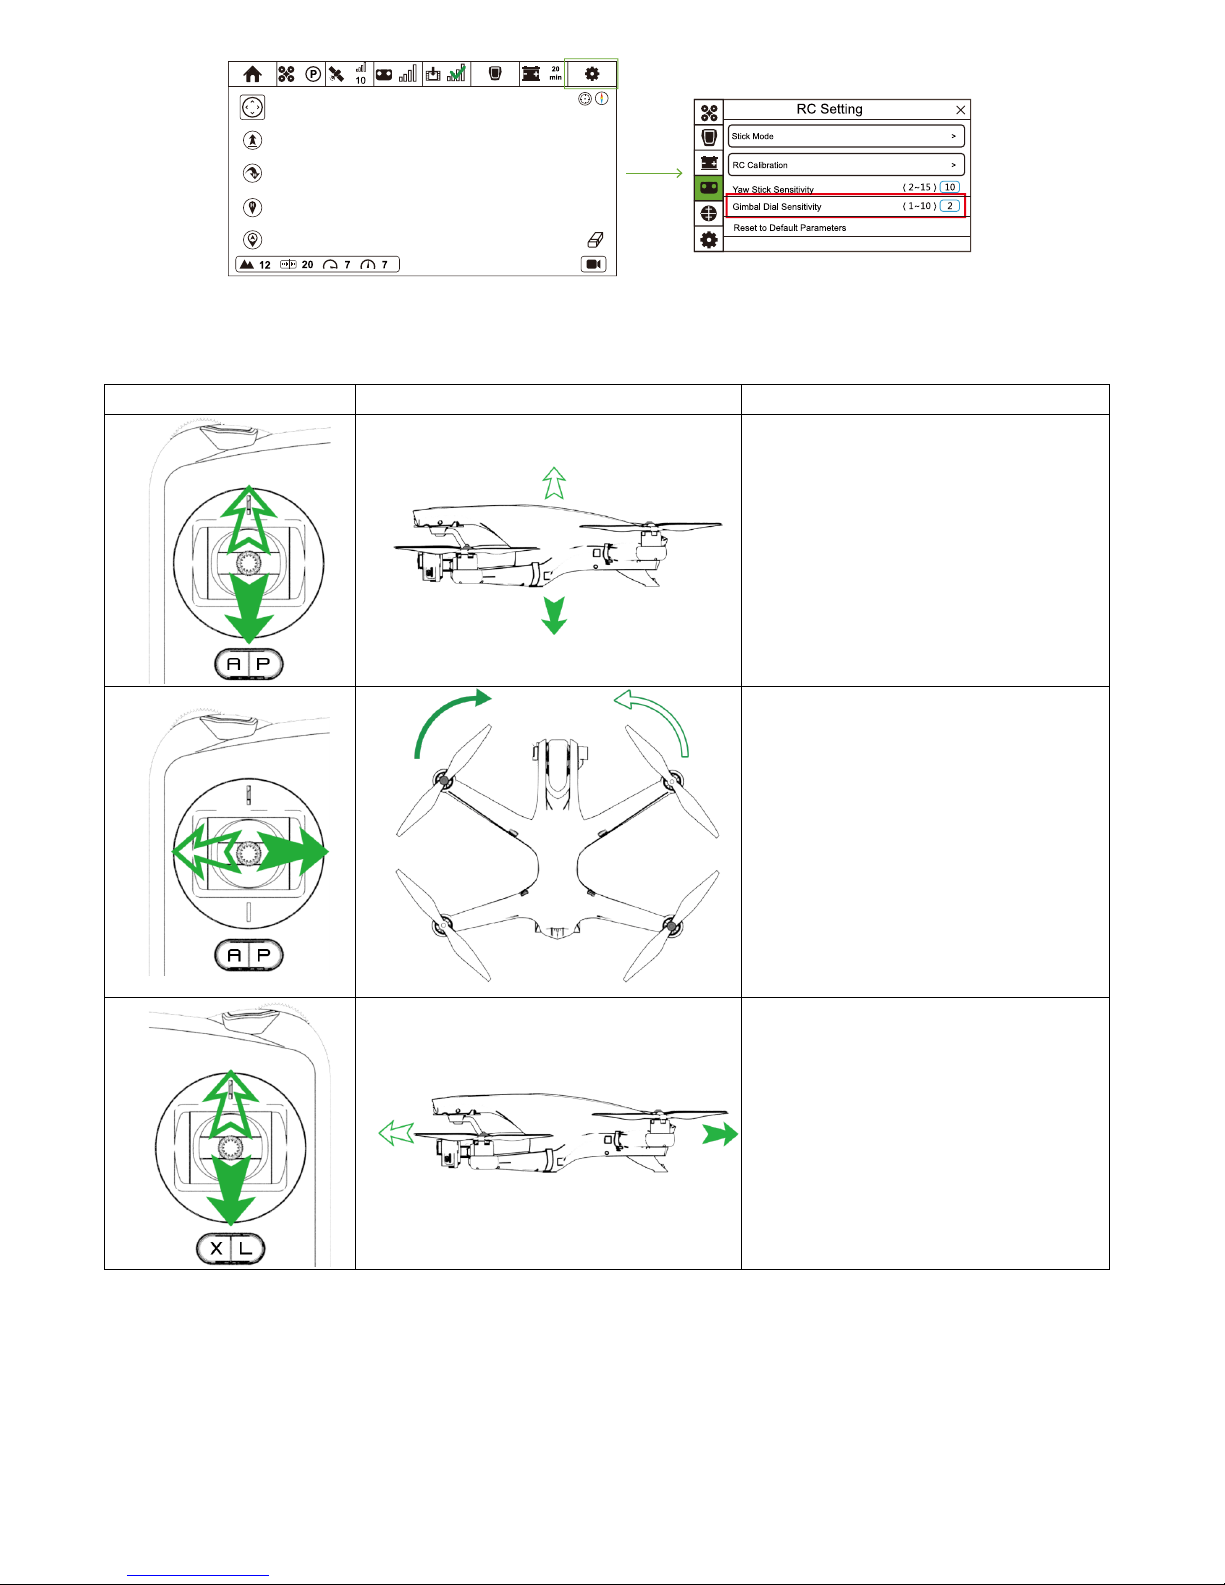
62
If you have no experience in controlling the drone, you can refer to the table below to adjust drone's attitude.
This table is based on the default control mode: Mode 2.
Control the drone
RC Drone Operation Methods
Move the left stick up and down to change the
elevation of the drone.
Push the stick up to ascend and down to
descend. When both sticks are centered, the
drone will hover.
Slowly push the throttle stick up over the
centered position to take off.
Move the left stick to the left or right to control
the rudder and rotation of Drone.
Push the stick to left to rotate Drone counterclockwise, while push the stick to right to rotate
Drone clockwise. If the stick is centered, Drone
will stay facing its current direction.
The more the stick is pushed away from the
centered position, the faster Drone will rotate.
Move the right stick up and down to change its
forward and backward pitch.
When pushing the stick up, Drone will fly
forward. When pushing the stick down, Drone
will fly backward.
If the stick is centered, Drone will hover.
Push the stick further away from the centered
position for a larger pitch angel (30 degrees at
max) and faster flight speed.
Page 66
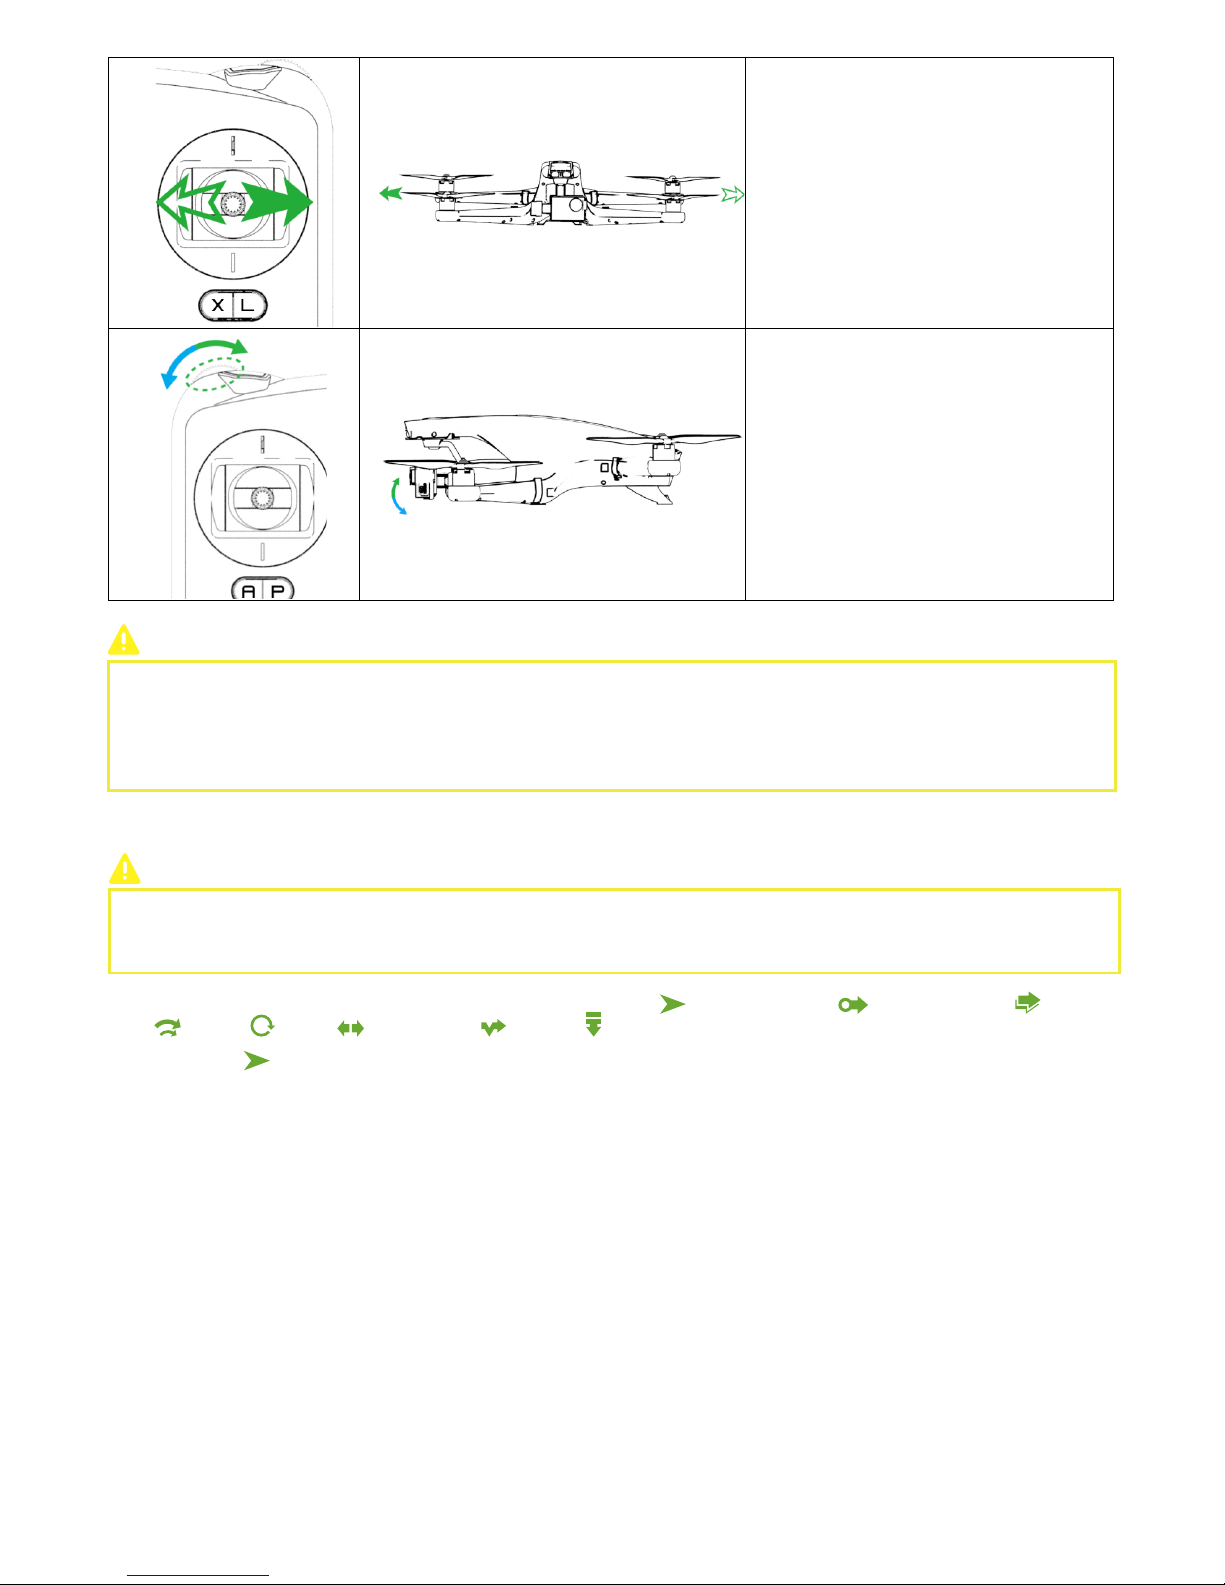
63
① Ensure Drone has taken-off.
② Click Follow Mode icon and enter Follow Mode menu.
③ Click Simple Follow icon and enter Simple Follow menu.
④ Click "Start". After all parameters have been uploaded, Simple Follow enables.
Step 11: Follow Mode
Before switching, please ensure parameters have been set correctly, flight environment is safe (e.g. no tall buildings and
interference sources), and distance between Drone & target is suitable.
Before Follow Mode, please put Drone & Follow Mode at the same height to calibrate!
There are 8 Follow Mode supported by CEEWA Drone: Simple-Follow ( ),Hover-and-Aim ( ),Follow-Shadow( ),FollowTrack( ),Orbit( ), Selfie( ),Follow-Line( ),Freeze( ) .
Simple Follow
Drone will auto follow the target with a fixed distance and altitude.
Attentions: ONLY activate Simple-Follow after taking-off. When this mode has been triggered, Drone will remain the relative altitude
and distance between Drone & Follow Module.
Keep a safe distance between Drone & Follow Module.
How to activate?
CEEWA APP
:
When pushing the stick to left, Drone flies to
the left. When pushing the stick to right, Drone
flies to the right. If the stick is centered, Drone
will hover.
Push the stick further away from the centered
position for a larger pitch angle (30 degrees at
max) and faster flight speed.
Gimbal Pitch Dial: Turn the dial to right and the
camera will shift to point upwards. Turn the
dial to the left and camera will shift to point
downwards.
After activating Follow Mode, the camera will always focus on the target. If you need to adjust Drone’s attitude, please pay
attention to the position and direction of nose. It is suggested to adjust drone’s attitude gradually and make sure you have set the
drone to the correct direction.
When head of drone faces Follow Module, you should pay special attentions because its orientation may be in the opposite
direction.
Page 67
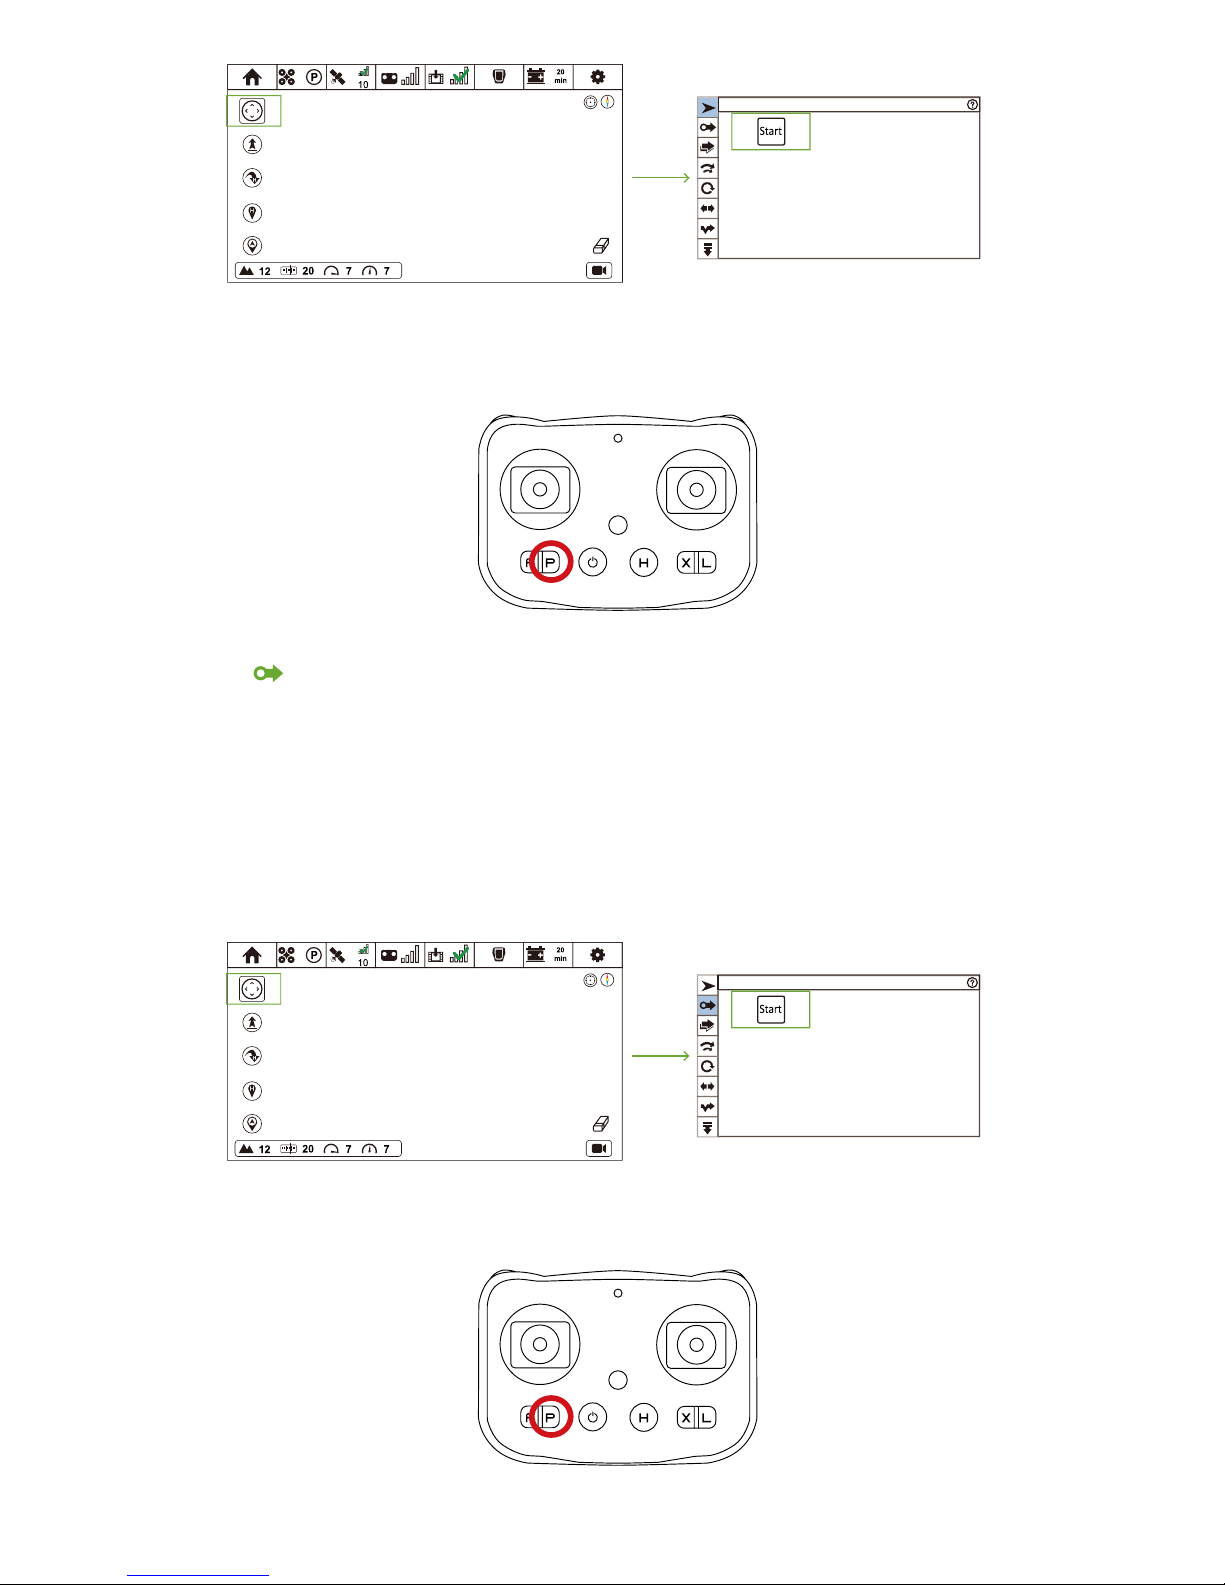
64
Simple Follow
In this mode, Drone will hover, but its nose and camera will rotate with the target. In other words, when target (Follow Module)
moves, Drone will stay hovering, but its nose and camera will move with Follow Module to capture images.
Keep a safe distance between Drone & Follow Module.
Hover-and-Aim
① Ensure Drone has taken-off.
② Click Follow Mode icon and enter Follow Mode menu.
③ Click Hover-and-Aim icon and enter Hover-and-Aim menu.
④ Click "Start". After all parameters have been uploaded, Hover-and-Aim enables.
How to activate?
CEEWA APP
:
Hover-and-Aim
How to deactivate?
Remote Controller:
Press P Button. When RC vibrates once P Button Status LED is constantly on, P Mode has been activated.
How to deactivate?
Remote Controller:
Press P Button. When RC vibrates once P Button Status LED is constantly on, P Mode has been activated.
Page 68
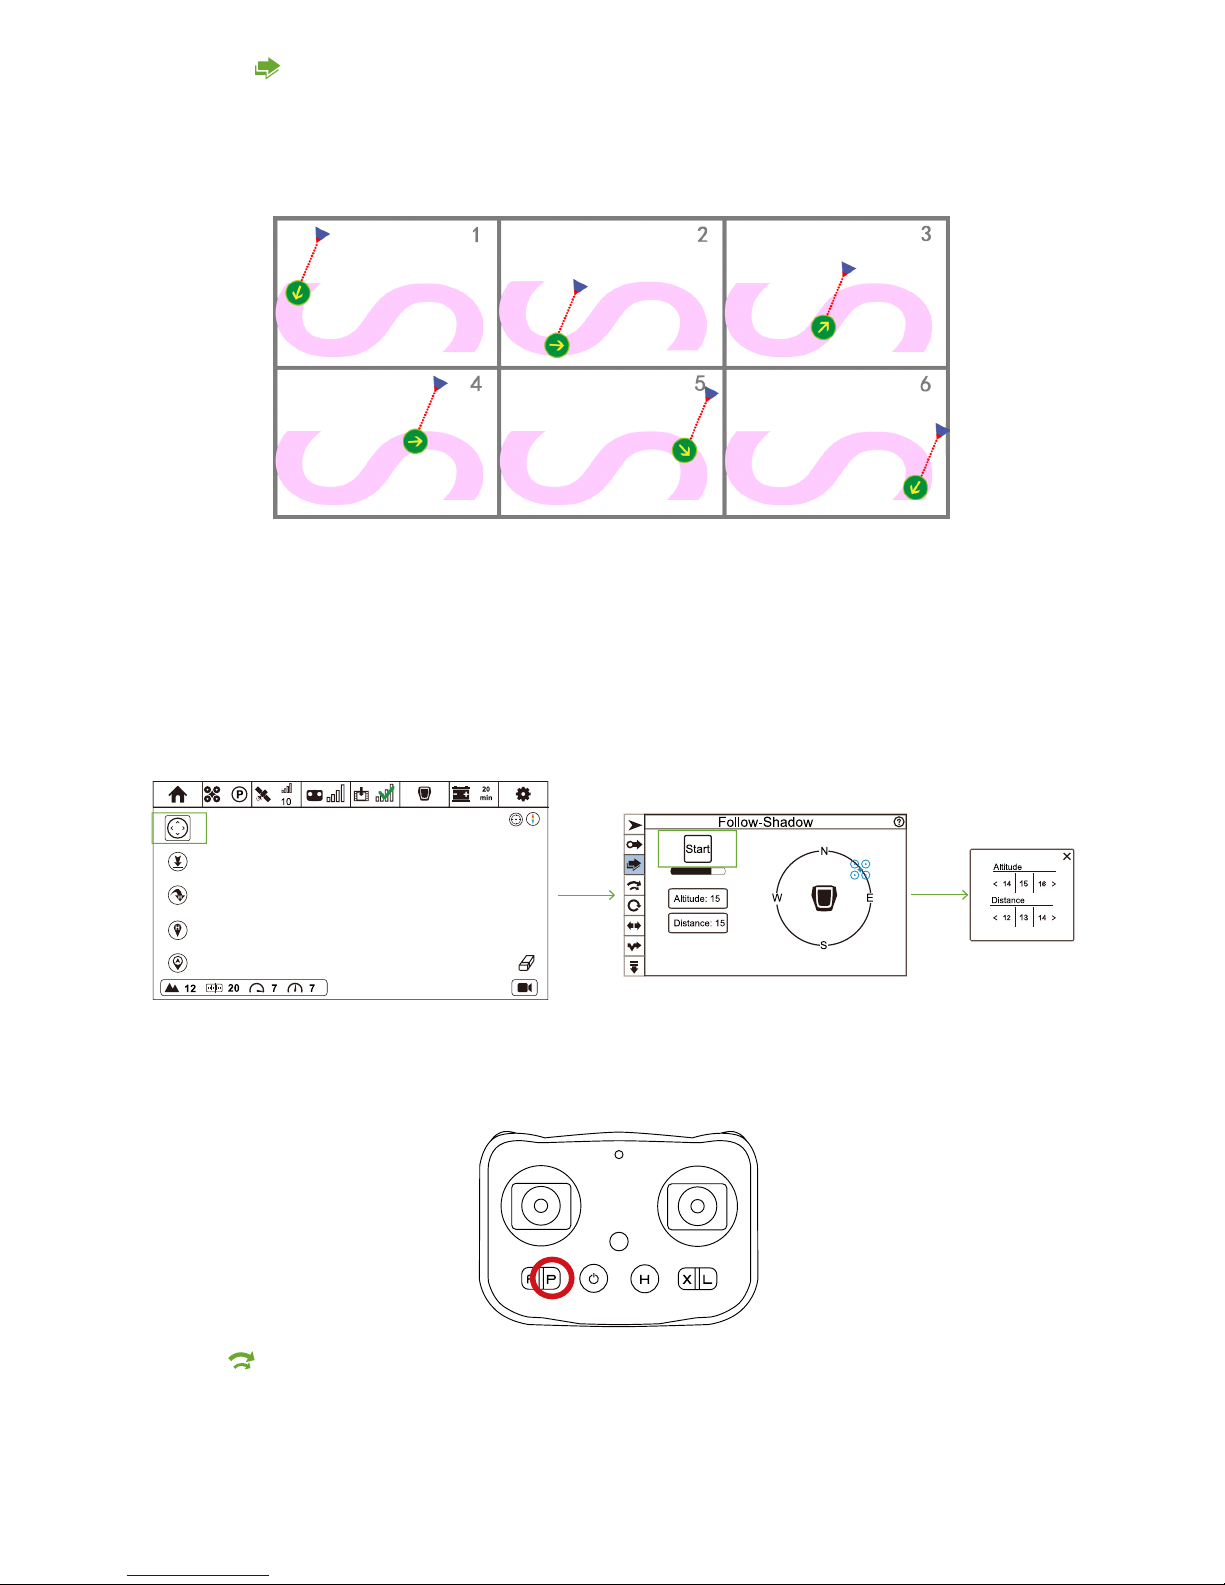
65
You need set relative distance, altitude and angle between Drone & Follow Module in APP. After activating, whatever the angle and
speed the Follow Module is, Drone will remain the preset altitude and distance. Moreover, it always keeps a same flight direction
and speed with Follow Module.
After activating, if you don't move Follow Module, Drone will stay hovering. However, once Follow Module moves, Drone would
fly to your preset altitude and distance.
Follow-Track
① Ensure Drone has taken-off.
② Click Follow Mode icon and enter Follow Mode menu.
③ Click Follow-Shadow icon and enter Follow-Shadow menu.
④ Drag Blue Drone icon to set the angle between Drone and Follow Module.
⑤ Click Altitude and Distance to adjust appropriate flight parameters in the pop-up window.
⑥
Click "Start". After all parameters have been uploaded, Follow-Shadow enables.
How to activate?
CEEWA APP
:
You need set relative distance, altitude and angle between Drone & Follow Module in APP. After activating, Drone will fly based on
the preset distance, altitude and angle.
In the following diagram, Green Circle represents Follow Module, while the Golden Arrow stands for the moving direction of Follow
Module. The Blue Triangle represents Drone.
Follow-Shadow
How to deactivate?
Remote Controller:
Press P Button. When RC vibrates once P Button Status LED is constantly on, P Mode has been activated.
Page 69
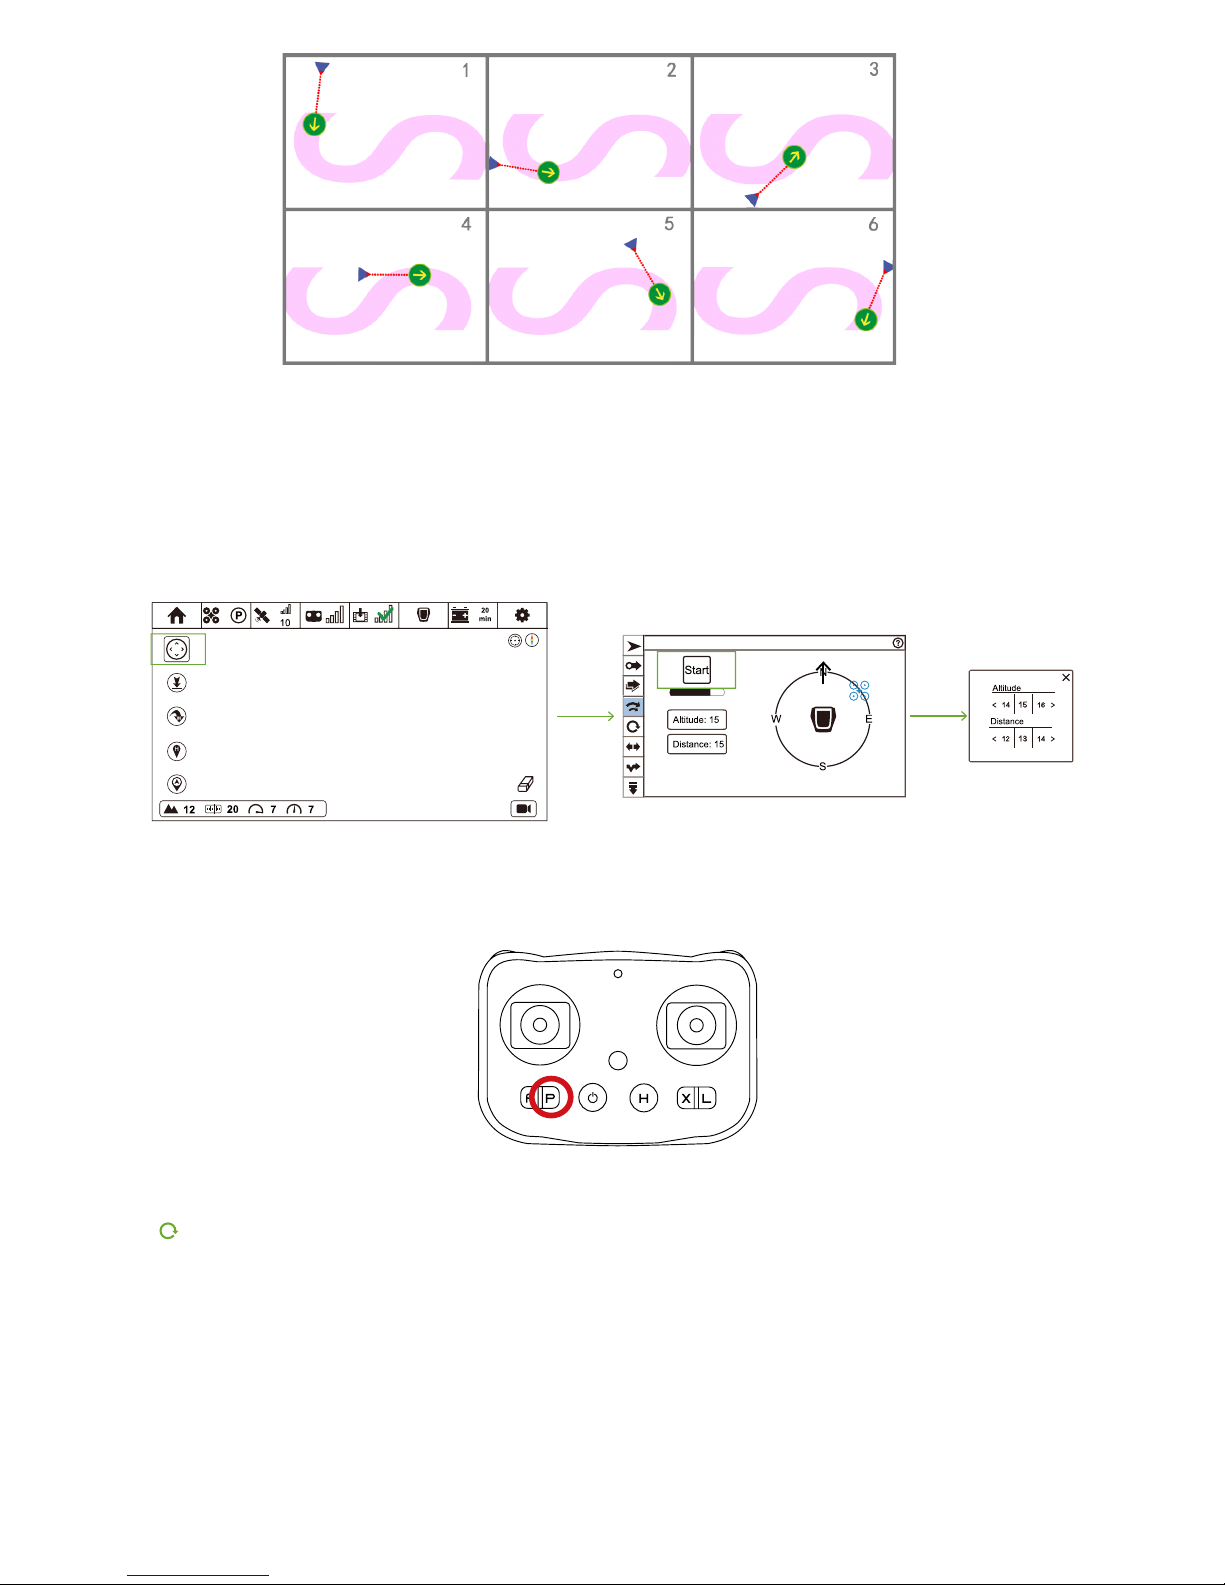
66
① Ensure Drone has taken-off.
② Click Follow Mode icon and enter Follow Mode menu.
③ Click Follow-Track icon and enter Follow-Track menu.
④ Drag Blue Drone icon to set the angle between Drone and Follow Module.
⑤ Click Altitude and Distance to adjust appropriate flight parameters in the pop-up window.
⑥
Click "Start". After all parameters have been uploaded, Follow-Track enables.
How to activate?
CEEWA APP
:
Follow-Track
How to deactivate?
Remote Controller:
Press P Button. When RC vibrates once P Button Status LED is constantly on, P Mode has been activated.
Drone will fly in a preset speed and radius surrounding the target. After activating, Drone will fly in the preset speed and radius
around the Follow Module. When the speed value is positive, Drone will orbit the target clockwise. When the speed value is
negative, Drone will orbit the target counter-clockwise.
Orbit
① Ensure Drone has taken-off.
② Click Follow Mode icon and enter Follow Mode menu.
③ Click Orbit icon and enter Orbit menu.
④ Click Altitude, Distance and to adjust appropriate flight parameters in the pop-up window.
⑤ Click "Start". After all parameters have been uploaded, Orbit enables.
How to activate?
CEEWA APP
:
Page 70
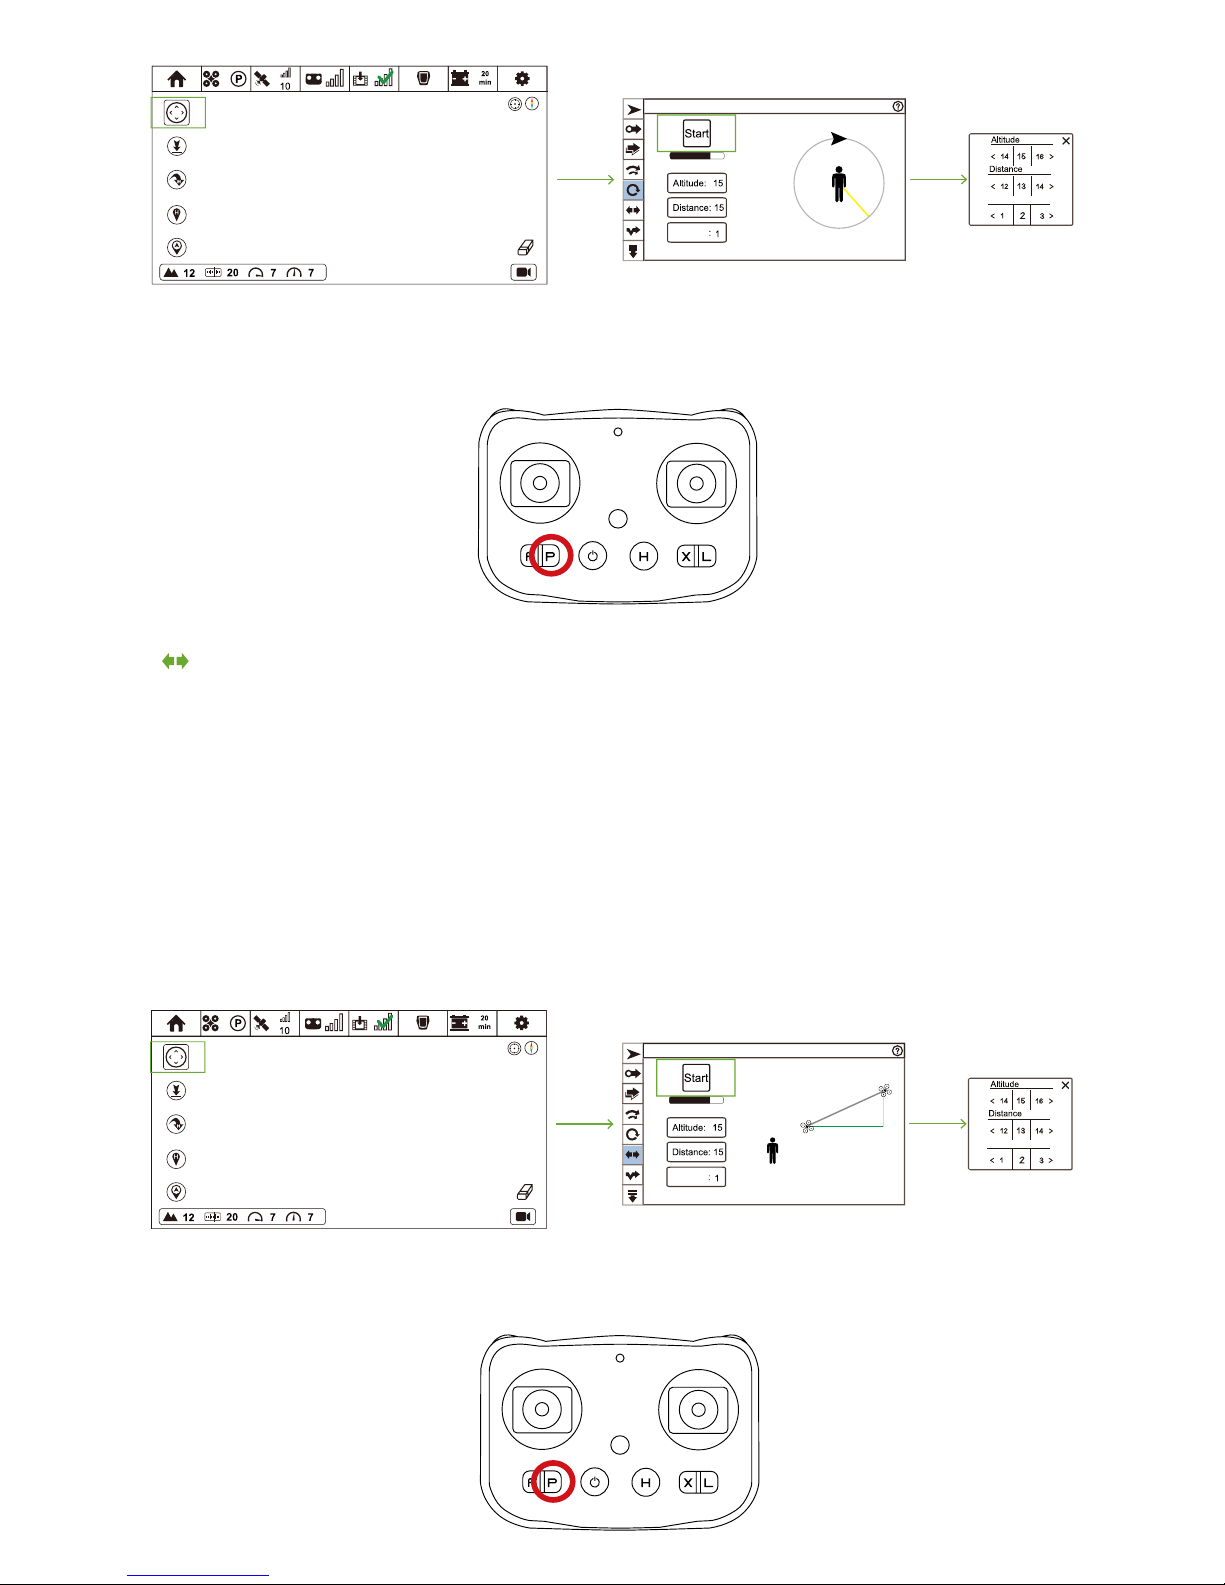
67
Set a terminal coordinate and flight speed in APP at first. Drone will fly from current position along in a straight line to the terminal.
After reaching the end coordinate, Drone will auto return to the initial point. During flight, the camera will be always pointing to the
Follow Module.
Through Selfie, you can get the transitional footage from small scene to large scene, and from large scene to small scene. Set a
reasonable distance, altitude and angle.
Selfie
① Ensure Drone has taken-off.
② Click Follow Mode icon and enter Follow Mode menu.
③ Click Selfie icon and enter Selfie menu.
④ Click Altitude, Distance and to adjust appropriate flight parameters in the pop-up window.
⑤ Click "Start". After all parameters have been uploaded, Selfie enables.
How to activate?
CEEWA APP
:
Orbit
Vcircle
Vcircle
D
H
Orbit
Vcircle
R
Vcircle
How to deactivate?
Remote Controller:
Press P Button. When RC vibrates once P Button Status LED is constantly on, P Mode has been activated.
How to deactivate?
Remote Controller:
Press P Button. When RC vibrates once P Button Status LED is constantly on, P Mode has been activated.
Page 71
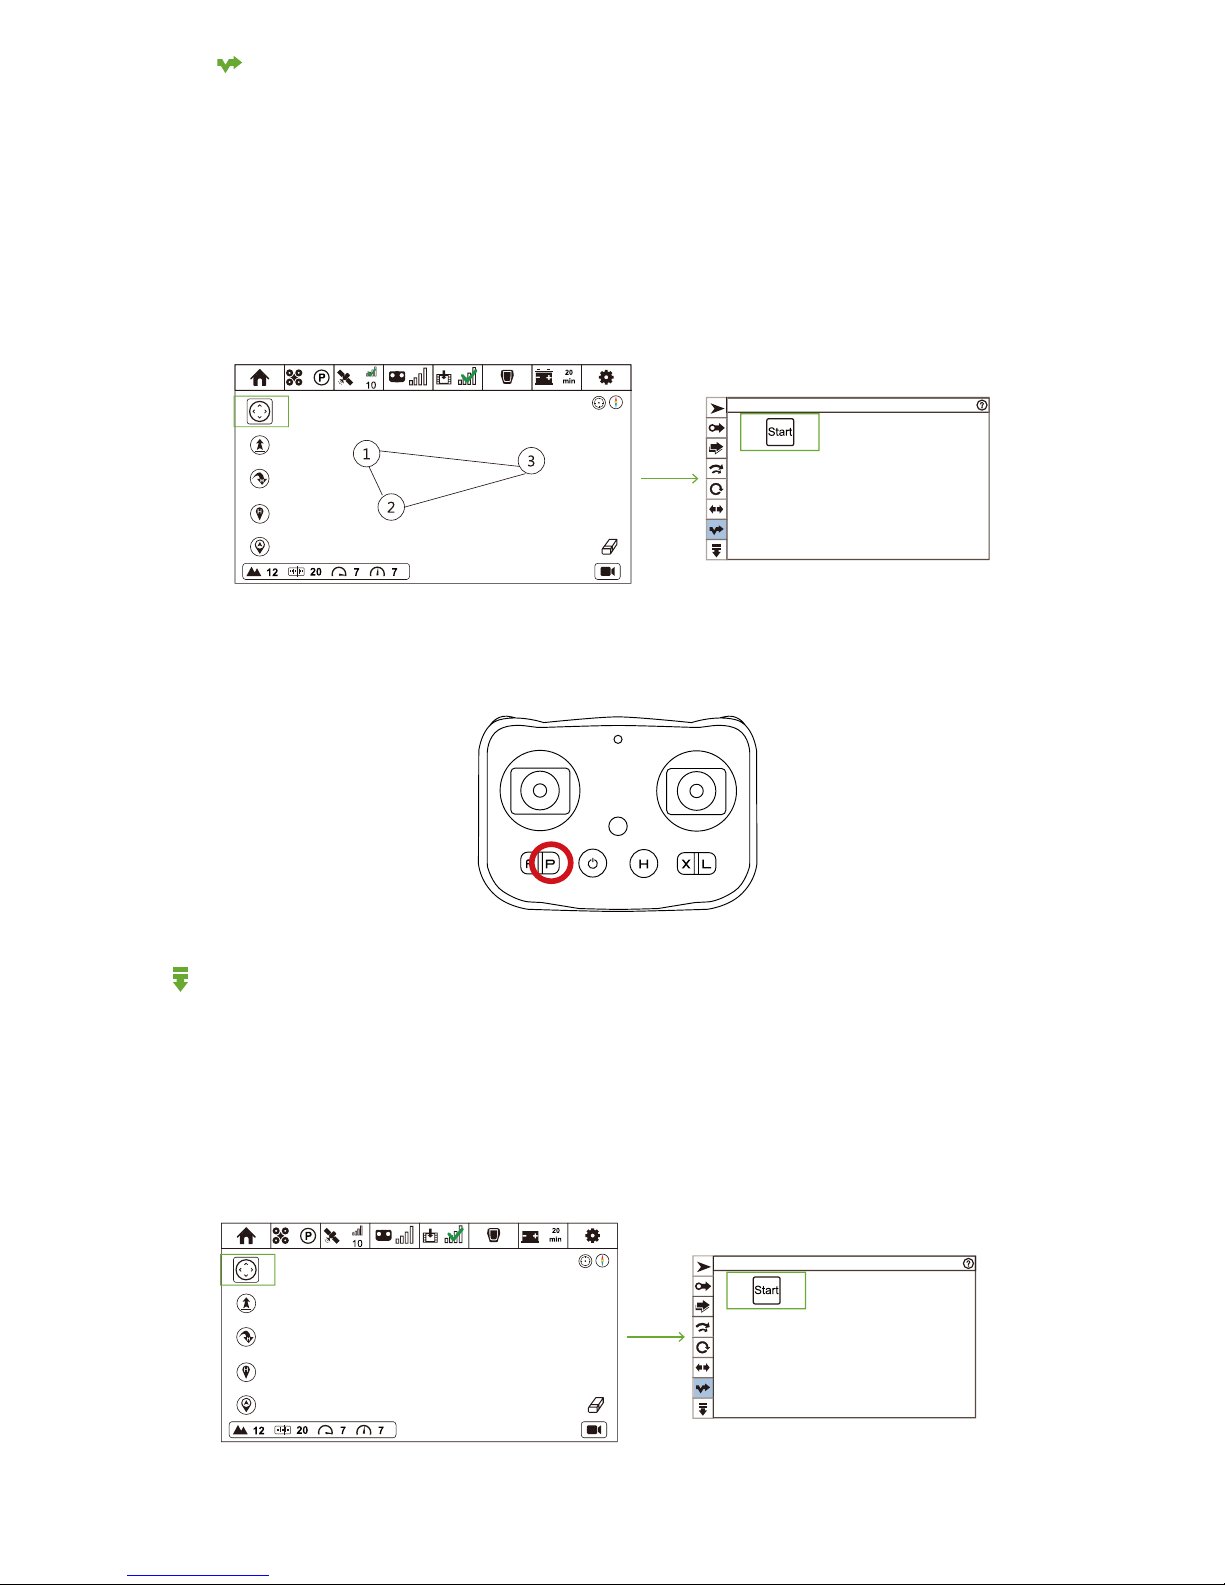
68
You need to set more than one waypoint in the map. These waypoints will auto generate route, and Drone will fly along this route
with Follow Module. If Follow Module goes beyond the route range, Drone will stay and hover at the nearest waypoint with camera
pointing to the direction of Follow Module.
CEEWA APP will auto check the reliability of route. If the route is not reasonable, waypoints will turn to red.
Follow-Line
① Ensure Drone has taken-off.
② Set waypoints in the map and these waypoints will automatically turn form a route. Click these waypoints to set different height.
③ Click Follow Mode icon and enter Follow Mode menu.
④ Click Follow-Line icon and enter Follow-Line menu. Click "Start". After all parameters have been uploaded, Follow-Line enables.
How to activate?
CEEWA APP
:
Follow-Line
How to deactivate?
Remote Controller:
Press P Button. When RC vibrates once P Button Status LED is constantly on, P Mode has been activated.
Drone will hover in the sky, but its gimbal will point straight down to support the camera to shoot. In this mode, the position of
Follow Module has nothing to do with Drone.
Freeze
① Ensure Drone has taken-off and achieve your desired position.
② Click Follow Mode icon and enter Follow Mode menu.
③ Click Freeze icon and enter Freeze menu.
④ Click "Start". After all parameters have been uploaded, Freeze enables.
How to activate?
CEEWA APP
:
Freeze
Page 72
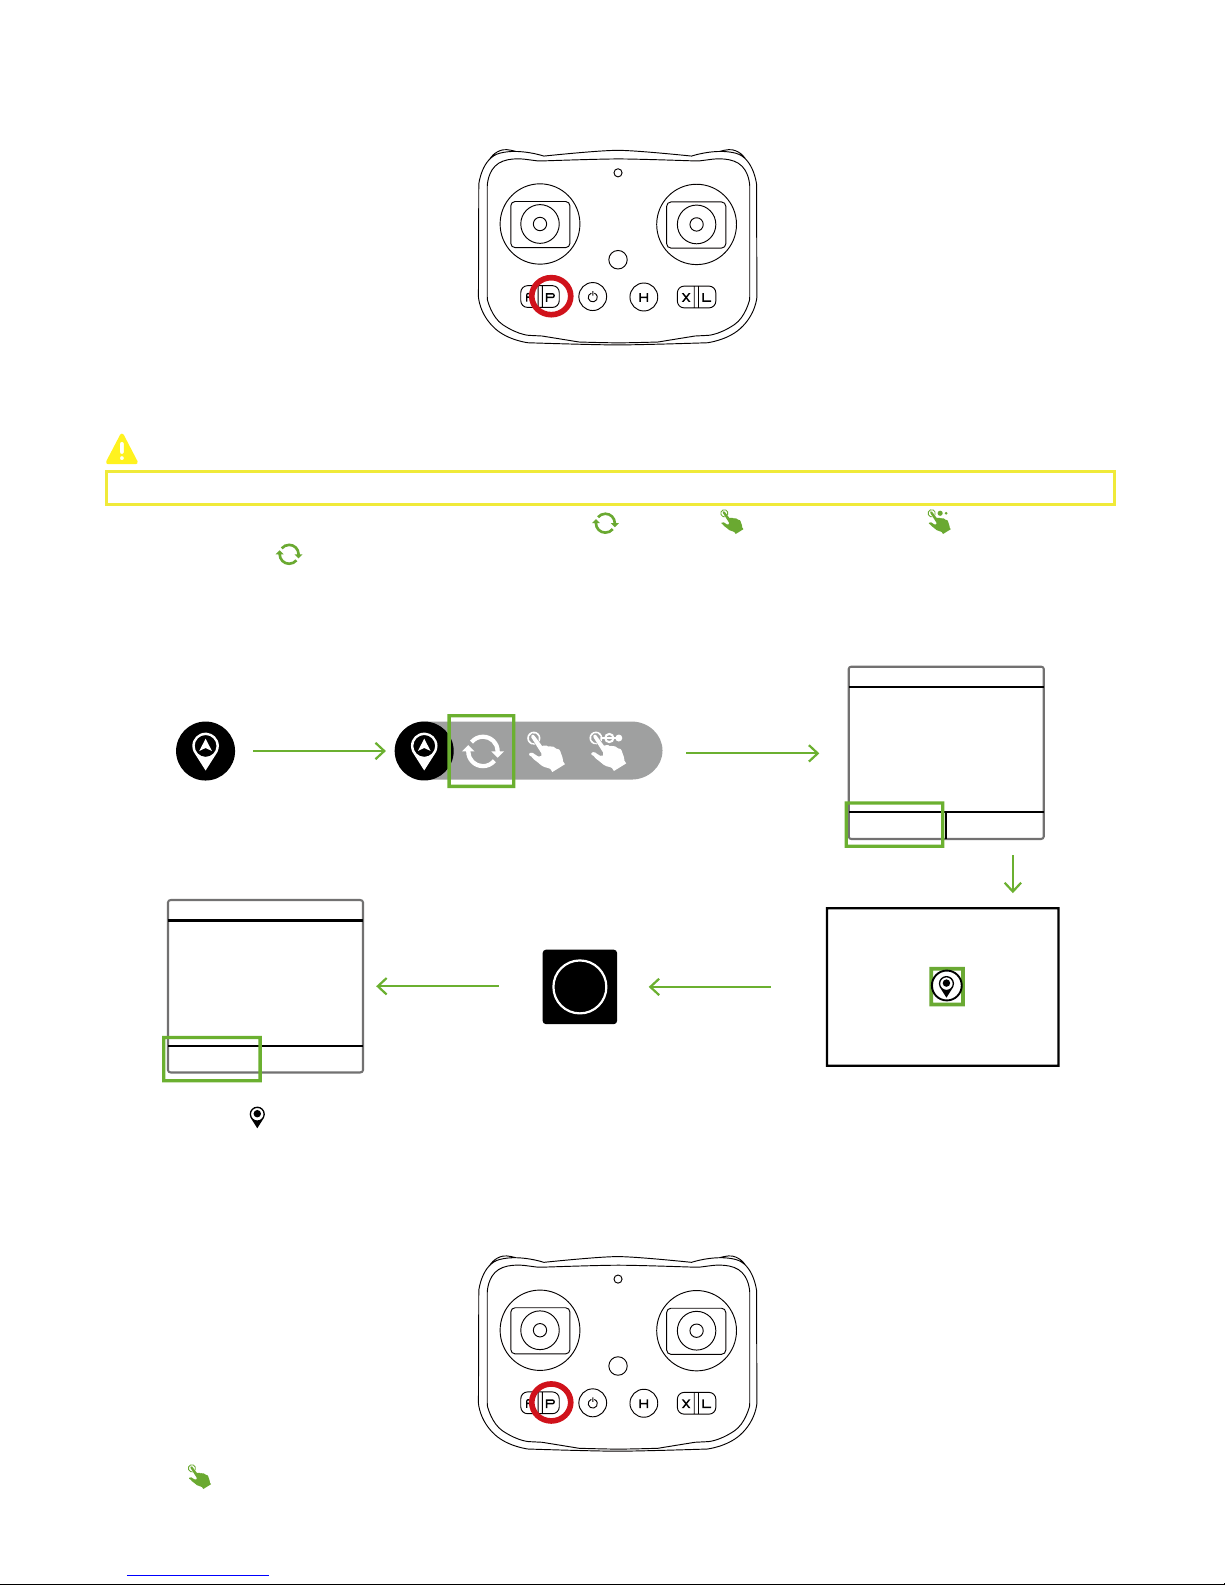
69
Step 12: Nav. Mode
Please activate Nav. Mode in CEEWA APP.
CEEWA Drone S1 supports three Nav. Mode : Single-Point Orbit( ),Pointing( ),Multiple-Points Nav.( ).
After finishing setting the waypoint in the map, Drone will orbit the waypoint constantly.
Tap the waypoint ( ) in the map to edit its altitude, speed, vcircle and radius in the pop-up window. Also, delete this waypoint in
this pop-up window.
Single-Point Orbit
Confirm Orbit
Please set an orbit point in the
map.
Orbit Velocity 3
Orbit Radius 5
Time Left 15
Single-Point Orbit
How to activate?
CEEWA APP
:
OK Cancel
OK Cancel
Start
How to deactivate?
Remote Controller:
Press P Button. When RC vibrates once P Button Status LED is constantly on, P Mode has been activated.
How to deactivate?
Remote Controller:
Press P Button. When RC vibrates once P Button Status LED is constantly on, P Mode has been activated.
You should set one waypoint in the map at first, and Drone will fly towards the waypoint.
Pointing
Page 73
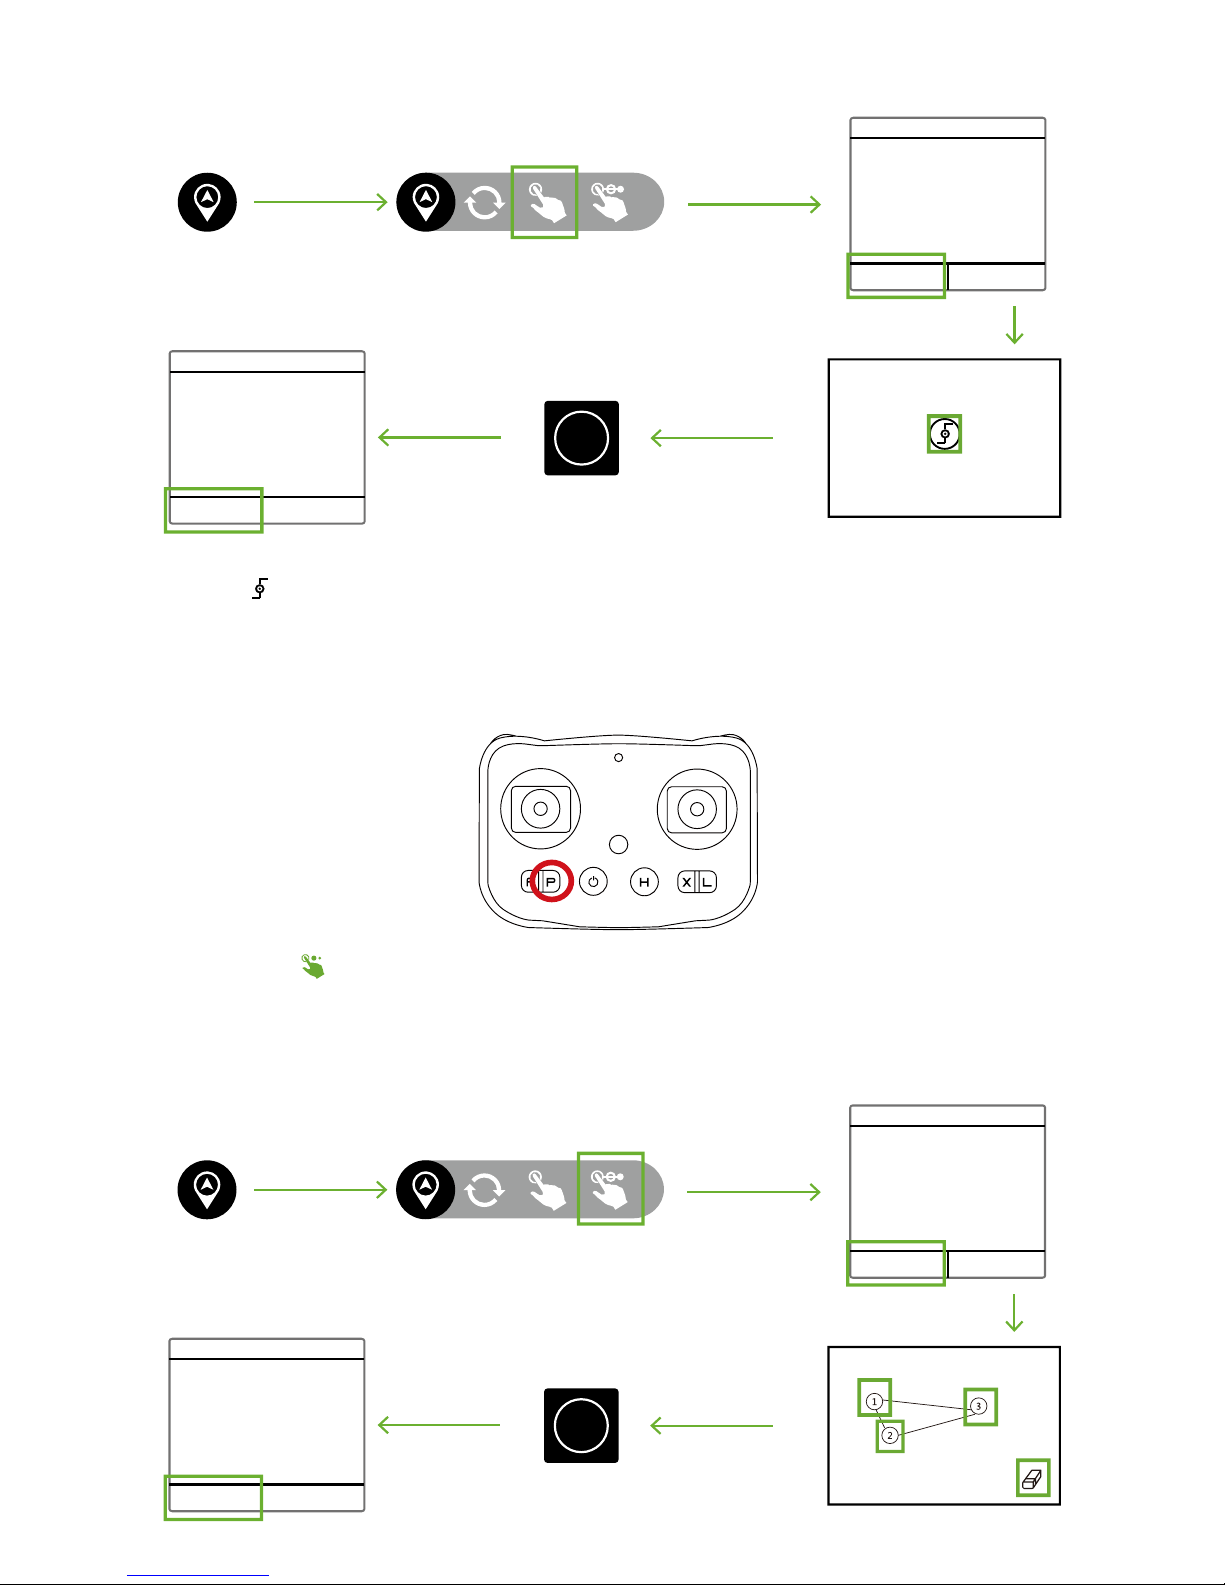
70
How to activate?
CEEWA APP
:
Pointing
Confirm Route
Please set a destination point in
the map.
Distance 32
Flight Velocity 5
Time Left 15
OK Cancel
OK Cancel
Start
Tap the waypoint ( ) in the map to edit its altitude and velocity in the pop-up window. Also, delete this waypoint in this pop-up
window.
How to deactivate?
Remote Controller:
Press P Button. When RC vibrates once P Button Status LED is constantly on, P Mode has been activated.
In Multiple-Points Nav., Drone will fly along the route of waypoints. After reaching the last waypoint, it will fly to the first waypoint
and repeat the route.
How to activate?
CEEWA APP
:
Multiple-Points Nav.
Multiple-Points Nav.
Confirm Orbit
Please set waypoints in the map.
Route Length 65
Number 3
Time Left 15
OK Cancel
OK Cancel
Start
Page 74
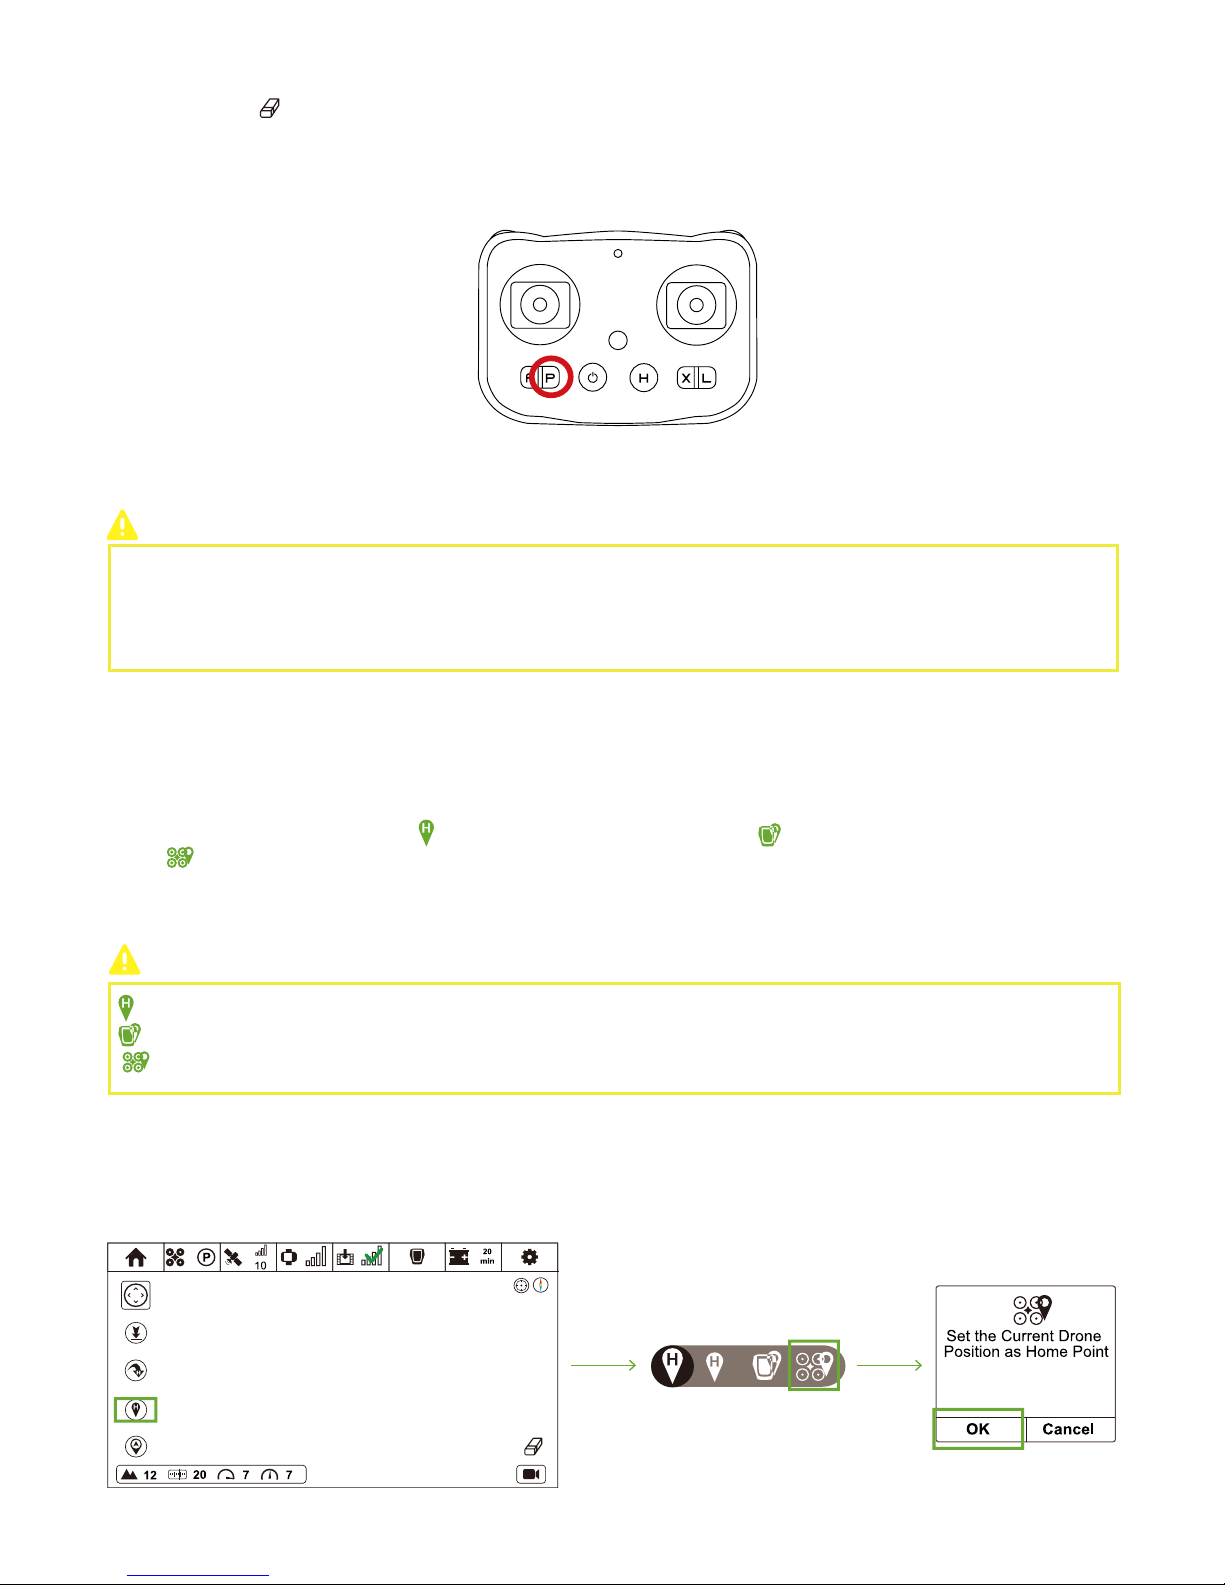
71
Tap each waypoint in the map to edit its altitude and velocity in the pop-up window. Also, delete this waypoint in this pop-up
window.
Tap the eraser icon ( ) to delete all the waypoints.
CEEWA APP:
Step 14: Go-Home
Step 13: Check Live Image
Go-Home brings the drone back to the latest recorded Home Point.
CEEWA Drone supports three kinds of Go-Home, including Smart Go-Home, Low-Battery Go-Home, and Failsafe Go-Home.
Before going-home, you should set Home Point through Sports Watch or CEEWA APP. Three are three kinds of Home Points, including
“Set Take-off Position as Home Point” ( ), “Set Module Position as Home Point”( ) and “Set Current Drone Position as Home
Point”( ).
If you have not set Home Point, Drone would return to Take-off position by default.
:
Set Take-off Position as Home Point
: Set Module Position as Home Point
: Set Current Drone Position as Home Point
Set Home Point
Refer to Chapter IV. Remote Controller Version: Check before Flight → Step 11: Check Image Transmission to get detailed methods
to check live image.
If you want to take photos during flight, please refer to 4K Camera User Manual and 1080P Camera User Manual. Switch to
Timelapse Mode and choose an appropriate time interval from 3sec, 5sec and 10sec. After taking-off, drone will keep taking
photos.
If you want to enable Go-Home, it is suggested to set Home Point at first. Otherwise, Drone will return to take-off position by
default.
Take “Set Drone Current Coordinate as the New Home Point” as an example.
How to deactivate?
Remote Controller:
Press P Button. When RC vibrates once P Button Status LED is constantly on, P Mode has been activated.
Page 75
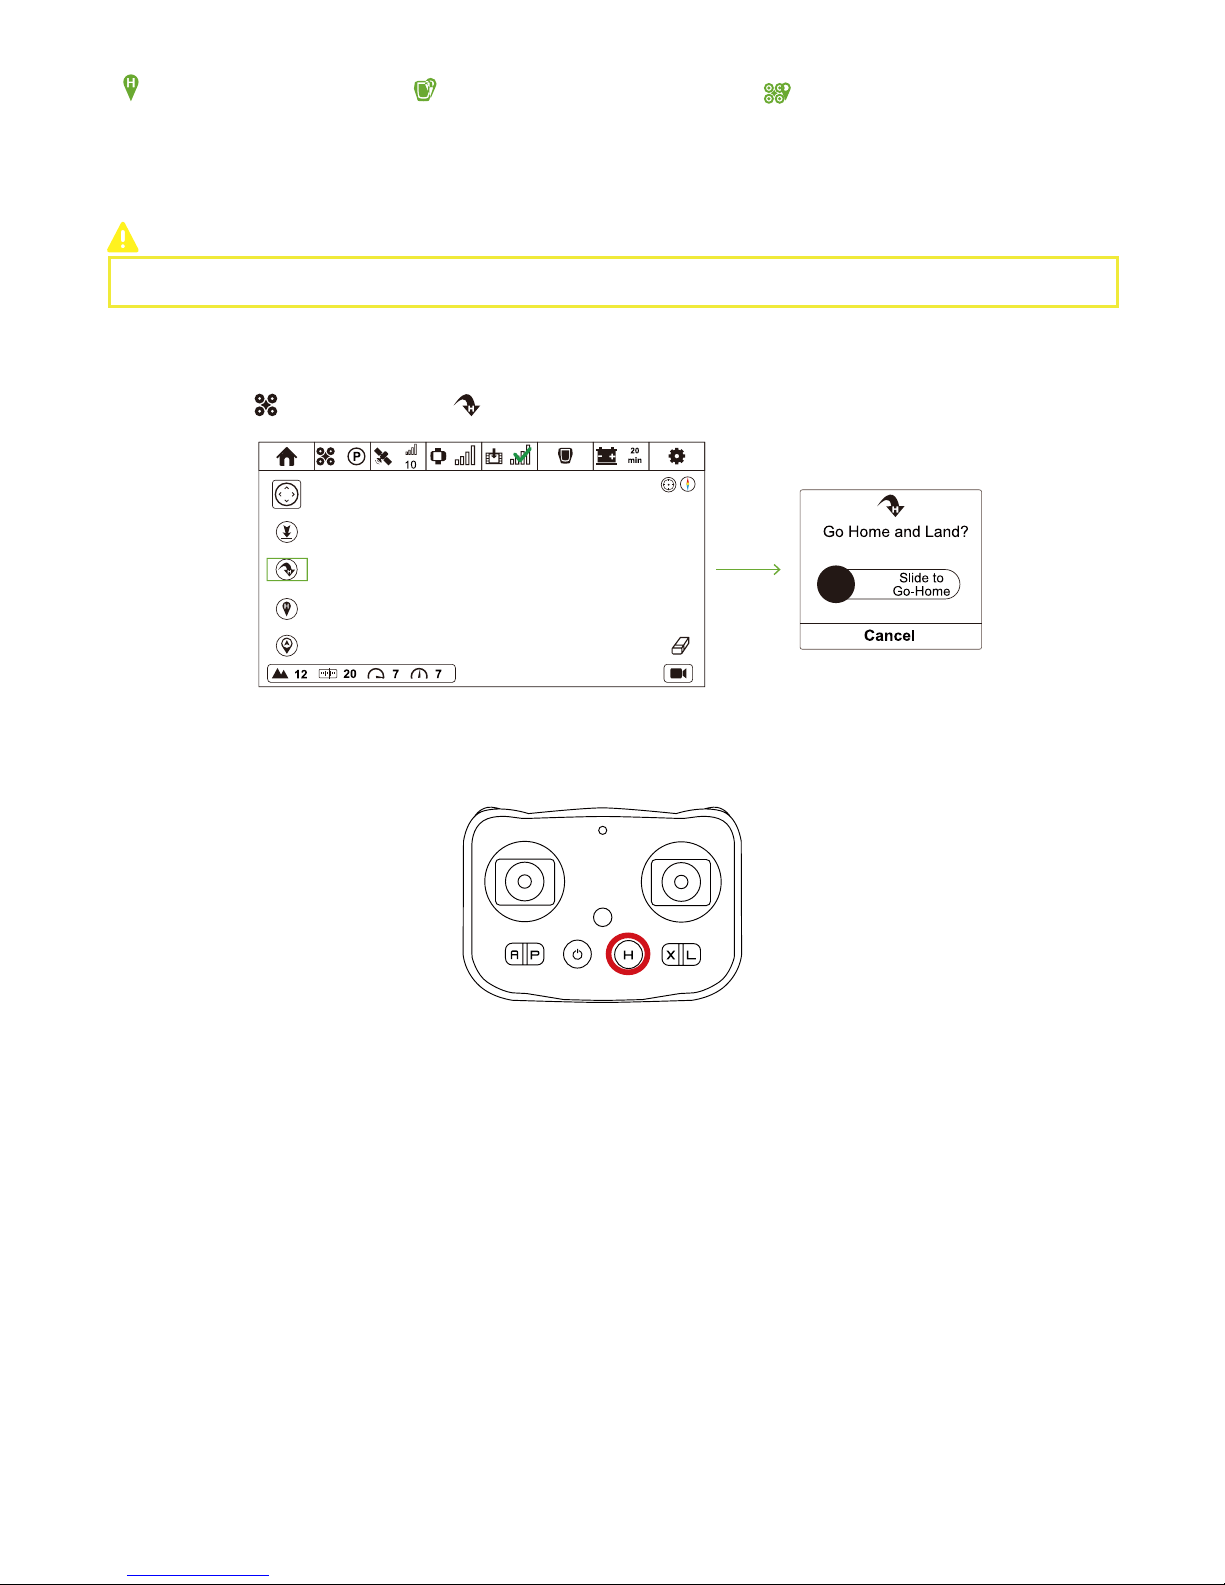
72
Smart Go-Home
Enable Go-Home by Sports Watch / CEEWA APP. During Smart Go-Home procedures, you can control its orientation and height
through Watch.
Press H Button for over 5s. If Remote Controller vibrates once, it indicates that Remote Controller enables.
It is suggested to enable Smart Go-Home in a safe and reliable environment to avoid obstacles.
How to activate?
CEEWA APP
:
Remote Controller
:
In Flight Interface ( ), tap Go-Home icon ( ) and slide the white slider to confirm going home.
Set Take-off Coordinate as
the New Home Point
Set Follow Module Current
Coordinate as the New Home Point
Set Drone Current Coordinate as the
New Home Point
Low-Battery Go-Home
Failsafe Go-Home
How to Go-Home?
The content of this table shows the go-home procedures in Smart Go-Home, Low-Battery Go-Home and Failsafe Go-Home.
In order to avoid dangers of low-battery, the main controller system will calculate the distance between Drone & Home Point and go-
home time in real-time. When the remaining battery is ONLY enough for going-home, Low-Battery Go-Home is triggered. During the
process, you could control Drone's attitude through Sports Watch and Remote Controller to avoid obstacles.
Moreover, you could switch to P Mode to cancel Low-Battery Go-Home. However, after canceling, if the battery is ONLY for landing,
Drone will auto land. You cannot disable this procedure, but can control Drone's attitude through Sports Watch to avoid obstacles.
When more than 10 satellites have been found & compass work properly & Home Point has been recorded, if Drone disconnects
with Sports Watch, Drone will auto return to the latest Home Point.
During Go-Home process, if the signal is recovered, Failsafe Go-Home can be cancelled and you can regain control over the drone by
Watch.
-------------------------------------------------------------------------------------------------------------------------------------------------------------------------------
Page 76
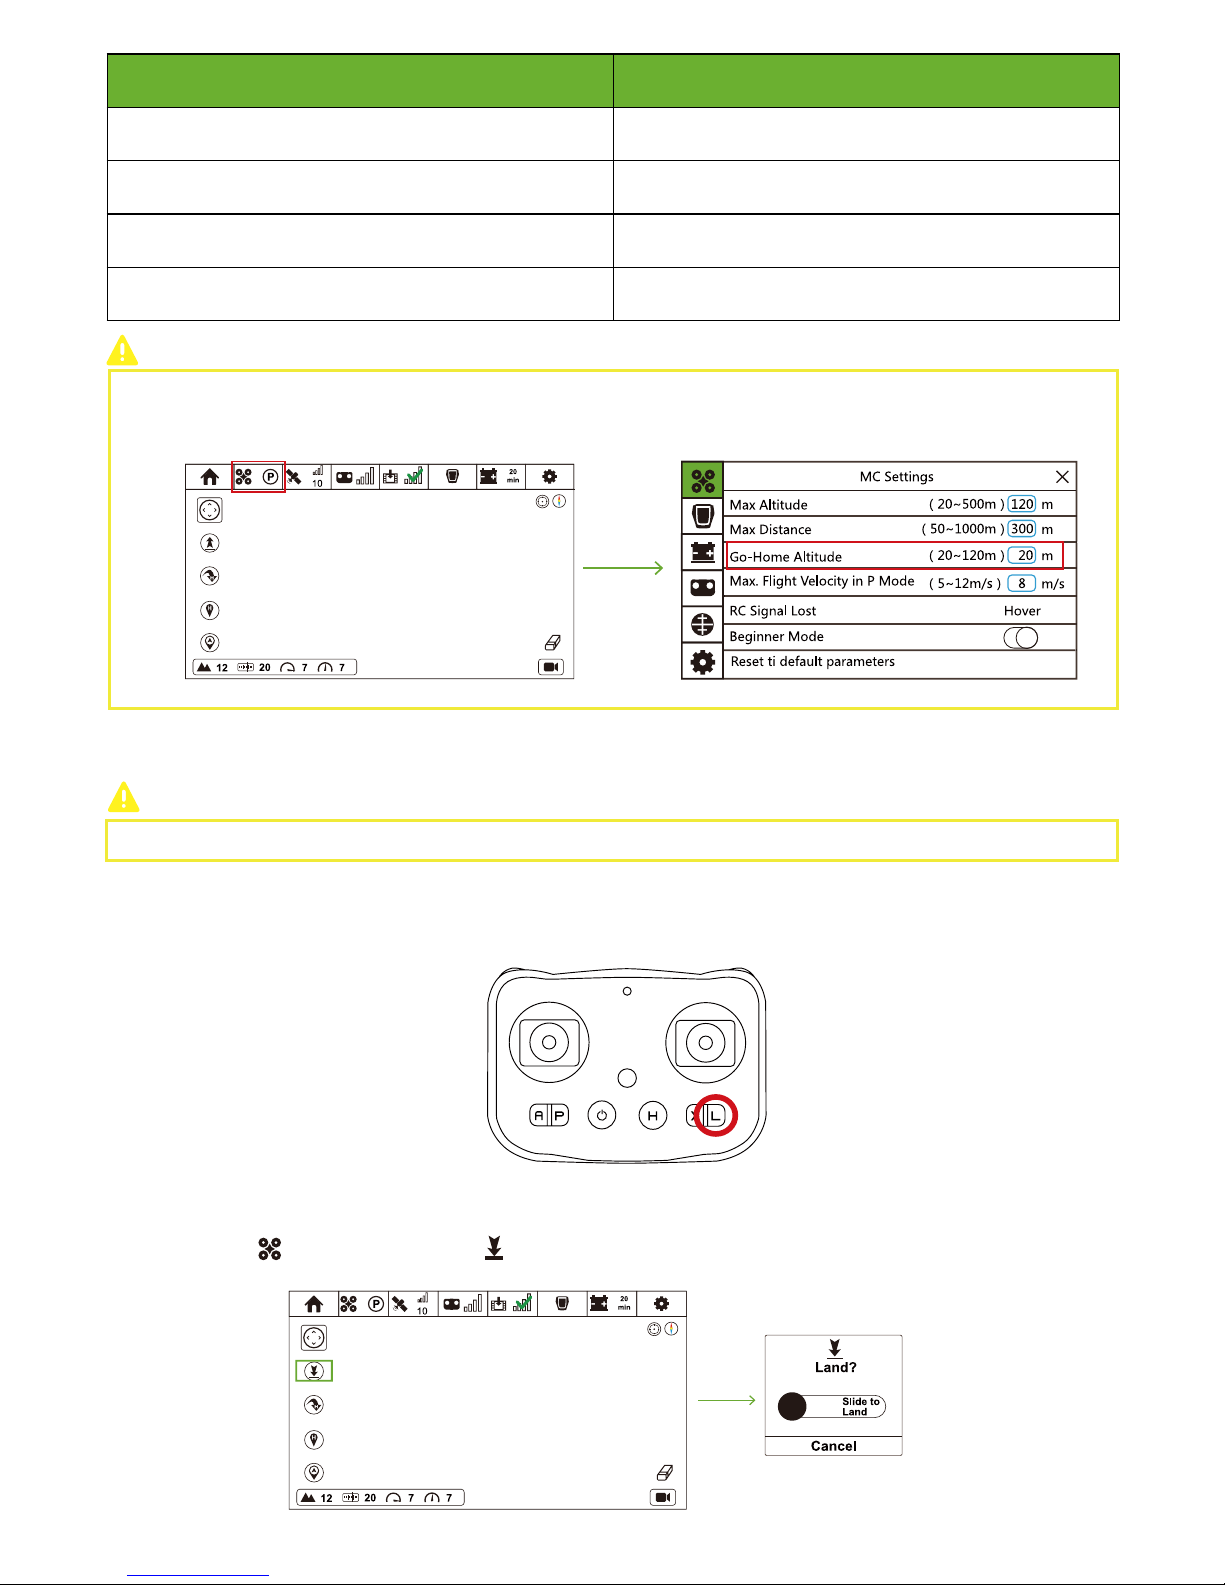
73
Before Go-Home, Altitude & Distance between Drone and
Home Point:
How to go home?
Distance>5m
Altitude<Preset Go-Home Altitude
Drone will ascend to your preset Go-Home Altitude, and then go
home.
Distance>5m
Altitude ≥ Preset Go-Home Altitude
Drone will go home directly.
Distance<5m
Altitude<5m
Drone will ascend to 5 meters, and then go home.
Distance≤5m
Altitude≥5m
Drone will go home directly.
How to set Go-Home Altitude?
In flight interface, tap "Drone" icon to enter MC setting interface. Set a reasonable value in Go-Home Altitude column.
Step 15: One-key Land
Please land the drone on the level ground.
Press L Button, and One-Key Land activates. During landing, Remote Controller vibrates to alert.
CEEWA APP:
Remote Controller:
In Flight Interface ( ), tap One-Key Land icon ( ) and slide the white slider to confirm landing.
Page 77
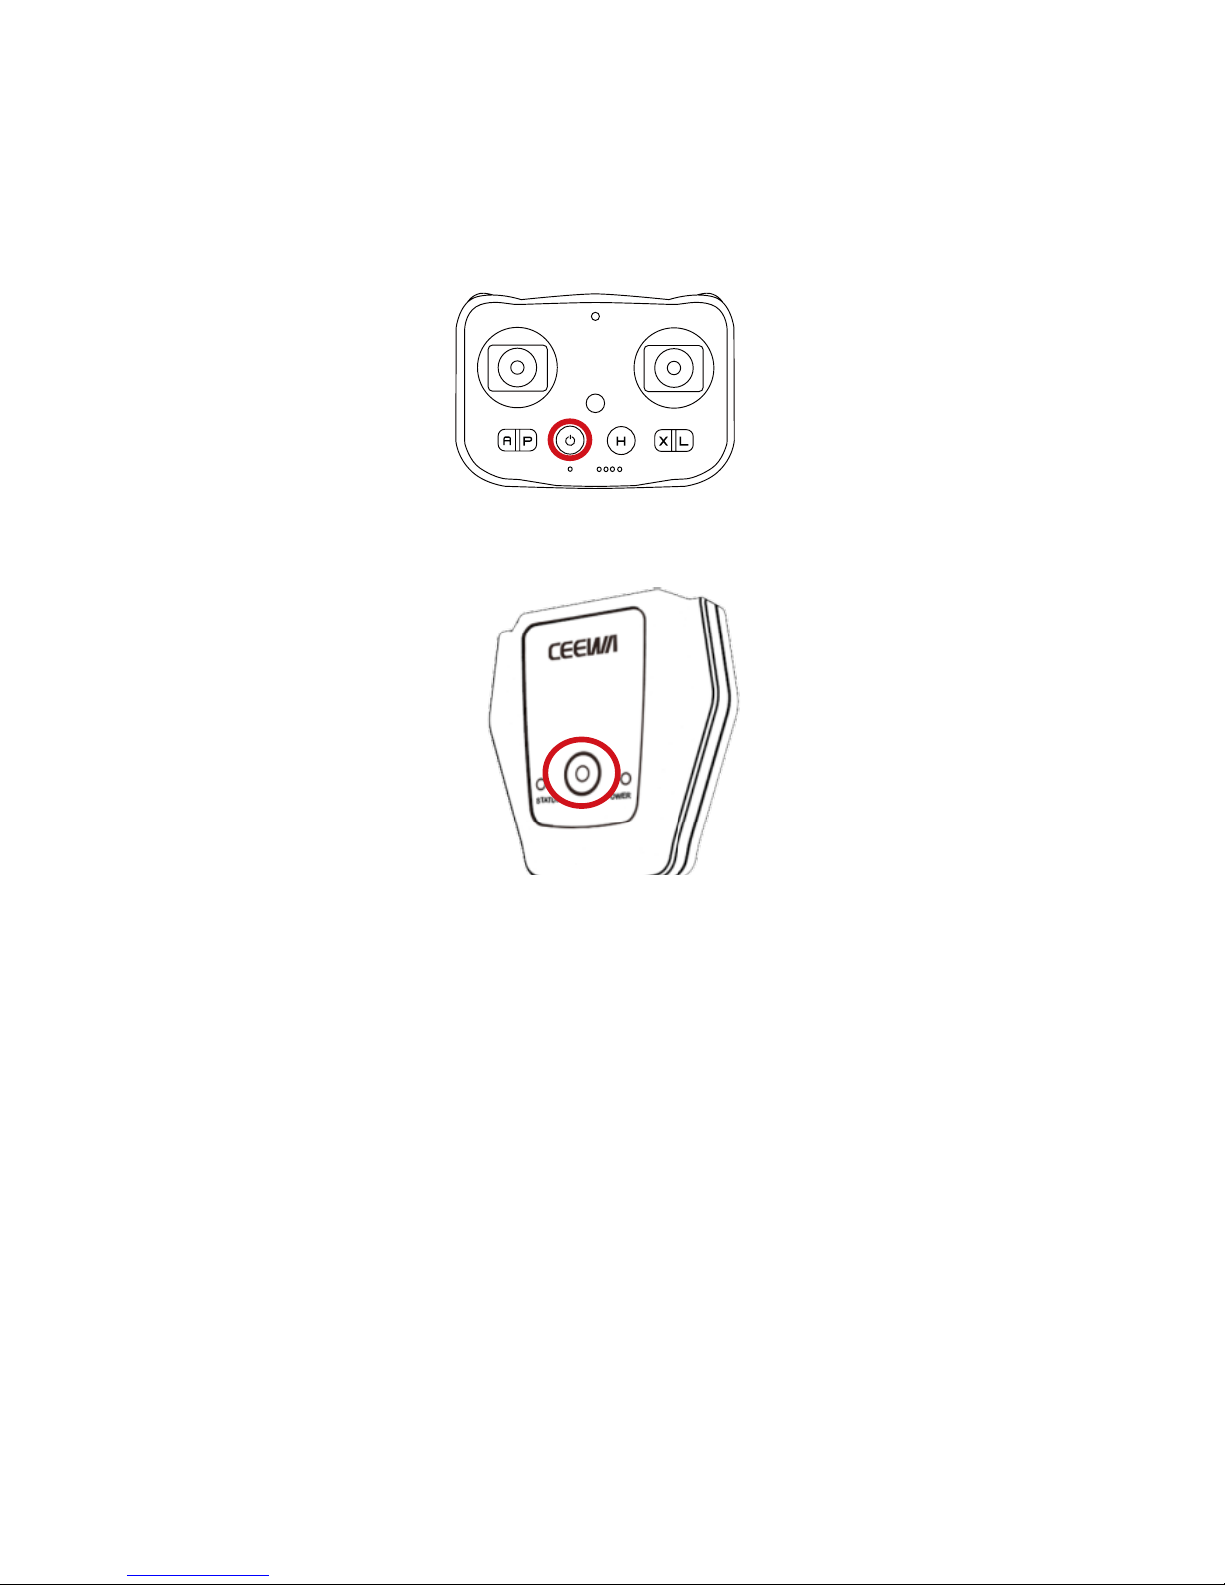
74
Smart Battery:
Remote Controller:
Follow Module:
Step 16: Turn Off All Devices
Turn off Smart Battery, Sports Watch, Follow Module and Camera.
Press the Power Button once, and then press this button for over 3s till all LEDs turn off.
Press the Power Button once, and then press this button for over 3s till all LEDs turn off.
Press the Power Button once, and then press this button for over 3s till all LEDs turn off.
Camera
4K Camera:Press the Power Button until the LED Indicator on the screen side turns off.
1080P Camera:Press the Power Button until the LED Indicators turn off.
Page 78
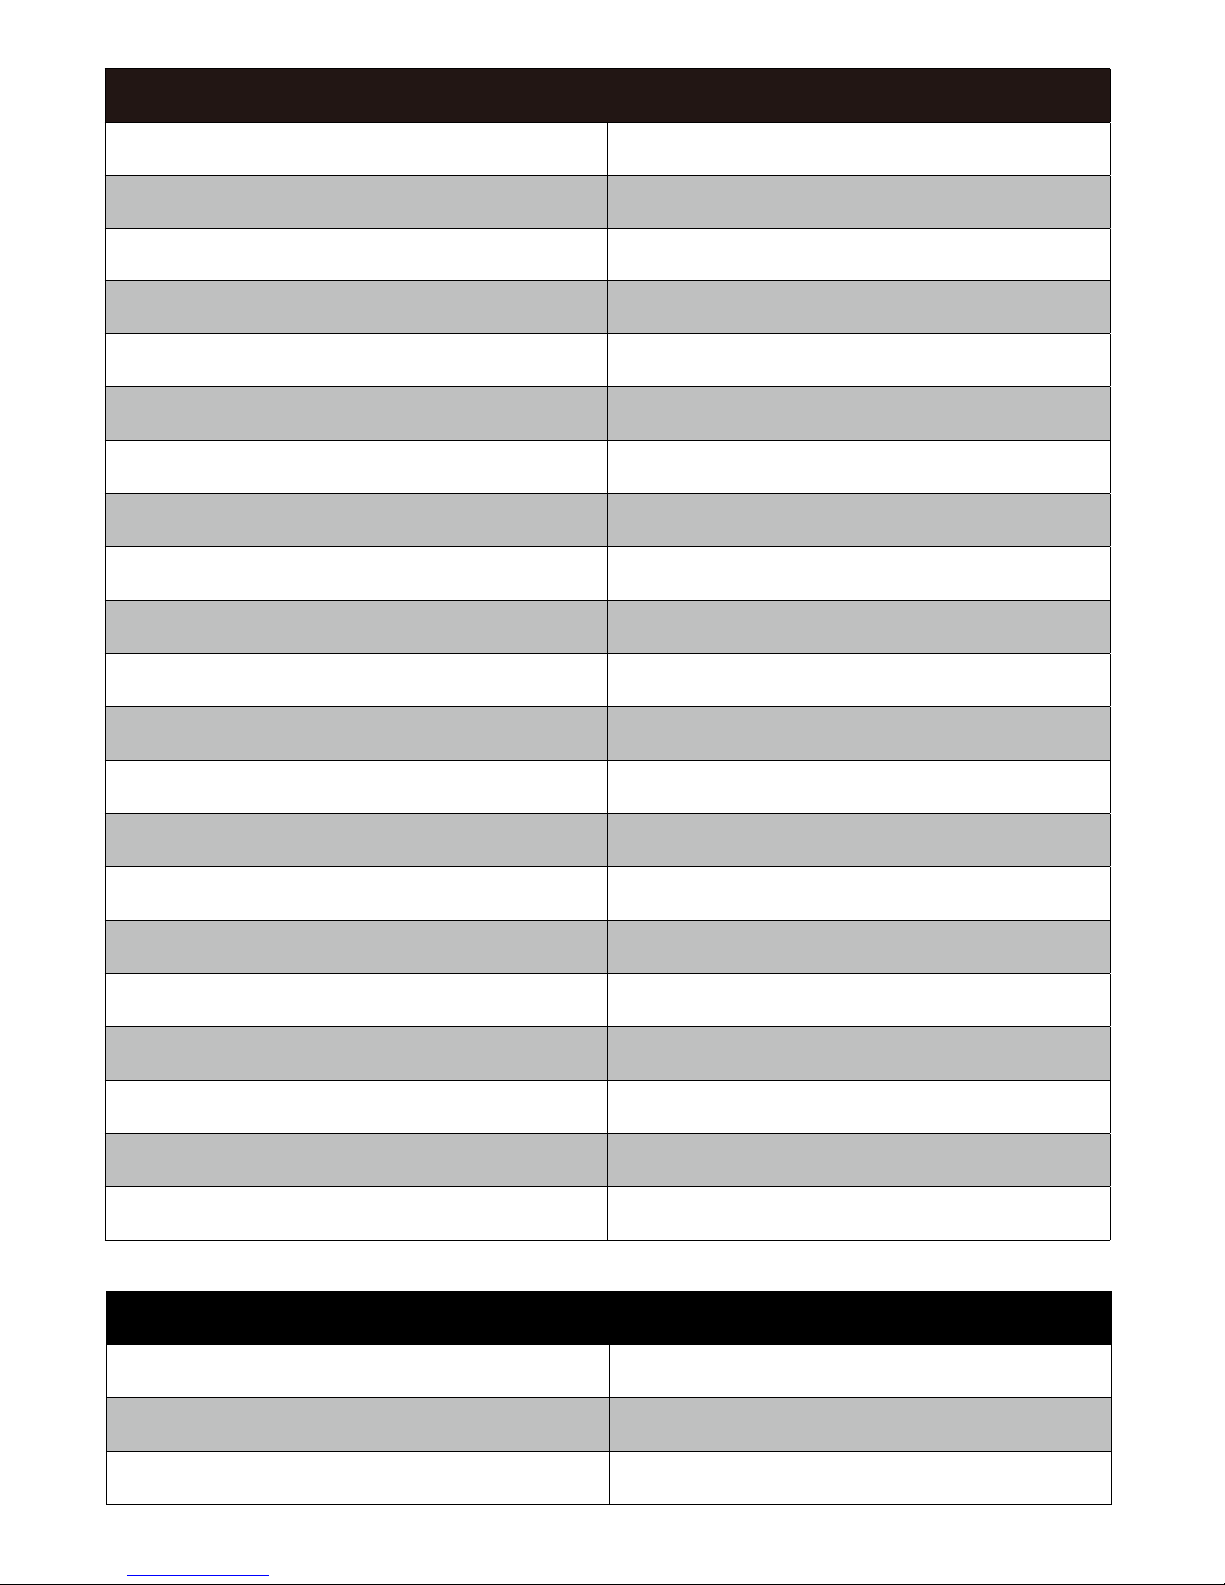
75
Drone
Drone Dimensions 44*35*15
mm
Package Dimensions 50*31*18
mm
Backpack Dimensions 48*32*18
mm
Weight 1370 g
Wheelbase 475 mm
Maximum Speed 72 Km / h
Hover Accuracy
Vertical: ±0.5 m
Horizontal: ±1 m
Propellers 10-inch
Motor 2216
GPS GPS & GLONASS
Barometer Built-in
3-Axis Gyro Built-in
3-Axis Accelerometer Built-in
3-Axis Compass Built-in
Battery Capacity 6000 mAh
Flight Time 22 min
Communication Distance 1 km (Remote Controller)/400 m(Sports Watch)
Smart Follow Support
Map Nav. One-Point Orbit/ Pointing/ Multiple-Points Nav.
Flight Mode A Mode/ P Mode
One-key Take-off/Land Support
Follow Module
Size 50 mm*50 mm*19 mm
Sensor GPS/ GLONASS/ Barometer / Gyro/ Accelerometer / Compass
Communication Distance 400 m
VI. Specifications
Page 79
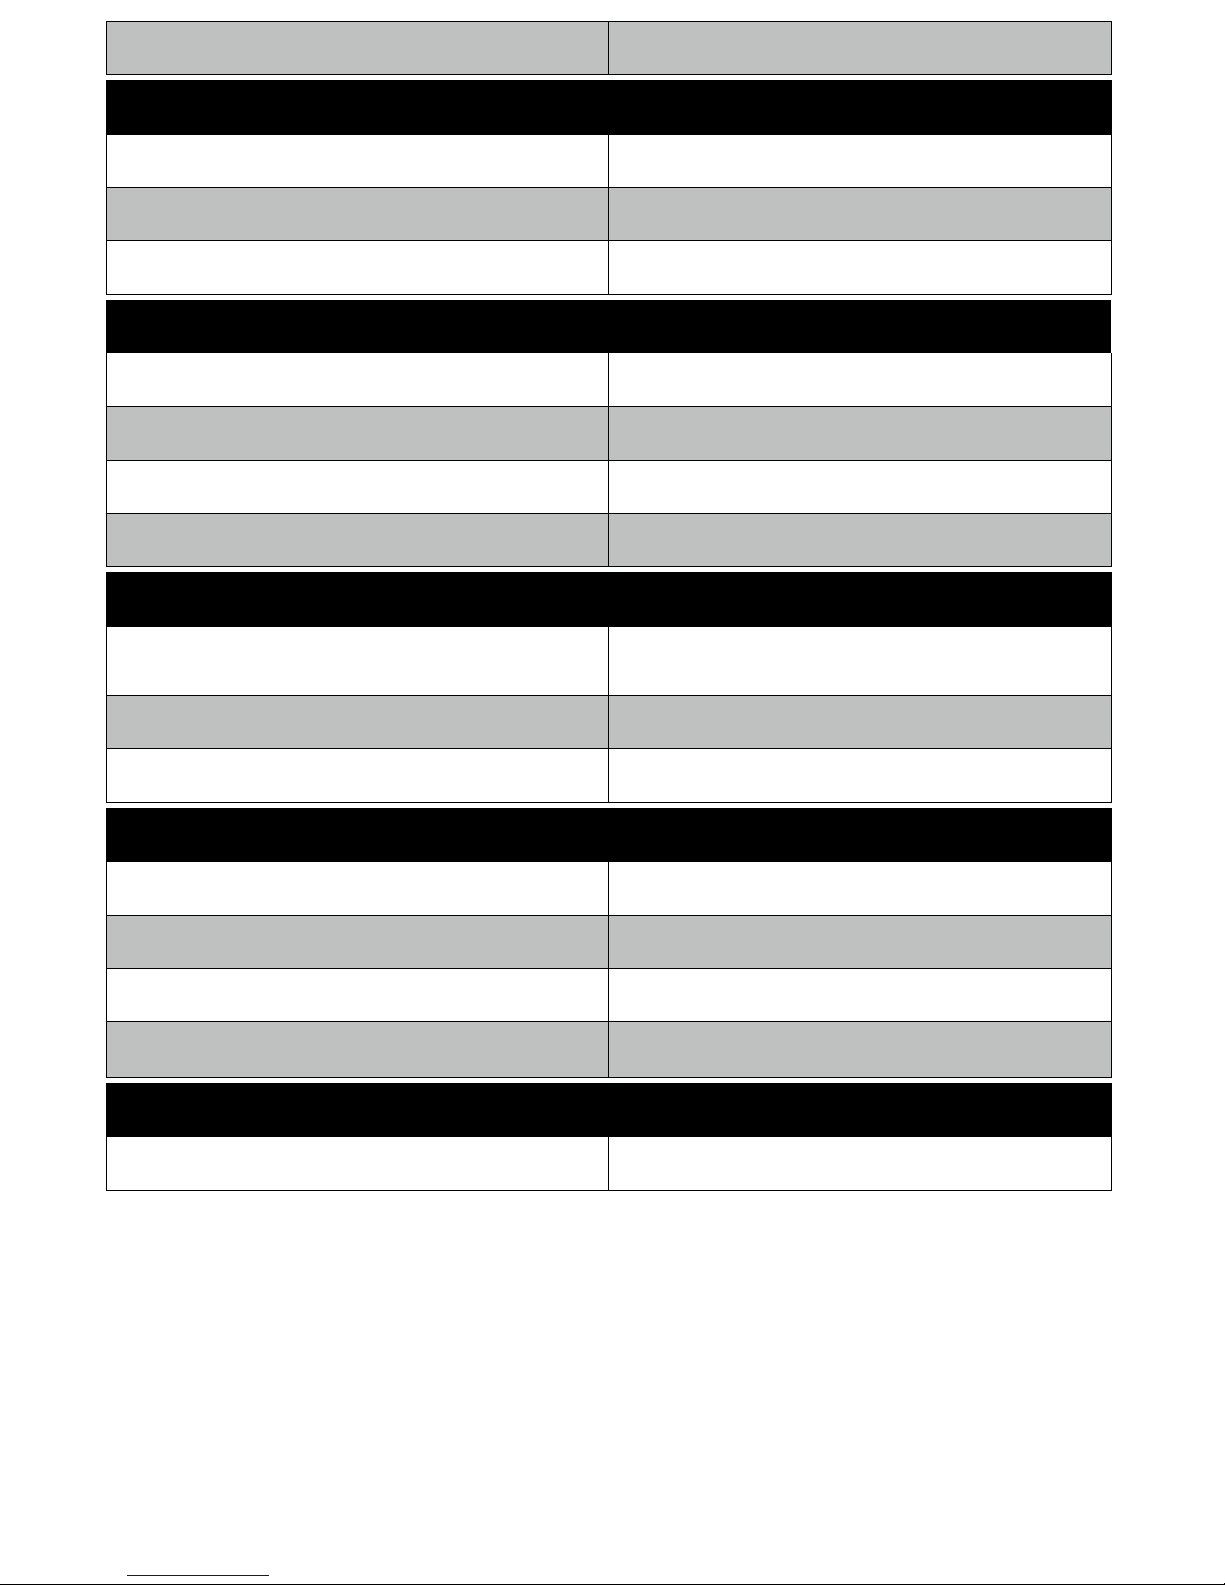
76
Working Hours 4 h
Sports Watch
Communication Distance
400 m
Working Hours
2.5 h
Screen High-brightness Screen
Gimbal
Gimbal Axis 3 Axis
Stabilization Accuracy
±
0.02
°
Frequency
2000 Hz
Gimbal Angle -135° ~ 30° (Pitch)
Camera
Image Quality
4K 15FPS
1920*1440P 30FPS
1080 60FPS
Pixel
16 million pixels
Sensor Sony HD Image Sensor IMX206
Operation Method
Smart Watch Support
Remote Controller Support
Follow Module Support
CEEWA APP Support
Image Transmission
Digital Image Transmission Low Latency / 800 m
Page 80
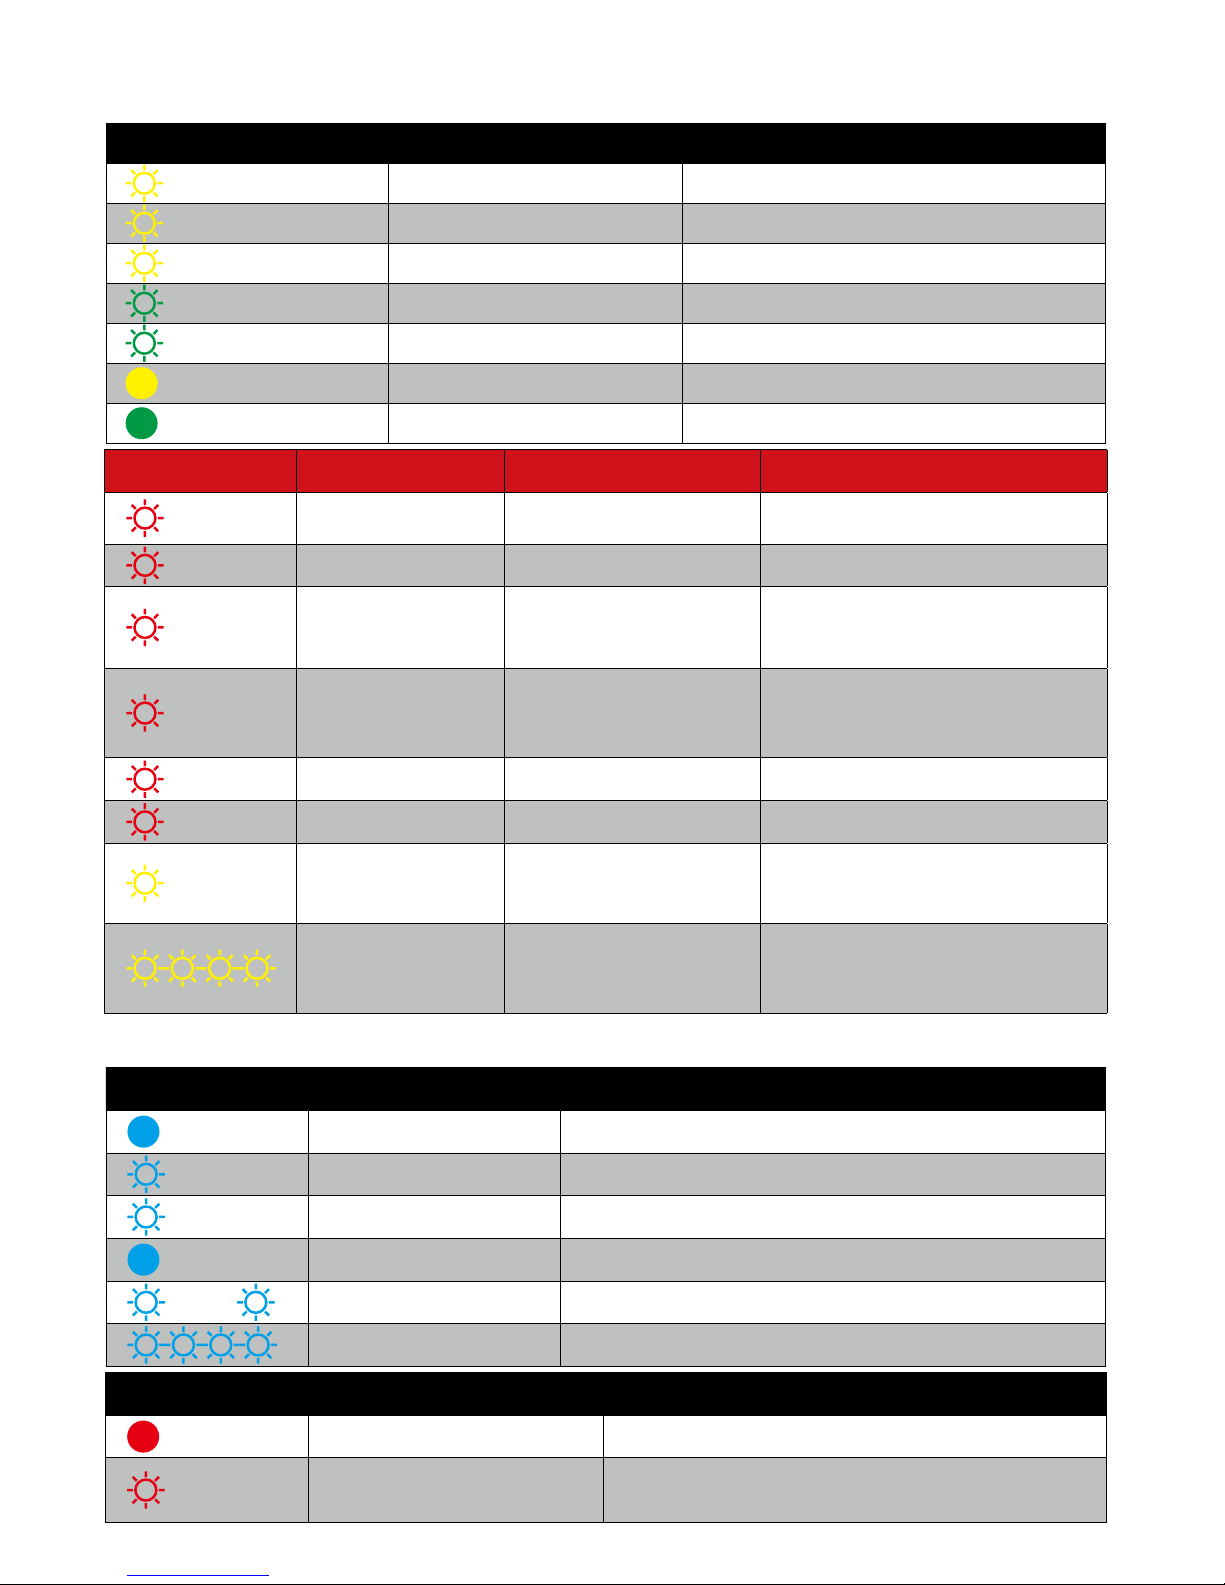
77
VII. LED Indicators & Vibrations
1. Drone Status LEDs
Normal
*3
Yellow Lights Blink 3 times. Binding
*4
Yellow Lights Blink 4 times. Data Transmission is upgrading.
Yellow Lights Blink slowly. A Mode(Attitude Mode)
Green Lights Blink slowly. P Mode(Position Mode)
*20
Green Lights Blink 20 times. GPS is positioned.
Yellow Lights are on. Calibrate Compass: horizontally rotate Drone.
Green Lights are on. Calibrate Compass: vertically rotate Drone.
Errors
*2 Red Lights blink twice.
Drone Compass should be
calibrated. / Calibration fails.
Do compass calibration.
*3 Red Lights blink 3 times. GPS Connection Error Contact to dealers for repairment.
*4
Red Lights blink 4 times.
Accelerometer Initialization
Error
Power cycle the drone. If the error still exists,
please contact to dealers for repairment.
*5 Red Lights blink 5 times. Gimbal Communication Error
Check the gimbal 6P connection cable. If the
error still exists, please contact to dealers for
repairment.
*6 Red Lights blink 6 times. TF Card Error of Data Logger Contact to dealers for repairment.
*10 Red Lights blink ten times. Entering No-fly zone. Leave No-fly zone.
*2 Yellow Lights blink twice. Drone Data Transmission Error
Power cycle the drone. If the error still exists,
please contact to dealers for repairment.
Yellow Lights Blink quickly.
Disconnecting between Drone
and Remote Controller.
If the error still exists when Drone and
Remote Controller are close, please contact
to dealers for repairment.
2. Follow Module LEDs
Status LED
Blue Light is on. Follow Module has turned on.
Blue Light blinks once. Press Power Button once.
*3
Blue Light blinks three times. Binding.
Blue Light is on. Binding is OK.
Blue Light blinks slowly. Calibrate Compass: horizontally rotate Follow Module.
Blue Light blinks quickly. Calibrate Compass: vertically rotate Follow Module.
Power LED
Red Light is on. Charging
Red Light blinks twice, and then
Follow Module is turned off.
Low Battery
Page 81
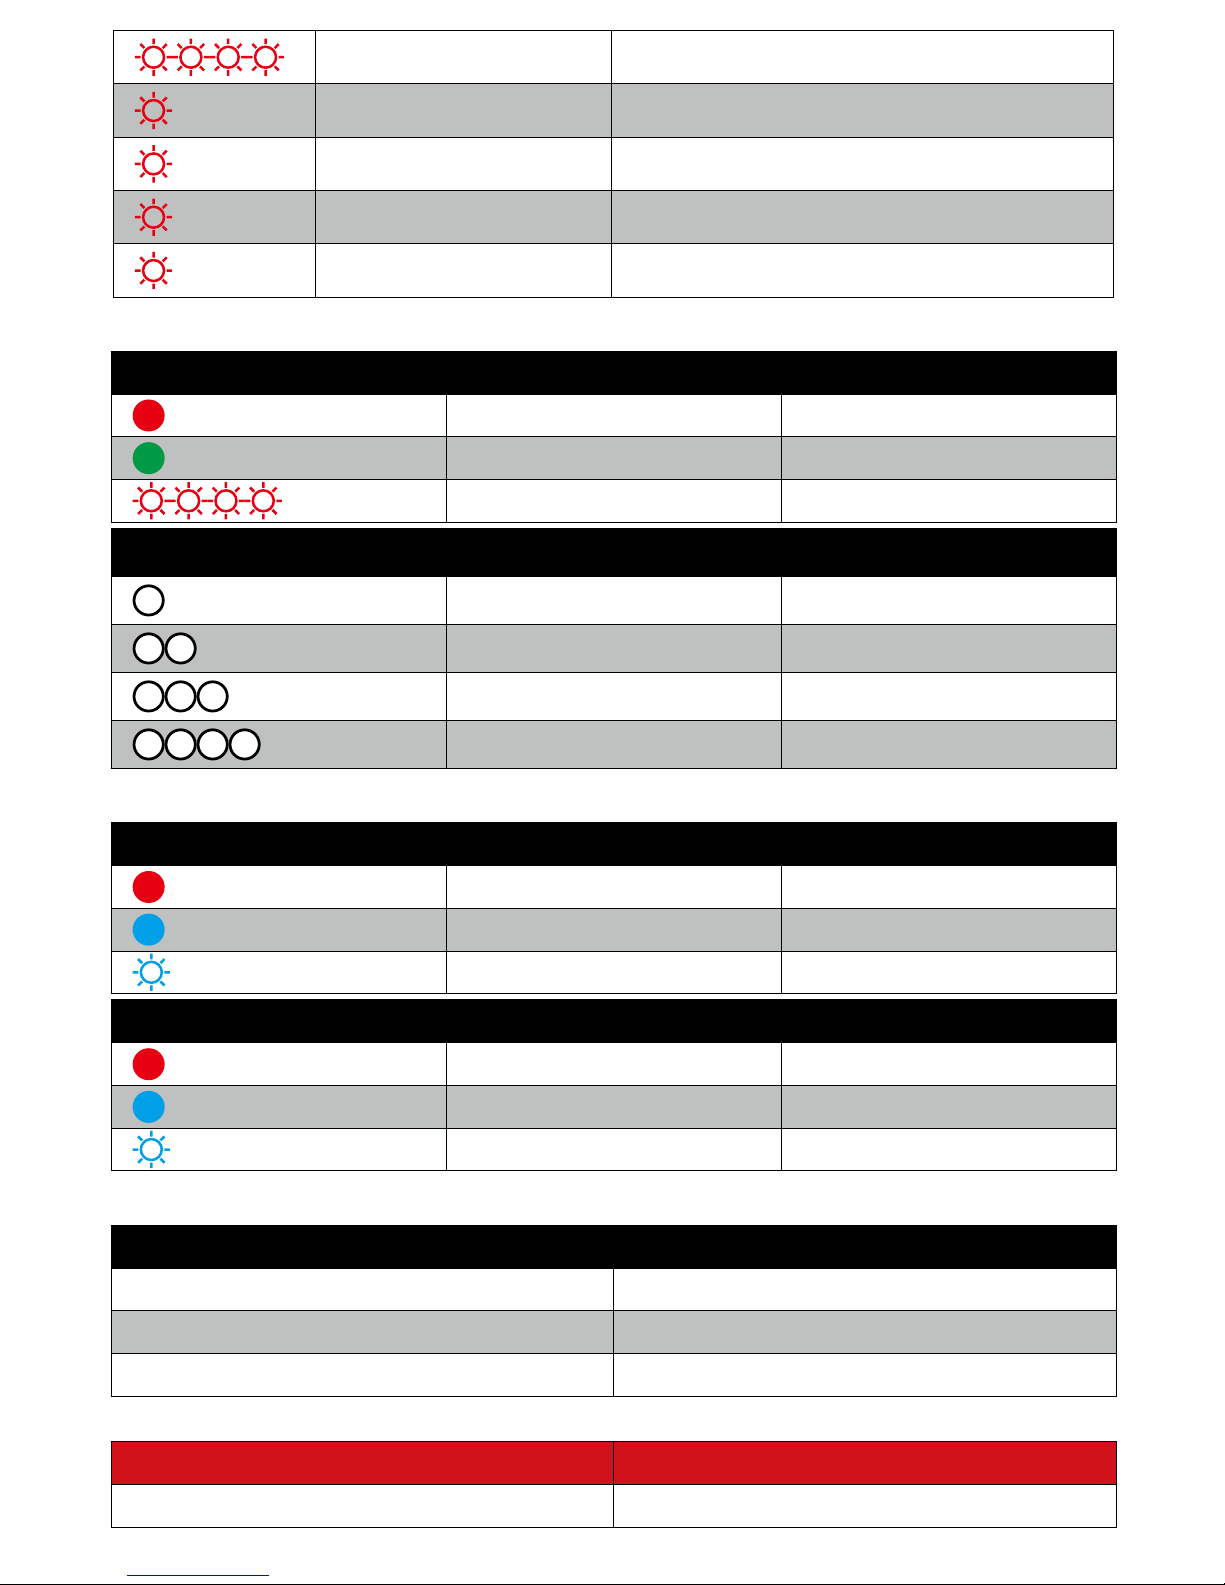
78
Red Light blinks. Less than 10%
Red Light blinks once. 25%
*2
Red Light blinks twice. 50%
*3
Red Light blinks 3 times. 75%
*4
Red Light blinks 4 times. Full
3. Remote Controller LEDs
Status LED
Red Light is on. Drone Disconnects with RC.
Green Light is on. Drone Connects with RC.
Red Light blinks. Bind with other devices.
Power LEDs
LED 1 is on. 0-25%
;
LED 1 and LED 2 is on. 25%-50%
;
LED 1, LED 2 and LED 3 is on. 50%-75%
;
All the LEDs are on. 75%-100%
;
4. Image Transmission LEDs
Ground System LEDs
灯
Red Light is on. Turn on the power.
Blue Light is on. Connection to Image Transmission is OK.
Red Light blinks. Connecting.
Image Transmission LEDs
Red Light is on. Turn on the power.
Red Light is on. Connection to Ground System is OK.
Red Light blinks. Connecting.
5. Sports Watch Vibration
Normal
Press STOP button Vibrate once.
Switch to Follow Mode Vibrate three times.
Motor STOP Vibrate twice.
Errors
Watch First-Level Low Battery Alarm Prompts for 5s & Vibrate once
Page 82
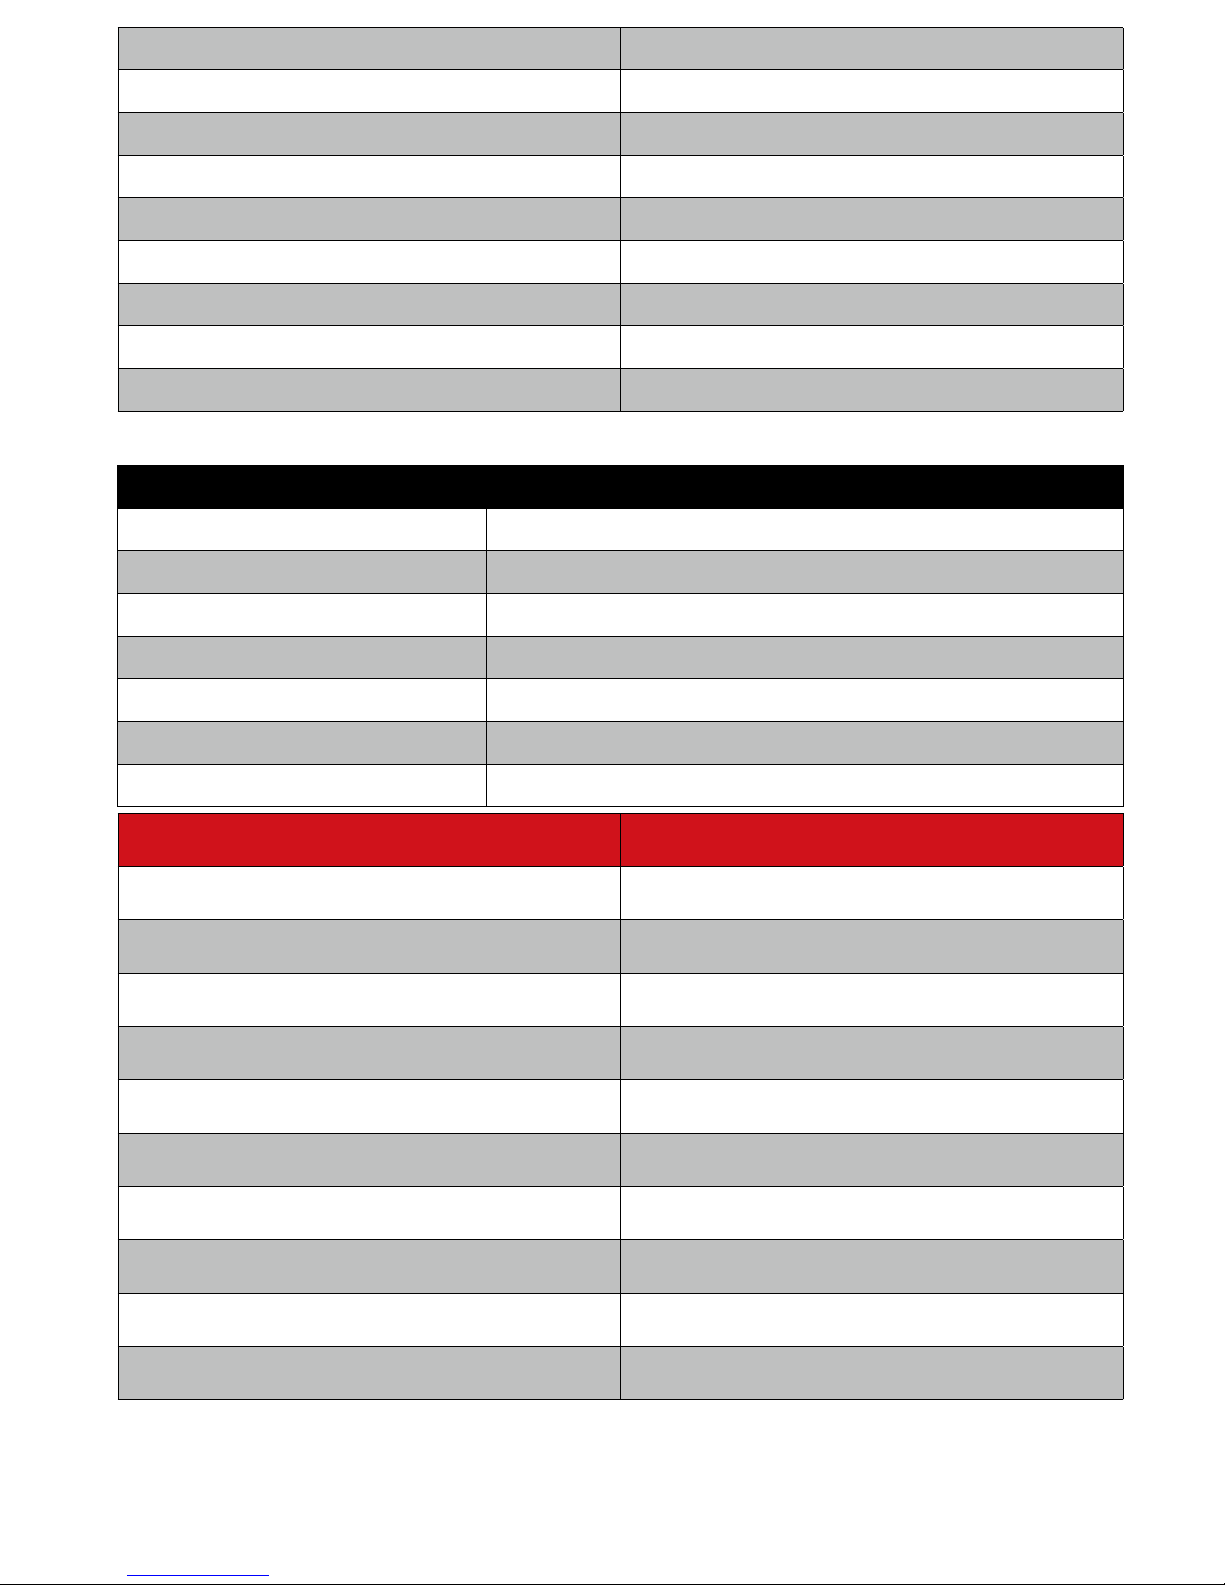
79
Watch Second-Level Low Battery Alarm Vibrate once every 2s before battery runs out.
Drone Low-Battery Alarm Prompts & Vibrate 3 times
Drone Low-Battery Go-Home Prompts & Vibrate once every 2s
Drone Low-Battery Land Prompts & Vibrate once every 2s
Drone Battery Data Lost Prompts & Vibrate once per second
Drone Smart Battery is broken. Prompts & Vibrate once per second
Drone temperature is too high. Prompts & Vibrate once per second
Drone is entering No-fly zone. Prompts
Data Transmission is broken. Prompts of "System Error"
6. Remote Controller Vibration
Normal
Turn on RC. Buzzer sounds 3 times.
Turn off RC. Buzzer sounds 3 times.
One-Key Take-off enables. Vibrate twice shortly and then once longer &Buzzer sounding during taking-off.
One-Key Land enables. Vibrate once & Buzzer sounding during landing.
Switch to Follow Mode. Vibrate once
Switch to P Mode. Vibrate once
Go-Home enables. Vibrate once
Errors
RC First-Level Low Battery Alarm Vibrate twice & Buzzer sounds twice
RC Second-Level Low Battery Alarm Vibrate once every 2s
Drone Low-Battery Alarm Vibrate 3 times & Buzzer sounding
Drone Low-Battery Go-Home Vibrate once every 2s & Buzzer sounding during landing.
Drone Low-Battery Land Vibrate once every 2s & Buzzer sounding during landing.
Drone Battery Data Lost Vibrate once per second & Buzzer sounding during landing.
Drone Smart Battery is broken. Vibrate once per second & Buzzer sounding during landing.
Drone temperature is too high. Vibrate once per second & Buzzer sounding during landing.
Drone is entering No-fly zone. Buzzer sounding.
Data Transmission is broken. Green Light blinks.
Page 83
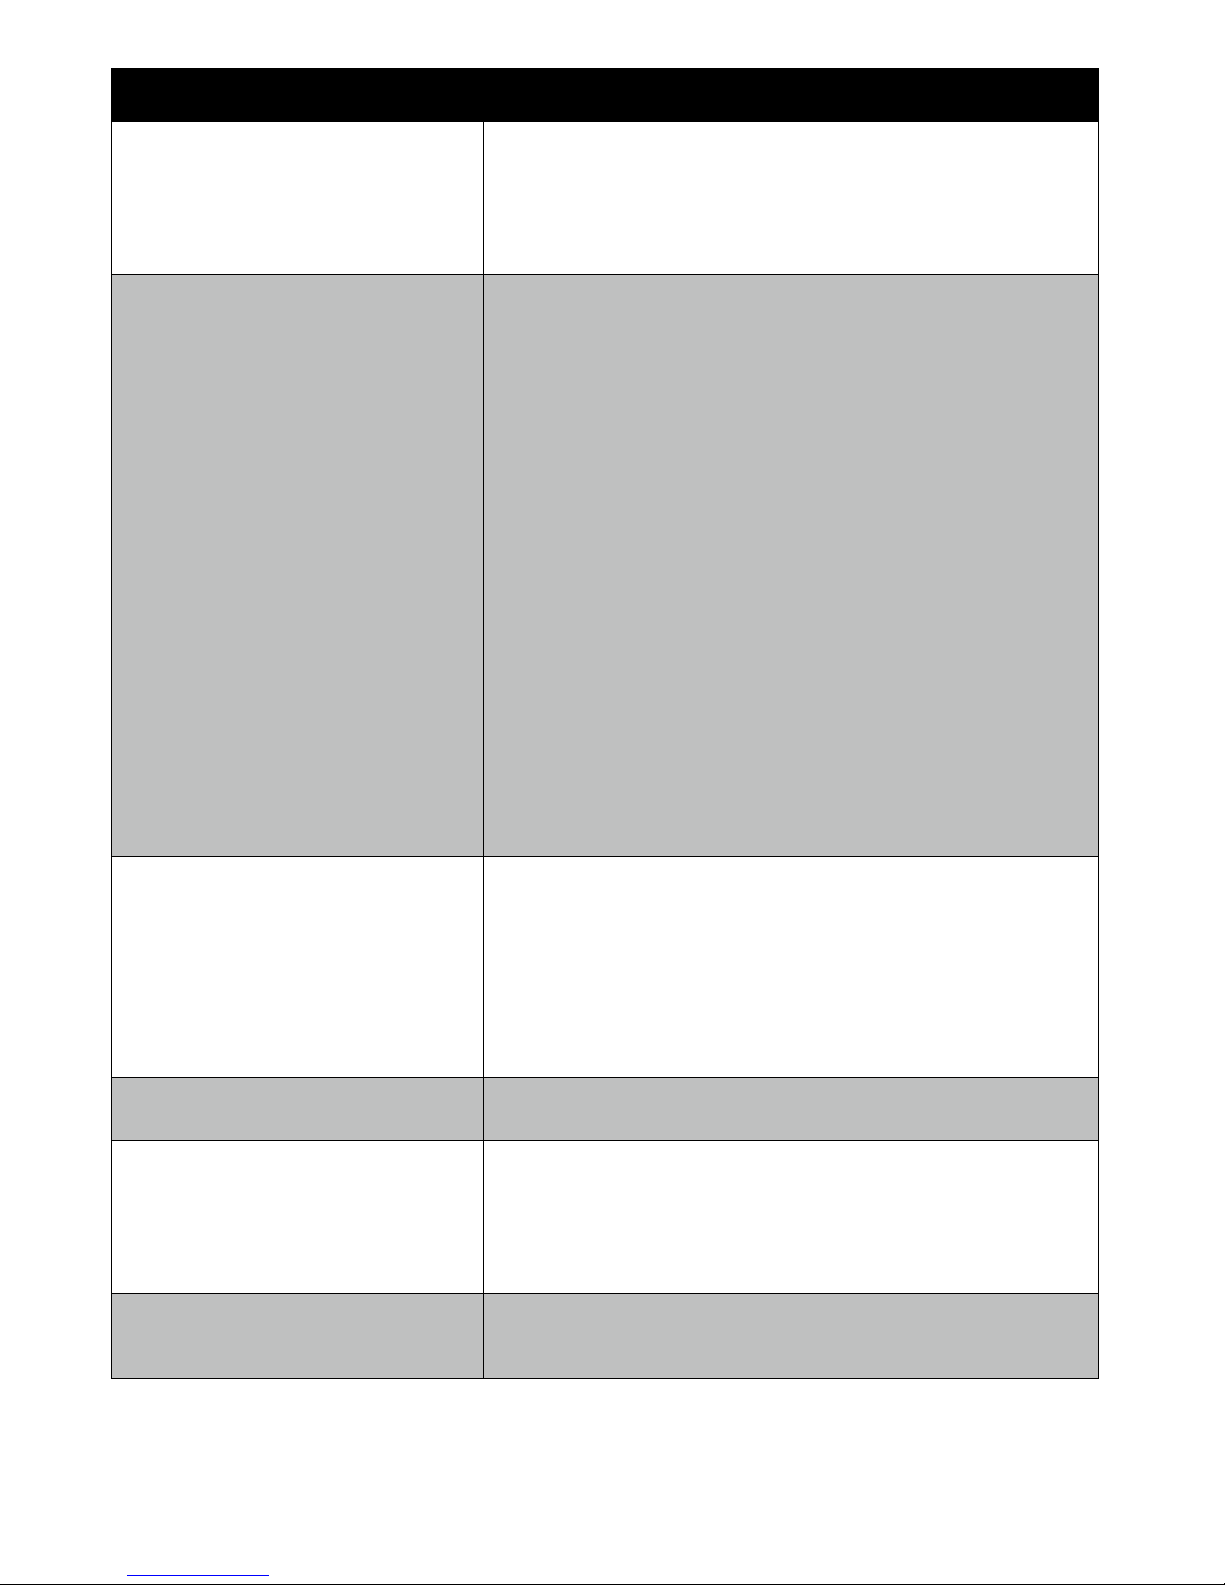
80
VIII. FAQ
Q A
What mobile devices are compatible with
the app?
iOS requires iOS V8.0 or later. Compatible with iPhone 5s, iPhone 6, iPhone 6
Plus, iPhone 6, and iPhone 6 Plus.
Android requires Android OS 4.3 or later and Bluetooth 4.0. Compatible with
Samsung Galaxy Note4, Huawei Honor 7, Meizu MX5, and Nubia Z7 mini.
Image Transmission: 5G Wi-Fi should be supported by smartphone.
*Supported Mobile Devices will update continuously on www.ceewa.com.
When should I do the calibraon?
Drone Compass Calibration
1. It is suggested to calibrate compass when you first use Drone.
2. Regularly calibrate the compass because it is easily interrupted by other
electronic devices.
3. If RED Status LEDs on Drone blink twice per second, please do compass
calibration before taking-off. If Drone has taken off, please land as soon as
possible and calibrate the compass.
Gyro Calibration
1. When drifts happen in A mode, calibration should be finished.
2. It is suggested to do Gyro calibration regularly by putting the drone on the
horizontal ground.
Follow Module Gyro Calibration
It is suggested to calibrate Follow Module Sensor regularly on the horizontal
ground to achieve a better flight experience.
Follow Module Compass Calibration
1. It is suggested to finish Follow Module Compass Calibration at first time.
2. Moreover, finish the calibration regularly to achieve a better flight
experience.
Height Calibration
Before using Follow Mode, you need put Drone and Follow Module at the
same height and do the calibration.
RC Calibration
1. It is suggested to finish RC Calibration at first time.
2. When adjusting drone's attitude and deviation happens, please finish RC
calibration.
What are the usage time of Drone, Sports
Watch, Remote Controller and Follow
Module?
When fully charged,
Smart Battery: 22 min; Sports Watch: 2.5 h; Follow Module: 3 h;
Remote Controller: 15 h (With Image Transmission)/30 h (Without Image
Transmission);
Charging time,
Smart Battery: 2 h; Sports Watch: 80 min; Follow Module: 6 h; Remote
Controller: 1.5 h;
*Battery life and charging time will vary depending on environmental
conditions and usage patterns.
Can I bring Smart Battery to airplane?
Battery capacity is 6000 mAh, so you can bring one battery to the airplane.
*It is suggested to inquiry for airlines for detailed information.
Can I remove the camera and attach my
own one?
CEEWA Drone S1 supports GoPro 3/3+/4.
You should detach the standard camera and mount GoPro into gimbal.
Moreover, you should purchase a standard GoPro Connection Cable from
CEEWA.
Be cautious during mounting procedures, CEEWA takes no responsibility of
damages due to changing cameras.
If I have more than one Sports Watch and
Remote Controller, could I use them at the
same time to control drone?
No.
Page 84
81
What are P Button and A Button on Remote
Controller?
P Button and A Button are switches of different flight modes. You can
switch to A Mode and P Mode based on your need.
P Mode stands for Position Mode with GPS accurate hovering of Drone.
A Mode stands for Attitude Mode without GPS. Only the barometer is used
for stabilization.
* For starters, please select Position Mode. Attitude Mode is suitable for
professionals.
* CEEWA APP activates Beginner Mode by default. During this mode, A
Mode disables.
What is Beginner Mode?
When Beginner Mode enables, users cannot switch to A Mode. Without
GPS, motors cannot turn on.
How to cancel Beginner Mode?
Deactivate Beginner Mode in MC Settings Interface of CEEWA APP.
It is suggested to enable Beginner Mode to ensure safety.
Why Blue Screen shows in the Image
Transmission Interface, instead of images?
1. Check whether or not the AV cable has connected to the AV port in the
gimbal and camera.
2. Camera has been turned on.
3. AV-OUT Mode of Camera enables.
4. Exit CEEWA APP from iOS / Android background and re-enter CEEWA
APP.
5. If none of the above solutions solve the problem, please check whether
or not Power Safe Mode of camera enables.
How to cancel Power Safe Mode of
Camera?
1. Detach Camera from Gimbal.
2. Power on Camera.
3. Deactivate AV-OUT Mode.
4. Press UP Button once to enter Mode Menu.
5. Press DOWN Button to enter Power Safe Mode.
6. Choose OFF option to deactivate Power Safe Mode.
How to control Camera to take photos and
record?
Press the Photo Button on the right top of Remote Controller once to get one
photo.
Take live footage by Record Button on the left top of Remote Controller. Press
once to record. Press again to stop.
Clock-wisely turn the Focal Length Button once to adjust the focal length. You
can observe the effect through CEEWA APP.
Please refer to page 6 to fetch more information about the position of
buttons.
Does Sports Watch alarm during low
battery?
Yes.
If Watch First Level Low Battery Alarm is triggered, Sports Watch shows
prompts and vibrates once. Drone will enter go-home process. (You can stop
go-home by pressing STOP Button, but it is suggested to keep going-home.)
If Watch Second Level Low Battery Alarm is triggered, Sports Watch shows
prompts and vibrates once every 2 seconds. When battery runs out, Sports
Watch will be turned off and drone will go home. (the failsafe method is
based on your setting.)
Does Remote Controller alarm during low
battery?
Yes.
If RC Level Low Battery Alarm is triggered, Remote Controller vibrates and
beeps twice. Drone will enter go-home process. (You can stop go-home by
pressing P Button, but it is suggested to keep going-home.)
If RC Second Level Low Battery Alarm is triggered, Remote Controller
vibrates once every 2 seconds. When battery runs out, RC will be turned off
and drone will go home. (The failsafe method is based on your setting.)
Can I mount Follow Module onto other
devices instead of my arm?
Yes.
Just keep it far away devices with magnetic interference.
Refer to Appendix: Mount Follow Module
Why is the video footage not clear? Please make sure the screws on the gimbal have been xed ghtly.
Page 85
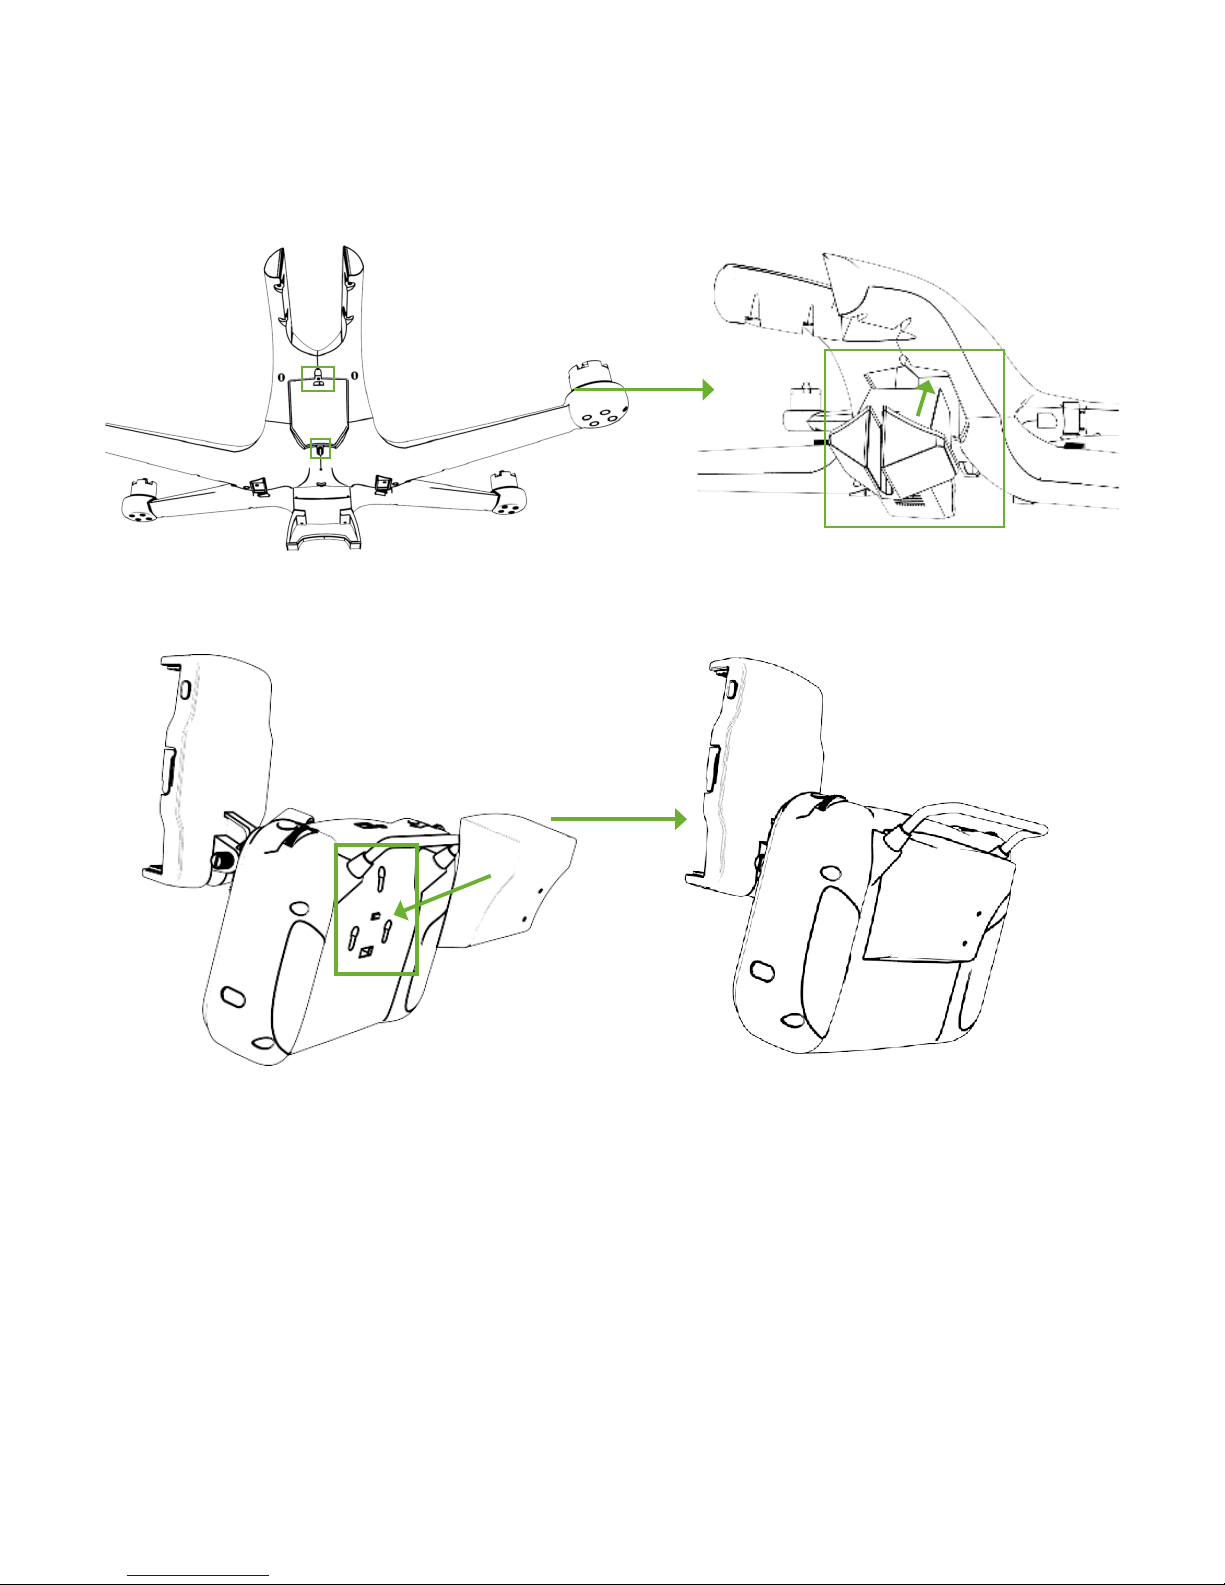
82
Appendix: Mount/Detach Image Transmission
Mount
Detach
If you purchase the Image Transmission separately, you need to mount it into Drone and install the ground system onto the back of
Remote Controller.
Steps:
① Detach two screws on the top and bottom side of Drone hatch.
③ On the back side of the RC, there are ports to fix the ground system. Just fix it tightly with them and you are finishing all the
mounting procedures.
Remove two screws on the top and bottom side and detach the Image Transmission.
If you DO NOT need Image Transmission, please mount the hatch onto Drone and fix it tightly.
② Mount Image Transmission into Drone and fix it
through two screws.
Page 86
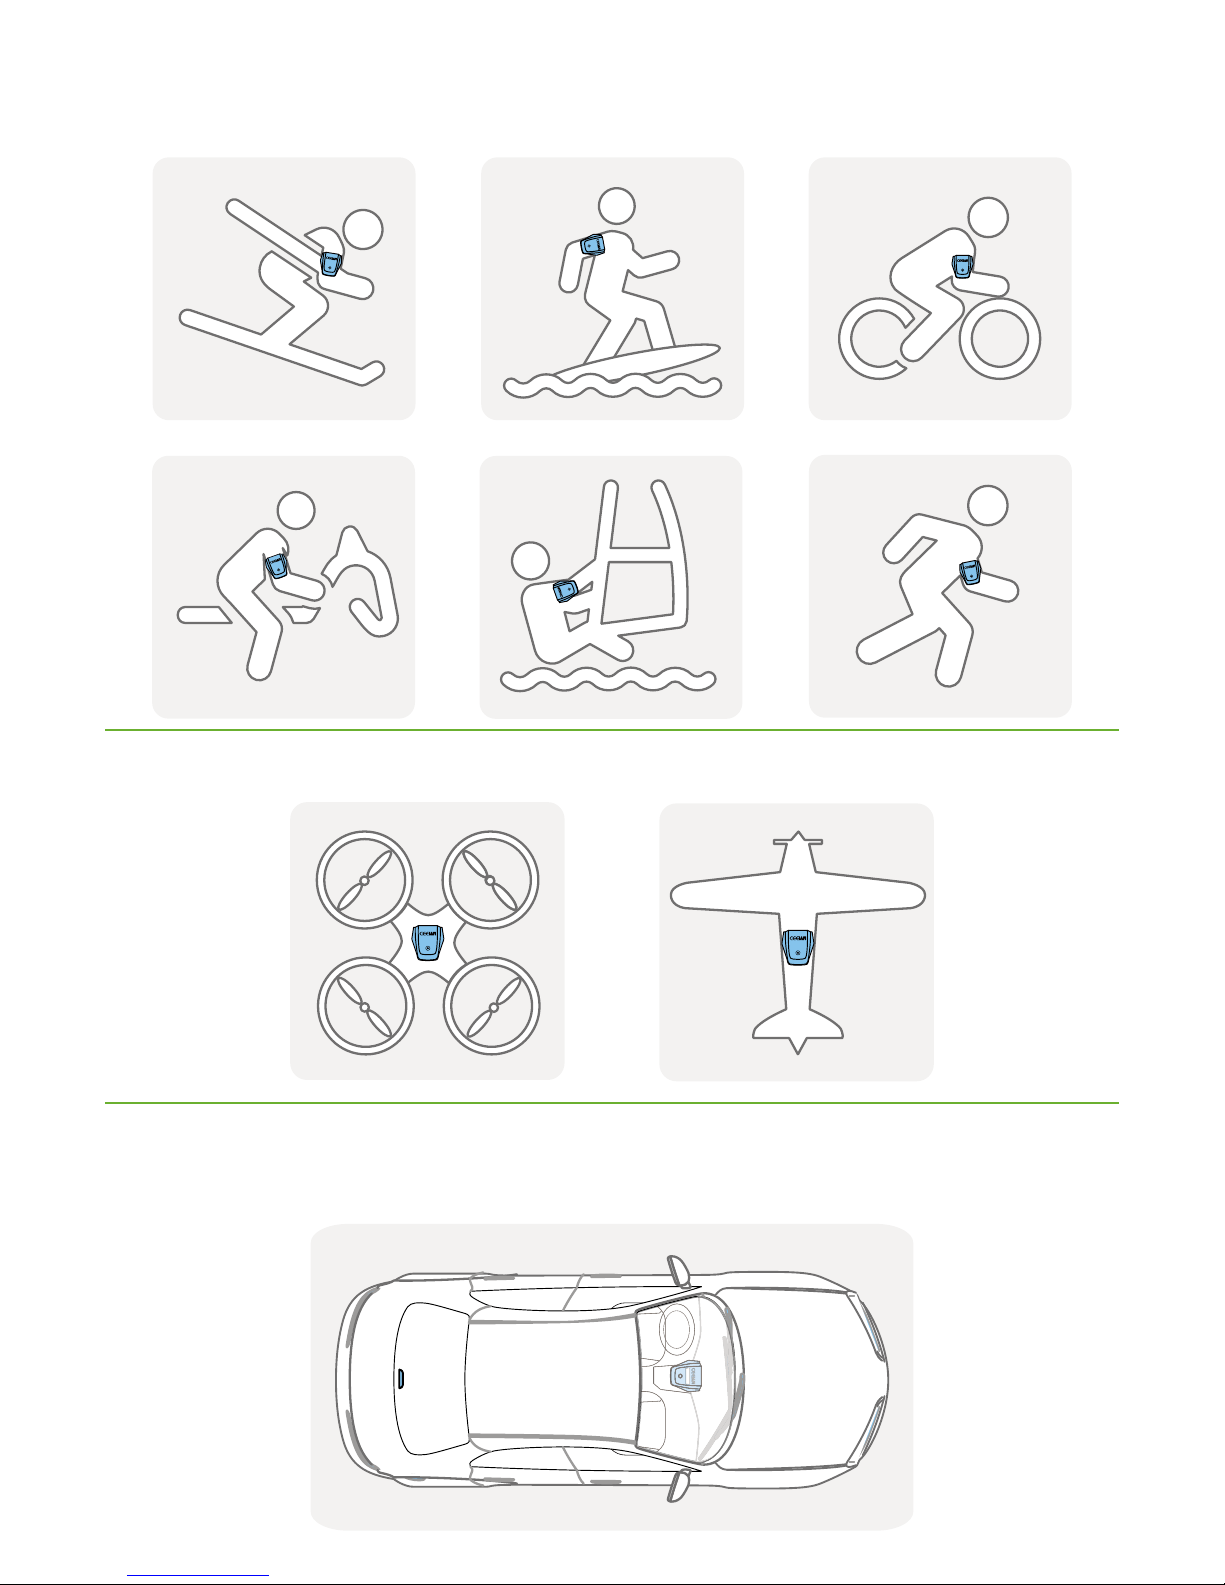
83
Appendix: Mount Follow Module
Please mount Follow Module into armband. Please ensure the side with LED light faces up and do not be covered. Fix the armband
onto the upper arm.
Fix the Follow Module onto Multi-rotors and Fixed-Wings with Double-coated Foam Tapes.
Please make sure it is far away from magnetic interference, such as motors and servo.
1. Fix Follow Module onto the middle part of inside windsheild. Please ensure Follow Module faces to the sky.
2. Ensure there is no magnetic interference around, such as car horns.
3. In Follow Mode, please close all the windows, including sunroof.
4. Ensure one person drives and another one controls drone.
5. If follow altitude is less than 5 meters, please gradually accelerate or slow down.
 Loading...